


Operator’s Manual 


Basic and Advanced Models
Serial# 3xxxxxxx or earlier

Copyright Information
CG Triumvirate is a trademark of Agfa Corporation.
CG Times based upon Times New Roman under license from the Monotype Corporation. Windows is a registered trademark of the Microsoft Corporation.
All other brand and product names are trademarks, service marks, registered trademarks, or registered service marks of their respective companies.
Limitation of Liability
In no event shall Datamax-O’Neil be liable to the purchaser for any indirect, special or consequential damages or lost profits arising out of or relating to Datamax-O’Neil’s products, or the performance or a breach thereof, even if Datamax-O’Neil has been advised of the possibility thereof. Datamax-O’Neil’s liability, if any, to the purchaser or to the customer of the purchaser hereunder shall in no event exceed the total amounts paid to Datamax- O’Neil hereunder by the purchaser for a defective product.
In no event shall Datamax-O’Neil be liable to the purchaser for any damages resulting from or related to any failure or delay of Datamax-O’Neil in the delivery or installation of the computer hardware, supplies or software or in the performance of any services.
Some states do not permit the exclusion of incidental or consequential damages, and in those states the foregoing limitations may not apply. The warranties here give you specific legal rights, and you may have other legal rights which vary from state to state.
Firmware (Software) Agreement
The enclosed Firmware (Software) resident in the Printer is owned by Licensor or its suppliers and is licensed for used only on a single printer in the user’s Trade or Business. The User agrees not to, and not to authorize or permit any other person or party to, duplicate or copy the Firmware or the information contained in the non-volatile or programmable memory. The firmware (Software) is protected by applicable copyright laws and Licensor retains all rights not expressly granted. In no event will Licensor or its suppliers be liable for any damages or loss, including direct, incidental, economic, special, or consequential damages, arising out of the use or inability to use the Firmware (Software).
Information in this document is subject to change without notice and does not represent a commitment on the part of Datamax-O’Neil Corporation. No part of this manual may be reproduced or transmitted in any form or by any means, for any purpose other than the purchaser's personal use, without the expressed written permission of Datamax-O’Neil Corporation.
Important Safety Instructions
This printer has been carefully designed to provide years of safe reliable performance. As with all types of electrical equipment, however, there are a few basic precautions that should be taken to avoid personal injury or damage to the device:
•Carefully read the installation and operating instructions provided with the printer.
•Read and follow all warning and instruction labels on the printer.
•Place the printer on a flat, stable surface.
•Do not insert anything into the ventilation slots or openings on the printer.
•Do not place the printer on or near a heat source.
•Do not use the printer near water. Never spill liquid into the printer.
•Be certain the power source is within the voltage rating and frequency listed for the printer. If you are unsure, check with your dealer, an electrician, or local power company.
•Do not place the power cord where it can be stepped on. If the power cord becomes damaged or frayed, replace it immediately.
•Only qualified, trained service technicians should attempt to repair the printer.
Cut-outs are not intended for wall-mount use.

Agency Compliance and Approvals
UL60950-1, Second Edition, Information Technology Equipment CSA C22.2 No. 60950-1-03, Second Edition
C US
Listed
The manufacturer declares under sole responsibility that this product conforms to the following standards or other normative documents:
EMC:EN 55022 (2006) Class A
EN 50024 (1998)
IEC 60950-1 :2001, Second Edition
Safety:This product complies with the requirements of IEC 60950-1:2001, Second Edition
Gost-R
GB4943-2001, GB9254-1998, GB17625.1-2003
E-4205A, E-4305A, E-4204B, E-4304B models:
The foregoing equipment has been registered under the Clause 3, Article 58-2 of Radio Waves Act
FCC: This device complies with FCC CFR 47 Part 15 Class A.
Note: This equipment has been tested and found to comply with the limits for a Class A digital device, pursuant to Part 15 of the FCC Rules. These limits are designed to provide reasonable protection against harmful interference when the equipment is operated in a commercial environment. This equipment generates, uses, and can radiate radio frequency energy, and if not installed and used in accordance with the instructions in this manual, it may cause harmful interference to radio communications. Operation of this equipment in a residential area is likely to cause harmful interference in which case the user will be required to correct the interference at his own expense.
All rights reserved
Copyright © 2013, Datamax-O’Neil
Part Number: 88-2353-01, Revision D

Contents
1 Getting Started...................................................................................... |
1 |
||
1.1 |
Introduction ........................................................................................................ |
1 |
|
1.2 |
Unpacking the Printer ........................................................................................... |
1 |
|
2 Printer Setup......................................................................................... |
3 |
||
2.1 |
Introduction ........................................................................................................ |
3 |
|
2.2 |
Connecting the Printer .......................................................................................... |
3 |
|
|
2.2.1 |
Power Connections ..................................................................................... |
3 |
|
2.2.2 |
Interface Connections ................................................................................. |
4 |
|
Cable Requirements.............................................................................................. |
4 |
|
2.3 |
Loading Media...................................................................................................... |
5 |
|
|
2.3.1 |
Loading Roll Media..................................................................................... |
5 |
|
2.3.2 Loading External or Fan-Fold Media.............................................................. |
7 |
|
|
2.3.3 Loading Media with the Peel and Present Option.............................................. |
9 |
|
|
2.3.4 Loading Media with the Cutter Option .......................................................... |
10 |
|
2.4 |
Loading Ribbon .................................................................................................. |
11 |
|
|
2.4.1 Using the Ribbon Core Adapters ................................................................. |
14 |
|
3 Printer Operation................................................................................. |
15 |
||
3.1 |
Introduction ...................................................................................................... |
15 |
|
3.2 |
LED Indicators ................................................................................................... |
15 |
|
3.3 |
Multi-Function Button.......................................................................................... |
16 |
|
3.4 |
Printer Configuration Tools .................................................................................. |
17 |
|
3.5 |
Printer Configuration Utility (DMXConfig) ............................................................... |
18 |
|
3.6 |
Windows Driver.................................................................................................. |
20 |
|
|
Important Notes: ............................................................................................... |
21 |
|
3.7 |
Media Calibration ............................................................................................... |
22 |
|
|
Calibration ensures correct media detection. .......................................................... |
22 |
|
|
3.7.1 |
Quick Calibration ...................................................................................... |
22 |
|
3.7.2 |
Media Calibration Wizard ........................................................................... |
23 |
3.8 |
Internal Labels................................................................................................... |
25 |
|
|
3.8.1 |
Database Configuration Label..................................................................... |
25 |
i

4 Maintenance & Adjustments................................................................ |
27 |
|
4.1 |
Introduction ...................................................................................................... |
27 |
4.2 |
Cleaning the Printhead ........................................................................................ |
28 |
4.3 |
Ribbon Tension Adjustment ................................................................................. |
30 |
4.4 |
Adjustable Media Sensor ..................................................................................... |
31 |
4.5 |
Printhead Replacement ....................................................................................... |
32 |
4.6 |
Platen Roller Replacement ................................................................................... |
34 |
4.7 |
Downloading Firmware and Fonts ......................................................................... |
35 |
5 Troubleshooting................................................................................... |
37 |
|
5.1 |
Introduction ...................................................................................................... |
37 |
5.2 |
Troubleshooting Tips........................................................................................... |
37 |
A Specifications...................................................................................... |
39 |
|
B Ethernet Setup..................................................................................... |
43 |
|
B.1 |
Network Card Setup ........................................................................................... |
43 |
|
B.1.1 Wired Configuration - Static IP Address ....................................................... |
43 |
B.2 Printer’s Internal Web Pages ................................................................................ |
46 |
|
B.3 Installing the Printer Driver.................................................................................. |
49 |
|
Glossary................................................................................................... |
51 |
|
ii
1 Getting Started
1.1 Introduction
The E-Class Mark III printer (hereafter referred to as “the printer”) is user-friendly thermal printing device that blends quality and durability in an affordable package to meet all of your labeling needs. This manual provides the information necessary to operate and maintain the printer.
To begin printing labels or tags, refer to the instructions included with your software labeling program. For your convenience, a Windows printer driver can be found on the Accessories CD-ROM, or it can be downloaded from our website at http://www.datamax-oneil.com. (If you wish to write custom programs or label formats, a copy of the Class Series 2 Programmer’s Manual also is included for your reference, or the manual can be downloaded.)
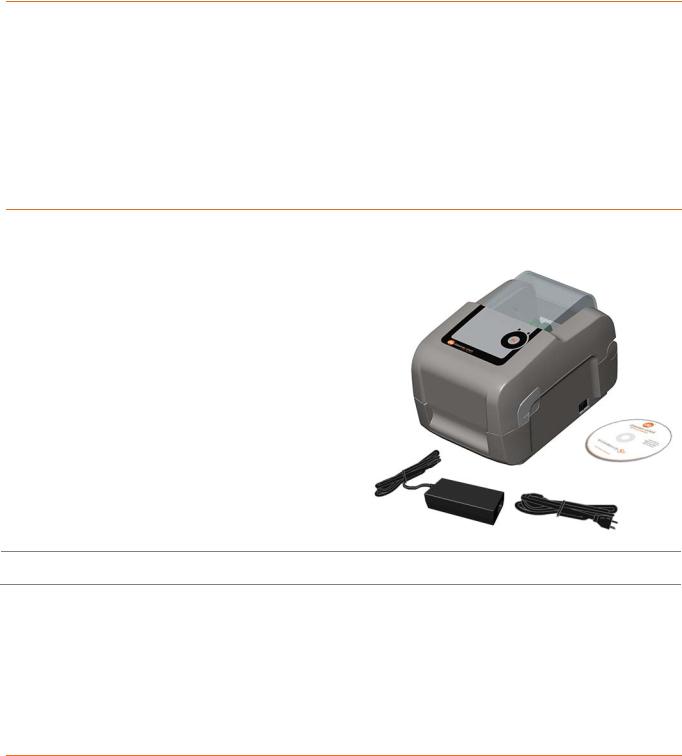
1.2 Unpacking the Printer
After removing the printer from the packaging material, check the contents of the box. In addition to the printer, the following items should be present:
312
Power Supply
Accessories CD-ROM
Any special or additionally ordered items
Additional Requirements
The following items are necessary to generate labels:
Parallel, Serial, USB, or (if equipped for LAN connectivity an Ethernet cable); see Section 2.2.2 for details.
Applicable media; see Appendix A for details.
Contact customer support or your sales representative for advice on the media and software that may best be suited for your application.
It is a good idea to save all packaging material for future use.
Chapter 1 – Getting Started |
1 |

2 |
Chapter 1 – Getting Started |
2 Printer Setup
2.1 Introduction
This section explains how to connect your printer and load media (including ribbon, if equipped for thermal transfer operation).
2.2 Connecting the Printer
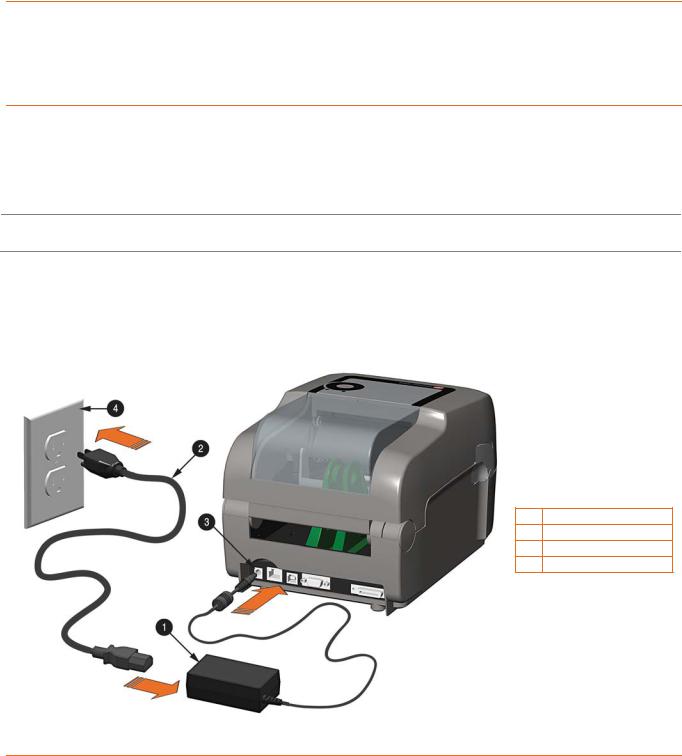
2.2.1 Power Connections
The printer is powered by an external auto-ranging power supply, which connects between the printer and an electrical outlet. Ensure that the operating ranges of the power supply are compatible with your electrical service, (see Appendix A for details) then connect power as follows:
Before connecting power to the printer, ensure that the Power Switch is in the OFF (O) position.
1)Connect the Power Supply to Power Jack of the printer.
2)Connect the AC Power Cord to the Power Supply.
3)Connect the AC Power Cord to an Electrical Outlet.
312
|
Power Supply |
|
AC Power Cord |
|
Power Jack |
|
Electrical Outlet |
Chapter 2 – Printer Setup |
3 |

2.2.2 Interface Connections
The printer can be connected to the host system via the parallel, serial, Ethernet or USB ports.
Before connecting interface cables to the printer, ensure that the Power Switch is in the OFF (O) position.
312
|
Ethernet Port |
|
USB Port |
|
Serial Port |
|
Parallel Port |
Cable Requirements
Choose the correct cable when interfacing the printer to the host:
The Parallel Port (optional) supports parallel communications via a 36-pin male mini-Centronics connector. Bi-directional communications (forward and reverse channels) is supported when an IEEE 1284 compliant cable and supporting host software is used.
The Ethernet Port (optional) supports Wired LAN communications (see Appendix B for information).
The Serial Port supports RS-232C communications via a DB-9 connector with specific pin-outs (interface cable part numbers and pin-outs are given below; contact your reseller to order). Serial port settings are menu-selectable and must match the host settings.
Part # 32-2483-01 |
Part # 32-2301-01 |
The USB Port supports high-speed serial communications and requires a standard USB interface cable.
received. Afterward, a timeout period must be exceeded (or power must be cycled OFF and ON) to change the established communications port.The printer automatically establishes communications with the first port through which valid data is
4 |
Chapter 2 – Printer Setup |
2.3 Loading Media
If the printer is equipped with an Adjustable Media Sensor it may require adjustment to match your media choice. If the printer is equipped with this type of sensor, proceed to Section 4.4.
2.3.1Loading Roll Media
Load media as follows:
1)Slide the Media Guides outward.
2)Slide the Media Hangers outward and insert the Roll Media as shown. Allow the Media Hangers to retract and grasp the media roll.
312
|
Media Hangers |
|
Media Guides |
|
Roll Media |
3)Pull out enough media to exit the front of the printer. Adjust the Media Guides so they are lightly touching the edge of the media.
312
Chapter 2 – Printer Setup |
5 |
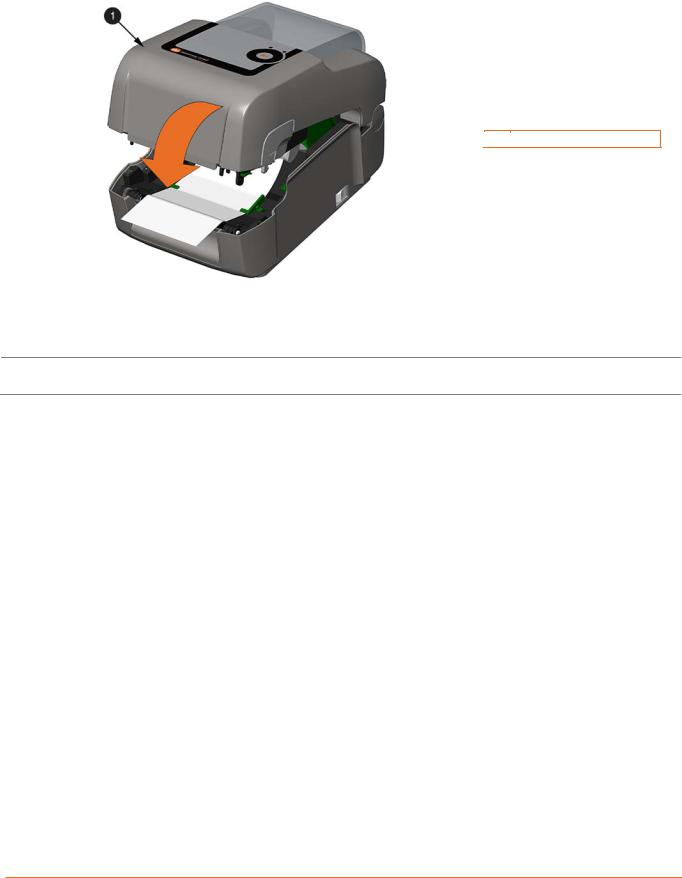
4)If using thermal transfer media (ribbon) proceed to Section 2.4 Loading Ribbon. Otherwise close the printer’s Cover and press downward until latched.
312

 Cover
Cover
5)Press the 
 button several times to advance the media (if the Fault Light is lit, see Section 3.7.)
The printer is factory set to use gap media. If using another media type (for example, continuous media), printer setup must be reconfigured; see Section 3.4.
6 |
Chapter 2 – Printer Setup |

2.3.2 Loading External or Fan-Fold Media
Load media as follows:
1)Slide the Media Guides outward.
2)Slide the Media Hangers outward and install the two Media Chute Guides into the Media Hangers.

 Media Chute Guides

 Media Hangers

 External Media Guide
3)Position the Media Hangers to match the width of the media being used. Slide the Hanger Lock against the Media Hanger to hold this position.

 Media Hangers

 Hanger Lock
Chapter 2 – Printer Setup |
7 |

4)Route the media through the External Media Slot in the rear of the printer. Pull out enough media to exit the front of the printer. Adjust the Media Guides so they are lightly touching the edge of the media.

 External Media Slot

 Media Guides

 External Media Supply
5)If using Thermal Transfer media (ribbon) proceed to Section 2.4 Loading Ribbon. Otherwise close the printer’s Cover and press downward until latched.
6)Press the 
 button several times to advance the media (if the Fault Light is lit, see Section 3.7.)
The printer is factory set to use gap media. If using another media type (for example, continuous media), printer setup must be reconfigured; see Section 3.4.
8 |
Chapter 2 – Printer Setup |
2.3.3 Loading Media with the Peel and Present Option
Load media for peeling (if the printer is equipped with the option) as follows:
When using the Peel Mechanism do not exceed a print speed of 4 IPS.
To utilize “Tear mode” with Peel and Present Option installed; move the Peeler Door to its open position.
1)Load media as described in Section 2.3, (steps 1-3).
2)Remove about 8 inches (200mm) of labels from the Media Backing.
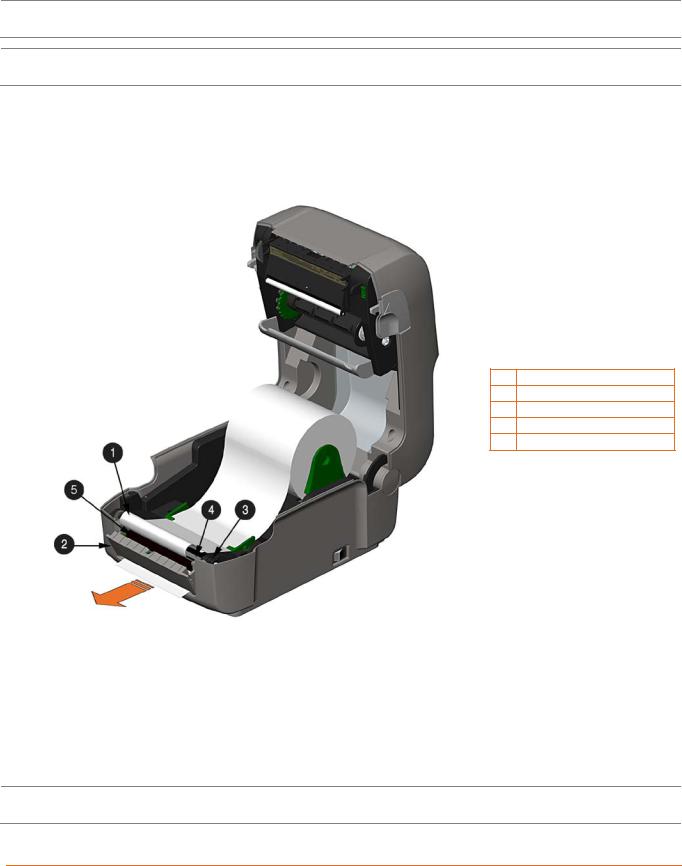
3)Open the Peeler Door. Route the Media Backing over the Platen Roller and Peel Bar, and then behind the Peel Roller and Peeler Door, as shown below.
312
|
Media Backing |
|
Peeler Door |
|
Platen Roller |
|
Peel Bar |
|
Peel Roller |
4)Close the Peeler Door.
5)If using Thermal Transfer media (ribbon) proceed to Section 2.4 Loading Ribbon. Otherwise close the printer’s Cover and press downward until latched.
6)Press the 
 button several times to advance the media (if the Fault Light is lit, see Section 3.7.)
7)The printer will now peel each label and present it to the operator for removal. The indicator light will flash orange and the next label will not feed/print until the previous label is removed.
The printer is factory set to use gap media. If using another media type (for example, continuous media), printer setup must be reconfigured; see Section 3.4.
Chapter 2 – Printer Setup |
9 |

2.3.4 Loading Media with the Cutter Option
Load media for cutting (if the printer is equipped with the option) as follows:
1)Load media as described in Section 2.3, (steps 1-3).
2)Route the media through the opening in the Cutter.
312

 Cutter

 Media
Media
3)If using Thermal Transfer media (ribbon) proceed to Section 2.4 Loading Ribbon. Otherwise close the printer’s Cover and press downward until latched.
4)Press the 
 button several times to advance the media (if the Fault Light is lit, see Section 3.7.). The printer will now cut each label as it exits from the printer.
7)The printer will now peel each label and present it to the operator for removal.
If the printer is equipped with the Present Sensor Option, the indicator light will flash orange and the next label will not feed/print until the previous label is removed.
The printer is factory set to use gap media. If using another media type (for example, continuous media), printer setup must be reconfigured; see Section 3.4.
10 |
Chapter 2 – Printer Setup |

2.4 Loading Ribbon
The printer is capable of using C.S.I (Coated Side In) and C.S.O (Coated Side Out) ribbons in the following configurations:
½” Core Ribbons
Ribbon Core Width: 4.3 inches (110mm)
Ribbon Width: 1.0 - 4.3 inches (25 - 110mm); Centered on core
1” Core Ribbons (with Ribbon Core Adapters, see section 2.4.1.)
Ribbon Core Width: 1.0 - 4.3 inches (25 - 110mm); Centered on Ribbon Core Adapters
Ribbon Width: 1.0 - 4.3 inches (25 - 110mm); Centered on core
Load ribbon as follows:
If equipped with the thermal transfer option, the printer is factory set to use ribbon; see Section 3.4 to change this setting if using direct thermal media.
1) Determine the type of ribbon (C.S.I or C.S.O) you are using.
312
 C.S.I
C.S.I  Coated Side In Ribbon
 C.S.O
C.S.O  Coated Side Out Ribbon
Ensure the inked side of the ribbon faces toward the label media, not the printhead.
Chapter 2 – Printer Setup |
11 |

2)Push out the Supply Hub and load the Supply Roll into the printer as shown. Depending on the size of the Supply Roll, the Media Bouncer may need to be pushed out of the way.
3)Once the Supply Roll is loaded, slide the Ribbon Handler Latch downward to unlatch the Ribbon Handler Assembly.
312

 Supply Roll

 Supply Hub

 Media Bouncer

 Ribbon Handler Latch

 Ribbon Handler Assembly
4) Push out the Take-up Hub and load an empty Ribbon Core into the printer as shown.
312

 Ribbon Core

 Take-up Hub
12 |
Chapter 2 – Printer Setup |
 Loading...