


7A300020-2 Rev. A
APEX 3
User Guide 


Contents
General Precautions...................................................................................................... |
1 |
|||
Safety ........................................................................................................................... |
|
1 |
||
1 |
|
Getting Started .................................................................................................... |
2 |
|
|
1.1 |
Unpacking the Printer.......................................................................................... |
2 |
|
|
1.2 |
Installing and Charging the Battery Cartridge ......................................................... |
3 |
|
|
1.2.1 |
Installing the Battery .................................................................................... |
3 |
|
|
1.2.2 |
Charging the Battery..................................................................................... |
4 |
|
|
1.3 |
Reading the LED Status ....................................................................................... |
5 |
|
|
1.4 |
Using the Belt Clip .............................................................................................. |
6 |
|
2 |
Loading Supplies..................................................................................................... |
7 |
||
|
2.1 |
Adding Paper or Labels ........................................................................................ |
7 |
|
|
2.2 |
Tearing Paper..................................................................................................... |
8 |
|
3 |
Using the Printer..................................................................................................... |
9 |
||
|
3.1 |
Initial Power-Up and Self-Test .............................................................................. |
9 |
|
|
3.2 |
Connecting the Printer....................................................................................... |
10 |
|
|
3.2.1 |
Dip Switch Location..................................................................................... |
10 |
|
|
3.2.2 |
Setting Dip Switches ................................................................................... |
10 |
|
|
3.2.3 |
Dip Switch Functions ................................................................................... |
11 |
|
|
3.3 |
Serial Communication ....................................................................................... |
12 |
|
|
3.4 |
Infrared Communications Mode (IrDA)................................................................. |
12 |
|
|
3.5 |
Bluetooth and 802.11g Communications .............................................................. |
13 |
|
|
3.6 |
Magnetic Strip Reader ....................................................................................... |
13 |
|
|
3.7 |
USB Communications ........................................................................................ |
14 |
|
|
3.8 |
Programming Information .................................................................................. |
14 |
|
4 |
Printer Maintenance.............................................................................................. |
16 |
||
|
4.1 |
Print Head Cleaning Instructions ......................................................................... |
16 |
|
|
4.2 |
Charging the Printer Battery............................................................................... |
16 |
|
|
4.2.1 Important Notes on Charging Batteries .......................................................... |
16 |
||
|
4.2.2 Important Notes on Replacing Batteries ......................................................... |
17 |
||
|
4.3 |
Verifying Battery Charge State ........................................................................... |
17 |
|
|
4.4 |
Battery and Safety Information........................................................................... |
18 |
|
|
4.5 |
Recycling your Batteries .................................................................................... |
18 |
|
|
4.6 |
Troubleshooting................................................................................................ |
18 |
|
|
4.7 |
Printer Supplies ................................................................................................ |
19 |
|
i

5 |
Specifications........................................................................................................ |
20 |
|
|
5.1 |
Printer Specifications......................................................................................... |
20 |
|
5.2 |
Supply Specifications ........................................................................................ |
20 |
|
5.3 |
Regulatory Notes .............................................................................................. |
21 |
|
5.3.1 FCC Part 15 Class B .................................................................................... |
21 |
|
|
5.3.2 Warranty ................................................................................................... |
21 |
|
|
5.3.3 Warranty and/or Repair Service .................................................................... |
21 |
|
6 |
Customer Support ................................................................................................. |
22 |
|
ii

General Precautions
Before using this product be sure to read through this manual. After reading please keep the manual in a safe place for future reference.
The information contained herein is subject to change without notice of any type.
Datamax-O’Neil is not responsible for any operational results regardless of missing information, errors or any misprinting in this manual.
Datamax-O’Neil is not responsible for problems created as a result of using options and consumables not approved by them.
This product is designed for servicing at an Authorized Service Center. Other than routine maintenance described in this manual the user should not attempt to repair, service or disassemble this product.
Incorrect operation, handling, improper supplies and operating environments may cause damage or otherwise affect the proper operation of this product. Such actions invalidate the product warranty.
Safety
In this manual, on the printer, and on the accessories we make use of internationally recognized safety symbols as follows:
Caution! Refer to the explanation in this Manual
Caution! Risk of electric shock
Double Insulation or Reinforced Insulation
DC, Direct Current or Voltage
AC + DC, Current or Voltage
1
1 Getting Started
1.1 Unpacking the Printer
The APEX 3 portable printer is a full featured portable receipt printer designed for a number of environments and uses including field service, field sales, hospitality and restaurants, ticketing, etc. where point of service receipts are required. The package contains:
Printer
Battery Cartridge
Universal AC adapter (US, UK, European or Australian plugs) for charging the battery inside the printer
Belt Clip
Roll of paper supply (already loaded in the printer)
Both cabled and wireless communication is possible.
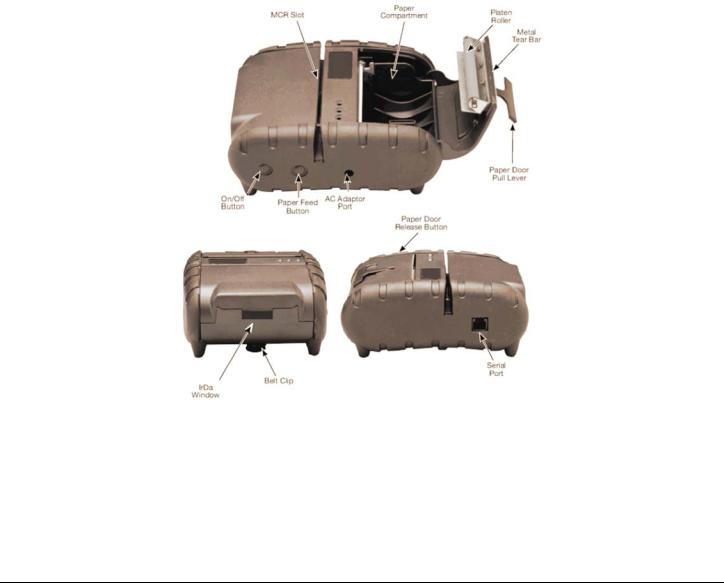
Overview
FIGURE 1: PRINTER OVERVIEW
2

1.2 Installing and Charging the Battery Cartridge
Note: One battery cartridge is included with the printer. Similar to a cordless phone battery, the printer’s battery must be charged before use.
Datamax-O’Neil batteries must be cycled several times to achieve maximum capacity. To cycle a battery, fully charge it and then allow a full discharge through normal use.
1.2.1Installing the Battery
Note: Refer to Figure 2 below to install the battery pack in the printer.
Unlock the battery door by sliding the battery door locking tab down.
Open the battery door.
Insert the battery as shown. The battery side with two contact terminals should be facing down to make contact with the two spring probes inside the battery compartment.
Close the battery door.
Lock the battery door by sliding the battery door locking tab up.
FIGURE 2: INSTALLING THE BATTERY CARTRIDGE
3
1.2.2Charging the Battery
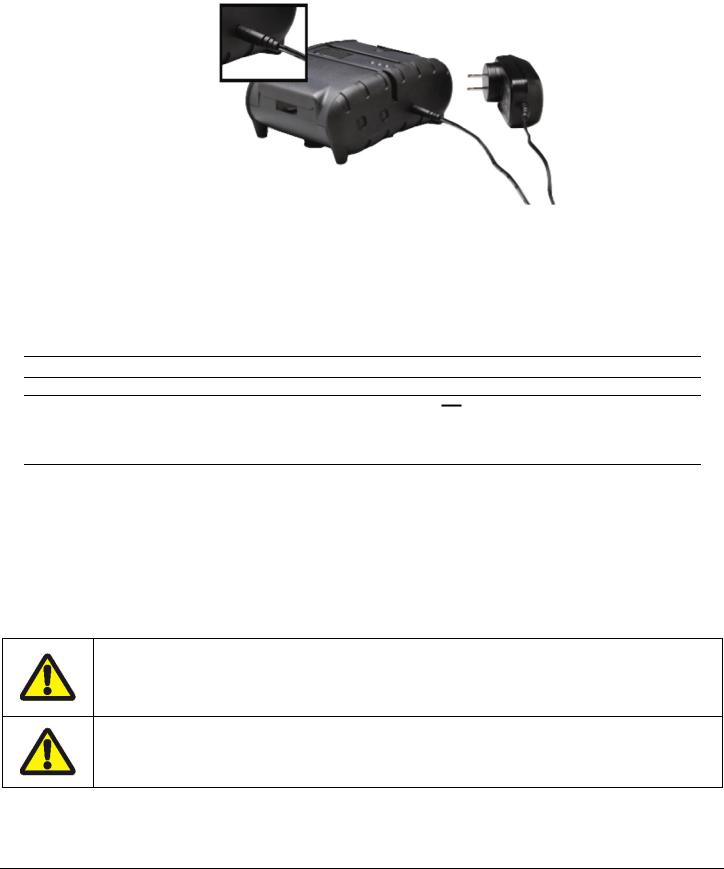
Plug the battery charger adapter output cable into the battery charger connector as shown in Figure 3.
FIGURE 3: CHARGING THE BATTERY CARTRIDGE
Plug the battery charger adapter into the appropriate AC line voltage socket.
The Yellow/Amber charging LED will illuminate indicating that the battery is charging.
The battery will be fast charged and, after approx. 180 minutes, the LED will turn off.
To remove the battery cartridge, open the battery door and tip the battery out of the printer.
Note: To ensure a full charge do not operate the printer while charging.
Note: The wall mounted charger is Class II equipment ( 


 ). Multiple plug configurations comply with most international standards. The wall mounted charger is not supplied with plugs for use in Korea.
The wall mounted charger has the following specifications:
Model |
|
|
|
|
|
|
APEX 3 |
|
Input Voltage/Current |
|
|
|
|
|
|
100-240 VAC/0.55A |
|
Input Frequency |
|
|
|
|
|
|
50-60 Hz |
|
Output Voltage/Current ( |
|
|
|
|
|
|
) |
10VDC/2.4A |
|
|
|
|
|
||||
|
|
|
|
|
|
|||
Do not use a charger not approved by Datamax-O’Neil for use with the APEX 3. Use of an unapproved charger could damage the battery pack or the printer and will void the warranty.
The battery terminals are well recessed inside the printer. Do not allow them to contact conductive material since this may create a short circuit which could cause injury or start a fire.
4

1.3 Reading the LED Status
Table 1 explains the LED indicator status. Refer to Figure 1 for the locations described for <ON/OFF> and <FEED> push button switches and AC adapter socket. Figure 4 provides the location of the status LEDs on the front of the printer.
FIGURE 4: LED STATUS
Table 1 - Reading the LED Status
|
LED |
|
Status |
|
Condition |
|
Function |
|
|
|
|
|
|
|
|
|
|
|
|
|
Flashing |
|
Power is ON and the printer is in RS232, USB or IrDA |
|
|
|
GREEN |
|
|
mode. |
|
|
|
|
|
|
|
||
|
|
|
|
Steady |
|
Communicating with host. |
|
|
|
|
|
|
|
||
|
LED # 1 |
|
|
|
|
|
|
|
|
BLUE |
|
Flashing |
|
Power is ON and the printer is in Bluetooth mode. |
|
|
|
|
|
|
|
|
|
|
|
|
|
Steady |
|
Transmitting/receiving |
|
|
|
|
|
|
|
||
|
Communication |
|
|
|
|
|
|
|
|
AMBER |
|
Flashing |
|
Power is ON and the printer is in 802.11b/g mode. |
|
|
|
|
|
|
|||
|
|
|
|
|
|
|
|
|
|
|
|
Steady |
|
Transmitting/Receiving |
|
|
|
|
|
|
|
||
|
|
|
|
|
|
|
|
|
|
|
RED |
|
Steady |
|
Low power indication. |
|
|
|
|
|
|
|
|
|
LED # 2 |
|
|
|
|
|
Battery being charged. The LED will turn off when the |
|
Battery |
|
AMBER |
|
Steady |
|
|
|
|
|
|
battery is fully charged. |
|||
|
|
|
|
|
|
||
|
|
|
|
|
|
|
|
|
|
|
|
|
|
|
Indicates that MCR is ready to accept data. |
|
LED # 3 |
|
GREEN |
|
Steady |
|
Indicates that SCR is ready to accept data. |
|
|
|
|
|
|
||
|
|
|
|
|
|
|
|
|
|
|
|
|
|
|
|
|
Magnetic Card |
|
|
|
|
|
Printer Error. The printer is out-of-paper or Paper |
|
|
|
|
|
|
door is open. |
|
|
Reader |
|
RED |
|
Steady |
|
|
|
|
|
|
MCR/SCR faulty condition. |
|||
& |
|
|
|
|
|||
|
Printer Error |
|
|
|
Flashing |
|
Indicates the print head is hot and printing is paused. |
|
|
|
|
|
|
||
|
|
|
|
|
|
|
|
Note: Refer to the troubleshooting guide to determine error or fault condition.
5
 Loading...