

Page 1

92-2573-01 Rev.B
Operation & Installation
Page 2

Page 3

Overview
This document describes the installation and use of the DMXrfNet
III
Card options for the H-Class and A-Class Mark II
printers. After verifying the contents of the kit and the tools needed, follow the steps below to install and begin using the
option. Keep this documentation for future reference.
For your safety and to avoid equipment damage, always turn ‘Off’ power and unplug the printer’s
CAUTION
power cord before beginning this installation.
Contents of the Kit
Note: If your card is already installed proceed to “Card Setup and Operation”
This kit contains the following items:
Network Card Assembly
Rear Cover Plate
Screws
CAUTION
(Appearance may vary depending on card configuration.)
When handling the Network Card, observe proper electrostatic discharge precautions to prevent damage.
Firmware Update Required
If you are installing this card into an existing printer, you must upgrade the printers firmware to support this network card.
Updated firmware can be downloaded from the Datamax-O’Neil FTP site at ftp.datamax-oneil.com. Refer to the printers
operator’s manual for more information on updating the printers firmware. Be sure the firmware file that you download is:
All Models: Version 14.033 or greater.
Before installing new firmware verify (via a Configuration Label) that the printer bootloader is version 14.033 or greater.
Overview 1
Page 4
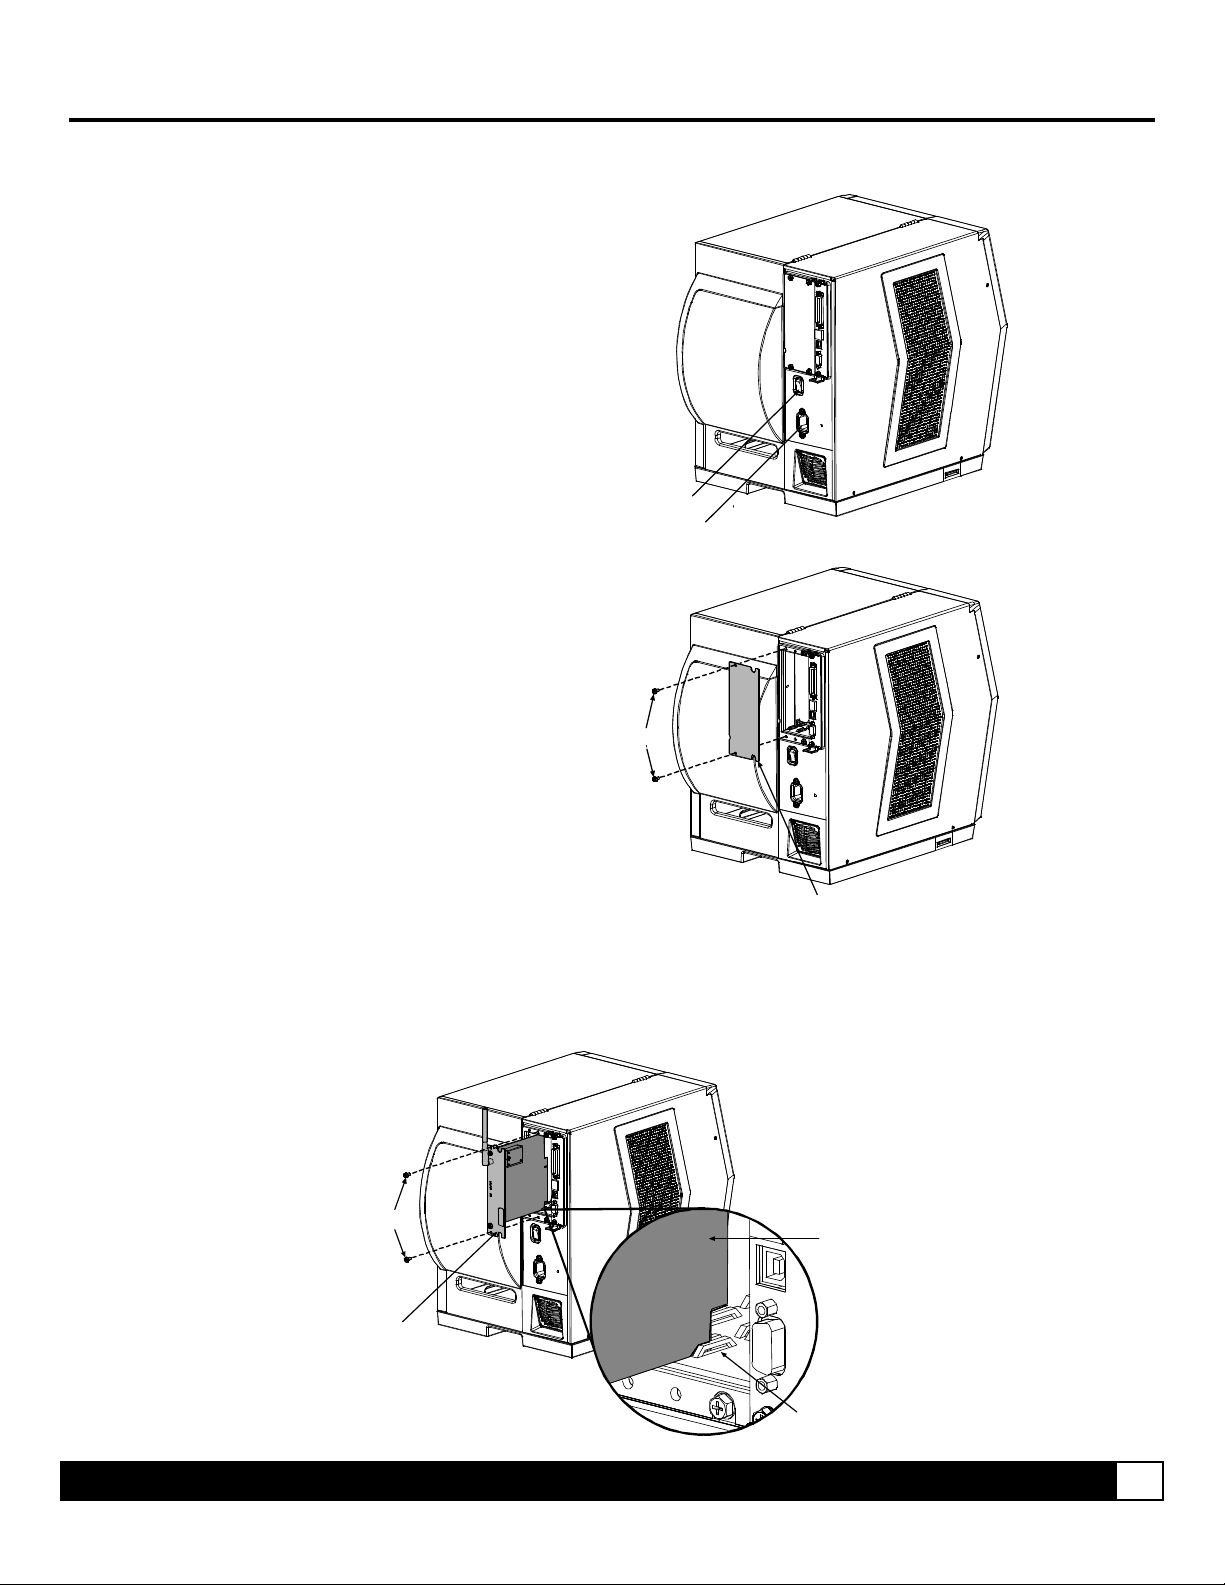
Card Installation
The following illustrations depict installation into an H-Class printer, other model installations are similar. On some AClass models, the Network Card is installed upside-down.
1. Turn ‘Off’ the Power Switch and unplug the power
cord from the AC Receptacle.
Power Switch
2. Remove the two Screws and Cover Plate from the
AC Receptacle
rear of the printer.
Screws
Cover P late
3. Slide the Wireless Card into the center slot of the printer. Be sure the Wireless Card is positioned between the Guides
while inserting.
4. Secure using the two previously removed Screws.
Screws
Wireless
Card
Wireless
Card
Guides
Overview 2
Page 5
Introduction
These network cards can be equipped in the following configurations:
Wired and Wireless Ethernet
Wireless Ethernet
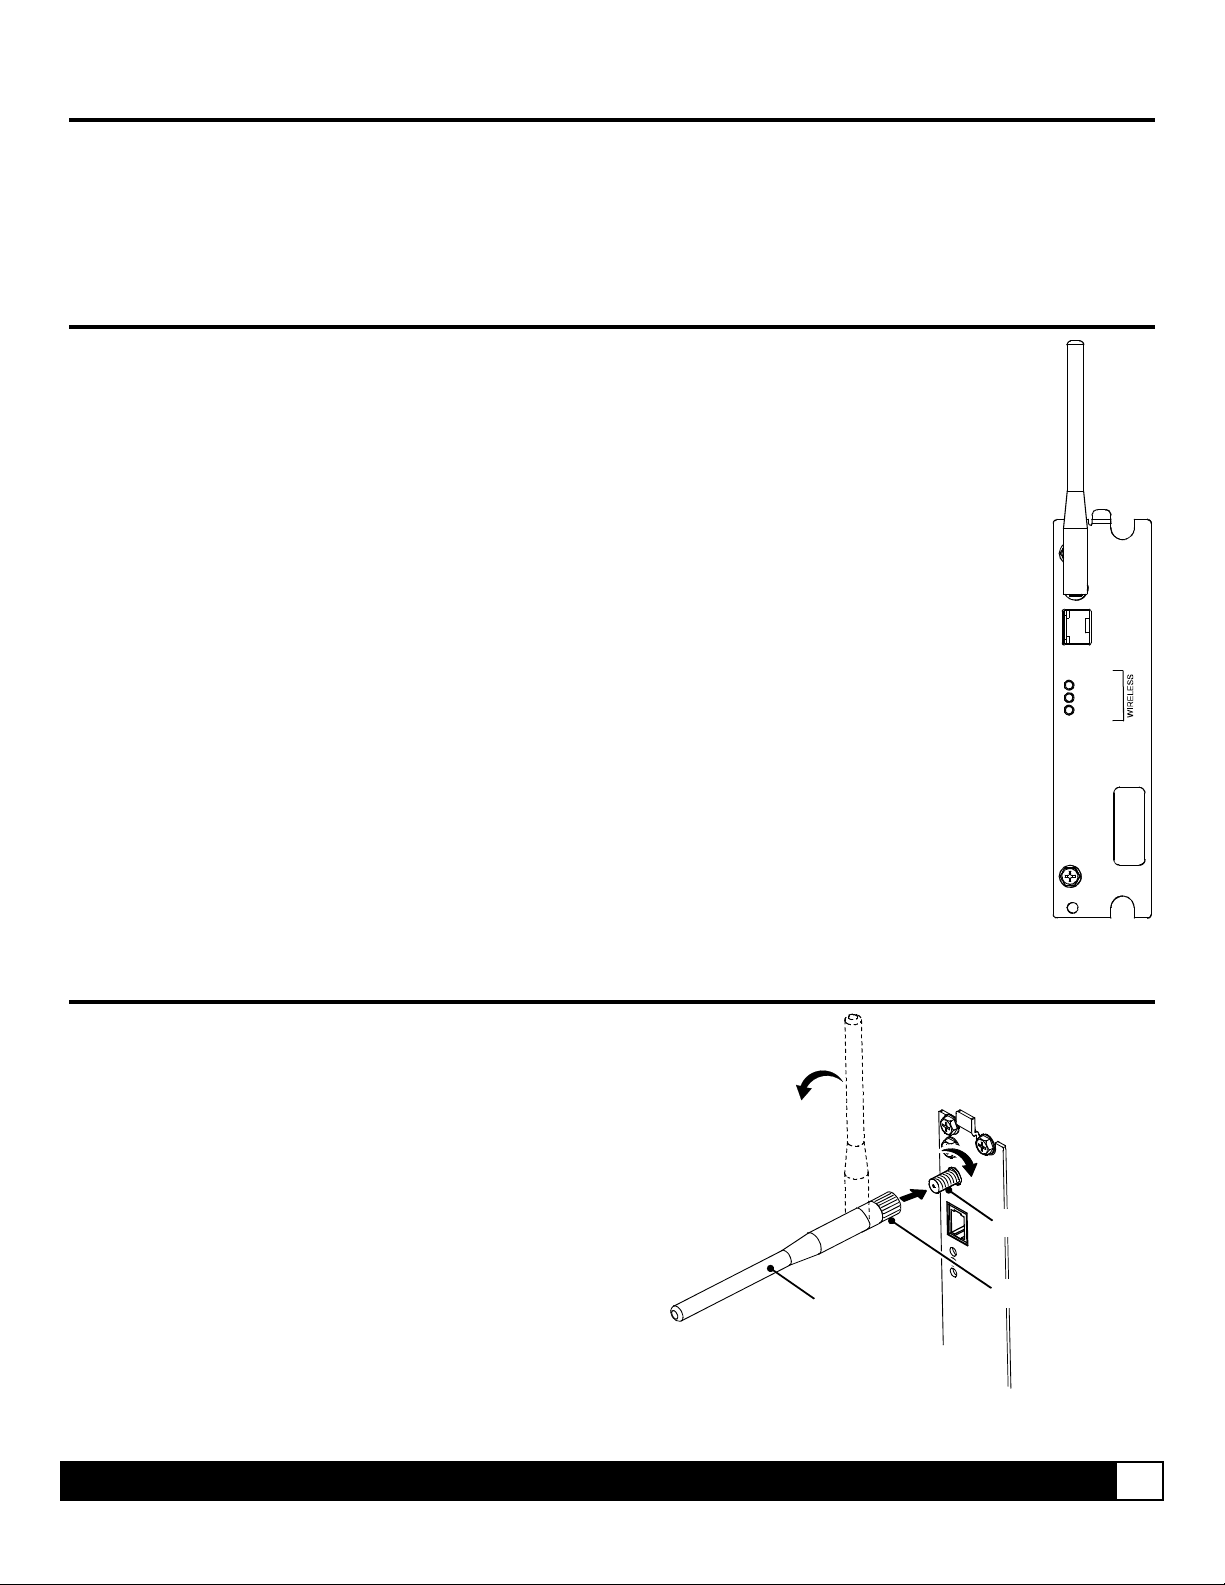
External Hardware Descriptions
The functions of the Interface Card’s external hardware are defined below. Depending on the configuration
of your card some items may not be present.
Connectors
ANTENNA is used to connect an antenna or coaxial cable for RF reception and transmission via this Multimedia
Indicator Lights
Label
This Label contains the MAC address of the Radio module on the network card and is not usually needed. The MAC address of the
printer is listed on the printer’s Configuration and Network Report test labels.
Communication Exchange (MMCX) Reverse Pin type connector.
10/100 BaseT is used to connect a 10/100 BaseT Ethernet cable via this RJ45 network connector.
ACTIVITY is a green indicator that flashes when the Card is not connected and scanning. The indicator will turn on when a
connection is made.
LINK is a yellow indicator that comes on when the Card is associated with an Access Point or Ad-hoc peer.
DATA is a green indicator that flashes when there is data transmitted between the printer and Host access point.
ANTENNA
ACTIVITY
LINK
DATA
Installing the Antenna
1. Extend the Antenna then align the Base to the
Connector.
2. Turn the Base clockwise until fully seated and tight on
the Connector.
3. Raise and position the Antenna.
To avoid permenant damage, do not pull on the antenna when
handling the Network Card.
Antenna
Overview 3
Connector
Base
Page 6

Network Card Reset
It is recommended that the printer’s communication settings be reset to factory defaults to avoid any conflicts in
configuration. To reset the printer’s communication settings:
1. Turn on the printer and press the MENU BUTTON.
2. Using the DOWN BUTTON scroll to ‘COMMMUNICATIONS’ and press ENTER.
3. Using the DOWN BUTTON scroll to ‘NIC ADAPTER’ and press ENTER.
4. Using the DOWN BUTTON scroll to ‘SET FACTORY DEFAULTS’ and press ENTER. When prompted press the
YES KEY. The printer with then reset and return to Ready Mode.
5. Once completed, turn the printer OFF.
Network Card Setup
The Print Server makes IP requests at power-up, so before making a network connection to the printer consider how your
IP addressing needs to be assigned. The IP addressing of the Internal Ethernet Print Server can be configured in one of
two ways: Using a static IP Address or Using IP Discovery (DHCP, BootP, or RARP). At factory default settings IP
DISCOVERY is ENABLED.
1. With Printer Off, connect the network cable then turn on Printer.
2. The printer will now search for a DHCP server. Once the printer has obtained an IP address the message “IP
Address xxx.xxx.xxx.xxx” will be displayed briefly signifying that an IP address has been obtained. Allow up to 90
seconds for the printer to retrieve an IP address.
3. At this point it is recommended to print a Network Report. This Network
Report is generated by the printer and lists important default information
such as the IP and MAC Addresses as well as SSID for wireless
equipped cards. To print the ‘Network Report’:
CANCEL buttons at the same time.
4. Verify the printer has obtained a valid IP address for your network. If a
valid IP address was not obtained or you wish to use a different static
address this can be set via the printer’s front panel.
Enter the printer’s menu and navigate to the Communications/NIC
Adapter menu branch. Set the “IP Discovery” menu item to Disable, then
set the “IP Address” menu item to desired value, continue the same
procedure with “Subnet Mask” and “Gateway Address” menu items if
necessary. Exit the printers menu, When prompted to save changes
press the YES KEY.
Once the previous steps have been successfully completed you may now use the IP Address to:
> Install a printer driver, and start printing from your Windows applications. See section, Installing the Printer Driver.
-or-
> If your card is equipped with wireless capabilities, see section Network Card Setup - Wireless for setup.
-or-
> Browse to the printer’s internal web pages for advanced configuration. See section, Printer’s Internal Web Pages.
Press the PAUSE, FEED,
The information on this label will vary depending on your
configuration and firmware version.
Network Setup 4
Page 7

Network Card Setup - Wireless (Infrastructure Mode)
After a successful setup is made via a wired connection, the
Wireless connection (if equipped) can now be configured in
infrastructure mode using a static or DHCP issued IP address.
1. Open your web browser. Type in the IP Address of the
printer. The Default IP is: 192.168.10.26.
Note: If a different IP Address has been assigned to
the printer, make sure to enter the correct IP
Address.
2. A page similar to the right will appear:
3. Click on the TCPIP Configuration menu item. Locate and set the following items:
> Select WIRELESS ETHERNET (WIFI 802.11) from the NETWORK INTERFACE drop down box.
> Select DMXrfNet3 from the WIFI OPTION TYPE drop down box.
Scroll down to the bottom of the page, enter the password (default is “sysadm”) and click apply.
4. Click on the DMXrfNet3 menu item on the left side of the screen. Locate and set the following items:
> Select INFRASTRUCTURE from the WIRELESS TYPE drop down box.
> Set the SSID field to match the SSID of your access point.
> Set any WLAN Security Settings if necessary.
For static IP setup:
> In the DHCP section, select the DISABLED radio button.
> In the STATIC IP ADDRESSES section, enter valid static addresses for PRINTER IP ADDRESS,
PRINTER SUBNET MASK, and PRINTER GATEWAY.
Scroll down to the bottom of the page, enter the password (default is “sysadm”) and click apply.
5. Click on the Restart Network menu item, enter the password and click the Restart Network button.
Once the previous steps have been successfully completed you may now use the IP Address to:
> Install a printer driver, and start printing from your Windows applications. See section, Installing the Printer Driver.
-or-
> Browse to the printer’s internal web pages for advanced configuration. See section, Printer’s Internal Web Pages.
Network Setup 5
Page 8

Network Card Setup - Wireless (Adhoc Mode)
To configure the wireless card in Adhoc mode, you must configure
your host computer to match the default settings of the printer. Your
wireless network type must be Adhoc. Refer to your operating
system’s or your wireless network card documentation for
information on how to configure your computer.
1. Power on the printer. Enter the printer’s menu and navigate to the Communications/NIC Adapter/Quick Setup
menu branch. Scroll down to the “WLAN RFNET 3 ADHOC” menu item and press the ENTER button. When
prompted press the YES KEY. The printer will now be set to the following settings:
Wireless Mode: Enabled
IP: 192.168.10.26
SSID: Blank; none
Subnet Mask: 255.255.255.0
Gateway: 192.168.10.26
2. Make sure your host computer’s network IP settings are in the same range, (but not identical) to the printers IP
address. (e.g. 192.168.10.20). Also be sure that Subnet Mask is set to 255.255.255.0 and the Gateway is set to
0.0.0.0 or the host computer’s IP address, (in this case 192.168.10.20).
3. From Windows, you may now “View Wireless Networks”.
From the list of available wireless networks select the printer
that you wish to connect to and then click on the Connect
button.
If you do not see your printer listed be sure you have the
host computer configured for Adhoc wireless networks.
This process will vary depending on your wireless device
installed in your host computer and your operating system
version.
Once the previous steps have been successfully completed you may now use the IP Address to:
> Install a printer driver, and start printing from your Windows applications. See section, Installing the Printer Driver.
-or-
> Browse to the printer’s internal web pages for advanced configuration. See section, Printer’s Internal Web Pages.
Network Setup 6
Page 9

Printer’s Internal Web Pages
1. Open your web browser. Type in the IP Address of the printer. The Default IP is: 192.168.10.26.
Note: If a different IP Address has been assigned to the printer, make sure to enter the correct IP Address.
2. The following page will appear:
The printer’s internal web pages are divided into 15 pages that are accessible via the navigation bar on the left-hand side.
Most of the items on these pages mimic the printer's internal menu. For more information on the function of these settings
see the corresponding function in the Operator’s Manual.
The GENERIC NETWORK CONFIGURATION, WIRED ETHERNET CONFIGURATION, and DMXrfNet3 pages contain
many items associated with the setup of the network card as well as wireless security settings. The following tables
provide information on each of the items listed on these pages.
Note: You must provide a password to change any settings, the default password is “sysadm”.
Note: After changes are sent to the printer, (on all web pages) the network card must be restarted in
Note: If any address parameters were changed such as IP address, subnet or gateway, the printer
order for the changes to take effect. This can be done from the “Restart Network” page.
might not be viewable from the current host if they are no longer on the same subnet.
Printer’s Internal Web Pages 7
Page 10

GENERIC NETWORK CONFIGURATION Page
NETWORK INTERFACE
NETWORK INTERFACE Selects WIRED ETHERNET (802.3) or WIRELESS ETHERNET (WIFI 802.11)
WIFI OPTION TYPE
WIFI OPTION TYPE Selects which model of the communication card. This setting must match the model
NET BIOS SERVICES
ENABLED/DISABLED Enables or disables the NET BIOS SERVICES
NETBIOS NAME Is the name used to reference the printer instead of the IP address. A WINS or DNS
PRIMARY WINS SERVER
SECONDARY WINS SERVER
TCP PRINT SERVICES
TCP PRINT SERVICES Selects the Port to use for all network communications; Default is 9100
LPD PRINT SERVICES
LPD PRINT SERVICES Enables or disables the LPD SERVICES
SNMP SERVICES
ENABLED/DISABLED Enables or disables the SNMP SERVICES
SNMP SERVER ADDRESS
SNMP TRAP ADDRESS
TELNET SERVICES
ENABLED/DISABLED Enables or disables Telnet protocol to transfer data.
FTP SERVICES
ENABLED/DISABLED Enables or disables FTP protocol to transfer data.
HTTP (WWW) SERVICES
ENABLED/DISABLED Enables or Disables the HTTP SERVICES.
NETCENTER SERVICES
ENABLED/DISABLED
GRATUITOUS ARP
GRATUITOUS ARP Sets time interval for ARP transmission packets, where:
installed in the printer; DMXrfNet2 or DMXrfNet3. The model of the card is shown in the
upper right hand corner of the cards mounting plate.
server is required for this capability.
The IP address of the primary WINS Server.
The IP address of a secondary WINS Server.
Allows management protocols, where:
ENABLED = Sends messages to SNMP-compliant devices.
DISABLED = Sends no messages.
Is the address in standard octet format for SNMP services.
Is the address in standard octet format where SNMP traps will be sent when SNMP service
is installed on your receiver. When zeroed, no traps are sent.
Enables or Disables the NETCENTER SERVICES.
(0-2048 minutes); Default is 0 (Disabled)
Printer’s Internal Web Pages 8
Page 11

WIRED ETHERNET CONFIGURATION Page
DHCP
ENABLED/DISABLED
Controls IP Address discovery, where:
ENABLED: Broadcasts over the network to receive addresses from the responsible
server at startup. Manual modifications to IP Address, Subnet Mask, or Gateway are not
allowed; and, if no server is found, the specified static value will be used.
DISABLED: Uses the stored static IP, Subnet Mask, and / or Gateway Address.
STATIC IP ADDRESSES
PRINTER IP ADDRESS
PRINTER SUBNET MASK
These are the static address the printer will use when “DHCP” is set to disabled or a valid
IP could not be retrieved from a DHCP server.
PRINTER GATEWAY
ETHERNET PORT
CONNECTION SETTINGS
ETHERNET MODE Allows the User to specify the line duplex and speed of the wired Ethernet connection.
Auto-Negotiate (default) 10 BaseT Full Duplex
100 BaseT Full Duplex 10 BaseT Half Duplex
100 BaseT Half Duplex
ADVERTISE CAPABILITIES
Selects the method in which the Duplex Capability setting is advertised, where:
Automatic (advertises the selected Duplex Capability setting)
All Capabilities (advertises all capabilities)
MINIMUM TRANSMISSION
UNIT (MTU)
Max Transmission Units Sets the Maximum Transmission Unit packet size, where:
Packet size, in bytes. (512-65515); Default is 1500
DMXrfNet3 Page
DHCP
ENABLED/DISABLED
STATIC IP ADDRESSES
PRINTER IP ADDRESS
PRINTER SUBNET MASK
PRINTER GATEWAY
WIRELESS TYPE
WIRELESS TYPE Specifies the type of network in which the Module will be used:
Controls IP Address discovery, where:
ENABLED: Broadcasts over the network to receive addresses from the responsible
server at startup. Manual modifications to IP Address, Subnet Mask, or Gateway are not
allowed; and, if no server is found, the specified static value will be used.
DISABLED: Uses the stored static IP, Subnet Mask, and / or Gateway Address.
These are the static address the printer will use when “DHCP” is set to disabled or a valid
IP could not be retrieved from a DHCP server.
INFRASTRUCTURE = connects to WLAN using an AP.
ADHOC = used to connect two peer-to-peer devices.
Printer’s Internal Web Pages 9
Page 12

DMXrfNet3 Page (continued…)
ADHOC CHANNEL
ADHOC CHANNEL When Wireless Network Type is Ad Hoc, selects the channel used for communication. The
WIFI REGION CODE
WIFI REGION CODE Specifies the wireless channels allowed. The AP controls the channel used during
SSID
SSID Service Set Identifier that identifies the Module to connect to an AP. To make this
WIFI SECURITY
WIFI SECURITY
WIFI AUTHENTICATION
WIFI AUTHENTICATION Selects the WIFI authentication method: (not available for all WIFI SECURITY modes)
WEP SETTINGS
WEP KEY USED Selects the default WEP Key from 1 – 4 if Shared Key or Both is selected for WEP
WEP Key 1 through 4 Specify up to four WEP key values:
WPA SETTINGS
WPA Passphrase WPA-PSK 8 to 63 characters or 64 hex digits
LEAP SETTINGS
LEAP USER ID User ID for LEAP security mode; 1 to 32 characters
LEAP PASSWORD Password for LEAP security mode; 1 to 32 characters
EAP SETTINGS
EAP USER ID User ID for EAP security mode; maximum of 64 ASCII characters
EAP PASSWORD Password for EAP security mode; maximum of 64 ASCII characters
PEAP SETTINGS
OUTER AUTHENTICATION
INNER AUTHENTICATION
two peer-to-peer devices must use the same channel. Range is 1 to 14 channels. Default
channel is 1.
Infrastructure mode. Default is US.
connection, the Module and AP must have the same SSID. The SSID cannot contain
spaces. Default setting is the MAC address of the wireless module.
Selects the WIFI SECURITY mode:
AUTO = automatically detects the authentication. (default)
OPEN = communicates the key across the network.
SHARED KEY = allows communication only with devices with identical settings
Authentication. Default is WEP Key 1.
If WEP Encryption = 64, enter 10 hexadecimal digits for each key.
If WEP Encryption = 128, enter 26 hexadecimal digits for each key.
Selects PEAP v0 or PEAP v1
Selects MSCHAPv2, EAP MSCHAPv2, or EAP MD5
Disable WPA-PSK64
WEP64 WPA-PSK128
WEP128 WPA2-PSK
WPA-PSK TLS
WPA-LEAP PEAP
WPA-LEAP64 TTLS
WPA-LEAP128
Printer’s Internal Web Pages 10
Page 13

Installing the Printer Driver
The following screen shots are taken from Windows 2000, other Windows versions will be similar.
1
Start the Windows
“Add Printer Wizard”.
The following screen
should appear, click
‘Next>’.
3
Select on ‘Create a
new port:’ and then
select ‘Standard
TCP/IP Port’ from the
drop down menu.
Click ‘Next’
2
Make sure that ‘Local
Printer’ is selected
and then click ‘Next’.
4
Click ‘Next’.
5
In the ‘Printer Name
or IP Address:’ field
enter the IP address
or NetBIOS name of
your printer. The ‘Port
Name’ field does not
need to be changed.
When finished click
‘Next’.
7
Confirm your settings
and then click ‘Finish’.
6
Make sure ‘Standard’
is selected and then
click ‘Next’.
8
Click on ‘Have Disk’.
Installing the Printer Driver 11
Page 14

9
Insert the Accessories
CD-Rom and click
‘Browse’.
10
Browse to the
“\DRIVERS\Seagull”
folder on the CDROM, make sure the
file “for 95, 98, me,
2000, and xp.inf” is
selected and click
‘OK’.
11
Click ‘OK’.
13
Name your printer in
the ‘Printer name:’
field. Next select
whether or not to set
this printer as your
default printer. Then
Click ‘Next’.
15
Select ‘No’ then Click
‘Next’.
12
Choose your printer
from the list and then
click ‘Next’.
14
Select whether or not
to share this printer
on your network.
Then Click ‘Next’
16
Confirm your settings
and then click
‘Finish’.
17
If prompted with the
"Digital Signature Not
Found" window, click
‘Yes’ to continue
installation.
18
Your computer will
now copy the
necessary files from
the CD-ROM.
The driver and port
installation is now
complete. The printer
can be selected
through any
Window’s application.
Installing the Printer Driver 12
Page 15

Wireless and Wired Ethernet Specifications
The following list and table describes the key features and specifications of the wireless/wired card.
802.11b/g wireless LAN (Wi-Fi) standards-based technology
Highly integrated module includes radio, baseband and MAC processor, and application processor
Wired 10/100Mbs RJ-45 Ethernet port.
Extended temperature and environmental specifications
Built-in TCP/IP and UDP features provide flexible LAN connectivity options
Built-in Web server enables remote configuration capabilities
Built in WEP, WPA, WPA2, TLS, TTLS, and LEAP security protocols
Specification Description
Technology IEEE 802.11b/g DSSS, Wi-Fi compliant
Frequency
Modulation DBPSK (1 Mbps), DQPSK (2 Mbps), and CCK (5.5 and 11 Mbps)
Channels
Data Rate 11, 5.5, 2, 1 Mbps (raw wireless rate)
RF Power +15 dBm (typical) Approx.32 mW
Sensitivity
Security
Antenna
Operating Temperature
Note 1: Temperatures above +80°C reduce wireless performance. Module operates from -40°C cold start.
The Communications Card is designed to prevent damage to sensitive components due
to electrostatic discharge during normal operation; however, when handling the card take
CAUTION
proper static-control precautions to prevent damage.
2.400 – 2.4835 GHz (US/Can/Japan/Europe)
2.471 – 2.497 GHz (Japan)
USA/Canada: 11 channels (1 – 11)
Europe: 13 channels (1 – 13)
Japan: 14 channels (1 – 14)
France: 4 channels (10 – 13)
-82 dBm for 11 Mbps
-86 dBm for 5.5 Mbps
-88 dBm for 2 Mbps
-90 dBm for 1 Mbps
WEP64, WEP128, WPA-PSK, WPA-LEAP, WPA-LEAP64, WPA-LEAP128,
WPA-PSK64, WPA-PSK128, WPA2-PSK, TLS, PEAP, TTLS
One U.FL coaxial connector, 50 , supports receive diversity
Industrial: -40°C +85°C (see Note 1 below)
(Meets IEEE 802.11 industrial temperature range)
Optimize Your Wireless Network
For the best wireless coverage, consider where you place the access point, where you place the adapters, and
how you adjust the antennas. Some recommendations are:
Position the access point in line of sight to the wireless adapters, and in a central location within the area
to be used for wireless communications. Try to position the access point in a place that is higher than
networked computers and equipment.
Position the access point away from other radio equipment operating at a frequency of 2.4 gigahertz
(GHz), such as microwave ovens and cordless telephones.
Keep your wireless equipment away from large metallic objects, such as computer cases, display
monitors, and appliances, as well as other electromagnetic devices, such as televisions, radios,
cordless telephones, and microwave ovens that might interfere with wireless transmissions.
Position your wireless equipment so that large masonry structures, such as fireplaces, are not obstructing the
radio path. Building construction, such as metal framing, ultraviolet-resistant window film, metallic paint,
concrete or masonry walls, or multiple floors and walls reduce radio signal strength.
Additional Information 13
Page 16

 Loading...