

Page 1
7A300020-2 Rev. A
APEX 3
User Guide
Page 2

Page 3

Contents
General Precautions......................................................................................................1
Safety ...........................................................................................................................1
1 Getting Started ....................................................................................................2
1.1 Unpacking the Printer..........................................................................................2
1.2 Installing and Charging the Battery Cartridge .........................................................3
1.2.1 Installing the Battery ....................................................................................3
1.2.2 Charging the Battery.....................................................................................4
1.3 Reading the LED Status.......................................................................................5
1.4 Using the Belt Clip .............................................................................................. 6
2 Loading Supplies.....................................................................................................7
2.1 Adding Paper or Labels........................................................................................7
2.2 Tearing Paper.....................................................................................................8
3 Using the Printer.....................................................................................................9
3.1 Initial Power-Up and Self-Test .............................................................................. 9
3.2 Connecting the Printer....................................................................................... 10
3.2.1 Dip Switch Location..................................................................................... 10
3.2.2 Setting Dip Switches ................................................................................... 10
3.2.3 Dip Switch Functions................................................................................... 11
3.3 Serial Communication ....................................................................................... 12
3.4 Infrared Communications Mode (IrDA)................................................................. 12
3.5 Bluetooth and 802.11g Communications .............................................................. 13
3.6 Magnetic Strip Reader ....................................................................................... 13
3.7 USB Communications........................................................................................ 14
3.8 Programming Information.................................................................................. 14
4 Printer Maintenance..............................................................................................16
4.1 Print Head Cleaning Instructions ......................................................................... 16
4.2 Charging the Printer Battery............................................................................... 16
4.2.1 Important Notes on Charging Batteries.......................................................... 16
4.2.2 Important Notes on Replacing Batteries ......................................................... 17
4.3 Verifying Battery Charge State ........................................................................... 17
4.4 Battery and Safety Information........................................................................... 18
4.5 Recycling your Batteries .................................................................................... 18
4.6 Troubleshooting................................................................................................ 18
4.7 Printer Supplies................................................................................................ 19
i
Page 4

5 Specifications........................................................................................................ 20
5.1 Printer Specifications......................................................................................... 20
5.2 Supply Specifications ........................................................................................ 20
5.3 Regulatory Notes.............................................................................................. 21
5.3.1 FCC Part 15 Class B .................................................................................... 21
5.3.2 Warranty................................................................................................... 21
5.3.3 Warranty and/or Repair Service.................................................................... 21
6 Customer Support .................................................................................................22
ii
Page 5
General Precautions
Before using this product be sure to read through this manual. After reading please keep the
manual in a safe place for future reference.
The information contained herein is subject to change without notice of any type.
Datamax-O’Neil is not responsible for any operational results regardless of missing
information, errors or any misprinting in this manual.
Datamax-O’Neil is not responsible for problems created as a result of using options and
consumables not approved by them .
This product is designed for servicing at an Authorized Service Center. Other than routine
maintenance described in this manual the user should not attempt to repair, service or
disassemble this product.
Incorrect operation, handling, improper supplies and operating environments may cause
damage or otherwise affect the proper operation of this product. Such actions invalidate the
product warranty.
Safety
In this manual, on the printer, and on the accessories we make use of internationally recognized
safety symbols as follows:
Caution! Refer to the explanation in this Manual
Caution! Risk of electric shock
Double Insulation or Reinforced Insulation
DC, Direct Current or Voltage
1
AC + DC, Current or Voltage
Page 6
1 Getting Started
1.1 Unpacking the Printer
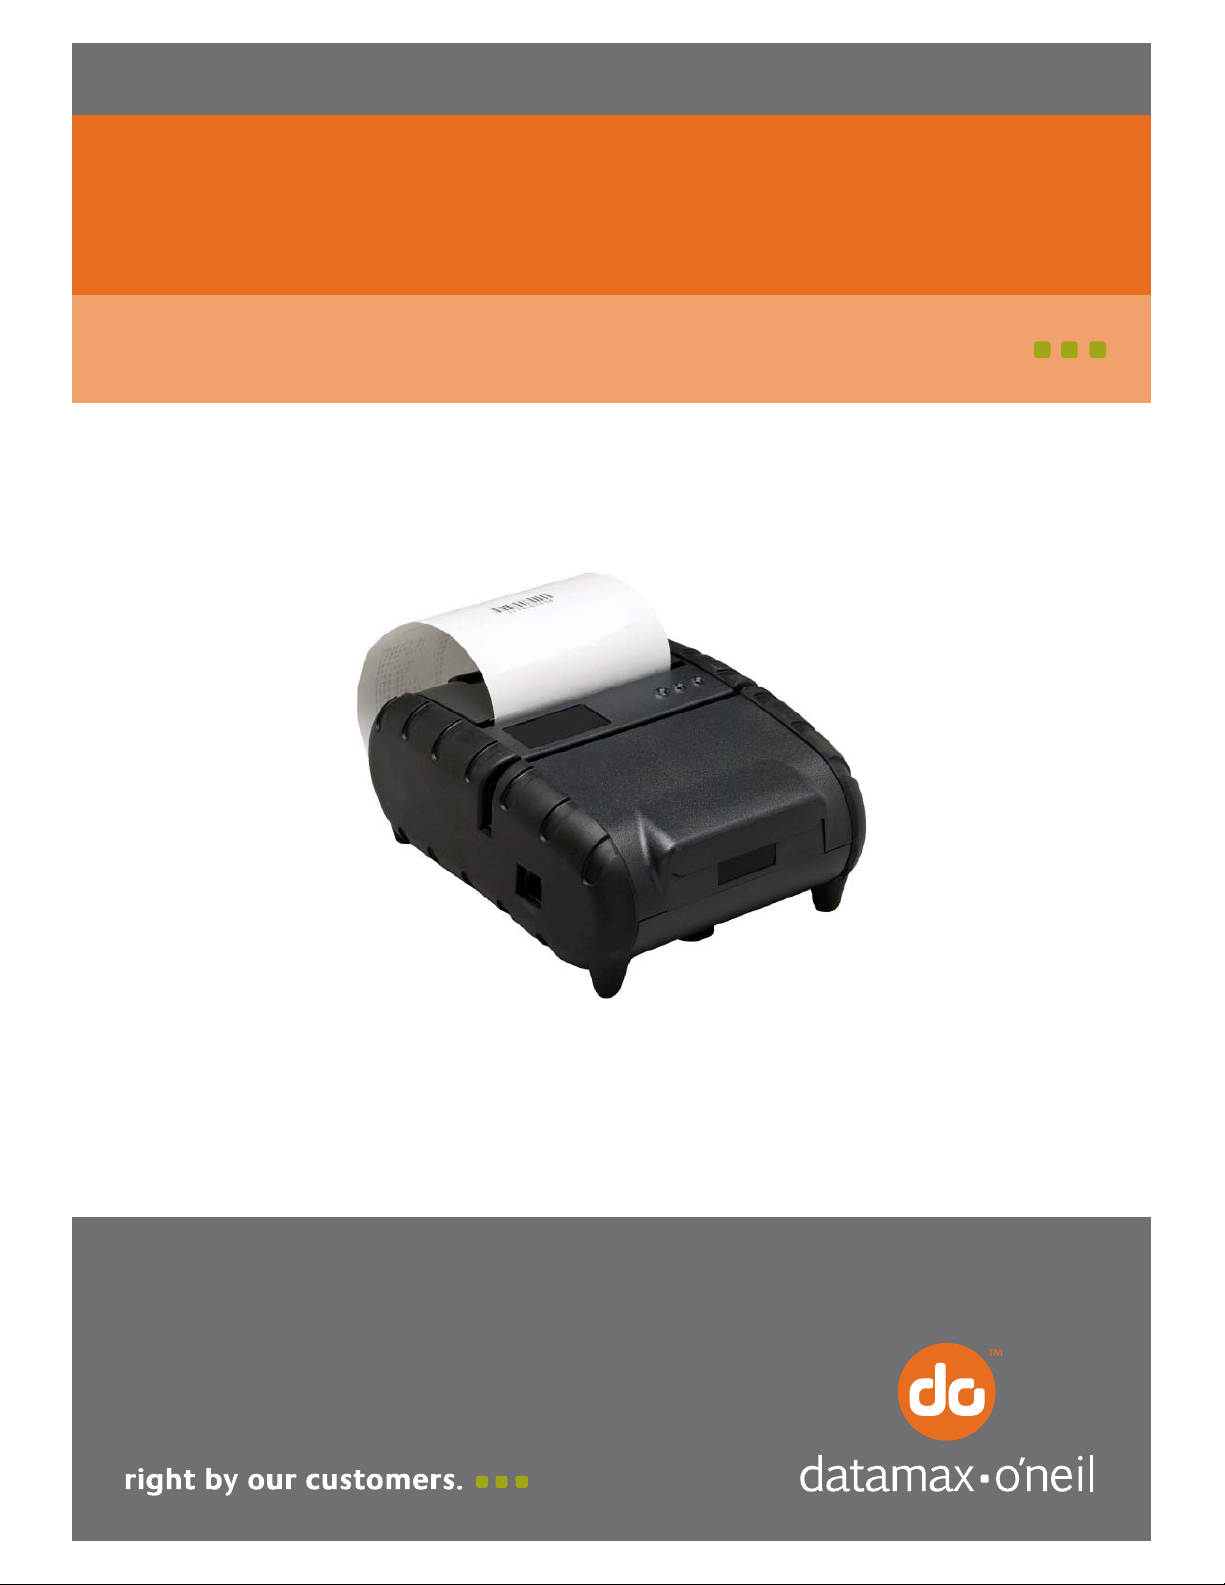
The APEX 3 portable printer is a full featured portable receipt printer designed for a number of
environments and uses including field service, field sales, hospitality and restaurants, ticketing,
etc. where point of service receipts are required. The package contains:
Printer
Battery Cartridge
Universal AC adapter (US, UK, European or Australian plugs) for charging the battery
inside the printer
Belt Clip
Roll of paper supply (already loaded in the printer)
Both cabled and wireless communication is possible.
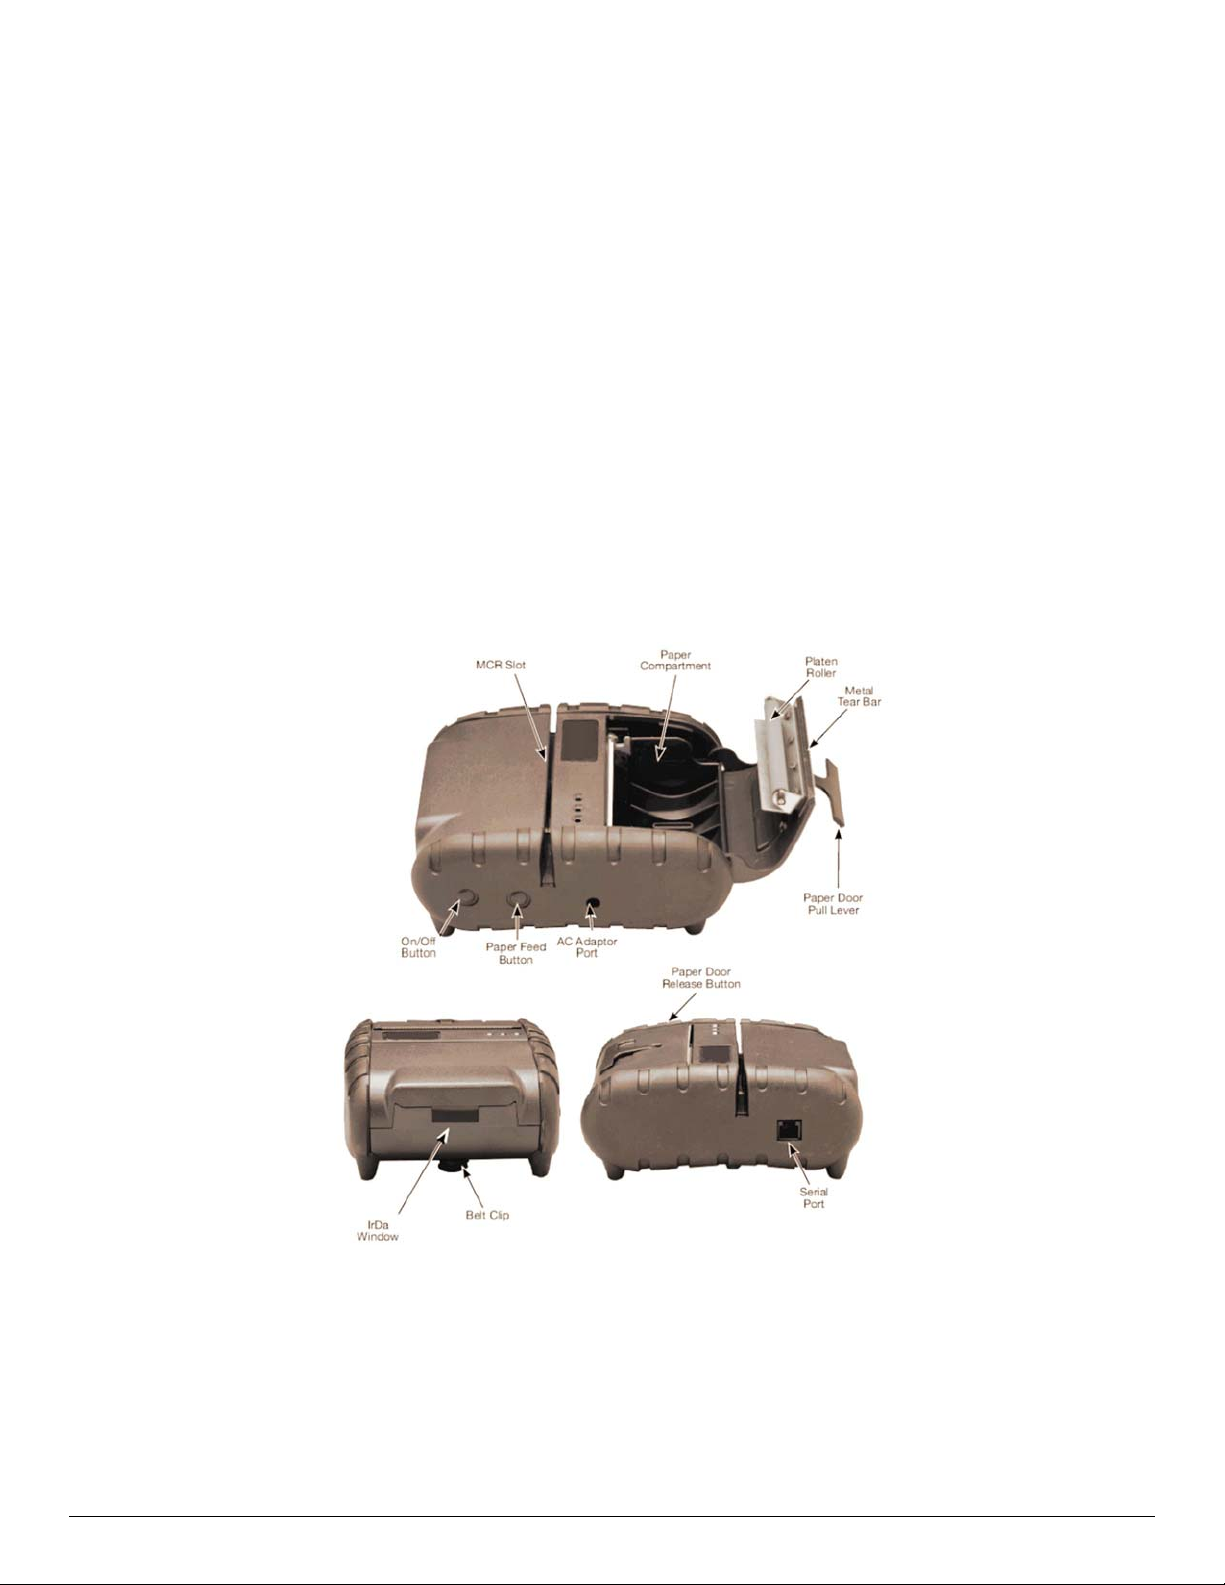
Overview
FIGURE 1: PRINTER OVERVIEW
2
Page 7
1.2 Installing and Charging the Battery Cartridge
Note: One battery cartridge is included with the printer. Similar to a cordless phone
battery, the printer’s battery must be charged before use.
Datamax-O’Neil batteries must be cycled several times to achieve maximum capacity.
To cycle a battery, fully charge it and then allow a full discharge through normal use.
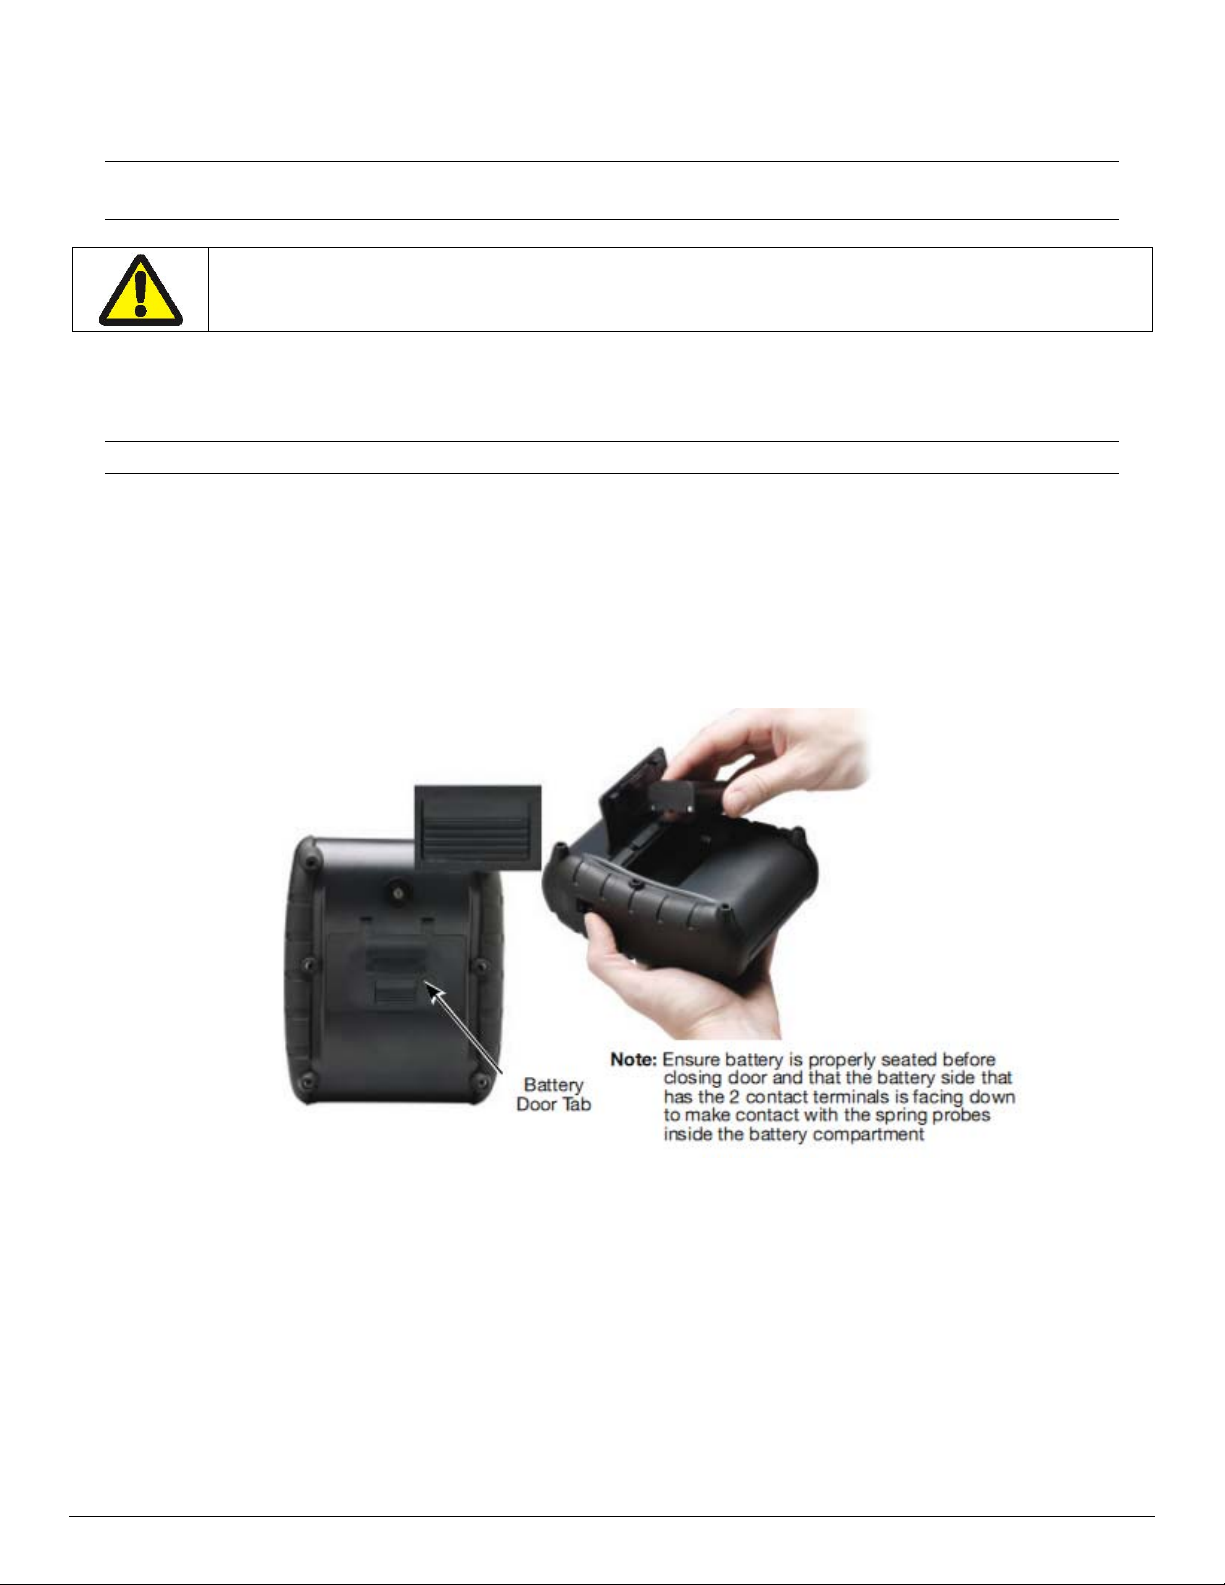
1.2.1 Installing the Battery
Note: Refer to Figure 2 below to install the battery pack in the printer.
Unlock the battery door by sliding the battery door locking tab down.
Open the battery door.
Insert the battery as shown. The battery side with two contact terminals should be facing
down to make contact with the two spring probes inside the battery compartment.
Close the battery door.
Lock the battery door by sliding the battery door locking tab up.
FIGURE 2: INSTALLING THE BATTERY CARTRIDGE
3
Page 8
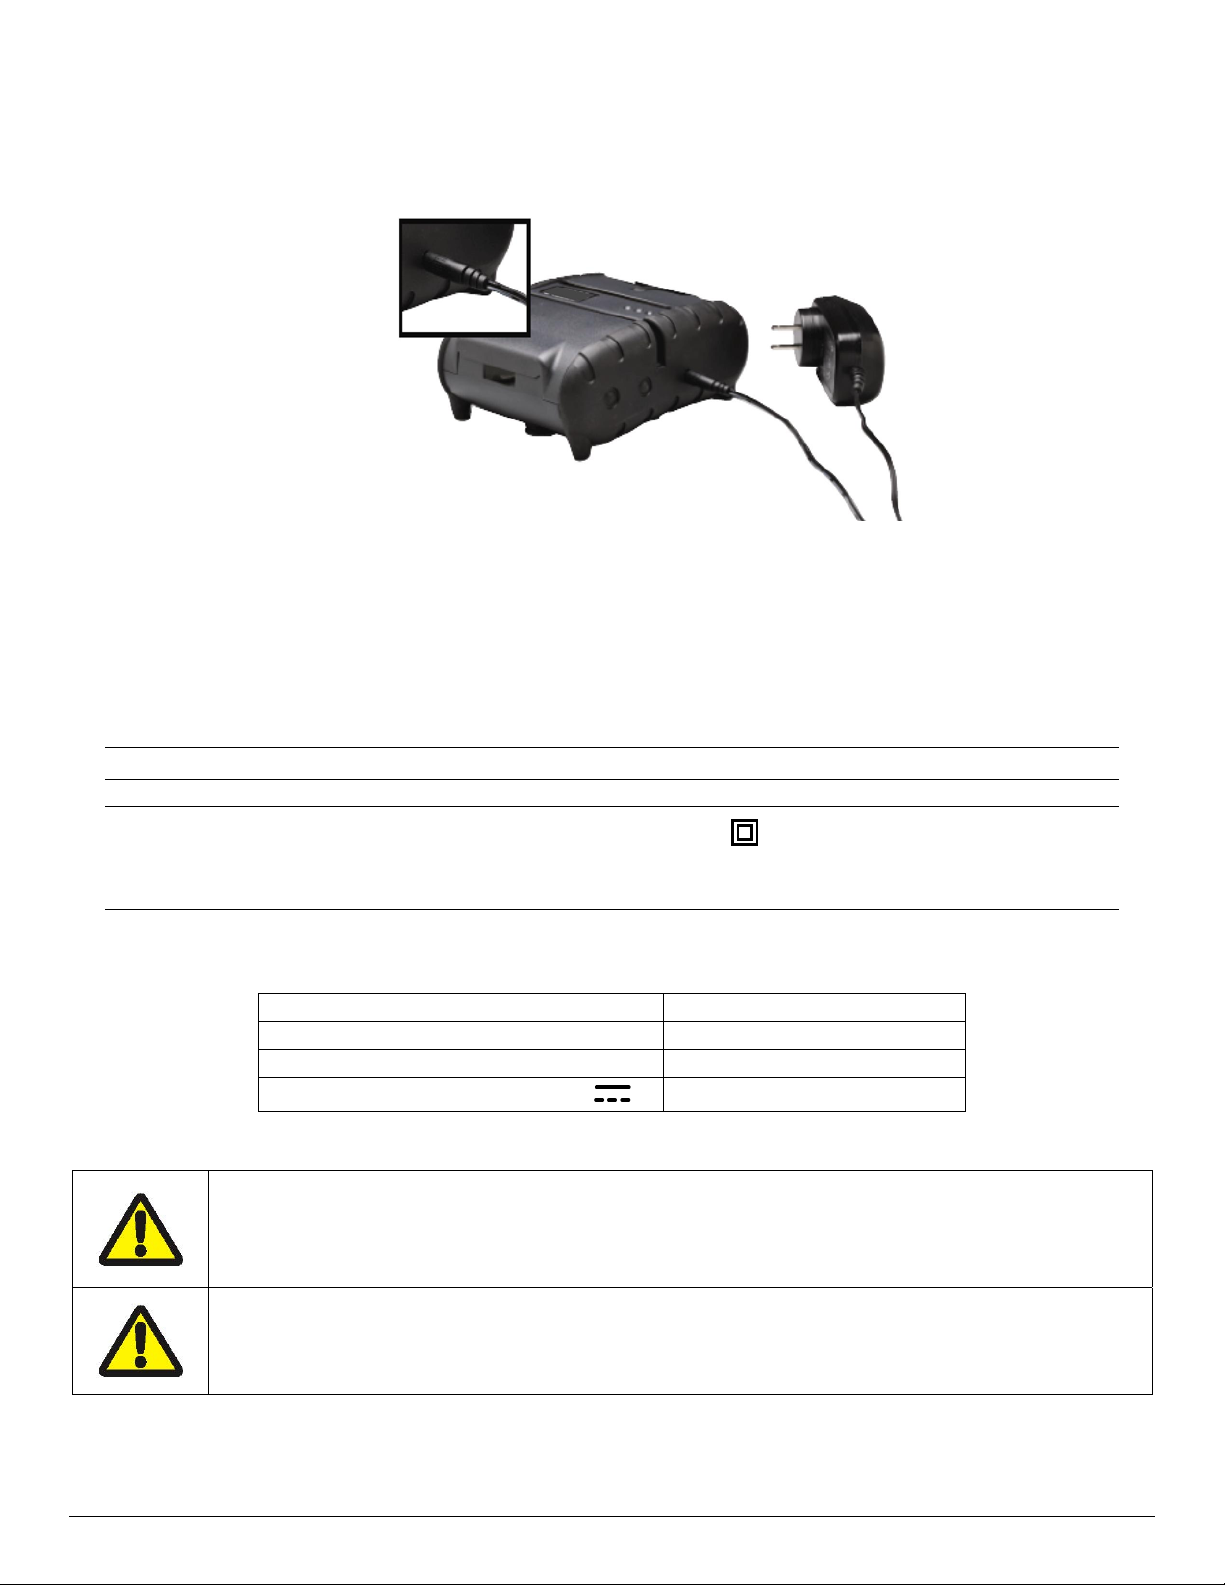
1.2.2 Charging the Battery
Plug the battery charger adapter output cable into the battery charger connector as shown
in Figure 3.
FIGURE 3: CHARGING THE BATTERY CARTRIDGE
Plug the battery charger adapter into the appropriate AC line voltage socket.
The Yellow/Amber charging LED will illuminate indicating that the battery is charging.
The battery will be fast charged and, after approx. 180 minutes, the LED will turn off.
To remove the battery cartridge, open the battery door and tip the battery out of the
printer
Note: To ensure a full charge do not operate th e p rint er while charging.
Note: The wall mounted charger is Class II equipment (
comply with most international standards. The wall mounted charger is not supplied with
plugs for use in Korea.
.
)
. Multiple plug configurations
The wall mounted charger has the following specifications:
Model APEX 3
Input Voltage/Current 100-240 VAC/0.55A
Input Frequency 50-60 Hz
Output Voltage/Current ( )
10VDC/2.4A
Do not use a charger not approved by Datamax-O’Neil for use with the APEX 3. Use of
an unapproved charger could damage the battery pack or the printer and will void the
warranty.
The battery terminals are well recessed inside the printer. Do not allow them to contact
conductive material since this may create a short circuit which could cause injury or
start a fire.
4
Page 9

1.3 Reading the LED Status
Table 1 explains the LED indicator status. Re fer to Figure 1 for the locations described for
<ON/OFF> and <FEED> push button switches and AC adapter socket. Figure 4
location of the status LEDs on the front of the printer.
provides the
FIGURE 4: LED STATUS
Table 1 - Reading the LED Status
LED Status Condition Function
LED # 1
Communication
LED # 2
Battery
LED # 3
Magnetic Card
Reader
&
Printer Error
GREEN
BLUE
AMBER
RED Steady Low power indication.
AMBER
GREEN
RED
Flashing
Steady Communicating with host.
Flashing Power is ON and the printer is in Bluetooth mode.
Steady Transmitting/receiving
Flashing Power is ON and the printer is in 802.11b/g mode.
Steady Transmitting/Receiving
Steady
Steady
Steady
Flashing Indicates the print head is hot and printing is paused.
Power is ON and the printer is in RS232, USB or IrDA
mode.
Battery being charged. The LED will turn off when the
battery is fully charged.
Indicates that MCR is ready to accept data.
Indicates that SCR is ready to accept data.
Printer Error. The printer is out-of-paper or Paper
door is open.
MCR/SCR faulty condition.
Note: Refer to the troubleshooting guide to determine error or fault condition.
5
Page 10

1.4 Using the Belt Clip
The belt loop system consists of two parts:
A knob located on the back part of the printer just above the battery door
A click-on connector
To use the clip, insert the knob located at the bottom of the printer into the slot of the
connector. Pull down until a click is heard; the printer is now secure
To release the printer, press inward on the two connector latches and pull the knob clear
of the slot.
Note: Do not force or pull the printer from the connector without pressing inward on the
two latches.
FIGURE 5: KNOB CONNECTION AND QUICK CLIP
Release Latches
6
Page 11

2 Loading Supplies
2.1 Adding Paper or Labels
The printer can print text, bar codes and graphics on thermal receipt paper. See “Supply
Specifications” in Section 5.2
Follow these steps to load printer paper.
Open the paper supply cover by placing your fingers under the “T” pull lever and pulling
upward firmly on the supply cover until the lever ceases to move. See Figure 6
for the width, thickness requirements and approved vendors.
for details.
FIGURE 6: OPENING PRINTER
Note: DO NOT pull with excessive force. Use only enough force to allow the cover to
unlock and lift freely.
Note: DO NOT force the “T” pull lever too far backward.
Place the paper supply roll into the paper supply compartment. Make sure the paper
supply unwinds from the bottom as shown in Figure 7
.
Position the paper supply between the print head guides.
Ensure that some supply (2-3 inches) extends beyond the top of the paper supply
compartment.
Close the paper supply cover and press it closed.
Note: Paper Supply Roll
To prevent possible damage to the print-head mechanism, it is important to verify that
the paper has not been fastened to the inside core in any way. The paper should be
wound on the core in such a way that the end of the paper will unwind freely from the
core. If fastened by tape or glue, the core will be pulled into the mechanism causing
jamming and possible gear damage. Proper paper roll supplies are available from
Datamax-O’Neil as P/N 757061.
7
Page 12

Note: Pull Paper Roll
Leader out of printer. Note
direction of paper travel.
FIGURE 7: OPERATOR CONTROLS AND PAPER LOADING
2.2 Tearing Paper
The printer’s paper door acts as a tear bar. Pull one edge of the paper against the tear bar as
indicated, then tear down and across against the tear bar to tear the paper. See Figure 8
details.
for
The tear bar may have sharp edges!
Note: Use of the tear bar is the only way to tear the paper.
Note: Pulling upward and pulling sideways without using the tear bar can cause a paper
jam due to paper misalignment in the print head mechanism.
FIGURE 8: TEARING PAPER
8
Page 13

3 Using the Printer
3.1 Initial Power-Up and Self-Test
Once the Battery is charged and the paper is loaded, an
initial power up self-test can be performed.
Press the <ON/OFF> switch once. This turns printer
on. LED #1 illuminates in green or blue depending on
the mode of communication.
o The printer will stay ON until it is manually tuned
OFF.
o If the printer is set for Bluetooth™ (BT) mode the
printer will stay on all the time. Pressing the
<ON/OFF> switch again will turn the printer off.
Press the <ON/OFF> switch to turn the printer off. The
LED turns off.
To start the self-test, press and hold the <FEED>
switch then press the <ON/OFF> switches.
The printer will start printing the self-test message.
Release the <FEED> switch.
o Press the <ON/OFF> or <FEED> switch to stop or
cancel the self-test print.
o The first few lines of self-test show the printer
firmware version, the current printer settings (for
example Bluetooth™ or Serial mode) and a list of
any optional or special features installed. Figure 9
shows a printing sample.
FIGURE 9: SELF-TEST
9
Page 14

3.2 Connecting the Printer
The APEX 3 printer supports Serial RS232 and Bluetooth® as default configuration. IrDA,
USB or 802.11g communication is also available as an optional feature.
Serial, USB, IrDA, 802.11g and Bluetooth® communication settings can be changed via
DIP switches located on the control card.
Printer drivers for WindowsTM 95/98/NT/2000/XP/Vista and Windows7 are available.
3.2.1 Dip Switch Location
The DIP switches are located inside the battery compartment.
The functions assigned to these switches are shown in Table 2.
If the Serial interface is selected, the communication parameters, Baud Rate, Data Bit and
Parity, must be set.
Note: Optional serial cable is available for Serial RS232 communication (part # 5892RJD9-
1).
3.2.2 Setting Dip Switches
FIGURE 10: DIP SWITCH SETTINGS (SHOWING SETTING FOR IRDA)
Note: Use caution when changing dip switch settings. Carefully use a pointer on the dip
switch to toggle its position. DO NOT apply excessive force.
10
Page 15

3.2.3 Dip Switch Functions
Table 2 shows the different printer setting available through the Dip Switches.
Table 2 – DIP Switch Setting
Switch #
Communication Interface
RS232
1
IrDA
Bluetooth or 802.11g
N/A
2
USB
3
USB Bootloader
4
Baud Rate
115200
57600
38400
19200
14400
9600
2400
1200
Parity Bit
Parity Enabled (ODD)
Parity Enabled (EVEN)
Auto Power Save
Power Save Enabled
Power Save Disabled
1
If IrDA is not installed, printer will default to RS232 mode with baud rate 115200
2
X stands for Don’t Care: Dip Switch 7 will override 1 and 2
3
Firmware Applies to Apex 3 – USB version only
4
Baud Rate and Parity are applicable to RS232 and IrDA communication mode ONLY
SW 1 SW 2 SW 3 SW 4 SW 5 SW 6 SW 7 SW 8
OFF OFF Baud rate set by Dip switches 3,4 and 5
Baud Rate can be negotiated up to the
value specified through Dip switches
ON
OFF
ON ON
OFF
ON
X X
X X
SW 3 SW 4 SW 5 RS232 and IrDA only
OFF OFF OFF
OFF
OFF OFF
OFF
SW 6 SW 7
SW 8
OFF Manual On/Off
Setting not supported
OFF OFF
ON
ON ON
ON
ON ON ON
OFF OFF
ON
OFF
ON ON
ON
OFF
OFF
ON
ON
ON
OFF
ON ON
ON
ON
Use for fixed IrDA
OFF Does not apply for IrDA
Does not apply for IrDA
ON
Notes
3,4 and 5
Auto Power Down
Note: In order for changes to the dip switch configuration to take effect, the printer power
must be reset. Please refer to the Developer’s Manual for more information
11
Page 16

3.3 Serial Communication
The RS232C Interface signals for the APEX 3 Series printers are terminated on a 6 PIN RJ
type data connector located on the side of the printer.
Six connections are provided from the Serial Interface to the host computer. Table 3 lists
the Serial Interface signals and pin outs for the RJ connector. The connector pin locations
are shown in Figure 11.
A minimum of two connections are required for operation: RXD – pin 3 and Common – pin
1
The communication parameters: Baud rate, Data Bit and Parity settings must match those
of the host device.
FIGURE 11 – RJ DATA CONNECTOR
TABLE 3 – APEX 3 Printers’ Serial RS232C Interface signals
Dip Switch #1 and #2 must be in <OFF> position to activate the serial communication
interface.
3.4 Infrared Communications Mode (IrDA)
Dip Switch #1 must be in the <ON> position.
The printer can be powered ON by pressing the power <On/Off> switch.
If no IrDA connection is made, the printer will automatically power down to a lower power
level to conserve battery life. It will remain in a “sleep” mode until an IrDA connection is
made, at which time the printer will “wake” and print the requested data.
Pressing the power switch again will turn the printer <OFF>.
12
Page 17

3.5 Bluetooth and 802.11g Communications
Bluetooth and 802.11g operation:
o Dip Switch #1 must be in the <OFF> position.
o Dip Switch #2 must be in the <ON> position.
Note: Adjust baud rate settings to match those of the Bluetooth™ or 802.11g module in
your computing device.
The printer can be powered ON by pressing the power <ON/OFF> switch.
Pressing the power <ON/OFF> switch again will turn the printer <OFF>.
Note: It is necessary for the mobile computing device you are using to discover the
printer. Refer to the instructions provided by the systems integrator.
Note: Systems Integrators: Refer to the Bluetooth™ manual provided with your mobile
computer and the Bluetooth™ section of the Developer’s Manual available for this printer.
3.6 Magnetic Strip Reader
The Magnetic Card Reader is a factory-installed option. This option requires special
application software to read and process cards with a magnetic strip, such as a credit card
or a driver’s license.
Quickly swipe the card through the reader either left to right or right to left. The magnetic
strip must be facing toward the paper supply door as indicated below while it is passed
through the reader.
Refer to Table 4 for the description of the LED indicator Status.
Table 4 - Magnetic Card LED Indicator
LED indicator State Status
Green
Red ON Error reading card’s data.
ON
OFF
Ready/waiting for card to be swiped.
Good swipe - Card data read OR
Card not ready to be swiped.
13
Page 18

3.7 USB Communications
The APEX 3 printer comes equipped with a USB 2.0 slave port. To enable USB, you must set
the dip switches on the printer as below:
SW 1 SW 2 SW 3 SW 4 SW 5 SW 6 SW 7 SW 8
Any
position
Compatible Software
The host and printer communicate through a method called the "Virtual Com Port", in which a
software intermediary called the "driver" makes the USB connection look like a com port to
the end-application. Consequently, all software that communicates through the com port is
compatible.
Software Driver Installation
You must install the driver befor e you can use USB to print. Turn on the printer and connect
it to the PC with a USB cable. If the driver has never been installed before, a dialog box will
appear. Reply by selecting "Install from a list or specific location" and indicating the location
of the file .inf supplied with the CD. The Driver can be downloaded from www.datamax-
oneil.com
Any
position
Any
position
Any
position
Any
position
OFF ON Any
position
After installing the driver, review the Virtual Serial Port # created under:
• (Control Panel > System > Hardware Tab > Device Manager)
• Under the Ports (COM & LPT), you should see an entry na med "Datamax-O’Neil USB
CDC Communications Port” and the Port number assigned by Windows.
3.8 Programming Information
For programming information, please refer to the Datamax-O’Neil Developer’s Manual.
14
Page 19

15 16
Page 20

4 Printer Maintenance
4.1 Print Head Cleaning Instructions
The print head and platen roller may require cleaning after printing a number of rolls of paper,
when new supplies are loaded, or when voids in the printout become apparent.
Do not use sharp objects to clean the print head. This may damage the printer and
require service.
Open the paper door by pulling the “T” bar lever on the top cover as shown in Figure 6.
The paper supply door will pop up.
Remove the paper roll.
Moisten a cotton swab with isopropyl alcohol and clean the print head.
Clean the platen roller with a dry cloth or small brush.
Note: Another cotton swab may be moistened with isopropyl alcohol in order to clean the
platen. Turn the platen roller with your finger and run the cotton swab or dry cloth across
it. Make sure the platen roller is clean all the way around.
Moisten another cotton swab with isopropyl alcohol. Rub the swab across the black mark
sensor to remove build-up.
Moisten another cotton swab and rub the swab across the tear bar to remove build-up.
Note: Dust build-up may occur depending on the environment and the quality of the paper
supply used. If this occurs, use a can of compressed air to blow dust and paper debris out
of the printer.
4.2 Charging the Printer Battery
The printer battery is charged using the wall mounted charger provided. Follow these steps to
charge the battery pack.
Plug the charger into an appropriate wall socket; then plug the charger line cord into the
adapter jack on the side of the printer (see Figure 3
).
The yellow CHARGE LED will illuminate to indicate that the battery is charging.
The Charge LED turns off when the battery cartridge is fully charged. It requires about
180 minutes to fast charge the battery cartridge.
To insure full charge, the printer should not be operated while the battery is charging.
4.2.1 Important Notes on Charging Batteries
The model APEX 3 printers require an adapter output of 10VDC/1.32A.
The battery fast-charge is initiated each time the power adapter is connected to the
printer.
The fast-charge controller checks the battery’s voltage and temperature before the start
of the fast recharge process. If the battery voltage or the temperature exceeds the fastcharge limits, the charger defaults to trickle charge at C/10 or 70 mA rate.
Page 21

Optional external battery chargers are available for Datamax-O’Neil batteries. Refer to
Section 4.7
4.2.2 Important Notes on Replacing Batteries
“Printer Supplies” for detailed information.
Check for the correct Datamax-O’Neil battery part number and use only that replacement
part.
Risk of explosion if battery is replaced by an incorrect type.
Dispose of used batteries according to instructions in Section 4.5.
4.3 Verifying Battery Charge State
It is strongly recommended that the printer be tested before it is returned to Datamax-O’Neil.
Follow these steps to identify and correct the battery power problem. These steps will help to
determine if the fault is with the printer or some other part of the system.
To test the AC adapter:
Use a multimeter and measure the output voltage. The output should be 10VDC.
Press the <ON/OFF> switch and wait until all of the LEDs switch off.
Insert the AC adapter plug into the printer. If the amber LED switches on, this indicates
that the battery is not fully charged, however it does indicate that the charge circuit is
functioning correctly.
Per the above, the AC power portion of the circuit can be considered OK.
To test the DC power:
Disconnect the AC Adapter after the battery has been charged for approx. 5 minutes.
Press and hold the <FEED> switch, press and release the <ON/OFF> switch, and then
release the <FEED> switch. The printer will print a “self test” receipt.
If the self test receipt is printed, the DC circuits can be considered OK.
To test if the battery is accepting a charge:
Press the <ON/OFF> switch and wait until all LEDs switch OFF.
Plug the AC power adapter into the printer. Press <ON>; the green LED illuminates and
switches OFF after approx. 20 seconds.
If the amber LED is ON, this indicates that the battery is charging and that the charging
circuit is OK. After the 180 minute charge cycle, the LED will switch off.
17
Page 22
4.4 Battery and Safety Information
The printer is powered by a 7.4V Li-Ion battery cartridge.
Charging time is approximately 3.0 hours.
Remove the battery from the printer when storing the printer for long periods of time.
The battery storage temperature is 40°F to 104°F (4°C to 40°C). Do not store a fully
charged battery at temperatures exceeding 104°F (40°C) for long periods of time – the
battery may permanently lose charge capacity.
The recommended temperature for charging is 68°F (20°C) to 77°F (25°C).
Be sure to use a fully charged battery for battery intensive printing sessions. Certain
operations (for example, printing receipts with many bar codes and graphics) drain the
battery more quickly than in other cases.
Dispose of the battery according to local regulations. Do not throw in trash.
Do not disassemble, short circuit, heat above 80°C, or incinerate. The battery may
explode
4.5 Recycling your Batteries
The Rechargeable Battery Recycling Corporation (RBRC) is a non-profit organization created to
promote recycling of rechargeable batteries. For more information on recycling batteries in your
area, visit www.rbrc.org
.
4.6 Troubleshooting
Problem Action
Does not feed paper
or has a paper jam.
Does not print Check or replace the printer’s battery.
Light printing Check or recharge the battery.
Voids in printing Clean the print head following the cleaning instruction listed in Section 4.1.
Red (Error) LED on Check that the paper roll has not been depleted.
If the problem persists, please contact Datamax-O’Neil Technical Support. Support contact
information is listed in Section 6 of this manual.
Remove any jammed supply.
Reload paper supply.
Make sure the paper supply is loaded correctly, not backwards.
Verify communication between the host device and the printer by
disconnecting the communication cable and performing a printer self test.
Adjust the print contrast through the print application.
Error reading MCR
After extended printing, print head may be hot; printer will pause before
resuming printing.
Other than routine cleaning and other maintenance described in Section 4, the printer
is not intended to be serviced by the user. It must be returned to an Authorized
Service Center. Under no circumstances should the user attempt to disassemble the
printer.
18
Page 23

4.7 Printer Supplies
Part Number Description
78828S1-3 Apex 3 with RS232, Class 2 Bluetooth®
78828S1R-3 Apex 3 with RS232, MCR, Class 2 Bluetooth®
78828I1-3 Apex 3 with RS232, IrDA, Class 2 Bluetooth®
78828I1R-3 Apex 3 with RS232, MCR, IrDA, Class 2
Bluetooth®
78828S1-2 Apex 3 with RS232, 802.11b/g
78828S1R-2 Apex 3 with RS232, MCR, 802.11b/g
151133 24V In-Vehicle Charger
157261 Multi-Plug Battery Charger Adapter
Input 100 ~ 240VAC/ Output 10VDC @ 1.4A
(US, UK, Euro & Australian Plug)
756985 IP54 Certified Environmental Case – No MCR
756998-1 Belt Loop System
740852-104 Apex 3 Thermal Paper
770184-200 Thermal Print Head Cleaning Cards
757351 Shoulder Strap with Quick Clip
767400-1 Battery Charger (2 Bay) Li-Ion, 120VAC
767400-2 Battery Charger (2 Bay) Li-Ion, 220VAC
767400-4 Battery Charger (2 Bay) Li-Ion, 240VAC
7A1000014-1 3750THS Li-Ion Battery Cartridge: 7.4VDC–
1800mA
5892RJD9 Serial Data Cable – RJ to DB9 PC compatible
Available from Datamax-O’Neil at
www.datamax-oneil.com
Windows
Drivers
TM
95/98/NT/2000/XP/Vista/Windows 7
19
Page 24

5 Specifications
5.1 Printer Specifications
Height: 2.25 inches (57mm)
Width: 4.25 inches (108mm)
Length: 6 inches (152mm)
Weight: w/battery & paper 1 lb 4 oz, (583 g)
Shipping weight: 3 lbs. (1.4 kg)
Power: 7.4 V Li-Ion battery
Operating Temp. Limits: 14F to 122F (-10 to 50C)
Storage Temp. Limits: -4F to 140F (-20C to 60C)
Operating Humidity Limits: 20% to 85% non-condensing
Storage Humidity Limits: 5% to 95% non-condensing
Print head: 3 inches wide (80mm)
203 dpi (8 dots per mm)
Printing Method: Thermal Direct
Print Speed: Up to 2.0 inches per second
Supported Fonts:
(Bitmap)
Supported Bar Codes: Codabar, Code 39, UCC/EAN – 128, UPC/EAN/JAN,
Memory: 1MB RAM, 4MB Program Flash
Charging Time: Approximately 180 minutes
Communications: RS-232 port, IrDA (optional), BT, 802.11g (optional)
Print Ratio: 25% black maximum/sq. in.
Standard (normal and bold)
Large (normal)
Reduced (normal and bold)
Large rotated.
Interleaved 2 of 5, Code 128, PDF 417
5.2 Supply Specifications
Supplies: Thermal direct receipt paper
Supply Thickness: 2.2 to 3.5 mils (receipt paper)
Supply Width: 3.125 inches (80mm)
Supply Length: 1 roll of receipt paper is approx. 600 inches (15,240 mm)
Supply Sensing: Black mark (on face of supply)
Paper roll diameter: Outside: 1.375 inches (32 mm)
Inside: .25 inches (6 mm)
Maximum Print Area: 2.85 inches (72 mm) X 8.0 inches (203mm)
Approved Vendors Kansaki: P300, P310, P350, P354, P390, P394, P530UV, TO281CA,
OP200, TO381N
Jujo: TF-50KS-E2C
Honshu: FH65BV-3
20
Page 25

5.3 Regulatory Notes
5.3.1 FCC Part 15 Class B
This equipment has been tested and found to comply with the limits for a Class B digital device,
pursuant to Part 15 of the FCC rules. These limits are designed to provide reasonable pro tection
against harmful interference in a residential installation. This equipment generates, uses and can
radiate radio frequency energy and, if not installed and used in accordance with the instructions,
may cause harmful interference to radio communications. However, there is no guarantee that
interference will not occur in a particular installation. If this equipment does cause harmful
interference to radio or television reception, which can be determined by turning the equipment
off and on, the user is encouraged to try to correct the interference by one or more of the
following measures:
Reorient or relocate the receiving antenna.
Increase the separation between the equipment and the receiver.
Connect the equipment into an outlet on a circuit different from that to which the receiver
is connected.
Consult the dealer or an experienced radio/TV technician for help.
For Bluetooth equipped printers please note:
The printer contains an OEM Serial Port Adapter from connectBlue with FCC ID:
PVH070101. This device complies with Part 15 of the FCC Rules. Operation is subject to
the following two conditions: (1) this device may not cause harmful interference, and (2)
this device must accept any interference received, including interference that may cause
undesired operation.”
5.3.2 Warranty
This printer is warranted by Datamax-O’Neil to be free of defects in pa rts and workmanship for a
period of one year from date of shipment. This warranty does not apply to defects resulting fro m
action of the user such as misuse, improper wir ing, operation outside of specification, improper
maintenance or repair, or unauthorized modification. Datamax-O’Neil specifically disclaims any
implied warranties of merchantability or fitness for a specific purpose and will not be liable for
any direct, indirect, special, incidental or consequenti al damages. Datamax-O’Neil’s total liability
is limited to the repair or replacement of the product. The warranty set forth above is inclusive
and no other warranty, whether written or oral is expressed or implied.
5.3.3 Warranty and/or Repair Service
A Return Authorization number must be issued before a unit is returned to Datamax-O’Neil for
repair. Once a unit has been properly returned to Datamax-O’Neil (Note: The customer is
responsible for ensuring proper packing to prevent damage in transit as well as the shipping
costs back to Datamax-O’Neil), it will be repaired (estimates are provided first if the repair cost
is estimated above $100.00) and returned via UPS ground. The customer may elect a faster
mode of transport at their cost.
21
Page 26

6 Customer Support
Datamax-O'Neil Americas
Orlando, FL USA
Monday - Friday
8:00am - 6:00pm EST
Tel: 407-523-5540
Fax: 407-523-5542
tech_support@datamax-oneil.com
Datamax-O’Neil EMEA
Valence France
Monday - Friday
0830 - 1700 GMT
Tel: + 33 (0) 4 75 75 63 00
Fax: +33 (0) 4 75 82 98 38
eurotech@datamaxcorp.com
Datamax-O'Neil Asia-Pacific
Singapore
Monday - Friday
0830 - 1730
Tel: +65 6505 2250
Fax: +65 6769 8135
tsaspa@datamax-oneil.com
COPYRIGHT © 2011, DATAMAX-O’NEIL
22
Page 27

 Loading...