

Page 1
Falcon® Management Utility
User’s Manual
Page 2

Datalogic Mobile, Inc
1505 Westec Dr.
Eugene, Oregon 97402
Telephone: (541) 743-4800
Fax: (541) 743-4900
An Unpublished Work - All rights reserved. No part of the contents of this documentation or the procedures
described therein may be reproduced or transmitted in any form or by any means without prior written permission of
Datalogic Mobile, Inc. or its affiliates or subsidiaries ("Datalogic" or “Datalogic Mobile”) . Owners of Datalogic prod
ucts are hereby granted a non-exclusive, revocable license to reproduce and transmit this documentation for the
purchaser's own internal business purposes. Purchaser shall not remove or alter any proprietary notices, including
copyright notices, contained in this documentation and shall ensure that all notices appear on any reproductions of
the documentation.
Should future revisions of this manual be published, you can acquire printed versions by contacting your Datalogic
representative. Electronic versions may either be downloadable from the Datalogic Mobile website
(
www.mobile.datalogic.com) or provided on appropriate media. If you visit our website and would like to make
comments or suggestions about this or other Datalogic publications, please let us know via the “Contact Datalogic”
page.
Disclaimer
Datalogic has taken reasonable measures to provide information in this manual that is complete and accurate,
however, Datalogic reserves the right to change any specification at any time without prior notice.
Datalogic is a registered trademark of Datalogic S.p.A. and the Datalogic logo is a trademark of Datalogic S.p.A. all
licensed to Datalogic Mobile, Inc. All other trademarks and trade names referred to herein are property of their
respective owners.
Falcon® is a registered trademark of Datalogic Mobile, Inc. and of its affiliates and subsidiaries.
Microsoft Windows
®
, Windows® 2000, Windows®CE, Windows® Mobile, ActiveSync®, Windows® XP and the
Windows logo are registered trademarks of Microsoft Corporation.
-
Patents
This product may be covered by one or more of the following patents:
4,861,972 • 4,866,257 • 4,879,456 • 5,198,649 • 5,208,449 • 5,212,372 • 5,247,161 • 5,311,000 • 5,440,110 •
5,481,098 • 5,493,108 • 5,508,505 • 5,664,231 • 5,671,374 • 5,686,716 • 6,041,374 • 6,412,698 • 6,415,978 •
6,454,168 • 6,478,224 • 6,513,714 • 6,536,670 • 6,561,427 • 6,585,157 • 6,923,377 • 7,108,170 • D377345 •
CA2,188,399 • Other U.S. and Foreign Patents Pending.
Page 3

Table of Contents
Datalogic Mobile Falcon® Management Utility™
End User License Agreement ............................................................................................... v
Preface ................................................................................................................................... ix
Overview ........................................................................................................................... ix
Registration ....................................................................................................................... x
Style Conventions .............................................................................................................x
Manual Formatting Conventions ................................................................................. x
Chapter 1.
Quick Start ......................................................................................................................... 1
Overview ............................................................................................................................ 2
Introduction ........................................................................................................................ 2
System Requirements .......................................................................................................4
Before You Begin .............................................................................................................. 5
Setting Up FMU .................................................................................................................8
FMU Server Architecture ...................................................................................................9
Chapter 2.
Overview .......................................................................................................................... 11
User Interface ..................................................................................................................13
Getting Started .................................................................................................. 1
Advantages .................................................................................................................2
Features ......................................................................................................................3
Supported portables .................................................................................................... 4
System Requirements .......................................................................................... 4
Establish Communication to Terminals ....................................................................... 5
Installing FMU .............................................................................................................5
FMU Installation Options ...................................................................................... 5
Firewalls and File Sharing ........................................................................................... 6
Using Firewalls ..................................................................................................... 6
Setting Up File Sharing ......................................................................................... 6
Complete System ........................................................................................................ 8
Separate Workstation/Server ...................................................................................... 8
Single Server Support ................................................................................................. 9
Multiple Server Support .............................................................................................10
About FMU....................................................................................................... 11
FMU’s Technology .................................................................................................... 11
FMU Server and Client .......................................................................................12
Maintaining Current Files .................................................................................... 13
User’s Manual i
Page 4

FMU Components ........................................................................................................... 15
FMU Start Page ........................................................................................................ 15
Servers ..................................................................................................................... 16
Groups ...................................................................................................................... 16
Configuration ...................................................................................................... 16
Assigned Packages ............................................................................................ 17
Terminal ............................................................................................................. 17
Available Packages .................................................................................................. 17
Menu ............................................................................................................................... 18
File ............................................................................................................................ 18
Add ..................................................................................................................... 18
Assign Packages ................................................................................................ 19
Update Terminal(s) Now .................................................................................... 19
Exit ..................................................................................................................... 19
Edit ...........................................................................................................................20
View .......................................................................................................................... 21
Help .......................................................................................................................... 22
Toolbar ............................................................................................................................ 23
Printing Reports ........................................................................................................ 23
Chapter 3.
FMU Operation................................................................................................ 25
Overview ......................................................................................................................... 25
Managing Servers ........................................................................................................... 25
Adding a Server ........................................................................................................ 26
Deleting a Server ...................................................................................................... 27
Server Error Log ....................................................................................................... 27
Viewing or Editing Server Properties ........................................................................ 27
Working with Groups ....................................................................................................... 29
Adding a Group ........................................................................................................ 29
Group Configuration Settings ................................................................................... 29
Deleting a Group ...................................................................................................... 30
Renaming a Group ................................................................................................... 31
Adding and Assigning Packages .................................................................................... 31
Adding a Package .................................................................................................... 32
Adding Files to a Package ........................................................................................ 32
Adding a Firmware Image File .................................................................................. 34
Viewing a File List ..................................................................................................... 35
Assigning a Package ...................................................................................................... 36
Terminals ........................................................................................................................ 36
Adding Terminals ...................................................................................................... 37
Terminal Setup ................................................................................................... 37
Terminal Check-in .............................................................................................. 37
Delete Terminal ........................................................................................................ 38
ii Falcon® Management Utility (FMU)
Page 5

Terminal Properties ................................................................................................... 38
Working with Files ........................................................................................................... 39
File Properties ........................................................................................................... 39
About Files .......................................................................................................... 39
Chapter 4.
Overview .......................................................................................................................... 41
Configuration Settings ..................................................................................................... 41
Chapter 5.
Overview .......................................................................................................................... 49
Direct Connect .................................................................................................................50
RF Connection ................................................................................................................. 52
Configuration Settings ................................................................................... 41
Reset Values ............................................................................................................. 42
Symbology Settings ..................................................................................................43
Device Settings .........................................................................................................44
Network Settings ....................................................................................................... 45
FDU Configuration Settings ......................................................................................46
2D Imager Settings ................................................................................................... 47
Terminal to FMU Server Communications ................................................... 49
Enabling a Terminal for FMU with Direct Connect ....................................................50
Explore Terminal ....................................................................................................... 51
Updating Terminals ................................................................................................... 51
Enabling Terminals for RF Connectivity .................................................................... 52
Exploring an RF Terminal .........................................................................................55
Updating RF Terminals ............................................................................................. 55
Update Terminal(s) Now ..................................................................................... 55
Scheduled Update Time ..................................................................................... 56
Terminal Configuration Settings ................................................................................ 56
Terminal Report ........................................................................................................ 58
Appendix A.
Overview .......................................................................................................................... 59
SNMP Concepts ........................................................................................................59
MIB Files ................................................................................................................... 59
Additional Resources ................................................................................................60
Appendix B.
Setting up your DHCP Server .......................................................................................... 61
Appendix C.
Overview .......................................................................................................................... 63
RF Connectivity ...............................................................................................................64
User’s Manual
SNMP Interface............................................................................................. 59
Datalogic MIBs ................................................................................................... 60
DHCP Server Setup...................................................................................... 61
Troubleshooting........................................................................................... 63
iii
Page 6

Windows Firewall Issues ................................................................................................. 65
How to Open Ports in the Windows Firewall ............................................................ 65
Network Domain File Transfer Troubleshooting .............................................................. 69
Windows XP Home ......................................................................................................... 72
Creating a Share in Windows XP Home ................................................................... 72
Installing the Server Only component using XP Home ..................................... 72
Technical Support ........................................................................................................... 74
Datalogic Mobile Website Support ........................................................................... 74
Datalogic Mobile Website TekForum ........................................................................ 74
Reseller Technical Support ...................................................................................... 74
Telephone Technical Support ................................................................................... 74
Sample Reports .............................................................................................................. 75
Terminal Report ........................................................................................................ 75
Appendix D.
Glossary....................................................................................................... 77
iv Falcon® Management Utility (FMU)
Page 7

Datalogic Mobile
Falcon
®
Management Utility
™
End User License Agreement
NOTICE: Your use of the Falcon Management Utility (FMU) Software and Documentation (“Licensed Products”) is conditioned
on your accepting and agreeing to the terms and conditions set forth in this Agreement. By using the Licensed Products, you
agree to be bound by the terms of this Agreement. If you do not intend to be bound to the terms of this Agreement, Datalogic is
unwilling to license the Licensed Products to you. In such event, you may not use or copy the Licensed Products, and you should
promptly contact the seller of the Licensed Products for instructions on return of the unused Licensed Products for a refund.
This End User Software License Agreement (“Agreement”) is a legal agreement between the entity or person who has purchased the Licensed Products (“End User”) and Datalogic Mobile Inc., its subsidiaries and affiliates, (Datalogic), and governs the
licensing of the Licensed Products by Datalogic to End User. Any software provided along with the Licensed Products that is
associated with a separate end-user license agreement is licensed to you under the terms of that license agreement. Datalogic
and End User agree as follows:
1. Definitions.
1.1 “Authorized Use” means End User’s Use of the Licensed Products exclusively with Datalogic Mobile Product(s) solely for End
User’s internal business purposes.
1.2 “Documentation” means materials such as user’s guides, program reference guides, quick reference guides, manuals, or
similar materials associated with or related to the Datalogic Product, whether in printed, “online”, or other form.
1.3 “Licensed Products” means the Software and Documentation acquired by End User.
1.4 “Software” means the Falcon Management Utility Software and any other software or computer program of Datalogic or its
third party licensors in machine readable form acquired by End User, including any related update or upgrade such as enhancements or modifications, whether obtained directly or indirectly from Datalogic.
1.5 “Proprietary Information” means all (a) source code, software, documentation, and any related internal design, system
design, data base design, algorithms, technology, technical data or information, implementation techniques, and trade secrets
related to the Licensed Products and (b) any other trade secrets marked appropriately or identified as proprietary or confidential,
or any information that End User, under the circumstances, should recognize as confidential. Proprietary Information does not
include any information that the receiving party can establish was (1) in the public domain, (2) already in the receiving party’s
possession or rightfully known prior to receipt, (3) rightfully learned from a third party not in violation of any other's proprietary
rights, or (4) independently developed.
1.6 “Use” means storing, installing, copying, downloading, accessing, executing, operating, or displaying any portion of the
Licensed Products by End User on any hardware device.2. Scope Of License Granted.
2. Scope of License Granted.
2.1 Unless End User has purchased a multiple user license, this Agreement grants End User a license to install a single copy of
the Software on a single Datalogic terminal. If End User has purchased a multiple user license, End User is granted a license to
install a copy of the Software on the number of Datalogic terminals authorized on the printed label of the Software package.
2.2 The license granted to End User by Datalogic shall be a non-exclusive, non-transferable, terminable license to use the Software in machine-readable form only, solely for End User's internal business purposes. This Agreement does not convey ownership of the Licensed Products to End User. Title to the Licensed Products shall be and remain with Datalogic or the third party
licensor from whom Datalogic has obtained a licensed right. As used in this Agreement, the term “purchase” or its equivalents
shall mean “acquire under license.” End User acknowledges that the Licensed Products constitute valuable trade secrets of Datalogic or Datalogic’s third party licensors and that the Licensed Products are protected by intellectual property laws and treaties.
End User is not entitled to receipt or use of the source code to any Software.
User’s Manual v
Page 8

Datalogic Mobile Falcon® Management Utility™ End User License Agreement
2.3 End User represents that the Licensed Products acquired under this Agreement will be acquired for End User’s sole use, and
not for resale or transfer. End User shall not copy, modify, decompile, disassemble, reverse engineer, or otherwise reproduce or
remanufacture the Licensed Products, whether modified or unmodified, nor sell, assign, sublicense, distribute, lend, rent, give, or
otherwise transfer them to any other person or organization, for purposes other than as expressly provided in this Agreement,
without Datalogic’s prior written consent.
3. Payment and Taxes.
3.1 Unless otherwise agreed in writing, prices will be as set forth in Datalogic's price list in effect for the Licensed Products and
the Territory. Prices and license fees do not include freight, insurance, sales tax, customs duties or other similar charges. Any
such charges or taxes will be added to the price or separately invoiced to End User unless End User provides Datalogic with a
certificate of exemption from the applicable taxing authority.
3.2 Any copying, installing, reproduction, reverse-engineering, electronic transfer, or other use of the Licensed Products on other
than the number of Datalogic terminals for which End User has purchased a license, or on any non-Datalogic equipment, will be
a material breach of this Agreement. However, Datalogic may elect not to terminate this Agreement or the granted license, but
instead may elect to notify End User that End User is deemed to have ordered and accepted a license for each breaching use.
End User shall pay Datalogic the applicable list price fees as of the date of such breach as determined by Datalogic.
4. Intellectual Property.
Falcon is a registered trademark of Datalogic Mobile, Inc. and its wholly owned subsidiaries, and Falcon Management Utility and
FMU are trademarks of Datalogic Mobile, Inc. The license set forth in this Agreement does not transfer to End User any ownership of Datalogic’s or its third party licensors' copyrights, patents, trademarks, service marks, trade secrets, or other intellectual
property rights and End User shall have no right to commence any legal actions to obtain such rights. End User shall not remove,
modify, or take any other action that would obscure any copyright, trademark, or other intellectual property notices contained in
the Licensed Products.
5. Proprietary Information.
5.1 End User acknowledges that Proprietary Information is the confidential, proprietary, and trade secret property of Datalogic
and Datalogic’s third party licensors and End User acquires no right or interest in any Proprietary Information.
5.2 End User shall not disclose, provide, or otherwise make available the Proprietary Information of Datalogic or its third party
licensors to any person other than End User’s authorized officers, directors, employees, agents, or contractors, all of whom must
be under confidentiality agreement, or use the Proprietary Information for other than the Authorized Use, without Datalogic’s
prior written consent. End User shall take at least reasonable steps to protect the Proprietary Information and shall protect it no
less securely than if it were End User's own intellectual property.
5.3 The provisions of this Proprietary Information Section shall survive and continue for five (5) years after the termination of this
Agreement.
6. Limited Warranty.
Datalogic warrants that, under normal use and operation, the Software will conform substantially to the applicable Documentation for a period of ninety (90) days from delivery to End User. During this period, for all reproducible nonconformities for which
Datalogic has been given written notice, Datalogic will use commercially reasonable efforts to remedy the nonconformities. End
User agrees to supply Datalogic with all reasonably requested information and assistance necessary to help Datalogic in remedying such nonconformities. For all defects reported to Datalogic within the warranty period, Datalogic’s liability is limited to providing End User with one copy of corrections or refunding End User's purchase price, at Datalogic's discretion, and responding to
End User's software problem reports according to Datalogic's standard assistance practices. Datalogic does not warrant that the
Licensed Products will meet End User's requirements or that use of the products will be uninterrupted or error free, or that Datalogic's remedial efforts will correct any nonconformance. This limited warranty does not cover any software that has been subjected to damage or abuse, whether intentionally, accidentally, or by neglect, or to unauthorized repair or unauthorized
installation, and shall be void if End User modifies the Software, uses the Software in a manner other than as established in the
Documentation, or if End User breaches any of the provisions of this Agreement.
THE LICENSED PRODUCTS ARE PROVIDED “AS IS” AND, EXCEPT AS PROVIDED IN THIS SECTION, DATALOGIC MAKES
NO WARRANTIES OF ANY KIND, EXPRESS OR IMPLIED, WRITTEN OR ORAL, WITH RESPECT TO THE LICENSED
PRODUCTS, AND SPECIFICALLY DISCLAIMS THE IMPLIED WARRANTIES OF MERCHANTABILITY AND FITNESS FOR A
PARTICULAR PURPOSE.
vi Falcon® Management Utility (FMU)
Page 9

Datalogic Mobile Falcon® Management Utility™ End User License Agreement
7. Infringement.
7.1 Datalogic will defend End User against any claim that the Licensed Products furnished hereunder infringe a United States
patent, trademark, or copyright of a third party and Datalogic will pay any damages finally awarded against End User by a court
of competent jurisdiction that are attributable to such claim or will pay End User’s part of any settlement that is attributable to
such claim, provided, that 1) End User notifies Datalogic promptly in writing of the claim, 2) Datalogic controls the defense or settlement of the claim, and 3) End User cooperates fully with Datalogic in such defense or settlement. All notices of a claim should
be sent to Datalogic Mobile, Inc., General Counsel, 1505 Westec Drive, Eugene, Oregon, 97402.
7.2 In the defense or settlement of any such claim, Datalogic may, at its option, 1) procure for End User the right to continue
using the Licensed Products, 2) modify the Licensed Products so that they become non-infringing, 3) replace the Licensed Products with an equivalent product not subject to such claim, or 4) provide End User an opportunity to return the Licensed Products
and receive a refund of the purchase price paid, less a reasonable allowance for use.
7.3 Datalogic shall have no liability to End User for claims of infringement based upon 1) the use of any Licensed Product in combination with any product which Datalogic has not either furnished or authorized for use with such Licensed Product, 2) the use
of any Licensed Product designed, manufactured, or modified to the specifications of End User, or 3) End User’s modification of
the Licensed Products without written authorization from Datalogic.
THE FOREGOING STATES DATALOGIC’S COMPLETE AND ENTIRE OBLIGATION TO END USER CONCERNING CLAIMS
OF PATENT, TRADEMARK, COPYRIGHT, OR OTHER INTELLECTUAL PROPERTY INFRINGEMENT, CANCELS AND
SUPERCEDES ANY PRIOR AGREEMENTS, WHETHER ORAL OR WRITTEN, BETWEEN DATALOGIC AND END USER
CONCERNING SUCH CLAIMS, AND WILL NOT BE MODIFIED OR AMENDED BY ANY PAST, CONTEMPORANEOUS, OR
FUTURE AGREEMENTS OR DEALINGS BETWEEN DATALOGIC AND END USER, WHETHER ORAL OR WRITTEN,
EXCEPT AS SET FORTH IN A FUTURE WRITING SIGNED BY AN AUTHORIZED REPRESENTATIVE OF EACH PARTY.
8. Limitation of Liability.
EXCEPT AS PROVIDED IN SECTION 8, DATALOGIC SHALL NOT BE LIABLE FOR ANY CLAIMS AGAINST END USER BY
ANY OTHER PARTY NOR SHALL DATALOGIC'S LIABILITY FOR DAMAGES, IF ANY, WHETHER BASED UPON CONTRACT,
TORT (INCLUDING NEGLIGENCE), PRODUCT LIABILITY, STRICT LIABILITY, WARRANTY, OR ANY OTHER BASIS,
EXCEED THE PRICE OR FEE PAID BY END USER FOR THE LICENSED PRODUCTS. UNDER NO CIRCUMSTANCES
SHALL DATALOGIC BE LIABLE TO END USER OR ANY THIRD PARTY FOR LOST PROFITS, LOST DATA, INTERRUPTION
OF SERVICE, OR FOR ANY SPECIAL, CONSEQUENTIAL, CONTINGENT, INDIRECT, INCIDENTAL, PUNITIVE, EXEMPLARY, OR OTHER SIMILAR DAMAGES, EVEN IF DATALOGIC HAS BEEN ADVISED OF THE POSSIBILITY OF SUCH DAMAGES.
9. Government Restricted Rights; International Use.
The Licensed Products are provided with Restricted Rights. Use, duplication, or disclosure by the U.S. Government is subject to
the restrictions for computer software developed at private expense as set forth in the U.S. Federal Acquisition Regulations at
FAR 52.227-14(g), or 52.227-19 or in the Rights in Technical Data and Computer Software clause at DFARS 252.2277013(c)(1)(ii), whichever is applicable. If End User is using the Licensed Products outside of the United States, End User must
comply with the applicable local laws of the country in which the Licensed Products are used, with U.S. export control laws, and
with the English language version of this Agreement.
10. Termination.
10.1 Either party may terminate this Agreement or any license granted under this Agreement at any time upon written notice if
the other party fails to comply with any material term or condition. Datalogic may terminate this Agreement immediately in the
event that End User (i) fails to pay any amount that is due within thirty (30) days of receiving a written demand, (ii) breaches any
provision of this Agreement unless such breach is corrected or cured within fifteen (15) days after receipt of written notice from
Datalogic, (iii) transfers any substantial part of its business or in any manner ceases to continue its business, or experiences any
material change or transfer in its management or control, or (vi) becomes insolvent, voluntarily files a petition in bankruptcy,
becomes the subject of an involuntary bankruptcy proceeding which is not dismissed within thirty (30) days, or is otherwise the
subject of an action provided by law which is intended to relieve it from any of its debts.
10.2 Upon termination of this Agreement, End User immediately shall cease using the Software and shall return to Datalogic or
destroy all Licensed Products covered by this Agreement, and shall furnish Datalogic with a certificate of compliance with this
provision signed by an officer or authorized representative of End User.
User’s Manual vii
Page 10

Datalogic Mobile Falcon® Management Utility™ End User License Agreement
11. General Provisions.
11.1 Entire Agreement; Amendment. This document contains the entire agreement between the parties relating to the subject
matter contained herein and supersedes all prior or contemporaneous agreements, written or oral, between the parties. This
Agreement may not be changed, amended, or modified except by written document signed by an authorized representative of
each party. No promise or representation which is not contained herein constituted an inducement to either party or was relied
upon by either party in entering into this Agreement.
11.2 Notice. All notices required or authorized under this Agreement shall be given in writing and shall refer to this Agreement.
Notices to End User shall be sent to such address as End User shall provide to Datalogic in writing. Notices to Datalogic shall be
sent to the attention of Datalogic Mobile, Inc., General Counsel, 1505 Westec Drive, Eugene, OR 97402, or such other address
as may be specified by Datalogic in writing. All notices shall be effective when received, with evidence of receipt.
11.3 Waiver. If either party fails to perform any of its obligations under this Agreement and the other party fails to enforce the relevant provisions, such failure to enforce shall not prevent later enforcement of those provisions.
11.4 Assignment. Datalogic may assign this Agreement or any of its rights under this Agreement without giving prior notice to
End User. End User may not sublicense, assign, pledge, lease, rent, or otherwise transfer this Agreement, and the rights under
it, whether voluntarily or by operation of law, without Datalogic’s prior written consent. No attempt to assign or transfer in violation
of this provision shall be valid or binding upon Datalogic.
11.5 Severability. Should any clause or section of this Agreement be determined to be invalid or unenforceable, that provision
shall be interpreted so as to most closely reflect the original intent of the parties in an enforceable manner and the remainder of
the Agreement will remain in full force and effect.
11.6 Governing Law. This Agreement shall be governed by the laws of the State of Oregon, United States of America, excluding
choice of law provisions.
11.7 Attorneys Fees. In the event an action is brought to enforce the terms and conditions of this Agreement, the prevailing party
shall be entitled to reasonable attorneys’ fees, both at trial and on appeal.
-END-
viii Falcon® Management Utility (FMU)
Page 11

Overview
Depending on the version of your device’s operating system, you might see some
slight differences between your screen and those described in this manual.
Preface
This manual contains information about installing and operating the Falcon®
Management Utility (FMU). It covers both Microsoft Windows
Windows Mobile
•This “Preface” describes the style and formatting conventions used in
this manual.
• “Getting Started”on page 1 tells you how to install and set up FMU.
• “About FMU”on page 11 provides an overview of the FMU concepts
and usage, as well as a description of the various components.
• “FMU Operation”on page 25 gives information on how to use FMU,
including terminal configuration and how to transfer data to and
from the portable device.
• “Configuration Settings”on page 41 provides details about the config-
uration settings available in FMU.
®
(WM) operating systems.
®
CE and
• “Terminal to FMU Server Communications”on page 49 provides
instructions for direct connect and RF configuration of terminals.
• Appendix A
nology used in FMU.
• Appendix B
DHCP Server so FMU can use DHCP Discovery.
• Appendix C, “Troubleshooting”on page 63 provides troubleshooting
information and error messages. This section also includes contact
information for Datalogic Mobile Technical Support.
• Appendix D, “Glossary”on page 77 lists selected terms used in this
manual.
Reference the Product Reference Guide (PRG) for your terminal type to get
additional information specific to that model.
User’s Manual ix
, “SNMP Interface”on page 59, discusses the SNMP tech-
, “DHCP Server Setup”on page 61, discusses setting up a
Page 12

Preface
Registration
Please take a few moments to register electronically with the Datalogic Product
Registration Utility, or complete the Pr
logic’s website (www.mobile.datalogic.com). Datalogic values your feedback.
Registering ensures that you will be informed of the latest product news, software updates and future developments from Datalogic.
Style Conventions
Formatting conventions are used throughout this document to provide a consistent method for representing various screenshots, buttons, notes, and cautions while you are working with the FMU manual.
Manual Formatting Conventions
Keyboard Keys. When keyboard keys are Linked with a plus sign (for
example,
second key once.
Keystrokes. Filenames, paths, field selections from a pull-down list, and
data or keystrokes entered by the user are shown in this
typeface.
SHIFT+ENTER, or Ctrl+C), hold down the first key while pressing the
oduct Registration form located on Data-
monospaced
Windows Controls. Windows controls including command bar
sequences, prompts, dialog boxes, fields, pull-down lists, checkboxes and
radio-buttons are printed in this
bold typeface.
Input characters are usually given in lowercase (no capital letters); you may
enter them in lowercase, uppercase, or a combination unless otherwise specified. When input characters are given in uppercase or a combination of lowercase and uppercase, enter the characters exactly as shown.
Cautions indicate an action where there is a possibility of damage to data integrity or
data failure. Cautions always have the Caution icon to the left.
CAUTION
Notes provide additional information on a topic, including technical details,
exceptions to instructions and other pertinent information. Notes have the notepad
icon to the left.
xFalcon
®
Management Utility (FMU)
Page 13

Quick Start
Following is a brief summary of the steps needed to set up FMU for configuring terminals. See the references to each section for further information.
Chapter 1
Getting Started
1.
Read “System Requirements” on page 4 and “Before You Begin” on
page 5.
2. Set Up Terminals
• Establish communication from terminal to host — see the PRG
for your terminal type.
•Enable FMU on terminal — see “Terminal to FMU Server
Communications” on page 49.
3.
Install FMU
See “Installing FMU” on page 5.
4.
Set Up FMU
See “Firewalls and File Sharing” on page 6 and “Setting Up FMU” on
page 8.
5.
Define Configuration Settings
See Chapter 4, “Configuration Settings” on page 41.
6.
Add Terminals to FMU
See “Adding Terminals” on page 37.
7.
Update Terminals
See “Updating Terminals” on page 51 and “Updating RF Terminals”
on page 55.
FMU will override any previously-defined settings on a terminal.
CAUTION
User’s Manual 1
Page 14

Overview
This section covers the following topics:
Introduction
Datalogic Mobile’s Falcon Management Utility (FMU) is designed to help you
install, configure, and manage your deployment of Windows-based Datalogic
mobile computers and PDAs.
Advantages
FMU can manage multiple terminals simultaneously over a wireless network,
on a USB bus, or via ActiveSync. FMU sets a new industry standard, using the
latest technology to create a reliable, automated, and easy-to-use system for
remote management of terminals.
Getting Started
• “Introduction” on page 2
• “Before You Begin” on page 5
• “System Requirements” on page 4
• “Setting Up FMU” on page 8
• “FMU Server Architecture” on page 9
• Lower deployment cost — new terminals are automatically configured.
• Lower maintenance cost — automated, rapid deployment of configuration, firmware and files.
• Better-maintained hardware.
•Faster recovery times.
2 Falcon® Management Utility (FMU)
Page 15

Features
Introduction
FMU is included with Windows-based Datalogic mobile computers. FMU
provides administrators with tools for managing the deployment of terminals,
including:
• Individual Diagnostic Terminal Update
• Group Terminal Update
• Wireless Connectivity
• Multiple Server Support
•On-Demand Updates
• Automated Terminal Updates
• Scheduled Terminal Updates
FMU encapsulates all aspects of terminal configuration into a single centralized interface. For example, FMU’s intuitive user environment provides an
interface that allows you to perform firmware upgrades, terminal configuration, network setup, and terminal monitoring via the Explorer-style interface.
Administrators can manage their terminal deployment on either an individual
or group basis. A group is a set of terminals that perform the same function
(e.g. shipping, or cycle counting, or price verification).
FMU allows administrators to gain additional management capabilities. Specifically, administrators can now manage a deployment of PDTs across a widearea-network (WAN) as well as take advantage of additional automation capabilities.
FMU is an essential tool for managing a large deployment of terminals,
grouped into different functional categories. FMU makes managing the different groups easy. With groups of terminals, configuration settings can be
applied once and distributed to each terminal in the group automatically. The
distribution of applications to a group of terminals can be easily accomplished
in the same one-step manner. Using wireless network technology, these functions can be accomplished without direct access to the terminal.
All of the benefits and capabilities of the Falcon Management Utility help you
to lower your ownership costs of your portable data deployment by making
the installation, configuration, and management of your deployment easier
and more efficient.
User’s Manual 3
Page 16

System Requirements
Supported portables
FMU supports Windows® CE and Windows® Mobile PDTs and PDAs,
including:
• Pegaso Industrial PDA
• Falcon 4400 Series (Laser & 2D Imager)
• Falcon 4220
System Requirements
Complete System/Workstation
CPU P3-600 MHz
Memory 256MB
Hard Disk 200MB
Server Only
CPU P3-600 MHz
Memory
Hard Disk 200MB
Getting Started
Minimum
Minimum
128MB + 1MB for each
Terminal being supported
FMU is supported under the following operating systems:
•Microsoft
®
Windows® 2000 Professional
• Windows 2000 Server
• Windows 2000 Advanced Server
•Windows XP Home
• Windows XP Professional
4 Falcon® Management Utility (FMU)
Page 17

Before You Begin
Establish Communication to Terminals
Before installing FMU, you must set up communication from the terminal(s)
to the host. See “Terminal to FMU Server Communications” on page 49 for
information.
Installing FMU
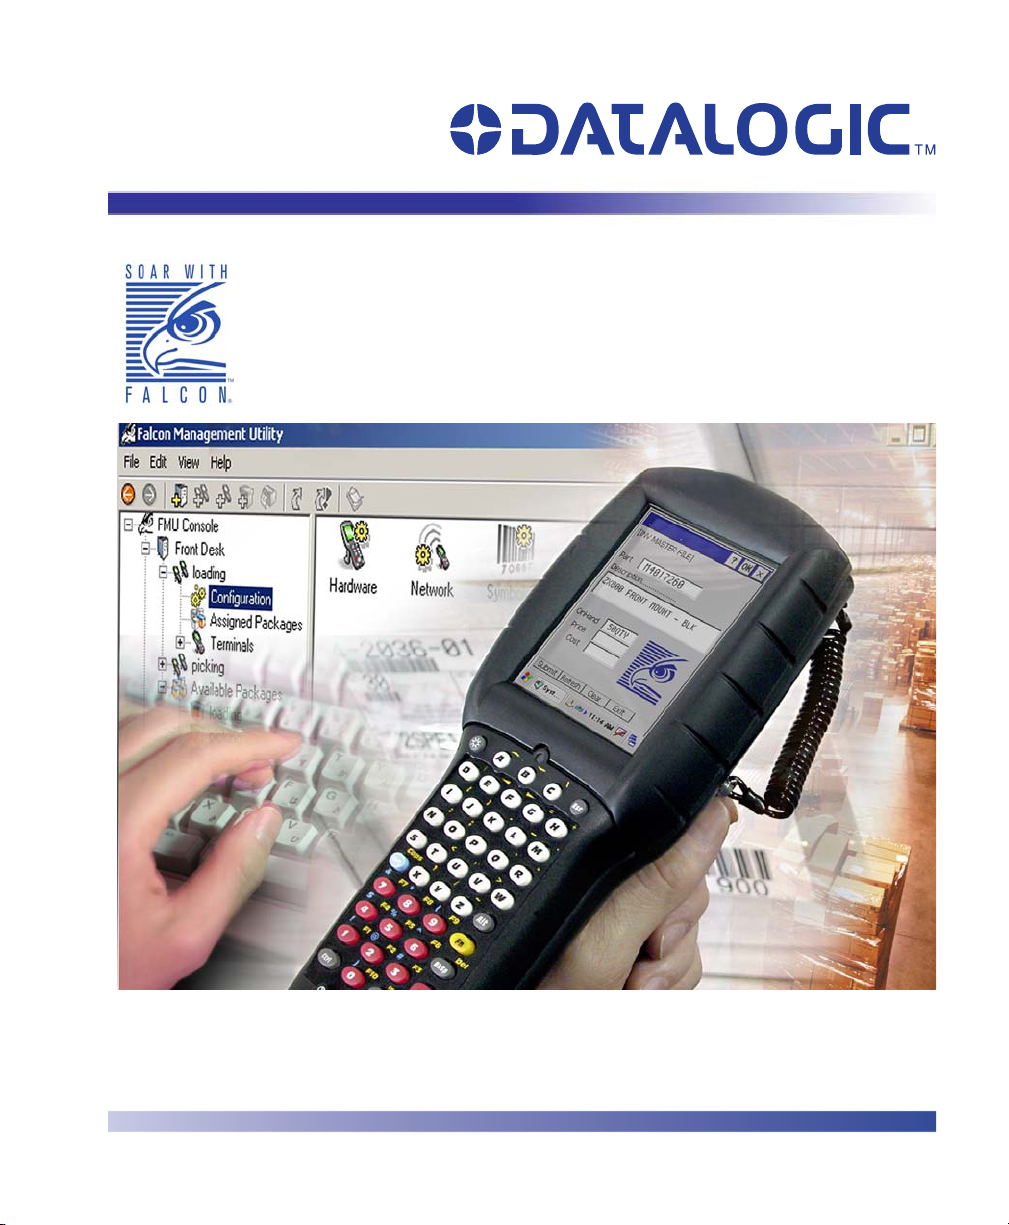
FMU Installation Options
Complete (Workstation + Server)
This option installs everything you need to run FMU on a single computer.
Server Only
This option is used when setting up a server to run on a separate computer
from the FMU Console. The server is used to communicate between the
FMU Console application and the terminals.
Workstation Only
This option is used to set up the FMU Console to run on a separate computer
from the FMU Server. The FMU Console is the application used to manage
and administer your terminal(s) using the remote FMU Servers.
Before You Begin
To install FMU:
1. Insert the Product CD provided with your unit into the CD-ROM
drive of the computer where you want to install it.
2. Click the link to
Falcon Management Utility (FMU) to begin the installa-
tion.
If the installation window does not automatically open after you insert the CD (if you
have disabled autorun on your computer), browse to the Contents folder on the CD
and click on index.html to launch the interface.
User’s Manual 5
Page 18
Getting Started
3. After you agree to the EULA and click Next, the Install Options dialog
will open.
4. Select the type of install (
station + Server)
you want to perform and click Next.
5. Continue to follow the on-screen instructions to complete the installation.
Firewalls and File Sharing
Using Firewalls
If you are using a firewall, FMU uses the following ports:
• 2151 UDP
• 2150 TCP
• 3453 TCP
These need to be open and enabled in order for FMU to communicate with
Datalogic terminals. For instructions, refer to “Windows Firewall Issues” on
page 65.
Setting Up File Sharing
File sharing must be enabled and a share created on the Server directory. Please
consult your operating system manual for information on setting up file sharing.
Server, Workstation, or Complete System (Work-
6 Falcon® Management Utility (FMU)
Page 19

Before You Begin
Server Directory Share
After the FMU Server installation is complete, you will need to share the
folder for the directory where the server files were installed (the default is
C:\Program Files\Datalogic\FMU\Server). See the help documentation specific to your Windows operating system for directions on creating a share.
Network Shares (Shared Files)
You must enable sharing for each directory in your network containing files
that will be sent to a terminal. The directory containing the files must have
permissions set for FMU Server access.
File Shares in Local Workstation
You can also elect to copy files to be sent to the terminal into a folder on the
FMU Workstation computer, and then share the directory on the local drive.
The FMU workstation installation allocates a folder for this. Unless you specified a different location during install, the default folder is
C:\Program Files\Datalogic\FMU\Workstation\Packages.
Since shared drives are tied to individual login names, if more than one login is used
for the same workstation sharing must be enabled for each login name that will be
using FMU.
File Sharing with Windows XP Home
Special considerations are necessary if you are using Windows XP Home.
Refer to “Creating a Share in Windows XP Home” on page 72 in the Trouble-
shooting section for more information.
File Sharing with Windows XP Professional
Under Windows XP Professional, you must enable file-sharing and give
explicit permissions to the Domain users that will be accessing files (server).
User’s Manual 7
Page 20

Setting Up FMU
Depending on the type of install you selected (Server Install, Workstation
Install, or Complete System), the process for setup will vary.
Complete System
If you did a Complete System install (both FMU Console and Server on the
same computer), use the following steps to set up FMU.
Getting Started
1. Open
2. A Default Group is created automatically for you during installation.
3. Set up terminals to communicate with FMU (see “Enabling a Termi-
FMU Console by choosing it from the Start menu.
If you want to assign terminals to a group other than the Default
Group, create the group(s) to which you want to add the terminals
before proceeding (see “Adding a Group” on page 29).
nal for FMU with Direct Connect” on page 50 and “Enabling Termi-
nals for RF Connectivity” on page 52).
Separate Workstation/Server
If you have installed FMU Console on one computer and the FMU Server
software on one or more other computers, use the following procedures:
1. Open
2. Add a server (see “Adding a Server” on page 26).
3. A Default Group is created automatically for you when a server is
4. Set up terminals to communicate with FMU (see “Enabling Termi-
FMU Console by choosing it from the Start menu.
added. To assign terminals to a group other than the Default Group,
create the group(s) to which you want to add the terminals before
proceeding (see “Adding a Group” on page 29).
nals for RF Connectivity” on page 52).
8 Falcon® Management Utility (FMU)
Page 21
FMU Server Architecture
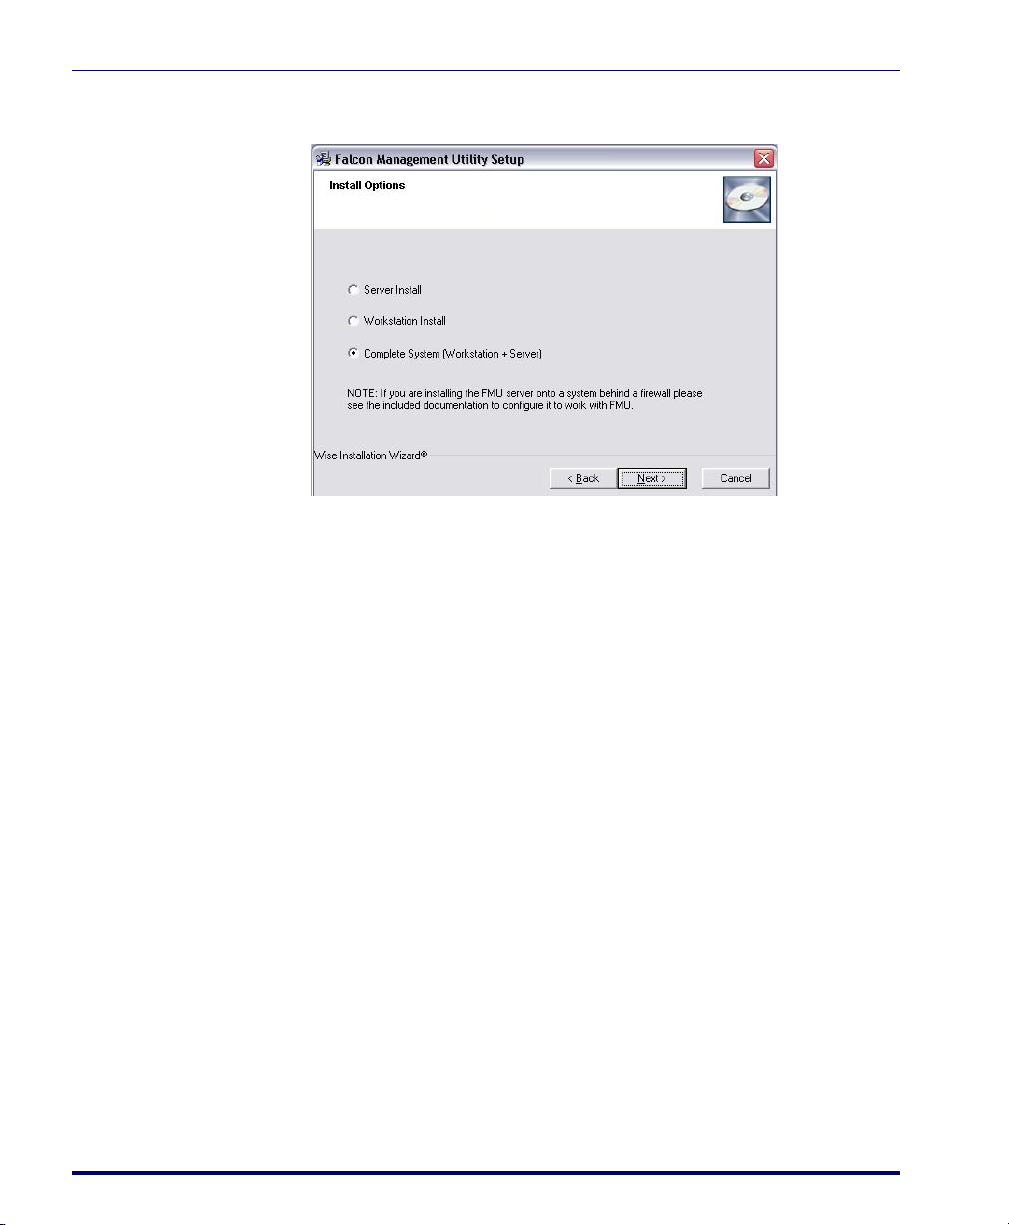
Single Server Support
FMU is included with each supported Windows-based Datalogic terminal.
FMU Console can connect to a single server and configure individual terminals. You can create groups within that server and assign as many terminals as
desired to those groups.
FMU provides the ability to drag configuration settings from one group to
another, where they can then be modified independently from the original settings. Package files can be shared across groups (see “Available Packages” on
page 17 for more information).
Figure 1. FMU Single Server
FMU Server Architecture
FMU Console
Single Server
FMU does not limit the number of terminals associated to one server; however, a
maximum of 35 - 50 terminals per server is recommended for optimum performance.
User’s Manual 9
Terminals
Page 22
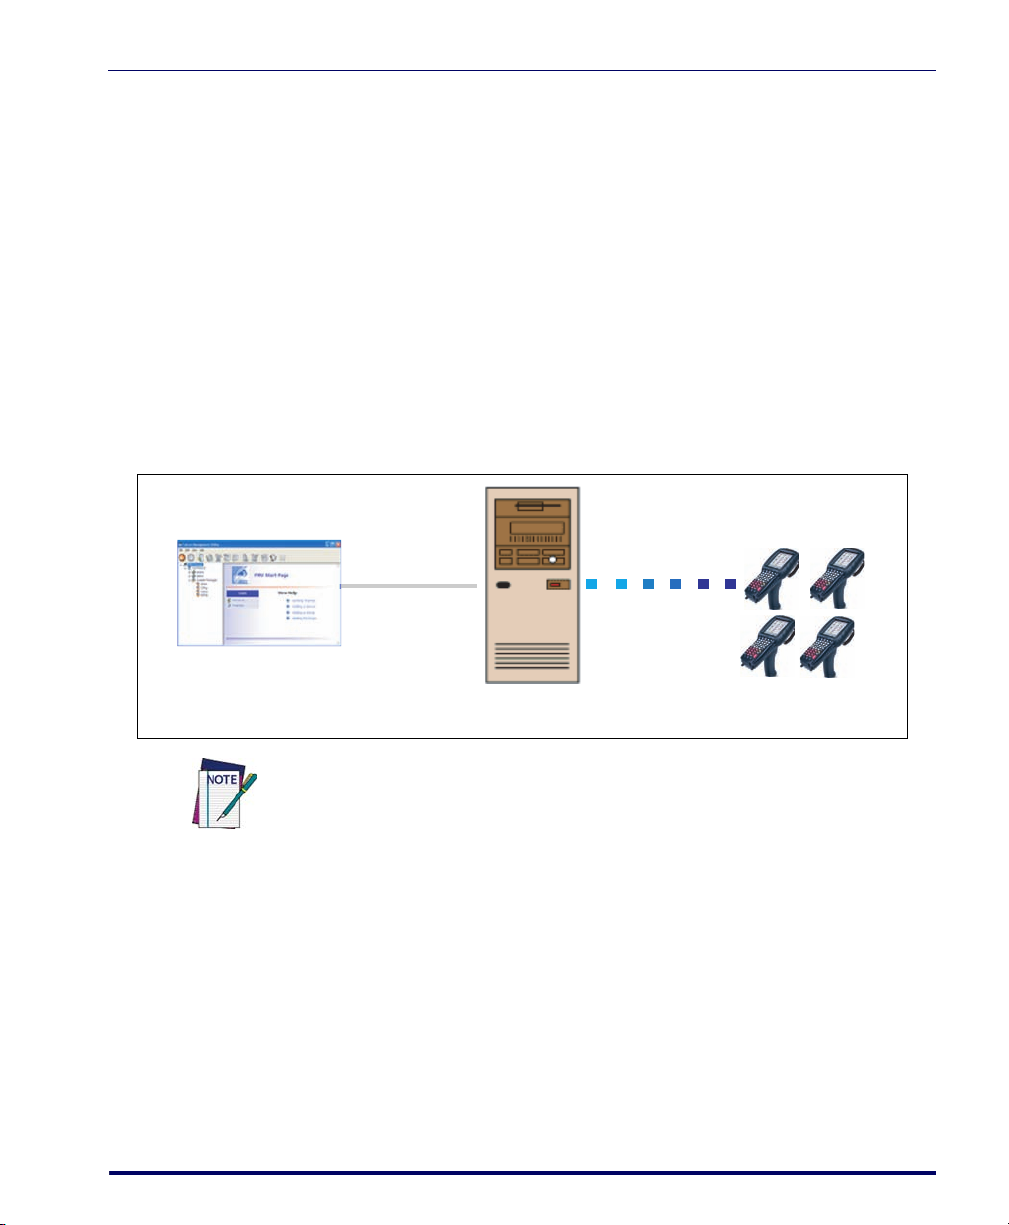
Multiple Server Support
FMU also enables administrators to manage more than one FMU server from
a single console, making it easier and more efficient to manage a large distributed deployment of terminals.
Specifically, FMU can manage more than one FMU Server which supports
WAN deployments. Additionally, FMU allows administrators to push configurations and applications to a group of terminals in a single process (vs. oneat-a-time approach). Terminals within a specified group can be updated automatically.
Figure 2. Multiple Server Support
Server 1
Getting Started
Terminal
Group(s)
FMU Console
FMU does not limit the number of servers associated to one console; however, a
maximum of 3-4 servers per console is recommended for optimum performance.
10 Falcon® Management Utility (FMU)
Server 2
Terminal
Group(s)
Page 23

Overview
Chapter 2
About FMU
This chapter will introduce you to the concepts of FMU. You will find information that will help you to understand FMU’s technology and interface. You
will also find explanations of groups, packages and files and how FMU uses
them to provide an easy-to-use automated system for configuring terminals.
You will learn how you can update a few terminals in a local environment, or
numerous terminals in multiple remote locations.
This section covers the following topics:
• “FMU’s Technology” on page 11
• “User Interface” on page 13
• “FMU Components” on page 15
• “Menu” on page 18
• “Toolbar” on page 23
FMU’s Technology
Microsoft® .NET Framework
FMU was developed using the Microsoft .NET Framework, which provides
an environment for extensibility. Future revisions of FMU will allow the FMU
Server components to be deployed on different platforms, as well as to interface with different wireless devices.
The Common Language Runtime provided by Microsoft to run applications
is supported on a wide variety of devices. This simplifies the task of creating
one application to run on multiple devices, making development fast and efficient. The Runtime also has security features which greatly enhance software
reliability.
User’s Manual 11
Page 24

About FMU
For more information on this topic, go to:
http://www.microsoft.com (Internet connection required).
XML
What is XML?
XML is defined as Extensible Markup Language (XML). Although it was originally created to be used for data on the web, it also provides a robust, nonproprietary, persistent, and verifiable file format for storing and/or exchanging
data off the Web.
How does FMU use this technology?
XML has become an integral part of the Microsoft® Windows® DNA architecture for data distribution and communication between multiple tiers. FMU
was designed as a multi-tier solution because of the flexibility and efficiencies
this type of architecture adds. FMU uses this technology to provide the structured environment needed for data integrity.
XML is at the core of FMU’s data management. Its use varies from generating
dynamic forms to keeping track of terminal configurations. This is accomplished with use of XML schemas, providing the flexibility needed to encapsulate the data shared between different layers. For our long-term plans, this is
also the best path to becoming platform independent. XML provides the ability to communicate with external computing systems that would otherwise be
unattainable with conventional methods of data storage.
For more information on this topic, go to:
http://www.microsoft.com
http://www.w3.org/XML/
FMU Server and Client
SNMP
SNMP (Simple Network Management Protocol) is the standard protocol for
managing devices on a network. FMU makes use of SNMP to send and
receive configuration information to the terminals. The terminals constantly
run SNMP, which allows FMU to interface with the terminal at any time
without requiring user intervention on the terminal.
12 Falcon® Management Utility (FMU)
Page 25

User Interface
With an SNMP agent always running on the terminal, other SNMP-based
®
network management tools, such as HP Openview
Associates’ Unicenter, or CastleRock SNMPpc
, IBM’s Tivoli, Computer
®
, may also be used to configure/manage the terminals. To support this capability, Datalogic has released
the Management Information Base (MIB) for Datalogic Windows-based terminals. The MIB is used by the SNMP management tools to allow them to
interface with the SNMP agent provided on the terminals. This interface
allows the management tool to configure the scanner controls or retrieve terminal type information.
For more information on SNMP, see “SNMP Interface” on page 59, or go to:
http://www.microsoft.com (Internet connection required).
Maintaining Current Files
FMU uses a proprietary file update system to maintain current files on the terminal. FMU uses this protocol to allow the FMU Server to compare files and
firmware versions between the server and the terminal, and to update the terminal if it is not up to date. FMU provides the administrator the ability to
update a single copy of a file or firmware image, and have that copy be distributed to all of the networked terminals with no further action required by the
administrator. FMU ensures data integrity by verifying that the downloaded
file is identical to the original prior to replacing the copy on the terminal,
avoiding any possibility of corrupting the file.
User Interface
Windows® XP Interface
The FMU graphical user interface was designed to be consistent with the
Windows XP GUI design practices and principles. The FMU User Interface is
simple and intuitive, allowing you to perform tasks quickly and efficiently.
FMU’s User Interface has a similar look and feel to standard Windows
Explorer tree-view/list-view design. The left pane displays the Tree View listing
the FMU components; the right pane displays the List View containing details
and options available for the selected component.
User’s Manual 13
Page 26
Menu
Too lbar
Start Page
Shortcut
Menu
Tree View
List View
About FMU
Figure 3. FMU Interface
Most features of FMU can be accessed several different ways:
Menu
Access items from the Menu by clicking on the desired option, then selecting a
command. See Menu for a detailed description of each menu item.
Toolbar
Buttons on the Toolbar provide shortcuts to commonly used features.
Tree View
Click on a component in FMU’s left pane Tree View to access its features.
Information and available options will display in the right pane List View.
List View
When an option is selected in the Tree View, the List View in the right pane
will display available choices for that component.
14 Falcon® Management Utility (FMU)
Page 27

Shortcut Menu
Right-click the selected item in Tree View to open a shortcut menu. Options
relevant to the selected component will be displayed.
Options are enabled or disabled according to their relevance to the item selected in
the Tree View.
FMU Components
This section contains the following items:
• “FMU Start Page” on page 15
• “Servers” on page 16
• “Groups” on page 16
• “Configuration” on page 16
• “Assigned Packages” on page 17
• “Terminal” on page 17
FMU Components
• “Available Packages” on page 17
FMU Start Page
The top (root level) of the Tree View is the FMU Start Page. Servers are
attached to the Start Page.
User’s Manual 15
Page 28
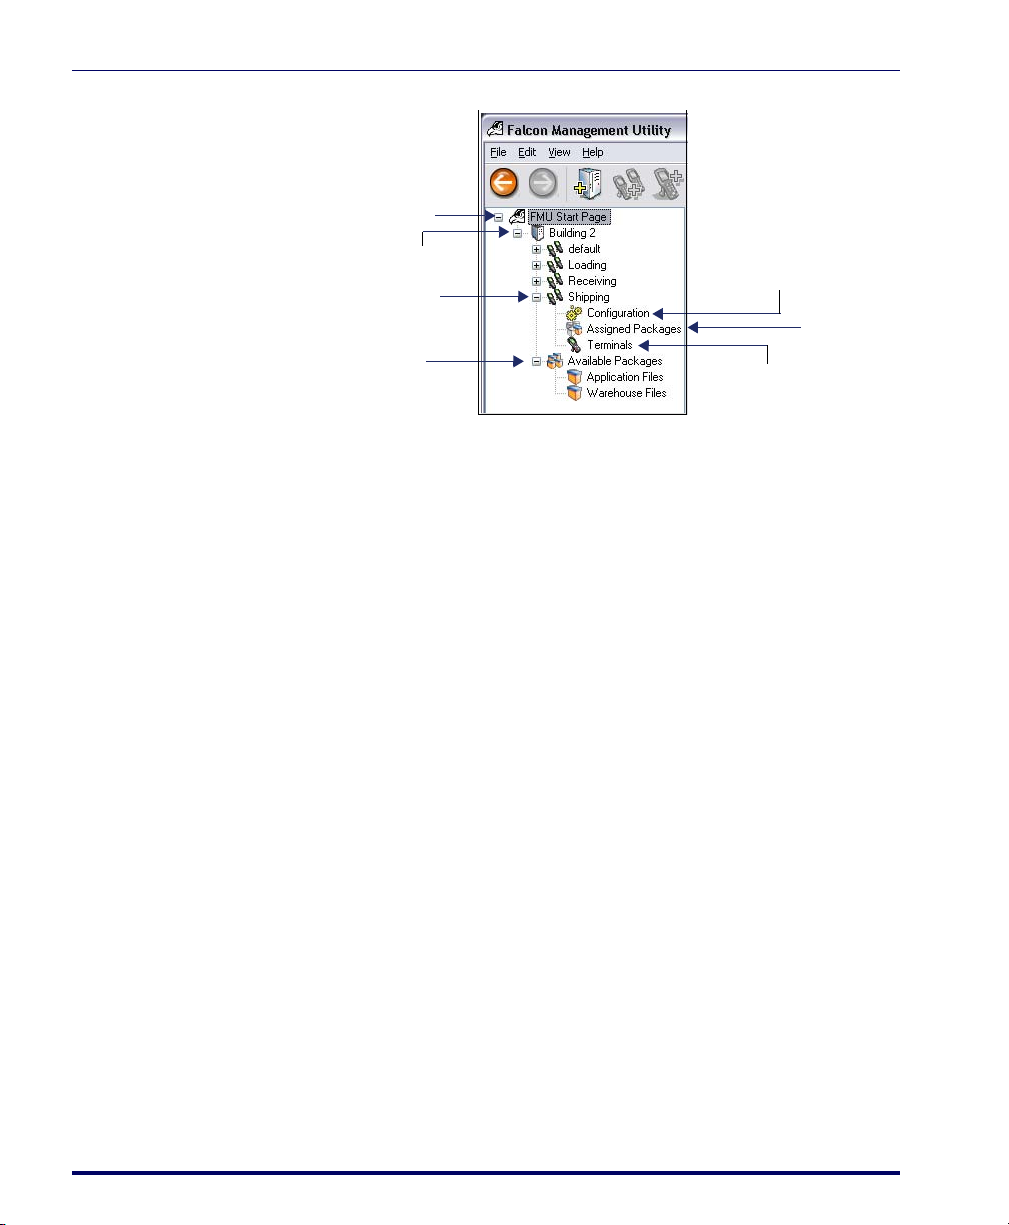
Servers
a
About FMU
Figure 4. FMU Tree View
FMU Start Page
Server
Group
Available Packages
Configuration
Assigned P
Terminal
A Server represents an FMU Server. Each server contains defined groups of terminals. The server component also contains an
Available Packages directory,
which holds defined sets of files.
• “Managing Servers” on page 25
• “SNMP Interface” on page 59
• “Adding and Assigning Packages” on page 31
Groups
Each Group represents a collection of specified terminals with common functionality. Each group contains settings for configuration (hardware, network
and symbology settings), assigned packages, and a list of assigned terminals.
You can create any number of groups on a server.
On installation of a server, a Default Group is created automatically. Expand
the server component to view or change the settings for the Default Group.
See “Working with Groups” on page 29.
Configuration
Group Configuration allows you to view or change configuration items for the
specified group.
16 Falcon® Management Utility (FMU)
Page 29

See “Group Configuration Settings” on page 29.
Assigned Packages
Assigned Packages provides a list of those packages assigned to the selected
group. When selected, the list of packages for that group will display in the
List View.
See
“Assigning a Package” on page 36 for more information.
Terminal
Terminals appear within the group to which they are attached. Each terminal
represents a physical Device as specified by the administrator and confirmed
by the server. Any number of terminals can be added to a group.
“Terminals” on page 36 for more information.
See
Available Packages
Available Packages represent a set of files that can be assigned to groups for ter-
minal updates. Packages contain two types of files: basic files (drivers, configuration, system software etc.) and firmware image files. Firmware image files are
system updates to the terminal firmware itself, and the others are those files
required to execute an application.
See Also
FMU Components
• “Adding and Assigning Packages” on page 31
• “Working with Files” on page 39
User’s Manual 17
Page 30
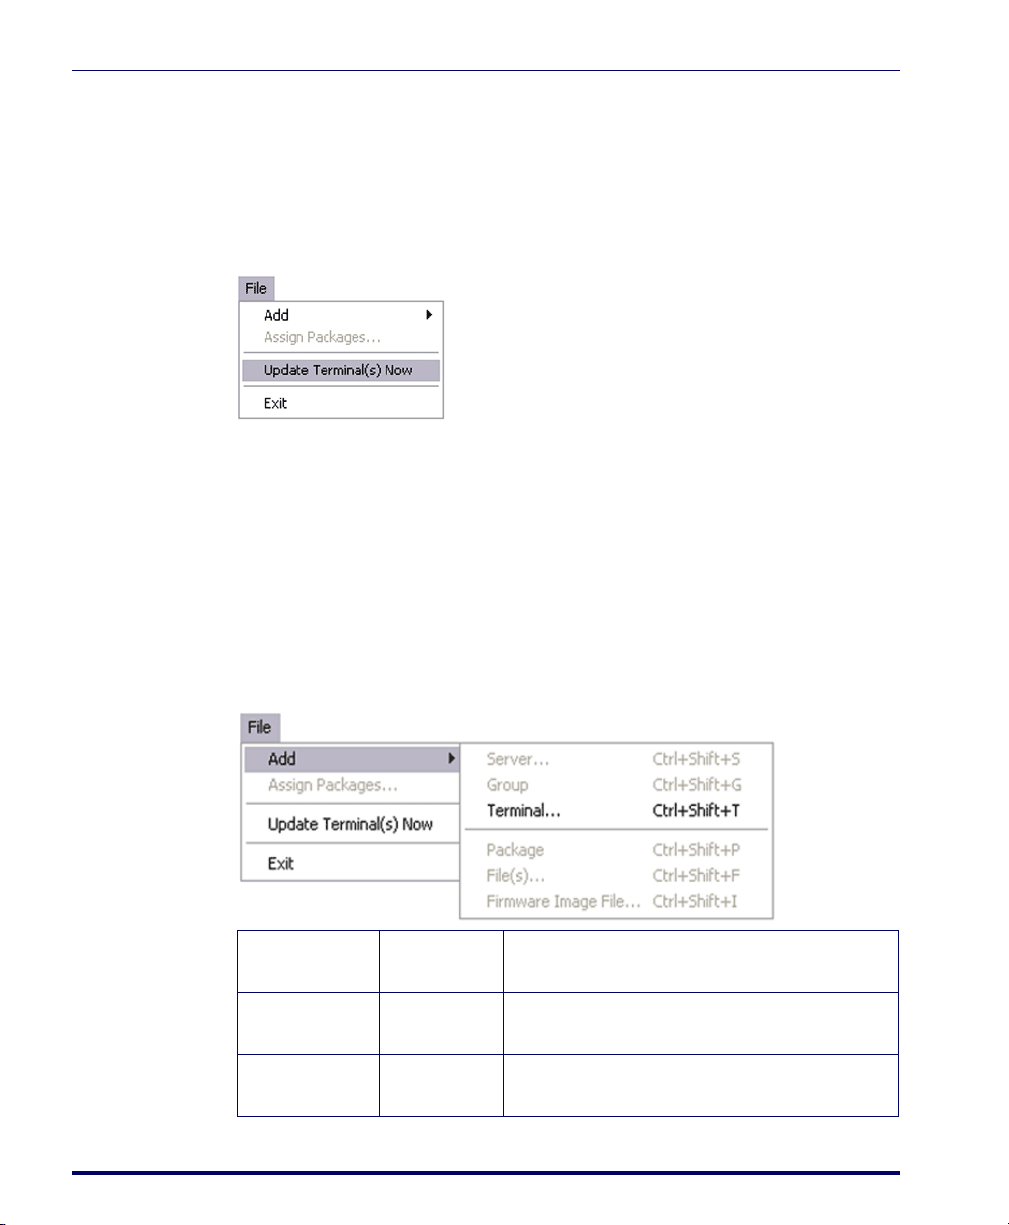
Menu
File
About FMU
Click on items in the menu to access the menu features.
Figure 5. File Menu
The following topics are covered in this section:
• Add
• Assign Packages
• Update Terminal(s) Now
• Exit
Add
Figure 6. Add Menu
Add Server Ctrl+Shift+S Adds a new server to the FMU Tree View.
“Managing Servers” on page 25
See
Add Group Ctrl+Shift+G Adds a new group to the selected server.
“Working with Groups” on page 29
See
Add Terminal Ctrl+Shift+T Adds a new terminal to the selected group.
“Terminals” on page 36
See
18 Falcon® Management Utility (FMU)
Page 31

Add Package Ctrl+Shift+P Adds a new package to the selected server.
“Adding a Package” on page 32
See
Add File(s) Ctrl+Shift+F Adds new files to the selected package.
“Adding Files to a Package” on page 32
See
Menu
Add Firmware
Image File
Ctrl+Shift+I Adds a firmware image file to the selected package.
“Adding a Firmware Image File” on page 34
See
Assign Packages
Adds or removes packages assigned to the selected group.
See “Assigning a Package” on page 36
Update Terminal(s) Now
Figure 7. Update Terminal(s) Now Menu
When Update Terminal Now is selected, the server will send a message to each
terminal indicating that the terminal needs to be updated. The terminal operator will be instructed on how to proceed. The selected terminal or group is
then updated immediately. See “Updating Terminals” on page 51 and “Updat-
ing RF Terminals” on page 55.
All terminals are updated automatically after a reset or reboot.
You can specify either an individual terminal or an entire group.
Exit
Quits the FMU application.
User’s Manual 19
Page 32

Edit
About FMU
Figure 8. Edit Menu
Cut (Ctrl+X) Moves the selected data into the clipboard to be pasted in another
location.
Copy (Ctrl+C) Copies the selected data into the clipboard so it can be pasted in
another group or server.
Paste (Ctrl+V) Pastes data stored in the clipboard to the selected item within FMU
(when applicable).
Delete (Del) Deletes the selected data (when applicable).
Rename Enter the desired text to rename the selected component.
20 Falcon® Management Utility (FMU)
Page 33

View
Menu
Figure 9. View Menu
FMU Toolbar Shows/hides the Toolbar.
Large Icons Displays list view in Large Icon mode.
Small Icons Displays list view in Small Icon mode.
List Displays list view in List Icon mode.
Details Displays list view in Details mode.
Explore Initiates a connection with the selected terminal, allowing you to
browse the terminal’s contents. You can drag & drop files to or
from a terminal. See "Exploring an RF Terminal" on page 55.
Terminal
Configuration
Terminal Report Displays the Terminal Report for the selected terminal. See "Ter-
Server Error Log Displays the Server Error Log Report when a server is selected.
Clear Server Error
Log
Refresh Refreshes the FMU User Interface.
User’s Manual 21
Retrieves configuration data for the selected terminal. See "Ter-
minal Configuration Settings" on page 56.
minal Report" on page 58 and "Terminal Report" on page 58.
Removes previous entries from the Server Error Log.
Page 34

Help
Figure 10. Go To Menu
Back (Ctrl+B) Will move the view back to the previous
Tree View selection.
Forward (Ctrl+F) Will move the Tree View selection forward if
you clicked on Back.
Up One Level
(Ctrl+U)
Start Page
(Ctrl+H)
Figure 11. Help Menu
Will move the Tree View selection up to the
selection’s parent option.
Returns to the root level (FMU Start) page.
About FMU
The Help menu enables you to retrieve help information quickly. You can also
print specific topics from the help system.
To access help about a specific dialog from within FMU, press F1.
22 Falcon® Management Utility (FMU)
Page 35

Toolbar
Toolbar
The FMU Toolbar is provided as a way to access commonly-used functions.
Table 1. Toolbar Icons
Icon
Command
Back See "" on page 22
Forward See "Forward (Ctrl+F)" on page 22
Add Server See "Adding a Server" on page 26
Add Group See "Adding a Group" on page 29
Add Terminal See "Adding Terminals" on page 37
Add Package See "Adding a Package" on page 32
Add File(s) See "Adding Files to a Package" on page 32
Update Terminal(s)
Now
Assign Packages See "Assigning a Package" on page 36
See "Updating RF Terminals" on page 55
Reference
View Report See "Sample Reports" on page 75
Explore See "Explore Terminal" on page 51
Printing Reports
FMU allows you to view and print server log data as well as system reports for
individual terminals. System reports include scanner, network, terminal, hardware configuration, and pertinent OS data.
User’s Manual 23
Page 36

NOTES
About FMU
24 Falcon® Management Utility (FMU)
Page 37

Overview
This section covers the following topics:
• “Managing Servers” on page 25
• “Working with Groups” on page 29
• “Adding and Assigning Packages” on page 31
• “Terminals” on page 36
• “Working with Files” on page 39
Managing Servers
This section contains the following information:
Chapter 3
FMU Operation
• “Adding a Server” on page 26
• “Deleting a Server” on page 27
• “Server Error Log” on page 27
• “Viewing or Editing Server Properties” on page 27
User’s Manual 25
Page 38

Adding a Server
If you installed the complete system, you do not need to specify the initial
server information. During a complete install, a local server is automatically
created for you. Additional servers can be added after installation.
To add a server you must select the FMU Start Page at the root level of the FMU Tree
View.
To add a server:
On the File menu, click Add > Server to open the Add Server dialog:
Figure 12. Add Server
FMU Operation
Name Enter the desired server Name.
Domain Name or
IP Address
Server Path Enter the network location of the server, i.e.,
Enter the server
’s Domain Name or IP address.
\\myserver\company\FMU\server.
*Copy files and
images to server
*The server needs access/security permissions to the specified directory.
See the section entitled “Troubleshooting” for more information.
26 Falcon® Management Utility (FMU)
When checked, the FMU remote server will keep a local copy of the
files associated with packages. This eliminates the need for the FMU
Workstation to be running during terminal updates.
Page 39

Managing Servers
Allow older
version firmware
updates
*The server needs access/security permissions to the specified directory.
See the section entitled “Troubleshooting” for more information.
Deleting a Server
To delete a server:
1. Select the server you want to delete.
2. Go to the
3. The server reference will be deleted from the FMU Tree View.
When a server is deleted, all groups, terminal settings and defined packages within it
are removed from the Tree View. However, the server configuration files still reside on
the server. An uninstall of the server must be performed to completely remove them.
Server Error Log
FMU provides users with the ability to view and print error log data for each
server. Use this log to identify problems that FMU encountered while updating terminals. The messages in the log will point you to possible solutions to
resolve problems. The FMU administrator should check this error log on a
regular basis to ensure that terminal updates are completing successfully.
Select to specify whether the server will allow older OS images to
overwrite new ones, such as returning to a previous version when
troubleshooting.
Edit menu and click on Delete.
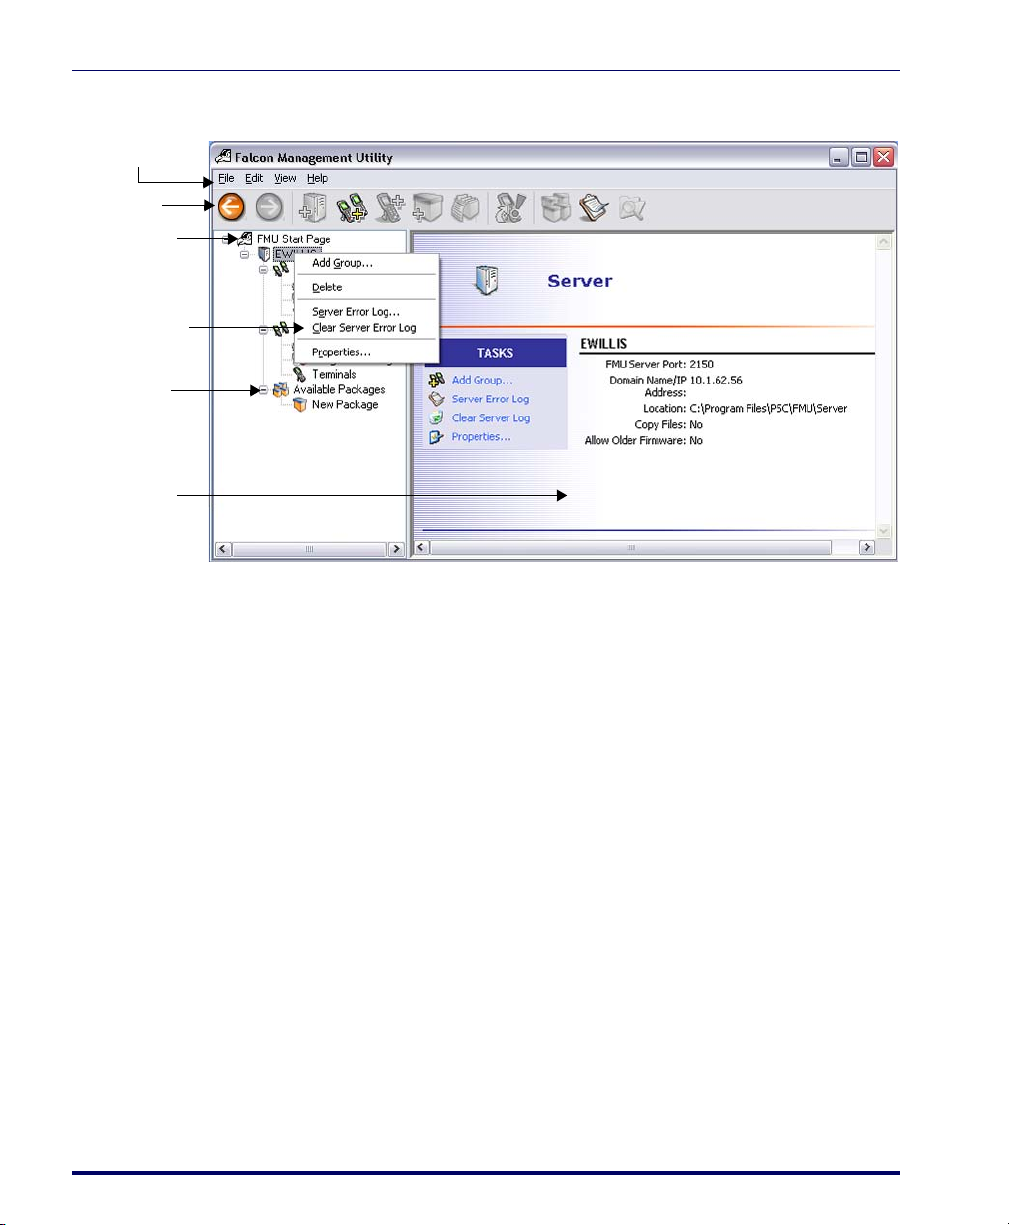
Viewing or Editing Server Properties
The Server Properties dialog displays information about the selected server.
To access server properties:
1. Select the server you wish to view or edit in the FMU Tree View.
User’s Manual 27
Page 40

FMU Operation
2. Click on Properties in the List View to view Server Properties.
3. View or change information as desired.
4. Click
OK to complete.
Name Enter the desired server Name.
Domain Name or
Enter the server
’s Domain Name or IP address.
IP Address
Server Path Enter the network location of the server, i.e.,
\\myserver\company\FMU\server.
*Copy files and
images to server
Allow older
version firmware
updates
Add License Click Add License to specify a license for the selected server.
*The server needs access/security permissions to the specified directory.
See the section entitled “Troubleshooting” for more information.
When checked, the FMU remote server will keep a local copy of the
files associated with packages. This eliminates the need for the FMU
Workstation to be running during terminal updates.
Select to specify whether the server will allow older OS images to
overwrite new ones, such as returning to a previous version when
troubleshooting.
This feature applies when upgrading from WinCE 4.2 to WinCE 5.0 .
Contact your reseller or Datalogic sales to purchase a license.
28 Falcon® Management Utility (FMU)
Page 41

Working with Groups
A Group is a defined set of terminals associated with a specific function, i.e.
picking, receiving, etc. See
A Default Group is created with each server installation. If you want to create
more groups, you can add them either before or after you add terminals.
Adding a Group
Add Group allows you to create a new group.
To add a group:
1. In the Tree View, select the server where you want to add the group.
Working with Groups
“Groups” on page 16 for more information.
2. On the
3. Type a new name for the group and then press
File menu, click Add > Group.
Group Configuration Settings
The Tree View displays configuration items for the specified group. Each setting can be expanded to dynamically display all of the options available for
group configuration.
To access group configuration settings:
1. Expand the group you want to configure by clicking on the plus sign
(+) to the left of the group.
2. Double-click
Configuration.
Enter.
Configuration
User’s Manual 29
Page 42

FMU Operation
3. The Configuration Settings dialog will open:
Within this dialog you can modify configuration values. The changes will be
applied to all terminals within the selected group the next time the terminals
are updated.
See “Configuration Settings” on page 41 for a detailed description of each configuration option.
Deleting a Group
To delete a group:
1. In Tree View, click on the group you want to delete.
2. On the
3. The group will be deleted.
If a group containing defined terminals is deleted, data associated with the terminals
will be deleted also. Those terminals will then be automatically assigned to the
Default Group the next time they update. The Default Group cannot be deleted, but
can be renamed.
You cannot undo this function once it has been performed. Any defined configuration
settings (device-specific, network, symbology, and FDU settings) will be lost upon
deletion of a group.
CAUTION
30 Falcon® Management Utility (FMU)
Edit menu, select Delete.
Page 43

Renaming a Group
To rename a group:
1. In Tree View, click on the group you want to rename.
2. On the
Adding and Assigning Packages
Edit menu, select Rename.
3. Type a new name for the group and then click
Adding and Assigning Packages
A Package is a collection of files that will be sent to a terminal (or group of terminals) when you assign the package to a group.
Package definitions are made at the server level. You can define the list of files
and configure the filter parameters for updating. When adding files to a package, you will be prompted for file source locations and the destination folder
on the terminal(s). When you click on a package in the Tree View, the contents of the package will be displayed in the List View.
The actual files being referenced can be kept on the FMU Console workstation or on a shared network drive. You can also specify that a copy be stored on
each local server, allowing for updates even if the network connection to the
PC where package files are stored is not available. Packages can be shared
between different groups, and package definitions can contain other packages.
Remote servers need sharing permission for directories that the package files reside
in. Do not include files larger than the terminal disk space or the files will be ignored.
OK.
See Also
• “Available Packages” on page 17
• “Working with Files” on page 39
User’s Manual 31
Page 44

Adding a Package
FMU Operation
Use Add Package
(Ctrl+Shift+P)
contents.
To add a package:
1. In Tree View, click on Available Packages on the server to which you
want to add a new package.
2. On the
File menu, click Add > Package.
3. Type in the name of the new package and then press
The package will now be available for assignment to any groups that reside on
that server.
Adding Files to a Package
To add files to a package:
1. In the Tree View, click on the package to which you want to add files.
2. On the
Refer to Figure 13.
Figure 13. Add Files Dialog
File menu, click Add > File(s) to open the Add File(s) dialog.
to create a new package definition and specify its
Enter.
32 Falcon® Management Utility (FMU)
Page 45

Adding and Assigning Packages
Source Enter the filename or browse to the location of the file(s) you want to add.
Destination Enter in the file's directory on the terminal.
Terminal Select a terminal type from this list to specify that files will only be down-
loaded to terminals of that type. If [Any] is selected, all terminals will be
updated with the specified file(s).
Keyboard When you select a keyboard type from this list, files will only be down-
loaded to terminals that have a keyboard of that type.
RF Card Select an RF Card type from this list to specify that the file will only be
downloaded to terminals that have an RF Card of that type.
If you include files larger than the terminal disk space, the files will be ignored.
You can include directories by selecting all files or multiple files using Shift or Ctrl
keys within a specific directory.
User’s Manual 33
Page 46

Adding a Firmware Image File
To add Firmware Image files to a package:
1. In Tree View, click on the package to which you want to add firmware
image files.
2. On the
Firmware Image
Figure 14. Add Firmware Image
File menu, click on Add > Firmware Image File to open the Add
dialog. Refer to Figure 14.
FMU Operation
Select firmware
image based on
terminal type
Terminal Choose the image file from the dropdown menu.
Manually select
image
Select image file
Firmware
information
34 Falcon® Management Utility (FMU)
Select to have FMU automatically detect images in the Workstation\Devices directory.
When selected, allows you to enter the filename or browse to the location where the firmware image is located.
Enter in the path\filename, or browse to the file’s location
and select it.
Displays the version of the firmware image and the type of terminal it
is for.
Page 47

Viewing a File List
The List View displays the files contained within the Package selected in the
Tre e V i e w.
To view a file list:
Click on a Package to view the files contained in it.
Source Displays the filename and the full path to the file.
Destination Displays the file's destination on a terminal.
*Terminal The file will only be sent to terminals that are the specified model.
*Keyboard The file will only be sent to terminals that have the specified key-
*RF Card The file will only be sent to terminals that have the specified RF Card.
Language This option applies only to firmware image files.
File Type Identifies file types.
File Version Displays version data for firmware image files.
Adding and Assigning Packages
board.
*If not specified, files will be sent to all terminals.
User’s Manual 35
Page 48

Assigning a Package
Assign packages allows you to assign packages to the selected group. All pack-
ages that are available to the selected group will appear.
To assign packages:
1. Select the group or package to which you want to assign a package.
2. From the
ages
3. Select or deselect package(s) by checking or unchecking the boxes
next to the package names.
File menu, select Assign Packages to open the Assign Pack-
dialog. This displays available packages within the server.
FMU Operation
CAUTION
Terminals
4. Click
It is recommended that you do not assign two or more packages containing the same
model of firmware image to the same group. You could experience undesired results.
OK to assign the selected packages.
Terminals represent a physical unit attached to a server, as specified by the
administrator. Terminals can be connected through a wireless network, or
physically attached to the FMU Server via a Datalogic Dock.
Terminal Group Assignments
Terminals are assigned to a group within FMU. If no group is specified, the
terminal will automatically become part of the Default Group. Terminals can
easily be moved from one group to another using cut and paste, drag and drop,
or by changing the group assignment within
Terminal Properties. You can also
change the group on the terminal itself.
36 Falcon® Management Utility (FMU)
Page 49

Adding Terminals
Terminal Setup
Before a terminal can be added to FMU for the first time, the terminal must
be set up to recognize FMU. See “Enabling a Terminal for FMU with Direct
Connect” on page 50 and “Enabling Terminals for RF Connectivity” on
page 52 for detailed information. Once you have enabled a terminal for FMU,
you will not need to perform this step again.
To add a terminal to FMU
1. Select the group to which you want to add the terminal.
Terminals
2. On the
Figure 15. Adding a Terminal
Serial Number
IP Address Enter the IP Address of the terminal.
Assigned
Group
1. See the PRG for your terminal for instructions on finding the serial number.
File menu, click Add > Terminal.
1
Enter the serial number for device
Displays the group to which the terminal will be attached.
.
Terminal Check-in
After a terminal has been enabled for FMU, it communicates with the FMU
Server upon reboot, when placed in a dock, or when requested by the server.
The server uses the defined group settings to update the terminal at the next
specified update. See “Updating Terminals” on page 51 and “Updating RF
Terminals” on page 55.
User’s Manual 37
Page 50

Delete Terminal
To delete a terminal from a group:
1. On the Tree View, click on the terminal you want to delete from the
selected group.
2. On the
puter keyboard.
The terminal will be removed from the group.
Terminal Properties
The Terminal Properties dialog displays properties for the selected terminal. See
“Adding Terminals” on page 37 for more information.
Figure 16. Terminal Properties
FMU Operation
Edit menu, select Delete, or press the Delete key on your com-
Serial Number View or change the serial number for device.
IP Address View or change the IP address of the terminal.
Assigned Group View or change the group to which the terminal is assigned.
38 Falcon® Management Utility (FMU)
Page 51

Working with Files
File Properties
Figure 17. File Properties
Source Displays the location of the file(s) you have selected.
Working with Files
Destination
Terminal View or change the terminal type specified, which determines which ter-
Keyboard View or change the keyboard type for the terminal to which files will be
RF Card View or change the RF Card type for the terminal to which the specified
View or change the file
minals will be updated. If [Any] is selected, all terminals will be updated
with the specified file(s).
sent.
file(s) will be sent.
’s destination.
About Files
File selections are simple file lists selected from a standard Windows dialog
box. Files are defined and manipulated at a package level. See “Addi ng a nd
Assigning Packages” on page 31 and “Adding Files to a Package” on page 32.
Firmware Image Files
FMU has an integrated mechanism for updating the firmware image on specified terminals. Firmware updates can be included in a package. See “Adding a
Firmware Image File” on page 34.
User’s Manual 39
Page 52

NOTES
FMU Operation
40 Falcon® Management Utility (FMU)
Page 53

Configuration Settings
Overview
This section covers the following topics:
• “Symbology Settings” on page 43
• “Device Settings” on page 44
• “Network Settings” on page 45
• “FDU Configuration Settings” on page 46
• “2D Imager Settings” on page 47
Configuration Settings
Each configuration screen contains fields that allow you to customize the configuration settings for each item. You can make changes to any or all of the settings.
Chapter 4
User’s Manual 41
Page 54

Reset Values
Globally resets all values in the selected Configuration dialog.
Figure 18. Reset Values
Factory Default Returns all Configuration items to their factory default settings.
All Off Turns every on/off parameter off and sets all min/max lengths to their
*All On Turns every On/Off parameter on and sets all min/max lengths to their
Configuration Settings
lowest values
highest values.
*This default set is normally used only for troubleshooting. It gives the best chance
of reading an unknown bar code symbology and also identifies the symbology
of each bar code scanned.
42 Falcon® Management Utility (FMU)
Page 55

Symbology Settings
Symbology Settings in FMU allow you to select desired symbologies and
options for terminal bar code scanning. Settings can be applied to entire
groups using the
terminal configurations can be applied to individual terminals.
Figure 19. Configure Symbology Settings
Configuration Settings
Group Configuration feature. For troubleshooting purposes,
Please refer to Bar Code Parameters in the PRG for the specific terminal model
you are using for more information.
User’s Manual 43
Page 56

Device Settings
FMU’s Device Settings configuration capabilities allow you to perform centralized, automated updates of selected terminal settings automatically.
Figure 20. Configure Device Settings
Refer to the PRG for the specific terminal model to see the parameters available under
using. Select the settings you want to change or enable.
Configuration Settings
Device Settings. These will vary based upon the device you are
44 Falcon® Management Utility (FMU)
Page 57

Network Settings
Click the Network Settings tab to view and select available options.
Figure 21. Network Configuration Settings
Table 2. Network Configuration Settings
Configuration Settings
Network Settings Description Action
Enable DHCP Automates configuring of computers using TCP/IP.
IP Address Network address of a computer on a network. Enter value.
Subnet Mask Number used to identify a subnetwork so an IP address can be
shared on a Local Area Network (LAN).
Gateway System (bridge) for exchanging information across networks. Enter value.
DNS Server Domain Name Server aka Domain Name Service, server that
resolves IP addresses from host names.
Network configuration settings only apply during Direct Connect Dynamic Terminal
configuration, they do not apply to RF connections.
User’s Manual 45
Check to
enable.
Enter value.
Enter value.
Page 58

FDU Configuration Settings
Falcon Desktop Utility (FDU) allows administrators to configure Windows
CE or Windows Mobile terminals to control individual user access. See the
PRG for your terminal type for detailed information about each parameter.
Figure 22. FDU Configuration Settings
Configuration Settings
Table 3. FDU Configuration Settings
FDU Description
Admin Enable/disable Falcon Desktop to activate FDU functions. Once enabled, define an
optional password by entering it into the field.
Hot Keys Use Hot Keys to associate specific keys with specific applications. You can also create
new Hot Key combinations.
Internet Explorer Allows you to set IE configuration options.
Windows Use Windows controls to allow or restrict access to Windows system functions.
Application
Selector
46 Falcon® Management Utility (FMU)
When Application Selector is enabled, it replaces the Desktop and allows only use of
authorized applications.
Page 59

2D Imager Settings
This panel contains settings for 2D bar code symbologies, as well as configuration items for Image Capture.
additional symbologies beyond those listed in the Symbology tab. These configuration items are supported only by units with the 2D Imager module.
Figure 23. 2D Imager Configuration Settings
Configuration Settings
2D Imager Settings in FMU allow you to set
Refer to the PRG for your device to see descriptions of the available parameters. Select the settings you want to change or enable.
User’s Manual 47
Page 60

NOTES
Configuration Settings
48 Falcon® Management Utility (FMU)
Page 61

Terminal to FMU Server
Overview
Chapter 5
Communications
Prior to installing FMU for the first time, you should set up terminals to communicate with FMU. This requires the completion of two steps:
1. Establish communication from the terminal(s) to the host computer.
Set up a connection using either an RF connection or using Direct
Connect with a Datalogic Dock. See the PRG for your terminal type
for specific information.
2. Enable FMU on the terminal. See either “Direct Connect” on
page 50 or “RF Connection” on page 52.
This section covers the following topics:
“Direct Connect” on page 50
• “Enabling a Terminal for FMU with Direct Connect” on page 50
• “Explore Terminal” on page 51
• “Updating Terminals” on page 51
• “RF Connection” on page 52
• “Terminal Report” on page 58
“RF Connection” on page 52
• “Enabling Terminals for RF Connectivity” on page 52
• “Exploring an RF Terminal” on page 55
• “Updating RF Terminals” on page 55
• “Terminal Configuration Settings” on page 56
• “See Appendix C, “Terminal Report” on page 75 to view a sample
report.” on page 58
User’s Manual 49
Page 62

Terminal to FMU Server Communications
Direct Connect
For terminals using a physical connection, communication needs to be established with the computer where the FMU Server will be installed. Please refer
to the PRG for your terminal type, included on the Datalogic Mobile Product
CD, for specific installation and configuration instructions.
Requirements for a physical connection may vary depending on the terminal
model. Refer to your terminal’s PRG.
Enabling a Terminal for FMU with Direct Connect
Use Direct Connect with terminals that use a dock.
Enable a terminal for FMU using Direct Connect
1. On the terminal you want to set up:
WinCE:
Go to Start > Programs > Falcon Management > FMUinit.
Windows Mobile:
Ta p > Settings > System > Falcon Config.
2. Check Enable FMU Client.
3. Select Direct from the drop-down list for the
Connection field.
4. Enter the group to which you want to add the terminal. If you leave
the field blank, the terminal will automatically be assigned to the
Default Group.
5. Tap
50 Falcon® Management Utility (FMU)
OK to complete the setup.
Page 63

Direct Connect
Enable FMU
Client
Connection
Group Name Enter a group name, or leave blank to select the Default Group.
Update Time This feature is disabled with Direct Connection. To enable, you must
Explore Terminal
Use the Microsoft ActiveSync Explore option to view directory structure on
direct connect terminals. Refer to the PRG for your terminal for instructions
on establishing a direct connection between the terminal and PC.
On direct connect terminals, the FMU Explore option is not available. Use the
Microsoft ActiveSync Explore option for access to the terminal's directory structure.
See the documentation for ActiveSync for information on this feature.
Updating Terminals
Placing the terminal in the dock will trigger an update. ActiveSync will initiate
when the unit is in place. Next, the
remain active while the unit remains in the dock. See ActiveSync instructions
in the terminal’s PRG.
Select to enable the terminal to work with FMU.
Direct.
Select
have an RF connection. See "RF Connection" on page 52.
FMU Update dialog will appear and will
Scheduled Update is not available on direct connect terminals. Updates are initiated
each time the unit is docked and successfully connects to the host computer via
ActiveSync.
Terminals should not be removed from the dock during the update process. Wait until
you see the FMU Update and FMU FAST Update indicating ‘Idle.’
CAUTION
User’s Manual 51
Page 64

Terminal to FMU Server Communications
RF Connection
For RF units, terminal(s) need to have existing communication to a wireless
network. See the PRG for your terminal for complete information.
Enabling Terminals for RF Connectivity
Each terminal that you want to connect to FMU must be enabled for FMU.
This only needs to be done once for each terminal upon initial installation.
To enable a terminal for FMU:
1. On the terminal you want to set up:
WinCE:
Go to Start > Programs > Falcon Management > FMUinit.
Windows Mobile:
Ta p > Settings > System > Falcon Config.
2. Select Enable FMU Client.
3. Select Network for the
Connection field.
4. Choose the Discovery method by selecting Manual or DHCP in the
Discovery field.
•Select Manual to specify the FMU Server manually (see
Figure 24A).
•Select DHCP to allow the FMU Server settings to be obtained
automatically using DHCP Discovery (see Figure 24B). Refer to
Appendix B on page 61 for information on configuring your
network to support DHCP Discovery.
5. Enter the server name or IP address in the
IP Address field.
52 Falcon® Management Utility (FMU)
Page 65

Figure 24. FMU Client Settings - RF
AB
RF Connection
Enable FMU
Check to enable the terminal to work with FMU.
Client
Connection Select Network.
Discovery Select Manual or DHCP.
IP Address Enter the server name or IP address.
Group Name Enter a group name, or leave blank for the Default group.
Update Time Select a time from the 24-hour clock to indicate when the terminal will
attempt to contact the FMU Server. The terminal must be ON in order
for the update to run.
An alarm can be set to wake the terminal at the scheduled update time.
User’s Manual 53
Page 66

Terminal to FMU Server Communications
.
IP Address
6. On the terminal, enter the group to which you want to add the terminal. If you leave the field blank the terminal will automatically be
assigned to the Default Group.
You can easily change the group assignment for a terminal after it has been added to
FMU. See "Terminal Group Assignments" on page 36.
7. If you want to set a specific update time, select a time in the dropdown box for
Update Time. The terminal will attempt to contact the
FMU Server at the selected time.
The terminal must have a valid RF connection and be ON in order for a scheduled
update to occur. See "Updating Terminals" on page 51 and "Updating RF Terminals"
on page 55.
8. Click
See Also
OK to complete the setup.
• “Managing Servers” on page 25
• “Working with Groups” on page 29
• “Adding and Assigning Packages” on page 31
• “Terminals” on page 36
• “Working with Files” on page 39
• “Network Settings” on page 45
54 Falcon® Management Utility (FMU)
Page 67

Exploring an RF Terminal
You can use FMU to view the contents of a terminal’s memory, similar to the
way you view files in Windows Explorer. FMU uses FTP technology to establish communication with the terminal.
ActiveSync must be installed on the machine where the FMU Server resides.
See your documentation for Microsoft ActiveSync for more information.
To Explore an RF Terminal:
1. From the Tree View, select the terminal you wish to explore.
RF Connection
2. On the
View menu, click Explore.
3. The contents of the terminal’s memory will be displayed in a new
Explorer window.
Figure 25. Exploring a Terminal
Updating RF Terminals
Updating terminals will transfer group configuration settings and assigned
packages to the specified terminal(s). You can specify update settings from the
FMU console, and also from the terminal itself.
Update Terminal(s) Now
This option is available for groups and individual terminals. When Update Ter-
minal(s) Now
ing that the terminal needs to be updated. The terminal operator will receive a
prompt requesting to proceed with the update as shown in Figure 26.
User’s Manual 55
is selected, the server will send a message to each terminal indicat-
Page 68

Figure 26. Terminal Updater prompt
If the operator taps Yes , the terminal will be immediately updated.
Scheduled Update Time
A second option is available only on the terminal itself. This option is configurable from the
Falcon Config application on the terminal. See “Enabling Ter-
minals for RF Connectivity” on page 52.
If an update was scheduled on the terminal, the FMU client on the terminal
will automatically trigger an update within the specified hour. The terminal
needs to be on in order for the update to proceed. It is advised that the unit be
left in its Datalogic Dock if unattended.
Terminal Configuration Settings
Terminal to FMU Server Communications
For diagnostic purposes, you can display an individual terminal’s configuration
settings. This view is similar to the group configuration view; however, the
data within this view reflects settings on the selected terminal.
Since terminal settings are superseded by group settings, the next time the terminal is
updated the defined group settings will be applied, overwriting changes made with
Terminal Configuration.
On units with Direct Connection, wait until the FMU Update
or Mgmt. Utility Client dialog on the terminal indicates ‘Idle’
mode before selecting this option.
To access terminal configuration settings:
1. Expand the view of the terminal you want to configure by clicking on
the plus sign (+) to the left of the terminal.
56 Falcon® Management Utility (FMU)
Page 69

RF Connection
2. Click on Terminal Configuration in the terminal List View pane.
Terminal
Configuration
3.
Terminal Configuration will open:
Within this dialog you can modify configuration values for the selected terminal. See “Configuration Settings” on page 41 for a detailed description of each
configuration option.
When exiting, click
Since terminal settings are superseded by group settings, the next time the terminal is
updated the defined group settings will be applied, overwriting changes made with
Terminal Configuration.
User’s Manual 57
OK to save any changes to the terminal configuration.
Page 70

Terminal Report
On units with Direct Connection, wait until the FMU Update
or Mgmt. Utility Client dialog on the terminal indicates ‘Idle’
mode before selecting this option.
A Terminal Report lists the following information:
• Scanner settings
• Device settings
• Network settings
• FDU settings
To access a terminal report:
1. Expand the view of the terminal you want to configure by clicking on
2. Click on
Terminal to FMU Server Communications
the plus sign (+) to the left of the terminal.
View Report in the terminal List View pane.
View Report
See Appendix C, “Terminal Report” on page 75 to view a sample report.
58 Falcon® Management Utility (FMU)
Page 71

Overview
SNMP Concepts
The Simple Network Management Protocol (SNMP) is a standardized protocol for network management services using a client/server model. The network
management program (client) issues queries and commands to the remote
device (agent/server). The protocol itself defines a number of variable types
and structures, and the rules for using them for data transfer. Using these variable types and rules, there are a number of standard variables that are supported by all SNMP agents. These standards include network addressing (IP
address, subnet mask, etc.), and network statistics (total packets, bad packets,
etc.).
FMU uses Simple Network Management Protocol (SNMP) to perform many
of its functions. When the Terminal Configuration or Terminal Report function is selected, SNMP is used to query the terminal for its current configuration settings, as well as current status information such as battery status and
memory usage. In the same function, SNMP is used to update terminal configuration settings when directed. SNMP is also used by FMU servers to perform automated group updates.
Appendix A
SNMP Interface
MIB Files
A Management Information Base (MIB) is a file that defines a set of SNMP
variables, and their types and usage. There are a number of standard MIBs
available, depending on the information being managed.
User’s Manual 59
Page 72

SNMP Interface
Datalogic MIBs
Beyond the standard values, SNMP allows manufacturers to define their own
private MIBs. For example, Datalogic has been assigned a MIB by the Internet
Assigned Numbers Authority that allows Datalogic to define SNMP values
relating specifically to devices that we manufacture. Within the Datalogic
MIB, several categories of values have been defined including scanner configurations, terminal power configurations and terminal network parameters.
The format of a MIB follows rules laid out in the appropriate standards, allowing the manufacturers of network management tools such as HP OpenView,
IBM’s Tivoli, Computer Associates’ Unicenter, and CastleRock SNMPc to
make use of the MIBs developed by manufacturers. The MIB can be processed
by following the procedures used by the management tool, allowing for the
proper display of SNMP values retrieved from the agent.
For example, if the Datalogic MIB is loaded into OpenView, the administrator
can then view all of the values defined by Datalogic using the names assigned
by Datalogic, as well as a brief explanation of what each value represents. This
will also allow the administrator to update most values, and provides range
checking information for the tool to take advantage of. The current Datalogic
MIB can be found on the Datalogic Mobile website at www.mobile.datalogic.com in the Downloads area.
Additional Resources
Additional information on SNMP can be found at the following websites:
www.snmplink.org
www.snmpworld.com
www.simpleweb.com
60 Falcon® Management Utility (FMU)
Page 73

Appendix B
DHCP Server Setup
Setting up your DHCP Server
In order for FMU to be able to use DHCP Discovery, the network DHCP
Server must be configured to provide an FMU server address. To set up your
DHCP Server to supply the FMU Server information to each terminal, you
will need to add a new DHCP option.
Option “233” is the default option used by the terminal if FMU DHCP Discovery is enabled. This option should contain the string “FMUserver”, where
server is either the IP address or hostname of the FMU Server where auto-discovering terminals will associate (for example, FMU127.0.0.1). See “Enabling
Terminals for RF Connectivity” on page 52 for details on setting up a terminal
for DHCP.
User’s Manual 61
Page 74

NOTES
DHCP Server Setup
62 Falcon® Management Utility (FMU)
Page 75

Overview
Appendix C
Troubleshooting
This section contains the following information:
• “RF Connectivity” on page 64
• “Windows Firewall Issues” on page 65
• “Network Domain File Transfer Troubleshooting” on page 69
• “Windows XP Home” on page 72
• “Sample Reports” on page 75
• “Technical Support” on page 74
User’s Manual 63
Page 76

RF Connectivity
Use the RF Connectivity Troubleshooting Flowchart when experiencing problems connecting a Datalogic terminal to a host. If you have questions, please
call Datalogic Mobile Technical Support.
Figure 27. RF Connectivity Troubleshooting Flowchart
START
Does the terminal
respond to a PING
command from
a PC?
YES
Gather fac t s :
•
Terminal type
•
AP & RF card brand (en s u r e latest version of firmwa re installe d)
•
Hos t type
•
Software type
•
Software version (en s u r e la test versi on is installed)
•
Freq uen cy an d duratio n of issue
Does the terminal
displ a y an error du ring the
boot pro c e ss?
Does the terminal
asso ciate wit h the AP
?
Troubleshooting
Contact Tech Support.
Potential Problems :
•
S e cu rit y I ssu e – Che c k
SSID, WEP, LEAP s e ttings
•
Ran ge Issue
Potential Problems
Does the terminal
connect to the host
?
Ping terminal from
host or use tracert to
determi ne the location
of the breakdown in
communication.
:
YES
RF conne ctivity
obtaine d. See your
s o ftware manual for
further info rm ation or
c ontac t Datalogic Mobile
technical
(For more information on the Ping command, go to the command prompt on the PC and type PING. For more information on the
trace route command, go to the command prompt on the PC and type tracert.)
upport.
s
YES
Can you pi ng the
terminal from the AP
YES
host from a P C on same
Potential Problems :
•
IP addre ss i s sue (dupli c at e address on terminal ). Turn off the terminal and
attempt PING again
•
Run t r a c ert comman d to determin e loca tion of brea kd own of connectivity.
?
Can you pi ng the
sub net
?
YES
Potential Problems :
•
IP Address Issue
•
Check security settings
Potential Problems :
•
Ho st unavaila ble
64 Falcon® Management Utility (FMU)
Page 77

Windows Firewall Issues
Windows Firewall Issues
How to Open Ports in the Windows Firewall
To work correctly, the FMU server must be able to send and receive information over the network. The information enters your computer through an
inbound port. After you turn on a firewall, the firewall will not allow FMU to
use these inbound ports. You must make some adjustments for FMU Server to
communicate with the terminals. The host PC must have the correct inbound
ports open in the firewall to allow this information to pass through.
Tab le 4 is a list of ports with instructions on manually opening the ports that
the Host PC can communicate correctly with the terminals. Following Tabl e 4
are step-by-step instructions for manually opening ports in Windows Firewall.
These instructions are specific to Windows XP with Service Pack 2 (SP2)
installed. For other types of firewalls, or Windows Firewall prior to SP2, please
refer to the documentation for your product.
Table 4. Inbound PC Ports
Used by Ports Notes
FMUFast
TCP 3453
FMUTrapshot
FMUWorkstation
Opening ports in a firewall can create a security risk and leave your computer
vulnerable. Only open ports that are absolutely needed.
CAUTION
User’s Manual 65
UDP 2151
TCP 2150
This port is used by the FMU server to communicate
with terminals. Required for file transfers and firmware
updates.
Required for file transfers. Required for terminalserver communications.
This port is used for communication between the FMU
workstation and server.
Page 78

Troubleshooting
To manually open ports in the Windows Firewall with Windows XP SP2
installed:
1. Go to
2. Click on
Start > Control Panel > Security Center.
Windows Firewall.
3. On the
General tab, uncheck the Don’t allow exceptions checkbox.
If “Off” is selected, the computers within your network may be secured by an external
firewall. Consult your network administrator before making any changes.
66 Falcon® Management Utility (FMU)
Page 79

Windows Firewall Issues
4. Click on the Exceptions tab. If you want to view the Port number for a
service, click
Edit.
5. Click
User’s Manual 67
Add Port.
Page 80

Troubleshooting
6. Enter the Port number (refer to Table 4 on page 65). In the Name
field, enter a name to identify the port you want to open.
Enter a name that will help you remember the service and the port,
such as those listed in Table 4 on page 65. You can use any name that
you want. The name does not have any effect on the functionality. It
is only to help you identify this exception.
7. Select either
TCP or UDP, and then click OK.
8. Click
OK to save your changes. Once ports have been added, make
sure they are enabled (checked).
9. Repeat this process for ports 2150(TCP) and 2151(UDP).
If you are using ActiveSync to communicate with the terminals, you will need
to ensure that your firewall allows ActiveSync Connection Manager to send/
receive data over the network. Refer to your documentation for more details
on this.
68 Falcon® Management Utility (FMU)
Page 81

Network Domain File Transfer Troubleshooting
Network Domain File Transfer Troubleshooting
If any of the files to be sent to a terminal are located on a computer other than
the one designated as the FMU Server, those files need to be shared. Because
FMU Server runs as a Windows service, you must set up sharing using the following steps:
1. On the computer where FMU Server is installed, go to the
and click on
2. Double-click the
Control Panel > Administrative Tools.
Services icon.
Start menu
User’s Manual 69
Page 82

3. Double-click FMU Server to display its Properties.
Troubleshooting
4. Click the
Log On tab and choose This account:. Enter a valid domain
user name and password.
70 Falcon® Management Utility (FMU)
Page 83

Network Domain File Transfer Troubleshooting
You can browse the domain users by clicking Browse and selecting the
domain where the FMU server is located.
5. Once the domain users information is entered, click
OK. This will
enable the server to retrieve files from a remote computer within the
Domain. You must have file sharing enabled on the remote computer
where the files are located.
6. If you are running
Windows XP Professional on the workstation you
must enable file sharing and give the Domain user exclusive rights to
the files. If you want to retrieve files from a computer inside another
domain you will have to copy the files to the computer within the
Domain where the server is located.
7. To ensure security, shares should be created and permissions given to
the Administrator specified in step 6. See documentation for your
Windows operating system for information.
It is recommended that the default Packages folder, located at C:\Program
Files\Datalogic\FMU\Workstation
need to be transferred to the terminals and the server. This folder will need to be
shared.
, be used to collect any files that
User’s Manual 71
Page 84

Windows XP Home
Creating a Share in Windows XP Home
Installing the Server Only component using XP Home
The following procedure is only necessary if you are installing the Server component
to a separate computer from the FMU Workstation. If you have performed a Complete
Install and FMU Workstation and Server are on the same computer, no additional
steps are necessary unless you intend to allow access from external workstations.
Windows XP Home Setup
Windows XP Home does not allow for an Active Directory domain. If installing on a system running Windows XP Home for a separate Server component,
you must complete the following additional steps to prepare it for FMU. This
will create a network share on the server that stores the .xml files.
Troubleshooting
1. Open
Windows Explorer or My Computer.
2. Go to the Tools menu and select Map Network Drive to open the Map
Network Drive
Drive Specify what drive letter to assign the new network drive.
Folder This is the network path to the server. You will need to
Reconnect at logon Recreates and connects the share every time you login.
dialog.
enter or browse to the network path as specified by your
network administrator.
72 Falcon® Management Utility (FMU)
Page 85

Windows XP Home
3. Select a drive letter that is available.
4. Make sure the
Reconnect at logon checkbox is checked.
5. Enter the network path for the server’s shared directory. (Example:
\\myserver\server, where myserver is the name of the server
and server is the shared directory.) Click
directory of the server manually. Click
Browse to find the shared
OK.
6. Click
7. If the
Finish to close the Map Network Drive dialog.
Enter Network Password dialog appears, enter your user name
and password.
8. Click
OK to complete the setup.
This creates the share between your computer and the server’s configuration
files. You are now ready to use FMU.
User’s Manual 73
Page 86

Technical Support
Datalogic Mobile Website Support
The Datalogic Mobile website (www.mobile.datalogic.com) is the complete
source for technical support and information for Datalogic products. The site
offers the Datalogic TekForum, product support, product registration, warranty information, product manuals, product tech notes, software updates,
demos, and instructions for returning products for repair.
Datalogic Mobile Website TekForum
Search for information on the TekForum on the Datalogic home page. Browse
the TekForum to find answers to your questions about common technical
issues.
Reseller Technical Support
An excellent source for technical assistance and information is an authorized
Datalogic reseller. A reseller is acquainted with specific types of businesses,
application software, and computer systems and can provide individualized
assistance.
Troubleshooting
Telephone Technical Support
If you do not have internet or email access, you may contact Datalogic technical support at (541) 743-4802.
74 Falcon® Management Utility (FMU)
Page 87

Sample Reports
Terminal Report
See “Terminal Report” on page 58 for information about accessing a Terminal
Report.
Figure 28. Sample Terminal Report
Terminal Report: F00000001
Symbologies
Code 39
Enable Code 39 Yes
Enable Checksum No
Send Checksum No
Full ASCII Mode Yes
Minimum Length 0
Maximum Length 20
User ID(Single ASCII Character) C
Sample Reports
Trioptic
Enable No
User ID(Single ASCII Character) X
Pharmacode 39(Code 32)
Enable No
Send Checksum No
Send Start Stop No
User ID(Single ASCII Character) Y
Standard 2/5
Enable No
Minimum Length 6
User’s Manual 75
Page 88

NOTES
Troubleshooting
76 Falcon® Management Utility (FMU)
Page 89

Appendix D
Glossary
Many definitions for this Glossary were taken directly from the Microsoft
Developer’s Network website at http://msdn.microsoft.com/library/default.asp.
1D Bar Code A traditional linear bar code. The code itself contains no information about the item to
which it is assigned but represents a string of identifying numbers or letters.
2D Bar Code Two-dimensional (2D) bar codes permit the encoding of information about an item in addi-
tion to an identifying code. Two axes, or directions, are used for recording and reading the
codes and the bar size is reduced, increasing the space available for data.
ActiveSync Microsoft Windows communication application that synchronizes a Windows CE or Win-
dows Mobile device with a Microsoft Windows-based host PC. ActiveSync can use RS232, IrDA, and USB.
AP Access Point used for RF applications.
ASCII American Standard Code for Information Interchange; a code for information exchange
between computers made by different companies; a string of 7 binary digits represents
each character; used in most microcomputers. Any member of the standard code for representing characters by binary numbers.
Check Digit A character included within a string of data whose value is used for the purpose of per-
forming a mathematical check to ensure the accuracy of that data.
Checksum A summation of check digits used to determine if an error has occurred in the transmis-
sion of data.
CLSI CLSI, Inc., developer of the “LIBS 100 scanning and decoding system”. The “Convert to
CLSI” parameter refers to formatting a Codabar bar code label in the manner defined by
CLSI, Inc.
Context Sensitive
Help
Control A standardized part of the window that can be manipulated by the user to perform an
User’s Manual 77
Context sensitive help can tell where you are in a program and can provide assistance
with the specific problems you might be having.
action or display information. The most common controls are buttons that allow the user
to select options and scroll bars that allow the user to move through a document or position text in a window.
Page 90

Glossary
Device
Partnership
A registry key on a Windows CE device that a desktop computer uses to identify the
device when it is connected. The key defines values for synchronization, file conversions,
and backup and restore information, which enable multiple Windows CE devices to connect to the same desktop computer. A device partnership is created the first time you connect a Windows CE device to a host PC.
DHCP Dynamic Host Configuration Protocol, used to automate the configuration of computers
that use TCP/IP.
DNS Server Domain Name Server (aka Domain Name Service) is a server that resolves IP addresses
from host names.
Falcon Config Falcon Config is a control panel on Windows Mobile that encapsulates FMU, and can
optionally also contain FDU.
Falcon Desktop
Utility (FDU)
Falcon
Management
Utility (FMU)
FAST
®
Falcon
Falcon Windows
Desktop Utility (FDU) allows Datalogic Windows® administrators to configure
®
CE terminals to control individual user access.
A Datalogic Windows-based management application for managing the configuration settings and updating the operating system and applications automatically from a server
using the wireless network system on the terminal.
Part of Datalogic
’s Falcon Management Utility (FMU) application for the terminal that
updates the operating system and applications automatically from a server using the
wireless network system.
Firmware Image Operating System files for the PDT.
FMU Console The administrative component of the FMU application, installed on the Workstation.
FMU Server FMU Component that performs terminal updates.
Gateway System (bridge) for exchanging information across networks.
Group A group of terminals associated with a specific function, i.e. picking, receiving, etc.
Invalid Characters Characters that cannot be entered into a field in FMU. Identified invalid characters are
'>,<&".
IrDA A communications protocol using an Infrared device to communicate with the Host PC.
ISBN International Standard Book Number. A unique number assigned to each book to allow
ease of ordering from any source: local bookstore, online book dealers, or directly from
the publisher. The ISBN number is usually printed on the back cover of a book, near the
bar code but can also appear within the book.
78 Falcon® Management Utility (FMU)
Page 91

ISSN International Standard Serial Number. An ISSN consists of eight digits comprising two
groups of four digits each, separated by a hyphen. The eighth digit is a check digit used
as a computer validity check; it consists of a number between 0 and 9 or an uppercase X
(for the arabic numeral 10).
List View The data that appears in the right pane when an option is selected in Tree View.
MIB (Management
Information Base)
Network ID Here used to mean that you should configure the Windows user settings, such as the user
Packages A grouping of files, packages and firmware images.
Portable Data
Assistant (PDA)
Portable Data
Terminal (PDT)
PRG Product Reference Guide. It is included on the Product CD that accompanies each Data-
QRG Quick Reference Guide. A printed copy is included in the box with each unit.
RF card A small card-shaped device installed in a terminal that allows wireless connection and
A Management Information Base (MIB) is a file that defines a set of
work Management Protocol)
standard MIBs available, depending on the information being managed. The MIB is used
by the management tools to allow them to better support the configuration values provided on the terminals, such as scanner controls and terminal type information.
name, password, and domain name. Microsoft
work IDs as equivalent to
A handheld Windows-based computer that can be synchronized with a host PC to share
files and data. Sometimes contains an infrared device to beam information to another
unit.
An industrial strength handheld computer with a keypad, navigation keys, and a bar code
scanner used in inventory, retail, and warehouse activities to collect data and upload it to
a host PC.
logic unit.
communication with a network.
variables, their types and usage. There are a number of
’s definition includes some wireless net-
SSIDs.
SNMP (Simple Net-
Server Error Log Server Activity Log. This log displays server actions and errors.
Shortcut menu A menu that is displayed for a selected object; usually accessed by right-clicking the
mouse over the selected object. The menu contains commands that are contextually relevant to the selection in the Tree View.
SNMP (Simple
Network
Management
Protocol)
User’s Manual 79
SNMP is the standard protocol for managing devices on a network. Simple Network Management Protocol (SNMP) is a standardized protocol for network management services
using a client/server model. The network management program (client) issues queries
and commands to the remote device
Page 92

Glossary
SSID Secure Set Identifier (32-character unique Identifier) — a sequence of characters that
uniquely names a wireless local area network (WLAN). This name allows workstations to
connect to the desired network when multiple independent networks operate in the same
physical area.
Start
Start ( ) opens the Start menu. The Start menu contains a list of the available appli-
cations, applets, and utilities on the device.
Subnet Mask Number used to identify a subnetwork so that an IP address can be shared on a Local
Area Network (LAN).
Symbology A symbology is a protocol for arranging the bars and spaces that make up a particular
kind of bar code. A bar code is made up of numbers, letters, and computer-recognized
characters that can be represented in a combination of bars and spaces. There are currently over 400 bar code symbologies that serve different uses, industries, or geographic
needs.
Terminal An individual unit attached to an FMU network.
Tracert Trace Route. A utility/command to determine TCP/IP packet routing.
Tree V i ew The list of items that appear in the left pane of the FMU Console.
UI User Interface.
Uniform Resource
Locator (URL)
The address of a resource on the Internet. URL syntax is in the form protocol://host/
localinfo, where protocol specifies the means of returning the object, such as HTTP or
FTP. Host specifies the remote location where the object resides and localinfo is a string,
often a file name, passed to the protocol handler at the remote location. Also called a Uniform Resource Identifier.
USB Universal Serial Bus is a hardware standard for connecting PCs with peripheral devices,
including PDTs, PDAs, mobile computers, cameras, printers, mice, scanners, etc.
Web Server The web server can perform several different actions, including generating a web page
containing statistics relating to performance of the mobile computer and creating an interface for interaction with the terminal to configure system behavior.
80 Falcon® Management Utility (FMU)
Page 93

INDEX
.NET 11
A
Add
Server
18
Adding a Server 26
Adding a Terminal 37
architecture 9
B
Basic Files 39
C
Complete System 8
Configuration Settings 41
context sensitive help 77
control 77
D
Datalogic MIBs 60
Delete Terminal 38
Deleting a Server 27
device partnership 78
Device Settings 44
DHCP
Enabling on terminal
Setting up Server 61
52
F
Falcon Management Utility 78
FAST 78
File
Add File
Add Group 18
Add Package 19
Add Server 18
Add Terminal 18
File List 35
File Menu 18
File Properties 39
Files
Adding
Firmware Image 34
FMU’s Technology 11
19
32
G
Glossary 77
Group
Configuration Settings
Deleting 30
Renaming 31
Groups 16, 29
About 16
Adding 29
Adding a Group 29
29
I
Installation 4
Invalid Characters 78
IP address 50, 52
User’s Manual 81
Page 94

Index
K
Keystrokes
entered by user
x
L
List View 14
M
Map Network Drive 72
Menubar 14, 18
File Menu 18
MIB 79
MIB Files 59
N
Network
ID
79
Network Settings 45
P
R
Registration x
Reset Values 42
RF
card
79
RF Connectivity 64
S
Sample Reports 75
Server
About
16
Server Error Log 27
Server Name 26, 28
Server Properties 27
Service Architecture 9
Shortcut Menu 15
Single Server Support 9
SNMP 79
SNMP Concepts 59
start button 80
Start Page 22
Style Conventions x
style conventions x
Supported portables 4
Symbology Settings 43
System Files 39
System Requirements 4
Package
Assigning
Packages 17
Adding a Package 32
Adding and Assigning 31
Adding Files 32
portable data assistant (PDA) 79
portable data terminal (PDT) 79
Printing 23
Properties
Terminal
82 Falcon® Management Utility (FMU)
36
38
T
Technical Support 74
Terminal
Adding
37
Exploring 55
Terminal Check-in 37
Terminal Configuration 38
Terminal Properties 38
Terminal Setup 37
Page 95

Terminals 17, 36
Group Assignments 36
Updating 51, 55
Toolbar 14, 23
Tree View 14
Troubleshooting 63
U
Uniform Resource Locator (URL) 80
Update Terminal Now 55
Updating Terminals 51, 55
USB 80
User Interface 13
W
windows controls x
Windows XP Home 72
Windows® XP Interface 13
Index
X
XML 12
User’s Manual 83
Page 96

NOTES
Index
84 Falcon® Management Utility (FMU)
Page 97

NOTES
Index
User’s Manual 85
Page 98

NOTES
Index
86 Falcon® Management Utility (FMU)
Page 99

ASCII Character Set
The table on this page shows a set of ASCII characters and their corresponding Hex Values. The Hex Values in this table are needed for setting symbology specific label identifiers, as well as enabling custom prefix and suffix characters.
ASCII
Char.
nul 00 sp 20 @ 40 ‘ 60
soh 01 ! 21 A 41 a 61
stx 02 “ 22 B 42 b 62
etx 03 # 23 C 43c63
eot 04 $ 24 D 44 d 64
enq 05 % 25 E 45 e 65
ack 06 & 26 F 46 f 66
bel 07 ‘ 27 G 47 g 67
bs 08 ( 28 H 48 h 68
ht 09 ) 29 I 49 i 69
lf 0A * 2A J 4A j 6A
vt 0B + 2B K 4B k 6B
ff 0C ‘ 2C L 4C l 6C
cr 0D - 2D M 4Dm6D
so 0E . 2E N 4E n 6E
si 0F / 2F O 4F o 6F
dle 10 0 30 P 50 p 70
dc1 11 1 31 Q 51 q 71
dc2 12 2 32 R 52 r 72
dc3 13 3 33 S 53s73
dc4 14 4 34 T 54 t 74
nak 15 5 35 U 55 u 75
syn 16 6 36 V 56v76
etb 17 7 37 W 57w77
can 18 8 38 X 58x78
em 19 9 39 Y 59y79
sub 1A : 3A Z 5A z 7A
esc 1B ; 3B [ 5B { 7B
fs 1C,3C< 5C | 7C
gs 1D = 3D ] 5D } 7D
rs 1E > 3E ^ 5E ~ 7E
us 1F ? 3F _ 5F del 7F
Hex
Value
ASCII
Char.
Hex
Value
ASCII
Char.
Hex
Value
ASCII
Char.
Hex
Value
Page 100

Corporate Headquarters
Datalogic S.p.A.
Via Candini, 2
40012 Lippo di Calderara di Reno
Bologna - Italy
Telephone: +39 051 3147011
Fax: +39 051 726562
www.mobile.datalogic.com
Datalogic Mobile, Inc.
1505 Westec Dr.
Eugene, OR 97402
Telephone: (541) 743-4800
Fax: (541) 743-4900
©2007 Datalogic Mobile, Inc. R44-2699 (Rev B) 6/07
 Loading...