

Page 1

User’s Guide for
Express™ and Select™
Class Printers
ImageCard® and
UltraGrafix® Series
June 2000
Part No. 526945-001
Page 2

Please note and heed the WARNING and CAUTION labels that have been placed on
the equipment for your safety. Please do not attempt to operate or repair this
equipment without adequate training.
Liability statement
This Datacard® product has been built to the high standards of Datacard Corporation.
See “Safety and compliance” on page A-1 for the statement of liability.
Regulatory compliance
This Datacard product conforms to regulatory requirements as specified in North
America and Europe. See “Safety and compliance” on page A-1 for detailed
regulatory compliance information.
Trademark acknowledgments
Trademark, service mark, and copyright acknowledgments are listed in “Safety and
compliance” on page A-1.
Proprietary Notice
ii
All drawings and information herein are the property of Datacard Corporation.
Copyright © 2000 Datacard Corporation. All rights reserved.
Revision Log: User’s Guide for Express™ and Select™ Class Printers
Revision Date Affected Pages Description of Changes
A Jan. 99 All Initial release
B June 2000 All Updated organization, added unpacking
and part number information
Datacard
11111 Br en Road West
Minnetonka, MN 55343-9015
www.datacard.com
952.933.0333
Fax: 952.935.2314
© 1997-2000 Datacard Corporation. All rights reserved. Printed in the United States of America.
User’s Guide for Express™ an d Select™ Class Printers
Page 3

Contents
Chapter 1: Overview . . . . . . . . . . . . . . . . . . . . . . . . . . . . . . . . . . 1-1
Chapter 2: Getting started . . . . . . . . . . . . . . . . . . . . . . . . . . . . . 2-1
iii
About this manual . . . . . . . . . . . . . . . . . . . . . . . . . . . . . . . . 1-2
Audience . . . . . . . . . . . . . . . . . . . . . . . . . . . . . . . . . . . . . . . . 1-2
About the Express or Select printer . . . . . . . . . . . . . . . . . . 1-2
Printer models . . . . . . . . . . . . . . . . . . . . . . . . . . . . . . . . . 1-2
Printer features . . . . . . . . . . . . . . . . . . . . . . . . . . . . . . . . 1-4
PC and software specifications . . . . . . . . . . . . . . . . . . . . . 1-8
General requirements . . . . . . . . . . . . . . . . . . . . . . . . . . . . . 2-1
Selecting the site . . . . . . . . . . . . . . . . . . . . . . . . . . . . . . . . . 2-2
Electrical requirements . . . . . . . . . . . . . . . . . . . . . . . . . . 2-2
Physical requirements . . . . . . . . . . . . . . . . . . . . . . . . . . . 2-2
Environmental requirements . . . . . . . . . . . . . . . . . . . . . 2-3
Unpacking the printer . . . . . . . . . . . . . . . . . . . . . . . . . . . . . 2-3
Who to call for assistance . . . . . . . . . . . . . . . . . . . . . . . . . . 2-4
Connecting the printer . . . . . . . . . . . . . . . . . . . . . . . . . . . . . 2-4
Loading cards . . . . . . . . . . . . . . . . . . . . . . . . . . . . . . . . . . . . 2-6
Loading the print ribbon . . . . . . . . . . . . . . . . . . . . . . . . . . . 2-7
Powering on the system . . . . . . . . . . . . . . . . . . . . . . . . . . 2-10
Installing the printer driver . . . . . . . . . . . . . . . . . . . . . . . . 2-11
Installing the Windows 95/98 printer driver . . . . . . . . . . 2-11
Installing the printer driver on Windows NT . . . . . . . . . . 2-12
Setup tips . . . . . . . . . . . . . . . . . . . . . . . . . . . . . . . . . . . . . . 2-14
Making and evaluating test cards . . . . . . . . . . . . . . . . . . . 2-15
Printer test card . . . . . . . . . . . . . . . . . . . . . . . . . . . . . . . 2-16
Chapter 3: Using the printer . . . . . . . . . . . . . . . . . . . . . . . . . . . 3-1
Working with printer settings and data . . . . . . . . . . . . . . . 3-1
Settings and data for Windows NT . . . . . . . . . . . . . . . . . 3-1
Settings and data for Windows 98 . . . . . . . . . . . . . . . . . . 3-4
Using the Status Monitor . . . . . . . . . . . . . . . . . . . . . . . . . . . 3-5
Opening and using the Status dialog box . . . . . . . . . . . . 3-6
Viewing Status Monitor information . . . . . . . . . . . . . . . . . 3-7
Making cards . . . . . . . . . . . . . . . . . . . . . . . . . . . . . . . . . . . . 3-8
Removing cards . . . . . . . . . . . . . . . . . . . . . . . . . . . . . . . . . . 3-9
Responding to messages . . . . . . . . . . . . . . . . . . . . . . . . . 3-10
Shutting down the system . . . . . . . . . . . . . . . . . . . . . . . . 3-11
Chapter 4: Maintaining the printer . . . . . . . . . . . . . . . . . . . . . . 4-1
Using the printer cleaning card . . . . . . . . . . . . . . . . . . . . . 4-1
Using the duplex cleaning card . . . . . . . . . . . . . . . . . . . . . 4-2
Using the magnetic stripe cleaning card . . . . . . . . . . . . . . 4-4
Cleaning the printer rollers . . . . . . . . . . . . . . . . . . . . . . . . . 4-5
Cleaning the printhead . . . . . . . . . . . . . . . . . . . . . . . . . . . . 4-7
Replacing the printhead cartridge . . . . . . . . . . . . . . . . . . . 4-7
User’s Guide for Express™ and Select™ Printers
Page 4

iv
Chapter 5: Advanced Information . . . . . . . . . . . . . . . . . . . . . . . 5-1
Reinstalling the printer driver . . . . . . . . . . . . . . . . . . . . . . . 5-1
Remove the existing printer driver . . . . . . . . . . . . . . . . . . 5-1
Installing two printers (Windows 95/98) . . . . . . . . . . . . . . . 5-5
Using two printers . . . . . . . . . . . . . . . . . . . . . . . . . . . . . . 5-5
Network printing . . . . . . . . . . . . . . . . . . . . . . . . . . . . . . . . . . 5-6
Requirements for local printer sharing . . . . . . . . . . . . . . . 5-6
Printer and PC setup . . . . . . . . . . . . . . . . . . . . . . . . . . . . 5-7
Setting up printing over the network . . . . . . . . . . . . . . . . 5-7
Installing the printer driver on the client PC . . . . . . . . . . . 5-8
Perform management tasks at the host PC . . . . . . . . . . . 5-9
Using the printer from the client PC . . . . . . . . . . . . . . . . 5-10
Changing the type of print ribbon . . . . . . . . . . . . . . . . . . 5-11
Change the print ribbon . . . . . . . . . . . . . . . . . . . . . . . . . 5-11
Change the Print Ribbon Type setting . . . . . . . . . . . . . . 5-11
Change the card design . . . . . . . . . . . . . . . . . . . . . . . . . 5-11
Change the printhead . . . . . . . . . . . . . . . . . . . . . . . . . . 5-13
Change printhead settings . . . . . . . . . . . . . . . . . . . . . . . 5-13
Print sample cards . . . . . . . . . . . . . . . . . . . . . . . . . . . . . 5-14
When to make changes . . . . . . . . . . . . . . . . . . . . . . . . . 5-14
Changing operational settings . . . . . . . . . . . . . . . . . . . . . 5-14
Chapter 6: Troubleshooting . . . . . . . . . . . . . . . . . . . . . . . . . . . . 6-1
If you think the printer is not working . . . . . . . . . . . . . . . . 6-1
Problems with card appearance . . . . . . . . . . . . . . . . . . . . . 6-2
Print station . . . . . . . . . . . . . . . . . . . . . . . . . . . . . . . . . . . 6-2
Topcoat applied using the print ribbon . . . . . . . . . . . . . . . 6-7
Obtaining service . . . . . . . . . . . . . . . . . . . . . . . . . . . . . . . . . 6-9
When to obtain service . . . . . . . . . . . . . . . . . . . . . . . . . . 6-9
Packing the printer for shipping . . . . . . . . . . . . . . . . . . . . . 6-9
Appendix A: Safety and compliance . . . . . . . . . . . . . . . . . . . . . A-1
Regulatory compliance . . . . . . . . . . . . . . . . . . . . . . . . . . . . A-1
Notice for USA (FCC notice) . . . . . . . . . . . . . . . . . . . . . . A-1
Notice for Canada (CSA) . . . . . . . . . . . . . . . . . . . . . . . . . A-1
Notice for Europe . . . . . . . . . . . . . . . . . . . . . . . . . . . . . . . A-1
Notice to Users of Printers Equipped with
Contactless Smart Card Coupler . . . . . . . . . . . . A-1
Liability statement . . . . . . . . . . . . . . . . . . . . . . . . . . . . . . . . A-2
Safety . . . . . . . . . . . . . . . . . . . . . . . . . . . . . . . . . . . . . . . . . . A-2
Safe environment . . . . . . . . . . . . . . . . . . . . . . . . . . . . . . . A-2
Safe human interface . . . . . . . . . . . . . . . . . . . . . . . . . . . . A-2
Acknowledgments . . . . . . . . . . . . . . . . . . . . . . . . . . . . . . . . A-3
Appendix B: Supplies and cards . . . . . . . . . . . . . . . . . . . . . . . . B-1
Personalization supplies . . . . . . . . . . . . . . . . . . . . . . . . . . . B-1
Print ribbons . . . . . . . . . . . . . . . . . . . . . . . . . . . . . . . . . . . B-1
Supply roll storage . . . . . . . . . . . . . . . . . . . . . . . . . . . . . . B-2
Cards . . . . . . . . . . . . . . . . . . . . . . . . . . . . . . . . . . . . . . . . . . . B-2
Card specifications . . . . . . . . . . . . . . . . . . . . . . . . . . . . . B-2
Card size . . . . . . . . . . . . . . . . . . . . . . . . . . . . . . . . . . . . . B-3
User’s Guide for Express™ and Select™ Printers
Page 5

Card material . . . . . . . . . . . . . . . . . . . . . . . . . . . . . . . . . . B-3
New cards preferred . . . . . . . . . . . . . . . . . . . . . . . . . . . . B-3
Pre-punched cards . . . . . . . . . . . . . . . . . . . . . . . . . . . . . B-4
Card quality guidelines . . . . . . . . . . . . . . . . . . . . . . . . . . B-4
Card storage specifications . . . . . . . . . . . . . . . . . . . . . . . B-5
Cleaning supplies . . . . . . . . . . . . . . . . . . . . . . . . . . . . . . . . B-5
Printer cleaning card . . . . . . . . . . . . . . . . . . . . . . . . . . . . B-5
Duplex cleaning card . . . . . . . . . . . . . . . . . . . . . . . . . . . . B-6
Magnetic stripe cleaning card . . . . . . . . . . . . . . . . . . . . . B-6
Citrus solvent . . . . . . . . . . . . . . . . . . . . . . . . . . . . . . . . . . B-6
Printer driver diskettes . . . . . . . . . . . . . . . . . . . . . . . . . . . . B-6
Anti-static wrist strap . . . . . . . . . . . . . . . . . . . . . . . . . . . . . B-6
Printer components . . . . . . . . . . . . . . . . . . . . . . . . . . . . . . . B-7
Printhead cartridge . . . . . . . . . . . . . . . . . . . . . . . . . . . . . B-7
Interface cable . . . . . . . . . . . . . . . . . . . . . . . . . . . . . . . . . B-7
Power cord . . . . . . . . . . . . . . . . . . . . . . . . . . . . . . . . . . . . B-8
Smart card serial cable . . . . . . . . . . . . . . . . . . . . . . . . . . B-8
Print ribbon cartridge . . . . . . . . . . . . . . . . . . . . . . . . . . . . B-9
Card cartridge . . . . . . . . . . . . . . . . . . . . . . . . . . . . . . . . . B-9
Fuse . . . . . . . . . . . . . . . . . . . . . . . . . . . . . . . . . . . . . . . . B-10
Appendix C: PC settings . . . . . . . . . . . . . . . . . . . . . . . . . . . . . . C-1
PC settings for all operating systems . . . . . . . . . . . . . . . . C-1
Configuring the ECP parallel port . . . . . . . . . . . . . . . . . . C-1
PC settings for Windows NT 4.0 . . . . . . . . . . . . . . . . . . . . . C-3
Setting port values . . . . . . . . . . . . . . . . . . . . . . . . . . . . . . C-3
Setting printer permissions . . . . . . . . . . . . . . . . . . . . . . . C-3
Setting a smart card serial port—Windows NT . . . . . . . . C-4
PC settings for Windows 98 . . . . . . . . . . . . . . . . . . . . . . . . C-6
Setting port values . . . . . . . . . . . . . . . . . . . . . . . . . . . . . . C-6
Setting a smart card serial port—Windows 98 . . . . . . . . . C-7
v
Appendix D: Magnetic stripe encoding . . . . . . . . . . . . . . . . . . D-1
IATA, ABA, and TTS character sets . . . . . . . . . . . . . . . . . . D-1
NTT character set . . . . . . . . . . . . . . . . . . . . . . . . . . . . . . . . . D-2
Magnetic Stripe settings used by the
Express or Select printer . . . . . . . . . . . . . . . . . . . . . . . D-3
User’s Guide for Express™ and Select™ Printers
Page 6

Overview
1
This chapt er presents the following:
•
•
•
•
The purpose of this manual
1
Who should use this manual
The Express or Select printer, including a description of the printer, the models
available, and their components
Specifications for the PC used with the printer and the software that runs on the
PC
User’s Guide for Express™ and Select™ Class Printers
Page 7

1-2
About this manual
This manual provides detailed information about the Datacard® Express™ or
Select™ Class photo ID printer. It also explains how to install, use, and maintain the
printer and its printer driver.
Audience
To perform the procedures in this manual, you must have the following skills:
•
Ability to read and understand written and graphical instructions
•
Ability to operate a personal computer (PC)
•
Experience with Microsof t® Windows® 98 or Windows NT®
•
Ability to load supplies
•
Ability to perform simple troubleshooting using written and graphical instructions
Datacard-authorized service personnel also use this manual.
About the Express or Select printer
Overview
The Express or Select photo ID printer includes the printer and a printer driver which
runs on a PC. The printer uses supplies such as print ribbon and blank cards when
printing cards.
The Express or Select printer prints full-color or monochrome images on one or both
sides of PVC cards. The images printed can include photos, text, logos, barcodes and
digitized signatures. The printer can also encode data on a card's magnetic stripe and
program a smart card chip on a card. (These steps are commonly called
“personalizing” the card.) Magnetic stripe encoding and smart card programming are
options that can be purchased as part of the printer.
The printer driver receives digital information from a card creation application and
processes the data to send to the printer. When the printer receives the data, it prints
the card. The driver keeps track of the progress of the card in the printer, and sends
data for the next card as soon as the printer is ready and the data is available.
See “PC and software specifications” on page 1-8 for more information about the
printer driver and the PC on which it runs.
Printer models
Several models of the printer are available. ImageCard printers can print full-color or
monochrome images, while UltraGrafix printers can print only monochrome images. A
printer can be ordered with the following optional modules:
•
Magnetic stripe module, for either 3-track encoding or single-track NTT encoding.
The module is installed in-line with the print operation. It encodes data on the
magnetic stripe and then verifies the data.
User’s Guide for Express™ and Select™ Class Printe rs
Page 8

Overview
Smart card module. The smart card module is available with a contact coupler.
•
The Select 2 printer is available with a contactless (RF) coupler. Both printers are
available with a contact station with external coupler. A custom smart card
application can use the module to initialize and program the smart card chip on a
card.
Duplex module, available on Select Class printers, which can automatically print
•
on both sides of the card.
Table 1-1 lists the models and their features.
Table 1-1: Express or Select printer features available
1-3
Duplex
Model name
Colors printed
module
ImageCard E Full color or monochrome No
ImageCard S Full color or monochrome No
ImageCard S2 Full color or monochrome Yes
UltraGrafix E Monochrome only No
UltraGrafix S Monochrome only No
UltraGrafix S2 Monochrome only Yes
Magnetic
#
stripe
# †
Yes
#
Yes
#
Yes
# †
Yes
#
Yes
#
Yes
Smart
Card
Yes
#
# †
No
#
Yes
†
Yes#
No
#
Yes
#. Optional
†. Only one option--either magnetic stripe or smart card--can be installed in a printer.
i
Monochrome printing uses a ribbon with a single color, such as black. T o optimize
monochrome printing, use a monochrome printhead cartridge.
i
An existing printer cannot have options added; options must be factory-installed.
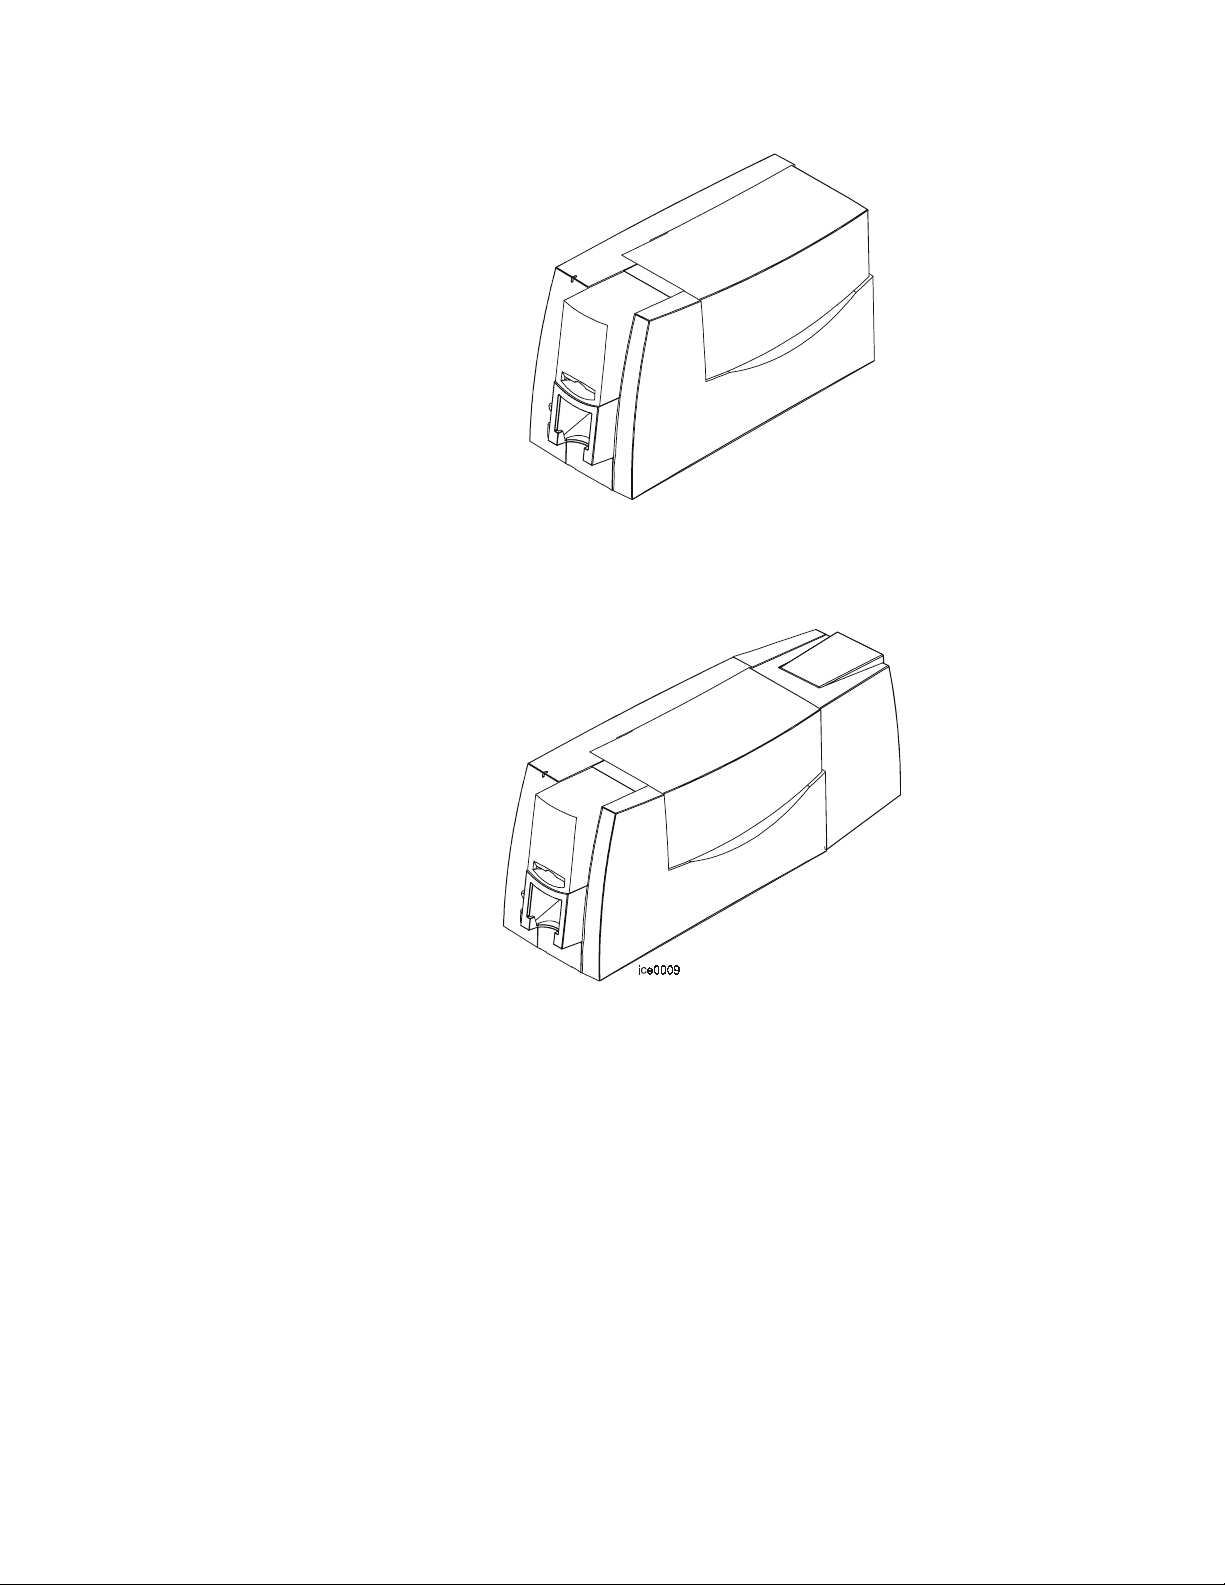
Figure 1-2 shows the E and S models of the Express or Select printer. The ImageCard
and UltraGrafix printers have the same appearance.
User’s Guide for Express™ and Select™ Class Printers
Page 9
1-4
Overview
ice0001
Figure 1-2: E and S models of the Express or Select printer
Figure 1-3 shows the S2 model of the Express or Select printer. The ImageCard and
UltraGrafix printers have the same appearance.
Printer features
Use the information in this section to identify the features and controls you use on the
printer.
Figure 1-3: S2 model of the Select Printer
User’s Guide for Express™ and Select™ Class Printe rs
Page 10

Overview
1-5
Top cover
Status light
Card cartridge
Exception card slot
Card output stacker
Ready button
Power button
Figure 1-4: Front of the Express or Select printer
Front of the printer
Find the following on the outside of the printer:
T op cover
The cover protects the internal parts of the printer from dust and debris. It also lessens
the sound from the printer.
Status light
The status light indicates that the printer is processing data, ready to receive data, or
in an error condition.
•
•
•
•
Card cartridge
When the status light is steady green, the printer is on and ready to print cards.
When the status light blinks green, the printer is receiving data from the PC, is
printing, or is paused.
When the status light blinks yellow, the printer has identified a problem and
stopped.
The status light can turn red on rare occasions. If this happens, contact your
service provider promptly for assistance.
The card cartridge holds blank cards to print. It holds about 100 cards (with a nominal
thickness of 0.030 inches (0.76 mm)). At the bottom of the card cartridge, the
exception card slot allows you to insert a single card that is different from the cards in
the card cartridge.
User’s Guide for Express™ and Select™ Class Printers
Page 11

1-6
Card output stacker
Ready button
Overview
The card output stacker holds the cards after they have been processed. Both
completed cards and rejected cards go to the card output stacker.
The Ready button allows you to pause the printer while printing a card, to clear an
error condition, to cancel a print job and delete all data for the job, or to create a
printer test card.
•
To pause the printer, press and hold the Ready button for three seconds or less.
Any cards being printed complete the current operation and stop. The status light
continues to blink green while the printer is paused. Press the Ready button to
resume printing.
i
If the printer is paused and a message box is displayed on the PC, use the
buttons on the message box to clear the message. If you press the Ready button
to clear the error, the current print job is cancelled. If you press the Ready button
to clear a pause condition, the job is not cancelled.
•
To cancel and clear the current print job, press and hold the Ready button for
between three and ten seconds. When the sound changes tone, release the
Ready button. The job is cleared from printer memory and the card is ejected.
Power button
Inside the printer
•
You can verify that the printer is working correctly by making a printer test card.
See “Making and evaluating test cards” on page 2-15 for more information.
Use the Power button to power on or power off the printer.
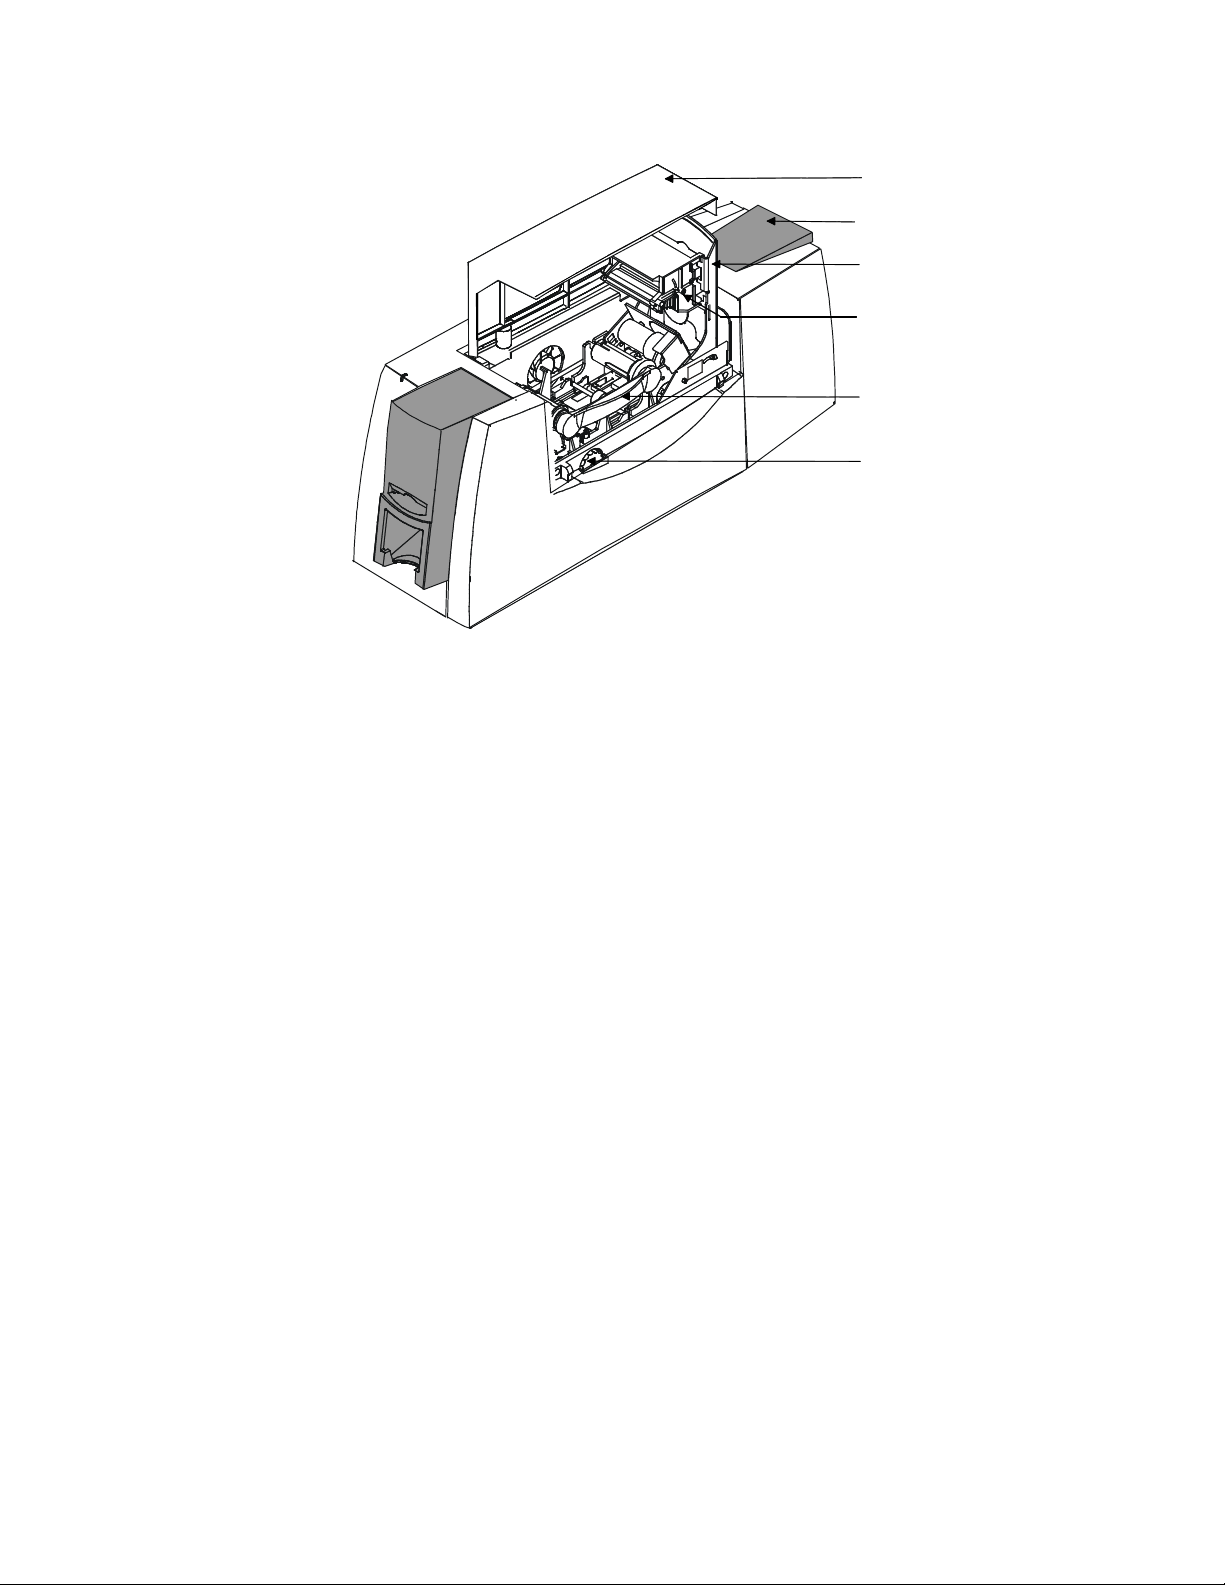
Open the cover to find the following on the inside of the printer.
User’s Guide for Express™ and Select™ Class Printe rs
Page 12
Overview
1-7
Top cover
Duplex module and door
Swing arm
Printhead cartridge
Print ribbon cartridge
Manual card feed knob
ExpPart
Duplex module and door
On the S2 printer model, this area contains the duplex mechanism, which turns the
card over for printing on both sides.
Swing arm
The swing arm opens to give you access to the printhead cartridge and print ribbon
cartridge. Push down on the left (curved) end of the swing arm to open it.
Printhead cartridge
The printhead, contained in the printhead cartridge, uses heat and pressure to
transfer dye and other material from the print ribbon to the card. The printhead
cartridge is replaceable.
Print ribbon cartridge
The print ribbon cartridge holds the print ribbon.
Manual card feed knob
The manual card feed knob turns to move a card along the card transport track. Use it
to release stuck cards in the print module.
Figure 1-5: Internal parts of the Express or Select printer
User’s Guide for Express™ and Select™ Class Printers
Page 13
1-8
Back of the printer
Overview
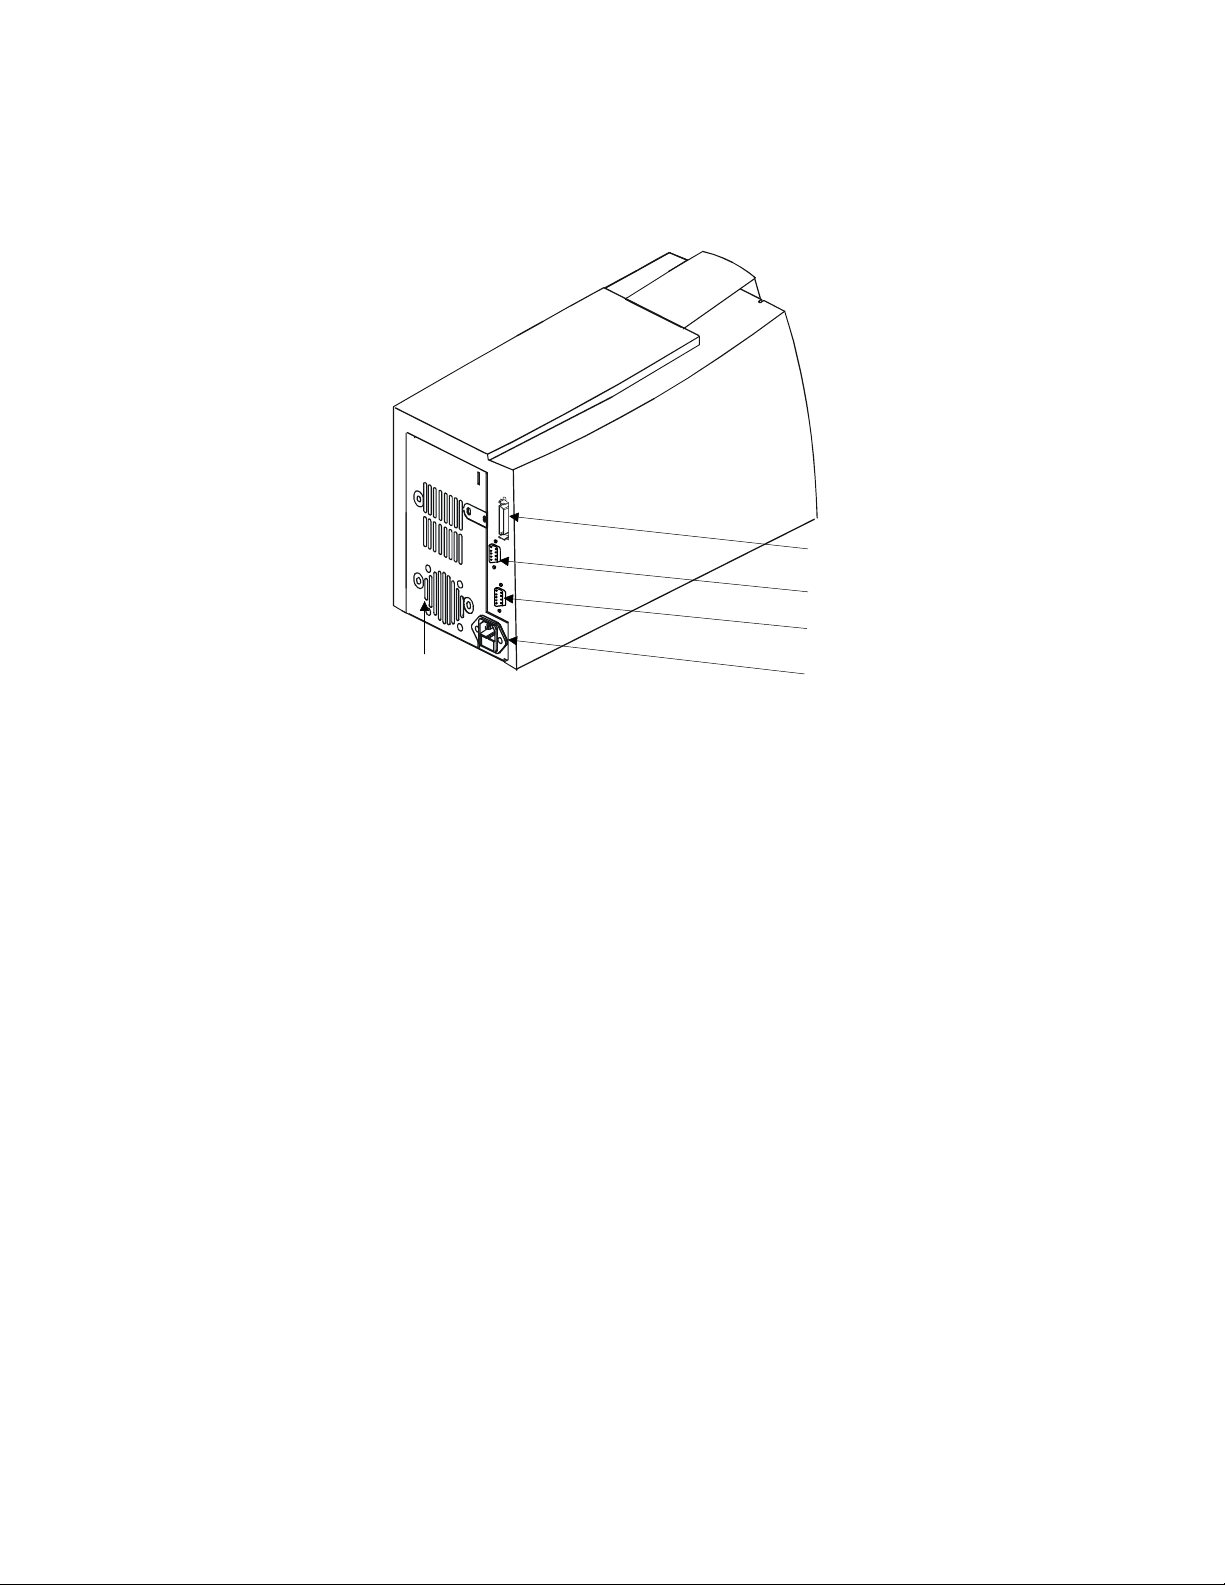
Figure 1-6 shows the back of the Express or Select Class printer:
ECP parallel port
Contactless smart card
Contact smart card
Fan
Figure 1-6: The back of the Express or Select printer
Find the following on the back of the printer:
ECP parallel port
Use the ECP parallel port to connect the printer's interface cable to the PC.
Power receptacle
This is the receptacle for connecting the power cable.
Smart card serial port(s)
On printers equipped with the smart card option, use these connectors for the serial
cable from the PC or contact station that carries the data to encode on the smart card
chip.
PC and software specifications
The Express or Select printer must be used with a PC that runs the printer driver. The
PC also runs a card creation application that captures and organizes the data to
appear on each card.
Power receptacle
User’s Guide for Express™ and Select™ Class Printe rs
Page 14

Overview
1-9
To support the printing speed that the Express or Select printer can deliver, the PC
must meet the following requirements:
Have a 233 MHz (or faster) Pentium MMX-, Pentium II- or Pentium III -compatible
•
processor
i
The PC resources, including processor speed, memory, and available hard disk
space, can have a dramatic effect on card processing speed. For faster card
printing, use a 450 MHz or faster processor with 128 MB of RAM.
Have an enabled ECP parallel port
•
Have at least 64 MB of memory (RAM)
•
Have a diskette drive to install the printer driver
•
Have 50 MB or more of hard disk space available to store the printer driver and
•
provide working space for preparing card data
Have one of the following operating systems:
•
– Windows 95 or 98
– Windows NT 4.0 with service pack 4 or higher
The PC must also have a card creation application that formats and prepares the card
data. For the PC requirements of your card creation application, see the application's
documentation.
User’s Guide for Express™ and Select™ Class Printers
Page 15

Getting started
2
This section describes how to install and set up the Datacard®
Express™ or Select™ Class photo ID printer. It describes:
General requirements for using the printer
•
Selecting the site
•
Unpacking the printer
•
Who to call for assistance
•
Connecting the cables
•
Loading supplies, including cards, and print ribbon
•
Powering on the printer
•
Installing the printer driver
•
Printing test cards
•
General requirements
When choosing a site for the Express or Select printer and its supplies, consider the
following general requirements:
Keep all dust, dirt, food, liquids, etc. away from the Express or Select printer at all
•
times.
Keep the top cover closed at all times, except when changing supplies, fixing
•
problems, or performing maintenance.
2
Do not use supplies or cards that have been dropped on the floor or have
•
otherwise become contaminated.
Keep paper and foreign materials off the Express or Select printer.
•
Do not block the back air vents or fan opening on the Express or Select printer.
•
Place the Express or Select printer on a stable platform; keep it off the floor.
•
Place the Express or Select printer away from direct sunlight.
•
Place the Express or Select printer away from heating ducts, blowers, or other air
•
vents.
Do not use the Express or Select printer for purposes other than its intended use.
•
When cleaning around the Express or Select printer, prevent debris from entering
•
the printer.
User’s Guide for Express™ and Select™ Class Printers
Page 16

2-2
•
Place the Express or Select printer in a clean office environment, protected from
any type of construction.
•
Store all supplies (ribbons, cards, etc.) in the original packaging until loaded in the
cartridges. Keep the original packaging closed.
•
Store all supplies in a clean, cool, dry location. See “Supply roll storage” on
page B-2 for information about the storage environment for Express or Select
supplies.
Selecting the site
After meeting general requirements, the site for the Express or Select printer should
meet the electrical, physical, and environmental requirements of the printer. Finally, be
sure to select an appropriate site for printer supplies.
Electrical requirements
The Express or Select printer requires the following electrical conditions for optimal
performance:
•
90-254 VAC at 50/60 Hz (The Express or Select printer automatically adjusts to
any power within this range.)
Getting started
•
Single phase, 3-wire grounded receptacle only
The maximum input current for the Express or Select printer is 1.4 amps at 100 VAC
applied.
Physical requirements
The Express or Select printer requires an environment that accommodates its
physical dimensions and weight.
The printer weighs between 21 and 26.5 pounds or 9.7 and 11.9 kilograms.
i
The surface holding the printer might also need to bear the weight of other
equipment such as a PC and camera.
The dimensions are:
•
Width of 17.8 inches (54.1 cm ) for E and S models
•
Width of 24 inches (65 cm) for S2 models
•
Depth of 8.8 inches (22.2 cm)
•
Height of 10 inches (25.4 cm)
User’s Guide for Express™ and Select™ Class Printe rs
Page 17
Getting started
Environmental requirements
The Express or Select printer requires the following environmental conditions for
optimal operation:
Operating relative humidity: 20% to 80% non-condensing
•
Operating temperature range: 55° F to 80° F (13° C to 27° C)
•
If you store the Express or Select printer, provide an environment with the following
conditions:
Storage relative humidity: 20% to 80% non-condensing
•
Storage temperature range: 0° F to 100° F (-17.8° C to 37.8° C)
•
Unpacking the printer
Follow these steps to unpack the printer. Be sure to select a location that meets the
site requirements for the Express or Select printer. See “Selecting the site” on
page 2-2 for more information.
You need scissors or another cutting device to unpack the printer.
2-3
i
Make sure you have one or more people to assist with unpacking the printer. One or
two people can lift the printer while another person assists with removing packaging.
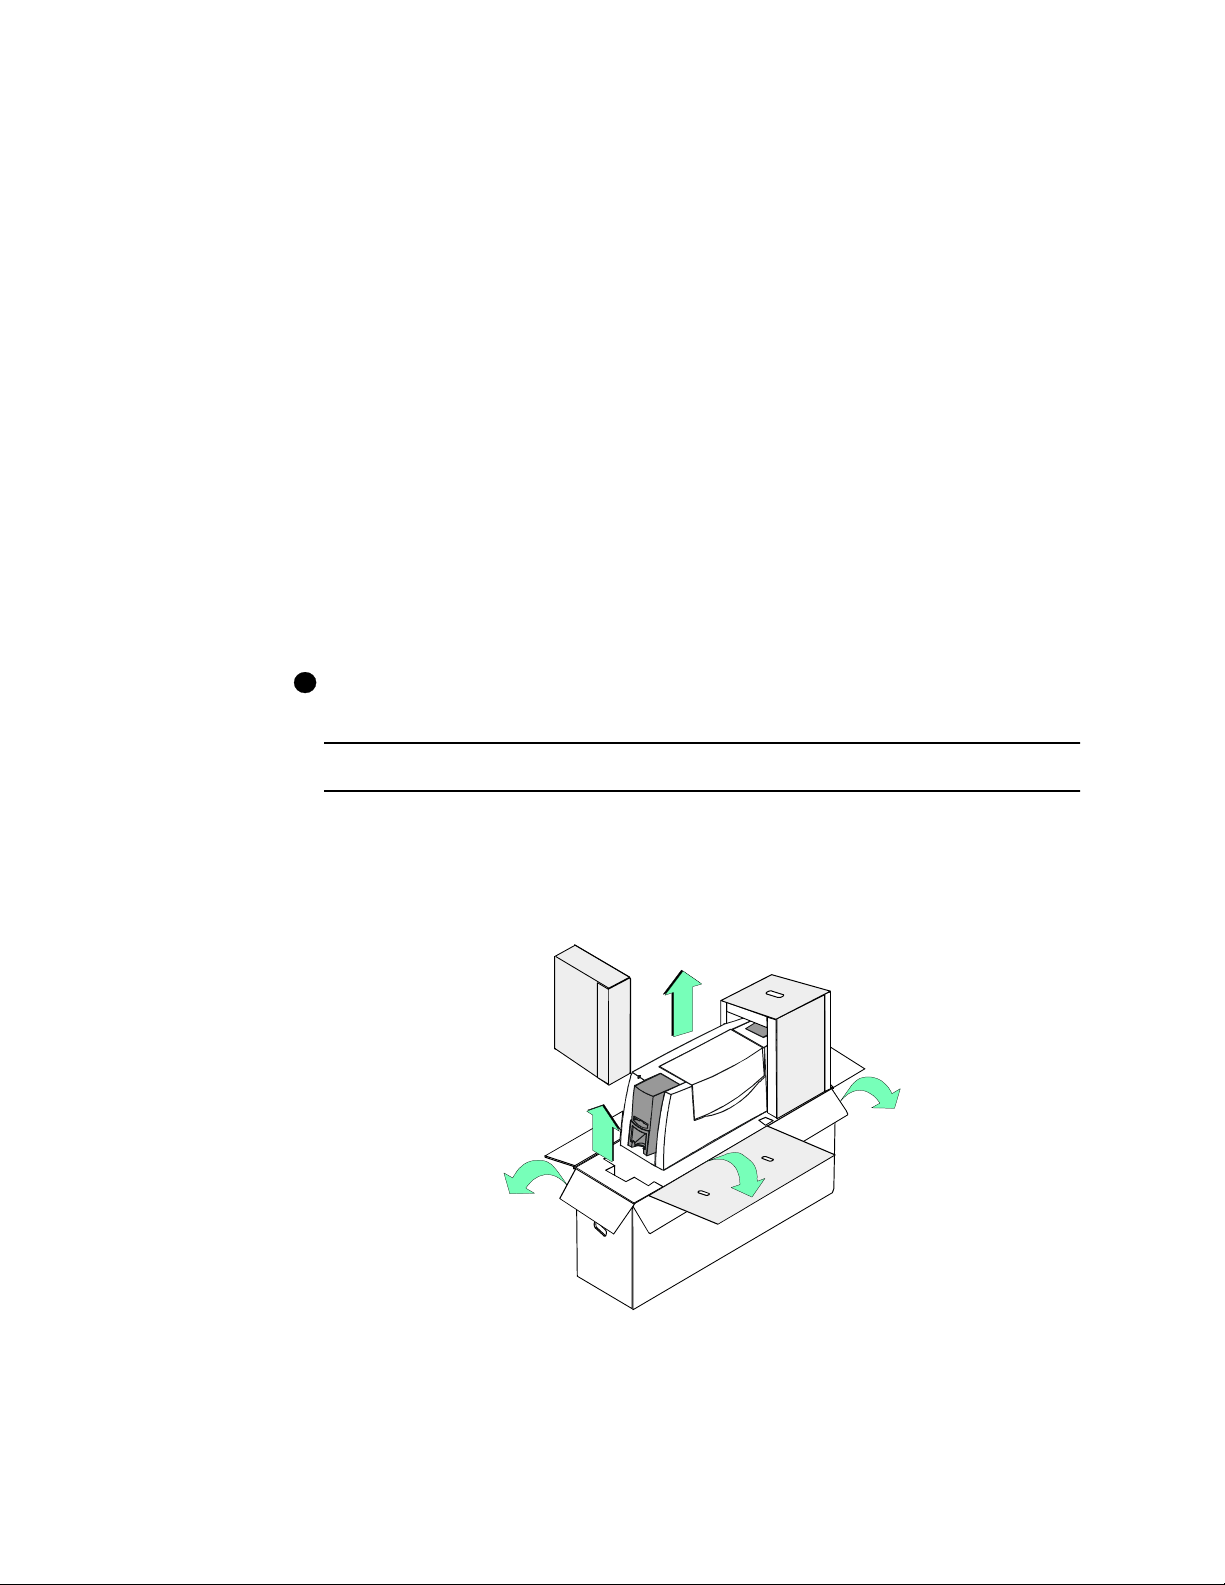
Unpack the printer
1 Place the shipping carton on a firm level surface.
2 Use a scissors to open the taped area on top of the shipping carton.
3 Open the shipping carton (step 1 in Figure 2-1).
4
1
2
1
3
Figure 2-1: Unpack the printer
User’s Guide for Express™ and Select™ Class Printers
Page 18

2-4
Getting started
4 Remove the accessories box (step 2 in Figure 2-1).
5 Open the top of the packing material (step 3 in Figure 2-1).
!
The printer weighs 21 to 26 pounds (9.7 to 11.9 kg). Use proper lifting techniques.
Make sure you have enough people to lift the printer comfortably.
6 Lift the printer from the carton (step 4 in Figure 2-1) and place it on a counter or
other solid surface.
7 If the end of the packing material comes out of the box, slide it off the end of the
printer and place the entire printer on a counter or other solid surface.
Save all packing material, including the plastic bag, shipping carton, shipping
i
cushions, and accessories box.
8 Open the accessories box and remove the contents. The accessories box
contains:
– Power cable
– Interface cable
– Warranty and declaration of conformity
– User’s Guide
– Printer driver
– Supplies kit if one was ordered with this printer
9 Make sure the card cartridge is securely seated in the printer. If needed, move it
gently to seat it.
Who to call for assistance
If you work with a Datacard-authorized distributor or value-added reseller, contact
your reseller for assistance. A value-added reseller provides the Express or Select
printer as part of an overall system.
If any contents of the box are missing, contact your distributor or reseller. If you
purchased your printer directly from Datacard, contact Datacard. Make sure you have
the serial number, located on the bottom of the printer, when you call.
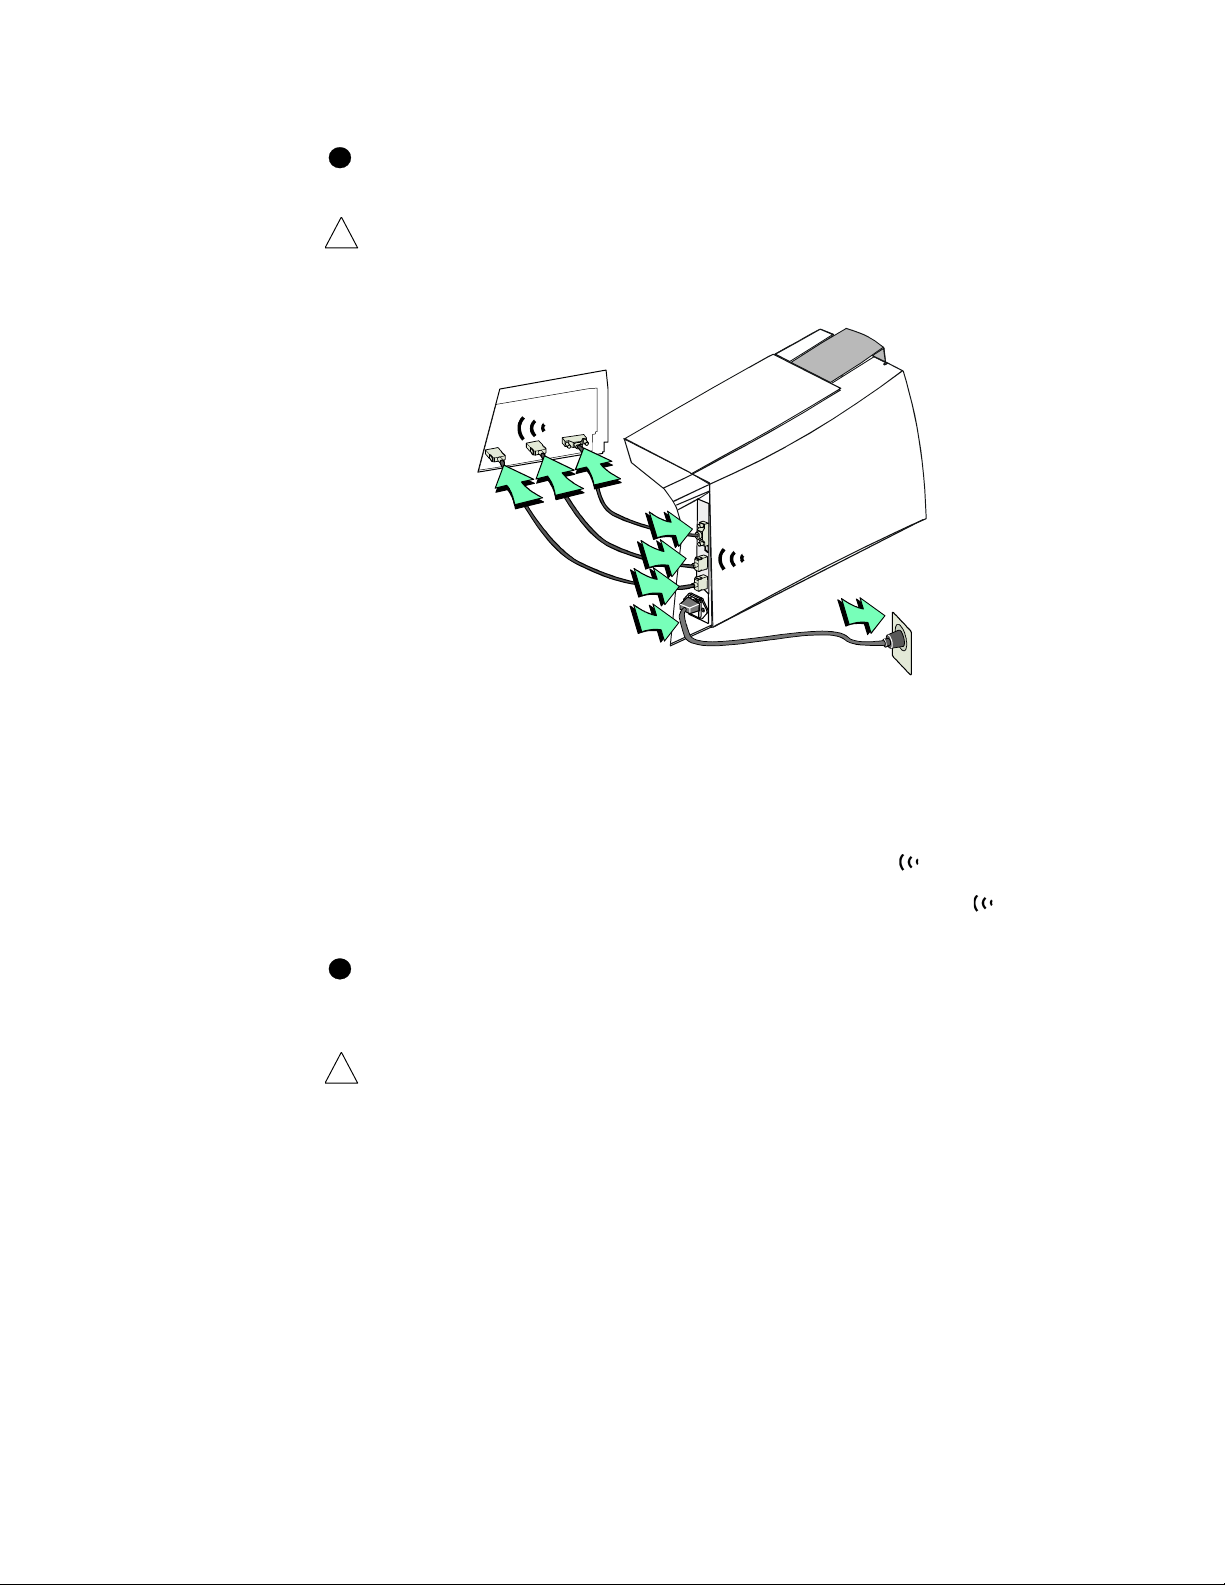
Connecting the printer
This section explains how to connect the printer to a power source and to the PC that
runs the printer driver. It also explains how to connect the optional smart card cable.
Connect the printer
1 Attach the interface cable to the ECP parallel port on the PC. Attach the other end
of the interface cable to the printer (step 1 in Figure 2-2).
♦
User’s Guide for Express™ and Select™ Class Printe rs
Page 19
Getting started
i
The interface cable must be a shielded, Type C, IEEE 1284 parallel port cable, up
to a maximum of 2 meters long.
!
If the PC has more than one parallel port, make sure you use the ECP capable
parallel port on the PC. Also, note whether the port is LPT1 or LPT2, so you can
specify the port when installing the printer driver.
1
2
3
1
2
3
4
5
2-5
Figure 2-2: Connect the printer cables
2 If your printer has a smart card module, the ports to use correspond to the module
installed:
– The lower port (step 3 in Figure 2-2) is for a contact smart card module or a
contact statio n.
– The upper port (step 2 in Figure 2-2) is for a contactless module.
– Both ports are installed for a module containing both contactless (upper
port) and contact couplers (lower port).
i
If the printer includes a smart card module, the printer’s smart card serial port is
connected to the PC using a smart card serial cable. The cable must be a
shielded DB9 serial ca ble, up to a maximum of 3 meters long.
!
If the PC has more than one serial port, attach the serial cable to the serial port for
the smart card application. See information with your smart card application for
the correct port to use.
Verify that serial port settings are correct using the steps in “PC settings” on
page C-1.
3 Attach the power cord to the power receptacle on the back of the printer (step 4 in
Figure 2-2).
4 Plug the other end of the power cord into a single phase, 3-wire grounded
receptacle with 90-130V AC or 195-254V AC at 50 or 60 Hz (step 5 in Figure 2-2).
User’s Guide for Express™ and Select™ Class Printers
Page 20

2-6
i
The printer power supply automatically adjusts to the voltage of the input power.
Loading cards
Load cards when beginning work or when the card cartridge is low on cards or empty.
You can load cards when the printer power is on or off. You can also load cards while
the printer is printing.
To order more cards, contact your card vendor. For information on card requirements,
see “Supplies and ca rd s” on page B-1.
Load cards
1 Lift the card cartridge up and out of the card cartridge cavity.
i
Pull up on the lower, rounded edge of the card cartridge to release the card
cartridge.
2 Fan cards (see Figure 2-3). Do not touch the surface of the cards.
Getting started
♦
74030c9
Figure 2-3: Fan cards
3 Place up to 100 blank cards into the card cartridge. Do not touch the surface of
the cards.
For magnetic stripe cards, the magnetic stripe faces down and is positioned
toward the front of the printer (see Figure 2-4). If your card design requires a
different orientation, position the magnetic stripe up and toward the front of the
printer.
For smart cards, position the card so the chip is up and toward the right side of the
printer.
i
If your cards are thicker or thinner than 0.030 inch (0.76 mm), the maximum
number of cards you can load varies.
User’s Guide for Express™ and Select™ Class Printe rs
Page 21
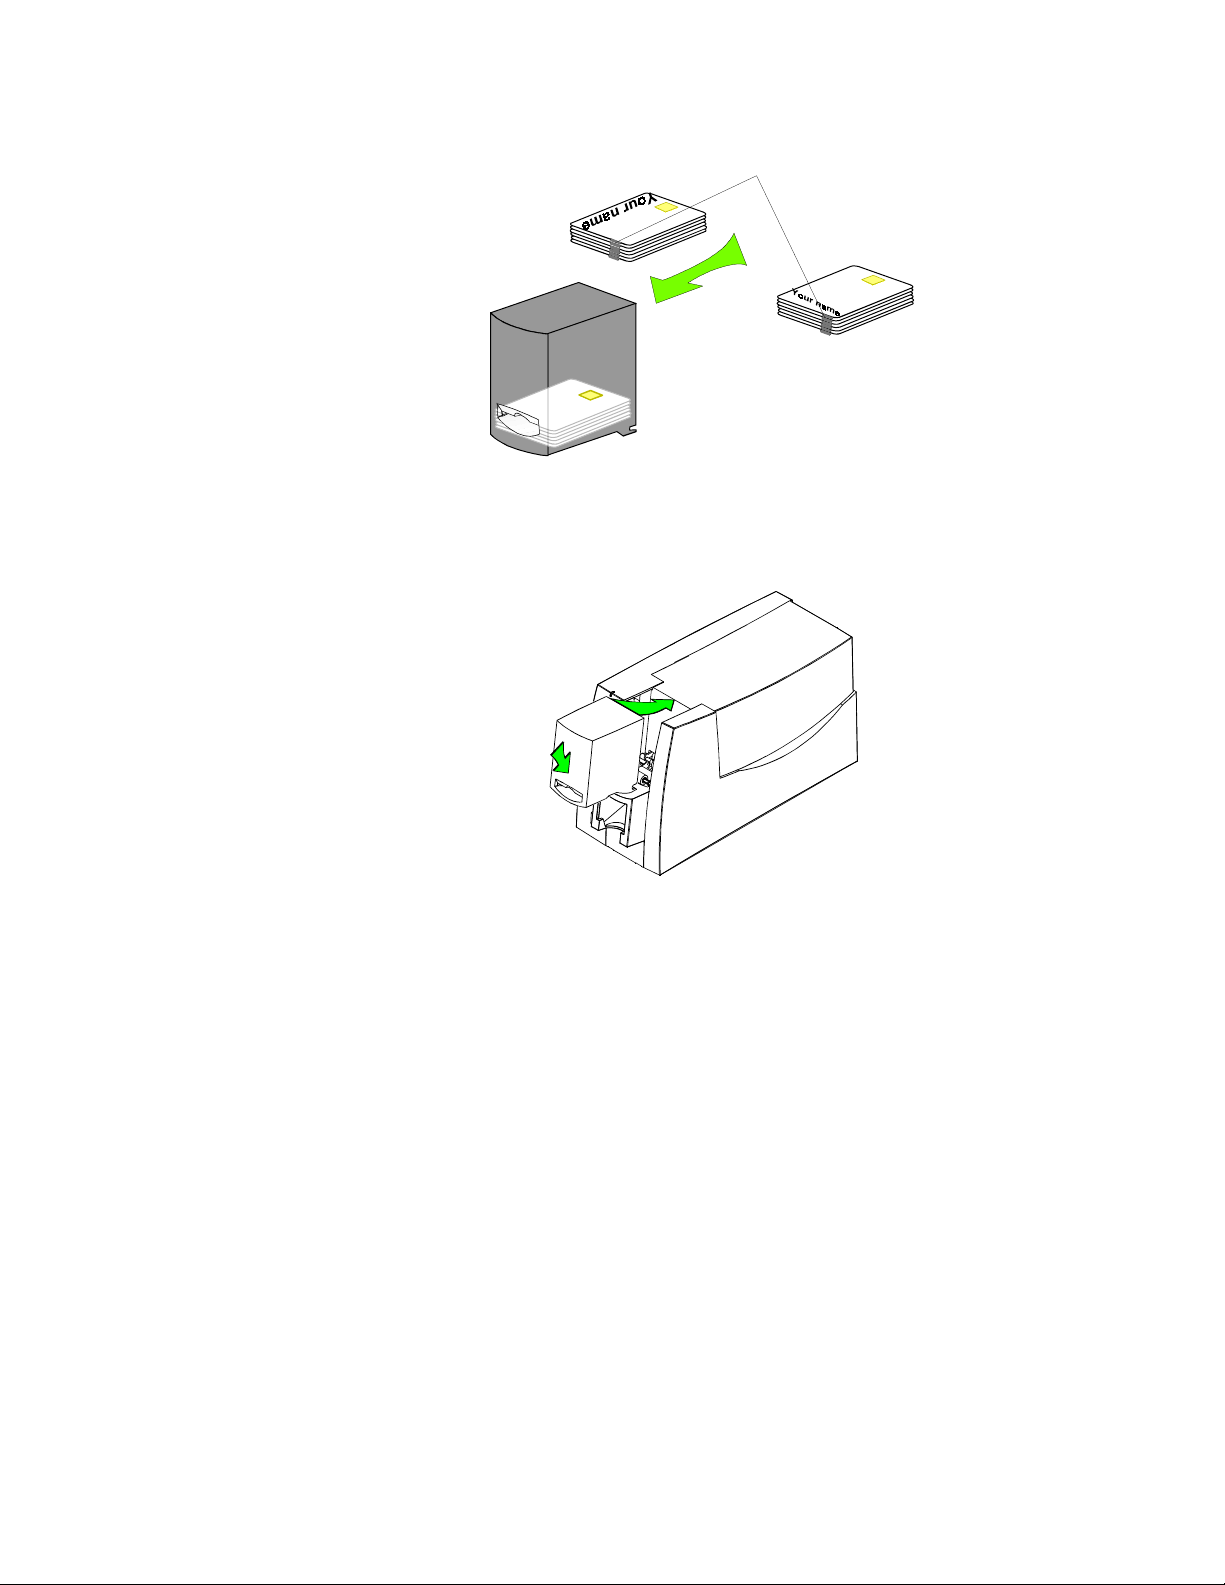
Getting started
2-7
Magnetic Stripes
Figure 2-4: Load cards into the card cartridge
4 Replace the card cartridge into the card cartridge cavity. Push the bottom of the
card cartridge toward the printer until it clicks into place (see Figure 2-5.).
2
Figure 2-5: Replace the card cartridge
Loading the print ribbon
The printer uses print ribbon with color panels, continuous color, or color and topcoat.
To order new ribbon, contact your service provider. See “Supplies and cards” on
page B-1 for ordering information.
1
iSEL007u
User’s Guide for Express™ and Select™ Class Printers
Page 22

2-8
Getting started
Remove the print ribbon cartridge
1 Lift the top cover, as shown in Figure 2-6.
Figure 2-6: Open the cover
2 Press down on the swing arm (see Figure 2-7). The push latch releases the swing
arm. Lift the swing arm until it is fully open.
Figure 2-7: Open the swing arm
3 Grasp the ribbon cartridge handle, and lift up to remove the print ribbon cartridge
(see Figure 2-8).
Ribbon supply
Figure 2-8: Remove the print ribbon cartridge
Ribbon take-up
♦
User’s Guide for Express™ and Select™ Class Printe rs
Page 23

Getting started
2-9
Load the print ribbon
1 If used print ribbon is in the printer, remove the used ribbon and used ribbon spool
from the ribbon cartridge shafts.
i
The print ribbon has a negative image of the information printed on the card.
Dispose of print ribbon according to your policy for protecting the data that might
be visible on it.
2 Unwrap the new print ribbon.
3 Slide the full supply roll onto the left ribbon cartridge shaft (see Figure 2-9).
4 Slide the empty take-up ribbon spool onto the right ribbon cartridge shaft. Leave
very little slack in the ribbon between the ribbon cartridge shafts (see Figure 2-9).
Ribbon supply
Figure 2-9: Load new print ribbon on the ribbon cartridge
Ribbon take-up
♦
Replace the print ribbon cartridge
1 Place the ribbon cartridge onto the ribbon cartridge supports, and press down until
it clicks into place (see Figure 2-10).
Print ribbon supply
Ribbon take-up
Figure 2-10: Replace the print ribbon cartridge
2 Close the swing arm, pressing it down until the push latch clicks into place.
3 Close the cover.
User’s Guide for Express™ and Select™ Class Printers
Page 24
2-10
4 If you are installing the print ribbon for the first time be sure to print a printer test
card after installing the printer driver. (See “Making and evaluating test cards” on
page 2-15 for more information.)
i
Set the print ribbon type or select autodetect. See “Working with printer settings
and data” on page 3-1 for steps to follow.
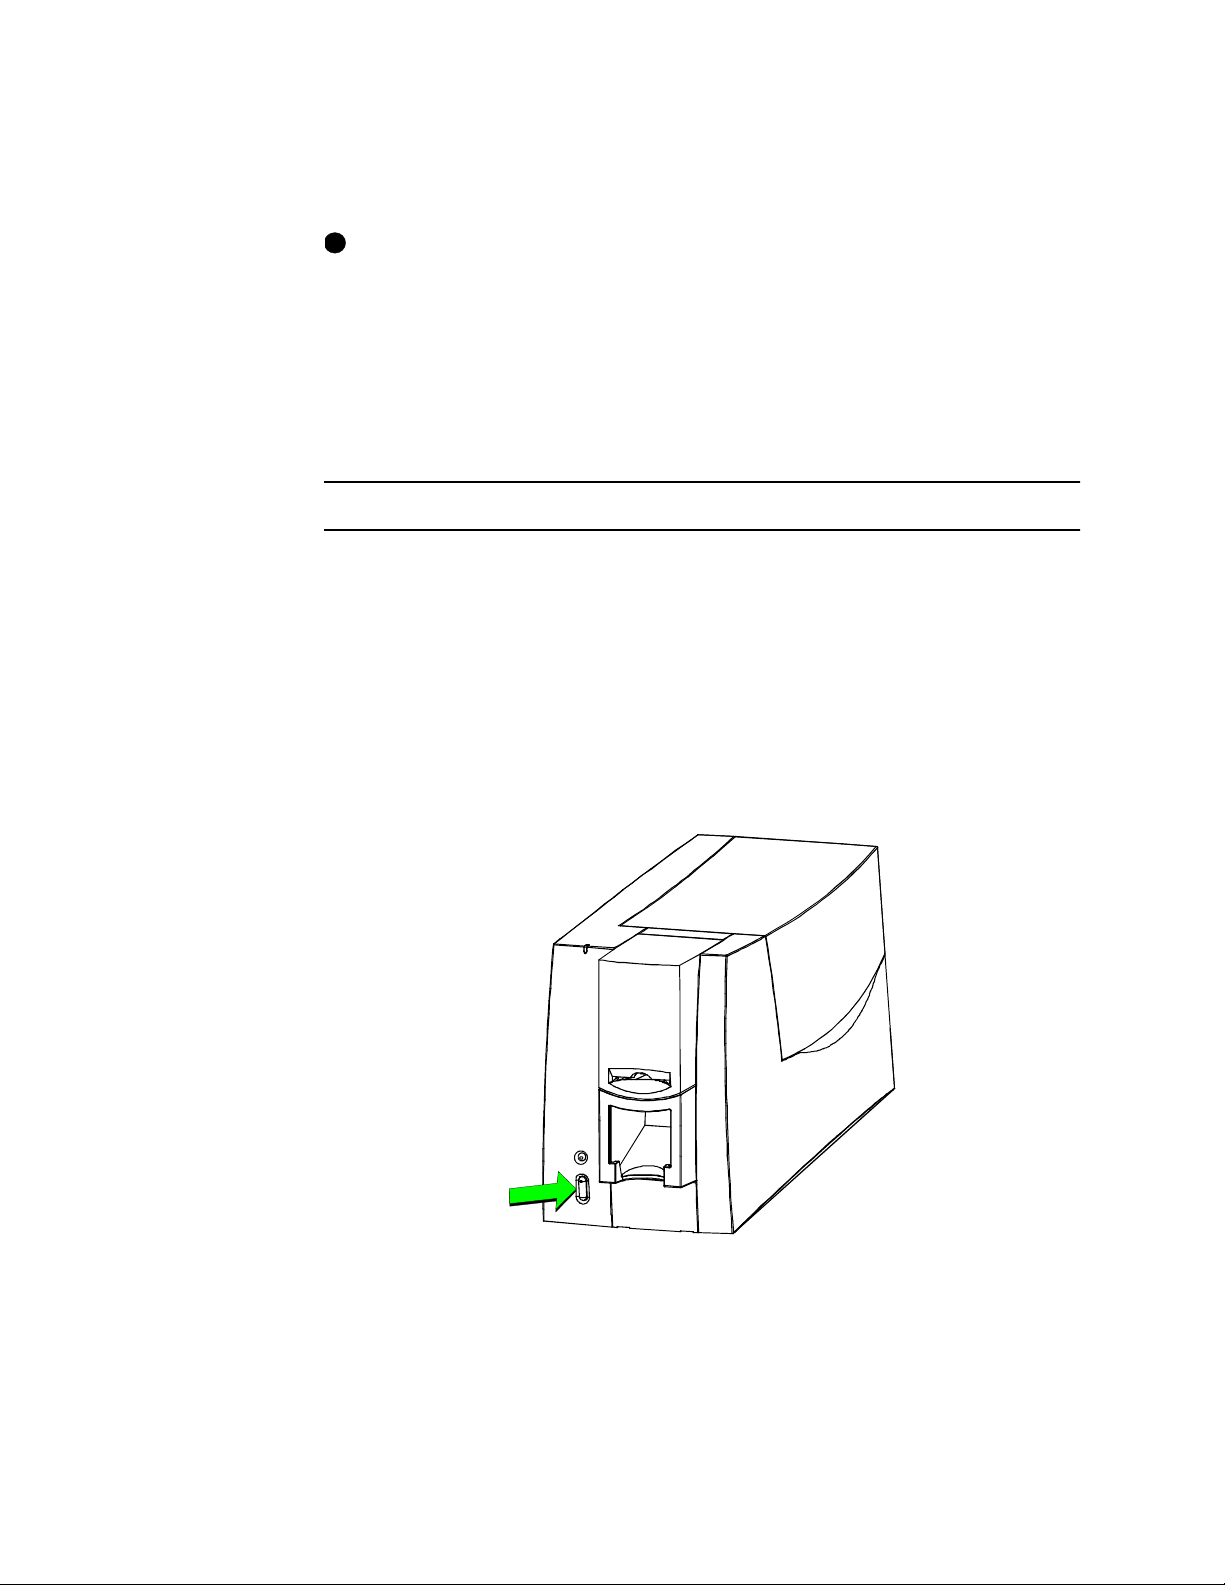
Powering on the system
Before installing the printer driver and before using the printer, follow these steps to
power on the printer.
Power on the printer
1 Make sure cards and all other supplies are loaded. See other sections of this
chapter for more information.
2 Remove any printed or rejected cards from the output stacker. See “Removing
cards” on page 3-9 for more information.
Getting started
♦
3 Make sure the power cord and interface cable are connected. If needed, see
“Connecting the printer” on page 2-4 for more information.
4 Press the printer Power button to turn on power. Observe the printer panel light.
See “Printer features” on page 1-4 for more information. The printer initializes all
components and makes audible sounds.
Figure 2-11: Turn on power to the printer
5 Press the PC Power button to turn on the power to the PC. Turn on power to any
other equipment needed.
User’s Guide for Express™ and Select™ Class Printe rs
Page 25

Getting started
E
i
The PC can be powered on before the printer; however, you should wait a few
minutes for the PC to obtain information from the printer. The PC power can also
remain on if the printer is powered off.
♦
Installing the printer driver
The Express or Select printer comes with different printer drivers for the Microsoft
Windows 95/98 and Windows NT operating systems. The printer driver is shipped with
the printer on diskettes.
i
If you have installed an Express or Select class driver and want to update to the
most recent printer driver, see “Reinstalling the printer driver” on page 5-1.
Installing the Windows 95/98 printer driver
i
To install a second printer driver of the same class on a PC running Windows 95/
98, see “Installing two printers (Windows 95/98)” on page 5-5. (You cannot install
a second printer driver on a PC running Windows NT.) Do not install two printer
drivers unless you have connected two printers to the PC.
2-11
Install the printer driver on Windows 95/98
i
A PC running Windows 95/98 automatically detects new hardware at PC power
on. If you power off the PC, attach the printer and power it on, and then power the
PC back on, the PC displays a message asking if you want to install the new
printer. Begin with step 6 below.
1 Make sure the printer is connected to the PC and powered on.
2 Close all applications. Do not close Windows.
3 Insert the first Windows 95/98 printer driver diskette into the disk drive of the PC.
4 Select Settings and then Printers from the Windows Start menu. The Printers
window appears.
5 In the Printers window, double-click on the Add Printer icon.
6 When the Manufacturers list appears, select the Have Disk button. If needed, click
on the Browse button to select the printer driver diskette location.
7 Select the port to which you have connected the printer.
8 In the Printer Name box, use the default name or change the printer name to
match the name on the front of your printer. For example, you might change
“Datacard Select Cl ass” to “ImageCard S2” or “UltraGrafix S”. Do not use the <>:"/
\ and | characters in the name.
9 Remove the diskette and insert the next diskette when prompted.
User’s Guide for Express™ and Select™ Class Printers
Page 26

2-12
Getting started
– A Version Conflict dialog might appear as the installer copies files. Select Y es
to keep the existing files on your PC.
– A Code Page Mismatch dialog might appear. Select Yes to keep the existing
files on your PC.
10 Remove the last diskette. A message will appear that prompts you to restart
Windows: Follow the prompt.
1 1 If a message prompts you to run the firmware update utility, follow the prompt. Do
NOT power off the printer while running the firmware update utility.
12 After installing the printer driver, there are several other tasks you might need to
perform. They are:
– Select whether to print on two sides (duplex printing).
– Select the ribbon type before printing a test card. See “Working with printer
settings and data” on page 3-1 for steps to follow.
– If you use a print ribbon with a topcoat (T) panel, select the topcoat pattern for
the front of the card, the back of the card, or both.
– If the printer has a magnetic stripe module, select the magnetic stripe
coercivity and encoding format. See “Working with printer settings and data”
on page 3-1 for steps to follow.
i
The card creation application might send settings with cards which override
the settings you make in the Properties dialog box.
13 Print a Windows test page to verify that the printer and driver are working. See
“Print the Windows test page” on page 2-17 for more information.
♦
Installing the printer driver on Windows NT
Use the following steps to install the printer driver on PCs running Windows NT.
i
If you move the printer from a PC running Windows 95/98 to a PC running
Windows NT 4.0, use the printer Properties dialog box on Windows 95/98 to set
“Always autodetect” before moving the printer.
i
One Express, Select, or Magna Class, or ImageCard IV printer can be installed on
the PC at a time. If you have a printer driver for Datacard printer installed on this
PC, see “Reinstalling the printer driver” on page 5-1 for steps to follow.
Install the printer driver on Windows NT
i
Use the Express or Select printer driver for Windows NT only with a PC that runs
Windows NT 4.0 with Service Pack 3 or higher. The printer driver is not supported
for PCs with Alpha, MIPS, or PowerPC processors.
1 Make sure the printer is connected to the PC and powered on.
User’s Guide for Express™ and Select™ Class Printe rs
Page 27

Getting started
2-13
2 Be sure you are logged in to the Windows NT system as the administrator before
starting this procedure.
3 Close all open applications. Do not close Windows NT.
4 Insert the first Windows NT printer driver diskette into the disk drive of the PC.
5 Select Settings and then Printers from the Start menu.
6 In the Printers window, double-click on the Add Printer icon. (Only the
administrator can use this icon to install the printer driver on the PC.)
7 Select the “My computer” choice, and not the “Network” choice. If the “My
computer” choice is not available, make sure you have logged on as the
administrator.
8 Select the port to which you have connected the printer.
– Do not select the “Enable printer pooling” choice when installing the printer
driver.
9 When the Manufacturers list appears, select the Have Disk button. If needed,
select the Browse button to specify the location of the printer driver diskette.
10 Make sure the printer has a unique name on the PC. If you change the printer
name, do not use the <>:"/\ and | characters in the name. The PC will not be able
to enable the driver if you use those characters.
– Printer sharing is not supported by the current version of the printer driver for
Express Class printers. Select Class printers can be shared.
1 1 Do not print a test page as part of the installation. Y ou must select the ribbon type
before printing a test page.
– A Version Conflict dialog might appear during the installation. If so, select Yes
to keep the existing files on your PC.
12 Remove the current diskette and insert the next diskette when prompted.
13 Remove the diskette and restart Windows NT when prompted after the printer
driver is installed.
i
If the “print a test page” choice remained selected, you might see messages
regarding the test page at the same time as the prompt to restart Windows NT.
14 When the PC restarts, log in as the administrat or again .
15 If a message appears prompting you to update the printer firmware, follow the
prompt. Do NOT power off the printer while running the firmware update utility.
16 After installing the printer driver, there are several other tasks you might need to
perform. They are:
a Set permissions to the printer for other users of the PC to support printing or
to prevent access to the printer. See “Setting printer permissions” on
page C-3.
b Select whether to print on two sides (duplex printing). See “Working with
printer settings and data” on page 3-1 for steps to follow.
User’s Guide for Express™ and Select™ Class Printers
Page 28

2-14
Getting started
c Select the print ribbon type before print a test card. See “Working with printer
settings and data” on page 3-1 for steps to follow.
d If you use a print ribbon with a topcoat (T) panel, select the topcoat pattern for
the front of the card, the back of the card, or both. See “Working with printer
settings and data” on page 3-1 for steps to follow.
e If the printer has a magnetic stripe module, select the magnetic stripe
coercivity and encoding format. See “Working with printer settings and data”
on page 3-1 for steps to follow.
i
The card creation application might send settings with cards which override
the settings you make in the Document Default Properties dialog box.
f Make sure that users of the printer have permission to write files to the temp
file location specified in the PC configuration. If the temp file location is not
specified, the driver uses the root location for the printer driver, WINNT.
17 Print a Windows test page card from the PC to verify that the driver is installed
correctly. See “Print the Windows test page” on page 2-17 for steps to follow.
i
If you downloaded the driver from the Internet, you can delete the folders created,
such as disk1, from your hard drive after installing the driver. You can also delete the
downloaded file.
Setup tips
♦
Make sure that:
•
The card cartridge is in place and contains cards.
•
The interface cable is connected to the parallel port of the printer and the ECP
parallel port of the PC.
•
If the PC has more than one parallel port, the port to which the printer is assigned
is the same as the port to which it is connected.
•
The parallel port is configured as an ECP parallel port in the PC’s BIOS. See “PC
settings” on page C-1 for more information.
•
Supplies are installed in all cartridges that you plan to use, and cartridges are
loaded correctly. See “Getting started” on page 2-1 for more information.
•
The printer is ready to print. The panel light on the printer should be steady green
when you send a test card. See “Printer features” on page 1-4 for more
information.
•
Use the Windows test page, not a card from a card creation application, to verify
that the printer and driver are working together.
User’s Guide for Express™ and Select™ Class Printe rs
Page 29
Getting started
Making and evaluating test cards
You can make two types of test cards.
Printer test cards verify the function of the printer. You print them using controls on
•
the printer. The appearance of the card is determined by the printer and the
modules installed in it.
The Windows test page, which you can print on a card, verifies that the PC and
•
printer work together. Y ou print them using the printer Properties dialog box on the
PC. The appearance of the card is determined by Windows.
E
You can also make sample cards, using your card creation application, to test
print quality and card design. Do not make sample cards until you make sure the
printer and driver work properly (by making a printer test card and Windows test
page).
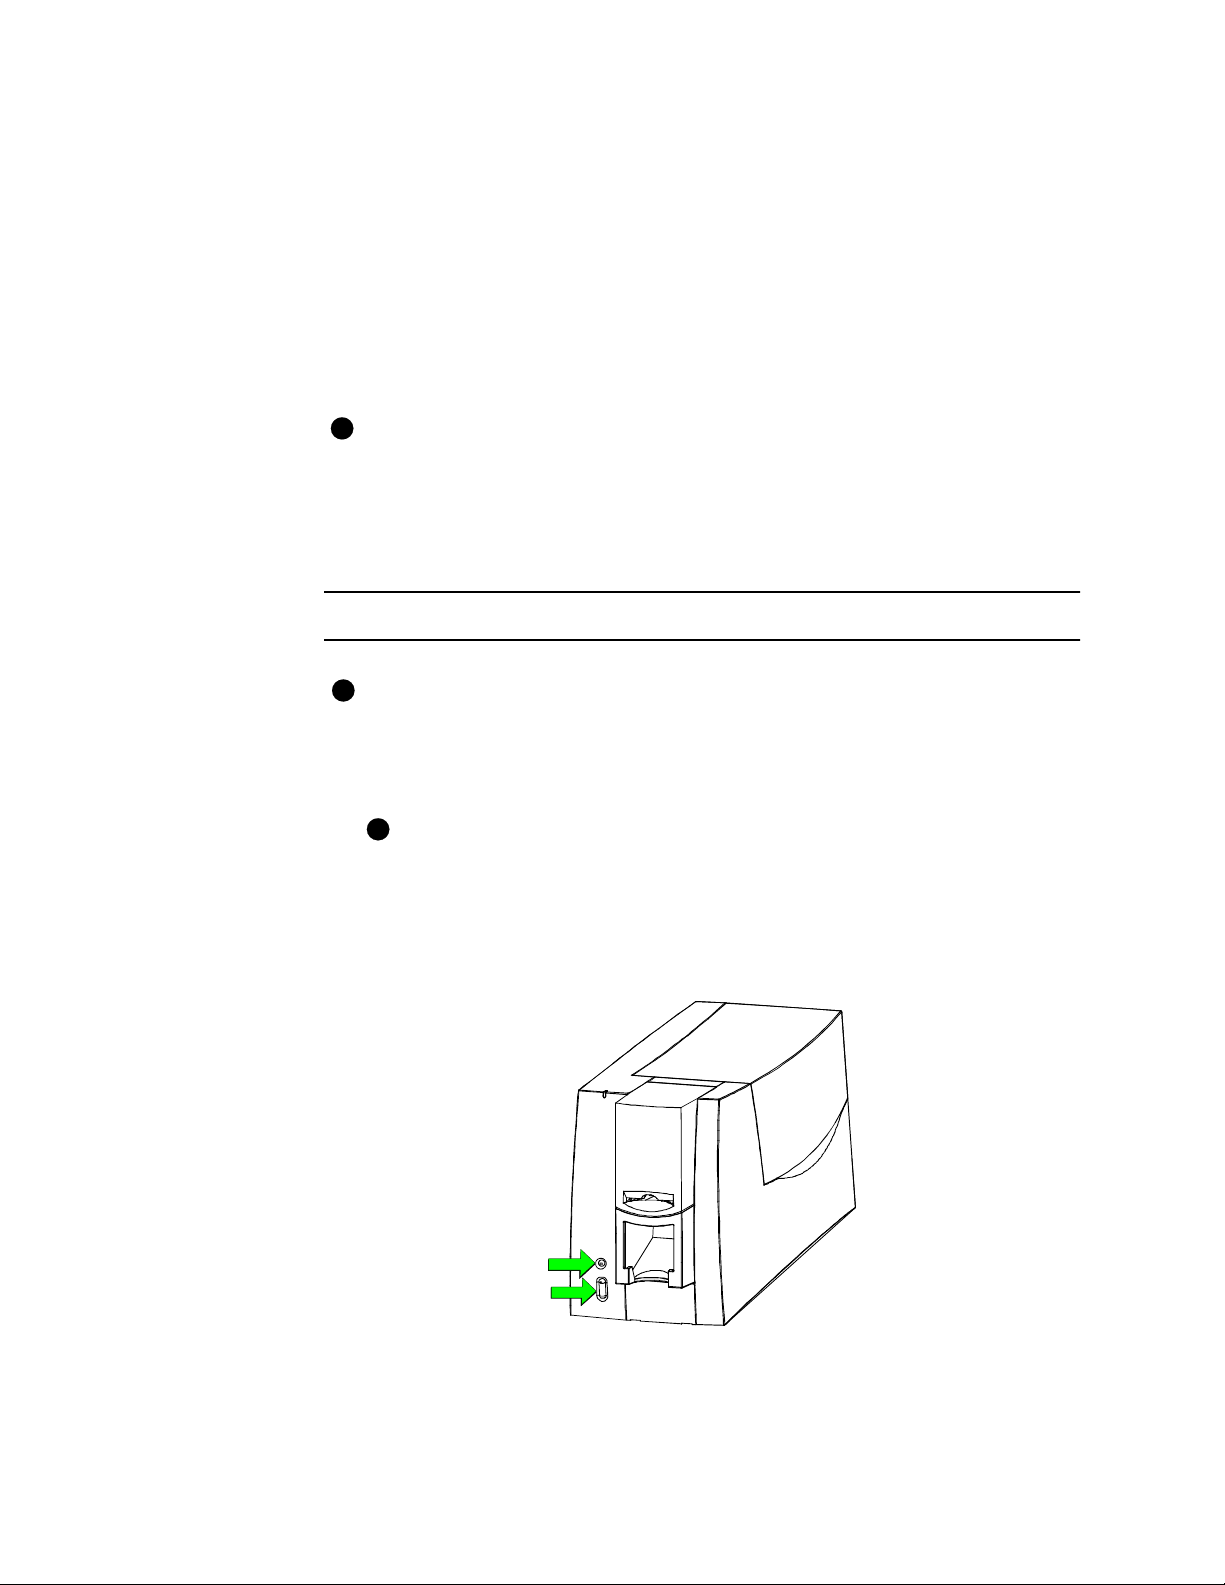
Follow these steps to make printer test cards on both the Windows NT 4.0 and
Windows 98 operating systems.
Make a Printer test card
2-15
E
The Express or Select printer does not need to be connected to a PC to print this
card.
1 Power off the Express or Select printer.
2 Confirm that all supplies are loaded. See “Getting started” on page 2-1 if needed.
E
If the printer has a magnetic stripe module, the cards for a printer test card
must have a magnetic stripe. If it is a three-track module, be sure to use the
high coercivity blank card shipped in the supplies kit.
3 Power on the Express or Select printer (2) while pressing and holding the Ready
button (1), as shown in Figure 2-12. Hold the button until the sound from the
internal components stops, usually about 30 seconds.
1
2
Figure 2-12: Press Power button (2) while you press and hold Ready button (1)
User’s Guide for Express™ and Select™ Class Printers
Page 30
2-16
4 Release the Ready button. You hear a series of tones.
Allow 30 to 60 seconds for the printer to begin printing the test card. The status
light will flash green while the Express or Select printer is processing the data.
5 Remove the card from the card output stacker.
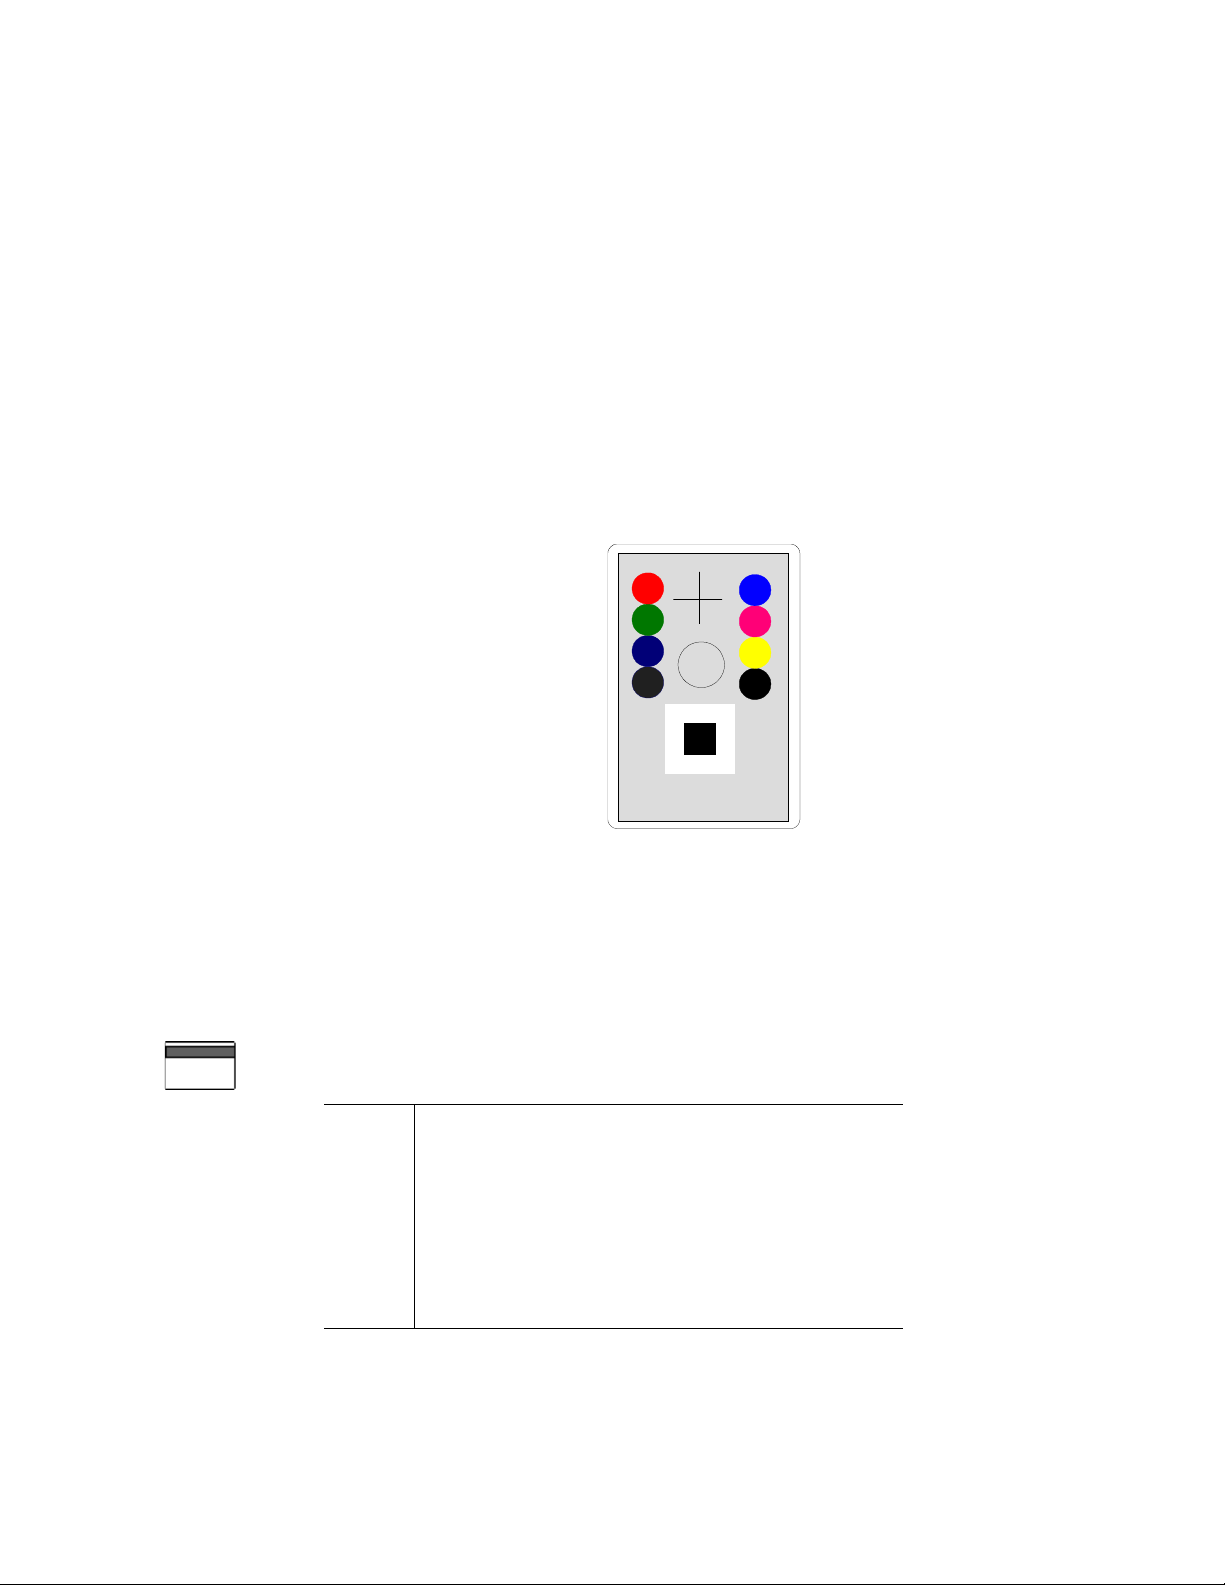
The printer test card is shown in Figure 2-13 on page 2-16.
If the printer test card did not print successfully, see “Setup tips” on page 2-14. If
needed, turn to “Troubleshooting” on page 6-1.
Printer test card
The printer test card is designed to perform most of the functions available in the
printer.
Getting started
♦
Figure 2-13: Printer test card
Check the following:
•
The test card has the pattern shown on the front of the card. The back of the card
is unprinted.
•
If a topcoat (T) panel is included in the ribbon and you select a ribbon type that
applies topcoat to the front of the card, the front of the card has topcoat applied.
•
If a magnetic stripe module is installed in the printer and enabled, the following
data is encoded on the card:
Track Format Data
Track 1 (IATA) TEST PATTERN IATA CHARACTER
SUBSET 0123456789
Track 2 (ABA) 012345678012345678990123456789
Track 3 (NTT) 0123456789=9876543210
Track 3 (TTS) 0123456789=9876543210
User’s Guide for Express™ and Select™ Class Printe rs
Page 31

Getting started
2-17
See “Magnetic stripe encoding” on page D-1 for more information about magnetic
stripe tracks.
The tracks available depend on the type of module installed.
•
If you are not satisfied with the appearance of the test card, see “Troubleshooting” on
page 6-1 to identify the problem and possible solutions.
Follow these steps to print a Windows test page on both the Windows NT 4.0 and
Windows 98 operating systems.
Print the Windows test page
E
i
The Express or Select printer must be connected to the PC with the driver
installed, and both printer and PC must be running.
1 Select Start from the Windows taskbar.
2 Select Settings and then Printers from the Windows Start menu. The Printers
window appears.
3 Click once on the Express or Select printer icon.
4 Select File from the Printers menu bar, and then select Properties. The Express or
Select Properties dialog box appears.
5 Select the Print Test Page button on the General tab. The card should print.
6 Remove the card from the card output stacker.
The card should look similar to the cards shown in Figure 2-14 and Figure 2-15. If
it does not print, see “Setup tips” on page 2-14.
Microsoft
:LQGRZV
&RQJUDWXODW
,I \RX FDQ
UHDG WKLV
LQIRUPDWLRQ
\RX KDYH
98
win98tp
Figure 2-14: Windows test page, portrait orientation
User’s Guide for Express™ and Select™ Class Printers
Page 32

2-18
Getting started
Win
Microsoft
:LQGRZV
NT
NT
Print
winNTtp
Figure 2-15: Windows test page, landscape orientation
The Windows test page has a slightly different appearance when it is printed from
a network-connected client PC.
The Windows test page is generated by Microsoft Windows. The small size of the
card, compared to printer paper, means that some of the text is not printed on the
card.
♦
User’s Guide for Express™ and Select™ Class Printe rs
Page 33

Using the printer
3
This chapter provides information to help you run the Express
or Select printer effectively and efficiently. It describes:
How to work with printer settings and data
•
How to make cards
•
How to remove completed cards and rejected cards
•
How to respond to messages
•
How to shut down the system
•
Working with printer settings and data
E
At installation, the Express or Select printer driver uses default settings for the
printer. At setup, you need to view, change, and save printer and driver settings.
As you use the printer, you might change the card design and need to change
settings to reflect that, or you might need to view settings or data about the printer.
E
If you use a card creation application specifically designed to create cards, that
application might include card settings that override driver settings.
Printer driver settings and data are organized differently for Windows NT and
Windows 98. Use the section that applies to the operating system you use.
Settings and data for Windows NT
3
Settings that control the printing and personalization of the card are in the Default
Document Properties dialog box for the printer. These settings include:
Card design settings, such as landscape or portrait orientation
•
Topcoat pattern during the print cycle
•
Printer supplies used
•
Cleaning interval
•
Magnetic stripe encoding formats and coercivity
•
The Default Document Properties dialog box also provides access to the About dialog
box, which shows the printer driver version.
Settings that control the non-printing operation of the printer are in the Properties
window for the printer. These settings include:
Port to which the printer is attached
•
User’s Guide for Express™ and Select™ Class Printers
Page 34

3-2
Using the printer
•
Permissions for other users of the PC
E
The Express or Select printer driver provides help for the Default Document
Properties dialog box and Windows NT provides help for the Properties dialog
box. Help provides information about specific settings of the Express or Select
printer driver. Help does not include step-by-step procedures or detailed
conceptual information.
Use the Properties dialog box
Make sure the printer power is on and the printer is connected to the PC.
1 Select Start from the Windows NT taskbar.
2 From the Windows NT Start menu, select Settings and then Printers. The Printers
window appears.
3 Click once on the Express or Select printer driver icon.
4 Select File from the Printers menu bar, and then select Properties. The Express or
Select Properties dialog box appears.
Figure 3-1: Express or Select Properties dialog box, Windows NT
5 Select the tab that contains the information you want to view or change.
6 If you make changes, click OK to save the settings and close the dialog box. If you
do not want to make changes, click Cancel to close the Properties dialog box.
7 If you change the port, reboot the PC and power cycle the printer.
♦
User’s Guide for Express™ and Select™ Class Printe rs
Page 35

Using the printer
3-3
Use the Default Document Properties dialog box
Make sure the printer power is on and the printer is connected to the PC.
1 Select Start from the Windows NT taskbar.
2 From the Windows NT Start menu, select Settings and then Printers. The Printers
window appears.
3 Click once on the Express or Select printer driver icon.
4 Select File from the Printers menu bar, and then select Document Defaults. The
Express or Select Default Document Properties dialog box appears.
Figure 3-2: The Express or Select Default Document Properties dialog box for
5 Select the tab that contains the information you want to view or change. On the
Advanced tab, click the plus sign (+) if needed to see all selections available.
When you click a selection, choices appear in the “Change
value you want.
E
If the selections you want to use are not available (are grayed out), make sure the
feature is available in the printer. Also make sure that the printer is powered on
and connected to the PC and resume the Status Monitor. See “Opening and using
the Status dialog box” on page 3- 6.
E
To view help for settings, click on the What's This help button and then click
any setting in the Printer Features list. A list of settings is displayed. Select the
setting for which you want help.
User’s Guide for Express™ and Select™ Class Printers
Windows NT
. . .
“ box. Click the
Page 36

3-4
6 If you make changes, or if this is the first time you have viewed the Document
Default Properties dialog box, click OK to save the settings and close the dialog
box.
Settings and data for Windows 98
Settings that control the printing and personalization of the card include:
•
Print on both sides (duplex printing)
•
Card design settings, such as landscape or portrait orientation
•
Topcoat pattern during the print cycle
•
Printer supplies used
•
Cleaning interval
•
Magnetic stripe encoding formats and coercivity
Data about the printer is available, including the "About" dialog box which shows the
printer driver version.
Using the printer
♦
Use the Properties dialog box
Make sure the printer power is on and the printer is connected to the PC.
1 Select Start from the Windows taskbar.
2 From the Windows Start menu, select Settings and then Printers. The Printers
window appears.
3 Click once on the Express or Select printer driver icon.
4 Select File from the Printers menu bar, and then select Properties. The Express or
Select Properties dialog box appears.
User’s Guide for Express™ and Select™ Class Printe rs
Page 37

Using the printer
3-5
Figure 3-3: Express or Select Properties dialog box, Windows 98
5 Select the tab with the information to view or change.
E
Select the Print on Both Sides setting before selecting the Print Ribbon Type and
Topcoat Pattern. The choices available for Print Ribbon Type and Topcoat Pattern
depend on the Print on Both Sides setting.
E
To view help for settings, click on the What's This help button .
6 If you make changes or if you have just installed the printer driver, click Apply to
save the settings. Click OK to close the dialog box. If you do not want to make
changes and have saved settings once, click Cancel to close the Properties dialog
box.
Using the Status Monitor
The Status Monitor tracks communication between the Express or Select printer and
its printer driver. The Status Monitor icon shows the state of communication between
them, listed in Table 3-4.
Table 3-4: Status Monitor icons
Icon Description Indicates
This Status Monitor
icon is white with
green.
♦
The Status Monitor is active and
communicating with the printer.
User’s Guide for Express™ and Select™ Class Printers
Page 38

3-6
E
Using the printer
Table 3-4: Status Monitor icons
This Status Monitor
icon is gray.
This Status Monitor
icon is white with a
white excl amation
point in a red circle.
This Status Monitor
icon is white with a
blue magnifying
glass.
Use the Help button on the Status dialog box for more information about each window.
The Status Monitor is suspended
and not monitoring the printer for
status, including errors. The
Status Monitor automatically
suspends when the Express or
Select printer has not printed a
card for 30 seconds or more.
The Status Monitor is active but is
not communicating with the
printer. The printer might be off,
cables might be loose, or a
problem might exist.
The Status Monitor is in
diagnostics mode.
Use diagnostics when your
service representative asks you to
do so.
Opening and using the Status dialog box
You can use the Status dialog box to do the following:
•
View Status Monitor information
•
Run a cleaning cycle (see “Maintaining the printer” on page 4-1)
•
Exit the Status Monitor
•
Start or quit diagnostics
•
Start or quit advanced setup
Open the Status dialog box
•
Double-click on the Express or Select Status Monitor icon. The Status dialog box
appears.
User’s Guide for Express™ and Select™ Class Printe rs
Page 39

Using the printer
Figure 3-5: Status dialog box
Viewing Status Monitor information
3-7
The Status dialog box displays the following status information:
The top line displays the current state of the Status Monitor or printer.
•
The second line displays any messages.
•
The third line displays the current parallel port mode.
•
Exiting the Status Monitor
Exiting the Status Monitor stops the Status Monitor (program) and closes the Status
dialog box.
To exit or stop the Status Monitor, double-click on the Status Monitor icon and select
Exit. You should exit the Status Monitor when you receive instructions to do so.
E
You cannot exit the Status Monitor while printing a card.
Starting or quitting diagnostics
The Start Diagnostics button on the Stat us dialo g box changes the Express or Select
printer driver from printing mode to diagnostics mode. When you select this button, a
message appears informing you that printing of cards will stop in diagnostics mode.
E
Y ou cannot start diagnostics mode while printing a card. Wait until all cards are printed
and then click the Start Diagnostics button.
When you start diagnostics mode, additional tabs appear on the Status dialog box.
User’s Guide for Express™ and Select™ Class Printers
Page 40

3-8
The Quit Diagnostics button on the Status tab changes the Express or Select printer
driver from diagnostics mode to printing mode. When you select this button, a
message appears informing you that the printer will reset; you can resume printing
cards. The internal components will move into the position for printing cards.
E
If you have entered diagnostics mode and selected the Close button in the Status
dialog box, a message appears that allows you to quit diagnostics before closing
the Status dialog box.
Making cards
This section describes several ways to make cards using the Express or Select
printer.
•
Usually, cards are sent from a card creation application, which captures,
organizes, and formats the information on the card. A card creation application is
specially designed software that handles the types of information used on cards.
See “Use a card creation application” for the steps to follow.
•
If you do not have a card creation application, you can use another PC application
to format the information to print on cards. If you are encoding magnetic stripe
data, be sure to use an application in which you can save the result and edit it
again, such as Windows WordPad™. See “Print from a PC application” for the
steps to follow.
Using the printer
E
With any application, test your card design to verify the results.
Use a card creation application
1 Follow the instructions for the card creation application to capture, format, and
save the data for the card.
2 In the card creation application, send cards to the printer.
The printer driver receives data for each card, prepares the card for printing, and
sends each card to the printer in the order received. The printer driver keeps
cards in a queue if the printer is busy.
♦
Print from a PC application
1 Select the printer settings that correspond to the cards to print. See “Working with
printer settings and data” on page 3-1 for more information. Settings might include
the following:
– Enable two-sided printing if you plan to print the front and back of the
card.The printer must have a duplex module to print on both sides of the card.
– Set the margins for the area to print on the card. A setting of Edge-to-Edge is
the same as a margin of 0.
User’s Guide for Express™ and Select™ Class Printe rs
Page 41

Using the printer
3-9
– Set the magnetic stripe format and coercivity if you plan to encode magnetic
stripe data.
2 In the application, select the Express or Select printer as the current printer.
3 Using the application's page setup feature, set the paper size to CR80 Card 2.13"
x 3.38." Set all the margins to the same value as the driver. (You can set the
margins in the application wider than the driver, if desired.)
4 Select the orientation for the card design—either portrait or landscape.
5 Format the text to print using a TrueType ( ) font. T o print using the true black (K)
panel of the print ribbon, use the Black color selection. All other colors are printed
using the color panels of the print ribbon if you use a color print ribbon.
6 To print on the front of the card, keep data on one page. To print the front and
back of the card, send a two-page document. (Make sure printing on both sides is
enabled.)
7 Also on the front of the card, enter the information to be encoded on the magnetic
stripe and format the text using one of the following fonts:
– Track 1—Magnetic Stripe
– Track 2—Magnetic Stripe
– Track 3—Magnetic Stripe
– Track NTT—Magnetic Stripe
E
Windows must be set to display all fonts. (Some PC’s are set to display
TrueType fonts only.) See Windows help for more information.
The text for one magnetic stripe track must be on one line. The text must use the
default type size of 3.5 or 4 points to keep characters on the same line. To view
the characters, zoom in on the text. Also, follow these guidelines:
– Do not use typographic features, such as letter spacing, on magnetic stripe
text.
– The paragraph style must be Normal.
– The magnetic stripe text, along with graphics and text to print on the front of
the card, must be on the first page.
8 When the card data is captured and formatted correctly, select the application’s
print function to send the card to print.
Removing cards
The card output stacker holds both completed cards and rejected cards. Remove
completed cards from the output stacker to distribute printed cards. The output
stacker holds up to 100 cards with a nominal thickness of 0.030 inch (0.76mm).
Remove rejected cards as soon as they are ejected from the printer so you do not
need to sort though all cards to locate them. Cards are rejected when a print job is
cancelled or when a problem occurs with personalizing a card.
♦
User’s Guide for Express™ and Select™ Class Printers
Page 42

3-10
You can remove cards when the printer power is on or off. You can remove cards
while the printer is printing. Completed and rejected cards are removed in the same
way.
Remove cards
1 Lift the cards from the card output stacker.
2 Dispose of partly processed cards according to your policies for handling the
confidential data that might be on the cards.
Responding to messages
The Express or Select printer provides information to the printer driver about the
status of cards being processed. If the printer is not able to process and print a card,
the printer driver displays a message on the PC in response to this situation.
Most messages describe situations from which the operator can recover. These
messages include a Help button, where information about recovering from the
situation is available. Typical messages might indicate that the print ribbon needs to
be replaced or that a card is stuck. See the “Fix a printer problem” procedure that
follows.
Using the printer
♦
i
If a message box appears, only use the buttons on the message box to respond
so that both the printer driver and printer can return to normal operation.
Figure 3-6: Typical message
If a message appears repeatedly and you cannot reliably correct the situation, service
might be required.
Service is required if an error such as the following occurs.
Figure 3-7: Service-required message
If the Express or Select printer driver displays a message that begins with “Service
required,” contact your service representative for assistance. Do not attempt to fix the
User’s Guide for Express™ and Select™ Class Printe rs
Page 43

Using the printer
3-11
error without the assistance of your service representative because you might
damage the printer.
E
Before you call your service representative, write down the following:
– The messa ge and mes sage number.
– The serial number of your Express or Select printer, located on the bottom
panel.
– The driver version, described in “Working with printer settings and data” on
page 3-1.
For more information about obtaining service, see “Obtaining service” on page 6-9.
Fix a printer problem
1 When a message is displayed on the PC, follow the suggested action. Click the
Help button to identify the likely cause of the problem and the possible solution.
2 Follow the procedure provided in help or in this guide to fix the problem. For
example, to fix a broken ribbon or supply roll, follow the procedures in help.
Most parts of the printer designed to be used by the operator are colored green.
These parts include knobs for clearing jams and handles of supply cartridges.
3 After fixing the problem, close the cover of the printer.
4 Depending on the situation, the message box might be removed automatically or
you might need to respond. Cards still in the printer might be ejected. Message
responses include:
– If a Retry button is available, the driver sends the card or cards to the printer
again. If the problem is corrected, normal operation resumes.
– If a Cancel button is available, the card is not sent to print again. If the
problem is corrected, normal operation resumes.
– If only an OK button is available, the message occurred when no card was
being printed or the problem requires service. If the problem is corrected,
normal operation resume s.
– If the message box disappears automatically, decide whether to return to the
card creation application to send the card to print again.
Shutting down the system
Shut down the Express or Select printer and the PC to which it is attached when you
are done making cards for the day or will be away from the system for an extended
period of time. The printer and PC can be left on during lunch time and other short
breaks. Follow your security procedures when leaving the printer.
♦
User’s Guide for Express™ and Select™ Class Printers
Page 44

3-12
Using the printer
Shut down the printer and system
1 Make sure all cards have completed processing before turning off the power.
2 Press the Power button to turn off power to the printer.
Figure 3-8: Press the power button to power off the printer
3 Follow your policy to secure unprinted card stock, supplies, and printed cards.
4 Close PC applications and power off other equipment (including the PC) following
the procedure established.
♦
User’s Guide for Express™ and Select™ Class Printe rs
Page 45

Maintaining the printer
4
This chapter provides information to help you maintain the
Express™ or Select™ Class printer for optimal performance.It
describes:
How to use the printer cleaning card
•
How to use the magnetic stripe cleaning card
•
How to clean the rollers in the printer
•
How to clean the printhead
•
How to replace the printhead cartridge
•
Using the printer cleaning card
The printer requires regular cleaning, and prompts you when it is time to clean. The
default Cards between cleaning value depends on the printer.You can change the
number of cards between cleaning in the printer Properties or Default Document
Properties dialog box. You might want to clean more often if:
4
The cards, especially magnetic stripe cards, have particles on them
•
A monochrome ribbon is used
•
The printer is operated in a relatively dirty environment
•
You can run a printer cleaning card at any time, whether or not you have been
prompted. See “Suppl ie s and card s” on page B-1 for information about ordering the
printer cleaning card.
Run a printer cleaning card
1 Remove the card cartridge and set it aside.
E
If the print ribbon sticks to the printer cleaning card, remove the print ribbon
and repeat this procedure with a new printer cleaning card.
2 Peel the protective paper packing from both sides of the printer cleaning card.
Figure 4-1: Printer cleaning card
User’s Guide for Express™ and Select™ Class Printers
Page 46

4-2
Maintaining the printer
3 Insert the printer cleaning card near the bottom of the card cartridge cavity (see
Figure 4-2). The card is inserted as shown for all models except Express Class
printers with a smart card module. For those printers, turn the card over so the
arrow in on the bottom and the smart card icon is on top (see Figure 4-3).
Figure 4-2: Insert the printer cleaning card
Figure 4-3: Cleaning card orientation for Express Class printers with a smart
card module
4 Start a cleaning cycle by doing one of the following:
– Click the OK button when the printer driver displays the “printer requires
cleaning” message. (If you do not click OK, the message appears each time
you print a card, until you use the printer cleaning card.)
– Open the Status dialog box by double-clicking the icon. Click the Printer
button in the Clean area.
5 The printer cleaning card is ejected on the left side of the printer, under the card
cartridge.
6 Discard the used printer cleaning card.
7 Replace the card cartridge. Push the bottom of the card cartridge until it clicks into
place.
The printer module is cleaned and the printer is ready to resume normal
operation.
♦
Using the duplex cleaning card
scclean
If the model of your printer is S2, use the duplex cleaning card to maintain card quality
and reduce the likelihood of jammed cards in the duplex module. Use the duplex
User’s Guide for Express™ and Select™ Class Printe rs
Page 47

Maintaining the printer
cleaning card once a month or when problems occur, such as repeated card jams in
the duplex module. See “Supplies and cards” on page B-1 for ordering information.
Use the duplex cleaning card
1 Remove the card cartridge and set it aside.
2 Peel the middle strip of protective paper from both sides of the duplex cleaning
3 Insert the duplex cleaning card near the bottom of the card cartridge cavity (see
i
If the print ribbon sticks to the duplex cleaning card, remove the print ribbon
and repeat this procedure with a new duplex cleaning card.
card.
The outside protective paper strips must stay on the card.
Keep
Remove
Keep
Figure 4-4: Duplex cleaning card
Figure 4-5).
4-3
Figure 4-5: Insert the duplex cleaning card
4 Open the Status dialog box by double-clicking the icon.
5 Click the Duplex button in the Clean area.
The printer automatically runs the duplex cleaning process and ejects the card in
the output stacker when it is complete.
6 Remove the used cleaning card and discard it.
User’s Guide for Express™ and Select™ Class Printers
Page 48

4-4
7 Replace the card cartridge. Push the bottom of the card cartridge until it clicks into
place.
The duplex module is clean and the printer is ready to resume normal operation.
Maintaining the printer
♦
Using the magnetic stripe cleaning card
The printer’s magnetic stripe module should be cleaned when the printer has
displayed several magnetic stripe errors that list running the magnetic stripe cleaning
card as a solution. See “Supplies and ca rd s” on page B-1 for information about
ordering magnetic stripe cleaning cards.
!
Do not use the magnetic stripe cleaning card more than once every 2000 cards or
excessive wear can result.
Run the magnetic stripe cleaning card
1 Insert a magnetic stripe cleaning card into the exception card slot. Make sure the
arrow is on top and pointing into the printer. (You can also remove the card
cartridge and place the cleaning card on the card input rollers.)
Figure 4-6: Insert the magnetic strip e cleanin g card
!
Do not peel off the blue stripe on the back of the card.
2 Open the Status dialog box by double-clicking the icon.
3 Click the Clean Magnetic Stripe button.
The printer automatically runs the magnetic stripe cleaning process and ejects the
card in the output stacker when it is complete.
User’s Guide for Express™ and Select™ Class Printe rs
Page 49

Maintaining the printer
4 Remove the used magnetic stripe cleaning card. The card can be used again.
Cleaning the printer rollers
The rollers in the printer move the card into position to begin operations, such as
printing, and move the card during operations. Clean the rollers once a month or when
problems occur, such as repeated card jams. To clean rollers, use:
Lint-free cloth
•
T960 citrus solvent (part number TUL003-007) OR Isopropyl alcohol (ISA)
•
Clean printer rollers
1 Power off the printer, and disconnect it from the power source.
2 Open the status monitor by double-clicking the printer icon.
i
Make sure that printing of cards is complete before starting diagnostics.
4-5
♦
3 Click the “Start Diagnostics” button, and click Yes to start diagnostics. Additional
tabs appear on the Status dialog box.
4 Click the Motor/Sensor Tests tab.
5 Clean the two pick rollers:
a Remove the card cartridge.
b Moisten an area of the lint-free cloth with citrus solvent or isopropyl alcohol.
c Place the moist area of the cloth on the first pick roller, in the area of the card
cartridge (step 1 in Figure 4-7).
2
1
Figure 4-7: Clean the pick rollers
User’s Guide for Express™ and Select™ Class Printers
Page 50

4-6
Maintaining the printer
dClick “Pick Motor test” and then click the Start button.
e Repeat steps b through d until no dirt appears on the cloth.
f Repeat steps a through e, placing the cloth on the second pick roller (step 2 in
Figure 4-7).
g Replace the card cartridge.
6 Clean the transport area rollers:
a Open the cover and remove the print ribbon cartridge.
b Moisten an area of the lint-free cloth with citrus solvent or isopropyl alcohol.
c Place the moist area of the cloth on the first transport roller (step 1 in
Figure 4-8).
1
Figure 4-8: Clean rollers in the card track
dClick “Transport Motor test” and then click the Start button.
e Repeat steps b through d until no dirt appears on the cloth.
f Repeat steps b through e, placing the cloth on the second transport roller
(step 2 in Figure 4-8).
g Repeat steps b through e, placing the cloth on the double rollers (step 3 in
Figure 4-8).
h Replace the printer ribbon cartridge, close the swing arm, and close the cover.
7 If the printer has a duplex module, clean the exit roller.
a Open the duplex cover.
b Moisten an area of the lint-free cloth with citrus solvent or isopropyl alcohol.
c Place the moist area of the cloth on the exit roller (step 1 in Figure 4-8).
dClick “Transport Motor test” and then click the Start button.
2
3
4
e Repeat steps b and c until no dirt appears on the cloth.
f Close the duplex cover.
8 Connect the power cable to the power source and power on the printer.
User’s Guide for Express™ and Select™ Class Printe rs
Page 51

Maintaining the printer
9 Print a card to verify the quality of printing. You can print a Windows test page or a
card using your card creation application.
Cleaning the printhead
The printhead can have contamination stuck to it. You might notice it as unprinted
lines on printed cards. Clean the printhead only when needed, such as:
The printhead has been accidently touched, such as when changing supplies or
•
cleaning a card jam
You have replaced the printhead
•
Your observe problems with card appearance, as described in “Troubleshooting”
•
on page 6-1.
!
Do not touch the printhead with your fingers. The oils on your fingers can damage
the printhead.
Use isopropyl alcohol and a lint-free cloth to clean the printhead. Do not use a cotton
swab. The fibers from the cotton can stick to the printhead.
4-7
♦
Clean the printhead
1 Power off the printer, and disconnect it from the power source.
2 Press down on the swing arm. The push latch will release the swing arm. Lift the
swing arm until it is fully open.
3 Moisten the lint-free cloth with isopropyl alcohol.
4 Using gentle pressure, move the cleaning cloth back and forth along the full length
of the printhead edge. Be sure to clean the rounded edge of the printhead
completely.
5 Close the swing arm, pressing it down until the push latch clicks into place.
6 Connect the power cable to the power source and power on the printer.
7 Print a card to verify the quality of printing. You can print a Windows test page or a
card using your card creation application. If card quality is still inadequate, see
“Troubleshooting” on page 6-1.
♦
Replacing the printhead cartridge
The Express or Select printer uses an operator-replaceable printhead cartridge. For
more information about printhead cartridges, see “Supplies and cards” on page B-1.
User’s Guide for Express™ and Select™ Class Printers
Page 52

4-8
Maintaining the printer
Remove the printhead cartridge
!
Do not touch the printing edge of the printhead cartridge. If you do, clean it, as
described in “Cleaning the printhead” on page 4-7.
1 Power off the printer.
2 Open the top cover .
3 Push down on the swing arm. The push latch will release the swing arm. Lift the
swing arm up until it is fully open.
4 Put on the ESD strap and ground it. Follow the instructions with the strap.
5 Press down on the green printhead cartridge latch to release the printhead (step 1
in Figure 4-9).
Figure 4-9: Printhead cartridge latch lever
6 Lift the printhead cartridge up and off the swing arm (step 2 in Figure 4-9).
7 Push the locking tabs to the side. Remove the printhead cable from the printhead
cartridge (see Figure 4-10).
i
The printhead installed in your printer might have a slightly different location
for the printhead cable receptacle.
User’s Guide for Express™ and Select™ Class Printe rs
Page 53

Maintaining the printer
Replace the printhead cartridge
1 Push the printhead cable into the new printhead cartridge (see Figure 4-10). Make
4-9
Figure 4-10: Remove or replace the printhead cable
♦
sure the locking tabs are in place.
!
Do not press on the wires of the printhead cable.
2 Align the printhead cartridge pins with the printhead cartridge slots on the swing
arm (see Figure 4-11).
3 Slide the new printhead cartridge onto the swing arm, so the pins slide into slots
(step 1 in Figure 4-11).
4 Hold the printhead cartridge latch lever down (step 2 in Figure 4-11) and pivot the
printhead cartridge down toward the swing arm (step 3 in Figure 4-11).
2
Figure 4-11: Replace the printhead cartridge
User’s Guide for Express™ and Select™ Class Printers
Page 54

4-10
Maintaining the printer
Be sure that the tabs on the back of the printhead cartridge fit into the notches on
the swing arm spring bar securely (location A in Figure 4-11). Release the latch
lever when the printhead cartridge is in place.
5 Clean the printhead. See “Clean the printhead” on page 4-7.
6 Close the swing arm, pressing it down until the push latch clicks into place.
7 Gently pull the excess printhead cartridge cable out of the top of the swing arm.
8 Remove the ESD strap.
9 Close the cover.
10 Power on the printer.
1 1 Print a card to verify the quality of printing. You can print a Windows test page or a
card using your card creation application. If card quality is still inadequate, see
“Troubleshooting” on page 6-1.
♦
User’s Guide for Express™ and Select™ Class Printe rs
Page 55

Advanced Information
5
This chapter describes advanced tasks you might perform
using the printer driver. To perform the procedures in this
chapter, you should know how to use the printer to print cards
and be comfortable using the Windows NT or Windows 95/98
operating system. It describes:
How to reinstall the printer driver
•
How to install two printers on one PC
•
How to print over a network
•
The operational settings in the printer that you can change
•
Reinstalling the printer driver
Obtain the most current Express or Select Class printer driver from the Datacard Web
site at www.datacard.com. You can also request the current driver from your
Datacard-authorized representative. Be sure to obtain the correct printer driver for
your operating system--Microsoft Windows 95/98 or Windows NT.
5
i
To install a second printer driver of the same class on a PC running Windows 95/
98, see “Installing two printers (Windows 95/98)” on page 5-5. (You cannot install
a second printer driver on a PC running Windows NT.) Do not install two printer
drivers unless you have connected two printers to the PC.
Remove the existing printer driver
Follow these steps for Windows NT and Windows 95/98.
Remove the existing printer driver
i
Make sure that all jobs have been printed or have been deleted from the print
spooler before removing the existing driver. See Windows help to use the print
spooler.
1 Close all applications. Do not close Windows.
2 Select Settings and then Printers from the Windows Start menu. The Printers
window appears.
3 In the Printers window, click once on the printer icon to select it. The icon has the
name chosen during printer driver installation.
4 Press the Delete key.
User’s Guide for Express™ and Select™ Printers
Page 56

5-2
Advanced Information
5 When the confirmation prompt appears, select Yes to delete the existing printer
driver.
6 Restart the PC. DO one of the following:
– Select Yes for the prompt that asks if you want to restart Windows.
– Close the Printers window. From the Windows Start menu, select Shut Down,
and then select Restart from the dialog box.
♦
i
An Express or Select Class printer cannot be installed on the same PC as a
Magna Class or ImageCard IV printer. If you have a Magna Class or ImageCard
IV printer driver installed on this PC, see the User Guide for that printer to remove
the printer driver before installing an Express or Select printer.
Install the printer driver on Windows 95/98
1 Make sure the printer is connected to the PC and powered on.
2 Close all applications. Do not close Windows.
3 Insert the first Windows 95/98 printer driver diskette into the disk drive of the PC.
4 Select Settings and then Printers from the Windows Start menu. The Printers
window appears.
5 In the Printers window, double-click on the Add Printer icon.
6 When the Manufacturers list appears, select the Have Disk button. If needed, click
on the Browse button to select the printer driver diskette location.
7 Select the port to which you have connected the printer.
8 In the Printer Name box, use the default name or change the printer name to
match the name on the front of your printer. For example, you might change
“Datacard Select Cl ass” to “ImageCard S2” or “UltraGrafix S”. Do not use the <>:"/
\ and | characters in the name.
9 Remove the diskette and insert the next diskette when prompted.
– A Version Conflict dialog might appear as the installer copies files. Select Yes
to keep the existing files on your PC.
– A Code Page Mismatch dialog might appear. Select Yes to keep the existing
files on your PC.
10 Remove the last diskette. A message will appear that prompts you to restart
Windows: Follow the prompt. If a message prompts you to run the firmware
update utility, follow the prompt.
11 After installing the printer driver, there are several other tasks you might need to
perform. They are:
– Select whether to print on two sides (duplex printing)
– Select the ribbon type before printing a test card. See “Working with printer
settings and data” on page 3-1 for steps to follow.
User’s Guide for Express™ and Select™ Printers
Page 57

Advanced Information
5-3
– If you use a print ribbon with a topcoat (T) panel, select the topcoat pattern for
the front of the card, the back of the card, or both.
– If the printer has a magnetic stripe module, select the magnetic stripe
coercivity and encoding format. See “Working with printer settings and data”
on page 3-1 for steps to follow.
i
The card creation application might send settings with cards which override
the settings you make in the Properties dialog box.
12 Print a Windows test page to verify that the printer and driver are working. See
“Print the Windows test page” on page 2-17 for more information.
♦
Use the following steps to install the printer driver on PCs running Windows NT.
i
If you move the printer from a PC running Windows 95/98 to a PC running
Windows NT 4.0, use the printer Properties dialog box on Windows 95/98 to set
“Always autodetect” before moving the printer.
i
An Express or Select Class printer cannot be installed on the same PC as a
Magna Class or ImageCard IV printer. If you have a Magna Class or ImageCard
IV printer driver installed on this PC, see the User Guide for that printer to remove
the printer driver before installing an Express or Select printer.
Install the printer driver on Windows NT
i
Use the Express or Select printer driver for Windows NT only with a PC that runs
Windows NT 4.0 with Service Pack 4 or higher. The printer driver is not supported
for PCs with Alpha, MIPS, or PowerPC processors.
1 Make sure the printer is connected to the PC and powered on.
2 Be sure you are logged in to the Windows NT system as the administrator before
starting this procedure.
3 Close all open applications. Do not close Windows NT.
4 Insert the first Windows NT printer driver diskette into the disk drive of the PC.
5 Select Settings and then Printers from the Start menu.
6 In the Printers window, double-click on the Add Printer icon. (Only the
administrator can use this icon to install the printer driver on the PC.)
7 Select the “My computer” choice, and not the “Network” choice. If the “My
computer” choice is not available, make sure you have logged on as the
administrator.
8 Select the port to which you have connected the printer.
– Do not select the “Enable printer pooling” choice when installing the printer
driver.
9 When the Manufacturers list appears, select the Have Disk button. If needed,
select the Browse button to specify the location of the printer driver diskette.
User’s Guide for Express™ and Select™ Printers
Page 58

5-4
Advanced Information
10 Make sure the printer has a unique name on the PC. If you change the printer
name, do not use the <>:"/\ and | characters in the name. The PC will not be able
to enable the driver if you use those characters.
– Printer sharing is not supported by the current version of the printer driver for
Express Class printers. Select Class printers can be shared.
1 1 Do not print a test page as part of the installation. Y ou must select the ribbon type
before printing a test page.
– A Version Conflict dialog might appear during the installation. If so, select Y es
to keep the existing files on your PC.
12 Remove the current diskette and insert the next diskette when prompted.
13 Remove the diskette and restart Windows NT when prompted after the printer
driver is installed.
i
If the “print a test page” choice remained selected, you might see messages
regarding the test page at the same time as the prompt to restart Windows NT.
14 When the PC restarts, log in as the administrat or again .
15 If a message appears prompting you to update the printer firmware, follow the
prompt. Do NOT power off the printer while running the firmware update utiliry.
16 After installing the printer driver, there are several other tasks you might need to
perform. They are:
a Set permissions to the printer for other users of the PC to support printing or
to prevent access to the printer. See “Setting printer permissions” on
page C-3
b Select whether to print on two sides (duplex printing). See “Working with
printer settings and data” on page 3-1 for steps to follow.
c Select the print ribbon type before print a test card. See “Working with printer
settings and data” on page 3-1 for steps to follow.
d If you use a print ribbon with a topcoat (T) panel, select the topcoat pattern
from the front of the card, the back of the card, or both. See “Working with
printer settings and data” on page 3-1 for steps to follow.
e If the printer has a magnetic stripe module, select the magnetic stripe
coercivity and encoding format. See “Working with printer settings and data”
on page 3-1 for steps to follow.
i
The card creation application might send settings with cards which override
the settings you make in the Document Default Properties dialog box.
f Make sure that users of the printer have permission to write files to the temp
file location specified in the PC configuration. If the temp file location is not
specified, the driver uses the root location for the printer driver, WINNT.
17 Print a Windows test page card from the PC to verify that the driver is installed
correctly. See “Print the Windows test page” on page 2-17 for steps to follow.
User’s Guide for Express™ and Select™ Printers
Page 59

Advanced Information
i
If you downloaded the driver from the Internet, you can delete the folders created,
such as disk1, from your hard drive after installing the driver. You can also delete the
downloaded file.
♦
Installing two printers (Windows 95/98)
You can connect two Express or Select Class printers to a PC running the Windows
95 or Windows 98 operating system.
i
Two printers cannot be connected to a PC running Windows NT.
Install two printers on a Windows 95/98 PC
1 Make sure the PC has two ECP parallel ports. If the PC has only one parallel port,
obtain and install a second ECP parallel port on the PC.
2 On diskette 1 for the printer driver, locate the Readme.rtf file and open it using
Word, WordPad, or another text application. Follow the instructions in that file
(which are very similar to t hese instructions).
5-5
3 Install the printer driver for the first printer. Make sure to record the name and
printer port used for the printer. See “Installing the printer driver” on page 2-11.
4 Exit the Status Monitor for the first printer before installing the second printer
driver.
a Right-click on the printer icon in the right corner of the status bar.
b Select Exit from the popup menu.
5 Install the second printer driver (“Installing the printer driver” on page 2-11),
following these guidelines:
– Make sure the second printer uses a different name. If you keep the default
name for both printers, Windows will add the copy number (2) to the name for
the second printer.
– Make sure to use a different parallel port for the second printer.
– In the Add Printer wizard, select the “Replace existing driver” choice (not the
recommended “Keep existing driver” choice).
Using two printers
Follow these guidelines to use two printers attached to one PC.
If you plan to use both printers during a PC session, power on both printers and
•
then power on the PC.
♦
User’s Guide for Express™ and Select™ Printers
Page 60

5-6
•
View the title bar of messages for the name of the printer to which the message
applies.
•
Y ou can use the Datacard QuikWorks Printer Fanout Controller to print to multiple
Express or Select Class printers. This application requires QuikWorks V. 2.5 or
higher.
Network printing
This section describes how you can print to an Express or Select printer over a
network using Microsoft File and Printer Sharing.
E
Printer sharing is not supported for the Express Class printer on Windows NT.
The Express or Select printer drivers provide support for local printer sharing. When a
printer is locally shared, the printer is attached to one PC (host) on a network. Users at
other PCs on the network (clients) can print to the shared printer over the network. Up
to 10 client PCs can share the printer at one time. Users at client PCs do not have the
same level of access to the printer driver as a user at the local PC.
Advanced Information
♦
Two operating system configurations are supported:
•
Both the client and host PCs run Windows NT 4.0 Workstation with Service Pack
4 or higher installed.
•
Both the client and host PCs run Windows 98 (Second Edition).
Requirements for local printer sharing
Before sharing a printer over the network, meet the following requirements:
•
A network card is installed and working on each PC.
•
The same Windows operating system is installed and operating on each PC.
E
If you are installing both a network card and a service pack or Windows upgrade,
install the network card first and then install the service pack or upgrade. If you
installed a service pack or upgrade before installing a network card, you must
install the service pack or upgrade again.
•
The printer must be enabled for sharing. See Windows help for information on
enabling printer sharing.
•
The PC with the printer attached must remain on, and the Windows operating
system must be running. For Windows NT, a user with Full Control permission to
the printer must be logged on at the host PC so that other users can print.
•
For Windows NT, you must set up user permission to the client PC and user
permission to the host PC. See administrator information for Windows NT for
more information.
User’s Guide for Express™ and Select™ Printers
Page 61

Advanced Information
Printer and PC setup
This section shows the components you need to use the Express or Select printer with
local printer sharing.
Network:
does not address network setup or requi reme nts .
A network must be set up and working before you begin. This document
5-7
Figure 5-1: Printer sharing
Host PC:
connected to the network. For Windows NT, you need to set up users and access.
Parallel port connection:
of the host PC as though you were using it just from the host PC.
Client PC:
The host PC has the printer attached to its parallel port. It must be
The printer is connected to the ECP-capable parallel port
The client PC is connected to the host PC over the network.
Setting up printing over the network
To set up local printer sharing, do the following:
1 Install the printer driver on the host PC. See “Installing the printer driver” on
page 2-13 for more information.
2 Enable printer sharing. See Windows help for more information.
3 For Windows NT, set up an account for each user at the host PC.
4 For Windows NT, grant users' permission to the printer from the host PC,
including:
– Client PC users who have Print permission to the printer.
– Host PC users who also have Full Control permission to the printer.
– Host PC users who have No Access permission to the printer.
5 For Windows NT, set up an account for the user at the client PC.
6 Make sure client PC users can access the host PC from the network.
7 Install the printer driver on the client PC. See the following procedure.
User’s Guide for Express™ and Select™ Printers
♦
Page 62

5-8
Installing the printer driver on the client PC
If an Express Class, Select Class, ImageCard IV, or Magna Class printer driver is
installed on the client PC, delete the printer driver and reboot the PC.
Install the printer driver on the client PC
1 Make sure that the printer and driver on the host PC are working properly before
beginning this task.
2 Start Windows at the client PC.
E
For Windows NT, log onto the client PC as a user with access rights to the host
PC. You also need Print permission to the shared printer to open the Default
Document Properties dialog box and to print test cards.
3 Use Windows Explorer or Network Neighborhood to locate the host PC.
4 When you locate the host PC, click the icon for the host PC to display the Enter
Network Password dialog box. Type your password and click OK to log on to the
host PC. Keep the window open during printer driver installation.
Advanced Information
5 In the Printers window, double-click the Add Printers icon.
6 In the Add Printers wizard, select the following choices:
a Select "Network printer server" and not "My Computer."
b In the Connect to Printer window, wait while network printers appear in the
Shared Printers list.
c If needed, double-click a server name to see the names of printers attached.
Wait while the list appears.
d Select the printer to which the user will print. The printer name appears in the
Printer box.
Do not change the name of the printer when you install it at the client PC.
e Click OK to continue.
If you have not logged into the PC with the printer attached, you will receive a
message. Return to step 2 and repeat the procedure.
E
Y ou can use printer sharing on the host PC to print to an Express or Select printer
attached to another PC. Both printers must be Express or Select printers and both
printers must have different names. Install the Express or Select printer directly
attached to the PC first, and then follow the steps in this section to install the
second (network) printer.
♦
User’s Guide for Express™ and Select™ Printers
Page 63

Advanced Information
Perform management tasks at the host PC
The user at the host PC has more control over the printer. This section describes
some tasks performed at the host PC.
Figure 5-2: Host PC for printer sharing
i
For Windows NT, the user must be logged in as a user with Full Control
permission.
5-9
Manage all jobs in the print queue.
•
in the print queue and to pause or delete any jobs in the print queue, no matter
who submitted the job. See Windows help for information on using Print Manager.
See and respond to messages.
•
card, the printer driver displays a message on the host PC. You can see the
message and view help, which guides you in resolving the situation. Printing for all
users is suspended until the situation is resolved. See “Responding to messages”
on page 3-10 for details.
On Windows NT, set printer values, such as ribbon type, for all users.
•
values you set in the Document Default Properties dialog box apply to all users.
Several values can be changed at client PCs, but those values apply only to the
print jobs being sent. Values you set are used at client PCs after the client PC
queries the host PC. Open the Default Document Properties dialog box at each
client PC after setting values at the host PC to query the host PC. (You can close
the dialog at the client PC after viewing it.) If you do not open the Default
Document Properties dialog, the client PC does not query the host PC, the first
card printed will not use the new settings, and you will need to send the card to
print again.
On Windows 98, set values, such as the cards between cleaning, that
•
control card processing for all users.
Cards between cleaning, and Mag Stripe encoding attempts apply to all users.
Record the ribbon type so you can set it correctly at the client PC.
You can use Print Manager to view all jobs
If the printer is not able to process and print a
The values you set for Ribbon type,
The
View printer status.
•
Status Monitor and view printer status. See “Using the Status Monitor” on
page 3-5 for details.
Use diagnostics and advanced setup.
•
host PC provides access to diagnostics and advanced setup, where you can
change some settings (such as the position of printing) and run tests with the
User’s Guide for Express™ and Select™ Printers
The host PC runs the Status Monitor. You can open the
The Status Monitor dialog box on the
Page 64

5-10
guidance of your service representative. See“Starting or quitting diagnostics” on
page 3-7 for details.
Run the firmware update utility.
•
to run the firmware update utility. The utility works only from a PC with the printer
connected to its parallel port.
The host PC displays a prompt when you need
Using the printer from the client PC
Users at the client PC can perform several actions, including:
Figure 5-3: Client PC for printer sharing
E
For Windows NT, users at the client PC must be logged into the host PC and must
have Print permission to the printer.
Advanced Information
Print a card using an application at the client PC.
•
an application to print cards by selecting the Express or Select printer as the
printer. See “Making cards” on page 3-8 for details.
Print a card using an application and magnetic stripe fonts from the client
•
PC.
When you print from an application such as Microsoft Word, you can type text
and format it using fonts provided by the printer driver. See “Making cards” on
page 3-8 for details.
For Windows 98, set card design values.
•
Host PC. For other settings, such as Magnetic stripe encoding format, Print on
two sides, and Apply option station material, the printer must support the setting
you select but the setting can be different from the Host PC setting.
For Windows NT, change card design settings
•
landscape or portrait orientation. Many settings are read from the host PC and
cannot be selected.
Pause or delete print jobs you submitted from Print Manager at the client
•
PC.
The card job remains in the print queue until it is sent to the printer. See
Windows help for information on using Print Manager.
On Windows NT, view Print Manager to see printer messages from the host
•
PC.
The card job remains in the print queue until it is sent to the printer. You can
expand the Status column in the Print Manager dialog box to see the messages.
Select the same Ribbon type as the
At the client PC, you can use
, including se ttings such as
User’s Guide for Express™ and Select™ Printers
Page 65

Advanced Information
Changing the type of print ribbon
When you change the type of print ribbon you use, perform the following tasks:
Change the print ribbon in the printer
•
Change the Print Ribbon Type setting
•
Change the card design if needed
•
Change the printhead if needed
•
Change printhead settings through the Status Monitor
•
Print sample cards to verify the new setup
•
Change the print ribbon
Change the print ribbon in the printer. See “Loading the print ribbon” on page 2-7 for
information on changing the ribbon in the printer.
Change the Print Ribbon Type setting
5-11
See “Working with printer settings and data” on page 3-1 for information on changing
the print ribbon setting.
If you use a solid-color ribbon such as red or gold, choose Black (K) for the Print
•
Ribbon Type (rather than using “Always Autodetect”).
If you are using a scratch-off ribbon, choose Black (K) for the print ribbon type.
•
If you use any other ribbon type, the autodetect feature and the “P rint on both
•
sides” selection will choose the correct selection.
If “Alway s Autode tect” is selected in the Windows 98 Properties dialog box, decide
whether to power the printer off and on to detect the new ribbon type or to change
from autodetect to selecting a ribbon type.
– If you use a YMCK or YMCKT ribbon and you want to use a panel set for each
side of the card, you can power cycle the printer and keep the “Always
Autodetect” setting.
– If you use a YMCK or YMCKT ribbon and you want to use one panel set to
print both sides of the card, you must deselect the “Always Autodete ct” setting
and select the ribbon type and usage (such as “YMC (color) front; K (black)
back”) from the Ribbon Type list.
Make sure your ribbon type and card design are compatible.
Change the card design
Change the card design to use the new ribbon type or use a new card design, if
needed. Some situations where you might change the card design and ribbon type
are:
User’s Guide for Express™ and Select™ Printers
Page 66

5-12
•
You decide to implement a two-step printing process. You might decide to preprint cards with information such as a logo using a monochrome ribbon, and then
personalize cards using a color (YMC) ribbon. Or, you might personalize cards
and then print scratch-off ribbon in an area of the card.
•
You decide to add features to the card. For example, you might add a Topcoat (T)
panel on the front or back, or change from printing color on the front only to
printing both sides with color. Usually, adding a feature to the card is a one-time
change.
Two-step printing process
If you use a two-step printing process, you should plan to print at least one step of the
process as a batch. For example, if you print a one-color logo before you personalize
cards, print enough cards with the logo to last (you might print enough for one day’s
personalization or one week’s personalization). (In the following process, you would
begin with step 3.)
If you use the scratch-off ribbon and have one printer, you must print each card twice,
first to personalize the cards, second to print the scratch-off material. Plan to use a
batch process, first personalizing cards and then printing with the scratch-off ribbon. A
suggested batch process is:
Advanced Information
1 Personalize cards with a ribbon that does not include a T panel. Use a ribbon
such as YMCK or K. If you use a T panel, make sure the design blocks the T
panel from printing in the area where scratch-off ribbon will be printed.
i
Be sure to print some sample cards for use in testing the scratch-off ribbon.
i
Carefully handle printed cards that you plan to print again. Avoid getting dirt or
fingerprints on the cards.
2 Run a printer cleaning card. See “Using the printer cleaning card” on page 4-1.
3 Power off the printer, and then install a monochrome printhead. See “Replacing
the printhead cartridge” on page 4-7.
4 Change the ribbon in the printer. See “Loading the print ribbon” on page 2-7.
5 Power on the printer before using the Properties or Default Document Properties
dialog boxes.
6 Set the Print Ribbon Type to “K.” See “Working with printer settings and data” on
page 3-1.
7 Set the Intensity value for K. See “Changing operational settings” on page 5-14.
8 Use a card design for the scratch-off material that has a black static bitmap over
the areas where you want the scratch-off material to be applied.
9 Print one or more sample cards. Verify that the scratch off material is in the correct
location.
10 Print personalized cards to apply scratch-off ribbon.
User’s Guide for Express™ and Select™ Printers
Page 67

Advanced Information
11 When the batch is complete, install the color printhead (if needed), change the
ribbon in the printer, change the ribbon type setting, and change the K Intensity/
Voltage if needed. Run a cleaning card and return to step 1.
Change the printhead
If you use a two-step printing process and use a monochrome ribbon for one step and
a color ribbon for the other step of the process, you need to change from a
monochrome printhead to a color printhead.
i
Installing a color printhead in an UltraGrafix (monochrome) printer will not permit
you to print in color.
The method of creating an image with color ribbon is slightly different from the method
of creating an image with a monochrome ribbon. Datacard provides two printheads to
support the needs of the two printing methods. To achieve complete coverage without
causing wrinkles or other printing problems, use the correct printhead for the type of
ribbon you use. See “Replacing the printhead cartridge” on page 4-7 for information
on removing and replacing a printhead.
5-13
♦
Change printhead settings
Change printhead settings to match the new ribbon type if you use a two step printing
process. If you are changing features of a card design, you might also decide to
change printhead settings to achieve best results. For example, if you are adding text
that prints in black (K), you might adjust K printing intensity for the clearest text
printing.
If you use a color ribbon that includes a K panel, and then use monochrome ribbon
(such as a red ribbon or a scratch-off ribbon), plan to change the K printing intensity,
using a process such as the following:
1 Start diagnostics. See “Changing operational settin gs ” on page 5-14 for
information.
2 Create a log for K intensity values for each ribbon type you use.
3 Use the Printhead tab to change K intensity values. Record the current K value
and ribbon type.
4 Change the K intensity value, using the following guidelines:
– For scratch-off ribbon, the recommended intensity range is 10000 to 12000.
Begin by setting the lower value (10000). Increase the value by 500 until the
scratch-off material covers the intended area so that you cannot see through
the scratch-off material. See Help for the Printhead tab for detailed steps to
follow.
– For printing text with a K panel, the intensity range is usually near 14000. The
intensity is correct when all of the characters are fully formed (no blank spots),
but not fuzzy due to “growth” at the edges. Smaller text characters can require
User’s Guide for Express™ and Select™ Printers
Page 68

5-14
a higher intensity than larger characters. See Help for the Printhead tab for
detailed steps to follow.
– The correct setting produces cards that meet your guidelines.
5 Record the new value in the log and return to printing mode.
Print sample cards
After the printhead, settings, and/or card design are changed, print sample cards,
using the new or changed card design (s). Test all aspects of the card design,
including printing, alignment, magnetic stripe encoding, barcode readability, and
durability.
When you use a two-step printing process, make sure to prepare enough cards in the
first step to allow thorough testing in the second step of your overall printing process.
When to make changes
This section provides some representative examples of changes you might make and
the changes required for the printer.
Advanced Information
♦
Change Print
ribbon 1
Add color printing to the
back of a card with color on
the front
Add scratch-of f area to color
and black ID card
Add scratch-of f area to color
ID card
Add scratch-off area to one-
color ID card
Pre-print cards with red
logo, then print color and
black ID cards
YMCKK
(old design)
YMCKTKT Scratch-off
YMCT/
YMCT
Green (K) Scratch-off
Red (K) YMCKTKT Yes No
Changing operational settings
This section describes the operational settings for the printer that you can change
using the printer driver. These settings can be used to customize the performance of
your printer to meet the demands of your card design.
Print
ribbon 2
YMCK/
YMCK
(K)
Scratch-off
(K)
(K)
Change
printhead?
No No
Yes Yes
Yes No
No Yes
Change K
intensity?
For detailed information about how to change each setting, see Help for the
appropriate dialog box.
User’s Guide for Express™ and Select™ Printers
Page 69

Advanced Information
E
You must use the PC to which the printer is connected to change operational
settings. You cannot change operational settings using a PC connected through a
network.
You can work with the following:
• Printer values
Before changing any operational settings, you need to record the current values in
the printer using the Printer Values tab. This record will allow you to return to
current settings if the changes you make do not address your concerns.
• Printing intensity
You can fine-tune the appearance and function of cards you print by changing the
intensity used to print types of panels. For full-color printing (YMC panels),
intensity affects the darkness or lightness of printing. For black (K) panels,
intensity affects the thickness of letters and barcodes. For topcoat (T) panels in
the print ribbon, intensity affects the degree of topcoat coverage. Use the
Printhead tab of the Status Monitor to change the printing intensity.
• Position of printing on the card
You can change where the printing is positioned on the card. For Select Printers,
when you select “Edge to edge” as the Print Margin value (in the Default
Document Properties dialog box), you should set the position of printing on the
card for best appearance and smooth operation. Y ou can also change the position
of printing to address card quality concerns. Use the Printhead tab of the Status
Monitor to change the position of printing on the card.
E
Diagnostics are designed to be used with the assistance of your service
representative, who can guide you in making settings that will meet your specific
needs.
5-15
E
Operational settings should be changed only by someone familiar with the
operation of the printer and with Windows. Allow enough time to perform all steps
of the procedures to achieve the card quality desired.
E
If this information does not result in the print quality that you want, contact your
service representative for assistance.
User’s Guide for Express™ and Select™ Printers
Page 70

Troubleshooting
6
This chapter explains how to troubleshoot the Express or
Select printer and how to obtain service. It explains:
What to do if you think the printer is not working
•
Problems you might see in the appearance of cards
•
How to obtain service
•
How to package the printer to return for service
•
When you experience problems using the printer, follow the guidelines in this chapter.
Record the printer model number and serial number (located on the bottom of the
•
printer).
Keep notes on the problem, including the message number and the solutions you
•
attempt.
Obtain information about the supplies used, including:
•
– Card stock and type (such as composite or PVC, three-track magnetic stripe,
manufacturer, and so on). This information is located on the packaging for
cards.
– Type of ribbon (such as YMCK) and the lot number used for personalizing
cards. This information is located on the package of the ribbon.
If you need to call for service, this information will help your service representative
address your concerns.
For more information about messages, see “Responding to messages” on page 3-10.
6
If you think the printer is not working
The printer, printer driver, and card creation application work together to produce
cards. If the system is not working as you expect and does not display messages,
follow these steps to isolate the source of the problem before contacting your service
representative.
1 Make a printer test card, following the steps in “Make a Printer test card” on
page 2-15.
If the printer does not make a test card, the printer is likely not working properly.
2 Print a Windows test page, following the steps in “Print the Windows test page” on
page 2-17.
If the Windows test page does not print as expected, the printer driver is likely not
set or operating properly.
User’s Guide for Express™ and Select™ Class Printers
Page 71

6-2
3Check “Setup tips” on page 2-14 to make sure the PC and printer are set up
correctly. Make a sample card using the card creation application.
If the sample card does not print the card as expected, the card creation
application is likely not set or operating properly.
Problems with card appearance
Problems with card appearance can be the result of the following:
•
Image capture tools, such as the camera
•
Card creation application, which displays the image
•
Limitations in technology, such as differences between how an image looks on the
monitor and how it looks after it is printed
•
Printer maintenance or PC settings
i
New Select Class printers include Datacard’s Tru Image™ processing. Cards
printed with Tru Image have a different appearance than card printed with earlier
Select Class printers.
This section describes possible problems you might observe with the quality of cards
you produce with the Express or Select printer. To diagnose and fix card quality
problems, find the symptom in the tables that follow. For each possible cause, attempt
the solutions listed.
Troubleshooting
Print station
Problem Troubleshooting
Print quality Table 6-1 on page 6- 2
Topcoat quali ty—print ribbon Table 6-2 on page 6- 7
Table 6-1 and Table 6-2 describe problems that can originate in the print module.
Table 6-1: Print quality problems
What you see Possible causes Solutions
One or more unprinted
lines run the entire length
of the card.
The printhead might be
dirty or damaged.
Clean the printhead. See
Chapter 4. Run a test
card. See Chapter 2.
If cleaning does not solve
the problem, replace the
printhead. See Chapter 4 .
#
User’s Guide for Express™ and Select™ Class Printe rs
Page 72

Troubleshooting
6-3
Table 6-1: Print quality problems
What you see Possible causes Solutions
Part of the printed card is
blank.
The leading or trailing
edge of the printed card is
not the expected color.
ic4tcpnl
No image is printed on the
card or the printing in very
light.
Cards might not meet
specifications.
Cards might be dirty.
The printhead cartridge
might not be installed
properly
Cards might be slipping in
the card track.
Two cards might have
been picked.
The print ribbon might not
be Datacardrecommended.
The ribbon registration
might be incorrect.
The ribbon is loaded
incorrectly.
The printhead cartridge
cable might be loose.
Obtain and use a different
supply of cards. See
Appendix B.
Increase the frequency of
cleaning. See Chapter 3.
Run a cleaning card. See
Chapter 4.
Remove and reinstall the
printhead cartridge. See
Chapter 4.
#
Use a printer cleaning
card, then clean the
rollers. See Chapter 4.
Fan cards before inserting
them in the card cartridge.
Obtain and use Datacardrecommended print
ribbon. See Appendix B.
Contact your service
representative.
Remove and replace the
ribbon. See Chapter 2.
Power off the printer.
Make sure the printhead
cable is securely
connected. See
Chapter 4.
The printhead cable or
printhead cartridge might
be damaged.
#
Obtain guidance from service before performing this task.
User’s Guide for Express™ and Select™ Class Printers
Replace the printhead.
See Chapter 4.
#
If the problem persists,
contact your service
representative.
Page 73

6-4
Troubleshooting
Table 6-1: Print quality problems
What you see Possible causes Solutions
One color panel is not
aligned correctly with
other panels.
ic4tcaln
Printed card images
(photos) are blurry
Printed cards, including
text, are blurry.
Cards might be slipping in
the card track.
The card registration
might be incorrect.
The image capture system
needs adjustment.
The rollers may be dirty.
The cards may not meet
specifications.
The printhead may be
dirty.
Use a printer cleaning
card, then clean the
rollers. See Chapter 4.
Set the position of printing.
See Chapter 5.
#
If the problem persists,
contact your service
representative.
See the information for the
image capture system.
Use the printer cleaning
card, then clean the
rollers. See Chapter 4.
Obtain and use a different
supply of cards. See
Appendix B.
Clean the printhead. See
Chapter 4.
All card data is positioned
unevenly on the card.
The print station needs
fine tuning.
The card registration
might be incorrect.
The print station needs
fine tuning.
If the problem persists,
contact your service
representative.
Set the position of printing.
See Chapter 5.
#
If the problem persists,
contact your service
representative.
#
Obtain guidance from service before performing this task.
User’s Guide for Express™ and Select™ Class Printe rs
Page 74

Troubleshooting
6-5
Table 6-1: Print quality problems
What you see Possible causes Solutions
Card is printed upside
down (the image is rotated
180 degrees).
Printed card images
(photos) look faded.
Printed cards, including
text, look faded.
The card creation
application has rotated the
card.
The card rotation setting
might be incorrect.
The image capture system
needs adjustment.
Print ribbon may have
been stored improperly or
damaged.
The printhead intensity
setting might need to be
changed.
The cards may not meet
specifications.
See the information for the
card creation application.
Set the card rotation using
the Default Document
Properties (NT) or
Properties (98) dialog box.
See Chapter 3.
See the information for the
image capture system.
Change the print ribbon
and then print a test card.
See Chapter 2.
Change the printhead
intensity. See Chapter 5.
Obtain and use a different
supply of cards. See
Appendix B.
#
Part of the printed image
is discolored.
The printhead may be
dirty.
Cards might have
fingerprints or other dirt on
them.
The cards might be
contami nated or otherw ise
not meet specifications.
The rollers might be dirty.
A signature panel is
located on the other side
of the card.
Clean the printhead. See
Chapter 4.
If the problem persists,
contact your service
representative.
Handle cards without
touching the surface to be
printed. Wear g loves wh en
handling unprinted cards.
Obtain and use a different
supply of cards. See
Appendix B.
Use a cleaning card, then
clean the rollers. See
Chapter 4.
Redesign the card to
avoid printing photos over
signature panel residue .
#
Obtain guidance from service before performing this task.
User’s Guide for Express™ and Select™ Class Printers
Page 75

6-6
Troubleshooting
Table 6-1: Print quality problems
What you see Possible causes Solutions
The printed card shows
small unprinted spots.
The printed card shows
wavy lines along the
length of the card
(woodgrain).
The printed card shows
lighter or darker bands
across the width.
The card is scratched or
the card surface is
uneven.
The rollers might be dirty.
The printhead intensity
setting is too high.
The print ribbon is not
loaded correctly.
The printhead is not
aligned correctly.
The printhead intensity
setting is too low.
If the problem occurs
frequently, obtain and use
a different supply of cards.
See Appendix B.
Use a cleaning card, then
clean the rollers. See
Chapter 4.
Lower the printhead
intensity for color (Y MC )
printing. See Chapter 5.
#
Load the print ribbon
again. Make sure the
cartridge is firmly seated.
See Chapter 2.
Contact your service
representative.
Increase the printhead
intensity setting for color
printing. See Chapter 5.
#
The card shows irregular
lighter or darker spots.
The print ribbon is
wrinkling because the
intensity setting is too
high.
The printhead is not
aligned correctly.
#
Obtain guidance from service before performing this task.
User’s Guide for Express™ and Select™ Class Printe rs
Lower the printhead
intensity setting for color
printing. See Chapter 5.
Contact your service
representative.
#
Page 76

Troubleshooting
6-7
Table 6-1: Print quality problems
What you see Possible causes Solutions
Part or all of the printed
image is expanded.
Part or all of the printed
image is compressed.
The printhead is not
installed properly.
The card path may be
obstructed.
The rollers might be dirty.
The cards might not meet
specifications.
Remove and reinstall the
printhead cartridge. See
Chapter 4.
Check the card transport
track for jams. Check the
duplex module (S2
printers only) for jams.
Clean any card jams.
Use the printer cleaning
card, then clean the
rollers. See Chapter 4.
Obtain and use a different
supply of cards. See
Appendix B.
Topcoat applied using the print ribbon
You might apply topcoat to the card using a T panel as part of the print ribbon.
Table 6-2: Topcoat quality problems—print ribbon
What you see Possible causes Solutions
Random scratches appear
in the topcoat of the
printed card.
#
Obtain guidance from service before performing this task.
User’s Guide for Express™ and Select™ Class Printers
The inside of the printer
might be dirty.
Supplies were
mishandled.
Run a printer cleaning
card and a duplex
cleaning card. Clean the
rollers. See Chapter 4.
Store supplies in a clean
environment. Keep
supplies in their packaging
until loaded in the
cartridge.
Page 77

6-8
Troubleshooting
Table 6-2: Topcoat quality problems—print ribbon
What you see Possible causes Solutions
The topcoat shows bands
across the width of the
card.
The topcoat shows lines
along the length of the
card.
A short edge of the
topcoat does not stick to
the card.
The printhead intensity is
too low.
The printhead is not
aligned correctly.
The printhead intensity is
too high.
The printhead is not
aligned correctly.
The printhead intensity is
too low.
Increase the printhead
intensity setting for
topcoat. See Chapter 5.
Contact your service
representative.
Lower the printhead
intensity setting for
topcoat. See Chapter 5.
Contact your service
representative.
Increase the printhead
intensity setting for
topcoat. See Chapter 5.
#
#
#
The printhead is not
aligned correctly.
The card shows irregular
lighter or darker spots.
The topcoat panel of print
ribbon is wrinkling
because the intensity
setting is too high.
The printhead is not
aligned correctly
#
Obtain guidance from service before performing this task.
Contact your service
representative.
Lower the printhead
intensity setting for
topcoat. See Chapter 5.
Contact your service
representative.
#
User’s Guide for Express™ and Select™ Class Printe rs
Page 78

Troubleshooting
Obtaining service
For repair assistance, contact your service representative. Place the service call from
a telephone close to the printer so that you can access the printer and the PC running
the driver while talking to the customer support representative.
Before you call for service, make sure you have the information recorded during
troubleshooting, as described on page 6-1. Also, make sure you have the serial
number of the printer. It is located on a label on the bottom of the printer.
When to obtain service
Perform the steps earlier in this chapter before obtaining service. Call for service if:
A troubleshooting process instructs you to call service
•
A troubleshooting process does not produce the expected result
•
You experience a problem repeatedly
•
Packing the printer for shipping
6-9
When service requests that you return the printer to a service center for repair, pack
the printer for shipping. You might also need to pack the printer to send it to another
location.
Pack the printer
1 Turn off power to the printer.
2 Remove the power cord from the printer and power receptacle. Remove the
interface cable and any other cables attached to the printer.
– If you are shipping the printer to use at another location, pack the power cord,
interface cable, and any other cables in the accessories box.
– If you are shipping the printer for service, do not ship cables with the printer
unless asked to do so.
3 Remove all cards from the card cartridge, and card output stacker, and printer. Do
not ship cards unless asked to do so.
4 Secure the print ribbon cartridge. Leave the print ribbon cartridge in place or apply
packing tape. Avoid applying tape to labels in the printer.
5 Make sure the card cartridge is firmly seated.
6 Close the cover.
7 Use the original shipping carton, plastic bag, and foam shipping supports.
8 Place the foam shipping support in the printer carton.
9 Place the plastic bag around the printer and close it.
User’s Guide for Express™ and Select™ Class Printers
Page 79

6-10
Troubleshooting
2
3
5
Figure 6-3: Pack an E or S printer for shipping
10 Place the protective box for your printer model:
– For models E and S, place the protective box in the shipping carton with the
closed end of the box toward the printer (step 1 in Figure 6-3).
– For model S2, place the open end of the protective box over the end of the
printer (step 1 in Figure 6-4).
11 Place the printer in the shipping carton (step 2 in Figure 6-3 or Figure 6-4).
1
5
4
i
Service might ask you to ship cards or additional samples of your current
supplies. If service requests cards or supply samples, place them in an envelope,
plastic bag, or in the accessory box to prevent damage to the printer.
12 Place the accessories box along the end of the shipping cushion, near the front of
the printer (step 3 in Figure 6-3 or Figure 6-4).
i
If you are transporting the printer to another location for use, be sure to pack the
User’s Guide, the interface cable, the power cord, any smart card serial cables,
printer driver CD, the warranty, and the declaration of conformity in the
accessories box.
13 Fold the top shipping support over the top of the printer (step 4 in Figure 6-3 or
Figure 6-4).
User’s Guide for Express™ and Select™ Class Printe rs
Page 80

Troubleshooting
6-11
2
3
5
1
5
4
Figure 6-4: Pack an S2 printer for shipping
14 Close the shipping carton (step 5 in Figure 6-3 or Figure 6-4).
15 Secure the carton with shipping tape. Be sure to wrap around the shipping carton
several times to secure it.
16 Put a shipping label on the carton. If you are returning the printer for service, use
the address provided by service.
17 Ship the carton. If you are returning the printer for service, follow the instructions
provided by service to ship the carton to a service center.
User’s Guide for Express™ and Select™ Class Printers
Page 81

Safety and compliance
A
This appendix presents:
• Regulatory compliance information
• Safety information
• Trademark acknowledgments
Regulatory compliance
Notice for USA (FCC notice)
This equipment generates, uses, and can radiate radio frequency energy. If it is not
installed and used in accordance with this instruction manual, it may interfere with
radio communications. This equipment has been tested and found to be within the
limits for Class A computing devices, pursuant to Subpart J of Part 15 of FCC rules,
designed to provide reasonable protection against radio interference in a commercial
environment. Operation of this equipment in a residential environment may possibly
cause interference. In the event of interference, the user, at their own expense, will be
required to take whatever measures are necessary to correct the problem.
A
Notice for Canada (CSA)
This digital apparatus does not exceed the Class A limits for radio noise for digital
apparatus set out in the Radio Interference Regulations of the Canadian Department
of Communications.
Le présent appareil numérique n'émet pas de bruits radioélectriques dépassant les
limites applicables aux appareils numériques de la classe A prescrites dans le
Règlement sur le brouillage radioélectrique édicté par le ministère des
Communications du Canada.
Notice for Europe
We hereby certify that the Datacard® Express™ or Select™ Class photo ID printer
complies with EMC Directive 89/336/EEC.This printer conforms to Class A of EN
55022. Operation of this equipment in a residential environment may possibly cause
interference. In the event of interference, the user, at their own expense, will be
required to take whatever measures are necessary to correct the problem.
Notice to Users of Printers Equipped with Contactless Smart Card Coupler
The contactless smart card coupler emits radio-frequency waves and must be used as
installed and recommended by Datacard, the printer manufacturer. You may not
modify the coupler or how it is used without the written permission of Datacard. You
may not operate the printer after modifying the coupler or its method of operation.
User’s Guide for Express™ and Select™ Printers
Page 82

A-2
Liability statement
This Datacard™ product has been built to the high standards of Datacard Corporation
(doing business as Datacard™ Group). Please note and heed the WARNING and
CAUTION labels that have been placed on the equipment for your safety. Please do
not attempt to operate or repair this equipment without adequate training. Any use,
operation or repair in contravention of this document is at your own risk. By
acceptance of this system you hereby assume all liability consequent to your use or
misuse of this equipment. Datacard Corporation assumes no liability for incidental,
special or consequential damage of any kind. Equipment specifications, applications
and options are subject to change at the sole discretion of Datacard Corporation
without notice.
Safety
All Datacard™ products are built to strict safety and reliability specifications in
accordance with UL1950 and CSA requirements, therefore, safety issues pertaining to
operation and repair of Datacard™ equipment are primarily environmental and human
interface.
The following basic safety tips are given to ensure safe installation, operation and
maintenance of Datacard™ equipment and are not to be considered as
comprehensive on all matters of safety.
Safe environment
•
Connect equipment to a grounded facility power source. Do not defeat or bypass
the ground lead.
•
Place the equipment on a stable surface (table) and ensure floors in work area are
dry and non-slip. Insulated rubber floor mats are preferred.
•
Know the location of equipment branch circuit interrupters or circuit breakers and
how to turn them on and off in case of emergency.
•
Know the location of fire extinguishers and how to use them. ABC type
extinguishers may be used on electrical fires.
•
Know local procedures for first aid and emergency assistance at the customer
facility.
•
Use adequate lighting at the equipment.
•
Maintain the recommended range of temperature and humidity in equipment area.
Safe human interface
•
Use proper lifting techniques when moving or installing the equipment.
•
Use standard electrostatic discharge (ESD) precautions when working on or near
electrical circuits.
•
Do not defeat or disconnect safety interlocks on covers. Operate the printer with
the cover closed.
User’s Guide for Express™ and Select™ Printers
Page 83

Acknowledgments
Microsoft, Windows NT, and Windows are trademarks or registered trademarks of
Microsoft Corporation.
Datacard, ImageCard, UltraGrafix, Express, Select, Tru Image, and QuikWorks are
trademarks or registered trademarks of Datacard Corporation.
All other trademarks are the property of their respective owners.
A-3
User’s Guide for Express™ and Select™ Printers
Page 84

Supplies and cards
B
This appendix describes specifications, part numbers, and
handling for:
• Personalization supplies, including print ribbons
• Cards to print
• Cleaning supplies, including cleaning cards
• Printer driver diskettes
• Printer components, including cables, additional supply cartridges, and the
replaceable printhead cartridge
Personalization sup plies
Print ribbon is used to personalize cards. This section describes Datacard®-
recommended personalization supplies for the Express™ or Select™ printer and how
to store them.
i
Use Datacard-recommended supplies in the Express or Select printer.
Print ribbons
You can use the following print ribbons in ImageCard printers:
Ribbon
type
YMC 806124-101
YMCK
YMCKT 806124-104 Three colors, true black, and
YMCT 806124-105 Three colors and topcoat Full-color One side of card
YMCKTKT 806124-106 Three colors, true black,
Part
number Panel description Colors
Three colors
806124-102 Three colors and true black Full-color One side of card
topcoat
topcoat, true black, and
topcoat
B
One panel set
prints:
Full-color Front side of card
OR
front–three colors;
back–true black
Full-color One side of card
OR
front–three colors;
back–true black &
topcoat
Full-color and
true black
Front–three colors,
true black & topcoat
back–true black &
topcoat
You can use the following single-color (monochrome) print ribbons in ImageCard and
UltraGrafix prin ters:
Ribbon
type
KT 806124-109 True black and topcoat Black One side of card
K black 596230-001 Continuous black Black Not applicable
User’s Guide for Express™ and Select™ Printers
Part
number Panel description Colors
One panel set
prints:
Page 85

B-2
Ribbon
type
K dark blue 596230-002 Continuous dark blue Blue Not applicable
K white
K red 596230-004 Continuous red Red Not applicable
K green 596230-006 Continuous green Green Not applicable
K silver 596230-007 Continuous silver Silver Not applicable
K scratch-
off
#.
loading this roll in the printer.
i
When you use a monochrome print ribbon, use a printhead designed for optimal
monochrome printing. See “Printhead cartridge” on page B-7 for more information.
i
If you change the type of ribbon you use, be sure to make the appropriate changes to
the Express or Select printer driver. See “Changing the type of print ribbon” on
page 5-11
#
Print ribbon is larger than printer capacity. Remove 7 yards (6.5 m) of ribbon before
Supply roll storage
Follow these guidelines when storing supply rolls:
Part
number Panel description Colors
596230-003 Continuous white White Not applicable
548237-001 Continuous scratch-off panel Scratch-off Not applicable
One panel set
prints:
•
The print ribbon maintains its quality for about a year. For optimal card quality,
purchase and store quantities that you can use up in less than a year.
•
The print ribbon and card stock might require secure storage and tracking. Follow
your policy for storing and tracking the supplies used to make cards.
•
Select a location away from direct sunlight, with a temperature between 55° F and
80° F or between 13° C and 27° C. A humidity range from 20% to 80% (noncondensing) is recomm end ed.
•
Supply rolls should be at room temperature when they are installed in the printer
and used. If supplies are stored in a cooler environment than the printer, allow
supplies to reach room temperature before using.
Cards
This section describes specifications and quality guidelines for card stock to use with
the Express or Select printer. It also describes the environmental specifications for
storage of card stock.
Card specifications
For best results with the Express or Select printer, use high-quality card stock that
meets the specifications and recommendations described in this section.
User’s Guide for Express™ and Select™ Printers
Page 86

Card size
B-3
Use CR-80 size cards with the following nominal dimensions:
Length 3.37 inches 85.60 mm
Width 2.125 inches 53.98 mm
Card bow must be less than the thickness of the card.
Card material
Use cards made of the following types of material:
•
•
•
Thickness with
smart card chip
Thickness (all
other cards)
i
Actual card thickness can vary by up to ten percent from the sizes listed. Smart
card chips can be raised slightly from the printing surface.
Glossy PVC surface, either 100% PVC cards or composite cards with a PVC
surface.
Cards with a magnetic stripe on one side of the card.
Cards with a smart card chip on the top of the card. Depending on the module
installed in the printer, contact-type, contactless, or both types of smart card chips
can be programmed.
0.020 to 0.030 inches 0.500 to 0.760 mm
0.020 to 0.050 inches 0.500 to 1.27 mm
Figure B-1: Excessive card bow
i
Embossed cards cannot be printed with the Express or Select printer.
New cards preferred
The Express or Select printer is designed to print on new card stock. If you print on
cards twice, be careful to avoid getting dirt, fingerprints, or other contamination on
cards before the second printing. Printing on cards that have been issued might
introduce substances that interfere with card printing or damage the printer. See
“Problems with card appearance” on page 6-2 to address card appearance problems
with pre-printed cards.
User’s Guide for Express™ and Select™ Printers
Page 87

B-4
Pre-punched cards
You can use prepunched cards with the Express or Select printer. Figure B-2 shows
where punched areas are not allowed.
The dimensions show how far from the edge any punched areas must be (dimensions
include any tolerance):
•
The cards cannot have a punched area closer than 0.2 in (0.51 cm) from the lefthand edge (as loaded in the card cartridge).
•
The cards cannot have a punched area closer than 0.45 in (1.14 cm) from the
right edge (as loaded in the card cartridge).
•
If the card has a magnetic stripe, the card cannot be punched anywhere in the
stripe.
0.2 in (0.51 cm)
Magnetic stripe on back
0.45 in (1.14 cm)
Figure B-2: Pre-punched card block-out areas
Card quality guidelines
Your cards must meet the following card quality guidelines for the Express or Select
printer to print high quality graphics on them successfully.
Card surface
•
The card surface must be free of irregularities such as particles embedded in the
surface.
•
The card surface must be smooth and even. Surface irregularities can cause loss
of contact, resulting in printing voids.
•
The printing surface must be glossy. It cannot have a matte finish (see other
sections in this appendix for more information).
Card handling
These guidelines apply to unprinted cards. Any debris or particles on an unprinted
card’s surface can reduce print quality and damage the printhead. Grease or oils,
such as oils from your fingers, also reduce print quality.
•
Keep cards completely clean.
•
Do not touch the print surface of a card with your fingers or hands.
•
Do not use a rubber band to bind blank cards together.
User’s Guide for Express™ and Select™ Printers
Page 88

•
If you drop a card on the floor, do not insert it into the Express or Select printer.
Card storage
These guidelines apply to both printed and unprinted cards.
•
Cards must be stacked so that they will not shift and rub against each other.
•
When storing cards, make sure that no two car ds contain im ages or block s of
color that will come in contact with each other.
•
Make sure that the magnetic stripe on one card does not come in contact with the
magnetic stripe on another card.
•
Make sure that cards with magnetic stripes are stored away from magnets and
other magnetic objects.
Card storage specifications
The cards should be stored in a cool, dry, and dark place. Excessive light can cause
yellowing of cards on exposed edges. Keep cards in their original packaging.
Cards should be at room temperature when they are installed in the printer and used.
If cards are stored in a cooler environment than the printer, allow them to reach room
temperature before using.
B-5
Cleaning supplies
The Express or Select printer uses the following cleaning supplies.
•
Printer cleaning cards
•
Magnetic stripe cleaning card
•
Duplex cleaning cards
•
Citrus solvent
Printer cleaning card
Use a printer cleaning card to remove particles left by printing supplies inside the
Express or Select printer. Use a printer cleaning card after every 5 to 100 cards. You
can set this interval. See “Working with printer settings and data” on page 3-1.
Printer cleaning cards are sold in packages of 10. The package part number is
557297-001.
Figure B-3: Printer cleaning card
i
If the printer does not have a magnetic stripe module, you can use cleaning card
part number 548714-001.
User’s Guide for Express™ and Select™ Printers
Page 89

B-6
Duplex cleaning card
Use the duplex cleaning card if the printer has automatic two-sided printing. The
duplex cleaning card is part number 557668-001.
Figure B-4: Duplex cleaning card
Magnetic stripe cleaning card
Use the magnetic stripe cleaning card if the printer has a magnetic stripe module. The
card is part number 590408-002.
Keep
Remove
Keep
Figure B-5: Magnetic stripe cleaning card
Citrus solvent
Use T960 citrus solvent to clean rollers inside the printer. The solvent is part number
TUL003-007.
Printer driver diskettes
The Express or Select printer drivers are updated from time to time to provide optimal
functionality. You can obtain the most recent printer driver for the PC operating system
you use from the Datacard Web site at www.datacard.com. Y ou also can request the
newest release of the printer driver on diskette. The part number changes with each
release.
Anti-static wrist st rap
When you change the printhead cartridge, you need to use an anti-static wrist strap,
also called an ESD strap. You can order an anti-static wrist strap, part number
805768-001, from Datacard or obtain one from any electronics store.
User’s Guide for Express™ and Select™ Printers
Page 90

Printer components
The Express or Select printer has a replaceable printhead. In addition, you can order
additional or replacement parts for the printer. This section describes the printer parts
you can order.
Printhead cartridge
The Express or Select printer has a replaceable printhead. The printhead is subject to
wear and has a direct impact on print quality.
Select the printhead to order based on the printer series.The following printheads are
available.
B-7
Printer
series
ImageCard Full color
UltraGrafix Monochrome
!
Do not touch the printing edge of the printhead in the printhead cartridge. If you
do, clean it. See “Cleaning the printhead” on page 4-7.
Printhead
type
Printhead type label
Printhead-do not
touch t his surface
Figure B-6: Express or Select replaceable printhead cartridge
Printhead type
label
Three colors 547675-999
All black 547674-999
Part number
Keep a replacement printhead in stock so it is available when you need it.
Interface cable
The Express or Select printer uses an interface cable (part number 806797-001) to
connect the port on the printer to the ECP parallel port on the PC.
i
The interface cable must be a shielded, Type C, IEEE 1284 parallel port cable, up
to 2 meters long, maximum, with a proprietary ferrite bead.
User’s Guide for Express™ and Select™ Printers
Page 91

B-8
Power cord
Figure B-7: Interfac e ca ble
The Express or Select printer uses one of the following power cords:
•
U.S. power cable (part number 556766-010)
iciv177u
Figure B-8: U.S. power cable
•
European power cable (part number 806842-001)
•
Australian power cable (part number 806842-002)
•
United Kingdom power cable (part number 806842-003)
•
Danish power cable (part number 806842-004)
•
Indian power cable (part number 806842-005)
•
Israeli power cable (part number 806842-006)
•
Italian power cable (part number 806842-007)
•
Swiss power cable (part number 806842-008)
•
Japanese power cable (part number 806842-009)
Smart card serial cable
If the Express or Select printer has one or more smart card modules, it uses the smart
card serial cable to connect the smart card port and the PC. The smart card serial
cable is part number 805815-001.
i
The smart card serial cable must be a shielded DB9 serial cable, up to 3 meters
long maximum.
iciv176u
Figure B-9: Smart card serial cable
User’s Guide for Express™ and Select™ Printers
Page 92

Print ribbon cartridge
The print ribbon cartridge is part number 555545-999.
i
Be sure to change the print ribbon setting in the printer driver when you change
the type of print ribbon.
Card cartridge
B-9
Figure B-10: Print ribbon cartridge
The card cartridge is different from Express and Select printers.
•
Express printers have green cartridges, which are part number 555540-998.
•
Select printers have gray cartridges which are part number 555540-997
Figure B-11: Card cartridge
User’s Guide for Express™ and Select™ Printers
Page 93

B-10
Fuse
The fuse, located in the power receptacle, is part number 804960-017.
3
2
1
Figure B-12: Power receptacle fuse
i
The power receptacle fuse is a 2.5 ampere slow blow fuse.
User’s Guide for Express™ and Select™ Printers
Page 94

PC settings
C
This appendix provides information about the PC on which
the Express or Selec t prin te r drive r is inst al led. I t des cribe s:
Configuring the ECP parallel port
•
Setting port values
•
Setting printer permis sions (Windows NT only)
•
Configuring the opti onal smart card serial port
•
This appendix includes a section for settings that are handled the same way in all
operating systems and also includes sections for each PC operating system
supported by the printer driver.
PC settings for all operating systems
This section describes how to configure the ECP parallel port.
Configuring the ECP parallel port
For most PCs, the parallel port is configured as an ECP parallel port in the PC's BIOS.
See the information that accompanies your PC for details about changing the BIOS
settings. The following applies to most PCs and to the Windows NT and Windows 98
operating systems.
Configure the ECP parallel port
C
1 Close all open applications.
2 Reboot the PC.
3 Enter Setup and follow the instructions that display early in the reboot sequence.
The setup screen will appear.
4 In Setup, check to see that the Parallel Port Mode field is set to ECP. If it is not,
set it to ECP.
i
If the PC has more than one parallel port, make sure you check the setting for
the parallel port to which the printer is attached (LPT1 or LPT2).
i
An ECP port is required for the printer to operate at its maximum processing
speed. The printer will operate in compatible or IBM AT mode; however, the
printer might not operate as fast.
5 Save the setting and exit Setup, following the instructions in the setup screen.
Continue with the “Set port values” procedure for your operating system.
User’s Guide for Express™ and Select™ Class Printers
♦
Page 95

C-2
Setting up two ECP parallel ports
1 Follow the instructions provided with the port to install it and set the jumpers.
Record the jumper settings.
i
The jumper settings must match the settings you choose in the Resources tab.
2 Right-click on the My Computer icon on the desktop and then select Properties
from the popup menu. The System Properties dialog box appears.
3 Select the Device Manager tab to view a list of devices.
4Select “View device s by type” if needed.
5 Click the + next to Ports (COM and LPT) to display the port entries. Usually the
second installed port is LPT2.
6 Click Printer Port (LPT2), or other entry for the installed port, and then select the
Properties button. The Printer Port (LPT2) Properties dialog box appears.
7 Click the Resources tab.
•
Make sure that “Use automatic settings” is not selected.
•
The “Conflicting device list” should show No conflicts.
•
If you are using a DMA channel for the second printer, the Resources settings list
should show Direct Memory Access and its channel setting.
Figure C-1: Printer Port (LPT) Properties dialog box
If the Resources tab shows conflicts, select another configuration or change the
settings for the port, following port instructions.
User’s Guide for Express™ and Select™ Class Printe rs
Page 96

8 Click OK on the Printer Port (LPT2) Properties dialog box and on the System
Properties dialog box to save settings and close the dialog boxes.
i
If you install the second parallel port and receive Windows errors, or if the printer
does not print reliably (without displaying errors), the port might have an
unresolved hardware conflict. Contact the port manufacturer or the PC
manufacturer for assistance.
♦
PC settings for Windows NT 4.0
This section describes the following settings for PCs running Windows NT 4.0.
•
Setting port values
•
Setting printer permissions
•
Setting serial port values
Setting port values
C-3
Port values include the port to which the printer is assigned, the communication mode
for the port, and printer spooling.
Set port values for Windows NT 4.0
1 From the Windows NT taskbar select Start, then Settings, and then Printers. The
Printers window appears.
2 Highlight the Express or Select printer driver icon by clicking on it once.
3 From the menu bar, select File and then Properties. The Properties window for
the Express or Select printer driver appears.
4 Select the Ports tab.
5 Make sure the correct port (usually LPT1) is selected in the Port list. “Express or
Select“ should appear in the Printer column for the checked port.
6 Make sure that Enable Bidirectional Support is checked.
7 Select OK to save the settings and close the Properties window.
8 Close the Printers window.
9 If you change the port to which the PC prints, power off the printer, shut down the
PC, and restart both of them before printing cards.
♦
Setting printer permissions
If the PC to which the printer is attached has other users, set permissions that:
User’s Guide for Express™ and Select™ Class Printers
Page 97

C-4
•
Allow users to use all features of the printer and driver, including messages.
(Messages inform users when they need to change the ribbon, load cards, and fix
problems.)
•
Prevent any access to the printer by unauthorized users.
Set printer permissions
1 From the Windows NT taskbar select Start, then Settings, and then Printers. The
Printers window appears.
2 Highlight the Express or Select printer driver icon by clicking on it once.
3 From the menu bar, select File and then Properties. The Properties window for
the Express or Select printer appears.
4 Select the Security tab.
5 Click the Permissions button to open the Printer Permissions dialog box.
6 Select the Add button to open the Add Users and Groups dialog box.
7 Select the Show Users button.
8 Select the name of the user (or group) to add to the printer and click the Add
button.
9 From the Type of Access list, select the access:
– For a user of the Express or Select printer on the PC connected to the printer,
select Full Control. The user will be able to see all messages. The user will
also be able to perform other actions, such as deleting the printer driver.
– For a user who accesses the printer over a network, select Print.
10 Select OK to save the change and close the Add Users and Groups window.
11 Repeat steps 6 through 10 to add other users or groups.
12 Select OK to save the changes and clos e the Pri nte r Perm is si ons windo w.
13 Select OK to close the Properties dialog box.
♦
Setting a smart card serial port—Windows NT
If you use a smart card application, you connect the PC to the serial port on the
Express or Select printer. The PC should be set to match the printer serial port
settings. This section describes how to set the PC serial port in the Windows NT 4.0
operating system. These settings apply to ports for both a contact smart card module
and a contactless smart card module. If you use a contact station with the printer, see
the information for the contact station for port settings.
User’s Guide for Express™ and Select™ Class Printe rs
Page 98

C-5
Set the serial port on Windows NT
1 From the Start menu, select Settings and then Control Panel.
2 From the Control Panel, select Ports.
3 From the Ports dialog box, select the port, such as COM1 or COM2 (Figure C-2).
Figure C-2: Ports dialog box
4 Select the Settings button to display the port settings.
i
If the PC has more than one serial port, make sure you view the settings for
the serial port to which the printer is attached.
Figure C-3: Settings dialog box
5 Select the following settings:
Setting Value
Baud rate 9600
Data bits 8
Parity None
Stop bits 1
Flow control None
User’s Guide for Express™ and Select™ Class Printers
Page 99

C-6
6 When the settings are correct, click OK to save settings and close the dialog box.
PC settings for Windows 98
This section describes the following settings for PCs running Windows 98.
•
Setting port values
•
Setting serial port values
Setting port values
Port values include the port to which the printer is assigned, the communication mode
for the port, and printer spooling.
Verify port assignment and settings
1 From the Windows taskbar select Start, then Settings, and then Printers. The
Printers window appears.
♦
2 Highlight the Express or Select printer driver icon by clicking on it once.
3 From the menu bar, select File and then Properties. The Properties window for the
Express or Select printer driver appears.
4 Select the Details tab and view the port in the Print to the Following Port list.
Make sure this is the ECP parallel port.
!
If you need to move the printer to another port, delete the existing printer driver
and install the printer to the correct port. See “Network printing” on page 5-6 for
steps to follow.
5 Cli c k Spo ol Set ting s to dis pla y the Spool Settings dialog.
6 Make sure that Enable Bidirectional Support is checked. Also make sure that
Spool Print Jobs so Program Finishes Printing Faster is checked.
7 Select OK to save the settings and close the Spool Settings dialog.
8 Select OK to save the settings and close the Properties dialog box.
9 Close the Printers window.
♦
Ve rify communication mode
1 From the Windows taskbar select Start, then Settings, and then Control Panel.
The Control Panel window appears.
User’s Guide for Express™ and Select™ Class Printe rs
Page 100

C-7
2 Double-click the System icon. The System Properties dialog box appears.
3 Select the Device Manager tab.
4 Make sure View Devices by Type is selected.
5 Click the Plus sign + next to Ports (COM & LPT) to show the available ports. The
list should include an entry such as "ECP Printer port (LPT1)."
6 Click the entry for the port to which the printer is assigned (such as LPT1 or
LPT2).
7 Select the Properties button to display the Properties dialog box.
8 Select the Driver tab, and then select the Update Driver button to display the
Select Device dialog box.
9 Make sure Show all devices is selected.
10 In the Manufacturers list, select (Standard port types). In the Models list, select
ECP Printer Port, if available.
11 Select OK or Close on each window to select the choice and close the window. If
the Version Conflict dialog box appears, select Yes to keep the existing version.
12 Select OK to close the System dialog box and make the changes take effect.
♦
Setting a smart card serial port—Windows 98
If you use a smart card application, you connect the PC to the serial port on the
Express or Select printer. The PC should be set to match the printer serial port
settings. This section describes how to set the PC serial port. These settings apply to
both a contact smart card module and a contactless smart card module.
Set the serial port on Windows 98
1 From the Start menu, select Settings and then Control Panel.
2 From the control panel, select System.
3 On the system Properties dialog box, select the Device Manager tab.
User’s Guide for Express™ and Select™ Class Printers
 Loading...