

Datacard Group SP User Manual

SP Series Network Printer Guide
558871-001 Rev. B
August 2004
Information resources for the SP Series Printer with the Built-in Ethernet Feature
SP Series
Network
Printer Guide
The Network Printer Guide (this document)
contains operating information for the printer. It also
tells you how install the printer.
SP Series Info
Central and
e-Guide
SP Series
Data
Formatting
Guide
FAQs
Dealer
Customer Care
For in-depth information about using the printer,
install SP Info Central on a Windows PC, then click
the icon on the desktop. (Insert the SmartDriver ™
CD-ROM and choose User Information to install SP
Series Info Central.)
Describes how to set up the printer and your data
stream to use the Open Card data format.
Find the Guide on the SP Series Open Card
CD-ROM, shipped only with the Open Card option.
Service and Support FAQs at www.datacard.com provide answers to questions about the printer.
For help with questions not addressed by other SP Series printer information, contact your dealer.
Contact the Datacard Customer Care Center at 1.800.328.3996 (U.S. & Canada) or 1.952.988.2316
(worldwide).

About the printer. . . . . . . . . . . . . . . . . . . . . . . . . . . 1
The outside of the printer . . . . . . . . . . . . . . . . 1
The inside of the printer. . . . . . . . . . . . . . . . . . 3
Features and options. . . . . . . . . . . . . . . . . . . . 3
Loading cards. . . . . . . . . . . . . . . . . . . . . . . . . . . . . 5
Loading print ribbon . . . . . . . . . . . . . . . . . . . . . . . . 7
Power on the printer. . . . . . . . . . . . . . . . . . . . . . . . 9
The LCD panel . . . . . . . . . . . . . . . . . . . . . . . . . . . 10
Making a printer test card. . . . . . . . . . . . . . . . . . . 13
Data formats for the SP Series Card Printer. . . . . 15
SmartDriver data. . . . . . . . . . . . . . . . . . . . . . 16
Open Card data format . . . . . . . . . . . . . . . . . 17
Data formats summary . . . . . . . . . . . . . . . . . 19
Printer Installation. . . . . . . . . . . . . . . . . . . . . . . . . 21
Site requirements . . . . . . . . . . . . . . . . . . . . . . . . . 22
Useful tools. . . . . . . . . . . . . . . . . . . . . . . . . . . . . . 23
Network installation . . . . . . . . . . . . . . . . . . . . . . . 25
Prepare the printer for installation . . . . . . . . . 26
Connect the printer to the network . . . . . . . . 27
Set up the network printer . . . . . . . . . . . . . . .30
Set up for your card design . . . . . . . . . . . . . .35
SNMP support . . . . . . . . . . . . . . . . . . . . . . . .36
Print a card . . . . . . . . . . . . . . . . . . . . . . . . . . . . . .37
From the SmartDriver. . . . . . . . . . . . . . . . . . .37
Using the Open Card data format . . . . . . . . .38
Cleaning the printer. . . . . . . . . . . . . . . . . . . . . . . .39
Cleaning the printer rollers. . . . . . . . . . . . . . .41
Getting the most out of your printer. . . . . . . . . . . .43
Printer LCD settings . . . . . . . . . . . . . . . . . . . . . . .45
LCD menu system . . . . . . . . . . . . . . . . . . . . .46
View status settings. . . . . . . . . . . . . . . . . . . . . . . .47
View the Serial Number . . . . . . . . . . . . . . . . .47
View the Firmware Revision. . . . . . . . . . . . . .48
View Card Counts . . . . . . . . . . . . . . . . . . . . .49
View the Data Format. . . . . . . . . . . . . . . . . . .50
View the Network Address Mode,
IP Addresses, and MAC Address . . . . . .51
Change settings. . . . . . . . . . . . . . . . . . . . . . . . . . .53
Set LCD Backlighting . . . . . . . . . . . . . . . . . . .54
539398-001 Rev. B Page iii

Page iv
Set the Data Format . . . . . . . . . . . . . . . . . . . 55
Set the Address Mode. . . . . . . . . . . . . . . . . . 56
Set the IP Address, Subnet Mask,
and Gateway Address . . . . . . . . . . . . . . 58
Set the K Power . . . . . . . . . . . . . . . . . . . . . . 60
Troubleshooting . . . . . . . . . . . . . . . . . . . . . . . . . . 61
Printer supplies. . . . . . . . . . . . . . . . . . . . . . . . . . . 63
SP55 color print ribbon . . . . . . . . . . . . . . . . . 63
SP60 color print ribbon . . . . . . . . . . . . . . . . . 63
Monochrome and Topcoat ribbon . . . . . . . . . 63
Monochrome print ribbon . . . . . . . . . . . . . . . 64
Cleaning supplies . . . . . . . . . . . . . . . . . . . . . 64
Printer messages . . . . . . . . . . . . . . . . . . . . . . . . . 65
DM-00760 Duplex Error. . . . . . . . . . . . . . . . . 66
DM-00762 Duplex Jam . . . . . . . . . . . . . . . . . 67
DM-00765 No Duplex . . . . . . . . . . . . . . . . . . 68
DM-00767 Duplex Jam . . . . . . . . . . . . . . . . . 69
IS-01206 No Card Picked . . . . . . . . . . . . . . . 70
SY-01305 Data Error. . . . . . . . . . . . . . . . . . . 71
SY-01306 Data Error. . . . . . . . . . . . . . . . . . . 72
SY-01310 Flash Error. . . . . . . . . . . . . . . . . . 73
SY-01312 Flash error . . . . . . . . . . . . . . . . . . 74
SY-01314 Flash Error. . . . . . . . . . . . . . . . . . 75
SY-01317 Memory Error. . . . . . . . . . . . . . . . 76
SY-01325 Data Error . . . . . . . . . . . . . . . . . . 77
SY-01327 Data Error . . . . . . . . . . . . . . . . . . 79
SY-01331 Comm Error . . . . . . . . . . . . . . . . . 81
SY-01332 Hardware Error . . . . . . . . . . . . . . 82
MS-01401, MS-01402, MS-01403
Mag Stripe Data. . . . . . . . . . . . . . . . . . . 83
MS-01404, MS-01405, MS-01406
Mag Stripe Error . . . . . . . . . . . . . . . . . . 84
MS-01407, MS-01408, or MS-01409
Mag Stripe Error . . . . . . . . . . . . . . . . . . 85
MS-01410, MS-01411, or MS-01412
Mag Stripe Error . . . . . . . . . . . . . . . . . . 86
MS-01413, MS-01414, or MS-01415
Mag Stripe Error . . . . . . . . . . . . . . . . . . 87
MS-01417, MS-01418, MS-01419,
MS-01420, MS-01421 Card Jam. . . . . . 88
MS-01424 Mag Stripe Error . . . . . . . . . . . . . 89

MS-01425 Mag Stripe Error. . . . . . . . . . . . . . 90
MS-01426 EEPROM Error . . . . . . . . . . . . . . 91
MS-01427, 1428 Mag Stripe Error. . . . . . . . . 92
MS-01429 Mag Stripe Data. . . . . . . . . . . . . . 93
MS-01430 Mag Stripe Error. . . . . . . . . . . . . . 94
MS-01431, MS-01432, MS-01433, MS-01434
EEPROM Error. . . . . . . . . . . . . . . . . . . . 95
MS-01435 No Mag Stripe . . . . . . . . . . . . . . . 96
PR-01703 Printhead Error. . . . . . . . . . . . . . . 97
PR-01705, PR-01706 Card Jam . . . . . . . . . . 99
PR-01710 EEPROM Error. . . . . . . . . . . . . . 101
PR-01715, PR-01716 Cover Open . . . . . . . 102
PR-01718 Printhead Temp . . . . . . . . . . . . . 103
PR-01719 Printhead Error. . . . . . . . . . . . . . 104
PR-01720 Ribbon Error. . . . . . . . . . . . . . . . 105
PR-01721, PR-01722 EEPROM Error. . . . . 106
PR-01723 Hardware Error. . . . . . . . . . . . . . 107
PR-01724 Ribbon Break. . . . . . . . . . . . . . . 109
PR-01726 Ribbon Out. . . . . . . . . . . . . . . . . 111
PR-01730 Printhead Error . . . . . . . . . . . . . 113
PR-01737 Ribbon Low . . . . . . . . . . . . . . . . 114
PR-01738 Ribbon Error . . . . . . . . . . . . . . . 115
SC-01804 No Smart Card. . . . . . . . . . . . . . 116
Safety and compliance (FCC) . . . . . . . . . . . . . . 125
Regulatory compliance . . . . . . . . . . . . . . . . 125
Liability statement. . . . . . . . . . . . . . . . . . . . 127
Safety . . . . . . . . . . . . . . . . . . . . . . . . . . . . . 127
Acknowledgments. . . . . . . . . . . . . . . . . . . . 128
Legal Notices (FCC). . . . . . . . . . . . . . . . . . . . . . 129
Liability statement. . . . . . . . . . . . . . . . . . . . 129
Regulatory compliance . . . . . . . . . . . . . . . . 129
Trademark acknowledgments. . . . . . . . . . . 129
Proprietary Notice. . . . . . . . . . . . . . . . . . . . 129
Page v
About the printer
This guide applies to SP Series printers with the Built-in Ethernet feature, and includes the SP55 card printer with
Built in Ethernet, the SP55 card printer with Built-In Ethernet and Open Card, and the SP60 card printer.
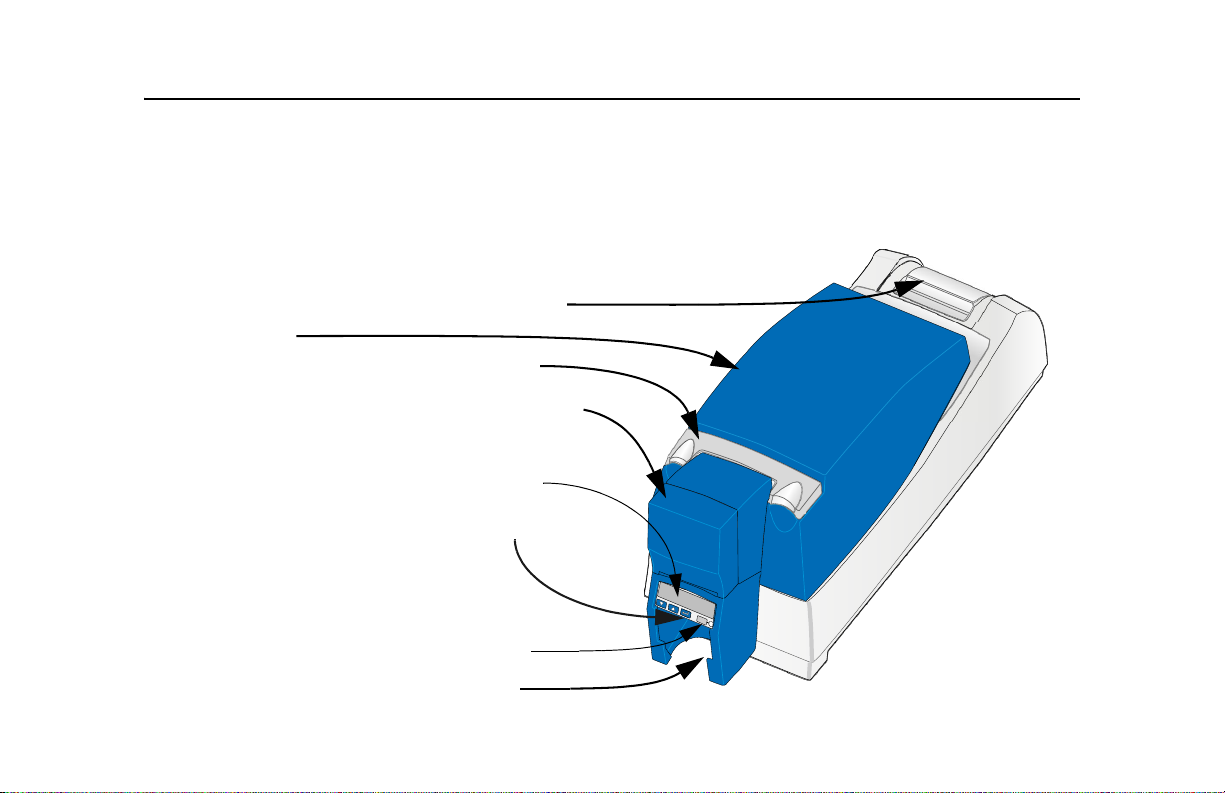
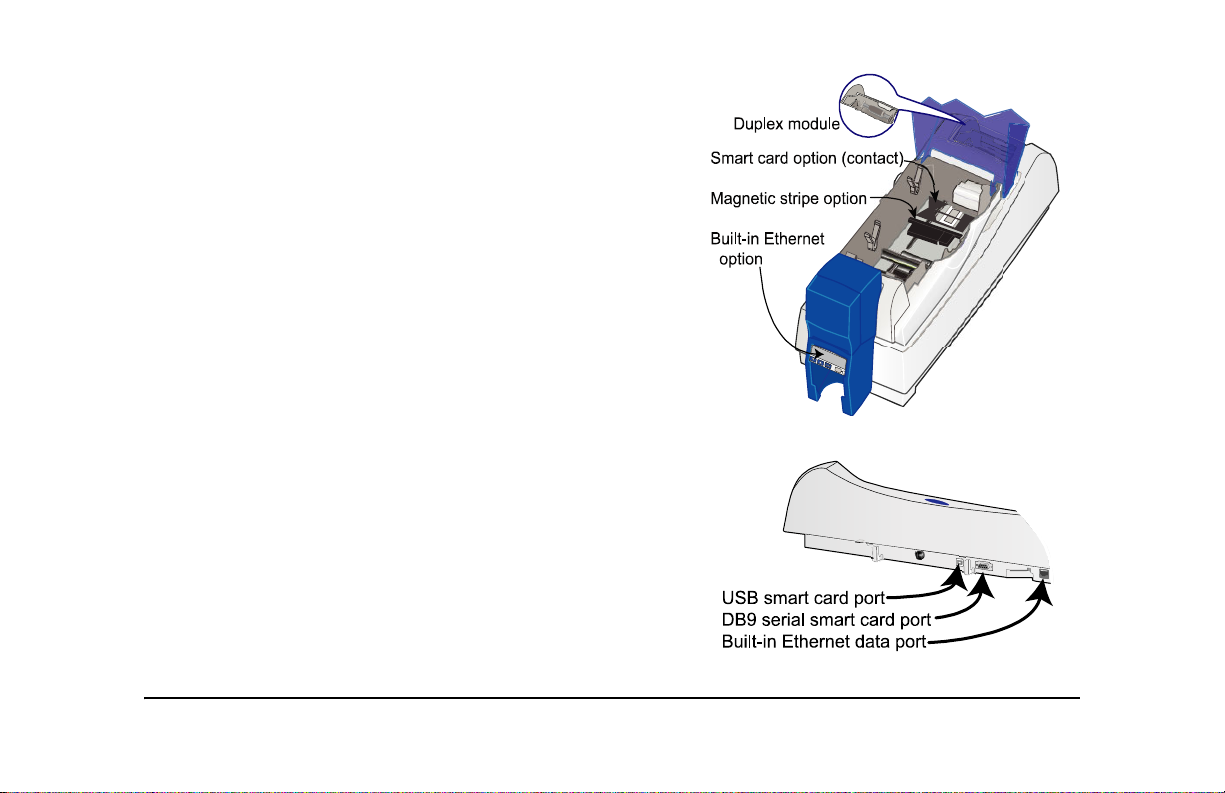
The outside of the printer
Duplex Module: Optional module at the back of the
printer that turns the card to print the other side.
Printer Cover.
Latch: Lift the latch to open the printer cover.
Input Hopper: Open the cover to load blank cards.
LCD Panel: Shows the printer status and any messages.
Use the LCD panel to change network settings for
printers with the Built-in Ethernet feature.
Ready Key: Push to pause or resume the
printer.
The Status Light helps you understand printer operation.
“The LCD panel” on page 10 for details.
See
Page 1
Output Hopper: Remove completed cards.
Ports are located on the left side of the printer.
Network Port: Use the Ethernet™ port to connect a
printer with the Built-in Ethernet feature.
USB Data Port: Connect the data cable to the printer.
ALL printers have this port.
Manual Advance Knob: Use to move a card in the
printer or to turn rollers.
Power Receptacle: Plug in the power supply to power
on the printer.
Security Lock Receptacle: Connect the optional security
lock to the opening under the ledge of the printer (not
visible in this drawing).
Cable Guides: Place the data cable in the guides. (You
can also place the power cable in the guide.)
Optional Smart Card USB Port: See “Features and
options” on page 3.
Optional Smart Card Serial Port: See “Features and
options” on page 3.
SP Series Network Printer Guide: Attach the holder and
place the guide in it to keep the guide with printer.
Attach the holder as shown or in any convenient
location.
Page 2
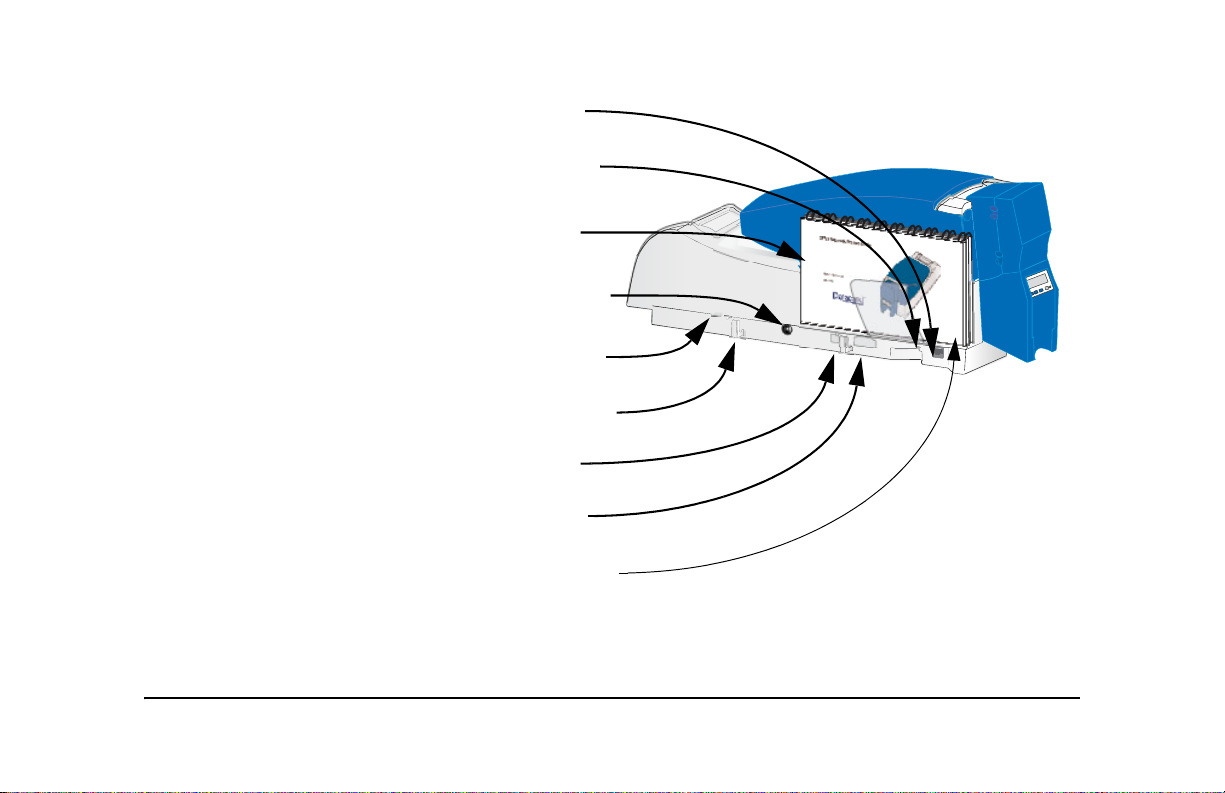
The inside of the printer
Cover Arm: Holds the cover and printhead cartridge in place.
Printhead Cartridge: Applies the image to the card. The label
includes”YMC” for color or “K” for monochrome printheads.
Print Ribbon Cartridge (shown with color print ribbon).
Printer Label: Includes the serial number and model information
(located on the left side of the printer and not visible in this drawing).
Cleaning Roller (not visible in this drawing): Removes dust
and debris from cards.
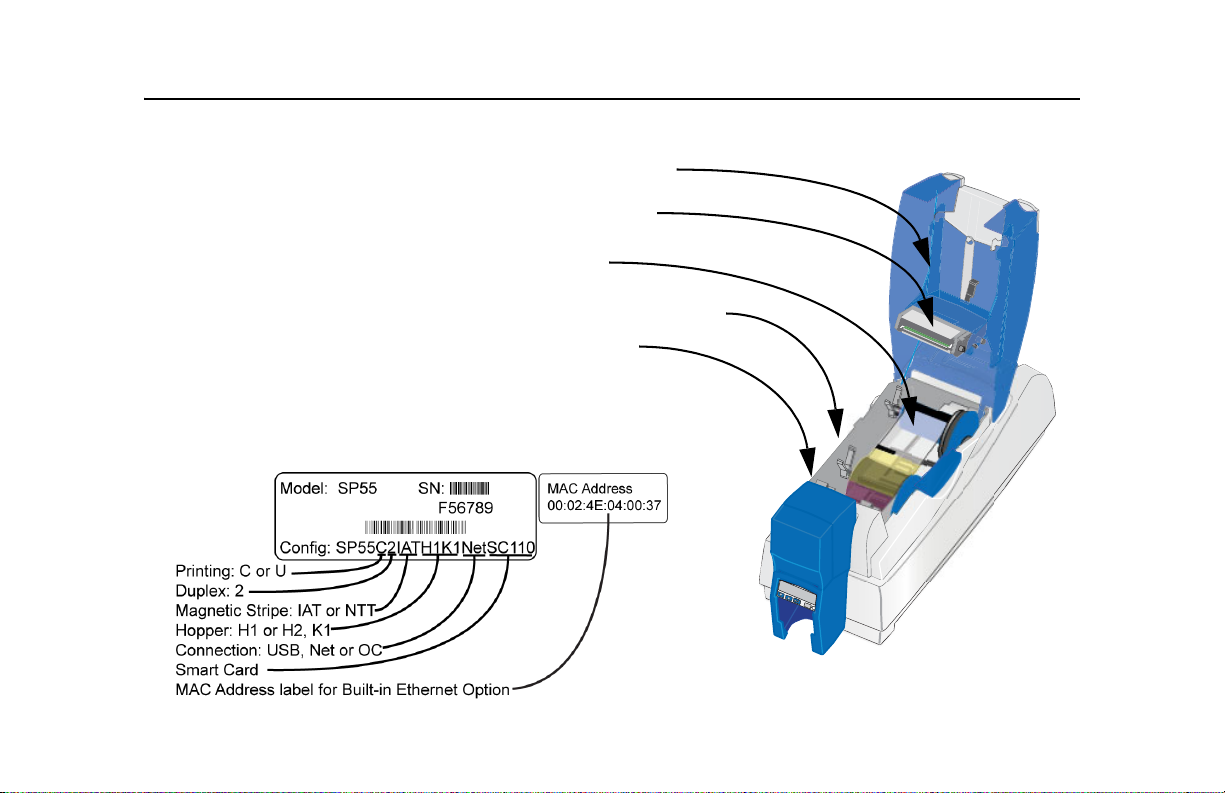
Features and options
Features and options are identified on the printer label.
Page 3
• Printers with “U” printing can print one color (monochrome)
only. “C” printing is full-color or monochrome (with specific
ribbons).
• All SP Series printers have a USB data connection. SP
Series printers can have one or more of the following:
— Built-in Ethernet (Net) connection
— Open Card (OC) data format and Built-in Ethernet
Printers with an Ethernet connection have an LCD panel and
a MAC address label.
• Printers can include a duplex (2) module.
•A magnetic stripe module can be a three-track (IAT) or
single-track (NTT) module.
• Printers can have a 100-card (H1) or 200-card (H2) input
hopper. The input hopper can have a lock (K1).
• An optional smart card module can have:
— Contact coupler (SC1x0 on the label): Visible inside the
printer. Includes a USB port on the printer.
— Contactless RF coupler (SC20x): Includes a serial or USB
port.
— Combination smart card coupler (SC3xx): Contact and
contactless couplers. Visible inside the printer, includes
USB or serial port. See SP Series Info Central for codes.
— Contact station (SC400): Visible inside the printer. Includes
a serial port.
Page 4
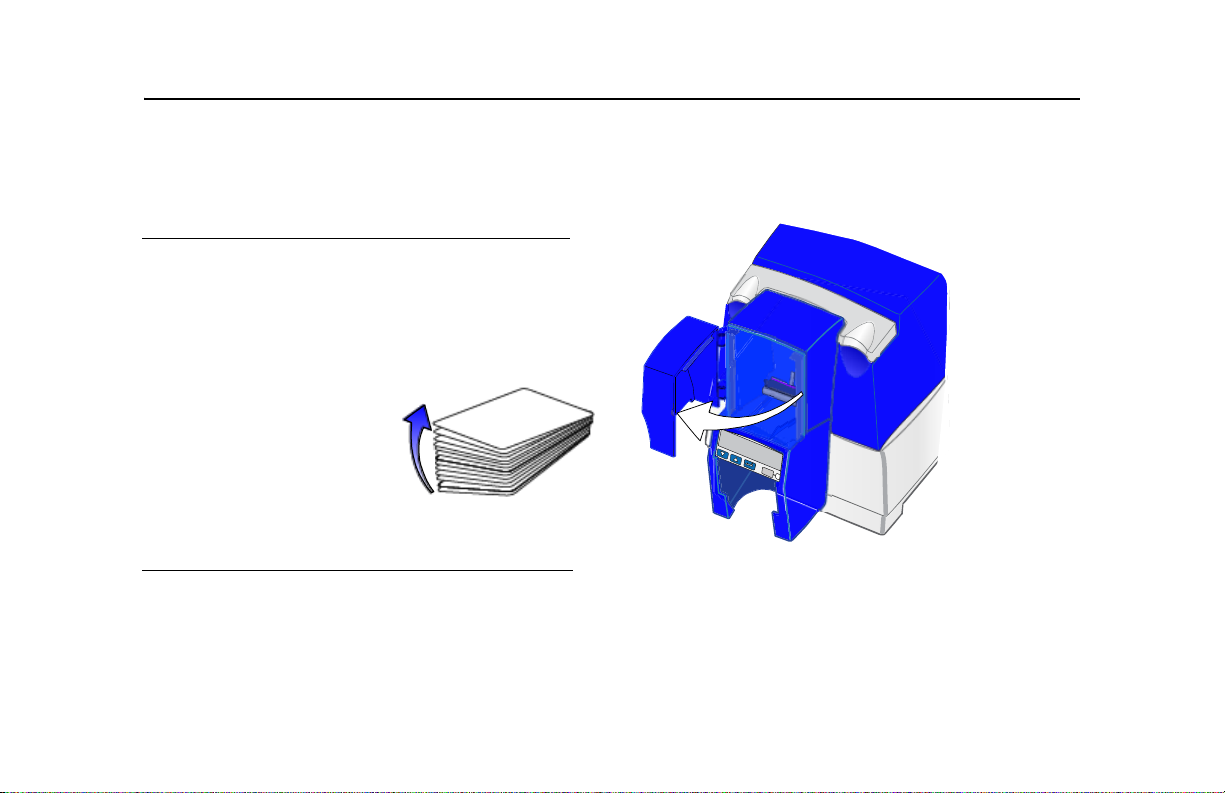
Loading cards
1 Open the input hopper cover.
2 Remove cards from the original package.
Tips: Handling cards
• Do not touch the surface of cards before printing
them. (Oils on hands will reduce printing quality.)
• Handle cards by the edges or wear gloves.
• Cards can stick
together: Slide or
fan cards to
separate the edges.
• Orient all cards the same way.
Page 5
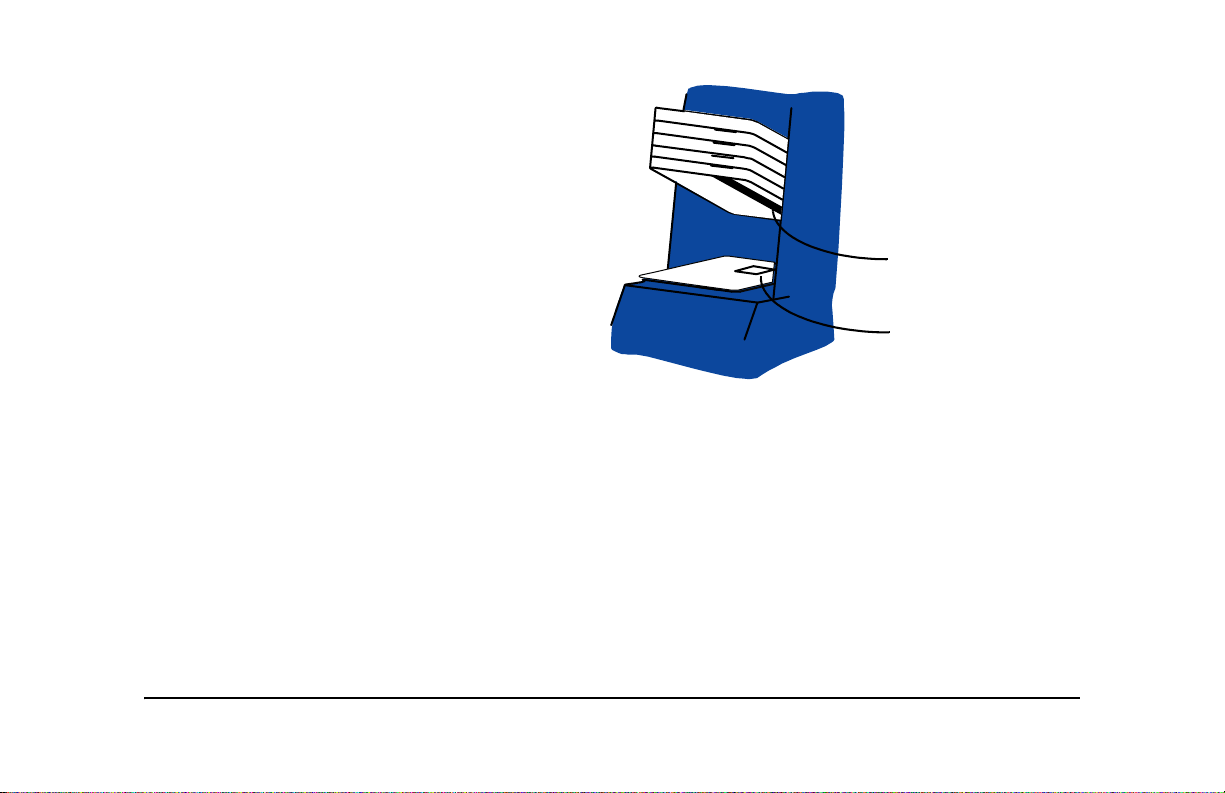
3 Place the cards in the input hopper.
The diagram shows the typical locations for the
magnetic stripe and smart card chip.
4 Push the input hopper cover closed until it
latches.
See SP Series Info Central for current information
about cards to use in the printer.
Magnetic stripe
Smart card chip
Page 6
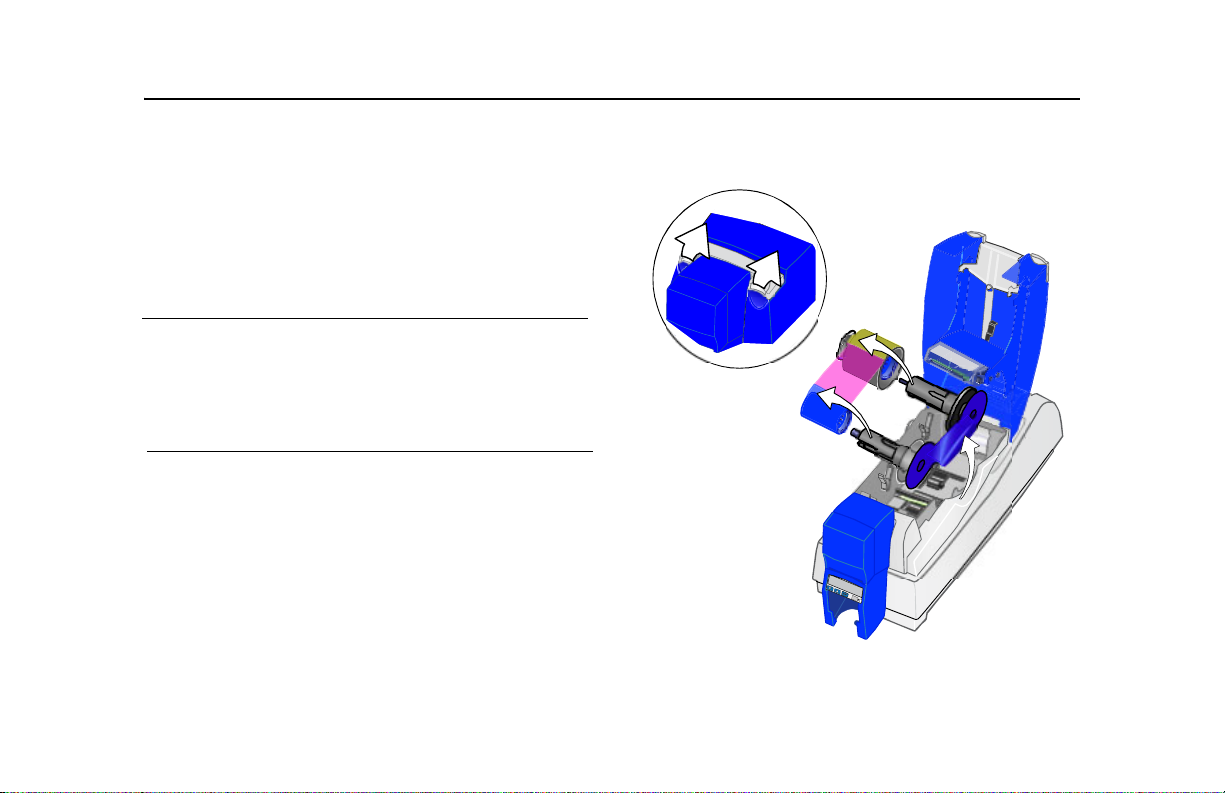
Loading print ribbon
1 Open the printer.
2 Remove the ribbon cartridge.
3 Remove both used ribbon spools from the cartridge (if
present).
Tips: Handling print ribbon
• Keep unused ribbon in the original package.
• Don’t place ribbon on a dusty or dirty surface–dirt
could damage the printhead.
4 Run a cleaning card and replace the cleaning sleeve
at the same time that you load a new print ribbon. See
“Cleaning the printer” on page 39 for the steps to
follow.
Page 7
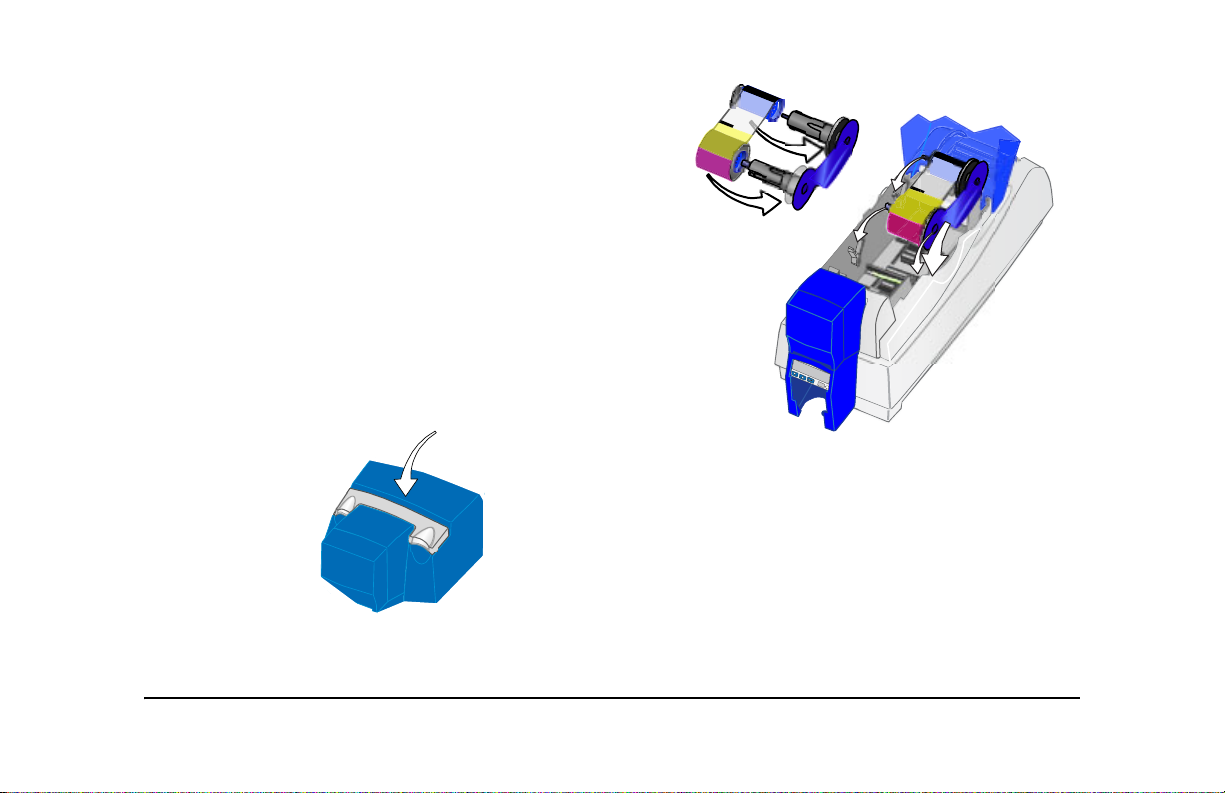
5 Load the new roll of print ribbon on the cartridge.
— Put the full spool of ribbon on the supply spindle of the
ribbon cartridge. Push until the spool clicks onto the
spindle.
— Put the empty take-up spool on the spindle with the solid
black gear. Push until the spool clicks onto the spindle.
6 Replace the loaded ribbon cartridge in the printer.
— Make sure both spindles rest in the black supports on the
left side of the printer.
— Make sure the ribbon cartridge handle rests in the
supports on the right side of the printer.
— Make sure to install the full, new spool toward the input
hopper of the printer.
7 Close the printer cover. Press down firmly to latch it.
Page 8

Power on the printer
Plug in the printer to power it on. The printer does not
have a power switch.
1 Make sure the power supply cord connects to the
printer power receptacle (1).
2 Connect the power cord to the power supply (2).
3 Connect the power cord to the power outlet (3).
4 The printer powers on and the Status Light is amber.
After a moment, the LCD panel shows the printer name (such
as SP55 or SP60) and firmware version.
5 When the printer is ready to print cards, the LCD panel shows
“Printer Ready” and the data format setting. The Status Light
displays steady green.
The printer must be connected to a computer (locally or through a
network) to print cards. See
Tips for printer power
• Wait while the printer initializes.
• Follow the guidelines for your organization about when to
power the printer on and off.
“Printer Installation” on page 21.
Page 9
3
2
1
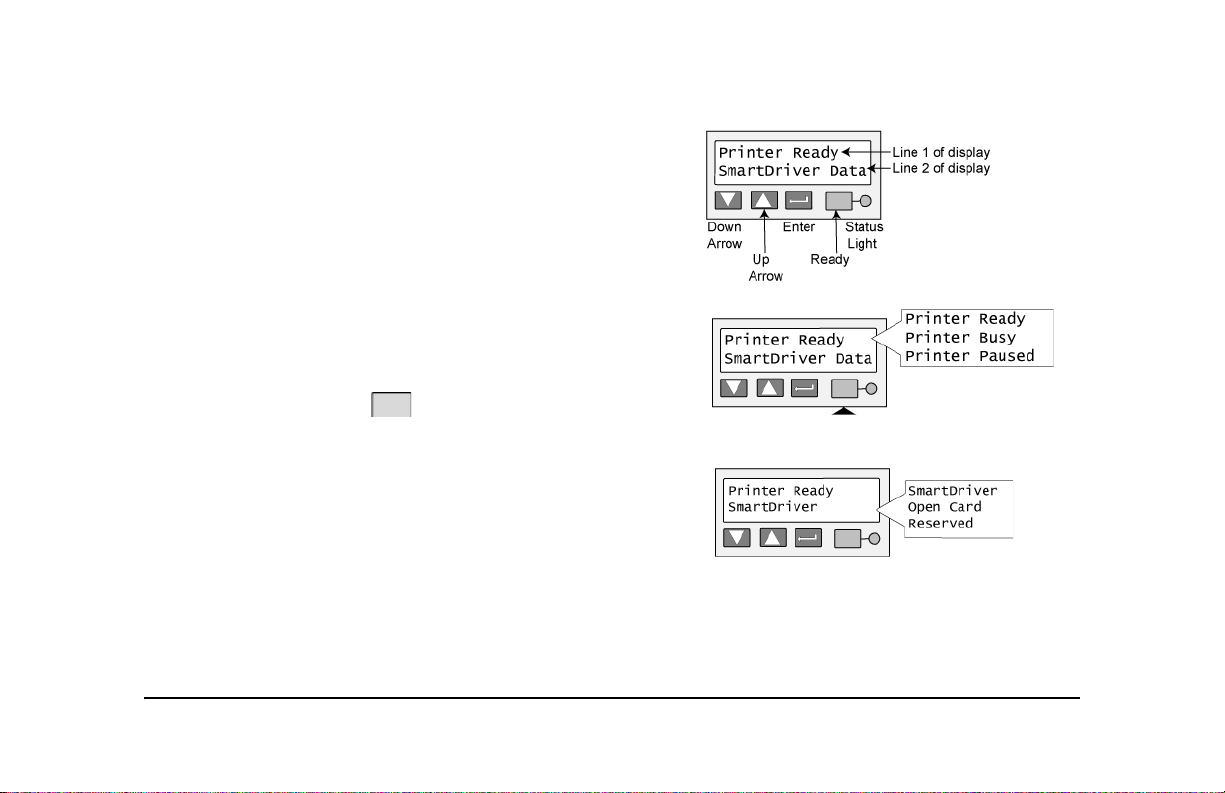
The LCD panel
The SP Series Card Printer with built-in Ethernet includes an
LCD panel. The LCD panel has a 2-line display, four keys, and
the Status light.
This section describes what you need to know when printing
cards. See “Printer LCD settings” on page 45 for detailed
information about viewing and changing network settings.
The LCD panel provides the following:
• Current State (line 1): Shows whether the printer is ready to
print, is busy, or is paused.
— Press the Ready key to pause or un-pause the
printer.
• Data format (line 2): The type of data the printer is ready to
accept.
Page 10
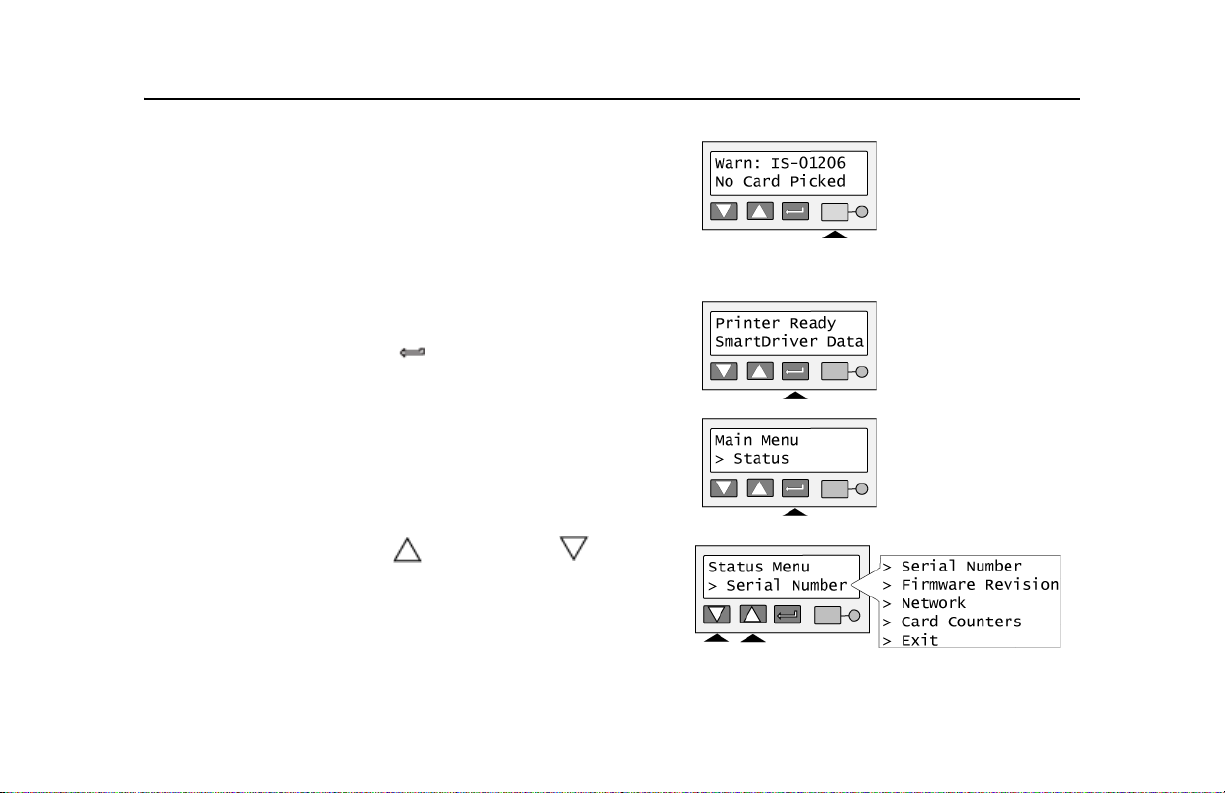
• Printer messages: The display shows the message number
and a short description of the problem.
— Fix the problem and then press the Ready key to clear
the message. Repeat if another message is displayed.
— See “Printer messages” on page 65 for details about
messages.
• Status: Information about the printer , including printer card
counts and network settings. To view status details:
— Press the Enter key to move to the Main Menu.
— Press the Enter key again to enter the Status Menu.
— Press the Up Arrow or Down Arrow key to
scroll through the Status Menu choices.
Page 11

— Press the Enter key to view the data
— Press the Enter key again to return to the menu.
— Scroll to “Exit” and press the Enter key to leave a choice.
Repeat as needed to leave the menus.
See “Printer LCD settings” on page 45 for details about viewing
and changing settings.
Page 12

Making a printer test card
1 Power off the printer.
2 Confirm that cards and print ribbon are loaded in the printer.
— If the printer has a magnetic stripe module, the card must have a magnetic stripe.
— If it is a three-track module, be sure to use blank cards with the correct coercivity (the default is high
coercivity).
— If the printer has been installed previously and
has used a custom magnetic stripe format, you
might need to set the printer to use the default
encoding format for the module. See SP
Series Info Central for information on magnetic
stripe setup.
3 Power on the printer (1). Within 5 seconds, press
and hold the Ready key (2), as shown in the
illustration. Hold the Ready key firmly until the
printer sounds three tones and displays “Printer
Test Card” on the LCD panel, usual l y abou t 30
seconds.
4 Release the Ready key and observe the printer.
Y ou hear the internal components initialize and the
printer starts processing the card.
5 After it is printed, remove the card from the output
hopper.
1
Page 13

Tips for success
• Allow 30 to 60 seconds for the printer to begin printing the test card.
• The status light will flash green while the printer is processing the data.
• If the status light is steady amber and the printer beeps, the printer is paused. Press the Ready key once to
un-pause the printer.
• If the printer test card did not print successfully, try the procedure again,
making sure you follow the instructions. If the test card does not print, or
if the printer does not initialize, contact your service provider.
• The test card has the pattern shown. (The pattern will be monochrome
dots, not colored dots, if the printer uses a monochrome ribbon.)
Page 14

Data formats for the SP Series Card Printer
All SP Series printers with the Built-in Ethernet feature are shipped with the SmartDriver CD-ROM, and can print
cards sent by the SmartDriver (when the Data Format is set to SmartDriver). The printer can also be purchased
with the Open Card option. Printers with the Open Card option can also print cards using the Open Card data
format (when the Data Format is set to Open Card). This section describes the requirements and functionality of
each format.
Page 15

SmartDriver data
The printer can be used with the SmartDriver installed on a PC. The SmartDriver
receives data from your Windows application and formats it for the printer. The printer
can print one or both sides of the card (duplex printing), print in landscape or portrait
orientation, and print in full color or one color.
The driver formats (renders) the data for each card. It can accept text, photos,
backgrounds, logos and other elements such as bar codes if they are supported by the
Windows application. With the corresponding options, the printer can encode a
magnetic stripe on the front or back of the card and read or program a smart card.
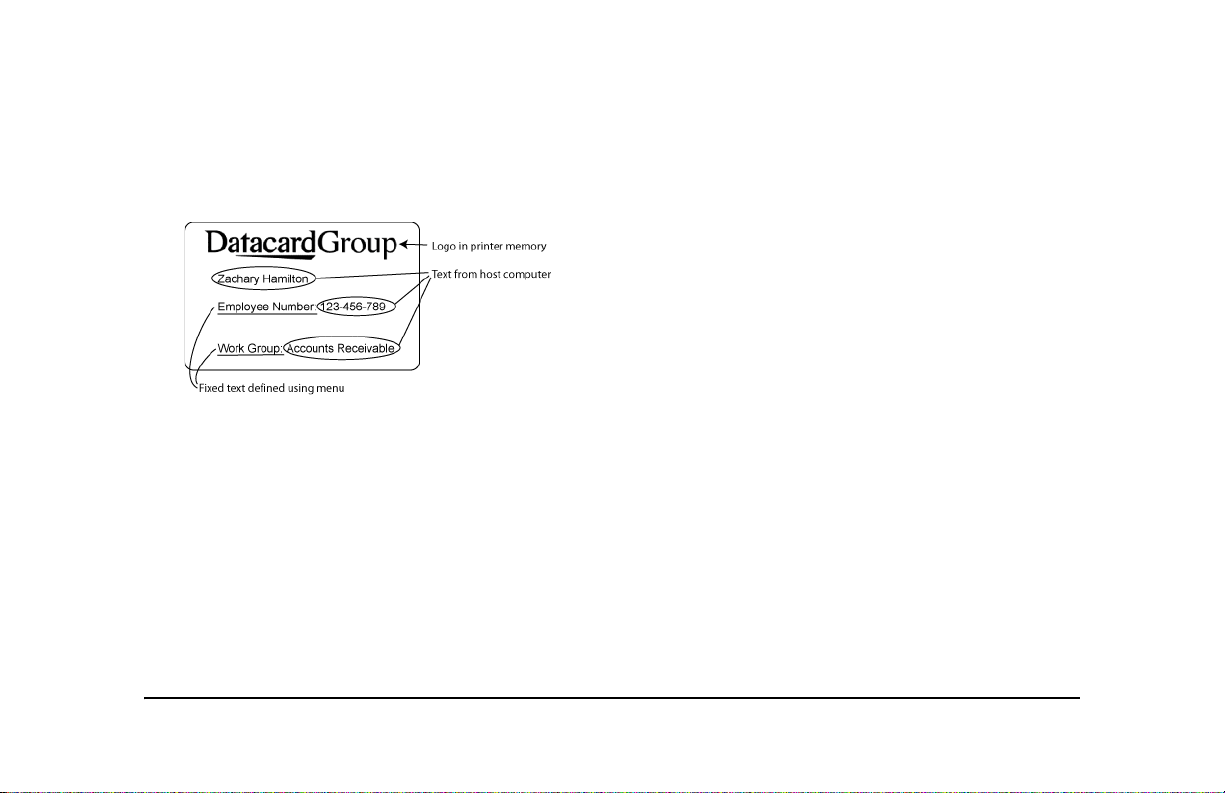
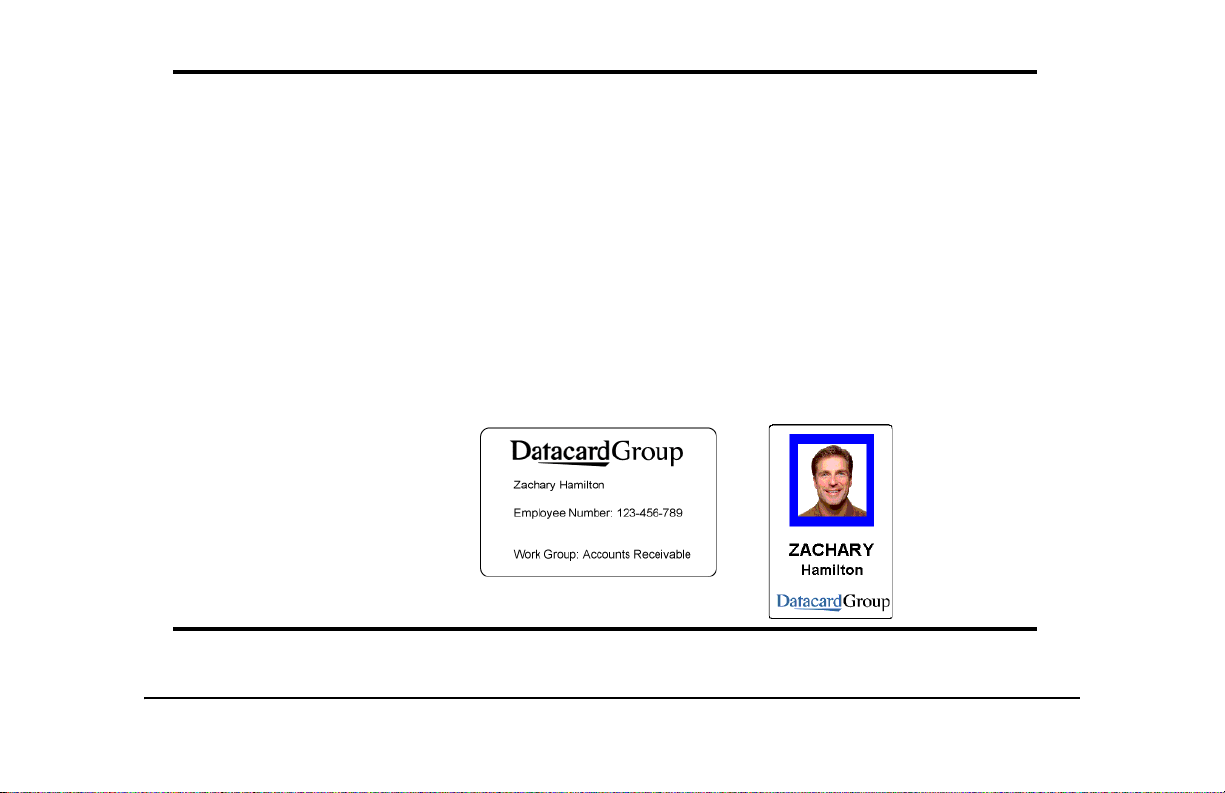
The sample card on this page is printed when you use the “Print Sample Card” button
of the Printer Toolbox, which is part of the SmartDriver. It shows typical features of a
card printed using the SmartDriver and the printer.
When you print from the SmartDriver, any errors on the printer cause a message to be
displayed on the PC, in addition to being displayed on the printer LCD panel. Datacard
recommends that you use buttons on the message box to clear the message from the
printer and driver. (This also clears the message from the LCD panel.) Using the driver
provides you with advanced features including retrying the card.
Page 16

Page 17
Open Card data format
The Open Card data format uses ASCII data. Any host computer that can generate an ASCII (text) data stream and
send it to the printer using TCP/IP (or TCP/IP with LPD/LPR) can send card data using the Open Card data format.
Organizations that use operating systems other than Windows can print cards without inserting a PC between the
host computer and the printer (provided that the systems can generate an ASCII data stream).
The SP Series Card Printers with Built-in Ethernet and the Open Card Option provides two methods for specifying
the format of the data; supported Open Card commands and Card Layout menus in the printer. For organizations
that currently send data tagged with Open Card commands to a printer or embosser, the printer can produce
printed cards from the same data stream. Or, you can use the Card Layout menus to define card designs that
reside in the printer and format the data.
The Open Card option supports printing text, printing bar codes, printing logos, and encoding magnetic stripe data
on a card. For text, you can choose from several fonts and sizes that are printer-resident. For bar codes, you can
also choose from several bar code fonts (for different types of bar codes) and sizes. For graphics, you can
download up to four black-and-white logo files to the printer and choose where to place the files on the card. The
printer does not provide the ability to download a different graphic for each card. Each text or graphic field can be
rotated independently. In addition, the entire card design can be rotated to change the relationship of printing to the
magnetic stripe.
For magnetic stripe data, you can define encoding formats in the printer (using SmartDriver Diagnostics) and then
send up to three tracks of data (with a magnetic stripe option). For some features, you must use a PC running the
SmartDriver and SmartDriver Diagnostics to configure the printer . Afte r configurin g, you ca n use the host co mputer
to send data and print cards.
The Open Card format supports printing with one color on one side of the card in landscape mode. If you use a fullcolor ribbon in a full-color printer when you send Open Card data, the printer will use only the K panel in the ribbon
and ignore the color and topcoat panels. The magnetic stripe (if it is encoded) must be located on the side of the
card opposite the printing.
The following card shows some of the features available using the Open Card forma t.
When you use the Open Card format, messages are displayed on the printer LCD panel. This guide provides
information for fixing problems. Use the Ready key on the LCD panel to clear the message from the printer.
The Open Card features are typically used with an Ethernet connection and a network. You can also use the Open
Card data format through the printer USB port when using a print server. See the SP Series Data Formatting Guide
for details on using the Open Card format.
See “Network installation” on page 25 for details on installing and setting up the printer for the data format you
choose.
Page 18

Data formats summary
The following table summarizes the requirements and features for each data format.
Open Card SmartDriver
Page 19
Source of data Any host computer that produces
an ASCII data stream and uses
TCP/IP (RAW or LPD/LPR)
Data formatted by Open Card commands or Card
Layout menus
Type of connection Ethernet or USB ports Ethernet or USB ports
Printer Messages Displayed on LCD panel Displayed in Windows message
Configuration tools • Network configuration utility
and LCD panel
• Telnet to use Card Layout
menus (optional)
• Text editor or batch process to
insert Open Card commands
in data (optional)
• SmartDriver Diagnostics (on
PC)
Windows application (with the
SmartDriver running on a
Windows PC)
SmartDriver running on a
Windows PC
boxes and on LCD panel
• Network configuration utility
and LCD panel
• SmartDriver Printer T oolbox
• Printer Properties and Printing
Preferences
• SmartDriver Diagnostics (on
PC)
Features:
• Print on both sides
• Portrait or landscape
orientation
• Rotate card 180 degrees
• Rotate fields
• Full-color or monochome
printing
• Unique graphics on each card
• Different design for each card
• Magnetic stripe encoding
• Smart Card programming
Example:
Open Card SmartDriver
•No
• Landscape only
•Yes
•Yes
• Monochrome only
• Up to 4 downloaded logos on
a card
•No
•Yes
•No
•Yes
•Both
•Yes
• Yes (using an application)
• Yes (with full-color printing
feature)
•Yes
•Yes
•Yes
•Yes
Page 20

Printer Installation
This section describes the following:
• Site requirements
• Useful tools for network installation and setup
• Preparing the printer for installation
• Connecting the printer to the network
• Setting up the printer on the network
• Setting up the printer for your card design
• SNMP (Simple Network Management Protocol) support
Page 21
Site requirements
Operating environment
• Relative humidity: 20% to 80% non-condensing
• Temperature: 60° F to 95° F (15° C to 35° C)
Electrical requirements
• The external power supply is rated at 100-240 VAC, 50-60 Hz,
1.8 amp. (It adjusts to any power within this range.)
• Single phase, 3-wire, grounded receptacle only.
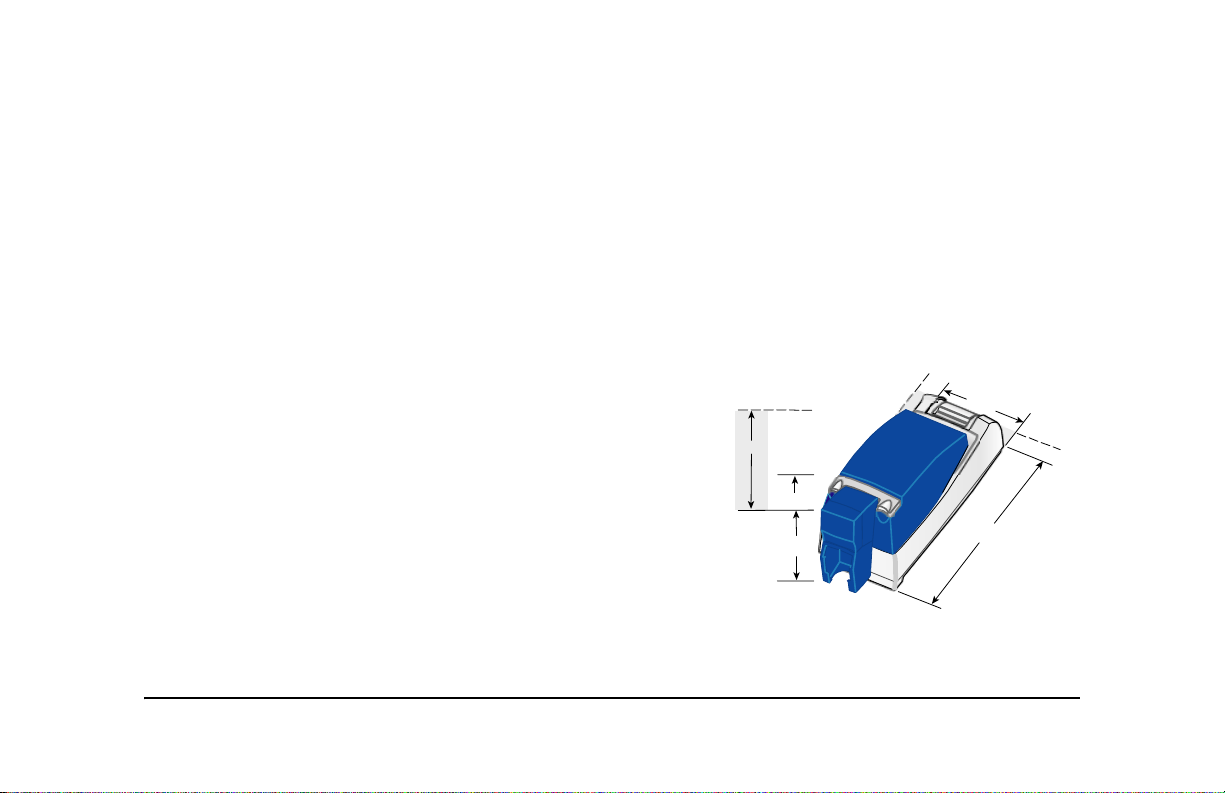
Physical requirements
• The printer weighs less than 11.5 pounds (5.3 kg). The weight
depends on the supplies and options installed.
• Printer dimensions are 21.5 inches (546 mm) long and 7.8
inches (198 mm) wide. The 100-card input hopper is 9.5 inches
(241 mm) high and the 200-card hopper is 11.9 inches (302 mm)
high.
• The clearance required 1 inch (25 mm) at the back, 2 inches (5
cm) on the left side, and 10.5 inches (267 mm) above the printer
latch to open the cover.
Do not use the printer in a dirty environment. Do not use the printer
in a closed compartment. Do not block air flow around the printer.
10.5” (for cove r )
11.9”
9.5”
2”
7.8”
1”
21.5”
Page 22

Useful tools
When you set up an SP Series Card Printer with Built-in Ethernet feature, you might use several tools. These
tools are part of the network operating system and a computer operating system; they are not provided with the
printer.
• Network configuration utility
When the printer is set up on the network where cards are produced, network support personnel use one or
more utilities to view and monitor the network. The SP Series printer was tested with HP Web JetAdmin on
Windows XP (service pack 1).
• Command prompt
If you are not using the SmartDriver, you can use a command prompt to type commands and use utilities to
set up the printer. You might also find a command prompt helpful for network testing.
•Ping
Ping is a network utility that obtains a response from a device connected to the network. It is a quick way to
query an IP address to verify that it is functioning on the network. The printer responds to Ping.
If the printer includes the Open Card option and you plan to send Open Card data, you might use several
additional tools, including the following:
•Telnet
Most operating systems include a telnet utility. The SP Series printer with the Open Card option provides
Card Layout menus through a telnet interface.
Page 23

• tiff2opencard
The SP Series Open Card CD-ROM includes the tiff2opencard utility, which you use to prepare logos
(graphics) before sending then to the printer.
• file2prn
The SP Series Open Card CD-ROM includes the file2prn utility, which you use to send files, including logo
files or sample card files, to the printer.
See the SP Series Data Formatting Guide for more information about them.
Page 24

Network installation
A networked printer is connected to a network without a host computer between the printer and network.
Depending on printer options and your needs, the printer can be connected to a print server and then to the
network. A host computer can connect to several networked printers at a time, and several host computers can
connect to one printer. To connect a printer to a network, you need the following:
• An Ethernet network that uses the TCP/IP protocol and can run at 10 megabits per second (also called
10base-T) or a faster network (such as 100 megabits per second) that automatically switches to the printer
speed of 10 megabits per second.
• SP Series Card Printer (with the Built-In Ethernet feature).
• Ethernet cable to connect the printer or print server to the network. An Ethernet cable is not supplied with the
printer.
• Network configuration utility. Network support personnel use utilities to set up and monitor the network and
devices on the network.
• Computer connected to and communicating with the network.
— From the computer, you will set up the printer on the network and verify that the printer is connected to
and communicating with the network. The printer was tested with PCs running the Windows operating
systems and the SmartDriver. (See SP Series Info Central for details.) The SP Series printer with Open
Card Option was also tested with a PC running the Knoppix Linux Boot CD-ROM (version 3.3).
— When setting up the printer using an operating system with permissions, such as Windows XP, make sure
you are logged in as the Administrator. If networking is set up on the computer, log into the network.
Page 25
 Loading...