


RP90 Plus E Card Printer and RL90 Card Laminator:
User Guide
June 2008
Part Number 570024-00
2 Rev B

Please note and heed the WARNING and CAUTION labels that have been placed on the equipment for your
safety. Please do not attempt to operate or repair this equipment without adequate training. See “Safety” on
page vi for the basic safety tips to ensure safe operation and maintenance of this equipment.
Regulatory compliance
These Datacard Group products conform to regulatory requirements as specified in North America, Europe, and
Asia. See
““Regulatory compliance” on page 82 for more information.
Trademark acknowledgments
Datacard and ID Works are registered trademarks of DataCard Corporation in the United States and/or other
countries.
Microsoft, Windows and Windows Vista are registered trademarks of Microsoft Corporation.
All other trademarks are the property of their respective owners.
Names and logos on sample cards are fictitious. Any similarity to actual names, trademarks, or trade names in
coincidental.
Proprietary Notice
All drawings and information herein are the property of DataCard Corporation. The design and information
contained in these materials are protected by US and international copyright laws.
Revision Log:
RP90 Plus E and RL90 User Guide
Revision Date Affected Pages Description of Changes
A October 2005 All RP90 Plus Release
B June 2008 All RP90 Plus E Release
ii RP90 Plus E and RL90 User Guide

Contents
Liability statement . . . . . . . . . . . . . . . . . . . . . . . . . . . . . . . . . . . . . vi
Safety . . . . . . . . . . . . . . . . . . . . . . . . . . . . . . . . . . . . . . . . . . . . . . vi
Safe environment . . . . . . . . . . . . . . . . . . . . . . . . . . . . . . . . . . . vi
Safe human interface . . . . . . . . . . . . . . . . . . . . . . . . . . . . . . . . vi
1 Introduction . . . . . . . . . . . . . . . . . . . . . . . . . . . . . . . . . . . . . . . . . 1
About this manual . . . . . . . . . . . . . . . . . . . . . . . . . . . . . . . . . . . . . 1
Who to call for assistance . . . . . . . . . . . . . . . . . . . . . . . . . . . . . . . 1
About the Printer . . . . . . . . . . . . . . . . . . . . . . . . . . . . . . . . . . . . . . 2
The outside of the printer . . . . . . . . . . . . . . . . . . . . . . . . . . . . . 2
The inside of the printer . . . . . . . . . . . . . . . . . . . . . . . . . . . . . . 3
The back of the printer . . . . . . . . . . . . . . . . . . . . . . . . . . . . . . . 4
About the laminator . . . . . . . . . . . . . . . . . . . . . . . . . . . . . . . . . . . . 5
The parts of the laminator . . . . . . . . . . . . . . . . . . . . . . . . . . . . 5
2 Using the printer . . . . . . . . . . . . . . . . . . . . . . . . . . . . . . . . . . . . . 7
Load Supplies . . . . . . . . . . . . . . . . . . . . . . . . . . . . . . . . . . . . . . . . 8
Load cards . . . . . . . . . . . . . . . . . . . . . . . . . . . . . . . . . . . . . . . . 8
Load ink ribbon . . . . . . . . . . . . . . . . . . . . . . . . . . . . . . . . . . . . . 9
Load retransfer film . . . . . . . . . . . . . . . . . . . . . . . . . . . . . . . . . 10
Load laminate . . . . . . . . . . . . . . . . . . . . . . . . . . . . . . . . . . . . . 11
Power on . . . . . . . . . . . . . . . . . . . . . . . . . . . . . . . . . . . . . . . . . . . 12
Check the PC connection . . . . . . . . . . . . . . . . . . . . . . . . . . . . 12
Optional laminator connection. . . . . . . . . . . . . . . . . . . . . . . . . 13
Power on the laminator . . . . . . . . . . . . . . . . . . . . . . . . . . . . . . 14
LCD sequence on laminator startup. . . . . . . . . . . . . . . . . . . . 14
Power on the printer . . . . . . . . . . . . . . . . . . . . . . . . . . . . . . . . 15
LCD sequence on printer startup . . . . . . . . . . . . . . . . . . . . . . 15
Prepare to print cards . . . . . . . . . . . . . . . . . . . . . . . . . . . . . . . . . 16
Initialize the ink ribbon. . . . . . . . . . . . . . . . . . . . . . . . . . . . . . . 16
Set the retransfer film type . . . . . . . . . . . . . . . . . . . . . . . . . . . 16
Initialize the retransfer film . . . . . . . . . . . . . . . . . . . . . . . . . . . 17
Initialize the patch or topcoat material
(optional RL90 laminator only) . . . . . . . . . . . . . . . . . . . . 17
Printing cards. . . . . . . . . . . . . . . . . . . . . . . . . . . . . . . . . . . . . . . . 18
Print cards using ID software . . . . . . . . . . . . . . . . . . . . . . . . . 18
Print from a PC application . . . . . . . . . . . . . . . . . . . . . . . . . . . 19
3 Viewing and changing
printer settings. . . . . . . . . . . . . . . . . . . . . . . . . . . . . . . . . . . . . . . . 21
Printing Preferences . . . . . . . . . . . . . . . . . . . . . . . . . . . . . . . . . . 22
Printing Properties . . . . . . . . . . . . . . . . . . . . . . . . . . . . . . . . . . . . 24
Status Monitor . . . . . . . . . . . . . . . . . . . . . . . . . . . . . . . . . . . . . . . 25
Open the Status Monitor . . . . . . . . . . . . . . . . . . . . . . . . . . . . . 25
Close the Status Monitor. . . . . . . . . . . . . . . . . . . . . . . . . . . . . 26
Printer Status tab . . . . . . . . . . . . . . . . . . . . . . . . . . . . . . . . . . 26
RP90 Plus E and RL90 User Guide iii
539653-002 Rev B

Printer Setting tab . . . . . . . . . . . . . . . . . . . . . . . . . . . . . . . . . . 27
Retransfer tab . . . . . . . . . . . . . . . . . . . . . . . . . . . . . . . . . . . .28
Bend Remedy tab . . . . . . . . . . . . . . . . . . . . . . . . . . . . . . . . .28
Media Setting tab . . . . . . . . . . . . . . . . . . . . . . . . . . . . . . . . . . 29
Property tab . . . . . . . . . . . . . . . . . . . . . . . . . . . . . . . . . . . . . .30
Printer Select tab . . . . . . . . . . . . . . . . . . . . . . . . . . . . . . . . . .30
Others tab . . . . . . . . . . . . . . . . . . . . . . . . . . . . . . . . . . . . . . . 31
Status monitor messages . . . . . . . . . . . . . . . . . . . . . . . . . . . . 31
Using the LCD menus . . . . . . . . . . . . . . . . . . . . . . . . . . . . . . . . . 35
About the Printer LCD panel . . . . . . . . . . . . . . . . . . . . . . . . . . 35
Using the Printer LCD panel . . . . . . . . . . . . . . . . . . . . . . . . . . 36
About the Laminator LCD panel . . . . . . . . . . . . . . . . . . . . . . . 41
Using the Laminator LCD panel . . . . . . . . . . . . . . . . . . . . . . . 42
4 Taking care of your printer . . . . . . . . . . . . . . . . . . . . . . . . . . . . 43
Cleaning the printer . . . . . . . . . . . . . . . . . . . . . . . . . . . . . . . . . . . 44
Cleaning the card cleaning rollers. . . . . . . . . . . . . . . . . . . . . . 44
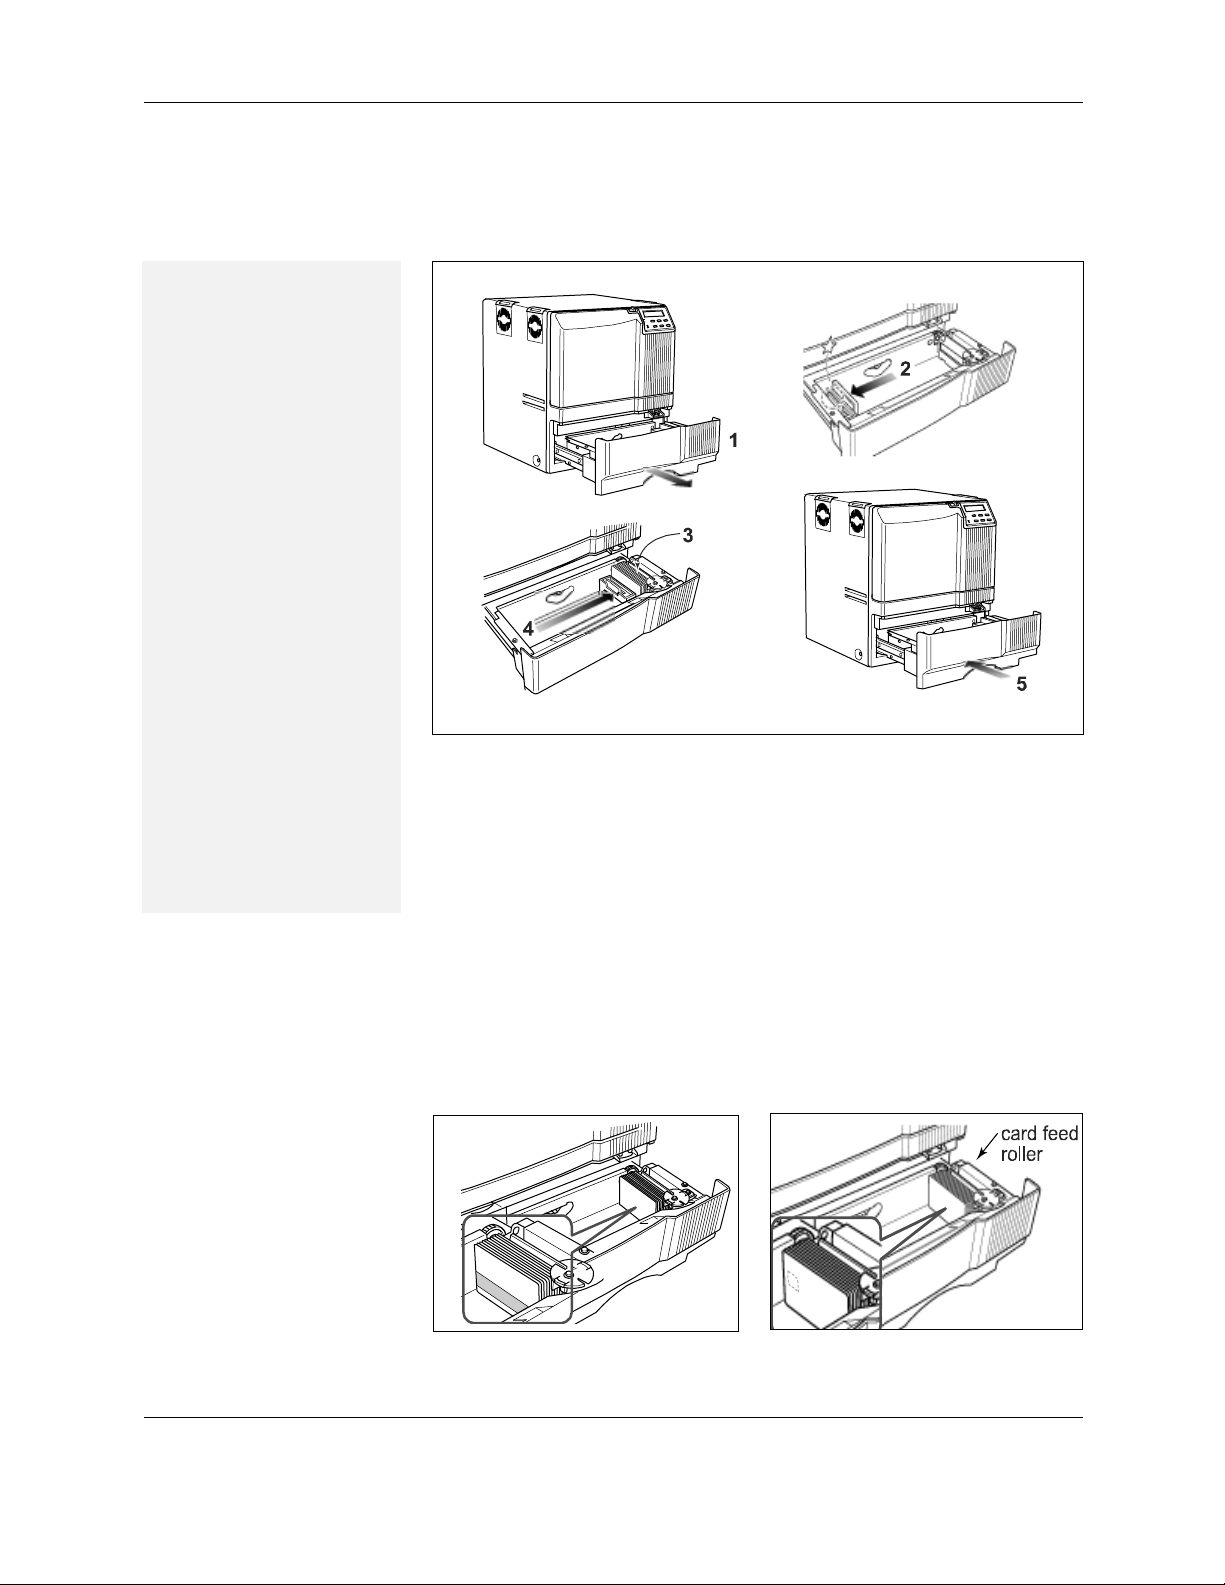
Card feed roller . . . . . . . . . . . . . . . . . . . . . . . . . . . . . . . . . . . . 44
Cleaning the card feed rollers and heat roller . . . . . . . . . . . . . 45
Cleaning the magnetic head . . . . . . . . . . . . . . . . . . . . . . . . . . 46
Cleaning the thermal head . . . . . . . . . . . . . . . . . . . . . . . . . . . 47
Cleaning printer fan filters . . . . . . . . . . . . . . . . . . . . . . . . . . . . 47
Preparing the printer and laminator for transport . . . . . . . . . . 48
Cleaning the laminator. . . . . . . . . . . . . . . . . . . . . . . . . . . . . . . . . 49
Run a laminator cleaning card . . . . . . . . . . . . . . . . . . . . . . . . 49
Cleaning the laminator cartridge . . . . . . . . . . . . . . . . . . . . . . . 50
Laminator fan filter . . . . . . . . . . . . . . . . . . . . . . . . . . . . . . . . . 50
5 Messages
and error recovery . . . . . . . . . . . . . . . . . . . . . . . . . . . . . . . . . . . . . 51
Printer roller layout . . . . . . . . . . . . . . . . . . . . . . . . . . . . . . . . . 51
Printer error recovery. . . . . . . . . . . . . . . . . . . . . . . . . . . . . . . . . . 52
Hopper jam . . . . . . . . . . . . . . . . . . . . . . . . . . . . . . . . . . . . . . . 52
Turnover jam . . . . . . . . . . . . . . . . . . . . . . . . . . . . . . . . . . . . . . 53
Retransfer section jam . . . . . . . . . . . . . . . . . . . . . . . . . . . . . . 54
Mending broken ink ribbon or retransfer film. . . . . . . . . . . . . . 55
Bend remedy. . . . . . . . . . . . . . . . . . . . . . . . . . . . . . . . . . . . . . 56
Bend remedy printer settings . . . . . . . . . . . . . . . . . . . . . . . . . 56
Bend remedy laminator settings. . . . . . . . . . . . . . . . . . . . . . . 57
Printer LCD messages . . . . . . . . . . . . . . . . . . . . . . . . . . . . . . 58
Laminator error recovery . . . . . . . . . . . . . . . . . . . . . . . . . . . . . . . 62
Card jam . . . . . . . . . . . . . . . . . . . . . . . . . . . . . . . . . . . . . . . . . 62
Patch position . . . . . . . . . . . . . . . . . . . . . . . . . . . . . . . . . . . . . 64
Laminator LCD messages. . . . . . . . . . . . . . . . . . . . . . . . . . . . 65
6 Supplies . . . . . . . . . . . . . . . . . . . . . . . . . . . . . . . . . . . . . . . . . . . 67
Ink ribbon, retransfer film, and laminator material. . . . . . . . . . 68
Ink ribbon . . . . . . . . . . . . . . . . . . . . . . . . . . . . . . . . . . . . . . . . 68
iv RP90 Plus E and RL90 User Guide

Retransfer film . . . . . . . . . . . . . . . . . . . . . . . . . . . . . . . . . . . . 68
Laminator material . . . . . . . . . . . . . . . . . . . . . . . . . . . . . . . . . 68
Cards. . . . . . . . . . . . . . . . . . . . . . . . . . . . . . . . . . . . . . . . . . . . 68
Card size . . . . . . . . . . . . . . . . . . . . . . . . . . . . . . . . . . . . . . . . 69
Card material . . . . . . . . . . . . . . . . . . . . . . . . . . . . . . . . . . . . . 69
Cleaning supplies . . . . . . . . . . . . . . . . . . . . . . . . . . . . . . . . . . 69
7 Site requirements. . . . . . . . . . . . . . . . . . . . . . . . . . . . . . . . . . . . 71
Site guidelines. . . . . . . . . . . . . . . . . . . . . . . . . . . . . . . . . . . . . 72
Operating environment. . . . . . . . . . . . . . . . . . . . . . . . . . . . . .72
Ventilation clearance . . . . . . . . . . . . . . . . . . . . . . . . . . . . . . . 73
Storage Environment for supplies . . . . . . . . . . . . . . . . . . . . . 73
Printer specifications . . . . . . . . . . . . . . . . . . . . . . . . . . . . . . . . 74
Laminator specifications . . . . . . . . . . . . . . . . . . . . . . . . . . . . . 75
A Magnetic Stripe Encoding . . . . . . . . . . . . . . . . . . . . . . . . . . . . 77
Inline Encoding . . . . . . . . . . . . . . . . . . . . . . . . . . . . . . . . . . . . . . 78
Example . . . . . . . . . . . . . . . . . . . . . . . . . . . . . . . . . . . . . . . . . 78
Character Code Table . . . . . . . . . . . . . . . . . . . . . . . . . . . . . . . . . 79
B Compliance (FCC) . . . . . . . . . . . . . . . . . . . . . . . . . . . . . . . . . . . 81
Regulatory compliance . . . . . . . . . . . . . . . . . . . . . . . . . . . . . . . . 82
Notice for USA (FCC notice) . . . . . . . . . . . . . . . . . . . . . . . . . . 82
Notice for Canada . . . . . . . . . . . . . . . . . . . . . . . . . . . . . . . . . . 82
Notice for Europe . . . . . . . . . . . . . . . . . . . . . . . . . . . . . . . . . . 82
Notice to Users of Printers Equipped with
Contactless Smart Card . . . . . . . . . . . . . . . . . . . . . . . . . 82
RP90 Plus E and RL90 User Guide v

Liability statement
This Datacard® product has been built to the high standards of DataCard Corporation
Corporation (doing business as Datacard Group). Please note and heed the WARNING
and CAUTION labels that have been placed on the equipment for your safety. PLEASE
DO NOT ATTEMPT TO OPERATE OR REPAIR THIS EQUIPMENT WITHOUT
ADEQUATE TRAINING. ANY USE, OPERATION OR REPAIR IN CONTRAVENTION OF
THIS DOCUMENT IS AT YOUR OWN RISK. BY ACCEPTANCE OF THIS SYSTEM YOU
HEREBY ASSUME ALL LIABILITY CONSEQUENT TO YOUR USE OR MISUSE OF THIS
EQUIPMENT. DATACARD CORPORATION SHALL NOT BE LIABLE FOR ANY
INCIDENTAL, INDIRECT, SPECIAL OR CONSEQUENTIAL DAMAGE OF ANY KIND.
Equipment specifications, applications and options are subject to change at the sole
discretion of DataCard Corporation without notice.
Safety
All Datacard® products are built to strict safety and reliability specifications in accordance
with UL60950 and Canadian requirements, and the Low Voltage Directive 73/23/EEC.
Therefore, safety issues pertaining to operation and repair of Datacard® equipment are
primarily environmental and human interface.
The following basic safety tips are given to ensure safe installation, operation and
maintenance of Datacard® equipment and are not to be considered as comprehensive on
all matters of safety.
Liability statement
Safe environment
• Connect equipment to a grounded facility power source. Do not defeat or bypass
the ground lead.
• Place the equipment on a stable surface (table) and ensure floors in the work area
are dry and non-slip. Insulated rubber floor mats are preferred.
• Know the location of equipment branch circuit interrupters or circuit breakers and
how to turn them on and off in case of emergency.
• Know the location of fire extinguishers and how to use them. ABC type
extinguishers may be used on electrical fires.
• Know local procedures for first aid and emergency assistance at the customer
facility.
• Use adequate lighting at the equipment.
• Maintain the recommended range of temperature and humidity in equipment area.
• Keep paper and foreign materials off the printer and optional laminator.
• Keep all dust, dirt, food, liquids, etc. away from the printer at all times.
Safe human interface
• Use proper lifting techniques when moving or installing the equipment.
• Use standard electrostatic discharge (ESD) precautions when working on or near
electrical circuits.
vi RP90 Plus E and RL90 User Guide

Introduction
About this manual
1
This manual provides detailed information about the Datacard® RP90 Plus E card printer
and the optional Datacard
basic information about the printer and laminator including drawings and parts
identification. The second section provides the information needed to use the printer, and
the third section talks about viewing and changing printer settings including printing
preferences and setting properties. Detailed error recovery information is provided in
section five and includes LCD messages and how to recover from them. Printer supplies,
storage information, and specifications are included in section six.
®
RL90 card laminator. The first section provides operators with
Who to call for assistance
If you work with a Datacard-authorized dealer, distributor, or value-added reseller, contact
them for assistance. A value-added reseller provides the RP90 Plus E printer and optional
RL90 laminator as part of an overall system.
If any contents of the box are missing, contact your Datacard-authorized dealer, distributor
or reseller. If you purchased your printer directly from Datacard, contact the Datacard
Customer Care Center at 1.800.328.3996 for service in the United States and Canada. For
worldwide service, call the Datacard Customer Care Center directly at 952.988.2316.
Make sure you have the printer serial number, located on the back of the printer and
optional laminator serial number, when you call.
RP90 Plus E and RL90 User Guide
About the Printer
The Datacard® RP90 Plus E card printer uses retransfer printing technology to produce
high-quality, edge-to-edge printing on one or both sides of a variety of PVC and non-PVC
card surfaces, including contact and contactless smart cards. The retransfer printing
process uses two ribbon types –a color ink ribbon and a retransfer film. The ink ribbon is
available in YMCK (Yellow, Magenta, Cyan, and Black) or YMCKK format. The printer uses
these colors to print images on the retransfer film, and a heat roller to transfer the image
onto a card. The printer can be equipped with optional magnetic stripe and smart card
capabilities.
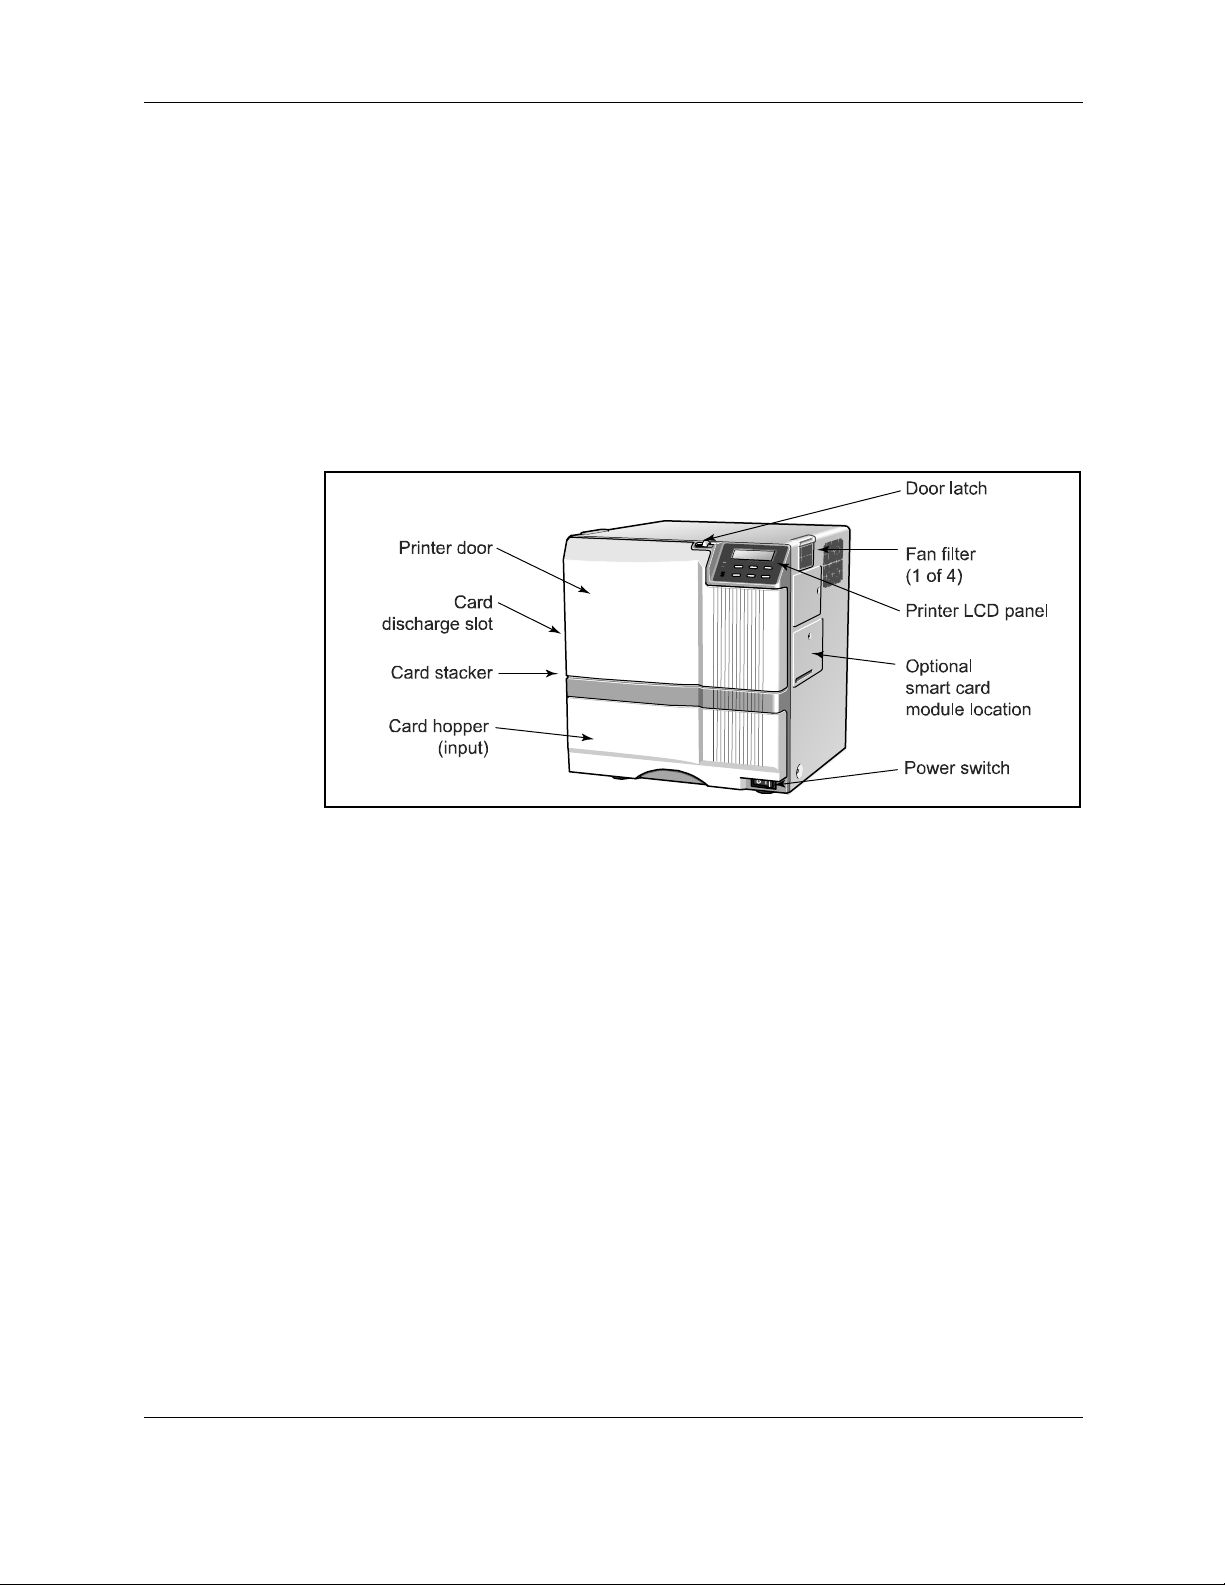
The outside of the printer
About the Printer
Printer door Open the door to access the ink ribbon and retransfer film
cartridges.
Printer LCD panel Shows the printer status and any messages. Use it to change
printer settings. (You can also use the driver Status Monitor, if
installed, to change some printer settings.)
Door latch Slide the latch to the right to open the printer door.
Card hopper Load blank cards.
Power switch Press the switch to power on the printer.
Fan filter Helps reduce airborne contaminates entering the printer.
Card discharge slot Cards removed from the print area exit here. If the optional RL90
laminator is installed, cards exit the printer and enter the laminator
here.
Smart card module An optional smart card module is available.
Card stacker Printed cards exit here. If the optional laminator is installed, the
card stacker is attached below the laminator’s card discharge slot.
2 RP90 Plus E and RL90 User Guide

About the Printer
The inside of the printer
Retransfer film cartridge Holds the retransfer film.
Film cartridge eject button Press to release and remove the retransfer film cartridge.
Ink ribbon cartridge Holds the ink ribbon.
Ribbon cartridge eject button Press to release and remove the ink ribbon cartridge.
Card discharge slot Cards removed from the print area exit here. If the optional
RL90 laminator is installed, cards exit the printer and enter
the laminator here.
Card stacker receptacle Attach the card stacker here.
Card cleaning rollers Removes dust or debris from the cards before printing.
Jog lever Used to turn the jog wheel when clearing a card jam.
Card bracket Slide to the left to load cards and to the right to hold cards
in position.
RP90 Plus E and RL90 User Guide 3
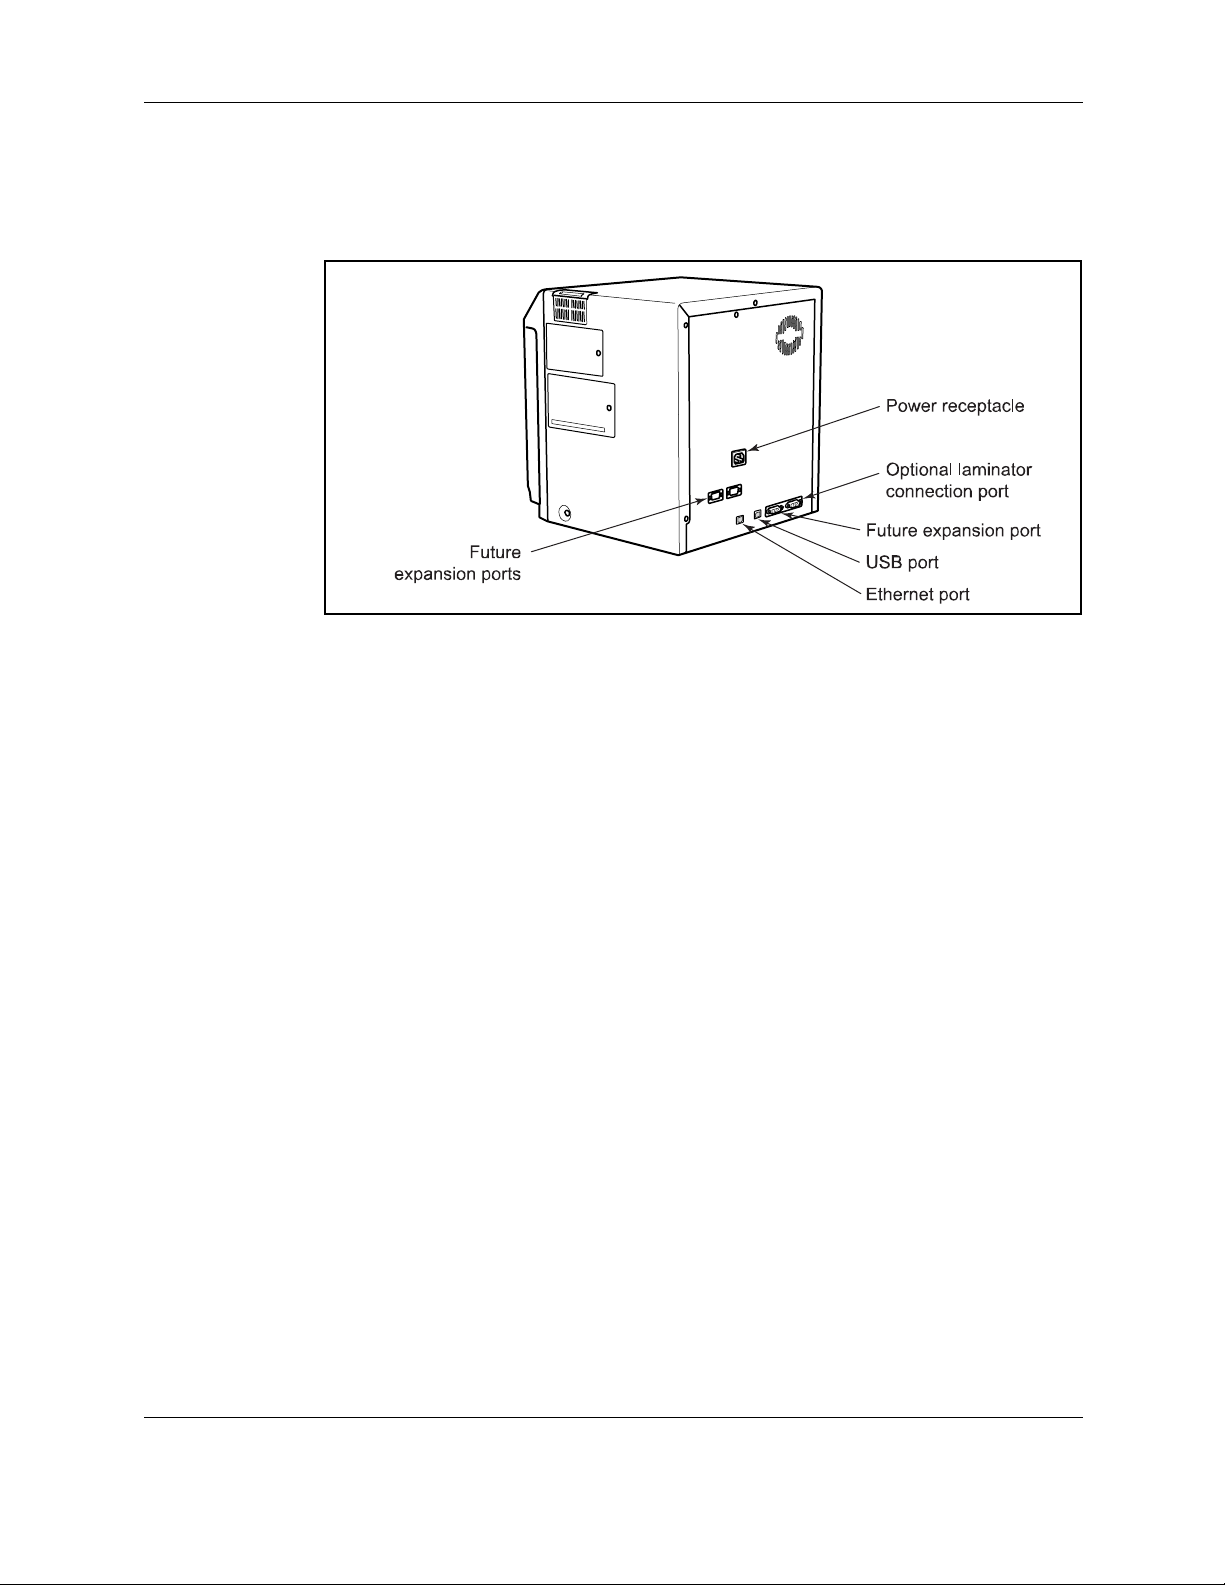
The back of the printer
About the Printer
Power receptacle Plug in the power cord.
USB port Plug in the USB cable.
Ethernet port Plug in the Network cable.
Laminator connection port Used to connect the optional laminator module or other
optional equipment.
Future expansion ports Not used at this time.
CAUTION:
Do not connect or disconnect the laminator cable while the printer or
laminator are powered on.
CAUTION:
Do not keep the power cord connected to facility power unless the
printer is also connected to the power cord.
4 RP90 Plus E and RL90 User Guide
About the laminator
About the laminator
The Datacard® RL90 card laminator is an optional laminating module that works with the
RP90 Plus E printer to add topcoat or patch material to printed cards. Holographic
laminating material is also available for added security and tamper resistance. A printed
card can be laminated manually by simply inserting it into the laminator, or automatically by
transferring the printed card from the RP90 Plus E printer to the laminator module.
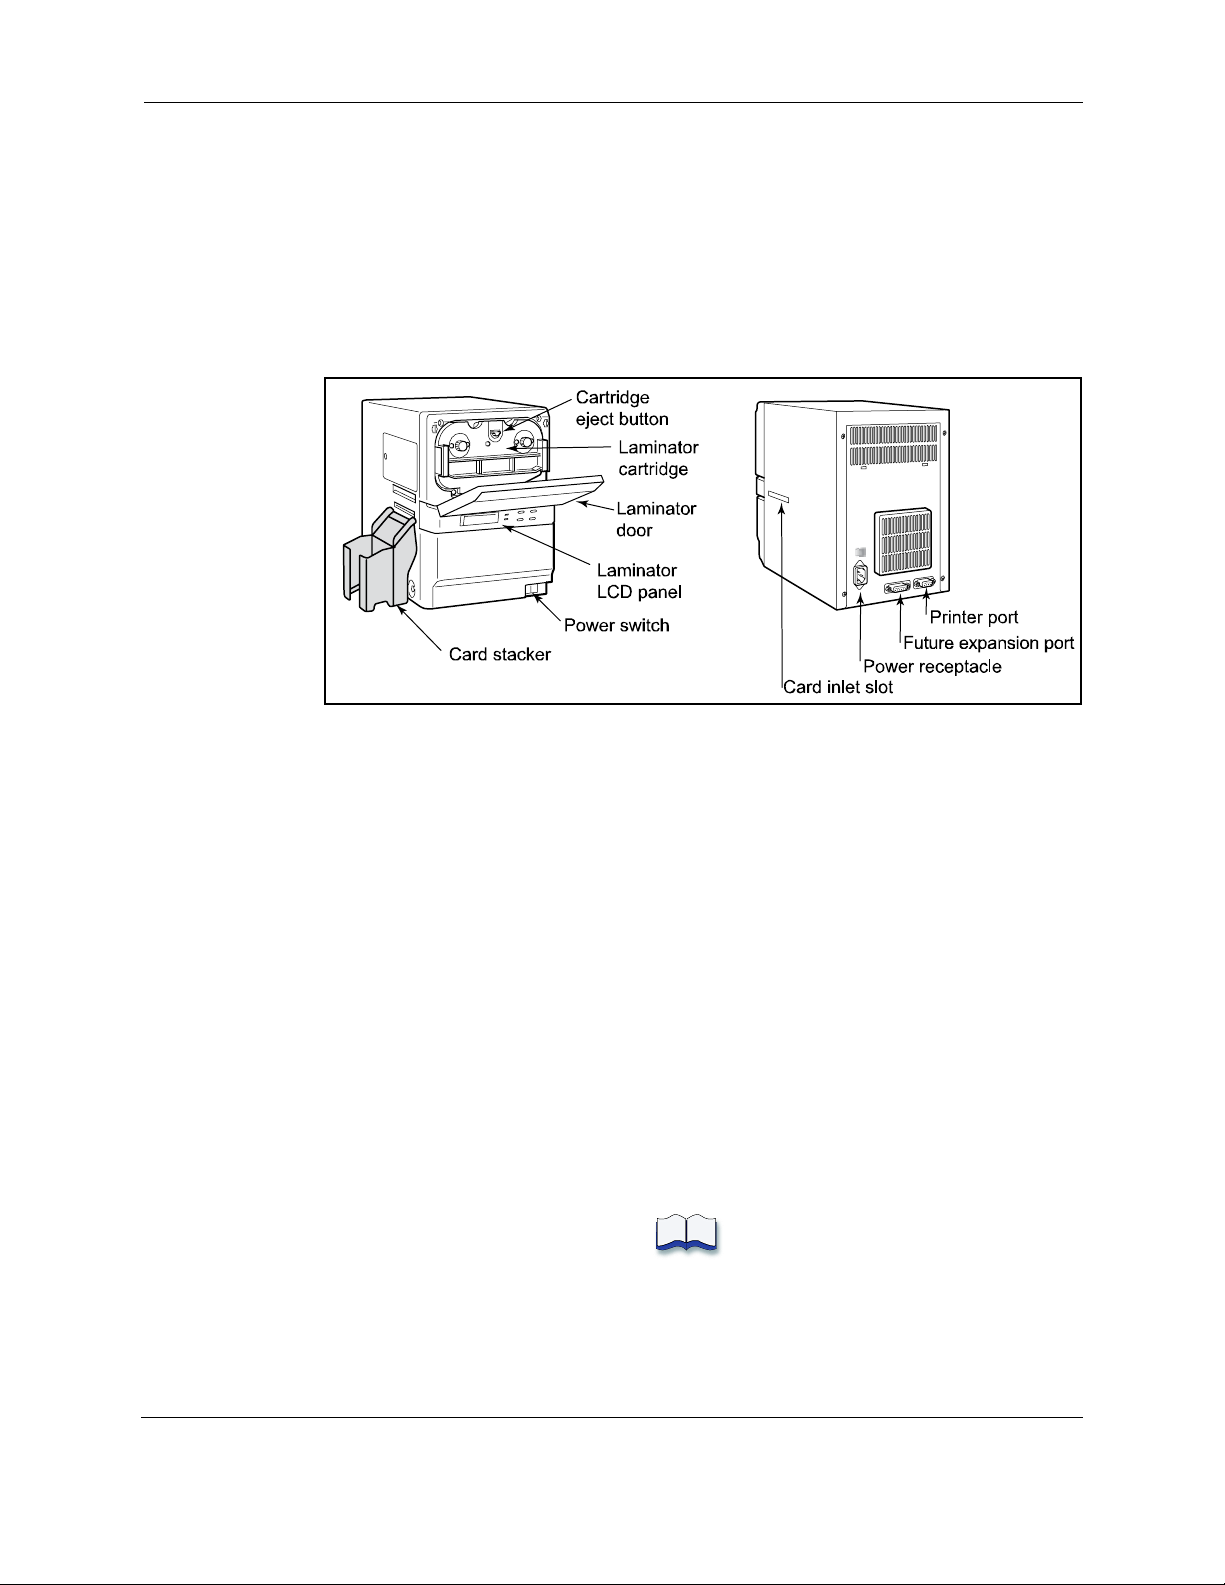
The parts of the laminator
Laminator door Open the door to access the laminator cartridge.
Laminator cartridge Holds the laminate material.
Cartridge eject button Press to release and remove the cartridge.
Laminator LCD panel Shows the laminator status and any messages. Use it
to change laminator settings.
Power switch Press the switch to power on the laminator.
Power receptacle Plug in the power cord.
Printer port Connection port for the printer.
Card stacker Laminated cards exit here.
Future expansion port Not used at this time.
Card inlet slot Cards enter the laminator here.
CAUTION:
Do not connect or disconnect the laminator cable while the printer or
laminator are powered on.
RP90 Plus E and RL90 User Guide 5

About the laminator
6 RP90 Plus E and RL90 User Guide

Using the printer
2
This section describes how to perform basic tasks required to operate the
Datacard®
It describes how to:
Load supplies
•
• “Load ink ribbon” on page 9
• “Load retransfer film” on page 10
• “Load laminate” on page 11
Power on
•
• “Optional laminator connection” on page 13
• “Power on the laminator” on page 14
• “Power on the printer” on page 15
Prepare to print cards
•
• “Set the retransfer film type” on page 16
• “Initialize the retransfer film” on page 17
• “Initialize the patch or topcoat material (optional RL90 laminator only)” on
Print cards
•
• “Print from a PC application” on page 19
Begin with the printer set up and the printer driver installed. This printer must be installed
by Datacard authorized and trained personnel. If the printer is not set up, contact your
service provider.
RP90 Plus E printer and the Datacard® RL90 card laminator.
“Load cards” on page 8
“Check the PC connection” on page 12
“Initialize the ink ribbon” on page 16
page 17
“Print cards using ID software” on page 18
RP90 Plus E and RL90 User Guide
Load Supplies
Load cards
Tips: Handling cards
• Do not open the card
hopper when “Loading”
is displayed on the LCD
panel.
• Do not touch the
surface of cards before
printing them. (Oils on
hands will reduce
printing quality.)
• Handle cards by the
edges or wear cotton
gloves.
• Cards can stick
together. Slide or fan
cards to separate the
edges.
• Orient all cards the
same way.
• Do not use cards that
are bent or otherwise
damaged.
• See “Supplies” on
page 67
card information.
for specific
Load Supplies
The card hopper can hold approximately 250, .030” (.75mm) cards. The cards
are loaded and held in position with a card bracket. Make sure that magnetic
stripe or smart cards are loaded in the proper orientation for processing.
1 Open the card hopper.
2 Slide the card bracket to the left until it latches.
3 Insert cards. See the diagrams below for the correct card orientation.
— Load magnetic stripe cards with the magnetic stripe down and
facing the card bracket.
— Load smart cards with the smart card chip toward the back of the
card hopper, facing the card feed roller.
4 Slide the card bracket back into position carefully so cards are not
disturbed and your fingers do not get pinched.
5 Close the card hopper.
Magnetic stripe card orientation
Smart card chip orientation
8 RP90 Plus E and RL90 User Guide
Load Supplies
Load ink ribbon
Tips: Handling ink ribbon
• Do not touch the printing
surface of the ink ribbon.
(Oils on hands will reduce
printing quality.)
• Place the cartridge on a
smooth level surface when
loading or reloading.
• Keep unused ink ribbon
in the original package until
ready for use.
• Initialize the ink ribbon
each time you remove and
replace the ink ribbon
cartridge. See
“Initialize
the ink ribbon” on
page 16
• See “Storage
.
Environment for supplies”
on page 73
on storing ink ribbon.
• See “Ink ribbon” on
page 68
information about ink
ribbon supply.
for information
for more
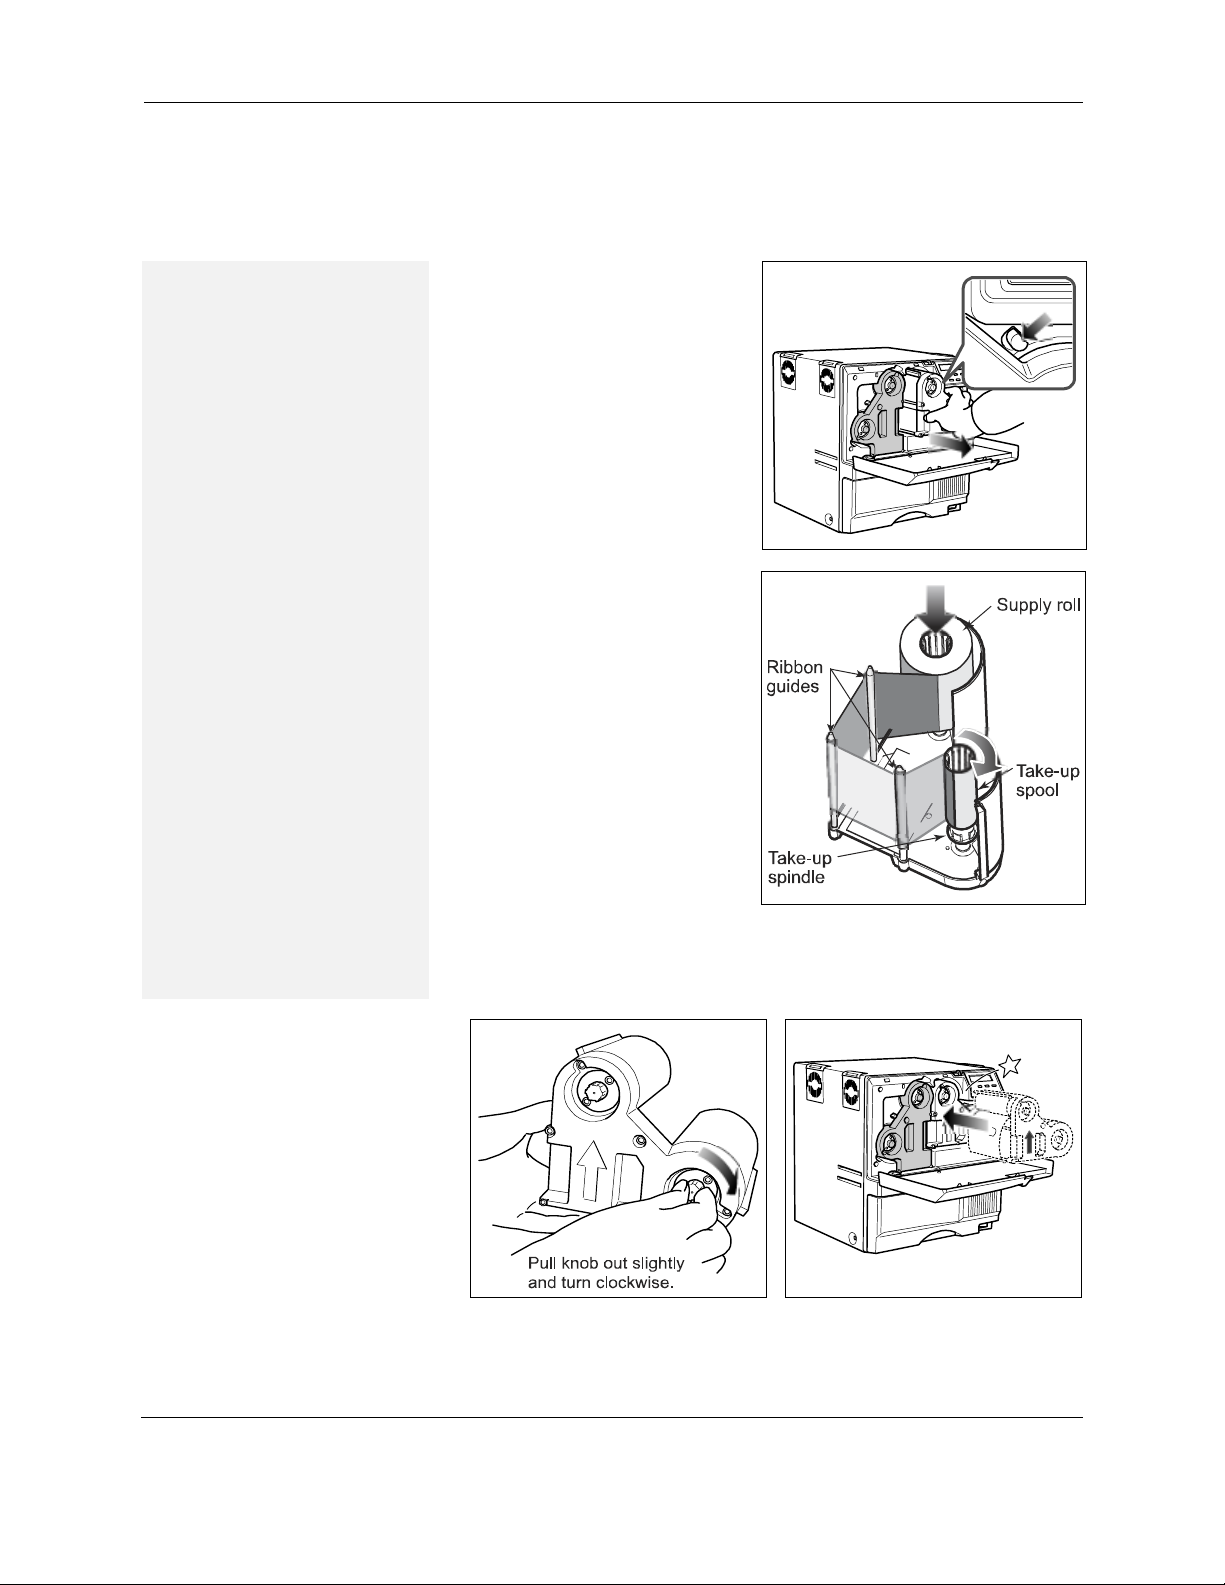
1 Slide the door latch to the right
and open the printer door.
2 Press the ink ribbon cartridge
eject button to remove the
orange cartridge.
3 Remove both used ribbon
spools from the cartridge (if
present).
4 Load the new roll of ink ribbon
on the cartridge:
a Put the full spool of ribbon
on the orange supply
spindle as shown.
b Put the empty take-up
spool on the black take-up
spindle.
c Align ribbon along the three
ribbon guides.
d Take up any slack by
turning the supply knob
clockwise. The supply knob
must be pulled out slightly
to turn. If slack cannot be
removed, check that the
supply and take-up spools
are firmly seated on the
spindles.
5 Replace the loaded ribbon cartridge in the printer until it clicks into
position.
6 Close the printer door.
RP90 Plus E and RL90 User Guide 9
Load retransfer film
Load Supplies
Tips: Handling retransfer film
• Place the cartridge on a
smooth level surface when
loading or reloading.
• Do not touch the printing
surface of the retransfer
film. (Oils on hands will
reduce printing quality.)
• After powering on the
printer, the retransfer film
must be initialized. See
“Initialize the retransfer
film” on page 17
for more
information.
• Keep unused film in the
original package.
• Don't place film on a dusty
or dirty surface — dirt can
affect print quality.
• When the retransfer film
has run out, “Media Run
Out” appears on the LCD
panel. After replacing it,
press the RESET key and
then the ENTER key to
initialize the film.
• See “Retransfer film” on
page 68
for more
information about retransfer
film.
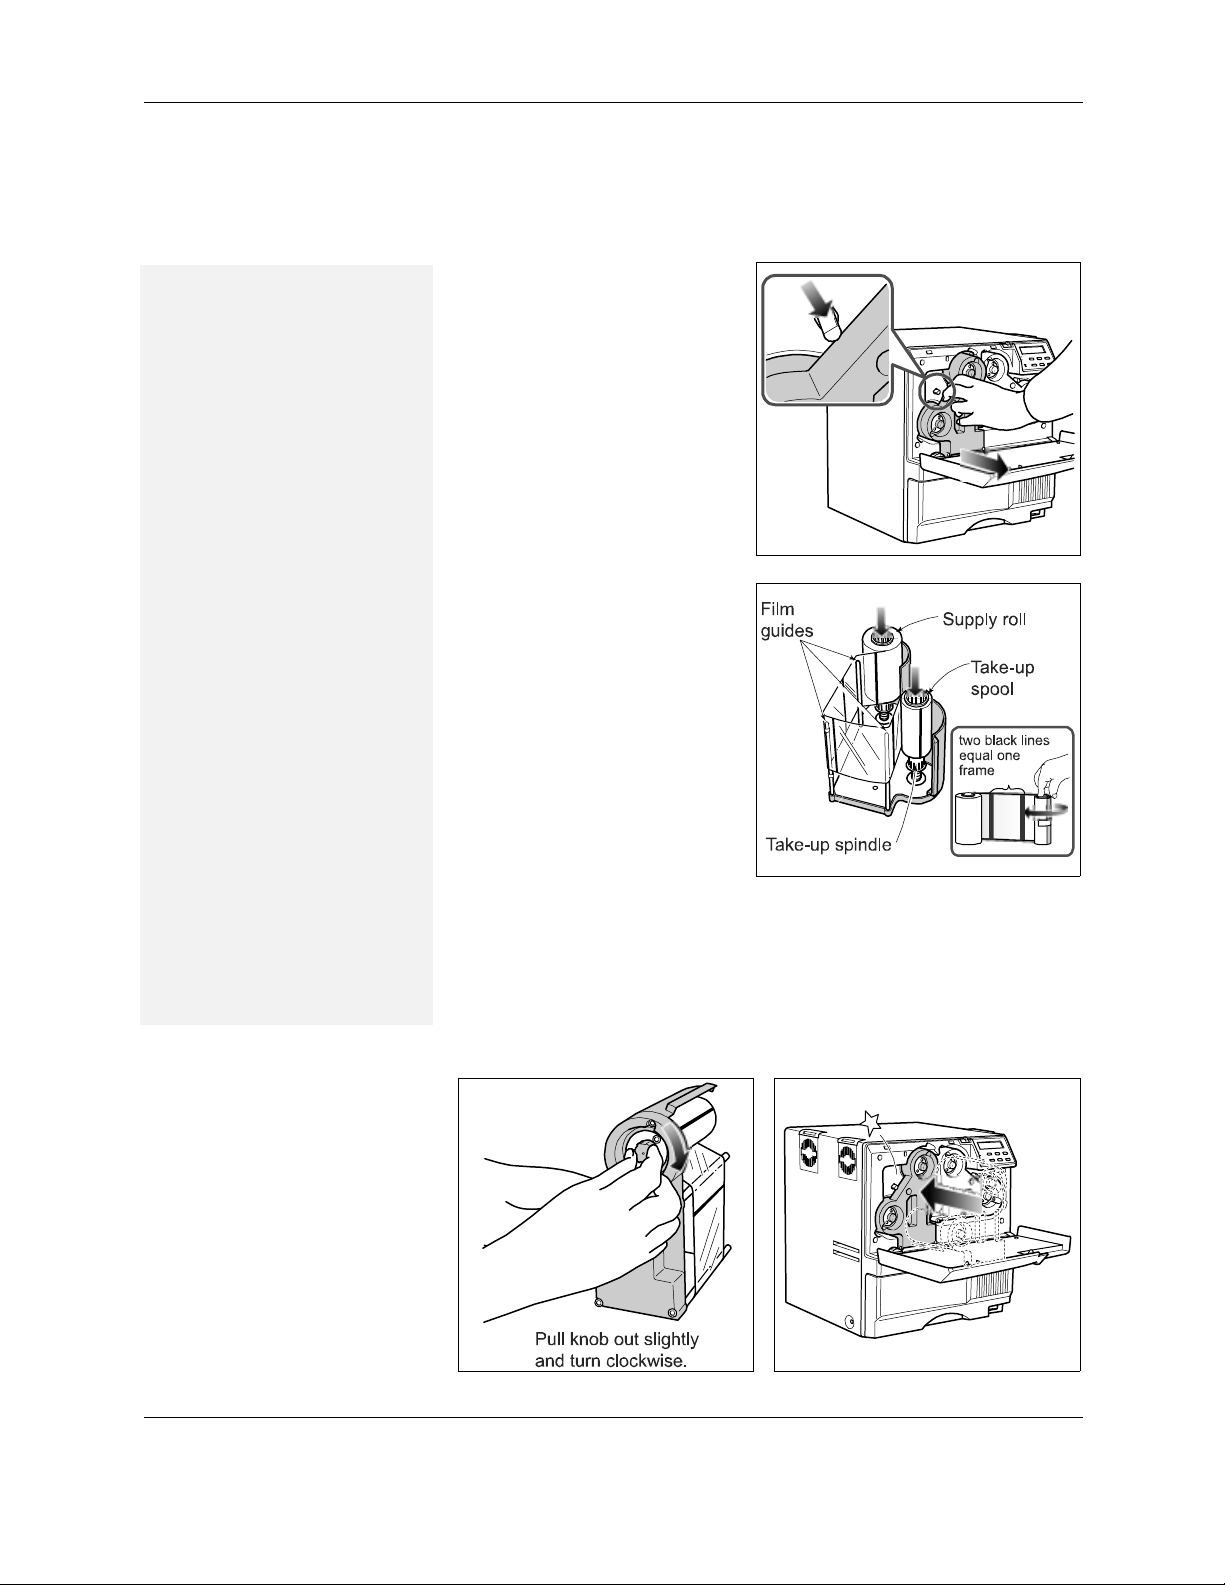
1 Slide the door latch to the right
and open the printer door.
2 Press the retransfer film
cartridge eject button to
remove the green cartridge.
3 Remove both used film spools
from the cartridge (if present).
4 Load the new roll of retransfer
film on the cartridge:
a Put the full roll of film on
the green supply spindle
as shown.
b Put the empty take-up
spool on the black take-up
spindle.
c Align the retransfer film
along the three film guides.
d Wind two frames of film
onto the take-up spool.
e Take up slack by turning
the supply knob clockwise.
The supply knob must be
pulled out slightly to turn. If
slack cannot be removed,
check that the supply and
take-up spools are firmly
seated on the spindles. To ease installation, the film must be tight
along the film guides. Turning the supply and take-up knobs will
help maintain the proper tension.
5 Replace the loaded retransfer film cartridge in the printer until it clicks
into position.
6 Close the printer door.
10 RP90 Plus E and RL90 User Guide
Load Supplies
Load laminate
Tips: Handling patch
or topcoat material
• After powering on the
laminator, the patch or
topcoat material must be
initialized. Press the
laminator’s RESET/
K and
then the ENTER keys to
initialize the material.
• The inside of the laminator
contains hot surfaces. Use
care when working in these
areas.
• Keep unused laminating
material in the original
package.
• Don't place material on a
dusty or dirty surface — dirt
can affect card quality.
• During the laminating
process, do not turn the
power switch off, open the
laminator door, or unplug the
laminator.
• See “Laminator material” on
page 68 for more information
about laminating material.
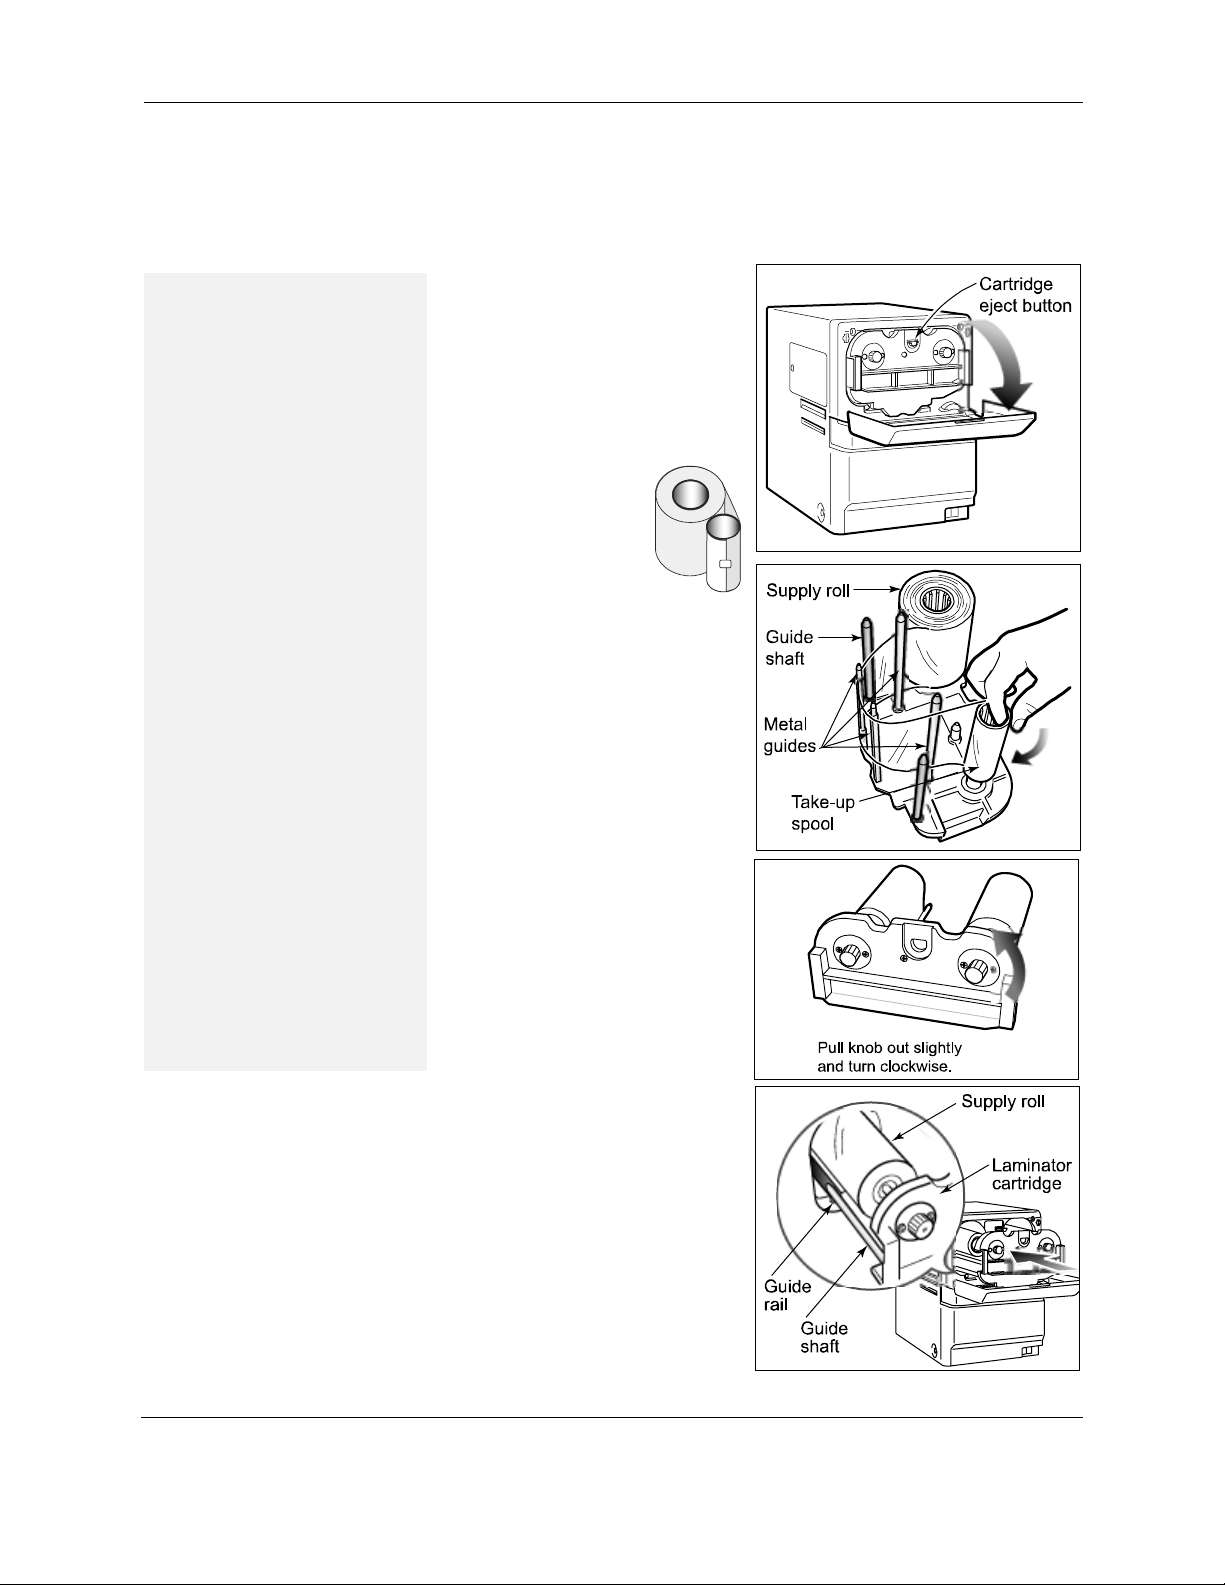
1 Open the laminator door by
pulling the top of the door
toward you.
2 Press the laminator cartridge
eject button and remove the
laminator cartridge carefully.
The material must be tight
when removing the cartridge.
3 Place the roll of
material and
empty take-up
spool side by side
on a clean
surface.
4 Remove the label from the
patch or topcoat material and
use it to secure the free end of
the material to the empty takeup spool, making sure the
edges are even.
5 Load the new roll of material
on the cartridge:
a Put the full roll of material
on the supply spindle.
b Put the empty take-up
spool on the take-up
spindle.
c Align the material along
the four metal guides as
shown on the cartridge
label.
d Wind two or three
rotations of film onto the
take-up spool. Take up
slack between the spools
by turning the supply knob
clockwise. If slack cannot
be removed, check that
the supply and take-up
spools are firmly seated on
the spindles.
6 Replace the loaded laminator
cartridge in the laminator until
it clicks into position.
7 Close the laminator door.
RP90 Plus E and RL90 User Guide 11
Power on
Check the PC connection
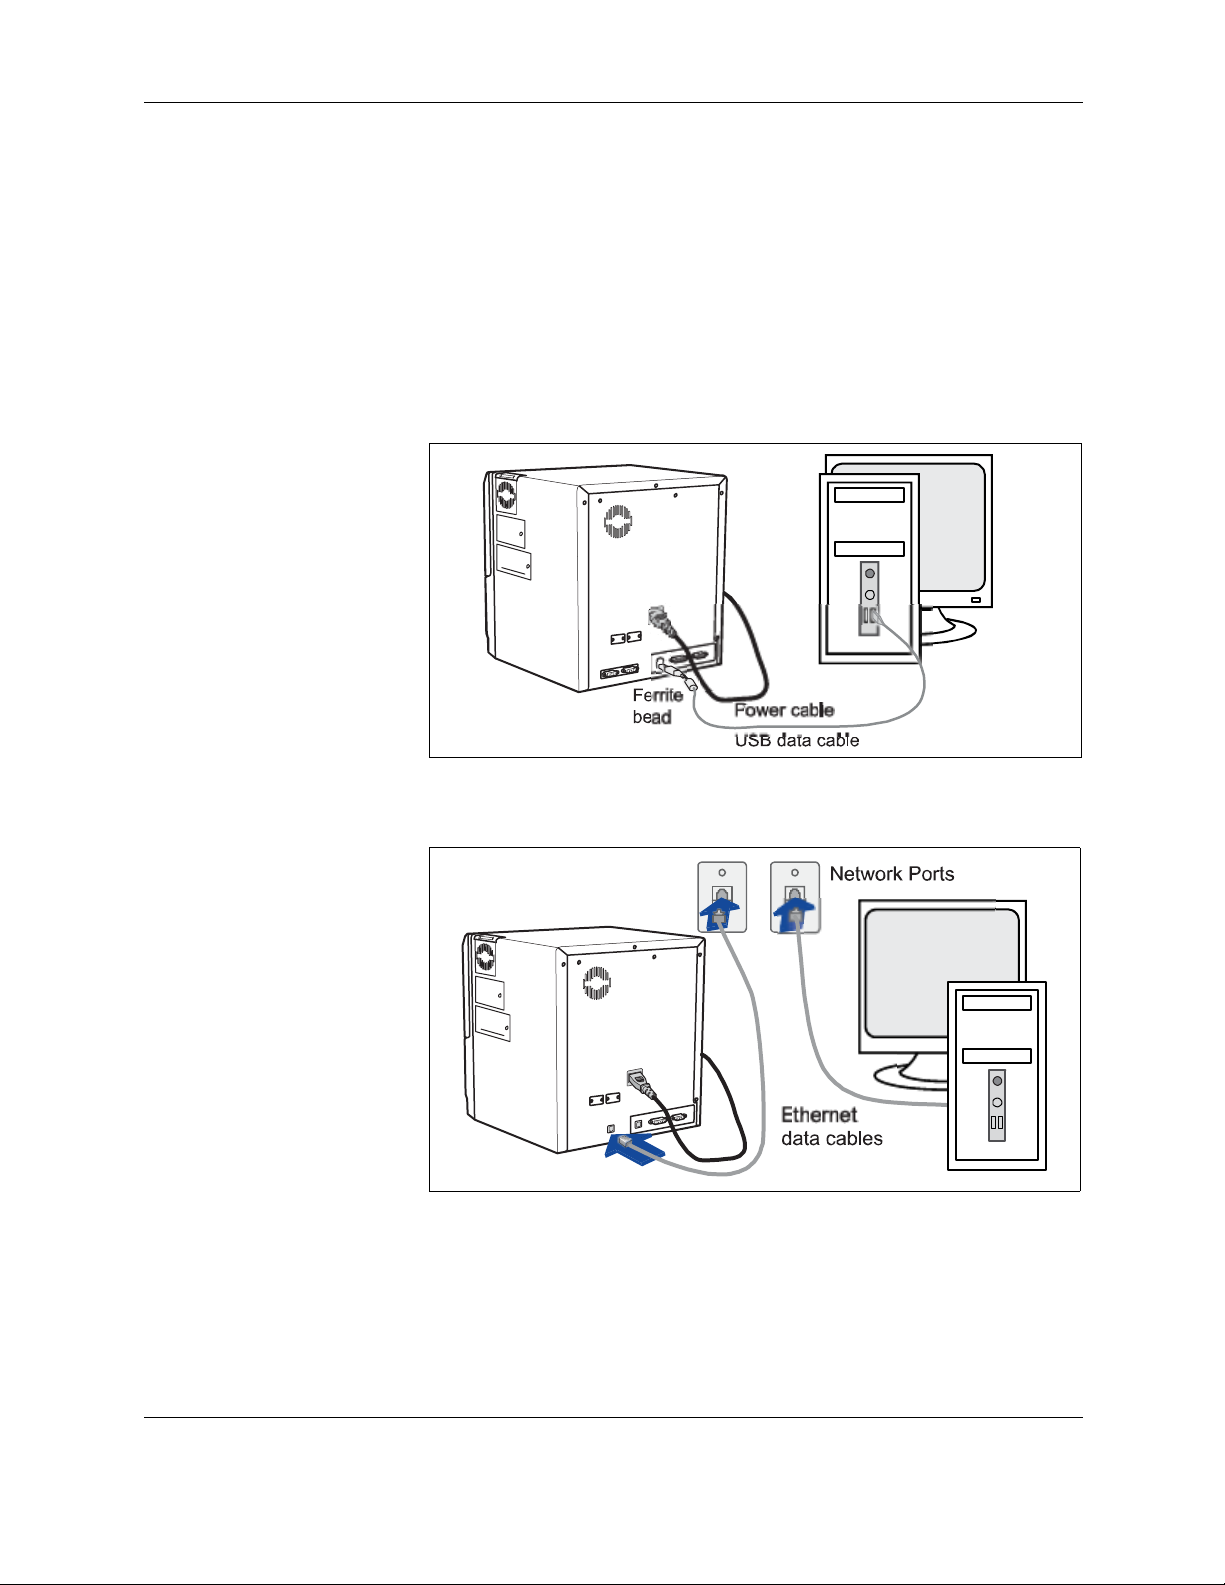
The printer and PC are connected when the printer is set up. To avoid
receiving error messages on the LCD panel, make sure that all supplies are
properly loaded and in position before powering on the printer. Before you
begin processing cards, check the following:
• The printer door and card hopper are closed securely.
• The USB data cable (with ferrite bead) is securely connected to the
Power on
printer and the PC.
OR
• The Network data cable is securely connected to the printer and to a
network port.
• The power cable is securely connected to the printer and appropriate
grounded power source.
• The card stacker is attached to the printer or to the optional laminator.
• Make sure cards and all other supplies are loaded. See
Supplies” on page 8
for more information.
“Load
12 RP90 Plus E and RL90 User Guide
Power on
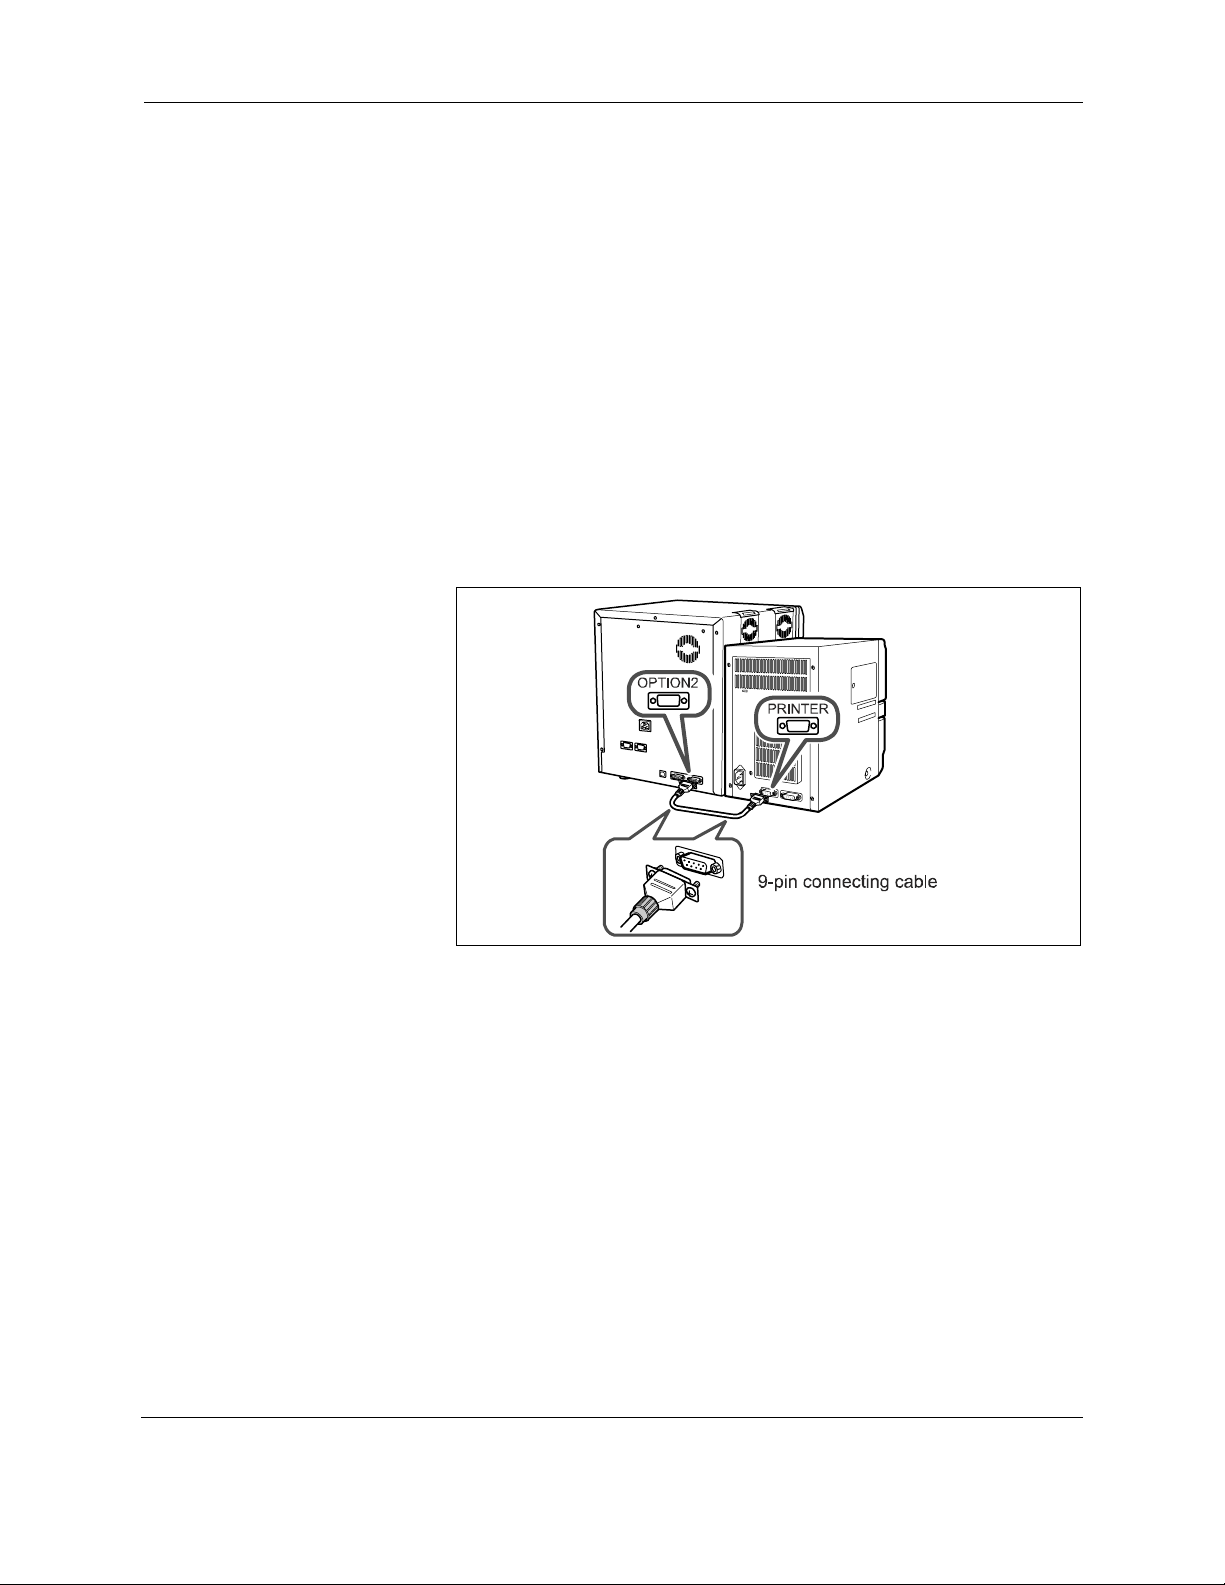
Optional laminator connection
When using the optional RL90 laminator, check the following:
• The optional laminator cable is securely connected to the printer and
the laminator.
• The power cord is connected to the laminator and appropriate
grounded power source.
• Supplies are loaded and the laminator door is closed securely.
Always power off the printer and laminator before you
CAUTION:
connect or disconnect the laminator cable.
RP90 Plus E and RL90 User Guide 13
Power on the laminator
Power on
Tips for laminator power
• When connected to a
printer, laminator
messages will not be
displayed until the
printer is powered on.
• Wait while the laminator
initializes.
• Follow the guidelines for
your organization about
when to power the
laminator on and off.
• Check that the red
INLET switch, located
on the back of the
laminator, is set for your
input voltage.
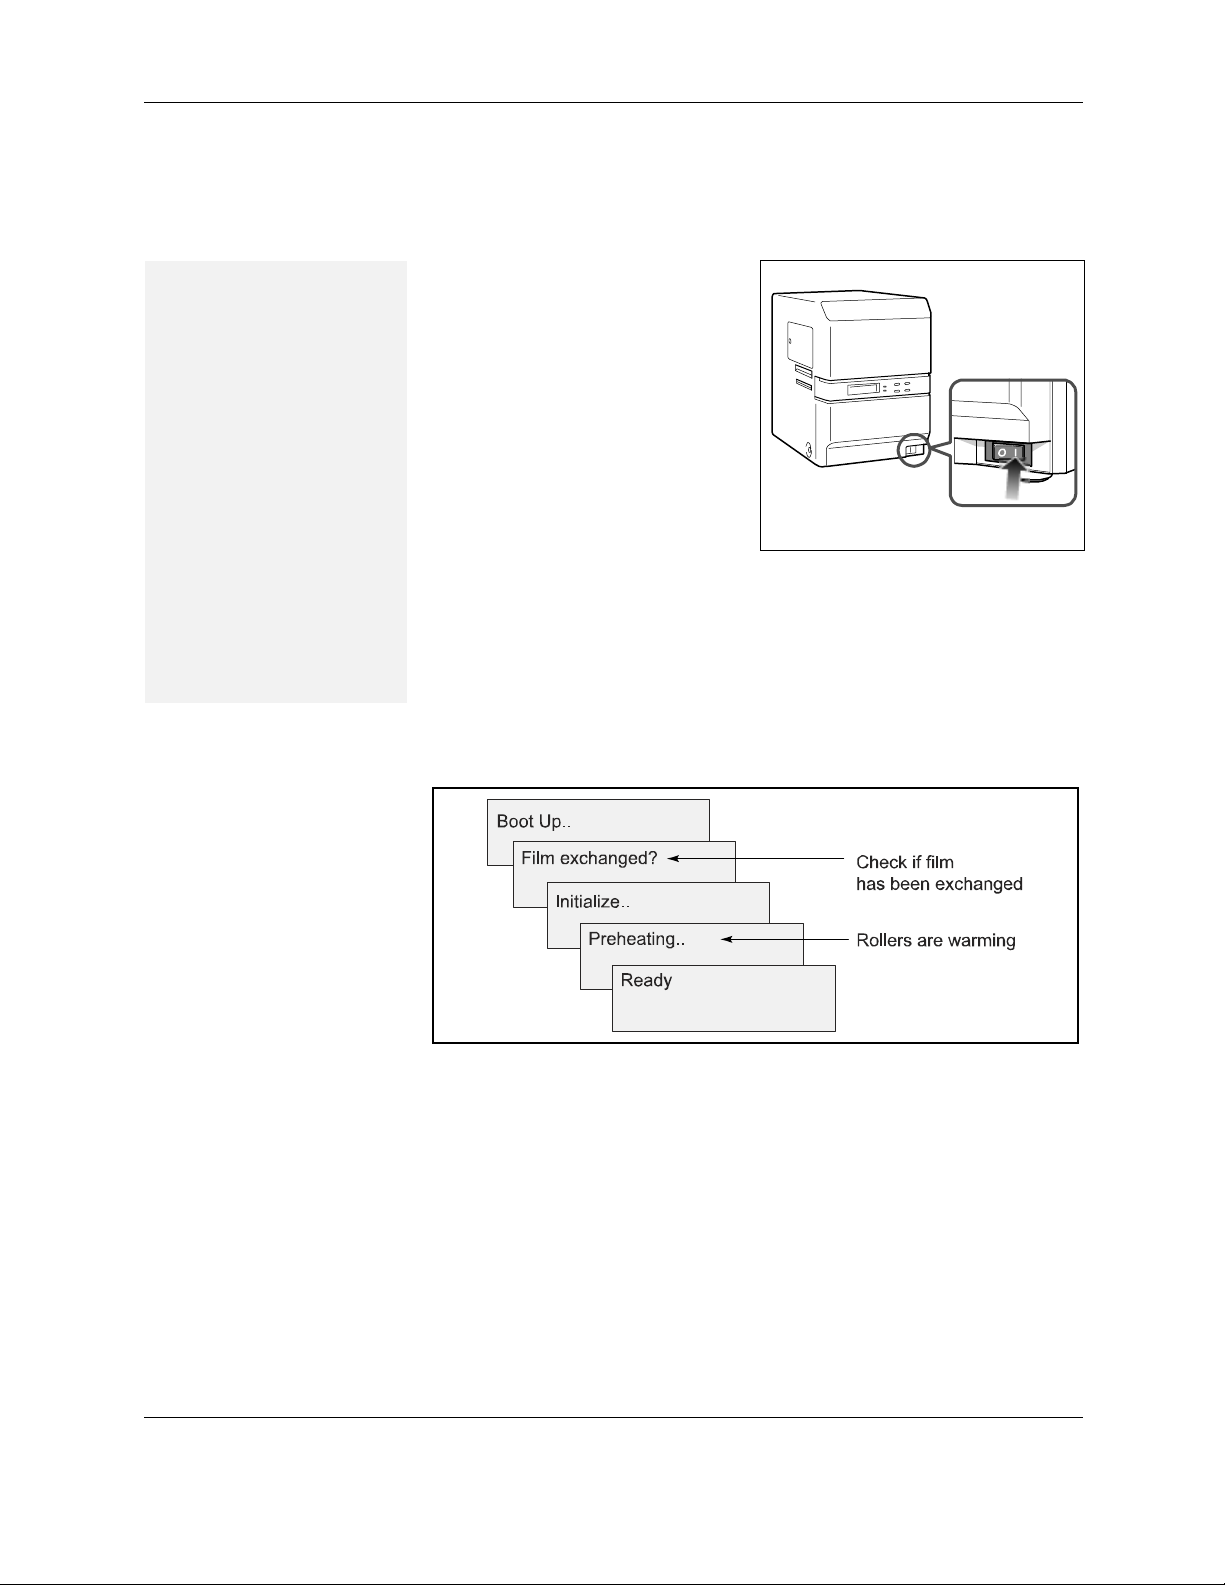
When the optional RL90 laminator is
installed, turn the laminator power on
before powering on the printer.
1 Press the “|" symbol on the
laminator power switch.
2 The laminator powers on. The
LCD panel displays
"Initializing" and the green
Ready light blinks.
3 "Preheating" is displayed for
approximately four minutes
while the heat roller warms to
operating temperature.
4 The LCD panel shows "Ready" and the Ready light is steady green
when the laminator is ready to process cards.
LCD sequence on laminator startup
14 RP90 Plus E and RL90 User Guide
Power on
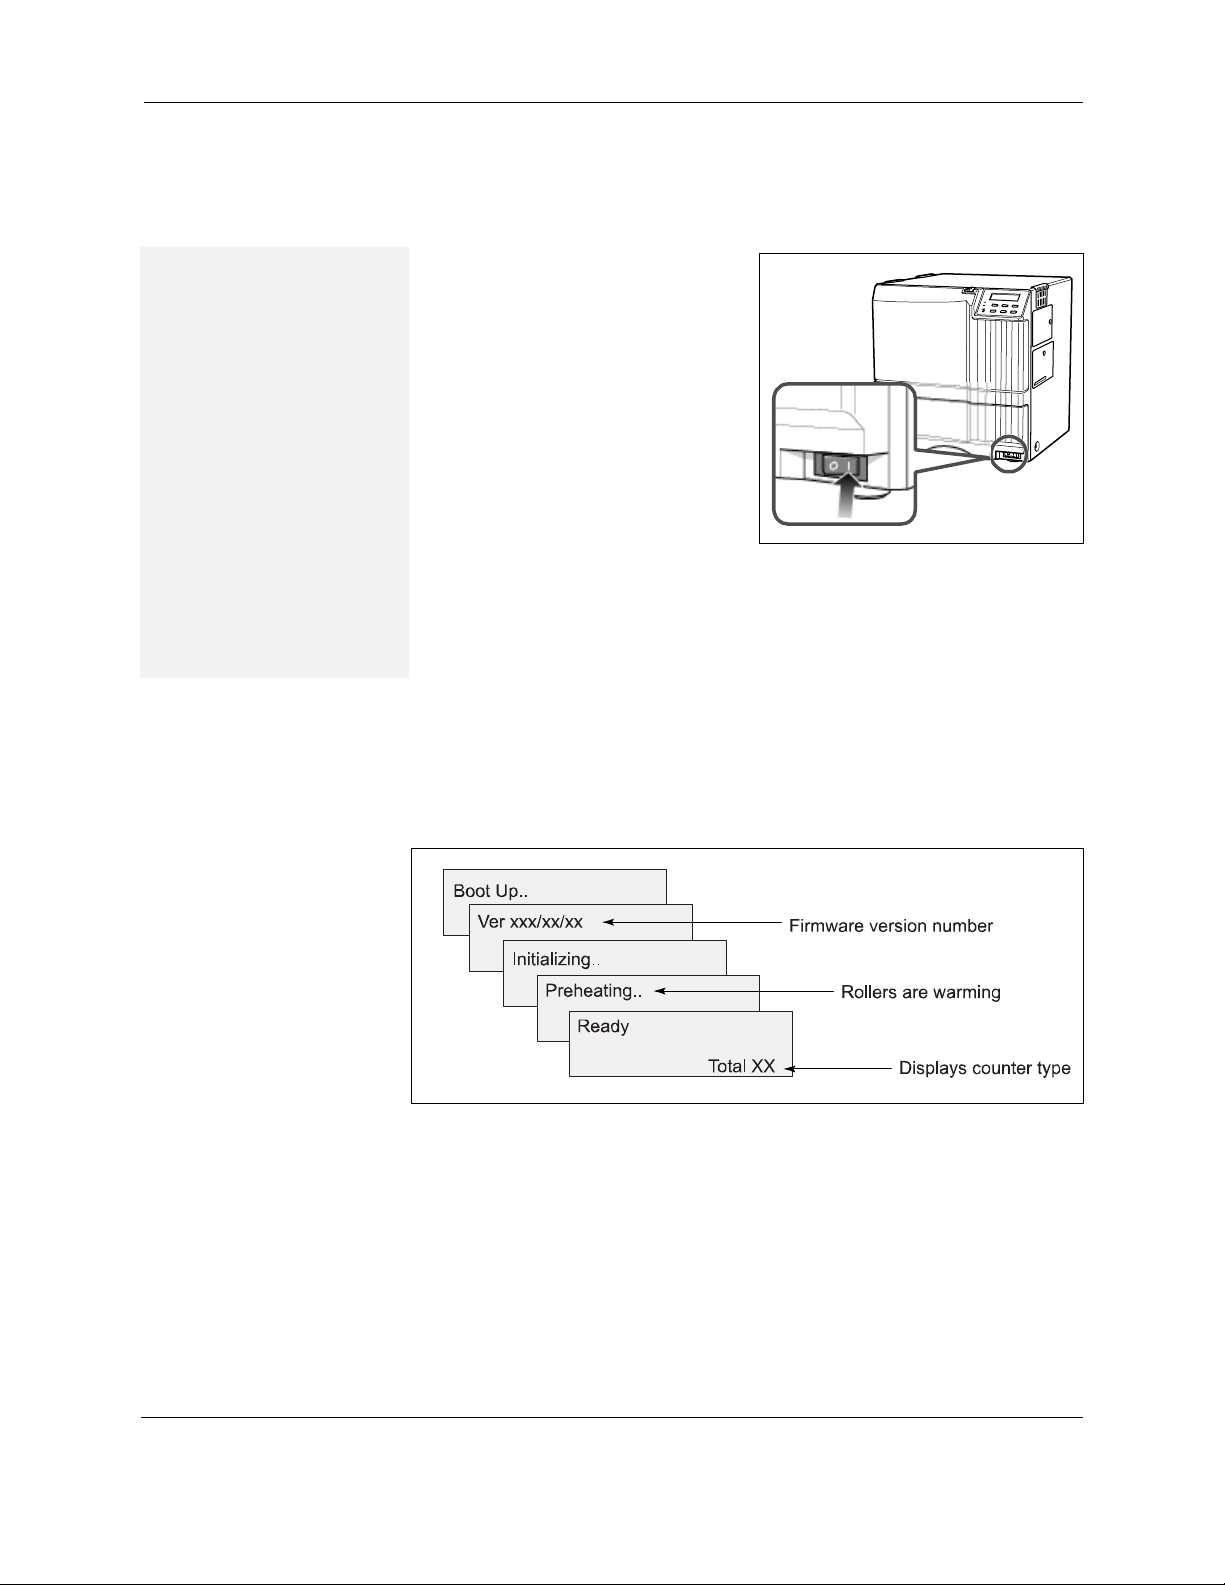
Power on the printer
Tips for printer power
• To avoid receiving errors
on the LCD panel, make
sure that all supplies are
properly loaded and in
position before powering
on the printer.
• Wait while the printer
initializes.
• Follow the guidelines for
your organization about
when to power the
printer on and off.
1 Press the “|" symbol on the
power switch.
2 The printer powers on. The
LCD panel shows the firmware
version and the printer begins
initializing. The LCD panel
shows "Initializing" while the
printer checks and positions
the ink ribbon and retransfer
film.
3 When operation checks are
complete, "Preheating" is
displayed on the LCD panel for
approximately four minutes while the retransfer roller and bend remedy
roller warm to their operating temperatures.
4 The LCD panel shows "Ready" and the Ready Light is steady green.
5 The first time you print cards, initialize the ink ribbon. See “Initialize
the ink ribbon” on page 16
6 The first time you print cards, set and initialize the retransfer film. See
“Set the retransfer film type” on page 16 and “Initialize the
retransfer film” on page 17
LCD sequence on printer startup
for the steps to follow.
for the steps to follow.
The printer can require up to 4 minutes between power-on and the “Ready”
status.
RP90 Plus E and RL90 User Guide 15
Prepare to print cards
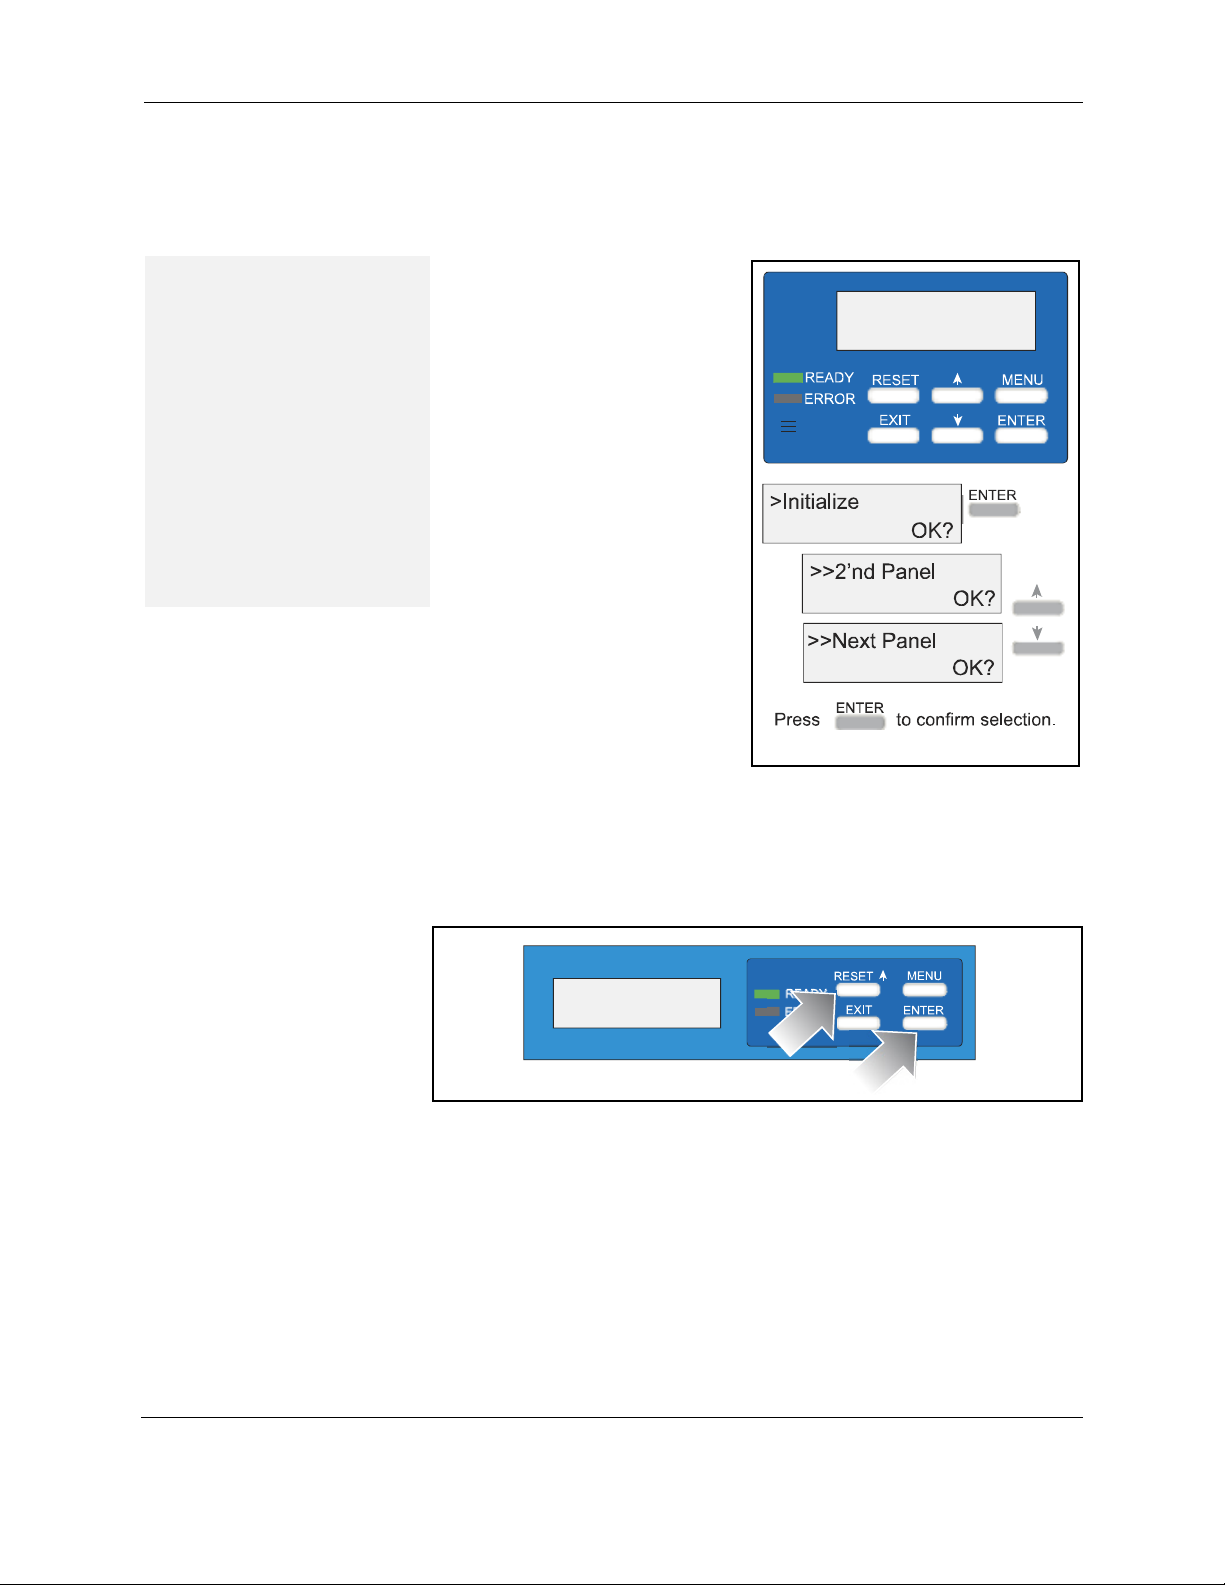
Initialize the ink ribbon
Prepare to print cards
Tips – Ink ribbon
• To avoid dirt and dust
particles that might adhere
to the ink ribbon during
loading, move (initialize)
the ink ribbon one or two
panels each time the ink
cartridge is removed from
the printer.
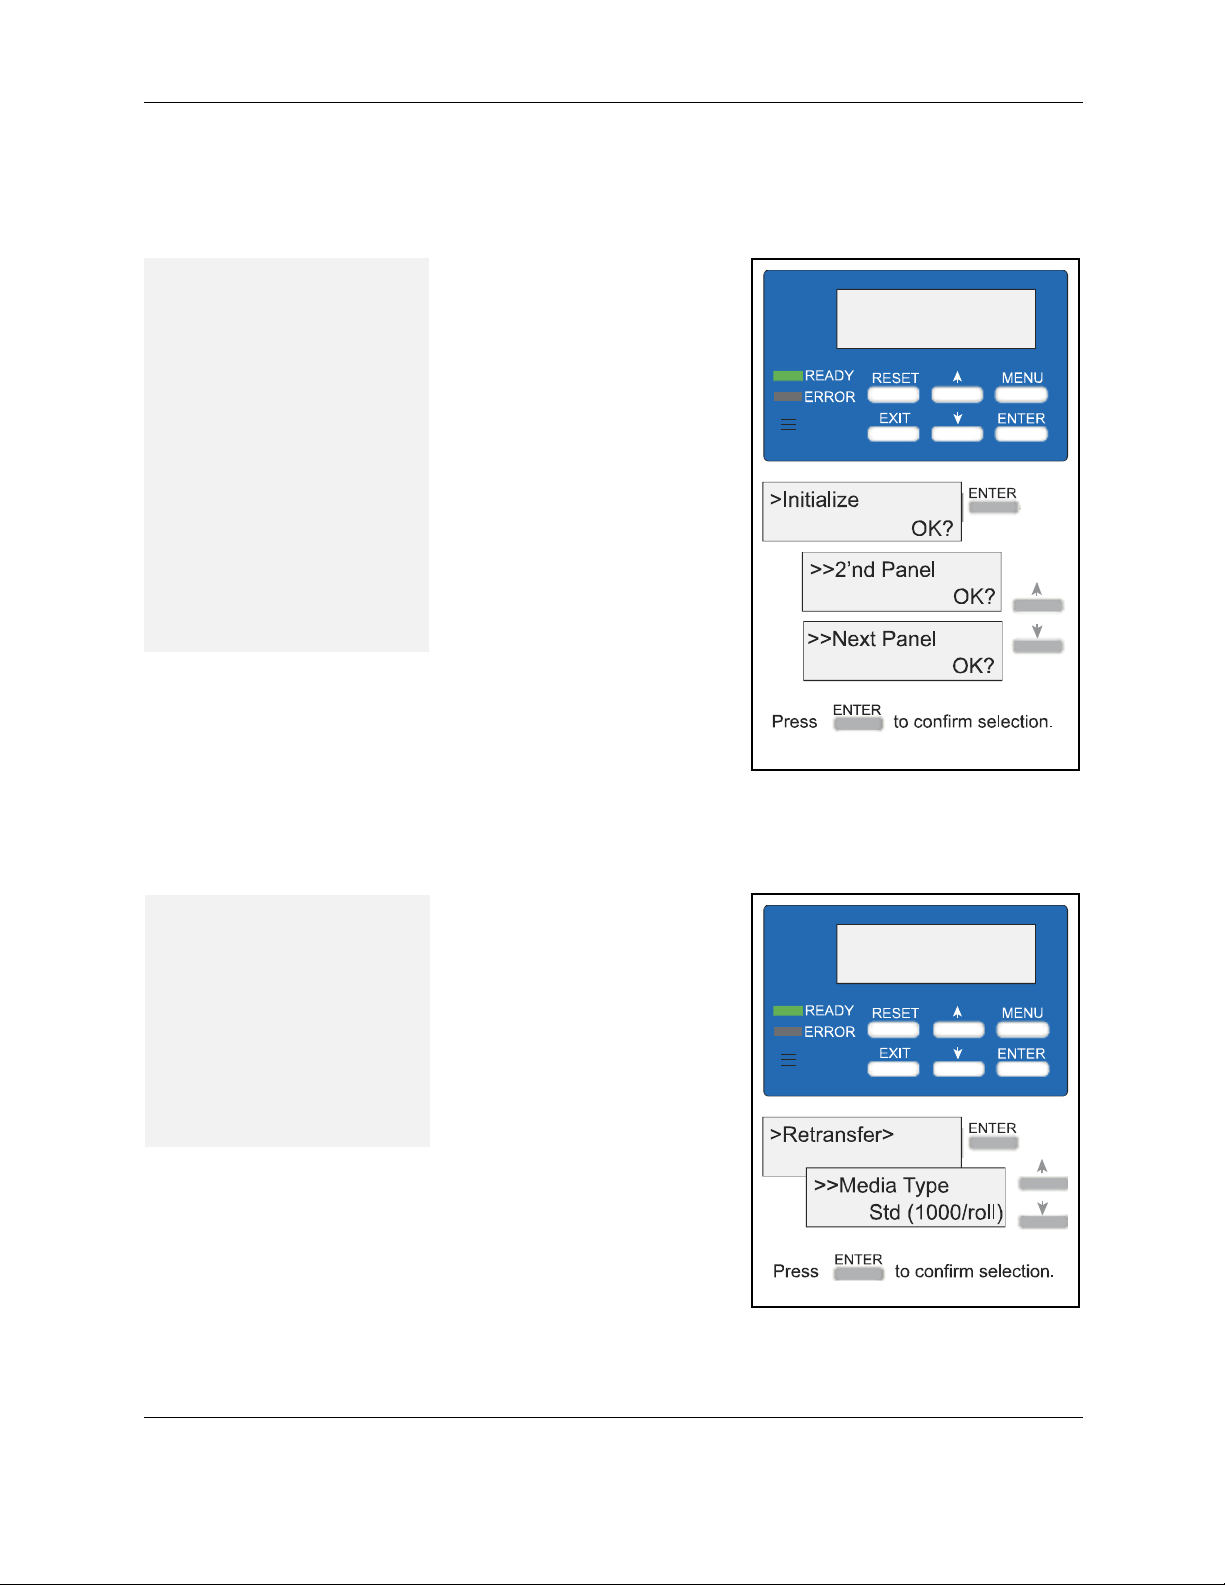
1 Press the RESET key on the
control panel.
2 The LCD display reads
"Initialize OK?"
3 Use the up and down arrow
keys to select "2'nd Panel,
OK?" or "Next Panel, OK?"
— Press the ENTER key
when "Initialize OK?" is
displayed to initialize the
printer without winding the
ribbon.
— Press the ENTER key
when "2'nd panel, OK" is
displayed and the printer
winds the ribbon two
panel sets.
— Press the ENTER key
when "Next Panel, OK?"
is displayed and the
printer winds the ribbon
one panel set.
Set the retransfer film type
Tips – Retransfer film
• Set the retransfer film type
when you set up the
printer.
• If you change the type of
film, set the type of
retransfer film you are
using.
16 RP90 Plus E and RL90 User Guide
1 Press the MENU key until
"Retransfer" is displayed.
2 Press the ENTER key.
3 "Media Type" is displayed.
4 Use the up and down arrow
keys to select Std (1000/roll).
Selections of 250 and 750
are not available at this time.
5 Press the ENTER key.
6 Press EXIT twice to return to
the "Ready" display.
Prepare to print cards
Initialize the retransfer film
Tips – Retransfer film
• To avoid dirt and dust
particles that might adhere
to the film during loading,
(move) initialize the
retransfer film one or two
panels each time the film
cartridge is removed from
the printer.
1 Press the RESET key on the
control panel.
2 The LCD display reads
"Initialize OK?"
3 Use the up and down arrow
keys to select "2'nd Panel,
OK?" or "Next Panel, OK?"
— Press the ENTER key
when "Initialize, OK?" is
displayed to initialize the
printer without winding the
film.
— Press the ENTER key
when "2'nd panel, OK?" is
displayed and the printer
winds the retransfer film
two panels.
— Press the ENTER key
when "Next Panel, OK?"
is displayed and the
printer winds the film one
panel.
Initialize the patch or topcoat material (optional RL90 laminator only)
You must initialize the laminate material each time it is changed.
To initialize the laminate, press RESET/K and then the ENTER key on the
laminator LCD panel.
RP90 Plus E and RL90 User Guide 17
Printing cards
Cards can be sent from ID software such as Datacard® ID Works® identification software.
ID software handles the types of information used on cards.
If you do not have ID software, you can use another PC application to format the
information to print on cards; however, most PC applications do not support magnetic
stripe encoding or smart card programming. With any application, test the card design to
verify the results.
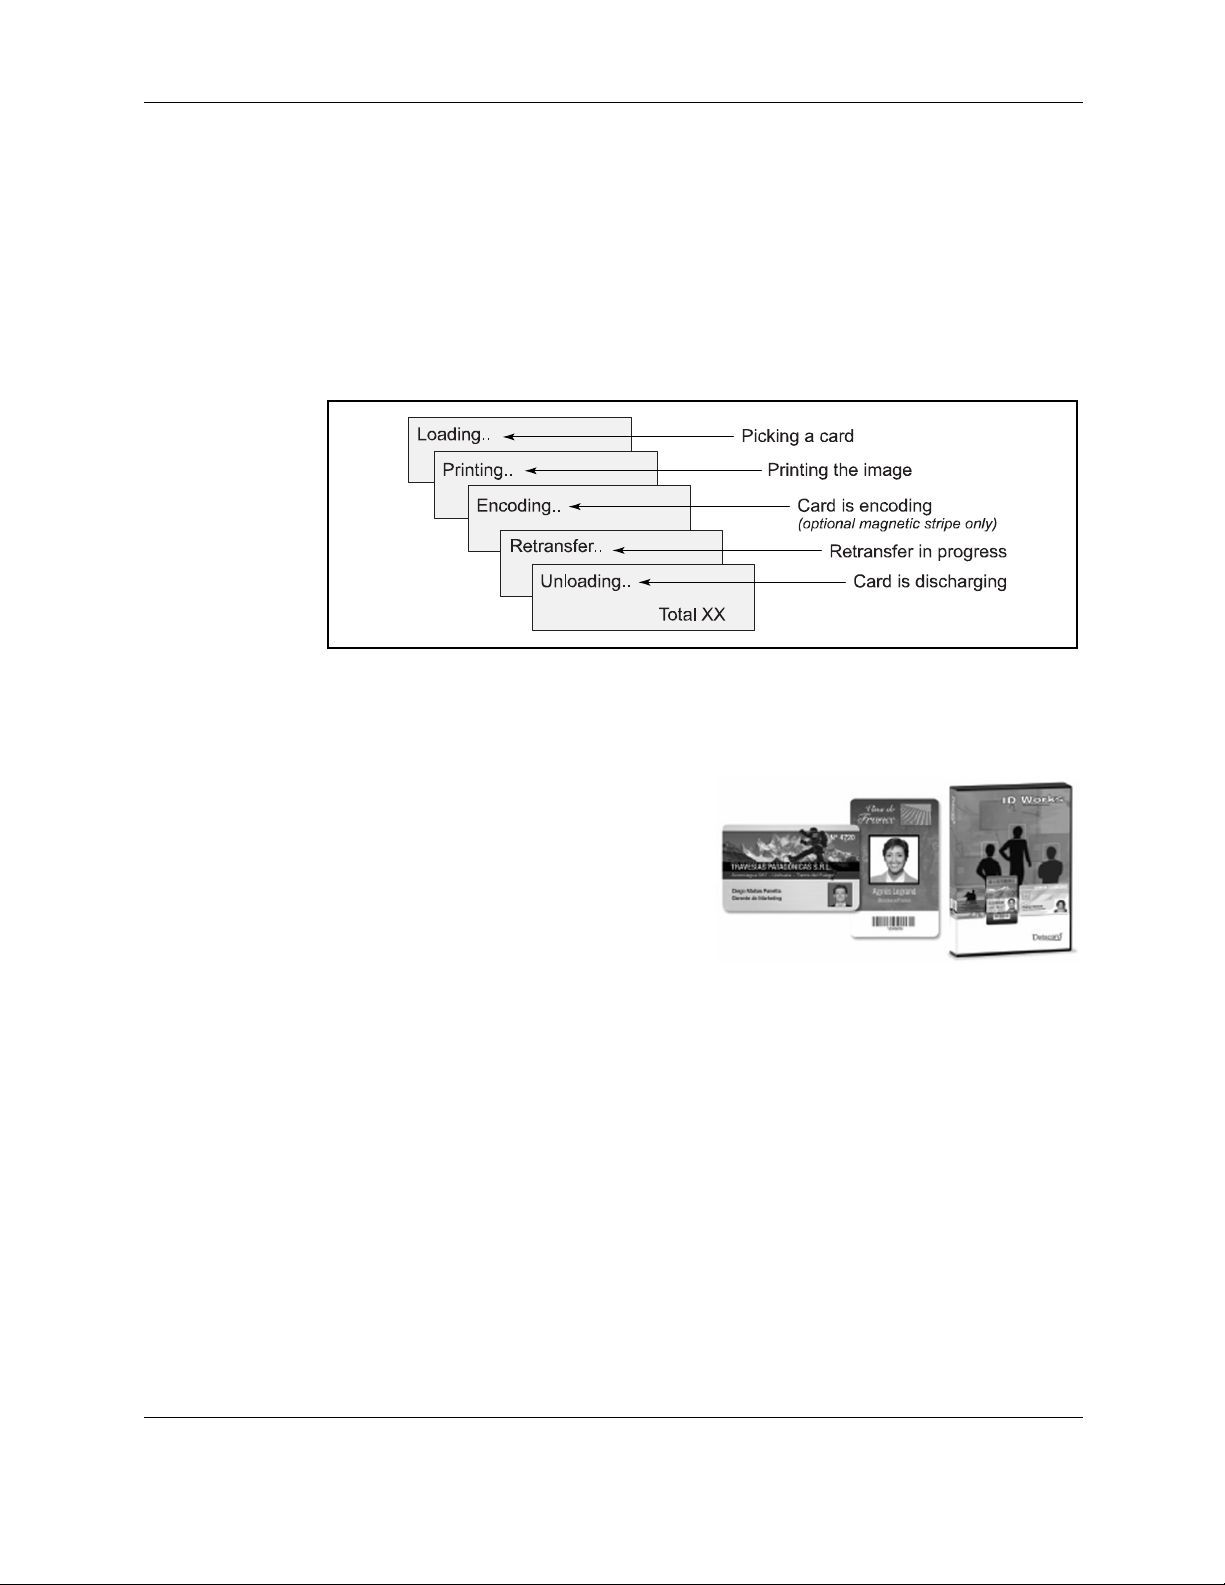
The printer’s LCD panel displays the following sequence when a card is sent to print:
Printing cards
Print cards using ID software
1 Follow the instructions for the ID software to capture, format, and save the data for
the card.
2 In the software, send cards to the
printer (usually, use the Print button).
3 The printer driver receives data for
each card, prepares the card for
printing, and sends each card to the
printer.
18 RP90 Plus E and RL90 User Guide
Print from a PC application
Tips – Printing
• The “Print” check box in
the Print tab must be
checked to print cards.
• During the printing
operation, do not open
the printer or optional
laminator door.
• Do not open the card
hopper when the printer
LCD panel displays
“Loading” through
“Retransfer”.
• Do not power off the
printer, laminator, or PC
during the printing or
laminating process.
• Do not unplug the printer
or optional laminator
during printing or
laminating.
• Do not pull out the data
cable or the printer-tolaminator connection
cable during printing or
laminating.
• On the PC, do not use
the hibernate or standby
modes. If the PC powers
down while a card is in
the printer, it can stop
processing and remain
in the printer.
1 Use the application's page setup feature to set the following:
— Set paper or page size to CR80 card or 2.125" x 3.375"
— Set the orientation for the card design – either portrait or landscape.
— Set margins to zero for edge to edge printing.
2 Format and save the card information.
3 Select the Datacard RP90 Plus E U1 printer from the Print dialog box.
Datacard RP90 Plus E U1 is the default name of the printer. Your
printer may have a different name.
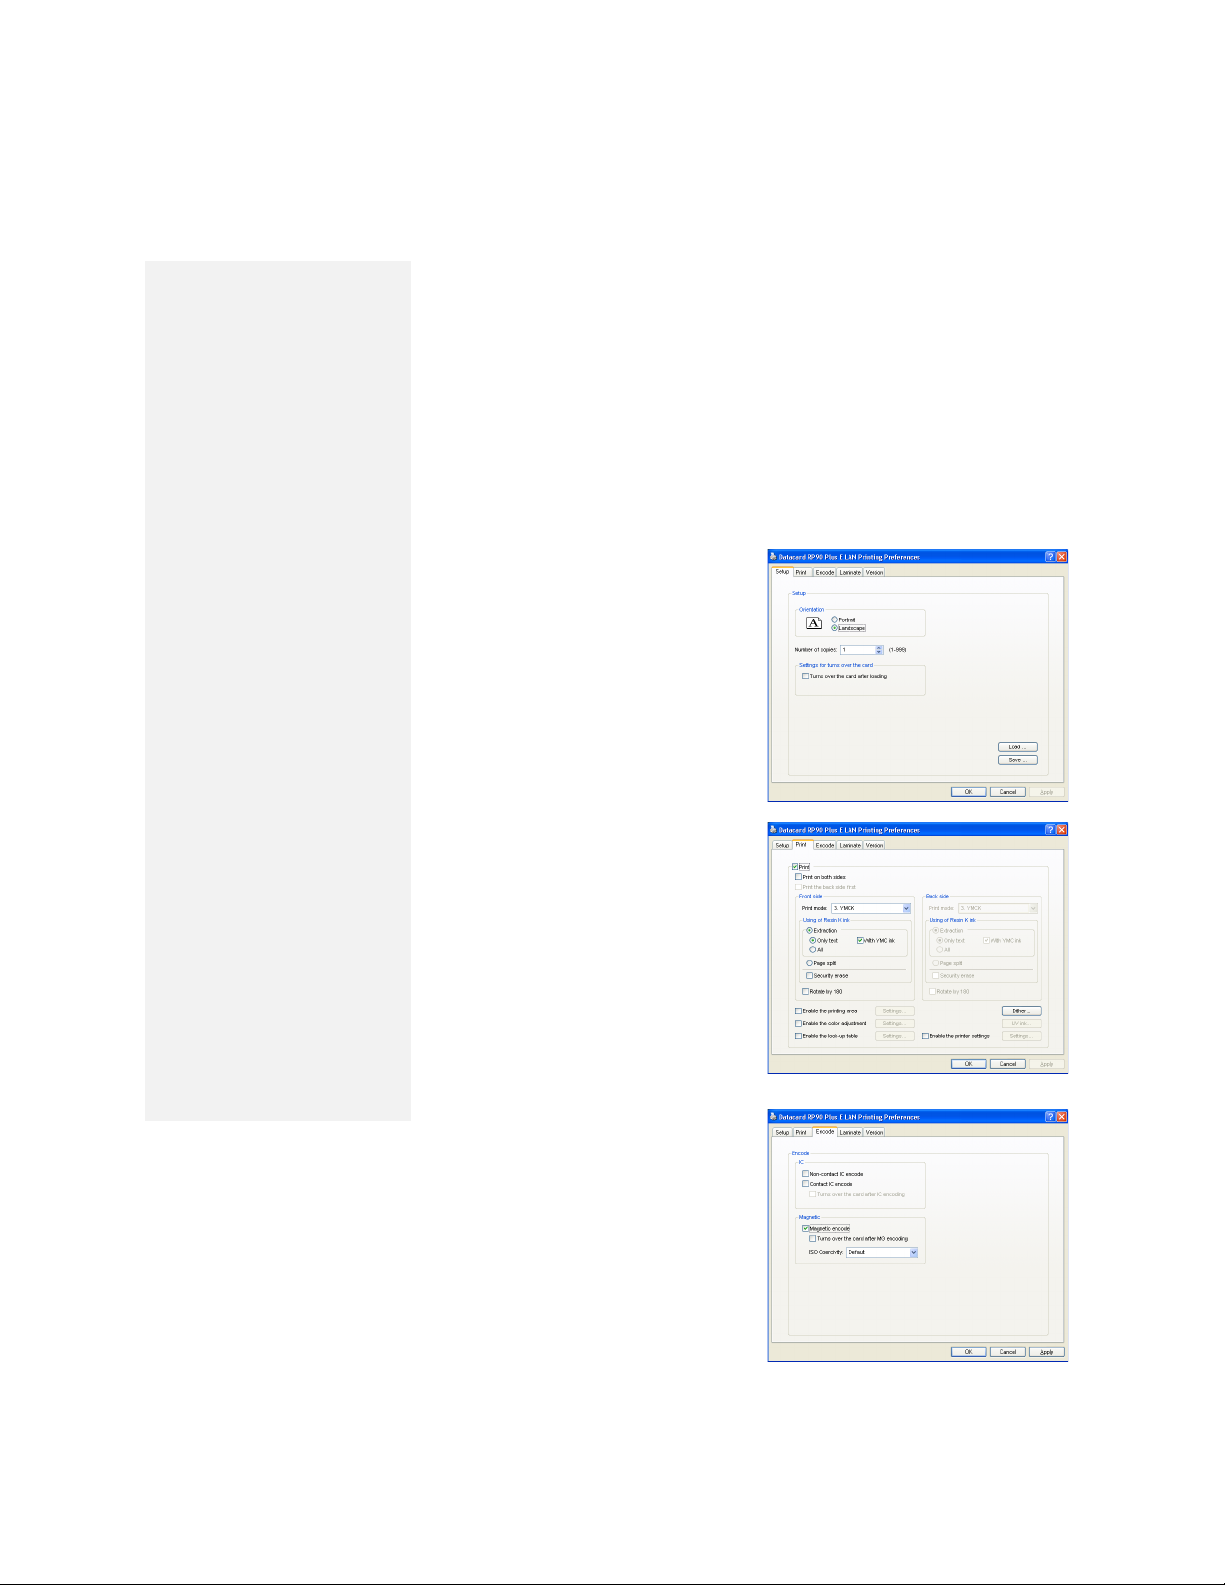
4 Click the Properties button to open the Printing Preferences dialog
box. Use the Setup, Print, and Encode tabs to set printer properties.
Setup tab
Use the Setup tab to set the
card orientation, number of
copies, and whether to
reverse the card. The Setup
tab also displays the type of
card, the type of ink ribbon in
the printer, and the quantity of
ink ribbon and retransfer film
remaining.
Print tab
Use the Print tab to set
printing, printing one side or
both sides, and rotate. The
Print tab contains settings for
using the color (YMC) and
black (K) panels of the print
ribbon. The tab also contains
controls for color adjustment,
setting up a look-up table, and
specifying the print area for
ribbon panels.
Encode tab
The Encode tab contains
settings for using smart card
(IC) and magnetic stripe
encoding. You can also
specify whether to rotate the
card after an encoding step.
5 Print the card.

Printing cards
20 RP90 Plus E and RL90 User Guide

Viewing and changing printer settings
This section describes how to view and change printer and laminator
settings. It describes:
•
“Printing Preferences” on page 22
• “Printing Properties” on page 24
• “Status Monitor” on page 25
• “Using the LCD menus” on page 35
— “About the Printer LCD panel” on page 35
— “Using the Printer LCD panel” on page 36
— “About the Laminator LCD panel” on page 41
— “Using the Laminator LCD panel” on page 42
3
RP90 Plus E and RL90 User Guide

Printing Preferences
The Printing Preferences dialog box contains the Setup, Print, Encode, and Version tabs.
To open Printing Preferences:
1 Choose Start from the Windows task bar.
2 Choose Settings and then Printers (and
Faxes). The Printers (and Faxes) window
opens.
3 Click once on the Datacard RP90 Plus E
printer icon to select it.
— The driver must be installed for the
printer icon to be present.
— Datacard RP90 Plus U1 is the default
name of the printer. The name of your printer might be different.
4 From the File menu, choose Preferences. The Printing Preferences dialog box
opens.
Setup tab
The Setup tab shows the type of card and the type
of ink ribbon in the printer. You can specify the
card orientation and number of copies (your ID
software might specify these settings, which
override the Setup tab). You can also specify
whether to reverse the card.
Printing Preferences
Print tab
The Print tab contains settings for using the color
(YMC) and black (K) panels of the print ribbon.
You can specify the whether to print on both sides
and whether to rotate the image (your ID software
might specify these settings, which override the
Print tab). The tab also contains controls for color
adjustment, setting up a look-up table, and
dithering. Use the Printing area settings if using
peel-off ribbon.
To print text, bar codes, or both using K ink on the
side of a card using YMCK ink ribbon, choose
Extraction>Only Text.
To print black areas on graphics with K ink ribbon,
choose Extraction>All.
22 RP90 Plus E and RL90 User Guide

Printing Preferences
The look up table requires a file with a full set of 256 values (0-255) for each plane for
Yellow, Magenta, Cyan, and Black. Each field can have a value from 0 through 255. Data
should be ASCII numeric values, separated by a comma or line feed.
To use the Security Erase feature, use a YMCK ink ribbon and choose Security Erase.
Security erase prints a random pattern using the K panel onto the transfer ribbon.
This illustration shows a printed card and the ink ribbon used to print it, without using the
Security Erase feature.
U.S.A.
123456789
Rank Service Date of Birth BloodType
GS4 DoD 06-25-1964 B-
Debra Wilson 123456789
U.S.A.
123456789
Rank Service Date of Birth BloodType
GS4 DoD 06-25-1964 B-
Debra Wilson 123456789
This illustration shows the same printed card and the ink ribbon used to print it, after using
the Security Erase feature.
U.S.A.
123456789
Rank Service Date of Birth BloodType
GS4 DoD 06-25-1964 B-
Debra Wilson 123456789
U.S.A.
123456789
Rank Service Date of Birth BloodType
GS4 DoD 06-25-1964 B-
Debra Wilson 123456789
This illustration shows the retransfer ribbon after using the Security Erase feature.
R an k S er vice D ate of B irth Blo o d T yp e
Encode tab
The Encode tab contains settings for using smart
card (IC) and magnetic stripe encoding (your ID
software might specify these settings, which
override the Encode tab). You can also specify
whether to rotate the card after an encoding step.
“Magnetic Stripe Encoding” on page 77 for
See
more information on encoding magnetic stripes.
RP90 Plus E and RL90 User Guide 23

Laminator tab
Tips – Card cleaning roller
• Values are blank if the
printer is disconnected
or powered off.
• Graphics controls show
all red if the printer is
disconnected or
powered off.
• Clicking on buttons
displays the “No printer
is found.” message if
the printer is
disconnected or
powered off.
Printing Properties
The Laminator tab contains settings
for using the optional RL90
laminator. You can set whether to
apply material to the front of the card,
the back of the card or both. You can
also set the temperature, speed,
patch position, and fan settings for
each side of the card.
Use this tab only if an RL90 laminator
is connected to the printer.
Version tab
The Version tab shows the build
version of the printer driver. Your
service provider might ask you for
this information.
Printing Properties
The Printing Properties dialog box options are set up when the printer is
installed or by your system administrator.
1 Choose Start from the Windows task bar.
2 Choose Settings and then Printers (and Faxes). The Printers (and
Faxes) window opens.
3 Click once on the Datacard RP90 Plus E U1 printer icon to select it.
— The driver must be installed for the printer icon to be present.
— Datacard RP90 Plus E U1 is the default
name of the printer. The name of your
printer might be different.
4 From the File menu, choose Properties.
The Properties window opens.
5 Use the tabs to set up Sharing, Ports, Color
Management, Security, and Advanced
options.
6 Choose OK to save and close, or choose
Cancel to close without saving changes.
24 RP90 Plus E and RL90 User Guide

Status Monitor
Status Monitor
The Status Monitor can be installed when the driver is installed. The Status Monitor
handles bidirectional communication between the printer and printer driver. You can use
the Status Monitor or the printer LCD panel for many settings.
Open the Status Monitor
To open the Status Monitor window:
Tips for Success
• Users without administrator permissions can view settings but cannot change them.
Start the Status Monitor with Administrator permissions if you want to change
settings.
• The first time you open the Status Monitor on Windows Vista, you must open it as
Administrator. If you do not, the Status Monitor will display the following message.
If you click Cancel, you can try to open it as an Administrator. If you click OK,
Windows Vista displays the error shown.
• When you receive the error, uninstall the Status Monitor, restart Windows Vista, and
install the Status Monitor again.
1 Begin with the printer powered on and attached to the PC.
2 To start the Status Monitor with Administrator Permissions, do the following:
— From the Windows task bar, choose Start>Programs>RP90 Plus E Status
Monitor.
— For Windows XP and 2000, right-click the RP90 Plus E Status Monitor icon
and choose Run As... In the Run As dialog box, enter the name and
password for a user name with Administrator permissions.
— For Windows Vista, right-click the RP90 Plus E Status Monitor icon and
choose Run As Administrator.
— The first time you start the Status Monitor on Windows Vista, a Windows
Security Alert dialog box might appear. Click
Unblock to use the Status Monitor.
RP90 Plus E and RL90 User Guide 25

If you choose Keep Blocking and decide that you want the Status Monitor to run,
you must uninstall the Status Monitor, restart Windows Vista, and install it again.
3 To start the Status Monitor without Administrator permissions, click the icon to open
it. A prompt appears to tell you that you cannot change settings. Click
continue.
4 The Status Monitor window opens.
Close the Status Monitor
To close the Status Monitor:
1 Click the red Close button.
2 A prompt asking if you want to close the Status Monitor appears. Click
Yes.
Tips for Success
• When you close the Status Monitor, communication between the printer and driver
becomes one way, with the driver sending cards to the printer.
• To keep the Status Monitor running without viewing it, click the
Minimize button.
Status Monitor
OK to
Printer Status tab
The Status tab shows:
• The type of ink ribbon, the approximate
• The type of retransfer (INTM) supply and the
• The resettable print count and a Clear button
• The printer name. If more than one printer is
• An estimate of the cards remaining in the card
• When the printer requires cleaning, the printer image changes to:
percentage remaining, and the lot number.
approximate percentage remaining.
to set it to zero (0).
installed, choose the printer to work with using
the
Printer Name list. Click the Update button
to search for additional RP90 Plus E printers.
The information changes automatically when
you choose another printer.
hopper.
— 25 or fewer 0.76mm (0.030in) cards
— 70 or fewer 0.25mm (0.010in) cards
Less means:
26 RP90 Plus E and RL90 User Guide

Status Monitor
• The current state of the printer, such as ready. The icon changes with different
states. See the table below.
Icon Status Icon Color Meaning
No Printer is found. Yellow The printer power is not switched on. or the host PC and
printer are not connected properly by the USB cable.
Ready Green The printer is ready and able to start card printing.
Initializing Yellow The printer is initializing. After the printer is initialized, it
goes into Ready state.
Offline Mode Yellow The printer is in Setting mode or it is being cleaned.
When the process ends, it goes into Ready state.
Preheating Yellow The heat roller is heating. When it reaches the correct
temperature, the printer goes into Ready state.
Card Loading
Card Transporting
MG Encoding
Retransfer
Contact IC Encoding
No-Contact IC
Encoding
Unloading
Printing
Power Saving Yellow The printer is in power save mode. To end Power
Error Red
Printer Setting tab
The Printer Setting tab shows:
• Controls for viewing or changing print settings:
Yellow The printer is issuing cards. The operating status during
card issuing is indicated. When the card is issued, the
printer goes into Ready state.
Saving, press the RESET button on the printer and then
press the ENTER button to initialize the printer.
“Status monitor messages” on page 31.
See
— Resin K Print Level, which sets the K
resin ink print density.
— Level of UV Ink and Level of Special Ink
2 which are not supported.
— Resin K Print Mode which sets the K
resin ink print quality. If Fine is selected,
the print quality improves but the printing
speed is slower.
— Cooling Time which sets the time in
seconds to wait until the retransfer film
peels off from the card after retransfer. The default value is 0.
RP90 Plus E and RL90 User Guide 27

Retransfer tab
Status Monitor
• Controls for viewing or changing magnetic stripe settings.
— Number of Retry, which sets the maximum number of retries when writing or
reading magnetic stripe data fails. Default value is 1.
— ISO Mode, which sets the power used by the magnetic card encoder. The
default is Hi-Co.
• A control to enable or disable the buzzer.
• A control to set power saving, which reduces the temperature of the retransfer heat
roller after the printer is not used for 30 minutes. The default is Disable.
• Controls to specify the smart card module(s) (IC Encoder) in the printer.
The Retransfer tab shows:
• Two matrices for setting the retransfer speed
and temperature. Click a square to choose the
setting. On the printer, press the
and then the
Enter button to initialize the
Reset button
printer and make the new setting take effect.
• The card type, set on the Media Setting tab.
• The Refresh button which displays the current
printer data.
Tips for success
• The transfer power to the card gets stronger
towards the upper right, but the card becomes
more distorted due to the heat.
• Changing the retransfer temperature on one card side also affects the other side.
• The range of values changes with the Card Type setting.
• Make sample cards to verify settings before using new settings.
Bend Remedy tab
The Bend Remedy tab shows:
• A matrix for setting the bend remedy time and
temperature. Click a square to choose the
setting. On the printer, press the
and then the
Enter button to initialize the
printer and make the new setting take effect.
• The card type, set on the Media Setting tab.
Tips for success
• Bend remedy is effective for single side
printing. For double side printing, choose the
Disable button.
• When you change to Disable, the printer goes
Preheat state for about 10 minutes while
into
the roller temperature drops. Wait until the printer state changes to
• The side of the card where bend remedy is performed can become faded.
• Make sample cards to verify settings before using the new settings.
28 RP90 Plus E and RL90 User Guide
Reset button
Ready.

Status Monitor
Media Setting tab
The Media Setting tab shows:
• The type of Ink ribbon in the printer, the lot
number of the ribbon, and the number of panel
sets included in the ribbon. The printer
provides this information and it cannot be
changed. If the printer cannot recognize the
type of ink ribbon, one of the following reasons
is displayed:
Display Reasons for ink recognition error and the solutions
252: Invalid TAG Data The data for the ink ribbon is incorrect. Replace the ink ribbon and try again.
253: Defective TAG The printer did not recognize the print ribbon data. Replace the ink ribbon and
try again.
254: No TAG The printer could not read the print ribbon data. Make sure the ink ribbon has
been loaded correctly. See
“Load ink ribbon” on page 9.
255: Defective R/W The printer is defective. The printer must be repaired.
• Settings to view or change the type and thickness of cards being used.
— For Material, choose PET-G, PVC, or PET (0.25mm). The values for retransfer
speed and temperature (on the
“Retransfer tab” on page 28) change
depending on the selected card type.
— For Thickness, choose:
— Standard for cards 0.76mm (0.030in) thick
— Thin for cards 0.25mm (0.010in) thick
• A setting to view or change the type of Retransfer (INTM) film.
Tips for success
• Make sample cards to verify settings before using cards of a different thickness.
• Print on one side of thin cards. Do not print on both sides.
RP90 Plus E and RL90 User Guide 29

Property tab
The Property tab shows:
Printer Select tab
The Printer Select tab shows:
Status Monitor
• The version of printer firmware, and firmware
versions of any installed options such as
magnetic stripe encoder or laminator. “
????”
means an option is not installed or connected.
• Configuration information for options installed.
• The unit number. (Use the LCD panel to set the
unit number, described in
LCD panel” on page 36
• The Print Count, which is the number of cards
“Using the Printer
.)
printed.
• The Thermal Head count, which is the number
of panels printed by the printhead currently
installed in the printer. (YMCK ink ribbon has four panels.)
• The currently selected printer.
• If more than one RP90 Plus E printer is
installed on the PC, you can change the printer
for which information is displayed by choosing
it from the Current Printer list. The Status
Monitor will communicate with the printer to
update information.
• Use the Scan button to locate another printer if
it is not displayed in the list.
• Use the Sync Time button to send the current
time on the PC to the printer.
• Use the Update button to send changed values
to the printer.
• Use the Refresh button to obtain current values from the printer.
• If the printer is set, using the LCD panel, to use a LAN connection, this tab displays
the default settings (which cannot be changed). If the printer is connected using a
USB connection, you can use this page to set the IP address and other network
values. See
• If you need to assign a printer name different from a choice provided by the printer,
About Network Settings in the Installation Guide.
make sure the printer is installed with a USB connection and then enter the new
printer name. Your network administrator can provide information about allowed or
required names on your network.
• Security settings, which can be set only when the printer is connected using a USB
connection. are available. Use the
box. See the
Installation Guide for the steps to follow.
Details button to open the IPSec Setting dialog
30 RP90 Plus E and RL90 User Guide

Status Monitor
Others tab
The Others tab shows the following for a USBconnected printer:
• Controls for printing a test card. The printer will
create one test card, using the internal test
pattern.
• A control for saving a command log. Your
service provider might ask you to save a
command log as part of troubleshooting.
• Controls for selecting a firmware file and
sending it to the printer. Only update printer
firmware when your service provider
recommends it.
For both USB-connected and Ethernet-connected
printers, the tab shows:
• Version information for the Status Monitor.
Status monitor messages
The following messages appear on the Status Monitor Status tab. See “Printer Status tab”
on page 26
.
Error Code Displayed Message Solution
No Printer is found. • Make sure that the host PC and the printers are
connected properly with a USB cable.
• Make sure that the printer is switched on.
0102D000 There is no card. Please supply cards.
0102D100 Printer door is opened. Please close the
door and initialize the printer by pressing
RESET and ENTER button.
0102D600 Ink Ribbon Cassette or Retransfer Film
Cassette is not set.
0102D700 Cleaning Unit is not set. 1 Install the Cleaning Unit and then close the card
01039000 Feed Jam happens. Please unset the
card tray and remove the card after
turning off the printer power.
1 Load cards as described in
page 8
2 Close or replace the card hopper securely.
1 Close the printer door.
2 Press RESET and then ENTER to initialize the
printer.
1 Load the Ink Ribbon Cassette or Retransfer
Film Cassette and then close the printer door.
2 Press RESET and then ENTER to initialize the
printer.
hopper.
2 Press RESET and then ENTER to initialize the
printer.
1 Switch off the printer power.
2 See
card.
3 Switch on the printer power.
.
“Hopper jam” on page 52 to remove the
“Load cards” on
RP90 Plus E and RL90 User Guide 31

Status Monitor
01039100 Card Jam happens in the printer. Please
open the printer door and remove the
card after turning off the printer power.
01039200 Card Jam happens in the printer. Please
open the printer door and remove the
card after turning off the printer power.
01039300 Card Jam happens in the printer. Please
open the printer door and remove the
card after turning off the printer power.
01039400 Card Jam happens in the printer. Please
open the printer door and remove the
card around the card outlet after turning
off the printer power.
0103A000 Retransfer Film is broken. 1 Repair the retransfer film as described in
1 Switch off the printer power.
2 See “Turnover jam” on page 53 to remove
the card.
3 Switch on the printer power.
1 Switch off the printer power.
2 See
3 Check that the card stacker is securely attached
4 Switch on the printer power.
1 Switch off the printer power.
2 See “Retransfer section jam” on page 54 to
3 Switch on the printer power.
1 Switch off the printer power.
2 Open the printer door and remove the card near
3 Switch on the printer power.
“Retransfer section jam” on page 54 to
remove the card.
to the card stacker receptacle.
remove the card.
the card discharge slot.
“Mending broken ink ribbon or retransfer
film” on page 55
2 Press RESET and then ENTER to initialize the
printer one ribbon panel.
.
0103A100 Mark on Retransfer Film could not be
detected. Please set Retransfer Film
correctly.
0103B000 Ink Ribbon is broken.
0103B100 Ink Ribbon cannot be controlled. Please
set Ink Ribbon correctly.
0103BB00 Card Jam happens in External IC unit.
Please remove the card in External IC
unit.
01044400
0104D800
0104FA00
Hardware failure happens in the printer
unit. Please turn off and on the printer
power to initialize the printer.
1 Make sure that the Retransfer Film is loaded
correctly (see
page 10
2 Close the printer door and press RESET and
then ENTER to initialize the printer.
1 Repair the ink ribbon as described in
“Load retransfer film” on
).
“Mending
broken ink ribbon or retransfer film” on
page 55
2 Press RESET and then ENTER to initialize the
printer.
1 Make sure that the Ink Ribbon is loaded
correctly (see
2 Close the printer door and press RESET and
then ENTER to initialize the printer.
1 Switch off the printer power.
2 Remove the jammed card from the IC unit on
the right side of the printer.
3 Switch on the printer power.
1 Turn the printer power switch off and then on.
2 If the error happens again, call for service.
.
“Load ink ribbon” on page 9).
32 RP90 Plus E and RL90 User Guide

Status Monitor
0104A900 MG encoder is not set correctly. Please
turn off the printer power and set MG
unit correctly.
0104AB00 Mechanical failure happens in the MG
encoder. Please turn off and on the
printer power to initialize the printer.
0104AC00 Hardware failure happens in the MG
encoder. Please turn off and on the
printer power to initialize the printer.
0104AF00 Communication error happens between
printer and MG encoder. Please turn off
and on the printer power to initialize the
printer.
0104B900 External IC unit is not set correctly.
Please turn off the printer power and set
External IC unit correctly.
0104BA00 Dip switch setting in the external IC unit
is not correct. Please turn off the printer
power and correct Dip switch setting in
External IC unit.
0104BE00 Communication error happens between
printer and External IC unit. Please turn
off the printer power and connect
communication cable correctly.
1 Turn the printer power switch off and then on.
2 If the error happens again, call for service.
1 Turn the printer power switch off and then on.
2 If the error happens again, call for service.
1 Turn the printer power switch off and then on.
2 If the error happens again, call for service.
1 Turn the printer power switch off and then on.
2 If the error happens again, call for service.
1 Turn the printer power switch off and then on.
2 If the error happens again, call for service.
1 Turn the printer power switch off and then on.
2 If the error happens again, call for service.
1 Switch off the printer power.
2 Connect the cable between the External IC unit
and the printer securely.
3 Switch on the printer power.
4 If the error happens again, call for service.
0104BF00 Communication error happens between
printer and laminator. Please turn off the
printer power and connect
communication cable correctly.
0104C000 Hardware failure happens in the
turnover unit. Please turn off and on the
printer power to initialize the printer.
0104C100 Hardware failure of Heater Cam
happens. Please turn off and on the
printer power to initialize the printer.
0104F000 The temperature of Retransfer Roller is
too hot. Please turn off the printer power
till it becomes cool enough.
1 Switch off the printer power AND laminator
power.
2 Connect the cable between the laminator and
the printer securely.
3 Switch on the printer and laminator power. See
“Power on the printer” on page 15 and
“Power on the laminator” on page 14.
4 If the error happens again, call for service.
1 Turn the printer power switch off and then on.
2 If the error happens again, contact you service
provider.
1 Turn the printer power switch off and then on.
2 If the error happens again, call for service.
1 Switch off the printer power.
2 Wait about 10 minutes for the Retransfer Roller
to cool down.
3 Switch on the printer power.
4 If the error happens again, call for service.
RP90 Plus E and RL90 User Guide 33

Status Monitor
0104F100 Hardware failure of Retransfer Roller
happens. Please turn off and on the
printer power to initialize the printer.
0104F200 Hardware failure of Retransfer Roller
Thermister happens. Please turn off and
on the printer power to initialize the
printer.
0104F300 The temperature of Bend Remedial
Roller is too hot. Please turn off the
printer power till it becomes cool
enough.
0104F400 Hardware failure of Bend Remedial
Roller happens. Please turn off and on
the printer power to initialize the printer.
0104F500 Bend Remedial Roller thermister is out
of order. Please turn off and on the
printer power to initialize the printer.
0104F600 The temperature in the printer is too
cool. Please turn off the printer power till
it becomes warm enough.
1 Turn the printer power switch off and then on.
2 If the error happens again, call for service.
1 Turn the printer power switch off and then on.
2 If the error happens again, call for service.
1 Switch off the printer power.
2 Wait about 10 minutes for the Bend Remedial
Roller to cool down.
3 Switch on the printer power.
4 If the error happens again, call for service.
1 Turn the printer power switch off and then on.
2 If the error happens again, call for service.
1 Turn the printer power switch off and then on.
2 If the error happens again, call for service.
1 Switch off the printer power.
2 Wait for the surrounding temperature to warm
up.
3 Switch on the printer power.
4 If the error happens again, call for service.
0104F800 The temperature of Thermal Head is too
hot. Please turn off the printer power till
it becomes cool enough.
0105FB00 Download data to the printer is invalid.
Please confirm the file is correct.
0142A200 End of Retransfer Film, please replace
the film with a new.
0142B200 End of Ink Ribbon, please replace the
ink with a new.
1 Switch off the printer power.
2 Wait about 10 minutes for the Thermal head to
cool down.
3 Switch on the printer power.
4 If the error happens again, call for service.
Check whether the downloaded file is correct.
1 Replace with a new roll of retransfer film. See
“Load retransfer film” on page 10.
2 Press RESET and then ENTER to initialize the
printer.
3 Initialize the new roll of film as described in
“Initialize the retransfer film” on page 17.
1 Replace with a new roll of ink ribbon. See “Load
ink ribbon” on page 9
2 Press RESET and then ENTER to initialize the
printer.
3 Initialize the new roll of ink ribbon as described
“Initialize the ink ribbon” on page 16.
in
.
34 RP90 Plus E and RL90 User Guide

Using the LCD menus
Using the LCD menus
About the Printer LCD panel
The printer LCD panel has a 2-line display,
six keys, a Ready light, Error light, and
speaker.
The display background color changes
according to the printer's function; the
background is bright green during
initialization, orange while processing a
card, and red on printer error. These colors
can be changed using the LCD panel.
Ready LED (green)
Steady Green The printer is ready and waiting to print cards.
Blinking The printer is receiving data.
Off The printer stopped due to error, initialization or preheat mode, or
operator setting preferences.
Error LED (red)
Keys:
LCD Display
On The printer has a condition that requires service or the printer did
not power on correctly. To correct the condition, press the RESET
and then the ENTER key. If this does not correct the condition,
power the printer off, and then back on before calling for service.
OFF Normal status
Reset Initializes the printer. Use the Reset key after loading supplies, to
end Power Saving, or after an error occurs.
Menu Press MENU to access the printer settings. Continue to press the
MENU key to access the settings in the order listed in
Printer LCD panel” on page 36
Enter Confirms the user selection.
Arrow Keys Use the up and down arrow keys to select options within a menu
selection.
Exit Exits the current menu or menu selection and returns user to the
previous menu selection.
Line one of the display shows the current printer or mode status.
The > symbol following a menu selection indicates that there are
subcategories listed within the selection. Use the up and down
arrow keys to select these options.
.
“Using the
RP90 Plus E and RL90 User Guide 35

Speaker
Provides an electronic beep that indicates:
• An error has happened.
• Fewer than 20 cards remain in the card hopper.
• Confirms that settings have been saved.
The speaker function can be turned on or off using the LCD panel.
Using the Printer LCD panel
Using the LCD menus
Press the MENU key and "User Mode" is displayed on the LCD
panel. The LCD panel changes to read "Display" within 0.5
seconds.
Press the ENTER key when "Display" is shown to access display
settings which include the card counter, LCD contrast, and LCD
background color.
Press the MENU key when “Ready” is displayed to access other
printer settings.
Press the EXIT key at any time to exit the menu system and return
to "Ready" status.
Many printer settings can be changed using the Status Monitor. See “Status Monitor” on
page 25
.
Menu Display Settings Function
Display Counter
• Total
• Head
•Free
Contrast
0
Back Color
SKY BLUE
Counter Reset OK? Press ENTER to reset the Free counter.
Cleaning Rollers
OK?
Magnetic Stripe (MG)
Head
Use the up and down arrow keys to select the card counter type:
• Total is the default setting, and displays the number of
cards printed. The Total counter cannot be reset.
• Head displays the number of complete dye panels. The
Head counter cannot be reset, however, it automatically
resets itself when the print head is replaced.
•The Free counter displays the number of cards that have
printed. The Free counter can be reset by the user.
Set the LCD panel contrast using 7 gradations from
-3 (low contrast) to +3 (high contrast). The default setting is 0.
Choose from eight LCD background colors. Sky blue is the
default color. Other selections are blue, light blue, green,
bright green, yellow, purple, and pink.
Start the cleaning function to clean the card feed rollers and
heated rollers, and to clean the magnetic head when using
magnetic stripe cards. See
and heat roller” on page 45
head” on page 46
for the steps to follow.
“Cleaning the card feed rollers
or “Cleaning the magnetic
36 RP90 Plus E and RL90 User Guide

Using the LCD menus
Menu Display Settings Function
Ink Ink Type
YMCK: 0
YMCKPO: 2
YMCKK: 4
Black level Choose from seven gradations from -3 (lighter) to +5 (darker).
Black mode Choose Standard or Fine. Change to Fine if thin lines or small
SP - Ink1 Level Use SP - Ink1 and Ink2 levels to set the darkness level of
SP - Ink2 Level See SP -Ink1 Level above.
Retransfer Media type:
750
1000
Temp Level Set the retransfer roller temperature. Set from -3 (lower) to +2
Speed (front)
Speed (back) Set the retransfer speed for the back of the card. Set from -10
Displays the type of ink ribbon that is loaded in the printer.
Datacard supports YMCK and YMCKK ink ribbons. (The printer
detects the type of ink ribbon; it cannot be set.) See your dealer
regarding support for YMCKPO ink ribbon.
black text is blurred (printing speed is slower).
special inks that will be available in the future.
Datacard retransfer ribbon is available in 1000 frames per roll.
(higher).
Set the retransfer speed for the front of the card. Set from -10
(slower) to +2 (faster). Initialize the retransfer film after making
changes. See
(slower) to +2 (faster).
changes. See
“Initialize the retransfer film” on page 17.
Initialize the retransfer film after making
“Initialize the retransfer film” on page 17.
MG Print (JIS) Select ON or OFF.
Standby Front Wait
Back Wait
Buzzer ON or OFF Use to turn the electronic beep sound ON or OFF. The sound
Power Saving OFF or up to 60 minutes The printer enters power save mode after a specified period
Bend Remedy Temp Level Choose from -5 (lower) to 0 (higher) or OFF to set the bend
Speed Choose from -2 (slower) to +2 (faster) to set the bend remedy
Cooling time Set the cooling time from 0 (None) to 15 seconds.
When printing both sides of a card and using an optional
smart card (IC) unit, specifies whether to wait after the front
side or the back side of the card.
can indicate an error, when fewer than 20 cards remain in the
card hopper, or to confirm a menu selection.
of inactivity. Choose from OFF or select from 5 to 60 minutes
in 5 to15 minute increments. “Sleeping” appears on the LCD
display. To cancel power save mode, press RESET and then
the ENTER key. The printer uses one set of supplies.
remedy roller temperature. See
for more information.
speed. See
information.
“Bend remedy” on page 56 for more
“Bend remedy” on page 56
RP90 Plus E and RL90 User Guide 37

Menu Display Settings Function
Using the LCD menus
Ink Ink Type
YMCK: 0
YMCKPO: 2
YMCKK: 4
Black level Choose from seven gradations from -3 (lighter) to +5 (darker).
Black mode Choose Standard or Fine. Change to Fine if thin lines or small
SP - Ink1 Level Use SP - Ink1 and Ink2 levels to set the darkness level of
SP - Ink2 Level See SP -Ink1 Level above.
Retransfer Media type:
750
1000
Temp Level Set the retransfer roller temperature. Set from -3 (lower) to +2
Speed (front)
Speed (back) Set the retransfer speed for the back of the card. Set from -10
Displays the type of ink ribbon that is loaded in the printer.
Datacard supports YMCK and YMCKK ink ribbons. (The printer
detects the type of ink ribbon; it cannot be set.) See your dealer
regarding support for YMCKPO ink ribbon.
black text is blurred (printing speed is slower).
special inks that will be available in the future.
Datacard retransfer ribbon is available in 1000 frames per roll.
(higher).
Set the retransfer speed for the front of the card. Set from -10
(slower) to +2 (faster). Initialize the retransfer film after making
changes. See
(slower) to +2 (faster).
changes. See
“Initialize the retransfer film” on page 17.
Initialize the retransfer film after making
“Initialize the retransfer film” on page 17.
MG Print (JIS) Select ON or OFF.
Standby Front Wait
Back Wait
Buzzer ON or OFF Use to turn the electronic beep sound ON or OFF. The sound
Power Saving OFF or up to 60 minutes The printer enters power save mode after a specified period
Bend Remedy Temp Level Choose from -5 (lower) to 0 (higher) or OFF to set the bend
Speed Choose from -2 (slower) to +2 (faster) to set the bend remedy
Cooling time Set the cooling time from 0 (None) to 15 seconds.
When printing both sides of a card and using an optional
smart card (IC) unit, specifies whether to wait after the front
side or the back side of the card.
can indicate an error, when fewer than 20 cards remain in the
card hopper, or to confirm a menu selection.
of inactivity. Choose from OFF or select from 5 to 60 minutes
in 5 to15 minute increments. “Sleeping” appears on the LCD
display. To cancel power save mode, press RESET and then
the ENTER key. The printer uses one set of supplies.
remedy roller temperature. See
for more information.
speed. See
information.
“Bend remedy” on page 56 for more
“Bend remedy” on page 56
38 RP90 Plus E and RL90 User Guide

Using the LCD menus
Menu Display Settings Function
Card Thickness Standard
Thin
Set Standard for 0.030 inch (0.76mm) thick cards or Thin for
0.010 inch (0.25mm) thick cards. Contact your dealer or
service provider before using 0.010in (.0.25mm) thick cards.
MG ISO Type ISO coercivity setting
Lo-Co
Hi-Co
IC Antenna Pos None
EXT. Unit
Added on
Set coercivity for writing data to ISO magnetic stripe cards:
2
Lo-Co: 238 x 10
Hi-Co: 218 x 10
[A/m] (300[Oe])
3
[A/m] (2750[Oe])
Select from three settings:
• None for no antenna.
• EXT.Unit when a smart card antenna is used.
• Added on when a contact smart card is used.
IC Contact Pos None
Built-in
EXT. Unit
Select from three positions to stop the card in:
• None for no contact.
• Built-in when the built-in contacts are used.
• EXT. Unit when an external smart card option is used.
Test Print OK? Press the ENTER key to print the default test pattern. Test
Print can be used with or without a host PC.
Unit No Choose from 1 to 7 Assign the unit number when more than one printer is
connected to a PC. Each unit attached to a PC must have a
unique number. After choosing the unit number, press the
ENTER key and then the EXIT key. “Please, power off” is
displayed on the LCD panel. Power the printer off and then
back on.
Network IP Address Shows the current IP Address of the printer.
Printer Name
PRINTER01 to
PRINTER09
Assign the Network Name of the printer. Change this name
when more than one RP90 Plus E printer is connected to the
network. Choose from the names supplied. If you set up a
network printer on the PC using a USB connection, this name
can be the name that you assigned from the PC.
Host Interface
USB
Choose the connection method for the printer and PC, either
USB or LAN (Ethernet).
LAN
DHCP
ON
OFF
Dynamic Host Configuration Protocol (DHCP) is a network
feature that assigns IP addresses to devices on the network.
• ON uses DHCP to assign the printer IP address. The IP
Address can change when you power off the printer and
then power it on again.
• OFF means that you must assign the IP Address of the
printer and it will not change (Static IP). Use this setting if
your network does not support DHCP.
Ask your network administrator which setting to use.
IP Address The default IP address of the printer is 192.168.0.141, and is
displayed when the printer is powered on for the first time or
when DHCP is set to On.
If you do not use DHCP, ask your network administrator for
the IP Address to use.
RP90 Plus E and RL90 User Guide 39

Menu Display Settings Function
Subnet Mask The default Subnet Mask of the printer is 255.255.255.0. If
you do not use DHCP, ask your network administrator for the
Subnet mask.
Gateway The default Gateway of the printer is 192.168.0.1. If you do
not use DHCP, ask your network administrator for the Subnet
mask.
Using the LCD menus
Session TimeOut
OFF or up to 60 minutes
MAC Address The MAC Address is unique to each printer. The MAC
IPSec Mode
ON
OFF
IPSec Type Set the type of IP Security. Choose from the following:
HR Control ON
OFF
Download To prepare the printer for a firmware download, press the
Set how many minutes to wait without using the printer to stop
the network session between the PC and printer.
Address is displayed and cannot be changed.
Set the Internet Protocol (IP) Security mode to ON or to OFF.
After setting up security using a PC and USB connection, this
setting cannot be changed.
• Not Setting, no IP Security.
• Preshared, using a preshared key for encryption.
• Certificate, using a public key certificate for encryption.
After setting up security using a PC and USB connection, this
setting cannot be changed.
Set whether to lower the temperature of the retransfer heat
roller after 30 minutes of no printing. The roller returns to
operating temperature when the next card is printed.
Setting HR Control to ON can add to the useful life of the
retransfer heat roller.
ENTER key. The firmware must be downloaded from a USBconnected PC with the driver and Status Monitor installed.
“Others tab” on page 31 for the Status Monitor page.
See
DO NOT power off the printer while the firmware is being
downloaded.
Transport Mode Set transport mode Set the Transport Mode when moving or shipping the printer.
Press the ENTER key to use the transport mode. “Please,
power off” is displayed on the LCD panel. The transport mode
is cancelled when the printer is powered back on.
“Preparing the printer and laminator for transport”
See
on page 48
transporting it.
for information on preparing the printer for
40 RP90 Plus E and RL90 User Guide

Using the LCD menus
About the Laminator LCD panel
When you power on the laminator, it begins initializing. The laminator searches for
laminate and then starts preheating. The laminator is ready when the LCD display reads
"Ready" and the Ready light is steady green.
Ready LED (green)
Steady Green The laminator is ready.
Blinking The laminator busy.
Off The laminator stopped because of an error, initialization or
preheating is in progress, or the operator is using the LCD panel to
set preferences.
Error LED (red)
Keys:
On The laminator may require service or did not power on correctly. To
correct the condition, press the RESET/K and then the ENTER key.
If this does not correct the condition, power the laminator off, and
then back on before calling for service.
Off Normal status
MENU Press MENU to access the laminator settings. Continue to press
the MENU key to access the settings in the order listed on the next
page.
ENTER Confirms your selection.
EXIT Exits the current selection and returns you to the previous menu
selection. Press the EXIT key at any time to exit the menu system
and return to "Ready" status.
RESET/K Initializes the laminator after an error occurs. Scrolls through
available values when you change settings.
RP90 Plus E and RL90 User Guide 41

Using the Laminator LCD panel
Use the LCD panel to change laminator settings, or use the Laminator tab of the Status
Monitor to change some settings from the PC.
LCD Display Settings Function
Using the LCD menus
Mode Single
Pass
Film 1-mil
0.6 mil
overlay
Film Position -7 to +7 Adjusts the patch transfer position. Default setting is 0; the
Temp Temperature, default 170° Press the RESET/K key to set temperature from 120° C to
Speed Lamination speed, default
5.5mm/sec
Card Fan Off, Low, Half, High, or
Full
Cool Time 0 (default), 5, 7, or 10
seconds
Power Save Off, 10, 20, 30 (default),
or 60 minutes
Default setting; laminates on one side only.
Passes card without laminating.
1-mil is the default setting. Use it for patch film 1-mil thick.
Use for patch film 0.6-mil thick.
Use with topcoat with no positioning markings.
patch moves to the right with a positive value and to the left
with a negative value.
200° C in 5° increments.
Press the ENTER key to confirm selection.
Press ENTER and use the RESET/K key to set lamination
speed from 2mm/sec to 10mm/sec in 0.5mm/sec
increments. The value that can be set may be limited by
the temperature setting.
Press the ENTER key to confirm selection.
Press the RESET/K key to turn the card cooling fan Off
(default), Low, Half, High, or Full.
Press the ENTER key to confirm selection.
Press the RESET/K key to select the amount of cooling
time before laminating starts.
Lowers the heater temperature if no lamination has
occurred in the set time period. Preheating automatically
returns when a card enters the laminator.
Using the default value of 30 minutes can reduce
discoloration of the laminator material.
LCD contrast 1 to 5 Press the RESET/K key to set the LCD display contrast
from 1 to 5. The larger the number, the higher the contrast.
Cleaning Without HR Cleans the transport roller only.
With HR Cleans transport and heat rollers. Remove the laminate
cartridge to clean the heat roller. See
laminator” on page 49
Online Setting Displays settings sent from the PC when the RL90 is
connected through an RP90 Plus E printer to a PC.
for more information.
“Cleaning the
42 RP90 Plus E and RL90 User Guide

Taking care of your printer
This chapter provides information to help you maintain the Datacard®
RP90 Plus printer and the Datacard
performance. It describes:
Cleaning the printer
“Cleaning the card cleaning rollers” on page 44
•
• “Card feed roller” on page 44
• “Cleaning the card feed rollers and heat roller” on page 45
• “Cleaning the magnetic head” on page 46
• “Cleaning the thermal head” on page 47
• “Cleaning printer fan filters” on page 47
“Preparing the printer and laminator for transport” on page 48
Cleaning the laminator
“Run a laminator cleaning card” on page 49
•
• “Cleaning the laminator cartridge” on page 50
• “Laminator fan filter” on page 50
®
RL90 card laminator for optimal
4
RP90 Plus E and RL90 User Guide

Cleaning the printer
Cleaning the printer
This section provides information on proper care and cleaning of the RP90
Plus printer. It also includes recommendations on how often to clean and
replace components.
Cleaning the card cleaning rollers
Tips – Card cleaning roller
• Wash the card cleaning
rollers regularly, such as
every time you change
the ink ribbon.
• More frequent cleaning
may be required under
heavy use conditions.
Clean rollers every 200
cards to improve print
quality.
• Allow the card cleaning
rollers to dry thoroughly
before reinstalling them in
the printer.
• Replace the card cleaning
rollers annually.
The card cleaning rollers are located inside the card hopper and clean lint and
other debris from the cards before printing. The card cleaning rollers should
be cleaned regularly, such as every time the ink ribbon or retransfer film is
changed. To clean the rollers:
1 Open the card hopper.
2 Pull the card cleaning rollers
3 Wash the blue cleaning rollers
4 Allow the card cleaning rollers
5 Reinstall the cleaning unit with
6 Close the card hopper.
out.
with water. Rub rollers gently
under running water. Do not
use isopropanol or detergents
to clean the rollers.
to dry thoroughly.
the blue rollers facing up.
Card feed roller
The card feed rollers move the card
through the printing process. To clean the card feed roller:
1 Open the card hopper and
remove cards.
2 Slide the card bracket to the
left until it locks.
3 Clean the card feed roller with
a cotton swab dipped in
ethanol.
4 Load cards as described in
“Load cards” on page 8.
44 RP90 Plus E and RL90 User Guide

Cleaning the card feed rollers and heat roller
Cleaning the printer
Tips – Cleaning card feed
and heat rollers
• The heat roller cannot be
cleaned while hot. Power
the printer off and allow it
to cool, or perform
cleaning before the heat
roller reaches operating
temperature.
• Clean the card feed
rollers and heat roller
every 1,000 printed
cards.
• Use the cleaning card
one time only. Using a
dirty cleaning card can
cause damage to the
rollers.
The heat roller provides the heat used during the retransfer process. The card
feed rollers move the card inside the printer. See
page 51
to find the location of the rollers.
“Printer roller layout” on
Begin with the printer (and optional laminator) powered off.
1 Move the RL90 laminator (if installed) away from the printer to avoid a
card jam during the cleaning process.
2 Slide the door latch to the right and open the printer door.
3 Press the retransfer film cartridge eject button and remove the
retransfer film cartridge.
4 Close the printer door.
5 Power on the printer. See “Power on the printer” on page 15.
6 The "No Cassette" message is displayed on the LCD display.
7 Remove the protective paper from a cleaning card.
8 Press the MENU key until "Cleaning" is displayed.
9 Press the ENTER key.
10 "Rollers OK?" is displayed. Press the ENTER key.
11 Insert the cleaning card into the card slot located on the right side of
the printer within 10 seconds. The card will be drawn into the printer by
the rollers and cleaning will begin.
12 Turn the card over when it is discharged and repeat Step 11 to
complete the cleaning process.
13 When the cleaning card is discharged, power off the printer, wait ten
seconds, reinstall the retransfer film cartridge, and power back on.
RP90 Plus E and RL90 User Guide 45

Cleaning the printer
Cleaning the magnetic head
When printing magnetic stripe cards, the magnetic head should be cleaned
every 1,000 cards. If you are not using magnetic stripe cards, the magnetic
head does not require cleaning.
Tips –Magnetic head
cleaning card
• Replace the magnetic
head cleaning card when
it becomes dirty. Using a
dirty magnetic head
cleaning card can
damage the magnetic
head.
Begin with the printer (and optional
laminator) powered off.
1 Move the RL90 laminator (if
installed) away from the printer
to avoid a card jam during the
cleaning process.
2 Open the card hopper and
remove cards.
3 Power on the printer. See
“Power on the printer” on
page 15
4 Press the MENU key until
"Cleaning" is displayed.
5 Press ENTER and use the up
and down arrow keys to select
"MG Head."
6 Place three or four drops of
isopropanol on the stripe of the
magnetic head cleaning card.
7 Place the magnetic head
cleaning card in the card
hopper in the correct
orientation for the type of cards
used. See
page 8
orientation.
8 Close the card hopper and
press the ENTER key on the
LCD panel.
9 When the cleaning card is
discharged, power off the printer, wait ten seconds, and power back
on.
.
“Load cards” on
for proper card
46 RP90 Plus E and RL90 User Guide

Cleaning the thermal head
Cleaning the printer
Tips – Thermal head
• Do not use metal or other
abrasive materials to
clean the thermal head.
• The thermal head can be
damaged by an
electrostatic charge.
Discharge yourself by
touching the printer
frame before cleaning
the thermal head.
The thermal head assembly should be
cleaned once every ten rolls of retransfer
film.
Begin with the printer (and optional
laminator) powered off.
1 Slide the door latch to the right and
2 Press the ink ribbon cartridge eject
3 Press the retransfer film cartridge
4 Wipe the thermal head with a
5 Reinstall the ink ribbon cartridge
6 Close the printer door.
Cleaning printer fan filters
The printer has four fan filters to prevent airborne particles from entering the
print area. Clean the filters regularly. Replace them when the foam begins to
deteriorate.
1 Remove the external fan filters; remove two filters from the left side of
2 Remove the card hopper.
3 Remove the fan filter located on the upper surface of the card hopper
4 Clean the filters carefully using a vacuum cleaner. Hold the foam filter
5 Reinstall the filters into the printer.
6 Replace the card hopper.
open the printer door.
button and remove the ink ribbon
cartridge.
eject button and remove the
retransfer film cartridge.
cotton swab dipped in ethanol.
and the retransfer film cartridge.
Thermal
head
the printer and one from the right side.
housing by sliding the filter to the left and pulling down.
in place to prevent it from being pulled into the vacuum. Replace the
foam filters into their frames if they have moved during cleaning.
cotton swab
RP90 Plus E and RL90 User Guide 47

Cleaning the printer
Preparing the printer and laminator for transport
Use saved packaging materials to prepare the printer and optional laminator
for transport. Transport includes moving the printer from one location to
another within the same facility.
1 Set the printer to transport mode using the LCD panel. See “Using the
Printer LCD panel” on page 36
2 Power off the laminator (if used) and the printer.
3 Disconnect the power and data cables from the printer.
4 Disconnect the power cable from the laminator (if used).
5 Disconnect the cable between the laminator and printer (if used).
6 Allow the unit(s) to cool down before preparing them for transport.
7 Remove cards from the printer card hopper.
8 Remove the printer ink ribbon cartridge and remove the ink ribbon from
the cartridge. Replace the empty cartridge in the printer.
9 Remove the transfer film cartridge and remove the transfer film from
the cartridge. Replace the empty cartridge in the printer.
10 Insert the head pad on the printer thermal head.
11 Remove the laminator cartridge and remove the laminator supply from
the cartridge.
12 Replace the laminator transport cushion and the empty cartridge in the
laminator.
13 Close all doors, including the input hopper.
14 Remove the output hopper.
15 Package each unit in the original shipping carton.
.
Note:
If the printer will not be used for a week or more, cover the
printer with the plastic shipping bag to keep dust and other
debris out of the printer.
48 RP90 Plus E and RL90 User Guide

Cleaning the laminator
Most card jams are caused by dirty rollers. Clean the laminator at the same
time that you clean the printer. If you are using the laminator as a stand-alone
unit, clean the laminator every 1,000 cards.
Run a laminator cleaning card
Tips – Laminator cleaning
card
• When the heat roller is
at operating
temperature, “HR is too
hot” is displayed on the
LCD display. Turn
power OFF and allow
unit to cool for
approximately 30
minutes before starting
the cleaning sequence.
• Use a cleaning card one
time only. Using a dirty
cleaning card can
cause card jams.
1 Press the MENU key on the laminator LCD panel until "Cleaning" is
displayed.
2 To clean the transport roller only:
a Press the ENTER key and "Without HR" is displayed.
b Press the ENTER key and "Cleaning OK" is displayed.
c Press the ENTER key and cleaning starts.
3 To clean the transport roller and heat roller:
a Press RESET and then ENTER and "With HR" is displayed.
b Press ENTER and "Film removed?" is displayed.
c Remove the laminator cartridge, remove patch or topcoat material,
replace the empty cartridge into the laminator, and close the
laminator door.
d Press the ENTER key and "Cleaning OK?" is displayed.
e Remove the protective paper
from the cleaning card and press
the ENTER key.
f Slide the cleaning card into the
card discharge slot. The card will
be drawn into the laminator and
will exit from the same slot when
cleaning is complete.
4 Press the EXIT key twice to exit the
cleaning menu.
5 Reload and initialize the material.
Cleaning the laminator
RP90 Plus E and RL90 User Guide 49

Cleaning the laminator cartridge
The laminator cartridge can collect debris and dust during lamination and
supply loading. Clean the cartridge every 1,000 cards.
1 Open the laminator door by pulling the top of the door toward you.
2 Press the laminator cartridge eject button to remove the laminator
cartridge.
3 Remove the supply and take-up spools if present.
4 Clean the two cartridge guide shafts and the four metal guides with a
lint free cloth and ethanol.
5 Clean the laminator guide rails and the cartridge opening.
6 Replace the supply and take-up spools on the cartridge. See “Load
laminate” on page 11
7 Replace the loaded laminator cartridge in the laminator until it clicks
into position.
8 Close the laminator door.
.
Laminator fan filter
50
The laminator fan filter is designed to
keep airborne particles from entering
the unit. Clean the filter regularly and
replace it when the foam begins to
deteriorate.
1 Remove the filter from the back
of the laminator by pulling the
filter cover off.
2 Clean the filter carefully using a
vacuum cleaner. Hold the foam
filter in place to prevent it from
being drawn into the vacuum.
3 Reinstall the filter.

Messages and error recovery
This chapter provides information to help you respond to the printer and
laminator messages and explains how to recover from an error. It
describes:
•
“Printer roller layout” on page 51
• “Printer error recovery” on page 52
• “Printer LCD messages” on page 58
• “Laminator error recovery” on page 62
• “Laminator LCD messages” on page 65
Printer roller layout
5
RP90 Plus E and RL90 User Guide

Printer error recovery
Printer error recovery
The printer’s LCD panel background color changes to red when the printer
has an error. The LCD panel displays text that describes the error.
Hopper jam
If a card jams in the card hopper
section, “Jam (Hopper)” is displayed
on the LCD panel. To remove the
jammed card:
1 Pull the card hopper out and
lift it slightly to remove it.
2 Remove the jammed cards:
— If you can reach the
— If you cannot reach the
3 Replace and close the card
hopper.
4 Press the RESET and then
the ENTER key to initialize the
printer.
jammed card, pull it out.
jammed card:
— Pull the cleaning roller
module out slightly.
— Turn the knob on the
right-hand side of the
cleaning roller module
clockwise to drop the
jammed card. Remove
the fallen card.
— Push the cleaning roller
module back into
position.
52 RP90 Plus E and RL90 User Guide

Turnover jam
Tips – Turnover jam
• Some internal parts may
be hot. Wear a glove
when rotating the
turnover table.
Printer error recovery
If a card jams in the card turnover section, “Jam (Turnover)” is displayed on
the LCD panel. To remove the jammed card:
1 Slide the door latch to the right and open the printer door.
2 Press the ink ribbon cartridge eject button and remove the ink ribbon
cartridge.
3 Remove the jammed card.
— If you can reach the jammed card, pull it out.
— If the jammed card is sticking out of the turnover table, push it back
into the table, and rotate the table slowly until the card can be
removed.
4 Replace the ink ribbon cartridge and initialize the ink ribbon as
described in
“Initialize the ink ribbon” on page 16.
RP90 Plus E and RL90 User Guide 53

Printer error recovery
Retransfer section jam
If a card jams in the retransfer section, “Jam (Transfer)” is displayed on the
LCD panel. To remove the jammed card:
Tips – Retransfer jam
• Some internal parts may
be hot. Be careful when
removing a jammed card.
1 Slide the door latch to the right and open the printer door.
2 Press the retransfer film cartridge eject button and remove the
retransfer film cartridge.
3 Open the card hopper and
remove the jog lever by
pushing the retaining tab
toward the front of the printer
and lifting the jog lever.
4 Use the jog lever to turn the
jog dial counterclockwise until
the card can be removed.
5 Remove the card.
6 Replace the retransfer film
cartridge and initialize the
retransfer film as described in
“Initialize the retransfer film”
on page 17
.
54 RP90 Plus E and RL90 User Guide

Mending broken ink ribbon or retransfer film
If the ink ribbon or retransfer film breaks, “Media Broken” is displayed on the
LCD panel. Broken ink ribbon is shown in the following example; repairing
broken retransfer film uses the same steps.
1 Slide the door latch to the right and open the printer door.
2 Remove the cartridge by pressing the cartridge eject button.
3 Trim the ends of the broken
portions evenly.
4 Do not remove the used ink
ribbon or film from the take-up
spool.
5 Align the ends of the broken
media evenly and apply tape
to secure.
6 Turn the take-up spool
clockwise until the mended
portion is wound onto the
spool two or three turns.
7 Reinstall the cartridge into the
printer until it clicks into
position.
8 Close printer door.
9 Initialize the ribbon or film as
described in
ribbon” on page 16
“Initialize the retransfer film”
on page 17
“Initialize the ink
or
.
Printer error recovery
RP90 Plus E and RL90 User Guide 55

Printer error recovery
Bend remedy
Single-sided printing can cause the card to warp depending on the type of
cards you use. Use the bend remedy Temp Level settings to correct the
condition and use the Speed settings to fine tune the adjustment.
Bend remedy printer settings
You can also change the printer setting using the Status Monitor. See “Bend
Remedy tab” on page 28
Tips –Bend Remedy
• You must initialize the
printer by pressing the
RESET and then the
ENTER key. Settings will
not be saved if the
printer is not initialized.
• Double-sided printing
with the Temp Level set
to a high temperature
can cause severe
warping. Set the Temp
Level to OFF when
printing on both sides of
the card.
• Allow sufficient time for
the bend remedy roller to
cool after decreasing the
temperature setting.
.
1 Press the printer MENU
key until "Bend Remedy" is
displayed.
2 Press the ENTER key.
Choose from three bend
remedy settings. Use the
up and down arrow keys to
select "Temp Level",
"Speed", or "Cooling Time".
a Temp Level
Use the up and down
arrow keys to set the
bend remedy roller
temperature. There are
seven settings: off and 5 to 0. The higher the
value, the higher the
temperature. Press the
ENTER key to confirm
the value.
b Speed
Use the up and down arrow keys to set the bend remedy roller
speed. There are five settings from -2 to +2; the higher the value,
the faster the speed. Press the ENTER key to confirm the value.
c Cooling Time
Set the cooling time from zero to 15 seconds using the up and
down arrow keys. Press the ENTER key to confirm the value.
3 Press the RESET and then the ENTER key to initialize the printer.
56 RP90 Plus E and RL90 User Guide

Bend remedy laminator settings
When the laminated card warps concave, the printer bend remedy settings
should be effective in correcting the problem. See
settings” on page 56
If the laminated card warps convex, set the printer Bend Remedy> Temp
Level to Off and set the laminator’s
Card Fan to one of five settings.
Set the printer Bend Remedy>Temp
Level to Off when laminating cards
that have been printed on both sides.
To set the laminator Card Fan:
1 Press the MENU key on the
laminator LCD display until
“Card Fan” is displayed.
Printer error recovery
“Bend remedy printer
on the previous page.
2 Press the ENTER key.
3 Press the RESET/K key to select from five settings: Off, Low, Half,
High, or Full. You may need to experiment with this setting to obtain
satisfactory results.
4 Press the ENTER key to confirm the setting.
RP90 Plus E and RL90 User Guide 57

Printer error recovery
Printer LCD messages
LCD Message Possible Cause Solution
Please, Power Off The power must be turned
off to initialize the printer.
Please Remove Media
Cassette
HR is too hot Cleaning cannot start
Jam (Hopper) There is a card jam in the
Jam (Turnover) There is a card jam in the
Cleaning cannot start
when the retransfer film
cartridge is in the printer.
because the temperature
of the heat roller is too
high.
hopper section.
turnover section.
Turn the power switch off and then on again.
1 Remove the retransfer film cartridge.
2 Press RESET and then ENTER to initialize the
printer.
3 Start the cleaning cycle again.
1 Power off the printer and allow the heat roller to
cool for about 20 minutes.
2 Power on the printer and start cleaning again.
Make sure that the retransfer film cartridge has
been removed.
3 See
4 Contact your service provider if “HR is too hot”
1 Remove jammed card from the card hopper.
2 Press RESET, and then ENTER to initialize the
3 See
1 Remove jammed card from the turnover section.
2 Press RESET, and then ENTER to initialize the
3 See
“Cleaning the card feed rollers and heat
roller” on page 45
the card feed and heat rollers.
appears on the LCD panel and you are not cleaning
the printer.
printer.
for instructions on how to clean
“Hopper jam” on page 52.
printer.
“Turnover jam” on page 53.
Jam (MG) There is a card jam in the
magnetic stripe encode
section.
Jam (Transfer) There is a card jam in the
retransfer section.
Jam (Discharge) There is a card jam in the
card discharge section.
1 Press RESET, and then ENTER to initialize the
printer. If no card is discharged, remove the card
from the encode section.
2 Press RESET, and then ENTER to initialize the
printer.
1 Remove the jammed card from the retransfer
section.
2 Press RESET, and then ENTER to initialize the
printer.
3 See
1 Press RESET, and then ENTER to initialize the
2 Remove the jammed card from the retransfer
3 Check that the card stacker is securely attached to
“Retransfer section jam” on page 54.
printer.
section.
the stacker receptacle. An incorrectly mounted card
stacker can cause discharge jams.
58 RP90 Plus E and RL90 User Guide

LCD Message Possible Cause Solution
Printer error recovery
Media Broken The retransfer film is
broken.
Media Search The printer is searching for
the retransfer film.
Media Run Out The retransfer film has run
out.
1 Repair the retransfer film as described in
“Mending broken ink ribbon or retransfer film”
on page 55
2 Press RESET, and then ENTER to initialize the
printer one ribbon panel.
1 Press RESET, and then ENTER to reset the
retransfer film.
2 Call for service if the problem persists.
1 Replace with new roll of retransfer film.
2 Press RESET, and then ENTER to initialize the
printer.
3 Initialize the new roll of film as described in
.
“Initialize the retransfer film” on page 17.
Ink Broken The ink ribbon is broken.
1 Repair the ink ribbon as described in
broken ink ribbon or retransfer film” on
page 55
2 Press RESET, and then ENTER to initialize the
printer.
Ink Search The printer is searching for
the ink ribbon.
Ink Run Out The ink ribbon has run out. 1 Replace with a new roll of ink ribbon.
1 Press RESET, and then ENTER to reset the ink
ribbon.
2 Call for service if the problem persists.
2 Press RESET, and then ENTER to initialize the
printer.
3 Initialize the new ribbon as described in “Initialize
the ink ribbon” on page 16
.
.
“Mending
Turn Over Unit The card turnover device
has malfunctioned.
Heater Cam Heat roller operation error. 1 Press RESET, and then ENTER to initialize the
No Card 1 There are no cards in
the card hopper.
2 The card hopper is
open or has been
removed.
Door Open The printer door is open. 1 Close the printer door.
Press RESET, and then ENTER to initialize the printer.
Call for service if the problem persists.
printer.
2 Call for service if the problem persists.
1 Load cards as described in “Load cards” on
page 8
2 Close or replace the card hopper securely.
2 Press RESET, and then ENTER to initialize the
printer.
.
RP90 Plus E and RL90 User Guide 59

Printer error recovery
LCD Message Possible Cause Solution
No Cleaning Ro. The cleaning rollers are
missing.
No Cassette The ink ribbon or retransfer
film cartridge is not
installed.
1 Reinstall the cleaning rollers.
2 Press RESET, and then ENTER to initialize the
printer.
3 See
1 Install the cartridge(s) in printer.
2 Initialize the ink ribbon as described in
3 Initialize the retransfer film as described in
“Cleaning the card cleaning rollers” on
page 44
the ink ribbon” on page 16
for more information.
.
“Initialize
“Initialize the retransfer film” on page 17.
Hardware There is a hardware error. Turn the power switch off and then on again. Call for
service if the problem persists.
TR Overheat The retransfer roller is too
hot.
TR Broken The retransfer roller is not
working.
TR Sensor Broken The retransfer roller
thermistor is not working.
RR Overheat The bend remedy roller is
too hot.
RR Broken The bend remedy roller is
not working.
Turn the power switch off and then on again. Call for
service if the problem persists.
Turn the power switch off and then on again. Call for
service if the problem persists.
Turn the power switch off and then on again. Call for
service if the problem persists.
Turn the power switch off and then on again. Call for
service if the problem persists.
Turn the power switch off and then on again. Call for
service if the problem persists.
RR Sensor Broken The bend remedy roller
thermistor is not working.
Overcool It is too cold for the printer
to operate.
Head Overheat The thermal head is
overheated.
EEProm Broken EEPROM malfunction Turn the power switch off and then on again. Call for
MG Unconnected Magnetic stripe module
connection error
MG Mechanical Magnetic stripe
mechanical error
MG Hardware Magnetic stripe hardware
error
Turn the power switch off and then on again. Call for
service if the problem persists.
The temperature in the printer area is too low. Use at
the recommended operating environment temperature
as described in
page 72
Turn the power switch off and allow the printer to cool
for approximately 10 minutes before turning power
back on.
service if the problem persists.
Turn the power switch off and then on again. Call for
service if the problem persists.
Turn the power switch off and then on again. Call for
service if the problem persists.
Turn the power switch off and then on again. Call for
service if the problem persists.
“Operating environment” on
.
60 RP90 Plus E and RL90 User Guide

LCD Message Possible Cause Solution
Printer error recovery
MG Write Magnetic stripe writing
error
EXT Unconnected An external device, such
as the optional laminator,
is not working.
MG Read Magnetic card reading
error.
MG Communicate Magnetic stripe module
communication error.
EXT SW Setting External device switch
setting error.
EXT Jam External retransfer unit jam
error.
1 Check the orientation of magnetic stripe cards in
the card hopper as described in
page 8
2 Press RESET, and then ENTER to initialize the
printer.
1 Check that the laminator’s power switch is on.
2 Make sure that the cable connecting the laminator
to the printer is plugged in securely.
3 Turn the printer and optional laminator power
switches off and then on again.
4 Call for service if the problem persists.
1 Check the type and orientation of magnetic cards in
the card hopper as described in “Load cards” on
page 8
2 Press RESET, and then ENTER to initialize the
printer.
Turn the printer’s power switch off and then on again.
Press RESET, and then ENTER to initialize the printer.
Turn the printer’s power switch off and then on again.
Press RESET, and then ENTER to initialize the printer.
1 Press RESET, and then ENTER.
2 Remove cards if they are not discharged as
described in “Retransfer section jam” on
page 54
3 Press RESET, and then ENTER to initialize the
printer.
.
.
.
“Load cards” on
EXT Communicate External unit
communications error.
EXT 2 Communicate The laminator
communication is lost.
Turn the printer’s power switch off and then on again.
1 REQUIRED: Power off the printer and laminator.
2 Make sure that the cable connecting the laminator
to the printer is plugged in securely.
3 Turn the printer’s power switch off and then on
again.
RP90 Plus E and RL90 User Guide 61

Laminator error recovery
Laminator error recovery
The laminator LCD panel displays the error.
Card jam
The laminator LCD panel displays the location of the card jam: Card Jam (In),
Card Jam (Middle), or Card Jam (Out). Use the following steps to remove
card jams.
Tips – Laminator card jam
• Make sure that the card
stacker is not blocking the
card discharge slot.
• The area around the heat
roller is very hot. Be
careful when removing a
jammed card.
1 Open the laminator door by
pulling the top of the door
toward you.
2 Turn the take-up knob
clockwise to remove slack in
the laminator material.
3 Press the laminator cartridge
eject button and remove the
laminator cartridge. The
cartridge may be difficult to
remove; pull firmly, but do not
force. If cartridge cannot be
removed, call for service.
4 Use a coin to turn the jog dial,
which will move the card. The
jog dial can be turned
clockwise or counterclockwise
depending on the location of
the card.
5 Remove the jammed card.
The area around the heat
roller is very hot. Be careful
when removing a jammed
card.
62 RP90 Plus E and RL90 User Guide

Laminator error recovery
6 Inspect the cartridge:
— If the material on the cartridge is in one piece:
— Turn the cartridge take-up knob counter-clockwise until all
damaged material is wound neatly on the take-up spool.
— If the material is split
or broken:
— Trim the ends of the broken portions evenly.
— Align the end of the
supply material with the
take-up spool and apply
tape to secure.
— Turn the material onto
the take-up spool until
the mended portion is
wound two or three
turns.
7 Replace the loaded laminator
cartridge in the printer until it
clicks into position.
8 Close the printer door.
9 Initialize the patch or topcoat
material by pressing the
laminator’s RESET/K and then
the ENTER key.
RP90 Plus E and RL90 User Guide 63

Laminator error recovery
Patch position
The position of the patch on the card can very slightly with a different lot of laminator
supply material. You can change the left-to-right position or the top to bottom position.
Change the left-to-right position
Use the laminator LCD panel to change the left-to-right position of the patch on the card.
“Using the Laminator LCD panel” on page 42 to use the Film Position setting.
See
Change the Top-to-Bottom Position
Move the supply-side sprocket once to shift the patch position, following these steps.
1 Power off the laminator and allow it to cool.
2 Open the laminator door and remove the
laminator cartridge.
3 Use the sprocket on the supply side of the
cartridge opening to change patch position.
4 Pull the sprocket out. It
moves a small amount.
5 Turn the sprocket knob to
move the patch:
— Turn clockwise 30° to
move the patch 1mm
toward the top of the
card.
— Turn counterclockwise
30° to move the patch
1mm toward the
bottom of the card.
— The sprocket does not
have a stop to indicate 30°; estimate the movement as closely as possible.
6 Release the sprocket.
Do not move the sprocket more than 30° from the default position.
7 Insert the cartridge, close the door, and power on the laminator. Press the Reset
button to initialize the supply material.
8 Laminate a card to verify the new position.
64 RP90 Plus E and RL90 User Guide

Laminator LCD messages
LCD Message Possible Cause Solution
Laminator error recovery
Please Power OFF To initialize this unit, the
power must be switched
off once.
Please Reset Displayed when Reset is
necessary after changing
the settings.
Please check inside The power was switched
off during lamination.
Card Jam (in) There is a card jam in the
entrance area.
Card Jam (middle) There is a card jam in the
center of the card path.
Card Jam (out) There is a card jam in the
card discharge area.
Turn the laminator’s power switch off, and then back
on to initialize the laminator.
Press the RESET/K and then the ENTER key to
initialize the laminator.
Remove the laminator cartridge and check for a card
inside the machine. If there is a card in the machine,
remove it.
Press the RESET/K and then the ENTER key to
initialize the laminator.
Check that the laminator is properly connected to the
printer as described in
connection” on page 13
See
“Card jam” on page 62 to clear the jam.
The laminating temperature is too high or the speed is
too slow. Set the temperature or speed as described in
“Optional laminator
.
“Using the Laminator LCD panel” on page 42.
See
“Card jam” on page 62 to clear the jam.
The laminating temperature is too high or the speed is
too slow. See
jam.
“Card jam” on page 62 to clear the
Film search The laminator is searching
for laminate material.
Film run out The end of the roll mark
has been detected.
No Cassette The laminator cartridge is
not installed.
Overcool The area surrounding the
laminator is too cold.
HR is too hot! The heat roller is too hot
for the cleaning operation.
Check that the laminating film is correctly loaded as
described in
Press the RESET/K and then the ENTER key to
initialize the laminating material.
Replace the laminating material as described in
laminate” on page 11
Press the RESET/K and then the ENTER key to
initialize the laminator.
Install the laminator cartridge as described in “Load
laminate” on page 11
Press the RESET/K and then the ENTER key to
initialize the laminator.
See
“Operating environment” on page 72 for
location guidelines.
Turn the power switch off and allow the roller to cool
before attempting to clean it. See
laminator” on page 49
“Load laminate” on page 11.
“Load
.
.
“Cleaning the
to clean the heat roller.
RP90 Plus E and RL90 User Guide 65

LCD Message Possible Cause Solution
HR Cam Heater Cam error. Turn the power switch off, and then back on. Contact
your service provider if this does not correct the
condition.
Heater Err The heater temperature
does not increase.
HR Overheat Heat roller temperature is
too high.
Temp Sensor The heat roller
temperature sensor is not
working.
Memory Err There is an internal
memory error.
Set Temp Err There is an error with the
heat temperature setting.
R. Encoder Err Rotary encoder error. Turn the unit off and contact your service provider
Overheat The temperature inside the
unit is too high.
PRT. Communicate Communication error with
the printer.
Check that the voltage inlet switch, located on the
back of the laminator, is in the proper position for the
input voltage. Contact your service provider if this
does not correct the condition.
Turn the unit off and contact your service provider
before powering back on.
Turn the unit off and contact your service provider
before powering back on.
Turn the unit off and contact your service provider
before powering back on.
Turn the unit off and contact your service provider
before powering back on.
before powering back on.
Turn the unit off and contact your service provider
before powering back on.
Check that the laminator cable is connected securely
to the printer.
Turn the printer and laminator off, and then back on to
recycle the power.
Film Exchanged? The patch or topcoat
material was changed
while the laminator was
turned off.
66
Press the RESET/K and then the ENTER key to
initialize the patch or topcoat material.

Supplies
6
This section outlines the recommended supplies to use with the
Datacard
laminator.
®
RP90 Plus E card printer and the Datacard® RL90 card
•
“Ink ribbon, retransfer film, and laminator material” on page 68
• “Cards” on page 68
• “Cleaning supplies” on page 69
RP90 Plus E and RL90 User Guide

Ink ribbon, retransfer film, and laminator material
Ink ribbon
Color print ribbons are designed for full-color card printing. The ribbons use the following
color panels: Y=yellow, M=magenta, C=cyan/blue, and K=black.
The following ink ribbons are available:
YMCK 568971-001 (Prints up to 1,000 cards per roll.)
YMCKK 568971-002 (Prints up to 750 cards per roll.) Use when printing two-sided
cards; full color on one side and black only on the other side.
Retransfer film
The following retransfer film is available:
568971-003 (Prints up to 1,000 single-sided cards.)
Laminator material
Successful laminating depends on the type of card used and its construction. If you are
interested in applying topcoat or patch on PVC cards, contact your dealer for guidance.
Datacard
The RL90 laminator can apply any of the following types of laminator supply materials:
®
provides two types of materials for use in laminators:
• Topcoat, which is a continuous film.
• Patch, which has die-cut patches sized to fit on a card.
Cards
Patch material
0.6 mil clear patch 565394-002
1 mil clear patch 565394-001
Topcoat material
clear topcoat 565394-003
You might use custom materials similar to those listed above.
Card success depends on the manufacturer and card construction. This section describes
specifications and quality guidelines for card stock to use with the RP90 Plus E printer and
the RL90 laminator. For best results, use high-quality card stock that meets the
specifications and recommendations described in this section.
Use cards that conform to the following specifications:
• ISO/IEC 7810 Type ID1
• ISO/IEC 7811-2 Magnetic stripe (optional)
• ISO/IEC 7816 Smart card (optional)
Contact your service provider before using a preprinted magnetic stripe card or smart card.
Dark color preprinted cards can cause positioning errors during encoding.
68 RP90 Plus E and RL90 User Guide

Card size
Use CR-80 size cards with the following nominal dimensions:
Length 3.375 inches 85.60 mm
Width 2.125 inches 53.98 mm
Thickness 0.010 or 0.030 inches 0.25 or 0.762 mm
Card material
For best results, use cards of the following types:
•PVC
•PET
•PET-G
• Polycarbonates
•ABS
Cleaning supplies
The printer uses the following cleaning supplies. For best results, keep cleaning supplies
on hand.
Cleaning card 564729-164, pack of 10 cards
Magnetic head cleaning card 564729-166, pack of 10 cards
Card cleaning rollers 564729-122
Printer fan filters 564729-167, set of four replacement foam filters
Laminator fan filter 564731-133 and 564731-134, set of replacement filters
0.030 is the printer’s default setting. Contact your service provider before
using 0.010in (0.25mm) thick cards.
RP90 Plus E and RL90 User Guide 69

70 RP90 Plus E and RL90 User Guide

Site requirements
This section describes the operating environment recommended for your
Datacard
It describes
®
RP90 Plus E card printer and Datacard® RL90 card laminator.
“Site guidelines” on page 72
•
— “Operating environment” on page 72
— “Ventilation clearance” on page 73
— “Storage Environment for supplies” on page 73
• “Printer specifications” on page 74
• “Laminator specifications” on page 75
7
RP90 Plus E and RL90 User Guide

Site guidelines
Tips – Site selection
• Avoid locating the
equipment in dirty or
dusty environments.
• Do not place in areas
susceptible to strong
vibration or shock.
• Do not place the printer,
optional laminator, or the
supplies in direct
sunlight.
Operating environment
When choosing a site for the printer and its supplies, consider these
guidelines:
• Keep all dust, dirt, food, liquids, etc. away from the printer at all times.
• Do not use supplies or cards that have been dropped on the floor or
have otherwise become contaminated.
• Keep paper and foreign materials off the printer.
• Place the printer on a stable platform; keep it off the floor.
• Place the printer away from direct sunlight.
• Place the printer away from heating ducts, blowers, or other air vents.
• Do not use the printer for purposes other than its intended use.
• When cleaning around the printer, prevent debris from entering the
printer.
• Place the printer in a clean office environment, protected from any type
of construction.
• Store all supplies in the original packaging until you load them in the
printer. Keep the original packaging closed.
• Store all supplies in a clean, cool, and dry location.
The performance of the printer and optional laminator is strongly influenced
by the installation location. Using the printer in areas below the recommended
temperatures can cause retransfer errors, while using the printer in areas
above the recommended temperatures can cause errors such as deformation
and retransfer film errors. Consider the following recommendations if you
need to move or relocate your printer.
Relative humidity: 35% to 70%
Temperature: 59° F to 86° F (15° C to 30° C)
72 RP90 Plus E and RL90 User Guide

Ventilation clearance
To ensure proper ventilation to the printer and laminator, maintain minimum
clearance distances as shown.
Sides: 8” (20mm)
Back: 4” (10mm)
• Keep paper and
foreign
materials off the
printer.
•Place the
printer on a
stable platform
• Do not place in
areas
susceptible to strong vibration or shock.
• Keep all dust, dirt, food, liquids, etc. away from the printer at all times.
Storage Environment for supplies
Follow these guidelines when storing supply rolls:
• Store supplies in their original packaging until you are ready to use
them.
• Choose a location away from direct sunlight, with a temperature
between 41° F and 77° F (5° C and 25° C) with a maximum of 40% to
60% relative humidity.
• Do not store supplies in direct sunlight or high humidity locations.
• The print ribbon maintains its quality for about one year. For optimal
card quality, purchase and store quantities that you can use up in less
than a year.
• The print ribbon and card stock might require secure storage and
tracking. Follow your policy for storing and tracking the supplies used
to make cards.
• Supply rolls should be at room temperature when they are installed in
the printer and used. If supplies are stored in a cooler environment
than the printer, allow supplies to reach room temperature before
using.
• If the printer will not be used for an extended period of time, remove
supplies from the printer and store them with new supplies.
RP90 Plus E and RL90 User Guide 73

Printer specifications
Recording method: Sublimation type retransfer
Feed format: Automatic feed
Recording density: 300 dpi
Expression gradation:256 gradations for yellow (Y), Magenta (M), and
Cyan (C); 2 for Black (K)
Printing time: 29 sec. (single sided, excluding data transfer time)
Interface: USB 2.0
Ethernet (100Base-Tx or 10Base-T)
Operating environment conditions
Temperature: 59°F to 86°F (15°C to 30°C)
Humidity: 35% to 70% (no condensation)
Storage environment conditions
Temperature: 5°F to 131°F (-15°C to 55°C)
Humidity: 20% - 80%
Power supply: 100-120VAC or 220-240VAC (±10%)
Current dissipation: 7.0A for 100V system and 5.0A for 200V system
Weight: 48.4 lbs (22kg) (Standard unit excluding built-in
magnetic encoder)
Sound level: less than 70dB(A) according
to DIN45635, part 19 (EN27779).
74 RP90 Plus E and RL90 User Guide

Laminator specifications
Tips – Electrical
• Check that the red
INLET switch, located
on the back of the
laminator, is set for your
input voltage.
Transfer method Halogen lamp built-in heat roller method
Transfer time 20 seconds. The time varies according to settings.
Usage environment
Temperature: 59° F to 86° F (15° C to 30° C)
Storage environment
Temperature: 5° F to 131°F (-15° C to 55° C)
Humidity: 30% to 70% (without condensation)
Power supply: 100-120VAC or 220-240VAC (±10%)
Power consumption: Approximately 200 W
Weight: 17.6 lbs (8 kg)
Sound level: less than 70dB(A) according
to DIN45635, part 19 (EN27779).
RP90 Plus E and RL90 User Guide 75

76 RP90 Plus E and RL90 User Guide

Magnetic Stripe Encoding
This section provides information about encoding magnetic stripe data. It
includes:
“Inline Encoding” on page 78
•
• “Character Code Table” on page 79
A
RP90 Plus E and RL90 User Guide

Inline Encoding
Inline Encoding
When the Magnetic Encode setting on the Printing Preferences Encode tab is checked, the
magnetic stripe encoder can be enabled. The encoding data is sent to the card printer
through the printer driver using the prefix characters described in this section. This function
is called “inline encoding”.
If the first three characters in a line are prefix characters (Tilde, “?” and numeral), the text
that follow is recognized as encoding data. Encoding data is not printed on a card.
Prefix
characters
~?0 JIS type 2 7 unit (bit) code 69
~?1 ISO track 1 (International Air Transport
~?2 ISO track 2 (American Bankers Association —
~?3 ISO track 3 (Thrift Third Standard — TTS) 4 unit (bit) code 104
Data format
Association — IATA)
ABA)
character code
table
6 unit (bit) code 76
4 unit (bit) code 37
Maximum
Character
Length
Tip for success
• Data must be formatted with the same, continuous font.
• Only characters specified in the table on page 79 can be included. Using other
characters will result in an error.
• The maximum number of characters does not include the three prefix characters, or
the start and end sentinels. The Datacard ID Software Printer Plug-in used with the
mag stripe plug-in adds the start and end sentinels.
• Make sure that the ID software or PC application does not process the encoding
data as graphics.
• Magnetic stripe data must be on the first page of the card data.
Example
78 RP90 Plus E and RL90 User Guide

Character Code Table
The following table shows the usable ASCII character codes. The encoding data must use
only allowed characters.
b4 b3 b2 b1 0 1 2 3 4 5 6 7
0000 0
0001 1
0010 2
0011 3
0100 4
0101 5
0110 6
0111 7
1000 8
1001 9
1010 A
1011 B
1100 C
1101 D
1110 E
1111 F
Character Code Table
b7 00001111
b6 00110011
b5 01010101
0@P ` p
!1AQaq
“2BRbr
#3CSc s
$4DTd t
% * 5 E U e u
&6FV f v
‘7GWgw
(8HXhx
)9IYIy
LF *:JZjz
+ ; * K [ k {
,<L\ l |
-=M]m}
.>N^n~
/ ? * O _ o DEL*
4-unit code
6 unit code
7 unit code (except DEL)
Do not use these characters as encoding data; They are reserved for use by the driver as start
*
or end sentinels.
Start Sentinel
(Hexadecimal)
4 unit code
(TTS & ABA)
6 unit code (IATA) % (25) ? (3F)
7 unit code (JIS) DEL (7F) DEL (7F)
RP90 Plus E and RL90 User Guide 79
; (3B) ? (3F)
End Sentinel
(Hexadecimal)

Character Code Table
80 RP90 Plus E and RL90 User Guide

Compliance (FCC)
This section describes the regulatory compliance of the Datacard® RP90
Plus E printer and the Datacard® RL 90 laminator. It includes the
following:
• Regulatory compliance
— Notice for USA (FCC notice)
— Notice for Canada
— Notice for Europe
• Notice to Users of Printers Equipped with Contactless Smart Card
B
RP90 Plus E and RL90 User Guide

Regulatory compliance
Regulatory compliance
Notice for USA (FCC notice)
This equipment generates, uses, and can radiate radio frequency energy. If it is not
installed and used in accordance with this instruction manual, it may interfere with radio
communications. This equipment has been tested and found to be within the limits for
Class B computing devices, pursuant to Subpart J of Part 15 of FCC rules, designed to
provide reasonable protection against radio interference in a commercial environment.
Operation of this equipment in a residential environment may possibly cause
interference. In the event of interference, the user, at their own expense, will be required
to take whatever measures are necessary to correct the problem.
This equipment has been tested and found to comply with the limits for a Class B digital
device, pursuant to part 15 of the FCC Rules. These limits are designed to provide
reasonable protection against harmful interference when the equipment is operated in a
commercial environment. This equipment generates, uses, and can radiate radio
frequency energy and, if not installed and used in accordance with the instruction
manual, may cause harmful interference to radio communications. Operation of this
equipment in a residential area is likely to cause harmful interference in which case the
user will be required to correct the interference at his own expense.
Notice for Canada
This digital apparatus does not exceed the Class B limits for radio noise for digital
apparatus set out in the Radio Interference Regulations of the Canadian Department of
Communications.
Le présent appareil numérique n'émet pas de bruits radioélectriques dépassant les
limites applicables aux appareils numériques de la classe B prescrites dans le
Règlement sur le brouillage radioélectrique édicté par le ministère des Communications
du Canada.
The term “IC:” before the radio certification number only signifies that Industry Canada
Technical specifications were met.
Notice for Europe
We hereby certify that the Datacard® RP90 Plus E printer complies with EMC Directive
89/336/EEC and R&TTE Directive 1999/5/EC. This printer conforms to Class B of EN
55022 and to EN 301 489-5. Operation of this equipment in a residential environment
may possibly cause interference. In the event of interference, the user, at their own
expense, will be required to take whatever measures are necessary to correct the
problem.
Notice to Users of Printers Equipped with Contactless Smart Card
The contactless smart card reader emits radio-frequency waves and must be used as
installed and recommended by Datacard Group. You may not modify the reader or how it is
used without the written permission of Datacard Group. You may not operate the printer after
modifying the reader or its method of operation.
82 RP90 Plus E and RL90 User Guide

11111 Bren Road West
Minnetonka, MN 55343-9015
952.933.1223
952.933.7971 FAX
www.datacard.com
The design and information contained in these June 2008 570024-002 Rev B
materials is protected by US and international
copyright laws and treaties.
 Loading...