

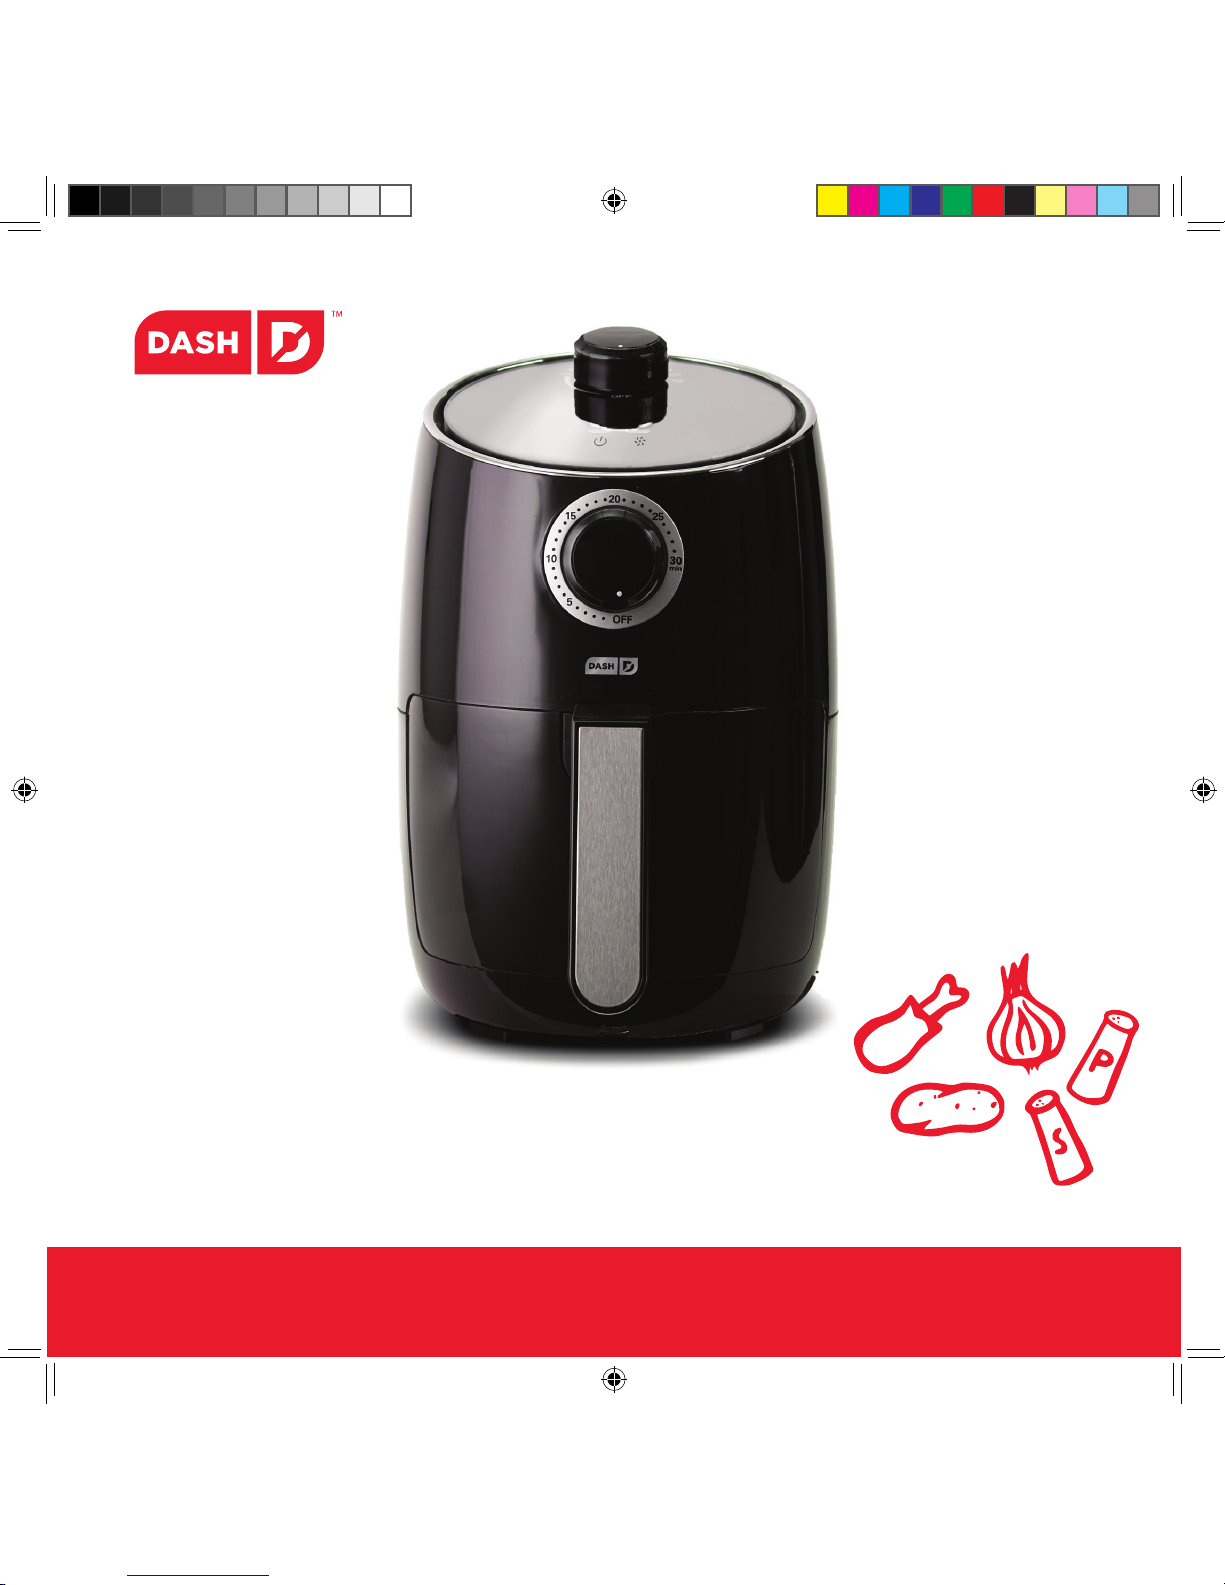
DCAF151
COMPACT AIR FRYER
AirCrisp ™ Technology | 2 Quart Capacity | 1200 Watts
DCAF151_20180926_v2.indd 1 10/1/18 10:46 AM

2 ∙ page title table of contents ∙ 3
Important Safeguards ....................................................................4-7
Parts & Features .............................................................................. 8-9
Using Your Compact Air Fryer ................................................. 10-11
Tips & Tricks .....................................................................................12
Temperature & Time Chart ............................................................ 13
Cleaning & Maintenance ............................................................... 14
Troubleshooting ........................................................................ 16-17
Recipes ....................................................................................... 19-41
Customer Support .......................................................................... 42
Warranty ...........................................................................................43
We believe that taking small steps every day to live a healthier life
can have a big impact and that the best path to wellness is to eat
whole, natural foods. At Dash, we make products that make it easier
for you to prepare and eat real food at home, so that you can feel
your best. In the store, in your kitchen, and online we gives you the
tools and the support to make delicious healthy meals.
That’s what living unprocessed is all about!
Dash
COMPACT AIR FRYER
DCAF151_20180926_v2.indd 3 10/1/18 10:46 AM

4 ∙ important safeguards
important safeguards
• Read all instructions.
• Remove all bags and packaging from the
appliance before use.
• Make sure the appliance is cleaned thoroughly
before using.
• Never leave the appliance unattended when in
use.
• Do not use the appliance for other than its
intended use.
• For household use only. Do not use outdoors.
• Close supervision is necessary when any
appliance is used by or near children.
• Do not touch hot surfaces. Use handles or knobs.
• Do not ll the Crisper Drawer with oil to avoid a
re hazard.
• During air frying, make sure all ingredients are
kept in the Crisper Drawer.
• Do not cover the Air Inlet or the Air Outlet when
the appliance is functioning.
• Do not place the appliance directly against a
wall or against other appliances. Leave at least 4
inches of free space surrounding the appliance.
• Do not place anything on top of the appliance.
• During hot air frying, hot steam is released
through the Air Outlet openings. Keep your
hands and face at a safe distance from the steam
and from the Air Outlet openings. Be careful of
hot steam and air when you remove the Crisper
Drawer from the appliance.
• Immediately unplug the appliance if you see
dark smoke coming out of it. Wait for the smoke
emission to stop before you remove the Crisper
Drawer from the appliance.
• The appliance requires approximately 30 minutes
to cool down before you can safely handle or
clean it.
• This appliance has a built-in timer and will
automatically shut off when the Timer has
nished. You can manually switch the appliance
off by turning the Timer counterclockwise to zero.
• Extreme caution must be used when moving an
appliance containing hot oil or other hot liquids.
• Turn the Timer and Temperature Dials to the
“OFF” position before disconnecting the power
cord from a wall outlet.
• Do not operate this appliance with a damaged
cord, damaged plug, or after the appliance
malfunctions or is dropped or damaged in any
manner. Return the appliance to the nearest
authorized service facility for examination, repair,
or adjustment.
• For maintenance other than cleaning, please
contact StoreBound directly at 1-800-898-6970
from 7AM-7PM PT Monday-Friday or by email at
support@storebound.com.
• Do not place the appliance on or near a hot gas
burner, hot electric burner, or in a heated oven.
IMPORTANT SAFEGUARDS IMPORTANT SAFEGUARDS
IMPORTANT SAFEGUARDS: PLEASE READ AND
SAVE THIS INSTRUCTION AND CARE MANUAL.
IMPORTANT SAFEGUARDS: PLEASE READ AND
SAVE THIS INSTRUCTION AND CARE MANUAL.
When using electrical appliances, basic safety precautions should be followed, including:
• Refrain from using attachments that are not
recommended by the appliance manufacturer,
as doing so can result in re, electric shock, or
personal injury.
• Do not let the cord touch hot surfaces or hang
over the edges of tables or counters.
• This appliance is not intended for use by
persons (including children) with reduced
physical, sensory, or mental capabilities, or
lack of experience and knowledge unless they
are provided with supervision and instruction
concerning use of the appliance by a person
responsible for their safety.
• Always be sure to unplug the appliance from
the outlet, and allow to cool completely prior to
moving, cleaning, and storing and when not in
use.
• StoreBound shall not accept liability for damages
caused by improper use of the appliance.
• Improper use of the appliance can result in
property damage or personal injury.
• To protect against electrical shock, do not
immerse cord, plugs or appliance in water or
other liquid.
• Make sure that the voltage indicated on the
appliance matches the local mains voltage.
Always make sure that the plug is inserted into a
grounded wall socket properly.
• This appliance has a polarized plug (one blade
is wider than the other). To reduce the risk of
electric shock, this plug will t in a polarized
outlet only one way. If the plug does not
completely t in the outlet, reverse the plug. If it
still does not t, contact a qualied electrician.
Do not attempt to modify the plug in any way.
• The power supply cord is short to reduce risk
from becoming entangled in or tripping over
a longer cord. An extension cord may be used
if care is exercised in its use. If an extension
cord is used, the marked electrical rating of the
extension cord should be at least as high as the
electrical rating of the appliance. The extension
cord should be arranged so that it will not
drape over the countertop or tabletop where
it can be pulled on by children or tripped over
unintentionally.
important safeguards ∙ 5
DCAF151_20180926_v2.indd 4-5 10/1/18 10:46 AM

6 ∙ garanties importantes
important safeguards
• Lisez toutes les instructions.
• Retirez tous les sacs et emballages de l’appareil
avant utilisation.
• Assurez-vous que l’appareil est bien nettoyé
avant de l’utiliser.
• Ne laissez jamais l’appareil sans surveillance
lorsqu’il est utilisé.
• N’utilisez pas l’appareil à d’autres ns que celles
pour lesquelles il a été conçu.
• Pour usage domestique seulement. Ne pas
utiliser à l’extérieur.
• Une surveillance étroite est nécessaire lorsqu’un
appareil est utilisé par ou près des enfants.
• Ne touchez pas les surfaces chaudes. Utilisez les
poignées ou les boutons.
• Ne remplissez pas le panier à légumes ou le bac
à légumes avec de l’huile car cela présente un
risque d’incendie.
• Assurez-vous que tous les ingrédients sont
conservés dans le bac à légumes dans le panier
à légumes.
• Ne couvrez pas l’entrée d’air ou la sortie d’air
lorsque l’appareil fonctionne.
• Ne placez pas l’appareil directement contre
un mur ou contre d’autres appareils. Laissez au
moins 10 cm d’espace libre autour de l’appareil.
• Ne placez rien sur le dessus de l’appareil.
• Pendant la cuisson à l’air chaud, de la vapeur
chaude est libérée par les ouvertures de
sortie d’air. Gardez vos mains et votre visage
à une distance sécuritaire de la vapeur et des
ouvertures de sortie d’air. Faites attention à la
vapeur et à l’air chaud lorsque vous retirez le
panier à légumes de l’appareil.
• Débranchez immédiatement l’appareil si vous
voyez de la fumée noire s’échapper de l’appareil.
Attendez que l’émission de fumée s’arrête avant
de retirer le panier à légumes de l’appareil.
• L’appareil nécessite environ 30 minutes pour se
refroidir avant de le manipuler ou de le nettoyer
en toute sécurité.
• Cet appareil dispose d’une minuterie incorporée
et s’éteindra automatiquement à la n de la
minuterie. Vous pouvez éteindre manuellement
l’appareil en tournant la minuterie dans le sens
antihoraire à zéro.
• Faites bien attention lors du déplacement d’un
appareil avec de l’huile chaude ou d’autres
liquides chauds.
• Tournez le bouton de la minuterie à la position
“OFF” avant de débranchez le cordon d’une
prise murale.
• Ne faites pas fonctionner cet appareil avec un
cordon endommagé ou une che endommagée
GARANTIES IMPORTANTES GARANTIES IMPORTANTES
GARANTIES IMPORTANTES: VEUILLEZ LIRE ET
CONSERVER CE MODE D’EMPLOI ET D’ENTRETIEN
GARANTIES IMPORTANTES: VEUILLEZ LIRE ET
CONSERVER CE MODE D’EMPLOI ET D’ENTRETIEN
Lors de l’utilisation d’appareils électriques, des précautions élémentaires de sécurité doivent être
respectées, notamment:
après un dysfonctionnement, une chute ou
un endommagement de l’appareil. Retournez
l’appareil à l’établissement de service autorisé le
plus proche pour qu’il soit examiné, réparé ou
réglé.
• Pour un entretien autre que le nettoyage, veuillez
contacter Storebound directement au 1-800-898-
6970 de 7h à 19h du lundi au vendredi ou par
courriel à support@storebound.com.
• Ne placez pas l’appareil sur ou près d’un brûleur à
gaz chaud, d’un brûleur électrique chaud ou dans
un four chauffé.
• Évitez d’utiliser des accessoires qui ne sont pas
recommandés par le fabricant de l’appareil,
car cela pourrait provoquer un incendie, une
électrocution ou des blessures.
• Ne laissez pas le cordon toucher des surfaces
chaudes ou pendre sur les bords des tables ou des
comptoirs.
• Cet appareil n’est pas destiné à être utilisé par
des personnes (y compris les enfants) ayant des
capacités physiques, sensorielles ou mentales
réduites ou un manque d’expérience et de
connaissances à moins d’être supervisé et instruit
par une personne responsable de leur sécurité.
• Assurez-vous toujours de débrancher l’appareil de
la prise avant de le déplacer, de le nettoyer, de le
ranger et lorsqu’il n’est pas utilisé.
• StoreBound décline toute responsabilité pour les
dommages causés par une mauvaise utilisation de
l’appareil.
• Une mauvaise utilisation de l’appareil peut
entraîner des dommages matériels ou même des
blessures.
• Pour eviter le choc électrique ne plongez pas
l’appareil dans l’eau ou d’autres liquides.
• Assurez-vous que la tension indiquée sur l’appareil
correspond à la tension secteur locale. Assurezvous toujours que la che est correctement insérée
dans une prise murale mise à la terre.
• Cet appareil a une che polarisée (une lame est
plus large que l’autre). Pour réduire le risque
d’électrocution, cette che ne peut être insérée
dans une prise polarisée que d’une seule façon. Si
la che ne rentre pas complètement dans la prise,
inversez la prise. Si cela ne vous convient toujours
pas, contactez un électricien qualié. N’essayez pas
de modier la che de quelque façon que ce soit.
• Un cordon d’alimentation court doit être fourni
pour réduire le risque de s’emmêler ou de
trébucher sur un cordon plus long. Une rallonge
peut être utilisée si des précautions sont prises
lors de son utilisation. Si une rallonge est utilisée,
la puissance électrique indiquée sur la rallonge
doit être au moins égale à la puissance nominale
de l’appareil. La rallonge doit être disposée de
manière à ne pas tomber sur le comptoir ou la
table de travail, où elle pourrait être tirée par des
enfants ou trébucher involontairement.
garanties importantes ∙ 7
DCAF151_20180926_v2.indd 6-7 10/1/18 10:46 AM

parts & features ∙ 9 8 ∙ parts & features
PARTS & FEATURES PARTS & FEATURES
Heating Light
Air Inlet
Power Light
Temperature Control Dial
Crisper Drawer
Crisper Drawer
Crisper Tray
Timer
Air Outlet
(Reverse Side)
Crisper Drawer
Handle
DCAF151_20180926_v2.indd 8-9 10/1/18 10:46 AM

For even results, some foods require shaking halfway through
the preparation time. See the Temperature & Time Chart for
recommendations. Remove the Crisper Drawer from the appliance and
shake it gently from side to side. Slide the Crisper Drawer back into the
Air Fryer.
When you set the timer, the Air Fryer will automatically turn on. The
Heating Light will automatically turn on. The Timer will begin to count
down from the set time. The Heating Light will blink during the air
frying process. This is normal and indicates that the heating element is
controlling the temperature.
When you hear the Timer ring, the preparation time has elapsed. Pull
the Crisper Drawer out of the appliance and place it on a heat-resistant
surface. Check if the food is done. If the food is not ready, simply slide
the Crisper Drawer back into the appliance and set the Timer for a few
extra minutes.
To remove items from the Crisper Drawer use tongs. Don’t turn over the
Crisper Drawer to prevent any oil that has collected on the bottom of
the Crisper Drawer from being spilled onto the food. Excess oil from any
foods will be collected at the bottom of the Crisper Drawer. Allow the
appliance to cool before disposing of any excess oil.
5
4
6
7
10 ∙ using your compact air fryer using your compact air fryer ∙ 11
BEFORE USING YOUR AIR FRYER
Remove all packaging materials. Check that the Air Fryer has no visible damage and that no parts are
missing. Before using the appliance for the rst time or before using it after prolonged storage, wash and
dry the appliance and any accompanying accessories. See “Cleaning & Maintenance” for instructions.
If you preheat the appliance before use, food will cook faster. To preheat, select desired temperature (see
section “Temperature and Time Chart”) and turn the Timer Dial to 3 minutes; do not put any food in the
Crisper Drawer. Wait until the Heating Light goes off (after approximately 3 minutes). Then ll the Crisper
Drawer and turn the Timer Dial to the desired preparation time.
Place the appliance on a stable, flat, heat-resistant surface. Plug the Air
Fryer into a wall socket. The Power Light will illuminate.
1
Remove the Crisper Drawer from the Air Fryer. Place food in the Crisper
Drawer on the Crisper Tray. The Crisper Tray helps circulate air around
your food and helps keep excess oil made by your food from pooling
around your food. There is no need to add any oil as the appliance works
with hot air.
2
Slide the Crisper Drawer back inside the Air Fryer. Refer to the Temperature
& Time Chart to determine the correct settings. Turn the Temperature
Control Dial to your desired temperature setting. Turn the Timer to the
correct setting.
3
using YOUR compact air fryerusing YOUR compact air fryer
DCAF151_20180926_v2.indd 11 10/1/18 10:46 AM

12 ∙ tips & tricks
tips & tricks
• Air frying smaller items or fewer items will require a slightly shorter cooking time than larger items or
more items.
• Shaking smaller items halfway during the preparation time optimizes the end result and can help
prevent unevenly fried foods.
• Soak fresh potatoes in water for 30 minutes, then add a small amount of oil for a crispy result. Fry your
potatoes in the air fryer within a few minutes of adding the oil.
• Do not prepare extremely greasy items, such as sausages, in the Air Fryer.
• Snacks like chicken nuggets and mozzarella sticks, that can be prepared in an oven can also be
prepared in the Air Fryer.
• Use store bought dough to prepare lled snacks like calzones quickly and easily. Items made with
store-bought dough will require a shorter preparation time than homemade dough.
• Use a baking pan in the Crisper Drawer if you want to bake a cake or quiche or if you want to fry fragile
or lled items.
• You can also use the Air Fryer to reheat foods. To reheat food, set the temperature to 300℉
for up to 10 minutes.
TEMPERATURE & TIME CHART
Please keep in mind that these temperatures and times are merely guidelines. Actual cooking times may
vary depending on the size, shape, and amount of food. When air frying a new item always make sure that
your food is cooked properly before consumption. According to the USDA, the safe internal temperature
for poultry is 165°F and for beef is 160°F.
*For even results, some foods require shaking halfway through the preparation time. See the chart below
for recommendations.
temperature & time chart ∙ 13
settings chart
FOODS COOKING TIME
(MINUTES)
COOKING
TEMPERATURE
SHAKE?
Thin Frozen Fries 9–16 400℉ Shake
Thick Frozen Fries 11–2 0 400℉ Shake
Homemade Fries 10– 16 400℉ Shake
Homemade
Potato Wedges
18 –2 2
350℉
Shake
Steak 8– 12 350℉
Pork Chops 10– 14 350℉
Hamburger 7–14 350℉
Chicken Breast 10– 15 350℉
Drumsticks 18 –2 2 350℉
Chicken Nuggets 8– 12 400℉ Shake
DCAF151_20180926_v2.indd 13 10/1/18 10:46 AM

page title ∙ 15 14 ∙ cleaning & maintenance
• Remove the plug from the wall socket and let the appliance cool down completely.
• Remove the Crisper Drawer to allow the Air Fryer cool down quicker.
• Clean the appliance after every use.
• Do not clean the Crisper Drawer, or the inside of the appliance with metal kitchen utensils or abrasive
cleaning materials as this may damage the non-stick coating.
• Wipe the outside of the appliance with a moist cloth.
• The Crisper Drawer and Crisper Tray are dishwasher safe.
• The Crisper Tray removes from the Crisper Drawer to allow for easier cleaning.
• Alternatively you can clean the Crisper Drawer with hot water, dish soap, and a non-abrasive sponge.
• TIP: If the Crisper Drawer or Crisper Tray is dirty, ll the Crisper Drawer with hot water and dish soap,
place the Crisper Tray in the Crisper Drawer and let it soak for about 10 minutes.
• Clean the inside of the appliance with hot water and a non-abrasive sponge.
• Clean the heating element with a cleaning brush to remove any food residue.
• NOTE: Make sure the appliance has cooled down completely before cleaning the heating element.
• Make sure that the appliance is unplugged and all parts are clean and dry before storage.
cleaning & maintenance
DCAF151_20180926_v2.indd 15 10/1/18 10:46 AM

page title ∙ 17 16 ∙ troubleshooting
TROUBLESHOOTING TROUBLESHOOTING
PROBLEM POSSIBLE CAUSE SOLUTION
The Crisper Drawer still contains
residue from previous use.
White smoke is caused by grease
heating up in the Crisper Drawer.
Make sure you clean the Crisper
Drawer properly after each use.
Fresh fries are fried unevenly in
the Air Fryer.
Certain types of food need to
be shaken halfway through the
preparation time.
Items that lie on top of or across
each other (e.g. fries) need to
be shaken halfway through the
preparation time (see section
“Settings”).
Fresh fries are not crispy when
they come out of the Air Fryer.
The crispiness of the fries
depends on the amount of oil
and water in the fries.
Make sure you dry the potato
sticks properly before you add
the oil.
Cut the potato sticks smaller
for a crispier result.
Add slightly more oil
for a crispier result.
PROBLEM POSSIBLE CAUSE SOLUTIONS
The Air Fryer does not work. The appliance is not plugged in.
Plug the mains plug into a grounded
wall socket.
You have not set the Timer.
Turn the Timer Dial to the required
preparation time to switch the
appliance on.
The food is not done after the
recommended time is up.
Too much food has been added to
the Crisper Drawer.
Use less food and cook in batches if
necessary. Your food will also cook more
evenly.
The temperature was set too low.
Turn the Temperature Dial to the
required temperature setting (see
section “Settings”).
Food is fried unevenly in the Air
Fryer.
Certain types of food need to
be shaken halfway through the
preparation time.
Items that lie on top of or across each
other (e.g. fries) need to be shaken
halfway through the preparation time
(see section “Settings”).
Snacks are not crispy when they
come out of the Air Fryer.
The food was not dry enough or
needs more oil.
Make sure to properly dry the food or
lightly brush some oil onto the snacks
for a crispier result.
I cannot slide the Crisper Drawer
into the appliance properly.
There is too much food in the
Crisper Drawer.
Do not ll the Crisper Drawer beyond
the MAX line.
White smoke is coming out of
the appliance.
Your food is too greasy.
When you fry greasy items in the Air
Fryer, a large amount of fat will leak into
the Crisper Drawer, the fat produces
white smoke and the Crisper Drawer
may heat up more than usual. This
does not affect the appliance or the
end result.
troubleshooting ∙ 17
DCAF151_20180926_v2.indd 17 10/1/18 10:46 AM

RECIPE
BOOK
Enjoy cooking these delicious, easy, healthy recipes with
your Compact Air Fryer!
COMPACT AIR FRYER
DCAF151_20180926_v2.indd 18-19 10/1/18 10:47 AM

20
1 lb ground pork
1 tsp kosher salt
2 tbsp unsalted, plain breadcrumbs
1 tbsp Chinese 5 spice powder
1 large egg
½ tsp sesame oil
INGREDIENTS:
5 spice
meatballs
DIRECTIONS:
Combine pork, salt, breadcrumbs, 5 spice powder, sesame oil and egg in large
bowl.
Mix together by hand until well combined.
Use hands or scoop to form 1.5” balls and place 4 balls at a time into Air Fryer
in one layer.
Fry for 10 minutes.
DCAF151_20180926_v2.indd 20-21 10/1/18 10:47 AM

22 ∙ page title page title ∙ 23
22 23
8 oz lump crab meat, cooked
½ cup unsalted, plain bread crumbs
2 eggs
1 tsp kosher salt
¼ tsp garlic powder
¼ tsp onion powder
½ tsp Cajun seasoning
1 tsp dill, minced
1 tsp parsley, minced
Spicy Mayo
1 tbsp Sriracha
3 tbsp mayonnaise
INGREDIENTS:
DIRECTIONS:
Combine crab meat, bread crumbs, eggs, salt, garlic powder, onion powder, Cajun
seasoning, dill and parsley in bowl and mix thoroughly.
Form into 2” balls and atten into round discs.
Place 2-3 patties in Air Fryer in one layer and fry for 10 minutes.
Combine Sriracha and mayonnaise and stir to combine. Serve crab cakes with spicy
Sriracha mayo and lemon wedges, if desired.
crab
cakes
INGREDIENTS:
DIRECTIONS:
Toss okra with kosher salt and curry powder. Add cornstarch and toss until thoroughly
mixed.
Place in Air Fryer and fry 15 minutes at 400ºF.
curry fried
okra
1 cup okra, sliced lengthwise into 4 pieces
¼ tsp kosher salt
½ to ¾ tsp curry powder (depending on your preference)
¼ tsp cornstarch
INGREDIENTS:
DCAF151_20180926_v2.indd 22-23 10/1/18 10:47 AM

24 ∙ page title page title ∙ 25
4 complete chicken wings, split into ats and drumsticks
½ cup sriracha
½ cup all-purpose our
1 cup unsalted, plain breadcrumbs
INGREDIENTS:
25
DIRECTIONS: (Temperature: 400ºF Time: 25–30 minutes)
Place chicken wings on paper towels and pat to dry thoroughly.
Dredge chicken wings in all-purpose our and shake off excess.
Dip chicken wings in sriracha, then breadcrumbs to cover thoroughly.
Place only ats or only drumsticks in Air Fryer and fry 25 minutes for ats
and 30 minutes for drumsticks.
SRIRACHA
CHICKEN WINGS
DCAF151_20180926_v2.indd 24-25 10/1/18 10:47 AM

page title ∙ 27
2 slices white, whole wheat, or potato bread
½ cup to ⅔ cup sharp cheddar, shredded
1 tbsp butter, melted
INGREDIENTS:
grilled
cheese
26 27
DIRECTIONS:
Spread shredded cheddar evenly between sliced bread.
Place sandwich into Air Fryer and fry for 10 minutes.
Remove from Air Fryer and brush both sides with melted butter. Serve with tomato soup, if
desired.
1 lb ground pork
3 tbsp soy sauce
½ cup garlic chive, sliced thinly
½ cup shiitake mushroom, minced
1 egg, beaten
½ tsp ginger, minced
¼ tsp ground white pepper
INGREDIENTS:
DIRECTIONS:
Combine ground pork, soy sauce, garlic chive, shiitake, egg, ginger, white pepper, sesame
oil in large bowl and mix by hand thoroughly to combine. Place wonton wrapper on at
surface and add 2 tsp pork mixture to center.
Wet all edges of wonton wrapper and fold in half to form a half moon shape. If desired,
overlap edges along the outer edge of wrapper to form a layered effect. Brush with vegetable
oil. Place dumplings, 5 at a time, standing upright, to Air Fryer. Fry at 400ºF for 10 minutes.
Do not overlap the dumplings.
Pro Tip:
For more even browning, turn dumplings 180 degrees halfway through the frying process.
pork & shiitake
dumplings
1 tsp sesame oil
25-30 wonton wrappers, cut into large circles
cold water
1 tbsp vegetable oil
DCAF151_20180926_v2.indd 26-27 10/1/18 10:47 AM

28 ∙ page title
1 lb ground beef, 90% lean
1 egg, beaten
¼ cup panko breadcrumbs
½ tsp garlic powder
½ tsp onion powder
½ tsp smoked paprika
½ tsp ground black pepper
2 tsp kosher salt
½ tsp worcestershire sauce
⅛ tsp cayenne pepper (optional)
INGREDIENTS:
DIRECTIONS:
Combine all ingredients for the burgers in one large bowl and mix by hand until
thoroughly combined.
Form into 4-5” patties and place 1 patty at a time, into Air Fryer.
Air fry at 375ºF for 10 minutes or until desired doneness. Serve with desired burger
bun and accompaniments.
air fryer
burger
28
1 jar marinara sauce, store bought
1 box cheese ravioli, store-bought
or meat ravioli
2 cups Italian-style bread crumbs
1 cup buttermilk
¼ cup Parmesan cheese
INGREDIENTS:
DIRECTIONS:
Dip each ravioli in buttermilk. Add about a tablespoon of olive oil to the breadcrumbs,
then roll each ravioli into the crumb mixture.
Place the breaded ravioli into your Air Fryer and cook for about 5 minutes, or until crispy.
Serve warm with marinara sauce for dipping.
air fryer
raviolis
29
DCAF151_20180926_v2.indd 28-29 10/1/18 10:47 AM

30 ∙ page title page title ∙ 31
Marinated Flank Steak
1lb ank steak, cut into minimum
number of pieces tting Air Fryer
(usually 2)
1 cup orange juice
4 cloves garlic, minced
2 shallots, minced
1 cup cilantro, chopped
INGREDIENTS:
31 30
DIRECTIONS:
Combine ank steak with all marinade ingredients and toss to combine. Let marinate for a minimum of
4 hours, or overnight. Remove steak from marinade. Heat a medium sauté pan with the vegetable oil on
high heat. Add the steak and sear each side for 2-3 minutes, or until well browned. Place the steak into the
Air Fryer, 1 at a time, and air fry for 30-40 minutes depending on desired doneness. Pour the remainder of
marinade into a sauté pan and cook on medium heat for 10-15 minutes. Remove the marinade from the
heat and strain to extract jus. Remove steak from the Air Fryer and let rest for 10 minutes. Slice into ½” cubes.
Assemble tacos with corn tortillas, steak, avocado, tomato, and cilantro. Serve with small bowl of jus,
if desired.
Pro Tip:
30 minutes will result in a medium-rare steak. Add time for more well-done steaks.
Cooking the marinade for longer periods of time will result in thicker and saltier just as the water reduces.
Adjust cooking times depending on your level of desired thickness and taste.
Carne Asada
tac o s
6 chicken thighs, boneless, skinless
2 tsp kosher salt
1 tbsp unsalted Cajun seasoning
1 cup all-purpose our
2 eggs, beaten
2 cups unsalted, plain breadcrumbs
INGREDIENTS:
DIRECTIONS:
Toss chicken thighs with salt and Cajun seasoning until well covered. Dredge thighs into
our and shake off excess. Dip thighs in egg mix, then breadcrumbs to cover thoroughly.
Place thighs 2 at a time into the Air Fryer and air fry for 20-25 minutes, or until the internal
temperature of the thighs reaches 178ºF, and juices run clear. Serve with maple syrup, if
desired.
Cajun Fried
Chicken Thighs
2 habanero peppers,
seeded, chopped (optional)
3 tbsp soy sauce
4 adobo peppers in chipotle
sauce, chopped
1 lime, juiced
15 grinds black pepper
¼ cup basil, chopped
1 tbsp vegetable oil
For Tacos
8” corn tortillas
¼ cup cilantro, chopped
½ avocado, sliced
10 cherry tomatoes, halved
DCAF151_20180926_v2.indd 30-31 10/1/18 10:48 AM

1 lb pork tenderloin
2 tsp kosher salt
1 tsp black pepper
2 tsp vegetable oil
¼ cup sage, minced
1 tbsp thyme, leaves only
Cherry Glaze
1 tsp shallot, minced
½ cup cherries, pitted, chopped
INGREDIENTS:
32
DIRECTIONS:
Season pork tenderloin with kosher salt and black pepper. In a medium sauté pan, heat
the vegetable oil. Sear the top side of the pork tenderloin in hot oil for 1-2 minutes until
a brown crust forms. Place the pork tenderloin in the Air Fryer and cover with sage and
thyme. Air fry for 20-25 minutes or until desired doneness. Remove pork tenderloin from
Air Fryer and let rest 5 minutes before slicing. Reduce the heat of your sauté pan to low.
Add minced shallot and cherries. Cook for 3-5 minutes until shallots are translucent and
cherries are soft. Transfer mixture to a blender and blend until smooth.
Pro Tip:
20 minutes will result in a medium-rare pork tenderloin.
Add more time as necessary for a more well done tenderloin.
Roast Pork
tenderloin
33
1 block extra-rm tofu,
drained,pressed, sliced
in ½” thick rectangles
1 tsp vegetable oil
Sesame ‘Chicken’ Sauce
½ cup unsalted chicken stock
¼ cup soy sauc
3 tbsp white sugar
INGREDIENTS:
DIRECTIONS:
Toss tofu with vegetable oil. Separate tofu into 3-4 batches and place into the Air Fryer
one batch at a time, in one even layer. Air fry for 20 minutes at 350ºF, turning once
halfway.
In a small sauté pan; combine the chicken stock, soy sauce, white sugar, mirin, garlic,
ginger, sesame oil, and sambal over low heat. Whisk together cornstarch with water.
Once stock mixture is simmering, add the cornstarch slurry and whisk to combine, for
about 1-2 minutes.
Remove from heat and toss the tofu in the sesame sauce. Top with white sesame seeds
and scallion.
Sesame ‘Chicken’
style tofu
2 tbsp mirin
¼ tsp garlic, minced
¼ tsp ginger, peeled, minced
2 tsp sesame oil
1 tbsp sambal
chili paste (optional)
1 tbsp cornstarch
¼ cup water
Toppings
1 tsp toasted white sesame
seeds
1 scallion, sliced
DCAF151_20180926_v2.indd 32-33 10/1/18 10:48 AM

34
Buffalo Sauce
1 tbsp unsalted butter
⅓ cup hot sauce
1 tsp honey
1 dash garlic powder
Cauliower
4 cups cauliower orets,
sliced into ¼ inch pieces
1 tbsp vegetable oil
INGREDIENTS:
DIRECTIONS:
Toss cauliower with oil. Place cauliower orets into Air Fryer in 2 batches. Fry at 400ºF
for 15 minutes, shaking once or twice throughout the cycle.
Melt butter in a small saucepan over medium-low heat. Add hot sauce, honey, and garlic
powder to the butter and whisk to combine.
Toss the cauliower orets with the hot sauce mixture and drain any extra sauce. Serve
immediately.
cauliflower
buffalo bites
DCAF151_20180926_v2.indd 34-35 10/1/18 10:48 AM

36 ∙ page title page title ∙ 37
2 cups plantains, peeled, sliced
¼” thick (approximately 2 plantains)
2 tsp vegetable oil (or 4 sprays of nonstick spray)
¼ tsp kosher salt
INGREDIENTS:
DIRECTIONS:
Toss plantains slices in a large bowl with oil and salt. Place 1 cup in Air Fryer, moving
pieces apart that are sticking together. Air fry for 15 minutes, remove and shake. Then fry
at 400ºF for 15 minutes until well-browned. Remove all plantains and repeat with second
cup. Serve with salsa verde and hot sauce, if desired.
Pro Tip:
Choose plantains that are almost all black - these are perfectly ripe and will cook up to
be wonderfully crunchy!
fried
plantains
36 37
1 russet potato
1 tsp kosher salt
1 tsp olive oil
1 tsp chives, minced
INGREDIENTS:
DIRECTIONS:
Place potato on its side lengthwise. Pierce russet potato with a metal skewer along its entire
length to serve as the stop guard for slicing.
Carefully slice potato into tiny thin slices without piercing through the bottom of the potato.
Remove metal skewer.
Sprinkle potato with kosher salt and olive oil. Place potato in Air Fryer and fry 50-60 minutes
until cooked through and tops are crispy.
Garnish with chives.
hasselback
potato
DCAF151_20180926_v2.indd 36-37 10/1/18 10:48 AM

page title ∙ 39
38 39
1 vidalia onion, peeled, ends cut off, sliced into ¾” rings
1 cup all-purpose our
1 egg, beaten
1 cup panko breadcrumbs
½ tsp kosher salt
INGREDIENTS:
DIRECTIONS:
Combine panko and salt. Dip onion rings in egg, then panko mixture to cover
thoroughly.
Place into Air Fryer 4-6 at a time, overlapping rings as little as possible. Fry for 15
minutes.
Serve with ketchup and mustard, if desired.
onion
rings
4 strips uncured bacon (not thick-cut)
INGREDIENTS:
DIRECTIONS:
Place 4 strips of bacon in Air Fryer, letting the sides of the bacon slide up the walls and
ensuring bacon does not overlap. Fry at 370ºF for 10 minutes. Remove and use paper towels
to remove some of the grease on top of the bacon. Place back into Air Fry and fry at 400ºF for
5 minutes. Drain on paper towels and serve.
Pro Tip:
You can adjust the length of the last few minutes at 400ºF depending on how crispy you like
your bacon!
easy crispy
bacon
INGREDIENTS:
onion
rings
DCAF151_20180926_v2.indd 38-39 10/1/18 10:48 AM

40 ∙ page title page title ∙ 41
10-12 shishito peppers
2 tsp vegetable oil
1 tsp kosher salt
½ lemon, cut into wedges (optional)
INGREDIENTS:
DIRECTIONS:
Place shishitos into Air Fryer and toss with salt and vegetable oil.
Fry for 15 minutes. Squeeze fresh lemon onto shishitos and shake. Serve immediately.
lemon shishito
peppers
40 41
DCAF151_20180926_v2.indd 40-41 10/1/18 10:48 AM

42 ∙ customer support
CUSTOMER SUPPORT
We welcome and value all concerns and questions from our customers. Please do not hesitate
to contact us for product support, warranty, and maintenance related questions directly at:
1(800)-898-6970 from 7AM - 7PM PST, Monday - Friday, or by email at support@storebound.com.
Feel free to give us a call any time
during the hours below: 1 (800) 898-6970
Hey Hawaii! You can reach our customer service team from 5AM to 5PM HAST.
And also, Alaska, feel free to reach out from 6AM - 6PM UTC.
7AM to 7PM
8AM to 8PM
9AM to 9PM
10AM to 10PM
warranty ∙ 43
STOREBOUND, LLC – 1 YEAR LIMITED WARRANTY
Your StoreBound product is warranted to be free from defects in material and workmanship for a period of
one (1) year from the date of the original purchase when utilized for normal and intended household use.
Should any defect covered by the terms of the limited warranty be discovered within one (1) year, StoreBound,
LLC will repair or replace the defective part. To process a warranty claim, contact Customer Support at
1-800-898-6970 for further assistance and instruction. A Customer Support agent will assist you by troubleshooting
minor problems. If troubleshooting fails to x the problem, a return authorization will be issued. Proof of purchase
indicating the date and place of purchase is required and should accompany the return. You must also include
your full name, shipping address, and telephone number. We are unable to ship returns to a PO box. StoreBound
will not be responsible for delays or unprocessed claims resulting from a purchaser’s failure to provide any or all
of the necessary information. Freight costs must be prepaid by the purchaser.
Send all inquiries to support@storebound.com.
There are no express warranties except as listed above.
REPAIR OR REPLACEMENT AS PROVIDED UNDER THIS WARRANTY IS THE EXCLUSIVE REMEDY OF THE
CUSTOMER. STOREBOUND SHALL NOT BE LIABLE FOR ANY INCIDENTAL OR CONSEQUENTIAL DAMAGES
OR FOR BREACH OF ANY EXPRESS OR IMPLIED WARRANTY ON THIS PRODUCT EXCEPT TO THE EXTENT
REQUIRED BY APPLICABLE LAW. ANY IMPLIED WARRANTY OF MERCHANTABILITY OR FITNESS FOR A
PARTICULAR PURPOSE ON THIS PRODUCT IS LIMITED IN DURATION TO THE DURATION OF THIS WARRANTY.
Some states do not allow the exclusion or limitation of incidental or consequential damages, or limitations on
how long an implied warranty lasts. Therefore, the above exclusions or limitations may not apply to you. This
warranty gives you specic legal rights and you may also have other rights, which vary from state to state.
REPAIRS
DANGER! Risk of electric shock! The Dash Compact Air Fryer is an electrical appliance.
Do not attempt to repair the appliance yourself under any circumstances.
Contact Customer Support regarding repairs to the appliance.
TECHNICAL SPECIFICATIONS
Voltage 120V ~ 60Hz
Power Rating 1200W
Stock#: DCAF151_20180321_v2
warranty
DCAF151_20180926_v2.indd 42-43 10/1/18 10:48 AM

1-800-898-6970 | @unprocessyourfood | bydash.com
DCAF151_20180926_v2.indd 44 10/1/18 10:48 AM
 Loading...