

Page 1

Artisan Technology Group is your source for quality
new and certied-used/pre-owned equipment
• FAST SHIPPING AND
DELIVERY
• TENS OF THOUSANDS OF
IN-STOCK ITEMS
• EQUIPMENT DEMOS
• HUNDREDS OF
MANUFACTURERS
SUPPORTED
• LEASING/MONTHLY
RENTALS
• ITAR CERTIFIED
SECURE ASSET SOLUTIONS
SERVICE CENTER REPAIRS
Experienced engineers and technicians on staff
at our full-service, in-house repair center
WE BUY USED EQUIPMENT
Sell your excess, underutilized, and idle used equipment
We also offer credit for buy-backs and trade-ins
www.artisantg.com/WeBuyEquipment
REMOTE INSPECTION
Remotely inspect equipment before purchasing with
our interactive website at www.instraview.com
LOOKING FOR MORE INFORMATION?
Visit us on the web at www.artisantg.com for more
information on price quotations, drivers, technical
specications, manuals, and documentation
Contact us: (888) 88-SOURCE | sales@artisantg.com | www.artisantg.com
SM
View
Instra
Page 2

VLT ® Series 2000 Table of Contents
Page
Specification Chart 2
Installation
Safety 4
Dimensions 5
Cooling 7
Wiring 8
Quick Setup 10
Operation 11
Programming
Group 0 -- Operation and Display 16
Group 1 -- Load and Motor 18
Group 2 -- Reference and Limits 22
Group 3 -- Functions and Timers 25
Group 4 -- Inputs and Outputs 27
Group 5 -- Serial Data Interface 31
Group 6 -- Service and Display 38
Appendix
Motor Coil and Filter Options 41
PI Regulation 42
Parameter Groups
Factory Default Settings 46
Customer Settings Chart 47
Artisan Technology Group - Quality Instrumentation ... Guaranteed | (888) 88-SOURCE | www.artisantg.com
1
Page 3

Installation; Safety
VLT ® Series 2000
The VLT® Series 2000 Adjustable
Frequency Drive (AFD) contains
dangerous voltages when connected to
line voltage. Only a competent electrician
should carry out the electrical installation.
WARNING
Improper installation of the motor or the AFD may cause
equipment failure, serious injury or death. Follow this
manual and local and national safety codes.
Caution:
The motor may start without warning during operation
and programming of the parameters. Activate the STOP
key on the VLT keypad when changing data.
Danfoss VLT® and CE Marking
Danfoss CE marks our VL T® Adjustable Frequency
Drives (AFD) according to the Electro Magnetic
Compatibility (EMC) Directive 89/336/EEC and LowVoltage Directive 73/23/EEC.
It is possible for the VLT to start upon application of AC
power. DO NOT attempt any maintenance on the VLT,
motor or system machinery without verifying that the AC
power has been disconnected.
DO NOT touch any electrical parts after the AC line has
been disconnected for at least 14 minutes. This allows
for capacitor discharge.
NOTE: The STOP key on the VLT keypad DOES NOT
disconnect the AC line.
It is the responsibility of the user or the person installing
the AFD to provide proper grounding and branch circuit
protection for incoming power and motor overload
protection according to the National Electrical Code
(NEC) and local codes.
Upon request we will issue a declaration of conformity to
the EMC and low-voltage directives. A manufacturer's
declaration for the Machinery Directive 89/392/EEC is
also available.
When the installation specification is followed and
shielded motor cables are used per instruction manuals
provided with the drive, we guarantee the AFD complies
with the EMC Directive 89/336/EEC.
4
Artisan Technology Group - Quality Instrumentation ... Guaranteed | (888) 88-SOURCE | www.artisantg.com
Page 4
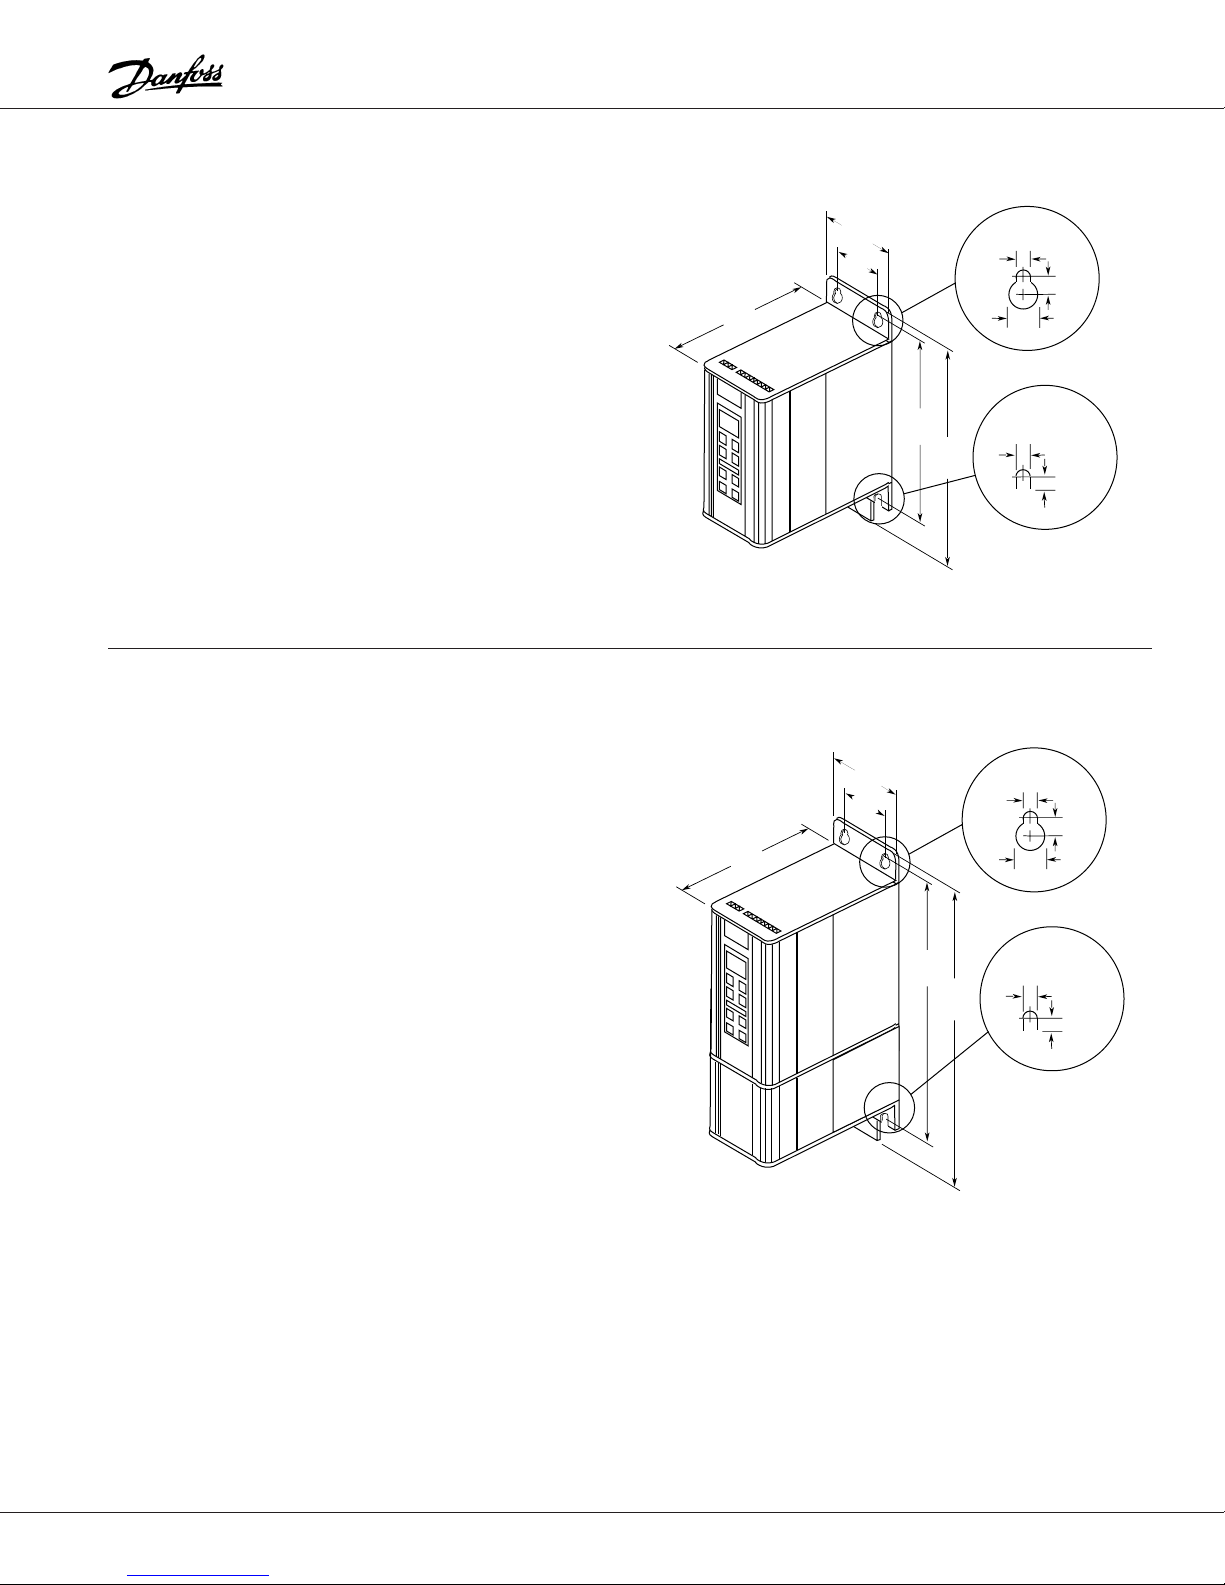
VLT ® Series 2000
VLT 2010-2030
Single-phase, 220-240 V
Three-phase, 208-240 V
NOTE:
Minimum space above and below the unit is 4 inches.
Minimum space to the sides of the unit is 0 inches.
7.1
(180)
Installation; Dimensions
4.3
(110)
3.5
(90)
9.3
(235)
10.2
(260)
0.21
(5.5)
0.29
(7.5)
0.43
(11)
0.21
(5.5)
0.17
(4.5)
VLT 2010-2030 with module
Single-phase, 220-240 V
Three-phase, 208-240 V
NOTE:
Minimum space above and below the unit is 4 inches.
Minimum space to the sides of the unit is 0 inches.
7.1
(180)
4.3
(110)
3.5
(90)
14.3
(338)
14.3
(363)
0.21
(5.5)
0.29
(7.5)
0.43
(11)
0.21
(5.5)
0.17
(4.5)
Artisan Technology Group - Quality Instrumentation ... Guaranteed | (888) 88-SOURCE | www.artisantg.com
5
Page 5

Installation; Dimensions
VLT 2020-2050
Three-phase, 380-415/460 V
VLT 2040-2050
Three-phase, 208-240 V
7.1
(180)
4.3
(110)
3.5
(90)
VLT ® Series 2000
0.21
(5.5)
0.29
(7.5)
0.43
(11)
NOTE:
Minimum space above and below the unit is 4 inches.
Minimum space to the sides of the unit is 0 inches.
VLT 2020-2050 with module
Three-phase, 380-415/460 V
7.1
(180)
4.3
(110)
3.5
(90)
13.2
(335)
14.2
(360)
0.21
(5.5)
0.17
(4.5)
0.21
(5.5)
0.29
(7.5)
0.43
(11)
NOTE:
Minimum space above and below the unit is 4 inches.
Minimum space to the sides of the unit is 0 inches.
6
Artisan Technology Group - Quality Instrumentation ... Guaranteed | (888) 88-SOURCE | www.artisantg.com
17.2
(437)
18.2
(462)
0.21
(5.5)
0.17
(4.5)
Page 6
VLT ® Series 2000
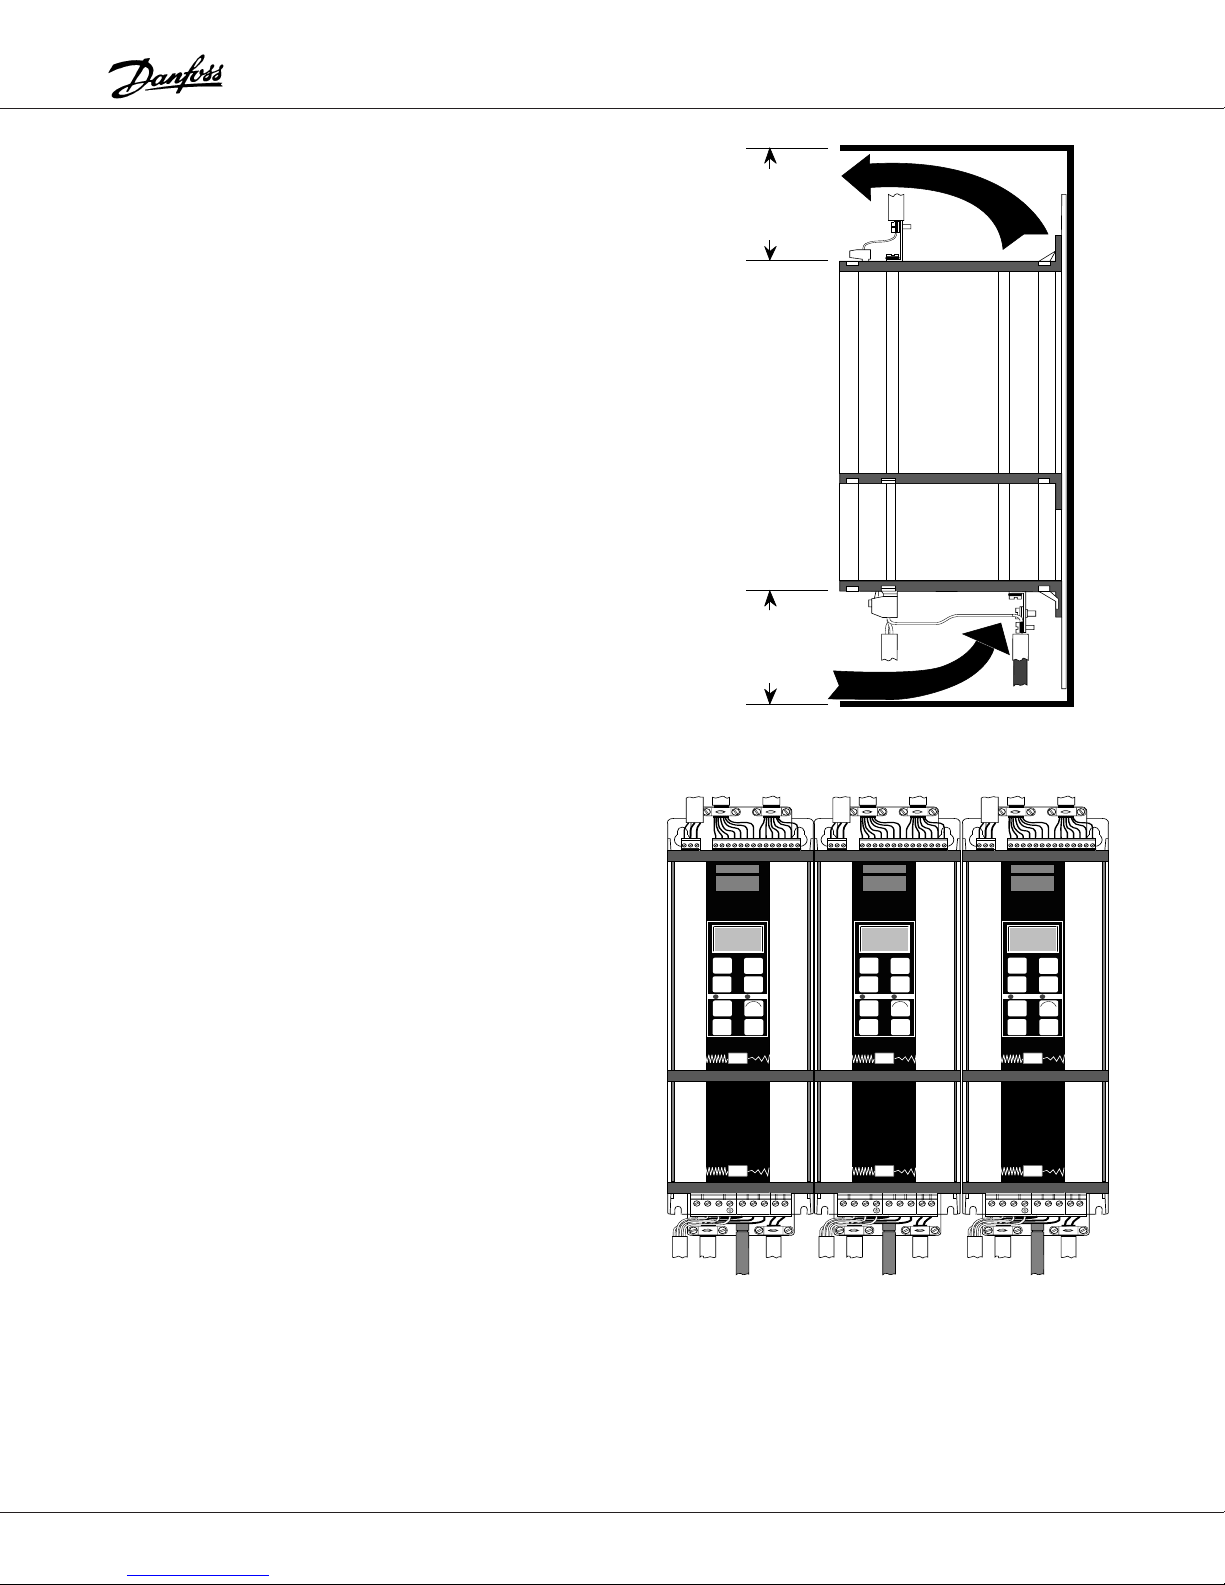
Mechanical Installation
The VLT Series 2000 is cooled by natural or forced air
convection. Therefore air must be able to pass freely
under and over the unit
The VLT adjustable frequency drive must be mounted on
a flat vertical surface.
To enable the VLT to get rid of the cooling air, you must
allow free air space both above and below the adjustable
frequency drive.
The ambient temperature must not exceed 40°C so that
the VLT can dispose of its power loss.
Installation; Cooling
Minimum
Clearance
4 Inches
(100 mm)
Minimum
Clearance
4 Inches
(100 mm)
Side by Side Mounting
The VLT Series 2000 adjustable frequency drive can be
installed side by side. There is no need for any space for
cooling along the side of the enclosure.
Variable Speed Drive
Menu
+
Data
–
Alarm
On
Fwd.
Jog
Rev.
Stop
Start
Reset
®
VLT
®
VLT
BR
MOTOR
LINE
Variable Speed Drive
Menu
+
Data
–
Alarm
On
Fwd.
Jog
Rev.
Stop
Start
Reset
®
VLT
®
VLT
BR
MOTOR
LINE
Variable Speed Drive
Menu
+
Data
–
Alarm
On
Fwd.
Jog
Rev.
Stop
Start
Reset
®
VLT
®
VLT
BR
MOTOR
LINE
Artisan Technology Group - Quality Instrumentation ... Guaranteed | (888) 88-SOURCE | www.artisantg.com
7
Page 7
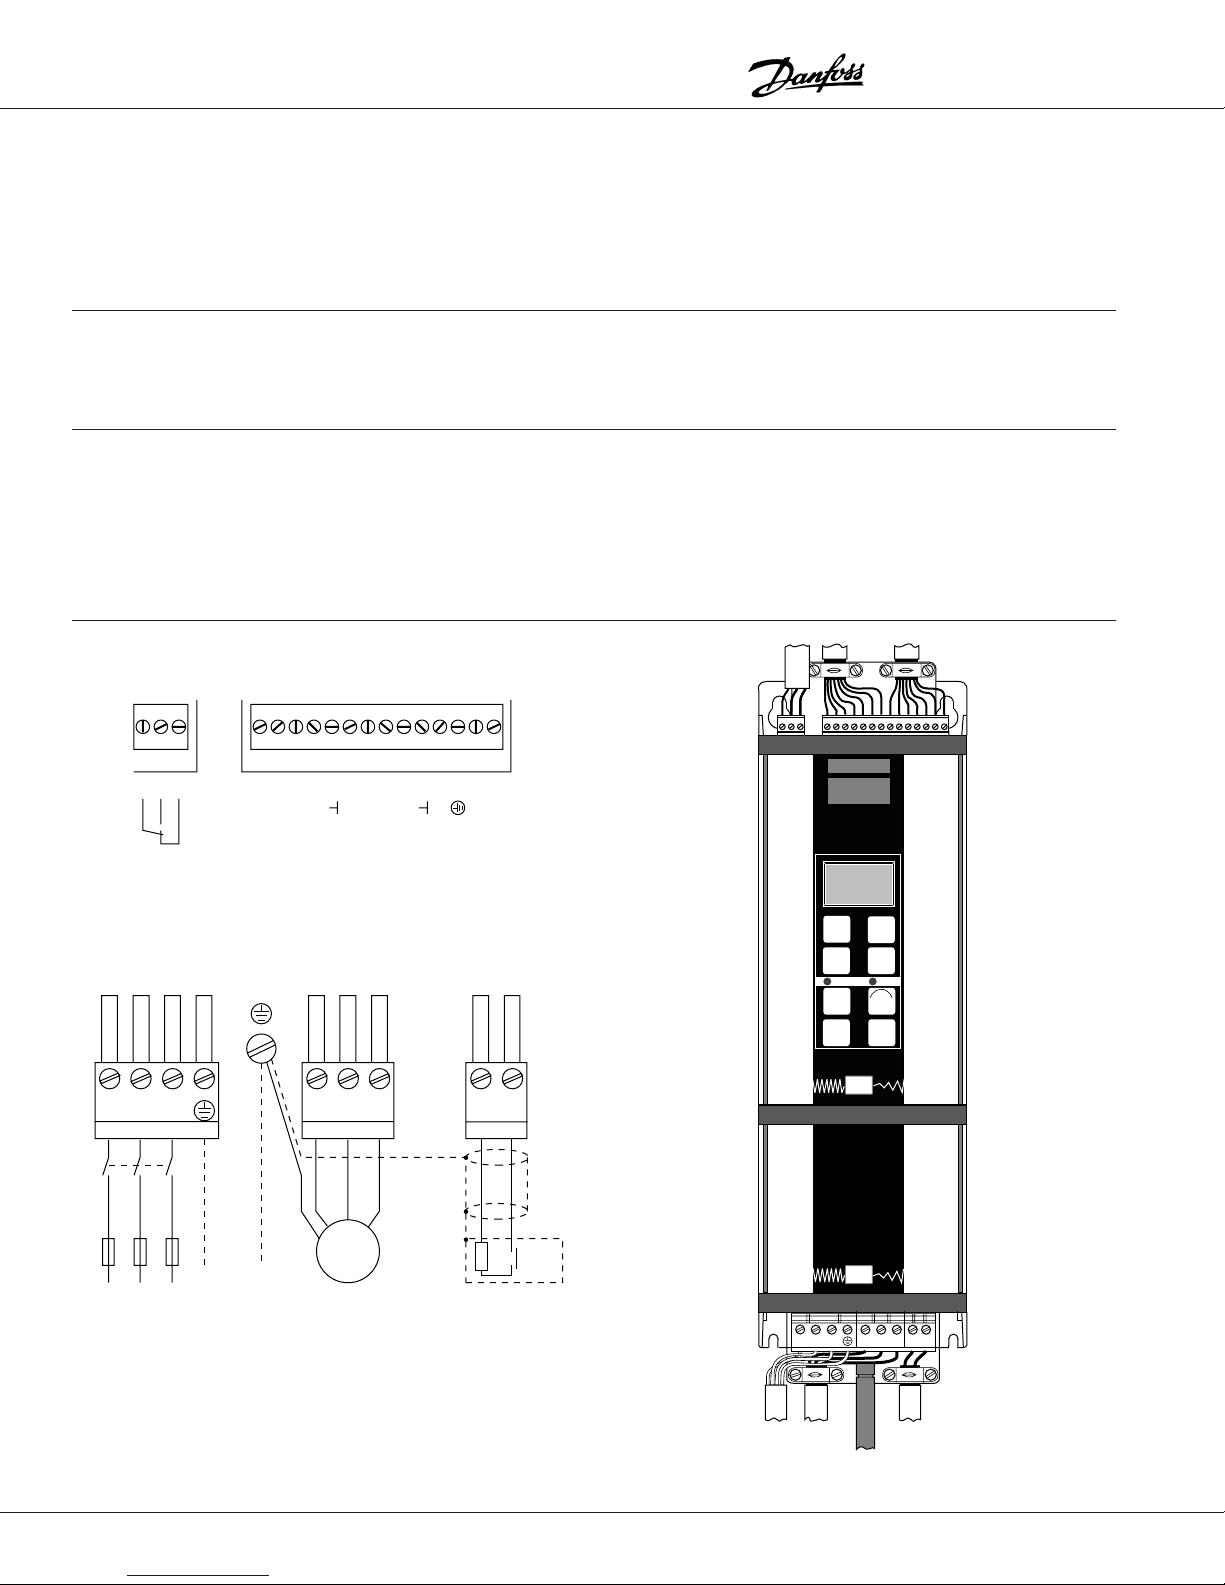
Installation; Wiring
VLT
VLT
®
®
Menu
Data
Stop
Reset
Jog
Start
Fwd.
Rev.
+
–
Variable Speed Drive
MOTOR
BR
LINE
Alarm
On
CAUTION:
It is the responsibility of the user or the person installing
the drive to provide proper grounding and branch circuit
protection for incoming power and motor overload.
National Electrical Codes (NEC) and local codes must be
observed.
Prefuses
Prefuses must be installed in the AC line feeding the
adjustable frequency drive.
Wiring
Cables for the control signals and the brake cable must
be shielded in order to comply with EMC specifications.
The maximum cable length and the maximum cable
cross section is listed in the Specification Chart.
Signal Wiring
VLT ® Series 2000
The Electronic Thermal Relay (ETR) in UL listed VLT's
provides class 20 motor overload protection in
accordance with NEC in single motor applications, when
parameter 315 is set to
to nominal motor (nameplate) current.
The correct sizes and ratings can be found in the
Specification Chart.
Any motor cable shielding is connected to the ground
terminals in the adjustable frequency drive and the motor.
If non-shielded cables are used, the control inputs can
occasionally be subject to signal disturbances. Normally
such a disturbance will not affect the VLT.
Trip
[2] and parameter 107 is set
03
02
01
0UT 46
DIN1 18
+24V 12
Line and Motor Wiring
L1 L2
L3 PE
20
DIN2 19
U
V
M
55
61
10V 50
A IN 53
DIN3 27
DIN4 29
W81
A IN 60
RS 232 TXD 72
RS 232 RXD 71
82
Tmax
8
Artisan Technology Group - Quality Instrumentation ... Guaranteed | (888) 88-SOURCE | www.artisantg.com
Page 8
VLT ® Series 2000
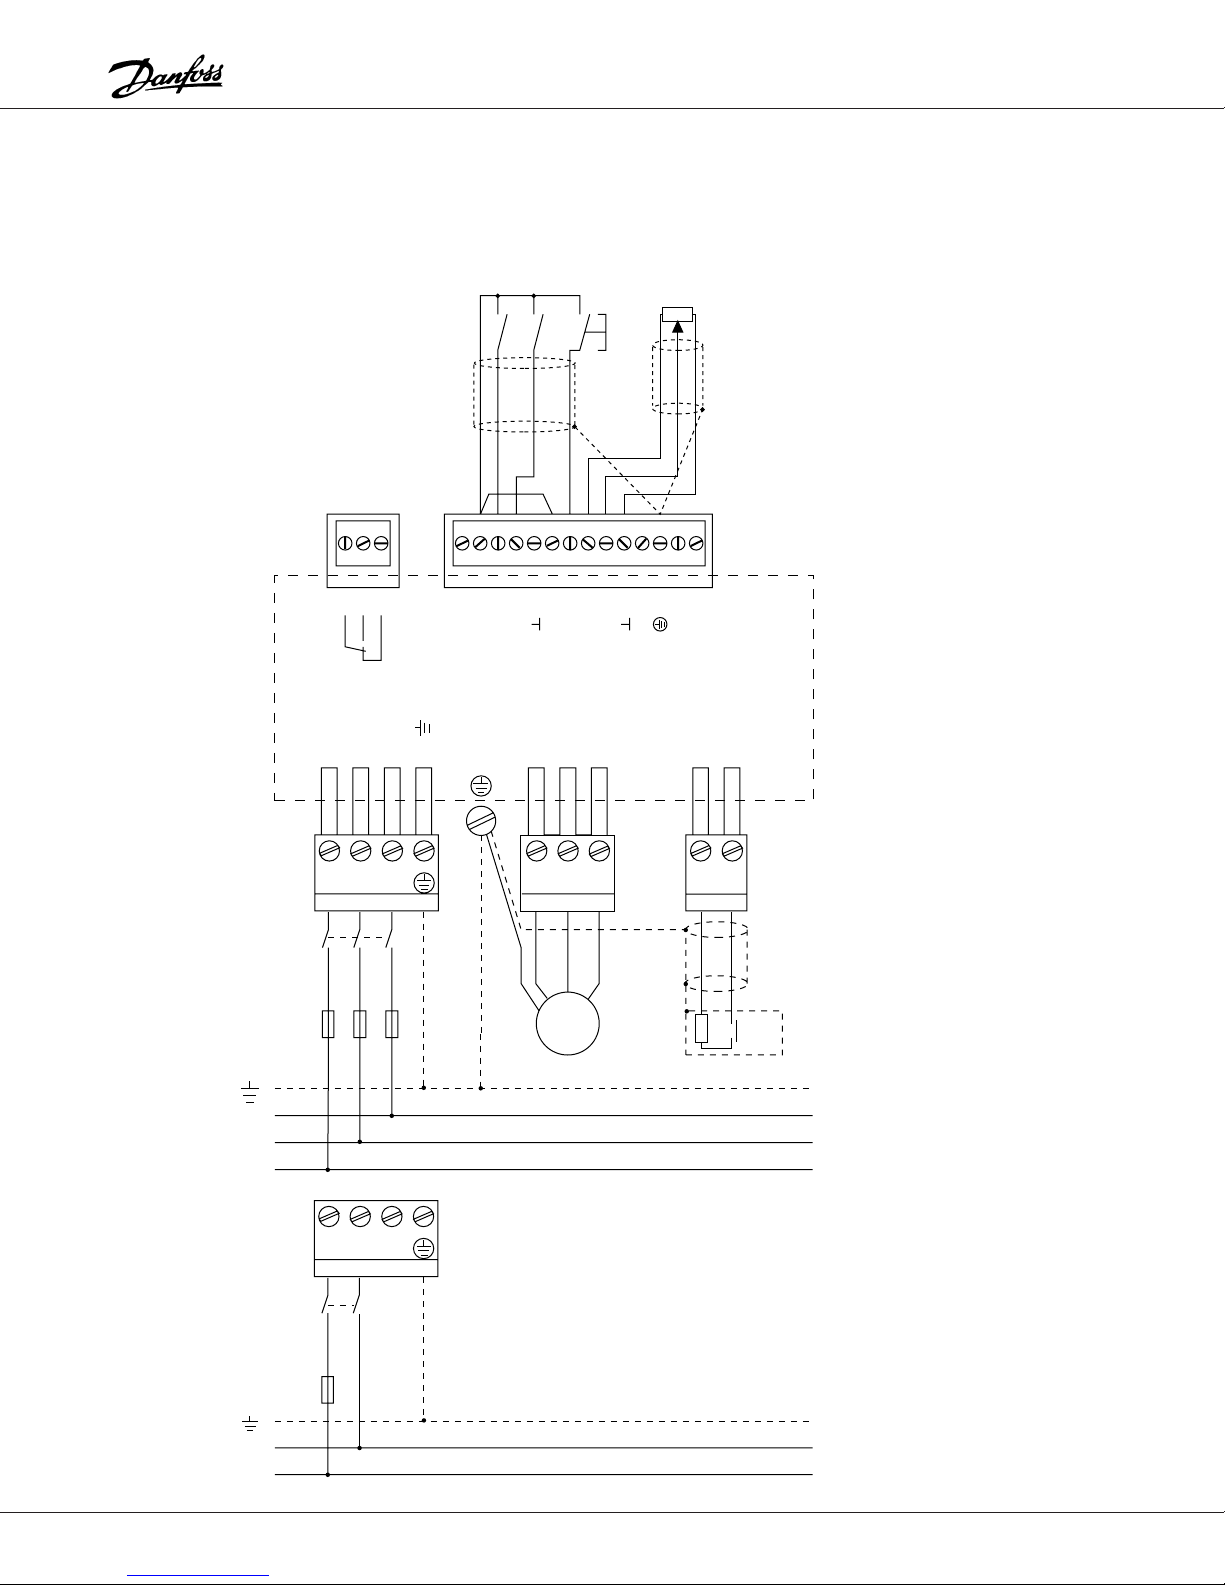
Typical Wiring Example
START/STOP
(par. 402)
REVERSING
(par. 403)
JOGGING
(par. 405)
Installation; Wiring
1k
L3
L2
L1
LINE
01
91 L1
L1 L2
03
02
92 L2
L3 PE
93 L3
94
0UT 46
DIN1 18
+24V 12
94 / 95
20
DIN2 19
DIN3 27
96
U
V
M
55
61
10V 50
A IN 53
DIN4 29
97
A IN 60
RS 232 TXD 72
RS 232 RXD 71
98
MOTOR
W81
81
82
82
BRAKE
Tmax
Three-phase connection
LINE
L1 L2
N
L1
Artisan Technology Group - Quality Instrumentation ... Guaranteed | (888) 88-SOURCE | www.artisantg.com
L3 PE
Single-phase connection
9
Page 9

Installation; Quick Setup
Quick Setup
VLT ® Series 2000
If you know how to operate the VLT Series and and are
familiar with the menus and parameters, go directly to the
How to Program section of this manual.
How to Program
This setup is based on the assumption that you want
your VLT to operate with the following:
1. External start/stop
2. Potentiometer connected for external speed control
3. Option to change rotation direction
4. Option to select a fixed speed (Jog)
If you are not familiar with the VLT Series Adjustable
Frequency Drive refer first the Operation section of this
manual.
NOTE: If you use a brake module, you must program
parameter 300. If you want local operation via the display
keys you must program parameters 003 and 004. To
store the data press the "Menu" key.
If you have connected your VLT as shown in the Typical
Wiring Example, you must program the parameters as
listed in the chart below.
Standard motor with constant torque load without a brake module on the adjustable frequenct drive
Step Parameter Designation Settings Display Indication
1 000 Language Choose
2 103 Motor output Read motor plate
3 104 Motor voltage Read motor plate
4 105 Motor frequency Read motor plate
5 201 Minimum frequency Set wanted frequency
6 202 Maximum frequency Set wanted frequency
7 215 Ramp up 1 Set wanted ramping time
8 216 Ramp down 1 Set wanted ramping time
9 Start the This is done by supplying terminals 18 and 27 with 24 VDC from
adjustable frequency the adjustable frequency drive's terminal 12 or by using an
drive external 24 VDC voltage.
English
ENGLISH
If a brake module is mounted, program the following parameters
Step Parameter Designation Settings Display Indication
1 300 Brake function If a brake module is used, choose
2 Start the This is done by supplying terminals 18 and 27 with 24 VDC from
adjustable frequency the adjustable frequency drive's terminal 12 or by using an
drive external 24 VDC voltage.
If you want local operation and start, program the following parameters
Step Parameter Designation Settings Display Indication
1 003 Operation site Choose
2 004 Local reference Record wanted output frequency by means of the "+" and "–" keys
10
Artisan Technology Group - Quality Instrumentation ... Guaranteed | (888) 88-SOURCE | www.artisantg.com
Loc/ext stop
Applied
APPLIED
LOC/EXT STOP
Page 10
VLT ® Series 2000
Operation
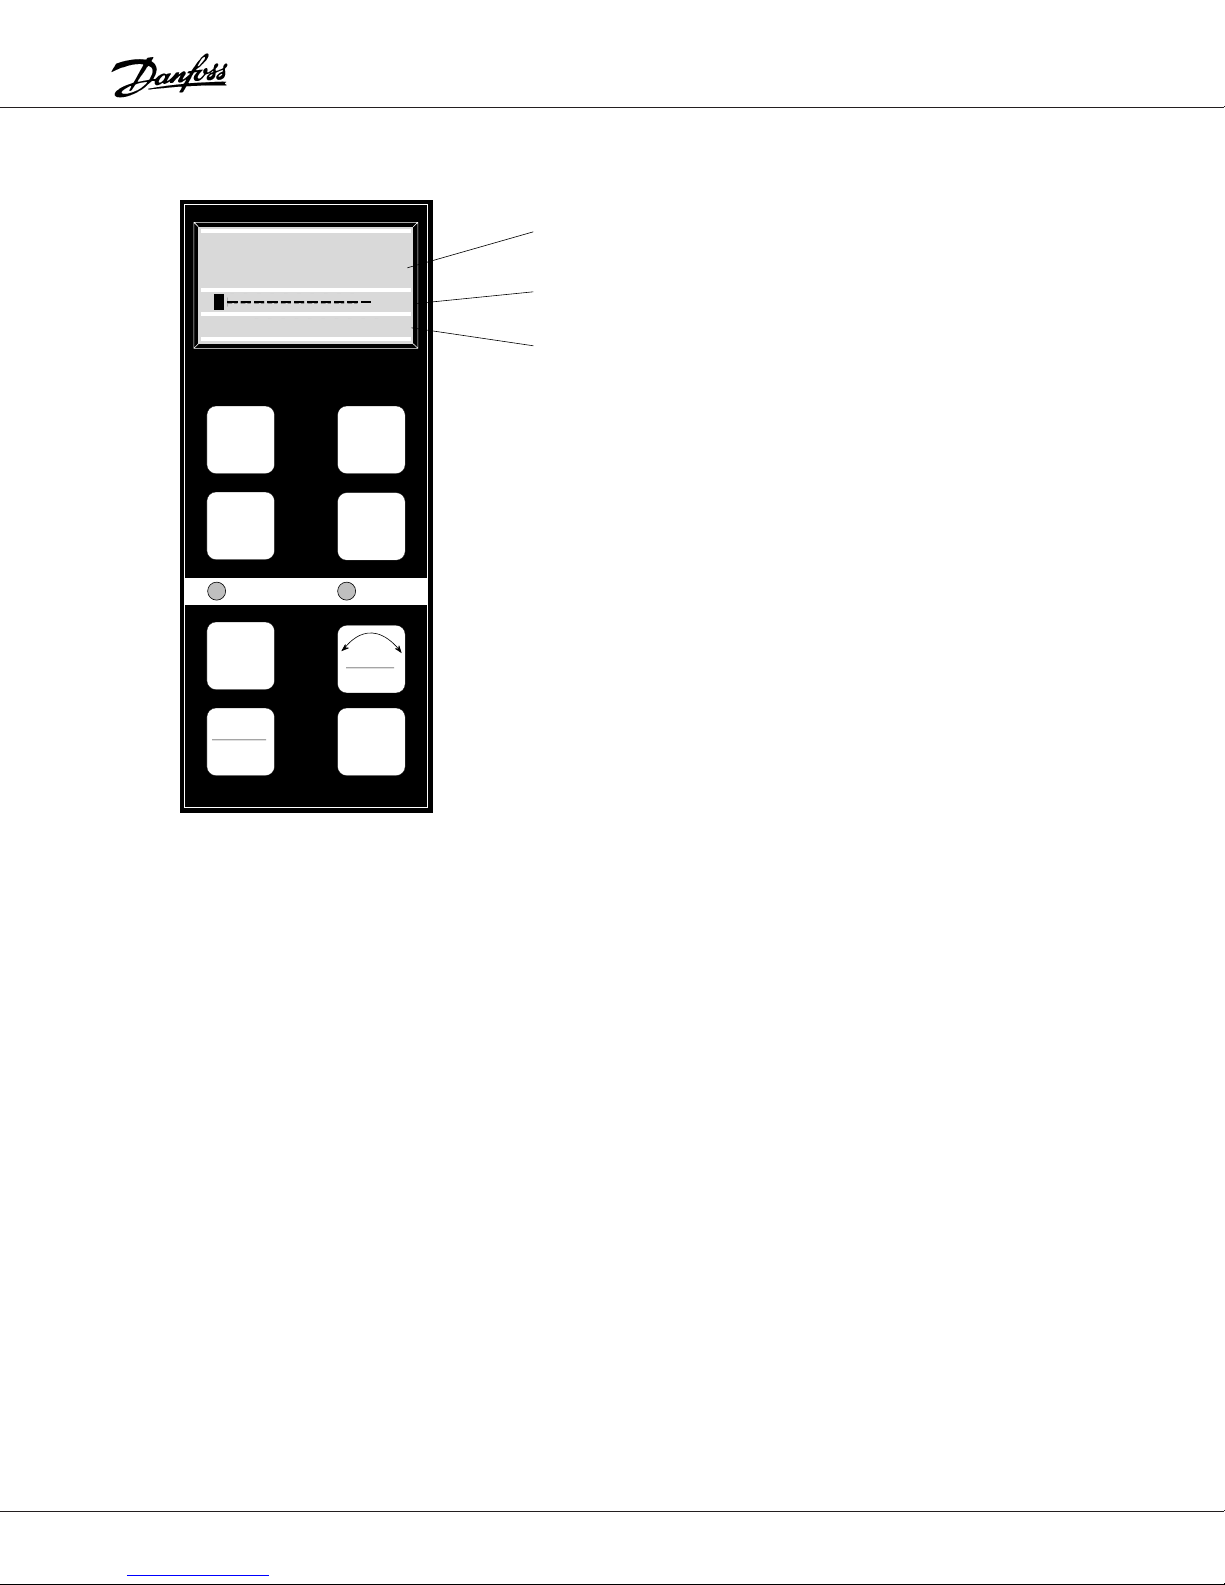
VLT Control Panel
60 Hz
0000000000000060
USE±000000000015
Menu
Data
Alarm On
Jog
Stop
Reset
+
–
Fwd.
Rev.
Start
A
B
C
All Danfoss VLT Series 2000 AC drives utilize the same
control card throughout the entire HP range. The VL T control
panel consists of a keyboard and a display.
The keyboard is used for two purposes: local control and
programming. The display communicates VLT, motor and
application information to the operator.
Located on the control panel is a red and green status LED.
When the green status LED is illuminated, there is AC power
applied to the VL T . The red LED is used for alarm indications.
In an ALARM MODE, the LED will flash.
The display is a three-line LCD display. Line A is used for
operating displays. It shows the value corresponding to the
setting in DISPLAY MODE. The set value remains in the
display line during programming of parameters. Line B
shows information about parameters and direction of motor
operation. Line C shows information about status and setup
or data value.
Artisan Technology Group - Quality Instrumentation ... Guaranteed | (888) 88-SOURCE | www.artisantg.com
11
Page 11

Operation
Programming Keys
VLT ® Series 2000
Menu
is used to enter MENU MODE from either DATA
MODE or DISPLA Y MODE. MENU is also used for entering
a specific group of parameters.
Data
is used for entering DATA MODE or DISPLAY
MODE from MENU MODE. DA T A is also used to move the
cursor in data values.
Operator Keys
Four keys are provided for local control:
Start
Stop
Reset
Jog
With theexception of the Start key the keys can be
programmed to be enabled or disabled to prevent unwanted
use in certain applications.
Fwd
Rev
The and keys are used for scrolling through
+
–
Groups, Parameters and Data V alue selections. Additionally
these keys are used for speed up and down when operating
in Local mode.
Local Stop: Local Stop is accomplished by pressing the
Stop/Reset key on the front control panel. The local stop
command has been designed to override all run signals
whether local or remote. When a local stop has been made
the top line of the display will flash. The only way to resume
running from a local stop condition is to initiate a local start.
Local Forward/Reverse: Local Forward/Reverse will be
automatically disabled if remote operation is selected. In
remote, it is not possible to make direction changes from
the keypad.
Operational Modes
The VLT will be in DISPLAY MODE when the motor is
running in normal operation. DISPLAY MODE provides
various information concerning the current status of the VLT
and motor.
The and keys are used to scroll among
+
the 12 main display readouts:
• Reference
• Frequency Hz
• Display Feedback unit
• Current A
• Torque %
• Power kW
• Power HP
• Energy kWH
• Output voltage V
• DC voltage V
• Motor ETR value %
• Inverter ETR value %
–
The MENU MODE is used to select and change operating
parameters. The and keys are used in the
+
–
MENU MODE to select a parameter group or an individual
parameter or the data value of a given parameter.
Group Description Parameters
0 Operation and Display 000-099
1 Load and motor 100-199
2 Reference and limits 200-299
3 Functions and timers 300-399
4 Input and Output 400-499
5 Serial data interface 500-599
6 Service and diagnostics 600-699
12
Artisan Technology Group - Quality Instrumentation ... Guaranteed | (888) 88-SOURCE | www.artisantg.com
Page 12
VLT ® Series 2000
Operation
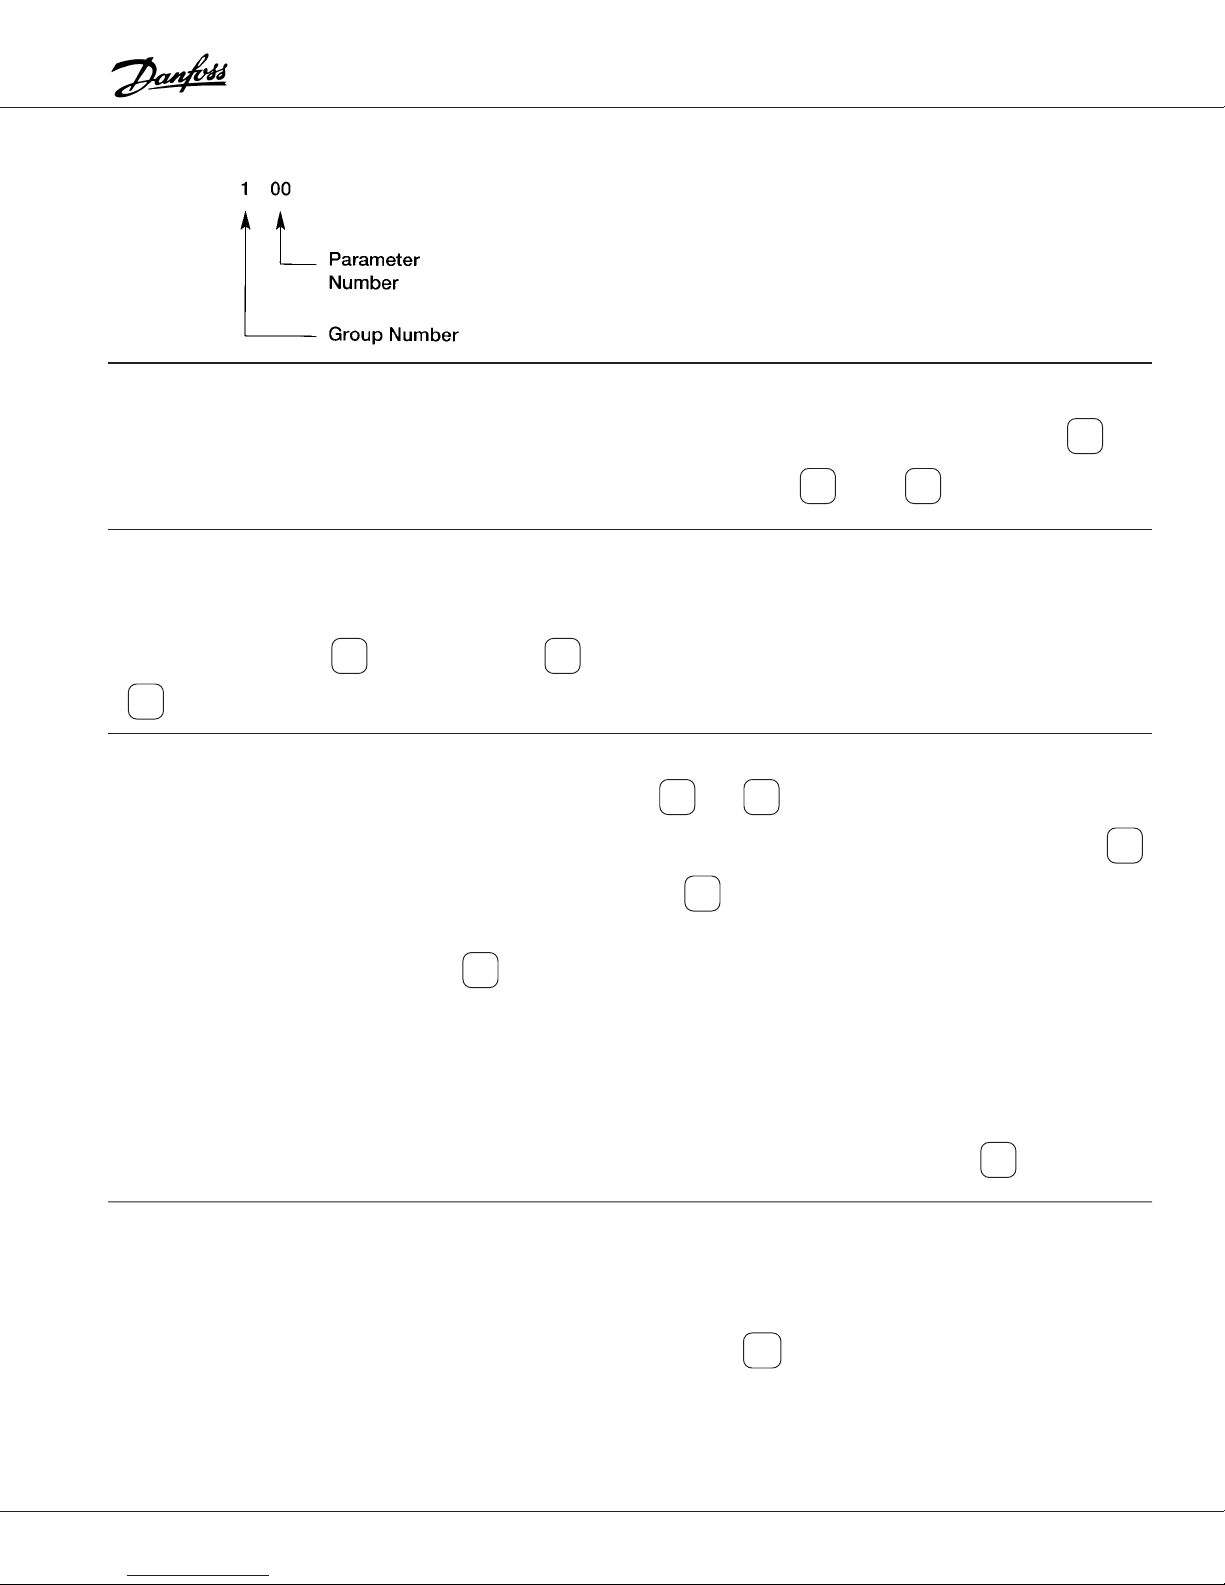
Parameter Numbering
Moving through the Program
After the first power up, the drive is in DISPLA Y MODE. To
program the VLT's various Groups, use the MENU key to
enter the MENU GROUP MODE.
Changing a Parameter number in a Group
Parameters in each group can be entered in the selected
group by also using the key followed by or
Menu
key.
+
–
The parameter number consists of three digits as shown.
The left digit indicates the Group, and the two digits at the
right specify the parameter number in the specific Group.
T o travel through the available Groups, use the key
followed by the or keys.
+
–
Menu
Changing a Numerical Data Value
The Data Value can be a continuous (numerical) value of
figures within a specified range (i.e., volts, Hz, etc.), or it
can be a discrete value represented by the text.
The new data value will be stored in the software when
leaving the DATA MODE.
Please Note: It is necessary to press to stop the
Stop
Reset
motor before changing the data value of some parameters.
If the data value of the chosen parameter is a discrete value,
a text will appear in the display . The text shown represents
the chosen parameter. In order to change it, press
Time-out
If the VLT is left in DATA MODE, a 20 second time-out will
prevent unwanted change of data.
+
or . All the other data value words that can
be chosen will be shown one at a time by using the
or key.
–
–
+
Due to space considerations, several words have been
abbreviated on the display.
When leaving the DATA MODE, the word shown in the
display will be stored.
Please Note: In order to change the data value of some
parameters, it is necessary to press .
Stop
Reset
It is possible to return to DATA MODE and program the
parameter that was blocked by the time-out with a single
The software leaves DATA MODE after 20 seconds if no
operation is recorded.
Artisan Technology Group - Quality Instrumentation ... Guaranteed | (888) 88-SOURCE | www.artisantg.com
stroke on .
Data
Note: The 20 second time-out does not occur in parameter
004, Local Reference.
13
Page 13
Operation
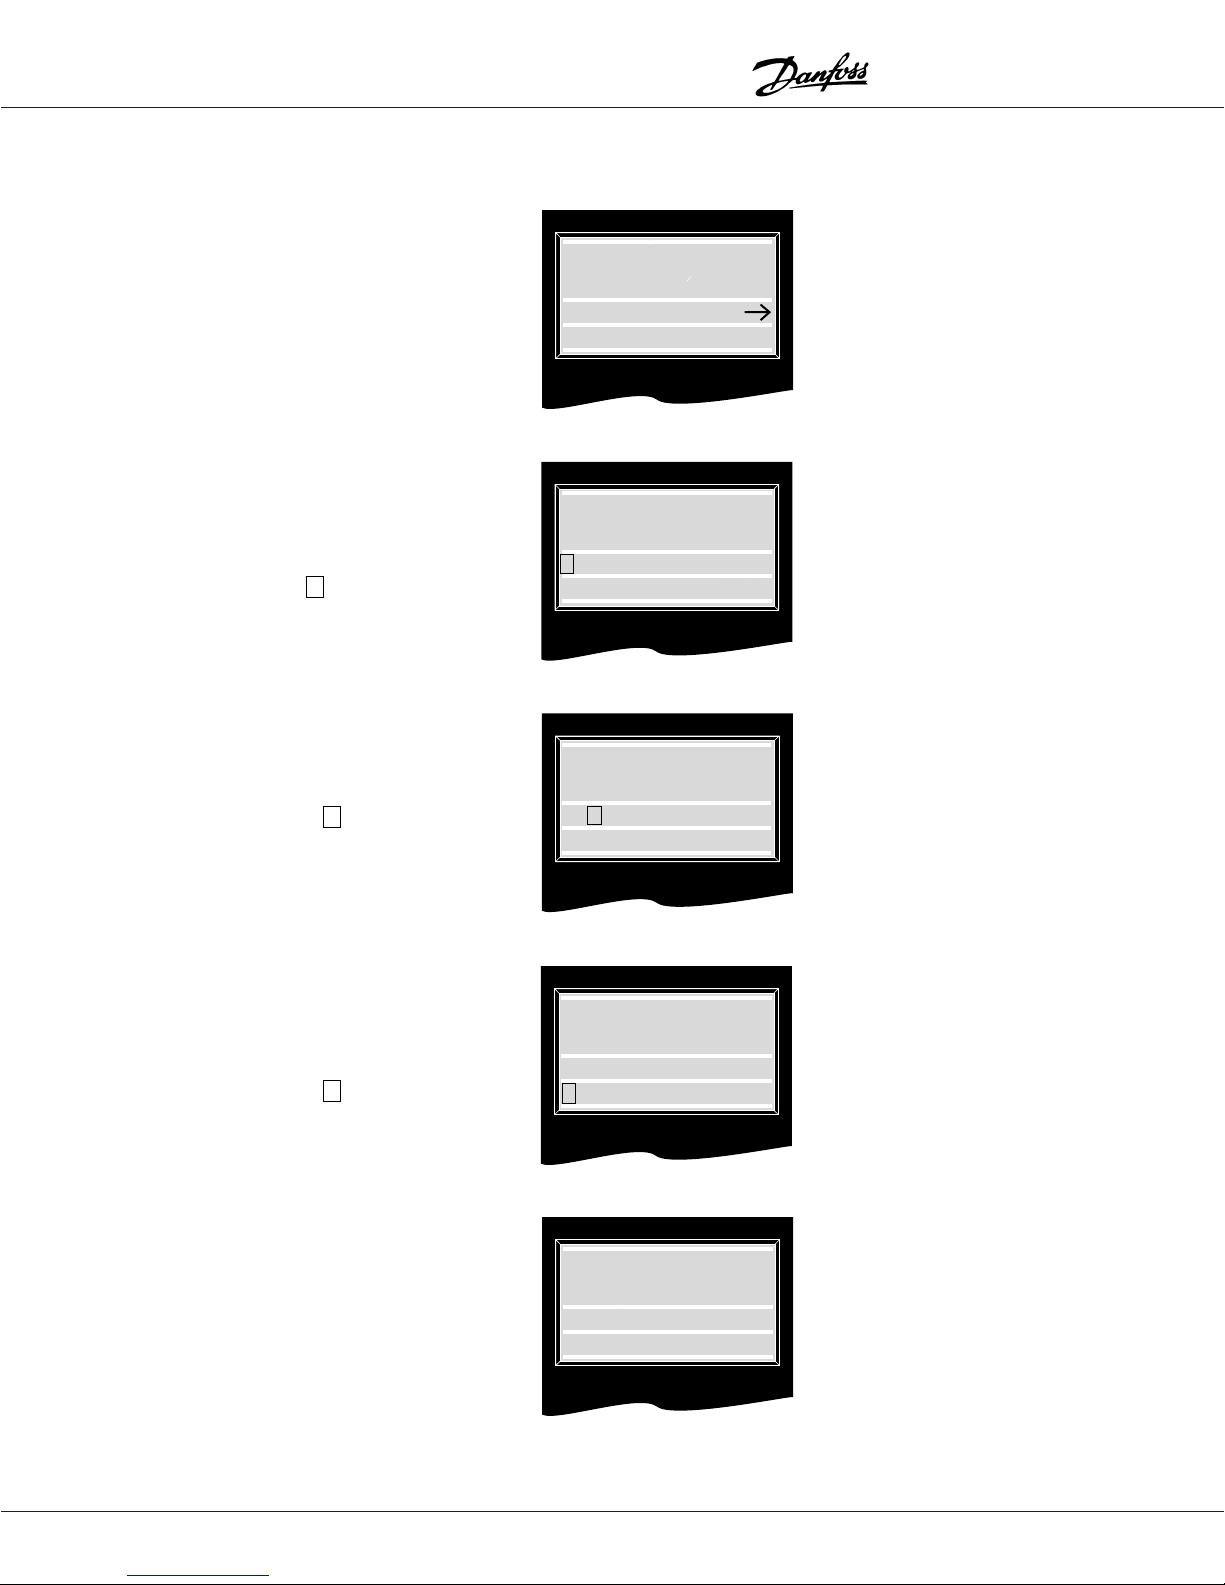
Operational Modes
Display Mode
VLT ® Series 2000
Status, and source of control —
Menu Mode
Parameter number flashes —
Parameter Mode
Flashing parameter numbe —
Shows value and unit —
Defines the display —
0.. = Cursor flashes
0 = Cursor flashes —
Selected data value —
15.0 Hz
FREQUENCY
RUN OK LOCAL. 1
0.0 Hz
0 . .OPERATION
AND0DISPLAY 0000
0.0 Hz
0000LANGUAGE0000
ENGLISH000000001
— Direction of rotation
— Setup number
— Parameter group
— Name
— Parameter name
— setup number
Data Mode
E = Cursor flashes —
Selected data value
NOTE: To store the newly selected data value,
you must quit Data group, by pressing "Menu".
Alarm Mode
Reset mode —
Cause of alarm —
NOTE: If TRIP is displayed the operation has
stopped and you must press the "Reset" key to
reset the VLT.
14
Artisan Technology Group - Quality Instrumentation ... Guaranteed | (888) 88-SOURCE | www.artisantg.com
0.0 Hz
LANGUAGE0ENGLISH
ENGLISH000000001
ALARM
TRIP000000000000
MOTOR TRIP000000
— Parameter name
— Setup number
NOTE: If TRIP LOCKED is
dispalyed you must switch off the
VLT and switch it on again. Press
the "Reset" key to reset the VLT.
Page 14
VLT ® Series 2000
Operation
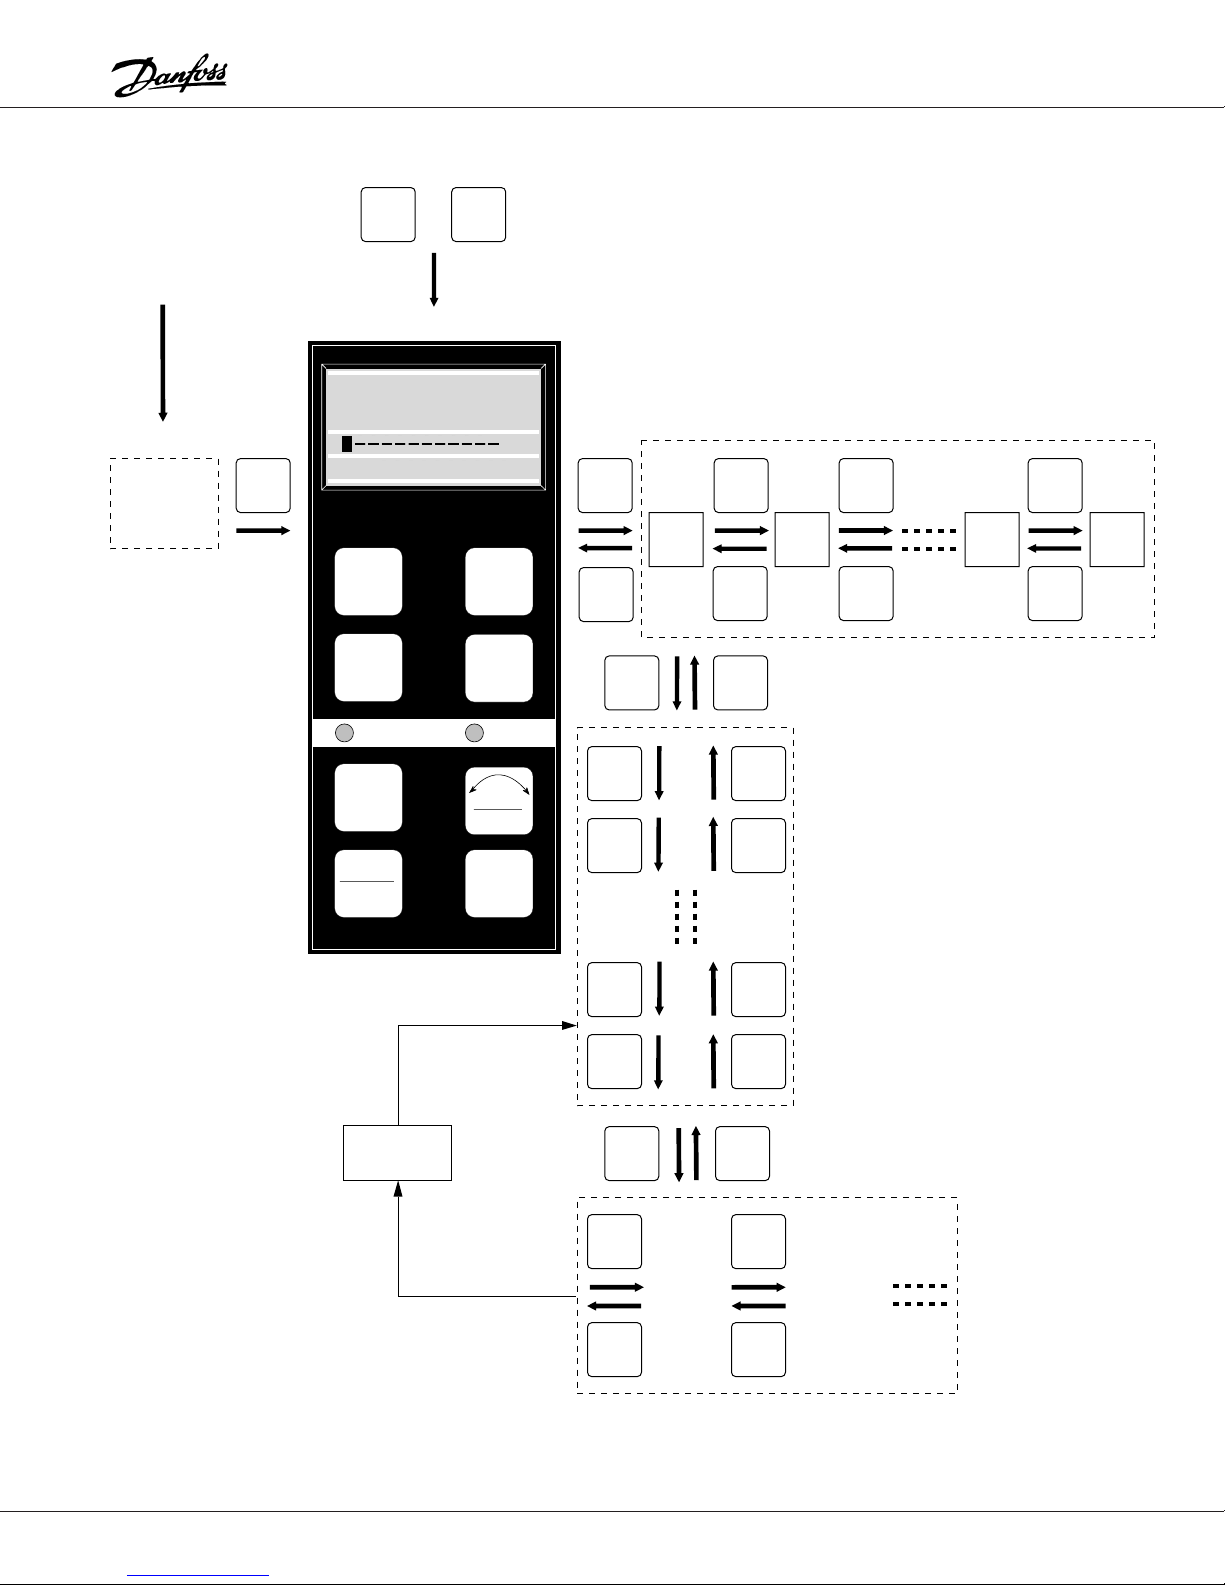
From any state
Alarm Mode
Stop
Reset
From any state
Menu
Display Mode
+
Data
60 Hz
0000000000000060
USE±000000000015
Menu
Data
Alarm On
+
–
The figure below shows how to switch
between the different groups.
Menu Mode
Menu
Data
Menu
Grou
0
p
+
–
Menu
Group
1
+
6
–
+
0
–
Time Out
Jog
Stop
Reset
20 Sec.
No Action
Fwd.
Rev.
Start
+
+
+
+
Data
+
000
001
00X
000
English
Menu
Parameter Mode
–
–
–
–
+
Deutsch
Data Mode
Artisan Technology Group - Quality Instrumentation ... Guaranteed | (888) 88-SOURCE | www.artisantg.com
–
–
15
Page 15

Programming VLT® Series 2000
Group 0 -- Operation and Display
000 Language (LANGUAGE)
Value:
★ English (ENGLISH) [0]
German (DEUTSCH) [1]
French (FRANCAIS) [2]
Danish (DANSK) [3]
Function and Description:
Determines the language of the display.
You can choose between
Danish.
001 Menu Setup Select (MENU SETUP)
Value:
★ Setup 1 (SETUP 1) [1]
Setup 2 (SETUP 2) [2]
Multi-setup (MULTI SETUP) [5]
Setup Terminal 29
10
21
Function:
You can select a menu setup which is different from the
factory setting and store it in
Description:
You start by selecting the setup you want to make or alter.
You can choose between
alter any data value you like. Your alterations make a setup
different from the factory setting. If you choose
you can switch between the two setups via terminal 29. The
parameters which can be chosen for the two setups have
been specially selected. Refer to the Parameter/Default
Settings chart in the back of this manual.
English, German, French and
Setup 1 or Setup 2
Setup 1 or setup 2.
.
Then you can
Multi-setup
002 Setup Copy ((MENU SET COPY)
Value
★ No copying (DO NOT COPY) [0]
Copy setup 1 to 2 (COPY 1 TO 2) [6]
Copy to 2 to 1 (COPY 2 TO 1) [7]
Copy from fact. setting to 1 (Fact. setting ➔1) [8]
Copy from fact. setting to 2 (Fact. setting ➔2) [9]
Function:
You can copy
always copy the factory setting back to
Description:
The copying starts when you have entered the desired
copying function and Data mode is left by pressing the
“Menu” key, or after 20 seconds of no activity. Line 3 in the
display flashes while copying is in progress. Time out does
not activate the copying function.
003 Operation Site (LOCAL /REMOTE)
Value:
★ Remote (REMOTE) [0]
Local with external stop (LOC/EXT./STOP) [1]
Local (LOCAL) [2]
Local and remote (LOCAL - REMOTE) [3]
Function:
You can choose four different operation sites:
Local with external stop, Local and Local and remote
Description:
If you choose
frequency drive via the control terminals. However, you can
still use the stop key of the control panel (provided you
have not chosen to disable this function in parameter (007).
If you choose
the connection between terminals 12 and 27 to activate
stop.
Local with external stop
coasting
have been chosen in parameter 404 (terminal 27).
Choose
keyboard (must be activated in parameter 007).
remote
selected for access to local reference even when the unit is
operated remotely.
Setup 1 to Setup 2
and vice versa. You can
Setup 1 or Setup 2.
Remote,
.
Remote
Local with external stop
,
Quick stop, Reset and motor coasting or Stop
Local
if you want to operate the unit via the
, you can control the adjustable
you must disconnect
can only be chosen if
Motor
Local and
adds local and external reference. This function is
★ = ROM default setting. Text in ( ) = display text. Figures in [ ] are used when communicating with the bus.
16
Artisan Technology Group - Quality Instrumentation ... Guaranteed | (888) 88-SOURCE | www.artisantg.com
Page 16

VLT® Series 2000 Programming
004 Local Reference (LOCAL SPEE)
Value:
0 to f
MAX
Function:
You choose
Local reference
if you want to set the speed
(frequency) via the control panel.
Description of choice:
To use this parameter you must choose
stop or Local and remote
in parameter 003. the output
Local with external
frequency of the adjustable frequency drive can be
changed by means of the "+" and "–" keys. If the AC line is
disconnected the value changes to 0.00. Parameter 004
cannot be controlled via the serial bus, RS 232.
There is no automatic switch back to Parameter Group from
this parameter. In parameter 010 you can lock data
changes in parameter 004.
005 Display Value (VALUE AT M)
Value:
1 to 9999 ★ 1000
Function:
Yoy can choose to have the speed/frequency displayed
without the unit Hz behind the value.
Description of choice:
The value will only be read out if
Display
is selected in
Display Group.
It is not possible to change Hz to another unit.
006 Local Reset (LOCAL RESE)
Value:
Disable (DISABLE) [0]
★ Enable (ENABLE) [1]
010 Local Reference (LOC REFERE)
Value:
Disable (DISABLE) [0]
★ Enable (ENABLE) [1]
Enable and save (ENABLE AND SAVE) [2]
Function:
You can enable/disable the function via the control panel.
You also can choose whether it must be possible to change
the output frequency via parameter 004.
Description:
If you choose
Disable
in parameter 006, 007, 008 or 009
you cannot activate the function via the control panel.
If you choose
Disable
in parameter 010 the output
frequency cannot be changed via parameter 004.
You can prevent data change by setting parameter 013 to
Locked.
If you choose
Enable
and savs a change of local speed
reference will be saved automattically after 15 sec.
013 Data Change Lock (DATA CHC. LOCK)
Value:
★ Not locked (NOT LOCKED) [0]
Locked (LOCKED) [1]
Function:
There is a way to avoid unintended programming.
Description:
If you choose Locked you cannot make any data change in
any parameter. However, it is still possible to change the
local reference.
If data change is attempted with data change lock, the
display shows: DATA LOCKED.
007 Local Start/Stop (LOCAL START/STOP)
Value:
Disable (DISABLE) [0]
★ Enable (ENABLE) [1]
008 Local Reversing (LOCAL/FWD/REV)
Value:
★ Not possible (DISABLE) [0]
Possible (ENABLE) [1]
009 Local Jog (LOCAL JOG)
Value:
Disable (DISABLE) [0]
★ Enable (ENABLE) [1]
★ = ROM default setting. Text in ( ) = display text. Figures in [ ] are used when communicating with the bus.
Artisan Technology Group - Quality Instrumentation ... Guaranteed | (888) 88-SOURCE | www.artisantg.com
17
Page 17

Programming VLT® Series 2000
Group 1 -- Load and Motors
101 Speed Control (SPEED CONT)
Value:
Open loop (OPEN LOOP) [0]
★ Slip comp. (SLIP COMP) [1]
Closed loop (CLOSED LOOP) [2]
Function:
You can choose among three different kinds of speed
control:
Choose
speed must be constant no matter what the load is. Choose
Open loop
when synchronous motors are used.
Choose Closed loop when you want operation with process
feedback. For closed loop opereation you must choose the
feedback type in parameter 114 (current, voltage or pulses).
★ Pre-programmed value (VALUE SET) [0]
You can choose to control the speed by means of the
current limit. This makes indirect torque control possible.
The current limit is set in parameter 209, or by means of a
current or voltage signal in parameter 412 or parameter
413.
Choose between controlling the current limit via parameter
209 or one of the analog inputs, terminal 53 0r 60.
mA
Do not select the same signal for PI control.
★ Nom. size [1]
This parameter allows a choice of the kW value that best
matches the rated motor power.
The factory setting will be for the nominal kW equivalent of
the horsepower size on the drive nameplate.
Open loop, Slip compensated
Description:
Slip compensation
when the motors used are parrellel connected or
102 Setting of Current Limit (SET CUR.LI)
Value:
Voltage signal (10VDC SIGNAL) [1]
Current signal (20 mA SIGNAL) [2]
Function:
Description:
corresponds to 160% current (2030: 140%).
103 Motor Power (MOTOR POWE)
Value:
Under size [0]
Over size [2]
Function:
for normal operation , where the
and
Closed loop
.
10V/20
103 (continued)
Description:
Check the rated motor power on the motor nameplate. If it
is not equal to the nominal horsepower rating on the drive
nameplate, select the most appropriate size (1 HP = 0.746
kW). Parameters 107, 108, 109, 110, 111 and 112 change
automatically when the value in parameter 103 is changed.
104 Motor Voltage (U
Value:
)(MOTOR VOLT)
M,N
Only 200-230 V units
200 V [0]
208 V [1]
★ 220 V [2]
230 V [3]
240 V [4]
Only 380-460 V units
380 V [0]
★ 400 V [1]
415 V [2]
440 V [3]
460 V [4]
Function:
The rated voltage that most closely matches the motor
nameplate voltage can be selected.
Description:
You can choose among different voltage values. The value
is selected on the basis of the data on the motor plate.
Parameters 107, 108, 109, 110, 111 and 112 change
automatically when the value in parameter 104 is changed.
105 Motor Frequency (fN)(MOTOR FREQ)
Value:
★ 50 Hz (50 Hz) [0]
60 Hz (60 Hz) [1]
87 Hz (87 Hz) [2]
100 Hz (100 Hz) [3]
Function:
Choose the frequency that corresponds to the rated motor
frequency.
Description:
You can choose among 4 different frequency values. The
value is selected on the basis of the data on the type plate
of the motor.
The U/f ratio in parameter 111 is changed automatically.
★ = ROM default setting. Text in ( ) = display text. Figures in [ ] are used when communicating with the bus.
18
Artisan Technology Group - Quality Instrumentation ... Guaranteed | (888) 88-SOURCE | www.artisantg.com
Page 18

VLT® Series 2000 Programming
107 Motor Current (MOTOR CURR)
Value:
I
MAG (par. 108)
Function:
It is important to specify the rated motor current because it
is used in part to calculate torque and thermal motor
protection, (ETR),
Description:
The rated motor current, which can be seen from the motor
nameplate, must be entered. This is also chosen in Quick
Set Up Menu step 2.
108 Motor Magnetizing Current (MOTOR MAG AMP)
Value:
0.3 - I
Function:
The VLT uses the value for different calculations such as
compensation.
Description:
If the factory setting is unsuitable, the motor current on
running idle should be measured with suitable
amperemeter (RMS). The magnetizing current is then set to
the measured value.
109 Start Voltage (START VOLT)
Value:
0 to (V
Function:
By increasing the start voltage, a high start torque can be
obtained. Small motors (<1 HP) normally require a high
start voltage. When motors are connected in parallel, it
may be desirable to increase the starting torque.
Description:
Do not forget to consider that the motor must be able to
start with the required torque:
1. Choose a value to make start possible with the load in
question.
2. Reduce value until starting up with the given
load is just possible.
3. Choose a value where operation in the rest of the
frequency range is possible at the lowest possible
current consumption.
If the start voltage makes normal operation impossible, you
can change the V/f ratio in parameter 111.
- I
VLT, MAX (par. 209)
M,N (par. 107)
+ 10%)
M,N
110 Start Compensation (START COMP)
Value:
0.00 - 99 V/A
Function:
Using this parameter you acn make a load dependent
torque adaptation. This is for example used for motors and
applications where there is a large difference between the
motor's full-load current (parameter 107) and no-load
current (parameter 108).
Description:
If the factory setting is not sufficient, you can set the
parameter so that the motor can start at the actual load.
You can also combine start compensation with parameter
109.
WARNING: Should not be used with
synchronous motors and parallel-coupled motors
and where quick load changes may occur. To
!
∆
111 V/f Ratio (V/F RATIO)
Value:
Function:
Using this parameter you can change the linear ratio
between voltage (V) and frequency (f) to correct motor
magnetization, optimal dynamics, accuracy or efficiency.
Description:
Use this parameter only if you cannot record the correct
motor data in parameters 104 and 105.
The value can be calculated as follows:
The value of the factory setting is based on no-load
operation. Therefore it is lower than the value calculated.
The compensation will give the necessary voltage
supplement.
For factory settings refer to the Parameter Chart in the back
of this manual.
avoid instability do not increase the value more
than necessary.
0.00 - 20 V/Hz
Motor voltage (para. 104)
V/f =
Motor frequency (para. 105)
WARNING: If the use of start voltage is
excessive, it can lead to magnetic saturation and
motor overheating.
!
∆
★ = ROM default setting. Text in ( ) = display text. Figures in [ ] are used when communicating with the bus.
Artisan Technology Group - Quality Instrumentation ... Guaranteed | (888) 88-SOURCE | www.artisantg.com
19
Page 19

Programming VLT® Series 2000
112 Slip Compensation (SLIP COMP.)
Value:
0.0 - 20 Hz
Function:
Slip Compensation
voltage of the VLT adjustable frequency drive with an
increasing load to compensate for the motor's increasing
slip (loss). This achieves a load-independent speed.
Description:
Choose a value so that the speed remains constant when
the load increases. If the value is too high the speed
increases with the load. This may lead to unstable motor
operation.
When you use synchronous motors and motors connected
in parallel, set slip compensation to 0 Hz. Slip
compensation should be avoided in case of high dynamics.
114 Feedback Signal (FEEDBACK T)
Value:
Voltage (VOLTAGE) [0]
★ Current (CURRENT) [1]
Pulses (PULSES) [2]
Function:
This parameter allows a choice of process feedback signal
in a closed loop system, as chosen in parameter 101. It has
no effect if parameter 101 is set to OPEN LOOP.
For further information, see the section on the PID
controller.
Description of choice:
If a PID controller is used, one of the inputs on terminal 29
(parameter 405), terminal 53 (parameter 412) or terminal
60 (parameter 413) must be used for the feedback signal.
The same type of signal cannot be the reference signal.
119 FF Factor (FEED FWD F)
Value:
0 to 500% ★ 100%
Function:
This parameter is used in connection with a PI controller.
The FF factor makes a large or small part of the reference
signal around the PID controller so that the PI controller
only affects part of the control signal. Any change of the
setpoint will affect the motor rpm directly. The FF factor
gives high dynamics at changes of the setpoint and less
overswing.
Description of choice:
You can choose the required % value in the interval f
Choose a value above 100% if the setpoint variations are
only minor.
increases the output frequency and
MIN-fMAX
120 Control Range (CONTRL RAN)
Value:
0 to 100% ★ 100%
Function:
The regulator range (bandwidth) limits the output from the
PID controller as a % of f
Description of choice:
A desired % value of f
range is reduced, speed variations will become smaller
during initial adjustment.
WARNING: The output frequency is limited by
0.9 x f
width setting is. The controller can therefore be
!
∆
121 Proportional Gain (PROPRT/L G)
Value:
Function:
The proportional gain sets the amplification factor of the
error (the difference between the feedback signal and the
setpoint).
Description of choice:
Quick regulation is obtained at a high amplification, but if
the amplification is too high, the process may become
unstable due to overshoot.
122 Integral Time (INTEGRAL T)
Value:
Function:
The integral time determines how long the PI controller
takes to correct the fault. The integral time results in a delay
of the signal, and therefore has a dampening effect that will
improve stability.
Description of choice:
Quick regulation is obtained through a short integral time.
However, if this time is set too short, the process will
become unstable. If the integral time is set long, regulation
becomes unnecessarily slow.
inactive.
active without affect the output frequency can
exceed f
0.01 to 10.00 ★ 0.01
0.01 to 7200 sec. ★ OFF
and 1.1 x f
MIN
MAX
.
MAX
can be selected. If the regulator
MAX
no matter what the band
MAX
by 10%.
Off
means that the function is
★ = ROM default setting. Text in ( ) = display text. Figures in [ ] are used when communicating with the bus.
20
Artisan Technology Group - Quality Instrumentation ... Guaranteed | (888) 88-SOURCE | www.artisantg.com
Page 20

VLT® Series 2000 Programming
125 Feedback Factor (FEEDBACK F)
Value:
0 to 500% ★ 100%
Function:
The feedback factor is used if the transmitter cannot be
selected optimally for the scale range of the setpoint.
Description of choice:
This parameter is only used if the feedback signal in
parameter 114 is not of a suitable level. If you choose
the feedback signal is not changed.
100%
★ = ROM default setting. Text in ( ) = display text. Figures in [ ] are used when communicating with the bus.
Artisan Technology Group - Quality Instrumentation ... Guaranteed | (888) 88-SOURCE | www.artisantg.com
21
Page 21

Programming VLT® Series 2000
Group 2 -- References and Limits
200 Frequency Range (FREQUE RANGE)
Value:
★ 0 to 120 Hz [0]
0 to 500 Hz [1]
Function:
Using this parameter you can set and thus limit the output
frequency range of the VLT adjustable frequency drive.
Description:
In most cases you can use 0-120 Hz.
WARNING: Only choose 0-500 Hz if you use
special motors designed for high speeds.
!
∆
201 Minimum Frequency (MIN FREQUE)
Value:
0.0 to f
MAX
Function:
Choose the minimum frequency that corresponds to the
minimum speed at which the motor is to run. The minimum
frequency can never be higher than the maximum
frequency, f
MAX
.
Description:
A value from 0.0 Hz to the max. frequency (f
parameter 202 can be chosen. This is also chosen in Quick
Set Up Menu step 5.
202 Maximum Frequency (MAX FREQUE)
Value:
0.0 - value in para. 200 ★ 60 Hz
Function:
Choose a maximum frequency that corresponds to the
maximum speed at which the motor is to run. The maximum
frequency can never be lower than the minimum frequency,
f
.
MIN
Description:
A value from f
f
(
120 Hz or 500 Hz
MAX
to the value selected in parameter 200 for
MIN
) This is also chosen in Quick Set
Up Menu step 6.
★ 0
) selected in
MAX
203 Jog Frequency (JOG FREQUE)
Value:
0.0 to f
MAX
★10 Hz
Function:
The jog frequency is the fixed output frequency at which the
drive runs when the jog function is activated.
Description:
The jog frequency can be selected to be lower than f
MIN
(parameter 201) but the highest output frequency is limited
(parameter 202).
by f
MAX
204 Digital Reference Type (DIG. REF.)
Value:
★ Sum (SUM) [0]
Relative (RELATIVE) [1]
Function:
The digital references are generated internally in the unit
and presented as a percentage of the difference between
the f
to f
MIN
MAX
and f
.
selected in parameters 201 and 202, added
MIN
Description:
If
Sum
is selected, one of the digital references (parameters
205-208) is added as a percentage of the difference
between f
MAX
and f
with the other references. If
MIN
Relative
is selected, one of the digital references )parameters 205-
208) is added as a percentage of the sum of the other
references.
205 Digital Reference 1 (REF. 1 DIG)
Value:
-100.00% to +100.00% ★ 0 % of f
MAX .
- f
MIN
206 Digital Reference 2 (REF. 2 DIGI)
Value:
-100.00% - +100.00% ★ 0 % of f
MAX .
- f
MIN
207 Digital Reference 3 (REF. 3 DIG)
Value:
-100.00% - +100.00% ★ 0 % of f
MAX.
- f
MIN
When the PI controller is active the maximum
frequency can be exceeded by 10%. The same
applies when slip compensation is active.
★ = ROM default setting. Text in ( ) = display text. Figures in [ ] are used when communicating with the bus.
22
Artisan Technology Group - Quality Instrumentation ... Guaranteed | (888) 88-SOURCE | www.artisantg.com
Page 22

VLT® Series 2000 Programming
208 Digital Reference 4 (REF. 4 DIG)
Value:
-100.00% - +100.00% ★ 0 % of f
MAX - fMIN
Function:
The digital speed references are generated internally in the
unit and presented as a percentage of the difference
between the f
202, added to f
MAX
and f
MIN
selected in parameters 201 and
MIN
.
Description:
By means of terminal 29 you can switch between the other
references (terminal 29 = 0 V) and the sum of the other/
digital references (terminal 29 = 24 V).
You must select Digital reference in parameter 402 and 403
to file one of the digital references:
Terminal 18/27 Terminal 19
0 0 Digital reference 1
1 0 Digital reference 2
0 1 Digital reference 3
1 1 Digital reference 4
209 Current Limit (CURRENT LI)
Value:
0.3 to I
VLT,MAX
Function:
Use this parameter to set the maximum intermittent output
current. If the current limit is exceeded, the output
frequency is reduced until the current falls to below the
current limit. The output frequency will not increase to the
reference level until the current has fallen below the current
limit.
Description of choice:
The value set at the factory corresponds to a load which is
160% (VLT 2030, 3Ø 208-240 V: 140%) of the rated output
current. If the current limit is to be used as motor protection,
the rated motor current must be programmed. Parameter
310 determines the length of time that the drive will run in
current limit before an overcurrent fault. The load range
between 100 and 160% can be programmed, but it is only
intended for intermittent operation therefore the unit can
only give an output of 160% (VLT 2030, 3Ø 208-240 V:
140%) for 60 seconds. The intermittent operating time will
be extended as the load drops below 110%, and becomes
unlimited at 100%.
If the switching frequency is higher than 4.5 kHz
this period will be shorter.
210 Warning: Low Frequency (LO FREQ. W)
Value:
0 to 500 Hz ★ 120 Hz
Function:
Set the low frequency (f
) at which the warning is to
LOW
occur.
Description:
If the output frequency falls below the frequency set (f
LOW
),
the display shows LO FREQ. WARN.
You can also choose to program the signal outputs in
parameters 408 and 409 to give a signal.
211 Warning: High Frequency (HI FREQ. W)
Value:
0 to 500 Hz ★ 120 Hz
Function:
Set the high frequency (f
) at which the warning is to
HIGH
occur.
Description:
If the output frequency increases above the frequency set
(f
), the display will read HI FREQ. WARN.
HIGH
You can also choose to program the signal outputs in
parameters 408 and 409) to give a signal.
213 Warning: High Current (HI CURR. W)
Value:
0.0 to I
VLT,MAX
★ I
VLT,MAX
Function:
Set the current (I
) at which the warning is to occur.
HIGH
Description of choice:
If the motor current rises above the I
programmed, the
HIGH
display will read HI CURR. WARN.
You can also choose to program the signal outputs in
parameters 408 and 409 to give a signal.
215 Accel (ramp-up) Time (RAMP UP TI)
Value:
0.1 to 800 sec. ★ 5 s
Function:
Using this parameter you can record the required
acceleration time from 0.1 Hz to the rated output frequency
(parameter 105).
Description:
To ensure the fastest possible start, choose a value for the
ramp-up time so that the current limit is not activated. The
ramp-up time is always defined as the acceleration time
from 0 Hz to the rated motor frequency.
★ = ROM default setting. Text in ( ) = display text. Figures in [ ] are used when communicating with the bus.
Artisan Technology Group - Quality Instrumentation ... Guaranteed | (888) 88-SOURCE | www.artisantg.com
23
Page 23

Programming VLT® Series 2000
216 Decel (ramp-down) Time (RAMP DOWN)
Value:
0.1 to 800 sec. ★ 5 s
Function:
Using this parameter you can record the required
deceleration time from rated output frequency to 0 Hz.
Description:
The ramp-down time can be selected in the range 0.1-800
seconds. If the ramp-down time is too short the VLT's
voltage limit becomes active, which will extend the rampdown time. Short ramp-down times will require a VLT unit
with a brake function and installation of a brake resistor.
The ramp-down time is always defined as the deceleration
time from the rated motor frequency to 0 Hz.
218 Quick Stop Ramp (QUICK STOP RAMP)
Value:
0.1 - 800 sec. ★ 1 s
Function:
Using this parameter you can choose an alternative
deleceration ramp - a programmable quick stop ramp.
Description of choice:
The ramp-down time can be selected in the range 0.1 - 800
seconds, calculated from the rated frequency to 0 Hz. If the
ramp-down time is too short the VLT's voltage limit
becomes active, which will extend the ramp-down time.
Short ramp-down times will require a VLT unit with a brake
function and installation of a brake resistor.
230 Digital Speed Up/Down (DIG. SPEED UP/DOWN)
Value:
★ Disable (DISABLE) [0]
Enable (ENABLE) [1]
Enable and Save (ENABLE and SAVE) [2]
Function:
Using this parameter you can make the VLT adjustable
frequency drive lock the output frequency to the latest
indicated speed reference.
Description:
You can choose to have either digital speed up/down
(terminal 18/27 and 19) or other speed references. When
you have chosen
(terminal 18) and
402/404 and 403.
When Enable and Save is selected a speed will be saved
automatically after new start-up.
The other references will not be active so that the digital
references cannot be combined with other references.
Enable
you must choose
Speed Down
Speed Up
(terminal 19) in parameters
224 Carrier Frequency (CARRIER FR)
Value:
2.0 to 14.0 kHz ★ 4.5 kHz
Function:
The set value determines the carrier frequency of the
inverter. Changing the carrier frequency may minimize
acoustic noise from the motor.
Description:
It is possible to change the carrier frequency between 2
and 14 kHz. The disadvantages of operating at a high
carrier frequency are:
- reduced continuous output current
- reduced efficiency
- higher capacitive leakage current
- increased RFI radiation from the VLT
★ = ROM default setting. Text in ( ) = display text. Figures in [ ] are used when communicating with the bus.
24
Artisan Technology Group - Quality Instrumentation ... Guaranteed | (888) 88-SOURCE | www.artisantg.com
Page 24

VLT® Series 2000 Programming
Group 3 -- Functions and Timers
300 Brake Function (START FREQ)
Value:
★ Not Applied (NOT APPLIED) [0]
Applied (APPLIED) [1]
Function:
Using this parameter you can inform the VLT adjustable
frequency drive that a brake function and a brake resistor
have been connected.
Description:
Choose Applied if you use a brake function and a brake
resistor.
306 DC Braking Time (DC-BRAKE T)
Value:
0 to 60 sec. ★ 0 sec.
Function:
Using this parameter you can record how long the DC
braking must be active
Description:
When you choose the braking time you must consider if you
want to maintain the braking torque or if you want to use a
stop function.
The DC braking time must be ≠ 0 to activate DC braking.
307 DC Brake Cut-in Frequency (DC-BRK ON)
Value:
0 to 500 Hz ★ 1 Hz.
Function:
Using this parameter you can record the output frequency
at which DC braking must start when ramping down to
standstill.
Description:
The cut-in frequency depends on the application. The cut-in
frequency must be ≠ 0 to activate DC braking. Instaed of
using this parameter you can activate DC braking via
terminal 27 if a DC braking time and a DC brake voltage
have been recorded.
308 DC Brake Voltage (DC-BRK VOL)
Value:
0 to 50 V ★ 10 V
Function:
Using this parameter you can record the DC brake voltage
for the motor.
Description:
The size of the voltage depends on the motor size. The
bigger the motor the lower the DC brake voltage.
WARNING: At frequent DC-braking the DC brake
voltage should not be too high. This is to avoid
!
∆
309 Reset Function (RESET MODE)
Value:
★ Manual reset (MANUAL) [0]
Automatic reset 1 (AUTO 1) [1]
Automatic reset 5 (AUTO 5) [5]
Function:
Using this parameter you can choose how you want to
reset an alarm
Description:
If you choose
adjustable frequency drive via the keyboard or via terminals
19, 27, or 29. The display shows TRIP.
If you choose
reset once after alarm. The display shows AUTO START.
As long as the display shows AUTOSTART the unit will try
to reset every 20 minutes.
If you choose Auto Reset 5 thr VLT will automatically try to
reset 5 times after alarm. The display shows AUTO START.
!
∆
motor overload. The DC brake voltage must be ≠
0 to activate DC braking.
Manual Reset
Auto Reset 1
WARNING: The motor may start without warning.
you must reset the VLT
the VLT will automatically try to
★ = ROM default setting. Text in ( ) = display text. Figures in [ ] are used when communicating with the bus.
Artisan Technology Group - Quality Instrumentation ... Guaranteed | (888) 88-SOURCE | www.artisantg.com
25
Page 25
Programming VLT® Series 2000
310 Trip Delay at Current Limit (TRIP DLY@C)
Value:
0 to 60 secs.
★ Infinite at 61
Function:
Using this parameter you can record how long the current
limit may be active before trip.
Description:
Record the delay time.
WARNING: If you choose Infinite, and your load
is between 105% and 160%, trip may occur after
!
∆
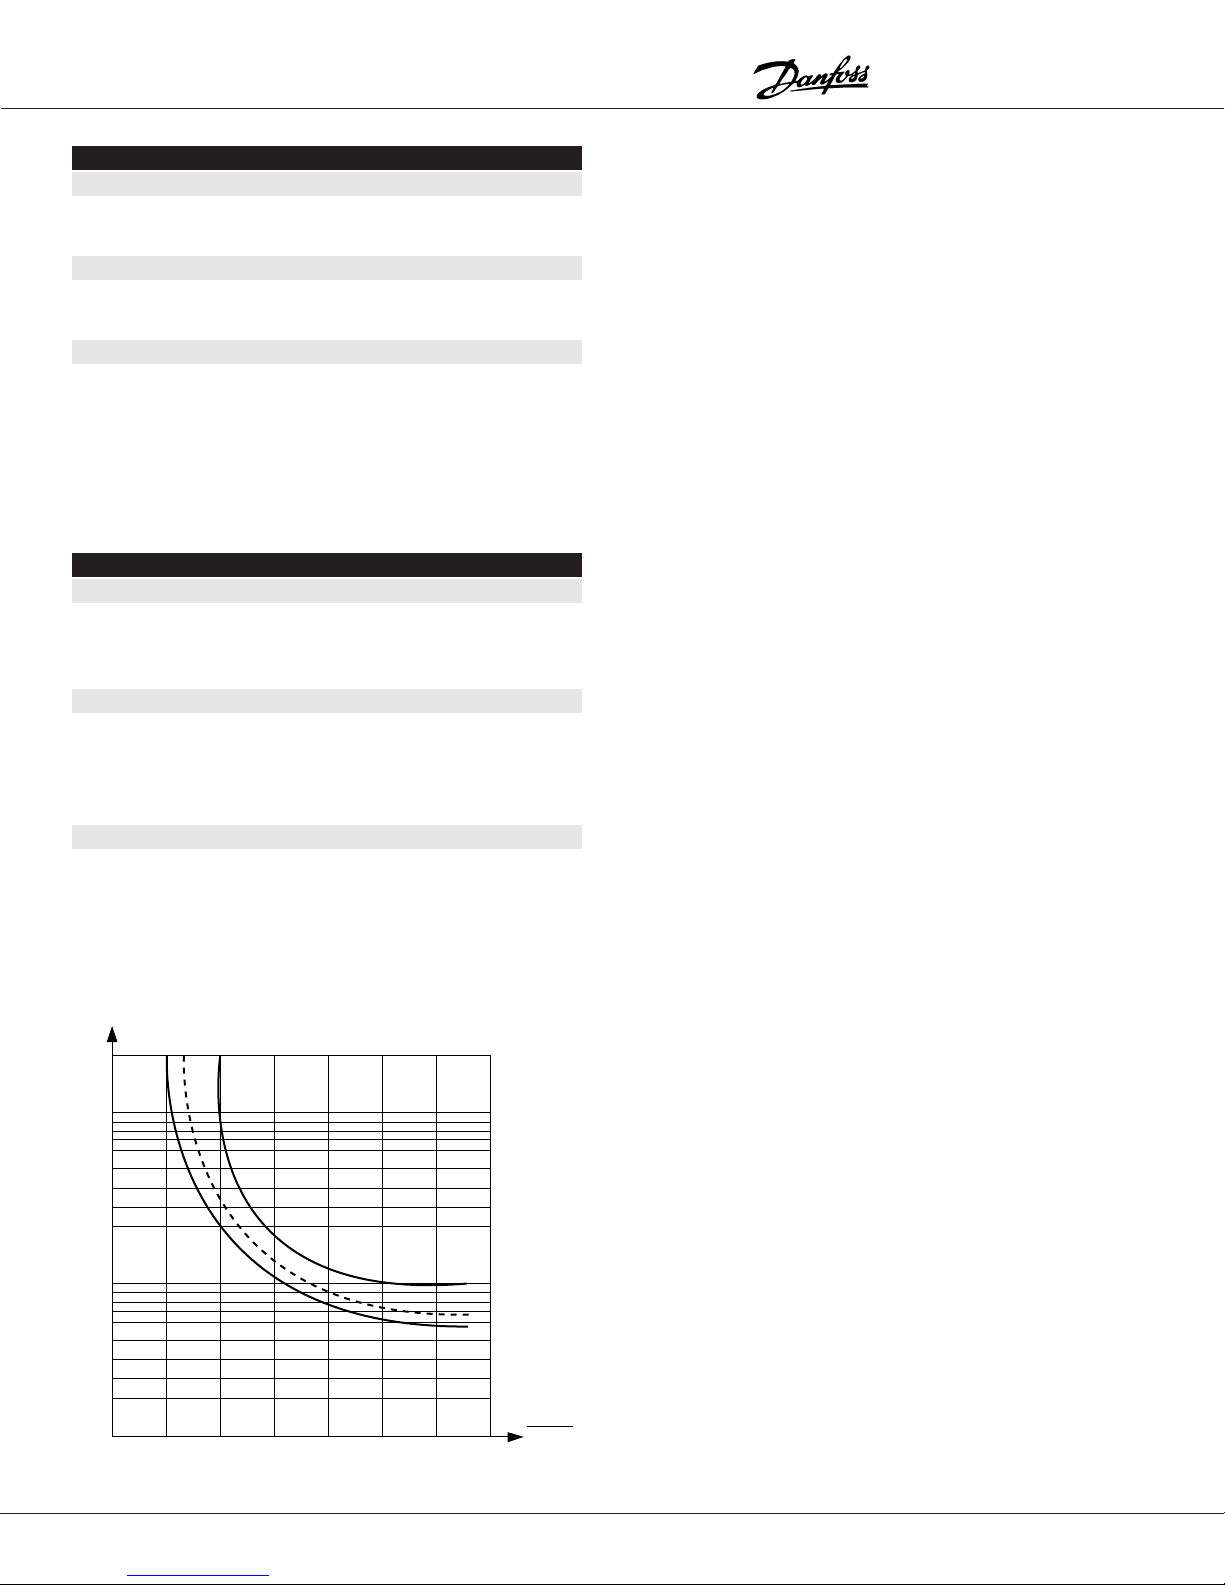
315 Motor Thermal Protection (MOTOR THER)
Value:
★ Off (PROTECT-OFF) [0]
Only Warning (ONLY WARNING) [1]
Trip (TRIP) [2]
Function:
The VLT adjustable frequency drive calculates whether the
motor temperature exceeds the permissible limits. The
calculation is based on 1.16 x rated motor current, as set in
parameter 107.
Description:
Select
Select
the motor is overloaded. The drive can be programmed to
give an external warning through the signal outputs set by
parameters 408 through 409.
Select
a given interval.
Off
(OFF) if no warning or tripping is required.
Warning
Trip
if only a warning is to be displayed when
if you want warning and trip to be displayed.
t [s]
2000
1000
6
5
4
3
2
100
60
50
40
30
20
10
★ = ROM default setting. Text in ( ) = display text. Figures in [ ] are used when communicating with the bus.
1.0 1.2 1.4 1.6 1.8 2.0
26
Artisan Technology Group - Quality Instrumentation ... Guaranteed | (888) 88-SOURCE | www.artisantg.com
PAR 105
2xPAR 105
0.2xPAR 105
M
I
I
M NOM
MENU 107
Page 26

VLT® Series 2000 Programming
Group 4 -- Inputs and Outputs
402 Terminal 18 (TERMINAL 18 START)
Value:
★ Start (START) [0]
Pulse Start (PRESS CONT.) [1]
No Function (NO FUNCTION) [2]
Speed Up (SPEED UP) [3]
Digital Reference Select (SPEED SELECT) [4]
Reversing (REVERSING) [5]
Reset and Start (RESET&START) [6]
Motor Coasting & Start (COASTING/START) [7]
Function:
This parameter gives the motor various start signals.
Description:
Start :
[0]
24 V on terminal 18 will make the motor ramp up to the set
reference. 0 V will make the motor ramp down to stop.
[1]
Pulse Start
On selection of Press Cont. in parameter 402 and
application of a pulse (24 V) to terminal 18, the motor will
ramp up to the set reference. Futher pulses do not have
any effect. (Therefore the motor must be stopped via
terminal 27 (parameter 404).
[2]
No Function
Locks the input.
[3]
Speed Up
This is used together with parameter 230. It is possible to
make the output frequency increase towards fMAX as long
as 24 V is applied to terminal 18.
At 0 V on terminal 18 the output frequency is maintained.
Also refer to parameter 403).
[4]
Digital Reference Select
Together with parameter 403 you can choose between four
different digital references:
Terminal 18/27 Terminal 19
[5]
Reversing
If the motor reverses when 24 V is applied to terminal 18, it
will change direction again when 0 V is applied.
[6]
Reset and Start
The function can be used as start when terminals 27 and
19 are used to select between the digital references and
terminal 29 to change setup (8 digital speeds). 24 V applied
to terminal 18 resets the VLT adjustable frequency drive
and the motor ramps up to the set reference according to
the ramp-up time set in parameter 215.
:
:
:
:
0 0 Digital reference 1
1 0 Digital reference 2
0 1 Digital reference 3
1 1 Digital reference 4
:
:
[7]
Motor Coasting and Start
24 V applied to terminal 18 makes the motor ramp up to the
set reference..
0 V applied to terminal 18 sets the motor coasting, running
freely until it stops. This can be used in connection with a
mechanical brake.
403 Terminal 19 Reversing (TERM 19 REVERSING)
Value:
★ Reversing (REVERSING) [0]
Start Reversing (START REV) [1]
No Function (NO FUNCTION) [2]
Speed Down (SPEED DOWN) [3]
Digital Reference Select (SPEED SELECT) [4]
Reset (RESET) [5]
Function:
Using this parameter (terminal 19) you can e.g. change the
motor's direction.
Description:
[0]
Reversing
Reverses the motor, when 24 V is applied to terminal 19
and changes the rotation direction again when 0 V is
applied to the terminal.
[1]
Start Reversing
Reverses the motor, when 24 V is applied to terminal 19.
The motor stops when 0 V is applied to the terminal.
[2]
No Function
Locks the input.
[3]
Speed Down
This is used together with parameter 230. It is possible to
make the output frequency drop towards f
V is applied to terminal 19.
At 0 V applied to terminal 19, the output frequency in
question is maintained. Also refer to parameter 402.
[4]
Digital Reference Select
Together with parameter 402 you can choose between four
different digital references:
Terminal 18/27 Terminal 19
[5]
Reset
Incase of alarm the VLT can be reset by applying 24 V to
terminal 19.
:
:
:
:
0 0 Digital reference 1
1 0 Digital reference 2
0 1 Digital reference 3
1 1 Digital reference 4
:
:
, as long as 24
MIN
:
★ = ROM default setting. Text in ( ) = display text. Figures in [ ] are used when communicating with the bus.
Artisan Technology Group - Quality Instrumentation ... Guaranteed | (888) 88-SOURCE | www.artisantg.com
27
Page 27

Programming VLT® Series 2000
404 Terminal 27 Stop (INPUT 27)
Value:
Motor Coasting Stop (MTR. COAST) [0]
Quick-Stop (Q-STOP) [1]
DC Braking (DC-BRAKE) [2]
★ Reset and Motor Coasting (RST & COAST) [3]
Stop (STOP=PRESS) [4]
Reset and Start (RST & START) [5]
Speed Down (SPEED DOWN) [6]
Digital Reference Select (SPEED SELECT) [7]
Function:
Using this parameter (terminal 27) you can give the motor
various stop signals.
Description:
[0]
Motor coasting stop
:
If 0 V is applied to terminal 27 the motor will coast to a stop.
[1]
Quick Stop
:
If 0 V is applied to terminal 27 the motor will brake to a stop
according to the ramp-down time set in parameter 218.
A DC current brakes the motor after ramping down to 0,
according to the setting of parameters 306-308.
[2]
DC Brake
:
If 0 V is applied to terminal 27 the motor will brake to a stop
according to the settings of parameters 306 and 308.
[3]
Reset and Motor Coasting
:
If 0 V is applied to terminal 27 the motor will start coasting
and the VLT adjustable frequency drive is reset.
[4]
Stop = Press
:
A circuit breaker between terminals 12 and 27, when
opened briefly causes ramp-down to stop.
[5]
Reset and Start
:
This can be used as a start function when you use
terminals 18 and 19 to select a digital reference. 24 V
applied to terminal 27 will make the adjustable frequency
drive reset and the motor ramp up to the set reference
according to the ramp-up time set in parameter 215.
[6]
Speed Down
:
This is used together with parameter 230. It is possible to
make the output frequency drop towards f
, as long as 24
MIN
V is applied to terminal 27.
At 0 V applied to terminal 27, the output frequency in
question is maintained. Also refer to parameter 402.
[7]
Digital Reference Select
:
Together with parameter 402 you can choose between four
different digital references:
Terminal 18/27 Terminal 19
0 0 Digital reference 1
1 0 Digital reference 2
0 1 Digital reference 3
1 1 Digital reference 4
405 Terminal 29 Jog (TERMINAL 29 JOG)
Value:
★ Jog (JOG) [0]
Start (START) [1]
Digital Reference (DIGITAL REF.) [2]
Pulse Input, 100 Hz (PULSES 100 Hz) [3]
Pulse Input, 1 KHz (PULSES 1 KHz) [4]
Pulse Input, 10 KHz (PULSES 10 KHz) [5]
Setup Select (SETUP SELECT) [6]
Reset (RESET) [7]
Reversing (REVERSING) [8]
Speed Down (SPEED DOWN) [9]
Function:
Using this parameter (terminal 29) you can give the motor
different jog signals.
Description:
You can set the output frequency to a pre-programmed
value (jog in parameter 203). Recording Digital reference
you can enable/disable values stored in parameters 205-
208.
If terminal 29 is used for either pulse signal reference (open
loop) or pulse signal feedback (closed loop) choose one of
the pulse inputs [3] - [5].
If Multi Setup is selected in parameter 001, the terminal can
be used to switch between setups 1 and 2.
★ = ROM default setting. Text in ( ) = display text. Figures in [ ] are used when communicating with the bus.
28
Artisan Technology Group - Quality Instrumentation ... Guaranteed | (888) 88-SOURCE | www.artisantg.com
Page 28

VLT® Series 2000 Programming
408 Terminal 46 Output (TERMINAL 46 OUTPUT)
Value:
Unit Ready (UNIT READY) [0]
★ Unit Ready Remote Control (UNT RDY RCTL) [1]
Enabled not Warning (ENABLED no WR) [2]
Running (RUNNING) [3]
Running, no warning (RUNNING noWR) [4]
Running in range, no warning (RUNinRANGE) [5]
Speed = reference, no warning (RUN@REF noWR) [6]
Alarm (ALARM) [7]
Alarm or warning (ALARM or WARN) [8]
Current limit (CURRENT LIMIT) [9]
Out of frequency range (OUT FREQ RGE) [10]
Out of current range (OUT CURR RGE) [11]
Reversing (REVERSING) [12]
Pulse output 15 Hz - 1.5 kHz (PULSEOUT 1500) [13]
Pulse output 15 Hz - 3.0 kHz (PULSEOUT 3000) [14]
Pulse output 15 Hz - value par. 005 (PULSPAR005) [15]
Send/receive RS485 (CTS/RTS-RS485) [18]
Receive/send RS485 (CTS/RTS-RS485) [19]
Function:
Using this parameter you can choose between different
output signals. The output is an open collector output and
therefore a pull-up resistor must be connected to terminal
12 (+24 V).
Description:
For the pulse output the lowest output frequency is 15 Hz
and the highest output frequency is 5 Hz.
RS 485 send/receive control is used when the serial port is
connected to the RS 485 network via a RS 232/RS 485
adapter.
Connection example where the signal is active high:
VLT
12
20
I
Imp
max
min
= 600
= 40mA
Connection example where the signal is active low:
VLT
12
46
I
max
Imp
min
= 600
= 40mA
★ = ROM default setting. Text in ( ) = display text. Figures in [ ] are used when communicating with the bus.
Artisan Technology Group - Quality Instrumentation ... Guaranteed | (888) 88-SOURCE | www.artisantg.com
20
Connection example using RS 232/485 adapter:
VLT
12
46
20
12V
I
Imp
max
min
= 600
= 30mA
SND/RCV
29
Page 29

Programming VLT® Series 2000
409 Terminal 01 Relay Output (RELAY 01)
Value:
★ Unit ready (UNIT READY) [0]
Unit ready - remote control (UNT RDY RCTL) [1]
Enabled no warning (ENABLED noWR) [2]
Running (RUNNING) [3]
Running, no warning (RUNNING noWR) [4]
Running in range, no warning (RUNinRANGE) [5]
Running on reference, no warn (RUN@REF noWR) [6]
Alarm (ALARM) [7]
Alarm or warning (ALARM or WARN) [8]
Current limit (CURRENT LIMIT) [9]
Out of frequency range (OUT FREQ RGE) [10]
Out of current range (OUT CURR RGE) [11]
Reversing (REVERSING) [12]
Description:
You can use the relay output 01 to indicate selected status
and warnings. The relay is activated when the conditions
for the selected data values are fulfilled.
When relay output 01 is not active, there is no connection
between terminal 01 and 02. The relay output is potentialfree and the maximum load is 2 A at 24 VDC or 250 VAC.
411 Analog Input Current (ANALOG REFTYPE)
Value:
★ Linear between minimum and maximum (LINEAR) [0]
Proportional with lower limit (PROP W/LIMIT) [1]
Function:
Is used to determine which frequency converter is to follow
an analog reference signal.
Description:
When you select [1] the reference signal will not affect the
output frequency until it reaches a value equivalent to the
set minimum frequency (parameter 201).
412 Terminal 53 Analog Input Voltage
(INPUT #53)
Value:
No Function (NO FUNCTION) [0]
★ 0 to 10 V (0 to 10 V DC) [1]
10 to 0 V (10 to 0 V DC) [2]
Description:
Record the polarity of analog control signals to inputs 53
and 60. You can choose between voltage, current and
polarity.
If you use both inputs for reference signals the total
reference signal will be a summation.
413 Terminal 60 Analog Input Current
(INPUT #60)
Value:
No Function (NO FUNCTION) [0]
★ 0 to 20 mA (0 to 20 mA) [1]
4 to 20 mA (4 to 20 mA) [2]
20 to 0 mA (20 to 0 mA) [3]
20 to 4 mA (20 to 4 mA) [4]
Description:
If you are using a PI controller one of the inputs or the pulse
input must be used for the feedback signal.
If you are using current control, one of the inputs must be
used to set a current limit.
Naturally these choices block the same type of reference
signal.
Output
Frequency
MAX
0
1
MIN
★ = ROM default setting. Text in ( ) = display text. Figures in [ ] are used when communicating with the bus.
30
Artisan Technology Group - Quality Instrumentation ... Guaranteed | (888) 88-SOURCE | www.artisantg.com
Ref.
Page 30

VLT® Series 2000 Programming
Group 5 -- Serial Data Interface
500 Address (ADDRESS)
Value:
01 to 99 (echo)
101 to 199 ★ 01
Function:
Using this parameter you set the bus address for each VLT
via the control panel. Howeve,r the first telegram after the
voltage connection can change the bus address. This
means that address change from the bus is no longer
possible. The echo function enables connection of several
VLT 2000 adjustable frequency drives to the same PC.
Description:
Specify an address of each unit connected. If the PC/PLC
addresses 00, all drives connscted will be written to at the
same time. The units in this case not give a reply to the
master.
address change via bus enables address change on units
without display.
The echo function is active on address 101-199, shown as
01-99 ECHO. The ring is built up by connecting Tx on the
first VLT to Rx on the next VLT.
501 Bits/Sec. Baud Rate (BAUD RATE)
Value:
300, 600, 1200 ★1200
Function:
Using this parameter you can set the speed at which a
character is transmitted via the RS 232 port. It is defined as
the number of bits transmitted per second.
Description:
The transmission rate of the VLT must be set in accordance
with the transmission rate of the PLC/PC applied. The
transmission rate can only be altered via the control panel.
502 Data Readout (DATA READO)
Value:
★ [0] Reference (REFERENCE %) %
[1] Frequency (FREQUENCY Hz) Hz
[2] Display/Feedback (FDBK UNIT) “unit”
[3] Current (CURRENT A) A
[4] Torque (TORQUE %) %
[5] Power (POWER kW) kW
[8] Motor voltage (OUTPUT VOLT.V) V
[9] DC voltage (DC BUS V) V
[10] Motor thermal load (ETR (MOT) %) %
[11] Thermal inverter load (ETR (VLT) %) %
[12] Digital input (DIG IN CODE) binary code
[13] Analog input 1 (ANALOG IN 53) in terminal 53
[14] Analog input 2 (ANALOG IN 60) in terminal 60
[15] Warning parameter (WARN CODE) binary code
[16] Control word (CONTROL WORD)
[17] Status word (STATUS WORD)
[18] Alarm parameter (ALARM CODE) binary code
[19] Software version no. 4 digits
The last unit's Tx is connected to Rx on the PC. Terminal 20
(frame) must be connected throughout, but with the PC
connected at only one end.
★ = ROM default setting. Text in ( ) = display text. Figures in [ ] are used when communicating with the bus.
Artisan Technology Group - Quality Instrumentation ... Guaranteed | (888) 88-SOURCE | www.artisantg.com
Description:
NOTE: Menu 502 can only be selected from the bus.
These values are read-only values.
The PC/PLC may prompt for a value from an index
between 0 and 19.
31
Page 31

Programming VLT® Series 2000
502 Data Read-Out (DATA READOUT) continued
[15] Warning parameter messages:
Frequency low re; parameter 210 value: 32768
Frequency high re; parameter 211 value: 16384
Current limit, re; power section value: 8192
Key blocked value: 2048
Motor overload value: 1024
Inverter overload value: 512
Outside frequency range value: 256
Current higher than par. 213 value: 128
Data locked value: 64
Read only value: 32
Current limit re; control card value: 16
Overvoltage value: 8
Undervoltage value: 4
Can only be changed in stop mode value: 2
Parameter limit value: 1
Usually only one warning occurs at a time, so one of the
figures in parameter 502, index 15, will show. In the event
of several simultaneous warnings, e.g. Motor overload and
Current limit, re; control card, the two values are added;
Motor overload: 512
Current limit re; control card:
Reading in par. 502, index 15: 528
[16] Alarm parameter messages:
Excess temperature, re; power section value: 16384
Ground connection value: 4096
Overvoltage value: 1024
Undervoltage value: 512
Unspecified inverter fault value: 236
Inverter overload value: 128
Motor overload value: 64
Short circuit value: 16
VLT attempts restart value: 8
Overcurrent value: 4
Trip locked value: 1
In contrast to warnings, alarms will always be combined,
i.e. at least 2 of the alarm parameters apply, e.g.
Unspecified inveter fault will usually occur with another
alarm, e.g. Inverter overload. It will give the following
reading:
Unspecified inverter fault: 256
Inverter overload:
Reading in par. 502, index 18: 384
In case of Short circuit Ground connection and Excess
temperature, re; power section, Trip locked will also occur.
This will give a typical reading:
Groung connection: 4096
Unspecified inverter fault: 256
Trip locked
Reading in par. 502, index 18: 4353
+ 16
+ 128
+ 1
503 Coasting (COAST)
Value:
Digital (DIGITAL) [0]
Bus (BUS) [1]
Logical and (AND) [2]
★ Logical or (OR) [3]
Description:
In parameters 503 to 510 you can choose to control the
VLT adjustable frequency drive via the control unit's
terminals (digitally) and or via the bus.
When using
the digital control terminals are either dependent on or
overruled by the bus commands.
504 Quick-Stop (Q-STOP)
Value:
Digital (DIGITAL) [0]
Bus (BUS) [1]
Logical and (AND) [2]
★ Logical or (OR) [3]
Description:
In parameters 503 to 510 you can choose to control the
VLT adjustable frequency drive via the control unit's
terminals (digitally) and or via the bus.
When using
the digital control terminals are either dependent on or
overruled by the bus commands.
505 DC Brake (DC-BRAKE)
Value:
Digital (DIGITAL) [0]
Bus (BUS) [1]
Logical and (AND) [2]
★ Logical or (OR) [3]
Description:
In parameters 503 to 510 you can choose to control the
VLT adjustable frequency drive via the control unit's
terminals (digitally) and or via the bus.
When using
the digital control terminals are either dependent on or
overruled by the bus commands.
506 Start (START)
Value:
Digital (DIGITAL) [0]
Bus (BUS) [1]
Logical and (AND) [2]
★ Logical or (OR) [3]
Description:
In parameters 503 to 510 you can choose to control the
VLT adjustable frequency drive via the control unit's
terminals (digitally) and or via the bus.
Logical
Logical
Logical
and
and
and
Bus
values in parameters 503-510,
Bus
values in parameters 503-510,
Bus
values in parameters 503-510,
★ = ROM default setting. Text in ( ) = display text. Figures in [ ] are used when communicating with the bus.
32
Artisan Technology Group - Quality Instrumentation ... Guaranteed | (888) 88-SOURCE | www.artisantg.com
Page 32

VLT® Series 2000 Programming
When using
Logical
and
Bus
values in parameters 503-510,
the digital control terminals are either dependent on or
overruled by the bus commands.
507 Direction of Rotation (DIRECTION)
Value:
★ Digital (DIGITAL) [0]
Bus (BUS) [1]
Logical and (AND) [2]
Logical or (OR) [3]
Description:
In parameters 503 to 510 you can choose to control the
VLT adjustable frequency drive via the control unit's
terminals (digitally) and or via the bus.
When using
Logical
and
Bus
values in parameters 503-510,
the digital control terminals are either dependent on or
overruled by the bus commands.
508 Reset (RESET)
Value:
Digital (DIGITAL) [0]
Bus (BUS) [1]
Logical and (AND) [2]
★ Logical or (OR) [3]
Description:
In parameters 503 to 510 you can choose to control the
VLT adjustable frequency drive via the control unit's
terminals (digitally) and or via the bus.
When using
Logical
and
Bus
values in parameters 503-510,
the digital control terminals are either dependent on or
overruled by the bus commands.
509 Selection of Setup (SETUP SELE)
Value:
Digital (DIGITAL) [0]
Bus (BUS) [1]
Logical and (AND) [2]
★ Logical or (OR) [3]
Description:
In parameters 503 to 510 you can choose to control the
VLT adjustable frequency drive via the control unit's
terminals (digitally) and or via the bus.
When using
Logical
and
Bus
values in parameters 503-510,
the digital control terminals are either dependent on or
overruled by the bus commands.
510 Selection of Speed (SPEED SELECT)
Value:
Digital (DIGITAL) [0]
Bus (BUS) [1]
Logical and (AND) [2]
★ Logical or (OR) [3]
Description:
In parameters 503 to 510 you can choose to control the
VLT adjustable frequency drive via the control unit's
terminals (digitally) and or via the bus.
When using
Logical
and
Bus
values in parameters 503-510,
the digital control terminals are either dependent on or
overruled by the bus commands.
511 Bus Jogging 1 (BUS JOG 1)
Value:
0 to 500 Hz ★ 10 Hz
Function:
Parameter 511 has the same function as parameter 203,
but is controlled via the RS 232 port.
You can change over to jog frequency, which is a present
motor speed, by activating the "Jog" key. Using this function
you have access to one additional jog frequency.
Description:
For the jog frequency you can choose a value which is
lower than f
, but cannot be higher than f
MIN
MAX
.
514 Bus Bit 4 (BUS BIT 4)
Value:
★ Quick-stop (Q-STOP) [0]
DC braking (DC BRAKE) [1]
Description:
See parameters 404, 306, 307 and 308.
516 Bus Reference (BUS REFERE)
Value:
-100.00% to +100.00% ★ 0
Description:
If you choose
Local Reference
in parameter 003 after
choosing a bus reference, the bus reference will be
transferred to local reference.
517 Save Data Values (STORE DATA)
Value:
★ Off (OFF) [0]
On (ON) [1]
Description:
Setting parameter 517 to On stores the downloaded values.
Data values will be stored after you have pressed the
"Menu" key.
While the unit is storing data, the display will show (SAVE
DATA) and flash in line C.
★ = ROM default setting. Text in ( ) = display text. Figures in [ ] are used when communicating with the bus.
Artisan Technology Group - Quality Instrumentation ... Guaranteed | (888) 88-SOURCE | www.artisantg.com
33
Page 33

Programming VLT® Series 2000
Group 5 -- Serial Data Interface
Using the serial RS 232 port (terminals 71 and 72) you can
read and set parameters of the VLT adjustable frequency
drive and issue reference and control commands. The
serial port can be used for point to point communication
between the VLT and a PC. Communication takes place by
means of a protocol specified by Danfoss, and using the
echo function (parameter 500) you can connect several VLT
adjustable frequency drives.
The data format consists of 10 bits:
One start bit (logical 0)
Eight data bits
One stop bit (logical 1)
Set the baud rate (rate of transmission) in parameter 501
and the address of each unit in parameter 500.
Protocol:
The communication protocol for the VLT Series 2000
consists of 22 ASCII characters make it possible to operate,
set and read parameters, and to receive status feedback
from the VLT adjustable frequency drive.
The communication takes place in the following way:
The master sends a telegram to a VLT adjustable frequency
drive. Then the master awaits a reply from the VLT before
sending a new message. The reply to the master resembles
the telegram sent by the master, but now contains any
updated data values and the status of the VLT.
Data format Telegram format
34
Artisan Technology Group - Quality Instrumentation ... Guaranteed | (888) 88-SOURCE | www.artisantg.com
Page 34

VLT® Series 2000 Programming
Byte 1:
Start byte, which in this case must be the character
"<" (ASCII: 60).
Byte 2 and 3:
The two-digit address of the adjustable frequency drive.
This address is also programmed in parameter 500.
Sending to address 00 means transmission to all units
connected to the bus. None of the units will reply, but they
will carry out the command.
Byte 4:
Control parameter telling the drive what to do with the
following data values.
U (update)
Means that the data value, bytes (14-18), must be read into
the drive.
R (read)
Means that the master wishes to read the data value of the
parameter in bytes 9 through 12.
C (control)
Means that the drive reads only the four command bytes, 5
through 8, and returns with status. Parameter number and
data value are ignored.
I (read index)
Means that the drive reads the index and parameter and
returns with status. The parameter is stated in bytes 9
through 12 and index is stated in bytes 13 through 18.
Parameters with indices are read-only parameters. Action
will be taken on the control word.
Byte 5 through 8:
Control and status words, used to send commands to the
frequency converter and to send status from the frequency
converter to the master.
Byte 9 through 12:
The parameter number is inserted in these bytes.
Byte 13:
Used for the sign before data value in bytes 14 through 18.
All characters other than “-” are taken as “+”.
Byte 14 through 18:
Here is placed the data value of the parameter stated in
bytes 9 through 12. The value must be a whole number. If a
decimal point is needed, it is stated in byte 19.
NOTE:
Some data values have brackets with a number, for
example “[0]”. Use this number instead of the “Text”
data value.
Byte 19:
The position of the decimal point in the data value stated in
bytes 14-18. The number states the number of characters
after the decimal point. Consequently, byte 19 can be 0, 1,
2, 3, 4 or 5. For example, the number 23.75 is stated:
Byte no. 13 14 15 16 17 18 19
in ASCII character + 23750 3
If byte 19 = 9, this indicates an unknown parameter.
Byte 20 and 21:
Used for summary control. If there is to be no control, the
function can be cancelled by means of the “?” character
(ASCII: 63) in the two bytes.
Artisan Technology Group - Quality Instrumentation ... Guaranteed | (888) 88-SOURCE | www.artisantg.com
Byte 22:
Stop byte, stating the end of the telegram. The character
“>” is used (ASCII: 62).
35
Page 35

Programming VLT® Series 2000
VLT Status
The four control and status bytes are used to send
control commands to the adjustable frequency drive
when the telegram is sent from the master and to send
status from the VLT to the master when the telegram is
returned from the VLT adjustable frequency drive. The
four bytes operate as status from the VLT with the
following functions:
Status word
Byte 8 Byte 7 Byte 6 Byte 5
TCVVDOLSNSOONCVC
IUOLOUOPOTNNOOLO
MRLTETCE A A TN
ERT S AEWR32FS T
REAO OLDAT ATNR
SNGKNFO R / /U OO
TE O P≠NE L/ TL
O/TOEINOOTS
KOO PRRNAFF ER
KKSREAEGBFF/NEN
/TURTFL AAO
//ANAE /E32TBDT
O L T / D RLY
VOOL / I/ W I E R
EVVS N SA/ PD /E
0
REE RGBPR A
ASCII
@
A
B
C
D
E
F
G
H
I
J
K
L
M
N
O
SRRAU UENS RD
HSSUNRSE I T EY
/
OHHTSACDNA A
OOOO NO GR D/
1
TOO– GN= T Y
TTS ET R
15 14 13 12 11 10 09 08 07 06 05 04 03 02 01 00
0000000000000000
0001000100010001
0010001000100010
0011001100110011
0100010001000100
0101010101010101
0110011001100110
0111011101110111
1000100010001000
1001100110011001
1010101010101010
1011101110111011
1100110011001100
1101110111011101
1110111011101110
1111111111111111
T/RRN E
AFOEO A
RRLFT D
TE Y
QE
LA
IB
ML
IE
TD
O
K
N
NOTE: Each byte consists of 8 bits, but the frequency converter uses only the last 4 bits.
36
Artisan Technology Group - Quality Instrumentation ... Guaranteed | (888) 88-SOURCE | www.artisantg.com
Page 36

VLT® Series 2000 Programming
VLT Control Commands
The four control and status bytes are used to send control
commands to the VLT adjustable frequency drive when the
telegram is sent from the master, and to send status from
the VLT to the master when the telegram is returned from
the VLT. When these four bytes are used for control, they
have the following meaning:
Byte 8 Byte 7 Byte 6 Byte 5
NCCNNDJ JNRHQCOOO
0HHOOAOOOAOUOFFF
OO TGG ML IAFFF
FI IFFA FPDCS
UCCUU 21U KT321
NEENNN NS / C CCOOOCT S////
TOOTTTFFTORT
IFFI I FFIPAOEOOO
O OOV O MPNNNN
0
NSSNNA/ /N/P A
ASCII
/EE L /B321
RTT//IOO/SE L
/
E-- DNN TNRE
VUUCS RAAAD
1
EPPAL / ERBM
RTO STLP
S21CWV E E
IHDATD
N-OL
GUWI
PND
OFF 1: Makes a normal ramp stop of the motor and
opens the relay output of the VLT (relay off).
OFF 2: Makes a motor coast and opens the relay output
(relay off)
OFF 3: Same as OFF 1, but the motor makes a
quick-stop.
Bit 10: This bit has to be 1, if any of the control commands
should cause a reaction.
CONTROL WORD
15 14 13 12 11 10 09 08 07 06 05 04 03 02 01 00
@
A
B
C
D
E
F
G
H
I
J
K
L
M
N
O
P
0000000000000000
0001000100010001
0010001000100010
0011001100110011
0100010001000100
0101010101010101
0110011001100110
0111011101110111
1000100010001000
1001100110011001
1010101010101010
1011101110111011
1100110011001100
1101110111011101
1110111011101110
1111111111111111
NOTE: Each byte consists of 8 bits, but the frequency converter uses only the last 4 bits.
Artisan Technology Group - Quality Instrumentation ... Guaranteed | (888) 88-SOURCE | www.artisantg.com
37
Page 37

Programming VLT® Series 2000
Group 600 -- Service and Diagnostics
606 Total Operation Hours (TOTAL OP HRS)
Description:
See parameter 610.
607 Running Hours (RUNNING HRS)
Description:
See parameter 610.
608 Number of Power-ups (NO POWER)
Description:
See parameter 610.
609 Number of Over-temperature (NO OVERTE)
Description:
See parameter 610.
610 Number of Over-voltage (NO OVERVO)
Description:
In formation stored by the VLT adjustable frequency drive
for later analysis.
Parameter 606-607 are only updated every hour.
★ = ROM default setting. Text in ( ) = display text. Figures in [ ] are used when communicating with the bus.
38
38
Artisan Technology Group - Quality Instrumentation ... Guaranteed | (888) 88-SOURCE | www.artisantg.com
Page 38

VLT® Series 2000 Programming
Status Messages
UNIT READY (LOCAL)
Control card and power section are powered up and OK.
When the adjustable frequency drive's output
frequency is reduced more quickly than the motor
speed (due to inertia) can be changed, the motor
will act as a generator. It will send energy back to
the VLT and as a result the intermediate circuit
voltage will increase.
ENABLED STOP (LOCAL)
Unit ready and Q-stop signal active.
START (LOCAL)
Enabled and start signal applied, no or too low reference
signal.
Alarm Messages
RUN OK (LOCAL)
Unit is running on reference.
JOGGING (LOCAL)
RAMPING (LOCAL)
If the warning OVERVOLTAGE is displayed when
the speed is reduced, you can increase the rampdown time. If that is not possible, it may be
necessary to activate the dynamic brake function
with brake resistor. If the warning occurs in other
situations, the problem is due to the AC line.
The following alarm messages are displayed after the
power section of the VLT adjustable frequency drive has
been disconnected.
Messages Caused by Consequence Reset
INVERTER Unknown error (not one of those Yes, possible
FAULT errors mentioned below)
OVER a: Supply voltage too high a: Lower supply voltage Yes, possible
VOLTAGE b: Ramp-down time too short b: Increase ramp down time or
activate brake function to avoid
overvoltage
UNDER Supply voltage too low or Yes, possible
VOLTAGE loss of AC line phase
OVER Motor current too high or wrong Check motor parameters Yes, possible
CURRENT motor parameter setting Use a larger VLT
GROUND Short circuit between VLT Check installation No, power off required
FAULT power section and ground and cable length
SHORT Short circuit between Check installation No, power off required
CIRCUIT two motor phases
OVER TEMP. VLT temperature too high Check installation No, power off required
OVER Load too heavy Yes, possible after VLT
LOAD thermal protection is
lower than 100%
MOTOR Motor protection Yes, possible after VLT
TRIP motor protection is zero
★ = ROM default setting. Text in ( ) = display text. Figures in [ ] are used when communicating with the bus.
Artisan Technology Group - Quality Instrumentation ... Guaranteed | (888) 88-SOURCE | www.artisantg.com
39
39
Page 39

Programming VLT® Series 2000
Warning Messages
Messages Caused by Consequence Reset
CURRENT LIMIT Over load VLT decreases speed - VOLTAGE HIGH Regenerative motor operation or The power section of the VLT - -
supply voltage too high stops within 5 sec. - -
VOLTAGE LOW Missing phase or low supply The power section of the VLT - -
stops within 5 sec.
INVERTER TIME Inverter overload At 98.2% load VLT displays the - -
following warning:
"INVERTER TIME"
At 100% load:
"ALARM OVERLOAD"
MOTOR TIME Motor overload VLT operates at least 60 sec. *) - -
VLT operates between 100% and depending on the value of the - -
load before the power section of
the VLT stops
LOW FRQ WARN Output frequency lower than the Depending on application - -
value in parameter 210 Warning only
HI FRQ WARN Output frequency higher than the Depending on application - -
value in parameter 211 Warning only
HI CUR WARN Motor current higher than the Depending on application - -
value in parameter 213 Warning only
*) The time is reduced at a higher switch frequency.
Reset Messages
Messages Caused by Consequence Reset
AUTO START VLT tripped The VLT attempts to restart - TRIP Fault condition of the VLT or the The power section of the VLT Yes
motor stops
TRIP LOCKED Fault condition (over temp., short The power section of the VLT No, power on
circuit, ground fault) of the VLT stops Reset required
★ = ROM default setting. Text in ( ) = display text. Figures in [ ] are used when communicating with the bus.
40
40
Artisan Technology Group - Quality Instrumentation ... Guaranteed | (888) 88-SOURCE | www.artisantg.com
Page 40

Appendix; Options
Appendix
VLT 2000/2000 PACK, Motor Coil and Filter Options
1Ø / 3Ø (1 x 220-240 V / 3 x 208-240 V) 3Ø (3 x 208-240 V)
VLT 2010 VLT 2015 VLT 2020 VLT 2030 VLT 2040 VLT 2050
EMC and motor coil module 195H6523 195H6524 195H6524 195H6525
IP20 1-phase
EMC and motor coil module 195H6522 195H6522 195H6522 195H6522
IP20 3-phase
EMC-filter module, IP20 (VBG-4) 195H6528 195H6528
Motor coil option, IP00 195H6510 195H6510 195H6510 195H6510
Motor coil option, IP10 (VGB-4) 195H6521 195H6521 195H6521 195H6521
LC and EMC filter module 195H6527 195H6526 195H6526 195H6526
IP20 3-phase
Motor coil module IP20 195H6529 195H6529 195H6529 195H6529
3Ø (3 x 380-460 V)
VLT 2020 VLT 2025 VLT 2030 VLT 2040 VLT 2050
EMC and motor coil module 195H6522 195H6522 195H6522 195H6522 195H6522
IP20, (380-415 V only)
Motor coil option, IP10 (VGB-4) 195H6521 195H6521 195H6521 195H6521 195H6521
LC and EMC filter module 195H6527 195H6527 195H6527 195H6526 195H6526
IP20
Motor coil module IP20 195H6529 195H6529 195H6529 195H6529 195H6529
195H6510, IP00
195H6521, IP10
7.5
(190)
(80)
195H6522, 195H6523, 195H6524, 195H6525,
195H6526, 195H6527, 195H6528, 195H6529,
3.0
(75)
3.1
PE
PE
U1 V1 W1
U2 V2 W2
IP20, Enclosure Module
4.0
(102)
5.1
(130)
6.3
(160)
Artisan Technology Group - Quality Instrumentation ... Guaranteed | (888) 88-SOURCE | www.artisantg.com
4.3
(110)
41
Page 41
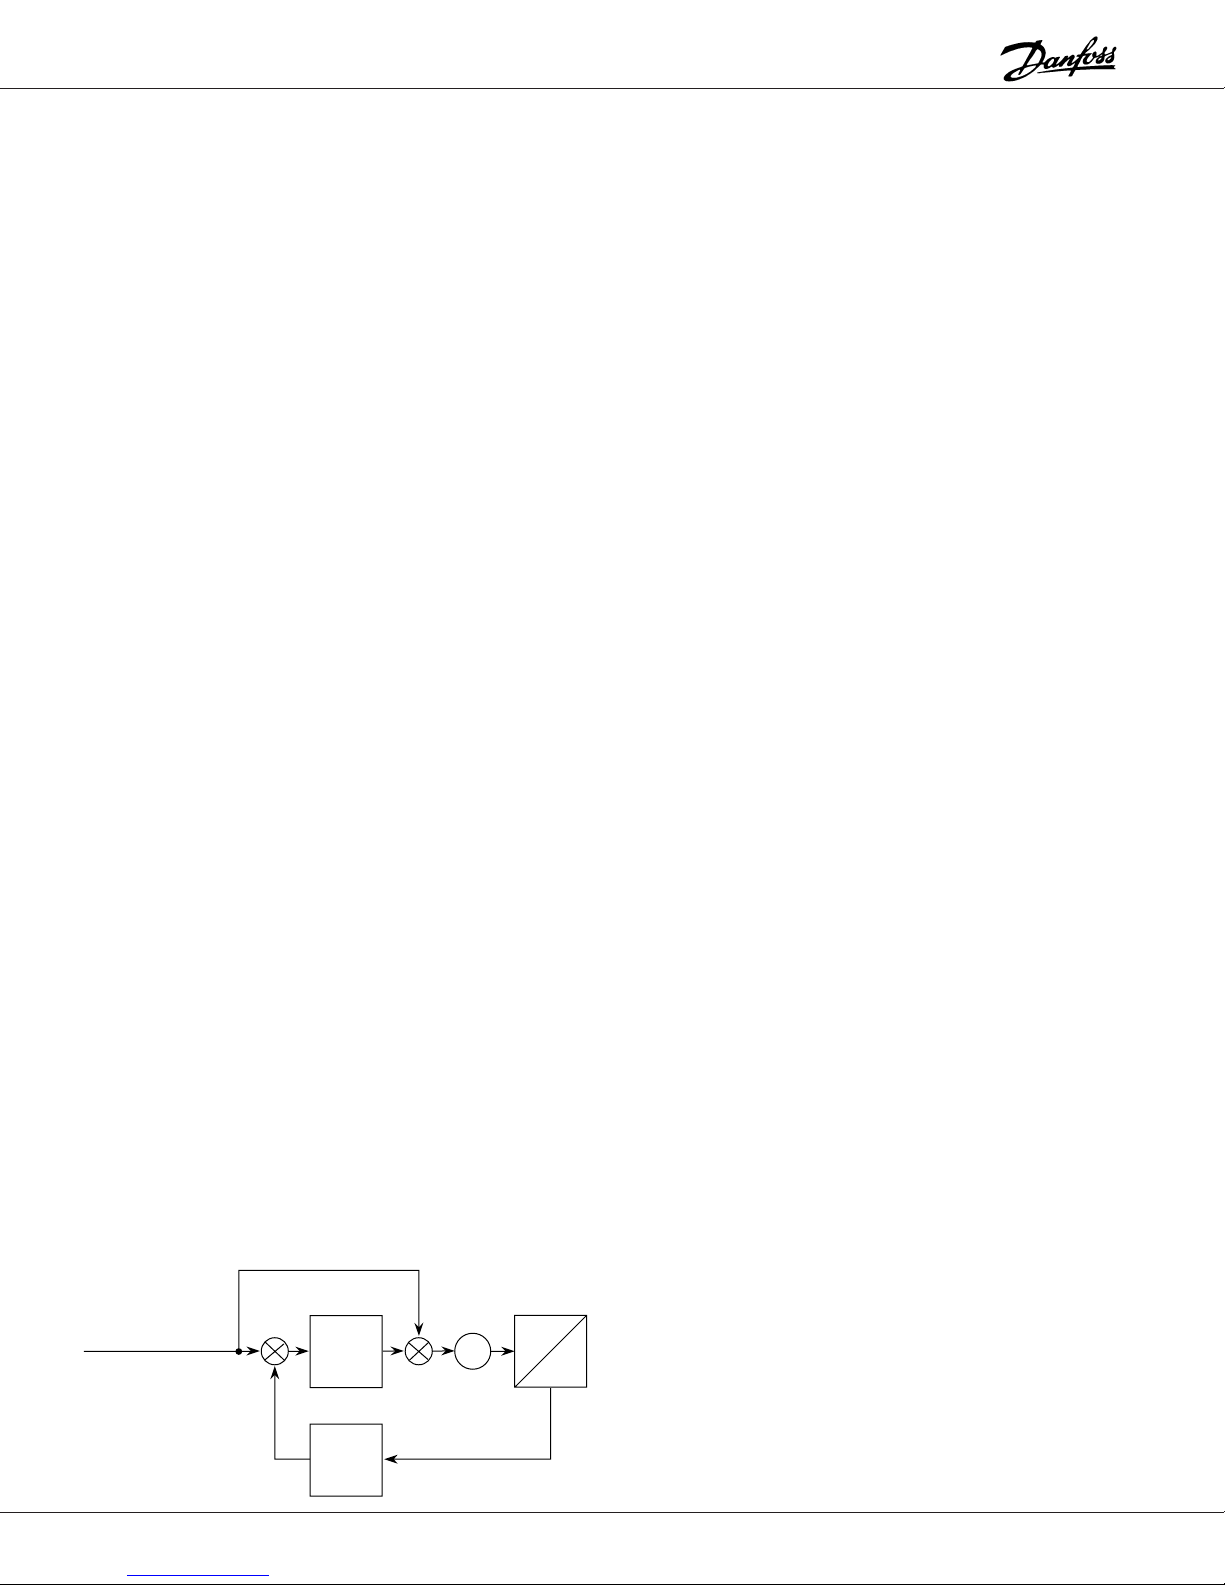
Appendix; PI Regulation
The following instructions will enable quick and easy setup of the PI regulation and associated parameter
settings. Detailed information about each parameter can
be found in the parameter section of this manual.
Parameter 100:
Set the load type. There are several choices in each
group but variable torque medium or variable torque
medium with AEO will suit most pumps or fans.
Parameter 101:
Select closed loop operation.
Parameter 114:
Choose the type of feedback signal the transmitter is
using. The default value is current as it is the most
widely used signal type.
Parameter 115 & 116:
Are used to scale a display read-out which is proportional
to the feedback transmitter signal. The value is displayed
only if feedback has been selected in display mode. To
get to display mode from any other mode press MENU &
DATA keys simultaneously.
If a transmitter has a range of 0-5 bar, 0 can be set in
parameter 115 and 5 in parameter 116. In parameter 117
the unit bar can be programmed.
The default values are 0 & 100, to display 0-100%.
Parameter 117:
Choose the unit of measurement for scaling the
feedback signal of the transmitter set in parameter 115 &
116. The default value is %.
Parameter 119:
The feed forward factor allows a part of the set-point
signal to by-pass the PID regulator. This gives faster
response when starting up a system where the
integration time (parameter 122) is very long, and the
system error is small.
Set at 0%. Only add 5% at a time, and only if the system
takes a long time to start up. The drawing shows the
influence of the feed forward.
Parameter 120:
Controls the bandwidth of the output from PID controller.
Set at 100%.
Parameter 121:
Controls the gain of the system. For most fan and pump
systems it should not be higher than 0.9. If set to higher
values the system may become unstable.
• Centrifugal fans - between 0.1 - 0.6
• Centrifugal pumps - between 0.3 - 0.8
Parameter 122:
Improves the final accuracy by integrating out the error.
• Centrifugal fans - between 10-12 seconds
• Centrifugal pumps - between 3-8 seconds
Parameter 123:
Differential time is not used in pump and fan systems.
Set to Off.
Parameter 124:
If the feedback signal is fluctuating it can be dampened
with a time constant. This can occur on pump systems
where the pipe can be shut off quickly and cause a
standing wave of water.
Set initially to 0 seconds.
Parameter 125:
Leave at the default value of 100% unless the
following conditions occur.
• If the feedback signal does not match the standard
analog signal choices in parameter 412 & 413 a value
must be programmed which scales the feedback signal
to a standard analog value.
• When using min. speed, parameter 201, it must be
ensured that the min. speed % value is not greater than
the set-point % value, otherwise the min. speed will
over-ride the set-point.
(See example on page 43.)
Feedforward
+
–
(P: 119)
e
PID
FB
factor
+
Feedback signal
Setpoint
or
Reference
(Ramps
P: 215, 216)
42
Artisan Technology Group - Quality Instrumentation ... Guaranteed | (888) 88-SOURCE | www.artisantg.com
Process
M
Page 42

Appendix; PI Regulation
Example:
The set-point is 40%, and the min. speed is 50%.
1. Selecting a new set-point. Choose a value that will
raise the set-point about 10% higher than the min.
speed.
New set-point = % min. speed x 1.1 = 55%
2. Setting parameter 125. Apply the same increase to
this parameter. 100 x 1.1 = 110%
Parameter 201:
Set min. frequency if required.
If you enter a min. speed you must observe the following:
• When min. speed is used parameter 411 must be set
to "proportional with min. limit".
• If the min. frequency % is higher than the set-point %
you must re-scale parameter 125 and the set-point.
Parameter 202:
Max. frequency is normally set to 50 Hz. Running
centrifugal pumps and fans above this speed will cause
overload of the pump or fan, as the power increases to
the third power of the speed change.
Example:
If the speed increased to 60 Hz the power will increase
by a massive 173%.
Set at 50 Hz.
Parameter 205:
The internal set-point for the regulator.
Enter the set-point % value.
Example:
A pressure transmitter has range of 0-10 bar. A set-point
of 4 bar is required.
Set-point = 4/10 x 100 = 40%
Enter 40 in parameter 205.
Parameter 214:
Use only linear ramps.
Parameter 215 & 216:
The ramps only function on starting and stopping the
system.
Enter the ramp up and down times in seconds.
Parameter 315:
Set the motor thermal protection to trip 1 if thermal
protection of the motor is required.
Parameter 411:
This parameter must be changed from its default value
when PID regulation is used.
Set to "proportional with min. limit".
Parameter 412-413:
Set the type of analog input signal for the set-point
and feedback signals. Parameter 114 has previously set
up the selection of the feedback signal type.
If parameter 205 (internal set-point) is used either current
or voltage can be used as the feedback signal.
If one of the inputs is not used it must be set to no
operation.
Externally it can be one of the choices of the analog
values. Use of one of the analog choices will prevent its
use as the feedback signal.
The use of the internal set-point reduces installation
costs. Up to 4 internal set-points (by using parameters
205-208) can be selected by a combination of 2 switches.
Refer to the instruction manual for further information.
The set-point can be found by calculating the percentage
of required signal from the transmitter range.
Artisan Technology Group - Quality Instrumentation ... Guaranteed | (888) 88-SOURCE | www.artisantg.com
Normal or Inverse Control
Introduction:
The control is called normal, if the motor speed is
increased when the feedback signal goes down, and the
motor speed is reduced if the feedback signal goes up.
Typical for pump pressure systems and air handling units
in variable air volume systems.
The control is called inverse if the motor speed is
increased when the feedback signal is increased. Typical
for pit pumping where: the faster the water flows into the
pit, the faster the pump must pump out the water.
43
Page 43

Appendix; PI Regulation
For inverse control; modification of the setpoint and
feedback signal is required.
Example:
A transmitter has a 0-15 foot span equal to 0-20mA. The
PID set-point must be set at 12 feet for inverse control.
• Enter 20-0 mA in parameter 413. The normal signal in
figure A is converted to an inverse signal as shown in
figure B.
mA
20
0 7.5 15 Ft
Figure A.
Normal signal from transmitter where
12 ft. represents 16mA (80%)
%
100
0 7.5 15 Ft
Figure B.
Inverted signal from par:413
12 ft. represents 100%-80%=20%
• Calculate the set point for inverse control.
Setpoint = 100 – (4/5 x 100) = 20%
It can be seen in figure C how the set point is calculated.
12
Link
27
16
18
50
53
55
55
60
VLT control terminals
12
Link
27
16
External Setpoint
Start/Stop
Parameter 402 (start)
+
External setpoint
using potentiometer.
1 kOhm wire wound.
Parameter 412 (0-10V)
–
–
+
0/4-20 mA transmitter
parameter 413 (0/4-20mA)
Internal Setpoint
Start/Stop
Parameter 402 (start)
% Setpoint
100
Setpoint = 20%
0 12 15 Feet
Figure C.
Inverted signal from par:413 (current)
where 12 ft. represents 100%-80%=20%
• If the internal set-point is used, ensure that parameter
412 (voltage input) is set to no operation.
• The values in parameter 115 & 116 must be reversed.
The display at min. feedback in parameter 115 becomes
display at max. feedback and parameter 116 becomes
display at min. feedback.
• Connections and set-up are identical to normal control.
18
50
53
Internal setpoint
parameter 205
55
Set parameter 412
to (no operation)
55
60
VLT control terminals
–
+
0/4-20 mA transmitter
parameter 413 (0/4-20mA)
44
Artisan Technology Group - Quality Instrumentation ... Guaranteed | (888) 88-SOURCE | www.artisantg.com
Page 44
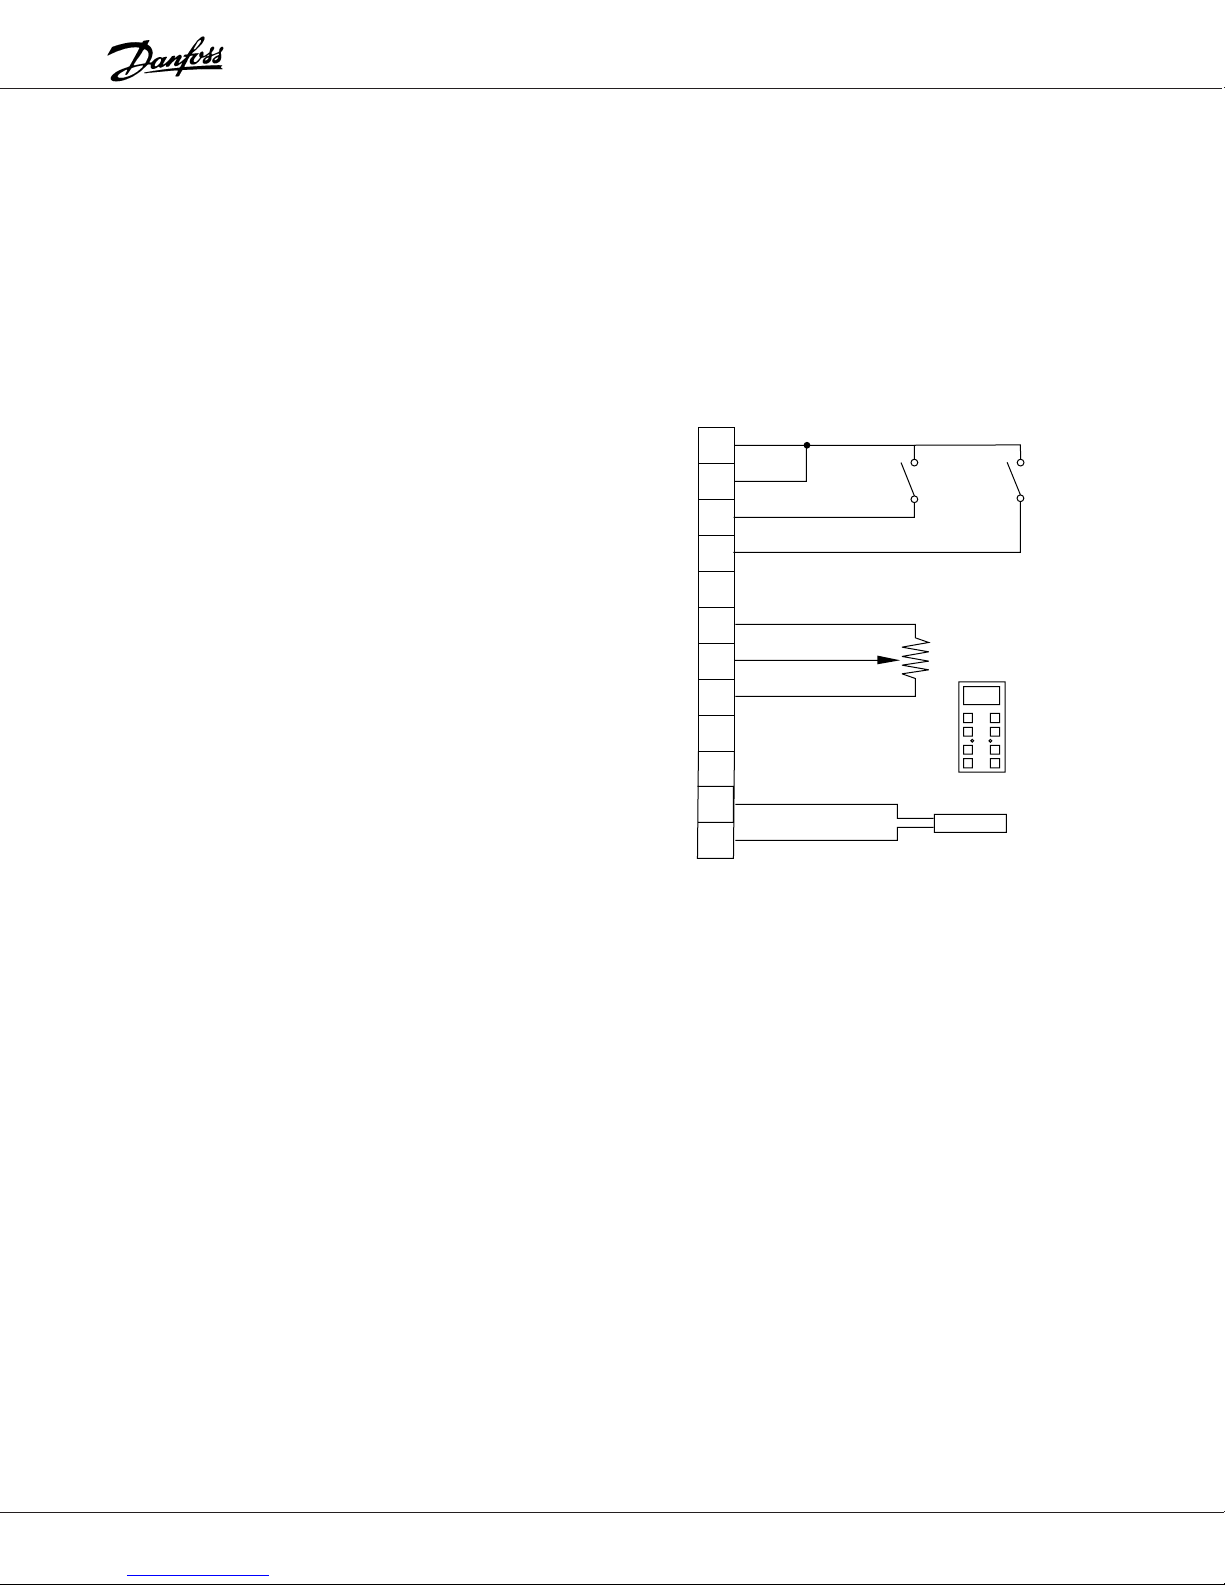
Appendix; PI Regulation
External Manual Control Over-ride
It is often necessary to run the machine manually for
maintenance reasons.
Manual control can be carried out manually from the
keypad of all the units.
If remote control of the manual over-ride is required
additional circuitry is necessary.
For the VLT Series 3500 special parameters are available
for external manual over-ride. Refer to the VLT Series
3500 instruction manual.
The following circuit and instructions for external manual
over-ride relates to the VLT Series 3000. The proposed
control scheme is based on using 2 of the 4 menu setups. Menu set-up 1 has the parameters set for PI
operation and Menu set-up 2 has the parameters set for
manual control.
1. Set parameter 001 to multi set-up.
2. Set parameter 400 to select set-up.
3. Install an "Auto-Manual" switch across terminals 12 &
16. This will allow selection between the 2 menu setups. The bottom right hand corner of the display will
show the menu set-up you are in.
• Parameter 315; Set the motor thermal overload
protection to trip 2.
• Parameter 412; Set to 0-10 V.
• Parameter 413; Set to no operation.
External Manual Control Over-ride
12
Link
27
16
Auto Manual
Start/Stop
Par: 402
(start)
18
Manual control
+
50
potentiometer.
1 kOhm wire wound.
53
55
–
Internal
setpoint
Par: 205
4. Program menu set-up 1 for PI operation.
5. Select menu set-up 2 and alter the following
parameters:
• Parameter 100; Set to the same load type as in
menu 1. You can check the parameter data in menu
2 against the parameter data in menu 1 by switching
between menu set-ups while you are in that
parameter.
• Parameter 107-113; Set to the same load types as
in menu 1.
• Parameter 201-201; Max. and Min. Frequency can
be set to suit manual control.
• Parameter 209; Set to the same load type as in
menu 1.
• Parameter 215-216; Set the ramp times to suit the
application.
55
60
VLT control terminals
NOTE: All control wiring needs to be
shielded and the shield grounded to
the clamps as shown in the respective
instruction manuals.
–
+
0/4-20 mA transmitter
parameter 413 (0/4-20mA)
Artisan Technology Group - Quality Instrumentation ... Guaranteed | (888) 88-SOURCE | www.artisantg.com
45
Page 45

VLT SERIES 2000 PARAMETER GROUPS AND FACTORY DEFAULT SETTINGS
OPERATION and
DISPLAY:
000 LANGUAGE SELECT
S)
ENGLISH
001 MENU SETUP SELECT
S)
SETUP 1
002 SETUP COPY
DO NOT COPY
003 LOCAL REMOTE
S)
REMOTE
004 LOCAL REFERENCE
S)
0 Hz
005 DISPLAY VALUE
S)
1000
006 LOCAL RESET
S)
ENABLE
007 LOCAL START/STOP
S)
ENABLE
008 LOCAL REVERSING
S)
DISABLE
009 LOCAL JOGGING
S)
ENABLE
010 LOCAL SPEED
SELECT
S)
ENABLE
013 DATA CHANGE LOCK
S)
NOT LOCKED
LOAD and
MOTOR:
101 SPEED CONTROL
2,S)
SLIP COMPENSATED
102 CURRENT LIMIT CONT.
S)
PROGRAMMED SET
103 MOTOR POWER
NOMINAL SIZE
104 MOTOR VOLTAGE
DEPENDING ON UNIT
105 MOTOR FREQUENCY
DEPENDING ON UNIT
107 MOTOR CURRENT
2, S)
DEPENDING ON UNIT
108 MOTOR MAGNETIZE
2,S)
DEPENDING ON UNIT
109 START VOLTAGE
2, S)
DEPENDING ON UNIT
110 START COMP
2,S)
DEPENDING ON UNIT
111 U/F RATIO
2,S)
DEPENDING ON UNIT
112 SLIP COMP
2, S)
DEPENDING ON UNIT
114 FEEDBACK SIGNAL
S)
CURRENT 20mA
119 FEED FWD FACTOR
2, S)
100%
120 CONTROL RANGE
42 S)
100%
121 PROPORTION GAIN
2, S)
0.01
122 INTEGRAL TIME
2, S)
OFF
125 FEEDBACK SCALING
2, S)
100%
REFERENCES and
LIMITS:
200 FREQUENCY RANGE
0-120 Hz
201 MIN. FREQUENCY
2, S)
0.00 Hz
202 MAX. FREQUENCY
2, S)
DEPENDING ON UNIT
203 JOG FREQUENCY
2, S)
10
204 DIGITAL REF. TYPE
2, S)
SUM
205 DIGITAL REF. 1
2, S)
00.0
206 DIGITAL REF. 2
2, S)
0
207 DIGITAL REF. 3
2, S)
0
208 DIGITAL REF. 4
2, S)
0
209 CURRENT LIMIT
2, S)
DEPENDING ON UNIT
210 WARN FREQ. LOW
2, S)
0
211 WARN FREQ. HIGH
2, S)
f
RANGE
(from 200)
213 WARN CURRNT HIGH
2,S)
I
VLT MAX
(from 209)
215 RAMP-UP TIME
2, S)
5 SEC
216 RAMP-DOWN TIME
2, S)
5 SEC
218 QUICK-STOP RAMP
1 SEC
224 CARRIER FREQ
2, S)
4.5
230 SPEED UP/DOWN
DISABLE
FUNCTIONS and
TIMERS:
300 BRAKE FUNCTION
S)
NOT APPLIED
306 DC BRAKING TIME
2, S)
0
307 DC BRAKE CUT-IN
FREQUENCY
2, S)
1
308 DC BRAKE VOLTAGE
2, S)
10
309 RESET MODE
S)
MANUAL RESET
310 TRIP DELAY AT
CURRENT LIMIT
S)
INFINITE
315 MOTOR THERMAL
2, S)
PROTECTION
OFF
INPUTS and
OUTPUTS:
402 TERMINAL 18 START
S)
START
403 TERMINAL 19
REVERSING
S)
REVERSING
404 TERMINAL 27 STOP
S)
MOTOR COASTING
405 TERMINAL 29 INPUT
S)
JOG
408 TERMINAL 46 OUTPUT
S)
UNIT READY
REMOTE CONTROL
409 TERMINAL 01
RELAY OUTPUT
S)
READY
411 ANALOG REF. TYPE
S)
LINEAR
412 TERMINAL 53
ANALOG VOLTAGE
2, S)
0-10VDC
413 TERMINAL 60
ANALOG I
2, S)
0-20 mA
SERIAL DATA
INTERFACE:
500 ADDRESS
1
501 BAUD RATE
1.2 K
502*DATA READ-OUT
S)
503*COASTING
S)
OR
504*Q-STOP
S)
OR
505*DC BRAKE
S)
OR
506*START
S)
OR
507*DIRECTION
S)
DIGITAL
508*RESET
S)
OR
509*SET-UP SELECT
S)
OR
510*SPEED SELECT
S)
OR
511 BUS JOG 1
S)
10
514 BUS BIT 4
S)
Q-STOP
516 BUS REFERENCE
S)
0
517 STORE DATA VALUES
S)
OFF
SERVICE and
DIAGNOSTICS:
606 TOTAL OPERATION
HOURS
607 RUNNING HOURS
608 NUMBER OF
POWER UPS
609 NIMBER OVER-TEMP
610 NUMBER OF
OVER-VOLTAGE
46
DISPLAY MODE
READOUTS:
REFERENCE %
FREQUENCY Hz
DISPLAY FEEDBACK "UNIT"
CURRENT A
TORQUE %
POWER kW
POWER HP
ENERGY KWh
OUTPUT VOLYAGE V
DC VOLTAGE V
MOTOR ETR value %
INVERTER ETR value %
* NOTE: Menu 502 can only be selected from the bus.
These values are read-only values.
The PC/PLC may prompt for a value from an index
between 0 and 19.
In parameters 503 to 510 you can choose to control
the VLT adjustable frequency drive via the control
unit's terminals (digitally) and or via the bus.
When using
Logical
and
Bus
values in parameters
503-510, the digital control terminals are either
dependent on or overruled by the bus commands.
2) AVAILABLE IN BOTH SETUPS
S) CAN BE CHANGED IN START MODE (RUNNING MOTOR)
Artisan Technology Group - Quality Instrumentation ... Guaranteed | (888) 88-SOURCE | www.artisantg.com
Page 46

REFERENCES & LIMITS:
200
201
202
203
204
205
206
207
208
209
210
211
213
215
216
218
224
230
LOAD & MOTOR:
101
102
103
104
105
107
108
109
110
111
112
114
119
120
121
122
125
FUNCTIONS & TIMERS:
300
306
307
308
309
310
315
INPUTS & OUTPUTS:
402
403
404
405
408
409
411
412
413
SERIAL DATA INTER.:
500
501
502*
503*
504*
505*
506*
507*
508*
509*
510*
511
514
516
517
SERVICE & DIAG.:
606
607
608
609
610
OPERATION & DISPLAY:
000
001
002
003
004
005
006
007
008
009
010
013
47
CUSTOMER PARAMETER SETTINGS
* NOTE: Menu 502 can only be selected from the bus.
These values are read-only values.
The PC/PLC may prompt for a value from an index
between 0 and 19.
In parameters 503 to 510 you can choose to control
the VLT adjustable frequency drive via the control
unit's terminals (digitally) and or via the bus.
When using Logical and Bus values in parameters
503-510, the digital control terminals are either
dependent on or overruled by the bus commands.
Artisan Technology Group - Quality Instrumentation ... Guaranteed | (888) 88-SOURCE | www.artisantg.com
Page 47

Artisan Technology Group is your source for quality
new and certied-used/pre-owned equipment
• FAST SHIPPING AND
DELIVERY
• TENS OF THOUSANDS OF
IN-STOCK ITEMS
• EQUIPMENT DEMOS
• HUNDREDS OF
MANUFACTURERS
SUPPORTED
• LEASING/MONTHLY
RENTALS
• ITAR CERTIFIED
SECURE ASSET SOLUTIONS
SERVICE CENTER REPAIRS
Experienced engineers and technicians on staff
at our full-service, in-house repair center
WE BUY USED EQUIPMENT
Sell your excess, underutilized, and idle used equipment
We also offer credit for buy-backs and trade-ins
www.artisantg.com/WeBuyEquipment
REMOTE INSPECTION
Remotely inspect equipment before purchasing with
our interactive website at www.instraview.com
LOOKING FOR MORE INFORMATION?
Visit us on the web at www.artisantg.com for more
information on price quotations, drivers, technical
specications, manuals, and documentation
Contact us: (888) 88-SOURCE | sales@artisantg.com | www.artisantg.com
SM
View
Instra
 Loading...