

Danfoss TP7000, TP7000-M, TP7000-MA, TP7000-M 24, TP7000A Installation Instructions & User Manual
Page 1
TP7000 + RF
GB
Installation Instructions
User Instructions
Instructions d’installation
Instructions d’utilisateur
Installationsanweisungen
Inbetriebnahme-Instruktion
Instrucciones de instalación
Instrucciones del usuario
Instruktions vejledning
Brugervejleding
Electronic 7 day programmable room thermostat
Installatie handleiding
Instructies voor Gebruik
ПдзгЯет егкбфЬуфбузт
ПдзгЯет чсЮузт
Instrukcja instalacji
Instrukcja Użytkownika
Montavimo instrukcijos
Informacija Vartotojui
Istruzioni per l’uso
Istruzioni per l’utente
F
D
ES
DK
NL
GR
PL
LT
I
®
Certification Mark
Page 2

2
INDEX
Installation Instructions 3-6
User Instructions 7-13
Instructions d’installation 14-17
Instructions d’utilisateur 18-23
Installationsanweisungen 24-27
Inbetriebnahme-Instruktion 28-33
Instrucciones de instalación 34-37
Instrucciones del usuario 38-43
Instruktions vejledning 44-47
Brugervejleding 48-53
Installatie handleiding 54-57
Instructies voor Gebruik 58-63
ПдзгЯет егкбфЬуфбузт 64-67
ПдзгЯет чсЮузт 68-73
Instrukcja instalacji 74-77
Instrukcja Użytkownika 78-83
Montavimo instrukcijos 84-87
Informacija Vartotojui 88-93
Instruzioni per l’uso 94-97
Instruzioni per l’utente 98-103
GB
F
D
ES
DK
NL
GR
PL
LT
I
Page 3
3
Thermostat Features TP7000-RF
TP7000
TP7000A
TP7000-M
TP7000-MA
TP7000-M 24
Power supply
2 x AA/MN1500/LR6
alkaline batteries
230v, 50 Hz 24v, 50 Hz
Memory backup
Capacitor during
battery change for 1
minute
Rechargable cell, 24 hrs (*1)
Switching action of output relay N/A 1 x SPDT, Type 1B
Switch rating of relay contact,
voltage and current
N/A 3(1) A, 10-230 volts
Transmitter frequency (RF only) 433.92 MHz N/A
Transmitter range (RF only) 30m max. N/A
Rated Impulse Voltage N/A 2.5Kv
Dimensions (mm) 138 wide x 88 high x 28 deep
Ball Pressure Test 75°C
Temperature Range 5-30°C
Design Standard EN 60730-2-7 (EN300220 for RF)
Control Pollution Situation Degree 2
Time accuracy ± 1 min.
Temperature accuracy ±1°C
*1: Unit must powered up for 6 days to charge cell before full back-up is available
Installation Instructions
Important note RF products: Ensure that there are no large metal objects,
such as boiler cases or other large appliances, in line of sight between the
transmitter and receiver as these will prevent communication between
thermostat and receiver.
Speci cation
Installation Instructions
Please Note:
This product should only be installed by a quali ed electrician
or competent heating installer and should be in accordance with
the current edition of the IEEE wiring regulations.
GB
Page 4
4
All models
Sw
1
5/2 day programming 7 day programming
Sw
2
Optimum start contoller enabled Optimum start contoller disabled
Sw
3
Chrono-proportional control On/O control
TP7000, M, & RF models with 3/6 cycles per hour option
Sw
4
Chrono-proportional, 6 cycles / hour Chrono-proportional, 3 cycles / hour
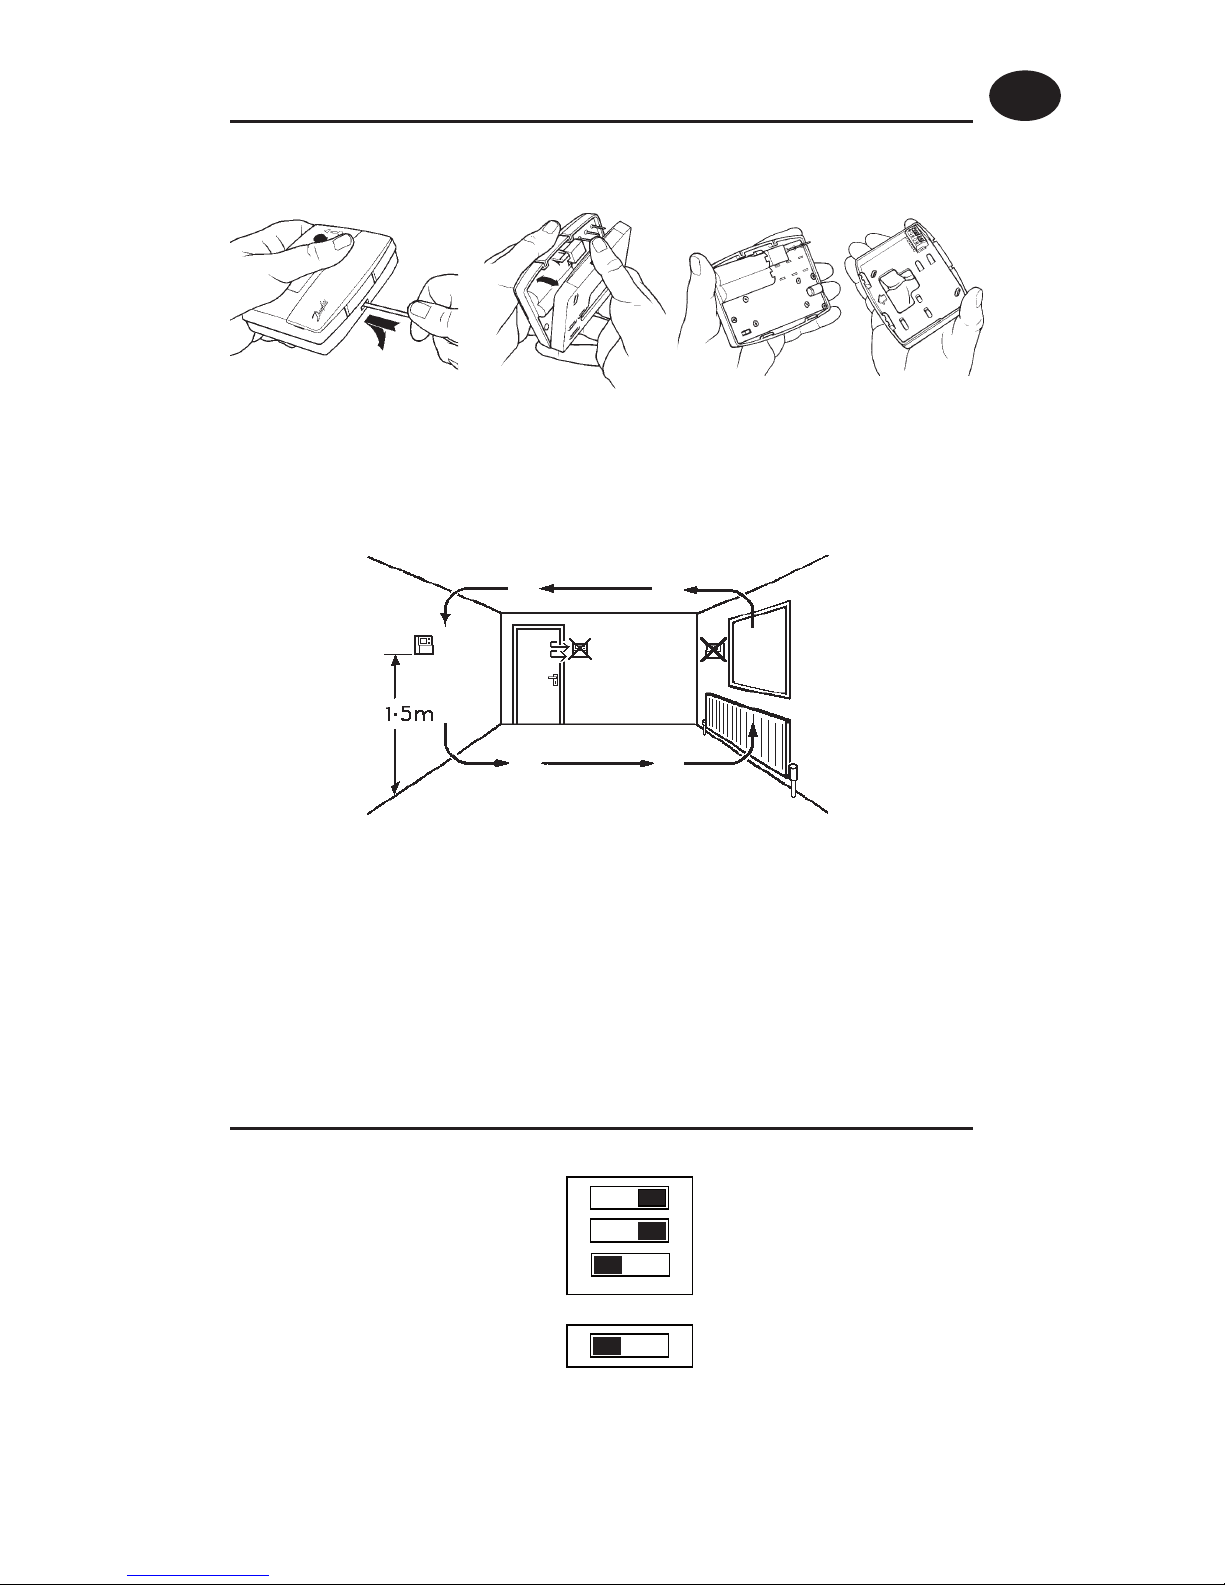
Installation
DIL Switch Settings
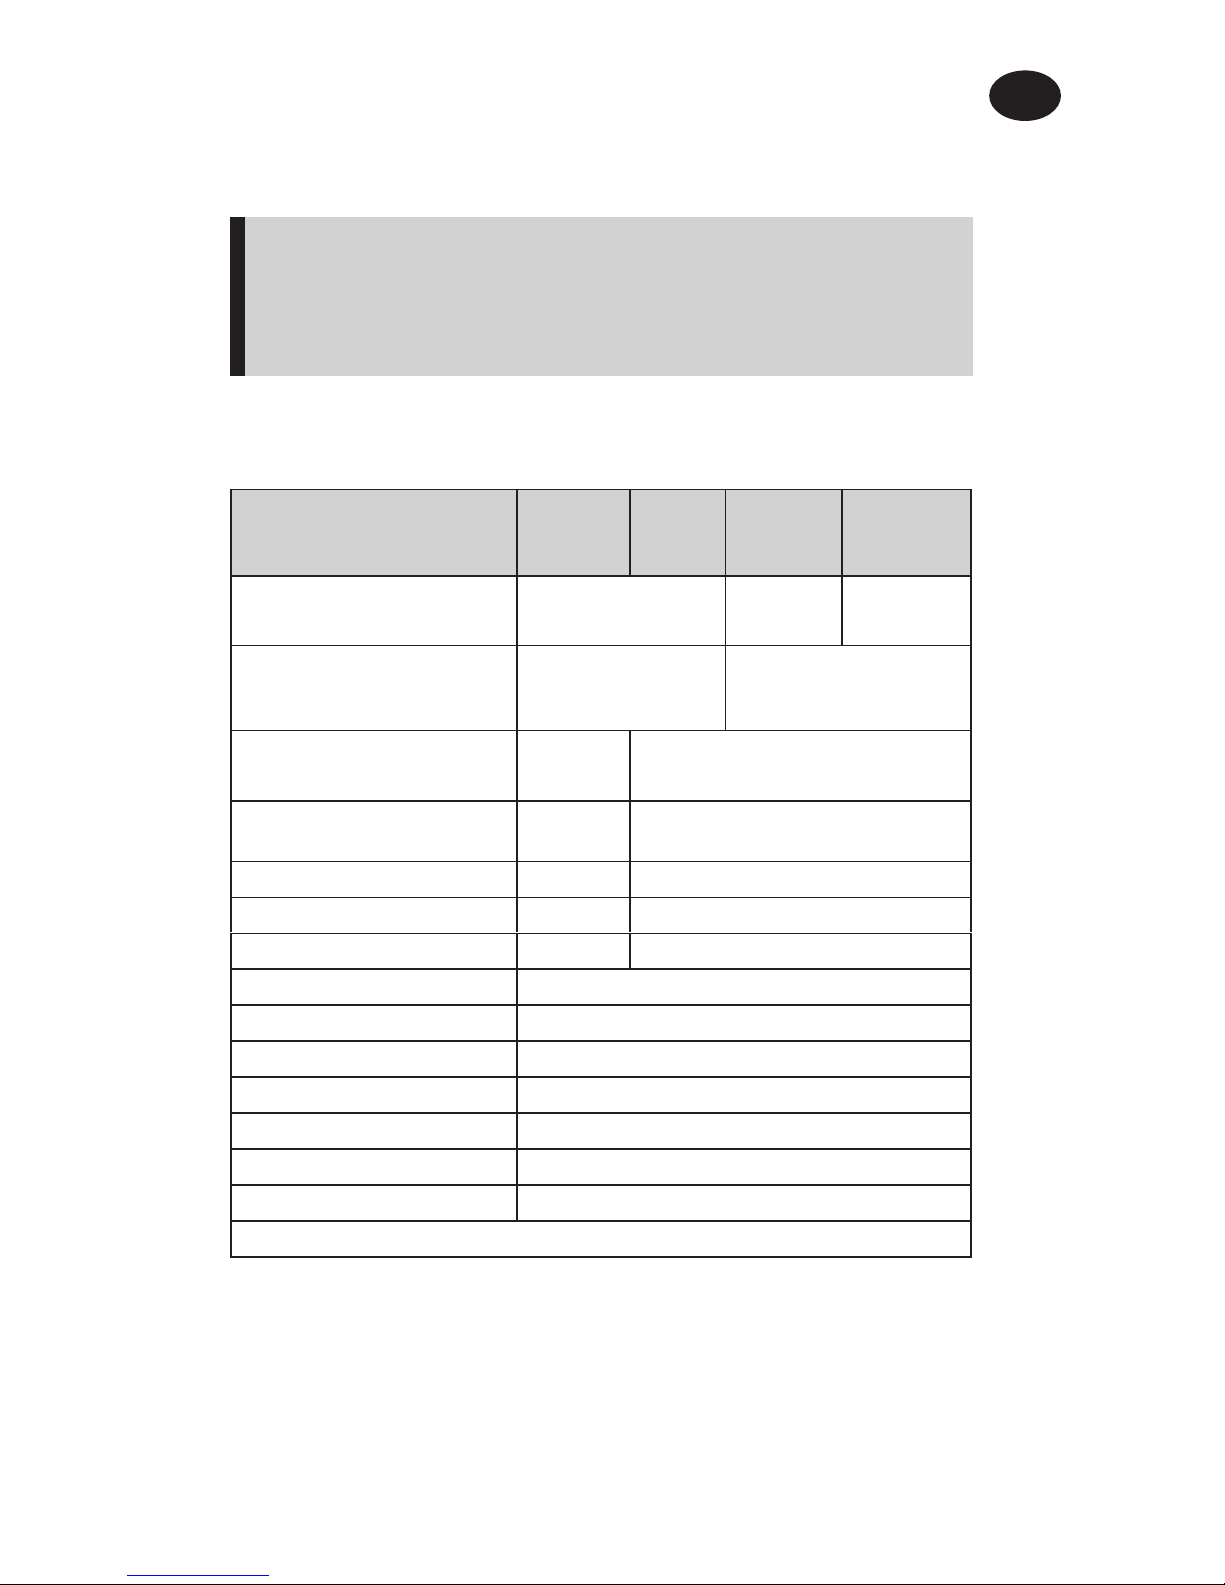
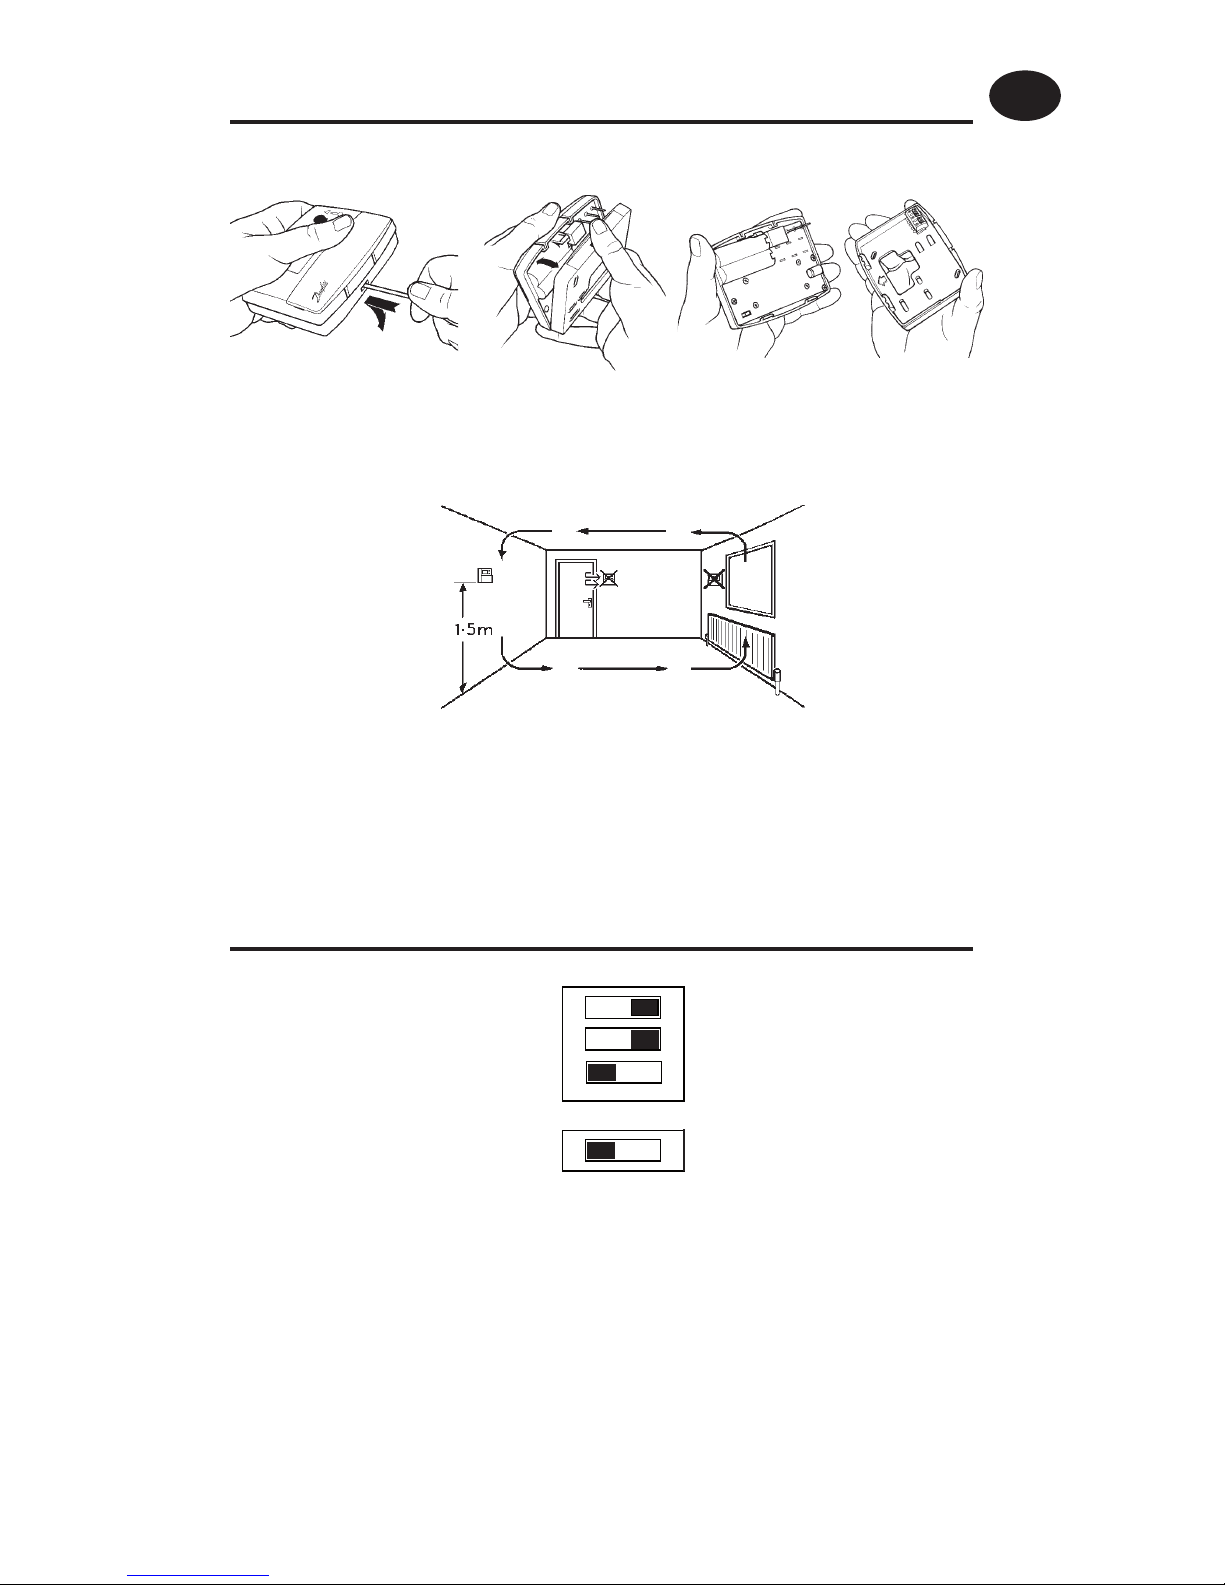
First remove the wallplate from the back of the unit.
From the top left hand corner of the wallplate, there must be
clearances of at least 140mm to the right, 15mm to the left, 30mm
above and 100mm below in order to mount the plug-in module.
Before mounting the unit ensure the 4 DIL switches on the rear of the
unit have been moved to the required settings (see below). Factory
preset is 7-day, with Optimum Start and Chrono-proportional
control OFF.
NOTE
Use Chrono 3 for high thermal inertia systems, e.g. oor standing cast iron boilers.
Use Chrono 6 for low thermal inertia systems, e.g. low water content boilers and combi
boilers.
Installation Instructions
GB
Page 5
5
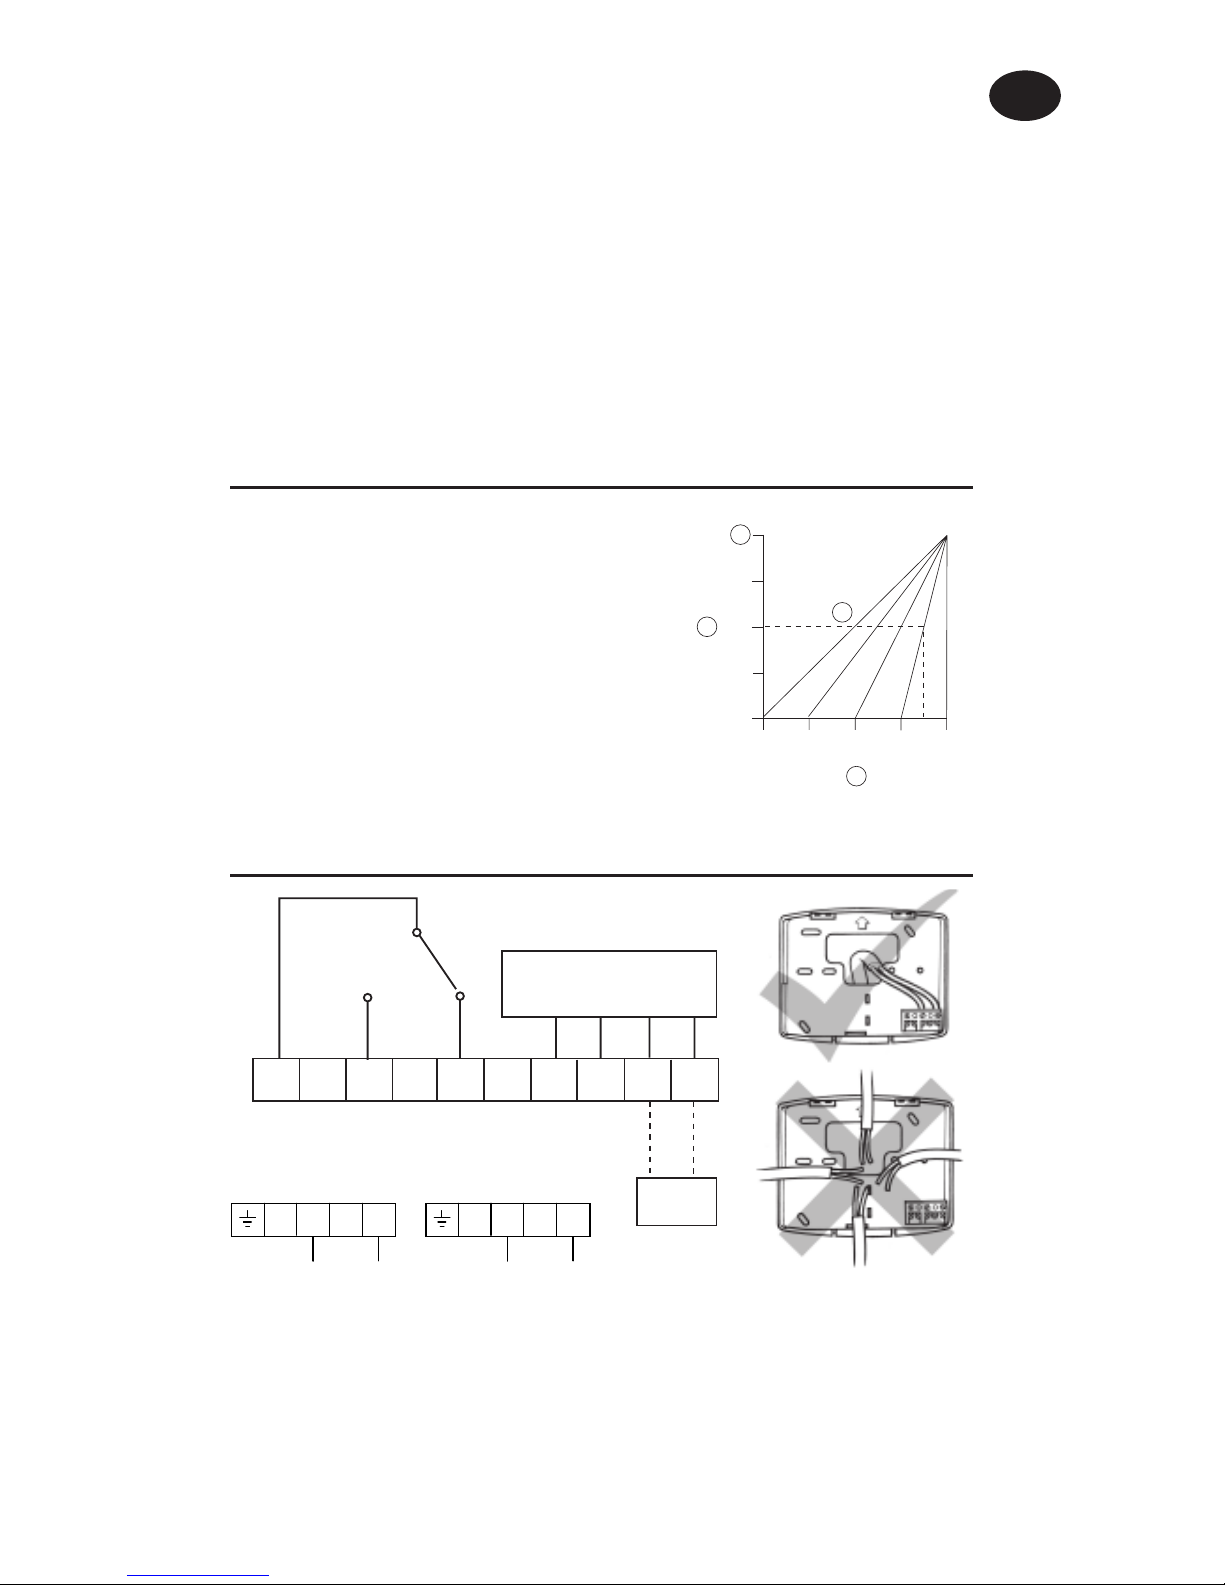
TP7000 Wiring (not RF models)
7-day - each day can be programmed with di erent times and
temperatures.
5/2 day - one set of times & temperatures for weekdays, and another
set for weekends.
Optimum start control - function which switches the heating on
earlier than the Event 1 programmed time to ensure the required
temperature is achieved by the set time.
Chrono-proportional control - energy saving feature which res the
boiler at regular intervals to maintain a set temperature, achieving a
constant ambient environment for the user.
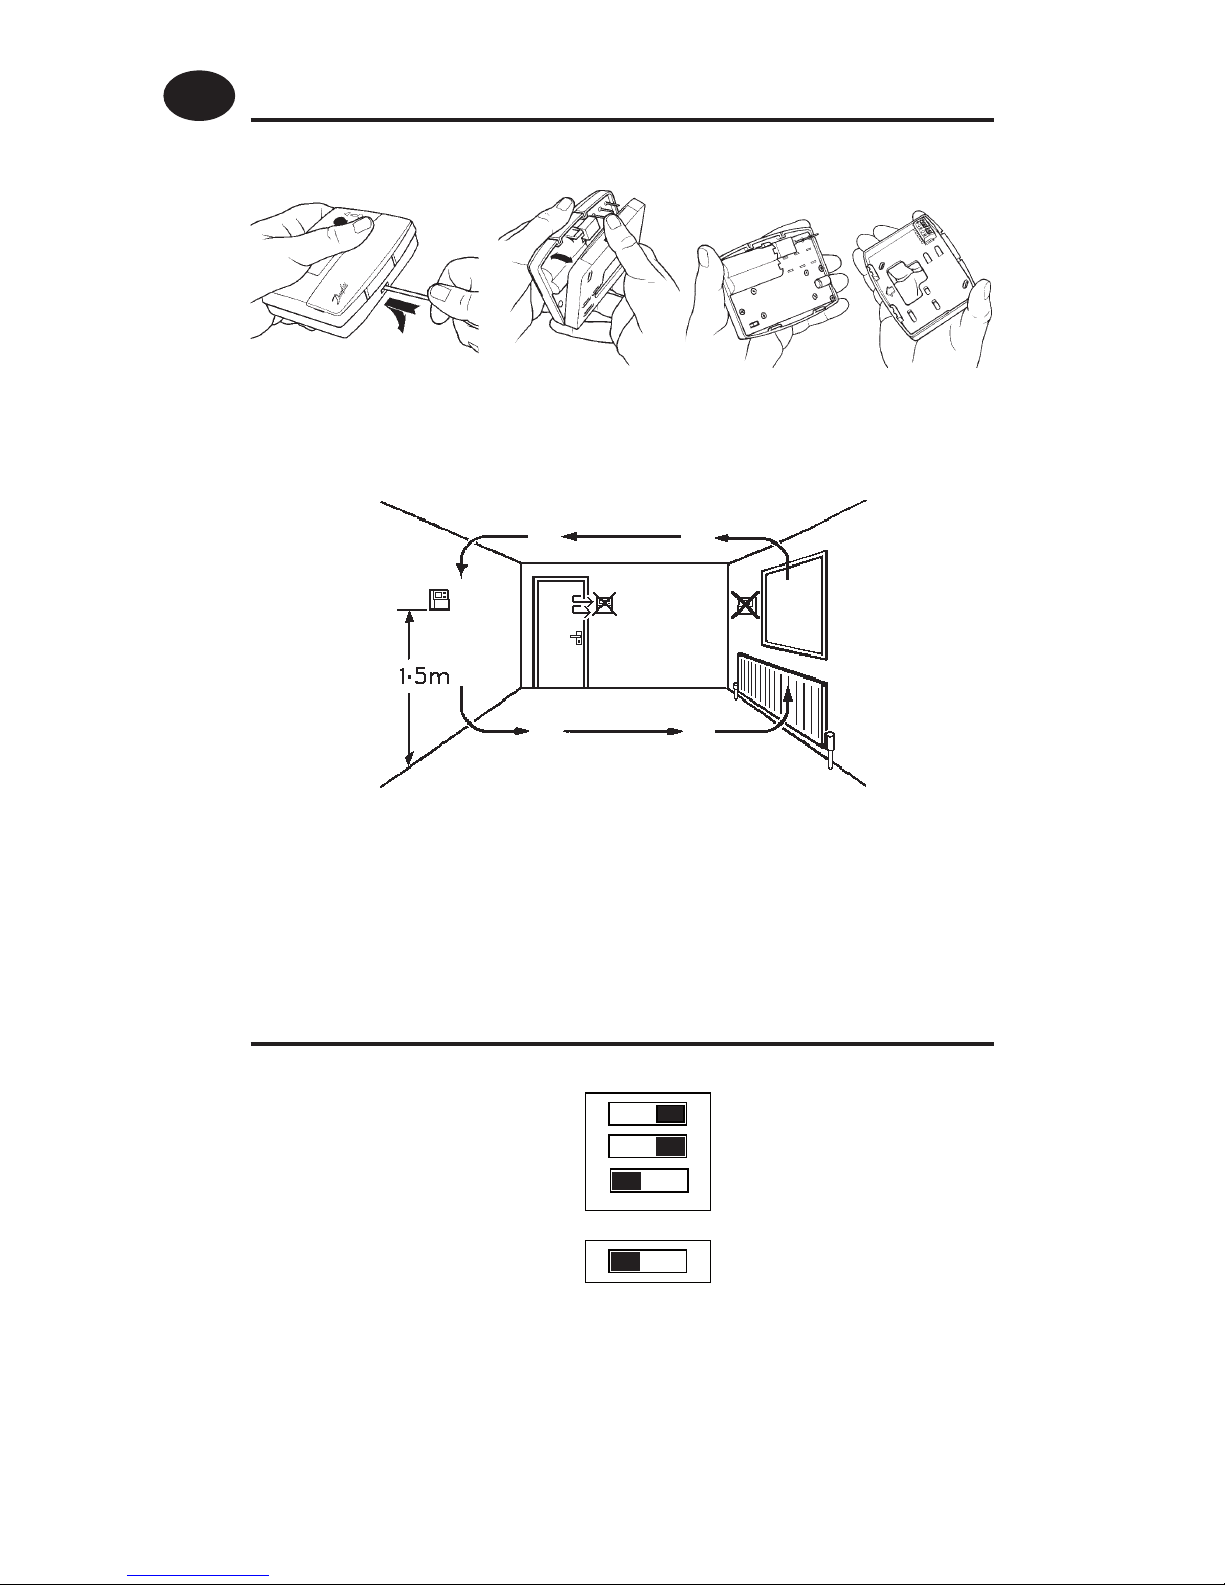
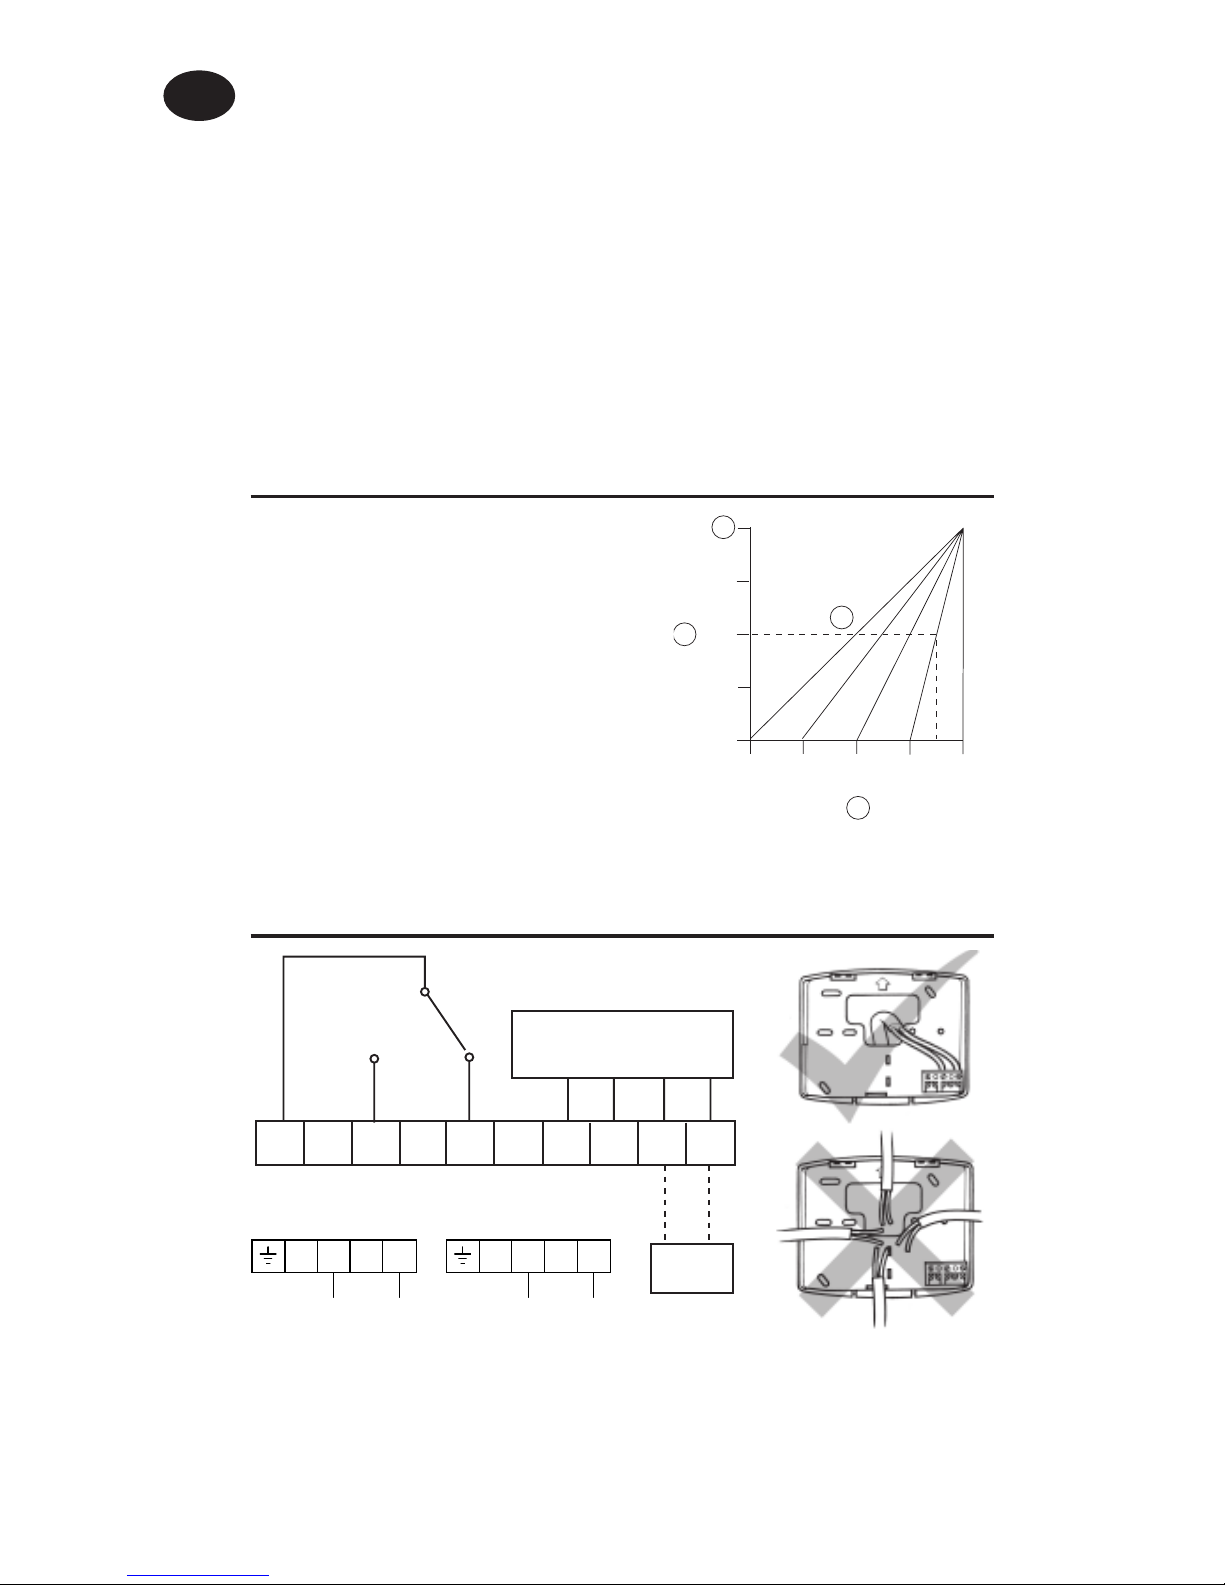
Setting Optimum Start Control
-4˚C
-3˚C
-2˚C
-1˚C
A
B
C
120
min.
90
min.
60
min.
30
min.
Event
time
(
D
Set Sw2 to OSC ON
(see DIL settings page 4)
Select OPTIMISER CURVE in
programming mode
A Event 1 Set Point
B Deviation from Set Point
C Switch On Time prior to Event
D Optimiser Curve Setting
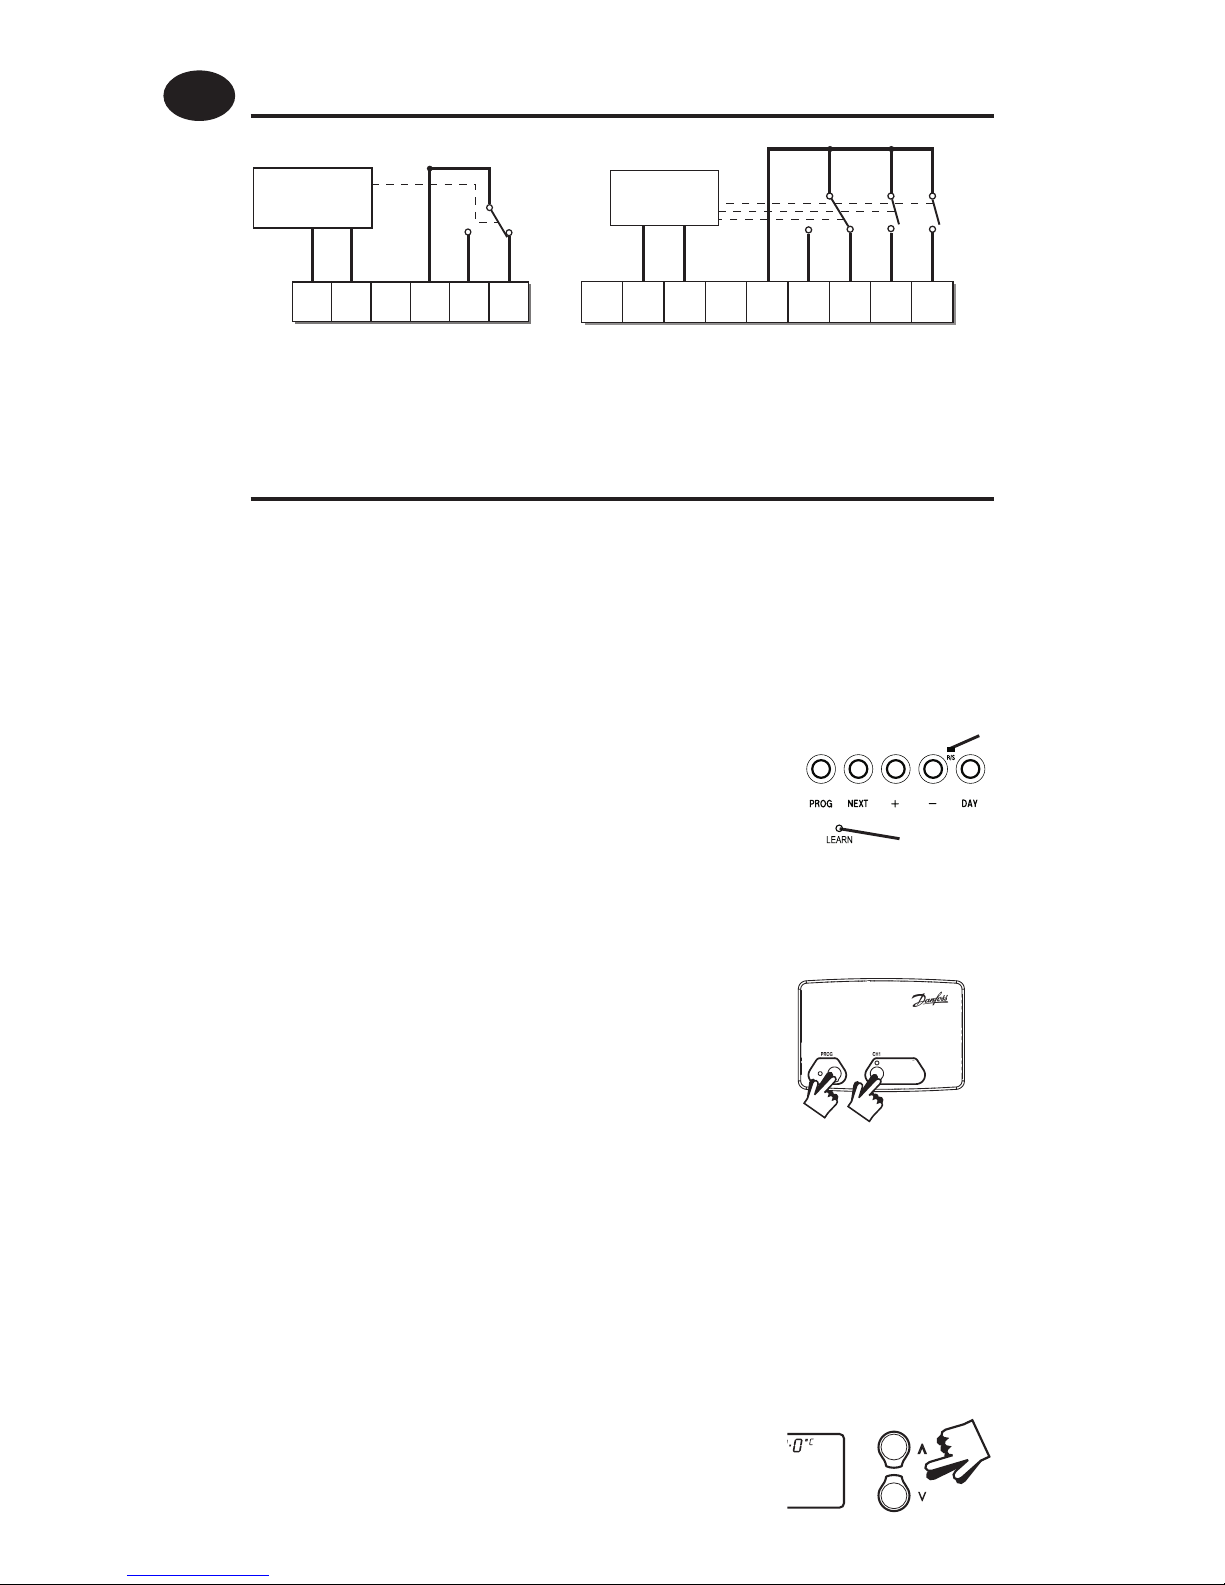
1
234567
ELECTRONICS
REMOTE
SENSOR
'A' models
only
COM
ON
OFF
Installation Instructions
GB
B
C
M 24V models onl
y
24V
L
N
M 230V models onl
230V
Note: 1.0mm2 solid copper cable should be used to connect the remote
sensor to the TP7000A. Please ensure that:
a) the cable length does not exceed 50 metres,
b) to avoid electrical interference the cable should not be run parallel
in close proximity to other cables carrying mains electricity, and where
necessary the cable should cross over mains cabling at right angles.
Page 6
6
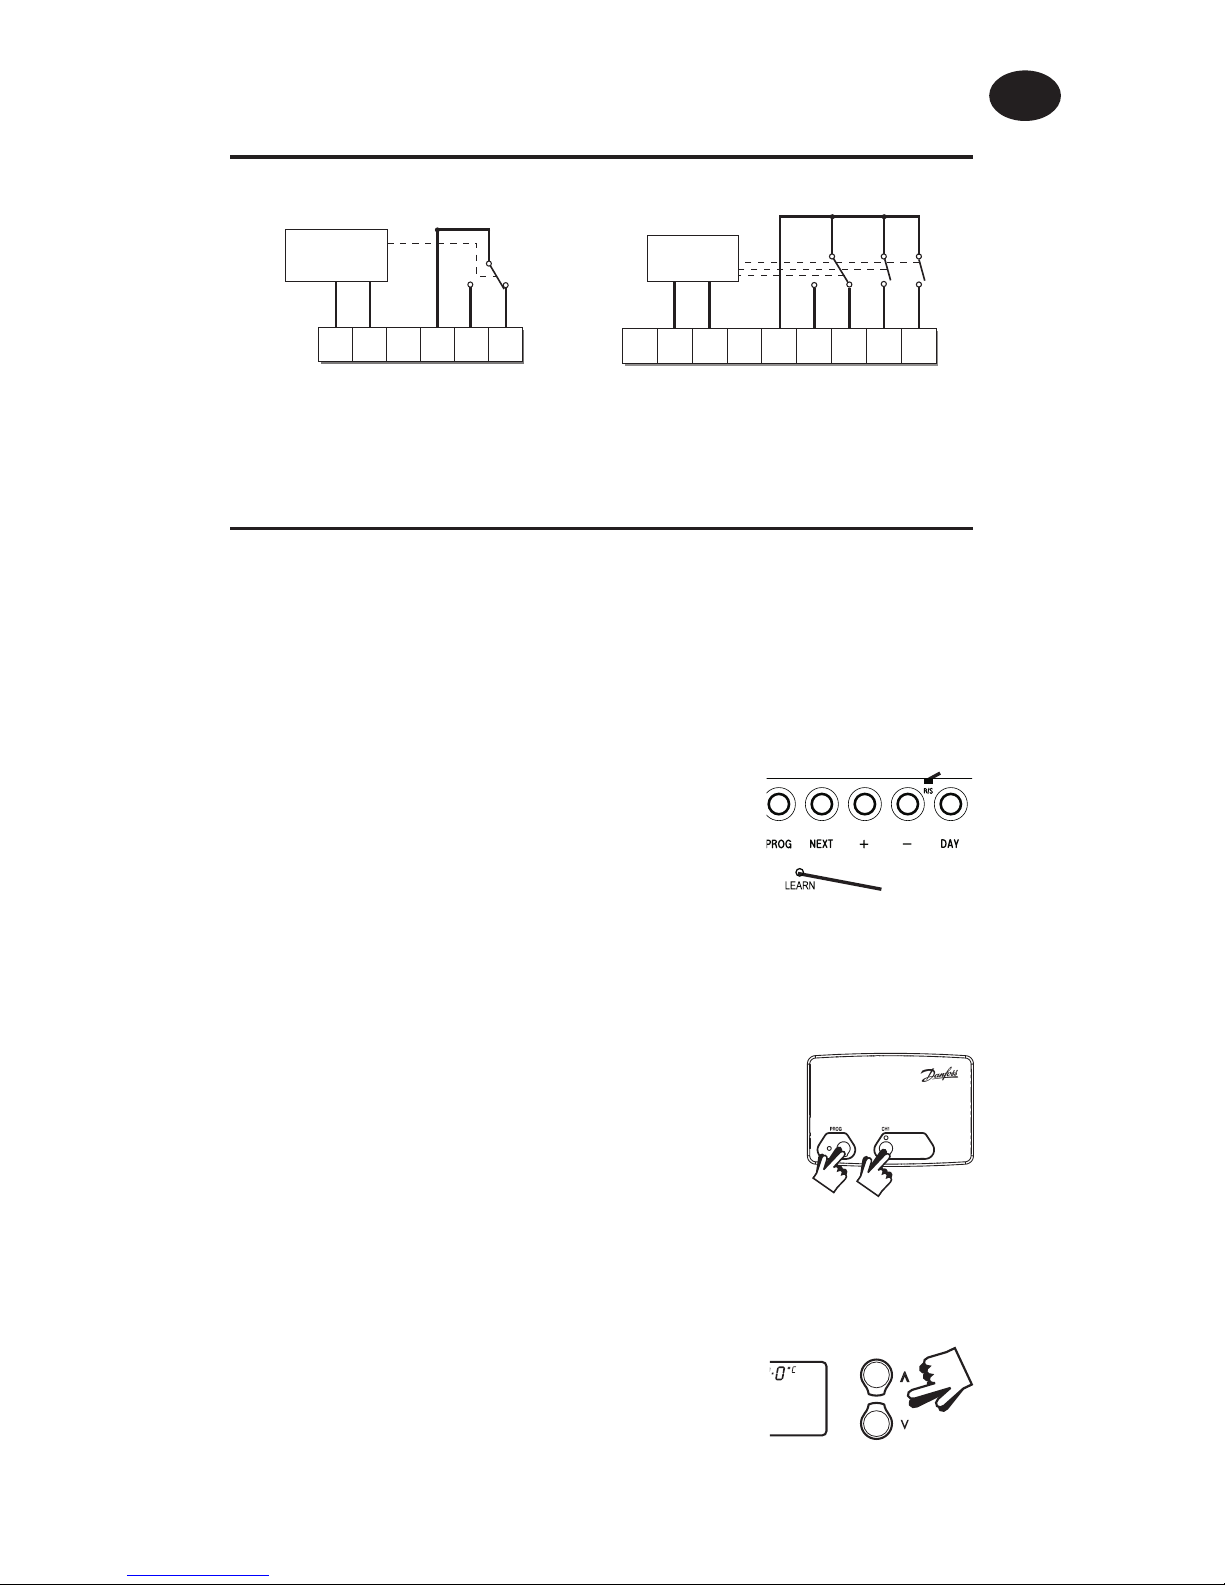
1. TP7000-RF
Press the recessed RESET button, using a nonmetallic object, to reset the unit.
2. Press & hold the recessed LEARN button for 3
seconds, using a non-metallic object.
NOTE: Thermostat now transmits continuously for 5 mins.
3. RX1 - Press and hold buttons PROG and CH1 for
3 seconds until green light ashes once.
4. RX2 (if applicable)
Stat 1 - perform steps 1-3.
Stat 2 - wait 5 mins, perform steps1-2 and then press PROG and CH2
on RX2.
RX3 (if applicable)
Stat 1 - perform steps 1 – 3.
Stat 2 - wait 5 mins, perform steps 1-2 and then press PROG and CH2
on RX3.
Stat 3 - wait 5 mins, perform steps 1-2 and then press PROG and CH3
on RX3.
5. TP7000-RF - Press or to return the unit to
normal operation.
Commissioning (RF versions only)
If the thermostat and the receiver have been supplied together in
a combined pack, the units have been paired in the factory and no
commissioning is required (RX1 only).
To tune the RX receiver to the frequency of the thermostat signal, follow
steps 1-5 below.
RX1
LEARN
RESET
Receiver Wiring (RF models only)
12
3
4
ELECTRONICS
N
L
COM
ZONE
1 ON
ZONE
1 OFF
A
ELECTRONICS
B
C12345
6
N
L
ZONE
1 ON
ZONE
1 OFF
ZONE
2 ON
ZONE
3 ON
COM
TERMINAL 6
RX3 ONLY
RX1 RX2 & RX3
Note: 1) For mains voltage operated systems link terminal 2 to mains live supply.
2) Power supply to unit must not be switched by timeswitch.
Installation Instructions
GB
Page 7

7
What is a programmable room thermostat?
... an explanation for householders
A programmable room thermostat is both a programmer and a room
thermostat. A programmer allows you to set ‘On’ and ‘O ’ time periods
to suit your own lifestyle. A room thermostat works by sensing the air
temperature, switching on the heating when the air temperature falls below
the thermostat setting, and switching it o once this set temperature has
been reached.
So, a programmable room thermostat lets you choose what times you want
the heating to be on, and what temperature it should reach while it is on.
It will allow you to select di erent temperatures in your home at di erent
times of the day (and days of the week) to meet your particular needs.
Turning a programmable room thermostat to a higher setting will not make
the room heat up any faster. How quickly the room heats up depends on the
design of the heating system, for example, the size of boiler and radiators.
Neither does the setting a ect how quickly the room cools down. Turning
a programmable room thermostat to a lower setting will result in the room
being controlled at a lower temperature, and saves energy.
The way to set and use your programmable room thermostat is to nd the
lowest temperature settings that you are comfortable with at the di erent
times you have chosen, and then leave it alone to do its job. The best way to
do this is to set low temperatures rst, say 18°C, and then turn them up by
one degree each day until you are comfortable with the temperatures. You
won’t have to adjust the thermostat further. Any adjustments above these
settings will waste energy and cost you more money.
If your heating system is a boiler with radiators, there will usually be only one
programmable room thermostat to control the whole house. But you can
have di erent temperatures in individual rooms by installing thermostatic
radiator valves (TRVs) on individual radiators. If you don’t have TRVs, you
should choose a temperature that is reasonable for the whole house. If you
do have TRVs, you can choose a slightly higher setting to make sure that
even the coldest room is comfortable, then prevent any overheating in other
rooms by adjusting the TRVs.
The time on the programmer must be correct. Some types have to be
adjusted in spring and autumn at the changes between Greenwich Mean
Time and British Summer Time.
You may be able to temporarily adjust the heating programme, for example,
‘Override’, ‘Advance’ or ‘Boost’. These are explained in the manufacturer’s
instructions.
Programmable room thermostats need a free ow of air to sense the
temperature, so they must not be covered by curtains or blocked by
furniture. Nearby electric res, televisions, wall or table lamps may prevent
the thermostat from working properly.
User Instructions
GB
Page 8

8
User Instructions
Your programmable room thermostat
The TP7000 allows you to programme up to 6 di erent time and
temperature settings for each day of the week, providing complete
exibility. It provides several energy saving features and features
several useful user overrides, including a 99 day holiday mode.
Preset Programmes
Your TP7000 comes ready programmed with a set of operating times and
temperatures which often suit most people.
If you want, you can change any of these settings by following the
instructions on pages 10-11. First follow the steps on page 9 to set your
display preferences and the correct time and date.
Before you start
Open the ap on the front of your
programmer. Using a non-metallic
object, press the recessed RESET
button, until you hear a click and the
display goes blank.
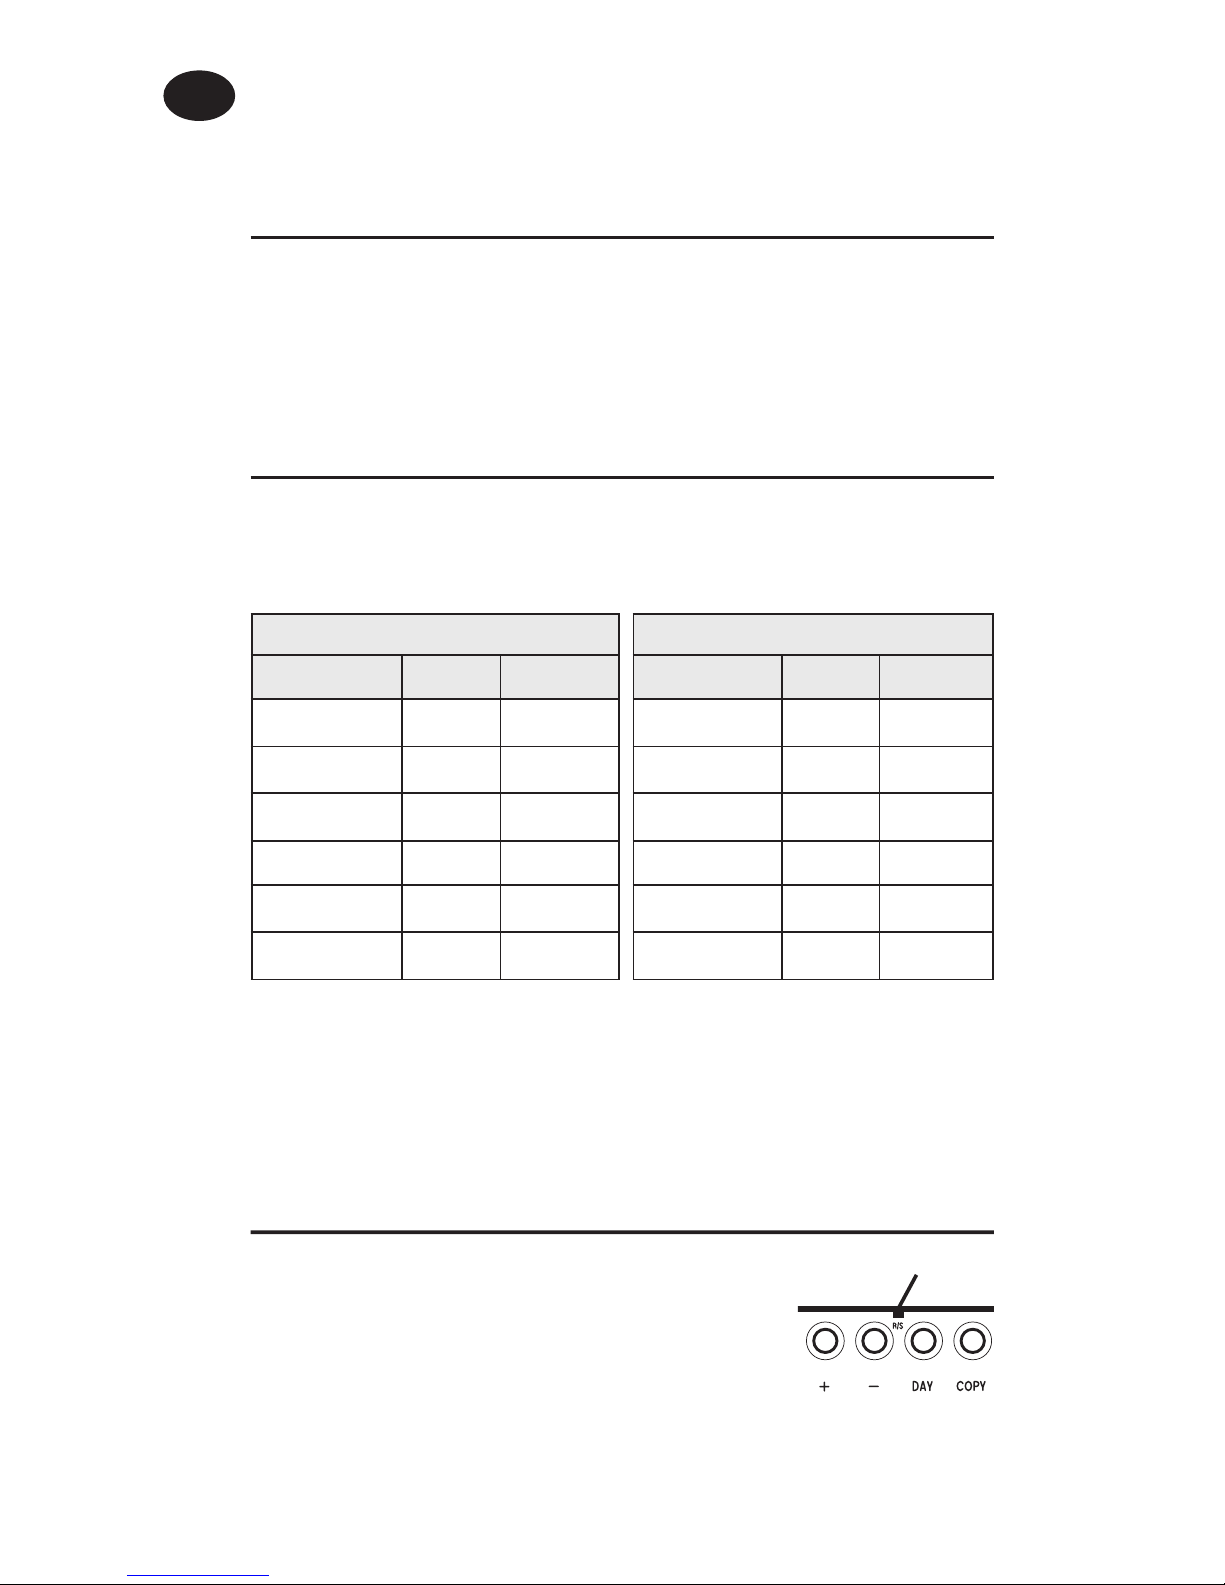
Weekdays (Mon-Fri) Weekend (Sat-Sun)
Event Time Temp °C Event Time Temp °C
1 06:30 20 1 07:30 20
2 08:30 15 2 09:30 20
3 11:30 20 3 11:30 20
4 13:30 15 4 13:30 20
5 16:30 21 5 16:30 21
6 22:30 15 6 22:30 15
RESET
User Instructions
GB
Page 9
9
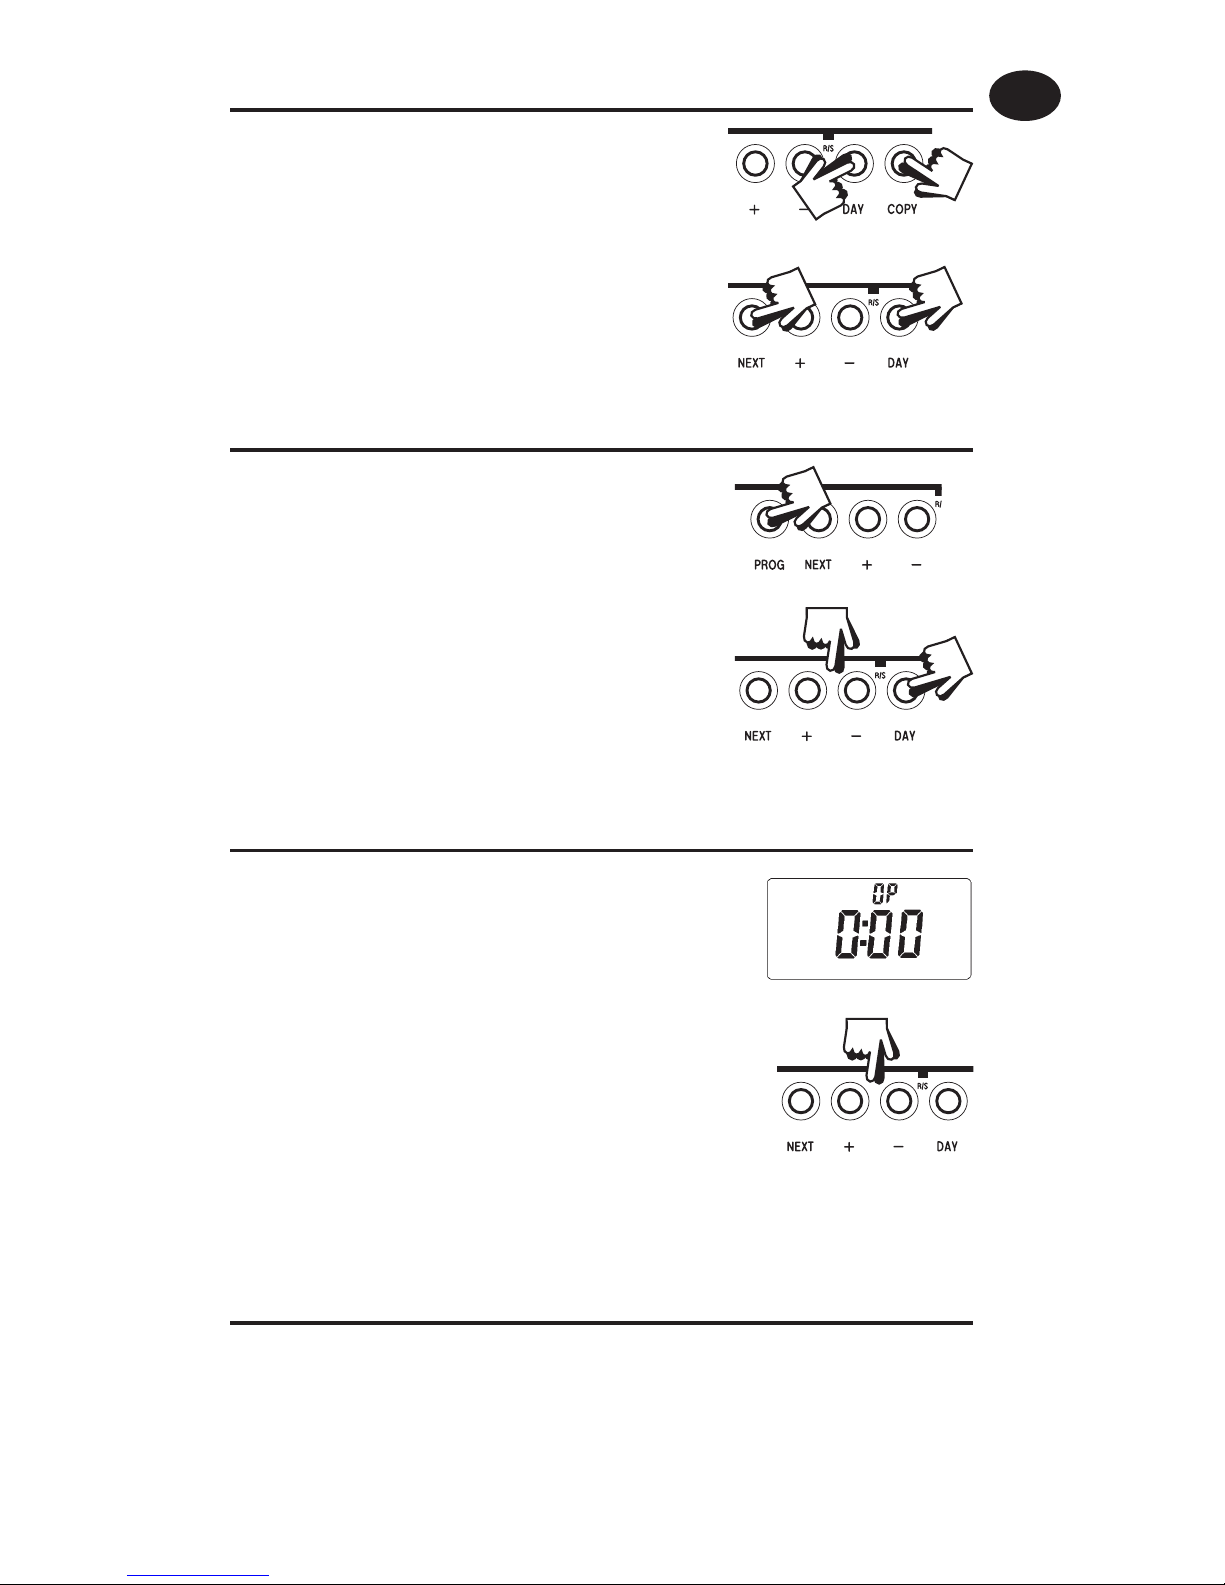
Display preferences
Temperature display (°C or °F)
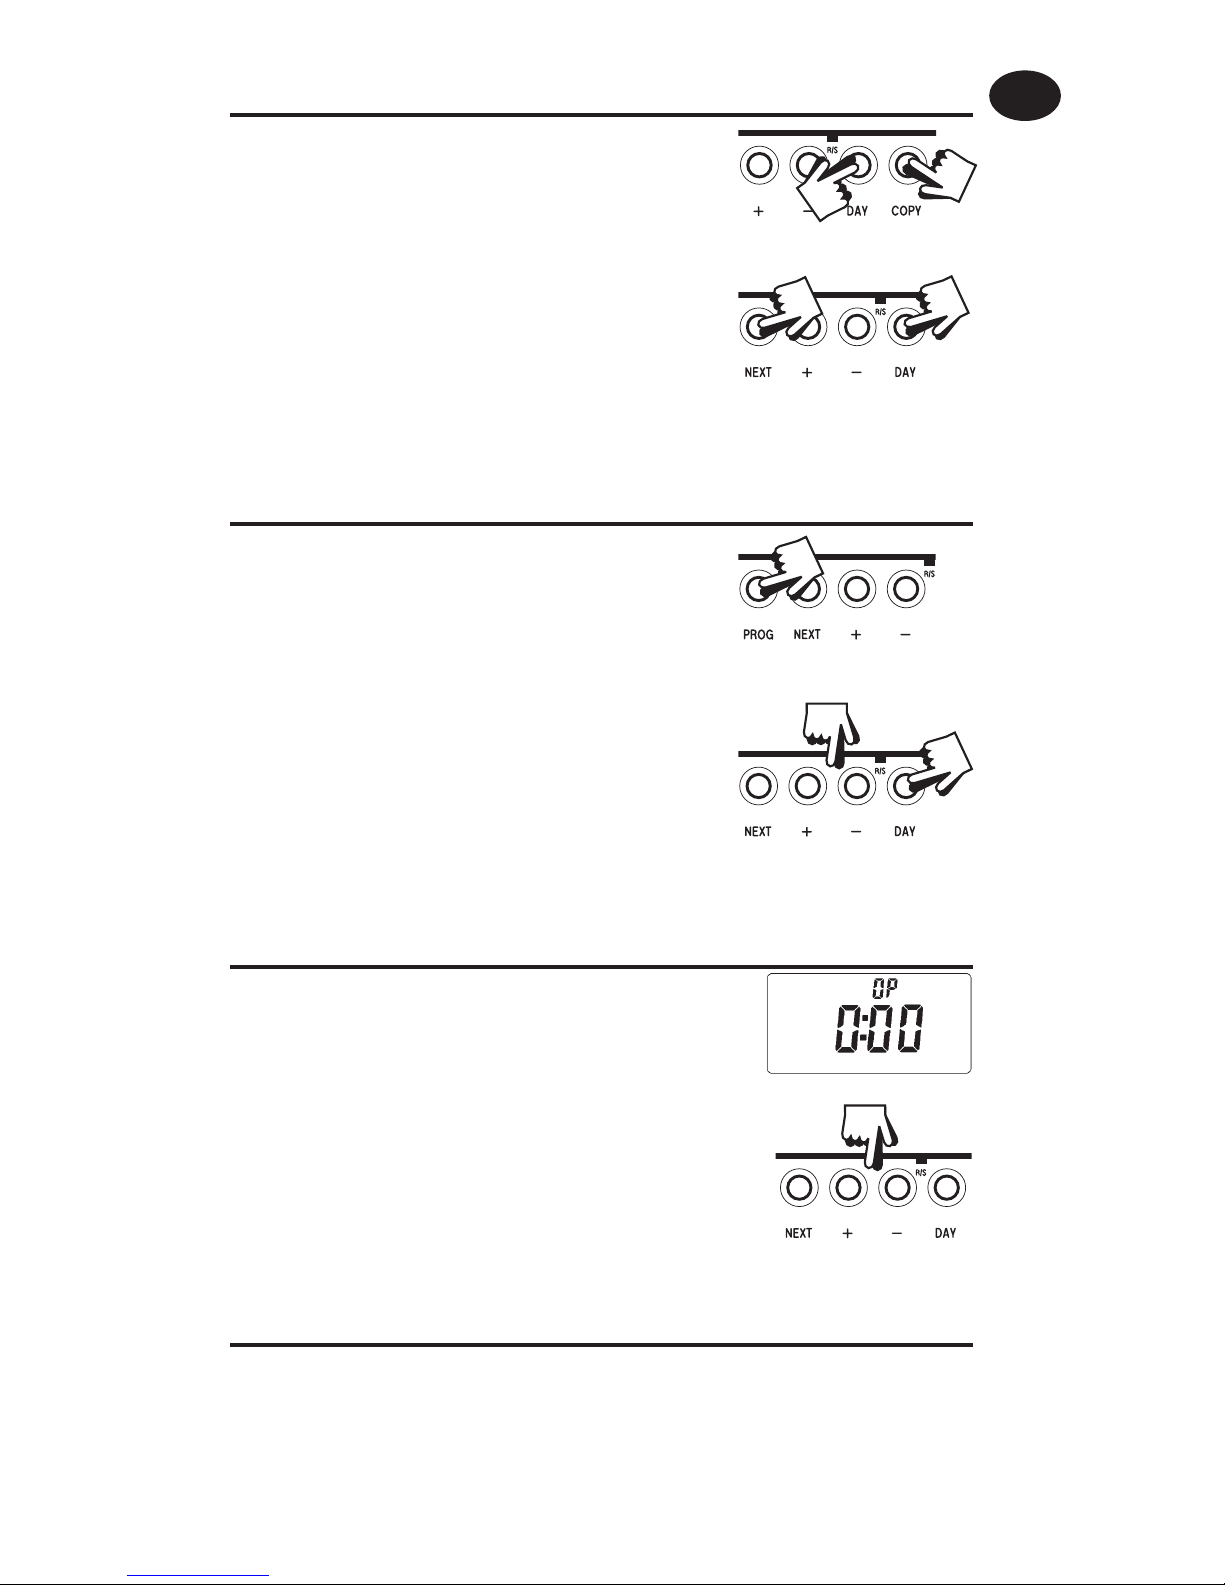
Press and hold DAY & COPY (for 2-3 seconds)
until display changes.
Clock display (12 or 24 hr)
Press and hold NEXT & DAY (for 2-3 seconds)
until display change.
(AM or PM will appear in 12 hr mode)
Setting the Clock & Day
Press PROG to begin programming.
DAY - Press DAY until correct day is shown
(1=Monday, 2=Tuesday etc).
TIME - Press + and - to change time (press and
hold to change in 10 min increments).
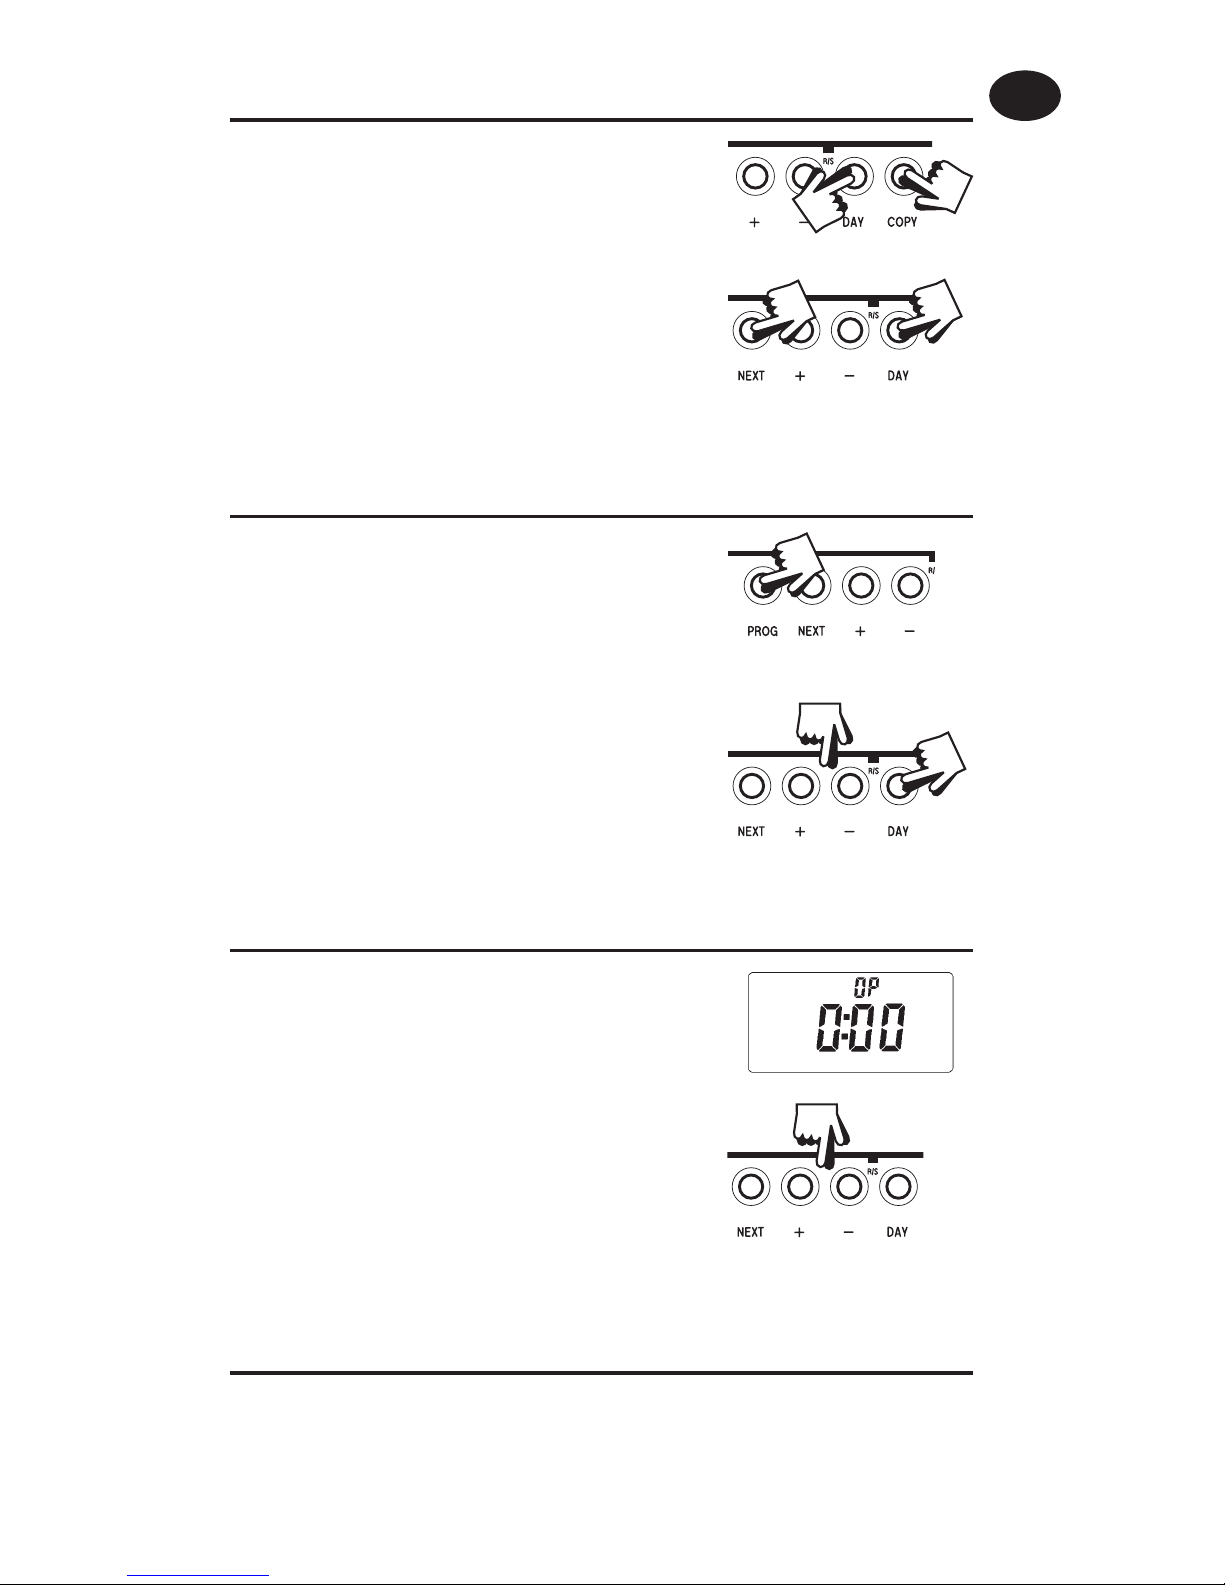
This display will ONLY appear if the OSC function has
been enabled by your installer.
Use the + or - buttons to select the OSC
period. The choices are 0:30 (30 mins), 1:00 (1
hr), 1:30 and 2:00.
The recommended setting is 0:30. If set to
0:00 the function is disabled.
To change DAY
To change TIME
Setting the OSC Period, if enabled (see pg.5)
Accepting the preset programmes
If you are happy to use the preset programmes on page 8, you don’t
need to do anything else. To accept these settings just close the
front cover and after 2 minutes the pre-settings will automatically be
accepted.
User Instructions
GB
Page 10
10
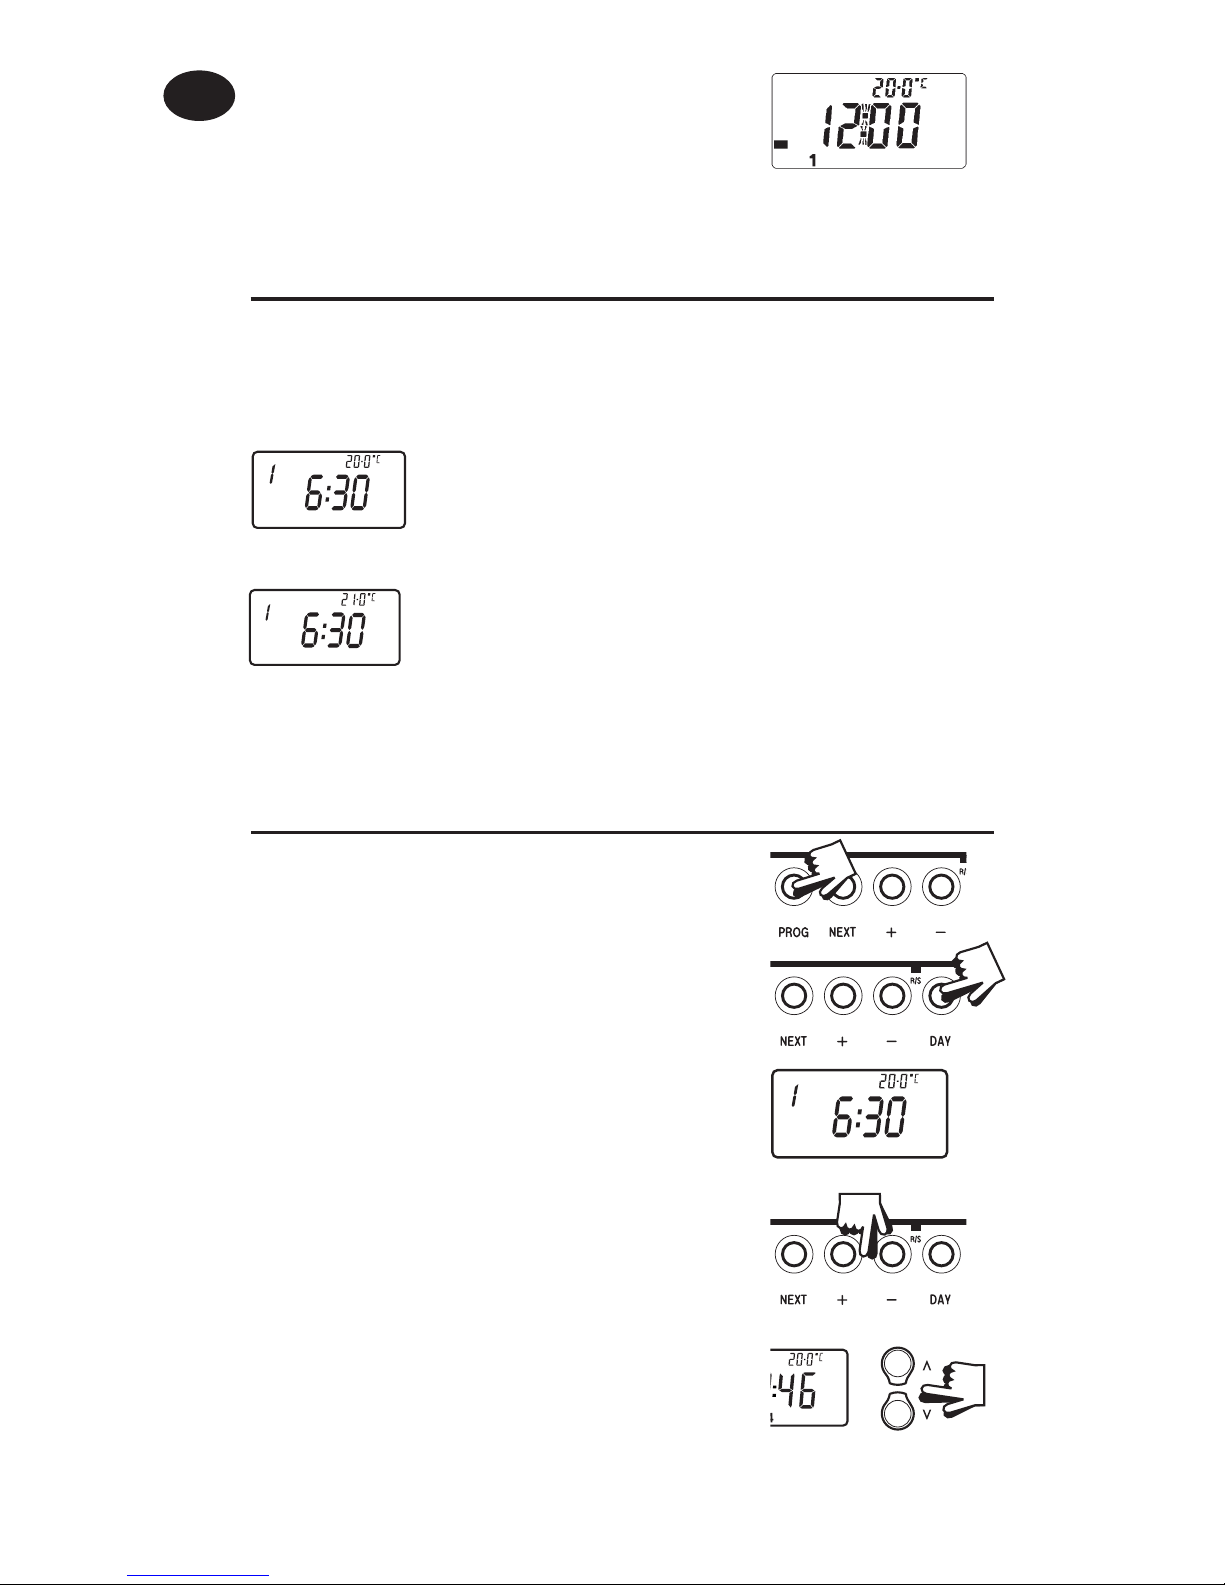
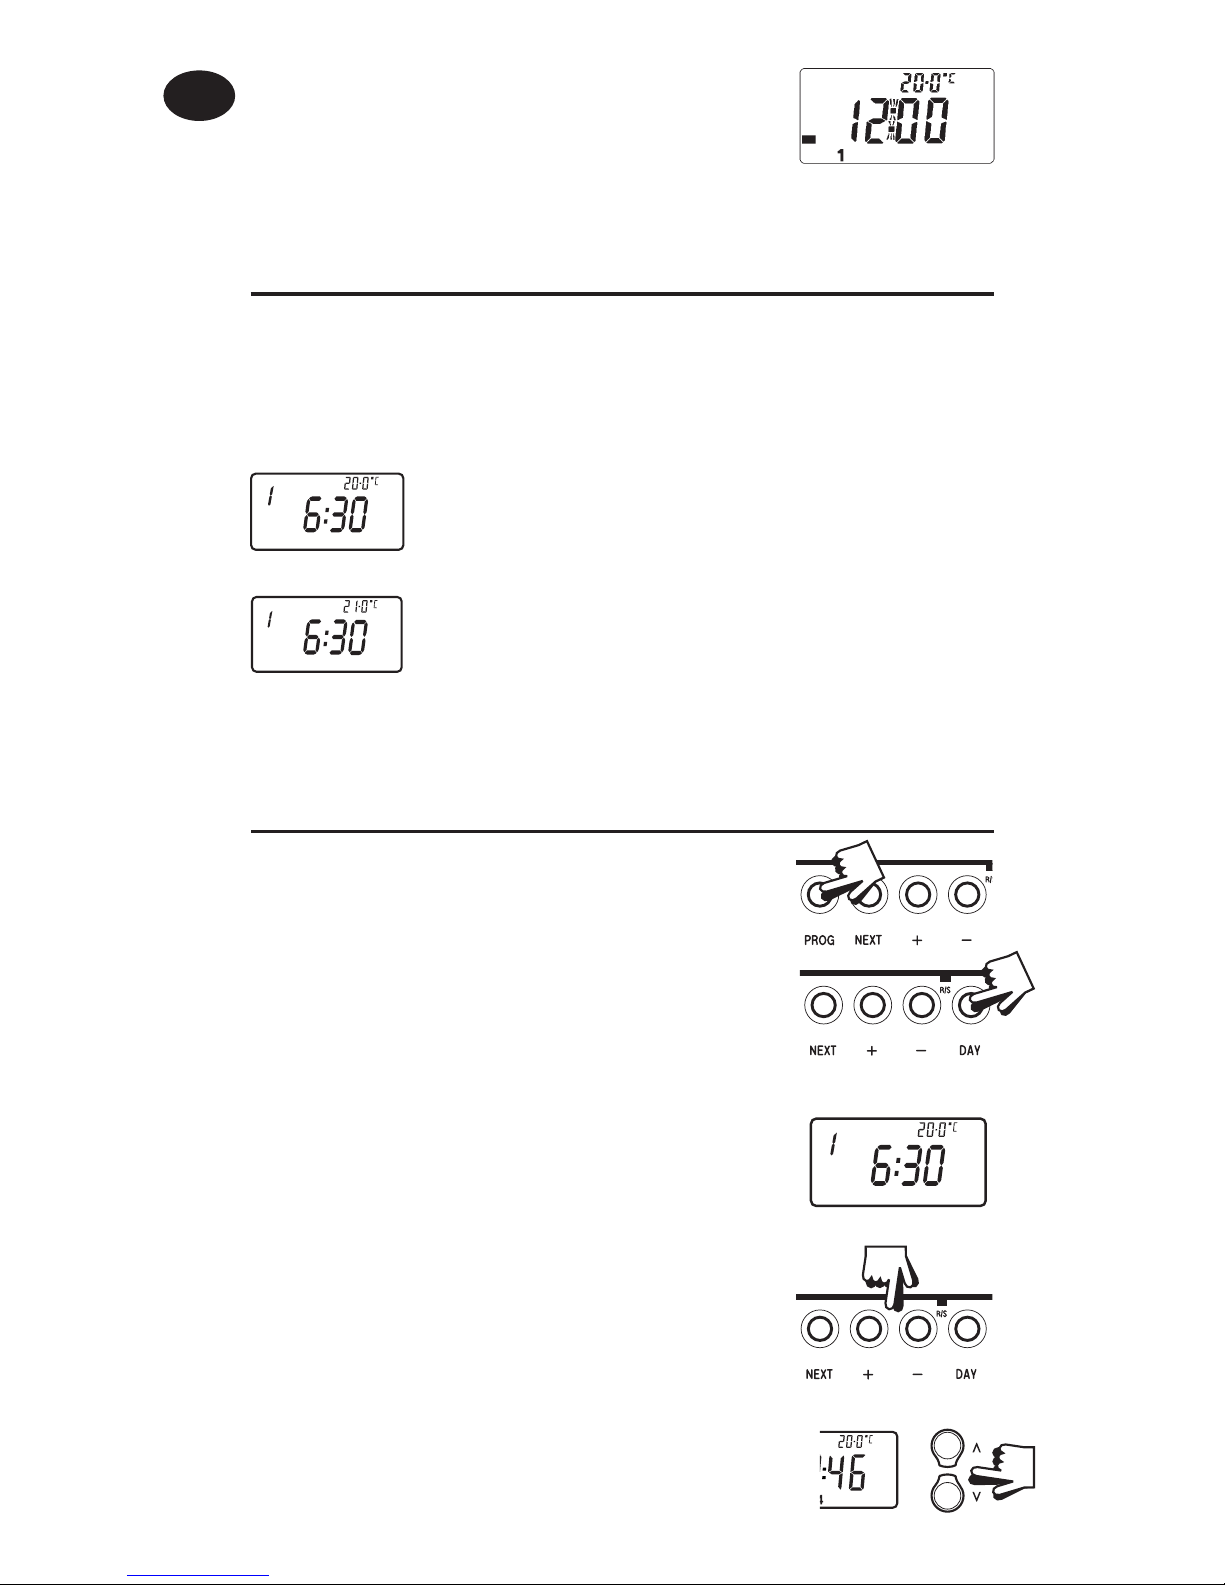
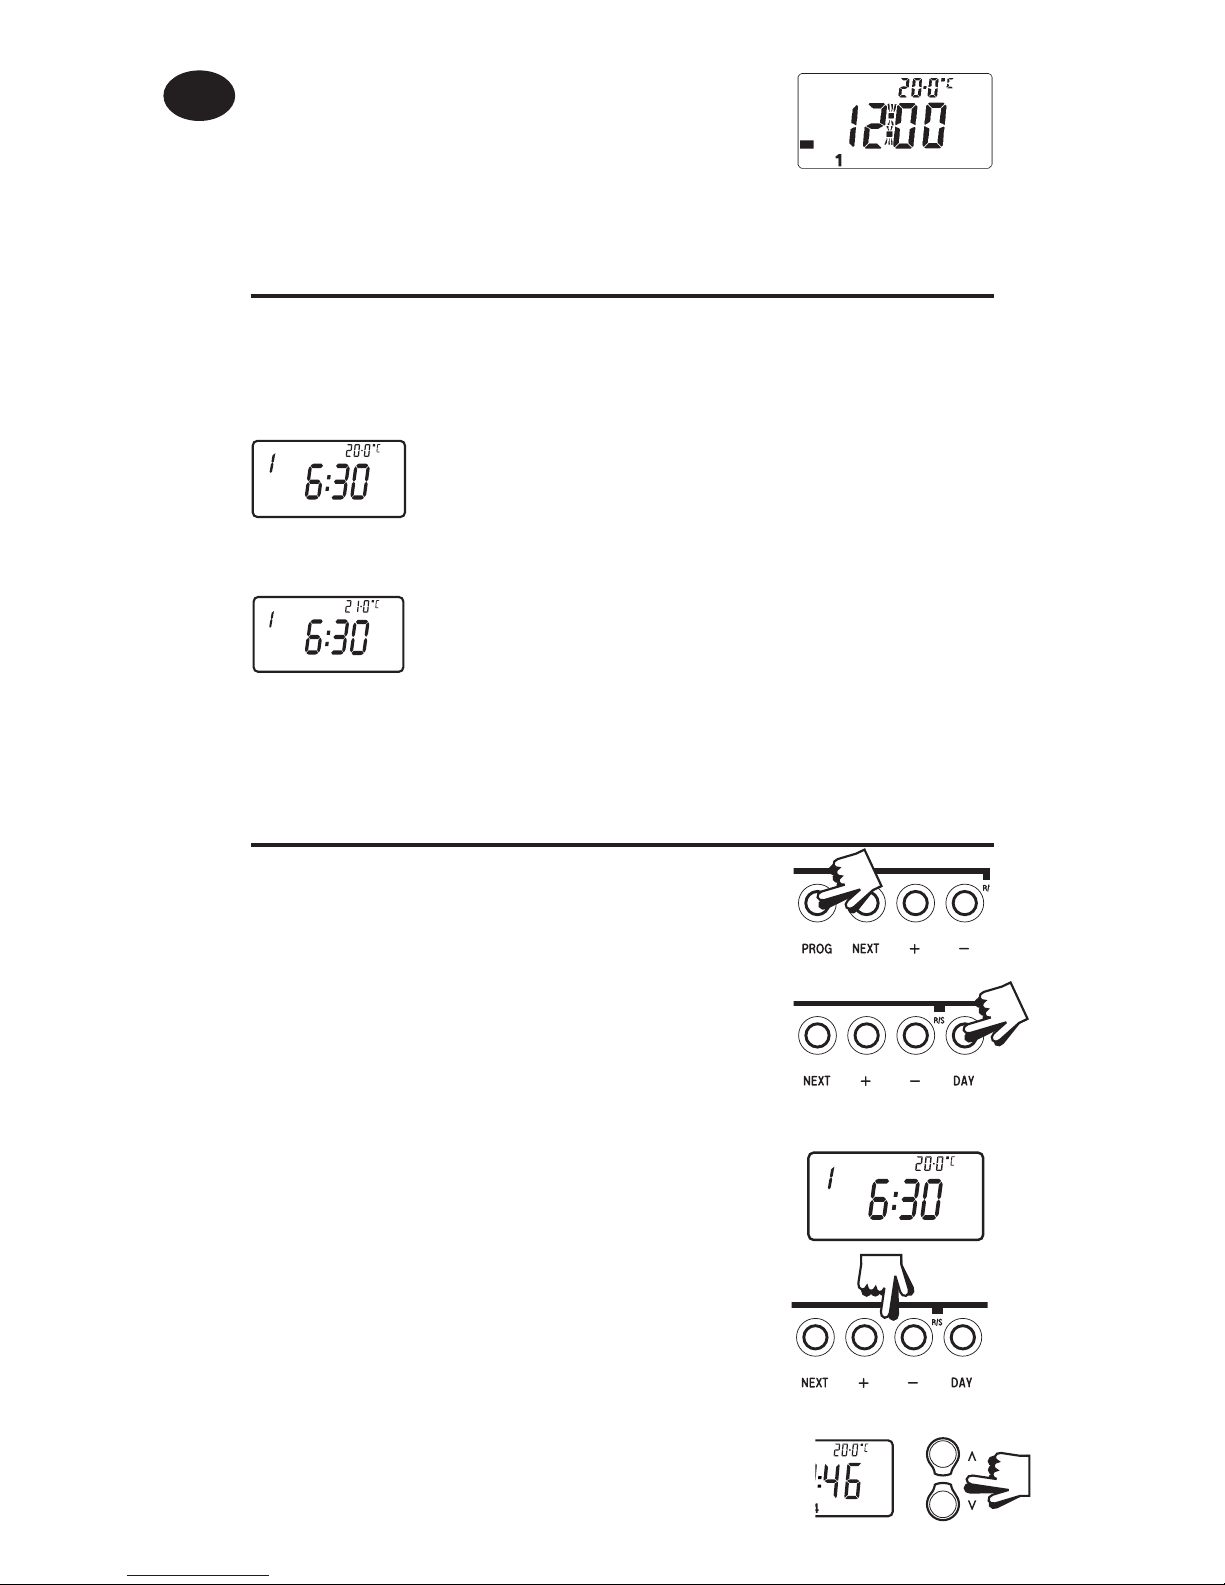
The unit is now in RUN mode (colon ashes in
display) and the heating will operate according
to the preset programmes.
a) Press PROG until Event 1 ashes, then press
DAY to move from current day to Day 1.
b) Amend the time and temperature as
follows:
i) Use + and – buttons to alter time
(press and hold to change in 10 min
increments).
ii) Use and buttons to alter
temperature in 0.5°C (1°F) steps.
iii) Press NEXT to advance to next Event.
iv) Repeat steps i,ii & iii above for Events 2,
3, 4, 5 & 6.
Programming in 7-day mode
(separate programmes for each day of the week)
1
Before you change the preset programmes
Your installer will have set your unit to operate in either 7-day mode
or 5/2 day mode. To tell which mode your unit is set press PROG until
Event 1 ashes in the display.
This unit is in 7-day mode and you can programme
di erent settings for each day of the week (see page 10-
11).
This unit is in 5/2 day mode and you can enter one of
set of programmes for weekdays and another set for
weekends (see page 11).
1
1 2 3 4 5
User Instructions
GB
Page 11
11
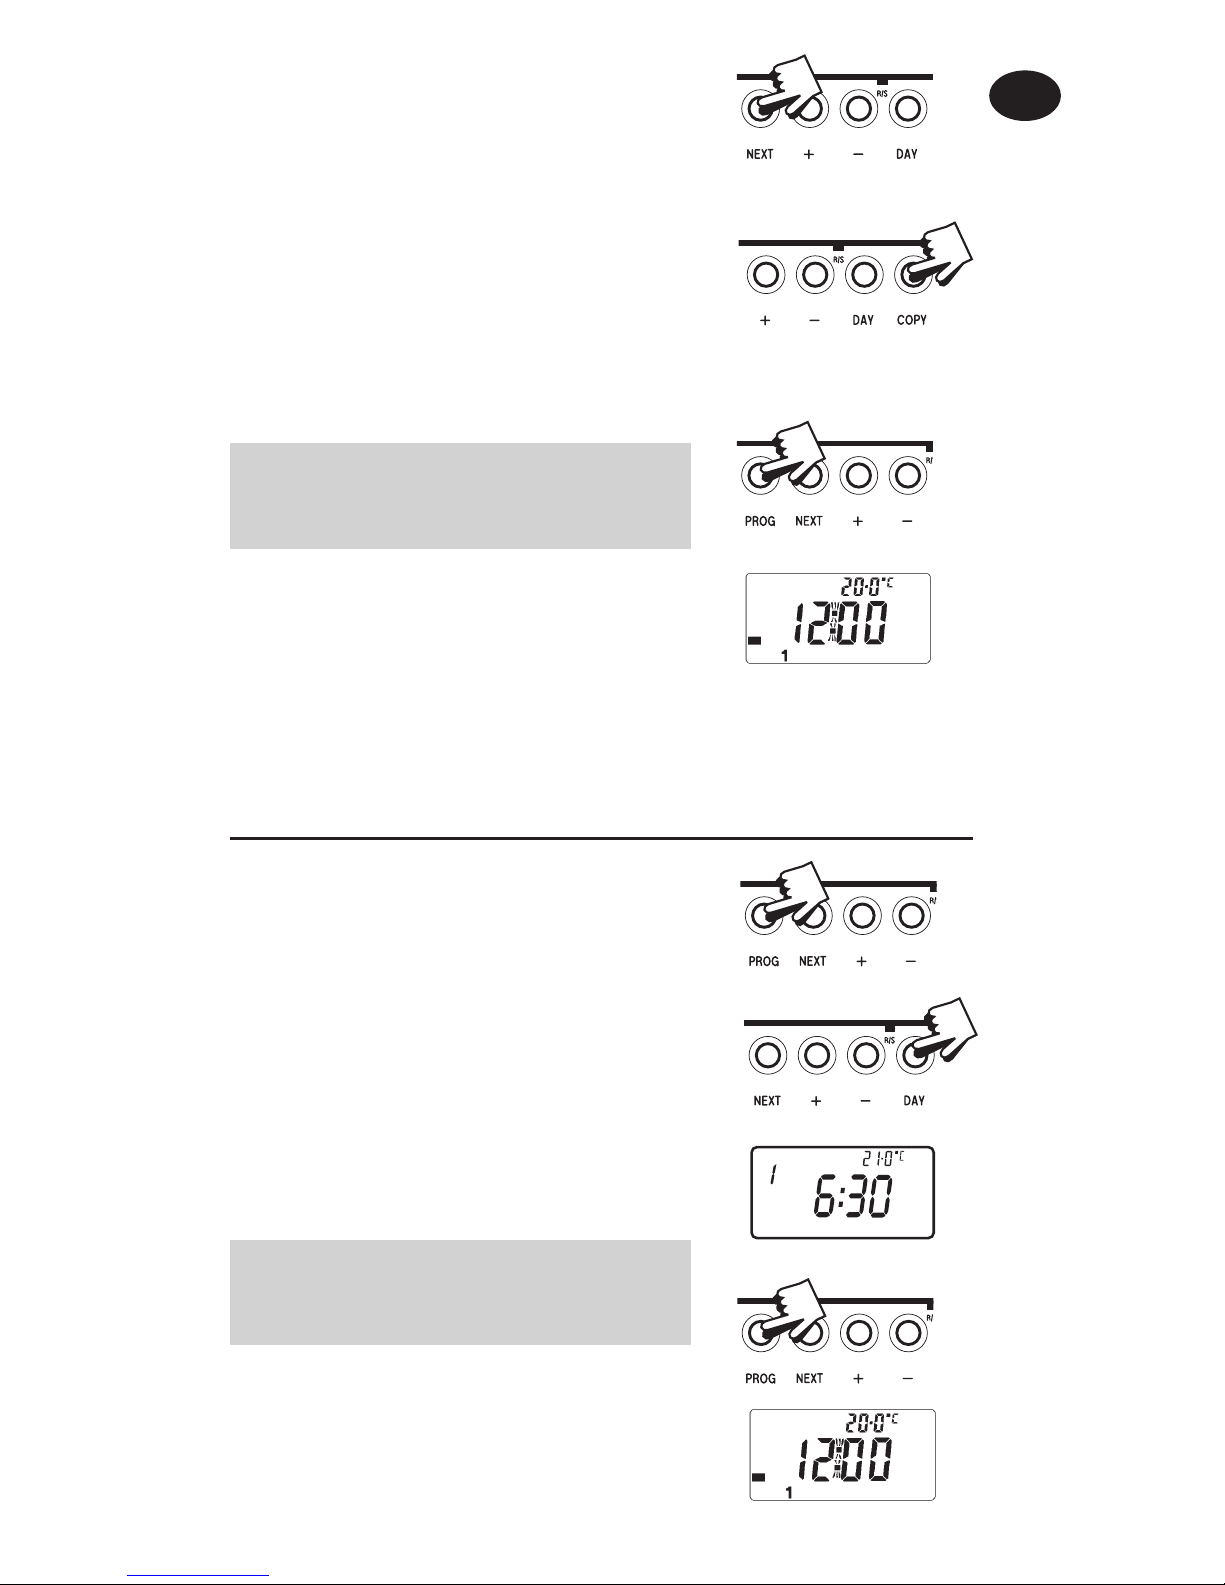
c) When all 6 events are correct, press
DAY to programme events for Day 2.
(If you wish to repeat the previous
day’s programme, simply press
COPY).
d) Repeat steps b & c above to
programme (or COPY) events for Days
3, 4, 5, 6 & 7.
Returning to RUN Mode – press PROG
until colon ashes in display.
Press PROG until Event 1 ashes, then
press DAY until display shows Day 1-
5.
Follow steps b & c on page 10-11 to
programme times & temperatures for
weekdays.
Press DAY to programme events for
weekend (Day 6-7) or press COPY to
repeat weekday programme.
Returning to RUN Mode – press PROG
until colon ashes in display.
Programming in 5/2 day mode
(one set of programmes for weekdays, another set for weekends)
1 2 3 4 5
User Instructions
GB
Page 12
12
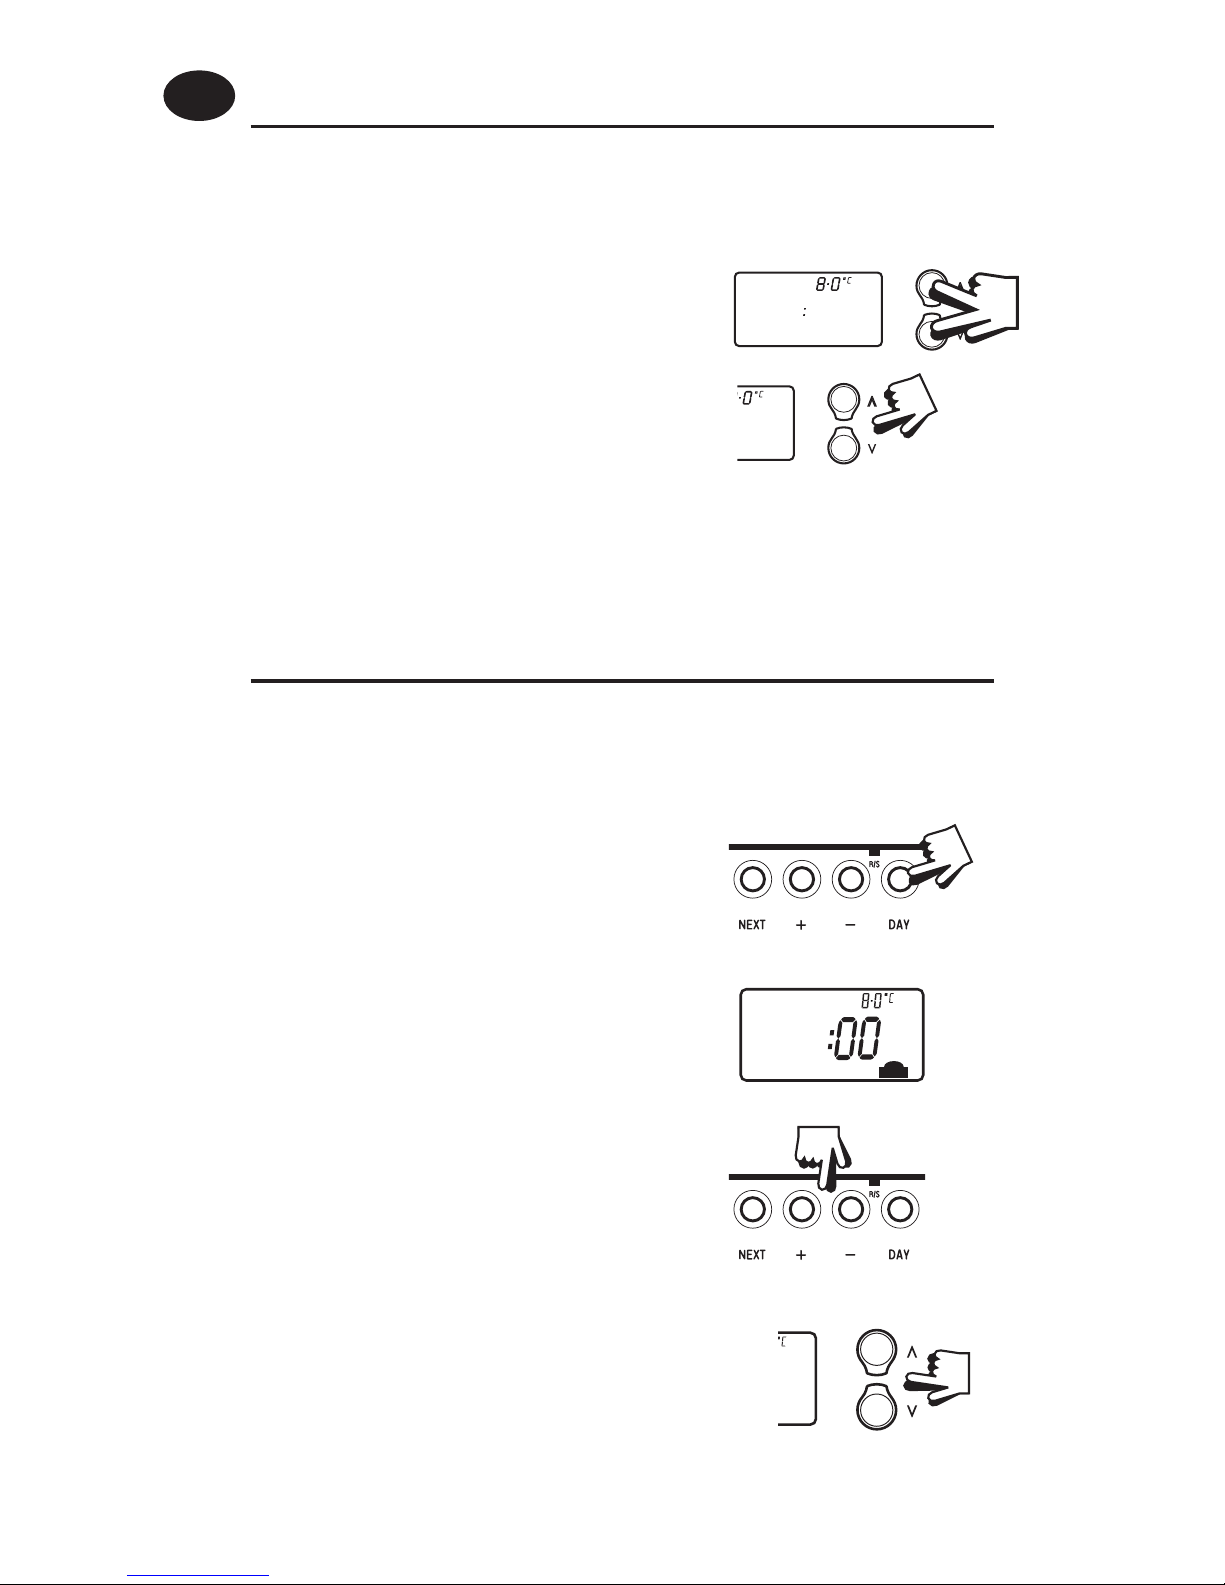
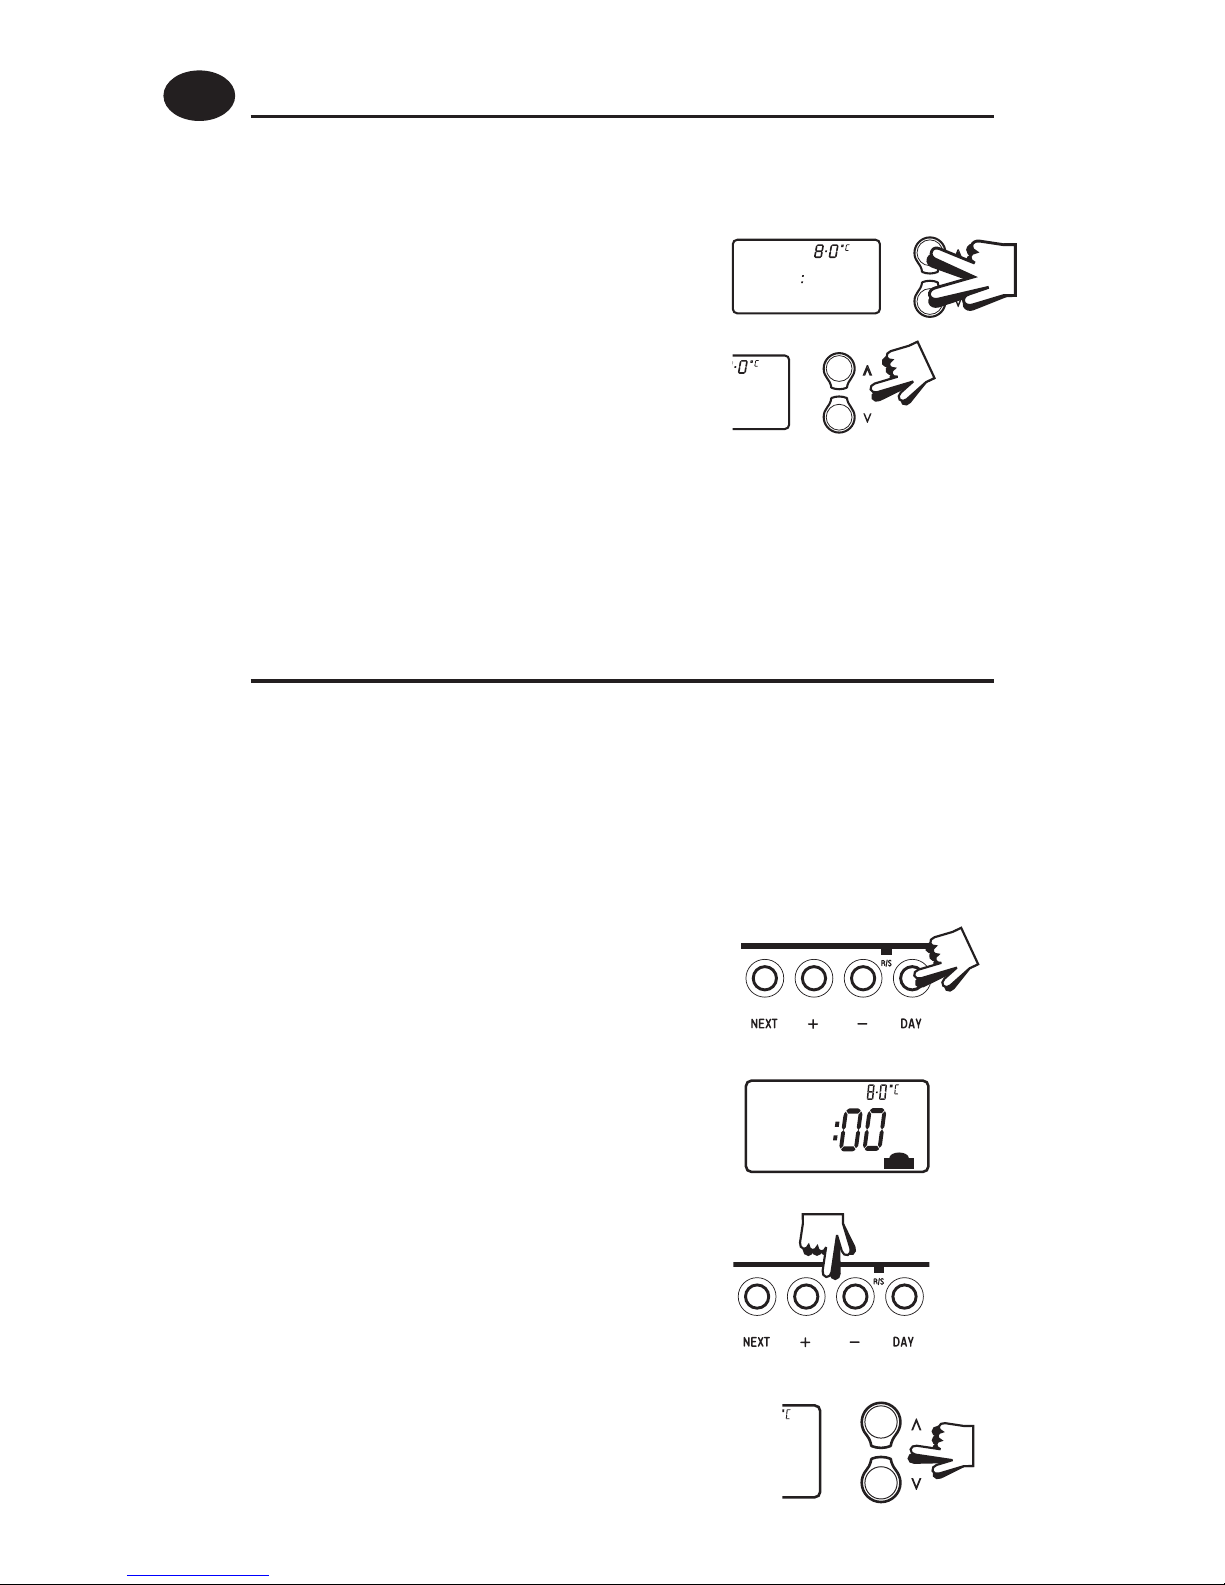
To convert to Thermostat mode
Press & hold and together until
display changes to colon blinking &
default temperature (8°C).
Press or to alter temperature as
required.
(If not already in Thermostat Mode, press
& hold and together until display
changes to colon blinking & 8°C).
Press DAY (display will show a suitcase
and :00).
Press + and - to enter number of days of
holiday (max.99).
Use and buttons to alter the constant
temperature, if required.
When selected number of days have elapsed,
the unit will return to normal, controlling
according to your set programmes.
NOTE: Press and buttons together
to exit holiday mode if necessary.
To programme Holiday Mode
(whilst in Thermostat Mode)
The TP7000 can be converted to control at a constant user selected
temperature, instead of following the set programme.
!
NOTE: unit will remain in thermostat mode until the and
buttons are pressed together again.
The TP7000 can control at a constant low temperature while you are away on
holiday, returning to your programmed settings after a speci ed number of
days (maximum 99 days).
User Instructions
GB
Page 13
13
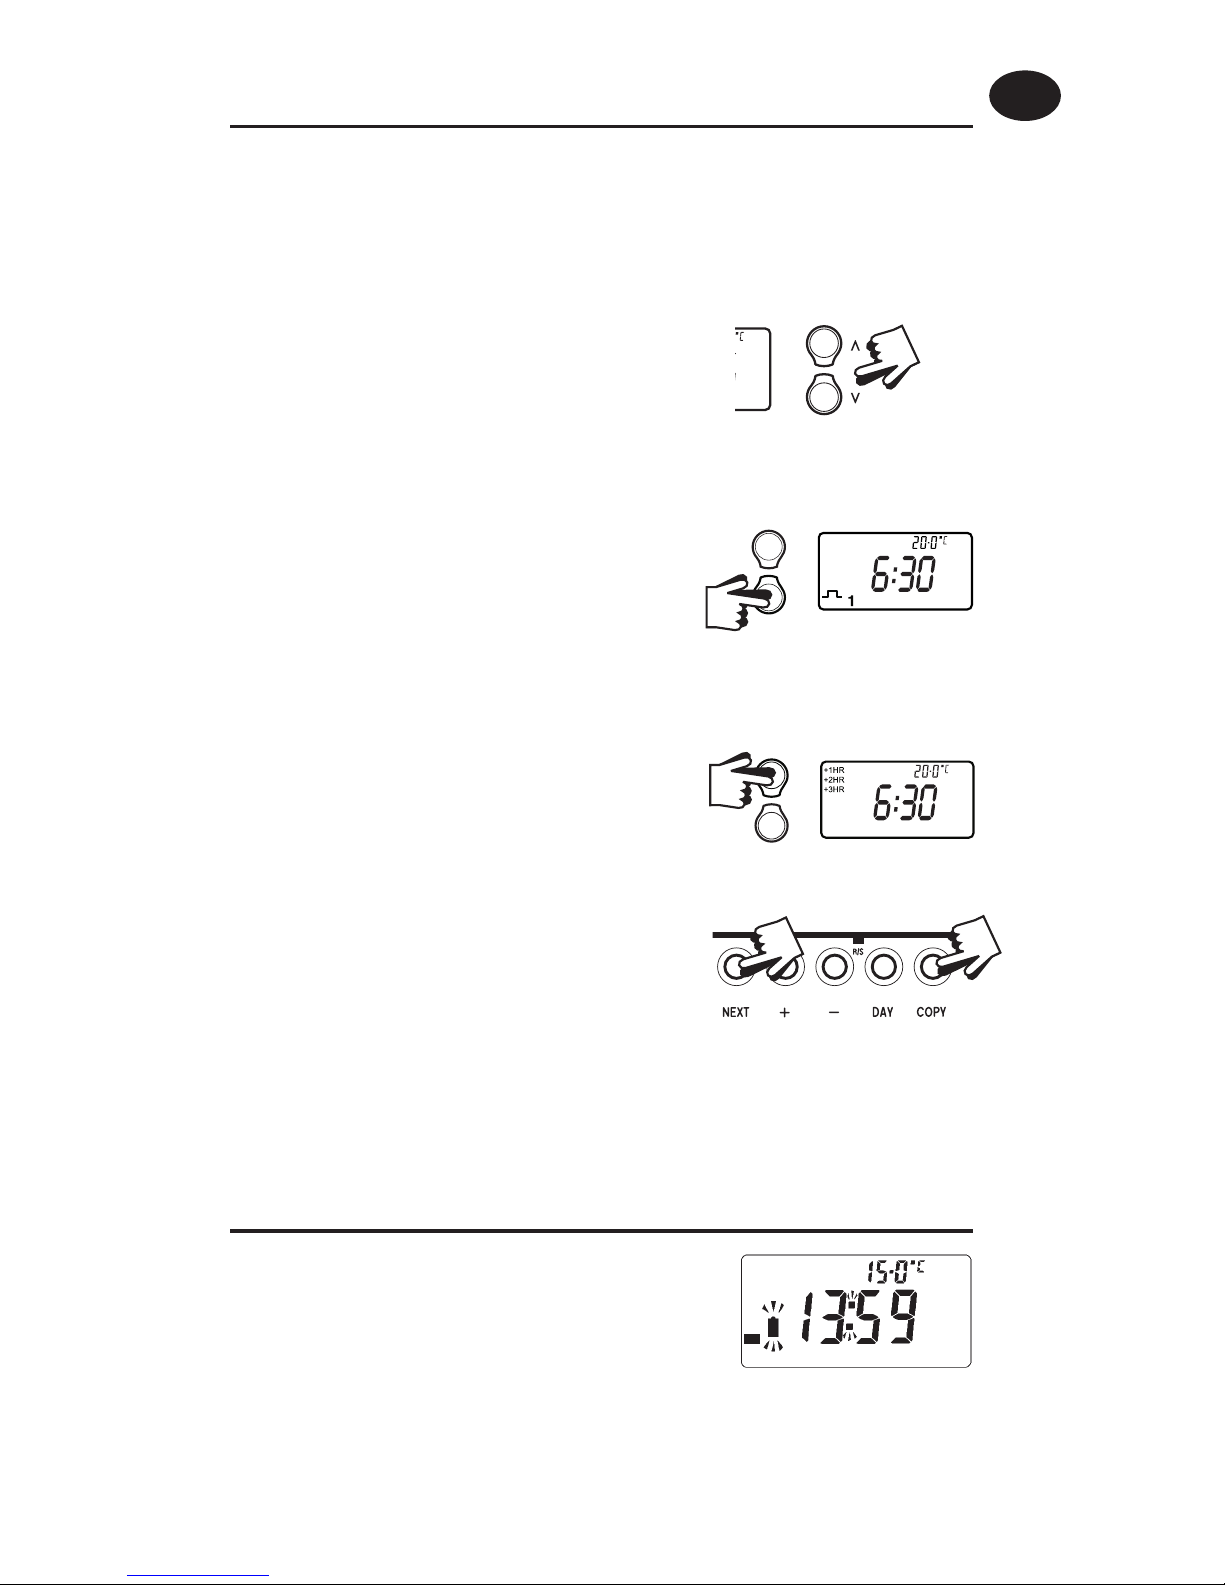
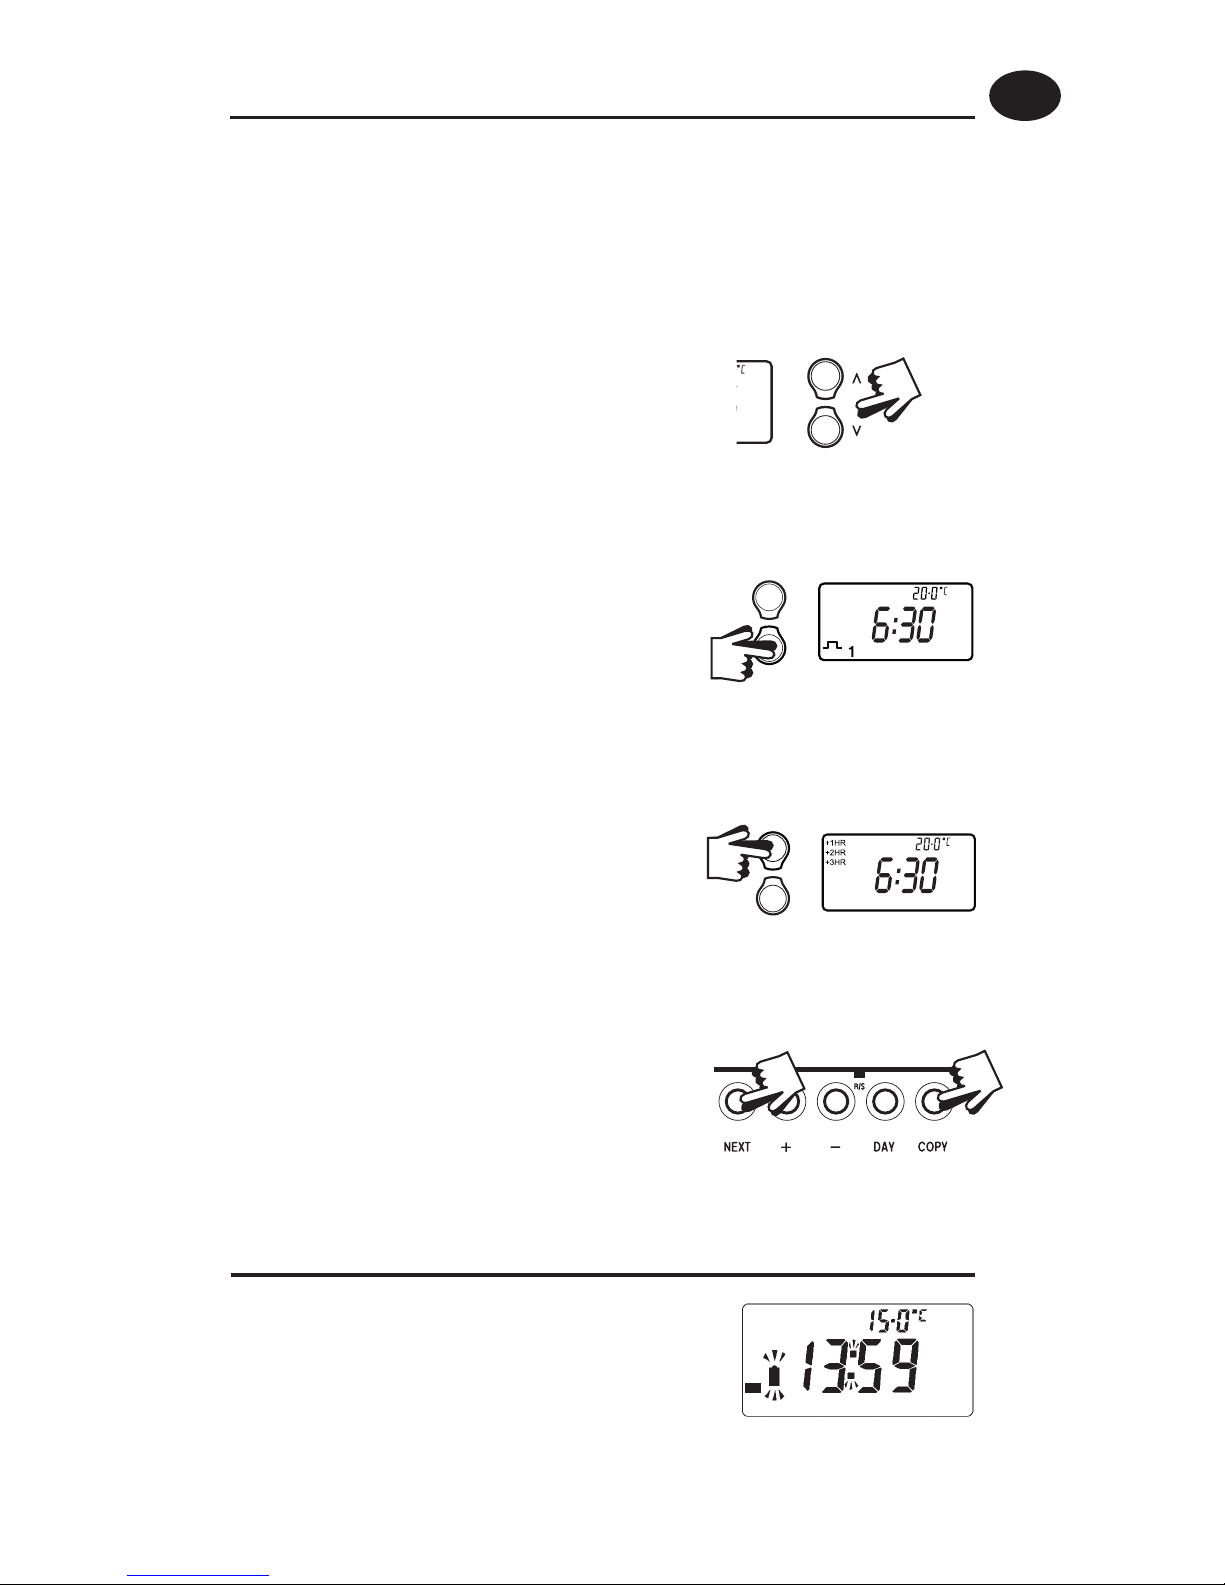
User Overrides
To temporarily increase or decrease the
programmed temperature.
– press or to select the desired
temperature.
Extend Event 1 (i.e. 06.30 20°C) to last all
day (so that heating remains on at a
constant temperature all day).
– press button once as shown.
To extend the current set temperature by
1, 2 or 3 hours.
– press button once for 1 extra hour,
twice for 2 extra hours, 3 times for 3
extra hours, and press 4 times to remove
override.
To alter main LCD display to show either
time or actual room temperature.
– press NEXT & COPY together.
Batteries will last in excess of two years.
Low battery indicator will ash on the LCD
display. The user has 15 days in which to
replace the batteries with high quality
alkaline cells.
Changing Batteries (not TP7000M)
2
Sometimes you may need to change the way you use your heating
temporarily, i.e. due to unusually cold or warm weather. The TP7000 has
several user overrides, which can be selected without a ecting the set
programmes.
User Instructions
GB
Page 14

14
Instructions d’installation
Importante: Veiller à ce qu’aucun gros objet métallique (caisson de
chaudière ou autres gros appareils domestiques) ne fasse obstacle aux
communications entre le thermostat et le récepteur.
Speci cations
Caractéristiques TP7000-RF
TP7000
TP7000A
TP7000M
TP7000MA
TP7000M 24
Alimentation
2 piles alcalines AA/MN
1500/LR6
230v, 50 Hz 24v, 50 Hz
Mémoire non volatile
Su sante pour
remplacer les piles
endéans la minute
Rechargeable (voir note 1*)
Type de contact N/A 1 x SPDT, Type 1B
Charge de contact, voltage et
courant
N/A 3(1) A, 10-230V
Fréquence d’émission (modèles RF) 433.92 MHz N/A
Rayon d’action (modèle RF
uniquement)
Max. 30
métres
N/A
Tension assignée de tenue au choc N/A 2.5Kv
Dimensions (mm) 138 largeur x 88 hauteur x 28 profondeur
Essai à la bille 75°C
Plage de températures 5-30°C
Normes de fabrication EN 60730-2-7 (EN300220 pour RF)
Pollution Degré 2
Précision de l’horloge ± 1 min.
Précision de la température ±1°C
Note 1) : Le thermostat doit être alimenté pendant 6 jours pour disposer de la
mémoire non volatile.
Remarque:
Ce produit doit être installé exclusivement par un électricien
quali é ou un installateur de chau age compétent et doit
être conforme à la version en vigueur des réglementations de
câblage IEEE.
Instructions d’installation
F
Page 15
15
Installation
Retirez tout d’abord la plaque murale de l’arrière de l’appareil.
Par rapport au coin gauche supérieur de la plaque murale, vous
devez disposer d’espacements d’au moins 140 mm à droite, 15 mm
à gauche, 30 mm au-dessus et 100 mm en-dessous a n de pouvoir
monter le module en chable.
Avant de monter l’appareil, assurez-vous que les 4 microcontacts
situés à l’arrière de l’appareil soient placés dans les positions
requises (voir ci-dessous). Le pré-réglage d’usine est 7 jours, avec
la régulation Optimum Start (démarrage optimum) et Chronoproportionnelle en position OFF (Arrêt).
Réglages d’installateur
REMARQUE
Utilisez Chrono 3 pour les systèmes à inertie thermique élevée, ex. chaudières en
fonte sur pied.
Utilisez Chrono 6 pour les systèmes à faible inertie thermique, ex. chaudières à
faible contenu d’eau et chaudières mixtes.
Tous les modèles
Sw
1
Programmation 5/2 jours Programmation 7 jours
Sw
2
Optimum Start Contol on Optimum Start Contol o
Sw
3
Règulation Chrono-proportionnelle Règulation On/O
TP7000, M, & RF modèles avec 3 ou 6 cycles par heure
Sw
4
Chrono-proportionnelle, 6 cycles par heure Chrono-proportionnelle, 3 cycles par heure
Instructions d’installation
F
Page 16
16
1
234567
ELECTRONICS
REMOTE
SENSOR
'A' models
only
COM
ON
OFF
TP7000 Câblage (versions câblées seulement)
7 jours – chaque jour peut être programmé avec des heures et des
températures di érentes.
5/2 jours – une série d’heures et de températures pour les jours de la
semaine, et une autre série pour le week-end.
Régulation démarrage optimum - fonction qui allume le chau age
avant l’heure programmée de la Période 1 pour s’assurer que la
température désirée soit atteinte à l’heure dé nie.
Chrono-proportionnel – fonction d’économie d’énergie qui déclenche
la chaudière à intervalles réguliers pour maintenir une température
dé nie, o rant un environnement ambiant constant à l’utilisateur.
Optimum Start Control
-4˚C
-3˚C
-2˚C
-1˚C
A
B
C
120
min.
90
min.
60
min.
30
min.
Event
time
(
D
Mettez Sw en position OSC On
(pg.14)
Réglez la courbe optimale en mode
programmation
A - Température choisie ordre n°1
B - Déviation température choisie
C - Temps d’anticipation de démarrage
pour ordre n° 1
D - Courbes optimales disponibles
Instructions d’installation
F
B
C
M 24V models onl
y
24V
L
N
M 230V models onl
230V
Nota: un câble de cuivre de 1 mm2 peut être utilisé pour raccorder la
sonde à distance au TP7000A. S’assurer que :
a) la longueur de câble ne dépasse pas 50 mètres
b) le câble ne chemine pas le long d’un autre câble véhiculant du 230
V ou plus , et si besoin faire des croisements de câbles angle droit.
Page 17

17
1. TP7000-RF
Appuyez sur la touche RESET encastrée, à l’aide
d’un objet non-métallique, pour réinitialiser
l’appareil.
2. Appuyez sur la touche LEARN encastrée en la maintenant enfoncée
pendant 3 secondes, à l’aide d’un objet non-métallique. (Le TP7000
transmet alors un signal unique en continu pendant 5 minutes).
3. RX1 - Appuyez sur les touches PROG et
CH1 en les maintenant enfoncées pendant 3
secondes jusqu’à ce que le voyant vert clignote
une fois.
4. RX2 (si applicable)
Etat 1 – exécutez les points 1-3.
Etat 2 - patientez 5 min, exécutez les points 1-2 puis appuyez sur les
touches PROG et CH2 du RX2.
RX3 (si applicable)
Etat 1 – exécutez les points 1-3.
Etat 2 - patientez 5 min, exécutez les points 1-2 puis appuyez sur les
touches PROG et CH2 du RX3.
Etat 3 - patientez 5 min, exécutez les points 1-2 puis appuyez sur les
touches PROG et CH3 du RX3.
5. TP7000-RF - Appuyez sur ou pour
sélectionner la température – l’appareil repassera
en mode de fonctionnement.
RX1
Instructions (versions câblées)
Si le thermostat émetteur et le récepteur ont été fournis ensemble
dans un kit, ces deux éléments peuvent communiquer directement
sans manipulation particulière (Modèles RX1 uniquement).
Pour ajuster le récepteur RX à la fréquence du signal du thermostat, suivez
les points 1-5 ci-dessous.
LEARN
RESET
Câblage du Récepteur RX
(modèles RF uniquement)
1234
Electronique
N
L
COM
Zone 1
Marche
Zone 1
Arrét
A
Electronique
B
C12345
6
N
L
Zone 1
Marche
Zone 1
Arrêt
Zone 2
Marche
Zone 3
Marche
COM
Borne 6 RX3
uniquement
RX1
RX2 & RX3
NB. Pour les systèmes alimentés sur secteur, reliez la borne 2 à la phase du secteur
Instructions d’installation
F
Page 18

18
Instructions d’utilisateur
Votre thermostat d’ambiance programmable
Le TP7000 vous permet de programmer jusqu’à 6 heures et
températures di érentes pour chaque jour de la semaine, o rant une
exibilité totale. Il intègre plusieurs fonctions d’économie d’énergie
ainsi que plusieurs fonctions prioritaires très utiles pour l’utilisateur,
dont un mode vacances de 99 jours.
Programmes Prédé nis
Votre TP7000 est livré préalablement programmé avec une série
d’heures et de températures de fonctionnement qui conviennent
généralement à la plupart des utilisateurs.
Si vous souhaitez modi er l’un de ces réglages, il vous su t de suivre les
instructions aux pages 20-21. Suivez tout d’abord les points indiqués à
la page 19 pour régler l’heure et la date.
Avant de commencer
Ouvrez le couvercle à l’avant de votrethermostat.
A l’aide d’un objet non-métallique, appuyez sur
la touche RESET encastrée, jusqu’à ce que vous
entendiez un clic et que l’écran s’éteigne
.
Jour de semaine (Lun-Ven) Week-end (Sam-Dim)
Période L’heure Temp °C Période L’heure Temp °C
1 06:30 20 1 07:30 20
2 08:30 15 2 09:30 20
3 11:30 20 3 11:30 20
4 13:30 15 4 13:30 20
5 16:30 21 5 16:30 21
6 22:30 15 6 22:30 15
RESET
Instructions d’utilisateur
F
Page 19
19
Préférences d’a chage
A chage de la température (°C ou °F)
Appuyez sur DAY & COPY en les maintenant
(pendant 2-3 secondes) enfoncés jusqu’à ce que
l’a chage change.
A chage de l’horloge (12 ou 24 hr)
Appuyez sur NEXT & DAY en les maintenant
(pendant 2-3 secondes) enfoncés jusqu’à ce
que l’a chage change (AM ou PM s’a chera en
mode 12 heures).
Régler l’Heure et le Jour
Appuyez sur PROG pour commencer la
programmation.
JOUR - Utilisez les boutons + ou – jusqu’à ce
que le bon JOUR s’a che (1 = Lundi, 2 = Mardi,
etc.).
L’HEURE - Utilisez les boutons + ou – pour
régler
l’HEURE (appuyez sur les boutons en les
maintenant enfoncés pour changer l’heure par
incréments de 10 min).
Cet écran s’a chera UNIQUEMENT si la fonction
OSC a été activée par votre installateur.
Utilisez les touches + ou - pour sélectionner la
période OSC. Les options proposées sont 0:30
(30 min), 1:00 (1 h), 1:30 et 2:00.
Le réglage recommandé est 0:30. Si cette valeur
est dé nie à 0:00, la fonction est désactivée.
Régler la Période OSC, si activée (voir page 16)
Accepter les programmes prédé nis
Si les programmes prédé nis indiqués à la page 18 vous conviennent,
aucune autre manipulation ne sera nécessaire.
Pour accepter les pré-réglages, fermez le couvercle frontal et après
2 minutes les pré-réglages seront automatiquement acceptés (& les
deux-points clignoteront).
Instructions d’utilisateur
F
Page 20
20
L’appareil est désormais en mode RUN
(Fonctionnement) (les deux-points clignotent
à l’écran) et le chau age fonctionnera selon les
programmes prédé nis.
a) Appuyez sur PROG jusqu’à ce que la
Période 1 clignote, puis appuyez sur DAY
pour passer du jour courant au Jour 1.
b) Modi ez l’heure et la température
comme suit:
i) Utilisez les boutons + et – pour
modi er l’heure (appuyez sur les
boutons en les maintenant enfoncés
pour changer l’heure par incréments
de 10 min).
ii) Utilisez les boutons & pour
modi er la température par
incréments de 0,5°C (1°F).
iii) Appuyez sur NEXT pour passer à la
Période suivante.
iv) Répétez les points i, ii & iii ci-dessus
pour les Périodes 2, 3, 4, 5 & 6.
Mode 7 jours
(périodes séparés pour chaque jour de la semaine)
1
Avant de modi er les programmes prédé nis
Votre installateur aura réglé votre appareil pour qu’il fonctionne
en mode 7 jours ou en mode 5/2 jours. Pour connaître le mode de
réglage de votre appareil, appuyez sur PROG jusqu’à ce que la Période
1 clignote à l’écran.
Cet appareil est en mode 7 jours et vous pouvez
programmer des réglages di érents pour chaque jour
de la semaine (voir pages 20-21).
Cet appareil est en mode 5/2 jours et vous pouvez
entrer une série de programmes pour les jours de la
semaine et une autre série pour le week-end (voir
page 21).
1
1 2 3 4 5
Instructions d’utilisateur
F
Page 21

21
c) Lorsque les 6 périodes sont
correctement programmés, appuyez
sur DAY pour programmer les périodes
du Jour 2.
Si vous souhaitez répéter le
programme du jour précédent, il vous
su t d’appuyer sur COPY.
d) Répétez les points b & c ci-dessus pour
programmer (ou COPY) les périodes
des Jours 3, 4, 5, 6 & 7.
Retourner au Mode
FONCTIONNEMENT – appuyez sur
PROG jusqu’à ce que les deux-points
clignotent à l’écran.
Appuyez sur PROG jusqu’à ce que la
Période 1 clignote, puis appuyez sur
DAY jusqu’à ce que Jour 1-5 s’a che
à l’écran.
Suivez les points b & c (pg.20-21)
pour programmer les heures &
températures des jours de la semaine.
Appuyez sur DAY pour programmer
les périodes du week-end (Jour 6-7)
ou appuyez sur COPY pour répéter le
programme de la semaine.
Retourner au Mode
FONCTIONNEMENT – appuyez sur
PROG jusqu’à ce que les deux-points
clignotent à l’écran.
Mode 5/2 jours
(une série de périodes pour les jours de la semaine, une autre série
pour les week-ends)
1 2 3 4 5
Instructions d’utilisateur
F
Page 22
22
Pour passer en mode Thermostat
Appuyez sur et simultanément en les
maintenant enfoncés jusqu’à ce que les
deux-points clignotent et la température par
défaut (8°C) s’a che à l’écran.
Appuyez sur et pour modi er la
température selon les besoins.
Appuyez sur DAY (une valise et :00
s’a cheront à l’écran)
Appuyez sur + et - pour entrer le nombre de
jours de vacances (max. 99)
Utilisez les touches et pour modi er la
température constante, si nécessaire.
Une fois le nombre de jours sélectionné
écoulé, l’appareil repassera en mode
de fonctionnement normal, régulant
la température en fonction de votre
programmation.
REMARQUE: Appuyez simultanément sur
les touches et pour sortir du mode
vacances si nécessaire.
Pour programmer le Mode Vacances
(en Mode Thermostat)
Le TP7000 peut être réglé pour maintenir une température constante
sélectionnée par l’utilisateur, au lieu de suivre le programme dé ni.
!
REMARQUE: L’appareil restera en mode thermostat jusqu’à ce que
l’utilisateur appuie une nouvelle fois simultanément sur les touches
et .
Le TP7000 peut maintenir une température basse constante pendant vos
vacances, et reprendre vos réglages programmés après un nombre de jours
spéci é (99 jours maximum).
(Si l’appareil ne se trouve pas déjà en mode Thermostat, appuyez
simultanément sur les touches et en les maintenant enfoncées jusqu’à
ce que les deux-points clignotent et 8°C s’a che à l’écran)
Instructions d’utilisateur
F
Page 23
23
Priorités Utilisateur
Pour augmenter ou diminuer
temporairement la température
programmée – appuyez sur or pour
augmenter ou baisser la température.
Etendre la période 1 (i.e. 06.30 20°C) à toute
la journée (a n que le chau age reste
à une température constante toute la
journée) – appuyez une fois sur la touche
comme illustré.
Pour étendre la température couramment
dé nie de 1, 2 ou 3 heures – appuyez une
fois sur le bouton pour 1 heure de plus,
deux fois pour 2 heures de plus, 3 fois
pour 3 heures de plus, et appuyez 4 fois
pour supprimer la priorité.
Pour modi er l’écran LCD principal a n qu’il
a che l’heure ou la température ambiante
e ective
– appuyez sur NEXT & COPY
simultanément.
Les piles ont une durée de vie de plus de
deux ans. Un indicateur de piles à plat
clignotera sur l’écran LCD. L’utilisateur
dispose de 15 jours pour remplacer les piles
usagées par des piles alcalines de qualité.
Changer les Piles (pas sur le TP7000M)
2
Vous pouvez parfois avoir besoin de modi er temporairement le
mode de fonctionnement de votre chau age, ex. en raison d’un
temps exceptionnellement froid. Le TP7000 intègre plusieurs fonctions
prioritaires pour l’utilisateur, qui peuvent être sélectionnées sans a ecter
la programmation du thermostat.
Instructions d’utilisateur
F
Page 24

24
Installationsanweisungen
Wichtiger Hinweis RF: Achten Sie darauf, dass sich keine größeren
Metallobjekte wie Boilergehäuse oder andere große Geräte zwischen
Thermostat und Empfänger be nden, da ansonsten die Kommunikation
zwischen dem Thermostat und dem Empfänger der Signale gestört
werden kann.
Technische Daten
Technische Daten TP7000-RF
TP7000
TP7000A
TP7000M
TP7000MA
TP7000M 24
Stromversorgung
2 x AA / MN1500
Batterien alkaline
230 V, 50 Hz 24V, 50Hz
Programmsicherung 1 Minute Au adbare Zelle*
Schaltkontakt
nicht
zutre end
Umschaltkontakt potentialfrei / SPDT
Schaltleistung
nicht
zutre end
3(1) A, 10-230V
Übertragungsfrequenz (nur RF) 433.92 MHz nicht zutre end
Übertragungsbereich (nur RF) max. 30 m nicht zutre end
Nennimpulsspannung
nicht
zutre end
2.5Kv
Abmessungen (mm) 138 x 88 x 28
Verformbarkeit unter Druck 75°C
Temperaturbereich 5-30°C
Bauart EN 60730-2-7 (EN300220 : RF)
Emissionswerte Grad 2
Zeitabweichung ± 1 min.
Temperaturgenauigkeit ±1°C
* Zelle muss bis zu 6 Tage aufgeladen werden, bevor die volle Programmsicherheit
gewährleistet ist.
Bitte beachten:
Dieses Produkt darf nur von einem quali zierten Elektriker
oder Heizungsinstallateur und gemäß den aktuellen IEEEBestimmungen installiert werden.
Installationsanweisungen
D
Page 25
25
Installation
Entfernen Sie zuerst die Wandplatte auf der Geräterückseite.
Es müssen folgende Abstände eingehalten werden: Von der linken
oberen Ecke der Wandplatte mindestens 140 mm nach rechts, 15
mm nach links, 30 mm nach oben und 100 mm nach unten, um das
Einsteckmodul einzubauen.
Vor Befestigen des Geräts muss gewährleistet sein, dass die 4
DIL-Schalter auf der Geräterückseite auf die erforderlichen Werte
eingestellt wurden (siehe unten). Die Werksvoreinstellung ist 7 Tage,
Optimum-Start deaktiviert und Ein-Aus-Regelung aktiviert.
Einstellungen
HINWEIS
Chrono 3 bei trägen Heizsystemen wie z.B. bei Gussheizkesseln.
Chrono 6 bei Heizsystemen mit geringer Trägheit wie zB.
Niedertemperatur-Heizkesseln und Kombispeichern.
Alle Modelle
Sw
1
5/2- Tages-Programm 7-Tage-Programmierung
Sw
2
Optimalstart-Funktion (OSC) aktiviert Optimalstart-Funktion (OSC) deaktiviert
Sw
3
Zeitproportionale Regelung Ein-Aus-Regelung
TP7000, TP7000M, und TP7000RF mit 3/6 Regelungszyklen pro Stunde
Sw
4
Zeitproportionale Regelung mit
6 Regelungszyklen pro Stunde
Zeitproportionale Regelung mit
3 Regelungszyklen pro Stunde
Installationsanweisungen
D
7 Tage - jeder Tag kann mit unterschiedlichen Zeiten und Temperaturen
programmiert werden.
5/2 Tage - es können jeweils Zeiten und Temperaturen gesondert für
Wochentage und Wochenenden programmiert werden.
Page 26
26
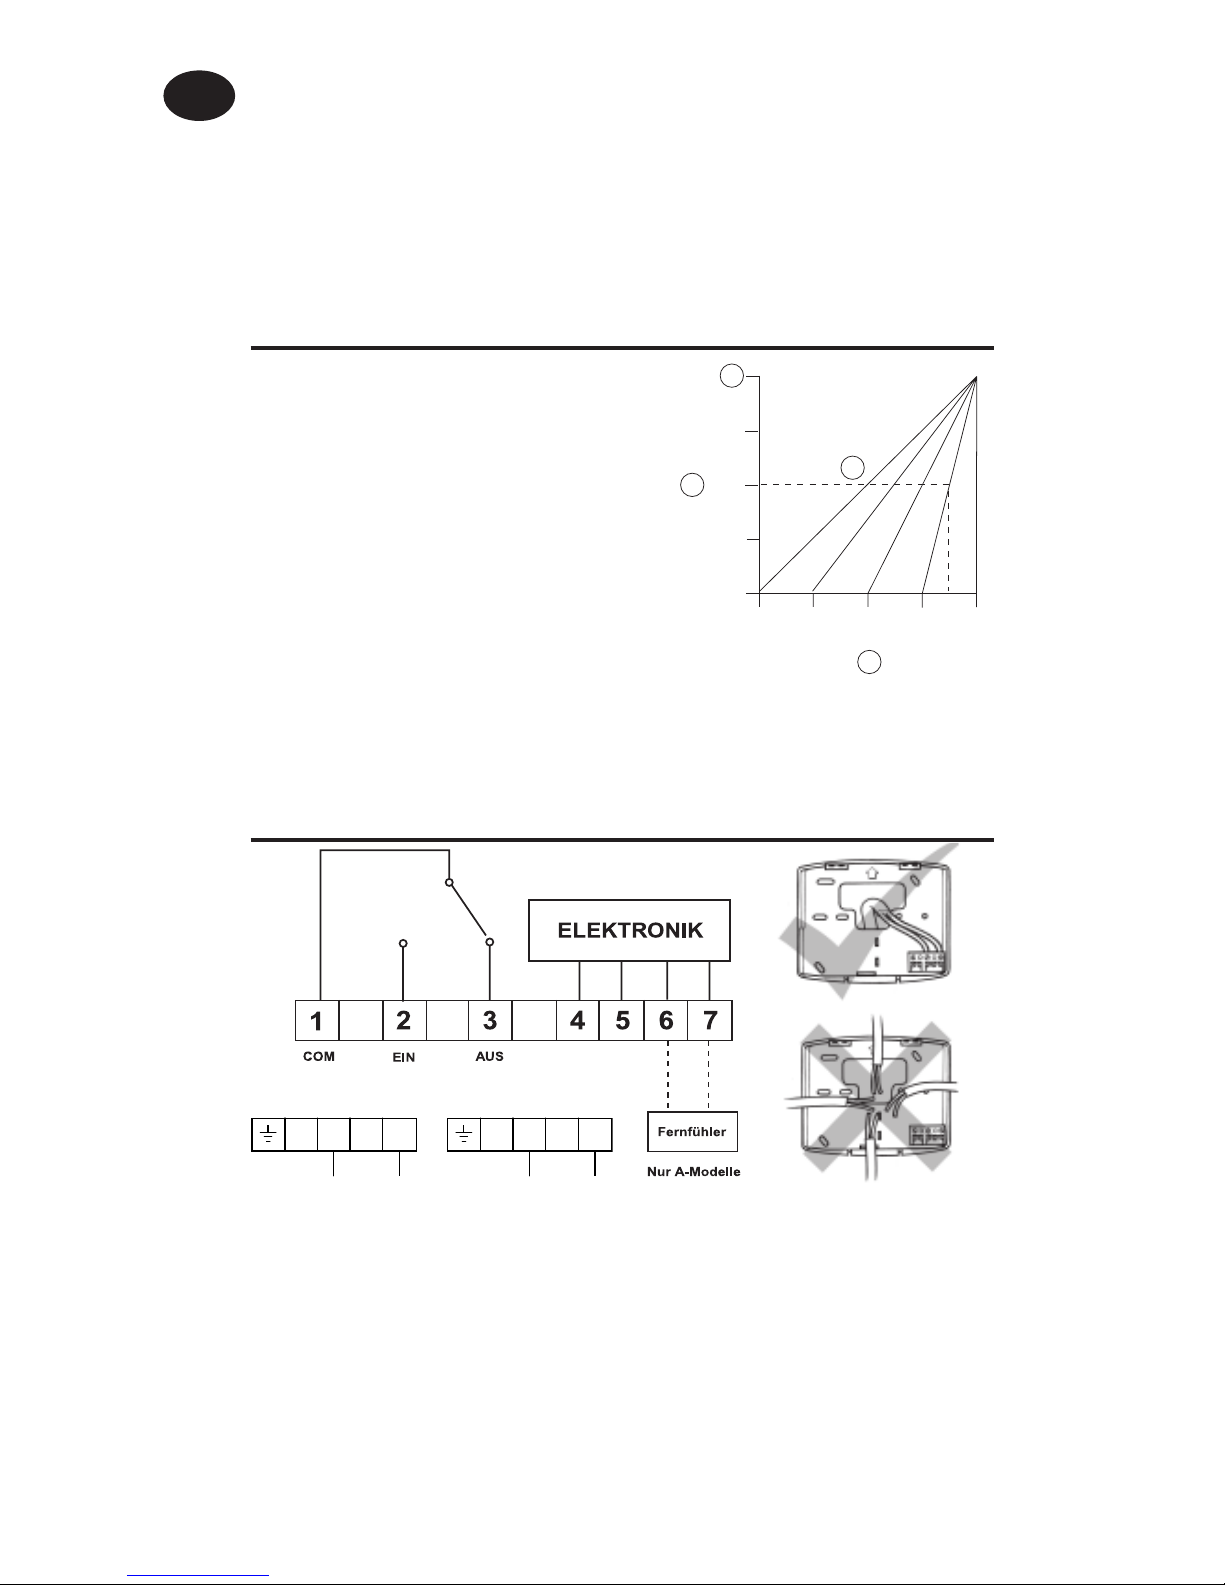
Verkabelung (nur bei Kabelversion)
Optimum-Startregelung
-4˚C
-3˚C
-2˚C
-1˚C
A
B
C
120
min.
90
min.
60
min.
30
min.
Event
time
(
D
Stellen Sie SW2 auf OSC ON (pg.24)
Wählen Sie eine passende Kurve
( z.B. 30 Minuten) im Programm-
Modus
A - Gewünschte Temperatur beim
ersten Schaltpunkt
B - Abweichung von der eingestellten
Temperatur
C - Vorgezogene Startzeit der
Heizungsanlage vor dem ersten
Schaltpunkt
D - Optimalstart-Kurve, um die ewünschte
Temperatur rechtzeitig zu erreichen
Hinweis! Bei TP 7000-M-Modell: Wenn das System (die Ausgänge) per
Netzspannung betrieben werden, bitte Klemme (1) an stromführende
Leitung (L) anschließen (brücken).
Installationsanweisungen
D
B
C
Nur M-Modelle 24
V
24V
L
N
Nur M-Modelle 230
230V
Achtung: Zum Anschluss eines Fernfühlers/Strahlungsfühlers sollten
ein Kupferkabel 2 x 1,0 mm verwendet werden.
a). Die Kabellänge sollte 50 m nicht überschreiten.
b). Um elektrische Störungen zu vermeiden, sollten die Kabel nicht
parallel in unmittelbarer Nähe anderer stromführender Kabel verlegt
werden. Falls dies dennoch nötig ist, so sollten die Kabel im rechten
Winkel über ein anderes Kabel verlegt werden.
Optimum-Startregelung – Funktion, die die Heizung früher als die
für daEreignis 1 programmierte Zeit einschaltet, um zu gewährleisten,
dass die erforderliche Temperatur zur eingestellten Zeit erreicht wird.
Zeitproportional – Energiesparfunktion, bei der das Heizgerät in
regelmässigen Intervallen anspricht, um eine eingestellte Temperatur
zu halten und eine konstante Temperatur für den Benutzer zu
erreichen.
Page 27
27
Inbetriebnahme Instruktion (nur RF-Modelle)
Wurde das Thermostat zusammen mit dem Receiver in einem
kombinierten Paket geliefert ist dieses eine Einheit und die
Einstellung/Programmierung erfolgte bereits im Werk (Nur RX1Modelle).
Befolgen Sie bitte zur Frequenzabgleichung des RX-Empfängers auf das
Thermostatsignal die unten aufgeführten Schritte 1 bis 5.
1. TP7000-RF - Drücken Sie die versenkte RESETTaste mit einem nichtmetallischen Gegenstand,
um das Gerät zurückzusetzen.
2. Halten Sie die versenkte LEARN-Taste
3. Sekunden mit einem nichtmetallischen
Gegenstand gedrückt.
HINWEIS: Thermostat sendet jetzt für die Dauer von 5 Minuten ohne
Unterbrechung.
3. RX1 - Die Tasten PROG und CH1 3 Sekunden gedrückt halten, bis das
grüne Licht einmal au euchtet.
4. RX2 (falls zutre end)
Stat 1 - Schritte 1-3 ausführen
Stat 2 - 5 Minuten warten, dann Schritte 1-2 für
den entsprechenden TP 7000-RF ausführen und
PROG und CH2 auf RX2 drücken
RX3 (falls zutre end)
Stat 1 - Schritte 1-3 ausführen
Stat 2 - 5 Minuten warten, dann Schritte 1-2 für den entsprechenden
TP 7000-RF ausführen und PROG und CH2 auf RX3 drücken
Stat 3 - 5 Minuten warten, dann Schritte 1-2 für
den entsprechenden TP 7000-RF ausführen und
PROG und CH3 auf RX3 drücken
5. TP7000-RF - Drücken Sie oder , um das
Gerät in den Normalbetrieb zurückzuführen.
LEARN
RESET
Verdrahtung der Empfangseinheit RX
(nur RF-Modelle)
RX1
RX2 und RX3
Hinweis: Bei Systemen, die per Netzspannung betrieben werden, Anschlussklemme (2) an
stromführende Leitung (L) anschließen (brücken).
A
ELEKTRONIK
B
C12345
6
N
L
ZONE
1 EIN
ZONE
1 AUS
ZONE
2 EIN
ZONE
3 EIN
COM
KLEMME 6
NUR BEI RX3
1234
ELEKTRONIK
N
L
COM
ZONE
1 EIN
ZONE
1 AUS
Installationsanweisungen
D
RX1
Page 28
28
Der programmierbare Raumthermostat
Der TP7000 kann mit 6 verschiedenen Zeit- und Temperatureinstellungen
für jeden Wochentag programmiert werden. Er verfügt über mehrere
Energiesparfunktionen und hilfreiche Möglichkeiten für den manuellen
Eingri , einschließlich eines 99 Tage Ferienmodus.
Werkseinstellung
Der TP7000 wird mit einer Werkseinstellung ausgeliefert, wobei die
verschiedenen Einstellungen für Betriebszeiten und Temperaturen in
vielen Fällen vom Kunden direkt übernommen werden können.
Falls diese Einstellungen geändert werden sollen, kann dies durch
Befolgen der Arbeitsschritte auf den Seiten 30 und 31 bewerkstelligt
werden. Führen Sie für die korrekte Einstellung von Zeit und Datum
zuerst die Arbeitsschritte auf Seite 29 durch.
Bevor Sie beginnen
Ö nen Sie die Klappe auf der Vorderseite des TP
7000. Drücken Sie mit einem nichtmetallischen
Gegenstand die versenkte RESET-Taste, bis Sie
ein Klicken hören und die Anzeige erlischt.
RESET
Benutzeranweisungen
Benutzeranweisungen
D
Wochentag (Montag bis Freitag) Wochenende (Samstag-Sonntag)
Schaltpunkt Zeit Temp °C Schaltpunkt Zeit Temp °C
1 06:30 20 1 07:00 20
2 08:30 15 2 16:00 21
3 11:30 20 3 23:00 15
4 13:30 15 4 00:00 15
5 16:30 21 5 01:00 15
6 22:30 15 6 01:59 15
Page 29
29
Temperaturanzeige (°C / °F)
Halten Sie DAY & COPY gedrückt, (für 2 bis 3
Sekunden) bis sich die Anzeige ändert.
Zeitanzeige (12 / 24 hr)
Halten Sie NEXT & DAY gedrückt, bis sich
die Anzeige ändert (im 12 Stundenschema
erscheint AM oder PM).
Einstellen von Uhrzeit & Tag
Drücken Sie PROG, um die Programmierung
zu beginnen.
TAG - drücken Sie DAY, bis der korrekte Tag
angezeigt wird (1= Montag).
UHRZEIT - drücken Sie zur Änderung der Zeit
+ oder -
(gedrückt halten zur Änderung in 10-
Minuten Abständen).
Die Anzeige erscheint NUR, FALLS die OSCFunktion von Ihrem Installateur aktiviert wurde.
Verwenden Sie die Tasten + oder -, um die
OSC-Periode zu wählen. Zur Auswahl stehen
0:30 (30 Minuten), 1:00 (1 Stunde), 1:30 und
2:00.
Der empfohlene Wert ist 0:30. Bei Einstellung
von 0:00 ist die Funktion deaktiviert.
Annahme der Werkseinstellung
Falls Sie die auf Seite 28 erwähnte Werkseinstellung übernehmen
möchten brauchen Sie nichts weiter zu tun. Schließen Sie zur Übernahme
dieser Einstellungen die Vorderabdeckung, wodurch die Voreinstellungen
automatisch nach 2 Minuten übernommen werden (Doppelpunkt blinkt).
Präferenzen für die Anzeige
Benutzeranweisungen
D
Einstellen der OSC-Periode, falls aktiviert (Seite 26)
Page 30
30
Das Gerät be ndet sich jetzt im RUN-Modus
(blinkender Doppelpunkt auf der Anzeige)
und die Heizung arbeitet gemäß der
eingestellten Programme.
a) Drücken Sie PROG, bis Ereignis 1 blinkt und
drücken Sie dann DAY, um vom aktuellen Tag
zu TAG 1 zu wechseln.
b) Zeit und Temperatur werden wie folgt
geändert:
i) Verwenden Sie zur Änderung der Zeit
die Tasten + und – (gedrückt halten zur
Änderung in 10-Minuten- Abständen).
ii) Verwenden Sie zur Änderung der Temperatur
in Abständen von 0,5°C (1°F) die Tasten
und .
iii) Drücken Sie auf NEXT, um zum nächsten
Ereignis vorzurücken.
iv) Wiederholen Sie die Arbeitsschritte i,ii und iii
oben für die Ereignisse 2, 3, 4, 5 & 6.
7 Tage-Modus
(unterschiedliche Ereignisse (Schaltpunkte) für jeden Tag der Woche)
1
Vor Änderung der Werkseinstellung
Ihr Installateur hat das Gerät entweder auf 7-Tage-Modus oder 5/2-Tage-
Modus eingestellt. Zur Abfrage welcher Modus eingestellt wurde, drücken
Sie PROG, bis das Ereignis 1 auf der Anzeige blinkt.
Dieses Gerät be ndet sich im 7-Tage-Modus und
es können unterschiedliche Einstellungen für jeden
Wochentag vorgenommen werden (siehe Seiten 30
und 31).
Diese Gerät be ndet sich im 5/2-Tage-Modus und es
können jeweils für Wochentage und Wochenenden
unterschiedliche Einstellungen vorgenommen
werden (siehe Seite 31).
1
1 2 3 4 5
Benutzeranweisungen
D
Page 31

31
c) Drücken Sie auf DAY, wenn alle sechs
Ereignisse korrekt sind, um Ereignisse
für TAG 2 zu programmieren.
(Falls Sie die Programmierung für den
vorherigen Tag übernehmen möchten,
drücken Sie einfach auf COPY).
d) Wiederholen Sie die Arbeitsschritte b
und c für die Programmierung (oder
das Kopieren) von Ereignissen der
Tage 3, 4, 5, 6 & 7.
Um in den RUN-Modus
zurückzukehren - drücken Sie PROG,
bis der Doppelpunkt in der Anzeige
blinkt.
Drücken Sie PROG, bis Ereignis 1 blinkt
und drücken Sie dann DAY, bis Tag 1-5
angezeigt wird.
Wiederholen Sie zur Programmierung
von Zeiten und Temperaturen für
Wochentage die Arbeitsschritte b und
c (siehe 7-Tage-Modus).
Drücken Sie DAY, um Ereignisse für
das Wochenende zu programmieren
(TAG 6-7) oder drücken Sie
COPY zur Wiederholung des
Wochentagprogramms.
Um in den RUN-Modus
zurückzukehren - drücken Sie PROG,
bis der Doppelpunkt in der Anzeige
blinkt.
5/2-Tage-Modus
(Einstellungen für Ereignisse an den Wochentagen - 1 bis 5- und
Einstellungen für Ereignisse am Wochenende - 6 und 7)
1 2 3 4 5
Benutzeranweisungen
D
Page 32

32
In den Thermostat-Modus zurückkehren
Halten Sie und gleichzeitig gedrückt, bis
die Anzeige zu einem blinkenden Strich und
der voreingestellten Temperatur zurückkehrt
(8°C).
Drücken Sie zur Änderung der Temperatur
und .
Drücken Sie DAY (es wird ein Ko ersymbol
und :00 angezeigt).
Drücken Sie + und - zur Eingabe der Anzahl
von Ferientagen (max. 99).
Verwenden Sie die Tasten und , um die
konstante Temperatur, falls erforderlich, zu
ändern.
Nach Ablauf der eingestellten Anzahl von
Tagen kehrt das Gerät in den Normalbetrieb
zurück und regelt gemäß der eingestellten
Programme.
HINWEIS: Drücken Sie gleichzeitig die
Tasten und , um den Ferien-Modus, falls
erforderlich, zu verlassen.
Programmierung des Ferien-Modus
(während des Thermostat-Modus)
Der TP7000 kann so eingestellt werden, dass er -anstatt einem eingestellten
Programm zu folgen- eine vom Benutzer gewählte konstante Temperatur
regelt.
!
HINWEIS: Das Gerät verbleibt im Thermostat-Modus bis die Tasten
und erneut gleichzeitig gedrückt werden.
Der TP7000 kann bei einer konstanten niedrigen Temperatur regeln
während Sie in den Ferien sind, halten und kehrt nach einer bestimmten
Anzahl von Tagen (maximal 99 Tage) zu den programmierten Einstellungen
zurück.
(Falls Sie noch nicht im Thermostat-Modus halten Sie und
gleichzeitig gedrückt, bis die Anzeige zu einem blinkenden Strich und
der voreingestellten Temperatur zurückkehrt (8 °C).
Benutzeranweisungen
D
Page 33

33
Zur kurzzeitigen Erhöhung oder Senkung
der programmierten Temperatur
– drücken Sie zur Erhöhung oder
Senkung der Temperatur oder .
Ereignis 1 (z.B. 06:30, 20 °C) auf den
ganzen Tag ausdehnen (so dass
die Heizung ganztägig bei einer
konstanten Temperatur läuft)
– drücken Sie die Taste einmal wie
dargestellt.
Zur Ausdehnung der aktuell eingestellten
Temperatur um 1, 2 oder 3 Stunden
– drücken Sie die Taste einmal für eine
Verlängerung um 1 Stunde, 2 mal zur
Verlängerung um 2 Stunden, 3 mal zur
Verlängerung um 3 Stunden und 4 mal
zur Aufhebung der Übersteuerung.
Änderung der Haupt-LCD-Anzeige, um
Zeit oder tatsächliche Raumtemperatur
anzuzeigen.
– drücken Sie gleichzeitig NEXT
und COPY.
Die Lebensdauer der Batterien beträgt
mindestens 2 Jahre. Bei niedriger
Batterieleistung blinkt das entsprechende
Symbol auf dem LCD. Sie haben für den
Batteriewechsel 15 Tage Zeit. Verwenden
Sie stets hochwertige Alkalibatterien Typ
AA LR6.
Batteriewechsel (nicht TP7000M)
2
Unter bestimmten Umständen kann es erforderlich werden den üblichen
Heizzyklus zu ändern, z. B. bei ungewöhnlich kaltem Wetter. Der TP 7000
verfügt über mehrere hilfreiche Möglichkeiten für den manuellen Eingri ,
die ohne Auswirkungen auf die Thermostatprogrammierung gewählt
werden können.
Manuelle Eingri smöglichkeit
Benutzeranweisungen
D
Page 34

34
Instrucciones de instalación
Nota importante RF: Asegurar que la línea de visión entre el transmisor
y el termostato no haya quedado obstaculizada por objetos grandes
metálicos tales como calderas u otros aparatos grandes ya que estos
impedirían la comunicación entre el termostato y el receptor.
Especi caciones
Caracteristicas TP7000-RF
TP7000
TP7000A
TP7000M
TP7000MA
TP7000M RF
Alimentación 2 pilas alcalinas 1,5 V. 230v, 50 Hz 24v, 50Hz
Respaldo de batería
Para carga de bateria
1 min.
Célula recargable (ver nota)
Contacto de salida N/A SPDT
Rango del contacto N/A 3(1) A, 10-230 V
Frecuencia del transmisor,
(solo modelos RF)
433.92 MHz N/A
Rango del transmisor,
(solo modelos RF)
30m,
máximo
N/A
Rango de los impulsos N/A 2.5Kv
Dimensiones en mm 138 ancho x 88 alto x 28 profundo
Prueba de presión
de bola
75°C
Rango de temperatura 5-30°C
Norma de fabricación EN 60730-2-7 (EN300220 for RF)
Situación de polución Grado 2
Exactitud en la hora ± 1 min.
Precisión de temperatura ±1°C
Nota: La unidad debe alimentarse durante 6 dias antes de que la bateria de respaldo
esté disponible.
Observe que:
Este producto deberá ser instalado solamente por un electricista
cualificado o por un instalador de calefacción competente y deberá
instalarse de acuerdo con la edición vigente de las normas de cableado
de la IEEE.
Instrucciones de instalación
ES
Page 35

35
Instalación
Ajustes del instalador
En primer lugar, quitar la placa mural de la parte trasera de la
unidad.
Desde la esquina superior izquierda de la placa mural, debe haber
un espacio libre de al menos 140mm a la derecha, de 15mm a la
izquierda, de 30mm arriba y de 100mm abajo con el n de montar el
módulo enchufable.
Antes de montar la unidad, asegurarse de que los 4 conmutadores
DIL situados en la parte trasera de la unidad han sido movidos
hasta las posiciones de ajuste requeridas (ver abajo). El preajuste
de Fábrica es de 7-días, con Arranque Óptimo y control Crono-
proporcional en OFF.
NOTA
Utilizar Crono 3 para sistemas de alta inercia térmica, por ejemplo para calderas de
hierro fundido que están situadas sobre el suelo.
Utilizar Crono 6 para sistemas de baja inercia térmica, por ejemplo para calderas de
bajo contenido de agua y calderas combi.
Todos los modelos
Sw
1
Programa 5/2 dias Programa 7 dias
Sw
2
Control de optimización de arranque activado Control de optimización de arranque desactivado
Sw
3
Control crono-proporcional Control todo/nada
TP7000, M, y RF. Modelos con opción de 3/6 ciclos por hora
Sw
4
Control crono-proporcional, 6 ciclos por hora Control crono-proporcional, 3 ciclos por hora
Instrucciones de instalación
ES
Page 36

36
1
234567
ELECTRONICS
COM
ON
OFF
Cableado (solo versiones de conexión permanente)
7-días: cada día puede programarse con diferentes horas y
temperaturas.
5/2 días: un ajuste de horas & temperaturas para días laborables, y otro
ajuste para los nes de semana.
Control de arranque óptimo: función que enciende la calefacción
antes de la hora programada con el “Evento 1” para asegurarse de que la
temperatura requerida se alcance a la hora establecida.
Crono-proporcional : con guración de ahorro de energía en la cual
la caldera se enciende a intervalos periódicos para mantener una
temperatura establecida, obteniéndose una temperatura ambiente
constante para el usuario.
Optimización de arranque
-4˚C
-3˚C
-2˚C
-1˚C
A
B
C
120
min.
90
min.
60
min.
30
min.
Event
time
(
D
Ajuste Sw2 a OSC ON (pg.34)
Seleccione OPTIMISER CURVE en
modo de programación
A - Valor del ajuste 1
B - Desviación sobre el ajuste
C - Tiempo de arranque antes
del ajuste
D - Ajuste de la curva de
optimización
SENSOR
REMOTO
Solo modelos A
Instrucciones de instalación
ES
B
C
M 24V models onl
y
24V
L
N
M 230V models onl
230V
Nota: Para conectar la sonda remota al TP7000A debe utilizarse cable
de cobre sólido 1.0 mm2. Por favor, asegúrese que:
a) la longitud del cable no excede los 50 metros.
b) para evitar interferencias eléctricas el cable no debe pasar próximo
a otros cables eléctricos, y donde sea necesario debería atravesar la red
eléctrica perpendicularmente.
Page 37

37
1. TP7000-RF - Oprimir el botón RESET
(restablecer) alojado en un entrante, utilizando un
objeto no-metálico, para restablecer la unidad.
2. Oprimir el botón LEARN (enterado) alojado
en un entrante y mantenerlo oprimido
durante 3 segundos, utilizando un objeto nometálico. NOTA: El termostato transmite ahora
de modo continuo durante 5 minutos.
3. RX1 - Oprimir los botones PROG y CH1 y
mantenerlos oprimidos durante 3 segundos
hasta que la luz verde dé un destello.
4. RX2 (si es aplicable)
Stat 1 – ejecutar los pasos 1-3
Stat 2 - esperar 5 mins., ejecutar los pasos 1-2 y a continuación oprimir
PROG y CH2 en el RX2
RX3 (si es aplicable)
Stat 1 - ejecutar los pasos 1-3
Stat 2 - esperar 5 mins., ejecutar los pasos 1-2 y a continuación oprimir
PROG y CH2 en el RX3
Stat 3 - esperar 5 mins., ejecutar los pasos 1-2 y a continuación oprimir
PROG y CH3 en el RX3
5. TP7000-RF- Oprimir o para restituir la
unidad a su funcionamiento normal.
Instrucciones de puesta en marcha
Si el termoestato y el receptor se han suministrado juntos en un
paquete combinado, las unidades han sido emparejadas en la
fábrica y no será necesaria ninguna operación (solo modelos RX1).
Para sintonizar el receptor RX en la frecuencia de la señal del termostato,
seguir los pasos 1-5 indicados a continuación.
LEARN
RESET
Cableado del Receptor RX (solo para modelos RF)
12
3
4
Electrónica
N
L
ZONA 1 ENCENDIDA
COMÚN
ZONA 1 APAGADA
A
Electrónica
B
C1
2
345
6
N
L
ZONA 1 ENCENDIDA
COMÚN
TERMINAL 6
ÚNICAMENTE
EN RX3
ZONA 1 APAGADA
ZONA 2 ENCENDIDA
ZONA 3 ENCENDIDA
RX1
RX2 & RX3
N.B. Para sistemas que funcionen con la tensión de la red unir el terminal 2
con la alimentación de la red
Instrucciones de instalación
ES
RX1
Page 38

38
Instrucciones del usuario
Su cronotermostato de temperatura
ambiente interior programable
El TP7000 permite que usted programe hasta 6 combinaciones
diferentes de ajustes de horas y temperaturas para cada día de la
semana, proporcionando una completa exibilidad. Tiene diversas
con guraciones de ahorro de energía y permite varias cancelaciones
útiles para el usuario, incluyendo un modo de funcionamiento en
vacaciones de 99 días.
Programas Preestablecidos
Su TP7000 se entrega ya programado con una combinación de horas y
temperaturas de funcionamiento que a menudo satisfacen a la mayoría
de las personas.
Si usted desea cambiar cualquiera de estos ajustes previos, lo puede
hacer siguiendo las instrucciones indicadas en las páginas 40-41. En
primer lugar, seguir los pasos indicados en la página 39 para ajustar la
hora y la fecha correctas.
Antes de comenzar
Abrir la tapa frontal de su programador.
Utilizando un objeto no-metálico, oprimir
el botón RESET (restablecer) alojado en
un entrante, hasta que oiga un “clic” y la
pantalla se borre.
Dias de la semana (Lun- Vier)
Fin de Semana (Sab-Dom)
Evento
Hora Temp °C
Evento
Hora
Temp °C
1 06:30 20 1 07:30 20
2 08:30 15 2 09:30 20
3 11:30 20 3 11:30 20
4 13:30 15 4 13:30 20
5 16:30 21 5 16:30 21
6 22:30 15 6 22:30 15
RESET
Instrucciones del usuario
ES
Page 39

39
Visualización de las temperaturas (°C/°F)
Pulse y mantenga presionado DAY y COPY
(durante 2-3 segundos) hasta que cambie la
visualización.
Visualización del Reloj (12/24 hr)
Pulse y mantenga presionado NEXT y DAY
hasta que cambie la visualización (aparecerá AM
o PM en el modo de 12 horas).
Ajustar el reloj y la fecha
Pulse PROG para iniciar la programación.
DÍA - pulse DAY hasta que aparezca el día
correcto (1=lunes).
HORA - pulse + y – para cambiar la hora.
Esta visualización aparecerá en pantalla SÓLO
si la función OSC ha sido habilitada por su
instalador.
Utilizar los botones + o – para seleccionar el
período de OSC. Las opciones son 0:30 (30
mins.), 1:00 (1 hora), 1:30 y 2:00.
El período recomendado es de 0:30. Si se
selecciona 0:00 la función queda desactivada.
Establecimiento del Período de OSC,
si está habilitada (ver página 36)
Si a usted le va bien utilizar los programas pre-establecidos según lo
indicado en la página 38, no necesita hacer nada más. Para aceptar
los programas pre-establecidos cerrar la tapa frontal y después de 2
minutos los preajustes serán aceptados automáticamente (y el signo de
dos puntos centelleará).
Preferencias de visualización en Pantalla
Aceptación de los programas pre-establecidos
Instrucciones del usuario
ES
Page 40

40
La unidad está ahora en el modo de RUN
(funcionamiento), (el signo de dos puntos
centellea en la pantalla) y la calefacción
funcionará de acuerdo con los programas preestablecidos.
a) Pulse PROG hasta que se ilumine el Evento
1, después pulse DAY para pasar del día
actual al Día 1.
b) Cambie la hora y la temperatura de la
siguiente forma:
i) Utilice los pulsadores + y – para cambiar
la hora (pulse y mantenga presionado
para cambiar en incrementos de
10min.).
ii) Utilice los pulsadores y para cambiar
la temperatura en pasos de 0,5°C (1°F).
iii) Pulse NEXT para pasar al siguiente
Evento.
iv) Repita los pasos i, ii y iii anteriores para
los Eventos 2, 3, 4, 5 y 6.
Modo 7 días
(eventos independientes para cada día de la semana)
1
Antes de que usted cambie los programas
preestablecidos
Su instalador habrá ajustado su unidad para funcionar en el modo de 7días o en el modo de 5/2 días. Para saber en qué modo está ajustada su
unidad, oprimir PROG hasta que “Evento 1” centellea en la pantalla.
Esta unidad está en el modo de 7-días y puede usted
programar diferentes ajustes para cada día de la
semana (ver páginas 40-41).
Esta unidad está en el modo de 5/2 días y puede
usted programar una combinación de ajustes para los
días laborables y otra combinación de ajustes para los
nes de semana (ver página 41).
1
1 2 3 4 5
Instrucciones del usuario
ES
Page 41

41
c) Cuando los 6 eventos sean correctos,
pulse DAY para programar los eventos
del Día 2.
(Si desea repetir el programa del día
anterior, simplemente pulse COPY).
d) Repita los pasos b y c anteriores para
programar (o COPIAR) eventos para
los Días 3, 4, 5, 6 y 7.
Volver al Modo FUNCIONAR (RUN) oprimir PROG hasta que el signo de dos
puntos centellea en la pantalla.
Pulse PROG hasta que se ilumine el
Evento 1, a continuación pulse DAY
hasta que aparezca en la pantalla Día
1-5.
Siga los pasos b y c anteriores para
programar horas y temperaturas para
los días de semana.
Pulse DAY para programar eventos
para el n de semana (Día 6-7) o pulse
COPY para repetir el programa de los
días de semana.
Volver al Modo FUNCIONAR (RUN) oprimir PROG hasta que el signo de dos
puntos centellea en la pantalla.
Modo días 5/2
(una serie de eventos para los días de semana, y otra para los nes de
semana)
1 2 3 4 5
Instrucciones del usuario
ES
Page 42

42
Para pasar al modo Termostato
Pulse y mantenga presionados
simultáneamente los pulsadores y
hasta que aparezcan en la pantalla los
puntos intermitentes y la temperatura
por defecto (8°C).
Pulse y para cambiar la temperatura
según se requiera.
(Si todavía no está en el Modo “Termostato”,
oprimir los botones y y mantenerlos
oprimidos a la vez hasta que la pantalla cambie
mostrando el signo de dos puntos centelleando
y la temperatura de 8°C).
Pulse DAY (la pantalla mostrará una maleta y
:00).
Pulse + y – para introducir el número de días
de vacaciones (máx. 99).
Utilizar los botones y para cambiar la
temperatura constante, si es necesario.
Cuando haya transcurrido el número de
días seleccionado, la unidad volverá al
funcionamiento normal, controlada de acuerdo
con los programas establecidos por usted.
NOTA: Oprimir los botones y a la vez para
salir del modo de “vacaciones” si es necesario.
Para programar el Modo Vacaciones
(estando en Modo Termostato)
El TP7000 se puede convertir para controlar a una temperatura constante
seleccionada por el usuario, en lugar de seguir el programa establecido.
!
NOTA: la unidad permanecerá en el modo termostato hasta que los
botones y se presionen juntos de nuevo.
El TP7000 puede controlarse a una temperatura baja constante mientras
usted está fuera por vacaciones, volviendo a los ajustes programados por
usted después de un número especi cado de días (máximo 99 días).
Instrucciones del usuario
ES
Page 43

43
Anulaciones de usuario
Para aumentar o disminuir temporalmente
la temperatura programada.
– pulse o para aumentar o reducir la
temperatura.
Ampliar el evento 1 (06:30, 20°C) para que
dure todo el día (para que la calefacción
permanezca a una temperatura constante
todo el día).
– oprimir el botón una vez tal como se
indica.
Para prolongar la temperatura establecida
en ese momento durante 1, 2 ó 3 horas.
– pulse el pulsador una vez para 1 hora
más, dos veces para 2 horas más, 3 veces
para 3 horas más y pulse 4 veces para
eliminar la anulación.
Para cambiar la visualización principal en
la pantalla LCD para mostrar la hora o la
temperatura del ambiente interior actual.
– pulse NEXT & COPY simultáneamente.
Las pilas durarán más de dos años. Se
encenderá un indicador de pilas gastadas
en la pantalla de cristal líquido. El usuario
dispone de 15 días para cambiar las pilas
con pilas alcalinas de primera calidad.
Cambiar las pilas (no en el TP7000M)
2
Algunas veces puede que necesite cambiar temporalmente la manera en que
utiliza su calefacción, por ejemplo debido a un tiempo excepcionalmente
frío. El TP7000 permite varias posibles cancelaciones por el usuario, las
cuales pueden seleccionarse sin afectar a la programación del termostato.
Instrucciones del usuario
ES
Page 44

44
Instruktions vejledning
Vigtig note ved RF produkter: Vær opmærksom på at større metal
genstande, som kedler eller andre store elektriske maskiner, placeret mellem
sender og modtager kan formindske modtage og sende forholdene og evt.
forhindre kommunikationen mellen termostat og modtager.
Speci cations
Funktioner TP7000-RF
TP7000
TP7000A
TP7000M
TP7000MA
TP7000M 24
Strømforsyning
2 stk. AA/MN1500/LR6
alkaline batterier
230 V, 50 Hz 24 V, 50 Hz
Hukommelses back up
1 minut
(Kondensator under
batteriskift)
15 dage
(Genopladeligt batteri, se *1)
Kontakt type N/A SPDT type 1B
Belastning på relækontakt N/A 3(1) A, 10-230 V
Sendefrekvens (RF) 433.92 MHz N/A
Rækkevidde
(se nedenstående note)
30m max. N/A
Nominel Impuls Spænding N/A 2.5Kv
Dimensioner (mm) 138 (h) x 88 (b) x 28 (d)
Kugle tryk test 75°C
Temperaturområde 5-30°C
Opfylder EN 60730-2-7 (EN300220 : RF)
Omgivelser Grad 2
Tidsnøjagtighed ± 1 min.
Temperaturnøjagtighed ±1°C
*1: Der skal være strøm på apparatet i 6 dage, for at batteriet er opladet til fuld back up
Bemærk:
Dette produkt må kun installeres af en uddannet elektriker eller
kompetent varmeinstallatør, og installation skal ske i henhold
til de gældende IEEE-standarder for trådføring.
Instruktions vejledning
DK
Page 45

45
Vejledning
Montørindstillinger
Fjern først vægpladen bag på enheden.
For at kunne montere indstiksmodulet skal der i øverste venstre
hjørne af vægpladen være en afstand på mindst 140mm til højre
for vægpladen, 15 mm til venstre for vægpladen, 30 mm over
vægpladen og 100 mm under vægpladen.
Før enheden monteres, skal du sikre, at de re vippeafbrydere på
bagsiden af enheden er indstillet korrekt (se nedenfor). Enheden
er fabriksindstillet til syv dage med optimal start og tidsmæssigt
proportionel kontroltilstand til OFF.
BEMÆRK:
Brug Krono 3 (tidsmæssig proportionalitet) til højtermiske inertialsystemer, f.eks.
støbejernskedler beregnet til at stå på gulvet.
Brug Krono 6 (tidsmæssig proportionalitet) til lavtermiske inertialsystemer, f.eks.
kedler med lavt vandindhold og kombikedler.
Alle modeller
Sw
1
5/2 dages programmering 7 dages programmering
Sw
2
Optimal startregulering aktiveret Optimal startregulering deaktiveret
Sw
3
Tidsproportional regulering On/O regulering
TP7000, M, & RF modeller med indstilling til 3/6 perioder pr. time
Sw
4
Tidsproportional, 6 perioder pr. time Tidsproportional, 3 perioder
Instruktions vejledning
DK
Page 46

46
1
234567
ELECTRONICS
REMOTE
SENSOR
'A' models
only
COM
ON
OFF
Ugens syv dage – hver dag kan programmeres med forskellige
tidspunkter og temperaturer.
5/2 dage – Du kan programmere et sæt tidspunkter og temperaturer, der
gælder på hverdage og et andet sæt, der gælder i weekender.
Optimal startkontrol – en funktion, som tænder varmen på et tidligere
tidspunkt end det programmerede tidspunkt, hændelse 1, for at sikre, at den
ønskede temperatur opnås på det indstillede tidspunkt.
Chrono-proportional control - Tidsmæssig proportionalitet
- energibesparelsesfunktion, som opvarmer kedlen med jævne
mellemrum for at bevare den indstillede temperatur, hvorved brugeren
opnår en konstant omgivende temperatur.
Optimal startregulering
-4˚C
-3˚C
-2˚C
-1˚C
A
B
C
120
min.
90
min.
60
min.
30
min.
Event
time
(
D
Stil Sw2 til OSC ON (pg.44)
Vælg OPTIMISER CURVE i
programmeringsindstilling
A Begivenhed 1, sætpunkt
B Afvigelse fra sætpunkt
C Tilkoblingstid før begivenhed
D Optimeringskurve til indstilling
Ledningsføring (ledningstrukne versioner)
Instruktions vejledning
DK
B
C
M 24V models onl
y
24V
L
N
M 230V models onl
230V
OBS : 1,0 mm2 masiv kobber-kabel skal anvendes til tilslutning af
ekstern føler på TP7000A. Venligst sikre:
a) At kablets længde ikke overstiger 50 meter.
b) For at undgå elektriske forstyrrelser bør kablet ikke installeres
parrallelt med andre strømførende kabler. Hvis det er nødvendigt at
krydse strømforende kabler, bør dette ske i en ret vinkel på disse.
Page 47

47
1. TP7000-RF - Tryk på den nedfældede
RESET-knap ved hjælp af en ikke-metallisk
genstand for at nulstille enheden.
2. Tryk på og hold LEARN-knappen nede i tre
sekunder ved hjælp af en ikke-metallisk
genstand. (BEMÆRK: Termostaten sender
nu signaler vedvarende i fem minutter).
3. RX1 - Tryk på og hold knapperne PROG og
CH1 nede i tre sekunder, indtil den grønne
lampe blinker én gang.
4. RX2 (hvis anvendelig)
Termostat 1 - udfør trin 1-3
Termostat 2 - vent fem minutter, udfør trin 1-2, og tryk herefter på
PROG og CH2 på RX2.
RX3 (hvis anvendelig)
Termostat 1 - udfør trin 1-3
Termostat 2 - vent fem minutter, udfør trin 1-2, og tryk herefter på
PROG og CH2 på RX3.
Termostat 3 - vent fem minutter, udfør trin 1-2, og tryk herefter på
PROG og CH2 på RX3
5. TP7000-RF - Tryk på - eller -knappen.
Enheden vender tilbage til normal drift.
Aktiveringsinstruktioner (kun RF-modeller)
Hvis termostat og modtager er leveret i sampak, er enhederne
indstillet fra fabrik, og trin 1-5 kan derfor springes over (Kun RX1
modeller).
Trin 1-5 nedenfor skal følges for justering af RX-modtageren i forhold til
frekvensen af termostatens signal.
LEARN
RESET
12
3
4
Elekronik
N
L
ZONE 1 TIL
COM
ZONE 1 FRA
A
Elektronik
B
C1
2
345
6
N
L
ZONE 1 TIL
COM
KUN KLEMME 6
RX3
ZONE 1 FRA
ZONE 2 TIL
ZONE 3 TIL
RX1 RX2 & RX3
Trådføring af RX-modtager (kun RF-modeller)
PS. I relation til systemer, der modtager netspænding, skal klemme 2
tilkobles forsyningsnettet
.
Instruktions vejledning
DK
RX1
Page 48

48
Brugervejleding
Din programmerbare rumtermostat
Med TP7000 kan du programmere op til seks forskellige tidspunkter
og temperaturer på hver af ugens syv dage, hvilket giver eksibilitet.
Enheden har ere energibesparende funktioner og nyttige
overstyringsfunktioner, herunder en 99 dages ferietilstand.
Forindstillede programmer
TP7000 leveres i programmeret tilstand med et antal driftstidspunkter
og temperaturer, som ofte passer de este mennesker.
Hvis du ønsker at ændre disse indstillinger, kan du gøre det ved at følge
instruktionerne på side 50-51. Du skal dog først følge trinene på side 49
for at indstille den korrekte tid og dato.
Før du starter
Åbn klappen på forsiden af den programmerbare
enhed. Tryk på den nedsænkede NULSTILLINGSknap ved hjælp af en ikke-metallisk genstand,
indtil du hører et klik og displayet bliver blankt.
Weekdays (Mon-Fri) Weekend (Sat-Sun)
Event Time Temp °C Event Time Temp °C
1 06:30 20 1 07:30 20
2 08:30 15 2 09:30 20
3 11:30 20 3 11:30 20
4 13:30 15 4 13:30 20
5 16:30 21 5 16:30 21
6 22:30 15 6 22:30 15
RESET
Brugervejleding
DK
Page 49

49
Foretrukne visninger
Temperaturvisning (°C/°F)
Tryk på DAY & COPY og hold knappen nede (i
to til tre sekunder), til visningen skifter.
Ur-visning (12/24 hr)
Tryk på NEXT & DAY og hold knappen nede
(i to til tre sekunder), til visningen skifter (AM
eller PM vises i 12-timers tilstand).
Indstilling af ur og dag
Tryk på PROG for at starte programmeringen.
DAG - Tryk på DAY, indtil den korrekte dag
vises (1 = mandag).
UR - Tryk på + & – for at ændre klokkeslættet
(tryk og hold nede for at ændre i intervaller på
10 minutter).
Denne visning kommer KUN frem, hvis OSKfunktionen er aktiveret af installatøren.
Brug +- eller --knapperne for at vælge
OSK-periode. Du har valget mellem 0:30 (30
minutter), 1:00 (én time), 1:30 og 2:00.
Den anbefalede indstilling er 0:30. Hvis
indstillingen er 0:00, deaktiveres funktionen.
Indstilling af OSK-periode (periode for
optimal startkontrol),
hvis den er aktiveret (se side 46)
Sådan accepterer du de forindstillede
programmer
Hvis du ønsker at bruge de forindstillede programmer på side 48,
behøver du ikke at foretage dig noget. Du skal lukke frontlågen for at
kunne acceptere de forindstillede programmer. Efter to minutter vil de
forindstillede programmer automatisk blive accepteret (og kolon blinker).
Brugervejleding
DK
Page 50

50
Enheden er nu i DRIFTS-tilstand (kolon
blinker i displayet), og opvarmningen
fungerer i henhold til de forindstillede
programmer.
a) Tryk på PROG, indtil Event 1 blinker, og
tryk derefter på DAY for at ytte fra den
aktuelle dag til dag 1.
b) Juster tidspunktet og temperaturen som
følger:
i) Brug knapperne + og – til at ændre
tidspunktet (tryk og hold nede for at
ændre i intervaller på 10 minutter).
ii) Brug knapperne og til at ændre
temperaturen i intervaller på 0,5°C
(1°F).
iii) Tryk på NEXT for at gå videre til næste
begivenhed.
iv) Gentag trin i, ii og iii ovenfor for
begivenhederne 2, 3, 4, 5 og 6.
7-dages tilstand
(separate begivenheder for hver af ugens dage)
1
Før du ændrer de forindstillede programmer
Installatøren har indstillet din enhed til at fungere enten i syv-dages
tilstand eller 5/2-dages tilstand. Tryk på PROG, indtil hændelse
1 blinker i displayet, for at nde ud af, hvilken tilstand din enhed er
indstillet i.
Denne enhed er indstillet i syv-dages tilstand, og du
kan programmere forskellige indstillinger for hver dag
eller uge (se side 50-51).
Denne enhed er indstillet i 5/2-dages tilstand, og du
kan indtaste et sæt programmer til hverdage og et
andet sæt til weekender (se side 51).
1
1 2 3 4 5
Brugervejleding
DK
Page 51

51
c) Når alle 6 begivenheder er korrekte,
skal du trykke på DAY for at
programmere begivenheder for dag
2.
(Hvis du ønsker at gentage den
foregående dags program, skal du
blot trykke på COPY).
d) Gentag trin b og c ovenfor for at
programmere (eller kopiere)
begivenheder for dag 3, 4, 5, 6 og 7.
Tilbage til RUN-tilstand – tryk på PROG,
indtil kolonnet blinker i displayet.
Tryk på PROG, til Event 1 blinker, og
tryk derefter på DAY, til displayet viser
Day 1-5.
Følg trin b og c ovenfor for at
programmere tidspunkter og
temperaturer for hverdage.
Tryk på DAY for at programmere
begivenheder forweekender (Day 6-
7), eller tryk på COPY for at gentage
hverdagsprogrammet.
Tilbage til RUN-tilstand – tryk på PROG,
indtil kolonnet blinker i displayet.
5/2-dages tilstand
(et sæt begivenheder for hverdage og et andet sæt for weekender)
1 2 3 4 5
Brugervejleding
DK
Page 52

52
Thermostat-mode
Trykke på og holde & nede samtidigt,
til displayet skifter til at vise et blinkende
kolon og standardtemperaturen (8°C).
Tryk på og for at ændre temperaturen
som ønsket.
(Hvis enheden ikke allerede er i termostattilstand,
skal du trykke på og holde - og -
knapperne nede samtidigt, indtil displayet
ændres til et kolon, der blinker og viser 8°C)
Tryk på DAY (displayet viser en ku ert og
:00)
Tryk på + & – for at angive antallet af
feriedage (maks. 99)
Hvis du ønsker at ændre den konstante
temperatur, skal du bruge - og -
knapperne.
Når det valgte antal dage er gået, vender
enheden tilbage til normal tilstand og fungerer
i henhold til de indstillede programmer.
BEMÆRK: Tryk på - og -knapperne
samtidigt, hvis du ønsker at afslutte
ferietilstand.
Programmering af Ferie-tilstand
(i Thermostat-tilstand)
TP7000 kan foretage regulering af temperaturen ved en konstant lav
temperatur, mens du er på ferie, og vende tilbage til de programmerede
indstillinger efter et speci ceret antal dage (maksimalt 99 dage).
!
BEMÆRK: enheden forbliver i termostattilstand, indtil der trykkes
samtidig på knapperne og igen.
TP7000 kan konverteres til at regulere ved en konstant temperatur
speci ceret af brugeren i stedet for at følge det indstillede program.
Brugervejleding
DK
Page 53

53
Brugerændringer
Sådan øges eller sænkes den
programmerede temperatur
midlertidigt.
– tryk på eller for at øge eller
sænke temperaturen.
Udvid begivenhed 1 (06.30 20°C) til at
vare hele dagen.
(således at varmen forbliver på en
konstant temperatur hele dagen)
– tryk på knappen én gang som vist.
Sådan forlænges varigheden af den
aktuelle temperaturindstilling med en, to
eller tre timer.
– tryk på knappen én gang for 1 ekstra
time, to gange for 2 ekstra timer, tre
gange for 3 ekstra timer.Tryk re gange
for at erne ændringen.
Sådan ændres hoved-LCD-displayet
for at vise enten tid eller aktuel
rumtemperatur
– tryk på NEXT og COPY samtidigt.
Batterierne holder mere end to år. En
indikator for lav batteristand blinker på
LCD-displayet. Brugeren har nu 15 dage
til at udskifte batterierne med alkaliske
batterier af høj kvalitet.
Udskiftning af batterier (ikke TP7000M)
2
Ind imellem bliver du måske nødt til midlertidigt at ændre din måde
at opvarme på, f.eks. på grund af usædvanlig kulde. TP7000 har ere
overstyringsfunktioner, som man kan vælge uden at påvirke termostatens
programmering.
Brugervejleding
DK
Page 54

54
Installatie handleiding
Belangrijk voor RF modellen: Let er op dat zich geen grote metalen
voorwerpen, zoals ketels of andere grote apparaten, in de gezichtslijn
tussen thermostaat en ontvanger bevinden, aangezien hierdoor de
communicatie tussen thermostaat en ontvanger wordt verhinderd.
Technische speci caties
Omschrijving TP7000-RF
TP7000
TP7000A
TP7000M
TP7000MA
TP7000-M 24
Voeding
2 x AA/MN1500/LR6
alkaline batterijen
230V, 50Hz 24V, 50Hz
Programma backup
Condensator, 1 minuut
tijdens batterijen
wisselen
Oplaadbare celbatterij (*1)
Relaisuitgang n.v.t. SPDT potentiaalvrij
Contactbelasting n.v.t. 3(1) A, 10-230 volt
Zendfrequentie (RF modellen) 433,92 MHz n.v.t.
Zendbereik (RF modellen)
max. 30
meter
n.v.t.
Max. piekspanning vlgns.
EN 6730.9
n.v.t. 2,5KV
Afmetingen (mm) 138 x 88 x 28 (bxhxd)
Kogeldruktest vlgns. EN
6730.9
75°C
Temperatuurbereik 5-30°C
Constructienorm EN 60730-2-7 (EN300220 : RF)
Milieu gradatie vlgns. EN
6730.9
2
Tijdnauwkeurigheid ± 1 min.
Nauwkeurigheid ±1°C
*1): Voedingsspanning moet minstens 6 dagen aanwezig zijn voor volledige backup
van 48 uur
N.B.: Dit product dient alleen te worden geïnstalleerd door een
erkend elektrotechnicus of een vakkundige verwarmingsinstallateur
conform de thans geldende IEEE-voorschriften voor bedrading.
Installatie handleiding
NL
Page 55

55
Montage
Instelling DIL-schakelaars
Verwijder eerst de wandplaat van de achterkant van de
thermostaat.
Monteer de wandplaat op een hoogte van ca. 1,5m vanaf de
vloer, niet op de tocht en uit de buurt van warmtebronnen zoals
radiatoren, open haard of direct zonlicht.
Rondom de wandplaat dient een vrije ruimte van minimaal 140 mm
te worden aangehouden.
Controleer voorafgaand aan de plaatsing van de thermostaat of
de 4 DIL-schakelaars aan de achterkant van de unit in de gewenste
stand zijn gezet (zie hieronder). De fabrieksinstelling is 7 dagen, met
de Optimum Start en Chrono-proportionele regeling op OFF.
N.B.
Gebruik Chrono 3 voor vloerverwarming en/of staande gietijzeren ketels.
Gebruik Chrono 6 voor radiatoren en/of ketels met kleine waterinhoud.
7-dagen – elke dag kan afzonderlijk worden geprogrammeerd met
verschillende tijden en temperaturen.
5/2-dagen - één set tijden en temperaturen voor doordeweekse dagen en
een andere set voor weekeinden.
Alle modellen
Sw
1
5/2-dagen programma 7-dagen programma
Sw
2
Optimum Start Control aan Optimum Start Control uit
Sw
3
Chrono-proportionele regeling Aan/Uit regeling
TP7000, M, & RF modellen met 3 of 6 schakelingen per uur
Sw
4
Chrono, 6 schakelingen/uur Chrono, 3 schakelingen/uur
Installatie handleiding
NL
Page 56

56
Aansluiting (niet voor RF-modellen)
Optimum-Start-Control - functie die de verwarming eerder inschakelt dan
Periode 1 om te zorgen dat de gewenste temperatuur op tijd bereikt wordt.
Chrono-proportioneel - energiebesparende comfortabele functie die de
ketel met regelmatige tussenpozen inschakelt waardoor een constante
ruimtetemperatuur voor de gebruiker wordt bereikt.
Instellen van Optimum Start Control
-4˚C
-3˚C
-2˚C
-1˚C
A
B
C
120
min.
90
min.
60
min.
30
min.
Event
time
(
D
Zet DIL-schakelaar S2 op OSC ON
(Optimum Start Control aan)
Stel tijdens het programmeren de
gewenste optimaliseringscurve in
(zie Instructies voor Gebruik)
A Ingestelde temperatuur van Periode 1
B Afwijking t.o.v. ingestelde
temperatuur
C Vervroegde inschakeling t.o.v. Periode
1
D Ingestelde optimaliseringscurve
Sluit de klemmen 1 en 2 aan op de thermostaatklemmen van de ketel (bij
modulerende ketels de klemmen voor schakelende thermostaten, indien
aanwezig).
1
234567
ELECTRONICS
REMOTE
SENSOR
'A' models
only
COM
ON
OFF
AFSTANDS
VOELER
Installatie handleiding
NL
B
C
A
lleen M modellen
24V
L
N
A
lleen M modellen
230V
Om de TS2 op de TP7000A aan te sluiten, dient koperkabel van 1,0mm
2
te worden gebruikt. Let erop dat:
a) de kabel niet langer dan 50 meter mag zijn;
b) de kabel niet naast of in de buurt van andere onder netspanning
staande stroomkabels mag lopen i.v.m. storingen en dat daar waar
kabels elkaar eventueel kruisen, dit onder een rechte hoek gebeurt.
Page 57

57
1. TP7000-RF
Druk met een niet metalen voorwerp
gedurende 3 seconden op de in een
uitsparing aangebrachte LEARN-toets.
N.B. De thermostaat zendt nu gedurende 5
minuten een aanmeldsignaal uit.
2. RX ontvanger
Druk binnen 5 minuten na stap 1
gedurende 3 seconden gelijktijdig op
PROG en CH1. De groene LED knippert
één keer: aanmelding in orde.
3. TP7000-RF
Druk op of van de zojuist aangemelde thermostaat.
Het aanmeldsignaal stopt en de thermostaat gaat naar
normaal bedrijf. Verhoog of verlaag de gewenste temperatuur
d.m.v. de of toets om te controleren of de thermostaat op de
juiste wijze schakelt.
4. RX2../RX3..(indien van toepassing)
Herhaal voor de overige thermostaten de stappen 1,2 en 3, nu
echter met de knoppen CH2 en CH3 van de RX ontvanger.
Inbedrijfstelling van RF modellen
Als de thermostaat en de ontvanger in een setverpakking zijn geleverd
is de aanmeldprocedure al in de fabriek uitgevoerd (enkel model RX1).
Verwijder de isolatiestrip uit het batterijcompartiment en volg
onderstaande stappen om de thermostaat bij de ontvanger aan te
melden.
LEARN
RESET
12
3
4
Electronica
N
L
ZONE 1 AAN
COM
ZONE 1 UIT
A
Electronica
B
C1
2
345
6
N
L
ZONE 1 AAN
COM
Aansluitpunt 6
(alleen RX3)
ZONE 1 UIT
ZONE 2 AAN
ZONE 3 AAN
RX1
RX2 & RX3
Aansluiting van de RX-ontvanger
(alleen bij RF-modellen)
N.B. Bij netspanning gevoede systemen dient klem 2 te worden aangesloten op de
fase van de netvoeding.
Installatie handleiding
NL
RX1
Page 58

58
Instructies voor Gebruik
Uw klokthermostaat
Met de TP7000 kunt u voor elke dag van de week maximaal 6 verschillende
tijds- en temperatuurinstellingen invoeren om volledige exibiliteit
mogelijk te maken. Hij biedt verschillende energiebesparende functies
en beschikt over een aantal nuttige tijdelijke wijzigingen, waaronder een
vakantiemodus van 99 dagen.
Vooraf ingestelde programma’s
Uw TP7000 wordt kant en klaar geprogrammeerd met een set
werktijden en temperaturen die vaak geschikt zijn voor de meeste
mensen.
Wanneer u een van deze instellingen wilt veranderen kunt u dit doen met
behulp van de instructies op bladzijde 60-61. Volg eerst de stappen op
bladzijde 59 voor het instellen van de correcte tijd en dag.
Alvorens te beginnen
Open de klep aan de voorkant van de thermostaat
en verwijder de isolatiestrip uit het batterijcompartiment. De fabrieksinstellingen worden
nu geactiveerd (reset) en de tijd op Dag 1 op
12:00 en de temperatuur op 20ºC gezet.
Voor een reset van een reeds geprogrammeerde
thermostaat: Druk met een niet metalen voorwerp op de in een
uitsparing aangebrachte RESET-toets tot de display blanco is.
Weekdagen (maa-vrij) Weekeinde (zat-zon)
Periode Tidj Temp °C Periode Tidj Temp °C
1 06:30 20 1 07:30 20
2 08:30 15 2 09:30 20
3 11:30 20 3 11:30 20
4 13:30 15 4 13:30 20
5 16:30 21 5 16:30 21
6 22:30 15 6 22:30 15
RESET
Instructies voor Gebruik
NL
Page 59

59
Display voorkeur
Temperatuur-weergave (°C / °F)
Druk tegelijk op DAY & COPY tot de display
verandert.
Klok-weergave (12 / 24 hr)
Druk tegelijk op NEXT & DAY tot de display
verandert (AM of PM verschijnt in 12-
uursstand).
De dag en kloktijd instellen
DAG - Druk op PROG en daarna op DAY tot de
correcte dag zichtbaar wordt (1 = maandag).
KLOKTIJD - Druk op + of - om de tijd in te
stellen (houd ingedrukt voor stappen van 10
minuten).
Deze display zal ALLEEN verschijnen wanneer de
OSC-functie is geactiveerd door uw installateur.
Gebruik de toetsen voor + of – voor het
selecteren van de OSC-periode. De keuzes zijn
0:30 (30 min), 1:00 (1 uur), 1:30 en 2:00.
De aanbevolen instelling is 0:30. Indien deze is
ingesteld op 0:00, is de functie uitgeschakeld.
Instellen van de OSC-periode,
indien geactiveerd (zie blz. 56)
Accepteren van de vooraf ingestelde
programma’s
Wanneer u de op bladzijde 58 vooraf ingestelde programma’s wilt
gebruiken hoeft u verder niets te doen. Voor het accepteren van de
ingevoerde instellingen sluit u gewoon de klep aan de voorkant en na
2 minuten zullen de vooraf ingestelde instellingen automatisch worden
geaccepteerd (& gaat de dubbele punt knipperen).
Instructies voor Gebruik
NL
Page 60

60
De thermostaat staat nu in Normaal Bedrijf
(de dubbele punt knippert in de display)
en de verwarming werkt volgens de vooraf
ingestelde programma’s.
a) Druk telkens op PROG tot Periode 1 knippert,
dan op DAY om naar Dag 1 (maandag) te
gaan.
b) Wijzig de tijd en temperatuur als volgt:
i) Gebruik de + of – toets om de tijd te
veranderen (houd ingedrukt voor stappen van
10 minuten).
ii) Gebruik de en toetsen om de temperatuur
in stappen van 0,5° C (1° F) te veranderen.
iii) Druk op NEXT om door te gaan naar de
volgende Periode.
iv) Herhaal bovengenoemde stap l, ll & lll voor
Periode 2, 3, 4, 5 & 6.
Als u minder dan 6 Perioden nodig heeft, maak
dan de niet gebruikte Perioden qua tijd en temperatuur gelijk aan de laatst geprogrammeerde
Periode.
7-dagen stand
(afzonderlijke programma’s voor elke dag van de week)
1
Voordat u programma’s gaat wijzigen
Uw installateur zal de thermostaat op de 7-dagen stand of op de
5/2-dagen stand hebben ingesteld. Om te zien op welke stand uw
thermostaat is ingesteld drukt u op PROG tot Periode 1 knippert in de
display.
Deze thermostaat staat in de 7-dagen stand en u
kunt voor elke dag van de week andere instellingen
programmeren (zie bladzijde 60-61).
Deze thermostaat staat in de 5/2-dagen stand en u
kunt een set programma’s voor weekdagen en een
andere set voor weekeinden invoeren (zie bladzijde
61).
1
1 2 3 4 5
Instructies voor Gebruik
NL
Page 61

61
c) Druk op DAY om Dag 2 te
programmeren.
(Wanneer u het programma van de vorige
dag wilt herhalen drukt u simpelweg op
COPY).
d) Herhaal bovenstaande stap b & c voor
het programmeren (of kopiëren) van
Perioden voor Dag 3, 4, 5, 6 & 7.
Terugkeren naar normaal bedrijf - druk op
PROG tot de dubbele punt knippert in de
display.
Druk telkens op PROG tot Periode 1
knippert, druk dan op DAY tot de display
Day 1-5 toont.
Volg bovenstaande stap b & c voor het
programmeren van tijden & temperaturen
voor weekdagen.
Druk op DAY voor het programmeren
van perioden voor weekeinden (Day 6-7)
of druk op COPY voor het herhalen van
weekdagprogramma’s.
Terugkeren naar normaal bedrijf - druk op
PROG tot de dubbele punt knippert in de
display.
1 2 3 4 5
Instructies voor Gebruik
NL
5/2-dagen stand
(een programma voor weekdagen, een ander programma voor
weekeinden)
Page 62

62
Thermostaat funktie (geen klokprogramma)
Druk gelijktijdig op en tot de display
verandert in knipperende dubbele punt
en standaard temperatuur (8° C).
Druk op of om de temperatuur naar
wens te veranderen.
(Vanuit Normaal Bedrijf: druk gelijktijdig op en
tot de display verandert in een knipperende
dubbele punt en 8ºC).
Druk op DAY (display toont een ko er en :00).
Druk op + of - om het aantal vakantiedagen in
te voeren (max. 99).
Gebruik de en toetsen om de constante
temperatuur indien nodig te veranderen.
Na het verstrijken van het ingestelde aantal
dagen zal de TP7000 terugkeren naar Normaal
Bedrijf en regelen volgens uw ingestelde
programma’s.
N.B.: Om de vakantiestand voortijdig te verlaten:
druk gelijktijdig op en .
Vakantie programmeren
(in de Thermostaat funktie)
De TP7000 kan worden ingesteld op een vaste, door de gebruiker gekozen
temperatuur, inplaats van de geprogrammeerde periodetemperaturen aan
te houden.
!
N.B.: de TP7000 blijft in de thermostaat funktie staan tot weer
gelijktijdig op en wordt gedrukt.
De TP7000 kan op een vaste lage temperatuur regelen terwijl u met vakantie
bent en na een ingesteld aantal dagen (maximaal 99) terugkeren naar uw
geprogrammeerde instellingen.
Instructies voor Gebruik
NL
Page 63

63
Tijdelijke wijziging van de
geprogrammeerde temperatuur:
- druk op of om de temperatuur
te verhogen of te verlagen (wordt
automatisch opgeheven bij de
volgende Periode).
Verlenging van Periode 1 voor de hele
dag:
- druk één keer op de aangegeven
knop (wordt automatisch opgeheven
aan het einde van de dag).
Verlenging van momentele temperatuur
met 1, 2 of 3 uur:
- druk respectievelijk 1, 2 of 3 keer op
de aangegeven knop. Om voortijdig
op te he en: druk een 4e keer.
Display wisselen van tijd naar gemeten
temperatuur (en andersom):
- druk gelijktijdig op NEXT en COPY.
Batterijen gaan meer dan 2 jaar mee. Als
het batterij-symbool knippert heeft u 15
dagen tijd om de batterijen te vervangen.
Verwijder de oude batterijen en zet er
binnen een minuut nieuwe in, dan gaat
de programmering niet verloren. Gebruik
hoogwaardige alkaline batterijen!
Batterijen vervangen (niet TP7000M)
2
Het is mogelijk dat u soms de manier waarop u uw verwarming gebruikt
tijdelijk moet veranderen, bijv. in verband met abnormaal koud weer.
De TP7000 heeft een aantal door de gebruiker toe te passen tijdelijke
wijzigingen, die geselecteerd kunnen worden zonder dat dit van invloed is
op de programmering van de thermostaat.
Tijdelijke veranderingen door de gebruiker
Instructies voor Gebruik
NL
Page 64

64
ПдзгЯет егкбфЬуфбузт
УзмбнфйкЮ рбсбфЮсзуз гйб фпхт RF фэрпхт: ВевбйщиеЯфе ьфй ден хрЬсчей кЬрпйп
мегЬлп мефбллйкь бнфйкеЯменп ьрщт егкбфЬуфбуз лЭвзфб Ю Ьллет фечнйкЭт ухукехЭт
рпх рбсемвЬллпнфбй ендйЬмеуб мефбоэ фпх иесмпуфЬфз чюспх кбй фзт мпнЬдбт фпх
дЭкфз Эфуй юуфе нб рбсемрпдЯжефбй з ерйкпйнщнЯб мефбоэ фпхт.
Speci cation
ЧбсбкфзсйуфйкЬ
иесмпуфЬфз
TP7000-RF
TP7000
TP7000A
TP7000M
TP7000MA
TP7000M 24
РбспчЮ сеэмбфпт
2 x AA/MN1500/LR6
БлкблйкЭт мрбфбсЯет
230V, 50Hz 24V, 50Hz
ЕцедсйкЮ мнЮмз
РхкнщфЮт кбфЬ фзн
бллбгЮ мрбфбсЯбт гйб
1 лерфь
Ербнбцпсфйжьменп
уфпйчеЯп, 24 юсет (*1)
ЛейфпхсгЯб мефбгщгЮт
селЭ еоьдпх
N/A 1 x SPDT
ПнпмбуфйкЮ фймЮ
мефбгщгЮт ербцЮт
селЭ, фЬуз кбй сеэмб)
N/A 3(1) A, 10-230 volt
Ухчньфзфб рпмрпэ
(мьнп RF)
433,92
MHz
N/A
ЕмвЭлейб рпмрпэ
30 мЭфсб фп
ðïëý
N/A
ПнпмбуфйкЮ фЬуз рблмпэ N/A 2.5KV
ДйбуфЬуейт (mm) 138 РлЬфпт x 88 эшпт x 28 вЬипт
ДпкймЮ рЯеузт уцбЯсбт 75°C
РесйпчЮ иесмпксбуйюн 5-30°C
Рсьфхрп учедйбумпэ EN 60730-2-7 (EN300220 : RF)
КбфЬуфбуз елЭгчпх
сэрбнузт
2
БксЯвейб чсьнпх ± 1 min.
БксЯвейб иесмпксбуЯбт ±1°C
З мпнЬдб рсЭрей нб фспцпдпфеЯфбй ме сеэмб гйб 6 мЭсет гйб нб цпсфйуфеЯ фп
уфпйчеЯп рспфпэ нб еЯнбй дйбиЭуймз рлЮсзт ецедсеЯб.
Рбсбкблпэме узмейюуфе:
Бхфь фп рспъьн иб рсЭрей нб егкбиЯуфбфбй брь ейдйкехмЭнп
злекфспльгп Ю бсмьдйп иесмйкь егкбфбуфЬфз кбй иб
рсЭрей нб еЯнбй уэмцщнп ме фзн йучэпхуб Экдпуз фщн
кбнпнйумюн злекфсйкюн егкбфбуфЬуещн фпх ЙЕЕЕ.
ПдзгЯет егкбфЬуфбузт
GR
Page 65

65
ЕгкбфЬуфбуз
СхимЯуейт дйбкьрфз DIL
Рсюфб бцбйсЭуфе фп рЬнел брь фп рЯущ мЭспт фзт мпнЬдбт.
Брь фзн рЬнщ бсйуфесЮ гщнЯб фпх рЬнел рсЭрей нб
хрЬсчпхн елеэиесет брпуфЬуейт фпхлЬчйуфпн 140 mm
рспт фб деойЬ, 15 mm рспт фб бсйуфесЬ, 30 mm рспт фб
ерЬнщ кбй 100 mm рспт фб кЬфщ гйб фзн егкбфЬуфбуз фпх
излхкщфпэ дпмпуфпйчеЯпх.
Рспфпэ егкбфбуфЮуефе фз мпнЬдб еобуцблЯуфе ьфй пй
фЭууесйт дйбкьрфет DIL уфп рЯущ мЭспт фзт мпнЬдбт
Эчпхн мефбкйнзиеЯ уфйт брбйфпэменет схимЯуейт (влЭре
рбсбкЬфщ). З рспссэимйуз брь фп есгпуфЬуйп еЯнбй 7
змесюн ме вЭлфйуфз ЕккЯнзуз кбй Чспнп–бнблпгйкь Элегчп
OFF.
УЗМЕЙЩУЗ
ЧсзуймпрпЯзуз Chrono 3 гйб ухуфЮмбфб хшзлЮт иесмйкЮт бдсЬнейбт, р.ч.
чхфпуйдзспЯ лЭвзфет.
ЧсзуймпрпЯзуз Chrono 6 гйб ухуфЮмбфб чбмзлЮт иесмйкЮт бдсЬнейбт, р.ч.
лЭвзфет ме мйксЮ ресйекфйкьфзфб неспэ кбй ухндхбумь мрьйлес жеуфпэ неспэ.
ПдзгЯет егкбфЬуфбузт
GR
Page 66

66
1
234567
ELECTRONICS
REMOTE
SENSOR
'A' models
COM
ON
OFF
ЗлекфсйкЮ уэндеуз TP7000 (ьчй мпнфЭлб RF)
7-day (7 змЭсет) – КЬие змЭсб мрпсеЯ нб рспгсбммбфйуфеЯ ме
дйбцпсефйкпэт чсьнпхт кбй иесмпксбуЯет.
5/2 day – Энб уэнплп чсьнщн кбй иесмпксбуйюн гйб
убввбфпкэсйбкб кбй Энб Ьллп гйб фйт есгЬуймет змЭсет.
ВЭлфйуфпт Элегчпт еккЯнзузт – лейфпхсгЯб рпх иЭфей уе
лейфпхсгЯб фз иЭсмбнуз рсйн брь фпн рспгсбммбфйумЭнп чсьнп фпх
УхмвЬнфпт 1 гйб нб еобуцблЯжефбй ьфй з брбйфпэменз иесмпксбуЯб
ерйфхгчЬнефбй уфпн схимйумЭнп чсьнп.
Чспнп-бнблпгйкьт Элегчпт – чбсбкфзсйуфйкь еопйкпньмзузт
енЭсгейбт рпх бнЬвей фп мрьйлес кбфЬ фбчфйкЬ дйбуфЮмбфб гйб нб
дйбфзсЮуей мйб иесмпксбуЯб сэимйузт, ерйфхгчЬнпнфбт уфбиесЮ
иесмпксбуЯб ресйвЬллпнфпт гйб фпн чсЮуфз.
ВЭлфйуфпт Элегчпт еккЯнзузт
-4˚C
-3˚C
-2˚C
-1˚C
A
B
C
120
min.
90
min.
60
min.
30
min.
Event
time
(
D
СхимЯуфе фпн Sw2 уфп OSC ON (влЭре
схимЯуейт DIL уелЯдб 64)
ЕрйлЭофе КБМРХЛЗ
ВЕЛФЙУФПРПЙЗУЗУ уфз иЭуз
рспгсбммбфйумпэ
A УзмеЯп сэимйузт УхмвЬнфпт 1
B Брьклйуз брь УзмеЯп сэимйузт
C Чсьнпт дйбкьрфз енфьт рсйн брь фп
УхмвЬн
D Сэимйуз кбмрэлзт велфйуфпрпЯзузт
ПдзгЯет егкбфЬуфбузт
GR
B
C
Мьнп мпнфЭлб М 24V
24V
L
N
Мьнп мпнфЭлб М 230
V
230V
УзмеЯщуз: 1.0mm2 ухмрбгЭт чЬлкйнп кблюдйп рсЭрей нб
чсзуймпрпйзиеЯ гйб нб ухндЭуей фпн бйуизфЮсб брьуфбузт ме фп
TP7000A. Рбсбкблю еобуцблЯуфе ьфй:
б) фп мЮкпт кблщдЯпх ден рсЭрей нб хресвбЯней фб 50 мЭфсб,
в) гйб фзн брпцхгЮ злекфсйкЮт рбсемвплЮт фп кблюдйп ден рсЭрей
нб пдеэей рбсЬллзлб кпнфЬ ме Ьллб кенфсйкЬ злекфспцьсб кблюдйб,
кбй ьрпх еЯнбй брбсбЯфзфп фп кблюдйп рсЭрей нб дйбуфбхсюнефбй ме
кенфсйкпэт бгщгпэт ме фзн ущуфЮ гщнЯб.
Page 67

67
¸нбсоз лейфпхсгЯбт (мьнп екдпчЭт RF)
Гйб нб ухнфпнЯуефе фпн дЭкфз RX уфз ухчньфзфб фпх уЮмбфпт
иесмпуфЬфз, бкплпхиЮуфе фб рбсбкЬфщ вЮмбфб 1-5.
1. TP7000-RF
РйЭуфе фп рлЮкфсп RESET рпх всЯукефбй
уе еупчЮ, чсзуймпрпйюнфбт мз мефбллйкь
бнфйкеЯменп, гйб нб ербнбцЭсефбй фз мпнЬдб.
2. РйЭуфе кбй ксбфЮуфе рйеумЭнп фп рлЮкфсп LEARN рпх всЯукефбй
уе еупчЮ гйб 3 дехфесьлерфб, чсзуймпрпйюнфбт мз мефбллйкь
бнфйкеЯменп.
УЗМЕЙЩУЗ: П иесмпуфЬфзт екрЭмрей фюсб ухнечют гйб 5 лерфЬ.
3. RX1
РйЭуфе кбй ксбфЮуфе рйеумЭнб фб рлЮкфсб
PROG кбй CH1 гйб 3 дехфесьлерфб Эщт ьфпх
фп рсЬуйнп цщт нб еклЬмшей мйб цпсЬ.
4. RX2 (еЬн Эчей ецбсмпгЮ)
УфЬдйп 1 – рсбгмбфпрпйЮуфе фб вЮмбфб 1-3.
УфЬдйп 2 – ресймЭнефе 5 лерфЬ, рсбгмбфпрпйЮуфе фб вЮмбфб 1-2 кбй
кбфьрйн рйЭуфе фб PROG êáé CH2 óôïí RX.2
RX3 (еЬн Эчей ецбсмпгЮ)
УфЬдйп 1 – рсбгмбфпрпйЮуфе фб вЮмбфб 1 – 3.
УфЬдйп 2 - ресймЭнефе 5 лерфЬ, рсбгмбфпрпйЮуфе фб вЮмбфб 1-2 кбй
кбфьрйн рйЭуфе фб PROG êáé CH2 óôïí RX3.
УфЬдйп 3 – рсбгмбфпрпйЮуфе фб вЮмбфб 1-2 кбй кбфьрйн рйЭуфе
PROG êáé CH3 óôïí RX3.
5. TP7000-RF
РйЭуфе фп Þ ôï гйб нб ербнбцЭсефе фз
мпнЬдб уфзн кбнпнйкЮ лейфпхсгЯб.
RESET
12
3
4
ELECTRONICS
N
L
COM
ZONE
1 ON
ZONE
1 OFF
A
ELECTRONICS
B
C1
2
345
6
N
L
ZONE
1 ON
ZONE
1 OFF
ZONE
2 ON
ZONE
3 ON
COM
TERMINAL 6
RX3 ONLY
RX1 RX2 & RX3
ЗлекфсйкЮ уэндеуз дЭкфз (мьнп мпнфЭлб RF)
Узм. Гйб ухуфЮмбфб рпх лейфпхсгпэн ме фЬуз дйкфэпх ухндЭуфе фпн бкспдЭкфз 2
уфпн бгщгь цЬуещт фпх дйкфэпх фспцпдьфзузт
LEARN
ПдзгЯет егкбфЬуфбузт
GR
RX1
Page 68

68
ПдзгЯет чсЮузт
П рспгсбммбфйумЭнпт убт иесмпуфЬфзт
чюспх
П TP7000 убт ерйфсЭрей нб рспгсбммбфЯуефе Эщт 6 дйбцпсефйкЭт
схимЯуейт чсьнпх кбй иесмпксбуЯбт гйб кЬие змЭсб фзт евдпмЬдбт,
рбсЭчпнфбт рлЮсз ехелйоЯб. РбсЭчей дйЬцпсб чбсбкфзсйуфйкЬ
еопйкпньмзузт енЭсгейбт кбй дйЬцпсб чсЮуймб рспгсЬммбфб гйб фпн
чсЮуфз, ухмресйлбмвбнпмЭнпх рспгсЬммбфпт бсгйюн 99 змесюн.
РспссхимйумЭнб рспгсЬммбфб
П дйкьт убт TP7000 рбсбдЯдефбй Эфпймпт рспгсбммбфйумЭнпт ме
уэнплп чсьнщн кбй иесмпксбуйюн лейфпхсгЯбт рпх ухчнЬ еЯнбй
кбфЬллзлп гйб фпн ресйууьфесп кьумп.
ЕЬн иЭлефе, мрпсеЯфе нб бллЬоефе прпйбдЮрпфе брь бхфЭт фйт схимЯуейт
бкплпхиюнфбт фйт пдзгЯет уфйт уелЯдет 70–71. БкплпхиЮуфе рсюфб фб
вЮмбфб уфз уелЯдб 69 гйб нб схимЯуефе фйт рспфймЮуейт убт гйб ендеЯоейт
кбй фз ущуфЮ юсб кбй змеспмзнЯб.
Рспфпэ оекйнЮуефе
БнпЯофе фп кбрЬкй уфп емрсьт мЭспт фпх
рспгсбммбфйуфЮ убт. Чсзуймпрпйюнфбт мз
мефбллйкь бнфйкеЯменп, рйЭуфе фп рлЮкфсп
RESET рпх всЯукефбй уе еупчЮ, Эщт ьфпх
бкпэуефе клйк кбй з пиьнз нб мз деЯчней фЯрпфб.
ЕсгЬуймет змЭсет (Дехф-Рбс)
Убввбфпкэсйбкб (Убв-Кхс)
УхмвЬн Чсьнпт
ИесмпксбуЯб
УхмвЬн Чсьнпт
ИесмпксбуЯб
1 06:30 20 1 07:30 20
2 08:30 15 2 09:30 20
3 11:30 20 3 11:30 20
4 13:30 15 4 13:30 20
5 16:30 21 5 16:30 21
6 22:30 15 6 22:30 15
RESET
ПдзгЯет чсЮузт
GR
Page 69

69
РспфймЮуейт ендеЯоещт
¸ндейоз иесмпксбуЯбт (°C Ю °F)
РйЭуфе кбй ксбфЮуфе рйеумЭнп фп DAY &
COPY (гйб 2-3 дехфесьлерфб) Эщт ьфпх
бллЬоей з Эндейоз.
¸ндейоз сплпгйпэ (12 Ю 24 юсет)
РйЭуфе кбй ксбфЮуфе рйеумЭнп фп NEXT
& DAY (гйб 2-3 дехфесьлерфб) Эщт ьфпх
бллЬоей з Эндейоз (AM (р.м.) Ю PM (м.м.) иб
емцбнйуфеЯ уфпн фсьрп лейфпхсгЯбт фщн 12
ùñþí).
Сэимйуз Сплпгйпэ кбй ЗмЭсбт
РйЭуфе PROG гйб нб бсчЯуефе фпн
рспгсбммбфйумь.
ЗМЕСБ – РйЭуфе DAY Эщт ьфпх цбнеЯ з
ущуфЮ змЭсб (1=ДехфЭсб, 2=ФсЯфз к.лр.).
ЧСПНПУ – РйЭуфе + êáé – гйб нб бллЬоефе
фпн чсьнп (рйЭуфе кбй ксбфЮуфе рйеумЭнп
гйб нб бллЬоефе ме вЮмбфб фщн 10
лерфюн).
БхфЮ з Эндейоз иб емцбнйуфеЯ МПНП еЬн з
лейфпхсгЯб OSC Эчей енесгпрпйзиеЯ брь фпн
егкбфбуфЬфз убт.
ЧсзуймпрпйЮуфе фб рлЮкфсб + Þ – гйб нб
ерйлЭоефе фзн ресЯпдп OSC. Пй ерйлпгЭт еЯнбй
0:30 (30 лерфЬ), 1:00 (1 юсб), 1:30 кбй 2:00.
З ухнйуфюменз сэимйуз еЯнбй 0:30. ЕЬн гЯнефбй
сэимйуз 0:00 з лейфпхсгЯб бренесгпрпйеЯфбй.
Сэимйуз фзт ресйьдпх OSC, еЬн еЯнбй
енесгпрпйзмЭнз (влЭре уелЯдб 66)
БрпдпчЮ фщн рспссхимйумЭнщн
рспгсбммЬфщн
ЕЬн ерйихмеЯфе нб чсзуймпрпйЮуефе фб рспссхимйумЭнб
рспгсЬммбфб фзт уелЯдбт 68, ден чсейЬжефбй нб кЬнефе фЯрпфе
Ьллп. Гйб нб брпдечфеЯфе бхфЭт фйт схимЯуейт клеЯуфе брлют фп
емрсьт кЬлхммб кбй мефЬ брь 2 лерфЬ пй рспссхимЯуейт иб гЯнпхн
брпдекфЭт бхфпмЬфщт.
ПдзгЯет чсЮузт
GR
Page 70

70
З мпнЬдб фюсб еЯнбй уфз иЭуз RUN (лейфпхсгЯб)
(пй дэп фелеЯет бнбвпувЮнпхн уфзн пиьнз) кбй
з иЭсмбнуз иб лейфпхсгЮуей уэмцщнб ме фб
рспссхимйумЭнб рспгсЬммбфб.
a) РйЭуфе PROG Эщт ьфпх бсчЯуей нб
бнбвпувЮней фп УхмвЬн 1, кбфьрйн
рйЭуфе. DAY гйб нб мефбкйнзиеЯфе брь фз
узмесйнЮ змЭсб уфзн ЗмЭсб 1.
b) ФспрпрпйЮуфе фпн чсьнп кбй фз
иесмпксбуЯб щт бкплпэищт:
i) ЧсзуймпрпйЮуфе фб рлЮкфсб + êáé
– гйб нб бллЬоефе фпн чсьнп (рйЭуфе кбй
ксбфЮуфе фб рйеумЭнб гйб нб бллЬоефе ме
вЮмбфб фщн 10 лерфюн).
ii) ЧсзуймпрпйЮуфе фб рлЮкфсб êáé
гйб нб бллЬоефе фз иесмпксбуЯб ме
вЮмбфб 0,5°C (1°F).
iii) РйЭуфе NEXT гйб нб рспчщсЮуефе
уфп ерьменп УхмвЬн.
iv) ЕрбнблЬвефе фб вЮмбфб i, ii кбй iii гйб
УхмвЬнфб 2, 3, 4, 5 кбй 6.
Рспгсбммбфйумьт ме фсьрп 7 змесюн
(чщсйуфЬ рспгсЬммбфб гйб кЬие змЭсб фзт евдпмЬдбт)
1
Рспфпэ бллЬоефе фб рспссхимйумЭнб рспгсЬммбфб
П егкбфбуфЬфзт иб рсЭрей нб схимЯуей фз мпнЬдб убт гйб нб
лейфпхсгеЯ еЯфе ме фсьрп 7 змесюн еЯфе ме фсьрп 5/2 змесюн. Гйб нб
дйбрйуфюуефе уе рпйп фсьрп еЯнбй схимйумЭнз з мпнЬдб убт рйЭуфе
фп PROG Эщт ьфпх фп УхмвЬн 1 нб бнбвпувЮней уфзн пиьнз убт.
БхфЮ з мпнЬдб еЯнбй ме фсьрп 7 змесюн кбй мрпсеЯфе
нб рспгсбммбфЯуефе дйЬцпсет схимЯуейт гйб кЬие
змЭсб фзт евдпмЬдбт (влЭре уелЯдет 70-71).
БхфЮ з мпнЬдб еЯнбй ме фсьрп 5/2 змесюн
кбй мрпсеЯфе нб ейубгЬгефе Энб уэнплп
рспгсбммЬфщн гйб есгЬуймет змЭсет кбй Энб
Ьллп гйб убввбфпкэсйбкб (влЭре уелЯдб 71).
1
1 2 3 4 5
ПдзгЯет чсЮузт
GR
Page 71

71
c) ¼фбн кбй фб 6 ухмвЬнфб еЯнбй псиЬ,
рйЭуфе DAY гйб нб рспгсбммбфЯуефе фб
ухмвЬнфб гйб фзн змЭсб 2.
(еЬн ерйихмеЯфе нб ербнблЬвефе фп
рсьгсбммб фзт рспзгпэмензт змЭсбт,
брлют рйЭуфе COPY).
d) ЕрбнблЬвефе фб рбсбрЬнщ вЮмбфб b
кбй c гйб нб рспгсбммбфЯуефе (Ю COPY)
ухмвЬнфб гйб фйт змЭсет 3, 4, 5, 6 кбй 7.
ЕрйуфсЭцпнфбт уфз иЭуз RUN – рйЭуфе
PROG Эщт ьфпх пй дэп фелеЯет бсчЯупхн
нб бнбвпувЮнпхн уфзн пиьнз
РйЭуфе PROG Эщт ьфпх бсчЯуей нб
бнбвпувЮней фп УхмвЬн 1, кбфьрйн
рйЭуфе DAY Эщт ьфпх деЯоей ЗмЭсб 1-
5.
БкплпхиЮуфе фб вЮмбфб b кбй c уфйт
уелЯдет 70-71 гйб нб рспгсбммбфЯуефе
чсьнпхт кбй иесмпксбуЯет гйб есгЬуймет
змЭсет.
РйЭуфе DAY гйб нб рспгсбммбфЯуефе
ухмвЬнфб гйб убввбфпкэсйбкп (змЭсет
6-7) Ю рйЭуфе COPY гйб нб ербнблЬвефе
рсьгсбммб есгЬуймзт змЭсбт.
ЕрйуфсЭцпнфбт уфз иЭуз RUN – рйЭуфе
PROG Эщт ьфпх пй дэп фелеЯет бсчЯупхн
нб бнбвпувЮнпхн уфзн пиьнз
Рспгсбммбфйумьт уфз иЭуз 5/2 змесюн
(Энб уэнплп рспгсбммЬфщн гйб есгЬуймет змЭсет, Энб Ьллп гйб
убввбфпкэсйбкб)
1 2 3 4 5
ПдзгЯет чсЮузт
GR
Page 72

72
Гйб нб бллЬоефе фз иЭуз иесмпуфЬфз
РйЭуфе кбй ксбфЮуфе рйеумЭнб мбжЯ
êáé Эщт ьфпх бллЬоей з Эндейоз уе
дэп фелеЯет рпх бнбвпувЮнпхн кбй
рспфесьиефз иесмпксбуЯб (8°C).
РйЭуфе Þ гйб нб бллЬоефе
иесмпксбуЯб ьрщт брбйфеЯфбй.
(ЕЬн ден еЯуфе Юдз уе иЭуз иесмпуфЬфз, рйЭуфе
кбй ксбфЮуфе рйеумЭнб фб êáé мЭчсй нб
бнбвпувЮнпхн уфзн пиьнз пй дэп фелеЯет кбй з
Эндейоз нб еЯнбй 8°C ).
РйЭуфе DAY (з пиьнз иб деЯоей вблЯфуб кбй
:00).
РйЭуфе + êáé – гйб нб ейубгЬгефе фпн бсйимь
фщн змесюн бсгйюн (фп рплэ 99).
ЧсзуймпрпйЮуфе фб рлЮкфсб êáé гйб
нб фспрпрпйЮуефе фз уфбиесЮ иесмпксбуЯб,
еЬн брбйфеЯфбй.
¼фбн Эчей ресЬуей п ерйлегьменпт бсйимьт
змесюн, з мпнЬдб иб ерйуфсЭшей уфзн
кбнпнйкЮ кбфЬуфбуз, елЭгчпнфбт уэмцщнб
ме фб схимйумЭнб рспгсЬммбфЬ убт.
УЗМЕЙЩУЗ: РйЭуфе мбжЯ фб рлЮкфсб êáé
гйб нб бкхсюуефе фпн фсьрп бсгйюн еЬн
чсейЬжефбй.
Гйб нб рспгсбммбфЯуефе лейфпхсгЯб бсгйюн
(еню всЯукеуфе уфз иЭуз иесмпуфЬфз)
П TP7000 мрпсеЯ нб мефбфсбреЯ гйб нб елЭгчей уе уфбиесЮ
иесмпксбуЯб ерйлегмЭнз брь фпн чсЮуфз, бнфЯ нб бкплпхиеЯ фп
схимйумЭнп рсьгсбммб.
!
УЗМЕЙЩУЗ: з мпнЬдб иб рбсбмеЯней уфпн фсьрп иесмпуфЬфз
Эщт ьфпх рйеуфпэн рЬлй мбжЯ фб рлЮкфсб êáé .
П TP7000 мрпсеЯ нб елЭгчей уе уфбиесЮ чбмзлЮ иесмпксбуЯб еню
еЯуфе мбксйЬ уе дйбкпрЭт, ерйуфсЭцпнфбт уфйт рспгсбммбфйумЭнет
схимЯуейт мефЬ брь псйумЭнп бсйимь змесюн (фп рплэ 99 змесюн)
ПдзгЯет чсЮузт
GR
Page 73

73
Гйб нб бхоЮуефе рспущсйнЬ Ю нб
мейюуефе фзн рспгсбммбфйумЭнз
иесмпксбуЯб.
- рйЭуфе Þ гйб нб ерйлЭоефе фзн
ерйихмзфЮ иесмпксбуЯб.
РбсбфеЯнефе фп УхмвЬн 1 (дзлбдЮ
06.30 20°C) гйб нб дйбскЭуей ьлз
фзн змЭсб (Эфуй юуфе з иЭсмбнуз нб
ухнечЯуей нб рбсбмЭней уе уфбиесЮ
иесмпксбуЯб ьлз фзн змЭсб).
– рйЭуфе фп рлЮкфсп мЯб цпсЬ,
ьрщт цбЯнефбй.
Гйб нб рбсбфеЯнефе фзн фщсйнЮ
схимйумЭнз иесмпксбуЯб кбфЬ 1, 2
Ю 3 юсет.
– рйЭуфе фп рлЮкфсп мЯб цпсЬ
гйб 1 ерйрлЭпн юсб, 2 цпсЭт гйб
2 ерйрлЭпн юсет, 3 цпсЭт гйб 3
ерйрлЭпн юсет кбй рйЭуфе 4 цпсЭт
гйб нб бкхсюуефе фзн ерйлпгЮ.
Гйб нб фспрпрпйЮуефе фзн кэсйб
пиьнз LCD юуфе нб деЯчней еЯфе
чсьнп еЯфе иесмпксбуЯб чюспх.
– рйЭуфе NEXT êáé COPY ìáæß.
Пй мрбфбсЯет иб дйбскЭупхн рЬнщ
брь дэп чсьнйб. П деЯкфзт реумЭнзт
мрбфбсЯбт иб бнбвпувЮней уфзн пиьнз
LCD. П чсЮуфзт Эчей 15 змЭсет гйб
нб бллЬоей фйт мрбфбсЯет ме блкблйкЬ
уфпйчеЯб хшзлЮт рпйьфзфбт.
БллбгЮ мрбфбсйюн (ьчй TP7000M)
2
МесйкЭт цпсЭт мрпсеЯ нб чсейбуфеЯ нб бллЬоефе рспущсйнЬ
фпн фсьрп рпх чсзуймпрпйеЯфбй фз иЭсмбнуЮ убт, дзлбдЮ льгщ
бухнЮийуфпх ксэпх Ю жеуфпэ кбйспэ. П TP7000 Эчей дйЬцпсет
дхнбфьфзфет чсЮуфз, рпх мрпспэн нб ерйлегпэн чщсЯт нб
ерзсебуфпэн фб схимйумЭнб рспгсЬммбфб.
Дхнбфьфзфет чсЮуфз
ПдзгЯет чсЮузт
GR
Page 74

74
Instrukcja instalacji
Ważna uwaga RF: Należy sprawdzić, czy w prostej linii między termostatem i nadajnikiem nie
znajdują się duże metalowe przedmioty, takie jak bojlery lub inne duże urządzenia, gdyż mogą
one uniemożliwić łączność między termostatem i nadajnikiem.
Specy kacja
Specy kacja TP7000-RF
TP7000
TP7000A
TP7000M
TP7000MA
TP7000M 24
Zasilanie
2 x AA / MN 1500 / LR 6
Baterie
230V, 50Hz 24V, 50Hz
Podtrzymanie pamięci
Zasilanie z kondensatora
w czasie wymiany baterii
(przez 1 min.)
Akumulator
(patrz not. 1)
Typy wbudowanych
przekaźników
N/A 1 x SPDT
Obciążalność styków N/A 3(1) A, 10-230 volt
Częstotliwość komunikacji 433.92 MHz N/A
Zasięg nadajnika (zob.
uwagę niżej)
Maksymalnie
30 metrów,
prosta linia
N/A
Znamionowe napiecie
impulsu
N/A 2.5KV
Wymiary (mm) 138 dł., 88wys., 28 szer.
Test twardości 75°C
Zakres temperatury 5-30°C
Zgodność z normą EN 60730-2-7 (EN300220 : RF)
Dokładność czasu ± 1 min.
Dokładność regulacji ±1°C
Not. 1): żeby akumulator został w pełni naładowany urządzenie musi pracować minimum 6
dni
Prosimy pamiętać:
Produkt ten powinien być instalowany wyłącznie przez
wykwali kowanego elektryka lub instalatora ogrzewania.
Montaż należy przeprowadzać zgodnie z aktualnymi
przepisami dotyczącymi przewodów elektrycznych IEEE.
Instrukcja instalacji
PL
Page 75

75
Instalacja
Ustawienia przy instalacji
Najpierw usuń pokrywę z tylnej części urządzenia
Aby zamontować przewód, w lewym górnym rogu pokrywy musi
znajdować się wolny obszar o wymiarach przynajmniej 140 mm z
prawej strony, 15 mm z lewej, 30 mm powyżej i 100 mm poniżej
pokrywy.
Przed zamontowaniem urządzenia upewnij się, że 4 przełączniki DIL,
znajdujące się w tylnej części urządzenia, mają właściwe ustawienia
(patrz poniżej). Ustawienie fabryczne jest siedmiodniowe, z
włączoną funkcją Optymalnego Startu (Optimum Start) oraz
chronoproporcjonalną kontrolą wyłączania.
UWAGA
System Chrono 3 stosuje się dla układów o dużej bezwładności
termicznej, np. stojących kotłów żeliwnych.
System Chrono 6 stosuje się dla układów o niskiej bezwładności
termicznej, np. kotłów wiszących jedno i dwufunkcyjnych.
Program 7-dniowy – dla każdego dnia można zaprogramować inny
czas i temperaturę.
Program 5/2 dni – jeden zestaw ustawień czasu i temperatury na dni
robocze tygodnia, drugi na weekendy.
Wszystkie modele
Sw
1
5/2 dniowe programowanie 7 dniowe programowanie
Sw
2
Optymalny start właczony Optymalny start wyłaczony
Sw
3
Regulacja chrono-proporcjonalna Regulacja włacz/wyłacz
TP7000, M, & RF modele 3/6 cyklilgodzine
Sw
4
Chrono-proporcjonalna, 6 cykli/godzine Chrono-proporcjonalna, 3 cykle/godzine
Instrukcja instalacji
PL
Page 76

76
1
234567
ELECTRONICS
REMOTE
SENSOR
'A' models
only
COM
ON
OFF
Podłączanie przewodów
(tylko dla wersji podłączanych na stałe)
Kontrola Optymalnego Startu – funkcja, która włącza ogrzewanie
wcześniej niż to zaprogramowano w nastawie 1, w celu zapewnienia,
że do ustawionego czasu wymagana temperatura zostanie osiągnięta.
Tryb chronoproporcjonalny – tryb oszczędzający energię, w którym
kocioł włącza się w regularnych odstępach czasu w celu utrzymania
wyznaczonej temperatury, tworząc ciągłe przyjazne środowisko dla
użytkownika.
Optymalny start - nastawy
-4˚C
-3˚C
-2˚C
-1˚C
A
B
C
120
min.
90
min.
60
min.
30
min.
Event
time
(
D
Sw2 w pozycji OSC ON
Wybierz odpowiednią krzywą w
module programowania
A Zaprogramowana temperatura
nastawy 1
B Założona odchyłka w momencie
optymalnego startu
C Programowane czasy
wyprzedzenia
D Krzywe optymalnego startu
Instrukcja instalacji
PL
B
C
M 24V models onl
y
24V
L
N
M 230V models onl
230V
Do połączeń TS2 z TP7000A powinien
być użyty kabel miedziany o przekroju 1 mm2. Uwaga:
a) długość kabla nie powinna przekraczać 50 metrów,
b) dla uniknięcia zakłóceń elektrycznych w kablu nie powinien być on
ułożony równolegle w bliskiej odległości od innych kabli zasilających,
a tam gdzie jest to niezbędne, powinien krzyżować się z kablami
zasilającymi pod odpowiednim kątem.
Page 77

77
Instrukcja
Jeżeli termostat i odbiornik dostarczone są w jednym, wspólnym
opakowaniu, nie ma potrzeby rejestracji termostatu - zostało to
wykonane fabrycznie (tylko w model RX1).
Aby nastawić odbiornik RX na częstotliwość sygnału termostatu, należy
wykonać czynności opisane w krokach 1-5 poniżej.
1. TP7000-RF - Przy użyciu niemetalowego
przedmiotu wciśnij znajdujący się w zagłębieniu
przycisk RESET, aby zresetować urządzenie.
2. Przy użyciu niemetalowego przedmiotu
wciśnij i przytrzymaj pr zez 3 sekundy znajdujący
się w zagłębieniu przycisk LEARN.
UWAGA: Termostat będzie teraz przesyłał sygnał
ciągły przez 5 minut.
3. RX1 - Naciśnij i przytrzymaj przyciski PROG oraz CH1 przez 3 sekundy, aż
jeden raz zabłyśnie zielona lampka.
4. RX2 (jeżeli dotyczy)
Czynność 1 - wykonaj czynności opisane w
krokach 1-3.
Czynność 2 - odczekaj 5 min.,
wykonaj czynności opisane w
krokach 1-2, a następnie naciśnij przyciski PROG oraz CH2 na RX2
RX3 (jeżeli dotyczy).
Czynność 1 - wykonaj czynności opisane w krokach 1-3.
Czynność 2 - odczekaj 5 min., wykonaj czynności opisane w krokach 1-2, a
następnie naciśnij przyciski PROG oraz CH2 na RX3.
Czynność 3 - odczekaj 5 min., wykonaj czynności opisane w krokach 1-2, a
następnie naciśnij przyciski PROG oraz CH3 na RX3.
5. TP7000-RF - Naciśnij przycisk lub , aby
przywrócić normalne działanie urządzenia.
LEARN
RESET
12
3
4
ELECTRONICS
N
L
COM
ZONE
1 ON
ZONE
1 OFF
A
ELECTRONICS
B
C1
2
345
6
N
L
ZONE
1 ON
ZONE
1 OFF
ZONE
2 ON
ZONE
3 ON
COM
TERMINAL 6
RX3 ONLY
RX1
RX2 & RX3
Przewody instalacji elektrycznej odbiornika RX
(tylko w modelach RF)
UWAGA: Dla systemów zasilanych z głównego systemu zasilania podłączyć złącze 2
do żyły prądowej.
Instrukcja instalacji
PL
RX1
Page 78

78
Instrukcja Użytkownika
Twój programowalny termostat pokojowy
Urządzenie TP7000 pozwala na zaprogramowanie do 6 różnych
ustawień czasu i temperatury na każdy dzień tygodnia, zapewniając
pełną elastyczność rozwiązań. Urządzenie posiada kilka funkcji
oszczędzania energii oraz kilka możliwości sterowania ręcznego przez
użytkownika, w tym tryb 99 dni wakacji.
Wstępnie ustawione programy
Urządzenie TP5000 dostarczane jest z zaprogramowanymi układami
czasów pracy i temperatur, które odpowiadają większości osób.
Jeżeli chcesz zmienić te ustawienia, możesz to zrobić, stosując się do
instrukcji na stronach 80-81. Najpierw wykonaj czynności opisane na
stronie 79, aby ustawić właściwą godzinę i datę.
Przed rozpoczęciem
Otwórz klapkę znajdująca się z przodu
programatora. Przy użyciu niemetalowego
przedmiotu wciskaj znajdujący się w zagłębieniu
przycisk RESET, aż usłyszysz kliknięcie, a
wyświetlacz zgaśnie.
Dni robocze (Pon-Piątek)
Weekend (Sob-Niedziela)
Nastawa
Czas
Temp °C
Nastawa Czas
Temp °C
1 06:30 20 1 07:30 20
2 08:30 15 2 09:30 20
3 11:30 20 3 11:30 20
4 13:30 15 4 13:30 20
5 16:30 21 5 16:30 21
6 22:30 15 6 22:30 15
RESET
Instrukcja Użytkownika
PL
Page 79

79
Ustawienia wyświetlacza
Wyświetlacz temperatury (°C lub °F)
Wcisnąć i przytrzymać DAY & COPY (przez 2-
3 sekundy)
Wyświetlacz zegara (tryb 12- lub 24godzinny)
Wcisnąć i przytrzymać NEXT & DAY (przez
2-3 sekundy). W systemie 12-godzinnym
pojawiać się będą oznaczenia AM - przed
południem oraz PM - po południu.
Ustawienia czasu i dnia
Wciśnij PROG aby rozpocząć programowanie
DNIA - Wciskaj DAY do momentu wyświetlenia
odpowiedniego dnia (1=Poniedziałek)
CZASU - Wciskaj + & - żeby ustawić
odpowiedni czas (naciśnij i przytrzymaj, aby
zmieniać w przedziałach 10-minutowych)
Ten obraz pojawi się TYLKO, jeżeli Twój instalator
włączył funkcję OSC - optymalnego startu.
Użyj przycisków + lub –, aby wybrać okres
OSC. Możesz wybrać 0:30 (30 minut), 1:00 (1
h), 1:30 oraz 2:00.
Zalecanym ustawieniem jest 0:30. Jeżeli
zostanie ustawione 0:00, funkcja zostaje
wyłączona.
Ustawianie wyprzedzenia dla Optymalnego
Startu,
jeżeli uruchomione (patrz str. 76)
Akceptowanie wstępnie ustawionych
programów
Jeżeli odpowiadają Ci bieżąco ustawione programy (strona 78), nie
musisz wykonywać żadnych dalszych czynności. Aby zaakceptować
ustawienia wstępne, zamknij przednią pokrywę. Po 2 minutach
ustawienia te zostaną automatycznie zaakceptowane (symbol
dwukropka będzie pulsował).
Instrukcja Użytkownika
PL
Page 80

80
Urządzenie znajduje się teraz w trybie RUN (praca
- na wyświetlaczu pulsuje symbol dwukropka) i
ogrzewanie działa według wstępnie ustawionych
programów.
a) Wciśnij PROG aby przejść do 1 nastawy 1
dnia.
b) Zmiany czasu dokonuje się w następujący
sposób:
I) Używając przycisków + i - dokonujemy
zmian czasu.
II) Używając , dokonujemy zmian
temperatury (co 0.5°C).
III) Naciśnij NEXT, aby przejść do następnego
programu.
IV) Powtórzyć dla kolejnych nastaw 2-5.
Progr. 7- dniowe
(oddzielne nastawy na każdy dzień tygodnia)
1
Zanim zmienisz programy ustawione wstępnie
Twój instalator może zaprogramować urządzenie na działanie w trybie
7-dniowym lub w trybie 5/2 dni. Aby określić, na jaki tryb urządzenie
zostało zaprogramowane, naciskaj przycisk PROG, aż na wyświetlaczu
pojawi się napis Event 1 (Nastawa 1).
Urządzenie to zaprogramowane jest na tryb 7-
dniowy i możesz zaprogramować różne ustawienia
dla każdego dnia tygodnia (patrz strony 80-81).
Urządzenie to zaprogramowane jest na tryb 5/2 dni i możesz
wprowadzić jeden zestaw programów na dni
robocze i drugi na weekendy (patrz strona 81).
1
1 2 3 4 5
Instrukcja Użytkownika
PL
Page 81

81
c) Jeżeli wszystkie 6 nastaw jest dokonanych
prawidłowo wciskając DAY przechodzimy
do programowania następnego dnia
Dzień 2.
(Jeżeli nastawy mają być takie same jak
poprzedniego dnia wystarczy wcisnąć
COPY).
d) Operację należy powtórzyć dla wszystkich
kolejnych dni Dni 3, 4, 5, 6 & 7.
Powrót do trybu pracy RUN - naciskaj
przycisk PROG, aż na wyświetlaczu
zacznie pulsować symbol dwukropka.
Po krokach a, b & c i zaprogramowaniu
czasu i temperatury na dni tygodnia (Dni
1-5).
Wykonaj kroki „b” i „c” opisane na stronach
80-81, aby zaprogramować czas i
temperatury na dni robocze tygodnia.
Wciśnij DAY aby przejść do programowania
dni week’endu (Dni 6-7) lub wciśnij COPY
aby powtórzyć poprzednie nastawy.
Powrót do trybu pracy RUN - naciskaj
przycisk PROG, aż na wyświetlaczu
zacznie pulsować symbol dwukropka
Progr. 5/2-dniowe
(oddzielne nastawy dla dni tygodnia i dla dni weekend’owych)
1 2 3 4 5
Instrukcja Użytkownika
PL
Page 82

82
Tryb termostatu
Wciśnij i przytrzymaj & termostat
przejdzie do pracy w funkcji termostatu
(utrzymywana temperatura 8°C).
Zmiany temperatury dokonujemy przy
użyciu lub .
(Jeżeli urządzenie nie jest jeszcze nastawione
na tryb termostatu, naciśnij równocześnie
i przytrzymaj przyciski oraz , aż na
wyświetlaczu pojawi się pulsujący symbol
dwukropka oraz temperatura 8°C).
Wciśnij DAY (na wyświetlaczu pokaże się walizka
i :00).
W razie potrzeby, aby zmienić stałą temperaturę,
naciśnij przyciski oraz .
Wciśnij + & - w celu wyboru ilości dni wakacji
(max.99).
Kiedy minie określona liczba dni, urządzenie
powróci do normalnego trybu działania,
zgodnego z zaprogramowanymi przez Ciebie
ustawieniami.
UWAGA: W razie konieczności naciśnij
równocześnie przyciski oraz , aby wyjść z
trybu wakacyjnego.
Tryb wakacyjny
(w trybie Termostat)
Urządzenie TP7000 można przełączyć na tryb utrzymywania stałej
temperatury wybranej przez użytkownika zamiast ustawionego programu.
!
UWAGA: urządzenie pozostanie w trybie termostatu aż do
ponownego jednoczesnego naciśnięcia przycisków & .
Urządzenie TP7000 może działać przy stałej niskiej temperaturze, gdy jesteś na
wakacjach i powrócić do zaprogramowanych ustawień po określonej liczbie
dni (maksymalnie po 99 dniach).
Instrukcja Użytkownika
PL
Page 83

83
Aby tymczasowo zwiększyć lub
zmniejszyć zaprogramowaną
temperaturę - wciśnij lub
w celu podniesienia lub obniżenia
utrzymywanej temperatury.
Pierwsze ustawienie temperatury
zostaje zachowane przez cały dzień
(tak, aby ogrzewanie działało przy stałej
temperaturze przez cały dzień) - naciśnij
przycisk jeden raz, jak pokazano.
Aby przedłużyć działanie przy bieżąco
ustawionej temperaturze o 1, 2 lub 3
godziny - wciśnij przycisk jednokrotnie
w celu przedłużenia nastawy o
1 godzinę, dwukrotnie w celu
przedłużenia o 2 godziny, trzykrotnie
w celu przedłużenia o 3 godziny.
Naciskając czwarty raz powrócimy do
trybu normalnej pracy.
Aby zmienić główny wyświetlacz LCD
tak, aby pokazywał czas lub bieżącą
temperaturę w pomieszczeniu - Wciśnij
NEXT & COPY.
Żywotność baterii wynosi ponad dwa
lata. Gdy napięcie baterii spadnie do
ustalonego poziomu, na wyświetlaczu
LCD zacznie migać wskaźnik zużycia
baterii. Użytkownik ma 15 dni na
wymianę baterii na nowe (po tym czasie
urządzenie wyłączy się). Należy używać
wysokiej jakości baterii alkalicznych.
Wymiana baterii (nie dotyczy TP7000M)
2
Może się czasami zdarzyć, że zaistnieje potrzeba tymczasowej zmiany
sposobu użytkowania ogrzewania, np. z powodu wyjątkowo niskiej
temperatury powietrza. Urządzenie TP7000 posiada kilka możliwości
sterowania ręcznego, które można wybrać bez wpływu na programowanie
termostatu.
Ustawienia użytkownika
Instrukcja Użytkownika
PL
Page 84

84
Montavimo instrukcijos
Svarbu pažymėti: užtikrinkite, kad nebūtų didelių metalinių dalių, kaip, pavyzdžiui,
boileriai arba kiti dideli árenginiai, (matomumo linijoje) tarp termostato ir imtuvo, kadangi
jie trukdys ryšiui tarp termostato ir imtuvo.
Speci kacija
Speci kacija TP7000-RF
TP7000
TP7000A
TP7000M
TP7000MA
TP7000M 24
Maitinimo šaltinis
2 x AA/MN1500/LR6
Šarminės (įkraunamos)
baterijos
230V, 50Hz 24V, 50Hz
Atminties dubliavimas
Kondensatorius keičiant
bateriją 1 min.
Pakartotinai įkraunamas
elementas, 24 val.
Išvado relės išjungimas N/A 1 x SPDT, Tipas 1B
Nuo relės kontakto, įtampos
ir srovės priklausantis
jungiklis)
N/A 3(1) A, 10-230 V
Siųstuvo dažnis (tik RF) 433.92 MHz N/A
Siųstuvo diapazonas
daugiausia 30
metrų
N/A
Nominali impulsinė įtampa N/A 2.5KV
Dydžiai (mm) 138 x 88 x 28 (plotis x aukštis x gylis)
Rutulio įspaudimo metodas 75°C
Temperatūros diapazonas 5-30°C
Konstrukcijos standartas EN 60730-2-7 (EN300220 : RF)
Kontroliuojama tarša Laipsnis 2
Tikslus laikas ± 1 min.
Tiksli temperatūra ±1°C
*1): Prietaisą reikia laikyti įjungtą į elektros tinklą iki 6 dienų, kad būtų galima visiškai
pasinaudoti dubliavimo sistema.
Įsidėmėkite:
Šį gaminį prijungti gali tik kvali kuotas elektrikas arba
kompetentingas šildymo sistemos instaliuotojas, o
prijungimas turi būti suderintas su IEEE elektros laidų
montavimo reglamento dabartine redakcija.
Montavimo instrukcijos
LT
Page 85

85
Montavimo instrukcijos
DIL jungiklio nustatymai
Pirmiausiai nuimkite sienos plokštelę nuo prietaiso galo.
Nuo viršutinio kairiojo sienos plokštelės kampo turi būti
mažiausiai 140 mm iki dešiniojo krašto, 15 mm iki kairiojo
krašto, 30 mm viršuje ir 100 mm apačioje tarpas, kad būtų
galima sumontuoti jungiamą kištuku modulį.
Prieš montuodami prietaisą, įsitikinkite, ar 4 DIL jungikliai
prietaiso gale nustatyti pagal reikalavimus (žr. toliau).
Gamyklinis nustatymas yra 7 dienos, su optimaliu paleidimu ir
išjungtu reguliavimu pagal laiką (OFF).
PASTABA
Chrono 3 pasirinktinas aukštos temperatūros inertinėms sistemoms, pvz., ant
grindų pastatytiems lieto metalo boileriams.
Chrono 6 naudotinas žemos temperatūros inertinėms sistemoms, pvz., boileriams
su nedideliu vandens kiekiu ir kombinuoto veikimo boileriams.
Montavimo instrukcijos
LT
Visi modeliai
Sw
1
5/2 dienų programavimas 7 dienų programavimas
Sw
2
Optimalaus paleidimo valdiklis įjungtas Optimalaus paleidimo valdiklis išjungtas
Sw
3
Reguliavimas pagal laiką On/O valdymas
TP7000, M, & RF modeliai su 3/6 apsukų per valandą pasirinktinai
Sw
4
Reguliavimas pagal laiką, 6 apsukos/val. Reguliavimas pagal laiką, 3 apsukos/val.
Page 86

86
1
234567
ELECTRONICS
REMOTE
SENSOR
'A' models
only
COM
ON
OFF
TP7000 laidai (ne RF modeliams)
7-dienų – kiekvieną dieną galima užprogramuoti skirtingą laiką ir
temperatūrą.
5/2 dienos – galite užprogramuoti vieną laiko ir temperatūros
kombinaciją darbo dienoms, o kitą – savaitgaliams.
Optimum start control (optimalaus paleidimo valdymas) – funkcija,
kuri įjungia šildymą anksčiau nei užprogramuota 1 nustatymu, kad
pageidaujama temperatūra būtų pasiekta nustatytu laiku.
Chrono-proportional control (reguliavimas pagal laiką) – taupantis
energiją režimas, kai boileris kaitinamas reguliariais intervalais, kad būtų
išlaikyta nustatyta temperatūra ir užtikrintos tinkamos aplinkos sąlygos.
Optimum Start Control (optimalaus paleidimo valdymas)
-4˚C
-3˚C
-2˚C
-1˚C
A
B
C
120
min.
90
min.
60
min.
30
min.
Event
time
(
D
Nustatykite Sw2 į OSC ON
(žr. DIL nustatymus p. 84).
Kaip programinį režimą
pasirinkite optimizavimo
kreivę.
A – 1 nustatymo taškas
B – nukrypimas nuo nustatymo taško
C – įjungimas prieš nustatymą
D – optimizavimo kreivės nustatymas
Montavimo instrukcijos
LT
B
C
Tik M modeliai 24V
24V
L
N
Tik M modeliai 230V
230V
Pastaba: 1. Norint prijungti nuotolinį daviklį prie TP7000A, būtina
naudoti 1.0 mm2 monolitinį varinį laidą. Prašome užtikrinti, kad:
a) laido ilgis neviršytų 50 metrų,
b) siekiant išvengti elektrinių trikdžių, laidas neturi būti tiesiamas
lygiagrečiai kitiems elektros laidams, o jeigu tai būtina, laidas neturėtų
praeiti skersai elektros tiekimo laidų.
Page 87

87
Komplektavimas (tik RF versijos)
Jeigu termostatas ir imtuvas tiekiami kartu vienoje pakuotėje,
jie parenkami gamykloje, todėl derinimas nereikalingas (Tik RX1
modeliams).
Norėdami suderinti RX imtuvą su termostato signalo dažniu, atlikite
toliau nurodytus 1-5 veiksmus.
1. TP7000-RF
Naudodami nemetalinį įrankį, paspauskite
nišoje įtaisytą RESET klavišą ir iš naujo
paleiskite prietaisą.
2. Naudodami nemetalinį įrank į, paspauskite
nišoje įtaisytą LEARN klavišą ir laikykite jį
nuspaudę 3 sekundes.
PASTABA: dabar termostatas nepertraukiamai 5 min. siunčia
signalus.
3. RX1 - Paspauskite PROG ir CH1 ir laikykite
nuspaudę 3 sekundes, kol vieną kartą
sumirksės žalia lemputė
4. RX2 (jei taikoma)
Stat 1 – atlikite 1-3 veiksmus.
Stat 2 – palaukite 5 minutes, atlikite 1-2 veiksmus ir tada paspauskite
klavišus PROG ir CH2, esančius RX2.
RX3 (jei taikoma)
Stat 1 – atlikite 1-3 veiksmus.
Stat 2 – palaukite 5 minutes, atlikite 1-2 veiksmus ir tada paspauskite
klavišus PROG ir CH2, esančius RX3.
Stat 3 – palaukite 5 minutes, atlikite 1-2 veiksmus ir tada paspauskite
klavišus PROG ir CH3, esančius RX3.
5. TP7000-RF - Jei prietaisą norite perjungti į
įprastą režimą, paspauskite arba .
LEARN
RESET
12
3
4
Elektronika
N
L
ZONA 1 ļJUNGTA
COM
ZONA 1 IŠJUNGT
A
Elektronika
B
C1
2
345
6
N
L
ZONA 1 ļJUNGTA
COM
GNYBTAS 6
TIK RX3
ZONA 1 IŠJUNGT
ZONA 2 ļJUNGTA
ZONA 3 ļJUNGTA
RX1
RX2 & RX3
Imtuvo laidai (tik RF modeliams)
Dėmesio! Jei naudojate su maitinimo šaltiniais veikiančias sistemas, prijunkite 2
gnybtą prie maitinimo šaltinio.
Montavimo instrukcijos
LT
RX1
Page 88

88
Jūsų programuojamas kambario termostatas
TP7000 leidžia jums užprogramuoti iki 6 laiko ir temperatūros
pasirinkčių kiekvienai savaitės dienai ir lanksčiai planuoti laiką. Šis
prietaisas turi kelis režimus, kurie taupo energiją; be to, jį galima
patogiai valdyti rankiniu būdu, įskaitant 99 dienų atostogų režimą.
Gamykloje nustatytos programos
Jūsų TP7000 pristatomas jau su užprogramuotomis daugeliui žmonių
tinkamomis darbo laiko ir temperatūros reikšmėmis.
Jei pageidaujate, galite pakeisti bet kurį šių nustatymų laikydamiesi p.
90-91 pateiktų nurodymų. Iš pradžių atlikite p. 89 nurodytus veiksmus
– taip nustatysite savo ekrano parametrus ir teisingą laiką bei datą.
Prieš pradedant
Atidarykite skydelį, esantį programavimo
prietaiso priekinėje dalyje. Naudodami nemetalinį
įrankį, paspauskite nišoje įtaisytą RESET klavišą,
kol išgirsite spragtelėjimą ir ekrane išnyks visi
rodmenys.
Darbo dienos (Pr-Pn) Savaitgalis (Š-S)
Nustatymas
Laikas
Temp °C
Nustatymas
Laikas Temp °C
1 06:30 20 1 07:30 20
2 08:30 15 2 09:30 20
3 11:30 20 3 11:30 20
4 13:30 15 4 13:30 20
5 16:30 21 5 16:30 21
6 22:30 15 6 22:30 15
RESET
Informacija Vartotojui
Informacija Vartotojui
LT
Page 89

89
Ekrano parametrai
Temperatūros rodiklis (°C arba °F)
Paspauskite DAY & COPY ir laikykite nuspaudę
(2-3 sekundes), kol pasikeis duomenys
ekrane.
Laikrodžio rodiklis (12 arba 24 val.)
Paspauskite NEXT & DAY ir laikykite nuspaudę
(2-3 sekundes), kol pasikeis duomenys ekrane
(įjungus 12 val. režimą, pasirodys užrašas AM
arba PM).
Norėdami pradėti programuoti, paspauskite
PROG.
DIENA – spauskite DAY, kol pasirodys tinkama
diena (1=pirmadienis, 2=antradienis ir pan.).
LAIKAS – norėdami pakeisti laiką, paspauskite
+ ir – (jei keičiate 10 min. intervalais,
paspauskite ir palaikykite nuspaudę).
Šis rodiklis pasirodys TIK tuo atveju, jei OSC
funkciją įjungė jūsų instaliuotojas.
Norėdami pasirinkti OSC laiką, spauskite + ar
- klavišus. Galima pasirinkti 0:30 (30 min.), 1:00
(1 val.), 1:30 ir 2:00.
Rekomenduojamas nustatymas yra 0:30. Jei
nustatyta 0:00, funkcija išjungta.
OSC laiko nustatymas, jei įjungtas (žr. p. 86)
Gamykloje nustatytų programų patvirtinimas
Jei jums tinka gamykloje nustatytos programos, nurodytos p. 88, jums
nieko daugiau nebereikia daryti. Norėdami patvirtinti šiuos nustatymus,
uždarykite priekinį dangtelį ir po 2 minučių gamykliniai nustatymai bus
patvirtinti automatiškai.
Laikrodžio ir dienos nustatymas
Informacija Vartotojui
LT
Page 90

90
Dabar prietaisas veikia RUN mode
(paleidimo režimu) (ekrane ima mirksėti
dvitaškis) ir šildymas įjungiamas pagal
gamykloje nustatytas programas.
a) Spauskite PROG tol, kol ims mirksėti 1
nustatymas, tada spauskite DAY – taip
pereisite iš šios dienos į 1 dieną.
b) Laiką ir temperatūrą pakeisite atlikę šiuos
veiksmus:
i) Norėdami pakeisti laiką, spauskite
+ ir – klavišus (paspauskite ir
laikykite nuspaudę, kad
pasikeistų 10 min intervalais).
ii) Norėdami pakeisti temperatūrą 0,5°C (1°F)
intervalais, spauskite ir
klavišus.
iii) Norėdami pereiti į kitą nustatymą,
paspauskite NEXT.
iv) Pakartokite minėtus i,ii ir iii veiksmus 2, 3,
4, 5 ir 6 nustatymams užprogramuoti.
Programavimas 7 dienų režimu
(atskiros programos kiekvienai savaitės dienai)
1
Prieš keičiant gamyklinių nustatymų
programas
Jūsų prietaiso instaliuotojas tikriausiai nustatęs arba 7-day mode (7
dienų režimą) ar 5/2 day mode (5/2 dienų režimą). Norėdami sužinoti,
kuris režimas nustatytas, spauskite PROG tol, kol ekrane ims mirksėti
1 nustatymas.
Šis prietaisas nustatytas 7-dienų režimu ir jūs galite
užprogramuoti skirtingus nustatymus kiekvienai
savaitės dienai (žr. p. 90-91).
Šis prietaisas nustatytas 5/2 dienų režimu ir jūs
galite įjungti vieną programą darbo dienoms ir kitą
programą savaitgaliams (žr. p. 91).
1
1 2 3 4 5
Informacija Vartotojui
LT
Page 91

91
c) Jei visi 6 nustatymai teisingi, paspauskite
DAY – taip užprogramuosite 2 dienos
nustatymus.
(Jei pageidaujate pakartoti ankstesnių
dienų programą, tiesiog paspauskite
COPY.)
d) Pakartokite minėtus b ir c veiksmus – taip
užprogramuosite (arba nukopijuosite) 3,
4, 5, 6 ir 7 dienos nustatymus.
Grįžimas į RUN režimą – spauskite PROG
tol, kol ekrane ims mirksėti dvitaškis.
Spauskite PROG tol, kol ims mirksėti 1
nustatymas, tada spauskite DAY tol, kol
ekrane pasirodys 1-5 diena.
Laiką bei temperatūrą darbo dienoms
užprogramuosite atlikę b ir c veiksmus,
nurodytus p. 90-91.
Jei norite užprogramuoti savaitgalio
nustatymus, paspauskite DAY ir (6-7
diena) arba paspauskite COPY – taip
pakartosite darbo dienų programą
Grįžimas į RUN režimą – spauskite PROG
tol, kol ekrane ims mirksėti dvitaškis.
Programavimas 5/2 dienų režimu
(viena programų serija skirta darbo dienoms, o kita – savaitgaliams)
1 2 3 4 5
Informacija Vartotojui
LT
Page 92

92
Keitimas į termostato režimą
Kartu paspauskite ir ir laikykite
nuspaudę tol, kol ekrane ims mirksėti
dvitaškis ir pasirodys nustatytoji
temperatūra (8°C).
Norėdami pakeisti temperatūrą,
paspauskite ar pagal pageidavimą.
(Jei dar neįjungėte termostato režimo,
kartu paspauskite ir ir palaikykite juos
nuspaudę tol, kol ekrane pasirodys mirksintis
dvitaškis ir 8°C.)
Paspauskite DAY (ekrane pasirodys lagamino
simbolis ir :00).
Norėdami įrašyti atostogų dienų skaičių,
paspauskite + ir - (daugiausia 99).
Jei reikia pakeisti nuolatinę temperatūrą,
paspauskite ir klavišus.
Praėjus nustatytam skaičiui dienų, prietaisas
grįžta į įprastą darbo režimą, kontroliuojamą
pagal nustatytas programas.
PASTABA: norėdami išjungti atostogų režimą,
kartu paspauskite ir klavišus.
Atostogų režimo programavimas
(kol nustatytas termostato režimas)
TP7000 gali būti keičiamas, kad kontroliuotų nuolatinę vartotojo
pasirinktą temperatūrą, o ne laikytųsi nustatytos programos.
!
PASTABA: prietaisas veiks termostato režimu tol, kol vėl kartu bus
paspausti ir klavišai.
TP7000 gali kontroliuoti nuolatinę žemą temperatūrą, kol esate išvykęs
atostogų, o jūsų užprogramuoti nustatymai bus atstatyti po nustatyto dienų
skaičiaus (daugiausia 99 dienos)
Informacija Vartotojui
LT
Page 93

93
Jei norite laikinai padidinti ar sumažinti
užprogramuotą temperatūrą
– paspauskite ar , kad
pasirinktumėte pageidaujamą
temperatūrą.
1 nustatymo išplėtimas (pvz., 06.30 20°C)
visai dienai (tada šildymas išlieka visą
dieną nekintantis)
– vieną kartą paspauskite klavišą, kaip
parodyta.
Jei norite, kad dabartinė nustatyta
temperatūra išsilaikytų 1, 2 ar 3 valandas
ilgiau
– paspauskite klavišą vieną kartą
1 papildomai valandai, du kartus
2 papildomoms valandoms, tris
kartus 3 papildomoms valandoms ir
paspauskite 4 kartus, kad išjungtumėte
rankinį valdymą.
Jei norite pakeisti ekrano rodmenis, kad
jis rodytų arba laiką, arba dabartinę
kambario temperatūrą
– paspauskite kartu NEXT ir COPY.
Baterijos veiks daugiau nei dvejus metus.
LCD ekrane ims mirksėti baterijos simbolis,
pranešantis, kad išsikrovė baterija.
Vartotojas turi per 15 dienų pakeisti
baterijas aukštos kokybės šarminiais
elementais.
Baterijų keitimas (ne TP7000M)
2
Kartais gali tekti pakeisti nustatymus ir laikinai įjungti ar išjungti
šildymą, pvz., dėl neįprastai šalto ar karšto oro. TP7000 turi kelis rankinio
valdymo nustatymus, kuriais galima pasinaudoti nedarant jokios įtakos
nustatytoms programoms.
Vartotojo rankinis valdymas
Informacija Vartotojui
LT
Page 94

94
Speci cazioni
Caratteristiche del
termostato
TP7000-RF
TP7000
TP7000A
TP7000M
TP7000MA
TP7000M 24
Alimentazione
2 x AA/MN1500/LR6
Batterie alcaline
230V, 50Hz 24V, 50 Hz
Supporto memoria
Condensatore durante
sostituzione batteria per
1 minuto
Elemento ricaricabile, 24 ore
Funzione di commutazione del
relè di uscita
N/A 1 x SPDT, Type 1B
Taratura del contatto relè,
tensione e corrente
N/A 3(1) A, 10-230 volt
Frequenza del trasmettitore
(solo RF)
433.92 MHz N/A
Campo di funzionamento del
trasmettitore
30 metri max. N/A
Tensione nominale impulsi N/A 2.5KV
Dimensioni (mm) 138 x 88 x 28 (larghezza x altezza x profondità)
Prova di pressione con sfere 75°C
Intervallo temperatura 5-30°C
Standard di progetto EN 60730-2-7 (EN300220 : RF)
Livello antinquinamento Degree 2
Precisione orario ± 1 min.
Precisione temperatura ±1°C
*1): L’unità deve essere collegata all’alimentazione per 6 giorni prima di poter disporre della
completa funzionalità di back-up
Istruzioni per l’uso
Nota importante per i prodotti RF: Accertarsi che tra il
trasmettitore e il ricevitore non vi siano oggetti metallici di grandi
dimensioni, quali ad esempio i rivestimenti esterni della caldaia
o altri dispositivi di una certa dimensione che impediscano le
comunicazioni tra termostato e ricevitore.
Nota:
L’installazione di questo prodotto deve essere e ettuata
esclusivamente da elettricisti quali cati o da installatori
specializzati in impianti di riscaldamento, in conformità con le
ultime prescrizioni della normativa IEEE.
Istruzioni per l’uso
I
Page 95

95
Installazione
Impostazione interruttori DIL
Rimuovere innanzitutto la piastra a parete dal retro dell’unità.
Per il montaggio del modulo plug-in, è necessario che, in
corrispondenza dell’angolo superiore sinistro della piastra, sia
disponibile uno spazio libero di almeno 140 mm verso destra, 15
mm verso sinistra, 30 mm verso l’alto e 100 mm verso il basso.
Prima di montare l’unità accertarsi che i 4 interruttori DIL sul retro
dell’unità siano stati impostati sui parametri prescritti (vedere sotto).
L’impostazione di fabbrica è 7 giorni, con comando Optimum Start
(ottimizzatore dell’intermittenza di funzionamento) e regolazione
crono-proporzionale disabilitati.
NOTA
Per gli impianti ad elevata inerzia termica, ad esempio caldaie in ghisa montate a
pavimento, utilizzare Chrono 3.
Per gli impianti a bassa inerzia termica, ad esempio le caldaie a basso contenuto
d’acqua o le caldaie combinate, utilizzare Chrono 6.
7-day (7 giorni): consente di programmare orari e temperature diversi
per ciascun giorno.
5/2 day (5/2 giorni): consente di programmare orari e temperature
diversi per i giorni feriali rispetto a quelli del ne settimana.
Tutti i modelli
Sw
1
Programmazione 5/2 giorni Programmazione 7 giorni
Sw
2
Ottimizzatore dell’intermittenza
di funzionamento abilitato
Ottimizzatore della intermittenza
di funzionamento disabilitato
Sw
3
Regolazione crono-proporzionale Comando inserimento/disinserimento (ON/OFF)
TP7000, modelli M e RF con opzione 3/6 cicli all’ora
Sw
4
Crono-proporzionale, 6 cicli/ora Crono-proporzionale, 3 cicli/ora
Istruzioni per l’uso
I
Page 96

96
1
234567
ELECTRONICS
REMOTE
SENSOR
'A' models
only
COM
ON
OFF
Cablaggio TP7000 (esclusi i modelli RF)
Ottimizzatore della intermittenza di funzionamento (OSC):
funzione che inserisce il riscaldamento in anticipo rispetto all’ora
programmata per l’evento 1, per garantire il raggiungimento della
temperatura richiesta entro l’ora impostata.
Regolazione crono-proporzionale: funzione a risparmio energetico
che inserisce la caldaia ad intervalli regolari per mantenere una
temperatura preimpostata, consentendo così all’utente di avere una
temperatura ambiente costante.
Ottimizzatore della intermittenza di
funzionamento
-4˚C
-3˚C
-2˚C
-1˚C
A
B
C
120
min.
90
min.
60
min.
30
min.
Event
time
(
D
Impostare Sw2 su OSC ON (vedere
le impostazioni degli interruttori
DIL a pagina 94)
Selezionare OPTIMISER CURVE
(CURVA OTTIMIZZATORE) in
modalità di programmazione
A - Impostazione evento 1
B - Scostamento da impostazione
C - Anticipo ora di inserimento
rispetto all’evento
D - Impostazione della curva
dell’ottimizzatore
Istruzioni per l’uso
I
B
C
Solo modelli M 24V
24V
L
N
Solo modelli M 230V
230V
Deve essere utilizzato un cavo da 1,0mm2 per collegare il TS2 alla
TP7000A. Si noti che:
a) la lunghezza del cavo non deve superare i 50 metri
b) per evitare interferenze elettriche, il cavo non deve essere fatto
passare parallelamente nelle immediate vicinanze di altri cavi che
trasportano corrente di rete e, dove necessario, il cavo deve passare
sopra i cavi dell’elettricità di rete ad angolo retto.
Page 97

97
1. TP7000-RF
Servendosi di un oggetto non metallico,
premere il pulsante incassato RESET, per
resettare l’unità.
2. Servendosi di un oggetto non metallico,
premere il pulsante incassato LEARN per
3 secondi. NOTA: Il trasmettitore trasmette ora
continuativamente per 5 minuti.
3. RX1
Premere i pulsanti PROG e CH1 per 3
secondi no a quando l’indicatore verde
non lampeggia una volta.
4. RX2 (se previsto)
Termostato 1: seguire le istruzioni di cui ai punti 1-3
Termostato 2: attendere 5 minuti, eseguire le operazioni di cui ai punti
1-2 e quindi premere PROG e CH2 su RX2
RX3 (se previsto)
Termostato 1: seguire le istruzioni di cui ai punti 1-3
Termostato 2: attendere 5 minuti, eseguire le operazioni di cui ai punti
1-2 e quindi premere PROG e CH2 su RX3
Termostato 3: attendere 5 minuti, eseguire le operazioni di cui ai punti
1-2 e quindi premere PROG e CH3 su RX3
5. TP7000-RF - Premere o per
ripristinare il normale funzionamento
dell’unità.
Messa in servizio (solo versioni RF)
Se il termostato ed il ricevitore sono stati forniti assieme in un’unica
confezione, gli stessi sono già stati sintonizzati in fabbrica. Nessuna
ulteriore operazione è richiesta (solo modello RX1).
Per la sintonizzazione del ricevitore RX sulla frequenza del segnale del
termostato, seguire le istruzioni di cui ai punti 1-5 seguenti.
LEARN
RESET
12
3
4
ELECTRONICS
N
L
COM
ZONE
ZONE
A
ELECTRONICS
B
C12345
6
N
L
ZONE
1 ON
ZONE
1 OFF
ZONE
2 ON
ZONE
3 ON
COM
TERMINAL 6
RX3 ONLY
RX1
RX2 & RX3
Cablaggio del ricevitore (solo modelli RF)
Importante: Sui sistemi alimentati con tensione di rete collegare il terminale 2 al
circuito di alimentazione di rete.
Istruzioni per l’uso
I
RX1
Page 98

98
Il vostro termostato ambiente programmabile
Il TP7000 consente di programmare no a 6 diversi orari e temperature
per ciascun giorno della settimana o rendo la massima essibilità.
O re numerose funzioni di risparmio energetico e prevede diverse
funzioni di esclusione temporanea, compresa una modalità vacanza a
99 giorni.
Programmi preimpostati
Il modello TP7000 è fornito con parametri programmati in stabilimento
con una serie di orari e temperature di funzionamento, adatti alla
maggior parte degli impieghi.
Queste impostazioni possono essere tutte modi cate seguendo le
istruzioni di cui alle pagine 100-101. Seguire prima le operazioni
descritte a pagina 99 per impostare le opzioni prescelte per il display e
l’ora e la data esatte.
Operazioni preliminari
Aprire lo sportello sulla parte anteriore del
programmatore. Servendosi di un oggetto non
metallico, premere il pulsante incassato RESET,
no a quando non si avverte uno scatto e il
display non visualizza alcuna indicazione.
Giorni feriali (Lun-Ven) Fine settimana (Sab-Dom)
Evento
Ora
Temp °C
Evento
Ora Temp °C
1 06:30 20 1 07:30 20
2 08:30 15 2 09:30 20
3 11:30 20 3 11:30 20
4 13:30 15 4 13:30 20
5 16:30 21 5 16:30 21
6 22:30 15 6 22:30 15
RESET
Istruzioni per l’utente
Istruzioni per l’utente
I
Page 99

99
Opzioni del display
Visualizzazione temperatura (°C o °F)
Premere il pulsante DAY & COPY (per 2-3
secondi) no alla commutazione del display.
Visualizzazione ora
(modalità a 12 o 24 ore)
Premere il pulsante NEXT & DAY (per 2-3
secondi) no alla commutazione del display
(Nella modalità a 12 ore compare l’indicazione
AM o PM).
Premere PROG per iniziare la
programmazione
GIORNO: premere DAY no a visualizzare il
giorno esatto (1= Lunedì, 2= Martedì ecc.)
ORA: premere + e – per regolare l’ora
(premendo i pulsanti senza rilasciarli
la regolazione avviene per incrementi
progressivi di 10 minuti).
Questa visualizzazione compare SOLTANTO se
l’installatore ha abilitato la funzione OSC.
Utilizzare i pulsanti + o – per selezionare il
periodo OSC. Le opzioni disponibili sono: 0:30
(30 minuti), 1:00 (1 ora), 1:30 e 2:00.
L’opzione consigliata è 0:30. Se si imposta
0:00, la funzione è disabilitata.
Impostazione del periodo di ottimizzazione
dell’intermittenza di funzionamento (OSC),
se abilitato (vedere pagina 96)
Conferma dei programmi preimpostati
Se si utilizzano i programmi preimpostati a pagina 98, non sono
necessarie altre operazioni. Per confermare queste impostazioni,
chiudere lo sportello anteriore: i parametri impostati in fabbrica saranno
accettati automaticamente dopo 2 minuti.
Impostazione ora e giorno
Istruzioni per l’utente
I
Page 100

100
L’unità è ora in modalità RUN (il segno dei
due punti (:) lampeggia) e il riscaldamento si
attiverà in base ai programmi preimpostati.
a) Premere PROG no a quando l’evento 1
non lampeggia, quindi premere DAY per
passare dal giorno corrente al giorno 1.
b) Modi care l’ora e la temperatura come
segue:
i) Utilizzare i pulsanti + e – per regolare
l’ora (premendo i pulsanti senza
rilasciarli la regolazione avviene per
incrementi progressivi di 10 minuti).
ii) Usare i pulsanti e per regolare la
temperatura con incrementi di 0,5°C.
iii) Premere NEXT per passare all’evento
successivo.
iv) Ripetere le operazioni i, ii e iii descritte
sopra per gli eventi 2, 3, 4, 5 e 6.
Programmazione in modalità 7 giorni
(programmi separati per ciascun giorno della settimana)
1
Prima della modi ca dei programmi
preimpostati
L’installatore avrà impostato il funzionamento in modalità 7 giorni o
5/2 giorni. Per individuare la modalità impostata, premere il pulsante
PROG no a quando l’evento 1 non lampeggia sul display.
Questa unità è in modalità 7 giorni, che consente
di programmare impostazioni diverse per ciascun
giorno della settima (vedere le pagine 100-101).
Questa unità è in modalità 5/2 giorni, che consente
di impostare programmi diversi per i giorni feriali
rispetto ai ne settimana (vedere pagina 101).
1
1 2 3 4 5
Istruzioni per l’utente
I
 Loading...