

Page 1

MAKING MODERN LIVING POSSIBLE
Operating Instructions
Modbus RTU
Page 2

Contents Modbus RTU Operating Instruction
Contents
1 Safety and Conformity
1.1 Safety Precautions
1.1.1 Safety Precautions - Continued 3
1.2.1 Caution 4
1.3.1 Software Version 4
1.4 CE Labelling
1.4.1 CE Conformity and Labelling 5
1.4.2 What Is Covered 5
1.4.3 Danfoss Frequency Converter and CE Labelling 5
1.4.4 Compliance with EMC Directive 2004/108/ECEMC Directive 2004/108/EC 6
1.5.1 Air Humidity 6
1.5.2 Aggressive Environments 6
1.5.3 Vibration and Shock 6
2 Introduction
2.1 Introduction
2.1.1 Modbus RTU Overview 8
3
3
5
8
8
3 RS-485 Installation and Set-up
3.1.1 Overview 9
3.1.2 Cable Specifications 9
3.1.5 EMC Precautions 11
4 Modbus RTU Message Framing Structure
4.1.1 Frequency Converter with Modbus RTU 12
4.1.2 Timing Constraints 12
4.1.3 Modbus RTU Message Structure 13
4.1.4 Start/Stop Field 13
4.1.5 Address Field 13
4.1.6 Function Field 13
4.1.7 Data Field 13
4.1.8 CRC Check Field 13
4.1.9 Coil and Register Addressing 14
4.1.10 Function Codes Supported by Modbus RTU 14
4.1.11 Coil Addresses 14
4.1.12 Register Addresses 16
9
12
4.1.13 Parameter Handling 16
4.1.14 Storage of Data 16
4.1.15 IND 16
4.1.16 Text Blocks 16
MG92B102 - VLT® is a registered Danfoss trademark 1
Page 3

Contents Modbus RTU Operating Instruction
4.1.17 Conversion Factor 17
4.1.18 Parameter Values 17
5 How to Control the Frequency Converter
5.1 How to Control the Frequency Converter
5.2 Parameter for Modbus RTU
5.2.1 Important Parameters for Modbus RTU 18
5.2.2 Access via PCD write/read 18
5.2.3 Mapping the Holding Registers to Drive Parameters 19
5.2.4 Mapping the Holding Registers to Drive Parameters, 32 bits 20
6 Function Code Examples
6.1 Examples
6.1.2 Force/Write Single Coil (05 HEX) 21
6.1.3 Force/Write Multiple Coils (0F HEX) 21
6.1.4 Read Holding Registers (03 HEX) 22
6.1.5 Preset Single Register (06 HEX) 22
6.1.6 Preset Multiple Registers (10 HEX) 23
7 FC Control Profile
7.1.1 Control Word According to FC Profile (8-10 Protocol = FC profile) 24
18
18
18
21
21
24
8 Parameters
8.1 Parameters: 8-** Communications and Options
8.1.3 8-3* FC Port Settings 30
8.1.4 8-4* FC MC protocol set 31
9 Troubleshooting
9.1.1 Modbus Exception Codes 35
9.1.2 8-80 Bus Message count 35
9.1.3 8-81 Bus Error Count 35
9.1.4 8-82 Slave Messages Rcvd 35
9.1.5 8-83 Slave Error 36
Index
28
28
35
37
2 MG92B102 - VLT® is a registered Danfoss trademark
Page 4

Safety and Conformity Modbus RTU Operating Instruction
1 Safety and Conformity
1.1 Safety Precautions
WARNING
The voltage of the frequency converter is dangerous
whenever connected to mains. Incorrect installation of the
motor, frequency converter or fieldbus may cause death,
serious personal injury or damage to the equipment.
Consequently, the instructions in this manual, as well as
national and local rules and safety regulations, must be
complied with.
Safety Regulations
1. The mains supply to the frequency converter
must be disconnected whenever repair work is to
be carried out. Check that the mains supply has
been disconnected and that the necessary time
has elapsed before removing motor and mains
supply plugs.
2. The [Off] button on the control panel of the
frequency converter does not disconnect the
mains supply and consequently it must not be
used as a safety switch.
3. The equipment must be properly earthed, the
user must be protected against supply voltage
and the motor must be protected against
overload in accordance with applicable national
and local regulations.
4. The earth leakage current exceeds 3.5 mA.
5. Protection against motor overload is not included
in the factory setting. If this function is desired,
set 1-90 Motor Thermal Protection to data value
ETR trip 1 [4] or data value ETR warning 1 [3].
6. Do not remove the plugs for the motor and
mains supply while the frequency converter is
connected to mains. Check that the mains supply
has been disconnected and that the necessary
time has elapsed before removing motor and
mains plugs.
7. Note that the frequency converter has more
voltage sources than L1, L2 and L3, when load
sharing (linking of DC intermediate circuit) or
external 24 V DC are installed. Check that all
voltage sources have been disconnected and that
the necessary time has elapsed before
commencing repair work.
1.1.1
Safety Precautions - Continued
Warning against unintended start
1. The motor can be brought to a stop with digital
commands, bus commands, references or a local
stop, while the frequency converter is connected
to mains. If personal safety considerations (e.g.
risk of personal injury caused by contact with
moving machine parts following an unintentional
start) make it necessary to ensure that no
unintended start occurs, these stop functions are
not sufficient. In such cases the mains supply
must be disconnected or the Safe Stop function
must be activated.
2. The motor may start while setting the
parameters. If this means that personal safety
may be compromised (e.g. personal injury caused
by contact with moving machine parts), motor
starting must be prevented, for instance by use
of the Safe Stop function or secure disconnection
of the motor connection.
3. A motor that has been stopped with the mains
supply connected, may start if faults occur in the
electronics of the frequency converter, through
temporary overload or if a fault in the power
supply grid or motor connection is remedied. If
unintended start must be prevented for personal
safety reasons (e.g. risk of injury caused by
contact with moving machine parts), the normal
stop functions of the frequency converter are not
sufficient. In such cases the mains supply must be
disconnected or the Safe Stop function must be
activated.
NOTE
When using the Safe Stop function, always follow the
instructions in the section Safe Stop of the Design Guide.
4. Control signals from, or internally within, the
frequency converter may in rare cases be
activated in error, be delayed or fail to occur
entirely. When used in situations where safety is
critical, e.g. when controlling the electromagnetic
brake function of a hoist application, these
control signals must not be relied on exclusively.
1 1
MG92B102 - VLT® is a registered Danfoss trademark 3
Page 5

Safety and Conformity Modbus RTU Operating Instruction
11
WARNING
1.2.1 Caution
High Voltage
Touching the electrical parts may be fatal - even after the
equipment has been disconnected from mains.
Also make sure that other voltage inputs have been
disconnected, such as external 24 V DC, load sharing
(linkage of DC intermediate circuit), as well as the motor
connection for kinetic back up.
Systems where frequency converters are installed must, if
necessary, be equipped with additional monitoring and
protective devices according to the valid safety regulations,
e.g law on mechanical tools, regulations for the prevention
of accidents etc. Modifications on the frequency converters
by means of the operating software are allowed.
CAUTION
The DC link capacitors remain charged after power has
been disconnected. Be aware that there may be high
voltage on the DC link even when the Control Card LEDs
are turned off. A red LED is mounted on a circuit board
inside the frequency converter to indicate the DC bus
voltage. The red LED will stay lit until the DC link is 50 V
DC or lower. To avoid electrical shock hazard, disconnect
the frequency converter from mains before carrying out
maintenance. When using a PM-motor, make sure it is
disconnected. Before doing service on the frequency
converter wait at least the amount of time indicated
below:
NOTE
Hazardous situations shall be identified by the machine
builder/integrator who is responsible for taking necessary
preventive means into consideration. Additional
monitoring and protective devices may be included, always
according to valid national safety regulations, e.g. law on
mechanical tools, regulations for the prevention of
accidents.
NOTE
Crane, Lifts and Hoists:
The controlling of external brakes must always have a
redundant system. The frequency converter can in no
circumstances be the primary safety circuit. Comply with
relevant standards, e.g.
Hoists and cranes: IEC 60204-32
Lifts: EN 81
Protection Mode
Once a hardware limit on motor current or DC link voltage
is exceeded the frequency converter will enter “Protection
mode”. “Protection mode” means a change of the PWM
modulation strategy and a low switching frequency to
minimize losses. This continues 10 s after the last fault and
increases the reliability and the robustness of the
frequency converter while re-establishing full control of the
motor.
In hoist applications “Protection mode” is not usable
because the frequency converter will usually not be able to
leave this mode again and therefore it will extend the time
before activating the brake – which is not recommendable.
The “Protection mode” can be disabled by setting
14-26 Trip Delay at Inverter Fault to zero which means that
the frequency converter will trip immediately if one of the
hardware limits is exceeded.
Voltage [V] Power [kW] Waiting Time [min]
380-500 0.25-7.5 4
11-75 15
90-200 20
250-800 40
525-690 11-75 (frame
size B and C)
37-315 (frame
size D)
355-1000 30
15
20
1.2.2 Protection Mode
Equipment containing electrical
components may not be disposed of
together with domestic waste.
It must be separately collected with
electrical and electronic waste according
to local and currently valid legislation.
1.3.1 Software Version
Design Guide
Software version: 6.4x
This Design Guide can be used for all frequency converters with
software version 6.4x.
The software version number can be seen from 15-43 Software
Version.
NOTE
It is recommended to disable protection mode in hoisting
applications (14-26 Trip Delay at Inverter Fault = 0)
4 MG92B102 - VLT® is a registered Danfoss trademark
Page 6

Safety and Conformity Modbus RTU Operating Instruction
1.4 CE Labelling
1.4.1 CE Conformity and Labelling
The machinery directive (2006/42/EC)
Frequency converters do not fall under the machinery
directive. However, if a frequency converter is supplied for
use in a machine, Danfoss provide information on safety
aspects relating to the frequency converter.
What is CE Conformity and Labelling?
The purpose of CE labelling is to avoid technical trade
obstacles within EFTA and the EU. The EU has introduced
the CE label as a simple way of showing whether a
product complies with the relevant EU directives. The CE
label says nothing about the specifications or quality of
the product. Frequency converters are regulated by two EU
directives:
The low-voltage directive (2006/95/EC)
Frequency converters must be CE labelled in accordance
with the low-voltage directive of January 1, 1997. The
directive applies to all electrical equipment and appliances
used in the 50 - 1000 V AC and the 75 - 1500 V DC voltage
ranges. Danfoss CE-labels in accordance with the directive
and issues a declaration of conformity upon request.
The EMC directive (2004/108/EC)
EMC is short for electromagnetic compatibility. The
presence of electromagnetic compatibility means that the
mutual interference between different components/
appliances does not affect the way the appliances work.
The EMC directive came into effect January 1, 1996.
Danfoss CE-labels in accordance with the directive and
issues a declaration of conformity upon request. To carry
out EMC-correct installation, see the instructions in this
Design Guide. In addition, Danfoss specify which standards
our products comply with. Danfoss offer the filters
presented in the specifications and provide other types of
assistance to ensure the optimum EMC result.
The frequency converter is most often used by professionals of the trade as a complex component forming part
of a larger appliance, system or installation. The EMC
directive (2004/108/EC)
What Is Covered
1.4.2
The EU "Guidelines on the Application of Council Directive
2004/108/EC" outline three typical situations of using a
frequency converter. See below for EMC coverage and CE
labelling.
1. The frequency converter is sold directly to the
end-consumer. The frequency converter is for
example sold to a DIY market. The end-consumer
is a layman. Installing the frequency converter for
use with a hobby machine, a kitchen appliance,
etc. For such applications, the frequency
converter must be CE labelled in accordance with
the EMC directive.
2. The frequency converter is sold for installation in
a plant. The plant is built up by professionals of
the trade. It could be a production plant or a
heating/ventilation plant designed and installed
by professionals of the trade. Neither the
frequency converter nor the finished plant has to
be CE labelled under the EMC directive. However,
the unit must comply with the basic EMC
requirements of the directive. This is ensured by
using components, appliances, and systems that
are CE labelled under the EMC directive.
3. The frequency converter is sold as part of a
complete system. The system is being marketed
as complete and could e.g. be an air-conditioning
system. The complete system must be CE labelled
in accordance with the EMC directive. The
manufacturer can ensure CE labelling under the
EMC directive either by using CE labelled
components or by testing the EMC of the system.
If only CE labelled components are used, it is
unneccessary to test the entire system.
Danfoss Frequency Converter and CE
1.4.3
Labelling
CE labelling is a positive feature when used for its original
purpose, i.e. to facilitate trade within the EU and EFTA.
However, CE labelling may cover many different specifications. Check what a given CE label specifically covers.
The covered specifications can be very different and a CE
label may therefore give the installer a false feeling of
security when using a frequency converter as a component
in a system or an appliance.
Danfoss CE labels the frequency converters in accordance
with the low-voltage directive. This means that if the
frequency converter is installed correctly, we guarantee
compliance with the low-voltage directive. Danfoss issues a
declaration of conformity that confirms our CE labelling in
accordance with the low-voltage directive.
The CE label also applies to the EMC directive provided
that the instructions for EMC-correct installation and
filtering are followed. On this basis, a declaration of
conformity in accordance with the EMC directive is issued.
The Design Guide offers detailed instructions for installation to ensure EMC-correct installation. Furthermore,
1 1
MG92B102 - VLT® is a registered Danfoss trademark 5
Page 7

Safety and Conformity Modbus RTU Operating Instruction
11
Danfoss specifies which our different products comply
with.
Danfoss provides other types of assistance that can help to
obtain the best EMC result.
1.4.4 Compliance with EMC Directive
2004/108/ECEMC Directive
IP54/55. As an extra protection, coated printed circuit
boards can be ordered as an option.
Airborne Particles such as dust may cause mechanical,
electrical, or thermal failure in the frequency converter. A
typical indicator of excessive levels of airborne particles is
dust particles around the frequency converter fan. In very
dusty environments, use equipment with enclosure rating
IP54/55 or a cabinet for IP00/IP20/TYPE 1 equipment.
2004/108/EC
In environments with high temperatures and humidity,
As mentioned, the frequency converter is mostly used by
professionals of the trade as a complex component
forming part of a larger appliance, system, or installation.
Note that the responsibility for the final EMC properties of
the appliance, system or installation rests with the installer.
As an aid to the installer, Danfoss has prepared EMC installation guidelines for the Power Drive system. The standards
and test levels stated for Power Drive systems are
complied with, provided that the EMC-correct instructions
for installation are followed, see the section EMC Immunity
in the Design Guide.
Air Humidity
1.5.1
The frequency converter has been designed to meet the
IEC/EN 60068-2-3 standard, EN 50178 pkt. 9.4.2.2 at 50° C.
corrosive gases such as sulphur, nitrogen, and chlorine
compounds cause chemical processes on the frequency
converter components.
Such chemical reactions rapidly affect and damage the
electronic components. In such environments, mount the
equipment in a cabinet with fresh air ventilation, keeping
aggressive gases away from the frequency converter.
An extra protection in such areas is a coating of the
printed circuit boards, which can be ordered as an option.
NOTE
Mounting frequency converters in aggressive environments
increases the risk of stoppages and considerably reduces
the life of the converter.
Aggressive Environments
1.5.2
A frequency converter contains a large number of
mechanical and electronic components. All are to some
extent vulnerable to environmental effects.
CAUTION
The frequency converter should not be installed in
environments with airborne liquids, particles, or gases
capable of affecting and damaging the electronic
components. Failure to take the necessary protective
measures increases the risk of stoppages, thus reducing
the life of the frequency converter.
Degree of protection as per IEC 60529
The Safe Stop function may only be installed and operated
in a control cabinet with degree of protection IP54 or
higher (or equivalent environment). This is required to
avoid cross faults and short circuits between terminals,
connectors, tracks and safety-related circuitry caused by
foreign objects.
Liquids can be carried through the air and condense in the
frequency converter and may cause corrosion of
components and metal parts. Steam, oil, and salt water
may cause corrosion of components and metal parts. In
such environments, use equipment with enclosure rating
Before installing the frequency converter, check the
ambient air for liquids, particles, and gases. This is done by
observing existing installations in this environment. Typical
indicators of harmful airborne liquids are water or oil on
metal parts, or corrosion of metal parts.
Excessive dust particle levels are often found on installation cabinets and existing electrical installations. One
indicator of aggressive airborne gases is blackening of
copper rails and cable ends on existing installations.
D and E enclosures have a stainless steel back-channel
option to provide additional protection in aggressive
environments. Proper ventilation is still required for the
internal components of the frequency converter. Contact
Danfoss for additional information.
1.5.3
Vibration and Shock
The frequency converter has been tested according to the
procedure based on the shown standards:
The frequency converter complies with requirements that
exist for units mounted on the walls and floors of
production premises, as well as in panels bolted to walls or
floors.
6 MG92B102 - VLT® is a registered Danfoss trademark
Page 8

Safety and Conformity Modbus RTU Operating Instruction
IEC/EN 60068-2-6: Vibration (sinusoidal) - 1970
•
IEC/EN 60068-2-64: Vibration, broad-band random
•
1 1
MG92B102 - VLT® is a registered Danfoss trademark 7
Page 9

Introduction Modbus RTU Operating Instruction
2 Introduction
22
confirming the action taken, any data to be returned, and
2.1 Introduction
This manual explains how to physically establish and
configure communication between the Danfoss FC Series
and a controller using the Modbus RTU protocol.
This instruction is intended to be used for both instruction
and reference. It only briefly touches on the basics of the
Modbus protocol whenever necessary to gain an
understanding of the Modbus RTU. This instruction is also
intended to serve as a guideline to specify and optimise
the communication system. Even experienced Modbus
programmers, should read these entire operating
instructions before starting programming since important
information can be found in all sections.
Modbus RTU Overview
2.1.1
Regardless of the type of physical communication
networks, the Modbus RTU Overview describes the process
a controller uses to request access to another device. This
process includes how the Modbus RTU responds to
requests from another device, and how errors are detected
and reported. It also establishes a common format for the
layout and contents of message fields.
During communications over a Modbus RTU network, the
protocol determines:
an error-checking field. If an error occurs in receipt of the
message, or if the slave is unable to perform the requested
action, the slave constructs an error message, and sends it
in response, or a time-out occurs.
How each controller learns its device address
Recognizes a message addressed to it
Determines which actions to take
Extracts any data or other information contained
in the message
If a reply is required, the controller constructs the reply
message and sends it.
Controllers communicate using a master-slave technique in
which only one device (the master) can initiate
transactions (called queries). The other devices (slaves)
respond by supplying the requested data to the master, or
by taking the action requested in the query.
The master can address individual slaves, or can initiate a
broadcast message to all slaves. Slaves return a message
(called a response) to queries that are addressed to them
individually. No responses are returned to broadcast
queries from the master. The Modbus RTU protocol
establishes the format for the master’s query by placing
into it the device (or broadcast) address, a function code
defining the requested action, any data to be sent, and an
error-checking field. The slave’s response message is also
constructed using Modbus protocol. It contains fields
8 MG92B102 - VLT® is a registered Danfoss trademark
Page 10

Wire # 1
Wire # 2
Data In Data Out
175ZB021.10
Wire #1
Wire #2
175ZB028.10
130BA060.11
68 69 68 69 68 69
RS 485
RS 232
USB
+
-
RS-485 Installation and Set... Modbus RTU Operating Instruction
3 RS-485 Installation and Set-up
3.1.1 Overview
The Modbus RTU protocol is based on the built-in RS-485
(EIA-485) interface on the FC Drive series control card.
RS-485 is a two-wire bus-interface that allows multi-drop
network topology i.e. nodes can be connected as a bus
(daisy chain), or via drop cables from a common trunk line.
Danfoss uses the two-wire system where the communication between master and slave is half-duplex, i.e. it
cannot transmit and receive at the same time.
Each signal uses one twisted-pair line — two wires twisted
around themselves. This is known as balanced data
transmission or differential voltage transmission (see
Illustration 3.1). The signal on one wire is ideally the exact
opposite of the signal on the second wire. In other words,
if one wire is transmitting a high, the other wire transmits
a low, and vice versa (see Illustration 3.2).
Since RS-485 is a multipoint communication system, all
devices are connected to the single twisted-pair cable.
3.1.2 Cable Specifications
When choosing a transmission line for RS-485, it is
necessary to examine the required distance of the cable
and the data rate of the system. Losses in a transmission
line are a combination of AC losses (skin effect), DC
conductor loss, leakage, and AC losses in the dielectric. In
high-quality cable, the conductor losses and the dielectric
losses are on the same order of magnitude.
The recommended maximum Modbus cable length
between the frequency converter and the Controller must
not exceed 30 m (100 feet). While the RS-485 specification
does not specify cabling, the recommendation is 0.25
mm2/24 AWG shielded twisted-pair cable with a shunt
capacitance of 16 pF/ft and 100 Ω impedance. Another
choice is the same cable commonly used in the twistedpair Ethernet cabling. This cable is commonly referred to
as Category 5 cable. The cable has a maximum capacitance
of 17 pF/ft (14.5 pF/ft typical) and characteristic impedance
of 100 Ω.
Network Connection
3.1.3
3
3
Illustration 3.1 Balanced Data Transmission
Illustration 3.2 Differential Concept
The Modbus RTU uses master/slave architecture, where
each slave device has its unique address and responds
only to packets addressed to this device.
The packets are generated by the master (Controller),
which periodically polls all connected slave devices. Data
travels over the single line in both directions.
According to the EIA-485 specification a total number of
32 nodes can be connected to one Modbus RTU network
segment, and a total of 247 nodes in a network are
supported. Network segments are divided with repeaters.
NOTE
Each repeater counts for a node in each segment it is
installed. Every node connected to the same network must
have a unique nodes address, across all segments.
One or more frequency converters can be connected to a
control (or master) using the RS-485 standardized interface.
Terminal 68 is connected to the P signal (TX+, RX+), while
terminal 69 is connected to the N signal (TX-,RX-).
If more than one frequency converter is connected to a
master, use parallel connections.
MG92B102 - VLT® is a registered Danfoss trademark 9
Page 11

130BB021.10
12 13 18 19 27 29 32
33 20 37
Remove jumper to enable Safe Stop
61 68 69 39 42 50 53 54 55
130BT310.10
1
2
N O
V LT
BUS TER.
OFF-ON
A53 A54
U- I U- I
3
RS-485 Installation and Set... Modbus RTU Operating Instruction
Illustration 3.3 Control Card Terminals
RS-485 Bus Termination
3.1.4
The RS-485 bus terminate by a resistor network at both
ends only. For this purpose, set switch S801 on the control
card for "On".
10 MG92B102 - VLT® is a registered Danfoss trademark
Page 12

Fieldbus cable
Min.200mm
90° crossing
130BA080.11
RS-485 Installation and Set... Modbus RTU Operating Instruction
3.1.5 EMC Precautions
The following EMC precautions are recommended to
achieve interference-free operation of the RS-485 network.
Relevant national and local regulations, for example
regarding protective earth connection, must be observed.
The RS-485 communication cable must be kept away from
motor and brake resistor cables to avoid coupling of high
frequency noise from one cable to another. Normally a
distance of 200 mm (8 inches) is sufficient, but keeping the
greatest possible distance between the cables is generally
recommended, especially where cables run in parallel over
long distances. When crossing is unavoidable, the RS-485
cable must cross motor and brake resistor cables at an
angle of 90o.
3
3
MG92B102 - VLT® is a registered Danfoss trademark 11
Page 13

at least 3.5 char
t
0
at least 3.5 char
3.5 char
4.5 char
Frame 1 Frame 2 Frame 3
175ZB026.10
Frame 1 OK
≤ 1.5 char
t
0
> 1.5 char
Frame 2 NOK
175ZB027.10
Modbus RTU Message Framing ... Modbus RTU Operating Instruction
4 Modbus RTU Message Framing Structure
4.1.1 Frequency Converter with Modbus
RTU
The controllers are set up to communicate on the Modbus
network using RTU (Remote Terminal Unit) mode, with
44
each byte in a message containing 8-bit hexadecimal
Bits Per Byte 1 start bit
8 data bits, least significant bit sent first
1 bit for even/odd parity; no bit for no
parity
1 stop bit if parity is used; 2 bits if no parity
characters. The format for each byte is shown in Table 4.1.
Start
bit
Table 4.1 The Format for each Byte
Data byte Stop/
parity
Stop
4.1.2 Timing Constraints
The Modbus Standard specifies two timing constraints.
Table 4.1 illustrates the inter-character timing which
determines that a message has been received.
NOTE
if the baud rate is greater than 19200, then the 3.5
character time is replaced by a timeout time of 1.75 ms.
NOTE
It is very important that the controller wait at least 3.5
character length otherwise the nodes can not separate the
telegrams.
There is an additional timing constraint, the framing error
time, as shown in Illustration 4.1. The Modbus specification
states that if a framing error occurs, the message should
frequency converter notes the occurrence of framing errors
and maintains a counter for them, but it does not discard
the message.
be considered invalid and discarded. The variable speed
12 MG92B102 - VLT® is a registered Danfoss trademark
Page 14

Modbus RTU Message Framing ... Modbus RTU Operating Instruction
4.1.3 Modbus RTU Message Structure
The transmitting device places a Modbus RTU message
into a frame with a known beginning and ending point.
This allows receiving devices to begin at the start of the
message, read the address portion, determine which
device is addressed (or all devices, if the message is
broadcast), and to recognise when the message is
completed. Partial messages are detected and errors set as
a result. Characters for transmission must be in
hexadecimal 00 to FF format in each field. The frequency
converter continuously monitors the network bus, also
during ‘silent’ intervals. When the first field (the address
field) is received, each frequency converter or device
decodes it to determine which device is being addressed.
Modbus RTU messages addressed to zero are broadcast
messages. No response is permitted for broadcast
messages. A typical message frame is shown in Table 4.2.
Start Address Function Data CRC
T1-T2-T3-T48 bits 8 bits N x 8
bits
check
16 bits T1-T2-T3-
End
T4
address in this address field to let the master know which
slave is responding.
4.1.6 Function Field
The function field of a message frame contains 8 bits. Valid
codes are in the range of 1-FF. Function fields are used to
send messages between master and slave. When a
message is sent from a master to a slave device, the
function code field tells the slave what kind of action to
perform. When the slave responds to the master, it uses
the function code field to indicate either a normal (errorfree) response, or that some kind of error occurred (called
an exception response). For a normal response, the slave
simply echoes the original function code. For an exception
response, the slave returns a code that is equivalent to the
original function code with its most significant bit set to
logic 1. In addition, the slave places a unique code into the
data field of the response message. This tells the master
what kind of error occurred, or the reason for the
exception. Also refer to the sections 4.1.10 Function Codes
Supported by Modbus RTU and 9.1.1 Modbus Exception
Codes.
4 4
Table 4.2 Typical Modbus RTU Message Structure
Start/Stop Field
4.1.4
Messages start with a silent period of at least 3.5 character
intervals. This is implemented as a multiple of character
intervals at the selected network baud rate (shown as Start
T1-T2-T3-T4). The first field to be transmitted is the device
address. Following the last transmitted character, a similar
period of at least 3.5 character intervals marks the end of
the message. A new message can begin after this period.
The entire message frame must be transmitted as a
continuous stream. If a silent period of more than 1.5
character intervals occurs before completion of the frame,
the receiving device flushes the incomplete message and
assumes that the next byte will be the address field of a
new message. Similarly, if a new message begins before
3.5 character intervals after a previous message, the
receiving device considers it a continuation of the previous
message. This causes a time-out (no response from the
slave), since the value in the final CRC field is not valid for
the combined messages.
4.1.5
Address Field
The address field of a message frame contains 8 bits. Valid
slave device addresses are in the range of 0 – 247 decimal.
The individual slave devices are assigned addresses in the
range of 1 – 247. (0 is reserved for broadcast mode, which
all slaves recognize.) A master addresses a slave by placing
the slave address in the address field of the message.
When the slave sends its response, it places its own
Data Field
4.1.7
The data field is constructed using sets of two hexadecimal
digits, in the range of 00 to FF hexadecimal. These are
made up of one RTU character. The data field of messages
sent from a master to slave device contains additional
information which the slave must use to take the action
defined by the function code. This can include items such
as coil or register addresses, the quantity of items to be
handled, and the count of actual data bytes in the field.
CRC Check Field
4.1.8
Messages include an error-checking field, operating on the
basis of a Cyclical Redundancy Check (CRC) method. The
CRC field checks the contents of the entire message. It is
applied regardless of any parity check method used for the
individual characters of the message. The CRC value is
calculated by the transmitting device, which appends the
CRC as the last field in the message. The receiving device
recalculates a CRC during receipt of the message and
compares the calculated value to the actual value received
in the CRC field. If the two values are unequal, a bus timeout occurs. The error-checking field contains a 16-bit
binary value implemented as two 8-bit bytes. When this is
done, the low-order byte of the field is appended first,
followed by the high-order byte. The CRC high-order byte
is the last byte sent in the message.
MG92B102 - VLT® is a registered Danfoss trademark 13
Page 15

Modbus RTU Message Framing ... Modbus RTU Operating Instruction
4.1.9 Coil and Register Addressing
In Modbus, all data are organized in coils and holding
registers. Coils hold a single bit, whereas holding registers
hold a 2-byte word (i.e. 16 bits). All data addresses in
Modbus messages are referenced to zero. The first
occurrence of a data item is addressed as item number
zero. For example: The coil known as ‘coil 1’ in a
programmable controller is addressed as coil 0000 in the
44
data address field of a Modbus message. Coil 127 decimal
is addressed as coil 007EHEX (126 decimal).
Holding register 40001 is addressed as register 0000 in the
data address field of the message. The function code field
already specifies a ‘holding register’ operation. Therefore,
the ‘4XXXX’ reference is implicit. Holding register 40108 is
addressed as register 006BHEX (107 decimal).
See 4.1.11 Coil Addresses for details regarding Coil
Addresses and 4.1.12 Register Addresses for details
Function
Read coils 1 hex
Read holding registers 3 hex
Write single coil 5 hex
Write single register 6 hex
Write multiple coils F hex
Write multiple registers 10 hex
Get comm. event counter B hex
Report slave ID 11 hex
Function Function
Code
Diagnostics 8 1 Restart communication
Subfunction
code
2 Return diagnostic register
10 Clear counters and
11 Return bus message
regarding Register Addresses
12 Return bus communi-
4.1.10
Danfoss FC Series Modbus RTU supports use of the
Function Codes Supported by
Modbus RTU
13 Return bus exception
14 Return slave message
following function codes in the function field of a
Function Code
Sub-function
diagnostic register
count
cation error count
error count
count
message.
4.1.11 Coil Addresses
Table 4.3 shows the coils addresses. Notice that the coil
known as ‘coil 1’ in a programmable controller is
addressed as coil 0000 in the data address field of a
Modbus message.
Coil Number Description Signal Direction
1-16
17-32 Frequency converter speed or set-point reference Range 0x0 – 0xFFFF (-200% ...
33-48
49-64 Open loop mode: Frequency converter output frequency Closed loop mode:
65 Parameter write control (master to slave) Master to slave
66-65536 Reserved
Table 4.3 Coil Addresses
Frequency converter control word (see Table 4.4)
~200%)
Frequency converter status word (see Table 4.5)
frequency converter feedback signal
0 = Parameter changes are written to the RAM of the frequency
converter
1 = Parameter changes are written to the RAM and EEPROM of the
frequency converter.
Master to slave
Master to slave
Slave to master
Slave to master
14 MG92B102 - VLT® is a registered Danfoss trademark
Page 16

Modbus RTU Message Framing ... Modbus RTU Operating Instruction
Control Word (FC profile)
Coil 0 1
00 Reference value External selection lsb
01 Reference value External selection msb
02 DC brake Ramp
03 Coasting No coasting
04 Quick stop Ramp
05 Hold output frequency Use ramp
06 Ramp stop Start
07 No function Reset
08 No function Jog
09 Ramp 1 Ramp 2
10 Data invalid Data invalid
11 Relay 01 open Relay 01 active
12 Relay 02 open Relay 02 active
13 Parameter set-up Selection lsb
15 No function Reverse
Table 4.4 Control Word (FC profile)
Status Word (FC profile)
Coil 0 1
00 Control not ready Control ready
01 Drive not ready Drive ready
02 Coasting Enable
03 No error Trip
04 No error Error (no trip)
05 Reserved 06 No error Triplock
07 No warning Warning
08 Speed # reference Speed = reference
09 Local operation Bus control
10 Out of frequency limit Frequency limit OK
11 No operation In operation
12 Drive OK Stopped, auto start
13 Voltage OK Voltage exceeded
14 Torque OK Torque exceeded
15 TImer OK Timer exceeded
4 4
Table 4.5 Status Word (FC profile)
See 7 FC Control Profile for detail on the Control word,
reference, status word and Main Actual Value. The Coil 65
decimal determines whether data written to the frequency
converter are stored in EEPROM and RAM (coil 65 = 1) or
only in RAM (coil 65 =0). Notice that coil 65 needs to be
set On before writing to register are stored in EEPROM.
MG92B102 - VLT® is a registered Danfoss trademark 15
Page 17

Modbus RTU Message Framing ... Modbus RTU Operating Instruction
4.1.12 Register Addresses
Table 4.6 shows the register addresses.
Holding registers
Modbus Register Number Description
00001-00006 Reserved
00007 Last error code from an FC data object interface
44
00008 Reserved
00009 Parameter index*
00010-00099 000 parameter group (parameters 001 through 099)
00100-00199 100 parameter group (parameters 100 through 199)
00200-00299 200 parameter group (parameters 200 through 299)
... ...
02810-02873
02910-02973
... ...
00300-00399 300 parameter group (parameters 300 through 399)
00400-00499 400 parameter group (parameters 400 through 499)
... ...
28000-28999 2800 parameter group (parameters 2800 through 2899)
... ...
50000 Control word (CTW)
50010 Bus reference (Ref)
50200 Status word (STW).
50210 Main Actual Value (MAV)
Write data block (PCD Write via 8-42 PCD write configuration)
Read data block (PCD Read via 8-43 PCD read configuration)
4.1.13 Parameter Handling
Each parameter number is translated to a register address.
The parameter number is translated to Modbus holding
address as parameter number x 10 DECIMAL.
Notice that holding register 40001 is addressed as register
0000 in the data address field of the message. The
function code field already specifies a ‘holding register’
operation. Therefore, the ‘4XXXX’ reference is implicit.
Example: 3-41 Ramp 1 up time is address as holding
register 3410. In the message field of the telegram it will
be addressed as register 2809 (D51 Hex).
4.1.14
The Coil 65 decimal determines whether data written to
the frequency converter are stored in EEPROM and RAM
(coil 65=1) or only in RAM (coil 65=0).
Storage of Data
NOTE
Coil 65 needs to be set On before changed parameters are
stored in EEPROM and after a Power cycle coil 65 is set
back to default Off, meaning only in RAM.
4.1.15 IND
The array index is set in holding register 9 and used when
accessing array parameters. Some parameters like 8-43 PCD
read configuration have structures of an index and the
Modbus protocol does not support index parameters in
the telegram frame. To read or write to those parameters
requires that register 009 Parameter index contains the
index number, before a read or write is done. Example:
Setup 8-43 PCD Read Configuration index 2 to the value
[1613] Frequency.
1. Write [2] to register 009 Parameter index
2. Write [1613] to holding register 8430
3. Write [0] to register 009 Parameter index to set it
back to default 0
Notice after a power cycle register 009 Parameter index is
set it back to default 0.
4.1.16
Parameters stored as text strings are accessed in the same
way as the other parameters. The maximum text block size
is 20 characters. If a read request for a parameter is for
more characters than the parameter stores, the response is
truncated. If the read request for a parameter is for fewer
Text Blocks
16 MG92B102 - VLT® is a registered Danfoss trademark
Page 18

Modbus RTU Message Framing ... Modbus RTU Operating Instruction
characters than the parameter stores, the response is space
filled.
NOTE
Text blocks are only used together with Function code 11
hex Report slave ID.
4.1.17 Conversion Factor
Since a parameter value can only be transferred as a whole
number, a conversion factor must be used to transfer
decimals.
The conversion index for each parameter can be found in
the Programming guide.
Example: 4-12 Motor Speed Low Limit [Hz] has a conversion
factor of 0.1. To set the Motor Speed Low Limit frequency
to 10 Hz, transfer the value 100. A conversion factor of 0.1
means that the value transferred is multiplied by 0.1. The
value 100 is thus perceived as 10.0.
Conversion index Conversion factor
100
75
74
67
6 1000000
5 100000
4 10000
3 1000
2 100
1 10
0 1
-1 0.1
-2 0.01
-3 0.001
-4 0.0001
-5 0.00001
-6 0.000001
-7 0.0000001
UNSIGNED32 and SIGNED32
An unsigned and signed integer of 4 bytes fills two
registers with the following byte mapping.
Register 1 Register 2
Byte 3 Byte 2 Byte 1 Byte 0
Example:
Register Address: 40201–Value 0x0102
Register Address: 40202–Value 0x0304
A read of an UNSIGNED32/SIGNED32 from Modbus register
40201 with the quantity of 2, is: 0x01020304.
UNSIGNED16 and SIGNED16
An unsigned and signed integer of 2 bytes fills one
register with the following byte mapping.
Register 1
Byte 1 Byte 0
Example:
Register Address: 40201–Value 0x0102
A read of an UNSIGNED16 from register 40201 with the
quantity of 1, is: 0x0102.
UNSIGNED8 and SIGNED8
An unsigned and signed integer of 1 byte fills one register
with the following byte mapping.
Register 1
0x00 Byte 0
The data type for each parameter can be found in the
Programming guide.
4 4
Table 4.6 Conversion Table
4.1.18
Parameter Values
One Modbus holding register is specified as a 16 bit
register, i.e. the data range goes from 0–65535. Some
parameters in the frequency converterhave data types of
32 bit, so to be able the read or write to these parameters
two registers need to be accessed to have the correct data
value read or written.
In order to read and write the different supported data
types, the following conversions must be used.
MG92B102 - VLT® is a registered Danfoss trademark 17
Page 19

How to Control the Frequenc... Modbus RTU Operating Instruction
5 How to Control the Frequency Converter
5.1 How to Control the Frequency Converter
Modbus RTU provides access to control the frequency
converter via the Control Word like start/stop and to
control the speed of the frequency converter via a bus
reference. In the same way it also provides information of
Control Method Address Function Code (hex)
55
Coils
Register 50000 group
Register 28-1x and 29-10 group
1-16 Control word 05 Write single coil
17-32 Reference 0F Write Multiple coils
33-48 Status word
49-64 Main Actual Value
65 Parameter Write Control
50000 Control Word
50010 Reference
50200 Status word
50210 Main Actual Value
2810 Control word
2811 Reference
2812-2873
2910 Status word
2911 Main Actual Value
2912-2973
Register write via 8-42 PCD Write configuration
Register read via 8-43 PCD Read configuration
the frequency converter status like running, alarm etc. via
the Status Word and the Main Actual Value, i.e. the actual
running speed.
01 Read coils
05 Write single coil
01 Read coils
06 Write single register
03 Read holding register
06 Write single register
0F Write Multiple register
03 Read holding register
NOTE
Danfoss recommends only using one of the three
mentioned ways to control the frequency converter!
NOTE
Danfoss recommends register 2810-2873 and 2910-2973 to
control the frequency converter ensuring compatibility
with all controllers.
5.2 Parameter for Modbus RTU
5.2.1 Important Parameters for Modbus
RTU
Set the following parameters to enable the Modbus RTU
for the frequency converter.
Parameter no. Setting
8-30 Protocol
8-31 Address
8-32 FC Port Baud Rate
8-33 Parity / Stop Bits
Modbus RTU [2]
1-247
2400-19200
Even parity, 1 Stop Bit [0] default
Odd Parity, 1 Stop Bit [1]
No Parity, 1 Stop Bit [2]
No Parity, 1 Stop Bits [3]
NOTE
8-32 FC Port Baud Rate and 8-33 Parity / Stop Bits should
match the setting on the controller and other slaves on
the network.
Other important parameters to setup are how the control
of the frequency converter should be established and what
should happen with the motor control in case of bus time
out.
See also 8 Parameters.
5.2.2 Access via PCD write/read
The advantage of using the PCD write/read configuration
is that the controller can write or read more data in one
telegram. Up to 63 registers can be read or written to via
the Function code Read Holding register or Write Multiple
Registers in one telegram. The structure is also flexible so
that only two registers can be written to and 10 registers
can be read from the controller.
The PCD write list is data send from the controller to the
frequency converter like Control word, Reference and
application dependent data like Minimum reference and
Ramp times.
18 MG92B102 - VLT® is a registered Danfoss trademark
Page 20
CTW
Holding
Register
2810
Write
Master Frequency Converter
Read
Frequency
Converter Master
Controlled by
Parameter
Holding
Register
Controlled by
Parameter
8-42 [0]
REF
2811
8-42 [1]
2812
8-42 [2]
PCD 2
write
2813
8-42 [3]
PCD 3
write
2814
8-42 [4]
PCD 4
write
2815
8-42 [5]
PCD 5
write
...
...
...
write
2873
8-42 [63]
PCD 63
write
STW
2910
8-43 [0]
MAV
2911
8-43 [1]
2912
8-43 [2]
PCD 2
read
2913
8-43 [3]
PCD 3
read
2914
8-43 [4]
PCD 4
read
2915
8-43 [5]
PCD 5
read
...
...
...
read
2919
8-43 [63]
PCD 63
read
130BC048.10
CTW
REF
Analog
output 42
Torque
limit
Register 2810
2811
2812
2813
Write
Frequency Converter Drive
CTW = Parameter 16-85,
Analog output = Parameter 6-52,
REF = Parameter 16-86,
Torque limit Motor mode = 4-16
130BC049.10
Motor
current
Digital
inputs
Actual
Torque [Nm]
Register 2910
2911
2912
2913
2914
Read
Frequency Converter Master
STW
MAV
130BC050.10
STW = Parameter 16-03,
Motor Current = Parameter 16-14,
Actual Torque [Nm]
MAV = Parameter 16-05,
Digital Inputs = Parameter 16-60
130BC198.10
130BC199.10
How to Control the Frequenc... Modbus RTU Operating Instruction
NOTE
The Control word and Reference is always sent in the list
from the controller to the frequency converter.
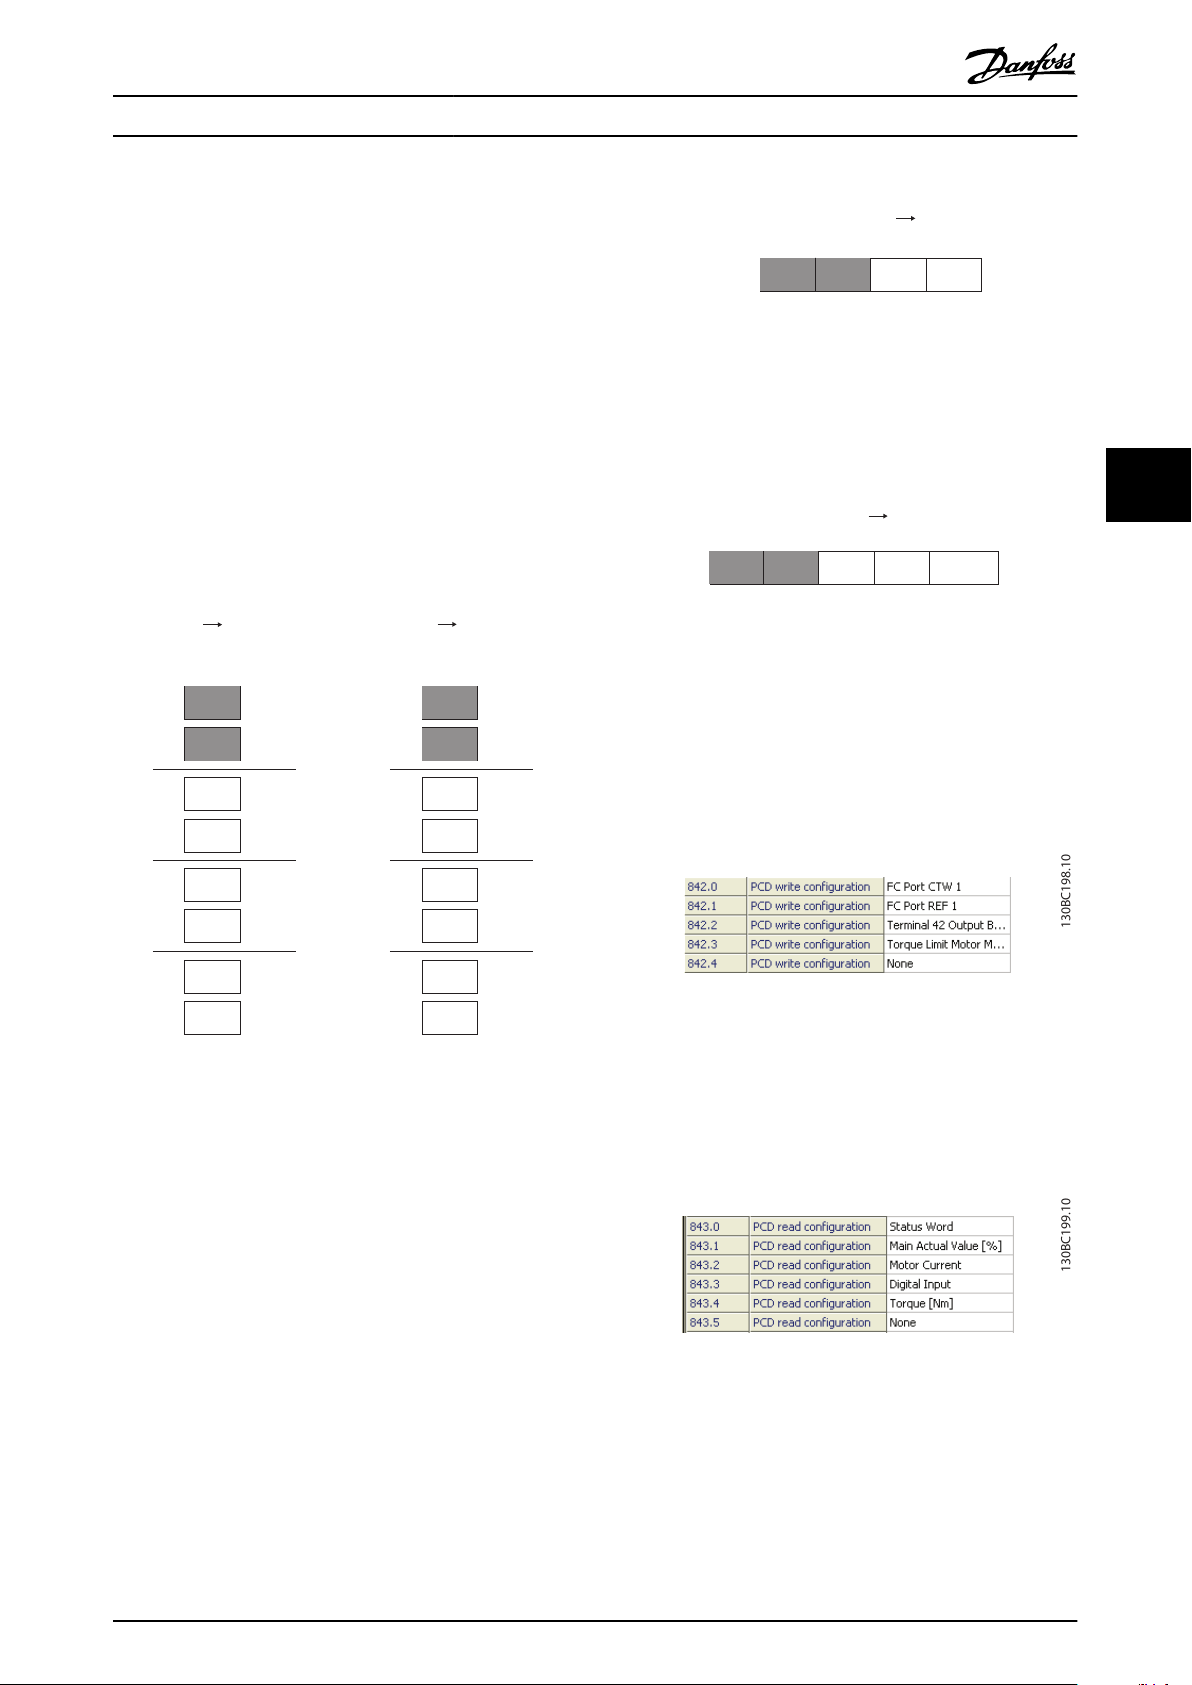
The PCD write list is setup in 8-42 PCD write configuration.
The PCD read list is data send from the frequency
converter to the controller like Status word, Main Actual
Value and application dependent data like Running Hours,
Motor current and Alarm word.
Example:
The frequency converter sends status word, main actual
value, actual motor current, digital inputs and torque [Nm]
NOTE
The Status word and Main Actual Value is always sent in
the list from the frequency converter to the Controller.
NOTE
The boxes marked in grey are not changeable, they are the
default values.
5 5
Example, continued
The input and output data of the Modbus RTU has to be
mapped to the Parameter of the frequency converter. This
is done in 8-42 PCD write configuration and 8-43 PCD read
configuration.
NOTE
Grey lines are fixed, red are user selectable.
Following parameters has to be set up in the frequency
converter:
NOTE
32 bit parameters must be mapped inside the 32 bit
boundaries, (PCD2 & PCD3 or PCD4 & PCD5 etc.) where the
parameter number is mapped twice to8-42 PCD write
configuration or 8-43 PCD read configuration.
5.2.3 Mapping the Holding Registers to
Drive Parameters
Example:
The PLC sends control word, reference, set the analog
output 42 and set the torque limit
NOTE
The motor current in 16-14 Motor Current is 32 bit. This
mapping is only mapping the lower 16 bit, so the
maximum motor current readout is 327 Amps.
For higher Amp readout, user 32 bit readout.
MG92B102 - VLT® is a registered Danfoss trademark 19
Page 21

CTW
REF
Ramp 1
Ramp up Time
Register 2810
2811
2812
2813
Write
Master Frequency Converter
CTW = Parameter 16-85,
Ramp 1 Ramp up time 3-41,
REF = Parameter 16-86,
130BC053.10
Ramp 1
Ramp up Time
Motor
current
Digital
inputs
Register 2910
2911
2912
2913
2914
Read
Frequency Converter Master
STW
MAV
130BC054.10
STW = Parameter 16-03,
Motor Current = Parameter 16-14,
MAV = Parameter 16-05,
Digital Inputs = Parameter 16-60
Motor
current
130BC200.10
How to Control the Frequenc... Modbus RTU Operating Instruction
Mapping a 32 bit parameter as 16 bit always accesses the
16 lower bits.
5.2.4 Mapping the Holding Registers to
Drive Parameters, 32 bits
Example:
The PLC sends control word, reference and Ramp 1 Ramp
up Time
55
Example:
The frequency converter sends status word, main actual
value, actual motor current and digital inputs
Example 32 bit, continued
Following parameters has to be set up in the frequency
converter:
NOTE
The motor current in parameter 16-14 is mapped as 32 bit.
Motor current can be readout up to 42949672 Amps.
20 MG92B102 - VLT® is a registered Danfoss trademark
Page 22

Function Code Examples Modbus RTU Operating Instruction
6 Function Code Examples
NOTE
6.1 Examples
The following examples illustrate various Modbus RTU
commands. If an error occurs, refer to 9.1.1 Modbus
Exception Codes.
Coils and registers are addressed explicit with an off-set of
-1 in Modbus.
I.e. Coil 33 is addressed as Coil 32.
6.1.2 Force/Write Single Coil (05 HEX)
6.1.1 Read Coil Status (01 HEX)
Description
This function reads the ON/OFF status of discrete outputs
(coils) in the frequency converter. Broadcast is never
supported for reads.
Query
The query message specifies the starting coil and quantity
of coils to be read. Coil addresses start at zero, i.e. coil 33
is addressed as 32.
Example of a request to read coils 33-48 (Status Word)
from slave device 01.
Field Name Example (HEX)
Slave Address 01 (frequency converter address)
Function 01 (read coils)
Starting Address HI 00
Starting Address LO 20 (32 decimals) Coil 33
No. of Points HI 00
No. of Points LO 10 (16 decimals)
Error Check (CRC) -
Response
The coil status in the response message is packed as one
coil per bit of the data field. Status is indicated as: 1 = ON;
0 = OFF. The LSB of the first data byte contains the coil
addressed in the query. The other coils follow toward the
high order end of this byte, and from ‘low order to high
order’ in subsequent bytes.
If the returned coil quantity is not a multiple of eight, the
remaining bits in the final data byte will be padded with
zeros (toward the high order end of the byte). The Byte
Count field specifies the number of complete bytes of
data.
Field Name
Slave Address 01 (frequency converter address)
Function 01 (read coils)
Byte Count 02 (2 bytes of data)
Data (Coils 40-33) 07
Data (Coils 48-41) 06 (STW=0607hex)
Error Check (CRC) -
Example (HEX)
Description
This function forces the coil to either ON or OFF. When
broadcast the function forces the same coil references in
all attached slaves.
Query
The query message specifies the coil 65 (parameter write
control) to be forced. Coil addresses start at zero, i.e. coil
65 is addressed as 64. Force Data = 00 00HEX (OFF) or FF
00HEX (ON).
Field Name Example (HEX)
Slave Address 01 (frequency converter address)
Function 05 (write single coil)
Coil Address HI 00
Coil Address LO 40 (64 decimal) Coil 65
Force Data HI FF
Force Data LO 00 (FF 00 = ON)
Error Check (CRC) -
Response
The normal response is an echo of the query, returned
after the coil state has been forced.
Field Name
Slave Address 01
Function 05
Force Data HI FF
Force Data LO 00
Quantity of Coils HI 00
Quantity of Coils LO 01
Error Check (CRC) -
Example (HEX)
6.1.3 Force/Write Multiple Coils (0F HEX)
This function forces each coil in a sequence of coils to
either ON or OFF. When broadcast the function forces the
same coil references in all attached slaves.
The query message specifies the coils 17 to 32 (speed setpoint) to be forced.
6
6
MG92B102 - VLT® is a registered Danfoss trademark 21
Page 23

Function Code Examples Modbus RTU Operating Instruction
6
NOTE
Coil addresses start at zero, i.e. coil 17 is addressed as 16.
Field Name Example (HEX)
Slave Address 01 (frequency converter address)
Function 0F (write multiple coils)
Coil Address HI 00
Coil Address LO 10 (coil address 17)
Quantity of Coils HI 00
Quantity of Coils LO 10 (16 coils)
Byte Count 02
Force Data HI
(Coils 8-1)
Force Data LO
(Coils 16-9)
Error Check (CRC) -
Response
The normal response returns the slave address, function
code, starting address, and quantity of coils forced.
Field Name Example (HEX)
Slave Address 01 (frequency converter address)
Function 0F (write multiple coils)
Coil Address HI 00
Coil Address LO 10 (coil address 17)
Quantity of Coils HI 00
Quantity of Coils LO 10 (16 coils)
Error Check (CRC) -
6.1.4 Read Holding Registers (03 HEX)
Description
This function reads the contents of holding registers in the
slave.
Query
The query message specifies the starting register and
quantity of registers to be read. Register addresses start at
zero, i.e. registers 1-4 are addressed as 0-3.
Example: Read 3-03 Maximum Reference, register 03030.
20
00 (ref. = 2000 hex)
Response
The register data in the response message are packed as
two bytes per register, with the binary contents right
justified within each byte. For each register, the first byte
contains the high order bits and the second contains the
low order bits.
Example: Hex 0016E360=1.500.000=1500 RPM.
Field Name Example (HEX)
Slave Address 01
Function 03
Byte Count 04
Data HI
(Register 3030)
Data LO
(Register 3030)
Data HI
(Register 3031)
Data LO
(Register 3031)
Error Check
(CRC)
00
16
E3
60
-
6.1.5 Preset Single Register (06 HEX)
Description
This function presets a value into a single holding register.
Query
The query message specifies the register reference to be
preset. Register addresses start at zero, i.e. register 1 is
addressed as 0.
Example: Write to 1-00 Configuration Mode, register 1000.
Field Name
Slave Address 01
Function 06
Register Address HI 03 (Register address 999)
Register Address LO E7 (Register address 999)
Preset Data HI 00
Preset Data LO 01
Error Check (CRC) -
Example (HEX)
Field Name
Slave Address 01
Function 03 (read holding registers)
Starting Address HI 0B (Register address 3029)
Starting Address LO D5 (Register address 3029)
No. of Points HI 00
No. of Points LO 02 - (Par. 3-03 is 32 bits long, i.e.
Error Check (CRC) -
22 MG92B102 - VLT® is a registered Danfoss trademark
Example (HEX)
2 registers)
Response
The normal response is an echo of the query, returned
after the register contents have been passed.
Page 24

Function Code Examples Modbus RTU Operating Instruction
Field Name Example (HEX)
Slave Address 01
Function 06
Register Address HI 03
Register Address LO E7
Preset Data HI 00
Preset Data LO 01
Error Check (CRC) -
6.1.6 Preset Multiple Registers (10 HEX)
Description
This function presets values into a sequence of holding
registers.
Query
The query message specifies the register references to be
preset. Register addresses start at zero, i.e. register 1 is
addressed as 0. Example of a request to preset two
registers (set parameter 1-24=738 (7.38 A)):
6
6
Field Name Example (HEX)
Slave Address 01
Function 10
Starting Address HI 04
Starting Address LO D7
No. of Registers HI 00
No. of registers LO 02
Byte Count 04
Write Data HI
(Register 4: 1049)
Write Data LO
(Register 4: 1049)
Write Data HI
(Register 4: 1050)
Write Data LO
(Register 4: 1050)
Error Check (CRC) -
00
00
02
E2
Response
The normal response returns the slave address, function
code, starting address, and quantity of registers preset.
Field Name
Slave Address 01
Function 10
Starting Address HI 04
Starting Address LO D7
No. of Registers HI 00
No. of registers LO 02
Error Check (CRC) -
Example (HEX)
MG92B102 - VLT® is a registered Danfoss trademark 23
Page 25

Speed ref.CTW
Master-slave
130BA274.10
15 14 13 12 11 10 9 8 7 6 5 4 3 2 1 0
Bit
no.:
FC Control Profile Modbus RTU Operating Instruction
7 FC Control Profile
7.1.1 Control Word According to FC Profile
(8-10 Protocol = FC profile)
Bit 02, DC brake
Bit 02 = ’0’ leads to DC braking and stop. Set braking
current and duration in 2-01 DC Brake Current and 2-02 DC
Braking Time.
Bit 02 = ’1’ leads to ramping.
Bit 03, Coasting
Bit 03 = ’0’: The frequency converter immediately "lets go"
of the motor, (the output transistors are "shut off") and it
coasts to a standstill.
Bit Bit value = 0 Bit value = 1
00 Reference value external selection lsb
01 Reference value external selection msb
02 DC brake Ramp
77
03 Coasting No coasting
04 Quick stop Ramp
05 Hold output
frequency
06 Ramp stop Start
07 No function Reset
08 No function Jog
09 Ramp 1 Ramp 2
10 Data invalid Data valid
11 Relay 01 open Relay 01 active
12 Relay 02 open Relay 02 active
13 Parameter set-up selection lsb
15 No function Reverse
use ramp
Bit 03 = ’1’: The frequency converter starts the motor if the
other starting conditions are met.
Make a selection in 8-50 Coasting Select to define how Bit
03 gates with the corresponding function on a digital
input.
Bit 04, Quick stop
Bit 04 = ’0’: Makes the motor speed ramp down to stop
(set in 3-81 Quick Stop Ramp Time).
Bit 05, Hold output frequency
Bit 05 = ’0’: The present output frequency (in Hz) freezes.
Change the frozen output frequency only with the digital
inputs (5-10 Terminal 18 Digital Input to 5-13 Terminal 29
Digital Input) programmed to Speed up = 21 and Slow down
= 22.
Explanation of the Control Bits
Bits 00/01
Bits 00 and 01 are used to choose between the four
reference values, which are pre-programmed in 3-10 Preset
Reference according to the Table 7.1.
Programmed ref.
value
1
2
3
4
Table 7.1 Control bits
NOTE
Make a selection in 8-56 Preset Reference Select to define
how Bit 00/01 gates with the corresponding function on
the digital inputs.
24 MG92B102 - VLT® is a registered Danfoss trademark
Parameter Bit 01 Bit 00
3-10 Preset Reference [0]
3-10 Preset Reference [1]
3-10 Preset Reference [2]
3-10 Preset Reference [3]
0 0
0 1
1 0
1 1
NOTE
If Freeze output is active, the frequency converter can only
be stopped by the following:
Bit 03 Coasting stop
•
Bit 02 DC braking
•
Digital input (5-10 Terminal 18 Digital Input to
•
5-13 Terminal 29 Digital Input) programmed to DC
braking = 5, Coasting stop = 2, or Reset and
coasting stop = 3.
06, Ramp stop/start
Bit
Bit 06 = ’0’: Causes a stop and makes the motor speed
ramp down to stop via the selected ramp down parameter.
Bit 06 = ’1’: Permits the frequency converter to start the
motor, if the other starting conditions are met.
Make a selection in 8-53 Start Select to define how Bit 06
Ramp stop/start gates with the corresponding function on
a digital input.
Page 26

Output freq.STW
Bit
no.:
Slave-master
15 14 13 12 11 10 9 8 7 6 5 4 3 2 1 0
130BA273.10
FC Control Profile Modbus RTU Operating Instruction
Bit 07, Reset Bit 07 = ’0’: No reset.
Bit 07 = ’1’: Resets a trip. Reset is activated on the signal’s
leading edge, i.e. when changing from logic ’0’ to logic ’1’.
Bit 08, Jog
Bit 08 = ’1’: The output frequency is determined by
3-11 Jog Speed [Hz].
Bit 09, Selection of ramp 1/2
Bit 09 = "0": Ramp 1 is active (3-41 Ramp 1 Ramp up Time
to 3-42 Ramp 1 Ramp Down Time).
Bit 09 = "1": Ramp 2 (3-51 Ramp 2 Ramp up Time to
3-52 Ramp 2 Ramp down Time) is active.
Bit 10, Data not valid/Data valid
Tell the frequency converter whether to use or ignore the
control word.
Bit 10 = ’0’: The control word is ignored. Bit 10 = ’1’: The
control word is used. This function is relevant because the
telegram always contains the control word, regardless of
the telegram type. Turn off the control word if not wanting
to use it when updating or reading parameters.
Bit 11, Relay 01
Bit 11 = "0": Relay not activated.
Bit 11 = "1": Relay 01 activated provided that Control word
bit 11 = 36 is chosen in 5-40 Function Relay.
Bit 12, Relay 02
Bit 12 = "0": Relay 02 is not activated. Bit 12 = "1": Relay 02
is activated provided that Control word bit 12 = 37 is
chosen in 5-40 Function Relay.
Bit 13, Selection of set-up
Use bit 13 to choose from the 2 menu set-ups according
to the table.
Set-up
1 0
2 1
Bit 13
7.1.2
Status Word According to FC Profile
(STW) (8-30 Protocol = FC profile)
Bit Bit = 0 Bit = 1
00 Control not ready Control ready
01 Drive not ready Drive ready
02 Coasting Enable
03 No error Trip
04 No error Error (no trip)
05 Reserved 06 No error Triplock
07 No warning Warning
08
09 Local operation Bus control
10 Out of frequency limit Frequency limit OK
11 No operation In operation
12 Drive OK Stopped, auto start
13 Voltage OK Voltage exceeded
14 Torque OK Torque exceeded
15 Timer OK Timer exceeded
Speed ≠ reference
Explanation of the Status Bits
Bit 00, Control not ready/ready
Bit 00 = ’0’: The frequency converter trips.
Bit 00 = ’1’: The frequency converter controls are ready but
the power component does not necessarily receive any
power supply (in case of external 24 V supply to controls).
Bit 01, Drive ready
Bit 01 = ’1’: The frequency converter is ready for operation
but the coasting command is active via the digital inputs
or via serial communication.
Speed = reference
7 7
The function is only possible when Multi Set-Ups = 9 is
selected in 0-10 Active Set-up.
Make a selection in 8-55 Set-up Select to define how Bit 13
gates with the corresponding function on the digital
inputs.
Bit 15 Reverse
Bit 15 = ’0’: No reversing.
Bit 15 = ’1’: Reversing. In the default setting, reversing is
set to digital in 8-54 Reversing Select. Bit 15 causes
reversing only when Ser. communication, Logic or Logic
and is selected.
Bit 02, Coasting stop
Bit 02 = ’0’: The frequency converter releases the motor.
Bit 02 = ’1’: The frequency converter starts the motor with
a start command.
Bit 03, No error/trip
Bit 03 = ’0’ : The frequency converter is not in fault mode.
Bit 03 = ’1’: The frequency converter trips. To re-establish
operation, press [Reset].
Bit 04, No error/error (no trip)
Bit 04 = ’0’: The frequency converter is not in fault mode.
Bit 04 = “1”: The frequency converter shows an error but
does not trip.
MG92B102 - VLT® is a registered Danfoss trademark 25
Page 27

Actual output
freq.
STW
Slave-master
Speed ref.CTW
Master-slave
16bit
130BA276.10
FC Control Profile Modbus RTU Operating Instruction
Bit 05, Not used
Bit 05 is not used in the status word.
Bit 12 = ’1’: The inverter stops because of over
temperature but the unit does not trip and will resume
operation once the over temperature stops.
Bit 06, No error / triplock
Bit 06 = ’0’: The frequency converter is not in fault mode.
Bit 06 = “1”: The frequency converter is tripped and locked.
Bit 13, Voltage OK/limit exceeded
Bit 13 = ’0’: There are no voltage warnings.
Bit 13 = ’1’: The DC voltage in the frequency converter’s
Bit 07, No warning/warning
intermediate circuit is too low or too high.
Bit 07 = ’0’: There are no warnings.
Bit 07 = ’1’: A warning has occurred.
Bit 14, Torque OK/limit exceeded
Bit 14 = ’0’: The motor current is lower than the torque
Bit 08, Speed≠ reference/speed = reference
Bit 08 = ’0’: The motor is running but the present speed is
different from the preset speed reference. It might e.g. be
limit selected in 4-18 Current Limit.
Bit 14 = ’1’: The torque limit in 4-18 Current Limit is
exceeded.
the case when the speed ramps up/down during start/
stop.
Bit 08 = ’1’: The motor speed matches the preset speed
reference.
77
Bit 15, Timer OK/limit exceeded
Bit 15 = ’0’: The timers for motor thermal protection and
thermal protection are not exceeded 100%.
Bit 15 = ’1’: One of the timers exceeds 100%.
Bit 09, Local operation/bus control
Bit 09 = ’0’: [Off/Reset] is activate on the control unit or
Bus Speed Reference Value
7.1.3
Local control in F-02 Operation Method is selected. It is not
possible to control the frequency converter via serial
communication.
Bit 09 = ’1’ It is possible to control the frequency converter
via the fieldbus/serial communication.
Speed reference value is transmitted to the frequency
converter in a relative value in %. The value is transmitted
in the form of a 16-bit word; in integers (0-32767) the
value 16384 (4000 Hex) corresponds to 100%. Negative
figures are formatted by means of 2’s complement. The
Bit 10, Out of frequency limit
Bit 10 = ’0’: The output frequency has reached the value in
Actual Output frequency (MAV) is scaled in the same way
as the bus reference.
4-12 Motor Speed Low Limit [Hz] or 4-14 Motor Speed High
Limit [Hz].
Bit 10 = "1": The output frequency is within the defined
limits.
Bit 11, No operation/in operation
Bit 11 = ’0’: The motor is not running.
Bit 11 = ’1’: The frequency converter has a start signal or
the output frequency is greater than 0 Hz.
Bit 12, Drive OK/stopped, autostart:
Bit 12 = ’0’: There is no temporary over temperature on
the inverter.
The reference and MAV are scaled as follows:
26 MG92B102 - VLT® is a registered Danfoss trademark
Page 28

Reverse Forward
Par.3-00 set to
(1) -max- +max
Max reference Max reference
Par.3-00 set to
(0) min-max
Max reference
Forward
Min reference
100%
(4000hex)
-100%
(C000hex)
0%
(0hex)
Par.3-03 0 Par.3-03
Par.3-03
(4000hex)(0hex)
0% 100%
Par.3-02
130BA277.10
FC Control Profile Modbus RTU Operating Instruction
7 7
MG92B102 - VLT® is a registered Danfoss trademark 27
Page 29

Parameters Modbus RTU Operating Instruction
8 Parameters
8-03 Control Word Timeout Time
8.1 Parameters: 8-** Communications and
Options
8.1.1 8-0* General Settings
8-01 Control Site
Option: Function:
The setting in this parameter overrides
the settings in 8-50 Coasting Select to
8-56 Preset Reference Select.
[0] * Digital and
ctrl.word
[1] Digital only Control by using digital inputs only.
[2] Controlword only Control by using control word only.
Control by using both digital input and
control word.
88
8-02 Control Word Source
Select the source of the control word: one of two serial interfaces
or four installed options. During initial power-up, the frequency
converter automatically sets this parameter to [3] Option A if it
detects a valid Fieldbus option installed in slot A. If the option is
removed, the frequency converter detects a change in the
configuration, sets 8-02 Control Word Source back to default
setting RS-485, and the frequency converter trips. If an option is
installed after initial power-up, the setting of 8-02 Control Word
Source does not change, but the frequency converter trips and
displays: Alarm 67 Option Changed.
When retrofitting a bus option into a frequency converter, that
did not have a bus option installed to begin with, take an
ACTIVE decision to move the control to Bus based. This is done
for safety reasons in order to avoid an accidental change.
Option: Function:
[0] None
[1] * FC RS485
[2] FC USB
[3] Option A
[4] Option B
[5] Option C0
[6] Option C1
[30] External Can
NOTE
This parameter cannot be adjusted while the motor is
running.
Range: Function:
1.0 s* [Application
dependant]
Enter the maximum time expected to
pass between the reception of two
consecutive telegrams. If this time is
exceeded, it indicates that the serial
communication has stopped. The
function selected in 8-04 Control Word
Timeout Functionis then carried out. A
valid control word triggers the time-out
counter.
8-04 Control Word Timeout Function
Select the time-out function. The time-out function activates
when the control word fails to be updated within the time
period specified in 8-03 Control Word Timeout Time.
Option: Function:
[0] * Off Resumes control via serial bus (Fieldbus or
standard) using the most recent control
word.
[1] Freeze output Freezes output frequency until communi-
cation resumes.
[2] Stop Stops with auto restart when communi-
cation resumes.
[3] Jogging Runs the motor at JOG frequency until
communication resumes.
[4] Max. speed Runs the motor at maximum frequency
until communication resumes.
[5] Stop and trip Stops the motor, then resets the frequency
converter to restart: via the Fieldbus, via the
reset button on the , or via a digital input.
[7] Select setup 1 Changes the set-up upon reestablishment of
communication following a control word
time-out. If communication resumes after a
time-out, 8-05 End-of-Timeout Function
defines whether to resume the set-up used
before the time-out, or to retain the set-up
endorsed by the time-out function.
[8] Select setup 2
[9] Select setup 3
[10] Select setup 4
[26] Trip
See [7] Select setup 1
See [7] Select setup 1
See [7] Select setup 1
NOTE
To change the set-up after a time-out, the following
configuration is required:
Set 0-10 Active Set-up to [9] Multi set-up and select the
relevant link in 0-12 This Set-up Linked to.
28 MG92B102 - VLT® is a registered Danfoss trademark
Page 30

Parameters Modbus RTU Operating Instruction
8-05 End-of-Timeout Function
Option: Function:
Select the action after receiving a valid
control word following a time-out. This
parameter is active only when 8-04 Control
Timeout Function is set to [Set-up 1-4].
[0] Hold set-up
[1] * Resume set-upResumes the set-up active before the time-
Retains the set-up selected in 8-04 Control
Timeout Function and displays a warning,
until 8-06 Reset Control Timeout toggles. Then
the frequency converter resumes its original
set-up.
out.
8-06 Reset Control Word Timeout
This parameter is active only when [0] Hold set-up has been
selected in 8-05 End-of-Timeout Function.
Option: Function:
[0] * Do not reset
[1] Do reset Returns the frequency converter to the
Retains the set-up specified in 8-04 Control
Word Timeout Function, following a control
word time-out.
original set-up following a control word timeout. The frequency converter performs the
reset and then immediately reverts to the [0]
Do not reset setting
8-08 Readout Filtering
If the speed feedback value readouts on fieldbus are fluctuating,
this function is used. Select filtered if the function is required. A
power-cycle is required for changes to take effect.
Option: Function:
[0] * Motor Data Std-
Filt.
[1] Motor Data LP-
Filter
Select [0] for normal bus
readouts.
Select [1] for filtered bus
readouts of the following
parameters:
16-10 Power [kW]
16-11 Power [hp]
16-12 Motor Voltage
16-14 Motor Current
16-16 Torque [Nm]
16-17 Speed [RPM]
16-22 Torque [%]
16-25 Torque [Nm] High
8.1.2 8-1* Ctrl. Word Settings
8-10 Control Word Profile
Select the interpretation of the control and status words
corresponding to the installed Fieldbus. Only the selections valid
for the Fieldbus installed in slot A will be visible in the display.
For guidelines in selection of [0] FC profile and [1] PROFIdrive
profile refer to Serial communication via RS 485 Interface section.
For additional guidelines in the selection of [1] PROFIdrive profile,
[5] ODVA and [7] CANopen DSP 402 , see Operating Instructions
for the installed Fieldbus.
Option: Function:
[0] * FC profile
[1] PROFIdrive profile
[5] ODVA
[7] CANopen DSP 402
[8] MCO
8-13 Configurable Status Word STW
Option: Function:
[0] No function The input is always low.
[1] * Profile Default Depended on the profile set in
8-10 Control Profile.
[2] Alarm 68 Only The input goes high whenever Alarm 68
is active and goes low whenever no alarm
68 is actived
[3] Trip excl Alarm68The input goes high whenever Trip on
other Alarms then Alarm 68 is active.
[10] T18 DI status The input goes high whenever T18 has 24
V and goes low whenever T18 has 0 V
[11] T19 DI status The input goes high whenever T19 has 24
V and goes low whenever T19 has 0 V
[12] T27 DI status The input goes high whenever T27 has 24
V and goes low whenever T27 has 0 V
[13] T29 DI status The input goes high whenever T29 has 24
V and goes low whenever T29 has 0 V
[14] T32 DI status The input goes high whenever T32 has 24
V and goes low whenever T32 has 0 V
[15] T33 DI status The input goes high whenever T33 has 24
V and goes low whenever T33 has 0 V
[16] T37 DI status The input goes high whenever T37 has 0
V and goes low whenever T37 has 24 V
[21] Thermal
warning
[30] Brake fault
(IGBT)
[40] Out of ref
range
The thermal warning turns on when the
temperature exceeds the limit in the
motor, the frequency converter, the brake
resistor, or the thermistor.
Goes high when the brake IGBT is shortcircuited.
If Comparator 0 is evaluated as TRUE, the
input goes high. Otherwise, it will be low.
8 8
MG92B102 - VLT® is a registered Danfoss trademark 29
Page 31
Parameters Modbus RTU Operating Instruction
8-13 Configurable Status Word STW
Option: Function:
[60] Comparator 0 If Comparator 0 is evaluated as TRUE, the
input goes high. Otherwise, it will be low.
[61] Comparator 1 If Comparator 1 is evaluated as TRUE, the
input goes high. Otherwise, it will be low.
[62] Comparator 2 If Comparator 2 is evaluated as TRUE, the
input goes high. Otherwise, it will be low.
[63] Comparator 3 If Comparator 3 is evaluated as TRUE, the
input goes high. Otherwise, it will be low.
[64] Comparator 4 If Comparator 4 is evaluated as TRUE, the
input goes high. Otherwise, it will be low.
[65] Comparator 5 If Comparator 5 is evaluated as TRUE, the
input goes high. Otherwise, it will be low.
[70] Logic Rule 0 If Logic Rule 0 is evaluated as TRUE, the
input goes high. Otherwise, it will be low.
[71] Logic Rule 1 If Logic Rule 1 is evaluated as TRUE, the
input goes high. Otherwise, it will be low.
88
[72] Logic Rule 2 If Logic Rule 2 is evaluated as TRUE, the
input goes high. Otherwise, it will be low.
[73] Logic Rule 3 If Logic Rule 3 is evaluated as TRUE, the
input goes high. Otherwise, it will be low.
[74] Logic Rule 4 If Logic Rule 4 is evaluated as TRUE, the
input goes high. Otherwise, it will be low.
[75] Logic Rule 5 If Logic Rule 5 is evaluated as TRUE, the
input goes high. Otherwise, it will be low.
[80] SL digital out A SL Controller Action. The input goes high
whenever the Smart Logic Action [38] Set
dig. out. A high is executed. The input
goes low whenever the Smart Logic
Action [32] Set dig. out. A low is
executed.
[81] SL digital out B SL Controller Action. The input goes high
whenever the Smart Logic Action [39] Set
dig. out. A high is executed. The input
goes low whenever the Smart Logic
Action [33] Set dig. out. A low is
executed.
[82] SL digital out C SL Controller Action. The input goes high
whenever the Smart Logic Action [40] Set
dig. out. A high is executed. The input
goes low whenever the Smart Logic
Action [34] Set dig. out. A low is
executed.
[83] SL digital out D SL Controller Action. The input goes high
whenever the Smart Logic Action [41] Set
dig. out. A high is executed. The input
goes low whenever the Smart Logic
Action [35] Set dig. out. A low is
executed.
8-13 Configurable Status Word STW
Option: Function:
[84] SL digital out E SL Controller Action. The input goes high
whenever the Smart Logic Action [42] Set
dig. out. A high is executed. The input
goes low whenever the Smart Logic
Action [36] Set dig. out. A low is
executed.
[85] SL digital out F SL Controller Action. The input goes high
whenever the Smart Logic Action [43] Set
dig. out. A high is executed. The input
goes low whenever the Smart Logic
Action [37] Set dig. out. A low is executed
[86] ATEX ETR cur.
alarm
[87] ATEX ETR freq.
alarm
[88] ATEX ETR cur.
warning
[89] ATEX ETR freq.
warning
[90] Safe Function
active
[91] Safe Opt. Reset
req.
Selectable if par. 1-90 is set to [20] or [21].
If the alarm 164 ATEX ETR cur.lim.alarm is
active, the output will be 1.
Selectable if par. 1-90 is set to [20] or [21].
If the alarm 166 ATEX ETR freq.lim.alarm is
active, the output will be 1.
Selectable if par. 1-90 is set to [20] or
[21] ]. If the alarm 163 ATEX ETR
cur.lim.warning is active, the output will
be 1.
Selectable if par. 1-90 is set to [20] or [21].
If the warning 165 ATEX ETR
freq.lim.warning is active, the output will
be 1.
8-14 Configurable Control Word CTW
Option: Function:
Selection of control word bit 10 if it
is active low or active high.
[0] None
[1] * Profile default
[2] CTW Valid, active low
[3] Safe Option Reset
8.1.3 8-3* FC Port Settings
8-30 Protocol
Option: Function:
[0] * FC Communication according to the FC Protocol
as described in the Design Guide, RS485 Instal-
lation and Set-up.
[1] FC MC Select the protocol for the FC (standard) port.
[2] * Modbus RTU
30 MG92B102 - VLT® is a registered Danfoss trademark
Page 32

Parameters Modbus RTU Operating Instruction
8-31 Address
Range: Function:
Size related* [ 1. - 255. ] Enter the address for the FC
(standard) port.
Valid range: 1 - 126.
8-32 FC Port Baud Rate
Option: Function:
[0] 2400 Baud Baud rate selection for the FC (standard)
port.
[1] 4800 Baud
[2] * 9600 Baud
[3] 19200 Baud
[4] 38400 Baud
[5] 57600 Baud
[6] 76800 Baud
[7] 115200 Baud
8-33 Parity / Stop Bits
Option: Function:
[0] * Even Parity, 1 Stop Bit
[1] Odd Parity, 1 Stop Bit
[2] No Parity, 1 Stop Bit
[3] No Parity, 2 Stop Bits
8-34 Estimated cycle time
Range: Function:
0 ms* [0 - 1000000
ms]
In noisy environments, the interface may
be blocked by due to overload of bad
frames. This parameter specifies the time
between two consecutive frames on the
network. If the interface does not detect
valid frames in that time it flushes the
receive buffer.
8-35 Minimum Response Delay
Range: Function:
10 ms* [Application
dependant]
Specify the minimum delay time
between receiving a request and
transmitting a response. This is used
for overcoming modem turnaround
delays.
8-36 Max Response Delay
Range: Function:
Application
dependent*
[Application
dependant]
Specify the maximum
permissible delay time
between transmitting a
request and receiving a
response. Exceeding this delay
time will cause control word
time-out.
8-37 Max Inter-Char Delay
Range: Function:
Application
dependent*
[Application
dependant]
Specify the maximum
permissible time interval
between receipt of two bytes.
This parameter activates timeout if transmission is
interrupted.
This parameter is active only
when 8-30 Protocol is set to [1]
FC MC protocol.
8.1.4 8-4* FC MC protocol set
8-41 Parameters for signals
Option: Function:
[0] * None This parameter contains a
list of signals available for
selection in 8-42 PCD
write configuration and
8-43 PCD read configuration.
[15] Readout: actual setup
[302] Minimum Reference
[303] Maximum Reference
[312] Catch up/slow Down Value
[341] Ramp 1 Ramp up Time
[342] Ramp 1 Ramp Down Time
[351] Ramp 2 Ramp up Time
[352] Ramp 2 Ramp down Time
[380] Jog Ramp Time
[381] Quick Stop Ramp Time
[411] Motor Speed Low Limit [RPM]
[412] Motor Speed Low Limit [Hz]
[413] Motor Speed High Limit [RPM]
[414] Motor Speed High Limit [Hz]
[416] Torque Limit Motor Mode
[417] Torque Limit Generator Mode
[590] Digital & Relay Bus Control
[593] Pulse Out #27 Bus Control
[595] Pulse Out #29 Bus Control
[597] Pulse Out #X30/6 Bus Control
[653] Term 42 Output Bus Ctrl
[663] Terminal X30/8 Bus Control
[673] Terminal X45/1 Bus Control
[683] Terminal X45/3 Bus Control
[748] PCD Feed Forward
[890] Bus Jog 1 Speed
[891] Bus Jog 2 Speed
[1472] Legacy Alarm Word
[1473] Legacy Warning Word
[1474] Leg. Ext. Status Word
[1500] Operating Hours
[1501] Running Hours
8 8
MG92B102 - VLT® is a registered Danfoss trademark 31
Page 33

Parameters Modbus RTU Operating Instruction
8-41 Parameters for signals
Option: Function:
[1502] kWh Counter
[1600] Control Word
[1601] Reference [Unit]
[1602] Reference %
[1603] Status Word
[1605] Main Actual Value [%]
[1609] Custom Readout
[1610] Power [kW]
[1611] Power [hp]
[1612] Motor Voltage
[1613] Frequency
[1614] Motor Current
[1615] Frequency [%]
[1616] Torque [Nm]
[1617] Speed [RPM]
[1618] Motor Thermal
[1619] KTY sensor temperature
[1620] Motor Angle
88
[1621] Torque [%] High Res.
[1622] Torque [%]
[1625] Torque [Nm] High
[1630] DC Link Voltage
[1632] Brake Energy /s
[1633] Brake Energy /2 min
[1634] Heatsink Temp.
[1635] Inverter Thermal
[1638] SL Controller State
[1639] Control Card Temp.
[1650] External Reference
[1651] Pulse Reference
[1652] Feedback [Unit]
[1653] Digi Pot Reference
[1657] Feedback [RPM]
[1660] Digital Input
[1661] Terminal 53 Switch Setting
[1662] Analog Input 53
[1663] Terminal 54 Switch Setting
[1664] Analog Input 54
[1665] Analog Output 42 [mA]
[1666] Digital Output [bin]
[1667] Freq. Input #29 [Hz]
[1668] Freq. Input #33 [Hz]
[1669] Pulse Output #27 [Hz]
[1670] Pulse Output #29 [Hz]
[1671] Relay Output [bin]
[1672] Counter A
[1673] Counter B
[1674] Prec. Stop Counter
[1675] Analog In X30/11
[1676] Analog In X30/12
[1677] Analog Out X30/8 [mA]
[1678] Analog Out X45/1 [mA]
8-41 Parameters for signals
Option: Function:
[1679] Analog Out X45/3 [mA]
[1680] Fieldbus CTW 1
[1682] Fieldbus REF 1
[1684] Comm. Option STW
[1685] FC Port CTW 1
[1686] FC Port REF 1
[1690] Alarm Word
[1691] Alarm Word 2
[1692] Warning Word
[1693] Warning Word 2
[1694] Ext. Status Word
[1860] Digital Input 2
[3310] Sync Factor Master
[3311] Sync Factor Slave
[3401] PCD 1 Write to MCO
[3402] PCD 2 Write to MCO
[3403] PCD 3 Write to MCO
[3404] PCD 4 Write to MCO
[3405] PCD 5 Write to MCO
[3406] PCD 6 Write to MCO
[3407] PCD 7 Write to MCO
[3408] PCD 8 Write to MCO
[3409] PCD 9 Write to MCO
[3410] PCD 10 Write to MCO
[3421] PCD 1 Read from MCO
[3422] PCD 2 Read from MCO
[3423] PCD 3 Read from MCO
[3424] PCD 4 Read from MCO
[3425] PCD 5 Read from MCO
[3426] PCD 6 Read from MCO
[3427] PCD 7 Read from MCO
[3428] PCD 8 Read from MCO
[3429] PCD 9 Read from MCO
[3430] PCD 10 Read from MCO
[3440] Digital Inputs
[3441] Digital Outputs
[3450] Actual Position
[3451] Commanded Position
[3452] Actual Master Position
[3453] Slave Index Position
[3454] Master Index Position
[3455] Curve Position
[3456] Track Error
[3457] Synchronizing Error
[3458] Actual Velocity
[3459] Actual Master Velocity
[3460] Synchronizing Status
[3461] Axis Status
[3462] Program Status
[3464] MCO 302 Status
[3465] MCO 302 Control
[3470] MCO Alarm Word 1
32 MG92B102 - VLT® is a registered Danfoss trademark
Page 34

Parameters Modbus RTU Operating Instruction
8-41 Parameters for signals
Option: Function:
[3471] MCO Alarm Word 2
[4280] Safe Option Status
[4285] Active Safe Func.
[4286] Safe Option Info
8-42 PCD write configuration
Range: Function:
Application dependent* [0 - 9999 ]
8-43 PCD read configuration
Range: Function:
Application dependent* [0 - 9999 ]
8.1.5 8-5* Digital/Bus
Parameters for configuring the control word Digital/Bus
merging.
NOTE
These parameters are active only when 8-01 Control Site is
set to [0] Digital and control word.
8-50 Coasting Select
Option: Function:
Select control of the coasting function via the
terminals (digital input) and/or via the bus.
[0] Digital
input
[1] Bus Activates Start command via the serial
[2] Logic AND Activates Start command via the fieldbus/serial
[3] * Logic OR Activates Start command via the fieldbus/serial
8-51 Quick Stop Select
Select control of the Quick Stop function via the terminals
(digital input) and/or via the bus.
Option: Function:
[0] Digital input
[1] Bus
[2] Logic AND
[3] * Logic OR
Activates Start command via a digital input.
communication port or fieldbus option.
communication port, AND additionally via one
of the digital inputs.
communication port OR via one of the digital
inputs.
8-52 DC Brake Select
Option: Function:
Select control of the DC brake via the terminals
(digital input) and/or via the fieldbus.
NOTE
Only selection [0] Digital input is available
when 1-10 Motor Construction is set to [1]
PM non-salient SPM.
[0] Digital
input
[1] Bus Activates Start command via the serial
[2] Logic AND Activates Start command via the fieldbus/serial
[3] * Logic OR Activates Start command via the fieldbus/serial
8-53 Start Select
Option: Function:
[0] Digital
input
[1] Bus Activates Start command via the serial
[2] Logic AND Activates Start command via the fieldbus/serial
[3] * Logic OR Activates Start command via the fieldbus/serial
8-54 Reversing Select
Option: Function:
[0] Digital
input
[1] Bus Activates the Reverse command via the serial
[2] Logic AND Activates the Reverse command via the
[3] * Logic OR Activates the Reverse command via the
Activates Start command via a digital input.
communication port or fieldbus option.
communication port, AND additionally via one
of the digital inputs.
communication port OR via one of the digital
inputs.
Select control of the frequency converter start
function via the terminals (digital input) and/or
via the fieldbus.
Activates Start command via a digital input.
communication port or fieldbus option.
communication port, AND additionally via one
of the digital inputs.
communication port OR via one of the digital
inputs.
Select control of the frequency converter
reverse function via the terminals (digital
input) and/or via the Fieldbus.
communication port or Fieldbus option .
Fieldbus/serial communication port, AND
additionally via one of the digital inputs.
Fieldbus/serial communication port OR via one
of the digital inputs.
8 8
MG92B102 - VLT® is a registered Danfoss trademark 33
Page 35

Parameters Modbus RTU Operating Instruction
8-55 Set-up Select
Option: Function:
Select control of the frequency converter setup selection via the terminals (digital input)
and/or via the fieldbus.
[0] Digital
input
[1] Bus Activates the set-up selection via the serial
[2] Logic AND Activates the set-up selection via the fieldbus/
[3] * Logic OR Activate the set-up selection via the fieldbus/
Activates the set-up selection via a digital
input.
communication port or fieldbus option.
serial communication port, AND additionally
via one of the digital inputs.
serial communication port OR via one of the
digital inputs.
8-83 Slave Error Count
Range: Function:
0 * [0 - 0 ] This parameter shows the number of error
telegrams, which could not be executed by the
frequency converter.
8.1.7 8-9* Bus Jog
8-90 Bus Jog 1 Speed
Range: Function:
100 RPM* [ 0 - par. 4-13
RPM]
8-91 Bus Jog 2 Speed
Enter the jog speed. Activate this
fixed jog speed via the serial port
or fieldbus option.
Range: Function:
8-56 Preset Reference Select
Option: Function:
Select control of the frequency converter
88
[0] Digital
input
[1] Bus Activates Preset Reference selection via the
[2] Logic AND Activates Preset Reference selection via the
[3] * Logic OR Activates the Preset Reference selection via the
Preset Reference selection via the terminals
(digital input) and/or via the fieldbus.
Activates Preset Reference selection via a
digital input.
serial communication port or fieldbus option.
fieldbus/serial communication port, AND
additionally via one of the digital inputs.
fieldbus/serial communication port OR via one
of the digital inputs.
200 RPM* [ 0 - par. 4-13
RPM]
Enter the jog speed. Activate this
fixed jog speed via the serial port
or fieldbus option.
8.1.6 8-8* FC Port Diagnostics
These parameters are used for monitoring the Bus
communication via the FC Port.
8-80 Bus Message Count
Range: Function:
0 * [0 - 0 ] This parameter shows the number of valid
telegrams detected on the bus.
8-81 Bus Error Count
Range: Function:
0 * [0 - 0 ] This parameter shows the number of telegrams
with faults (e.g. CRC fault), detected on the bus.
8-82 Slave Messages Rcvd
Range: Function:
0 * [0 - 0 ] This parameter shows the number of valid
telegrams addressed to the slave, sent by the
frequency converter.
34 MG92B102 - VLT® is a registered Danfoss trademark
Page 36

Troubleshooting Modbus RTU Operating Instruction
9 Troubleshooting
Parameter group 8-8* FC Port Diagnostics provides
information on the Modbus RTU communication. The
diagnostics information is both for the network i.e. how
many valid or corrupted telegrams have been on the
RS-485 network and for each slave i.e. how many
telegrams have been send to this slave.
NOTE
The diagnostics counter in Parameter group 8-8* will be
reset to 0 after a power cycle. Additionally it is possible to
reset the counters to 0 via the Modbus Function code 8,
sub-function code 1 Restart communication or 10 Clear
counters and diagnostic register.
9.1.1 Modbus Exception Codes
For a full explanation of the structure of an exception code
response, please refer to 4 Modbus RTU Message Framing
Structure, Function Field.
Modbus Exception Codes
CodeName Meaning
1 Illegal
function
2 Illegal data
address
3 Illegal data
value
The function code received in the query is
not an allowable action for the server (or
slave). This may be because the function
code is only applicable to newer devices,
and was not implemented in the unit
selected. It could also indicate that the
server (or slave) is in the wrong state to
process a request of this type, for example
because it is not configured and is being
asked to return register values.
The data address received in the query is
not an allowable address for the server (or
slave). More specifically, the combination of
reference number and transfer length is
invalid. For a controller with 100 registers, a
request with offset 96 and length 4 would
succeed, a request with offset 96 and length
5 will generate exception 02.
A value contained in the query data field is
not an allowable value for server (or slave).
This indicates a fault in the structure of the
remainder of a complex request, such as
that the implied length is incorrect. It specifically does NOT mean that a data item
submitted for storage in a register has a
value outside the expectation of the
application program, since the Modbus
protocol is unaware of the significance of
any particular value of any particular
register.
Modbus Exception Codes
4 Slave device
failure
An unrecoverable error occurred while the
server (or slave) was attempting to perform
the requested action.
9.1.2 8-80 Bus Message count
If a valid Modbus RTU telegram is sentd on the RS-485
network, the 8-80 Bus Message count counts one up for the
controller request and if the slave responses, then count
up again. If the controller is connected and sending valid
Modbus telegrams and 8-80 Bus Message Count is not
counting, check the following:
Check that the cable is mounted correct. See
•
guidelines in 3.1.3 Network Connection
Check that the bus cable is terminated correct.
•
See guidelines in 3.1.4 Bus Termination
Check that 8-30 Protocol is set to [2] Modbus RTU
•
Check that 8-32 FC Port Baud Rate is set to the
•
same baud rate as the controller
Check that 8-33 Parity/Stop Bits is set to the same
•
parity control as the controller
8-81 Bus Error Count
9.1.3
8-81 Bus Error Count counts up if a Modbus telegram has a
CRC error. If 8-81 Bus Error Count periodical is counting up,
it might be EMC noise that disturbs the communication
between the controller and the slave. Check the following:
Check that the bus cable is terminated correct.
•
See guidelines in 3.1.4 Bus Termination
Check that screened bus cable is used and that it
•
is connected to earth
Check that screened motor cable is used and that
•
it is connected to earth
Stop all running motors. If the 8-81 Bus Error
•
Count also stops to count then EMC noise is
generated from the motors to the bus cable and
are disturbing the communication. Follow the
EMC guideline in the Operating Instructions.
9.1.4
8-82 Slave Messages Rcvd
8-82 Slave Messages Rcvd shows the number of telegrams
address to this slave. If 8-82 Slave Messages Rcvd does not
count up then check the following:
9 9
MG92B102 - VLT® is a registered Danfoss trademark 35
Page 37

Troubleshooting Modbus RTU Operating Instruction
Check if the controller is sending a valid Modbus
•
telegram to the address set in 8-31 Address
Check that the slave address number is not
•
duplicated on the network
9.1.5 8-83 Slave Error
8-83 Slave Error Count count shows the number of
telegrams that the slave received, but replies with an error.
If 8-83 Slave Error Count count is counting up, check the
following:
Check that the function code is supported. See
•
details in 4.1.10 Function Codes Supported by
Modbus RTU.
Check if the coils or holding register in within the
•
specify area. See 4.1.11 Coil Addresses and
4.1.12 Register Addresses.
99
36 MG92B102 - VLT® is a registered Danfoss trademark
Page 38

Index Modbus RTU Operating Instruction
Index
T
A
Aggressive Environments.................................................................... 6
Air Humidity.............................................................................................. 6
The
EMC Directive (2004/108/EC)......................................................... 5
Low-voltage Directive (2006/95/EC)........................................... 5
Machinery Directive (2006/42/EC)............................................... 5
Timing Constraint................................................................................. 12
C
CE Conformity And Labelling............................................................. 5
Coasting............................................................................................ 25, 24
Configuration......................................................................................... 28
Control Word.......................................................................................... 24
D
DC Brake................................................................................................... 24
V
Vibration And Shock.............................................................................. 6
W
What
Is CE Conformity And Labelling?................................................... 5
Is Covered.............................................................................................. 5
E
EMC
Directive 2004/108/EC...................................................................... 6
Precautions........................................................................................ 11
F
FC Profile.................................................................................................. 24
Function Codes Supported By Modbus RTU.............................. 14
H
Hold Output Frequency..................................................................... 24
J
Jog.............................................................................................................. 25
M
Modbus Exception Codes.................................................................. 35
Motor Thermal Protection................................................................. 26
N
Network Connection.............................................................................. 9
P
Protection
Protection.............................................................................................. 6
Mode....................................................................................................... 4
R
Read Holding Registers (03 HEX).................................................... 22
S
Safety Precautions.................................................................................. 3
Status Word............................................................................................ 25
MG92B102 - VLT® is a registered Danfoss trademark 37
Page 39
www.danfoss.com/drives
130R0277 MG92B102 Rev. 2011-10-31
*MG92B102*
 Loading...