

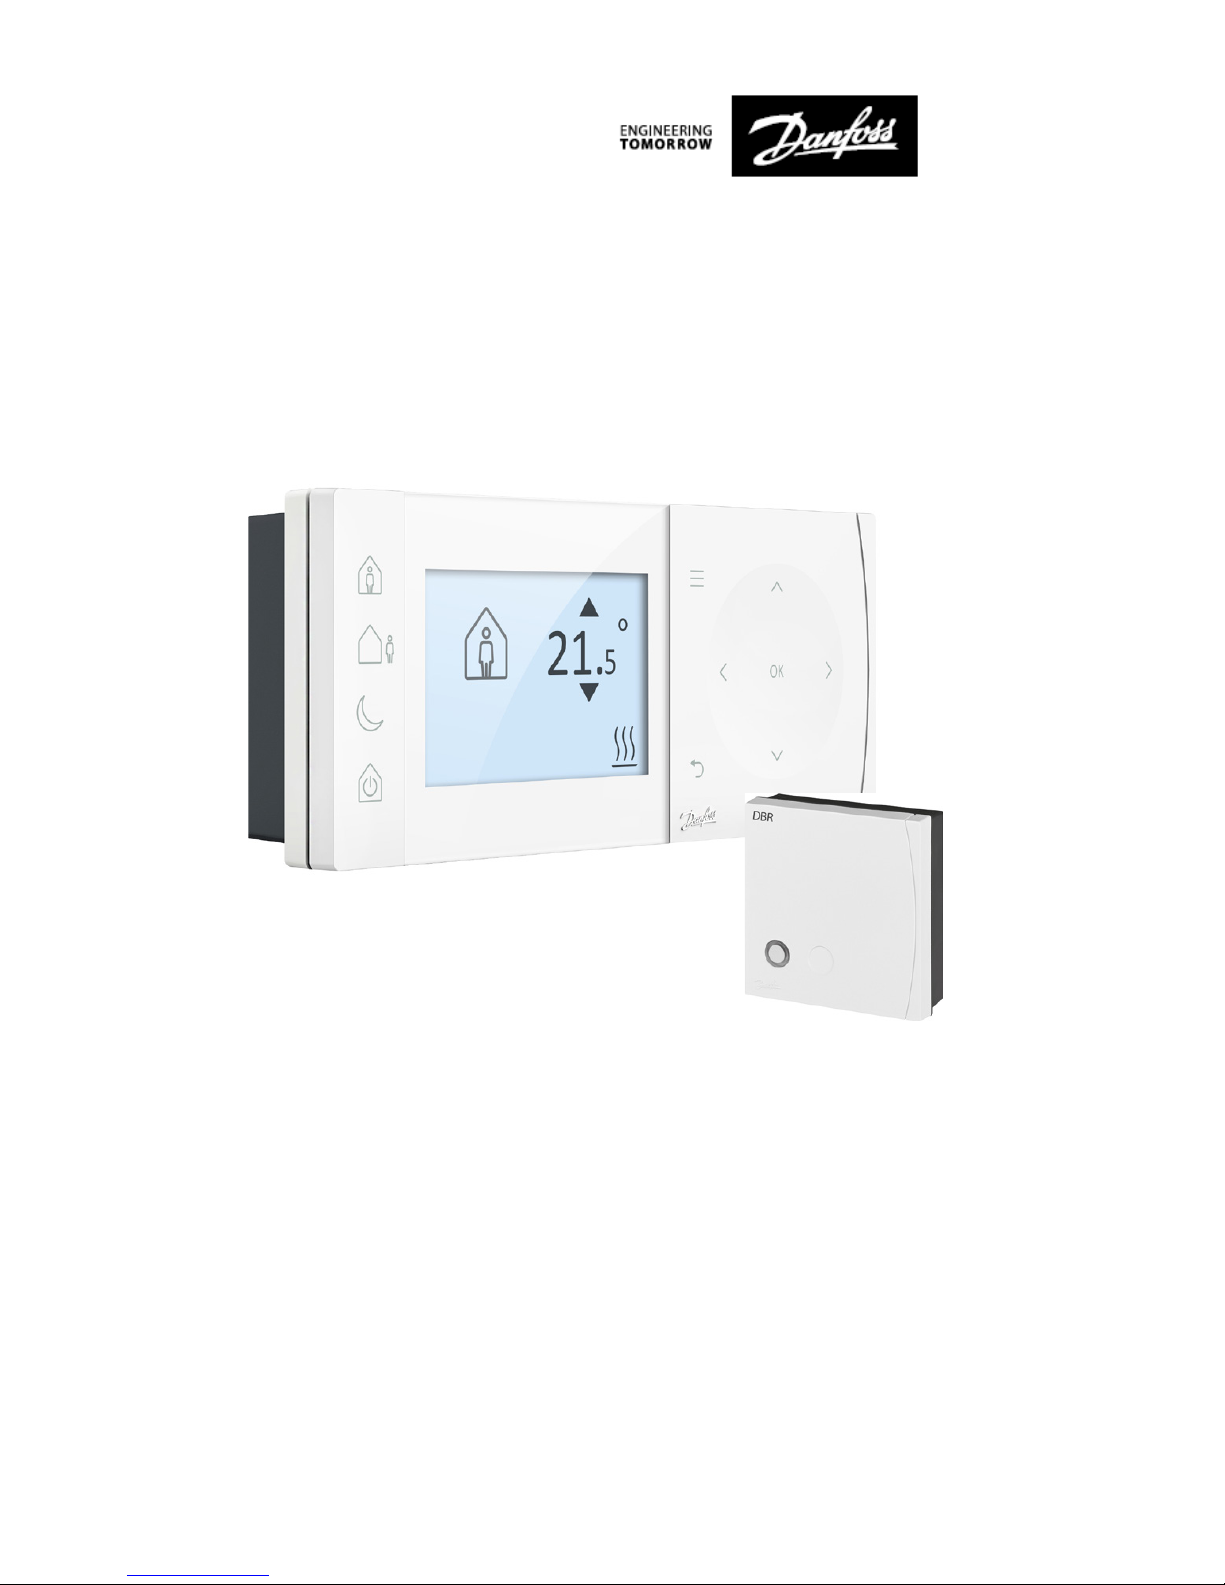
Danfoss Heating
TPOne-S
Electronic Programmable Room Thermostat
Installation Guide
2
TPOne-S
Danfoss can accept no responsibility for possible errors in catalogues, brochures, and other
printed material. All trademarks in this material are property of the respective companies.
Danfoss and the Danfoss logotype are trademarks of Danfoss A/S. All rights reserved.
ErP Class
The products represented within this document are classified according
to, and allow completion of, the Energy Related Product (ErP) Directive
System Package fiche and the ErP system data label. ErP Labelling
obligation is applicable from 26th September 2015.
ERP Class Product Function and ErP Description
Additional
efficiency
gain
V
Modulating Room Thermostat, for use with
modulating heaters
An electronic room thermostat that varies the
flow temperature of the water leaving the
heater dependent upon measured room temperature deviation from room thermostat set
point. Control is achieved by modulating the
output of the heater.
3%
ErP
5
Product
Class
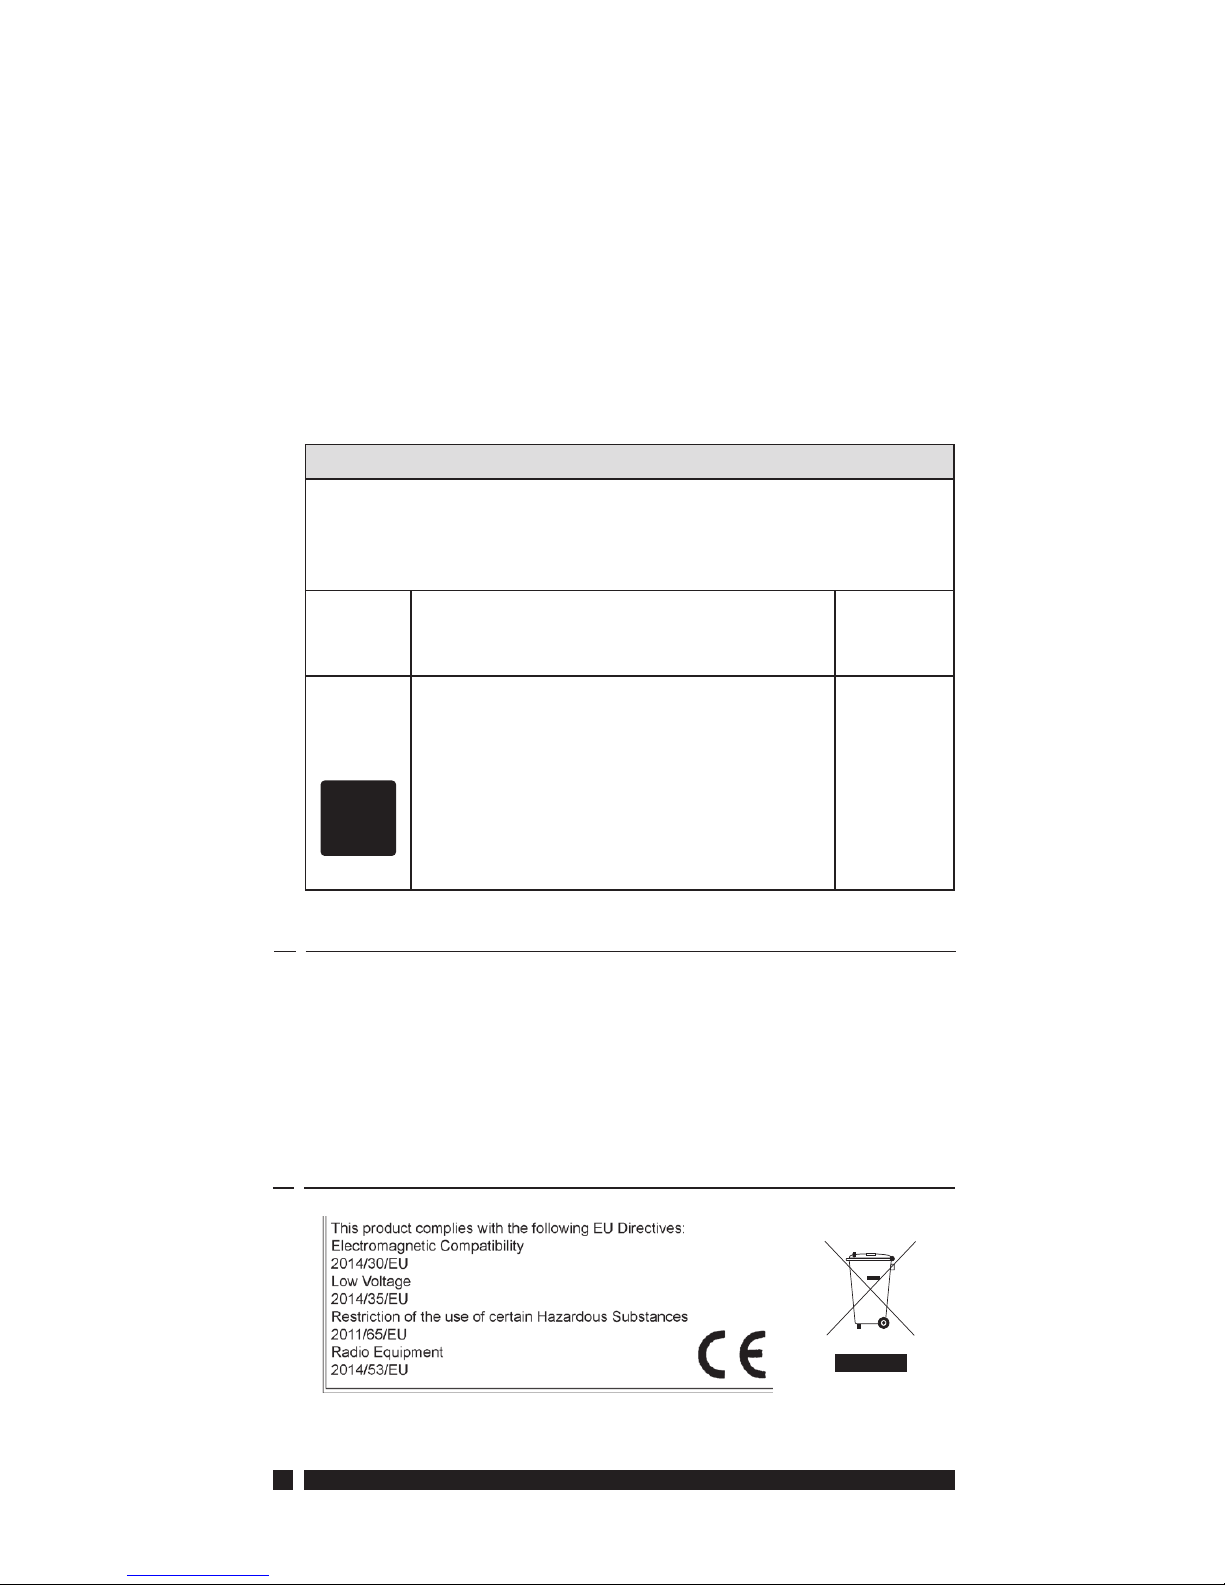
SIMPLIFIED EU DECLARATION OF CONFORMITY
The simplified EU declaration of conformity referred to in Article 10(9) shall be
provided as follows:
Hereby, Danfoss A/S declares that the radio equipment type TPOne-S are in
compliance with Directive 2014/53/EU
The full text of the EU declaration of conformity is available at the following internet address: heating.danfoss.com
Danfoss Heating
3
Installation Instructions
Specifications TPOne-S
DBR
Operating Voltage 230V AC, 50 Hz
Setting temperature range 5-35°C
-
Operating temprature range 0-45°C
Switch rating -
3A (1) at 230Vac
Switch type -
SPST Type 1A
Transmission frequency 868.42 MHz
WiFi Specification 802.11b/g (2.4GHz) -
Transmission range (in
normal buildings)
up to 30m
Transmission power Max 1 mW
IP rating IP20
IP40
On/off control Yes
Chrono-proportional control Yes
Operating mode Heating
-
Construction EN 60730-2-9
EN 60730-1
Control pollution situation Degree 2
Rated impulse voltage 2.5kV
Ball pressure test 75°C
Dimensions (mm) H66 x W155 x D30
H84 x W84 x D30
Software Classification A
Important note RF products: Ensure that there are no large metal objects,
such as boiler cases or other large appliances, in line of sight between the
transmitter and receiver as these will prevent communication between
thermostat and receiver.
4
TPOne-S
OK
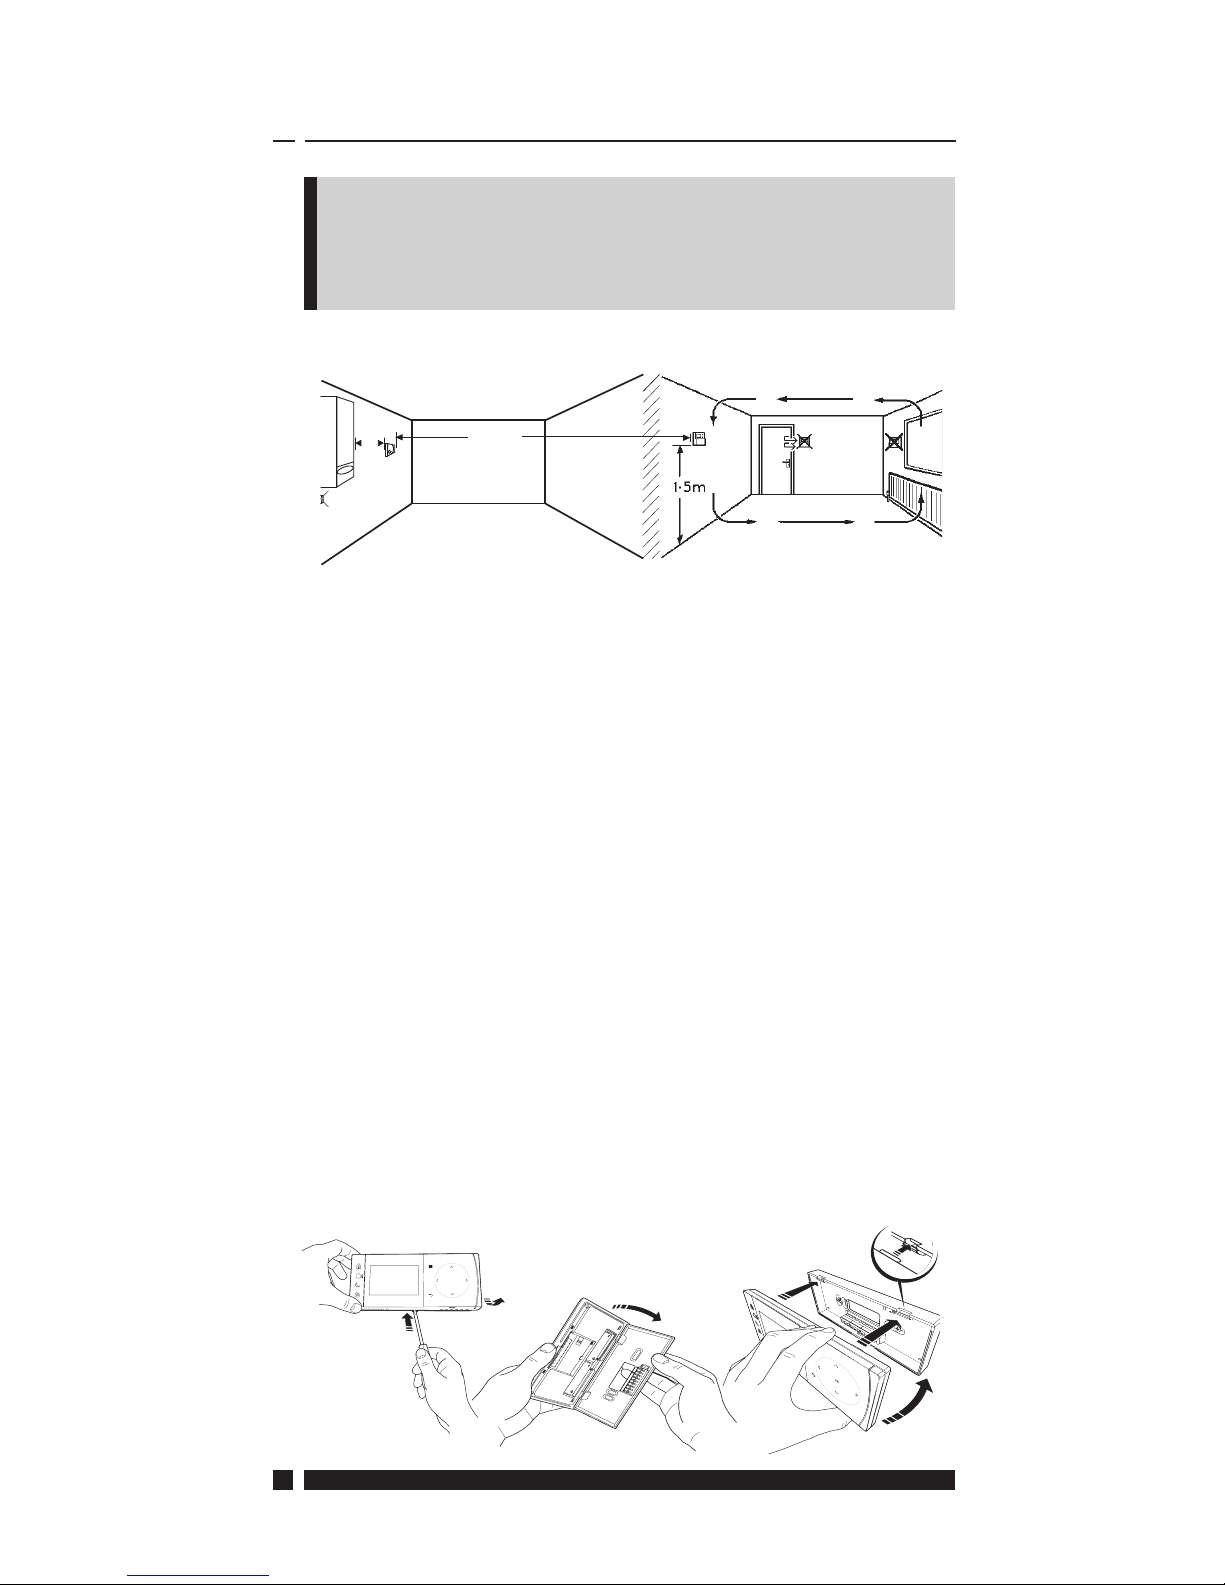
Mounting
Thermostat positioning:
30
cm
MIN
30m MAX
Please note: This product should only be installed by
a qualified electrician or competent heating installer
and should be in accordance with the local wiring
regulations.
Note: These products use RF (Radio Frequency) technology to
communicate with each other and it is important that care is taken
during installation to ensure good wireless connection. Building
structure and materials may influence performance and large metal
objects such as boiler cases, appliances or mirrors in line of sight
between the thermostat and the receiver will prevent communication.
The receiver should be mounted near to the heat source leaving
a minimum distance of 30cm away from any metal enclosures or
appliance and positioned so that no large metal obstruction is between
the receiver and thermostat. The thermostat can be mounted remotely
up to 30m from the receiver while considering signal strength will
be reduce as it passes through walls and ceilings. Walls and ceilings
containing steel reinforcement or with metal foil lined insulation will
also have a significant effect on communication distance and may
block signal completely.
It is recommended that the RF connection should be checked
before permanently mounting the thermostat and where necessary
the location of the thermostat must be moved to ensure reliable
communication. The thermostat should be mounted at a height of
approximately 1.5m from the floor and away from draughts or heat
sources such as radiators, open fires or direct sunlight.
Danfoss Heating
5
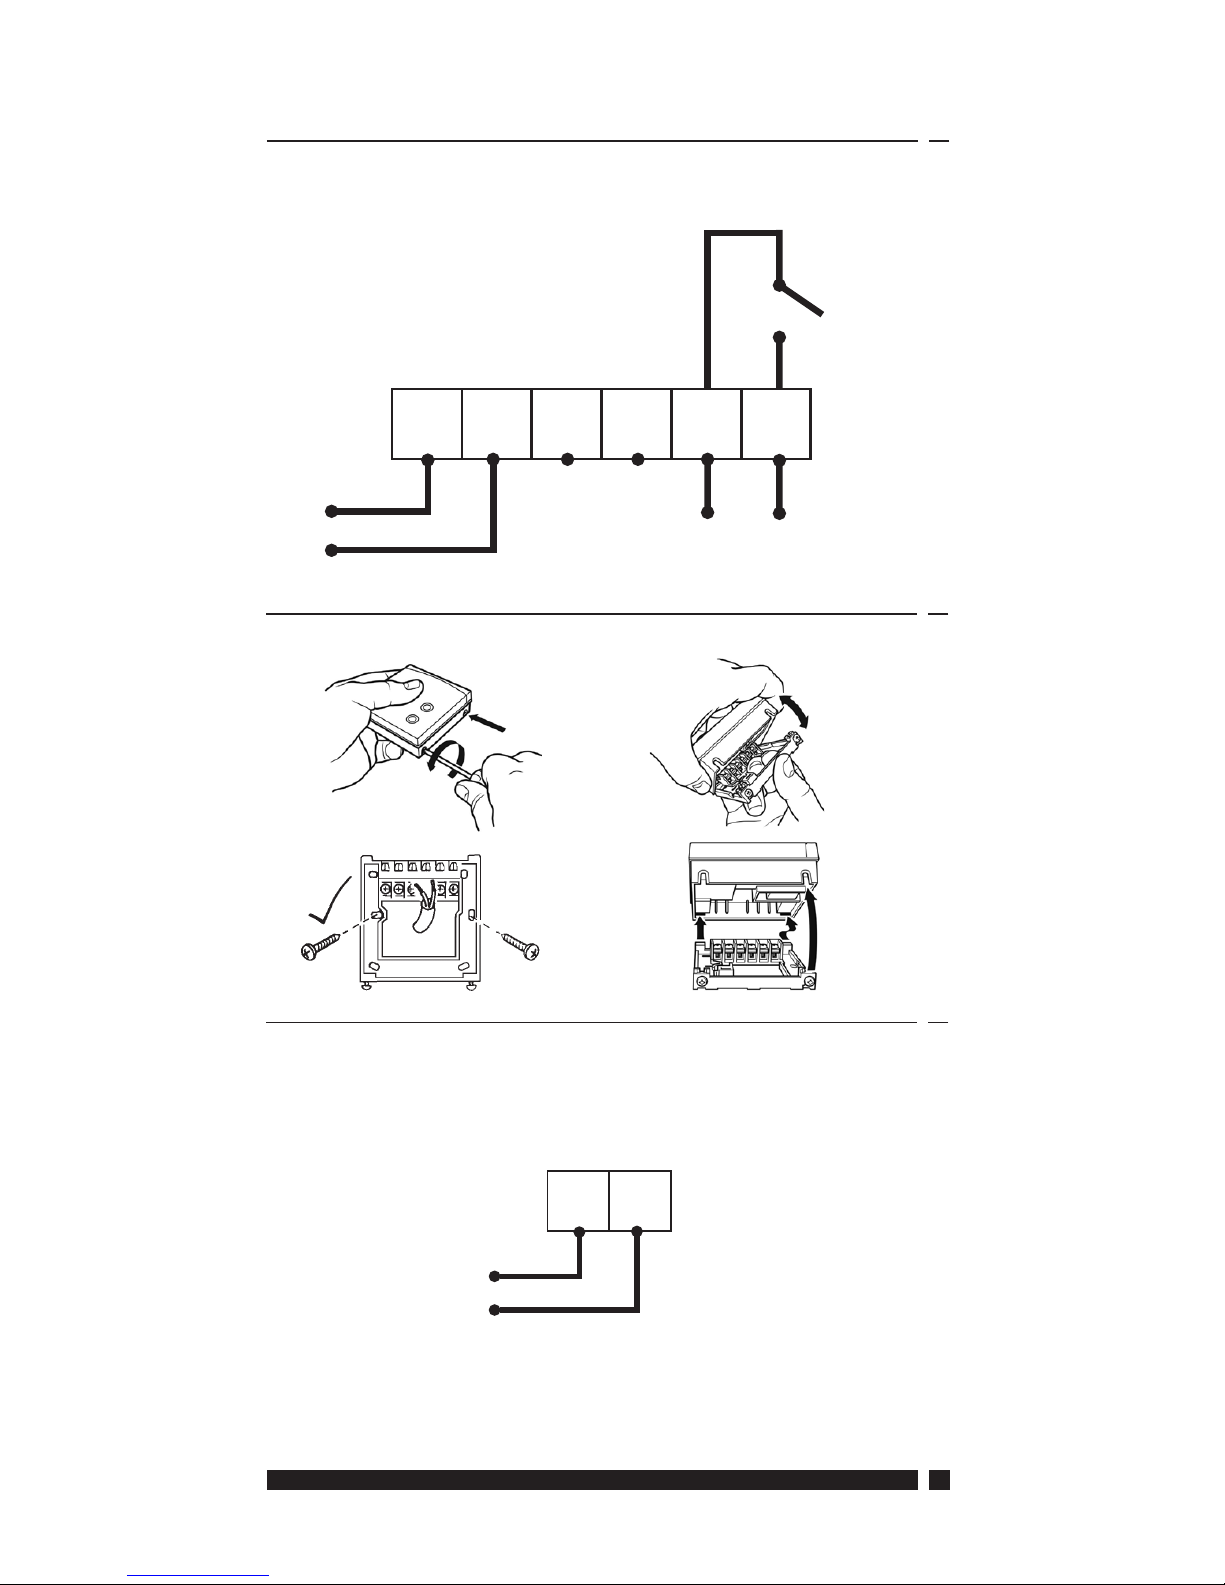
TPOne-S wiring
Wiring
DBR Receiver
DBR Receiver
1NL 234
230 Vac
COM OUT
(Not Used)
NL
230 Vac
Note: When using the table stand ONLY USE the power
supply and USB cable provided.
6
TPOne-S
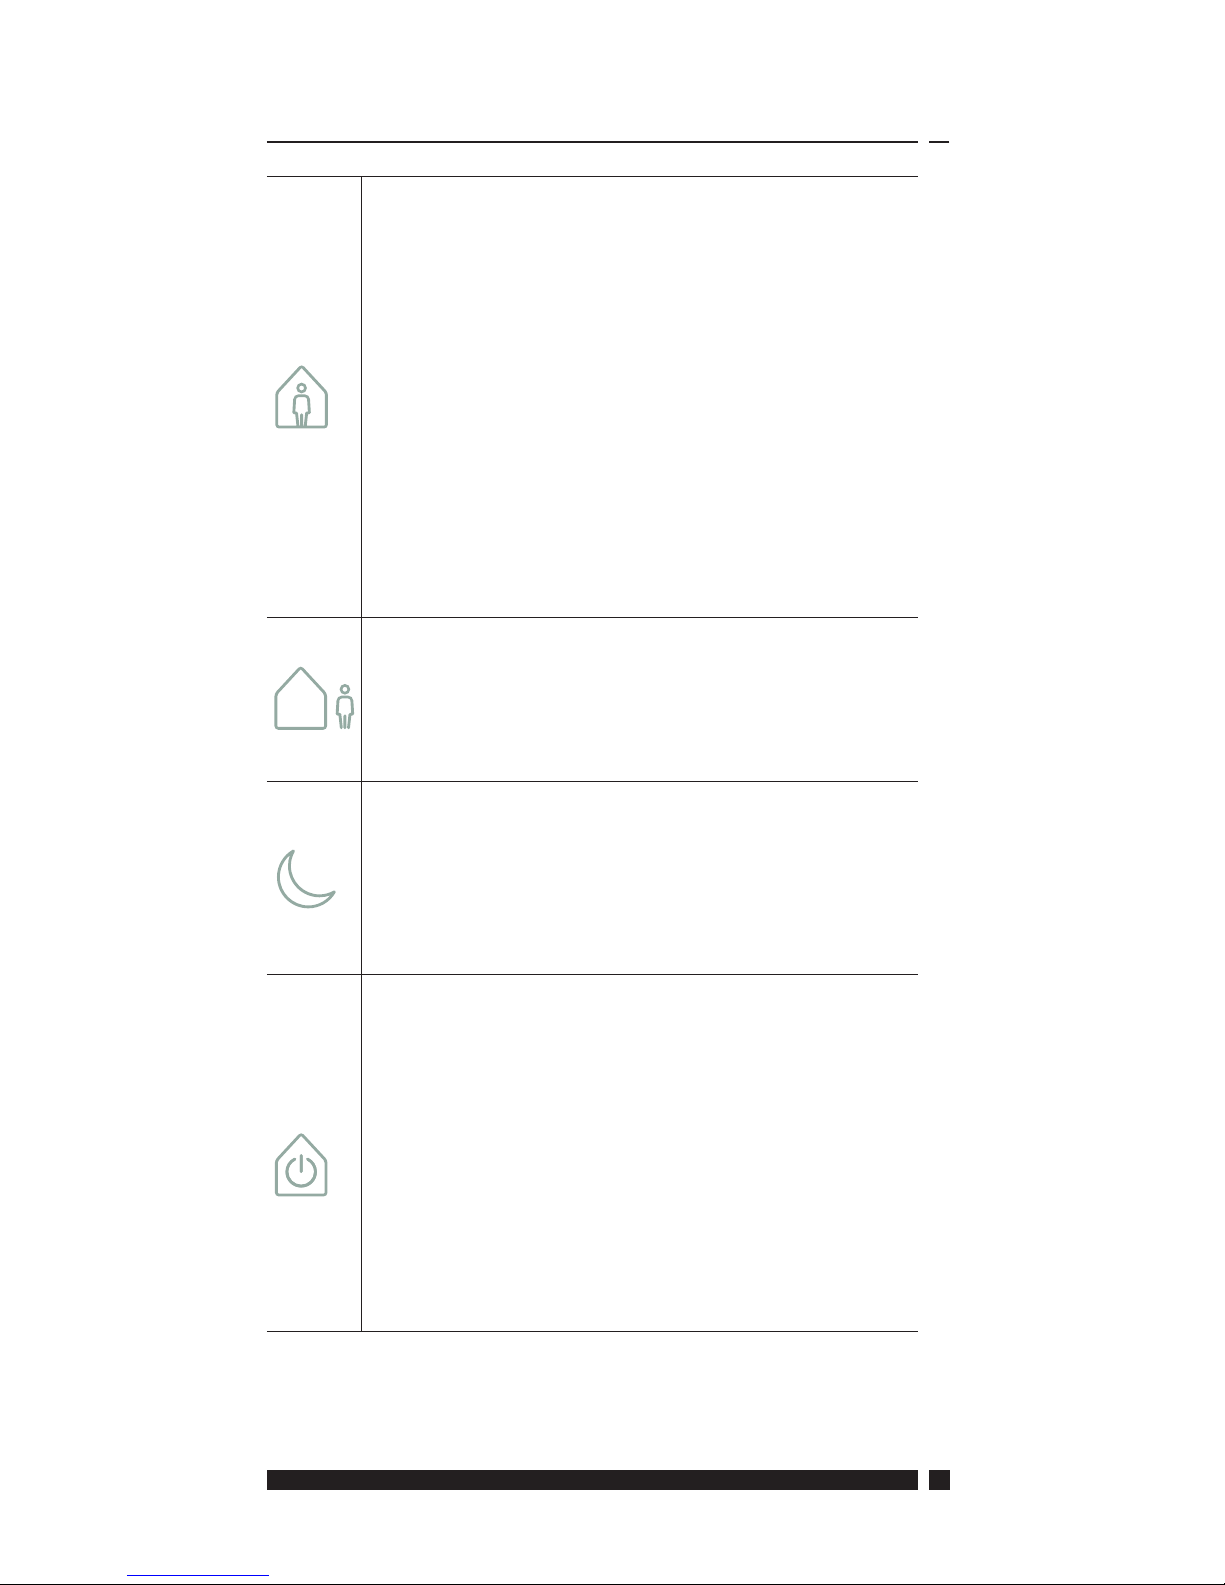
Comfort modes
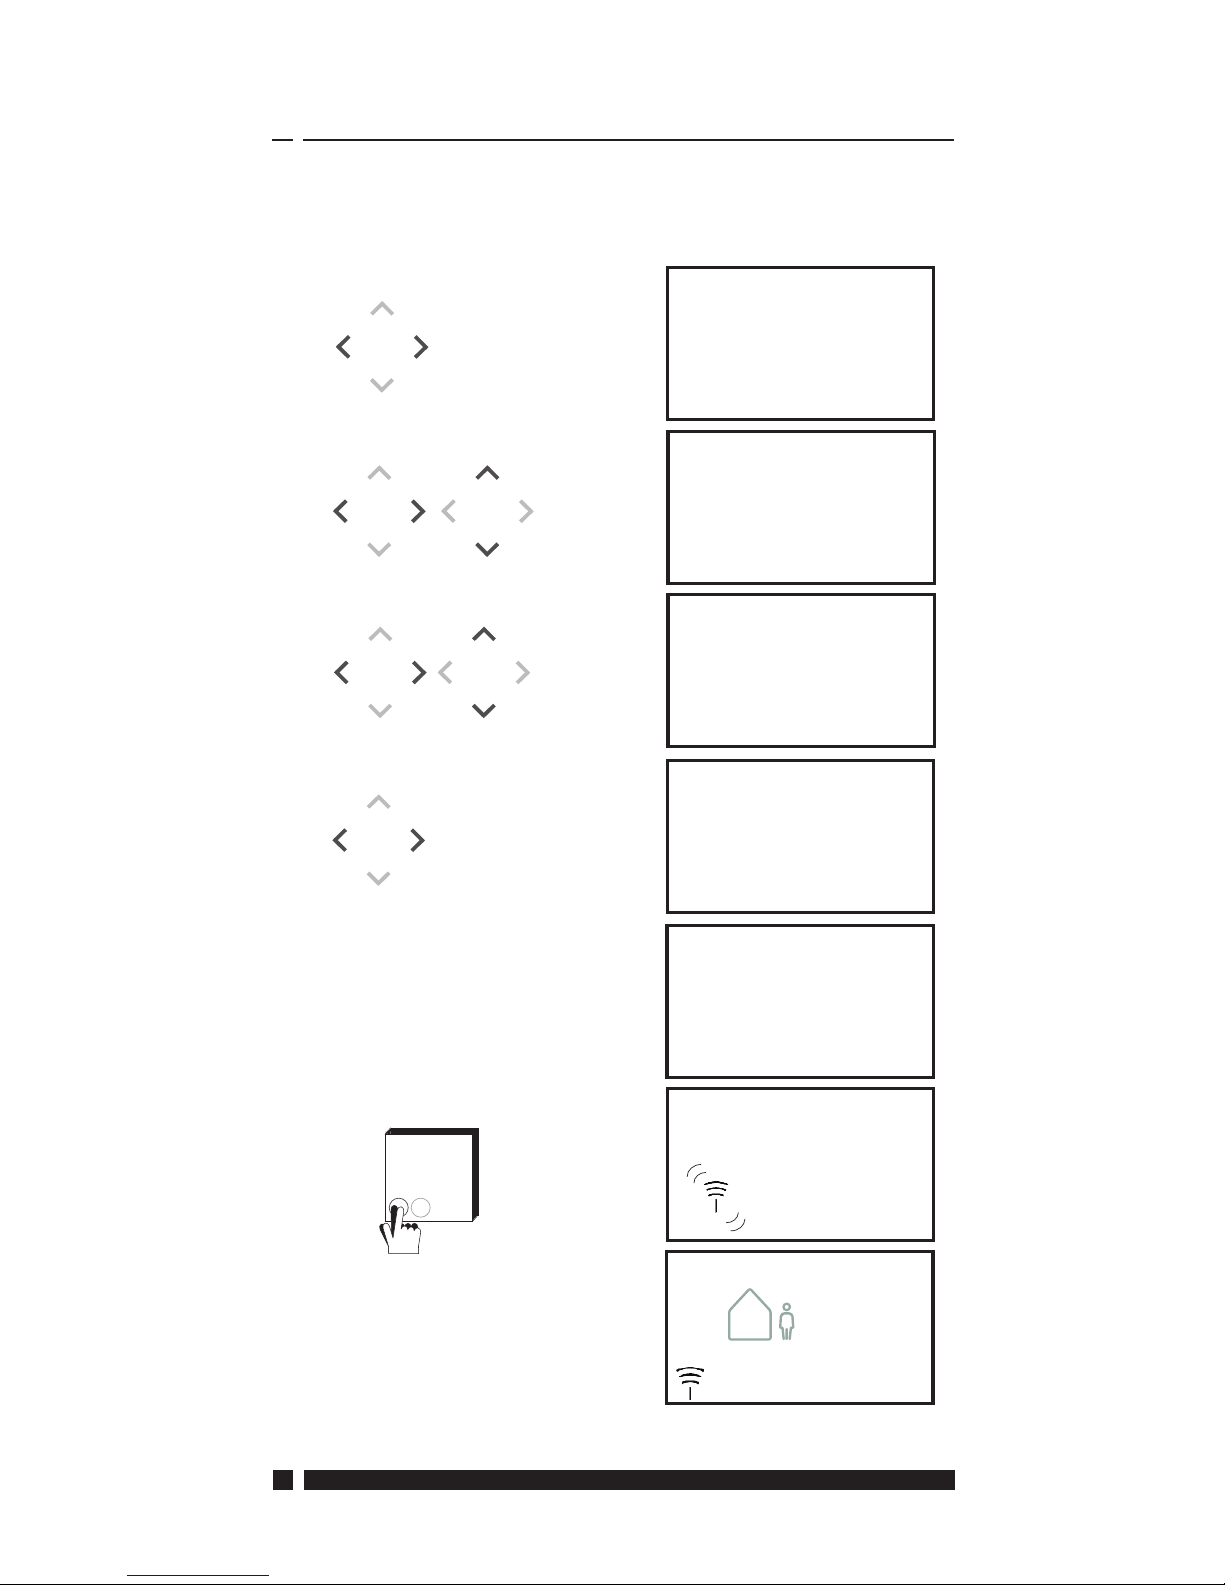
User Interface
Display
Navigation
Comfort Modes
Heating made easy: TPOne Comfort Modes simplify the way you
plan your heating day to day. You define your comfort modes in the
user schedule and manually override when you need, allowing you
to adapt your schedule to the way you live.
The Home, Away and Asleep comfort modes are linked to your
defined comfort temperatures. The schedule follows the daily
routine you have set or you just choose the comfort mode required
and TPOne will recall the settings you have defined.
The TPOne Standby Mode allows you to switch your heating off
when not required although the thermostat continues to monitor
the room temperature and call for heating should there be a risk of
frost damage.
Danfoss Heating
7
Comfort Modes
Home
Home Mode selects the home comfort
temperature typically when the home is
occupied during the day. The required
temperatures for Home mode are selectable
in the Temperature setting (see User Menu
> Temperatures.) A separate Home AM and
Home PM temperature can be chosen and
these are automatically set according to the
time of the day.
Note: When in Home mode if the home button
is pressed again a 1, 2 or 3 hour heating boost
is selected and the current home period is
extended by the chosen time period. The
chosen boost period is displayed under the
Home icon on the display.
Away
Away Mode selects the away comfort
temperature typically when the home is
unoccupied during the day. The required
temperature for Away mode is selectable in
the Temperature setting (see User Menu >
Temperatures).
Asleep
Asleep Mode selects the nightime comfort
temperature which is set between the end
of the last home period of the day and the
beginning of the first home period of the
following day. The required temperature for
Asleep mode is selectable in the Temperature
setting (see User Menu > Temperatures).
Standby
The TPOne can be placed in Standby
Mode. While in Standby the TPOne will
not control the heating system other than
to protect against frost damage (see User
Menu > Installer Settings > Frost Protect for
information on frost protect). Standby can
be cancelled by pressing the Standby button
again or by selecting another comfort mode.
Note: the standby option places the heating
control in standby only, if Hot Water is set
up this is not affected. To switch Hot Water
control off see User Menu > Hot Water > Mode
8
TPOne-S
OK
Navigation
Menu
Press Menu to access the intuitive text menu.
The common feature User Menu will be
displayed first. Additional settings can found
in the User Setting option and more advance
settings can be found in the Installer Setting
option.
OK
Select /
Confirm
Press OK to select menu options or confirm
settings. OK will be shown on the display
when it can be used or is required.
Menu
Back
Press to exit a menu option. Pressing
while in a setting will result in that setting
change not be accepted. will also exit the
menu system. will be shown on the display
when it can be used
Naviga-
tion
The Navigation buttons are used to navigate
the TPOne menus and change setting values.
The up & down buttons are also used to
manually change the required temperature.
Navigation arrows will be shown on the
display when these buttons can be used.

Danfoss Heating
9
Button
Lock
Indicates that Button Lock has been activated to
avoid unintentional setting changes. To activate
buttons while button lock is active press the OK
button for 5 seconds. The Button Lock setting is
found in the Installer Menu.
Heat
Calling
When the current room temperature is below the
required room set temperature the TPOne will call
for heating from the connected heat source. This is
indicated by the Heat Calling icon.
Hot
Water
Calling
Where the TPOne-S has been set up for control
of domestic hot water the TPOne will call for
hot water heating according to the user set
schedule. This is indicated by the Hot Water
Calling icon.
The TPOne-S is connected by radio signal to a
receiver. The Radio Frequency icon will be displayed
to confirm that this connection is active and that the
TPOne-S is controlling the heating.
If connection is lost the icon will go off and a warning
will be shown at the top of the display.
Important Note: Ensure that there are no large metal
objects, such as boiler cases, other large appliances
or mirrors in line of sight between the transmitter
and receiver as these will prevent communication
between the TPOne-S and receiver.
Display
Info & Settings Status Icons
Dates &
Warnings
21
.5
°
16:35 Mon
NOTE:
TPOne monitors several conditions and will provide warning or
information messages when necessary. Details on these can be
found on pages 26-29.
10
TPOne-S
Setup Wizard/ Unit
The setup wizard will run when power is first applied to the TPOne.
Once set the further changes can be made in the user and installer
setting menus.
OK
RF Pairing
RF Pairing
Language
English
OK
Set Date
04 - 02 - 2016
OK
Set Time
24hr - 10 : 45
OK
OK
OKOKOK
OK
OK
OK
OK
READY
OK
DBR Receiver
21.
5
o
10:45 Thurs
Press button on
reciever to confirm
Press OK to pair
Hot Water Setup
OFF
OK
OK
OK

Danfoss Heating
11
Set Temperatures/ Unit
Home AM - 21.
0
o
C
Home PM - 22.
0
o
C
Away - 16.
0
o
C
Asleep - 12.
5
o
C
OK
User Menu
Temperatures
OK
Temperatures
AM 21.
0
o
OK
21.
5
o
10:45 Thurs
User Menu
Temperatures
OK
OK
OK
OK
OK
OK
OK
OK
21.
0
o
Follow this routine to set required Comfort Mode temperatures.
Changes can be made for each mode, once all changes have been
made press OK and a confirmation screen will display the new
settings.
See page 25 for default temperatures

12
TPOne-S
Setup Schedule/ Unit
User Menu
Schedule - Heating
Schedule
Schedule
OK
Heating
OK
21.
5
o
10:45 Thurs
Schedule - Heating
OK
OK
Select Days
OK
OK
Mon Tues Weds Thurs
Fri Sat Sun
Mon
OK
Thurs
OK
OK
OK
OK
OK
OK
Follow this routine to set Heating Schedule. Days can be set
individually or grouped and options for weekdays and weekend
settings can be selected. All day combinations can then have one,
two or three Home Periods selected. TPOne will automatically fill in
the gaps with Away and Asleep Periods depending on the time of
the day.
Where TPOne-S is set up to control domestic hot water as well as
heating there is a dedicated Hot Water schedule which can be set
See page 24 for default schedule times

Danfoss Heating
13
Setup Schedule (Continued)
Schedule - Heating
Home Period - 1
Sechedule - Heating
User Menu
Mon Tues We ds Thurs
Fri
Sat Sun
OK
OK
OK
OK
From To
06.00
08.30
OK
OK
OK
Home Period - 2
OK
From To
12.30
13.30
OKOKOK
Home Period - 3
OK
From To
17.30
22.30
OK
OK
OK
OK
OK
Select Home Periods
OK
3
OK
Your heating schedule
has been saved
Schedule
OK
3s
OK

14
TPOne-S
TPOne Programme via App
TPOne can be programmed via a smartphone App.
Download the App from App Store or Google Play by following the
QR code or by searching for TPOne.

Danfoss Heating
15
Pairing TPOne-S
Follow the prompts from the TPOne-S App to pair your TPOne-S.
User Settings
WiFi Setup
WiFi Setup
WiFi Setup
OK
Press OK to setup
WiFi connection
21.
5
o
10:45 Thurs
OK
OK
Open TPOne Heating
App on mobile device
and follow setup
instructions
OK
User Menu
User Settings
OK
OK
OK

16
TPOne-S
User Menu
Hot Water User override settings for Domestic Hot Water:
Boost - choose to extend the current hot water
heating period for 1, 2 or 3 hours. Once boost
time is finished hot water heating will return to
user set schedule.
Mode - choose between scheduled on or off.
Scheduled mode will follow the user set hot water
heating schedule. Off mode will switch hot water
heating off and will remain off until set back to
scheduled.
Default settings:
Boost - Off
Mode - Scheduled
Note: The Domestic Hot Water feature will be set at
installation and will require a separate hot water
cylinder thermostat and suitable wiring to the
boiler. If the TPOne has been installed for heating
only this menu option will not be given. The hot
water heating feature can be deactivated after
installation, see User Menu > Installer Settings >
Hot Water Setup
Click & Save Click & Save is an easy access saving function.
Switching Click & Save ON will reduce the user set
comfort temperatures by 1°C. Switching Click &
Save OFF will return TPOne to the user set comfort
temperatures.
Default setting: Off
Note: Independent tests have proven that a
reduction in home heating temperatures by 1oC
can save on average 10% energy.
Heating
Mode
Heating Mode will change the TPOne from a
thermostat with full user set heating schedule to a
manually set temperature only thermostat.
In schedule mode the thermostat will follow the
user set heating schedule.
In manual mode the user set schedule will be
ignored, the required comfort mode is then
chosen manually
Default setting: Scheduled

Danfoss Heating
17
Schedule User set heating schedule option:
Heating - settings for the daily heating schedule.
Choose weekday, weekend or independent daily
options and 1,2 or 3 periods per day.
Option to reset daily heating schedule to factory
defaults.
Hot Water - settings for the daily domestic hot
water schedule. Choose weekdays, weekend or
independent daily options and 1,2 or 3 periods
per day. (Option only available if TPOne has been
configured for domestic hot water control)
Option available to reset daily domestic hot water
schedule to factory defaults.
Summary - graphical overview of the set daily
heating or hot water schedule
Default settings: see default heating times later
in this guide
Tempertures User set comfort temperatures (heating),
individual comfort temperatures for Home AM,
Home PM, Away and Asleep.
Home AM and Home PM temperatures will be set
during the home periods chosen in the user set
heating schedule, see User Menu > Schedule
Away temperature will be set during the day
between the home periods. Asleep temperature
will be set during the night between the home
periods.
Default settings:
Home AM - 20°C
Home PM - 20°C
Away - 15°C
Asleep - 15°C
Holiday Holiday feature allows you to set in advance your
holiday dates. TPOne will reduce the heating
to your chosen Holiday temperature on the first
day set to save energy and will return to your set
schedule and mode temperatures on the return
date to ensure the home is comfortable for your
return.
Enter start and end date of your holiday and the
required energy saving home temperature.
User Menu (Continued)

18
TPOne-S
User Settings
WiFi Setup Option to connect the TPOne-S to the internet to
allow remote smart phone control. Ensure the
TPOne-S App is downloaded before selecting WiFi
Setup, see page 15 for details.
Note: TPOne-S will operate and control your
heating without connection to the internet. Only
setup WiFi if there is a home WiFi network and
internet connection available.
Set Date
Option to set the current date.
Set Time
Option to set the current time and 12 or 24hr clock
setting.
Button Click Button Click is an audible feedback feature
to confirm button press. Button Click can be
switched On or Off
Default setting: On
Backlight When buttons are pressed on the TPOne the
display backlight will come on to aid viewing.
Where backlight is not required this feature can be
switched off.
Default setting: On
Language Choose menu language
Default: English
Note: if required a reset menu language feature
is available, press and hold OK for 5 secs and the
option to change language will be given.
User Reset User Reset will return user settings only to the
TPOne-WiFi factory default.
Note: User Reset will not reset settings in the first
level user menu or the date and time.
Information
Information on product type, software level and
boiler service interval date if set.
Connectivity
Information on TPOne-S connectivity status

Danfoss Heating
19
Installer Settings
Hot Water
Setup
The TPOne-S can be used as a single channel
programmable thermostat to control the
temperature regulation of the heating system only
or as a two channel programmable thermostat
to control the heating and the time schedule of
a domestic hot water circuit. The domestic hot
water selection will have been chosen in the
startup wizard on initial installation. Choose this
setting after installation to switch the domestic
hot water option on/off.
Default: Set at startup
Note: Settings in the menu which are required for
domestic hot water are only accessable if the Hot
Water Setup is switched on. TPOne-S controls
only the time schedule for domestic hot water and
should always be used with a suitable hot water
cylinder thermostat.
RF Pairing The TPOne-S must be paired to a compatible
receiver/boiler relay. The initial pairing is made
in the startup wizard. If pairing was not made at
startup or if pairing is required to a new receiver/
boiler relay select this setting to start new pairing.
Control Type This allows the thermostat to be set to run in On/
Off mode or in chrono-proportional 3, 6 or 12
cycle rate.
Default: Chrono 6
Note: for condensing boiler control tests have
shown that boiler efficiency is significantly
improved when controlled by a chronoproportional type controller

20
TPOne-S
Start-up
Method
This feature allows the thermostat to start up the
heating system in three different ways.
Normal - Heating is turned up or down at the
programmed times.
Delayed start (or Economy Setting) Set the period start times in the normal way
taking into account the time that the building
takes to heat on an average day. The thermostat
monitors switch on time, actual temperature and
wanted temperature and delays the start of the
heating if the actual temperature is close to the
programmed temperature. Delayed Start in TPOne
is dynamic and will adjust automatically to the
home heating characteristics while maximising
energy savings.
Optimised Start (or Comfort Setting) -
This allows you to programme the time at
which you would like to be up to the required
temperature. The thermostat then calculates
how soon before the required time the heating is
turned up. Optimised Start in TPOne is dynamic
and will adjust automatically to the home heating
characteristics to reach required temperature at
the required time.
Default: Normal
Temperature
Limits
This allows the upper and lower temperature of
the thermostat setting range to be limited.
Defaults:
Minimum 5°C,
Maximum 35°C
Frost Protect To help protect against damage to the heating
system caused by extreme low temperatures the
TPOne includes a Frost Protect level. This is the
minimum temperature level and is also used when
the TPOne is placed in standby mode.
Default: 5°C
Temperature
Override
This establishes the degree of manual temperature
override available to the user, No Limit, Limited +/2°C or No Override
Default: No Limit
Installer Settings (Continued)

Danfoss Heating
21
Daylight
Saving
Choose to set automatic daylight saving changes
on or off.
Default: On
Button Lock Button lock can be set to avoid unintentional
setting changes. To activate buttons while button
lock is active the user must press the OK button
for 5 seconds.
Default: Off
Display Idle
Mode
When the TPOne is in idle mode the display can be
set to go off. The display will come on when any
button is pressed.
Default: On
Service
Interval
TPOne incorporates a service interval timer where
a service due date for the boiler can be set. The
service interval timer is passcode protected and
must only be set by a qualified heating installation
engineer. The installer can set the service due date
and select from one of four service due restriction
modes:
1 - Warning Only - visual and audible warnings
only, no reduction of heat.
2 - Heat 45min/hr - visual and audible warnings
with reduction of heat to 45 minutes per hour.
3 - Heat 30min/hr - visual and audible warnings
with reduction of heat to 30 minutes per hour.
4 - Heat 15min/hr - visual and audible warnings
with reduction of heat to 15 minutes per hour.
5 - No Heating - visual and audible warnings
with no heating.
Once set, the service interval timer can only be
reset or deactivated by an installer having the
correct access code. Additional information on
Service Interval can be found later in this guide
Note: If the TPOne is fitted to a combination
boiler, thefunction only works in conjunction
with a heating demand, hot water production is
unaffected.
Installer Settings (Continued)

22
TPOne-S
Service
Demo
Choose this feature to provide a demonstation of
the audible and visual warning which will be given
when service is due.
Installer Lock TPOne allows the installer to lock all installer
settings by means of a passcode. The 3 digit
passcode can be chosen and set by the installer
and once set will be required to make any installer
setting changes.
Installer
Reset
Select option to reset all installer settings to
factory defaults.
Note: Service interval will not be reset and can
only be reset or deactivated by entering the service
interval setup.
Installer Settings (Continued)
TPOne is an intelligent programmable heating control
made easy. TPOne includes features which are designed
to save energy. Look out for the leaf symbol throughout
this guide for settings which can directly influence the
energy saved.

Danfoss Heating
23
If the property is owned by a landlord he may, for gas safety reasons,
have instructed the installer to set the service interval timer. The
feature is primarily aimed at the rented property sector where the
Landlord has a legal responsibility under gas safety regulations* to
ensure that the boiler is serviced every year.
- If set, 28 days prior to the service due date, an audible warning will
start each day at noon, the service icon will also be displayed. The
audible warning will last for 10 seconds and will be repeated every
hour until a button is pressed to cancel it. If cancelled the alarm will
recommence the following day at noon.
- If the boiler is not serviced before the due date, an audible
warning will start each day at noon, the service icon will also
be displayed. The audible warning will last for 1 minute and will
be repeated every hour until a button is pressed to cancel it. If
cancelled the alarm will recommence the following day at noon.
- In addition, all overrides and programming buttons will be
disabled and the Heating and Hot Water may operate for a limited
amount of time each hour.
- The installer may cancel or reset the service interval timer as part
of the boiler service.
- This is a gas safety feature that can only be accessed by a qualified
heating installation engineer.
*Gas Safety Regulations may vary according to region
Service Interval

24
TPOne-S
Default tables
SCHEDULE DEFAULTS
06:30 - 22:30
(Weekend
07:30 - 22:30)
06:30 - 08:30
(Weekend
07:30 - 09:30)
16:30 - 22:30
06:30 - 08:30
(Weekend
07:30 - 09:30)
11:30 - 13:30
16:30 - 22:30
1
2
3
Note: Where TPOne has been set up for domestic hot water
control the default schedule for hot water is the same as for
heating. In schedule set up user can set one, two or three ON
periods, TPOne will automatically fill in gaps with OFF periods

Danfoss Heating
25
AM
20°C
PM
20°C
15°C
15°C
TEMPERTURE DEFAULTS
Default tables (Continued)

26
TPOne-S
Information
TPOne will show information related to current operation, these
messages will be shown at the top of the display.
Information messages will be displayed while the operation is active
and will automatically reset when operation is completed
Optimised
Start
If the TPOne start up method is set to Optimised
Start this message will display while this feature
is active.
see page 18
Delayed
Start
If the TPOne start up method is set to Delayed
Start this message will display while this feature
is active.
see page 18
Warnings
TPOne monitors several conditions and will provide warnings when
necessary, these messages will be shown at the top of the display.
If the condition that has created the warning has been corrected
then the message can be cancelled by selecting Clear Warnings
in the TPOne menu. Where more than one warning has occurred
the most recent will be shown on the display. All warnings can be
viewed and cleared in the Clear Warnings menu.
RF Lost If the RF connection between the TPOne-S and
Receiver has been lost this warning will be shown.
If this warning is shown and the RF Icon is still
displayed on the TPOne-S the loss of connection
may have only been temporary and re-connection
was made automatically. The warning can then be
cleared in the menu. If the RF Icon is not displayed
then connection may not be possible or may be
inconsistant.
Important Note: Ensure that there are no large
metal objects, such as boiler cases, other large
appliances or mirrors in line of sight between
the transmitter and receiver as these will prevent
communication between the TPOne-S and
receiver.

Danfoss Heating
27
Pairing
Failed
When first installed the startup Wizard will include
the pairing of the TPOne-S and the Receiver. If this
function was not completed correctly or failed due
to unreliable connection then this warning will be
shown. Manual pairing can be made by selecting
this option in the installer menu.
Important Note: Ensure that there are no large
metal objects, such as boiler cases, other large
appliances or mirrors in line of sight between
the transmitter and receiver as these will prevent
communication between the TPOne-S and
receiver.
Frost Risk This will be displayed if the TPOne monitors a
temperature of below 5oC. TPOne will call for
heat if this occurs but if the heat source is faulty
then risk of frost damage may still occur. The
heating system should be checked to confirm it is
operating correctly
Low Heat If set mode temperature is not reached within
2 hours then TPOne will warn of Low Heat. The
heating system should be checked to confirm it is
operating correctly
Service Due Where the TPOne Service Interval timer has been
set this warning will be shown when the timer has
expired. Contact the property owner or landlord
to arrange the boiler safety mainantance.
see page 21
Heat
Reduced
Where the TPOne Service Interval timer has been
set this warning will show after the timer has
expired and will indicate that heating has been
reduced for your safety until a boiler service has
been completed. Contact the property owner or
landlord to arrange the boiler safety mainantance.
see page 21
Sensor Fail If the TPOne in-built temperature sensor is
measuring outside it’s operational parameters
then it may have failed. If this warning cannot be
reset then contact your service provider for advice.

28
TPOne-S
Warnings (continued)
No Network
Connection
If the TPOne fails to find the home router, then this
warning will be shown. The WiFi signal may be
obstructed or the TPOne-S may be out of range
of the DBR. Where possible move the router or
TPOne-S and re-try WiFi Setup.
If WiFi has previously been set and working and
this warning is shown, where possible move the
router or TPOne-S and the TPOne-S will re-connect
to the router when in range and obstruction free.
Important Note: Ensure that there are no large
metal objects, such as boiler cases, other large
appliances or mirrors in line of site between the
TPOne-S and home router as these may prevent
connection
No IP
Address
If the TPOne-S is connected to the home router
but it is unable to obtain a valid IP address this
warning will be shown.
No Internet
Found
If the TPOne-S has a good connection the home
router but the home router has no internet
connection, then this warning will show
Set-up Timed
Out
During WiFi setup the TPOne will wait 2 minutes
for a valid mobile device connection. If this
time is exceeded without valid connection, then
this warning will show and WiFi setup will need
repeating.
Software
Update
Failed
Automatic software updates will be performed
when the TPOne-S is connected to the Internet. If
an update fails to load correctly, then this warning
will be shown and control of the heating may be
stopped. To reset, power to the TPOne-S must be
removed for minimum 30secs and then re-applied.

Danfoss Heating
29
Hot Water Paring
Follow this routine to pair optional hot water channel. An additional
DBR receiver will need to be installed for domestic hot water
control.
OK
Hot Water
RF Pairing
User Menu
Installer Settings
OK
Installer Settings
RF Pairing
OK
OK
OK
OK
OK
READY
OK
DBR Receiver
21.
5
o
10:45 Thurs
Press button on
reciever to confirm
Press OK to pair
RF Pairing
Hot Water
OK
OK
OK
21.
5
o
10:45 Thurs

30
TPOne-S
TPOne-S - End User License Agreement and Disclaimer
1. License
This end user license agreement and disclaimer (“Agreement”) is entered into
between Danfoss A/S or its Affiliates (each of which is referred to as “Danfoss”) and
you as an end user (“You” or “User”). In this Agreement “Affiliate” shall mean an entity
directly or indirectly controlled by Danfoss A/S whether by shares or voting rights.
Upon acceptance of this Agreement Danfoss grants You a limited, non-exclusive,
non-transferable, royalty-free, worldwide license (“License”) to install and use the
software (“Software”) embedded on your TPOne-S. The License is granted subject
to User’s compliance with the following:
a) The terms of this Agreement
b) Danfoss Terms of Use (available at www.Danfoss.com)
c) Danfoss Privacy Policy (available at www.Danfoss.com)
2. Automatic Software Updates
Danfoss may from time to time develop patches, bug fixes, updates and other
modifications to improve the performance of the Software (“Updates”). By
connecting the TPOne-S to to the internet You accept that Updates may be
automatically downloaded and installed on your TPOne-S without further notice
or consent being required. If you do not wish such Updates to be automatically
downloaded and installed You must disable the TPOne-S from the internet. You
acknowledge that you may be required to install Updates to use the Product for
remote access.
3. Consent to use of data
By installing and using the Application you give your consent and agree that
Danfoss may collect, use, register and store information concerning your heating
requirements, user set-points, IP-addresses, software and hardware attributes,
connection errors and user interaction. We do not collect personal contact
information such as address and names. The only personal information Danfoss
processes is the users IP-address. This information is used to analyse user behaviour
concerning operation of the app and will not be shared or sold to third parties.
Such information is processed by Danfoss to improve user experience, enhance
the performance of the Application and for security reasons. If you cannot agree
that we collect this information the app must be uninstalled as we can’t deliver the
services described above without it.
General question regarding processing of personal data can be forwarded to the
Danfoss Global Data Protection Office at: GDPO@danfoss.com
4. Proprietary Rights
This License and the Software contains proprietary information which is owned
by Danfoss and protected by applicable intellectual property rights. Except as
expressly permitted herein, such Danfoss information herein may not
i. be used for any purpose except in compliance with this Agreement,
ii. be copied or reproduced in any form, or
iii. be modified, rented, leased, sold, distributed or exploited commercially.
End User License Agreement
and Disclaimer

Danfoss Heating
31
Danfoss reserves the right to change, suspend, remove or disable User’s access
at any time without notice. The Danfoss name, Danfoss logo and other Danfoss
trademarks, graphics and logos are trademarks or registered trademarks of Danfoss
or its affiliated companies. User is granted no right or license with respect to such
trademarks.
5. Third Party Components
The Software may include certain third party software components (“Third Party
Components”) including open source and free software components, each of
which has its own copyright and its own license conditions (“Third Party License”).
A list of included Software Components and their respective licenses can be found
in clause 8. To the extent any Third Party License grants the User rights to use,
copy or modify the Open Source Component that are broader or narrower than
the rights granted in this Agreement, then such rights shall take precedence over
the rights and restrictions granted in this Agreement solely for such Third Party
Components.
6. Disclaimer of Warranty
This License is provided on an “as is” and “as available” basis for the intended
purposes as determined by Danfoss only and any use hereof is at User’s sole risk.
The Software and results and information generated thereby cannot substitute
technical advice but must be verified by the User, they are not promises and
should not be relied on as accurate data or analyses. Danfoss disclaims all
warranties and conditions regarding the Software, whether express, implied, or
statutory, including, but not limited to, conditions of merchantability, satisfactory
quality, fitness for a particular purpose, accuracy and non-infringement of
third parties’ rights. Danfoss does not warrant that the Software will meet your
requirements or that the operation hereof will be uninterrupted or error-free.
6. Limitation of Liability
To the extent not prohibited by law, in no event shall Danfoss be liable for any
direct, special, indirect or consequential dam-ages, whatsoever, including, without
limitation, damage to property, damages for loss of savings or profits, or loss of
data arising out of any use of the Software.
7. Miscellaneous
The License shall automatically terminate upon User’s breach of any of the terms
of this Agreement. Danfoss may terminate the License at its sole discretion without
prior notice. This Agreement and the License is subject to the substantive law of
Denmark. Any dispute arising out of or in connection with this Agreement shall be
submitted to the exclusive jurisdiction of the courts in Denmark.
8. Third Party Components licenses

Danfoss Ltd.
Ampthill Road
Bedford MK42 9ER
Tel: 01234 364621
Fax: 01234 219705
Email: ukheating@danfoss.com
Website: www.heating.danfoss.co.uk
© Danfoss HS | 01/2018 | VIHSK102
 Loading...