

Danby DDW621WDB User Manual [nl]

OWNER’S USE AND CARE GUIDE
GUIDE D’UTILISATION ET D'ENTRETIEN
GUÍA DE UTILIZACIÓN Y CUIDADO PARA EL PROPIETARIO
MODEL • MODÈLE • MODELO
DANBY PRODUCTS LIMITED, ONTARIO, CANADA N1H 6Z9
DANBY PRODUCTS INC., FINDLAY, OHIO, USA 45840
2016.03.03
DISHWASHER
LAVE-VAISSELLE
LAVAPLATOS
DDW621WDB

DO NOT RETURN THIS UNIT TO THE RETAILER
WITHOUT FURTHER INSTRUCTIONS
Dear valued customer, we hope your Danby product purchase fulfills all
your requirements. Your satisfaction is our priority!
Please contact us at our toll free consumer service number for any inquiries
you may have about your new unit.
NE PAS RETOURNER CET APPAREIL CHEZ LE
DÉTAILLANT SANS CONSIGNES SUPPLÉMENTAIRES
Cher(ère) client(e) important(e), nous espérons que votre produit Danby
répond à tous vos besoins. Votre satisfaction est notre priorité!
Veuillez nous contacter au numéro gratuit de service après-vente, si
vous avez des questions quelconques à propos de votre nouvel appareil.
NO DEVUELVA ESTA UNIDAD A LA TIENDA SIN
INSTRUCCIONES ADICIONALES
Estimado cliente, esperamos que el producto Danby que ha comprado
satisfaga completamente sus necesidades. Su satisfacción
es nuestra prioridad!
Por favor, contáctenos gratuitamente a nuestro número de Servicio al
Cliente para cualquier pregunta que tenga sobre su nuevo electrodoméstico.
1-800-263-2629
(1-800-26-DANBY)
Danby 28.08.2014

Contents / Table des matières / Índice
Model • Modèle • Modelo •
DDW621WDB
1
CAUTION
Read and follow all safety rules and
operating instructions before first use of
this product.
Never operate the appliance unattended!
PRECAUTION:
Veuillez lire attentivement les consignes
de sécurité et les instructions d’utilisation avant l’utilisation initiale de ce
produit.
Ne jamais faire fonctionner l'appareil
sans surveillance!
DISHWASHER
Owner’s Use and Care Guide ...........................................2-21
• Welcome
• Important Safety Information
• Features
• Installation Instructions
• Operation Instructions
• Care and Maintenance
• Troubleshooting
• Warranty
LAVE-VAISSELLE
Guide d’utilisation et d’entretien du propriétaire...............22-41
• Bienvenue
• Consignes de sécurité importantes
• Caractéristiques
• Consignes d’installation
• Consignes d’utilisation
• Soins et entretien
• Dépannage
• Garantie
LAVAPLATOS
Guía de utilización y cuidado para el propietario.............42-61
• Bienvenido
• Información importante sobre seguridad
• Características
• Instrucciones de instalación
• Instrucciones de funcionamiento
• Cuidado y mantenimiento
• Solución sugerida
• Garantía
PRECAUCIÓN
Lea y observe todas las relgas de seguridad y las instrucciones de operación
antes de usar este producto por la
primera vez.
Nunca deje el aparato sin vigilancia.
Thank you for choosing Danby
We know you’re excited. We are too! However, the more familiar you are with your new appliance, the better experience you will
have. We therefore strongly suggest that you read this Owner’s Manual before plugging in your new appliance. It contains
important operational information that will help you make full use of the technical features available in your Danby appliance. The
manual also contains information designed to enhance operating reliability and safety, as well as tips to maintaining your new
appliance so that it brings you happiness for years to come.
Please visit www.danby.com to access self-service tools, FAQs and more. Should you need additional assistance, please call
1-800-26-DANBY (1-800-263-2629).
Note: You will need the below information to obtain service under warranty.
To receive service, you must provide the original receipt.
Model Number:
Serial Number:
Date of Purchase:
NEED HELP?
Before you call for service, here are a few things you can do to help us serve you
better:
Read this Owner’s Manual:
It contains instructions to help you use and maintain your appliance properly.
If you received a damaged appliance:
Immediately contact the retailer (or builder) that sold you the appliance.
Save time and money:
Check the Troubleshooting section at the end of the guide before calling. This section
helps you solve common problems that may occur.
If you do need service, you can relax, knowing help is only a phone call away.
Tel: 1-800-26-
(1-800-263-2629)
Thank you for choosing Danby
Thank you for choosing Danby
Thank you for choosing Danby
www.dan
Please visit
appliance so that it brings you happiness for years to come.
manual also contains information designed to enhance operating reliability and safety, as well as tips to maintaining your new
important operational information that will help you make full use of the technical features available in your Danby appliance.
have. We therefore strongly suggest that you
We know you’re excited. We are too! However, the more familiar you are with your new appliance, the better experience you will
1-800-26-DANBY (1-800-263-2629).
to access self-service tools, FAQs and more. Should you need additional assistance, please call
appliance so that it brings you happiness for years to come.
manual also contains information designed to enhance operating reliability and safety, as well as tips to maintaining your new
important operational information that will help you make full use of the technical features available in your Danby appliance.
read this Owner’s Manual before plugging in your new appliancehave. We therefore strongly suggest that you
We know you’re excited. We are too! However, the more familiar you are with your new appliance, the better experience you will
1-800-26-DANBY (1-800-263-2629).
to access self-service tools, FAQs and more. Should you need additional assistance, please call
appliance so that it brings you happiness for years to come.
manual also contains information designed to enhance operating reliability and safety, as well as tips to maintaining your new
important operational information that will help you make full use of the technical features available in your Danby appliance.
read this Owner’s Manual before plugging in your new appliance
We know you’re excited. We are too! However, the more familiar you are with your new appliance, the better experience you will
to access self-service tools, FAQs and more. Should you need additional assistance, please call
manual also contains information designed to enhance operating reliability and safety, as well as tips to maintaining your new
Theimportant operational information that will help you make full use of the technical features available in your Danby appliance.
. It contains read this Owner’s Manual before plugging in your new appliance
We know you’re excited. We are too! However, the more familiar you are with your new appliance, the better experience you will
Serial
Model
service,receiveoT
needwillou: YNote
Number:Serial
Number: Model
originaltheprovidemustyou
toinformationthe belowneed
receipt.original
warrantunderserviceaintob
. ywarrant
Date
Purchase:ofDate
better:
service,forcallyouBefore
canyouthingsfewaarehere
HELP?NEED
youservehelp ustodocan
roubleshootingTtheCheck
money:andtimeSave
retheacttconImmediately
damagedareceivedyouIf
helptoinstructionsainstconIt
Manual:s’rOwnethisRead
better:
guidetheofendtheatsection
yousoldthatbuilder)(orailert
appliance:damaged
your applianceaintmainanduseyouhelp
Manual:
calling. This sectionbeforeguide
the appliance. you
.yproperlyour appliance
calling. This section
youservice,needdoyouIf
problemscommonsolveyousphel
ishelpknowingrelax,canyou
.roccumaythatproblems
phone call away.aonly
(1-800-263-2629)
2

• Do not abuse, sit on, or stand on the door or dish rack of
the dishwasher.
• Do not touch the heating element during or
immediately after use. (These instructions are only applicable to machines with a visual heating element).
• Do not operate your dishwasher unless all enclosure panels are properly in place.
• Do not place any heavy objects on the door when it is
open. The appliance could tip forward.
• When loading items to be washed:
1) Locate sharp items so that they are not likely to damage
the door seal;
2) Warning: Knives and other utensils with sharp points
must be loaded in the basket with their points down or
placed in a horizontal position.
• When using your dishwasher, you should prevent
plastic items from coming into contact with a heating element. (These instructions are only applicable to machines
with a visual heating element).
• Check that the detergent receptacle is empty after completion of the wash cycle.
• Do not wash plastic items unless they are marked
dishwasher safe or equivalent. For plastic items not
marked, check the manufacturer's recommendations.
• Use only detergent and rinse additives designed for an
automatic dishwasher.
• Never use soap, laundry detergent, or hand washing
detergent in your dishwasher. Keep these products out of
the reach of children.
• Keep children away from detergent and rinse aid and
keep children away from the open door of the dishwasher.
there could still be some detergent left inside.
• This appliance is not intended for use by people (including children) with reduced physical, sensory or mental
capabilities, or lack of experience and knowledge, unless
they have been given supervision or instructions concerning the use of the appliance by a person responsible for
their safety.
• Children should be supervised to ensure that they do
not play with the appliance.
• Dishwasher detergents are strongly alkaline, they can be
extremely dangerous if swallowed. Avoid contact with skin
and eyes and keep children away from the dishwasher
when the door is open.
• The door should not be left in the open position since this
could present a tipping hazard.
• If the supply cord is damaged, it must be replaced by
a qualified person in order to avoid a hazard.
• Remove the door of the dishwasher when discarding it.
• Please dispose of packing materials properly.
• Use the dishwasher only for its intended function.
• During installation, the power supply must not be
excessively or dangerously bent or flattened. Do not tamper with controls.
• The appliance is to be connected to the water tap using
new hose sets and the old hose-sets should not be reused.
• The maximum number of place settings to be washed is
6.
• The maximum permissible inlet water pressure is 85 PSI.
• The minimum permissible inlet water pressure is 25 PSI.
Important Safety Information
READ AND FOLLOW ALL SAFETY INSTRUCTIONS
GROUNDING
INSTRUCTIONS
When using your dishwasher, follow the precautions listed below:
3
This appliance must be grounded. In the event of a malfunction or breakdown, grounding will reduce the risk of electric shock by providing a path
of least resistant electric current. This appliance is equipped with a cord
having a equipment grounding conductor and a grounding plug.
The plug must be plugged into an appropriate outlet that is installed and
grounded in accordance with all local codes and ordinances.
WARNING
• Improper connection of the equipment-grounding conductor can
result in a risk of electric shock.
• Check with a qualified electrician or service representative if
you are not sure if the appliance is properly grounded. Do not
modify the plug provided with the appliance; If it does not fit into
the outlet have a proper outlet installed by a qualified electrician.
SAFETY
PRECAUTIONS
SAVE THESE INSTRUCTIONS
Operating Instructions
READ AND FOLLOW ALL OPERATING INSTRUCTIONS
To get the best performance from your dishwasher, read all operating instructions before using it for the first time.
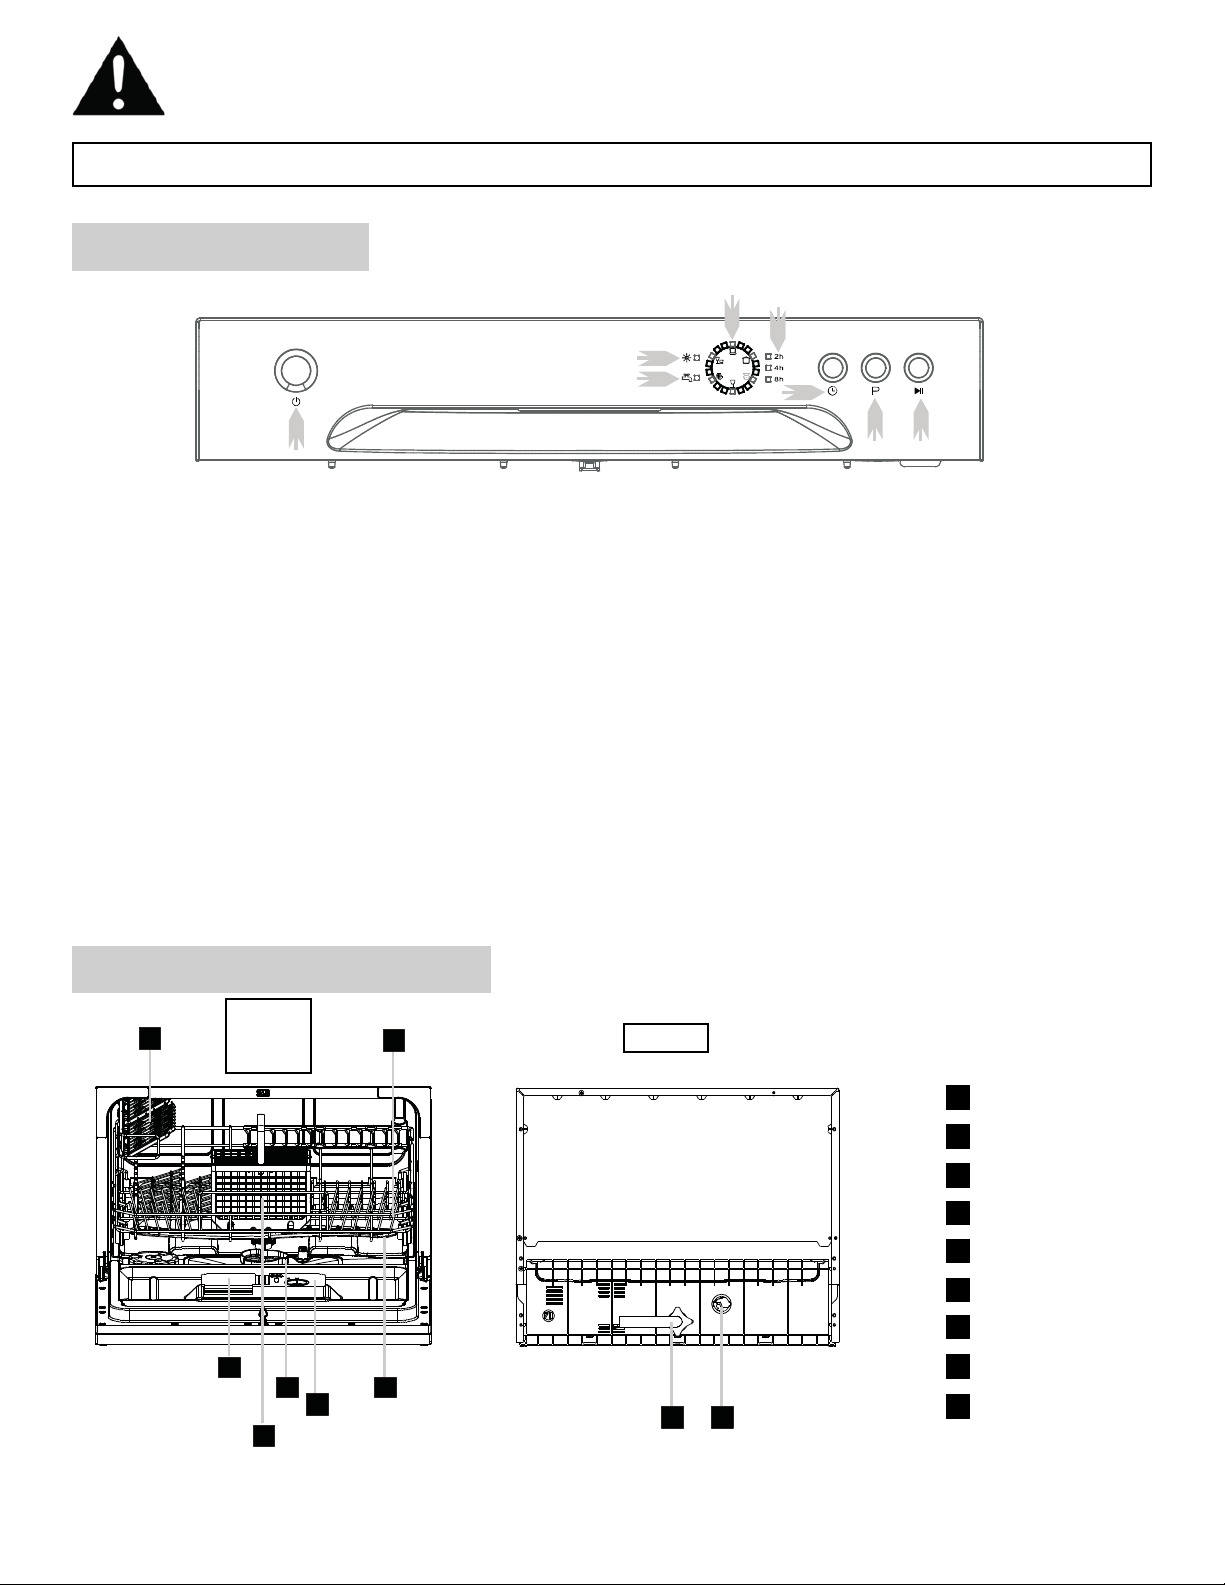
CONTROL PANEL
4
1) Power Button: To turn on/off the power supply.
2) Rinse Aid Warning Light : To be on when the rinse aid
dispenser needs to be refilled.
3) Water Faucet Light: Illuminated when the water faucet
has not been turned on.
4) Program indicator light: Displays which washing
program has been selected.
5) Delay time: Indicates the delay time of either 2, 4, 6 or 8
hours. For 6 hours, the 2 hour and 4 hour lights will illuminate at the same time.
6) Delay Button: Press this button to set a delayed start
time.
7) Washing Program Selector: Press this button to select
wash cycles.
8) Start/Reset Button: Press this button to start or pause
the dishwasher.
DISHWASHER FEATURES
1
Detergent Dispenser
2
Cutlery Basket
3
Filter assembly
4
Rinse Aid Dispenser
5
Spray Arms
6
Cup Shelf
7
Basket
8
Drain pipe connector
9
Inlet pipe connector
FRONT
DOOR
OPEN
REAR
6
7
8
1
2
3
45
4
6
7
1
3
4
2
5
9
8
5
Operating Instructions
PRIOR TO USING FOR THE FIRST TIME
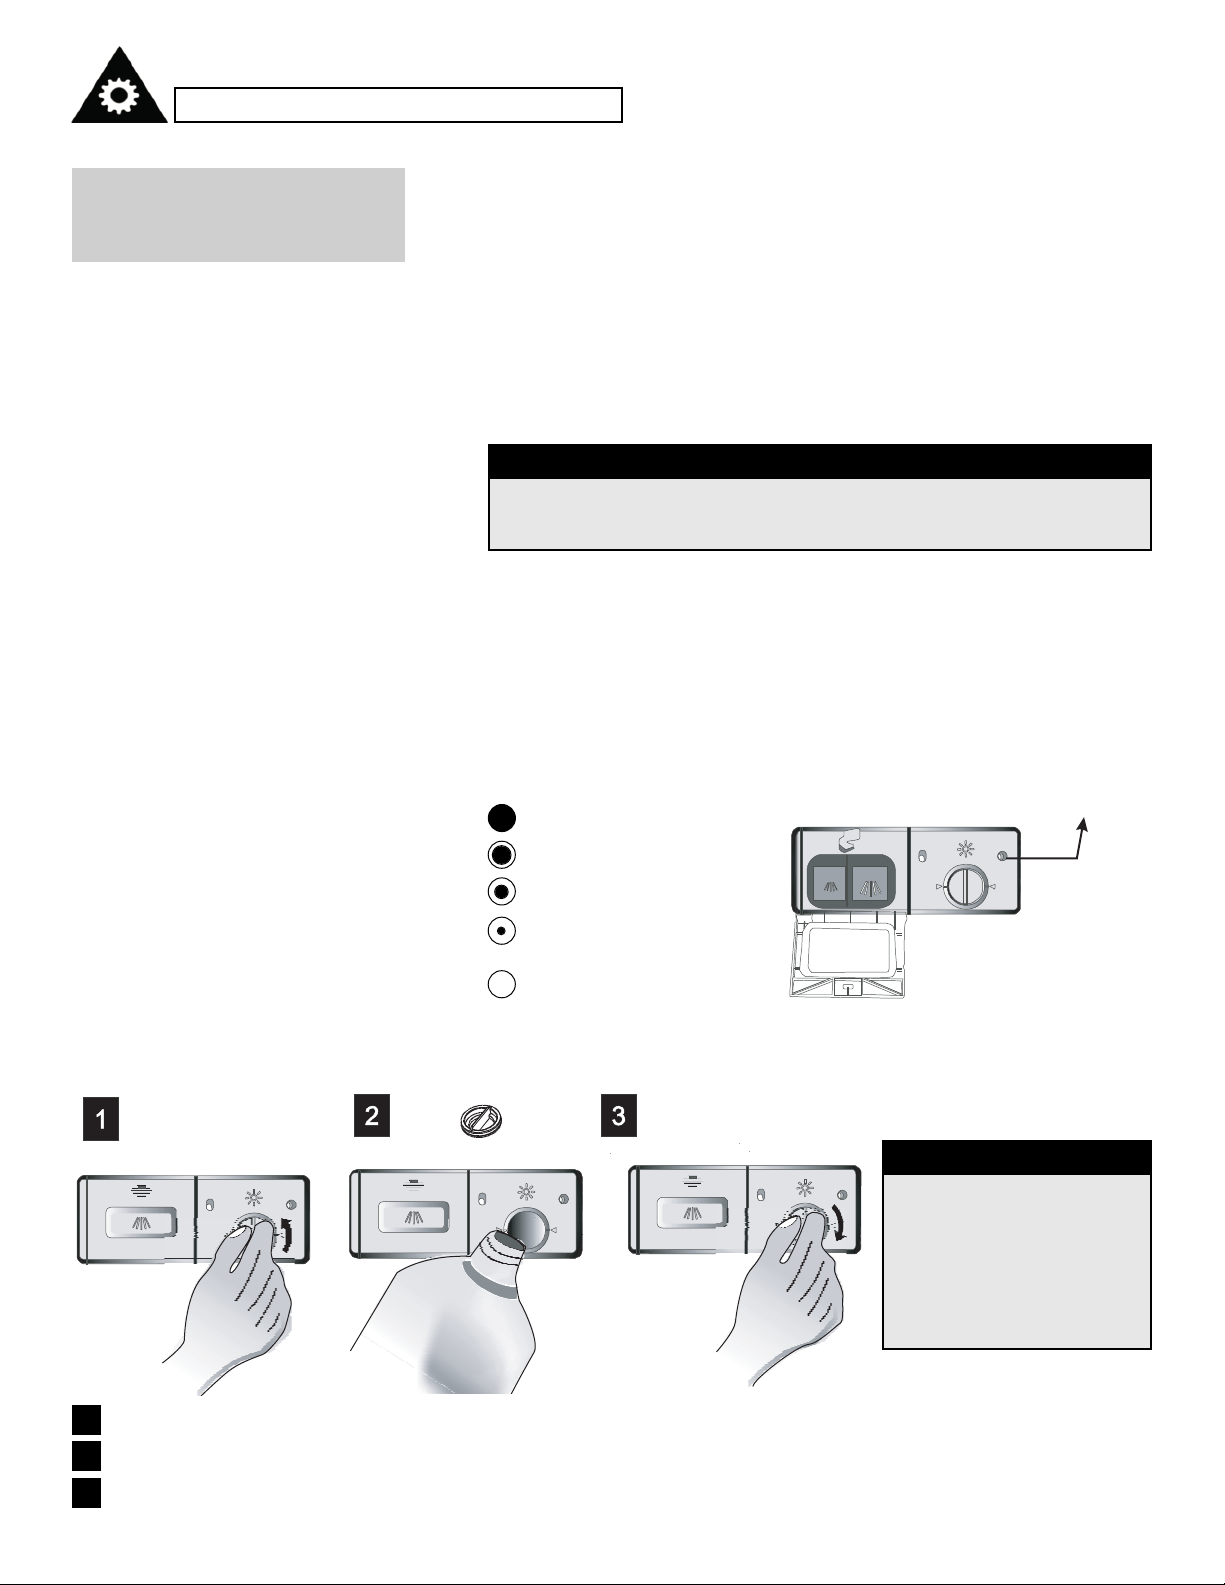
A. FILL THE RINSE
AID DISPENSER
RINSE AID DISPENSER
The rinse aid is released during the final rinse to prevent water from forming droplets on your dishes that can leave spots and streaks. It also
improves drying by allowing water to sheet off the dishes. Your dishwasher is designed to use liquid rinse aids. The rinse aid dispenser is located
inside the door next to the detergent dispenser. To fill the dispenser, open
the cap and pour the rinse aid into the dispenser until the level indicator
turns completely black. The volume of the rinse aid container is about
110ml.
FUNCTION OF RINSE AID
Rinse aid is automatically added during the last rinse, ensuring thorough
rinsing, and spot and streak free drying.
ATTENTION
Never fill the rinse aid dispenser with any other substances (e.g.
dishwasher cleaning agent, liquid detergent). This would damage
the appliance.
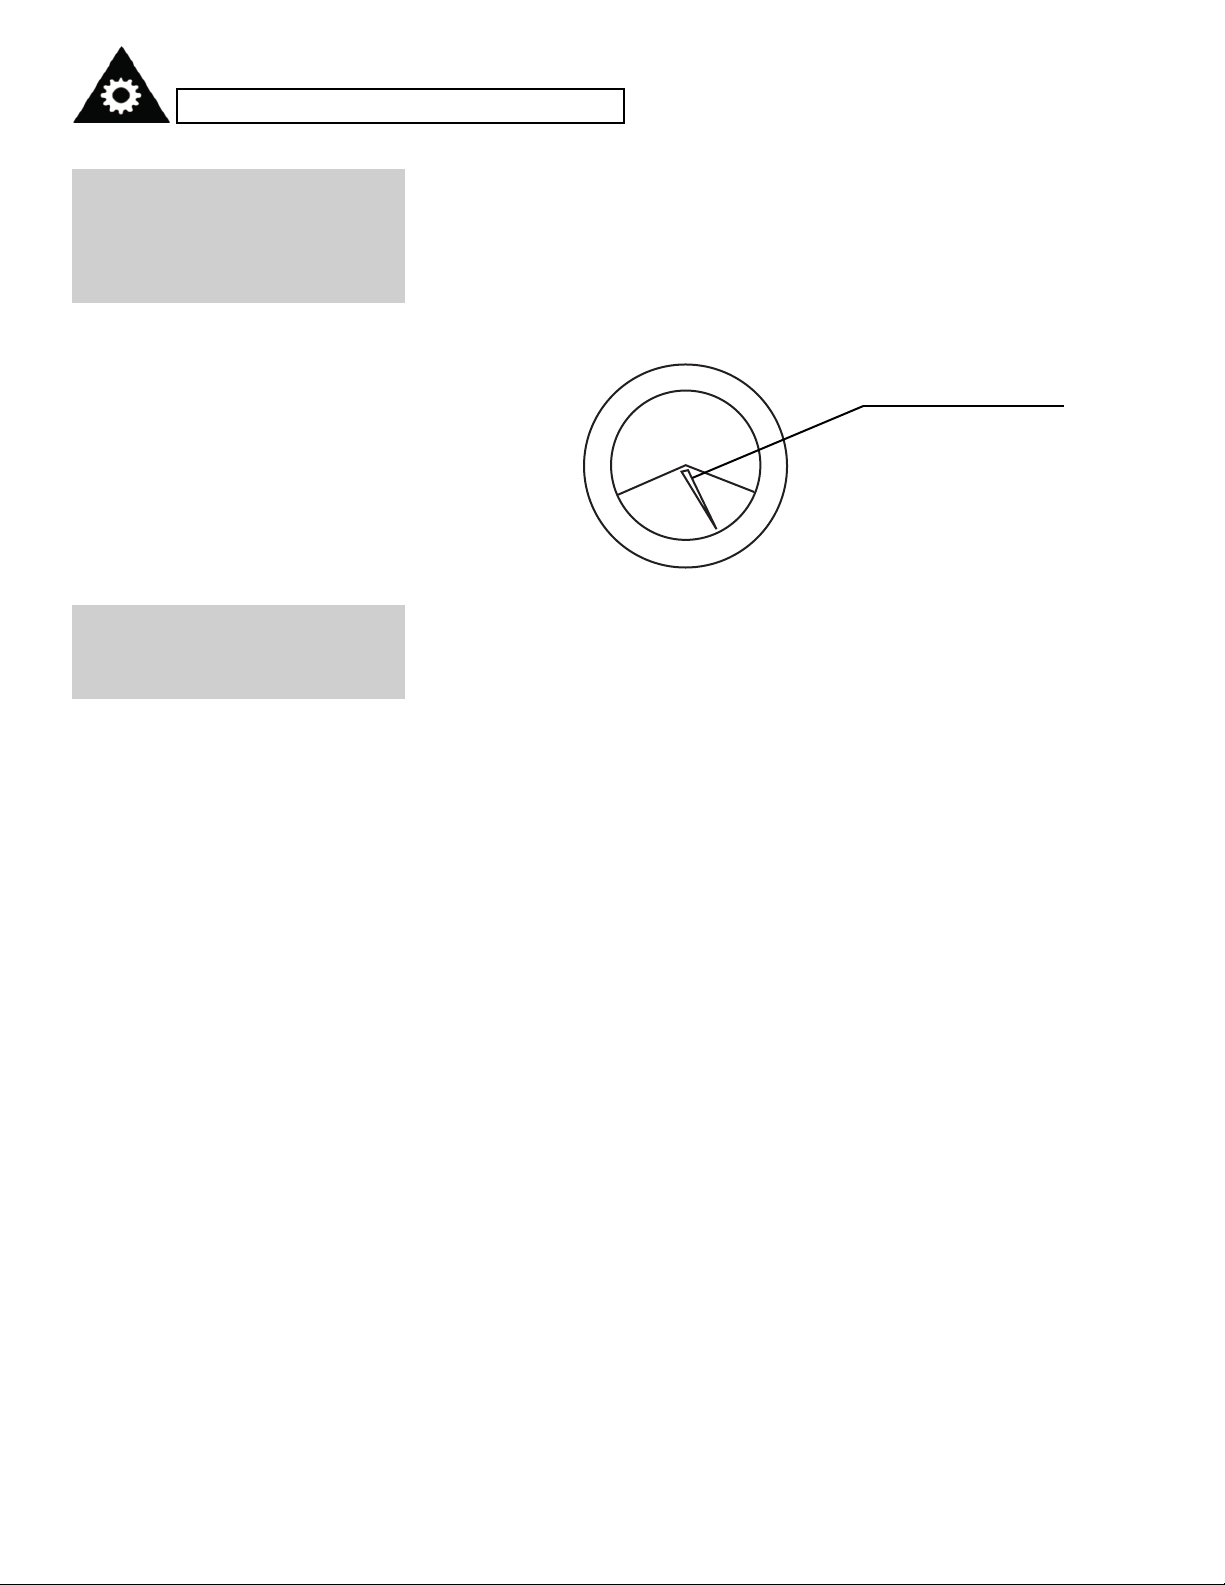
WHEN TO REFILL THE RINSE DISPENSER
The amount of rinse aid can be judged by the color of the optical level
indicator “C” located next to the cap. When the rinse aid container is full,
the whole indicator will be black. As the rinse-aid diminishes, the size of
the dark dot decreases. You should never let the rinse aid get below 1 / 4
full.
As the rinse aid diminishes, the size of the black dot on the rinse aid level
indicator changes, as illustrated below.
Full
3/4 full
1/2 full
1/4 full should refill
to eliminate spotting
Empty
C (Rinse-Aid Indicator)
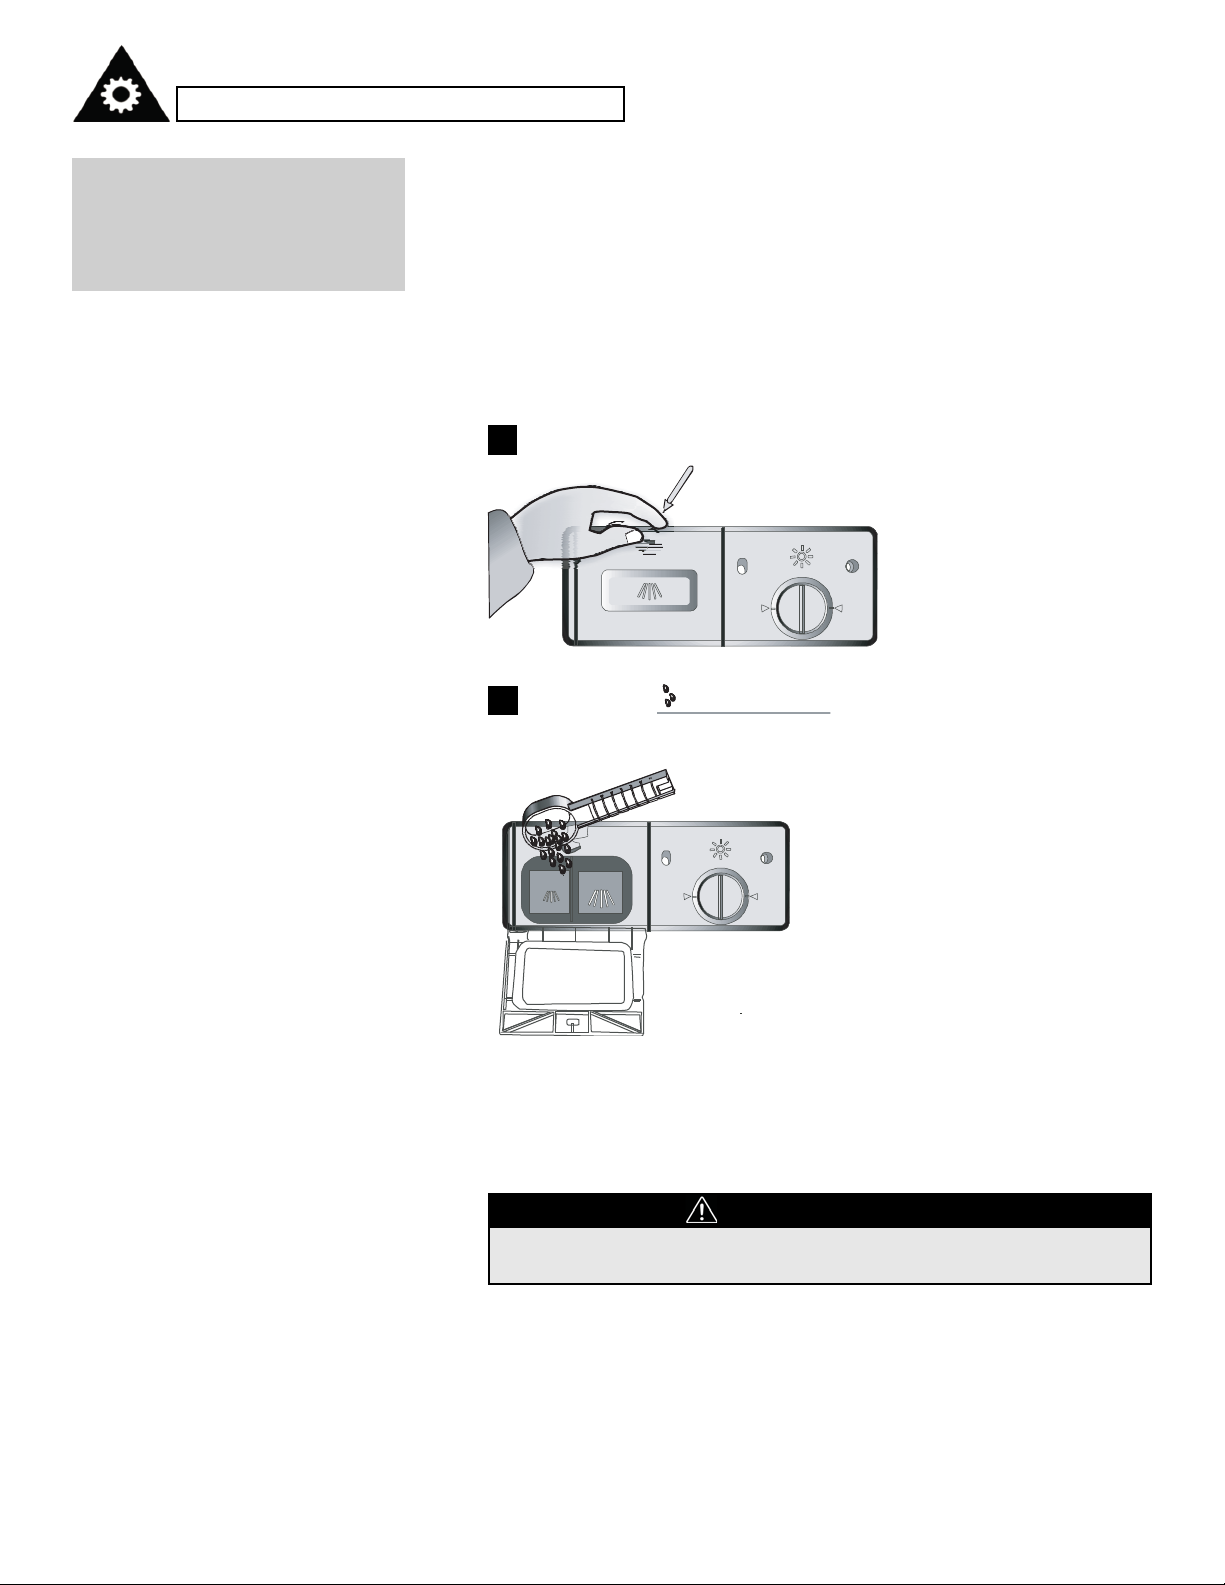
OPENING THE DISPENSER
1
2
3
To open the dispenser, turn the cap to the "open" (left) arrow and lift it out.
Pour the rinse aid into the dispenser, being careful not to overfill.
Replace the cap by inserting it aligned with "open" arrow and turning it to the closed (right) arrow.
ATTENTION
Clean up any rinse aid
spills during filling with
an absorbent cloth to
avoid excessive foaming
during the next wash.
Don't forget to replace
the cap before you close
dishwasher door.
6
Operating Instructions
PRIOR USING FOR THE FIRST TIME
ADJUSTING RINSE AID DISPENSER
The rinse aid dispenser has four settings. The recommended setting is on
"3". If the dishes still are not drying properly or are spotted, adjust the dial
to the next higher number on "4".
NOTE: Increase the dose if there are drops of water or lime spots on the
dishes after washing. Reduce it if there are sticky white stains on your
dishes or a blue tinged film on glassware or knife blades.
Adjust lever (Rinse)
B. FUNCTION OF
DETERGENT
PROPER USE OF DETERGENT
• Detergents with chemical ingredients are necessary to clean dirt from
kitchenware and remove it from the dishwasher.
• Use only detergent specifically made for use in dishwashers. Keep your
detergent fresh and dry.
• Don't put powder detergent into the dispenser until you're ready to begin
a new cycle
DETERGENTS
There are 3 types of detergents.
1. With phosphate and with chlorine
2. With phosphate and without chlorine
3. Without phosphate and without chlorine
CONCENTRATED DETERGENT
Based on their chemical composition, the detergents can be split in two
basic types:
• conventional, alkaline detergents with caustic components.
• low alkaline concentrated detergents with natural enzymes.
The use of “normal” washing programs in conjunction with concentrated
detergents reduces pollution and is good for your dishes; these wash programs are specially matched to the dirt-dissolving properties of the
enzymes of the concentrated detergent. For this reason normal wash programs in which concentrated detergents are used can achieve the same
results that can otherwise only be achieved using “intensive” programs.
A. FILL THE RINSE
AID DISPENSER
(cont.)
MAX
1
2
4
3
7
Operating Instructions
PRIOR TO USING FOR THE FIRST TIME
DETERGENT DISPENSER
The dispenser must be refilled before the start of each wash cycle following the instructions provided in the Wash Cycle Table . Your dishwasher
uses less detergent and rinse aid than a conventional dishwasher.
Generally, only one tablespoon of detergent is needed for a normal wash
load. Also, more heavily soiled items need more detergent. Always add
the detergent just before starting the dishwasher, otherwise it could get
damp and will not dissolve properly.
AMOUNT OF DETERGENT TO USE
B. FUNCTION OF
DETERGENT
(cont.)
1
2
Push latch to open
Detergent Powder
NOTE:
• If the lid is closed: press release button. The lid springs open.
• Always add the detergent just before starting each wash cycle.
• Only use brand name detergents for the dishwasher.
WARNING
Dishwasher detergent is corrosive! Take care to keep it out of
reach of children.
8
Operating Instructions
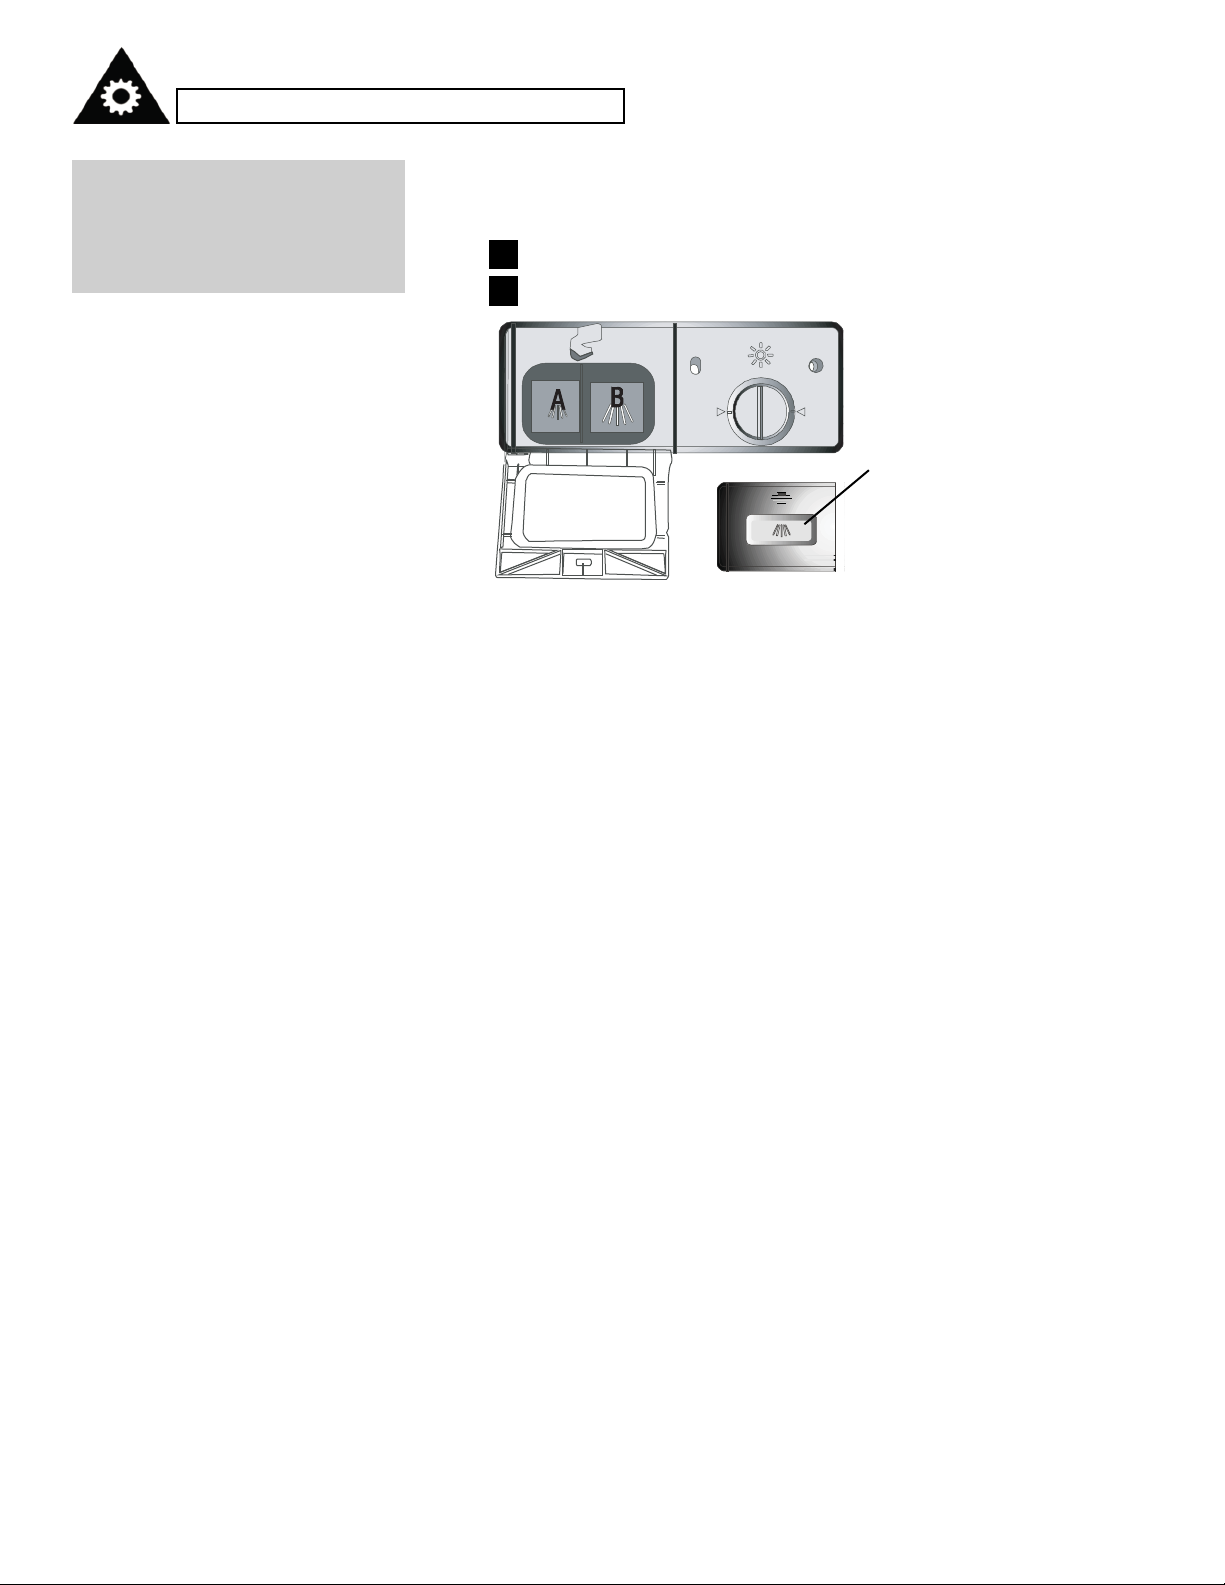
PRIOR TO USING FOR THE FIRST TIME
ADD DETERGENT
Fill the detergent dispenser with detergent. The marking indicates the dosing levels, as illustrated below:
B. FUNCTION OF
DETERGENT
(cont.)
A
B
Can hold 15g of detergent.
Can hold 25g of detergent.
Please see the manufacturers recommendations for the amount of detergent to use as stated on the detergent packaging.
Close the lid and press until it locks in place.
If the dishes are heavily soiled, place an additional detergent dose in the
pre-wash detergent chamber. This detergent will take effect during the
pre-wash phase.
NOTE:
• Please be aware, that according to the level of soiling and the specific
hardness of water differences are possible.
• Please read the manufacturer's recommendations on the detergent
packaging.
Pre-wash Compartment

9
Operating Instructions
LOADING THE DISHWASHER BASKETS
• Consider buying utensils which are identified as dishwasher-proof.
• For particular items, select a program with a low temperature.
• Do not take glass and cutlery out of the dishwasher immediately after
the program (wash cycle) has ended as they may be hot.
RECOMMENDATION
WASHING CUTLERY/
DISHES
ARE NOT SUITABLE
• Cutlery with wooden, horn china
or mother-of-pearl handles.
• Plastic items that are not heat
resistant.
• Older cutlery with glued parts that
are not temperature resistant.
• Bonded cutlery items or dishes.
• Pewter or copper items.
• Crystal glass
• Steel items prone to rusting.
• Wooden platters
• Items made from synthetic fibres.
ARE OF LIMITED SUITABILITY
• Some types of glasses can
become dull after a large number of
washes.
• Silver and aluminum parts have a
tendency to discolour during/after
washing.
• Glazed patterns may fade if
machine washed frequently.
BEFORE/AFTER
LOADING THE DISHWASHER BASKETS
(For best performance of the dishwasher, follow these loading guidelines.
Features and appearance of baskets and cutlery baskets may vary from
your model).
Scrape off any large amounts of leftover food. Soften remnants of burnt
food in pans. It is not necessary to rinse the dishes under running water.
Place objects in the dishwasher the following way:
1. Items such as cups, glasses, pots/pans, etc. are face down.
2. Curved items, or those with recesses, should be loaded at a slant so
the water can run off.
3. All utensils are loaded securely and cannot tip over.
4. All utensils are placed in the way that the spray arms can freely
rotate during washing.
NOTE: Very small items should not be washed in the dishwasher as they
could easily fall out of the basket.
• Dishes and cutlery must not lie inside one another or cover each other.
• To avoid damage to glasses, they must not touch.
• Load large items which are most difficult to clean into the basket.
• Long bladed knives stored in an upright position are a potential hazard!
• Long and/or sharp items of cutlery such as carving knives must be posi-
tioned horizontally in the rack (basket).
• Please do not overload your dishwasher. This is important for good
results and for reasonable energy consumption.

10
Operating Instructions
LOADING THE DISHWASHER BASKETS
LOADING THE
BASKET
Position the dishes and cookware so that they will not get moved by
the spraying water.
Cups
Serving bowl
Glasses
Saucers
Fruit bowl
Oval platter
Dinner plates
Bread and
butter plates
Cutlery basket
Plate racks in basket
The basket is fitted with plate racks which
can be stowed horizontal if required.
2
5
6
IN
1
2
1
1
5
6
3
7
9
4
65
8
11
Operating Instructions
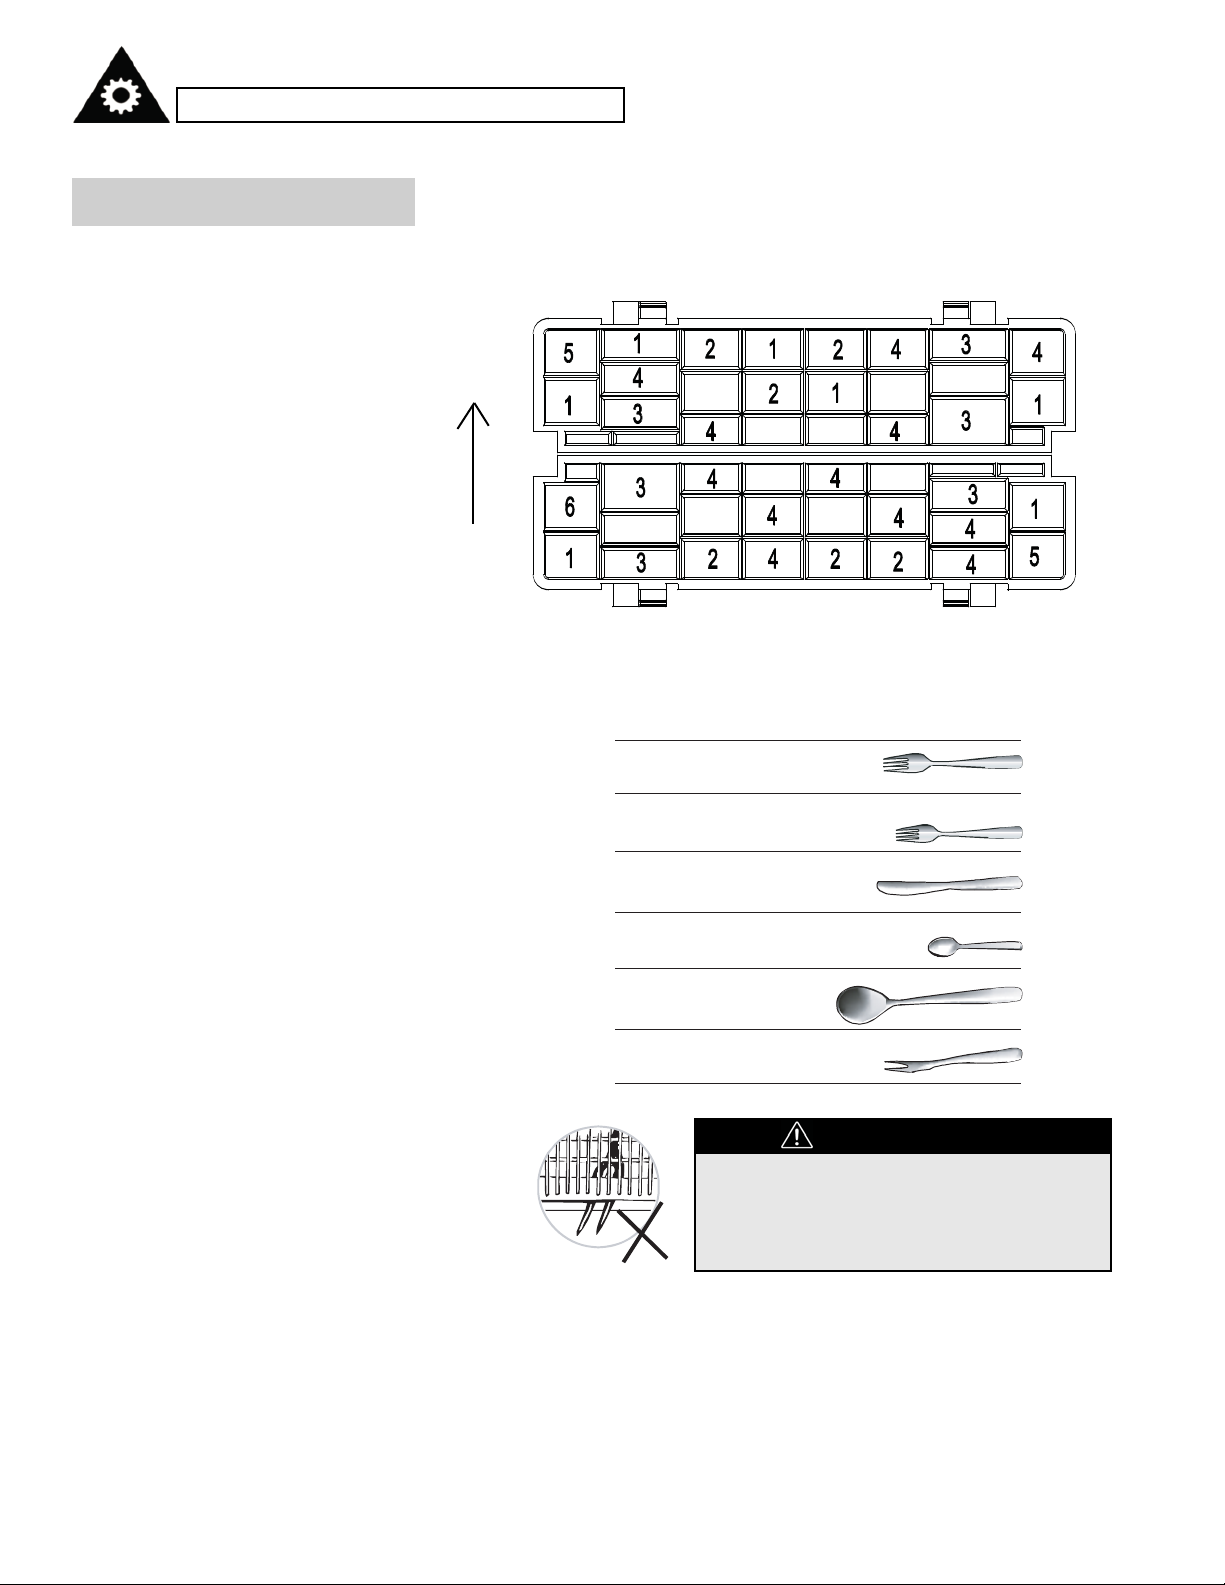
LOADING THE DISHWASHER BASKETS
CUTLERY BASKET
Cutlery should be placed in the cutlery basket with handles at the bottom.
If the rack has side baskets, spoons should be loaded individually into the
appropriate slots, especially long utensils should be placed in the horizontal position at the front of the upper basket as shown.
IN
1 Dinner forks
2 Salad forks
3 Knives
4 Teaspoons
5 Serving spoons
6 Serving forks
WARNING
• Do not let any item extend through the
bottom.
• Always load sharp utensils with the
sharp end down!
For personal safety and a top quality clean, place your cutlery in the
basket:
• Make sure they do not nest together
• Place silverware with handles-down.
• Place knives and other potentially dangerous utensils handles-up.

12
Operating Instructions
STARTING A WASHING PROGRAM
WASH CYCLE TABLE
• ( * ) Means: Need to fill rinse in the Rinse-Aid Dispenser.
• AHAM DW-1-2005 : This program is the test cycle. The rinse aid
dispenser position 6 is recommended.
Program
Cycle selection
Information
Description
of cycle
Detergent
pre/main
Running
time(min)
Energy
(Kwh)
Water
(L)
Rinse
Aid
For the heaviest soiled loads,
such as pots, pans, casserole
dishes and dishes that have
been sitting with dried food
on them for a while.
For normally soiled loads,
such as pots, plates,glasses
and lightly soiled pans.
standard daily cycle.
For lightly soiled loads,such
as plates,glasses,bowls and
lightly soiled pans.
For lightly soiled loads, such as
glasses, crystal and fine china.
A shorter wash for lightly soiled
loads that do not need drying.
Use for rinsing dishes, glasses
and silverware that will not be
washed right away.
Pre-wash
Pre-wash (50°C)
Wash (55°C)
Wash (50°C)
Rinse
Rinse (68°C)
Drying
Pre-wash
Pre-wash
Wash (52°C)
Rinse
Rinse (65°C)
Drying
Pre-wash
Pre-wash (50°C)
Wash (50°C)
Rinse
Rinse (60°C)
Drying
Wash (45°C)
Rinse
Rinse (50°C)
Pre-wash
Pre-wash (50°C)
Wash (50°C)
Rinse
Rinse (55°C)
Pre-wash
Main-wash
Heavy
Normal
AHAM DW-1-2005
Light
Glass
Speed
Rinse
3/25g
3/25g
3/25g
15g
15g
/
100
110
75
20
45
24
0.47
0.38
0.32
0.22
0.29
0.02
14.5
10.8
12
7
12
5
*
*
*
*
TURNING ON THE
APPLIANCE
Starting a washcycle...
Draw out the basket (see the section entitled Loading the Dishwasher).
Pour in the detergent and insert the plug into the socket. The power
supply is 120V/60 Hz.
Make sure that the water supply is turned on to full pressure.
• Press the program button to select the program you need.
• Normal-> Light-> Glass-> Rinse-> Speed-> Heavy
• Then, press the Start/Reset button to start the dishwasher.
NOTE: When you press the Start/Reset button to pause a wash cycle, the
display time will stop blinking and the program will pause. It remains in
this stage of the cycle until you restart it again.
*

13
Operating Instructions
STARTING A WASHING PROGRAM
You can modify the washing program when the dishwasher just runs for a
short time. Otherwise, the detergent may have already been released,
and the appliance may have already drained the wash water. If this is the
case, the detergent dispenser must be refilled.
To change the washing program, press the Start/Reset button to pause
the working program, and then press and hold the program button for at
least 3 seconds before choosing a different program and resuming the
wash cycle.
NOTE: If you open the door during washing, the machine will pause.
When you close the door and press the Start/Reset button the washing
resumes 10 seconds after you close the door.
The lights show the state of the dishwasher:
a) All phase lights off-----------------------------------On stand by
b) The display has no blinking-----------------------Being paused
c) The display is blinking------------------------------Running
CHANGING THE
PROGRAM
FORGOT TO ADD A
DISH?
A forgotten dish can be added any time before the detergent cup
opens.
1
Press the Start/Reset button to pause the cycle.
2
Open the door a little to stop the washing.
3
After the spray arms stop working, you can open the door completely
4
Add forgotten dishes.
5
Close the door
6
Press the Start/Reset button, the dishwasher will run after 10 seconds.
AT THE END OF THE
WASH CYCLE
When the working cycle has finished, the buzzer will sound for 8 seconds,
then stop. Turn off the appliance using the ON/OFF button, shut off the
water supply and open the door of the dishwasher. Wait a few minutes
before unloading the dishwasher to avoid handling the dishes and utensils
while they are still hot and more susceptible to breakage. They will also
dry better.
• Turn off the dishwasher
All the phase lights are off!
1.Switch off the dishwasher by pressing the ON/OFF button.
2.Turn off the water tap!
• Open the door carefully
Hot dishes are sensitive to impact. The dishes should therefore be
allowed to cool down around 15 minutes before being removed from the
appliance. Open the dishwasher's door, leave it ajar and wait a few minutes before removing the dishes. This way they will be cooler and the drying will be improved.
• Unloading the dishwasher
It is normal that the dishwasher is wet inside.
WARNING
It is dangerous to open the door during operation because the hot
water may scald you.

Installation Instructions
The installation position of the dishwasher should be near the existing inlet and drain hoses and power cord. One side of the cabinet
sink should be chosen to facilitate the connection of drain hoses to
the dishwasher.
14
INSTALLATION
PREPARATION
POSITIONING
THE APPLIANCE
Position the appliance in the desired location on the countertop.
Make sure the unit is level and is close enough to electrical and water
supplies.
ABOUT POWER
CONNECTION
WARNING
For personal safety:
• DO NOT USE AN EXTENSION CORD OR AN ADAPTER PLUG
WITH THIS APPLIANCE.
• DO NOT, UNDER ANY CIRCUMSTANCES, CUT OR REMOVE THE
GROUNDING CONNECTION FROM THE POWER CORD.
ELECTRICAL REQUIREMENTS
Please look at the rating label to know the voltage rating and connect the
dishwasher to the appropriate power supply. Use the required 15 amp
fuse, time delay fuse or circuit breaker recommended and provide separate circuit serving only for this appliance.
ELECTRICAL CONNECTION
Ensure that the voltage and frequency of the power being used corresponds to those on the rating plate. Only insert the plug into an electrical
socket which is grounded properly. If the electrical socket to which the
appliance must be connected is not appropriate for the plug:
• Have the socket replaced by a qualified professional.
• Avoid using adaptors because they could cause overheating and burns.
WARNING
Ensure appliance is properly grounded before use.
GROUNDING INSTRUCTIONS
This appliance must be grounded. In the event of a malfunction or breakdown, grounding will reduce the risk of electric shock by providing a path
of least resistant electric current. This appliance is equipped with
a cord that has an equipment-grounding conductor and a grouding plug.
The plug must be plugged into an appropriate outlet that is installed and
grounded in accordance with all local standards and requirements.
WARNING
• Improper connection of the equipment grounding conductor can
result in the risk of an electric shock.
• Check with a qualified electrician or service representative if you
are in doubt as to whether the appliance is properly grounded.
• Do not modify the plug provided with the appliance. If the plug
does not fit properly in the outlet, please have a qualified electrician install a proper outlet.

15
Installation Instructions
WATER
CONNECTION
Back View
Rear of dishwasher:
1. Drain Port
2. Power Cord
3. Inlet Port
Your dishwasher comes equipped with a 'quick connect' assembly
(includes inlet and drain hose). The faucet adapter must be installed on
the faucet before you can connect the dishwasher. This adapter is included inside your dishwasher. The faucet adapter is compatible with faucets
inclusive of either male (outside) or female (inside) threaded faucet connections.
QUICK CONNECT ASSEMBLY
Drain Hose
1. Drain port connection
2. Quick connect connection
Inlet Hose
3. Inlet port connection
4. Quick connect connection
Faucet Adapter
5. Faucet adapter
6. Faucet washer
Quick Connect
7. Pressure relief valve
8. Faucet adapter connection
9. Locking collar
10. Inlet hose connection
11. Drain hose connection
WARNING
In order to avoid water staying in the inlet hose, please turn off the
faucet after using.

16
Installation Instructions
WATER
CONNECTION
(cont)
1. Screw the faucet adapter onto (or into) the faucet tap. Check for leaks
(use Teflon tape to eliminate if necessary).
2. Connect the six-sided connection of the drain hose to the drain port
connection on the back of the dishwasher cabinet. Do not over-tighten (to
avoid damage to threads).
3. Connect the star-shaped connection of the inlet hose to the inlet port
on the back of the dishwasher cabinet. Do not over-tighten (to avoid damage to threads).
4. Connect the circular connection of the drain hose onto the longer (bottom) male connection on the quick connect.
5. Connect the circular connection of the inlet hose onto the shorter (top)
male connection on the quick connect.
6. Attach the quick connect onto the faucet adapter, by pulling down the
outer locking collar on the quick connect, while pushing the quick connect
upward onto the faucet adapter.
7. When the quick connect snaps onto the faucet adapter, release the
locking collar. Verify the connection is secure.
8. Slowly open the hot water line and check for any sign of water leaks at
all hose connections. If leaks are located, immediately turn off the water
supply and repair the hose connections.
IMPORTANT
1. Once you open the water supply line, (even if it is closed immediately thereafter), the inlet hose will be pressurized.
2. To relieve water pressure from inside the inlet hose, first make
sure the water line (faucet) is closed, then press and hold the red
pressure relief button on the quick connect until the flow of water
stops.
WARNING
Failure to relieve water pressure before disconnecting the quick
connect from the faucet will result in back pressure over-spray.
The temperature of the incoming water can be very hot and can
cause severe burns and/or scalding.
DANGER
Do not let children disconnect the dishwasher. Close supervision
of children is always important around appliances.
NOTE: Hard water conditions will adversely affect the washing perform-
ance of your dishwasher. Hard water conditions will also contribute to
'lime' (white film substance) deposits and/or 'scaling' on the stainless steel
surface of the dishwasher tub and heater element, located in the sump
underneath the removable filter screen. To minimize these conditions, it is
recommended to operate/rinse the inside of the dishwasher (empty) using
1 cup of white vinegar once a week.
DISCONNECTING YOUR DISHWASHER
1. Shut off the water supply at the faucet.
2. Disconnect the power supply cord
3. Relieve water pressure
4. Pull down on the quick connect collar

Installation Instructions
The following things should be checked before starting the
dishwasher:
STARTING THE
DISHWASHER
1
The dishwasher is level and fixed properly
2
3
There is no leakage at the connections of the conducts.
4
The wires are tightly connected
5
The power is turned on
6
Make sure the inlet and drain hoses are not twisted
All packing materials and removable printings should be taken out from
the dishwasher
Care and maintenance
The filter prevents larger remnants of food or other objects from
getting inside the pump.
The filter system consists of a coarse filter, a flat (main filter) and a micro
filter (fine filter).
FILTERING
SYSTEM
Main filter
1
Food and soil particles trapped by this filter are pulverized by a special jet
on the spray arm and washed down to drain.
Fine filter
2
This filter holds soil and food residue in the sump area and
prevents it from being deposited on the dishes during a wash cycle.
Course filter
3
Larger items, such as pieces of bone or glass, that could block the drain
are trapped in the coarse filter. To remove the items caught by the filter,
gently squeeze the tap on the top of this filter and lift it out.
FILTER ASSEMBLY
The filter efficiently removes food particles from the wash water, allowing it
to be recycled throughout a cycle. For best performance and results, the
filter assembly must be regularly cleaned. For this reason, it is a good
idea to remove the larger food particles trapped in the filter after each
wash cycle by rinsing the filter and cup under running water. To remove
the filter assembly, pull upward on the cup handle in the upward direction.
Note: It is recommended that you remove and rinse the filters after
each wash cycle.
17
3
2
1
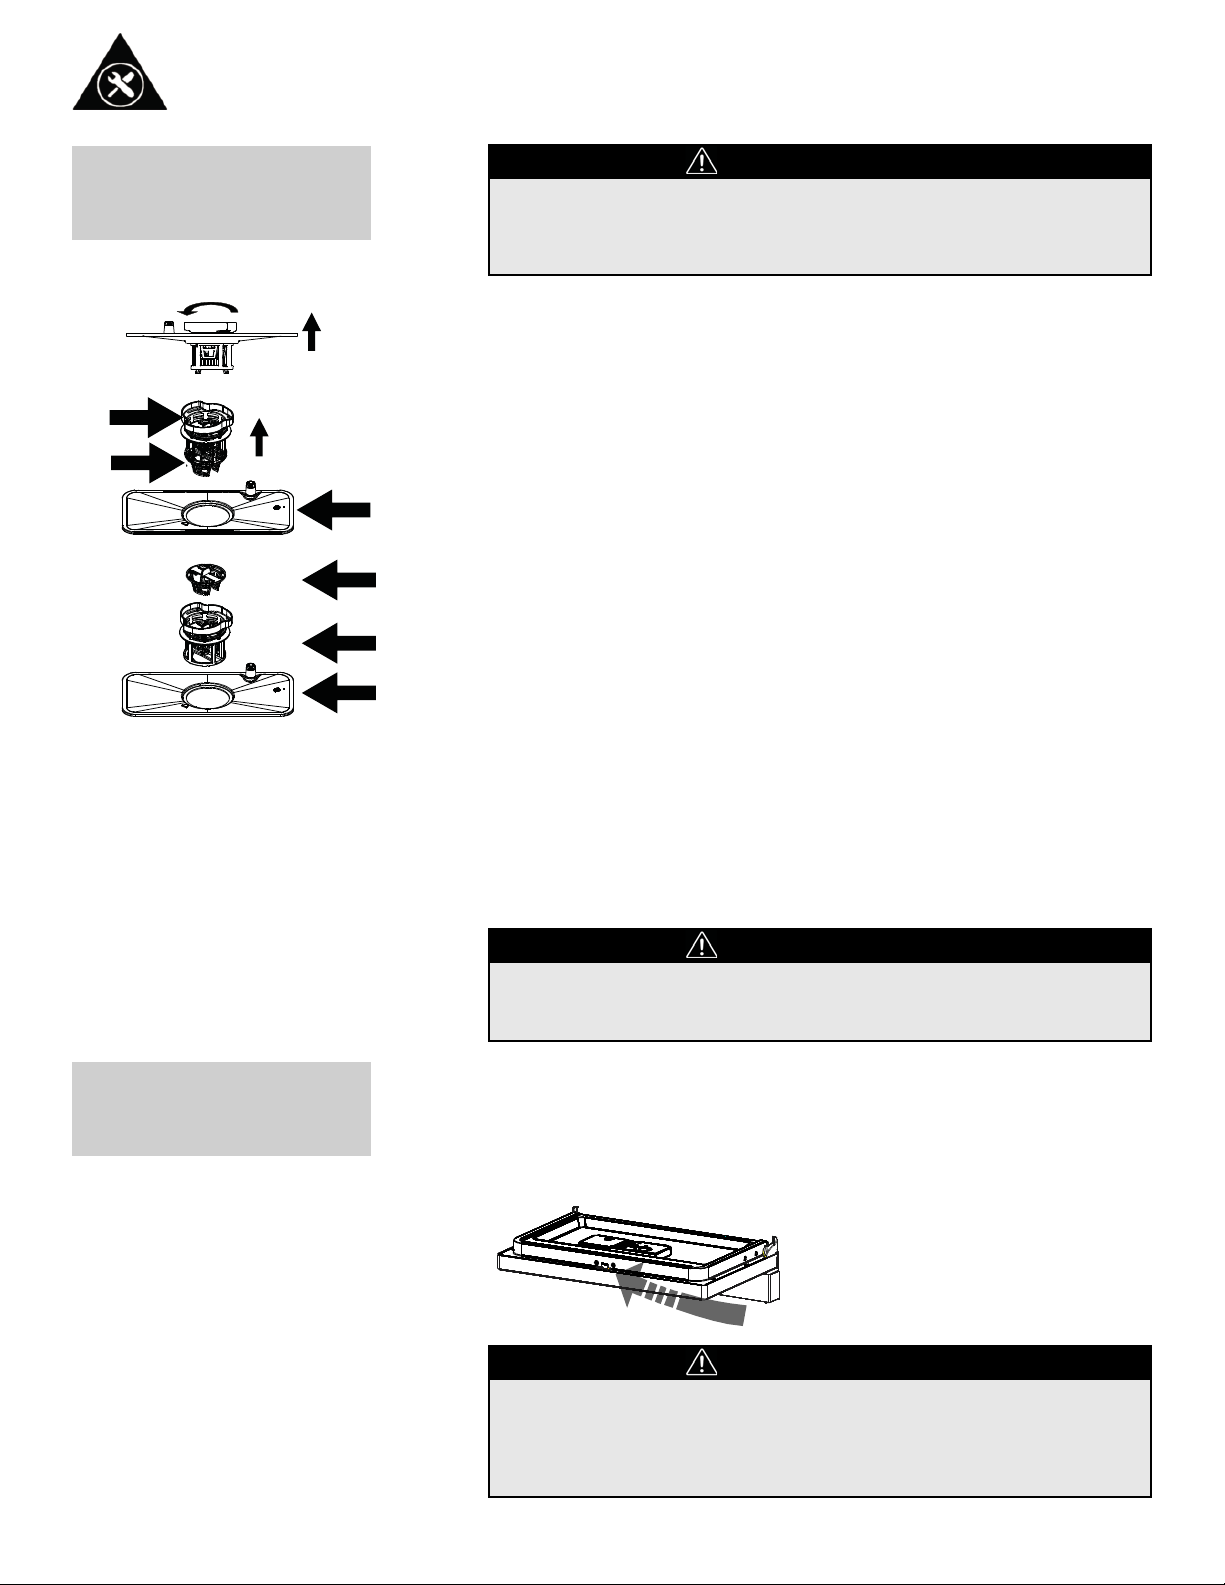
Care and Maintenance
FILTERING
SYSTEM (cont)
WARNING
• Never run the dishwasher without the filters in place.
• The dishwasher must never be used without the filters.
• Improper replacement of the filter may reduce the performance
level of the appliance and damage dishes and utensils.
Step 1. Rotate the fine filter counter-
clockwise
Step 2. Lift it up.
Step 3. Lift the main filter up.
NOTE: If you follow the steps from Step1 to Step 3, the filter system will
be removed; if you follow the steps from Step 3 to Step 1, the filter system
will be installed.
- Inspect the filters for blockage every time the dishwasher is used.
- By unscrewing the coarse filter you can remove the filter system.
Remove any food remnants and clean the filters under running water.
- The entire filter assembly should be cleaned once a week.
CLEANING THE FILTER
To clean the coarse filter and the fine filter, use a cleaning brush.
Reassemble the filter parts and reinsert the entire assembly in the dishwasher, by positioning it in the proper location and pressing downward.
WARNING
When cleaning the filters, handle with care. Otherwise, the filters
could be damaged and the performance of dishwasher could be
reduced.
CARING FOR THE
DISHWASHER
The control panel can be cleaned by using a lightly dampened cloth and
dried thoroughly. For the exterior use a good quality appliance polish wax.
Never use sharp objects, scouring pads or harsh cleaners on any part of
the dishwasher.
CLEANING THE DOOR
To clean the edge around the door,
you should use only a soft damp cloth.
To avoid penetration of water into the
door lock and electrical components,
do not use a spray cleaner of any
kind.
WARNING
• Never use a spray cleaner to clean the door panel as it may damage the door lock and electrical components.
• Abrasive agents or some paper towels should not be used
because of the risk of scratching or leaving spots on the stainless
steel surface.
18
3
2
1
3
2
1
 Loading...