

Page 1
DISHWASHER
Owner’s Manual............................1 - 14
OWNER’S MANUAL
MANUEL DU PROPRIÉTAIRE
MANUAL DEL PROPIETARIO
LAVE-VAISSELLE
Manuel du propriétaire................15 - 28
LAVAPLATOS
Manual del propietario................29 - 42
MODEL • MODÈLE • MODELO
DDW1804EW
DDW1804EBSS
DANBY PRODUCTS LIMITED, ONTARIO, CANADA N1H 6Z9
DANBY PRODUCTS INC., FINDLAY, OHIO, USA 45840
2018.02.08
Page 2

Welcome
Welcome to the Danby family. We are proud of our quality products and we believe in
dependable service. We suggest that you read this owner’s manual before plugging in your new
appliance as it contains important operation information, safety information, troubleshooting and
maintenance tips to ensure the reliability and longevity of your appliance.
Visit www.Danby.com to access self service tools, FAQs and much more. For additional assistance
call 1-800-263-2629.
Note the information below; you will need this information to obtain service under warranty.
You must provide the original purchase receipt to validate your warranty and receive service.
Model Number: _________________________________________________
Serial Number: _________________________________________________
Date of Purchase: _______________________________________________
Need Help?
Before you call for service, here are a few things you can do to help us serve you better.
Read this owner’s manual:
It contains instructions to help you use and maintain your appliance properly.
If you receive a damaged appliance:
Immediately contact the retailer or builder that sold you the appliance.
Save time and money:
Check the troubleshooting section at the end of this manual before calling. This section
will help you solve common problems that may occur.
1-800-26- Danby
(1-800-263-2629)
1
Page 3

Important Safety Information
READ AND FOLLOW ALL SAFETY INSTRUCTIONS
GROUNDING INSTRUCTIONS
This appliance must be grounded. In the event of an
electrical short circuit, grounding reduces the risk of
electrical shock by providing an escape wire for the
electrical current.
This appliance is equipped with a cord that has a
grounding wire and grounding plug. The power
cord must be plugged into an outlet that is properly
grounded. If the outlet is a 2-prong wall outlet, it
is your responsibility to have it replaced with a
properly grounded 3-prong wall outlet. The serial
rating plate indicates the voltage and frequency the
appliance is designed for.
WARNING - Improper use of the grounding
plug can result in a risk of electric shock.
Consult a qualifi ed electrician or service agent
if the grounding instructions are not completely
understood, or if doubt exists as to whether the
appliance is properly grounded.
DO NOT USE AN EXTENSION CORD
SAFETY REQUIREMENTS
• Children should be supervised to ensure that
they do not play with the appliance.
• Do not stand, sit or lean on the door or dish
rack. Do not place heavy items on the door
when it is open.
• Do not touch the heating element during or
immediately after use.
• Do not operate the appliance unless all
enclosure panels are properly installed.
• Open door carefully during operation, water
may leak. Proceed with caution as water may be
hot.
• Do not wash plastic items unless they are
marked dishwasher safe.
• Use only detergent and rinse additives that are
designed for an automatic dishwasher.
Do not connect your appliance to extension cords
or together with another appliance in the same wall
outlet. Do not splice the power cord. Do not under
any circumstances cut or remove the third ground
prong from the power cord.
If the power supply cord is damaged, it must be
replaced by the manufacturer, its service agent or
similar qualifi ed person in order to avoid hazard.
Ensure that component parts are replaced with like
components and that servicing is done by factory
authorized service personnel to minimize the risk of
possible ignition due to incorrect parts or improper
service.
This appliance is not intended for use by persons
(including children) whose physical, sensory or
mental capabilities may be different or reduced,
or who lack experience or knowledge, unless such
persons receive supervision or training to operate
the appliance by a person responsible for their
safety.
• Never use soap, laundry detergent or hand
washing detergent in the dishwasher.
• Keep detergent and rinse aid out of the reach of
children.
• Check that the detergent dispenser is empty after
completion of the wash cycle.
• Dishwasher detergents are strongly alkaline and
can be extremely dangerous if swallowed. Avoid
contact with the skin and eyes.
• Remove the door of the appliance when
removing from service or discarding.
• The hot water supply line pressure must be
between 0.04 - 1 MPa.
• The water supply inlet temperature should be
between 48 - 65°C (120 - 149°F).
SAVE THESE INSTRUCTIONS!
2
Page 4

INSTALLATION INSTRUCTIONS
ACCESSORIES
1. ST3.5*9 screws for the installation brace (x2)
2. ST3.9*13 screws for the kick plate (x2)
3. ST4*14 screws for the installation brace (x2)
4. Condensation strip
5. Installation brace (x2)
6. Adjustment caps (x2)
7. Kick plate
8. Cable tie to secure the drain hose
ENCLOSURE
The installation location must have a solid fl oor
that is able to support the appliance when it is fully
loaded and fi lled with water. The location must be
within 9.8 feet (3 meters) of a sink with easy access
to the water supply, the drain and an electrical
outlet. The location must have enough space in
front of it for the door to open to 90° so that the
dishwasher can be loaded.
1
2
3
4
90 r
32.5 inches
(82.5 cm)
22.8 inches
(58 cm)
5
6
7
8
17.7 inches
(45 cm)
90 r
The installation enclosure should have the following
dimensions: 17.7 inches (45 cm) wide by 32.5
inches (82.5 cm) tall by 22.8 inches (58 cm) deep.
There should be less than 5 mm between the top of
the dishwasher and the cabinet and the dishwasher
door should align with the cabinet face.
If necessary, cut holes in the surrounding cabinetry
to provide access the water and power connections.
WATER CONNECTION INSTRUCTIONS
The hot water supply line pressure must be between
0.04 - 1 MPa.
The water supply inlet temperature should be
between 48 - 65°C (120 - 149°F). Ensure that the
water temperature does not exceed 65°C (149°F) to
avoid damage to dishes.
Ensure that the circuit breaker and the water supply
valve are turned off before connecting the hot water
supply line to the dishwasher.
The power cable will connect to the junction box on
the front right side of the appliance. The hot water
supply line will connect to the water port on the
front left side of the appliance.
Hot water
supply line
Power cable
135 - 185 mm
(5 1/3 - 7 1/3”)
Note: It is recommended to only use soft water in
the appliance to achieve the best washing results.
3
Page 5

INSTALLATION INSTRUCTIONS
Connecting the hot water line
Run the hot water line through the channel on the
bottom left side of the appliance. Make sure the hot
water line is not twisted and then connect it to the
appliance using an elbow joint. Use Tefl on tape or
sealing compound on the connection to avoid leaks.
Do not over tighten the 90° elbow. This can damage
the water inlet and cause a leak.
Connecting the drain line
The drain hose will connect to the drain pump on
the bottom of the appliance. Run the drain line in
the same channel on the bottom of the appliance
as the hot water line. Ensure there is nothing inside
the drain hose and that it does not tear during the
installation process.
There are a number of different ways to connect
the drain hose depending on the confi guration of
the sink. Review the different ways of connecting
the drain system and choose a method that best
suits the application. Local codes may require the
installation of an air gap kit. Check with a qualifi ed
plumber if there is any doubt.
1. Air gap
2. Air gap with garbage disposal
3. No air gap
4. No air gap with garbage disposal
Use a rubber connector to connect drain hoses and
hose clamps on all connection points.
Secure the drain hose to the sink wall using cable
ties or other fastening materials. If not fastened, the
drain hose may bend causing drainage problems.
1
2
3
4
The drain hose internal diameter is 0.8 inches (21
mm).
The top of the drain hose must be less than 39
inches (100 cm) from the fl oor.
If the drain hose is not looped up the water may
siphon out during a wash cycle.
Any bends in the drain hose must be supported so
that the hose will not kink or bend.
4
Page 6
INSTALLATION INSTRUCTIONS
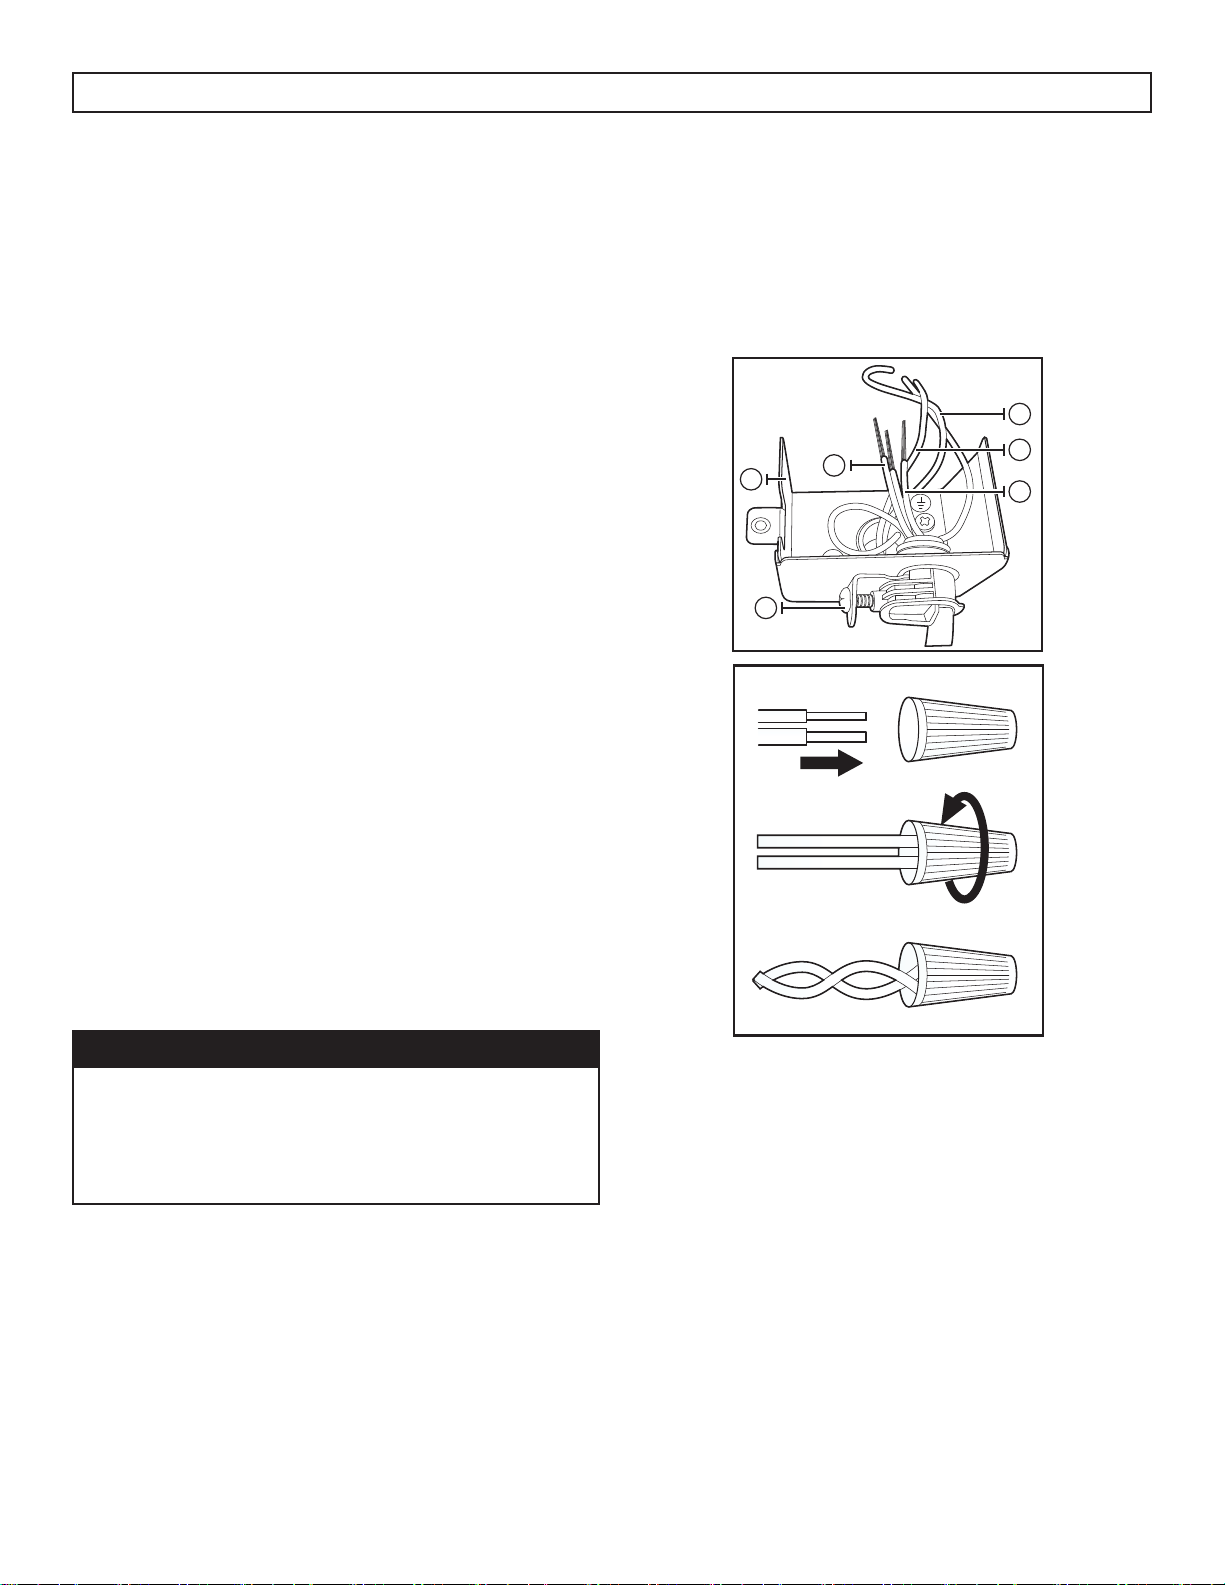
WIRING CONNECTION INSTRUCTIONS
Before connecting the power cable to the
dishwasher, make sure the circuit breaker is off.
In the junction box located at the front bottom right
of the dishwasher, fi nd the three power wires from
the dishwasher including the grounding line.
Pass the power cable through the strain relief, and
then into the junction box.
Connect the black wire of the dishwasher to the
black wire of the power cable by inserting both into
a wire nut and then rotating the wire connector.
Connect the white wire to the white wire and the
green to the green in the same manner.
Recheck each wire to ensure it is connected correctly
and securely.
Each colored wire should be connected to the
corresponding wire of the same color.
1. Junction box
2. Power cable
3. Black to black
4. White to white
5. Green to green (ground to ground)
6. Strain relief
1
6
2
3
4
5
White should be connected to white, black to black,
and green to green.
Replace the junction box cover on the dishwasher.
Recheck each wire to ensure it is connected
correctly and securely. Each coloured wire should
be connected to the corresponding wire of the same
colour.
WARNING ELECTRICAL SHOCK HAZARD
To avoid electrical shock, do not work on an
energized circuit. Doing so could result in serious
injury or death. To avoid a fi re hazard, make sure
electrical work is properly installed. Only qualifi ed
electricians should perform electrical work.
5
Page 7
INSTALLATION INSTRUCTIONS
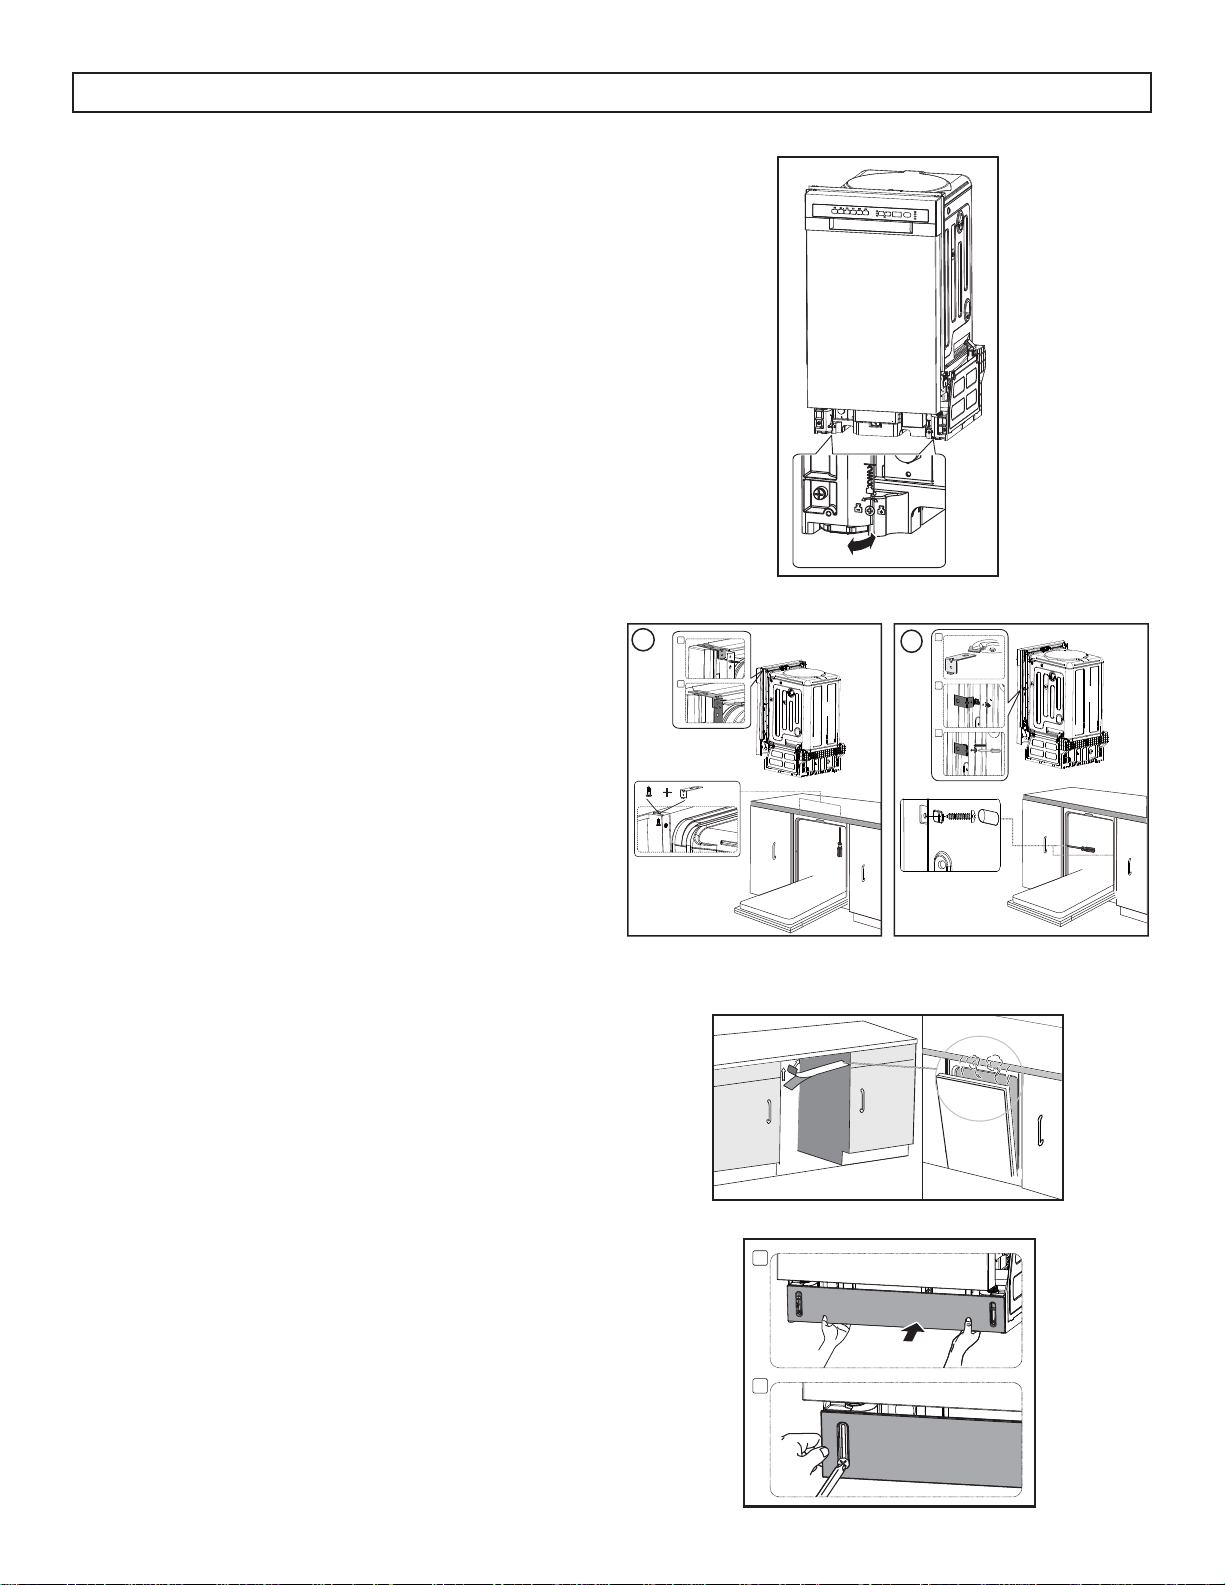
LEVELING INSTRUCTIONS
Ensure that the appliance is level before placing it
into the enclosure. The rear foot can be adjusted
from the front of the dishwasher by turning. Use
a fl at screwdriver to adjust the front feet until the
appliance is level.
INSTALLATION BRACES
The appliance must be secured in place with the
installation braces. There are two different ways to
use the braces.
A. Normal work surface
Put the installation hook into the slot of the side
plane and secure it to the work surface with the
wood screws.
B. Marble or granite counter top
Fix the side with the screw. Place the screw covers
over the internal screws to protect them from water.
CONDENSATION STRIP
Attach the condensation strip under the work
surface of the cabinet. Ensure that the strip is fl ush
with the edge of the work surface.
1
A
2
1
B
2
3
TOE KICK INSTALLATION
Install the toe kick on the bottom of the appliance.
1
2
6
Page 8
OPERATING INSTRUCTIONS
CONTROL PANEL
3 4
A
1
2
B
C
D
E
F
G
H
I
J
K
L
6 7 8
1. Power button: Use to turn the appliance on or off.
2. Handle
3. Programs: The light will illuminate to show which program has been selected.
A: Heavy wash
B: Normal wash
C: ECO wash
D: Glass wash
E: Rapid wash
F: Rinse
5
9
4. Features: The light will illuminate to show which features have been selected.
G: High temp wash - water temperature will be maintained at 60°C (140°F)
H: Heated dry - the heater will operate during the drying cycle
I: Sanitize - water temperature will be maintained at 69°C (156°F)
J: Rinse aid indicator light - light will illuminate when the rinse aid dispenser is empty
K: Cycle end indicator light - light will illuminate when the program is fi nished
L: Faucet warning indicator light - light will illuminate when the appliance is not receiving enough
water; turn on the nearby water faucet to correct the water fl ow
5. Display screen: Shows the remaining running time in the current program.
6. Program button: Press to select the desired program.
7. Features button: Press to select the desired features.
8. Timed delay button: Press to set the desired time delay.
9. Start/Cancel button: Press to start the desired program. Press to cancel a program which it is in
operation.
7
Page 9
OPERATING INSTRUCTIONS
WASH CYCLE TABLE Press the program button to select the desired wash program.
Note: Cycle times are approximate and will vary based on the options selected.
Program Cycle Description Cycle Breakdown Running Time Water Use
Heavy For heavily soiled loads
such as pots and pans
Normal For normally soiled loads;
standard daily cycle
ECO Energy conserving cycle
for lightly soiled loads
Glass For lightly soiled
glassware
Pre-Wash
Wash (60°C)
Rinse (65°C)
Rinse (with sani 69°C)
Drying
Pre-Wash
Wash (50-55°C)
Rinse (58-60°C)
Rinse (with sani 69°C)
Drying
Pre-Wash
Wash (45-50°C)
Rinse (50-55°C)
Rinse (with sani 69°C)
Drying
Pre-Wash
Wash (48-50°C)
Rinse (50-55°C)
Drying
155 minutes 21.5 litres
(5.7 gallons)
100~130 minutes 10.5~21.5 litres
(2.8~5.7 gallons)
115 minutes 18 litres
(4.8 gallons)
105 minutes 18 litres
(4.8 gallons)
Rapid A fast cycle for lightly
soiled loads
Rinse Rinse cycle only Pre-Wash
Pre-wash
Wash (50°C)
Rinse (50°C)
Wash
SMART WASH SYSTEM
This appliance is equipped with a Smart Wash
System. When a partial load of lightly soiled dishes
is placed in the appliance, a wash cycle similar to a
short wash will automatically be performed.
When a full load of heavily soiled dishes is
placed in the appliance, a heavy wash cycle will
automatically be performed.
When a cycle is running, the remaining time could
suddenly increase or drop several minutes. This
indicates that the Smart Wash System has checked
the soil level and determined in additional water fi lls
are needed or if water fi lls can be deleted.
60 minutes 14 litres
(3.7 gallons)
20 minutes 7.5 litres
(2 gallons)
CHILD LOCK FUNCTION
Press and hold the features button and the time
delay button for three seconds to engage the child
lock function. The display screen will show a lock
icon and the buttons on the control panel will not
respond. Press and hold the features button and the
time delay button for three seconds to disengage the
child lock function.
8
Page 10
OPERATING INSTRUCTIONS
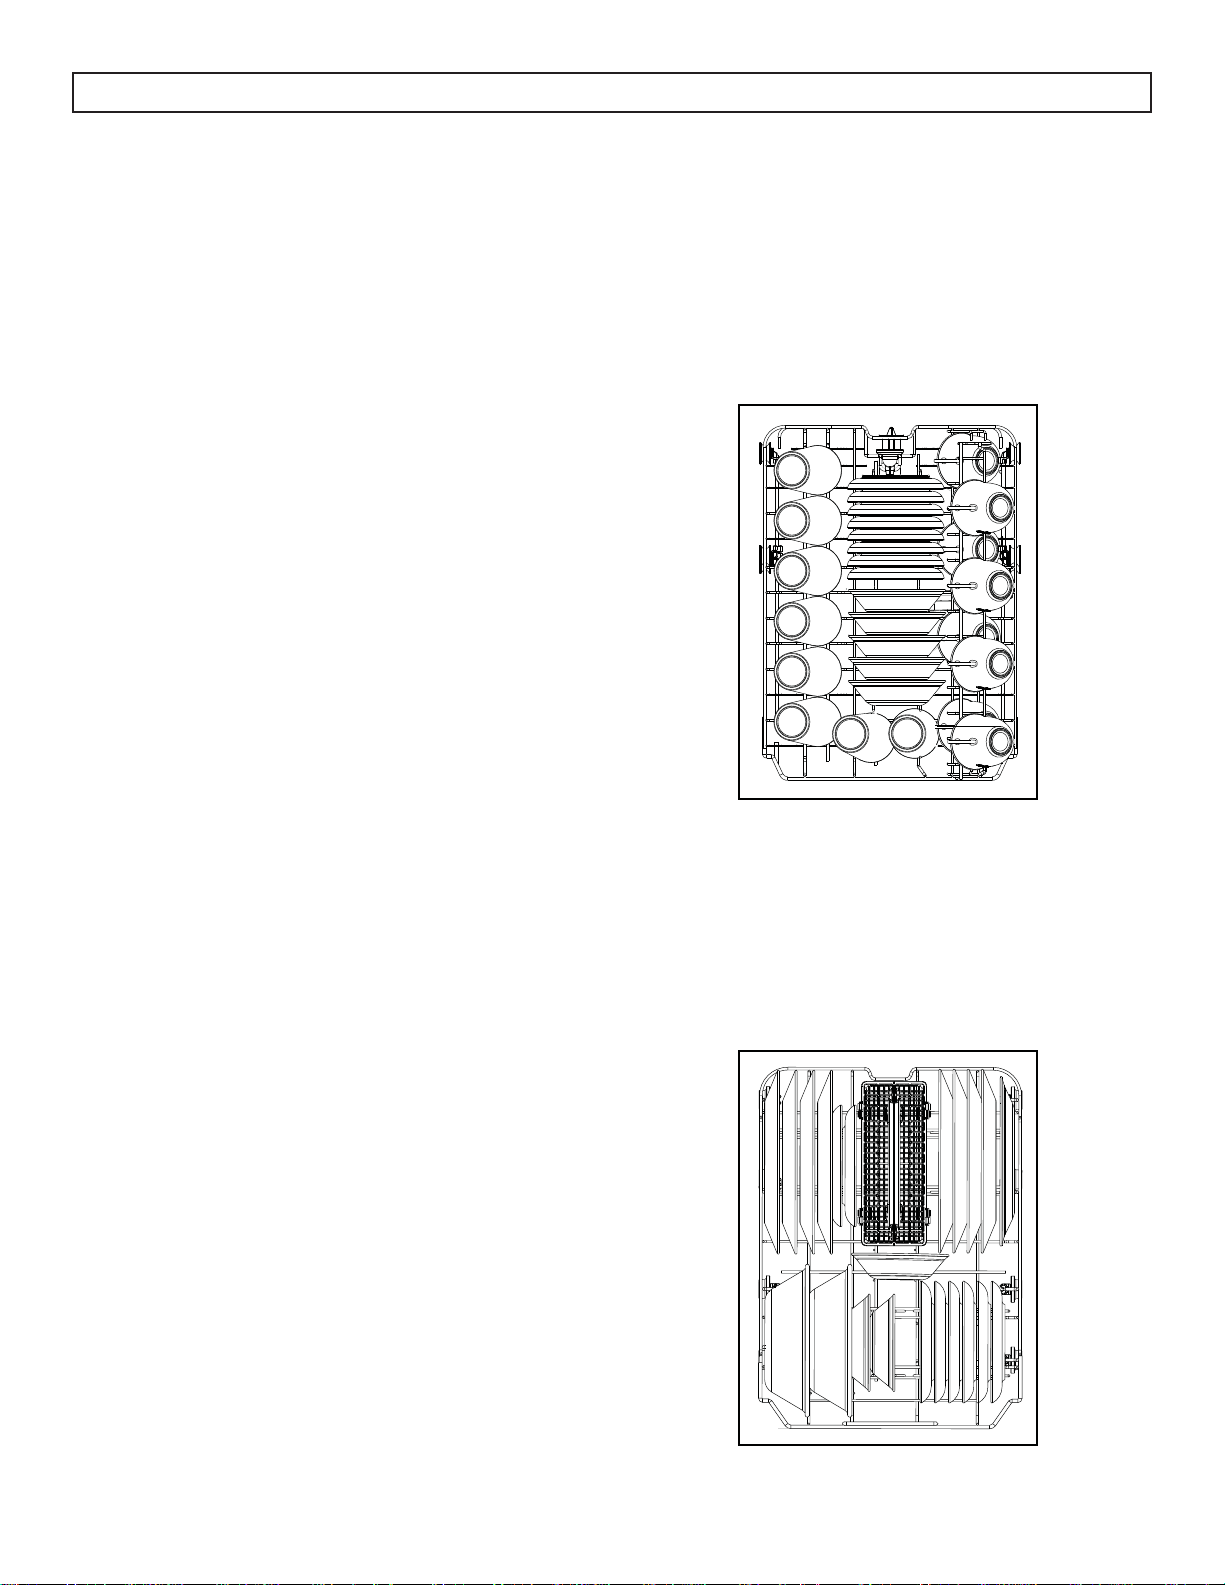
LOADING THE DISHWASHER
• Scrape all dishes to remove any large food
residue before placing in this appliance.
• Only place dishes in this appliance that are
marked as dishwasher safe.
• Use a mild detergent.
Items that should not be placed in a dishwasher
• Cutlery with wooden, bone china or mother-ofpearl handles.
• Plastic items that are not heat resistant.
• Items that have been repaired with glue that is
not heat resistant.
• Pewter, copper or steel items.
• Wooden platters.
• Items made from synthetic fi bers.
• Items with glazed patterns may fade if machine
washed frequently.
Tips for effi cient loading
• Load hollow items such as cups, glasses or
pans with the opening downward so that water
cannot collect in the container.
• Items must not lie inside one another or cover
one another.
• To avoid damage to glasses, they should not
touch.
• Sharp items of cutlery such as carving knives
should be loaded horizontally in the basket to
avoid injury when unloading.
• Do not overload the appliance.
LOADING THE CUTLERY BASKET
LOADING THE UPPER BASKET
The upper basket is designed for cups, glasses,
small plates, bowls and plastic items that are
marked dishwasher safe.
Make sure the loaded dishes do not interfere with
the rotation of the spray arm located on the bottom
of the upper basket.
LOADING THE LOWER BASKET
The lower basket is designed for dinner dishes, soup
bowls, plates, pots, lids, casserole dishes and plates.
Load large items such as pans and pots should be
loaded with their open sides facing downwards.
Cutlery should be placed in the cutlery basket with
the handles facing down. Ensure that cutlery items
do not nest inside of one another as this can affect
cleaning performance.
Sharp or pointed items should be placed in the
cutlery basket with points facing down to avoid
injury when unloading.
Do not place excessively small items into the
dishwasher as they could fall through the basket
and impact the operation of the appliance.
9
Page 11
OPERATING INSTRUCTIONS
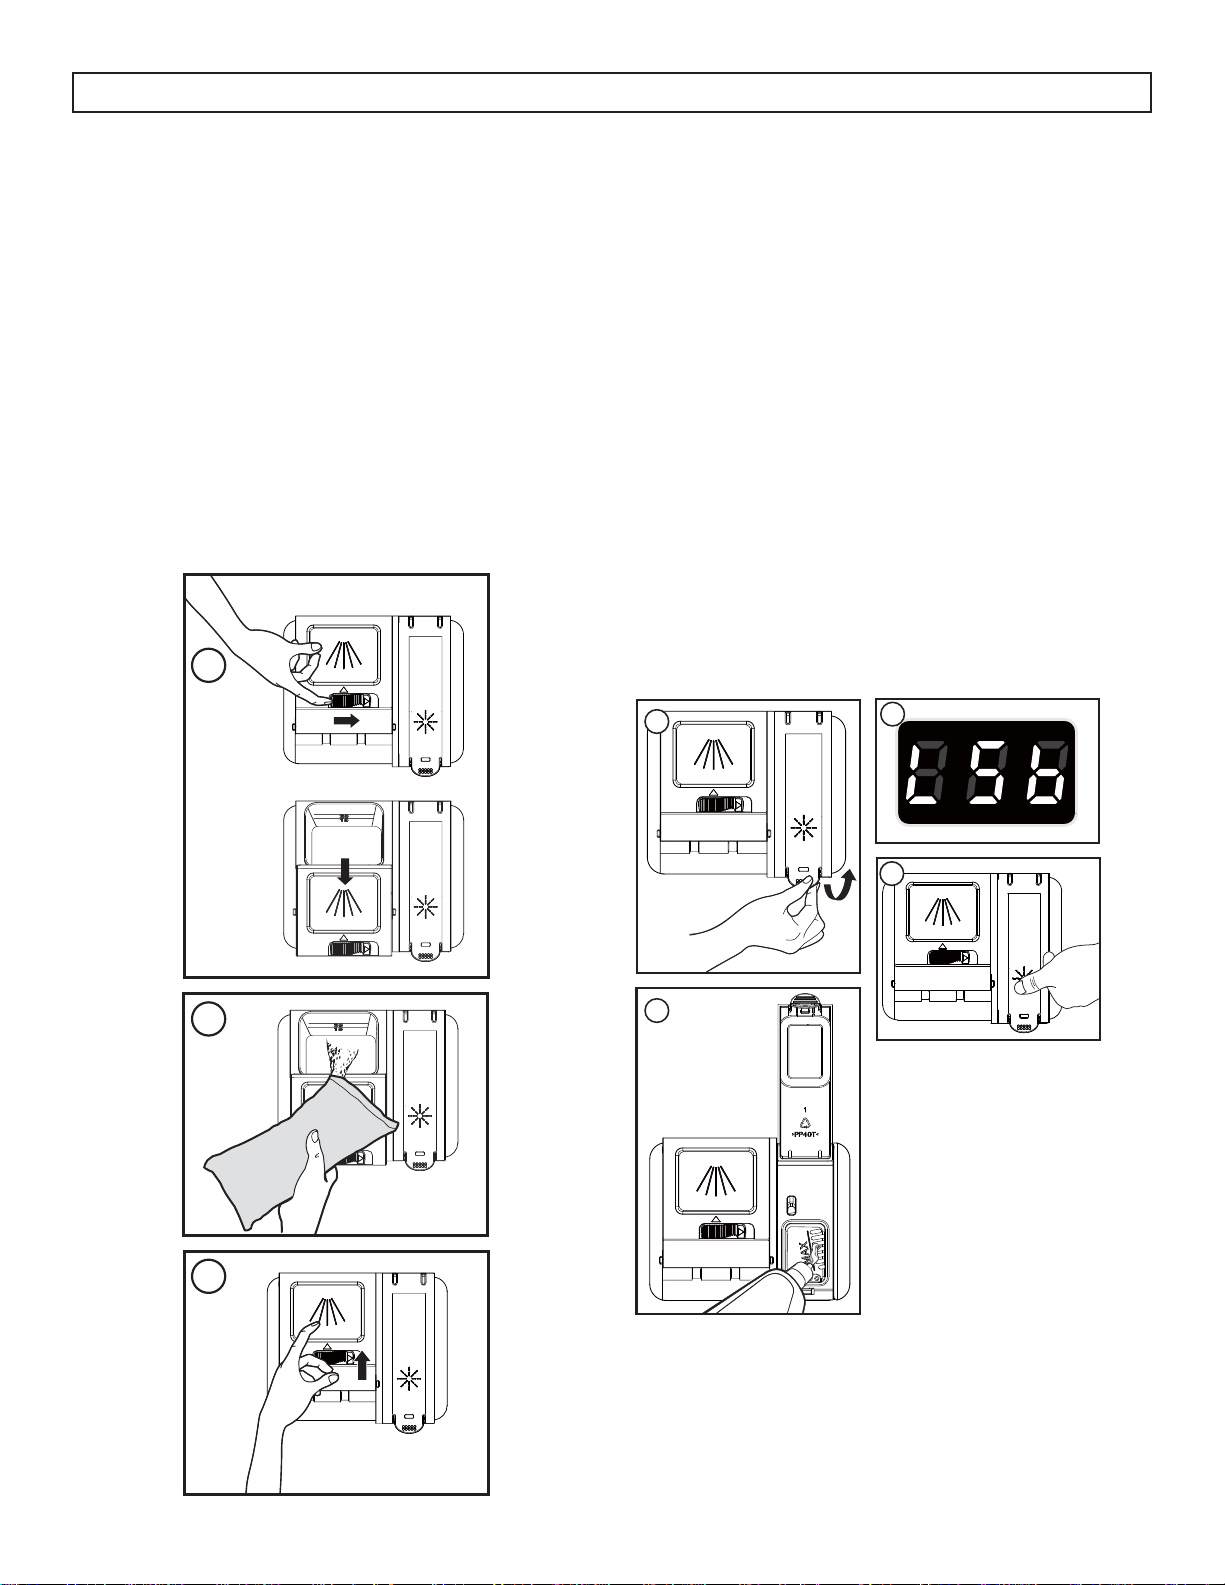
DETERGENT DISPENSER
The detergent dispenser must be fi lled before the
start of each wash cycle. Add the detergent just
before starting the wash cycle. Adding the detergent
to the appliance too soon can cause it to become
damp and it may not dissolve properly.
1. If the detergent dispenser is closed, press the
latch to open it.
2. Add the recommended amount of detergent to
the main detergent component.
3. Close the fl ap by sliding it to the left and
pressing down.
1
RINSE AID DISPENSER
Rinse aid can be used to prevent water droplets or
streaks from forming on dishes. The rinse aid will be
released automatically during the fi nal rinse. This
appliance is designed to use liquid rinse aid only.
Do not use a powdered rinse aid as it will clog the
reservoir opening. Do not put any other substance
in the rinse aid dispenser as this can damage the
appliance.
1. Open the rinse aid dispenser by lifting the lid.
2. Use the viewing port when fi lling the rinse aid
reservoir. Do not fi ll the reservoir above the full
level indicator.
3. If the display screen shows “LSb”, the rinse aid
dispenser is empty.
4. Close the rinse aid cap by pressing down.
1
3
2
3
4
2
10
Page 12

OPERATING INSTRUCTIONS
CARE & MAINTENANCE
STARTING A WASH CYCLE
1. Load the dishwasher as per the loading
instructions.
2. Add detergent and rinse aid as required.
3. Close the dishwasher door and press the power
button to turn on the appliance.
4. Press the Program button repeatedly to choose
the desired wash program. The programs will
cycle in the following order: Heavy -> Normal
-> ECO -> Glass -> Rapid -> Rinse
5. Press the Options button to select the desired
options.
6. Run the hot water faucet nearest the appliance
until the water is hot and then turn it off.
7. Press the Start/Pause button to begin the cycle.
Note: When a wash program is fi nished the
appliance will buzz 8 times and END will appear
on the display screen.
CLEANING
• After every wash, leave the door slightly open so
that moisture and odors are not trapped inside
the appliance.
• Only use a soft cloth and mild detergent to
clean the appliance. Never use solvents or
abrasive cleaning agents as this can damage the
appliance.
• To remove water spots from the interior of the
appliance, use a soft cloth dampened with a
small amount of vinegar.
• If the appliance will not be used for a long
period of time, it is recommended to run a
normal wash cycle with the dishwasher empty
and then leave the door open until the interior
of the appliance is completely dry. This will help
the door seals last longer and will help prevent
odors from forming inside the appliance.
• Clean the door seals with a damp sponge
regularly to prevent odors from food particles
that can become trapped in the door seal.
ADDING A FORGOTTEN DISH
A forgotten dish can be added to a running cycle
any time before the detergent dispenser has
opened. If the detergent has already been released
into the appliance, it is recommended not to add
more dishes as they will not receive adequate
cleaning.
To add a dish:
1. Open door slightly and wait a few seconds
until the wash action stops before completely
opening.
2. Add the forgotten item.
3. Close the door fi rmly to latch within 4 seconds
and the cycle will automatically resume.
Caution: Wait until wash action completely stops
before opening the door. Hot water may splash out
of the dishwasher and can cause injury.
11
Page 13
CARE & MAINTENANCE
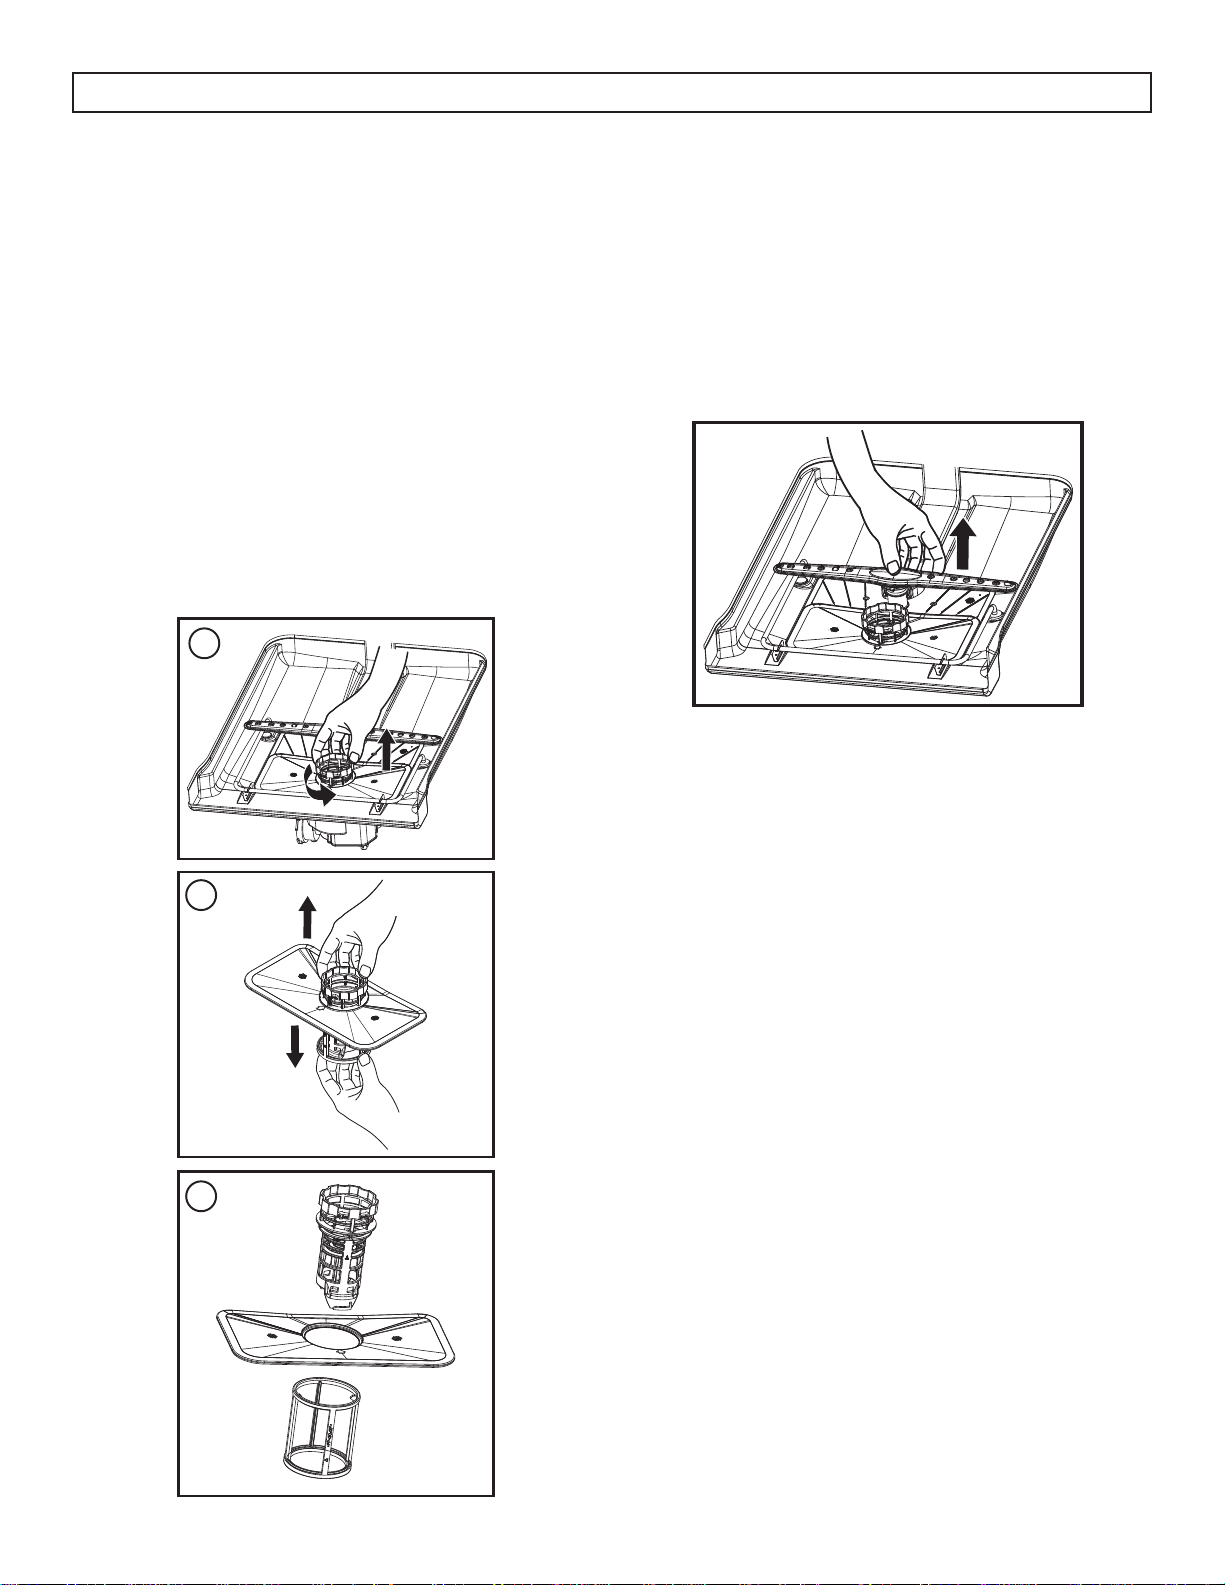
FILTER SYSTEM
The fi lter system removes food particles from
the wash water and traps them. It is highly
recommended to empty and clean the fi lters after
every wash cycle.
To clean the fi lter system:
1. Turn off the dishwasher. Turn the fi lter and lift
upwards to remove the fi lter system from the
appliance.
2. Rotate the fi lter insert counterclockwise to
unfasten and then detach the fi lter insert.
3. Rinse and clean the fi lters with water and
replace them inside the appliance.
1
SPRAY ARM
The spray arm can be removed from the appliance
by pulling gently upwards. Rinse the spray arm with
warm water to remove any debris that can clog the
nozzles. Replace the spray arm in the appliance by
pushing downward until it clicks into place. Ensure
that the spray arm movement is not impeded before
running another cycle.
ERROR CODES
2
3
E1: Water intake is restricted or water pressure is
too low.
E3: Malfunction of heating element
E4: Water overfl ow
If the appliance displays any error code, a power
reset may resolve the issue. Unplug the appliance,
wait approximately 5 minutes and then plug the unit
back in.
12
Page 14

TROUBLESHOOTING
Danby Consumer Care: 1-800-263-2629
Hours of operation:
Monday to Thursday 8:30 am - 6:00 pm Eastern Standard Time
Friday 8:30 am - 4:00 pm Eastern Standard Time
Information in this manual is subject to change without notice.
PROBLEM POSSIBLE CAUSE
No power • A fuse may be blown or the circuit breaker tripped
• Power surge
• Plug not fully inserted into the wall outlet
• Door not closed correctly
Water not drained from dishwasher • Kink in drain hose
• Filter clogged
• Drain pump malfunction
Detergent left in the dispenser • Dishes blocking dispenser from fully opening; unit may be
over loaded
Suds left in the appliance • Too much detergent or wrong kind of detergent
• Too much rinse aid
White fi lm or cloudiness on dishes or
interior tub
Noise inside the tub while running • The spray arm is hitting an item in the basket
Dishes are not clean • Dishes were loaded incorrectly
• Hard water minerals
• Too much detergent
• Not enough rinse aid
• An item has fallen out of the basket and is on the bottom of
the wash tub
• The wash program was not powerful enough
• Not enough detergent
• Items are blocking the spray arm; unit may be over loaded
• Filter clogged
Dishes are not drying • Dishes were loaded incorrectly
• Too many dishes were loaded
• Not enough rinse aid
• Dishes removed too quickly
13
Page 15

LIMITED “IN HOME” WARRANTY
LIMITED IN-HOME APPLIANCE WARRANTY
This quality product is warranted to be free from manufacturer’s defects in material and workmanship, provided that the unit is used under the normal operating
This quality product is warranted to be free from manufacturer’s defects in material and workmanship, provided that the unit is used
conditions intended by the manufacturer.
under the normal operating conditions intended by the manufacturer.
This warranty is available only to the person to whom the unit was originally sold by Danby Products Limited (Canada) or Danby Products Inc. (U.S.A.) (hereafter
This warranty is available only to the person to whom the unit was originally sold by Danby Products Limited (Canada) or Danby
“Danby”) or by an authorized distributor of Danby, and is non-transferable.
Products Inc. (U.S.A.) (hereafter “Danby”) or by an authorized distributor of Danby, and is non-transferable.
TERMS OF WARRANTY
Plastic parts are warranted for thirty (30) days from the date of purchase, with no extensions provided.
Plastic parts, are warranted for thirty (30) days only from purchase date, with no extensions provided.
First 12 months
First Year
To obtain service
To obtain
Service
Boundaries of
in-home service
During the first twelve (12) months, any functional parts of this product found to be defective, will be repaired or
replaced, at warrantor’s option, at no charge to the original purchaser.
During the rst twelve (12) months, any functional parts of this product found to be defective, will be repaired or replaced, at warrantor’s
option, at no charge to the ORIGINAL purchaser.
Contact the dealer where the unit was purchased, or contact the nearest authorized Danby service depot, where
service must be performed by a qualified service technician. If service is performed on the unit by anyone other
Danby reserves the right to limit the boundaries of “In Home Service” to the proximity of an Authorized Service Depot. Any app liance
than an authorized service depot, all obligations of Danby under this warranty shall be void.
requiring service outside the limited boundaries of “In Home Service” , it will be the consumer’s responsibility to transport the appliance (at
their own expense) to the original retailer (point of purchase) or a service depot for repair. See “Boundaries of In Home Serv ice” below.
Danby reserves the right to limit the boundaries of “In Home Service” to the proximity of an authorized service
Contact your dealer from whom your unit was purchased, or contact your nearest authorized Danby service depot, where service
depot. Any appliance requiring service outside the limited boundaries of “In Home Service”, will be the consumer’s
must be performed by a qualied service technician.
responsibility to transport at their own expense to the original point of purchase or a service depot for repair. If the
If service is performed on the units by anyone other than an authorized service depot, or the unit is used for commercial appli cation, all
appliance is installed in a location that is 100 kilometers (62 miles) or more from the nearest service center, it must
obligations of Danby under this warranty shall be void.
be delivered to the nearest authorized Danby Service Depot by the purchaser.
TERMS OF WARRANTY
Boundaries of
In Home Service
If the appliance is installed in a location that is 100 kilometers (62 miles) or more from the nearest service center your unit must be
Transportation charges to and from the service location are not protected by this warranty and are the
delivered to the nearest authorized Danby Service Depot, as service must only be performed by a technician qualied and certif ied for
responsibility of the purchaser.
warranty service by Danby. Transportation charges to and from the service location are not protected by this warranty and are t he
Nothing within this warranty shall imply that Danby will be responsible or liable for any spoilage or damage to food or other
contents of this appliance, whether due to any defect of the appliance, or its use, whether proper or improper.
responsibility of the purchaser.
Nothing within this warranty shall imply that Danby will be responsible or liable for any spoilage or damage to food or other c ontents of this appliance, whether due
to any defect of the appliance, or its use, whether proper or improper.
Save as herein provided, by Danby, there are no other warranties, conditions, representations or guarantees, express or implied, made
or intended by Danby or its authorized distributors and all other warranties, conditions, representations or guarantees, including any
warranties, conditions, representations or guarantees under any Sale of Goods Act or like legislation or statute is hereby expressly
Save as herein provided, Danby, there are no other warranties, conditions, representations or guarantees, express or implied, m ade or intended by Danby or its
excluded. Save as herein provided, Danby shall not be responsible for any damages to persons or property, including the unit itself,
authorized distributors and all other warranties, conditions, representations or guarantees, including any warranties, conditio ns, representations or guarantees
howsoever caused or any consequential damages arising from the malfunction of the unit and by the purchase of the unit, the
under any Sale of Goods Act or like legislation or statue is hereby expressly excluded. Save as herein provided, Danby shall no t be responsible for any damages
purchaser does hereby agree to indemnify and hold harmless Danby from any claim for damages to persons or property caused by
to persons or property, including the unit itself, howsoever caused or any consequential damages arising from the malfunction o f the unit and by the purchase of
the unit.
the unit, the purchaser does hereby agree to indemnify and hold harmless Danby from any claim for damages to persons or propert y caused by the unit.
No warranty or insurance herein contained or set out shall apply when damage or repair is caused by any of the following:
No warranty or insurance herein contained or set out shall apply when damage or repair is caused by any of the following:
1) Power failure.
2) Damage in transit or when moving the appliance.
1) Power failure.
3) Improper power supply such as low voltage, defective house wiring or inadequate fuses.
2) Damage in transit or when moving the appliance.
4) Accident, alteration, abuse or misuse of the appliance such as inadequate air circulation in the room or abnormal operating
3) Improper power supply such as low voltage, defective house wiring or inadequate fuses.
conditions (ie. extremely high or low room temperature).
4) Accident, alteration, abuse or misuse of the appliance such as inadequate air circulation in the room or abnormal operating con ditions
5) Use for commercial or industrial purposes (ie. If the appliance is not installed in a domestic residence).
6) Fire, water damage, theft, war, riot, hostility, acts of God such as hurricanes, floods etc.
7) Service calls resulting in customer education.
8) Improper Installation (ie. Building-in of a free standing appliance or using an appliance outdoors that is not approved for outdoor
application, including but not limited to: garages, patios, porches or anywhere that is not properly insulated or climate controlled).
Proof of purchase date will be required for warranty claims; retain bills of sale. In the event that warranty service is required, present
Proof of purchase date will be required for warranty claims; so, please retain bills of sale. In the event warranty service is required, present this document to our
the proof of purchase to our authorized service depot.
AUTHORIZED SERVICE DEPOT.
(extremely high or low room temperature).
5) Use for commercial or industrial purposes (ie. If the appliance is not installed in a domestic residence).
6) Fire, water damage, theft, war, riot, hostility, acts of God such as hurricanes, oods etc.
7) Service calls resulting in customer education.
8) Improper Installation (ie. Building-in of a free standing appliance or using an appliance outdoors that is not approved for out door application).
EXCLUSIONS
EXCLUSIONS
GENERAL PROVISIONS
GENERAL PROVISIONS
Danby Products Limited
Danby Products Limited
PO Box 1778, Guelph, Ontario, Canada N1H 6Z9
PO Box 1778, Guelph, Ontario, Canada N1H 6Z9
Telephone: (519) 837-0920 FAX: (519) 837-0449
Telephone: (519) 837-0920 FAX: (519) 837-0449
Warranty Service
Warranty Service
In-home
In Home
1-800-263-2629
1-800-263-2629
04/17
04/09
Danby Products Inc.
PO Box 669, Findlay, Ohio, U.S.A. 45840
Telephone: (419) 425-8627 FAX: (419) 425-8629
PO Box 669, Findlay, Ohio, U.S.A. 45840
Telephone: (419) 425-8627 FAX: (419) 425-8629
Danby Products Inc.
Page 16

Bienvenue
Bienvenue à la famille Danby. Nous sommes fi ers de la qualité de nos produits et nous croyons
en le service fi able. Nous vous suggérons de lire ce manual d’utilisation avant de brancher
votre nouvel appareil car il contient des informations inportantes sur l’utilisation, la sécurité, le
dépannage et la maintenance, afi n d’assurer la fi abilité et la longévité de votre appareil.
Visitez www.Danby.com pour accéder aux outils d’autoservice, aux FAQ et bien plus encore. Pour
obtenir de l’aide supplémentaire, composez 1-800-263-2629.
Notez les informations ci-dessous; Vous aurez besoin de cette information pour obtenir un
service sous garantie.
Vous devez fournir le reçu d’achat original pour valider votre garantie et recevoir le service.
Numéro de modèle: _____________________________________________
Numéro de serie: _______________________________________________
Date d’achat: __________________________________________________
Besoin d’assistance?
Avant d’appeler pour service, voici quelques choses que vous pouvez faire pour nous
aider à mieux vous servir.
Lire ce manuel du propriétaire:
Il contient des instructions pour vous aider à utiliser et à maintenir votre appareil
correctement.
Si vous recevez un appareil endommagé:
Contactez immédiatement le revendeur ou l’entrepreneur qui vous a vendu l’appareil.
Gagnez du temps et de l’argent:
Avant d’appeler pour service, consultez la section de dépannage à la fi n de ce manuel.
Cette section vous aidera à résoudre les problèmes courants pouvant survenir.
1-800-26- Danby
(1-800-263-2629)
15
Page 17

Consignes de sécurité importantes
LIRE ET SUIVRE TOUTES LES INSTRUCTIONS DE SÉCURITÉ
INSTRUCTIONS DE MISE À LA TERRE
Cet appareil doit être mis à la terre. En cas de
courtcircuit, la mise à la terre réduit les risques de
décharge électrique en fournissant un échappatoire
au courant électrique.
Cet appareil est équipé d’un cordon doté d’un
fi l de mise à la terre et d’une prise de mise à la
terre. Le cordon d’alimentation doit être branché
sur une prise correctement mise à la terre. Si la
sortie est une prise murale à 2 broches, il est de
votre responsabilité de la remplacer par une prise
murale à 3 broches correctement mise à la terre. La
plaque signalétique en série indique la tension et la
fréquence auxquelles l’appareil est conçu.
AVERTISSEMENT - Une utilisation incorrecte de la
fi che de mise à la terre peut entraîner un risque de
choc électrique. Consultez un électricien qualifi é
ou un agent de service si les instructions de mise
à la terre ne sont pas complètement comprises, ou
s’il existe un doute quant à savoir si l’appareil est
correctement mis à la terre.
N’UTILISER JAMAIS DE FIL DE RALLONGE
Ne connectez pas votre appareil aux rallonges ou
avec un autre appareil dans la même prise murale.
Ne pas épisser le cordon d’alimentation. Ne coupez
ou retirez en aucun cas la troisième broche du
cordon d’alimentation.
Si le cordon d’alimentation est endommagé, il doit
être remplacé par le fabricant, son agent de service
ou une personne qualifi ée similaire afi n d’éviter tout
risque.
Assurez-vous que les composants sont remplacés
par des composants similaires et que l’entretien est
effectué par le personnel de maintenance autorisé
en usine pour minimiser le risque d’allumage
en raison de pièces incorrectes ou d’un service
incorrect.
EXIGENCES DE SÉCURITÉ
• Les enfants devraient être surveillés pour
s’assurer qu’ils ne jouent pas avec l’appareil.
• Ne pas tenir debout, assis ou appuyer sur
la porte ou le porte-vaisselle. Ne placez pas
d’objets lourds sur la porte lorsqu’il est ouvert.
• Ne pas toucher l’élément chauffant pendant ou
immédiatement après l’utilisation.
• Ne faites pas fonctionner l’appareil à moins
que tous les panneaux de l’enceinte ne soient
correctement installés.
• Ouvrez la porte avec précaution pendant le
fonctionnement, l’eau peut fuir. Procéder avec
prudence car l’eau peut être chaude.
• Ne pas laver les articles en plastique à moins
qu’ils soient marqués comme étant au lavevaisselle.
• Utilisez uniquement des additifs de détergence
et de rinçage conçus pour un lave-vaisselle
automatique.
• N’utilisez jamais de savon, détergent à lessive
ou détergent à la main dans le lave-vaisselle.
• Garder le détergent et le rinçage hors de la
portée des enfants.
• Vérifi ez que le distributeur de détergent est vide
après la fi n du cycle de lavage.
• Les détergents de la lave-vaisselle sont fortement
alcalins et peuvent être extrêmement dangereux
en cas d’ingestion. Eviter le contact avec la peau
et les yeux.
• Retirez la porte de l’appareil en cas de
démontage ou de rejet.
• La pression maximale d’eau d’entrée autorisée
est de 0.04 - 1 Mpa.
Cet appareil n’est pas destiné à être utilisé par
des personnes (y compris des enfants) dont les
capacités physiques, sensorielles ou mentales
peuvent être différentes ou réduites, ou qui ont de
l’expérience ou des connaissances, à moins que
ces personnes ne soient surveillées ou formées
pour faire fonctionner l’appareil par une personne
responsable de leur sécurité.
GARDER CES INSTRUCTIONS!
• La température d’entrée d’alimentation en
eau doit être comprise entre 48 - 65°C (120 149°F).
16
Page 18

INSTRUCTIONS D’INSTALLATION
ACCESSOIRES
1. Vis ST3.5*9 pour le support d’installation (x2)
2. Vis ST3.9*13 pour la plaque de protection (x2)
3. Vis ST4*14 pour l’accolade d’installation (x2)
4. Bande de condensation
5. Support d’installation (x2)
6. Bouchons de réglage (x2)
7. Plaque de protection
8. Serre-câble pour fi xer le tuyau de vidange
ENCLOSURE
L’emplacement d’installation doit avoir un sol
solide capable de supporter l’appareil lorsqu’il
est complètement chargé et rempli d’eau.
L’emplacement doit être à moins de 3 mètres d’un
évier avec un accès facile à l’alimentation en eau,
au drain et à une prise électrique. L’emplacement
doit avoir suffi samment d’espace devant pour que
la porte s’ouvre à 90° afi n que le lave-vaisselle
puisse être chargé.
L’enceinte d’installation doit avoir les dimensions
suivantes: 23,6 pouces (60 cm) de largeur sur 32,5
pouces (82,5 cm) de hauteur sur 22,8 pouces (58
cm) de profondeur. Il doit y avoir moins de 5 mm
entre le haut du lave-vaisselle et le meuble et la
porte du lave-vaisselle doit être alignée avec la face
du meuble.
1
2
3
4
90 r
32.5 inches
(82.5 cm)
22.8 inches
(58 cm)
5
6
7
8
17.7 inches
(45 cm)
90 r
Si nécessaire, découpez des trous dans les armoires
environnantes pour accéder aux connexions d’eau
et d’alimentation.
INSTRUCTIONS DE RACCORDEMENT À L’EAU
La pression de la conduite d’alimentation en eau
chaude doit être comprise entre 0,04 et 1 MPa.
La température d’entrée d’alimentation en eau
doit être comprise entre 48 et 65°C (120 et
149°F). Assurez-vous que la température de
l’eau ne dépasse pas 65°C (149°F) pour éviter
d’endommager la vaisselle.
Assurez-vous que le disjoncteur et la vanne
d’alimentation en eau sont éteints avant de
raccorder la conduite d’alimentation en eau chaude
au lave-vaisselle.
Le câble d’alimentation se connecte à la boîte
de jonction sur le côté avant droit de l’appareil.
La conduite d’alimentation en eau chaude se
raccordera à l’orifi ce d’eau sur le côté avant
gauche de l’appareil.
Remarque: Il est recommandé de n’utiliser que
de l’eau douce dans l’appareil pour obtenir les
meilleurs résultats de lavage.
Ligne d'alimentation
en eau chaude
Câble
d'alimentation
135 - 185 mm
(5 1/3 - 7 1/3”)
17
Page 19

INSTRUCTIONS D’INSTALLATION
Connexion de la ligne d’eau chaude
Faites passer la ligne d’eau chaude dans le canal
sur le côté inférieur gauche de l’appareil. Assurezvous que la ligne d’eau chaude n’est pas tordue,
puis connectez-la à l’arrière de l’appareil en
utilisant un coude. Utilisez du ruban téfl on ou un
produit d’étanchéité sur la connexion pour éviter les
fuites.
Ne pas trop serrer le coude à 90°. Cela peut
endommager l’entrée d’eau et provoquer une fuite.
Connexion de la ligne de vidange
Le tuyau de vidange se raccordera à la pompe de
vidange située au bas de l’appareil. Exécutez la
ligne de vidange dans le même canal sur le fond de
l’appareil que la ligne d’eau chaude. Assurez-vous
qu’il n’y a rien à l’intérieur du tuyau de vidange
et qu’il ne se déchire pas pendant le processus
d’installation.
1
3
Il existe plusieurs façons de raccorder le tuyau
d’évacuation en fonction de la confi guration de
l’évier. Passez en revue les différentes façons
de relier le système de vidange et choisissez la
méthode qui convient le mieux à l’application. Les
codes locaux peuvent nécessiter l’installation d’un
kit d’entrefer. Vérifi ez auprès d’un plombier qualifi é
s’il y a un doute.
1. Espace d’air
2. Espace d’air avec élimination des déchets
3. Pas d’espace d’air
4. Pas d’espace d’air avec élimination des déchets
Utilisez un connecteur en caoutchouc pour
connecter les tuyaux de vidange et les colliers de
serrage sur tous les points de connexion.
Fixez le tuyau de vidange au mur de l’évier
en utilisant des colliers de serrage ou d’autres
matériaux de fi xation. S’il n’est pas fi xé, le tuyau de
vidange risque de se plier, entraînant des problèmes
de drainage.
Le diamètre interne du tuyau de vidange est de 21
mm (0,8 pouce).
2
4
Le haut du tuyau de vidange doit être à moins de
100 cm (39 pouces) du sol.
Si le tuyau de vidange n’est pas enroulé, l’eau peut
siphonner pendant un cycle de lavage.
Les coudes du tuyau de vidange doivent être
soutenus de sorte que le tuyau ne plie pas ou ne plie
pas.
18
Page 20

INSTRUCTIONS D’INSTALLATION
INSTRUCTIONS DE CONNEXION DE CÂBLAGE
Avant de connecter le câble d’alimentation au lavevaisselle, assurez-vous que le disjoncteur est éteint.
Dans la boîte de jonction située à l’avant en bas
à droite du lave-vaisselle, trouvez les trois fi ls
d’alimentation du lave-vaisselle, y compris la ligne
de mise à la terre.
Faites passer le câble d’alimentation à travers le
réducteur de tension, puis dans la boîte de jonction.
Connectez le fi l noir du lave-vaisselle au fi l noir du
câble d’alimentation en insérant les deux dans un
écrou de fi l, puis en tournant le connecteur de fi l.
Connectez le fi l blanc au fi l blanc et le vert au vert
de la même manière.
Revérifi ez chaque fi l pour vous assurer qu’il est
connecté correctement et solidement.
Chaque fi l coloré doit être connecté au fi l
correspondant de la même couleur.
1. Boîte de dérivation
2. Câble d’alimentation
3. Noir à noir
4. Blanc à blanc
5. Vert à vert (terre à terre)
6. Soulagement des contraintes
1
6
2
3
4
5
Le blanc doit être connecté au blanc, noir au noir et
vert au vert.
Replacez le couvercle de la boîte de jonction sur le
lave-vaisselle.
Revérifi ez chaque fi l pour vous assurer qu’il est
connecté correctement et solidement. Chaque fi l
coloré doit être connecté au fi l correspondant de la
même couleur.
AVERTISSEMENT RISQUE DE CHOC ÉLECTRIQUE
Pour éviter les chocs électriques, ne travaillez pas
sur un circuit sous tension. Cela pourrait entraîner
des blessures graves ou la mort. Pour éviter les
risques d’incendie, assurez-vous que les travaux
électriques sont correctement installés. Seuls les
électriciens qualifi és doivent effectuer des travaux
électriques.
19
Page 21

INSTRUCTIONS D’INSTALLATION
INSTRUCTIONS DE NIVELLEMENT
Assurez-vous que l’appareil est de niveau avant de
le placer dans le boîtier. Le pied arrière peut être
réglé depuis l’avant du lave-vaisselle en tournant.
Utilisez un tournevis plat pour régler les pieds avant
jusqu’à ce que l’appareil soit de niveau.
ACCOLADES D’INSTALLATION
L’appareil doit être fi xé avec les entretoises
d’installation. Il y a deux manières différentes
d’utiliser les accolades.
A. Surface de travail normale
Mettez le crochet d’installation dans la fente du plan
latéral et fi xez-le à la surface de travail avec les vis
à bois.
B. Dessus de marbre ou de granit
Fixez le côté avec la vis. Placez les couvercles de vis
sur les vis internes pour les protéger de l’eau.
BANDE DE CONDENSATION
Fixez la bande de condensation sous la surface de
travail de l’armoire. Assurez-vous que la bande
affl eure le bord de la surface de travail.
1
A
2
1
B
2
3
INSTALLATION DE PLAQUE DE COUP
Installez la plaque de protection au bas de
l’appareil.
1
2
20
Page 22

CONSIGNES D’UTILISATION
PANNEAU DE CONTRÔLE
3 4
A
1
2
B
C
D
E
F
G
H
I
J
K
L
6 7 8
5
9
1. Bouton d’alimentation: Permet d’allumer ou d’éteindre l’appareil.
2. Poignée
3. Programmes: Le voyant s’allume pour indiquer quel programme a été sélectionné.
A: lavage lourd
B: lavage normal
C: lavage ECO
D: lavage de verre
E: lavage rapide
F: rinçage
4. Caractéristiques: La lumière va s’allumer pour montrer quelles fonctionnalités ont été sélectionnées.
G: Lavage à haute température - la température de l’eau sera maintenue à 60 °C (140 °F)
H: Chauffée à sec - le chauffage fonctionnera pendant le cycle de séchage
I: Assainir - la température de l’eau sera maintenue à 69 °C (156 °F)
J: Voyant d’aide au rinçage - la lumière s’allume lorsque le distributeur de liquide de rinçage est vide
K: Voyant de fi n de cycle - la lumière s’allume quand le programme est fi ni
L: Indicateur d’avertissement du robinet - la lumière s’allume lorsque l’appareil ne reçoit pas assez
d’eau; allumer le robinet d’eau à proximité pour corriger le débit d’eau
5. Écran d’affi chage: Affi che le temps restant dans le programme en cours.
6. Bouton de programme: Appuyez pour sélectionner le programme désiré.
7. Bouton Caractéristiques: Appuyez pour sélectionner les fonctions souhaitées.
8. Touche de temporisation: Appuyez sur cette touche pour régler la temporisation souhaitée.
9. Bouton Démarrer/Pause: Appuyez pour lancer le programme souhaité. Appuyez sur pour annuler un
programme en cours.
21
Page 23

CONSIGNES D’UTILISATION
Appuyez sur le bouton de programme pour sélectionner le
TABLEAU DES CYCLES DE LAVAGE
programme de lavage souhaité.
Remarque: Les temps de cycle sont approximatifs et varient en fonction des options sélectionnées.
Programme Description du cycle Répartition du cycle Temps de marche Utilisation de l’eau
Lourd Pour les charges
fortement souillées telles
que des pots et des
casseroles
Normal Pour les charges
normalement souillées;
Cycle quotidien
standard
ECO Cycle de conservation
de l’énergie pour les
charges légèrement
sales
Verre Pour verrerie légèrement
sale
Vitesse Un cycle rapide pour
les charges légèrement
souillées
Pré-lavage
Lavage (60°C)
Rincer (65°C)
Rincer (avec sani 69°C)
Séchage
Pré-lavage
Lavage (50-55°C)
Rincer (58-60°C)
Rincer (avec sani 69°C)
Séchage
Pré-lavage
Lavage (45-50°C)
Rincer (50-55°C)
Rincer (avec sani 69°C)
Séchage
Pré-lavage
Lavage (48-50°C)
Rincer (50-55°C)
Séchage
Pré-lavage
Lavage (50°C)
Rincer (50°C)
155 minutes 21.5 litres
(5.7 gallons)
100~130 minutes 10.5~21.5 litres
(2.8~5.7 gallons)
115 minutes 18 litres
(4.8 gallons)
105 minutes 18 litres
(4.8 gallons)
60 minutes 14 litres
(3.7 gallons)
Rincer Cycle de rinçage
uniquement
Pré-lavage
Rincer
SYSTÈME DE LAVAGE INTELLIGENT
Cet appareil est équipé d’un système de lavage
intelligent. Lorsqu’une charge partielle de vaisselle
légèrement sale est placée dans l’appareil, un
cycle de lavage similaire à un lavage court sera
automatiquement effectué.
Lorsqu’une charge complète de vaisselle très sale est
placée dans l’appareil, un cycle de lavage intensif
est automatiquement effectué.
Lorsqu’un cycle est en cours, le temps restant peut
soudainement augmenter ou diminuer de plusieurs
minutes. Cela indique que le système de lavage
intelligent a vérifi é le niveau du sol et qu’il est
nécessaire d’ajouter d’autres remplissages d’eau ou
de supprimer les remplissages d’eau.
20 minutes 7.5 litres
(2 gallons)
FONCTION DE VERROUILLAGE
Appuyez et maintenez enfoncé le bouton de
fonctions et le bouton de temporisation pendant
trois secondes pour activer la fonction de
verrouillage parental. L’écran affi che une icône
de verrouillage et les boutons du panneau de
commande ne répondent pas. Appuyez et
maintenez enfoncé le bouton de caractéristiques et
le bouton de temporisation pendant trois secondes
pour désactiver la fonction de verrouillage parental.
22
Page 24

CONSIGNES D’UTILISATION
CHARGEMENT DE LA LAVE-VAISSELLE
• Mettez tous les plats au rebut pour éliminer les
résidus de nourriture importants avant de les
placer dans cet appareil.
• Ne placez que des plats marqués au lavevaisselle dans cet appareil.
• Utilisez un détergent doux.
Éléments qui ne doivent pas être placés dans un
lave-vaisselle
• Couverts avec des poignées en bois, en
porcelaine ou en nacre.
• Les articles en plastique qui ne sont pas
résistants à la chaleur.
• Les articles qui ont été réparés avec de la colle
qui ne résiste pas à la chaleur.
• Articles en étain, en cuivre ou en acier.
• Plateaux en bois
• Articles fabriqués à partir de fi bres synthétiques.
• Les articles avec des motifs vitrés peuvent
s’estomper si la machine est lavée fréquemment.
Conseils pour un chargement effi cace
CHARGEMENT DU PANIER SUPÉRIEUR
Le panier supérieur est conçu pour les tasses, les
verres, les petites assiettes, les bols et les articles en
plastique qui sont marqués au lave-vaisselle.
Assurez-vous que la vaisselle chargée n’interfère
pas avec la rotation du bras d’aspersion situé au
bas du panier supérieur.
• Chargez des articles creux tels que des tasses,
des verres ou des casseroles avec l’ouverture
vers le bas afi n que l’eau ne puisse pas
s’accumuler dans le récipient.
• Les objets ne doivent pas se trouver l’un dans
l’autre ou se couvrir les uns les autres.
• Pour éviter d’endommager les lunettes, elles ne
doivent pas toucher.
• Les articles tranchants de coutellerie tels que
les couteaux à découper doivent être chargés
horizontalement dans le panier pour éviter les
blessures lors du déchargement.
• Ne surchargez pas l’appareil.
CHARGEMENT DU PANIER À COUVERTS
Les couverts doivent être placés dans le panier à
couverts avec les poignées vers le bas. Assurez-vous
que les articles de coutellerie ne s’emboîtent pas l’un
dans l’autre car cela peut affecter les performances
de nettoyage.
Les articles pointus ou pointus doivent être placés
dans le panier à couverts avec les pointes vers le
bas pour éviter les blessures lors du déchargement.
CHARGEMENT DU PANIER INFÉRIEUR
Le panier inférieur est conçu pour les plats de dîner,
les bols à soupe, les assiettes, les casseroles, les
couvercles, les plats en cocotte et les assiettes.
Chargez de grands articles tels que des casseroles
et des casseroles devraient être chargés avec leurs
côtés ouverts vers le bas.
Ne placez pas d’objets trop petits dans le lavevaisselle car ils pourraient tomber à travers le
panier et nuire au fonctionnement de l’appareil.
23
Page 25

CONSIGNES D’UTILISATION
DISTRIBUTEUR DE DÉTERGENT
Le distributeur de détergent doit être rempli avant
le début de chaque cycle de lavage. Ajoutez le
détergent juste avant de commencer le cycle de
lavage. L’ajout de détergent à l’appareil trop tôt
peut le rendre humide et ne pas se dissoudre
correctement.
1. Si le distributeur de détergent est fermé,
appuyez sur le loquet pour l’ouvrir.
2. Ajouter la quantité de détergent recommandée
dans l’élément détergent principal.
3. Fermez le rabat en le faisant glisser vers la
gauche et en appuyant vers le bas.
1
DISTRIBUTEUR D’AGENT RINÇAGE
L’agent de rinçage peut être utilisé pour empêcher
la formation de gouttelettes d’eau ou de traînées
sur la vaisselle. Le produit de rinçage sera libéré
automatiquement lors du rinçage fi nal. Cet appareil
est conçu pour utiliser uniquement un agent de
rinçage liquide. N’utilisez pas de produit de rinçage
en poudre car cela obstruerait l’ouverture du
réservoir. Ne placez aucune autre substance dans le
distributeur de liquide de rinçage car cela pourrait
endommager l’appareil.
1. Ouvrez le distributeur de produit de rinçage en
soulevant le couvercle.
2. Utilisez l’orifi ce de visualisation lorsque vous
remplissez le réservoir de produit de rinçage.
Ne remplissez pas le réservoir au-dessus de
l’indicateur de niveau complet.
3. Si l’écran affi che “LSb”, le distributeur de
produit de rinçage est vide.
4. Fermez le bouchon du liquide de rinçage en
appuyant dessus.
2
3
1
2
3
4
24
Page 26

CONSIGNES D’UTILISATION SOINS ET ENTRETIEN
COMMENCER UN CYCLE DE LAVAGE
1. Chargez le lave-vaisselle selon les instructions de
chargement.
2. Ajouter du détergent et du produit de rinçage si
nécessaire.
3. Fermez la porte du lave-vaisselle et appuyez sur
le bouton d’alimentation pour allumer l’appareil.
4. Appuyez plusieurs fois sur le bouton Programme
pour choisir le programme de lavage souhaité.
Les programmes fonctionneront dans l’ordre
suivant: Lourd -> Normal -> ECO -> Verre ->
Rapide -> Rinçage
5. Appuyez sur le bouton Options pour
sélectionner les options souhaitées.
6. Faites couler le robinet d’eau chaude le plus
près de l’appareil jusqu’à ce que l’eau soit
chaude, puis éteignez-le.
7. Appuyez sur le bouton Départ/Pause pour
commencer le cycle.
Remarque: Lorsqu’un programme de lavage est
terminé, l’appareil émet 8 bips et END apparaît sur
l’écran d’affi chage.
NETTOYAGE
• Après chaque lavage, éteignez l’alimentation en
eau et laissez la porte légèrement ouverte afi n
que l’humidité et les odeurs ne soient pas piégés
à l’intérieur de l’appareil.
• Utilisez uniquement un chiffon doux et un
détergent doux pour nettoyer l’appareil.
N’utilisez jamais de solvants ou de produits
abrasifs car cela pourrait endommager
l’appareil.
• Pour enlever les points d’eau de l’intérieur de
l’appareil, utilisez un chiffon doux humecté avec
une petite quantité de vinaigre.
• Si l’appareil ne doit pas être utilisé pendant une
longue période, il est conseillé d’utiliser un cycle
de lavage normal avec le lave-vaisselle vide
puis de laisser la porte ouverte jusqu’à ce que
l’intérieur de l’appareil soit complètement sec.
Cela aidera les joints de la porte à durer plus
longtemps et aidera à empêcher les mauvaises
odeurs de se former à l’intérieur de l’appareil.
• Nettoyez les joints de la porte avec une éponge
humide régulièrement pour éviter les mauvaises
odeurs des particules alimentaires qui peuvent
être piégées dans le joint de la porte.
AJOUT D’UN PLAT OUBLIÉ
Un plat oublié peut être ajouté à un cycle de
fonctionnement à tout moment avant l’ouverture
du distributeur de détergent. Si le détergent a déjà
été libéré dans l’appareil, il est recommandé de ne
pas ajouter plus de vaisselle car ils ne seront pas
nettoyés correctement.
Pour ajouter un plat:
1. Ouvrez légèrement la porte et attendez quelques
secondes jusqu’à ce que l’action de lavage
s’arrête avant de s’ouvrir complètement.
2. Ajouter l’article oublié
3. Fermez la porte et appuyez sur le bouton de
démarrage pour redémarrer le cycle.
Mise en garde: Attendez que l’action de lavage
s’arrête complètement avant d’ouvrir la porte. De
l’eau chaude peut éclabousser le lave-vaisselle et
causer des blessures.
25
Page 27

SOINS ET ENTRETIEN
SYSTÈME DE FILTRAGE
Le système de fi ltration élimine les particules de
nourriture de l’eau de lavage et les emprisonne. Il
est fortement recommandé de vider et de nettoyer
les fi ltres après chaque cycle de lavage.
Pour nettoyer le système de fi ltre:
1. Éteignez le lave-vaisselle. Tournez le fi ltre et
soulevez-le pour retirer le système de fi ltration
de l’appareil.
2. Tournez l’insert du fi ltre dans le sens inverse des
aiguilles d’une montre pour le détacher, puis
retirez l’insert du fi ltre.
3. Rincez et nettoyez les fi ltres avec de l’eau et
remplacez-les à l’intérieur de l’appareil.
1
BRAS DE PULVÉRISATION
Le bras de pulvérisation peut être retiré de l’appareil
en tirant doucement vers le haut. Rincez le bras de
pulvérisation avec de l’eau chaude pour éliminer
tout débris qui peut obstruer les buses. Remplacez le
bras de pulvérisation dans l’appareil en appuyant
vers le bas jusqu’à ce qu’il s’enclenche. Veillez à ce
que le mouvement du bras de pulvérisation ne soit
pas entravé avant d’exécuter un autre cycle.
CODES D’ERREUR
2
3
E1: La prise d’eau est restreinte ou la pression de
l’eau est trop faible
E3: Dysfonctionnement de l’élément chauffant
E4: Débordement d’eau
Si l’appliance affi che un code d’erreur, une
réinitialisation de l’alimentation peut résoudre le
problème. Débranchez l’appareil, attendez environ
5 minutes, puis rebranchez l’appareil.
26
Page 28

DÉPANNAGE
Danby soins du consommateur: 1-800-263-2629
Heures d’ouverture:
Lundi à Jeudi 8 h 30 à 18 h, heure normale de l’Est
Vendredi de 8 h 30 à 16 h, heure normale de l’Est
Les informations contenues dans ce manuel sont sujettes à modifi cation sans préavis.
PROBLÈME CAUSE POSSIBLE
Aucune puissance • Un fusible peut être souffl é ou le disjoncteur a déclenché
• Surtension
• La fi che d’alimentation n’est pas complètement insérée dans
la prise murale
• La porte n’est pas fermée correctement
Eau non vidangée du lave-vaisselle • Pli dans le tuyau de vidange
• Filtre bouché
• Dysfonctionnement de la pompe de vidange
Détergent laissé dans le distributeur • Plats bloquant le distributeur de l’ouverture complète;
L’appareil peut être surchargé
Suds laissés dans l’appareil • Trop de détergent ou mauvais type de détergent
• Trop d’agent rinçage
Film blanc ou nébuleuse sur la
vaisselle ou l’intérieur du lave-vaisselle
Le bruit à l’intérieur de l’appareil lors
de l’exécution
Les plats ne sont pas propres • Les plats ont été mal chargés
• Minéraux d’eau dure
• Trop de détergent
• Pas assez d’agent de rinçage
• Le bras de pulvérisation frappe un article dans le panier
• Un objet est tombé du panier et se trouve au fond du bac
de lavage
• Le programme de lavage n’était pas assez puissant
• Pas assez de détergent
• Les éléments bloquent le bras de pulvérisation; L’appareil
peut être surchargé
• Filtre bouché
Les plats ne sont pas séchés • Les plats ont été mal chargés
• Trop de plats ont été chargés
• Pas assez d’agent de rinçage
• Les plats ont été enlevés trop rapidement
27
Page 29

GARANTIE LIMITÉE “À DOMICILE”
LIMITED IN-HOME APPLIANCE WARRANTY
Cet appareil de qualité est garanti exempt de tout vice de matière première et de fabrication, s’il est utilisé dans les conditions
This quality product is warranted to be free from manufacturer’s defects in material and workmanship, provided that the unit is used under the normal operating
normales recommandées par le fabricant.
conditions intended by the manufacturer.
Cette garantie n’est offerte qu’à l’acheteur initial de l’appareil vendu par Danby Products Limited (Canada) ou Danby Products Inc.
This warranty is available only to the person to whom the unit was originally sold by Danby Products Limited (Canada) or Danby Products Inc. (U.S.A.) (hereafter
(E.- U.A.) (ci-après « Danby ») ou par l’un des ses distributeurs agréés et elle ne peut être transférée.
“Danby”) or by an authorized distributor of Danby, and is non-transferable.
CONDITIONS
Les pièces en plastique sont garanties pendant trente (30) jours seulement à partir de la date de l’achat, sans aucune prolongation
prévue.
Plastic parts, are warranted for thirty (30) days only from purchase date, with no extensions provided.
Premiers 12 mois
First Year
Pendant les premiers douze (12) mois, toutes les pièces fonctionnelles de ce produit qui s’avèrent défectueuses
seront réparées ou remplacées, selon le choix du garant, sans frais à l’acheteur initial.
During the rst twelve (12) months, any functional parts of this product found to be defective, will be repaired or replaced, at warrantor’s
TERMS OF WARRANTY
option, at no charge to the ORIGINAL purchaser.
Pour bénéficier
du service
To obtain
Service
Limites de l’entretien
à domicile
Boundaries of
In Home Service
Nothing within this warranty shall imply that Danby will be responsible or liable for any spoilage or damage to food or other c ontents of this appliance, whether due
Aucune partie de la garantie ne prévoit implicitement que le fabricant sera tenu responsable des dommages subis par les aliments ou
to any defect of the appliance, or its use, whether proper or improper.
d’autres types de contenu, qu’ils soient causés par la défectuosité de l’appareil ou par son usage adéquat ou inadéquat.
Save as herein provided, Danby, there are no other warranties, conditions, representations or guarantees, express or implied, m ade or intended by Danby or its
En vertu de la présente, il n’existe aucune autre garantie, condition ou représentation, qu’elle soit exprimée ou tacite, de façon
authorized distributors and all other warranties, conditions, representations or guarantees, including any warranties, conditio ns, representations or guarantees
manifeste ou intentionnelle, par Danby ou ses distributeurs agréés. De même, sont exclues toutes les autres garanties, conditions ou
under any Sale of Goods Act or like legislation or statue is hereby expressly excluded. Save as herein provided, Danby shall no t be responsible for any damages
représentations, y compris les garanties, conditions ou représentations en vertu de toute loi régissant la vente de produits ou de toute
to persons or property, including the unit itself, howsoever caused or any consequential damages arising from the malfunction o f the unit and by the purchase of
autre législation ou règlement semblables. En vertu de la présente, Danby ne peut être tenue responsable en cas de blessures
the unit, the purchaser does hereby agree to indemnify and hold harmless Danby from any claim for damages to persons or propert y caused by the unit.
corporelles ou des dégâts matériels, y compris à l’appareil, quelle qu’en soit les causes. Danby ne peut pas être tenue responsable
des dommages indirects dus au fonctionnement défectueux de l’appareil. En achetant l’appareil, l’acheteur accepte de mettre à
couvert et de dégager Danby de toute responsabilité en cas de réclamation pour toute blessure corporelle ou tout dégât matériel
causé par cet appareil.
No warranty or insurance herein contained or set out shall apply when damage or repair is caused by any of the following:
1) Power failure.
La garantie ou assurance ci-dessus ne s’applique pas si les dégâts ou réparations sont dus aux cas suivants:
2) Damage in transit or when moving the appliance.
1) Panne de courant.
3) Improper power supply such as low voltage, defective house wiring or inadequate fuses.
2) Dommage subis pendant le transport ou le déplacement de l’appareil.
4) Accident, alteration, abuse or misuse of the appliance such as inadequate air circulation in the room or abnormal operating con ditions
3) Alimentation électrique incorrecte (tension faible, câblage défectueux, fusibles incorrects).
4) Accident, modification, emploi abusif ou incorrect de l’appareil tel qu'une circulation d'air inadéquate dans la pièce ou des
conditions de fonctionnement anormales (température extrêmement élevée ou basse).
5) Utilisation dans un but commercial ou industriel (à savoir, si l'appareil n'est pas installé dans un domicile résidentiel).
6) Incendie, dommages causés par l’eau, vol, guerre, émeute, hostilités, cas de force majeure (ouragan, inondation, etc.).
7) Visites d’un technicien pour expliquer le fonctionnement de l’appareil au propriétaire.
8) Installation inappropriée (par exemple, encastrement d'un appareil autoportant, ou utilisation extérieure d'un appareil non conçu à
Proof of purchase date will be required for warranty claims; so, please retain bills of sale. In the event warranty service is required, present this document to our
cet effet, y compris, mais sans s'y limiter: les garages, les patios, les porches ou ailleurs qui ne sont pas correctement isolés ou
AUTHORIZED SERVICE DEPOT.
climatisés).
(extremely high or low room temperature).
5) Use for commercial or industrial purposes (ie. If the appliance is not installed in a domestic residence).
6) Fire, water damage, theft, war, riot, hostility, acts of God such as hurricanes, oods etc.
7) Service calls resulting in customer education.
8) Improper Installation (ie. Building-in of a free standing appliance or using an appliance outdoors that is not approved for out door application).
S’adresser au détaillant qui a vendu l’appareil, ou à la station technique agréée de service la plus proche, où
les réparations doivent être effectuées par un technicien qualifié. Si les réparations sont effectuées par
Danby reserves the right to limit the boundaries of “In Home Service” to the proximity of an Authorized Service Depot. Any app liance
quiconque autre que la station de service agréée où à des fins commerciales, toutes les obligations de Danby
requiring service outside the limited boundaries of “In Home Service” , it will be the consumer’s responsibility to transport the appliance (at
en vertu de cette garantie seront annulées.
their own expense) to the original retailer (point of purchase) or a service depot for repair. See “Boundaries of In Home Serv ice” below.
Contact your dealer from whom your unit was purchased, or contact your nearest authorized Danby service depot, where service
Danby se réserve le droit de limiter les limites de "Service au domicile" à proximité d'un dépôt de service
must be performed by a qualied service technician.
agréé. Tout appareil nécessitant un service en dehors des limites de "Service à domicile" sera la responsabilité
If service is performed on the units by anyone other than an authorized service depot, or the unit is used for commercial appli cation, all
du consommateur de transporter l'appareil à laur propres frais le point d'achat original ou un dépôt de service
obligations of Danby under this warranty shall be void.
pour réparation. Si l'appareil est installé à plus de 100 kilomètres (62 milles) du centre de service le plus
proche, il doit être livré à l'atelier de réparation autorisé par Danby le plus proche, car l'entretien doit
If the appliance is installed in a location that is 100 kilometers (62 miles) or more from the nearest service center your unit must be
uniquement être réalisé par un technicien qualifié et certifié pour effectuer un entretien couvert par la garantie
delivered to the nearest authorized Danby Service Depot, as service must only be performed by a technician qualied and certif ied for
de Danby.
warranty service by Danby. Transportation charges to and from the service location are not protected by this warranty and are t he
responsibility of the purchaser.
Les frais de transport entre votre domicile et le lieu de l'entretien ne sont pas couverts par la présente garantie
et doivent être acquittés par l'acheteur.
EXCLUSIONS
EXCLUSIONS
GENERAL PROVISIONS
CONDITIONS GÉNÉRALES
La preuve de la date d'achat sera requise pour les réclamations de garantie; Conserver les factures de vente. Dans le cas où un
service de garantie est requis, présentez la preuve d'achat à notre dépôt de service agréé.
Warranty Service
In-home
Service sous garantie
Danby Products Limited
Danby Products Limited
PO Box 1778, Guelph, Ontario, Canada N1H 6Z9
PO Box 1778, Guelph, Ontario, Canada N1H 6Z9
Telephone: (519) 837-0920 FAX: (519) 837-0449
Téléphone : (519) 837-0920 Télécopieur: (519) 837-0449
Service au domicile
1-800-263-2629
1-800-263-2629
04/17
04/09
Danby Products Inc.
PO Box 669, Findlay, Ohio, U.S.A. 45840
PO Box 669, Findlay, Ohio, U.S.A. 45840
Téléphone: (419) 425-8627 Télécopieur: (419) 425-8629
Telephone: (419) 425-8627 FAX: (419) 425-8629
Danby Products Inc.
Page 30

Bienvenido
Bienvenido a la familia Danby. Estamos orgullosos de nuestros productos de calidad y creemos en
un servicio confi able. Sugerimos que lea este manual del propietario antes de conectar el nuevo
aparato ya que contiene información importante sobre la operación, información de seguridad,
solución de problemas y consejos de mantenimiento para garantizar la fi abilidad y longevidad de
su electrodoméstico.
Visite www.Danby.com para acceder a herramientas de autoservicio, preguntas frecuentes y
mucho más. Para asistencia adicional, llame al 1-800-263-2629.
Tenga en cuenta la información siguiente; Necesitará esta información para obtener un servicio
bajo garantía.
Debe proporcionar el recibo de compra original para validar su garantía y recibir servicio.
Número de modelo: _____________________________________________
Número de serie: _______________________________________________
Fecha de compra: _______________________________________________
Necesitas ayuda?
Antes de llamar al servicio, aquí hay algunas cosas que puede hacer para ayudarnos a
servirle mejor.
Lea este manual del propietario:
Contiene instrucciones para ayudarle a usar y mantener su aparato correctamente.
Si recibe un aparato dañado:
Inmediatamente póngase en contacto con el minorista o el constructor que le vendió el
aparato.
Ahorre tiempo y dinero:
Consulte la sección de solución de problemas al fi nal de este manual antes de llamar. Esta
sección le ayudará a resolver problemas comunes que pueden ocurrir.
1-800-26- Danby
(1-800-263-2629)
29
Page 31

Importantes Instrucciones de Seguridad
LEA Y SIGA TODAS LAS INSTRUCCIONES DE SEGURIDAD
LA CONECIÓN A TIERRA
Este artefacto debe ser conectado a tierra. En
caso de un corto circuito eléctrico, la conexión a
tierra reduce el riesgo de una descarga eléctrica
proporcionando un cable de retorno para la
corriente eléctrica.
Este aparato está equipado con un cable que
tiene un cable de puesta a tierra y un enchufe de
conexión a tierra. El cable de alimentación debe
estar enchufado en un tomacorriente que esté
debidamente conectado a tierra. Si el tomacorriente
es un tomacorriente de pared de 2 terminales, es su
responsabilidad reemplazarlo por un tomacorriente
de 3 clavijas con conexión a tierra adecuada. La
placa de serie indica el voltaje y frecuencia que se
debe utilizar para el aparato.
ADVERTENCIA - El uso incorrecto del enchufe de
conexión a tierra puede resultar en un riesgo de
descarga eléctrica. Consulte a un electricista o
agente de servicio califi cado si las instrucciones de
conexión a tierra no se entienden completamente o
si existe duda sobre si el aparato está debidamente
conectado a tierra.
NO UTILICE CABLES DE EXTENSIÓN
No conecte el aparato a los cables de extensión ni
con otro aparato en la misma toma de corriente.
No empalme el cable de alimentación. No corte ni
quite en ningún caso la tercera clavija de tierra del
cable de alimentación.
REQUERIMIENTOS DE SEGURIDAD
• Los niños deben ser supervisados para asegurar
que no jueguen con el electrodoméstico.
• No se pare, se siente o se apoye en la puerta o
en el plato. No coloque objetos pesados en la
puerta cuando esté abierto.
• No toque el elemento calefactor durante o
inmediatamente después de su uso.
• No haga funcionar el aparato a menos que
todos los paneles del armario estén instalados
correctamente.
• Abrir la puerta con cuidado durante el
funcionamiento, el agua puede tener fugas.
Proceda con precaución ya que el agua puede
estar caliente.
• No lave artículos de plástico a menos que estén
identifi cados como aptos para lavaplatos.
• Utilice únicamente detergentes y aditivos
de enjuague que estén diseñados para un
lavaplatos automático.
• Nunca use jabón, detergente para la ropa
o detergente para el lavado de manos en el
lavaplatos.
• Mantenga el detergente y el abrillantador fuera
del alcance de los niños.
Si el cable de alimentación está dañado, debe
ser reemplazado por el fabricante, su agente de
servicio o persona califi cada similar para evitar
riesgos.
Asegúrese de que los componentes se reemplacen
con componentes similares y que el servicio sea
realizado por personal de servicio autorizado por
la fábrica para minimizar el riesgo de encendido
debido a piezas incorrectas o servicio inadecuado.
Este aparato no se destina para utilizarse por
personas (incluyendo niños) cuyas capacidades
físicas, sensoriales o mentales sean diferentes
o estén reducidas, o carezcan de experiencia
o conocimiento, a menos que dichas personas
reciban una supervisión o capacitación para el
funcionamiento del aparato por una persona
responsable de su seguridad.
¡GUARDE ESTAS INSTRUCCIONES!
• Compruebe que el dispensador de detergente
esté vacío después de completar el ciclo de
lavado.
• Los detergentes para lavaplatos son muy
alcalinos y pueden ser extremadamente
peligrosos si se ingieren. Evite el contacto con la
piel y los ojos.
• Retire la puerta del aparato cuando la saque de
servicio o deseche.
• La presión máxima admisible del agua de la
entrada es 0.04 - 1 Mpa.
• La temperatura de entrada del suministro de
agua debe estar entre 48 - 65°C (120 - 149°F).
30
Page 32

INSTRUCCIONES DE INSTALACIÓN
ACCESORIOS
1. ST3.5*9 tornillos para la llave de instalación (x2)
2. ST3.9*13 tornillos para la placa de patada (x2)
3. ST4*14 tornillos para la abrazadera de
instalación (x2)
4. Tira de condensación
5. Soporte de instalación (x2)
6. Tapas de ajuste (x2)
7. Placa de proteccion
8. Brida para asegurar la manguera de drenaje
RECINTO
La ubicación de instalación debe tener un piso
sólido que pueda soportar el electrodoméstico
cuando esté completamente cargado y lleno
de agua. La ubicación debe estar dentro de los
3 metros de un fregadero con fácil acceso al
suministro de agua, el desagüe y una toma de
corriente. La ubicación debe tener sufi ciente espacio
delante para que la puerta se abra a 90 °, de
modo que se pueda cargar el lavavajillas.
1
2
3
4
90 r
32.5 inches
(82.5 cm)
22.8 inches
(58 cm)
5
6
7
8
90 r
El gabinete de instalación debe tener las siguientes
dimensiones: 23.6 pulgadas (60 cm) de ancho por
32.5 pulgadas (82.5 cm) de alto por 22.8 pulgadas
(58 cm) de profundidad. Debe haber menos de
5 mm entre la parte superior del lavavajillas y el
gabinete, y la puerta del lavavajillas debe estar
alineada con la cara del gabinete.
Si es necesario, haga orifi cios en los gabinetes
circundantes para proporcionar acceso a las
conexiones de agua y alimentación.
INSTRUCCIONES DE CONEXIÓN DE AGUA
La presión de la línea de suministro de agua
caliente debe estar entre 0.04 - 1 MPa.
La temperatura de entrada del suministro de
agua debe estar entre 48 - 65°C (120 - 149°F).
Asegúrese de que la temperatura del agua no
supere los 65°C (149°F) para evitar daños a los
platos.
Asegúrese de que el interruptor de circuito y la
válvula de suministro de agua estén apagados
antes de conectar la línea de suministro de agua
caliente al lavavajillas.
17.7 inches
(45 cm)
Cable de energía
El cable de alimentación se conectará a la caja de
conexiones en el lado frontal derecho del aparato.
La línea de suministro de agua caliente se conectará
al puerto de agua en el lado delantero izquierdo
del aparato.
Nota: Se recomienda utilizar únicamente agua
blanda en el aparato para lograr los mejores
resultados de lavado.
31
Línea de suministro
de agua caliente
135 - 185 mm
(5 1/3 - 7 1/3”)
Page 33

INSTRUCCIONES DE INSTALACIÓN
Conexión de la línea de agua caliente
Pase la línea de agua caliente a través del
canal en la parte inferior izquierda del aparato.
Asegúrese de que la línea de agua caliente no esté
retorcida y luego conéctela a la parte posterior del
electrodoméstico utilizando una junta acodada.
Use cinta de tefl ón o compuesto de sellado en la
conexión para evitar fugas.
No apriete demasiado el codo de 90°. Esto puede
dañar la entrada de agua y causar una fuga.
Conectando la línea de drenaje
La manguera de drenaje se conectará a la bomba
de drenaje en la parte inferior del artefacto. Ejecute
la línea de drenaje en el mismo canal en la parte
inferior del aparato como la línea de agua caliente.
Asegúrese de que no haya nada dentro de la
manguera de drenaje y que no se rompa durante el
proceso de instalación.
Hay varias formas diferentes de conectar
la manguera de drenaje en función de la
confi guración del fregadero. Revise las diferentes
formas de conectar el sistema de drenaje y elija el
método que mejor se adapte a la aplicación. Los
códigos locales pueden requerir la instalación de
un kit de espacio de aire. Consulte con un plomero
califi cado si tiene alguna duda.
1
2
3
4
1. Entrehierro
2. Entrehierro con eliminación de basura
3. Sin espacio de aire
4. Sin espacio de aire con eliminación de basura
Use un conector de goma para conectar las
mangueras de drenaje y las abrazaderas de
manguera en todos los puntos de conexión.
Asegure la manguera de drenaje a la pared del
fregadero usando abrazaderas u otros materiales
de sujeción. Si no está abrochado, la manguera
de drenaje puede doblarse y causar problemas de
drenaje.
El diámetro interno de la manguera de drenaje es
de 0.8 pulgadas (21 mm).
La parte superior de la manguera de desagüe debe
estar a menos de 39 pulgadas (100 cm) del piso.
Si la manguera de drenaje no está enrollada, el
agua puede desviarse durante un ciclo de lavado.
Cualquier doblez en la manguera de drenaje debe
ser soportada para que la manguera no se doble ni
doble.
32
Page 34

INSTRUCCIONES DE INSTALACIÓN
INSTRUCCIONES DE CONEXIÓN DE CABLEADO
Antes de conectar el cable de alimentación al
lavavajillas, asegúrese de que el interruptor de
circuito esté apagado.
En la caja de conexiones ubicada en la parte
inferior delantera derecha del lavavajillas, busque
los tres cables de alimentación del lavavajillas,
incluida la línea de conexión a tierra.
Pase el cable de alimentación a través del alivio de
tensión y luego a la caja de conexiones.
Conecte el cable negro del lavavajillas al cable
negro del cable de alimentación insertando ambos
en una tuerca de cable y luego girando el conector
del cable.
Conecte el cable blanco al cable blanco y el verde
al verde de la misma manera.
Vuelva a verifi car cada cable para asegurarse
de que esté conectado correctamente y de forma
segura.
1. Caja de conexiones
2. Cable de energía
3. Negro a negro
4. Blanco a blanco
5. Verde a verde (tierra a tierra)
6. Alivio de tensión
1
6
2
3
4
5
Cada cable de color debe estar conectado al cable
correspondiente del mismo color.
El blanco debe estar conectado a blanco, negro a
negro y verde a verde.
Vuelva a colocar la tapa de la caja de conexiones
en el lavavajillas.
Vuelva a verifi car cada cable para asegurarse
de que esté conectado correctamente y de forma
segura. Cada cable de color debe estar conectado
al cable correspondiente del mismo color.
ADVERTENCIA PELIGRO DE DESCARGA ELÉCTRICA
Para evitar descargas eléctricas, no trabaje en
un circuito energizado. Hacerlo podría ocasionar
lesiones graves o la muerte. Para evitar un riesgo
de incendio, asegúrese de que el trabajo eléctrico
esté instalado correctamente. Solo electricistas
califi cados deben realizar trabajos eléctricos.
33
Page 35

INSTRUCCIONES DE INSTALACIÓN
INSTRUCCIONES DE NIVELACIÓN
Asegúrese de que el dispositivo esté nivelado
antes de colocarlo en el gabinete. El pie trasero se
puede ajustar desde la parte frontal del lavavajillas
girando. Use un destornillador plano para ajustar
las patas delanteras hasta que el electrodoméstico
esté nivelado.
ABRAZADERAS DE INSTALACIÓN
El aparato debe estar asegurado en su lugar con
las llaves de instalación. Hay dos formas diferentes
de usar los aparatos.
A. Superfi cie de trabajo normal
Coloque el gancho de instalación en la ranura del
plano lateral y fíjelo a la superfi cie de trabajo con
los tornillos para madera.
B. Mostrador de mármol o granito
Fije el lado con el tornillo. Coloque las cubiertas
de los tornillos sobre los tornillos internos para
protegerlos del agua.
TIRA DE CONDENSACIÓN
Coloque la banda de condensación debajo de
la superfi cie de trabajo del gabinete. Asegúrese
de que la tira esté alineada con el borde de la
superfi cie de trabajo.
1
A
2
1
B
2
3
INSTALACIÓN DE PLACA DE PATADA
Instale la placa de protección en la parte inferior
del aparato.
1
2
34
Page 36

INSTRUCCIONES DE OPERACIÓN
PANEL DE CONTROL
3 4
A
1
2
B
C
D
E
F
G
H
I
J
K
L
6 7 8
5
9
1. Botón de encendido: Utilícelo para encender o apagar el dispositivo.
2. Manija
3. Programas: La luz se iluminará para mostrar qué programa se ha seleccionado.
A: Lavado pesado
B: lavado normal
C: lavado ECO
D: lavado de vidrio
E: lavado rápido
F: Enjuague
4. Características: La luz se iluminará para mostrar qué características se han seleccionado.
G: Lavado de alta temperatura - la temperatura del agua se mantendrá a 60 °C (140 °F)
H: Secado al calor - el calentador funcionará durante el ciclo de secado
I: Esterilizar - la temperatura del agua se mantendrá a 69 °C (156 °F)
J: Luz indicadora de enjuague - la luz se iluminará cuando el dispensador de abrillantador esté vacío
K: Luz indicadora del extremo del ciclo - la luz se iluminará cuando el programa esté terminado
L: Luz indicadora de advertencia del grifo - la luz se iluminará cuando el electrodoméstico no esté
recibiendo sufi ciente agua; encienda el grifo de agua cercano para corregir el fl ujo de agua
5. Pantalla de visualización: Muestra el tiempo de ejecución restante en el programa actual.
6. Botón de programa: Presione para seleccionar el programa deseado.
7. Botón de funciones: Presione para seleccionar las características deseadas.
8. Botón de retardo programado: Presione para confi gurar el retardo de tiempo deseado.
9. Botón de inicio/pausa: Presione para iniciar el programa deseado. Presione para cancelar un
programa que está actualmente en operación.
35
Page 37

INSTRUCCIONES DE OPERACIÓN
TABLA DE CICLOS DE LAVADO Pulse el botón de programación para seleccionar el programa
de lavado deseado.
Nota: Los tiempos de ciclo son aproximados y variarán según las opciones seleccionadas.
Programa Descripción del ciclo Desglose del ciclo Tiempo de ejecución Uso del agua
Pesado Para cargas muy
sucias como ollas y
sartenes
Normal Para cargas
normalmente sucias;
Ciclo diario estándar
ECO Ciclo de ahorro de
energía para cargas
ligeramente sucias
Vaso Para cristalería
ligeramente sucia
Prelavado
Lavar (60°C)
Enjuagar (65°C)
Enjuagar (con sani 69°C)
El secado
Prelavado
Lavar (50-55°C)
Enjuagar (58-60°C)
Enjuagar (con sani 69°C)
El secado
Prelavado
Lavar (45-50°C)
Enjuagar (50-55°C)
Enjuagar (con sani 69°C)
El secado
Prelavado
Lavar (48-50°C)
Enjuagar (50-55°C)
El secado
155 minutos 21.5 litros
(5.7 galones)
100~130 minutos 10.5~21.5 litros
(2.8~5.7 galones)
115 minutos 18 litros
(4.8 galones)
105 minutos 18 litros
(4.8 galones)
Velocidad Un ciclo rápido para
cargas ligeramente
sucias
Enjuagar Rinse cycle only Prelavado
Prelavado
Lavar (50°C)
Enjuagar (50°C)
El secado
Enjuagar
SISTEMA DE LAVADO INTELIGENTE
Este electrodoméstico está equipado con un sistema
de lavado inteligente. Cuando se coloca una carga
parcial de platos ligeramente sucios en el aparato,
se realizará automáticamente un ciclo de lavado
similar a un lavado breve.
Cuando se coloca una carga completa de platos
muy sucios en el electrodoméstico, se realizará
automáticamente un ciclo de lavado intenso.
Cuando se está ejecutando un ciclo, el
tiempo restante podría aumentar o disminuir
repentinamente durante varios minutos. Esto indica
que el sistema de lavado inteligente ha comprobado
el nivel del suelo y determinado en rellenos de agua
adicionales que se necesitan o si se pueden eliminar
los rellenos de agua.
60 minutos 14 litros
(3.7 galones)
20 minutos 7.5 litros
(2 galones)
FUNCIÓN DE BLOQUEO
Mantenga presionado el botón de funciones y el
botón de demora de tiempo durante tres segundos
para activar la función de bloqueo para niños. La
pantalla de visualización mostrará un ícono de
bloqueo y los botones en el panel de control no
responderán. Mantenga presionado el botón de
funciones y el botón de demora por tres segundos
para desactivar la función de bloqueo para niños.
36
Page 38

INSTRUCCIONES DE OPERACIÓN
CARGANDO LA LAVAVAJILLAS
• Deseche todos los platos para eliminar cualquier
residuo de comida grande antes de colocarlo en
este electrodoméstico.
• Coloque únicamente platos en este
electrodoméstico que estén marcados como
aptos para lavavajillas.
• Use un detergente suave.
Artículos que no deben colocarse en el lavavajillas
• Cubiertos con mangos de madera, porcelana
china o nácar.
• Artículos de plástico que no son resistentes al
calor.
• Artículos que han sido reparados con
pegamento que no es resistente al calor.
• Artículos de peltre, cobre o acero.
• Platos de madera.
• Artículos hechos de fi bras sintéticas.
• Los artículos con patrones acristalados pueden
desvanecerse si la máquina se lava con
frecuencia.
CARGANDO LA CESTA SUPERIOR
La canasta superior está diseñada para tazas,
vasos, platos pequeños, cuencos y artículos de
plástico que están marcados como seguros para
lavavajillas.
Asegúrese de que los platos cargados no interfi eran
con la rotación del brazo rociador ubicado en la
parte inferior de la cesta superior.
Consejos para una carga efi ciente
• Cargue los artículos huecos como tazas, vasos o
sartenes con la abertura hacia abajo para que
el agua no pueda acumularse en el recipiente.
• Los artículos no deben estar uno dentro del otro
o cubrirse entre sí.
• Para evitar dañar las gafas, no deben tocarse.
• Los artículos afi lados de los cubiertos, como
los cuchillos de trinchar, deben cargarse
horizontalmente en la cesta para evitar lesiones
durante la descarga.
• No sobrecargue el aparato.
CARGANDO LA CESTA DE CUBIERTOS
Los cubiertos deben colocarse en la cesta de los
cubiertos con las asas hacia abajo. Asegúrese de
que los cubiertos no aniden uno dentro del otro ya
que esto puede afectar el rendimiento de limpieza.
Los artículos afi lados o puntiagudos deben
colocarse en la cesta de los cubiertos con las
puntas hacia abajo para evitar lesiones durante la
descarga.
CARGANDO LA CESTA INFERIOR
La canasta inferior está diseñada para platos para
la cena, cuencos de sopa, platos, ollas, tapas,
platos de cazuela y platos.
Cargue elementos grandes, como cacerolas y ollas,
deben cargarse con sus lados abiertos hacia abajo.
No coloque objetos excesivamente pequeños en el
lavavajillas ya que podrían caerse a través del cesto
y afectar el funcionamiento del aparato.
37
Page 39

INSTRUCCIONES DE OPERACIÓN
DISPENSADOR DE DETERGENTE
El dispensador de detergente debe llenarse antes
del inicio de cada ciclo de lavado. Agregue el
detergente justo antes de comenzar el ciclo de
lavado. Agregar el detergente demasiado pronto
puede hacer que se humedezca y no se disuelva
adecuadamente.
1. Si el dispensador de detergente está cerrado,
presione el pestillo para abrirlo.
2. Agregue la cantidad recomendada de
detergente al componente principal de
detergente.
3. Cierre la solapa deslizándola hacia la izquierda
y presionando hacia abajo.
1
DISPENSADOR DE AGENTE DE ENJUAGUE
El agente de enjuague se puede usar para evitar
que se formen gotas de agua o rayas en los platos.
El abrillantador se liberará automáticamente
durante el enjuague fi nal. Este electrodoméstico
está diseñado para usar solo abrillantador líquido.
No use un abrillantador en polvo ya que obstruirá
la abertura del depósito. No coloque ninguna otra
sustancia en el dispensador de abrillantador ya que
puede dañar el aparato.
1. Abra el dispensador de abrillantador
levantando la tapa.
2. Use el puerto de visualización cuando llene el
depósito de abrillantador. No llene el depósito
por encima del indicador de nivel completo.
3. Si la pantalla muestra “LSb”, el dispensador de
abrillantador está vacío.
4. Cierre la tapa del abrillantador presionando
hacia abajo.
2
3
1
2
3
4
38
Page 40

INSTRUCCIONES DE OPERACIÓN CUIDADO Y MANTENIMIENTO
COMENZANDO UN CICLO DE LAVADO
1. Cargue el lavavajillas según las instrucciones de
carga.
2. Agregue detergente y abrillantador según sea
necesario.
3. Cierre la puerta del lavavajillas y presione el
botón de encendido para encender el aparato.
4. Presione el botón de Programa repetidamente
para elegir el programa de lavado deseado. Los
programas realizarán un ciclo en el siguiente
orden: Pesado -> Normal -> ECO -> Vidrio ->
Rápido -> Enjuague
5. Presione el botón de Opciones para seleccionar
las opciones deseadas.
6. Haga funcionar el grifo de agua caliente más
cercano al artefacto hasta que el agua esté
caliente y luego apáguelo.
7. Presione el botón de Inicio / Pausa para
comenzar el ciclo.
Nota: Cuando fi nalice un programa de lavado, el
dispositivo zumbará 8 veces y aparecerá END en la
pantalla.
LIMPIEZA
• Después de cada lavado, apague el suministro
de agua y deje la puerta ligeramente abierta
para que la humedad y los olores no queden
atrapados dentro del aparato.
• Utilice únicamente un paño suave y detergente
suave para limpiar el aparato. No utilice nunca
disolventes ni productos de limpieza abrasivos,
ya que pueden dañar el aparato.
• Para eliminar manchas de agua del interior del
aparato, utilice un paño suave humedecido con
una pequeña cantidad de vinagre.
• Si el aparato no se va a utilizar durante un
largo período de tiempo, se recomienda ejecutar
un ciclo de lavado normal con el lavavajillas
vacío y luego dejar la puerta abierta hasta que
el interior del aparato esté completamente seco.
Esto ayudará a que los sellos de la puerta duren
más y ayudará a prevenir que los olores se
formen dentro del aparato.
• Limpie los sellos de la puerta con una esponja
húmeda con regularidad para evitar olores de
partículas de alimentos que pueden quedar
atrapados en el sello de la puerta.
AGREGAR UN PLATO OLVIDADO
Un plato olvidado puede agregarse a un ciclo
de funcionamiento en cualquier momento antes
de que se abra el dispensador de detergente. Si
el detergente ya se ha liberado en el aparato, se
recomienda no agregar más platos ya que no
recibirán una limpieza adecuada.
Para agregar un plato:
1. Abra ligeramente la puerta y espere unos
segundos hasta que la acción de lavado se
detenga por completo antes de abrirse por
completo.
2. Agrega el artículo olvidado
3. Cierre la puerta y presione el botón de inicio
para reiniciar el ciclo.
Precaución: Espere hasta que la acción de lavado
se detenga por completo antes de abrir la puerta.
El agua caliente puede salpicar del lavavajillas y
causar lesiones.
39
Page 41

CUIDADO Y MANTENIMIENTO
SISTEMA DE FILTRO
El sistema de fi ltro elimina partículas de alimentos
del agua de lavado y las atrapa. Se recomienda
encarecidamente vaciar y limpiar los fi ltros después
de cada ciclo de lavado.
Para limpiar el sistema de fi ltro:
1. Apaga el lavaplatos. Gire el fi ltro y levante
hacia arriba para quitar el sistema de fi ltro del
aparato.
2. Gire el inserto del fi ltro en el sentido contrario
a las agujas del reloj para desabrochar y luego
separe el inserto del fi ltro.
3. Enjuague y limpie los fi ltros con agua y
reemplácelos dentro del aparato.
1
BRAZO ROCIADOR
El brazo rociador puede retirarse del aparato
tirando suavemente hacia arriba. Enjuague el brazo
rociador con agua tibia para eliminar cualquier
escombro que pueda obstruir las boquillas.
Vuelva a colocar el brazo rociador en el aparato
empujando hacia abajo hasta que encaje en su
lugar. Asegúrese de que el movimiento del brazo
aspersor no se vea impedido antes de ejecutar otro
ciclo.
CÓDIGOS DE ERROR
2
3
E1: La entrada de agua está restringida o la presión
del agua es demasiado baja
E3: Mal funcionamiento del elemento calefactor
E4: Desbordamiento de agua
Si el dispositivo muestra algún código de error, un
reinicio de energía puede resolver el problema.
Desenchufe el aparato, espere aproximadamente 5
minutos y luego vuelva a enchufar la unidad.
40
Page 42

SOLUCIÓN SUGERIDA
Danby cuidado del consumidor: 1-800-263-2629
Horas de operación:
Lunes a Jueves 8:30 am - 6:00 pm Hora estándar del este
Viernes 8:30 am - 4:00 pm Hora estándar del este
La información de este manual está sujeta a cambios sin previo aviso.
PROBLEMA POSSIBLE CAUSA
Ninguna energía • Se puede quemar un fusible o disparar el disyuntor
• Sobrecarga de energía
• El enchufe no está completamente insertado en la toma de
corriente
• Puerta no cerrada correctamente
Agua no drenada del lavaplatos • Doblar en la manguera de desagüe
• Filtro tapado
• Funcionamiento incorrecto de la bomba de drenaje
Detergente en el dispensador • Platos que bloquean la apertura total del dispensador; La
unidad puede estar sobrecargada
Las espumas dejadas en el aparato • Demasiado detergente o tipo incorrecto de detergente
• Demasiado agente de enjuague
Película blanca o nubosidad en los
platos o en la bañera interior
Ruido dentro de la bañera durante el
funcionamiento
Los platos no están limpios • Los platos se cargaron incorrectamente
• Minerales de agua dura
• Demasiado detergente
• No hay sufi ciente agente de enjuague
• El brazo rociador está golpeando un artículo en la cesta
• Un artículo se ha caído de la cesta y está en el fondo de la
tina de la colada
• El programa de lavado no era lo sufi cientemente potente
• No hay sufi ciente detergente
• Los artículos bloquean los brazos rociadores; La unidad
puede estar sobrecargada
• Filtro tapado
Los platos no se secan • Los platos se cargaron incorrectamente
• Se cargaron demasiados platos
• No hay sufi ciente agente de enjuague
• Platos eliminados con demasiada rapidez
41
Page 43

GARANTÍA LIMITADA “A DOMICILIO”
LIMITED IN-HOME APPLIANCE WARRANTY
Este producto de calidad está garantizado contra defectos de fabricación, incluyendo partes y mano de obra, siempre y
This quality product is warranted to be free from manufacturer’s defects in material and workmanship, provided that the unit is used under the normal operating
cuando la unidad se utilice bajo las condiciones normales de funcionamiento para las que fue diseñado.
conditions intended by the manufacturer.
Esta garantía está solamente disponible para la persona que haya comprado originalmente esta unidad directamente de Danby
This warranty is available only to the person to whom the unit was originally sold by Danby Products Limited (Canada) or Danby Products Inc. (U.S.A.) (hereafter
Products Limited (Canada) o Danby Products Inc. (U.S.A.) (en adelante “Danby”) o uno de sus distribuidores
“Danby”) or by an authorized distributor of Danby, and is non-transferable.
autorizados, y no es transferible.
CONDICIONES DE LA GARANTÍA
Las piezas plásticas, se autorizan por treinta (30) días solamente a partir de la fecha de la compra, sin las extensiones
proporcionadas.
Plastic parts, are warranted for thirty (30) days only from purchase date, with no extensions provided.
Primeros 12 meses
First Year
Para obtener
servicio
To obtain
Service
Límites del servicio
técnico a domicilio
Boundaries of
In Home Service
Durante los primeros doce (12) meses, cualquier parte en buen estado de este producto que resulte defectuosa,
During the rst twelve (12) months, any functional parts of this product found to be defective, will be repaired or replaced, at warrantor’s
incluyendo cualquier sistema sellado, será reparado o reemplazado, a opción del
option, at no charge to the ORIGINAL purchaser.
fabricante, sin cargo para el comprador ORIGINAL.
Comuníquese con el distribuidor donde haya comprado la unidad, o llame al Taller de Servicio Autorizado más
cercano, donde debe ser reparada por un técnico calificado. Si esta unidad es reparada en otro lugar que no
Danby reserves the right to limit the boundaries of “In Home Service” to the proximity of an Authorized Service Depot. Any app liance
sea un Taller de Servicio Autorizado, o si la unidad se utiliza para aplicaciones comerciales, Danby no se hará
requiring service outside the limited boundaries of “In Home Service” , it will be the consumer’s responsibility to transport the appliance (at
responsable de ninguna forma y la garantía será anulada.
their own expense) to the original retailer (point of purchase) or a service depot for repair. See “Boundaries of In Home Serv ice” below.
Contact your dealer from whom your unit was purchased, or contact your nearest authorized Danby service depot, where service
Danby se reserva el derecho de limitar la cobertura de "Servicio en Domicilio" sujeto a la proximidad de un
must be performed by a qualied service technician.
Taller de Servicio Autorizado. Para todo artefacto que requiera servicio fuera del área limitada de "Servicio en
If service is performed on the units by anyone other than an authorized service depot, or the unit is used for commercial appli cation, all
Domicilio", el cliente será responsable por transportar dicho artefacto hasta el Taller de Servicio Autorizado
obligations of Danby under this warranty shall be void.
mas cercano. Si el electrodoméstico está instalado en un lugar que se encuentra a 100 kilómetros (62 millas)
o más del centro de servicios más cercano, se debe llevar la unidad al Centro de servicios Danby autorizado
If the appliance is installed in a location that is 100 kilometers (62 miles) or more from the nearest service center your unit must be
más cercano, ya que dicho servicio sólo puede realizarlo un técnico calificado y certificado por Danby para
delivered to the nearest authorized Danby Service Depot, as service must only be performed by a technician qualied and certif ied for
prestar servicios de garantía.
warranty service by Danby. Transportation charges to and from the service location are not protected by this warranty and are t he
responsibility of the purchaser.
Los cargos por transporte desde y hacia el lugar en que se efectúe el servicio técnico no están cubiertos por
esta garantía y son de responsabilidad del comprador.
TERMS OF WARRANTY
Nothing within this warranty shall imply that Danby will be responsible or liable for any spoilage or damage to food or other c ontents of this appliance, whether due
Nada dentro de esta garantía implica que Danby será responsable por cualquier daño que hayan sufrido los alimentos u otros
to any defect of the appliance, or its use, whether proper or improper.
contenidos de este aparato, ya sea debido a un defecto del aparato, o su uso, adecuado o inadecuado.
EXCLUSIONS
Save as herein provided, Danby, there are no other warranties, conditions, representations or guarantees, express or implied, m ade or intended by Danby or its
Salvo lo aquí indicado por Danby, no existen otras garantías, condiciones o representaciones, explícitas o implícitas, concretas o
authorized distributors and all other warranties, conditions, representations or guarantees, including any warranties, conditio ns, representations or guarantees
intencionales por parte de Danby o sus distribuidores autorizados y todas las demás garantías, condiciones o representaciones,
under any Sale of Goods Act or like legislation or statue is hereby expressly excluded. Save as herein provided, Danby shall no t be responsible for any damages
incluyendo cualquier garantía, condiciones o representaciones bajo cualquier Acta de Venta de Productos o legislación o estatuto
to persons or property, including the unit itself, howsoever caused or any consequential damages arising from the malfunction o f the unit and by the purchase of
similar, quedan de esta forma expresamente excluidas. Salvo lo aquí indicado, Danby no serán responsables por ningún daño a
the unit, the purchaser does hereby agree to indemnify and hold harmless Danby from any claim for damages to persons or propert y caused by the unit.
personas o bienes, incluyendo la propia unidad, sin importar su causa, o de ningún daño indirecto causado por el desperfecto de la
unidad, y al comprar esta unidad, el comprador acepta por la presente, indemnizar y proteger a Danby contra cualquier reclamo
por daños a personas o bienes causados por la unidad.
EXCLUSIONES
GENERAL PROVISIONS
No warranty or insurance herein contained or set out shall apply when damage or repair is caused by any of the following:
1) Power failure.
No se considerará ninguna de estas garantías o seguros cuando el daño o la necesidad de reparación sea el producto de los
2) Damage in transit or when moving the appliance.
siguientes casos:
3) Improper power supply such as low voltage, defective house wiring or inadequate fuses.
1) Falla del suministro eléctrico.
2) Daños en tránsito o durante el transporte de la unidad.
4) Accident, alteration, abuse or misuse of the appliance such as inadequate air circulation in the room or abnormal operating con ditions
3) Alimentación incorrecta, como bajo voltaje, instalación eléctrica defectuosa o fusibles inadecuados.
4) Accidente, modificación, abuso o uso incorrecto del artefacto, tal como insuficiente ventilación del ambiente o condiciones de
operación anormales (temperatura ambiente extremadamente alta o baja).
5) Utilización comercial o industrial (v.g., si el electrodoméstico no está instalado en una vivienda particular).
6) Incendio, daños por agua, robo, guerra, disturbios, hostilidades, actos de fuerza mayor como huracanes, inundaciones, etc.
7) Pedidos de servicio debido a desinformación del usuario.
8) Instalación inadecuada (v.g., instalación empotrada de un electrodoméstico diseñado como unidad independiente o uso de un
Proof of purchase date will be required for warranty claims; so, please retain bills of sale. In the event warranty service is required, present this document to our
electrodoméstico al aire libre que no esté aprobado para dicho fin, incluyendo pero no limitado a: garajes, patios, porches o en
AUTHORIZED SERVICE DEPOT.
cualquier lugar que no esté bien aislado o controlado por el clima).
(extremely high or low room temperature).
5) Use for commercial or industrial purposes (ie. If the appliance is not installed in a domestic residence).
6) Fire, water damage, theft, war, riot, hostility, acts of God such as hurricanes, oods etc.
7) Service calls resulting in customer education.
8) Improper Installation (ie. Building-in of a free standing appliance or using an appliance outdoors that is not approved for out door application).
CONDICIONES GENERALES
Se requerirá una prueba de la fecha de compra para reclamaciones de garantía; Retener las facturas de venta. En el caso de que se
requiera servicio de garantía, presente el comprobante de compra a nuestro depósito de servicio autorizado.
Warranty Service
In-home
Servicio de Garantía
Danby Products Limited
PO Box 1778, Guelph, Ontario, Canada N1H 6Z9
Danby Products Limited
Telephone: (519) 837-0920 FAX: (519) 837-0449
PO Box 1778, Guelph, Ontario, Canada N1H 6Z9
Telephone: (519) 837-0920 FAX: (519) 837-0449
Servicio en Domicilio
1-800-263-2629
1-800-263-2629
04/17
04/09
PO Box 669, Findlay, Ohio, U.S.A. 45840
Telephone: (419) 425-8627 FAX: (419) 425-8629
Telephone: (419) 425-8627 FAX: (419) 425-8629
PO Box 669, Findlay, Ohio, U.S.A. 45840
Danby Products Inc.
Danby Products Inc.
Page 44

MODEL • MODÈLE • MODELO
DDW1804EW
DDW1804EBSS
Printed in China
Imprimé en Chine
Impreso en China
Danby Products Limited, Guelph, ON, Canada N1H 6Z9
Danby Products Inc., Findlay, Ohio, USA 45840
 Loading...