

Danby DCF1020W, DCF1504W, DCF719W, DCF1500W, DCF1018W Owner's Manual
...
OwnersManual
CHESTFREEZERS
CONTENTS
Important Safety Instructions ......... 2
If Your Electricity Goes Off ............ 3
Installing Your Freezer ................... 3
Installation Requirements ....... 3
Picking a Location ................. 3
Starting the Freezer ............... 4
Freezer Features ............................ 4
Temperature Control ............. 4
Cool Down Period .................. 4
Interior Light ........................... 4
Sliding Basket ........................ 4
Power Light ............................. 5
Built-in Lock ............................ 5
Defrost Drain .......................... 5
Defrosting Your Freezer .................... 6
Cleaning Your Freezer ...................... 6
Troubleshooting ................................. 7
Energy Saving Tips ........................... 8
Vacation & Moving Tips ..................... 8
b
If you need service or call with a question, have this information ready,
We advise you to keep this Owners Manual and your sales slip in your possession,
Model:
Serial Number:
Date of Purchase:.
Guided'utilisation- CONGI_LATEURHORIZONTAL
TabledesMati_res 9
/
Manualdeinstrucciones - CONGELADORTIPOCAJON
lndice 18
Printed in Canada 1-35684-001Revo03

ImportantSafetyInstructions
• I
Warning. Risk of Child Entrapment
tLex_e_allow children to operate, play wlth, or crawl Inside a
freezer or refrigerator,
Ifyou are storing a refrigerator or freezer;
1, Biockthedooropen: Glue thickwooden blocks
tothe door so it can't closer Be sure to use strong
glue and place the blocks high, out of children's reach.
Leave onlyenough room toallowventilation to keep
appliance from collecting mildew.
2. Band, tape or secure the door shut: Use strong tape and wrap itall the
way around the appliance several times orpass a heavy duty chain
around the appliance and through the handle(s) and then padlock it
ensuring it cannotslide loose°
Before you throw away your old refrigerator or freezer:
1, Take off the lid or door; The hinge of chest type freezers are under
spring tension. Instructions for removal of the hinges are found on the back of the
freezer.
2. Cut off any electrical wlres: Ordinary household tools are allyou need.
3. Leave the shelves in place: so thatchildren my not easily climbinside.
Talk to your children about the dangers of playing around or inside any
container that might shut them In.
WHY all these precautions?
Each year children die because they climb insidean old refrigerator or freezer,
the door closes and they are trapped inside and suffocate.., usually in less
than 10 minutesl Please take a few minutes and prevent such a needless tragedy.
if you are selling your old appliance or giving it away, put this manual inside
so the new owners will know what to do when they discard or store the uniL
Jill [ ,
• Destroy carton, plastic bags, and any exterior wrapping material immediately after the
freezer is unpacked° Children should never use these items for play. Cartons covered
with rugs, bedspreads, plastic sheets or stretch wrap may become airtight chambers
and can quickly cause suffocation°
• Extreme caution should be used when removing the lid of the freezer. The hinge of
chest type freezers are underspdng tensionl Before attempting to remove hinges, see
instruction label on the back ofthe cabinet.
• Do not store or use gasoline or other flammable items inthe area of this or any
appliance, as the fumes can create a fire hazard or explosion°
• This freezer is designed for free-standing installation only; it should not be recessed or
built-in.
-2.
• Replace or repair all electric service cords that have become damaged or frayed.
° Never unplug your freezer by pulling on the power cord. Always grip plug firmly and pull straight out
from the outlet.
° Be careful not to rol!over or damage the cord, when moving the freezer.
• Unplug your freezer before making repairs orcleaning. Itis our recommendation that servicing be
done by a qualified technician.
• Unplug your fraezer or turn power off atthe circuit breaker or fuse box in order to avoid touching a live
wire, when replacing a burned-out light bulb. Turning the control to OFF turns off the compressor,
but does not disconnect power to other electrical components_
• Do not pinch, knot, orbend powercord in any manner.
If your electricity goes off follow this procedure:
• Call your power company tosee how long the powerwill be out.
• If service isto be interruptedfor less than 24 hours, keep freezer closed. 'Thiswill help food stay
frozen.
• Ifservice is to be interrupted for more than 24 hours, either remove food and store in frozen food
locker or another freezer or place drY ice in freezer (2 Ibs. or 1.0 kg for every cubic foot of freezer
space)_ This will keep food frozen for 2 to 4 days.
NOTE: Dry icecan usually be found by looking in your telephone directory under'Ice or Dry Ice'.
I WARNING: HANDLE DRY ICE ONLY WHEN WEARING PROTECTIVE GLOVES |
1
TO PROTECT HANDS FROM INJURY.
1
InstallingYourFreezer
Your dealer is responsible for unpacking your freezer properly. Should any evidence
of mishandling be presen t, contact him immediately.
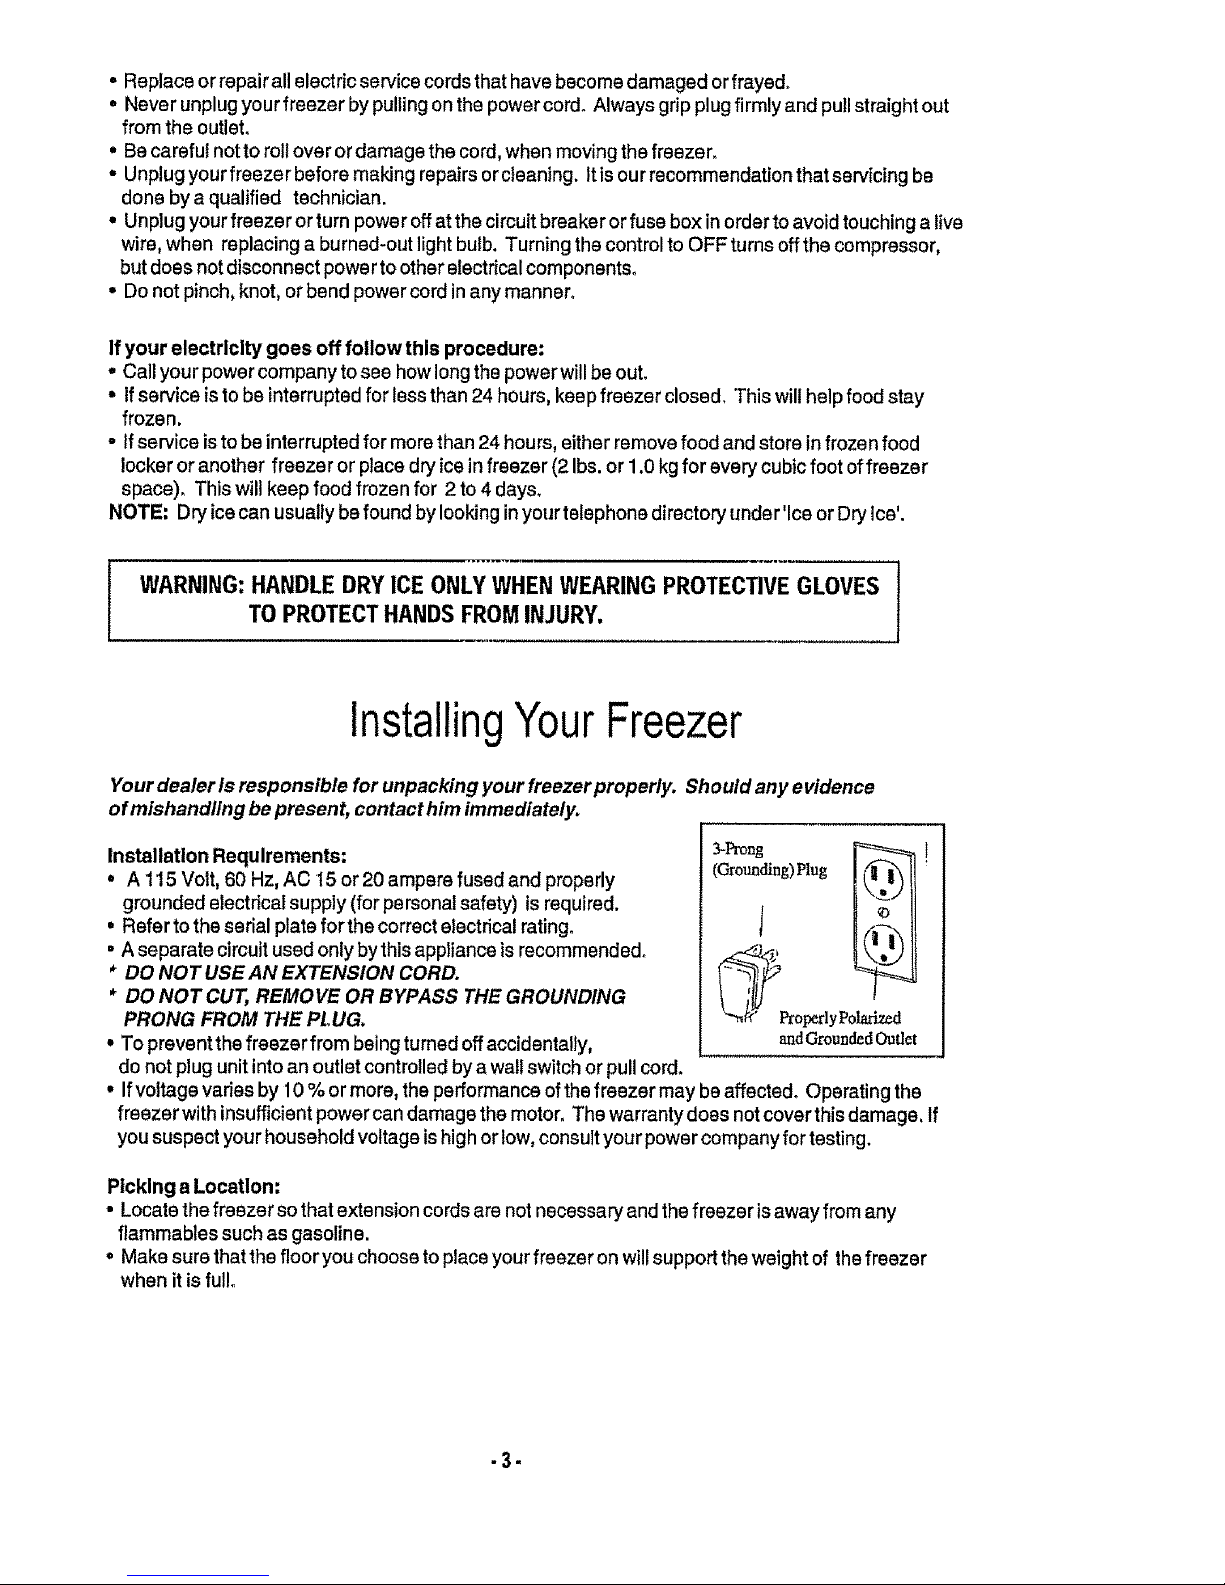
Installation Requirements:
* A 115 Volt, 60 Hz, AC 15 or 20 ampere fused and properly
grounded electrical supply (for personal safety) is required.
, Refer tothe serial plate forthecorrect electrical rating.
, A separate circuit used only bythis appliance isrecommended°
* DO NOTUSEANEXTENSION CORD.
* DO NOT CUT, REMOVE OR BYPASS THE GROUNDING
PRONG FROM THE PLUG.
, To prevent the freezer from being turned offaccidentally,
do not plug unit into an outlet controlled by a wall switch or pullcord.
and Grounded O_det
• Ifvoltage varies by 10 % or more, the performance ofthefreezer may be affected. Operating the
freezer with insufficient powercan damage the motor. The warranty does not cover this damage, If
you suspect your household voltage is high or low, consult your power company for testing.
Ptcklng a Locstlon:
• Locate thefreezer so that extension cords are not necessary and the freezer is away from any
flammables such as gasoline.
° Make sure thatthe floor you choose to place your freezer on will support the weight of the freezer
when it is ful!o
-3.

° Due to the Iid and hinge arrangement, it is impossible to install the freezer directly against the wail.
The spacing on the back is essential for maintaining proper air circulation around the freeze nit is
recommended that you leave a3 inch (75 mm) space on all sides of the freezer.
• Locate the freezer where it will beconvenient to use and away from direct sunlight or heat
sources such as the range, dishwasher, laundry equipment or furnace. Freezers are designed to
operate efficiently between 4°C to 32°C (40°F to 90°F). Temperatures above or below this range
will cause the fraezer to operate less efficiently_ Additional compressor heaters are not
recommended
° If the place selected for your freezer is damp or moist, as in some basements, place freezer on
wooden blocks. (Two or three boards under entire length will assure adequate support.)
• The freezer should never be placed on a carpeted floor.
• In order for your freezer to work properly, it must be level with the floor, if not, you may add metal or
wood shims between feet pads and floor.
Note: the floor must be strong enough to support a fully loaded freezer.
• If there istape residue on the freezer, remove with a mixture of warm water and mild detergent or
touch the residue with the sticky side oftape already removed_
• DO NOT REMOVE THE SERIAL PLATE.
Starting the Freezer:
• The freezer is ready to operate when you receive it. Just connectthe cord to the power outlet.
• Turnthe temperature control knob (located at the lower righthand side ofthe cabinet) to No. 4_This
setting is normalfor providingsafe long term freezing. Forcolder temperatures turn to a higher
setting.
• NOTE: Some modelshave a presettemperature and nocontrol knob.
• Allow thefreezer tooperatefor approximately 2 hoursbefore placingfrozen food inside.
FreezerFeatures
Temperature Control
• Located at the lower right hand side of the cabinet°
At setting No.4, the temperature will be at or near 0°F (-t 7.8°C) under
normal operating conditions.
• Turning the temperature control all theway to the left or past "0" until it
clicks will switch off power to the compressor.
• 'Toadjust the thermostat control: turn control tohigher number for colder
temperatures, lower number for less cold temperatures. It is recommended
that you adjust by one numerical increment at a time, allowing several hours
for ternperatures to stabilize between increments.
• Some ofthe models are equipped with preset thermostats which do not have a knob.
• Some models may have the temperature control mounted on cabinet rear.
Cool Down Period
• To ensure proper food storage, allow 4hours for freezer tocool down completely. The freezer willrun
continuouslyfor thefirst several hours. Already frozen foods may be placedin after the first few hours of
operation,howeveryou must wait4 hours before placing in any unfrozenfood.
IIMPORTANT: Freeze approximately 22 pounds (10 kg) of fresh room temperature food at one time.
There is no restriction for adding already frozen food. Distribute packages to be frozen evenly throughout
the freezer. When freezing food, it is not necessary to set control knob to colder setting°
Sliding Basket (on some models)
• Numberof baskets can varywith different models.
• Use yourslidingbasket(s) to keep frequently used
food within easy reach.
-4-

reezerFeatures(continued)
WARNING: FAILURE TO DISCONNECT FREEZER FROM POWER SUPPLY WHEN
CHANGING BULB COULD RESULT IN PERSONAL INJURY
Interior Light (on some models)
• Turns on whenever you open the lid toyour freezer.
° When changing the interior light, disconnect freezer from power supply, replace old bulb with
new appliance bulbwith similar wattage and re-connect freezer to power supply.
/
Power Light (on some models)
• The power lightnormally will be "on"_
• Itspurposeisto warn you when there isa power
absence. If for any reason the power tothe freezer is
interrupted(blownfuse, looseplug, etc.) the indicator
lightwill be "off".
• WARNING: The presence ofthe lightdoes not
indicate proper food temperatures, or properoperation
ofthe refrigeration system.
° Flickering light indicates faulty or burned out light, l
WARNING:.FNLURETODISCONNECTFREEZERFROM
POWERSUPPLYWHENCHANGINGBULB
COULDRESULTINPERSONALINJURY
Built-in Lock (on some models)
• A built-in lock allows you to keep your food supply secure if necessary.
° An excellent toolto help reduce the hazard of child entrapment.
° This type of lock is spring loaded, preventing the key from being left in the lock.
To lock or unlock the freezer, you must hold the key in the lock while tuming.
Defrost Drain (on some models)
The outer cabinet drain plug is located on theoutsideof the freezer at the front bottom left hand comer. The
interior ptug is located on theinside of the freezer on the left side ofthe floor. The drain hose adaptor can be
located in the plastic bag with the Use &Care Guide. The purpose of the defrost drain isto allow quicker
and more convenient clean up of water.
Step 1. Remove the outer cabinet drain plug bytwisting and pulling.
Step 2. Insert the drain hose adaptor intothe drain hole and connect the
hose to the adaptor. Run the hose down towards a suitable drain,
Step. 3. Remove the interior drain plug by twisting and pulling. When the
water inthe freezer has been drained, replace the parts removed eadier.
Temperature Monitor Alarm (onsome models)
Some models feature atemperature monitorthat provides an audible alarm, The temperature monitoralarm
islocated above thetemperature control. The alarm sounds ifthetemperature in thefreezer rises 10°F or more
above norma] forselected setting. Alarm may sound ifthe temperature control dial is turned toa much lower/
colds rsettingor if a large amount ofunfrozen food isadded atone time, Alarm iscontrolled bya three position
switch.
• Oor OFFprevents alarm from sounding when freezer is warm, such
as during initial start-upor defrosting.
• ,# or TESTsounds alarm regardless of temperature. Alarm system
should be tested at least once amonth.
• I or ONis proper setting for normal freezer use, Return switch to 1
after defrosting,
"5"

DefrostingYourFreezer
o Do not place electrical devices into your freezer° Personal injury can occur.
, Do not use sharp objects to defrost you rfreezer. Personal injury and/or
damage to your freezer can occur.
, Do not use abrasive cleaners, waxes, concentrated detergents or bleaches
on your freezer. Damage can occur.
After you have used your freezer for some time, frost will accumulate inside mostly on the upper part of
the foodliner. This is due to warm, moist air entering the freezer when the door is open and is normal. If
this frost becomes thicker than 1/4", it should be removed as it will become less energy efficient due to
longer running times+ Under normal circumstances, defrosting will not be necessary more than once a
year, To defrost your freezer properly, follow these instructions:
1. Unplug freezer.
2. Quickly remove allfrozen food and store in baskets, cartons or other suitable containers° Keep
them well covered with blankets to avoid excessive temperature rise.
3. Place pans of hot water in freezer with lid open to speed melting.
4+ Using a wooden spatula or plastic scraper, remove the frost and ice off the foodliner walls as soon
as it becomes loose (approximately 15 minutes from start),
5 A cloth or towel soaked inhot water wilt help speed up the process. Remove ice from freezer as
soon as it becomes loose. Allowing it to melt will only make cleaning it more difficult.
6. You are now readyto clean your freezer.
Cleanin YourFreezer
Cleaning the Inside
We recommend the following cleaning method: sprinkle baking soda on the sides and bottom ofthe freezer,
thiswill helpin cleaning andodor removal. Inorder toretain the finish ofthefreezercabinet, inside and outside,
wash painted and plastic parts only with warm water and mild soap, then rinse and dry. Do not use, under
any circumstances, agritty soap or a scouring pad as they will scratch the finish.
During the defrosting operation, some water may have dripped from the back flange of the lid cover. This is
quite normal. Ice has built-up on the lid insulation during normal operation and this ice will melt during
defrosting, You will probably have to fold over anddrythe gasket onthe hinge side ofthe lid to complete the
cleaning process.
Cleaning the Outside
Wash the cabinet with warm water and mild liquid detergent. Rinse well and wipe dry with aclean soft cloth,
-6-

Troubleshooting
FREEZER DOES NOT WORK
• Freezer may not be plugged in. Make sure plug is secure.
• Perhaps outlet is not working properly or fuse is burned out. Try plugging in a small appliance to
check outlet.
LID WON'T CLOSE ALL THE WAY
• Package may be holding lid open.
• Baskets may beoverlapping at cornerso
EXCESSIVE FROST BUILD UP
• Package may be holding lid open.
• Opening lid excessively or left open for too long.
FOODS DEFROSTING
° Freezer may not be plugged in.
• Outlet is not working propedy or fuse is burned out.
• Package is holding tidopen or lid is being opened excessively orfor too long.
WET OUTSlDE CABINET
• Extended hot, humid weather.
FOODS ARE DRYING OUT
• Not properly wrapped or sealed,
FREEZER TOO COLD
• Temperature control set too high. Adjust and wait several hours for temperature to stabilize.
FREEZER TOO WARM
• Temperature control set too low. Adjust and wait several hours for temperature to stabilize.
• Lid is being open too often ortoo long.
• Large amount of warm or hot food has been stored requiring time for cool down again
° Freezer lid is open slightly.
• Freezerhad recently been disconnected and needs time to cool down again.
FREEZER START8 OFTEN
* Package holding lid open, Iid open too often or too tong.
FREEZER OPERA TES TOO LONG
• Temperature control set on too high a setting.
• Freezer may bemaintaining a uniform temperature.
• Room oroutside temperature is hot. A freezerwould normallywork harder under these conditions.
• Freezer had recently been disconnected and needs time to cool down again,
• Large amount of warm or hotfood has been stored requiring time for cool down again
• Lid is being open too often or too Iong_
• Freezer lid isopen slightly,
• Gasket isdirty, worn, cracked, or poorly fitted. Clean or change gasket. Leaks inthe door sea! will
cause freezer to run longer in order to maintain desired temperature.
SLOW TO STARTAFTER BEING OFF
• Built in overload protection at work.
ODOUR IN FREEZER
• Interior needs to be cleaned.
-7-

EXTERNAL FREEZER SURFACE TOO WARM
• The exterior freezer walls can be as much as 30°F (16o6°C)warmer than room tempe rature. This is
normal.
TO0 NOISY
• Floor weakness, freezer may vibrate ifcompressor is on
° Cabinet is not positioned solidly. Shim to even freezer°
• When the surrounding noise level is low, you may hear the compressor running. This is normal as
freezers require high efficiency compressors°
LOUDER SOUND LEVELS WHEN COMPRESSOR COMES ON
• During the start of the 'ON' cycle, the freezer operates at higher pressures, This is normal, Sound
willlevel off or disappear as the freezer continues to run.
POPPING OR CRACKING SOUND WHEN THE FREEZER COMES ON
• This is normal. The metal parts within the freezer expand and contract. The sound should level off or
disappear as the freezer continues to run.
BUBBLING OR GURGLING SOUND
• When refrigerant is circulating throughout the system this type of sound may be heard. This is
normal.
VIBRATING OR RATTLING NOISE
• Freezer is notlevel°
• Floor is uneven or weak.
EnergySavingTips
, Be careful not to leave the lid open. Always make sure that the lid is closed properly.
, Try notto open the lid more than is necessary especially inhot, humid weather.
• Arrange frozen food systematically so you can quickly find what you need.
• Thelocation ofyourfreezerisveryimportant. Don'tsituateit in awarm, unventilated room, nextto
your range or heating vent or where itis in direct contact with the sun.
° If you turn the temperature control tothe coldest setting for quick freezing, don't forget to turn it back
to the normal setting.
• Defrost the freezer whenever the frost become 1/4" thick.
• A full freeze rstays cold longer than a partty filled one. Afreezer full of meat stays cold longer than a
freezer full of baked goods.
• Let hot foods cool to room temperature before placing in the freezer. Overloading the freezer forces
the compressor to run longer. Foods that freeze too slowly may lose quality or spoil.
° Be sure to wrap foods properly and wipe containers dry before placing them in the freezer° This
cuts down on frost build-up inside the freezer.
• Freezer shelves and baskets should not be lined with aluminum foil, wax paper, or paper toweling.
Liners interfere with cold air circulation, making the freezer less efficient.
VacationandMovingTips
Short Vacations (less than 3 weeks): Leave the freeze roperating.
Long Vacations: Ifthe freezer wiltnot be used for several months, remove all food and unplug the
power cord. Clean and dry the interior thoroughly. To prevent odor and mold growth, leave the freeze r
door open slightly, blocking itopen if necessary°
Movlng: Disconnect the power cord plug from the wall outlet. Remove food, defrost and clean freezer.
Secure a!lloose items such as base panel, baskets and shelves by taping them securely in place to
preventdamage, tnthe moving vehicle, secure the freezerto prevent movement and protectthe outside
ofthe freezer with a blanket or similar item.
-8-
 Loading...