

Page 1
DakStats® Soccer Quick Start Guide 1 of 7
201 Daktronics Drive PO Box 5128, Brookings, SD 57006-5128
Tel: 1-800-DAKTRONICS (1-800-325-8766) Fax: 605-697-4746
Web: www.daktronics.com
ED-17016 Rev 4
12 December 2012
This quick start guide for DakStats Soccer is designed to familiarize new users with the main features and entry modes of the program. For more complete
instructions, refer to the Installation & Operation Manual (ED-18155), available online at dakstats.daktronics.com/Pages/Download.aspx.
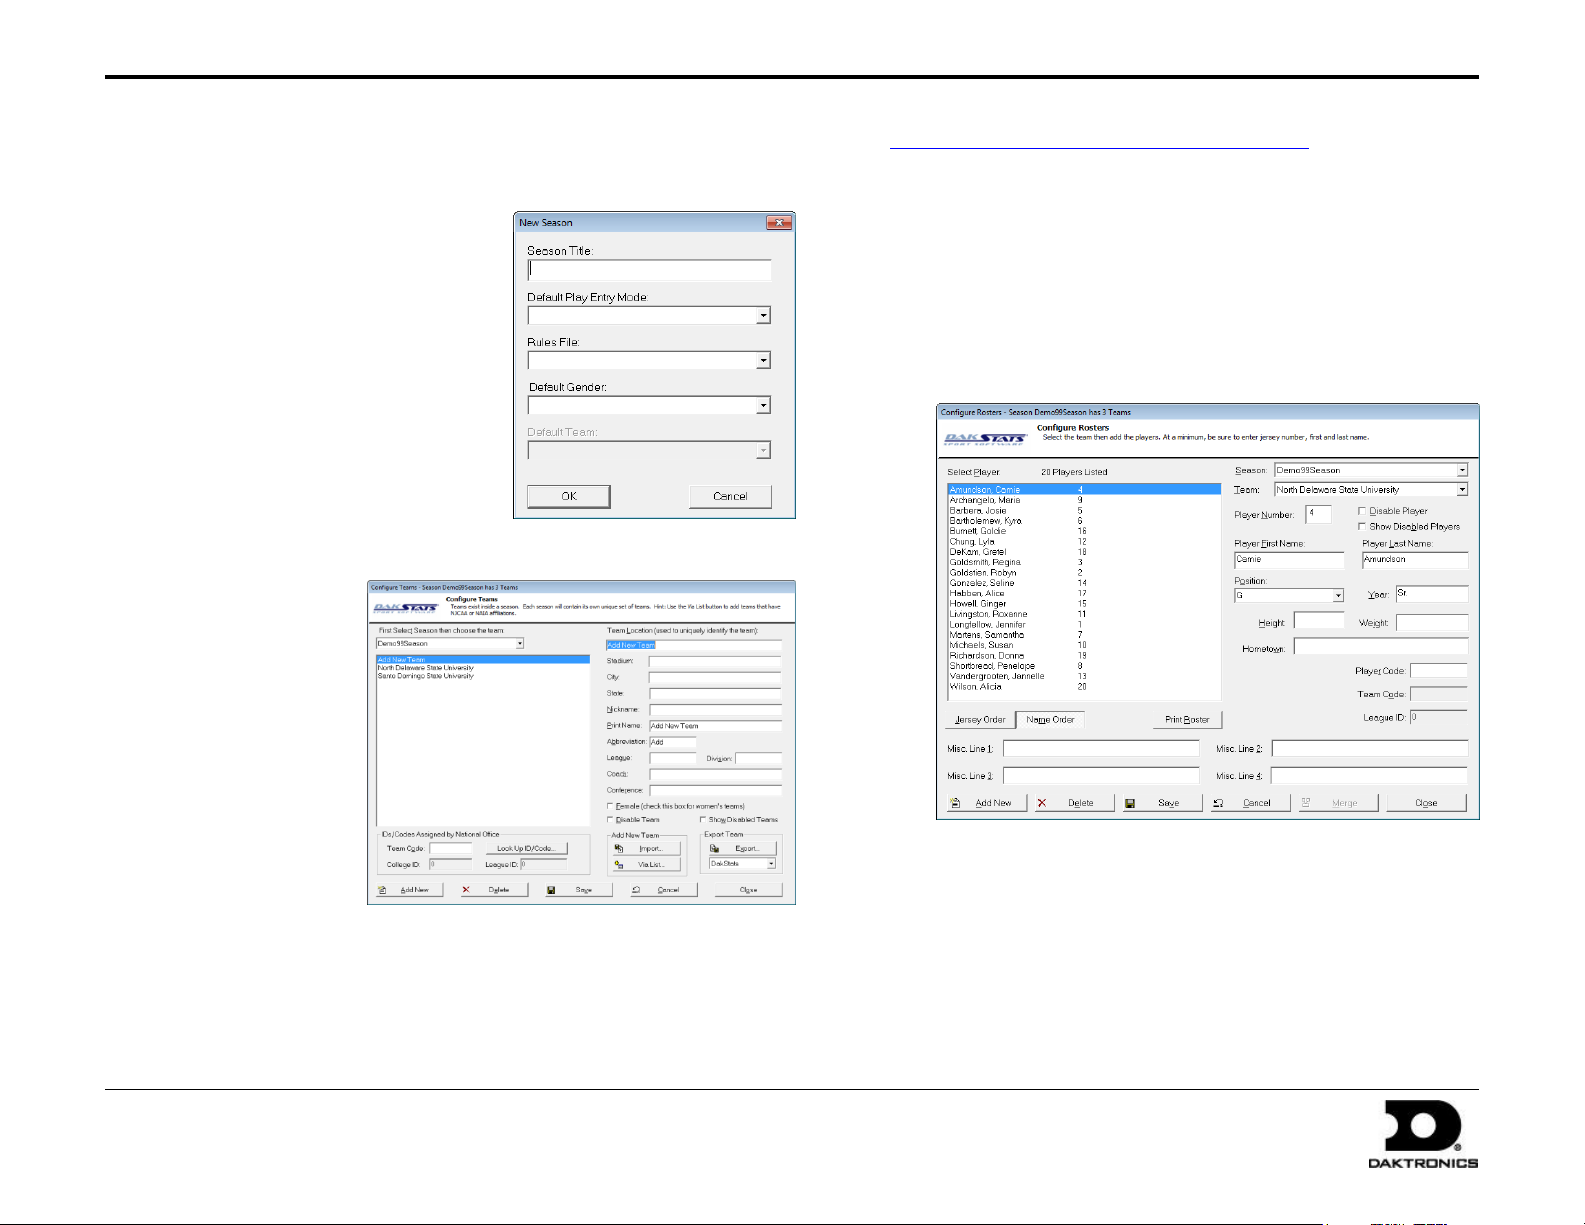
Creating Seasons
1. Go to Configure > Seasons and
System Preferences.
2. Click Add, and type in a name for
the season under Season Title.
3. Select the Default Play Entry Mode.
4. Select the proper Rules File for your
league.
5. Select the Default Gender.
6. Click OK when finished.
Creating Teams
1. Go to Configure > Teams.
2. Select your Season.
3. Click Add New.
If your league uses
the DakStats WebSync, you may
click the Via List
button to select
your teams from
the list.
4. Type in a Team
Location, Nickname,
Print Name, and
Abbreviation for
each team.
5. Click Save, and
then Close when finished.
Creating Rosters
1. Go to Configure > Rosters.
2. Select a Season and your Team.
3. Click Add New.
4. Type in the First Name, Last Name, and Player Number of the
new player. All other information is optional at this point.
5. Click Save, and then Close when finished.
Page 2
DakStats® Soccer Quick Start Guide 2 of 7
201 Daktronics Drive PO Box 5128, Brookings, SD 57006-5128
Tel: 1-800-DAKTRONICS (1-800-325-8766) Fax: 605-697-4746
Web: www.daktronics.com
ED-17016 Rev 4
12 December 2012
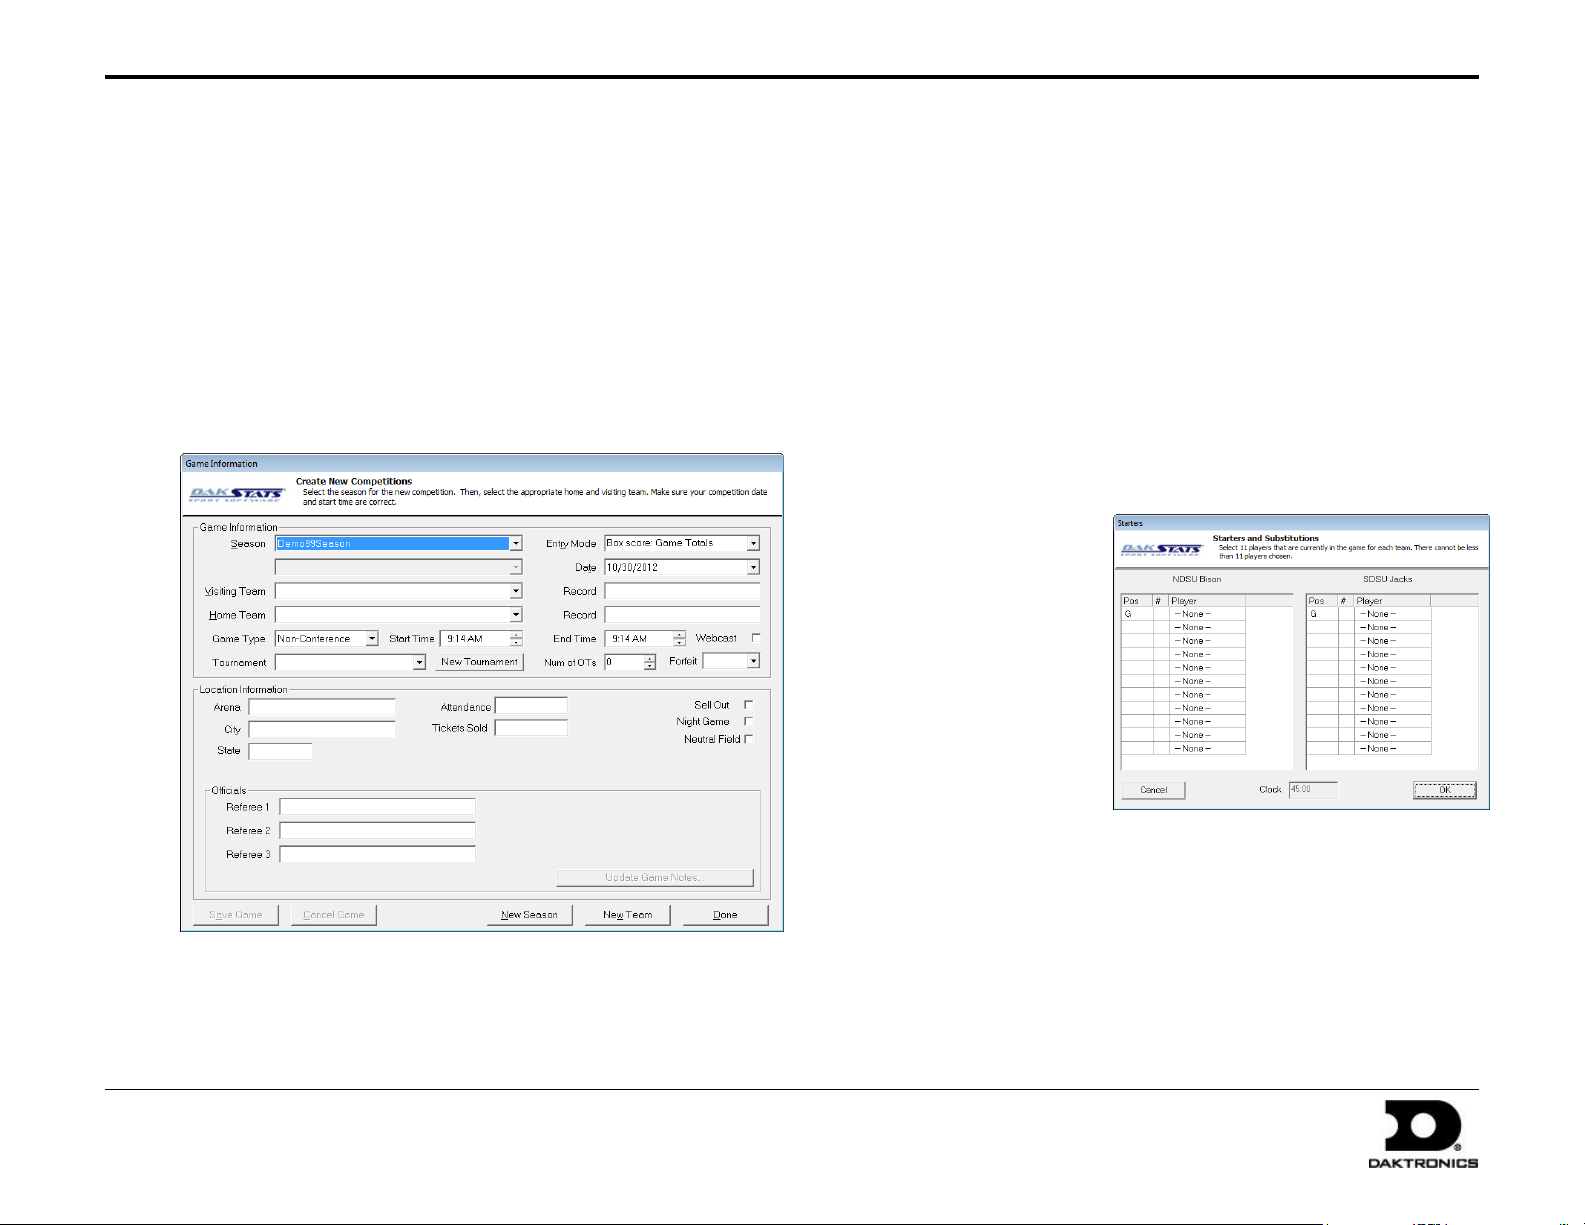
Creating Games
1. Go to File > New Game.
2. Select the Season.
3. Select the Visiting Team and Home Team for the game.
4. Make sure the Date and Start Time are correct.
5. Select an Entry Mode:
Play-by-Play: Simple mode records each play as it happens
Box Score: Game Totals records total game stats
Box Score: Period by Period records stats for each period
6. Click Save Game, and then click Done when finished.
Note: Go to Configure > Games to edit a game’s information after it
has been created. Select the correct Season and Game ID to make the
appropriate changes.
Play-by-Play Entry
Daktronics recommends that at least two people operate the
DakStats software in Play-by-Play mode with one person acting as
the spotter and the other actually entering the stats.
1. Go to File > Open Game.
2. Select the Season and Play-by-Play (Pbp) game, and click OK.
Note: In Play-by-Play mode, you can use the [Space Bar] to start
and stop the game clock.
Entering Starters
Before beginning the game, the players/positions for each team should
be assigned.
1. Click the Subs
tab, and the
Starters window
will appear.
2. Enter the starters
for each team by
either typing
each number in
the number (#)
column or
selecting each
player from the
drop down menu.
Note: It is not necessary to set the position for every player, but
the screen will not close unless a goalie is selected for each team.
3. You can use this same process for making substitutions to the
starters later in the game.
Page 3
DakStats® Soccer Quick Start Guide 3 of 7
201 Daktronics Drive PO Box 5128, Brookings, SD 57006-5128
Tel: 1-800-DAKTRONICS (1-800-325-8766) Fax: 605-697-4746
Web: www.daktronics.com
ED-17016 Rev 4
12 December 2012
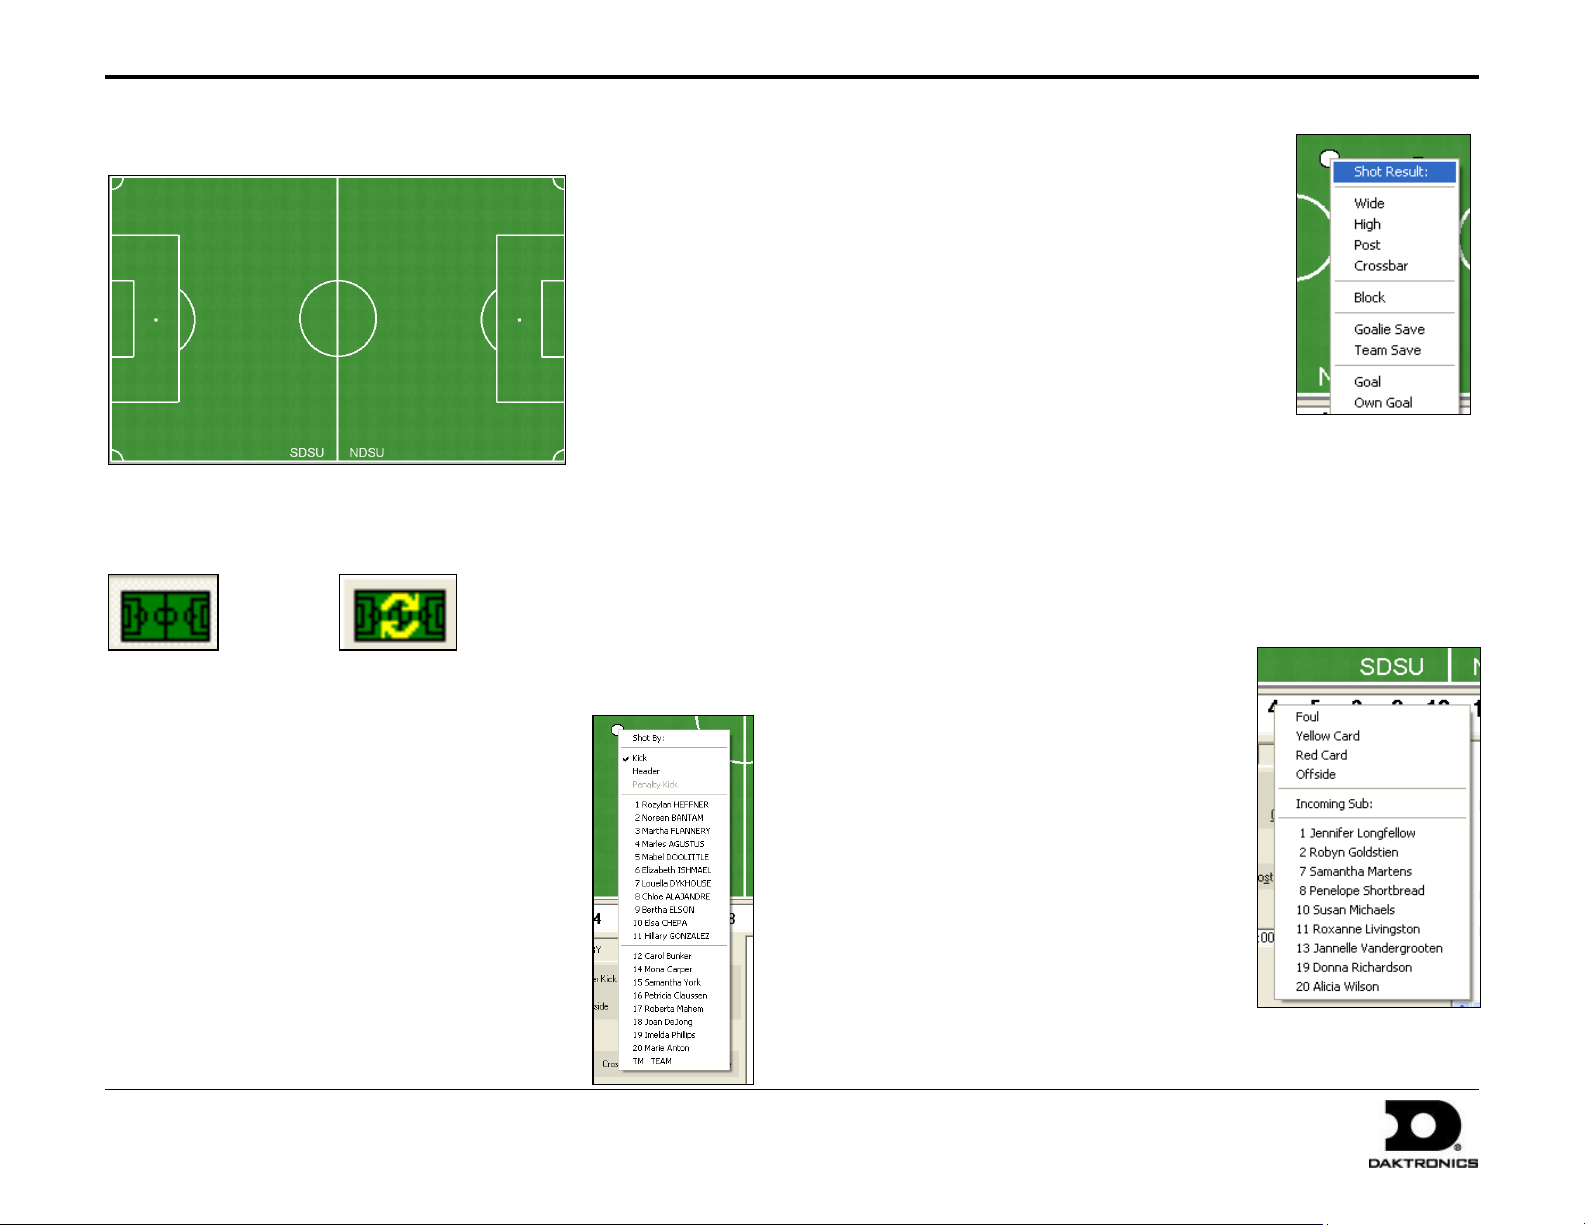
Using the Shot Chart
Attempted Shots
1. Click on the field where the shot was
taken, and a white ball will appear.
2. Select the player who attempted the
shot from the Shot By menu.
3. On the Shot Result menu, choose
whether the shot was Wide, High, hit
the Post or Crossbar, or if it was a
Goalie Save or Team Save.
Blocked Shots
Using the shot chart is optional, and it may be disabled by clicking the
Toggle Field button. If you accidently click on the field and a shot appears,
click the Redraw Shots button to erase it.
Toggle Field Redraw Shots
Made Shots
1. Click on the field where the shot was taken,
and a white ball will appear.
2. Select the player who made the shot from
the Shot By menu.
Note: If the shot was a header, click Header
before selecting the player.
3. Select Goal from the Shot Result menu.
4. Select up to two assisting players on the
next menus. If no players assisted the made
goal, click None.
5. The white ball turns black to indicate a
successful shot.
1. Click on the field where the shot was taken, and a white ball
will appear.
2. Select the player who attempted the shot from the Shot By menu.
3. On the Shot Result menu, select Block, and then select the
player who blocked the shot.
Fouls
1. Right-click on the player who
received the foul from the ingame roster.
2. Select Foul from the list.
Cards
1. Right-click on the player who
received the card from the ingame roster.
2. Select Yellow Card or Red Card
from the list.
Offsides
1. Right-click on the player who
received the offside from the ingame roster.
2. Select Offside from the list.
Page 4

DakStats® Soccer Quick Start Guide 4 of 7
201 Daktronics Drive PO Box 5128, Brookings, SD 57006-5128
Tel: 1-800-DAKTRONICS (1-800-325-8766) Fax: 605-697-4746
Web: www.daktronics.com
ED-17016 Rev 4
12 December 2012
Substitutions
1. Right-click on the player leaving the game from the in-game roster.
2. Select the incoming player from the list.
Using Play Entry Buttons
Click on the appropriate buttons
or use hotkeys (underlined
letters) to enter plays.
Note: If using the shot chart,
there is no need to use the Miss,
Goal, or Block buttons.
Goals
1. Click Goal.
2. Enter the jersey number of the player who made the shot, or
click on a player from the in-game roster.
3. Enter the jersey number of the player(s) who made the assist, or
click on the player(s) from the in-game roster.
4. Click Kick, Header, or Own Goal for the type of shot and then click
or press Enter.
Misses
1. Click Missed Shot.
2. Enter the jersey number of the player who attempted the shot, or
click on a player from the in-game roster.
3. Choose whether the shot was Wide, High, Post, Crossbar, Goalie
Save, or Team Save and then click or press Enter.
Corner Kicks
1. Click Corner Kick (CK).
2. Enter the jersey number of the kicker, or click on the player from
the in-game roster, and then click or press Enter.
Fouls
1. Click Foul.
2. Enter the jersey number of the kicker or click on the player from
the in-game roster and then click or press Enter.
Penalty Kicks
1. Click Penalty Kick (PK).
2. Enter the jersey number of the kicker or click on the player from
the in-game roster.
3. Select the kick result (Goal, Saved, Wide, High, Post, or
Crossbar) and then click or press Enter.
Offsides
1. Click Offside.
2. Enter the jersey number of the kicker or click on the player from
the in-game roster and then click or press Enter.
Cards
1. Click Card.
2. Enter the jersey number of the kicker or click on the player from
the in-game roster. If the card is assigned to the team, enter
“TM” or “?”.
3. Select a Yellow or Red card and then click or press Enter.
Blocks
1. Click Block.
2. Enter the jersey number of the player whose shot was blocked,
or click on the player from the in-game roster.
3. Enter the jersey number of the player who blocked the ball, or click
on the player from the in-game roster and then click or press Enter.
Timeouts
1. Click Timeout.
2. Select Television or Referee and then click or press Enter.
Substitutions
See Entering Starters on page 2.
Page 5

DakStats® Soccer Quick Start Guide 5 of 7
201 Daktronics Drive PO Box 5128, Brookings, SD 57006-5128
Tel: 1-800-DAKTRONICS (1-800-325-8766) Fax: 605-697-4746
Web: www.daktronics.com
ED-17016 Rev 4
12 December 2012
Taking Timeouts
1. Click the Timeout tab or press [F6].
2. Select the team taking the timeout and then click or press Enter.
Entering Penalties
1. Click Card or press [F3].
2. Select a red or yellow Player, Coach, or Bench card.
3. If the penalty is on a player, enter the player’s jersey number and
then click or press Enter.
Editing Plays
1. Click on an incorrect play in the Play-by-Play script.
2. Make the changes to the play and then click or press Enter.
3. After editing a play, go to Edit > Rebuild Stats, and select Go.
Game Control
The Game Control menu contains several game options:
Start Next Period: Begins the next period
Game Finished: Ends the game
Balance: Shows if every stat equals out for each team
Swap Teams: Changes teams to the other side of the field
Toggle Active Team: Changes team possession
Use Previous Period’s Starting Players: Brings in all starters from last
period (only available after performing the Start Next Period command)
Export game as XML file: Saves the game in XML format
Box Mode Entry
1. Open a game by clicking File > Open Game.
2. Select the Season and Box mode game (Box Tot or Box Per),
and then click OK.
Entering Scores
Scores can be entered three ways:
Double-left-click the cell for the appropriate period and
team to increase the score by one. Double-right-click to
decrease the score by one.
Select a cell, type in a new value number for the score, and
then press [Enter].
Select a cell, and click the green plus (+) button
or red minus (–) button to increase or decrease
the score.
Edit
The Edit menu contains several play-by-play options:
Insert Play: Inserts a new play before a selected play
Add Play: Inserts a new play after a selected play
Delete Play: Deletes a selected play
Delete Event: Deletes a selected event
Insert Period: Inserts a new period before a selected play
Delete Period: Deletes an entire period
Rebuild Stats: Updates the season database after editing plays
Entering Stats
Individual player stats are entered the same way as scores. Refer to
the above instructions to record the stats too. When all stats and
scores are entered, go to Game Control > Game Finished.
Note: Go to Game Control > Balance to check game stats for errors.
A red X will indicate an error to correct.
Page 6

DakStats® Soccer Quick Start Guide 6 of 7
201 Daktronics Drive PO Box 5128, Brookings, SD 57006-5128
Tel: 1-800-DAKTRONICS (1-800-325-8766) Fax: 605-697-4746
Web: www.daktronics.com
ED-17016 Rev 4
12 December 2012
Printing Season Stats
1. Go to File > Print Season.
2. Select the season and your team.
3. Use the All through Other buttons to select game types to view.
4. On the Team Reports sub-tab of the Competitions tab, click the
Add New Set of Reports button.
5. Type in a name for the collection, and then click OK.
6. In the Team Reports tab, highlight the new collection. Check your
most used or favorite printouts, and then click the Save icon.
7. Click the Other tab to enter a Report Title for the report.
8. Click GO to view reports in the default Internet browser.
Reports are created in HTML format for easy printing and
posting on websites.
Page 7

DakStats® Soccer Quick Start Guide 7 of 7
201 Daktronics Drive PO Box 5128, Brookings, SD 57006-5128
Tel: 1-800-DAKTRONICS (1-800-325-8766) Fax: 605-697-4746
Web: www.daktronics.com
ED-17016 Rev 4
12 December 2012
Exporting Game Files
DakStats offers the ability
to export and import game
and roster files for quick
and easy sharing with other
DakStats users.
1. Go to File > Export
Game.
2. In the Export
Competition
window, select the
season and team.
3. Highlight the
competition you
wish to export.
4. Click Directory to
change where the
files are saved.
5. Click Export.
Importing Game Files
1. Go to File > Import
Game.
2. Select the directory
that contains the
file(s) by clicking
Change Import
Directory. Click
OK and the file(s)
will appear on the
left side of the
Import Competition
window.
3. Select the season,
and then click
Import File.
Note: If prompted with a Problem resolving TEAM window,
highlight the team from the list that matches the team in gray
and click OK. If the team is not on the list, click Add New.
Repeat the above steps if Problem resolving PLAYER appears.
Importing & Exporting Rosters
Exporting Rosters
1. Go to Configure > Teams.
2. Select the season and highlight the team you wish to export.
3. Click Export, navigate to the directory, and then click Save.
4. Be sure to also Save any changes made to the roster.
Importing Rosters
1. Go to Configure > Teams.
2. Select the season you wish to import the roster and team into.
3. Click Import.
4. Navigate to the desired directory.
5. Select the roster file, and then click Open.
6. Click Save to keep the changes in the roster.
 Loading...