

Page 1

All Sport® 2000 Series Control
Console
Operation Manual
Page 2

Page 3

ED-10102
Project/Contract #1065
Rev 3 – 20 January 1999
DAKTRONICS, INC.
Copyright 1999
All rights reserved. While every precaution has been taken in the preparation of this manual, the publisher
assumes no responsibility for errors or omissions. No part of this book covered by the copyrights hereon may be
reproduced or copied in any form or by any means – graphic, electronic, or mechanical, including photocopying,
taping, or information storage and retrieval systems – without written permission of the publisher.
ProStar®, ProAd®, V-Link®, Venus®, and V-Play® are registered trademarks of Daktronics, Inc. DeoxIT™, CaiLube™, Mate-n-Lok™, and
Phoenix™ are trademarks of their respective companies.
Page 4

Page 5
Error! Bookmark not defined.
1.1 How To Use This Manual ...................................................................................................... 1
1.2 Console Overview ................................................................................................................... 1
1.3 Using the Console ................................................................................................................... 1
3.1 Console Overview ................................................................................................................... 4
3.2 Overlays ................................................................................................................................... 4
3.3 Overlay Operation Concepts ................................................................................................. 4
Examples ........................................................................................................................... 5
3.4 Startup ...................................................................................................................................... 5
3.5 Time of Day Operation ........................................................................................................... 5
3.6 Clock ......................................................................................................................................... 5
4.1 LL-1895: Codes 30,31, 32 ........................................................................................................ 7
4.2 LL-1896: Codes 33, 34, 39 ....................................................................................................... 7
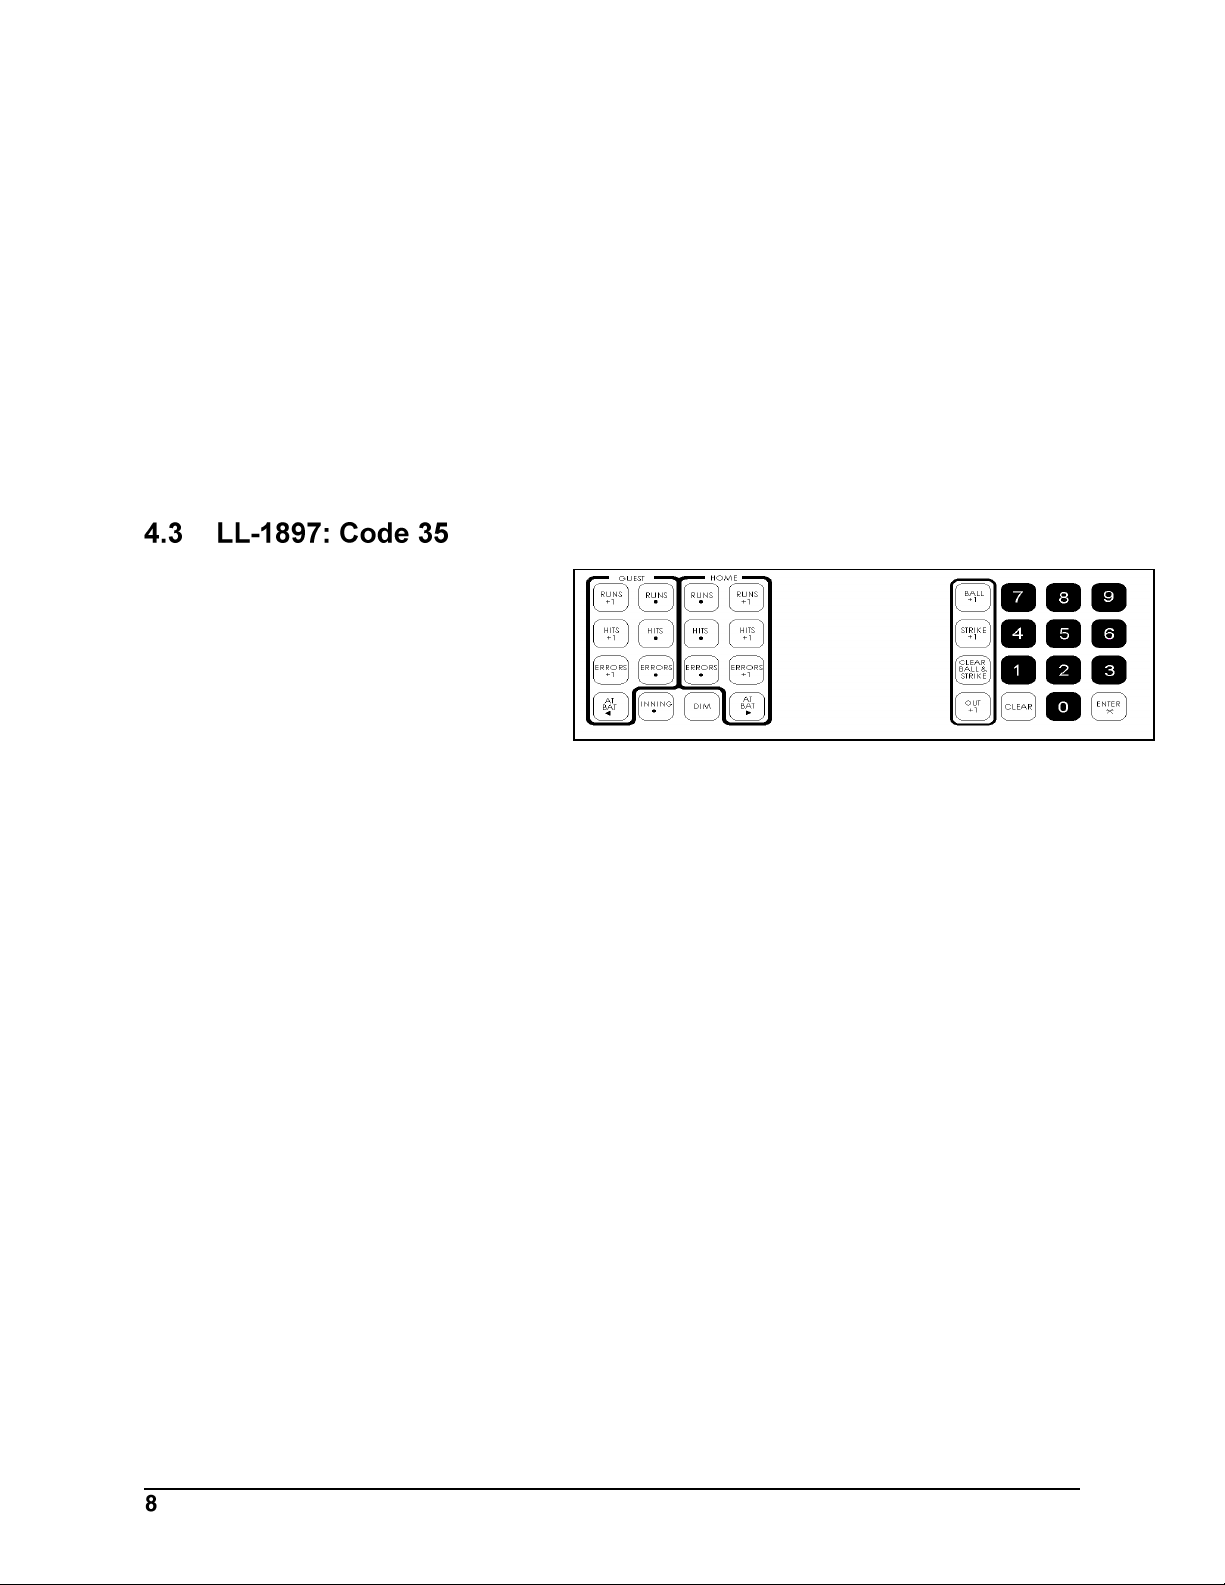
4.3 LL-1897: Code 35 ..................................................................................................................... 8
4.4 LL-1903Codes 36,40 ................................................................................................................ 9
4.5 LL-1910: Code 37 ................................................................................................................... 10
4.6 LL-1911: Code 38 ................................................................................................................... 10
4.7 LL-2089 Code 44 .................................................................................................................... 11
5.1 LL-1885: Codes 03,04,11,12 .................................................................................................. 13
5.2 LL-1930: Codes 05,06, 13,14 ................................................................................................. 13
5.3 LL-1902: Codes 15,16 ............................................................................................................ 14
5.4 LL-1941: Codes 07, 08, 17,18 ................................................................................................ 15
5.5 LL-1947: Code 10 ................................................................................................................... 16
6.1 LL-1894: Codes 20,21,22,23,24,25,26 ................................................................................... 17
6.2 LL-1919: Code 27 ................................................................................................................... 17
7.1 LL-1900: Code 61 ................................................................................................................... 19
i
Page 6
7.2 LL-1904: Codes 62,63 ............................................................................................................ 19
8.1 LL-2182: Code 64 ................................................................................................................... 21
8.2 LL-2183: Codes 65,66,67,68 .................................................................................................. 21
9.1 LL-1905: Code 81 ................................................................................................................... 23
9.2 LL-1929: Code 83 ................................................................................................................... 23
10.1 LL-1898: Codes 41,42,43 ....................................................................................................... 25
11.1 LL-1901: Codes 71,72,73 ....................................................................................................... 27
12.1 LL-1899: Codes 51,52,53,54 .................................................................................................. 29
13.1 LL-1922: Code 82 ................................................................................................................... 31
14.1 LL-2094: Code 98 ................................................................................................................... 33
14.2 Selecting Sign Size ................................................................................................................. 33
14.3 Selection Character Width ................................................................................................... 33
14.4 Selecting Character Font ...................................................................................................... 34
14.5 Selecting Bright or Dim Mode ............................................................................................. 34
14.6 Starting the Lamp Test ......................................................................................................... 34
14.7 Team Name Operation Using Current Loop Boards ....................................................... 34
14.8 Team Name Operation Using a Venus 100 Board ............................................................ 35
14.9 Exiting the Team Name Mode ............................................................................................. 35
Page 7
Introduction
Model
Part No.
Power
# Outputs
Programming
2000
0A-1065-0015
12 V 1 Standard
2010
0A-1065-0129
120 VAC
1
Standard
2100
0A-1065-0092
12 V 1 Standard
2110
0A-1065-0131
120 VAC
1
Standard
2200
0A-1065-0019
12 V 4 Standard
2210
0A-1065-0130
120 VAC
4
Standard
2300
0A-1065-0094
12 V 4 Standard
2310
0A-1065-0132
120 VAC
4
Standard
2400
0A-1065-0036
12 V 4 Custom
2410
0A-1065-0124
120 VAC
4
Custom
2420
0A-1065-0147
230 VAC
4
Custom
2500
0A-1065-0115
12 V 1 Standard
2510
0A-1065-0122
120 VAC
1
Standard
2520
0A-1065-0148
230 VAC
1
Standard
2600
0A-1065-0117
12 V 4 Standard
2610
0A-1065-0120
120 VAC
4
Standard
2620
0A-1065-0149
230 VAC
4
Standard
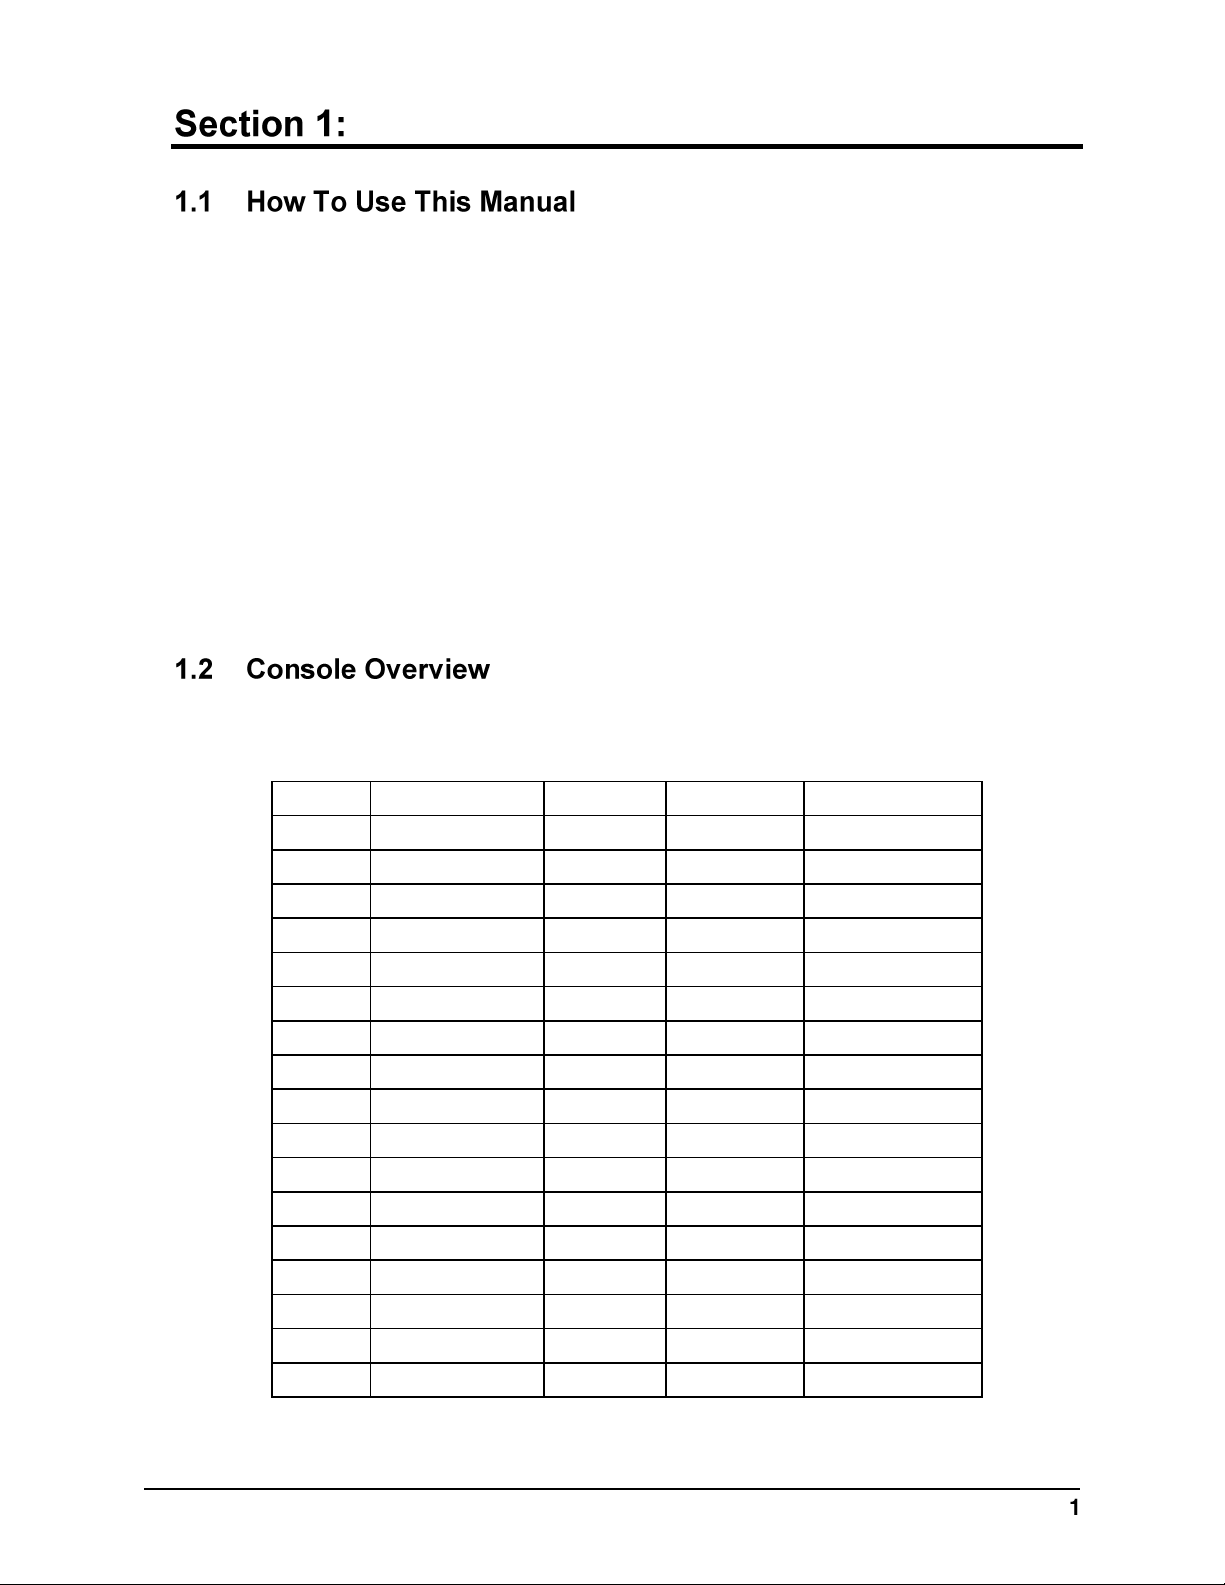
This manual is designed to explain the operation of the All Sport® 2000 series control console.
For questions regarding the safety, installation, operation, or service of this system, please refer
to the telephone numbers listed on the cover page of this manual.
Important Safeguards:
1. Read and understand these instructions before installing.
2. Do not drop the control console or allow it to get wet.
3. Do not let any power cord touch hot surfaces or hang over the edge of a table which
would damage or cut the cord.
4. Always unplug the control equipment when it is not in use. Never yank the power cord
to pull the plug from the outlet. Grasp the plug and pull to disconnect.
5. To avoid electrical shock, do not disassemble the control equipment or the driver
modules. Incorrect reassembly can cause electric shock and faulty operation or
permanent damage to the circuits.
There are several console models in the All Sport 2000 series that differ by voltage and/or
outputs. The following table lists the models and their differences.
Introduction
Page 8

Page 9
An uppercase word in brackets (such as [OK]) represents a button on the screen. The names
or letters of keys on the keyboard will be given enclosed in arrows (such as <ENTER>) to
differentiate between the screen commands.
2 Introduction
Page 10

Page 11
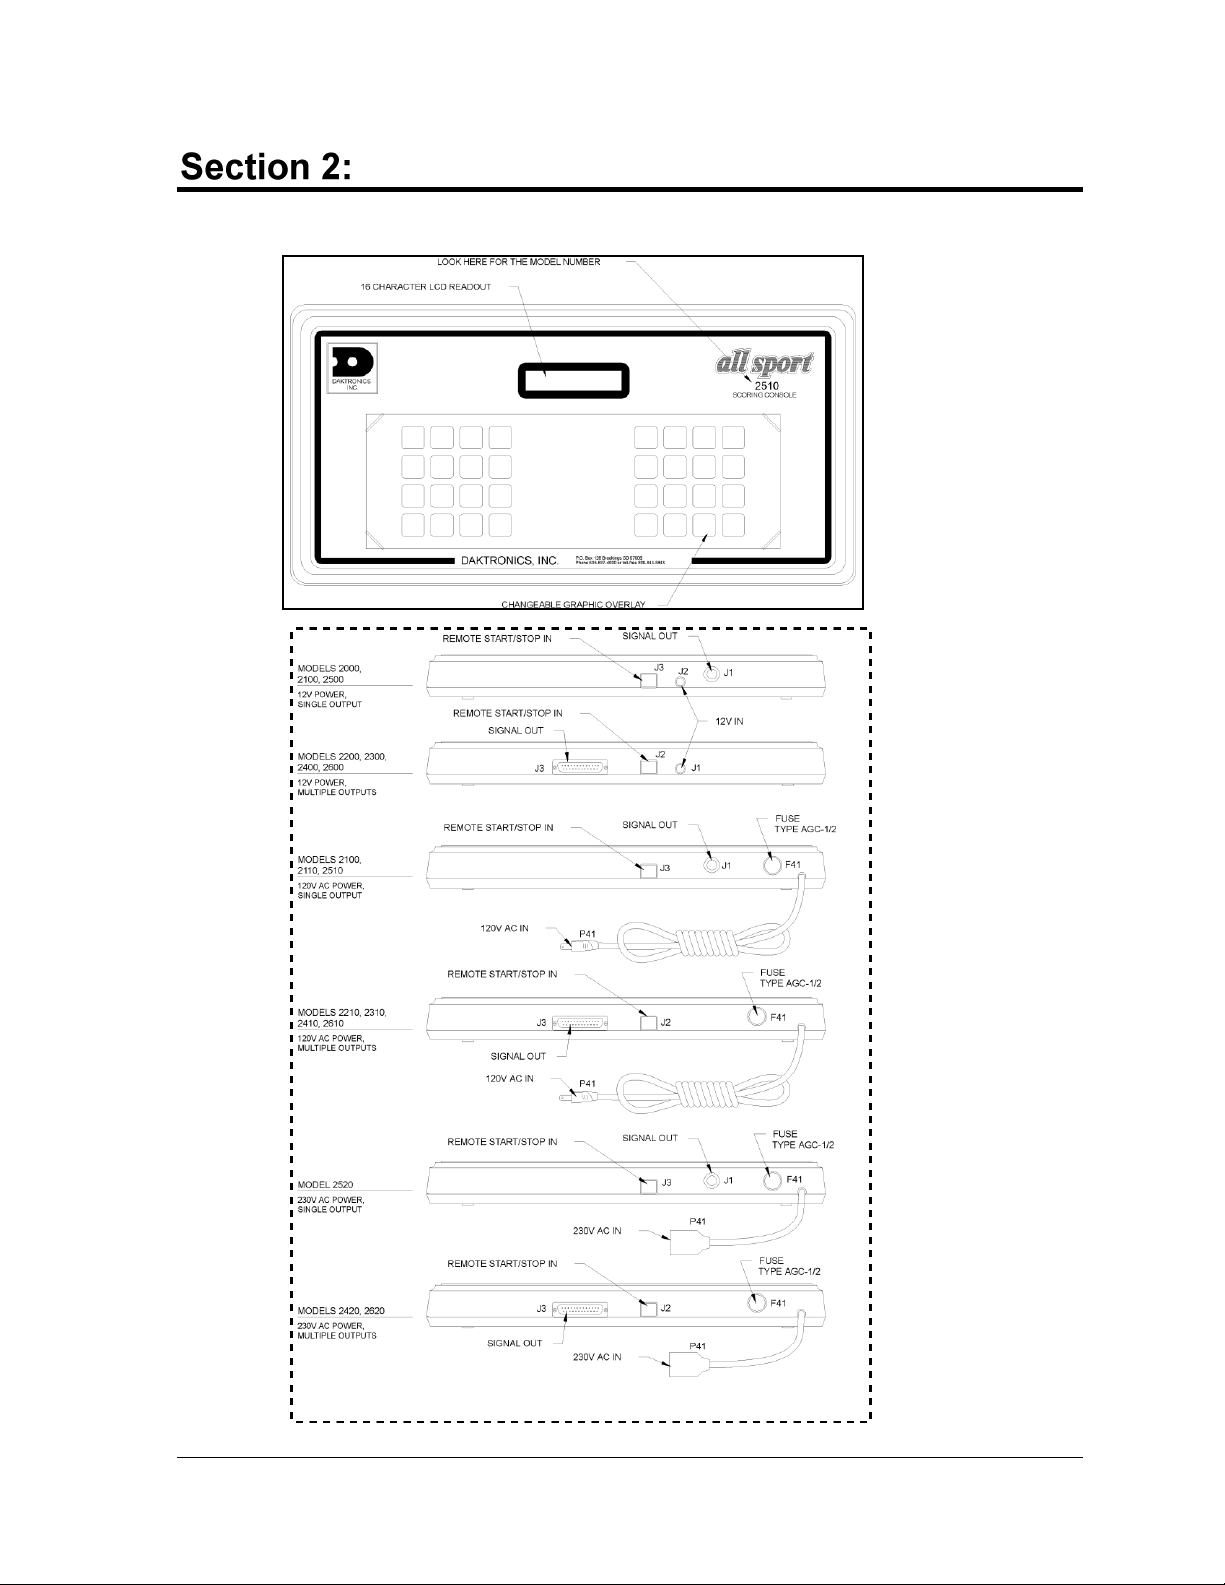
Console Overview
6 Basic Operation
Page 12
Basic Operation
The console face consists of a LCD and a sport overlay. In most cases, the LCD will display
the game time, the direction the clock is counting in and whether or not the horn is set to
automatic.
Various overlays are available depending on the sport and the type of scoreboard.
To change an overlay, press down and slide the top edge of the current overlay towards its
middle. Once the overlay is slightly bowed in the middle, reach under it on the side and pull
it up and out. To insert a new overlay, insert the top or bottom edge, bow the overlay
slightly and slip in the other edge.
Each overlay has a list of code numbers and corresponding models. The models are the
scoreboard model that the console controls. For example, a BA-3718 would use code 40. This
code would be entered when prompted upon startup. Refer to Section 3.4 for more
information on starting up the console.
Note: We recommend that a permanent marker be used to mark which code number on the
overlay is to be used. This is a precaution in case the model number is uncertain or unknown
at a later date.
The overlay consists of the action keys required in the normal course of the overlay’s
designated sport. In some cases, pressing a key will immediately cause a change on the
scoreboard. Most of the time additional keys must be pressed. Keys that require additional
information are marked by a “•.” This additional information usually consists of a number
and then pressing <ENTER>.
Keys with arrows () are indicators (possession, bonus, etc.) and will activate an indicator on
the scoreboard for the proper team. Note: The arrow points to either the left or right (home
or guest).
Some keys have a “+1,” “+2” or “+3” on them. By pressing one of these keys once, the value
of the corresponding field on the scoreboard (such as score or period) will increase by the
corresponding number of points. A key with a “-1” will decrease by one.
On most overlays, certain keys have been grouped together under the heading Home or
Guest. These keys are Team keys and work the same for both teams. They affect the statistics
for that one team. For example, to increment the score of the home team, press <SCORE+1>
under the Home caption. Keys not under one of these headings are Game keys. They are
general keys for the progress of the game (such as period or quarter).
Other keys have been blocked together to emphasize that these keys work together.
Basic Operation
Page 13
The following are examples of two of the most common operations in a sport. If an overlay
Key
LCD
SCORE +1 (Home)
H. Score ··4
Key
LCD
SCORE • (Guest)
G. Score ·21
1
G. Score ··1
2
G. Score ·12
ENTER
G. Score ·12
has a key that functions in a manner differing from the usual, an example will be included in
the corresponding section.
Example 1: Change the home score from 3 to 4.
Example 2: Change the guest score from 21 to 12.
When the console is turned on, it will go through a self test, after which the LCD will prompt
“Enter Code.” Enter the correct code and press <ENTER>.
Note: This operation is only available on scoreboards equipped with a game clock. No
special overlay is required for this operation. Use any overlay with a numeric keypad.
To have the game clock on the scoreboard display the time of day, enter code 99. Press
<CLEAR> and enter the correct time of day.
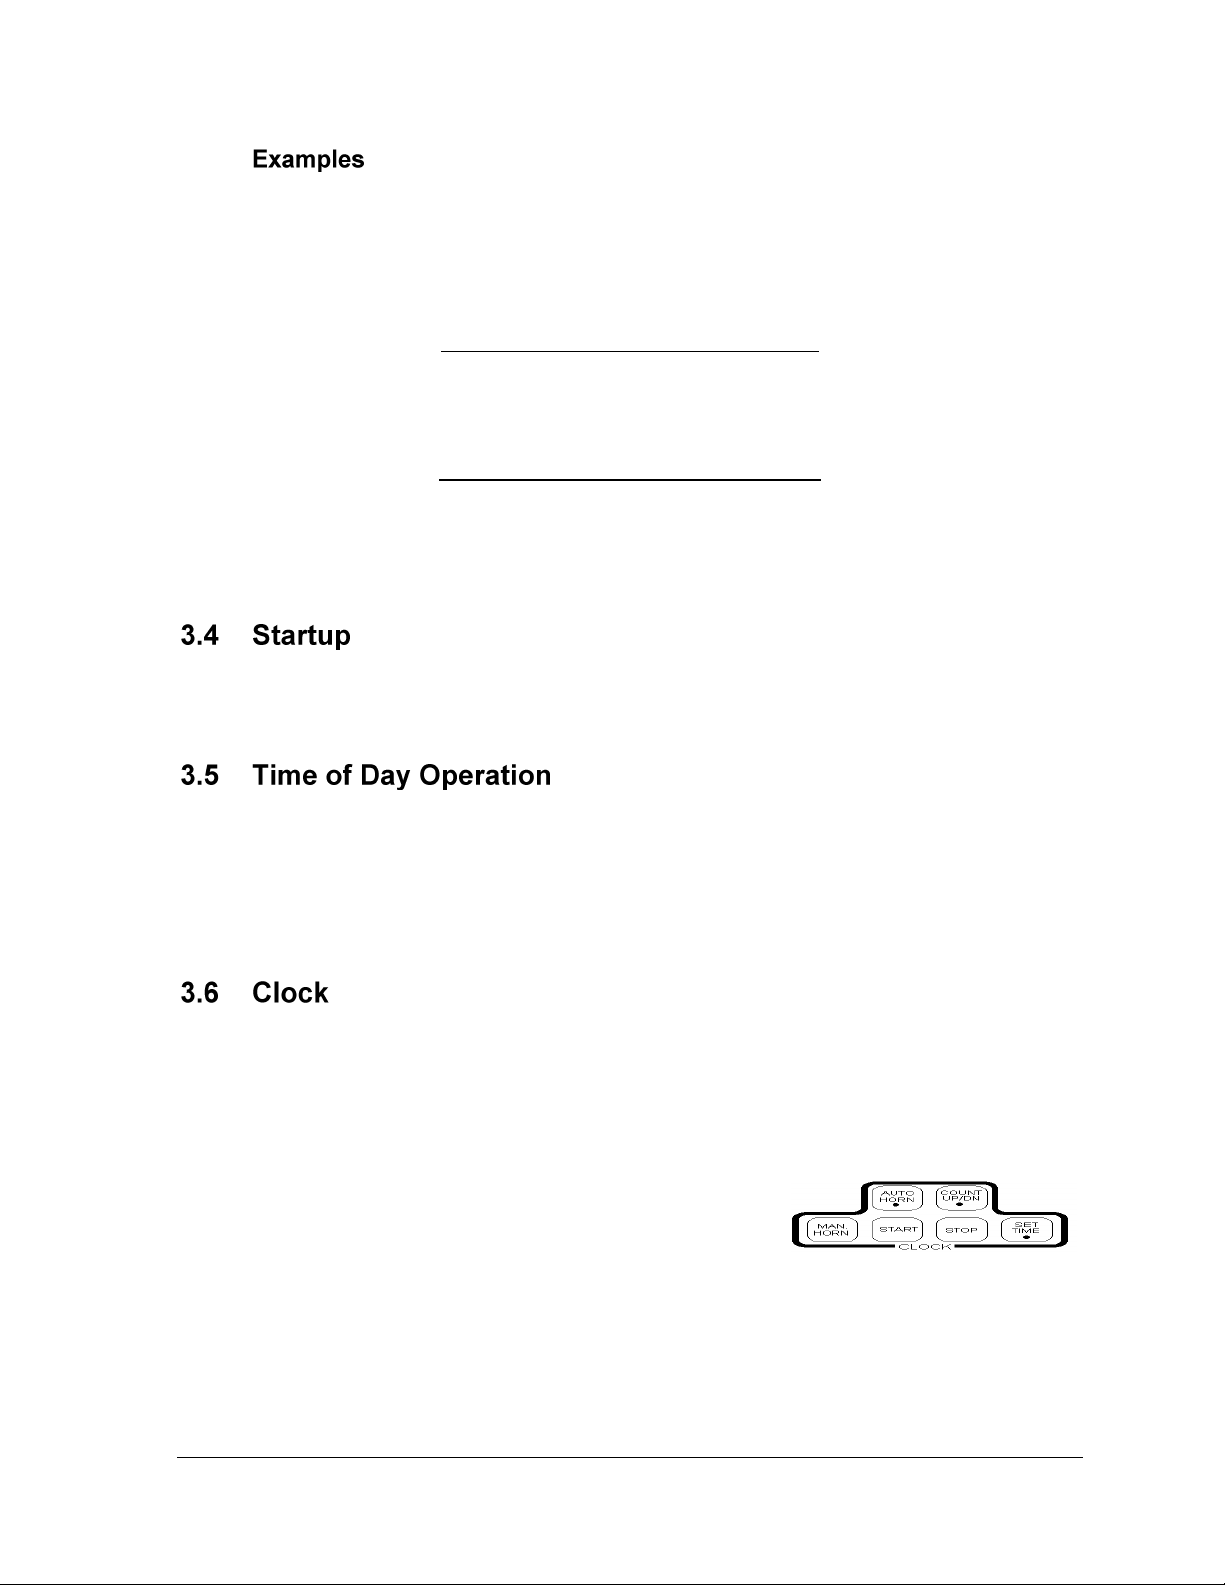
Most overlays have a grouped section labeled “CLOCK”. This section will review the keys
found in this block.
<AUTO HORN>: Turns on or off the automatic horn. If the horn is on, an “h” will appear on
the LCD.
<MAN HORN>: Sounds the horn if set to manual. The
horn will sound as long as this key is pressed.
<COUNT UP/DN>: Sets the clock to count up or down.
Press <ENTER> to toggle between the directions. “UP” will be displayed if the clock is
counting up and “DN” if the clock is counting down.
<START>: Starts the main clock
<STOP>: Stops the main clock
<SET TIME>: Sets the time on the main clock
6 Basic Operation
Page 14

Page 15
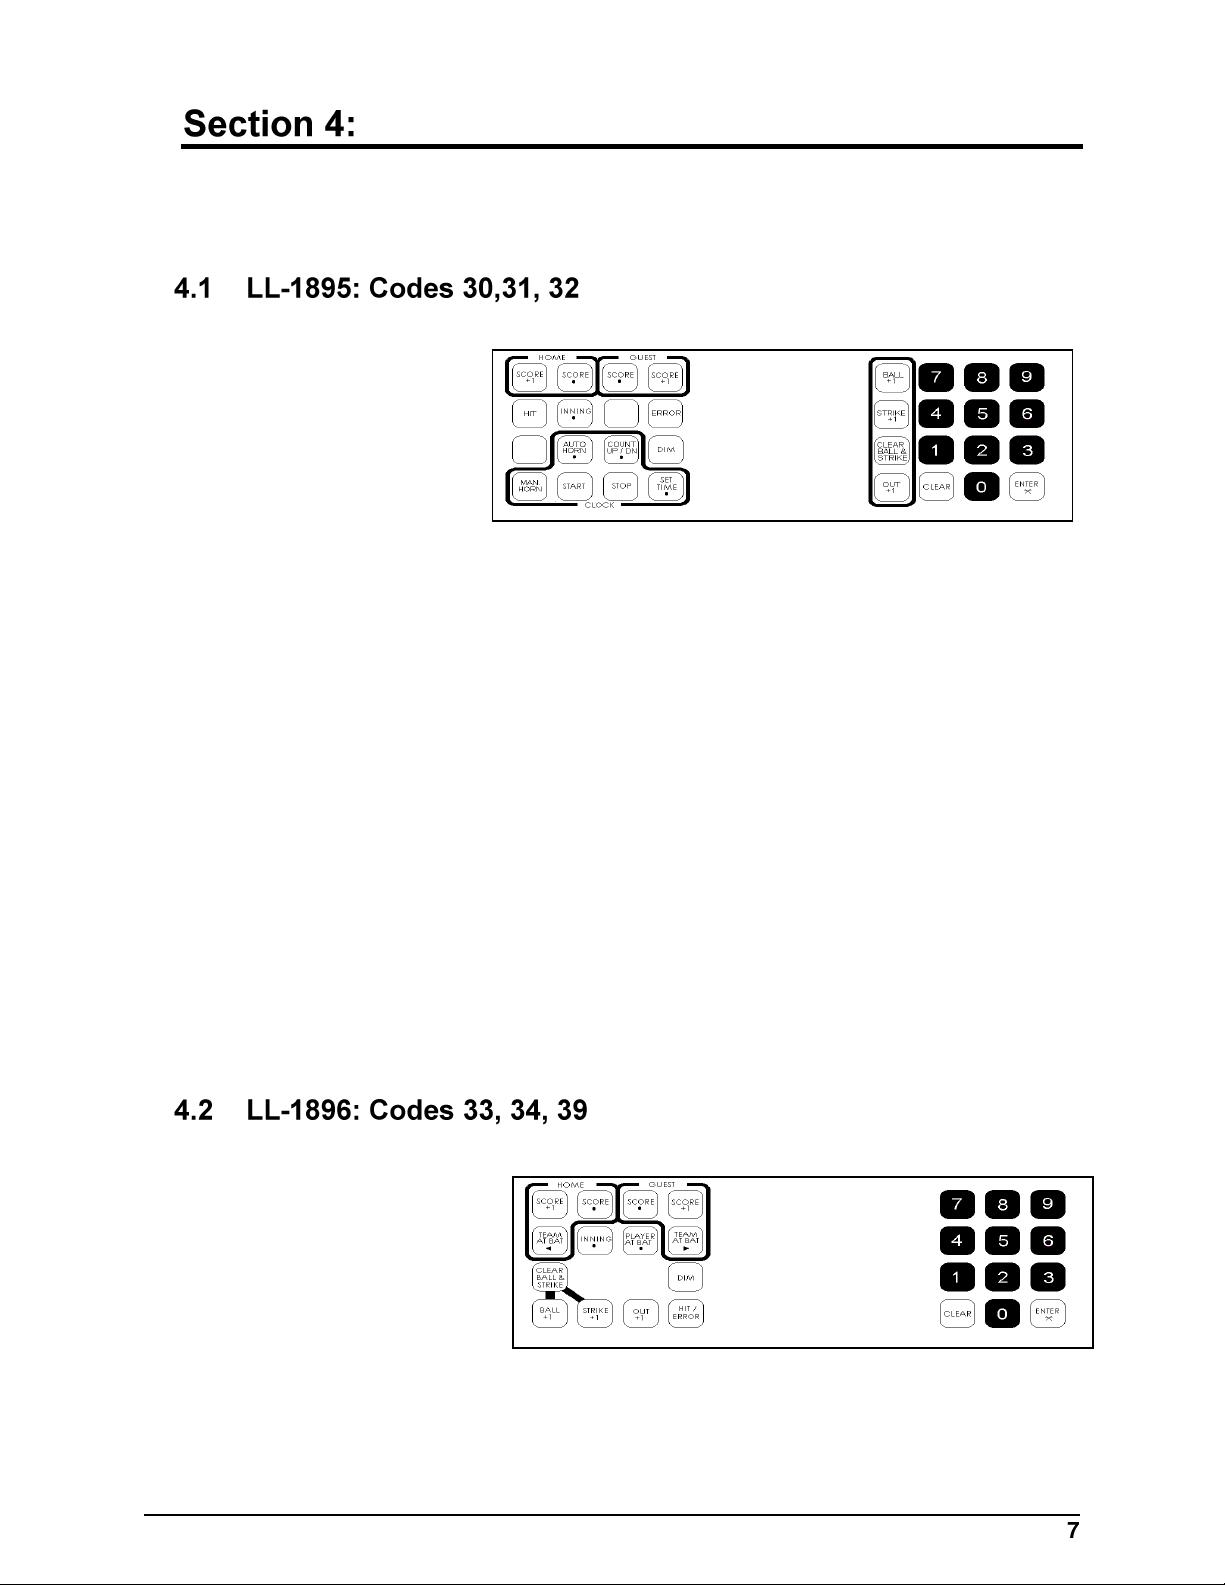
Baseball/Softball Operation
Refer to the information in Section 3 to start up the console and use the overlay. It is recommended
that Section 3 be read carefully to fully understand the following operation instructions.
Team Keys
<SCORE+1>
Increases the
team score by
one
<SCORE>
Edits the team
score
Game Keys
<HIT>
Indicates a hit. An “H” will appear on the H/E digit on the scoreboard or an
indicator will light up.
<INNING•>
Edits the inning number
<ERROR>
Indicates an error. An “E” will appear on the H/E digit on the scoreboard or an
indicator will light up.
<DIM>
Dims the scoreboard for night viewing. Press this key a second time to return the
scoreboard digits to full brightness.
<BALL+1>
Increases the number of balls by one
<STRIKE+1>
Increases the number of strikes by one
<CLEAR BALL &STRIKE>
Sets the Ball and Strike (on the scoreboard) to zero
<OUT+1>
Increases the number of outs by one
Team Keys
<TEAM AT BAT>
Indicates the team
currently at bat
<SCORE•>
Edits the team’s score
<SCORE+1>
Increments the team’s
score by one
Game Keys
<INNING•>
Edits the number of the inning
<PLAYER AT BAT•>
Baseball/Softball Operation
Page 16
Team Keys
Game Keys
Displays the number of the player currently at bat
<DIM>
Dims the scoreboard for night viewing. Pressing this key a second time will return the
scoreboard digits to full brightness.
<OUT+1>
Increments the number of outs by one
<HIT/ERROR>
Indicates an “H” for a hit or an “E” for an error on the H/E digit on the scoreboard or an
indicator will light up
<CLEAR BALL AND STRIKE>
Sets the Ball and Strike (on the scoreboard) to zero or blanks the indicator
<BALL+1>
Increases the number of balls by one
<STRIKE+1>
Increases the number of strikes by one
<AT BAT>
Indicates the team currently at
bat
<ERRORS•>
Edits the team’s number of
errors
<ERRORS+1>
Increases the team’s number of errors by one
<HITS•>
Edits the team’s number of hits
<HITS+1>
Increases the team’s number of hits by one
<RUNS•>
Edits the total number of runs
<RUNS+1>
Increases the total number of runs by one
<INNING•>
Edits the number of the inning
<DIM>
Dims the scoreboard for night viewing. Pressing this key a second time will return the
scoreboard digits to full brightness.
<OUT+1>
Increases the number of outs by one
<HIT>
Indicates a hit. An “H” will appear on the H/E digit on the scoreboard or an indicator
will light up
<ERROR>
Indicates an error. An “E” will appear on the H/E digit on the scoreboard or an
indicator will light up.
<CLEAR BALL & STRIKE>
Sets the Ball and Strike (on the scoreboard) to zero or blanks the indicator
<BALL+1>
Increases the number of balls by one
Baseball/Softball Operation
Page 17

<STRIKE+1>
Increases the number of strikes by one
Team Keys
<INNING RUNS•>
Edits the team’s inning runs
<INNING RUNS+1>
Increases the team’s
inning runs by one
<ERRORS•>
Edits team’s number of
errors
<ERRORS+1>
Increases the team’s number of errors by one
<HITS•>
Edits the team’s number of hits
<HITS+1>
Increases the team’s number of hits by one
<RUNS•>
Edits the total number of runs
<RUNS+1>
Increases the total number of runs by one
Game Keys
<AT BAT•>
Indicates the team currently at bat
<INNING•>
Edits the number of the inning
<INNING+1>
Increases the inning number by one
<AT BAT•>
Displays the number of the player currently at bat
<AVG•>
Displays the average of a player
<DIM>
Dims scoreboard for night viewing. Press this key a second time to return to full
brightness.
<OUT+1>
Increases the number of outs by one
Baseball/Softball Operation
Page 18

Player
Number
Player
Position
1
Pitcher
2
Catcher
3
1st Base
4
2nd Base
5
3rd Base
6
Short Stop
7
Left Field
8
Center Field
9
Right Field
10 Rover
Team Keys
Game Keys
<CLEAR HIT/ERROR>
Clears the H/E digit or indicator on the scoreboard or blanks the
indicator
<HIT>
Indicates a hit. An “H” will appear on the H/E digit on the
scoreboard or an indicator will light up.
<ERROR>
Indicates an error. An “E” will appear on the H/E digit on the
scoreboard. For Code 40, a number (see table) representing the
field position of the player with the error is also needed.
<CLEAR BALL AND STRIKE>
Sets the Ball and Strike (on the scoreboard) to zero
<BALL+1>
Increases the number of balls by one
<STRIKE+1>
Increases the number of strikes by one
<AT BAT>
Indicates team currently at bat
<SCORE•>
Edits the team’s score
<SCORE+1>
Increases team’s score by one
<INNING•>
Edits the number of the inning
<INNING+1>
Increases the inning number by one
<DIM>
Dims the scoreboard for night viewing. Pressing this key a second time will return the
scoreboard digits to full brightness.
<OUT+1>
Increases the number of outs by one
<HIT>
Indicates a hit. An “H” will appear on the H/E digit on the scoreboard or an indicator will
light up.
<ERROR>
Indicates an error. An “E” will appear on the H/E digit on the scoreboard or an indicator
will light up.
<CLEAR BALL &STRIKE>
Sets the Ball and Strike (on the scoreboard) to zero or blanks the indicator
<BALL+1>
Increases the number of balls by one
<STRIKE+1>
Increases the number of strikes by one
Baseball/Softball Operation
Page 19

Game Keys
Team Keys
<AT BAT>
Indicates team currently at bat
<SCORE•>
Edits the total score
<SCORE+1>
Increases the score by one
<INNING•>
Edits the number of the
inning
<INNING+1>
Increases the inning
number by one
<DIM>
Dims scoreboard for night viewing. Press this key a second time to return to full
brightness.
<OUT+1>
Increases the number of outs by one
Team Keys
Game Keys
<SCORE•>
Edits the total number of runs
<SCORE+1>
Increases the total number of runs
by one
<INNING•>
Edits the number of the inning
<INNING+1>
Increases the inning number by one
<DIM>
Dims the scoreboard for night viewing. Pressing this key a second time will return the
scoreboard digits to full brightness.
<OUT+1>
Increases the number of outs by one
<CLEAR BALL AND STRIKE>
Sets the Ball and Strike (on the scoreboard) to zero or blanks the indicator
<BALL+1>
Increases the number of balls by one
<STRIKE+1>
Increases the number of strikes by one
Baseball/Softball Operation
Page 20

Page 21

Basketball Operation
Refer to the information in Section 3 to start up the console and use the overlay It is recommended
that Section 3 be read carefully to fully understand the following operation instructions.
Team Keys
<POSS>
Indicates which team has the next possession of the ball
<BONUS>
Indicates that a team gets a
bonus
<TEAM FOULS•>
Edits number of team fouls
<SCORE•>
Edits the team score
<SCORE+1>
Increases the team score by one
Game Keys
<SET TIME OUT•>
Sets the length of the time out. The time out cannot be set while the clock is running.
<TIME OUT ON/OFF>
Turns the time out clock on and off
<PERIOD•>
Edits the period number
<PLAYER FOULS•>
Displays the player number and the number of fouls the player has
Note: This overlay is to be used with overlay LL-1902 on another console (refer to Section
5.3). Refer to the block diagram in Appendix A to properly set up the consoles.
Team Keys
<POSS>
Indicates which team has the
next possession of the ball
<SCORE•>
Edits the team score
<SCORE+1>
Increases the team score by one
Game Keys
<SET TIME OUT•>
Sets the length of the time out. The time out cannot be set while the clock is running.
Basketball Operation
Page 22

Set-Up Keys
Game Keys
<TIME OUT ON/OFF>
Turns the time out clock on and off
<PERIOD•>
Edits the period number
Note: This overlay is to be used with overlay LL-1930 on another console (refer to Section
5.2). Refer to the block diagram in Appendix A to properly set up the consoles.
Team Keys
<BONUS>
Indicates a team bonus
<TEAM FOULS•>
Edits number of team fouls
<TEAM FOULS+1>
Increases fouls by one
<SUB•>
Substitutes one player for
another. First, enter the number of the player to be brought in, press <ENTER> then
enter the number of the player being brought out and press <ENTER> again.
<PLAYER NO.•>
Used to enter a player’s number so that points and fouls can be credited to the player
and so that it can be known whether the player is in the game or not. Press <ENTER>,
<PREV> or <NEXT> after the player data is edited to update the data to the scoreboard.
<HOME PLAYERS•>
Used to enter the home player’s numbers into the memory. The player’s numbers must
be entered before the game so that the <PLAYER NO.> key can be used to select a
player.
<GUEST PLAYERS•>
Used to enter the guest player’s numbers into the memory. The player number must be
entered before the game so that the <PLAYER NO.> key can be used to select a player.
<FOULS-1>
Decreases the number of fouls for the selected player and also the team fouls. <PLAYER
NO.> must be pressed first and a player selected.
<FOULS+1>
Increases the number of fouls for the selected player and also the team fouls. <PLAYER
NO.> must be pressed first and a player selected.
<IN GAME (Y)>
Sets a player in the game (on the scoreboard). Press <PLAYER NO.> first.
<OUT OF GAME (N)>
Sets a player out of the game (on the scoreboard). Press <PLAYER NO.> first.
<POINTS-1>
Decreases points for selected player. Press <PLAYER NO.> first and select player.
<POINTS+1>
Increases number of points for the selected player. Press <PLAYER NO.> first.
Basketball Operation
Page 23

<DISPLAY PLAYER FOULS>
Displays the number of fouls of the player who just received a foul (on the scoreboard).
<PLAYER NO.> must be pressed first and a player selected.
<BLANK PLAYER FOULS>
Blanks the digits of the Player-Foul field on the scoreboard
<PREV >
Used to scroll backward through the team’s roster
<NEXT >
Used to scroll forward through the team’s roster
Team Keys
<POSS>
Indicates which team has
the next possession
of the ball
<BONUS>
Indicates a team bonus
<TEAM FOULS•>
Edits number of team fouls
<SCORE•>
Edits the team score
<SCORE+1>
Increases score by one
Stat Keys
<HOME PLAYER•>
Used to enter a player’s number so that the fouls can be edited and so that it can be
known whether the player is in the game or not
<GUEST PLAYER•>
Used to enter a player’s number so that the fouls can be edited and so that it can be
known whether the player is in the game or not
<FOULS+1>
Increases the number of fouls for the selected player and also the team fouls. <HOME
PLAYER> or <GUEST PLAYER> must be pressed first.
<FOULS-1>
Decreases the number of fouls for the selected player and also the team fouls. <HOME
PLAYER> or <GUEST PLAYER> must be pressed first.
<IN GAME (Y)>
Sets player in game (scoreboard). Press <HOME PLAYER> or <GUEST PLAYER> first.
<OUT OF GAME (N)>
Sets player out of game. Press <HOME PLAYER> or <GUEST PLAYER> first.
Set-Up Keys
Basketball Operation
Page 24

Game Keys
<HOME PLAYER>
Used to enter the home player’s number to select the player’s foul memory
<GUEST PLAYER>
Used to enter the guest player’s number to select the player’s foul memory
<PREV>
Used to scroll backwards through a team’s roster
<NEXT>
Used to scroll forwards through a team’s roster
<SET TIME OUT•>
Sets the length of the time out. The time out cannot be set while the clock is running.
<TIME OUT ON/OFF>
Turns the time out clock on and off
<PERIOD•>
Edits the period number
<BLANK PLAYER FOUL•>
Blanks the player digits of the Player-Foul field on the scoreboard
<HOME SUB•>
Substitutes one home player for another. First enter the number of the player to be set
out and then enter the player to be set in.
<GUEST SUB•>
Substitutes one guest player for another. First enter the number of the player to be set
out and then enter the player to be set in.
<HOME PLAYER FOUL•>
Edits the home Player-Foul digits on the scoreboard
<GUEST PLAYER FOULS•>
Edits the guest Player-Fouls digits on the scoreboard
Team Keys
<SCORE•>
Edits the team score
<SCORE+1>
Increases the team score by one
Game Keys
<PERIOD•>
Edits the period number
<DISPLAY TIME>
Displays the time on the scoreboard
<DISPLAY SCORE>
Displays the score on the scoreboad
Basketball Operation
Page 25

Football Operation
Refer to the information in Section 3 to start up the console and use the overlay It is recommended
that Section 3 be read carefully to fully understand the following operation instructions.
Note: Not all of these keys will be used for all the codes.
Team Keys
<POSS>
Indicates which team has the
next possession of the ball
<SCORE•>
Edits the team score
<SCORE+1>
Increases score by one
Game Keys
<SET TIME OUT•>
Sets the length of the time out. The time out cannot be set while the clock is running.
<TIME OUT ON/OFF>
Turns the time out clock on and off
<DIM>
Dims the scoreboard for night viewing. Press this key again to return the digits to full
brightness.
<DOWN•>
Edits the number of downs
<TO GO•>
Edits the number yards to go
<BALL ON•>
Edits the yard line that the ball is on
<QTR•>
Edits the quarter
Team Keys
<POSS>
Indicates which team has the next
possession of the ball
<TIME OUTS LEFT•>
Edits the number of time outs left
for the team
<SCORE•>
Edits the team score
<SCORE+1>
Increases the team score by one
Football Operation
Page 26

Game Keys
<SET TIME OUT•>
Sets the length of the time out. The time out cannot be set while the clock is running.
<TIME OUT ON/OFF>
Turns the time out clock on and off
<DOWN•>
Edits the number of downs
<TO GO•>
Edits the number yards to go
<BALL ON•>
Edits the yard line that the ball is on
<QTR•>
Edits the quarter
Football Operation
Page 27

Hockey Operation
Refer to the information in Section 3 to start up the console and use the overlay It is recommended
that Section 3 be read carefully to fully understand the following operation instructions.
Team Keys
<SCORE•>
Edits the team score
<SCORE+1>
Increases the team score by one
<PENALTY>
Turns on the team penalty
indicator
Game Keys
<SET TIME OUT•>
Sets the length of the time out. The time out cannot be set while the clock is running
<TIME OUT ON/OFF>
Turns the time out clock on and off
<PERIOD•>
Edits the period
Team Keys
<SCORE•>
Edits the team score
<SCORE+1>
Increases the team score by one
<PENALTY>
Turns on the team penalty
indicator
<PLAYER• PENALTY•>
Assigns a player penalty time. There are six memory slots for player penalty times. The
first available penalty slot will be shown on the LCD. The up/down arrow keys can be
used to scroll through the penalty memory. Press <ENTER> to edit the selected player’s
penalty time. Enter the player number and press <ENTER>, then enter the penalty time and
press <ENTER>.
<SHOTS ON GOAL+1>
Increases the number of shots on goal by one
<SHOTS ON GOAL•>
Edits the number of shots on goal
Game Keys
<PERIOD•>
Edits the period
<ENABLE PENALTY TIMERS>
Hockey Operation
Page 28

Start the penalty clocks
<DISABLE PENALTY TIMERS>
Stops the penalty clocks
Hockey Operation
Page 29

Soccer Operation
Refer to the information in Section 3 to start up the console and use the overlay It is recommended
that Section 3 be read carefully to fully understand the following operation instructions.
Team Keys
<SCORE•>
Edits the team score
<SCORE+1>
Increases the team score by one
<SHOTS ON GOAL•>
Edits the shots on goal
<SHOTS ON GOAL+1>
Increases the shots on goal by one
<C KICKS/SAVES•>
Edits the corner kicks/saves
<C KICKS/SAVES+1>
Increases the corner kicks/saves by one
Game Keys
<SET TIME OUT•>
Sets the length of the time out. The time out cannot be set while the clock is running.
<TIME OUT ON/OFF>
Turns the time out clock on and off
<DIM>
Dims the scoreboard for night viewing. Press this key again to return the digits to full
brightness.
<HALF+1>
Increases the half number by one
Note: Not all of these keys will be used for all the codes.
Team Keys
<SCORE•>
Edits the team score
<SCORE+1>
Increases the team score by
one
<SHOTS ON GOAL•>
Edits the shots on goal
<SHOTS ON GOAL+1>
Increases the shots on goal by one
<C KICKS/SAVES•>
Edits the corner kicks/saves
<C KICKS/SAVES+1>
Soccer Operation
Page 30

Game Keys
Increases the corner kicks/saves by one
<PENALTY>
Edits the number of penalties
<SET TIME OUT•>
Sets the length of the time out. The time out cannot be set while the clock is running.
<TIME OUT ON/OFF>
Turns the time out clock on and off
<DIM>
Dims the scoreboard for night viewing. Press this key again to return the digits to full
brightness.
<HALF+1>
Increases the half number by one
Soccer Operation
Page 31

Swimming Operation
Refer to the information in Section 3 to start up the console and use the overlay It is recommended
that Section 3 be read carefully to fully understand the following operation instructions.
Team Keys
<SCORE•>
Edits the team score
<SCORE+1>
Increases the score by one
<SCORE (EVENT)•>
Edits the third team score or
the event number
<SCORE (HEAT)•>
Edits the fourth team score or
the heat number
Team Keys
<SCORE•>
Edits the team score
<SCORE+1>
Increases the score by one
Display Keys
<DISPLAY LANE•>
Displays score for lane
<CYCLE LANES>
Cycles through the individual scores, starting with lane one
<CLEAR MEMORY•>
Clears the last race’s scores
Game Keys
<EVENT•>
Edits the event number
<EVENT+1>
Increases the event number by one
<TIME• PLACE•>
Edits time and place for each lane. The console starts with lane one; to skip or go back
to a lane, press <NEXT> or <PREV>. Enter place number for the appropriate lane and
press <ENTER>, then enter the time for the lane and press <ENTER>.
<NEXT>
Scroll forward through the time and place rankings
<PREV.>
Scroll backward through the time and place rankings
Swimming Operation
Page 32

Page 33

Track Operation
Refer to the information in Section 3 to start up the console and use the overlay It is recommended
that Section 3 be read carefully to fully understand the following operation instructions.
Note: Not all of these keys will be used for all the codes.
Team Keys
<HOME SCORE•>
Edits the home team score
<SCORE+1>
Increases the team score by one
<GUEST 1 SCORE•>
Edits the guest team score
<GUEST 2 SCORE (EVENT)>
Edits the score for guest 2 or the event number
<GUEST 3 SCORE (HEAT)>
Edits the score for guest 3 or the heat number
<DIM>
Dims the scoreboard for night viewing. Press this key again to return the digits to full
brightness.
Game Keys
<PLACE•>
Edits the place number
<LANE•>
Edits the lane number
<TRAINING MODE•>
Enters the training mode. In this mode, a tape switch for start and a photo cell for the
finish are brought into the external start/stop input. This allows for automatic timing of
runners. Holding the tape switch for two seconds to reset the timer and enable it. When
the tape switch is released, the timer starts. The timer is stopped when the photo cell at
the finish is activated.
<RESET•>
Resets the training mode
Swimming Operation
Page 34

Page 35

Volleyball Operation
Refer to the information in Section 3 to start up the console and use the overlay It is recommended
that Section 3 be read carefully to fully understand the following operation instructions.
Note: Not all of these keys will be used for all the codes.
Team Keys
<SERVE>
Indicates which team is serving
<GAMES WON•>
Edits the number of games the
team has won
<SCORE•>
Edits the team score
<SCORE+1>
Increases the team score by one
Game Keys
<SET TIME OUT•>
Sets the length of the time out. The time out cannot be set while the clock is running
<TIME OUT ON/OFF>
Turns the time out clock on and off
<GAMES PLAYED•>
Edits the number of games played
<PERIOD•>
Edits the period number
Volleyball Operation
Page 36

Page 37

Wrestling Operation
Refer to the information in Section 3 to start up the console and use the overlay It is recommended
that Section 3 be read carefully to fully understand the following operation instructions.
Note: Not all of these keys will be used for all the codes.
Team Keys
<TEAM SCORE•>
Edits the team score
<TEAM SCORE+1>
Increases the team score by one
<MATCH SCORE•>
Edits the match score for the
team
<MATCH SCORE+1>
Increases the match score for the team by one
Game Keys
<SET ADV TIME (MATCH)•>
Sets the advantage time
<START HOME COUNT>
Starts the home team advantage time
<START GUEST COUNT>
Starts the guest team advantage time
<STOP ADVANT TIME>
Stops the advantage timer
<PERIOD•>
Edits the period number
Wrestling Operation
Page 38

Page 39

Two Digit Timer Operation
Refer to the information in Section 3 to start up the console and use the overlay. It is recommended
that Section 3 be read carefully to fully understand the following operation instructions.
<MAN HORN>
Sounds the horn if it is set to manual.
The horn will sound as long as this
key is pressed.
<AUTO HORN•>
Turns on or off the automatic horn.
If the horn is on, an h will appear on
the LCD.
<SET TIME•>
Sets the time on the main clock
<SET RESET TIME•>
Sets the reset time value
<SET OUT OF BOUNDS•>
Sets the out of bounds time value
<DIM>
Dims the scoreboard for night viewing. Press this key to return the digits to full brightness.
<START>
Starts the main clock
<STOP>
Stops the main clock
<RESET>
Resets the timer to the reset time
<OUT OF BOUNDS>
Resets the timer to the out of bounds
Two Digit Timer Operation
Page 40

Page 41

Team Name Operation
Sign Size
Keys
16 columns (1 lampbank)
ESC, 1
32 columns (2 Lamp banks)
ESC, 2
48 columns (3 Lamp banks)
ESC, 3
64 columns (4 Lamp banks)
ESC, 4
Refer to the information in Section 3 to start up the console and use the overlay It is recommended
that Section 3 be read carefully to fully understand the following operation instructions.
This team name insert allows
the console to be used like a
keyboard to type in team
names that will show up on
the team name message
centers of the scoreboard. It
can also be used to store and
display various messages. Be
sure that the team names are not too long for the display. Small 32-column displays are adequate
only for a few initials or a short name. Large 48-column displays can hold longer names. The
particular combination of letters affects how many characters will fit. For example, the letter “I”
is only three columns wide while an “M” or “W” is much wider. Note: When operating in the
team name mode, commands and prompts will not appear on the LCD. All functions appear on
the team name message centers of the scoreboard only.
When powered up, the team name message center defaults to a sign size of 48 columns (3 Lamp
banks). If this is the correct size, the team names can automatically be entered.
If the sign size needs to be changed, enter one of the following combinations.
Note: The display will blank when the sign size is changed.
The characters in the display may be single stroke or double stroke. Double stroke characters
are wider then single stroke characters since the vertical strokes are two dots wide. Use double
stroke characters when entering school initials. Use single stroke characters for longer school or
team names. Press <DOUBLE> before entering each name to create double stroke characters.
Press <SINGLE> to return to single stroke. If neither key is pressed, the characters will be single
stroke.
Team Name Operation
Page 42

There are four character fonts available for the team name message center.
7 high single stroke font
7 high double stroke font
8 high single stroke font
8 high single stroke font
To choose a 7 high font, press <ESC><7>. To choose an 8 high font, press <ESC><8>. The fonts
will default to single stroke. Refer to Section 14.3 to choose double stroke.
The team name message center can be operated in either bright (default) or dim mode. The
bright mode should be used for indoor applications or during the day for outdoor applications.
The dim mode should be used at night for outdoor applications.
To select the dim mode press <ESC><D>. To select the bright mode press <ESC><B>.
The team name message centers include a lamp test to assist in finding burnt out lamps. This test
alternates between the top four rows and the bottom four rows of the display at six second
intervals.
To start the lamp test, press <ESC><T>. Press any key to end the test. Note: The lamp test will
go through one more complete rotation before exiting.
These operation instructions are for displays using team name message centers with current loop
boards. Section 14.8 covers team name message centers with a Venus® 100 board.
Each team name is entered as a separate message. Either the name for the left side or right side
of the scoreboard may be entered first by pressing <LEFT> or <RIGHT> before entering the
name. Press <ENTER> after each name. To clear the display, press <ENTER> and then <LEFT>
or <RIGHT>.
Example: Enter SDSU in double stroke on the left side of the display and USD in single stroke
on the right side.
1. Press <DOUBLE>
2. Press <LEFT>
3. Type “SDSU”
4. Press <ENTER>
5. Press <SINGLE>
6. Press <RIGHT>
7. Type “USD”
8. Press <ENTER>
Team Name Operation
Page 43

Note: Post, Esc and Message # are not used.
These operation instructions are for displays with team name message centers using a Venus
100 board. Section 14.7 covers team name message centers with current loop boards.
Each team name is entered as a separate message. Type in the first team name and press
<ENTER>. The first team name is entered as message number one. Type the second team name
and press <ENTER>. The second team name is entered as message number two. The characters
for each name will appear on the left display as they are entered.
To post the name, press <POST>, which side (<LEFT> or <RIGHT>), the number of the message
and then <ENTER>. To get out of the post mode and return to the edit mode, press <ESC>
(which will also return the operator to message number one). Up to 99 messages can be saved.
Any of these messages can be displayed by pressing <POST>,<LEFT> or <RIGHT>, the message
number and <ENTER>. To scroll through the messages, from the edit mode press <ENTER> to
view the next message or <BACKSPACE> to review the previous message. To verify the
message number of the message being viewed on the LCD, press <MESSAGE#> and the message
number will be displayed on the left side of the scoreboard.
Note: If there are five messages in the console and a new message is entered while viewing
message four on the LCD, the original message four will be overwritten. Remember: The
message number will always go back to one every time the edit mode is entered.
Example: Enter SDSU in double stroke on the left side of the display and USD in single stroke
on the right side.
1. Press <DOUBLE> and type in “SDSU”
2. Press <ENTER>
3. Press <SINGLE> and type in “USD”
4. Press <ENTER>
5. Press <POST>, <LEFT>, <1>,<ENTER>
6. Press <POST>, <RIGHT>, <2>, <ENTER>
Press <EXIT> to leave the team name mode and change to the sport mode for timing and
scoring the game. After <EXIT> is pressed, the console’s LCD will read “ENTER CODE.”
Enter the desired code.
Don’t forget to replace the team name overlay with the appropriate sport overlay.
Team Name Operation
Page 44

Page 45

Reference Drawings: Block Diagrams, Baseball ............................................. Drawing A-89118
Block Diagrams, Basketball ........................................... Drawing A-89079
Block Diagrams, Basketball with Stats Panels .............. Drawing A-89120
Block Diagrams, Football .............................................. Drawing A-89119
Block Diagram, Hockey ................................................. Drawing A-89121
37
Page 46

Page 47

Page 48

Page 49

Page 50

Page 51

Page 52

Sport or Function
Overlay
Code
2000
2100
2200
2300
2500
2510
2600
2610
Scoreboard
Models
Baseball/Softball
Format 1 w/clock
LL-1895
30
FB-16T, -18TS, -1624, -1630, -
1730, -1830
31
MS-9, -918
32
FB-14S, -15TS, -1424, -1525, -
1430, -1530
LL-1911
38
SO-718
LL-2089
44
BA-718
Baseball/Softball
Format 2 -
No Clock
LL-1896
33
FB-14S, -15TS, -1424, -1524, -
1430, -1530, BA-1018
34
FB/BA-12
39
FB-16T, -18TS, -1630, -1730, -
1830
LL-1897
35
BA-1518, -1524
LL-1903
36
BA-36, -43, -3624, -4324
40
BA-3718, -3724
LL-1910
37
BA-618, -624, -515, -518
Basketball
LL-1885
03
BB-18, -11, -2021, -2025
04
BB-18A
11
BB-87, -10, -17
12
BB-17A
LL-1930
05
BB-18 Score w/15 or 16
06
BB-18A Score w/15 or 16
13
BB-17 Score w/15 or 16
14
BB-17A Score w/15 or 16
LL-1941
07
BB-18 w/FP-15
08
BB-18A w/FP-15
17
BB-17 w/FP -15
18
BB-17A w/FP-15
LL-1947
10
PCS-413S
LL-1902
15
FP-15
16
FP-25
Football
LL-1894
20
FB-8S, -824, S-8FB, SO-918
A under a console model number indicates that the code is included in that model.
39
Page 53

21
FB-13S, -14TS
22
FB-14S, -15TS, -1424, -1430, -
1524, -1530
23
FB-11TS
24
FB-12, FB/BA-12
25
MS-9, -918
26
FB-16T
LL-1909
27
FB-18TS, -1630, -1730, -1830, -
1624 Hockey
LL-1900
61
H-8
LL-1904
62
H-20, -28, -80, -112
63
H-24, -32, -96, -128
Soccer
LL-2182
64
SO-1624
LL-2183
65
FB-824, SO-824, -918
66
MS-918
67
SO-1424, FB-1424, -1524, -1530
68
FB-1624, -1630, -1730, -1830
Team Name
LL-2094
98
BB-18 or FB w/TN, Custom
Test Console
LL-1951
01
All Models
Time Of Day
None
99
All Models w/Clock
Track
LL-1898
41
FB-14S, -15TS, -1424, -1524, -
1430, -1530
42
FB-14TS
43
FB-16T, -18TS, -1630, -1730, -
1830
Two-Digit Timing
LL-1922
82
DG-230, -236, TI-213, -218
Volleyball
LL-1901
71
BB-10, -17, -17A
72
VB-87
73
BB-11, -18, -18A
Wrestling
LL-1899
51
BB-17
52
BB-17A
53
BB-18
54
BB-18A
LL-2077
55
Matside II w/Adv time
56
Matside II w/o Adv Time
Table of Consoles and Codes
 Loading...