

Daikin OM-G15-1008 Operation manuals
OPERATING
88
88
MANUAL
AUTO
MODE
SLEEP
88
AM
PMONOFF
SET
CLR
P1
P2
❆
1818:88
SET
ON TIMER OFF TIMER
CLR
˚F
˚C
Operating Manual
Handset Wireless
Bedienungsanleitung
Drahtloses Handgerät
Bedieningsaanwijzing
Draadloos handapparaat
Manual De Instrucciones
Auricular Inalámbrico
Manuale Di Funzionamento
Ricevitore wireless
Εγχειρίδιο Οδηγιών
Ασύρµατη Χειροσυσκευή
Manual De Funcionamento
Aparelho Sem Fios
Руководство По Зксплуатации
Беспроводное Дистанционное Управление
Mode D’emploi
Combiné sans fil
English
Deutsch
Français
Nederlands
Español
Italiano
Ελληνικά
Portugues
Pycckий
OM-G15-1008-Daikin 11/17/08, 9:25 AM23
Kullanım Kılavuzu
Kablosuz Kulaklık
TürkçeTürkçe
Türkçe
TürkçeTürkçe
G15 Remote Controller Indication /
88
88
G15-Remote-Controller-Anzeige / Indication De
Télécommande G15 / G15 Indicatie afstandsbediening /
Indicación Del Mando A Distancia G15 / Indicazione
Controller Remoto G15 / ∆είκτης τηλεχειριστηρίου
G15 / Indicador do Controlo Remoto G15 / Пульт
Дистанционного Управления G15 Индикация /
G15 Uzaktan Kumanda GöstergesiG15 Uzaktan Kumanda Göstergesi
G15 Uzaktan Kumanda Göstergesi
G15 Uzaktan Kumanda GöstergesiG15 Uzaktan Kumanda Göstergesi
1
12
11
13
2
AUTO
88
AM
PMONOFF
P1
P2
˚F
˚C
❆
1818:88
3
6
4
5
MODE
SLEEP
SET
8
ON TIMER OFF TIMER
CLR
SET
CLR
7
10
9
OM-G15-1008-Daikin 11/17/08, 9:25 AM24
i
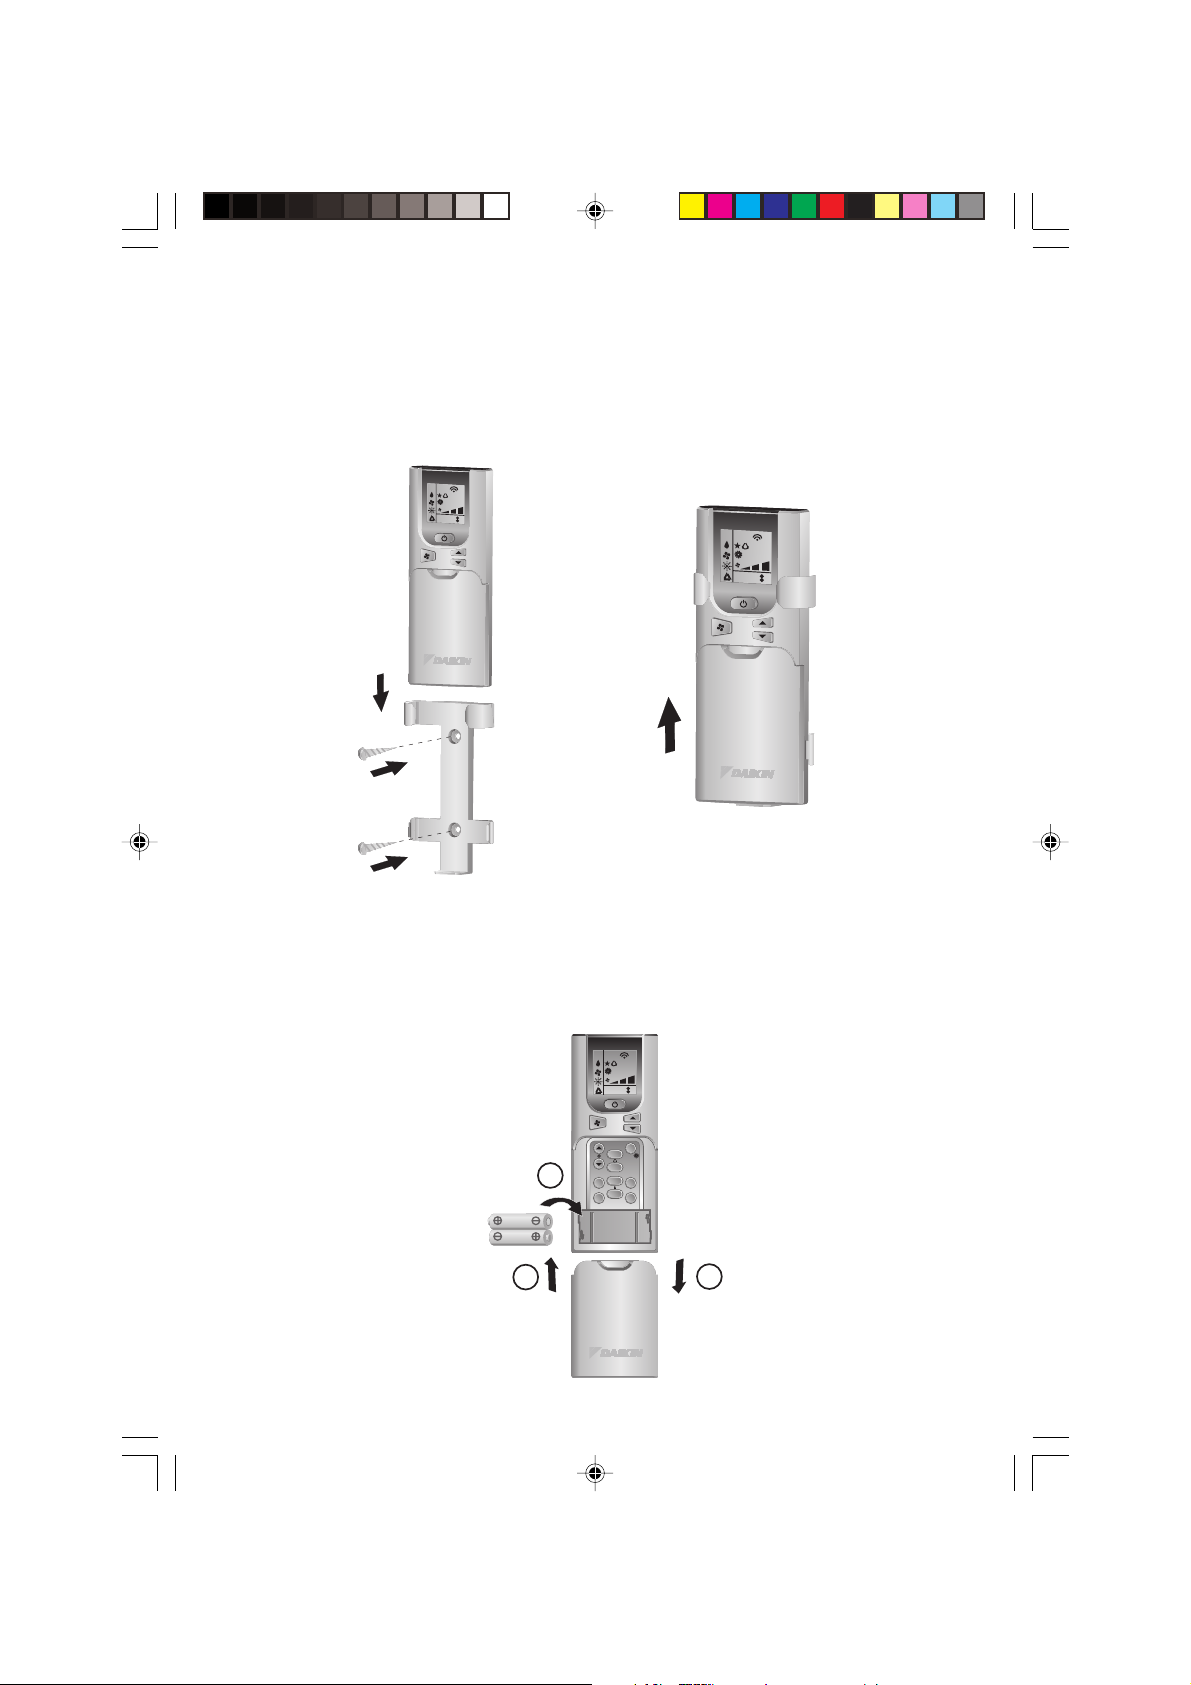
HOW TO MOUNT ONTO THE WALL / ANBRINGEN DER FERNSTEUERUNG AN
18
88
88
88
88
18
88
88
DER WAND / COMMENT INSTALLER SUR LE MUR / MONTAGE OP DE MUUR /
MONTAJE SOBRE LA PARED / COME FISSARE L’ASTUCCIO DEL
TELECOMANDO ALLA PARETE / ΠΩΣ ΝΑ ΤΟ ΤΟΠΟΘΕΤΗΣΕΤΕ ΠΑΝΩ ΣΤΟΝ
ΤΟΙΧΟ / FIXAÇÃO DO APARELHO NA PAREDE / КАК УСТАНОВИТЬ НА
СТЕНУ /
DUVARA NASIL YERLEfiT‹R‹L‹RDUVARA NASIL YERLEfiT‹R‹L‹R
DUVARA NASIL YERLEfiT‹R‹L‹R
DUVARA NASIL YERLEfiT‹R‹L‹RDUVARA NASIL YERLEfiT‹R‹L‹R
P1
❆
P2
˚F
88
˚C
A
UTO
AM
ON
18
:88
PM
OFF
P1
❆
P2
˚F
88
˚C
AU
T
O
AM
ON
18
:88
PM
OFF
TO INSERT BATTERIES (AAA.R03) / EINSETZEN DER BATTERIEN (AAA.R03) /
INTRODUIRE LES PILES (AAA.R03) / BATTERIJEN INZETTEN (AAA.R03) /
INSERTE LAS PILAS (AAA.R03) / INSERIMENTO DELLE BATTERIE (AAA.R03) /
ΓΙΑ ΝΑ ΕΙΣΑΓΕΤΕ ΤΙΣ ΜΠΑΤΑΡΙΕΣ (AAA.R03) / PARA INTRODUZIR AS
PILHAS (AAA.R03) / УСТАНОВКА БАТАРЕЙ (AAA.R03) /
TAKILIR (AAA.R03)TAKILIR (AAA.R03)
TAKILIR (AAA.R03)
TAKILIR (AAA.R03)TAKILIR (AAA.R03)
P1
❆
P2
˚F
˚C
88
AUTO
AM
PMONOFF
1818:88
P‹LLER NASILP‹LLER NASIL
P‹LLER NASIL
P‹LLER NASILP‹LLER NASIL
MODE
1
SLEEP
SET
ON TIMER OFF TIMER
CLR
SET
CLR
23
OM-G15-1008-Daikin 11/17/08, 9:25 AM25
ii
OM-G15-1008-Daikin 11/17/08, 9:25 AM26
iii

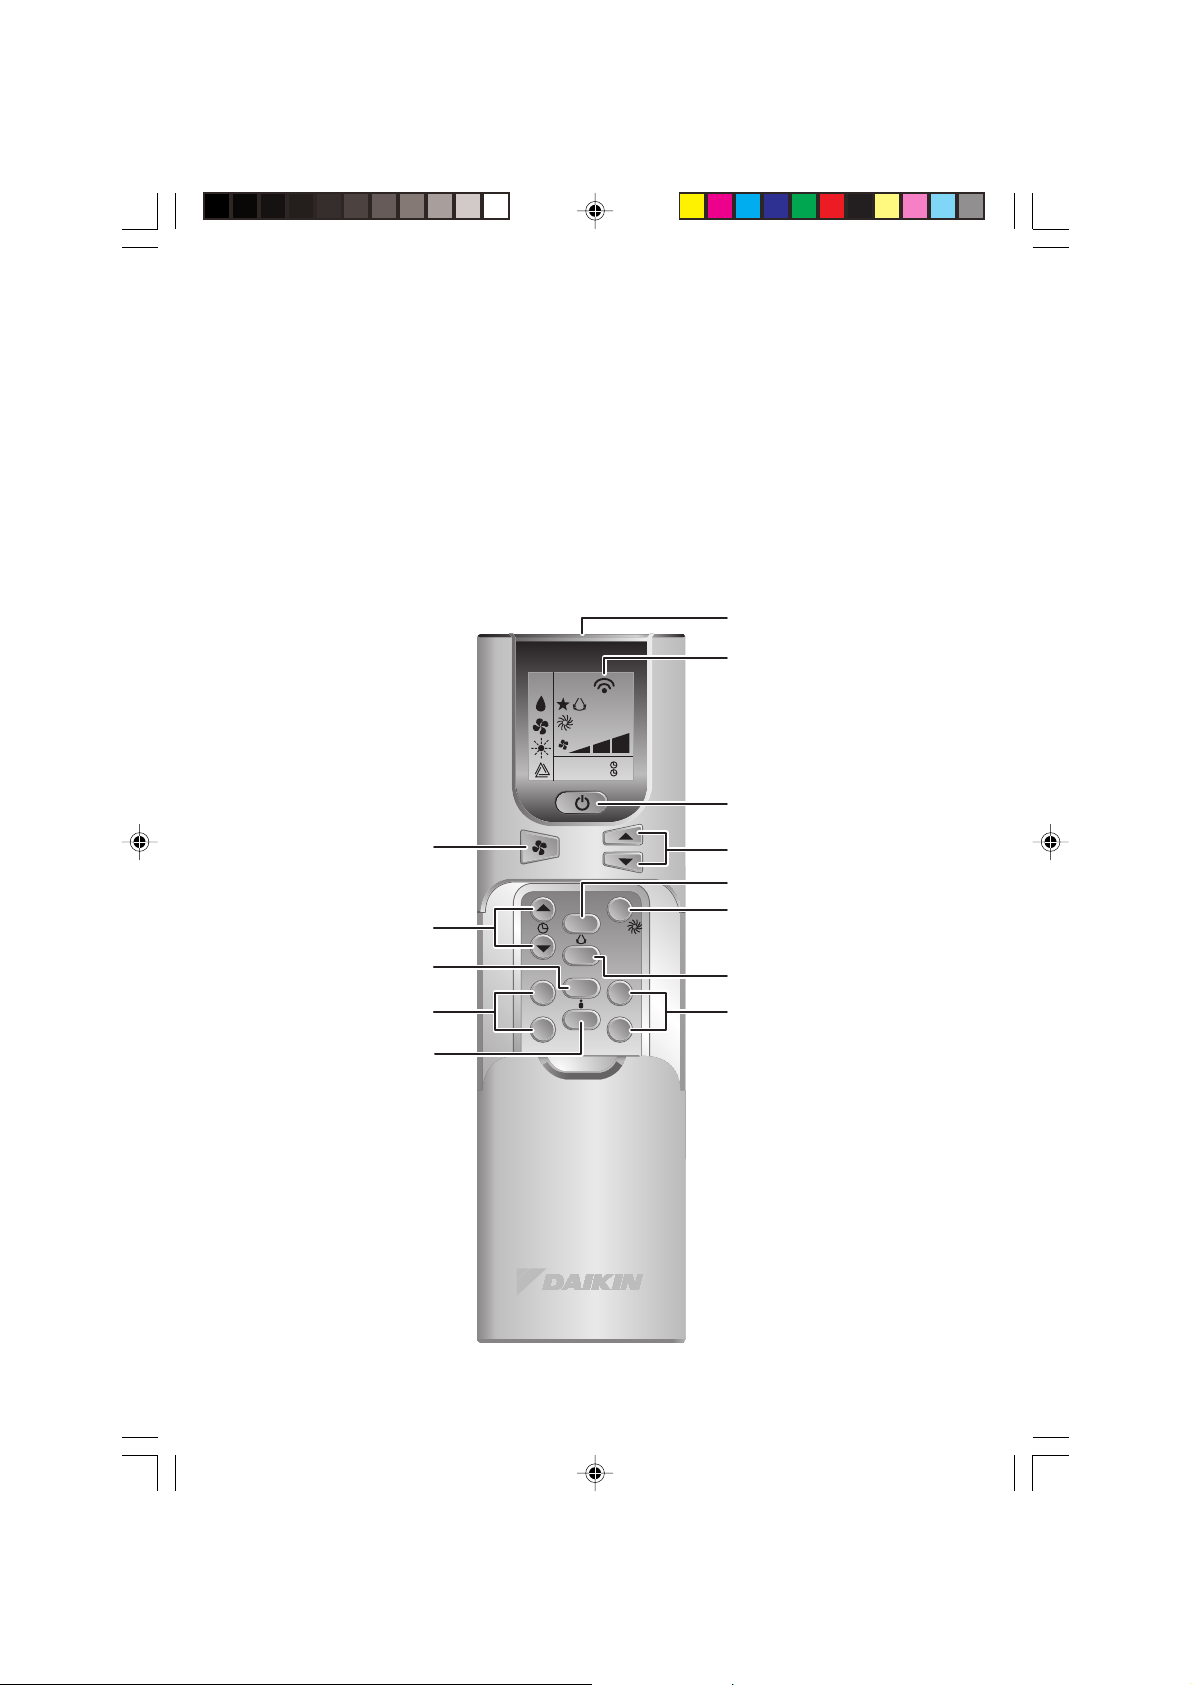
OPERATING GUIDE
1. Transmission source
• The source where the signal will be transmitted.
2. Signal transmission indication
• Blink to confirm that the last setting has been transmitted to the unit.
3. “ON/OFF” Button
• Press once to start the air conditioner unit.
• Press again to stop the unit.
4. Temperature setting
• To set the desired room temperature, press the ▲ or ▼ button to increase or
decrease the set temperature.
• The temperature setting range is from 16°C to 30°C (Optional setting 20°C to
30°C).
• Press both buttons simultaneously to toggle ▲ and ▼ from °C to °F setting.
5. Operation mode
• Press the MODE button to select the type of operating mode.
•
For cooling only unit, the available modes are: COOL (❆), DRY ( ) and
FAN ( ).
• For heat pump unit, the available modes are: AUTO ( ), COOL (❆), DRY ( ),
FAN ( ) and HEAT ( ).
• The AUTO ( ) mode is unavailable for chilled water system.
6. Fan speed selection
• Press the button continuously will toggle the fan speed in the following order:
Low –––: Med –––: High –––: Auto
• Stop pressing when the desired fan speed appears on the display screen.
7. Turbo function
• Press for fast cooling or heating operation.
• The temperature will be increased internally if it is in HEAT mode, decreased if
in COOL or DRY mode.
Fan speed will be increased if it is not at maximum speed.
• The temperature and fan speed will resume to user setting if is pressed again or
after 20 minutes.
• Available under HEAT, COOL and DRY modes only.
• The Turbo function ( ) is unavailable for chilled water system.
8. ON timer setting
• Press the SET button will activate the on timer function.
• Set the desired on time by pressing the SET button continuously. If the timer is
set to 7.30am, the air conditioner will turn on at 7.30am sharp.
• Press the CLR button to cancel the on timer setting.
OM-G15-1008-Daikin 11/17/08, 9:25 AM1
1
9. OFF timer setting
• Press the SET button will activate the off timer function.
• Set the desired off time by pressing the SET button continuously.
• Press the CLR button to cancel the off timer setting.
10. Automatic air swing (optional)
• Press the SWING button to activate the automatic air swing function.
• To distribute the air to a specific direction, press the SWING button and wait
until the louver move to the desired direction and press the button once again.
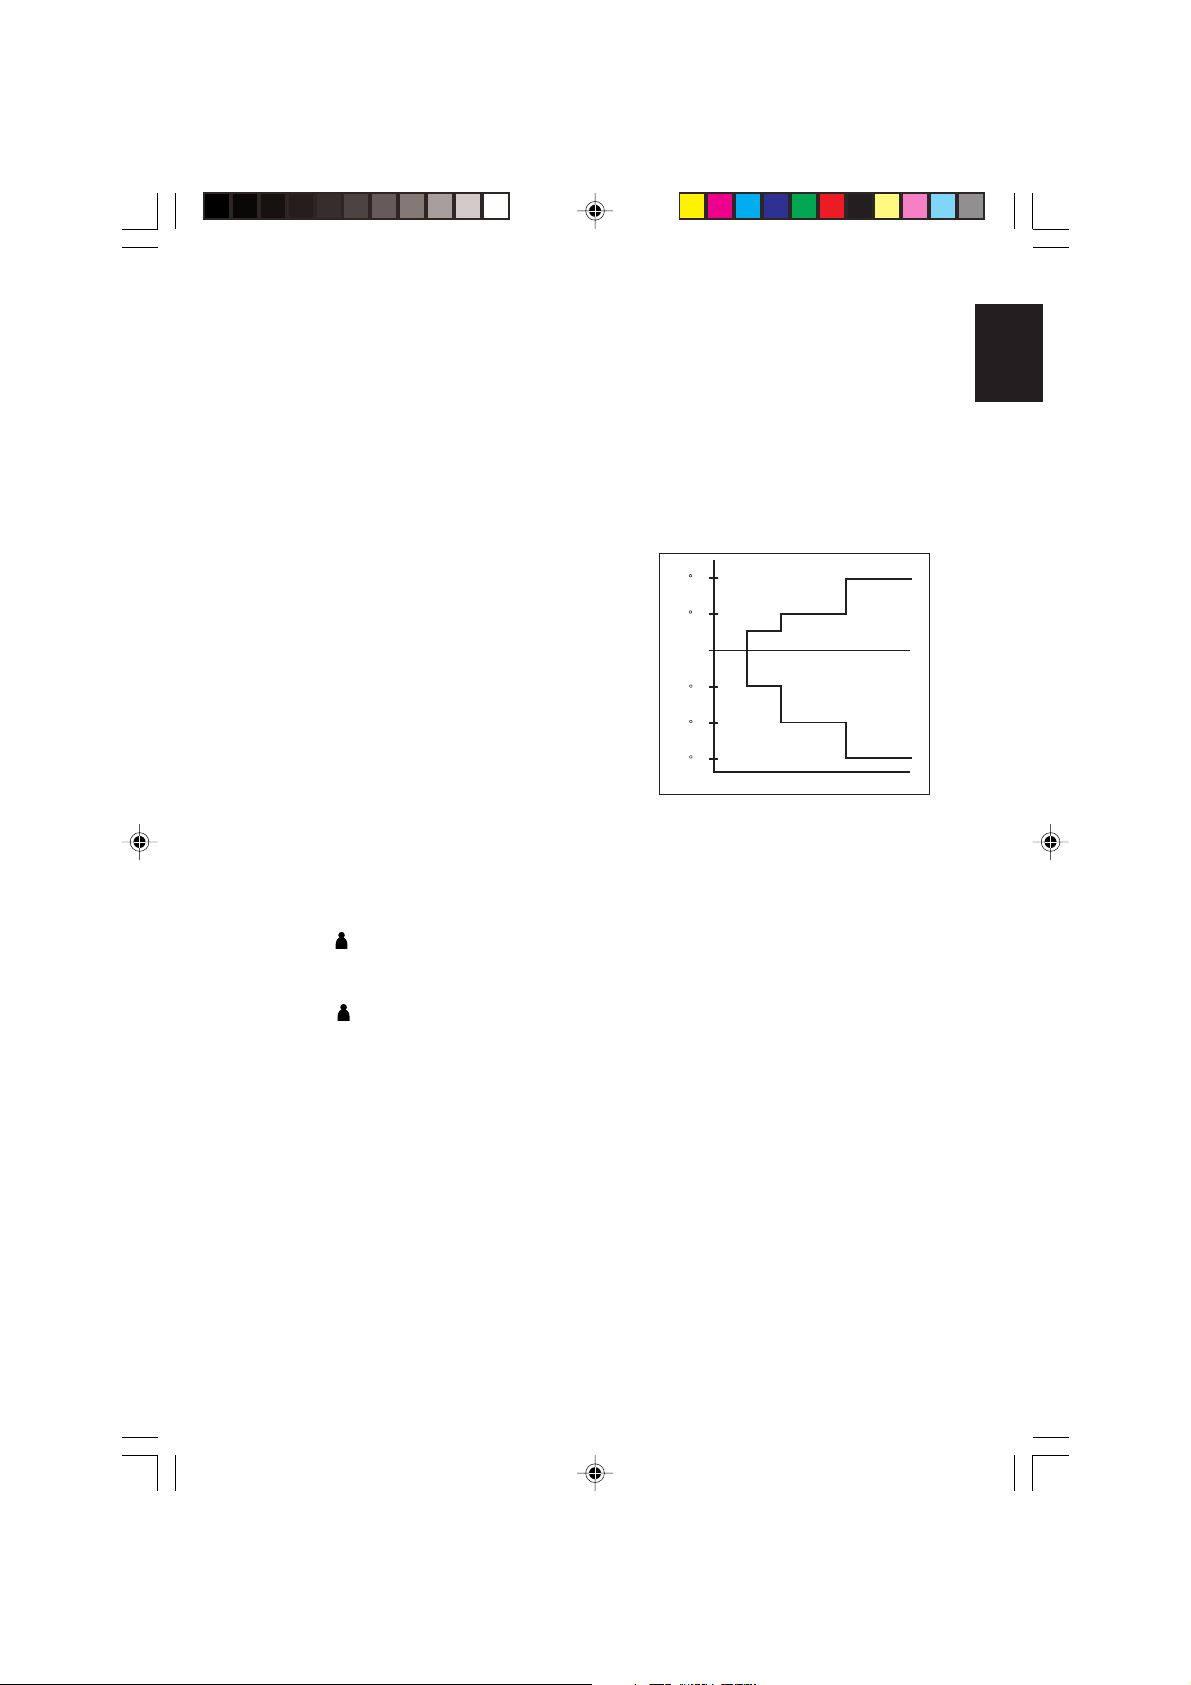
11. Sleep mode setting
• Press the SLEEP button will activate the sleep mode function.
• This is an energy saving option. When the unit is
operating under cooling mode, the set temperature
is increased by 0.5°C after the first half an hour,
another 0.5°C after the second half an hour and
+2 C
+1 C
1°C after the following 1 hour.
• When the unit is operating under heating mode,
the set temperature is decreased by 1°C after
the first half an hour, another 1°C after the
second half an hour and 1°C after the following
1 hour.
- 1 C
- 2 C
- 3 C
0 0.5 1 1.5 2
• This function is available under COOL,
HEAT and AUTO mode.
12. Clock time setting
• Press ▲ button to increase the clock time.
• Press ▼ button to decrease the clock time.
13. Personalize setting
•
Press and hold for 3s, then P1 will blink. Press again to cycle between P1 and P2.
• Set the desire setting, then leave the handset for 4s without pressing any key and
it will save the setting into the programme.
• Press once to activate the P1 setting, press again to cycle between P1 and P2.
• Press any key to deactivate the personalize setting.
ENGLISH
OM-G15-1008-Daikin 11/17/08, 9:25 AM2
2
GEBRAUCHSANWEISUNG
1. Sendungsquelle
• Die Ausgangsquelle des Signals.
2. Signalübertragungsanzeige
• Blinkt auf, um anzuzeigen, dass das letzte Signal an das Gerät übertragen wurde.
3. “ON/OFF” (AN/AUS) schalter
• Einmal betätigen - das Gerät schaltet sich ein.
• Nochmals betätigen - das Gerät schaltet sich aus.
4. Temperatureinstellung
• Um die gewünschte Temperatur einzustellen, den ▲ oder den ▼ Knopf betätigen,
so wird die eingestellte Temperatur höher oder niedriger gestellt.
• Der Temperatur-Einstellbereich liegt zwischen 16°C zu 30°C (Die optimale
Einstellung liegt zwischen 20°C zu 30°C).
• Die beiden Knöpfe ▲ und ▼ zugleich betätigen, um die Gradeinstellung von
Celsius auf Fahrenheit zu bringen.
5. Betrieb
• Zur Wahl der verschiedenen Arten des Betriebs wird der MODE Knopf betätigt.
• Für die Kühlung kann man: COOL (❆), DRY ( ) und FAN ( ) wählen.
• Für den Betrieb der Wärmepumpe hat man die Wahl zwischen: AUTO ( ),
COOL (❆), DRY ( ), FAN ( ) und HEAT ( ).
• Der AUTO ( )-Modus ist für gekühlte Wassersysteme nicht verfügbar.
6. Wahl der drehzahl-Stufe des kühlgebläses
• Wird der Knopf kontinuierlich betätigt, dann ändert sich jeweils die
Drehzahlstufe des Kühlgebläses in dieser Reihenfolge:
Niedrig –––: Mittel –––: Hoch –––: Automatisch
• Den Knopf nicht weiter betätigen, wenn die gewünschte Drehzahlstufe des
Kühlgebläses angezeigt wird.
7. Turbofunktion
• Zum schnellen Kühlen oder Erwärmen die Taste betätigen.
• Die Innentemperatur erhöht sich bei HEAT (WÄRME) und sinkt bei
COOL (KÜHL) oder DRY (TROCKEN) betrieb.
Falls die Gebläsedrehzahl nicht schon auf Höchstgeachwindigkeit läuft, wird sie
erhöht.
• Bie nochmaligem Betätigen der Taste gehen Temperatur und Gebläsedrehzahl
auf die Benutzereinstellung zurück, andernfalls nach 20 Minuten.
• Erhältlich nur für HEAT (WÄRME), COOL (KÜHL) und DRY (TROCKEN)
betrieb.
• Die Turbo-Funktion ( ) steht für das Kühlwassersystem nicht zur Verfügung.
8. EIN - Zeitschalter-einstellung
• Die Funktion des EIN - Zeitschalters wird durch Betätigen des SET-Knopfes
aktiviert.
• Den SET-Knopf solange betätigen, bis die gewünschte Zeit angezeigt und somit
eingestellt wird. Ist der Zeitschalter auf 7.30 Uhr eingestellt, so schaltet sich die
Klimaanlage genau um diese Zeit ein.
• Zum Löschen der Einstellung des EIN - Zeitschalters wird der CLR-Knopf betätigt.
OM-G15-1008-Daikin 11/17/08, 9:25 AM3
3
9. AUS - Zeitschalter-einstellung
•
Die Funktion des AUS - Zeitschalters wird durch Betätigen des SET-Knopfes aktiviert.
• Den SET-Knopf solange betätigen, bis die gewünschte Ausschaltungszeit angezeigt
und somit eingestellt ist.
•
Zum Löschen der Einstellung des AUS - Zeitschalters wird der CLR-Knopf betätigt.
10. Automatische Luftschwingung (wahlweise)
• Durch Betätigen des SWING Knopfs wird die automatische
Luftschwingungsfunktion aktiviert.
• Damit die Luft in eine bestimmte Richtung bläst, wird der SWING Knopf betätigt,
danach warten, bis sich die Lüftungsschlitze in die gewünschte Richtung bewegen
und dann den Knopf nochmals betätigen.
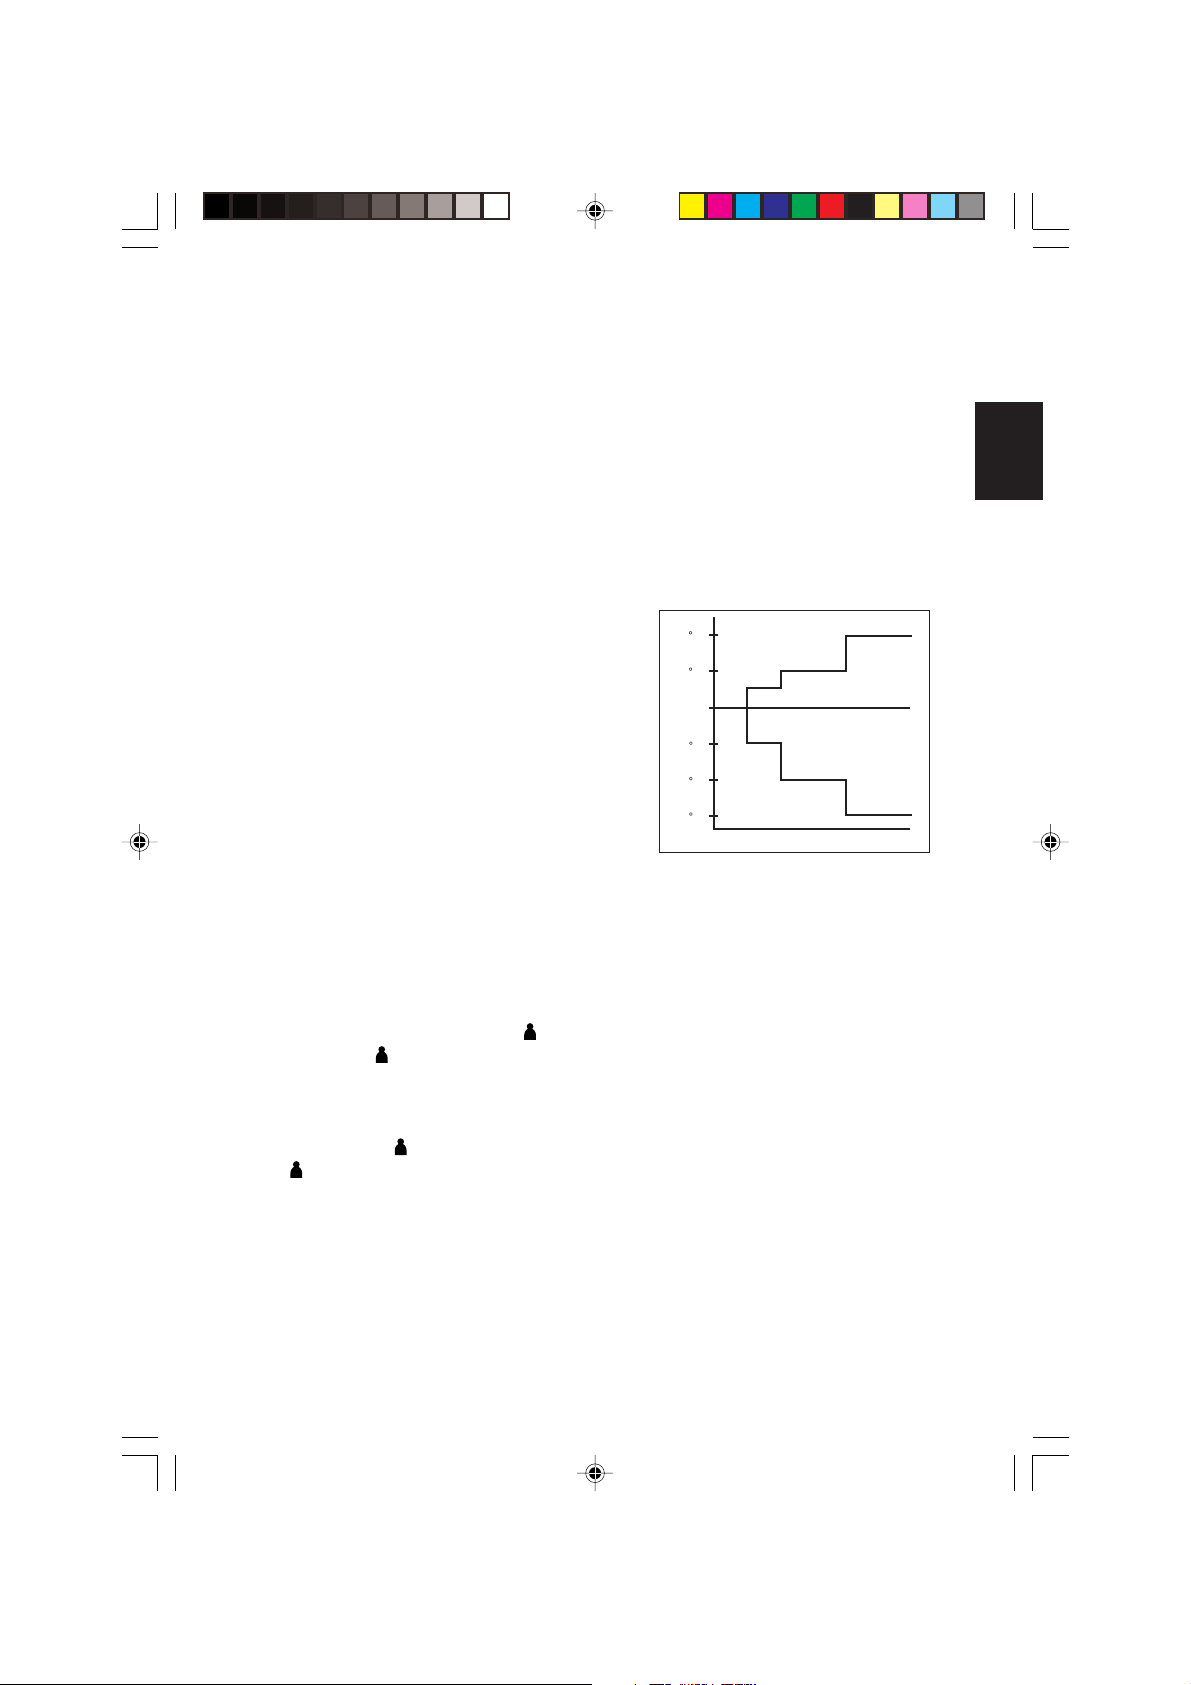
11. Einstellen des Nachtbetriebs
• Durch Betätigen des SLEEP Knopfs wird der
Nachtbetrieb aktiviert.
• Dabei kann man Energie sparen. Befindet sich
das Gerät im Kühlmodus, steigt die
eingestellte Temperatur nach der ersten halben
+2 C
+1 C
Stunde um 0,5°C. Nach der zweiten halben
Stunde steigt die Temperatur um weitere 0,5°C
und um 1°C nach der folgenden Stunde.
• Befindet sich das Gerät im Heizmodus, sinkt
die eingestellte Temperatur nach der ersten
halben Stunde um 1°C. Nach der zweiten
halben Stunde sinkt die Temperatur um
- 1 C
- 2 C
- 3 C
0 0,5 1 1,5 2
weitere 1°C und um 1°C nach der folgenden Stunde.
• Diese Funktion gibt es bei COOL (KÜHL), HEAT (WÄRME) und
AUTO (AUTOMATISCH) Betrieb.
12. Einstellen der Uhrzeit
• Den ▲ Knopf betätigen, um die Uhrzeit vorzustellen.
• Den ▼ Knopf betätigen, um die Uhrzeit zurückzustellen.
13. Personalisierte Einstellung
• Behalten Sie für 3 Sekunden gedrückt, dann wird P1 aufleuchten. Drücken
Sie erneut , um zwischen P1 und P2 zu wechseln.
• Nehmen Sie die gewünschte Einstellung vor, drücken Sie für 4 Sekunden auf
keine Taste des Handapparats und die Einstellung wird in das Programm
gespeichert.
• Drücken Sie einmal, um die P1-Einstellung zu aktivieren. Drücken Sie erneut
um zwischen P1 und P2 zu wechseln.
• Drücken Sie eine beliebige Taste, um die personalisierte Einstellung zu
deaktivieren.
DEUTSCH
OM-G15-1008-Daikin 11/17/08, 9:25 AM4
4
 Loading...