

Page 1
OPERATION MANUAL
SYSTEM Air Conditioners
According to GB4706. 32-96 GB4706. 32-96
English
Deutsch
MODELS
Wall-mounted type
FXA20LVE FXA20LVEC (KFR-22G)
FXA25LVE FXA25LVEC (KFR-28G)
FXA32LVE FXA32LVEC (KFR-36G)
Français
Español
Italiano
ЕллзнйкЬ
Nederlands
Portugues
Russian
Taiwanese
Chinese
Page 2
1
NOTE
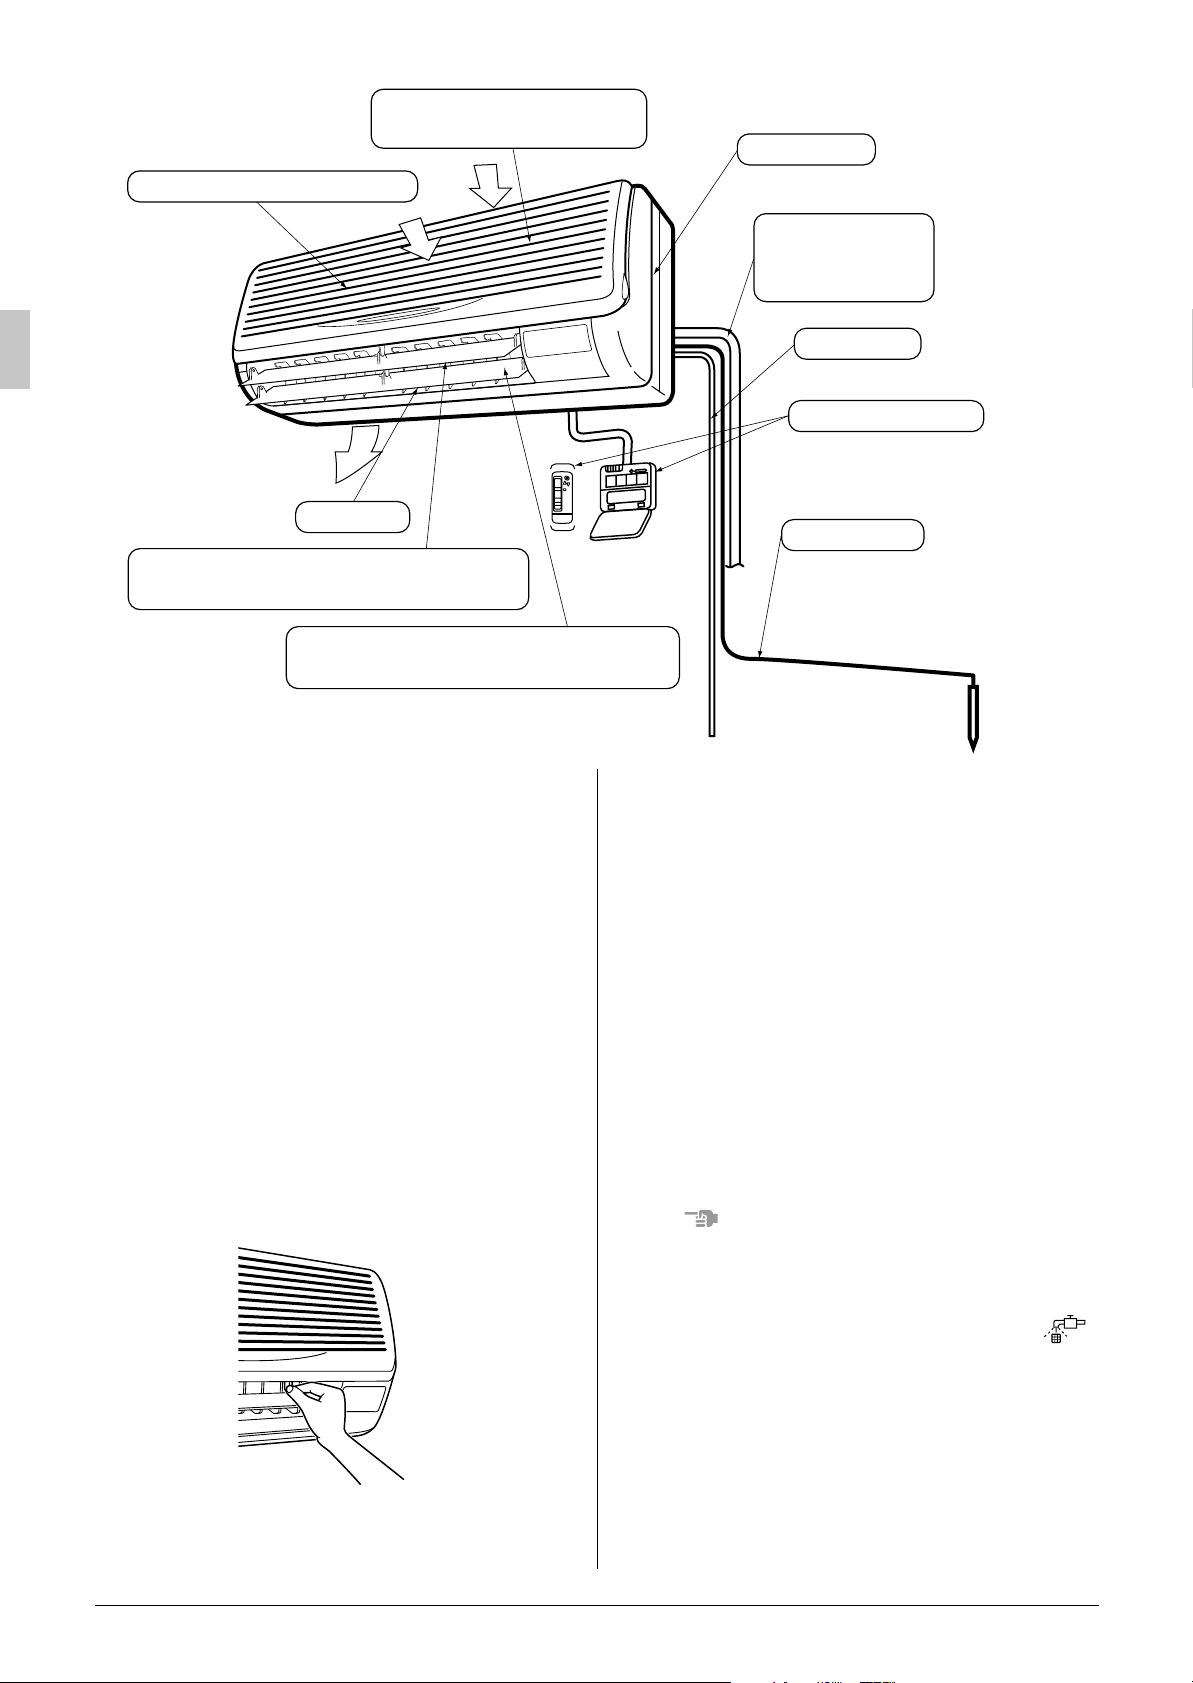
Air filter (Inside intake vent)
Intake vent
(front and top of main unit)
Name plate
(Indoor unit model name)
Refrigerant pipe
Interconnecting
electric cable
Drain pipe
Remote controller
Air outlet
Louver
(horizontal fan direction adjustment flaps)
Horizontal flaps
(vertical fan direction adjustment flaps)
Thank you for purchasing this Daikin air conditioner.
Carefully read this operation manual before using
the air conditioner. It will tell you how to use the
unit properly and help you if any trouble occurs.
This manual explains about the indoor unit only.
Use it along with the operation manual for the
outdoor unit. After reading the manual, file it away
for future reference.
HOW TO ADJUST THE HORIZONTAL
FAN DIRECTION ANGLE
Hold the tabs on edge louvers (horizontal fan
direction adjustment flaps) down slightly and
adjust left and right to match the room conditions
or your preference.
Ground wire
Provided to ground the
indoorunit to preventelectric
shock and ensure safety
MAINTENANCE
(FOR SERVICE PERSONNEL)
ONLY A QUALIFIED SERVICE PERSON IS
ALLOWED TO PERFORM MAINTENANCE
IMPORTANT!
• BEFORE OBTAINING ACCESS TO TERMINAL DEVICES, ALL POWER SUPPLY
CIRCUITS MUST BE INTERRUPTED
To clean the air conditioner, be sure to stop
•
operation, and turn the power switch off. Otherwise, an electric shock and injury may result.
Do not wash the air conditioner with water.
•
Doing so may result in an electric shock.
Be careful with a scaffold or staging.
•
Caution must be exercised because of work at a
high place.
Do not remove the air filter except when cleaning.
•
This may cause breakage.
HOW TO CLEAN THE AIR FILTER
Clean the air filter when the display shows “ ”
(TIME TO CLEAN AIR FILTER).
It will display that it will operate for a set amount
•
of time.
Increase the frequency of cleaning if the unit is
•
installed in a room where the air is extremely
contaminated.
Stop the horizontal flaps at a position where you
can hold the tabs and adjust it left and right.
1 English
Page 3
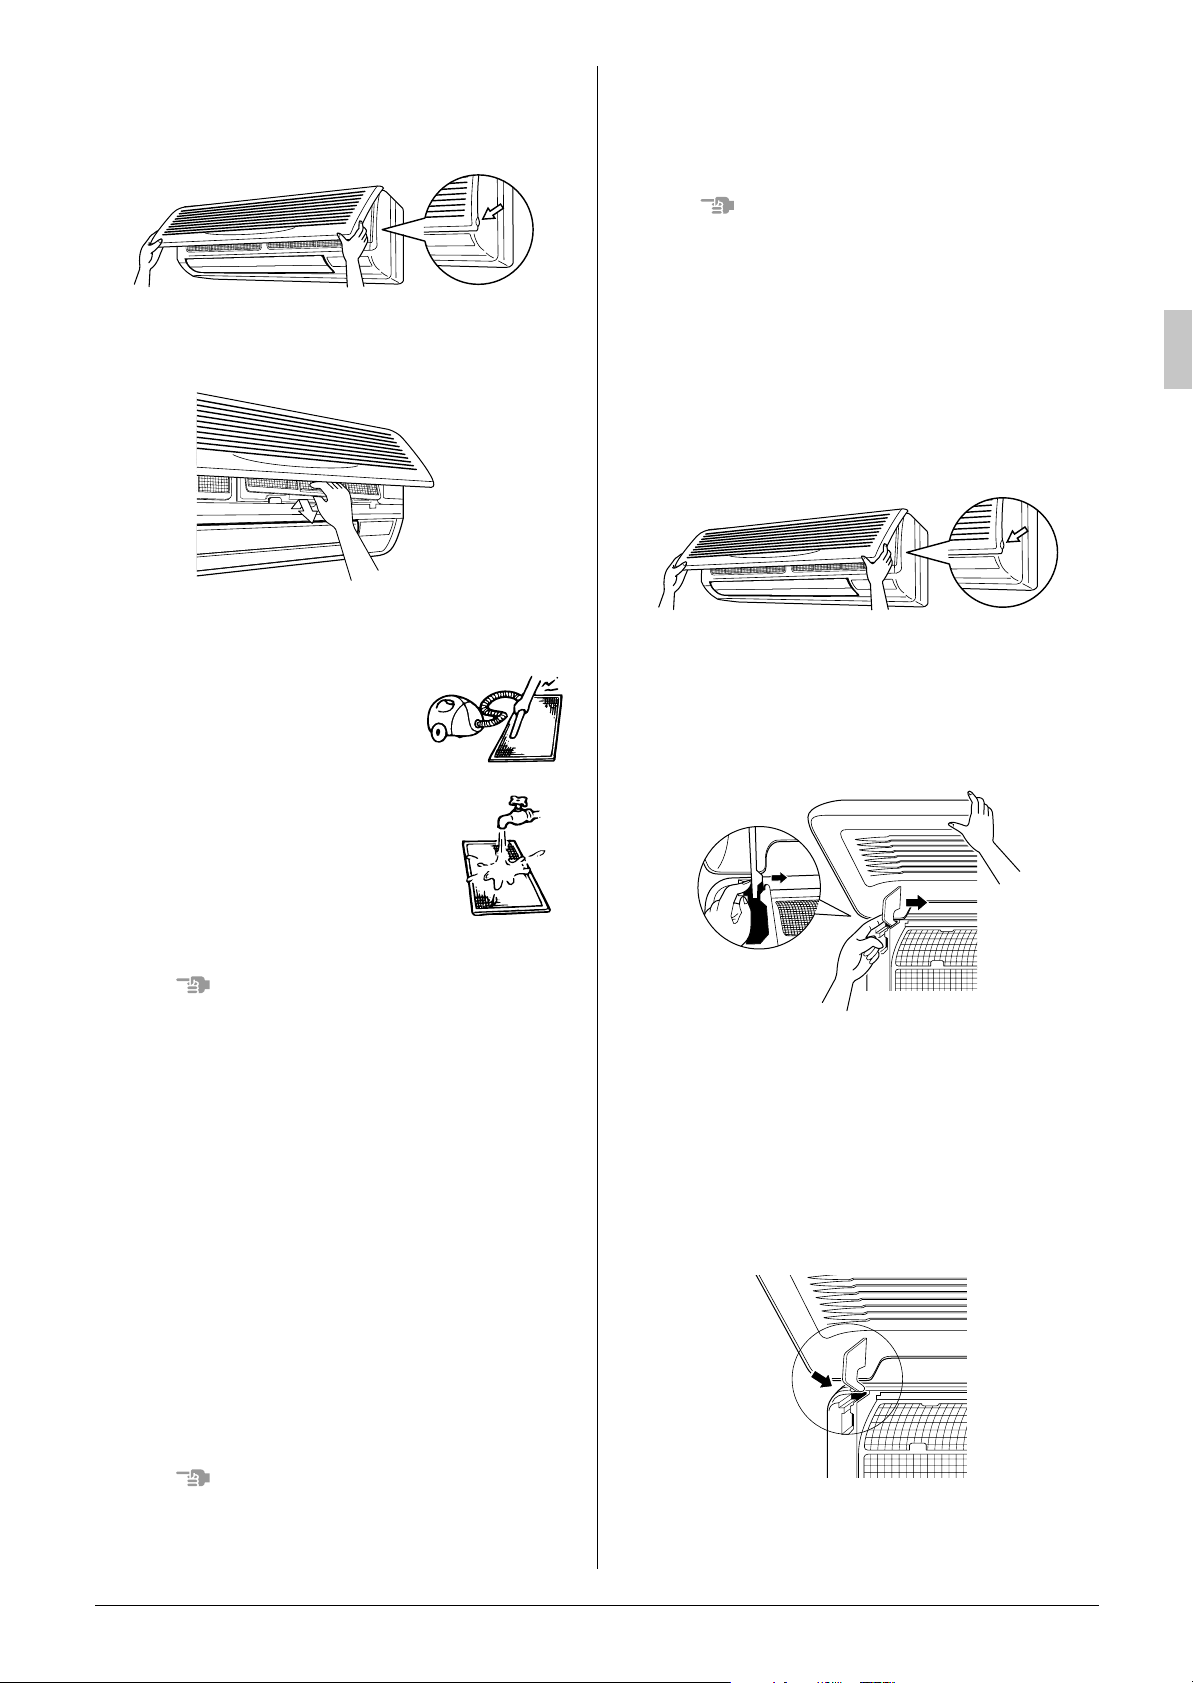
1. Open the front panel.
NOTES
Place your fingers on the panel protrusions on
the left and right sides of the main unit and
open until the panel stops.
2. Pullout the air filter.
Push up the tab in the center of the air filter
slightly then pull out in a downward direction.
3. Clean the air filter.
Use vacuum cleaner A) or wash the air filter
with water
Using a vacuum cleaner
A)
B).
Do not use water or air of 50°C or higher for
•
cleaning air filters.
HOW TO CLEAN THE FRONT PANEL
You can remove the front panel to clean it.
Hold the front panel firmly so that it does not fall.
•
Do not use water over 50 °C, benzine, gasoline,
•
thinner, or other volatile substances, polishing
powder, or hard scrub brushes to clean the
panel.
Make sure the front panel is solidly in place.
•
1. Open the front panel.
Place your fingers on the panel protrusions on
the left and right sides of the main unit and
open until the panel stops.
2. Remove the front panel.
Push the axes on either side of the front panel
towards the center of the main unit and
remove.
(
You can also remove it by sliding the front panel
either to the left or right and pulling it forward.
)
Washing with water
B)
When the air filter is very
dirty, use soft brush and
neutral detergent
Remove water and dry in the shade.
NOTES
Do not wash it with hot water of more than 50°C,
•
as doing so may result in discoloration and/or
deformation.
Do not expose it to fire, as doing so may result
•
in burning.
4. Attach the air filter.
Once cleaning is done be sure to replace the
air filter as it was.
5. Press the FILTER SIGN RESET button on
the remote controller.
The “TIME TO CLEAN AIR FILTER” display
vanishes.
HOW TO CLEAN THE AIR OUTLET AND
EXTERIOR
Clean with soft cloth.
•
When it is difficult to remove stains, use water or
•
neutral detergent.
3. Clean the front panel.
Wipe gently with a soft wet cloth.
•
Only use neutral cleaning agents.
•
After washing off, wipe off any excess water
•
and dry in a shaded location.
4. Attach the front panel.
Set the keys of the front panel into the slots
and push them in all the way.
Close the front panel slowly in this state.
NOTES
Do not use gasoline, benzene, thinner, polish-
•
ing powder, liquid insecticide. It may cause discoloring or warping.
English 2
Page 4
3PN02401-5F EM01A184
(0203) HT
 Loading...