

DAIKIN FTX30NVJU, FTX36NVJU User Manual
DAIKIN ROOM AIR CONDITIONER
English
Français
Español
OPERATION MANUAL
MODELS
FTX30NVJU
FTX36NVJU

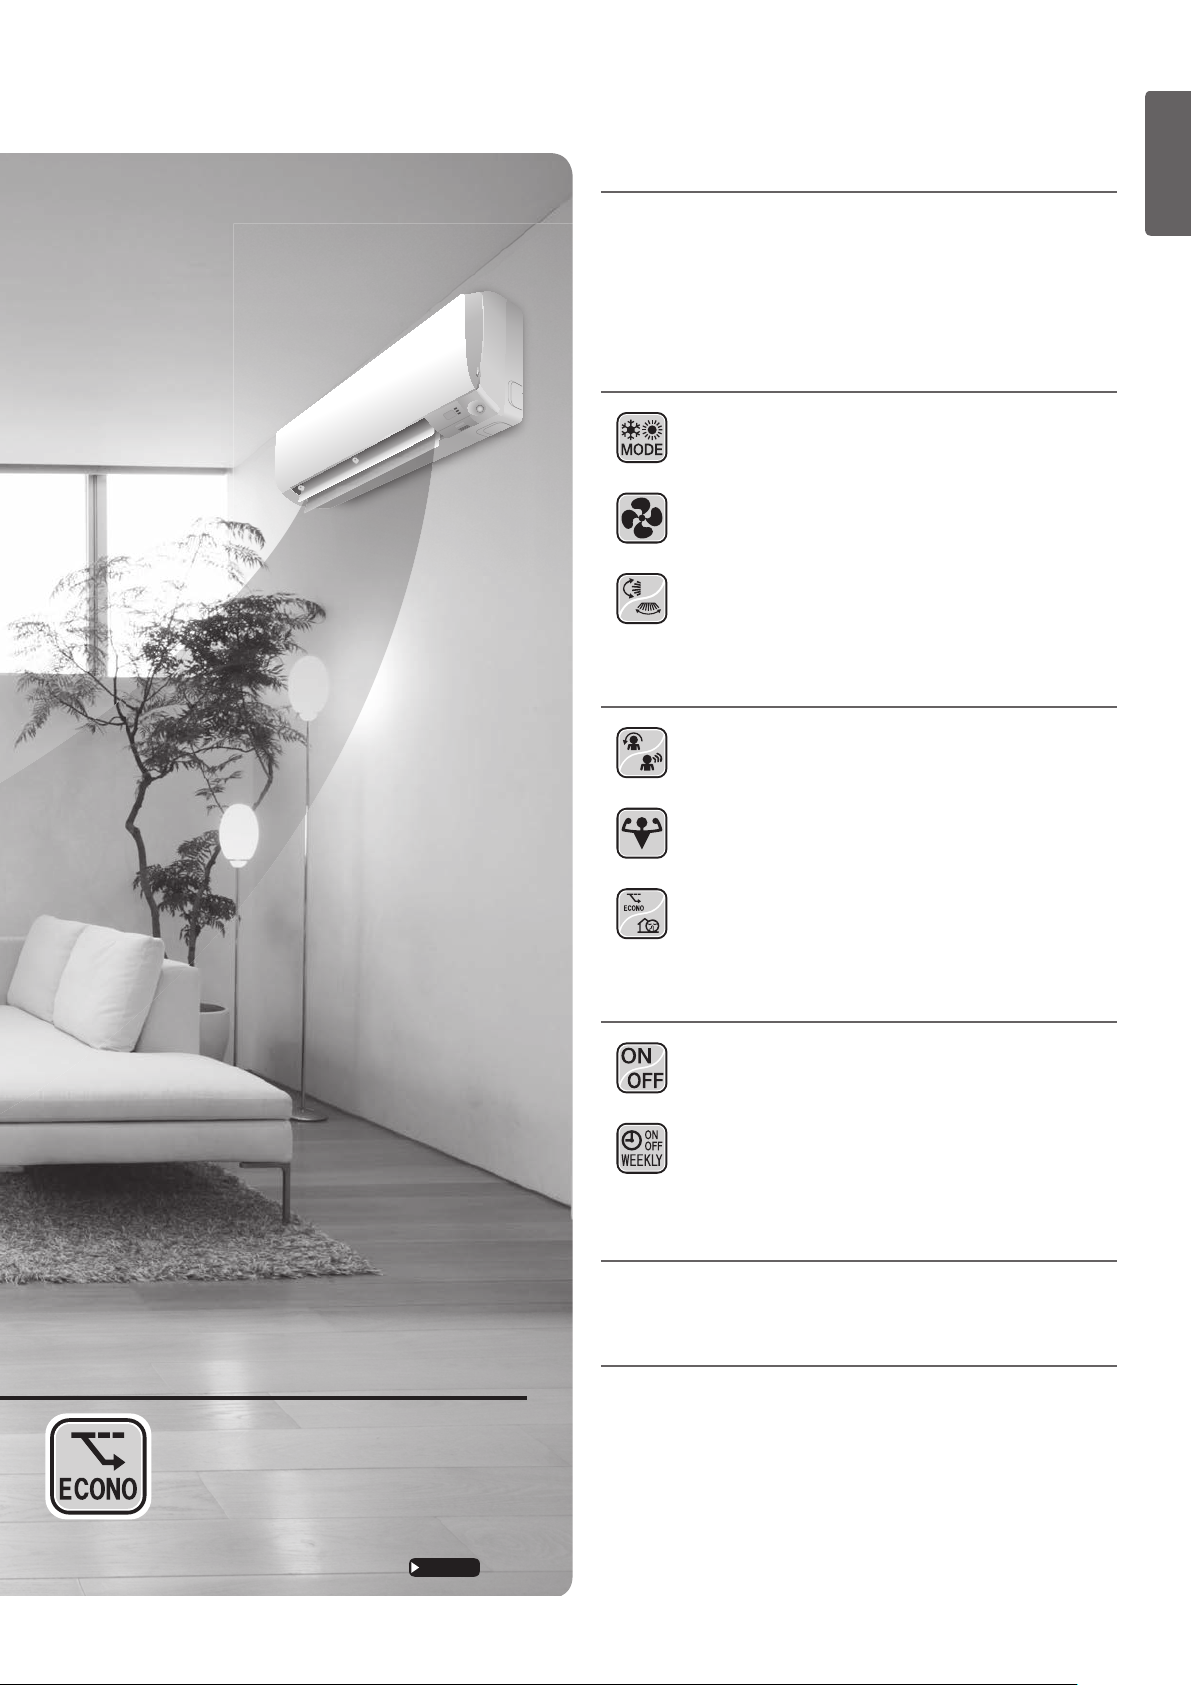
Features
Enhanced comfort and energy
savings
INTELLIGENT EYE
The INTELLIGENT EYE sensor detects human movement in a
room. If no one is in the room for more than 20minutes, the
operation automatically changes to energy saving operation.
Page 15
WEEKLY TIMER
Up to 4timer settings can be saved for each day of the week
according to your family’s life style. The WEEKLY TIMER allows
you to set on/off times and the desired temperature.
Page 21
Other functions
COMFORT AIRFLOW OUTDOOR UNIT QUIET ECONO
The air ow direction is upward while in
COOL and DRY operation, and
downward while in HEAT operation. This
function prevents cold or warm air from
blowing directly on your body.
1
Page 15
OUTDOOR UNIT QUIET operation
assures a low noise level of the
outdoor unit. This function is useful
to maintain a quiet neighborhood.
Page 18
English
Contents
Read Before Operation
Safety Considerations ..................................... 3
Names of Parts ............................................... 5
Preparation Before Operation ......................... 9
Basic Operation
AUTO · DRY · COOL · HEAT · FAN
Operation ........................................... 11
Adjusting the Airflow Rate .................. 13
Adjusting the Airflow Direction ........... 14
Useful Functions
COMFORT AIRFLOW /
INTELLIGENT EYE Operation ...........15
POWERFUL Operation ......................17
ECONO / OUTDOOR UNIT QUIET
Operation ........................................... 18
TIMER Operation
ON/OFF TIMER Operation ................19
WEEKLY TIMER Operation ................21
Care
This function enables ef cient operation by
limiting the maximum power consumption.
It is useful when using the air conditioner
and other electrical devices simultaneously
on a shared electrical circuit.
Page 18
Care and Cleaning ....................................... 27
When the Need Arises
FAQ .............................................................. 32
Troubleshooting ........................................... 33
2
Read Before Operation
Safety Considerations
Read these Safety Considerations for Operations carefully
before operating an air conditioner or heat pump.
Make sure that the unit operates properly during the startup
operation. Instruct the user on how to operate and maintain
the unit.
Inform users that they should store this operation manual
with the installation manual for future reference.
Meanings of DANGER, WARNING, CAUTION, and NOTE
Symbols:
DANGER
WARNING
CAUTION
NOTE
• Do not install the unit in an area where ammable
materials are present due to risk of explosion resulting in
serious injury or death.
• Any abnormalities in the operation of the air conditioner
or heat pump, such as smoke or re, could result in
severe injury or death. Turn off the power and contact
your dealer immediately.
• Refrigerant gas may produce toxic gas if it comes into
contact with re, such as from a fan heater, stove, or
cooking device. Exposure to this gas could cause severe
injury or death.
• For refrigerant leakage, consult your dealer.
Refrigerant gas is heavier than air and replaces oxygen.
A massive leak could lead to oxygen depletion, especially
in basements, and an asphyxiation hazard could occur
leading to serious injury or death.
• If equipment utilizing a burner is used in the same room
as the air conditioner or heat pump, there is the danger
of oxygen deciency which could lead to an asphyxiation
hazard resulting in serious injury or death. Be sure to
ventilate the room sufciently to avoid this hazard.
• Safely dispose of the packing materials. Packing
materials, such as nails and other metal or wooden parts,
may cause stabs or other injuries.
• Tear apart and throw away plastic packaging bags so
that children will not play with them. Children playing with
plastic bags face the danger of death by suffocation.
�����������
���������
����������
����������������
DANGER
Indicates an imminently hazardous
situation which, if not avoided, will
result in death or serious injury.
Indicates a potentially hazardous
situation which, if not avoided,
could result in death or serious
injury.
Indicates a potentially hazardous
situation which, if not avoided, may
result in minor or moderate injury.
It may also be used to alert against
unsafe practices.
Indicates situations that may result
in equipment or property-damage
accidents only.
WARNING
• Contact your dealer for repair and maintenance.
Improper repair and maintenance may result in water
leakage, electric shock, and re. Only use accessories
made by Daikin that are specically designed for use with
the equipment and have them installed by a professional.
• Contact your dealer to move and reinstall the air
conditioner or heat pump. Incomplete installation may
result in water leakage, electric shock, and re.
• Never let the indoor unit or the remote controller get wet.
Water can cause an electric shock or a re.
• Never use ammable spray such as hair spray, lacquer,
or paint near the unit. Flammable spray may cause a re.
• When a fuse blows out, never replace it with one of
incorrect ampere ratings or different wires. Always replace
any blown fuse with a fuse of the same specication.
• Never remove the fan guard of the unit. A fan rotating at
high speed without the fan guard is very dangerous.
• Never inspect or service the unit by yourself. Contact a
qualied service person to perform this work.
• Turn off all electrical power before doing any maintenance
to avoid the risk of serious electric shock; never sprinkle
or spill water or liquids on the unit.
• Do not touch the switch with wet ngers. Touching a
switch with wet ngers can cause electric shock.
• Do not allow children to play on or around the unit to
prevent injury.
The heat exchanger ns are sharp enough to cut. To avoid
•
injury wear gloves or cover the ns while working around them.
•
Do not put a nger or other objects into the air inlet or air
outlet. The fan is rotating at high speed and will cause injury.
• Check the unit foundation for damage on a continuous
basis, especially if it has been in use for a long time. If left
in a damaged condition the unit may fall and cause injury.
• Placing a ower vase or other containers with water or
other liquids on the unit could cause a shock or re if a
spill occurs.
• Do not touch the air outlet or horizontal blades while
the swing ap is in operation because ngers could get
caught and injured.
• Never touch the internal parts of the controller. Do not
remove the front panel because some parts inside are
dangerous to touch. To check and adjust internal parts,
contact your dealer.
CAUTION
• Do not use the air conditioner or heat pump for any other
purposes other than comfort cooling or heating.
Do not use the unit for cooling precision instruments,
food, plants, animals or works of art.
3

English
Read Before Operation
• Do not place items under the indoor unit as they may be
damaged by condensates that may form if the humidity is
above 80% or if the drain outlet gets blocked.
• Before cleaning, stop the operation of the unit by turning
the power off or by pulling the supply cord out from its
receptacle. Otherwise, an electric shock and injury may
result.
• Do not wash the air conditioner or heat pump with
excessive water. An electric shock or re may result.
• Avoid placing the controller in a spot splashed with water.
Water entering the controller may cause an electric shock
or damage the internal electronic parts.
• Do not operate the air conditioner or heat pump when
using a room-fumigation type of insecticide.
Failure to observe this could cause the chemicals to be
deposited in the unit and can endanger the health of
those who are hypersensitive to chemicals.
• Do not turn off the power immediately after stopping
operation. Always wait for at least 5 minutes before
turning off the power. Otherwise, water leakage may
occur.
• The appliance is not intended for use by young children
or inrm persons without supervision.
• The remote controller should be kept away from children
so they cannot play with it.
• Consult with the installation contractor for cleaning.
• Incorrect cleaning of the inside of the air conditioner
or heat pump could make the plastics parts break and
cause water leakage or electric shock.
Do not touch the air inlet or aluminum n of the air
•
conditioner or heat pump as they can cut and cause injury.
•
Do not place objects in direct proximity of the outdoor unit.
Do not let leaves and other debris accumulate around
the unit. Leaves are a hotbed for small animals which can
enter the unit. Once inside the unit, animals can cause
the unit to malfunction, and cause smoke or re when
they make contact with electrical parts.
• Never press the button of the remote controller with
a hard, pointed object. The remote controller may be
damaged.
• Never pull or twist the electric wire of the remote
controller. It may cause the unit to malfunction.
• Do not place appliances that produce open ames in
places that are exposed to the airow of the unit or under
the indoor unit. It may cause incomplete combustion or
deformation of the unit due to the heat.
• Do not expose the controller to direct sunlight. The LCD
display can become discolored and may fail to display the
data.
NOTE
• Do not wipe the controller operation panel with benzene,
thinner, chemical dust cloth, etc. The panel may get
discolored or the coating can peel off. If it is heavily dirty,
soak a cloth in water-diluted neutral detergent, squeeze it
well and wipe the panel clean. Then wipe it with another
dry cloth.
• Dismantling of the unit, disposal of the refrigerant, oil, and
additional parts, should be done in accordance with the
relevant local, state, and national regulations.
Operate the air conditioner or heat pump in a sufciently
•
ventilated area and not surrounded by obstacles. Do not
use the air conditioner or heat pump in the following places.
a. Places with a mist of mineral oil, such as cutting oil.
b. Locations such as coastal areas where there is a lot
of salt in the air.
c. Locations such as hot springs where there is a lot of
sulfur in the air.
d. Locations such as factories where the power voltage
varies a lot.
e. In cars, boats, and other vehicles.
f. Locations such as kitchens where oil may splatter or
where there is steam in the air.
g. Locations where equipment produces
electromagnetic waves.
h. Places with an acid or alkaline mist.
i. Places where fallen leaves can accumulate or where
weeds can grow.
• Take snow protection measures. Contact your dealer for
the details of snow protection measures, such as the use
of a snow protection hood.
• Do not attempt to do electrical work or grounding work
unless you are licensed to do so. Consult with your dealer
for electrical work and grounding work.
• Pay attention to operating sound. Be sure to use the
following places:
a. Places that can sufciently withstand the weight of
the air conditioner or heat pump yet can suppress the
operating sound and vibration.
b.
Places where warm air from the air outlet of the
outdoor unit or the operating sound of the outdoor unit
does not annoy neighbors.
• Make sure that there are no obstacles close to the
outdoor unit. Obstacles close to the outdoor unit may
drop the performance of the outdoor unit or increase the
operating sound of the outdoor unit.
• Consult your dealer if the air conditioner or heat pump in
operation generates unusual noise.
• Make sure that the drainpipe is installed properly to drain
water. If no water is discharged from the drainpipe while
the air conditioner or heat pump is in the cooling mode,
the drainpipe may be clogged with dust or dirt and water
leakage from the indoor unit may occur. Stop operating
the air conditioner or heat pump and contact your dealer.
FTP001-U
4
Read Before Operation
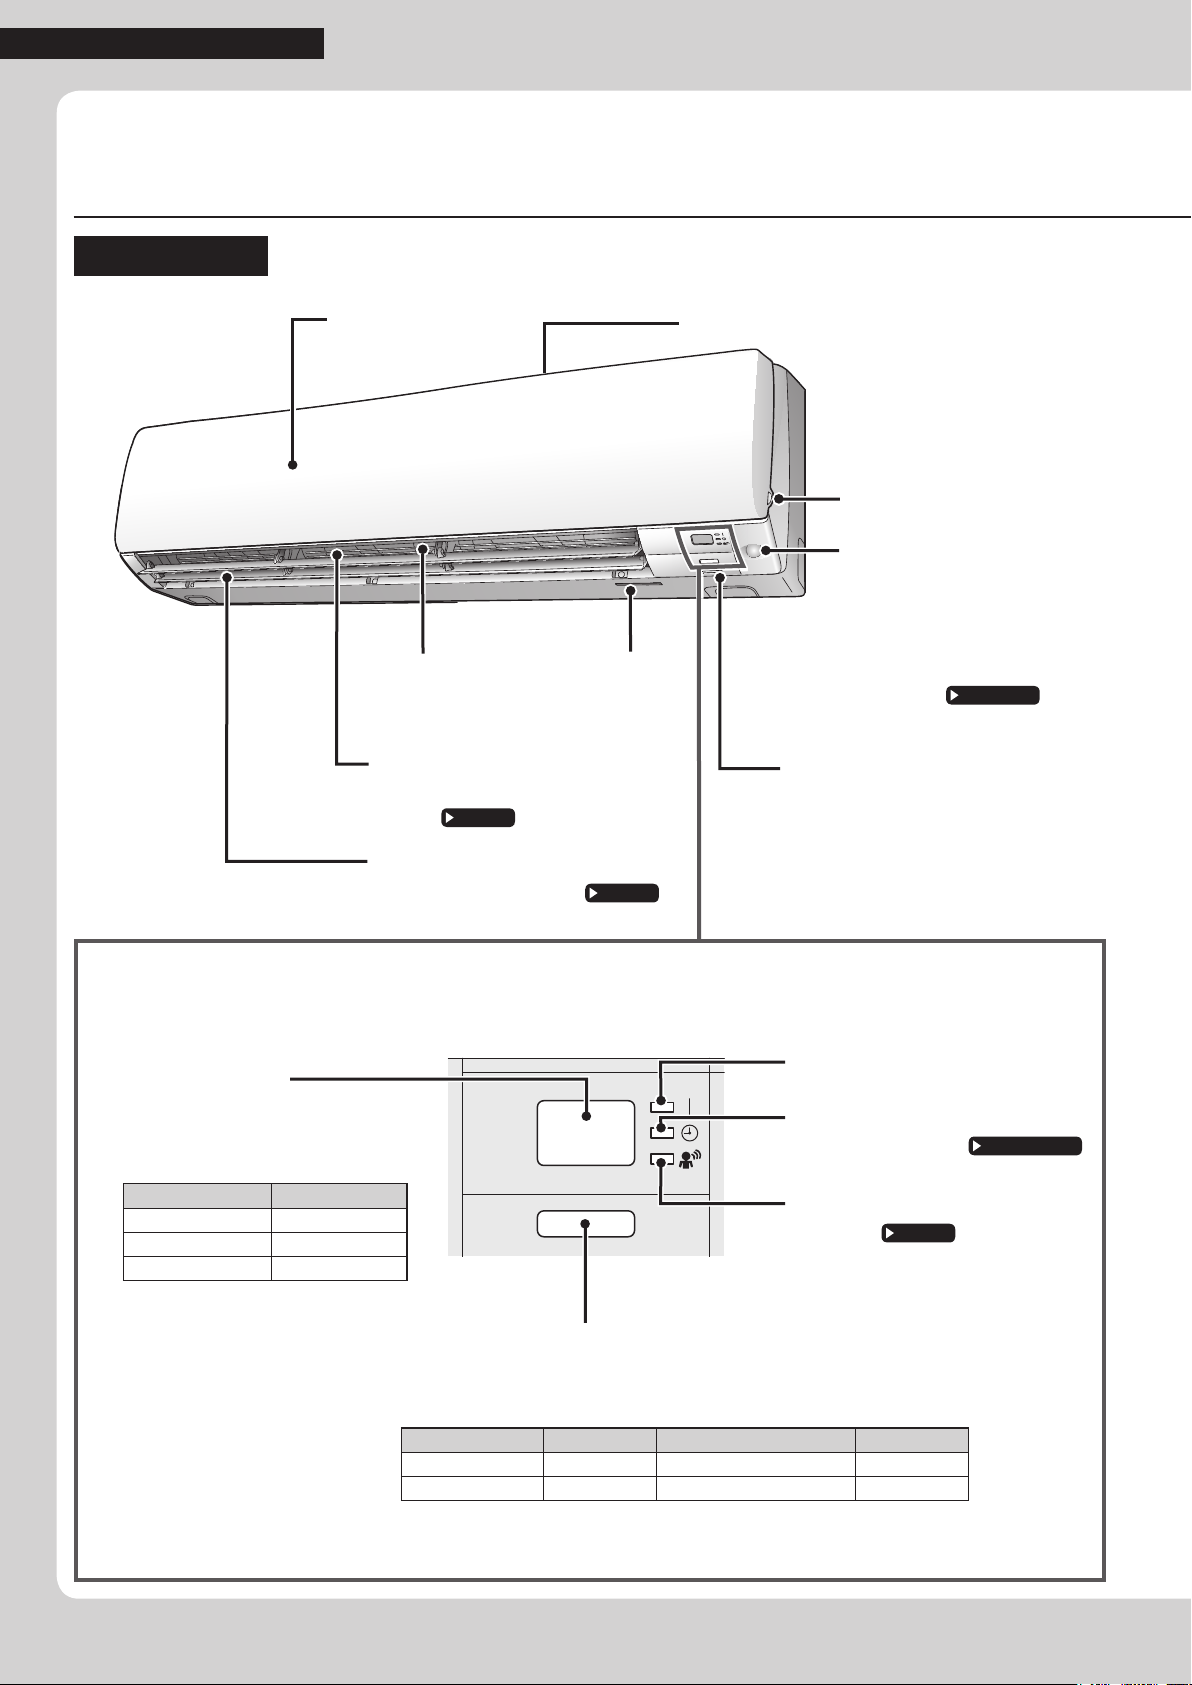
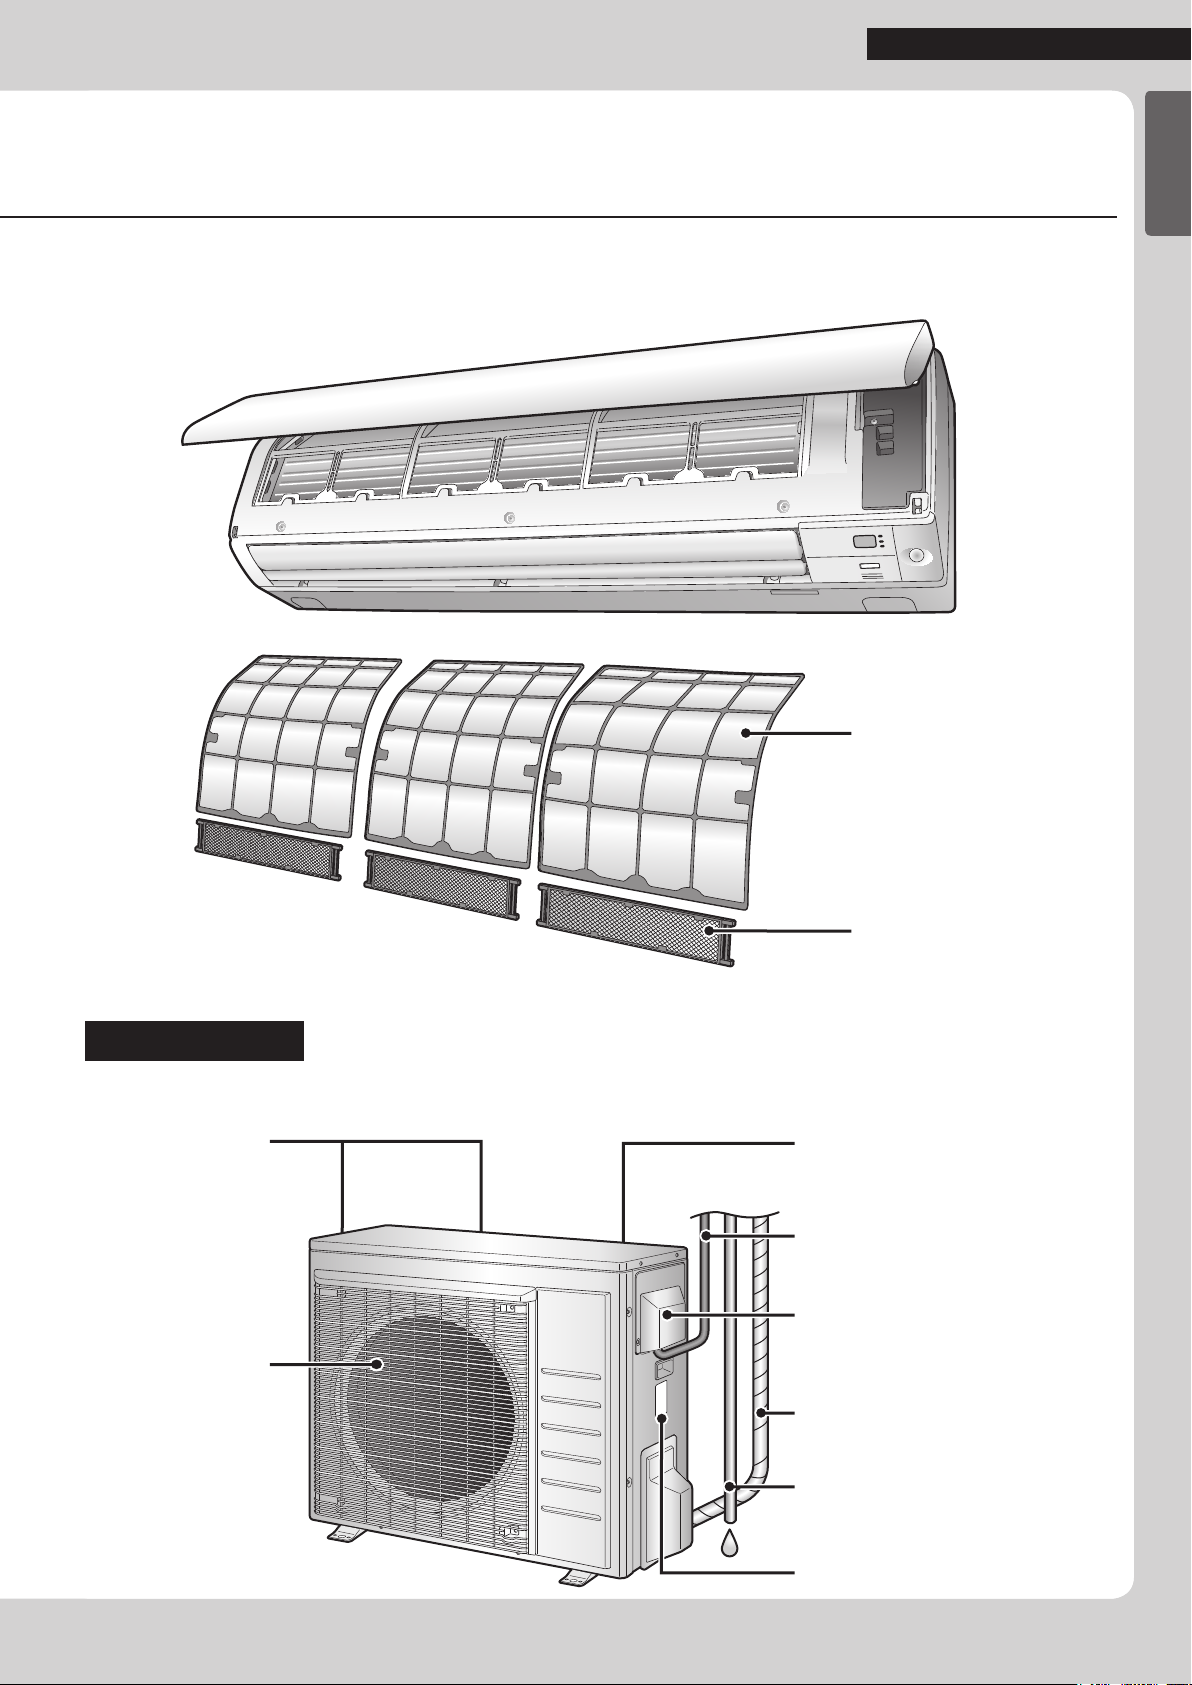
Names of Parts
Indoor Unit
Front panel
Air outlet
Model name
Louvers (vertical blades)
• The louvers are inside of the air
outlet.
Page 14
Flaps (horizontal blades)
Page 14
Air inlet
Panel tab
INTELLIGENT EYE
sensor
• Detects the movements of
people and automatically
switches between normal
operation and energy saving
operation.
Page 15,16
Indoor temperature
sensor
• Detects the air temperature
around the unit.
Signal receiver
• Receives signals from the remote
controller.
• When the unit receives a signal, you
will hear a beep sound.
Case Sound type
Operation start beep-beep
Setting changed beep
Operation stop long beep
Indoor unit ON/OFF switch
• Press this switch once to start operation.
• For the operation mode setting, refer to the following table.
• This switch can be used when the remote controller is missing.
Display
OPERATION lamp (green)
TIMER lamp (orange)
INTELLIGENT EYE lamp
(green)
Press once again to stop it.
Model Mode Temperature setting Air ow rate
HEAT PUMP AUTO 77°F (25°C) AUTO
COOLING ONLY COOL 72°F (22°C) AUTO
Page 15
Page 19,20,23
5
English
Open the front panel
Read Before Operation
Outdoor Unit
Air inlet
(back and side)
Air lter
Titanium apatite
photocatalytic
air-purifying lter
Outdoor temperature
sensor (back)
Inter-unit wire
Ground terminals
(inside)
Air outlet
Refrigerant pipes
Drain hose
Model name
6
Read Before Operation
Names of Parts
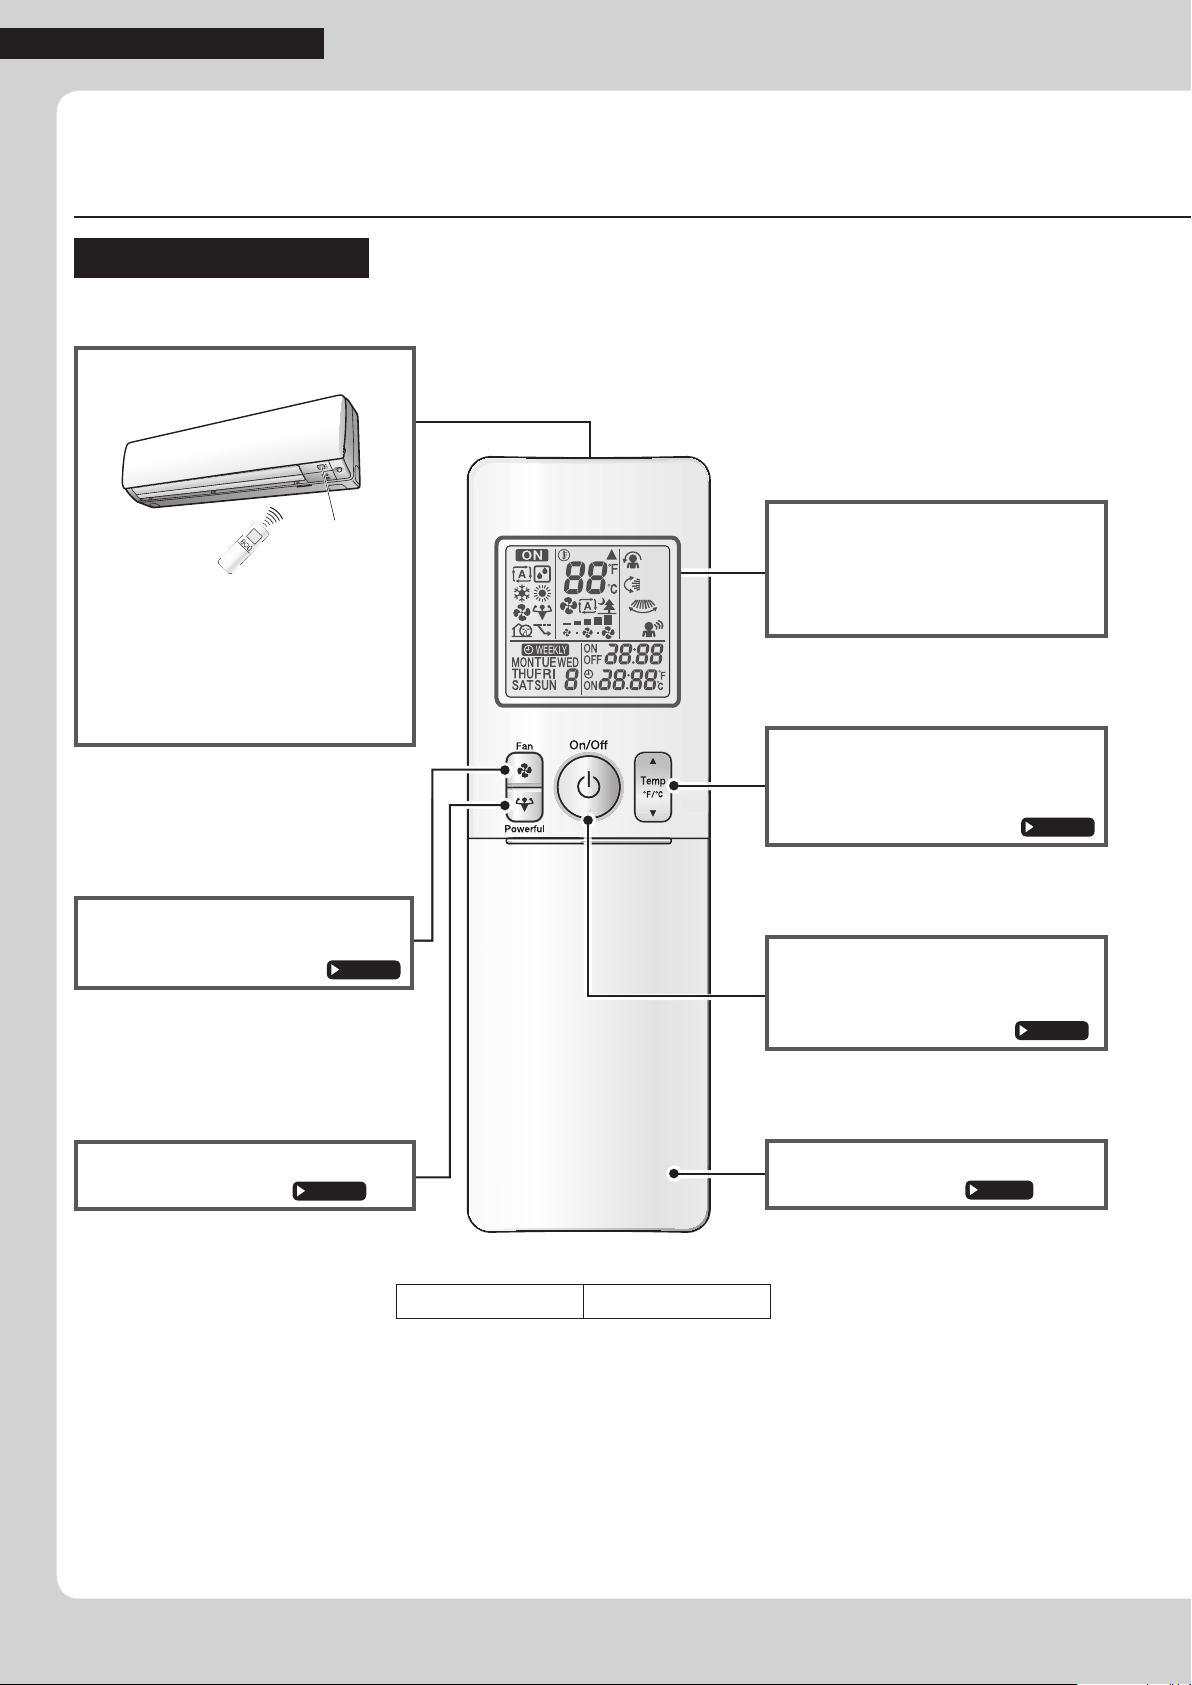
Remote Controller
Signal transmitter
Receiver
•
To use the remote controller, aim the
transmitter at the indoor unit. If there is
anything blocking the signals between
the unit and the remote controller, such
as a curtain, the unit may not operate.
•
The maximum transmission distance is
about 23ft (7m).
FAN setting button
• Selects the air ow rate setting.
Page 13
Display (LCD)
• Displays the current settings.
(In this illustration, each section is
shown with all its displays on for the
purpose of explanation.)
TEMPERATURE
adjustment button
• Changes the temperature setting.
Page 12
ON/OFF button
• Press this button once to start
operation.
Press once again to stop it.
Page 11
POWERFUL button
• POWERFUL operation.
7
Page 17
Model ARC466A37
Front cover
• Open the front cover.
Page 8

English
Open the front cover
COMFORT/SENSOR
button
• COMFORT AIRFLOW /
INTELLIGENT EYE
operation.
Page 15
MODE selector button
• Selects the operation mode.
(AUTO/DRY/COOL/HEAT/
Page 11
FAN)
Read Before Operation
ECONO/QUIET button
• ECONO/OUTDOOR UNIT
QUIET operation.
Page 18
SWING button
•
Adjusts the air ow direction
Page 14
.
OFF TIMER button
(NIGHT SET mode)
Page 20
TIMER CANCEL
button
• Cancels the timer setting.
• Cannot be used for the
WEEKLY TIMER operation.
Page 19,20
SELECT button
• Changes the clock, ON/OFF
TIMER and WEEKLY TIMER
settings.
: WEEKLY button
: PROGRAM button
: COPY button
: BACK button
: NEXT button
• WEEKLY TIMER operation.
Page 21
ON TIMER button
CLOCK button
Page 19
Page 10
8
Read Before Operation
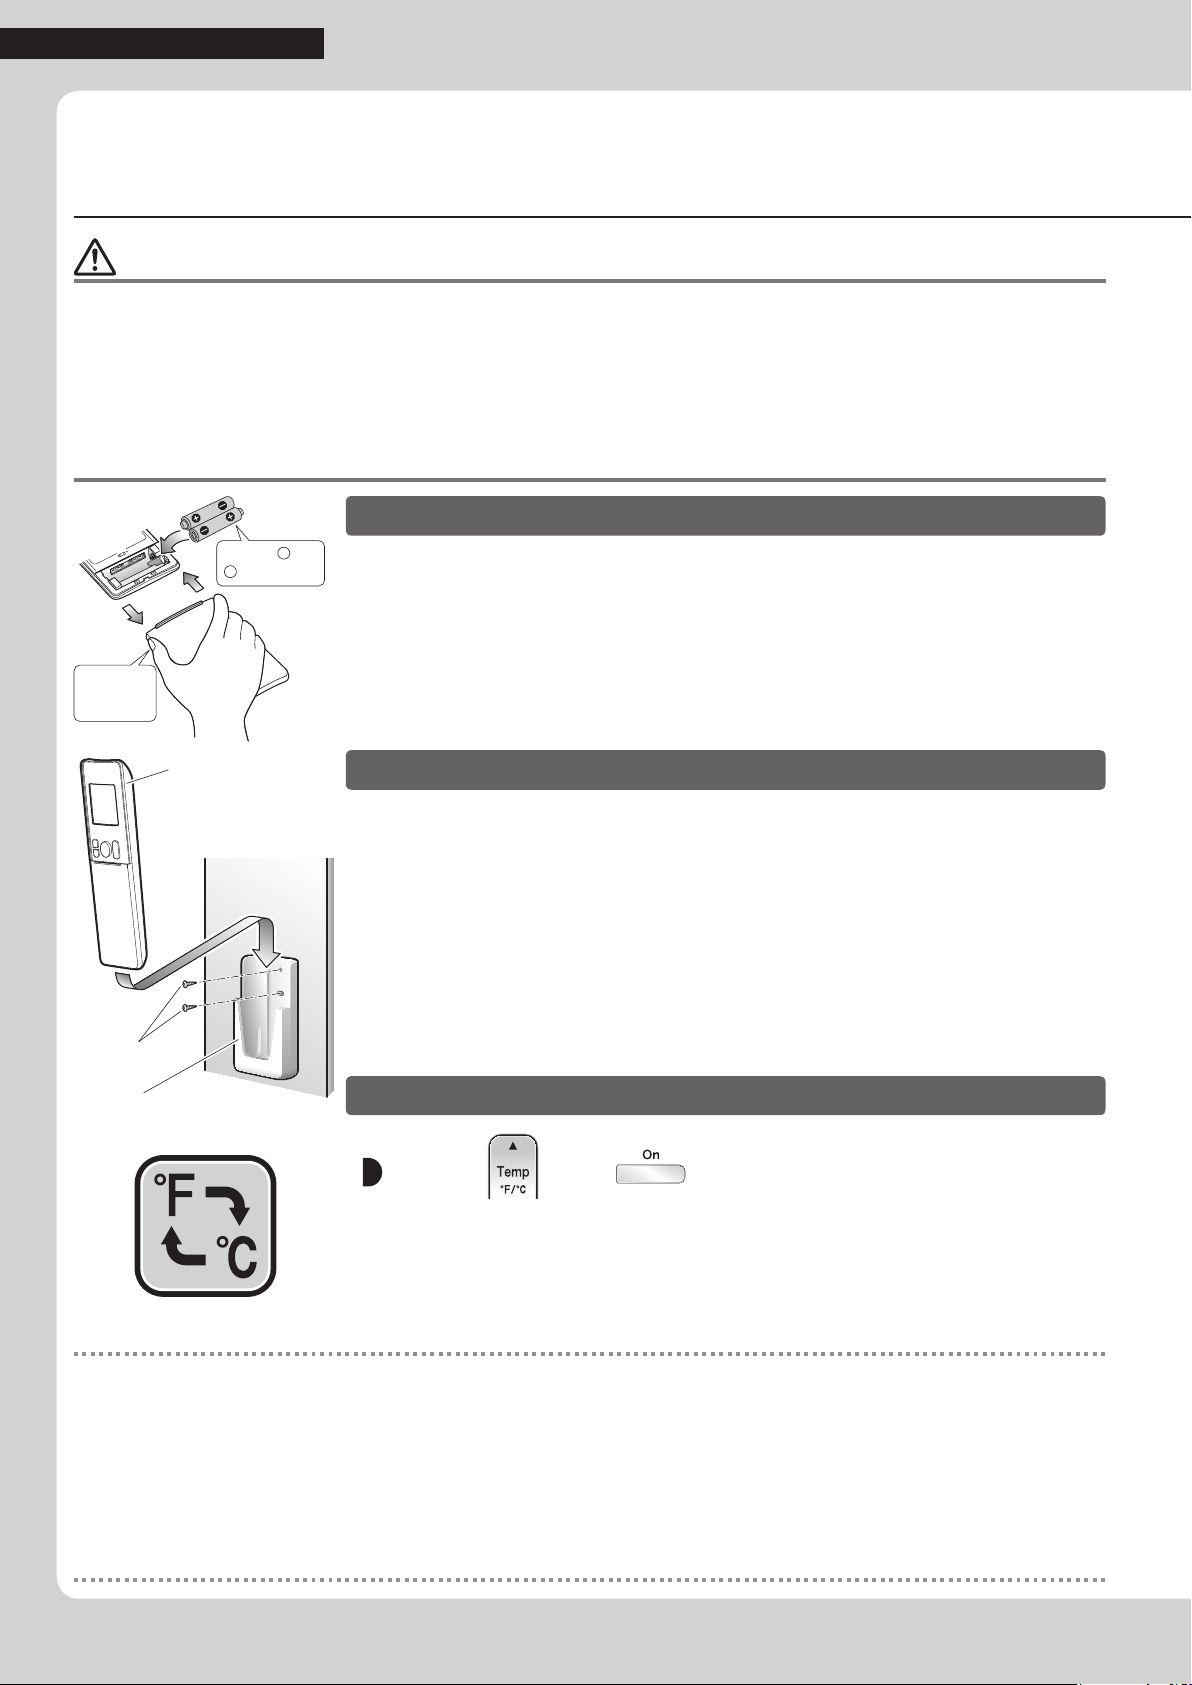
To insert the batteries
To attach the remote controller holder to a wall
Preparation Before Operation
CAUTION
Incorrect handling of batteries can result in injury from battery leakage, rupturing or heating, or lead to equipment failure�
Please observe the following precautions and use safely�
• If the alkaline solution from the batteries should get in the eyes, do not rub the eyes. Instead, immediately ush the eyes with tap water and
seek the attention of a medical professional.
• Keep batteries out of reach of children. In the event that batteries are swallowed, seek the immediate attention of a medical professional.
• Do not expose batteries to heat or re. Do not disassemble or modify batteries. The insulation or gas release vent inside the battery may be
damaged, resulting in battery leakage, rupturing, or heating.
• Do not damage or peel off labels on the batteries.
2
+
Position and
correctly!
–
3
1
1. Slide the front cover to take it off�
2. Insert 2dry batteries AAA.LR03 (alkaline).
Grip both
sides of the
front cover.
Remote controller
3. Replace the front cover�
1.
Choose a place where the signals reach the unit�
2.
Attach the holder to a wall, a pillar, or similar
location with the screws supplied with the holder�
3. Place the remote controller in the remote
Screws
Remote
controller holder
NOTE
Notes on batteries
• To avoid possible injury or damage from battery leakage or rupturing, remove the batteries when not using the product for long periods of time.
• The standard replacement time is about 1 year. Both batteries should be replaced at the same time. Be sure to replace them with new size AAA.
LR03 (alkaline) batteries.
However, if the remote controller display begins to fade and the possible transmission range becomes shorter within a year, replace both
batteries as speci ed above.
• The batteries supplied with the remote controller are for initial operation. The batteries may run out in less than 1 year.
controller holder�
Fahrenheit/Celsius display switch
Press and (TIMER button)
simultaneously for about 5seconds.
• The temperature will be displayed in Celsius when it is presently displayed in
Fahrenheit, and vice versa.
• The switch operation is only possible when the temperature is being displayed.
Note on remote controller
• Do not drop the remote controller. Do not get it wet.
9
English
Read Before Operation
Turn on the circuit breaker
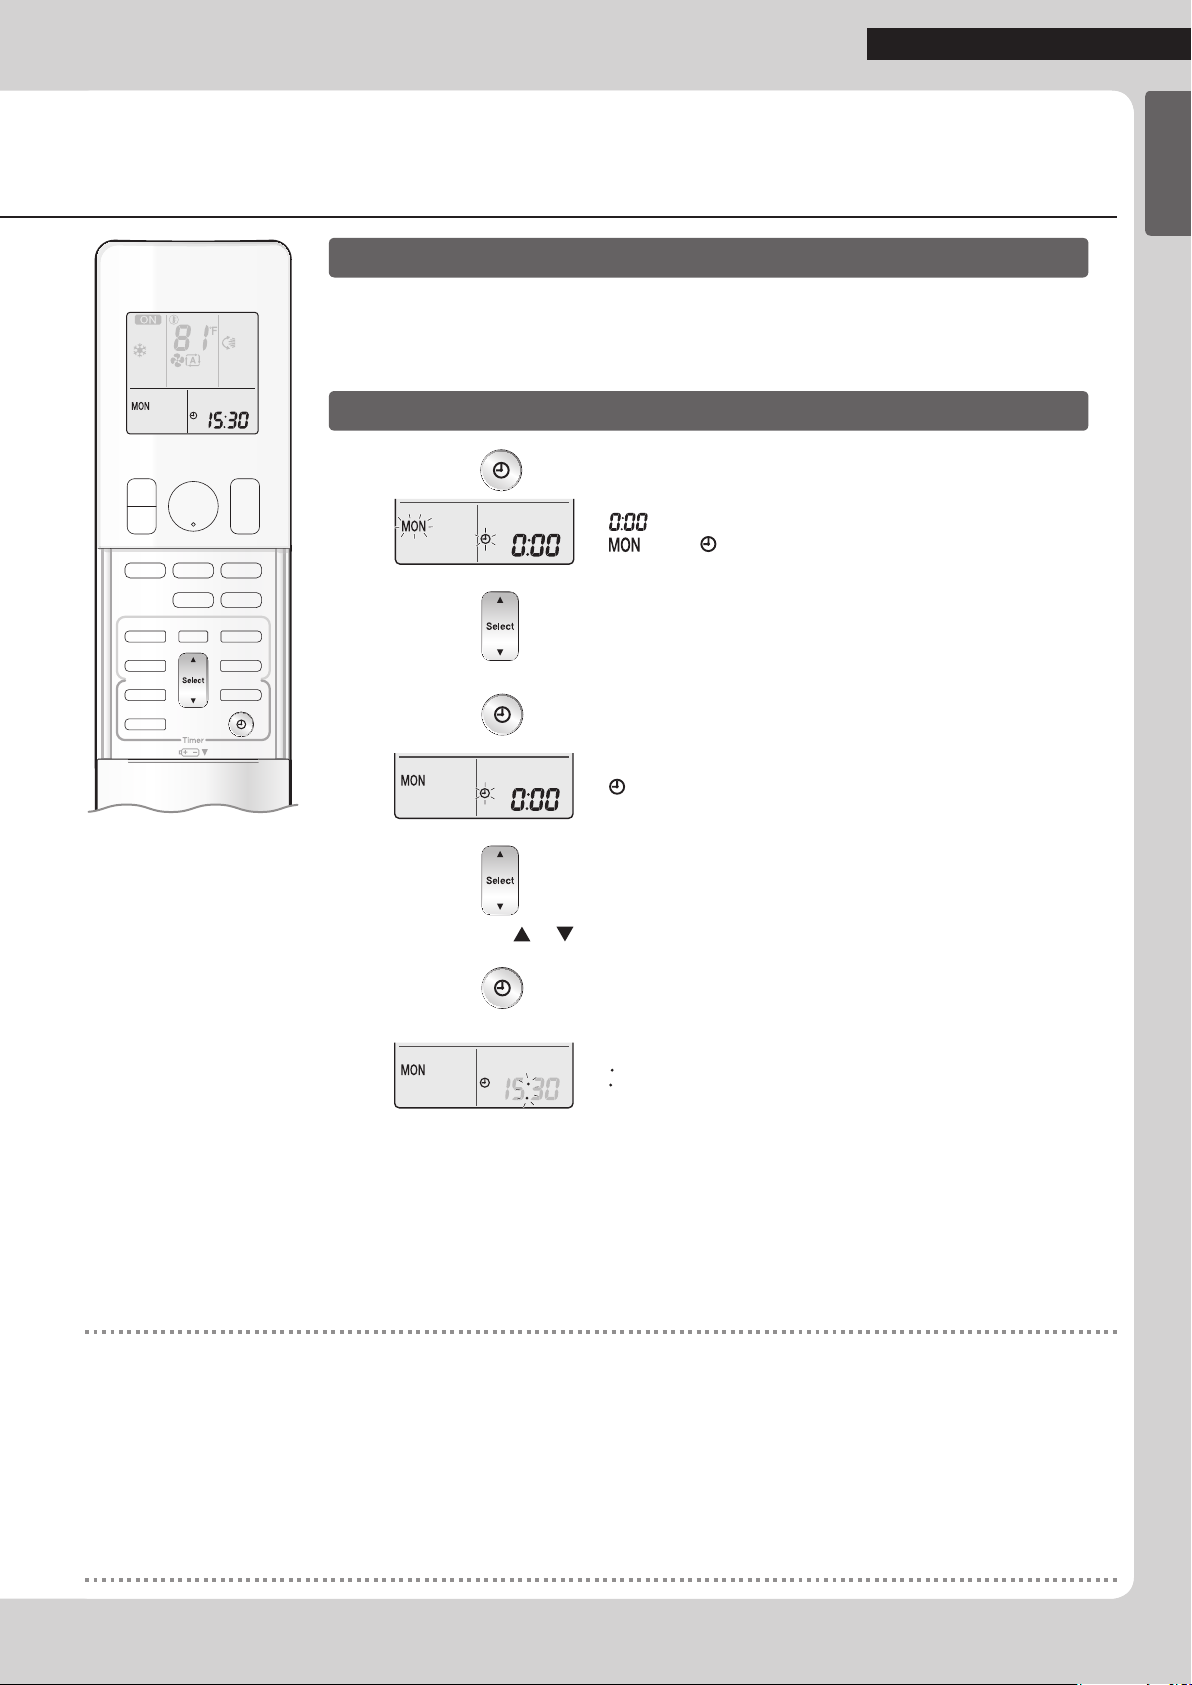
To set the clock
• After the power is turned on, the aps of the indoor unit open and close once to set the
reference position.
1. Press �
“ ” is displayed on the LCD.
“
” and “ ” blink.
2. Press to set the current day of the week�
3. Press �
“ ” blinks.
4. Press to set the clock to the present time�
• Holding down or rapidly increases or decreases the displayed time.
5. Press �
• Point the remote controller at the indoor unit when pressing the buttons.
“ ” blinks.
NOTE
Fahrenheit/Celsius display change function of remote controller
• The set temperature may increase when the display is changed to Celsius from Fahrenheit, because a fraction of 0.5°C is rounded up.
• Example: A set temperature of 65°F (equivalent to 18.5°C) will be converted into 19°C.
When the display is changed to Fahrenheit again, the set temperature will be converted into 66°F (equivalent to 19°C) instead of the
original set temperature (65°F) but a set temperature of 66°F (equivalent to 19°C) will be converted into 19°C with no temperature
change.
• A reception sound will go off for the transmission of set temperature to the indoor unit at the time of setting the Fahrenheit/Celsius display
change function.
Note on setting the clock
• If the indoor unit’s internal clock is not set to the correct time, the ON/OFF TIMER and WEEKLY TIMER will not operate punctually.
10

Basic Operation
To start operation
To stop operation
AUTO · DRY · COOL · HEAT · FAN Operation
The air conditioner operates with the operation mode of your choice.
From the next time on, the air conditioner will operate with the same operation
mode.
1. Press and select an operation mode�
• Each pressing of the button changes the mode setting in sequence.
HEAT PUMP
model
AUTO DRY COOL HEAT FAN
COOLING ONLY
model
2. Press �
• “ ” is displayed on the LCD.
• The OPERATION lamp lights green.
Display
Press again�
• “ ” disappears from the LCD.
• The OPERATION lamp goes off.
DRY COOL FAN
NOTE
Notes on AUTO operation
• In AUTO operation, the system selects an appropriate operation mode (COOL or HEAT) based on the indoor temperature and starts the
operation.
• The system automatically reselects setting at a regular interval to bring the indoor temperature to the user-setting level.
Note on DRY operation
• Eliminates humidity while maintaining the indoor temperature as much as possible. It automatically controls temperature and air ow rate, so
manual adjustment of these functions is unavailable.
11
 Loading...