

Daikin EKSV21P, EKSV26P, EKSH26P Installation manuals
Planning and installation
instructions
DAIKIN DrainBack solar system
EKSV21P
EKSV26P
EKSH26P
Solar assembly packages
Planning and installation instructions
DAIKIN DrainBack solar system
English
Table of contents
1 General information. . . . . . . . . . . . . . . . . . . . 3
1.1 Refer to the manual . . . . . . . . . . . . . . . . . . . . . . . 3
2 Safety . . . . . . . . . . . . . . . . . . . . . . . . . . . . . . . 4
2.1 Warning signs and explanation of symbols . . . . . 4
2.1.1 Meaning of the warnings. . . . . . . . . . . . . . . . . . . . . .4
2.1.2 Handling instructions. . . . . . . . . . . . . . . . . . . . . . . . .4
2.2 Avoiding danger . . . . . . . . . . . . . . . . . . . . . . . . . . 4
2.3 Use as intended . . . . . . . . . . . . . . . . . . . . . . . . . . 4
2.4 Instructions for operating safety. . . . . . . . . . . . . . 5
2.4.1 Working on the roof. . . . . . . . . . . . . . . . . . . . . . . . . .5
2.4.2 Before working on the heating system . . . . . . . . . . .5
2.4.3 Electrical installation . . . . . . . . . . . . . . . . . . . . . . . . .5
2.4.4 Installation room, water quality, heating and sanitary
connection. . . . . . . . . . . . . . . . . . . . . . . . . . . . . . . . .5
2.4.5 Instruct the owner . . . . . . . . . . . . . . . . . . . . . . . . . . .5
2.4.6 Relevant national regulations . . . . . . . . . . . . . . . . . .5
3 Product description. . . . . . . . . . . . . . . . . . . . 6
3.1 Construction and components of the Solar system
(unpressurised system) . . . . . . . . . . . . . . . . . . . . 6
3.2 Brief description . . . . . . . . . . . . . . . . . . . . . . . . . . 7
3.3 System components for pressure-less systems. . 7
3.3.1 System components for all systems . . . . . . . . . . . . .7
3.3.2 System components for roof-mounted systems
(ADM) . . . . . . . . . . . . . . . . . . . . . . . . . . . . . . . . . . . .9
3.3.3 System components for in-roof systems (IDM). . . .11
3.3.4 System components for flat roof systems (FDM) . .13
4 Installation . . . . . . . . . . . . . . . . . . . . . . . . . . 16
4.1 Transport and storage . . . . . . . . . . . . . . . . . . . .16
4.1.1 Transport. . . . . . . . . . . . . . . . . . . . . . . . . . . . . . . . .16
4.1.2 Storage . . . . . . . . . . . . . . . . . . . . . . . . . . . . . . . . . .16
4.2 System layouts. . . . . . . . . . . . . . . . . . . . . . . . . . 17
4.2.1 Parallel connection . . . . . . . . . . . . . . . . . . . . . . . . .17
4.2.2 Series connection . . . . . . . . . . . . . . . . . . . . . . . . . .17
4.3 Laying the connecting pipe . . . . . . . . . . . . . . . . 18
4.4 Mounting the flat solar panels . . . . . . . . . . . . . . 20
4.5 Connecting the pressure-less Solar system
hydraulically . . . . . . . . . . . . . . . . . . . . . . . . . . . . 23
4.6 Installing the equipotential bonding terminal . . . 24
4.7 Installing the solar panel temperature sensor . . 24
5 Start-up and taking out of operation . . . . . 25
5.1 Start-up . . . . . . . . . . . . . . . . . . . . . . . . . . . . . . . 25
5.2 Taking out of operation . . . . . . . . . . . . . . . . . . .25
5.2.1 Temporary shutdown . . . . . . . . . . . . . . . . . . . . . . .25
5.2.2 Final shutdown . . . . . . . . . . . . . . . . . . . . . . . . . . . .25
6 Technical data . . . . . . . . . . . . . . . . . . . . . . . 27
6.1 Product fiche . . . . . . . . . . . . . . . . . . . . . . . . . . . 27
6.2 General technical information . . . . . . . . . . . . . . 27
6.3 Roof-mounted system – Max. permissible snow
load (roof-mounted) as per EN 1991-1-3 . . . . . . 28
6.4 Flat roof system – Required ballast weights
(flat roof mounting) as per EN 1991-1-4. . . . . . . 29
6.5 Flat roof system – Shading . . . . . . . . . . . . . . . . 30
7 List of keywords . . . . . . . . . . . . . . . . . . . . . 31
Planning and installation instructions
2
EKSV21P + EKSV26P + EKSH26P
DAIKIN DrainBack solar system
008.1629499_02 – 07/2020 – EN

1 General information
1.1 Refer to the manual
These instructions are a >> translation of the original
version << in your language.
All procedures required for installation, start-up, operation and
adjustment of the system are described in this instruction manual
and associated documents. Detailed information on the connected components of your heating system is given in the relevant manuals.
● Work on the DAIKIN Solar system (such as hydraulic and
electrical connection and initial start-up) is only to be carried
out by persons who are authorised and who have successfully completed qualifying technical or vocational training in
the respective activity and who have taken part in professional advanced training courses recognised by the
competent authority. This especially includes heating
specialists who have experience in the proper installation and
maintenance of heating and solar systems due to their
technical training and specialist knowledge.
● Please read this manual carefully and thoroughly before
proceeding with the installation and initial start-up or modification of the system.
● Comply strictly with warning instructions.
1 x General information
Relevant documents
Documents listed below are part of the technical documentation
of the DAIKIN solar system and therefore must be observed. The
documents are part of the scope of delivery of the respective
components.
– DAIKIN Solar EKSRPS4A: Operating and installation instruc-
tions
– DAIKIN hot water storage tank (EKHWP or Altherma
EHS(X/H)): Operating and installation instructions
– Quick instructions for solar panel assembly and the requisite
assembly materials, which accompany the respective construction kits, for roof-mounted, in-roof and flat roof mounting
When connecting to an external heat generator or storage tank
which is not included in the scope of delivery, the individual associated operating and installation instructions apply.
EKSV21P + EKSV26P + EKSH26P
DAIKIN DrainBack solar system
008.1629499_02 – 07/2020 – EN
Planning and installation instructions
3
2 x Safety
2 Safety
2.1 Warning signs and explanation of
symbols
2.1.1 Meaning of the warnings
Warnings in this manual are classified according
into their severity and probability of occurrence.
DANGER!
Draws attention to imminent danger.
Disregarding this warning can lead to serious
injury or death.
WARNING!
Indicates a potentially dangerous situation.
Disregarding this warning may result in serious
physical injury or death.
2.1.2 Handling instructions
● Handling instructions are shown as a list.
Actions for which the sequential order must be
maintained are numbered.
Results of actions are identified with an
arrow.
2.2 Avoiding danger
DAIKIN solar installations are state-of-the-art
and are built to meet all recognised technical
requirements. However, improper use may result
in serious physical injuries or death, as well as
property damage. To prevent such risks, install
and operate DAIKIN solar installations only:
– as stipulated and in perfect condition,
– with an awareness of safety and the hazards
involved.
This assumes knowledge and use of the contents of this manual, of the relevant accident prevention regulations as well as the recognised
safety-related and occupational health rules.
CAUTION!
Indicates a situation which may cause possible
damage.
Disregarding this warning may cause damage
to property and the environment.
This symbol identifies user tips and particularly useful information, but not warnings or hazards.
Special warning signs
Some types of danger are represented by
special warning symbols.
Electric current
Risk of burning or scalding
Danger of falling
2.3 Use as intended
The DAIKIN solar system may only be used for
solar-supported heating of hot water systems.
The DAIKIN solar system must be installed, connected and operated only according to the instructions in this manual.
Any other use outside the intended use is considered as improper. The operator alone shall
bear responsibility for any resulting damage.
Intended use also includes compliance with the
maintenance and service conditions. Replacement parts must at least satisfy the technical requirements defined by the manufacturer.
This is the case, for example, with original spare
parts.
Danger of falling parts
Planning and installation instructions
4
EKSV21P + EKSV26P + EKSH26P
DAIKIN DrainBack solar system
008.1629499_02 – 07/2020 – EN
2 x Safety
2.4 Instructions for operating safety
2.4.1 Working on the roof
● Installation work on the roof may only be
carried out by authorised and trained persons
(heating technicians, roofers, etc.) in
compliance with the relevant Accident
Prevention Regulations.
● Material and tools must be secured against
falling.
● Barriers must be erected to prevent persons
from entering the area below the roof where
the work is being carried out.
2.4.2 Before working on the heating system
● All work on the heating system (such as installation, connection and initial start-up) may
only be carried out by authorised and trained
heating technicians.
● Switch off the main switch and secure against
being switched on inadvertently when
carrying out any work on the heating system.
2.4.3 Electrical installation
● Electrical installations must only be carried
out by electrical engineers and in compliance
with valid electrical guidelines as well as the
specifications of the responsible energy
supply company (EVU).
● In accordance with IEC 60335-1, connect the
mains via a separator device which exhibits
contact separation in all poles with a contact
opening distance that provides full disconnection in accordance with the conditions of
overvoltage category III and a residual current
circuit breaker (RCD) with a reaction time
≤ 0.2 s.
● Compare the mains voltage (230 V, 50 Hz)
indicated on the nameplate with the supply
voltage before connecting to the mains.
● Before beginning work on live parts,
disconnect them from the power supply
(switch off main switch, remove fuse) and
secure against being switched on again
inadvertently.
● Equipment covers and service panels must be
replaced as soon as the work is completed.
2.4.4 Installation room, water quality, heating
and sanitary connection
The requirements on installing the hot water tank
(EKHWP or Altherma EHS(X/H)), on the water
quality, as well as the heating and sanitary connection are described in detail in the instructions
for the hot water tank. It is essential they are
complied with.
2.4.5 Instruct the owner
● Before you hand over the heating system,
explain to the user/owner how to operate and
check the heating system.
● Document the handover by filling out the
installation and instruction forms together with
the owner and sign them.
2.4.6 Relevant national regulations
● DIN 1055-4: 2005 / EN 1991-1-4 Wind actions
● DIN 1055-5: 2005 / EN 1991-1-3 Snow loads
● DIN 18338 Roofing work
● DIN 18451 Scaffolding work
● DGUV Information 208-016
● DGUV Information 201-054
● DGUV Regulation 112-198
The accident prevention regulations must be
heeded when working on the roof.
EKSV21P + EKSV26P + EKSH26P
DAIKIN DrainBack solar system
008.1629499_02 – 07/2020 – EN
Planning and installation instructions
5
3 x Product description
3 Product description
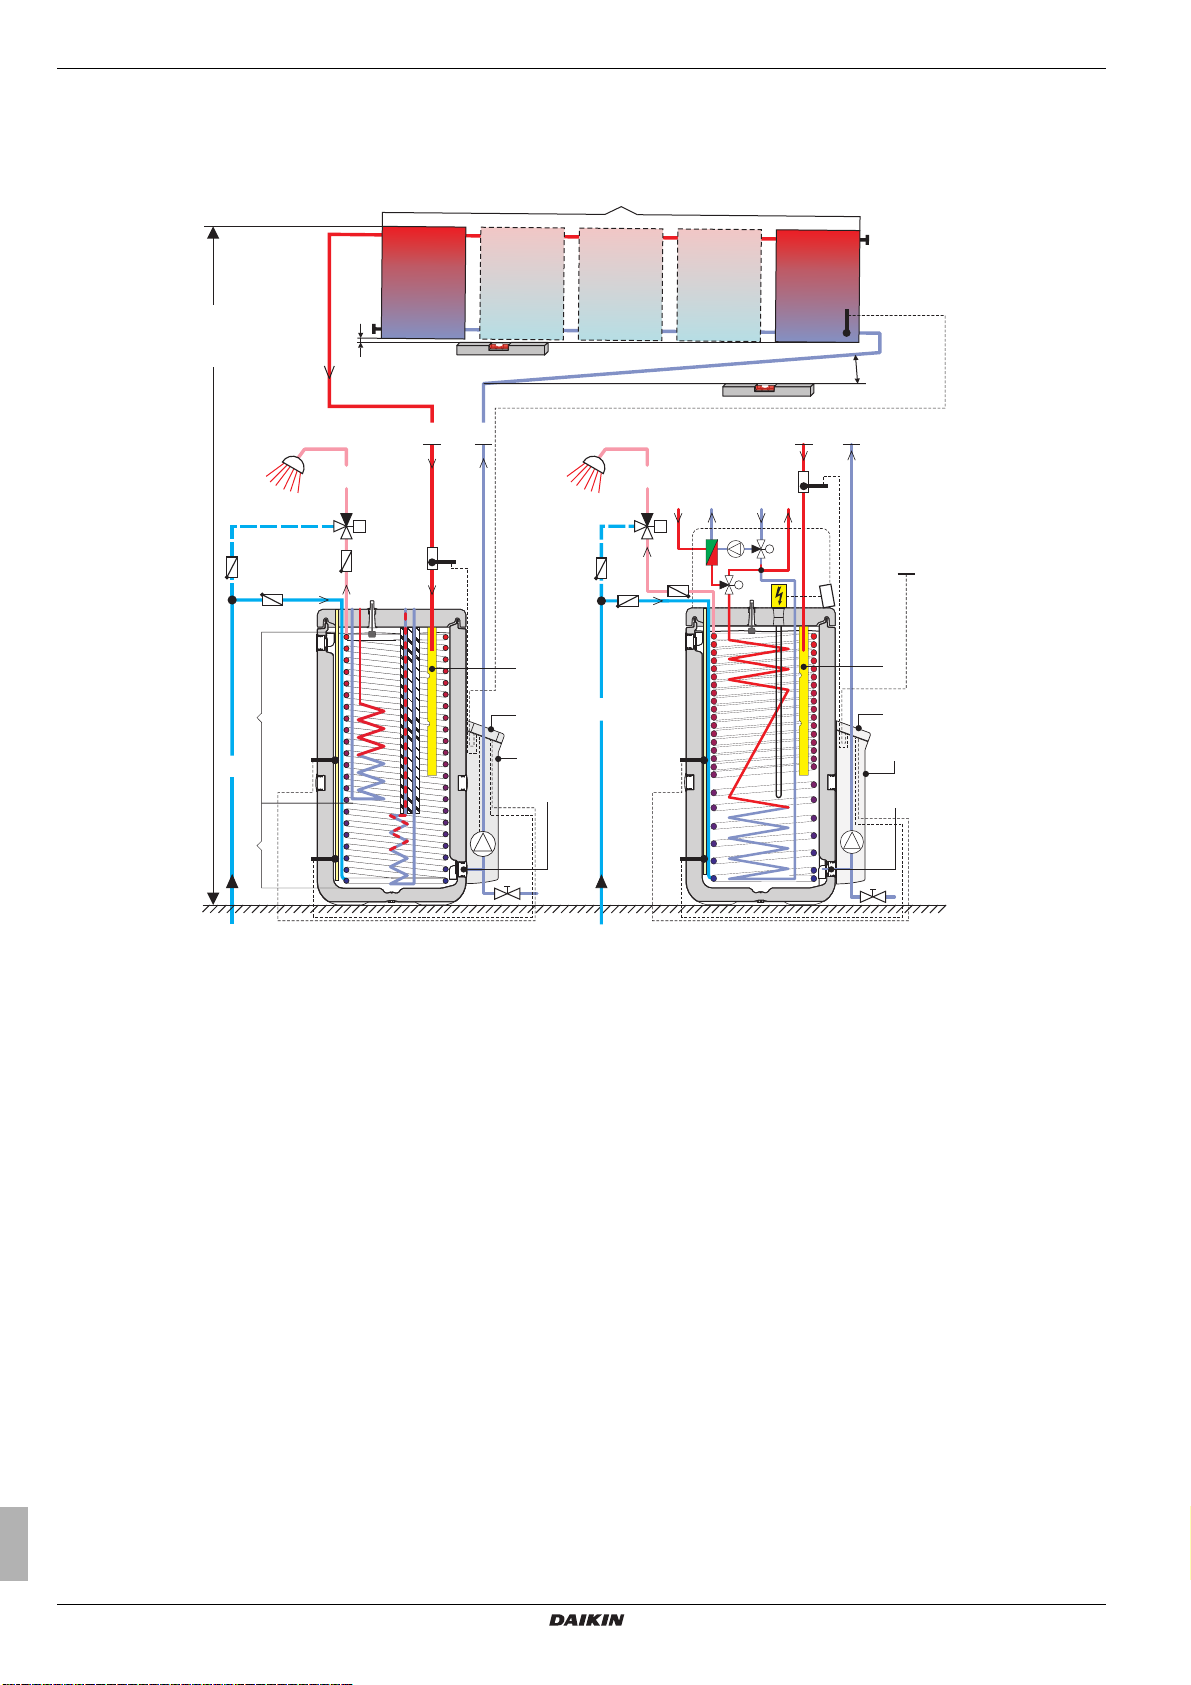
3.1 Construction and components of the Solar system (unpressurised system)
7
T
K
≤12 m
A
1
B
T
T
S
R
≥0,5 %
2
>2%
55
66
FLS
T
V
8
4
EKSRPS4A
P
S
3
2
1
T
S
9
T
R
FLS
T
V
B
M
A
AB
AB
A
M
B
T
K
8
4
EKSRPS4A
9
P
S
3
EKHWP
1 Cold water connection pipe
2 Hot water distribution pipe
3 Filling and draining ball valve (accessory KFE BA)
4 Solar R4 control unit
5 Solar return flow pipe (bottom of the solar panel)
6 Solar inflow pipe (top of the solar panel)
7 Solar panel array
8 Solar inflow layering pipe
9 Solar return flow connection
A Hot water zone
B Solar zone
FLS Solar FlowSensor (flow rate measurement)
PSSolar operating pump
EKSRPS4A
Control and pump unit
TKSolar panel temperature sensor
TRSolar return flow temperature sensor
TSSolar storage tank temperature sensor
EHS(X/H)
TVSolar inflow temperature sensor
EHS(X/H)
Solar tank with integrated interior heat pump unit
EKHWP
Energy storage tank EKHWP
Fig. 3-1 Standard design of a DAIKIN Solar system (DAIKIN recommends a two-way connection)
Planning and installation instructions
6
EKSV21P + EKSV26P + EKSH26P
DAIKIN DrainBack solar system
008.1629499_02 – 07/2020 – EN

3 x Product description
3.2 Brief description
The DAIKIN solar system is a thermal solar system for supplying
hot water for consumption and solar support.
The pressure-less system (DrainBack) must only be
used with the EKSRPS4A control and pump unit.
Prerequisite for fault-free operation in the DrainBack
system is that the connecting pipes are laid with a consistent
gradient (at least 2 %) and, with two-way connection, the bottom
edges of the solar panel with constant gradient to the return flow
connection or with equilateral connection, mounted horizontally.
Operating mode
The Solar EKSV21P, EKSV26P and EKSH26P high-performance flat solar panels convert solar radiation into heat with a
high degree of efficiency. The heat carrying medium is water with
which the storage tanks are filled in accordance with the associated installation instructions.
As soon as the solar panels have reached a useful temperature
level, the buffer water in the storage tank (which is not under
pressure) is pumped directly through the panels. With insufficient
panel temperature, the circulation pump is switched off and the
system is drained automatically. This operating mode has
several advantages:
– High operating safety as there are no components (such as
expansion vessel, safety valve, vent valves) sensitive to damage or interference
– Excellent heat transfer and heat storage capacity (system
works without antifreeze agents)
– Minimum maintenance requirements
– Frostproof
– No additional solar heat exchanger required
– No stagnation problems
Modular design
The system consists of several pre-assembled modules. Plug-in
technology and a high degree of pre-assembly ensure fast and
simple system installation.
3.3 System components for pressure-less
systems
3.3.1 System components for all systems
High-performance flat solar panels
EKSV21P
H x W x D: 2000 x 1006 x 85 mm, weight: approx. 35 kg
EKSV26P
H x W x D: 2000 x 1300 x 85 mm, weight: approx. 42 kg
EKSH26P
H x W x D: 1300 x 2000 x 85 mm, weight: approx. 42 kg
B
1a
V21P
H
V26P
T
1a High-performance EKSV21P / EKSV26P flat solar panel
1b High-performance EKSH26P flat solar panel
Fig. 3-2 Flat solar panel
FIX MP solar panel mounting rails
FIX MP100 for one EKSV21P flat solar panel
FIX MP130 for one EKSV26P flat solar panel
FIX MP200 for one EKSH26P flat solar panel
2a (2x)
B
H26P
H
1b
Storage tank
The following storage tanks can be used for the DAIKIN solar
system:
– DAIKIN EKHWP: Highly thermally insulated, unpressurised
solar stratified tank (with possibility to connect to a DAIKIN
air/water heating pump).
– Daikin Altherma integrated solar unit: Solar stratified tank with
integrated indoor unit of an air/water heating pump.
Design, functionality, start-up and operation of the storage tanks and other Solar components not mentioned in
chap. 3.3 are not described in these instructions.
Detailed information on these components can be found
in the associated operating and installation instructions.
The handling instructions and descriptions mentioned in these
instructions basically apply to all DAIKIN storage tanks that can
be used in this solar system, even if only one type is described
for illustrative purposes. If there are variances to other storage
tanks, special reference is made.
Electronic control
The fully electronic DAIKIN Solar R4 control unit ensures optimum utilisation of the solar heat (hot water heating, heating
support) and the observance of all safety-relevant aspects. All
parameters needed for trouble-free operation have been preset
at the factory.
2b (2x)
2a Mounting profile rail
2b Solar panel securing clips
Fig. 3-3 FIX MP
EKSV21P + EKSV26P + EKSH26P
DAIKIN DrainBack solar system
008.1629499_02 – 07/2020 – EN
Planning and installation instructions
7
3 x Product description
Solar panel connection Solar
FIX VBP
3a (2x)
3a Double terminal block for solar panel fastening
3b Mounting profile connector
3c Compensator for solar panel connection with mounting support
Fig. 3-4 FIX VBP
3b (2x)
3c (2x)
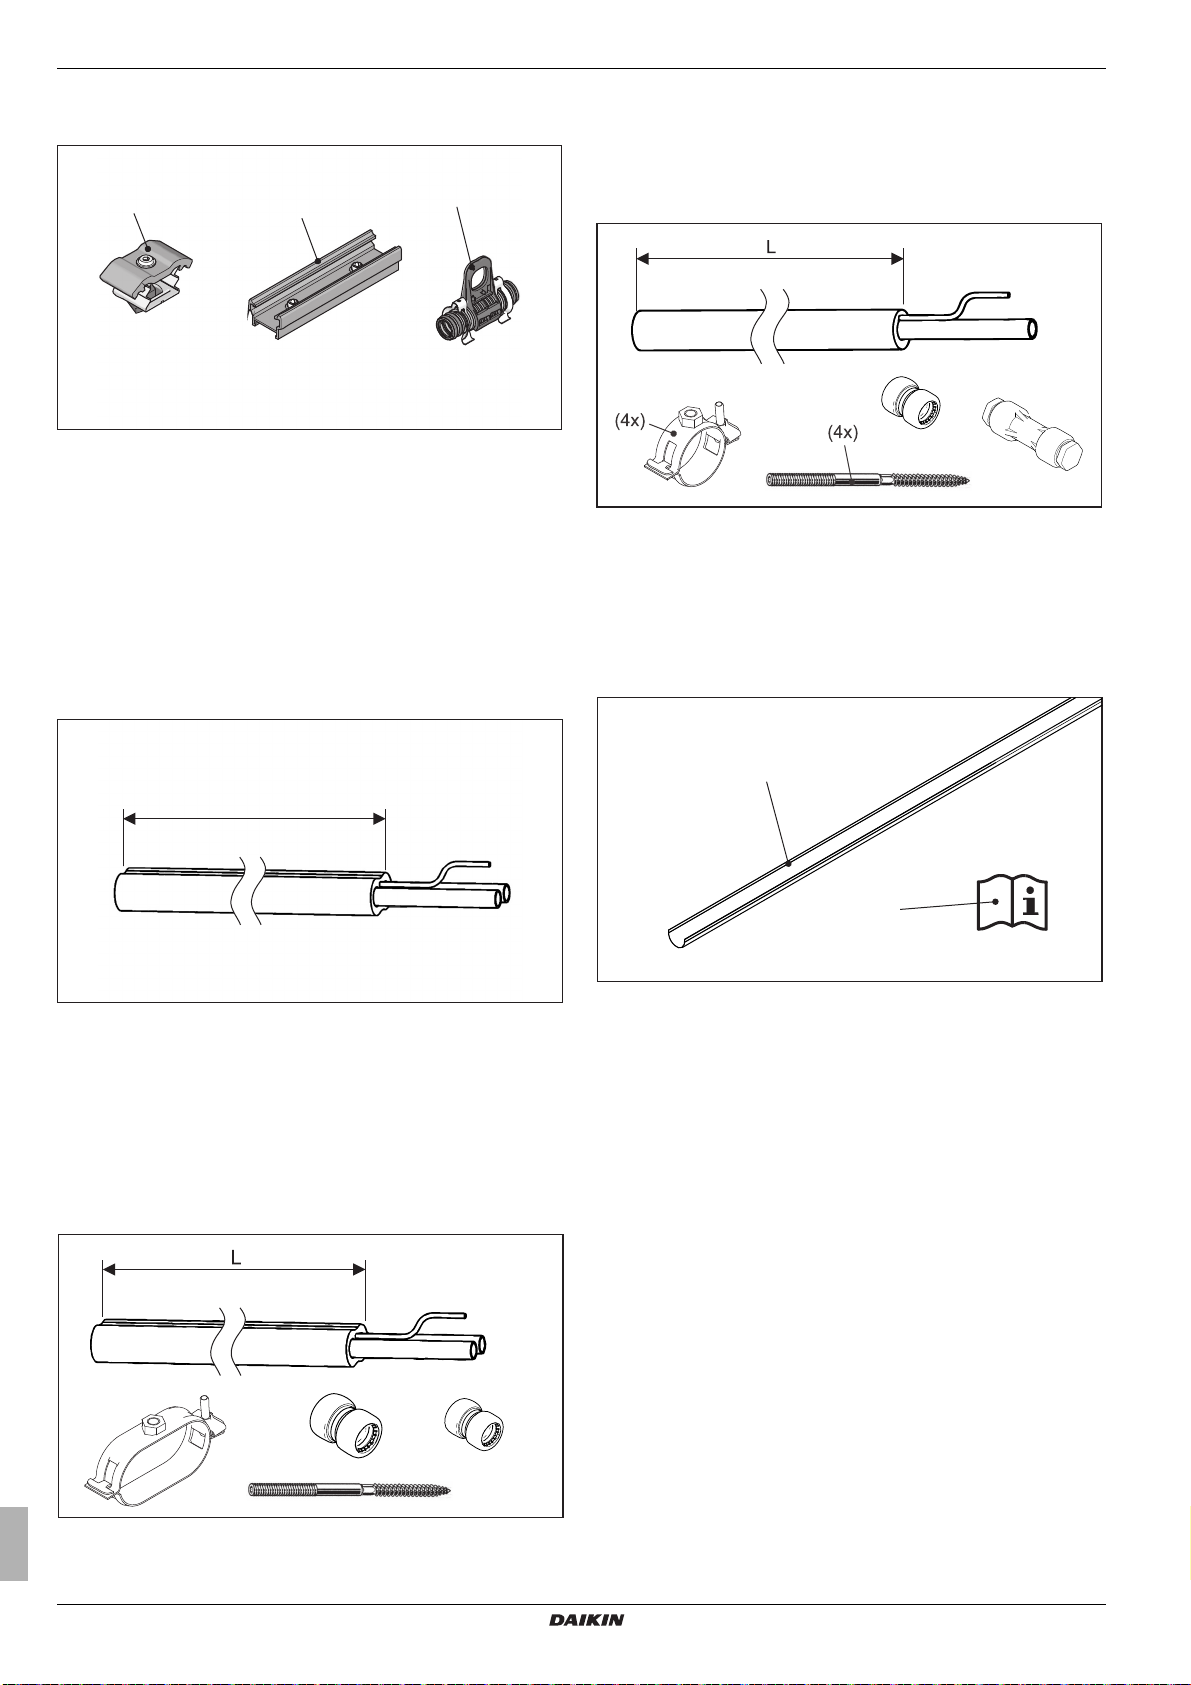
CON 15 and CON 20 connection pipes
CON 15, L=15 m
and
CON 20, L=20 m
Connecting pipes between solar panel array and EKSRPS4A
(heat-insulated inflow pipe and return flow pipe (Al-PEX compound pipe) with integrated sensor cable).
Extension kit for CON XV feed line
CON XV80, L=8 m
UV-resistant thermally insulated feed line with integrated sensor
cable, pipe clamps, cable connection fitting and connecting
fitting.
Fig. 3-7 CON XV (optional)
Vessel holder set (TS) for CON 15 and CON 20
connecting pipes
TS, L=1.30 m
Vessel holders for supporting CON 15 and CON 20 connecting
pipes (avoidance of water sacks).
L
Fig. 3-5 CON 15 / CON 20
Extension kits for CON X connection pipe
CON X25, L=2.5 m
CON X50, L=5 m
CON X100, L=10 m
Heat insulated feed and return line with integrated sensor cable,
pipe clamps and connecting fittings.
4a (5x)
4b
4a Vessel holders
4b Quick instructions
Fig. 3-8 TS (optional)
Fig. 3-6 CON X (optional)
Planning and installation instructions
8
EKSV21P + EKSV26P + EKSH26P
DAIKIN DrainBack solar system
008.1629499_02 – 07/2020 – EN
3.3.2 System components for roof-mounted systems (ADM)
3 x Product description
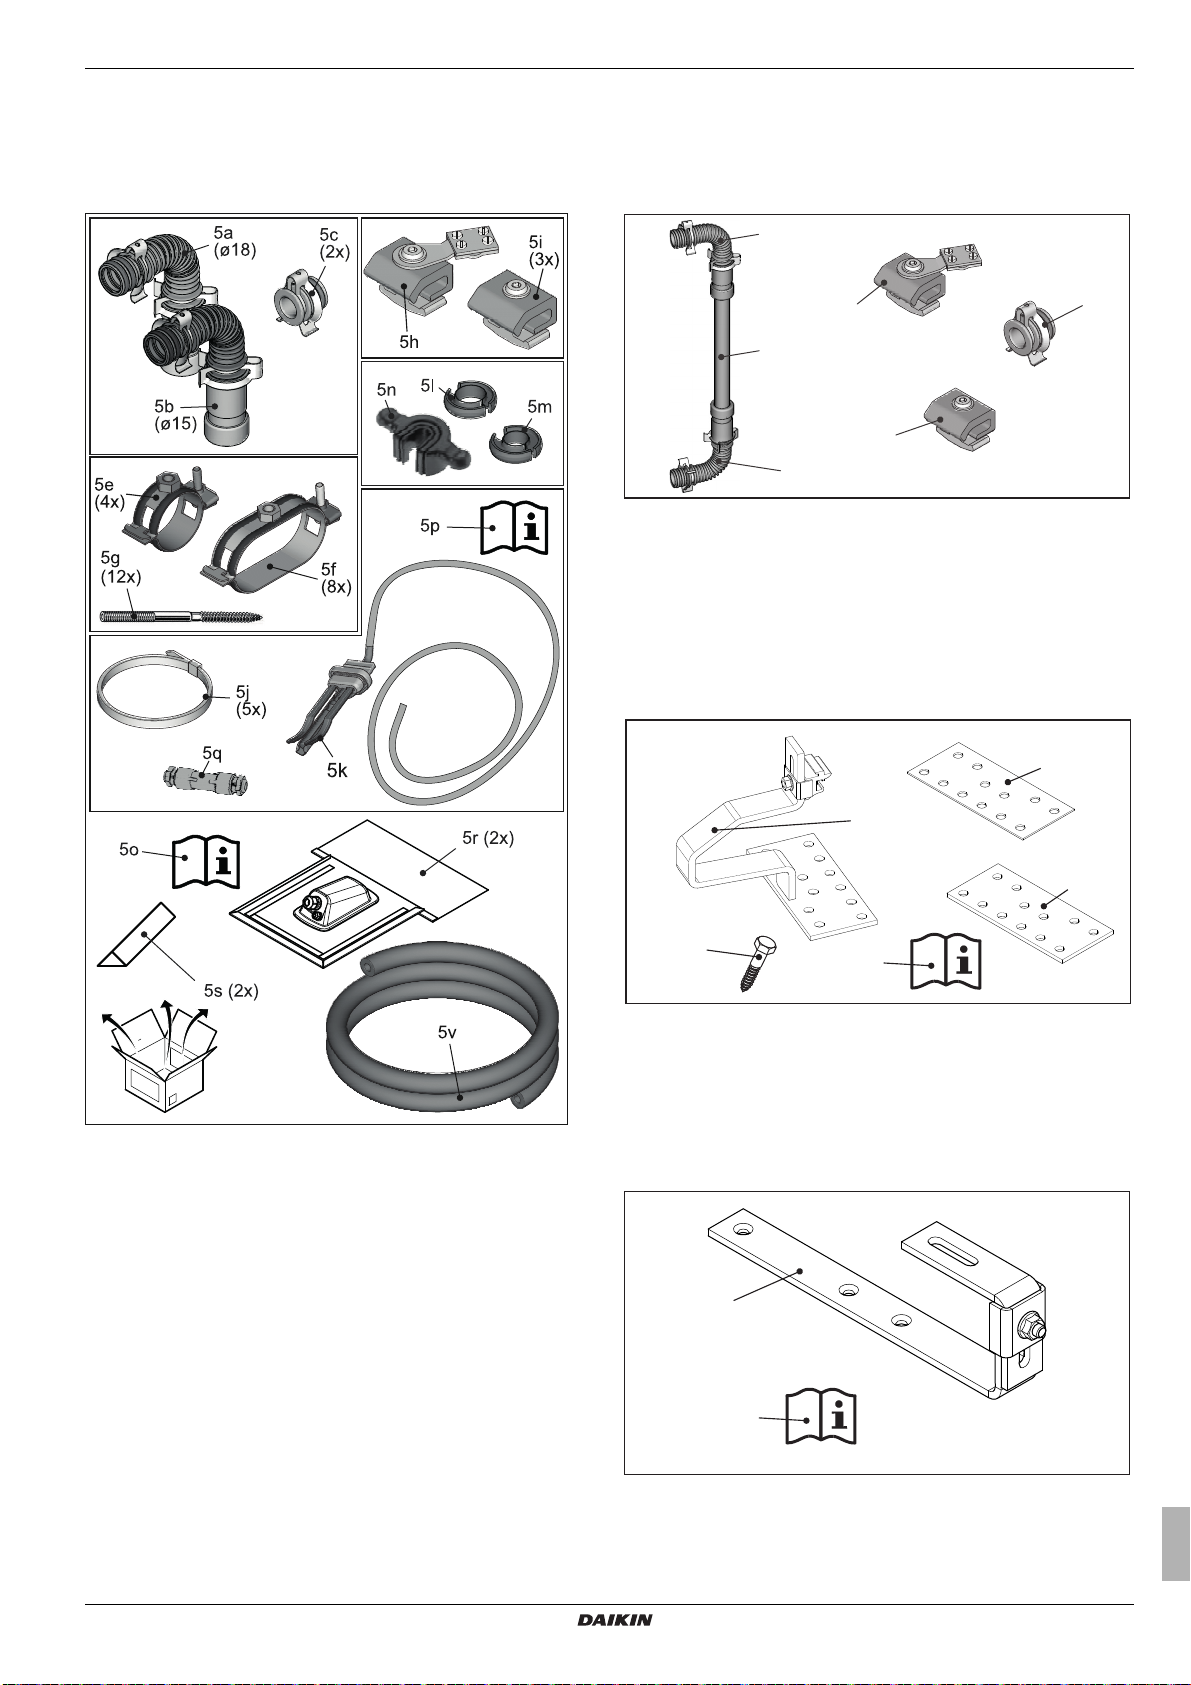
Roof penetration packs, roof-mounted
EKSRCAP (anthracite)
EKSRCRP (brick-red)
Solar panel row connector
CON RVP
For connecting two solar panel rows one above the other.
5a
5h ( x)2
5w
5i ( x)2
5a
5i Single terminal block
5h Single terminal block with equipotential bonding terminal
5c Sealing plugs
5a Solar panel connecting elbow
5w 1 m heat-insulated Al-PEX compound pipe
Fig. 3-10 CON RVP
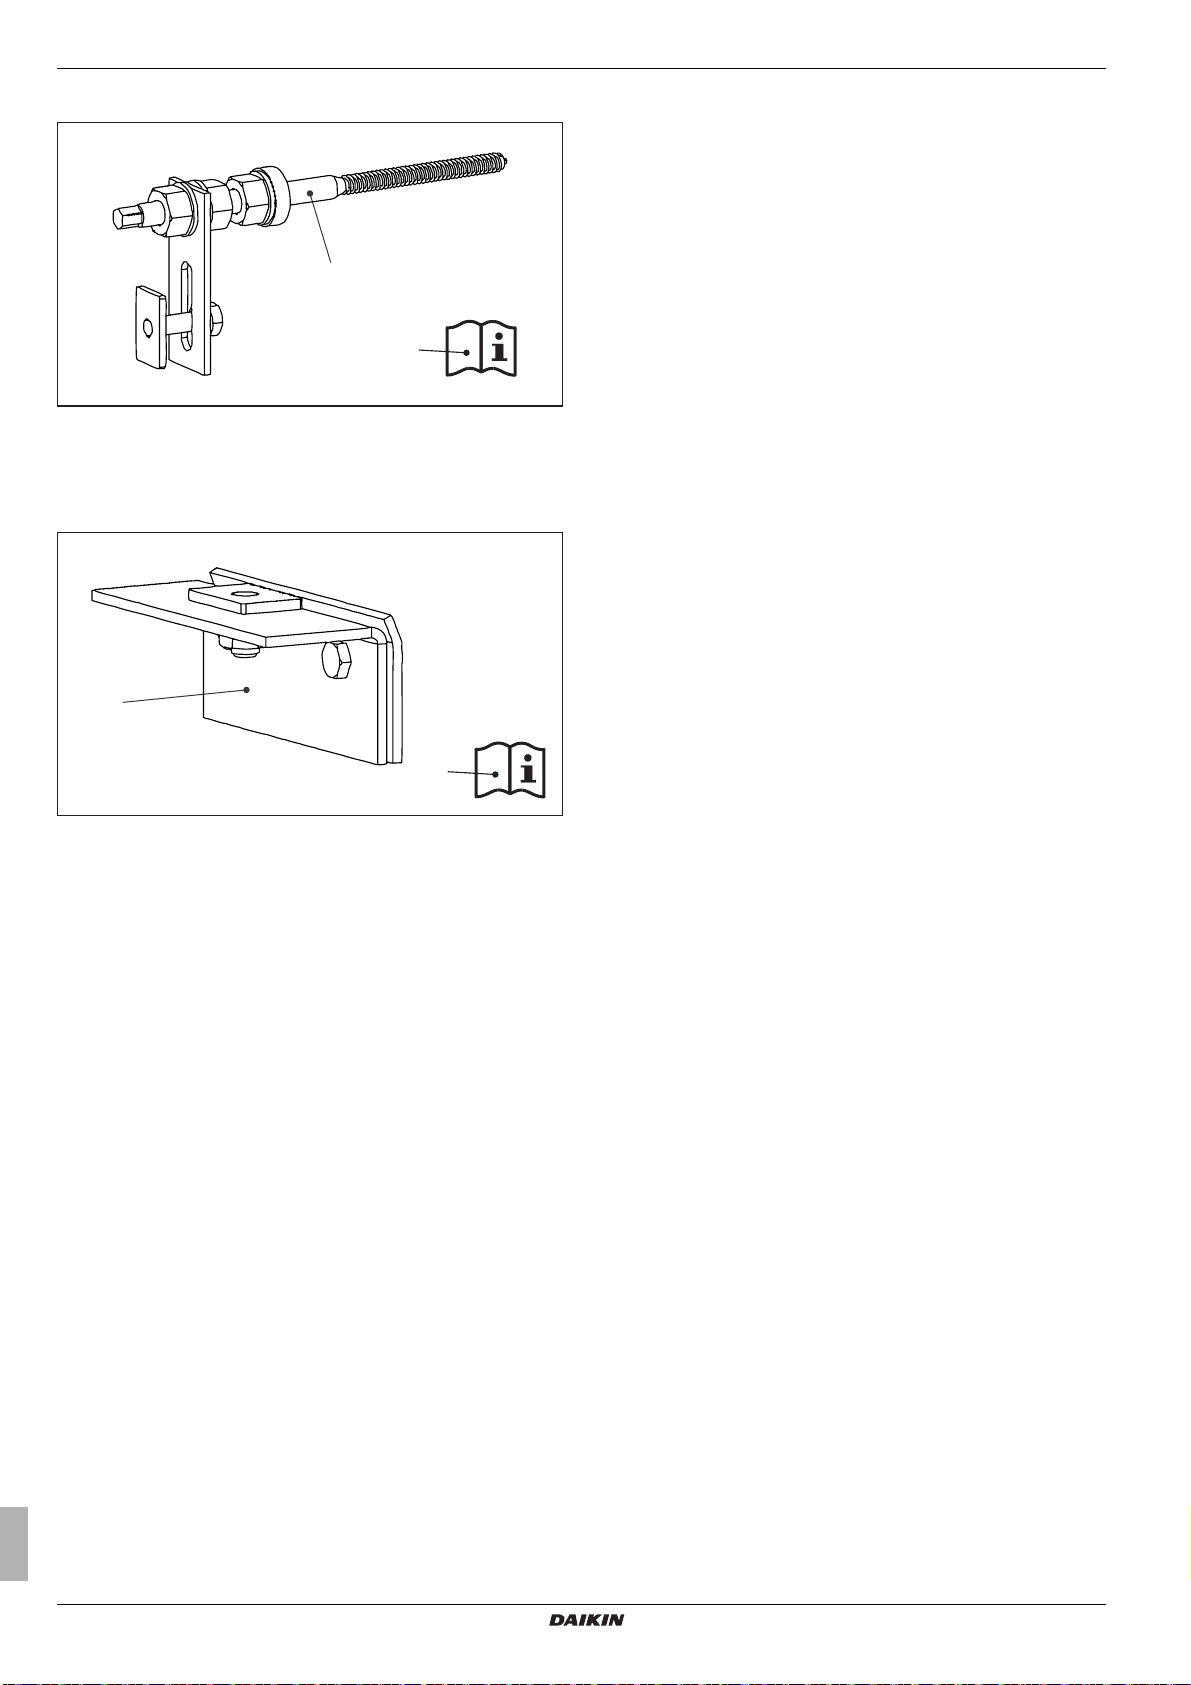
On-roof mounting packs
FIX ADDP for roof tiles/shingles
5c
(2x)
5a Solar panel connecting elbow, return flow
5b Solar panel connecting elbow, inflow
5c Sealing plugs
5e-g Pipe clamps with hangar bolts
5h Single terminal block with equipotential bonding terminal
5i Single terminal block
5j Cable tie
5k Solar panel temperature sensor
5l-n Extraction tool with inserts for Ø 15 mm and Ø 18 mm
5o Planning and installation instructions
5p Quick instructions
5q Cable connection fitting
5r Roof penetration
5s Foam wedge
5v HT-Armaflex ø22x13 UV-resistant (2 m)
Fig. 3-9 EKSRCAP, EKSRCRP
12a
(2x)
12d (4x)
12a Roof mounting hook
12b Packing plate 2 mm
12c Packing plate 5 mm
12d Hexagon wood screws M8 x100
12e Quick instructions
Fig. 3-11 FIX ADDP
12e
FIX ADS for flat roofing (e.g. slate)
12f
(4x)
12g
12b
(2x)
12c
(2x)
EKSV21P + EKSV26P + EKSH26P
DAIKIN DrainBack solar system
008.1629499_02 – 07/2020 – EN
12f Roof mounting hook
12g Quick instructions
Fig. 3-12 FIX ADS
Planning and installation instructions
9
3 x Product description
FIX WD for corrugated roofing
12h
4(x)
12h Mounting profile beam
12i Quick instructions
Fig. 3-13 FIX WD
FIX BD for folded sheet metal roofing
12i
12j
4(x)
12j Mounting profile beam
12k Quick instructions
Fig. 3-14 FIX BD
12k
Planning and installation instructions
10
EKSV21P + EKSV26P + EKSH26P
DAIKIN DrainBack solar system
008.1629499_02 – 07/2020 – EN
 Loading...