

Daikin ATXM20R2V1B, ATXM20R5V1B, ATXM25R2V1B, ATXM25R5V1B, ATXM35R2V1B Operation manuals
...
Operation manual
Daikin room air conditioner
ATXM20R2V1B
ATXM20R5V1B
ATXM25R2V1B
ATXM25R5V1B
ATXM35R2V1B
ATXM35R5V1B
ATXM50R2V1B
Operation manual
Daikin room air conditioner
English
Table of contents
Table of contents
1 About the documentation 2
1.1 About this document.................................................................. 2
2 User safety instructions 2
2.1 General...................................................................................... 2
2.2 Instructions for safe operation ................................................... 3
3 About the system 5
3.1 Indoor unit ................................................................................. 5
3.1.1 Indoor unit display....................................................... 5
3.2 About the user interface ............................................................ 5
3.2.1 Components: User interface ....................................... 5
4 Before operation 5
4.1 To insert the batteries................................................................ 5
4.2 To mount the user interface holder ........................................... 6
4.3 To set the clock ......................................................................... 6
4.4 To set the brightness of the indoor unit display......................... 6
4.5 To turn on the power supply...................................................... 6
5 Operation 6
5.1 Operation range ........................................................................ 6
5.2 Operation mode and temperature setpoint................................ 6
5.2.1 To start/stop operation mode and to set the
temperature................................................................. 7
5.3 Airflow rate ................................................................................ 7
5.3.1 To adjust the airflow rate............................................. 7
5.4 Airflow direction ......................................................................... 7
5.4.1 To adjust vertical airflow direction............................... 7
5.4.2 To adjust horizontal airflow direction........................... 7
5.4.3 To use 3-D airflow direction ........................................ 8
5.5 Comfort airflow and Intelligent eye operation ............................ 8
5.5.1 Comfort airflow operation............................................ 8
5.5.2 Intelligent eye operation.............................................. 8
5.5.3 To start/stop Comfort and Intelligent eye operation.... 8
5.6 Powerful operation .................................................................... 8
5.6.1 To start/stop Powerful operation ................................. 8
5.7 Econo and Outdoor unit quiet operation.................................... 8
5.7.1 Econo operation.......................................................... 8
5.7.2 Outdoor unit quiet operation ....................................... 9
5.7.3 To start/stop Econo and Outdoor unit quiet operation 9
5.8 Flash Streamer (air cleaning) operation .................................... 9
5.8.1 To start/stop Flash Streamer (air cleaning) operation. 9
5.9 OFF/ON timer operation............................................................ 9
5.9.1 To start/stop OFF timer operation............................... 9
5.9.2 To start/stop ON timer operation................................. 9
5.9.3 To combine OFF timer and ON timer.......................... 10
5.10 Weekly timer operation.............................................................. 10
5.10.1 To set Weekly timer operation .................................... 10
5.10.2 To copy reservations................................................... 11
5.10.3 To confirm reservations .............................................. 11
5.10.4 To deactivate and reactivate Weekly timer operation . 11
5.10.5 To delete reservations ................................................ 11
5.11 Wireless LAN connection .......................................................... 12
5.11.1 Precautions when using the wireless LAN .................. 12
5.11.2 To install the Daikin Residential Controller
application................................................................... 12
5.11.3 To set the wireless connection.................................... 12
6 Energy saving and optimum operation 13
7 Maintenance and service 14
7.1 Overview: Maintenance and service ......................................... 14
7.2 To clean the indoor unit and user interface ............................... 14
7.3 To clean the front panel............................................................. 15
7.4 To remove the front panel ......................................................... 15
7.5 To clean the air filters ................................................................ 15
7.6 To clean the titanium apatite deodorising filter and the silver
allergen removal air purifying filter ............................................. 16
7.7 To replace the titanium apatite deodorising filter and the silver
allergen removal air purifying filter ............................................. 16
7.8 To re-install the front panel......................................................... 16
8 Troubleshooting 16
9 Disposal 17
1 About the documentation
1.1 About this document
Thank you for purchasing this product. Please:
▪ Keep the documentation for future reference.
Target audience
Endusers
INFORMATION
This appliance is intended to be used by expert or trained
users in shops, in light industry, and on farms, or for
commercial and household use by lay persons.
Documentation set
This document is part of a documentation set. The complete set
consists of:
▪ General safety precautions:
▪ Safety instructions that you must read before operating your
system
▪ Format: Paper (in the box of the indoor unit)
▪ Operation manual:
▪ Quick guide for basic usage
▪ Format: Paper (in the box of the indoor unit)
▪ User reference guide:
▪ Detailed step-by-step instructions and background information
for basic and advanced usage
▪ Format: Digital files on http://www.daikineurope.com/support-
and-manuals/product-information/
Latest revisions of the supplied documentation may be available on
the regional Daikin website or via your installer.
The original documentation is written in English. All other languages
are translations.
2 User safety instructions
Always observe the following safety instructions and regulations.
2.1 General
WARNING
If you are NOT sure how to operate the
unit, contact your installer.
WARNING
This appliance is not intended for use
by persons, including children, with
reduced physical, sensory or mental
Operation manual
2
ATXM20~35R2V1B + ATXM50R2V1B + ATXM20~35R5V1B
Daikin room air conditioner
3P485919-12S – 2020.06
2 User safety instructions
capabilities, or lack of experience and
knowledge, unless they have been
given supervision or instruction
concerning use of the appliance by a
person responsible for their safety.
Children should be supervised to
ensure that they do not play with the
appliance.
Cleaning and user maintenance must
not be carried out by children without
supervision.
WARNING
To prevent electrical shocks or fire:
▪ Do NOT rinse the unit.
▪ Do NOT operate the unit with wet
hands.
▪ Do NOT place any objects containing
water on the unit.
CAUTION
▪ Do NOT place any objects or
equipment on top of the unit.
▪ Do NOT sit, climb or stand on the
unit.
▪ Units are marked with the following symbol:
This means that electrical and electronic products may NOT be
mixed with unsorted household waste. Do NOT try to dismantle
the system yourself: the dismantling of the system, treatment of
the refrigerant, of oil and of other parts must be done by an
authorized installer and must comply with applicable legislation.
Units must be treated at a specialized treatment facility for reuse,
recycling and recovery. By ensuring this product is disposed of
correctly, you will help to prevent potential negative consequences
for the environment and human health. For more information,
contact your installer or local authority.
▪ Batteries are marked with the following symbol:
This means that the batteries may NOT be mixed with unsorted
household waste. If a chemical symbol is printed beneath the
symbol, this chemical symbol means that the battery contains a
heavy metal above a certain concentration.
Possible chemical symbols are: Pb: lead (>0.004%).
Waste batteries must be treated at a specialized treatment facility
for reuse. By ensuring waste batteries are disposed of correctly,
you will help to prevent potential negative consequences for the
environment and human health.
2.2 Instructions for safe operation
WARNING: MILDLY FLAMMABLE
MATERIAL
The refrigerant inside this unit is mildly
flammable.
CAUTION
The indoor unit contains radio
equipment, minimum separation
distance between the radiating part of
the equipment and the user is 10 cm.
CAUTION
Do NOT insert fingers, rods or other
objects into the air inlet or outlet. When
the fan is rotating at high speed, it will
cause injury.
WARNING
▪ Do NOT modify, disassemble,
remove, reinstall or repair the unit
yourself as incorrect dismantling or
installation may cause an electric
shock or fire. Contact your dealer.
▪ In case of accidental refrigerant
leaks, make sure there are no naked
flames. The refrigerant itself is
entirely safe, non-toxic and mildly
flammable, but it will generate toxic
gas when it accidentally leaks into a
room where combustible air from fan
heaters, gas cookers, etc. is present.
Always have qualified service
personnel confirm that the point of
leakage has been repaired or
corrected before resuming operation.
CAUTION
ALWAYS use a user interface to adjust
the position of the flaps and louvers.
When the flaps and louvers are
swinging and you move them forcibly
by hand, the mechanism will break.
CAUTION
NEVER expose little children, plants or
animals directly to the airflow.
ATXM20~35R2V1B + ATXM50R2V1B + ATXM20~35R5V1B
Daikin room air conditioner
3P485919-12S – 2020.06
Operation manual
3
2 User safety instructions
WARNING
Do NOT place objects below the indoor
and/or outdoor unit that may get wet.
Otherwise condensation on the unit or
refrigerant pipes, air filter dirt or drain
blockage may cause dripping, and
objects under the unit may get dirty or
damaged.
WARNING
Do NOT place a flammable spray
bottle near the air conditioner and do
NOT use sprays near the unit. Doing
so may result in a fire.
CAUTION
Do NOT operate the system when
using a room fumigation-type
insecticide. Chemicals could collect in
the unit, and endanger the health of
people who are hypersensitive to
chemicals.
WARNING
The refrigerant inside the unit is mildly
flammable, but normally does NOT
leak. If the refrigerant leaks in the room
and comes in contact with fire from a
burner, a heater, or a cooker, this may
result in fire, or the formation of a
harmful gas.
Turn off any combustible heating
devices, ventilate the room, and
contact the dealer where you
purchased the unit.
Do NOT use the unit until a service
person confirms that the part from
which the refrigerant leaked has been
repaired.
WARNING
▪ Do NOT pierce or burn refrigerant
cycle parts.
▪ Do NOT use cleaning materials or
means to accelerate the defrosting
process other than those
recommended by the manufacturer.
▪ Be aware that the refrigerant inside
the system is odourless.
WARNING
The appliance shall be stored in a
room without continuously operating
ignition sources (example: open
flames, an operating gas appliance or
an operating electric heater).
DANGER: RISK OF
ELECTROCUTION
To clean the air conditioner or air filter,
be sure to stop operation and turn all
power supplies off. Otherwise, an
electric shock and injury may result.
CAUTION
After a long use, check the unit stand
and fitting for damage. If damaged, the
unit may fall and result in injury.
CAUTION
Do NOT touch the heat exchanger fins.
These fins are sharp and could result
in cutting injuries.
WARNING
Be careful with ladders when working
in high places.
WARNING
Improper detergents or cleaning
procedure may cause damage on
plastic components or water leakage.
Splashed detergent on electric
components, such as motors, may
cause failure, smoke or ignition.
DANGER: RISK OF
ELECTROCUTION
Before cleaning, be sure to stop the
operation, turn the breaker off or pull
out the supply cord. Otherwise, an
electric shock and injury may result.
WARNING
Stop operation and shut off the
power if anything unusual occurs
(burning smells etc.).
Leaving the unit running under such
circumstances may cause breakage,
electric shock or fire. Contact your
dealer.
Operation manual
4
ATXM20~35R2V1B + ATXM50R2V1B + ATXM20~35R5V1B
Daikin room air conditioner
3P485919-12S – 2020.06
3 About the system
ON/
OFF
a
b
c
d
e
d
a
g
m
h
c
b
n
l
f
e
i
j
k
p
o
3 About the system
WARNING: MILDLY FLAMMABLE MATERIAL
The refrigerant inside this unit is mildly flammable.
CAUTION
The indoor unit contains radio equipment, minimum
separation distance between the radiating part of the
equipment and the user is 10 cm.
NOTICE
Do NOT use the system for other purposes. In order to
avoid any quality deterioration, do NOT use the unit for
cooling precision instruments, food, plants, animals, or
works of art.
3.1 Indoor unit
CAUTION
Do NOT insert fingers, rods or other objects into the air
inlet or outlet. When the fan is rotating at high speed, it will
cause injury.
INFORMATION
The sound pressure level is less than 70dBA.
WARNING
▪ Do NOT modify, disassemble, remove, reinstall or
repair the unit yourself as incorrect dismantling or
installation may cause an electric shock or fire. Contact
your dealer.
▪ In case of accidental refrigerant leaks, make sure there
are no naked flames. The refrigerant itself is entirely
safe, non-toxic and mildly flammable, but it will
generate toxic gas when it accidentally leaks into a
room where combustible air from fan heaters, gas
cookers, etc. is present. Always have qualified service
personnel confirm that the point of leakage has been
repaired or corrected before resuming operation.
3.2 About the user interface
▪ Direct sunlight. Do NOT expose the user interface to direct
sunlight.
▪ Dust. Dust on the signal transmitter or receiver will reduce
sensitivity. Wipe off dust with a soft cloth.
▪ Fluorescent lights. Signal communication might be disabled if
fluorescent lamps are in the room. In that case, contact your
installer.
▪ Other appliances. If the user interface signals operate other
appliances, move the other appliances, or contact your installer.
▪ Curtains. Make sure that the signal between the unit and the user
interface is NOT blocked by curtains or other objects.
NOTICE
▪ Do NOT drop the user interface.
▪ Do NOT let the user interface get wet.
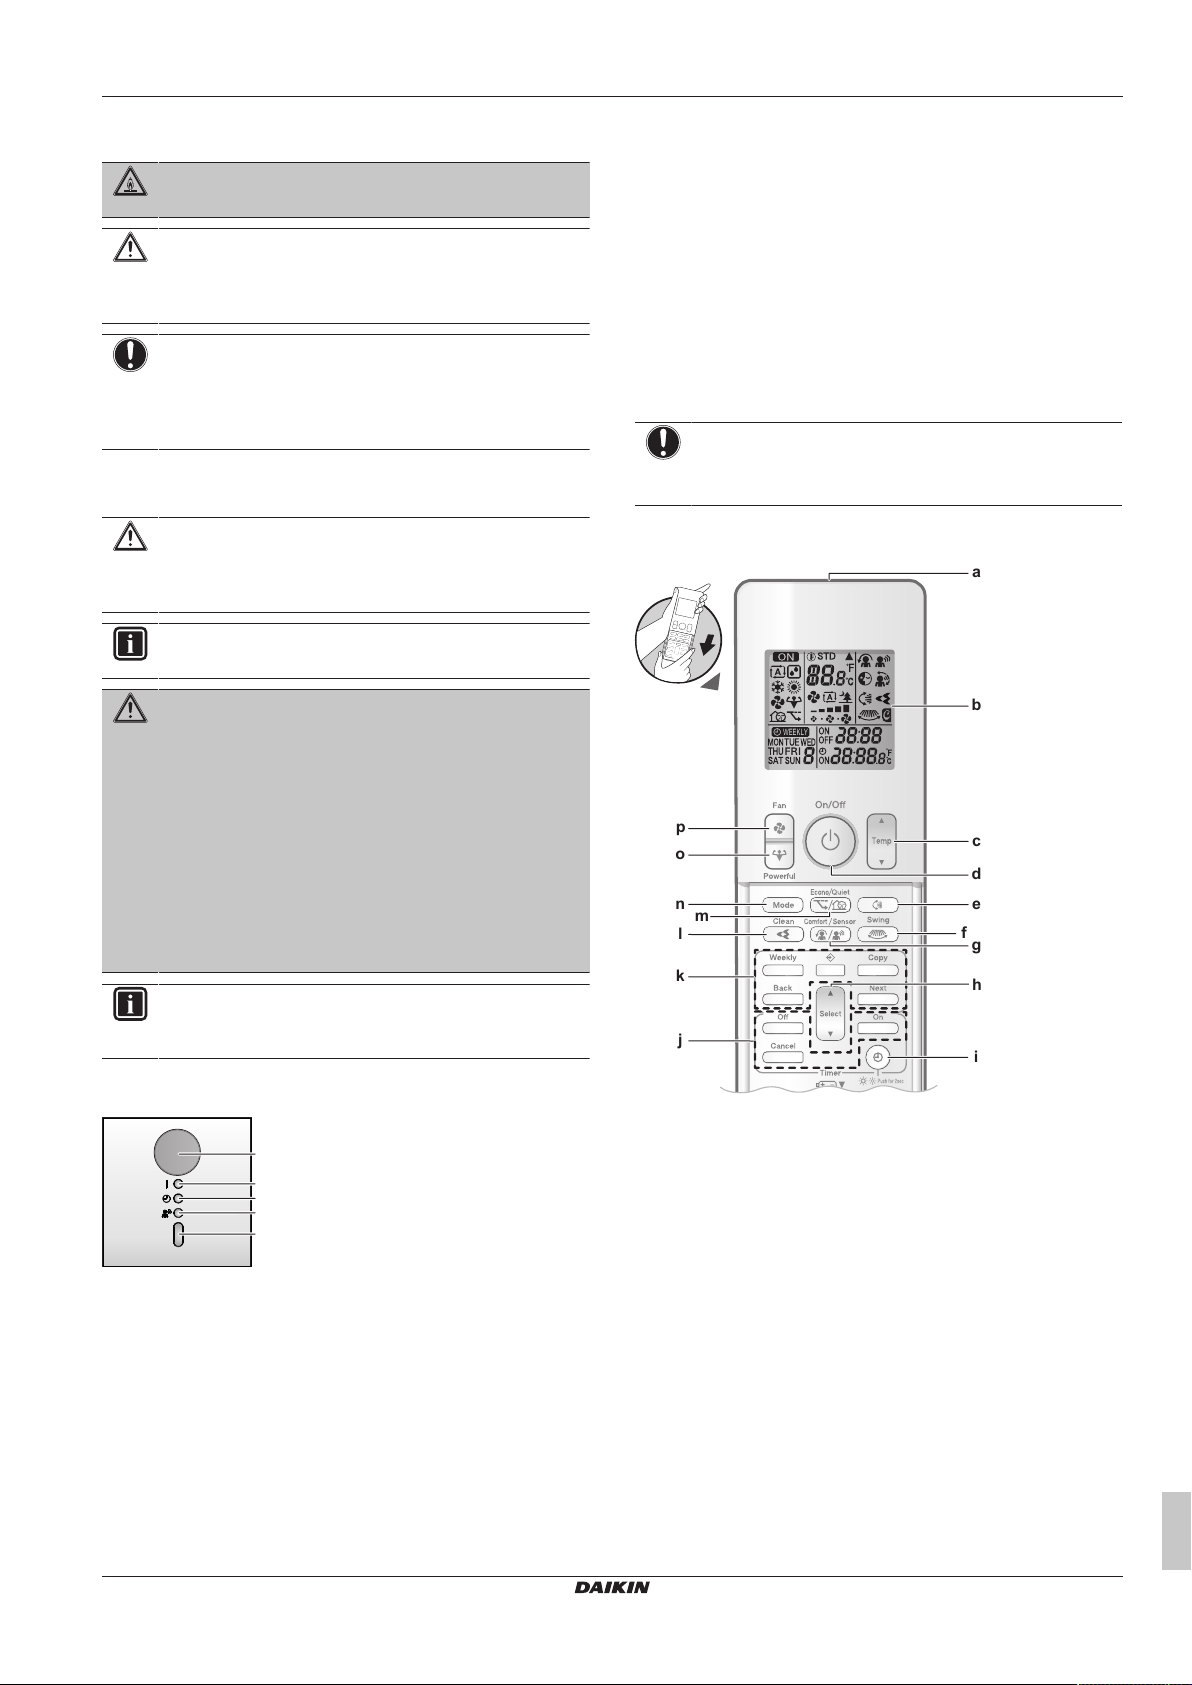
3.2.1 Components: User interface
INFORMATION
The following figures are just examples and may NOT
completely match your system layout.
3.1.1 Indoor unit display
a Signal transmitter
a Signal receiver for user interface
b Operation lamp
c Timer lamp
d Intelligent eye lamp
e ON/OFF button
ON/OFF button
If the user interface is missing, you can use the ON/OFF button on
the indoor unit to start/stop operation. When operation is started
using this button, the following settings are used:
▪ Operation mode = Automatic
▪ Temperature setting = 25°C
▪ Airflow rate = Automatic
ATXM20~35R2V1B + ATXM50R2V1B + ATXM20~35R5V1B
Daikin room air conditioner
3P485919-12S – 2020.06
4 Before operation
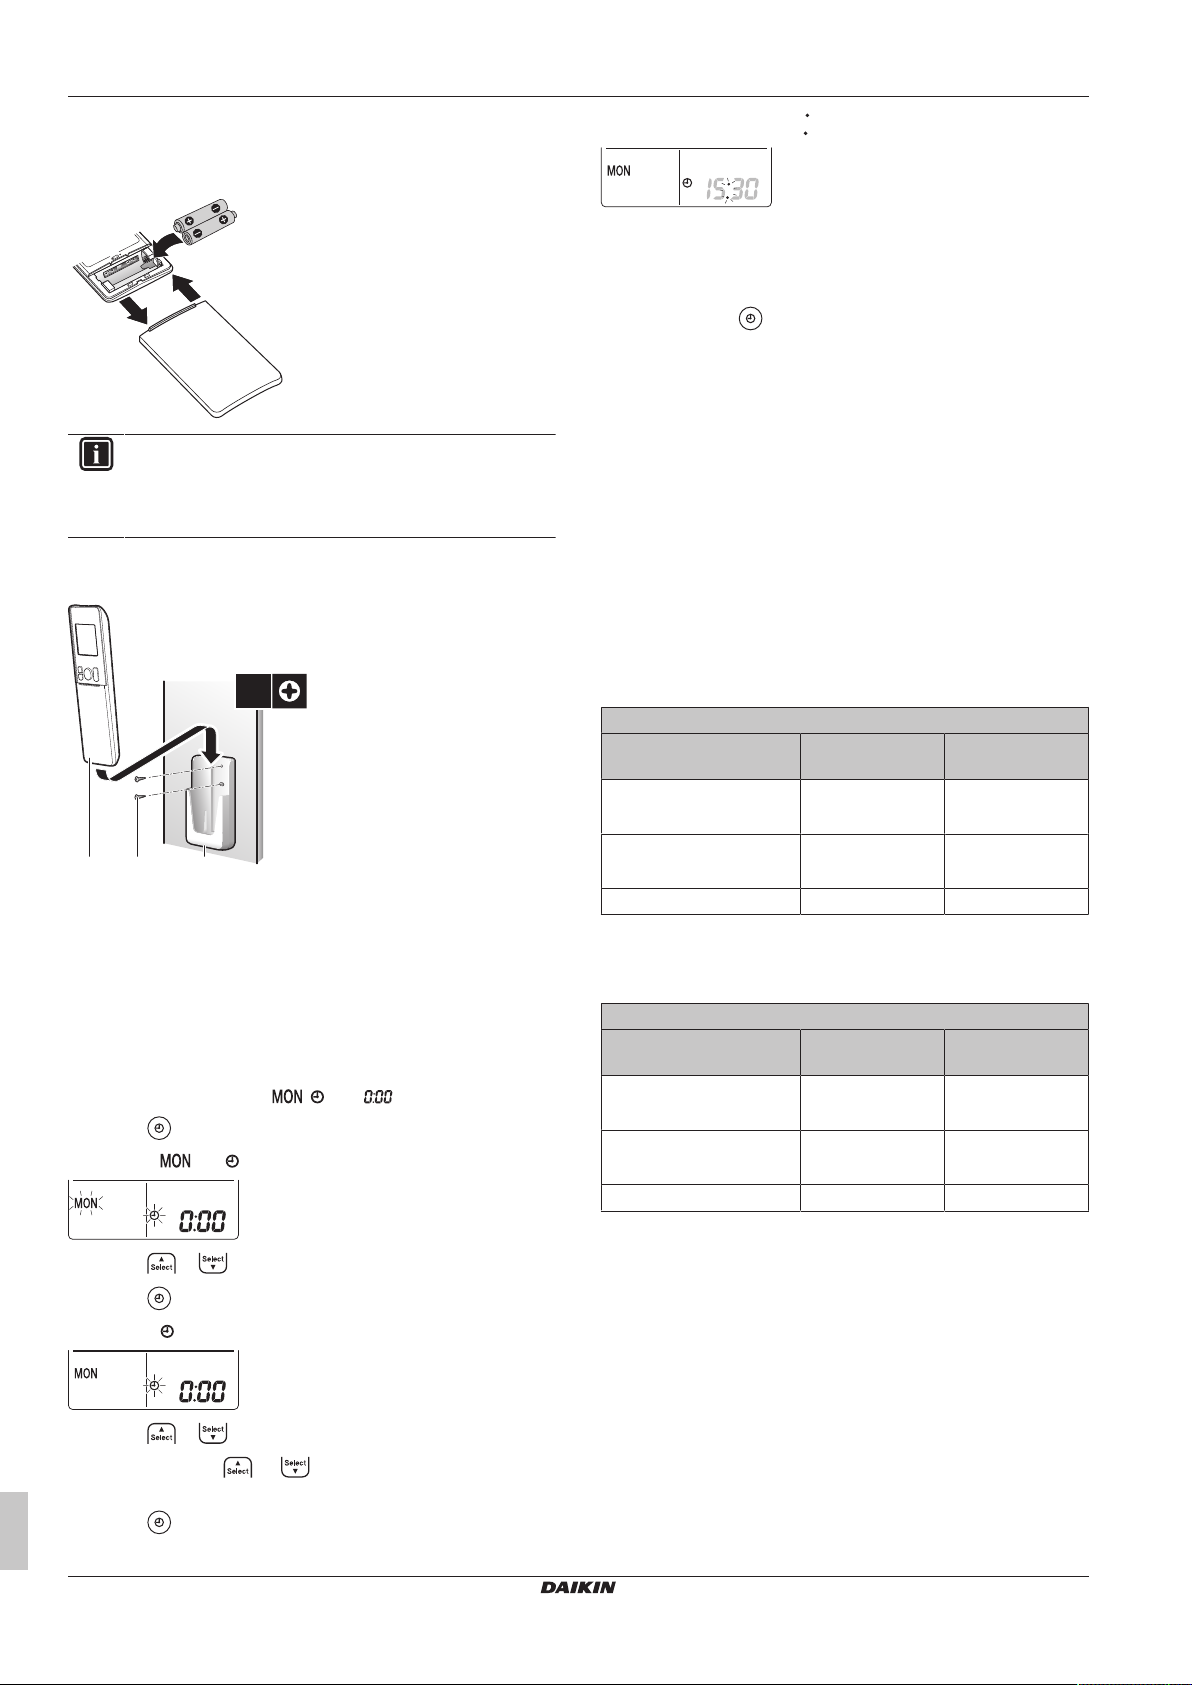
4.1 To insert the batteries
The batteries will last for about 1 year.
b LCD display
c Temperature adjustment button
d ON/OFF button
e Vertical swing button
f Horizontal swing button
g Comfort airflow and Intelligent eye operation button
h Select button
i Clock and indoor unit display brightness button
j OFF/ON timer operation buttons
k Weekly timer operation buttons
l Flash Streamer (air cleaning) operation button
m Econo and Outdoor unit quiet operation button
n Mode button
o Powerful button
p Fan button
Operation manual
5
5 Operation
2
3
1
AAA.LR03
cba
2×
1 Remove the front cover.
2 Insert both batteries at once.
3 Put back the front cover.
INFORMATION
▪ Low energy of battery is indicated by flashing of LCD
display.
▪ ALWAYS replace both batteries at once.
4.2 To mount the user interface holder
a User interface
b Screws (field supply)
c User interface holder
1 Choose a place where the signals reach the unit.
2 Attach the holder with screws to the wall or a similar location.
3 Hang the user interface on the user interface holder.
4.3 To set the clock
Note: If the time is NOT set, , , and blink.
1 Press .
Result: and blink
2 Press or to set the current day of the week.
3 Press .
Result: blinks.
4 Press or to set the correct time.
Note: Holding down or increases or decreases the time
setting rapidly.
5 Press .
Operation manual
6
Result: Setting is complete. blinks.
4.4 To set the brightness of the indoor unit display
1 Keep pressed for at least 2seconds every time you need to
change the setting.
Result: Brightness will be changed in order: high, low, off.
4.5 To turn on the power supply
1 Turn the circuit breaker on.
Result: The flap of the indoor unit will open and close to set the
reference position.
5 Operation
5.1 Operation range
Use the system in the following temperature and humidity ranges for
safe and effective operation.
In combination with outdoor units: 2AMXM and 3AMXM
Cooling and
(a)(b)
drying
Outdoor temperature –10~46°CDB –15~24°CDB
–15~18°CWB
Indoor temperature 18~37°C DB
10~30°CDB
14~28°CWB
Indoor humidity ≤80%
(a)
A safety device might stop the operation of the system if the unit
runs outside its operation range.
(b)
Condensation and water dripping might occur if the unit runs
outside its operation range.
(b)
In combination with other outdoor units
Cooling and
(a)(b)
drying
Outdoor temperature –10~50°CDB –20~24°CDB
–21~18°CWB
Indoor temperature 18~37°C DB
10~30°CDB
14~28°CWB
Indoor humidity ≤80%
(a)
A safety device might stop the operation of the system if the unit
runs outside its operation range.
(b)
Condensation and water dripping might occur if the unit runs
outside its operation range.
(b)
5.2 Operation mode and temperature setpoint
When. Adjust the system operation mode and set the temperature
when you want to:
▪ Heat up or cool down a room
▪ Blow air in a room without heating or cooling
▪ Decrease the humidity in a room
What. The system operates differently, depending on the user
selection.
ATXM20~35R2V1B + ATXM50R2V1B + ATXM20~35R5V1B
Daikin room air conditioner
3P485919-12S – 2020.06
Heating
—
Heating
—
(a)
(a)
 Loading...