

DAEWOO KOR-616T0A Service Manual

Service Manual
Microwave Oven
Model: KOR-616T0A
KOR-816T0A
KOR-616T1A
DAEWOO ELECTRONICS CO., LTD.

1
PRECAUTIONS TO BE OBSERVED BEFORE AND
DURING SERVICING TO AVOID POSSIBLE EXPOSURE
TO EXCESSIVE MICROWA VE ENERGY
(a) Do not operate or allow the oven to be operated with the door open.
(b) Make the following safety checks on all ovens to be serviced before activating the
magnetron or other microwave source, and make repairs as necessary: (1) Interlock
operation, (2) proper door closing, (3) seal and sealing surfaces (arcing, wear, and other
damage), (4) damage to or loosening of hinges and latches, (5) evidence of dropping or
abuse.
(c) Before turning on microwave power for any service test or inspection within the micro-
wave generating compartments, check the magnetron, wave guide or transmission line,
and cavity for proper alignment, intergrity, and connections.
(d) Any defective or misadjusted components in the interlock, monitor, door seal, and
microwave generation and transmission systems shall be repaired, replaced, or
adjusted by procedures described in this manual before the oven is released to the
owner.
(e) A microwave leakage check to verify compliance with the Federal performance
standard should be performed on each oven prior to release to the owner.
PROPER USE AND SERVICE PRECAUTIONS....................................................................................................2
SPECIFICATIONS ................................................................................................................................................... 3
FEATURES DIAGRAM............................................................................................................................................4
INSTALLA TION........................................................................................................................................................5
OPERATION PROCEDURE....................................................................................................................................6
CONTROLS .............................................................................................................................................................7
INTERLOCK MECHANISM FUNCTIONS AND ADJUSTMENTS........................................................................17
MEASUREMENT OF THE MICROWAVE OUTPUT POWER..............................................................................19
WIRING DIAGRAM................................................................................................................................................21
CIRCUIT DESCRIPTION.......................................................................................................................................22
SAFETY PRECAUTIONS FOR DISASSEMBLY AND REPAIR...........................................................................25
DISASSEMBLY AND ASSEMBL Y.........................................................................................................................26
TROUBLE SHOOTING GUIDE.............................................................................................................................31
COMPONENT TEST PROCEDURE.....................................................................................................................36
SAFETY INTERLOCK CONTINUITY TEST .........................................................................................................37
PRINTED WIRING BOARD...................................................................................................................................38
CIRCUIT CHECK PROCEDURE.....................................................................................................................38
P.C.B. CIRCUIT DIAGRAM ..............................................................................................................................44
COMPONENT INFORMATION........................................................................................................................45
PRINTED CIRCUITS BOARD.......................................................................................................................... 46
P.C.B. LOCATION NO......................................................................................................................................48
EXPLODED AND PARTS LIST.............................................................................................................................50
TABLE OF CONTENTS

2
CAUTION: This Device is to be Serviced Only by Properly Qualified Service Personnel. Consult the
Service Manual for Proper Service Procedures to Assure Continued Safety operation and
for Precautions to be Taken to Avoid Possible Exposure to Excessive Microwave Energy.
PROPER USE AND SERVICE PRECAUTIONS
1. For Safe Operation
Damage that allows the microwave energy(that cooks or heats the food) to escape will result in poor
cooking and may cause serious bodily injury to the operator.
IF ANY OF THE FOLLOWING CONDITIONS EXIST, OPERATOR MUST NOT USE THE
APPLIANCE.
(Only a trained service personnel should make repairs.)
1) A broken door hinge.
2) A broken door viewing screen.
3) A broken front panel, oven cavity.
4) A loosened door lock.
5) A broken door lock.
The door gasket plate and oven cavity surface should be kept clean.
No grease, soil or spatter should be allowed to build up on these surfaces or inside the oven.
DO NOT ATTEMPT TO OPERATE THIS APPLIANCE WITH THE DOOR OPEN. The microwave
oven has concealed switches to make sure the power is turned of f when the door is opened.
Do not attempt to defeat them.
DO NOT ATTEMPT TO SERVICE THIS APPLIANCE UNTIL YOU HAVE READ THIS SERVICE
MANUAL.
2. For Safe Service Procedures.
1) If the oven is operative prior to servicing, a microwave emission check should be performed prior to
servicing the oven.
2) If any certified oven unit is found to have excessive emission level 5mW/cm2, the service
person should:
(a) inform the manufacturer, importer or assembler,
(b) repair the unit at no cost to the owner,
(c) attempt to ascertain the cause of the excessive leakage,
(d) tell the owner of the unit not to use the unit until the oven has been brought into compliance.
3) If the oven operates with the door open, the service person should tell the user not to operate the
oven and contact the manufacturer and CDRH immediately.
3
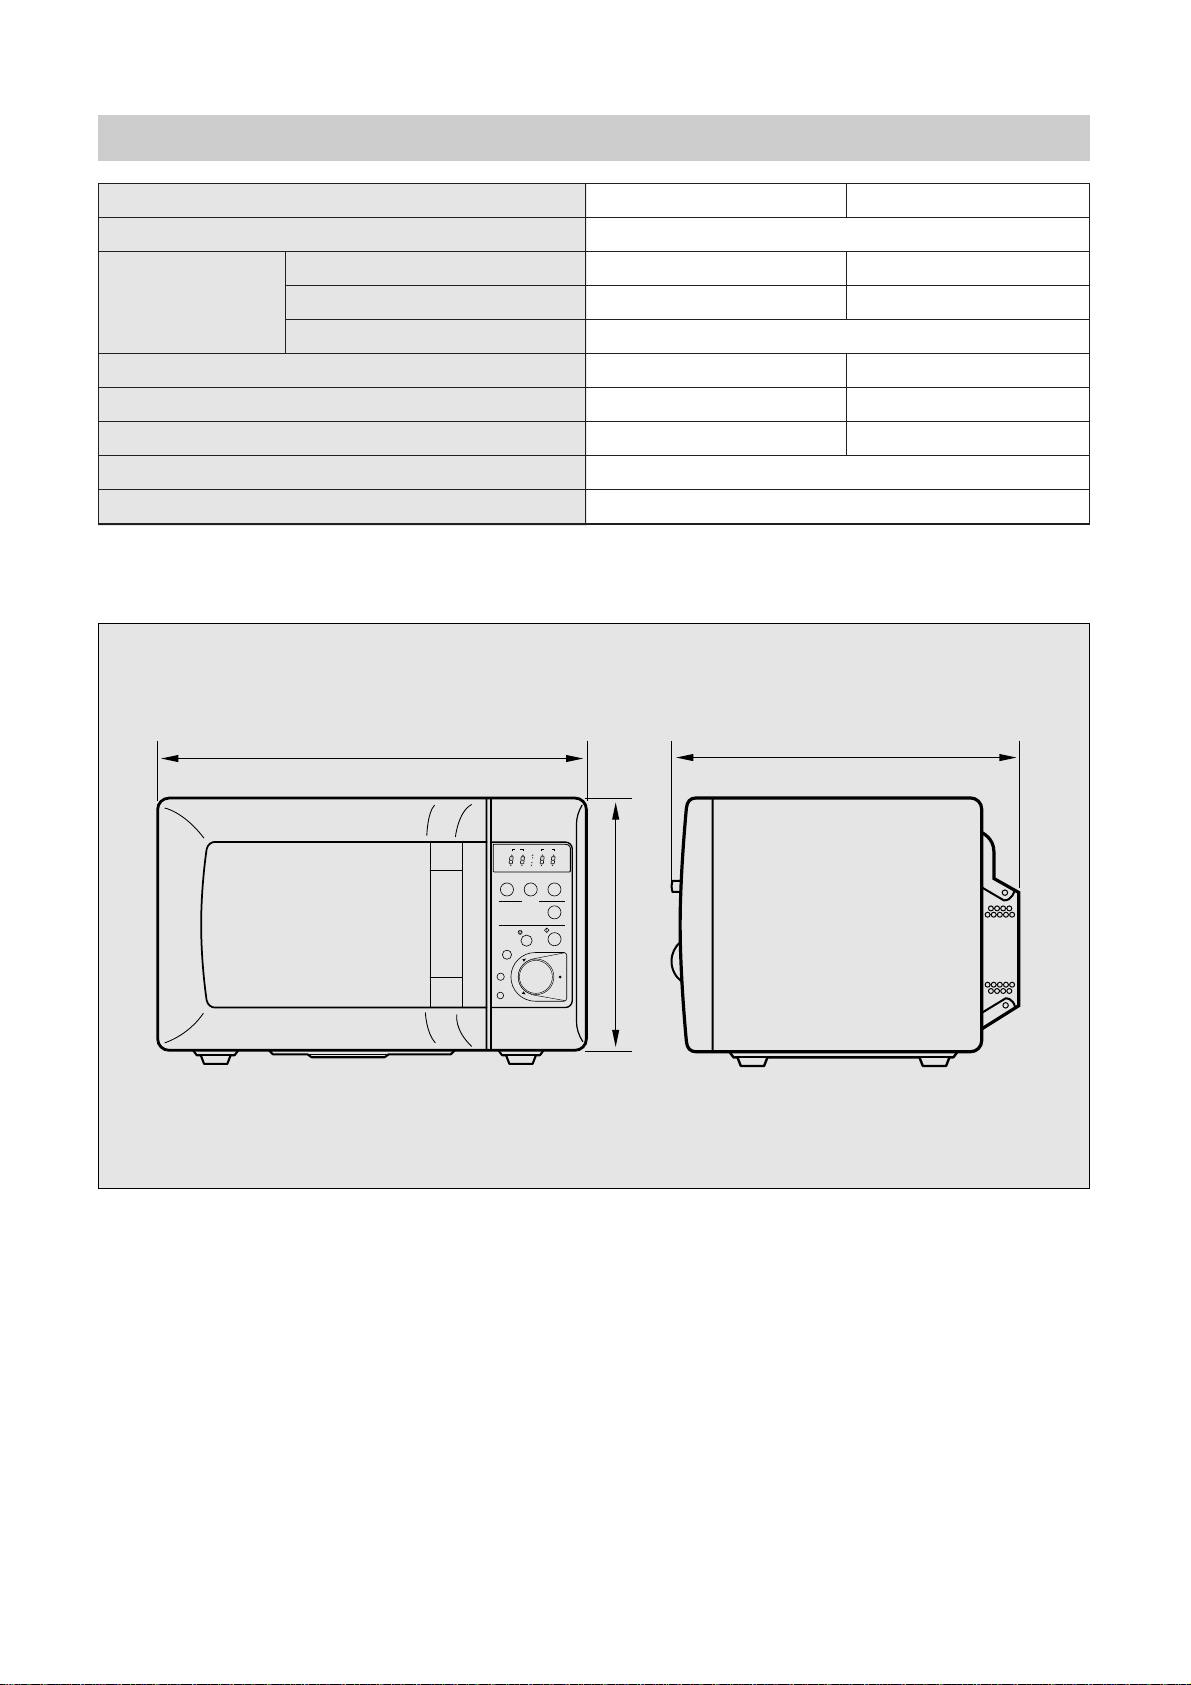
SPECIFICATIONS
Specifications KOR-816T KOR-616T
Power Supply 120V ~ 60Hz, SINGLE PHASE WITH EARTHING
POWER CONSUMPTION 1200 W 920 W
MICROWAVE OUTPUT POWER 800 W (IEC 705) 600 W (IEC 705)
FREQUENCY 2450 MHz
OUTSIDE DIMENSIONS (W x H x D) 495 x 289 x 409 mm 465 x 274 x 372 mm
CA VITY DIMENSIONS (W x H x D) 320x 225 x 330 mm 290x 200 x 290 mm
NET WEIGHT APPROX. 14.0Kg APPROX. 12.5Kg
TIMER 60 min. 00 sec
POWER SELECTIONS 5 LEVELS
495
409
289
Stop Defrost
1 2 WeightQuantity Time
Lock Auto cook Wattlb oz
Power Defrost+1min
Auto Cook
STOP
START
CLEAR
Speedy
More
Less
Clock
T
i
m
e
r
/
W
e
i
g
h
t
/
Q
u
a
n
t
i
t
y
1. Beveroge
2. Soup
3. Casserole
4. Vegetable
5. Fish Fillets
(465)
(274)
(372)
* Specifications subject to change without notice.
( ) : For KOR-616T
4
FEATURES DIAGRAM
Power Defrost+1min
Auto Cook
STOP
START
CLEAR
Speedy
More
Less
Clock
T
i
m
e
r
/
W
e
i
g
h
t
/
Q
u
a
n
t
i
t
y
1. Beveroge
2. Soup
3. Casserole
4. Vegetable
5. Fish Fillets
Stop Defrost
1 2 WeightQuantity Time
Lock Auto cook Watt ozl
Power Defrost+1min
Auto Cook
STOP
START
CLEAR
Speedy
More
Less
Clock
T
i
m
e
r
/
W
e
i
g
h
t
/
Q
u
a
n
t
i
t
y
1. Beveroge
2. Soup
3. Casserole
4. Vegetable
5. Fish Fillets
Stop Defrost
1 2 WeightQuantity Time
Lock Auto cook Wattlb oz
1 2 3
4
5
6
7
8
0
q
t
y
u
i
o
p
r
e
w
9
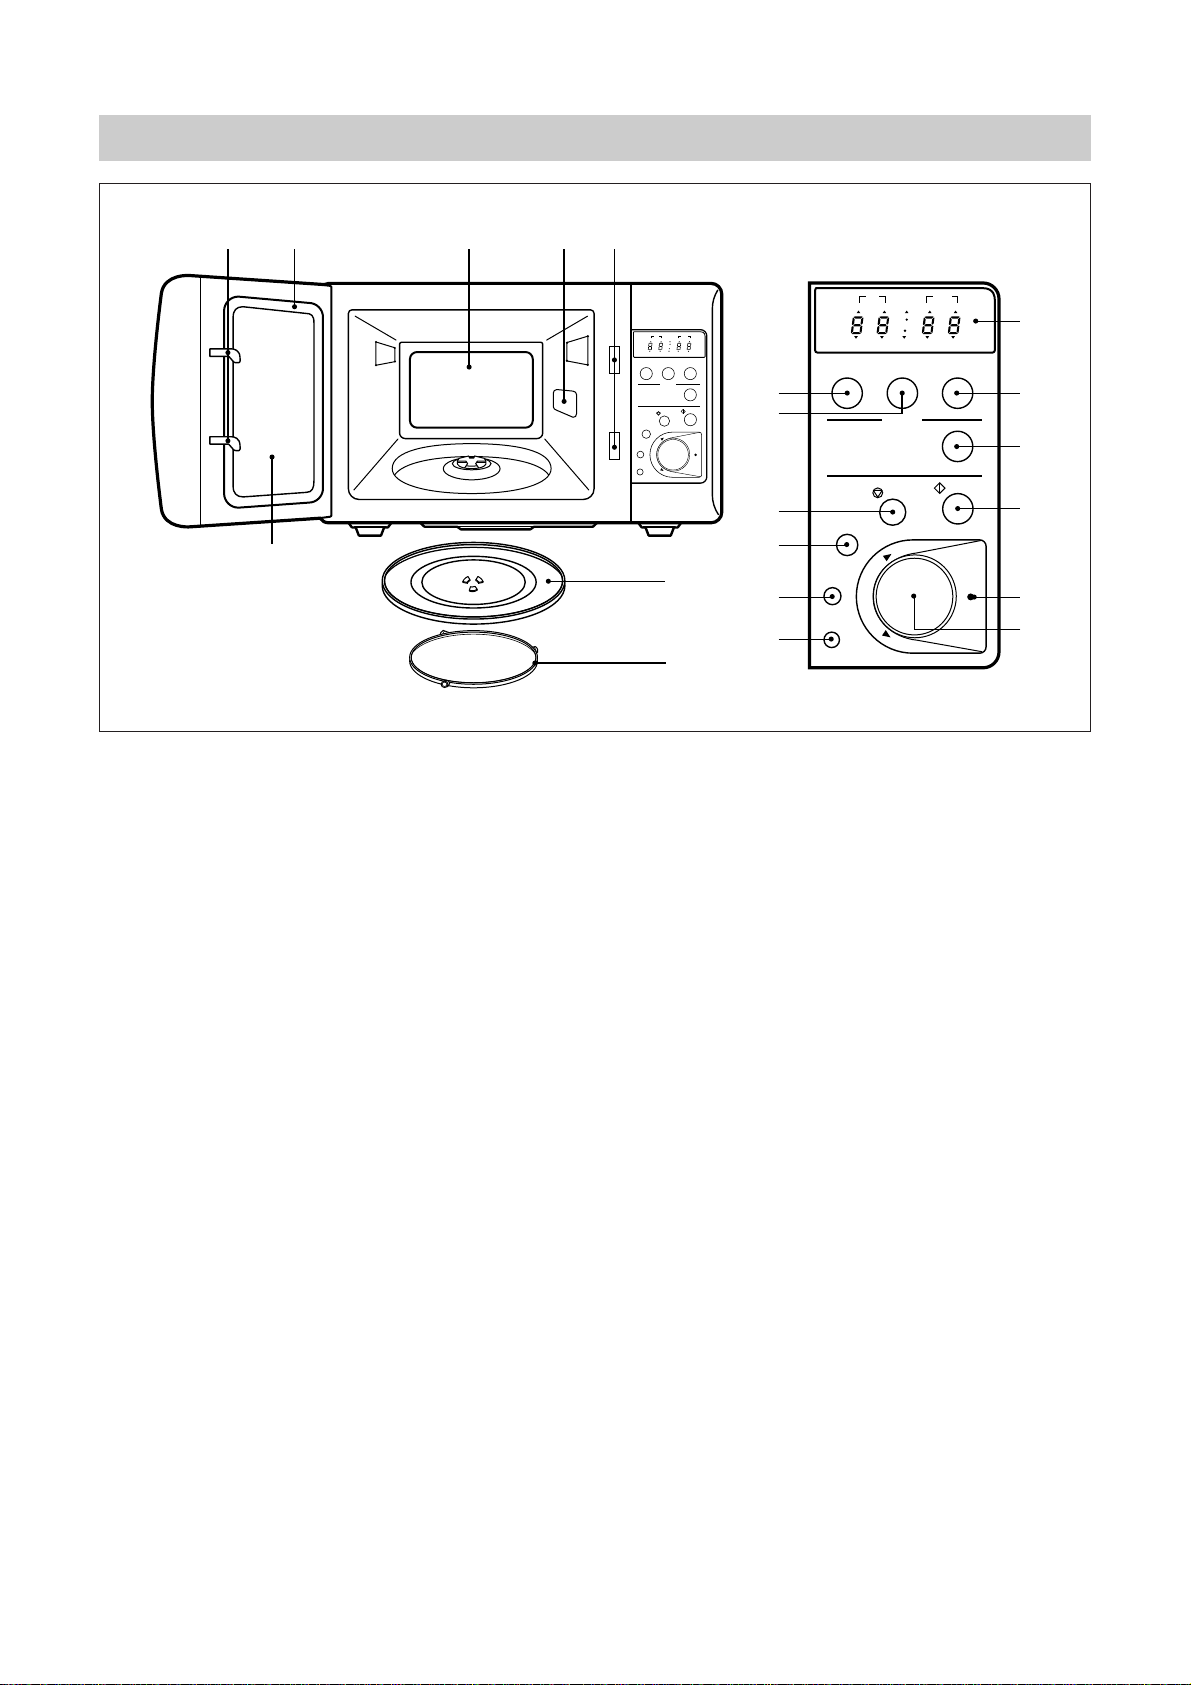
¤ Door latch - When the door is closed it will automatically lock shut. If the door is opened while the
oven is operating, magnetron will immediately stop operating.
¤Ł Door seal - Door seal maintains the microwave energy within the oven cavity and prevents microwave
leakage.
¤Ø Oven cavity.
¤Œ Spatter shield - Protects the microwave outlet from splashes of cooking foods.
¤º Safety interlock system.
¤ Door viewing screen - Allows viewing of food. The screen is designed so that light can pass through,
but not the microwaves.
¤ Glass cooking tray - Made of special heat resistant glass. Food in a proper receptacle is placed on
this tray for cooking.
¤ Roller guide - This must always be used for cooking together with the glass cooking tray.
¤ Display - Cooking time, power level, present time are displayed.
¤ ¤æ ¤ Function buttons - Used to select desired oven operation.
: MICROWAVE, DEFROST, AUTOCOOK.
¤ +1 min. button - Used to increase time of operating.
¤ Start button - Used to start a selected operation. When lamp blinks, press the start button.
Speedy cook button - Used to set desired time.(It is incresed 30 seconds.)
¤ı Stop/clear button - Used to pause or clear all information manually put into the oven control panel
except clock.
§ §æ More/Less button - Used to select auto cook time. (More/less 10% of auto cook time)
§ Clock button - Used to set and recall the time of day.
§ Dial knob - Used to set the cooking time, weight and quantity.
§ Guide lamp - When blinking it informs you to be ready to operte dial knob.
5
INSTALLA TION
STEADY, FLAT LOCATION
This microwave oven should be set on a steady, flat surface.
LEAVE SPACE BEHIND AND SIDE
All air vents should be kept a clearance. lf all vents are covered during operation, the oven may overheat
and, eventually, cause oven failure.
AWAY FROM RADIO AND TV SETS
Poor television reception and radio interference may result if the oven is located close to a TV, Radio, or
antenna, feeder and so on.
AWAY FROM HEATING APPLIANCES AND WATER TAPS
Keep the oven away from hot air, steam or splash when choosing a place to position it, or the insulation
might be adversely affected and breakdowns occur.
POWER SUPPLY
• Check your local power source. This oven must be plugged into at least at 12 Amp 120 Volt, 60Hz
grounded outlet.
• Power supply cord is about 1.0 meters long.
1. A short power-supply cord is provided to reduce the risks resulting from becoming entangled in or tripping
over a longer cord.
2. Longer cord sets or extension cords are available and may be used if care is exercised in their use.
3. If a long cord or extension cord is used, (1) the marked electrical rating of the cord set or extension cord
should be at least as great as the electrical rating of the appliance, (2) the extension cord must be a
grounding-type 3-wire cord, and (3) the longer cord should be arranged so that will not drape over the
countertop or tabletop where it can be pulled on by children or tripped over accidentally.
EXAMINE THE OVEN AFTER UNPACKING FOR ANY DAMAGE SUCH AS:
Dents, a misaligned door, broken door, a dent in cavity.
If any of the above are visible, DO NOT INSTALL, and notify dealer immediately.
1
2
3
4
5
6
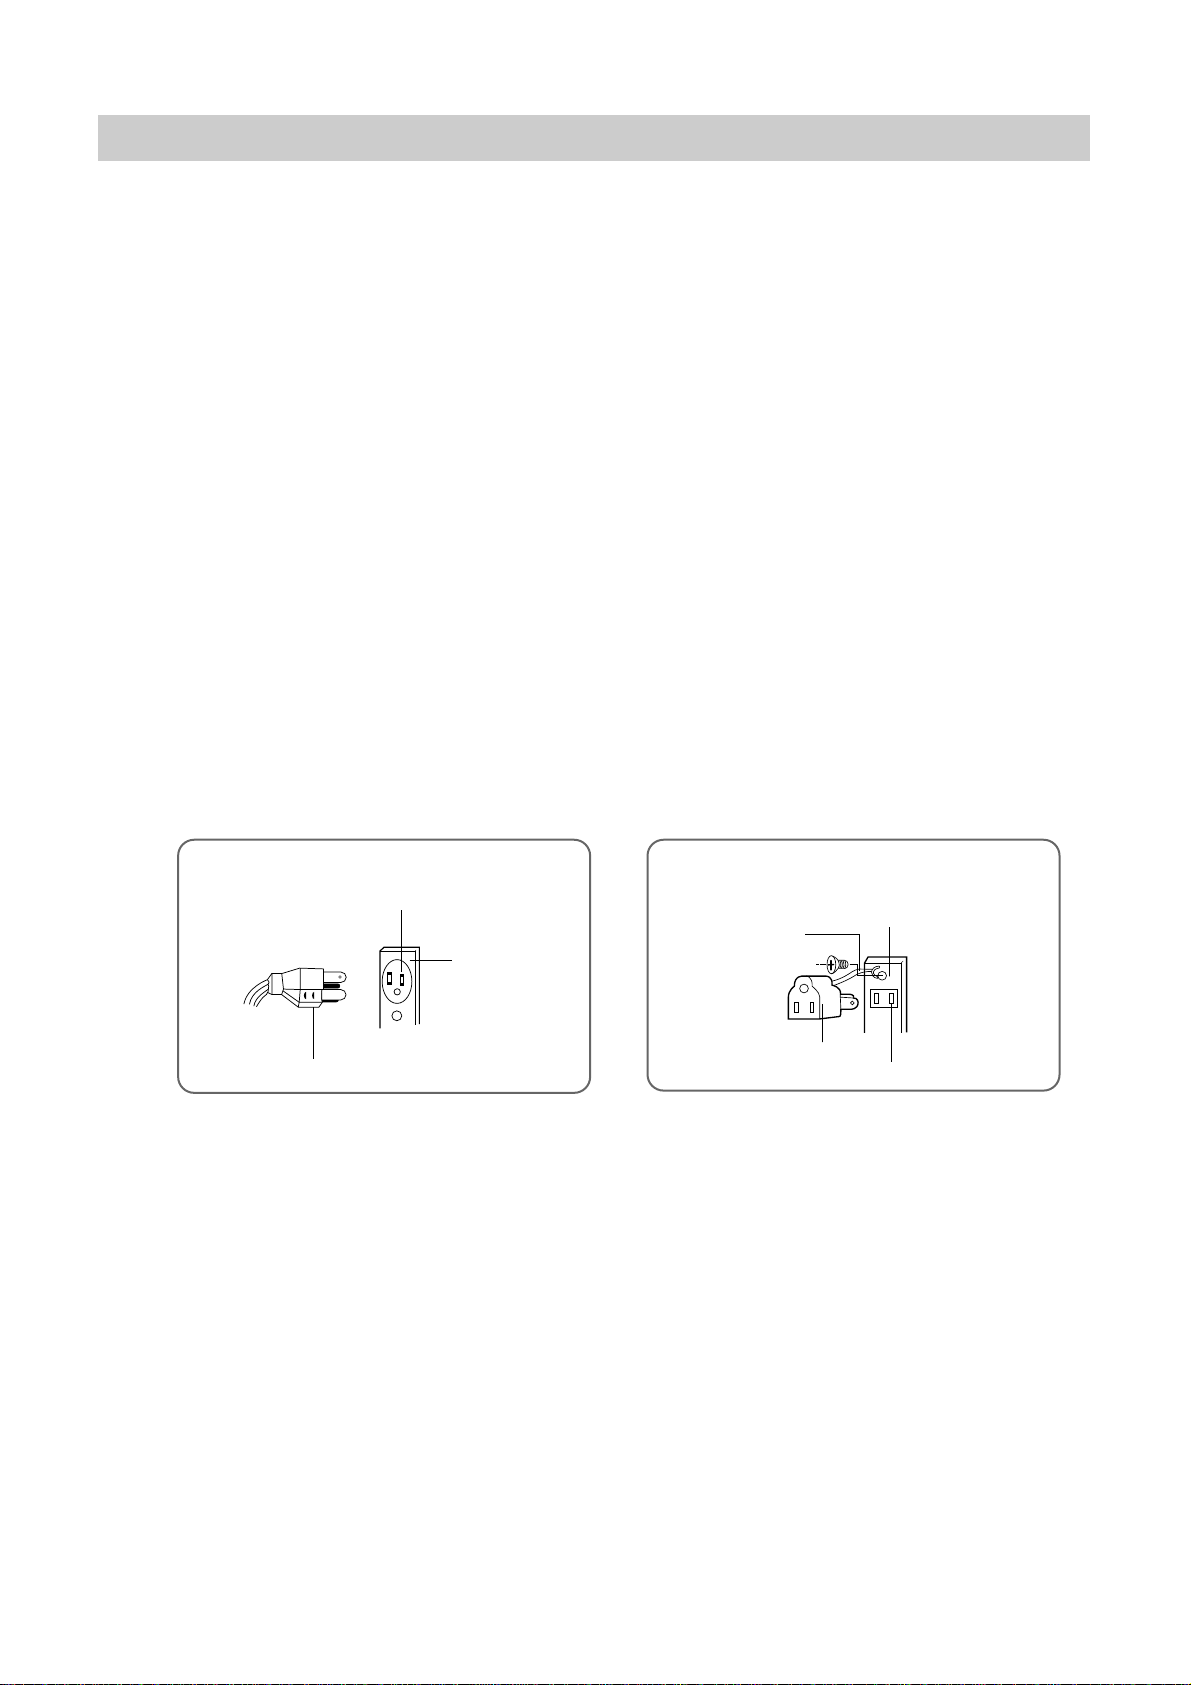
When use 3-pronged plug When use grounding adaptor, make sure the
receptacle box is fully grounded
3-prong Receptacle
3-prong plug
Receptacle
Box cover
Grounding Lead
Receptacle Box Cover
Grounding Adaptor
Receptacle

6
When the oven door is opened, the light turns
off.
The oven door can be opened at any time
during operation by touching the door release
button on the control panel. The oven will
automatically shut off. To restart the oven,
close the door and then touch START.
Each time a pad is touched, a BEEP will
sound to acknowledge the touch.
The oven automatically cook on full power
unless set to a lower power level.
The display will show “ :0” when the oven is
plugged in.
Time clock returns to the present time when
the cooking time ends.
When the STOP/CLEAR pad is touched
during the oven operation, the oven stops
cooking and all information retained. To erase
all information (except the present time), touch
the STOP/CLEAR pad once more. If the oven
door is opened during the oven operation, all
information is retained.
If the START pad is touched and the oven
does not operate, check the area between the
door and door seal for obstructions and make
sure the door is closed securely. The oven will
not start cooking until the door is completely
closed or the program has been reset.
Wattage output chart
• The power-level is set by pressing the M/W pad. The chart shows the display, the power level and the
percentage of power .
( ) : For KOR-616T
OPERATION PROCEDURE
1
2
3
4
5
6
7
8
This section includes useful information about oven operation.
1. Plug power supply cord into a 120V 60Hz power outlet.
2. After placing the food in a suitable container, open the oven door and put it on the glass tray. The glass
tray must always be in place during cooking.
3. Shut the door. Make sure that it is firmly closed.
Make sure the oven is properly installed and
plugged into the electrical outlet.
Touch Power pad,
Power Level (Display)
Approximate Percentage
Once the Touch of Power
5 800W (600W) 100%
4 650W (500W) 80%
3 450W (350W) 60%
2 300W (250W) 40%
1 140W (100W) 20%
7
Tips: • Be sure to read the cookbook's introduction before operating the oven.
• Also remember to read this operating instruction for proper safety information and instruction bfore using
the oven.
• See the cookbook for specific recipes.
• Prior to setting the controls, place one cup of water in the oven, in a heat-proof glass measuring cup, for
testing purposes.
• When setting the controls, everytime a button is pressed, a beep can be heard.
• If you don't take off the food after end cooking, buzzer will sound as 1 minute.
CONTROLS
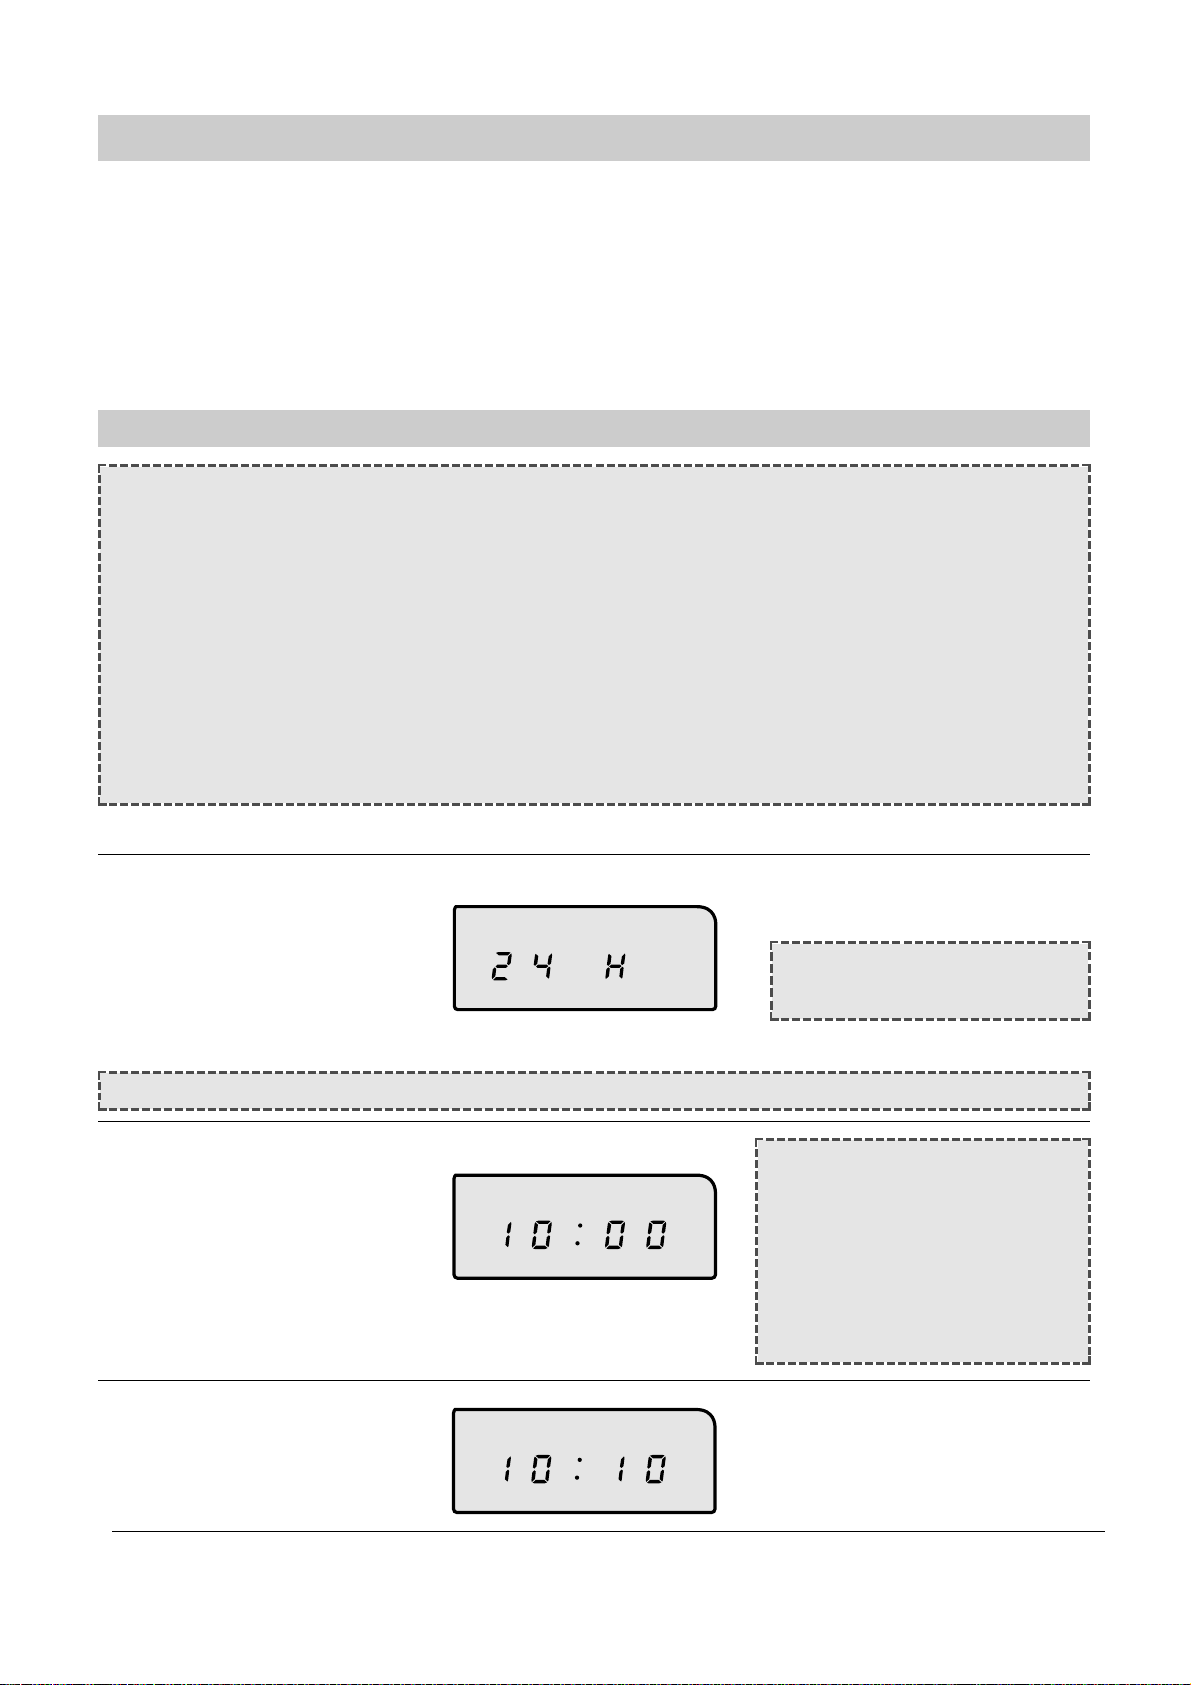
CLOCK
NOTE:
• When the oven is plugged in, “0:00”appears in the display window .
• The two dots between the hour and minute are the clock indicator lights. They will start
to flash on and off.
• The time of day will be displayed at all times, except when the oven is operating.
• In the oven of a power failure or if the oven is unplugged, the clock will have to be reset
for the proper time. Once power is restored or oven is plugged in, the display will show
“0:00”.
• To reset the time of day, repeat the steps given below.
• To check the time of day while the oven is poerating, press the CLOCk button, then the
time will be displayed for 3 seconds.
• When you turn DIAL KNOB, minutes are increased by to turn right and hours are
increased as to turn left.
SETTING THE CONTROL
1. Press CLOCK button.
If you push the CLOCK
button once again, you can
select 12 hour clock
system.
Then guide lamp will starts
blinking.
This example is 24 hour clock
system.
NOTE: This oven is mul-
tiple clock system.
2. Turn left the DIAL KNOB for
hour you want.
NOTE:
• If you selected 12 hour clock
system, this digital clock allows
you to set from 1:00 to 12:59.
• If you selected 24 hour clock
system, this digital clock allows
you to set from 0:00 to 23:59.
• The colon will stop blinking.
3. Turn right the DIAL KNOB for
minute you want.
NOTE: If you are not setting current time for 3 seconds, display return to old time.

8
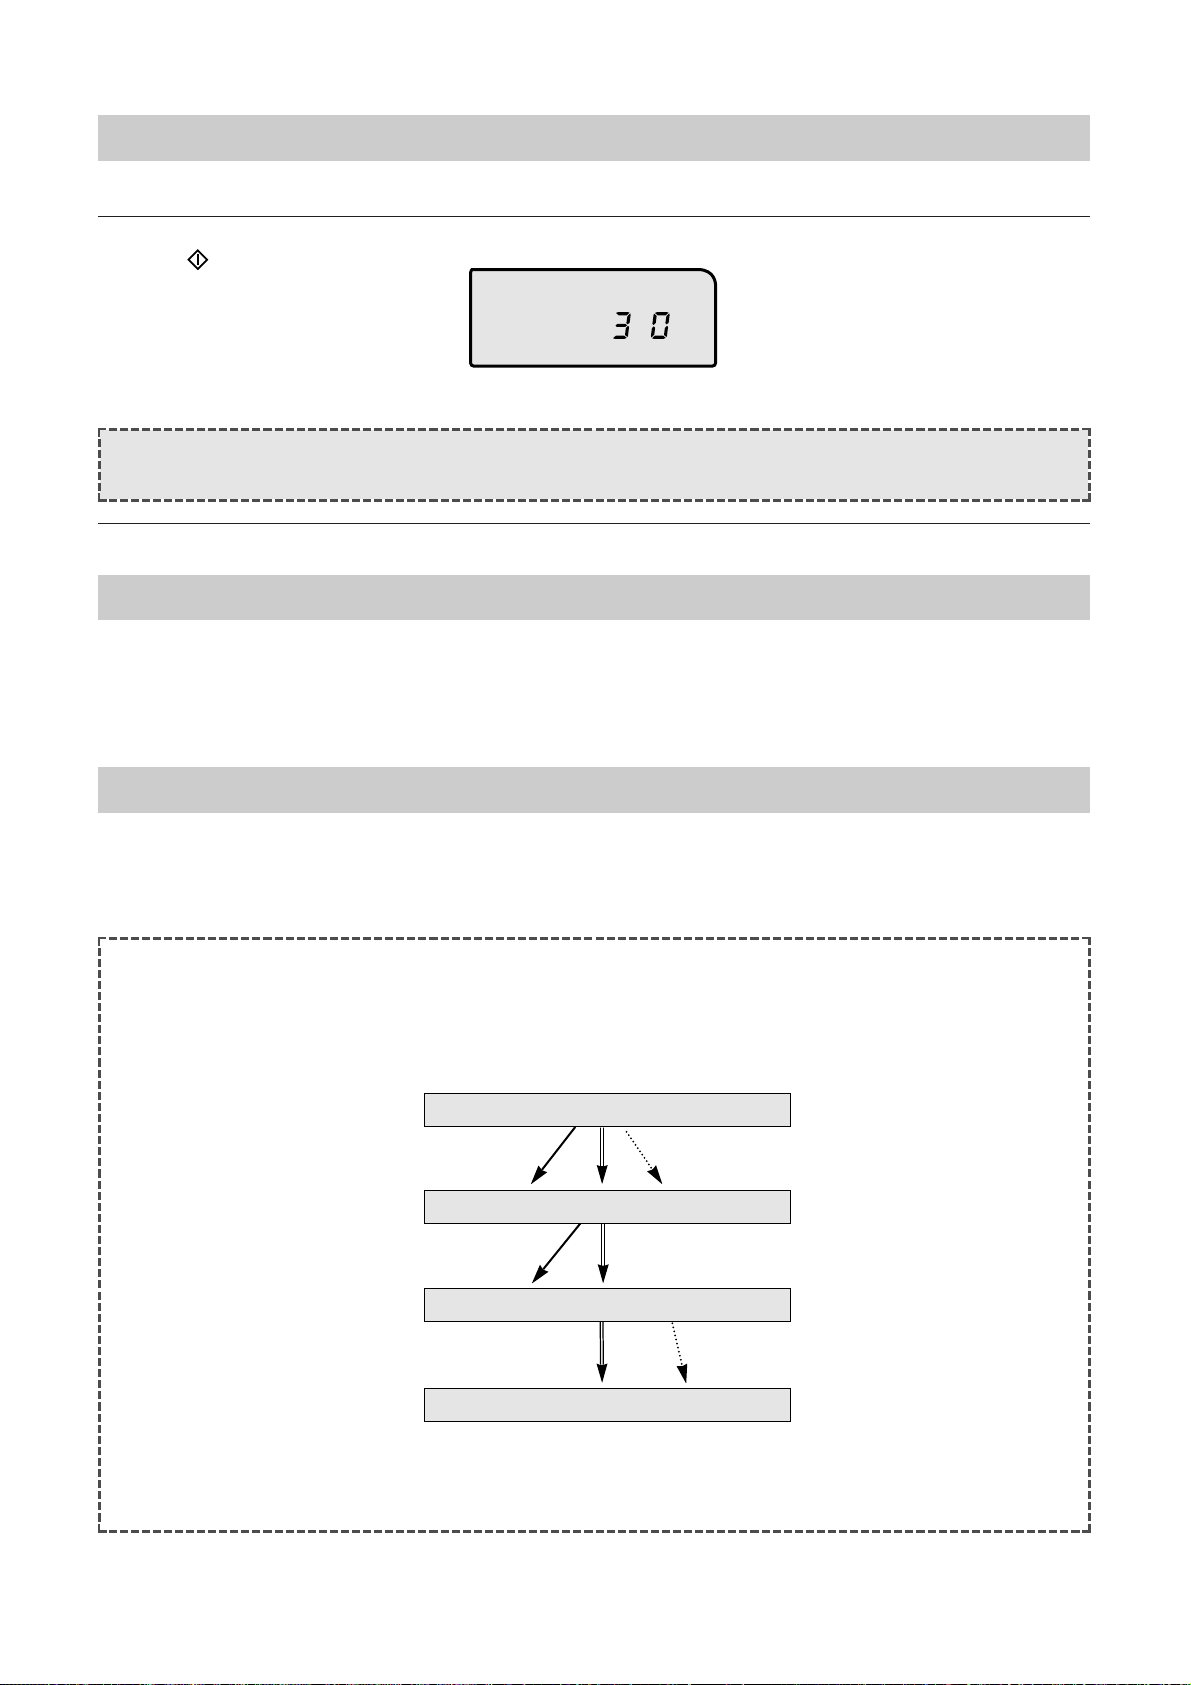
TIME DEFROST
SETTING THE CONTROL
1. Press DEFROST button
twice.
This TIME DEFROST indicator
light will light up.
Time
4. Press CLOCK button. The display will show present
time, and the colon starts
blinking.
This digital clock allows you to set
to “10:10”
2. Turn the DIAL KNOB for the
desired defrosting time.
For example: 20 minutes.
20:00 will show in the display.
Time
3. Press button.
The TIME DEFROST indicator
light will start blinking to show the
oven is in TIME DEFROST
mode.
Time
NOTE: During the defrosting operation, turn over after buzzer sound for completed defrosting.
NOTE: Time can be set up
to 60 minutes.
4. Buzzer will sound at the end of the cooking time. The indicator light will go off. The display panel will
return to the time of day . The oven light will turn off and the turntable will stop turning.
9
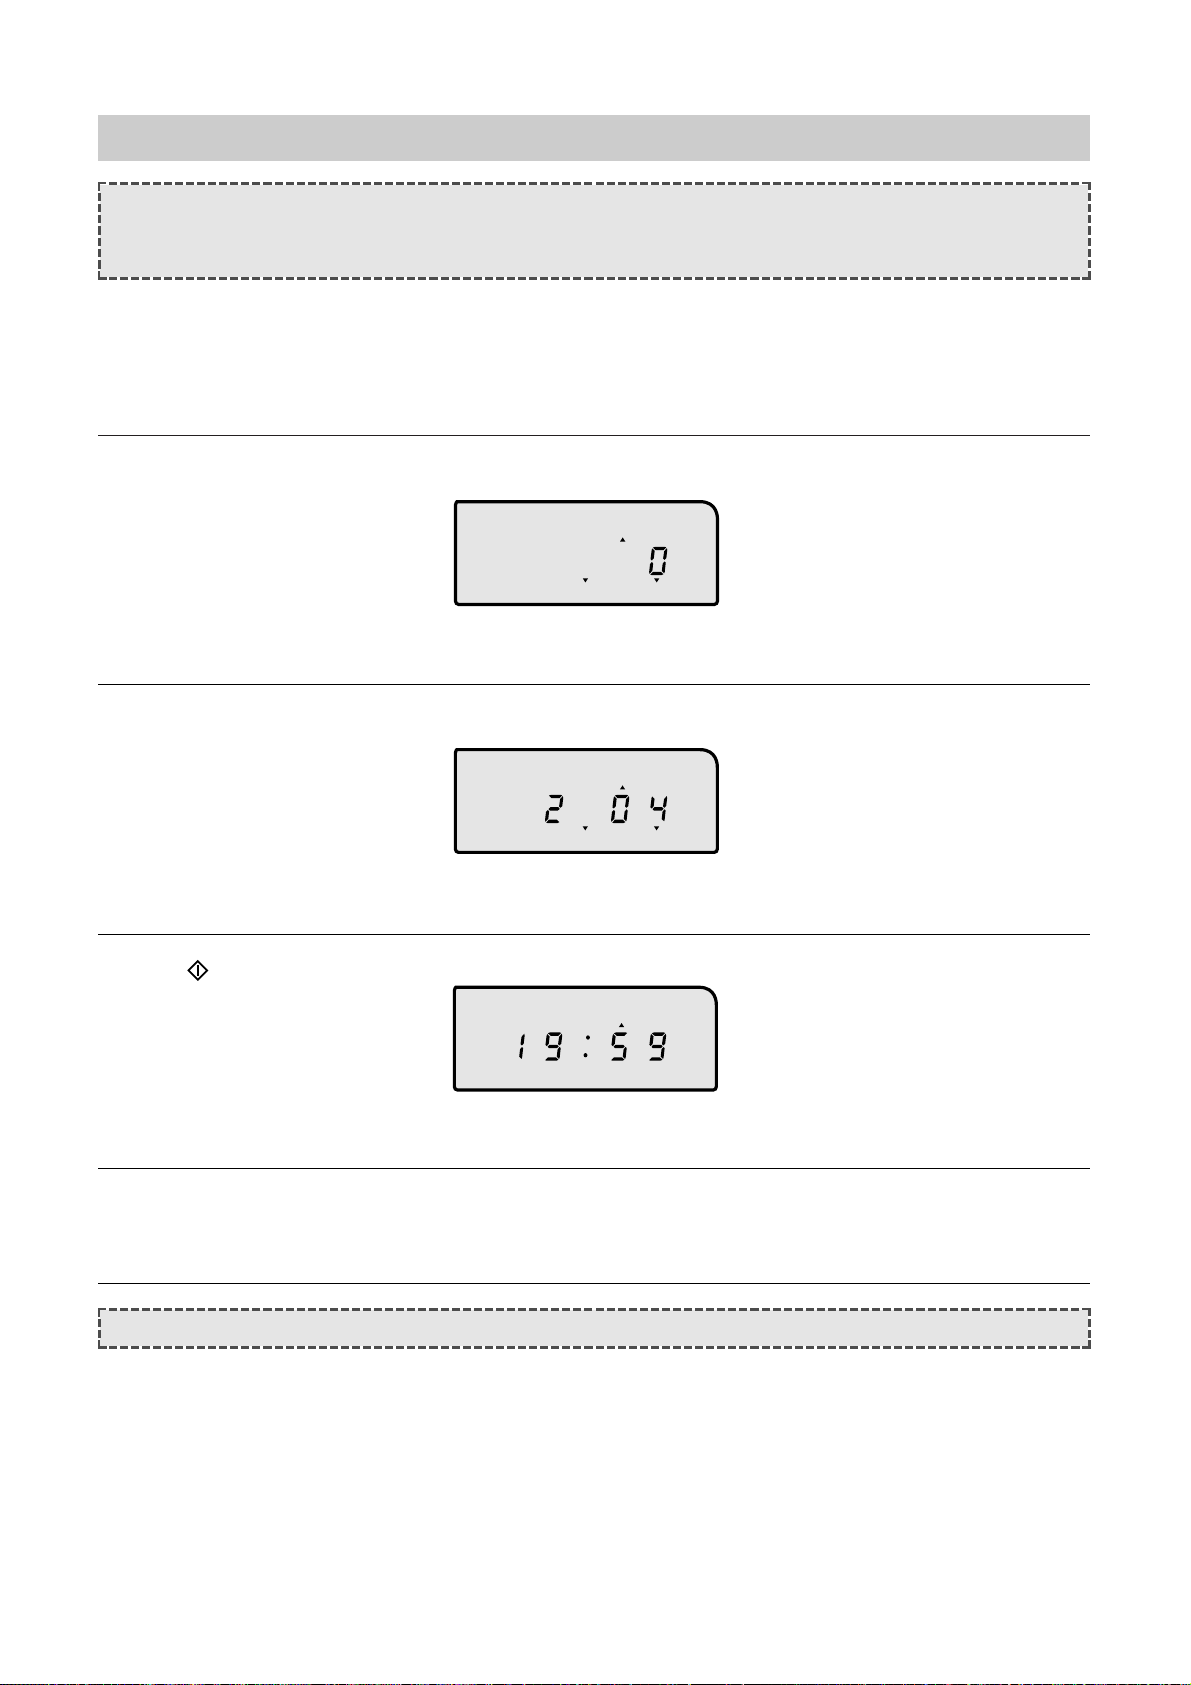
WEIGHT DEFROST
SETTING THE CONTROL
1. Press DEFROST button
once.
The WEIGHT DEFROST
indicator light will come on.
The lb, oz indicator light will start
blinking.
Weight
lb oz
2. Turn the DIALKNOB for the
desired defrosting weight.
For example: 2 lb 4 oz
The 204 will show in the display.
Weight
lb oz
3. Press button.
The WEIGHT DEFROST
indicator light will start blinking to
show the oven is in WEIGHT
DEFROST mode.
Weight
NOTE: During the defrosting operation, turn over the food after buzzer sound for completed defrosting.
NOTE:• This digital weight allows you set from 8 oz to 6 lb 8 oz.
• Whenever you press this button, the display is circulated WEIGHT DEFROST, TIME
DEFROST, and MICROWA VE mode.
4. Buzzer will sound at the end of the cooking time. The indicator light will go off. The display panel will
return to the time of day . The oven light will turn off and the turntable will stop turning.
10
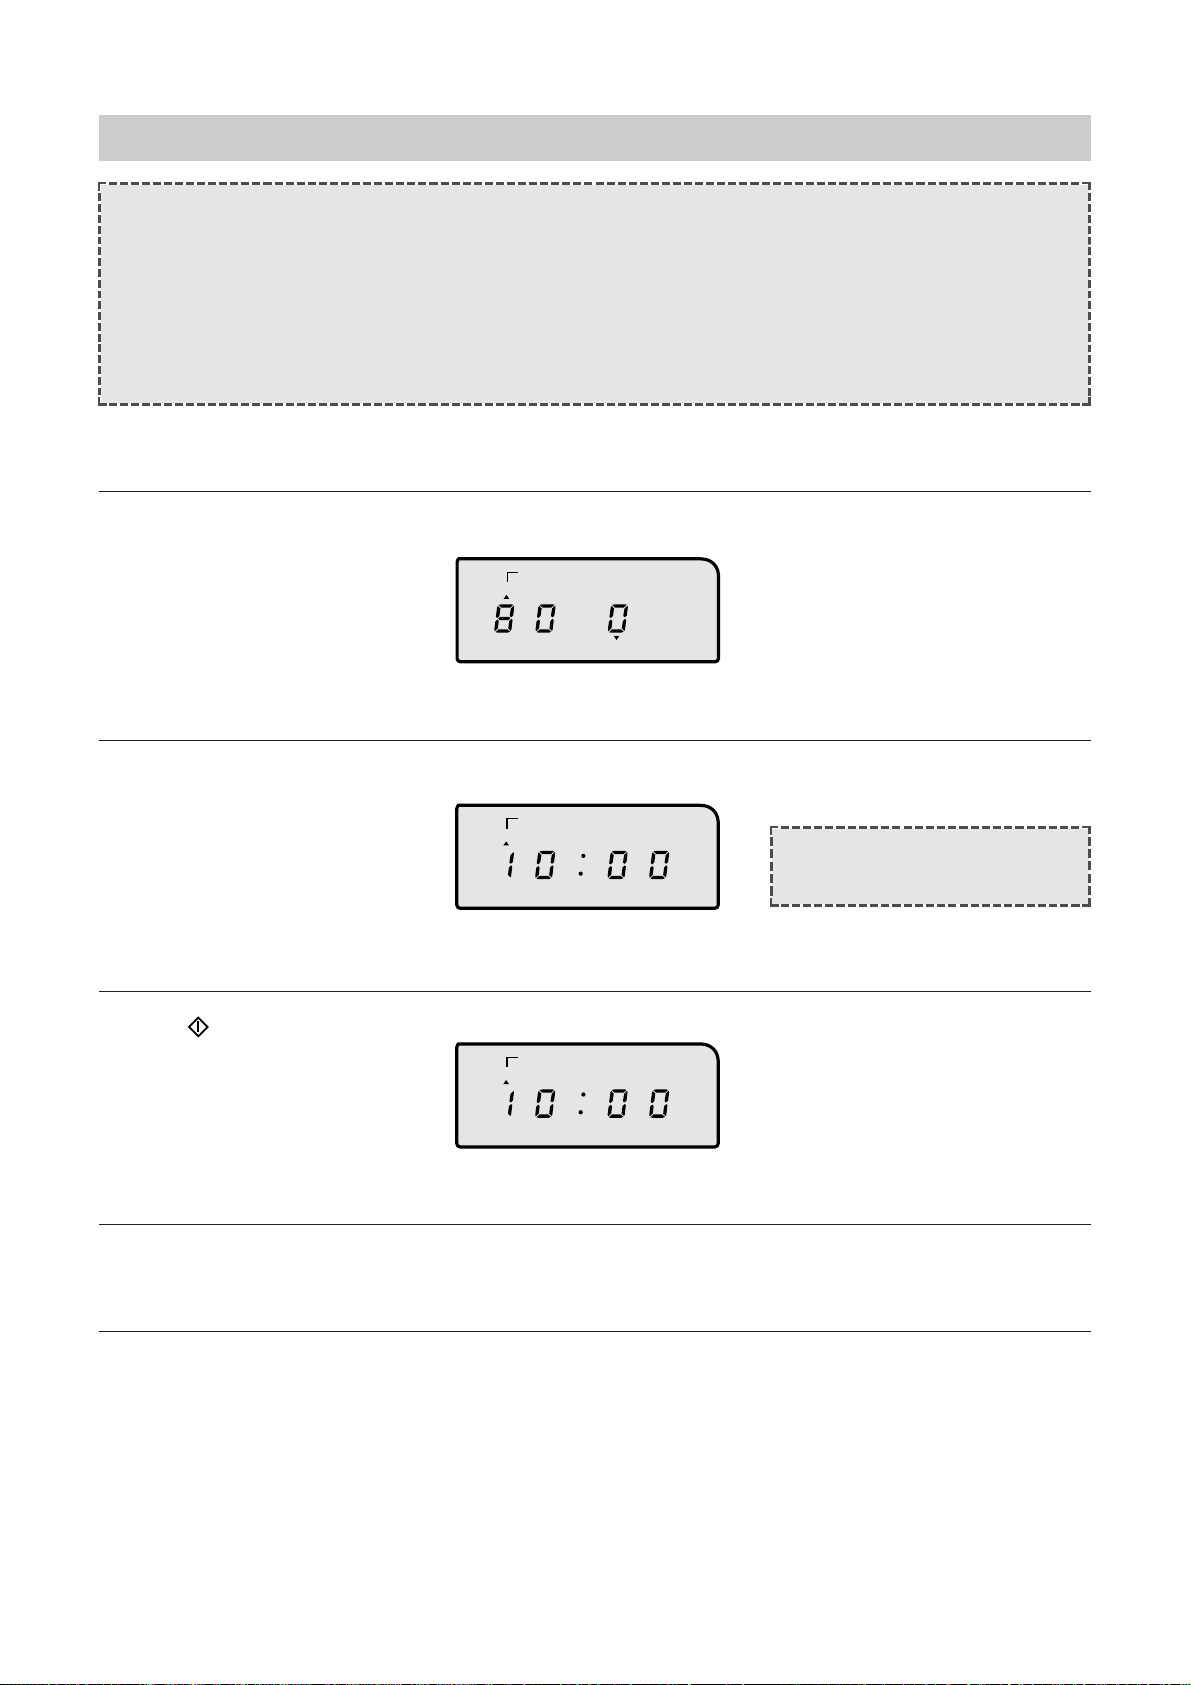
COOKING IN ONE STAGE
SETTING THE CONTROL
1. Press POWER button
By repeatedly pressing this
button, you can also select
other power levels.
For example: 800WATT
(KOR-616T:600)
The ST AGE1 indicator light will
light. The WATT indicator light
start blinking.
1
Watt
Stage
2. Turn the DIAL KNOB for the
desired cooking time.
For example: 10minutes
10:00 will show in the display.
Stage
1
3. Press button.
The ST AGE1 indicator light will
starts blinking to show the oven is
in MICROWAVE mode.
Stage
1
NOTE:
• To insure the best microwave and defrost results, be sure to start with a cool oven.
Let the oven cool 15~20minutes with the door slightly open.
• Power levels are 800W, 650W, 450W, 300W , 140W(KOR-816T) or 600W, 500W, 350W ,
250W and 100W(KOR-616T)
• It is displayed after an interval of 10 seconds from 10 seconds to 5 minutes, 30 seconds
from 5 minutes to 10 minutes, 1 minute from 10 minutes to 60 minutes.
4. Buzzer will sound at the end of the cooking time. The indicator light will go off. The display panel will
return to the time of day . The oven light will turn off and the turntable will stop turning.
NOTE: Time can be set up
to 60 minutes.
11
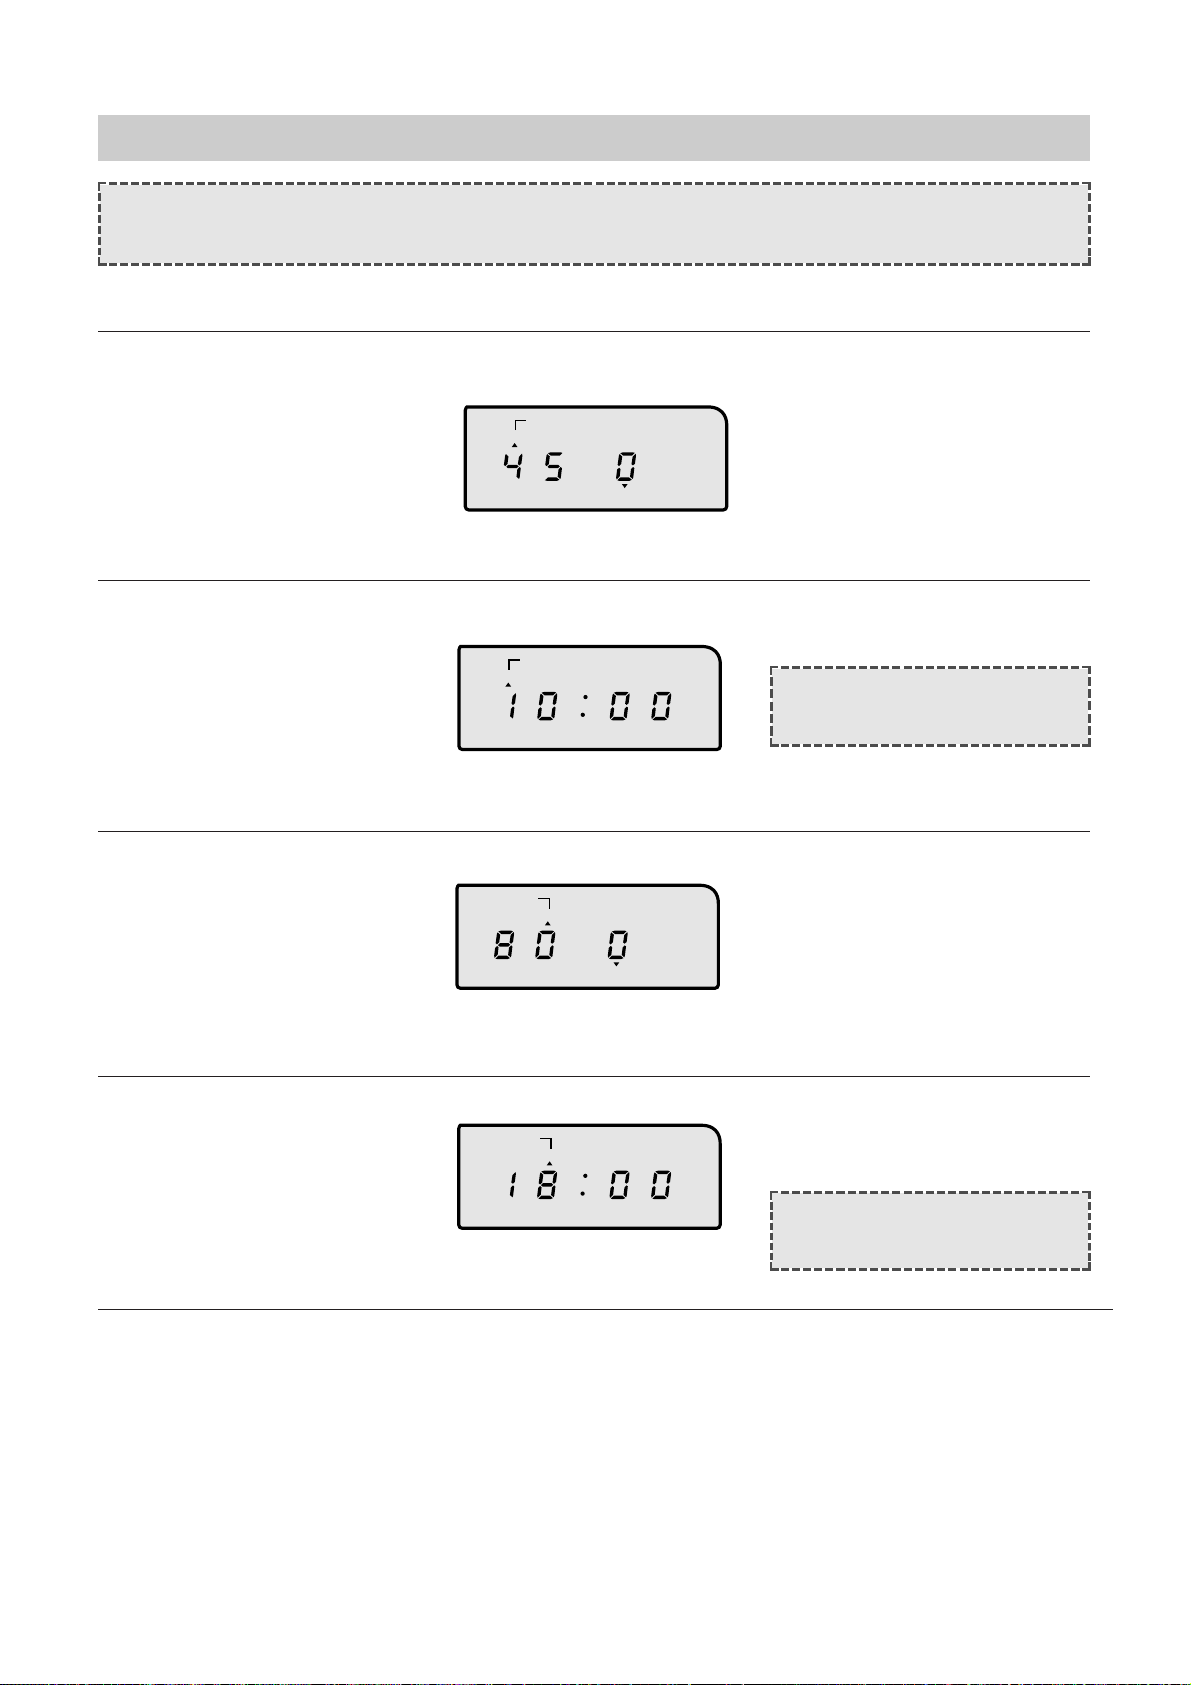
COOKING IN TWO STAGES
SETTING THE CONTROL
1. Press POWER button more
than three times.
By repeatedly pressing this
button, you can also select
other power levels.
For example: 450WATT
(KOR-616T:350WA TT)
The ST AGE1 indicator light will
light.
The WATT indicator light start
blinking.
1
Watt
Stage
2. Turn the DIALKNOB for the
desired cooking time.
For example: 10 minutes
10:00 will show in the display.
1
Stage
3. Press POWER button
By repeatedly pressing this
button, you can also select
other power levels.
For example:800WATT
(KOR-616T:600W)
The ST AGE2 indicator light will
light
The WATT indicator start blinking.
2
Watt
Stage
4. Turn the DIALKNOB for the
desired cooking time.
For example: 18minutes
18:00 will show in the display.
2
Stage
NOTE:
For best results, some recipes call for one power level for a certain length of time and
another power level for a different length of time.
NOTE: Time can be set up
to 60 minutes.
NOTE:
Time can be set up
to 60 minutes.
12
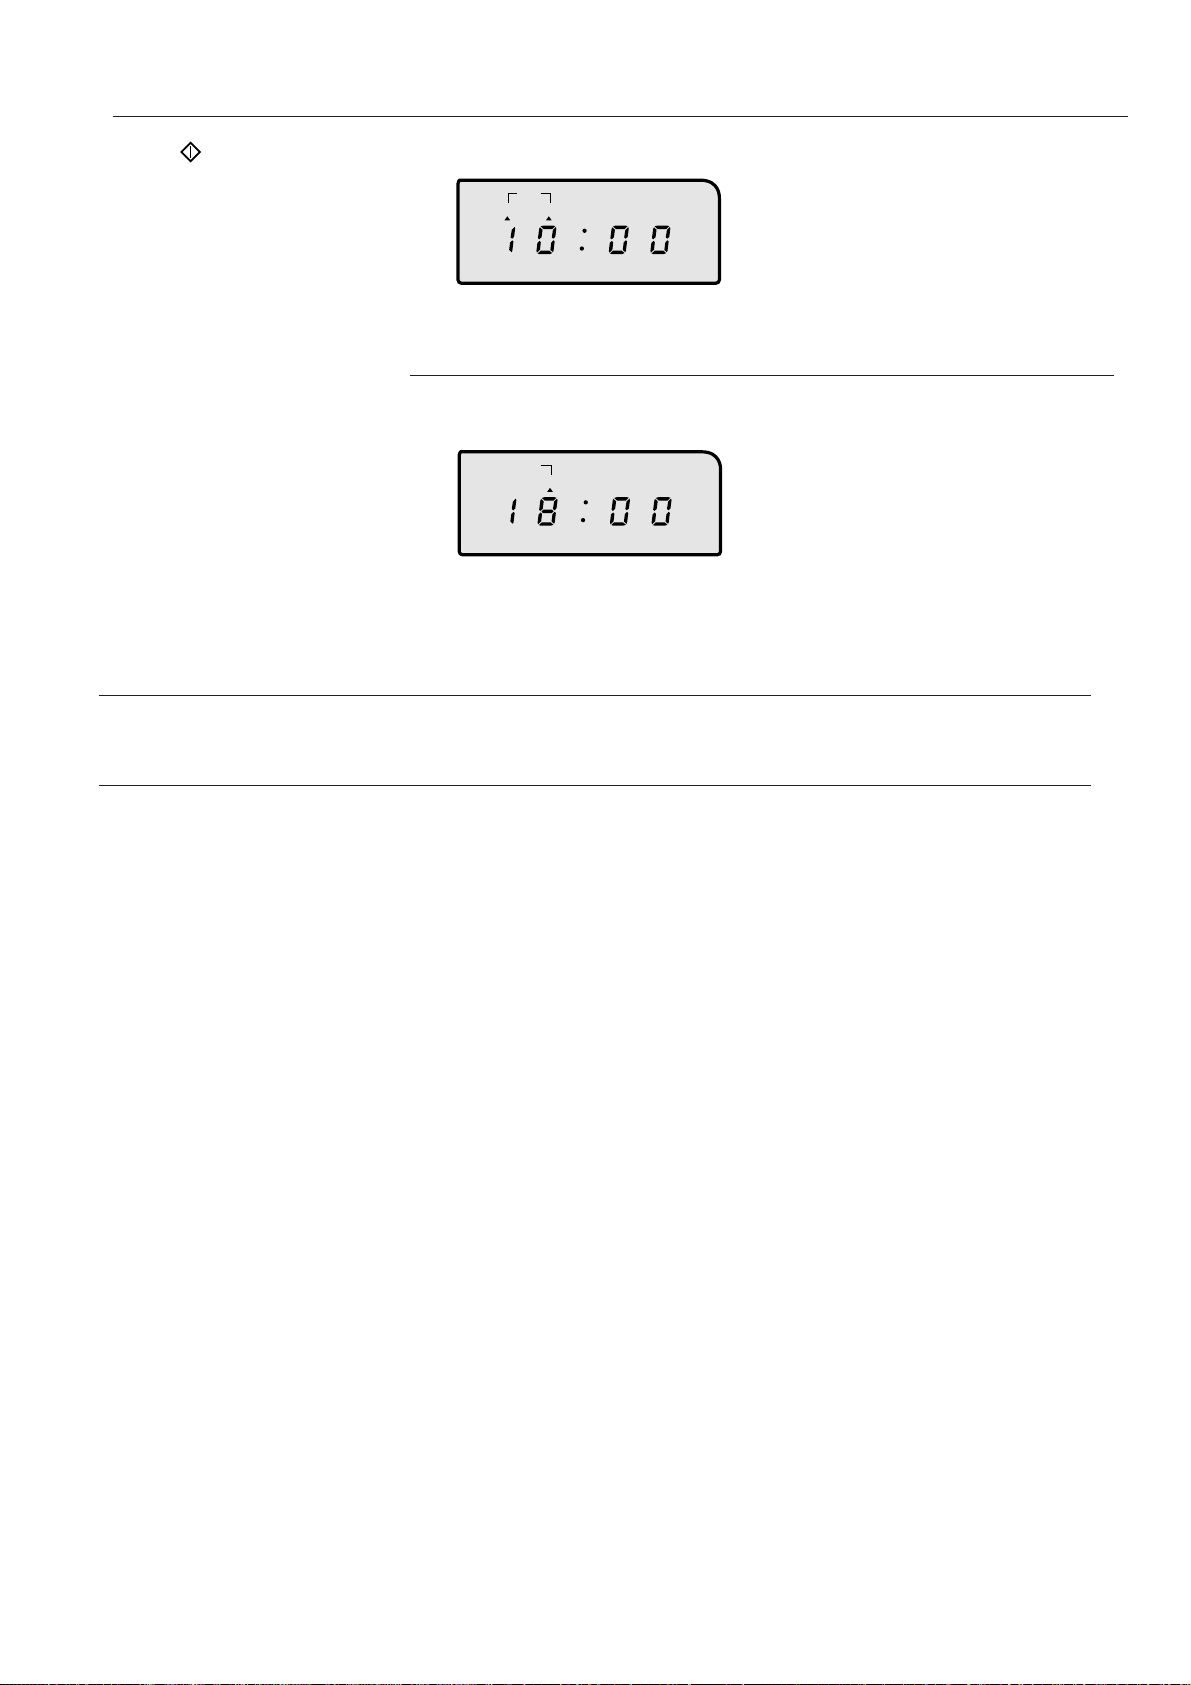
5. Press button.
When you touch ST AR T, both
ST AGE1 & 2 indicator lights come
on.
ST AGE1 indicator light blinking to
show you that the oven is cooking in
the first of two cook stages.
The oven will cook at the power you
selected for stage 1.
1 2
Stage
At the end of stage 1, the oven will
beep and start the second stage 2.
The ST AGE1 indicator light will go of f
and the ST AGE2 indicator light starts
blinking. The display counts down the
time to show you how much cooking
time is left in the second stage.
2
Stage
6. Buzzer will sound at the end of the cooking time. The indicator light will go off. The display panel will return to the
time of day . The oven light will turn of f and the turntable will stop turning.
13
AUTO COOK
SETTING THE CONTROL
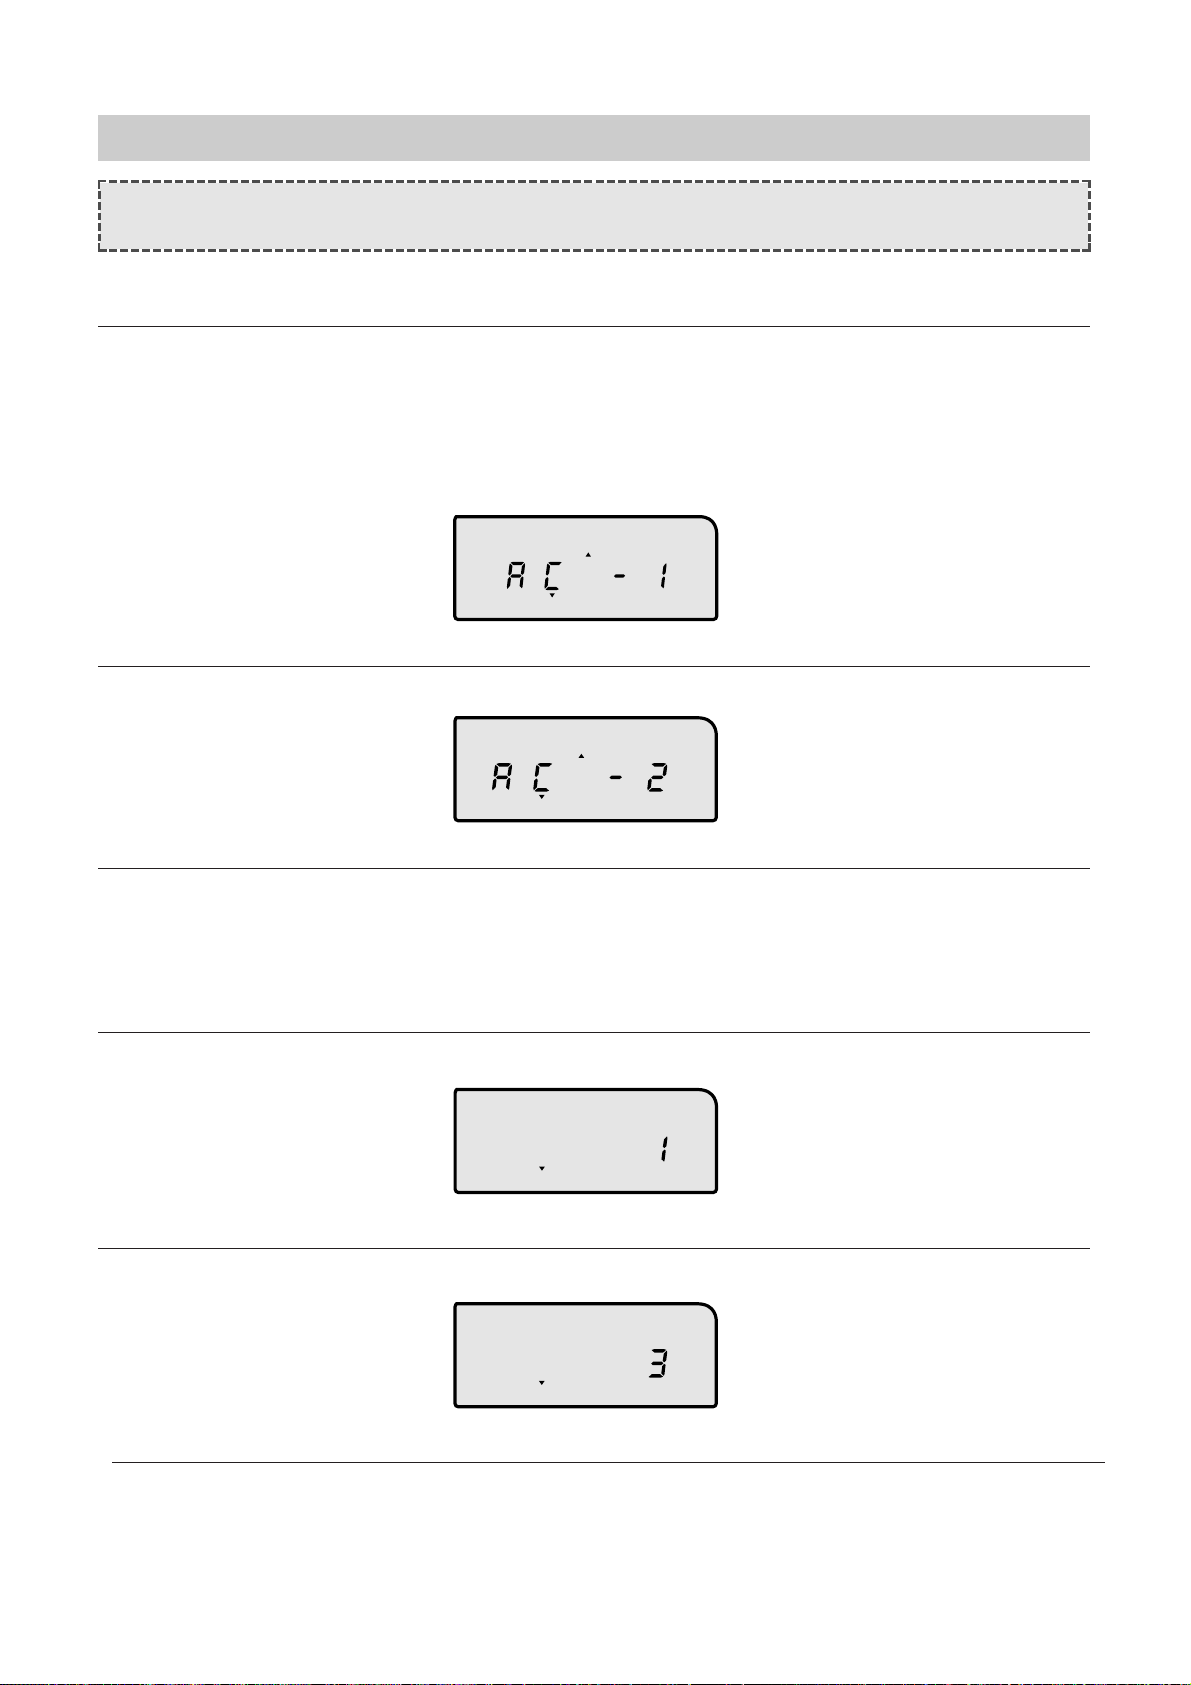
1. Press AUTO COOK button
The AUTO COOK indicator light
will light “AC-1” will show in the
display.
Quantity
Auto cook
2. Select the desired cooking.
For example: SOUP
Press AUTO COOK button
twice.
“AC-2” will show in the display .
The quantity indicator light will
start blinking
Auto cook
Quantity
4. Turn the DIALKNOB for
desired cooking quantity.
Auto cook
5. Select the desired cooking
quantity .
For example: 3(12.3oz)
“3” will show in the display.
Auto cook
3. If you want to select other menu, press AUTOCOOK button until display your desired cooking menu.
NOTE: •
There is programmed for cooking of five kinds (1~5)
• You don't have to worry about setting time, power and function.
You can operate MORE or LESS than programmed time as pressing MORE or LESS button whenever
MORE or LESS button, display is changed “10” or “-10”.
10: Adds 10% for programmed time.
-10: Romove 10% for prjogrammed time.
14
7. Press button.
This example don't set MORE
or LESS function.
For example: KOR-616T
The oven will now start auto cook
for menu2.
The indicator light starts blinking.
Auto cook
NOTE:
• AUTO COOK menu and quantity.
6. If you want to select other, turn the dial Knob until display you desired.
8.Buzzer will sound at the end of the cooking time. The indicator light will go off. The display panel will
return to the time of day . The oven light will turn off and the turntable will stop turning.
MENU NO QUANTITY NO
1 1 CUP
1 BEVERAGE 2 2CUPS
3 3CUPS
1 8.8 oz
2 SOUP 2
10.6 oz
3
12.3 oz
4
14.1 oz
1
7.1 oz
3 CASSEROLE 2 14.1 oz
3
1 lb 5 oz
4
1 lb 12 oz
1
8.8 oz
4 VEGETABLE 2
10.6 oz
3
12.3 oz
4
14.1 oz
1
10.6 oz
2
14.1 oz
5 FISH FILLET 3
1 lb 2 oz
4
1 lb 5 oz
5
1 lb 9 oz
15
1. Press button.
Then start lamp will start
blinking.
Whenever the button is pressed,
cooking time is increased 30
seconds.
If the time was setting, this oven
is operated automatically after 2
seconds to microwave high power.
STAGE COMVINA TIONS
This oven has the ability to be programmed to do up to three consecutive functions. These
combinations are five below and either the complete program or part of it can be used.
¡ When you set stage mode, indicator is lighted only setting.
¡ When you press START button, all indicators are lighted setted function.
Indicator of operating function is blinking.
SPEEDY COOK
+1 min.
CHILD SAFTY LOCK
SETTING THE CONTROL
NOTE: This key is increased from 30 seconds to 5 minutes.
If you are pressing more than about 0.5 seconds, the time is increased 30 seconds
continuously .
• The safty lock prevents unwanted oven operation such as by small children.
• To set, press STOP/CLEAR for 3 seconds, lock indicator light starts blinking.
• To cancel, press STOP/CLEAR for 3 seconds, lock indicator goes off.
• The function can use when oven is working state.
• Whenever press this button, time is increased as 1 minute.
• Time is increased until 60 minutes.
STAGE COOKING
STAGE 2 (M/W)
TIME / WEIGHT DEFROST
STAGE 1 (M/W)
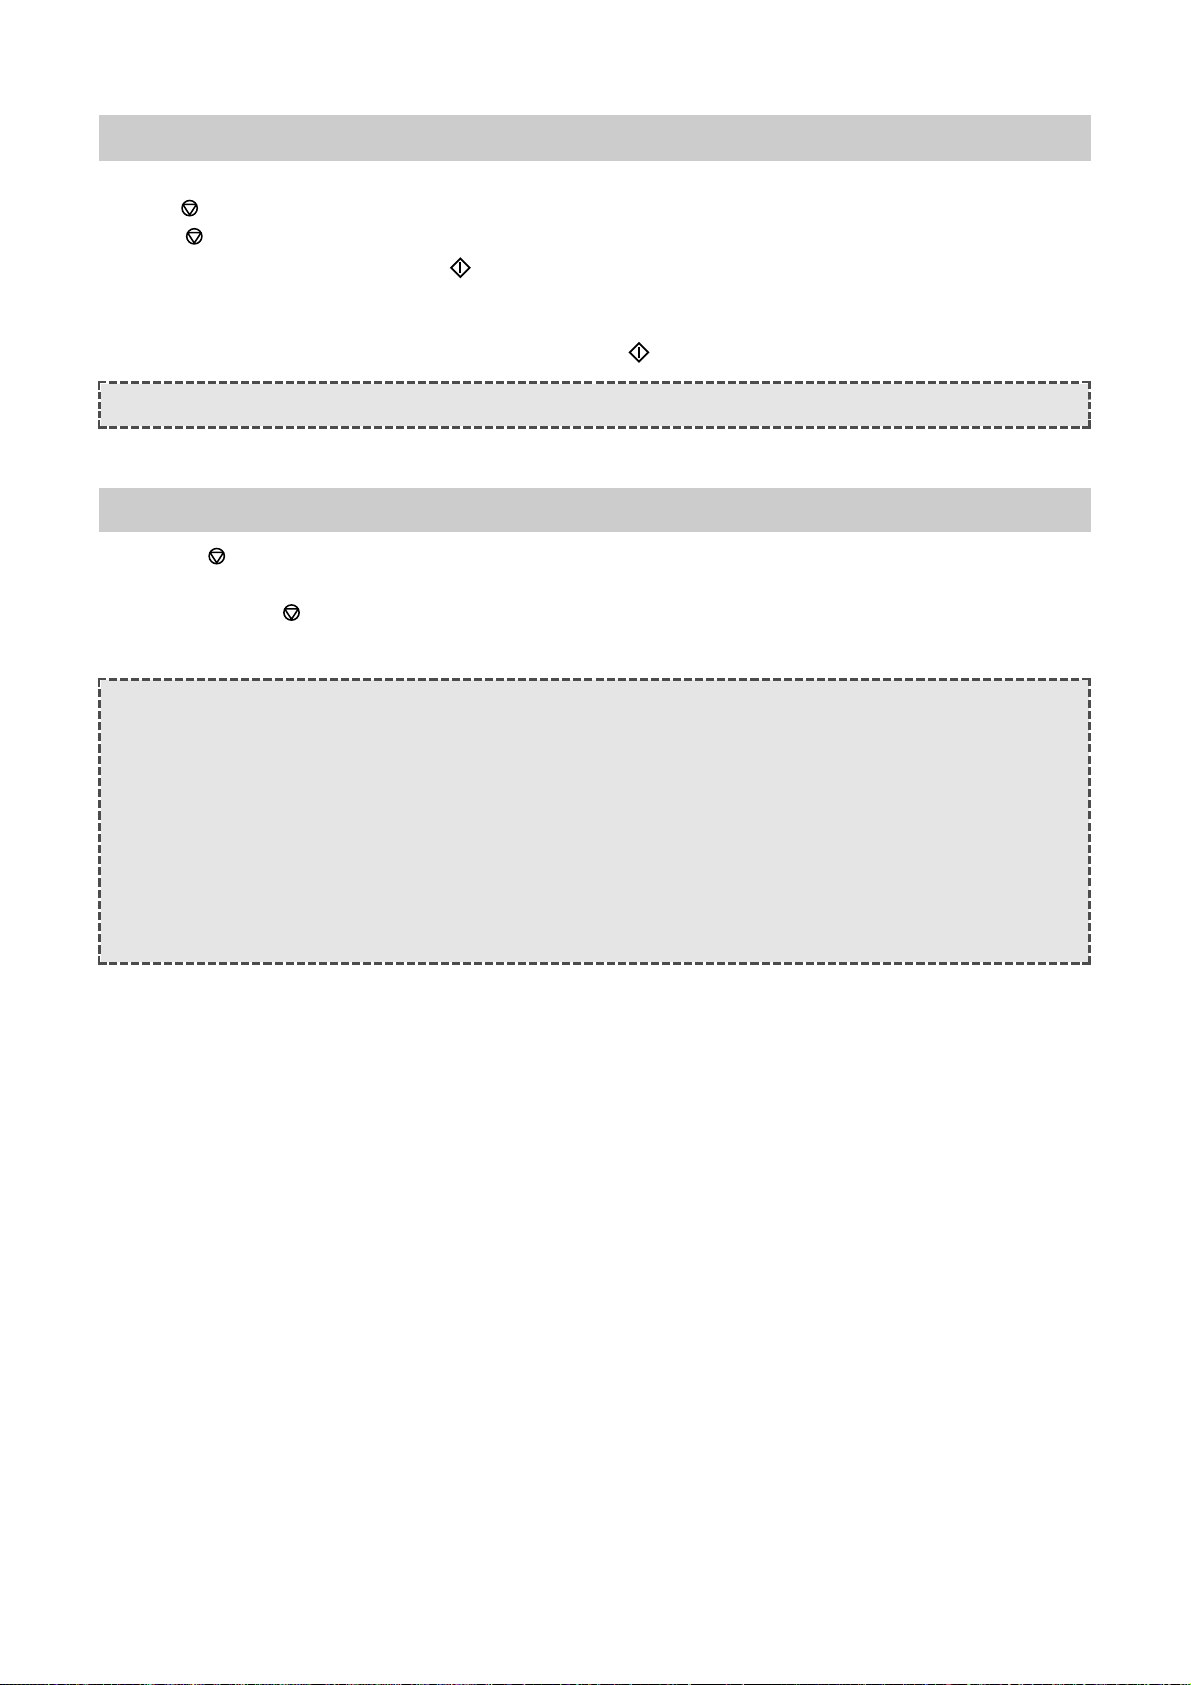
16
TO STOP THE OVEN WHILEITIS OPERATING
ERASING INSTRUCTIONS
GENERAL COOKING HINTS
1. When cook a roast with an excess amount of drippings, it is helpful to remove the drippings at
turnover time to prevent spattering.
2. Prick the meats, fish or poultry with a fork to prevent bursting.
Steam builds up pressure in meats, fish or poultry which are tightly covered by a skin or membrane.
3. Reduce suggested cooking times, It is always better to undercook foods rather than to over-cook them.
If a range of times is stated in a recipe, cook the minimun suggested time, check for doneness, and then
cook slightly longer if necessary.
NOTE:
Oven stops operating when door is opened.
• TOUCH (STOP/CLEAR)button to erase all instructions you set previously.
• Opening the oven door during cooking dose not erase cooking instruction.
• If you push twice button during operation, the cooking instruction is all erased.
1. Press (STOP/CLEAR) button.
-Touch once more to erase all instruction except clock.
-You can restart the oven by touching (ST ART) button.
2. Open the door
-You can restart the oven by closing the door and touching button.
17
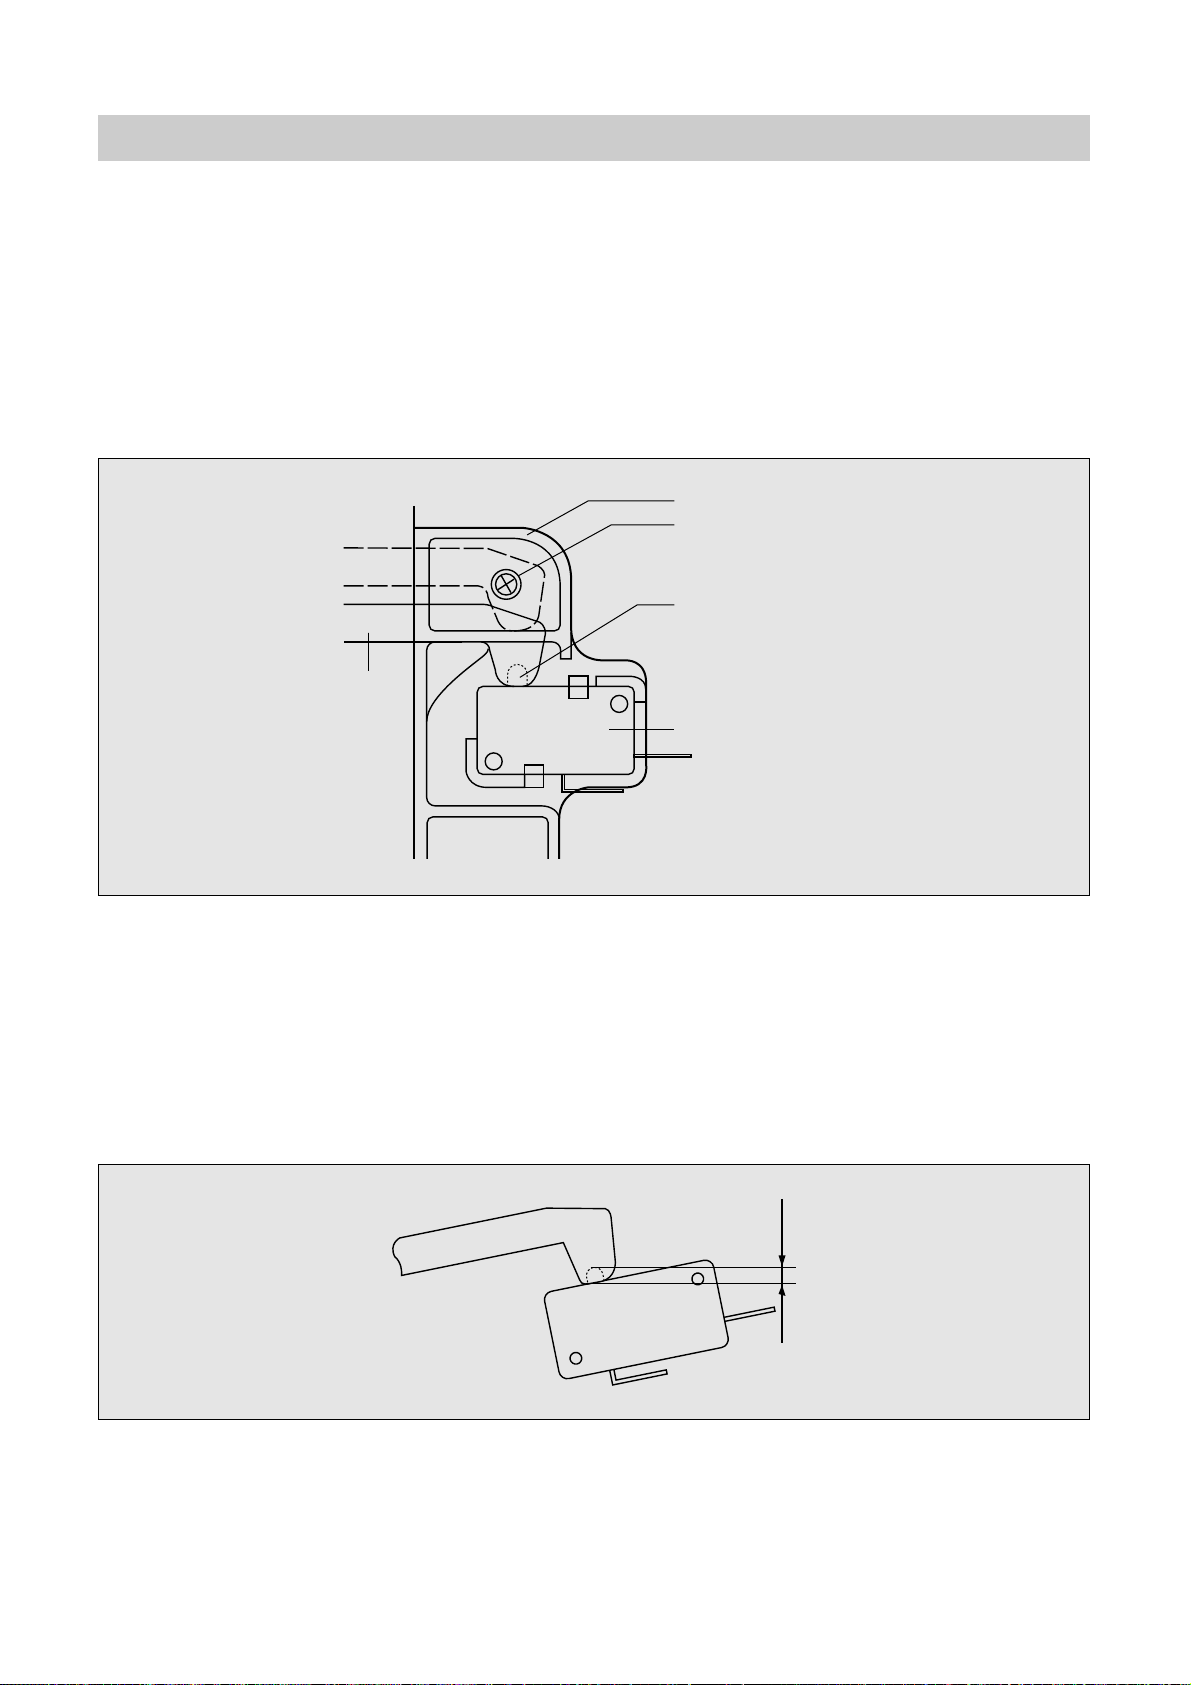
The door lock mechanism is a device which has been specially designed to completely eliminate
microwave radiation when the door is opened during operation, and thus to perfectly prevent the danger
resulting from the leakage of microwave.
(1) Primary interlock switch
When the door is closed, the hook locks the oven door. If the door is not closed properly the oven will not
operate. When the door is closed, the hook pushes the button of the micro switch. Then the button of the
primary interlock switch bring it under on condition.
Adjustment 1.
When the door is closed, the switch button is pushed by the hook.
The movement of the switch button should exceed 1.2mm measured at the top of the button.
INTERLOCK MECHANISM FUNCTIONS AND ADJUSTMENTS
Latch
Mounting serew
Button
Primary interlock switch
Hook
1.2mm
 Loading...