

Page 1
INSTRUCTION MANUAL
DWD-M8011/DWD-M8012/DWD-M8013
Washing Machine Instruction Manual
CONTENTS Page
A NOTE TO YOU
Thank you for buying a DAEWOO appliance.
DAEWOO washers are easy to use, save time, and help you manage your home better.
This manual contains valuable information about how to operate and maintain your washer properly and safely.
Please read it carefully.
Economic washing system
The washing machine determines the water level and washing time
automatically by sensing the amount of laundry and water temperature
in order to minimize energy and water consumption.
Low noise system
The washing machine minimizes the spinning noise level by sensing
the amount of unbalance of laundry.
Nano-silver sterilization washing(Option)
By applying very fine silver particles on essential parts inside, the
washer sterilizes up to 99.9% as is done by boiling wash.
Air bubble washing(Option)
This is an advanced technology that generates millions of air bubbles inside the drum on washing
sequence, and the bubbles dissolve the detergent particles completely and cleanse all the soil in
clothes gently and neatly.
PARTS AND FEATURES.................................................................................................................2
WASHER SAFETY...........................................................................................................................3
INSTALLATION INSTRUCTIONS....................................................................................................4
ELECTRICAL REQUIREMENTS .....................................................................................................6
OPERATING YOUR WASHER........................................................................................................6
THE FUNCTIONS OF THE CONTROL PANEL...............................................................................8
PROGRAMS AND FUNCTIONS......................................................................................................9
WASHING PROCEDURE AND PROGRAM SELECTION.............................................................10
MAINTENANCE .............................................................................................................................11
HOW TO CLEAN THE FILTER......................................................................................................12
REMOVING STAINS......................................................................................................................13
TROUBLE SHOOTING ..................................................................................................................14
SPECIFICATION............................................................................................................................15
Page 2
2
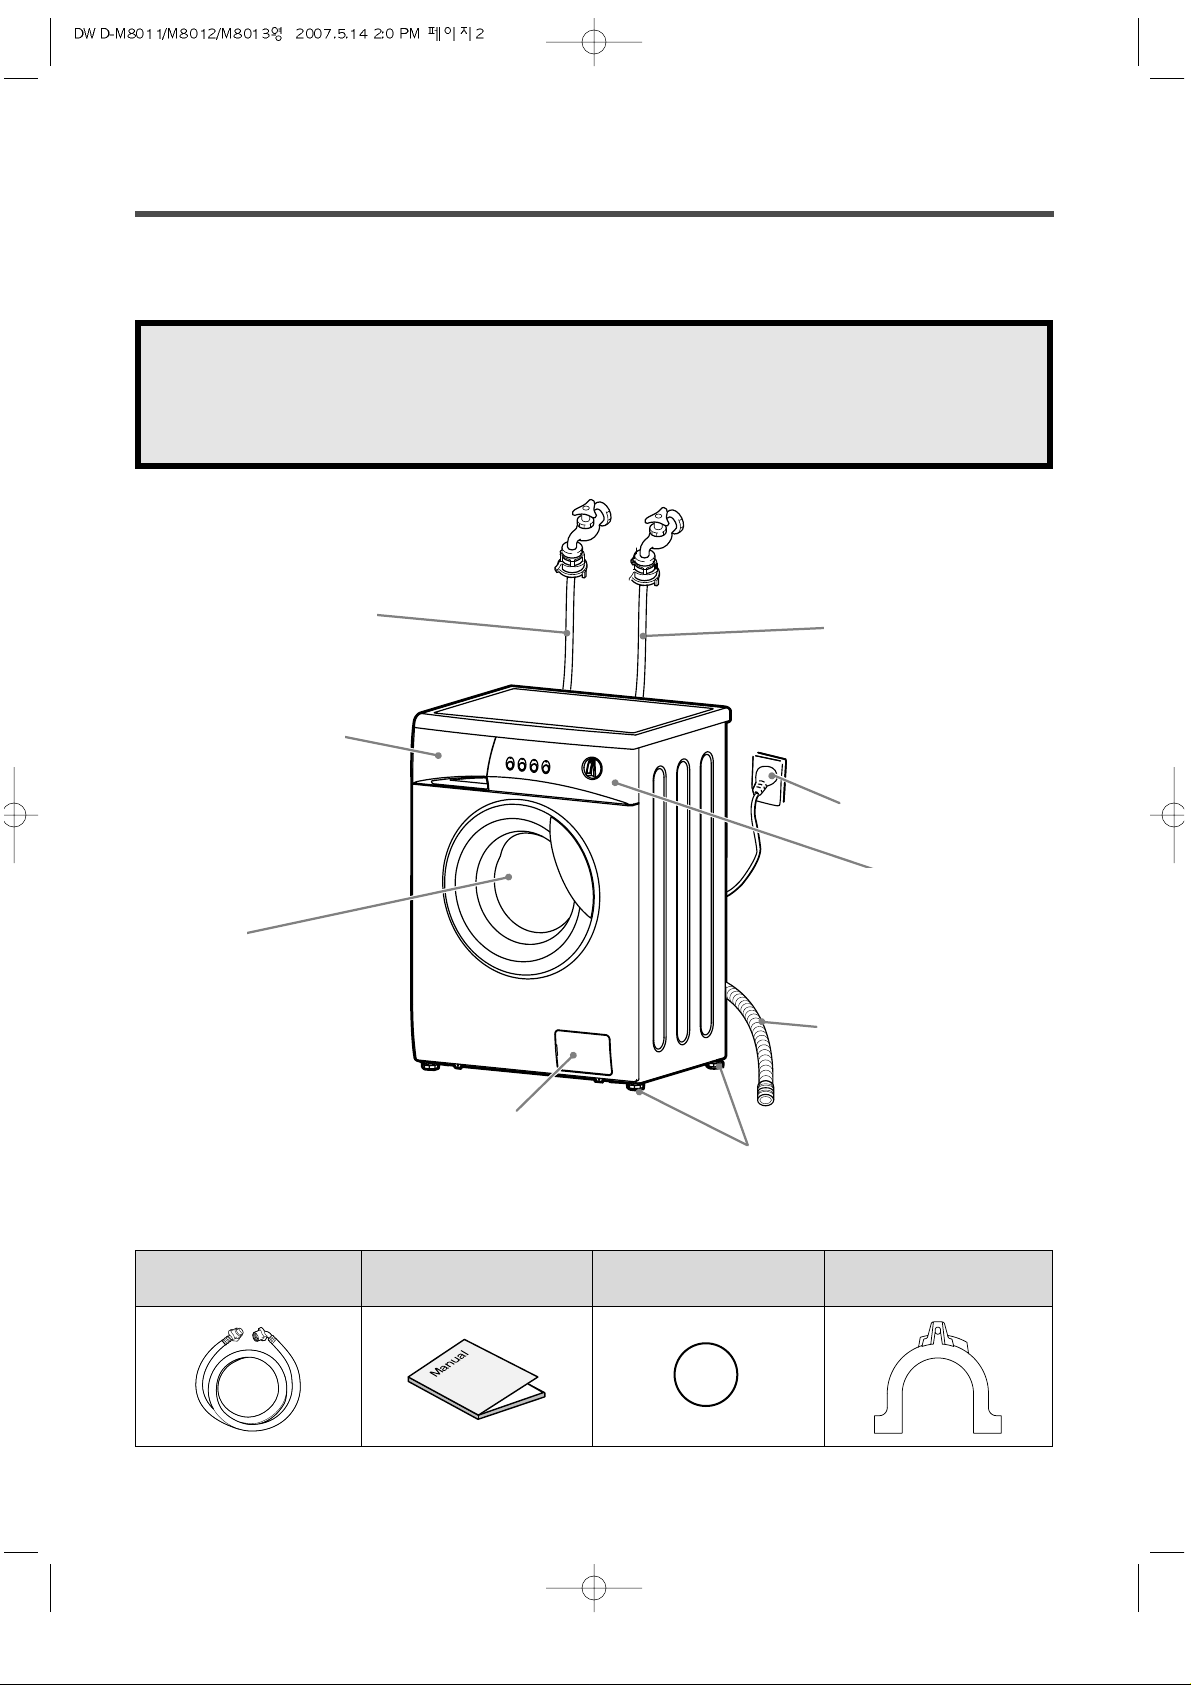
PARTS AND FEATURES
The parts and features of your washer are illustrated on the page.
Become familiar with all parts and features before using your washer .
Accessories
NOTE
The drawings in the book may vary from your washer model.
They are designed to show the different features of all models coverd by this book.
Your model may not include all features.
Inlet hose
(Cold: 1EA, Hot: 1EA)
Manual Sticker holder (3EA)
Guide Hose Drain
(Option)
ADJUSTABLE LEG
CONTROL PANEL
DOOR
DETERGENT CASE
INLET HOSE (HOT)
(OPTION)
INLET HOSE (COLD)
COVER PUMP
POWER CORD
HOSE DRAIN
Page 3
3
Save these instructions
Your safety is important to us.
To reduce the risk of fire, electrical shock, or injury when using your washer adhere to the
following basic precautions.
Understanding your responsibilities
• Do not use chlorine bleach and ammonia or acid(such as vinegar or rust remover) in the same
wash. Hazardous fumes can form.
• Unplug power supply cord before attempting to service your washer .
• Do not wash fiberglass material.
Small particles can stick to fabrics washed in following loads and cause skin irritation.
• Do not spray water on the control panel of the washer .
It could cause fire or an electric shock.
• In case of the dual valve model, if you connect only one water inlet valve, the water leakage
from other water inlet valve(unconnected) can occurs.
• This appliance must be grounded.
To avoid electrical shock, use a metal pipe for the ground connection.
• Flammable fluids (dry-cleaning solvents,
kerosene, gasoline, etc.) should not be used
or stored in or near your washer .
Do not add flammable fluids to your wash
water.These substances give off vapors that
can create a fire hazard or explosion.
• After starting a cycle, do not reach into the
washer until all motions stop.
• Do not tamper with the controls.
• The appliance is not intended for use by
young children or infirm persons without
supervision.
• If the supply cord is damaged, it must be
replaced by the manufacturer , or its service
agent or a similarly qualified person in order
to avoid a hazard.
• If the appliance is supplied from a cord
extension set or electrical portable outlet
device it should be positioned so that it is not
subjected to splashing or ingress of
moisture.
Please ...
• Have only a qualified person install, repair ,
or replace parts on washer .
• Maintain washer properly.
• Protect washer from the weather and keep
it where the temperature will not fall below
freezing.
• Do not install the washer at a place of
extremely high humidity. It could cause an
electric shock or a short circuit.
• Connect washer to the correct outlet,
electrical supply, water supply , and drain
supply .
WASHER SAFETY
Read all instructions before using your washer
Page 4
4
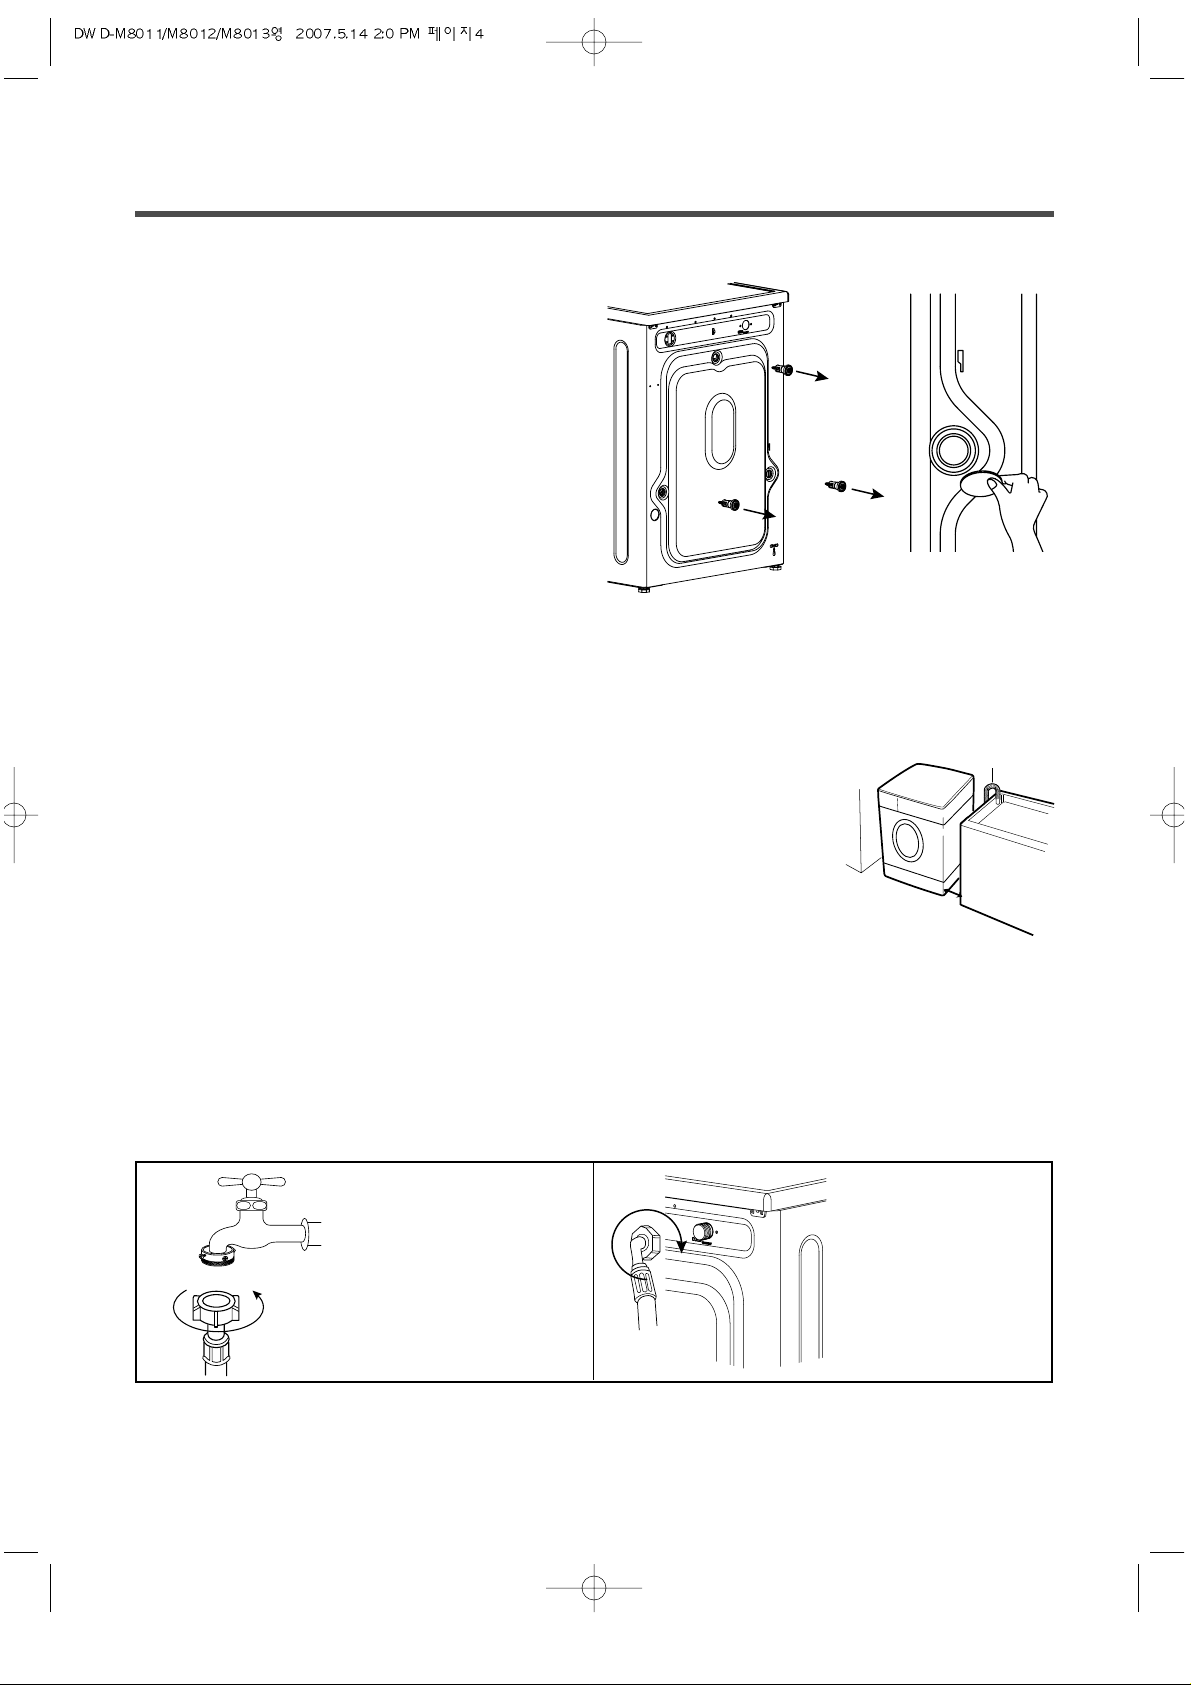
Removing transit bolts
1. Before operating the washer, remove the transit
bolts(3ea) along with the rubber.
• If the bolts are not removed, it may cause
heavy vibration, noise and malfunction.
2. Unscrew the 3 bolts with the 10mm hex wrench
or spanner or cross-tip screwdriver. Keep the 3
bolts for a later time.
• When the appliance is transported, transit bolts
will be re-used.
3. Close the holes with sticker holders supplied.
Location of washer
• Check location where the washer will be installed. Make sure you have everything necessary for correct
installation.
• Do not place or store your washer below 0°C (32°F) to avoid any damage from freezing.
• Do not place or store laundry products on top of washer at any times.
• Install the washer on the horizontal solid floor.
If the washer is installed on an unsuitable floor, it could make considerable noise,
vibrate severely and cause a malfunction. If the washer is not level, adjust leg up or
down for horizontal installation.
• Ventilation openings must not be obstructed by carpeting when the washer is
installed on a carpeted floor.
• Leave some space (right & left : 2cm, rear : 10cm).
• In case of built-in installation, the distance between top of the washer and bottom of
upper plate should be at least 3mm.
Inlet hose connection
• The washer should be connected to the water mains using new hose set and old hose sets should not be
reused.
• In case of only one water inlet valve, connect the inlet hose to the cold water tap.
• Periodically check the tightness of the inlet hose.
• Make sure that the inlet hose is not kinked or folded and that it is not crushed.
INSTALLATION INSTRUCTIONS
Laundry
Tub
Washer
approx.
2cm
Drain Hose
1. Connect the inlet hose
to the water tap tightly .
2. Connect the inlet
hose to the water
inlet valve
tightly .
Page 5
5
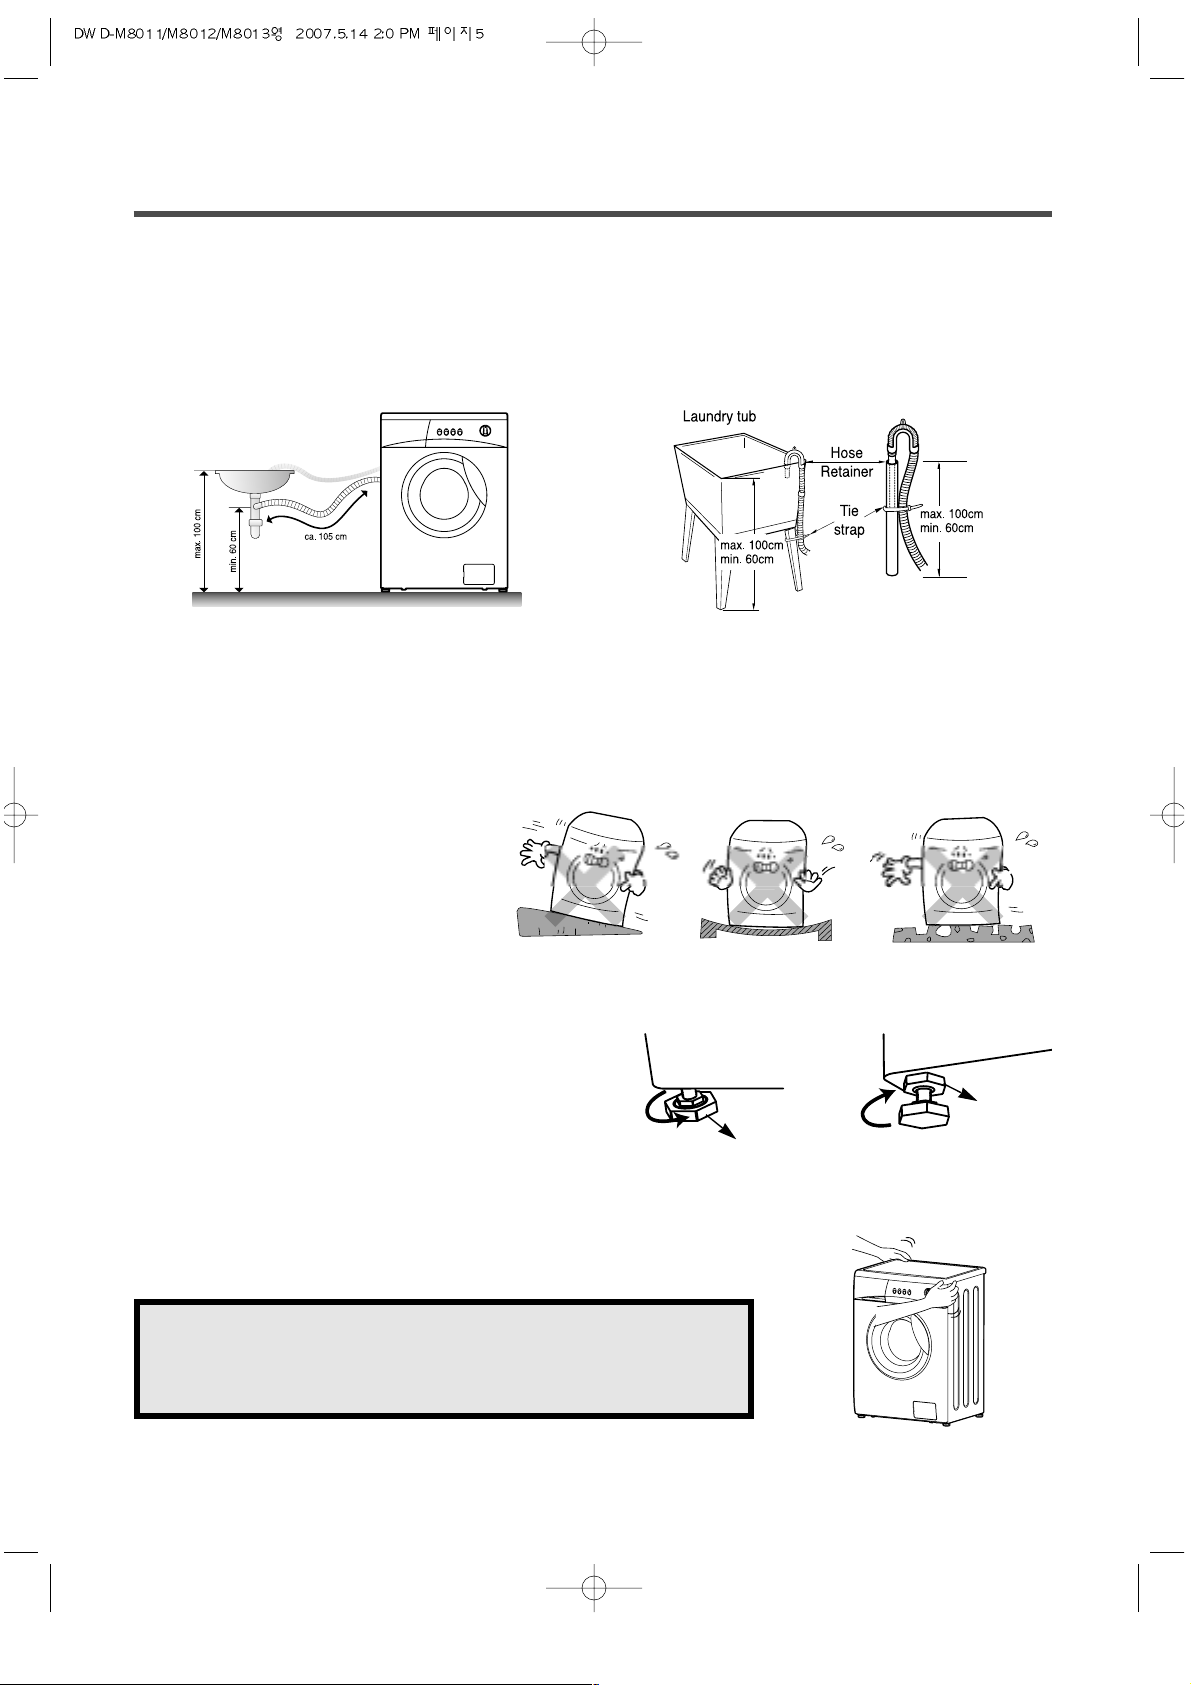
Drain system
• Never forget to install drain hose before operating your washer .
• Open the packing box, and the drain hose is tied at backside of washer.
• If you use the laundry tub,
Top of laundry tub must be at least 60cm high and no higher than
100cm from bottom of washer.
• When installing the drain hose to tub(sink), secure it tightly with a string.
• Proper securing of the drain hose will protect the floor from damage due to water leakage.
• When the drain hose is too long, do not force it back into the washer .
This will cause abnormal noise.
Level adjustment
1 If the washer is installed on an
unsuitable floor, it could make
considerable noise, vibrate and
cause a malfunction.
2 Adjust the level of washer using adjustable legs.
• Please check if there is any gap between the
four adjustable legs and the floor .
• Adjust the level of washer by turning
adjustable legs. And make it sure that there is
no swaying of washer .
• After the adjustment is finished, turn the fixing
nuts up tightly so that the washer maintains
the adjustment.
3 Make it sure that the washer does not sway when you press
down the four corners of the washer's top plate.
adjustable leg
Fixing Nut
NOTE
There should be no swaying of washer and all the
adjustable legs should stick to the floor closely.
Page 6

Recommended earthing method
For your personal safety , this washer must be earthed.
This washer is equipped with a power supply cord ‘A’ having a earthing plug ‘B’.
To minimize possible shock hazard, the cord must be plugged into a mating
earthing-type wall receptacle ‘C’. If a mating wall receptacle is not available,
it is the personal responsibility and obligation of the customer to have the
proper earthed wall receptacle installed by a qualified electrician.
C
B
A
6
ELECTRICAL REQUIREMENTS
• Electrical earth is required on this washer
• If it does not fit the outlet, have a proper outlet
installed by a qualified electrician.
• Don’t earth to a gas pipe.
• Don’t change the power supply cord plug.
• Check with a qualified electrician if you are not
sure the washer is properly earthed.
WARNING
Electrical shock hazard : Failure to follow these instructions could result in
death or serious injury.
OPERATING YOUR WASHER
To obtain the best washing results, you must operate your washer properly.
This section gives you this important information.
• Close zippers, snaps, and hooks to avoid
snagging other items.
Remove pin, buckles, and other hard
objects to avoid scratching the washer
interior.
• Empty pockets and pull them inside out.
• Turn down cuf fs and turn synthetic knits
inside out to avoid pilling.
• Tie strings and sashes to avoid tangling.
• Treat spots and stains.
(See “Removing stains” on page 21)
Preparing clothes for washing
Page 7

7
• Drop items into washer loosely. Items should move
easily through wash water for best cleaning and
wrinkle-free results.
• Load washer properly and select correct load size
setting.
Overloading and selecting a setting too small for
the wash load can :
- Cause poor cleaning
- Increase wrinkling
- Create excessive lint
- Wear out items faster (because of pilling)
• Mix large and small items in each load. Load evenly
to maintain washer balance.
An unbalanced load can make the washer vibrate
during spin.
• Reduce wash time when using a small load size
setting. Load with only a few small items needs
less wash time.
• Use a large load size setting to reduce wrinkling
with permanent press clothes and some synthetic
knits. These items should have more room to move
in the water than heavy items. (towels, jeans)
Loading
1 Detergent case 2 Adding fabric softener
• If desired, add measured liquid fabric
softener to the softener inlet.
• Pour liquid fabric softener into the
dispenser using the amount
recommended on the package.
• Do not exceed the maximum fill line.
Overfilling can cause early dispensing of the
fabric softener which could stain clothes.
• Do not open the detergent case when
water is supplied.
• Avoid pouring fabric softener directly on
the clothes.
Adding detergent
• Separate heavily soiled items from lightly soiled ones, even if they would normally be washed together.
• Separate dark colors from light colors, colorfast items from non-colorfast item.
Sorting
Soil (Heavy, Normal, Light) Separate clothes according to amount of soil.
Color (White, Lignts, Darks) Separate white clothes from colored clothes.
Lint (Lint producers, Collectors) Wash lint producers and lint collectors separately.
Main wash
Pre wash
Fabric softener
• Please use only the powder detergent for the front loader washing machine.
• Please use the proper amount of detergent in conformity with the instruction of the detergent manufacturer.
• A use of a large amount of detergent more than the recommended amount can cause many soapsuds and
the overload to the motor. In addition to, this will deteriorate the washing and rinse performance.
• If too much detergent used, it can occur that the detergent directly falls down to the inside cavity. In this
case, remove the detergent case and clean the cavity after washing cycle is finished. (See page 12)
Page 8

8
THE FUNCTIONS OF THE CONTROL PANEL
Program selector
For switching the washing machine on and off
and for selecting the program.
Can be rotated in both direction.
Even if the program selector rotates while the program is running,
the program is not changed (except for off ) .
(All program is electronically controlled by PCB)
Start/Hold button
For starting the washing cycle
(program must have been selected)
Button for options
(in addition to the program if required)
Intensive wash Extended washing time.
Rinse + Extra rinse cycle.
Rinse Hold No final spin cycle
• Combination of additional option is possible.
• The indicator lamp of the buttons lights up
if options are active.
• Switch off option : Press button again.
Page 9

9
PROGRAMS AND FUNCTIONS
Rinse : Rinse cycle with subsequent spin cycle for rinsing hand-washed items.
Spin : Spin cycle after a program with setting “Rinse hold” is finished or for spinning hand-washed washing.
Washing and rinsing water is drained before the spin cycle
Drain : Water is drained after program with setting “Rinse hold” is finished.
Intensive wash : The washing time is extended so that highly soiled laundry is washed more intensively.
Rinse+ : Additional rinsing of laundry . Program duration and rinsing water is extended accordingly . This help
to remove residuary traces of detergent and recommended in area with very soft water.
Rinse Hold : For delicate textiles and net curtains. All program can be carried out without the final spin
cycle. The laundry is left in the final rinsing water. Before the laundry is unloaded, the “Drain” or
“Spin” must be run by using program selector.
Programs and functions
Program Proper
Temp.
Cold
40°C
60°C
60°C/Pre
95°C
30°C
Cold
40°C
60°C
60°C/Pre
Cold
40°C
Degree
of soiling
Lightly
soiled
Normally
to heavily
soiled
Heavily
soiled
Normally
soiled
Lightly
soiled
Lightly
soiled
Normally
to heavily
soiled
Lightly
soiled
Option
Intensive wash
Rinse+
Rinse hold
Intensive wash
Rinse+
Rinse hold
Intensive wash
Rinse+
Rinse hold
Intensive wash
Rinse+
Rinse hold
Max.
Load
Rating
1.0kg
2.5kg
1.0kg
Remark
First Check if
laundry is
washable.
Short program
(Fast washing)
Fabric type
Colorfast garments
(shirts, night dresses,
pajamas…) and lightly
soiled white cotton
(underwear…)
White cotton, linen
and sheet….
Colored laundry .
Made of polyamide,
acrylic, polyester.
Machine washable
wool or wool-rich
textiles or silk.
Page 10

10
W ASHING PROCEDURE AND PROGRAM SELECTION
Washing Procedure
• T urn the program selector to the desired program
The indicator light of Start/Hold button is on.
• If required, press the button(s) for option(s).
The indicator light of the selected option button is on.
• Press the Start/Hold button.
The selected program starts and the indicator light of
Start/Hold button twinkle.
Changing the program
If you have accidentally selected the wrong program, follows next procedure.
After washing
When the washing is complete, the indicator light of Start/Hold button is not twinkle but on.
• T urn the program selector to OFF .
• Press the Start/Hold button.
The selected program stops and the indicator light of
Start/Hold button is not twinkle but on.
• T urn the program selector to OFF and reselect
the desired program by using the program selector.
• If required, select the option(s).
And press the Start/Hold button. The newly selected
program starts
Page 11

11
MAINTENANCE
Proper care of your washer can extend its life. This section explains how to care for your washer
properly and safely.
Cleaning your washer
Winter storage or moving care
Install and store your washer where it will not freeze. Because some water may stay in the
hoses, freezing can damage your washer.
If you store or move your washer during freezing weather, winterize it.
Non-use or vacation care
Operate your washer only when you are at home.
If you are on vacation or don’t use your washer for an extended period of time, you should:
• Unplug the power supply cord or turn off eletrical power to the washer.
• Turn of f the water supplier to the washer.
This helps avoid accidental flooding (due to a water pressure surge) while you are away.
Wipe up detergent, bleach, and other spills with
a soft, damp cloth or sponge as they occur.
Occasionally wipe the outside of the washer to
keep its looking like new one.
Clean interior with 250ml of chlorine bleach
mixed with 500ml of detergent.
Run washer through a complete cycle.
Repeat this process if necessary .
Exterior Interior
• Turn of f the water tap.
• Disconnect inlet hoses and drain the water
of inlet hoses.
• Run the washer on the drain and spin cycle
setting.
• Unplug the power supply cord.
• Flush water pipes and hoses.
• Reconnect water inlet hoses.
• Turn on water faucet.
• Reconnect power supply cord.
To winterize washer To use washer again
Do not put sharp or metal object in your washer, or they
can damage the finish. Check all pockets for pins, clips,
money , bolts, nuts, etc.
Do not lay these objects in your washer after emptying
pockets.
Page 12

12
HOW TO CLEAN THE FILTER
Cleaning the water inlet filter
• Clean the filter when water leaks from the water inlet.
Cleaning the drain filter
• This drain filter is used to screen the foreign stuf fs such as threads, coins, pins, buttons etc..
• If the drain filter is not cleaned at proper time(every 10 times of use), drain problem could be
caused.
CAUTION : Be careful when draining if the water is hot.
Cleaning the detergent case
• In case of residual detergents or fabric softeners have accumulated ;
- it should be cleaned with a jet of running water .
- If necessary , it can be removed completely from the washing machine.
• Detergents can be also accumulate the inside cavity.
In this case, the inside cavity should be cleaned with a brush.
• After cleaning, replace the detergent case and run Rinse cycle without laundry.
1 Turn off the water
tap.
2 Separate the inlet
hose.
3 Pull out the inlet filter.
Clean the inlet filter
with the brush
4 Connect the inlet
hose
1. Open the cover-pump(1)
by using coin.
Separate the cover-pump(1)
from the washing machine.
2. Install the cover-pump(1) to the
lower frame(2).
Open the pump-filter(3) slowly
and allow the remaining water to
flow into a suitable container.
3. Remove foreign objects
from the pump-filter(3) and
clean the interior.
Close the pump-filter(3) and
replace the cover-pump(1).
1
2
1
3
1
3
1 Pull-out
2 Push and pull again
Push point
Page 13

13
Stained, heavily-soiled, or greasy items may need to be prewashed or soaked for best results.
Soaking helps remove protein-type stains like blood, milk or grass. Prewashing helps loosen soil
before washing.
Stain removal rules
• Use warm water for soaking or prewashing stained laundry. Hot water can set stains.
• Most stains are easier to remove when they are fresh.
• Before treating any stain, find out what kind of stain it is, how old the stain is, what kind of
fabric it is, and whether the fabric is colorfast. (Check the care label)
• Washing and drying can set some stains.
• Start with cold or warm water. Hot water can set some stains.
• When bleach is recommended, use a bleach that is safe for the fabric.
• Put the stained area face down on a paper towel or white cloth. Apply the stain remover to the
back of the stain. This forces the stain off fabric instead of through it.
Stain removal guide
REMOVING STAINS
Rinse immediately in COLD water.
If stain remains, soak in cold water with an enzyme prewash.
Use ice in plastic bag to harden the gum.
Scrape off what you can and the sponge with white spirits.
Sponge with COLD water and soak in an enzyme prewash.
If stains persist, rub in a little detergent and rinse in cold water.
Blot up quickly and rinse out in COLD water.
Rub in a little detergent and wash in the maximum temperature allowed for the
fabric type.
Rinse in COLD water and wash normally.
If stain is still apparent, sponge with white spirits.
Rub affected area with white vinegar and then rinse out in COLD water.
Sponge with white spirits.
Treat stiffened areas with enzyme prewash.
Soak in a COLD enzyme prewash, rinse and wash normally.
Rub affected area with bar soap and wash normally.
Treat as soon as possible by sponging with COLD water.
Rub a little detergent on the stain and wash normally.
Sponge with white spirits.
Rub in an enzyme prewash and wash as normally.
Lay the affected area face down on an absorbent cloth and work from the back.
Sponge with white spirits or dry cleaning fluid. Wash normally.
Apply lemon juice and salt and place in the sun. Wash normally.
Sponge with white methylated spirits and wash normally.
Wash in WARM water and detergent.
Moisten area with lemon juice, dry in the sun and wash normally.
If stain persists and the fabric allows, use a bleach.
Brush off any dry mud. Rinse in cold water.
If stain persists rub in a little detergent and wash normally.
Scrape off any fresh paint and sponge with a non flammable dry cleaning fluid
and wash normally.
Treat while still wet, rinse in WARM water and wash normally.
Dampen a cloth with hydrogen peroxide, lay it over the affected area and press
with a fairly hot iron.
Blood
Chewing gum
Cocoa, Chocolate
Coffee
Cream/Milk
Ice cream
Deodorant
Egg
Fabric/Softener
Fruit stains
Grass
Grease and oil
Iron or rust
Lipstick
Mildew
Mud
Paint-oil based
Paint-water based
Scorch marks
ST AIN TO REMOVE
Page 14

14
TROUBLE SHOOTING
Most problems are easily solved if you understand the cause.
Check the following list for problem before calling for service.
Program dose not start.
Water dose not enter
the washing machine.
Washing machine is
not drain.
Washing machine is
not spin.
Spin result is
unsatisfactory.
Foam come out of the
detergent case.
Serious noise and
vibration
Plug is loose or not plugged in.
Power failure.
Loading door is not closed.
Program is not selected.
Start/hold button is not pressed.
Water tap is not turned on.
Inlet hose is kinked or folded.
Filters is blocked in water inlet
filter.
Drain hose is kinked or clogged.
Pump filter is clogged.
The amount of laundry is too
small.
The laundry is unbalanced.
Drain hose is placed over 1m
above the floor.
Too much detergent or unsuitable
detergent used.
Transit bolts are not removed.
Washing machine is installed on
uneven floor.
Washing machine is not leveled.
Insert plug tightly.
An interrupted program will be resumed when the
power return.
Check whether laundry is trapped in door.
Close the loading door. (a click should be heard)
Select the desired program.
Press the Start/hold button.
Turn the water tap on.
Straighten the inlet hose.
Clean the water inlet filter.
Straighten and clean the drain hose.
Clean the pump filter
Add the laundry to balance. And repeat the Spin
cycle.
Rearrange the laundry. And repeat the Spin cycle.
If articles of heavy clothing (e.g. bath robe) are
loaded, washing machine may skip or stop the spin
cycle.
Place the drain hose under 1m above the floor.
Repeat the Rinse cycle.
Remove the transit bolts
Reinstall washing machine on even floor.
Adjust the level of washing machine using adjustable
legs.
Problem Cause Solution
Page 15

15
Dimension (mm)
Maximum mass of textile (kg)
Unit Weight (kg)
Standard Water Consumption
Spin Speed (RPM)
Operating Water Pressure
595x440x850 (WxDxH)
5.5
43(Net)/46(Gross)
42
l
800
0.03MPa ~ 0.8MPa (0.3kgf/cm
2
~ 8kgf/cm2)
MODEL DWD-M801 1/DWD-M8012/DWD-M8013
SPECIFICATION
Page 16

담 당 이충휘님 TEL
MODEL
DWD-FD1021/1022/1023/1024/1025
BUYER
((영영어어)) DDWWDD--MM88001111//DDWWDD--MM88001122//DDWWDD--MM88001133
1차 07.4.2 6차
2차 07.4.6 7차
일 정 3차 07.4.10 8차
4차 07.4.12 9차
5차 07.4.16 10차
제판 07.5.10(Han)
인인쇄쇄 동동일일
규격
MEMO
연연락락처처
VVIISSIIOONN
담담 당당
전지현
TEL: 730-0660 FAX: 730-3788
07.4.2-신규(15page)
07.4.6-set교체(표지,2,5)수정
07.4.10-전체페이지수정
07.4.12-표지,2,6,10,15-수정
07.4.16-3,4,5,9,11-수정
07.5.10-전체필름출력
07.5.11-12p수정(이충휘님)
07.5.14-12p수정(이충휘님)
VISION CREATIVE, INC.
서울 종로구 통의동 6번지
이룸빌딩4층
ABOUT THIS MANUAL
ABOUT THIS MANUAL
 Loading...