


Daewoo DVR-06 User Manual

DVD Recorder
DVD Recorder
DVR06
User Manual
DW-Q73D2N-LS(GB)USA 2006.2.3 5:56 PM ˘ ` A mac001 1200DPI 90LPI
i
Important Safeguards
Important Safeguards
CAUTION:
TO REDUCE THE RISK OF ELECTRIC
SHOCK, DO NOT REMOVE COVER (OR BACK).
NO USER-SERVICEABLE PARTS INSIDE.
REFER SERVICING TO QUALIFIED SERVICE
PERSONNEL.
The lightning flash with arrowhead symbol,
within an equilateral triangle, is intended to
alert the user to the presence of uninsulated
‘dangerous voltage‘ within the product’s
enclosure that may be of sufficient magnitude
to constitute a risk of electric shock.
The exclamation point within an equilateral triangle
is intended to alert the user to the presence of
important operating and servicing instructions in
the literature accompanying the appliance.
CAUTION
RISK OF ELECTRIC SHOCK
DO NOT OPEN
WARNING
TO REDUCE THE RISK OF FIRE OR ELECTRIC SHOCK, DO NOT EXPOSE THIS APPLIANCE TO RAIN
OR MOISTURE.
CAUTION
TO PREVENT ELECTRIC SHOCK, MATCH WIDE BLADE OF PLUG TO WIDE SLOT, FULLY INSERT.
ATTENTION
POUR ÉVITER LES CHOC ÉLECTRIQUES, INTRODUIRE LA LAME LA PLUS LARGE DE LA FICHE
DANS LA BORNE CORRESPONDANTE DE LA PRISE ET POUSSER JUSQU’AU FOND.
WARNING:
Do not install this equipment in a confined space such as a bookcase or
similar unit.
NOTE TO CABLE/TV INSTALLER:
This reminder is provided to call the cable TV system installer’s attention to
Article 820-40 of the National Electric Code (U.S.A.). The code provides
guidelines for proper grounding and, in particular, specifies that the cable
ground shall be connected to the grounding system of the building, as close to the point of the cable entry as
practical.
CAUTION:
This DVD Recorder employs a Laser System. To ensure proper use of this product, please read this owner’s
manual carefully and retain for future reference. Should the DVD Recorder require maintenance, contact an
authorized service center. Use of controls, adjustments, or the performance of procedures other than those
specified herein may result in hazardous radiation exposure. To prevent direct exposure to laser beam, do not
try to open the enclosure. Visible laser radiation when open. DO NOT STARE INTO BEAM.
CAUTION:
The apparatus should not be exposed to water (dripping or splashing) and no objects filled with liquids, such as
vases, should be placed on the apparatus.
FCC WARNING:
This equipment may generate or use radio frequency energy. Changes or modifications to this equipment may
cause harmful interference unless the modifications are expressly approved in the instruction manual. The user
could lose the authority to operate this equipment if an unauthorized change or modification is made.
CLASS 1 LASER PRODUCT
KLASSE 1 LASER PRODUKT
LUOKAN 1 LASER LAITE
KLASS 1 LASER APPARAT
CLASSE 1 PRODUIT LASER
DW-Q73D2N-LS(GB)USA 2006.2.3 5:56 PM ˘ ` i mac001 1200DPI 90LPI

INTRODUCTION
ii
CAUTION: PLEASE READ AND OBSERVE ALL WARNINGS AND INSTRUCTIONS IN THIS OWNER’S
MANUAL AND THOSE MARKED ON THE PRODUCT. RETAIN THIS MANUAL FOR FUTURE
REFERENCE.
This product has been designed and manufactured to assure personal safety. Improper use can result in
electric shock or fire hazard. The safeguards incorporated in this product will protect you if you observe the
following procedures for installation, use, and servicing.
This product does not contain any parts that can be repaired by the user.
DO NOT REMOVE THE CABINET COVER, OR YOU MAY BE EXPOSED TO DANGEROUS VOLTAGE. REFER
SERVICING TO QUALIFIED SERVICE PERSONNEL ONLY.
IMPORTANT SAFETY INSTRUCTIONS
REGULATORY INFORMATION: FCC Part 15
This product has been tested and found to comply with the limits for a Class B digital device, pursuant to Part
15 of the FCC Rules. These limits are designed to provide reasonable protection against harmful interference
when the product is operated in a residential installation. This product generates, uses, and can radiate radio
frequency energy and, if not installed and used in accordance with the instruction manual, may cause harmful
interference to radio communications. However, there is no guarantee that interference will not occur in a
particular installation. If this product does cause harmful interference to radio or television reception, which can
be determined by turning the product off and on, the user is encouraged to try to correct the interference by one
or more of the following measures:
- Reorient or relocate the receiving antenna.
- Increase the separation between the product and receiver.
- Connect the product into an outlet on a circuit different from that to which the receiver is connected.
- Consult the dealer or an experienced radio/TV technician for help.
FCC COMPLIANCE:
The responsible party for this product’s compliance is: GoVideo, 7835 East McClain Drive, Scottsdale, AZ
85260, USA.
SERIAL NUMBER:
The serial number is found on the back of the DVD Recorder. This number is for this unit only. You should record
requested information here and retain this guide as a permanent record of your purchase.
Model No. ___________________________________
Serial No. ___________________________________
1 Read these instructions.
All these safety and operating instructions
should be read before the product is operated.
2 Keep these instructions.
The safety, operating and use instructions should
be retained for future reference.
3 Heed all warnings.
All warnings on the product and in the operating
instructions should be adhered to.
4 Follow all instructions.
All operating and use instructions should be
followed.
Important Safeguards
DW-Q73D2N-LS(GB)USA 2006.2.3 5:56 PM ˘ ` ii mac001 1200DPI 90LPI

iii
5 Do not use this product near water.
For example: near a bath tub, wash bowl, kitchen
sink, laundry tub, in a wet basement; or near a
swimming pool; and other areas located near
water.
6 Clean only with dry cloth.
Unplug this product from the wall outlet before
cleaning. Do not use liquid cleaners.
7 Do not block any ventilation openings. Install in
accordance with the manufacturer’s instructions.
Slots and openings in the cabinet are provided
for ventilation and to ensure reliable operation of
the product and to protect it from overheating.
The openings should never be blocked by placing
the product on a bed, sofa, rug or other similar
surface. This product should not be placed in a
built-in installation such as a bookcase or rack
unless proper ventilation is provided or the
manufacturer’s instructions have been adhered
to.
8
Do not install near any heat sources such as
radiators, heat registers, stoves, or other
apparatuses (including amplifiers) that produce
heat.
9
Make sure that rating of your household
electricity supply matches that shown on the
back of your product.
10
Protect the power cord from being walked on or
pinched particularly at plugs, convenience
receptacles, and the point where they exit from
the product.
11
Only use attachments/accessories specified by
the manufacturer.
12
Use only with the cart, stand,
tripod, bracket, or table specified
by the manufacturer, or sold with
apparatus. When a cart is used,
use caution when moving the
cart/ product combination to avoid injury from
tip-over.
13
Unplug this product during lightning storms or
when unused for long periods of time.
14
Refer all servicing to qualified service personnel.
Servicing is required when the product has been
damaged in any way, such as: Power-supply cord
or plug is damaged; liquid has been spilled or
objects have fallen into the product; the product
has been exposed to rain or moisture, does not
operate normally, or has been dropped.
15
Do not connect the product to the power supply
if you have just moved it from a cold environment
to a warm room. This can lead to condensation
inside the product, which can damage it. Wait
for approximately 2 hrs for it to reach room
temperature.
16
Make sure the product is placed at least 4 inches
(10 cm) apart from other home appliances or
obstacles to ensure sufficient ventilation.
17
This product is designed to work continuously.
Switching if off does not disconnect if from the
power outlet. To disconnect if from the power
outlet you have to unplug it.
Important Safeguards
DW-Q73D2N-LS(GB)USA 2006.2.3 5:56 PM ˘ ` iii mac001 1200DPI 90LPI

INTRODUCTION
1
Important Safeguards _________________________i
Table of Contents ______________________________1
Overview ______________________________________2
Identification of Controls_______________________6
INTRODUCTION
Connecting Antenna/Cable ____________________11
Connecting a TV _______________________________12
Connecting an Amplifier/Receiver _____________13
Connecting Optional Equipment ______________14
Connecting a Digital Camcorder ______________14
CONNECTIONS
Initial Installation ______________________________15
Initial Setup____________________________________17
Setup Menu Overview 17
INSTALLATION Settings 17
RECORDING OPTIONS Settings 20
LANGUAGE Settings 21
PREFERENCE / Video Settings 22
PREFERENCE / Audio Settings 23
PREFERENCE / Parental Controls 24
Various PREFERENCE Settings 26
System Information 27
Restore Defaults 27
On-Screen Display Overview __________________28
SETUP
DVD Playback _________________________________31
Other Disc Playback __________________________35
PLAYBACK
Basic Recording________________________________37
Recording from TV 37
One Touch Record (OTR) 38
Checking the Recording Time 38
To Pause the Recording 38
Timer Recording _______________________________39
Recording from an External Input _____________41
RECORDING
Title Menu _____________________________________46
DISC EDIT
Disc Initialize __________________________________43
Disc Operation in DVD±RW disc _______________43
Disc Operation in DVD±R, DVD-RW disc _______45
DISC OPERATION
Troubleshooting _______________________________49
Technical Specifications ________________________52
REFERENCE
Table of Contents
Table of Contents
DW-Q73D2N-LS(GB)USA 2006.2.3 5:56 PM ˘ ` 1 mac001 1200DPI 90LPI

2
Overview
Overview
DVD, DVD+R, DVD+RW?
What is a DVD?
DVD (Digital Versatile Disc) is a storage medium that combines the convenience of the compact disc with the
latest digital video technology. DVD video uses modern MPEG2 data compression technology that enables an
entire feature film to be stored on a single five inch disc.
How good is the resolution of DVD compared with VHS?
The razor-sharp digital images have more than 500 lines of resolution at 720 pixels per line. This is more than
twice as high as VHS and even better than laser disc quality. DVD picture quality is easily comparable to the
digital masters produced in recording studios.
What is a DVD+RW?
DVD+ReWritable uses ‘phase change‘ media, the same technology on which rewritable CDs are based. A highperformance laser is used to change the reflective properties of the recording layer; this process can be
repeated more than a thousand times.
What is a DVD+R?
Unlike a DVD+RW disc, a DVD+R (write-once DVD) can only be written to once. If it is not finalized after a
recording, further recordings can be added to it. Old recordings can be deleted but they can no longer be
overwritten. The deleted recordings (titles) are marked 'deleted title'.
Before a DVD+R can be played in a DVD player, it must be finalized in the DVD Recorder. Once this process is
complete, no further recordings can be added.
What can I do with my DVD Recorder?
Your DVD Recorder is a machine for recording and playing back digital video discs with ‘two-way‘ compatibility
with the universal DVD video standard. This means:
• existing DVD video discs can be played on the recorder.
• recordings made on your DVD Recorder can be played on other DVD video players and DVD-ROM drives.
Dual Media
Supporting Disc
±RW / ±R
Recording Format
±Disc + VR format
Finalize
-RW, -R, +R
After finalize other DVD playback
All disc can playback
Consumer
Does not need selection (recording format)
Remark :
A DVD Recorder that supports ‘dual media’ recording allows DVD+RW format recording (+VR) on either DVD-R,
DVD-RW, DVD+R or DVD+RW media. Any editing feature that is available with the +RW logical format is
available on any of the media types. This system allows the flexibility for the consumer to use any of the above
media formats for recording in the same system. Since the +VR format is DVD-Video compatible, the consumer
can take any disk recorded on this platform and should be capable of playing it back on the majority of DVD
players on the market.
DW-Q73D2N-LS(GB)USA 2006.2.3 5:56 PM ˘ ` 2 mac001 1200DPI 90LPI

INTRODUCTION
3
Disc-related Terms
Title (DVD only)
The main film, accompanying feature content, or music album. Each title is assigned a title reference number
enabling you to locate it easily.
Chapter (DVD only)
Sections of a movie or a musical piece that are smaller than titles. A title is composed of one or several
chapters. Each chapter is assigned a number to enable you to easily locate the chapter you want. Depending on
the disc, chapters may not be labeled.
Track (Audio CD only)
Sections of a movie or a musical piece on an audio CD. Each track is assigned a number, enabling you to easily
locate the track you want.
Which discs you can use
The following discs can be used in your DVD Recorder:
Playback and recording
DVD+RW (Digital Versatile Disc + ReWritable)
DVD-RW (DVD-Rerecordable)
DVD+R (Digital Versatile Disc + Write-Once)
DVD-R (DVD-Recordable)
Playback only
DVD Video (Digital Versatile Disc)
Audio CD (Compact Disc Digital Audio)
CD-R (CD recordable) Audio/ CD-RW (CD rewritable) Audio
Video Format : JPEG
Audio Format : CDDA / MP3
Not all recordable CDs may be played by your player.
Regional code
If the region number on your DVD disc does not correspond to the region
number of this player, the disc cannot be played.
1
ALL
Overview
DW-Q73D2N-LS(GB)USA 2006.2.3 5:56 PM ˘ ` 3 mac001 1200DPI 90LPI

4
Overview
Notes on Recording
• The recording times shown are not exact because the DVD Recorder uses variable bit-rate video
compression. This means that the exact recording time will depend on the material being recorded.
• When recording a TV broadcast, if the reception is poor or the picture contains interference, the recording
times may be shorter.
• Discs recorded at high speeds (equal to or greater than 2X) may not be recognized.
• If you record still pictures or audio only, the recording time may be longer.
• The displayed times for recording and time remaining may not always add up to the exact length of the
disc.
• The available recording time may decrease if you heavily edit a disc.
• When using a DVD+R disc, you can keep recording until the disc is full, or until you finalize the disc. Before
you start a recording session, check the amount of recording time left on the disc.
Recording TV Audio Channels
The DVD Recorder can record one or two channel audio. For TV broadcasts, this usually means mono or stereo,
but some programs are broadcast with a main and a SAP (Secondary Audio Program) audio channel. You can
record either the main audio or the SAP audio.
Restrictions on Video Recording
• You cannot record copy-protected video using this DVD Recorder. Copy-protected video includes DVD-Video
discs and some satellite broadcasts. If copy-protected material is encountered during a recording, recording
will pause or stop automatically and an error message will be displayed on-screen.
• Video that is ‘copy-once only’ can only be recorded using DVD+RW discs with CPRM.
Copyright Notice
• Audio and video recordings you make using the DVD Recorder are for your personal use only. You may not
sell, lend, or rent them to other people.
• This product incorporates copyright protection technology that is protected by method claims of certain
U.S.patents and other intellectual property rights owned by Macrovision Corporation and other rights
owners. Use of this copyright protection technology must be authorized by Macrovision Corporation, and is
intended for home and other limited viewing uses only unless otherwise authorized by Macrovision
corporation. Reverse engineering or disassembly is prohibited.
Handling the Unit
When shipping the unit
The original shipping carton and packing materials come in handy. For maximum protection, re-pack the
unit as it was originally packaged at the factory.
When setting up the unit
The picture and sound of a nearby TV, VCR, or radio may be distorted during playback. In this case, position
the unit away from the TV, VCR, or radio, or turn off the unit after removing the disc.
To keep the surface clean
Do not use volatile liquids, such as insecticide spray, near the unit. Do not leave rubber or plastic products
in contact with the unit for a long period of time. They will leave marks on the surface.
Precautions
About DVD Recording
DW-Q73D2N-LS(GB)USA 2006.2.3 5:56 PM ˘ ` 4 mac001 1200DPI 90LPI
INTRODUCTION
5
Cleaning the Unit
To clean the cabinet
Use a soft, dry cloth. If the surfaces are extremely dirty, use a soft cloth lightly moistened with a mild
detergent solution. Do not use strong solvents such as alcohol, benzine, or thinner, as these might damage
the surface of the unit.
To obtain a clear picture
The DVD Recorder is a high-tech, precision device. If the optical pick-up lens and disc drive parts are dirty
or worn, the picture quality will be poor. Regular inspection and maintenance are recommended after every
1,000 hours of use. (This depends on the operating environment.) For details, please contact your nearest
dealer.
Remote Control Operation Range
Point the remote control at the remote sensor and press the buttons.
Distance: Within 23 ft (7 m) of the remote sensor.
Angle: Within 30° in each direction of the remote sensor.
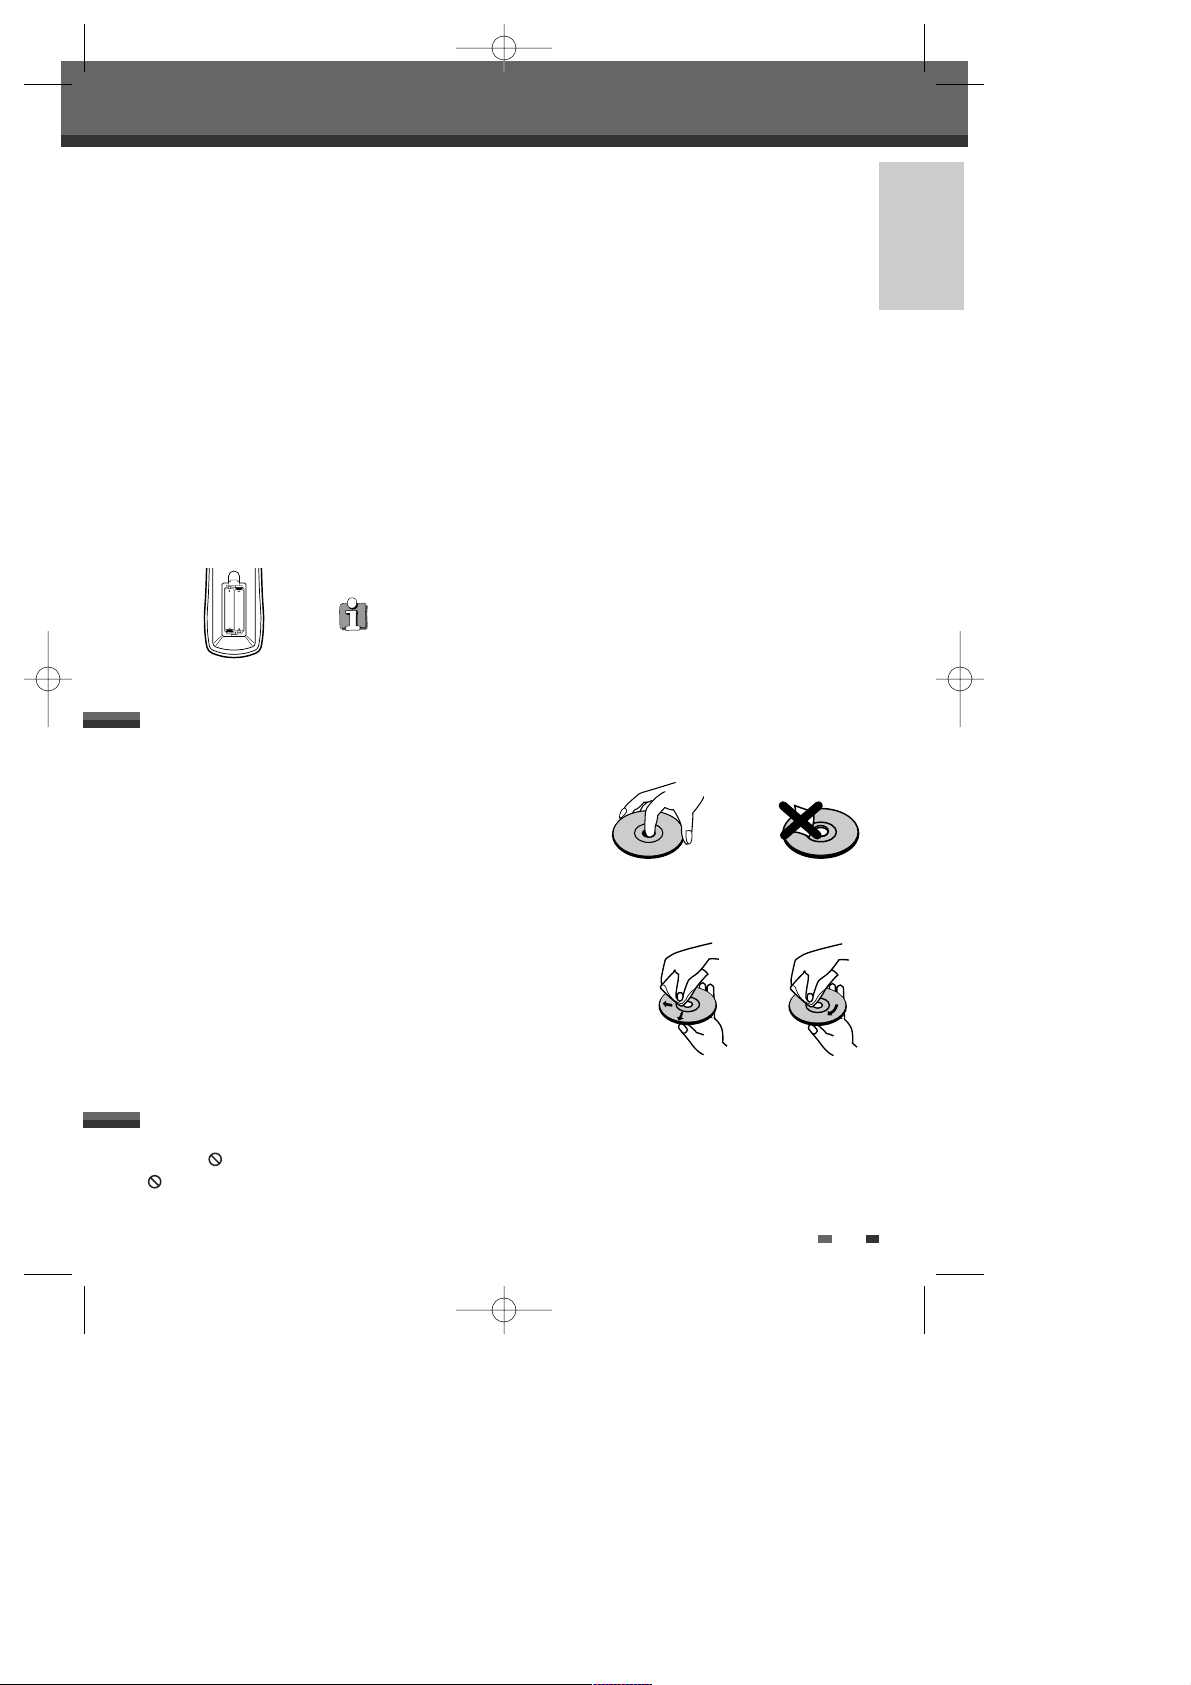
Remote Control Battery Installation
Detach the battery cover on the rear of the remote control, and insert two AAA
batteries. Make sure the polarities (+ and -) are aligned correctly.
AAA
AAA
Caution
Do not mix old and new batteries. Never mix different types of batteries (standard,
alkaline, etc.).
Handling Discs
Do not touch the playback side of the disc. Hold the disc by the edges
so that fingerprints will not get on the surface. Do not stick paper or
tape on the disc.
Storing Discs
After playing, store the disc in its case.
Do not expose the disc to direct sunlight or sources of heat, or leave it in a parked car exposed to direct
sunlight, as there may be a considerable temperature increase inside the car.
Cleaning Discs
Fingerprints and dust on the disc can cause poor picture quality and
sound distortion. Before playing, clean the disc with a clean cloth.
Wipe the disc from the center outward.
Do not use strong solvents such as alcohol, benzine, thinner,
commercially available cleaners, or anti-static spray intended for older
vinyl records.
Notes on Discs
About the Symbol
‘ ‘ may appear on the TV screen during operation. This icon means the function explained in this User's Guide
is not available on that specific disc.
About Symbols
NoYes
Overview
DW-Q73D2N-LS(GB)USA 2006.2.3 5:56 PM ˘ ` 5 mac001 1200DPI 90LPI
6
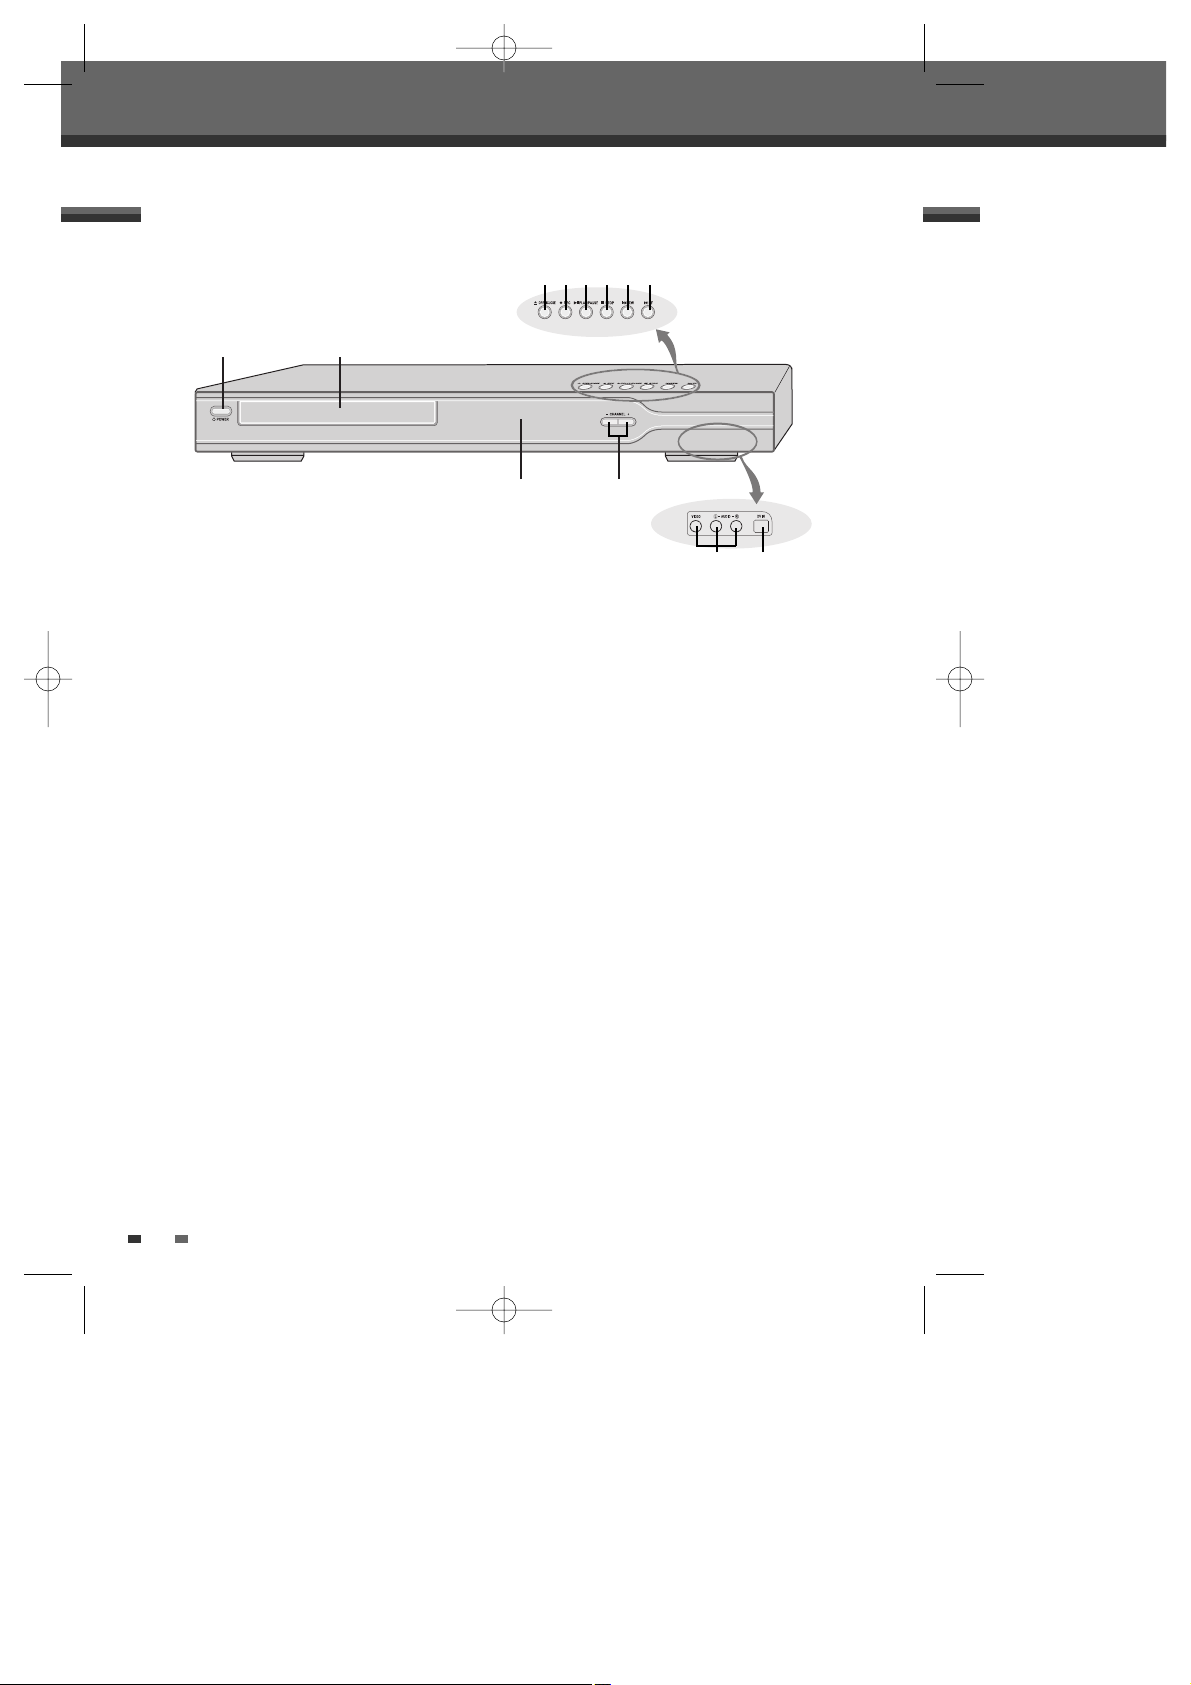
Front Panel
!
POWER (STANDBY/ON)
Turns the DVD Recorder on and off.
@
Disc Tray (DVD deck)
Insert a disc here.
#
Front Panel Display
Shows the current status of the DVD Recorder.
$
CH+/–
Scans up or down through memorized channels.
Also moves up and down in DVD navigation
menus.
%
OPEN/CLOSE
Opens or closes the disc tray.
^
REC
Starts recording. Press repeatedly to set the
recording time.
&
PLAY/PAUSE
Starts playback of a disc. Pauses playback or
recording temporarily.
*
STOP
Stops playback.
(
PREV
Skips to previous chapter.
)
NEXT
Skips to next chapter.
1
LINE1 (VIDEO, L-AUDIO-R)
Connects to the audio/video output of an external
source (VCR, Camcorder, etc.).
2
DV IN
Connects to the DV output of an external source
(VCR, Camcorder, etc.).
! @
# $
Identification of Controls
Identification of Controls
1
2
% ^& * ( )
DW-Q73D2N-LS(GB)USA 2006.2.3 5:56 PM ˘ ` 6 mac001 1200DPI 90LPI
INTRODUCTION
7
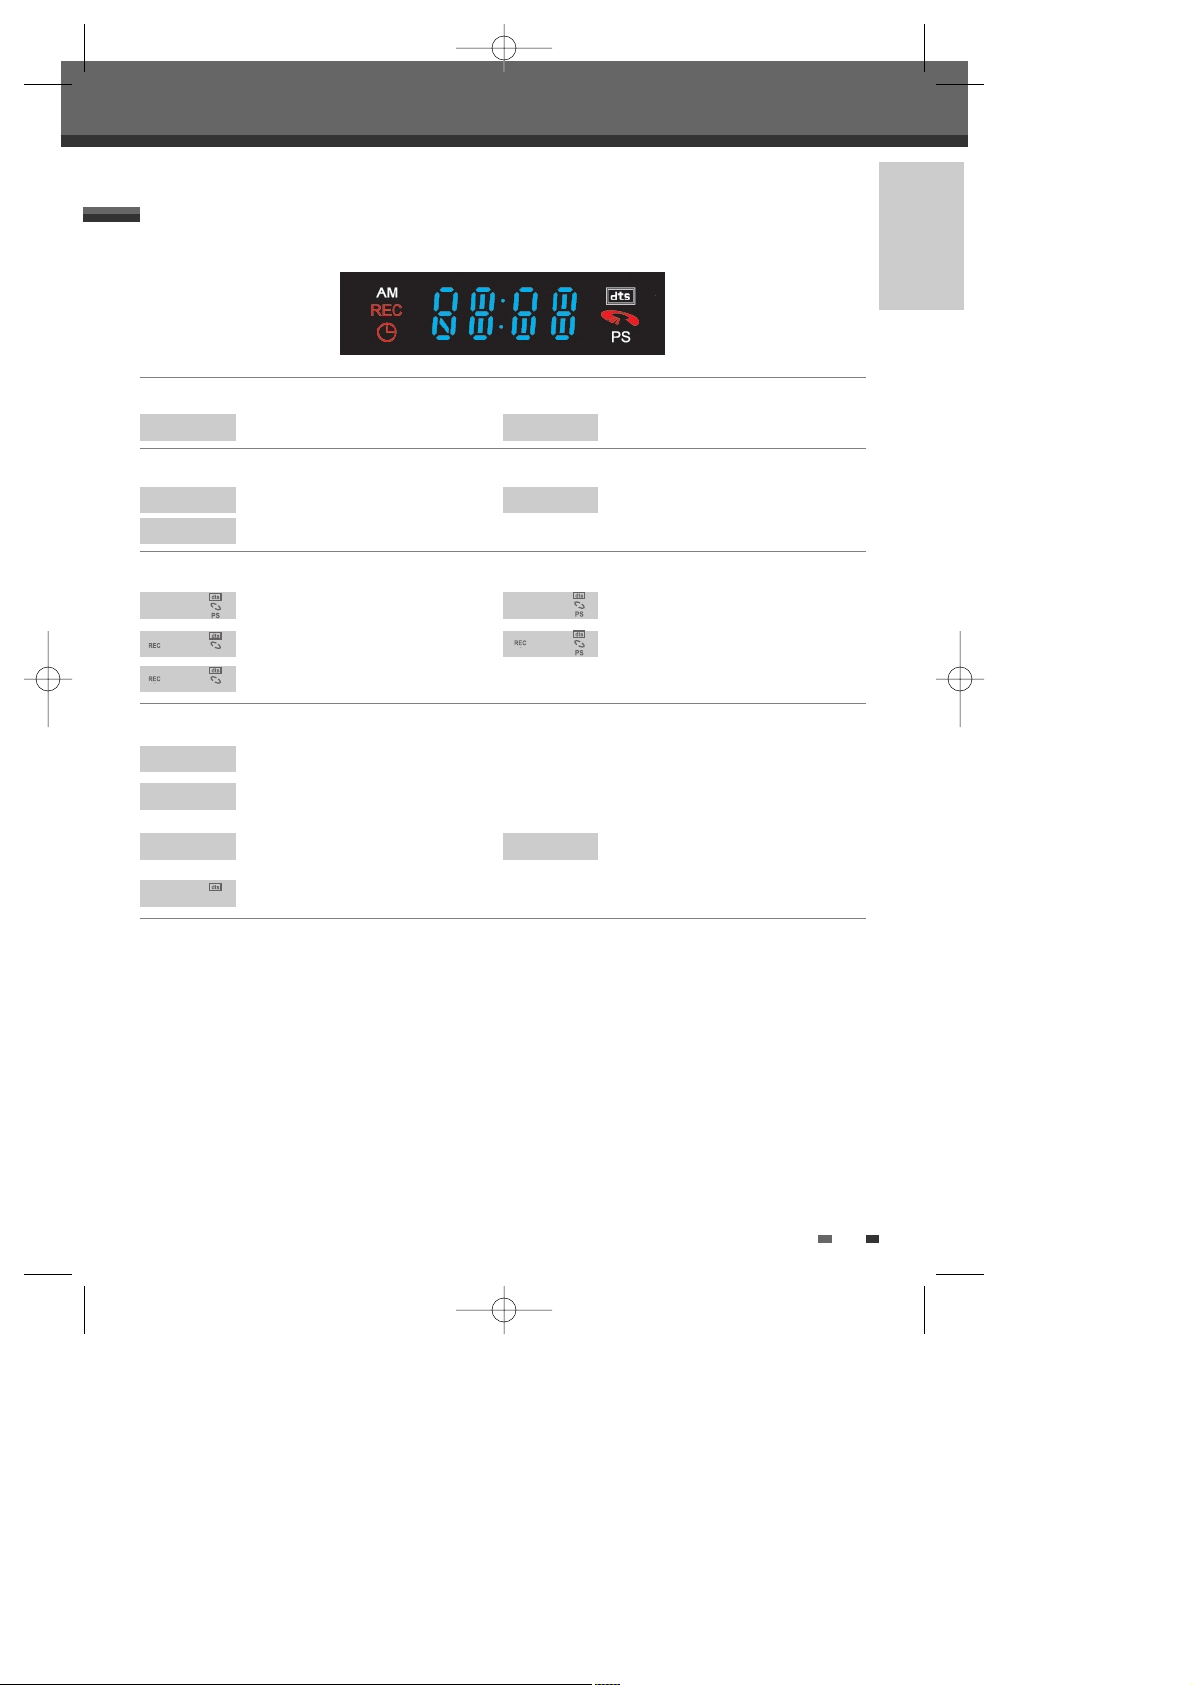
Front Panel Display
Channel
Identification of Controls
CH23
TV Channel
C123
CATV Channel
Input mode
AW-1
AV1 input
AW-2
AV2 input
DW
DV input
Recording on disc
11:15
Indicates a DVD Timer recording is set.
11:15
Indicates a DVD Timer Recording is in
standby mode.
11:15
Indicates the DVD is recording.
Indicates the dts title is playing.
RECP
Recording Pause mode
0:30
OTR Recording mode
Others
SAFE
Indicates when the DVD Recorder is locked.
TW
Indicates the DVD Recorder is in TV mode (set by [TV/DVD] button).
I-S
Indicates when the DVD Recorder+
VCR is outputting the video signal in
Interlaced Scan mode.
P-S
Indicates when the DVD Recorder+ VCR
is outputting the video signal in
Progressive Scan mode.
DW-Q73D2N-LS(GB)USA 2006.2.3 5:56 PM ˘ ` 7 mac001 1200DPI 90LPI
Starts recording. Press repeatedly to set the recording time. For more
details, Refer to One Touch Record (OTR) on page 39.
- Starts playback.
- Pauses playback or recording temporarily. Press again to exit Pause mode.
Stops playback or recording.
Selects Recording mode: - Approx 1 Hour (HQ mode), 2 Hours (SP mode), 4
Hours (EP mode), 8 Hours (SEP mode)
Selects a subtitle language, if available.
Selects an audio language (DVD), audio channel (CD) or audio type (TV).
8
Identification of Controls
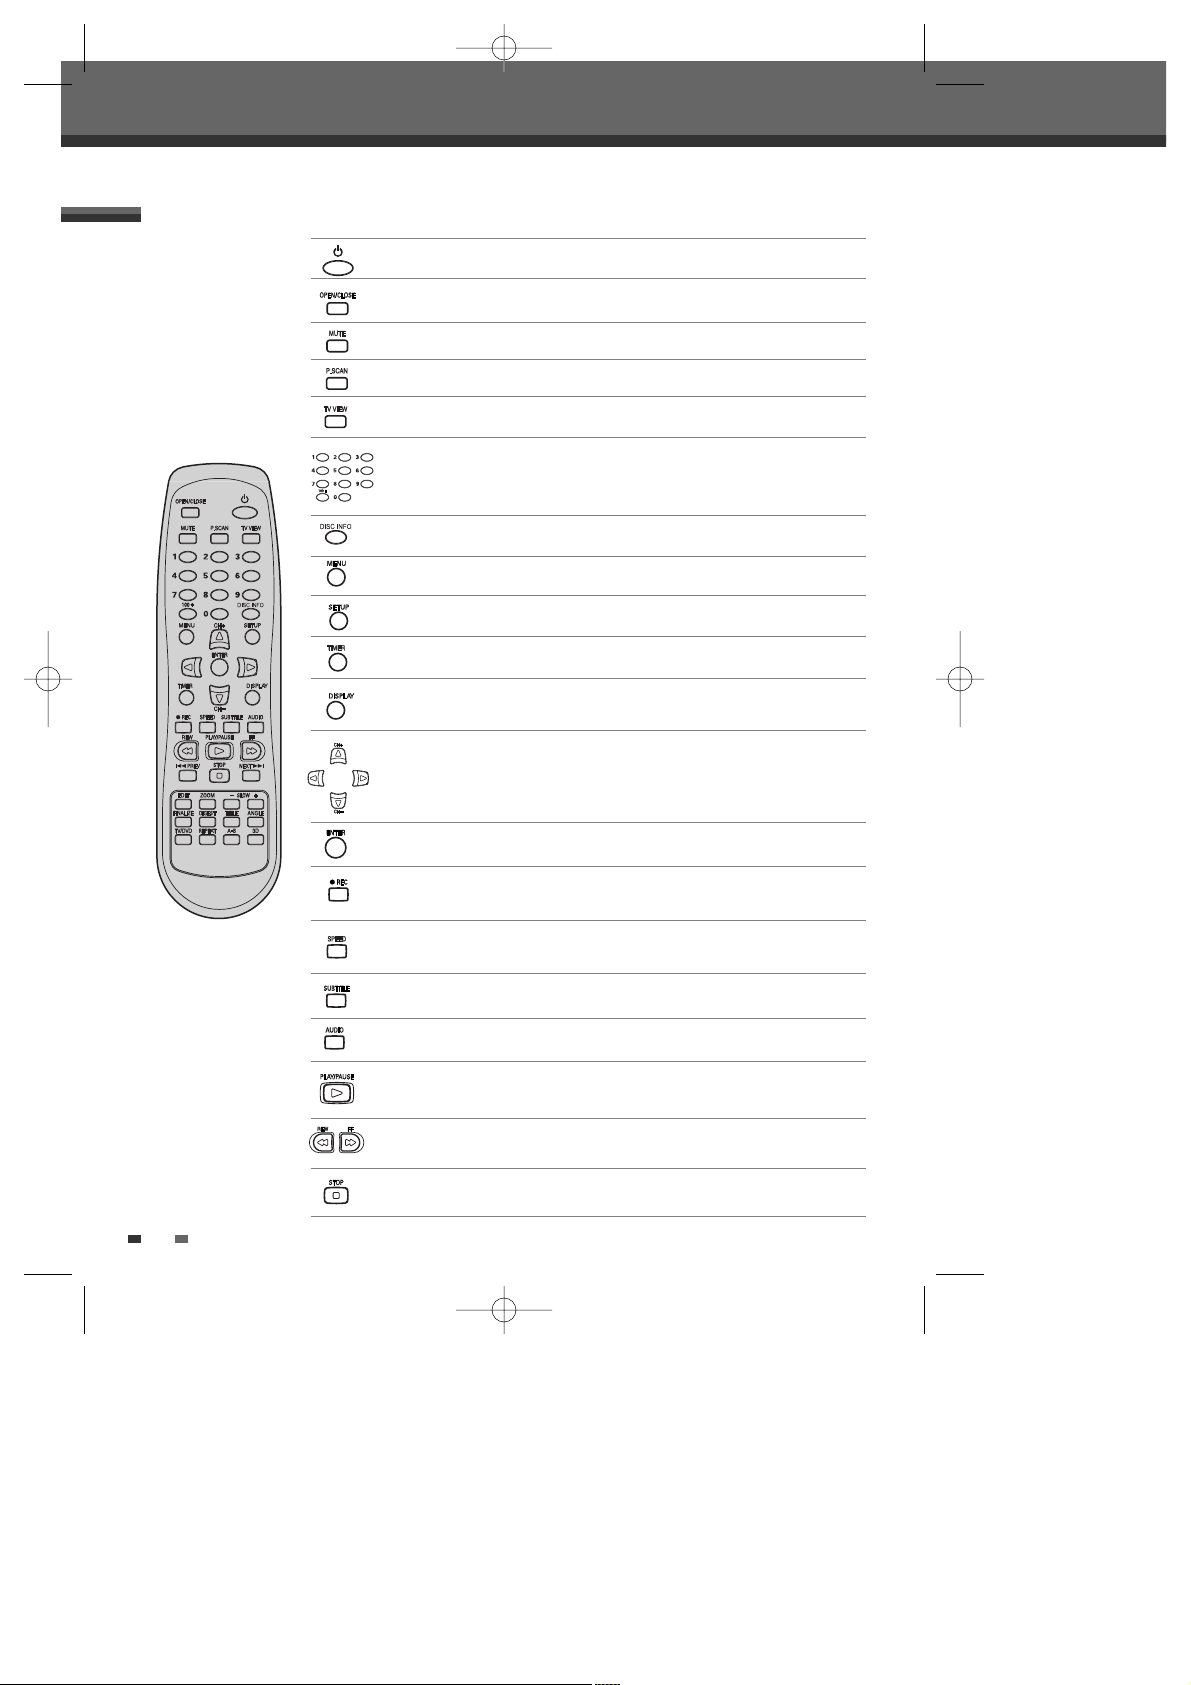
Remote Control
Turns the DVD Recorder on and off.
Opens and closes the disc tray in DVD mode.
Switches the DVD Recorder input to TV tuner, Line 1, Line 2, or DV.
Progressive scan mode
Mutes the sound.
Displays or exits the Setup menu.
Displays information about the currently loaded disc or TV channel.
Displays the Timer Recording menu.
Confirms menu selections.
- œ √…† : Selects menu options.
- CH(+/–) : Selects channels.
Accesses DVD disc menus.
Displays “Disc Info” when inserting recordable disc.
- Selects numbered options in menus.
- Selects TV channels.
- Manually adjusts tracking.
Searches backward/forward.
DW-Q73D2N-LS(GB)USA 2006.2.3 5:56 PM ˘ ` 8 mac001 1200DPI 90LPI

INTRODUCTION
9
Displays a disc’s Title menu, if available.
Enlarges the DVD video image.
Selects a DVD camera angle, if available.
Displays the edit menu for DVD+RW/+R discs or sets a chapter marker.
Displays the finalize menu for DVD+R discs.
Displays the digest menu for DVD+RW/+R discs.
Repeats the current chapter, track, title or the entire disc.
Repeats playback between two points (A and B).
Virtual sound effect on and off.
Switches between the DVD Recorder tuner and your TV tuner.
Increases or decreases the slow motion speed when playing a DVD.
Identification of Controls
Skips to the next or previous chapter/track.
DW-Q73D2N-LS(GB)USA 2006.2.3 5:56 PM ˘ ` 9 mac001 1200DPI 90LPI
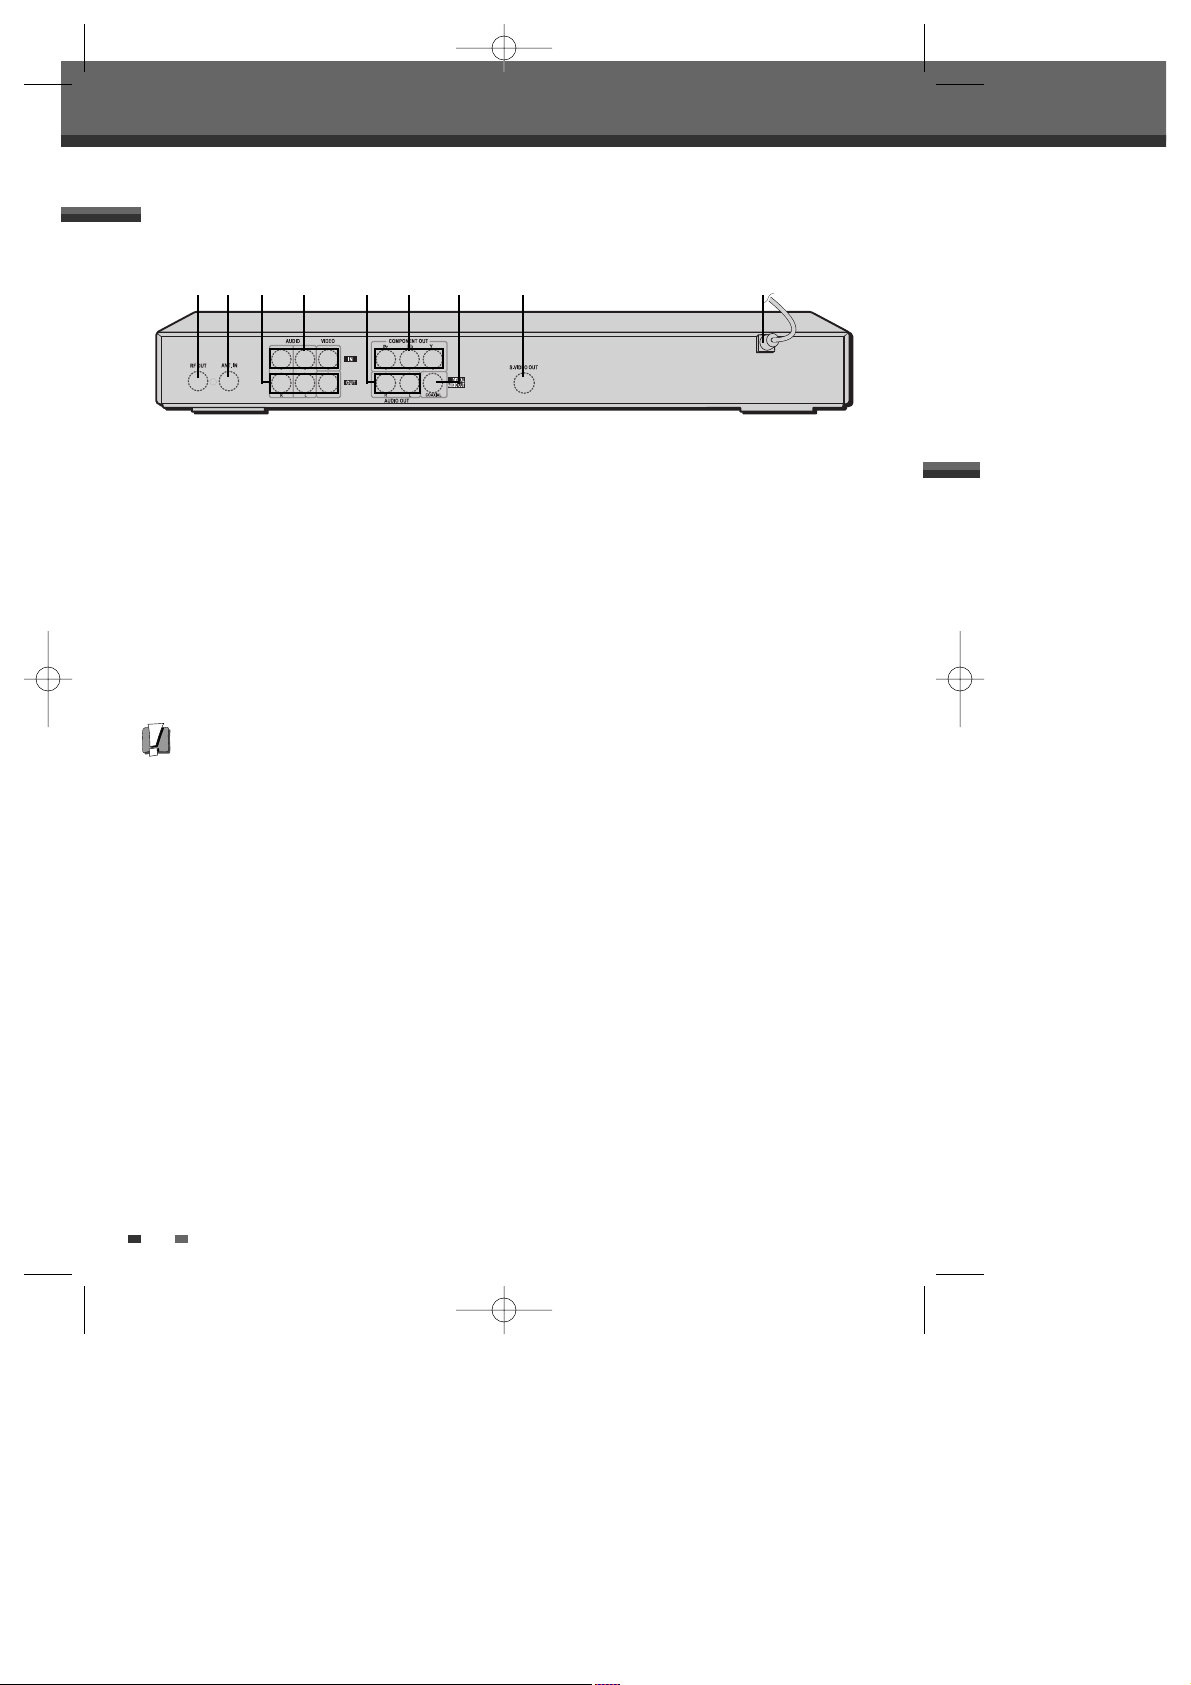
10
!
RF OUT (TO TV)
Connect to a TV with an RF coaxial input.
@
RF IN (FROM ANT.)
Connect to your antenna or cable TV outlet.
#
AV OUT (VIDEO, L-AUDIO-R)
Connect to a TV with video and audio inputs.
$
LINE2 (VIDEO, L-AUDIO-R)
Connect to the audio/video outputs of an external
source (VCR, Camcorder, etc.).
%
AUDIO OUT (L-AUDIO-R)
Connect to other equipment with audio inputs.
^
COMPONENT/PROGRESSIVE VIDEO OUT (Y Pb Pr)
Connect to a TV with Component Video (Y Pb Pr)
inputs.
&
COAXIAL (Digital Audio Out)
Connect to an amplifier with a coaxial digital
audio input.
*
S-VIDEO OUT
Connect to a TV with an S-Video Input.
(
AC Power Cord
Plug into a power outlet.
Rear panel
Identification of Controls
! @ * ($
Caution
Do not touch the inner pins of the jacks on the rear panel. Electrostatic discharge may cause permanent damage to
the DVD Recorder.
# ^% &
DW-Q73D2N-LS(GB)USA 2006.2.3 5:56 PM ˘ ` 10 mac001 1200DPI 90LPI
INTRODUCTION
11
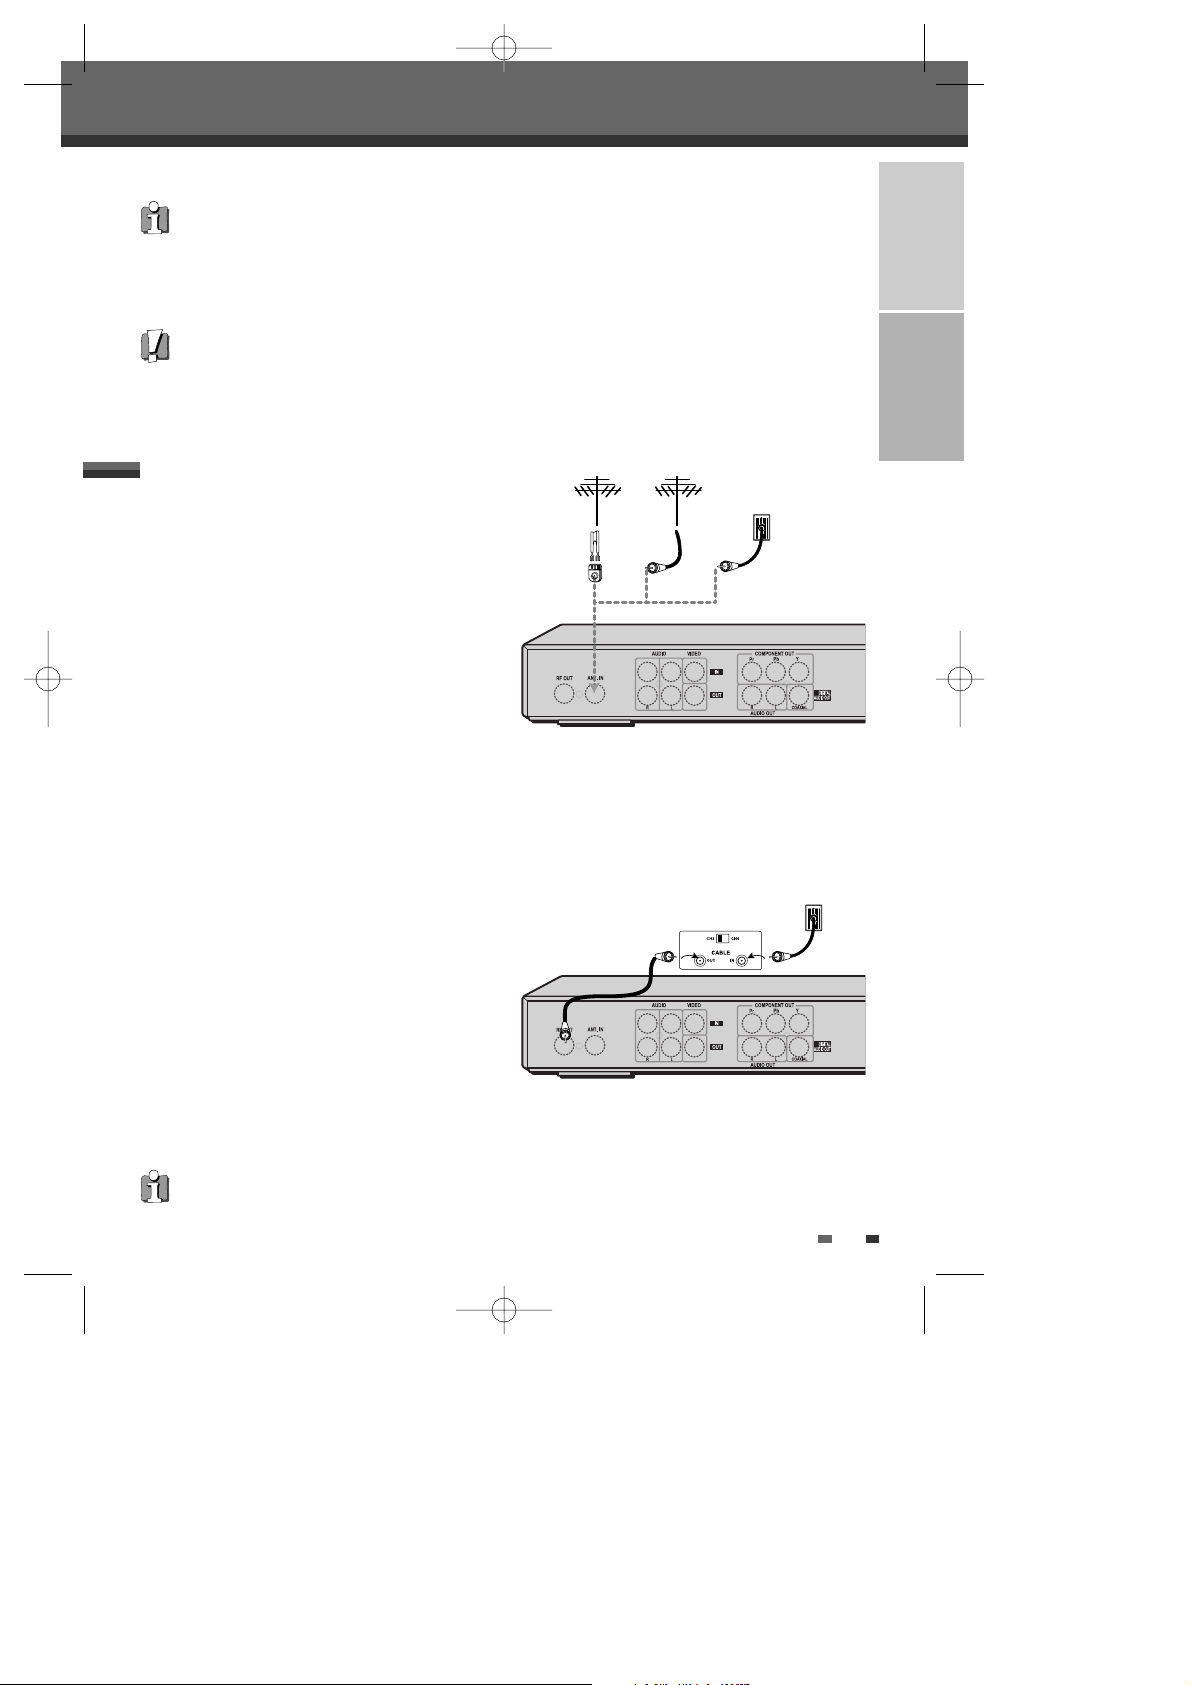
Connecting Antenna/Cable
CONNECTIONS
1
Disconnect the antenna/cable from the rear of
your TV.
2
Connect this cable to the jack marked ANT IN
(FROM ANT.) on the rear panel of the DVD
Recorder.
Cable Service Without Cable Box
If your cable wire is connected to your TV without a converter or descrambler box, unscrew the wire from your
TV and attach it to the ANT IN (FROM ANT.) jack on the rear panel of the DVD Recorder.
Use the supplied coaxial cable to connect between the DVD Recorder’s OUT (TO TV) jack and the antenna input
jack on your TV. With this connection, you can receive
all midband, superband, and hyperband channels (all
cable channels).
Cable Service With Cable Box
If a cable box is required in your cable system, follow
the instructions shown at right. This hookup permits
both TV and DVD Recorder operation.
To view or record a CATV channel:
1
Tune the TV to the correct video input channel.
2
Set the DVD Recorder to the output channel of the
cable box using the [CH …/†] or the [0-9] buttons on your DVD Recorder (e.g., CH3).
3
Select the channel you wish to view on the cable box.
• There are a variety of ways to connect the DVD Recorder to your TV and other equipment. Use only one of the
connections described below. Whichever TV connection you use will work with all input sources.
• Please refer to the manuals for your TV, VCR, stereo system, or other devices as necessary to make the best
connections.
• For better sound reproduction, connect the DVD Recorder’s AUDIO OUT jacks to the audio in jacks of your
amplifier, receiver, stereo, or audio/video equipment. See ‘Connecting an Amplifier/Receiver‘ on page 13.
If you are using a cable box to tune channels, it is not necessary to run Auto Channel Search as indicated on page 18.
Caution
• Make sure the DVD Recorder is connected directly to the TV, and the TV is set to the correct video input.
• Do not connect the DVD Recorder’s AUDIO OUT jack to the phono in jack (record deck) of your audio system.
• Do not connect the DVD Recorder via your VCR. The DVD image could be distorted by the copy protection system.
Connections
Connections
Antenna Antenna
Flat Wire
(300 ohm)
300/75 ohm
Adaptor
(Not supplied)
Cable TV
Wall Jack
OR OR
Rear of DVD Recorder
Rear of DVD Recorder
Cable TV
Wall Jack
Back Panel of
Typical Cable Box
DW-Q73D2N-LS(GB)USA 2006.2.3 5:56 PM ˘ ` 11 mac001 1200DPI 90LPI
12
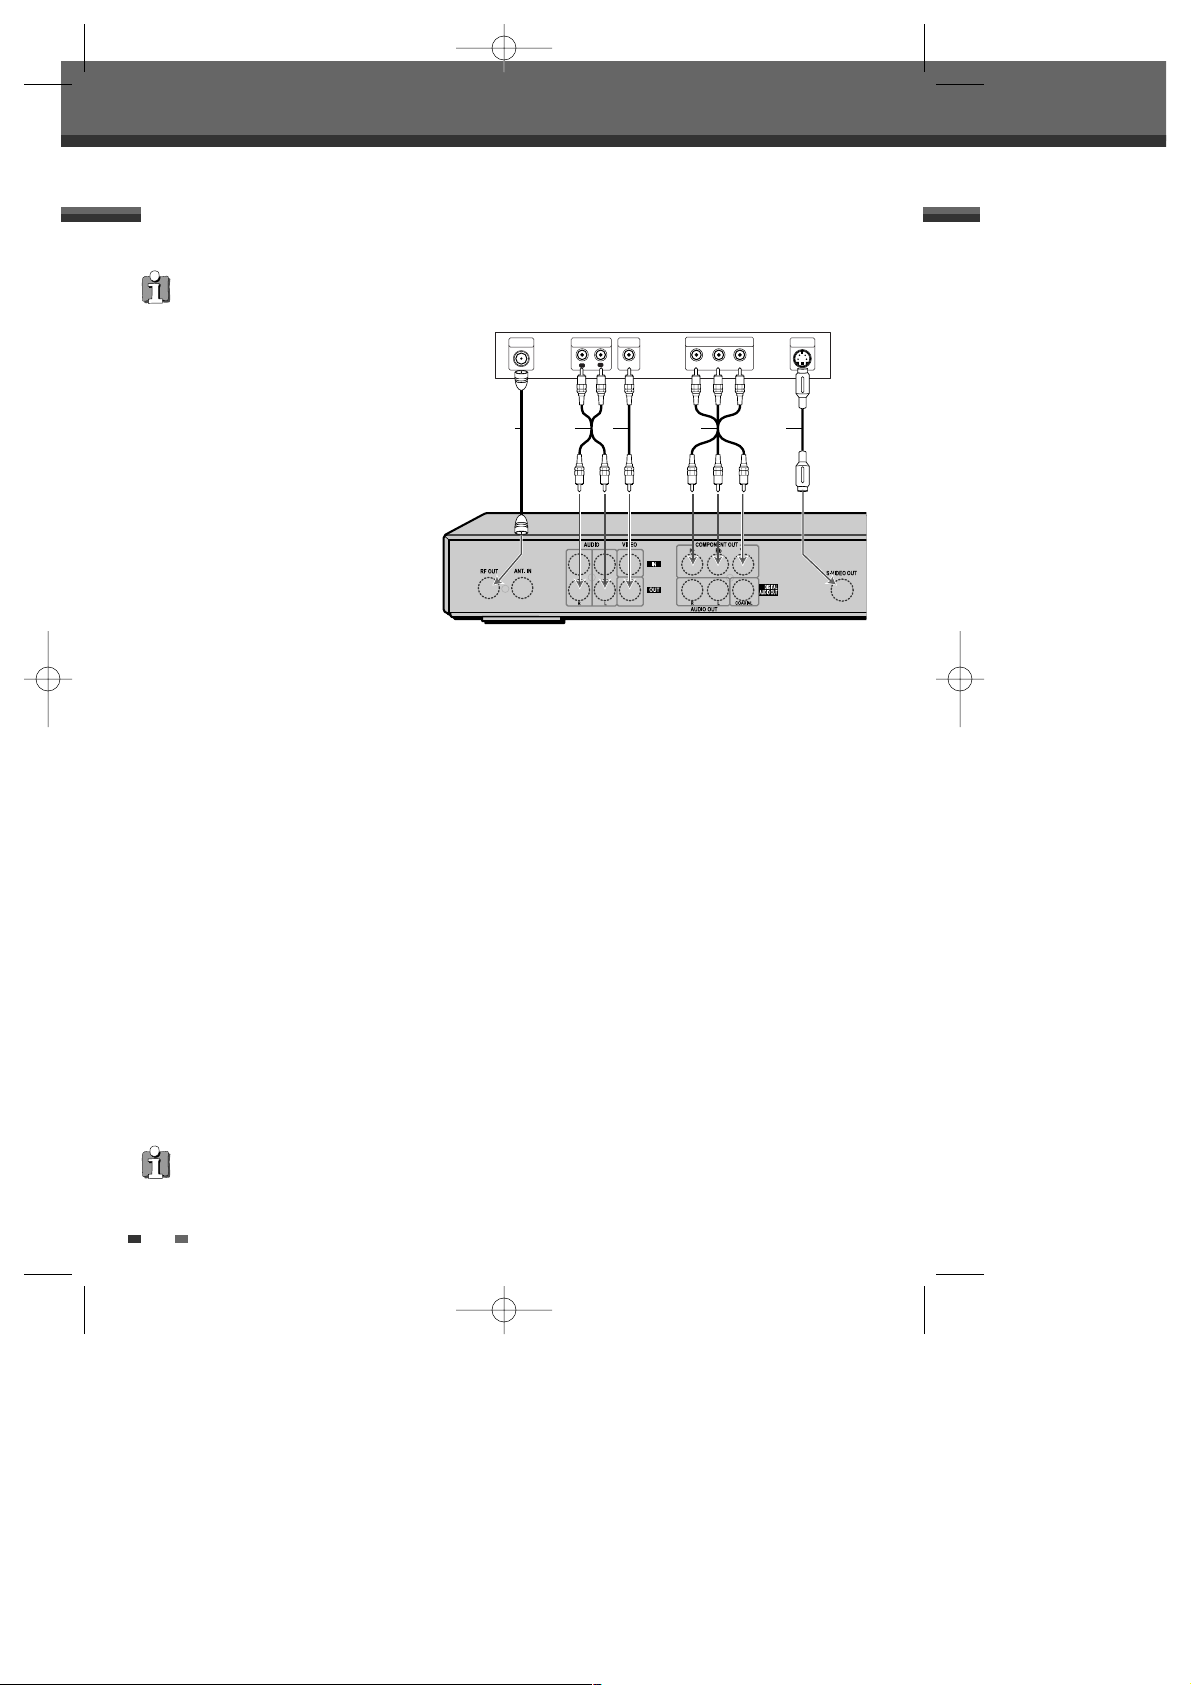
Progressive Scan Connection
• If your television is a high-definition or ‘digital ready‘ television, you may take advantage of the DVD
Recorder’s Progressive Scan output for the highest video resolution possible.
• If your TV does not accept the Progressive Scan format, the picture will appear scrambled.
1
Connect the COMPONENT/PROGRESSIVE VIDEO OUT jacks on the DVD Recorder to the corresponding in
jacks on your TV using an optional Y Pb Pr cable (C).
2
Connect the Left and Right AUDIO OUT jacks from the DVD Recorder to the left/right audio in jacks on your
TV using the supplied audio cables (A).
Choose one of the following TV connections, depending on the capabilities of your equipment.
RF Coaxial Connection
Connect the RF OUT (TO TV) jack on the DVD
Recorder to the antenna in jack on your TV
using the supplied coaxial cable (R). If you
use this connection, tune your TV to the DVD
Recorder’s RF output channel (CH 3 or 4).
How to set the DVD Recorder’s RF output
channel
Press [SETUP] and select Installation ➝
Modulator Out to change the RF out channel.
For details refer to page 18.
Audio/Video Connection
1
Connect the VIDEO OUT jack on the DVD
Recorder to the video in jack on your TV
using the supplied video cable (V).
2
Connect the Left and Right AUDIO OUT jacks from the DVD Recorder to the left/right audio in jacks on your
TV using the supplied audio cables (A).
S-Video Connection
1
Connect the S-VIDEO OUT jack on the DVD Recorder to the S-Video in jack on your TV using an S-Video
cable (S).
2
Connect the Left and Right AUDIO OUT jacks from the DVD Recorder to the left/right audio in jacks on your
TV using the supplied audio cables (A).
Component Video Connection
1
Connect the COMPONENT/PROGRESSIVE VIDEO OUT jacks on the DVD Recorder to the corresponding input
jacks on your TV using a Y Pb Pr cable (C) if the Component Video jacks (Y, Pb, Pr) are available on your TV.
2
Connect the Left and Right AUDIO OUT jacks from the DVD Recorder to the left/right audio in jacks on your
TV using the supplied audio cables (A).
Connecting a TV
Connections
All video signals are available from all video outputs.
That means that whichever TV connection you use, it will
work with all input sources, including VHS out of the Component/Progressive Video Output.
• Be sure to set the DVD Recorder to Progressive Scan mode by pressing and holding [P.SCAN] for 3 seconds (or
changing the Scan Mode in the Setup Menu; see page 21).
• Progressive Scan does not work with the RF, Audio/Video or S-Video connections.
ANTENNA
INPUT
L
R
Y
Pb
Pr
COMPONENT/PROGRESSIVE VIDEO INPUT
AUDIO INPUT
VIDEO
INPUT
S-VIDEO
INPUT
Rear of TV
R
SA V C
Rear of DVD Recorder
DW-Q73D2N-LS(GB)USA 2006.2.3 5:56 PM ˘ ` 12 mac001 1200DPI 90LPI
CONNECTIONS
13
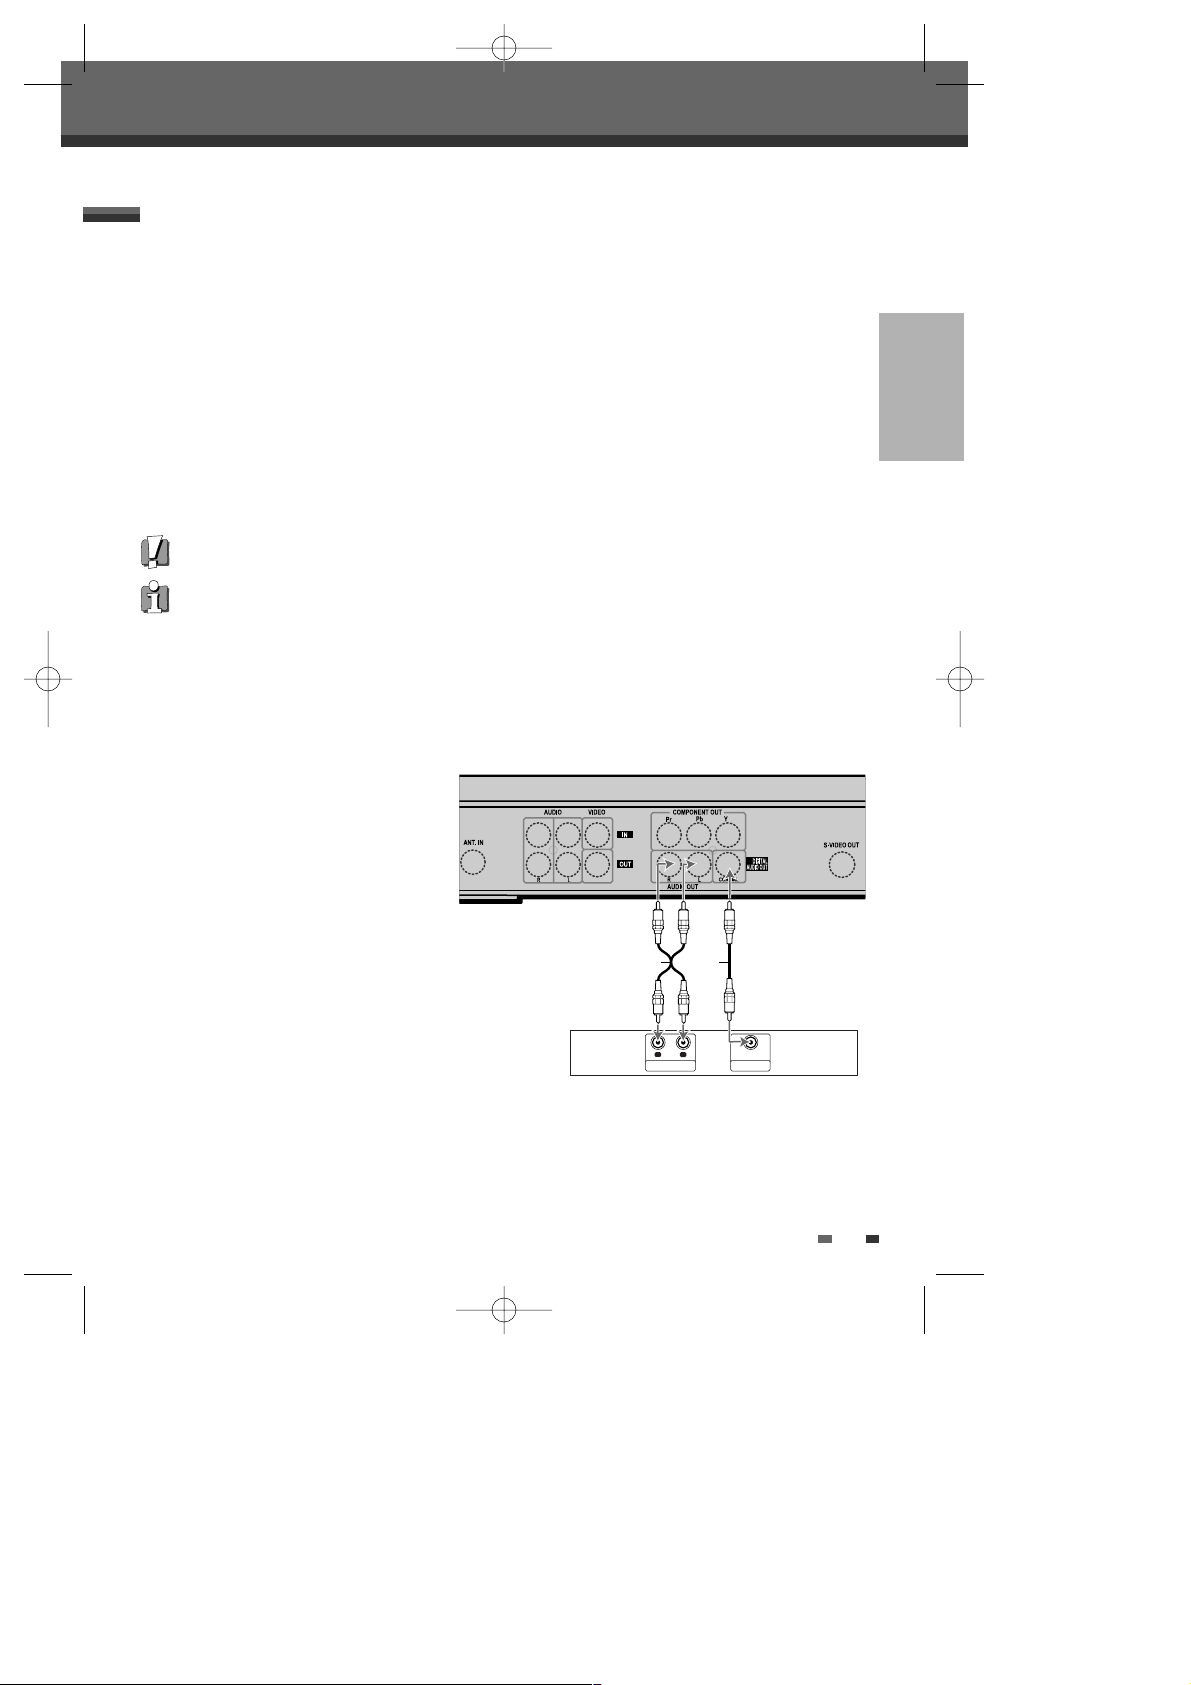
Connecting to an amplifier equipped with two channel analog stereo or Dolby Pro Logic ll/Pro Logic
Connect the Left and Right AUDIO OUT jacks on the DVD Recorder to the left and right audio in jacks on your
amplifier, receiver, or stereo system, using the supplied audio cables (A).
Connecting to an amplifier equipped with two channel digital stereo (PCM) or to an Audio/Video receiver equipped
with a multi-channel decoder (Dolby Digital™, MPEG 2, or DTS)
1
Connect the DVD Recorder’s DIGITAL AUDIO OUT jack (COAXIAL X) to the corresponding in jack on your
amplifier. Use an optional digital coaxial audio cable.
2
You will need to activate the DVD Recorder’s digital output; see ‘AUDIO Settings‘ on page 22.
Digital Multi-Channel Sound?
A digital multi-channel connection provides the best sound quality. For this you need a multi-channel
audio/video receiver that supports one or more of the audio formats supported by your DVD Recorder (MPEG 2,
Dolby Digital, and DTS). Check the receiver manual and the logos on the front of the receiver.
Connecting an Amplifier/Receiver
• Due to the DTS Licensing agreement, the digital output will be in DTS digital out when DTS audio stream is
selected.
• If the audio format of the digital output does not match the capabilities of your receiver, the receiver will produce
a strong, distorted sound or no sound at all.
• 5.1 channel digital surround sound via the digital connection can only be obtained if your receiver is equipped with
a digital multi-channel decoder.
• To see the audio format of the current DVD on the on-screen display, press [AUDIO].
The DVD Recorder does not perform internal (2- channel) decoding of DTS sound tracks. To enjoy DTS multi-channel
surround, you must connect the DVD Recorder to a DTS compatible receiver via one of the DVD Recorder’s digital audio
outputs.
Amplifier (Receiver)
R
L
AUDIO INPUT DIGITAL INPUT
COAXIAL
A X
Connections
Rear of DVD Recorder
DW-Q73D2N-LS(GB)USA 2006.2.3 5:56 PM ˘ ` 13 mac001 1200DPI 90LPI
14
Connections
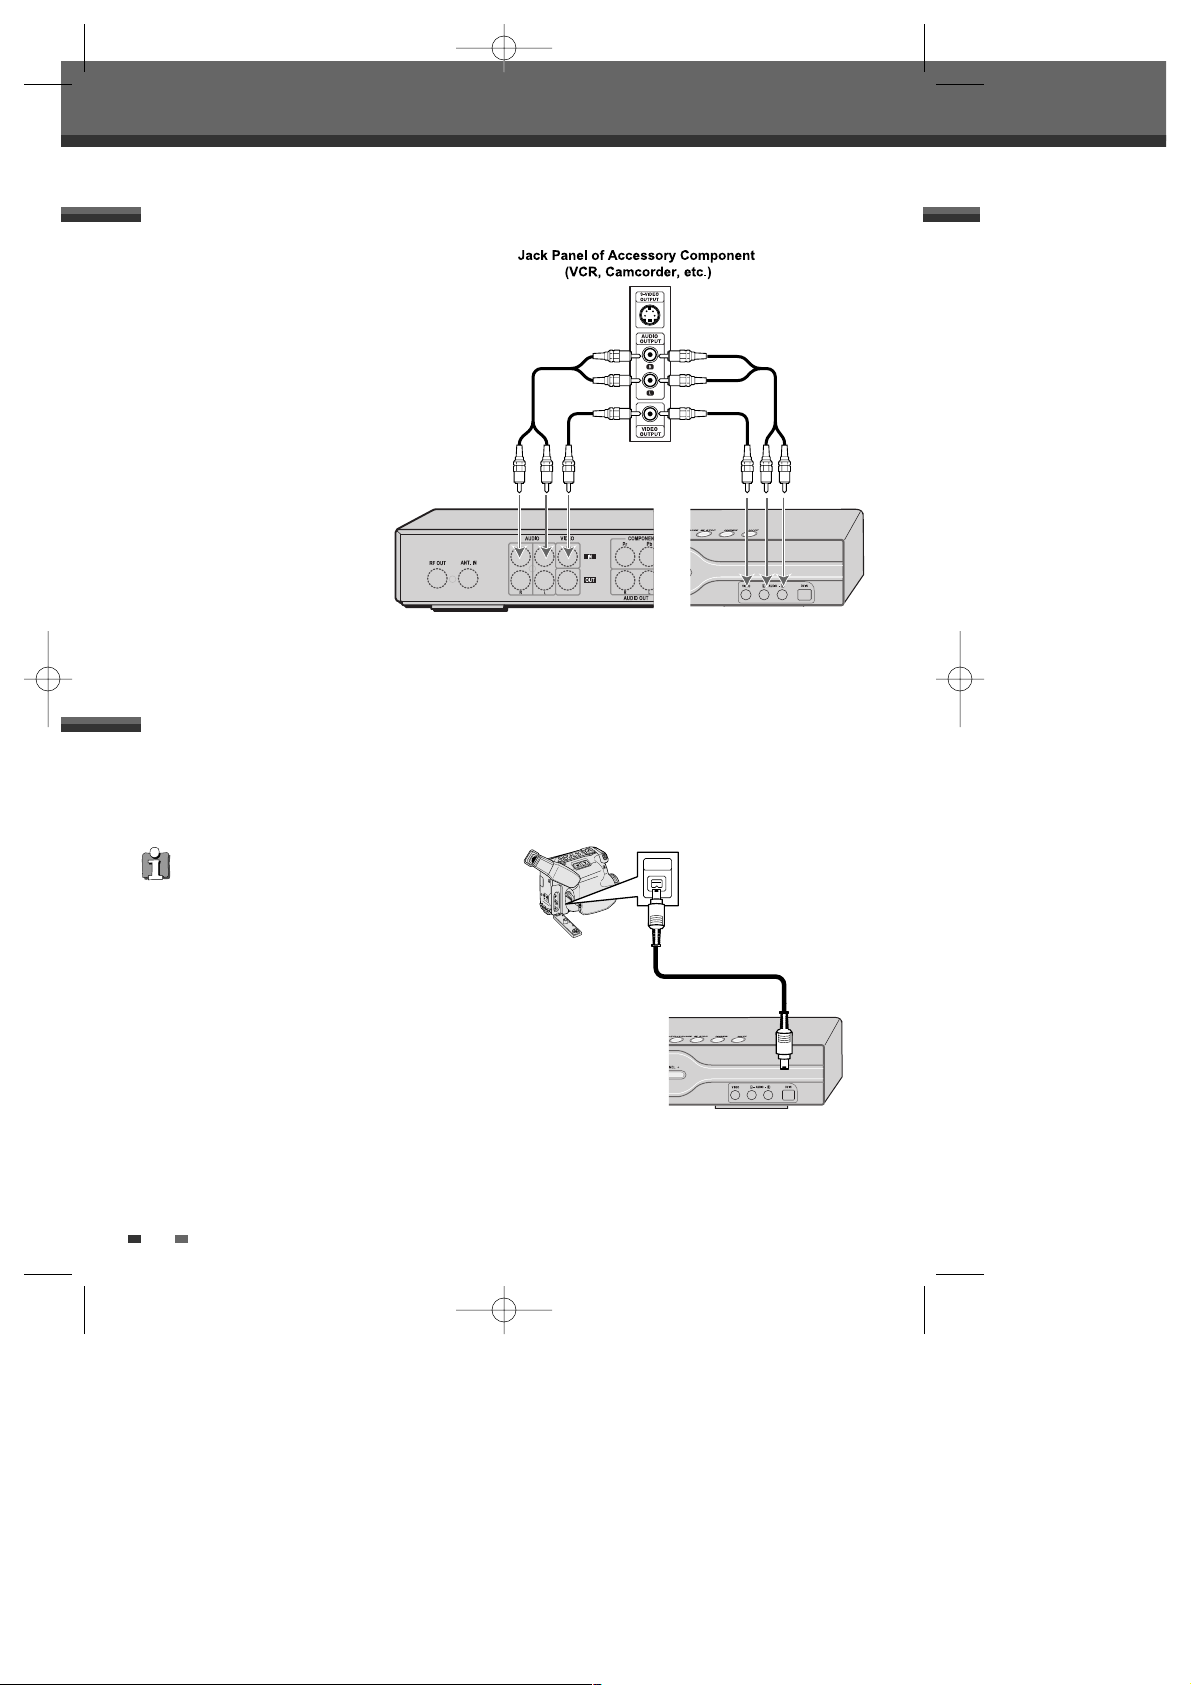
To receive audio/video signals from other equipment,
connect the LINE1 or LINE2 jacks on the DVD Recorder
to the audio/video out jacks on your external
component, using optional audio/video cables.
Connecting Optional Equipment
Using the front panel DV IN jack, it is possible to connect a DV digital camcorder, video deck or DVD+R/RW
recorder and digitally transfer DV tapes or DVD+R/RW discs to DVD+R/RW.
Use a DV cable (not supplied) to connect the DV In/Out jack of your DV camcorder/video deck to the front panel
DV IN jack of the DVD Recorder.
Connecting a Digital Camcorder
This jack is for connection to DV equipment only. It is not
compatible with digital satellite tuners or D-VHS video
decks.
Rear of DVD Recorder Front of DVD Recorder
Front of DVD Recorder
DV IN
DV
IN/OUT
DW-Q73D2N-LS(GB)USA 2006.2.3 5:56 PM ˘ ` 14 mac001 1200DPI 90LPI
 Loading...