

Page 1
CONTENTS
1
LOCATION OF CONTROLS...........................................................................................................................................2
MAIN CONTROLS & REMOTE SENSOR......................................................................................................................3
REMOTE CONTROLLER...............................................................................................................................................4
BASIC OPERATION METHOD ......................................................................................................................................6
CHECK AGAIN BEFORE USING.............................................................................................................................6
REMOVE OUTDOOR UNIT COVER........................................................................................................................6
OPERATION METHOD ..................................................................................................................................................7
ON/OFF............................................................................................................................................................................................7
COOL MODE ...................................................................................................................................................................................7
FAN MODE.......................................................................................................................................................................................8
HEAT MODE (ONLY HEAT PUMP MODEL)..................................................................................................................................8
TO SELECT THE FAN SPEED .......................................................................................................................................................9
TO SELECT THE FAN DIRECTION................................................................................................................................................9
TO SET THE TIMER MODE..........................................................................................................................................................10
SAVE MODE..................................................................................................................................................................................12
LOCK OPTION...............................................................................................................................................................................12
UNIQUE FUNCTIONS. ..................................................................................................................................................................13
INSTALLATION INSTRUCTIONS................................................................................................................................................14
CLEANING THE AIR FILTER.......................................................................................................................................15
CARE AND MAINTENANCE........................................................................................................................................16
TROUBLESHOOTING GUIDE .....................................................................................................................................17
Page 2
2
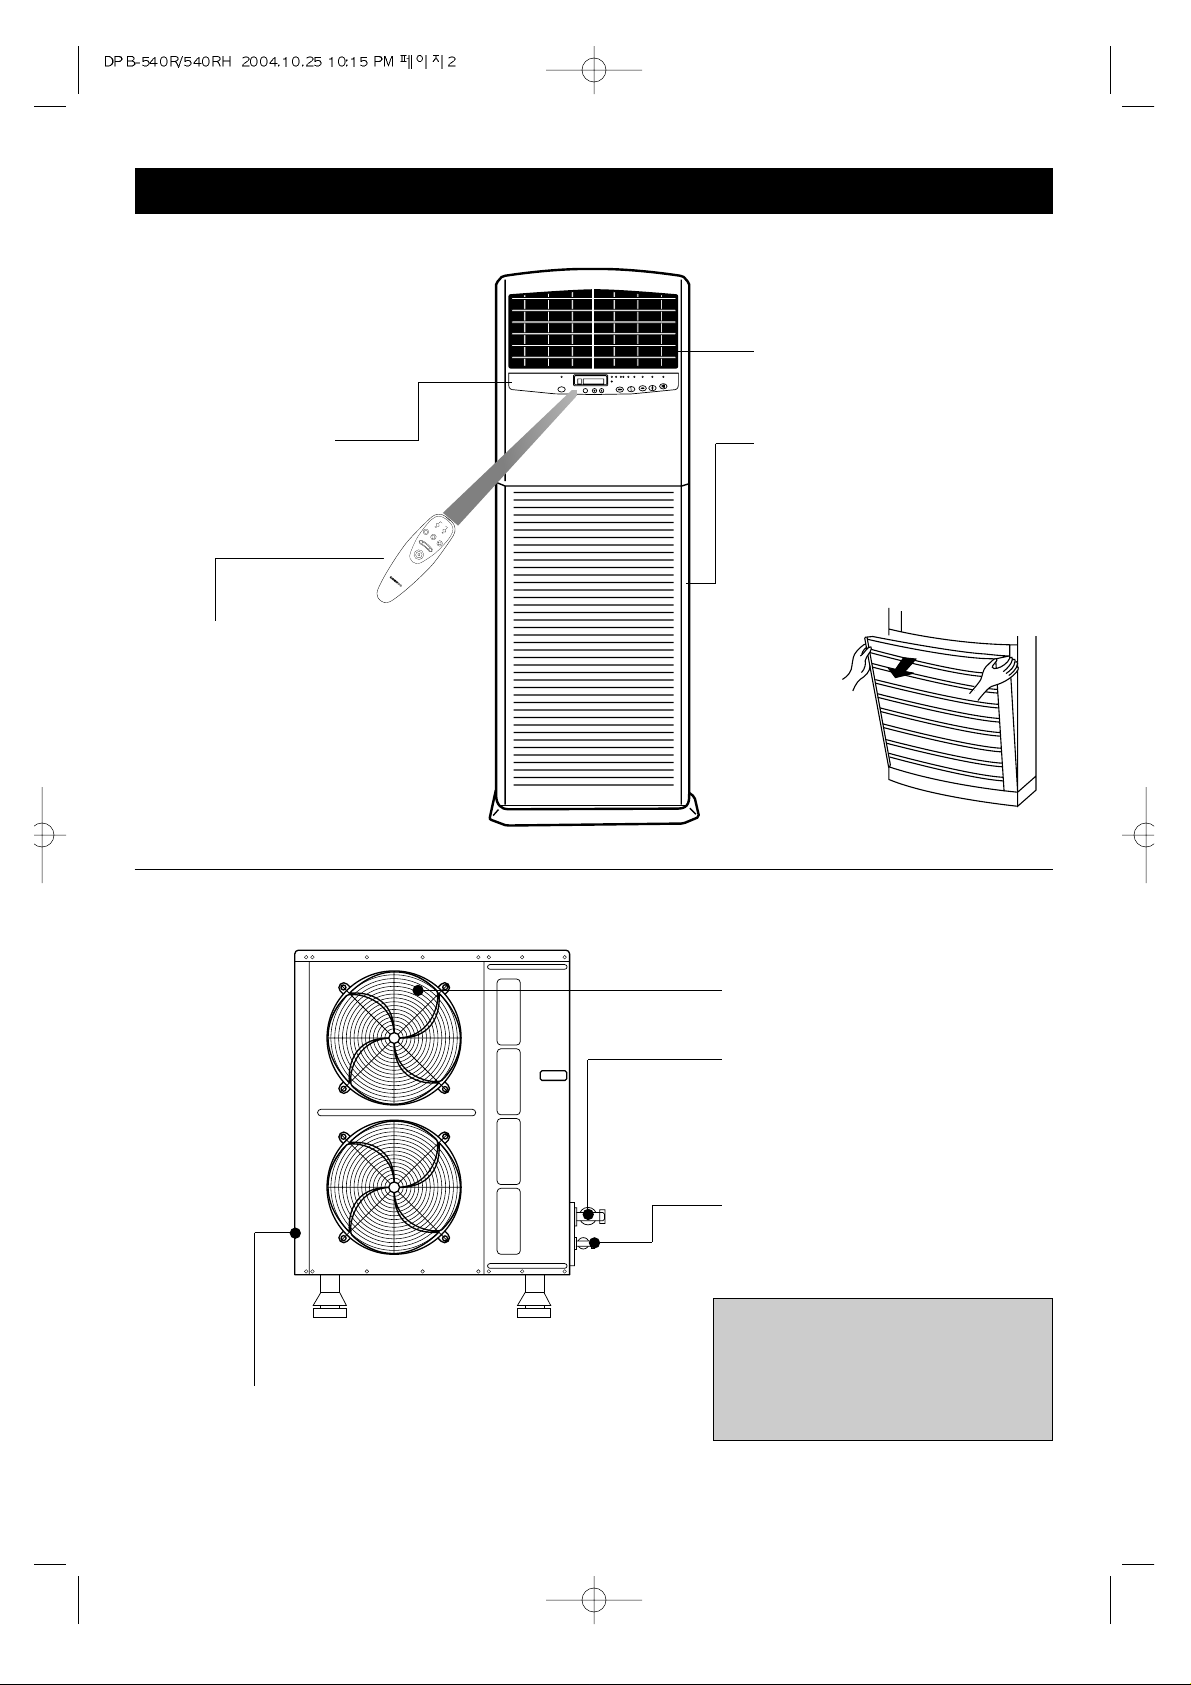
LOCATION OF CONTROLS
OUTDOOR UNIT
CAUTION
• Do not install the outdoor unit on unstable place like outside wall of building or
outside of balcony. In case of falling, it
may cause serious trouble and damage.
INDOOR UNIT
MAIN CONTROLS/
REMOTE SENSOR
REMOTE CONTROLLER
- Operative distance is within 7m
from the indoor unit.
- Use toward to the remote sensor
AIR OUT
AIR IN
- There is an air filter inside this
grille.
* The method to open the air suc-
tion grille
Pull the upper side of grille with
both hands.
FAN DIR.
LOCK
MODE
FAN
S
PEED
TEMP
FAN
DIR
.
AUTO
SWING
OUTDOOR UNIT AIR IN
- If there is any obstacle in front of
the grille, the efficiency of the unit
can be lowered.
SERVICE VALVES(GAS TUBE)
SERVICE VALVES(LIQUID TUBE)
OUTDOOR UNIT AIR OUT
Page 3
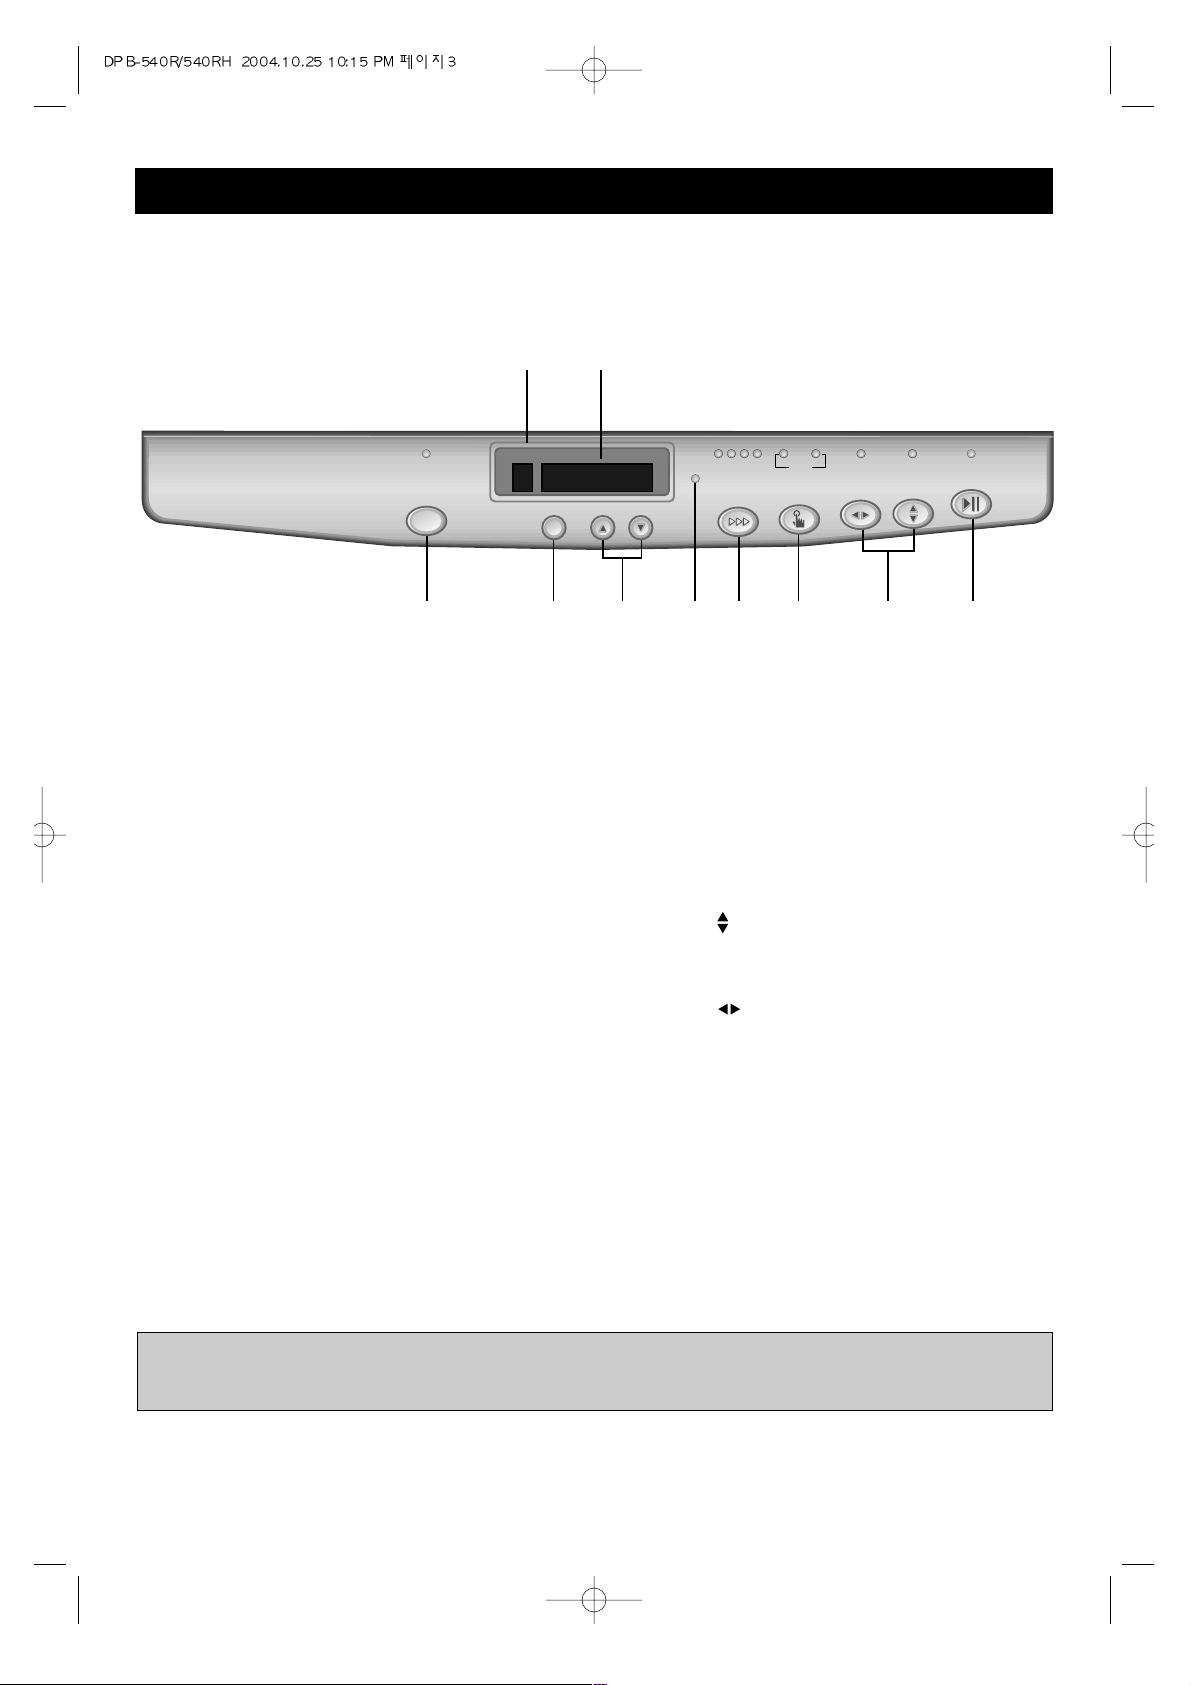
MAIN CONTROLS & REMOTE SENSOR
3
SAVE Mode Button and Indicator
TIMER ON/OFF Button
Press to set the unit off or on time.
(1, 2, 3......24hr)
TEMPERATURE & RESERVATION TIME
Button
Press to raise or lower the desired temperature and time.
OUTDOOR UNIT OPERATION Indicator
Lights to indicate the outdoor unit operation.
FAN SPEED Button and Indicator
Press to select the fan speed
(High / Middle / Low / Auto)
MODE Button and Indicator
Press to cycle through the modes
(Cool / Fan / Heat)
FAN DIR. Button and Indicator
Press to select up/down direction for fan.
FAN DIR. Button and Indicator
Press to select left/right direction for fan.
ON/OFF Button and Indicator
Press to turn the unit on or off
Remote Sensor
TEMPERATURE & RESERVATION TIME
Indicator
1
2
3
4
5
6
7
8
9
10
1 2
9 0
3 4 5 6 7
8
REMOCON
SAVE
TIMER UP DOWN
FAN SPEED MODE
FAN DIR.
ON/OFF
CURRENT TEMP DESIRED TEMP
COMP
COOL FAN
HEAT
LO. MI. HI. AUTO
NOTE:
• Heat mode is available on the only heat pump model.
Page 4
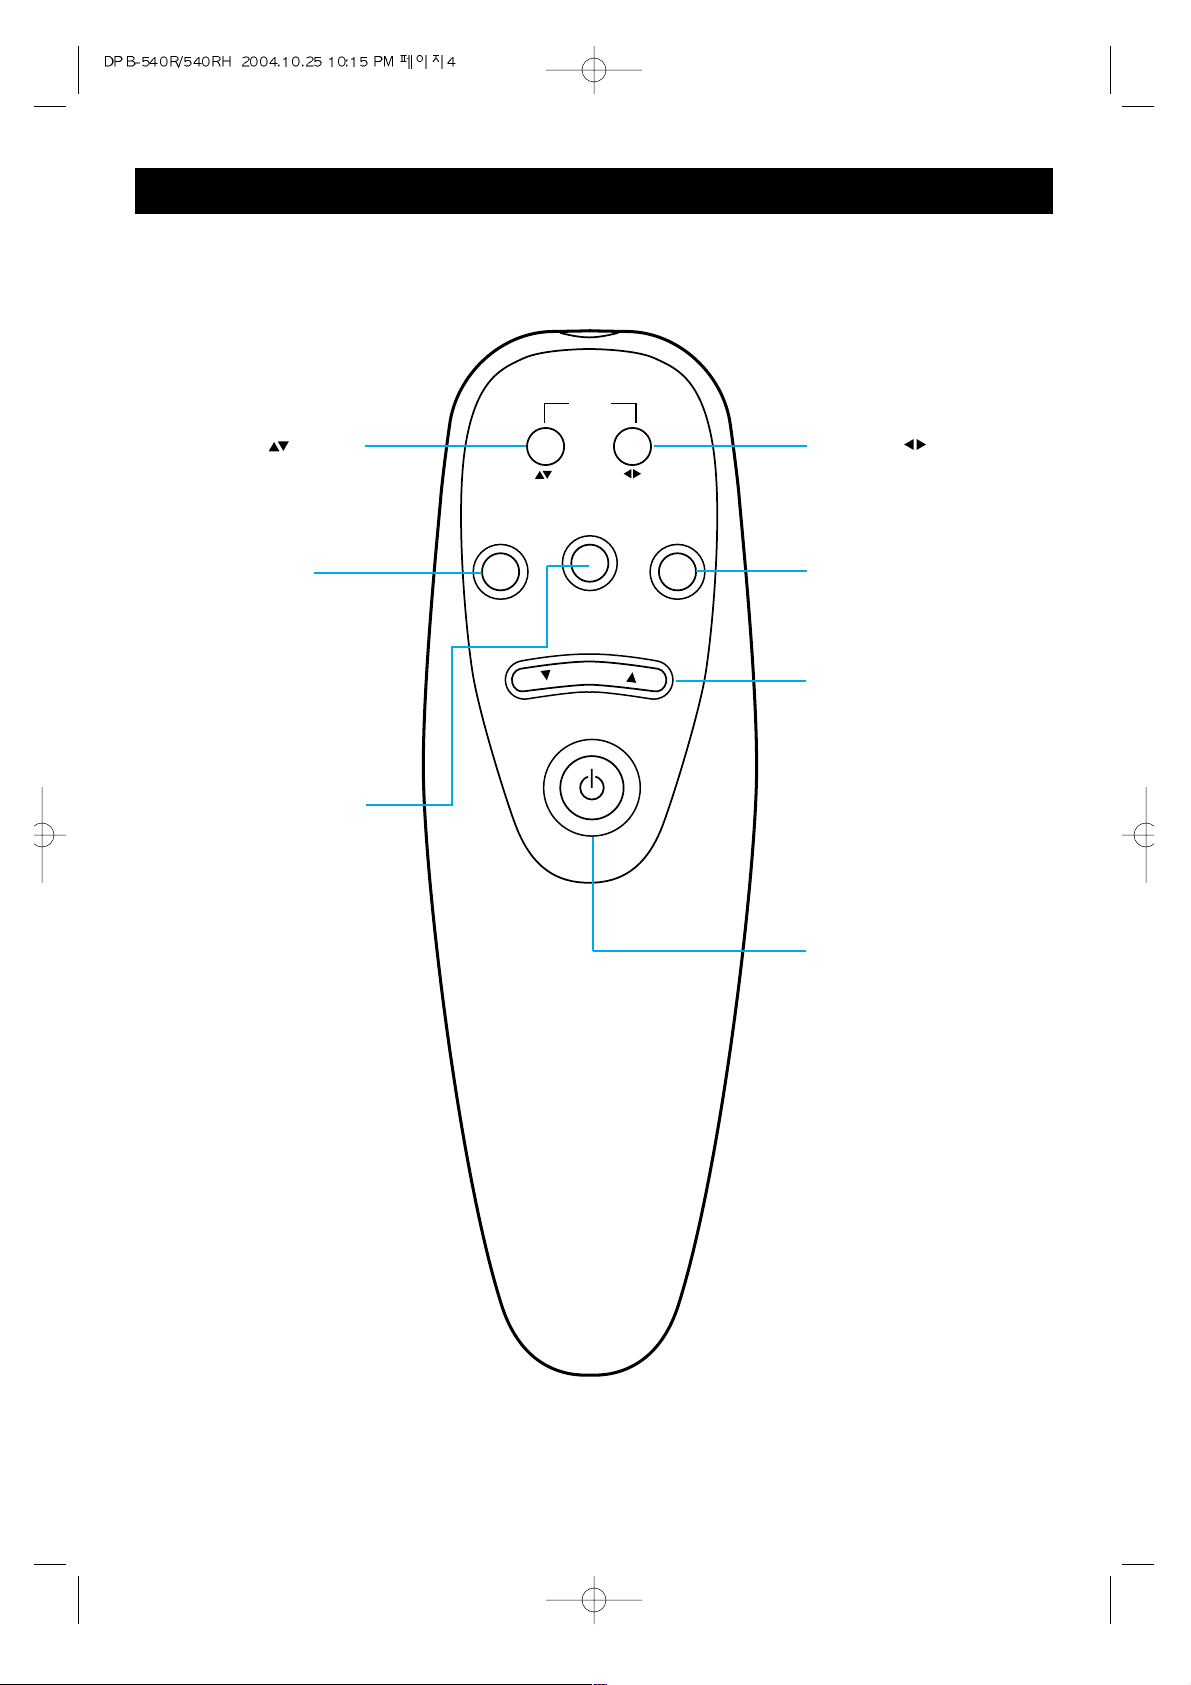
REMOTE CONTROLLER
4
FAN DIR.
LOCK MODE
FAN
SPEED
TEMP
FAN DIR.
AUTO
SWING
FAN DIR. Button
Press to select left/right
direction for fan.
TEMPERATURE Button
Press to raise or lower the
desired temperature and
time.
MODE Button
Press to cycle through
the modes
(Cool/Fan/Heat)
LOCK Button
In case that the Lock option is applied, other
buttons on the indoor unit
don’t work.
To cancel the Lock option,
press any botton on the
remote controller.
FAN SPEED Button
Press to select the fan
speed
(High/Middle/Low/Auto)
FAN DIR. Button
Press to select up/down
direction for fan.
ON/OFF Button
Press to turn the unit on
or off
Page 5
5
CELSIUS TO FAHRENHEIT CONVERSION CHART
CELSIUS FAHRENHEIT
16 60.8
17 63
18 64.4
19 66.2
20 68
21 69.8
22 71.6
24 75.2
23 73.4
CELSIUS FAHRENHEIT
25 77
26 78.8
27 80.6
28 82.4
29 84.2
30 86
31 87.8
32 89.6
NOTES:
• When operating the remote controller, make sure there are no obstructions between the remote controller and the remote sensor.
• After a while the display goes blank to conserve battery power. To check the settings, press the ON/OFF button once.
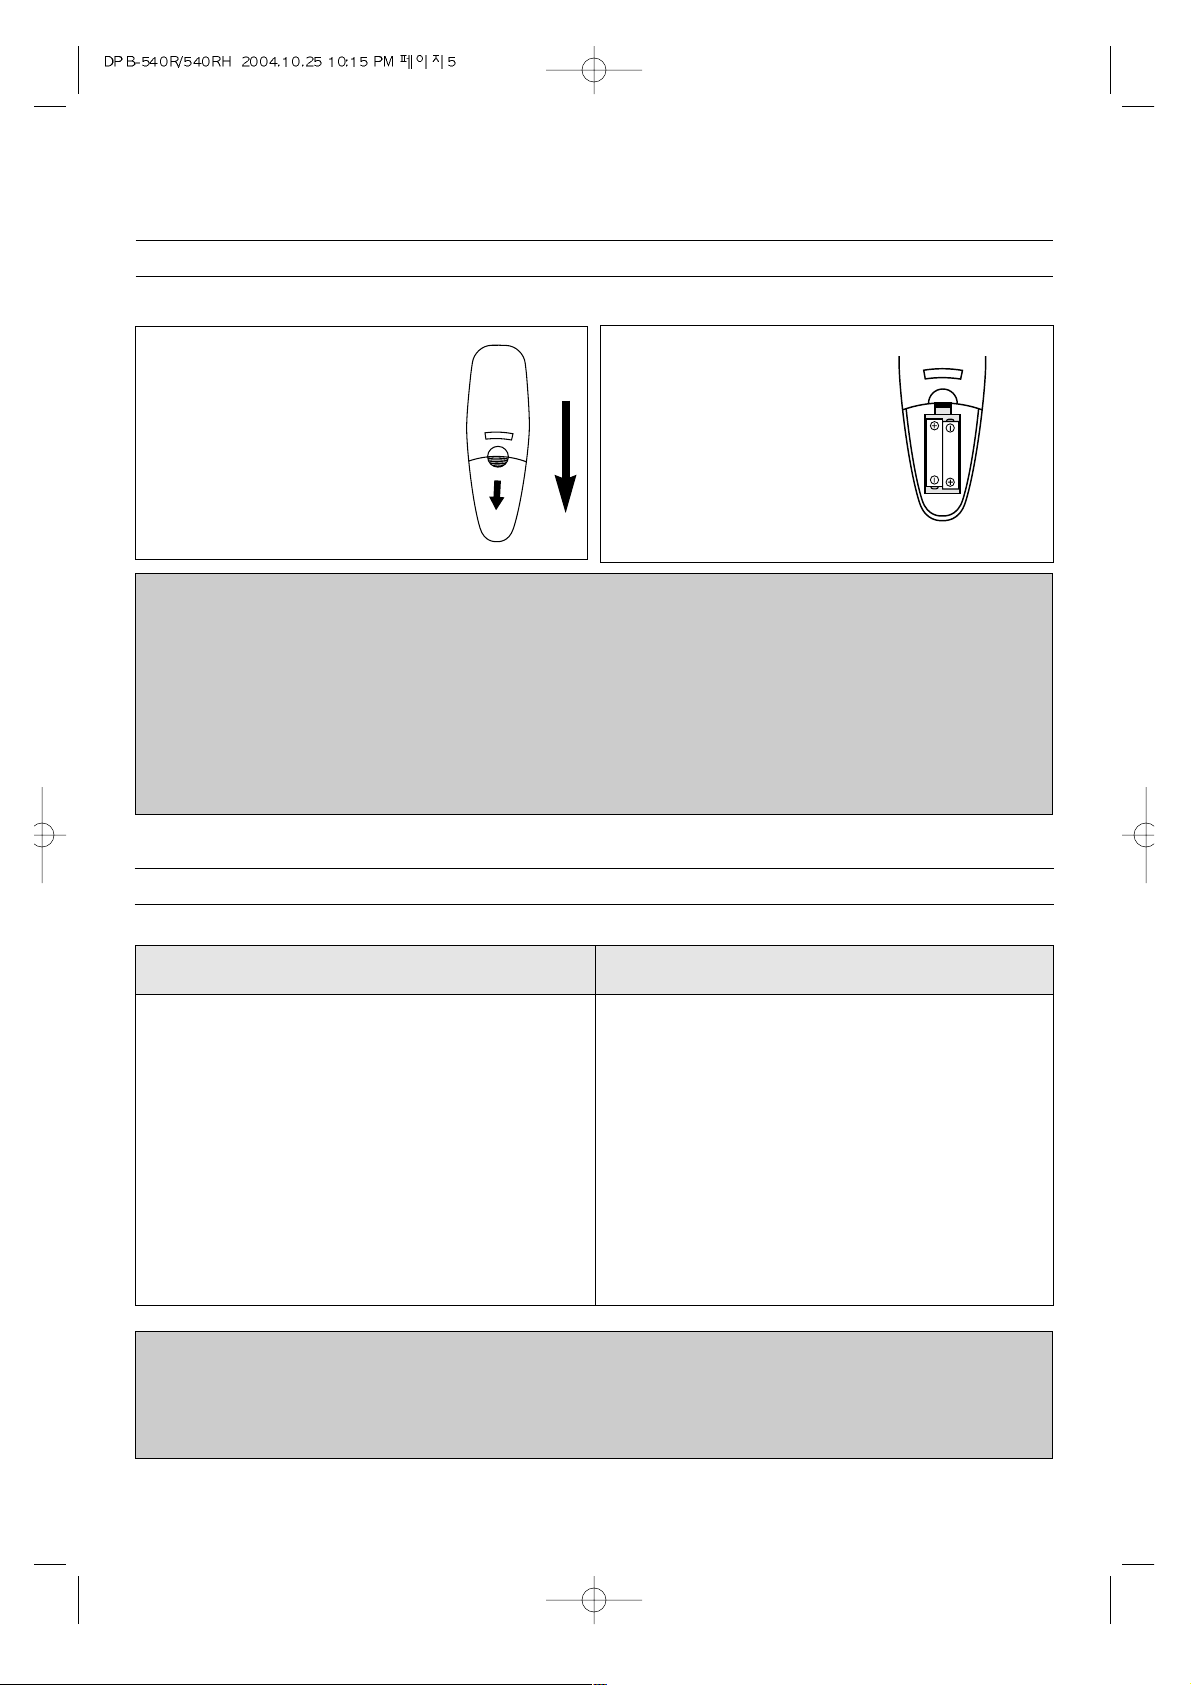
1. Slide down further to access the
battery compartment.
2. Insert two “AAA” size
Alkaline batteries following
the polarity diagram below.
BATTERY PRECAUTIONS
The precautions below should be followed when using batteries in this device:
1. Use only the size and type of batteries specified.
2. Be sure to follow the correct polarity when installing the batteries as indicated in the battery compartment. Reversed
batteries may cause damage to the device.
3. Do not mix different types of batteries together (e.g. Alkaline and Carbon-zinc) or old batteries with fresh ones.
4. If the device is not to be used for a long period of time, remove the batteries to prevent damage or injury from possible
battery leakage.
5. Do not try to recharge batteries not intended to be recharged; they can overheat and rupture. (Follow battery manufacturer’s directions).
HOW TO INSTALL BATTERIES
To install the batteries, follow the procedures below:
Page 6
BASIC OPERATION METHOD
6
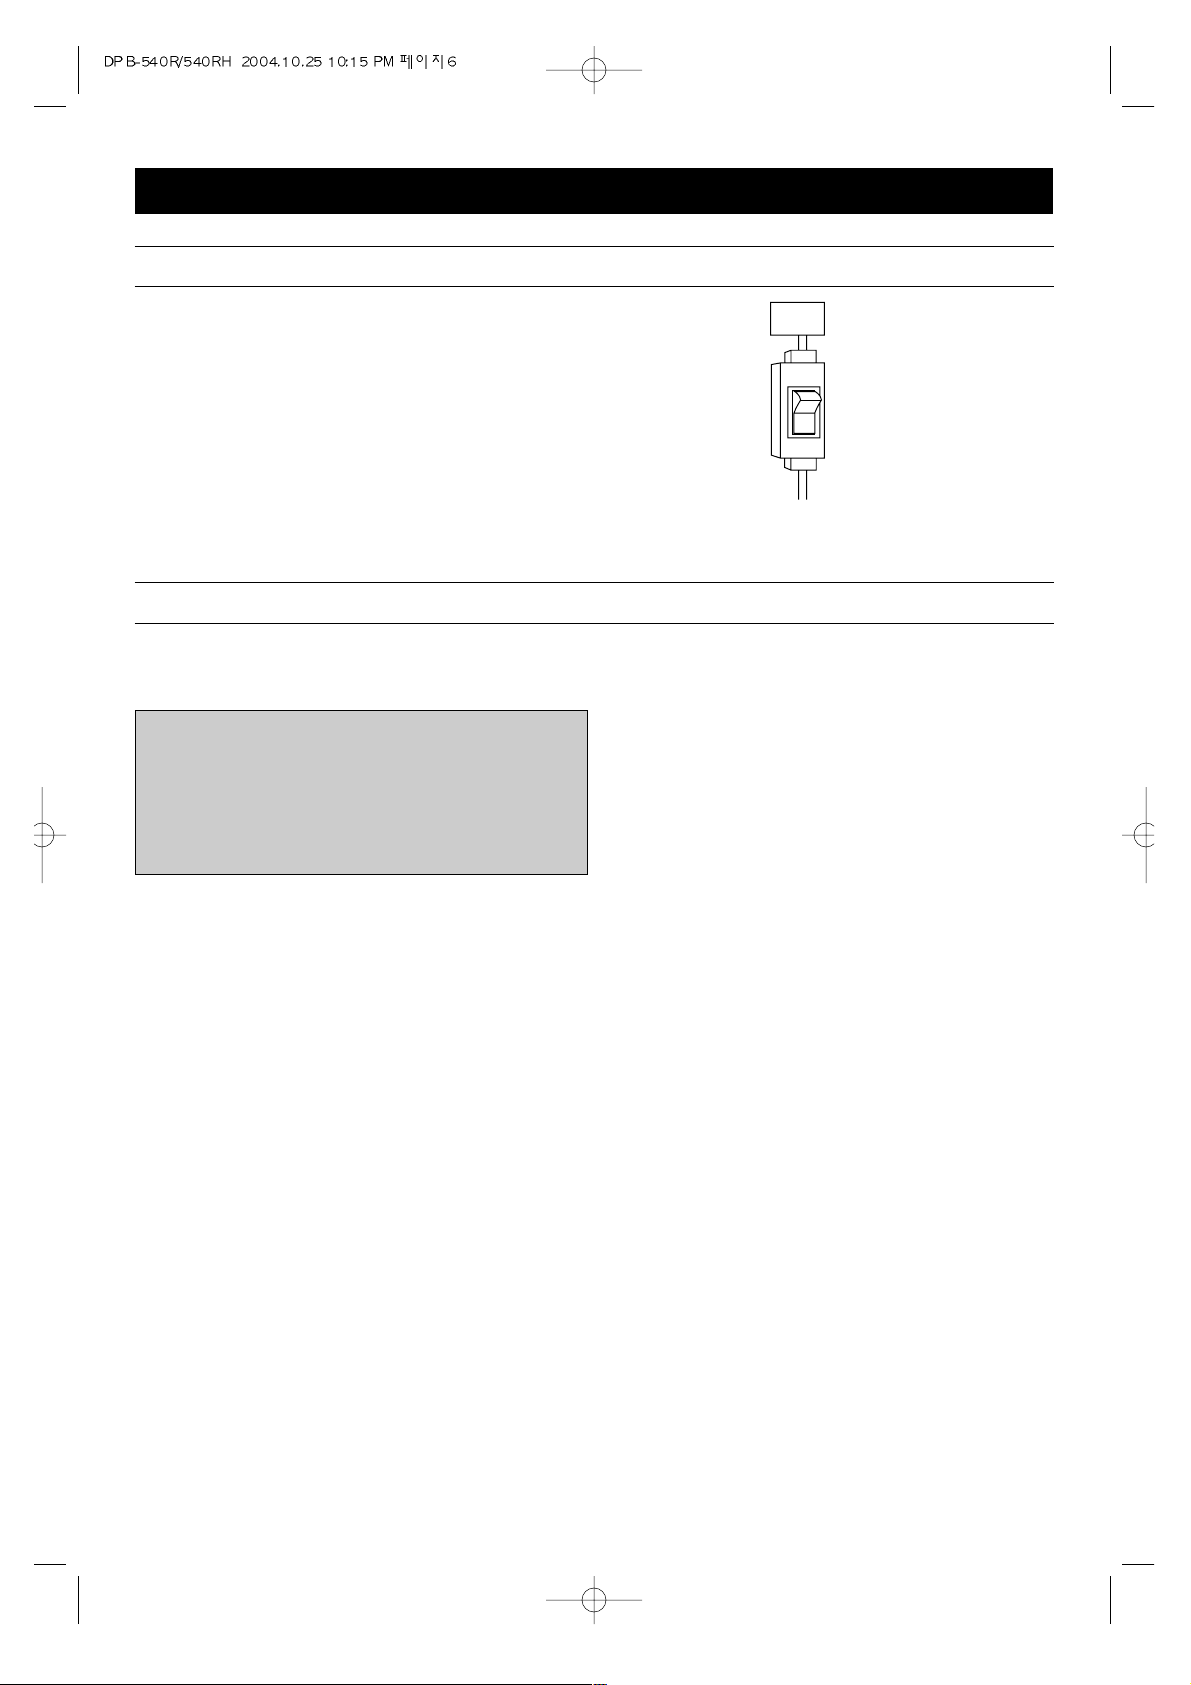
CHECK AGAIN BEFORE USING
Turn on the main power supply switch setted exclusively.
The main power supply switch should be located near the indoor unit.
• Check the status of main switch for safety.
• Turn off the switch when cleaning the unit or not using for a long time.
The main power supplying switch is not included to the unit, so, it is necessary to buy separately when installing the unit.
• The standard power supply of this unit is 380V-400V three phase.
• Use an electricity leakage interrupter, if not, may cause trouble.
REMOVE OUTDOOR UNIT COVER
Make sure to remove the outdoor cover before operating, Otherwise, it may bring damage to the unit.
220V
ON
NOTE:
• Compressor protecting function
- In normal operation, there is a time delay of three min-
utes between turn off and turn back on including the
MODE conversion.
This is due to compressor protecting function which
delays compressor for three minutes.
380V~
400V
Page 7

7
OPERATION METHOD
ON/OFF
• Turn on the main power supply switch and press the
on/off button.
• Each time the on/off button pressed, the air conditioner
starts and stops repeatedly.
• Press the Mode button to select Cool mode.
• Every time the Mode button pressed, you can set the mode Cool
→
Fan →Heat in order.
• Outdoor unit operation indicator gets lit on and the Cool mode starts, with 3 minutes' delay after
the Cool mode indicator is lit on.
• To cancel the Cool mode, press the on/off button and all functions stop.
• With the button pressed, temperature goes up by 1°C and with the
button pressed, temperature goes down by 1°C
• You can freely set your desired temperature, ranging from 16 to 32℃.
• In case that your desired temperature is higher than the current
temperature, the Cool mode isn't working.
OPERATION CONDITION COOL
STANDARD
FAN SPEED CONDITION HIGH
CONDITION
DESIRED TEMPERATURE 26˚C
COOL MODE
Setting T emperature(ex. When the desired temperature is 23)
CURRENT TEMP DESIRED TEMP
HEAT
COOL FAN
ON/OFF
CURRENT TEMP DESIRED TEMP
CURRENT TEMP DESIRED TEMP
UP DOWN
¿ /`⁄`
‡ˆ„ …˙‡
¿ …–¯ˆ
Page 8

8
• Press the Mode button to select Fan mode.
(Cool
→
Fan →Heat)
• Fan mode indicator gets lit on and the Fan mode starts.
• During the Fan mode, The temperature control is not available.
• To stop the Fan mode, press the on/off button and all functions stop.
FAN MODE
• Press the Mode button to select Heat mode.
(Cool
→
Fan →Heat)
• Outdoor unit operation indicator gets lit on and the Heat mode starts,
with 3 minutes' delay after the Heat mode indicator is lit on.
• To stop the Heat mode, press the on/off button and all functions stop.
HEA T MODE (ONLYHEAT PUMPMODEL)
• With thebutton pressed, temperature goes up by 1°C and with the
button pressed, temperature goes down by 1°C.
• You can freely set your desired temperature, ranging from 16 to 32°C.
• In case that your desired temperature is lower than the current
temperature, the Heat mode isn't working.
Setting T emperature(ex. In case that desired temperature is 23)
¿ …–¯ˆ
‡ˆ„ …˙‡
HEAT
COOL FAN
¿ …–¯ˆ
‡ˆ„ …˙‡
HEAT
COOL FAN
UP
DOWN
CURRENT TEMP DESIRED TEMP
CURRENT TEMP DESIRED TEMP
Page 9

9
• Press the Fan Speed button.
• At the outset of operation, the Fan Speed is set on 'High'
• By pressing the Fan Speed button during Heat or Cool mode, you can
change the speed High, Middle, Low, Auto in order.(During the Fan
mode, the speed changes High, Middle, Low in order.
FAN SPEED
• Press the Fan Dir. button.
• At the outset of operation, the direction is fixed.
• To set the direction left/right, press the Fan Dir button to start and
press the button again to stop it.
• To set the direction up/down, press the Fan Dir button to start and
press the button again to stop it.
• To set the direction both up/down and left/right, press button and button.
FAN DIRECTION
LO. MI. HI. AUTO
FAN DIR.
Page 10

10
• During operation
TURN - OFF TIMER: available during operation only (ex. In case of setting the timer to turn off the air-conditioner in
5 hours.)
• Press the Timer on/off button.
• Timer indicator blinks.
• "1hr" is shown.
• Press thebutton to set "5 hr".
• Press the Timer on/off button.
• Timer indicator gets lit on and the
Temperature & Reservation Time
indicator shows the current temperature.
• Reservation time is set by 1hr unit.
• To check the reservation time, press the
Timer on/off button.
• When the Turn-off time is due, the operation stops automatically.
Cancel the reservation and apply the same proce-
dure of Turn-off Timer.
To cancel the Turn-off Timer, press the Timer On/Off
button twice in a row.
• You can cancel the Timer only in case that the reservation time is already set.
TO CANCEL THE TIMER
TO CHANGE THE RESERVATION
CURRENT TEMP DESIRED TEMP
CURRENT TEMP DESIRED TEMP
TIMER
OFF
OFF
OFF
TIMER
CURRENT TEMP DESIRED TEMP
CURRENT TEMP DESIRED TEMP
UP
DOWN
TIMER
TIMER
¿„
TIMER
¿„
TIMER
¿„
Page 11

11
Cancel the reservation and apply the same procedure
of Turn -on Timer.
To cancel the turn-on timer, press the timer on/off button
twice in a row.
• You can cancel the Timer only in case that the reservation time is already set.
TO CANCEL THE TIMER
TO CHANGE THE RESERVATION
• During operation.
TURN -ON TIMER: available during non-operation only (ex. In case of setting the timer to turn on the air-condition-
er in 2 hours.)
• Press the Timer on/off button.
• Timer indicator blinks.
• "1hr" is marked.
• Press the button to set "2 hr".
• Press the Timer on/off button.
• Timer indicator gets lit on and the
Temperature & Reservation Time
indicator shows the present temperature.
• Reservation time is set by 1hr unit.
• To check the reservation time, press the
Timer on/off button.
• When the Turn-on time is due, the operation starts automatically.
CURRENT TEMP DESIRED TEMP
CURRENT TEMP DESIRED TEMP
CURRENT TEMP DESIRED TEMP
CURRENT TEMP DESIRED TEMP
TIMER
TIMER
ON
ON
ONTIMER
¿„
TIMER
¿„
TIMER
¿„
TIMER
UP
DOWN
Page 12

12
• Press the Save Mode button.
• Save Mode can be applied during Cool or Heat mode.
• To set the Save Mode, press the Save Mode
button while operating the air conditioner.
• By applying the Save Mode, the desired
temperature is adjusted gradually enough not to
feel the change of temperature, so that electricity
cost can be cut down and also over-air cooling
and - heating can be prevented.
• To cancel the mode, press the Save Mode button again.
Save Mode : available on Main Control Panel only .
• Press the Lock button.
• In case that the Lock option is applied, other buttons on
the indoor unit don't work.
• Lock Option can prevent strangers and children from
operating the air conditioner.
• To cancel the Lock option, press any button on the
remote controller.
Lock option: available on remote controller only
LOCK
LOCK
CURRENT TEMP DESIRED TEMP
CURRENT TEMP DESIRED TEMP
Page 13

13
Unique Functions
● What is Momentary power failure compensation.?
In case that power goes off for a very short time during operation, all
the functions go on working without having to be set all again.
● What is 3 minutes' delay function?
Sometimes the air cooling current doesn't blow out in case that the air
conditioner is operated right after stopping it during Cool mode. This is
due to the protecting device delaying the operation of outdoor unit for 3
minutes for the protection of compressor and the air cooling current will
blow out automatically after 3 minutes' delay.
● In case that the power is resupplied.
Select the functions all again in case that the power is resupplied after
the main power supply switch gets turned off or power goes off.
● Little noise and neat appearance.
Antibacterial function and excellent air cooling system for more pleasant
atmosphere.
Self-operating of Fan Direction with up/down and left/right.
Remote Controller for more convenient use.
Momentary
power failure
compensation.
3 minutes'
delay
function
Reoperation
after power
failure.
Other Merits
Page 14

14
Installation Instructions
Where to Install.
• Have the outdoor unit installed on the even and solid ground and make sure that the air current is not disturbed.
• Make sure that there are no obstacles around the air conditioner.
• Those obstacles could deteriorate the functions of air conditioner.
• Have the air conditioner installed in place where its noise wouldn't disturb neighborhood.
• Refer to the picture above for the information of the necessary distance between the outdoor unit and the wall.
• Avoid installing the air conditioner on the outside wall of a building or of apartment railings. In case the installation on those
places is inevitable, please contact the authorized service center in your area or the authorized appliance distributor you
purchased your air conditioner from.
Cautions on Installations
• Use the electric outlet for air conditioners only and have it electrically grounded to prevent any electric shock accident.
• Install the exclusive switch and short circuit breaker for air conditioner only.
• Purchasers are supposed to bear the electric work and installation removal expense.
Page 15

15
CLEANING THE AIR FILTER
PLEASE FOLLOW THE INSTRUCTION BELOW
1. Pull forward the insert grille
3. Clean off dust by vacuum cleaner or soft brush
5. Dry the air filter completely in the shade after
cleaing by neutral detergent
2. Remove upward the air filter
4. If the air filter is dirty, clean that with water
below 40˚C melted neutral detergent.
6. Insert the air filter into the insert grille in the
right direction and then close the insert grille
Page 16

CARE AND MAINTENANCE
16
Clean the casing and front of the indoor unit with a vacuum brush or wipe with a clean damp cloth.
• NEVER USE Solvents, harsh chemicals or hot water to clean the unit.
• Some metal edges on the unit are sharp. Be careful when cleaning or handling.
• Internal parts in the outdoor unit may need cleaning or routine maintenance from time to time. Consult your local ser-
vice center for more details.
AFTER THE SEASON:
• Operate the fan, then dry the indoor unit.
• Shut off the indoor unit and then unplug it from the wall.
• Clean the air filters.
• Cover the outdoor unit with the supplied cover; this is very important to protect this unit.
BEFORE THE SEASON:
• Make sure the air filters are clean.
• Make sure the inlet and outlet on the indoor and outdoor units are not blocked by obstructions.
• Make sure the unit is grounded. Consult a serviceman for help.
PRECAUTIONS:
• Do not use this unit for animal or plant storage.
• In a lightning or thunder storm, immediately unplug it from the wall.
warning
• Make sure the AC cord is unplugged and the unit is off before cleaning.
• Do not use water on the unit to clean it. This is a shock hazard and the unit can be damaged.
Page 17

TROUBLESHOOTING GUIDE
17
Before requesting service, please refer to the chart below for possible solutions:
SYMPTOMS POSSIBLE CAUSE POSSIBLE SOLUTIONS
No power . Power failure. Restore the power
Line voltage too low. Contact electrician to install new outlet.
Unit is unplugged or not completely Insert plug all the way.
plugged in.
Unit is off. Turn unit on.
Batteries in remote are weak or dead. Replace remote’s batteries.
The compressor does If the unit is turned off and then Wait 3 minutes for the unit to operate.
not turn on. immediately back on, the compressor
(no cool air at cooling will delay for 3 minutes.
no warm air at heating)
The air filter(s) is dirty or clogged. Clean or replace filter(s).
Unit is located near a heat When locating unit for the first time,
source (heater, stove, etc.) make sure it is in a desirable location.
A door or window is open. Shut door or window.
There is an obstacle in front of Remove obstacle.
intake or indoor unit.
The temperature has been set Check and reset if necessary
improperly.
Strange sounds occur. During operation, especially after This is normal.
turning it on or off, refrigerant flows
inside the unit.
Strange smells occur. The fan is bringing out the The smell should go away shortly.
smells of the carpet, walls, etc.
No remote operation. Batteries are weak, dead or Replace batteries.
inserted improperly.
Remote is out of range. Move closer to unit.
Remote not aimed at sensor. Aim remote at sensor.
There is an obstruction between Remove obstruction.
unit and remote.
Page 18

MODEL #:
DPB-540R/DPB-540RH
OWNER'S MANUAL
FLOOR STANDING AIRCONDITIONER
S1
Page 19

VISION CREATIVE, INC.
중구 남대문로 5가 526
대우재단빌딩 16층
담담 당당
박진근대리님
TTEELL
MMOODDEELL
DPB-540R/540RH
BBUUYYEERR IIRRAANN((PPAARRSSOONN))
1차 03.10.24 7차
2차 8차
일일 정정
3차
4차 10차
5차 11차
6차
제제 판판
03.11.26(Han)
인인쇄쇄
규규 격격
MMEEMMOO
연연락락처처
VVIISSIIOONN 담담 당당 전전지지현현
TEL: 757-9340 FAX: 774-1039
-매뉴얼의 첫장에 이 서식을 작성해주세요-
 Loading...