


LCD TELEVISION
INSTRUCTION MANUAL
DLN-15D3
DLN-17D3
DLN-20D3
DLN-17D4
DLN-20D4
Important
Information
OUTDOOR USER MARKING
WARNING : To reduce the risk of fire or electric shock hazard, do not expose this appliance to rain or
moisture.
WET LOCATION MARKING
“Apparatus shall not be exposed to dripping or splashing and no objects filled with lipuids, such as vases,
shall be placed on the apparatus.”
Service Instructions
2
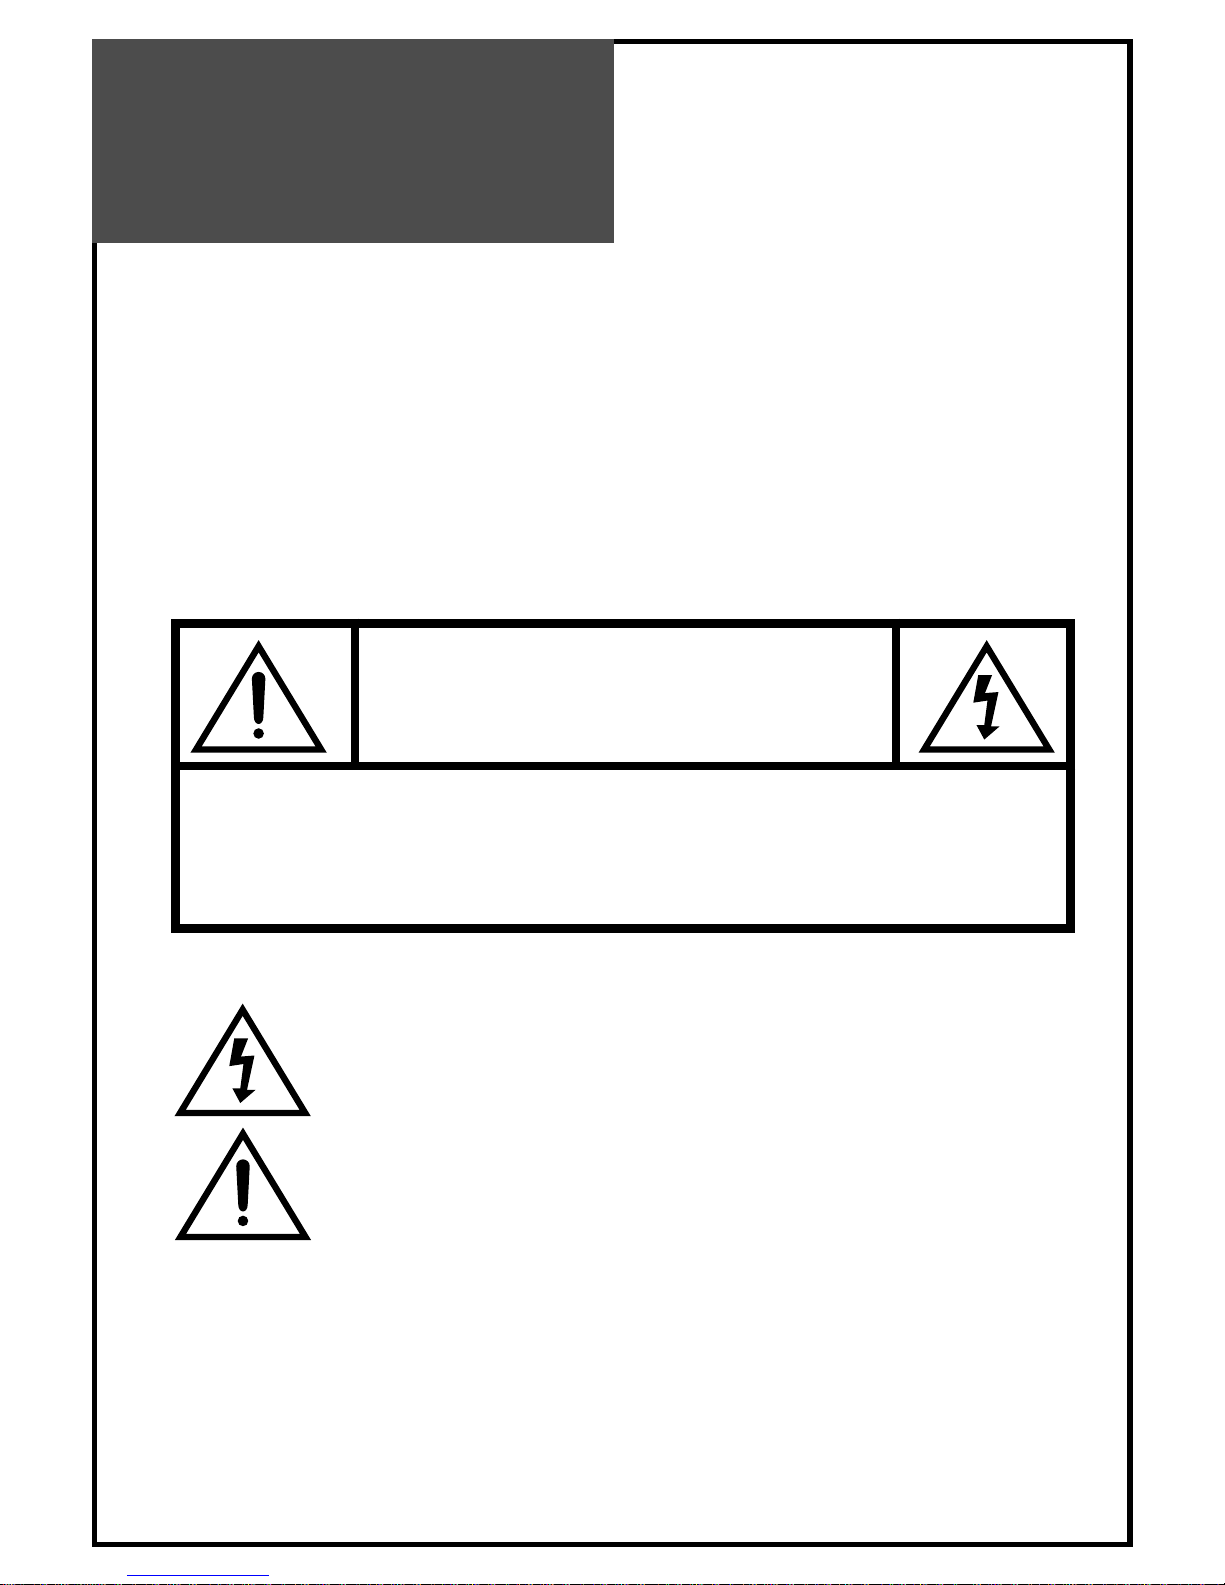
CAUTION
RISK OF ELECTRIC SHOCK
DO NOT OPEN
CAUTION : TO REDUCE THE RISK OF ELECTRIC SHOCK,
DO NOT REMOVE COVER (OR BACK)
NO USER-SERVICEABLE PARTS INSIDE.
REFER SERVICING TO QUALIFIED SERVICE PERSONNEL.
The lightning flash with arrowhead symbol, within an equilateral triangle, is
intended to alert the user to the presence of uninsulated “dangerous voltage” within the product’s enclosure that may be of sufficient magnitude to constitute a risk
electric shock.
The exclamation point within an equilateral triangle is intended to alert the user to
the presence of important operating and servicing instructions in the literature
accompanying the appliance.

Important
Information
FCC RF INTERFERENCE STATEMENT
NOTE : This equipment has been tested and found to comply with the limit for a Class B digital device,
pursuant to Part 15 of the FCC Rules. These limits are designed to provide reasonable protection
against harmful interference in a residential installation.
This equipment generates, uses and can radiate radio frequency energy and, if not installed and
used in accordance with the instructions, may cause harmful interference to radio communications.
However, there is no guarantee that interference will not occur in a particular installation.
If these equipment does cause harmful interference to radio or television reception which can be
determined by turning the equipment off and on, the user is encouraged to try to correct the
interference by one or more of the following measure.
• Reorient or relocate the receiving antenna.
• Increase the separation between the equipment and receiver.
• Correct the equipment into an outlet on a circuit different from that to which the receiver is
connected.
• Consult the dealer or an experienced radio, TV technical for help.
• Only shielded interface cable should be used.
WARNING : FCC regulations state that any unauthorized changes or modifications to this equipment not
expressly approved by the manufacturer could void the user’s authority to operate this
equipment. U.S.A. ONLY
Note to CATV system installer : This reminder is provided to call the CATV system installer’s attention to
Article 820-40 of the National Electrical Code that provides guidelines for
proper grounding and, in particular, specifies that the cable ground shall
be connected to the grounding system of the building, as close to the point
of cable entry as practical.
This product utilizes tin-lead solder, and fluorescent lamp containing a small amount of mercury.
Disposal of these materials may be regulated due to environmental considerations. For disposal or
recycling information, please contact your local authorities or the Electronic Industries Alliance :
www.eia.org
3
Safety
Precautions
4
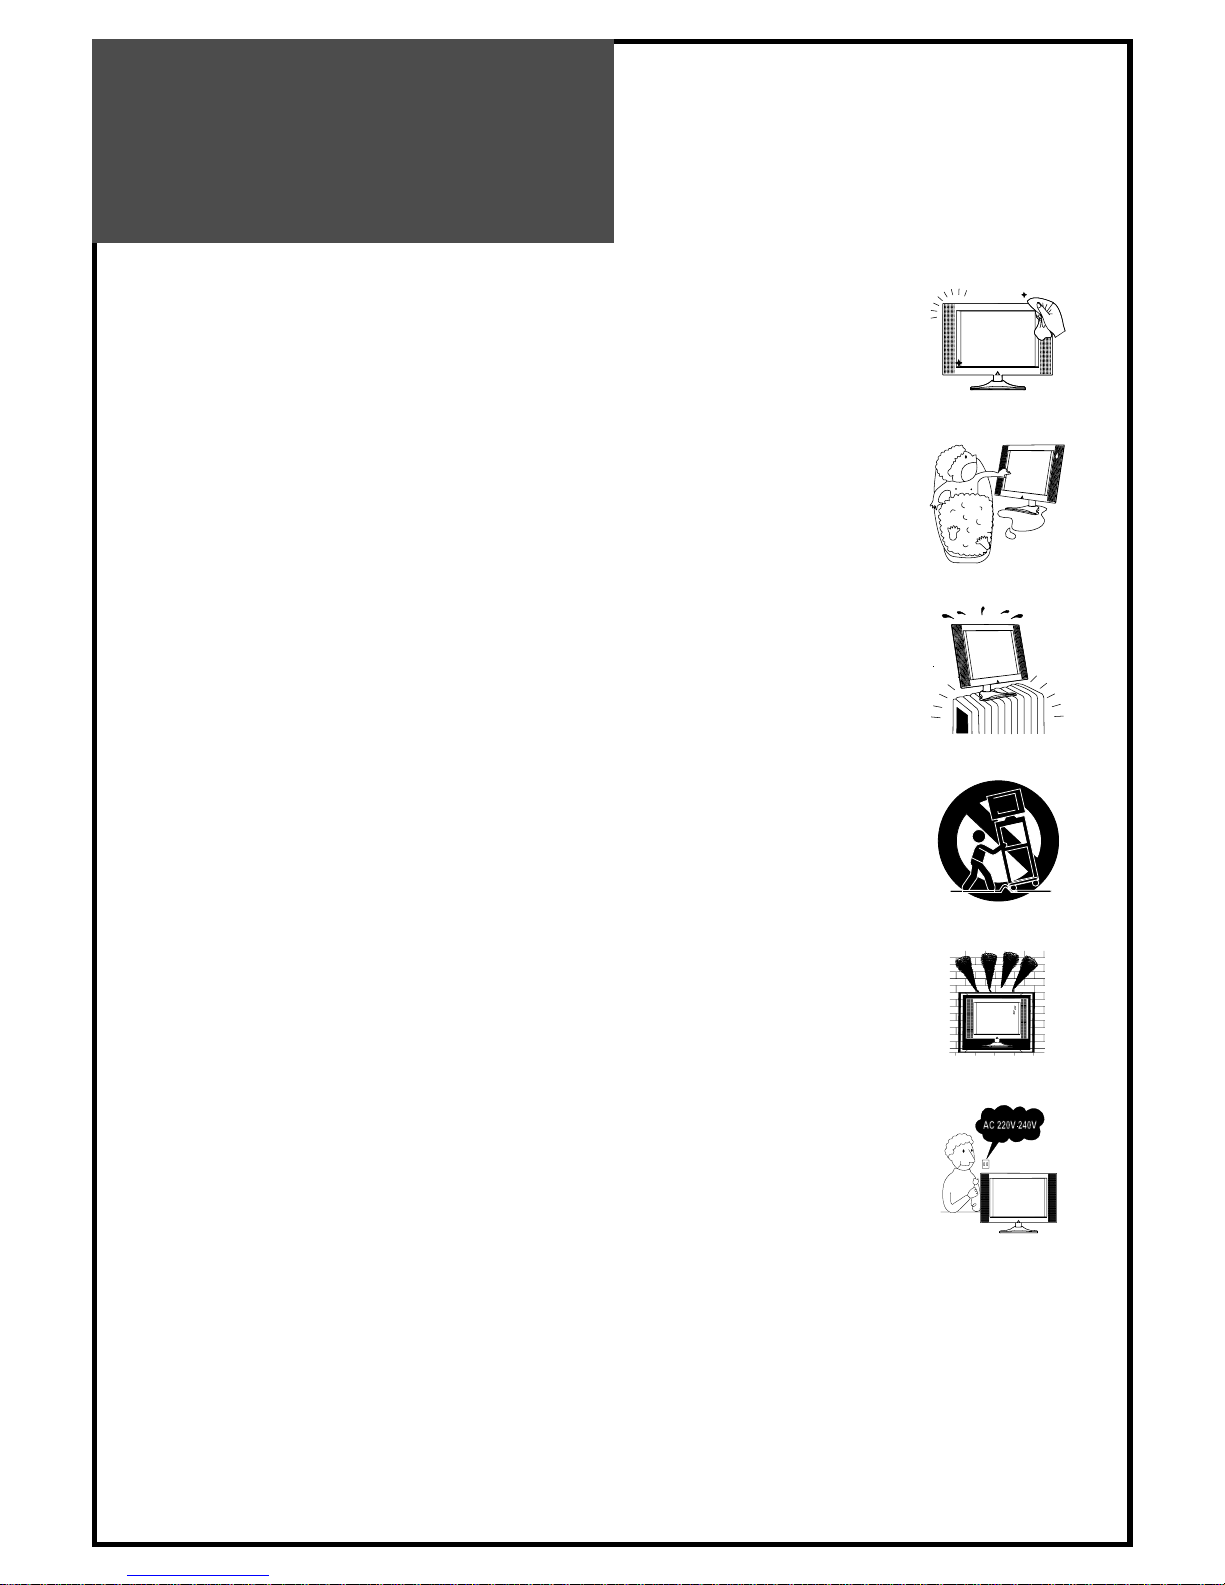
1. CLEANING
Unplug this TV equipment from the AC power outlet before cleaning.
Do not use liquid cleaner or aerosol cleaners. Use a soft and damp cloth for
cleaning.
2. ATTACHMENTS
Do not use attachments not recommended by the TV equipment manufacturer
as they may result in the risk of fire, electric shock or other injury.
3. WATER AND MOISTURE
Do not place this TV equipment near water, for example, near bathtub,
kitchen sink, laundry tub, in a wet basement, or near a swimming pool, or
the like.
4. HEAT
Keep the TV equipment away from the heat sources such as radiator, heater,
stoves and other heat-generating products.
5. SETTING
Do not place this TV on unstable cart, stand, or table. Placing the TV on an
unstable base can cause the TV to fall, resulting in serious personal injuries
as well as damage to the TV. Use only a cart, stand, bracket or table
recommended by the manufacturer or salesperson.
6. WALL OR CEILING MOUNTING
When mounting the product on a wall or ceiling, be sure to install the
product using the designated mounting tool according to the method
recommended by the manufacturer.
7. POWER
This TV equipment should be operated only from the type of power source
indicated on the marking label. If you are not sure of the type of power
supplied to your home, consult your TV dealer or local power company.
8. PIXEL
The LCD panel is a very high technology product with 2,359,296(15")
2,949,120(17”) 1,440,000(20”) thin film transistors which give you fine
picture details. Occasionally, a few non-active pixels may appear on the
screen as a fixed point of blue, green or red please note that this does not
affect the performance of your product.
9. SET MOVING
When moving the product, place your fingers of one hand in the socket on
the back of the TV and support the front of the TV with the other hand.
SAFETY
PRECAUTIONS
5
Contents
IMPORTANT INFORMATION 2
SAFETY PRECAUTIONS 4
IMPORTANT SAFEGUARDS 6
SUPPLIED ACCESSORIES 7
FUNCTIONAL OVERVIEW 8
Front (Control panel) 8
Remote Controller 9
PREPARATION 10
Inserting Batteries into the Remote Control Unit 10
Mains Connection 10
CONNECTIONS 11
Antenna Connection 11
Connecting External Equipment 14
BASIC OPERATIONS 16
Switching On / Off 16
TV/AV Mode Selection 16
Volume Control 17
Channel Selection 17
MENU ADJUSTMENT 18
Channel Adjustment 18
Picture Adjustment 19
Sound Adjustment 20
PC Adjustment 21
Utilities Adjustment 23
WALL/ARM MOUNTING 27
TROUBLE SHOOTING 28
SPECIFICATIONS 30

6
Important
Safeguards
Location
Heat, Moisture, Dust, Vibration
Position your set so that bright light or sunlight doesn't fall directly onto the screen.
Care should be taken not to expose the set to any unnecessary vibration, moisture, dust or
heat.
Do not expose the set to dripping or splashing.
Ventilation
Also ensure that the set is placed in a position to allow a free flow of air.
Do not cover the ventilation openings on the back cover.
Leave at least 10 cm around each side of the TV set.
Mounting
This set can be positioned by using the table top stand or wall mounting bracket.
When you install the set using the wall mounting bracket, fix it carefully so it is secure.
Object Entry
Do not insert foreign objects, such as needles and coins, into the ventilation openings.
Lightning striking
You should disconnect your set from the mains and the aerial system during thunderstorms.
Cleaning
Unplug the set from the mains before cleaning.
Dust the set by wiping the LCD screen and the cabinet with a soft, clean cloth.
If the screen requires additional cleaning, use a clean, damp cloth.
Do not use liquid cleaners or aerosol cleaners.
Do not rub or strike the LCD with anything hard as this may scratch, or damage the LCD
permanently.
Service
Never remove the back cover of the set as this can expose you to high voltage and other
hazards.
If the set does not operate properly,unplug it and call your dealer.
7
Supplied
Accessories
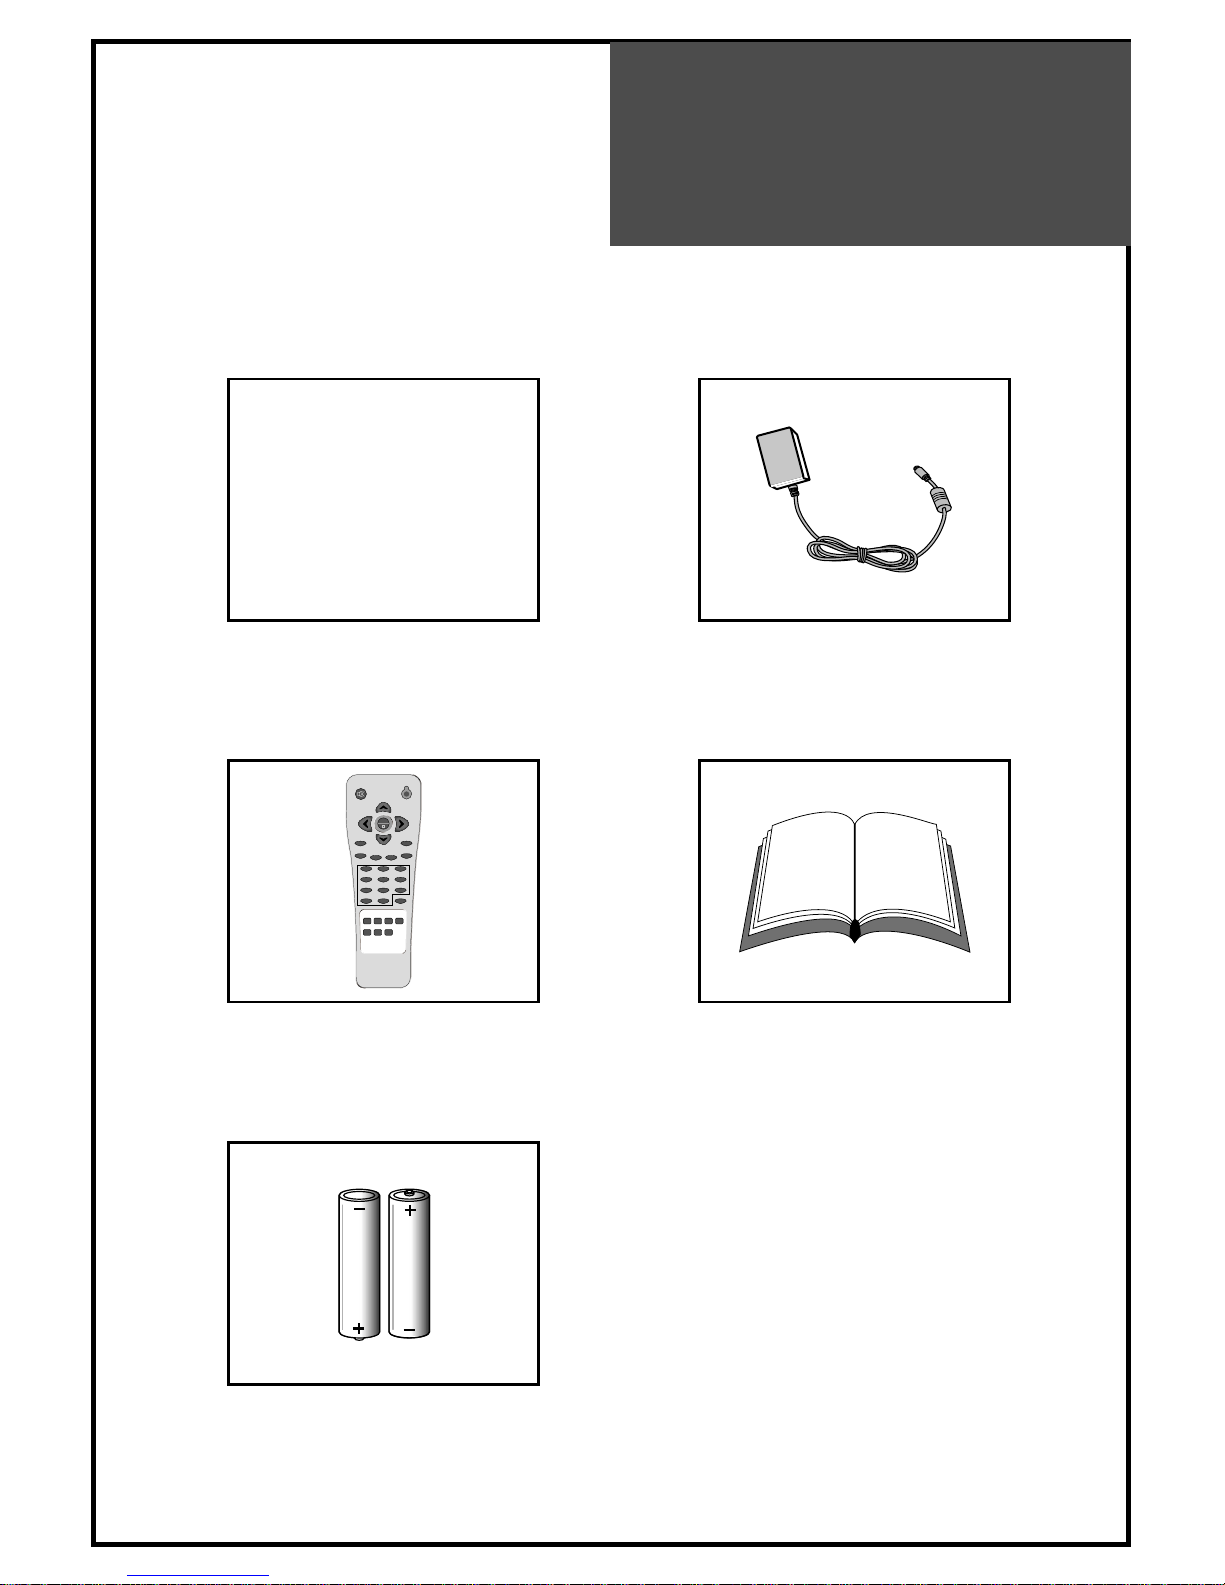
Make sure that the following accessories are provided with the product.
AC cord
AC cord
AC/DC adapter
123
456
789
PICTURE
MODE
SOUND
MODE
DISPLAY MTS
TV
AV
COMPONENT
PC
POWER
MUTE
VOL VOL
CH
CH
PREV. CH
CAPTION
SLEEP
TV/CABLEADD/DEL
ASPECT
MENU
0
100
Remote controller
Batteries (Option)
(2x1.5V, AAA)
Instruction manual

8
Functional
Overview
Front (Control panel)
Remote
sensor
LED
indicator
STAND-BY
ON/OFF CH VOL
TV/VIDEO
MENU
Power
On/Off
CH
Up/Down
Volume
Up/Down
TV/VIDEO
MENU
LED Indicator : Lights up red in Stand-By mode and Lights up green in TV on mode.
Remote Sensor : Receives signals from the remote controller.
Power On/Off Button : Use this button to power on/off.
CH Up/Down Buttons : Use these buttons to change channels on your TV or to move the cursor in the menu.
VOL Up/Down Buttons : Use these buttons to change your TV’s volume or to move the cursor in the menu.
TV/VIDEO Button : Each time you press the TV/VIDEO button, the TV will cycle through:
TV / AV / S-VIDEO / COMPONENT 1 / COMPONENT 2 / PC
MENU Button : Use this button to enter and exit the MENU.

9
Functional
Overview
Remote Controller
1. MUTE : Press this button, and the sound goes off. Press again,
and the sound returns.
2. POWER : Power on/off button in Stand-By mode.
3. CH : Change channels on your TV or move the cursor (up/down)
in the menu.
4. VOL : Adjust the volume or move the cursor (left/right) in the
menu.
5. MENU : Menu display button.
6. DISPLAY : Display the current channel number and broadcasting
sound mode, or the external mode.
7. MTS (Multi CH TV Sound) : You can select sound mode in Mono,
Stereo, SAP (Second Audio Program). Choose the sound
mode you want. It works only in TV mode.
8. TV : Select TV input mode.
9. AV : Select AV / S-VIDEO input mode.
10. COMPONENT : Select COMPONENT1 / COMPONENT2 input
mode.
11. PC : Select PC input mode.
12. NUMBER : Press the numbers on this board, you can select
channels directly in TV mode.
13. PREV. CH : Previous channel button.
14. PICTURE MODE : Picture modes change as follows : Standard /
Soft / User
15. SOUND MODE : Select Super bass on / off.
16. ASPECT : Select screen aspect ratio : Normal / 16:9(15”,20”) /
4:3(17”) / Zoom
17. CAPTION : Select CC1, CC2, CC3, CC4, T1, T2, T3, T4 and off
the Closed Caption mode.
18. ADD / DEL : Channel ADD or DELETE button.
19. TV / Cable : Select Air / CATV broadcasting mode.
20. SLEEP : Sleep Timer setting. (Sleep 0 ->Sleep 15 ->Sleep 30
->Sleep 45 -> Sleep 60 -> Sleep 90 -> Sleep 120)

10
Preparation
Inserting Batteries into the Remote Control Unit
Mains Connection
1. Connect the DC plug of the AC adaptor to the DC 12V(DC 15V-only 20”) input terminal of
the set.
2. Connect the AC adaptor and AC cord.
3. Plug the other end of AC cord into a Power outlet with 100V~240V AC, 60Hz.
To load the batteries, turn the remote control
handset over and open the battery compartment.
Insert the batteries (two 1.5v, type R03 or AAA).
Make sure that the polarity matches with the (+)
and (-) marks inside of the battery compartment.
Note: To avoid damage from possible battery
leakage, remove the batteries if you do not
plan to use the remote control handset for
an extended period of time.
DC IN 12V
-
+
Power outlet
AC/DC Adapter
AC Cord
DC 12V input terminal
(DC 15V-only 20”)
11
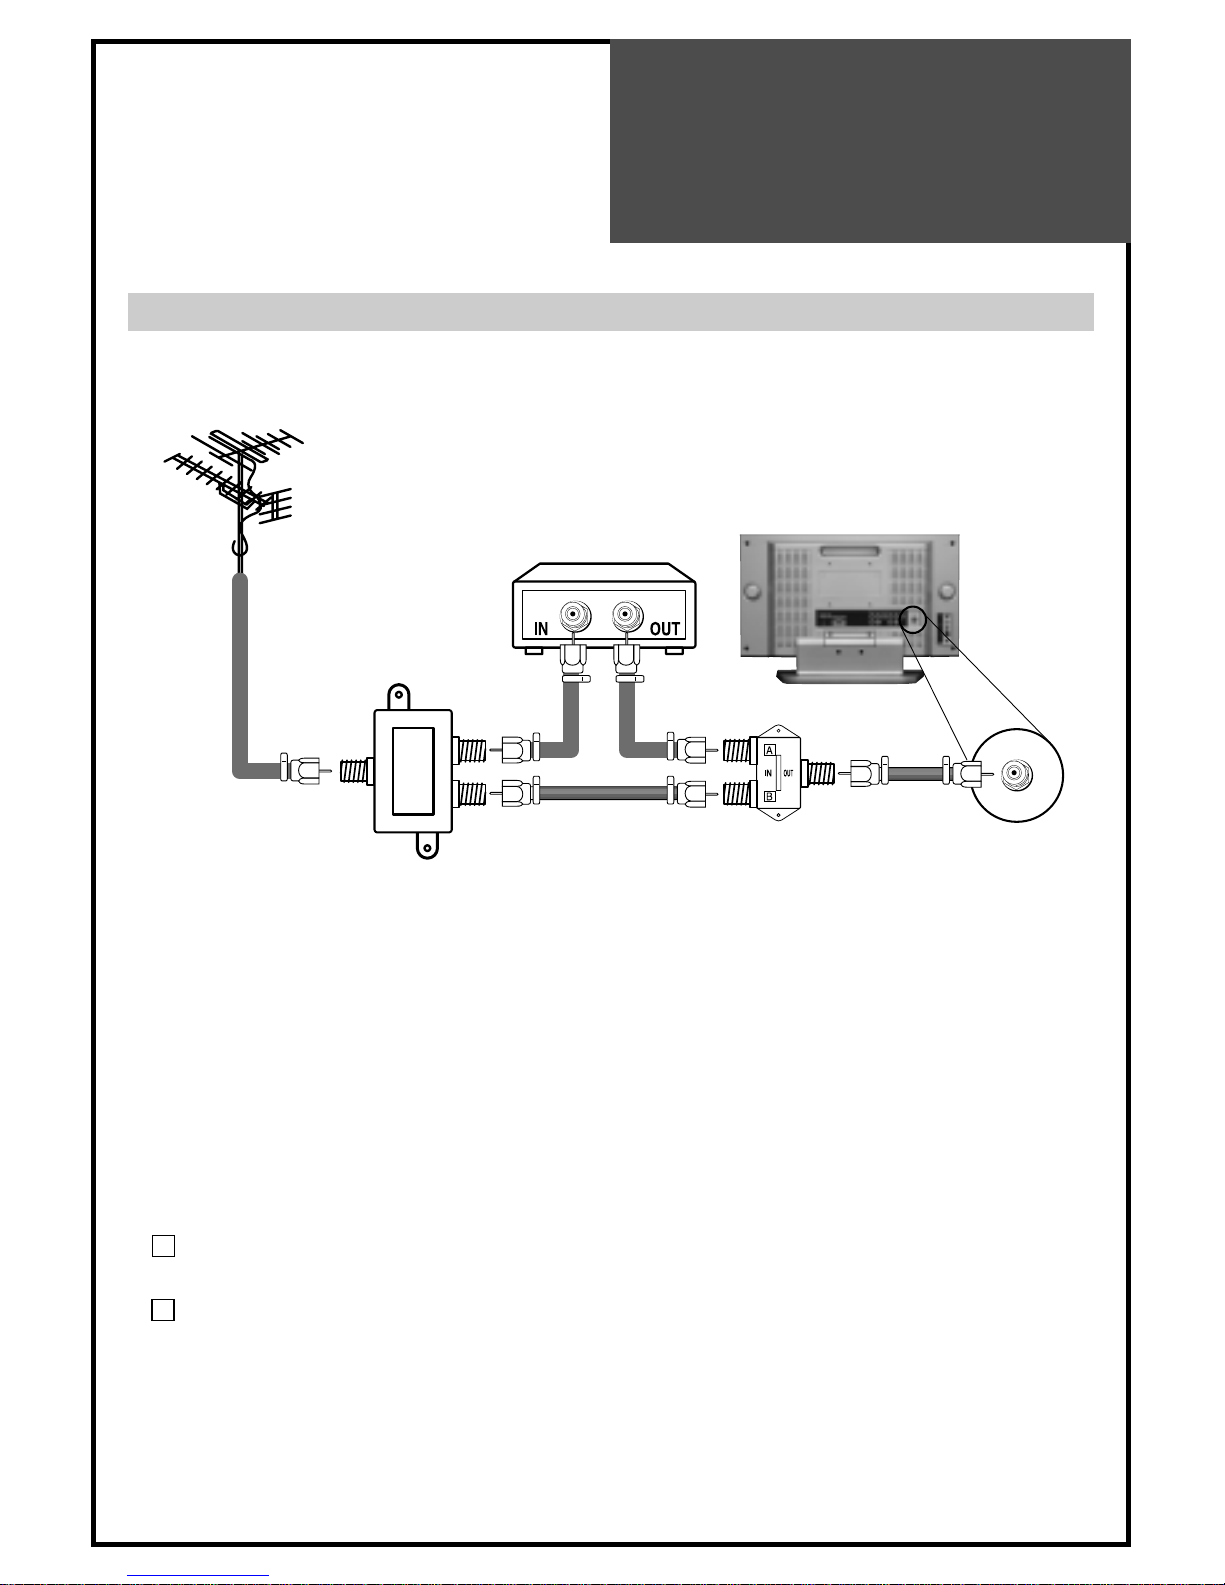
Connections
Antenna Connection
TO CABLE TV (CATV)
• A 75-ohm coaxial cable connector is built into the set for easy hook up. When connecting the
75-ohm coaxial cable to the set, screw the 75-ohm cable to the ANT. terminal.
• Some cable TV companies offer “premium pay channels”. Since the signals of these premium
pay channels are likely to be scrambled, a cable TV converter/descrambler is generally
provided to the subscriber by the cable TV company. This converter/descrambler is
necessary to watch scrambled channels normally. (Set your TV to channel 3 or 4 as one of
them is generally used. If the channel is unknown, consult your cable TV company.) For more
specific instructions on installing cable TV, consult your cable TV company. Please note: an
SPLITTER provided with two inputs ( A and B ) is required (not supplied).
Position on the RF switch (not supplied) : You can view all unscrambled channels by using
the keys for TV channels.
Position on the RF switch (not supplied) : You can view the scrambled channels via
converter / descrambler by using its channel keys.
Cable TV
Converter/Descrambler
Two-set signal
SPLITTER
RF Switch
Incoming cable
A
B

12
Connections
TO WALL ANTENNA SOCKET
If there is a wall antenna socket in apartment house, connect the antenna cable as shown
below. (Use the type of antenna cable corresponding to that of wall antenna socket.)
For good quality of image, the antenna requirements of color television reception are more
strict than those of black & white television reception. Thus, it is strongly recommended to use
good outdoor antenna.
The following is a brief explanation of the type of connections that are provided with the
various antenna systems.
1. A 75-ohm system is generally a round cable with F-type connector that can be easily
attached to a terminal without tools (not supplied).
2. A 300-ohm system is a flat “twin-lead” cable that can be attached to a 75-ohm terminal
through a 300-75-ohm antenna converter (not supplied).
• If you have a 75-ohm round cable, insert bronze wire and then tighten connecting nut. If you
have a 300-ohm flat cable, connect twisted wire to antenna converter and then connect the
converter to ANT IN.
• When using 75-ohm round cable, do not bend bronze. It may cause poor picture quality.
Wall connecting port
75 round cable
300 flat cable
Antenna
converter
Turn clockwise
to tighten

13
Connections
TO OUTDOOR ANTENNA
This type of antenna is usually used at common private house.
• Use one of the two following diagrams if you connect an outdoor antenna.
A : Using a VHF/UHF combination outdoor antenna.
B : Using separate VHF and/or UHF outdoor antennas.
• Connect the outdoor antenna cable lead-in to the ANT IN on the back of TV set.
Combination
VHF/UHF Antenna
75
round cable
300
flat cable
(Figure A)
(Figure B)
Turn clockwise
to tighten
Antenna
converter
Signal
Amplifier
UHF
VHF
A
B

14
Connections
Connecting External Equipment
PC INPUT
Pr Pb Y R L
PC
AUDIO
VIDEO
AUDIO
L
R
S-VIDEO
Pr Pb
RL
Y
COMPONENT 2
Pr Pb
RL
Y
COMPONENT 1
DC IN 12V
-
+
PC DVD
DTV Set Top Box
Headphone
S-video cable
VCR/Camcorder/
Video Game
15
Connections
You can enjoy picture and sound by connecting VCR, DVD player (or DTV Set-Top Box) and
PC to the terminals located on the back of TV set. Before connecting an external device, turn the
TV set off to avoid any possible damage.
DVD or DTV Set-Top Box input terminal [COMPONENT IN]
These jacks have Y/Pb(Cb)/Pr(Cr) inputs and AUDIO inputs.
These jacks are used to connect a DVD player, DTV Set-Top Box. (Available input mode :
480i, 480p, 720p, 1080i)
External AV devices input terminal [AV IN]
These jacks have VIDEO/AUDIO/S-VIDEO inputs. Connect them to VCR, Camcorder or
Video game with RCA or S-VIDEO cable.
* If your AV device has both VIDEO OUT terminal and S-VIDEO OUT terminal, S-VIDEO
connection is recommended for better picture quality.
• VIDEO and S-VIDEO in AV IN share the same jack with AUDIO input. Thus, they can’t be
used at the same time.
• Whenever you connect external equipment system to TV, make sure that all elements are
switched off. Refer to the documentation supplied with your equipment for detailed
connection instructions and associated safety precautions.
Headphone Jack
Insert the headphone plug (3.5mmØ) into this jack. The sound from the speaker will be
automatically cut off. You can control the headphone sound with Volume Up/Down (
)
buttons.
* Headphones are not included in the supplied accessories.
PC In
Connect the D-sub 15 pin cable and the audio cable with personal computer.
* See page 21 for more information of PC mode.
16
Basic
Operations
TV/AV Mode Selection
By pressing the TV/VIDEO button on the TV set,
you can
Change the mode as follows:
TV AV S-Video Component1
Component2 PC TV ....
With the remote controller, you can select the
mode as below.
• TV button : Selection for TV input mode.
• AV button : Selection for AV/S-Video input
mode.
• COMPONENT button : Selection for
Component input mode.
• PC button : Selection for PC monitor input
mode.
Switching On/Off
SWITCHING ON
1 If the indicator is not lit, the TV set is powered off. You must press the ON/OFF button of
the TV set.
2 Press the POWER button on the remote controller when the indicator is red. The TV set
will be switched on and the indicator will be changed to green.
SWITCHING OFF
1 To set the TV set back to stand-by mode, press the POWER button on the remote
controller. The indicator will become red.
2 Press the ON/OFF button on the TV set to switch the TV set off completely.
* If you turn the TV off, the present time that you have set will disappear.
• If you don't use the set for extended periods of time, unplug the AC cord from power
outlet.
TVAVPC
COMPONENT
17
Basic
Operations
Volume Control
Adjust the volume with VOL ( ) buttons.
TO MUTE THE SOUND
Press the MUTE button on the remote controller to
cut the sound off. By pressing either the MUTE
button or VOL (
) buttons, you can get sound
back.
Channel Selection
The TV set has 68 channels [AIR02 ~ AIR69] in
AIR mode and 125 channels [CATV01 ~
CATV125] in CATV mode.
DIRECT SELECTION
The numeric buttons are used for direct channel
selection. To select two-digit channels, press the
second number button after the first number.
To select 3-digit channels, press ‘100’ button
before pressing the rest of number buttons in
order.
• Channel number in green : Memorized
channels by automatic search or added
channels by user.
• Channel number in red : Skipped channels by
automatic search or deleted channels by user.
UP/DOWN SELECTION
You can also select a memorized channel by
pressing the CH (
) buttons.
VOL VOL
MUTE
123
456
789
0
100
CH
CH
1818
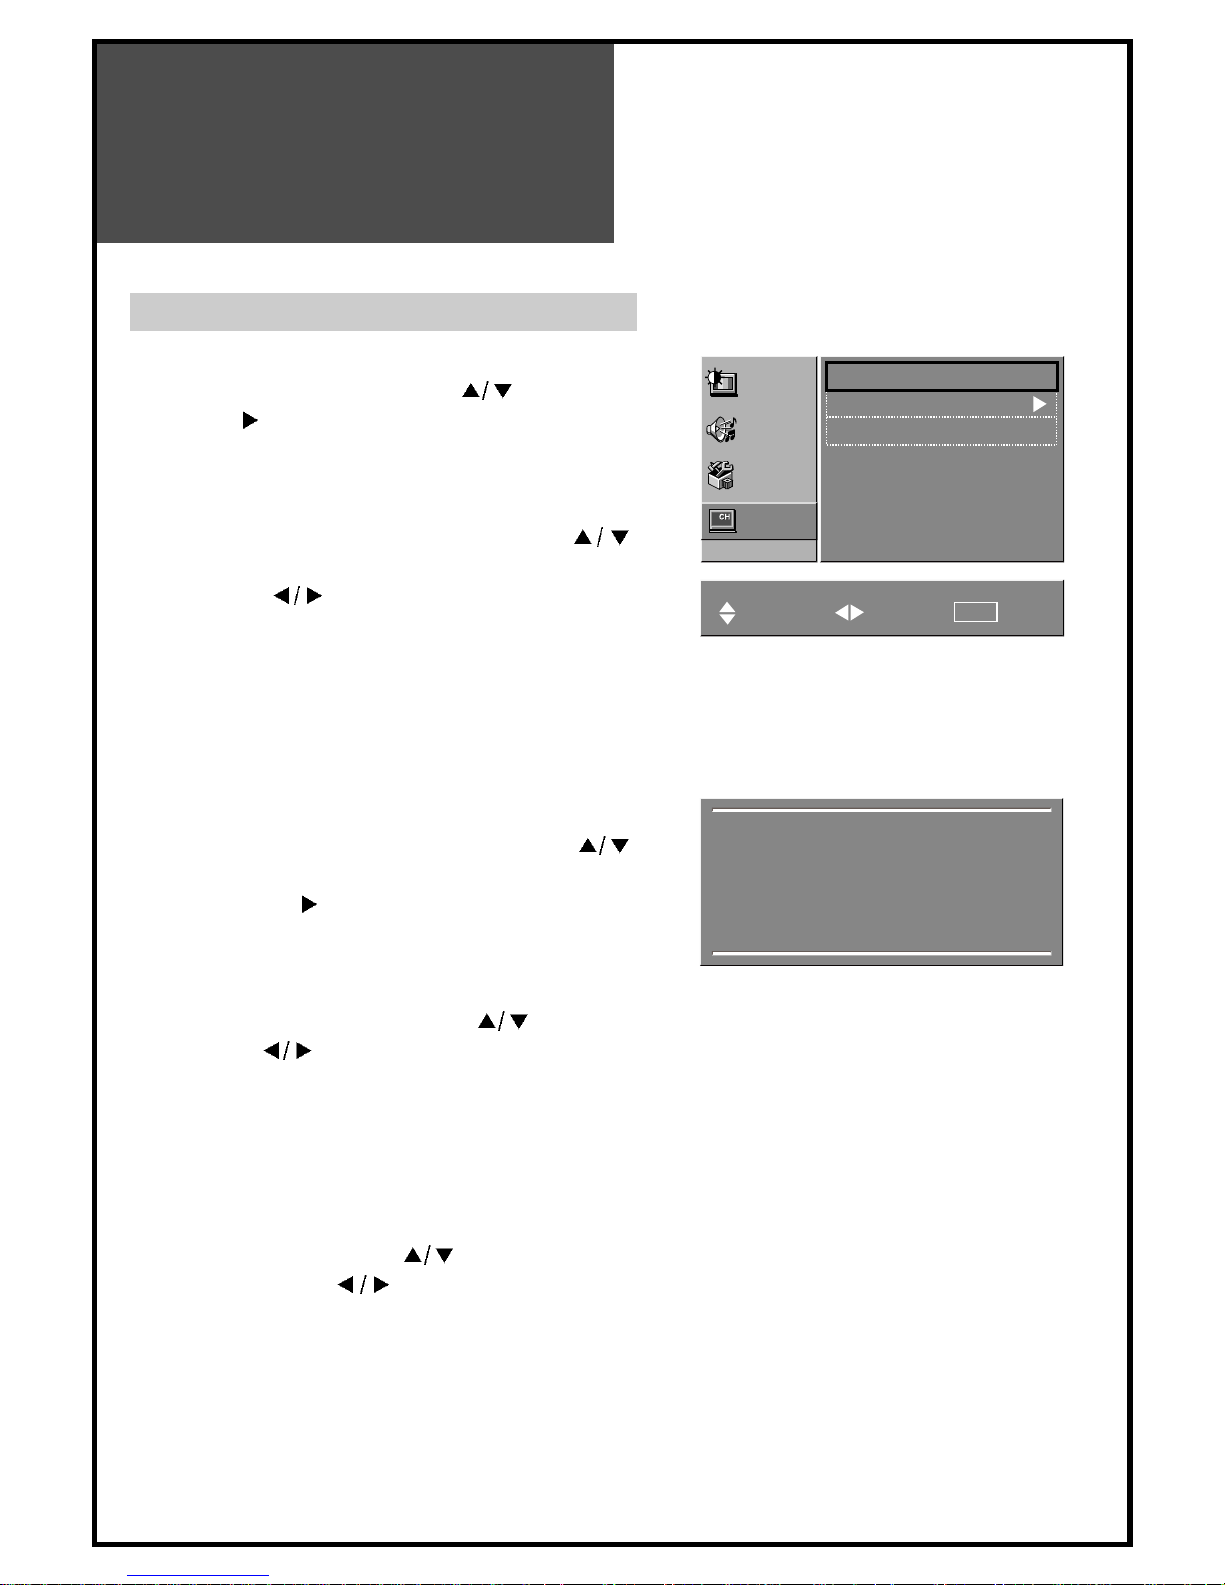
Channel Adjustment(ONLY IN TV MODE)
Press MENU button to display the MENU screen.
Select “CHANNEL” by pressing CH(
) buttons and
press VOL (
) button to enter into the submenu.
The selected item becomes highlighted.
AIR/CABLE SELECTION
1 Move to “AIR/CABLE” by pressing CH (
)
buttons.
2 Press VOL (
) buttons to select either AIR or
CABLE which is appropriate to your antenna system.
CHANNEL AUTO SEARCH
CHANNEL AUTO SEARCH function memorizes all the
channels which are being received at real time. Before
operating this function, select one between AIR and
CABLE.
1 Move to “AUTO SEARCH” by pressing CH (
)
buttons.
2 Press VOL up (
) button to operate the searching.
Wait until the searching ends.
CURRENT CHANNEL SELECTION
1 Move to “channel” by pressing CH (
) buttons.
2 Press VOL (
) buttons to select a current channel
you want.
ADD OR DELETE CHANNEL
You can add additional channels or erase unwanted
channels from TV memory.
1 Select desired channel to add or delete and move to
"add/del" by pressing CH (
) buttons.
2 By pressing VOL (
) buttons, select ADD for
adding the current channel to the TV’s memory or
select DEL for erasing the channel from the TV’s
memory.
3 Exit with MENU button. The change is stored.
• To interrupt AUTO SEARCH, press
MENU button. SEARCH will stop at
the current channel and will not add
any higher channels.
Picture
Air / Cable Air Cable
Auto search
Channel 10
Add / Del Add Del
Sound
Utilities
Channel
Move Adjust Prev.
MENU
Memorizing channels
CATV 11
Press Menu to Cancel and
return to Channel menu.
Menu
Adjustment

Menu
Adjustment
19
Picture Adjustment
Press MENU button to display the MENU screen.
Press VOL (
) button to enter into the submenu.
MODE
1. Move to “Mode” by pressing CH (
) buttons.
2. Each time you press VOL (
) button, the screen
adjustment status changes as following :
Standard
Soft User
BRIGHTNESS
1 Move to “BRIGHTNESS” by pressing CH (
) buttons.
2 Press VOL ( ) buttons to adjust picture brightness.
CONTRAST
1 Move to “CONTRAST” by pressing CH (
) buttons.
2 Press VOL (
) buttons to adjust the picture contrast.
COLOR
1 Move to “COLOR” by pressing CH (
) buttons.
2 Press VOL ( ) buttons to adjust color intensity.
TINT
1 Move to “TINT” by pressing CH (
) buttons.
2 Press VOL (
) buttons to adjust skin color to a more
natural tone.
SHARPNESS
1 Move to “SHARPNESS” by pressing CH (
) buttons.
2 Press VOL (
) buttons to adjust picture sharpness.
Picture
Mode Standard
Brightness 35
Contrast 45
Color 28
Tint 0
Sharpness 32
Sound
Utilities
Channel
Move Adjust Prev.
MENU
For less contrast For more contrast
For less brightness For more brightness
For less color intensity For more color intensity
Skin tones become purplish
Skin tones become greenish
For less sharpness For more sharpness
• For COMPONENT mode, “TINT” is
excluded.
• For PC mode, only “CONTRAST”,
“BRIGHTNESS” and “SHARPNESS”
can be selected.

20
Menu
Adjustment
Sound Adjustment
Press MENU button to display the MENU screen.
Select “SOUND” by pressing CH (
) buttons
and press VOL (
) button to enter into the submenu.
BALANCE
1 Move to “BALANCE” by pressing CH (
) buttons.
2 Press VOL (
) buttons to adjust audio output
between left and right speakers.
BASS
1 Move to “BASS” by pressing CH (
) buttons.
2 Press VOL (
) buttons to adjust the bass
weaker or stronger.
TREBLE
To stress high frequency sound
1 Move to “TREBLE” by pressing CH (
) buttons.
2 Press VOL (
) buttons to adjust the treble
weaker or stronger.
Picture
Balance 0
Bass 0
Treble 0
Spatial On Off
Super bass
On Off
Mts M
ono Stereo Sap
Sound
Utilities
Move Adjust Prev.
MENU
LR
Channel
CH
For weaker treble For stronger treble
For weaker bass For stronger bass
Decrease left
speaker sound
Decrease right
speaker sound
• When “MONO” mode is selected, the
sound remains mono even if the TV set
receives a stereo broadcast. You must
switch the mode to “STEREO” if you
want to hear stereo sound.
• If you get some strange sound on
stereo mode in poor signal area or
non-dual signal service area, make
sure to select MONO mode.
SPATIAL
This function is to work virtual surround sound effect.
1 Move to “SPATIAL” by pressing CH (
) buttons.
2 Press VOL (
) buttons to select function on/off.
SUPER BASS
1 Move to “SUPER BASS” by pressing CH (
) buttons.
2 Press VOL (
) buttons to select function on/off.
MTS
1 Move to “MTS” by pressing CH (
) buttons.
2 Press VOL (
) buttons to select among Mono, Stereo or Sap.
STEREO Broadcasts : Watch programs like live sports, shows and concerts in dynamic stereo sound.
SAP Broadcasts : Listen to the second language, supplementary commentary and other information.
(SAP is mono sound.)
MONO : Obtain clearer sound by switching the mode into fixed mono-sound manually.
You can select one directly with MTS button on the remote controller.

21
Menu
Adjustment
PC Adjustment (ONLY IN PC MODE)
PC Mode input format.
If the signal from the PC system equals one of the standard signal modes, the screen will
automatically adjust and display image. If the signal from the PC system doesn’t equal any of
the modes, adjust the Video card setting on the computer. For the display modes listed below,
the screen image has been optimized during manufacture. The message “Out Of Range” will
appear when the PC signal does not correspond to any of the below standard setting
Please up-grade the video card driver with the latest version because some of old version video
cards may not support the 1280x768 resolution.
Standard Resolution(Mode) V-frequency(Hz) H-frequency(KHz) 15” 17” 20”
MAC 640x480 66 35.00 O O O
832x624 75 49.73 O O O
IBM 640x480 60 31.47 O O O
720x400 70 31.47 O O O
VESA 640x480(VGA) 72 37.86 O O O
800x600(SVGA) 60 37.88 O O O
72 48.08 O O O
1024x768(XGA) 60 48.37 O O X
70 56.48 O O X
1280x768(WXGA) 60 47.70 X O X

22
Menu
Adjustment
Press MENU button to display the MENU screen.
Select “SCREEN” by pressing CH (
) buttons
and press
VOL ( )
button to enter into the
submenu.
H POSITION
1 Move to “H POSITION” by pressing CH (
)
buttons.
2 Press VOL (
) buttons to adjust the
horizontal position of displayed image.
V POSITION
1 Move to “V POSITION” by pressing CH (
)
buttons.
2 Press VOL (
) buttons to adjust the vertical
position of displayed image.
PHASE
(Fine image adjustment in PC monitor mode)
1 Move to “PHASE” by pressing CH (
)
buttons.
2 Press VOL (
) buttons to adjust the phase to
get a clearer picture.
Picture
H position 100
V position 0
Phase 11
Frequency 0
Auto setup
Sound
Utilities
Screen
Move Adjust Prev.
MENU
FREQUENCY
1 Move to “FREQUENCY” by pressing CH (
) buttons.
2 Press VOL (
) buttons to adjust the frequency.
AUTO SETUP
1 Move to “AUTO SETUP” by pressing CH(
) buttons.
2 Press VOL (
) button to detect optimal resolution automatically.

23
UTILITIES ADJUSTMENT
Press MENU button to display the MENU screen.
Select “UTILITIES” by pressing
CH( / )
buttons and
press VOL
( )
button to enter into the submenu.
LANGUAGE
1 Move to "LANGUAGE" by pressing CH(
/
)
buttons.
2 Language of the OSD changes in the order of
"English
Français Español" whenever pressing
VOL
( )
buttons.
TIME
1 Move to "TIME" by pressing CH(
/
) buttons.
2 Press VOL( ) button.
3.Time Adjust mode appears.
Setup the "Time", "On time" and " Off time"
You can start to set up when press VOL(
) buttons.
Hour and minute is set up if pressing CH(
/
) buttons
and VOL( ) buttons in the - -:- - status.
Off timer : You can turn off the TV at desired time.
On timer : You can turn on the TV at desired time.
On Channel : You can set the channel number when the
TV turns on automatically.
On Volume : You can set the sound volume when the TV
turns on automatically.
Picture
Language English
Time
OSD Translucent
Color temp Normal
Closed caption Off
Parental control
Sound
Utilities
Channel
Move Adjust Prev.
MENU
Opaque
CH
Picture
Time --:--
On timer
On time 00:01
Off timer On Off
Off time
On channel 3
On volume
Sound
Utilities
Channel
Move Adjust Prev.
MENU
On Off
CH
00:01
22
Menu
Adjustment

Menu
Adjustment
24
OSD
1 Move to "OSD" by pressing CH(
) buttons.
2 Press VOL(
) buttons to select either
Translucent or Opaque.
COLOR TEMP
1 Move to "COLOR TEMP" by pressing CH(
)
buttons.
2 Color temp of the screen changes in the order
of "NORMAL
WARM COOL" whenever
pressing VOL(
) buttons.
CLOSED CAPTION
1 Move to "CLOSED CAPTION" by pressing
CH(
) buttons.
2 Closed caption of the screen changes in the
order of "off, cc1, cc2, cc3, cc4, t1, t2, t3, t4"
whenever pressing VOL(
) buttons.
PARENTAL CONTROL
This is function to protect children or juveniles
from the harmful broadcasting or videotapes.
1 Move to "PARENTAL CONTROL" by pressing
CH(
) buttons.
2 Press VOL(
) button.
Enter the password ----
0 - 9 : Adjust Prev.
MENU
Picture
Parental control
Tv guide
Movie ratings
No ratings Unblock Block
Ext. source Unblock Block
Change password
Sound
Utilities
Channel
Move Adjust Prev.
MENU
CH
The password screen appears as follows:
• Press Password by using number 0~9.
V-chip menu will be appeared and set up
the V-chip item below.

Menu
Adjustment
25
Parental control
1 Move to "Parental control" by pressing CH( ) buttons.
2 Press VOL( ) buttons to select either V-Chip on or V-Chip off.
V-Chip Setting:
This function allows TV program to be restricted and TV usage to be controlled based on FCC data.
It prevents children from watching violent or sexual scenes that may be harmful.
Restriction of TV program includes two ratings that contain information about the program, MPAA rating
and the TV Parental Guidelines.
The MPAA rating is restricted by age.
TV Parental Guidelines are restricted by age and content.
Tv guide
1 Move to "Tv guide" by pressing CH(
) buttons.
2 Press VOL( ) button.
3 TV Parental guidelines screen will be appeared and mark the desired rating with CH( ) and
VOL( ) buttons.
[TV Parental Guidelines] : age and content based
Example of TV Parental Guidelines (TV Channel Blocking) rating
If TV-Y7 in the age-based rating is set to Block, this will automatically block the higher ratings ; TV-G,TVPG, TV-14 and TV-MA.
In addition, all of Content base Rating items are automatically blocked unless you set the Content base
Rating.
FV V S L D
Rating (Fantasy (Violence) (Sexual (Adult (Sexually
Violence) Situation) Language) Suggestive Dialog)
TV-Y(All Children) V V V V V
TV-Y7(Direct to Older Chidren) O V V V V
TV-G(General Audience) V V V V
TV-PG(Parental Guidance Suggested) O O O O
TV-14(Parents Strongly Cautioned) O O O O
TV-MA(Mature Audience Only) O O O

Menu
Adjustment
Movie ratings
1 Move to "Movie ratings" by pressing CH( ) buttons.
2 Press VOL ( ) button.
3
MPAA rating screen will be appeared and mark the desired rating with CH( ) and VOL ( ) buttons.
[MPAA rating] : only age-based
Rating Descriptions
G General audiences. All ages admittde.
PG Parental Guidance suggested. Some material may not be suitable for children.
PG-13 Parental strongly cautioned. Some material may be inappropriate for children under 13.
R Restricted. Under 17 requires accompanying parent or adult guardian.
NC-17 No one 17 and under admitted.
X X is older rating that is unified with NC-17 but may be encoded in the data of older movies.
*Example of MPAA rating
If PG in the MPAA rating is blocked, higher ratings (PG-13, R, NC-17 and X) are blocked automatically.
So, you can prevent the children from watching the program rated PG, PG-13, R, NC-17, and X in this case.
26
Enter a new password ----
0 - 9 : Adjust Prev.
MENU
• Press new Password by using number 0~9.
Repeat it.
No ratings
This menu allows No rating program to be unblocked
or blocked.
1
Move to "No ratings" by pressing CH( ) buttons.
2 Press VOL ( ) buttons to select either unblock or
block.
Ext. source
This menu allows external source program to be
unblocked or blocked.
1
Move to "Ext. source" by pressing CH( ) buttons.
2 Press VOL ( ) buttons to select either unblock or
block.
Change password
1 Move to "Change password" by pressing CH(
)
buttons.
2 Press VOL (
) button.
The change password screen appears as
follows:
27
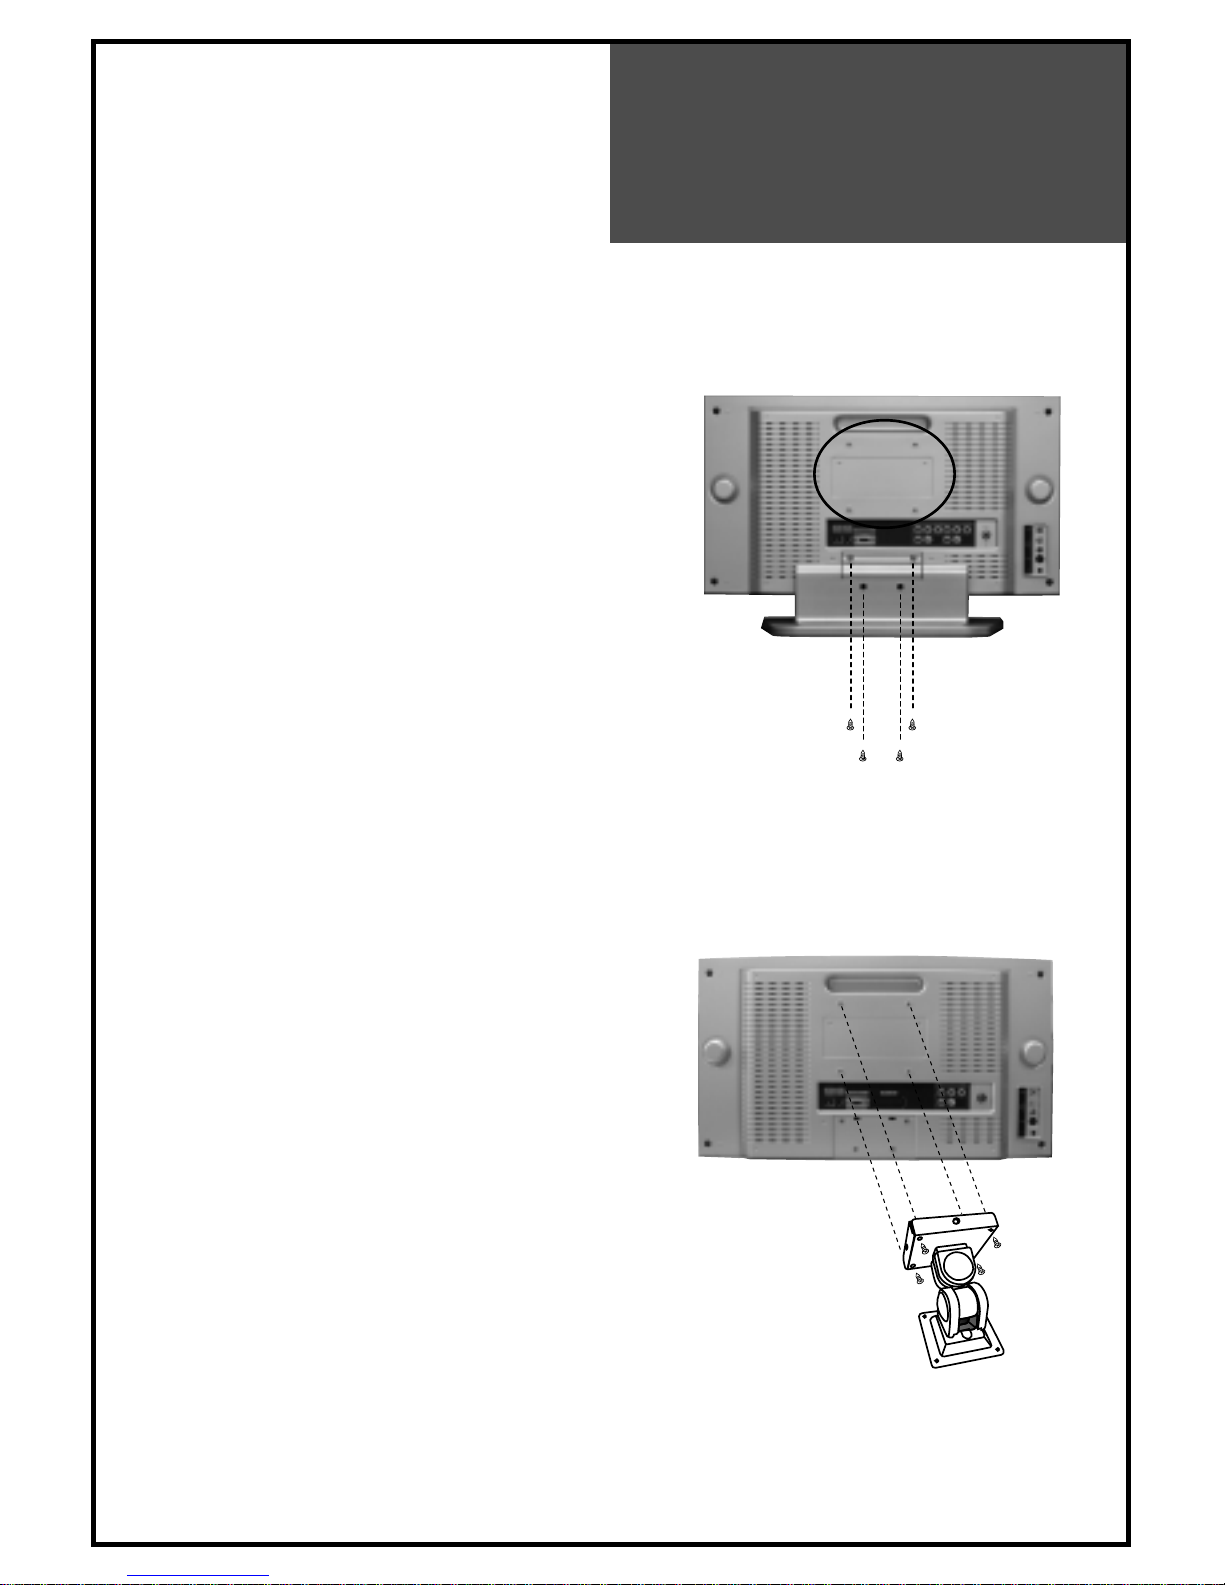
Wall/Arm
Mounting
Attaching a Wall or Arm mounting device
This TV supports the VESA mounting standard
and will accommodate various VESA mounting
devices.
To install any VESA mounting device, please
follow the manufacturer’s instructions.
1. Remove all cables connected to the TV.
2. Lay the LCD TV face-down on a flat surface
with a blanket or other soft materials to protect
the screen.
3. Remove the four screws attaching the stand.
Remove stand from LCD TV.
4. Remove the four screws attaching the VESA.
5. Now you are ready to install the VESA
mounting device suited to your applications
(see instructions below).
6. Connect all cables removed at step 1.
Installing VESA compliant mounting devices
1. Align the mounting interface pad (100mm x
100mm hole spacing) with the holes in the
televisions rear cover mounting pad.
2. Secure bracket with the four screws (4mmØ)
that came with the VESA mounting device.

Trouble
Shooting
28
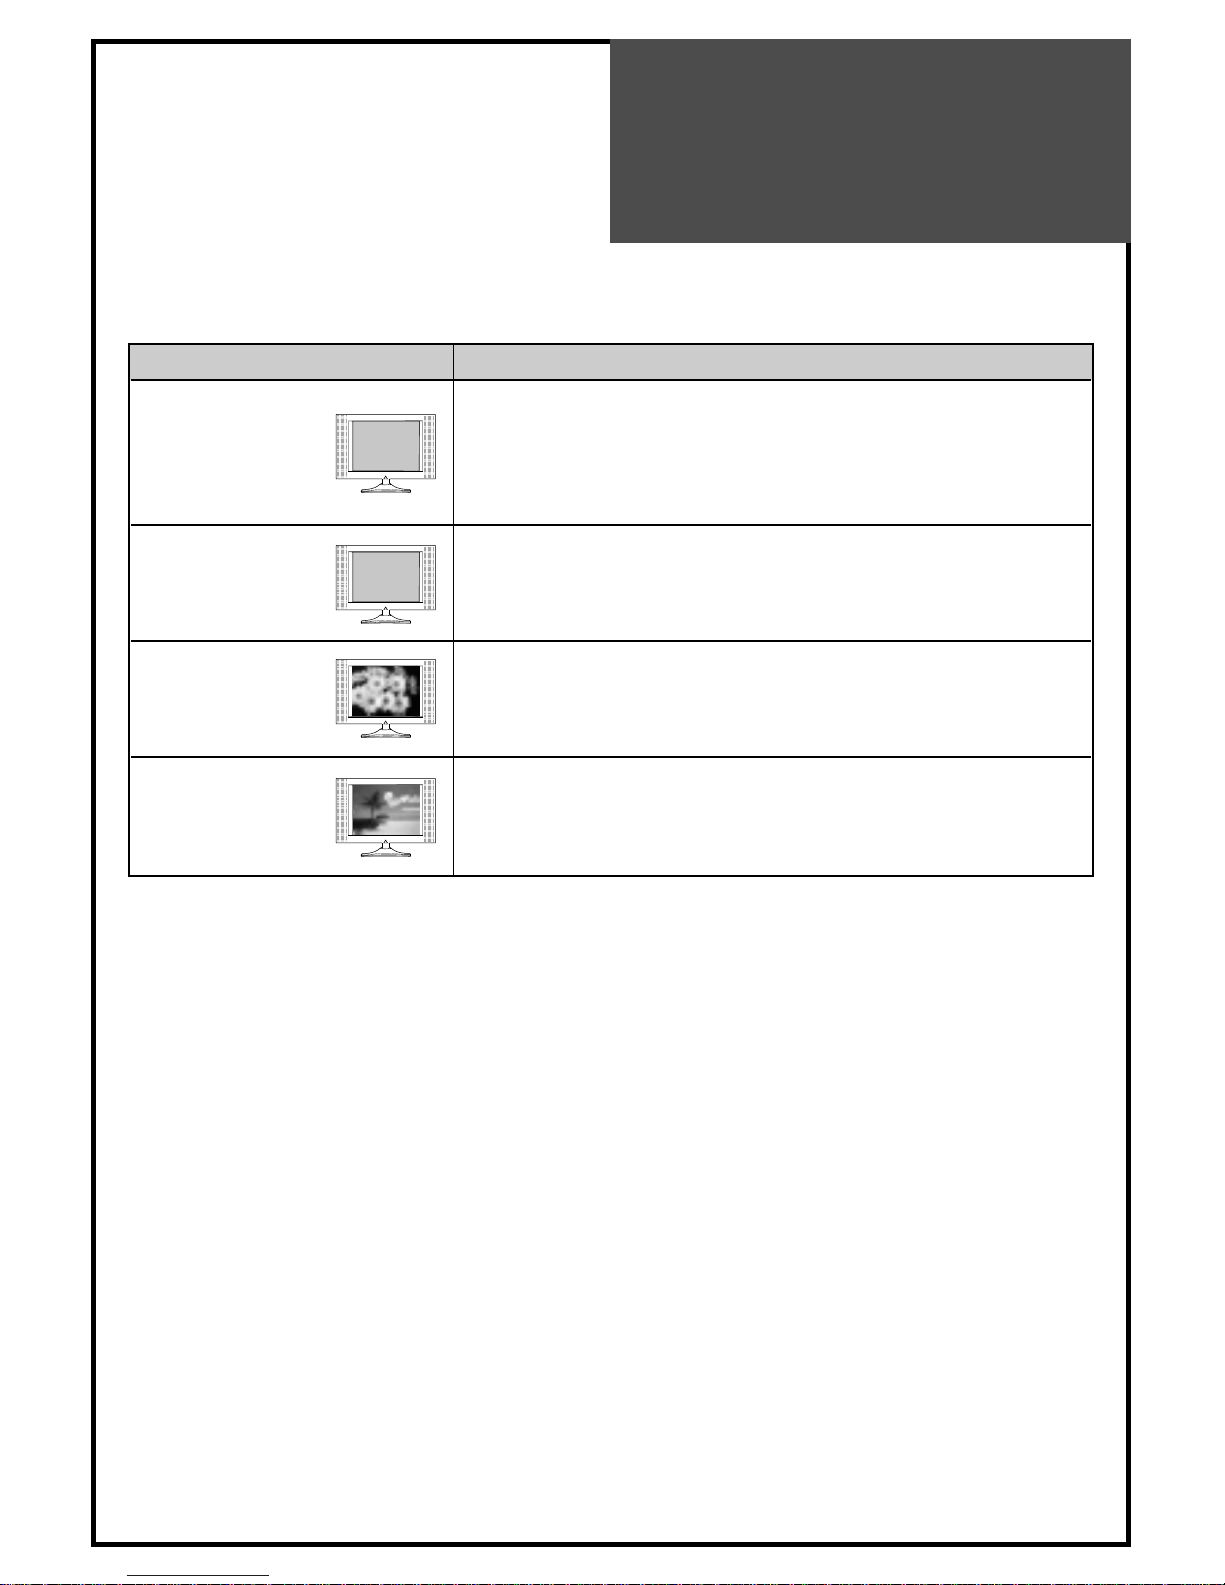
TROUBLE
SHOOTING
Please check the following items before asking for repair service.
Symptom Check items
Neither picture - Check the contact of sockets is all right.
nor sound - Check the TV main power is on.
Picture is OK - Check the Volume control is set to minimum or mute.
but no sound
Sound is OK, but - Check the color control and adjust it properly.
no color. - Check the program is in color or in black & white.
The picture is - Check the antenna is installed correctly and if not, adjust the
overlapped image. antenna toward the broadcasting station.
Picture has “snow - Check the antenna or its connection is correct and if not, correct the
noise”. antenna fault or connection cable fault.
- Check if car traffic or neon sign disturbs the sound effect.
Stripes on - Check the susceptible interference by other electronic devices such
picture. as radio and television and keep magnetic or electronic devices
away from the TV.
Bad stereo or SAP - Long distance from the station or other radio waves can generate
sound. bad sound reception. If so, change the mode to Mono.
Remote control - Check if the batteries in the Remote control die.
does not - Check if any object between IR sensor of the TV and the Remote
work. control does not obstruct.
1
23
4
56
78
9
P
I
C
T
U
R
E
M
O
D
E
S
O
U
N
D
M
O
D
E
P
O
W
E
R
M
U
T
E
P
R
E
V
.
C
H
C
A
P
T
IO
N
S
L
E
E
P
T
V
/
C
A
B
L
E
A
D
D
/
D
E
L
A
S
P
E
C
T
0
1
0
0
Trouble
Shooting
29
IN PC MODE
Symptom Check items
“OUT OF RANGE” - Check the resolution and frequency of your PC. Then, adjust them
appears on the to optimum condition for LCD TV.
screen - Refer to the table of PC mode input format
(Not being registered resolution and frequency on the table won’t
be displayed.)
“NO SIGNAL” - Ensure that the signal cable is firmly connected to PC and TV.
appears on the
screen.
Image is not - Adjust the PHASE control.
clear.
Image is not - Adjust the H-POSITION and V-POSITION control.
centered.
• AFTER SALES SERVICE
Do not hesitate to contact your retailer or service agent if a change in the perfomance of your product
indicates that a faulty condition may be present.
OUT OF RANGE
NO SIGNAL
Specifications
30
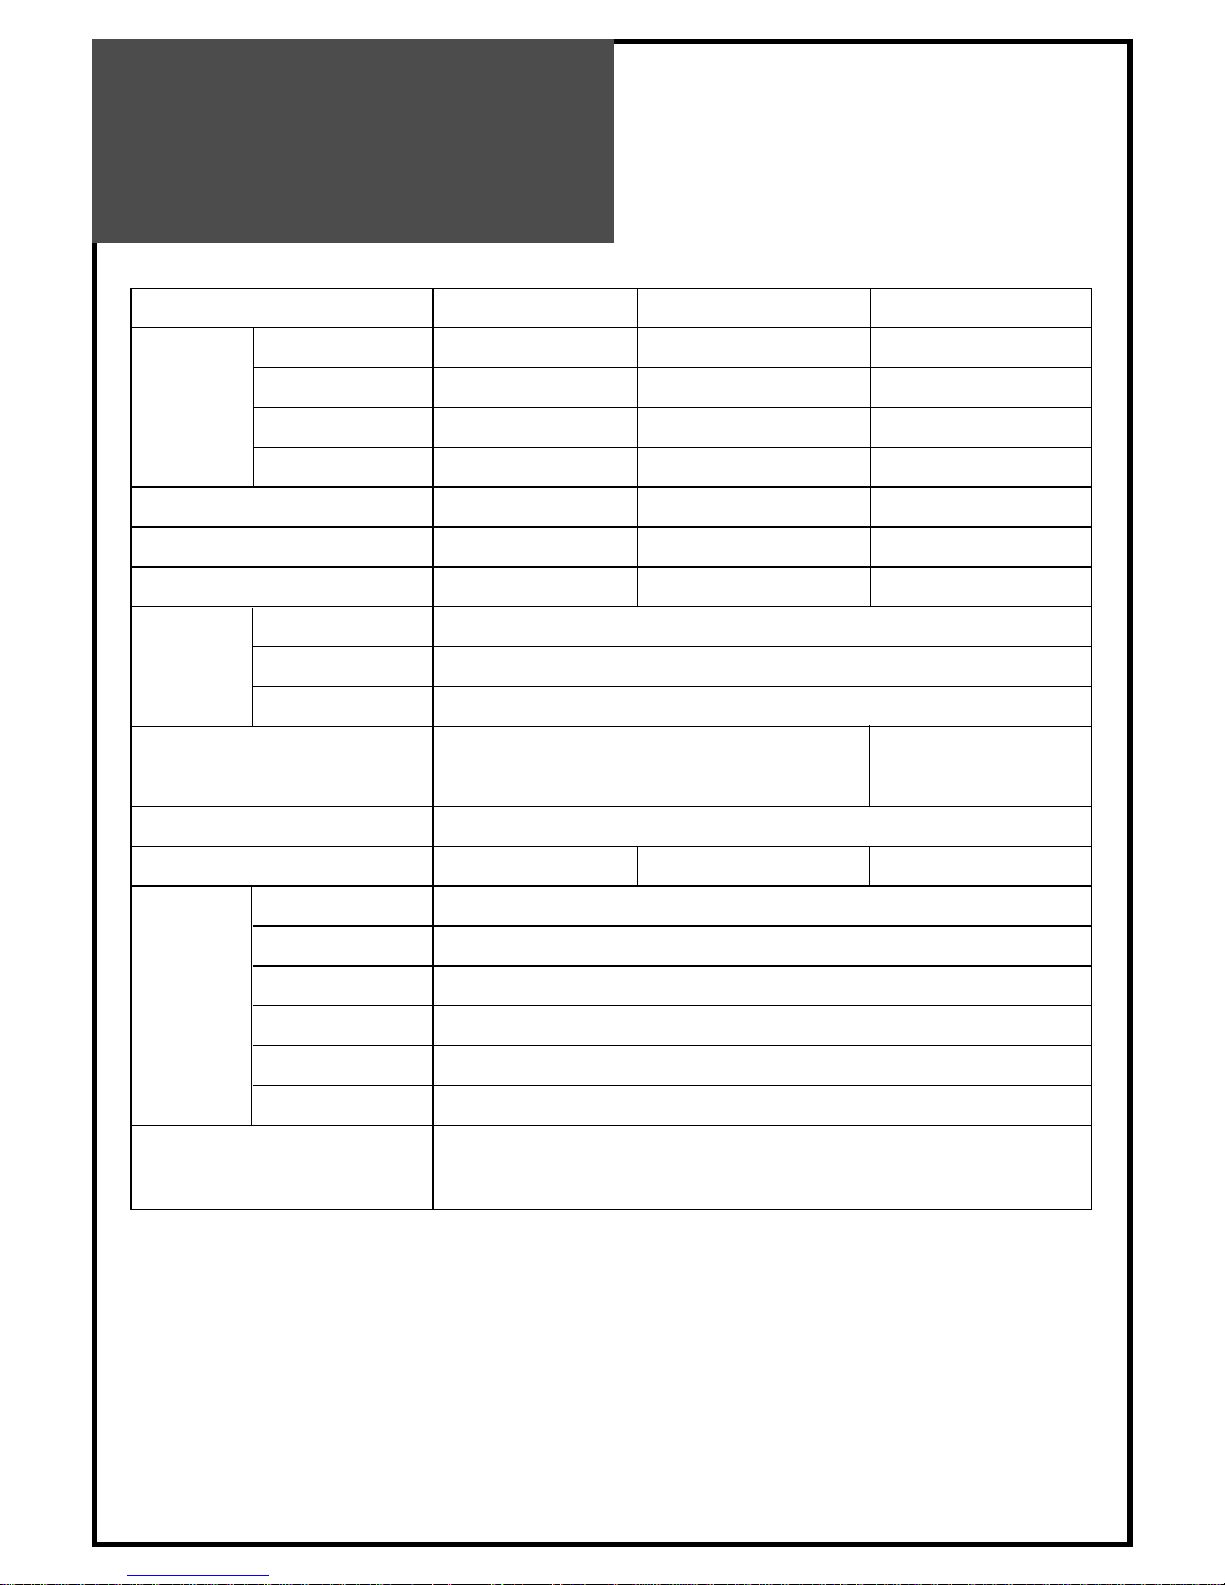
MODEL DLN-15D3 DLN-17D3/D4 DLN-20D3/D4
PANEL 15” TFT LCD 17” WIDE TFT LCD 20” TFT LCD
RESOLUTION 1024*768(XGA) 1280*768(WXGA) 800*600(SVGA)
SCREEN SIZE 381mm 434.38mm 510.54mm
PIXEL PITCH 0.297(H)*0.297(V) 0.289(H)*0.289(V) 0.51(H)*0.51(V)
APPEARANCE (mm) 463*345*215 544*358*215 608*456*215
ASPECT RATIO 4 : 3 15 : 9 4 : 3
WEIGHT 6Kg 7Kg 11Kg
STANDARD NTSC-M
TUNING SYSTEM ELECTRIC TUNING SYSTEM WITH PLL 181 CHANNELS
CATV 125 CHANNELS
DC 15V, AC 100V -
240V, 50/60Hz
SOUND OUTPUT 2.5W + 2.5W
POWER CONSUMPTION 34W 40W 50W
AV IN COMPOSITE VIDEO, S-VIDEO, AUDIO L & R
COMPONENT 1 Y, Pb(Cb), Pr(Cr), [480i, 480p, 720p, 1080i], AUDIO L & R
COMPONENT 2 Y, Pb(Cb), Pr(Cr), [480i, 480p, 720p, 1080i], AUDIO L & R
HEADPHONE 3.5 STEREO MINI - JACK
PC IN D - SUB 15PIN RGB IN, PC AUDIO IN
ANT, IN F - TYPE
REMOTE CONTROLLER, AC/DC ADAPTER, AC CORD,
2 Batteries(Option), INSTRUCTION MANUAL
ACCESSORIES
TERMINALS
INPUT POWER
TV-
FUNCTION
LCD
DC 12V (Adapter output)
AC 100V - 240V, 50/60HZ (Mains Voltage)

P/N : 48586110E10N-R0
 Loading...