

Page 1
Owner’s Manual
ENGLISH
Digital-to-Analog Converter Box
Digital-to-Analog Converter Box
• Electronic Program Guide
• Parental Control / Caption / Text
• English / Spanish / French support
• Auto Clock Setting
DAC-100 / DAC-200 /DAC-300
Page 2
IMPORTANT SAFETY INSTRUCTION
PRODUCT INFORMATION
CAUTION
RISK OF ELECTRIC SHOCK
DO NOT OPEN
CAUTION: TO REDUCE THE RISK OF
ELECTRIC SHOCK, DO NOT REMOVE
COVER (OR BACK). NO USER-SERVICEABLE
PARTS INSIDE. REFER SERVICING TO
QUALIFIED SERVICE PERSONNEL.
WARNING TO REDUCE THE RISK OF FIRE OR ELECTRIC SHOCK, DO NOT EXPOSE THIS
CAUTION TO PREVENT ELECTRIC SHOCK, MATCH WIDE BLADE OF PLUG TO WIDE SLOT,
FCC NOTICE: This equipment has been tested and found to comply with the limits for a Class B
APPLIANCE TO RAIN OR MOISTURE.
FULLY INSERT.
digital device, pursuant to part 15 of the FCC Rule. These limits are designed to
provide reasonable protection against harmful interference in a residential installation.
This equipment generates, uses and can radiate radio frequency energy and if not
installed and used in accordance with the instructions, may cause harmful
interference to radio communications. However, there is no guarantee that
interference will not occur in a particular installation. If this equipment does cause
harmful interference to radio or television reception; which can be determined by
turning the equipment off and on, the user is encouraged to try to correct the
interference by one or more of the following measures:
• Reorient or relocate the receiving antenna.
• Increase the separation between the equipment and receiver.
• Connect the equipment to an outlet on a circuit different from that to which the
receiver is connected.
• Consult the dealer or an experience radio/TV technical for help.
This device complies with part 15 of the FCC Rules. Operation is subject to the
following two conditions: (1) This device may not cause harmful interference, and (2)
This device must accept any interference received, including interference that may
cause undesired operation.
The lightning flash with arrowhead symbol,
within an equilateral triangle, is intended to
alert the user to the presence of uninsulated
“dangerous voltage” within the product’s
enclosure that may be of sufficient magnitude
to constitute a risk of electric shock.
The exclamation point within an equilateral
triangle is intended to alert the user to the
presence of important operating and servicing
instructions in the literature accompanying the
appliance.
CAUTION Any changes or modification in construction of this device which are not expressly
approved by the party responsible for compliance could void the user’s authority to
operate the equipment.
1
Page 3

I
MPORTANTSAFETYINSTRUCTION
1 Read these instructions.
2 Keep these instructions.
3 Heed all warnings.
4 Follow all instructions.
5 Do not use this apparatus near water.
6 Clean only with dry cloth.
7 Do not block any ventilation openings. Install in accordance with the manufacturer’s instructions.
8 Do not install near any heat sources such as radiators, heat registers, stoves, or other apparatus
(including amplifiers) that produce heat.
9 Do not defeat the safety purpose of the polarized or grounding-type plug. A polarized plug has
two blades with one wider than the other. A grounding type plug has two blades and a third
grounding prong. The wide blade or the third prong are provided for your safety. If the provided
plug does not fit into your outlet, consult an electrician for replacement of the obsolete outlet.
10 Protect the power cord from being walked on or pinched particularly at plugs, convenience
receptacles, and the point where they exit from the apparatus.
11 Only use attachments/accessories specified by the manufacturer.
12 Use only with the cart, stand, tripod, bracket, or table specified by the manufacturer, or sold with
the apparatus. When a cart is used, use caution when moving the cart/apparatus combination to
avoid injury from tip-over.
13 Unplug this apparatus during lightning storms or when unused for long periods of time.
14 Refer all servicing to qualified service personnel. Servicing is required when the apparatus has
been damaged in any way, such as power-supply cord or plug is damaged, liquid has been
spilled or objects have fallen into the apparatus, the apparatus has been exposed to rain or
moisture, does not operate normally, or has been dropped.
2
Page 4

CONTENTS
PRODUCT INFORMATION
1. PRODUCT INFORMATION
Important Safeguards ................................ 1
Contents ................................................... 3
Read Carefully Before Using ..................... 4
Identification of Controls .......................... 5
Remote Control ........................................ 6
2. INSTALLATION
Connecting to a TV.................................... 8
3. SETUP
Menu Overview ........................................ 9
Channel Menu Options .......................... 10
Option Menu Features ............................ 13
Lock Menu Options ................................ 22
4. BASIC OPERATION
Information Displays ............................... 30
Program and Station Guide ..................... 32
Normal Operation .................................. 33
5. HELP
Specifications ......................................... 34
Warranty
3
Page 5
MUTE
PRE-CH
1
2
3
4
5
6
7
8
9
-
0
POWER
ENTER
EXIT
MENU
VOL
EPG INFO CH-LIST
AUDIO CAPTION ASPECT
CH
READ CAREFULLY BEFORE USING
Please read carefully before using this unit.
Placement and handling
• The picture and sound of a nearby TV, VCR,
or radio may be distorted. In this case,
position the unit away from the TV, VCR, or
radio.
• Do not use volatile liquids, such as
insecticide spray, near the unit. Do not leave
rubber or plastic products in contact with the
unit for a long period of time. They will leave
marks on the surface.
When Not in Use
• When the unit is not in use, be sure to
remove the disc or tape and turn off the
power.
• If you do not use the unit for a long period of
time, remove the remote control batteries to
prevent leakage.
Moving
• The original shipping carton and packing
materials come in handy. For maximum
protection, re-pack the unit as it was
originally packaged at the factory.
Cleaning
• Use a soft, dry cloth. If the surfaces are
extremely dirty, use a soft cloth lightly
moistened with a mild detergent solution. Do
not use strong solvents such as alcohol,
benzine, or thinner, as these might damage
the surface of the unit.
Maintenance
• This is a high precision video device. For
optimal performance, we recommend regular
inspection and maintenance every 1,000
hours by qualified service personnel.
Contact your dealer or nearest service center.
Antenna Orientation
• Antennas are subject to changes in direction
or damage due to wind and rain. For best
results, contact your nearest service center
about proper orientation and/or replacement.
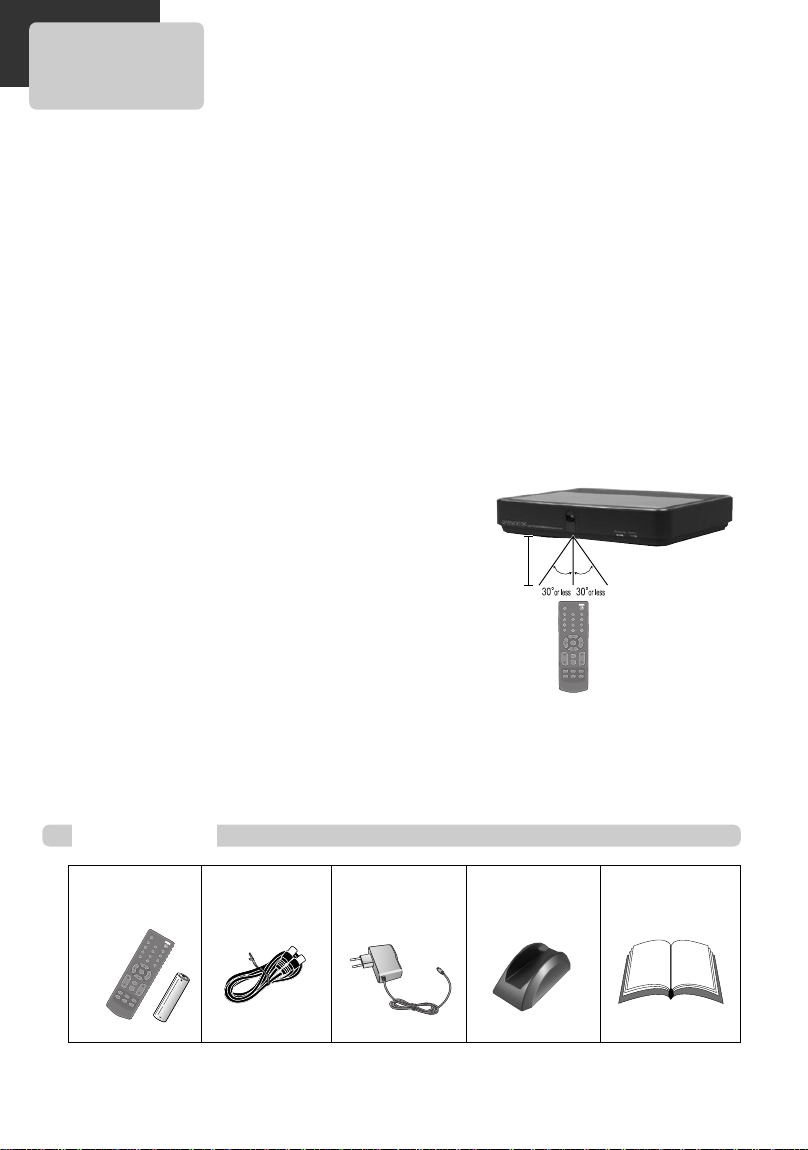
Using the Remote Control
• Operate remote control within 23 ft. (7m) of
the unit.
• Do not press two buttons at the same time.
• Do not store in a dusty or humid location.
23' (7m)
POWER
MUTE
1 2 3
4 5 6
7 8 9
PRE-CH
- 0
ENTER
EXIT
VOL
CH
MENU
EPG INFO CH-LIST
AUDIO CAPTION ASPECT
Accessories
Remote Control &
1 Battery
• To purchase accessories or additional parts, contact your nearest dealer or service center.
4
RF Cable Adaptor Supporter
(DAC-200 only)
Owner’s Manual/
Warranty
Page 6
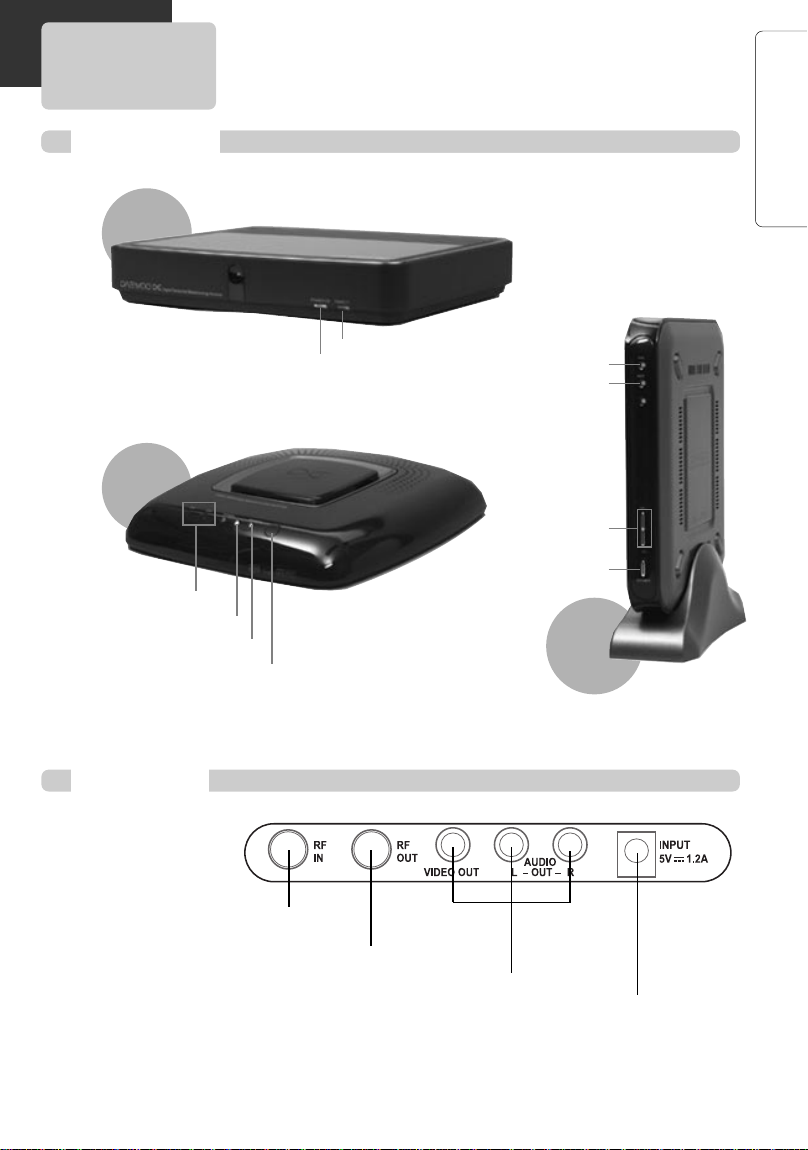
IDENTIFICATION OF CONTROLS
Front Panel
DAC-100
PRODUCT INFORMATION
DAC-300
Channel +/-
Remote sensor
Power indicator
Rear Panel
Connection to Antenna
Remote sensor
Power button
Power indicator
Power indicator
Remote sensor
Channel +/-
Power button
DAC-200
Connection to TV
A/V Output Jack
Power Adaptor
Connect to wall outlet.
5
Page 7
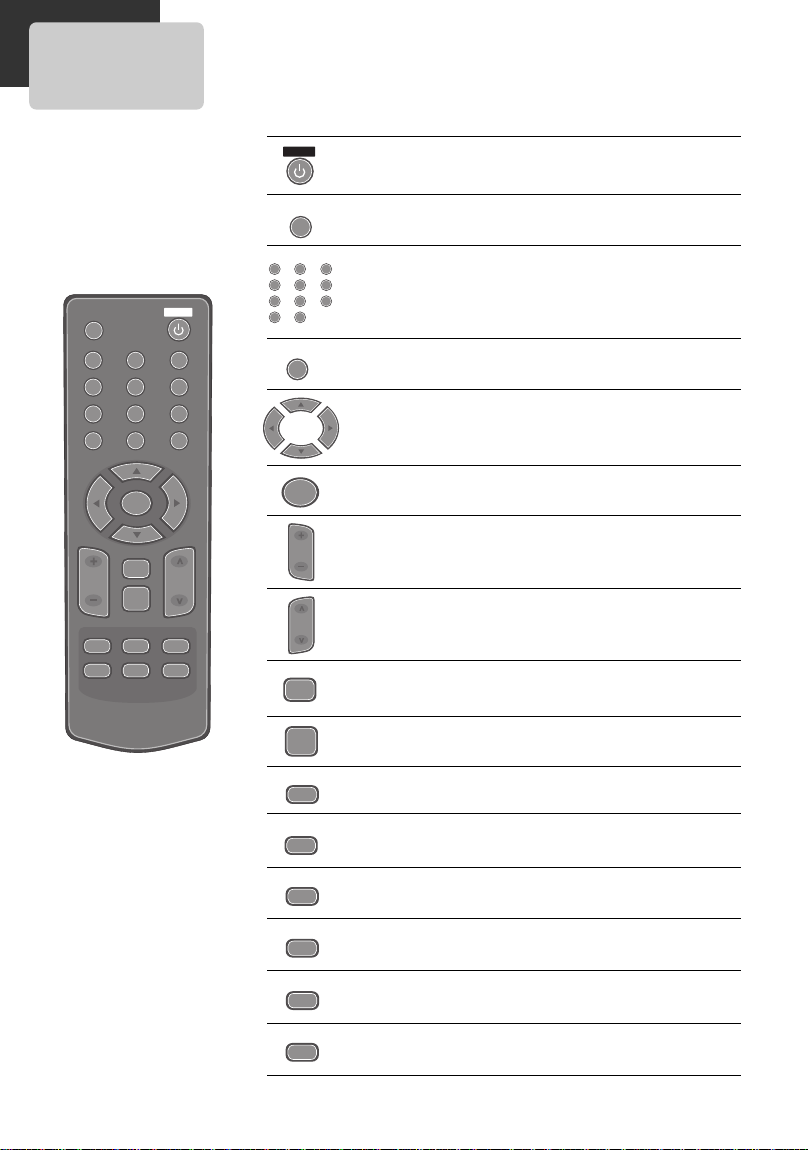
REMOTE CONTROL
POWER
MUTE
1 2 3
4 5 6
7 8 9
- 0
PRE-CH
ENTER
VOL
CH
EXIT
MENU
EPG
INFO
CH-LIST
AUDIO
CAPTION
ASPECT
POWER : Switches the receiver on or off.
MUTE : Turns sound ON and OFF
Numbers : Chooses channels and enters programming
information
MUTE
POWER
Dash : Enters a channel number for multiple program
channels such as 2-1,2-2, etc
1 2 3
4 5 6
7 8 9
- 0
VOL
EPG INFO CH-LIST
AUDIO CAPTION ASPECT
PRE-CH
ENTER
EXIT
MENU
PRE-CH : Chooses previous channel
Navigation Buttons : Selects options in a menu
ENTER : Confirms a menu selection.
Volume : Sets sound level
CH
Channel : Selects channels in memory
EXIT : Removes all on-screen displays and returns to TV
viewing from any menu
MENU : Accesses or closes main menu
EPG : Brings up the Program Guide
INFO : Shows the current station and program information
on the screen
CH-LIST : Shows the all channels in memory
AUDIO : Selects program`s audio language or analog
audio options if available
CAPTION : Selects caption mode if available
ASPECT : Selcets TV-Ratio if available
6
Page 8

R
EMOTECONTROL
Digital-to-Analog Converter Box Remocon Code Table
NO CUSTOM DATA Function
1 E8H 00H 0
2 E8H 01H 1
3 E8H 02H 2
4 E8H 03H 3
5 E8H 04H 4
6 E8H 05H 5
7 E8H 06H 6
8 E8H 07H 7
9 E8H 08H 8
10 E8H 09H 9
11 E8H 0AH 12 E8H 0DH CAPTION
13 E8H 0FH AUDIO
14 E8H 10H MUTE
15 E8H 11H ENTER
16 E8H 13H VOL UP
17 E8H 14H VOL DOWN
18 E8H 15H STANDBY
19 E8H 17H CH+
20 E8H 18H CH21 E8H 19H Right
22 E8H 1AH Left
23 E8H 20H PRE-CH
24 E8H 21H INFO
25 E8H 22H MENU
26 E8H 2CH EPG
27 E8H 2DH CH LIST
28 E8H 2EH EXIT
29 E8H 30H ASPECT
30 E8H 37H Up
31 E8H 38H Down
PRODUCT INFORMATION
Format : M50560
7
Page 9
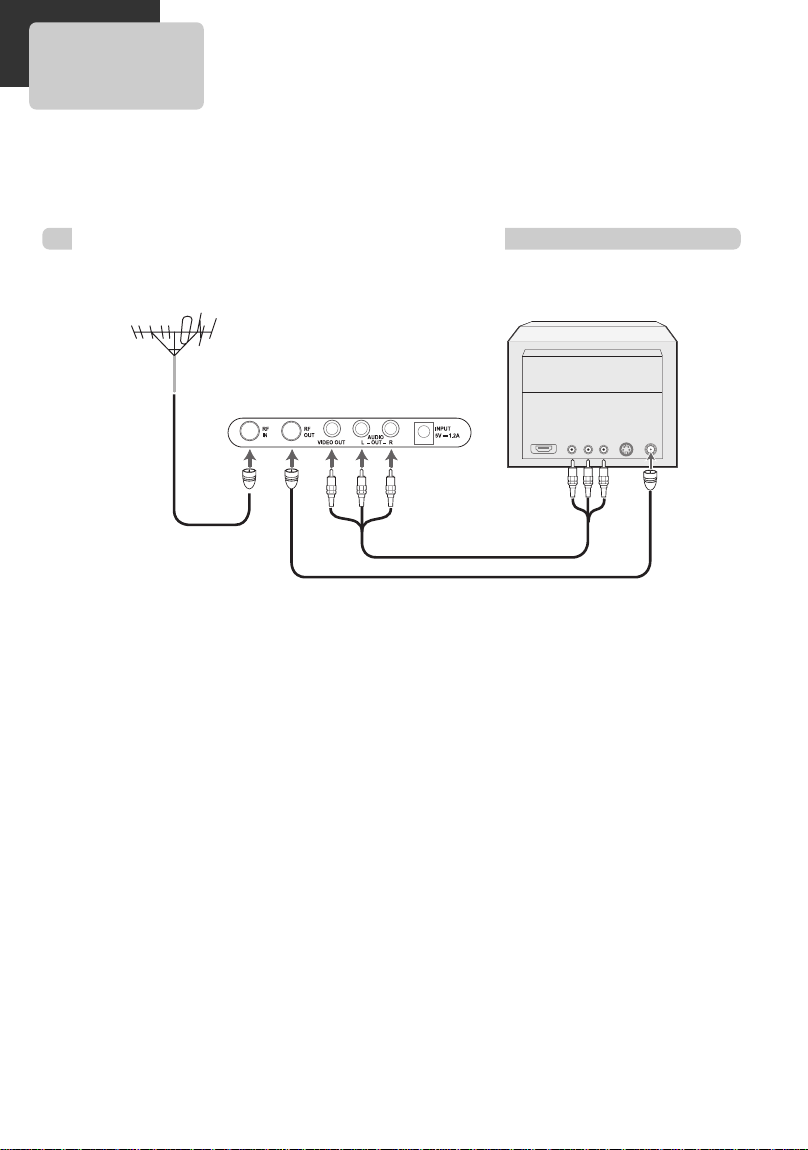
CONNECTING TO A TV
■ The default RF Output channel is Ch 4. And you can change it to Ch 3. See “Output Channel” on
page 18.
Various methods of connecting your TV
Outside Antenna or Wall
Antenna Outlet
Rear Panel of Converter Box
Method 2
Rear Panel of TV
Method 1
Method 1
Unplug the RF cable from the “ANT.IN” Jack on the rear panel of the TV.
Plug this cable into the “RF IN” jack on the rear panel of the Converter Box.
Connect the “RF OUT” jack on the Converter Box to the “RF IN” jack on the TV with another RF
cable.
Method 2 : Connecting to a TV equipped with audio/video in jacks
Use the audio/video cable (
the “Video In” jack on your TV.
Connect the “Audio Out jack on the Converter Box to the “Audio In” jack on the TV.
Match the color of the cable to the color of the jack.
Not supplied
) to connect the “Video Out” jack on the Converter Box to
8
Page 10
MENU OVERVIEW
In this menu system, there are several ways to customize the menu settings provided. Most menus
consist of three levels to set up the options, but some require greater depth for the variety of settings.
If you press the [MENU] button, only the first and second level of the menu system will appear on
the TV screen. The third level can be displayed by pressing [ENTER]. If a menu has more than three
levels, the pop-up dialogue box will be displayed as the fourth or fifth level. For navigating the menu
levels, you will see [√] on the right side of the menu label to help you go to the next level.
To show and remove the Menu:
Press the [MENU] button on the Remote Control to display the menu. A second press of the [MENU]
button or a press of the [EXIT] button will take you back to TV viewing.
To go to the next level:
Press [√] on the Remote Control.
To go back to the previous level:
Press [MENU] (or [œ]) on the Remote Control.
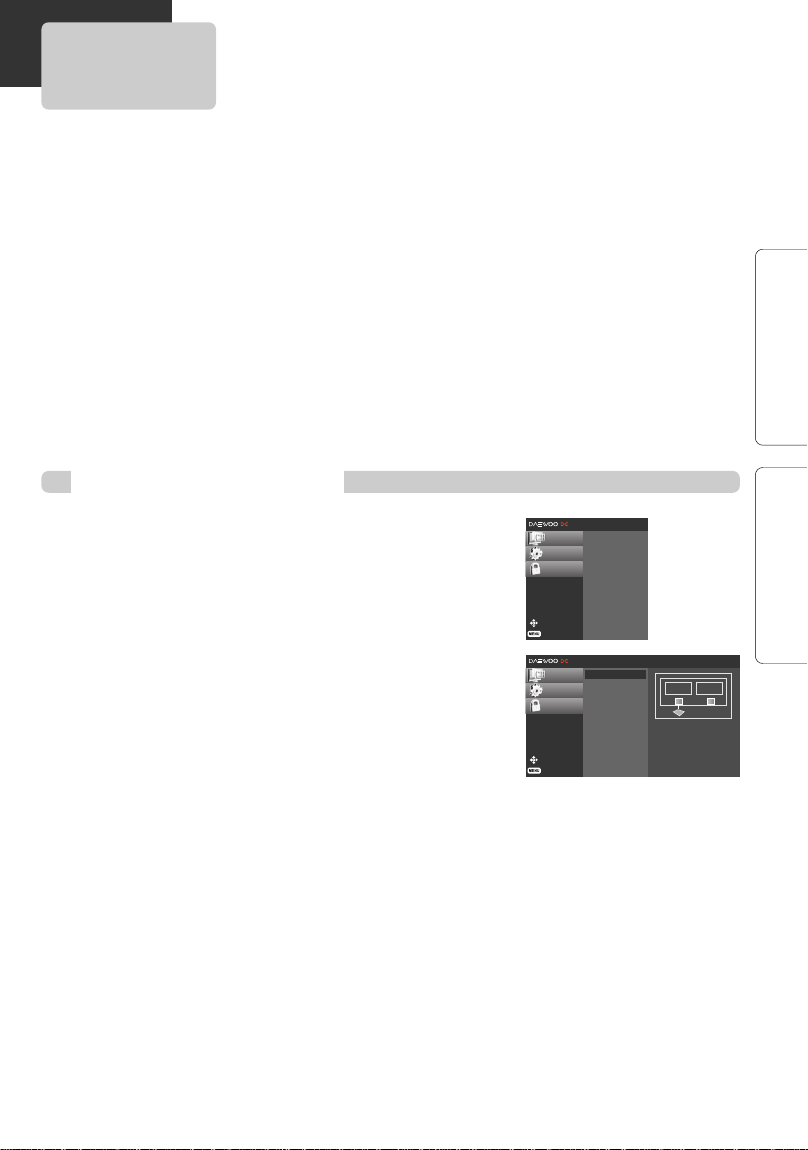
Typical Menu Operation
INSTALLATION SETUP
1 Press [MENU].
The main menu will appear.
2 Use […†] to select the desired menu option.
3 While the desired menu option is selected, press [√]
or [ENTER] to move to the second level.
4 Use […†] to select the second menu option.
5 Press [√] or [ENTER] to move to the third level.
Some menu options require additional steps.
6 Press [MENU] to return to the previous menu or press
[EXIT] on the Remote Control to return to TV viewing.
CHANNEL √
OPTION √
LOCK √
Move
Prev.
CHANNEL √
OPTION
LOCK
Move
Prev.
Channel Scan
Channel Add
Channel Edit
Manual Scan
Channel Scan
Channel Add
Channel Edit
Manual Scan
√
Selection
(RIGHT or ENTER)
leads you to the
Channel Scan.
ANTENNAINRF 3/4
OUT
9
Page 11
CHANNEL MENU OPTIONS
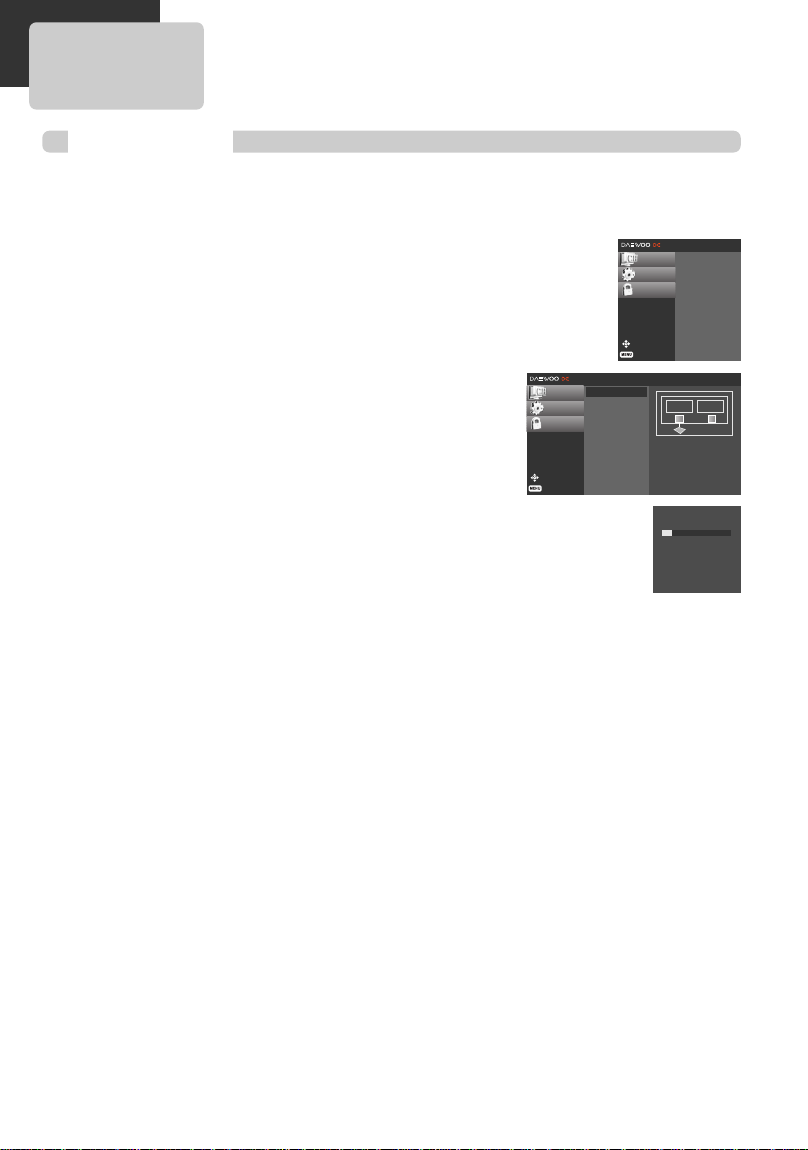
Channel Scan
Automatically finds all channels available through the ‘RF IN’ source. The unit stores all the active
channels found, on the channel list. Inactive or weak channels may not appear on the list. In that
case, add missing channels manually with the Manual Scan menu.
The channel list created here can be seen in the Channel Edit menu.
1 Press [MENU] to display the on-screen menu.
2 Select the SETUP menu using […†] then press
[ENTER] or [√] to move to the second level.
3 Select the “Channel Scan” using […†] then press
[ENTER] or [√] .
4 Press [ENTER].
The channel search process begins.
You can skip the current scanning by pressing [ENTER].
You can stop the process by pressing [MENU] or [EXIT].
5 After the channel search is complete, the lowest
channel number found appears on the TV screen.
CHANNEL √
OPTION
LOCK
Move
Prev.
Channel Scan
Channel Add
Channel Edit
Manual Scan
CHANNEL √
OPTION √
LOCK √
Move
Prev.
√
Selection
(RIGHT or ENTER)
leads you to the
Channel Scan.
Channel Scan
Channel Add
Channel Edit
Manual Scan
ANTENNAINRF 3/4
Processing Channel
scan...
DTV Ch.12
Press ENTER to stop
local channel scan.
OUT
10
Page 12

Channel Add
C
HANNELMENUOPTIONS
Automatically adds new channels available through the antenna
input (RF IN) except memorized channels already in the channel
list.
1 Press [MENU] to display the on-screen menu.
2 Select the SETUP menu using […†] then press
[ENTER] or [√] to move to the second level.
CHANNEL √
OPTION
LOCK
Move
Prev.
Channel Scan
Channel Add
Channel Edit
Manual Scan
√
Selection
(RIGHT or ENTER)
leads you to the
Channel Add.
3 Select the “Channel Add” using […†] then press [ENTER] or [√] .
Channel Add channel search process begins.
You can skip the current scanning by pressing [ENTER].
You can stop the process by pressing [MENU] or [EXIT].
4 After Channel Add search is complete, the lowest channel number found appears
on the TV screen.
Channel Edit
Channel Edit allows you to manually add or delete channels from
the channel list in memory and create your own surf list of favorite
channels.
1 Press [MENU] to display the on-screen menu.
2 Select the SETUP menu using […†] then press
[ENTER] or [√] to move to the second level.
3 Select the “Channel Edit” using […†] then press
[ENTER] or [√] .
Channel Edit menu appears.
To add or delete a channel:
Press [ENTER] to add or delete the channel on the channel
editing menu.
4 Press [MENU] to return to the previous menu or press [EXIT] on the Remote Control
to return to TV viewing.
Notes
Deleted channels can not be selected with the CH (+/–) buttons.
CHANNEL √
OPTION
LOCK
Move
Prev.
CHANNEL √
OPTION
LOCK
Move
Prev.
Channel Scan
Channel Add
Channel Edit
Manual Scan
Channel Scan
Channel Add
Channel Edit
Manual Scan
Antenna Channels
2-1
√
4-1
5-1
Antenna Channels
2-1
4-1
5-1
ENTER Add/Delete
SETUP
11
Page 13

Manual Scan
C
HANNELMENUOPTIONS
This feature manually adds or deletes channels.
1 Press [MENU] to display the on-screen menu.
2 Select the SETUP menu using […†] then press
[ENTER] or [√] to move to the second level.
3 Select the “Manual Scan” using […†] then press
[ENTER] or [√] .
Manual Add menu appears.
4 Select a channel to add or delete using […†] or the
numbered buttons.
5 Press [ENTER] to confirm your selection.
CHANNEL √
OPTION
LOCK
Move
Prev.
CHANNEL √
OPTION
LOCK
Move
Prev.
Channel Scan
Channel Add
Channel Edit
Manual Scan
Channel Scan
Channel Add
Channel Edit
Manual Scan
Select RF-channel number.
DTV 2-1
2
√
Signal
Bad Good
ENTER
Add the channel
Select RF-channel number.
DTV 2-1
œ √
2
Signal
Bad Good
ENTER
Add the channel
6 Repeat steps 4-5 to add or delete additional channels with the Manual Scan menu.
7 Press [MENU] to return to the previous menu or press [EXIT] on the Remote Control
to return to TV viewing.
12
Page 14

OPTION MENU FEATURES
Clock
Enables the user to set up the clock information. Normally, your clock is set
using signals transmitted by DTV stations. Choosing your time zone sets the
current time automatically.
CHANNEL √
OPTION √
LOCK √
1 Press [MENU] to display the on-screen menu.
Clock
Aspect Ratio
Language
Audio Language
Caption Select
DCC View
Sleep Mode
Output Channel
System Info
Move
Prev.
√
Current TIme
Sun, Jan 5 12:00:00 AM
Time Zone
Eastern
2 Select the OPTION menu using […†] then press
[ENTER] or [√] to move to the second level.
3 Use […†] to select the Clock option then press [√] or
[ENTER] to move to the third level.
4 Use [œ √] to set Time Zone: (Hawaii, New F.land,
Atlantic, Eastern, Central, Mountain, Pacific, Alaska)
5 Press [MENU] to return to the previous menu or press
CHANNEL
OPTION √
LOCK
Move
Prev.
[EXIT] on the Remote Control to return to TV viewing.
Notes
There are cases where the TV station does not send, or sends wrong date and/or time information causing
the Converter Box to set an incorrect time.
Clock
Aspect Ratio
Language
Audio Language
Caption Select
DCC View
Sleep Mode
Output Channel
System Info
SETUP
13
Page 15

O
PTIONMENUFEATURES
Aspect Ratio
Selects the screen format. To view a picture with a wide (16:9) aspect ratio, you can choose Set By
Program, Letter Box, Cropped, or Squeezed.
1 Press [MENU] to display the on-screen menu.
CHANNEL
2 Select the OPTION menu using […†] then press
[ENTER] or [√] to move to the second level.
3 Use […†] to select the Aspect Ratio option.
4 Press [√] or [ENTER] to move to the third level.
5 Use […†] to select an option then press [ENTER] to
confirm your selection.
6 Press [MENU] to return to the previous menu or press [EXIT] on the Remote
Control to return to TV viewing.
TIP
While watching TV, you can change the picture aspect ratio using [ASPECT] on the Remote Control.
Clock
Aspect Ratio
√
OPTION √
LOCK
Move
Prev.
Language
Audio Language
Caption Select
DCC View
Sleep Mode
Output Channel
System Info
✔ Set By Program
Letter Box
Cropped
Squeezed
Options to view a picture with a
wide (16:9) aspect ratio at 480i or
480p mode output format.
Aspect Ratio Descriptions
Use the [ASPECT] button to choose Aspect Ratios
Aspect Ratios available for viewing high definition content
Set By Program
Aspect Ratio is set by program.
Letter Box
Use for a picture with an original 16:9 aspect ratio (in a wide format). Letterbox mode will shrink the
picture to fill the screen, with black/gray (or blank) bars appearing at the top and bottom of the
screen.
Cropped
Use for a picture filling the entire screen by cropping (removing) the left and right portions of the
picture.
Squeezed
Use for a full picture filling the entire screen with no black/gray bars. The picture in a 16:9 format
will be horizontally adjusted or squeezed to fit the 4:3 ratio Monitor. This setting can also be useful
when used with 16:9 aspect ratio monitors or with 4:3 aspect ratio Monitors that have a “16:9
enhancement” feature.
14
Page 16

O
PTIONMENUFEATURES
Menu Language
Select a language for the menus to appear in.
1 Press [MENU] to display the on-screen menu.
2 Select the OPTION menu using […†] then press [ENTER] or [√] to move to the
second level.
3 Select the Language option using […†].
4 Press [√] or [ENTER] to move to the third level.
5 Select the desired language using […†] then press
[ENTER] to confirm your selection.
6 Press [MENU] to return to the previous menu or press
[EXIT] on the Remote Control to return to TV viewing.
CHANNEL
OPTION √
LOCK
Move
Prev.
Clock
Aspect Ratio
Language
Audio Language
Caption Select
DCC View
Sleep Mode
Output Channel
System Info
√
✔ English
Español (Spanish)
Français (French)
SETUP
15
Page 17

O
PTIONMENUFEATURES
Audio Language
Digital channels sometimes provide multiple audio tracks, often in a different language. You can set
a default audio language with the Audio Language menu.
1 Press [MENU] to display the on-screen menu.
2 Select the OPTION menu using […†] then press [ENTER] or [√] to move to the
second level.
3 Select the Audio Language option using […†].
4 Press [√] or [ENTER] to move to the third level.
5 Select the desired language using […†] then press
[ENTER] to confirm your selection.
6 Press [MENU] to return to the previous menu or press
[EXIT] on the Remote Control to return to TV viewing.
TIP
• If provided by the broadcaster, you can also select a different audio language while viewing TV by pressing
AUDIO repeatedly.
• If multiple audio tracks are available, the audio icon appears on the program information display or
Program guide. You can select one of the other languages with the AUDIO button.
CHANNEL
OPTION √
LOCK
Move
Prev.
Clock
Aspect Ratio
Language
Audio Language
Caption Select
DCC View
Sleep Mode
Output Channel
System Info
√
✔ English
Spanish
French
16
Page 18

Captions Select
O
PTIONMENUFEATURES
1 Press [MENU] to display the on-screen menu.
2 Select the OPTION menu using […†] then press
[ENTER] or [√] to move to the second level.
3 Select the Caption Select option using […†].
CHANNEL
OPTION √
LOCK
Move
Prev.
Clock
Aspect Ratio
Language
Audio Language
Caption Select
DCC View
Sleep Mode
Output Channel
System Info
ACC Off
DCC Off
DCC Service Service 1
√
4 Press [√] or [ENTER] to move to the third level.
5 Select the desired Caption using […†] then press [ENTER] to confirm your
selection.
6 Press [MENU] to return to the previous menu or press [EXIT] on the Remote
Control to return to TV viewing.
ACC (Analog Captions)
Allows you to select a mode for displaying Analog Caption Data. In the Analog Caption Service,
Caption 1-4 display program’s dialog, and Text 1-4 display data service information.
Notes
Analog Captions will appear if they are provided by the broadcaster.
Off
Analog Caption is not displayed.
Caption 1
Caption 1 is the primary caption service that synchronizes the captioning language with the
sound, used by most broadcasters. Captioning is displayed in the same language as the program’s
dialog.
Caption 2
Caption 2 is the special non-synchronous caption service that does not need to be in sync with
the sound and may provide simplified captioning, which is usually delayed.
Caption 3
Caption 3 serves as an alternate captioning service channel. Captioning is often a secondary
language translation such as French, Spanish, simplified English or displayed at a slower rate.
Caption 4
Caption 4 is another special non-synchronous caption service that does not need to be in sync
with the sound and may provide simplified captioning, usually delayed.
Text 1 - 4
Text 1-4 usually displays information on the lower portion of the screen and is used for a data
service, generally not program related.
Tip
If available, press [CAPTION] repeatedly to select a caption language while viewing TV.
Notes
If DTV and Analog Caption are received simultaneously, you can only select DTV Captions, analog captions
will not appear.
SETUP
17
Page 19

O
PTIONMENUFEATURES
DCC (DTV Captions)
Selects a default Caption language.
Off
DTV Caption is not displayed.
Custom
Set DTV Captions by user
Standard
Set DTV Captions by program
Notes
• DTV Caption (Standard EIA /CEA 708) will appear only if provided by the broadcaster.
• If DTV and Analog Captions are received simultaneously, you can only select DTV Caption.
Tip
• If available, you can also select a caption language while viewing TV, press CC repeatedly.
• If captions are available, the DTV caption icon appears on the program information display, Program Guide,
or Station Guide to indicate that you can select one of those caption options with the CC button. The
caption icon will not appear on the program information display or Program Guide for analog caption.
DCC Service (DTV Captions)
Selects a default Caption language
Sevice 1
Service1 language is selected for DTV captions
Sevice 2
Service2 language is selected for DTV captions
Sevice 3
Service3 language is selected for DTV captions
Sevice 4
Service4 language is selected for DTV captions
Sevice 5
Service5 language is selected for DTV captions
Sevice 6
Service6 language is selected for DTV captions
18
Page 20

DCC View
O
PTIONMENUFEATURES
1 Press [MENU] to display the on-screen menu.
2 Select the OPTION menu using […†] then press
[ENTER] or [√] to move to the second level.
3 Select the DCC View option using […†].
CHANNEL
OPTION √
LOCK
Move
Prev.
Clock
Aspect Ratio
Language
Audio Language
Caption Select
DCC View
Sleep Mode
Output Channel
System Info
Font Size Small
Font Type Font 0
Text Color White
Text Opacity Solid
BG Color White
√
BG Opacity Solid
Edge Color White
Edge Type None
4 Press [√] or [ENTER] to move to the third level.
5 Select the desired setup using […†] then press [ENTER] to confirm your
selection.
6 Press [MENU] to return to the previous menu or press [EXIT] on the Remote
Control to return to TV viewing.
DTV Caption Style
Selects DTV Captions appearance menu options.
Font Size
Selects the font size for captions.
Standard: The standard text size is used for the caption display (15 pixels).
Large: The large text size is used for the caption display (21 pixels).
Small: The small text size is used for the caption display (11 pixels).
Font Type
Selects the font type for captions.
Text Color
Selects the font color for captions.
Text Opacity
Selects the font opacity for captions.
Solid: The text is solid (without any transparency).
Flash: The text blinks twice a second.
Translucent: The text is translucent.
Transparent: The text is transparent (In this case, whatever the color is, the color does not affect
BG Color
Selects the background color for captions.
BG Opacity
Selects the background opacity for captions.
Solid: The text background color is solid (without any transparency).
Flash: The text background color blinks twice a second.
Translucent: The text background color is translucent.
Transparent: The text background color is transparent (In this case, whatever the background
Edge Color
Selects the edge color for captions (If the edge type is selected as None, the edge color does not
have any effect on the captions display).
the captions display).
color is, the color does not affect the captions.).
SETUP
19
Page 21

Edge Type
Selects the edge type for captions.
None: The text has no edge.
Uniform: The text has a uniform edge.
Raised: The text is raised.
Depressed: The text is depressed.
Left Shadow: The text has a left-shadow edge.
Right Shadow: The text has a right-shadow edge.
Sleep Mode
O
PTIONMENUFEATURES
Use this option to change the Converter Box’s sleep mode time.
The default is 4 hours.
1 Press [MENU] to display the on-screen menu.
2 Select the OPTION menu using […†] then press
[ENTER] or [√] to move to the second level.
CHANNEL
OPTION √
LOCK
Move
Prev.
Clock
Aspect Ratio
Language
Audio Language
Caption Select
DCC View
Sleep Mode
Output Channel
System Info
√
Off
1 hour
2 hours
✔ 4 hours
8 hours
3 Select the Sleep Mode option using […†].
4 Press [√] or [ENTER] to move to the third level.
5 Select the desired sleep mode using […†] then press [ENTER] to confirm your
selection.
6 Press [MENU] to return to the previous menu or press [EXIT] on the Remote Control
to return to TV viewing.
Notes
• If you have no input in selected time, the Converter Box will be turn off on selected time.
• If you have selected "Off", the Converter Box is not turn off automatically.
20
Page 22

Output Channel
O
PTIONMENUFEATURES
Use this option to change the Converter Box’s output channel.
The default is channel 4.
1 Press [MENU] to display the on-screen menu.
2 Select the OPTION menu using […†] then press
[ENTER] or [√] to move to the second level.
CHANNEL
OPTION √
LOCK
Move
Prev.
Clock
Aspect Ratio
Language
Audio Language
Caption Select
DCC View
Sleep Mode
Output Channel
System Info
✔ Ch. 4
√
Ch. 3
3 Select the Output Channel option using […†].
4 Press [√] or [ENTER] to move to the third level.
5 Select the desired output channel using […†] then press [ENTER] to confirm your
selection.
6 Press [MENU] to return to the previous menu or press [EXIT] on the Remote Control
to return to TV viewing.
System Information
You can see the firmware version.
CHANNEL
OPTION √
LOCK
Move
Prev.
Clock
Aspect Ratio
Language
Audio Language
Caption Select
DCC View
Sleep Mode
Output Channel
System Info
√
Version BN202NBACIW
SETUP
21
Page 23

LOCK MENU OPTIONS
Lock System
Allows you to set up specific channels and ratings through blocking schemes.
Also allows you to activate or disable all of the lock schemes previously set up.
A password is required to gain access to the LOCK menus. If the Lock System is
set to Off, the Channel and Program Ratings are not functional.
1 Press [MENU] to display the on-screen menu.
2 Select the LOCK menu using […†] then press [ENTER] or [√] to
move to the second level.
CHANNEL √
OPTION √
LOCK √
Move
Prev.
Lock System
Set Password
Block Channel
TV Rating-Children
TV Rating-General
Movie Rating
Downloadable RRT
Enter Password
* – – –
If you have not entered a password yet;
Key-in the “0000” password using the numbered buttons to
create a per-sonal 4-digit security password.
If you have already entered a password;
Key-in the 4-digit password using the numbered buttons to
confirm the personal 4-digit security password.
CHANNEL
OPTION
LOCK √
Move
Prev.
Lock System
Set Password
Block Channel
TV Rating-Children
TV Rating-General
Movie Rating
Downloadable RRT
✔ Off
√
On
3 Select the Lock System option using […†].
4 Press [√] or [ENTER] to move to the third level.
5 Select an option (On or Off) using […†] then press [ENTER] to confirm your
selection.
6 Press [MENU] to return to the previous menu or press [EXIT] on the Remote
Control to return to TV viewing.
Set Password
Changes the password.
CHANNEL
1 Follow steps 1-2 as shown above (Lock System).
2 Select the Set Password option using […†].
3 Press [√] or [ENTER] to move to the third level.
4 Enter the new 4-digit password.
5 Enter the same password again.
6 Press [MENU] to return to the previous menu or press [EXIT] on the Remote
Control to return to TV viewing.
OPTION
LOCK √
Move
Prev.
Lock System
Set Password
Block Channel
TV Rating-Children
TV Rating-General
Movie Rating
Downloadable RRT
√
New * * * *
Confirm * * * *
22
Page 24

Block Channel
L
OCKMENUOPTIONS
Blocks any channel that you do not want to view or that you do
not want your children to watch. If you tune in a blocked channel,
a black screen with a pop-up box will appear. Block Ch can
override Channel Edit menu settings (see page 20).
1 Press [MENU] to display the on-screen menu.
2 Select the LOCK menu using […†] then press [ENTER]
or [√] to move to the second level.
If you have not entered a password yet;
Key-in the “0000” password using the numbered buttons to
create a per-sonal 4-digit security password.
If you have already entered a password;
Key-in the 4-digit password using the numbered buttons to
confirm the personal 4-digit security password.
3 Select the Block Channel option using […†].
The channel list menu appears.
To lock or unlock a channel:
CHANNEL
OPTION
LOCK √
Move
Prev.
CHANNEL
OPTION
LOCK √
Move
Prev.
CHANNEL
OPTION
LOCK √
Move
Prev.
Lock System
Set Password
Block Channel
TV Rating-Children
TV Rating-General
Movie Rating
Downloadable RRT
Lock System
Set Password
Block Channel
TV Rating-Children
TV Rating-General
Movie Rating
Downloadable RRT
Lock System
Set Password
Block Channel
TV Rating-Children
TV Rating-General
Movie Rating
Downloadable RRT
Antenna Channels
2-1
√
4-1
5-1
Antenna Channels
2-1
4-1
5-1
ENTER Block/Unblock
Antenna Channels
2-1
4-1
5-1
ENTER Block/Unblock
Use (SELECT) to block or unblock the channel on the block
channel menu.
The mark will appear to the right of the station name to indicate the blocked channel.
4 Repeat step 2 to block or unblock additional channels on the channel list menu.
5 Press [MENU] to return to the previous menu or press [EXIT] on the Remote
Control to return to TV viewing.
SETUP
23
Page 25

L
OCKMENUOPTIONS
TV Rating-Children
Prevents children from watching certain children’s TV programs according to the ratings limit set.
This rating applies only to TV programs for children. Unless you block TV programs intended for
mature audiences in the TV Rating – General menu, your children could view those programs.
1 Press [MENU] to display the on-screen menu.
2 Select the LOCK menu using […†] then press [ENTER]
or [√] to move to the second level.
If you have not entered a password yet;
Key-in the “0000” password using the numbered buttons to
create a personal 4-digit security password.
If you have already entered a password;
Key-in the 4-digit password using the numbered buttons to confirm the personal 4-digit security
password.
3 Select the TV Rating-Children option using […†].
4 Press [√] or [ENTER] to move to the third level.
5 Select the Age or Fantasy Violence option using […†]
then press [ENTER] to confirm your selection.
:
Age
Selection applies regardless of content category of rating.
Fantasy Violence :
Selection applies if TV programs include rating for Fantasy
Violence.
6 Select a rating using […†] then press [ENTER] to confirm your
selection.
Blocking Off :
TV-Y :
This program is designed to be appropriate for all children.
Whether animated or live-action, the themes and elements in
this program are specifically designed for a very young
audience, including children from ages 2 - 6. This program is
not expected to frighten younger children.
TV-Y7 :
This program is designed for children age 7 and older. It may be more appropriate for children
who have acquired the developmental skills needed to distinguish between make-believe and
reality. Themes and elements in this program may include mild fantasy violence or comedic
violence, or may frighten children under the age of 7. Therefore, parents may wish to consider
the suitability of this pro-gram for their very young children.
Note: For those programs where fantasy violence may be more intense or more combative than
other programs in this category, such programs will be designated TV-Y7-FV.
All programs with a rating are blocked.
All Children.
Directed toward children age 7 and older.
CHANNEL
OPTION
LOCK √
Move
Prev.
CHANNEL
OPTION
LOCK √
Move
Prev.
CHANNEL
OPTION
LOCK √
Move
Prev.
Lock System
Set Password
Block Channel
TV Rating-Children
TV Rating-General
Movie Rating
Downloadable RRT
Lock System
Set Password
Block Channel
TV Rating-Children
TV Rating-General
Movie Rating
Downloadable RRT
Lock System
Set Password
Block Channel
TV Rating-Children
TV Rating-General
Movie Rating
Downloadable RRT
Age
√
Fantasy Violence
Age
Fantasy Violence
Age
Fantasy Violence
Permits all programs
TV-Y
TV-Y7
Blocking Off
Children 7 years and
older
TV-Y
TV-Y7
Blocking Off
All Children
TV-Y
TV-Y7
Blocking Off
Permits all programs
TV-Y7
Blocking Off
24
Page 26

L
OCKMENUOPTIONS
7 Press [MENU] to return to the previous menu or press [EXIT] on the Remote
Control to return to TV viewing.
TV Rating-General
Blocks TV programs that you or your family may not wish to
watch, based on the rating scheme set.
1 Press [MENU] to display the on-screen menu.
2 Select the LOCK menu using […†] then press [ENTER]
or [√] to move to the second level.
If you have not entered a password yet;
Key-in the “0000” password using the numbered buttons to
create a personal 4-digit security password.
If you have already entered a password;
Key-in the 4-digit password using the numbered buttons to
confirm the personal 4-digit security password.
CHANNEL
OPTION
LOCK √
Move
Prev.
CHANNEL
OPTION
LOCK √
Move
Prev.
Lock System
Set Password
Block Channel
TV Rating-Children
TV Rating-General
Movie Rating
Downloadable RRT
Lock System
Set Password
Block Channel
TV Rating-Children
TV Rating-General
Movie Rating
Downloadable RRT
√
3 Select the TV Rating-General option using […†].
4 Press [√] or [ENTER] to move to the third level.
5 Select the Age, Dialogue, Language, Sex, or Violence
option using […†] then press [ENTER] to confirm
your selection.
Age
:
Selection applies regardless of content category of rating.
CHANNEL
OPTION
LOCK √
Move
Prev.
Lock System
Set Password
Block Channel
TV Rating-Children
TV Rating-General
Movie Rating
Downloadable RRT
Dialogue :
CHANNEL
Selection applies if TV programs have rating for Dialogue.
Language :
Selection applies if TV programs have rating for Language.
Sex :
OPTION
LOCK √
Move
Prev.
Lock System
Set Password
Block Channel
TV Rating-Children
TV Rating-General
Movie Rating
Downloadable RRT
Selection applies if TV programs have rating for Sex.
Violence :
Selection applies if TV programs have rating for Violence.
6 Select a rating using […†] then press [ENTER] to confirm your selection.
Blocking Of
TV-G :
f :
All programs with a ratings are blocked.
General Audience.
Age
Dialogue
Language
Sex
Violence
Age
Dialogue
Language
Permits all programs
Sex
Violence
TV-G
TV-PG
TV-14
TV-MA
Blocking Off
Age
Dialogue
Language
Sex
Violence
Permits all programs
TV-PG
TV-14
Blocking Off
Age
Dialogue
Language
Sex
Violence
Permits all programs
TV-PG
TV-14
TV-MA
Blocking Off
SETUP
25
Page 27

L
OCKMENUOPTIONS
Most parents would find this program suitable for all ages.
Although this rating does not signify a program designed
specifically for children, most parents may let younger children
watch this program unattended. It contains little or no
violence, no strong language and little or no sexual dialogue or
situations.
TV-PG :
Parental Guidance Suggested.
This program contains material that parents may find unsuitable for younger
children. Many parents may want to watch it with their younger children. The
theme itself may call for parental guidance and/or the program contains one or
CHANNEL
OPTION
LOCK √
Move
Prev.
Lock System
Set Password
Block Channel
TV Rating-Children
TV Rating-General
Movie Rating
Downloadable RRT
Age
Dialogue
Language
Sex
Violence
Permits all programs
TV-PG
TV-14
TV-MA
Blocking Off
more of the following: moderate violence (V), some sexual
situations (S), infrequent coarse language (L), or some
suggestive dialogue (D).
TV-14 :
Parents Strongly Cautioned.
This program contains some material that many parents would
find unsuitable for children under 14 years of age. Parents are
strongly urged to exercise greater care in monitoring this
program and are cau-tioned against letting children under the
age of 14 watch unattended.
This program contains one or more of the following: intense violence (V), intense
CHANNEL
OPTION
LOCK √
Move
Prev.
Lock System
Set Password
Block Channel
TV Rating-Children
TV Rating-General
Movie Rating
Downloadable RRT
Age
Dialogue
Language
Sex
Violence
Permits all programs
TV-PG
TV-14
TV-MA
Blocking Off
sexual situations (S), strong coarse language (L), or intensely suggestive dialogue
(D).
TV-MA :
Mature Audience Only.
This program is specifically designed to be viewed by adults and there-fore may be unsuitable for
children under 17. This program contains one or more of the following: graphic violence (V),
explicit sexual activity (S), or crude indecent language (L).
7 Press [MENU] to return to the previous menu or press [EXIT] on the Remote
Control to return to TV viewing.
26
Page 28

Movie Rating
L
OCKMENUOPTIONS
Blocks movies according to the movie ratings restrictions so
children cannot view certain movies. You can set the ratings to
block out all the movies with ratings above a specified level. Keep
in mind that the movie ratings apply only to movies shown on TV,
not TV programs such as soap operas.
1 Press [MENU] to display the on-screen menu.
2 Select the LOCK menu using […†] then press [ENTER]
or [√] to move to the second level.
If you have not entered a password yet;
Key-in the “0000” password using the numbered buttons to
create a personal 4-digit security password.
If you have already entered a password;
CHANNEL
OPTION
LOCK √
Move
Prev.
CHANNEL
OPTION
LOCK √
Move
Prev.
Lock System
Set Password
Block Channel
TV Rating-Children
TV Rating-General
Movie Rating
Downloadable RRT
Lock System
Set Password
Block Channel
TV Rating-Children
TV Rating-General
Movie Rating
Downloadable RRT
General audiences
G
PG
PG-13
√
R
NC-17
X
Blocking Off
Restricted
G
PG
PG-13
R
NC-17
X
Blocking Off
Key-in the 4-digit password using the numbered buttons to confirm the personal 4-digit security
password.
3 Select the Movie Rating option using […†].
4 Press [√] or [ENTER] to move to the third level.
5 Select a rating using […†] then press [ENTER] to confirm your selection.
f :
Blocking Of
G : (
General Audiences) Content is not offensive to most viewers.
This is a film which contains nothing in theme, language, nudity and sex, violence, etc. which
would be offensive to parents whose younger children view the film. The G rating is not a
“certificate of approval,” nor does it signify a children’s film. Some snippets of language may go
beyond polite conversation but they are common everyday expressions. No stronger words are
present in G-rated films. The violence is at a minimum. Nudity and sex scenes are not present;
nor is there any drug use content.
PG :
Parental Guidance Suggested. Some Material May Not Be Suitable For Children
The PG rating, suggesting parental guidance, is an alert for examina-tion of a film by parents
before deciding on its viewing by their children. This is a film which clearly needs to be
examined or inquired into by parents before they let their children see it. The label PG plainly
states that parents may consider some material unsuitable for their children, but the parent must
make the decision. Parents are warned against allowing their children to see PG-rated movies.
The theme of a PG-rated film may itself call for parental guidance. There may be some profanity
in these films. There may be some violence or brief nudity. But these elements are not deemed so
intense as to require that parents be strongly cautioned beyond the suggestion of parental guidance. There is no drug use content in a PG-rated film.
PG-13 :
PG-13 is a sterner warning to parents to determine for themselves the attendance in particular of
their younger children as they might consider some material not suited for them. Parents, by the
rating, are alerted to be very careful about viewing by their underteenage children. A PG-13 film
is one which leaps beyond the boundaries of the PG rating in theme, violence, nudity, sensuality,
language, or other contents, but does not quite fit within the restricted R category. Any drug use
All programs with a rating are blocked.
PG-13 Parents Strongly Cautioned. Some Material May Be Inappropriate For Children
Under 13
SETUP
27
Page 29

L
OCKMENUOPTIONS
content will initially require at least a PG-13 rating. In effect, the PG-13 cautions parents with
more stringency than usual to give special attention to this film before they allow their 12-year
olds and younger to see it. PG-13 places larger responsibilities on parents for their children’s
movie viewing. The rating system is not a surrogate parent, nor should it be. It cannot, and should
not, insert itself in family decisions that only parents can, and should, make. Its purpose is to give
prescreening advance informational warnings, so that parents can form their own judgments. PG13 is designed to make these parental decisions easier for films between PG and R.
R :
(Restricted viewing) Not for children under age 17. Strong elements of sex and/or violence.
Requires Accompanying Parent Or Adult Guardian. The film definitely contains some adult
material. Parents are strongly urged to find out more about the film before they allow their
children to see it. An R-rated film may include hard language, or tough violence, or nudity within
sensual scenes, or drug abuse or other elements, or a combination of some of the above, so that
parents are counseled, in advance, to take this advisory rating very seriously. Parents must find
out more about an R-rated movie before they allow their teenagers to view it.
NC-17 :
This rating declares that this is a film that most parents will consider patently too adult for their
youngsters under 17. No children should see the film. NC-17 does not necessarily mean
“obscene or pornographic” in the oft-accepted or legal meaning of those words. The reasons for
the application of an NC-17 rating can be violence or sex or aberrational behavior or drug abuse
or any other elements which, when present, most parents would consider too strong and
therefore off-limits for viewing by their children.
X :
(Restricted Viewing) Not for children under age 17 under any circumstances. Strong
sexual content.
(Hard Core Films) Same as NC-17 rating.
6 Press [MENU] to return to the previous menu or press [EXIT] on the Remote
Control to return to TV viewing.
28
Page 30

Downloadable RRT
L
OCKMENUOPTIONS
You can block TV program with downloadable region rating table.
1 Press [MENU] to display the on-screen menu.
2 Select the LOCK menu using […†] then press [ENTER]
or [√] to move to the second level.
If you have not entered a password yet;
Key-in the “0000” password using the numbered buttons to
create a personal 4-digit security password.
If you have already entered a password;
Key-in the 4-digit password using the numbered buttons to
confirm the personal 4-digit security password.
3 Select the Downloadable RRT option using […†].
4 Press [√] or [ENTER] to move to the third level.
5 Select the Rating Value option using […†] then press
[ENTER] to confirm your selection.
CHANNEL
OPTION
LOCK √
Move
Prev.
CHANNEL
OPTION
LOCK √
Move
Prev.
CHANNEL
OPTION
LOCK √
Move
Prev.
Lock System
Set Password
Block Channel
TV Rating-Children
TV Rating-General
Movie Rating
Downloadable RRT
Lock System
Set Password
Block Channel
TV Rating-Children
TV Rating-General
Movie Rating
Downloadable RRT
Lock System
Set Password
Block Channel
TV Rating-Children
TV Rating-General
Movie Rating
Downloadable RRT
Region Rating Table
√
Clear Rating Table
Region Rating Table
Dim0
DIm1
Dim2
Dim3
√
Clear Rating Table
Categorical Rating
DOL0
DOL1
DOL2
DOL3
DOL4
DOL5
DOL6
DOL7
DOL8
ENTER Add/Delete
DOL9
DOLA
DOLB
DOLC
DOLD
DOLE
Block Off All
SETUP
29
Page 31

INFORMATION DISPLAYS
Channel Banner Display
The Channel Banner appears whenever you tune to a new channel or press the [ENTER] button on
the Remote Control while viewing a program.
DWE 1004
CH BLOCKED
1 Press [ENTER] while watching a program.
The Channel Banner appears on the TV screen (Channel number, audio, station name, and
current time).
• The Channel Banner can be seen displayed on the TV screen for a moment.
a. Channel Number
Displays the current channel number.
b. Station Name
Displays the station name of the current channel.
c. Block Information
Displays the block information such as No Signal, Rating Blocked, Channel Blocked, Audio Only
or Scrambled.
d. Time
Displays the current time.
2 Press [ENTER] again while the Channel Banner is displayed.
The Channel Banner disappears from the TV screen.
Notes
• Station name and clock are displayed only if they are provided by broad-caster.
• If the channel is scrambled, you may not be able to see the program.
a
b
c
d
30
Page 32

I
NFORMATIONDISPLAYS
Program Information Display
The Program Information Display appears if you press the [INFO] button on the Remote Control
while viewing a program.
c d
a
b
g
h
i
DWE 3803
1 Press [INFO] while watching a program.
Program Information appears on the TV screen.
a. Program Title
Indicates title of current program.
b. Date
Displays the current date.
c. Start Time and End Time
Displays the start time and end time for the current program.
d. Time
Shows current time.
e. Channel Number
Displays the current channel number.
f. Station Name
Displays the station name of the current channel.
g. Multiple Audio Icon
Channels sometimes provide multiple audio tracks, often in a different language. When multiple
audio tracks are available, the Multiple Audio Icon is displayed that you can select one of those
other audio tracks with the AUDIO button.
h. DTV Caption Icon
Indicates that the current program contains Digital Closed Caption Data Service.
i. Wide Icon
Indicates that the current program is shown in wide picture format.
2 Press [INFO] or [EXIT] while the Program Information is displayed.
The Program Information disappears from the TV screen.
Notes
Station name and clock are displayed only if they are provided by the broad-caster.
e
f
BASIC OPERATION
31
Page 33

PROGRAM AND STATION GUIDE
The Program and Station Guide contains schedule and program information for all channels. They
also provide local over-the-air channels information including conventional digital channels. Use the
Program and Station Guide to find programs easily and conveniently and to view schedule and
descriptive program information for the channels.
To Display the Program or Station Guide
Press the [EPG] button on your Remote Control.
To Exit the Program or Station Guide
Press the [EXIT] button to return to the last channel you tuned to.
To Navigate through programs on the Guides
The Program and Station Guide are operated based on a simple straightforward “Highlight and
Select” process.
[œ √]
1. Use
2. Press [ENTER] to select or execute the highlighted menu or function.
on your Remote Control to navigate the guide screen.
32
Page 34

NORMAL OPERATION
Channel Selection
You can select channels as described below.
Number and – (dash) buttons (on the Remote Control)
Use Number (0-9) and – (dash) buttons to select a channel directly.
[CH +/–] buttons (on the Remote Control) or […†] (on the front panel)
Use [CH +/–] on the Remote Control or
through the channels in memory.
Volume Adjustment
Adjusts the sound level for analog audio out on the HDTV Receiver. You must set Audio Variable to
On in the OPTION menu to use the Volume Adjustment.
[VOL +/–] buttons (on the Remote Control) or [œ √] (on the front panel)
Use [VOL +/–] on the Remote Control or
analog audio out on the Converter Box.
MUTE (on the Remote Control)
Press [MUTE] to turn off the volume for audio out on the Converter Box.
Notes
Before setting Audio Variable to Off, make sure that you have turned down the TV’s volume to the
minimum. Otherwise, sudden high volume sound may cause hearing or speaker damage.
[…†]
on the front panel to cycle the Converter Box
[œ √]
on the front panel to adjust the sound level for
33
BASIC OPERATION
Page 35

SPECIFICATION
Television System Fully ATSC Compliant
Channel Coverage Terrestrial : 2 ~ 69
ATSC RF input RF IN (1)
RF Output 3 / 4 Channel
Video Output 480i Composite
Audio Output Analog Audio (L/ R)
3
Dimension (DAC-100) 180 x 150 x 30 (mm
Weight (DAC-100) ~290 g
Power Requirements AC 120V, 60Hz
Power Consumption In standby : 1.6W
Operating : 8W
Accessories RF Cable, Remote Control, Batteries
)
34
Page 36

LIMITED WARRANTY
This limited warranty begins on the original date of purchase, and is valid only on products purchased and
used in the United States.Your DAEWOO product will be repaired or replaced, at DAEWOO's option, if it
proves to be defective in material or workmanship under normal use, during the warranty period set forth
below. This limited warranty is good only to the original purchaser of the product and effective only when
used in the United States, including Hawaii, and U.S. Territories.
WARRANTY PERIOD :
LABOR : 90 days
PART : 90 days
Replacement Units and Repair Parts may be new or factory remanufactured.
Replacement Units and Repair Parts are warranted for the remaining portion of the original unit's warranty
period.
HOW SERVICE IS HANDLED :
The original dated bill of sale must be presented upon request as proof of purchase to DAEWOO or
DAEWOO authorized service center. Shipping costs of the product to and from the service center or
DAEWOO factory Service is the responsibility of the purchaser.
THIS WARRANTY IS IN LIEU OF ANY OTHER WARRANTY, EXPRESS OR IMPLIED, INCLUDING WITHOUT
LIMITATION, ANY WARRANTY OF MERCHANTABILITY OR FITNESS FOR A PARRICULAR PURPOSE.
TO THE EXTENT ANY IMPLIED WARRANTY IS REQUIRED BY LAW, IT IS LIMITED IN DURATION TO THE
EXPRESS WARRANTY PERIOD ABOVE.
NEITHER THE MANUFACTURER NOR ITS U.S DISTRIBUTOR SHALL BE LIABLE FOR ANY INCIDENTAL
CONSEQUENTIAL, INDIRECT, SPECIAL, OR PUNITIVE DAMAGES OF ANY NATURE.
INCLUDING WITHOUT LIMITATION, LOST REVENUES OR PRO PROFITS, OR ANY OTHER DAMAGE
WHETHER BASED IN CONTRACT, TORT, OR OTHERWISE.
Some states do not allow the exclusion or limitation of incidental or consequential damages or limitations
on how an implied warranty lasts, so the above exclusion or limitation may not apply to you. This warranty
gives you specific legal rights and you may also have other rights that vary from state to state.
THIS LIMITED WARRANTY DOES NOT APPLY TO :
Service trips to your home to deliver, pick up, and/or install the product, instruct, or replace or correct
wiring, or correction of unauthorized repairs.
Damages or operating problem that result from misuse, abuse, operation outside environmental
specifications or contrary to the requirements of precautions in the Operating Guide, accident, vermin, fire,
flood, improper installation, acts of God, unauthorized modification or alteration, incorrect electrical
current or voltage, or commercial use, or use for other than intended purpose.
The cost of repair or replacement under these excluded circumstances shall be borne by the consumer.
CUSTOMER INTERACTIVE CALL CENTER NUMBER
To obtain Customer Assistance, or Authorized Service Center location:
Call 1-877-393-7823(1-877-DWESVC3)
website : http://www.e-daewoo.com
TO CONTACT DAEWOO ELECTRONICS BY MAIL:
DAEWOO Customer Service
300-3E State Route 17 South Lodi,NJ 07644
from the Date of Purchase.
from the Date of Purchase.
and select the appropriate option from the menu.
Model : DAC-100/DAC-200/DAC-300
Or visit our
The CSA US mark indicates that a product meets applicable U.S.standards, including those from
ANSI, ASME, ASSE, ASTM, NSF, CSA America and UL.
Daewoo Electronics America Inc.
 Loading...