

Page 1
Installation Instructions/User Manual
Heritage Integrated Hood Liner
RNIHL30, RNIHL36, RNIHL48
Part No. 113922 Rev. A
Page 2

Table of Contents
Important Safety Instructions .......................................... 1
Important Information About Safety Instructions .............. 1
General Safety Precautions ............................................. 1
Preparation and Setup ...................................................... 2
Planning the Installation ................................................... 2
Product Specifications ...................................................... 3
Installation Instructions .................................................... 4
Installing the RNIHL (Hood Liner) .................................... 4
Installing the RNIVS (Ventilation System) ........................ 5
Verifying the Setup ........................................................... 5
Before You Begin...
Important:
• Installer: For safety and to minimize problems, read this manual thoroughly before starting the
installation. Leave this manual with the owner.
For owner reference, write below the unit’s model and serial numbers, which are on the data plate.
• User: Keep this manual for personal and professional reference.
Care and Cleaning ............................................................. 6
Maintaining the Liner ........................................................ 6
Cleaning the Liner ............................................................ 6
Warranty ............................................................................. 7
Warranty Card .................................................. Back Cover
If you have installation issues, contact Dacor Customer Assurance. When you call, have available the
unit’s model and serial numbers, which are on the unit’s data label.
Dacor Customer Assurance
Phone: 833-35-ELITE (833-353-5483) USA, Canada
Mon – Fri 5:00 a.m. to 5:00 p.m. Pacific Time
Website: www.dacor.com/customer-care/contact-us
All specifications are subject to change without notice. Dacor assumes no liability for changes to specifications.
© 2018 Dacor®, all rights reserved.
Page 3
Important Safety Instructions
Important Information About
Safety Instructions
• The Important Safety Instructions and warnings in
these instructions are not meant to cover all possible
problems and conditions that can occur. Use common
sense and caution when installing, maintaining, or
operating this or any other appliance.
• Always contact Dacor Customer Assurance about
issues you cannot resolve.
Safety Symbols and Labels
These alerts are meant to bring attention to important areas
in the manual. Whenever you see these symbols or labels,
read the message carefully before continuing.
DANGER
Immediate hazards that WILL result in severe personal
injury or death.
WARNING
Hazards or unsafe practices that COULD result in severe
personal injury or death.
CAUTION
Hazards or unsafe practices that COULD result in minor
personal injury or property damage.
General Safety Precautions
TO REDUCE THE RISK OF FIRE, ELECTRIC SHOCK, OR
INJURY TO PERSONS, OBSERVE THE FOLLOWING:
1. Use this unit only in the manner intended by the
manufacturer. If you have questions, contact the
manufacturer.
2. Before servicing or cleaning unit, switch power OFF at
service panel and lock the service disconnecting means
to prevent power from being switched on accidentally.
When the service disconnecting means cannot be locked,
securely fasten a prominent warning device, such as a
tag, to the service panel. Exception: The additional safety
instructions do not apply to a ceiling-suspended fan.
TO REDUCE THE RISK OF A RANGE TOP GREASE FIRE:
1. Never leave surface units unattended at high settings.
Boilovers cause smoking and cause greasy spillovers
that could ignite. Heat oils slowly on low or medium
settings.
2. Always turn hood ON when cooking at high heat or when
cooking flaming foods.
3. Clean ventilating fans frequently. Grease should not be
allowed to accumulate on fan or filter.
4. Use proper pan size. Always use cookware appropriate
for the size of the heating element.
TO REDUCE THE RISK OF INJURY TO PERSONS IN THE
EVENT OF A RANGE TOP GREASE FIRE, OBSERVE THE
FOLLOWING*:
1. SMOTHER FLAMES with a close-fitting lid, cookie
sheet, or metal tray, then turn the burner OFF. BE
CAREFUL TO PREVENT BURNS. If the flames do not
go out immediately, EVACUATE AND CALL THE FIRE
DEPARTMENT.
2. NEVER PICK UP A FLAMING PAN - You may be burned.
3. DO NOT USE WATER, including wet dishcloths or towels
- a violent steam explosion will result.
4. Use an extinguisher ONLY if:
a) You know you have a Class ABC extinguisher, and you
already know how to operate it.
b) The fire is small and contained in the area where it
started.
c) The fire department is being called.
d) You can fight the fire with your back to an exit.
*From “Kitchen Fire Safety Tips” published by NFPA.
1
Page 4
Preparation and Setup
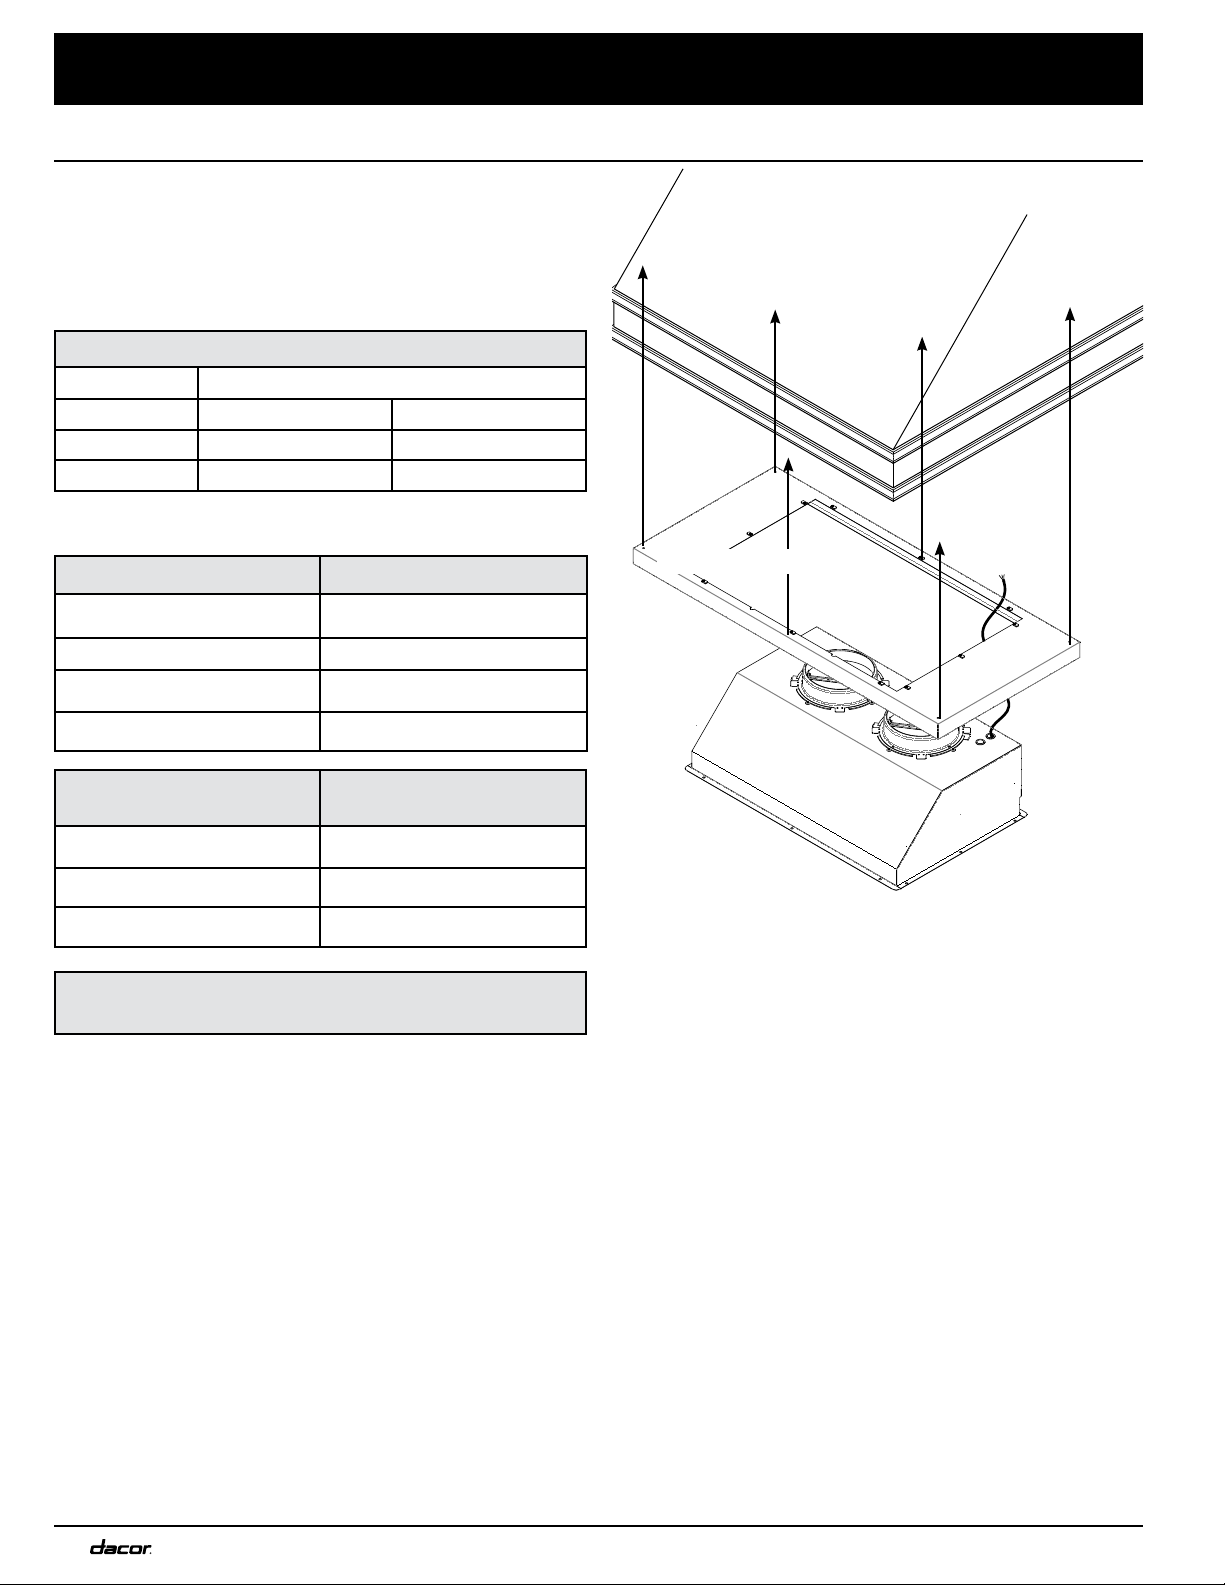
Planning the Installation
The Heritage Integrated Hood Liner (RNIHL) is made from
of non-combustible stainless steel. Its dimensions and
design make it an excellent component for any custom
hood.
These liners fit the Heritage Integrated Ventilation Systems
(RNIVS) shown in this table:
Compatibility
Liner Model Model
RNIHL30 RNIVS1 RNIVSR1
RNIHL36 RNIVS1 RNIVSR1
RNIHL48 RNIVS2 RNIVSR2
See the RNIVS Installation Instructions manual for details
and specifications.
Model Weight
hood canopy
RNIHL2 Hood Liner
RNIVS1 28 lb.
(12.70 kg)
RNIVS2 44 lb. (20 kg)
RNIVSR1 23.35 lb. (10.60 kg)
RNIVSR2 37.4 lb. (17 kg)
Model Weight
RNIHL30
RNIHL36
RNIHL48
For general cooking ventilating use only. Do not use to
exhaust hazardous or explosive materials and vapors.
• Follow the complete RNIVS Installation Instructions
manual to correctly install your custom hood ventilation
system.
• Follow all electrical requirements specified in the
RNIVS Installation Instructions.
• The RNIHL Series Hood Liner has no electrical parts.
• Plan the installation so that all minimum clearances are
met or exceeded.
• The RNIVS is attached using the lock washers and
bolts provided with the RNIHL liner. Quantity varies
according to the RNIHL liner model.
• The RNIHL liner is designed for vertical exhaust duct
(VED) configurations only.
5 lb. (2.3 kg)
5.5 lb. (2.5 kg)
7 lb. (3.18 kg)
RNIVS2
Planning a Hood-Liner Installation
2
Page 5

Preparation and Setup
Product Specifications
Tolerance: ±1/16” (±0.32 cm)
Heritage Integrated
Hood Liner (Model RNIHL)
Depth
RNIHL
Hood Liner
RNIHL30
RNIHL36
RNIHL48
Width Height Depth Weight
27 in
68.58 cm
33 in
83.82 cm
45 in
114.3 cm
2 in
5.08 cm
2 in
5.08 cm
2 in
5.08 cm
21 in
53.34 cm
21 in
53.34 cm
21 in
53.34 cm
Width
Height
5 lb.
2.3 kg
5.5 lb.
2.5 kg
7 lb
3.18 kg
Installed with a Heritage
Integrated Ventilation System
RNIHL Hood Liner
+ RNIVS Int. Vent
System
RNIHL30 +
RNIVS1 & RNIVSR1
RNIHL36 +
RNIVS1 & RNIVSR1
RNIHL48 +
RNIVS2 & RNIVSR2
Width
27 in
68.58 cm
33 in
83.82 cm
45 in
114.3 cm
(Model RNIVS)
Height:
RNIVS +
RNIHL
10 3/4 in
27.31 cm
10 3/4 in
27.31 cm
10 3/4 in
27.31 cm
Height:
Duct
Collar
1 7/8 in
4.76 cm
1 7/8 in
4.76 cm
1 7/8 in
4.76 cm
Width
Depth
21 in
53.34 cm
21 in
53.34 cm
21 in
53.34 cm
Duct Collar
Height
RNIVS
RNIHL
Depth
3
Page 6

Installation Instructions
Installing the RNIHL (Hood Liner)
The hood canopy must already be mounted and ready
for the ventilation system to be installed. But before the
ventilation system is installed, the hood liner is fitted
inside.
Refer to the following images when installing the hood
liner.
To Install the RNIHL Hood Liner:
1. Position the RNIHL with the half-circle cutouts
pointing forward.
2. Mount the RNIHL with mounting screws (not
provided) at the corners of the liner. See #2 in the
image at right.
Make sure the RNIHL is securely fastened to the
hood canopy. The RNIHL will hold the weight of the
RNIVS.
lock washer
#2
cutouts
hood canopy
#2
cutouts
#2
RNIHL
hood liner
#2
bolt
Mounting Hardware
RNIVS
Installing the RNIHL Hood Liner Inside a
Hood Canopy
4
Page 7

Installation Instructions
Installing the RNIVS (Ventilation
System)
The hood liner must be secured inside the hood canopy
and ready for the ventilation system to be attached.
Refer to the image below while installing the ventilation
system.
To Install the RNIVS:
1. Feed the electrical wires through the hood liner
opening (see the previous graphic).
2. Push the RNIVS through opening of the RNIHL until it
stops.
3. Attach the RNIVS to the RNIHL using all the lock
washers and bolts (see images at right). This hardware
is provided.
4. The installed RNIVS will sit atop the RNIHL. The
assembled parts will look like the image on the right.
Make sure the RNIHL is securely fastened to the hood
canopy. The RNIHL will hold the weight of the RNIVS.
Verifying the Correct Setup
See the RNIVS Installation Instructions, and follow the
steps in Verifying the Correct Setup.
NOTE: If the blower or lights do not function correctly,
follow these troubleshooting steps:
1. Verify that power is being supplied to the RNIVS.
2. Verify the electrical connections are wired correctly.
3. If the unit still does not work, contact Dacor Customer
Assurance:
Do not attempt to repair the unit yourself. Have the
model and serial numbers available when you call.
Dacor is not financially responsible for correcting
issues due to faulty installation.
833-353-5483.
RNIHL RNIVS
lock washers
RNIVS Installed on an RNIHL
bolts
Correct Placement & Setup
5
Page 8

Care & Cleaning
Maintaining the Hood Liner
The RNIHL is a sheet of formed stainless steel. There are
no moving or replaceable parts.
No maintenance is required.
Cleaning the Hood Liner
Clean the RNIHL as you would any other stainless-steel
surface.
WARNING
• Before cleaning, turn off power to the RNIVS.
• Wait until the hood and cooking unit are safe to touch before cleaning.
CAUTION
• Always wipe stainless-steel with the grain.
• Do not use abrasive cleaners/scrubbers on stainless steel or glass.
• To avoid damaging the fans, do not reinstall damaged filters.
• Adapt the cleaning cycle to the type/volume of cooking.
• Remove soil as soon after use as possible.
Cleaning Stainless-Steel Surfaces
• Clean the RNIHL with a mild solution of dish soap and
warm water, always wiping with the grain. (For best
results, use Dacor stainless-steel cleaner; contact Dacor
Customer Assurance to order the cleaner; see inside
front cover for contact information).
• Do not clean with abrasive cleaners or abrasive cloths.
• Rinse and dry with a micro-fiber or other soft, lint-free
cloth.
6
Page 9
Warranty
Review this section to learn the warranty and non-warranty terms and conditions concerning this product. For details/
clarifications, contact Dacor.
What Is Covered—Certificate of Warranties: Dacor Range Hoods
Within the 50 States of the USA, District of Columbia, and Canada*
The warranty applies only to the Dacor appliance sold to the first-use purchaser, starting from the date of original
retail purchase or closing date for new construction, whichever period is longer. The warranty is valid on products
purchased brand new from a Dacor Authorized Dealer or other Dacor authorized seller.
Full 1-Year
Warranty
Coverage
Limitations
Outside the 50 States of the USA, District of Columbia, and Canada*
Limited
1st-Year
Warranty
*The warranty is null and void if a non-UL-approved product is transported from the US; **(Free On Board at the Factory) Title (responsibility for the product) passes to the buyer
when the goods leave Dacor’s loading dock. Dacor pays the freight charges, but the buyer is responsible for claims against the product and for promptly notifying Dacor of product
shortages/damage/shipping errors. (For details/clarification on the subject of FOB Factory, contact Dacor Customer Service at the toll-free number provided.)
If your Dacor product fails to function within one year of the original date of purchase due to a defect in material or
workmanship, Dacor will remedy it without charging you.
All cosmetic damage (e.g., scratches on stainless steel, paint/porcelain blemishes, etc.) to the product or included
accessories must be reported to Dacor within 60 days of the original purchase date to qualify for warranty
coverage.
Service will be provided by a Dacor-designated service company during regular business hours. (Service providers
are independent entities and are not agents of Dacor.)
These types of products carry a one-year parts warranty only:
• Dealer-display and model-home-display products with a production date greater than 5 years
• Products sold “As Is”
• Products installed for non-residential use (e.g., religious organizations, fire stations, bed and breakfast, spas,
etc).
All delivery, installation, labor costs, and other service fees are the purchaser’s responsibility.
The warranty is null and void if the product’s serial numbers and/or tags are altered/defaced/missing.
The owner must provide proof of purchase or a closing statement for new construction upon request.
All Dacor products must be accessible for service.
If your Dacor product fails to function within one year of the original date of purchase due to a defect in material or
workmanship, Dacor will furnish a new part, FOB Factory**, to replace the defective part.
All delivery, installation, labor costs, and other service fees are the buyer’s responsibility.
What Is Not Covered
• Slight color variations (due to differences in painted parts, kitchen lighting, product placement, etc)
• Service calls (to teach the user proper use and care of the product)
• Travel fees to islands/remote areas (ferries, toll roads, etc)
• Consequential/incidental damage (food/medicine loss, time away from work, restaurant meals, etc)
• Product failure (when product is used for commercial, business, rental, or any application other than residential use)
• Product failure (caused by improper product installation)
• Replacement of house fuses, fuse boxes, or resetting of circuit breakers)
• Product damage (caused by accident, fire, flood, power interruption, power surges, or other “acts of God”)
• Liability or responsibility for damage to surrounding property (cabinetry, floors, ceilings, and other structures/objects)
• Breakage, discoloration, or damage to glass, metal surfaces, plastic parts, trim, paint, or other cosmetic finish from improper use/abuse/care/neglect
• Consumable parts (e.g., filters, light bulbs).
Out of Warranty
Contact us if you experience a service issue beyond the standard warranty period. Dacor reviews each issue and customer concern to provide the best possible
solution under the circumstances.
THE REMEDIES PROVIDED IN THE ABOVE EXPRESS WARRANTIES ARE THE SOLE AND EXCLUSIVE REMEDIES; THEREFORE, NO OTHER EXPRESS
WARRANTIES ARE MADE, AND OUTSIDE THE FIFTY STATES OF THE UNITED STATES, THE DISTRICT OF COLUMBIA AND CANADA, ALL IMPLIED
WARRANTIES, INCLUDING BUT NOT LIMITED TO, ANY IMPLIED WARRANTY OF MERCHANTABILITY OR FITNESS FOR A PARTICULAR USE OR
PURPOSE, ARE LIMITED IN DURATION TO ONE YEAR FROM THE DATE OF ORIGINAL PURCHASE. IN NO EVENT SHALL DACOR BE LIABLE FOR
INCIDENTAL EXPENSE OR CONSEQUENTIAL DAMAGES. IN THE EVENT DACOR PREVAILS IN ANY LAWSUIT, DACOR SHALL BE ENTITLED TO
REIMBURSEMENT OF ALL COSTS AND EXPENSES, INCLUDING ATTORNEY’S FEES, FROM THE DACOR CUSTOMER. NO WARRANTIES, EXPRESS OR
IMPLIED, ARE MADE TO ANY BUYER FOR RESALE.
Some states do not limit the length of an implied warranty, or do not exclude/limit inconsequential damages; therefore, the above exclusions/limitations may not
apply to you. This warranty gives you specific legal rights. You may also have other/additional rights depending on the state in which you reside.
7
Page 10

Page 11

fold here
BUSINESS REPLY MAIL
FIRST-CLASS MAIL CITY OF INDUSTRY CAPERMIT NO 1600
POSTAGE WILL BE PAID BY ADDRESSEE
DACOR
ATTN WARRANTY PROCESSING DEPT
PO BOX 90070
NO POSTAGE
NECESSARY
IF MAILED
IN THE
UNITED STATES
CITY OF INDUSTRY CA 91715-9907
Page 12

First Middle
Please visit www.dacor.com to activate your warranty online.
WARRANTY INFORMATION
IMPORTANT:
Your warranty will not be activated until you activate it online or return this form to Dacor. If you have purchased more
than one Dacor product, please return all forms in one envelope or activate the warranty for each product online.
Please rest assured that under no conditions will Dacor sell your name or any of the information on this form for mailing list purposes. We
are very grateful that you have chosen Dacor products for your home and do not consider the sale of such information to be a proper way
of expressing our gratitude!
Owner’s Name:
(Please Print or Type)
Street:
Last
City: State: Zip:
Purchase Date: Email: Telephone:
Dealer:
City: State: Zip:
Your willingness to take a few seconds to fill in the section below will be sincerely appreciated. Thank you.
1. How were you first exposed to Dacor products? (Please check one only.)
A. T.V. Cooking Show F Builder
B. Magazine G. Architect/Designer
C. Appliance Dealer Showroom H. Another Dacor Owner
D. Kitchen Dealer Showroom I. Model Home
E. Home Show J. Other
2. Where did you buy your Dacor appliances?
A. Appliance Dealer D. Builder
B. Kitchen Dealer E. Other
C. Builder Supplier
3. For what purpose was the product purchased?
A. Replacement only C. New Home
B. Part of a Remodel D. Other
cut here cut here
4. What is your household income?
A. Under $75,000 D. $150,000 – $200,000
B. $75,000 – $100,000 E. $200,000 – $250,000
C. $100,000 – $150,000 F. Over $250,000
5. What other brands of appliances do you have in your kitchen?
A. Cooktop C. Dishwasher
B. Oven D. Refrigerator
6. Would you buy or recommend another Dacor product?
Yes No
Comments:
Thank you very much for your assistance. The information you have
provided will be extremely valuable in helping us plan for the future
and giving you the support you deserve.
Web site: www.dacor.com
Corporate phone: (800) 793-0093
 Loading...