

Page 1

Installation Instructions
Millennia™ Cooktops
SAVE AND READ THESE INSTRUCTIONS
TESTED IN ACCORDANCE WITH THE LATEST EDITION OF ANSI Z21.1 STANDARD FOR HOUSEHOLD GAS
COOKING APPLIANCES.
CONVENTIONS USED IN THESE INSTRUCTIONS
WARNINGS:
Must be followed carefully to avoid personal injury or damage.
NOTES:
Contain helpful hints and tips to facilitate the installation.
IMPORTANT
1. Before beginning installation, please thoroughly read and become familiar with these instructions.
2. Installation and service must be completed by a qualified installer or service agency.
3. Installer: Please leave these Installation Instructions with the owner.
4. Owner: Please keep these instructions for local electrical inspector’s use and for future reference.
5. Read the accompanying Use & Care Manual prior to operating this appliance.
TABLE OF CONTENTS
STEP 1 Verifying the package contents Page 2
STEP 2 Power disconnection Page 2
STEP 3 Electrical power supply requirements Page 2
STEP 4 Countertop preparation Page 2
STEP 5 Below countertop preparation Page 3
STEP 6 Installing the cooktop Page 3
STEP 7 Electrical connection Page 3
STEP 8 Verifying cooktop operation Page 3
Part No. 65170 Rev. D
Page 2

IMPORTANT SAFETY INSTRUCTIONS
WARNINGS:
To reduce the risk of burns,
electric shock, fire or injury to
persons:
1. Read all instructions before
using the appliance.
2. This appliance must be
grounded. Connect only to a
properly grounded outlet.
3. Install or locate this appliance
only in accordance with these
installation instructions.
4. Use this appliance only for
its intended use as described
in this manual. Do not use
corrosive chemicals or vapors
in this appliance. This type
of cooktop is specifically
designed to heat and cook
food and liquids, it is not
designed for industrial or
laboratory use.
5. As with any appliance, close
supervision is necessary
when used by children.
6. Do not operate this appliance
if it has a damaged electrical
conduit or wires, if it is not
working properly or if it has
been damaged or dropped.
11. Some products, such as
closed glass jars may explode
and should not be heated on
this cooktop.
12. If the information in this
manual is not followed exactly,
a fire or explosion may result
causing property damage,
personal injury, or death.
13. Do not store or use gasoline
or other flammable vapors and
liquids in the vicinity of this or
any other appliance.
14. Installation and service must
be performed by a qualified
installer, service agency, or
the electric company.
15. Improper installation,
adjustment, alteration, or
maintenance can cause
personal injury or property
damage. Refer to these
instructions and the
accompanying Use and Care
Manual. For assistance or
additional information, consult
a qualified installer, service
agency, dealer, or the electric
company.
16. Do not obstruct the flow of air
to the unit.
8. This appliance should be
serviced only by qualified
service personnel. Contact the
nearest DACOR Authorized
Servicer at (800) 772-7778,
or at www.dacor.com for
examination, repair or
adjustment.
9. Do not cover or block any
openings on the appliance.
10. Do not store or use this
appliance outdoors. Do not
use this product near water
– for example, near a kitchen
sink, in a wet basement or
near a swimming pool, etc.
1
17. Keep the appliance area clear
and free from combustible
material.
18. Do not attempt to use this
appliance in the event of a
power failure.
19. This appliance is designed as
a cooking appliance. Never
use it for warming or heating a
room.
Page 3
Verifying the Package Contents
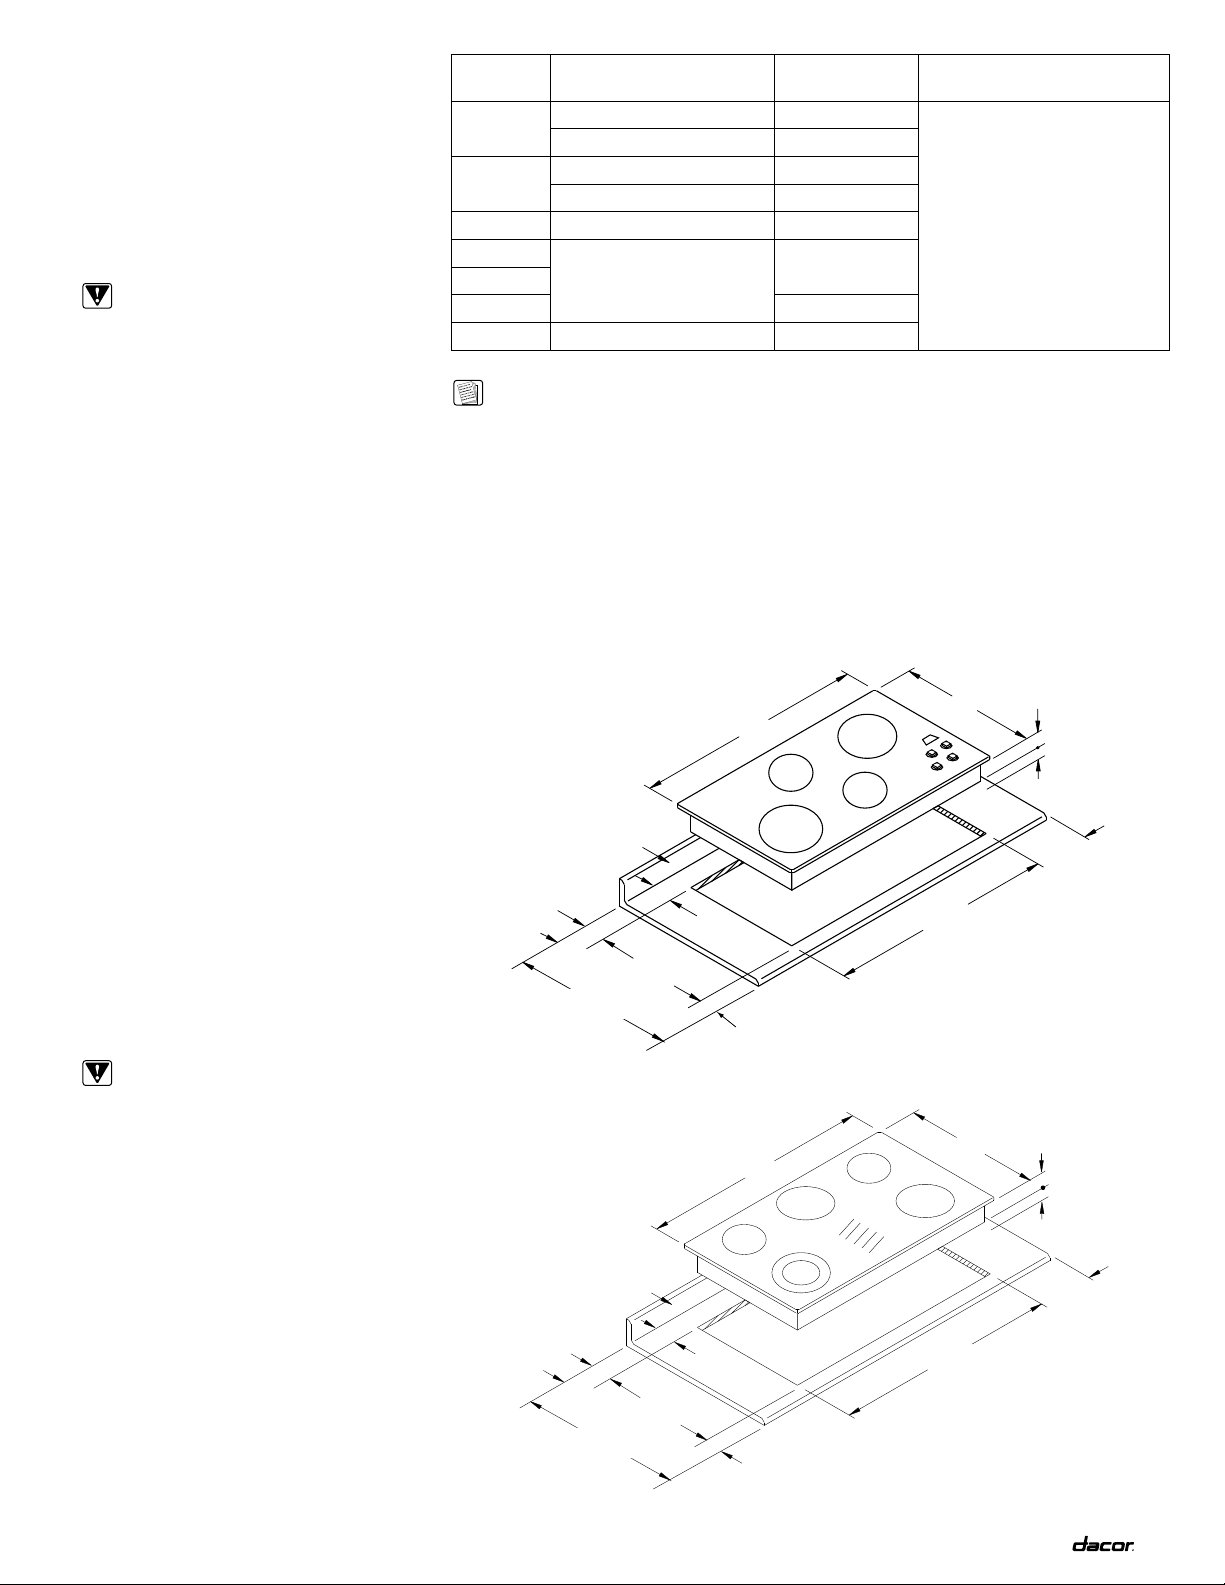
6" (152mm) Min.
to combustible
side wall above
the cooktop
(both sides)
2" (51mm) Min.
to combustibles
below chassis
4" (102mm)
Chassis height
28 1/2" (724mm)
2" (51mm)
21" (533mm)
30" (762mm)
Vertical
Combustible
Surface
3 1/8"
(79mm)
Rear Wall
2 1/4"
(57mm)
Min.
19 7/8" (505mm)
25" (635mm)
6" (152mm) Min.
to combustible
side wall above
the cooktop
(both sides)
2" (51mm) Min.
to combustibles
below chassis
4" (102mm)
Chassis height
34 1/2" (876mm)
2"
(51mm)
25" (635mm)
21"
(533mm)
36" (914mm)
Vertical
Combustible
Surface
3 1/8"
(79mm)
Rear Wall
19 7/8" (505mm)
2 1/4"
(57mm)
Min.
Please contact your dealer immediately if
components are missing.
• Use and Care Manual
• Mounting Brackets
• Cleaning Creme
• Glass Scraper
• Foam Tape
Power Disconnection
WARNING:
Failure to disconnect power may
result in electrical shock or fire
hazard! If the electric service
provided does not meet the
product specifications, do not
proceed with the installation. Call
the selling dealer or a licensed
electrician
Electrical Power Supply
Requirements
It is the owner ’s responsibility to ensure that
the electrical connection of this appliance
is performed by a qualified electrician. The
electrical installation, including minimum supply
wire size and grounding, must be in accordance
with the National Electric code ANSI/NFPA 701993* (or latest revision) and local codes and
ordinances.
Model No. Electrical Circuit Required
CER304
CERB365
240VAC, 60Hz, 40A 6.9kW (29A)
208VAC, 60Hz, 40A 6.9kW (33A)
240VAC, 60Hz, 50A 9.6kW (40A)
208VAC, 60Hz, 50A 9.6kW (46A)
Load
ETT304 240VAC, 60Hz, 30A 6.9kW (29A)
Total Connected
ETT365
ETT365S
240VAC, 60Hz, 40A
8.9kW (37A)
MET304 6.9kW (29A)
METB365 240VAC, 60Hz, 50A 9.6kW (40A)
Electrical Supply Requirments
NOTES:
2. Allow a minimum 2-inch
1. If cabinet storage space is to
be provided directly above the
cooktop, the risk of personal
injury may be reduced by
installing a ventilating hood
that projects horizontally a
minimum of 5 inches beyond
3. Access to the underside of
the face of the cabinets.
Minimum Supply Wire Size
Line and Ground Connections
No. 8 AWG
clearance between the bottom
of the cooktop chassis and
any combustible surface,
including the upper edge of
a drawer installed below the
cooktop.
the cooktop and the junction
box must be provided for
inspection and service.
*A copy of this standard may be obtained from:
National Fire Protection Association
1 Batterymarch Park
Quincy, Massachusetts 02269-9101
The correct voltage, frequency, and amperage
must be supplied to the appliance from a
separate, grounded, circuit that is protected by a
properly sized circuit breaker or time delay fuse.
Refer to the data plate located on the bottom
of the chassis, and/or to Table 1 below, for
electrical supply requirements.
Countertop Preparation
WARNINGS:
1. To reduce the risk of personal
injury caused by reaching
over a hot appliance, cabinet
storage space located directly
above the cooktop should be
avoided.
2. Do not store combustible
materials or items adversely
affected by heat in cabinet
areas above the appliance.
3. Failure to provide proper
clearances may result in a fire
hazard!
Cutout Dimensions for the CER304, ETT304, and MET304
Cutout Dimensions for the CERB365, ETT365, ETT365S, and METB365
(CER304 shown)
(ETT365 shown)
2
Page 4

Below Countertop Preparation
Glass Top and
Frame
Foam Tape Seal
Countertop
4“ (102mm)
Hold Down Bracket
and Screw
WARNING:
Failure to provide proper
clearances may result in a fire
hazard!
NOTES:
1. Plastic or other utensils with
low melting temperatures
should not be stored in
drawers immediately below
the cooktop.
2. Access to the underside of
the cooktop and the junction
box must be provided for
inspection and service.
All models are designed for standard 24-inchdeep (610mm) base cabinets with 25-inch
(635mm) overall depth countertops. Before
making the countertop cutout, make certain that
the cooktop will clear the front and side walls
of the base cabinet as shown. Clearance is
required for proper fastening of the cooktop hold
down brackets.
Also allow a minmimum 2-inch (51mm)
clearance between the bottom of the cooktop
chassis and any combustible surface, including
the upper edge of a drawer installed below the
cooktop.
Locate the junction box within reach of the
included 48-inch-long (1219mm) cooktop power
lead such that the junction box is accessible
when the cooktop is in place.
Installing the Cooktop
WARNING:
Do not use a hardening
compound or caulking to
permanently seal the cooktop into
place, as the unit must be readily
removable for service. If such a
hardening compound is used,
removal of the unit will be at the
customer’s expense.
Attach the foam tape provided with the unit to
the underside of the cooktop frame. Place and
center the cooktop within the cutout. Secure the
cooktop to the countertop utilizing the two (2)
hold-down brackets provided. Slide the brackets
into the slots located on the left and right sides
of the chassis, then tighten the screws to the
underside of the countertop.
Cooktop Installation
Section View
Electrical Connection
WARNINGS:
1. Ensure that the power supply
is disconnected before
proceeding.
2. Verify that the power supply
matches the ratings found on
the appliance data plate before
proceeding.
3. The complete appliance must
be properly grounded at all
times when electrical power is
applied.
4. Do not ground the appliance
with the neutral (white) house
supply wire. A separate
ground wire must be utilized.
5. If aluminum house supply
wiring is utilized, splice the
appliance copper wires to the
aluminum house wiring using
special connectors designed
and agency-certified for
joining copper and aluminum.
6. Follow the connector
manufacturer’s recommended
procedure carefully. Improper
connection can result in a fire
hazard!
These products are provided with a flexible
conduit consisting of two (2) insulated hot lead
conductors (both copper) and one (1) insulated
ground conductor (copper).
For UL installations attach the conductors to the
residence wiring in accordance with National
Electric Codes and all state, municipal and local
codes.
Verifying Proper Operation
WARNINGS:
1. Never touch any heating
elements when the power is
on.
2. If the cooktop glass is broken,
turn off power to the unit. Do
not operate until glass has
been replaced by a qualified
service technician.
3. This product must be repaired
only by a qualified service
technician. Unit must be
disconnected from power
prior to service.
NOTES:
Before operating the unit:
1. Clean the glass surface
carefully using the Cooktop
Cleaning Creme provided
with the product. Remove all
cleaner residue.
2. Read and understand the
accompanying Use and
Care Manual. Important
safety, service and warranty
information is contained
within the manual.
If all final electrical connections are complete
as indicated, then proceed to turn on the power.
Once the power is on, test each burner position
for correct operation.
Any problems should be reported immediately to
your installer or an authorized Dacor servicer.
3
Page 5

NOTES:
4
Page 6

NOTES:
5
Page 7

NOTES:
6
Page 8

Web Site: www.dacor.com
For a Dealer/Service: (800) 772-7778
Corporate Phone: (800) 793-0093
 Loading...