

Dacor ERD30S06SCH, MORD230S, ESG486SBK, EGR30, ERD30 Use And Care Manual
...
Use and Care Manual
Epicure® Range
For Use With Models:
EGR30, ERD30, ERD60
Ta b l e o f Co n T e n T s
Im p o r T a n T sa f e T y In s T r u C T I o n s ............................................. 1-3
Ge T T I n G T o Kn o w yo u r ra n G e ............................................ 4-5
e T T I n G up yo u r ra n G e ......................................................... 6
s
op e r a T I n G yo u r ra n G e ..................................................... 7-13
Ca r e a n d Cl e a n I n G ....................................................... 14-19
e f o r e yo u Ca l l fo r se r v I C e .......................................... 20-21
b
wa r r a n T y a n d se r v I C e ........................................................ 22
wa r r a n T y Ca r d ......................................................ba C K Co v e r
Place Serial Number Label Here
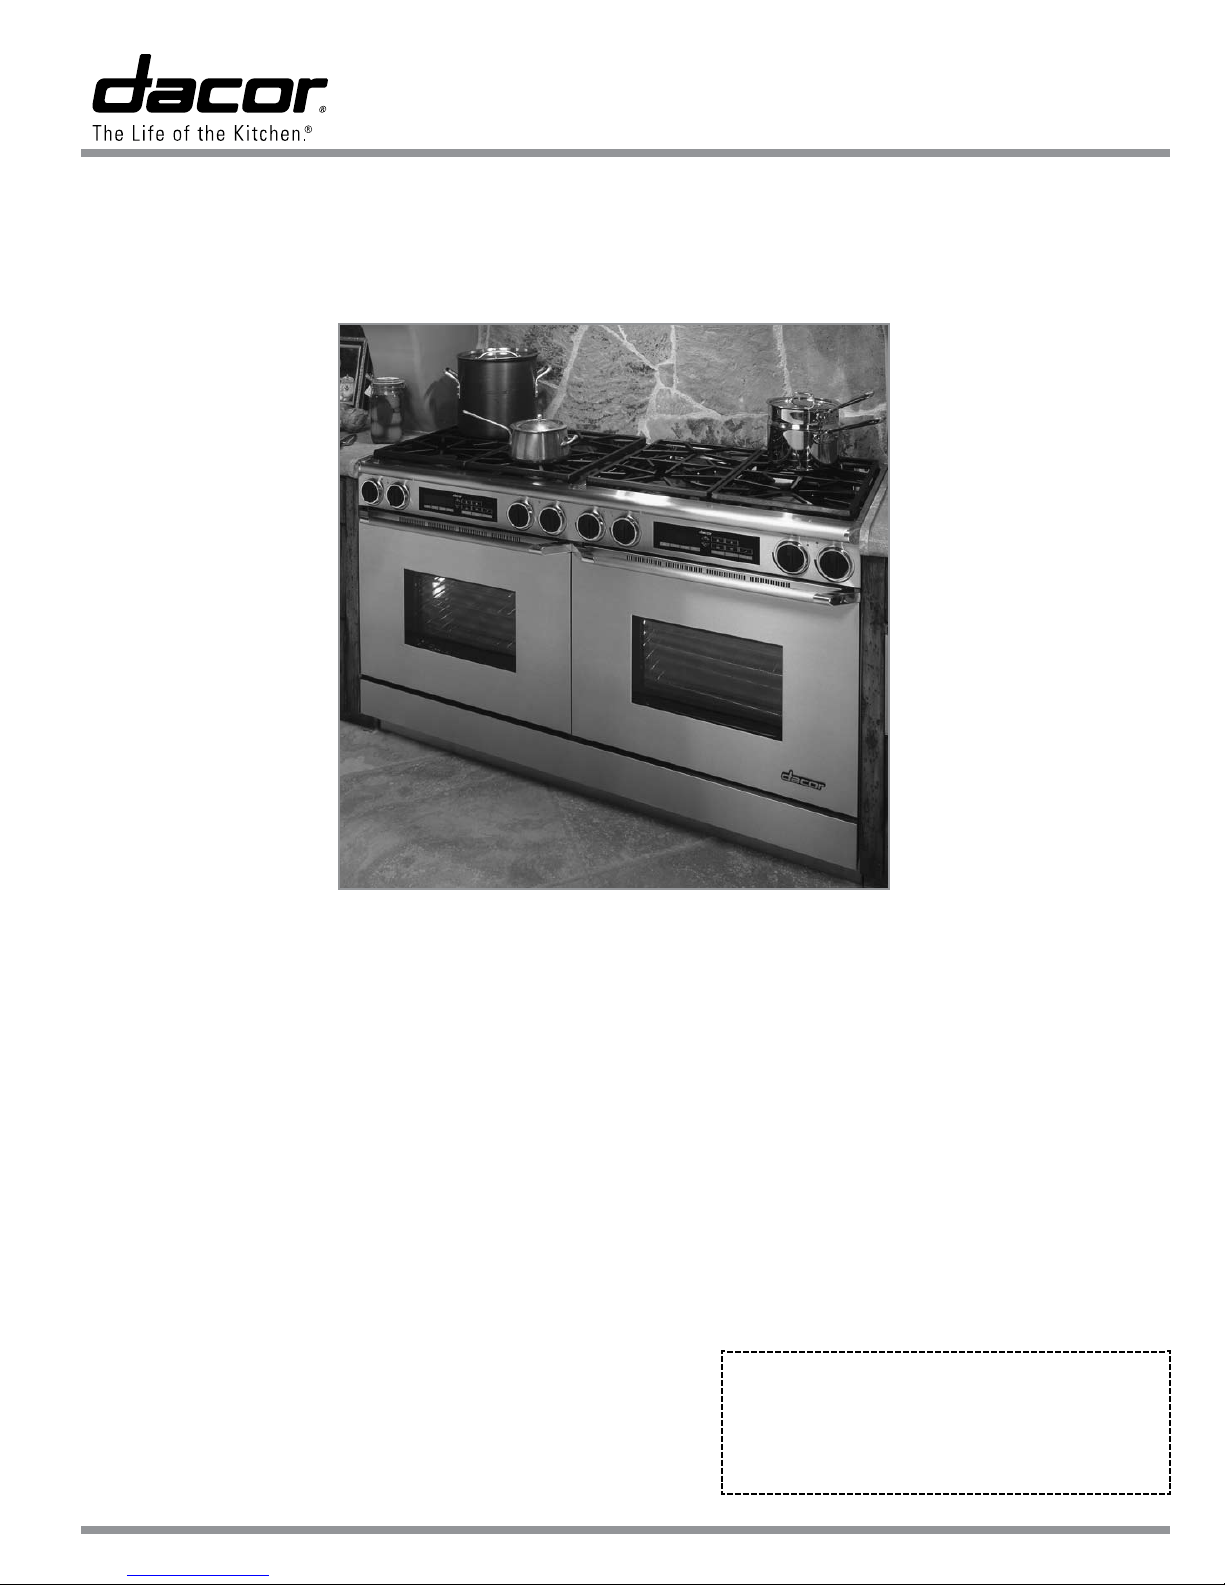
Style varies
Model ERD60 Shown
Part No. 65091 Rev. J

© 2008 Dacor, all rights reserved

Important Safety Instructions
Installer: Leave these instructions with the appliance.
Consumer: Read this use and care manual completely before using this appliance. Save it for future
reference. It contains important use and care information. Keep your sales receipt or canceled check
in a safe place. Proof of original purchase date is
required for warranty service.
If you have any questions call:
Dacor Customer Service
(800) 793-0093 (U.S.A. and Canada)
Monday — Friday 6:00 a.m. to 5:00 p.m. Pacific Time
Web site: www.Dacor.com
Have the complete model and serial number from
the product data label ready. To expose the label,
open the oven door and remove the inlet cooling
grill. Record these numbers below for easy access.
Model Number ______________________________
Serial Number ______________________________
Date of Purchase____________________________
For service and warranty information, see
page 22.
Since Dacor continualy improves the quality and
performance of our products, we may need to make
changes to the appliance without updating this
manual.
Important Information About
Safety Instructions
The Important Safety Instructions and warnings in this manual are not meant to cover all possible problems and situations that can occur. Use
common sense and caution when installing, maintaining or operating this or any other appliance.
Always contact the Dacor Customer Service Team
about problems or situations that you do not understand.
Safety Symbols and Labels
DANGER
Immediate hazards that WILL result in severe personal
injury or death.
WARNING
Hazards or unsafe practices that COULD result in severe
personal injury or death.
CAUTION
Hazards or unsafe practices that COULD result in minor
personal injury or property damage.
DANGER
IMPORTANT: If you smell gas:
Do not use or light any appliance.•
Do not touch any electrical switch or use any electrical devices including the telephone in your building.•
From a neighbor’s phone, immediately call the gas supplier. Follow the gas supplier’s instructions.•
If you cannot contact the gas supplier, call the fire department.•
IMPORTANT: To avoid the possibility of explosion or fire, do not store or use combustible, flammable or explosive
vapors and liquids (such as gasoline) inside or in the vicinity of this or any other appliance. Also keep items that could
explode, such as aerosol cans away from the range. Do not store flammable or explosive materials in adjacent cabinets
or areas.
WARNING
NEVER use this appliance as a space heater to heat or
warm the room. Doing so may result in carbon monoxide
poisoning and overheating of the appliance.
WARNING
NEVER block or cover any slots, holes, or passages
anywhere inside the oven or on the outside of the range.
Doing so blocks airflow through the oven and cooktop
and may cause carbon monoxide poisoning or fire. See
the Getting to Know Your Range section for the location
of the various air holes (slots).
CALIFORNIA PROPOSITION 65 WARNING
The burning of gas cooking fuel generates some
by-products that are on the list of substances which
are known by the State of California to cause cancer or
reproductive harm. California law requires businesses
to warn customers of potential exposure to such
substances. To minimize exposure to these substances,
always operate this unit according to the use and care
manual, ensuring you provide good ventilation when
cooking with gas.
READ AND SAVE
THESE INSTRUCTIONS
1

Important Safety Instructions
General Safety Precautions
To reduce the risk of fire, electric shock, serious injury or death when using your range, follow basic safety
precautions, including the following:
WARNING WARNING
If you receive a damaged product, immediately contact •
your dealer or builder. Do not install or use a damaged
appliance.
Make sure that the range has been properly installed •
and grounded by a qualified installer according to
the accompanying installation instructions. Have the
installer show you the location of the gas shut off valve
and the fuse or junction box so that you know where
and how to turn off the gas supply and power to the
range.
Do not install, repair or replace any part of the range •
unless specifically recommended in the literature
accompanying it. A qualified service technician should
perform all other service.
Before performing any type of service, make sure that •
the gas supply and electrical power to the range is
turned off.
Only use this range for cooking tasks expected of a •
home appliance as outlined in this manual. This range
is not intended for commercial use.
DO NOT TOUCH THE SURFACES OF THE RANGE •
DURING OR IMMEDIATELY AFTER USE. After use,
make sure these surfaces have had sufficient time to
cool before touching them.
Make sure individuals who use the range are able to •
operate it properly.
Never allow anyone, including children to sit, stand or •
climb on any part of the range. Doing so may cause
damage, serious injury or death. Do not leave children
alone or unattended in the area around the range. Do
not allow children to play with the controls, pull on the
handle or touch other parts of the range.
Do not store items of interest to children on top of or •
above the range. Children could be burned or injured
while climbing on the appliance.
Do not attempt to use this appliance in the event of a •
power failure. If a power failure occurs while operating
the cooktop, turn all control knobs to the OFF position.
Do not tamper with the controls. Do not adjust or alter •
any part of the range unless specifically instructed to
do so in these instructions.
Do not cover the burners and grates with anything •
except properly selected utensils. Decorative covers
may cause a fire hazard or damage to the cooktop if a
burner is accidentally turned on with the cover in place.
Do not heat unopened food containers such as baby •
food jars and cans. Pressure build up may cause the
container to burst and cause injury.
Keep flammable items, such as paper, cardboard, •
plastic and cloth away from the burners and other
hot surfaces. Do not allow pot holders to touch hot
surfaces or gas burners.
Do not wear loose or hanging apparel while using •
the range. Do not allow clothing to come into contact
with the range and surrounding areas during and
immediately after use.
Do not use towels or bulky cloth as pot holders.•
Use only dry pot holders when removing food and •
cookware from the cooktop or oven. Wet pot holders
can cause steam burns.
Do not hang flammable or heat sensitive objects over •
the range.
If the range is near a window, do not use long curtains •
as window treatment. The curtains could blow over the
cooktop and create a fire hazard.
To avoid the possibility of fire, do not leave the range •
unattended when in use.
Clean the range thoroughly before operating it for the •
first time.
Clean and maintain the range regularly as instructed in •
the Care and Cleaning section of this manual. Keep
the entire range, ventilation filters and range hoods
free of grease that could catch fire.
Use cookware only for its intended purpose. Check •
the manufacture’s recommendations before use to
determine if a utensil is suitable for use with a range.
Certain types of glass, ceramic and earthenware
are not suitable for use with a range. Personal injury
or damage may result from the improper use of
cookware.
Select cookware carefully. Use utensils of the proper •
size, material and construction for the particular type
of cooking being done. Utensils need to be large
enough to contain the desired quantity of food without
boil-overs or spill-overs. Choose pans with easy to
hold handles that will stay cool while cooking. Do not
use utensils with loose handles. Avoid using pans that
are too heavy to lift safely.
Use extreme caution if adding water to food on a hot •
cooktop or oven. The steam can cause serious burns
or scalds.
Make sure that all the cooktop parts are dry before •
lighting a burner.
Turn the knobs to the OFF position prior to removing •
them from the valve stems.
2

Important Safety Instructions
WARNING CAUTION
Do not use the oven for storage•
Exercise caution when opening the oven door. Let hot •
air or steam escape before looking or reaching into the
oven.
The cooktop should never be operated without the •
knobs or trim rings in place.
For your safety, do not use the oven to cook without •
the convection filter(s) installed. When the filter is not
installed, the spinning fan blades at the back of the
oven are exposed.
Do not allow food to sit in the oven for more than one •
hour before or after cooking. Eating spoiled food can
result in food poisoning.
Non-stick coatings, when heated, can be harmful to •
birds. Remove birds to a separate, well-ventilated
room during cooking.
When deep fat frying:•
Be certain that the pan is large enough to contain ◊
the desired volume of food without overflow caused
by the bubbling of the fat. Never leave a deep fat
fryer unattended.
Avoid frying moist or frost-covered foods. Foods ◊
with high water content may cause spattering or
spilling of the hot fat.
Heat fat slowly, and stir together any combination ◊
of oils and fats prior to applying heat. Utilize a deep
fat frying thermometer to avoid heating the fat to
temperatures above the flash point.
TO REDUCE THE RISK OF INJURY TO PERSONS IN
THE EVENT OF A RANGE TOP GREASE FIRE:
SMOTHER FLAMES with a close-fitting lid, cookie a.
sheet or metal tray, then turn off the burner. BE
CAREFUL TO PREVENT BURNS. If the flames do not
go out immediately, EVACUATE AND CALL THE FIRE
DEPARTMENT.
NEVER PICK UP A FLAMING PAN - you may be b.
burned.
DO NOT USE WATER, including wet dish cloths or c.
towels - a violent steam explosion may result.
Use a fire extinguisher ONLY if:d.
You have a Class ABC extinguisher, and you ◊
already know how to operate it.
The fire is small and contained in the area where it ◊
started.
The fire department is being called.◊
You can fight the fire with your back to an exit.◊
Do not allow acids (citrus juices, tomato sauces, etc.) •
to remain on the range’s surfaces. The porcelain finish
may stain.
Never use the cooktop surface as a cutting board.•
Do not try to remove heavy spills with a sharp object •
such as a knife or metal spatula. Sharp objects may
scratch the range’s surfaces.
Do not expose the knobs or trim rings to direct flame, •
hot utensils or other sources of heat.
Do not line the oven with aluminum foil or other •
materials. These items can melt or burn up during
self-cleaning and cause permanent damage to the
oven.
To prevent damage, remove the meat probe from the •
oven when it is not being used.
3
Time and Temperature
Set Keys
Electronic Clock
Oven Mode
Indicators
CANCEL
SECURE
OVEN
LIGHT
COOK
TIME
MINUTE
TIMER #2
STOP
TIME
CLOCK
SET
MINUTE
TIMER #1
TIMER 1 CLOCK
BAKE
STOP TIME TIMER 2 CANCEL ● SECURE LIGHT COOK TIME
BAKE BROIL
CONVECTION BAKE PURE CONVECTION
SELF CLEAN
TIME ● TEMP
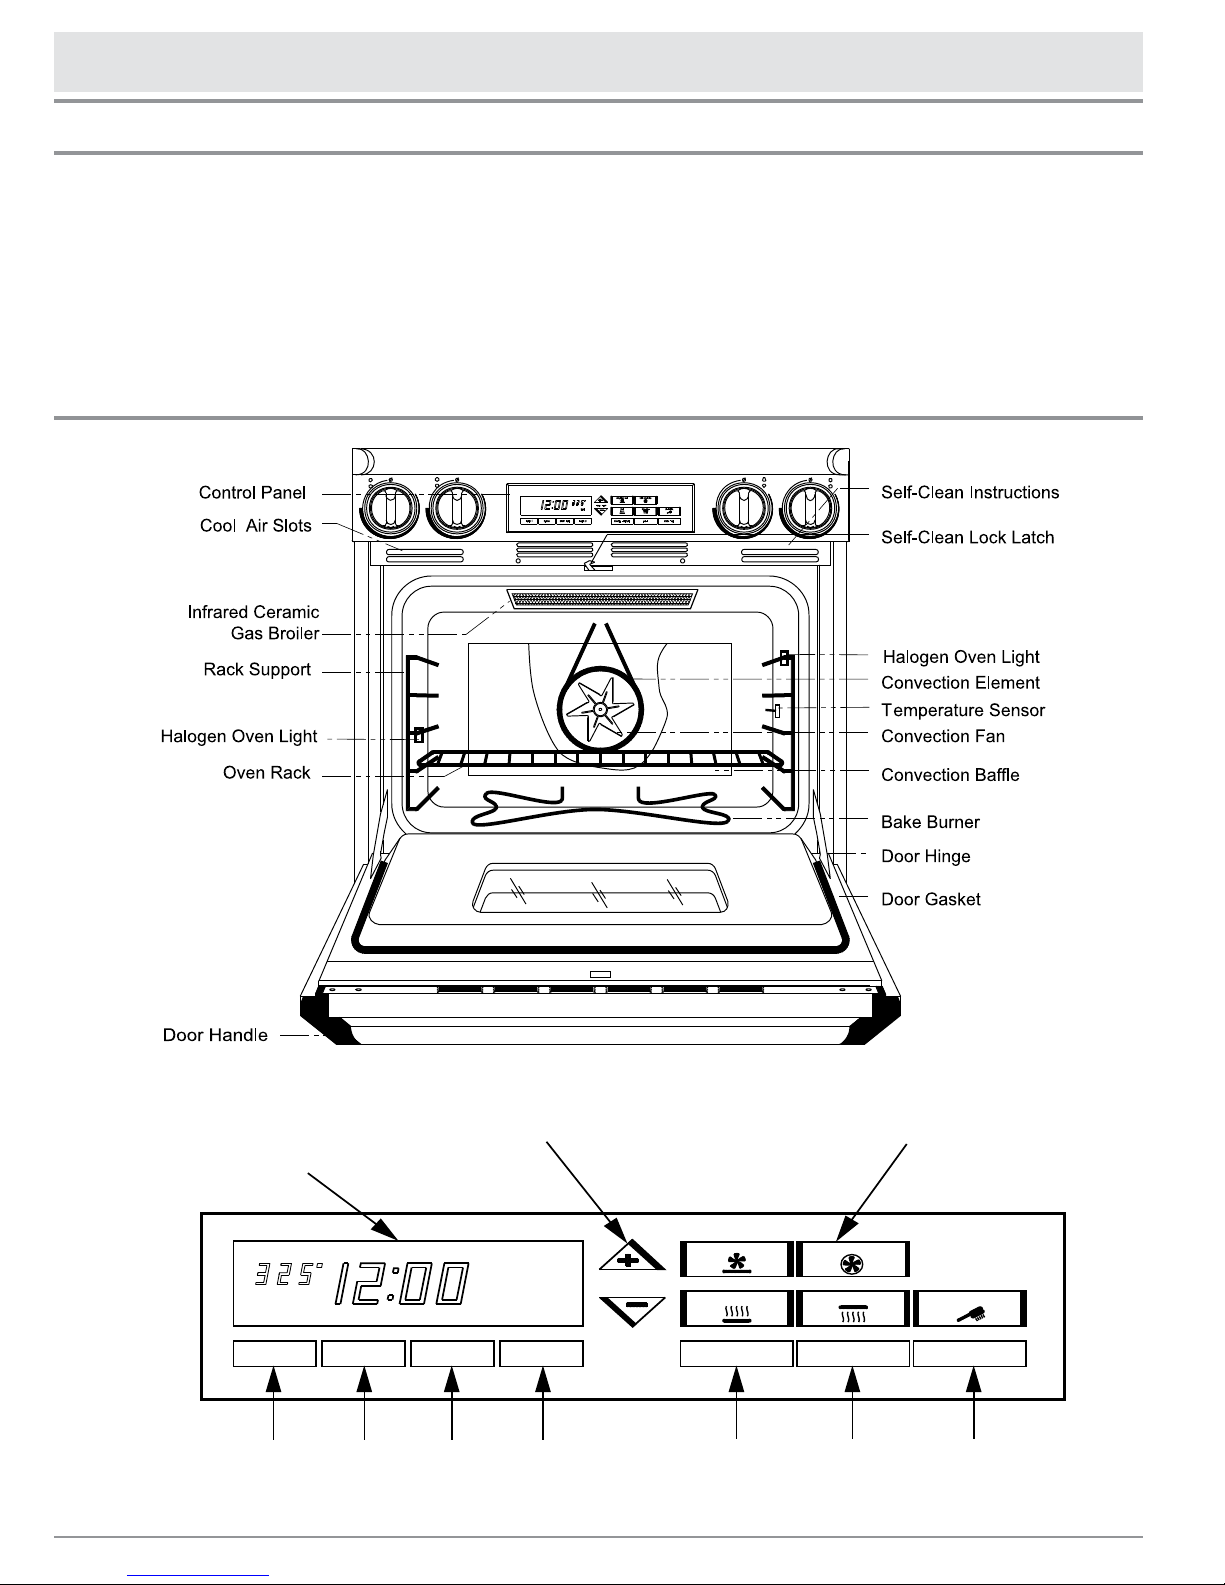
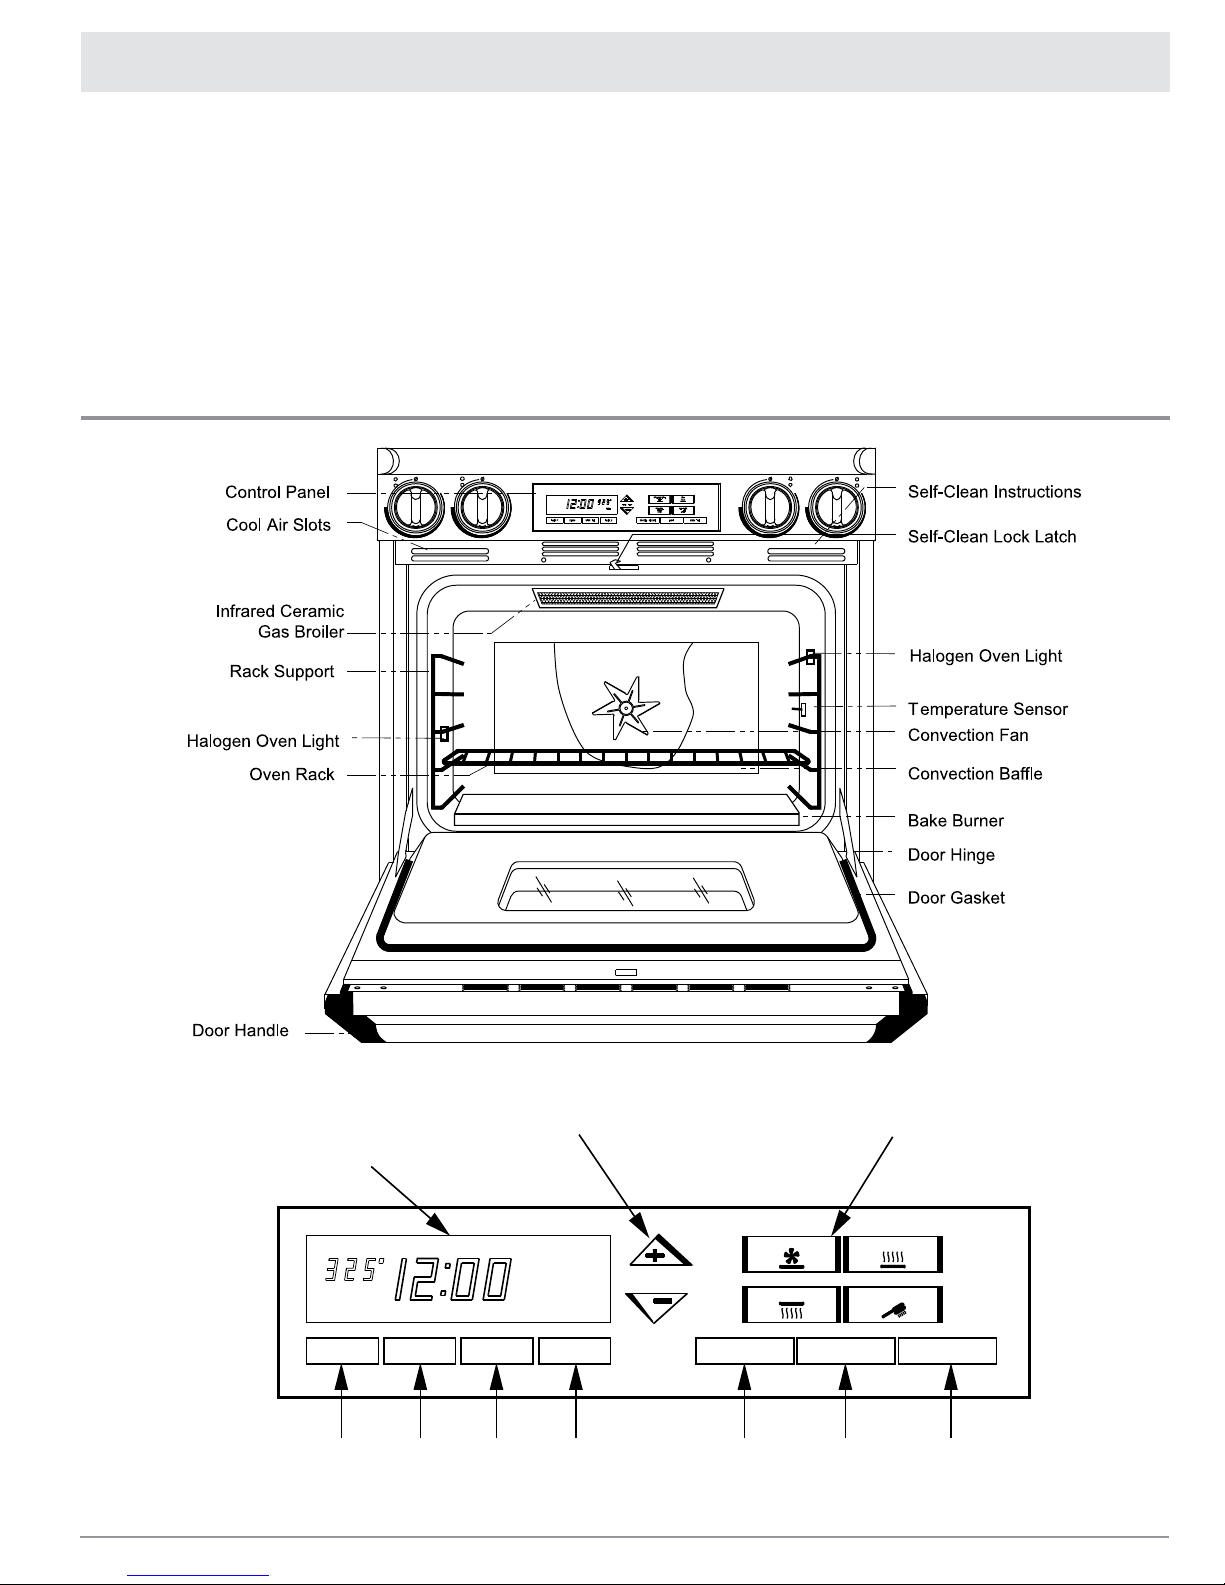
Getting to Know Your Range
Parts of the Range
Before using your range, become familiar with the
features and control panel layout.
Below the oven mode touch keys are three •
touch keys labeled CANCEL • SECURE, LIGHT
and COOK TIME. The CANCEL • SECURE key
enables the user to cancel the selection of an
oven mode or Delay Timed program, or disable
the control panel by pressing and holding the
key for approximately three (3) seconds.
Once the control panel is in the “secure” mode, •
“OFF” will be displayed on the clock. The LIGHT
key turns the interior oven light on and off. The
LIGHT key will remain functional if the control
panel has been disabled.
The • COOK TIME key is used to select the length
of time for a cooking process in delay timed
cooking mode.
Oven Features - Models ERD30 and ERD60
Control Panel - Models ERD30 and ERD60
(Convection filter not shown)
4
Time and Temperature
Set Keys
Electronic Clock
Oven Mode
Indicators
CANCEL
SECURE
OVEN
LIGHT
COOK
TIME
MINUTE
TIMER #2
STOP
TIME
CLOCK
SET
MINUTE
TIMER #1
TIMER 1 CLOCK
BAKE
STOP TIME TIMER 2 CANCEL • SECURE LIGHT COOK TIME
TIME • TEMP
BAKE
BROIL
CONVECTION BAKE
SELF CLEAN
Getting to Know Your Range
Clock functions are selected by pressing the •
touch keys located below the clock display and
oven mode keys. Oven functions are chosen by
pressing the touch key for the desired mode.
Once a clock or oven function has been chosen,
a description of the selection will flash in the
clock display area.
IMPORTANT:
After choosing a clock function or oven mode, you
have six seconds to perform the next programming
step. If the next step is not completed within six
(6) seconds, the program selection displayed on the
clock will disappear. Should this occur, just repeat
the initial function selection.
Oven Features - Model EGR30
(Convection filter not shown)
Control Panel - Model EGR30
5
Setting Up Your Range
Setting the Clock
Follow these two steps to set the correct
time of day:
Press the 1. CLOCK touch key. The time of day will
flash on the display.
Press the 2. + or – key until the correct time of
day is displayed and release.
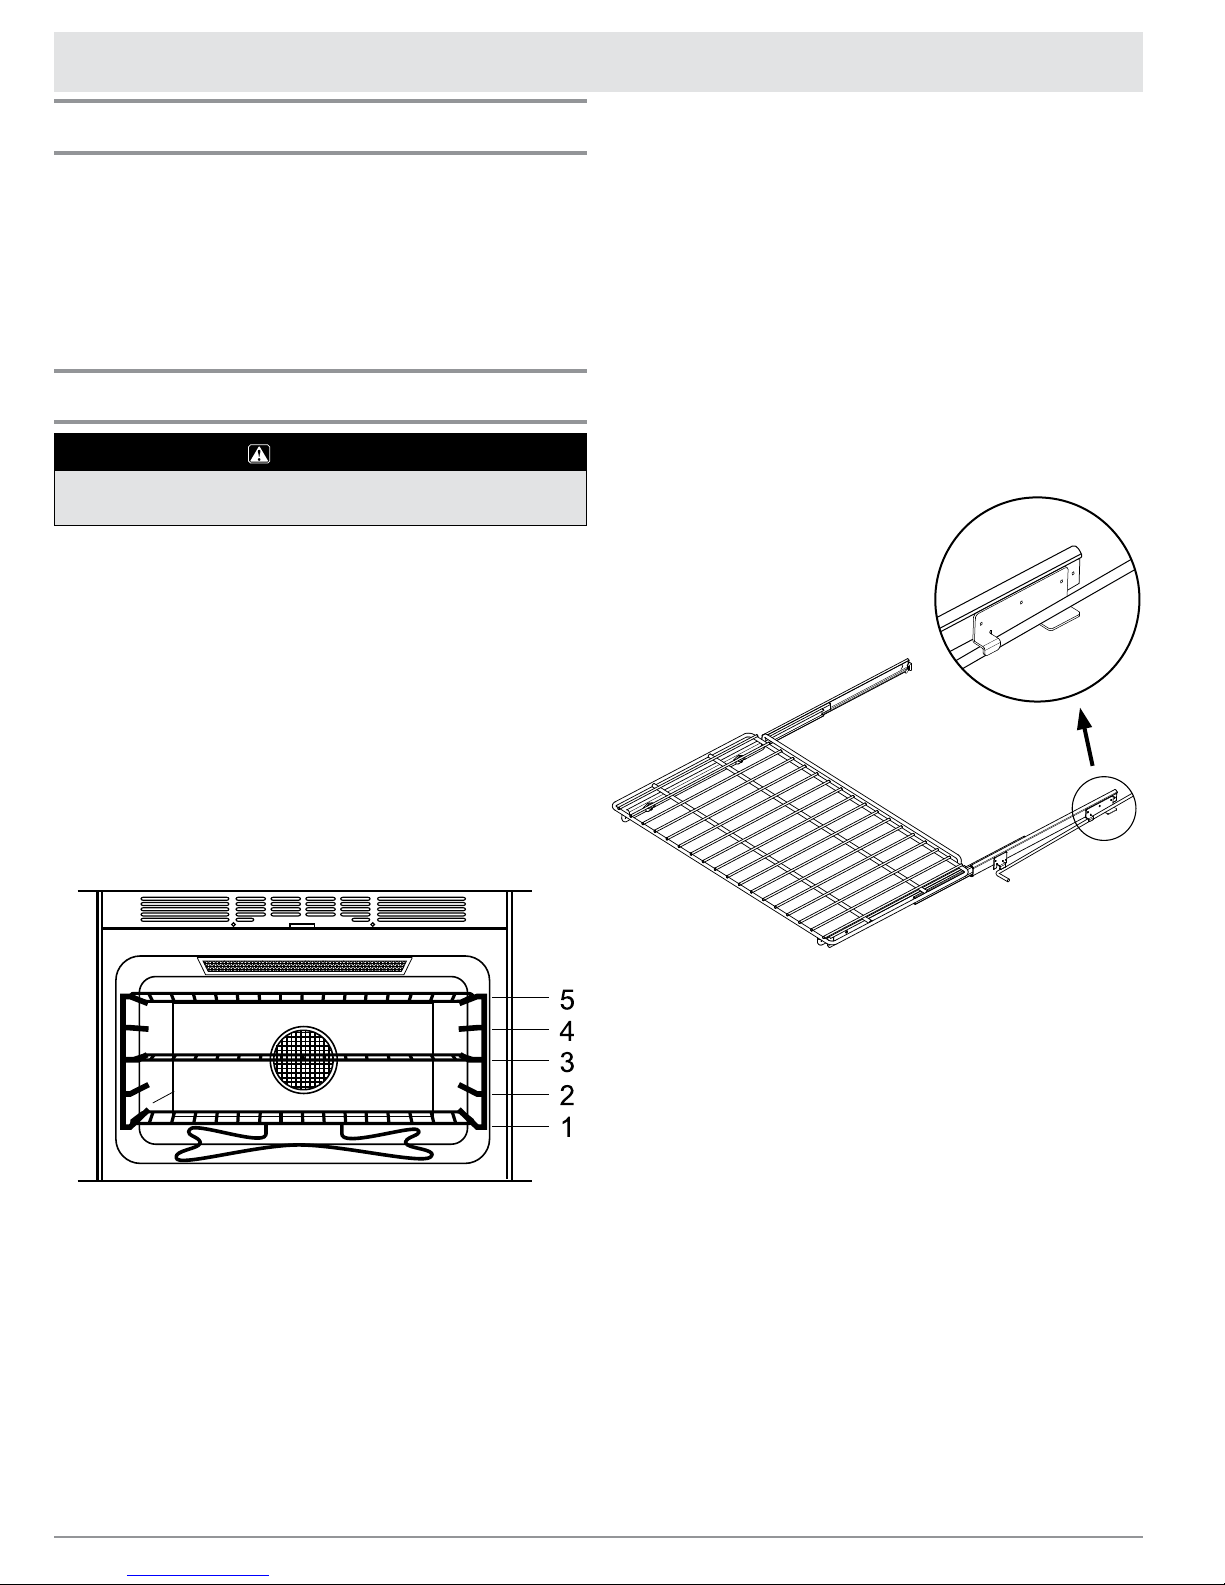
Installing the Oven Racks
WARNING
The oven racks become hot when the oven is in use. Use
potholders to install and adjust the racks.
Standard Oven Racks
Three chrome-plated oven racks are provided. •
Always remember to position the racks prior to
heating the oven.
Also, remove the oven racks prior to self-clean-•
ing to prevent permanent discoloration of the
racks.
The porcelain rack supports provide five (5) •
heights for positioning of the oven racks. To
install a rack, align the left and right edges of
the rack with the horizontal guide rails of the
rack supports, then slide the rack into the oven.
For Proper Installation:
Hold the GlideRack oven rack with the guides 1.
fully extended away from you (see the diagram
below).
Align both sets of safety clips (right and left) on 2.
the back of the guides with the oven rack supports as shown.
Begin to slide the rack in, lifting the front safety 3.
clips over the front of the oven rack supports.
Push the rack all the way to the back.4.
Grasp the rack in the center of the front and 5.
pull. The rack should come forward while the
guides remain in place.
Oven Rack Locations
Gliderack™ Oven Racks
Dacor’s GlideRack oven rack is designed to install
effortlessly and glide at a full extension. The full
extension of the rack allows you to slide pizza on
and off the Dacor’s optional pizza stone (model
number ABS20). It is also great for large roasts in
large roasting pans.
The easy-slide action allows you to baste more
easily and check food temperatures more safely and
quickly.
GlideRack Oven Rack Installation
Helpful Hints When Using Your GlideRack
Oven Rack:
This type of rack works particularly well with •
heavier items, although you can use it during
any baking, broiling or roasting in your Dacor
oven.
Gliderack oven racks will need to be spaced out •
when using more than one in the oven at a time.
For instance, the racks should be used on rack
positions 1, 3 and 5 or 2 and 4, counting up
from the bottom, instead of using racks 2, 3 and
4.
When using the rack with Dacor’s ABS20 baking •
stone, use rack position 1 for best results.
Heavier roasting pans and dishes will also cook •
better on rack position 1.
6
AIR FLOW
TIMER 1 CLOCK STOP TIME TIMER 2
BAKE
ON
Operating Your Range
About the Various Cooking Modes
Standard Bake (Selected Models Only)
In standard bake mode, the bottom heat
element provides conventional baking heat.
Temperaturesmaybesetfrom135˚Fto
555˚Fin5˚Fincrements.Usestandardbakefor
single rack baking and roasting.
Standard Broil
The infrared ceramic gas broiler supplies the
heat in Broil mode. The broil temperature
isadjustablefrom135˚FtotheHIsetting
(equivalentto555˚F)forgreatercookingflexibility.
Broiling is always performed with the door closed.
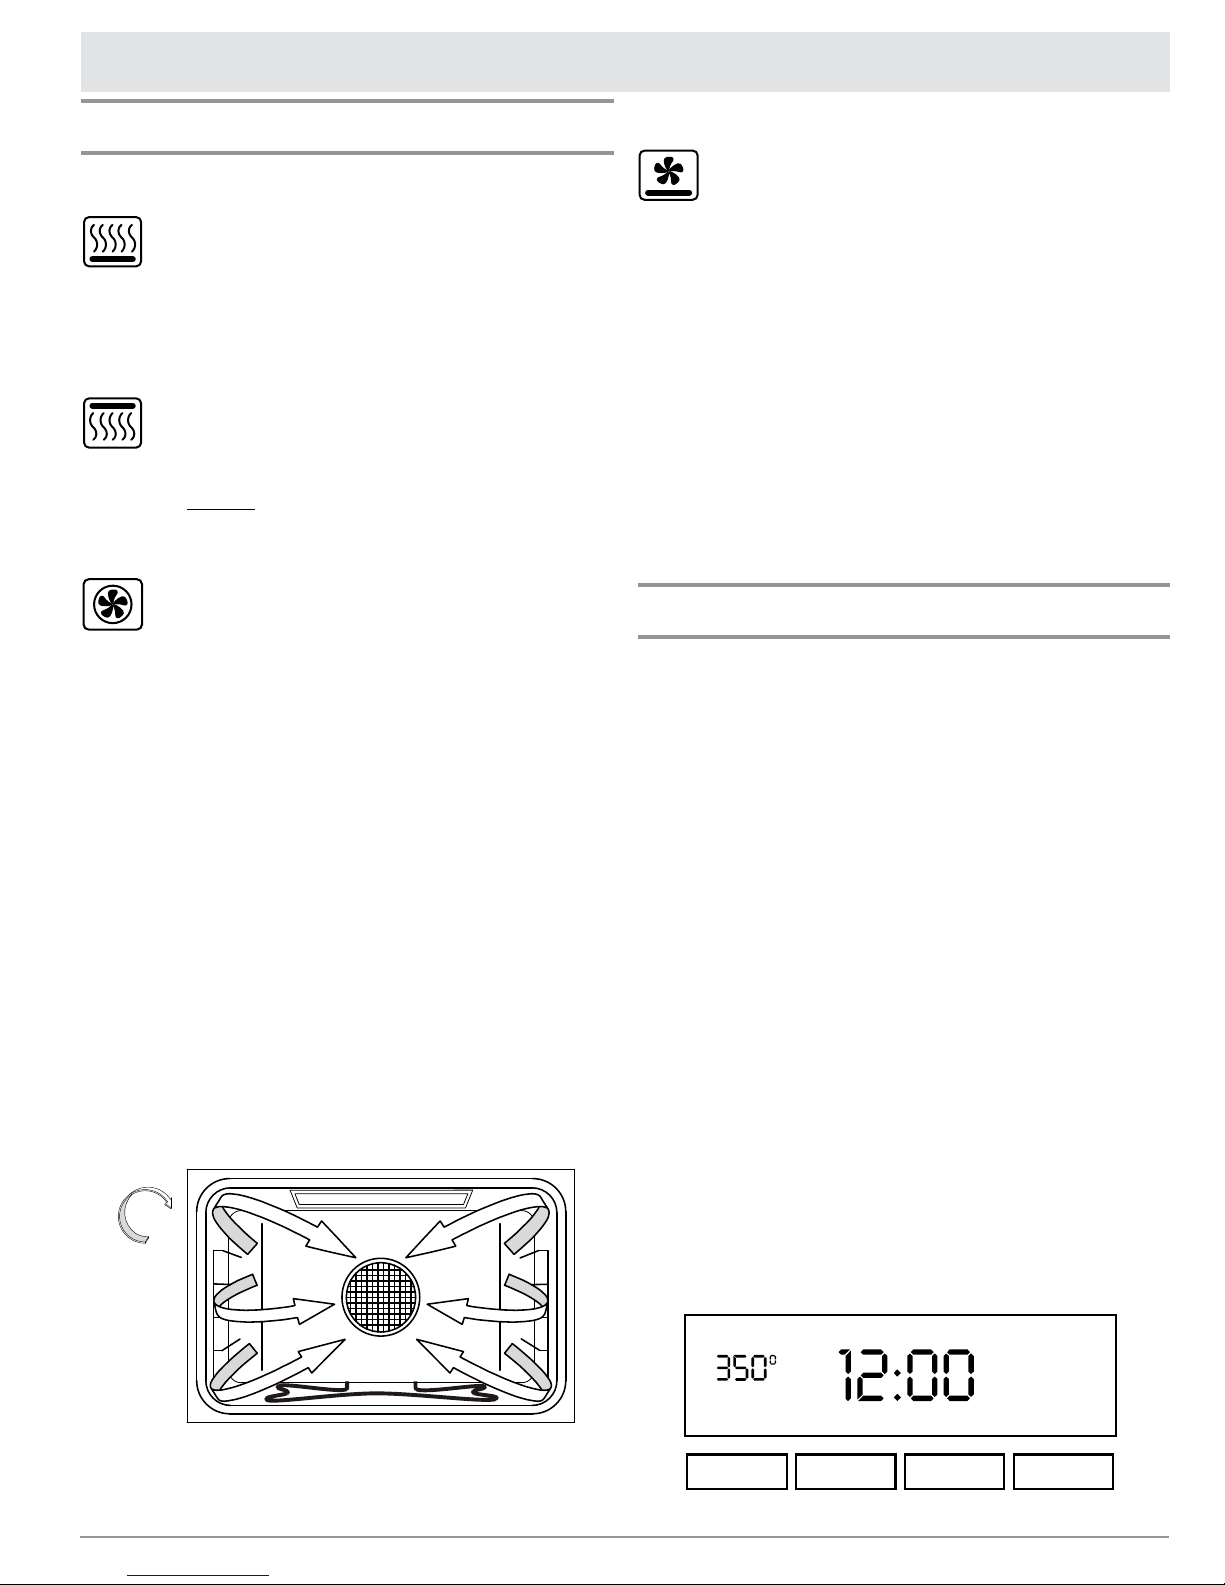
Pure Convection™ (ERD models only)
Your new oven has the best cooking system
available today, Pure Convection™. Pure
Convection is a total system approach to
cooking. Pure Convection allows multi-rack cooking while achieving even results from one rack to
another.
In Pure Convection mode a third heating element,
encircling the convection fan, is located in the rear
of the oven chamber behind a baffle.
The convection fan draws air from the oven •
chamber, then forces it across the hot convection
heating element. The heated air is directed back
into the oven chamber through the convection
baffle.
The baffle distributes the heated air evenly to •
ensure uniform results. It also separates the
food from the heat source and channels the air
evenly into the oven eliminating any hot or cool
spots.
The convection filter, in the back of the oven, •
eliminates the transference of flavors when
cooking entire meals and keeps the oven
cleaner.
Convection Bake
In this combination convection-radiant mode,
the lower element provides the heat. As in
Pure Convection mode, the convection fan
and baffle combine to circulate heated air evenly
throughout the oven chamber. Temperatures may be
setfrom135˚Fto555˚Fin5˚Fincrements.Usethis
mode for single rack baking, multiple rack baking
and roasting.
Pre-Heat Cycle
The oven features an automatic pre-heat cycle that
rapidly brings the oven chamber up to temperature.
Simply by choosing a cooking mode and setting a
temperature, the oven will automatically perform
the pre-heat function. Pre-heat operates in standard
bake, Pure Convection and convection bake modes.
There is no pre-heat cycle for the broil mode.
Basic Oven Operation
Follow these steps to operate the various oven
modes:
Position the oven rack(s) at the proper height(s).1.
Press the touch key for the mode of your choice. 2.
The oven will beep once, the selected cooking
mode will flash, and “– – –” will be displayed.
Press either the 3. + or – key. The default temperature will be displayed.
To adjust the default temperature for baking, 4.
press and hold the TIME • TEMP key. (Press
+ key to increase the temperature setting, – to
decrease).
“PRE”5. and “ON” and the selected cooking
mode will appear in the clock display. The oven
will begin to heat. If in a convection mode,
the convection fan will turn on. Also, the clock
display will change from the desired cooking
temperature to the actual oven temperature,
startingwith135˚F.Thetemperaturedisplay
willincreasein5˚Fincrementsuntilthedesired
temperature is reached. The cooling fan will turn
onwhentheoventemperaturereaches200˚F.
IMPORTANT: Do not place food inside the oven
until the pre-heat cycle is complete (there is no preheat cycle in broil mode). Continued...
Temperaturesmaybesetfrom135˚to555˚F
in 5˚F increments. Use this mode for single rack
baking, multiple rack baking, roasting and preparation of complete meals.
Example of Display in Bake Mode
7
 Loading...