

Dacor ER36GSCHLP, ER36GSCHNG Installation Guide
Installation
Instructions
Epicure ®36-Inch Gas
For use with models ER36G and ER36GI
Range
PartNo. 106554 Rev. D
THIS APPLIANCE HAS BEEN TESTED IN ACCORDANCE WITH THE LATEST EDITION
OF ANSI Z21.1 STANDARD FOR HOUSEHOLD GAS COOKING APPLIANCES.
Important Safety Instructions ..................................................... 1
Important Information About Safety Instructions ......................... 2
General Safety Precautions ........................................................ 2
Installation Specifications ........................................................... 3
Product Dimensions .................................................................... 3
Electrical Power Supply Requirements ...................................... 4
Gas Supply Requirements .......................................................... 4
Cabinet Layout ............................................................................ 5
Gas and Electrical Locations ...................................................... 6
Installation Instructions ............................................................... 6
Verifying the Package Contents ................................................. 6
Parts List ..................................................................................... 6
Backguard Kit Installation ........................................................... 7
Self-Rimming Trim Installation .................................................... 7
Adjust the Range Height ............................................................. 8
Install the Anti-Tip Bracket .......................................................... 9
Door Removal ............................................................................. 9
Gas Connection ........................................................................ 10
Moving the Range to Final Location ......................................... 11
Re-Installing the Door ............................................................... 11
Cooktop Assembly .................................................................... 12
Verifying Proper Operation ....................................................... 13
Installation Checklist ................................................................. 13
Wiring Diagram ........................................................................... 14
Notes ............................................................................................ 15
IMPORTANT:
• Installer: In the interest of safety and to minimize problems, read these installation instructions completely and
carefully before you begin the installation process. Leave these installation instructions with the customer.
• Customer: Keep these installation instructions for future reference and the local building inspector's use.
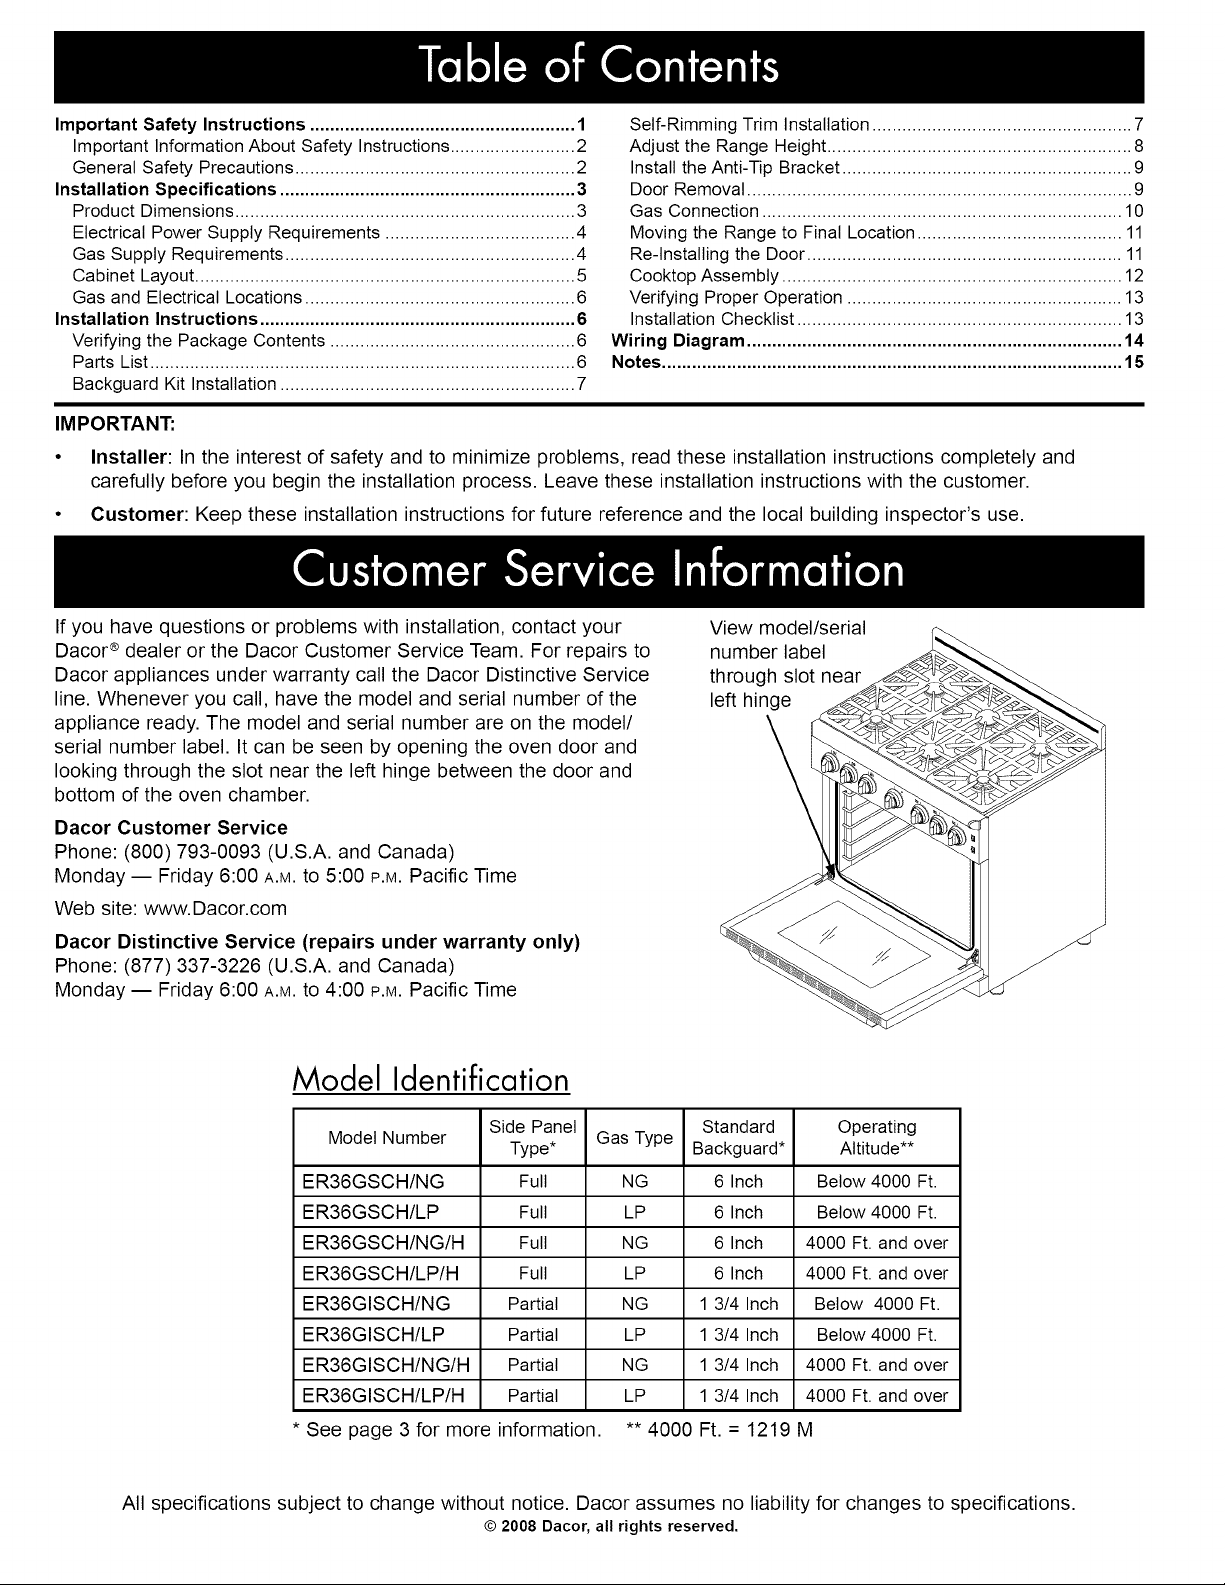
If you have questions or problems with installation, contact your
Dacor ®dealer or the Dacor Customer Service Team. For repairs to
Dacor appliances under warranty call the Dacor Distinctive Service
line. Whenever you call, have the model and serial number of the
appliance ready. The model and serial number are on the model/
serial number label. It can be seen by opening the oven door and
looking through the slot near the left hinge between the door and
bottom of the oven chamber.
Dacor Customer Service
Phone: (800) 793-0093 (U.S.A. and Canada)
Monday -- Friday 6:00 A.M.to 5:00 P.M.Pacific Time
Web site: www.Dacor.com
Dacor Distinctive Service (repairs under warranty only)
Phone: (877) 337-3226 (U.S.A. and Canada)
Monday -- Friday 6:00 A.M.to 4:00 P.M.Pacific Time
Model Identification
Model Number Gas Type
ER36GSCH/NG Full NG 6 Inch Below 4000 Ft.
ER36GSCH/LP Full LP 6 Inch Below 4000 Ft.
ER36GSCH/NG/H Full NG 6 Inch 4000 Ft. and over
ER36GSCH/LP/H Full LP 6 Inch 4000 Ft. and over
ER36GISCH/NG Partial NG 1 3/4 Inch Below 4000 Ft.
ER36GISCH/LP Partial LP 1 3/4 Inch Below 4000 Ft.
ER36GISCH/NG/H Partial NG 1 3/4 Inch 4000 Ft. and over
ER36GISCH/LP/H Partial LP 1 3/4 Inch 4000 Ft. and over
See page 3 for more information.
Side Panel Standard Operating
Type* Backguard* Altitude**
** 4000 Ft. = 1219 M
View model/serial
number label
through slot near
left hinge
All specifications subject to change without notice. Dacor assumes no liability for changes to specifications.
© 2008 Dacor, all rights reserved.
Important Information About Safety
Instructions
The Important Safety Instructions and warnings in this
Manual are not meant to cover all possible problems and
conditions that can occur. Use common sense and caution
when installing, maintaining or operating this appliance.
Always contact the Dacor Customer Service Team about
problems or conditions you do not understand.
Safety Symbols and Labels
WARNING - NEVER use this appliance as a space
heater to heat or warm the room. Doing so may result
in carbon monoxide poisoning and overheating of the
appliance.
WARNING - Failure to install this appliance as specified
in these instructions may result in personal injury or
death.
Immediate hazards that WILL result in severe personal
injury or death.
Hazards or unsafe practices that COULD result in severe
personal injury or death.
Hazards or unsafe practices that COULD result in minor
personal injury or property damage.
IMPORTANT: If you smell gas:
• Do not use or light any appliance.
• Do not touch any electrical switch or use any electrical
devices, including the telephone, in your building.
• From a neighbors phone, immediately call the gas
supplier. Follow the gas supplier's instructions.
• If you cannot contact the gas supplier, call the fire
department.
• Do not return to the building until instructed to do so
by the gas supplier or fire department.
IMPORTANT: Do not store or use combustible, flammable
or explosive vapors and liquids (such as gasoline) inside
or in the vicinity of this or any other appliance. Also keep
items that could explode, such as aerosol cans, away
from the burners and the oven. Do not store flammable or
explosive materials in adjacent cabinets or areas.
IMPORTANT: Junked or abandoned appliances are
dangerous and can cause a child entrapment and
suffocation hazard. When taking an appliance out of
service, immediately follow the instructions below to help
prevent accidents:
• Take off the door.
• Leave the racks in place so children cannot easily
climb inside.
• Cut the prongs off the power cable plug and discard
them.
• Cut the power cable off and discard it separately from
the old appliance.
WARNING - NEVER cover any slots, holes or passages
on the inside or outside of the range or cover an entire
rack with materials such as aluminum foil. Doing so
blocks air flow through the oven and may cause carbon
monoxide poisoning. Aluminum foil linings may also trap
heat, causing a fire hazard.
TO REDUCE THE RISK OF INJURY TO PERSONS IN
THE EVENT OF A RANGE TOP GREASE FIRE:
a. SMOTHER FLAMES with a close-fitting lid, cookie
sheet or metal tray, then turn off the burner. BE
CAREFUL TO PREVENT BURNS. If the flames do not
go out immediately, EVACUATE AND CALL THE FIRE
DEPARTMENT.
b. NEVER PICK UP A FLAMING PAN - you may be
burned.
c. DO NOT USE WATER, including wet dish cloths or
towels - a violent steam explosion may result.
d. Use a fire extinguisher ONLY if:
0 You have a Class ABC extinguisher, and you
already know how to operate it.
0 The fire is small and contained in the area where it
started.
0 The fire department is being called.
0 You can fight the fire with your back to an exit.
[o,_11!l_o]r,,!#IP'_'II;,tr,(o]_o],.lki[o] #I[._11'_'/_'Ir,,!#II#[_
The burning of gas cooking fuel generates some
by-products that are on the list of substances which
are known by the State of California to cause cancer or
reproductive harm. California law requires businesses
to warn customers of potential exposure to such
substances. To minimize exposure to these substances,
always operate this unit according to the use and care
manual, ensuring you provide good ventilation when
cooking with gas.
READ AND SAVE THESE
INSTRUCTIONS

General Safety Precautions
To reduce the risk of fire, explosion, electric shock, serious injury or death when installing or using this
appliance, follow basic safety precautions, including the following:
• If you receive a damaged product, immediately contact your dealer or builder. Do not insta I or use a damaged
appliance.
• This range must be properly installed by a qualified installer according to these installation instructions prior to use.
The installer should show the customer the location of the gas shut off valve and the fuse or junction box so that
. they know where and how to turn off the gas supply and electric power to the range.
i o not operate the range without the backguard in place. A fire may result.
Do not install, repair or replace any part of the range unless specifically recommended in the literature
accompanying it. A qualified service technician should perform all other service.
• Do not connect this range to the gas supply without the supplied gas pressure regulator installed.
• Before performing any type of service or installation, make sure that the gas supply to the range is turned off and
• the power cord is disconnected.
Do not cover the IR broil burner in the top of the oven with cookie sheets, aluminum foil, pots, pans, etc. Covering it
could cause it to overheat resulting in a risk of fire and damage to the oven.
• Only use the range for cooking tasks expected of a home appliance as outlined in the literature accompanying it.
Th s range is not ntended for commercial use. This range is certified for indoor nsta lation only.
• DO NOT TOUCH THE SURFACES OF THE OVEN OR COOKTOP DURING OR IMMEDIATELY AFTER USE.
• Do not climb on any part of the appliance.
• Never leave this appliance unattended when in use.
• Do not leave children or pets alone or unattended in the area around the range. Do not allow children to play with
the controls, pull on the handle, or touch other parts of the range. Do not store items of interest to children on top of
or above the range. Children could be burned or injured while climbing on the appliance.
• Do not attempt to use this appliance in the event of a power failure.
• Do not tamper with the controls. Do not adjust or alter any part of the range unless specifically instructed to do so in
these instructions.
• To prevent the unit from tipping forward and to provide a stable installation, this range must be secured in place with
the anti-tip device as specified in these instructions.
• Clean the cooktop thoroughly before operating it for the first time.
• Keep flammable items, such as paper, cardboard, plastic and cloth away from the burners and other hot surfaces.
Do not place such items in the oven. Do not allow pot holders to touch hot surfaces or gas burners.
• Do not wear loose or hanging apparel while using the range. Do not allow clothing to come into contact with the
interior of the oven or the cooktop and surrounding areas during and immediately after use.
• To avoid a fire hazard do not hang flammable or heat sensitive objects over the range.
• If the range is near a window, do not use long curtains as window treatment. The curtains could blow over the
cooktop and create a fire hazard
• Do not use the oven for storage. Do not use the cooktop as a counter for storage of utensils or other items.
• Make sure that all the cooktop parts are dry before lighting a burner.
• Turn the knobs to the OFF position prior to removing them from the valve stems
• For your safety, do not use the oven to cook without the convection filter installed. When the filter is not installed,
the spinning fan blades at the back of the oven are exposed.
• Always ensure that the light fixture lens cover is in place when using the oven. The lens cover protects the light bulb
from breakage caused by high oven temperatures or mechanical shock.
2 _acar
• Do not operate the cooktop without the knobs and trim rings in place.
• Non-stick coatings, when heated, can be harmful to birds. Remove birds to a separate, well-ventilated room during
cooking.
IMPORTANT - This appliance is equipped with a three-prong grounding plug for your protection against
possible electric shock hazards. Plug it only into a dedicated, grounded three-
prong electrical outlet. It is the responsibility of the customer to make sure the
proper type of outlet is installed. Do not under any circumstances:
• Cut or remove the third (ground) prong from the power cord.
• Use an adapter plug.
• Use an extension cord.
• Use a power cord that is frayed or damaged.
• Connect to an electrical outlet with a ground fault interrupter (GFI).
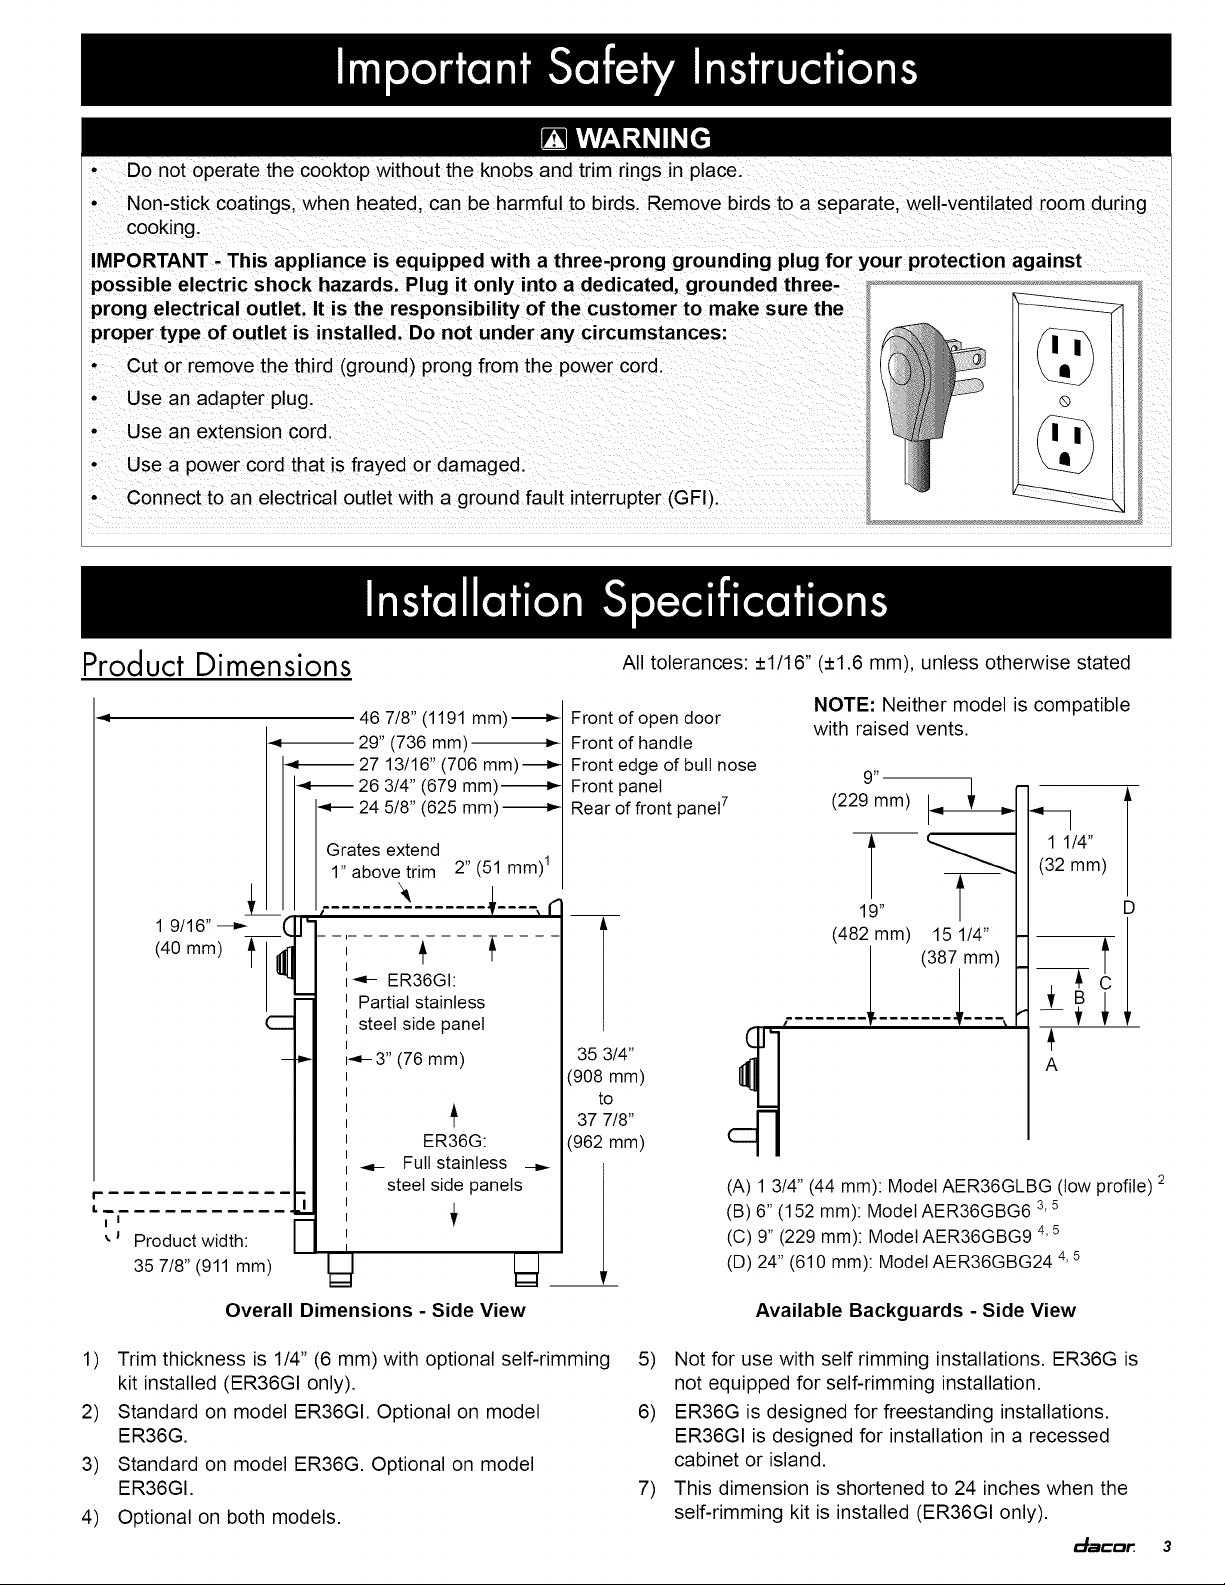
Product Dimensions All tolerances: _+1/16"(_+1.6mm), unless otherwise stated
1 9/16" ---_
(40 mm)
I-
i ....
I I
Product width:
35 7/8" (911 mm)
46 7/8" (1191 mm)---_
= 29" (736 mm) .=
-_--27 13/16" (706 mm)---_.-
_-- 26 3/4" (679 mm)---_
_-- 24 5/8" (625 mm) ---_
Grates extend 1
1"above trim 2" (51 mm)
L
;...... .......!----,r __
I
i_- ER36GI:
i Partial stainless
i
i steel side panel
I
I_q-3'' (76 mm)
t
ER36G:
_- Full stainless
steel side panels
Front of open door
Front of handle
Front edge of bull nose
Front panel
Rear of front panel 7
(908 mm)
to
35 3/4" (_
37 7/8"
(962 mm)
(A) 1 3/4" (44 mm): Model AER36GLBG (low profile) 2
(B) 6" (152 mm): Model AER36GBG6 3,5
(C) 9" (229 mm): Model AER36GBG9 4,5
(D) 24" (610 mm): Model AER36GBG24 4, 5
NOTE: Neither model is compatible
with raised vents.
9"
(229 mm)
t ""-
19" _--
(482 ram) 15 1/4"
(32 mm)
(387 ram)
........ !
t
[........ -_r---.%
1 1/4"
D
t
A
Overall Dimensions - Side View
1) Trim thickness is 1/4" (6 mm) with optional self-rimming
kit installed (ER36GI only).
2) Standard on model ER36GI. Optional on model
ER36G.
3) Standard on model ER36G. Optional on model
ER36GI.
4) Optional on both models.
Available Backguards - Side View
5) Not for use with self rimming installations. ER36G is
not equipped for self-rimming installation.
6) ER36G is designed for freestanding installations.
ER36GI is designed for installation in a recessed
cabinet or island.
7) This dimension is shortened to 24 inches when the
self-rimming kit is installed (ER36GI only).
I_BCD_
Electrical Power Supply Requirements
• The range is supplied with a factory installed, 6 foot
long, power cord with a three-prong grounding plug.
It is connected to the chassis at the rear of the range.
It must be connected to a dedicated, grounded three-
prong electrical outlet installed by a licensed electrician.
The electrical installation, including minimum supply
wire size and grounding, must be done in accordance
with National Electric Code ANSI/NFPA 70* and local
codes and ordinances. A copy of this standard may be
obtained from:
National Fire Protection Association
1 Batterymarch Park
Quincy, Massachusetts 02269-9101
The correct voltage, frequency and amperage must be
supplied to the electrical outlet according to the product
data label located on the top of the kick plate under the
door. Remove the door to view the data label (see
page 9). See the Electrical Supply Requirements
table below for reference.
Electrical Circuit
Required
120 Vac 60 Hz, 120 Vac 60 Hz,
15 Amp. 5.0Amp.
Electrical Supply Requirements
IMPORTANT: The above information is for reference only.
If the information above differs from the information on the
product data label on the appliance, use the information on
the label.
Total Connected Load
Gas Supply Requirements
• Be certain that the range being installed is correct for
the gas service being provided (natural gas or LP gas).
Check your local building codes for the proper method
of installation. In the absence of local codes, this
appliance should be installed in accordance with the
National Fuel Gas Code ANSI Z223.1/NFPA 54.
An external manual shut-off valve must be installed
between the gas inlet and the range for the purpose of
turning on or shutting off gas to the appliance.
The cooktop comes from the factory with the regulator
installed, Use only the installed regulator, The inlet
accommodates a 3/4" gas line, The range ships with a
1/2" to 3/4" adapter connected to the regulator,
Manifold
Gas Pressure* Min. Gas Supply Max. Input
Type (WC) Pressure (WC) Pressure
Natural 5" 6" 1/2 p.s.i.
LP 10" 11" 1/2 p.s.i.
Gas Supply Requirements
* The gas supply pressure for testing the regulator setting
shall be at least 1 inch water column (249Pa) above the
specified manifold pressure.
IMPORTANT: The information above is for reference only.
If the above data does not agree with the product data
label, use the data on the product data label on top of the
kick plate below the door (remove the door according to the
instructions on page 9 to view it).
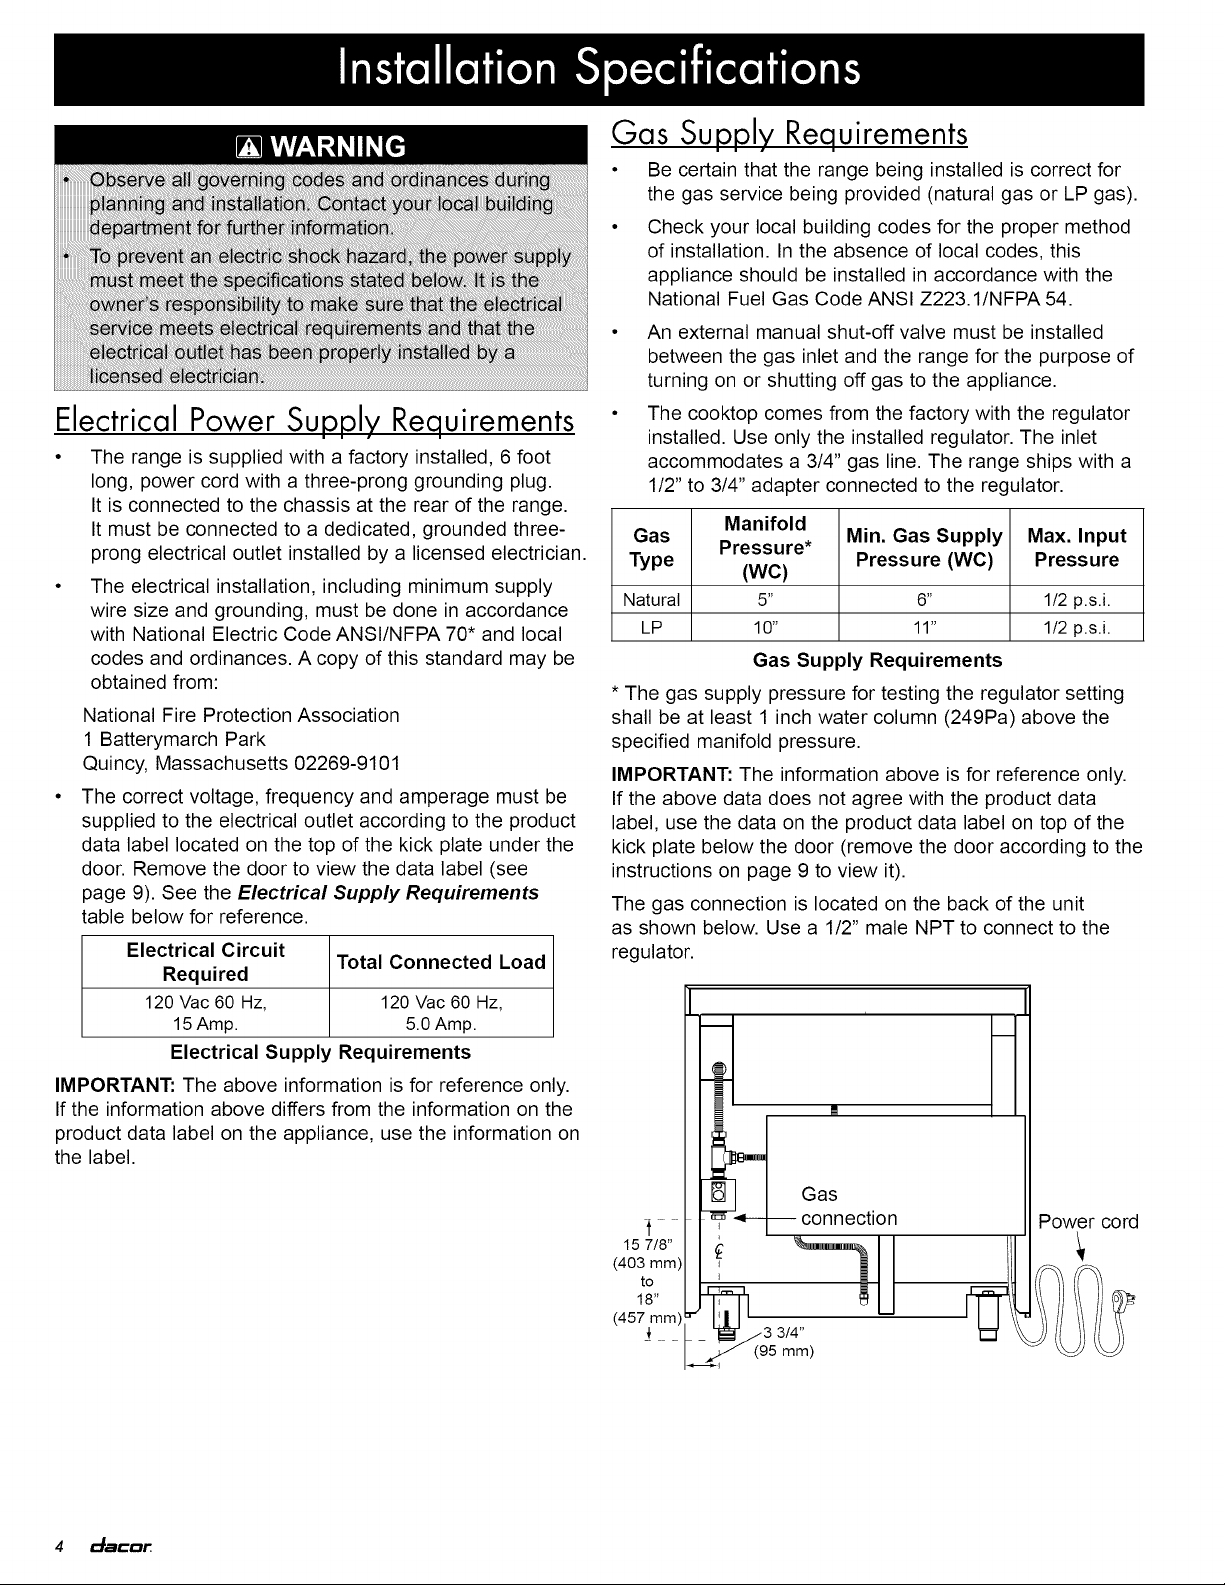
The gas connection is located on the back of the unit
as shown below. Use a 1/2" male NPT to connect to the
regulator.
.
I
4 _acar
15 7/8"
(403 mm)
to
18"
(457jm m)
Gas
[_, _-_, connection
I-
Power cord
 Loading...