

Page 1
Contemporary Style Pro Range
DOP48C86D**/DOP36C86D**
User Manual
DG68-01507A-00
FULL_DOP36C86DLSDA_DG68-01507A-00_EN+MES+CFR.indb 1FULL_DOP36C86DLSDA_DG68-01507A-00_EN+MES+CFR.indb 1 2023-02-23 오후 5:08:482023-02-23 오후 5:08:48
Page 2
WARNING
Never Operate the Top Surface Cooking Section of this Appliance
Unattended
• Failure to follow this warning statement could result in fire,
explosion, or burn hazard that could cause property damage,
personal injury, or death.
• If a fire should occur, keep away from the appliance and
immediately call your fire department.
DO NOT ATTEMPT TO EXTINGUISH AN OIL / GREASE FIRE WITH
WATER.
WARNING : If the information in this manual is not followed
exactly, a fire or explosion may result causing property damage,
personal injury or death.
• DO NOT store or use gasoline or other flammable vapors and
liquids in the vicinity of this or any other appliance.
• WHAT TO DO IF YOU SMELL GAS
- DO NOT try to light any appliance.
- DO NOT touch any electrical switch.
- DO NOT use any phone in your building.
- Immediately call your gas supplier from a neighbor’s phone.
Follow the gas supplier’s instructions.
- If you cannot reach your gas supplier, call the fire department.
• Installation and service must be performed by a qualified
installer, service agency or the gas supplier.
English2
FULL_DOP36C86DLSDA_DG68-01507A-00_EN+MES+CFR.indb 2FULL_DOP36C86DLSDA_DG68-01507A-00_EN+MES+CFR.indb 2 2023-02-23 오후 5:08:492023-02-23 오후 5:08:49
Page 3
ANTI-TIP DEVICE
WARNING
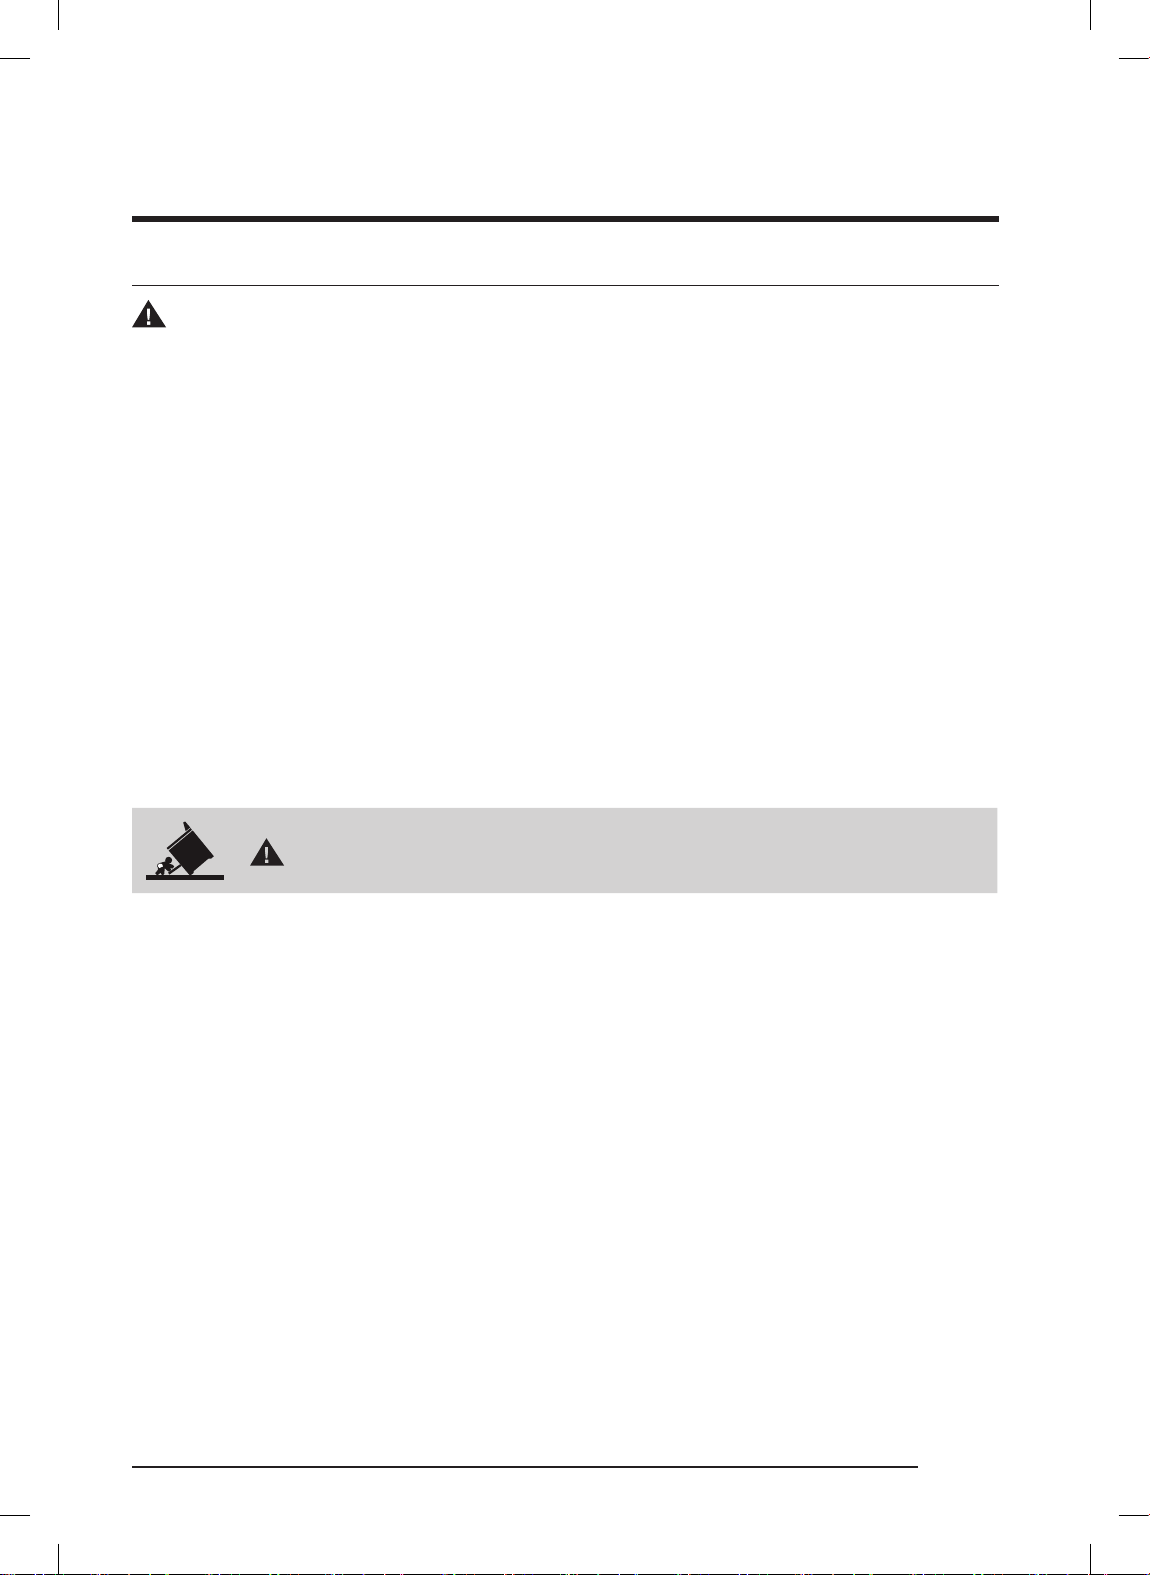
To reduce the risk of tipping the range, the range must be secured by a
properly installed Anti-Tip device. AFTER THE RANGE HAS BEEN INSTALLED,
CONFIRM THAT THE ANTI-TIP DEVICE HAS BEEN PROPERLY INSTALLED AND
VERIFY THAT THE ANTI-TIP DEVICE IS PROPERLY ENGAGED. Refer to the
installation manual for instructions.
a) If the anti-tip device is not installed, a child or adult can tip the range and
be killed.
b) Verify the anti-tip device has been properly installed and engaged at the
rear right (or rear left) of the range bottom.
c) If you move the range and then move it back into place, ensure the anti-
tip device is re-engaged at the right or left rear of the range bottom.
d) Do not operate the range without the anti-tip device in place and engaged.
Failure to do so can result in death or serious burns to children or adults.
WARNING
Do not step, lean, or sit on the oven door of the range. You can cause the
range to tip, resulting in burns or serious injuries.
Confirm that the Anti-Tip device is installed properly. Then, to verify that
the Anti-Tip device is engaged, grasp the top rear edge of the range and
carefully attempt to tilt it forward. The Anti-Tip device should prevent the
range from tilting forward more than a few inches.
If you pull the range out from the wall for any reason, make sure the anti-tip
device is properly engaged when you push the range back against the wall.
If it is not, there is a risk of the range tipping over and causing injury if you
or a child stand, sit or lean on an open door.
Never completely remove the leveling legs. If you remove the leveling legs,
the range will not be secured to the anti-tip device properly.
English 3
FULL_DOP36C86DLSDA_DG68-01507A-00_EN+MES+CFR.indb 3FULL_DOP36C86DLSDA_DG68-01507A-00_EN+MES+CFR.indb 3 2023-02-23 오후 5:08:492023-02-23 오후 5:08:49
Page 4

Regulatory Notice
1. Radio Apparatus Notice
CAUTION
Any changes or modifications not expressly approved by the party
responsible for compliance could void the user’s authority to operate
the equipment.
The remote enable equipment installed on this product complies
with Part 15 of FCC Rules and Innovation, Science and Economic
Development Canada’s license-exempt RSS(s). Operation is Subject to
following two conditions:
1) This equipment may not cause harmful interference, and
2) This equipment must accept any interference received including
interference that cause undesired operation.
For products available in the US/Canadian markets, only channels
1~11 are available. You cannot select any other channels.
1. Radio Apparatus STATEMENT:
This equipment has been tested and found to comply within the
limits for a Class B digital device, pursuant to part 15 of the FCC
Rules and Canadian ICES-003. These limits are designed to provide
reasonable protection against harmful interference in a residential
installation.
This equipment generates, uses, and can radiate radio frequency
energy and, if not installed and used in accordance with
the instructions, may cause harmful interference to radio
communications. However, there is no guarantee that interference
will not occur in a particular installation. If this equipment does
cause harmful interference to radio or television reception, which
can be determined by turning the equipment off and on, the user is
encouraged to try to correct the interference by one or more of the
following measures:
English4
FULL_DOP36C86DLSDA_DG68-01507A-00_EN+MES+CFR.indb 4FULL_DOP36C86DLSDA_DG68-01507A-00_EN+MES+CFR.indb 4 2023-02-23 오후 5:08:492023-02-23 오후 5:08:49
Page 5

• Reorienting or relocating the receiving antenna
• Increasing the separation between the equipment and receiver
• Connecting the equipment to an outlet that is on a different circuit
than the radio or TV
• Consulting the dealer or an experienced radio/TV technician for
help.
RADIATION EXPOSURE STATEMENT:
This equipment complies with FCC and IC RSS-102 radiation exposure
limits set forth for an uncontrolled environment. This equipment
should be installed and operated so there is at least 8 inches (20 cm)
between the radiator and your body. This device and its antenna(s)
must not be co-located or operated in conjunction with any other
antenna or transmitter.
English 5
FULL_DOP36C86DLSDA_DG68-01507A-00_EN+MES+CFR.indb 5FULL_DOP36C86DLSDA_DG68-01507A-00_EN+MES+CFR.indb 5 2023-02-23 오후 5:08:492023-02-23 오후 5:08:49
Page 6
To Our Valued Customer:
Congratulations on your purchase of the very latest in Dacor products! Our unique
combination of features, style and performance make us a great addition to your home.
In order to familiarize yourself with the controls, functions and full potential of your new
Dacor Appliance, read this use and care manual thoroughly, beginning with the Before you
begin section.
All Dacor appliances are designed and manufactured with quality and pride, while working
within the framework of our company value. Should you ever experience a problem with
your product, please first check the Troubleshooting section of this manual for guidance. It
provides useful suggestions and remedies prior to calling for service.
Valuable customer input helps us to continuously improve our products and services, so
please feel free to contact our Customer Service Team for assistance with any of your
product support needs.
Dacor Customer Assurance
• USA
Samsung Electronics America, Inc.
85 Challenger Road
Ridgefield Park, NJ 07660
• Canada
Samsung Electronics Canada Inc.
2050 Derry Road West, Mississauga,
Ontario L5N 0B9 Canada
Telephone: 833-353-5483(USA), 844-509-4659(Canada)
Hours of Operation: Mon – Fri, 8:00 a.m. to 8:00 p.m. Pacific Time
Website: www.dacor.com
Thank you for choosing Dacor for your home. We are a company built by families for
families and we are dedicated to serving yours. We are confident that your new Dacor
product will deliver a high level of performance and enjoyment for many years to come.
Sincerely,
English6
FULL_DOP36C86DLSDA_DG68-01507A-00_EN+MES+CFR.indb 6FULL_DOP36C86DLSDA_DG68-01507A-00_EN+MES+CFR.indb 6 2023-02-23 오후 5:08:492023-02-23 오후 5:08:49
Page 7

Contents
Before You Begin 9
Important Notes to the Owner 9
Energy-Saving Tips 9
Using the Water Reservoir 9
About the Oven Vent 11
Important safety instructions 12
Read all instructions before using this appliance 12
Symbols used in this manual 12
California Proposition 65 Warning 13
Commonwealth of Massachusetts 13
General safety 13
Fire safety 14
Gas safety 15
Electrical and grounding safety 16
Installation safety 17
Location safety 18
Cooktop safety 19
Oven safety 21
Self-cleaning oven safety 21
Contents
Overview 22
External Features 22
Control Panel (DOP48C86D**) 24
Control Panel (DOP36C86D**) 25
Display (DOP48C86D** Only) 26
Display (DOP36C86D** Only) 27
What is Included 28
Using the Cooktop 30
About the Burners 30
About Burner Ignition 31
Using the Proper Cookware 32
Special Cooktop Features 33
About the Grates 34
Griddle (Additional purchase Accessories) 35
About the Wok Ring 37
Using the Basic Oven 38
Basic Settings: Clock, Date&Time, Language 38
Using the Oven Racks 39
Using the Gliding Rack 40
Using the Temp Probe 42
About Oven Functions 43
Setting the Cooking Mode 47
English 7
FULL_DOP36C86DLSDA_DG68-01507A-00_EN+MES+CFR.indb 7FULL_DOP36C86DLSDA_DG68-01507A-00_EN+MES+CFR.indb 7 2023-02-23 오후 5:08:492023-02-23 오후 5:08:49
Page 8

Contents
Contents
Setting the Cooking Temperature 47
Basic Baking and Broiling Instructions 48
Using the Kitchen Timer 51
Using Timed Cooking 53
Using Delay Start 54
Using the Cleaning Features 55
Using the Sabbath Feature 62
Using the Special Functions 64
Using Chef Mode 66
Using iQ Control 68
Starting the Oven Remotely 68
Using Control Lockout 69
Using Settings 69
Using the Steam Oven 74
Using the Oven Racks 74
About Oven Functions 75
Basic Baking and Broiling Instructions 79
Using the Special Functions 83
Cooktop Maintenance 85
Cleaning the Cooktop Surface 85
Cleaning Stainless-Steel Surfaces 85
Cleaning the Control Knobs 86
Disassembling / Assembling the Burners and Grates 86
About Burner Caps and Heads 87
About Burner Bases 87
About Electrodes 88
About the Grates and Wok Ring 88
Assembling the Burner Caps and Heads 89
Oven Maintenance 91
Oven Care and Cleaning 91
Removing/Re-installing the Oven Door 97
Changing the Oven Light 98
Troubleshooting 99
Warranty and Service 104
Warranty 104
Appendix 106
Question 106
Model name & serial number 106
Open Source Announcement 107
English8
FULL_DOP36C86DLSDA_DG68-01507A-00_EN+MES+CFR.indb 8FULL_DOP36C86DLSDA_DG68-01507A-00_EN+MES+CFR.indb 8 2023-02-23 오후 5:08:492023-02-23 오후 5:08:49
Page 9
Before You Begin
Important Notes to the Owner
Installer
• For best results, read this manual
thoroughly before starting the
installation.
• Leave this manual with the user.
• Write the range’s model/serial numbers
in this manual for service/maintenance
use.
User
Keep this manual for personal/
professional use.
Clean the oven fully before its first use. Then, ventilate the kitchen well, remove the
accessories and set the oven to Bake at 400 °F for 1 hour. There will be a distinct odor.
This is normal.
Before You Begin
Energy-Saving Tips
• During cooking, the oven door should be closed except when you turn food. Leaving
the door closed also maintains oven temperature, which saves energy.
• If cooking longer than 30 minutes, you can switch the oven off 5-10 minutes before
the cooking is done. The residual heat finishes cooking the food.
• Plan oven use to avoid turning the oven off between cooking tasks.
• When possible, cook multiple items simultaneously.
Using the Water Reservoir
This feature is used with steam functions: Steam Bake, Steam Roast, GreenClean™,
Steam, etc. It is also used for removing water scale from the oven walls, especially after
using steam functions. Fill it with water before use.
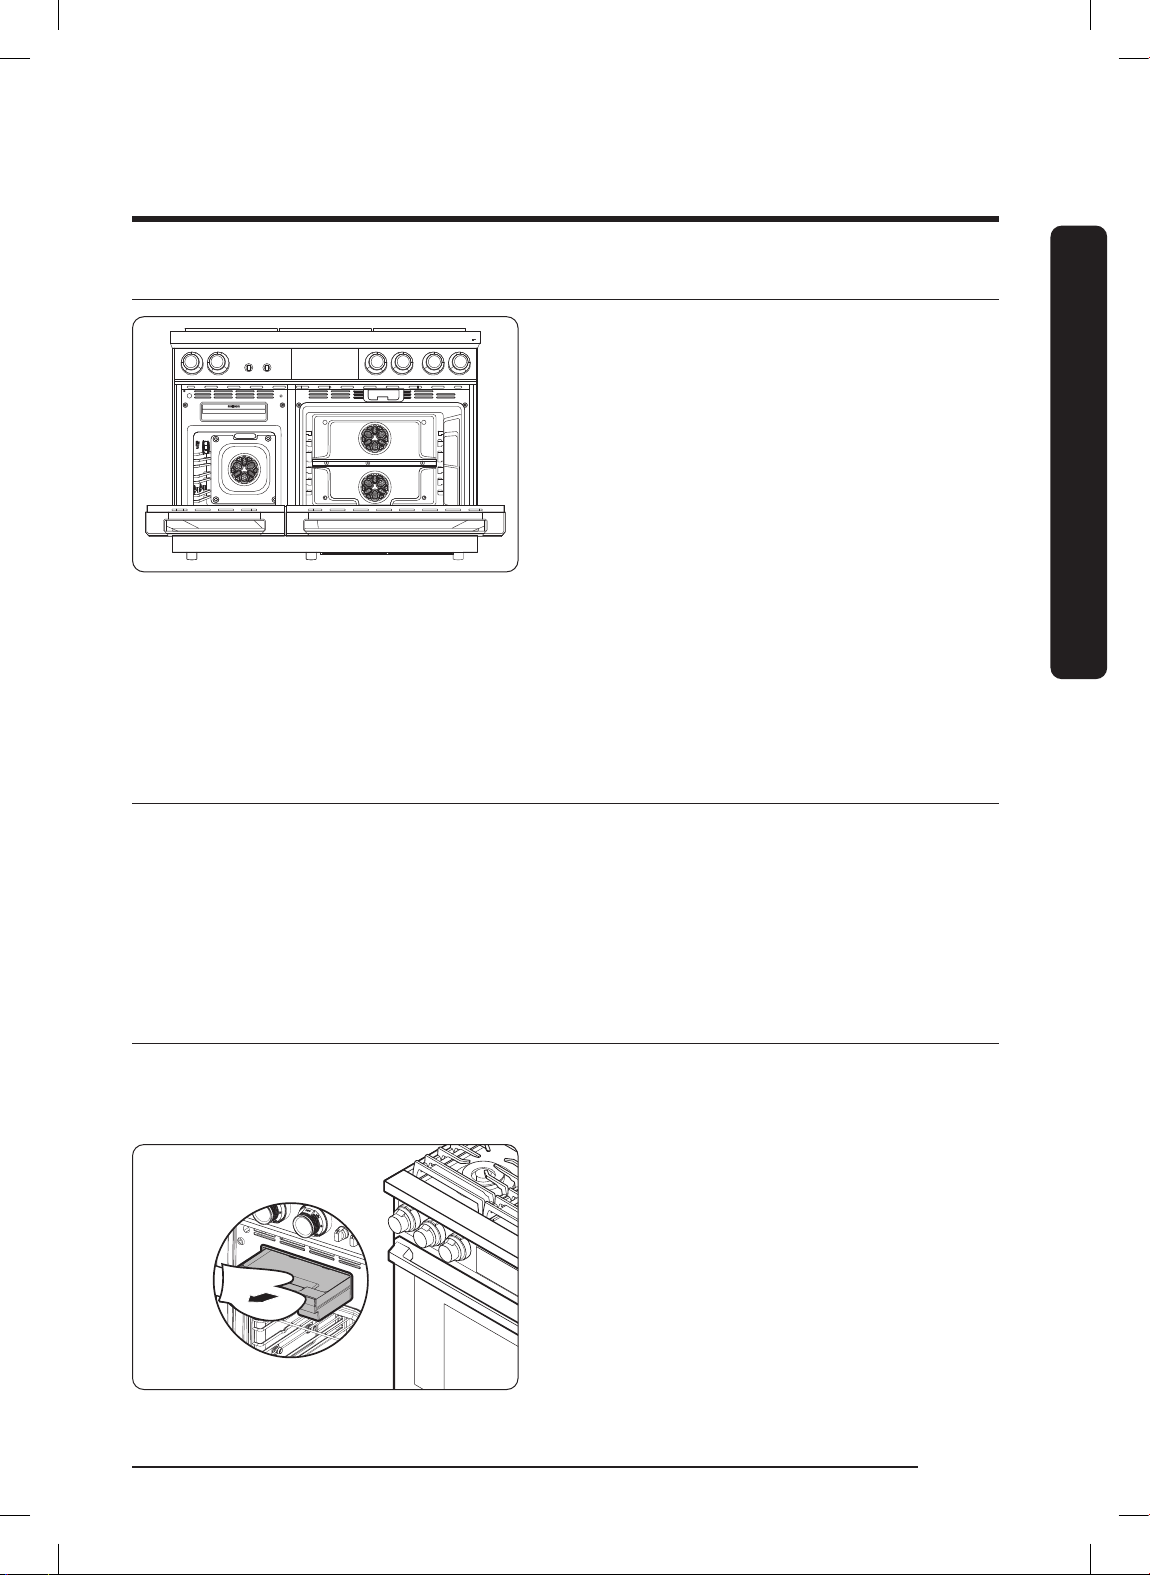
1. Pull the water reservoir out.
48" range: the reservoir is on the left
side, above the oven. To remove this
reservoir, grasp the handle and pull.
36" range: the reservoir is on the
right side, above the oven. To remove
this reservoir, on the control panel,
press OPEN/CLOSE RESERVOIR. Pull
out the partially ejected reservoir.
English 9
FULL_DOP36C86DLSDA_DG68-01507A-00_EN+MES+CFR.indb 9FULL_DOP36C86DLSDA_DG68-01507A-00_EN+MES+CFR.indb 9 2023-02-23 오후 5:08:492023-02-23 오후 5:08:49
Page 10
Before You Begin
1.0L
Max
0.75L
0.5L
NOTE
• The reservoir may be hot from oven use. If so, grasp the reservoir with an oven
Before You Begin
mitt.
• The reservoir can be fully removed from the range. Check the water level and add
water as needed. You may add water without removing the reservoir completely.
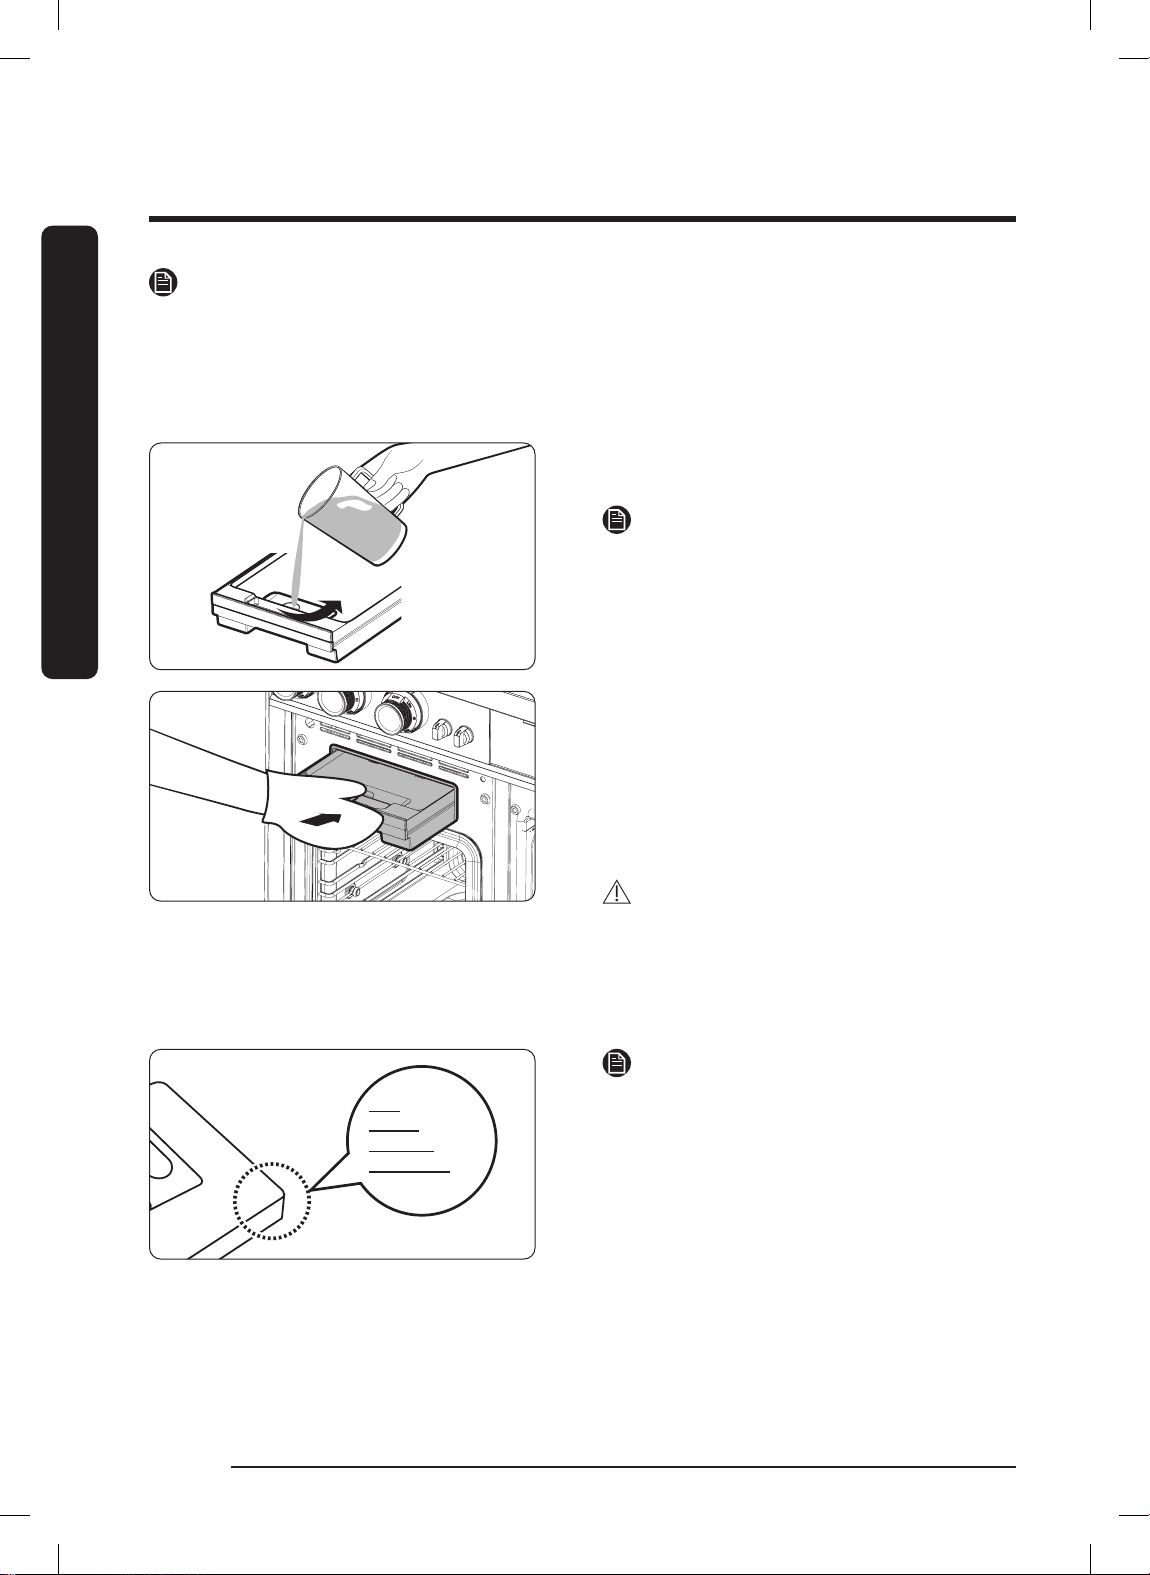
2. Open the reservoir cap and then fill
the reservoir with tap water.
NOTE
You can open the reservoir by removing
the rubber cap or by removing the clear
plastic top. To avoid spilling water, filling
water through the hole after removing
rubber cap is recommended.
3. Replace the cap or the clear plastic.
4. 48" range: Push the reservoir fully
into the opening;
36" range: Slide the reservoir into
its slot and touch OPEN/CLOSE
RESERVOIR.
CAUTION
The reservoir and slot heat up during
cooking. Wear oven mitts to handle the
reservoir during and right after cooking.
5. Close the oven door.
NOTE
Do not exceed the max line. Maximum
reservoir capacity by model:
• DOP48C86D**: 1500 ml
• DOP36C86D**: 650 ml
English10
FULL_DOP36C86DLSDA_DG68-01507A-00_EN+MES+CFR.indb 10FULL_DOP36C86DLSDA_DG68-01507A-00_EN+MES+CFR.indb 10 2023-02-23 오후 5:08:502023-02-23 오후 5:08:50
Page 11
NOTE
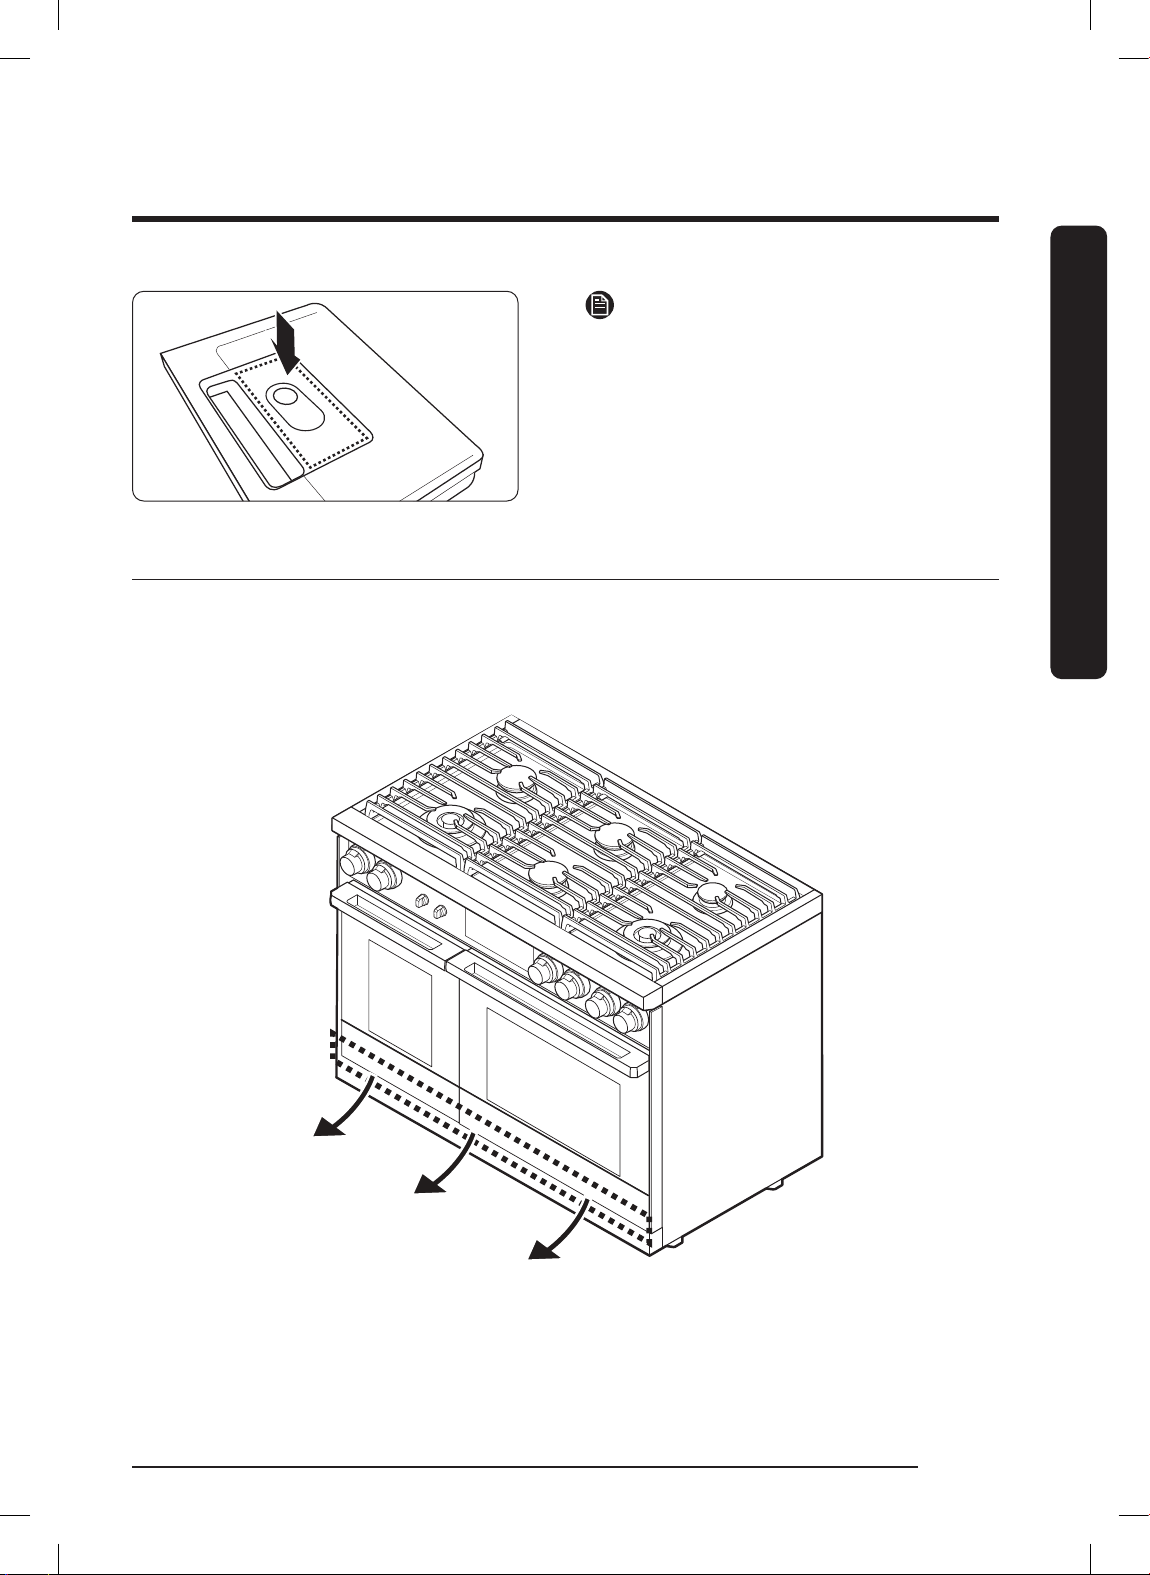
Close the cap and upper portion of the
water reservoir before using the oven.
About the Oven Vent
The oven vent is under the oven door. Proper air circulation prevents burner
combustion problems and ensures good performance. Do not block the vent or
surrounding area. Be cautious near the vent. Steam can burn skin and melt certain
items.
Before You Begin
English 11
FULL_DOP36C86DLSDA_DG68-01507A-00_EN+MES+CFR.indb 11FULL_DOP36C86DLSDA_DG68-01507A-00_EN+MES+CFR.indb 11 2023-02-23 오후 5:08:512023-02-23 오후 5:08:51
Page 12
Important safety instructions
Read all instructions before using this appliance
• All electrical and gas equipment with moving parts can be dangerous. Be sure to read
Important safety instructions
the Important Safety Information in this manual. The instructions must be followed to
minimize the risk of property damage, injury, or death.
• Keep this manual in a handy place so you can refer to it as needed.
Symbols used in this manual
WARNING
Hazards or unsafe practices that may result in severe personal injury or death.
CAUTION
Hazards or unsafe practices that may result in electric shock, personal injury, or property
damage.
NOTE
Useful tips and instructions
These warning symbols are intended to prevent property damage and personal injury.
Follow them explicitly.
English12
FULL_DOP36C86DLSDA_DG68-01507A-00_EN+MES+CFR.indb 12FULL_DOP36C86DLSDA_DG68-01507A-00_EN+MES+CFR.indb 12 2023-02-23 오후 5:08:512023-02-23 오후 5:08:51
Page 13
California Proposition 65 Warning
WARNING
Cancer and Reproductive Harm - www.P65Warnings.ca.gov
Commonwealth of Massachusetts
This product must be installed by a licensed plumber or gas fitter qualified or licensed by
the State of Massachusetts. When using ball-type gas shut-off valves, you must use the
T-handle type. Multiple flexible gas lines must not be connected in series.
General safety
WARNING
To reduce the risk of fire, electric shock, personal injuries, and/or death, observe the
following precautions.
• Do not touch any surface, component, or mechanism of the range during or
immediately after cooking.
• Learn where and how to shut off the valve that feeds gas to the range.
• Make sure the anti-tip device is properly installed on the range. See the installation
instructions for more information.
• Do not let children near the range. Do not let children go into the range or onto the
range. Do not let children play with the range or any part(s) of the range. Do not leave
children unattended in the kitchen when the range is in use. For children’s safety, we
recommend utilizing the control/door lockout feature.
• Remove all packaging before operating the range to keep this material from catching
fire. Keep all packaging away from children. Properly dispose of packaging as soon as
the range is unpacked.
• Do not keep objects of interest to children on or around the range.
• Do not operate the range if it is damaged in any way, if it malfunctions, or is missing
parts.
• Do not use the range as a space heater. Use the range for cooking only.
• Do not use oven cleaners or oven liners in or around any part of the oven.
• Use only dry pot holders.
• Do not use the range to heat sealed food containers.
• Do not strike the oven glass.
Important safety instructions
English 13
FULL_DOP36C86DLSDA_DG68-01507A-00_EN+MES+CFR.indb 13FULL_DOP36C86DLSDA_DG68-01507A-00_EN+MES+CFR.indb 13 2023-02-23 오후 5:08:512023-02-23 오후 5:08:51
Page 14

Important safety instructions
• When disposing of the range, cut off the power cord and remove the door to prevent
children and animals from getting trapped.
Important safety instructions
• Unplug the range before service/maintenance.
• Make sure all meat and poultry is cooked thoroughly. Meat should always be cooked
to an internal temperature of 160 °F (71 °C). Poultry should always be cooked to an
internal temperature of 180 °F (82 °C).
• Do not make any attempt to operate the electric ignition range burners during an
electrical power failure.
• Keep the appliance area clear of combustible materials, gasoline, and other flammable
vapors and liquids.
• Teach children not to touch or play with the controls or any part of the range. We
recommend you utilize the control / door lockout feature to reduce the risk of misuse
by children.
• An air curtain or other overhead range hood, which operates by blowing a downward
airflow onto a range, shall not be used in conjunction with a gas range unless the
hood and range have been designed and tested in accordance with the Standard
for Domestic Gas Ranges, ANSI Z21.1 • CSA1.1, and listed by an independent testing
laboratory for combination use.
Fire safety
WARNING
To reduce the risk of fire, electric shock, personal injury, or death, observe these
precautions:
• Do not store/place/use combustible materials (e.g., paper, plastic, pot holders, linens,
gasoline, alcohol) near the range.
• Do not wear loose fitting or hanging garments while using the range.
• To avoid grease buildup, regularly clean the vents.
• Do not let pot holders or other flammable materials touch a heating element. Do not
use a towel or other bulky cloth in place of a pot holder.
• Do not douse a grease fire with water. Instead, turn off the heat source, and smother
the fire with a tight-fitting lid, or use a multi-purpose, dry-chemical or foam
extinguisher.
• Do not heat unopened food containers. The buildup of pressure may cause the
containers to burst and result in injury.
• Do not use the oven for storage. Paper and other flammable items stored in the oven
can ignite.
• Do not put any combustible material or items around the range.
English14
FULL_DOP36C86DLSDA_DG68-01507A-00_EN+MES+CFR.indb 14FULL_DOP36C86DLSDA_DG68-01507A-00_EN+MES+CFR.indb 14 2023-02-23 오후 5:08:512023-02-23 오후 5:08:51
Page 15

Gas safety
WARNING
To reduce the risk of fire, electric shock, personal injury, or death, observe these
precautions:
If you smell gas:
• Close the valve and do not use the range.
• Do not light a match, candle, or cigarette.
• Do not turn on any gas or electric appliances.
• Do not touch any electrical switches or plug in a power cord.
• Do not use any phone in your building.
• Evacuate everyone from the building.
• Immediately call your gas supplier from a neighbor’s phone. Follow the gas supplier’s
instructions.
• If you cannot reach your gas supplier, call the fire department.
Checking for gas leaks
Leak-testing the appliance must be done according to the manufacturer’s instructions.
Do not use a flame to check for gas leaks. Use a brush to spread a soap-and-water solution
around the area you are checking. If there is a gas leak, small bubbles will appear in the
solution. When not sure, call for professional help.
Important safety instructions
English 15
FULL_DOP36C86DLSDA_DG68-01507A-00_EN+MES+CFR.indb 15FULL_DOP36C86DLSDA_DG68-01507A-00_EN+MES+CFR.indb 15 2023-02-23 오후 5:08:512023-02-23 오후 5:08:51
Page 16

Important safety instructions
Electrical and grounding safety
WARNING
Important safety instructions
To reduce the risk of fire, electric shock, personal injury, or death, observe these
precautions:
• Plug the range into a grounded 4-prong outlet.
• Do not remove the ground prong.
• Do not use an adapter or an extension cord.
• Do not use a damaged power plug, power cord, or loose power outlet.
• Do not modify the power plug, cord, or outlet.
• Do not put a fuse in a neutral or ground circuit.
• Use a dedicated 240 Vac, 60Hz, 50 Amp breaker for the 48" range and a 40 Amp
breaker for the 36" range. A time-delay fuse or circuit breaker is recommended.
Do not plug more than one appliance into this circuit.
• Do not connect the ground wire to plastic plumbing lines, gas lines, or hot water pipes.
• This range must be Earth grounded. If the range malfunctions or breaks down,
grounding reduces the risk of electric shock by providing a safe path for the current.
This range’s power cord has a grounding plug, which must be firmly plugged into an
outlet that is properly installed and grounded according to local regulations. If you
are not sure your electrical outlet is properly grounded, have it checked by a licensed
electrician.
• The range is supplied with a 4-pronged grounded plug. This cord must be plugged into
a mating, grounded 4-prong outlet that meets all local codes and ordinances. If codes
permit the use of a separate ground wire, we recommend that a qualified electrician
determine the proper path for this ground wire.
• Electrical service to the range must conform to local codes. Barring local codes,
it should meet the latest ANSI/NFPA No. 70 – Latest Revision (for the U.S.) or the
Canadian Electrical Code CSA C22.1 – Latest Revisions.
• The range owner shall ensure that the proper electrical service is provided for the
range.
English16
FULL_DOP36C86DLSDA_DG68-01507A-00_EN+MES+CFR.indb 16FULL_DOP36C86DLSDA_DG68-01507A-00_EN+MES+CFR.indb 16 2023-02-23 오후 5:08:512023-02-23 오후 5:08:51
Page 17

Installation safety
WARNING
To reduce the risk of fire, electric shock, personal injury, or death, observe these
precautions:
• The appliance should be installed and properly grounded by a qualified installer, as
specified in the Installation Instructions. Adjustments and service should be performed
only by qualified installer or service technician.
• Do not try to service/modify/replace the appliance or any part of it unless specifically
recommended in this manual. All other service should be performed by a qualified
technician.
• Use only new, flexible connectors when installing the appliance.
• Due to the size and weight of the appliance, have two or more people move the
appliance.
• Remove all tape and packaging materials.
• After unpacking the appliance, remove all accessories from inside and around it.
(Cautiously handle the heavy grates and griddles.)
• Make sure no parts came loose during shipping.
• Make sure your rangetop is correctly installed / adjusted by a qualified service
technician or installer for the type of gas (natural or LP) you will use.
• Installation of this appliance must conform with local codes or, in the absence of
local codes, with the National Fuel Gas Code, ANSI Z223.1/NFPA.54, latest edition. In
Canada, installation must conform with the current Natural Gas Installation Code, CAN/
CGA-B149.1, or the current Propane Installation Code, CAN/CGA-B149.2, and with local
codes where applicable. This rangetop has been design-certified by ETL according to
ANSI Z21.1, latest edition, and Canadian Gas Association according to CAN/CGA-1.1,
latest edition.
Important safety instructions
English 17
FULL_DOP36C86DLSDA_DG68-01507A-00_EN+MES+CFR.indb 17FULL_DOP36C86DLSDA_DG68-01507A-00_EN+MES+CFR.indb 17 2023-02-23 오후 5:08:512023-02-23 오후 5:08:51
Page 18

Important safety instructions
Location safety
WARNING
Important safety instructions
To reduce the risk of fire, electric shock, personal injuries, and/or death, observe the
following precautions.
• This range is for indoor, household use only. Do not install the range outdoors or
anywhere that it will be exposed to weather/water or wind/strong drafts.
• Do not install the range in a place which is exposed to a strong draft.
• Select a level, well-constructed floor that can support the range’s weight. Synthetic
flooring, such as linoleum, must withstand 180 °F (82 °C) temperatures without
shrinking, warping, or discoloring. Do not install the range directly over interior kitchen
carpeting unless a sheet of ¼ inch plywood or a similar insulator is placed between the
range and carpeting.
• For the range to ventilate properly, make sure the range’s vents are not blocked or
covered, and that there is enough clearance at the top, back, sides, and underneath the
range. The vents allow the necessary exhaust for the range to operate properly with
correct combustion and get the good cooking result. Blocking or covering the vents
may cause incorrect combustion which could result in gas leaks and fire.
• Make sure the wall coverings around the range can withstand heat up to 200 °F (93 °C)
generated by the range.
• Cabinet storage above the surface of the range should be avoided. If cabinet storage
above the range is necessary, allow a minimum clearance of 30 inches (76.2 cm)
between the cooking surface and the bottom of the cabinets or install a range hood
that projects horizontally a minimum of 5 inches (12.7 cm) beyond the bottom of the
cabinets.
• Locate the range out of kitchen traffic paths and drafty locations to prevent poor air
circulation.
• If the range is located near a window, NEVER hang long curtains or paper blinds on
that window. They could blow over the surface burners and ignite, causing a fire
hazard.
English18
FULL_DOP36C86DLSDA_DG68-01507A-00_EN+MES+CFR.indb 18FULL_DOP36C86DLSDA_DG68-01507A-00_EN+MES+CFR.indb 18 2023-02-23 오후 5:08:512023-02-23 오후 5:08:51
Page 19

Cooktop safety
WARNING
To reduce the risk of fire, electric shock, personal injury, or death, observe these
precautions:
• Make sure all burners are off when not in use.
• Do not use aluminium foil to line the grates or any part of the cooktop. This can cause
carbon monoxide poisoning. Aluminum foil linings may also trap heat, causing a fire
hazard. Do not leave burners unattended on medium or high heat settings.
• Before igniting, make sure all burner caps are properly in place and all burners are
level.
• Always use the flame symbol position when igniting the burners and make sure the
burners have ignited. If ignition fails, turn the knob to OFF and wait for the gas to
dissipate before re-igniting the burner.
• When you set a burner to simmer, do not turn the knob quickly. Make sure the flame
stays on.
• To heat food, you must have a ventilation hood. When you heat food, the hood must be
on.
• Before removing or changing cookware, turn off the burners.
• Remove food and cookware immediately after cooking.
• Before removing any parts of the burner for cleaning, make sure the range is off and
completely cool.
• After cleaning the burner spreader, make sure it is completely dry before reassembling.
• Make sure the spark mark on the dual burner spreader is placed beside the electrode
when it is assembled.
• To avoid carbon monoxide poisoning, do not pour water into the cooktop well while
cleaning.
• Select cookware that is designed for cooktop cooking. Use recommended cookware no
larger than the cooktop grates.
• To avoid cookware discoloration, deformity, and/or carbon monoxide poisoning, do not
use cookware that is substantially larger than the grate.
• Make sure cookware handles are turned to the side or rear of the cooktop, but not over
other surface burners or the front edge of the cooktop.
• Do not stand directly over a pot while frying food.
• Always heat frying oils slowly, and watch as they heat. If you are frying foods at high
heat, carefully monitor the cooking process. If you are going to combine fats or oils
when frying, mix them before heating.
• Use a deep-fry thermometer when possible so you do not heat the oil beyond its
smoke point.
Important safety instructions
English 19
FULL_DOP36C86DLSDA_DG68-01507A-00_EN+MES+CFR.indb 19FULL_DOP36C86DLSDA_DG68-01507A-00_EN+MES+CFR.indb 19 2023-02-23 오후 5:08:512023-02-23 오후 5:08:51
Page 20

Important safety instructions
• Use a minimum amount of oil when shallow pan-frying or deep-frying. Do not fry
frozen, icy, cold, or wet food.
Important safety instructions
• Before moving cookware full of fats or oils, make sure it has completely cooled.
• To prevent delayed eruptive boiling, always allow heated liquids to stand at least 20
seconds after you have turned off the burner so that the temperature in the liquid can
stabilize. In the event of scalding, follow these first-aid instructions:
• Immerse the scalded area in cool water for at least 10 minutes.
• Do not apply any creams, oils, or lotions.
• Cover with a clean, dry cloth.
• Place pots in the center of the grate. Do not place a pot larger than 9” in diameter
on the rear burners. If you place an oversized pot in the wrong position, it might
disrupt necessary air circulation and make the flame on the burner sputter and burn
inefficiently.
• Do not wear loose or hanging garments when using the range. They could ignite and
burn you if they touch a surface burner.
• Never leave plastic items on the cooktop. Hot air from the vent can melt or ignite
plastic items or cause build up of dangerous pressure in closed plastic containers. The
melted plastic may clog the vents at the rear of the range. Clogged vents may cause
incorrect combustion which could result in gas leaks and fire. You may get severe
burns if you touch the surfaces near the vent while the oven is operating.
• Do not place portable appliances, or any other object other than cookware on the
cooktop. Damage or fire could occur if the cooktop is hot.
• Always make sure the controls are Off and the grates are cool before you remove them
to prevent any possibility of being burned.
• Do not put any combustible material or items around the range.
• Do not touch the burners when they are on. Turn off the burners when you change a
pan or pot.
English20
FULL_DOP36C86DLSDA_DG68-01507A-00_EN+MES+CFR.indb 20FULL_DOP36C86DLSDA_DG68-01507A-00_EN+MES+CFR.indb 20 2023-02-23 오후 5:08:512023-02-23 오후 5:08:51
Page 21

Oven safety
WARNING
To reduce the risk of fire, electric shock, personal injuries, and/or death, observe the
following precautions.
• Do not use the oven for non-cooking purposes such as drying clothes or storage. Use
the oven for cooking only.
• Make sure the oven racks are placed on the same level on each side.
• Do not damage, remove, or clean the door gasket.
• Do not spray water on the oven glass while the oven is on or just after you have
turned it off.
• Stand aside when opening the oven door.
• Keep the oven free from grease buildup.
• When repositioning the oven racks, make sure the oven is completely cool.
• Do not put plastic items inside the oven.
• To avoid damaging the burner control knobs or oven control, always bake and/or broil
with the oven door closed.
• Do not place meat too close to the broil element. Trim excess fat before broiling.
• When using cooking or roasting bags in the oven, follow the manufacturer’s directions.
• NEVER cover any slots, holes, or passages in the oven bottom or cover an entire rack
with material such as aluminum foil. Doing so blocks air flow through the oven and
may cause carbon monoxide poisoning. Aluminum foil linings may also trap heat,
causing a fire hazard.
Important safety instructions
Self-cleaning oven safety
WARNING
To reduce the risk of fire, electric shock, personal injuries, and/or death, observe the
following precautions.
• The self-cleaning feature operates the oven at temperatures high enough to burn away
food soils in the oven. The range is extremely hot during a self-cleaning cycle. Do not
touch any surfaces of the range during a self-cleaning cycle.
• Keep children away from the oven during a self-cleaning cycle.
• Before starting a self-cleaning cycle, remove all loose items from the oven, and wipe
down all oven surfaces.
• After a self-cleaning cycle, stand aside when opening the oven door.
• If the self-cleaning cycle malfunctions, turn off the oven, turn off the power breaker,
and contact a qualified service technician.
• Some birds are extremely sensitive to the fumes given off during the self-cleaning
cycle of any oven. Move birds to another well-ventilated room.
English 21
FULL_DOP36C86DLSDA_DG68-01507A-00_EN+MES+CFR.indb 21FULL_DOP36C86DLSDA_DG68-01507A-00_EN+MES+CFR.indb 21 2023-02-23 오후 5:08:512023-02-23 오후 5:08:51
Page 22
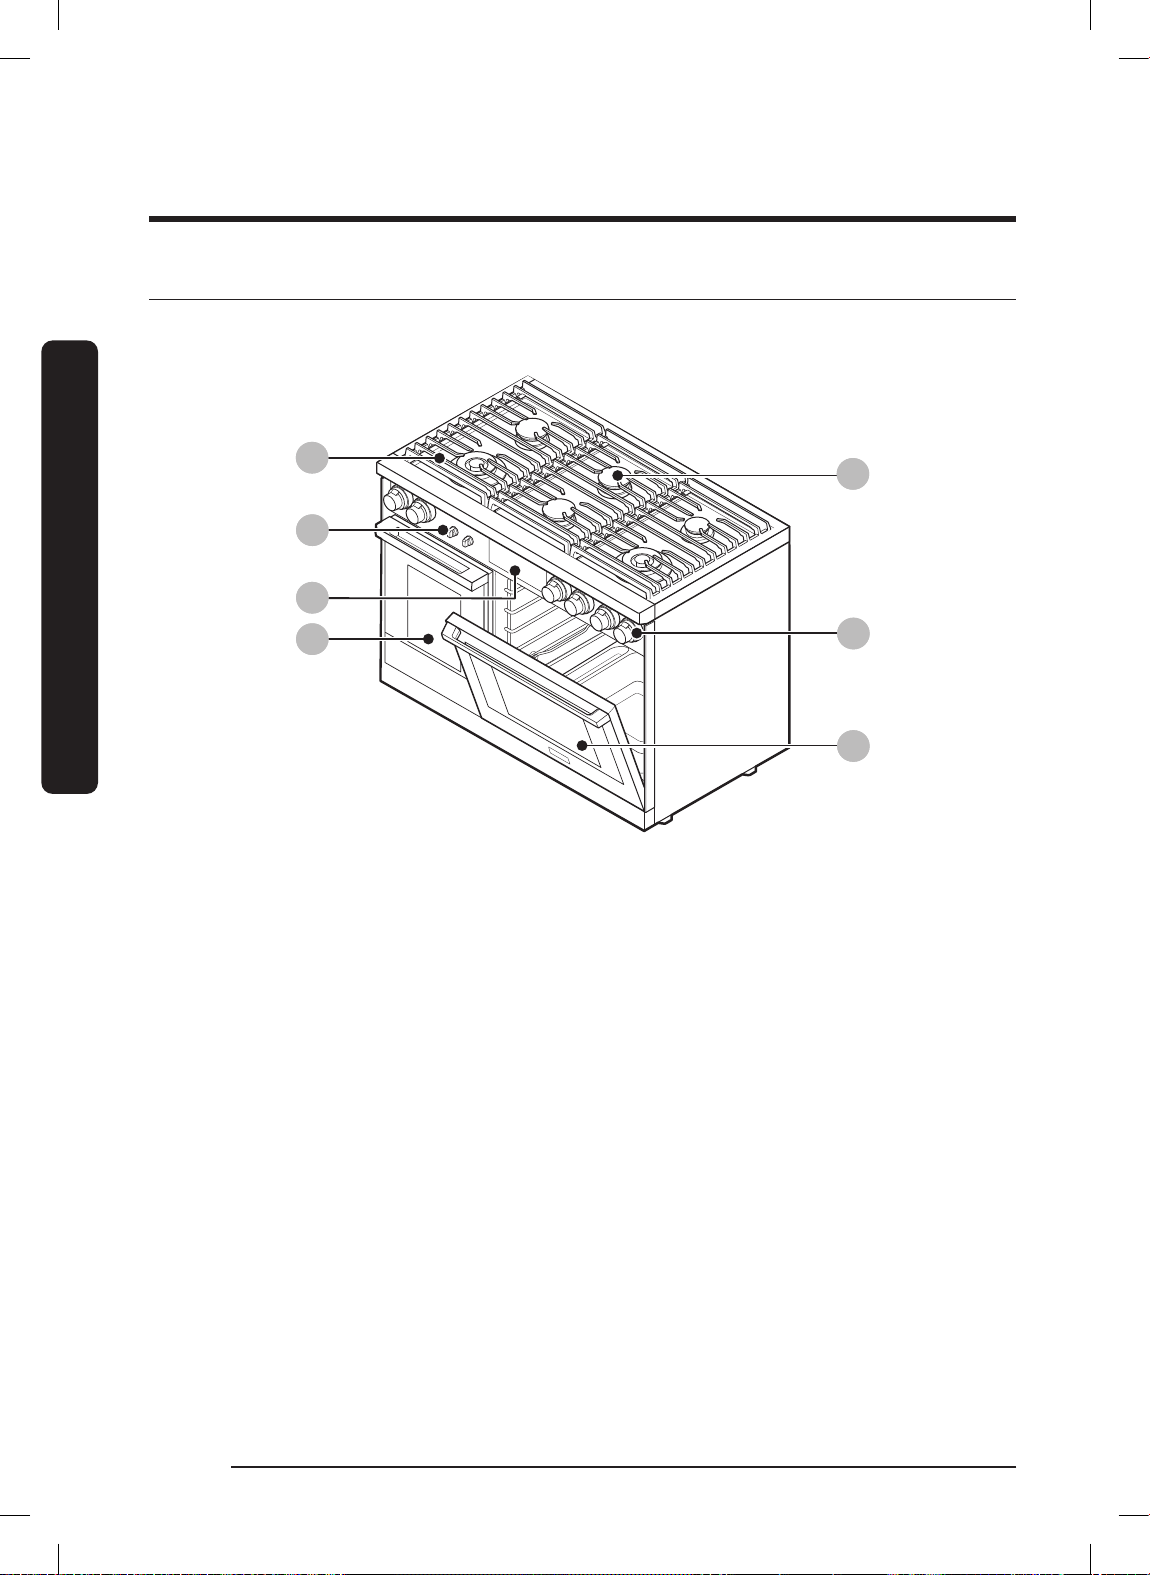
Overview
External Features
DOP48C86D**
Overview
01
05
06
03
01 Grate
02 Surface burners
03 Removable oven door
04 Surface burner knobs (6)
05 Knob (Manual oven lighting)
06 Control panel
02
04
03
English22
FULL_DOP36C86DLSDA_DG68-01507A-00_EN+MES+CFR.indb 22FULL_DOP36C86DLSDA_DG68-01507A-00_EN+MES+CFR.indb 22 2023-02-23 오후 5:08:512023-02-23 오후 5:08:51
Page 23
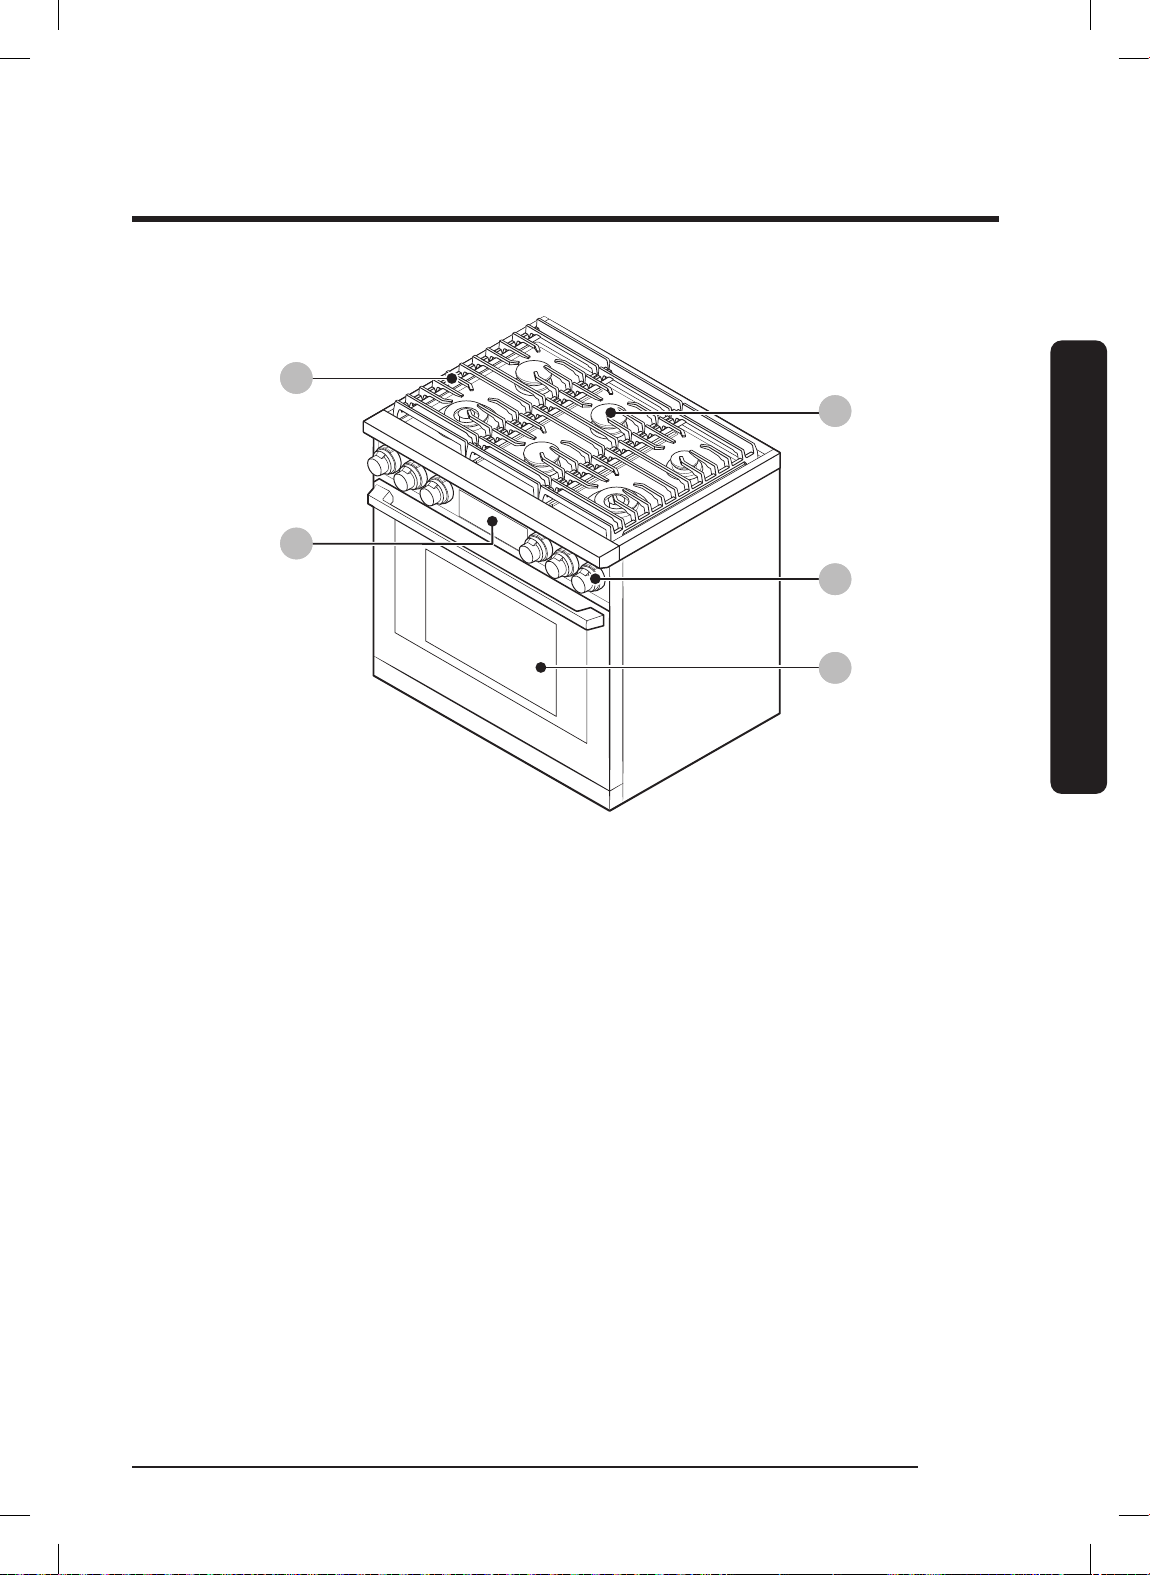
DOP36C86D**
01
02
Overview
05
04
03
01 Grate
02 Surface burners
03 Removable oven door
04 Surface burner knobs (6)
05 Control panel
English 23
FULL_DOP36C86DLSDA_DG68-01507A-00_EN+MES+CFR.indb 23FULL_DOP36C86DLSDA_DG68-01507A-00_EN+MES+CFR.indb 23 2023-02-23 오후 5:08:522023-02-23 오후 5:08:52
Page 24
Overview
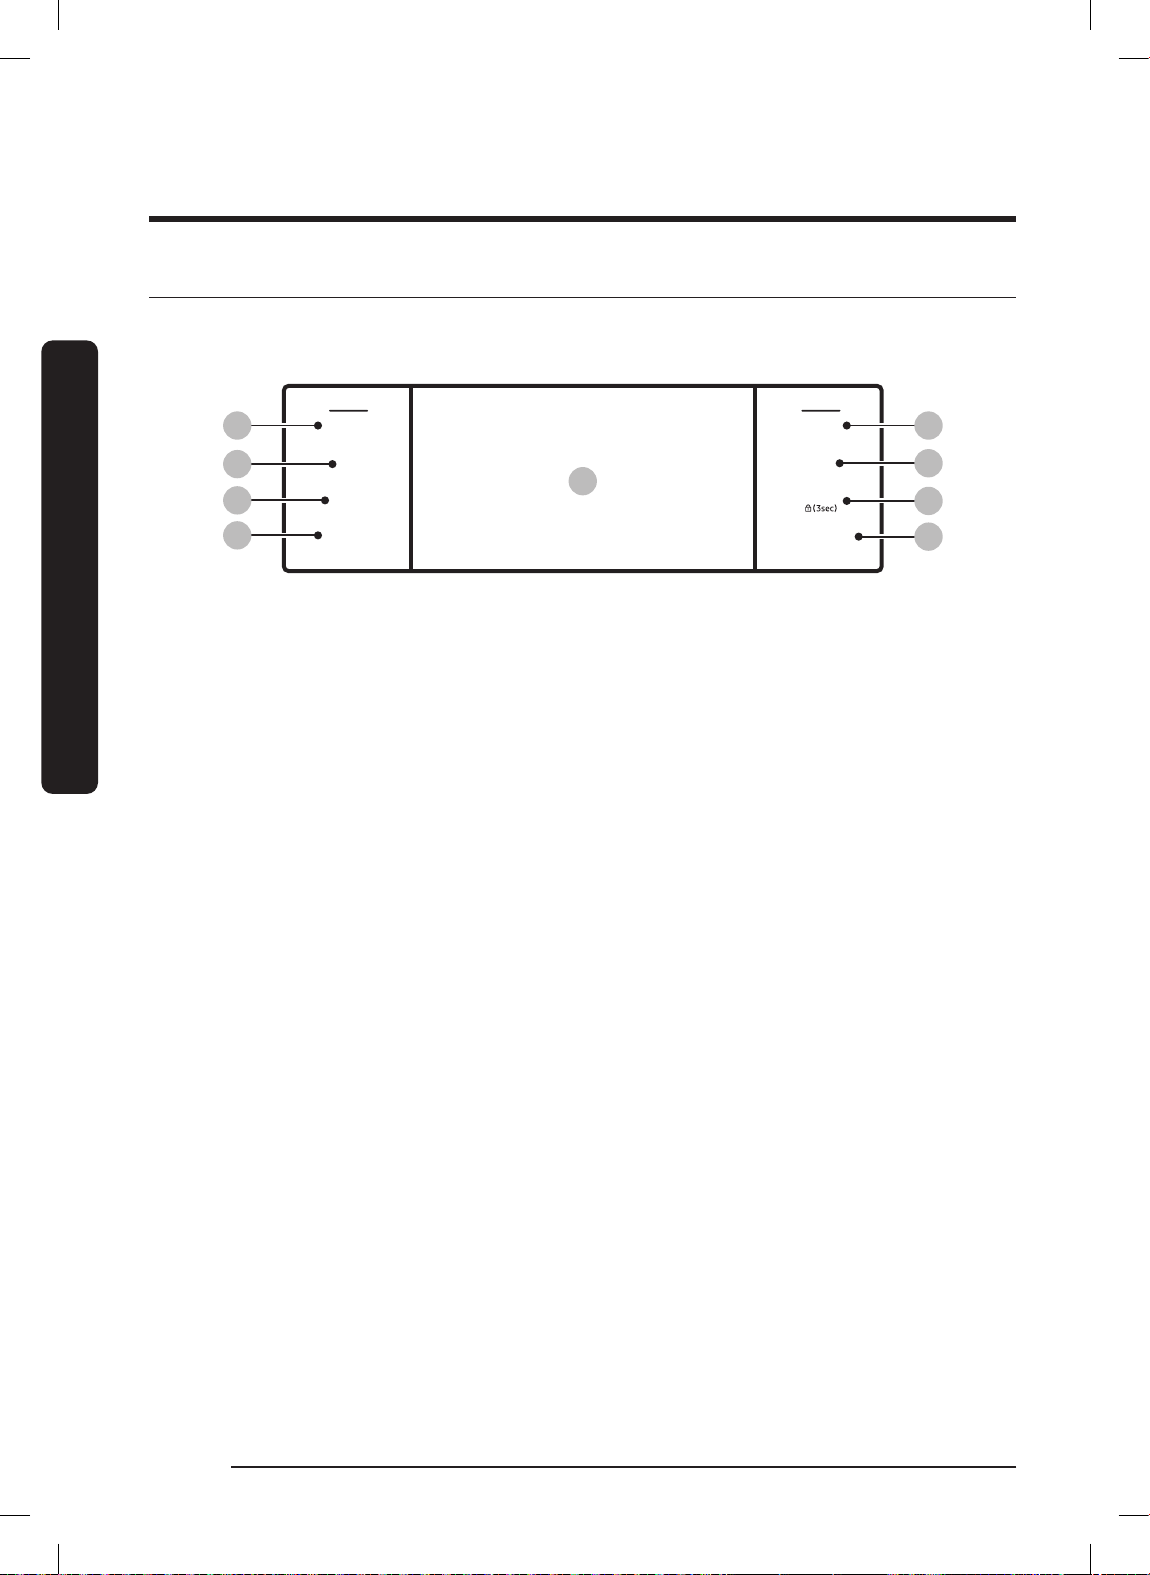
Control Panel (DOP48C86D**)
Tap the display with clean, bare fingers. Oven mitts and wet or dirty fingers block the
electronic transfer between finger and panel.
Overview
01 LEFT, RIGHT:
02 OFF: Cancels cooking in the respective oven.
03 TIMER: Displays the Timer screen.
04 SETTINGS: Displays the Settings screen.
05 OFF: Cancels cooking in right oven.
06 LOCK: Press-hold for 3 seconds to disable all oven functions.
07 LIFT PANEL: Touch to tilt or flatten the panel.
08 Display: Swipe to navigate menus; tap to select a setting.
01
02
03
04
RIGHTLEFT
TIMER
08
SETTINGS LIFT PANEL
OFFOFF
LOCK
01
05
06
07
Displays left/right oven mode. Shows status; does not turn ovens on/off.
English24
FULL_DOP36C86DLSDA_DG68-01507A-00_EN+MES+CFR.indb 24FULL_DOP36C86DLSDA_DG68-01507A-00_EN+MES+CFR.indb 24 2023-02-23 오후 5:08:522023-02-23 오후 5:08:52
Page 25
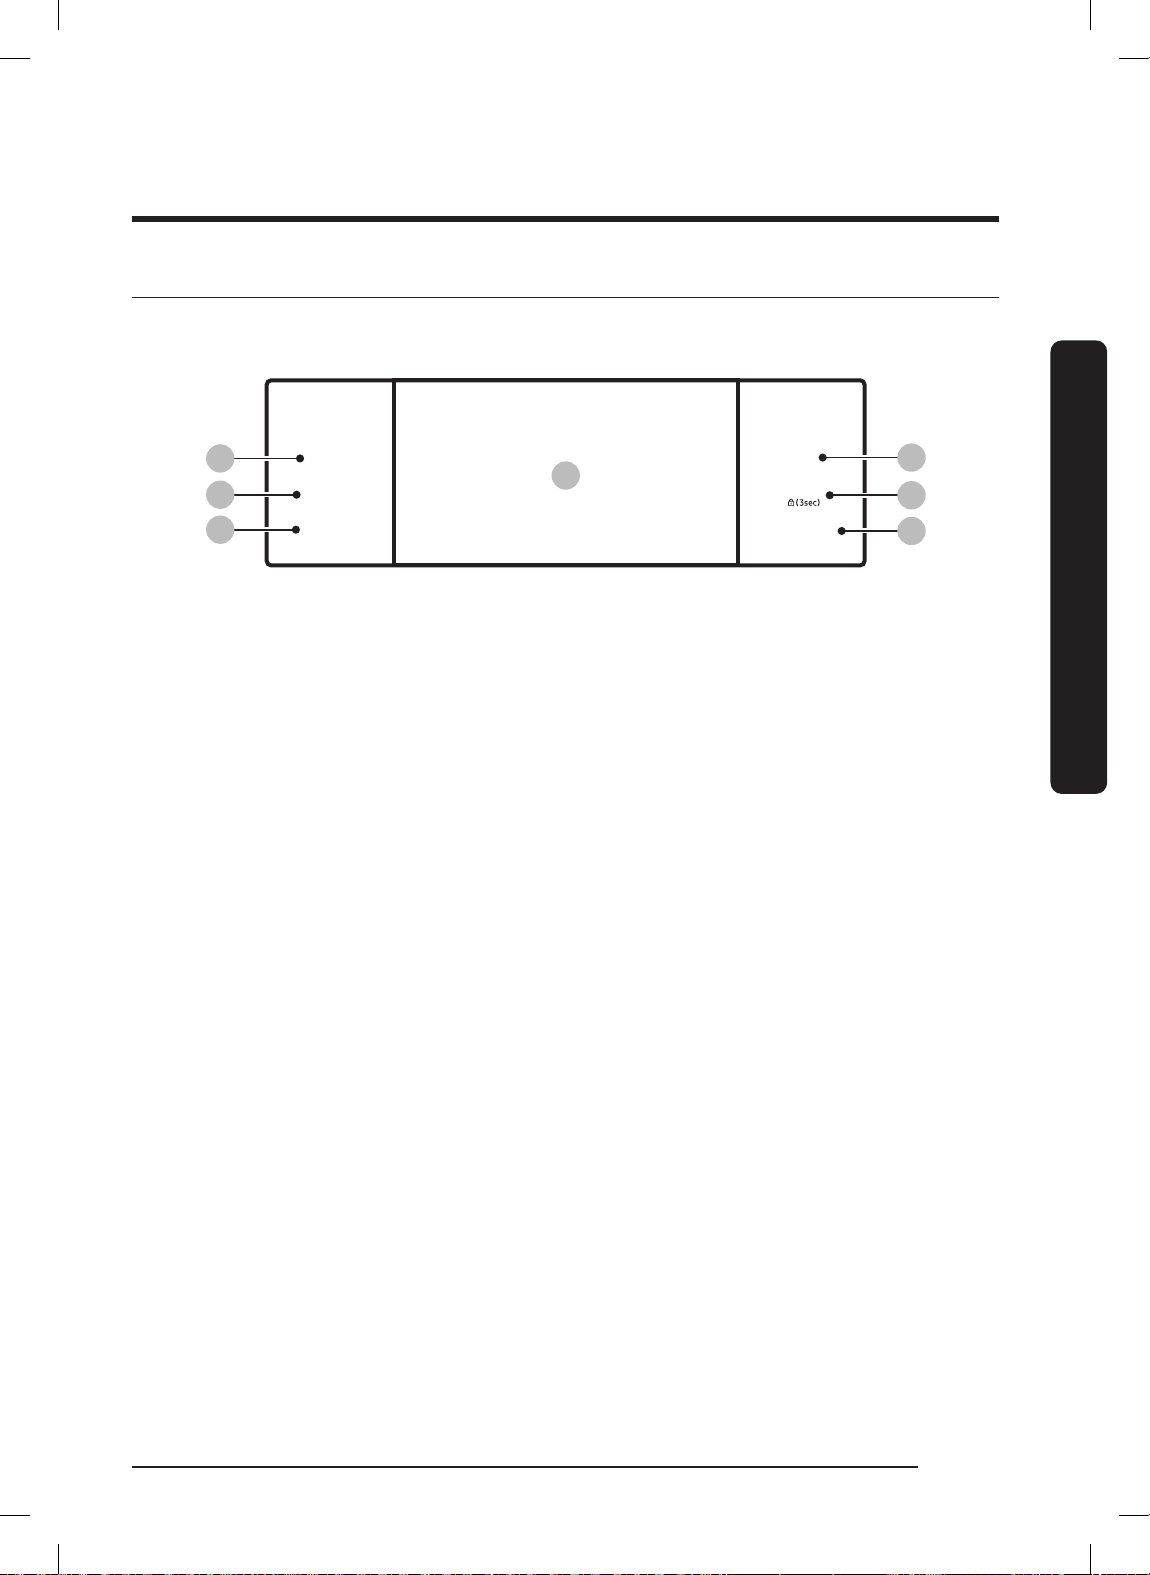
Control Panel (DOP36C86D**)
Tap the display with clean, bare fingers. Oven mitts and wet or dirty fingers block the
electronic transfer between finger and panel.
01
02
03
TIMER
LIGHT
OPEN/CLOSE
RESERVOIR
07
OFF
SETTINGS
LIFT PANEL
04
05
06
01 TIMER: Displays the Timer screen.
02 LIGHT: Turn On/Off the oven light.
03 OPEN/CLOSE RESERVOIR: Opens/closes the water reservoir.
04 OFF: Cancels the oven's cooking mode.
05 SETTINGS / LOCK: Display the Settings screen. / Press-hold 3 second to disable all
oven functions.
06 LIFT PANEL: Touch to tilt or flatten the panel.
07 Display: Swipe to navigate menus; tap to select a setting.
Overview
English 25
FULL_DOP36C86DLSDA_DG68-01507A-00_EN+MES+CFR.indb 25FULL_DOP36C86DLSDA_DG68-01507A-00_EN+MES+CFR.indb 25 2023-02-23 오후 5:08:522023-02-23 오후 5:08:52
Page 26
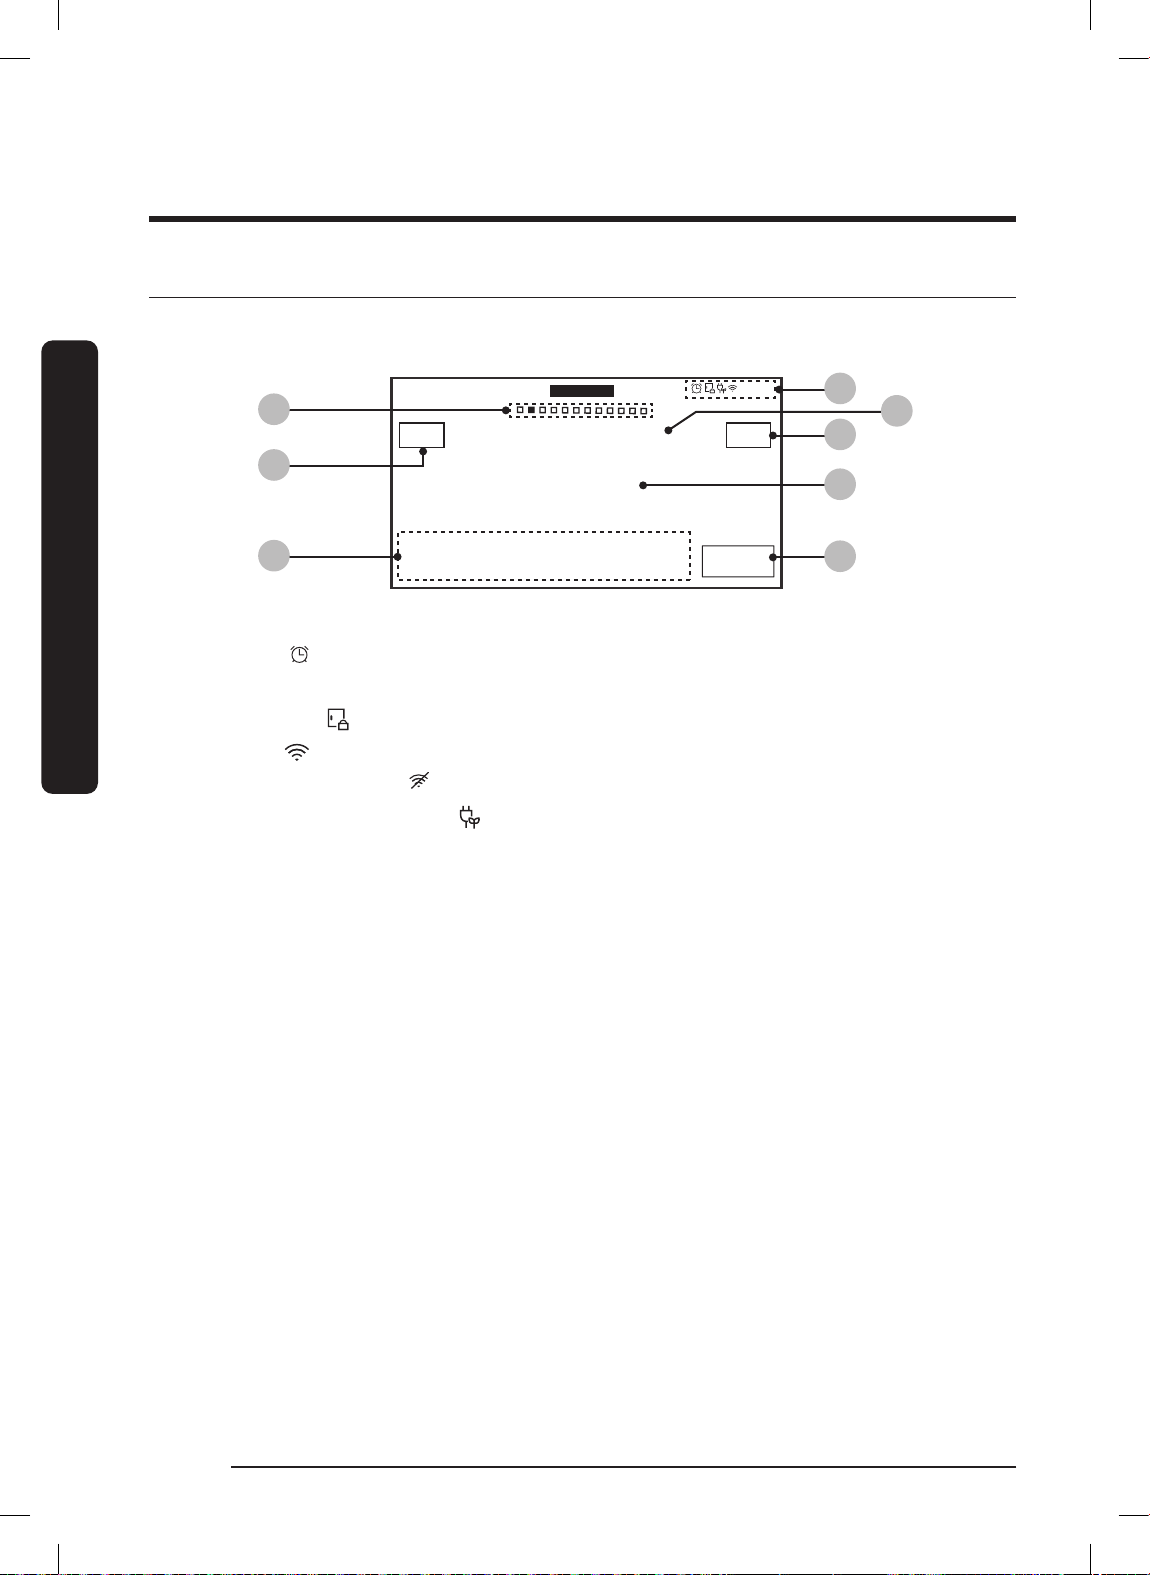
Overview
Display (DOP48C86D** Only)
The display shown is for reference only and may differ somewhat from the actual
display.
Overview
01 Indicator area
02 Page indicator: Shows the location (by page number) of the current mode.
03 Mode: The current/selected menu appears with a mode description.
02
08
OVEN
MODE
Convection Bake
Faster, more even baking
325
05
• Timer (
): When set, the T mer indicator appears. If 3 or more timers are set,
Temp Probe
145
the number of set timers appears.
• Door lock (
• Wi-Fi (
): Appears when the oven door is locked.
): Shows Wi-Fi signal strength in 4 levels. When Wi-Fi is disconnected,
appears .
• 12-hour energy saving (
• Current time: Shows the current time.
Cook Time
°
None
Delay Start
None
): Appears if 12-hour energy saving is on.
LEFT
°F
InstantHeat™
Off
4:35 PM
View
Summary
START
01
03
07
04
06
04 Temperature: The current/selected temp appears; tap to display the Temp
Adjustment screen.
05 Information area
• Temp Probe: The probe's set temperature appears; tap to show the Temp Probe
screen.
• Cook Time: Shows the remaining cook time; tap to show the Cook Time screen.
• Delay Start: Shows the Delay Start time; tap to show the Delay Start screen.
• InstantHeat™: Shows that this feature is on/off; appears in Convection Bake or
Convection Roast mode.
• Steam: Shows the steam level; tap to show the Steam Level screen; appears in
Steam Bake and Steam Roast modes.
06 START: Tap to start the oven using the chosen setting.
07 View Summary: Tap to show cooking modes of left and right oven.
08 OVEN MODE: Tap to display mode select menu.
English26
FULL_DOP36C86DLSDA_DG68-01507A-00_EN+MES+CFR.indb 26FULL_DOP36C86DLSDA_DG68-01507A-00_EN+MES+CFR.indb 26 2023-02-23 오후 5:08:522023-02-23 오후 5:08:52
Page 27
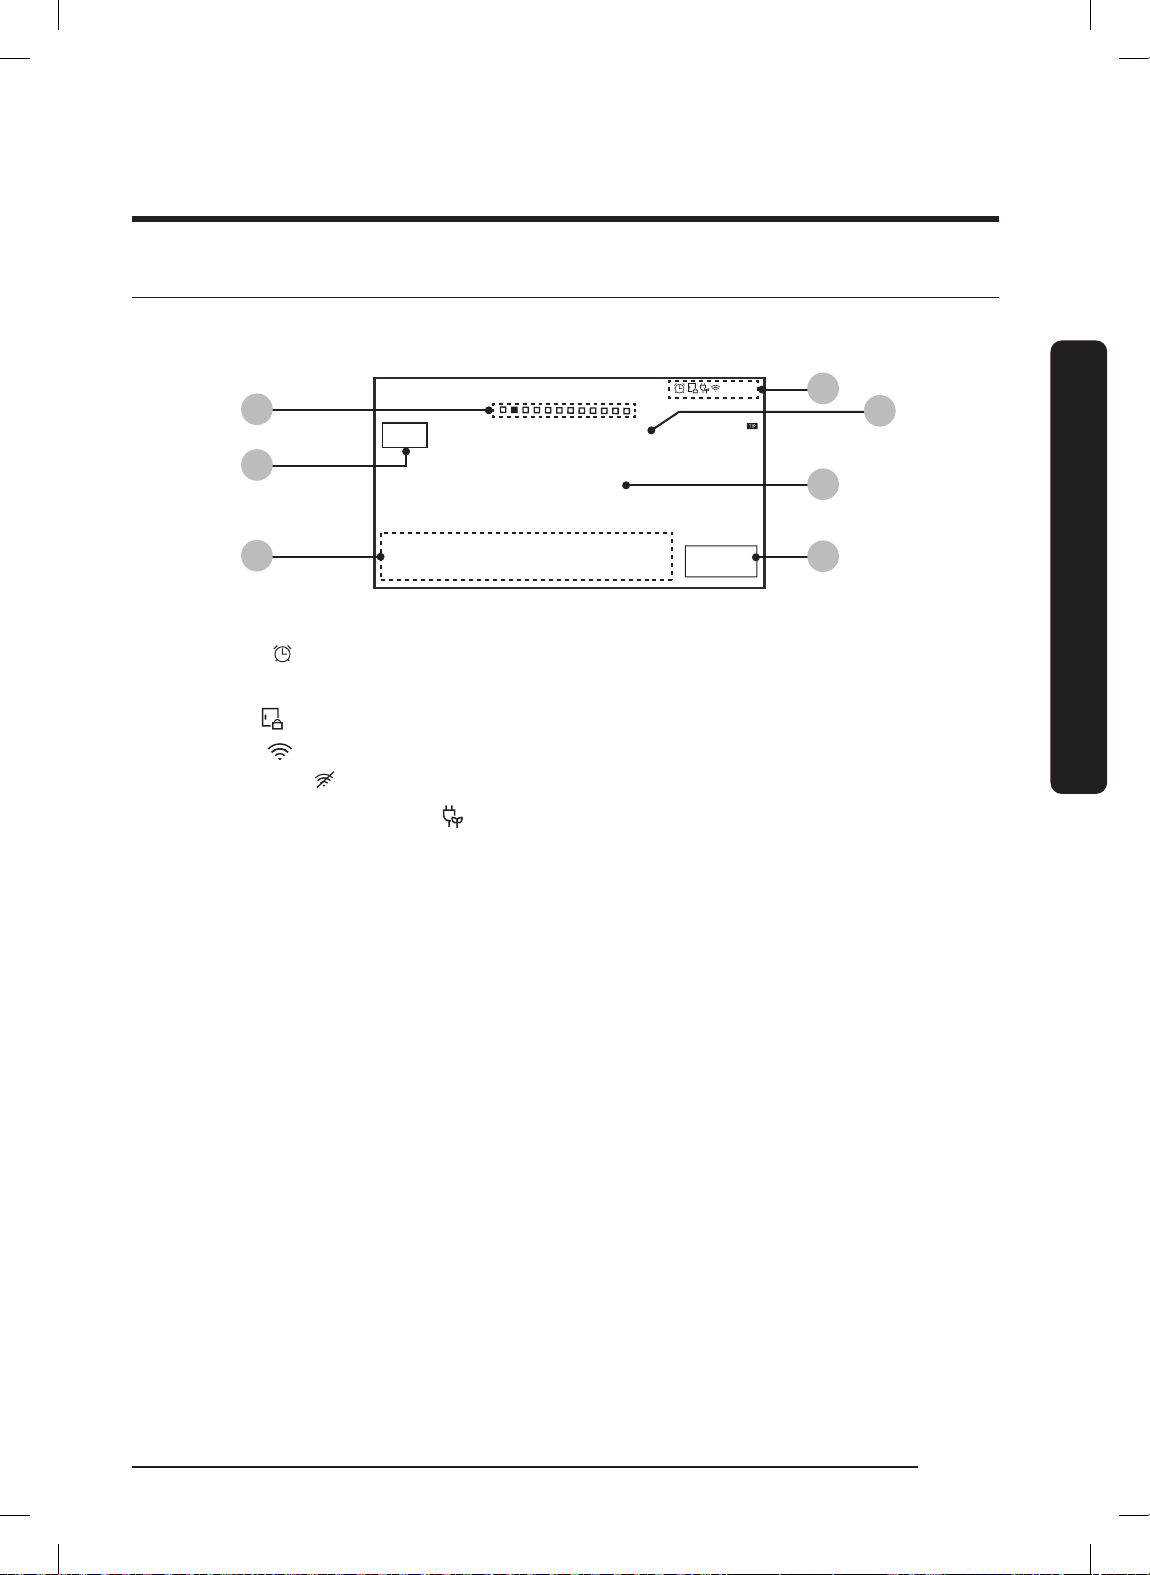
Display (DOP36C86D** Only)
Tap the display with clean, bare fingers. Oven mitts and wet or dirty fingers block the
electronic transfer between finger and panel.
02
07
05
OVEN
MODE
Temp Probe
°
145
Convection Bake
Faster, more even baking
325
Cook Time
None
Delay Start
None
°F
InstantHeat™
Off
4:35 PM
START
01
03
04
06
01 Indicator area
• Timer (
): When set, the Timer indicator appears. If 3 or more timers are set,
the number of set timers appears.
• Lock (
• Wi-Fi (
• 12-hour energy saving (
): Appears when the oven door is locked.
): Shows Wi-Fi signal strength in 4 levels.; when Wi-Fi is disconnected,
appears.
.
): Appears if 12-hour energy saving is on.
• Current time: Shows the current time.
02 Page indicator: Shows the location (by page number) of the current mode.
03 Mode: The current/selected menu appears with a mode description.
Overview
04 Temperature: The current/selected temp appears; tap to show the Temp Adjustment
screen.
05 Information area
• Temp Probe: The probe's set temperature appears; tap to show the Temp Probe
screen.
• Cook Time: Shows the remaining cook time; tap to show the Cook Time screen.
• Delay Start: Shows Delay Start time; tap to show the Delay Start screen.
• InstantHeat™: Shows that this feature is on/off; appears in Convection Bake and
Convection Roast modes.
• Steam: Shows the steam level; tap to show the Steam Level screen; appears in
Steam Bake and Steam Roast modes.
06 START: Tap to start oven using displayed settings.
07 OVEN MODE: Tap to show the mode's select menu.
English 27
FULL_DOP36C86DLSDA_DG68-01507A-00_EN+MES+CFR.indb 27FULL_DOP36C86DLSDA_DG68-01507A-00_EN+MES+CFR.indb 27 2023-02-23 오후 5:08:522023-02-23 오후 5:08:52
Page 28
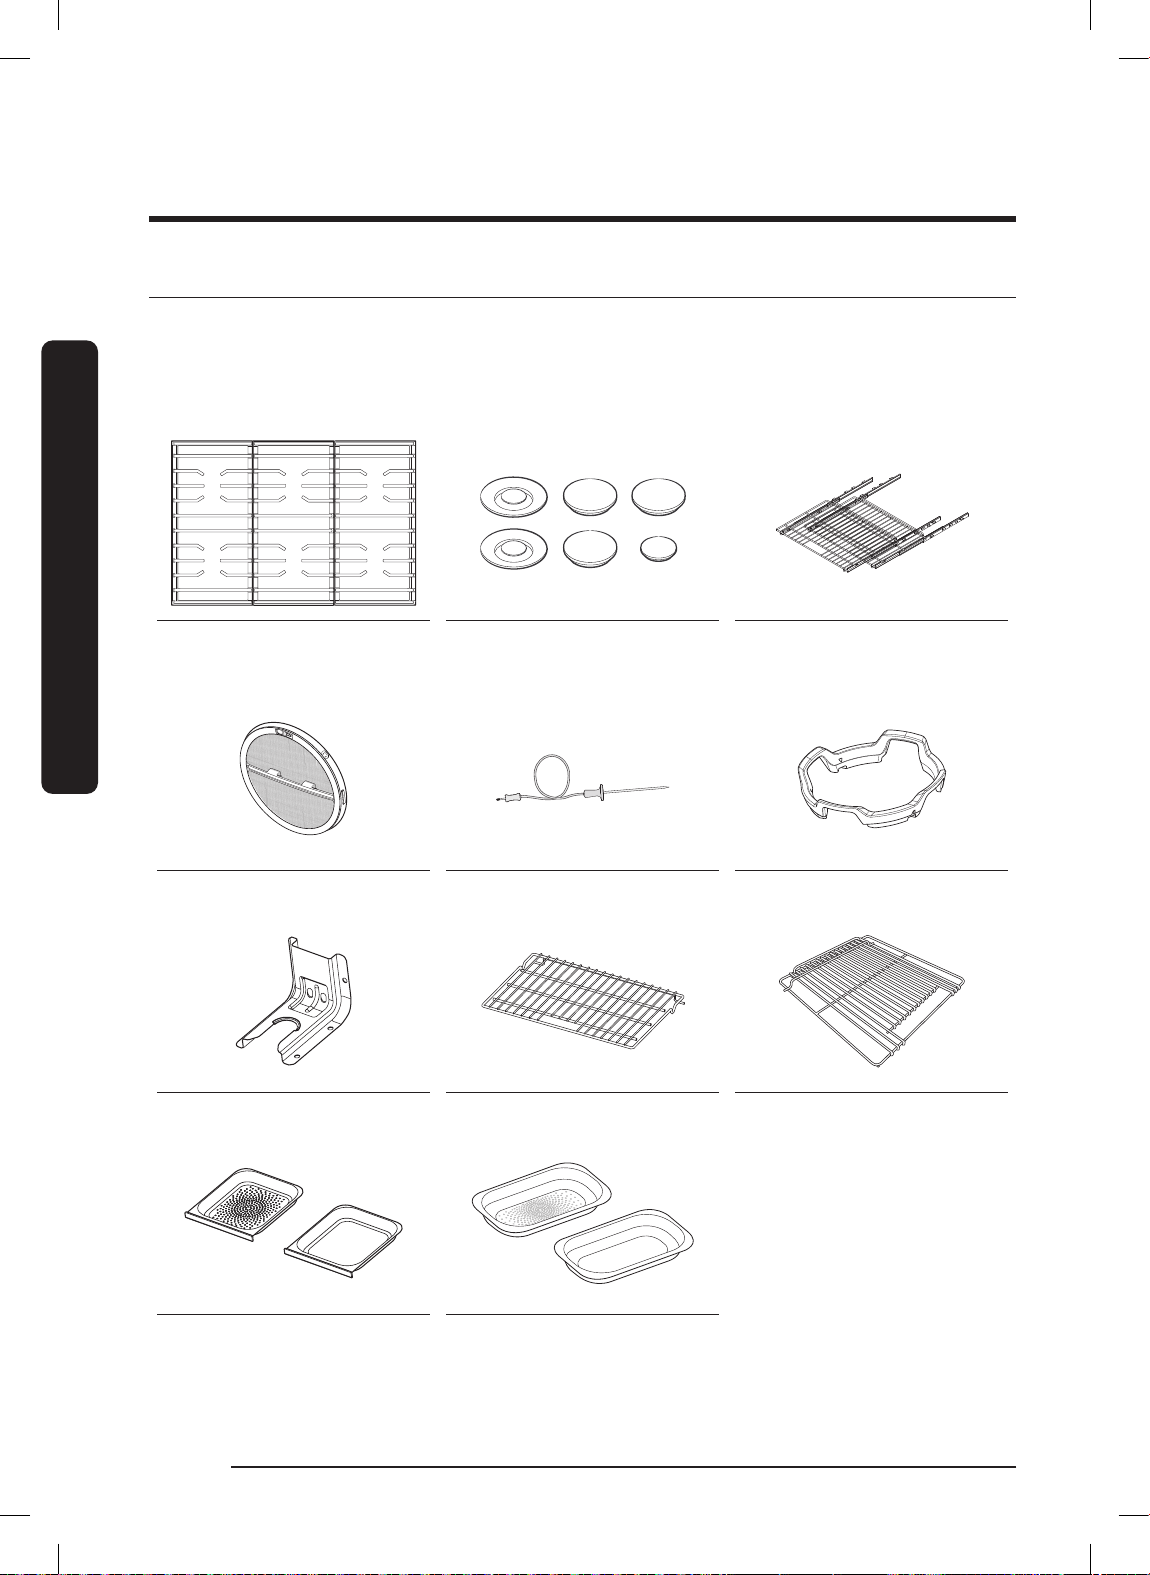
Overview
What is Included
The range comes with brass and porcelain burner caps to suit customer preference.
(The brass caps will discolor with use; however, the discoloration does not affect the
caps' intended function.)
Overview
DOP48C86D**
Grates (3) Burner heads (6)
and Burner caps (8)
Convection filters (3) Temp. Probes (2) Wok ring (1)
Anti-tip bracket (1)
Wire rack (1) Small rack (1)*
Glide racks (2)
Steam trays (2)* Half steam trays (2)*
(* Steam ovens only)
English28
FULL_DOP36C86DLSDA_DG68-01507A-00_EN+MES+CFR.indb 28FULL_DOP36C86DLSDA_DG68-01507A-00_EN+MES+CFR.indb 28 2023-02-23 오후 5:08:542023-02-23 오후 5:08:54
Page 29
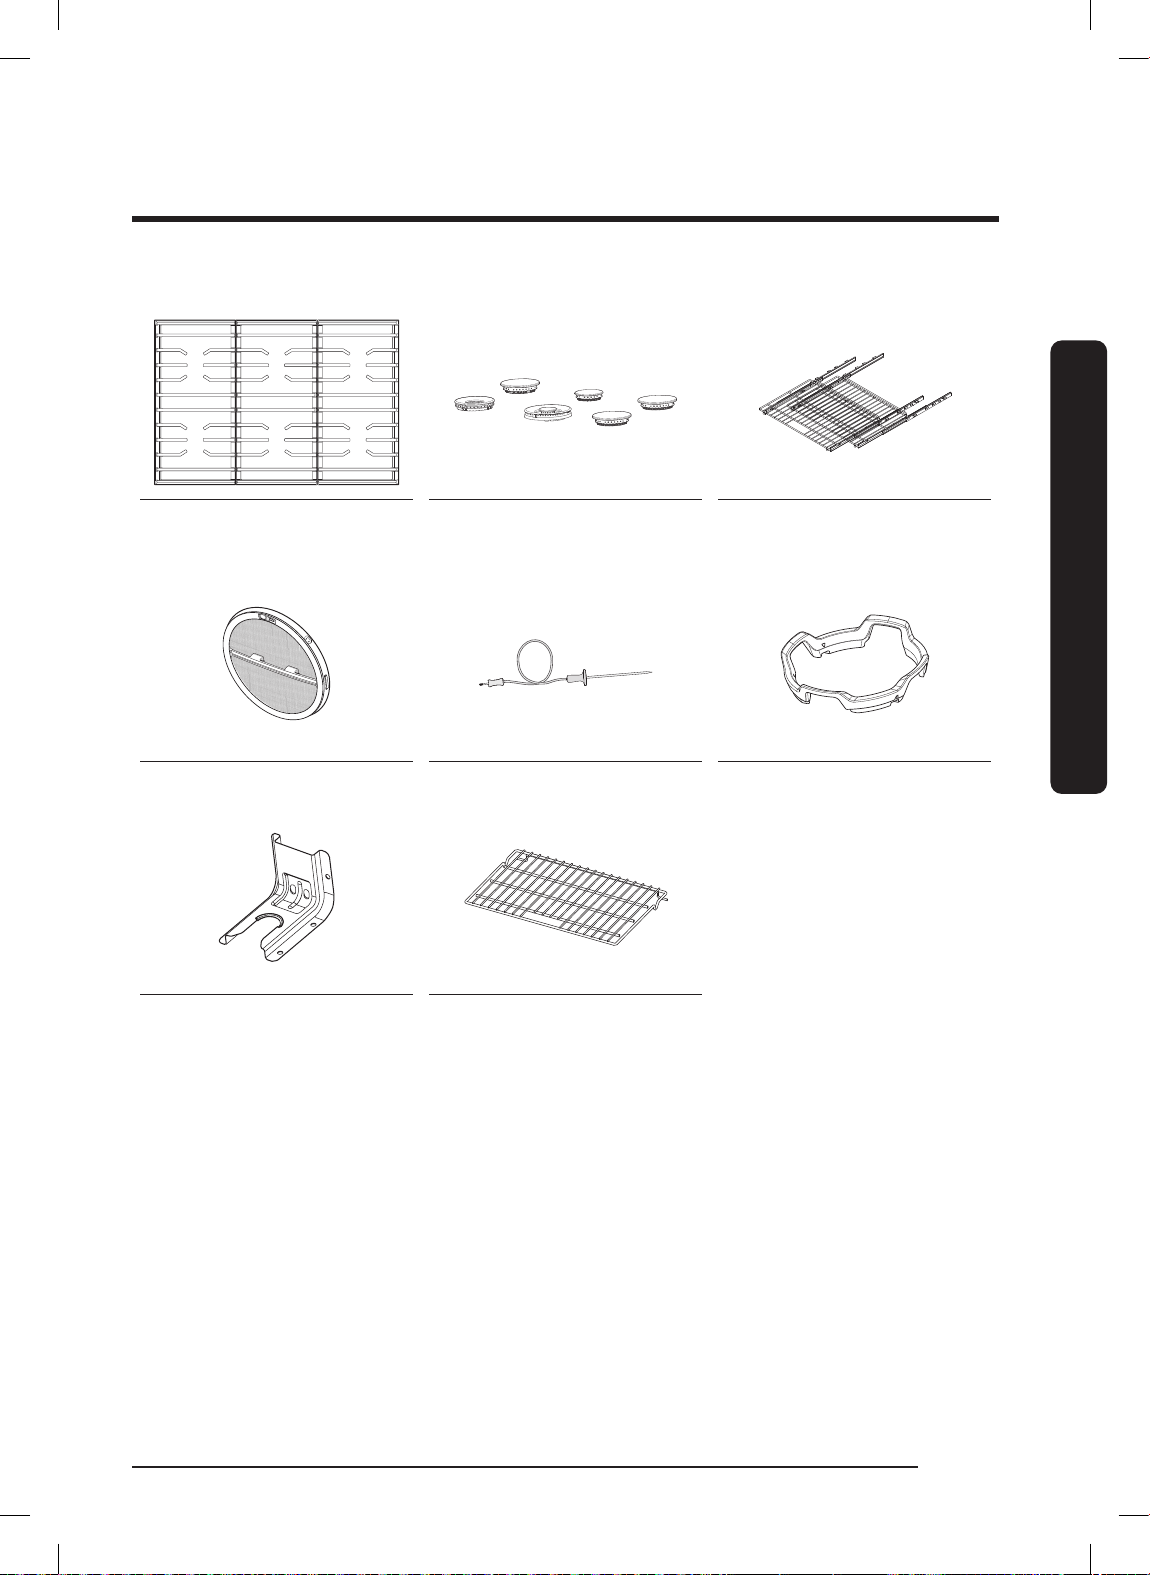
DOP36C86D**
Grates (3) Burner heads (6)
Glide racks (2)
and Burner caps (8)
Convection filters (2) Temp. Probe (1) Wok ring (1)
Anti-tip bracket (1)
Wire rack (1)
Overview
English 29
FULL_DOP36C86DLSDA_DG68-01507A-00_EN+MES+CFR.indb 29FULL_DOP36C86DLSDA_DG68-01507A-00_EN+MES+CFR.indb 29 2023-02-23 오후 5:08:562023-02-23 오후 5:08:56
Page 30
Using the Cooktop
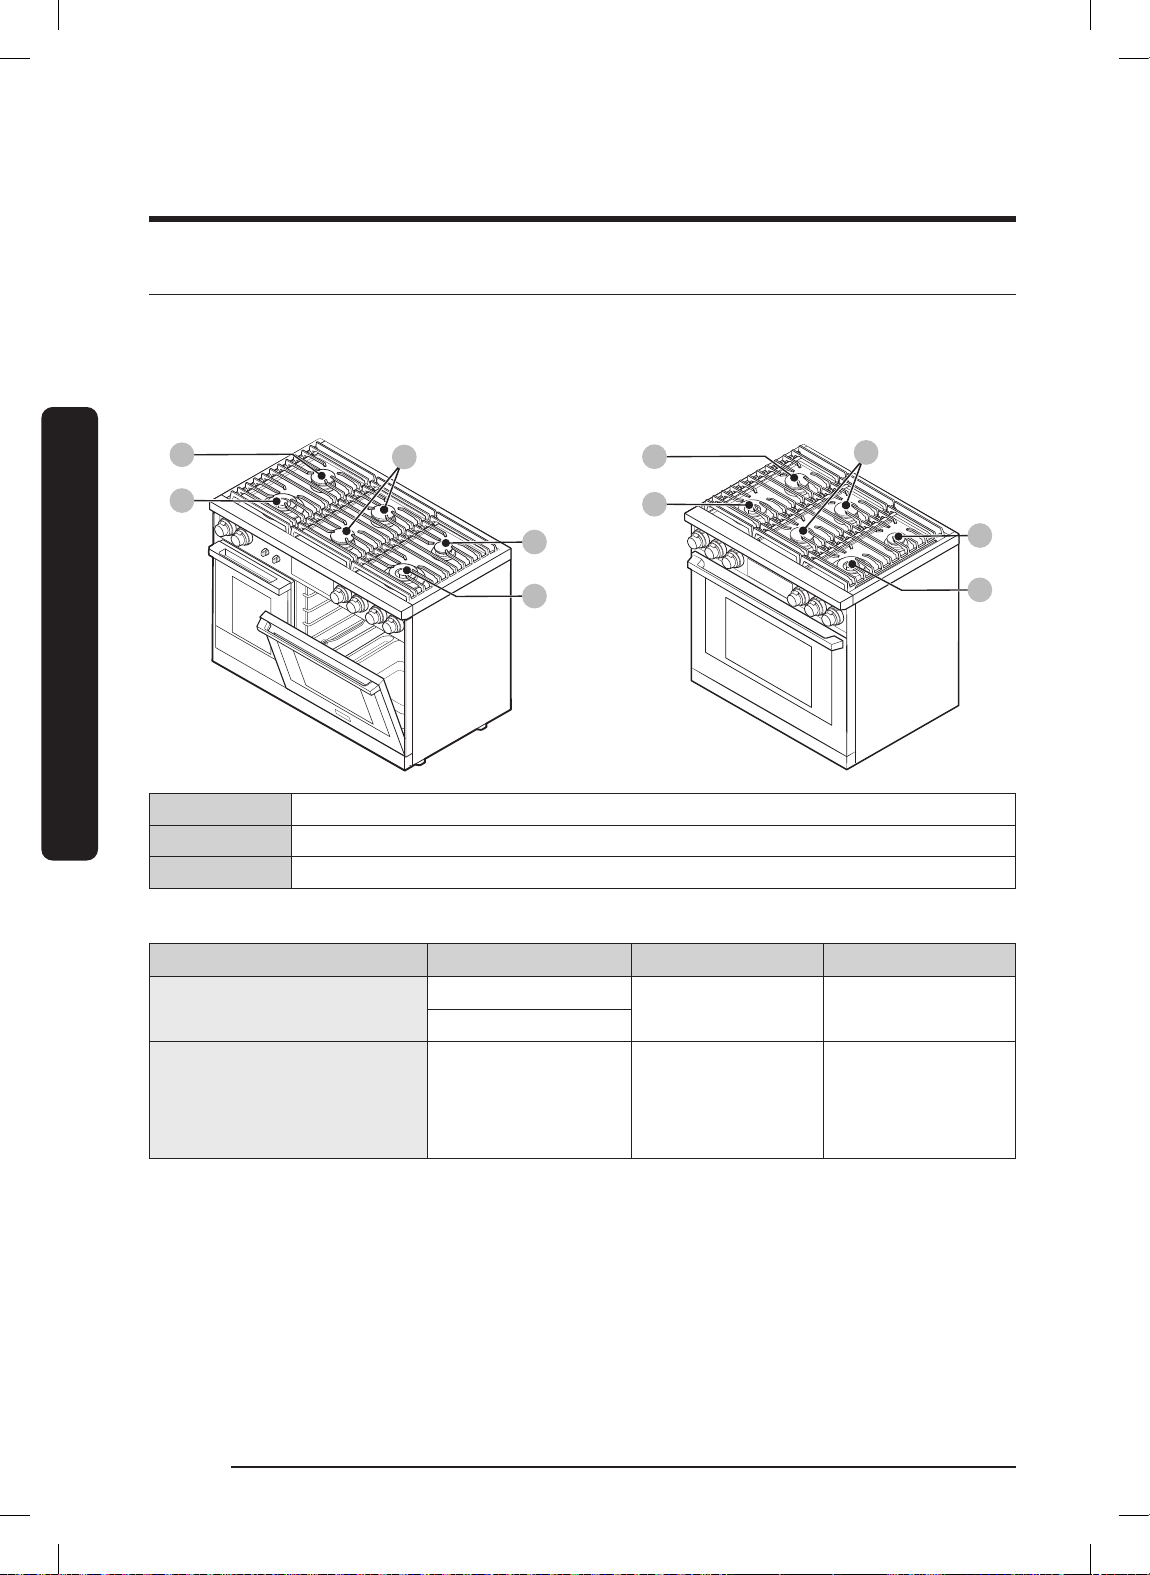
About the Burners
The range has three types of burners. (See below for heat output and location.)
The range generates a spark to light the burner when you turn the knob to HI.
Gaskets under the burners keep spilled liquids from leaking into internal parts.
DOP48C86D** DOP36C86D**
B
A
Using the Cooktop
A 22K BTU Dual burner
B 16K BTU Stack dual burner
C 9K BTU Stack dual burner
Each burner is designed for specific cooking purpose as below table.
Dual burner
Stack dual burner
B
C
A
B
A
B
Burner Position Purpose Food type
Right Front (RF)
Left Front (LF)
Power heating/
Low simmering
Boiling food,
Tomato sauce
Left Rear (LR),
Center Front (CF),
Right Rear (RR),
General heating/
Low simmering
General food,
Casseroles
Center Rear (CR).
C
A
English30
FULL_DOP36C86DLSDA_DG68-01507A-00_EN+MES+CFR.indb 30FULL_DOP36C86DLSDA_DG68-01507A-00_EN+MES+CFR.indb 30 2023-02-23 오후 5:08:562023-02-23 오후 5:08:56
Page 31
About Burner Ignition
LO
MED
OFF
HI
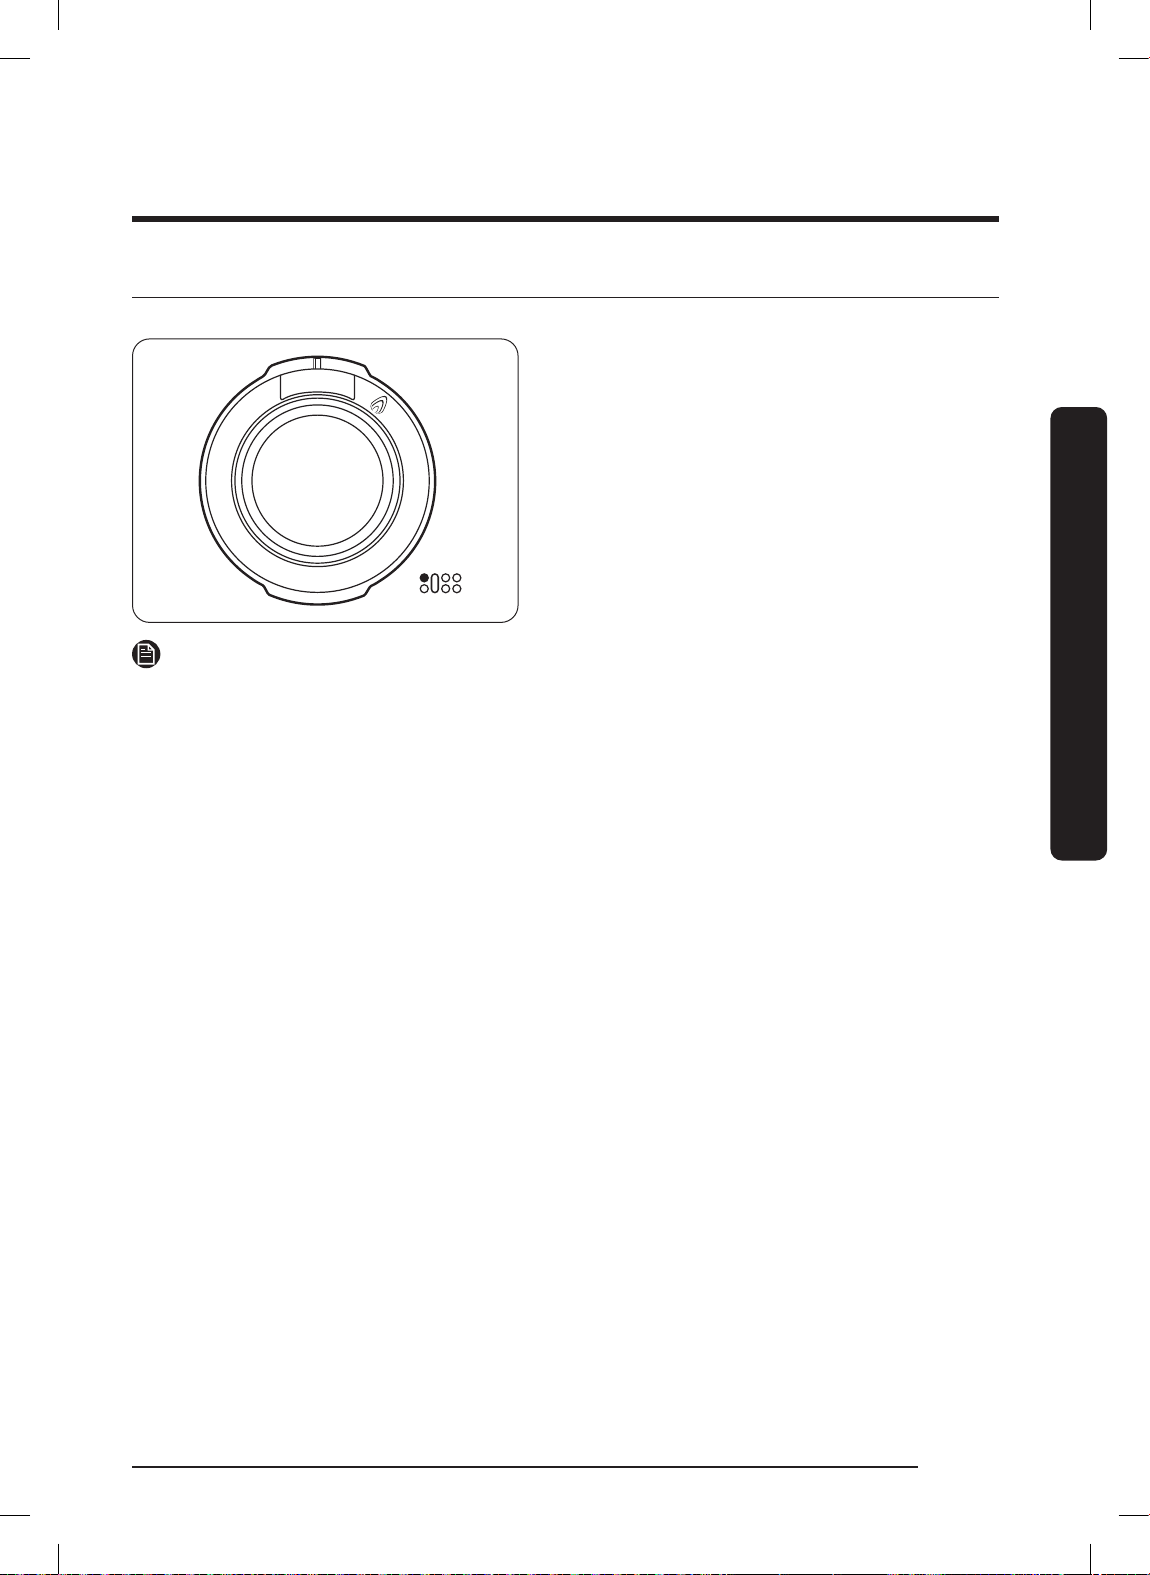
Each knob has an associated burner, the location of which appears next to the knob.
To light a burner:
1. Push in the knob and turn it
counterclockwise to the flame symbol.
The igniter sparks and clicks until the
burner lights (about 4 seconds).
2. Place the cookware on the grate.
3. Adjust the flame as needed for proper
cooking.
NOTE
• The flame should burn evenly around the burner, except below each grate support,
where flame height is reduced by Dacor’s Smart Flame feature. A normal flame is
steady and blue. Foreign matter in the gas line, especially in new construction, may
cause an orange color that disappears with use. Yellow-tipped flames are normal
for LP gas. If a burner does not ignite, or the igniter keeps sparking, or the flame is
uneven, see Troubleshooting, Pg. 99.
• The igniter sparks if the flame is affected by a draft or home ventilation. Eliminate
drafts and reduce the ventilation blower speed to minimize this condition.
• If no spark is produced, verify that electricity is available. If there is a power failure,
see Manual Ignition (below).
• Food cooks as quickly at a gentle boil as it does at a rolling boil, which wastes
energy and cooks moisture, flavor and nutrients out of food.
• Use a low/medium flame for cookware that conducts heat poorly (e.g., glass,
ceramic, cast iron). Lower the flame until it covers about 1/3 of the cookware
diameter to ensure even heating and minimize scorching.
Using the Cooktop
Manual Ignition
During a power failure, you can ignite the burner manually. Use caution when doing
this.
1. Hold a long gas grill lighter to the surface burner you want to light.
2. Push in the control knob for that burner and then turn it to the flame symbol position.
Turn on the grill lighter to ignite the burner.
3. After the burner is lit, turn the control knob to adjust the flame level.
FULL_DOP36C86DLSDA_DG68-01507A-00_EN+MES+CFR.indb 31FULL_DOP36C86DLSDA_DG68-01507A-00_EN+MES+CFR.indb 31 2023-02-23 오후 5:08:572023-02-23 오후 5:08:57
English 31
Page 32
Using the Cooktop
YES NO YES NO
Using the Proper Cookware
WARNING
• Cookware with rough bottoms can permanently damage the coated surfaces.
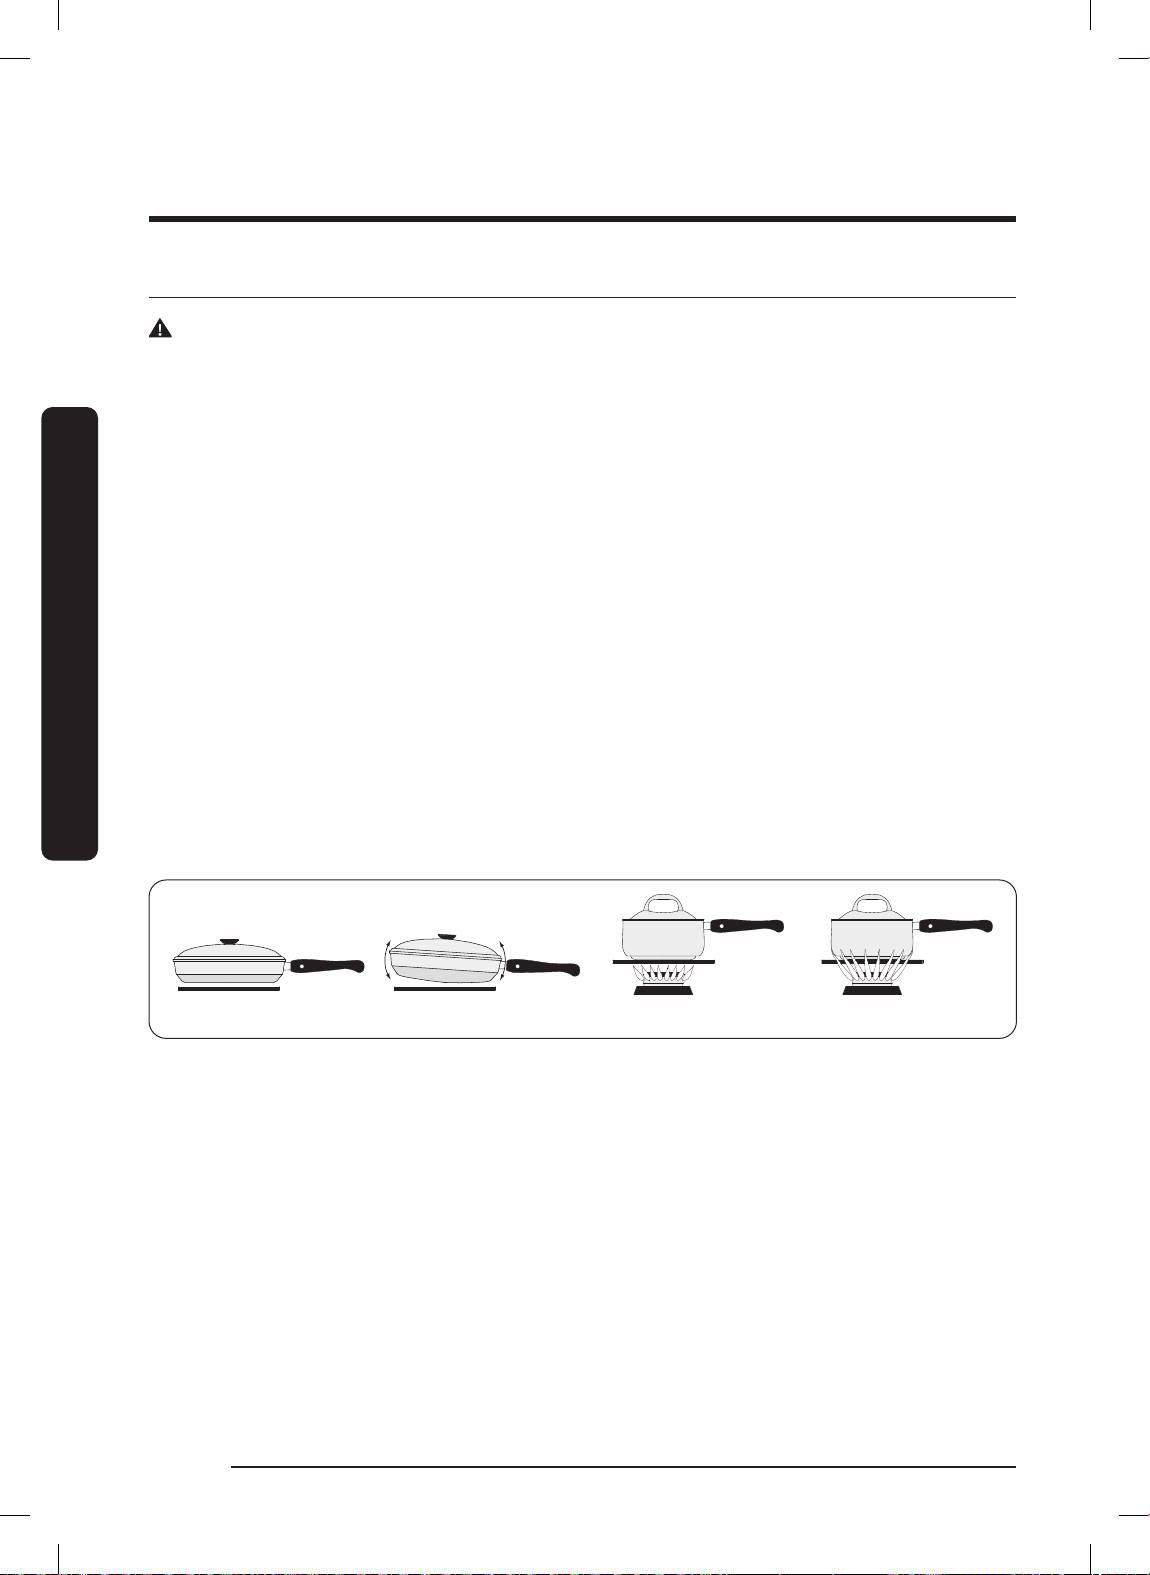
• To avoid burns and scalding, turn handles away from the the front of the range and
adjacent burners. Always center cookware on the grates for best balance.
• Always lift to reposition cookware. Do not drop cookware on a grate.
• To avoid burns or fire, keep the flame beneath the cookware.
Using the Cooktop
• Verify that glass cookware is designed for cooktop use.
• Never leave plastic items on the cooktop or in front of the range. Flames or hot air
in these areas can melt/ignite/explode such items.
• Hold a wok or small pot by its handle while cooking.
For overall safety and best performance, select cookware suitable for the task so food
cooks evenly and efficiently.
Use cookware that:
• has flat, smooth bottoms
• has tight-fitting lids to keep heat, odors and steam in
• well-balanced with the handle weighing less than the main portion of the pot or
pan.
Material Characteristics
• Aluminum: Excellent heat conductor. Some food may darken the aluminum.
(Anodized aluminum resists staining and pitting.)
• Copper: Excellent heat conductor; discolors easily.
• Stainless steel: Slow heat conductor; cooks unevenly; durable, easy to clean, resists
staining.
• Cast Iron: Poor conductor; retains heat very well.
• Enamelware: Heating traits depend on base material.
• Glass: Slow heat conductor; must be designed for cooktop or oven use.
English32
FULL_DOP36C86DLSDA_DG68-01507A-00_EN+MES+CFR.indb 32FULL_DOP36C86DLSDA_DG68-01507A-00_EN+MES+CFR.indb 32 2023-02-23 오후 5:08:572023-02-23 오후 5:08:57
Page 33
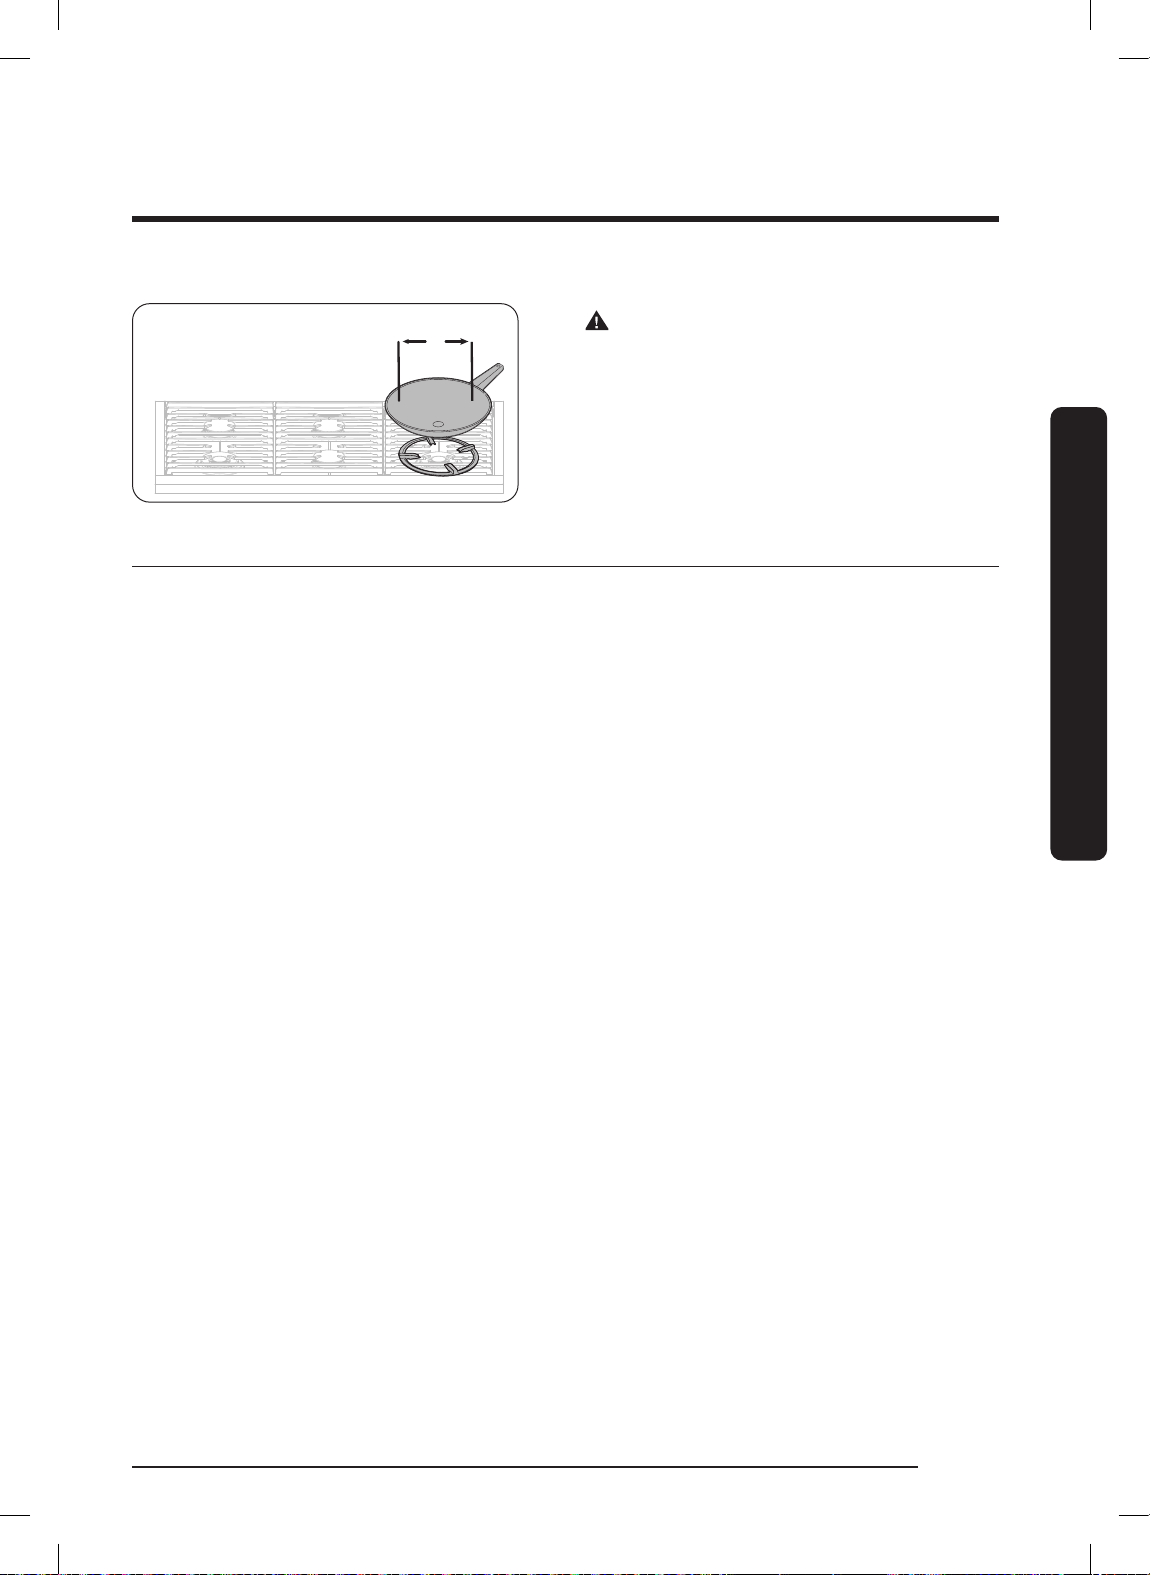
Size limitations
* 6 inches or less
*
* 6 inches or less
WARNING
To avoid tipping and personal injury, do
not place a pan/pot with bottom diameter
of 6" or less on the large burner. Use the
rear burners for this size of cookware.
Special Cooktop Features
Perma-Flame™
The Perma-Flame instant re-ignition feature automatically re-lights a burner quickly if it
goes out. With Perma-Flame, your cooking experience is uninterrupted because the flame
is re-ignited at the same level as when it went out.
Smart Flame™
Smart Flame technology reduces the temperature under the fingers of the porcelaincoated cast iron grates. Smart-Flame extends grate life and protects the finish.
SimmerSear™
Dacor’s exclusive precision burner control system. It allows you to cook with a wide range
of heat settings, from simmer to sear.
Using the Cooktop
FULL_DOP36C86DLSDA_DG68-01507A-00_EN+MES+CFR.indb 33FULL_DOP36C86DLSDA_DG68-01507A-00_EN+MES+CFR.indb 33 2023-02-23 오후 5:08:572023-02-23 오후 5:08:57
English 33
Page 34
Using the Cooktop
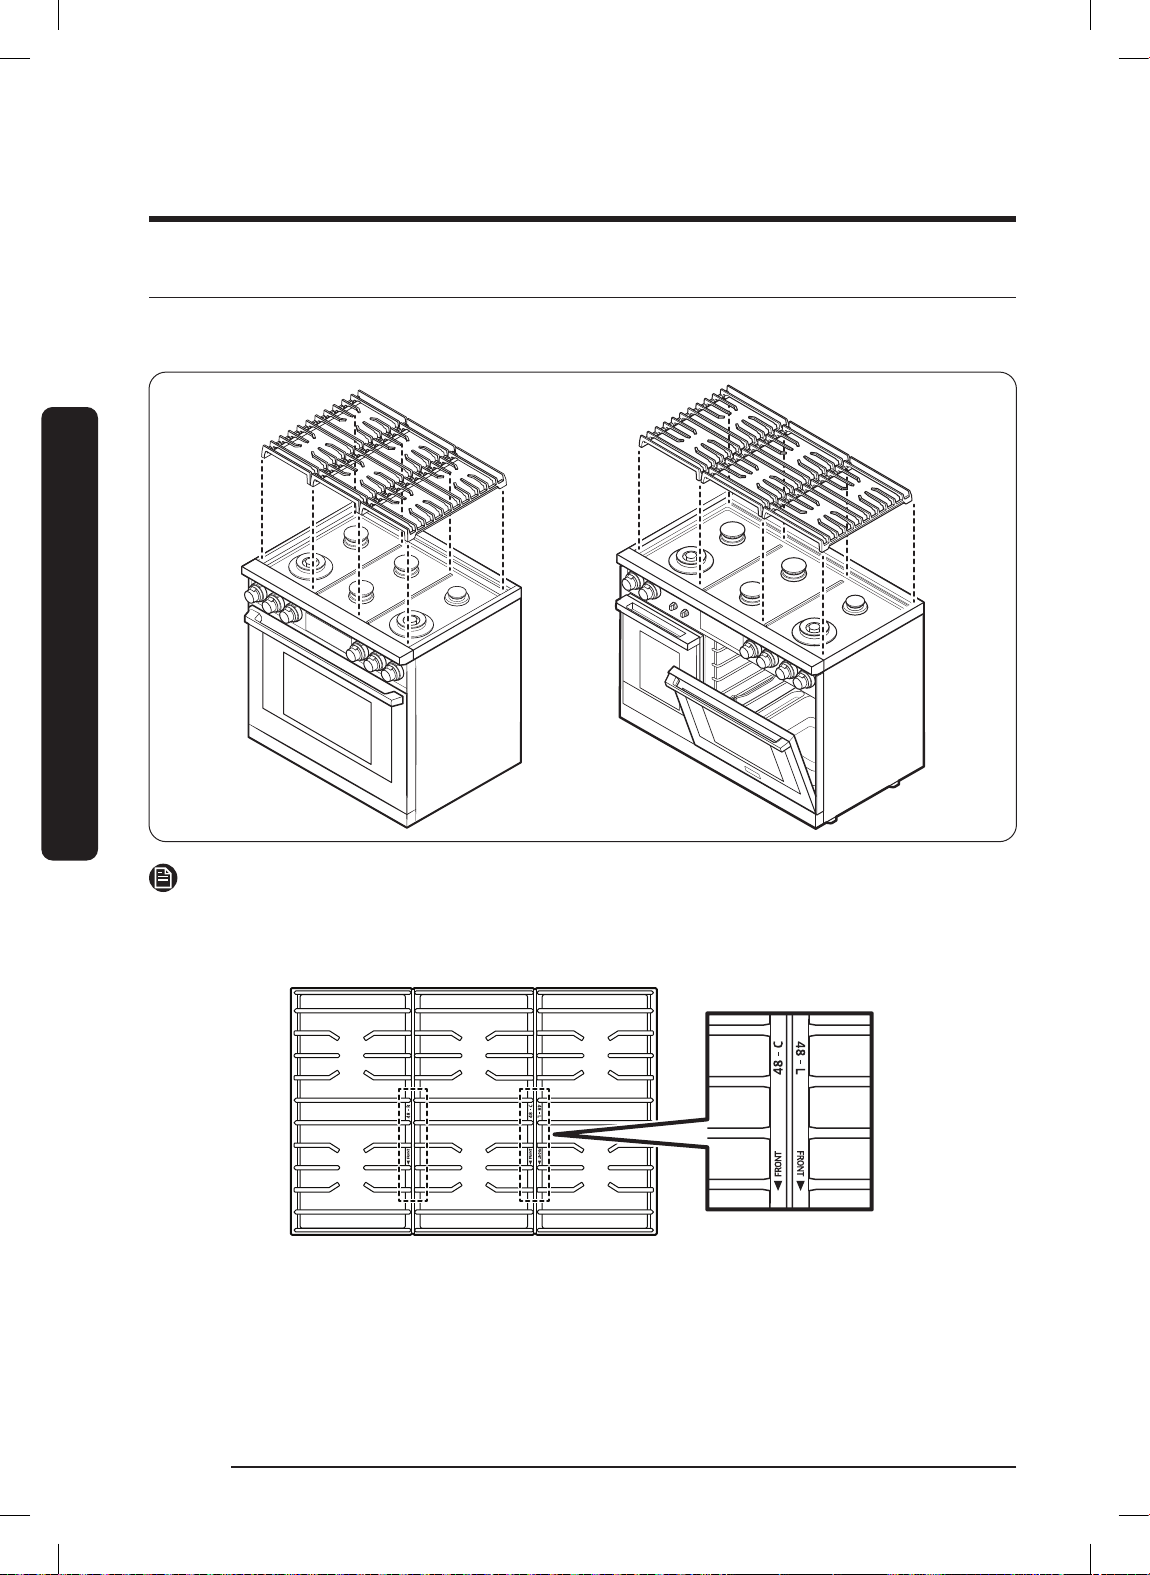
About the Grates
Check the underside of each grate for their proper position, then place the grates so
their feet rest in the corresponding dimples. (Handle the heavy grates with care.)
Using the Cooktop
NOTE
Before installing grates, please check the words under the grates. The words inform you
where the front side is and the proper position of grate, right, center or left.
English34
FULL_DOP36C86DLSDA_DG68-01507A-00_EN+MES+CFR.indb 34FULL_DOP36C86DLSDA_DG68-01507A-00_EN+MES+CFR.indb 34 2023-02-23 오후 5:08:582023-02-23 오후 5:08:58
Page 35
Griddle (Additional purchase Accessories)
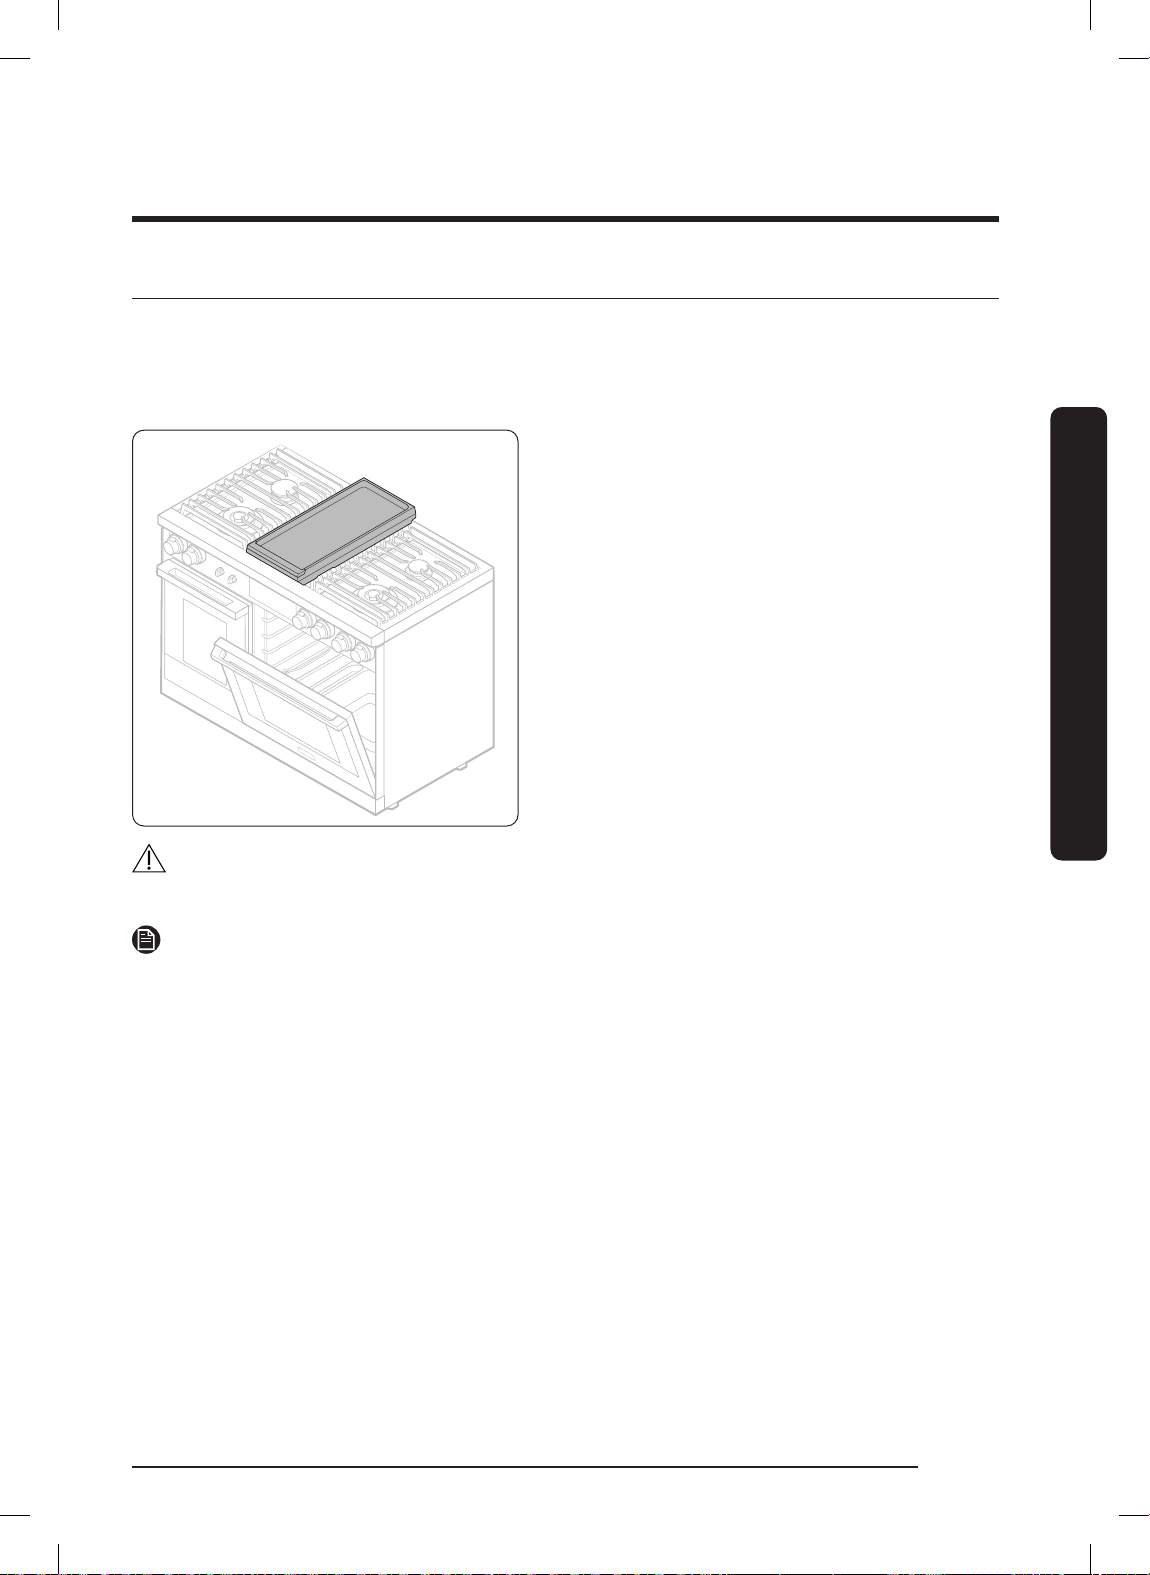
• Before using the griddle for the first time, wash it in hot, soapy water. then rinse and
let it dry fully.
• For best results, preheat the griddle for 3 - 5 minutes.
• Orient the griddle's grease trap at the rear of the range.
1. With all burners off and the range cool
to the touch, place the griddle and
grate in the center of range.
• The specified burners are the same
size, which ensures even cooking
front and rear.
• Fit the tabs on the bottom of the
feet into the inside corners of the
grate. Slight rocking is normal.
2. Push and turn the center burners knob
to the ignite (flame) setting. The burner
ignites.
Using the Cooktop
CAUTION
Avoid using metal utensils on the surface because they can scratch the non-stick coating.
NOTE
Clean the griddle after each use.
English 35
FULL_DOP36C86DLSDA_DG68-01507A-00_EN+MES+CFR.indb 35FULL_DOP36C86DLSDA_DG68-01507A-00_EN+MES+CFR.indb 35 2023-02-23 오후 5:08:582023-02-23 오후 5:08:58
Page 36
Using the Cooktop
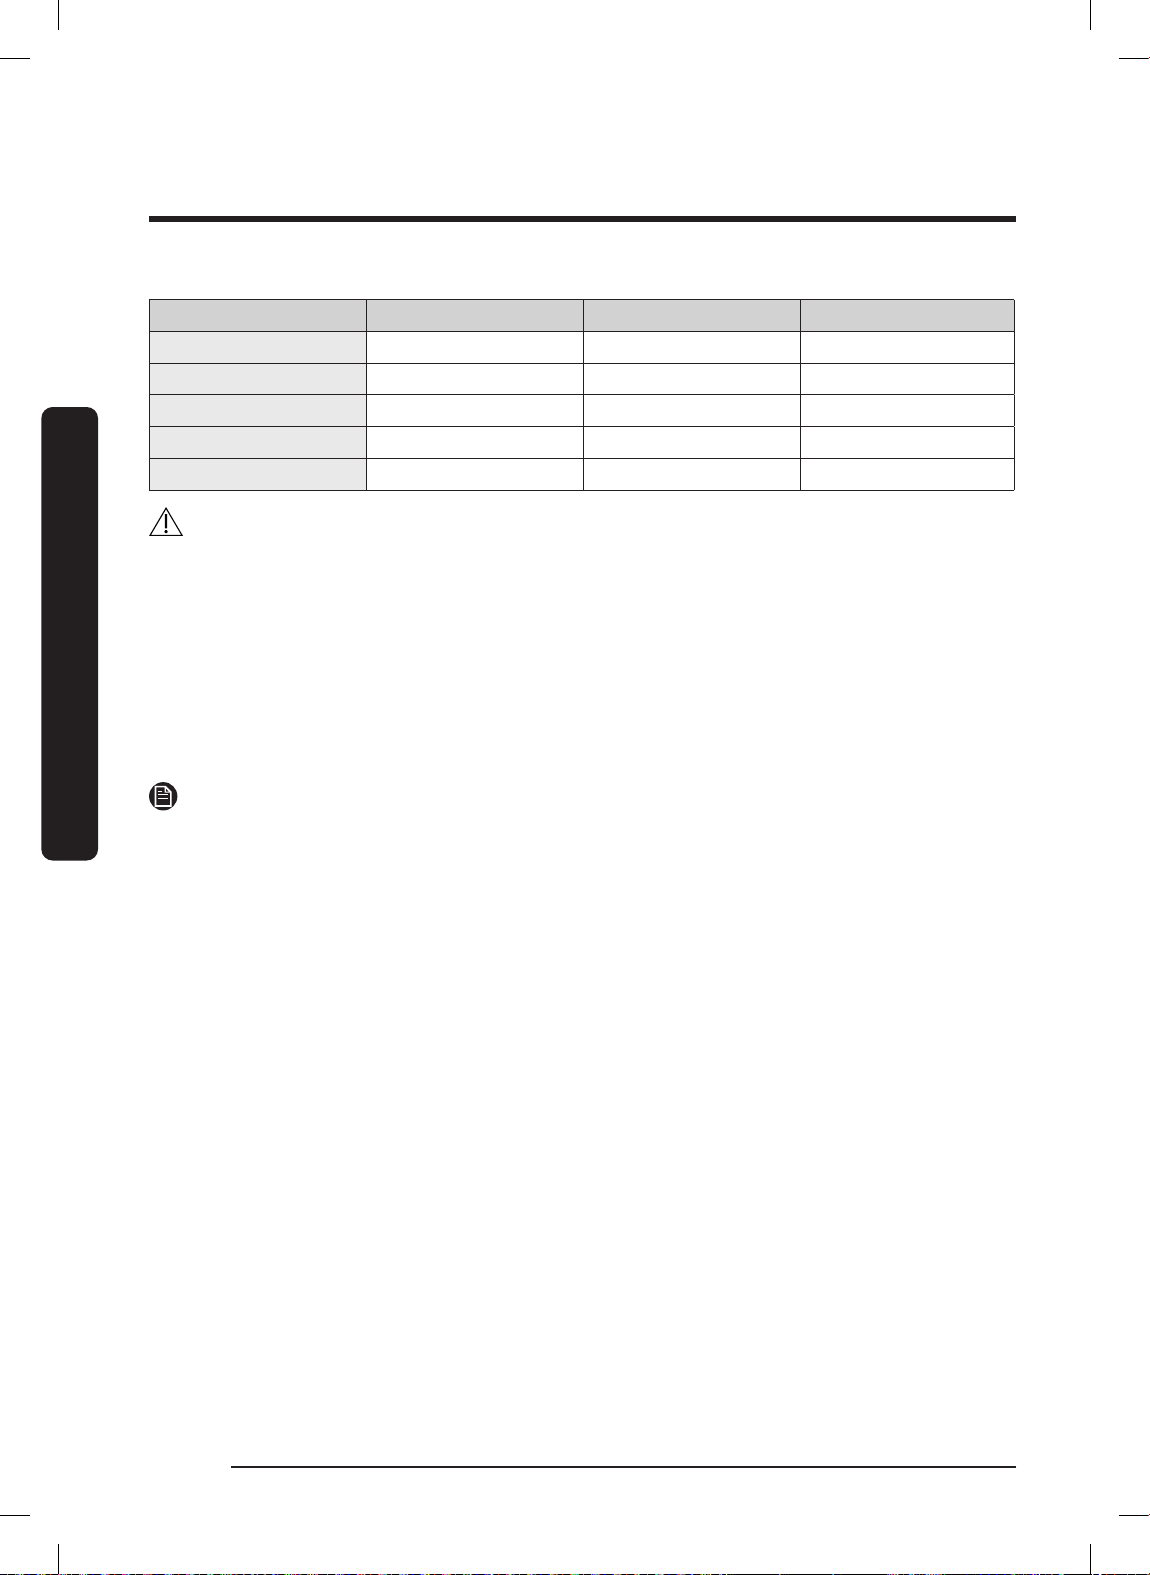
The information for preheating is as below table.
Type of Food Preheating time Preheat setting Cook setting
Pancakes 3 - 5 min. MED - LO MED - LO
Hamburgers 3 - 5 min. MED - HI MED - HI
Fried Eggs 3 - 5 min. MED - LO MED - LO
Bacon 3 - 5 min. MED MED
Breakfast Sausages 3 - 5 min. MED MED
Using the Cooktop
CAUTION
• Do not remove the griddle until the range grates, surfaces and griddle itself cool down.
• The griddle may become very hot when you use the range.
• Do not overheat the griddle. This can damage the coating of the griddle.
• Do not use metal utensils that can damage the griddle surface.
• Do not use the griddle for other purposes, for example, as a cutting board or a storage
shelf.
• Do not cook excessively greasy foods. The grease may spill over.
• The griddle is quite heavy. Use both hands when placing or removing the griddle.
NOTE
• You may need to adjust heat settings for the griddle over time.
• The griddle may discolor over time as it becomes seasoned with use.
• Do not let rust remain on the griddle. If rust appears on the griddle, remove it as soon
as possible
.
English36
FULL_DOP36C86DLSDA_DG68-01507A-00_EN+MES+CFR.indb 36FULL_DOP36C86DLSDA_DG68-01507A-00_EN+MES+CFR.indb 36 2023-02-23 오후 5:08:582023-02-23 오후 5:08:58
Page 37
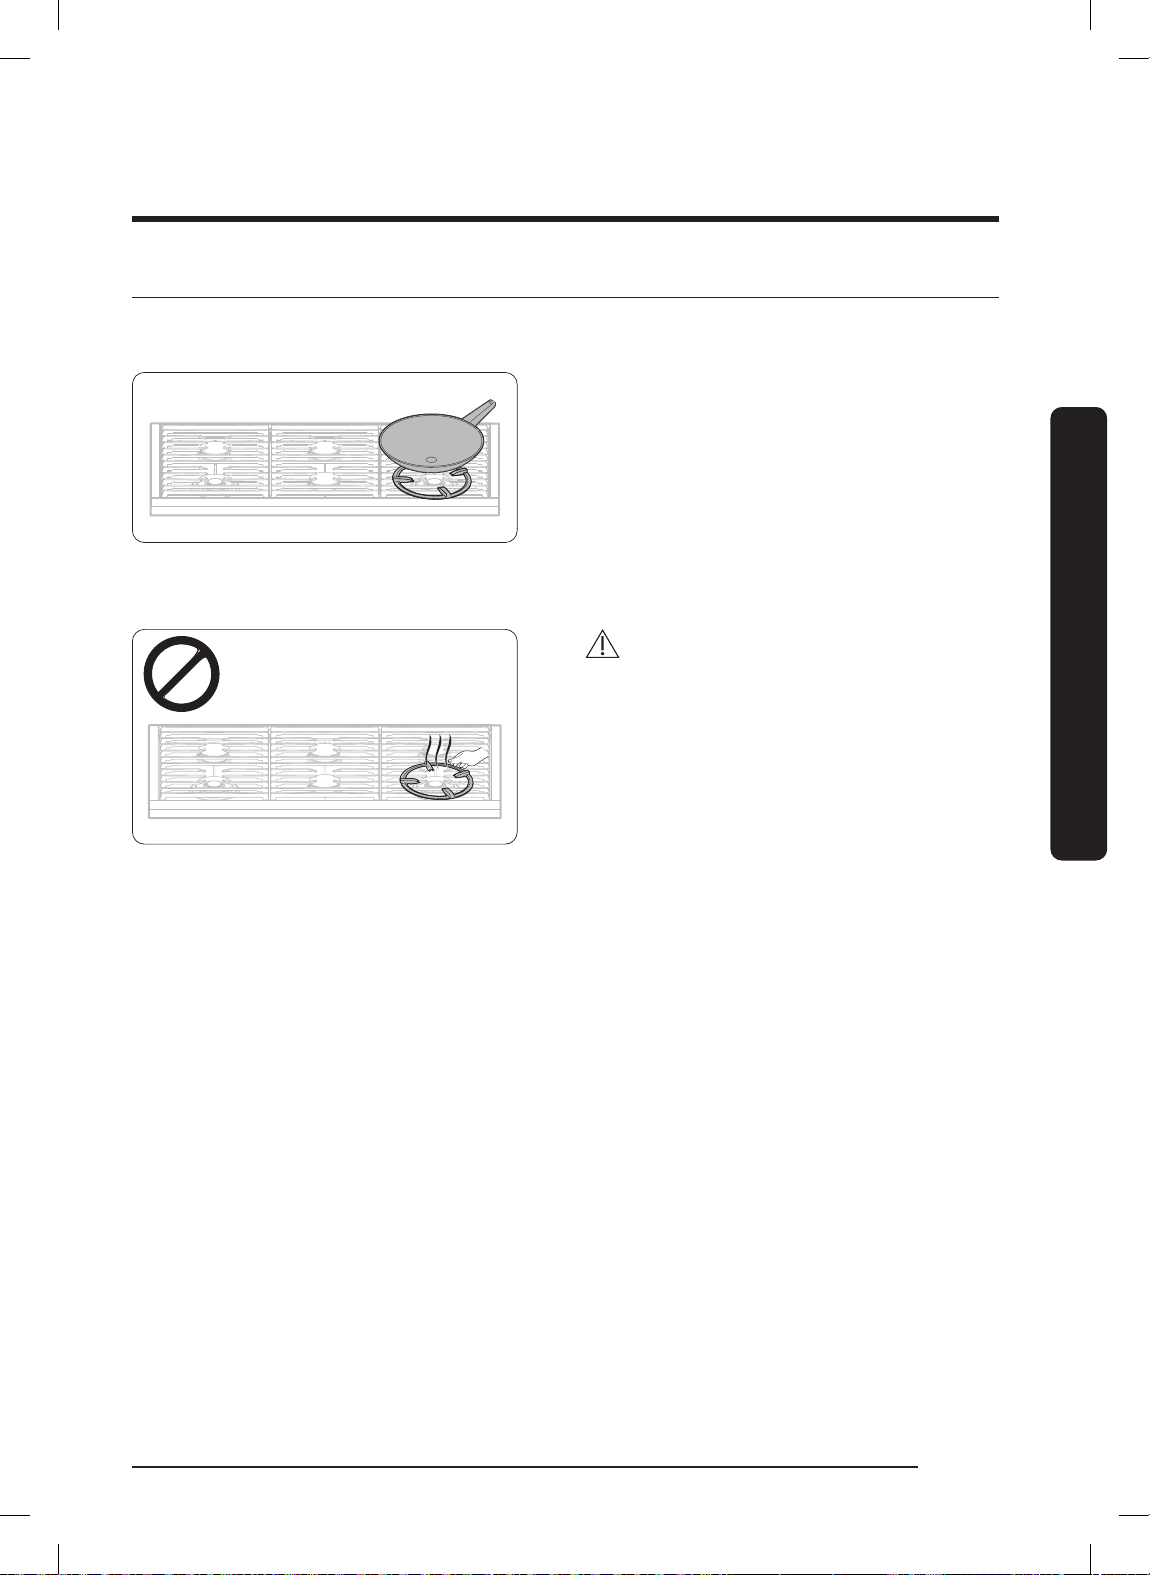
About the Wok Ring
Woks are often used for stir frying, pan frying, deep frying and poaching. The provided
Wok Ring supports 12" to 14" woks.
1. Turn off all burners and let the grates
cool fully.
2. Put the Wok Ring on the grate over
the 'RF' dual burner.
3. Set a wok on the Wok Ring.
4. Turn on the burner; adjust the flame
as desired.
CAUTION
• Do not remove the Wok Ring until all
heated surfaces cool completely.
• Do not use flat-bottom cookware or
that has a diameter under 12".
• Do not use an oversized wok. Burner
flames may damage property and
cause burns.
• Flame foods only under an active
ventilation hood.
• Do not use wok ring and griddle at
the same time.
• Use oven gloves when placing or
removing the wok ring.
Using the Cooktop
English 37
FULL_DOP36C86DLSDA_DG68-01507A-00_EN+MES+CFR.indb 37FULL_DOP36C86DLSDA_DG68-01507A-00_EN+MES+CFR.indb 37 2023-02-23 오후 5:08:592023-02-23 오후 5:08:59
Page 38

Using the Basic Oven
Basic Settings: Clock, Date&Time, Language
Clock Theme
To change clock theme.
1. Tap SETTINGS > Display.
2. Tap Clock theme, swipt the display to view themems and select a theme.
Date & Time
To enable automatic date and time.
1. Activate Wi-Fi.
Using the Basic Oven
2. Tap SETTINGS > Date & Time > Automatic date and time and in the right-hand
screen, tap ON. The date and time are set automatically.
To manually input date and time.
1. Tap SETTINGS > Date & Time > Automatic date and time and in the right-hand
screen, tap OFF. Time zone, set date and set time are activated.
2. Set the time zone, date and time.
To change the time format
1. Tap SETTINGS > Date & Time > Select time format and tap the right-hand screen.
2. Select 12-hour clock or 24-hour clock.
Language
Choose a display language.
1. Tap SETTINGS > Language and tap the right-hand screen.
2. Select English, Spanish, or French.
English38
FULL_DOP36C86DLSDA_DG68-01507A-00_EN+MES+CFR.indb 38FULL_DOP36C86DLSDA_DG68-01507A-00_EN+MES+CFR.indb 38 2023-02-23 오후 5:08:592023-02-23 오후 5:08:59
Page 39
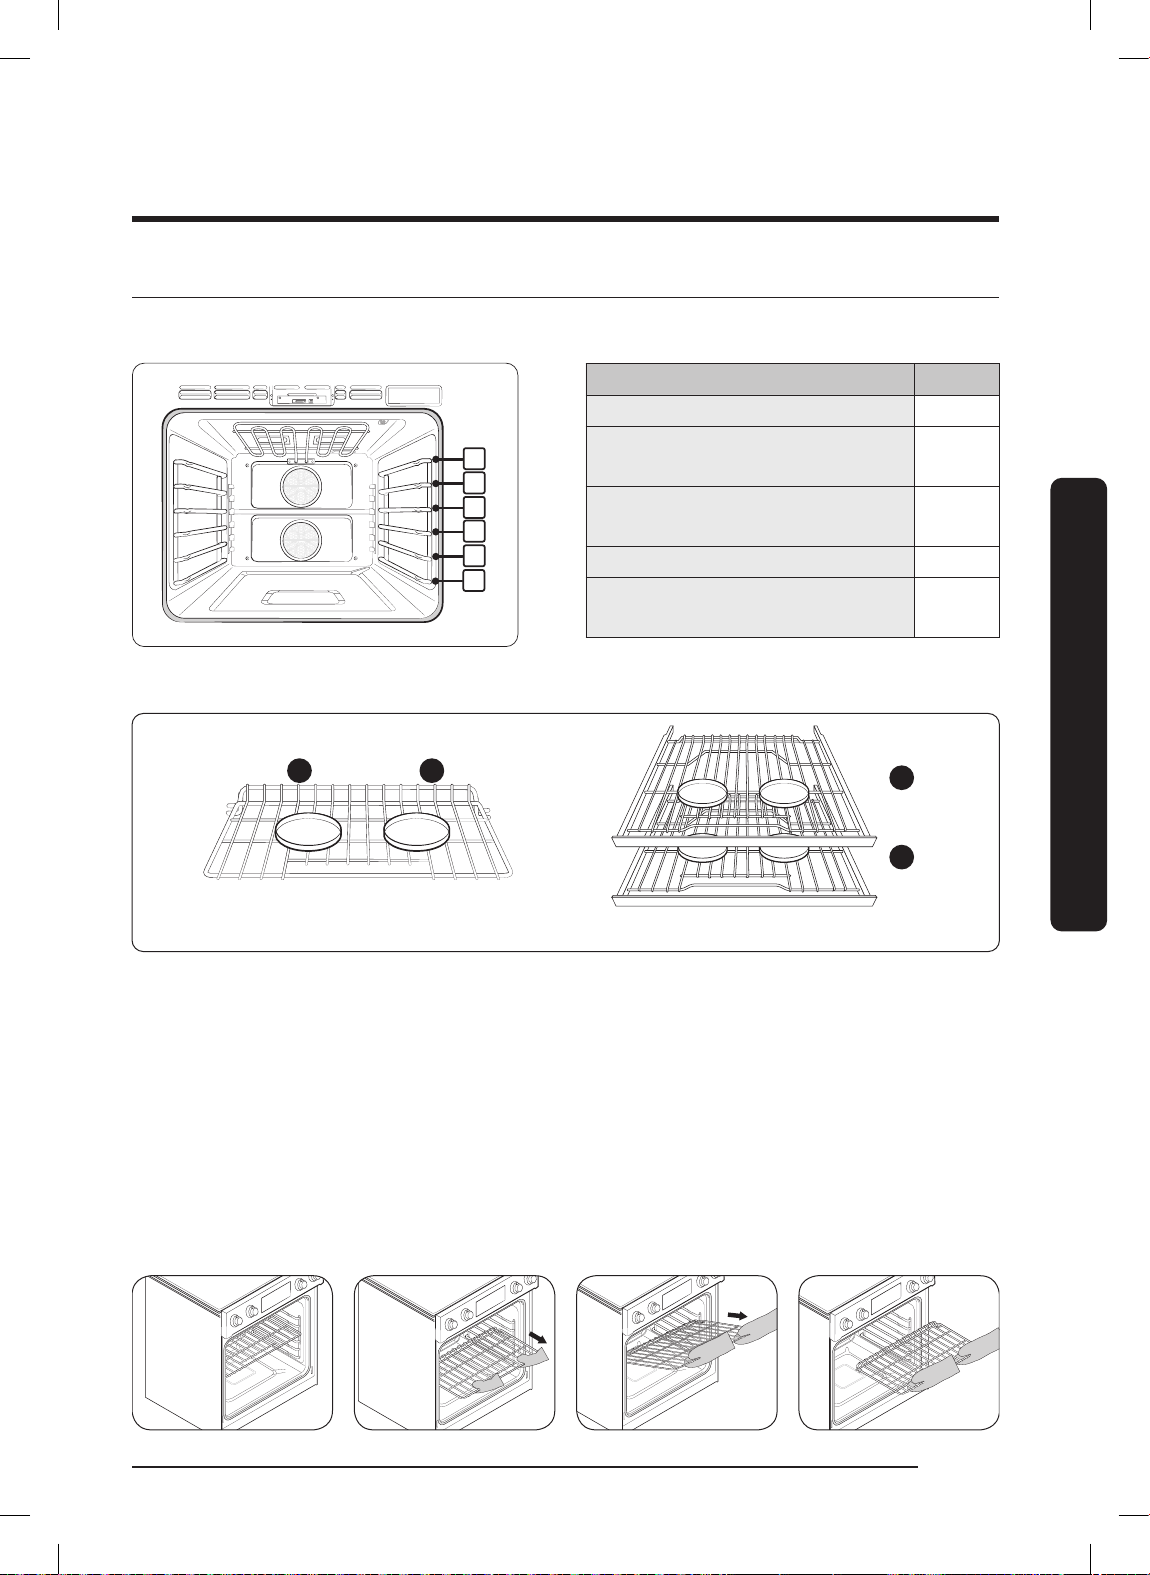
Using the Oven Racks
1
2
3
4
5
6
Single-rack baking: Use Level 3 or 4
3 4
5
3
Multi-rack baking: Use Level 3 or 5
DOP36C86D**, DOP48C86D** (right oven)
Rack and Pan Placement
Type of Food Level
Broiling hamburgers 6
Broil meat, small,
cuts of poultry, fish
Bundt/pound cake,
frozen pie, casserole
3 - 5
4 or 3
Angel-food cake, small roast 2
Turkey, large roast, ham,
fresh pizza
1
Using the Basic Oven
Single-rack baking: Use Level 3 or 4 Multi-rack baking: Use Level 3 or 5
For best results, center pans in the oven as much as possible. If using multiple pans,
each should have at least 1" of space around it.
Before Using the Racks
Each rack has stops that must be placed correctly on the supports to keep the rack from
accidentally being pulled completely out. (Adjust racks only when the oven is cool.)
Removing the Racks
Pull the rack straight out until it stops, then tilt the rack up and pull it out.
Installing the Racks
Place the end of the rack on the support, then tilt the front up and push the rack in.
English 39
FULL_DOP36C86DLSDA_DG68-01507A-00_EN+MES+CFR.indb 39FULL_DOP36C86DLSDA_DG68-01507A-00_EN+MES+CFR.indb 39 2023-02-23 오후 5:08:592023-02-23 오후 5:08:59
Page 40
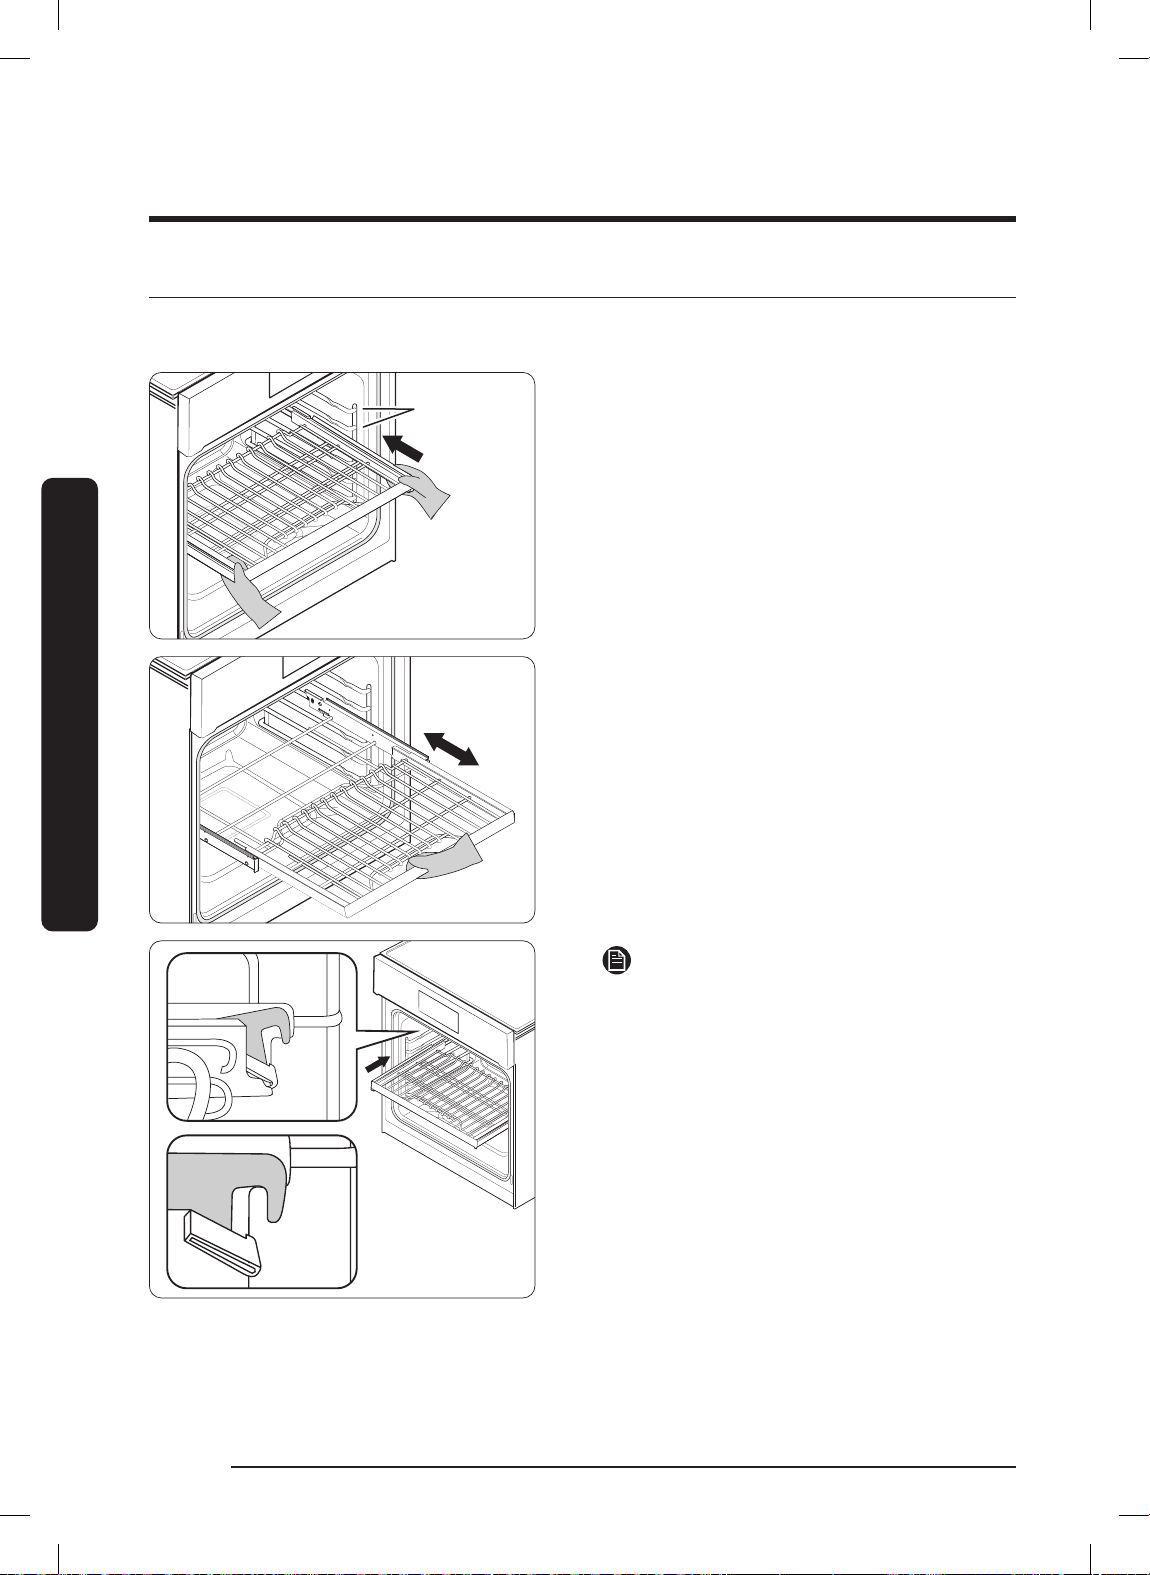
Using the Basic Oven
Rack Guides
Closed
Open
Using the Gliding Rack
Two glide tracks let the rack extend fully out of the oven for easy removal and
placement of cookware, especially heavier dishes.
Using the Basic Oven
Rack Guides
With the gliding rack slides retracted and
the oven off, insert the rack between the
guides until the rack reaches the back.
Grasp the handle to pull the gliding rack
(left).
Pulling by the frame may cause the rack
to come off the guides, possibly harming
the rack and the user. Wear oven mitts
when handling the gliding rack during
cooking.
NOTE
Lock the lower part of gliding rack on
the oven wall during use to keep the rack
securely on the guides. The hook on the
gliding rack is controlled via the upper
Closed
Open
English40
FULL_DOP36C86DLSDA_DG68-01507A-00_EN+MES+CFR.indb 40FULL_DOP36C86DLSDA_DG68-01507A-00_EN+MES+CFR.indb 40 2023-02-23 오후 5:09:002023-02-23 오후 5:09:00
part of the rack. The closed hook tilts up.
(See left.)
Page 41
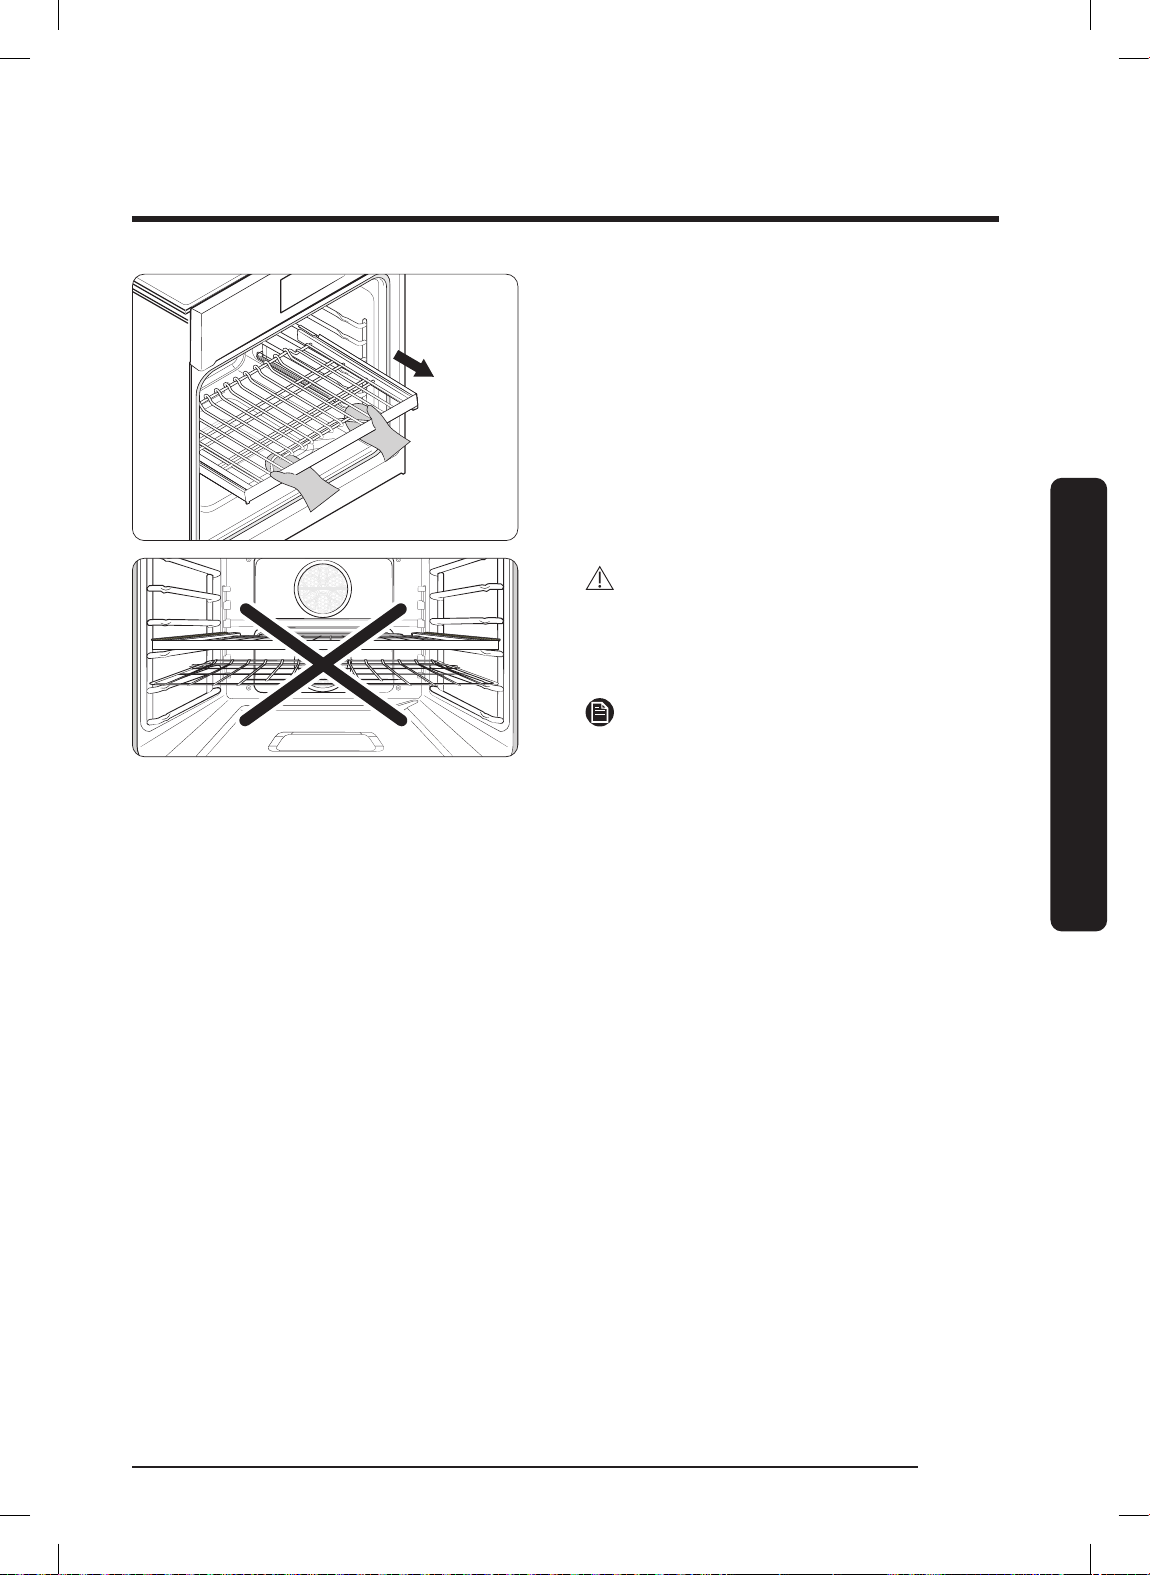
With the gliding rack closed and the oven
off and cool, grasp the rack and frame
and pull both forward to remove.
CAUTION
Keep at least one open rack level
between a gliding rack and a wire rack
(see left).
NOTE
You can install the gliding rack on any
but the lowest rack level (available rack
levels: 2-6).
Using the Basic Oven
English 41
FULL_DOP36C86DLSDA_DG68-01507A-00_EN+MES+CFR.indb 41FULL_DOP36C86DLSDA_DG68-01507A-00_EN+MES+CFR.indb 41 2023-02-23 오후 5:09:002023-02-23 오후 5:09:00
Page 42
Using the Basic Oven
Using the Temp Probe
For many foods, especially roasts and poultry, measuring the internal temperature is
the best way to determine proper doneness. This feature lets you cook meat to an exact
internal temperature. Use it with Bake, Convection Bake, Convection Roast, Pure Conv.
Sear, Dual Four-Part Pure Convection, Steam Bake, Steam Roast, Steam, or Fine Steam.
Once the meat's internal temperature reaches 100 °F, the current temperature appears
on the probe display.
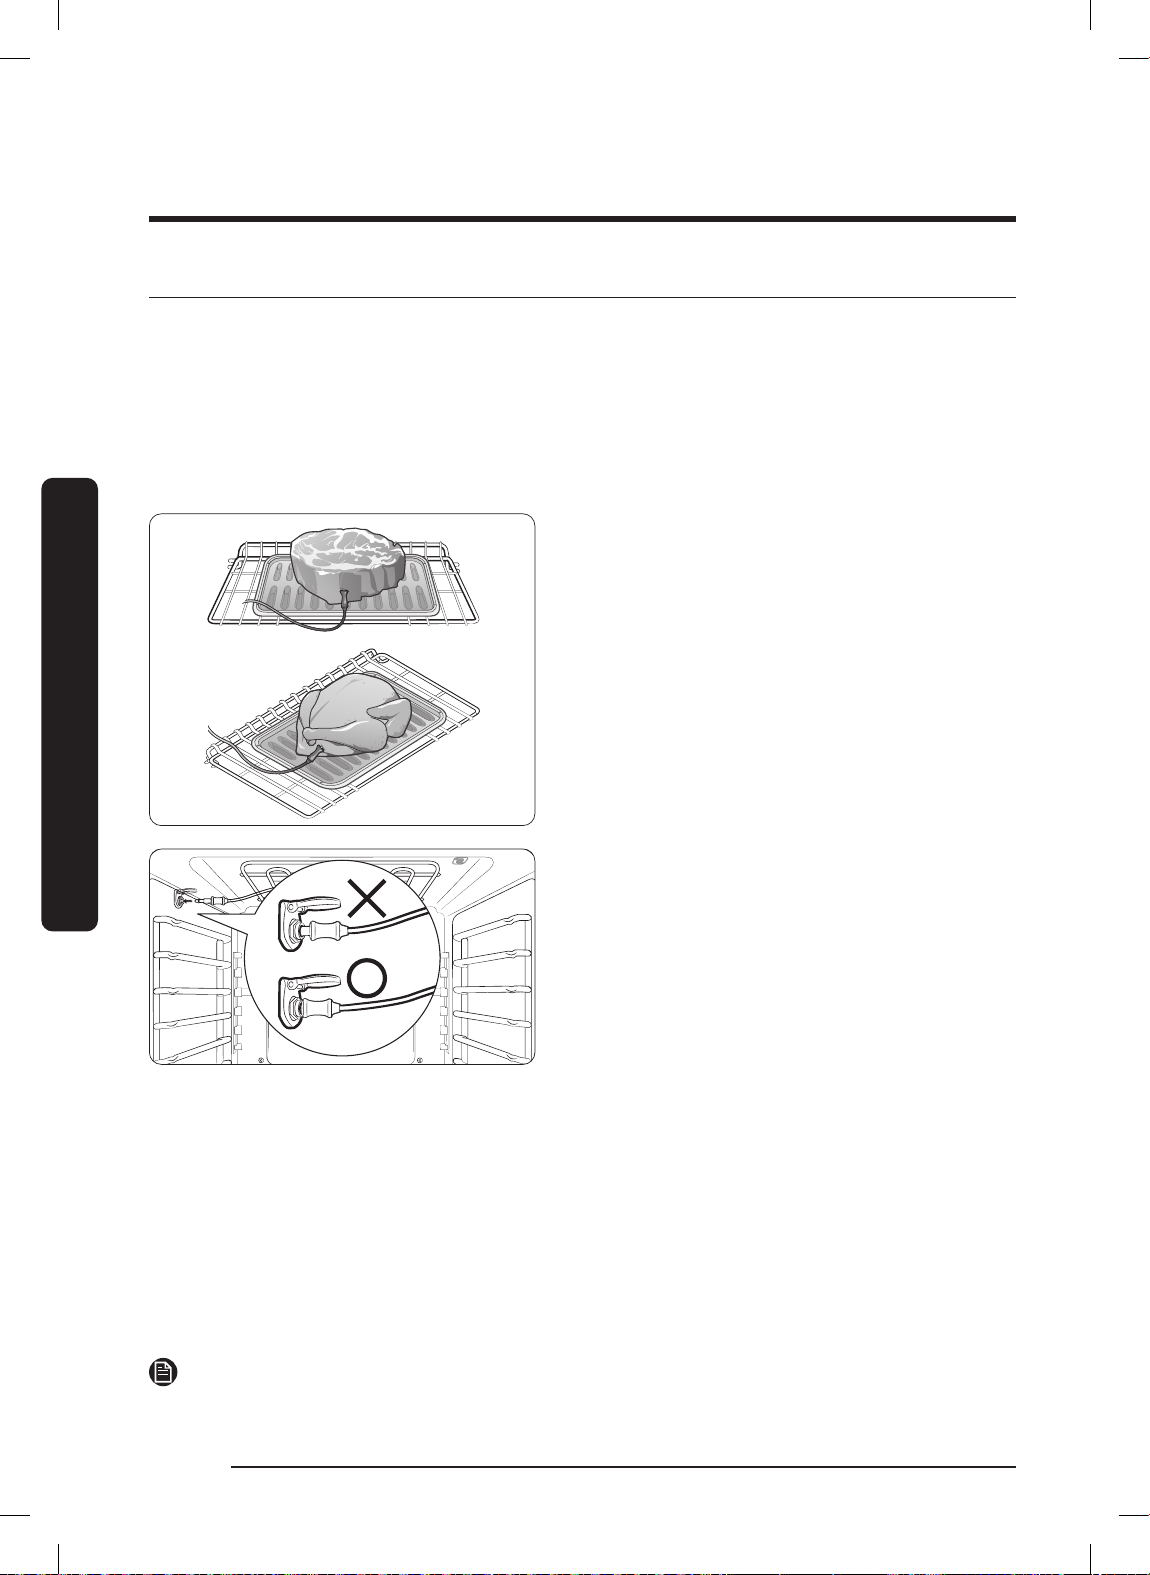
1. Push the temp probe tip into the center of the meat.
Using the Basic Oven
• Insert the probe as shown at left. Do
not touch bone, fat, or gristle. If you
do not fully insert the probe, it senses
oven temp, not meat temp.
• Bone-in meat: Insert the probe in the
center of the lowest, thickest portion.
• Whole poultry: Insert the probe in
the thickest part of the inner thigh,
parallel to the leg.
• If you activate Keep Warm to keep
the meat warm after cooking it using
the temp probe, the meat may cook
beyond the desired temp.
• Temp probe socket location
- 48" range (left oven) :
left oven wall
- 48" range (right oven) :
right oven wall
- 36" range :
left oven wall
2. Insert the temp probe plug fully into the socket on the top side wall of the oven.
3. (48" range) Tap LEFT or RIGHT and swipe to a cooking operation (Bake, Convection
Bake, Convection Roast, Pure Conv.Sear, or Dual Four-Part Pure Convection).
(36" range) Select a cooking mode and set the cooking temperature. (See Pg. 47)
4. Tap Temp Probe and on the numeric pad, set an internal temp from 100 °F to 200 °F.
5. (Option) Set Cook Time/Delay Start.
6. Tap START. (When the set internal temp is reached, the probe turns off and an alarm
sounds.)
NOTE
If you remove the temp probe without canceling the function or insert it without
setting the function, cooking stops after 1 min.
English42
FULL_DOP36C86DLSDA_DG68-01507A-00_EN+MES+CFR.indb 42FULL_DOP36C86DLSDA_DG68-01507A-00_EN+MES+CFR.indb 42 2023-02-23 오후 5:09:002023-02-23 오후 5:09:00
Page 43
CAUTION
• To protect the probe tip, defrost food fully and do not let the tip poke out of the
meat.
• The probe should only be in the oven if the probe is in use.
• Do not use tongs to insert/remove the probe.
• Use the Temp probe only as instructed.
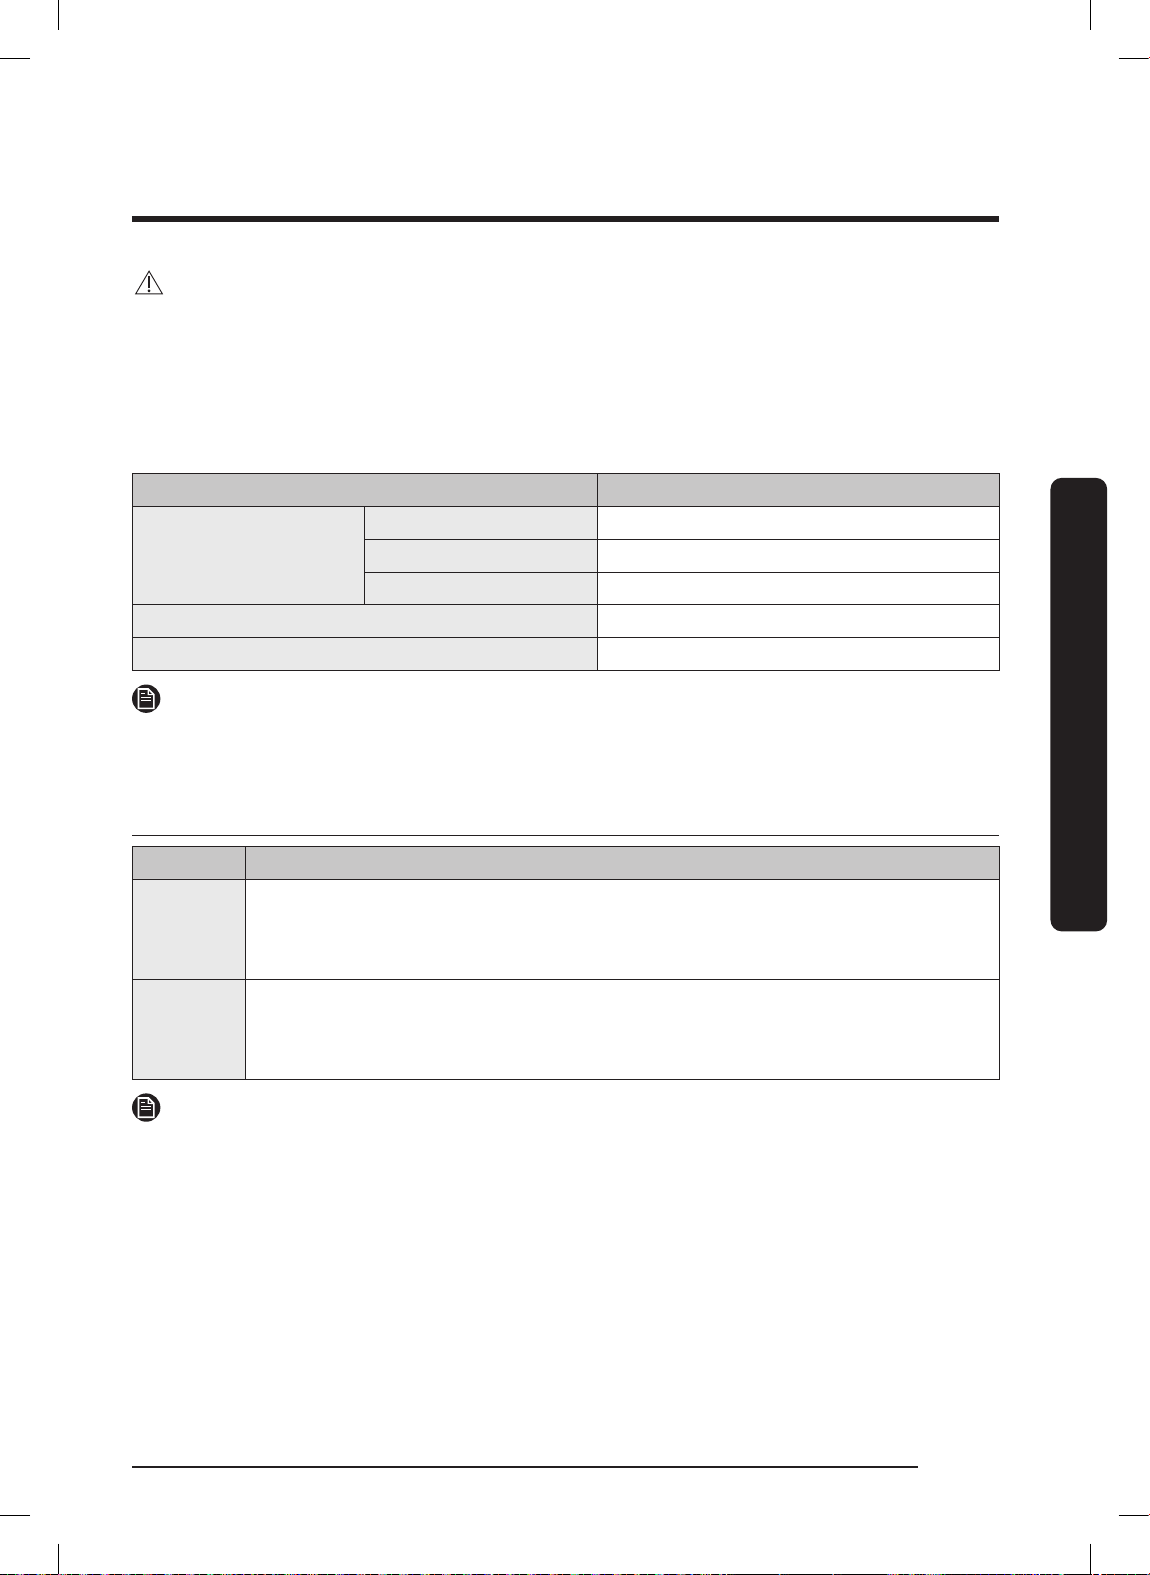
Type of Food Level
Rare 140 °F
Beef / Lamb
Medium 160 °F
Well done 170 °F
Pork 170 °F
Poultry 180 - 185 °F
NOTE
If you cover the cooked meat with foil and let it sit 10 minutes, the internal temp rises
5-10 degrees. After cooking, remove the probe from the socket, then the meat
About Oven Functions
Oven Oven functions (*36" model only)
Using the Basic Oven
Basic
oven
Steam
oven
(48" only)
Bake, Convection Bake, Convection Roast, Broil, Pure Convection Sear,
Convection Broil, Dual 4-Part Pure Convection, Special Function, Chef
Mode, Clean, Steam Bake*, Steam Roast*
Bake, Convection Bake, Convection Roast, Broil, Convection Broil, 4-Part
Pure Convection, Steam Bake, Steam Roast, Steam, Special Function,
Special Steam Cook, Clean
NOTE
For descriptions of steam oven functions in the 48" range, see the chart on Pg. 74.
English 43
FULL_DOP36C86DLSDA_DG68-01507A-00_EN+MES+CFR.indb 43FULL_DOP36C86DLSDA_DG68-01507A-00_EN+MES+CFR.indb 43 2023-02-23 오후 5:09:002023-02-23 오후 5:09:00
Page 44
Using the Basic Oven
Cooking Mode
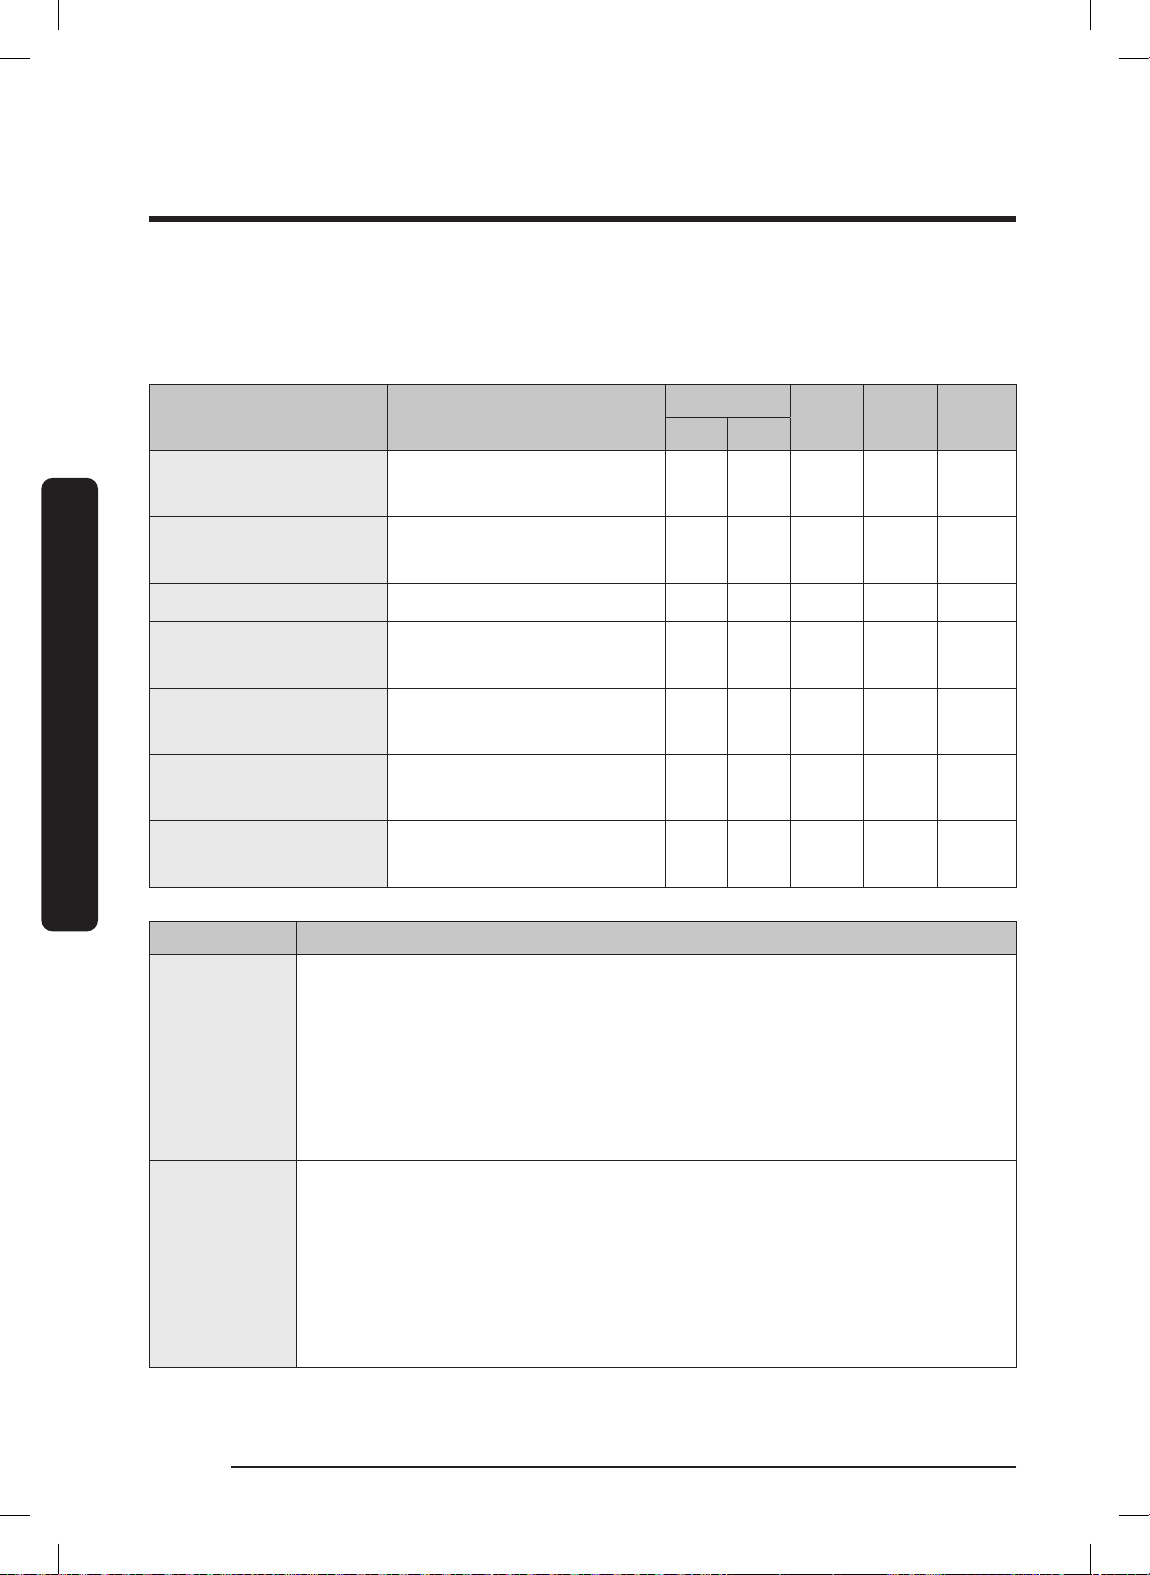
For 48" range, tap RIGHT, then swipe to select the cooking mode; for 36" product, select
a cooking mode, then set a temperature. (See Setting the Temperature, Pg. 47 and Basic
Baking and Broiling Instructions, Pg. 48)
Mode Temperature range
Bake
Convection Bake /
Roast
Using the Basic Oven
Broil High / Low O O O - -
Pure Conv. Sear
Convection Broil
Steam Bake,
Steam Roast
Dual 4-Part
Pure Convection
Oven Instruction
Bake
48" Model
Left Right
175 °F (80 °C) -
550 °F (285 °C)
175 °F (80 °C) -
550 °F (285 °C)
175 °F (80 °C) -
475 °F (245 °C)
175 °F (80 °C) -
550 °F (285 °C)
230 °F (110 °C) -
550 °F (285 °C)
175°F (80 °C) -
550 °F (285 °C)
• This mode is for baking cakes, cookies, casseroles. Always preheat
the oven.
• Baking temps/times vary with ingredients and size/shape of the
baking pan.
• Dark or nonstick coatings may cook faster with more browning.
• Convection fan may turn on/off during baking.
O O O O -
O O O O O
- O O O -
O O O - -
O - O O -
O O O O -
36"
Model
Temp
probe
Instant-
Heat™
• This mode uses a fan to circulate oven heat evenly and
continuously.
Convection
Bake
English44
FULL_DOP36C86DLSDA_DG68-01507A-00_EN+MES+CFR.indb 44FULL_DOP36C86DLSDA_DG68-01507A-00_EN+MES+CFR.indb 44 2023-02-23 오후 5:09:002023-02-23 오후 5:09:00
• Better heat distribution allows even cooking and top results with
multiple racks.
• Breads/pastries brown more evenly.
• Oven temp must be manually adjusted in 25 °F increments.
Page 45
Convection
Roast
Broil
Pure Conv.
Sear
Convection
Broil
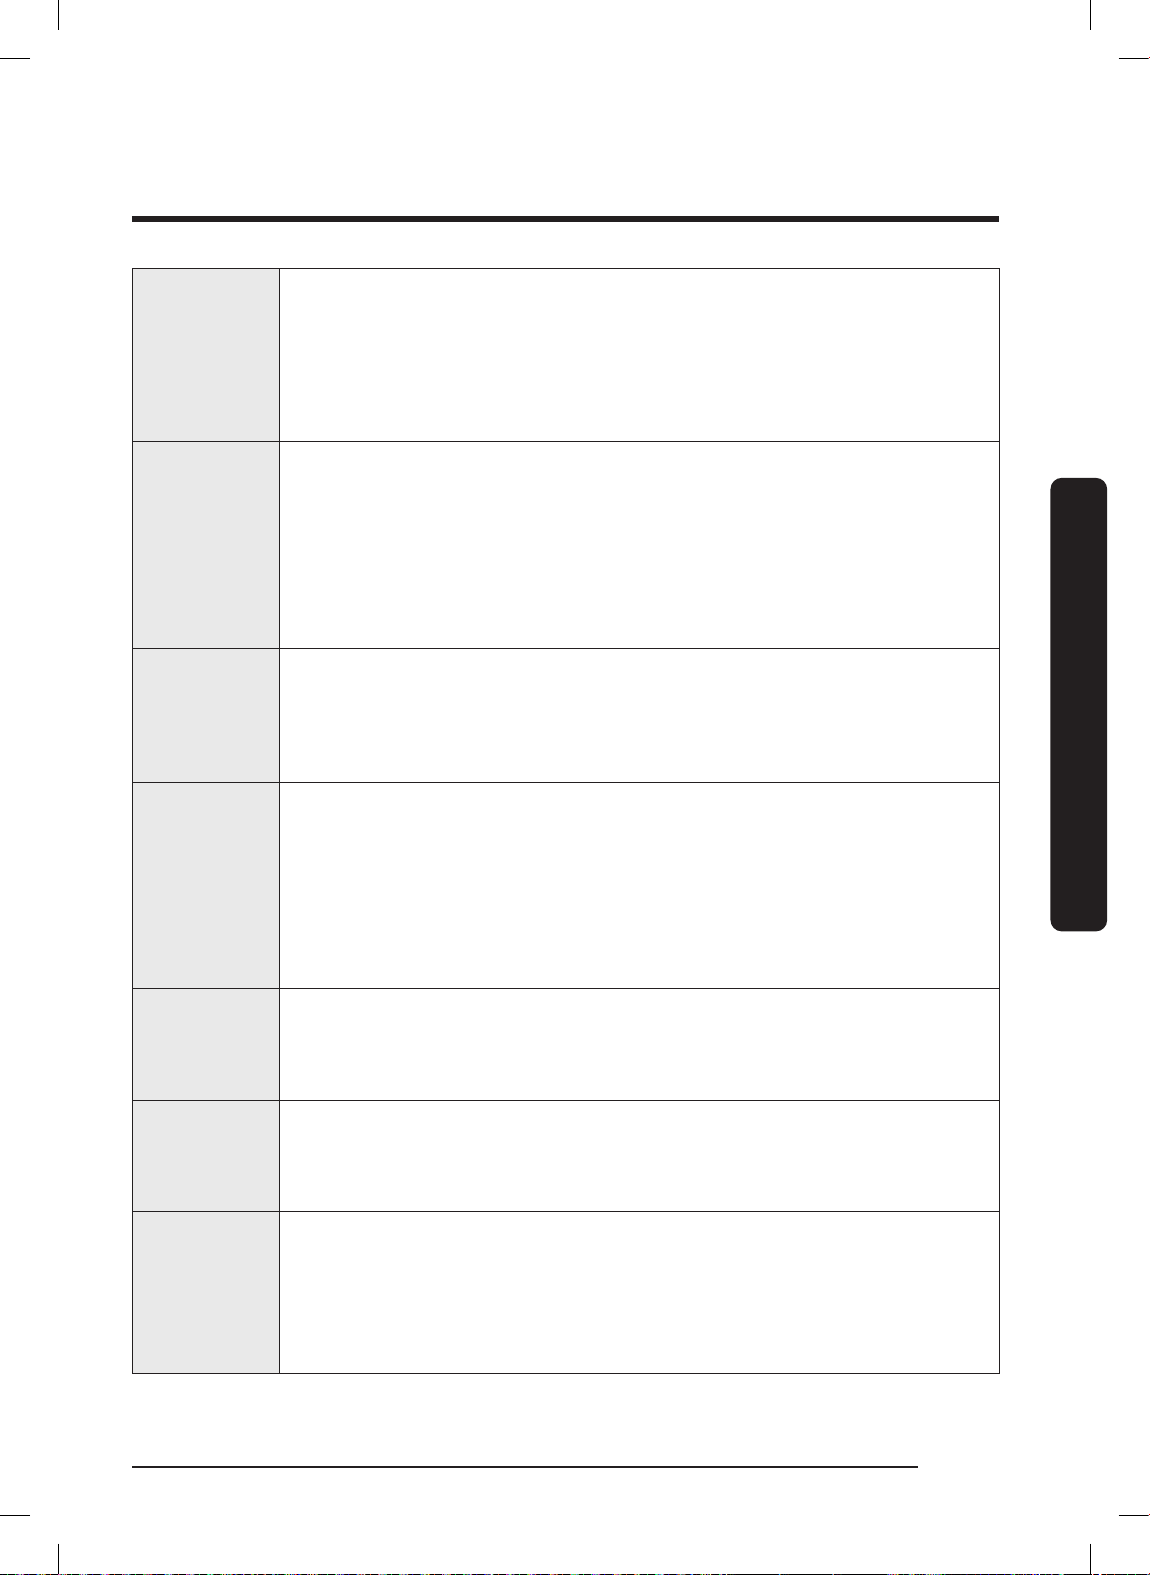
• Good for cooking large tender cuts of meat uncovered; convection
fan circulates heated air evenly all around the food.
• Meat/poultry brown on all sides as if rotisseried.
• Heated air traps juices for moistness/tenderness while creating a
golden-brown exterior.
• Cooks tender cuts of meat by direct heat under oven's broil
element.
• High heat cooks quickly for a rich, brown exterior; best for meat/
fish/poultry up to 1" thick.
• Always preheat the oven for 5 minutes.
• See Broiling Recommendation Guide, Pg. 46.
Uses convection element and fan; oven cooks meat 75 °F (42 °C) higher
than set temperature for first 15 min.; browning process sears meat
exterior to trap natural juices; best for game hens, chickens, turkeys
(stuffed or not), turkey breasts, pork tenderloin, pork loins.
• Similar to Broil but with the air circulated by the convection fan.
• Broil element cycles on/off to maintain oven temp, while fan
circulates hot air.
• For thicker cuts of meat, fish, poultry; gently browns exterior and
traps juices.
• For best results, preheat broil element 5 minutes.
Using the Basic Oven
• Ideal for bread, pastries, desserts; raises moisture for improved
Steam Bake
texture, flavor.
• See Steam Bake / Steam Roast Recommendation Guide, pg. 46.
• Ideal for roasted meat / poultry; maintains crispy surface while
Steam Roast
trapping juices for moistness / tenderness.
• See Steam Bake / Steam Roast Recommendation Guide, pg. 46.
Uses convection element and fan to uniformly circulate air, allowing
Dual Four-
Part Pure
Convection
use of more oven space; good for single- / multi-rack baking, roasting,
cooking full meals; food like pizza, cake, cookies, biscuits, frozen
convenience foods can be cooked on 2 – 3 racks; also good for whole
roasted duck, lamb shoulder, short leg of lamb.
English 45
FULL_DOP36C86DLSDA_DG68-01507A-00_EN+MES+CFR.indb 45FULL_DOP36C86DLSDA_DG68-01507A-00_EN+MES+CFR.indb 45 2023-02-23 오후 5:09:012023-02-23 오후 5:09:01
Page 46
Using the Basic Oven
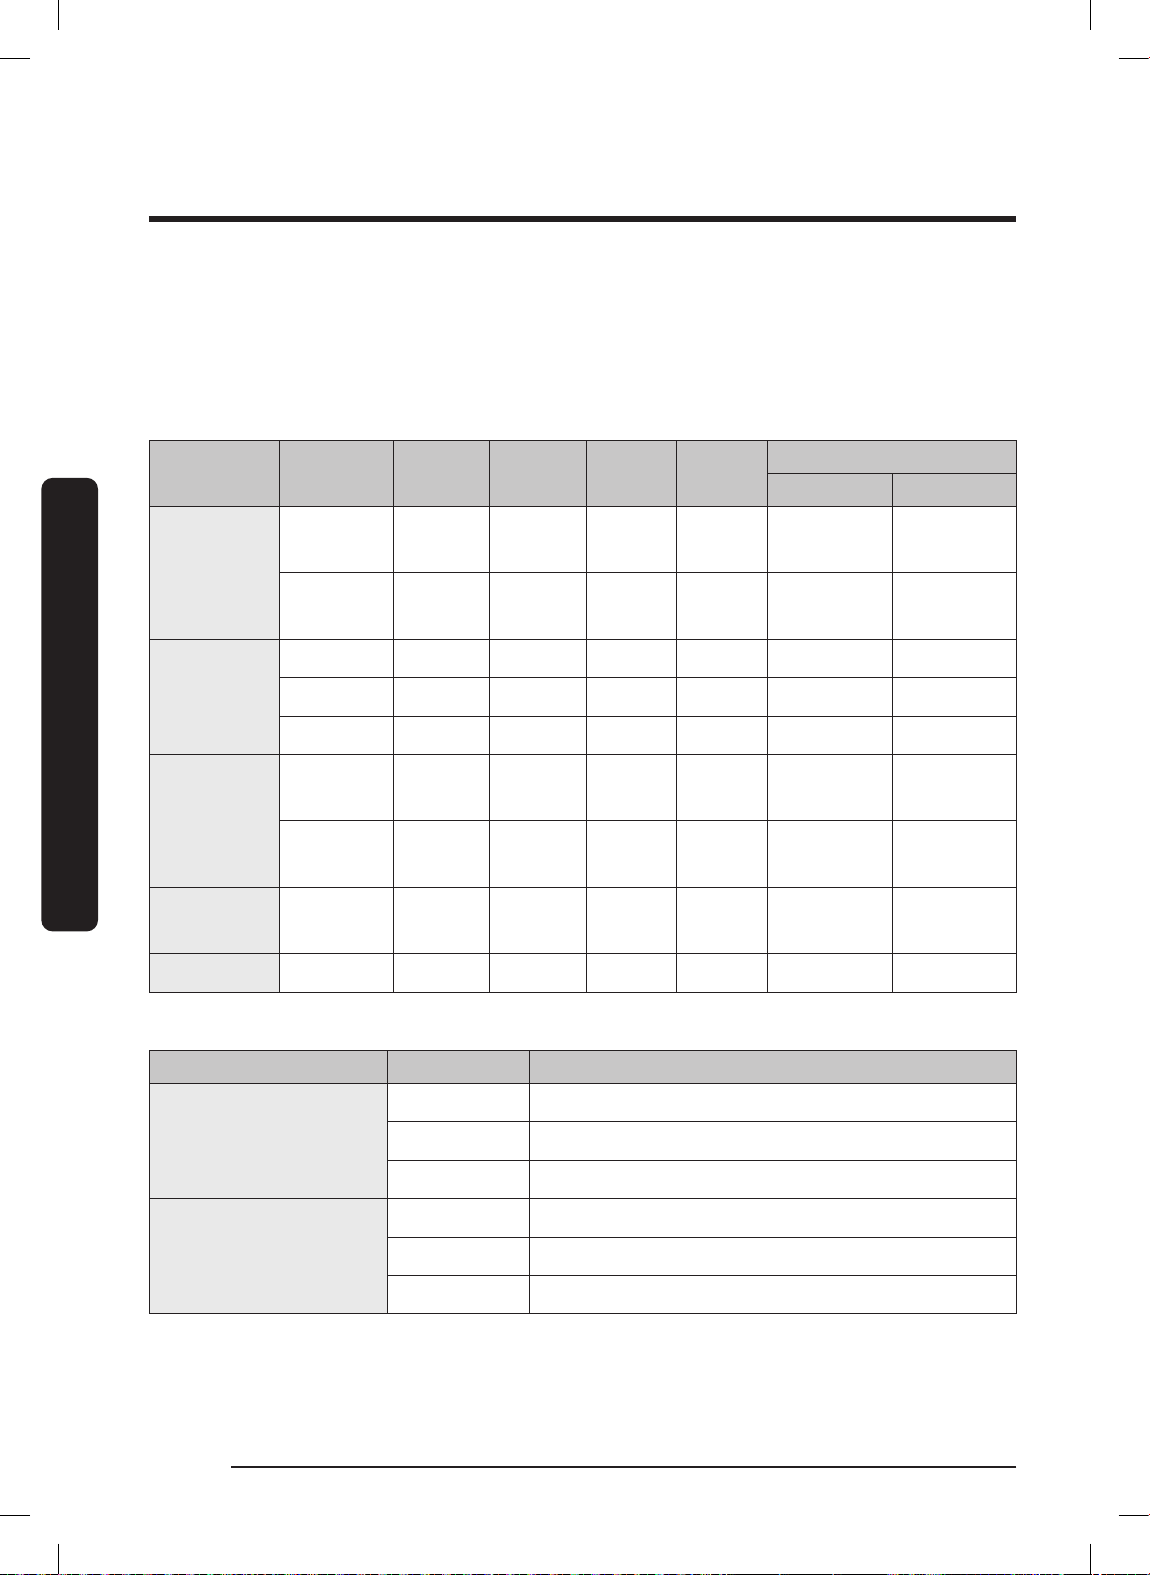
Broiling Recommendation Guide
The size, weight, thickness, starting temperature and your doneness preference will
affect broiling times.
This guide is based on meats at refrigerator temperature. Always use a broiler pan and
its grid when broiling.
Always preheat the oven for 5 minutes.
Food Doneness Size
Hamburgers
Using the Basic Oven
Beef steaks
Chicken
pieces
Pork chops Well done 1 lbs. 1" Lo 3
Fish fillets Well done - ¼ - ½" Lo 3 or 4 7:00 - 8:00 4:00 - 5:00
Steam Bake / Steam Roast Recommendation Guide
Thickness
Medium
Medium
Rare - 1" Hi 5 5:00 4:00
Medium - 1 - 1½" Hi 5 6:00 - 6:30 4:30 - 4:00
Well done - 1 - 1½" Lo 4 7:00 - 8:00 4:00 - 5:00
Well done 4.5 lbs. ½ - ¾" Lo 3
Well done 2 lbs. ½ - ¾" Lo 3 or 4
9
patties
9
patties
¾" Hi 6 3:00 2:00
1" Hi 6 3:20 2:20
Level
Rack
positon
Cooking time (min)
1st side 2nd side
16:00 -
18:00
15:00 -
16:00
8:00 10:00
13:00 -
15:00
10:00 -
12:00
6:00 - 8:00
Steam Mode Level Foods
High Rye breads, Desserts (Flan caramel)
Steam Bake
Steam Roast
English46
FULL_DOP36C86DLSDA_DG68-01507A-00_EN+MES+CFR.indb 46FULL_DOP36C86DLSDA_DG68-01507A-00_EN+MES+CFR.indb 46 2023-02-23 오후 5:09:012023-02-23 오후 5:09:01
Med Croissants, Pies, Reheats (Pizza, Casseroles)
Low Pastries
High -
Med Meats, Poultry
Low Turkey, Large meats
Page 47
Setting the Cooking Mode
4:35 PM
RIGHT
START
Convection Bake
Faster, more even baking
325
°F
None
Cook Time
None
Delay Start
Off
InstantHeat™
OVEN
MODE
OFF
TIMER
SETTINGS
LEFT
OFF
LOCK
LIFT PANEL
RIGHT
4:35 PM
1
6 7 8 9 0
2 3 4 5
OK
325
°F
OFF
TIMER
SETTINGS
LEFT
OFF
LOCK
LIFT PANEL
RIGHT
Adjust temp. 175°F ~ 550°F
4:35 PM
RIGHT
START
Convection Bake
Faster, more even baking
325
°F
None
Cook Time
None
Delay Start
Off
InstantHeat™
OVEN
MODE
OFF
TIMER
SETTINGS
LEFT
OFF
LOCK
LIFT PANEL
RIGHT
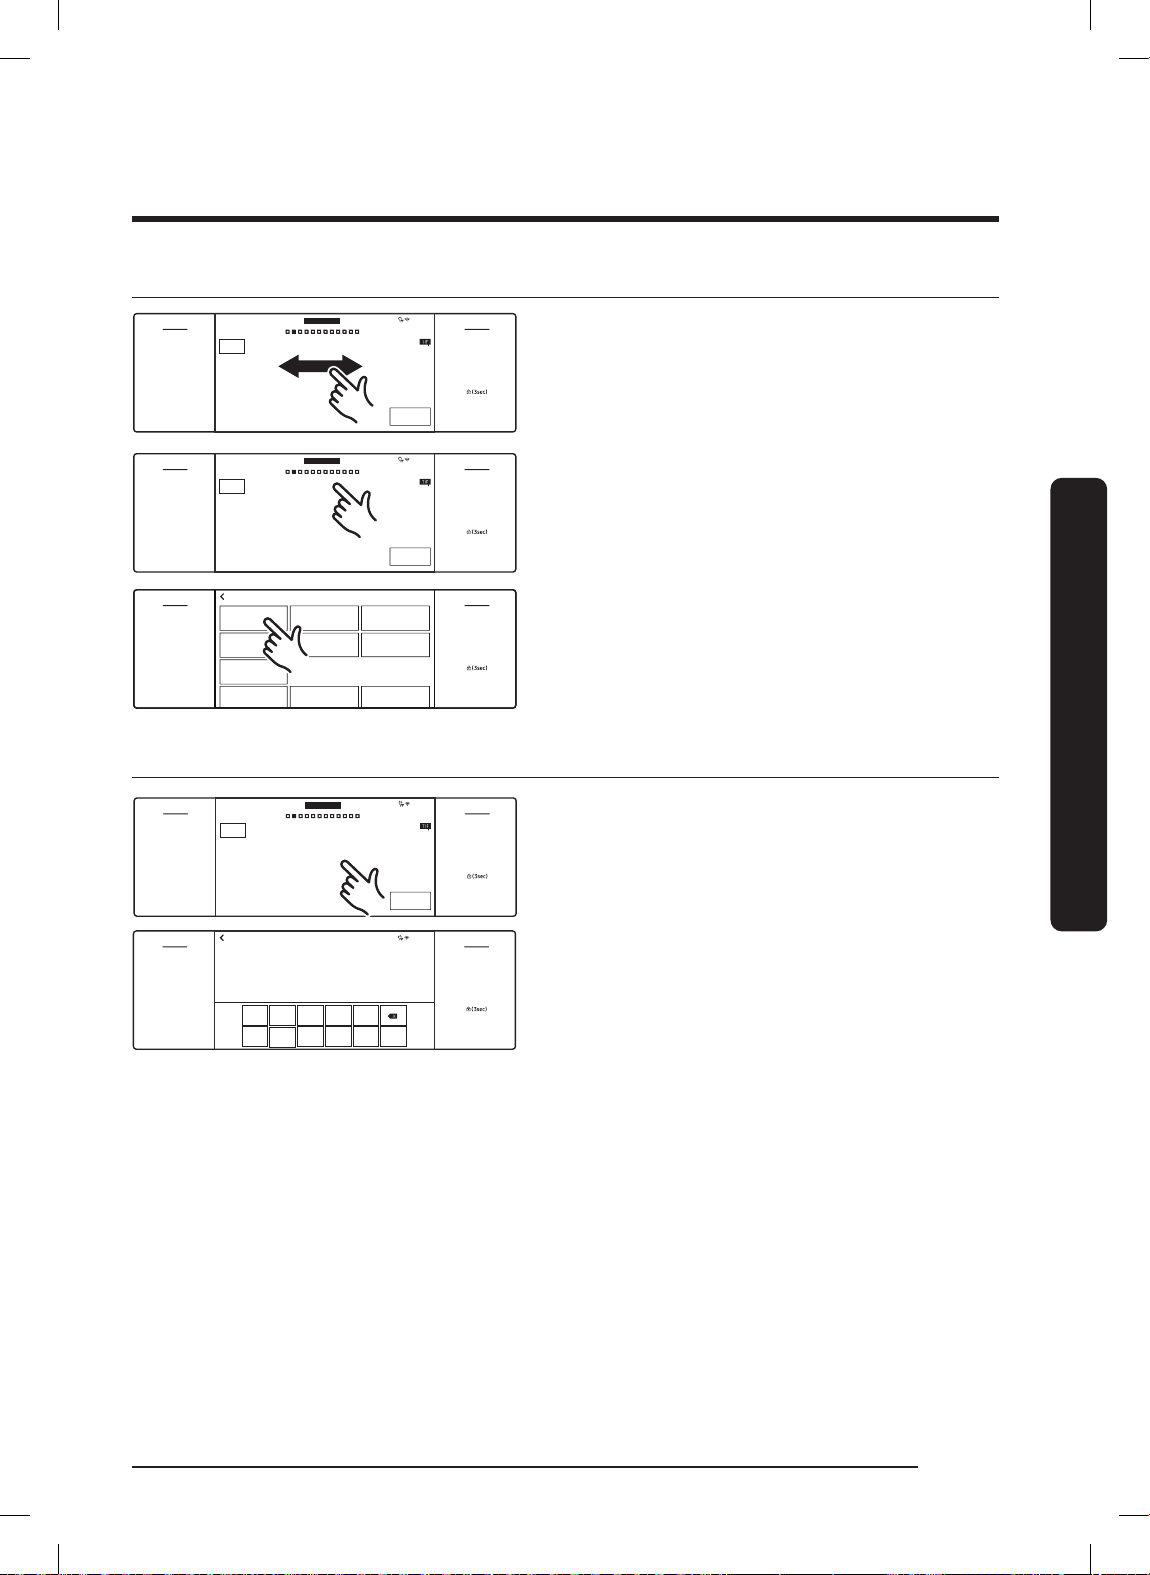
• Swipe the screen left/right to select a
mode.
Conv.Roast
325°F
325
START
4:35 PM
RIGHT
OFF
LOCK
LIFT PANEL
RIGHT
OFF
LOCK
LIFT PANEL
LEFT
OFF
TIMER
SETTINGS
LEFT
OFF
TIMER
SETTINGS
RIGHT
OVEN
Convection Bake
MODE
Faster, more even baking
°F
325
Cook Time
Delay Start
None
None
Bake
350°F
Broil
High
Dual Four Part
Pure Conv.
°F
325
Special Function Chef Mode Clean
InstantHeat™
Off
Right Oven mode
Conv.Bake
325°F
Pure Conv. Sear°FConv.Broil
325°F
Setting the Cooking Temperature
• Tap the mode area to show the
summarized mode.
• Tap a mode.
• Tap the temperature to show the
numeric pad.
• Tap the numeric pad to set the
temperature.
• Tap OK.
Using the Basic Oven
English 47
FULL_DOP36C86DLSDA_DG68-01507A-00_EN+MES+CFR.indb 47FULL_DOP36C86DLSDA_DG68-01507A-00_EN+MES+CFR.indb 47 2023-02-23 오후 5:09:012023-02-23 오후 5:09:01
Page 48
Using the Basic Oven
START
4:35 PM
Convection Bake
Faster, more even baking
RIGHT
325
°F
InstantHeat™
Off
Cook Time
None
Delay Start
None
OFF
TIMER
SETTINGS
LEFT
OFF
LOCK
LIFT PANEL
RIGHT
OVEN
MODE
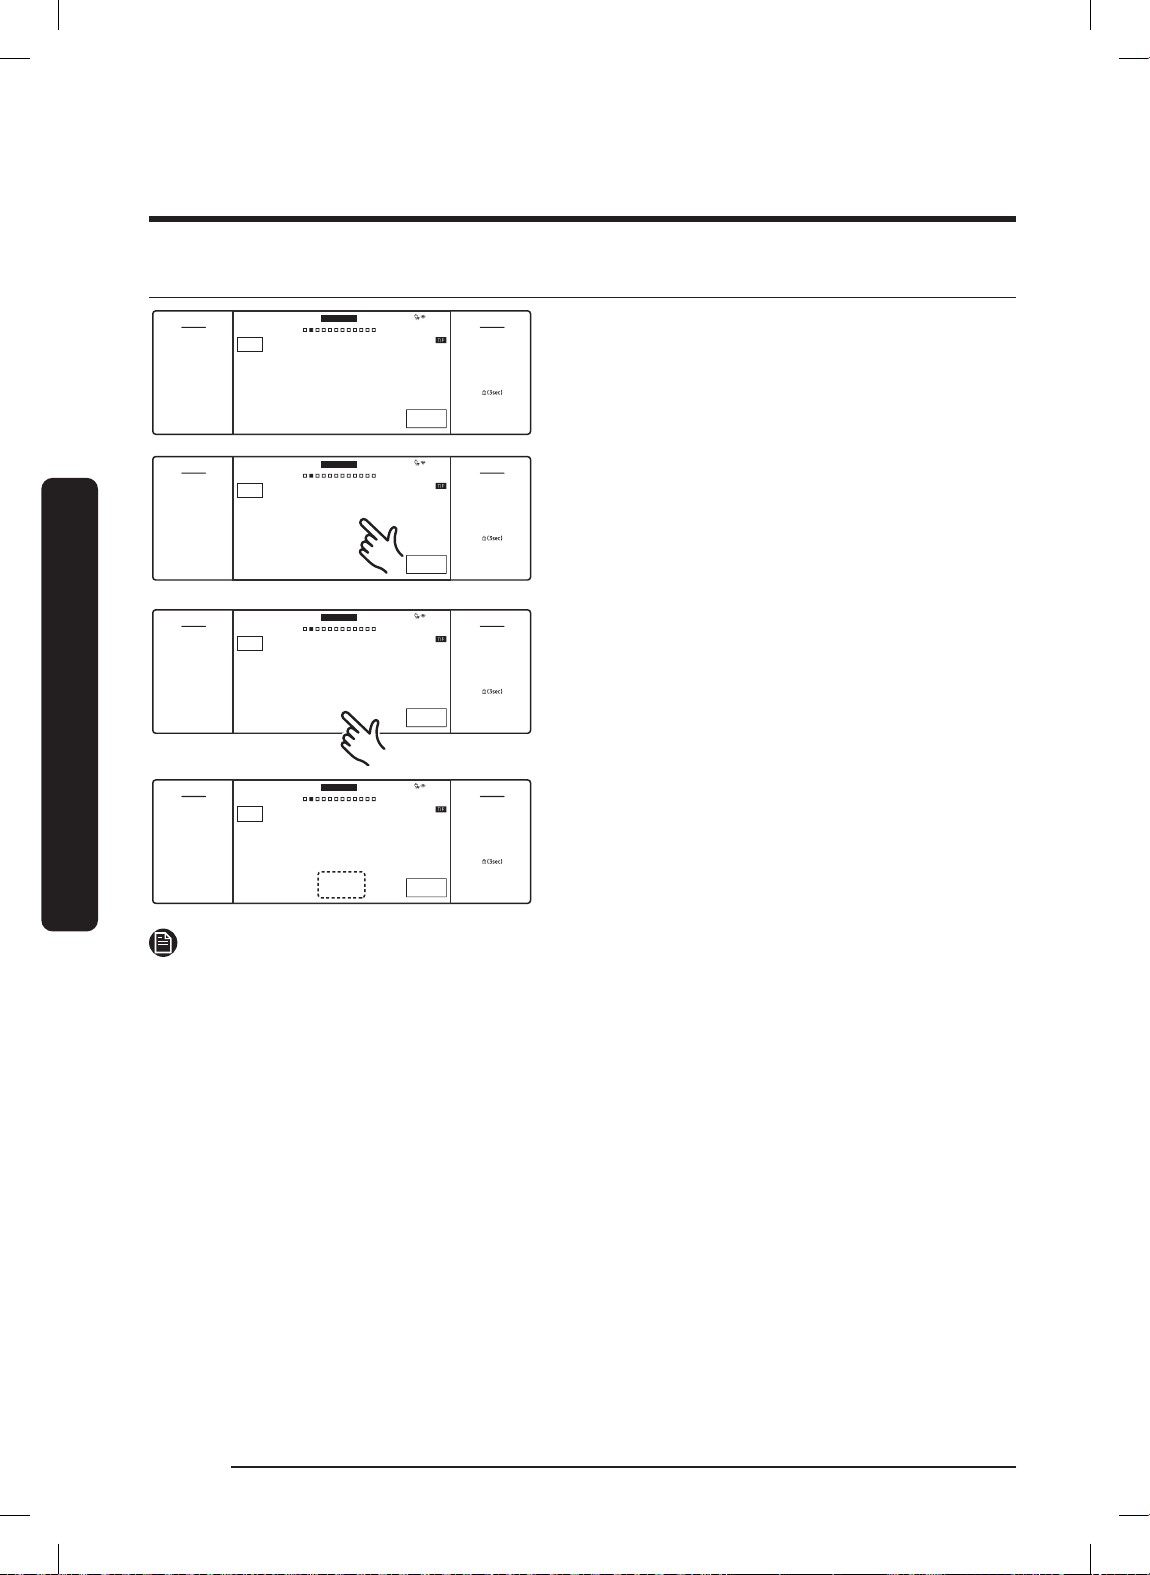
Basic Baking and Broiling Instructions
1. (48" range) Tap RIGHT and swipe to
select a cook mode (36" range) Select
a cook mode.
LEFT
OVEN
MODE
OFF
TIMER
SETTINGS
Cook Time
None
Using the Basic Oven
LEFT
OVEN
MODE
OFF
TIMER
LEFT
OFF
TIMER
Cook Time
None
OVEN
MODE
Cook Time
None
SETTINGS
SETTINGS
NOTE
• For best results, cook on one rack. (Baking on rack level 3 or 4; Roast on level 1 or 2.)
• When using InstantHeat™, do not preheat the oven.
• Preheat the oven if baking rising products (cakes, puff pastries).
Convection Bake
Faster, more even baking
Delay Start
None
Convection Bake
Faster, more even baking
Delay Start
None
Convection Bake
Faster, more even baking
Delay Start
None
RIGHT
325
InstantHeat™
Off
RIGHT
325
InstantHeat™
Off
RIGHT
325
InstantHeat™
On
4:35 PM
RIGHT
°F
START
OFF
LOCK
LIFT PANEL
2. Set a temperature. (See Pg. 47)
• Broil mode can be set only High or
Low.
• Keep Warm and Bread Proof
temp's cannot be adjusted.
4:35 PM
RIGHT
°F
START
OFF
LOCK
LIFT PANEL
3. This step shows how to use
InstantHeat™, Steam Bake, or Steam
Roast. If not using these features, skip
to Step 4.
InstantHeat™
4:35 PM
RIGHT
°F
START
OFF
LOCK
LIFT PANEL
a. If you select Convection Bake or
Convection Roast, the display shows
InstantHeat™ info. (Default: OFF).
Tap InstantHeat™ to activate the
feature; the display shows ON.
English48
FULL_DOP36C86DLSDA_DG68-01507A-00_EN+MES+CFR.indb 48FULL_DOP36C86DLSDA_DG68-01507A-00_EN+MES+CFR.indb 48 2023-02-23 오후 5:09:022023-02-23 오후 5:09:02
Page 49
START
4:35 PM
OVEN
MODE
Cook Time
0
hr 40min
Steam
Medium
Steam Bake
Steam baking
350
°F
Delay Start
4:35
PM
TIMER
SETTINGS
OPEN/CLOSE
RESERVOIR
OFF
LIFT PANEL
LIGHT
SETTINGS
TIMER
LIGHT
OPEN/CLOSE
RESERVOIR
TIMER OFF
LIGHT SETTINGS
OPEN/CLOSE
RESERVOIR
TIMER OFF
LIGHT SETTINGS
OPEN/CLOSE
RESERVOIR
Medium
Low
CANCEL OK
OVEN
MODE
Steam Bake
Steam baking
350
Delay Start
hr 40min
4:35
PM
Steam
High
Steam Bake
Steam baking
Cook Time
0
OVEN
MODE
350
Delay Start
hr 40min
Steam
4:35
PM
High
Cook Time
0
4:35 PM
°F
START
4:35 PM
°F
START
High
OFF
SETTINGS
LIFT PANEL
LIFT PANEL
LIFT PANEL
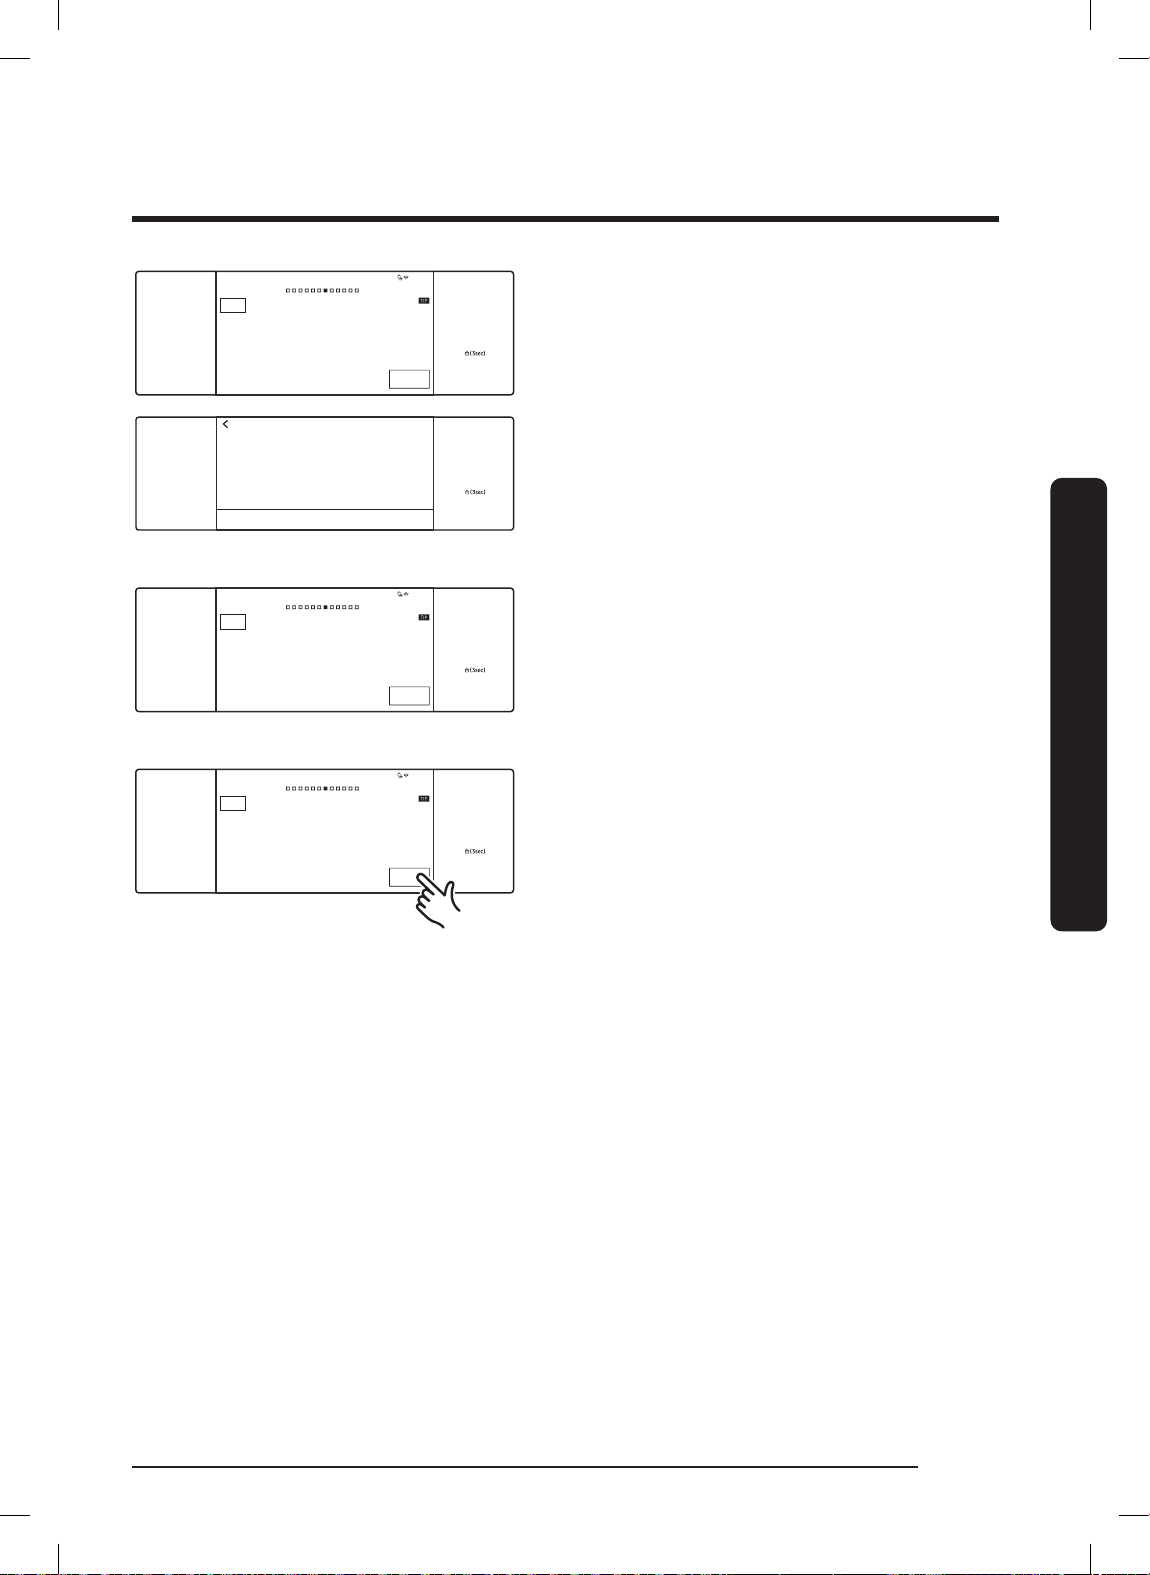
Steam Bake / Steam Roast (36” range)
b. Tap Steam Bake or Steam Roast.
(The display shows the steam-level
info; default: Medium).
c. Tap the Steam area to view the
steam level screen,
d. Set the level and tap OK. (The steam
level screen closes; the new level
appears.) Fill the water reservoir
before steam cooking.
(See Pg. 9)
4. If you want to use Cook Time or Delay
Start, set the function now. (See Pgs.
53, 54 if needed.)
• Tap START to cook.
• Tap OFF when cooking is done or
to cancel cooking.
Using the Basic Oven
FULL_DOP36C86DLSDA_DG68-01507A-00_EN+MES+CFR.indb 49FULL_DOP36C86DLSDA_DG68-01507A-00_EN+MES+CFR.indb 49 2023-02-23 오후 5:09:022023-02-23 오후 5:09:02
English 49
Page 50
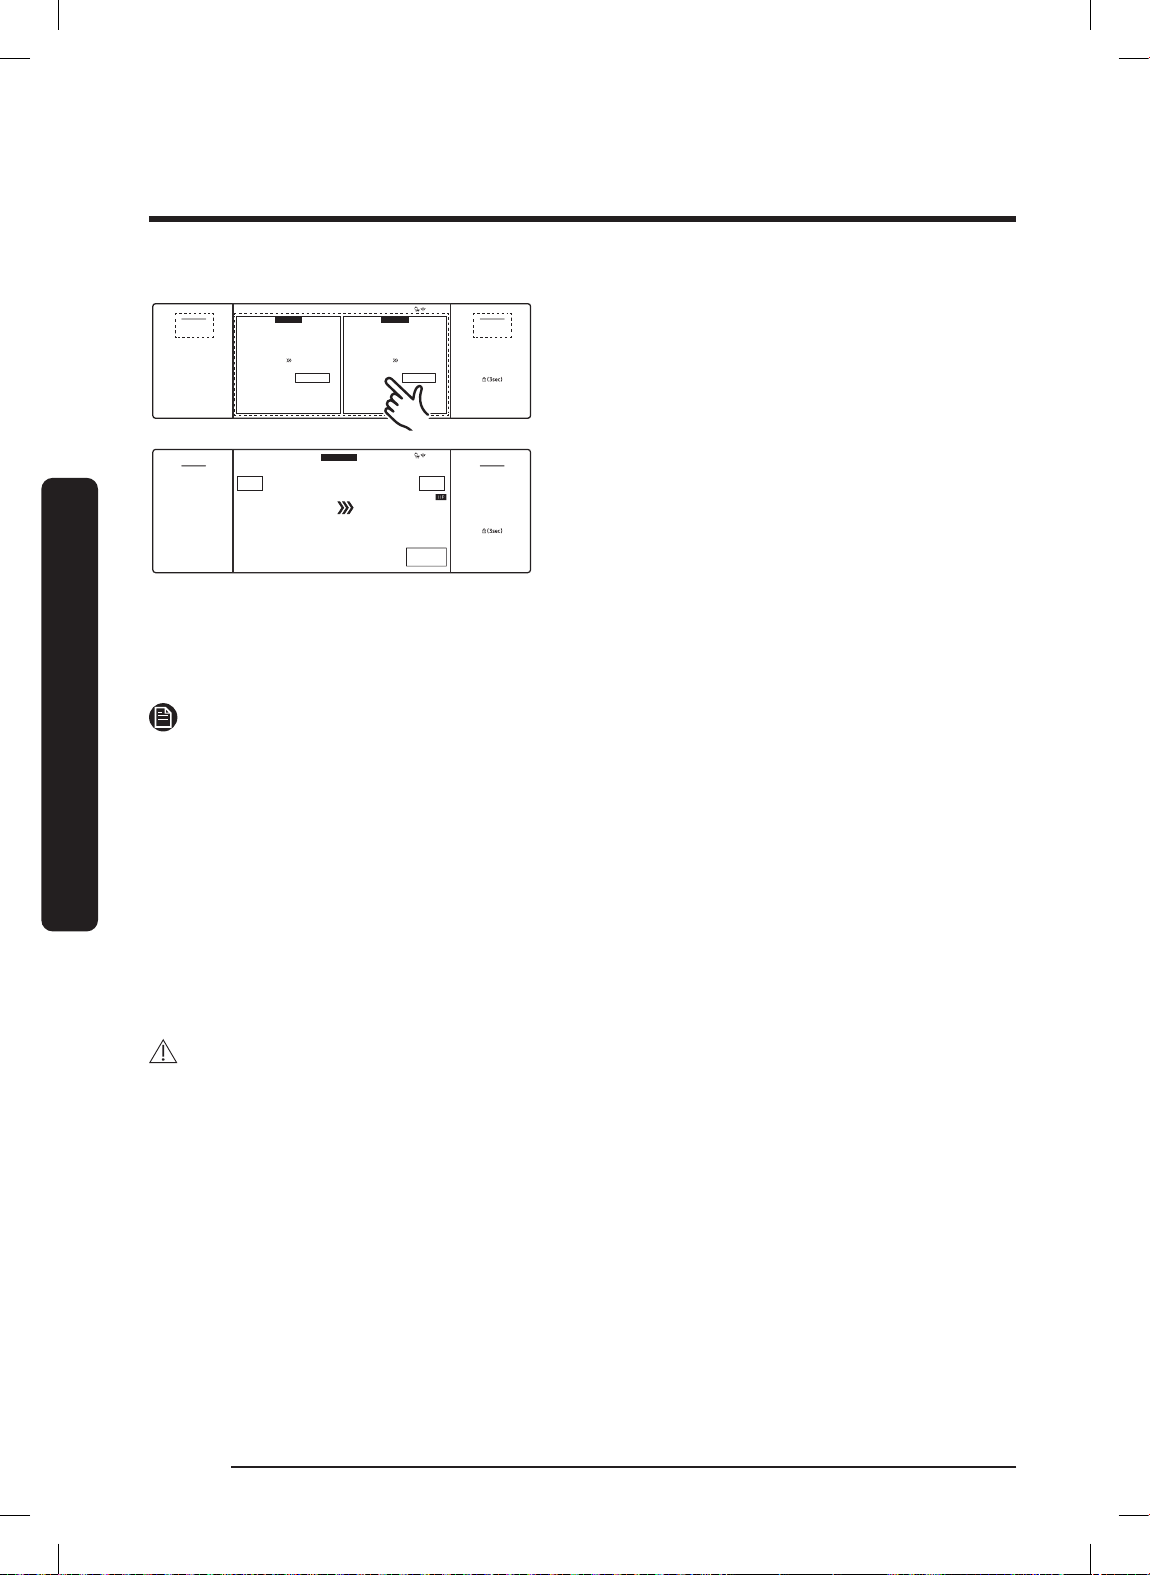
Using the Basic Oven
4:35 PM
Convection Bake
LEFT
175°F 325°F
OFF
Bake
RIGHT
175°F 350°F
OFF
OFF
TIMER
SETTINGS
LEFT
OFF
LOCK
LIFT PANEL
RIGHT
Adjusting the Temperature While Cooking
LEFT
OVEN
MODE
OFF
TIMER
Cook Time
SETTINGS
Using the Basic Oven
• The convection oven fan shuts off when the oven door is opened.
• DO NOT leave the door open for long periods of time while using convection
• If the door is open on an operating oven, cooking stops automatically after
• When cooking is done, the cooling fan runs until the oven cools down.
• Drain residual water after steam cooking. Do not interrupt the draining process.
• After steam cooking, empty the reservoir so residual water does not affect other
• The temperature on an oven thermometer may differ from the set oven
• The convection fan normally cycles on and off during cooking.
None
cooking or you may shorten the life of the convection heating element.
NOTE
2 minutes.
cook modes.
temperature.
175
RIGHT
Bake
°F
Preheating...
350
If using single mode, do one of these:
• Tap RIGHT (area or button), then tap
the temperature area and use the
keypad to enter a new temperature.
4:35 PM
RIGHT
View
Summary
°F
OFF
OFF
LOCK
LIFT PANEL
• Place food in the preheated oven
if the recipe calls for it. Preheating
is crucial for good results if baking
cakes, cookies, pastry and breads.
When the set temp is reached, the
oven beeps 6 times.
CAUTION
Always broil with the oven door closed. Open the door carefully. Let hot air escape
before removing food from or put food in the oven.
English50
FULL_DOP36C86DLSDA_DG68-01507A-00_EN+MES+CFR.indb 50FULL_DOP36C86DLSDA_DG68-01507A-00_EN+MES+CFR.indb 50 2023-02-23 오후 5:09:022023-02-23 오후 5:09:02
Page 51
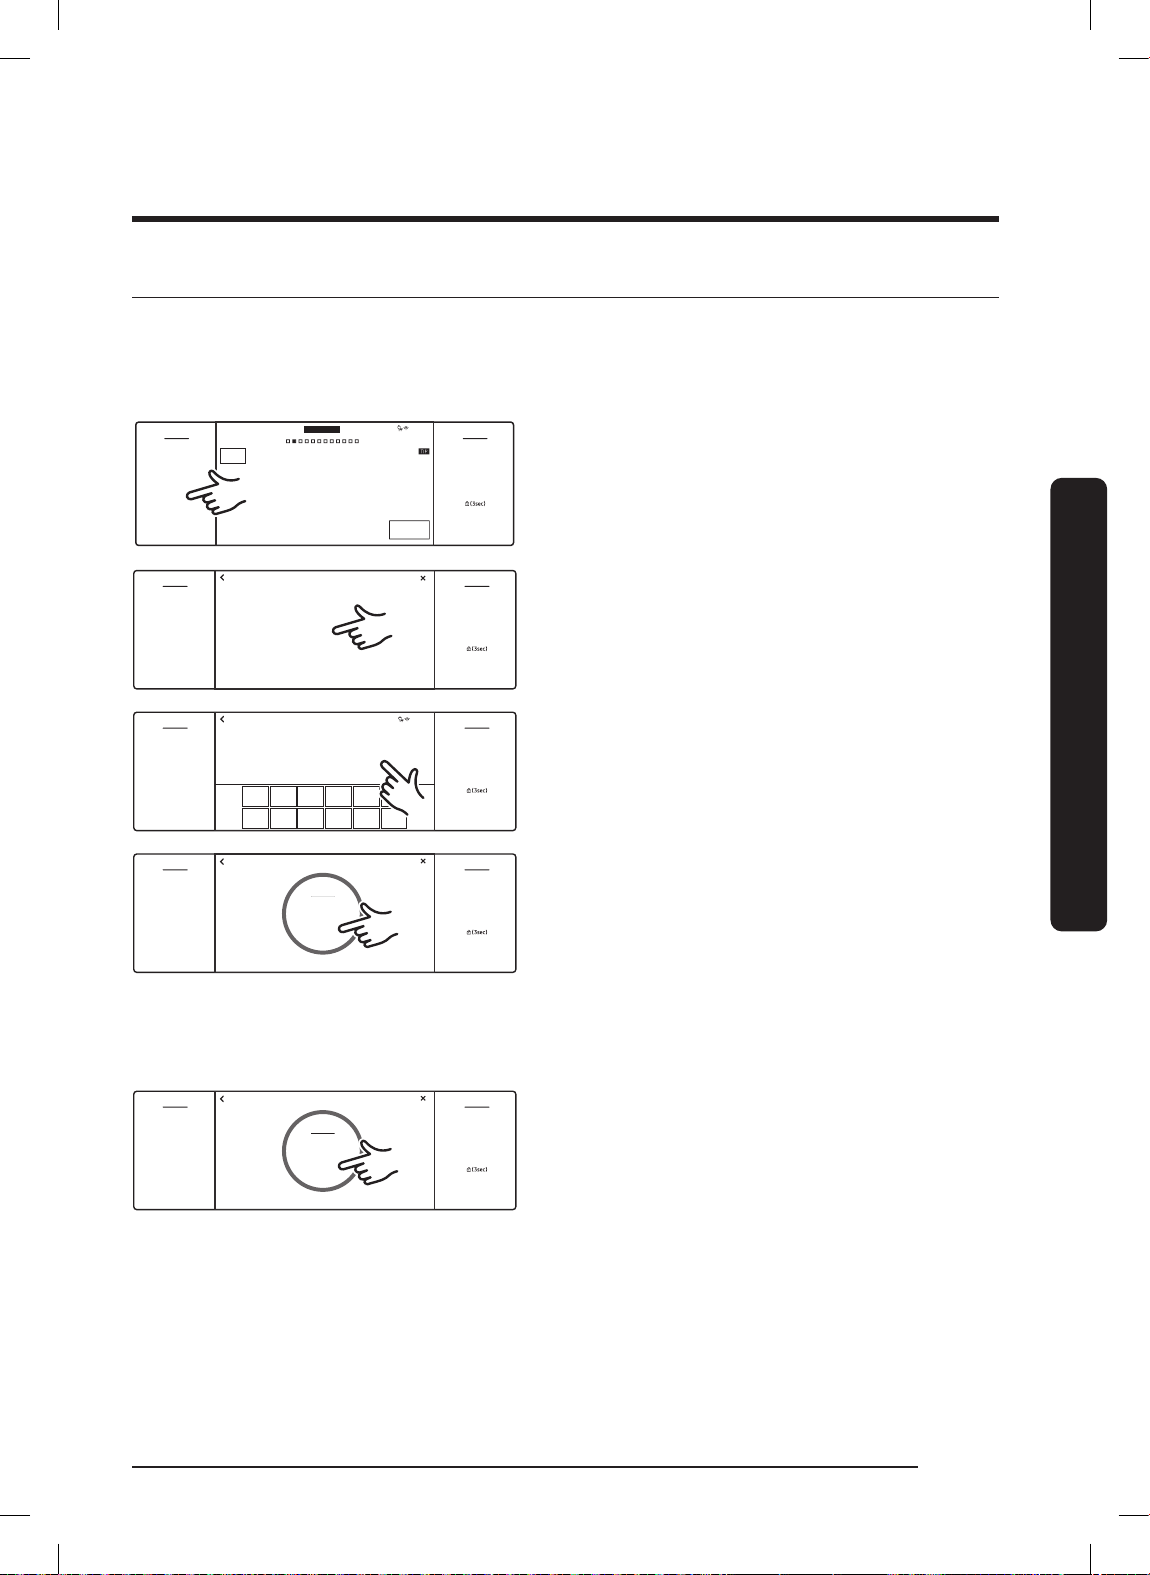
Using the Kitchen Timer
START
4:35 PM
Convection Bake
Faster, more even baking
RIGHT
325
°F
InstantHeat™
Off
Temp Probe
Cook Time
None
Delay Start
None
OFF
TIMER
SETTINGS
LEFT
OFF
LOCK
LIFT PANEL
RIGHT
OVEN
MODE
145
°
This extra timer beeps when the set time elapses. It works with all oven modes but
does not start or stop cooking functions.
How to Set the Timer
1. Touch TIMER.
Timer
+
TIMER
SETTINGS LIFT PANEL
TIMER
SETTINGS LIFT PANEL
TIMER
SETTINGS LIFT PANEL
TIMER
SETTINGS LIFT PANEL
Add timer
hr 00 min 00 sec
0
1
2 3 4 5
6 7 8 9 0
Timer
Timer 01
00:00:20
START
DELETE RESET
Timer
Timer 01
00:00:18
PAUSE
DELETE RESET
OK
+ Add
+ Add
RIGHTLEFT
OFFOFF
LOCK
4:35 PM
RIGHTLEFT
OFFOFF
LOCK
RIGHTLEFT
OFFOFF
LOCK
RIGHTLEFT
OFFOFF
LOCK
2. On the Timer screen, tap + Add timer.
Using the Basic Oven
3. Use the numeric pad to set the time
from 1 sec to 23 hr, 59 min, 59 sec.
4. Tap START. When the set time elapses,
the oven beeps; the display shows the
Timer is complete.
• Pause/reset/delete the timer
anytime by touching the screen.
• (48" range) The timer you set in
the left oven can be used in the
right oven and vice versa.
FULL_DOP36C86DLSDA_DG68-01507A-00_EN+MES+CFR.indb 51FULL_DOP36C86DLSDA_DG68-01507A-00_EN+MES+CFR.indb 51 2023-02-23 오후 5:09:032023-02-23 오후 5:09:03
English 51
Page 52
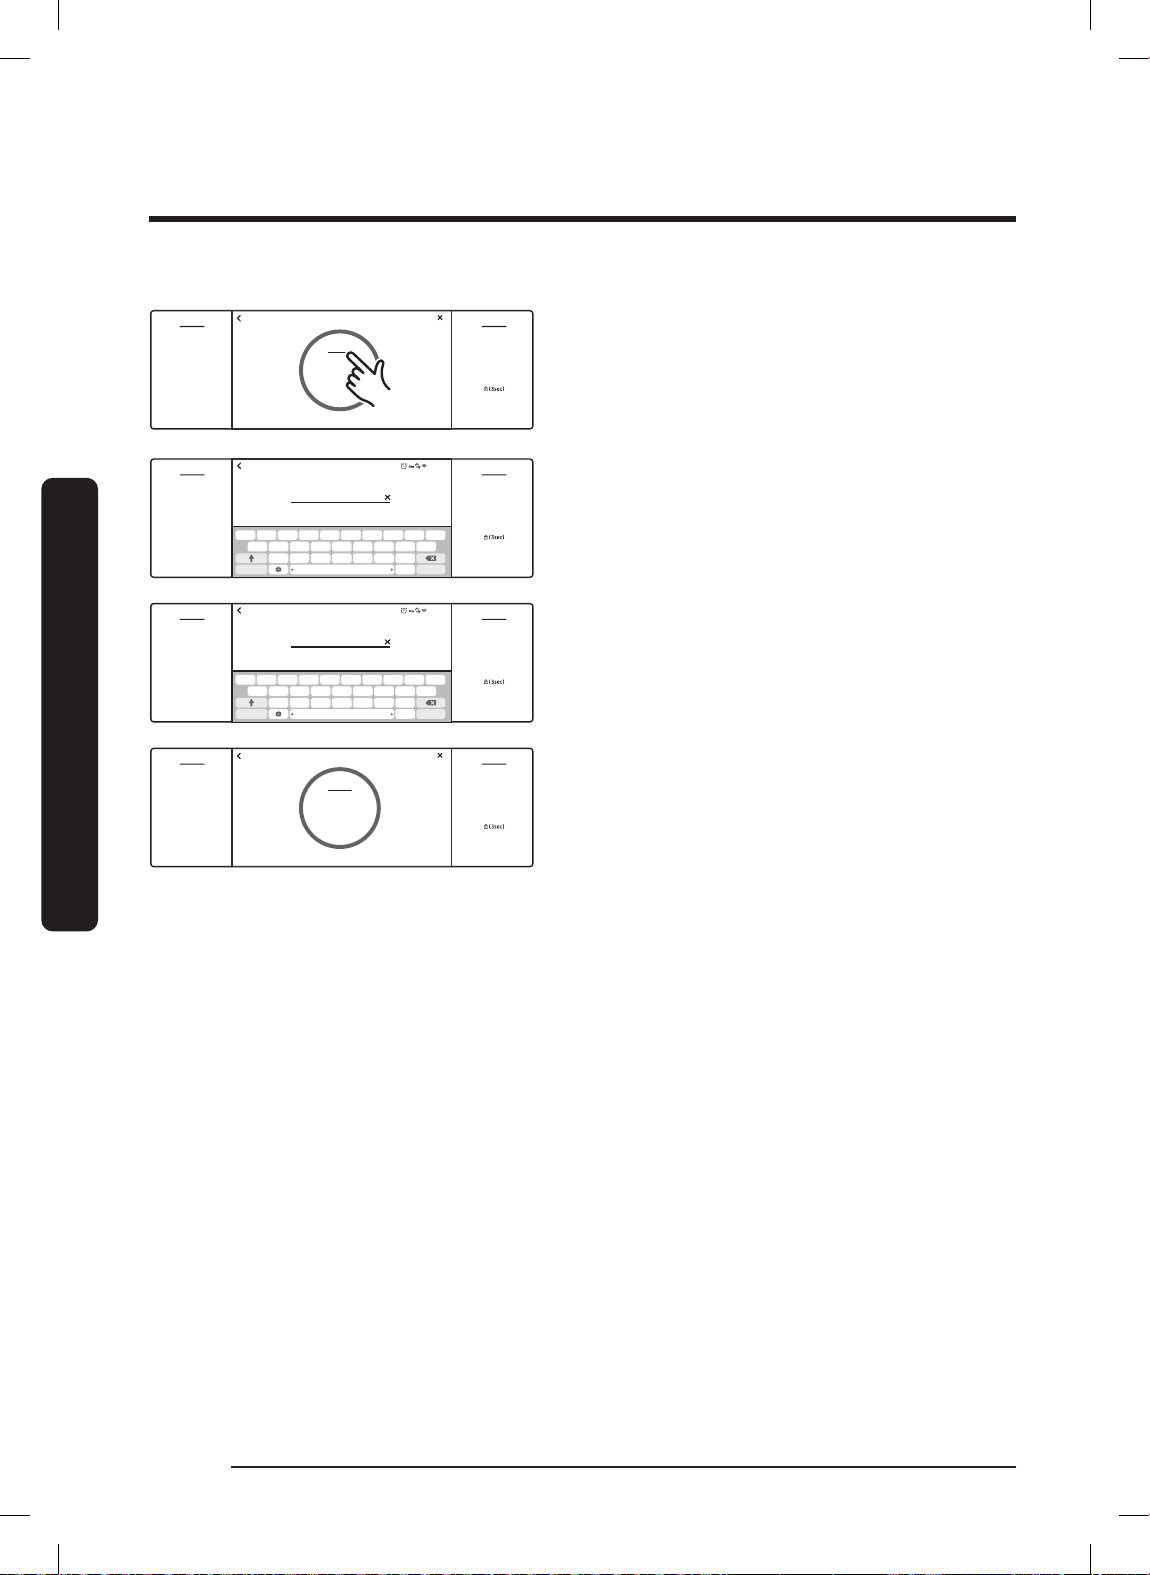
Using the Basic Oven
Timer 01
00:00:20
START
DELETE RESET
Timer
OFFOFF
TIMER
LOCK
SETTINGS LIFT PANEL
RIGHTLEFT
+ Add
Changing the Timer Name
You can change the timer name to reflect
the cooking task. (e.g., Chicken)
TIMER
SETTINGS LIFT PANEL
1 2 3 4 5 6 7 8 9 0
wq e r t y u i o p
- @ * ^ : ; ( )
... ...
Using the Basic Oven
TIMER
SETTINGS LIFT PANEL
TIMER
SETTINGS LIFT PANEL
1 2 3 4 5 6 7 8 9 0
wq e r t y u i o p
- @ * ^ : ; ( )
... ...
Enter timer name.
Timer 01
s d f g h j k l
/ ‘ “ : , ? !
z x c v b n m
English?123
Enter timer name.
.
Chicken
s d f g h j k l
/ ‘ “ : , ? !
z x c v b n m
English?123
Timer
Chicken
.
00:00:20
START
DELETE RESET
+ Add
4:35 PM
OK
4:35 PM
OK
RIGHTLEFT
OFFOFF
LOCK
~
appears.)
2. Use the keyboard to set the timer
1. Tap the timer name area. (The keypad
RIGHTLEFT
OFFOFF
LOCK
~
RIGHTLEFT
OFFOFF
LOCK
name. (The shows the new name.)
English52
FULL_DOP36C86DLSDA_DG68-01507A-00_EN+MES+CFR.indb 52FULL_DOP36C86DLSDA_DG68-01507A-00_EN+MES+CFR.indb 52 2023-02-23 오후 5:09:032023-02-23 오후 5:09:03
Page 53
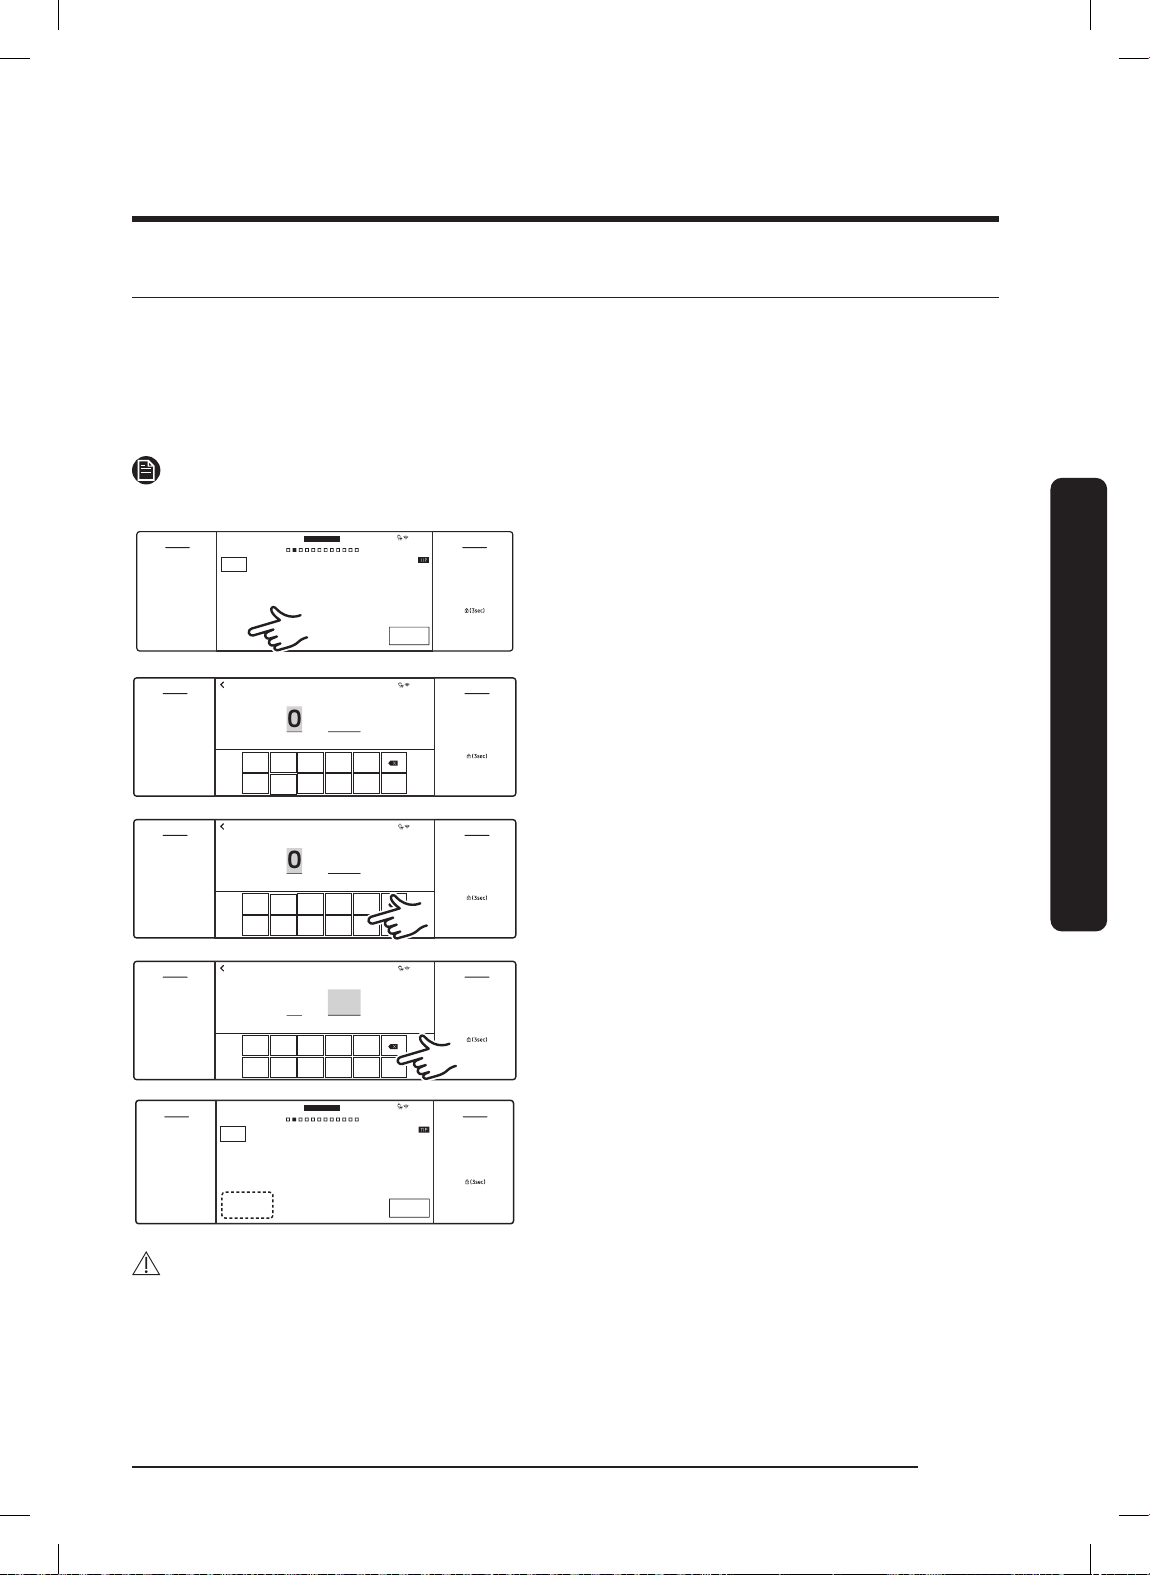
Using Timed Cooking
START
4:35 PM
Convection Bake
Faster, more even baking
RIGHT
325
°F
InstantHeat™
Off
Cook Time
None
Delay Start
None
OFF
TIMER
SETTINGS
LEFT
OFF
LOCK
LIFT PANEL
RIGHT
OVEN
MODE
The oven turns on immediately, cooks for the set time period, then turns itself off
when cooking is done. Timed Cooking only operates with another cooking operation
(Bake, Convection Bake, Convection Roast, Pure Conv. Sear, Convection Broil, Steam
Bake, Steam Roast, Dual Four-Part Pure Convection, Steam, Proof, Stone Bake Mode,
Dehydrate, Fine Steam).
NOTE
See Pg. 44 for the available modes for each oven.
1. (48" range) Tap LEFT or RIGHT, then
swipe to a cooking operation.
(36" range) Select a cooking mode.
Using the Basic Oven
LEFT
OFF
TIMER
SETTINGS
LEFT
OFF
TIMER
SETTINGS
LEFT
OFF
TIMER
SETTINGS
LEFT
OFF
TIMER
SETTINGS
0 hr 00 min
1
2 3 4 5
6 7 8 9 0
0 hr 30 min
1
2 3 4 5
6 7 8 9 0
1 hr min
1
2 3 4 5
6 7 8 9 0
OVEN
Convection Bake
MODE
Faster, more even baking
Cook Time
1hr 45min
Delay Start
None
Set cooking time
Set cooking time
Set cooking time
45
RIGHT
325
InstantHeat™
Off
°F
OK
Ready at 5:05PM
OK
Ready at 5:05PM
OK
START
4:35 PM
4:35 PM
4:35 PM
4:35 PM
RIGHT
OFF
LOCK
LIFT PANEL
to the cooking time screen.)
3. Tap numbers on the numeric pad to
2. Tap Cook Time. (The display changes
RIGHT
OFF
LOCK
LIFT PANEL
RIGHT
OFF
LOCK
LIFT PANEL
RIGHT
OFF
LOCK
LIFT PANEL
set the cooking time (from 1 min to
9 hrs 59 min's).
4. The cooking time appears in the
screen's Cook Time area. (Cancel the
set time anytime by setting it to
0 minutes.)
CAUTION
Use Timed Cooking and Delay Start to cook cured or frozen meats and most fruits and
vegetables. Foods that spoil easily (e.g., milk, eggs, fish, meat, poultry) should be chilled
in the refrigerator first. Even chilled food should not sit in the oven over 1 hour before
cooking starts and should be removed promptly when cooking is done.
English 53
FULL_DOP36C86DLSDA_DG68-01507A-00_EN+MES+CFR.indb 53FULL_DOP36C86DLSDA_DG68-01507A-00_EN+MES+CFR.indb 53 2023-02-23 오후 5:09:042023-02-23 오후 5:09:04
Page 54
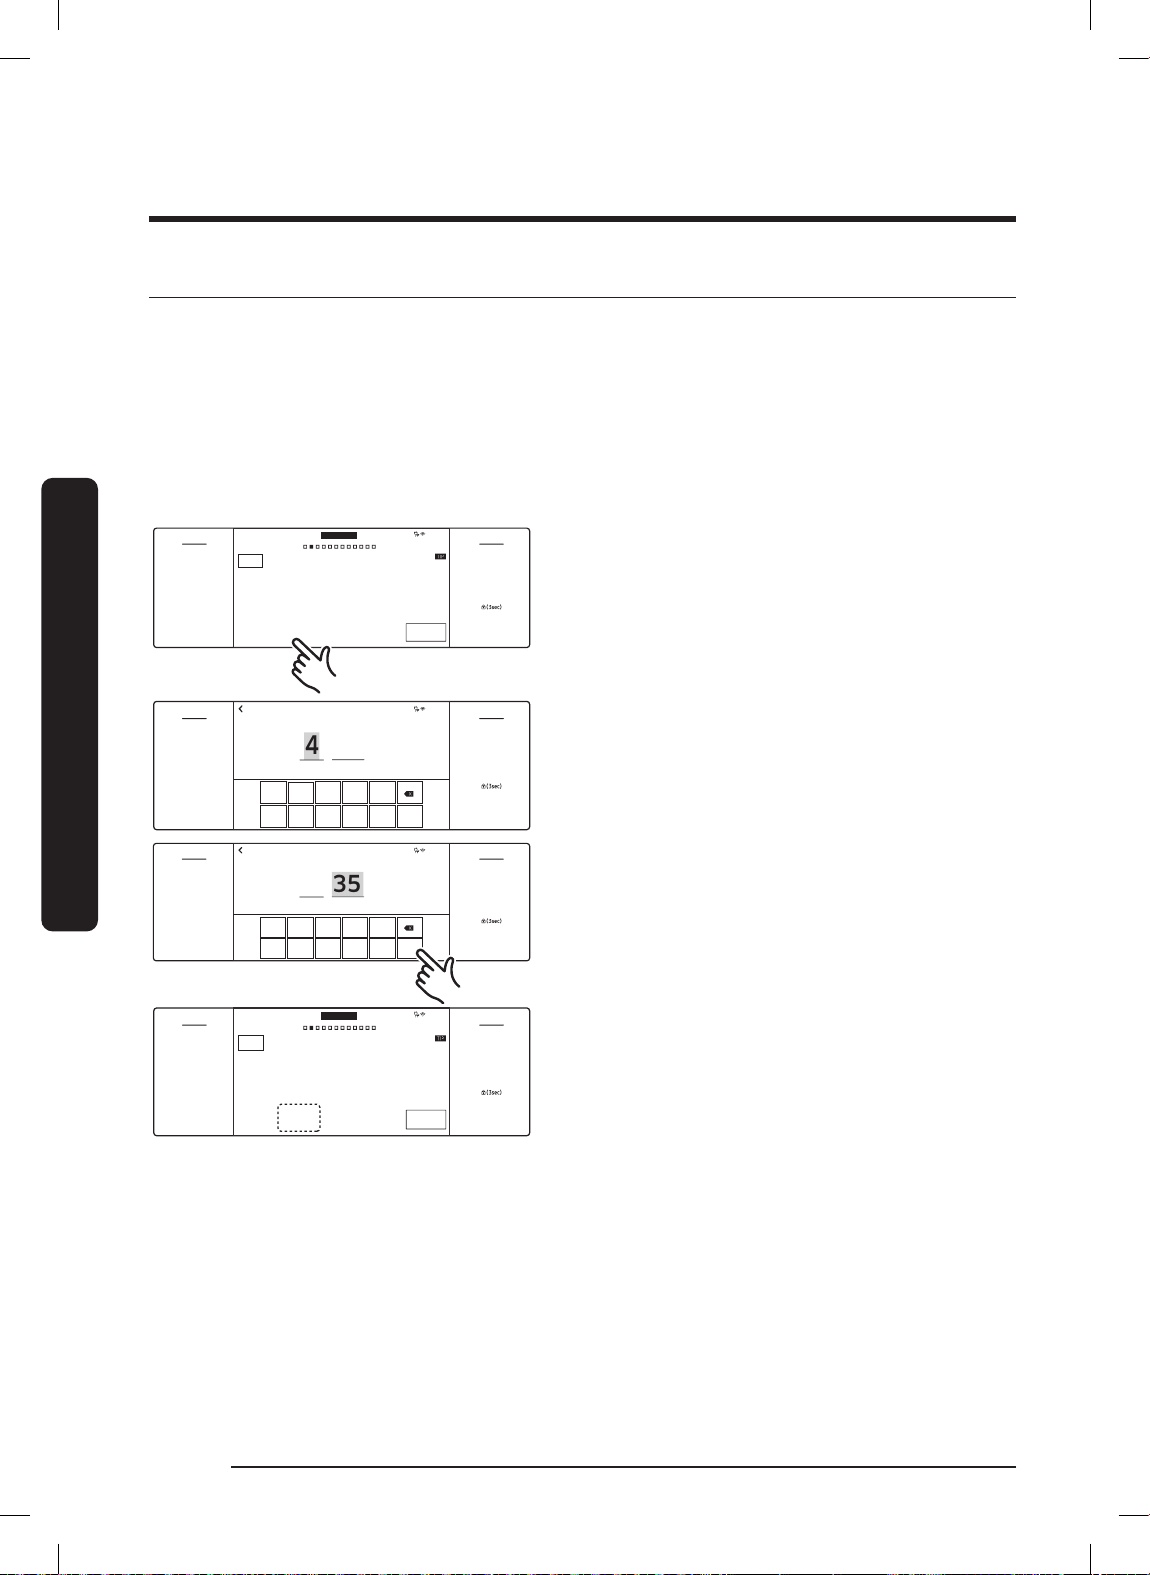
Using the Basic Oven
START
4:35 PM
Convection Bake
Faster, more even baking
RIGHT
325
°F
InstantHeat™
Off
Cook Time
None
Delay Start
None
OFF
TIMER
SETTINGS
LEFT
OFF
LOCK
LIFT PANEL
RIGHT
OVEN
MODE
Using Delay Start
In this mode, the oven timer turns the oven on according to the set time. You can have
the oven turn itself off when a preset time elapses by setting Timed Cooking as well.
• Delay start can be used only with another cooking operation (Bake, Convection
Bake, Convection Roast, Pure Conv.Sear, Steam Bake, Steam Roast, Dual Four Part
Pure Convection, Steam, Proof, Stone Bake Mode, Dehydrate, Fine Steam, Self clean).
• You can set the oven for a delay start before setting other cooking operations.
• The clock must be set to the current time.
Using the Basic Oven
1. Adjust the rack(s) and place the food
in the oven.
2. (48" range) Tap LEFT or RIGHT, then
swipe to a cooking mode; (36" range)
Select a cooking mode.
LEFT
OFF
TIMER
SETTINGS
LEFT
OFF
TIMER
SETTINGS
LEFT
OFF
TIMER
SETTINGS
Set start time
4
1
2 3 4 5
6 7 8 9 0
Set start time
5
1
2 3 4 5
6 7 8 9 0
OVEN
Convection Bake
MODE
Faster, more even baking
325
Cook Time
1hr 45
min
Delay Start
5:35 PM
:
35
:
35
RIGHT
InstantHeat™
Off
4:35 PM
4:35 PM
4:35 PM
RIGHT
OFF
LOCK
LIFT PANEL
RIGHT
OFF
LOCK
LIFT PANEL
RIGHT
OFF
LOCK
LIFT PANEL
AM
PM
OK
AM
PM
OK
°F
START
3. Set a cook time if you want the oven
to turn itself off at a set time. (See
Using Timed Cooking, Pg. 53).
4. Tap Delay Start. (The current time
appears as the first entry.)
5. Use the numeric pad to set a cook
start time. (The Delay Start screen
closes; the start time and, if set, the
cook time appear on screen.)
English54
FULL_DOP36C86DLSDA_DG68-01507A-00_EN+MES+CFR.indb 54FULL_DOP36C86DLSDA_DG68-01507A-00_EN+MES+CFR.indb 54 2023-02-23 오후 5:09:042023-02-23 오후 5:09:04
Page 55
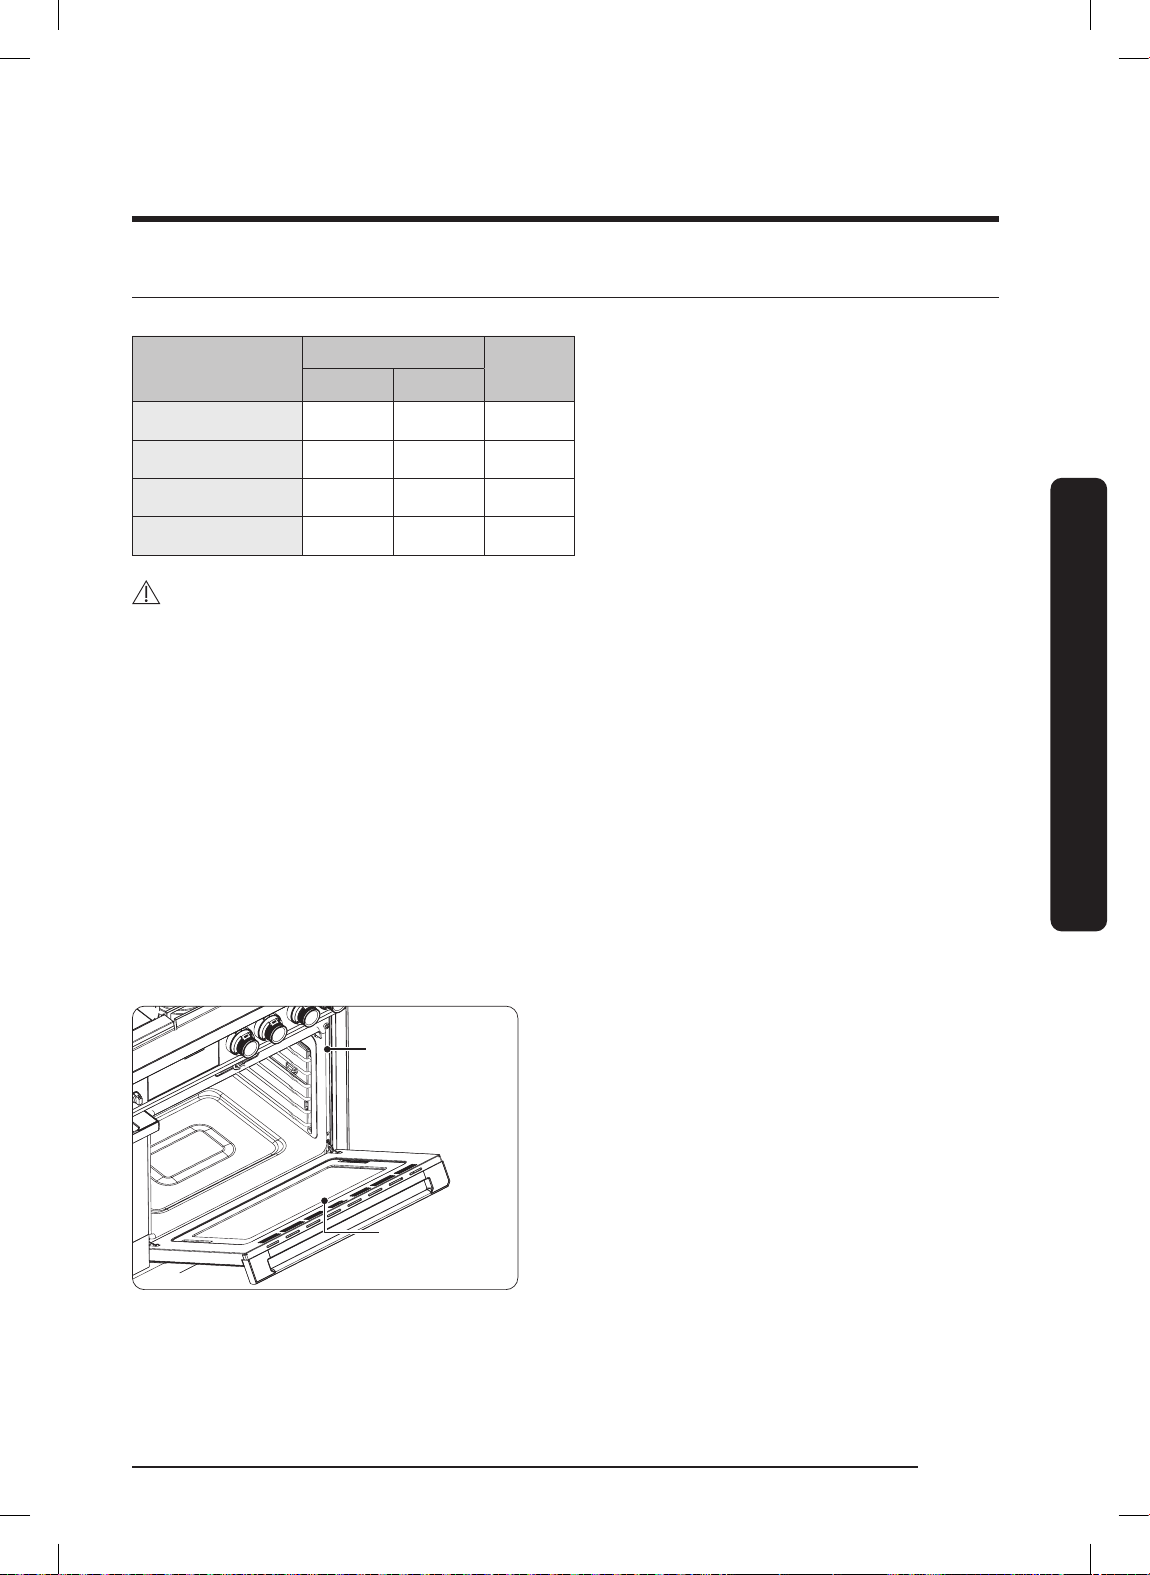
Using the Cleaning Features
Don’t hand clean
the oven door
gasket.
You may hand
clean the door.
The Clean feature has four selections: Self-Clean, GreenClean™, Descale and Draining.
Feature
48" Pro Range
Left Right
36" Pro
Range
Self Clean - o o
GreenClean™ o o o
Descale o - o
Draining o - o
Self clean (48" right oven, 36" oven)
Self-cleaning uses temperatures well
above cooking temp's to burn off
residual grease and food completely or
reduce them to a fine ash you can wipe
away with a damp cloth.
CAUTION
• During self-cleaning, the outside of the oven become very hot. Do not leave children
unattended near the appliance.
• Fumes emitted during self-cleaning are harmful to pet birds, which should be
moved temporarily to separate, well-ventilated room.
• Do not line any part of the oven with aluminum foil. Doing so impedes heat
circulation, causes poor results and can permanently damage the oven interior.
• Do not force the oven door open during self-cleaning or you risk damaging the
auto-locking system. Stand aside when opening the oven door after self-cleaning to
let hot air escape.
Self-Cleaning
This function heats the oven chamber to a very high temperature, incinerating residue
to a fine ash that can be wiped up with a damp cloth.
• Ventilate the kitchen well during self-
Don't hand clean
the oven door
gasket.
cleaning.
• If you self-clean the chrome oven
racks, they will darken, dull and
become hard to slide.
• Hand-clean residue on the oven's
front frame and outside the door
You may hand
clean the door.
gasket with hot water, soap-filled
steel-wool pads, or mild cleansers.
Rinse with clean water and dry.
• Wipe debris from the oven floor.
• Ensure the oven light cover is in place
and the light is off.
Using the Basic Oven
English 55
FULL_DOP36C86DLSDA_DG68-01507A-00_EN+MES+CFR.indb 55FULL_DOP36C86DLSDA_DG68-01507A-00_EN+MES+CFR.indb 55 2023-02-23 오후 5:09:042023-02-23 오후 5:09:04
Page 56
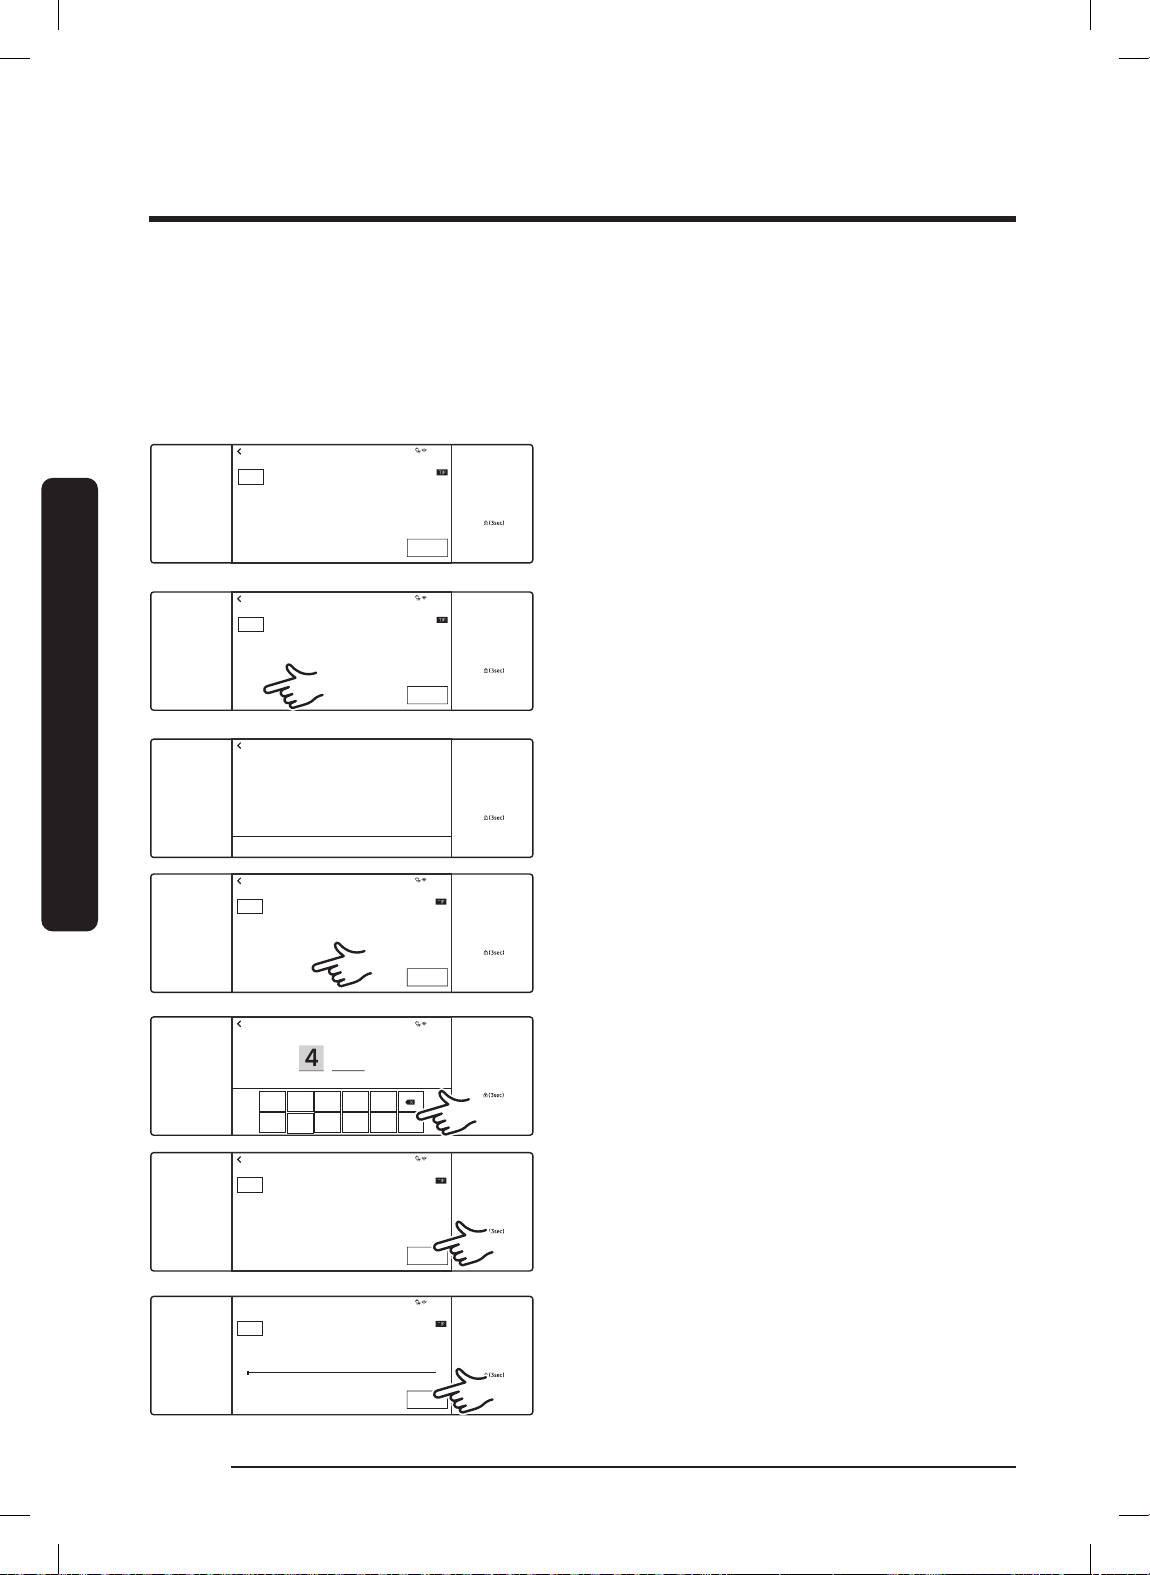
Using the Basic Oven
4:35 PM
Self clean
Oven cleaning
None
Clean Time
3hr 00min
START
Delay Start
OVEN
MODE
TIMER
LIGHT
OPEN/CLOSE
RESERVOIR
OFF
SETTINGS
LIFT PANEL
4:35 PM
Self clean
Oven cleaning
Ninguno
Clean Time
3hr 00min
START
Delay Start
TIMER
LIGHT
OPEN/CLOSE
RESERVOIR
OFF
SETTINGS
LIFT PANEL
OVEN
MODE
4:35 PM
Self clean
None
Clean Time
3hr 00min
START
Delay Start
TIMER
LIGHT
OPEN/CLOSE
RESERVOIR
OFF
SETTINGS
LIFT PANEL
OVEN
MODE
Cleaning in progress...
4:35 PM
Self clean
Oven cleaning
None
Clean Time
3hr 00min
START
Delay Start
TIMER
LIGHT
OPEN/CLOSE
RESERVOIR
OFF
SETTINGS
LIFT PANEL
OVEN
MODE
• Hand-clean residue on the oven's front frame and outside the door gasket with hot
water, soap- filled steelwool pads, or mild cleansers. Rinse with clean water and dry.
• Do not clean the gasket. Its fiberglass material cannot withstand abrasion. The
gasket must remain intact. If it becomes worn, replace it.
• Dacor recommends self-cleaning only once per year. If additional cleaning is needed
throughout the year, use the green-cleaning function. (See Pg. 57)
Using the Basic Oven
1. Remove racks, fan filter and
accessories from the oven.
2. Swipe the screen to Clean.
3. Tap Self clean.
4. Tap Clean Time.
TIMER
LIGHT
OPEN/CLOSE
RESERVOIR
TIMER
LIGHT
OPEN/CLOSE
RESERVOIR
TIMER
LIGHT
OPEN/CLOSE
RESERVOIR
02
03
05
CANCEL OK
Set start time
:
4
35
1
2 3 4 5
6 7 8 9 0
OVEN
MODE
Time Left
3hr 00min
Self clean
Cleaning in progress...
5. Tap the screen to set the clean time
hr
OFF
SETTINGS
LIFT PANEL
(2, 3, or 5 hrs (default: 3)) and tap OK.
6. If not using Delay Start, go to Step 8.
Otherwise, tap Delay Start and go to
Step 7.
4:35 PM
AM
PM
End at 12:38PM
OK
OFF
SETTINGS
LIFT PANEL
7. Set the time you want self-cleaning to
start and tap OK.
8. Tap START to begin self-cleaning.
(Auto door lock engages; both doors
lock when you run self-cleaning on
either oven.)
End at 02:16 PM
OFF
4:35 PM
OFF
SETTINGS
LIFT PANEL
9. If you need to cancel self-cleaning,
tap OFF.
English56
FULL_DOP36C86DLSDA_DG68-01507A-00_EN+MES+CFR.indb 56FULL_DOP36C86DLSDA_DG68-01507A-00_EN+MES+CFR.indb 56 2023-02-23 오후 5:09:052023-02-23 오후 5:09:05
Page 57
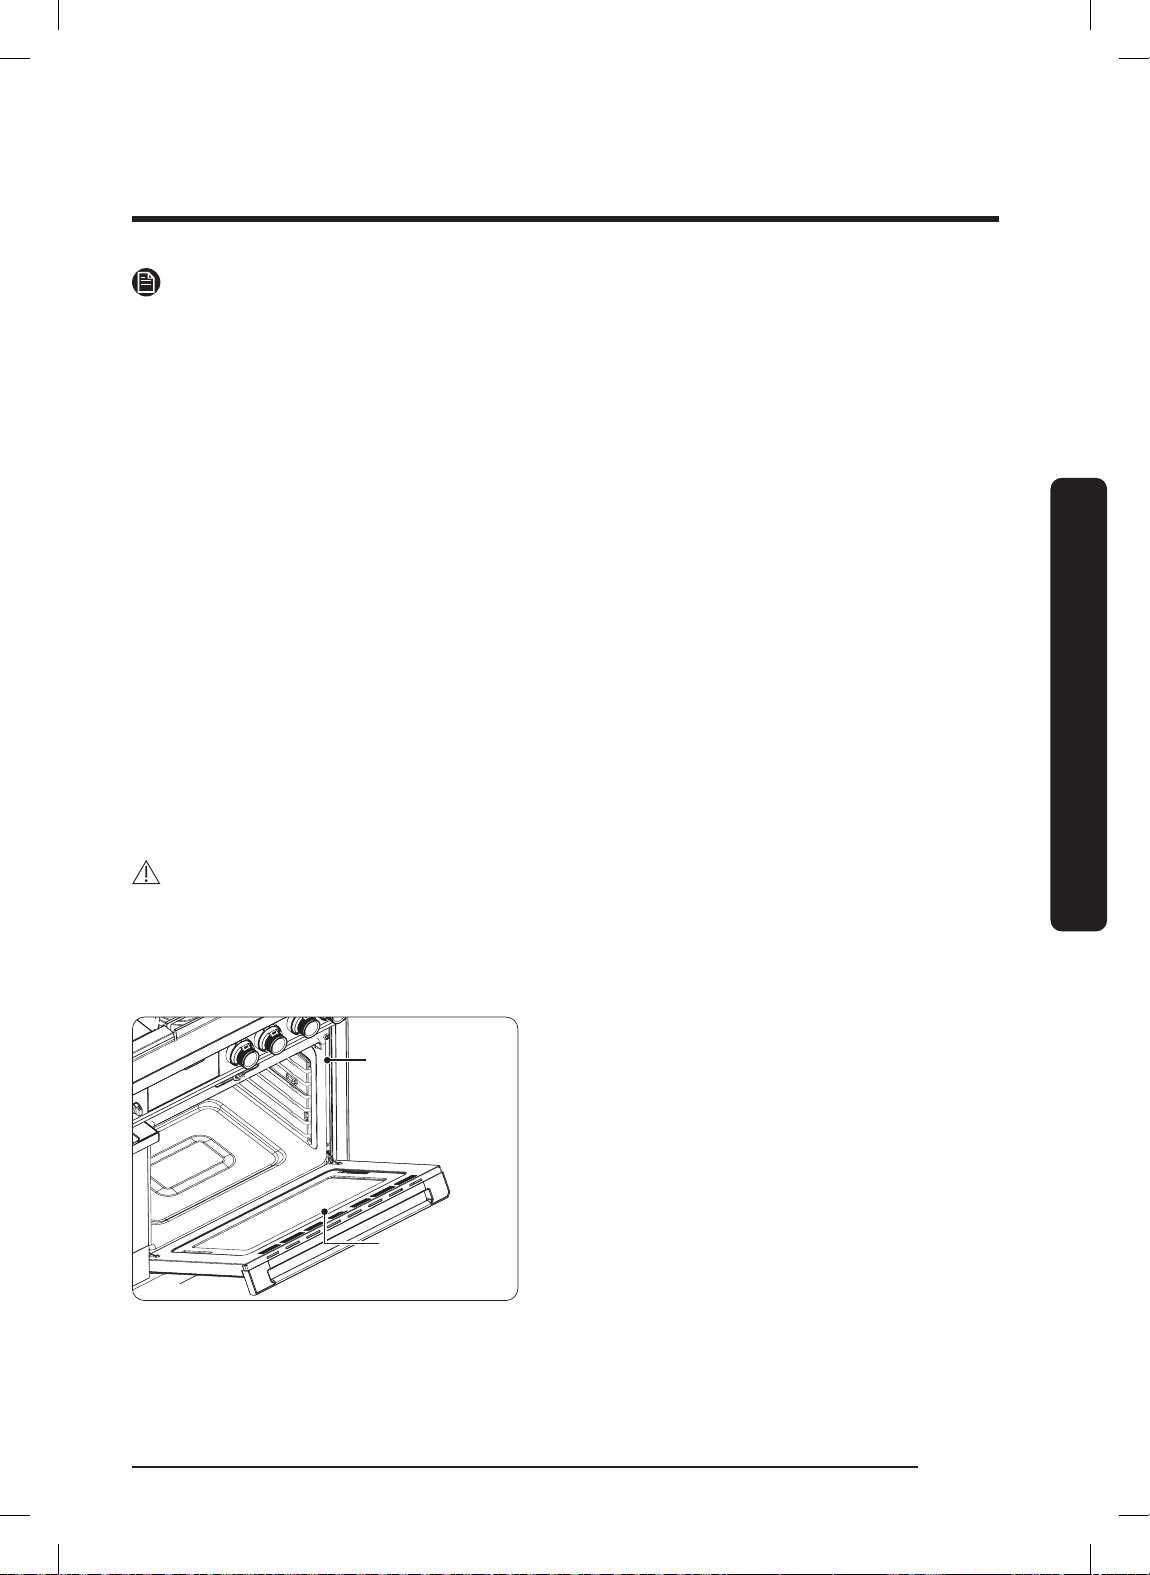
NOTE
Don’t hand clean
the oven door
gasket.
You may hand
clean the door.
• You cannot start self-cleaning if control lockout is active or if the oven is too hot.
• During self-cleaning, the oven doors lock automatically. The display shows the
remaining cleaning time. The oven doors will not open until the oven has cooled fully.
• Self-cleaning can be used in only one oven at a time and the idle oven cannot be used.
• Do not operate the cooktop during self-cleaning.
After a Self-Cleaning Cycle
• Wipe up any ash with a damp cloth. (If white spots remain, remove them with a
soap-filled steel-wool pad and rinse thoroughly with a vinegar and water mixture.)
• If the oven is not clean after one cycle, repeat the cycle.
• You cannot set the oven to cook until the door unlocks.
• Fine lines generated inside the cavity may occur during repeated cooling and
heating of the product after long-term use. This phenomenon is normal, does not
affect product performance and is harmless to the human body.
GreenClean™
This function saves time and energy by heating the oven chamber enough to loosen
cooking residue so it can be wiped away with a damp cloth.
Using the Basic Oven
CAUTION
The oven door locks during GreenClean™. Forcing the door open can harm the auto-lock
system.
Before a GreenClean™ Cycle
• Remove racks, rack supports, broil
Don't hand clean
the oven door
gasket.
pan, broil pan insert and all cookware.
• The silver-colored oven racks can be
Green-Cleaned, but they will darken
and become harder to slide.
• Do not clean the door gasket. Its
material cannot withstand abrasion.
You may hand
clean the door.
The gasket must remain intact. If it
becomes worn, have it replaced.
• Ensure the oven light cover is in place
• Residue on the front frame of the oven and outside the door gasket needs to be
and the oven light is off.
hand cleaned with hot water, soap-filled steel-wool pads, or cleansers such as Soft
Scrub. Rinse well with clean water and dry.
English 57
FULL_DOP36C86DLSDA_DG68-01507A-00_EN+MES+CFR.indb 57FULL_DOP36C86DLSDA_DG68-01507A-00_EN+MES+CFR.indb 57 2023-02-23 오후 5:09:052023-02-23 오후 5:09:05
Page 58
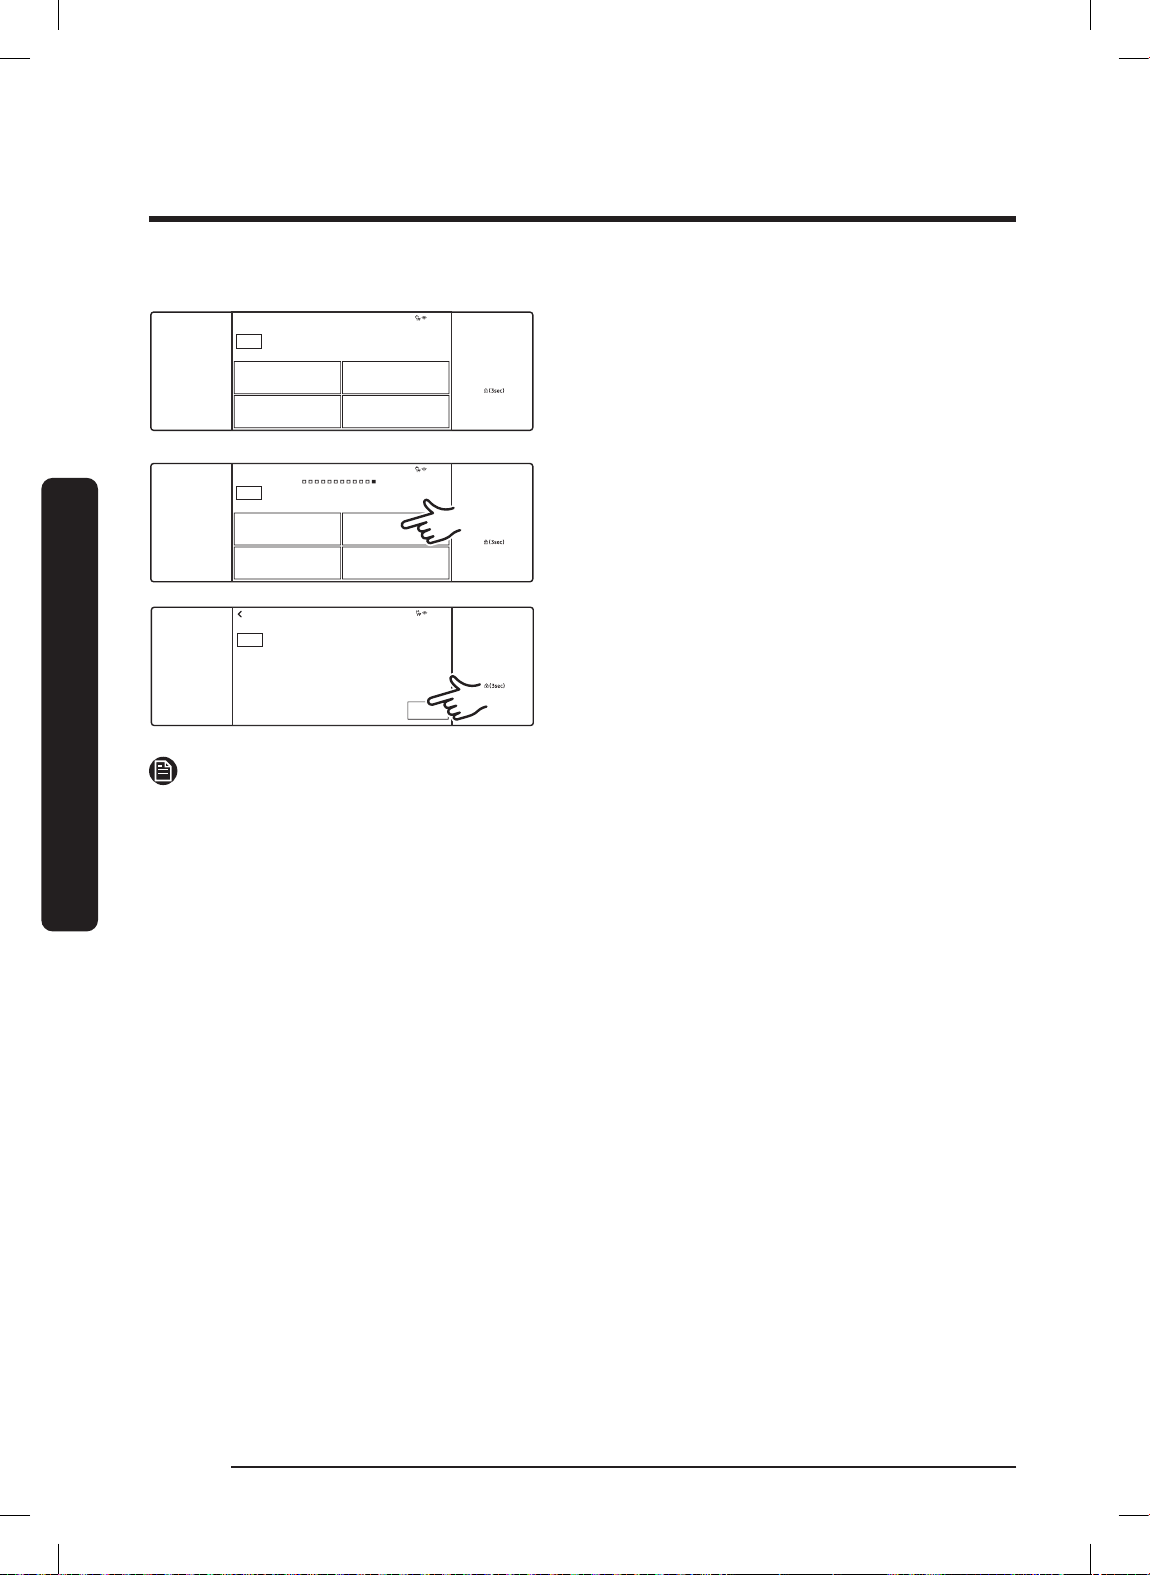
Using the Basic Oven
4:35 PM
Self clean
Descale
GreenClean™
Draining
Clean
OVEN
MODE
TIMER
LIGHT
OPEN/CLOSE
RESERVOIR
OFF
SETTINGS
LIFT PANEL
4:35 PM
GreenClean™
Quick 20 minute steam clean
0hr 20min
START
Clean Time
TIMER
LIGHT
OPEN/CLOSE
RESERVOIR
OFF
SETTINGS
LIFT PANEL
OVEN
MODE
Running a GreenClean™ Cycle
1. Swipe the screen to Clean.
OVEN
MODE
TIMER
Self clean
LIGHT
OPEN/CLOSE
RESERVOIR
Descale
Using the Basic Oven
NOTE
• (Basic oven) For best results, pour exactly 10 oz (300 ml) of water on the oven
floor.
• (Steam oven) Operates with the steam function. Add 33.8 oz (1,000 ml) of water to
the reservoir.
• You cannot start GreenClean™ if Control Lockout is active or until the oven cools.
• The oven doors lock automatically. The display shows the cleaning time remaining.
You cannot open the oven doors or set the oven to cook until the oven has cooled.
• GreenClean™ can be used in only one oven at a time. While one oven is in
GreenClean™ mode, you cannot use the other oven for cooking.
Clean
GreenClean™
Draining
4:35 PM
2. Tap GreenClean™.
OFF
SETTINGS
LIFT PANEL
3. Tap START to begin GreenClean™ and
follow the onscreen instructions.
English58
FULL_DOP36C86DLSDA_DG68-01507A-00_EN+MES+CFR.indb 58FULL_DOP36C86DLSDA_DG68-01507A-00_EN+MES+CFR.indb 58 2023-02-23 오후 5:09:062023-02-23 오후 5:09:06
Page 59
After a GreenClean™ Cycle
• Stand aside and carefully open the oven door to let hot air escape safely; residual
water on the oven floor is hot enough to burn.
• Immediately remove residual water with a sponge.
• With a detergent-soaked sponge or soft brush, wipe the oven interior. Remove
stubborn residue with a nylon scourer and limescale with a vinegar-soaked cloth.
• If the oven remains dirty, you can repeat the procedure once the oven has cooled.
• After wiping the interior clean and dry, leave the oven door ajar so the interior
enamel surface can dry thoroughly.
Descale (steam oven)
If you use steam functions, you should descale regularly to remove minerals from the
oven that may affect the taste or quality of your cooking. For a descaling cycle, use
only descaling agents specific to steam ovens or coffee machines.
NOTE
If you use the steam functions for a specific time period, the Descale indicator turns on.
You can use steam functions for a few hours without descaling; however, when those
hours are exhausted, all steam functions are disabled until you run a descaling cycle.
Operation hour
DOP36C86D**
Pre Alert Cleaning alert
12 14 (+2)
DOP48C86D** Operation hour
WATER HARDNESS Pre Alert Cleaning alert
Soft 39 42 (+3)
Medium 30 33 (+3)
Hard 23 26 (+3)
Using the Basic Oven
English 59
FULL_DOP36C86DLSDA_DG68-01507A-00_EN+MES+CFR.indb 59FULL_DOP36C86DLSDA_DG68-01507A-00_EN+MES+CFR.indb 59 2023-02-23 오후 5:09:062023-02-23 오후 5:09:06
Page 60
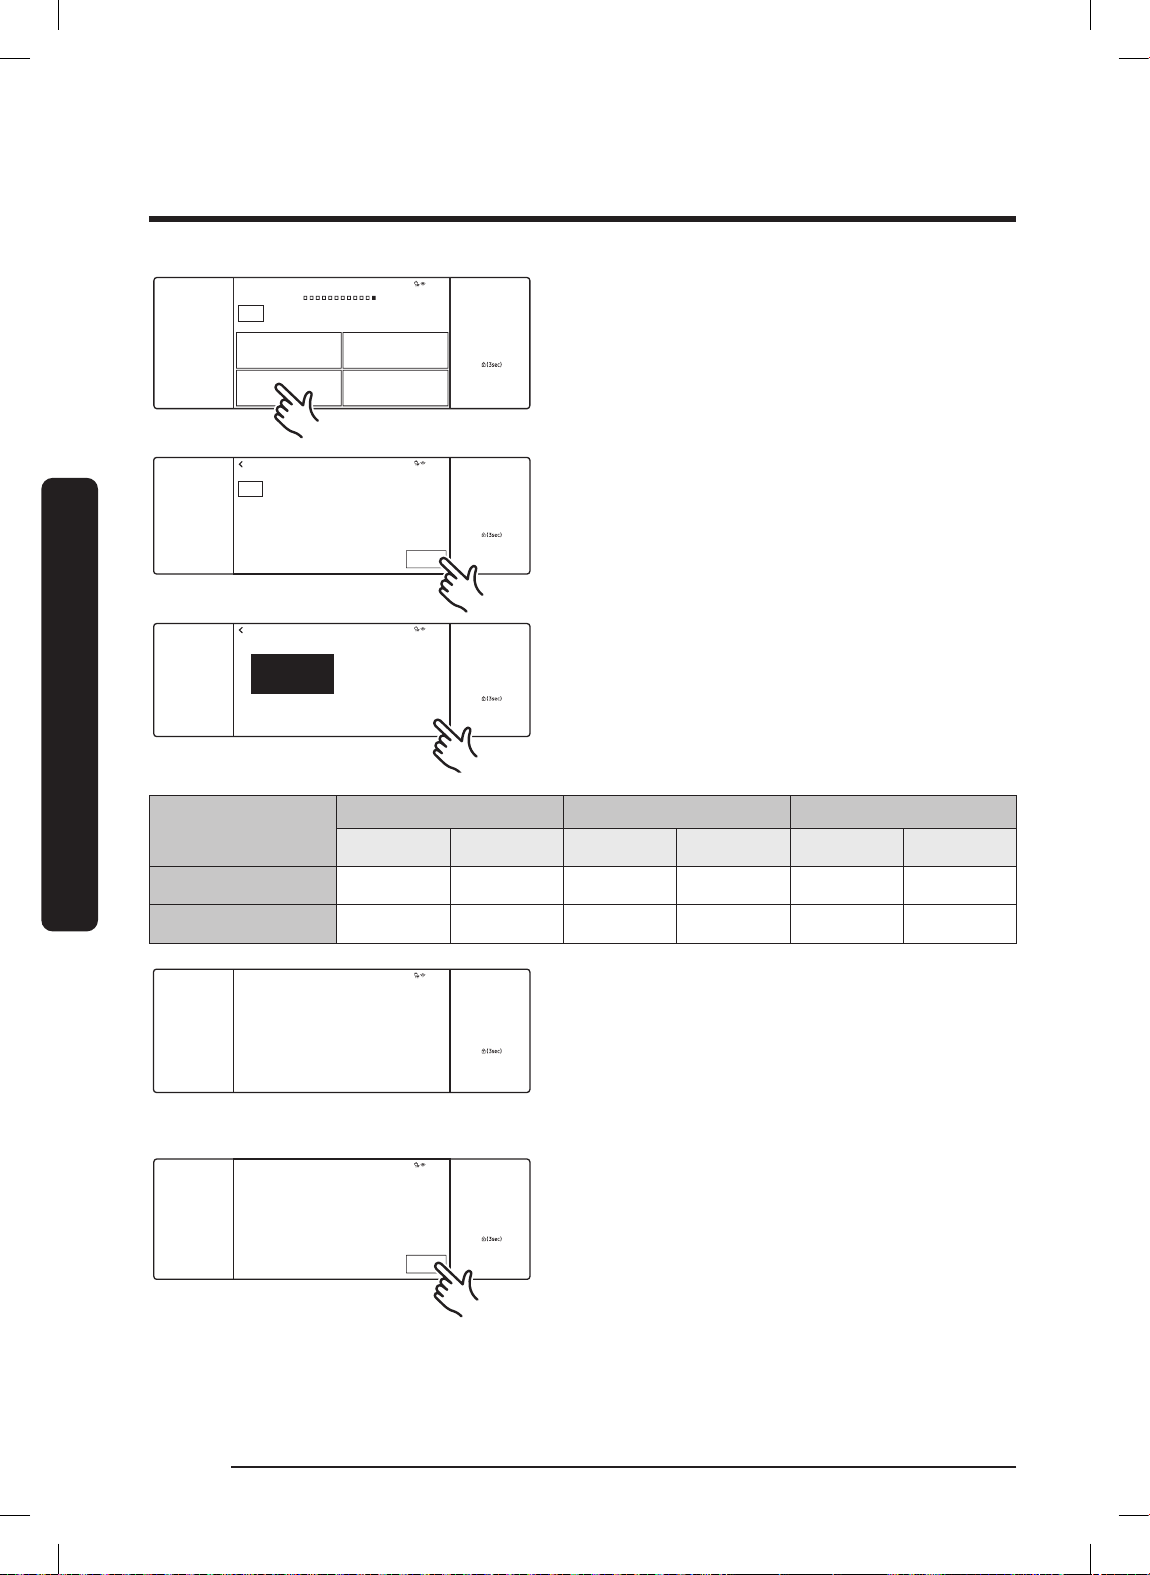
Using the Basic Oven
Clean
Self clean
Descale
4:35 PM
GreenClean™
Draining
TIMER
OPEN/CLOSE
RESERVOIR
OFF
LIFT PANEL
OVEN
MODE
LIGHT
SETTINGS
TIMER
OPEN/CLOSE
RESERVOIR
OFF
LIFT PANEL
LIGHT
SETTINGS
Descale
OK
4:35 PM
Pour 29.6oz (875ml) water
and 4.23oz (125ml) descaling
solution into Water Reservoir.
(Image)
Descale
Draining…
Caution: Hot Water.
Do not remove Water Reservoir while draining.
4:35 PM
TIMER
OPEN/CLOSE
RESERVOIR
OFF
LIFT PANEL
SETTINGS
LIGHT
Descaling complete.
Wipe oven interior.
Clean Water Reservoir and Drip Tray.
OK
4:35 PM
TIMER
OPEN/CLOSE
RESERVOIR
OFF
LIFT PANEL
LIGHT
SETTINGS
1. Swipe the screen to Clean.
2. Tap Descale.
OVEN
LIGHT
MODE
Clean Time
3hr 00
TIMER
OPEN/CLOSE
RESERVOIR
Using the Basic Oven
Required amount
36" Basic oven 13.5 400 1.7 50 22.0 650
48" Steam oven 29.6 875 4.2 125 50.7 1500
Descale
Please descale Water Reservoir to improve quality.
min
4:35 PM
START
OFF
SETTINGS
LIFT PANEL
3. Tap START.
4. Follow the onscreen instructions. The
cycle lasts 3 hours. Empty and clean
the reservoir, then pour in water and
descaling agent. (See the table for
amounts.)
Water Descaling solution Rinsing water
oz. mL oz. mL oz. mL
5. When descaling is done, the water
drains automatically.
6. Use oven gloves to remove an empty
the water reservoir and then refill it
with tap water for rinsing refer to the
above table.
7. Follow the on-screen instructions and
then tap OK to start rinsing.
8. When rinsing is complete, use oven
gloves to empty and clean the water
reservoir.
FULL_DOP36C86DLSDA_DG68-01507A-00_EN+MES+CFR.indb 60FULL_DOP36C86DLSDA_DG68-01507A-00_EN+MES+CFR.indb 60 2023-02-23 오후 5:09:062023-02-23 오후 5:09:06
English60
Page 61
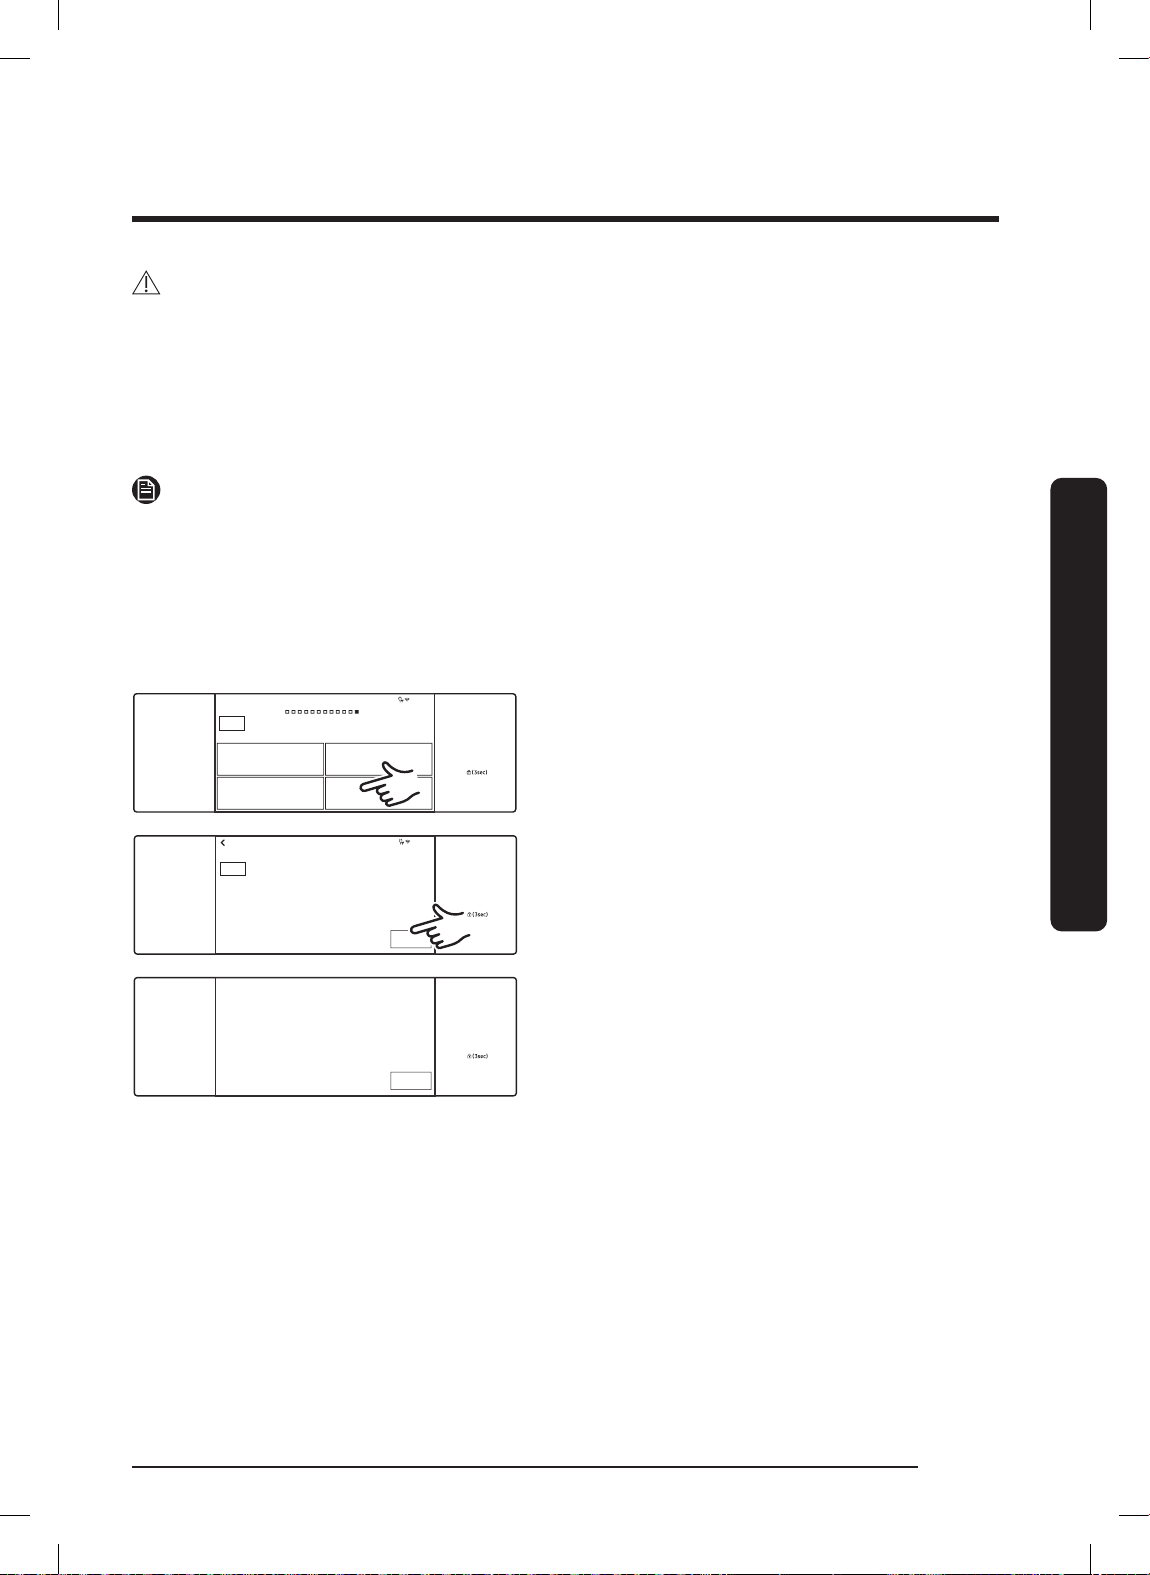
CAUTION
4:35 PM
Self clean
Descale
GreenClean™
Draining
Clean
OVEN
MODE
TIMER
LIGHT
OPEN/CLOSE
RESERVOIR
OFF
SETTINGS
LIFT PANEL
Draining is complete.
OK
TIMER
LIGHT
OPEN/CLOSE
RESERVOIR
OFF
SETTINGS
LIFT PANEL
• While descaling, steam functions are disabled. If you cancel descaling, you must
restart and complete the cycle within 3 hours to enable steam functions.
• To avoid accidents, keep children away from the oven.
• For the correct water-to-descaling agent ratio, use the manufacturer’s directions.
If the ratio is not 8 to 1, use the descaling agent's ratio.
NOTE
Though the oven automatically starts descaling in 5 seconds without your confirmation,
you should confirm your selection to keep descaling from starting by mistake.
Draining
When a steam function is complete, you must drain the remaining water to prevent the
water from affecting other cooking modes. To drain the water, follow these steps:
1. Swipe to the Clean screen and tap
Draining.
TIMER
LIGHT
OPEN/CLOSE
RESERVOIR
OVEN
MODE
Prior to draining, empty the water reservoir to prevent overflow.
Draining
Water is draining after Steam function use.
START
4:35 PM
OFF
SETTINGS
LIFT PANEL
2. Tap START. The oven drains water
from the steam generator to the
reservoir.
3. When draining is done, use oven mitts
to remove and empty the reservoir.
Using the Basic Oven
FULL_DOP36C86DLSDA_DG68-01507A-00_EN+MES+CFR.indb 61FULL_DOP36C86DLSDA_DG68-01507A-00_EN+MES+CFR.indb 61 2023-02-23 오후 5:09:062023-02-23 오후 5:09:06
English 61
Page 62
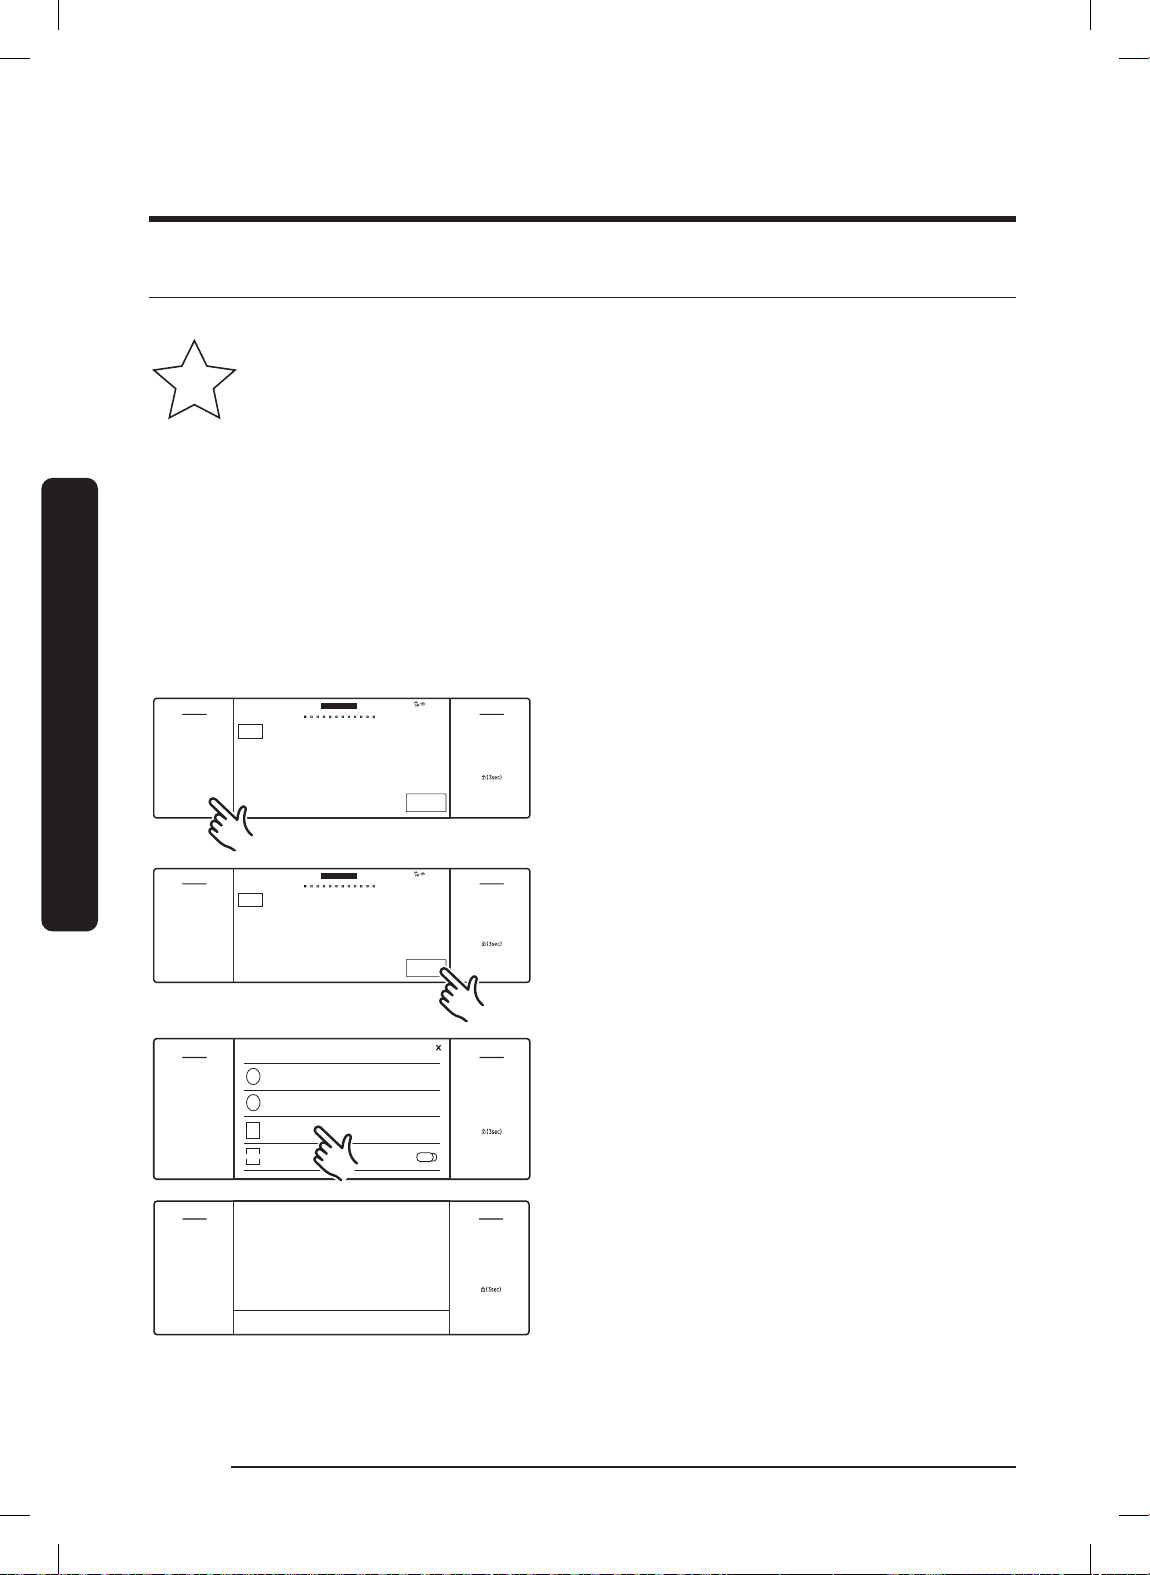
Using the Basic Oven
K
Bake
Thermal heat baking
LEFT
350
°F
START
4:35 PM
Cook Time
None
Delay Start
None
OFF
TIMER
SETTINGS
LEFT
OFF
LOCK
LIFT PANEL
RIGHT
OVEN
MODE
Settings
About device
Sabbath
Demo mode
Help
?
i
12th
+
DEMO
OFF
OFF
TIMER
SETTINGS
LEFT
OFF
LOCK
LIFT PANEL
RIGHT
Using the Sabbath Feature
(For use on the Jewish Sabbath & Holidays)
For further assistance, guidelines on proper usage and a complete list of
models with the Sabbath feature, visit http:\\www.star-k.org.
You can use the Sabbath feature with baking only. You can adjust the oven temperature
after you set the Sabbath feature. (Use oven-temp adjustment only during Jewish
holidays.) The display, however, will not change and tones will not sound when a
change occurs. Once the Sabbath feature is active and the oven properly set, the oven
stays on until the Sabbath feature is cancelled. This overrides the factory preset 12-hr
Using the Basic Oven
energy-saving feature. To use the oven light during the Sabbath, touch LIGHT before
activating the Sabbath feature. Once the oven light is on and the Sabbath feature is
active, the oven interior light stays on until the Sabbath feature is cancelled. If you will
not use the oven light, turn it off before activating the Sabbath feature.
1. Swipe the screen to Bake mode.
2. Set the temperature and cook time
you want.
4:35 PM
LEFT
OFF
TIMER
SETTINGS
OVEN
MODE
None
Cook Time
Delay Start
None
LEFT
LEFT
Bake
Thermal heat baking
350
°F
RIGHT
OFF
LOCK
START
LIFT PANEL
3. Tap START.
4. Tap SETTINGS > Sabbath, then tap
Sabbath to start Sabbath mode. (The
oven will not beep or show changes;
you may change the oven temp once
baking starts.)
LEFT
OFF
TIMER
SETTINGS
FULL_DOP36C86DLSDA_DG68-01507A-00_EN+MES+CFR.indb 62FULL_DOP36C86DLSDA_DG68-01507A-00_EN+MES+CFR.indb 62 2023-02-23 오후 5:09:072023-02-23 오후 5:09:07
English62
Sabbath
- Temperature +
Sabbath Mode Off (3 sec)
RIGHT
OFF
LOCK
LIFT PANEL
Page 63
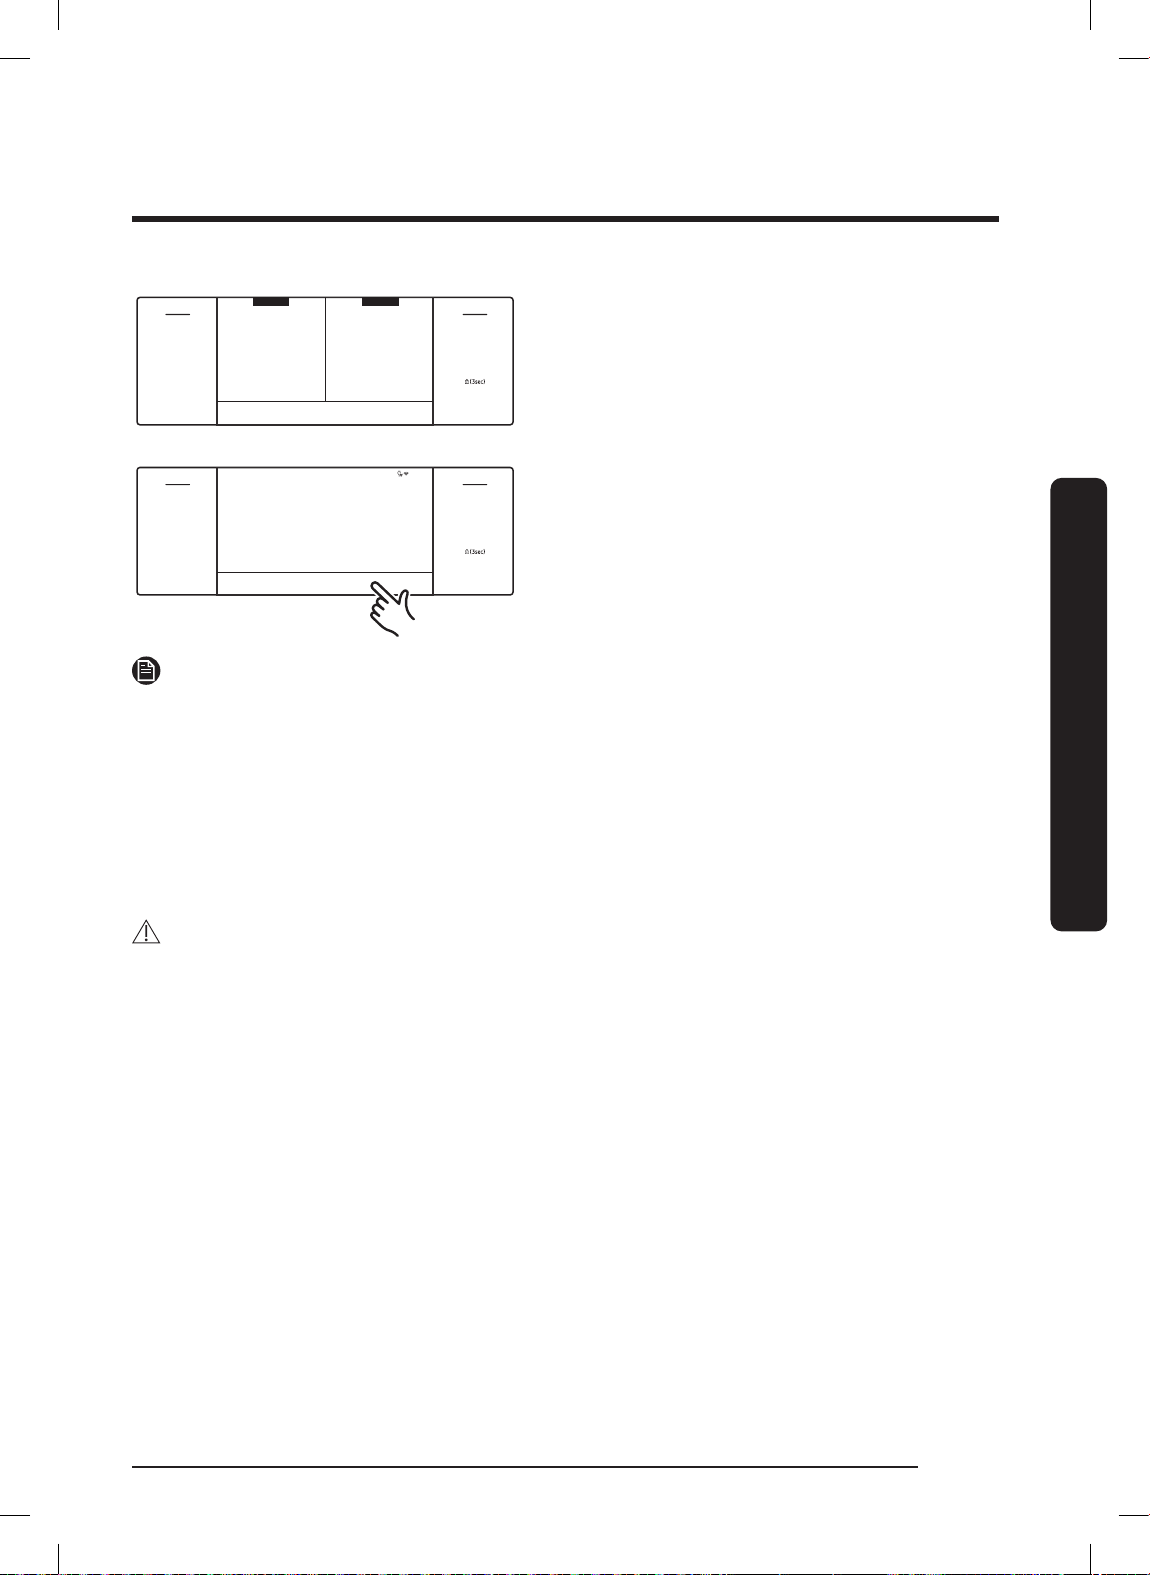
OFF
TIMER
SETTINGS
LEFT
OFF
LOCK
LIFT PANEL
RIGHT
Double Oven
Sabbath Mode Off (3 sec)
Sabbath
- Temperature +
LEFT
Sabbath
- Temperature +
RIGHT
4:35 PM
OFF
TIMER
SETTINGS
LEFT
OFF
LOCK
LIFT PANEL
RIGHT
Sabbath
- Temperature +
Sabbath Mode Off (3 sec)
Single Oven
5. Turn the oven off anytime by tapping
OFF. (This does not cancel Sabbath
mode.)
6. To turn Sabbath mode off, tap-hold
Sabbath Mode Off for 3 seconds.
NOTE
• After you change the oven temperature while the unit is in Sabbath mode, there is a
15 second delay before the unit recognizes the change.
• You can set the Cook Time function before activating Sabbath mode.
• If there is a power failure or interruption, the oven shuts off. When power returns,
Sabbath appears on the control display, but the oven is disabled. Food may be
removed from the oven; however, the oven cannot be turned on until after the
Jewish Holidays,
CAUTION
To let the oven reach the set temperature, do not open the oven door or change the
oven temp for about 30 minutes after starting Sabbath mode.
Using the Basic Oven
FULL_DOP36C86DLSDA_DG68-01507A-00_EN+MES+CFR.indb 63FULL_DOP36C86DLSDA_DG68-01507A-00_EN+MES+CFR.indb 63 2023-02-23 오후 5:09:072023-02-23 오후 5:09:07
English 63
Page 64
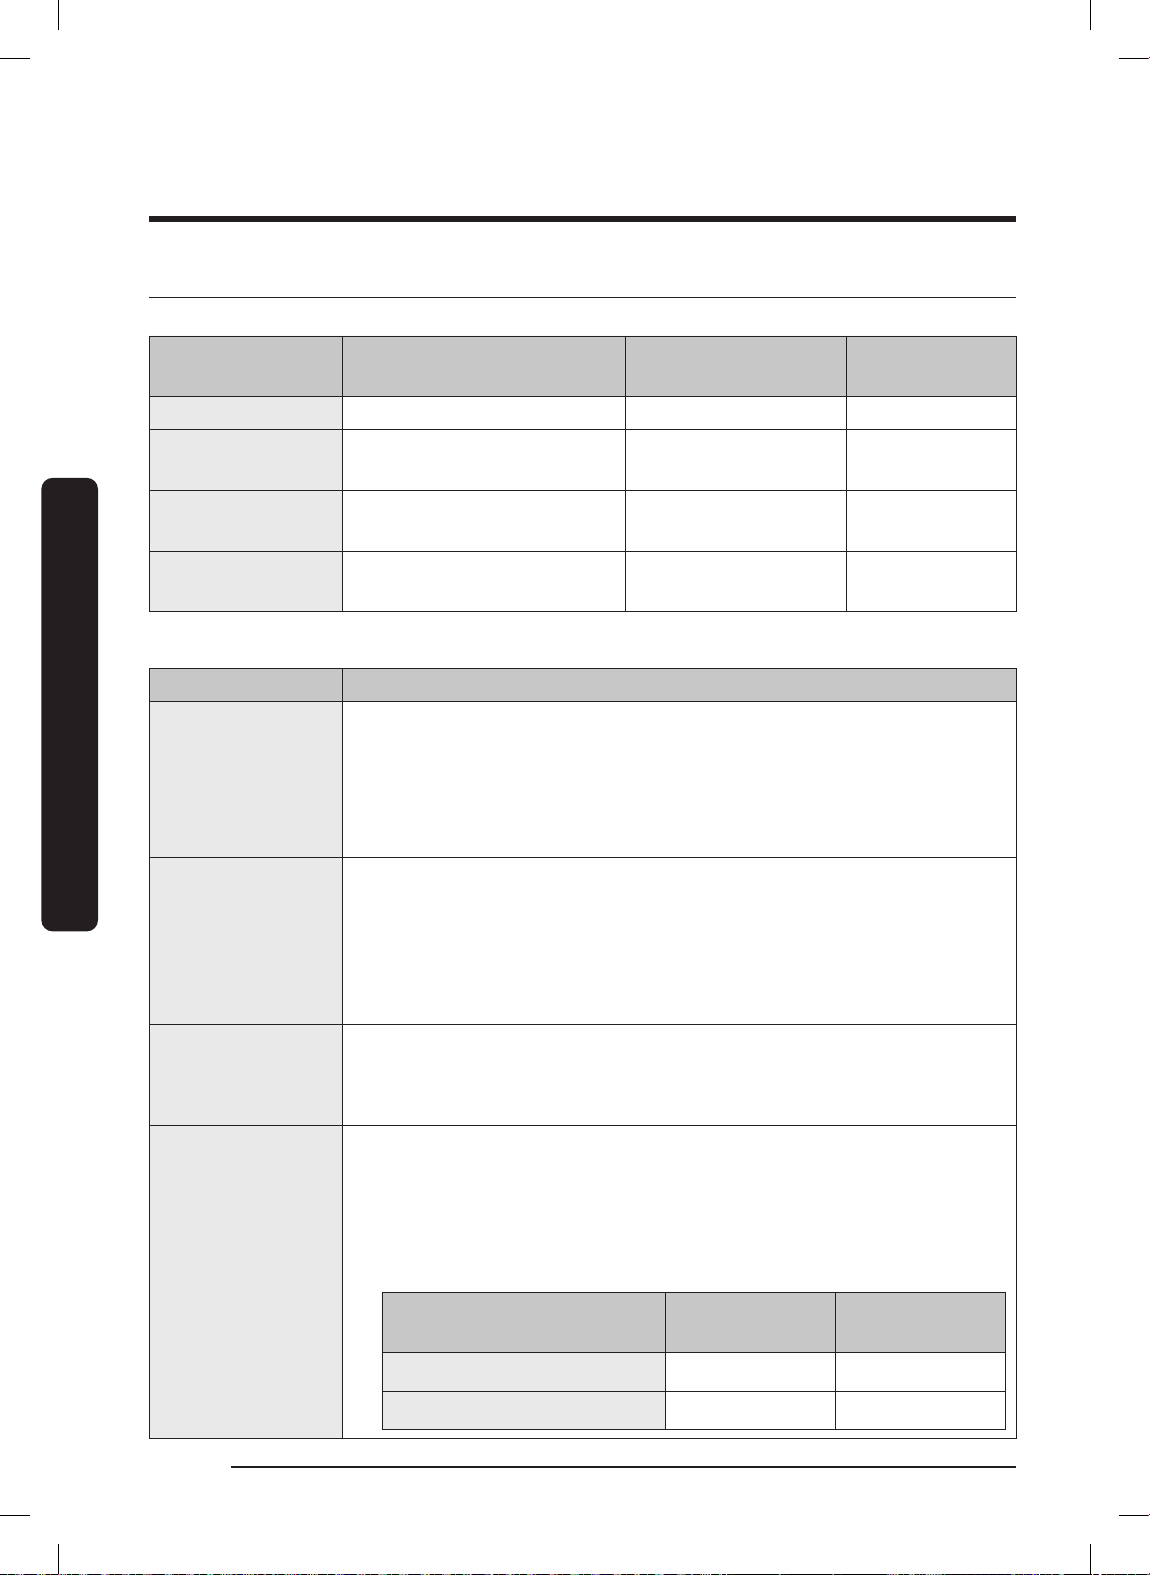
Using the Basic Oven
Using the Special Functions
There are four specialized cooking options.
Mode Temperature range
Keep Warm **None O O
Proof
Stone Bake Mode
Using the Basic Oven
Dehydrate
** Non-adjustable. A factory-set temperature is applied for the best performance.
Mode Instruction
Keep Warm
Proof
Stone Bake Mode
Dehydrate
48" Pro Range
Basic Oven
95 °F (35 °C) /
105 °F (40 °C)
175 °F (80 °C) -
550 °F (285 °C)
105 °F (40 °C) -
225 °F (105 °C)
• Keeps cooked food warm for serving up to 3 hours after
cooking is done.
• Use this mode by itself, or set it to activate after timed or delay
timed cooking.
• Not for reheating food; 175 °F temperature is non-adjustable.
• Provides optimal temperature for dough proofing:
- 48" product left oven : 85 °F / 95 °F;
- 48" product right oven : 95 °F / 105 °F;
- 36" product : 95 °F / 105 °F
• For the best results, start Proof with a cool oven.
• Stone accessory required.
• Bake on a baking or pizza stone for pizza and bread.
• For best results, preheat with a stone.
• Removes moisture from food via heat circulation.
• Keep dehydrated food in a cool, dry place.
• Add lemon or pineapple juice, or sprinkle sugar on fruit to help
retain sweetness.
• See the table below for Dehydrate settings.
Category Rack Level
O O
O O
O O
36" Pro Range
Temperature
(°F)
Vegetables or Fruit 3 or 4 105 - 150
Meat 3 or 4 145 - 225
English64
FULL_DOP36C86DLSDA_DG68-01507A-00_EN+MES+CFR.indb 64FULL_DOP36C86DLSDA_DG68-01507A-00_EN+MES+CFR.indb 64 2023-02-23 오후 5:09:072023-02-23 오후 5:09:07
Page 65
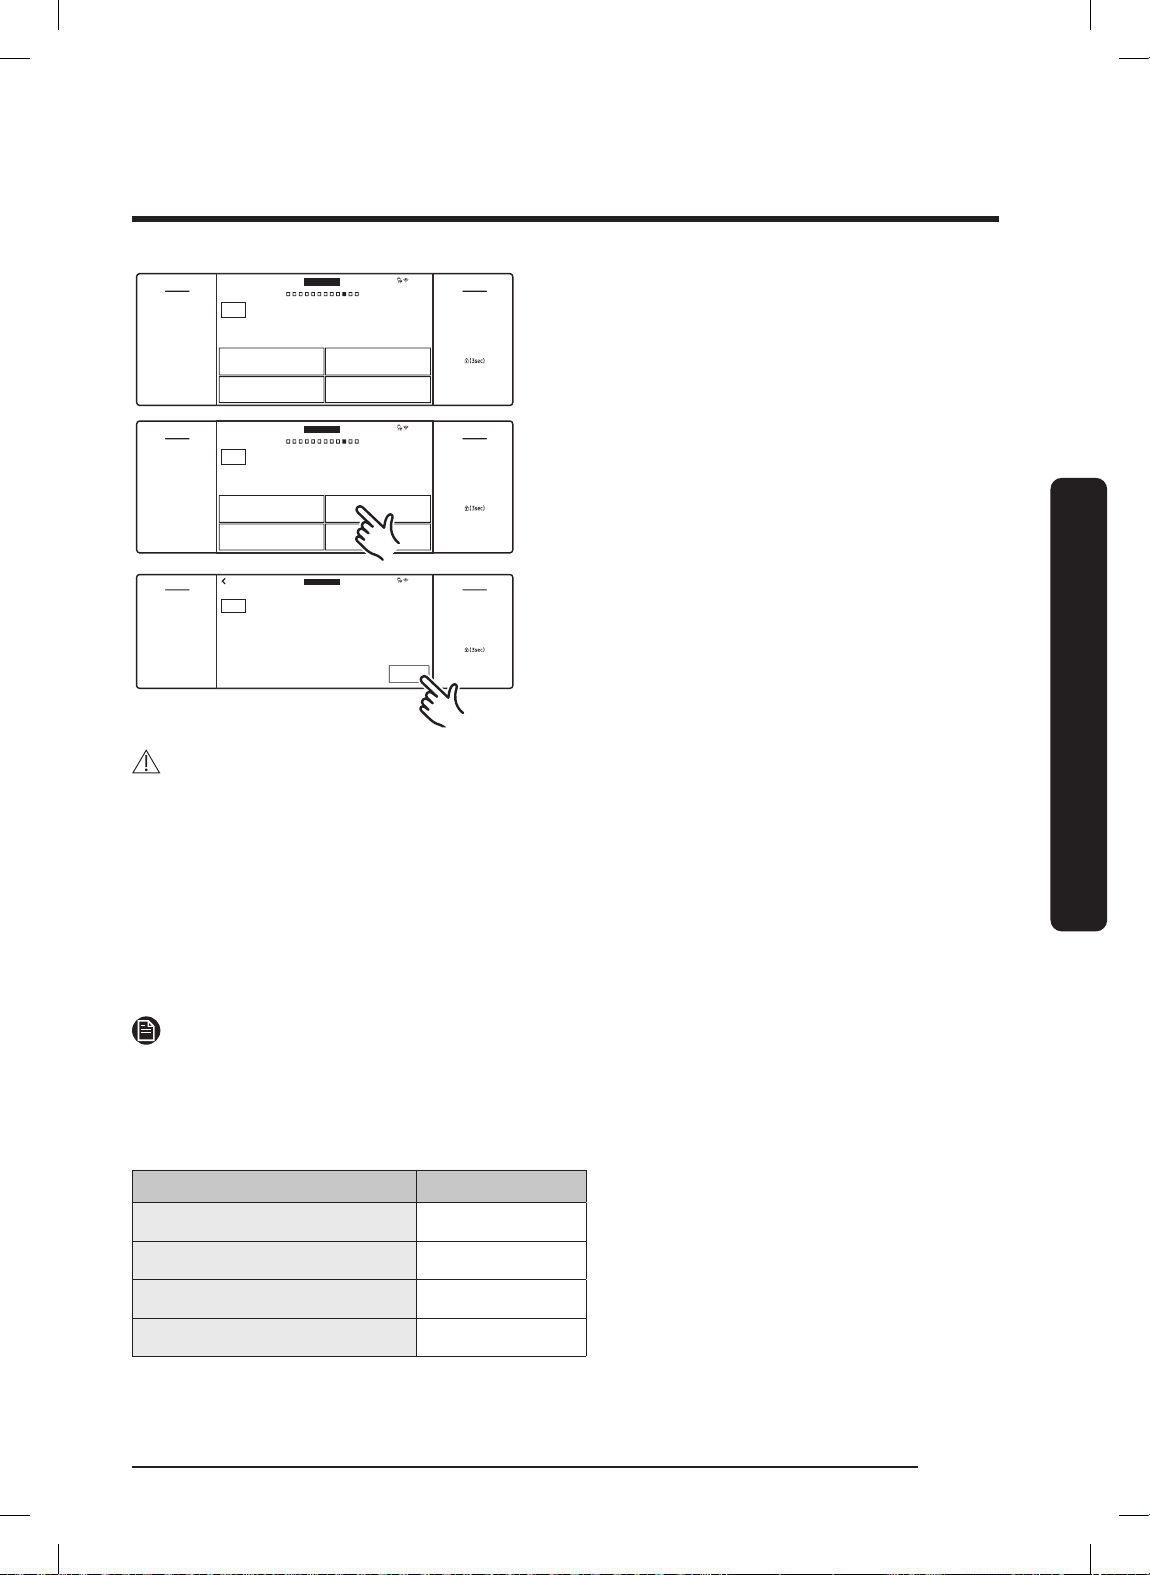
Keep Warm
Stone Bake Mode
Proof
Dehydrate
4:35 PM
Special Function
Additional Cooking Modes
RIGHT
OFF
TIMER
SETTINGS
LEFT
OFF
LOCK
LIFT PANEL
RIGHT
OVEN
MODE
LEFT
Proof
Proofing...
105
°F
START
4:35 PM
Delay Start
None
Cook Time
None
RIGHT
OFF
TIMER
SETTINGS
LEFT
OFF
LOCK
LIFT PANEL
RIGHT
OVEN
MODE
OFF
TIMER
SETTINGS
OVEN
MODE
Keep Warm
Stone Bake Mode
RIGHT
Special Function
Additional Cooking Modes
Proof
Dehydrate
1. Swipe to the Special Function screen
and tap a cooking option.
4:35 PM
RIGHT
OFF
LOCK
LIFT PANEL
2. Set the temperature and tap START.
CAUTION
• If the oven temperature is above 125 °F, Proof will not work properly.
• Do not use Proof to warm food. The proofing temp cannot keep food warm.
• Place dough in a heat-safe bowl on rack level 3 or 4 and cover it with cloth or
plastic wrap. (Anchor the plastic wrap beneath the bowl so the oven fan does not
blow away the plastic wrap.)
• To avoid lowering the oven temp and prolonging proofing, leave the oven door
closed.
NOTE
• Preheating is unnecessary for special functions, except Stone Bake Mode.
• An error beeps if the temperature is set out of range.
Rack position chart for special cooking options
Using the Basic Oven
Mode Rack Position
Keep Warm 5
Proof 3
Stone Bake Mode 1 or 2
Dehydrate 3 or 4
English 65
FULL_DOP36C86DLSDA_DG68-01507A-00_EN+MES+CFR.indb 65FULL_DOP36C86DLSDA_DG68-01507A-00_EN+MES+CFR.indb 65 2023-02-23 오후 5:09:072023-02-23 오후 5:09:07
Page 66
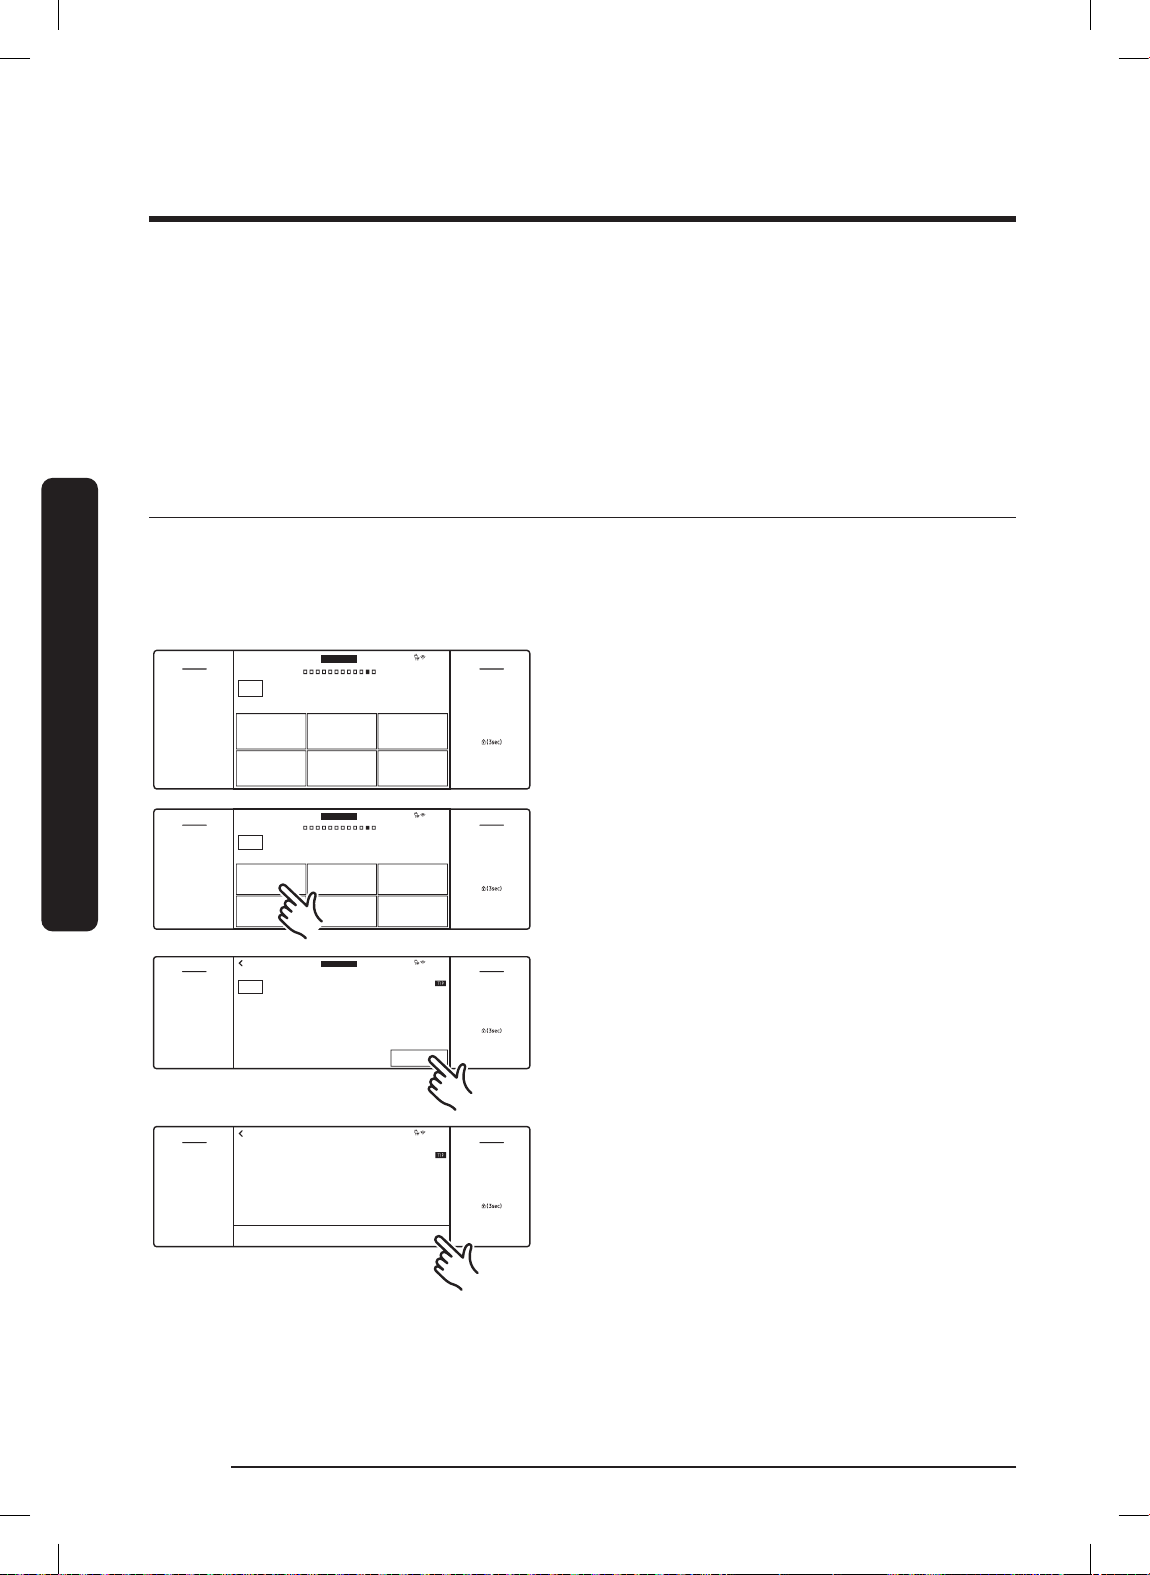
Using the Basic Oven
Chef Mode
Garlic prime rib
Mustard Filet
mignon steak
Roasted lemon
chicken thighs
Garlic basil
shrimp
Roasted honey
mustard chicken
breasts
Sweet banana nut
bread
Pre-programmed cooking temperature and time
4:35 PM
RIGHT
OFF
TIMER
SETTINGS
LEFT
OFF
LOCK
LIFT PANEL
RIGHT
OVEN
MODE
Garlic prime rib
OK
- For 8-9 servings
- Use Roasting Pan with Roasting Rack
- Use Temperature probe
4:35 PM
RIGHT
OFF
TIMER
SETTINGS
LEFT
OFF
LOCK
LIFT PANEL
RIGHT
OVEN
MODE
4:35 PM
Garlic prime rib
Previous START
4
:
35
3
:
34
5
:
36
AM
PM
OFF
TIMER
SETTINGS
LEFT
OFF
LOCK
LIFT PANEL
RIGHT
Common features:
• Basic settings
• Using the temp probe
• Setting the mode
• Setting the temperature
Using Chef Mode
Fifteen Chef Mode dishes simplify cooking for novice users, saving time or shortening
the learning curve.
Using the Basic Oven
Cook time and temperature are adjusted according to the selected recipe. You can
download detailed recipes for each feature from the Dacor website.
LEFT
OVEN
MODE
OFF
Garlic prime rib
TIMER
Roasted honey
SETTINGS
mustard chicken
breasts
RIGHT
Chef Mode
Pre-programmed cooking temperature and time
Mustard Filet
mignon steak
Garlic basil
shrimp
Roasted lemon
chicken thighs
Sweet banana nut
bread
• Kitchen timer
• Delay start
• Using the clean feature
• Using the Sabbath
feature
1. Swipe to the Chef Mode screen.
4:35 PM
RIGHT
OFF
LOCK
LIFT PANEL
2. Scroll and tap a Chef Mode dish.
• Using the iQ control feature
• To start the oven remotely
• Control lockout
• Settings
3. Follow the on-screen instructions.
4. Tap START to start cooking.
FULL_DOP36C86DLSDA_DG68-01507A-00_EN+MES+CFR.indb 66FULL_DOP36C86DLSDA_DG68-01507A-00_EN+MES+CFR.indb 66 2023-02-23 오후 5:09:082023-02-23 오후 5:09:08
English66
Page 67
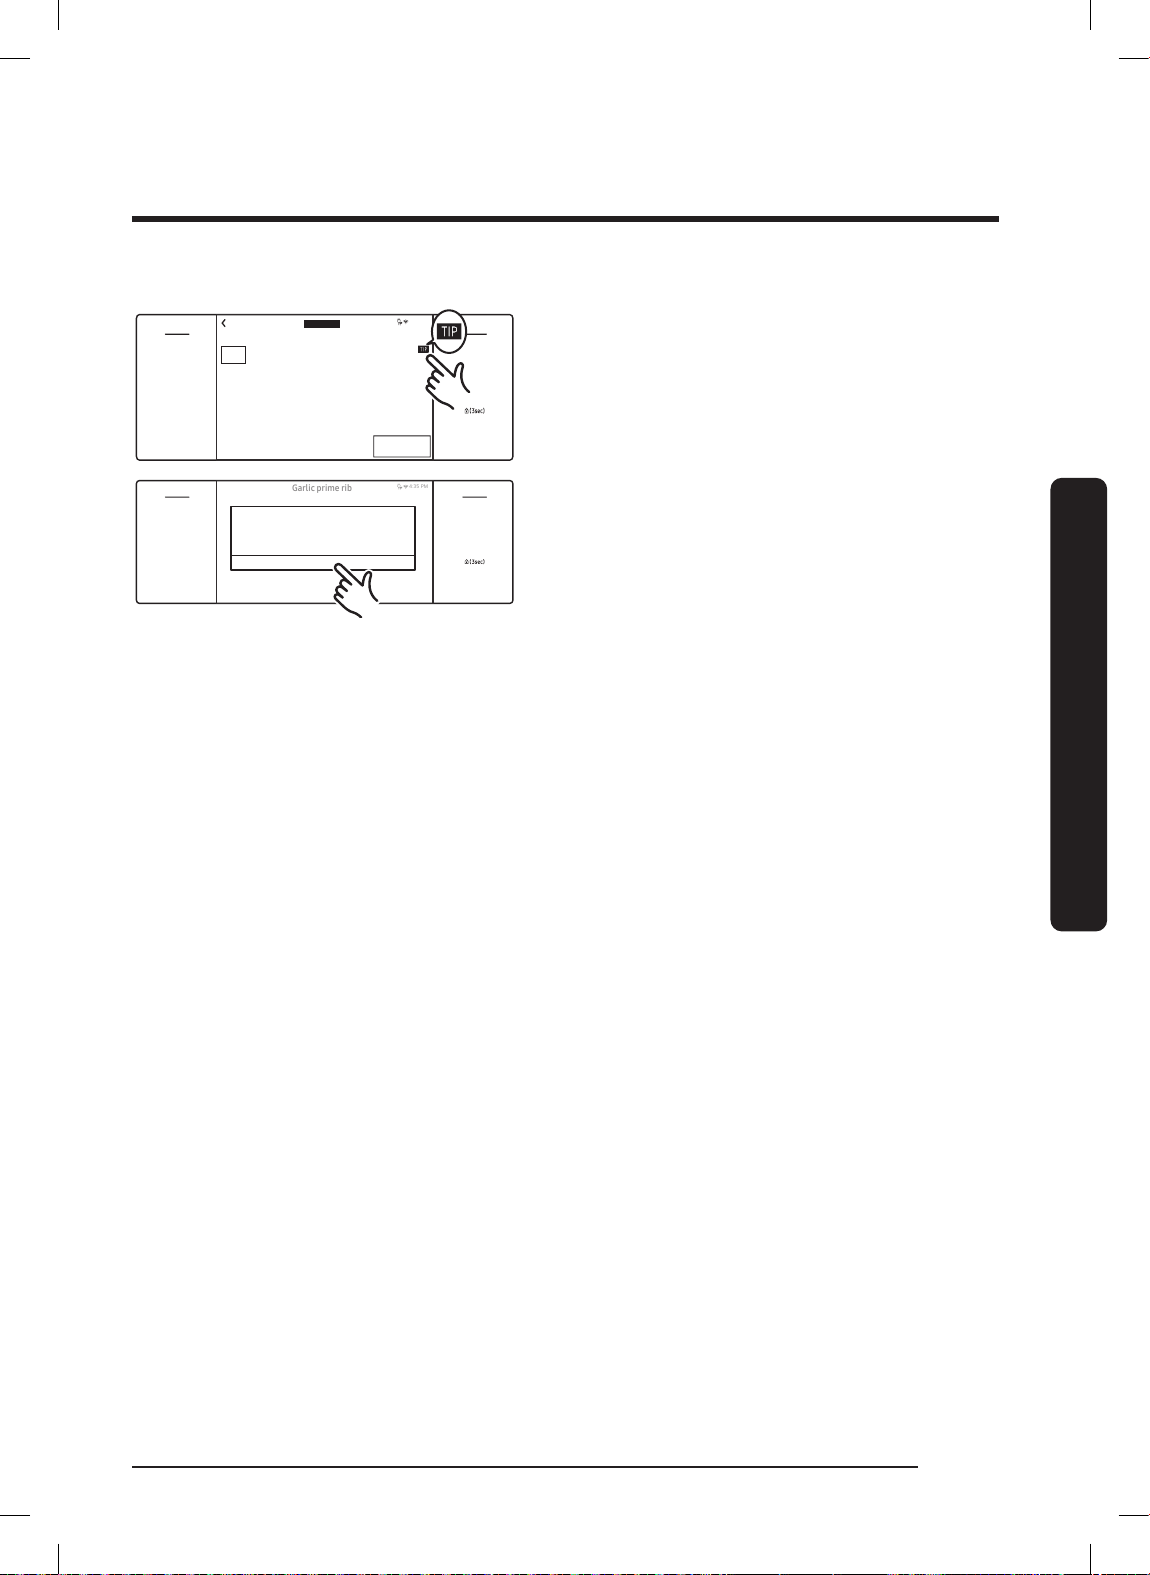
Cooking Tips in Chef Mode
OFF
Garlic prime rib
OK
4:35 PM
RIGHT
- For 8-9 servings
- Use Roasting Pan with Roasting Rack
- Use Temperature probe
OFF
TIMER
SETTINGS
LEFT
OFF
LOCK
LIFT PANEL
RIGHT
OVEN
MODE
4:35 PM
Garlic prime rib
1. Tap TIP on the display.
LEFT
OFF
TIMER
SETTINGS
Insert temperature probe into center of
meat. Avoid touching bone, fat or gristle.
OK
RIGHT
OFF
LOCK
LIFT PANEL
2. The tip appears with info relevant to
the cooking task. When finished, tap
OK.
Using the Basic Oven
English 67
FULL_DOP36C86DLSDA_DG68-01507A-00_EN+MES+CFR.indb 67FULL_DOP36C86DLSDA_DG68-01507A-00_EN+MES+CFR.indb 67 2023-02-23 오후 5:09:082023-02-23 오후 5:09:08
Page 68
Using the Basic Oven
4:35 PM
iQ Control
Start a cooking at your mobile.
Turn the mode knob to release this mode.
OFF
TIMER
SETTINGS
LEFT
OFF
LOCK
LIFT PANEL
RIGHT
Using iQ Control
To use this feature, download the SmartThings app to a mobile device. Functions
operated via SmartThings may not work will if communication conditions are poor or if
the Wi-Fi signal is weak at the oven location. See the table for the main functions that
can be operated from the app.
When iQ Control on the oven is off Monitoring (Oven, Probe), Oven off
When iQ Control on the oven is on.
Connecting the Oven
Using the Basic Oven
1. Download and open the Samsung SmartThings app on your smart device.
2. Follow the app’s instructions to connect your oven.
The connected icon appears on the oven display and the app confirms the connection. If
the connection icon does not appear, follow the app's instructions to connect.
Starting the Oven Remotely
When iQ Control is on you can remotely turn on/off the oven and change oven settings
with your mobile device.
NOTE
• Self-clean mode cannot be started remotely.
• Opening the oven door deactivates iQ Control, disabling remote operation.
• Even iff iQ Control is deactivated, you can monitor oven status and turn the oven off.
• When oven cooking is finished or cancelled, iQ Control deactivates itself.
Monitoring (Oven, Probe), Oven start, Oven off,
Error check
Tap SETTINGS > Connections > iQ Control
> ON (for the appropriate oven).
FULL_DOP36C86DLSDA_DG68-01507A-00_EN+MES+CFR.indb 68FULL_DOP36C86DLSDA_DG68-01507A-00_EN+MES+CFR.indb 68 2023-02-23 오후 5:09:082023-02-23 오후 5:09:08
English68
Page 69
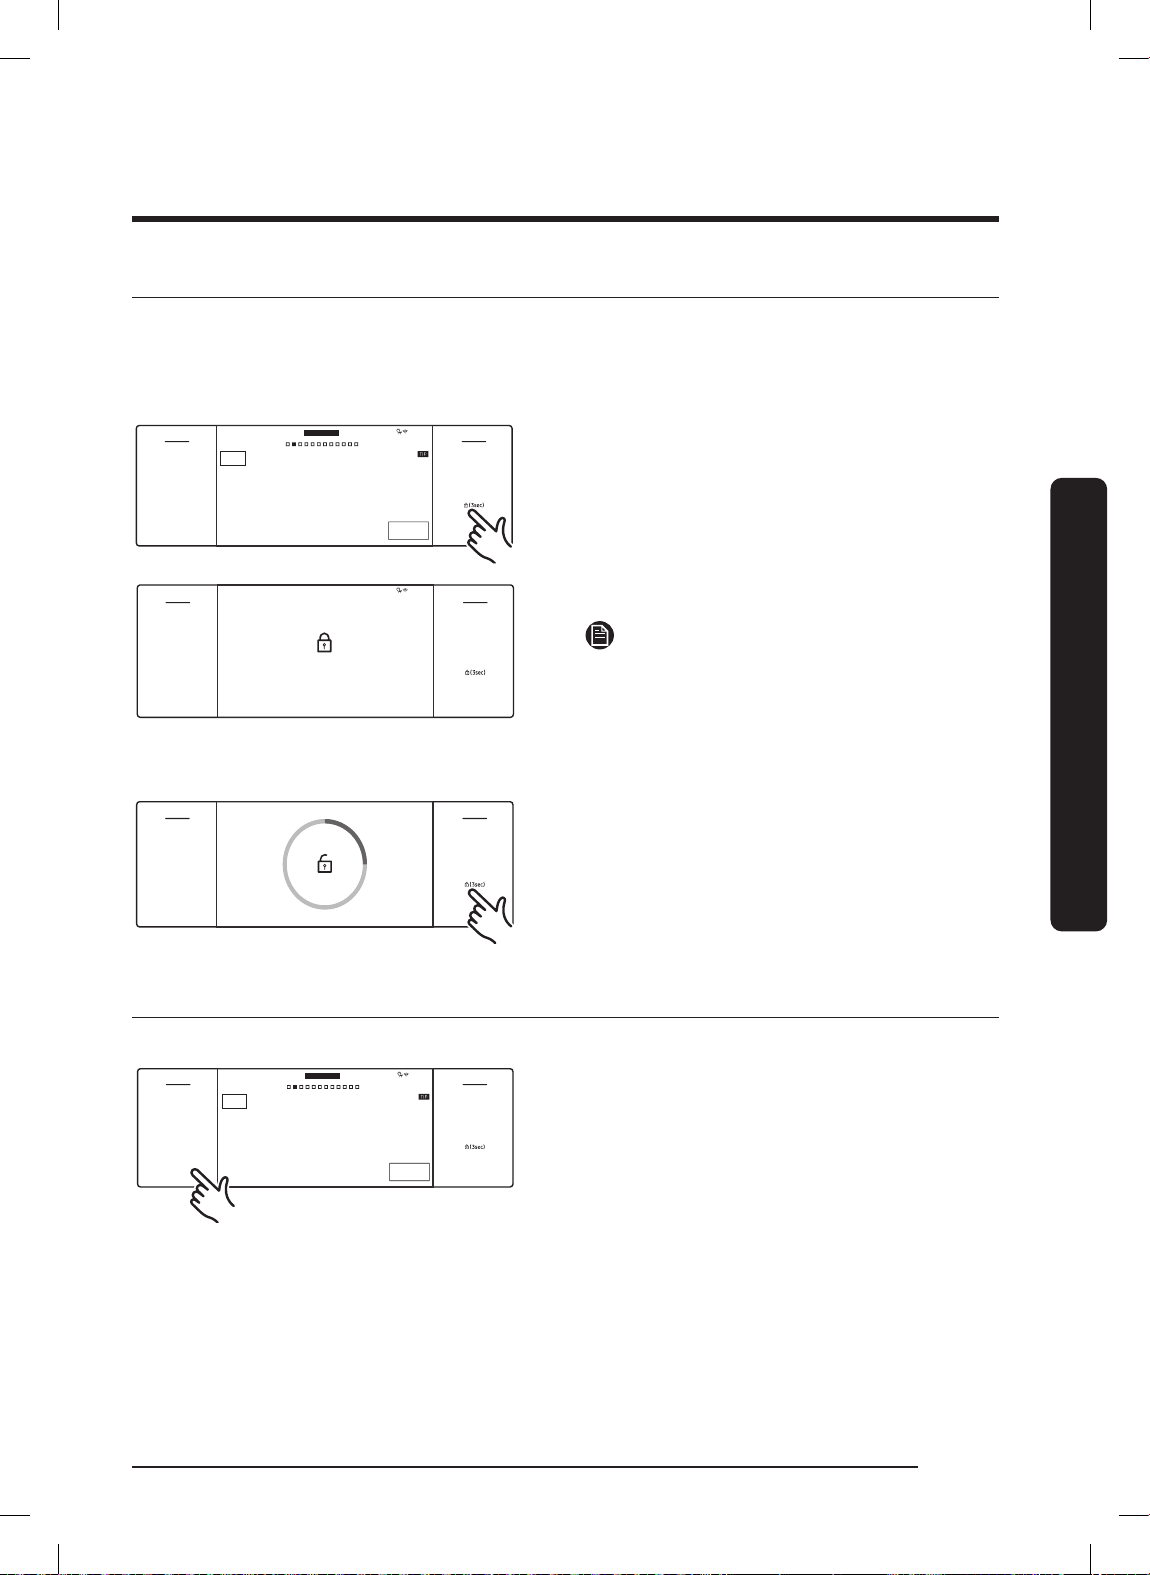
Using Control Lockout
Convection Bake
Faster, more even baking
RIGHT
325
°F
Temp Probe
145
°
No Preheat
Off
Cook Time
None
Delay Start
None
START
4:35 PM
View
Summary
OFFOFF
TIMER
LOCK
SETTINGS LIFT PANEL
RIGHTLEFT
OVEN
MODE
Child Lock
OFFOFF
TIMER
LOCK
SETTINGS LIFT PANEL
RIGHTLEFT
4:35 PM
OFFOFF
TIMER
LOCK
SETTINGS LIFT PANEL
RIGHTLEFT
4:35 PM
Convection Bake
Faster, more even baking
RIGHT
325
°F
No Preheat
Off
Cook Time
None
Delay Start
None
START
OFF
TIMER
SETTINGS
LEFT
OFF
LOCK
LIFT PANEL
RIGHT
OVEN
MODE
This mode lets you disable touch pad functions. The oven doors also lock automatically.
Control Lockout must be activated when the oven is in standby mode.
Activating Control Lockout
1. Cancel or turn off all functions.
2. Touch-hold LOCK for 3 seconds.
3. The Control Lock screen appears.
NOTE
Control Lockout is available only when
the oven temperature is under 400 °F.
Disabling Control Lockout
Touch-hold LOCK for 3 seconds.
The control lock confirmation and lock
icon disappear.
Using Settings
Change default settings to your preference or diagnose network-connection issues.
Tap SETTINGS to show the Settings
screen.
Using the Basic Oven
FULL_DOP36C86DLSDA_DG68-01507A-00_EN+MES+CFR.indb 69FULL_DOP36C86DLSDA_DG68-01507A-00_EN+MES+CFR.indb 69 2023-02-23 오후 5:09:092023-02-23 오후 5:09:09
English 69
Page 70

Using the Basic Oven
Wi-Fi
To enable a Wi-Fi connection:
1. Tap SETTINGS > Connections > Wi-Fi, then tap ON in the right screen.
(To disable Wi-Fi, follow the same path and tap OFF.)
2. Tap Wi-Fi, then tap a network in the list that appears.
3. When prompted, provide a password.
To manually input an IP address:
1. Tap SETTINGS > Connections > Wi-Fi, then tap ON in the right screen.
2. Tap Wi-Fi > Add Network.
Using the Basic Oven
3. Enter an IP manually, then tap CONNECT to apply your settings.
NOTE
For details on the above features, see the Samsung SmartThings User Manual.
Display
1. Brightness
You can change the brightness of the display screen.
• Tap SETTINGS > Display > Brightness and use the adjacent bar to adjust screen
brightness.
2. Screen Saver
If screen saver is off, the Clock theme and Timeout menu are disabled.
• Tap SETTINGS > Display > Screen saver, then tap OFF on the right screen.
3. Clock Theme
• Tap SETTINGS > Display > Clock theme, then tap the right screen and select a
theme.
4. Setting the Clock Display to Always On
• Go to Menu
• Select SETTINGS > Display > Timeout > Always On
• Initial 1 hour displays setting clock and then displays Burn-In prevention theme
clock in 1 hour. (analog type or digital type)
• Analog Clock: Center > Left > Right (Movement Repeat)
• Digital Clock: Top > Bottom (Movement Repeat)
English70
FULL_DOP36C86DLSDA_DG68-01507A-00_EN+MES+CFR.indb 70FULL_DOP36C86DLSDA_DG68-01507A-00_EN+MES+CFR.indb 70 2023-02-23 오후 5:09:092023-02-23 오후 5:09:09
Page 71

Temp
1. Temp unit
You can program the oven control to display the temperature in Fahrenheit or
Celsius. The oven has been preset at the factory to display in Fahrenheit.
• Tap SETTINGS > Temp > Temp unit, then tap the right screen and select °C or °F.
2. Temp adjust
Oven temperature is factory calibrated. When first using the oven, follow recipe
times and temperatures. If the oven cooks too hot/cool, you can recalibrate the oven
temp. Before doing so, test a recipe by using a higher/lower temp than the recipe
stipulates. The results will help you to decide the degree of adjustment. (Oven temp
can be adjusted ±35 °F (±19 °C). This adjustment will not affect broil or the selfclean temp's. The adjustment will be retained after a power failure.
• Tap SETTINGS > Temp > Temperature Adjust, then tap in the right screen and
adjust the temp.
• Temp can be increased/decreased by 35 °F (19 °C).
Volume
Adjust the volume level for beeps and melodies.
• Tap SETTINGS > Volume, then use the adjacent bar to adjust the volume.
Using the Basic Oven
Lighting
Dacor's Pro range has two distinctive lighting features: 'Shower lighting' shines on knobs
from above; 'Welcome lighting' is an array that appears when you lift the LCD panel.
• To adjust Shower lighting, tap SETTINGS > Lightings and select On, Automatic, or Off.
• To adjust Welcome lighting, tap SETTINGS > Lightings and select On or Off.
12- hour Energy Saving
This feature turns the oven off after 12 hours of baking or 3 hours of broiling.
1. Tap SETTINGS > 12 hour energy saving, then tap ON on the right screen.
2. The 12-hour energy saving icon appears in the indicator area.
Water Hardness (DOP48C86D** only)
Adjust water hardness for the Steam oven. (The harder the water, the more you need to
descale.)
• Tap SETTINGS > Water hardness and select Soft, Medium, or Hard.
English 71
FULL_DOP36C86DLSDA_DG68-01507A-00_EN+MES+CFR.indb 71FULL_DOP36C86DLSDA_DG68-01507A-00_EN+MES+CFR.indb 71 2023-02-23 오후 5:09:092023-02-23 오후 5:09:09
Page 72
Using the Basic Oven
iQ Control
To start the oven remotely.
• Tap SETTINGS > Connections > iQ Control, then tap ON on the appropriate oven.
(See Using iQ Control, Pg. 68)
Easy Connection
Easily configure network settings, including the authentication procedure.
• Tap SETTINGS > Connections > Easy connection, then tap CONNECT.
Hood Connectivity
By connecting to the hood, Hood is turned on/off automatically when you use the
Using the Basic Oven
cooktop.
1. Tap SETTINGS > Connections > Hood connectivity.
2. Turn on Bluetooth on hood.
3. Tap CONNECT on LCD display to connect to the hood.
Hood-Control Range Model Hood Model
DHD30M967W, DHD36M967I,
DOP36C86D**, DOP48C86D**
Help
Help provides useful tips and explanations on a specific item that you select.
1. Troubleshooting
• Tap a checkpoint directly on the screen and try the suggestions.
2. Guide for first use
• Provides simple instructions on the basic use of the oven.
DHD36M987W, DHD48M967I,
DHD48M987W
English72
FULL_DOP36C86DLSDA_DG68-01507A-00_EN+MES+CFR.indb 72FULL_DOP36C86DLSDA_DG68-01507A-00_EN+MES+CFR.indb 72 2023-02-23 오후 5:09:092023-02-23 오후 5:09:09
Page 73

About Device
You can see information about the oven and do a software update. To update the
software:
1. Tap SETTINGS > About device > Software update and then tap Update in the right
screen.
2. Tap INSTALL. The software is updated and the system restarts automatically.
Sabbath
You can set Sabbath mode. See Using the Sabbath Feature, Pg. 62.
Demo Mode
This mode is used retail display only. (The heating element does not operate.)
1. Tap SETTINGS > Demo mode and then tap ON in the right screen.
2. The Demo mode indicator appears on screen.
Remote Management
The call center will access your product remotely to check internal when you have
some problems.
• Tap SETTINGS > Connections > Remote management and then tap ACTIVATE.
Using the Basic Oven
English 73
FULL_DOP36C86DLSDA_DG68-01507A-00_EN+MES+CFR.indb 73FULL_DOP36C86DLSDA_DG68-01507A-00_EN+MES+CFR.indb 73 2023-02-23 오후 5:09:092023-02-23 오후 5:09:09
Page 74
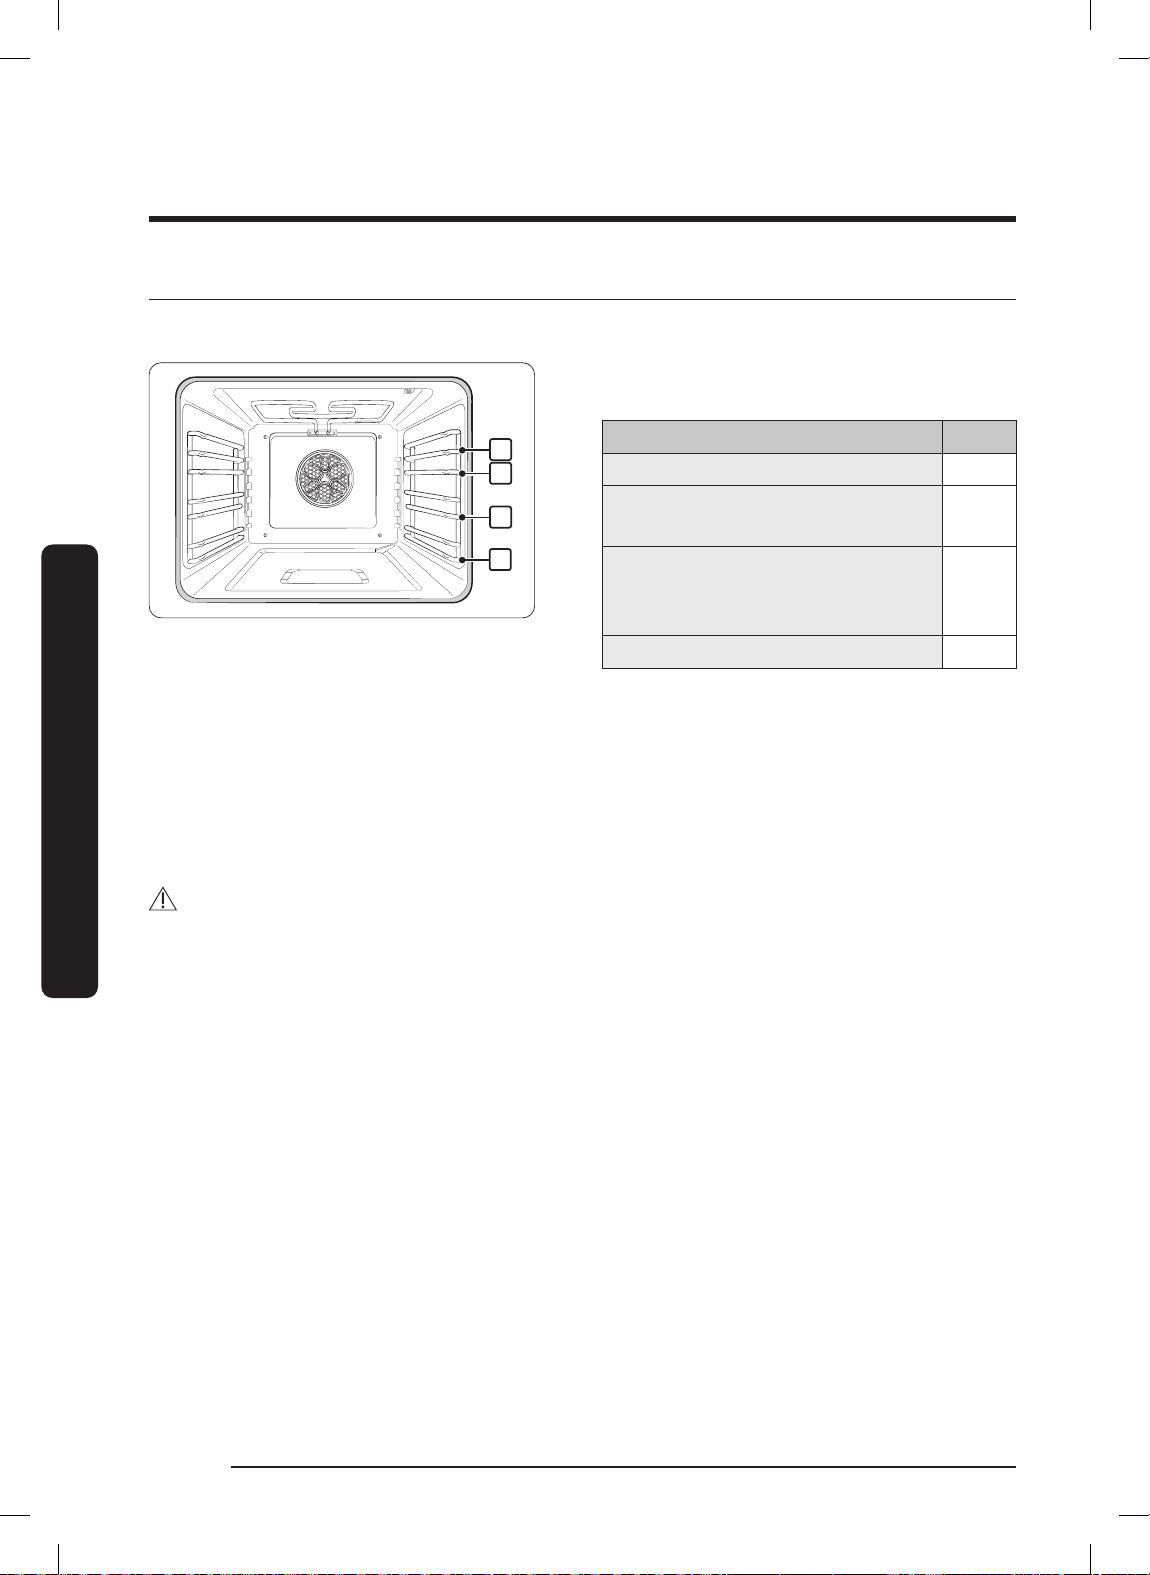
Using the Steam Oven
1
2
3
4
Using the Oven Racks
DOP48C86D** Left Oven
Using the Steam Oven
Each rack has stops that need to be placed correctly on the supports. These stops keep
the rack from coming completely out.
1. Pull the rack straight out until it stops, then tilt up to release the catch and pull the
rack away from the oven.
Rack levels for certain cooking tasks
(reference only)
Type of Food Level
Broiling hamburgers 4
Broiling meats or
small cuts of poultry, fish
Bundt cakes, pound cakes,
frozen pies, Angel food cakes,
casseroles, small roasts
Large roasts, hams, fresh pizza 1
3 - 4
1 - 2
2. Place the end of the rack on the support, tilt up to engage the catch and push the
rack in.
CAUTION
• Do not cover any part of the oven with aluminum foil. Doing so hinders baking
results and may harm the oven.
• Arrange racks only when the oven is cool.
English74
FULL_DOP36C86DLSDA_DG68-01507A-00_EN+MES+CFR.indb 74FULL_DOP36C86DLSDA_DG68-01507A-00_EN+MES+CFR.indb 74 2023-02-23 오후 5:09:092023-02-23 오후 5:09:09
Page 75
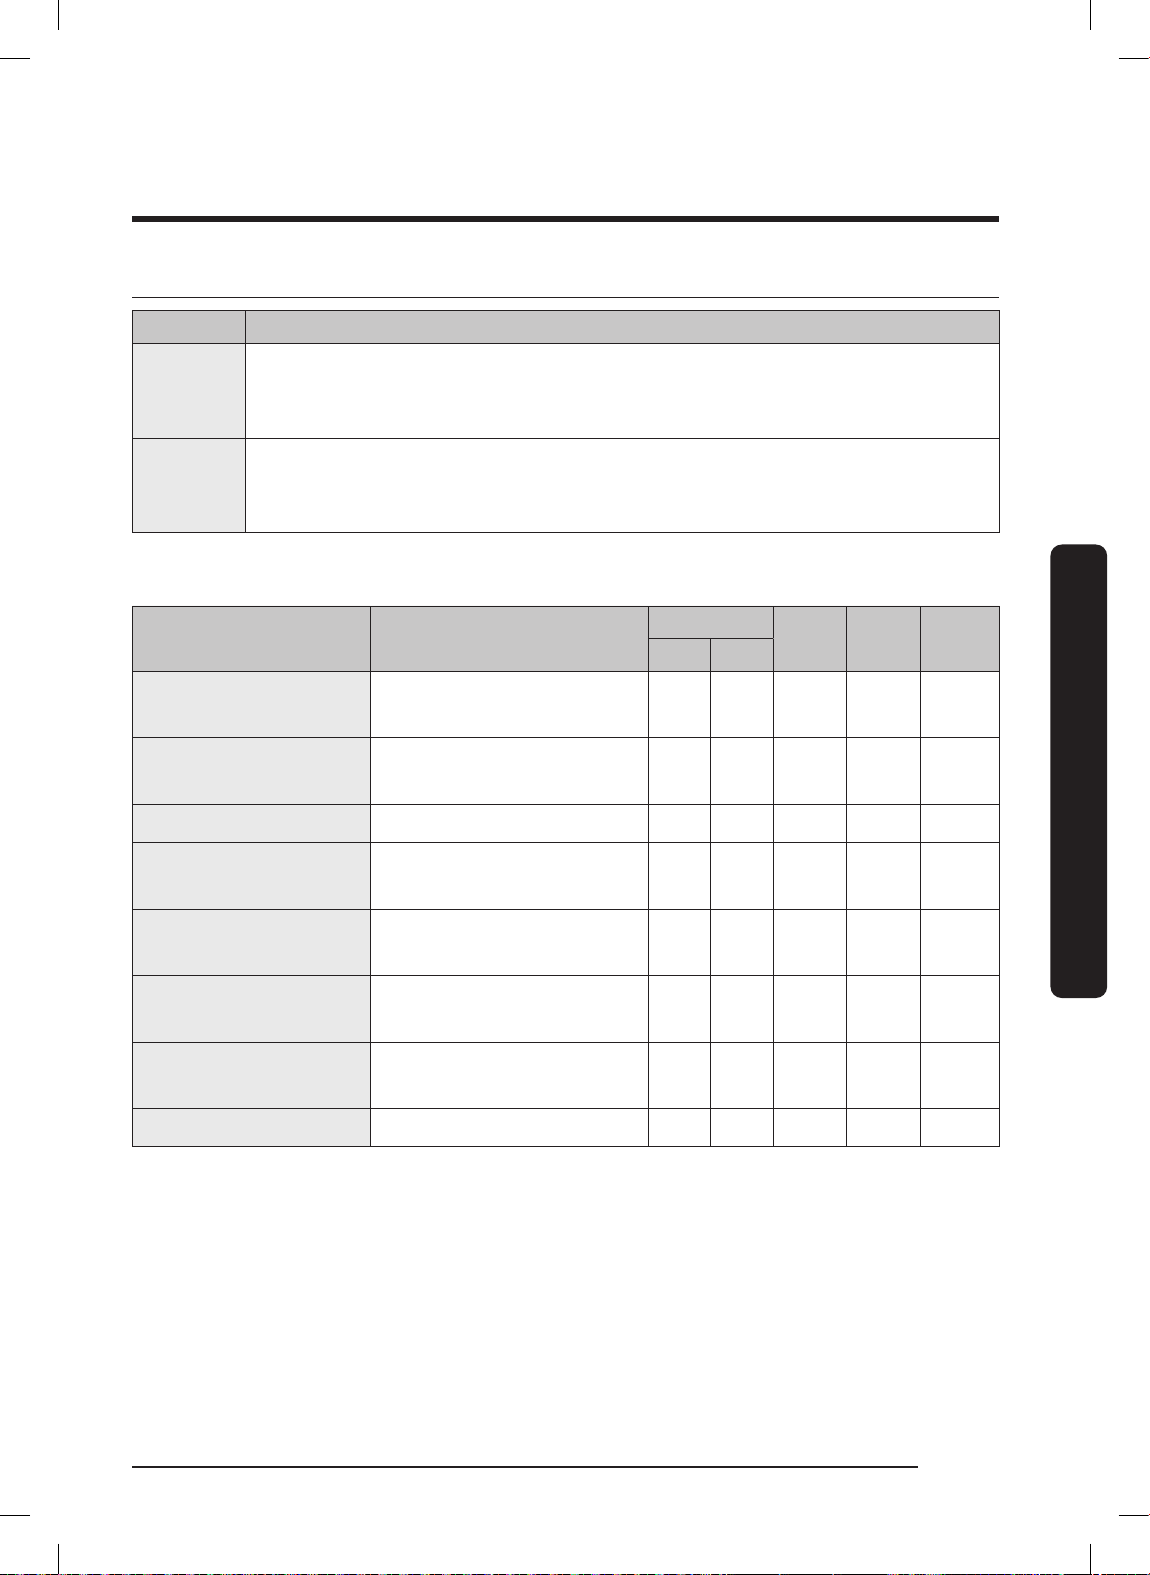
About Oven Functions
Oven Oven Functions
Basic
Oven
Steam
oven
(48" only)
Bake, Convection Bake, Convection Roast, Broil, Pure Convection Sear,
Convection Broil, Dual Four Part Pure Convection, Special Function, Chef
Mode, Clean, Steam Bake*, Steam Roast* (*36" range only).
Bake, Convection Bake, Convection Roast, Broil, Convection Broil, 4 Part
Pure Convection, Steam Bake, Steam Roast, Steam, Special Function,
Special Steam Cook, Clean. (See Using the Steam Oven, starting Pg. 74)
Tap LEFT, swipe to select a cooking mode and set a temperature. (See Setting the
Temperature, Pg. 47 and Basic Baking and Broiling Instructions, Pg. 79)
Mode Temperature range
Bake
Convection Bake /
Roast
175 °F (80 °C) -
450 °F (230 °C)
175 °F (80 °C) -
450 °F (230 °C)
48" Model
Left Right
O O O O -
O O O O O
36"
Model
Temp
probe
Broil High / Low O O O - -
Pure Conv. Sear
Convection Broil
175 °F (80 °C) -
475 °F (245 °C)
175 °F (80 °C) -
450 °F (230 °C)
- O O O -
O O O - -
Instant-
Heat™
Using the Steam Oven
Steam Bake / Roast
4-Part Pure
Convection
230 °F (110 °C) -
450 °F (230 °C)
175°F (80 °C) -
450 °F (230 °C)
O - O O -
O O O O -
Steam 215 °F (100 °C) O - - O -
English 75
FULL_DOP36C86DLSDA_DG68-01507A-00_EN+MES+CFR.indb 75FULL_DOP36C86DLSDA_DG68-01507A-00_EN+MES+CFR.indb 75 2023-02-23 오후 5:09:092023-02-23 오후 5:09:09
Page 76
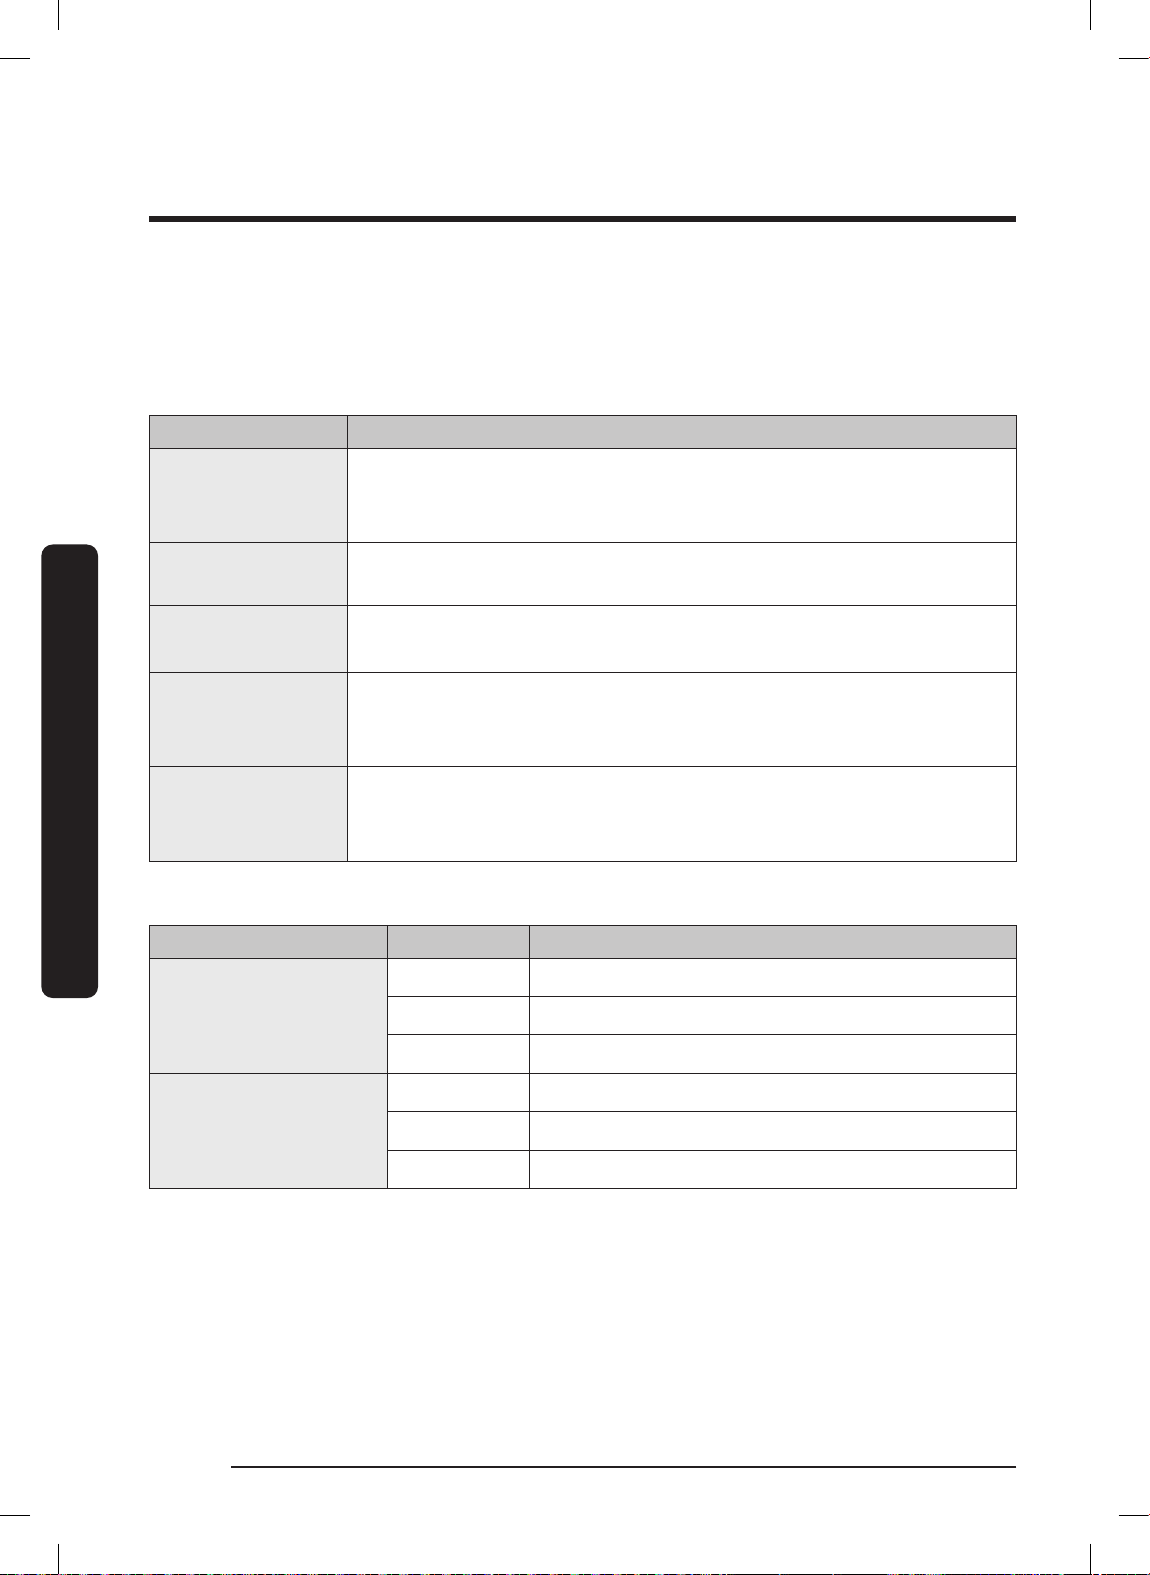
Using the Steam Oven
Cooking Mode with Steam Function (48" range)
On the display, tap LEFT and select Steam or Special steam cook. Steam and Fine Steam
temp's (215 °F / 100 °C and 195 °F / 90 °C respectively) are non-adjustable. For Guided
Steam Cook and Steam Reheat, follow display directions. Be sure to fill the water
reservoir. (See Steam Bake / Steam Roast Recommendation Guide, this page.)
Mode Instruction
A gentle cooking method using steam; steam vegetables, seafood,
Steam
grain, eggs and side dishes; suitable for all types of food, bottling,
juicing, reheating.
Special
steam cook
Using the Steam Oven
Fine Steam
Guided
steam cook
Steam Reheat
Steam Bake / Steam Roast Recommendation Guide
Steam mode Level Foods
Steam Bake
Steam Roast
Consists of: Fine steam, Guided steam cook, Steam reheat.
A very gentle cooking method suitable for seafood and chicken
breast; food will be more tender and soft.
20 pre-programmed dishes are available in 5 categories: poultry
and meat, fish, vegetables, eggs and grain; cook time/temp are
adjusted per the selected menu.
Heat with steam, then use convection or steam bake to finish;
cook time/temp are adjusted per the selected menu; 10 preprogrammed dishes are available.
High Rye breads, Desserts (Flan caramel)
Med Croissants, Pies, Reheats (Pizza, Casseroles)
Low Pastries
High -
Med Meats, Poultry
Low Turkey, Large meats
English76
FULL_DOP36C86DLSDA_DG68-01507A-00_EN+MES+CFR.indb 76FULL_DOP36C86DLSDA_DG68-01507A-00_EN+MES+CFR.indb 76 2023-02-23 오후 5:09:092023-02-23 오후 5:09:09
Page 77
Recommended Cook Times for Steam Mode
1. Vegetables
Put veggies in the perforated tray at rack Level 2 with the unperforated tray at Level 1
to catch drippings.
Food Size Cook time
Artichokes, red beets Whole 30 - 35 min
Broccoli, Cauliflower Florets 10 - 15 min
Cabbage Shredded 25 - 35 min
Potatoes (unpeeled) Medium 30 - 40 min
Potatoes (peeled) Quartered 20 - 25 min
Peas - 5 - 10 min
Green beans - 15 - 20 min
Carrots Sliced 10 - 20 min
Kohlrabi Slices 15 - 20 min
Leeks Slices 4 - 6 min
Green asparagus Whole 8 - 10 min
White asparagus Whole 10 - 15 min
Spinach - 4 - 6 min
Brussels sprouts Whole 20 - 25 min
Zucchini Slices 2 - 3 min
2. Meat, poultry,fish
Put food in the perforated tray at rack Level 2 with the unperforated tray at rack Level
1 to catch drippings.
Food Size Cook time
Pork chop Sliced 15 - 25 min
Sausage Whole 12 - 15 min
Using the Steam Oven
Chicken breast 25 lbs. 20 - 25 min
Fish fillet 25 lbs. 12 - 15 min
Whole fish 1 lb 20 - 25 min
Shellfish - 10 - 15 min
Shrimp - 8 - 10 min
English 77
FULL_DOP36C86DLSDA_DG68-01507A-00_EN+MES+CFR.indb 77FULL_DOP36C86DLSDA_DG68-01507A-00_EN+MES+CFR.indb 77 2023-02-23 오후 5:09:092023-02-23 오후 5:09:09
Page 78
Using the Steam Oven
Tip: Fine Steam is ideal for all seafood and chicken breasts, providing moist, tender
results; the cooking method is same as Steam cooking but with a somewhat longer
cook time.
3. Grain and side dish
Add water as the recipe instructs.
Food Size Accessories
Long grain rice 1 : 2 Unperforated steam tray Steam cook 20 - 30 min
Brown rice 1 : 2 Unperforated steam tray Steam cook 30 - 40 min
Basmati rice 1 : 1.5 Unperforated steam tray Steam cook 20 - 30 min
Parboiled rice 1 : 1.5 Unperforated steam tray Steam cook 10 - 20 min
Using the Steam Oven
Couscous 1 : 1 Unperforated steam tray Steam cook 5 - 10 min
Lentils 1 : 2 Unperforated steam tray Steam cook 35 - 45 min
Dumplings - Perforated + Unperforated Steam cook 20 - 25 min
Eggs (soft-boiled) Large Perforated steam tray Steam cook 10 - 13 min
Eggs (hard boiled) Large Perforated steam tray Steam cook 14 - 18 min
4. Dessert, Compotes
Compotes use pear, berries, cherry, apple, plum, or rhubarb. Weigh the fruit, add 1/3
cup water and add sugar and sugar and spices to taste.
Food Size Accessories
Cooking
mode
Cooking
mode
Cook time
Cook time
Yeast dumplings - Perforated steam tray Steam cook 20 - 25 min
Rice pudding - Perforated steam tray Steam cook 25 - 35 min
Yogurt - Perforated steam tray Proof 95 °F 5 - 6 hrs
Fruit compote* - Perforated steam tray Steam cook 10 - 20 min
English78
FULL_DOP36C86DLSDA_DG68-01507A-00_EN+MES+CFR.indb 78FULL_DOP36C86DLSDA_DG68-01507A-00_EN+MES+CFR.indb 78 2023-02-23 오후 5:09:092023-02-23 오후 5:09:09
Page 79
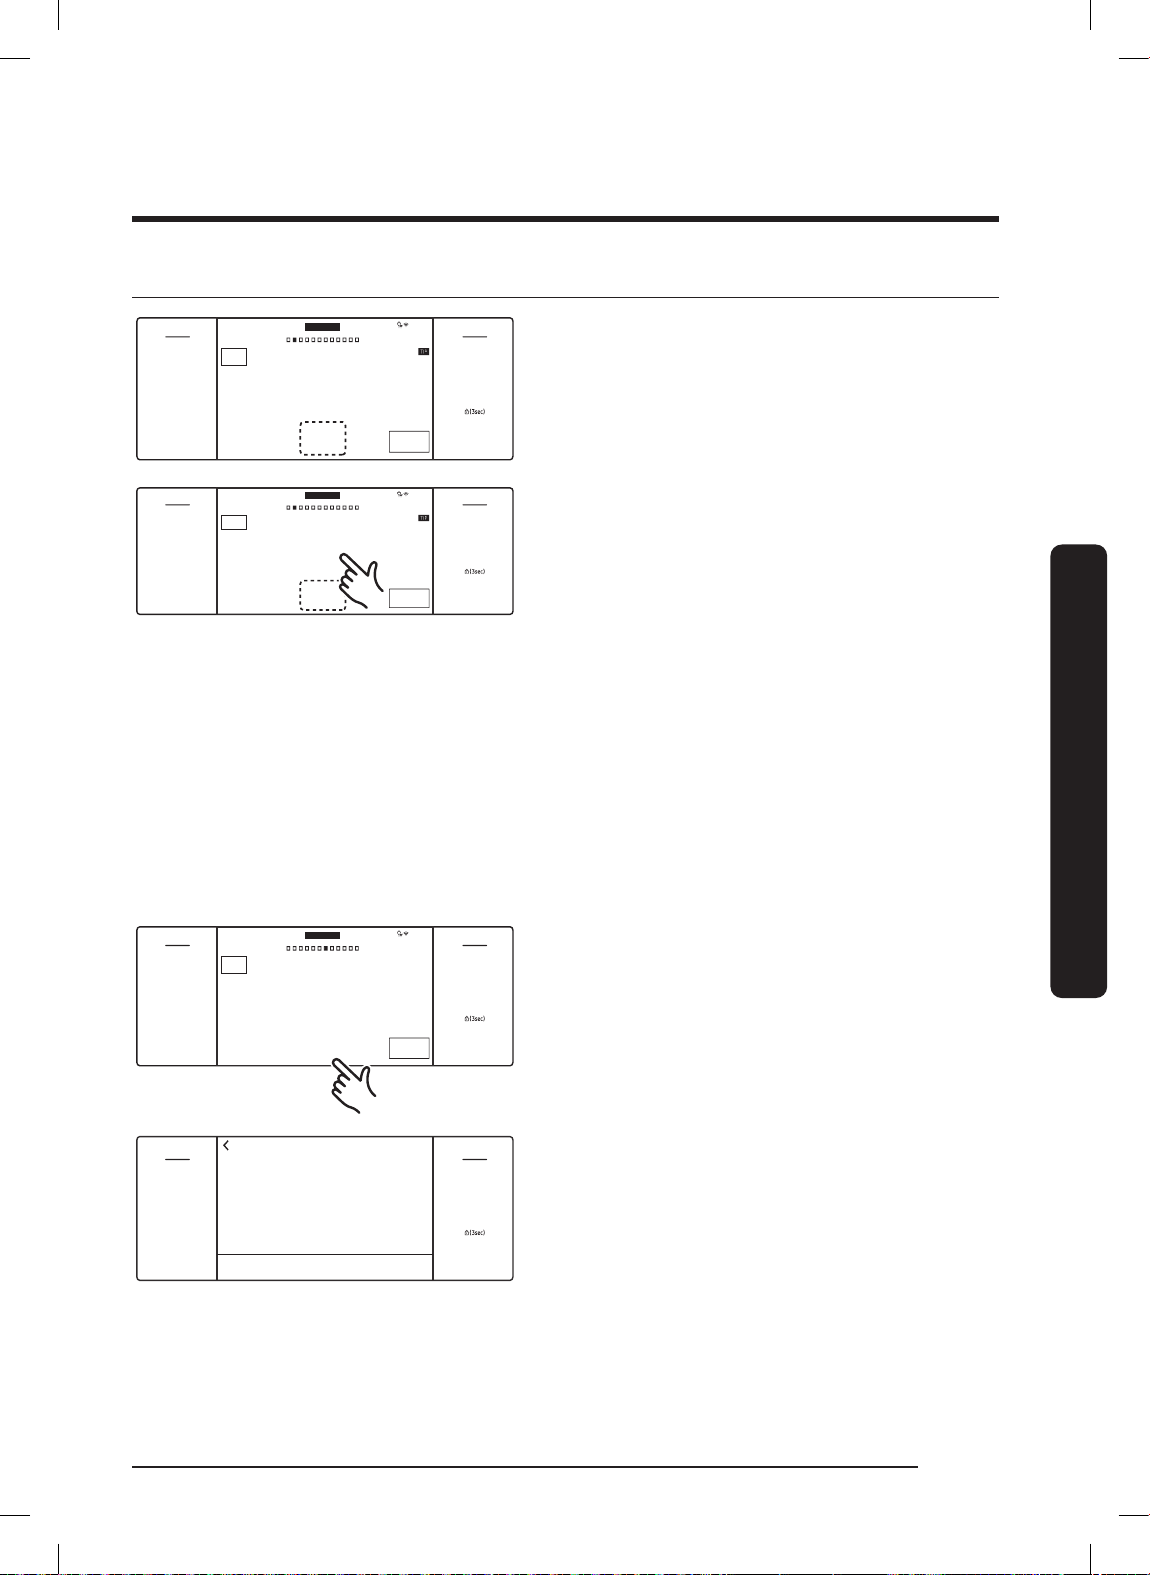
Basic Baking and Broiling Instructions
START
4:35 PM
Convection Bake
Faster, more even baking
LEFT
325
°F
InstantHeat™
On
Cook Time
None
Delay Start
None
OFF
TIMER
SETTINGS
LEFT
OFF
LOCK
LIFT PANEL
RIGHT
OVEN
MODE
START
4:35 PM
Convection Bake
Faster, more even baking
LEFT
325
°F
InstantHeat™
On
Cook Time
None
Delay Start
None
OFF
TIMER
SETTINGS
LEFT
OFF
LOCK
LIFT PANEL
RIGHT
OVEN
MODE
START
4:35 PM
Cook Time
0
hr 40min
Steam
Medium
Steam Bake
Steam baking
LEFT
350
°F
Delay Start
4:35
PM
OFF
TIMER
SETTINGS
LEFT
OFF
LOCK
LIFT PANEL
RIGHT
OVEN
MODE
Low
High
Medium
CANCEL OK
OFF
TIMER
SETTINGS
LEFT
OFF
LOCK
LIFT PANEL
RIGHT
1. Tap LEFT and swipe to select a cook
mode.
2. Set the temperature. (See Setting the
Cooking Temperature, Pg. 47)
• Broil mode can be set only Hi or Lo.
• Keep Warm and Bread Proof
temperatures are unchangeable.
3. Follow the steps below to use
InstantHeat™, Steam Bake, or Steam
Roast. Otherwise, skip to Step 4.
InstantHeat™
With Convection Bake or Convection
Roast, the display shows the InstantHeat™
info (default: OFF). Tap the InstantHeat™
area; the display shows the feature is ON.
• When using InstantHeat™, place food
in the oven before starting cooking.
• For best results, preheat the oven to
bake 'rising' foods.
Steam Bake / Steam Roast
a. If you select either of these modes,
steam-level info appears onscreen
(default: Medium).
b. Tap the Steam area to view the steam
level adjustment screen. Set the level
to Low, Medium, or High.
Using the Steam Oven
FULL_DOP36C86DLSDA_DG68-01507A-00_EN+MES+CFR.indb 79FULL_DOP36C86DLSDA_DG68-01507A-00_EN+MES+CFR.indb 79 2023-02-23 오후 5:09:102023-02-23 오후 5:09:10
English 79
Page 80
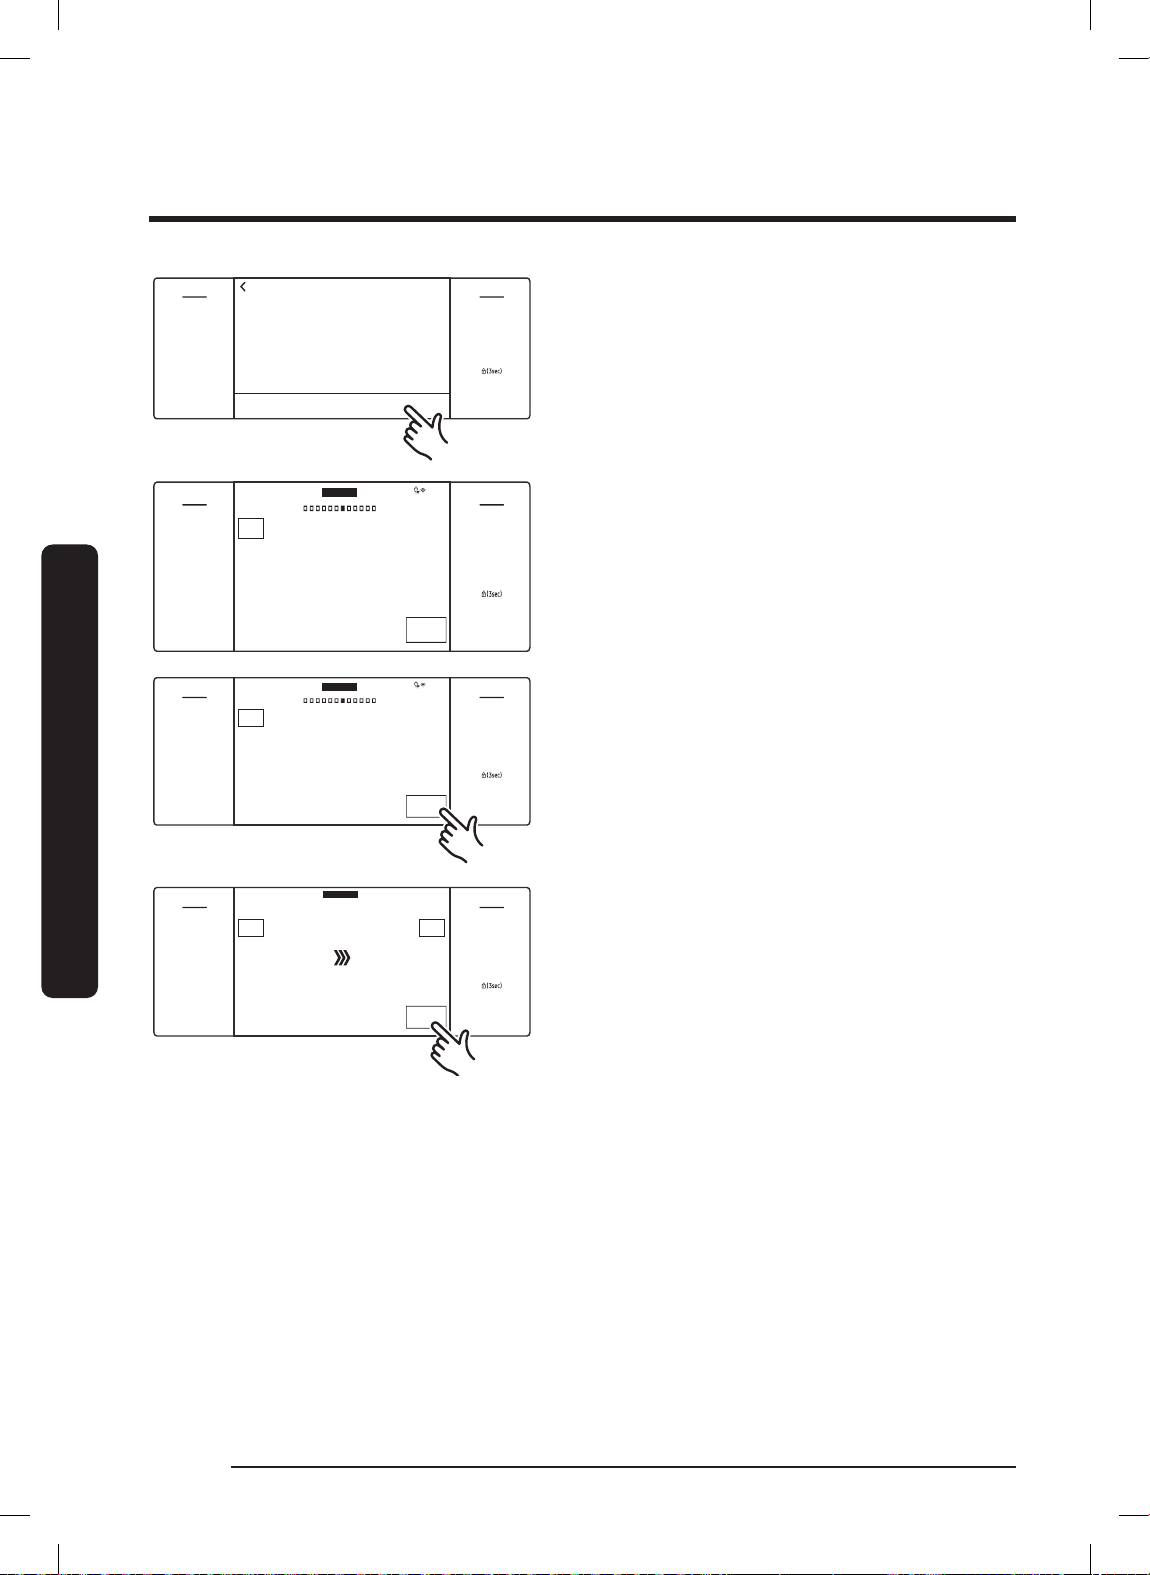
Using the Steam Oven
CANCEL OK
High
Medium
OFF
TIMER
SETTINGS
LEFT
OFF
LOCK
LIFT PANEL
RIGHT
START
4:35 PM
Cook Time
0
hr 40min
Steam
High
Steam Bake
Steam baking
LEFT
350
°F
Delay Start
4:35
PM
OFF
TIMER
SETTINGS
LEFT
OFF
LOCK
LIFT PANEL
RIGHT
OVEN
MODE
START
4:35 PM
LEFT
OFF
TIMER
SETTINGS
LEFT
OFF
LOCK
LIFT PANEL
RIGHT
OVEN
MODE
Cook Time
0
hr 40min
Steam
High
Steam Bake
Steam baking
350
°F
Delay Start
4:35
PM
OFF
TIMER
SETTINGS
LEFT
OFF
LOCK
LIFT PANEL
RIGHT
View
Summary
OVEN
MODE
Cook Time
0
hr 40min
Steam
High
350
°F
100
°F
OFF
Steam Bake
LEFT
Preheating...
Using the Steam Oven
c. Tap OK. The steam level adjustment
appears.
4. The new steam level appears on the
main screen. Important: Fill the water
reservoir before cooking. (See Using
the Water reservoir, Pg. 9)
5. If using Cook Time or Delay Start, set
it now (see Pgs. 53, 54 for directions)
and tap START.
6. Tap OFF when cooking is done or to
cancel cooking.
FULL_DOP36C86DLSDA_DG68-01507A-00_EN+MES+CFR.indb 80FULL_DOP36C86DLSDA_DG68-01507A-00_EN+MES+CFR.indb 80 2023-02-23 오후 5:09:102023-02-23 오후 5:09:10
English80
Page 81
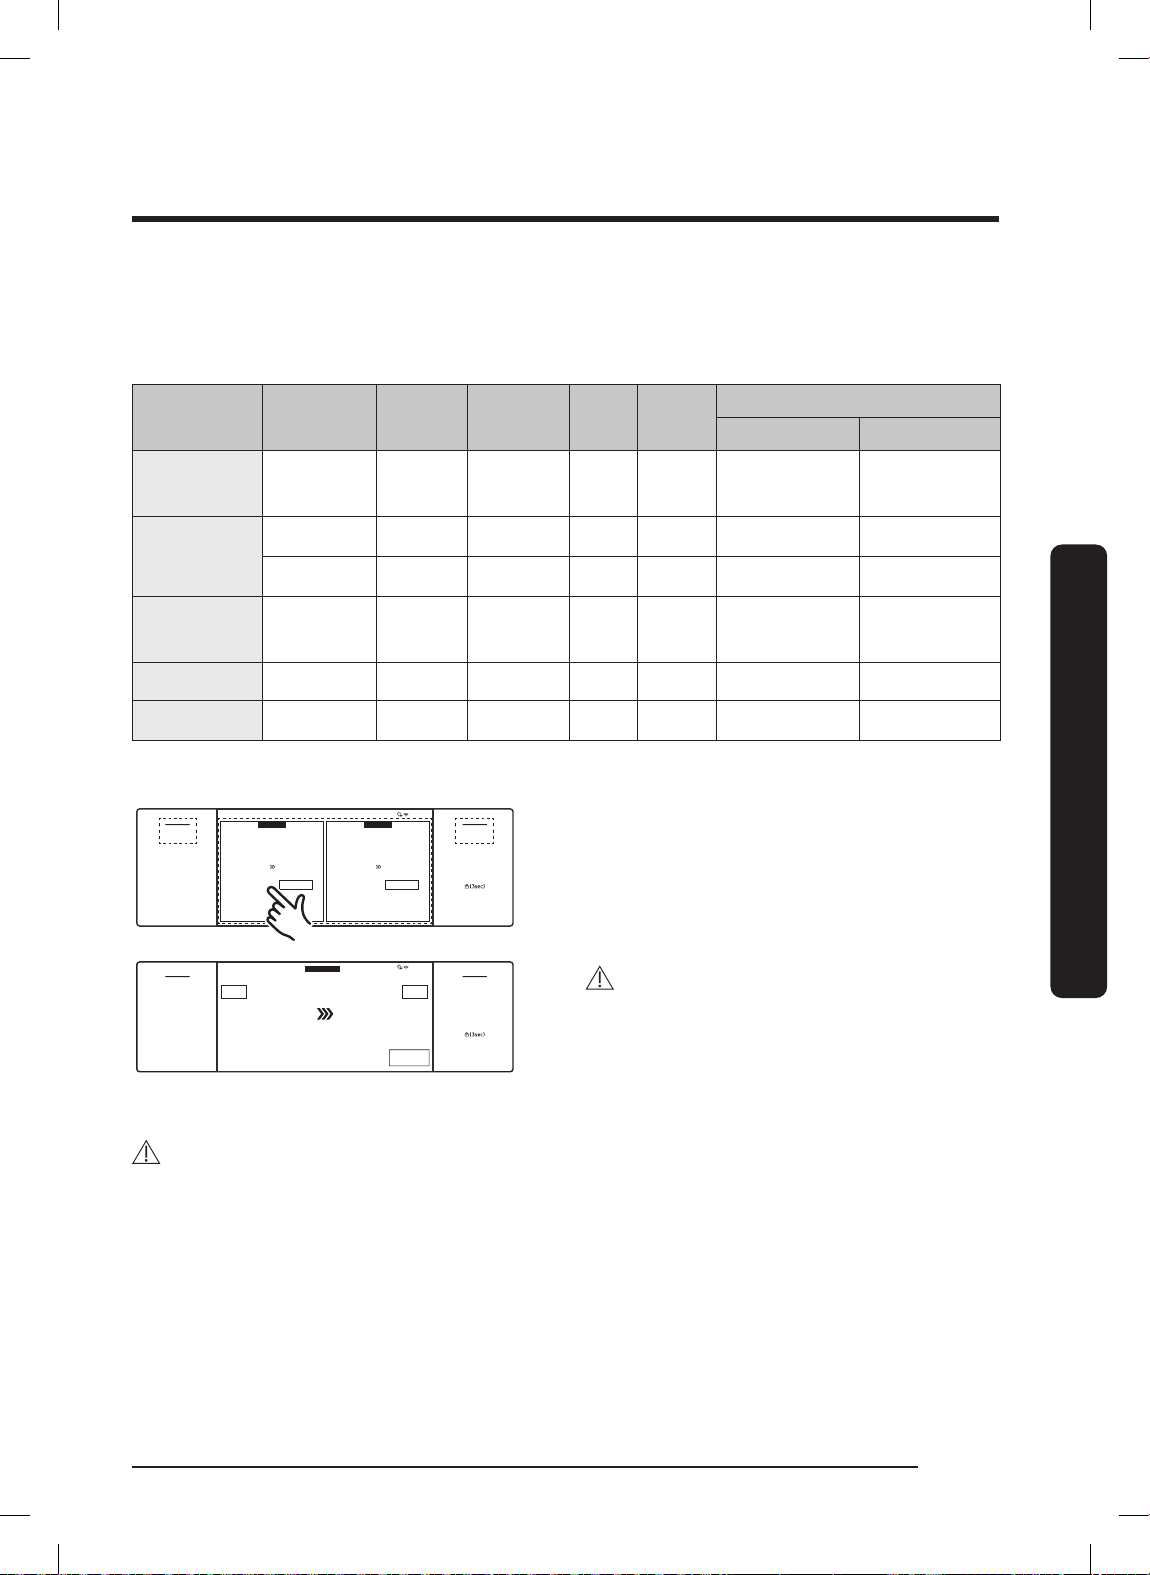
Broiling Recommendation Guide
4:35 PM
Convection Bake
LEFT
175°F 325°F
OFF
Bake
RIGHT
175°F 350°F
OFF
OFF
TIMER
SETTINGS
LEFT
OFF
LOCK
LIFT PANEL
RIGHT
Bake
OFF
4:35 PM
350
°F
175
°F
Preheating...
LEFT
Cook Time
None
OFF
TIMER
SETTINGS
LEFT
OFF
LOCK
LIFT PANEL
RIGHT
View
Summary
OVEN
MODE
The size, weight, thickness, start temperature and your doneness preference affect broil
times. This guide is based on meats at refrigerator temperature. Always use a broiler
pan and its grid when broiling. Always preheat the oven for 5 minutes before broiling.
Food Doneness Size
Hamburgers
Medium
patties
6
Thickness
¾"
Level
Hi 4
positon
Rare - 1" Hi 4
Beef steaks
Chicken
pieces
Medium -
Well done 2 lbs.
1 - 1
½"
½ - ¾"
Hi 4
Lo 3
Pork chops Well done 1 lbs. 1" Lo 3
Fish fillets Well done -
¼ - ½"
Lo 3
Adjusting the Oven Temperature While Cooking
If using the ovens in single mode, tap the
LEFT or RIGHT area on screen, then tap
the temperature area and use the number
pad to enter a new temp.
CAUTION
When opening/closing the door, stand
aside to let hot air or steam escape safely
before you remove food from or put food
into the oven.
Rack
Cooking time (min)
1st side 2nd side
4:00 - 5:00 3:00 - 4:00
5:00 - 6:00 4:00 - 5:00
6:00 - 7:00 5:00 - 6:00
18:00 - 20:00 15:00 - 16:00
Using the Steam Oven
10:00 - 12:00 8:00 - 10:00
8:00 - 9:00 5:00 - 6:00
CAUTION
Preheating is important for good results when baking cakes, cookies, pastry and breads.
When the set temperature is reached, the oven beeps 6 times.
• The convection oven fan shuts off when the oven door is opened.
• Leaving the door open during convection cooking may shorten the life of the
convection heating element.
FULL_DOP36C86DLSDA_DG68-01507A-00_EN+MES+CFR.indb 81FULL_DOP36C86DLSDA_DG68-01507A-00_EN+MES+CFR.indb 81 2023-02-23 오후 5:09:112023-02-23 오후 5:09:11
English 81
Page 82

Using the Steam Oven
NOTE
• If the door is left open longer than 2 minutes when cooking, all heating elements
shut off.
• When finished cooking, the cooling fan runs until the oven has cooled down.
• Drain residual water after steam cooking. Do not interrupt the draining cycle.
• After steam cooking, empty the reservoir so residual water does not affect other
cook modes.
• If using an oven thermometer, its reading may differ from your set oven
temperature.
• The convection fan normally cycles on/off during cooking.
• The oven door must be closed during broiling.
Using the Steam Oven
English82
FULL_DOP36C86DLSDA_DG68-01507A-00_EN+MES+CFR.indb 82FULL_DOP36C86DLSDA_DG68-01507A-00_EN+MES+CFR.indb 82 2023-02-23 오후 5:09:112023-02-23 오후 5:09:11
Page 83
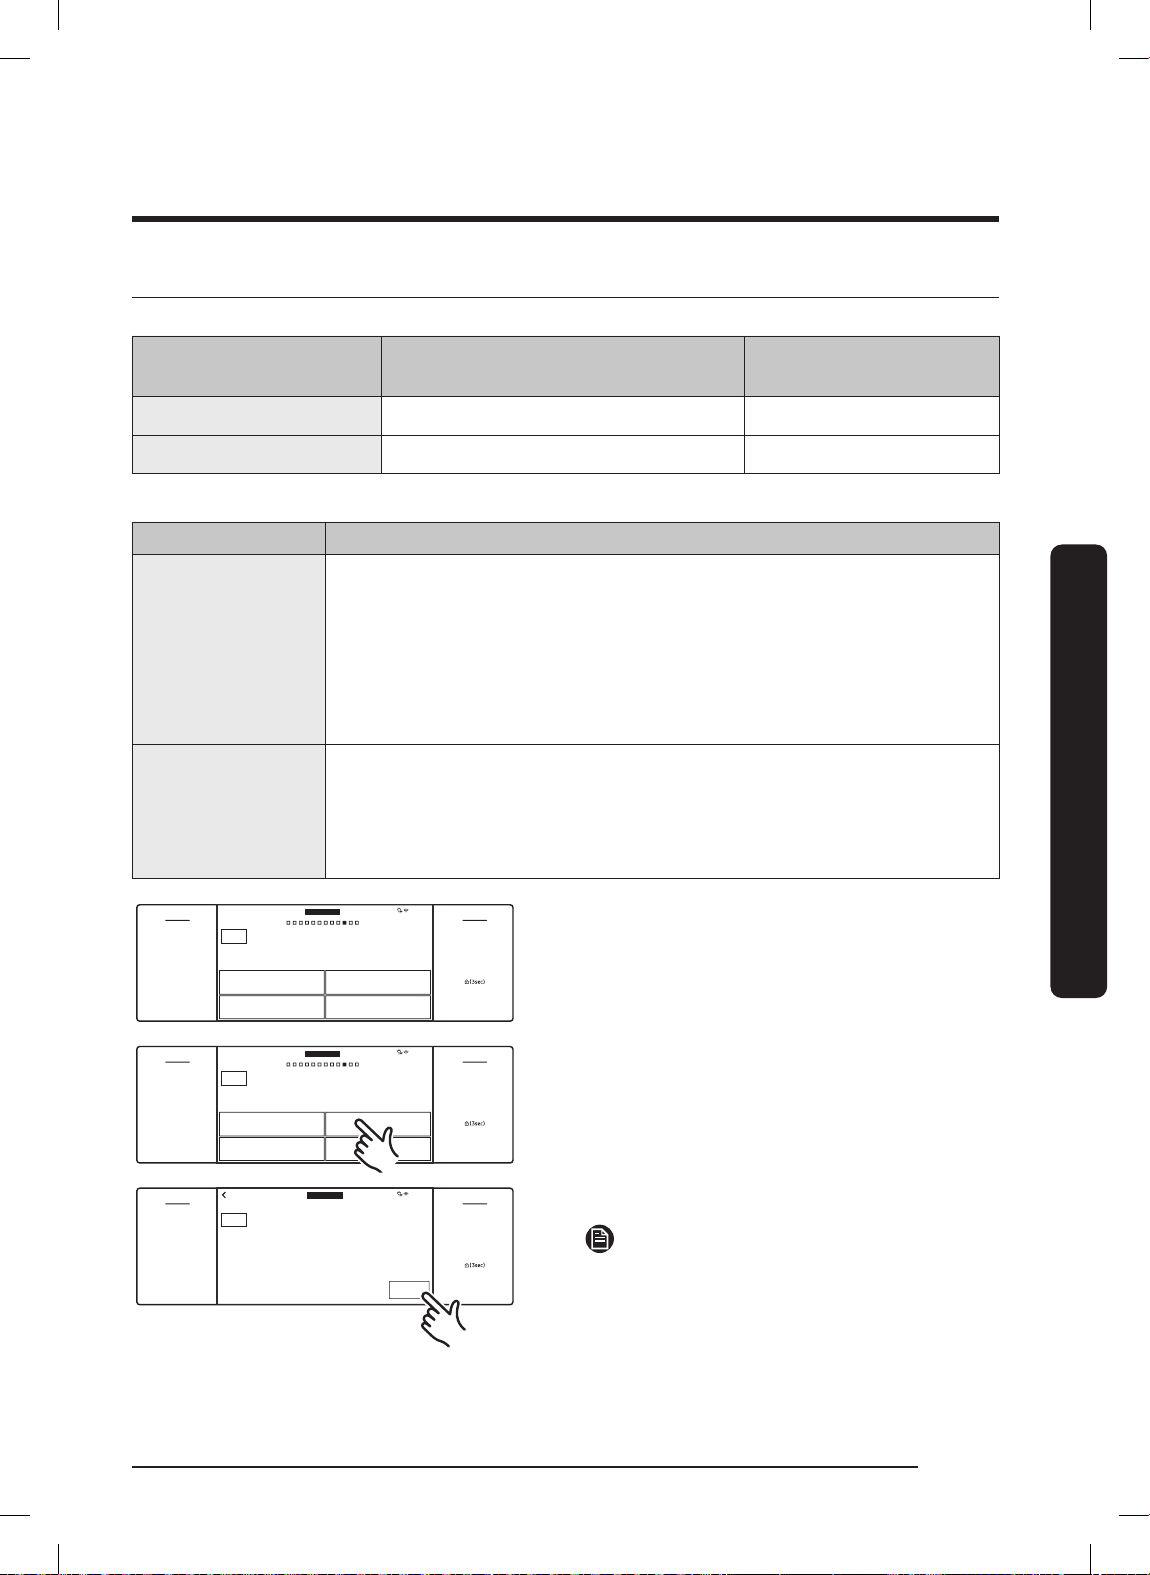
Using the Special Functions
Keep Warm
Stone Bake Mode
Proof
Dehydrate
4:35 PM
Special Function
Additional Cooking Modes
RIGHT
OFF
TIMER
SETTINGS
LEFT
OFF
LOCK
LIFT PANEL
RIGHT
OVEN
MODE
Keep Warm
Stone Bake Mode
Proof
Dehydrate
4:35 PM
Special Function
RIGHT
OFF
TIMER
SETTINGS
LEFT
OFF
LOCK
LIFT PANEL
RIGHT
OVEN
MODE
Additional Cooking Modes
Proof
Proofing
105
°F
START
4:35 PM
Delay Start
None
Cook Time
None
RIGHT
OFF
TIMER
SETTINGS
LEFT
OFF
LOCK
LIFT PANEL
RIGHT
OVEN
MODE
Special function provides 2 specialized cooking options.
Mode Temperature range
48" Pro range
Steam oven
Keep Warm **None O
Proof 85 °F (29 °C) / 95 °F (35 °C) O
** A non-adjustable, factoryset temperature is applied for best performance.
Mode Instruction
• Keeps cooked food at serving temp up to 3 hours after cooking
is done.
Keep Warm
• Use this mode individually or set it for timed or delay-timed
cooking.
• Keep Warm temperature is not high enough to reheat cold
food.
• Provides optimal temperature for proofing bread dough.
- 48" range (left oven): 85°F / 95°F; (right oven): 95°F / 105°F
Proof
- 36" range: 95°F / 105°F
• For best results, start the Proof option with a cool oven.
1. Swipe to the Special Function page.
Using the Steam Oven
2. Tap an option.
3. Set a temperature and tap START.
NOTE
Keep Warm mode's temp (175 °F) is nonadjustable.
FULL_DOP36C86DLSDA_DG68-01507A-00_EN+MES+CFR.indb 83FULL_DOP36C86DLSDA_DG68-01507A-00_EN+MES+CFR.indb 83 2023-02-23 오후 5:09:112023-02-23 오후 5:09:11
English 83
Page 84

Using the Steam Oven
NOTE
• If the oven temperature is over 125 °F, Proof mode will not function properly.
• Do not use Proof for warming food. The temperature is insufficient to keep food
warm.
• Place the dough in a heat-safe container on rack level 3 or 4 and cover it with a
cloth or plastic wrap. (Ensure the oven fan cannot blow the plastic off.)
• To avoid prolonging proofing time, do not open the oven door.
• Of the four special functions, only Stone Bake Mode requires preheating.
• An error beeps if the temperature is beyond the set range.
• For Keep Warm mode, use rack level 1 or 2; for Proof mode, use rack level 3 or 4.
Using the Steam Oven
English84
FULL_DOP36C86DLSDA_DG68-01507A-00_EN+MES+CFR.indb 84FULL_DOP36C86DLSDA_DG68-01507A-00_EN+MES+CFR.indb 84 2023-02-23 오후 5:09:112023-02-23 오후 5:09:11
Page 85
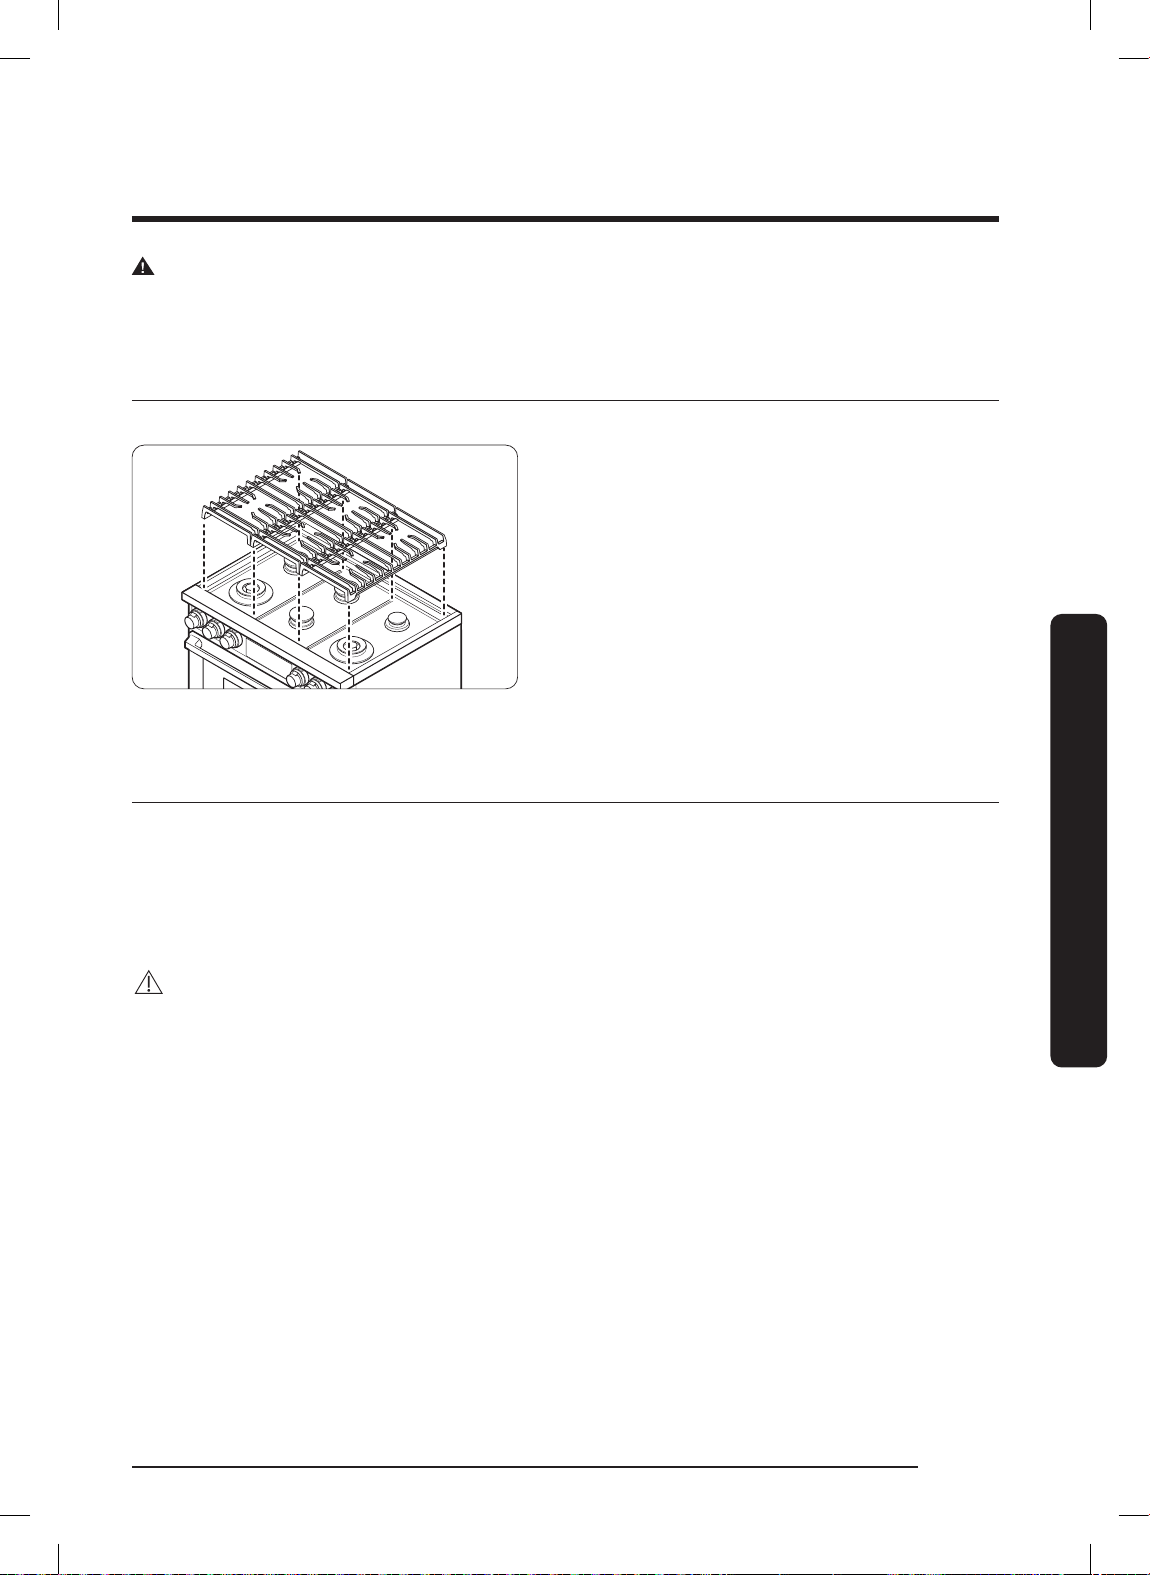
Cooktop Maintenance
WARNING
Turn off power and let all surfaces cool before cleaning the cooktop. Wear rubber
gloves and be mindful of sharp edges.
Cleaning the Cooktop Surface
Clean up spills immediately.
1. Turn off all burners.
2. When the grates have cooled, remove
them.
3. Clean the cooktop surface with a soft
cloth. If spills run into gaps in the
burners, remove the burner caps and
head and wipe up the spills.
4. When finished, reassemble the
burners and reposition the grates.
Cooktop Maintenance
Cleaning Stainless-Steel Surfaces
Remove spills, spots and grease stains with a soft, wet cloth.
1. Apply an approved stainless-steel cleanser to a cloth or paper towel.
2. Clean one small area then another, rubbing with the grain if applicable.
3. Dry the surface with a soft, dry cloth.
CAUTION
• Do not use steel wool, sharp scrapers, or abrasive cleaners that can damage the
range.
• Do not remove the cooktop basin. Gas lines can be damaged, perhaps causing a fire/
malfunction.
• Do not pour water into the cooktop. The water could enter the mechanisms below,
causing an electric-shock hazard or high levels of carbon monoxide from corroded
gas valves/ports.
• Do not spray cleanser into the manifold holes. The ignition system inside them must
remain dry.
English 85
FULL_DOP36C86DLSDA_DG68-01507A-00_EN+MES+CFR.indb 85FULL_DOP36C86DLSDA_DG68-01507A-00_EN+MES+CFR.indb 85 2023-02-23 오후 5:09:112023-02-23 오후 5:09:11
Page 86
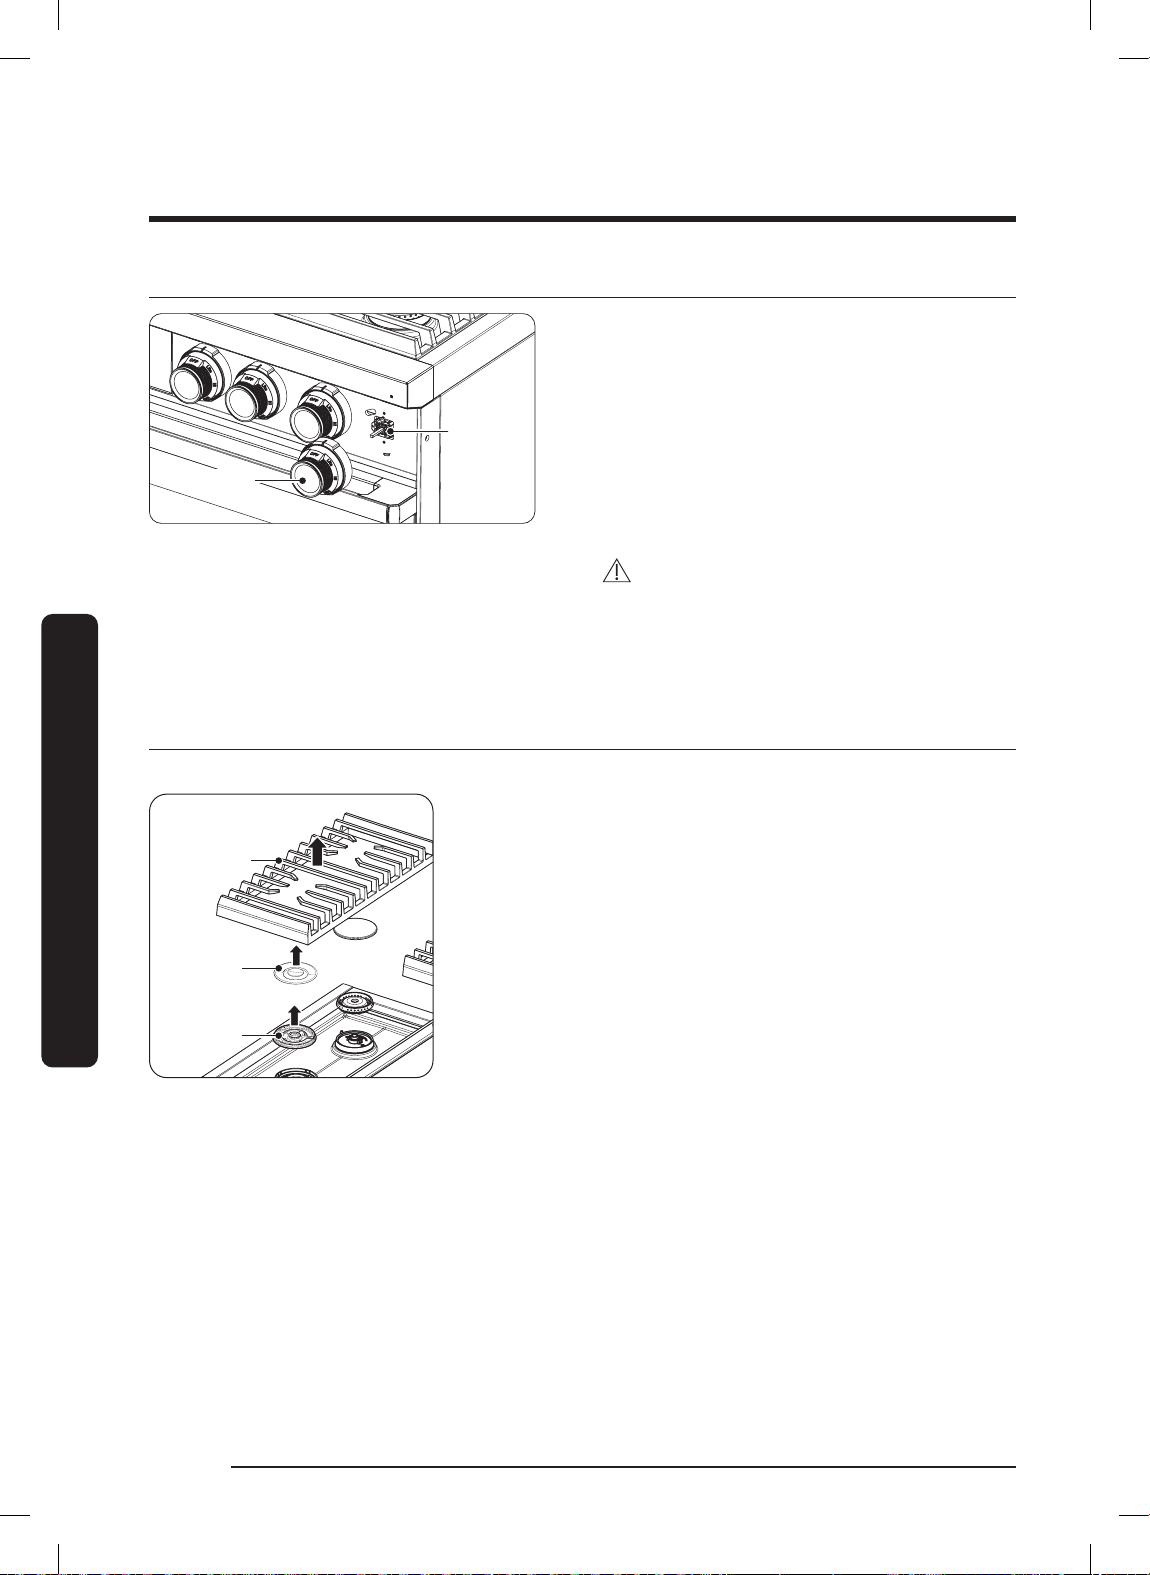
Cooktop Maintenance
Spill
protector
(Do not
remove)
Knob
Cleaning the Control Knobs
Spill
protector
Knob
(Do not
remove)
1. Pull the knobs off their valve stems.
2. Clean the knobs in warm, soapy water
(not the dishwasher), then rinse and
dry them thoroughly.
3. Clean steel surfaces with stainlesssteel cleaner.
4. Reattach the knobs.
CAUTION
Do not spray the control panel.
The circuitry may be harmed and create
an electric shock hazard.
Cooktop Maintenance
Disassembling / Assembling the Burners and Grates
Turn off burners and wait for all surfaces to cool down.
Grate
Grate
Cap
Cap
Head
Head
1. Remove the burner grates.
2. Remove the burner caps and heads.
3. Clean the grates and burner parts
in warm, soapy water. (Do not use
abrasive pads or cleaners.)
4. Rinse/dry grates and burner parts
fully. (Ensure the burner ports are
dry.)
5. Reassemble the burner heads,
ensuring a starter electrode passes
through the hole in each head.
6. Finish reassembly, ensuring each cap
lies flat on each head.
7. Set the grates in their respective
places.
8. Test all burners for proper function.
English86
FULL_DOP36C86DLSDA_DG68-01507A-00_EN+MES+CFR.indb 86FULL_DOP36C86DLSDA_DG68-01507A-00_EN+MES+CFR.indb 86 2023-02-23 오후 5:09:122023-02-23 오후 5:09:12
Page 87
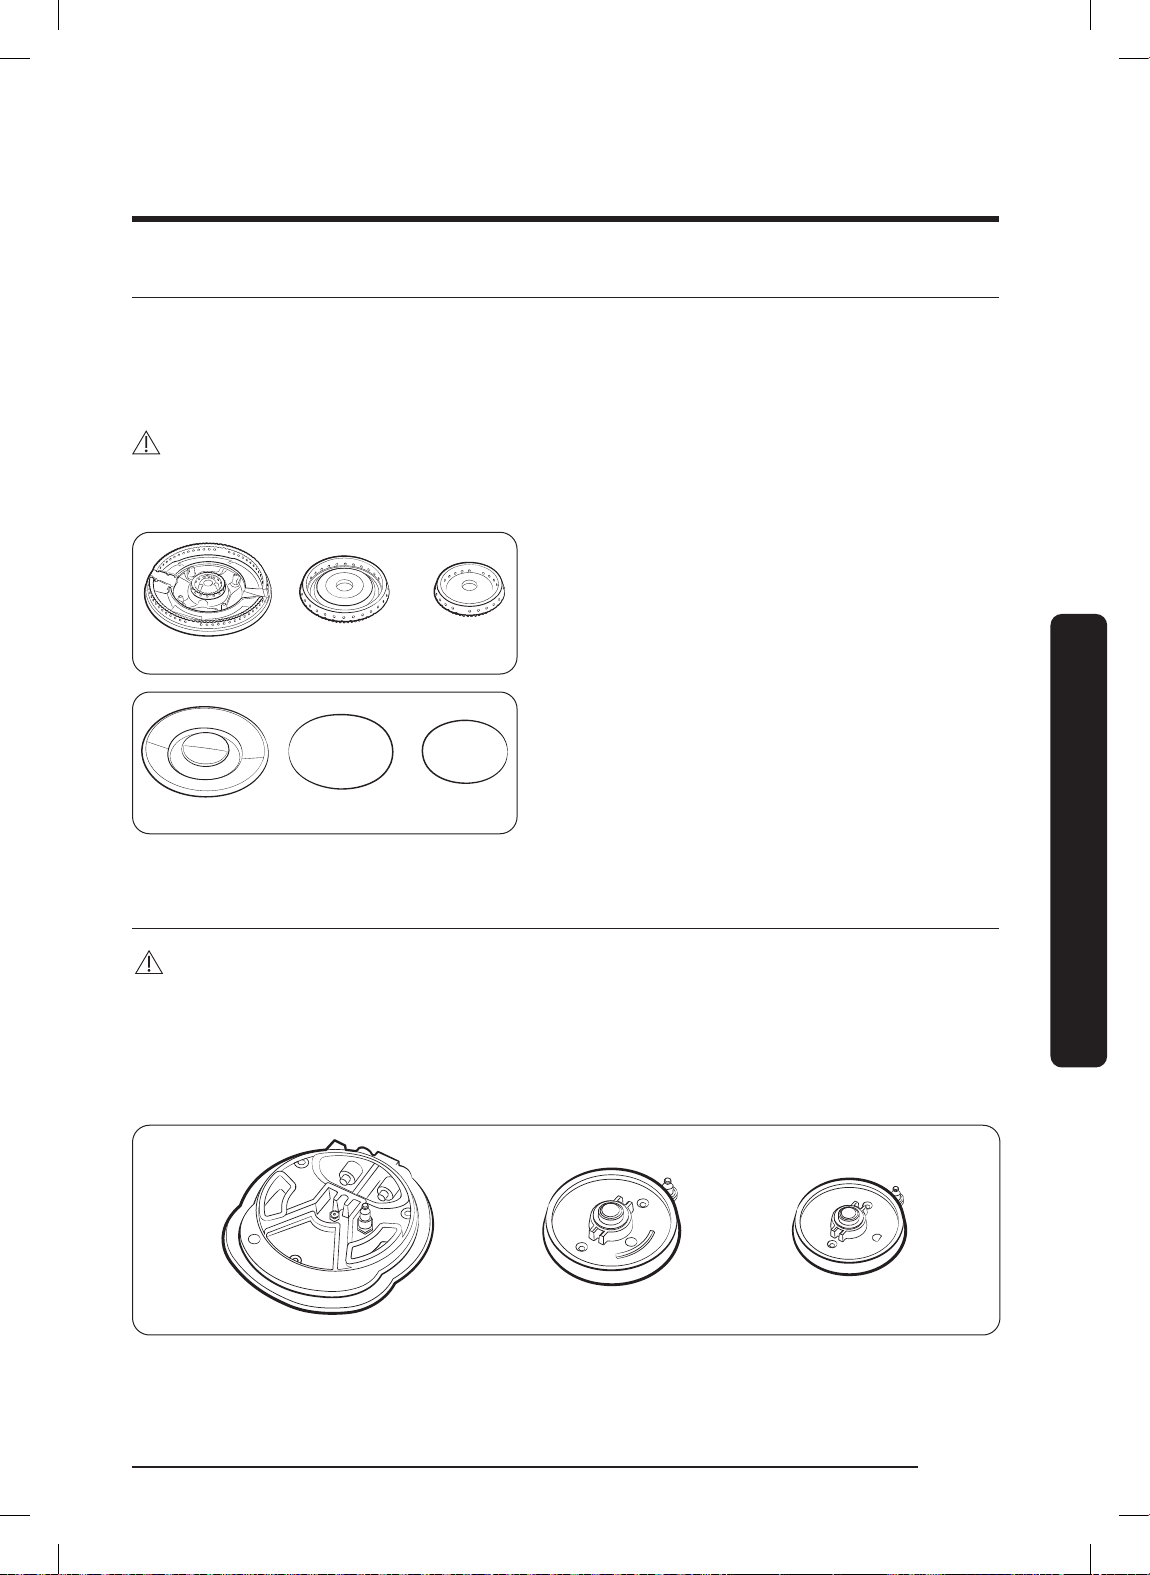
About Burner Caps and Heads
Brass burners
Brass burner cap
Wash the caps and heads in hot, soapy water, then rinse them under the tap. You may
scour with a plastic scouring pad to remove burned-on residue. Use a sewing needle or
twist tie to unclog the small holes in the burner head, if needed. After cleaning, return
all burner caps and heads to their original positions.
CAUTION
Burner parts are not dishwasher safe. Do not use steel wool or scouring powders to
clean them.
• The brass parts will discolor. However,
this will not affect performance.
• After cleaning, check that all burner
Brass burners
Brass burner cap
ports are unclogged.
• You may swap the original burner
caps for porcelain caps.
• To remove burnt-on grease, soak the
cap in a solution of 1 cup water and
either 1 tbsp white vinegar or lemon
juice. Do not clean with a metallic
brush, which can damage the brass.
Cooktop Maintenance
About Burner Bases
CAUTION
• The burner bases are not removable.
• Allow no water in the burner bases and the brass gas orifices.
• Wipe them clean with a damp cloth, being careful not to damage the bases.
Dry the bases completely before using the cooktop.
English 87
FULL_DOP36C86DLSDA_DG68-01507A-00_EN+MES+CFR.indb 87FULL_DOP36C86DLSDA_DG68-01507A-00_EN+MES+CFR.indb 87 2023-02-23 오후 5:09:122023-02-23 오후 5:09:12
Page 88
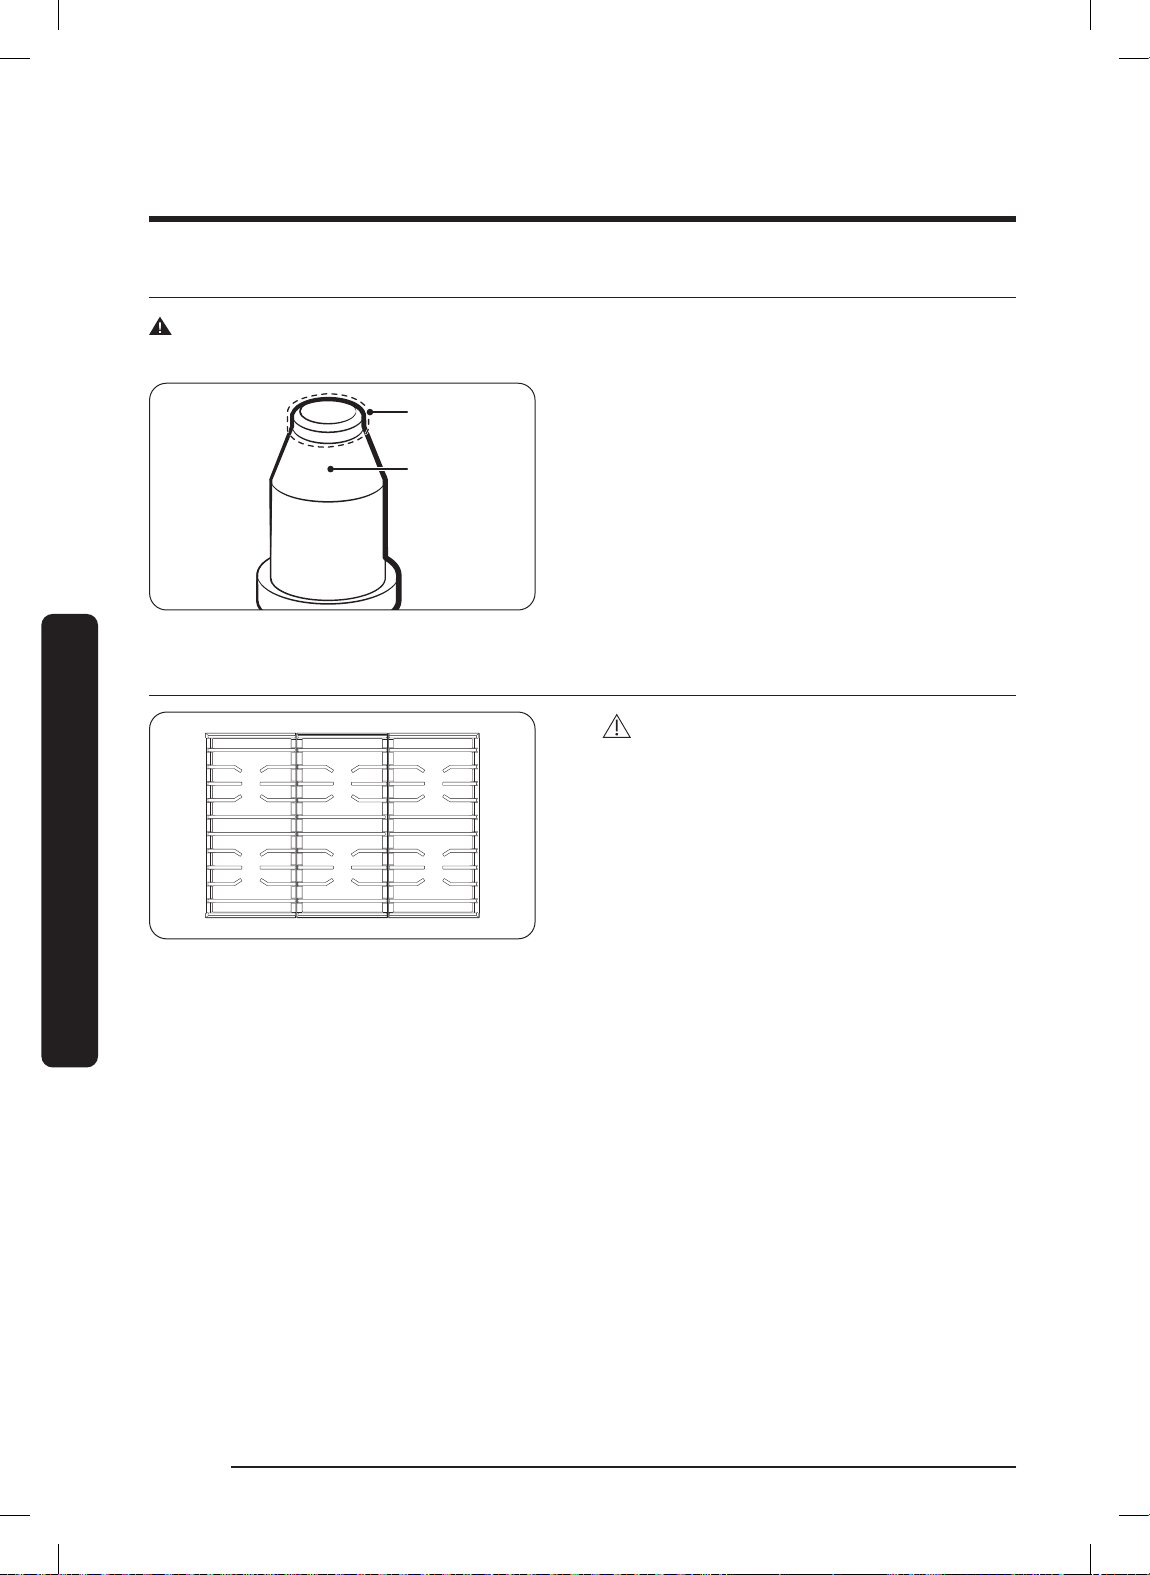
Cooktop Maintenance
Clean the
metal tip
Do not clean
ceramic
portion with
emery board
About Electrodes
WARNING
Do not turn on the valve while touching the electrode; do not try to remove the electrode.
About the Grates and Wok Ring
Cooktop Maintenance
Clean the
metal tip
Do not clean
ceramic
portion with
emery board
• Clean the electrode metal portion with
a soft cloth.
• Clean/dry the white ceramic
electrodes.
• Do not clean the igniters with water.
• Before reassembling the burners,
push down gently on each electrode
to verify it contacts the burner bases.
CAUTION
The grates are not dishwasher-safe. Wash
them regularly and after spillovers. When
the grates are safe to touch, remove and
wash them in hot, soapy water, then rinse
and dry them fully. Reposition the grates
as instructed in this manual.
English88
FULL_DOP36C86DLSDA_DG68-01507A-00_EN+MES+CFR.indb 88FULL_DOP36C86DLSDA_DG68-01507A-00_EN+MES+CFR.indb 88 2023-02-23 오후 5:09:122023-02-23 오후 5:09:12
Page 89
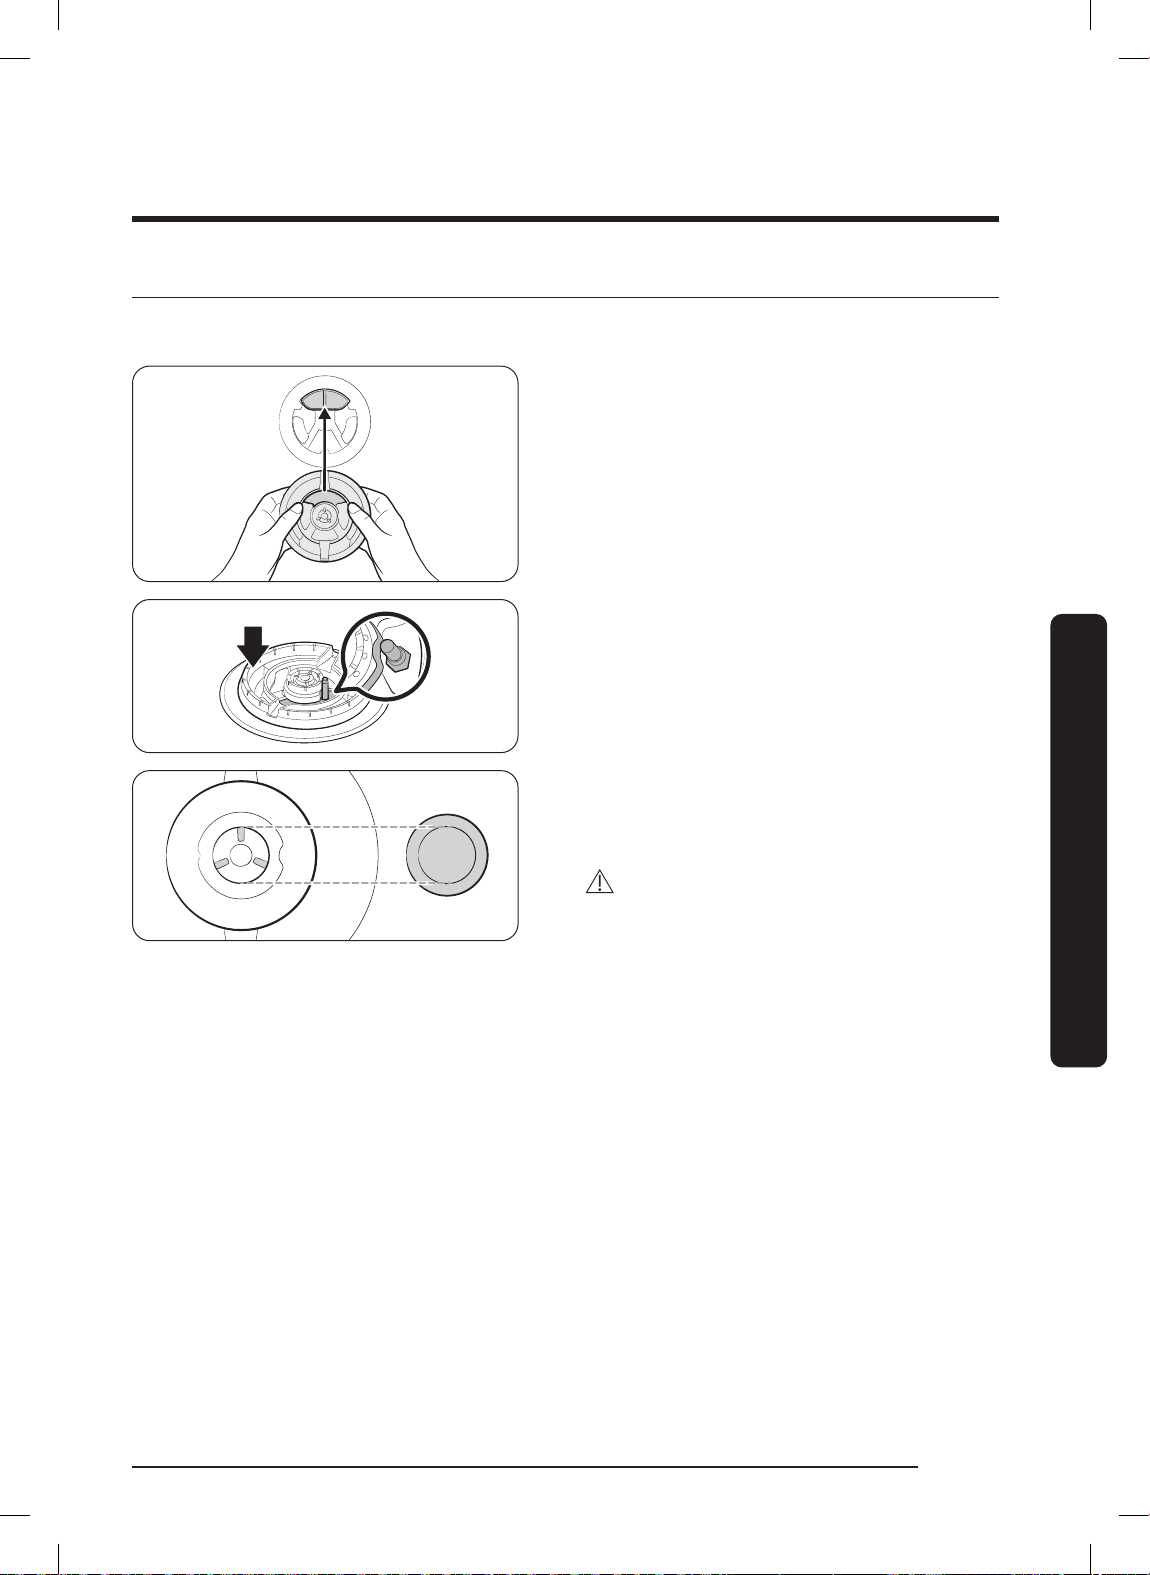
Assembling the Burner Caps and Heads
Dual-Burner Head / Caps
1. Orient the burner head so the
electrode opening aligns with the
electrode.
2. Install the burner head so the
electrode passes through its hole in
the head. (Ensure the burner head lies
flat on the cooktop.)
Cooktop Maintenance
3. Match the burner caps to the burners
by size, then install the caps on the
burner heads.
CAUTION
Each cap fits a specific burner head.
Verify that each cap is installed and lies
flat on the correct head.
English 89
FULL_DOP36C86DLSDA_DG68-01507A-00_EN+MES+CFR.indb 89FULL_DOP36C86DLSDA_DG68-01507A-00_EN+MES+CFR.indb 89 2023-02-23 오후 5:09:132023-02-23 오후 5:09:13
Page 90
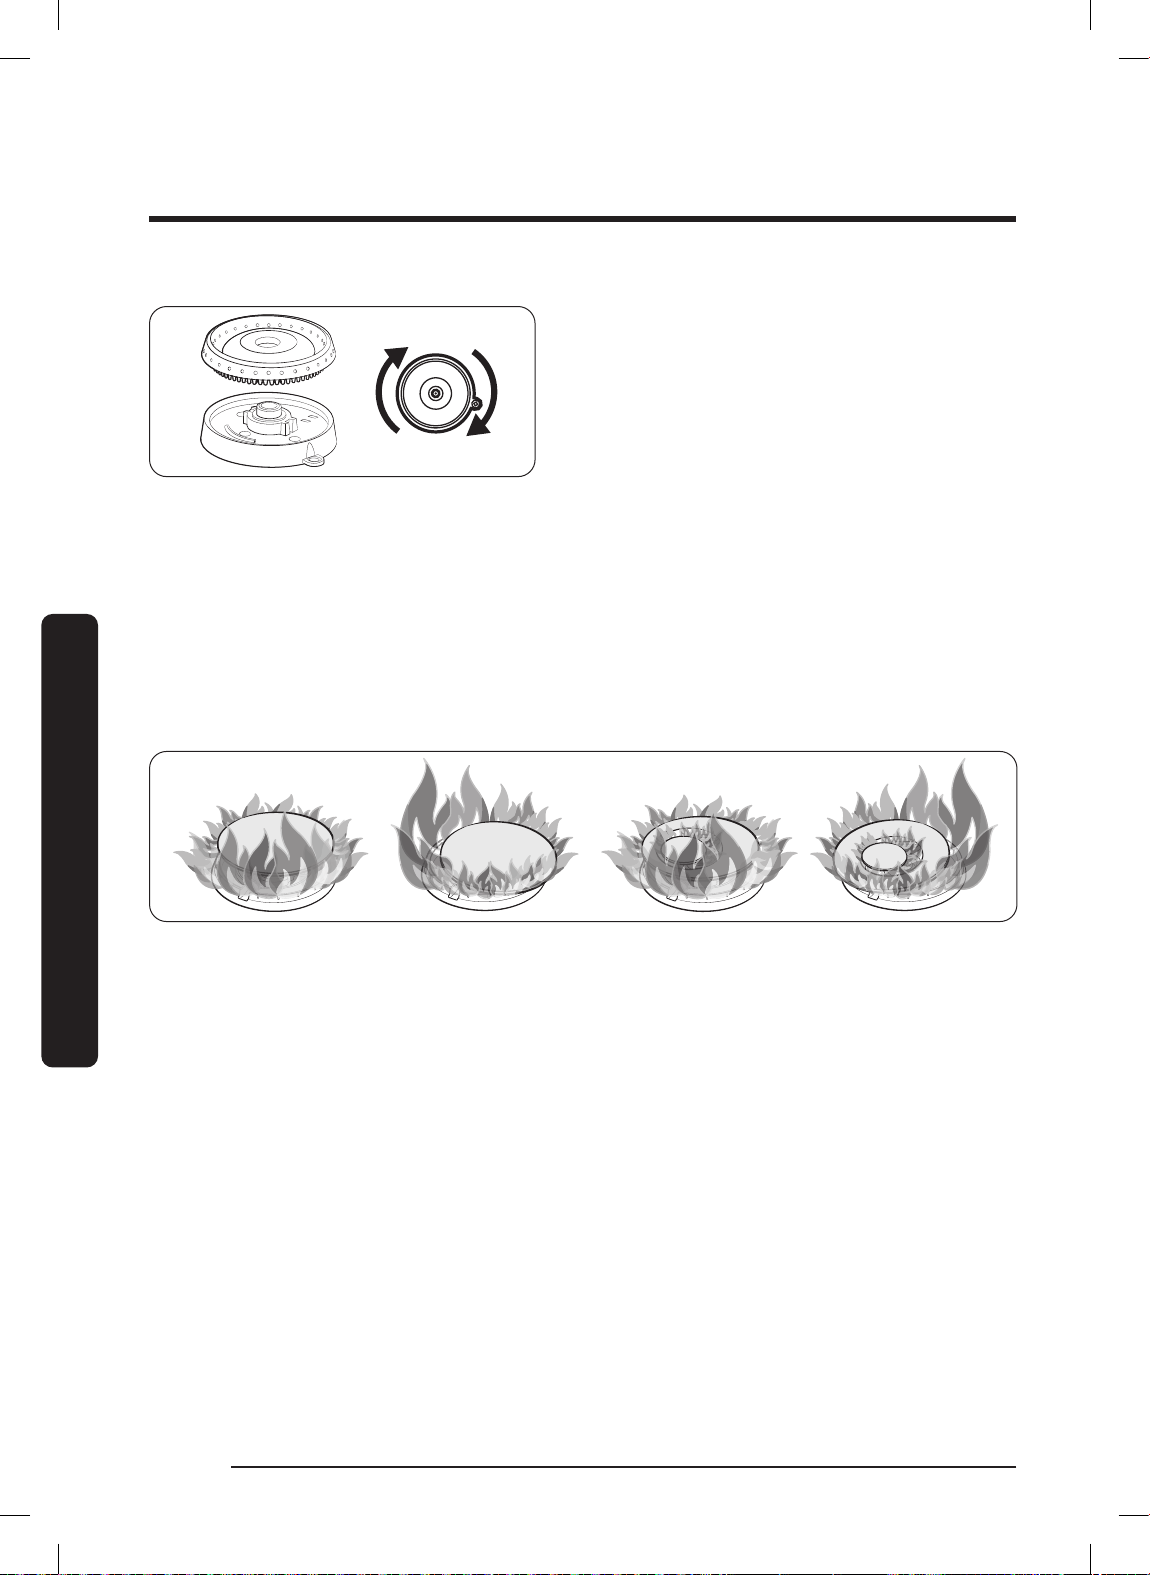
Cooktop Maintenance
Round Burner Head / Caps
After assembling the burners, test for proper function. Improper assembled parts will
cause poor ignition or uneven flames (see below). If the flame and excessively yellow,
shut off the burner immediately and let it cool. Adjust the burner caps and relight the
Cooktop Maintenance
burner. A good flame is blue and even all around the burner.
1. Put the burner heads on the burner
bases as shown at left. (The bottom
of the head fits inside the top of the
base.)
2. Twist each head back and forth
slightly until it drops into place.
3. Place the burner caps atop the burner
rings. The ridge around the bottom
of each cap fits around the top of the
ring.
English90
FULL_DOP36C86DLSDA_DG68-01507A-00_EN+MES+CFR.indb 90FULL_DOP36C86DLSDA_DG68-01507A-00_EN+MES+CFR.indb 90 2023-02-23 오후 5:09:132023-02-23 오후 5:09:13
Page 91
Oven Maintenance
Oven Care and Cleaning
WARNING
Be sure electrical power is off and all surfaces are cool before cleaning any part of the
appliance.
Cleaning Painted Parts and Decorative Trim
• For general cleaning, use a cloth with hot, soapy water.
• For more difficult residue, apply liquid detergent directly on the area and leave for
60 minutes. Wipe with a damp cloth and dry. Do not use abrasive cleaners; they can
scratch oven surfaces.
Cleaning Stainless Steel
1. Shake a bottle of Stainless Steel Appliance Cleaner or Polish well.
2. Place a dab of stainless-steel-appliance cleaner on a damp cloth or paper towel.
3. Clean a small area, rubbing with the grain of the steel if applicable.
4. Dry and buff with a clean, dry paper towel or soft cloth.
NOTE
Some paper towels tend to scratch stainless, test on a inconspicuous location before
using.
5. Repeat as needed.
NOTE
• Do not use a steel-wool pad. It will scratch the surface.
• If the range was last cleaned with a mineral-oil-based stainless-steel cleaner, wash
the surface with dish soap and water before using the stainless-steel cleaner.
About the Convection Filter
The convection filter is in the back of each oven chamber. Clean the filter regularly. If it
becomes clogged, the oven’s convection cooking modes will not work properly. Always
remove the filter before self-cleaning.
NOTE
For best performance, re-install the convection filter before cooking. Not doing so will
damage the blade and cookware and potentially injure the user.
Oven Maintenance
English 91
FULL_DOP36C86DLSDA_DG68-01507A-00_EN+MES+CFR.indb 91FULL_DOP36C86DLSDA_DG68-01507A-00_EN+MES+CFR.indb 91 2023-02-23 오후 5:09:132023-02-23 오후 5:09:13
Page 92
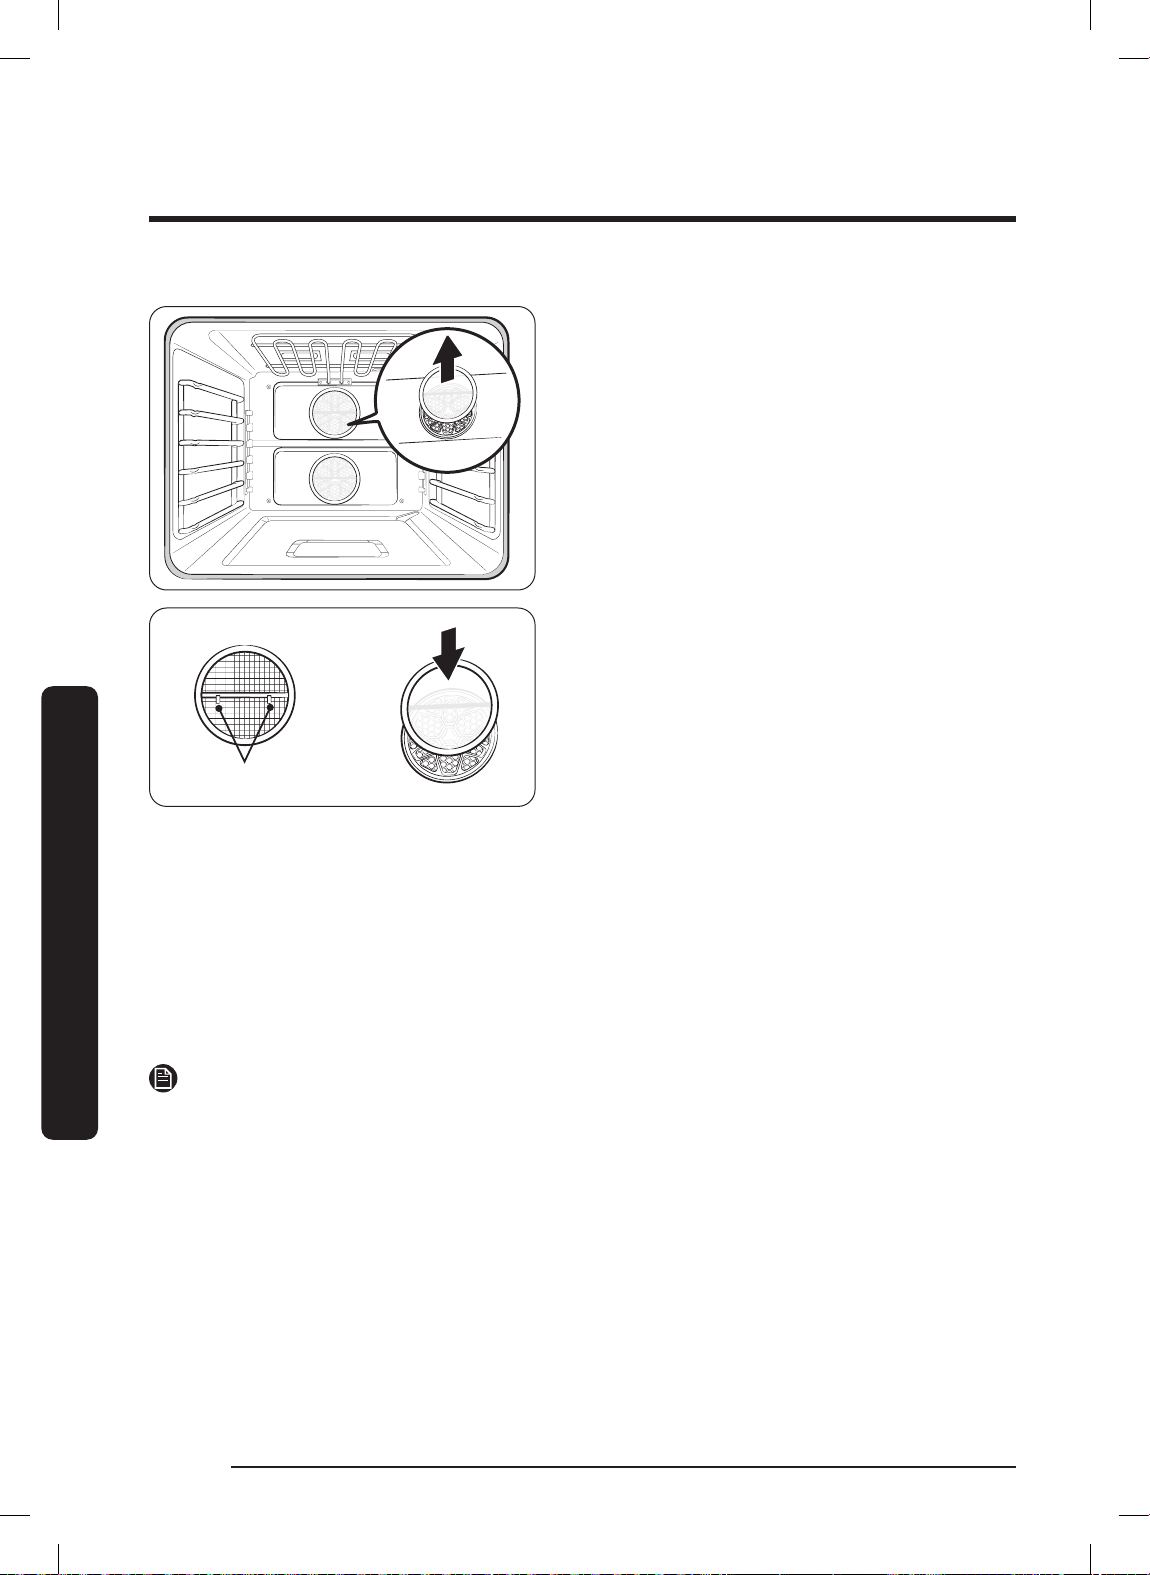
Oven Maintenance
Clips
Removing / Re-installing the Convection Filter
When the oven is cool, grasp the edges of
the filter and gently push up.
Cleaning the filter
Put the filter on the top rack of a
dishwasher, or soak the filter in hot,
soapy water, then rinse it well. Dry the
filter before re-installing it.
Centering the filter over the fan hole,
carefully hook the metal clips (back of
filter) over the metal bar across the hole.
Do not scratch the oven's porcelain with
the filter.
Clips
Oven Maintenance
Oven Racks
• If left in the oven during self-cleaning, the racks will discolor and will not slide as
easily on their tracks.
When the oven is cool, rub the rack sides with wax paper or a bit of oil to help the
racks glide more easily on their tracks.
• Clean gliding racks by hand with an abrasive cleaner or steel wool. Do not let water
or cleaner enter the rack slides.
NOTE
• Do not clean the racks in a dishwasher.
• If the rack does not slide easily, it can be treated with an FDA-approved graphite
lubricant. (Graphite lubricant can be purchased from many stores and online.)
English92
FULL_DOP36C86DLSDA_DG68-01507A-00_EN+MES+CFR.indb 92FULL_DOP36C86DLSDA_DG68-01507A-00_EN+MES+CFR.indb 92 2023-02-23 오후 5:09:132023-02-23 오후 5:09:13
Page 93
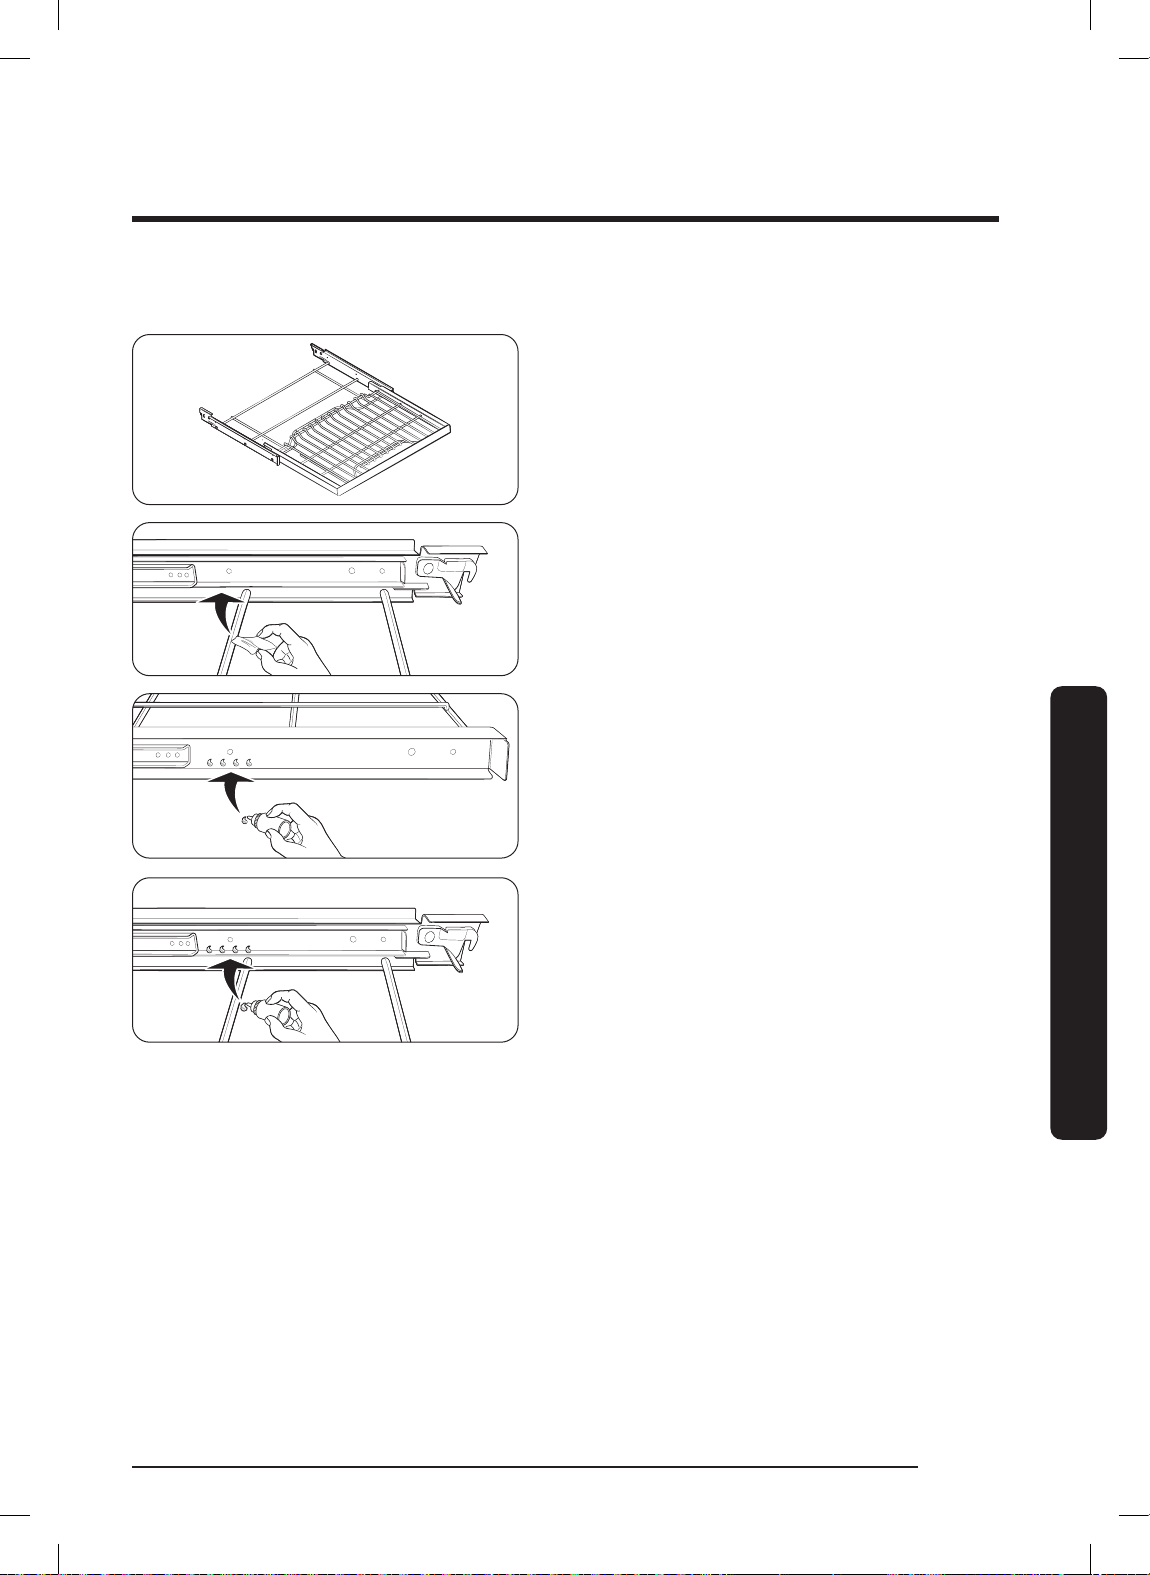
Lubricating the Gliding-Rack Slides
Do not lubricate the gliding rack with cooking spray or other such sprays.
1. Remove the rack from the oven.
(See Using the Gliding Rack, Pg. 40)
2. Fully extend the rack on a surface
covered with newspaper or cloth.
3. With paper towel, wipe debris from
the slide tracks.
4. Shake the graphite lubricant before
opening it. Starting with the rack's
left (front, back) slide mechanism,
place 4 small drops of lubricant on the
2 bottom tracks of the slide close to
the bearing carriers (see left).
Oven Maintenance
5. Repeat for the right (front, back) slide
mechanism.
English 93
FULL_DOP36C86DLSDA_DG68-01507A-00_EN+MES+CFR.indb 93FULL_DOP36C86DLSDA_DG68-01507A-00_EN+MES+CFR.indb 93 2023-02-23 오후 5:09:142023-02-23 오후 5:09:14
Page 94
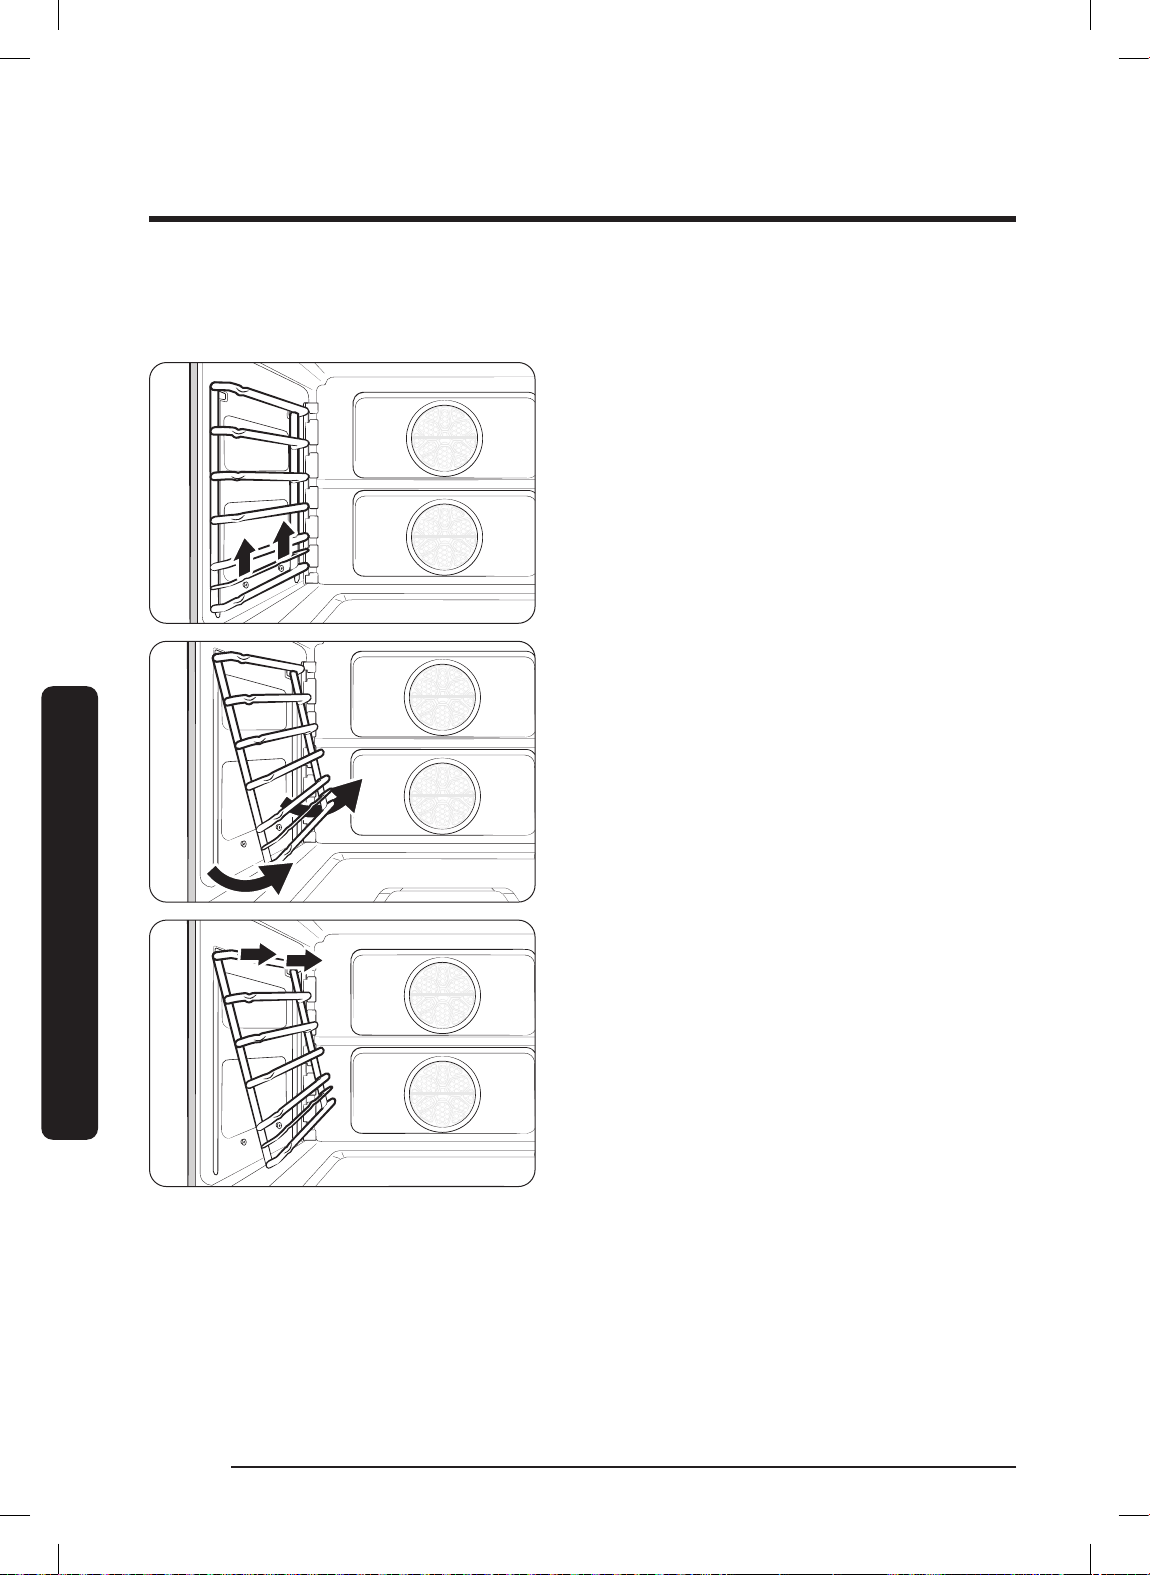
Oven Maintenance
Removing/Re-installing the Rack Supports
Rack supports can be removed for cleaning. (Self-Cleaning, GreenClean™ and Manual
cleaning).
1. Grasp the bottom-center of the
support and lift.
2. Swing the support bottom outward
about 45°.
Oven Maintenance
3. Pull the rack support from the
mounting holes.
English94
FULL_DOP36C86DLSDA_DG68-01507A-00_EN+MES+CFR.indb 94FULL_DOP36C86DLSDA_DG68-01507A-00_EN+MES+CFR.indb 94 2023-02-23 오후 5:09:142023-02-23 오후 5:09:14
Page 95
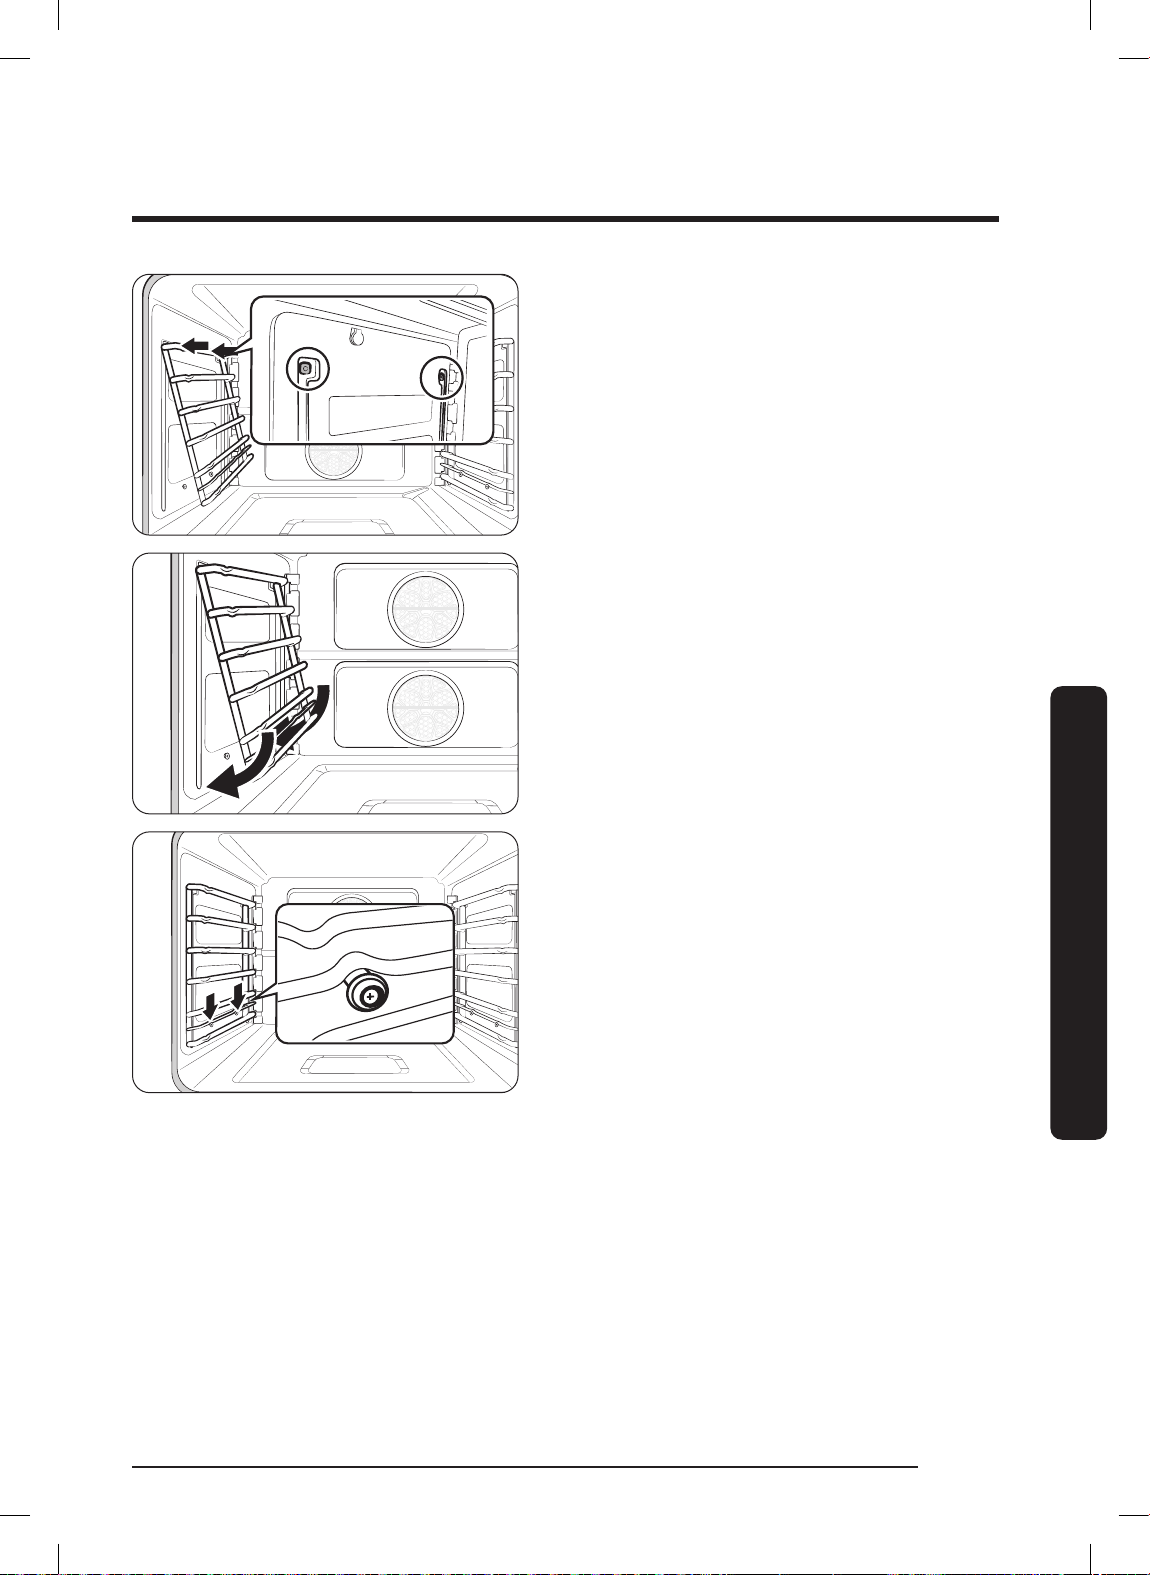
4. Insert the rack-support prongs into
the holes near the top of the ovenchamber wall.
5. Swing the bottom of the rack support
toward the oven-chamber wall.
6. Pull the rack support down, making
sure the two humps on the support
bar rest upon the nuts attached to the
oven-chamber wall.
Oven Maintenance
English 95
FULL_DOP36C86DLSDA_DG68-01507A-00_EN+MES+CFR.indb 95FULL_DOP36C86DLSDA_DG68-01507A-00_EN+MES+CFR.indb 95 2023-02-23 오후 5:09:152023-02-23 오후 5:09:15
Page 96
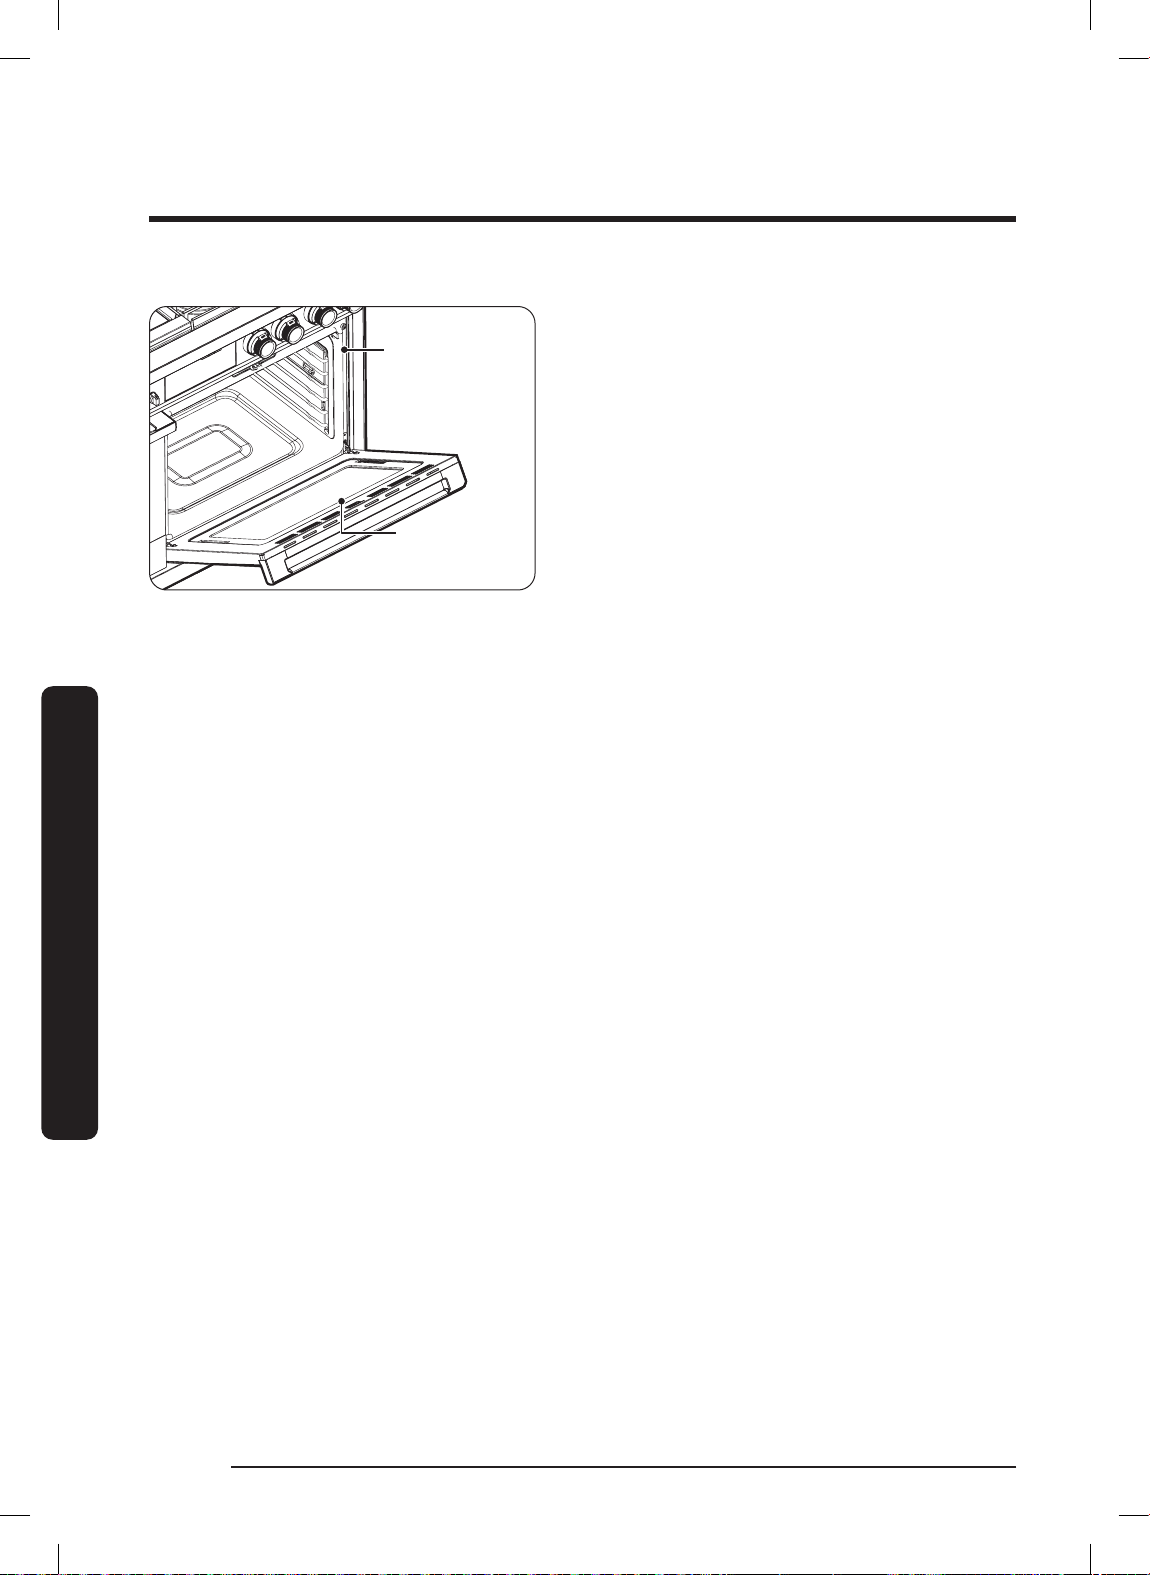
Oven Maintenance
Don’t hand clean
the oven door
gasket.
You may hand
clean the door.
Cleaning the Oven Door
Don't hand clean
the oven door
gasket.
You may hand
clean the door.
• Clean the oven door surfaces with
soap and water and rinse well. Clean
the exterior door glass with glass
cleaner. Do not immerse the door in
water. Keep liquids out of the door
vents. Do not use oven cleaners,
cleansers, or abrasive cleaners on the
outside of the door.
• DO NOT clean/rub/remove/damage
the door gasket, which is made of a
fragile material that is essential for a
good seal.
Oven Maintenance
English96
FULL_DOP36C86DLSDA_DG68-01507A-00_EN+MES+CFR.indb 96FULL_DOP36C86DLSDA_DG68-01507A-00_EN+MES+CFR.indb 96 2023-02-23 오후 5:09:152023-02-23 오후 5:09:15
Page 97
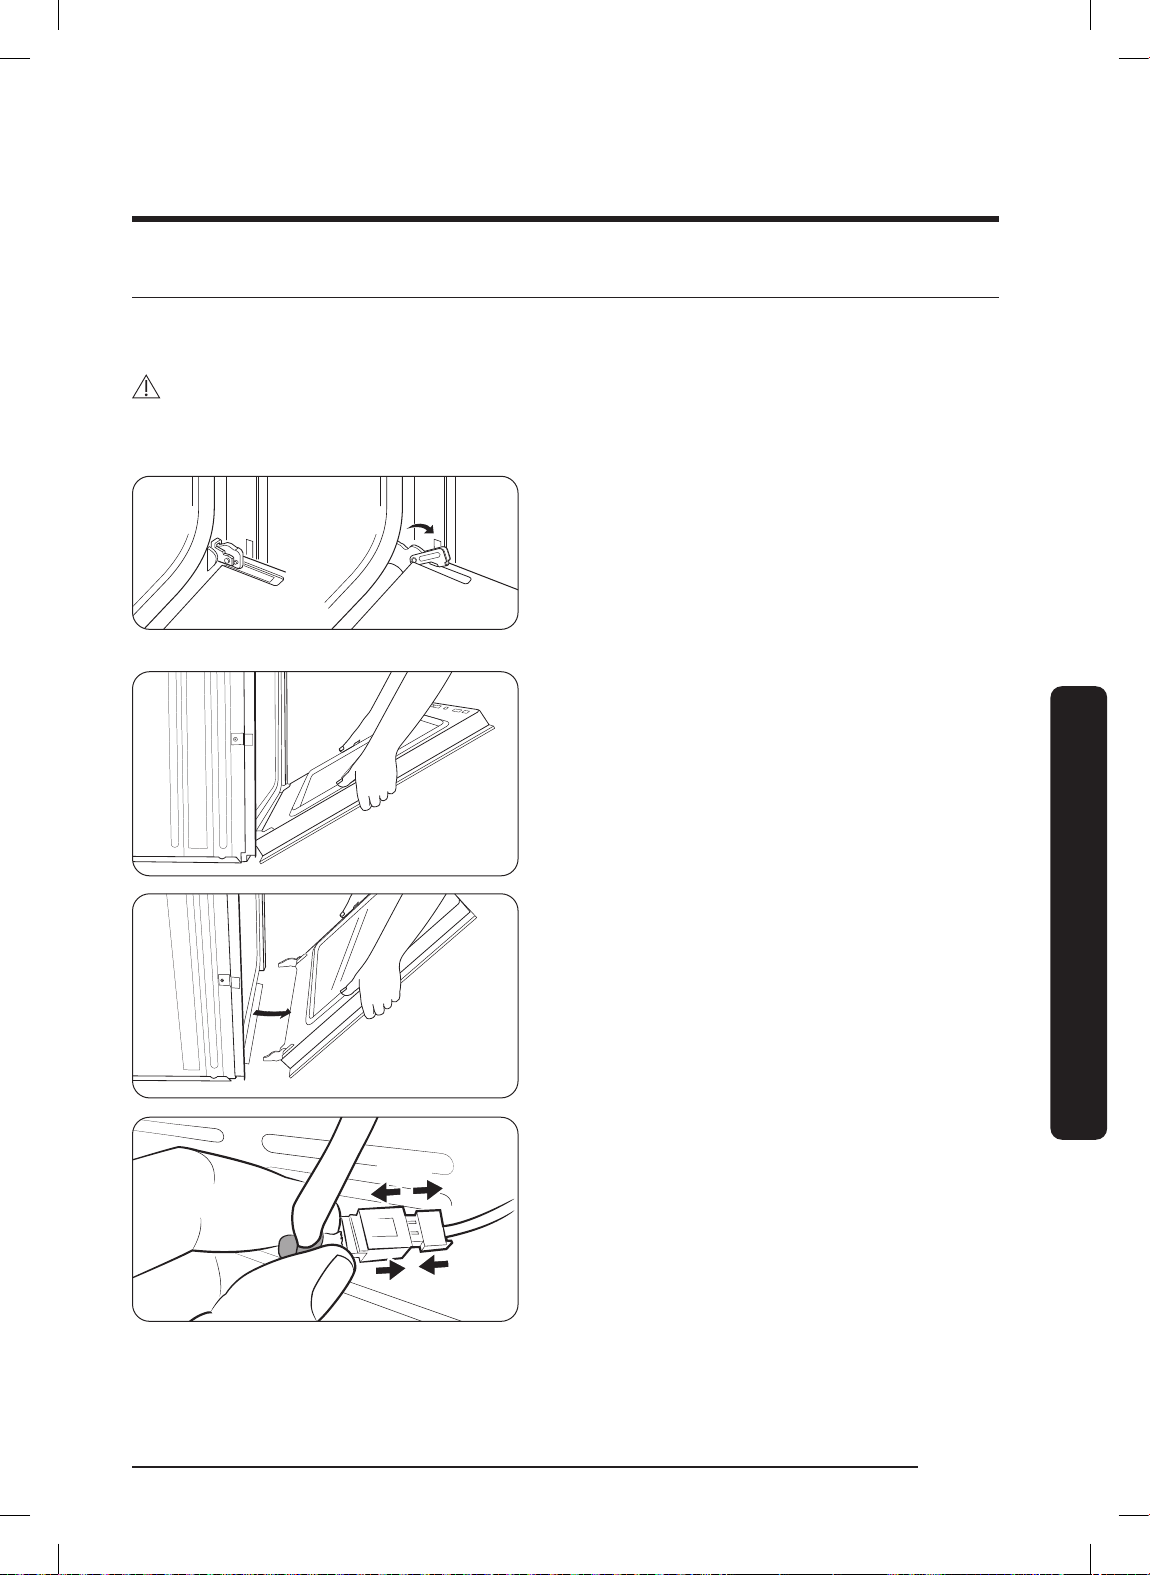
Removing/Re-installing the Oven Door
Locked Unlocked
Step 8
Step 6
Spread a blanket on a stable, flat surface where you can lay the door once you have
removed it.
CAUTION
The 30" oven door weighs 42 lbs (19 kg). Grasp the door with both hands. Do not lift by
the handle.
1. Open the oven door fully.
2. In the bottom corners of the oven
door, flip the hinge locks toward you
Locked Unlocked
to unlock them. If the hinge locks are
not fully forward (see left), you cannot
remove the door.
3. Partially close the door to engage the
hinge locks. (The door stops at this
point.)
Oven Maintenance
4. Grasp the sides of the door below the
handle and as you pull, gently jiggle
the door side to side as needed to
loosen it.
5. Set the door down without damaging
the LED cable at the door's bottom
right corner.
6. Disconnect the cable's wire harness
and set the door (handle-down), on
the blanket you prepared.
7. When ready to re-install the door,
stand at the top of the door, grasp
each side below the handles and take
the door to the oven.
8. Set the door down and connect the
wire harness.
English 97
FULL_DOP36C86DLSDA_DG68-01507A-00_EN+MES+CFR.indb 97FULL_DOP36C86DLSDA_DG68-01507A-00_EN+MES+CFR.indb 97 2023-02-23 오후 5:09:162023-02-23 오후 5:09:16
Page 98
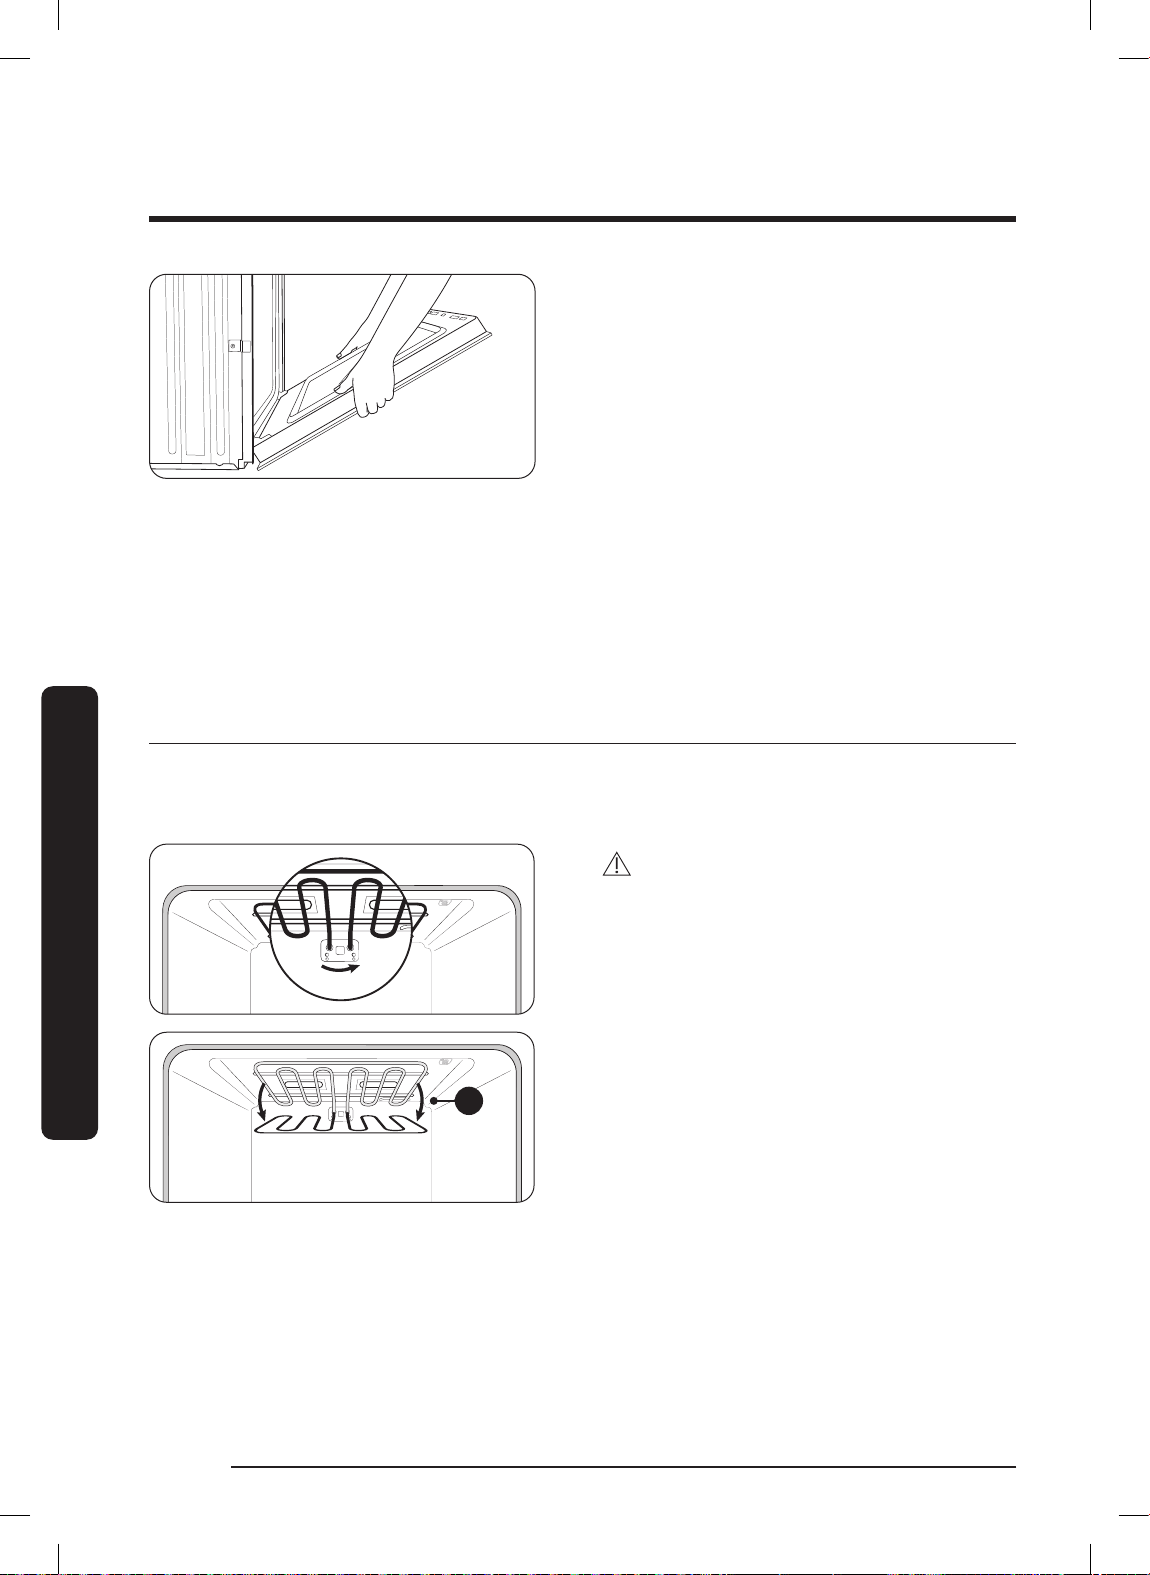
Oven Maintenance
01
Changing the Oven Light
The oven light is a standard 40-watt halogen appliance bulb. It comes on when the
oven door is opened. When the door is closed, touch LIGHT to turn the light on/off. The
Oven Maintenance
light does not work during self-cleaning. Wear gloves to halogen bulbs.
9. Holding the door at a 45° angle, insert
the hinges in the slots. (A slight drops
engages the hinges.)
10. Fully open the door. (If it does not
open 90°, repeat Steps 7 – 9.)
11. Flip the hinge locks forward to lock
them and close the door. (The gap
between door and control panel
should be even; if not, the hinge on
the wide end of the gap is not seated
properly.)
12. Stuff the wire harness into its hole
and re-insert the rubber seal.
CAUTION
Before starting, ensure all oven surfaces
are cool, then turn off power to the oven
at the circuit-breaker panel or fuse box.
1. Support the broil element and turn
the round nut counterclockwise. The
element loosens and tilts down.
(The broil element is not removable;
do not force it down or let it drop.)
2. Remove the glass cover, then the bulb
cover.
3. Replace the halogen bulb, then the
glass cover.
4. Lift the broil element into position
and turn the nut clockwise to hold the
element in place.
English98
FULL_DOP36C86DLSDA_DG68-01507A-00_EN+MES+CFR.indb 98FULL_DOP36C86DLSDA_DG68-01507A-00_EN+MES+CFR.indb 98 2023-02-23 오후 5:09:162023-02-23 오후 5:09:16
Page 99
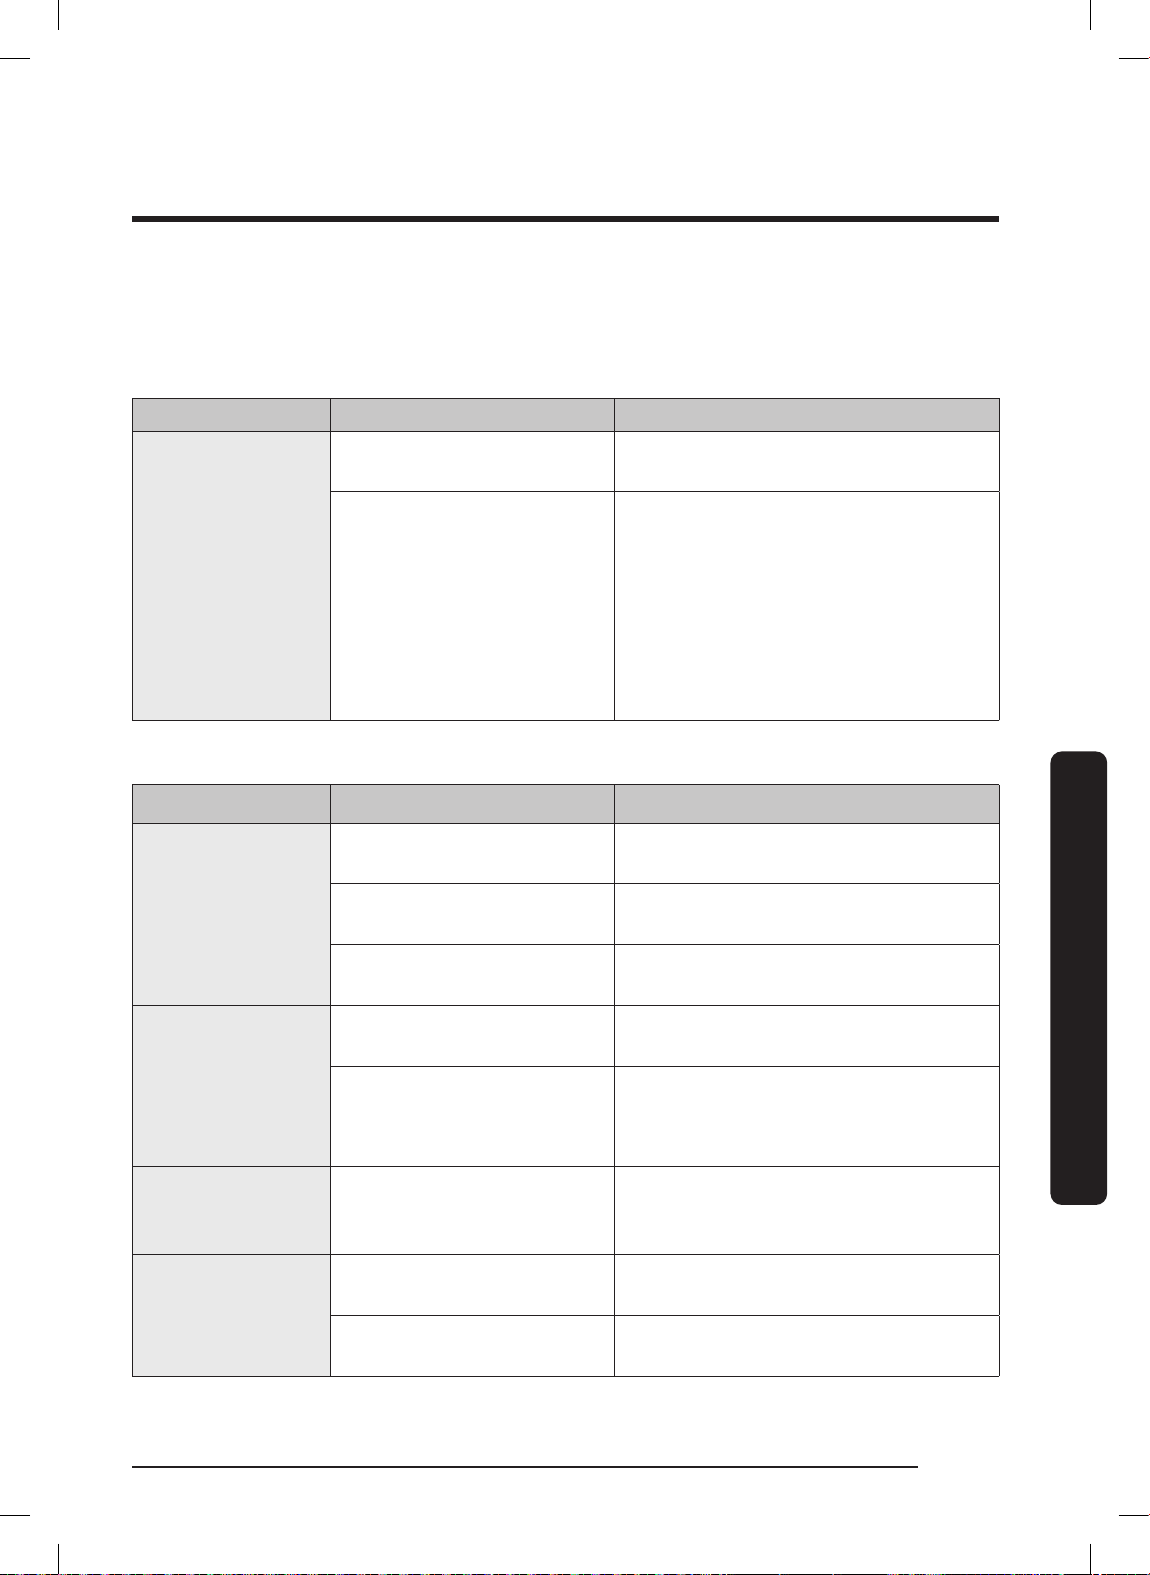
Troubleshooting
If you experience an issue with your range, review the tables in this section to resolve
it. If you cannot find a solution, call Dacor Customer Assurance 833-353-5483(USA),
844-509-4659(Canada) for assistance.
Gas Safety
Problem Possible cause Action
Burner is ON, but burner is
not lit.
You smell gas.
Gas leak.
Surface Burner
Turn the burner knob to OFF.
• Evacuate the building.
• From a neighbor's home (your
phone may cause a spark that
ignites the gas), immediately call
the gas supplier and follow their
directions. (If you cannot reach
your gas supplier, call the fire
department.)
Problem Possible causes Action
Ensure power cord is plugged into a
live, grounded outlet.
Replace fuse/reset circuit breaker.
See the Installation Instructions.
Push in knob and turn to flame
symbol position.
• Clean the electrodes.
• Put burner cap on burner head.
• Align burner base.
After burner ignites, turn knob to
desired setting; if burner still clicks,
contact service technician.
See Pg. 89.
Clean the burner components, see
Pg. 87.
No burners light
Burner does not
light
Burner clicks
during operation
Burner not
burning evenly
Cooktop is unplugged.
Blown fuse/tripped circuit
breaker.
Gas supply not on or
improperly connected.
Control knob not set
properly.
Burner caps not in place or
burner base misaligned.
Control knob in flame
position.
Burner improperly
assembled.
Dirty burners.
Troubleshooting
English 99
FULL_DOP36C86DLSDA_DG68-01507A-00_EN+MES+CFR.indb 99FULL_DOP36C86DLSDA_DG68-01507A-00_EN+MES+CFR.indb 99 2023-02-23 오후 5:09:162023-02-23 오후 5:09:16
Page 100
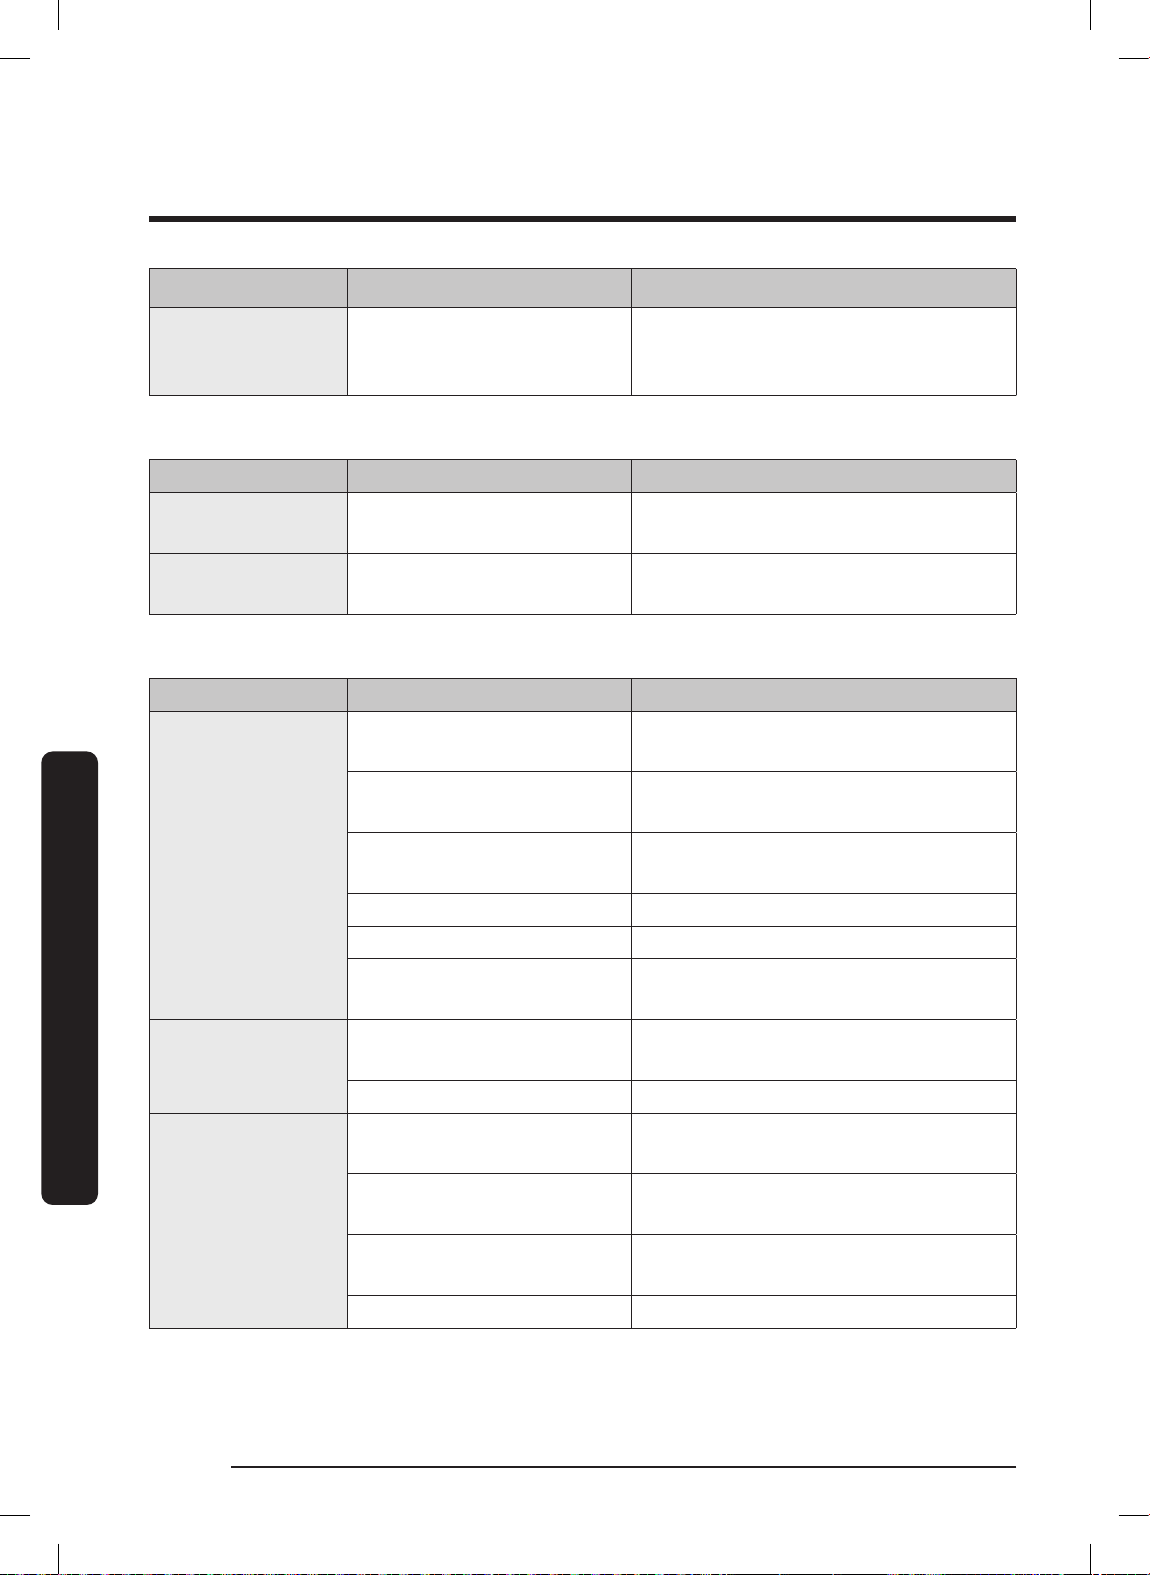
Troubleshooting
Problem Possible causes Action
Very large or
yellow burner
flames
Control Display
Problem Possible cause Solution
Display goes
blank
Control panel not
responding
Oven
Problem Possible cause Solution
Oven not turning
Troubleshooting
on
Oven light not
turning on
Excessive smoke
during broiling
Wrong burner orifice
installed.
Bad fuse/tripped circuit
breaker.
Moisture/residue on panel;
Control Lock enabled.
Oven not fully plugged in.
Bad fuse/tripped circuit
breaker.
Oven controls improperly
set.
Oven too hot. Let oven cool.
Incomplete service wiring. Call for service.
Power outage.
Light loose/defective.
Broken light switch. Call for service.
Oven controls improperly
set.
Meat too close to broil
element.
Meat not properly
prepared.
Grease buildup in oven. Clean oven more frequently.
Check burner orifice size; if you have
wrong orifice (LP gas instead of
natural gas), call service technician.
Replace fuse/reset circuit breaker.
Remove moisture/residue, retry;
disable Control Lock.
Verify the range plug is properly
inserted in its outlet.
Replace fuse/reset circuit breaker.
See Using the Steam Oven, Pg. 74.
Check house lights. call utilities
provider if needed.
Tighten/replace lamp; call for service
if door light stays off.
See Using the Steam Oven, Pg. 74.
Lower the rack one level.
Trim excess fat from around meat.
English100
FULL_DOP36C86DLSDA_DG68-01507A-00_EN+MES+CFR.indb 100FULL_DOP36C86DLSDA_DG68-01507A-00_EN+MES+CFR.indb 100 2023-02-23 오후 5:09:162023-02-23 오후 5:09:16
 Loading...