

Page 1

Modernist Microwave In-A-Drawer
User Manual
Model Numbers:
DMR24M977WM, DMR24M977WS,
DMR30M977WM, DMR30M977WS
™
Table of Contents
Important Safety Instructions .................... 1-2
PRECAUTIONS TO AVOID POSSIBLE EXPOSURE
TO EXCESSIVE MICROWAVE ENERGY ............. 1
Information You Need to Know ................... 3-5
Part Names ................................................. 6
Before Operating ......................................... 7
To Set The Clock ..................................... 7
Timer .................................................... 7
Stop/Clear ............................................. 7
Open or Close Drawer ............................ 7
Standby Mode ........................................ 7
Microwave In-A-Drawer
Time Cooking ......................................... 8
To Set Power Level .................................. 8
Sensor Settings ...................................... 8
Sensor Popcorn / Sensor Reheat ............... 9
Sensor Cooking .....................................10
Defrost.................................................11
Manual Defrost ......................................11
Reheat .................................................12
™
Cooking ..............8-13
Beverage Center ....................................12
Melt/Soften/Warm .................................13
Other Features ...................................... 14-15
Keep Warm ...........................................14
Help ....................................................14
More or Less Time Adjustment ................14
Multiple Sequence Cooking .....................14
Easy Minute ..........................................14
Setup/Help ...........................................14
Audible Signal Elimination .......................15
End of Cooking Reminder ........................15
Auto Start ............................................15
Demonstration Mode ..............................15
Control Lock .........................................15
Cleaning and Care ......................................16
Before You Call for Service ...........................17
Auto-Touch Guide ..................................18-19
Product Warranty .......................................20
Warranty Card ............................... Back cover
Part No. 112243 Rev A TINSKB242MRR0
Page 2
To Our Valued Customer:
Congratulations on your purchase of the very latest in Dacor® products! Our unique
combination of features, style, and performance make us a great addition to your home.
To familiarize yourself with the controls, functions and full potential of your new Dacor
microwave, read this manual thoroughly, starting at the Important Safety Instructions
section (pg. 1).
Dacor appliances are designed and manufactured with quality and pride, while working
within the framework of our company values. Should you ever have an issue with your
microwave, first check the Before You Call For Service section (pg. 17) for guidance. It gives
suggestions and remedies that may pre-empt a call for service.
Valuable customer input helps us continually improve our products and services, so feel free
to contact our Customer Assurance Team for assistance with all your product-support needs.
Dacor Customer Assurance Team
14425 Clark Avenue
City of Industry, CA 91745
T
elephone:
(800) 793-0093
Fax:
Hours of Operation:
Website:
Thanks for choosing Dacor for your home. We are a company built by families for families,
and we are dedicated to serving yours. We are confident that your new Dacor microwave will
deliver a top-level performance and enjoyment for decades to come.
Sincerely,
The
Dacor Customer Assurance Team
(626) 403-3130
Mon – Fri, 5:00 A.M. to 5:00 P.M. Pacific Time
www.dacor.com/customer-care/contact-us
Copyright © 2017 by Dacor Inc. All rights reserved.
Page 3
IMPORTANT SAFETY INSTRUCTIONS
Installer: Leave these instructions with the owner.
Customer: Read and keep this manual for reference.
Keep this guide and the sales receipt/cancelled
check in a safe place for reference. Proof of original
purchase date is needed for warranty service.
If you have any questions, call:
Dacor® Customer Assurance
1-800-793-0093 x2813 (U.S.A. and Canada)
Monday – Friday 5:00
Web site: www.dacor.com/customer-care/contact-us
Before you call, have available the model and serial numbers, which you can view by opening the drawer fully and
reading the rating label on the oven-cavity oor just past
the drawer’s rear panel.
Record these numbers below for easy access.
Model Number __________________________________
Serial Number __________________________________
Date of Purchase________________________________
For service and warranty information, see page 20.
At Dacor, we continually improve the quality and performance of all our products. We may need to make changes
to this appliance without updating these instructions.
This device complies with Part 18 of the FCC Rules.
am to 5:00 pm Pacic Time
(a) Do not attempt to operate this oven with the door
(b) Do not place any object between the oven front
(c) Do not operate the oven if it is damaged. It is par-
(d) The oven should not be adjusted or repaired by
WARNING
PRECAUTIONS TO AVOID
POSSIBLE EXPOSURE TO
EXCESSIVE MICROWAVE
ENERGY
open since open-door operation can result in harmful exposure to microwave energy. It is important
not to defeat or tamper with the safety interlocks.
face and the door or allow soil or cleaner residue to
accumulate on sealing surfaces.
ticularly important that the oven door close properly and that there is no damage to the: (1) door
(bent), (2) hinges and latches (broken or loosened),
(3) door seals and sealing surfaces.
anyone except properly qualied service personnel.
IMPORTANT INFORMATION ABOUT SAFETY
INSTRUCTIONS
The Important Safety Instructions and warnings in this
manual are not meant to cover all possible conditions and
situations that can occur. Use common sense and caution
when installing, maintaining or operating this or any other
appliance.
Always contact the Dacor Customer Service Team about
problems or situations that you do not understand.
SAFETY SYMBOLS AND LABELS
DANGER
Immediate hazards that WILL result in severe personal
injury or death.
WARNING
Hazards or unsafe practices that COULD result in severe
personal injury or death.
CAUTION
Hazards or unsafe practices that COULD result in minor
personal injury or property damage.
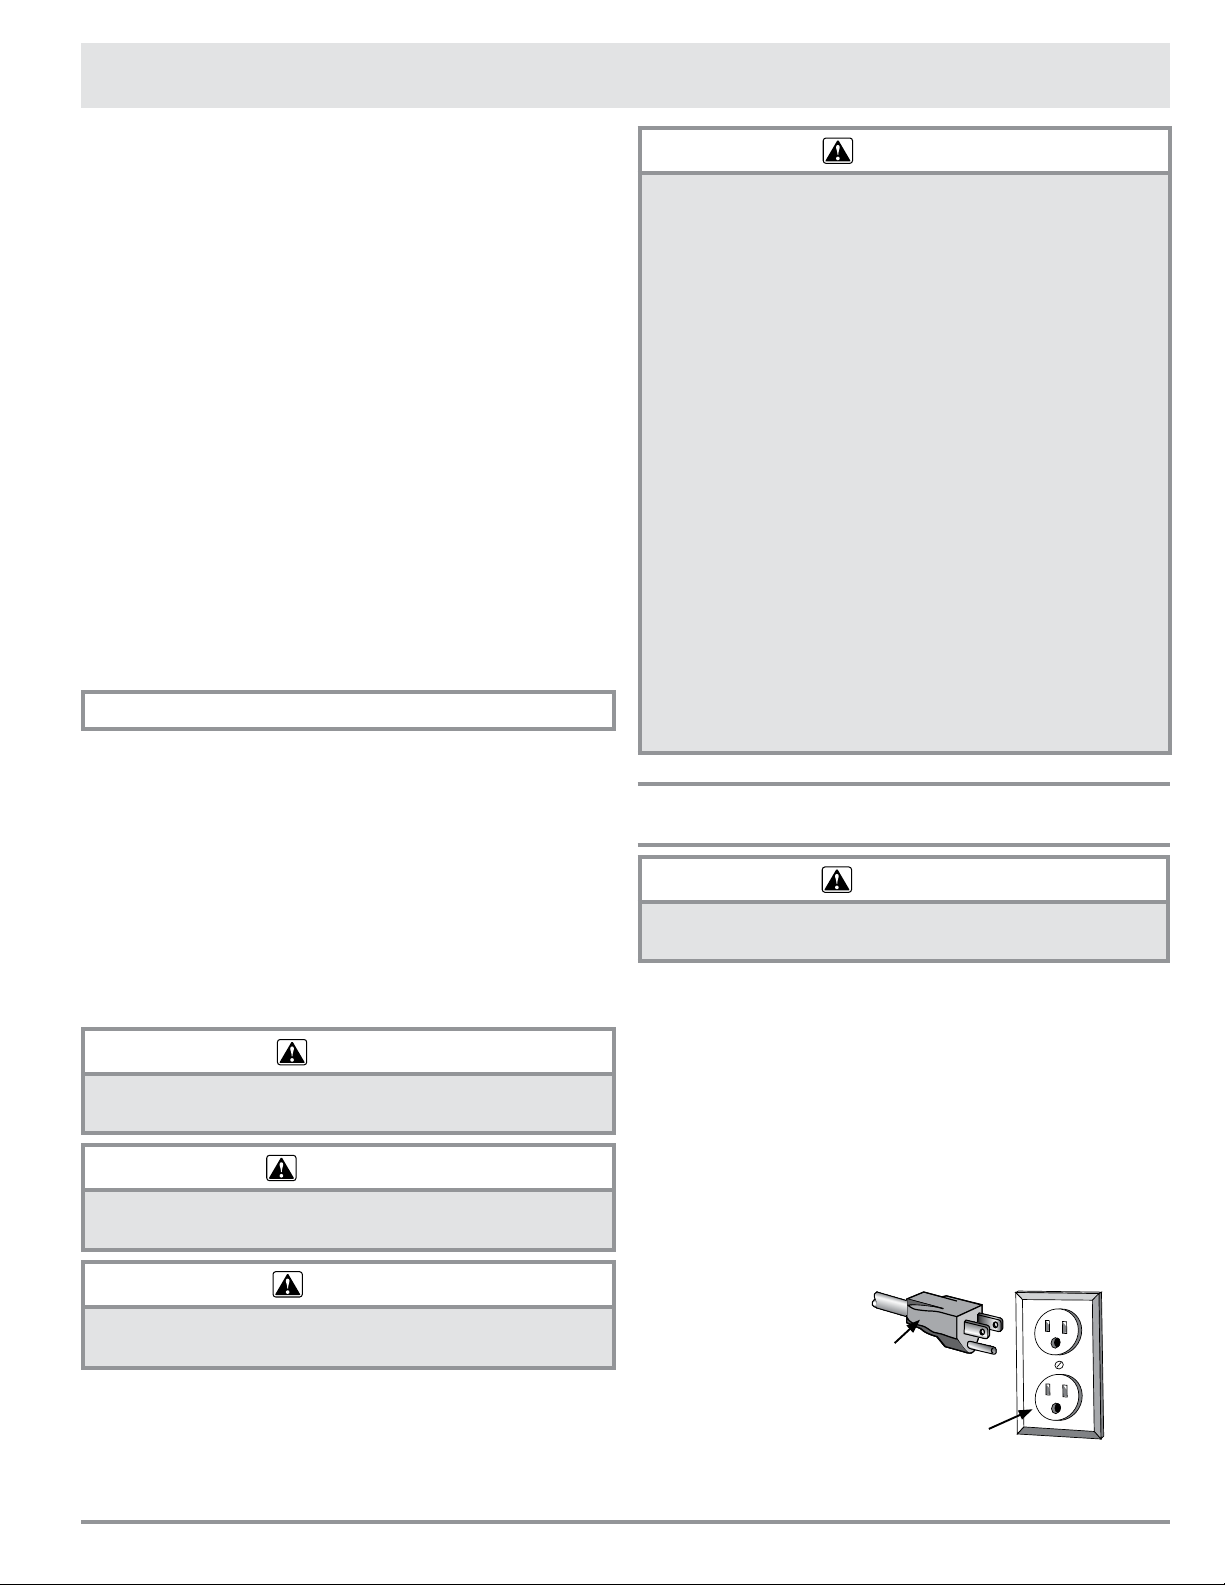
GROUNDING INSTRUCTIONS
WARNING
Improper use of the grounding plug can result in a risk
of electric shock.
This appliance must be grounded. In the event of an
electrical short circuit, grounding reduces the risk of
electric shock by providing an escape wire for the electric
current. This appliance is equipped with a cord having
a grounding wire with a grounding plug. The plug must
be plugged into an outlet that is properly installed
and grounded. Do not under any circumstances,
cut or remove the third (ground) prong from the
power cord. Do not use an adapter plug. Do not use
an extension cord. If the power supply cord is too short,
have a qualied electrician or serviceman install an outlet
near the appliance. Do not use a Ground Fault Circuit
Interrupter.
Power supply cord with
three-prong grounding plug
E1
Grounding type wall receptacle
(ground fault circuit not allowed)
Page 4
IMPORTANT SAFETY INSTRUCTIONS
WARNING
When using the appliance, basic safety precautions should be followed, including the following:
WARNING
1. Read all instructions before using the appliance.
2. Read and follow the specic “PRECAUTIONS TO
AVOID POSSIBLE EXPOSURE TO EXCESSIVE
MICROWAVE ENERGY” on page 1.
3. This appliance must be properly grounded. See
page 1 and the separate installation instructions
for grounding instructions .
4. Install or locate this appliance only in accordance
with the provided installation instructions.
5. Some products such as whole eggs and sealed
containers - for example, closed glass jars—can
explode and should not be heated in the drawer.
6. Use this appliance only for its intended use as
desc
chemicals or vapors in this appliance. This
microwave is specically designed to heat and
cook food. It is not designed for industrial or
laboratory use.
7. As with any appliance, close supervision is
necessary when used by children.
8. Do not operate this appliance if it has a damaged
cord or plug, if it is not working properly or if it has
been damaged or dropped.
9. This appliance should be serviced only by qualied
service personnel. Contact the nearest Dacor
Authorized Servicer for examination, repair or
adjustment.
10. Do not cover or block any openings on the appliance.
11. Do not store or use this appliance outdoors. Do not
use this product near water—for example, near a
kitchen sink, in a wet basement, near a swimming
pool or similar locations.
12. Do not immerse the power cord or plug in water.
13. Keep the power cord away from heated surfaces.
14. Do not climb or sit on the drawer.
15. Be sure that ngers or other objects or materials
are not around the drawer opening when the
appliance is closed.
16. Do not put ngers or clothes around the drawer
guides when the appliance is opened or closed.
They could be caught in the guides when the
drawer is closed.
To reduce the risk of burns, electric shock, fire, injury to persons or exposure to excessive microwave
energy:
17. Be sure that the food and its container can t
inside the drawer completely before closing it.
18. When cleaning drawer sealing surfaces that come
together on closing the drawer, use only mild, nonabrasive soaps or detergents applied with a sponge
or soft cloth. See cleaning instructions on page 16.
19. To reduce the risk of re in the appliance cavity:
a. Do not overcook food. Carefully attend
appliance when paper, plastic or other
combustible materials are placed inside the
drawer to facilitate cooking.
b. Remove wire twist-ties from paper or plastic
bags before placing bag in drawer.
ribed in this manual. Do not use corrosive
c. If materials inside the appliance ignite, keep
drawer door closed, turn microwave off and
shut off power at the fuse or circuit breaker
panel.
d. Do not use the drawer for storage purposes.
Do not leave paper products, cooking utensils,
or food in the drawer when not in use.
20. Liquids, such as water, coffee or tea are able to
be overheated beyond the boiling point without
appearing to be boiling due to surface tension of
the liquid. Visible bubbling or boiling when the
container is removed from the appliance is not
always present. THIS COULD RESULT IN VERY
HOT LIQUIDS SUDDENLY BOILING OVER WHEN
A SPOON OR OTHER UTENSIL IS INSERTED INTO
THE LIQUID.
To reduce the risk of injury to persons:
a. Do not overheat the liquid.
b. Stir the liquid both before and halfway through
heating.
c. Do not use straight-sided containers with
narrow necks. Use a wide-mouthed container.
d. After heating, allow the container to stand
in the drawer for at least 20 seconds before
removing the container.
e. Use extreme care when inserting a spoon or
other utensil into the container.
21. If the appliance light fails, consult a DACOR
AUTHORIZED SERVICER.
READ AND SAVE THESE INSTRUCTIONS
E2
Page 5
Information You Need To Know
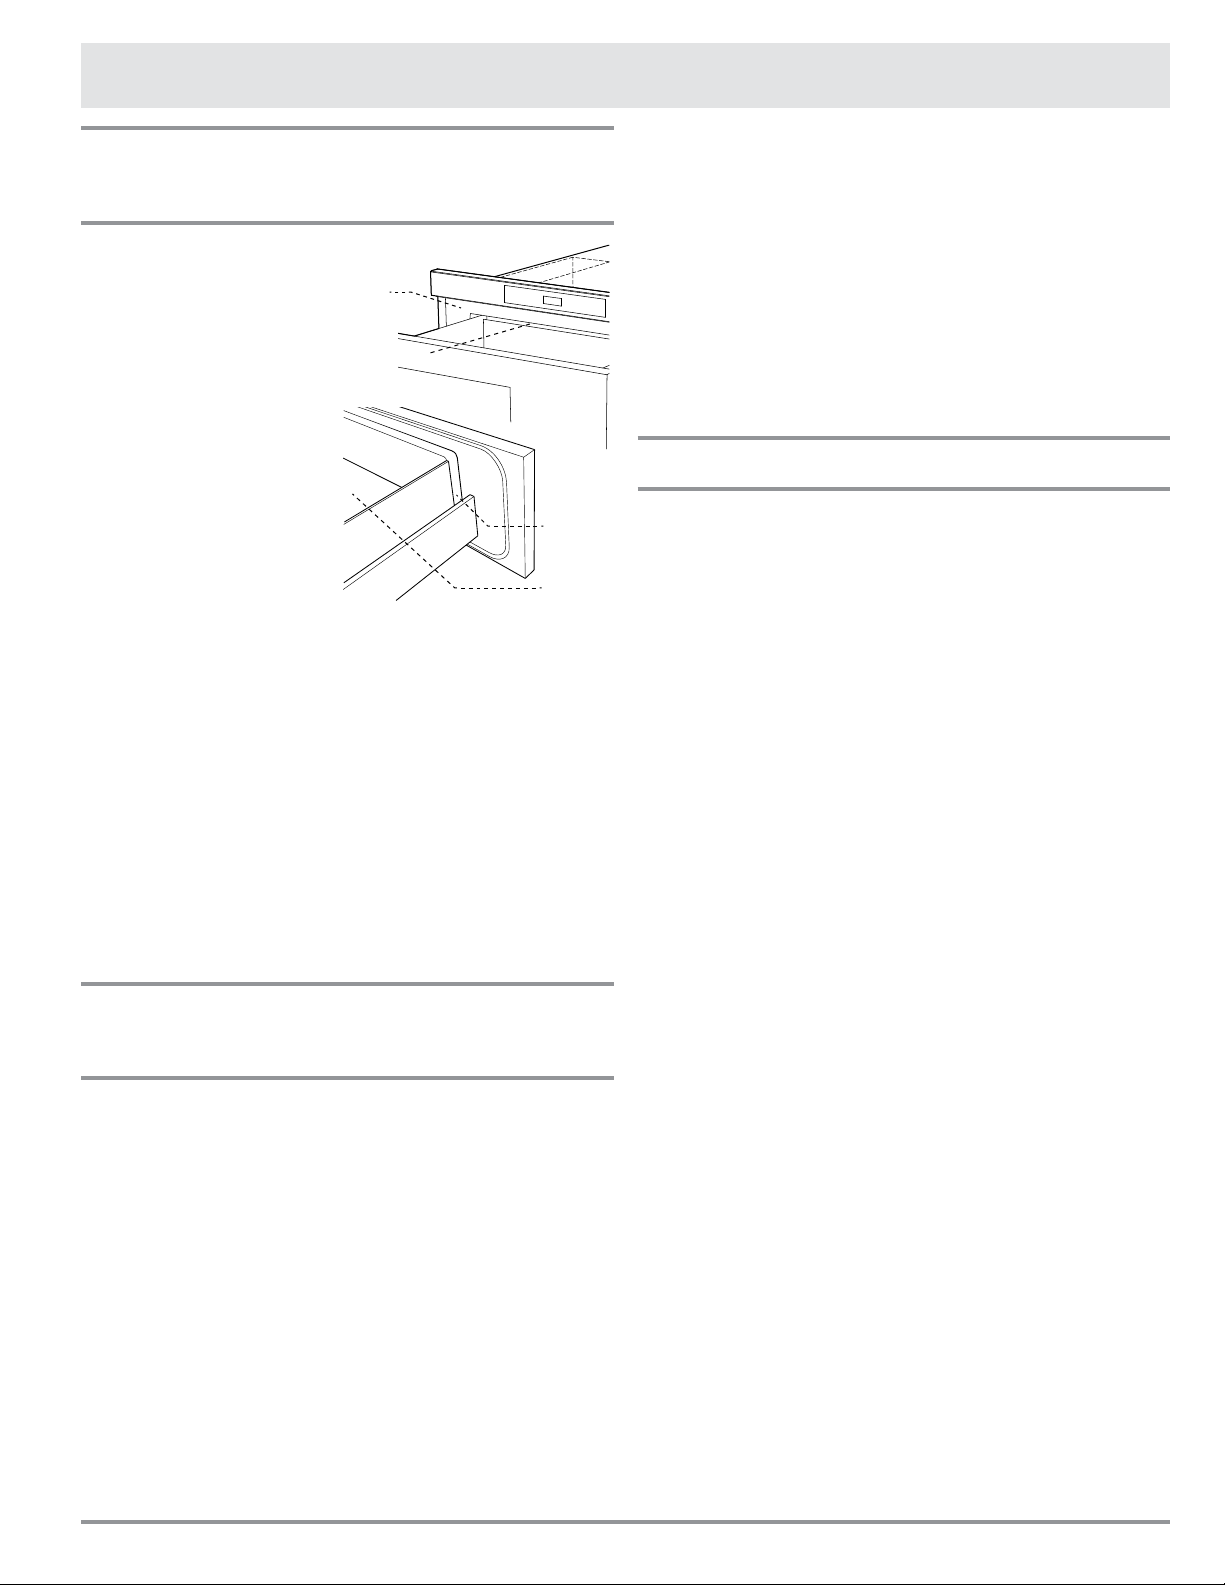
About Unpacking And Examining
Your Microwave In-A-Drawer
1. Remove all packing
materials from inside
the Microwave InA-Drawer™. DO NOT
REMOVE THE WAVEGUIDE COVER, which is
located inside, on the
ceiling of the Microwave In-A-Drawer™.
2. Remove the feature
sticker, if there is one.
Check the drawer for
any damage, such as
misaligned or bent
drawer, damaged
drawer seals and sealing surfaces, broken or loose drawer guides and dents
inside the cavity or on the front side of the drawer. If
there is any damage, do not operate the Microwave
In-A-Drawer™ and contact your dealer or a DACOR
AUTHORIZED SERVICER.
Sealing
Surface
Waveguide
Cover
RADIO OR TV INTERFERENCE
Should there be any interference caused by the Microwave
In-A-Drawer™ to your radio or TV, check to make sure that
the appliance is on a different electrical circuit, relocate
the radio or TV as far away from the drawer as feasible or
check the position and signal of receiving antenna.
About Your Microwave
In-A-Drawer
ALWAYS have food in the drawer when it is on to absorb
the microwave energy.
The vent under the Microwave In-A-Drawer™ must not be
blocked. During microwaving, steam may come from the
right side of the vent.
When using the Microwave In-A-Drawer™ at power levels
below 100%, you may hear the magnetron cycling on and
off. It is normal for the exterior of the drawer to be warm
to the touch when cooking or reheating.
Condensation is a normal part of microwave cooking.
Room humidity and the moisture in food will inuence
the amount of moisture that condenses in the drawer.
Generally, covered foods will not cause as much
™
™
Sealing
Surface
Oven
Cavity
condensation as uncovered ones.
The Microwave In-A-Drawer™ is for food preparation only.
It should not be used to dry clothes or newspapers.
Your Microwave In-A-Drawer™ is rated 950 watts by using
the IEC Test Procedure. In using recipes or package
directions, check food one or two minutes before the
minimum time and add time accordingly.
When opening or closing the Microwave In-A-Drawer
quickly, food in the drawer may be spilled. To clean,
please refer to the Cleaning and Care section on page 16.
™
About Microwave Cooking
• Arrange food carefully. Place thickest areas towards
outside of dish.
• Watch the cooking time. Cook for the shortest amount
of time indicated and add more as needed. Food
severely overcooked can smoke or ignite.
• Cover foods while cooking. Check a recipe or
cookbook for suggestions like: paper towels, wax
paper, microwave plastic wrap or a lid. Covers prevent
spattering and help foods to cook evenly.
• Shield with small at pieces of aluminum foil any
thin areas of meat or poultry to prevent overcooking
before dense, thick areas are cooked thoroughly.
• Stir foods from outside to center of dish once or twice
during cooking, if possible.
• Turn foods over once during microwaving to speed
cooking of such foods as chicken and hamburgers.
Large items like roasts must be turned over at least
once.
• Rearrange foods such as meatballs halfway through
cooking both from top to bottom and from right to
left.
• Add standing time. Remove food from drawer and stir,
if possible. Cover during standing time, allowing the
food to nish cooking without overcooking.
• Check for doneness. Look for signs indicating that
cooking temperatures have been reached.
Signs of doneness include:
- Food steams throughout, not just at edge.
- Poultry thigh joints move easily.
- Meat and poultry show no pinkness.
- Fish is opaque and akes easily with a fork.
E3
Page 6

Information You Need To Know
About Utensils And Coverings
It is not necessary to buy all new cookware. Many pieces
already in your kitchen can be used successfully in your
new microwave. Make sure the utensil does not touch the
interior walls during cooking.
Use these utensils for safe microwave cooking and
reheating:
• Glass ceramic (Pyroceram®), such as Corningware
• Heat-resistant glass (Pyrex®)
• Microwave-safe plastics
• Microwave-safe paper plates
• Microwave-safe pottery, stoneware and porcelain
• Browning dish (Do not exceed recommended preheating time. Follow manufacturer’s directions.)
These items can be used for short time reheating of foods
that have little fat or sugar in them:
• Wood, Straw, Wicker
DO NOT USE
• Metal pans and Bakeware
• Dishes with metallic trim
• Non-heat-resistant glass
• Non-microwave-safe plastics (margarine tubs)
• Recycled paper products
• Brown paper bags
• Food storage bags
• Metal twist-ties
Should you wish to check if a dish is safe for microwaving, place the empty dish in the microwave on HIGH for
30 seconds. A dish which becomes very hot should not be
used.
THE FOLLOWING COVERINGS ARE IDEAL:
• Paper towels are good for covering foods for reheating
and absorbing fat while cooking bacon.
• Wax paper can be used for cooking and reheating.
• Plastic wrap that is specially marked for microwave
use can be used for cooking and reheating. DO NOT
allow plastic wrap to touch food. Vent so steam can
escape.
• Lids that are microwave-safe are a good choice
because heat is kept near the food to hasten cooking.
• Oven cooking bags are good for large meats or foods
that need tenderizing. DO NOT use metal twist ties.
Remember to slit the bag so steam can escape.
®
HOW TO USE ALUMINUM FOIL IN YOUR
DRAWER:
• Small at pieces of aluminum foil placed smoothly on
• Foil should not come closer than one inch to any
Should you have questions about utensils or coverings,
check a good microwave cookbook or follow recipe
suggestions.
ACCESSORIES:
There are many microwave accessories available for
purchase. Evaluate carefully before you purchase to
make sure that they meet your needs. A microwavesafe thermometer will assist you in determining correct
doneness and assure you that foods have been cooked
to safe temperatures. Dacor is not responsible for any
damage to the appliance when accessories are used.
Open Or Close Drawer
Always press the OPEN or CLOSE key on the control panel
to open or close the drawer.
Do not push or pull the drawer by hand, except
in case of emergency, such as a power failure. If
necessary, push or pull slowly.
About Children And The
Microwave
Children below the age of 7 should use the Microwave InA-Drawer™ with a supervising person very near to them.
Between the ages of 7 and 12, the supervising person
should be in the same room. The child must be able to
reach the drawer comfortably.
At no time should anyone be allowed to lean or sit on the
Microwave In-A-Drawer™.
Children should be taught all safety precautions: how
to use potholders, remove coverings carefully and pay
special attention to packages that crisp food because they
may be extra hot.
Do not assume because a child has mastered one cooking
skill that he/she can cook everything.
Children need to learn that the Microwave In-A-Drawer™ is
not a toy. See page 15 for Control Lock feature.
the food can be used to shield areas that are either
defrosting or cooking too quickly.
surface of the Microwave In-A-Drawer™.
E4
Page 7
Information You Need To Know
About Safety
Check foods to see that they are cooked to the United States Department of Agriculture’s recommended temperatures.
160˚F - For fresh pork, ground meat, boneless white poultry, sh, seafood, egg dishes and frozen prepared food.
165˚F - For leftovers, ready-to-reheat refrigerated; deli and carry-out “fresh” food.
170˚F - White meat of poultry.
180˚F - Dark meat of poultry.
™
To test for doneness, insert a meat thermometer in a
thick or dense area away from fat or bone. NEVER leave
the thermometer in the food during cooking, unless it is
approved for microwave use.
• ALWAYS use potholders to prevent burns when
handling utensils that are in contact with hot food.
Enough heat from the food can transfer through
utensils to cause skin burns.
• Avoid steam burns by directing steam away from
the face and hands. Slowly lift the farthest edge of a
dish’s covering and carefully open popcorn and oven
cooking bags away from the face.
• Stay near the Microwave In-A-Drawer
and check cooking progress frequently so that there is
no chance of overcooking food.
• NEVER use the Microwave In-A-Drawer™ for storing
cookbooks or other items.
• Select, store and handle food carefully to preserve
its high quality and minimize the spread of foodborne
bacteria.
• Keep waveguide cover clean. Food residue can cause
arcing and/or res. See page 16.
while it’s in use
About Foods
FOOD DO DON’T
Eggs, sausages,
fruits & vegetables
Popcorn • Use specially bagged popcorn for the
Baby food • Transfer baby food to small dish and
General • Cut baked goods with lling after
• Puncture egg yolks before cooking to
prevent “explosion”.
• Pierce skins of potatoes, apples,
squash, hot dogs and sausages so
that steam escapes.
microwave.
• Listen while popping corn for the popping to slow to 1 or 2 seconds or use
the special SENSOR POPCORN key.
heat carefully, stirring often. Check
temperature before serving.
• Put nipples on bottles after heating
and shake thoroughly. “Wrist” test
before feeding.
heating to release steam and avoid
burns.
• Stir liquids briskly before and after
heating to avoid “eruption”.
• Use deep bowl, when cooking liquids
or cereals, to prevent boilovers.
• Food should be shorter than the
drawer. Please refer to the height of
side walls of the drawer.
• Cook eggs in shells.
• Reheat whole eggs.
• Dry nuts or seeds in shells.
• Pop popcorn in regular brown bags or glass
bowls.
• Exceed maximum time on popcorn package.
• Heat disposable bottles.
• Heat bottles with nipples on.
• Heat baby food in original jars.
• Heat or cook in closed glass jars or airtight
containers.
• Heat cans in the microwave as harmful
bacteria may not be destroyed.
• Deep fat fry.
• Dry wood, gourds, herbs or wet papers.
E5
Page 8
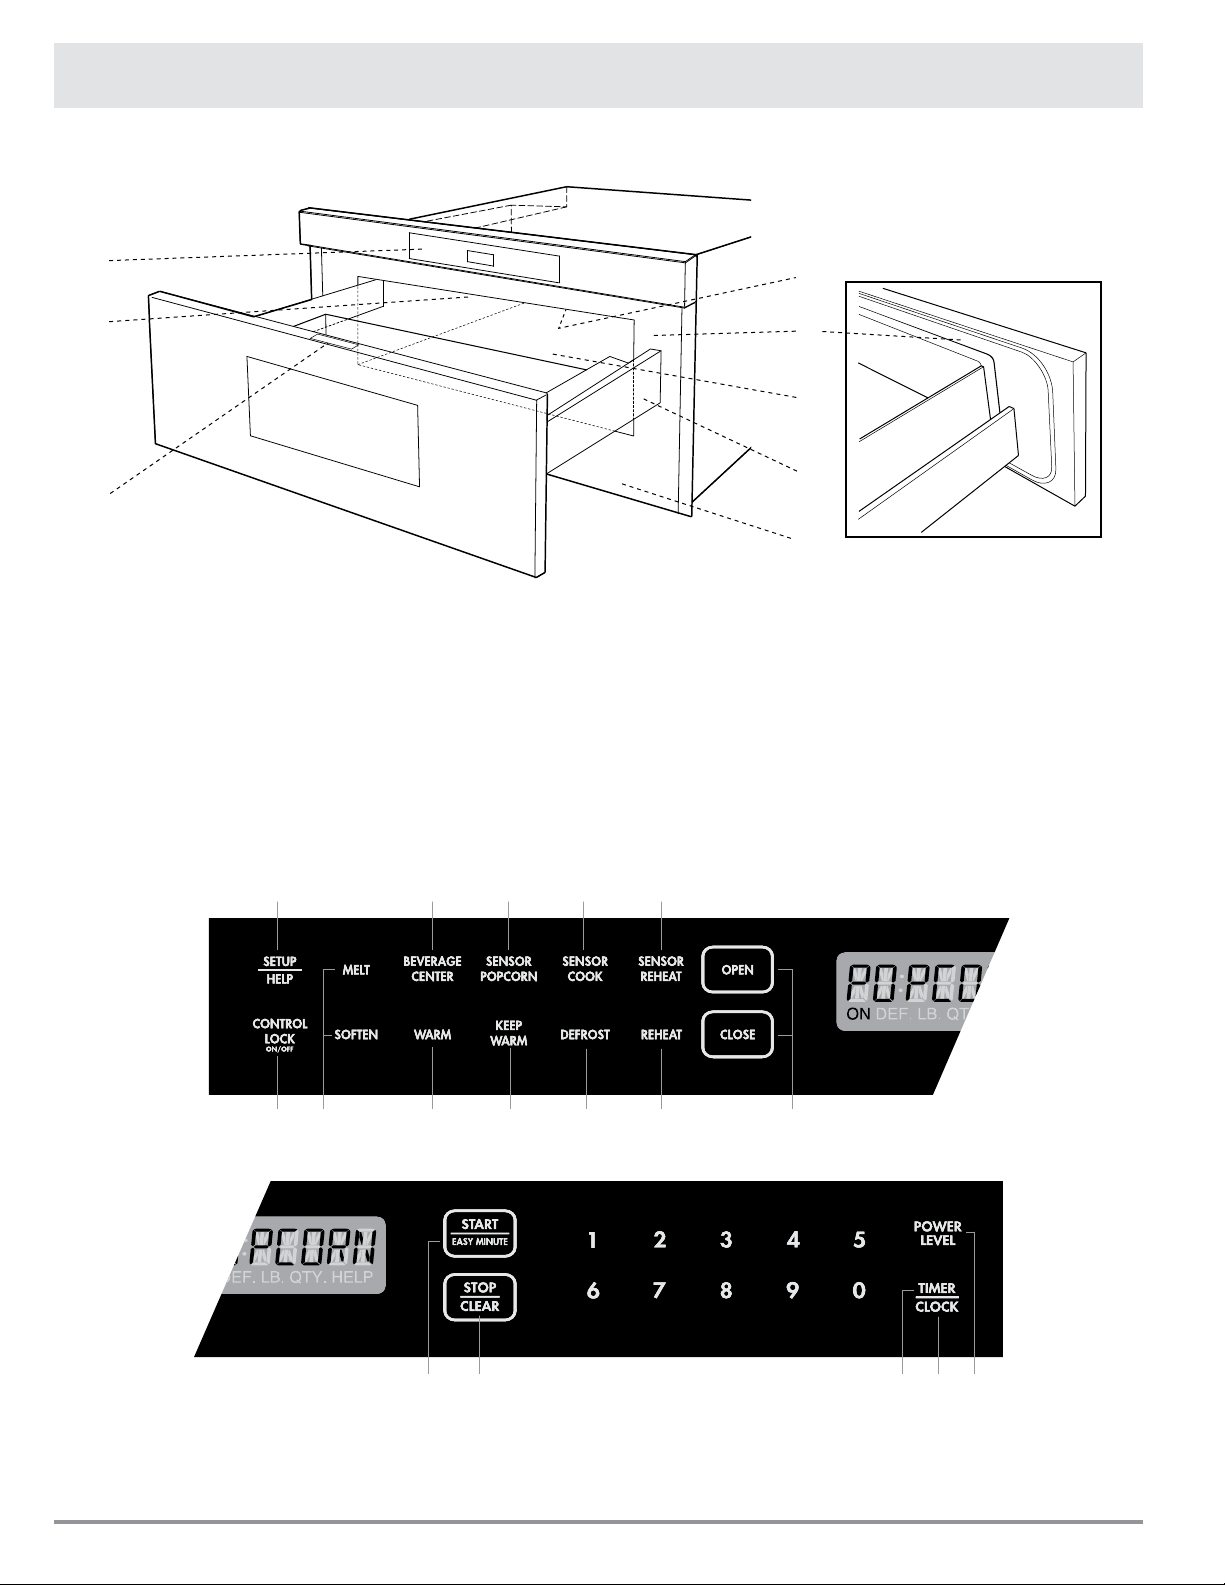
Part Names
Microwave In-A-Drawer
1
2
3
1. Control Panel
2. Waveguide Cover DO NOT REMOVE
3. Menu Label
4. Drawer Sealing Surfaces
6. Drawer Guides
7. Vent
8. Rating Label: Open the Microwave Drawer
fully. The label is on the oven-cavity oor
just past the drawer’s rear panel.
™
5
4
8
6
7
5. Drawer Light
KEYPAD
14 12 9 10 9
13 71315
14 77 87
11 1214
Numbers next to the keypad illustration indicate page numbers
where feature descriptions and usage information is located.
E6
Page 9
Before Operating
Before operating your new Microwave In-A-Drawer™ make
sure you read and understand this manual completely.
Timer
• Before the Microwave In-A-Drawer™ can be used,
follow these steps:
1. Plug in the Microwave In-A-Drawer™.
MICRO-
CLOCK
2. Touch the STOP/CLEAR key.
3. Set the clock.
WAVE TOUCH CLEAR AND TOUCH
will appear.
:
ENJOY YOUR
will appear.
To Set The Clock
1. Touch the TIMER/CLOCK key and number 2.
2. Touch the number keys for correct time of day and
touch the TIMER/CLOCK key again.
This is a 12 hour clock. If you attempt to enter an incorrect
clock time,
STOP/CLEAR key and re-enter the time.
• If the electrical power supply to your Microwave
In-A-Drawer™ should be interrupted, the display will
intermittently show
TOUCH CLEAR
power is restored. If power is interrupted during
cooking, the program will be erased. The time of day
will also be erased. Simply touch the STOP/CLEAR
key and reset the clock for the correct time of day.
NOTE:
ERROR
will appear in the display. Touch the
ENJOY YOUR
AND TOUCH CLOCK
MICRO-
WAVE
after the
1. Touch the TIMER/CLOCK key and number 1.
2. Enter time.
3. Touch the TIMER/CLOCK key again.
4. To cancel timer, touch the STOP/CLEAR.
Stop/Clear
Touch the STOP/CLEAR key to:
1. Clear a mistake made during programming.
2. Cancel the timer.
3. Stop the Microwave In-A-Drawer™ temporarily during
timed cooking.
4. Return the time of day to the display.
5. Cancel a program during cooking, touch twice for
timed cooking.
Open Or Close Drawer
Always press the OPEN or CLOSE key on the control
panel to open or close the drawer.
Do not push or pull the drawer by hand, except in case of
emergency, such as during a power failure. If necessary,
push or pull slowly.
• The Microwave In-A-Drawer™ can be programmed
with the drawer open except for the START/EASY
MINUTE feature.
Standby Mode
This Microwave In-A-Drawer™ will go into standby mode
after a period of inactivity. The backlight of the display will
automatically dim after 3 minutes if the unit has not been
in operation. If the display is in standby mode, simply
touch any key on the control panel to return the backlight
to maximum brightness.
E7
Page 10
Microwave In-A-Drawer
™
Cooking
Time Cooking
Your Microwave In-A-Drawer™ can be programmed for
99 minutes 99 seconds (99.99). Always enter the seconds
after the minutes, even if they are both zeros.
• For example: Cook for 5 minutes at 100%.
1. Enter cooking time
OR TOUCH
2. To cook at 100% power (High), touch the START/
EASY MINUTE key.
5 0 0
POWER
5.00 TOUCH START
.
LEVEL
Sensor Settings
Dacor's Sensor is a semi-conductor device that detects
the vapor (moisture and humidity) emitted from the food
as it heats. The sensor adjusts the cooking times and
power levels for various foods and quantities.
USING SENSOR SETTINGS:
1. After the Microwave In-A-Drawer™ is plugged in, wait
2. Be sure the exterior of the cooking container and the
To Set Power Level
There are eleven preset power levels.
Using lower power levels increases the cooking time,
which is recommended for foods such as cheese, milk and
long slow cooked meats. Consult a microwave cookbook
or recipes for specic recommendations.
• For example: Defrost for 5 minutes at 30%.
1. Enter defrost time
2. Touch the POWER LEVEL key 8 times.
3. Touch the START/EASY MINUTE key.
TOUCH POWER
LEVEL KEY NUMBER
OF TIMES FOR
5 0 0
APPROXIMATE
PERCENTAGE
OF POWER
.
5.00
COMMON
WORDS FOR
POWER LEVELS
DESIRED POWER
Power Level x 1 100% High
Power Level x 2 90%
3. The sensor works with foods at normal storage tem-
4. Any sensor selection can be programmed with more
5. During the rst part of sensor use, the food name will
When the sensor detects the vapor emitted from the
2 minutes before using any sensor setting.
interior of the Microwave In-A-Drawer™ are dry. Wipe
off any moisture with a dry cloth or paper towel.
perature. For example, popcorn would be at room
temperature.
or less food than the quantity listed in the charts
and should be cooked following the guidelines in any
microwave cookbook.
appear on the display. Do not open the Microwave
In-A-Drawer™ or touch STOP/CLEAR during this part
of the cycle. The measurement of vapor will be interrupted. If this occurs, an error message will appear.
To continue cooking, touch the STOP/CLEAR key and
cook manually.
food, the remainder of cooking/reheating time will
appear. The Microwave In-A-Drawer™ may be opened
when the remaining time appears on the display. At
this time, you may stir or season food, as desired.
Power Level x 3 80%
Power Level x 4 70% Medium High
Power Level x 5 60%
Power Level x 6 50% Medium
Power Level x 7 40%
Power Level x 8 30% Med Low/Defrost
Power Level x 9 20%
Power Level x 10 10% Low
Power Level x 11 0%
6. Except for Popcorn, if the sensor does not detect
vapor properly when cooking other foods,
be displayed, and the microwave will turn off.
7. Check food temperature after cooking. If additional
time is needed, continue to cook manually.
8. Each food has a cooking hint. Touch the SET UP/
HELP key when the HELP indicator is lighted in the
display.
E8
ERROR
will
Page 11

Microwave In-A-Drawer
™
Cooking
COVERING FOODS:
Sensor Popcorn / Sensor Reheat
Some foods cook best when covered. Use the cover
recommended in the charts for these foods. You may refer
to the hints by touching the SET UP/HELP key.
1. Casserole lid.
2. Plastic wrap: Use plastic wrap recommended for
microwave cooking. Cover dish loosely; allow
approximately 1/2 inch to remain uncovered to allow
steam to escape. Plastic wrap should not touch food.
3. Wax paper: Cover dish completely; fold excess wrap
under dish to secure. If dish is wider than paper,
overlap two pieces at least one inch to cover.
Be careful when removing any covering to allow steam to
escape away from you.
SENSOR POPCORN / SENSOR REHEAT CHART
FOOD AMOUNT PROCEDURE
Sensor Popcorn Only 1 package at a time Use only popcorn packaged for the microwave. Try several brands to
decide your favorite. Do not try to pop unpopped kernels.
You can pop popcorn and reheat many foods without
calculating the cooking time or power level.
Touch the SENSOR REHEAT or SENSOR POPCORN
and the START/EASY MINUTE key.
When the sensor detects the vapor emitted from the food,
the remainder of cooking/reheating time will appear.
NOTE:
• The Sensor Popcorn setting has 2 choices. Follow
directions on the display to choose desired option.
2.85 - 3.5 oz.
(Regular / Regular light)
1.2 - 1.75 oz.
(Mini / Snack)
Sensor Reheat 4 - 36 oz. Place food to be reheated in a dish or casserole slightly larger than
Touch the SENSOR POPCORN key once.
Touch the SENSOR POPCORN key twice.
the amount. Flatten, if possible. Cover with a lid, plastic wrap or wax
paper. Use covers such as plastic wrap or lids with larger quantities
of more dense foods such as stews. After reheating, stir well if
possible. Re-cover and allow to stand 2 to 3 minutes. Foods should
be very hot. If not, continue to heat with variable power and time.
E9
Page 12
Microwave In-A-Drawer
Sensor Cooking
™
Cooking
3. Touch the START/EASY MINUTE key.
NOTE:
1. Touch the SENSOR COOK key once.
SEE LABEL
2. See the Menu Label. Select desired food by touching
the number key. Ex: Touch 5 for baked potatoes.
SELECT
FOOD
NUMBER
SENSOR COOK CHART
FOOD AMOUNT PROCEDURE
1. Fresh vegetables: Quick
Broccoli
Brussel sprouts
Cabbage
Cauliower (owerets)
Cauliower (whole)
Spinach
Zucchini
Baked apples
2. Fresh vegetables: Longer
Carrots, sliced
Corn on the cob
Green beans
Winter squash:
diced
halves
.25 - 2.0 lb.
.25 - 2.0 lb.
.25 - 2.0 lb.
.25 - 2.0 lb.
1 med.
.25 - 1.0 lb.
.25 - 2.0 lb.
2 - 4 med.
.25 - 1.5 lb.
2 - 4
.25 - 1.5 lb.
.25 - 1.5 lb.
1 - 2
Wash and place in casserole. Do not add water if vegetables have just
been washed. Cover with lid for tender vegetables. Use plastic wrap for
tender-crisp vegetables. After cooking, stir, if possible. Let stand covered
for 2 to 5 minutes.
Place in casserole. Add 1 - 4 tablespoons water. Cover with lid for tender
vegetables. Use plastic wrap cover for tender-crisp vegetables. After
cooking, stir, if possible. Let stand covered for 2 to 5 minutes.
• To heat or cook other foods or foods above or below
the quantity allowed on the SENSOR COOK CHART,
cook manually.
3. Frozen vegetables .25 - 1.25 lb. Do not add water. Cover with lid or plastic wrap. After cooking, stir and let
stand covered for 3 minutes.
4. Frozen entrees 6 - 17 oz. Use this key for frozen convenience foods. It will give satisfactory results
for most brands. You may wish to try several and choose your favorite.
Remove package from outer wrapping and follow package directions for
covering. After cooking, let stand covered for 1-3 minutes.
5. Baked potatoes
6. Sweet potatoes
7. Ground meat .25 - 2.0 lb. Use this setting to cook ground beef or turkey as patties or in a casserole
8. Fish/seafood .25 - 2.0 lb. Arrange in ring around shallow glass dish (roll llet with edges
9. White Rice
10. Brown Rice
1 - 6 med.
1 - 6 med.
.5 - 2.0 cups
.5 - 2.0 cups
Pierce. Place on paper-towel-lined drawer. After cooking, remove from
microwave, wrap in aluminum foil and let stand 5 to 10 minutes.
to be added to other ingredients. Place patties on a microwave-safe rack
and cover with wax paper. Place ground meat in a casserole and cover with
wax paper or plastic wrap. When microwave stops, turn patties over or stir
meat in casserole to break up large pieces. Re-cover and touch START/
EASY MINUTE. After cooking, let stand covered for 2 to 3 minutes.
underneath). Cover with vented plastic wrap. After cooking, let stand
covered for 3 minutes.
Place rice into a deep casserole and add a double quantity of water. Cover
with lid or plastic wrap. After cooking, stir, cover and let stand 3 to 5
minutes or until all liquid has been absorbed.
Rice Water Size of casserole
.5 cup 1 cup 1.5 quart
1 cup 2 cups 2 quart
1.5 cups 3 cups 2.5 or 3 quart
2 cups 4 cups 3 quart or larger
E10
Page 13
Microwave In-A-Drawer
Defrost
Use this feature to defrost the foods shown in the DEFROST
CHART below.
1. Touch the DEFROST key.
FOOD
2. See the Menu Label. Select desired food by touching
the number key. For example: Touch 2 for steaks/
chops.
3. Enter the weight by touching 10.
4. Touch the START/EASY MINUTE key.
5. The Microwave In-A-Drawer™ will stop so that the food
can be checked.
6. After the rst stage, open the drawer. Turn steak over
and shield any warm portions. Close the drawer. Touch
the START/EASY MINUTE key.
NUMBER
STEAKS
CHOPS
SEE LABEL
ENTER
WEIGHT
1.0 LB
SELECT
™
Cooking
7. After the second stage, open the drawer. Shield any
warm portions. Close the drawer. Touch the START/
EASY MINUTE key.
8. After defrost cycle ends, cover and let stand as
indicated in the chart below.
NOTE:
• Defrost can be programmed with More or Less Time
Adjustment. See page 14.
• To defrost other foods or foods above or below the
weights allowed on the DEFROST CHART, see MANUAL
DEFROST below.
• Do not defrost until all ice crystals are thawed.
• Check foods when the Microwave In-A-Drawer™
signals. After the nal stage, small sections may still
be icy. Let stand to continue thawing.
• Shielding prevents cooking from occurring before the
center of the food is defrosted. Use small smooth
strips of aluminum foil to cover edges and thinner
sections of the food.
DEFROST CHART
FOOD AMOUNT PROCEDURE
1. Ground meat .5 - 2.0 lb Remove any thawed pieces after each audible signal. Let stand covered for 5 to 10
minutes.
2. Steaks/chops .5 - 3.0 lb After each audible signal, rearrange and if there are warm or thawed portions,
shield with small at pieces of aluminum foil. Remove any meat or sh that is
almost defrosted. Let stand covered for 10 to 20 minutes.
3. Boneless
poultry
4. Bone-in poultry .5 - 3.0 lb After each audible signal, rearrange pieces or remove portions should they become
5. Roast 2.0 - 4.0 lb Start defrosting with fat side down. After each stage, turn roast over and shield the
Manual Defrost
If the food that you wish to defrost is not listed on the
DEFROST CHART or is above or below the limits in the
AMOUNT column on the DEFROST CHART, you need to
defrost manually.
You can defrost any frozen food, either raw or previously
cooked, by setting the Power Level to 30%. Follow the
exact 3-step procedure found under TO SET POWER
LEVEL on page 8. Estimate defrosting time and press
POWER LEVEL key eight times for 30% power.
.5 - 2.0 lb After each audible signal, if there are warm or thawed portions, rearrange or
remove. Let stand covered for 10 to 20 minutes.
warm or thawed. Let stand covered for 10 to 20 minutes.
warm portions with aluminum foil. Let stand, covered, for 30 to 60 minutes.
For either raw or previously cooked frozen food, the
rule of thumb is approximately 4 minutes per pound.
For example, defrost 4 minutes for 1 pound of frozen
spaghetti sauce.
™
Always stop the Microwave In-A-Drawer
to remove or separate the portions that are defrosted.
If food is not defrosted at the end of the estimated
defrosting time, program the Microwave In-A-Drawer™ in
1 minute increments at a Power Level of 30% until totally
defrosted.
When using plastic containers from the freezer, defrost
only long enough to remove from the plastic, then place in
a microwave-safe dish.
periodically
E11
Page 14
Microwave In-A-Drawer
3. Touch the number key to select quantity. For exam-
Reheat
Reheat automatically computes the correct warming time
and microwave power level for foods shown in the chart
below.
1. Touch the REHEAT key once.
FOOD
2. See Menu Label. Select desired food by touching the
number key. For example: Touch 2 for frozen rolls or
mufns.
NUMBER
SEE LABEL
REHEAT CHART
FOOD AMOUNT PROCEDURE
1. Fresh rolls/
mufns
1 - 8 pcs Use this key to warm rolls, mufns, biscuits, bagels etc. Large items should be
considered as 2 or 3 regular size. Arrange on plate; cover with paper towel. For
refrigerated rolls or mufns, it may be necessary to double the entered amount
to ensure the proper serving temperature. For example, enter quantity of 2 for 1
refrigerated mufn.
SELECT
ple: Touch
4. Touch the START/EASY MINUTE key.
NOTE:
• Reheat can be programmed with More or Less Time
Adjustment. See page 14.
• To reheat other foods or foods above or below the
quantity allowed on the REHEAT CHART, heat manually.
™
Cooking
2
for 2 rolls or mufns.
2. Frozen rolls/
mufns
Beverage Center
Beverage Center enables you to reheat coffee or tea to
restore to a more suitable drinking temperature or to
make instant coffee or tea.
1. Touch BEVERAGE CENTER key once.
SELECT
LABEL
2. See Menu Label. Select desired selection by touching
number key. Ex: Touch 2 to make coffee.
1 - 8 pcs Use this key to warm frozen rolls, mufns, biscuits, bagels etc. Large items should
be considered as 2 or 3 regular size. Arrange on plate; cover with paper towel.
3. Repeating touching same number key to select quantity. Ex: Touch
4. Touch START/EASY MINUTE key.
NOTE:
• Beverage Center can be programmed with More or Less
Time Adjustment. See page 14.
• Should you attempt to enter more or less than the
allowed amount, an error message will appear in the
display.
FOOD
NUMBER
SEE
BEVERAGE CENTER CHART
FOOD AMOUNT PROCEDURE
1. Reheat
beverage
.5 - 2.0 cups This setting for good for restoring cooled beverage to a better drinking tempera-
ture. Touch number 1 key for a 0.5 cup increase per touch. Stir after heating.
2 two more times for 2 cups of coffee.
2. Hot water 1 - 6 cups Use this setting for heating COLD TAP WATER to a temperature somewhat below the
2
boiling point to make instant coffee or tea. Touch number
per touch. Stir liquid briskly before and after heating to avoid “eruption”.
E12
key for 1 cup increase
Page 15

Microwave In-A-Drawer
Melt/Soften/Warm
Melt, Soften and Warm automatically compute the correct heating time and microwave power level for melting,
softening and warming foods shown in the chart below.
1. Touch MELT key once.
FOOD
2. See Menu Label. Select desired food by touching
number key. Ex: Touch 2 for chocolate.
NUMBER
SEE LABEL
SELECT
3. Repeat touching same number key to select quantity.
Ex: Touch
4. Touch START/EASY MINUTE key.
NOTE:
• Melt, Soften and Warm can be programmed with More or
Less Time Adjustment. See page 14.
• To melt, soften or warm other food or foods above or
below the quantity allowed on the MELT/SOFTEN/ WARM
CHART, use manual operation.
™
Cooking
2 two more times for 1 square.
MELT/SOFTEN/WARM CHART
FOOD AMOUNT PROCEDURE
Melt Use a Pyrex measuring cup. Cover with plastic wrap.
1. Butter 2 tbsp
.5 cup
2. Chocolate 1 cup chips
1 square
Soften DO NOT COVER.
1. Ice cream 1 pint
.5 gallon
2. Cream cheese 3 oz.
8 oz.
Warm Use a Pyrex measuring cup. DO NOT COVER.
1. Syrup
2. Dessert
toppings
1/4 cup
1/2 cup
1/4 cup
1/2 cup
After touching MELT, touch 1 two times for 2 tbsp.
After touching MELT, touch 1 three times for .5 cup.
After touching
After touching
After touching SOFTEN, touch 1 two times for 1 pint.
After touching
After touching SOFTEN, touch 2 two times for 3 oz.
After touching SOFTEN, touch 2 three times for 8 oz.
After touching WARM, touch 1 two times for 1/4 cup.
After touching
After touching WARM, touch 2 two times for 1/4 cup.
After touching WARM, touch 2 three times for 1/2 cup.
, touch 2 two times for 1 cup chips.
MELT
, touch 2 three times for 1 square.
MELT
SOFTEN
WARM
, touch 1 three times for .5 gallon.
, touch 1 three times for
1/2 cup
.
E13
Page 16

Other Features
Heading
Keep Warm
Keep Warm allows you to keep food warm up to 30 minutes.
DIRECT USE
1. Touch the Keep Warm key.
ENTER TIME UP TO 30
2. Enter the desired time by touching the number keys.
To enter 30 minutes, touch
30.00 TOUCH START
3. Touch the START/EASY MINUTE key.
The Microwave In-A-Drawer™ will start. The display will
show
30.00
displayed intermittently during the count down.
and count down.
MINUTES
3000
KEEP WARM
.
WITH MANUAL COOKING
1. Enter the desired cooking time and power level.
2. Touch the Keep Warm key.
3. Enter the desired warming time, up to 30 minutes.
4. Touch the START/EASY MINUTE key.
The operation will start. When the cooking time is
complete, a long tone will sound and Keep Warm will
start. The display will count down.
be displayed intermittently during the count down.
NOTE:
KEEP WARM
will be
will
Multiple Sequence Cooking
Your Microwave In-A-Drawer™ can be programmed for up
to 4 automatic cooking sequences, switching from one
power level setting to another automatically.
Sometimes cooking directions tell you to start on one
power level and then change to a different power level.
Your Microwave In-A-Drawer™ can do this automatically.
1. First enter the cooking time. Then touch the POWER
LEVEL key once for 100% cooking or repeat touching
the POWER LEVEL key for a lower power level.
2. Enter the second cooking time. Touch the POWER
LEVEL key repeatedly for desired level. You can follow
this procedure up to 4 times.
3. Touch the START/EASY MINUTE key.
NOTE:
• If the POWER LEVEL key is touched once,
will be displayed.
• If 100% is selected as the nal sequence, it is not
necessary to touch the POWER LEVEL key.
• If you wish to know the power level during cooking,
simply touch the POWER LEVEL key. As long as your
nger is touching the POWER LEVEL key, the power
level will be displayed.
• Keep Warm can be programmed even if 4 cooking
sequences have been set.
TOUCH START
HIGH
• If you attempt to enter more than 30 minutes for
Keep Warm, an error message will appear in the display.
• Keep Warm cannot be programmed with Sensor Popcorn, Sensor Reheat, Sensor Cook, Defrost or Reheat.
Help
Each setting of Sensor Reheat, Sensor Cook, Sensor
Popcorn, Keep Warm, Reheat and Defrost has a cooking
hint. If you wish to check, touch SET UP/HELP whenever
HELP is lighted in the interactive display for these and
other manual operation hints.
More Or Less Time Adjustment
Should you discover that you like any of the Sensor,
Reheat or Defrost settings slightly more done, touch the
POWER LEVEL key once after touching your selection.
The display will show
For slightly less done, touch the POWER LEVEL key twice
after touching your selection.
The display will show
MORE
less
.
.
Easy Minute
Easy Minute allows you to cook for a minute at 100% by
simply touching the EASY MINUTE key. You can also extend cooking time in multiples of 1 minute by repeatedly
touching the EASY MINUTE key during manual cooking.
NOTE:
• To use
• Easy Minute cannot be used with Sensor settings,
Setup/Help
If the electrical power supply to your Microwave In-ADrawer™ should be interrupted, the display will intermittently show
stated. If this situation occurs, the SETUP/HELP option
you input will be erased. Simply touch the STOP/CLEAR
key and reset.
Easy Minute
after cooking, closing the door or touching the
STOP/CLEAR
Reheat or Defrost.
ENJOY YOUR MICRO- WAVE TOUCH
CLEAR AND TOUCH CLOCK
, touch the key within 3 minutes
key.
after the power is rein-
E14
Page 17

HeadingOther Features
AUDIBLE SIGNAL ELIMINATION
4. Touch the TIMER/CLOCK key.
At the end of timed cook, a series of beeps will sound. If
you wish to operate the appliance with no audible signals,
5. Touch the number keys to enter cooking time.
you can turn them off.
TO TURN SOUND OFF
1. Touch the SETUP/HELP key.
2. Touch the SETUP/HELP key again.
TOUCH START
TOUCH AGAIN
SOUND
OFF ?
3. Touch the START/EASY MINUTE key. The display
shows
SOUND OFF
.
6. Touch the START/EASY MINUTE key.
DEMONSTRATION MODE
TO SELECT DEMO MODE
1. Touch the SETUP/HELP key ve times. The display
TO RESTORE SOUND
1. Touch the SETUP/HELP key.
2. Touch the SETUP/HELP key again.
TOUCH START
TOUCH AGAIN
SOUND
ON ?
3. Touch the START/EASY MINUTE key. The display
shows
SOUND ON
.
END OF COOKING REMINDER
At end of timed cooking, the microwave will signal every
10 seconds for the rst minute; then every 3 minutes
until the STOP/CLEAR key is touched, up to one hour.
TO TURN REMINDER OFF
1. Touch the SETUP/HELP key three times. The display
shows
REMIND SIGNAL OFF ? TOUCH START
.
2. Touch the START/EASY MINUTE key.
The display shows
REMIND SIGNAL OFF
.
TO TURN REMINDER SIGNAL BACK ON
1. Touch the SETUP/HELP key three times. The display
shows
2. Touch the START/EASY MINUTE key.
The display shows
REMIND SIGNAL ON ? TOUCH START
REMIND SIGNAL ON
.
2. Hold the START/EASY MINUTE key for 3 seconds.
TO CANCEL DEMO MODE
1. Hold the SETUP/HELP key ve times. The display
2. Touch the START/EASY MINUTE key. The display
NOTE:
• Microwave In-A-Drawer™ doesn’t heat in Demo Mode.
• The display counts down quickly.
Control Lock
The Control Lock prevents unwanted Microwave InA-Drawer™ operation such as by small children. The
Microwave In-A-Drawer™ can be set so that the control
panel is deactivated or locked.
.
TO LOCK
Touch the CONTROL LOCK key and hold for 3 seconds.
The display shows
AUTO START
If you wish to program the Microwave In-A-Drawer™ to
begin cooking automatically at a designated time of day,
follow this procedure:
1. Touch the SETUP/HELP key 4 times. The display
shows
AUTO START
TOUCH START
.
2. Touch the START/EASY MINUTE key.
ENTER START TIME
TO UNLOCK
Touch the CONTROL LOCK key and hold for 3 seconds.
The display shows
The CONTROL LOCK is canceled when the electrical power
supply to your oven is interrupted. Set the CONTROL LOCK
again when power to the oven is restored.
ENTER
TOUCH
COOKING
START
TIME
20.00
OR
TOUCH
POWER LEVEL
Touch the POWER LEVEL key repeatedly until the
desired power level is reached.
shows
DEMO ON?
The display shows
shows
shows
DEMO OFF ? TOUCH START
DEMO OFF
HOLD START 3 SEC
DEMO ON
.
.
LOCK ON
LOCK OFF
.
.
TOUCH START
.
.
3. Enter start time.
4:30 TOUCH CLOCK
E15
Page 18

Cleaning and Care
Heading
Exterior
The outside surface is precoated metal and plastic. Clean
the outside with mild soap and water; rinse and dry with
a soft cloth. Do not use any type of household or abrasive
cleaner.
Cleaning is easy because no heat is generated to the
interior surfaces; therefore, there is no baking and setting
of spills or spattering. To clean the interior surfaces,
including drawer sealing surfaces, wipe with a soft damp
cloth. DO NOT USE ABRASIVE OR HARSH CLEANERS OR
SCOURING PADS. For heavier soil, use mild soap; wipe
clean with a soft damp cloth. Do not use any chemical
oven cleaners.
Stainless Steel Surface
Drawer Guides
(Select Models)
The exterior should be wiped often with a soft damp cloth
and polished with a soft dry cloth to maintain its beauty.
Always wipe in the direction of the grain. There are also
a variety of products designed especially for cleaning
and shining the stainless exterior of the Microwave In-ADrawer™. We recommend that the cleaner be applied to a
soft cloth and then carefully used on the stainless exterior
rather than sprayed directly onto it. Follow package
directions carefully.
Front Side Of The Drawer
Wipe the window on both sides with a soft damp cloth to
remove any spills or spatters. Metal parts will be easier to
maintain if wiped frequently with a soft damp cloth. Avoid
the use of spray cleaners and other harsh cleaners as they
may stain, streak or dull the door surface.
Remove the food crumbs from the drawer guides. Wipe
them with a soft dry cloth in order to keep the drawer
opening and closing smoothly.
Waveguide Cover
ATTENTION
top of the Microwave area, is made of mica, so it requires
special care. Keep the waveguide cover clean to assure
good microwave performance. Carefully wipe with a soft
damp cloth any food spatters from the surface of the
cover immediately after they occur. Soil build up may
overheat and cause smoke or possibly catch re. Do not
remove the waveguide cover.
Odor Removal
The waveguide cover, located on the inside
Touch Control Panel
If desired, the touch keys may be deactivated before
cleaning. See the Control Lock information on page 14
of this manual. Wipe the panel with a cloth dampened
slightly with water only. Dry with a soft cloth. Do not
scrub or use any sort of chemical cleaners. Close the door
and follow directions on page 15 for turning Control Lock
off. Touch STOP/CLEAR.
Occasionally, cooking odors may remain in the drawer.
To remove odors, combine 1 cup water, grated peel and
juice of one lemon and several whole cloves in a 2-cup
glass measuring cup. Boil for several minutes using 100%
power. Allow to set in the drawer until cool. Wipe interior
with a soft cloth.
Interior
Before cleaning the the Microwave In-A-Drawer™, touch
and hold the Control Lock button for 3 seconds to lock
the control key and the automatic door mechanism. The
drawer can be locked in either the open or closed position.
The display will show
drawer from accidentally opening or closing during
cleaning. After cleaning, touch and hold the Control Lock
button for 3 seconds to turn the lock off. The display will
show
LOCK OFF
LOCK ON
.
. This will prevent the
E16
Page 19

Before You Call For Service
Please check the following before calling for service. It may save you time and expense.
Heading
PROBLEM POSSIBLE CAUSE SOLUTION
1. Part or all of Microwave
In-A-Drawer™ does not
operate.
• Power cord of Microwave In-ADrawer™ is not completely connected
to the electrical outlet.
• Make sure the power cord is tightly
connected to the outlet.
• Power outage.
• Fuse/circuit breaker at home doesn’t
work.
• Microwave In-A-Drawer™ is in Demo
Mode.
2. Food in microwave is not
heated.
3. Microwave In-A-Drawer
light does not work.
4. Touch controls will not
operate.
5. Display ashes. • Power failure. • Press the STOP/CLEAR key and reset
• No power to the appliance.
• Drawer controls improperly set.
• Drawer is in Demo Mode.
™
• Light bulb is loose or burned out. • Call for service.
• Control Lock is on. • See page 15 to unlock.
• Check house lights to be sure. Call your
local electric company for service.
• Replace the fuse or reset the circuit
breaker.
• See page 15 for how to cancel Demo
Mode.
• See SOLUTION for PROBLEM 1.
• Check if the controls have been properly
set.
• See page 15.
the clock. If the Microwave In-A-Drawer
was in use, you must reset the cooking
function.
™
6. Steam from the vent.
•
Normal operation.
microwaving, steam may come
from the right side of the vent.
During
E17
Page 20

Auto-Touch Guide
Heading
Microwave In-A-Drawer™
SET CLOCK
1. Touch the TIMER/CLOCK key and number 2.
2. Touch number keys for correct time of day and
touch the TIMER/CLOCK key again.
If the electrical power supply
to your appliance should be
interrupted, the display will
intermittently show:
TIME COOKING
High Power Cooking
1. Enter cooking time by touching number keys. To enter
5 minutes, touch
5 0 0
.
ENJOY
MICRO-
TOUCH
AND
CLOCK
5.00 TOUCH
START
TOUCH
LEVEL
YOUR
WAVE
CLEAR
TOUCH
OR
POWER
SENSOR POPCORN/SENSOR REHEAT
Touch SENSOR REHEAT or SENSOR POPCORN and
the START/EASY MINUTE key.
REHEAT
Reheat automatically computes the correct warming
time and microwave power level for foods shown on the
Menu Label.
1. Touch the REHEAT key once.
2. See Menu Label. Select desired
food by touching the number
key. Ex: Touch 2 for frozen
rolls or mufns.
3. Touch the number key to
SEE
SELECT
NUMBER
FROZEN
MUFFINS
NUMBER
2 PCS
select quantity. Ex: Touch 2
for 2 rolls or mufns.
4. Touch the START/EASY MINUTE ke y.
LABEL
FOOD
ROLLS
ENTER
2. Touch the START/EASY MINUTE key.
Variable Power Cooking
1.
After step 1 above, touch
until desired power level is in the display.
the POWER LEVEL
key
2. Touch the START/EASY MINUTE key.
SENSOR COOK
Sensor Cook automatically computes the correct time
and power level to cook foods on the Menu Label
perfectly.
1. Touch the SENSOR COOK
key once.
SEE
FOOD
NUMBER
SELECT
LABEL
2. See Menu Label. Select desired food by touching
the number key. Ex: Touch 5 for baked potatoes.
3. Touch the START/EASY MINUTE key.
DEFROST
Use this feature to defrost the foods shown on the Menu
Label.
1. Touch the DEFROST ke y.
SELECT
NUMBER
2. See Menu Label. Select desired
STEAKS
food by touching the number
key. Ex: Touch 2 for steaks/
SEE
ENTER
LABEL
FOOD
CHOPS
WEIGHT
chops.
3. Enter weight by touch-
1.0 LB
ing number keys. To enter
1 pound, touch
1 0
.
4. Touch the START/EASY MINUTE ke y.
5. Microwave will stop to allow food to be turned over,
shielded and/or removed. Close the drawer. Touch
the START/EASY MINUTE key.
E18
Page 21

Auto-Touch Guide
Heading
KEEP WARM
Keep Warm allows you to keep food warm up to
30 minutes.
Direct Use
1. Touch the Keep Warm key.
2. Enter desired time by touching
the number keys. To enter 30
minutes, touch
3. Touch the START/EASY MINUTE key.
With Manual Cooking
1. Enter desired cooking time and power level.
2. Touch the Keep Warm key.
3. Enter desired warming time up to 30 minutes.
4. Touch the START/EASY MINUTE key.
TIMER
1. Touch the TIMER/CLOCK key and number 1.
2. Enter time.
3. Touch the TIMER/CLOCK key again.
To cancel timer, touch STOP/CLEAR.
3 0 0 0
.
ENTER
UP TO
MINUTES
30:00
START
TIME
TOUCH
30
Other Features
CONTROL LOCK
The Control Lock prevents unwanted drawer operation
such as by small children. The Microwave In-A-Drawer™
can be set so that the control panel is deactivated or
locked.
To Lock
Touch CONTROL LOCK key and hold for
3 seconds.
To Unlock
Touch CONTROL LOCK key and hold for
3 seconds.
HELP
Check operation manual for specic details.
Touch the SETUP/HELP key.
2 times for Sound Off/On.
3 times for End of Cooking Reminder.
4 times for Auto Start.
5 times for Demonstration Mode.
LOCK ON
LOCK OFF
EASY MINUTE
Touch START/EASY MINUTE for 1 minute at 100%
microwave power or to add a minute during manual
cooking. Continue to touch for additional minutes.
E19
Page 22

Product Warranty
Heading
What Is Covered
CERTIFICATE OF WARRANTIES
DACOR Microwave In-A-Drawer™
WITHIN THE FIFTY STATES OF THE U.S.A., THE DISTRICT OF COLUMBIA AND CANADA*:
FULL 2-YEAR WARRANTY
If, due to material or manufacturing defect, your DACOR Modernist product malfunctions within 2 years of the original
purchase date, DACOR will remedy the defect without charge to you or subsequent users. The owner must provide proof
of purchase upon request and have the appliance accessible for service.
* Warranty is null and void if non-CSA approved product is transported from the U.S.
OUTSIDE THE FIFTY STATES OF THE U.S.A., THE DISTRICT OF COLUMBIA, AND CANADA:
LIMITED FIRST-YEAR WARRANTY
If, due to material or manufacturing defect, your DACOR Modernist product malfunctions within 1 year of the original
purchase date, DACOR will furnish a new part, FOB factory, to replace the defective part. All delivery, installation, and
labor costs are the responsibility of the owner, who must provide proof of purchase upon request and have the appliance
accessible for service.
What Is Not Covered
• Failure of the product caused by faulty installation, improper usage, or neglect of required maintenance.
• Service calls to educate the customer in the proper use and care of the product.
• Failure of the product when used for commercial, business, rental or any application other than for residential
consumer use.
• Replacement of house fuses or fuse boxes, or resetting of circuit breakers.
• Damage to the product caused by accident, re, ood or acts of God.
• Breakage, discoloration or damage to glass, metal surfaces, plastic components, trim, paint, porcelain or other cos-
metic nish, caused by improper usage or care, abuse, or neglect.
THE REMEDIES PROVIDED FOR IN THE ABOVE EXPRESS WARRANTIES ARE THE SOLE AND EXCLUSIVE
REMEDIES THEREFORE NO OTHER EXPRESS WARRANTIES ARE MADE, AND OUTSIDE THE FIFTY STATES OF THE
UNITED STATES AND THE DISTRICT OF COLUMBIA, ALL IMPLIED WARRANTIES, INCLUDING BUT NOT LIMITED
TO, ANY IMPLIED WARRANTY OF MERCHANTABILITY OR FITNESS FOR A PURCHASE. IN NO EVENT SHALL
DACOR BE LIABLE FOR INCIDENTAL EXPENSE OR CONSEQUENTIAL DAMAGES. NO WARRANTIES, EXPRESS OR
IMPLIED, ARE MADE TO ANY BUYER FOR RESALE.
Some states do not allow limitations on how long an implied warranty lasts or do not allow the exclusion or limitation of
incidental or consequential damages, so the above limitations or exclusions may not apply to you. This warranty gives you
specific legal rights, and you may also have other rights that vary from state to state.
E20
Page 23

Modernist Micro-Onde Tiroir
Mode D’emploi
Numéros de Modèle:
DMR24M977WM, DMR24M977WS,
DMR30M977WM, DMR30M977WS
™
Table Des Matières
Importantes Consiges De Sécurité .............. 2-3
MESURES POUR ÉVITER UNE EXPOSITION
POSSIBLE À UNE ÉNERGIE MICRO-ONDE
EXCESSIVE ................................................. 2
Ce Que Vous Devez Savoir ......................... 4-6
Nom Des Pièces .......................................... 7
Avant L’utilisation ........................................ 8
Pour Régler L’horloge .............................. 8
Timer (Minuterie) ................................... 8
Stop/Clear (Arrêt/remise À Zéro) .............. 8
Ouvrir Ou Fermerture Du Tiroir ................. 8
Mode veille ............................................ 8
Cuisson au Microwave In-A-Drawer
Temps de Cuisson ................................... 9
Pour Régler le Niveau de Puissance ........... 9
Réglages des Capteurs ........................9-10
Sensor Popcorn/Sensor Reheat
(Mais Soufflé au Capteur/
Réchauffage au Capteur) ........................10
Sensor Cook (Cuisson au Capteur) ...... 10-11
™
......... 9-15
Defrost (Décongélation) .........................12
Décongélation Manuelle ..........................13
Reheat (Réchauffage) ............................13
Beverge Center (Centre de boissons) .......14
Melt/Soften/Warm
(Fondre/Ramollir/Chauffer) .....................15
Autres Caractéristiques ..........................16-17
Keep Warm (Micro Réchaud) ...................16
Cuisson à Séquences Multiples ................16
Help (Aide) ...........................................16
Easy Minute ..........................................16
Control Lock
(Verrouillage des Commandes) ................16
Réglage de Durée en Plus ou en Moins .....17
Setup/Help (Réglages/Aide) ....................17
Nettoyage et Entretien ................................18
Avant d’Appeler Pour Une Réparation ............19
Guide des Touches Automatiques ............. 20-21
Garantie du Produit .....................................22
Page 24

IMPORTANTES CONSIGES DE SÉCURITÉ
Installateur : Veuillez laisser ce guide avec cet appareil.
Client: Lire et conserver ces mode d’emploi pour ré-
férence ultérieure. Ce livre fournit les informations appro-
priées d’utilisation et d’entretien. Gardez ce livre et les
ventes acquittent et/ou ont décommandé signent
un endroit sûr la future référence. La preuve de la
date originale d’achat est nécessaire pour le service de garantie.
Si vous avez n’importe quelles questions, appelez :
Assurance Client Dacor
1-800-793-0093 poste 2813 (Etats-Unis et le Canada)
Lundi - Vendredi 5:00 A.M. au temps Pacique de 5:00 P.M.
Accès par internet : www.dacor.com/customer-care/contact-us
Avant d’appeler, disposez des numéros de modèle et de série qui
vous pouvez afcher en ouvrant entièrement le tiroir et en lisant
la note étiquette sur le plancher de la cavité du four juste après le
panneau arrière du tiroir.
Enregistrez ces nombres ci-dessous pour l’accès facile.
Numéro de Modèle ___________________________________
Numéro de Série _____________________________________
Date D’achat Marchand ________________________________
Pour le service et l’information de garantie, voir la
page 20.
Dans notre effort continu d’améliorer la qualité et
l’exécution de nos appareils, il peut être nécessaire de faire
des changements à l’appareil sans mettre à jour ce livre.
Ce dispositif est conforme à la section 18 des
règlements FCC.
ADVERTISSEMENT
MESURES POUR ÉVITER
UNE EXPOSITION
POSSIBLE À UNE ÉNERGIE
MICRO-ONDE EXCESSIVE
(a) Ne pas essayer de faire fonctionner ce four avec
la porte ouverte puisque le fonctionnement avec
la porte ouverte peut entraîner une exposition
dangereuse à l’énergie micro-onde. Il est important
de ne pas enlever ou modier les verrouillages de
sécurité.
(b) Ne pas placer d’objet entre l’avant du four et la
porte ou laisser s’accumuler de la saleté ou des
résidus de nettoyant sur les surfaces d’étanchéité.
(c) Ne pas faire fonctionner le four s’il est endommagé.
Il est particulièrement important que la porte du
four ferme bien et qu’il n’y ait pas de dommages:
(1) porte (déformation), (2) charnières et dispositif
de verrouillage (brisés ou desserrés), (3) joints de
porte et surfaces d’étanchéité.
(d) Seul du personnel qualié en réparations doit
ajuster ou réparer ce four.
CE QUI VOUS DEVEZ SAVOIR CONSIGES DE
SÉCURITÉ
Instructions de sûreté d’avertissement et importantes apparaître en ce livre ne sont pas censés couvrir toutes les
conditions possibles et situations qui peuvent se produire.
Le bon sens, l’attention et le soin doivent être employés
en installant, en maintenant ou en actionnant un appareil.
Entrez en contact avec toujours le fabricant au sujet des
problèmes ou des conditions que vous ne comprenez pas.
SYMBOLES DE SÛRETÉ, MOTS, ÉTIQUETTES
DANGER
Risques immédiats qui auront comme conséquence des
blessures ou la mort graves.
ADVERTISSEMENT
Risques ou pratiques peu sûres qui POURRAIENT avoir
comme conséquence des blessures ou la mort graves.
ATTENTION
Risques ou pratiques peu sûres qui POURRAIENT avoir
comme conséquence des blessures ou des dégats
matériels mineurs.
INSTRUCTIONS POUR LA MISE
À LA TERRE
MISE EN GARDE
Un mauvais usage de la prise de terre peut causer des
décharges électriques.
Cet appareil doit être mis à la terre. En cas de courtcircuit électrique, la mise à la terre réduit le risque de
choc électrique en fournissant un l d’échappement
pour le courant électrique. Cet appareil est équipé
d’un cordon ayant un l de mise à la terre avec une
che de mise à la terre. La che doit être branchée
sur une prise correctement installée et mise à la
terre. Pas dans aucune circonstance, coupe ou
enlever la troisième fourche (de la terre) du cordon de secteur. N’utilisez pas une prise d’adapteur.
N’employez pas une corde de prolongation. Si le cordon d’alimentation est trop court, demander à un électricien ou un réparateur quali-
é de poser une prise près de
l’appareil. N’employez pas
un interrupteur moulu de
circuit de défaut.
Corde d’alimentation
d’énergie avec la trois-
fourche fondant la prise
F2
Prise murale fondée
(circuit au sol de défaut non permis)
Page 25

IMPORTANTES CONSIGES DE SÉCURITÉ
ADVERTISSEMENT
Lors de l’utilisation l’appareil, il faut prendre des mesures de sécurité élémentaires, y compris les suivantes :
ADVERTISSEMENT
1. Lire toutes les directives avant d’utiliser l’appareil.
2. Lire et suivre expressément les « MESURES POUR
ÉVITER UNE EXPOSITION POSSIBLE À UNE ÉNERGIE MICRO-ONDE EXCESSIVE » à la page 2.
3. Cet appareil doit être correctement mis à la terre.
Voir les directives d’installation séparées pour les
consignes de mise à la terre.
4. Installer cet appareil uniquement selon les directives d’installation fournies.
5. Certains produits comme les œufs entiers ou des
contenants scellés —par exemple, des bocaux fermés— exploseront et ne doivent pas être chauffés
au l’appareil.
6. N’utiliser cet appareil que pour l’usage prévu
comme décrit dans ce manuel. Ne pas utiliser de
produits chimiques ou de vapeurs corrosives dans
cet appareil. Cet appareil est spéciquement conçu
pour chauffer, cuire ou sécher de la nourriture. Il
n’a pas été conçu pour un usage industriel ou de
laboratoire.
7. Comme tout appareil, une surveillance attentive
est nécessaire quand des enfants l’utilisent.
8. Ne pas faire fonctionner cet appareil si son cordon
ou sa che sont endommagés, s’il ne fonctionne
pas correctement ou s’il a été endommagé ou est
tombé.
9. Seul un personnel qualié doit réparer cet appareil.
Communiquer avec le réparateur Dacor autorisé le
plus proche pour une inspection, une réparation ou
in réglage.
10. Ne couvrir ou bloquer aucune ouverture de cet appareil.
11. Ne pas ranger ou utiliser cet appareil à l’extérieur. Ne
pas utiliser ce produit près de l’eau —par exemple,
près d’un évier de cuisine, dans un sous-sol humide,
près d’une piscine ou autre endroit semblable.
12. Ne pas immerger le cordon ou la prise dans l’eau.
13. Tenir le cordon loin des surfaces chauffées.
14. Ne pas monter ou s’asseoir sur de l’appareil.
15. Assurez-vous de ne pas tenir vos doigts ou autres
objets ou matériaux près de l’ouverture du tiroir
quand le l’appareil est fermé.
16. Ne pas placer les doigts ou des vêtements près
des glissières du tiroir lors de l’ouverture ou de la
fermeture du l’appareil. Il pourrait être pris dans
les glissières lors de la fermeture du tiroit.
17. Vérier que la nourriture ou le contenant sont plus
petits que du tiroir avant de le fermer. Vous pouvez
Pour réduire le risque de brûlures, de choc électrique, de blessures personnelles et d’exposition
excessive à l’énergie micro-onde :
vous reporter à la hauteur des parois latérales cet
appareil.
18. Lors du nettoyage des surfaces d’étanchéité qui
viennent en contact lors de la fermeture l’appareil,
utiliser uniquement des savons ou des détergents
doux non abrasifs à l’aide d’une éponge ou d’un
chiffon doux. Voir les consignes de nettoyage à la
page 16.
19. Pour réduire le risque d’incendie dans la cavité du
l’appareil:
a. Ne pas trop faire cuire les aliments. Rester
prudemment près du four lorsqu’on utilise du
papier, du plastique ou tout autre matériel
combustible pour faciliter la cuisson.
b. Retirer les attaches de métal des sacs de pa-
pier ou de plastique avant de mettre les sacs
au four.
c. Si les matériaux à l’intérieur du l’appareil
prennent feu, garder la porte du four fermée,
arrêter le four et couper l’électricité au fusible
ou au panneau d’entrée.
d. Ne pas utiliser la cavité comme espace de
rangement. Ne laisser ni papier, ni ustensiles
de cuisson, ni aliments dans l’appareil lorsque
l’appareil n’est pas utilisé.
20. Des liquides comme l’eau, le café ou le thé peuvent chauffer au-delà du point d’ébullition sans
qu’aucun bouillonnement n’apparaisse à cause de
la tension de surface du liquide. Ainsi, quand le
contenant est retiré du l’appareil, il peut ne pas y
avoir d’ébullition ou de bouillonnement apparents.
IL PEUT EN RÉSULTER UN DÉBORDEMENT DES
LIQUIDES TRÈS CHAUDS LORSQU’UNE CUILLER
OU UN AUTRE USTENSILE EST PLONGÉ DANS LE
LIQUIDE.
Pour réduire le risque de blessures personnelles :
a. Ne pas trop chauffer le liquide.
b. Remuer le liquide et avant de le chauffer et à
mi-cuisson.
c. Ne pas utiliser de contenants à bords droits et
à goulot mince. Utiliser un bocal à large goulot.
d. Après le chauffage, laisser reposer le conten-
ant dans le four à l’appareil pour au moins 20
secondes avant de le retirer.
e. Faire très attention lorsque vous mettez une
cuiller ou un autre ustensile dans le contenant.
21. Si la lumière l’appareil manque, consulter un RÉPARATEUR DACOR AUTORISÉ.
LIRE ET CONSERVER CES DIRECTIVES
F3
Page 26

Ce Que Vous Devez Savoir
préparation des aliments. Il ne doit pas servir à faire
À Propos Du Déballage Et De
L’inspection De Votre
Microwave In-A-Drawer
1. Retirer tous
les matériaux
d’emballage de
l’intérieur du Microwave In-A-Drawer™.
NE PAS RETIRER LE
GUIDE D’ONDES qui
est situé au plafond
du Microwave In-ADrawer™.
2. Retirer l’étiquette des
caractéristiques, s’il y
en à une Vérier que le
four n’a aucun dommage, comme un tiroir
mal aligné ou plié, des
joints ou des surfaces d’étanchéité de porte endommagés, des glissières cassés ou lâches et des bosses
à l’intérieur de la cavité ou sur la façade du tiroir. En
cas de dommages, ne pas faire fonctionner le Microwave In-A-Drawer™ et contacter votre détaillant ou un
RÉPARATEUR AUTORISE DACOR.
INTERFÉRENCE RADIO OU TÉLÉVISION
Si le Microwave In-A-Drawer™ provoque de l’interférence
avec la radio ou la télévision, vérier qu’il est branché sur
un circuit électrique indépendant, en éloigner la radio ou
la télévision le plus possible et vérier la position et le
signal de l’antenne de réception.
Surface
d’étanchéité
Couvercle du
guide d’onde
™
Surface
d’étanchéité
Cavité
du four
À Propos De Votre
Microwave In-A-Drawer
Veiller à ce qu’il y ait TOUJOURS des aliments dans
le tiroir lorsqu’il est allumé, de sorte qu’ils absorbent
l’énergie micro-onde.
L’évent sous le four doit toujours être dégagé.
Pendant la cuisson aux micro-ondes, de la vapeur peut
s’échapper par le côté droit de l’évent.
Quand on utilise le Microwave In-A-Drawer™ à des niveaux
de puissance inférieurs à 100 %, on peut entendre la
mise en marche et l’arrêt du magnétron. Il est normal que
l’extérieur du tiroir soit chaud au toucher pendant la cuisson ou le réchauffage.
La condensation est un phénomène normal pendant la cuisson aux micro-ondes. L’humidité ambiante et la teneur en eau
des aliments déterminent le degré de condensation à l’intérieur
du tiroir. En règle générale, les aliments couverts produisent
moins de condensation que ceux cuits à découvert.
Le Microwave In-A-Drawer™ n’est conçu que pour la
™
sécher des vêtements ou des journaux.
La puissance nominale de ce four est égale à 950 watts
selon la méthode d’essai IEC. Vérier la cuisson des aliments une minute ou deux avant l’expiration du temps
minimum indiqué sur les recettes et les emballages et, s’il
y a lieu, augmenter le temps de cuisson.
Lors d’une ouverture ou d’une fermeture rapide du Microwave In-A-Drawer™, de la nourriture peut être renversée
dans le tiroir. Pour nettoyer, veuillez vous reporter au
chapitre Nettoyage et entretien à la page 18.
À Propos De La Cuisson Aux
Microondes
• Disposer les aliments avec soin. Placer la partie la plus
• Surveiller le temps de cuisson. Cuire les aliments
• Recouvrir les aliments pendant la cuisson. Selon la
• Protéger les parties de viande ou de volaille très
• Si possible, remuer les aliments de l’extérieur du plat
• Retourner les aliments comme du poulet et des
• Au milieu de la cuisson, déplacer les aliments comme
• Ajouter du temps de repos. Retirer les aliments du four
• Les signes d’une bonne cuisson sont les suivants :
épaisse des aliments vers l’extérieur du plat.
pendant la plus courte période indiquée et prolonger
la cuisson au besoin. Des aliments trop cuits peuvent
dégager de la fumée ou prendre feu.
recette ou le livre de cuisine, utiliser un essuie-tout, du
papier ciré, un lm plastique allant au micro-onde ou un
couvercle. Couvrir les aliments empêche les éclaboussures et leur permet de cuire de manière uniforme.
minces par des petits écrans en papier d’aluminium
pour éviter qu’ils ne cuisent trop vite par rapport aux
parties plus épaisses.
vers le centre une ou deux fois pendant la cuisson.
hamburgers une fois au cours de la cuisson an
d’accélérer le processus. Il faut retourner les grosses
pièces comme les rôtis au moins une fois.
les boulettes de viande du haut vers le bas et de
droite à gauche.
et, si possible, les remuer. Couvrir les aliments pendant
ce temps pour leur permettre Vérier que les aliments
sont bien cuits. Rechercher les signes qui indiquent que
les températures de cuisson ont été atteintes.
- La vapeur s’élève de toute la surface des aliments,
pas seulement des bords.
- Les cuisses de poulet se détachent facilement.
- La viande et la volaille ne présentent plus de parties rosées.
- Le poisson est opaque et se défait facilement à la
fourchette.
F4
Page 27

Ce Que Vous Devez Savoir
À Propos Des Ustensiles Et Des
Moyens De Couvrir Les Aliments
Il n’est pas nécessaire d’acheter une nouvelle batterie de
cuisine. La plupart des ustensiles de votre cuisine peuvent
être utilisés dans votre nouveau micro-onde. S’assurer
que les ustensiles ne touchent pas les parois intérieures
pendant la cuisson.
Se servir de ces ustensiles pour cuire et réchauffer sans
danger aux micro-ondes :
• La vitrocéramique (Pyroceram®), comme Corningware®.
• Le verre résistant à la chaleur (Pyrex
• Les plastiques pour micro-ondes
• Les assiettes en papier pour micro-ondes
• La céramique, la poterie, la porcelaine pour micro-ondes
• Les plats à brunir (ne pas dépasser pas les temps de
préchauffage recommandés. Suivre les directives du
fabricant).
Les articles suivants peuvent être utilisés pour le
réchauffage très court des aliments qui contiennent peu
de sucre ou de graisses :
• Le bois, la paille et l’osier
NE PAS UTILISER
• De casseroles et de plats de cuisson métalliques
• De plats à bordure métallique
• Du verre qui ne résiste pas à la chaleur
• De plastiques ne convenant pas aux micro-ondes
(contenants de margarine)
• De produits en papier recyclé
• De sacs en papier brun
• De sacs pour la conservation des aliments
• D’attaches métalliques
Pour vérier si un plat va au four à micro-ondes, le placer
dans le four et mettre le four en marche à la puissance
maximale pendant 30 secondes. Si le plat devient très
chaud, il ne faut pas l’employer.
LES ARTICLES SUIVANTS SONT IDÉALS POUR
COUVRIR :
• Les essuie-tout conviennent bien pour recouvrir les
aliments pendant le réchauffage et pour absorber la
graisse de cuisson du bacon.
• Le papier ciré peut être employé pour la cuisson et le
réchauffage.
• Le lm plastique destiné spécialement à l’usage du
micro-onde peut être utilisé pour la cuisson et le
réchauffage. Le lm plastique ne doit JAMAIS entrer
en contact avec les aliments. Faire une ouverture pour
laisser la vapeur s’échapper.
• Les couvercles pour micro-ondes sont un très bon
choix, car ils concentrent la chaleur sur les aliments et
®
)
• Les sacs de cuisson au four conviennent pour les
COMMENT SE SERVIR DU PAPIER ALUMINIUM
DANS VOTRE TIROIR:
• De petits morceaux non froissés de papier aluminium
• Le papier d’aluminium doit être à au moins 2,5 cm des
Pour toute question concernant les ustensiles ou la
manière de couvrir les aliments, consulter un bon livre de
cuisine spécialisé en micro-ondes ou suivre les conseils de
la recette.
ACCESSORIES:
De nombreux accessoires pour four à micro-ondes sont
offerts sur le marché. Évaluer soigneusement vos besoins
avant d’en faire l’acquisition. Un thermomètre pour
micro-ondes permettra de vérier la cuisson à point et de
s’assurer que les aliments ont été cuits à la bonne température Dacor n’est pas responsable des dommages au
tiroir résultant de l’utilisation d’accessoires.
Ouverture Ou Fermeture Du Tiroir
Toujours appuyer sur les touches OPEN ou CLOSE du panneau de commande pour ouvrir ou fermer le tiroir.
Ne pas pousser ou tirer le tiroir à la main, sauf en
cas d’urgence, comme une panne de courant. En cas
de nécessité, pousser ou tirer doucement.
À Propos Des Enfants Et Du
Micro-onde
Les enfants de moins de 7 ans ne devraient utiliser le
Microwave In-A-Drawer™ que sous la surveillance étroite
d’un adulte. Entre 7 et 12 ans, l’adulte surveillant doit se
trouver dans la même pièce qu’eux. L’enfant doit pouvoir
accéder facilement au tiroir.
Jamais personne ne doit être autorisé à s’appuyer ou à
s’asseoir sur le Microwave In-A-Drawer™.
Il faut enseigner les mesures de sécurité aux enfants :
Employer des gants isolants, enlever les couvercles avec
précaution, faire très attention aux contenants d’aliments
croustillants parce qu’ils peuvent devenir très chauds.
Ne pas présumer qu’un enfant qui connaît bien une
fonction de l’appareil peut cuire n’importe quoi.
Les enfants doivent apprendre que le Microwave InA-Drawer™ n’est pas un jouet. Voir à la page 16 la
caractéristique du verrouillage des commandes.
accélèrent la cuisson.
grosses pièces de viande ou les aliments à attendrir.
NE PAS SE SERVIR d’attaches métalliques. Ne pas
oublier de percer le sac pour laisser s’échapper la
vapeur.
posés sur les aliments peuvent servir à protéger les
parties qui décongèlent ou cuisent trop rapidement.
surfaces du Microwave In-A-Drawer™.
F5
Page 28

Ce Que Vous Devez Savoir
À Propos De La Sécurité
Inspecter les aliments pour voir s’ils ont été cuits
aux températures recommandées par le ministère de
l’agriculture des États-Unis.
71 °C (160 °F) - Pour le porc frais, la viande hachée, le
blanc de poulet désossé, le poisson, les
fruits de mer, les oeufs frais et les aliments préparés surgelés.
74 °C (165 °F) - Pour les restes, les aliments réfrigérés
prêts-à-réchauffer, et les aliments frais
d’un traiteur ou l’équivalent.
77 °C (170 °F) - Les blancs de volaille.
82 °C (180 °F) - La viande brune de volaille.
Pour vérier si les aliments sont cuits à point, insérer
un thermomètre à viande dans un endroit épais, à
l’écart de la graisse et des os. Ne JAMAIS laisser le
thermomètre dans les aliments qui cuisent, sauf s’il
est approuvé pour emploi aux micro-ondes.
• TOUJOURS utiliser des gants isolants pour éviter
des brûlures lorsque l’on se sert d’ustensiles en
contact avec des aliments chauds. Assez de chaleur
des aliments peut être transféré aux ustensiles pour
provoquer des brûlures de la peau.
• Diriger la vapeur loin du visage et des mains an
d’éviter des brûlures. Soulever doucement la partie la
plus éloignée des couvercles et des pellicules et ouvrir
lentement les sacs de maïs soufé ou de cuisson en
les tenant loin du visage.
• Rester près du four quand il fonctionne et vérier
fréquemment la cuisson an d’éviter de trop cuire les
aliments.
• Ne JAMAIS entreposer des livres de cuisine ou autres
objets dans le Microwave In-A-Drawer™.
• Choisir, entreposer et manipuler la nourriture de
manière à préserver sa qualité et de minimiser la
prolifération de bactéries alimentaires.
• Garder propre le couvercle du guide d’ondes. Les
résidus d’aliments peuvent causer des étincelles ou
s’enammer. Voir page 18.
À Propos Des Aliments
ALIMENTS À FAIRE À NE PAS FAIRE
Oeufs,
saucisses,
fruits et
légumes
Maïs
soufé
Aliments
pour bébé
Général • Couper les aliments avec garniture après chauffage
• Percer les jaunes d’œufs avant la cuisson pour
empêcher une « explosion ».
• Percer la peau des pommes de terre, des pommes,
des courges, des hot dogs et des saucisses pour que
la vapeur s’échappe.
• Utiliser du maïs soufé en sac pour micro-onde.
• Porter attention à l’éclatement du maïs pour que
celui-ci ralentisse à 1 ou 2 secondes ou utiliser la
touche SENSOR POPCORN.
• Transférer les aliments pour bébé dans un plat plus
petit et chauffer prudemment en remuant souvent.
Vérier la température avant de servir
• Mettre les tétines sur les bouteilles après le
réchauffage et bien agiter. Essayer sur le poignet
avant de nourrir.
pour relâcher la vapeur et éviter les brûlures.
• Remuer vivement les liquides avant et après
chauffage pour empêcher une « éruption ».
• Se servir d’un bol profond, pour cuire des liquides ou
des céréales pour empêcher les débordements.
• Vous pouvez vous reporter à la hauteur des parois
latérales du tiroir.
• Cuire les œufs dans leur coquille
• Réchauffer des œufs entiers
• Sécher des noix ou des graines dans leur
coquille
• Faire éclater du maïs soufé dans des sacs
bruns ordinaires ou des bols de verre
• Dépasser le temps maximal inscrit sur le
paquet de maïs soufé.
• Chauffer les bouteilles jetables.
• Chauffer les bouteilles avec les tétines.
• Chauffer les aliments pour bébé dans les
pots d’origine
• Chauffer ou cuire dans des pots de verre
fermés ou des contenants hermétiques
• Mettre en conserve dans le micro-onde car
des bactéries dangereuses pourraient ne
pas être détruites.
• Faire frire de la graisse épaisse
• Sécher du bois, des gourdes, des herbes
ou des papiers humides
F6
Page 29

Nom des Pièces
Microwave In-A-Drawer
1
2
3
1. Panneau de commande
2. Couvercle du guide d’ondes NE PAS ENLEVER
3. Aide-mémoire
4. Surfaces d’étanchéité du tiroir
5. Lumière du tiroir
™
5
4
8
6
7
6. Glissières du tiroir
7. Évent
8. Étiquette des caractéristiques nominales : Ouvrez
entièrement le tiroir micro-ondes. L’étiquette est
sur le plancher de la cavité du four juste après le
panneau arrière du tiroir.
FEUILLE DES TOUCHES
17 14 10 10-11 10
15 81516
16 88 98
12 1316
Les chiffres à côté de l’illustration des touches indiquent les pages où on retrouve la
description des caractéristiques et les renseignements concernant l’utilisation.
F7
Page 30

Avant L’utilisation
Avant d’utiliser votre nouveau Microwave In-A-Drawer™,
prendre la peine de lire et de comprendre intégralement
ce mode d’emploi.
• Avant d’utiliser le Microwave In-A-Drawer™, procéder
ainsi :
1. Brancher le Microwave In-A-Drawer™.
ENJOY YOUR
AND TOUCH CLOCK
2. Appuyer sur la touche S TOP/CL E AR .
s’afche.
:
3. Régler l’horloge.
MICRO-
Pour Régler L’horloge
1. Appuyer sur la touche TIMER/CLOCK et sur 2.
2. Appuyer sur les chiffres pour corriger l’heure du jour et
appuyer de nouveau sur TIMER/CLOCK.
Cette horloge a un cycle de 12 heures..En cas d’entrée
d’une heure invalide,
touche STOP/CLEAR et entrer à nouveau l’heure.
• Si l’alimentation électrique du four à microondes est coupée,
WAVE TOUCH
s’afchera et clignotera dès que l’alimentation
sera rétablie. Si cela se produit durant la cuisson,
la programmation sera effacé. L’heure aussi
sera effacée. Appuyer simplement sur la touche
STOP/CLEAR et remettre l’horloge à l’heure.
NOTA :
ERROR
CLEAR AND TOUCH CLOCK
WAVE TOUCH CLEAR
s’afchera.
s’afchera. Appuyer sur la
ENJOY YOUR MICRO-
Timer (Minuterie)
1. Appuyer sur la touche TIMER/CLOCK et sur 1.
2. Entrer l’heure.
3. Appuyer à nouveau sur la touche TIMER/CLOCK.
4. Pour annuler la minuterie appuyer sur S TOP/CL EAR .
Stop/Clear
(Arrêt/Remise À Zéro)
Appuyer sur la touche STOP/CLEAR pour:
1. Effacer une erreur durant la programmation.
2. Annuler la minuterie.
3. Arrêter le micro-onde tiroir temporairement durant la
cuisson.
4. Afcher à nouveau l’heure.
5. Annuler un programme durant la cuisson, appuyer
deux fois.
Ouverture Ou Fermeture Du Tiroir
Toujours appuyer sur les touches OPEN ou CLOSE du panneau de commande pour ouvrir ou fermer le tiroir.
Ne pas pousser ou tirer le tiroir à la main, sauf en cas
d’urgence, comme une panne de courant. En cas de
nécessité, pousser ou tirer doucement.
• Le Microwave In-A-Drawer™ peut être programmé
avec le tiroir ouvert sauf pour START/EASY
MINUTE.
Mode veille
Cette Microwave In-A-Drawer™ se met en mode veille
après une période d’inactivité. Le rétro-éclairage de
l’écran dim automatiquement après 3 minutes si l’unité
n’a pas été appliqué. Si l’afchage est en mode veille, il
suft de toucher le panneau de commande ou pour ouvrir
/ fermer la porte pour retourner le rétroéclairage à la
luminosité maximale.
F8
Page 31

Cuisson au Microwave In-A-Drawer
™
Temps De Cuisson
Votre Microwave In-A-Drawer™ peut être programmé pour
99 minutes 99 secondes (99.99). Toujours entrer les
secondes après les minutes même si les deux sont égales
à zéro.
• Supposons que l’on veuille faire cuire pendant 5
minutes à 100 %.
1. Entrer le temps de cuisson
START OR TOUCH
2. Pour cuire à la puissance 100 % (élevée), Appuyer sur
la touche START/EASY MINUTE.
5 0 0
POWER
5.00 TOUCH
.
LEVEL
Réglages Des Capteurs
Le capteur de Dacor est un dispositif à semi-conducteur
qui décèle la vapeur humidité) émise par les aliments
lorsqu’ils sont chauffés. Le capteur permet de régler
les durées de cuisson et les niveaux de puissance
selon les divers aliments et leur quantité.
UTILISATION DES RÉGLAGES DU CAPTEUR :
1. Après le branchement du Microwave In-A-Drawer™,
2. S’assurer que l’extérieur du récipient de cuisson et
Pour Régler Le Niveau De
Puissance
3. Le capteur fonctionne pour les aliments conservés à la
Onze niveaux de puissance sont prévus.
Plus le niveau de puissance est faible, plus le temps de
cuisson est long, ce qui est conseillé pour les aliments
tels que le fromage, le lait ou les viandes qui exigent une
cuisson lente. Consulter un livre de cuisine ou de recettes
pour chaque cas particulier.
• Supposons que l’on veuille décongeler pendant 5
minutes à 30 %.
1. Entrer le temps de décongélation
2. Appuyer 8 fois sur la touche POWER LEVEL.
3. Appuyer sur START/EASY MINUTE.
APPUYER SUR LA
TOUCHE POWER
LEVEL JUSQU’À CE
QUE LE NIVEAU DE
POURCENTAGE
APPROXIMATIF
DE LA
PUISSANCE
5 0 0
NOMS DONNÉS
AUX NIVEAUX DE
5.00
.
PUISSANCE
PUISSANCE DÉSIRÉ
S’AFFICHE
Power Level x 1 100% Fort
Power Level x 2 90%
Power Level x 3 80%
Power Level x 4 70% À demi fort
Power Level x 5 60%
Power Level x 6 50% Moyen
Power Level x 7 40%
Power Level x 8 30% Moyen faible/
Décongélation
Power Level x 9 20%
Power Level x 10 10% Faible
Power Level x 11 0%
4. Toute sélection du capteur peut être programmée
5. Au cours de la première période d’utilisation du
Quand le capteur détectera la vapeur émise par les
6. Si pendant le soufage du maïs, le capteur ne détecte
7. Vérier la température des aliments après cuisson.
8. Il existe un conseil de cuisson pour chaque aliment.
attendre 2 minutes avant d’utiliser un réglage du
capteur.
l’intérieur du Microwave In-A-Drawer™ sont secs.
Essuyer toute trace d’humidité avec un chiffon sec ou
un essuie-tout.
température de rangement normale. Par exemple, le
maïs soufé devrait être à la température de la pièce.
avec réglage de durée en plus ou en moins (More or
Less Time Adjustment). Voir page 17.
capteur, le nom de l’aliment s’afchera. Ne pas ouvrir
la porte du Microwave In-A-Drawer
touche STOP/CLEAR au cours de cette période, car
cela provoquerait l’interruption de la mesure du degré
d’humidité. Dans un tel cas, un message d’erreur
s’afchera. Pour poursuivre la cuisson, appuyer sur la
touche STOP/CLEAR et cuire en mode manuel.
aliments, le temps de cuisson/réchauffage restant
s’afchera. On peut ouvrir le Microwave In-A-Drawer™
lorsque le temps de cuisson restant s’afche à l’écran.
À ce moment-là, on peut aussi remuer les aliments et
les assaisonner, au goût.
pas correctement la vapeur émise, le four cessera
de fonctionner et l’heure sera afchée. Si le capteur
ne détecte pas correctement la vapeur émise lors
de la cuisson d’autres aliments, l’indication
s’afchera et le micro-onde cessera de fonctionner.
S’il faut plus de temps, continuer à cuire en mode
manuel.
Appuyer sur la touche SET UP/HELP quand
l’indicateur HELP est allumé sur l’afcheur.
™
, ni appuyer sur la
ERROR
F9
Page 32

Cuisson au Microwave In-A-Drawer
™
COVERING ALIMENTS:
Certains aliments cuisent mieux lorsqu’ils sont couverts.
Se servir su couvercle recommandés dans les tableaux
pour ces aliments. Vous pouvez vous reporter aux conseils
en appuyant sur la touche SET UP/HELP.
1. Couvercle.
2. Film plastique : Utiliser un lm plastique recommandé
pour la cuisson aux micro-ondes. Couvrir le plat
sans serrer et en conservant une ouverture de 1,25
cm (1/2 po) de manière à ce que la vapeur puisse
s’échapper. Le lm plastique ne doit pas entrer en
contact avec les aliments.
3. Papier ciré : Couvrir entièrement le plat et replier
le papier sous le plat de manière à ce qu’il soit
maintenu. Si le plat est plus large que le papier,
utiliser deux morceaux de papier se chevauchant d’au
moins 2,5 cm (1 po).
Faire attention en retirant l’élément couvrant les aliments
de laisser la vapeur s’échapper loin de vous.
Sensor Popcorn / Sensor Reheat
(Mais Soufflé Au Capteur /
Réchauffage Au Capteur)
Vous pouvez faire éclater du maïs ou réchauffer de
nombreux aliments sans avoir besoin de calculer le temps
de cuisson ou le niveau de puissance.
Appuyer sur SENSOR REHEAT ou SENSOR POPCORN
puis sur la touche START/EASY MINUTE.
Quand le capteur détectera la vapeur émise par les
aliments, le temps restant de cuisson/réchauffage
s’afchera.
NOTA :
• Il y a 2 choix pour le réglage du maïs soufé au
capteur. Suivre les instructions sur l’afcheur pour
choisir l’option désirée.
TABLEAU DE SENSOR POPCORN / SENSOR REHEAT
ALIMENTS QUANTITÉ MARCHE À SUIVRE
Sensor Popcorn 1 paquet à la fois N’utiliser que du maïs soufé emballé pour le micro-onde. Essayer
plusieurs marques et choisir celle qui vous plait. Ne pas tenter de
soufer les grains qui n’ont pas éclaté.
80 – 98 g (2,85 – 3,5 oz)
(Régulier / Régulier léger)
34 – 50 g (1,2 – 1,75 oz)
(Mini / Collation)
Sensor Reheat 112g – 1 kg (4 – 36 oz) Mettre dans un plat ou une casserole un peu plus grande que la
Sensor Cook
(Cuisson Au Capteur)
1. Appuyer une fois sur la touche SENSOR COOK.
SEE LABEL
2. Voir l’aide-mémoire. Choisir un aliment en appuyant
sur un chiffre. Ex : Appuyer 5 fois pour des pommes
terre au four.
SELECT
FOOD
NUMBER
Appuyer une fois sur SENSOR POPCORN.
Appuyer deux fois sur SENSOR POPCORN.
quantité à réchauffer. Aplatir si possible. Couvrir avec un couvercle,
lm plastique ou un papier ciré. Couvrir avec du lm plastique
ou des couvercles pour de plus grandes quantités d’aliments
plus denses comme les ragoûts Si possible, bien remuer après
réchauffage. Couvrir à nouveau et laisser reposer 2 à 3 minutes. Les
aliments devraient être très chauds. Dans le cas contraire, continuer
à chauffer avec une puissance et une durée variables.
3. Appuyer sur START/EASY MINUTE.
NOTA :
• Pour réchauffer d’autres aliments ou des aliments en
quantités inférieure ou supérieure à celles permises
sur le TABLEAU DE SENSOR COOK, cuire en mode
manuel.
F10
Page 33

Cuisson au Microwave In-A-Drawer
TABLEAU DE SENSOR COOK
ALIMENTS QUANTITÉ MARCHE À SUIVRE
1. Légumes frais : Rapide
Brocoli
Choux de Bruxelles
Choux
Chou-eur (en bouquet)
Chou-eur (entier)
Épinards
Courgettes
Pommes au four
0,25 - 2 lb.
0,25 - 2 lb.
0,25 - 2 lb.
0,25 - 2 lb.
1 moyen
0,25 - 1.0 lb.
0,25 - 2 lb.
2 - 4 moyen
™
Laver et mettre dans une casserole. Ne pas ajouter d’eau si les légumes
viennent d’être lavé. Couvrir avec un couvercle pour obtenir des
légumes tendres. Utiliser un lm plastique pour obtenir des légumes
tendres mais croustillants. Après la cuisson, remuer si possible, Laisser
reposer, à couvert, 2 à 5 minutes.
2. Légumes frais : Longue
Carottes, tranchées
Maïs en épi
Haricots verts
Courge d’hiver : en dés
en moitié
3. Légumes congelés 0,25 - 1,25 lb. Ne pas ajouter d’eau. Couvrir avec un couvercle ou un lm plastique.
4. Plats congelés 112g - 1kg
5. Pommes terre au four
6. Patates douces
7. Viande hachée 0,25 - 2 lb. Utiliser ce réglage pour cuire du bœuf ou de la dinde hachés en fric-
0,25 - 1,5 lb.
2 - 4
0,25 - 1,5 lb.
0,25 - 1,5 lb.
1 - 2
(6 - 17 oz)
1 - 6 moyen Les piquer. Les placer sur un essuie-tout au fond du tiroir. Après la cuis-
Mettre dans une casserole. Ajouter 1 à 4 c. à soupe d’eau. Couvrir avec
un couvercle pour obtenir des légumes tendres. Utiliser un lm plastique
pour obtenir des légumes tendres mais croustillants. Après la cuisson,
remuer si possible, Laisser reposer, à couvert, 2 à 5 minutes.
Après la cuisson, remuer et laisser reposer, à couvert, 3 minutes.
Utiliser cette touche pour les plats prêt-à-servir congelés. Cela don-
nera des résultats satisfaisants avec la plupart des marques. Peut-être
voudrez-vous en essayer plusieurs et choisir votre préféré. Retirer le plat
de l’emballage extérieur et suivre les indications pour le recouvrement
du plat. Après la cuisson, laisser reposer, à couvert, 1 à 3 minutes.
son, les retirer du four, les envelopper dans une feuille d’aluminium et
les laisser reposer pendant 5 à 10 minutes.
adelles ou en cocotte avec d’autres ingrédients. Placer les fricadelles
sur une grille transparente aux micro-ondes et couvrir de papier ciré.
Placer la viande hachée dans une cocotte et couvrir avec du papier ciré
ou du lm plastique. Quand le four s’arrête, retourner les fricadelles
ou mélanger la viande dans la cocotte pour séparer les gros morceaux.
Recouvrir et appuyer sur START/EASY MINUTE. Après la cuisson, laisser reposer, à couvert, 2 à 3 minutes.
8. Poisson/Fruits de mer 0,25 –2 lb Disposer en anneau autour d’un plat en verre peu profond (rouler le let
en mettant les bords en dessous). Couvrir avec du lm plastique ventilé.
Après la cuisson, laisser reposer, à couvert, 3 minutes
9. Riz
10. Riz brun
0,5 à 2 tasses Placer le riz dans une cocotte profonde et ajouter le double d’eau. Cou-
vrir avec un couvercle ou un lm plastique. Après la cuisson, remuer,
couvrir et laisser reposer de 3 à 5 minutes ou jusqu’à ce que tout le
liquide ait été absorbé.
Riz Eau Taille de la casserole
0,5 tasse 1 tasse 1,5 pinte
1 tasse 2 tasses 2 pinte
1,5 tasse 3 tasses 2,5 ou 3 pintes
2 tasses 4 tasses 3 pinte ou plus
F11
Page 34

Cuisson au Microwave In-A-Drawer
7. Après la deuxième étape, ouvrir le Microwave
Defrost (Décongélation)
Utiliser cette caractéristique pour décongeler les aliments
indiqués dans le TABLEAU DE DEFROST.
1. Appuyer sur la touche DEFROST.
SEE LABEL
2. Voir l’aide-mémoire. Choisir l’aliment désirée en appuyant sur un chiffre. Ex : Appuyer sur 2 pour les
biftecks ou les côtelettes.
STEAKS
3. Entrer le poids en appuyant sur les chiffres 1 0.
1.0 LB
4. Appuyer sur START/EASY MINUTE.
5. Le four d’arrêtera pour que vous puissiez inspecter
l’aliment.
6. Après la première étape, ouvrir le Microwave In-ADrawer™. Retourner le bifteck et masquer les parties
chaudes. Fermerle tiroir. Appuyer sur START/EASY
MINUTE.
CHOPS
SELECT
ENTER
FOOD
WEIGHT
NUMBER
8. À la n du cycle de décongélation, masquer et laisser
NOTA :
• Defrost peut être programmé avec réglage de durée
• Pour décongeler d’autres aliments dont le poids est
• Ne pas décongeler jusqu’à ce que tous les cristaux de
• Inspecter les aliments au signal du four. Après l’étape
• Le masquage empêche que la cuisson ait lieu avant
™
In-A-Drawer™. Masquer tout les parties chaudes.
Fermer le micro-onde tiroir. Appuyer sur
EASY MINUTE.
reposer comme indiqué dans le tableau ci-dessous.
en plus ou en moins. Voir page 17.
supérieur ou inférieur à celui autorisé au TABLEAU
DE DEFROST, voir la DÉCONGÉLATION MANUELLE.
glace sont décongelés.
nale, de petites sections peuvent être encore gelées.
Laisser reposer pour que le dégel se poursuive. Ne
pas décongeler avant que tous les cristaux de glace
soient fondus.
que le centre de l’aliment ne soit dégelé. Utiliser de
petites bandes souples de papier d’aluminium pour
couvrir les bords et les parties les moins épaisses de
l’aliment.
STAR T/
TABLEAU DE DEFROST
ALIMENTS QUANTITÉ MARCHE À SUIVRE
1. Viande hachée 0,5 - 2 lb Retirer les parties dégelées après chaque signal sonore. Laisser reposer, à couvert, 5 à 10 minutes.
2. Biftecks/
Côtelettes
3. Poulet désossé 0,5 - 2 lb Après chaque signal sonore, s’il y a des morceaux chauds ou dégelés, changer la
4. Poulet avec
les os
5. Rôti 2,0 - 4 lb Mettre les parties grasses en dessous. Après chaque étape de décongéla-
0,5 - 3 lb Après chaque signal sonore, changer la disposition des aliments et masquer les
parties chaudes ou dégelées au moyen de bandes de papier d’aluminium. Retirer
la viande ou le poisson presque entièrement dégelés. Laisser reposer, à couvert,
10 à 20 minutes.
disposition ou retirer. Laisser reposer, à couvert, 10 à 20 minutes.
0,5 - 3 lb Après chaque signal sonore, changer la disposition ou retirer les morceaux. s’il
sont chauds ou dégelés Laisser reposer, à couvert, 10 à 20 minutes.
tion, retourner et protéger les parties chaudes au moyen de bandes de papier
d’aluminium. À la n de la décongélation, laisser reposer à couvert de 30 à 60
minutes.
F12
Page 35

Cuisson au Microwave In-A-Drawer
™
Décongélation Manuelle
Si les aliments que vous voulez décongeler ne sont
pas dans le TABLEAU DE DÉCONGÉLATION, ou sont en
quantité supérieure ou inférieure à celle de la colonne
QUANTITÉ du TABLEAU DE DÉCONGÉLATION, vous devrez
décongeler en mode manuel.
Vous pouvez décongeler tout aliment, cru ou déjà cuit, à
l’aide du niveau de puissance de 30 %. Suivre exactement
la marche suivre en 3 étapes sous LE RÉGLAGE DU
NIVEAU DE PUISSANCE à la page 9. Estimer la durée de
décongélation et appuyer sur la touche POWER LEVEL huit
fois pour une puissance de 30%.
Pour des aliments crus ou déjà cuits, la règle d’or est
d’environ 4 minutes par livre. Par exemple, 1 livre de
spaghetti dégèlera en 4 minutes.
Toujours arrêter le four périodiquement pour séparer et
retirer les portions dégelées. Si les aliments ne sont pas
complètement dégelés à a n du temps de décongélation
estimé, programmer le four en incréments d’1 minute,
au niveau de puissance de 30 % jusqu’à décongélation
complète.
Quand vous utilisez des contenants plastique sortant du
congélateur, décongeler seulement assez longtemps pour
retirer les aliments du plastique et les mettre dans un plat
pour micro-onde.
Reheat (Réchauffage)
Reheat calculera automatiquement le temps de
réchauffage approprié et la puissance du four à microondes pour les aliments énumérés dans le tableau
suivant.
1. Appuyer une fois sur la touche REHEAT.
2. Voir l’aide-mémoire Choisir un aliment en appuyant
3. Appuyer sur un chiffre pour choisir la quantité.
4. Appuyer sur START/EASY MINUTE.
NOTA :
• Reheat peut être programmé avec réglage de durée
• Pour réchauffer d’autres aliments ou des aliments en
SEE
SELECT
LABEL
sur un chiffre. Ex : Appuyer sur 2 pour des petits
pains ou des mufns congelés.
Ex : Appuyer sur 2 pour 2 pains ou mufns.
en plus ou en moins. Voir page 17.
quantités inférieure ou supérieure à celle permise sur
le TABLEAU DE REHEAT, réchauffer en mode manuel.
FOOD
NUMBER
TABLEAU DE REHEAT
ALIMENTS QUANTITÉ MARCHE À SUIVRE
1. Petits pains
frais/mufns
2. Pains ou mufns
congelés
1 - 8 pièces Utiliser cette touche pour décongeler petits pains, mufns, biscuits, baguels, etc.
il faut compter les grosses pièces comme 2 ou 3 de taille régulière. Disposer sur
une assiette; couvrir avec un essuie-tout. Pour des petits pains et des mufns
réfrigérés, il peut être nécessaire de doubler la quantité pour que la portion soit
à la température appropriée. Par exemple, entrer la quantité 2 pour 1 petit pain
réfrigéré.
1 - 8 pièces Utiliser cette touche pour décongeler petits pains, mufns, biscuits, baguels, etc.
il faut compter les grosses pièces comme 2 ou 3 de taille régulière. Disposer sur
une assiette; couvrir avec un essuie-tout.
F13
Page 36

Cuisson au Microwave In-A-Drawer
Beverage Center
(Centre de boissons)
™
3. Répétez le processus en appuyant sur la même
touche pour sélectionner la quantité. Ex: Appuyez 2
2
fois de plus le numéro
4. Appuyer sur START/EASY MINUTE.
pour 2 tasses de café.
Beverage Center vous permet de réchauffer le café ou
le thé pour réaliser une température plus convenable à
la consommation, ou pour préparer du café ou du thé
instantané.
1. Appuyez une fois sur BEVERAGE CENTER.
SELECT
LABEL
2. Regardez l’étiquette de Menu. Choisissez la sélection
voulue en appuyant sur le pavé numérique.
Ex: Appuyez sur le 2 pour préparer du café.
FOOD
NUMBER
SEE
NOTA:
• Réchauffer peut être programmé avec un réglage de
durée en plus ou en moins. Voir page 17.
• Si vous essayez de saisir un chiffre en dessous ou en
dessus de la quantité permise, un message d’erreur
s’afchera.
TABLEAU DE BEVERAGE CENTER
ALIMENTS QUANTITÉ MARCHE À SUIVRE
1. Reheat
beverage
2. Hot water 1 à 6 tasses Utiliser ce réglage pour chauffer de l’EAU FROIDE DE ROBINET vers une tempéra-
0,5 à 2 tasses Ce réglage sert à remettre une boisson chaude refroidie à une température conven-
able à la consommation. Appuyer sur la touche numéro 1 pour augmenter de 0,5
tasses par pression. Remuer après la cuisson.
ture juste en dessous du point d’ébullition, pour préparer le café ou le thé instan-
2
tané. Appuyer sur la touche numéro
Remuer bien le liquide après la cuisson pour éviter toute «éruption» éventuelle.
pour augmenter de 1 tasse par pression.
F14
Page 37

Cuisson au Microwave In-A-Drawer
Melt/Soften/ Warm
(Fondre/Ramollir/Chauffer)
Melt, Soften et Warm calculera automatiquement le temps
de réchauffement approprié et la puissance du four à
micro-ondes pour faire fondre, ramollir et réchauffer les
aliments du tableau suivant.
1. Appuyer une fois sur MELT.
FOOD NUMBER
2. Voir l’aide-mémoire. Choisir un aliment en appuyant
sur un chiffre. Ex : Appuyer sur 2 pour chocolat.
TABLEAU DE MELT/SOFTEN/WARM
SEE LABEL SELECT
™
3. Répéter la pression sur la même touche pour choisir
la quantité. Ex : Appuyer sur
1 carré.
4. Appuyer sur START/EASY MINUTE.
NOTA :
• Melt, Soften et Warm peut être programmé avec réglage
de durée en plus ou en moins. Voir page 17.
• Pour faire fondre, faire ramollir ou faire chauffer doucement
un autre aliment ou d’autres aliments que ceux mentionnés
ci-avant, ou pour des quantités en dessous ou en dessous
de la quantité indiquée au tableau MELT/SOFTEN/ WARM,
faire fonctionner manuellement l’appareil.
2 deux fois de plus pour
ALIMENTS QUANTITÉ MARCHE À SUIVRE
Melt (Fondre) Utiliser une tasse à mesurer en pyrex. Couvrir avec du lm plastique ventilé.
1. Beurre 2 c. à soupe
1/2 tasse
2. Chocolat 1 tasse de
brisures
1 carré
Soften (Ramollir)
1. Crème glacée 1 chopine
1/2 litres
2. Fromage à la
crème
Warm (Chauffer) Utiliser une tasse à mesurer en pyrex. NE COUVREZ PAS.
1. Sirop 1/4 tasse
2. Garniture de
dessert
84 g.
184 g.
1/2 tasse
1/4 tasse
1/2 tasse
Après une pression sur MELT, appuyer sur
Après une pression sur MELT, appuyer sur 1 trois fois pour 1/2 tasse.
Après une pression sur MELT, appuyer sur
brisures.
Après une pression sur MELT, appuyer sur 2 trois fois pour 1 carré.
NE COUVREZ PAS.
Après une pression sur SOFTEN, appuyer sur 1 deux fois pour 1 chopine.
Après une pression sur SOFTEN, appuyer sur 1 trois fois pour 1/2 litres.
Après une pression sur SOFTEN, appuyer sur
Après une pression sur SOFTEN, appuyer sur 2 trois fois pour 184 g.
Après une pression sur WARM, appuyer sur
Après une pression sur WARM, appuyer sur 1 trois fois pour 1/2 tasse.
Après une pression sur WARM, appuyer sur
Après une pression sur WARM, appuyer sur 2 trois fois pour 1/2 tasse.
1 deux fois pour 2 c. à soupe.
2 deux fois pour 1 tasse de
2 deux fois pour 84 g.
1 deux fois pour 1/4 tasse.
2 deux fois pour 1/4 tasse.
F15
Page 38

Autres Caractéristiques
NOTA :
Keep Warm (Micro Réchaud)
Keep Warm vous permet de garder les aliments au chaud
pendant 30 minutes.
USAGE DIRECT
1. Appuyer sur la touche KEEP WARM.
ENTER TIME UP TO 30
2. Entrer la durée désirée en appuyant sur les chiffres.
Pour entrer 30 minutes appuyer sur
30.00 TOUCH START
3. Appuyer sur START/EASY MINUTE.
Le four se mettra en marche. L’afcheur indiquera
et le compte à rebours.
pendant le compte à rebours.
KEEP WARM
MINUTES
3000
sera afché
.
30.00
AVEC CUISSON EN MODE MANUEL
1. Entrer le temps de cuisson et le niveau de puissance.
2. Appuyer sur la touche Keep Warm.
3. Entrer la durée de réchauffage désirée jusqu’à 30 minutes.
4. Appuyer sur START/EASY MINUTE.
L’opération démarrera. Quand la durée de cuisson est
terminée, une longue tonalité résonnera et Keep Warm
démarrera. L’afcheur indiquera le compte à rebours
KEEP WARM
pendant le compte à rebours.
NOTA :
• Si vous essayez d’entrer plus de 30 minutes pour
Keep Warm, un message d’erreur s’afchera.
• Keep Warm ne peut pas être programmé avec Sensor
Popcorn, Sensor Reheat, Sensor Cook, Defrost ou Reheat.
sera afché de manière intermittente
Cuisson À Séquences Multiples
•
• Si le niveau 100 % doit être utilisé au cours de la
• Si vous voulez savoir le niveau de puissance, appuyer
• Keep Warm peut être programmé même si 4 séquenc-
Help (Aide)
Il y a un conseil de cuisson pour chaque réglage de
Sensor Reheat, Sensor Cook, Sensor Popcorn, Keep
Warm, Reheat et Defrost. Si vous êtes intéressé, appuyer
sur SET UP/HELP quand HELP est allumé sur l’afcheur
interactif, pour lire les conseils de cuisson et ceux de
fonctionnement des autres manuels.
Easy Minute
Easy Minute vous permet de cuire pendant une minute
à 100 % simplement en appuyant sur la touche EASY
MINUTE. Vous pouvez aussi prolonger la durée de cuisson de multiples fois 1 minute en appuyant répétitivement
sur EASY MINUTE en mode manuel de cuisson.
NOTA :
• Pour utiliser EASY MINUTE, appuyer sur la touche
• On ne peut pas utiliser Easy Minute avec Sensor,
sera afché si on appuie une fois sur la touche
HIGH
POWER LEVEL.
dernière séquence, il n’est pas nécessaire d’appuyer
sur la touche POWER LEVEL.
simplement sur la touche POWER LEVEL. Aussi long
temps que votre doigt appuie sur la touche POWER
LEVEL, le niveau de puissance sera afché.
es de cuisson ont été réglées.
dans les trois minutes après la cuisson, en fermant la
porte ou en appuyant sur la touche STOP/CLEAR.
Reheat ou Defrost.
Votre micro-onde tiroir peut être programmé pour 4
séquences automatiques de cuisson, passant d’un réglage
de puissance à l’autre automatiquement.
Parfois, les conseils de cuisson suggèrent de commencer à
un certain niveau de puissance et de poursuivre à un autre
niveau. Votre micro-onde tiroir peut le faire automatiquement.
1. Entrer d’abord le temps de cuisson. Puis appuyer sur
la touche POWER LEVEL pour la cuisson à 100%
ou appuyer de nouveau sur POWER LEVEL pour un
niveau plus faible.
2. Entrer le second temps de cuisson. Appuyer répétitivement sur la touche POWER LEVEL jusqu’au
niveau de puissance désiré. Vous pouvez faire cette
marche à suivre jusqu’à 4 fois.
3. Appuyer sur START/EASY MINUTE.
TOUCH START
.
Control Lock
(Verrouillage Des Commandes)
Le verrouillage des commandes vise à empêcher
l’utilisation du four comme par de jeunes enfants. Le
micro-onde tiroir peut être réglé de telle sorte que le
tableau de commande est inopérant ou verrouillé.
POUR VERROUILLER
Appuyer sur CONTROL LOCK pendant 3 secondes.
LOCK ON
POUR DÉVERROUILLER
Appuyer sur CONTROL LOCK pendant 3 secondes.
LOCK OFF
F16
s’afchera.
s’afchera.
Page 39

Autres Caractéristiques
Réglage De Durée En Plus Ou En
POUR RÉACTIVER LE RAPPEL
1. Appuyer trois fois sur SETUP/HELP.
Moins
Si vous trouvez que vous préférez les réglages de Sensor,
Reheat or Defrost un peu plus forts, appuyer une fois
sur la touche POWER LEVEL après avoir appuyé sur les
touches de votre choix.
MORE
s’afchera.
Pour des réglages un peu moins forts, appuyer deux fois
sur la touche POWER LEVEL après avoir appuyé sur les
touches de votre choix.
less
s’afchera.
Setup/Help (Réglages/Aide)
Si l’alimentation électrique de votre Microwave Drawer
est coupée,
CLEAR
dès que l’alimentation sera rétablie. Dans un tel cas,
l’option SETUP/HELP que vous avez entrée sera effacée. Appuyer simplement sur la touche STOP/CLEAR et
remettre à zéro.
SUPPRESSION DU SIGNAL SONORE
À la n d’une durée de cuisson, un bip résonnera Si vous
désirez que votre appareil n’émette pas de signal sonore,
vous pouvez le désactiver.
POUR DÉSACTIVER LE SIGNAL SONORE
1. Appuyer sur SETUP/HELP.
2. Appuyer à nouveau sur SETUP/HELP.
SOUND
3. Appuyer sur START/EASY MINUTE.
SOUND
POUR RÉACTIVER LE SON
1. Appuyer sur SETUP/HELP.
2. Appuyer à nouveau sur SETUP/HELP.
SOUND
3. Appuyer sur START/EASY MINUTE.
SOUND ON
RAPPEL DE FIN DE CUISSON
À la n d’une cuisson, le micro-onde signalera toutes les
10 secondes pendant une minutes et ensuite toutes les 3
minutes pendant une heure, jusqu’à ce qu’on appuie sur
STOP/CLEAR.
ENJOY YOUR MICRO- WAVE TOUCH
AND TOUCH CLOCK
OFF ? TOUCH START
s’afchera.
OFF
ON ? TOUCH START
s’afchera et clignotera
TOUCH AGAIN
TOUCH AGAIN
s’afchera.
2. Appuyer sur START/EASY MINUTE.
AUTO DÉMARRAGE
Si vous voulez programmer le micro-onde tiroir pour
commencer à cuire automatiquement à une heure
donnée, prendre cette marche à suivre.
1. Appuyer 4 fois sur SETUP/HELP.
2. Appuyer sur START/EASY MINUTE.
3. Entrer l’heure de démarrage.
4. Appuyer sur la touche TIMER/CLOCK.
5. Appuyer sur les chiffres pour entrer la durée de cuis-
6. Appuyer sur START/EASY MINUTE.
MODE DE DÉMONSTRATION
POUR CHOISIR LE MODE DÉMO
1. Appuyer 5 fois sur SETUP/HELP.
2. Appuyer sur START/EASY MINUTE.
POUR ANNULER LE MODE DÉMO
1. Appuyer 5 fois sur SETUP/HELP.
2. Appuyer sur START/EASY MINUTE pendant 3 sec-
NOTA :
• Le micro-onde tiroir ne chauffe pas en mode démo.
• Le compte à rebours s’afche rapidement.
REMIND
SIGNAL
REMIND
AUTO START
ENTER START TIME
ENTER
son.
LEVEL
ON ? TOUCH START
SIGNAL
COOKING
20.00
ON
TOUCH START
TIME
TOUCH START
s’afchera.
. Appuyer sur POWER LEVEL répétitivement
jusqu’au niveau de puissance désiré.
DEMO ON?
DEMO ON
DEMO OFF ? TOUCH START
ondes.
HOLD START 3 SEC
s’afchera.
DEMO OFF
s’afchera.
s’afchera.
s’afchera.
4:30 TOUCH CLOCK
OR
TOUCH
TOUCH START
s’afchera.
POWER
s’afchera.
POUR DÉSACTIVER LE RAPPEL
1. Appuyer trois fois sur SETUP/HELP.
SIGNAL
OFF ? TOUCH START
2. Appuyer sur START/EASY MINUTE.
SIGNAL
REMIND
OFF
s’afchera.
REMIND
s’afchera.
F17
Page 40

Nettoyage et Entretien
Extérieur
La surface extérieure est en métal peint et en plastique.
Nettoyer la surface extérieure à l’eau et au savon doux;
rincer et sécher au moyen d’un chiffon doux. Ne pas
utiliser de produits de nettoyage ménagers ou abrasifs.
Surface D’acier Inox
(Modèles Choisis)
Il faut essuyer souvent l’extérieur avec un chiffon doux
humide et le frotter avec un chiffon doux sec pour lui
garder son lustre. Toujours essuyer dans le sens du grain.
Il existe aussi de nombreux produits conçus spécialement
pour nettoyer et faire briller l’extérieur en inox du four.
Nous recommandons d’appliquer le nettoyant sur un
chiffon doux et de s’en servir ensuite sur l’inox plutôt que
de le vaporiser directement dessus. Suivre à la lettre les
instructions de l’emballage.
Avant Du Tiroir
Essuyer les deux surfaces du hublot à l’aide d’un chiffon
humide pour enlever les éclaboussures. ll est plus facile
de nettoyer les parties métalliques si on les essuie
fréquemment avec un chiffon humide. Éviter tout emploi
de produits nettoyants vaporisés ou abrasifs car ils
peuvent tacher, strier ou ternir la surface de la porte.
Intérieur
Le nettoyage est facile car les parois intérieures
n’absorbent pas de chaleur de telle sorte que les
éclaboussures ne cuisent pas. Pour nettoyer les parois
intérieures, y compris les surfaces d ‘étanchéité du tiroir,
essuyer avec un chiffon doux humide. NE PAS UTILISER
DE PRODUITS ABRASIFS OU DE TAMPONS À RÉCURER.
Pour les taches tenaces, utiliser du savon doux et nettoyer
avec un chiffon doux humide Ne pas utiliser de nettoyants
chimiques pour les fours.
Glissières Du Micro-onde Tiroir
Nettoyer les glissières du tiroir des miettes de nourriture.
Les essuyer avec un chiffon doux et sec pour que le tiroir
s’ouvre et se ferme en douceur.
Couvercle Du Guide D’ondes
ATTENTION
pour assurer un bon fonctionnement du four. Essuyer
immédiatement et délicatement avec un chiffon humide
toute éclaboussure d’aliments sur la surface du couvercle.
Une accumulation d’éclaboussures peut surchauffer et
causer de la fumée ou même s’enammer. Ne pas retirer
le couvercle du guide d’ondes.
Désodorisation
Tenir propre le couvercle du guide d’ondes
Tableau De Commandes
Si désiré, les touches peuvent être désactivées avant le
nettoyage. Voir les renseignements sur le verrouillage
des commandes à la page 16 de ce manuel. Essuyer le
tableau de commande avec un chiffon humecté d’eau.
Sécher avec un chiffon doux. N’utiliser ni poudre à récurer
ni produits chimiques de nettoyage. Refermer la porte et
suivre les instructions de la page 16 pour déverrouiller les
commandes. Appuyer sur STOP/CLEAR.
Il peut arriver qu’une odeur de cuisson persiste dans le
tiroir. Pour l’éliminer, mettre dans un récipient pouvant
contenir 2 tasses, 1 tasse d’eau, le zeste et le jus d’un
citron, et plusieurs clous de giroe entiers. Faire bouillir
pendant plusieurs minutes à 100 %. Laisser reposer dans
le micro-onde tiroir jusqu’à ce qu’il soit froid. Essuyer
l’intérieur avec un chiffon doux.
F18
Page 41

Avant d’appeler pour une Réparation
Vérier ce qui suit avant de faire appel à un réparateur. Vous pourriez sauver du temps et de l’argent.
PROBLÈME CAUSE POSSIBLE SOLUTION
1. Une pièce ou tout le
Microwave In-A-Drawer™
ne fonctionne pas.
• Le cordon du Microwave In-ADrawer™ n’est pas complètement
branché à la prise.
• Vérier que le cordon est bien branché
dans la prise.
• Coupure de courant.
• Le fusible ou le disjoncteur de la
maison ne fonctionne pas.
• Le Microwave In-A-Drawer™ est en
mode démo.
2. Le micro-onde ne chauffe
pas les aliments.
3. La lumière du Microwave
In-A-Drawer
pas.
4. Les touches de commande
ne fonctionne pas.
5. L’afcheur clignota. • Panne de courant. • Appuyer sur STOP/CLEAR et remettre
™
ne fonctionne
• Pas de courant à l’appareil.
• Les commandes du tiroir sont mal
réglées.
™
• Le Microwave In-A-Drawer
en mode démo.
• L’ampoule est desserrée ou brûlée. • Appeler un réparateur.
• Les commades sont verrouillées. • Voir page 16 pour déverrouiller.
est
• Vérier les lumières de la maison pour
vous en assurer. Appeler la compagnie
d’électricité.
• Remplacer le fusible ou réenclencher le
disjoncteur.
• Voir page 17 comment annuler le mode
Démo.
• Voir la SOLUTION pour le PROBLÈME 1.
• Vérier les réglages de commandes
• Voir page 17.
l’horloge à l’heure. Si le Microwave InA-Drawer
redémarrer la fonction de cuisson.
™
était en marche, vous devez
6. Vapeur sortant de l’évent • Pendant la cuisson aux micro-ondes,
de la vapeur peut s’échapper par le
côté droit de l’évent.
F19
Page 42

Guide des Touches Automatiques
Microwave In-A-Drawer™
RÉGLER L’HORLOGE
1. Appuyer sur la touche TIMER/CLOCK et sur 2.
2. Appuyer sur les chiffres pour corriger l’heure du
jour et appuyer de nouveau sur TIMER/CLOCK.
En cas d’une interruption
du courant de votre four,
l’écran afchera de façon
intermittente:
ENJOY
MICRO-
TOUCH
CLOCK
TEMPS DE CUISSON
Cuisson à haute puissance
1. Entrer la durée de cuisson en
appuyant sur les chiffres.
(Ex: 5 minutes) 5 0 0.
START
TOUCH
LEVEL
2. Appuyer sur START/EASY MINUTE.
AND
5.00 TOUCH
YOUR
WAVE
CLEAR
TOUCH
POWER
OR
SENSOR POPCORN/SENSOR REHEAT
Appuyer sur SENSOR REHEAT ou SENSOR POPCORN puis sur la touche START/EASY MINUTE.
REHEAT
Reheat calculera automatiquement le temps de
réchauffage approprié et la puissance du four à microondes pour les aliments inscrits à l’aide-mémoire.
1. Appuyer une fois sur la touche
REHEAT.
2. Voir l’aide-mémoire. Choisir
l’aliment désiré en appuyant
sur un chiffre. Ex : Appuyer sur
2
pour des petits pains ou des
SEE
SELECT
NUMBER
FROZEN
MUFFINS
NUMBER
mufns congelés.
3. Appuyer sur un chiffre pour
2 PCS
choisir la quantité. Ex :
Appuyer sur 2 pour 2 pains ou
mufns.
4. Appuyer sur START/EASY MINUTE.
LABEL
FOOD
ROLLS
ENTER
Cuisson à puissance variable
1.
Après l’étape 1 ci-dessus, appuyer sur
LEVEL
désiré s’afche.
jusqu’à ce que le niveau de puissance
POWER
2. Appuyer sur START/EASY MINUTE.
SENSOR COOK
La cuisson au capteur calcule automatiquement la
bonne durée et le bon niveau de puissance pour cuire
parfaitement les aliments inscrits sur l’aide-mémoire.
1. Appuyer une fois sur la touche
SENSOR COOK.
SEE
FOOD
NUMBER
SELECT
LABEL
2. Voir l’aide-mémoire. Choisir un aliment en appuyant sur un chiffre. Ex : Appuyer 5 fois pour des
pommes terre au four.
3. Appuyer sur START/EASY MINUTE.
DEFROST
Utiliser cette caractéristique pour décongeler les aliments inscrits à l’aide-mémoire.
1. Appuyer sur la touche
DEFROST.
2. Voir l’aide-mémoire. Choisir
l’aliment désiré en appuyant
sur un chiffre. Ex : Appuyer
SEE
SELECT
NUMBER
STEAKS
ENTER
LABEL
FOOD
CHOPS
WEIGHT
sur 2 pour les biftecks ou les
côtelettes.
3. Entrer le poids en appuyant sur
1.0 LB
les chiffres. 1 0.
4. Appuyer sur START/EASY MINUTE.
5. Le micro-onde s’arrêtera pour permettre de tourner,
masquer et/ou retirer les aliments. Fermer le tiroir.
Appuyer sur. Appuyer sur START/EASY MINUTE.
F20
Page 43

Guide des Touches Automatiques
KEEP WARM
Keep Warm vous permet de garder les aliments au chaud
pendant 30 minutes.
Usage direct
1. Appuyer sur la touche KEEP
WARM.
2. Entrer la durée désirée en
appuyant sur les chiffres. Pour
entrer 30 minutes appuyer sur
3 0 0 0
.
ENTER
UP TO
MINUTES
30:00
START
TIME
TOUCH
30
3. Appuyer sur START/EASY MINUTE.
Avec cuisson en mode manuel
1. Entrer le temps de cuisson et le niveau de puissance.
2. Appuyer sur la touche KEEP WARM.
3. Entrer la durée de réchauffage désirée jusqu’à 30
minutes.
4. Appuyer sur START/EASY MINUTE.
TIMER
1. Appuyer sur la touche TIMER/CLOCK et sur 1.
2. Entrer l’heure.
3. Appuyer à nouveau sur la touche TIMER/CLOCK.
Pour annuler la minuterie appuyer sur STOP/
CLEAR.
Autres Caractéristiques
CONTROL LOCK
Le verrouillage des commandes vise à empêcher
l’utilisation non désirée du four comme par de jeunes
enfants. Le Microwave In-A-Drawer™ peut être réglé de
telle sorte que le tableau de commande est inopérant
ou verrouillé.
Pour verrouiller
Appuyer sur CONTROL LOCK pendant 3
secondes.
To Unlock
Appuyer sur CONTROL LOCK pendant 3
secondes.
AIDE
Reportez-vous au mode d’emploi pour les détails
spéciques.
Appuyer sur SETUP/HELP.
2 fois pour Suppression du Signal Sonore.
3 fois pour Rappel de Fin de Cuisson.
4 fois pour Auto Démarrage.
5 fois pour Mode De Démonstration.
LOCK ON
LOCK OFF
EASY MINUTE
Appuyer sur START/EASY MINUTE pendant une
minute à 100% de puissance ou pour ajouter une
minute pendant la cuisson en mode manuel. Continuer
à appuyer pour des minutes supplémentaires.
F21
Page 44

Ce Qui Est Couvert
Garantie du Produit
CERTIFICAT DE GARANTIE
Microwave In-A-Drawer™ DACOR
DANS LES CINQUANTE ÉTATS DES É.-U., LE DISTRICT DE COLUMBIA ET AU CANADA* :
GARANTIE COMPLÈTE DE 2 ANS
Si, en raison de défaut matériel ou vice de fabrication, votre produit Modernist DACOR occasionnelles dans les
2 ans de la date d’achat, DACOR va remédier à l’irrégularité, sans frais pour vous ou les utilisateurs. Le proprié
taire doit fournir une preuve d’achat sur demande et l’appareil accessible pour l’entretien.
* La garantie est nulle et non avenue si un produit non approuvé CSA est transporté des É.-U.
HORS DES CINQUANTE ÉTATS DES É.-U., LE DISTRICT DE COLUMBIA ET AU CANADA :
GARANTIE LIMITÉE À LA PREMIÈRE ANNÉE
Si, en raison de défaut matériel ou vice de fabrication, votre produit fonctionne mal Modernist DACOR dans
l’année de la date d’achat, DACOR fournisse une nouvelle partie, FAB usine, pour remplacer la pièce dé
fectueuse. L’ensemble de livraison, d’installation, et les coûts du travail sont de la responsabilité du propriétaire, qui doit fournir une preuve d’achat sur demande et l’appareil accessible pour l’entretien.
-
-
Ce Qui N’est Pas Couvert
• Une panne du produit causée par une mauvaise installation,un usage inadéquat, ou un manque de l’entretien
requis.
• Les appels de service pour former le client aux bons usage et entretien du produit.
• Une panne du produit s’il est utilisé pour le commerce, les affaires ou la location ou pour tout autre
application que pour l’usage résidentiel du client.
• Le remplacement des fusibles ou des boîtes de fusibles de la maison ou le réenclenchement des disjoncteurs.
• Les dommages au produit causés par accident, incendie, inondation ou autres actes de Dieu.
• Le bris, la décoloration ou les dommages au verre, aux surfaces métalliques, aux composantes plastiques,
aux garnitures, à la peinture, la porcelaine ou autre ni esthétique, causés par un usage ou un entretien
inadéquats, un abus ou par négligence.
LES RECOURS OFFERTS DANS LES GARANTIES EXPRESSES CI-DESSUS SONT LES RECOURS
UNIQUES ET EXCLUSIFS; PAR CONSÉQUENT AUCUNE AUTRE GARANTIE EXPRESSE N’EST OFFERTE,
ET HORS DES CINQUANTE ÉTATS DES É.-U., LE DISTRICT DE COLUMBIA ET AU CANADA, AUCUNE
GARANTIE IMPLICITE, Y COMPRIS MAIS SANS Y ÊTRE LIMITÉE, TOUTE GARANTIE IMPLICITE DE
QUALITÉ MARCHANDE ET D’ADAPTATION À UN USAGE PARTICULIER POUR UN ACHAT. EN AUCUN
CAS, DACOR NE SERA TENU RESPONSABLE POUR DES FRAIS ACCESSOIRES OU DES DOMMAGES
INDIRECTS. AUCUNE GARANTIE N’EST OFFERTE, EXPRESSE OU IMPLICITE À UN ACHETEUR POUR
LA REVENTE.
Certains états ou provinces n’autorisent pas de restriction à la durée d’une garantie implicite ni l’exclusion
ou la restriction de dommages accessoires ou indirects; les restrictions ou exclusions pourraient donc ne pas
s’appliquer à vous. Cette garantie vous donne des droits particuliers et vous pourriez également avoir d’autres
droits qui varient selon les états et provinces.
F22
Page 45

fold here
BUSINESS REPLY MAIL
FIRST-CLASS MAIL CITY OF INDUSTRY CAPERMIT NO 1600
POSTAGE WILL BE PAID BY ADDRESSEE
DACOR
ATTN WARRANTY PROCESSING DEPT
PO BOX 90070
NO POSTAGE
NECESSARY
IF MAILED
IN THE
UNITED STATES
CITY OF INDUSTRY CA 91715-9907
Page 46

Please visit www.Dacor.com to activate your warranty online.
WARRANTY INFORMATION
IMPORTANT:
Your warranty will not be activated until you activate it online or return this form to Dacor. If you have purchased more
than one Dacor product, please return all forms in one envelope or activate the warranty for each product online.
Please rest assured that under no conditions will Dacor sell your name or any of the information on this form for mailing list purposes. We
are very grateful that you have chosen Dacor products for your home and do not consider the sale of such information to be a proper way
of expressing our gratitude!
Owner’s Name:
Street:
City: State: Zip:
Purchase Date: Email: Telephone:
Dealer:
City: State: Zip:
Your willingness to take a few seconds to fill in the section below will be sincerely appreciated. Thank you.
1. How were you first exposed to Dacor products? (Please check one only.)
A. T.V. Cooking Show F Builder
B. Magazine G. Architect/Designer
C. Appliance Dealer Showroom H. Another Dacor Owner
D. Kitchen Dealer Showroom I. Model Home
E. Home Show J. Other
2. Where did you buy your Dacor appliances?
A. Appliance Dealer D. Builder
B. Kitchen Dealer E. Other
C. Builder Supplier
3. For what purpose was the product purchased?
A. Replacement only C. New Home
B. Part of a Remodel D. Other
(Please Print or Type)
Last First Middle
cut herecut here
4. What is your household income?
A. Under $75,000 D. $150,000 – $200,000
B. $75,000 – $100,000 E. $200,000 – $250,000
C. $100,000 – $150,000 F. Over $250,000
5. What other brands of appliances do you have in your kitchen?
A. Cooktop C. Dishwasher
B. Oven D. Refrigerator
6. Would you buy or recommend another Dacor product?
Yes No
Comments:
Thank you very much for your assistance. The information you have
provided will be extremely valuable in helping us plan for the future
and giving you the support you deserve.
Web site: www.Dacor.com
Corporate phone: (800) 793-0093
 Loading...