Cyberlink ColorDirector - 5.0 Operation Manual

CyberLink
ColorDirector
User's Guide

Copyright and Disclaimer
All rights reserved.
To the extent allowed by law, ColorDirector IS PROVIDED “AS IS”,
WITHOUT WARRANTY OF ANY KIND, EITHER EXPRESS OR IMPLIED,
INCLUDING WITHOUT LIMITATION ANY WARRANTY FOR
INFORMATION, SERVICES, OR PRODUCTS PROVIDED THROUGH OR IN
CONNECTION WITH ColorDirector AND ANY IMPLIED WARRANTIES OF
MERCHANTABILITY, FITNESS FOR A PARTICULAR PURPOSE,
EXPECTATION OF PRIVACY, OR NON-INFRINGEMENT.
BY USING THIS SOFTWARE, YOU AGREE THAT CYBERLINK WILL NOT BE
LIABLE FOR ANY DIRECT, INDIRECT, OR CONSEQUENTIAL LOSS
ARISING FROM THE USE OF THIS SOFTWARE OR MATERIALS
CONTAINED EITHER IN THIS PACKAGE.
The terms and conditions here under shall be governed and
construed in accordance with the laws of Taiwan.
ColorDirector is a registered trademark along with other company and
product names mentioned in this publication, used for identification
purposes and remain the exclusive property of their respective
owners.
Manufactured under license from Dolby Laboratories. Dolby and the
double-D symbol are registered trademarks of Dolby Laboratories.
Confidential unpublished works. Copyright 1995-2005 Dolby
Laboratories. All rights reserved.
International Headquarters
Mailing Address CyberLink Corporation
15F., No. 100, Minquan Rd., Xindian Dist.
New Taipei City 231, Taiwan (R.O.C.)
Web Site
Telephone 886-2-8667-1298
Fax 886-2-8667-1385
Copyright © 2016 CyberLink Corporation. All rights reserved.
http://www.cyberlink.com

Contents
Introduction
................................................................................................1Welcome
.................................................................................................1Latest Features
.................................................................................................2DirectorZone and CyberLink Cloud
.................................................................................................2ColorDirector Versions
................................................................................................4System Requirements
Importing Videos
................................................................................................5Supported File Formats
................................................................................................5Importing 360 Video Files
................................................................................................6Importing Videos into the Program
................................................................................................6Downloading Videos from CyberLink Cloud
The ColorDirector Workspace
................................................................................................8ColorDirector Modules
.................................................................................................9Library
.................................................................................................9Adjustment
.................................................................................................9Production
................................................................................................9Library/Adjustment/Production Panel
.................................................................................................9Library Panel
.................................................................................................12Adjustment Panel
.................................................................................................12Production Panel
................................................................................................12Keyframe Settings Panel
................................................................................................12Storyboard Panel
................................................................................................13Video Viewer Window
..................................................1
..................................................5
..................................................8
i

Cyb erLink ColorDirecto r Help
.................................................................................................14Trimming Video Clips
.................................................................................................15Detecting Scenes in Video Clips
.................................................................................................16Splitting Video Clips
.................................................................................................17Rendering a Preview
.................................................................................................17Selecting Viewer Display Mode
.................................................................................................18Selecting View Mode
.................................................................................................19View er Zoom
.................................................................................................20Video Player Controls
ColorDirector Projects
Utilizing Keyframes
.................................................................................................29Timeline Markers
.................................................................................................32Setting Keyframe Behavior
.................................................................................................33Modifying and Removing Keyframes
Making Video Adjustments
..................................................22
................................................................................................22Setting Project Aspect Ratio
................................................................................................23Exporting Projects
................................................................................................23CyberLink Cloud Projects
..................................................25
................................................................................................27Keyframe Timeline
................................................................................................31Adding Keyframes
..................................................35
................................................................................................36Histogram
.................................................................................................36Applying Color Look-up Tables (CLUT)
.................................................................................................37Converting Videos to Black and White
.................................................................................................37Viewing Exposed Areas
................................................................................................38Regional Adjustment Tools
.................................................................................................38Using a Selection Mask
.................................................................................................45Using a Motion Tracking Mask
.................................................................................................51Using a Gradient Mask
.................................................................................................57Using a Radial Filter
.................................................................................................62Regional Adjustment Options
................................................................................................65Global Adjustment Tools
ii

.................................................................................................65White Balance
.................................................................................................66Tone
.................................................................................................67HDR Effect
.................................................................................................68Curve
.................................................................................................69Detail
.................................................................................................70Hue
.................................................................................................71Saturation
.................................................................................................71Lightness
.................................................................................................71Black and White
.................................................................................................72Split Toning
.................................................................................................73Color Replaceme nt
.................................................................................................74Blur
.................................................................................................74Tint Filter
.................................................................................................74Vignetting Effect
.................................................................................................75Color Splash
.................................................................................................75Color Shift
Using Adjustment Presets
.................................................................................................78My DirectorZone Presets
Turning Adjustments On/Off
..................................................77
................................................................................................77Downloading Presets from DirectorZone
................................................................................................78Downloading Presets from CyberLink Cloud
................................................................................................79Saving Custom Presets
................................................................................................79Applying Presets on Videos
................................................................................................80Sharing and Backing Up Presets
................................................................................................81Exporting/Import Presets
..................................................82
Production
.................................................................................................84Producing 360 Video
.................................................................................................84Customizing Profiles
.................................................................................................85Configuring Production Options
..................................................83
................................................................................................83Producing Video Files
iii

Cyb erLink ColorDirecto r Help
................................................................................................86Sharing Videos
.................................................................................................86Uploading Videos to YouTube
.................................................................................................88Uploading Videos to Vimeo
ColorDirector Preferences
ColorDirector Hotkeys
..................................................90
................................................................................................90General Preferences
................................................................................................91DirectorZone Preferences
................................................................................................91Color Preferences
................................................................................................92Hardware Acceleration Preferences
................................................................................................92Production Preferences
................................................................................................92CyberLink Cloud Preferences
..................................................94
Licenses and Copyrights
Technical Support
................................................................................................100Before Contacting Technical Support
................................................................................................101Web Support
................................................................................................101Help Resources
..................................................98
..................................................100
iv

Introduction
Note: this document is for reference and informational use only. Its content
and the corresponding program are subject to change without notice.
Chapter 1:
Introduction
This chapter introduces CyberLink ColorDirector and provides an overview of all its
features. It also outlines the system requirements for installing and using the
CyberLink ColorDirector program.
Welcome
Welcome to the CyberLink family of digital media tools. CyberLink ColorDirector is a
video editing program that turns your video footage into eye-catching movies
through the use of video color creating and correcting. You can then render the
videos for use in other editing programs, or for upload to YouTube and Vimeo.
Latest Features
This section outlines the latest features within the CyberLink ColorDirector program.
· Improved program performance and editing times with the latest TrueVelocity
engine.
· Render a preview of a selected range of videos on the storyboard, for a
smoother preview of color adjustments.
· More efficient regional adjustments on all masks with mask interpolation and
the duplicate mask feature.
· Use the Color Splash feature to keep only a specified color, instantly removing
all the other colors in a video clip.
· Remap all the colors in a video clip with the new Color Shift feature.
· Support for projects and video clips (import and export) with both 9:16 and 2:1
aspect ratios.
1
Cyb erLink ColorDirecto r Help
Note: CyberLink Cloud is a subscription cloud storage service that is
included with some CyberLink products, and is available for purchase
through our web site. For more detailed information, see http://
www.cyberlink.com/products/cyberlink-cloud/.
DirectorZone and CyberLink Cloud
You can upload/download color presets, and back up media, preferences, projects,
and more with the DirectorZone and CyberLink Cloud features.
DirectorZone
DirectorZone is a web service that lets you download adjustment presets created by
other users, so you can use them on your videos. You may also share your own
custom presets by uploading them to DirectorZone.
To access the benefits of DirectorZone, you can sign in by clicking the button at
the top of the window to open the ColorDirector preferences, and then on the
DirectorZone tab. See DirectorZone Preferences for more information.
Also, be sure to periodically click the button to check out the latest
DirectorZone B ulletin. Just click in this section in the Notifications window to view
the bulletin. Or go to http://directorzone.cyberlink.com to find out more
information on the features and benefits of the DirectorZone web service.
CyberLink Cloud
CyberLink Cloud is a cloud storage service from CyberLink where users can upload
and download their presets, ColorDirector projects, produced video clips, and more.
CyberLink Cloud allows users to back up media, preferences, projects, etc., and
ensure their working environment is the same on multiple computers.
ColorDirector Versions
The features that are available in CyberLink ColorDirector are completely dependent
on the version you have installed on your computer.
Click the CyberLink ColorDirector logo in the top right, or select Help > About
CyberLink ColorDirector from the menu, to determine the version and build
number for your copy of CyberLink ColorDirector.
2

Introduction
Note: you must connect to the Internet to use this feature.
ColorDirector Live
ColorDirector Live is a subscription based version of CyberLink ColorDirector that
provides all the editing and color correcting features you expect, and adds the
CyberLink Cloud storage service and more.
With a ColorDirector Live subscription, you get:
· All the advanced video color grading features of the Ultra version of CyberLink
ColorDirector, including the production of 4K ultra HD video.
· The ability to back up program preferences, projects, custom output profiles,
and presets on the cloud storage space CyberLink Cloud.
· Guaranteed updates to the latest versions of CyberLink ColorDirector Ultra.
ColorDirector Live is the must-have solution for on-the-go video editors who want
easy access to their media and the latest up-to-date editing technologies.
Updating ColorDirector
Software upgrades and updates (patches) are periodically available from CyberLink.
CyberLink ColorDirector automatically prompts you when either is available.
To update your software, do this:
1. Click the button to open the Notifications window.
2. Check the New U pdates and U pgrade Info sections.
3. Select an item in these sections to open your web browser, where you can
purchase product upgrades or download the latest patch update.
3

Cyb erLink ColorDirecto r Help
System R equirements
Operating System
· Microsoft Windows 10, 8/8.1, 7 (64 bit OS
recommended)
Scr een Resolution
· 1024 x 768, 16-bit color or above
Memory
· 2GB required (6GB or above
recommended)
CPU
· Multi-core Intel processor with 64-bit
support
VGA
· 128 MB VGA VRAM or higher
Hard Disk S pace
· 1GB required
Internet Connection
· Internet connection also required for initial
software & file formats activation
System Requirements
The system requirements listed below are recommended as minimums for using
the CyberLink ColorDirector program.
4

Impo rting Videos
Note: the 360 video must be stitched before it can be used in a 360 video
project in CyberLink ColorDirector. See the documentation for your 360
camera manufacturer for information on stitching the files for viewing and
editing.
Note: imported 360 files cannot be previewed in 360 mode within CyberLink
ColorDi rector.
Chapter 2:
Importing Videos
The first step when using CyberLink ColorDirector is to import your videos into the
program library. You can import videos one by one, or import the entire contents
of a folder into CyberLink ColorDirector.
Supported File Formats
CyberLink ColorDirector supports the following video file formats:
Videos: AVI, FLV (H.264), M2TS (H.264 AVC, H.265 HEVC), MKV (H.264 AVC, H.265
HEVC), MOD, MOV, MPEG-1, MPEG-2, MPEG-4 (H.264 AVC, H.265 HEVC), TOD, VOB
(with Dolby Digital 2ch or 5.1ch), VRO (with Dolby Digital 2ch or 5.1ch), WMV, XAVC
S.
CyberLink ColorDirector also supports Canon & Nikon DSLR video files.
Importing 360 Video Files
You can import and edit video files that were recorded with a 360 camera. Before
importing, make sure your project aspect ratio is set to 2:1. See Setting Project
Aspect Ratio for more information.
Once you are done color correcting your 360 video file, you can produce the video
and it will be outputted as a 360 video file. See Producing 360 Video for more
information.
5

Cyb erLink ColorDirecto r Help
Note: you can also drag and drop video files onto the CyberLink
ColorDirector window to import them into the program.
Importing Videos into the Program
You can import videos into CyberLink ColorDirector from your computer's hard
drive, and from removable devices, such as memory cards and portable hard drives.
To import videos into CyberLink ColorDirector, do this:
1. Click on Library, and then on one of the following import options:
· - select to import individual video files. Once selected, browse to and then
select all of the videos on your computer/removable device that you want to
import, and then click Open.
· - select to import a folder that contains your videos. Once selected,
browse to and then select the folder on your computer/removable device that
you want to import videos from, and then click Select Folder.
· - select to download video files you previously uploaded to CyberLink
Cloud. See Downloading Videos from CyberLink Cloud for more information.
2. CyberLink ColorDirector imports the video files into the library.
Downloading Videos from CyberLink Cloud
If you have a CyberLink Cloud subscription you can download videos from your
CyberLink Cloud storage directly into the library.
To download videos from CyberLink Cloud, do this:
1. Click on the File menu item and then select D ownload Media from CyberLink
Cloud. You can also click the button in the library panel.
2. Browse to and then select all the video files you want to download.
6

Impo rting Videos
3. Click on the Download button. CyberLink ColorDirector downloads the
selected files and then imports them into the library.
7
Cyb erLink ColorDirecto r Help
Chapter 3:
The ColorDirector Workspace
This chapter outlines the CyberLink ColorDirector workspace, and all of its features.
Getting familiar with the workspace is helpful, because it is where you spend all of
your time when using CyberLink ColorDirector.
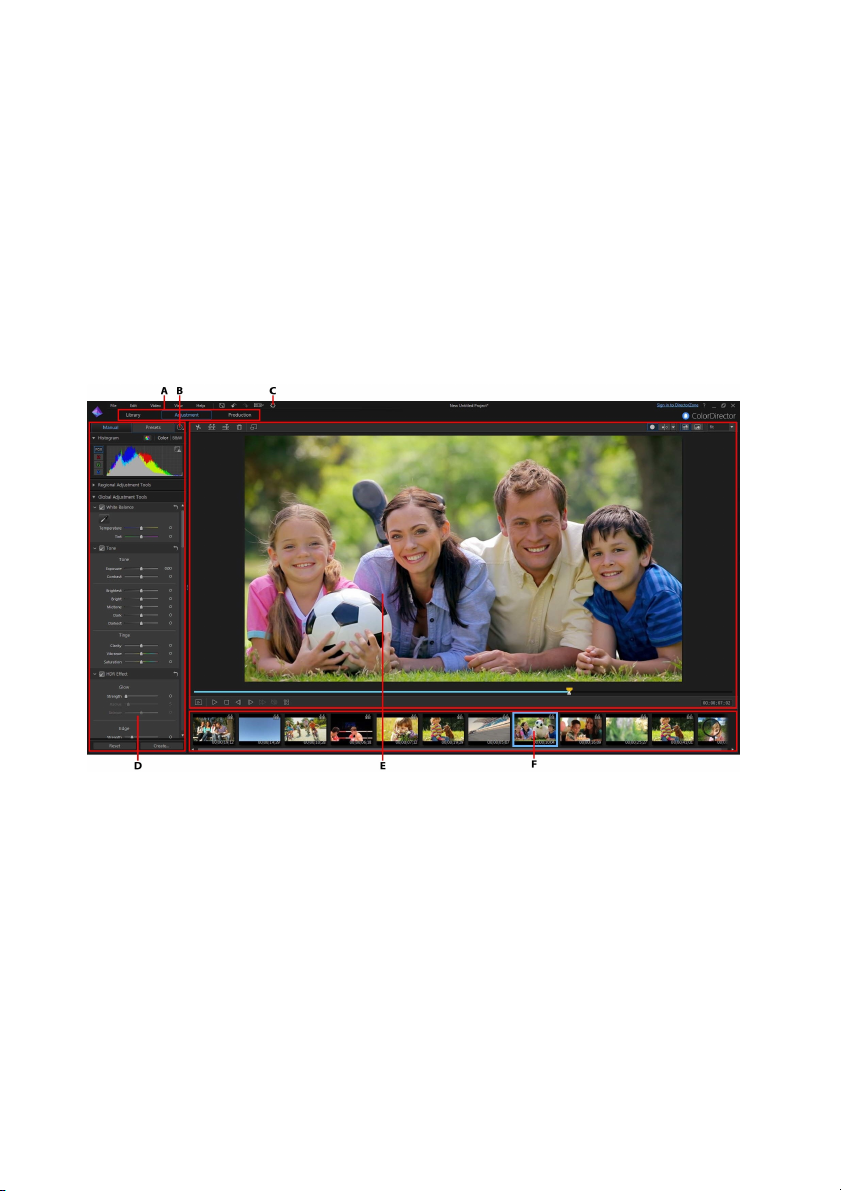
A - Col orDirector Mod ules, B - Key frame Settings P anel, C - Col orDirector Preferences, D - Li brary/
Adjustment/Produ ction P anel, E - V ideo Vi ewer Windo w, F - Storyboard Pa nel
ColorDirector Modules
CyberLink ColorDirector is comprised of three main modules: Library, Adjustment,
and Production.
8

The Colo rDirector Worksp ace
Library
Click the Library button to import video clips into CyberLink ColorDirector and view
detailed information video file information. Once imported into the library, you can
add them to the storyboard panel for adjusting and editing. See Library Panel for
more information.
Adjustment
The Adjustment module is where you touch up and make adjustments to the video
clips you imported into CyberLink ColorDirector. Click the Adjustment button to
apply presets, use motion track masks and gradients, adjust video saturation, hue,
white balance, and much more. See Making Video Adjustments for detailed
information.
Production
Once you finish adjusting your video clips, you must render them in the Production
module to apply the adjustments you made. All the video clips in the storyboard
panel will be rendered into one longer video once produced in the Production
module. For more detailed information see Production.
Library/Adjustment/Production Panel
The panel on the left side of the CyberLink ColorDirector window that displays is
dependent on which module of the program you are in. The following outlines
each of the panels and some of the available features.
Library Panel
The library panel is where you import all of the video clips into CyberLink
ColorDirector. It also provides access to the metadata information for each
individual video clip. You can double-click on any video clip in the library to begin
playing it in the preview window.
9
Cyb erLink ColorDirecto r Help
Importing Videos
You can import video files individually or by importing all the videos in a specific
folder. See Importing Videos for detailed information.
Sorting Videos in the Library
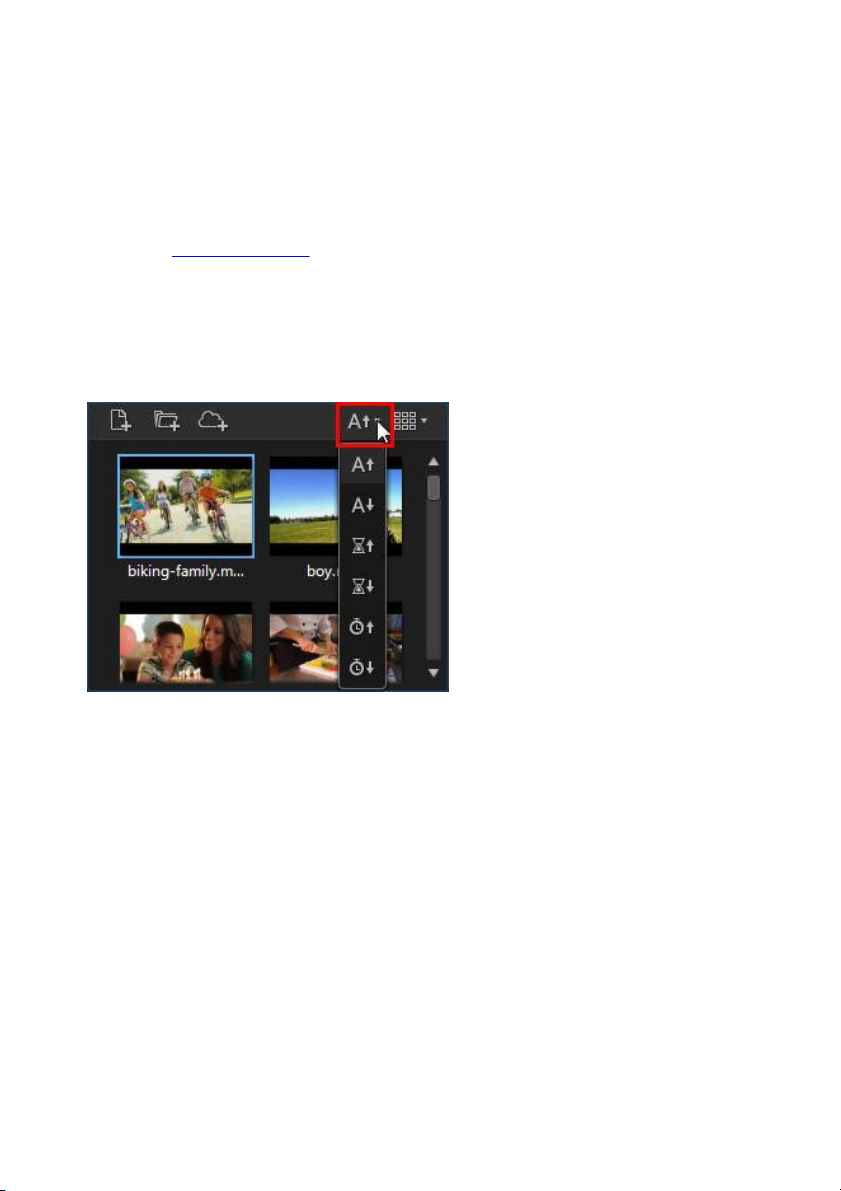
You can easily sort the videos in the ColorDirector library by selecting a sort option
from the list.
You have the option of sorting the videos in ascending or descending order by file
name, duration, or the date the videos were created.
Setting Library View
If required you can change the library view to fit your personal preference. By
default the video clips in the library display in thumbnail view, but you can click the
button in the top right corner of the library panel to change the view.
10

The Colo rDirector Worksp ace
Note: you can click and drag on the divider between the clips library and
video information for a larger view of the clips in the library.
Select to view the video clips by file name. Select to view them by their
video thumbnails.
Video Information
When you select video clips in the library, CyberLink ColorDirector displays each
clip's detailed embedded information in the library panel. Included in the
information is video and audio codec information, file size and type, video
resolution, frame rate, aspect ratio, and more.
Adding Video Clips to the Storyboard
Once you have video clips in the library, you must add them to the storyboard to
make adjustments and edit them. You can adjust and produce them one at a time,
or add multiple video clips that are merged into a longer video.
To add a video clip to the storyboard, do either of the following:
· drag it from the library to the storyboard.
· select it in the library and then click on its thumbnail.
11
Cyb erLink ColorDirecto r Help
Note: all the video clips in the storyboard panel will be rendered into one
longer video once produced in the Production window. If you do not want the
video clips rendered together, you must add each of them to the storyboard
separately, and then adjust and produce them one by one.
Adjustment Panel
The adjustment panel displays when in the Adjustment module and contains all of
the tools you use to color correct and adjust your videos. See Making Video
Adjustments for a detailed description of the all the tools available on the
adjustment panel.
Production Panel
When in the Production module, you can set produce preferences in the
production panel before rendering your adjusted video clips. See Producing Videos
for detailed information about the controls on the production panel.
Keyframe Settings Panel
When in the Adjustment module, click on the Manual tab and then the button
to display the keyframe settings panel. You can use keyframes when adjusting your
video clips to define the start and end points of the applied changes.
See Utilizing Keyframes for more detailed information on this feature.
Storyboard Panel
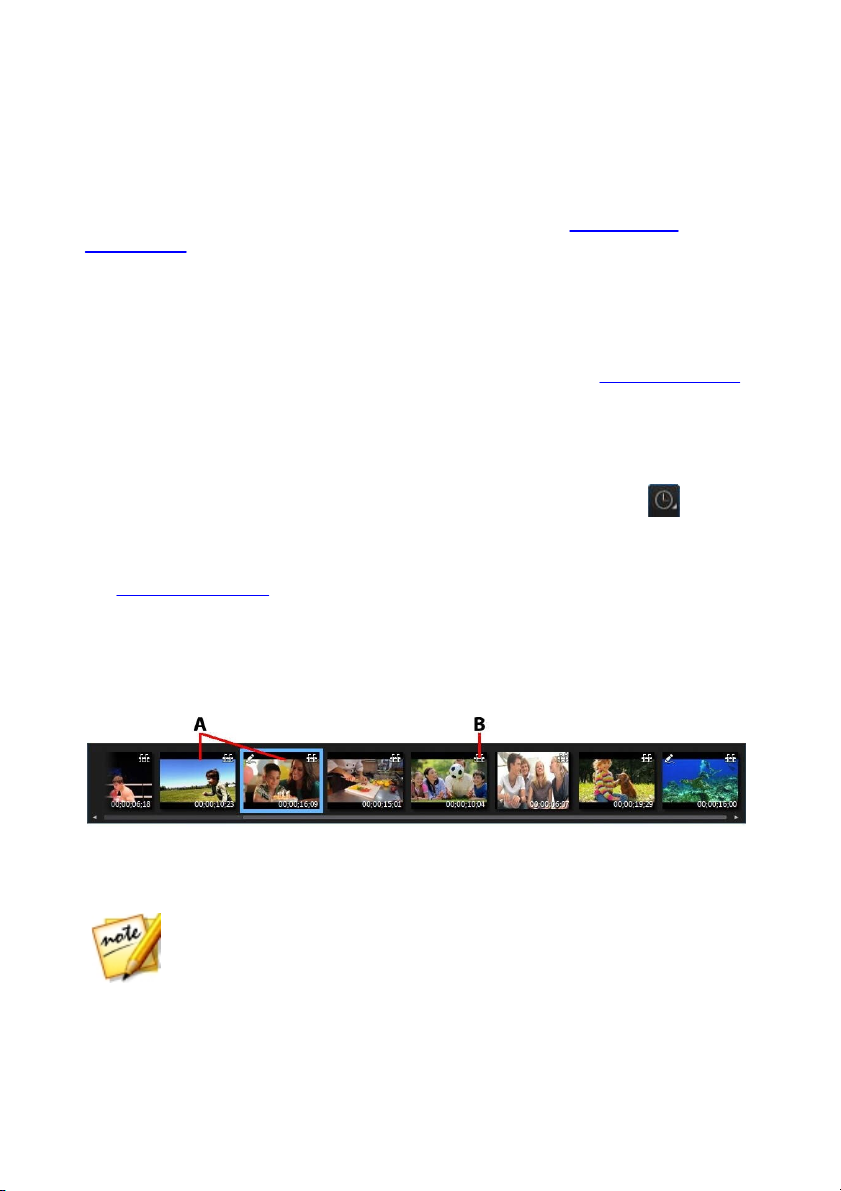
The storyboard panel is where the videos you want to adjust are located.
A - Vid eo Cli ps, B - Scen e Detection
Select a video in the storyboard panel to display it in the video viewer window for
playback and adjustment.
While browsing through video clips in the storyboard panel, you can:
12

The Colo rDirector Worksp ace
Note: you cannot detect scenes in a video clip that was previously trimmed
or split.
· rearrange the order of the video clips in the storyboard panel, just select it in
the panel and then drag it to the new position.
· remove a clip from the storyboard panel, right-click on it and then select
Remove. You can also remove multiple video clips at once by holding down
the Ctrl key on your keyboard, selecting the clips in the panel, and then
clicking the button at the top of the video viewer window.
· right-click on a video clip in the storyboard panel and then select Open File
Location to view the file in Windows Explorer.
· a video clip thumbnail with the icon in the storyboard indicates that
adjustments were made on the clip.
· click on the icon in a video clip's thumbnail to detect any scenes that the
clip may contain. The detected scenes are added to the storyboard panel like
any other video clip. See Detecting Scenes in Video Clips for more detailed
information on this feature.
· double-click in the video viewer canvas area to hide the storyboard panel
from view and get a larger view of the current video (viewer only mode).
Double-click on it again to redisplay the storyboard panel (viewer & storyboard
mode).
Video Viewer Window
The video viewer window displays a preview of the video selected in the storyboard
panel. Any adjustments you make to videos are viewable this window.
13

Cyb erLink ColorDirecto r Help
Note: the trim function is only available when in the Library and Adjustment
modules.
A - Trim Vi deo, B - Scene Detection , C - Split Vi deo, D - Remo ve Video , E - View at Full Screen, F Seconda ry M onitor Displ ay Mo de, G - Sel ect Viewer Disp lay M ode, H - Sel ect View Mode, I - View er
Zoom, J - Pla yer Controls, K - Pl ayback Options, L - Motio n Tracking Controls, M - Video Timeco de
Display
Trimming Video Clips
Use the trim function to quickly trim off unwanted portions at the beginning and
end of a video clip in the storyboard panel.
To trim a video clip, do this:
1. Select the video clip in the storyboard panel you want to trim, and then click
on the button at the top of the video viewer window to open the Trim
window.
2. Use the player controls to find where you want the trimmed clip to begin, or
the mark in position.
3. Click and drag the mark in and mark out indicators to positions where you
want the clips trimmed.
14

The Colo rDirector Worksp ace
Note: the detected scenes are not split from the original clip, but can be
separately moved around or removed from the storyboard panel.
Note: you cannot detect scenes in a video clip that was previously trimmed
or split. The detect scenes function is only available when in the Library and
Adjustment modules.
You can also manually set the timecodes for the In position and Out position
using the up and down arrows as required.
4. Click OK to set your changes and trim the clip as specified.
When trimming videos clips, please note:
· use the Duration controls if you want to trim the video clip to a specific
length.
· to preview what the trimmed clip will look like, ensure Output is selected and
then click the play button.
· if required, you can reenter the Trim window to refine the trimmed clip at any
time.
Detecting Scenes in Video Clips
The scene detection function automatically detects the individual scenes (or preedited shots) contained within a video clip, and then separates them into multiple
clips. The detected scenes are added to the storyboard panel like any other video
clip.
To detect the scenes in a video clip, do this:
1. Select a clip it in the storyboard panel and then click the button at the
top of the video viewer window to open the Scene Detection window. You
can also click the icon on the video clip's thumbnail in the storyboard
panel.
2. The scenes in the video clip are automatically detected and then displayed in
the Scenes panel.
3. Once you are done detecting the scenes in the video clip, click the OK button.
All the separate clips that were detected are now visible in the storyboard
panel.
15

Cyb erLink ColorDirecto r Help
Note: the split function is only available when in the Library and Adjustment
modules.
When using scene detection, please note:
· if required, use the Sensitivity slider to increase or decrease scene detection
sensitivity. Doing this may yield an increased or decreased number of scenes
that are detected. Click Start to redetect the scenes in the video clip. You are
asked to confirm the clearing of the previously detected clips and then the
updated scenes are detected and displayed in the Scenes panel.
· click on the button to configure the Advanced Scene Detection Settings.
If the selected video clip is a DV-AVI file, you have the option to Detect by
change of v ideo frame (used on all other file formats) or Detect by change of
timecodes (i.e.: time codes are automatically set when you start and stop
recording). Select the Disable preview during detection option to speed up
the detection process if you find your computer runs slow during the
process.
· to stop the scene detection process before completion, click the stop button
on the playback controls.
· to detect scenes manually, drag the slider (in Clip mode) to the beginning of
each new scene and then click .
· to preview a detected scene, just select it in the Scenes panel (ensure Scene is
selected) and then click the play button.
· to view all the detected scene markers on the clip timeline, ensure that Clip is
selected.
· to merge two or more detected scenes into one longer scene, select them in
the Scenes panel and then click Merge. Click Remove All if you want to
restore the clip to the original.
Splitting Video Clips
You can quickly split a video clip that is in the storyboard panel into two separate
clips. To do this, move the timeline slider (or use the player controls) to the position
in the clip where you want to split it. Next, click the button to separate it into
two clips that you can then move around and adjust separately from one another.
16
The Colo rDirector Worksp ace
You can also use it to quickly remove unwanted portions of a video clip, or if you
want to insert other media between the two portions.
Rendering a Preview
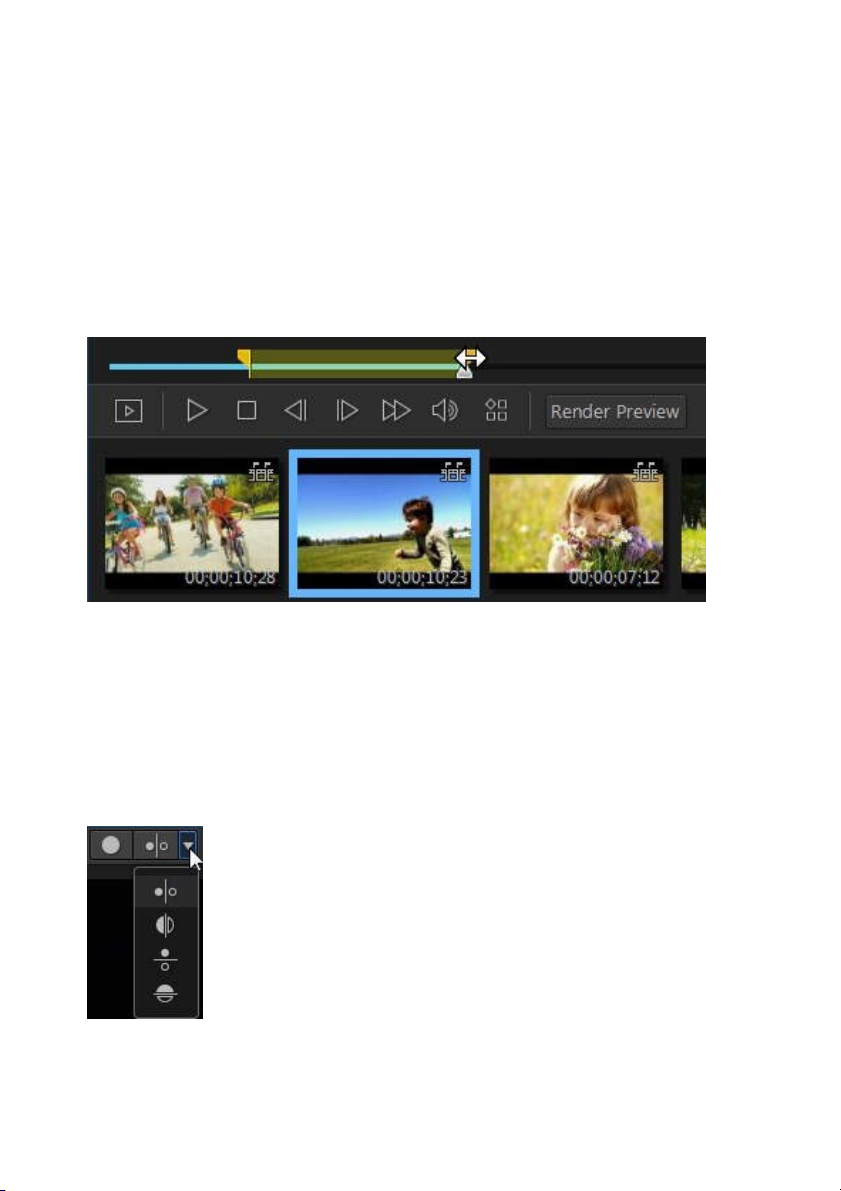
When in the Adjustment module or viewing a video at full screen, you can click and
drag one of the yellow markers on either side of the timeline slider to select a range
of the video clips on the storyboard.
Once selected, click Render Pr eview to have CyberLink ColorDirector render a video
preview of only the selected range. Once rendered, click the play button for a
smoother preview of color adjustments in the selected range.
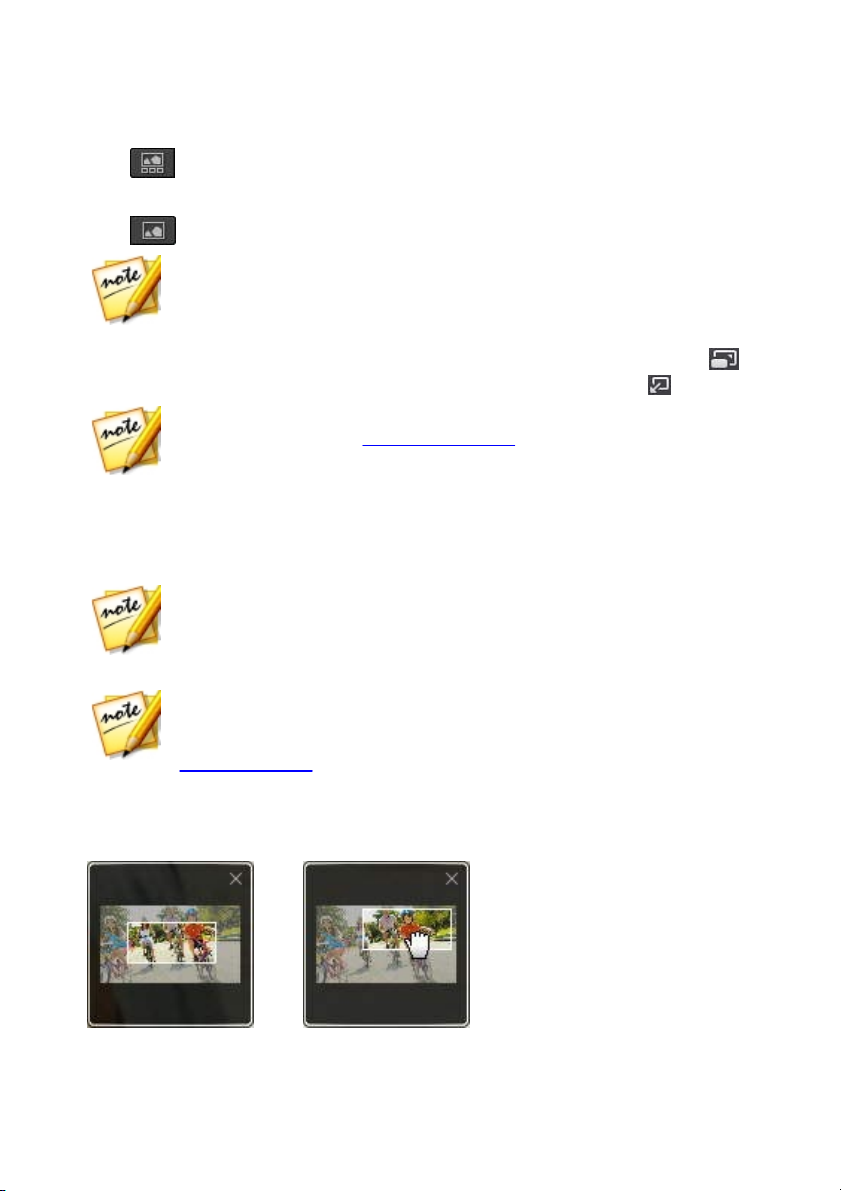
Selecting Viewer Display Mode
The video viewer window has several display modes that let you more easily view
the adjustments made to video clips. Click the arrow next in the viewer display
mode section to view all of the available display modes.
17

Cyb erLink ColorDirecto r Help
Note: these display mode buttons are only available when in the Adjustment
module of CyberLink ColorDirector.
Note: for this button to display, you must connect a secondary display to
your computer and then enable extend desktop to a secondary display in the
Windows Display Properties Settings.
· Show one - shows one preview window for the selected video clip in the
storyboard panel.
· Side by side - select to compare adjustments to videos side by side.
· Split - left/right - select to split the video, with the left half containing
the original video, and the right half of the video with the adjustments
applied.
· Top/bottom - select to compare adjustments to videos top to bottom.
· Split - top/bottom - select to split the video, with the top half containing
the original video, and the bottom half of the video with the adjustments
applied.
Secondary Monitor Display Mode
If you have more than one monitor connected to your computer, click the
button and then select the display mode for the secondary monitor.
· Mirror: duplicates the viewer display on the secondary monitor.
· Alternate: provides a secondary view of the videos you are adjusting. For
example, if you are adjusting a video in side by side mode, the "After" video
displays at full screen on the secondary monitor.
· None: select if you don't want anything displayed on your secondary
monitor.
Selecting View Mode
In the top left of the video viewer window, select one of the following view modes
when browsing through and viewing videos in CyberLink ColorDirector:
18
The Colo rDirector Worksp ace
Note: you can double-click in the video viewer canvas area to hide the
storyboard panel from view and get a larger view of the current video (viewer
only mode). Double-click on it again to redisplay the storyboard panel
(viewer & storyboard mode).
Note: when in full screen mode you can render a selected range for
smoother playback. See Rendering a Preview for more information.
Note: you can also hold down the Ctrl key on your keyboard and then use the
mouse scroll wheel to zoom in or out on the video viewer window.
Note: if you find that the size of the video in the video preview window seems
quite s mall when 100% zoom is selected, and becomes distorted after
selecting Fit, check that the quality setting of the video is correct. See
Playback Options for more information.
· Viewer & S toryboard Mode - select to display the video viewer window
and the storyboard panel for easy browsing and viewing of videos.
· Viewer Only Mode - select to display a larger view of the videos.
When playing back videos in the program or when making adjustments, select
to view the current video at full screen. When in full screen mode, click to exit.
Viewer Zoom
When previewing videos in the video viewer window, use the zoom drop-down in
the top right corner to set the size of the video preview.
Select Fit to resize the selected video so that is fits in the viewer window.
When you zoom in or out on a video clip, a navigation thumbnail for the viewer
displays in the bottom right of the video frame. Click and drag the available box to
change the focus area to suit your zooming requirements.
19

Cyb erLink ColorDirecto r Help
Video Player Controls
Select a video clip in the storyboard panel and then click the button to begin
playing it back. CyberLink ColorDirector will just play back the selected clip when
the play button is clicked. If you want to play all the clips in the storyboard, click
the button to enter full screen mode, and then click to play the whole
movie.
Use the video playback controls available in the video viewer window to control
playback, including pausing/stopping playback, fast forwarding videos, jumping to
the previous/next frame, or adjusting the volume. You can also click and drag the
playback slider to quickly go to a specific timecode in the timecode display, if
necessary.
Playback Options
Click the button to access the following playback options:
· Quality: select to set the quality of the video in the video viewer window. For
best results it is recommended that you set this based on the quality of the
original video.
· Real-time Preview: select one of the following preview modes:
· Real-time Preview: synchronizes and renders clips and effects in real-time,
displaying a preview of your video at the standard 25 (PAL)/30 (NTSC)
frames per second.
· Non R eal-time Preview: mutes the audio and displays a preview at a
reduced speed to help make editing much more fluid. Useful when editing
high-definition video on a less powerful computer, or when you receive
dropped frames when previewing. By muting the audio and slowing down
the video, CyberLink ColorDirector lets you view more frames per second
when your computer has trouble providing a smooth preview during
editing.
Motion Tracking Controls
The motion tracking controls are available when on the motion tracking mask tab
of the Regional Adjustment Tools. They are used when applying regional
20

The Colo rDirector Worksp ace
adjustments on moving objects in videos. See Using a Motion Tracking Mask for
more detailed information.
21

Cyb erLink ColorDirecto r Help
Note: a CyberLink ColorDirector project (.cds) file essentially contains a
list of the video clips in the storyboard panel, and a log of all the edits and
adjustments you want to make to them. Project files do not include the video
clips in them. If you want to save all your video production files in one place,
use the Pack Project Materials function. To do this select, File > Pack
Project M aterials from the menu.
Note: when you create a new project, CyberLink ColorDirector resets your
library. If you want to create a new video production using the same media
that's currently in your library, select File > New Workspace.
Chapter 4:
ColorDirector Projects
When adjusting video clips in CyberLink ColorDirector, click the button to save
your work as a project in the .cds file format, which is used exclusively by CyberLink
ColorDirector.
Use the options in the File menu to save, create new, or open existing projects in
CyberLink ColorDirector. If you have a CyberLink Cloud subscription you can also
upload saved projects and more to CyberLink Cloud. See CyberLink Cloud Projects
for more information.
The changes you make to your video clips in CyberLink ColorDirector do not affect
the original videos you imported into the program. Since your edits are all saved in
the project file, you can trim and make adjustments to your clips, but still keep your
original files on your hard drive, untouched. So let yourself get creative. If you end
up changing things too drastically, you can always start over.
Setting Project Aspect Ratio
To set the aspect ratio for your project, select from the available options in the
aspect ratio drop down at the top of the window.
22

Colo rDirector Projects
Note: if you have CyberLink PowerDirector 11 or above installed on your
computer, you can also select File > Export Proj ect to PowerDi rector
from the menu to quickly send all the individual adjusted video clips in the
storyboard directly to the PowerDirector timeline.
The video viewer window changes according to the aspect ratio you select.
If the video you imported is a 360 video file, your project aspect ratio should be 2:1
(for 360 Video) so you can edit and produce it as a 360 virtual reality videos. See
Importing 360 Video Files for more information on importing them, and Producing
a 360 Video for information on outputting them in the 360 video format.
Exporting Projects
You can export your CyberLink ColorDirector projects by packing all the materials in
a folder on your computer's hard drive or CyberLink Cloud*. Exported projects can
then be imported into another computer running CyberLink ColorDirector.
To export your project, select File > Pack Proj ect Materials. If you have a CyberLink
Cloud subscription you can select File > Pack Pr oject Materials and Upload to
CyberLink Cloud to back it up in a folder on CyberLink Cloud.
CyberLink Cloud Projects
If you have a CyberLink Cloud subscription you can select F ile > Upload Project to
CyberLink Cloud to store project files on CyberLink Cloud.
To open a project that was saved on CyberLink Cloud, including projects that were
packed in a folder with their media (materials), select Download Project from
CyberLink Cloud from the File menu or in the Welcome window. In the window that
displays, select a project and then click Download.
23

Cyb erLink ColorDirecto r Help
Note: when you open a packed project stored on CyberLink Cloud, the
project file and all the project media is downloaded to your local computer
and stored in the download folder specified in CyberLink Cloud
Preferences.
24
 Loading...