

Page 1
Cuisinart
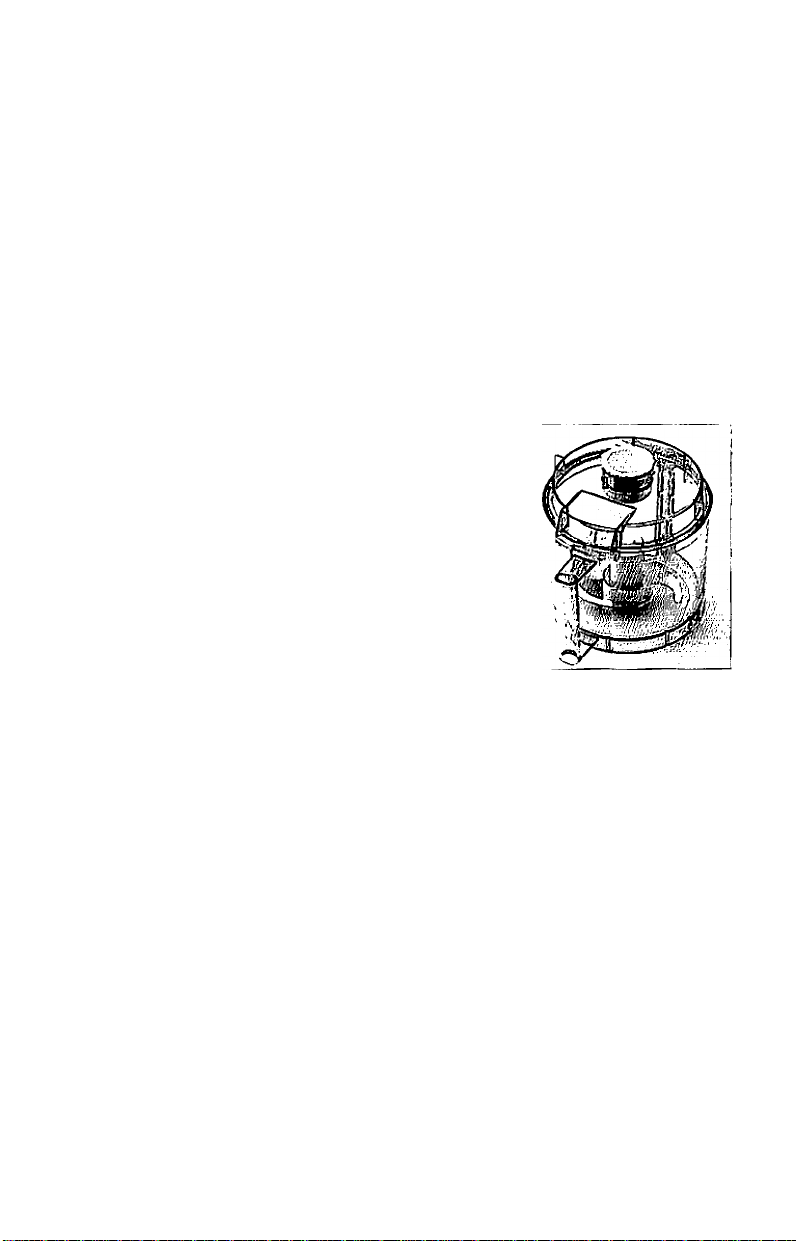
STEP-BY-STEP GEnWG STARTED
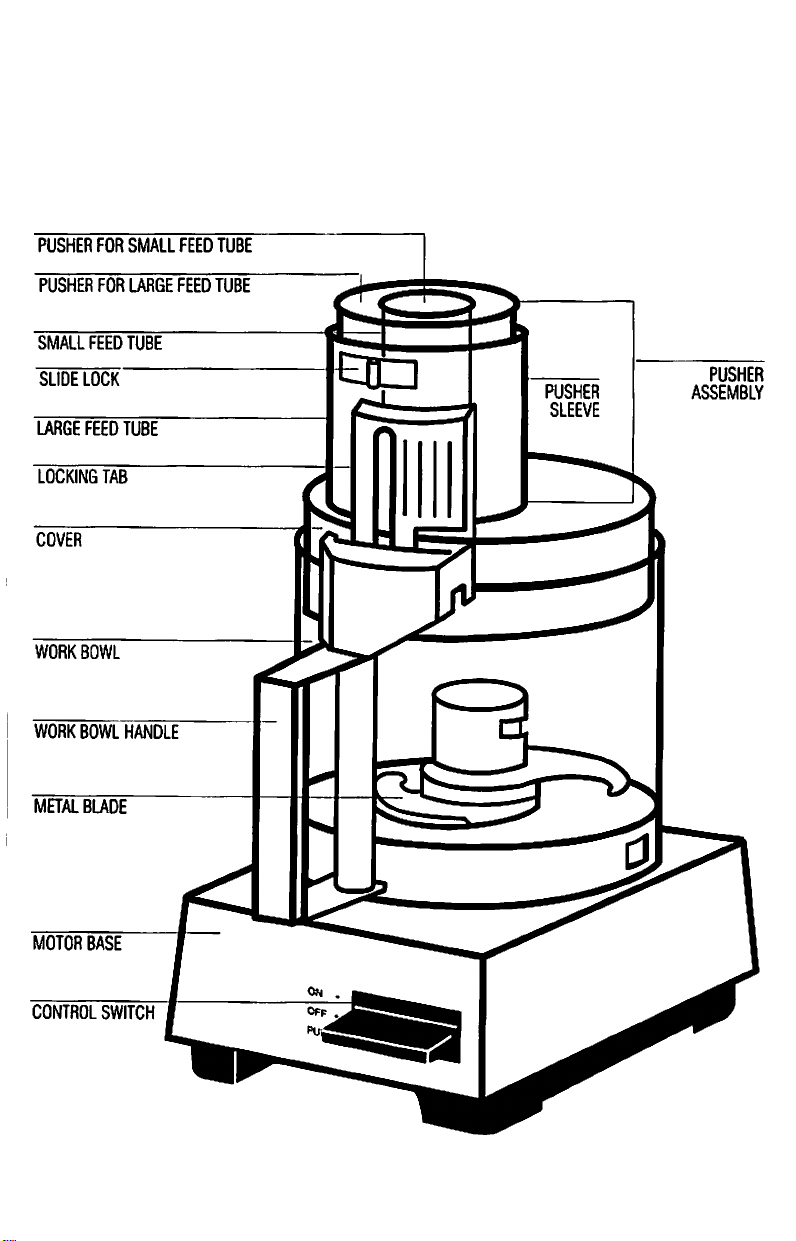
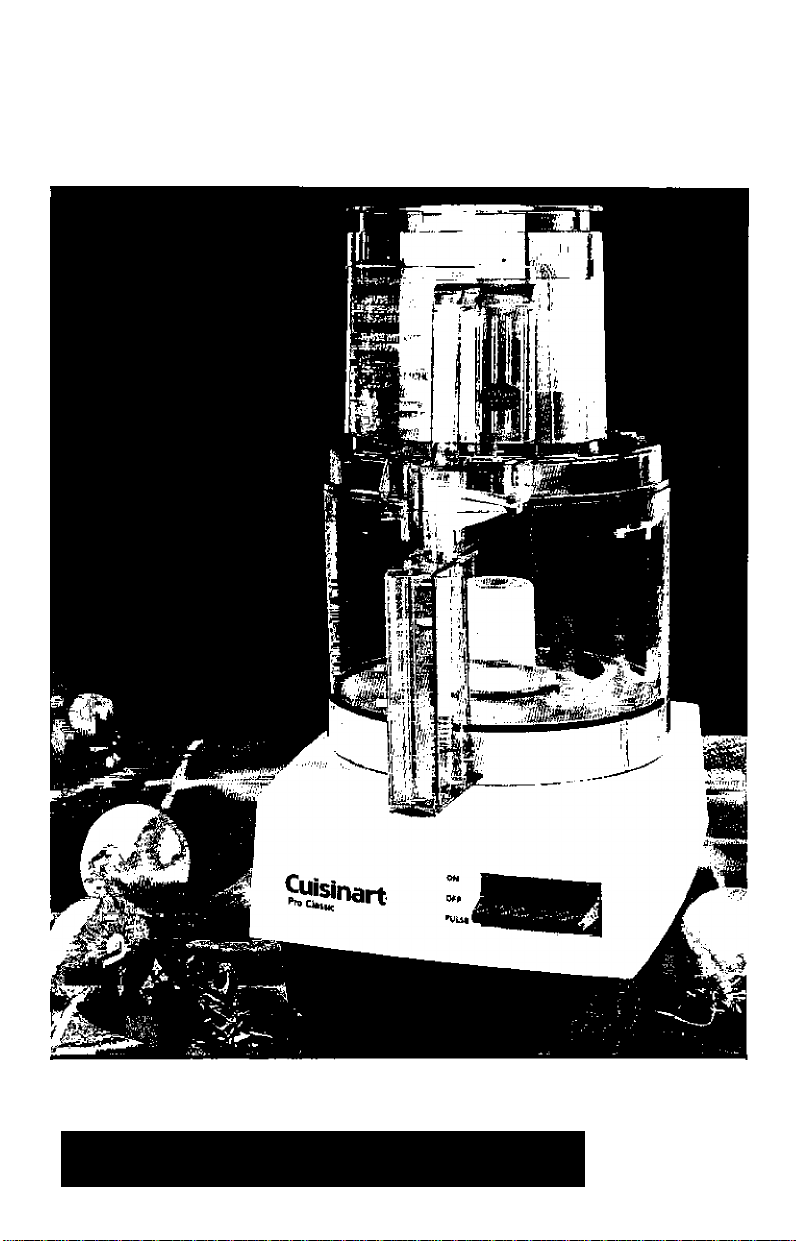
Your Cuisinarf DLC-10S or DLC-10C will look like this after
you follow the easy step-by-step assembly instructions inside.
’ Move up to ON posilion lo start motor
' Move down to OFF posilion to slop motor
' Press down to PULSE position and release for pulse/chopping
Page 2
CHOPPING AND PUREEING
WITH THE METAL BLADE
SLICING AND SHREDDING
WITH THE SLICING AND
SHREDDING DISCS
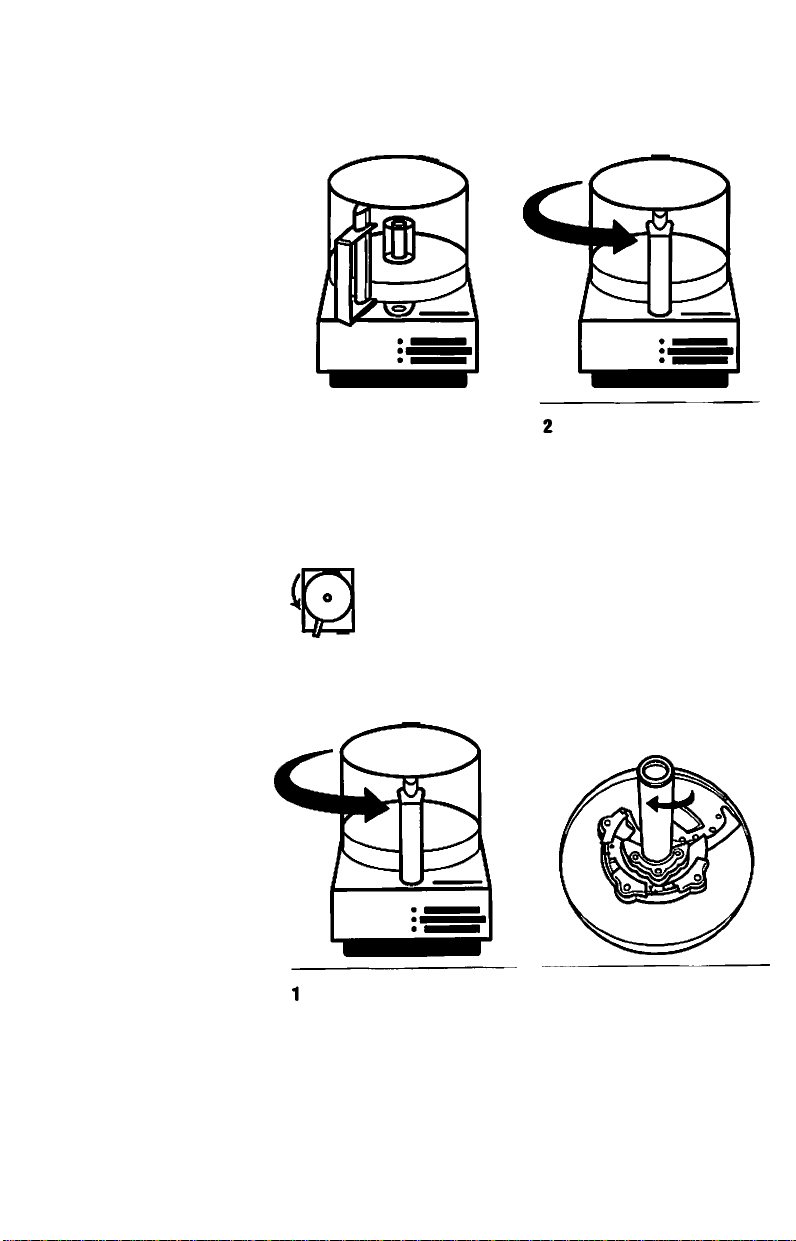
1
Put base on counter, with nameplate
facing you.
Turn work bowl counterclockwise
until it clicks.
Pick up work bowl, with handle
facing you, and place it on base
with handle at about 7 o'clock.
Lock bowl in place. (See 1 and 2
above.)
Place disc, cutting side down, on
flat, stable surface and hold it down
firmly with one hand. With other
hand, line up two symbols
(oand
symbols on disc. Turn stem clock
wise until it clicks into position.
a) on stem with similar
Page 3
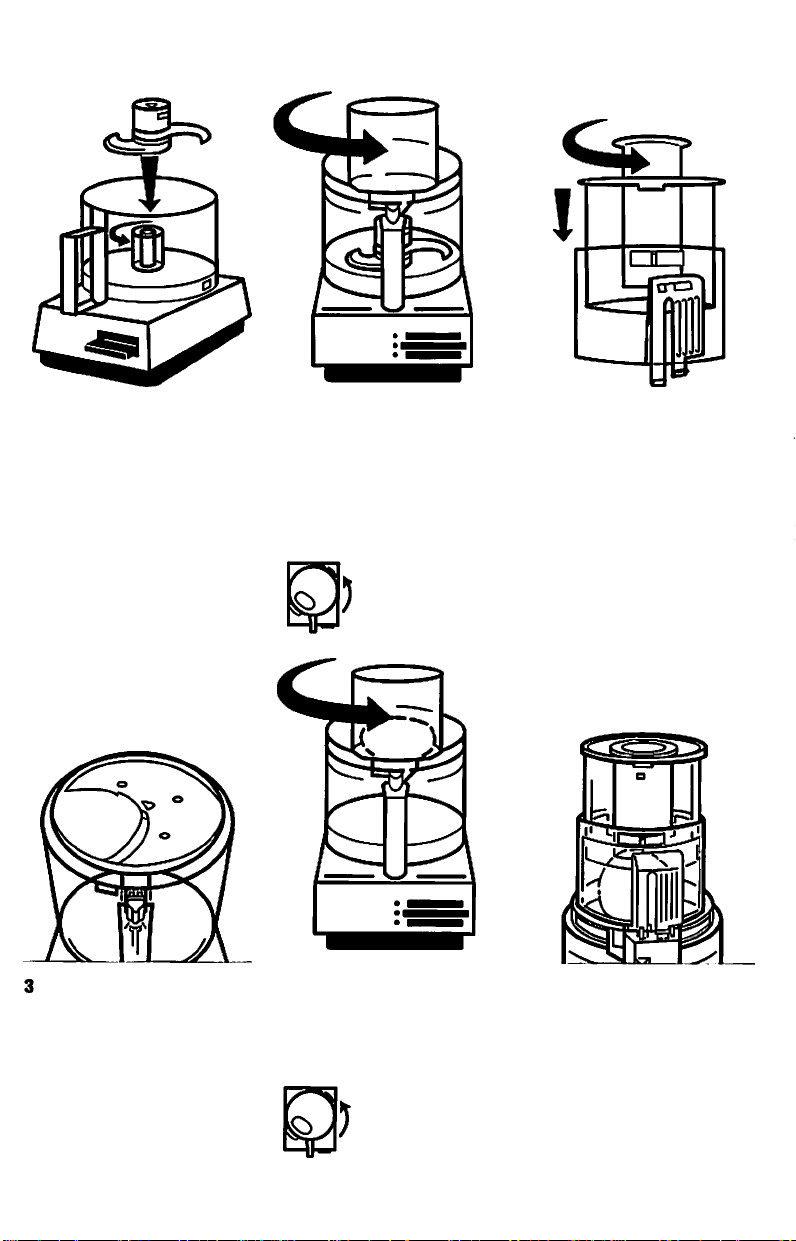
Place metal blade over shaft,
matching outline O on top of
hub to shape of shaft. Lower blade
will almost touch bottom of bowl.
Put cover on work bowl, with feed
tube at about 7 o'clock.
Turn cover counterclockwise until
it fits into position.
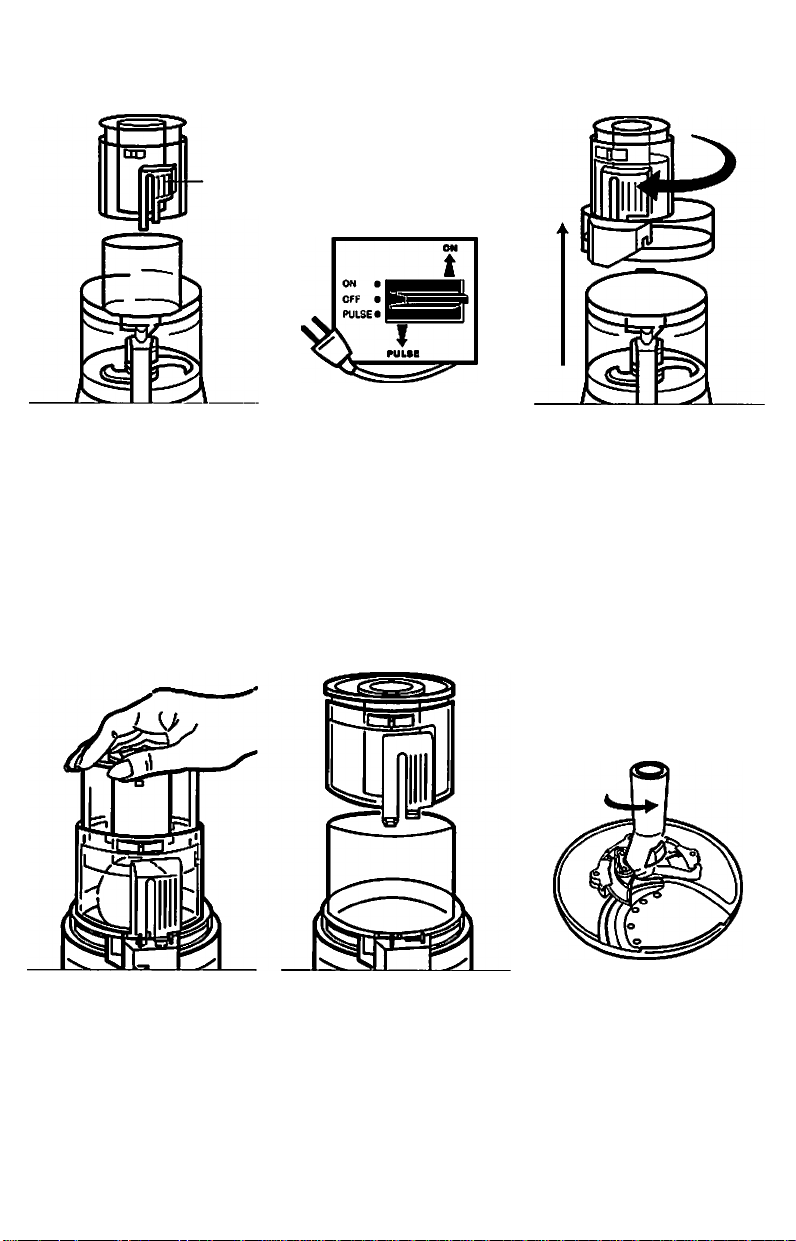
The pusher assembly slides over
the large feed tube. It has a large
pusher and a small pusher.
Push the small white pusher all
the way down and twist it to lock.
Push the large pusher all the way
down and push white Slide Lock
right to lock.
Place disc over shaft, matching
outline Q on its top to shape
of shaft.
Without touching blade edge, push
disc down as far as it will go.
Put cover on bowl, feed tube
at 7 o'clock, and turn until it clicks.
Insert food in feed tube.
Twist small pusher to lock it and
push Slide Lock to left to unlock
pusher sleeve.
Slide large pusher sleeve over feed
tube and push all the way down
until labs click into place.
Page 4

Cuisinart
Cuisinai® is a registered trademark of Cuisinai
ISO Milford Road
East Windsor. NJ 08520
1-800-726-0190
Printed in China
U PG-3200
cut 9228.94
Page 5
Locking
Tab
6
Hold pusher with while Slide Lock
toward you. Slide pusher over feed
tube on cover and push locking tab
down until locking tab clicks.
CAUTION: Machine must be unplugged
when you practice iocking and unlocking
pusher. Repeated locking and unlocking
with machine plugged in is never neces
sary in normal use and will make
machine inoperable.
6
Apply even pressure to large
pusher while holding lever down
at PULSE position, and push food
through.
Plug in machine. Move control
switch up to ON position to start
motor. Move control switch down to
OFF position to stop motor. Move
control switch down to PULSE
position and release it for
pulse/chopping. If machine doesn't
start, make sure it is plugged in and
work bowl, cover and pusher
assembly are locked in position.
To remove pusher assembly, hold
it with thumb on large tab. Press
firmly on lab and lift straight up.
Cover will stay in place, allowing
you to reload feed tube.
8
To remove cover, hold pusher
assembly with thumb away from
two locking tabs. Turn and lift.
The work bowl won't come off
until the cover is unlocked.
8
To remove disc from stem, slide
button up as far as it will go and
turn stem counterclockwise.
Page 6

IMPORTANT
SAFEGUARDS
Always follow these safety
precautions when using this
appliance.
Getting Ready
1. Read all instructions.
2. Blades are sharp. Handle
them carefully.
3. Unplug from outlet when not
in use, before putting on or
taking off parts, and before
cleaning, to unplug, grasp plug
and pull from electrical outlet.
Never pull cord.
4. Do not use outdoors.
5. Do not let cord hang over
edge of table or counter, or
touch hot surfaces.
6. Do not operate any appliance
with damaged cord or plug,
or after appliance has been
dropped or damaged in any way.
Operation
1. Do not use pusher assembly
if sleeve becomes detached
from pusher.
2. Keep hands as well as
spatulas and other utensils
away from moving blades or
discs while processing food,
to prevent possibility of severe
personal injury or damage to
food processor. A plastic
scraper may be used but must
be used only when food proces
sor motor is stopped.
3. Avoid contact with moving
parts. Never push food down by
hand when slicing or shredding.
Always use pusher.
4. Make sure motor has
been completely stopped
before removing cover.
(If machine does not stop
within 2 seconds when
you turn cover, call
1.800-726-0190 for
assistance. Do not use
machine.)
5. Never store any blade or disc
on motor shaft. No blade or disc
should be placed on the shaft
except when the bowl is proper
ly locked in place and the
processor is in use. Store
blades and discs, as you would
sharp knives, out of reach of
children.
6. Be sure cover is securely
locked in place before operating
food processor.
7. Do not try to override cover
interlock mechanism.
Cleaning
To protect against risk of
electrical shock, do not put
base in water or other liquid.
General
1. Close supervision is neces
sary when any appliance is used
by or near children.
2. Do not operate this, or any
other motor-driven appliance,
while under the influence of
alcohol or other substances
that affect your reaction time
or perception.
3. This food processor is UL
listed tor household use.
Use it only for food preparation
as described in the accompany
ing recipe and technique book.
4. The use of attachments not
recommended or sold by
Cuisinart may cause fire,
electrical shock, personal
injury or damage to your
food processor.
5. To avoid possible malfunction
of work-bowl switch, never store
processor with pusher assembly
in locked position.
6. Maximum rating of 5.1
amperes is based on attachment
that dravirs greatest current.
Other recommended attach
ments may draw significantly
less current.
SAVE THESE
INSTRUCTIONS
NOTICE
This appliance has a polarized
plug (one blade is wider than
the other). As a safety feature,
this plug will fit in a polarized
outlet only one way. if the plug
does not fit fully In the outlet,
reverse the plug. If it still does
not fit, contact a qualified
electrician. Do not attempt to
defeat this safety feature.
Page 7
Cuisinart-
PRO CLASSIC''
Use and Care and Redpe Booklet
Food Processor
7-cup
Bowl
Page 8

IMP OR TA NT
SAF EG UA RD S
Always follow these safety
precautions when using this
appliance.
Getting Ready
1. Read all instructions.
2. Blades are sharp. Handle
them carefully.
3. Unplug from outlet when not
in use, before putting on or tak
ing oft parts and before cleaning.
To unplug, grasp plug and pull
from electrical outlet. Never pull
cord.
4. Do not use outdoors.
5. Do not let cord hang over edge
of table or counter, or touch hot
surfaces.
6. Do not operate any appliance
with damaged cord or plug, or
after appliance has been dropped
or damaged in any way. Return
appliance to the nearest autho
rized service facility tor examina
tion, repair or electrical or
mechanical adjustment.
Operation
t. Do not use pusher assembly if
sleeve becomes detached from
pusher.
2. Keep.hands as well as spatulas
and other utensils away from
moving blades or discs while
processing food, to prevent pos
sibility of severe personal injury
or damage to food processor. A
plastic scraper may be used but
must be used only when food
processor motor is stopped.
3. Avoid contact with moving
parts. Never push food down by
hand when slicing or shredding.
Always use pusher.
4. Make sure motor has com
pletely stopped before removing
cover, (machine does not stop
within 4 seconds when you turn
cover, call 1-800-762-0190 for
assistance. Do not use
machine).
5 Never store any blade or disc
on motor shaft. To reduce the
risk of injury, no blade or disc
should be placed on the shaft
except when the bowl is properly
locked in place and the processor
is in use. Store blades and discs,
as you would sharp knives, out of
reach of children.
6. Be sure cover is securely
locked in place before operating
food processor.
7. Do not try to override cover
interlock mechanism.
Cleaning
To protect against risk ot electri
cal shock, do not put base in
water or other liquid.
General
1. Close supervision is necessary
when any appliance is used by or
near children.
2. Do not operate this, or any
other motor-driven appliance,
while under the intiuence of
alcohol or other substances that
affect your reaction time or per
ception.
3. The food processor is UL list
ed for household use. Use it only
for food preparation as described
in the accompanying recipe and
technique book.
4. The use of attachments not
recommended or sold by
Cuisinart. may cause fire, electri
cal shock, personal injury or
damage to your food processor.
5. To avoid possible malfunction
of work-bowl switch, never store
processor with pusher assembly
in locked position.
6. Maximum rating of 5
amperes is based on attachment
that draws greatest current.
Other recommended attachments
may draw significantly less cur
rent.
SAV E TH ES E
INS TR UC TI ON S
NOTICE
This appliance has a polarized
plug (one blade is wider than the
other). As a safety feature, this
plug will fit in a polarized outlet
only one way. It the plug does
not fit fully in the outlet, reverse
the plug. If it still does not fit.
contact a qualified electrician. Do
not attempt to defeat this safety
feature.
Compact Cover
1. Do not use the Compact Cover
when mixing hot. thin liquids
such as soups or sauces. If you
do, it is possible that hot liquid
may splash and injure you.
2. DO NOT use any slicing,
shredding, julienne. French trycut or fine grater discs with the
Compact Cover. Doing so may
expose the user to injury.
3. Although the Cuisinart
Compact Cover may seem com
patible with machines from other
manufacturers, using the cover
with other machines may be dan
gerous and may expose the user
to injury. We specitically caution
you not to use the Compact
Cover with other brand machines.
FOR H OU SE HO LD
USE O NL Y
Page 9

CONTENTS
IMPORTANT SAFEGUARDS
THE PARTS
PRACTICING WITH FOOD
REMOVING PROCESSED FOOD
CW)PPING,PUlâN6&MIXING WITH MEDU.BUDE 6
TO CHOP RAW FRUITS AND VEGETABLES 6
TO PURÉE FRUIT ANO COOKED VEGETABLES 6
TO CHOP HARD FOOD LIKE GARLIC 7
TO CHOP PARSLEY. OTHER FRESH HERBS 7
TO CHOP PEEL FROM CITRUS FRUIT 7
TO CHOP STICKY FRUIT LIKE DATES 7
TO CHOP MEAT. POULTRY AND FISH 8
TO PURÉE MEAT. POULTRY AND FISH 8
TO CHOP NUTS 9
TO MAKE PEANUT BUTTER 9
TO MAKE FLAVORED BUTTERS. SPREADS AND DIPS 9
TO MAKE MAYONNAISE 10
TO BEAT EGG WHITES 10
TO WHIP CREAM 10
TO MAKE CRUMBS AND CRUMB CRUSTS 11
TO MAKE PASTRY 11
TO MAKE QUICK BREADS AND CAKES 11
KNEADING YEAST DOUGH WITH DOUGH BLADE 12
TYPICAL BREAD DOUGH
TYPICAL SWEET DOUGH
MACHINE CAPACITY
USING THE RIGHT BLADE
MEASURING THE FLOUR
PROOFING THE YEAST
PROCESSING DRY INGREDIENTS
ADDING LIQUIDS
KNEADING BREAD DOUGH
KNEADING SWEET DOUGH
RISING
SHAPING. FINISHING AND BAKING
MAKING CONSECUTIVE BATCHES
PROBLEMS «SOLUTIONS FOR MAKING DOUGH 14
PREPARING FOOD FOR SUCING ANO SHREDDING 16
ROUND FRUITS AND VEGETABLES 16
WHDLE PEPPERS 16
LARGE FRUITS LIKE PINEAPPLE 16
CABBAGE AND ICEBERG LEHUCE 16
IFTHEFOODDOESNTFIT 17
PACKING FEED TUBE FOR DESIRED RESULTS 17
PRACTICING SUCING AND SHREDDING 18
REMOVING SLICED OR SHREDDED FOODS 19
SLICING AND SHREDDING TECHNIQUES 20
SMALL. ROUND FRUITS AND VEGETABLES 20
LONG FRUITS AND VEGETABLES 20
SMALL AMOUNTS OF FOOD 20
FRENCH-CUT GREEN BEANS 21
MATCHSTICKS OR JULIENNE STRIPS 21
SLICING COOKED MEAT AND POULTRY 22
SLICING FRANKFURTERS AND OTHER SAUSAGES 22
SLICING AND SHREDDING CHEESE 23
12
12
12
IF YOU HAVE A PROBLEM 24
12
12
CLEANING AND STORING 24
12
12
FOR YOUR SAFETY 25
13
SOME TECHNICAL DATA 25
13
13
13
13
13
RECIPES 26
WARRANTY 49
Page 10
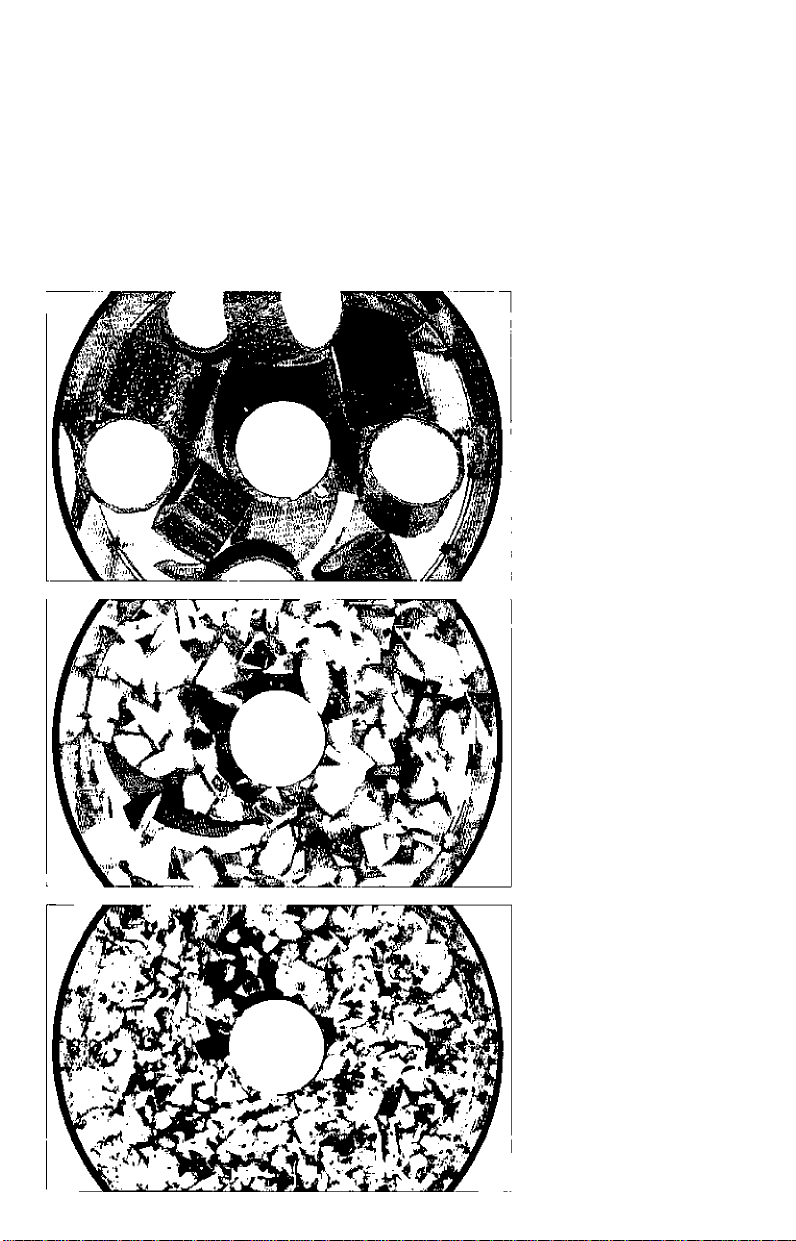
PRACTICING WITH FOOD
Try chopping some practice foods
before you process food to eat. A
zucchini or potalo is a good choice.
First cut it into 1'inch pieces.
Insert the metal blade and pul the
pieces in the work bowl. Pul on the
cover and the pusher assembly:
press the pusher assembly down to
lock it into place. Press the lever
down to PULSE and released.
Repeat two or three times and see
what happens. Each time the blade
slops, let the pieces drop to the
bottom ol the bowl before you
pulse again. That puts them in the
path of the blade each time the
motor starts.
Using the pulse/chopping
technique, you can get an even
chop without danger of over
processing. Check the texture
Irequently by looking through the
cover o( the work bowl. II you want
a finer chop, keep pressing the
lever down to PULSE and releasing
it until you achieve the desired
texture. Onions and other food with
a high water content will quickly
end up as a puree unless examined
after each pulse to make sure it is
not overprocessed.
Try chopping other food, like meat
for hamburger or sausage. Then
make mayonnaise, pastry or bread,
as described in the recipes in this
book.To obtain consistent results:
► Be sure alt the pieces you add to
the bowl are about the same size
*■ Be sure the amount of food is
no ¡arger than recommended.
Page 11
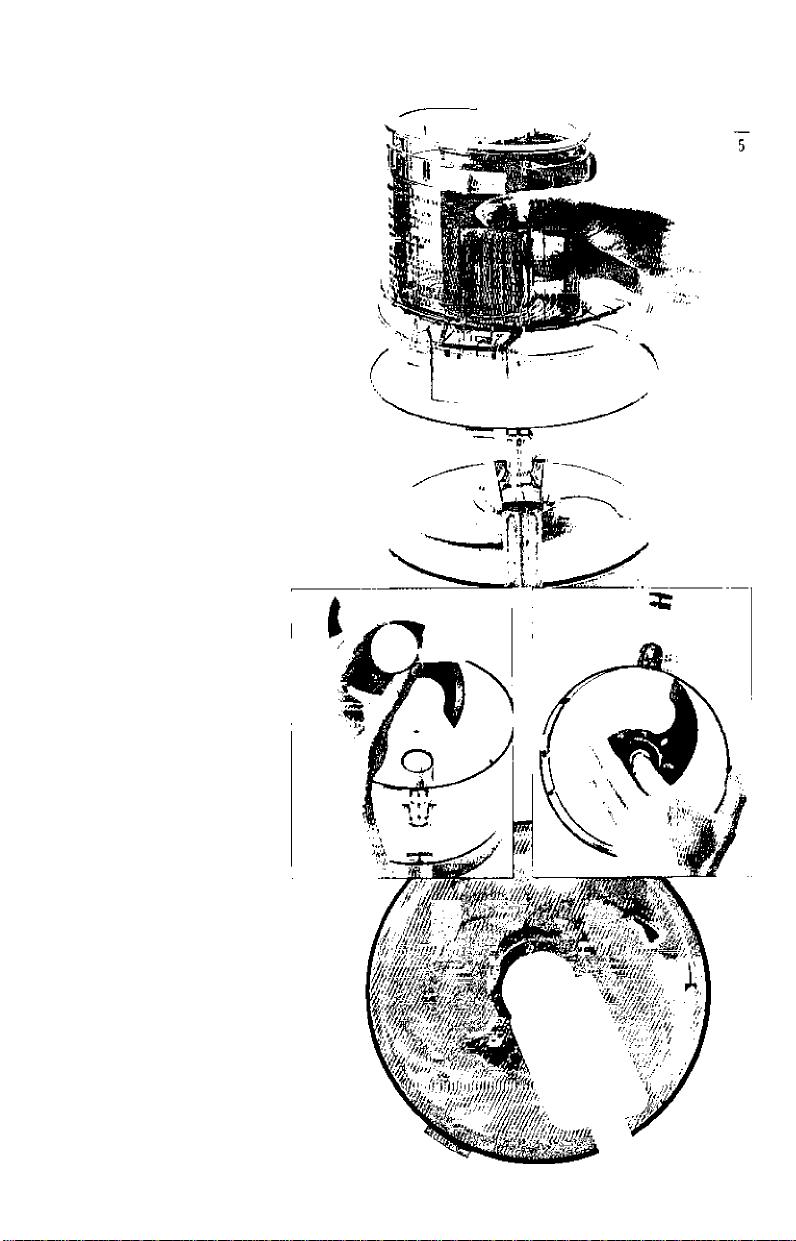
REMOVING PROCESSED FOOD
Before you do anything, wait
for the blade to stop spinning.
When i! does, remove the cover
lirst. You can remove the cover and
pusher assembly in one operaiion.
Hold the pusher assembiy wilh your
Ihumb
away horn the descending
labs and turn it ciockwise. Lilt it off,
and the cover wiil come with it.
Never try to remove the cover and
Ihe work bowi together; this can
damage the work bowl.
Remove ihe bowl from the base of
the machine before removing the
blade, This creates a seat to prevent
(ood from leakihg. Turn Ihe bowl
clockwise to unlock it from the base
and lift it straight up to remove it.
To prevent the blade from falling out
of Ihe work bowl onto your hand,
use one of the methods shown at
the right. Be sure your hands are
dry. Remove the metal blade before
tilting the bowl, using a spatula to
scrape off any food sticking to it. Or
insert your finger through the hole
in the bottom ot the work bowl,
gripping Ihe blade from the boltom,
and grip Ihe outside of the work
bowl with your thumb. Ot hold the
blade in place wilh your linger or a
spalula while pouring oul processed
food.
Page 12
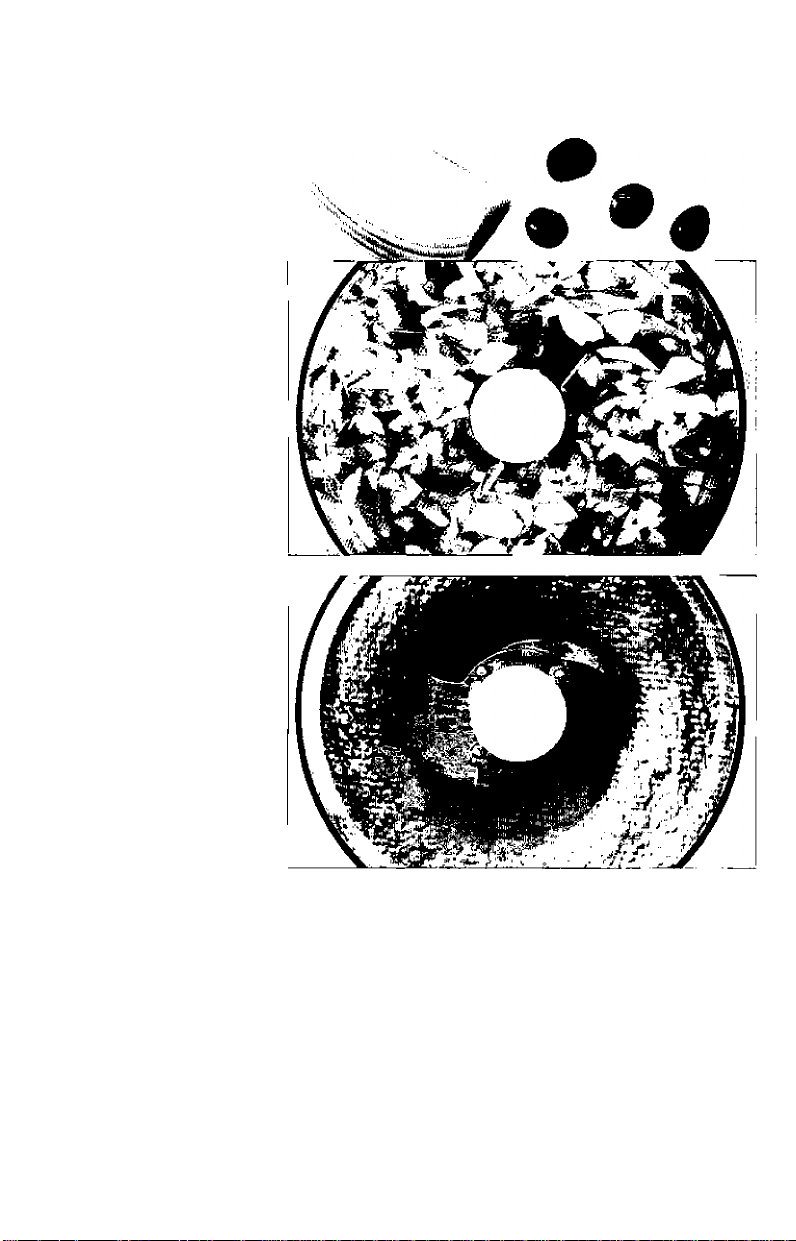
CHOPPING AND
WITH THE META
To chop rawlruits and
vegetables
P U H E E I N G
L BLADE
First, cut [tie food into 1-inch
pieces. You get a more even chop
when ail pieces are about Ihe same
size.
Put no more than 2 cups ol food
into the worl< bowl. Lock the cover
and pusher assembly in place.
Press (he lever down lo PULSE and
release it, repeating al the rate of 1
second on. 1 second off unlit the
food is coarsely chopped. Then
move Ihe lever up to ON, letting the
machine run continuously until the
food is chopped. Check frequently
to avoid overprocessing Use the
spatuta to scrape down any pieces
that stick to the sides.
To puree Iruit and cooked
vegetables
First, cut the food into linch
pieces. You get a smoother puree
faster when all pieces are about
equal in size. Put no more than
2
cups of food in the work bowl. Lock
Ihe cover and pusher assembly in
place. Pulse to chop coarsely, then
move the lever up to ON and
process continuously until the food
is pureed. (NOTE: Cooked potatoes
are an exception lo this procedure
They develop a gluey texture when
processed wilh the me'al blade. See
puree faster and smoother withoul
liquid Then add just enough liquid
to make Ihe puree pourable, return
it to Ihe soup liquid and stir lo
combine.
the recipe for mashed potatoes at
the end of the book.)
► Occasionally, a piece of lood may
become wedged between the blade
► When making soup, you will wan!
to puree vegetables that have
cooked in liquid Don't add the
liquid lo the work bowl —just the
cooked vegetables; remove them
wilh a slotted spoon. They will
and the work bowl. If this happens,
remove the cover, lilt the blade out
carefully and remove the wedged
piece. Empty the bowl, reinsert Ihe
blade and lock the cover and the
pusher assembly into place, firsi
removing Ihe small pusher. Wove
the lever up to ON and drop the
food pieces through Ihe small teed
tube while the machine is running.
After adding a cupful this way. add
Ihe remaining food lo the bowl and
process lithe usual way.
Page 13
TECHNIQUES FOR CHOPPING AND PURÉEING
WITH THE METAL BLADE
To chop hard food like garlic,
hard cheese
Remove the small pusher, press
the ON lever and drop the food
through the small feed tube while
the machine is running.
Small foods like garlic can be
dropped in whoie. Large foods
like hard cheese should be cut
into 1-inch pieces. This method
of processing minces garlic, shal
lots and onions. Hard cheese and
coconut will have the same tex
ture as if they had been hand
grated.
IMPORTANT; Never try to
process cheese that is too hard to
cut with a knife. You may dam
age the blade or the machine.
To chop parsley and other fresh
herbs
The herbs, the work bowl and the
metal blade must all be thorough
ly clean and dry. Remove stems
from herbs. Add leaves to bowl
and process until they are
chopped as fine as you want.
The more herbs you chop at a
time, the finer chop you can
obtain. If completely dry when
chopped, parsley and other herbs
will keep tor at least 10 days,
slored in an airtight bag in the
refrigerator. They may be frozen
tor months, stored in an airtight
container or bag.
To chop peel from citrus fruit or
to chop sticky fruit like dates or
raisins
For citrus, remove the peel with a
vegetable peeler, leaving on the
white pith, which is bitter tasting.
Cut the peel into lengths of 2
inches or less and process with
1/2 cup of granulated sugar
until finely chopped. This may
take 2 minutes or longer.
For sticky fruit like dates, raisins,
prunes and candied fruit, first
freeze the fruit for about 10 min
utes. Add to it some of the flour
called for in the recipe. Use no
more than 1 cup of flour for each
cup of fruit.
COMPACT FLAT COVER
Use the Compact Cover for added
convenience vrhen your recipe
calls for chopping, mixing, pureeing and kneading. It is particularly
useful when you are preparing
baked goods such as cakes,
cookies, pies and breads.
To assemble the Compact Caver:
Begin with the work bowl and the
melal blade, dough blade, or whisk
attachment in place. Place the
Compact Cover on the work bowl
so that the Cuisinart logo written
on the cover is face up and read
able. Then turn cover COUNTER
CLOCKWISE to lock into place.
To disassemble the Compact
Cover:
Place one hand near the Cuisinart
logo and one hand on opposite
end ot cover: turn cover CLOCK
WISE. Lift cover up and off work
bowl.
Page 14

CHOPPING AND PUREEING
WITH THE METAL BLADE
Ta chop meal, poultry, lish
and sealood
The food should tie very cold, but
not frozen Cut it into 1-inch pieces
to ensure an even chop. Process no
more than 2-1/2 cups (M/'l
pounds} al a time. Press the iever
down to PULSE and release il,
repeating 3 or 4 times at a rate ot 1
second on. 1 second oft. if the food
is not chopped line enough, let ihe
processor run continuously lor a
few seconds. Check the texture
often to avoid overpiocessing. Use
a spatula to scrape lood Irom the
sides of the bowl as necessary.
To puree meat, poultry, tish
and seafood
Prepare Ihe food as described
above. Pulse until il is evenly
chopped, then process conlinuously lo Ihe desired texture.
Scrape the bowl with a spalula as
needed.
Leave Ihe puree in the work bowl
and add eggs, cream and
seasonings as called for by Ihe
recipe. Process lo combine
thoroughly.
Remember you control texture by
the length of time you process. By
varying the processing time, you
can get a range of textures suitable
for femburgers, hash, stuffed
peppers, rough pates dr smooth
mousses.
Page 15

To make peanut butter and
To chop nuts
Chop no more than 2 cups at one
time. Press the lever down to
PULSE and release it, repeating
several limes. Check Irequently to
avoid lelling powdered nuls clomp
together in a nut butler.
other nut butlers
Process up to 2 cups of nuts. Let
the machine run continuously. After
2 or 3 minutes, the ground nuts will
lorm a ball lhat will gradually
smootti out. Scrape the sides of the
bowl and continue processing until
drops ol oil are visible. Taste lor
When a recipe calls lor Hour or
sugar, add some to the nuts tretore
you chop them — about 1/2 cup
for each cup of nuts This allows
you to chop the nuts as fine as you
warn without lurning them into a
nut butter.
consistency. The longer you
process, the softer the butter will
be. For chunk style, add a handtut
of nuts just alter the ball of nut
butter begins to smooth out. To
make cashew butter, add a little
bland vegetable oil. Ptocessor nut
butters contain no preservatives.
You can also chop nuls with a
shredding disc. The optional Fine
Store in ihe refrigerator to keep
them wiihoul separating.
Shredding Disc is parlicularly
good.
To make llavored butters,
spreads and dips
Cul room-temperature butter into
tablespoon si;e pieces. Process
flavoring ingredients lirsl —
anchovies, cheese, herbs, etc —
chopping them fine. Be sure Itie
work bowl is clean and dry. Add
small hard tngredienis like gatiic
and hard cheese through the feed
tube while the machine is running
Next, add the bulter and process
until smooth Add any liquid
ingredients last, while the
processor is running, and process
jusl long enough lo blend. Process
ingredients for spreads and dips in
Ihe same way. They should be at
room temperature and cul into 1 -
inch cubes, or added by
lablespoontuls.
Page 16

TECHNIQUES
PURÉEING W
10
FOR CHOPPING AND
ITH THE METAL BLADE
To make mayonnaise
The work bowl and melal blade
most he clean and dry. Use one
whole large egg. or the yolks
Irom two large eggs. Mayonnaise
made from yolks vhll be almost
as thick as bntter. You should be
able to add 2/3 cup of oil for each
yolk or 1-1/4 cups (or a whole
egg.
Process the yolks or egg with
vhtli salt, mustard and 2 table
spoons of vegetable oil for at
least 30 seconds. Then, wliile the
machine is running, pour 1/4 cup
of oil into the small pusher. After
it dribbles through the pinliole at
the bottom, remove the small
pusher and slovrly add the
remaining oil while the machthe
runs. See the recipe at the back
ot this book
To beat egg whites
Use this method only for recipes
that can be done almost entirely
by food processor
The y/ork howl must be absolute
ly clean. Add 3 or mote egg
whites and press the ON lever.
Add about 1 teaspooh ot lemon
juice ot vinegar tor every egg
white. Vinegar makes stifter
whites; its flavor is hardly
detectable in cakes, souillés or
icecreams. Continue processing
until the egg whites hold their
shape ■ about 1-1/2 to 2-1/2 min
utes.
For the lightest, fluffiest egg
whites, use the Whisk Attachment
which is an optional attachment
for the Pro Classic’" Food
Processor.
To whip cream
Processor whipped cream holds
it shape very well. It is good tor
decoration or as a topping for
gingerbread, berries or other
desserts. It will not whip to the
light. tIuMy consistency obtained
by methods that beat in more
air. Use the optional Whisk
Attachment for the fluffiest
whipped cream
Chill the cream well before
slartthg. Process continuously
until it begins to Ihicken.
Then add sugar as desired and
continue processing, walcliing
carefully until the cream reaches
the desired consistency For con
sistently reliable results, add 2
tablespoons of non-fat dried milk
for every cup ot cream, before
whipping.
Page 17

11
To make crumbs and crumb
crusts
Cut or break bread. crackers or
cookies into pieces and put them
in the work bowl. Process con
tinuously until they reach the
desired texture. For seasoned
crumbs, chop the parsley or other
fresh herbs with the crumbs. For
buttered crumbs, process until
the dry crumbs are of the desired
texture, then dribble melted butter
through the small teed tube while
the machine is running.
For crumb crusts, process crack
ers or cookies as described
above. Add sugar, spices and
butter, cut into pieces, as speci
fied by your recipe. Process until
well combined.
To make pastry
This describes general procedure.
A recipe giving exact proportions
is at the back of this book.
Combine unbleached all-purpose
flour, salt and pieces of very cold
or frozen butter in the work bowl.
Process to the consistency of
cornmeal. While the machine is
running, start pouring ice water
through the feed tube. Stop pro
cessing as soon as the dough
begins to form a ball, to ensure
tender, flaky pastry. Use the
dough immediately or form it into
a round disc about 11nch thick.
Wrap it in plastic wrap and refrig
erate or freeze for later use.
To make quick breads, and
cakes that use baking powder
and/or soda.
The most important rule for suc
cess is not to overmIx after the
flour is added.
The ingredients for these soft
doughs should be cold. If the
recipe calls for chopped ingredi
ents like lemon peel or nuts, chop
them first while the work bowl is
clean and dry. Then set them
aside until needed. (Always use
sugar when chopping lemon peel:
see page 7.)
Put dry ingredients like flour, salt
and leavening in the work bowl
and process with the metal blade
for 5 seconds to mix them.
Remove and reserve the dry
ingredients.
Add the eggs and sugar to the
work bowl and process to mix.
letting the machine run about 1
minute. Next, add butter, at room
temperature and cut into 1-inch
pieces. Let the machine run con
tinuously for a minute, until the
butter is thoroughly mixed with
the sugar and eggs. Then add
flavoring and liquid • vanilla,
spices, cocoa, etc. Process until
mixed. Add the dry ingredients
to the work bowl. Process by
pulsing, inspecting after each
pulse. Stop pulsing as soon as
the dry ingredients have almost
disappeared into the batter.
Overprocessing will cause quick
breads and cakes to be tough. (If
your recipe calls for ingredients
that are to be coarsely chopped -
like raisins or nuts - add them
last with the mixed dry
ingredients.)
To make cake mix
Your food processor work bowl is
large enough for the preparation
of an 18.5-ounce packaged cake
mix.
Insert the metal blade and add
the cake mix to the work bowl.
While the machine is running,
add the eggs and liquid through
the small feed tube and process
for 5 seconds. Scrape down the
side of the work bowl and
process again for 1 minute for
maximum volume. Do not
remove the metal blade, insert a
finger into the underside of the
blade from the bottom of the
work bowl to hold the blade in
place while emptying the batter.
Tip:
After emptying cake batter or
purged soup from the work bowl,
replace the bowl on the motor
base. Insert the metal blade and
pulse once. Centrifugal force will
spin the batter off the blade onto
the side of the work bowl.
Remove the blade, and use the
spatula to scrape any remaining
batter from the bowl.
Page 18

TECHNIQUES FOR KNEADING YE AST
DOUGH WITH THE DOUGH BLADE
12
The Pro Classic™ Foot! Processor
can mi!( and Idiead dough in a
fraction of the time it takes to do
it by hand. You will get perfect
results every time it you follow
these directions. NEVER TRY TO
PROCESS DOUGH THftT IS TOO
STIFF TO KNEAD COMFORTABLY
BY HAND.
There are hvo general types ot
yeast dough.
Machine capacity
If a bread dough calls for more
Typical bread dough is made
vdlP a flour mix thal contains at
least 50% white flour, it is uni
formly soit, pliable and slightly
sticky v/hen properly kneaded It
always cleans the inside of the
work bowl completely when
properly kneaded.
than the recommended amount
of tiour. mix and knead it in equal
batches. Do the same tor sweet
doughs thal call tor more than 3-
1/2 cups oMIour. Recommended
maximum amount ol Hour is:
<1 cups of all-purpose Hour or 2-
1/2 cups of vrhoie-grain flour
Using the right blade
Measure flour by the "stir, scoop
and sweep" nreihod described
below Use the dough blade
when the recipe calls for more
than 3-1/2 cups (17-1/2 ounces)
of flour. Use the melal blade
when a recipe calls for fess than
3-1/2 cups of flour.
Typical sweet dough oonlains a
higher proportion ot sugar, hiitter
and/or eggs than typical bread
dough It is rich and sticky and
It
does not clean the inside ot the
Because the dough blade does
not extend to the outside nm of
the work bowl, it cannot pick up
all the flour when small amourUs
are processed.
work bowl. It requires less
kneading afler the ingredients are
mixed. Although 30 seconds is
usually sutficient, 60 to 90 sec
Whichever blade you use, always
push if down as far as it vrill go
on the molor shaft.
onds gives better results it the
machine does not slow down.
Except for kneading, descriheti
below, the processing procedures
are the same tor both types of
dough.
Measuring the Ilnur
It's best to weigh
have a scale, or the recipe does
n't specify v/eight. measure by
the "stir scoop and svreep"
It.
If you don't
method. Use a standard, gradu
ated dry measure, not a cup lor
liquid ingredients.
With a spoon or fork. sf/Mhe
Hour in
Its
dry measure,
container With the
scoop
up the flour
so it overflows. With a spatula,
knife or chopstick — being care
ful not to press down —
sweep
excess Hour back into the con
tainer so the top of the measure
is level.
Prnnling the yeast
The expiraiion dale is marked on
Hie packages. To be sure your
yeast IS active, dissolve it in a
small amount of warm liquid
(about 1/3 cup for one package
ot dry yeast). II the recipe
includes a sweetener like sugar or
honey, add a tablespoon with the
yeast. It no svreetener is called
lor. add a pinch
loaio mihoijt it.
stand until
The yeasi
Let the mixture
It
foams — up to 10
won'/
minutes.
Page 19

13
Processing dry Ingredients
Put the flour in the work bowl
with all the other dry ingredients.
If the recipe calls for herbs, oil or
solid fats like butter, add them
with the flour. Turn the machine
on and let it run for about 20 sec
onds. (Cheese, nuts and raisins
may be added with the dry ingre
dients or during the final knead
ing. To leave them almost whole,
add them 5 seconds before you
stop kneading. For a finer tex
ture. add them sooner.)
Adding liquids
All liquid should be added
through the feed tube v/hile the
machine Is running. Add liquid in
a slow, steady stream, only as
fast as dry ingredients absorb it.
If liquid sloshes or splatters, stop
adding it but do not turn off
machine. Wait until ingredients in
bowl have mixed, then add
remaining liquid slowly. Pour liq
uid onto dough as it passes under
feed tube opening. Oo not pour
liquid directly onto bottom of
bowl.
Follow the recipe carelully. It is
important to add enough liquid to
make the dough soft enough to
knead. Kneading dough that is
too still can strain the machine.
The temperature of liquids used
to dissolve and activate yeast
must be between 105° and 120°F.
Yeast cells are not activated at
temperatures lower than this and
they die when exposed to temper
atures higher than 130°F.
All liquid except that used to acti
vate yeast should be cold, to min
imize the possibility of overheat
ing the dough. You must never
knead a yeast dough to a temper
ature higher than 100°F. Doing
so will slow or even prevent the
action of the yeast.
Kneading bread dough
Do not try to use the machine to
knead dough that is too stiff to
knead comfortably by hand.
Doing so can strain the machine.
After the dough starts to clean the
inside of the work bowl complete
ly and forms a ball, process it for
60 seconds to knead it. Stop the
machine and test the dough to be
sure it's properly kneaded.
Typical bread dough should have
a soft, pliable texture and it
should feel slightly sticky. Stretch
the dough with your hands to test
it. If it feels hard, lumpy or
uneven, continue processing until
it feels uniformly soft and pliable.
Make sure that the blade is firmly
pressed back into place after
removing the dough to test it.
Kneading dough for coffee
cakes, batter bread and brioche
Process dough tor at least 30
seconds after all the ingredients
are incorporated. It will not clean
the inside ot the work bowl. If
necessary, scrape the bowl and
process for 5 more seconds.
Rising
Put the dough in a large, lightly
floured plastic bag. Squeeze out
all the air and close the end with
a wire twist, allowing space for
the dough to rise.
Or put the ball of dough in a large
bowl coated with soft butter or
vegetable oil. Roll the dough
around to coat its entire surface.
Cover it with a damp towel or a
piece of oiled plastic wrap.
Let it rise in a warm, draft-free
place — about 80°F. The rising
time is usually about 1-1/2 hours
but will vary from 45 minutes to
several hours, depending on the
type of flour and the humidity of
the air. To test if the dough has
risen enough, stick a finger in it.
An indentation should remain. If
it doesn't, let the dough rise more
and test again. When it has risen
enough, punch the dough down.
Shaping, finishing and baking
If you shape the dough in loaf
pans, fill them only half full. Let
rise until dough is just slightly
above the top of the pan. If shap
ing tree-form loaves, let them rise
on an oiled baking sheet until at
least doubled in bulk.
Making consecutive batches
You can make several batches of
bread dough In a row.
The motor in the Pro Classic™
Food Processor is extremely
efficient. Follow the recipe for
White Bread, pg. 43.
Page 20

TECHNIQUES FOR KNEADING YEAST
DOUGH WITH THE DOUGH BLADE
14
Problems and Solutions with
Typical Bread Bough
Blade doesn’! incorporate
ingredients
Always start processor before
adding liquid. Add liquid in slov/.
steady stream, only as fast as dry
ingredients absorb it. If you hear
liquid sloshing, stop adding it but
do not turn oM machine. Instead,
y/ait until ingredients in work
bowl have mixed, then add
remaining liquid slowly. Pour liq
uid onto dough as it passes
under teed lube: do not pour liq
uid directly onto bottom of vrork
bowl.
Blade rises in work bowl
Blade may not have been pushed
dovrn as tar as it will go before
processing started.
Excessively sticky dough can
cause blade to rise even thqugh it
cleans inside ol work bov/l It
dougti feels very sticky, reinsert
blade and immediately add 2
tablespcons flour through feed
tube while machine is running.
Dough doesn't clean inside nf
work howl.
• Amount of dough may exceed
maximum capacity of your food
processor. Remove halt and
process in 2 batches.
• Dough may he too dry. If it
feels crumhly, add water -1
tablespoon at a time - while
machine is running, until dough
becomes moist and cleans inside
ol work bovjl. Wait 10 seconds
betv/een additions of vyater
• Dough may be too wet While
machine is runing, add 1 table
spoon of Hour. If necessary, add
more ■ 1 tablespoon at a time ■
until dough cleans inside of work
bowl and forms a ball.
• Plastic dougb blade is intended
only for recipes calling for at least
3-1/2 cups of flour[17-1/2
ounces, 495g). If your recipe
calls for less flour, remove plastic
dough blade and insert metal
blade. Always use metal blade
for recipes calling tor less than
3-1/2 cups ot flour, such as pizza
dough.
Hub nl dough forms on top ol
blade and does not become onitormty kneaded.
Stop machine, carefully remove
dough, divide it into 3 pieces and
redistribute them evenly in work
bowl. Continue processing until
dough is uniformly soft and pli
able.
Dough feels tough after kneading
Divide dough into 2 or 3 pieces
and redistribute evenly in bowl.
Process 10 seconds or until uni
formly soft and pliable.
Salt dough or liquid leaks onto
base olload processor
Always start processor before
adding liquid and add liquid only
as tasi as dry ingredients absorb
it.
flint) ol dougti lorms.
Dougti is too dry. Dougti is too wet end sticky.
Page 21

15
Motor stops
• Pusher assembly may have
become unlocked. Push down
pusher sleeve to lock It into place
and continue processing.
• Cover may have become
unlocked. Lock cover and contin
ue processing.
• Power cord may have become
unplugged. Plug machine in and
continue processing.
• Excessive strain may have
caused motor to overheat and
stop. Wait for the motor to cool
off, 5-10 minutes. A safety pro
tector in the motor prevents it
from excessive overheating. If
the motor stops, turn the
machine off. Alter 5-10 minutes,
divide dough into 2 batches and
complete processing. Pinch
dough to make sure that it is not
too stiff to knead comfortably by
hand. If it Is. add liquid -1 tea
spoon at a time - until dough is
sufficiently moist to clean inside
of bowl.
Dough doesn't rise
We recommend that you always
test activity of yeast before using
it by stirring it and at least 1/2
teaspoon sugar into about 1/3
cup warm liquid (105° - 120°F).
Within 10 minutes foam should
develop, indicating yeast Is active.
Do not use dry yeast after expira
tion date on package.
Don't knead so long that it
becomes overheated. The ideal
temperature for kneaded dough is
80°F; It should never exceed
100°F.
Let dough rise in draft-free envi
ronment of about 80°-90°F.
Dough containing whole grain
flour will take longer to rise than
dough made of white flour only.
Baked bread too heavy
Next time, feel dough to be sure It
is uniformly soft, pliable and
slightly sticky before setting it
aside to rise. Let dough fully
double in bulk in bowl or bag.
punch it down, then let it double
again after it is shaped.
PROBLEMS AND SDLUTIONS
WITH TYPICAL SWEET DDUGHS
Motor slows down.
• Amount of dough may exceed
maximum capacity of your food
processor. Remove half and
process in 2 batches.
• Don't process too long after all
the ingredients are incorporated.
These rich doughs will give you
good results after only 30 sec
onds of kneading.
Blade doesn't Incorporate
Ingredients.
Butter or margarine. If not melt
ed. must be cut into tablespoonsize pieces before being added to
work bowl.
Metal blade rises in work bowl
Blade may not have been pushed
down as tar as it will go before
processing started. Machine may
be overloaded.
Stop it. remove half of dough and
process in 2 batches.
Motor stops
See comments under "Typical
Bread Dough".
Dough doesn't rise
See comments under "Typical
Bread Dough".
Avoid killing yeast cells by dis
solving yeast in too warm water
or overheating dough by exces
sive kneading. Dissolve yeast in
about 1/3 cup of warm liquid at
105°-120° F. All other liquid
should be cold.
Page 22

PREPARING FOOD FOR
SLICING AND SHREDDI N G
16
Round Irults and vegelables
Before processing onions, apples
and olher large, round Iruits and
vegetables, trim them with a knile.
Cut the bottom end flal, to make the
food lie stable on Ibe disc.
Place the food in the feed tube, tlat
side down, Posilion it as lar right as
possible, to prevent it from tilling
when being processed.
Choose fruits that are tirm and not
too ripe. Always remove large hard
pits and seeds Irom trails before
processing Seeds Irom citrus fruits
need not be removed. You may
remove the rind betöre slicing or
shredding, or leave the rind on.
Whole peppers are an
exception
Remove the stem and cut the stem
end Hat Remove the core and
scoop oul the seeds. Leave the end
apposite the stem whole, to keep
the structure stiff. This ensures
round, even slices.
t. .
Large fruits like pineapple
and cantaloupe
Cul Ihem in hall and remove the
seeds or core, it necessary, cut the
halves into smaller pieces to lit the
leed tube. Remember to cut the
ends Hat.
Cabbage and iceberg lettuce
Turn the head on its side and slice
off the lop and bottom, leaving a
center section about 3 inches deep.
Remove the core and cul the center
section in wedges to lit the feed
lube. Remove the core from the
Page 23

bottom piece and cut it and the top
piece into wedges to lit the teed
tube. The optional 2mm or 1mm
Slicing Discs are excellent tor
slicing cabbage for coleslaw.
lithe fruit orvegelable
doesn’t til
Try inserting it from the bottom of
Ihe feed tube. The opening there is
slightly larger.
Pack the teed tube for desired
results
For small, round, slices or short
shreds from carrots, zucchini and
other long vegetables, cut them in
teed-tube heighls and pack them
tightly upright.
For long slices or shreds, cut the
the food in teed-tube widths and
pack Ihe pieces horizontally.
17
I
Food should fit snugly but not so
tight that it prevents the pusher
Irom moving.
When slicing or shredding food,
always use Ihe pusher Never put
your fingers or a spatula into
the teed tube.
Never push down hard on Ihe
pusher Use ligfil pressure lor soft
fruits and vegetables like bananas,
mushrooms, strawberries and
tomatoes, and for all cheese. Use
medium pressure for most food —
apples, celery, cilrus Iruii. polaloes
and zucchini. Use t/rm pressure for
really hard vegelables tike carrots
and yams.
Page 24

PRACTICING SLI
AND SHREDDING
GING
ia
1. Insert a slicing or shredding
disc, put the covet on the work
bowl and insert the prepared tood
in the feed lube.
2. Prepare the pusher assembly.
Lock the small pusher in place and
unlock the slide lock on back ol the
sleeve, so the pusher can move up
and down freely,
3. Slide the pusher assembly over
the teed tube and push the sleeve
down lo lock it into place. Apply
pressure to the pusher while
pressing the lever down to PUtSE
Release the lever as soon as the
food is sliced or shredded.
d. You can load the leed tube
repeatedly wilhoul removing the
work bowl cover. Simply grasp the
pusher assembly wilh your thumb
on Ihe wide locking lab. Press
firmly on the tab and lift up. The
pusher assembly will come oil
easily, leaving the cover and feed
lube in place. Your other hand is
free to reload the feed lube
Page 25

REMOVING
SHREDDED
SLICE
FOOD
DOR
19
Sefore you do anything, wait
for the disc to stop spinning.
When it does, remove the cover
lirst. Hold ihe pusher assembly
with your thumb away Irom Ihe
locking labs and turn it clockwise.
Lift, and the pusher assembly and
cover wiilcome otf together.
Remove the slicing or shredding
disc before removing the work
bowl. Place two fingers under each
side of the disc and lilt it straight
up. Then turn the bowl clockwise to
unlock il Irom the base and Iltl it
straight up to remove it.
You can place the disc on top of the
inverted work bowl cover, to
minimiae drips and spills.
Page 26

SLICING AND
TECHNIQUES
20
Small, round fruits and
vegetables
SHREDDING
For large berries, radishes and
mushrooms, Irim ibe opposite ends
Hat wilh a knile. Insert Ihefood
Ihrough the teed lube, standing
each piece on a tiat end. You can
fill the lube to abou! 1 inoh from the
top. The bottom la/er gives you
perfect slices for garnish.
If you want all the slices to be
perfect, it’s best to process one
layer at a time.
Long fruits and vegetables
Trim food like bananas, celery, and
zucchini by culling them into
pieces a lltlle shorter than the feed
tube. Cut both ends Hat. (Use a
ruler as a guide, or the pusher
assembly wilh the pusher pulled
out as far as it will go )
Fill the feed tube wilh the pieces,
standing them vertically and adding
enough pieces so they are solidly
packed and cannot till sideways as
Iheyare sliced or shredded.
Small amounts of food
Lise the small feed lube and the
smalt pusher. Remove Ihe small
pusher trom the pusher assembly.
Slide the pusher assembly over the
leed tube and press the sleeve
down to lock it into place. Be sure
the slide lock on the sleeve is
locked.
Cul Ihefood m lenglhsa little
shorter than Ihe leed lube If you
aie slicing one or two long, thin
vegetables like carrots, push them
against the right. II you are slicing a
Page 27

tew vegetables that are wide al one
eed and narrow at the other —
carrots, celery or scallions — cul
them in halt aid pack in pairs, one
wide end up, one narrow end up
French-cut green beans
Trim Iresh green beans lo feed-tube
widths, Blanch them tor 60 seconds
in boiling salted water. Plunge
them immediately into cold water to
slop Ihe cooking. When they are
cold lo the touch, drain and dry
them. Stack them in the feed tube
horizontally to about 1 inch bom
Ihe top Use the slicing disc.
Be sure Ihe small puslier is locked
and the slide lock on the sleeve is
unlocked. Apply light pressure lo
Ihe pusher and press Ihe lever
down to PULSE until beans are
sliced.To make long, horizontal
slices or shreds ol raw zucchini or
carrots, use the same procedure.
Matctisticks or julienne strips
Process the food twice — "double
slice" it. Insert any large Iruit or
vegetable — potatoes, turnips,
zucchini, apoles — in the teed tube
horizontally. Apply pressure lo the
pusher while pressing the lever
down lo PULSE until the (ood is
sliced. You will get long slices.
Remove the slices from ihe work
bowl and reassemble them as
shown. Reinsert them in the leed
tube, wedging them in tightly. Slice
them again. You will obtain long
julienne strips With the optional
Square Julienne Discs, you can
make square julienne ships in one
operalion.
Page 28

SLICING MEAT
AND POULTRY
22
Cooked meat and poultry
The food must be very cold. If
possible, use a chunk ol food jusl
large enough to fit Ihe feed lube. To
make julienne strips of ham.
bologna or luncheon meat, slack
slices ol them. Then roll or (old
them double and sland (hem
upright in the feed lube, wedging in
as many rolls as possible. This
technique works better with square
or rectangular pieces than wilh
round ones.
Uncooked meat and poultry
Cul Ihe food into pieces to lit ihe
teed lube. Boned, skinned chicken
breads will usually til when cut in
half crosswise. Wrap Ihe pieces in
plastic wrap and put them in the
freezer. They are ready lo slice
when they pass this "knile lest’.
They are easily pierced with the lip
Ota sharp knife although semitrozen and hard to Ihe touch. Stand
them in Ihe teed tube, cul side
down, and slice them againsl the
grain, using firm pressure on the
pusher. Or lay them Hat In the feed
lube, as many as will fit, and slice
with the grain, using firm pressure.
Frankfurters, salami and other
sausages
It the sausage is soft, Iteeze it until
hard lo the touch but easily pierced
with Ihe tip of a sharp knife. Hard
sausages need rot be frozen. If the
sausage is thin enough lo til in Ihe
small feed tube, use thal lube.
Otherwise, cut the sausage into
pieces to tit the large feed tube
completely. Stand the pieces
vertically, packing them in tightly
so they cannot till sideways.
Page 29

SLICING
CHEESE
AND SHREDDING
TYPE OF CHEESE
Soft
Brie, Camembeft,
Mozzarella, ricotla,
Liederkranz, collage,
cream
CHOP SHRED
SLICE
yes no no
23
Firm cheese like Swiss and
Cheddar
Cut the cheese into pieces to fit the
teed tube. Put it in the treezer until
It is serri-froien — hard to the
touch bul easily pierced with the tip
of a sharp kiite. Stand the pieces in
the feed tube and apply light
pressure to the pusher.
IMPORTANT: Never try to slice
soft cheese like Mozzarella or hard
cheese like Parmesan. You may
damage the slicing disc or Ihe food
processor itself. You can
successfully shred most cheeses
except soft ones. The exception is
Mozzarella, which shreds well It
thoroughly chilled. Hard cheeses
like Parmesan shred well only at
room temperature.
Semi-Soft
blue,
Fonlina.
Bel Paese
Semi-Hard
Cheddar. Monterey
Jack, Longhorn.
Swiss. Jarlsberg.
Edam. Gouda.
Provolone
Hard
Parmesan, Romano,
Pecorino. Sapsago
yes
yes no
chill
chill
chill
yes yes yes
chill chill
chill chill
chill chill
yes
chill
chill
yes no
chill
chill
room
temp
Page 30

ADDITIONAL INFORMATION
24
IF YOU HAVE A PROBLEM
Most problems with the food
processor are easily solved. Here
are some possible problems and
their solutions.
Food Is unevenly chopped
Either you are trying to process
too much food at one time, or
you are running the machine con
tinuously instead of pulsing on
and off until pieces of food are no
larger than 1/2-inch cubes.
Liquid leaks from bottom of
bowl onto motor base
Remove bowl from base as soon
as you finish processing. Do not
remove metal blade first. Vi/hen
bowl and blade are removed
together, blade drops down and
forms an almost perfect seal
against the bowl.
Liquid leaks out between bowl
and cover when machine
is running
You added too much liquid.
Never use more than:
2-3/4 cups thin, 5 cups thick
liquid.
The thicker the liquid, the more
you can use. The figures above
are for thick mixtures like pan
cake or cake batter.
Slices are uneven or slanted
Pack feed tube more carefully as
described on pages 16 and 17.
Maintain even pressure on pusher.
Carrots or similar food falls over
in feed lube
Cut food into enough short pieces
of equal height to fill feed tube.
To slice one or two pieces, use
small feed tube. Cut carrots in
half and insert one piece point
down and the other stem down.
Sliced or shredded food piles up
on one side of work bowl
This is normal. Remove disc
occasionally and even out
processed food. When food gets
close to bottom of disc, empty
work bowl.
A tew pieces of food remain on
lop ol slicing or shredding disc
This is normal. In most cases,
you can shred more of the food
by moving the large pusher up
and down, allowing the piece to
be shredded, or by repositioning
the piece in the feed tube and
reshredding it.
Soft cheese like monarella
spreads out and collects on top
ol shredding disc
The cheese was not cold enough,
or the pressure on the pusher
was too great. To shred soft
cheese, do not push on the push
er but let the cheese go through
by itself. Tap on the pusher to
guide it through.
CLEANING AND STORING
Keep your Pro Classic™ Food
Processor ready to use on a
kitchen counter. When it's not
being used, leave it unplugged.
Don't leave it with the pusher
assembly in locked position, this
could damage the on-off mecha
nism.
Store the blades and discs as you
would sharp knives — out of the
reach of children. The Disc and
Blade Holders, optional acces
sories. offer sale and convenient
storage.
All parts except for the motor
base are dishwasher-sale, and we
recommend washing them in the
dishwasher. Insert the work bowl
upside down. Remember where
you place sharp blades and discs,
and unload the dishwasher care
fully.
To simplify cleaning, rinse the
vrork bowl, cover, pusher assem
bly and blade or disc immediately
after use so food won't dry on
them. Openings at the bottom of
the large pusher provide drainage
and make cleaning easy. If food
lodges in the pusher, remove it by
running water through or by
using a bottle brush.
If you wash blades and discs by
hand, do it carefully. Avoid leav
ing them in soapy water where
they may disappear from sight.
To clean the metal blade, fill the
work bowl with soapy water, hold
the blade by its plastic center and
move it rapidly up and down on
the center shaft of the bowl. Use
of a spray attachment is also
effective. If necessary, use a
brush.
The work bowl is made of Lexan®
plastic, which is shatter-resistant
and heat-resistant. It should not
be placed in a microwave oven.
The tube at the back of the bowl
houses the metal rod that
activates the motor.
Page 31

25
Chopping certain foods may
scratch or cloud the work bowl.
Among them are ice, whole spices
and oils like wintergreen. If you like
to prepare your own spice blends,
you nuy want to keep a second
bowl just for that purpose.
The base housing is made of a
tough plastic with high impact
resistance. Its smooth surface will
FOR YOUR SAFETY
Like all powerful electrical
appliances, a food processor
should be handled with care.
Follow these guidelines to protect
you and your family from misuse
lhat could cause Injury.
^ Handle metal blade and discs
carefully. Their cutting edges are
very sharp.
look new for years. Keep a sponge
handy as you work and wipe spills
from the base.
^Always place disc on flat stable
surface before connecting
detachable stem.
Four rubber feet on the underside
keep the base from moving on most
work surfaces when the machine is
processing heavy loads. If the feet
^ Never put blade or disc on motor
shaft until work bowl is locked in
place.
leave spots on the counter, spray
them with a spot remover like
Fantastik or K2-R and wipe with a
damp sponge. If any trace of the
^Always be sure that blade or disc
is down on motor shaft as tar as it
will go.
spot remains, repeat the procedure
and wipe the area with a damp
sponge and non-abrasive cleaning
powder.
To clean the inside of the
detachable stem, slide the stem
release button on the side up as far
^Always insert metal blade in work
bowl before pulling ingredients in
bowl.
^ When slicing or shredding food,
always use pusher. Never put your
fingers or a spatula into teed lube.
as it will go and hold it there as you
>
run water through the stem.
Always wait tor blade or disc to
stop spinning before you remove
IMPORTANT:
Never store any
blade or disc on the motor shaft.
pusher assembly or cover from
work bowl.
No blade or disc should be placed
>
on the shaft except when the
processor is about to be used.
Always remove work bowl from
base of machine before you remove
metal blade or dough blade.
^ Be careful to prevent metal blade
from falling out of work bowl when
emptying bowl. Remove it before
tilting bowl, or hold it in place with
your finger, a spatula or a spoon.
► Do not use pusher assembly if
sleeve becomes detached from
pusher. Call Cuisinart Owner
Service immediately. Our toll-tree
number is listed in the warranty.
SOME TECHNICAL DATA
The motor in your food processor
operates on standard line operating
current. The appropriate voltage and frequency for your machine are
shown on a label under the base.
An automatic, temperaturecontrolled circuit breaker in the
motor ensures complete protection
against motor burnout. If the
processor runs for an exceptionally
long time when chopping, mixing
or kneading a thick or heavy
mixture in successive batches, the
motor may overheat. It this
happens, the processor will stop.
Turn it off and wait for the motor to
cool off before proceeding. It will
usually cool off within 10 minutes.
In extreme cases, it could take an
hour.
Safety switches prevent the
machine from operating when the
work bowl or the cover is not
locked into position. The motor
stops within seconds when the
motor is turned off. and a fast-stop
circuit stops it instantly when the
pusher assembly is unlocked.
Page 32

RECIPES
26
APPEnZERS
GUACAMOLE
BLUE CHEESE AND PECAN SPREAD
CHICKEN LIVER PATE
CHEESE COINS
SOUPS
CHUNKY GAZPACHO
LEEK AND POTATO SOUP/VICHYSSOISE
LENTIL SOUP
SPLIT PEA SOUP
MEATS AND FISH
HAMBURGERS
MEATLOAF OR MEATBALLS
CHILI
SAUSAGE
FARMHOUSE HASH
CHICKEN AND VEGETABLES STIR-FRY
CRAB CAKES
VEGETABLES
BROCCOLI PUREE
MASHED POTATOES
POTATOES AU GRATIN
SHREDDED CARROTS AND ZUCCHINI
SALADS PEAR YOGURT 47
TOMATO SALAD 37
CREAMY COLE SLAW 38 APPLE PIE 48
SHREDDED CARROT SALAD
SAUCES
27
PESTO
27 MEXICAN SALSA
28 MAYONNAISE 40
28 NO-COOK CRANBERRY RELISH 40
PASTRY CREAM
CHOCOLATE SAUCE
RASPBERRY SAUCE 41
29
29
30 PASTRY
30 PIE PASTRY 41
FRUIT TART 41
31 QUICK BREADS, YEAST BREAD AND PIZZA
31 CORN BREAD 42
32
COFFEE CAKE 42
33
WHITE BREAD 43
33
WHOLE WHEAT BREAD 43
34
PIZZA DOUGH 44
35 PIZZA IN A HURRY 44
PIZZA SAUCE 45
35 DESSERTS
36 BROWNIES 45
36 CHOCOLATE CHIP OATMEAL COOKIES 46
37 CARROT CAKE 46
CREAM CHEESE FROSTING
BANANA-APPLE SHERBET
38
39
39
40
41
47
47
TIP: Use the Compact Cover for added convenience when your recipe calls for chopping, mixing,
purieing or kneading. It is particularly useful when you are preparing baked goods such as cakes,
cookies, pies and bread.
Page 33

APPETIZERS
21
Guacamole
Serve with tortilla chips or crisp vegetables. For a less
pungent tasle, use tiat-leaf parsley instead of cilantro
Blue Cheese and Pecan Spread
You can substitute collage cheese lor all or pari of the
cream cheese and you can substitute walnuts for
pecans.
INGREDIENTS INGREDIENTS
1
1
1/2
1 medium scallion, white part and 2 inches
large garlic clove, peeled 1/4 cup shelled pecans
medium jalapeno pepper, halved
and seeded
6 ounces cream cheese, in 1 -inch pieces
2 tablespoons blue cheese
cup tightly packed cilantro leaves
1 сируШ
of green, cut ini-inch pieces
3
3
1/4
1
1/4
ripe medium avocados (1/2
pound each), peeled, halved and pitted
tablespoons lemon juice
Pinch cumin
teaspoon sail
medium tomato, quartered, seeds removed
teaspoon chili powder
Process nuts with metal blade until they are finely
chopped, about 10 seconds. Add cream cheese and
blue cheese. Process unlil well mixed and smooth,
about 10 seconds. (If substituling cottage cheese.
process il until smoolh, aboul 90 seconds.)
2-1/4 cups y/fi/rf
Use metal blade to chop garlic, pepper, cilanlro, and
scallion until minced, aboul 15 seconds. Scrape down
work bowl. Add avocados and all remaining
ingredienis except tomato. Process unlil smooth,
about 1 minute, scraping bowl as necessary. Add
tomato and pulse aboul 6 to 8 times, until il is linely
chopped. Adjust sail if necessary.
Page 34

28
Chicken Liver Pate
An extraordinarily good party dish that is easy to make
and keeps well. Serve it on toasted French bread or
apple slices.
INGREDIENTS
1 large unpeeled garlic clove
3
tablespoons butler, for sauteeing
1 pound chicken livers, trimmed
8 ounces unsalted butter
1 teaspoon salt
1/8 teaspoon freshly ground black pepper
1/4
1
2-1/4
teaspoon freshly ground allspice
tablespoon Cognac 1
cups yield
Put garlic in small saucepan, cover with water and
simmer 10 minutes. Reserve. Heat butter in skillet until
it bubbles. Saute chicken livers over medium-high
heat until brown on the outside but still pink within.
Cheese Coins
These tender and flavorful appetizers are easy to make,
convenient to serve, and they can be refrigerated or
frozen.
INGREDIENTS
8
ounces Cheddar cheese, cut in 1-inch
pieces
4 ounces unsalted butter,at room tempera -
lure, cut in pieces
1/4
1/4
teaspoon salt
teaspoon Tabasco sauce or pinch of
cayenne pepper
cup Hour
100
cheese coins
Use metal blade to chop cheese until it resembles
coarse meal, about 30 seconds. Add butter, salt and
pepper. Process until smooth, about 60 seconds.
Scrape down bowl, add flour and proems until flour is
just mixed in. Chill dough until firm enough to shape
Squeeze softened interior of garlic into work bowl. Add
into logs, about 1 hour.
livers and remaining ingredients. Process until creamy
and smooth, about 1 minute. Scrape down bowl as
necessary.
Divide dough into 3 equal parts and roll each into a
cylinder about 1-1/2 inches in diameter. Chill until
firm, about 2 hours.
Transfer pate to crock or serving dish, cover and
refrigerate at least 4 hours. Let stand at room
temperature for 30 minutes before serving. Well
covered, can be refrigerated for up to 5 days.
Preheat oven to 400“F. Cut dough into 1/8-inch slices
and place slices 1-1/2 inches apart on lightly greased
baking sheet. Bake until lightly colored, about 10
minutes, being careful not to brown them. Transfer to
wire rack to cool.
Unbaked, plastic-wrapped cylinders keep for about a
week in the refrigerator. Cooked cheese coins can be
frozen and reheated for 6 to 8 minutes in a 300°F oven.
Page 35

SOUPS
29
Chunky Gazpacho
This refreshing coid soup carr be ready in fess lhan 10
minutes. You may serve it at once, but it improves with
chitting
INGREDIENTS
1
1/2
A
small garlic clove, peeled
small jalapeno pepper'
scallions
1 celery stalk
1/2
2
2
1
medium bell pepper
tomatoes 1-1/2 cups chicken stock
cups tomato or V-8 juice 1 cup waler
medium cucumber
Leek and Potato SoupAfichyssoise
Louis Dial, iongtime chef at the New York Ritz Hoiei,
transformed the everyday Leek and Potato Soup into a
cold soup suitable for parties
INGREDIENTS
2
medium leeks, while part only, thoroughly
cleaned
1/2 medium onion, peeled and halved
1
2
tablespoon unsalled butter
medium all-purpose potatoes, peeled
Salt and freshly ground pepper to taste
2 tablespoons lemon juice 1 cup milk
1
1/4
teaspoon salt
1/4 cup heavy cream
teaspoon Ireshly ground black pepper
Chopped chives, for garnish
4-1/2 cups yield 4 cups yield
Halve jalapeno pepper and remove seeds. TrimCut leeks to fit feed lube. Use slicing disc lo slice leeks
scallions and celery and cut into 1 -inch pieces.and onions. Mell butter in large saucepan. Add leeks
Quarter and seed bell pepper and tomatoes. Peeland
cucumber and cut in half lengthwise. Remove seeds
onion and saute, stirring often, unlil soil but nol
brown, about 10 minutes.
and cut to fit feed tube vertically.
Cut potatoes in half crosswise, then quarter length
Use metal blade to process garlic and jalapeno pepper
until finely chopped. Add scallion, celery and bell
pepppet. Pulse/chop to medium chop. Pul in large
mixirig bowl, Pulse/chop 1/2 the tomatoes unlil
coarsely chopped. Add lo mixing bowl. Puree
remaining tomatoes unlil smooth, about 1 minute.
wise, Use slicing disc to slice them. Add potatoes,
stock and water lo saucepan. Bring to boil, reduce
heal, cover and simmer gently, slirring occasionally,
until vegetables are very lender, about 25 minutes.
Adjust seasoning and serve hot as Leek and Potato
Soup or proceed as follows for cold Vichyssoise.
With machine running, pour in 1/2 cup ol lomato
juice. Add lo mixing bowl wilh remainirrg lomato juice
and stir.
Strain liquid into large saucepan and set aside. Use
metal blade to puree vegetables, stopping once to
scrape bowl Whisk puree into reserved liquid, add
Insert slicing disc, stand cucumber pieces upright in
feed tube and slice, using light pressure. Add lo
mixing bowl with remaining ingredients and slir to
combine. Cover and chill belore serving.
milk and bring to a boil over moderate heal, stirring
conslanlly. Remove from the heal and stir in cream.
Season lo taste with salt and pepper. Relrigerale until
Ihoroughly chilled Taste again for seasoning and
sprinkle with chopped chives.
'Handle hot peppers carefully. Their oil can irritate the
skin and eyes. Wash your hands after preparing them.
Page 36

30
Lentil Soup
This hearty winter soup is a meal on its own,
Split Pea Soup
A perfect family lunch or supper.
accompanied by crusty bread and a salad.
INRRFDIFNTS
8 ounces lentils
1/2 large garlic clove, peeled
1/2
1/2
1/2
2
small onion, peeled and halved
medium celery rib. in 1-inch pieces
medium carrot, in 1-inch pieces
medium tonratoes, quartered
2-1/2 cups beef broth
2-1/2 cups water
2 teaspoons white-wine vinegar
1/2
1/2
1/8
teaspoon paprika
teaspoon salt*
teaspoon freshly ground pepper
Pinch dried thyme
1/2
pound Polish kielbasa or other smoked
sausage
1/2
1/2
1/2
3/4
3-1/2
1 medium carrot
1/2
1/2
4 cups yield
Rinse peas and place in large pot. Peel onion and
garlic. Use metal blade to chop garlic tine, about 10
seconds. Add onion and pulse until coarsely chopped.
INGREDIENTS
pound split green peas
large onion, quartered
large garlic clove
pound smoked ham hocks
cups water
large celery rib
medium potato
Salt and pepper
about 6 to 8 pulses. Add to pot with ham hocks and
6 cups yield
water. Bring to a boil and reduce heat. Cover and
simmer (or 1 hour, stirring occasionally. Uncover and
Wash lentils under cold running water, drain them and
place them in a large saucepot.
simmer until hocks are tender, about 30 to 40 minutes.
Stir occasionally and add more water if necessary.
Remove hocks and let them cool while preparing
Use metal blade to pulse/chop ^rlic, onions, celery
vegetables.
and carrots until finely chopped. Put in pot with lentils.
Chop tomato into line pieces. Add to pot with all
remaining ingredients except sausage. Cover pot and
cook for about 1 hour.
Peel carrot, cut in feed-tube lengths, then halve
lengthwise. Cut celery in f%d-tube lengths then halve
lengthwise. Peel potato, halve crosswise then quarter
halves lengthwise. Insert slicing disc. Stand vegetables
Freeze sausage until hard to the touch but easily
pierced with tip of sharp knife, about 30 minutes.
upright in feed tube and slice with medium to firm
pressure. Reserve.
Drain and reserve soup liquid and puree solids with
metal blade. Return puree to broth and stir to combine.
Use slicing disc to slice sausage. Add sausage to soup
and reheat gently until sausage is warm, stirring
occasionally, about 20 minutes.
Puree soup with metal blade until smooth, about 15
seconds. Return to pot. Remove meat from hocks and
pulse until coarsely chopped, 4 to 6 pulses. Add to pot
with vegetables. Cover and simmer until tender,
stirring occasionally to prevent sticking. This will take
about 20 minutes. Season to taste.
*Omit salt if using salty sausage.
Page 37

MEATS AND FISH
31
Hamburgers
Chop meat to the exact texture you want — and
control the amount of fat Our test kitchen finds 20%
Mealloaf or Meatballs
For a spicier meat loaf, add a few drops of Tabasco
sauce and a teaspoon of Worcestershire sauce.
fat ideal — less than the usual supermarket mixture.
Use boneless beef—round, chuck or any cut you
choose. Before chopping it, trim off all membrane,
gristle and fat. Reserve the fat. which will usually be
more than you need. Cut the b№f into 1-inch cubes
and chill until slightly firm—usually 30 minutes in
the freezer.
1 small onion, quartered
1/4 cup loosely packed parsley leaves
1 slice day-old bread, broken in pieces
3/4 pound boneless chuck, cut in 1 -inch
INGREDIENTS
pieces*
_______
3/4
INGREDIENTS
___________
pound combined meal and fat
1-1/2 tablespoons milk*
1/2 teaspoon salt
1/8 teaspoon dried thyme leaves
If you don't have a kitchen scale, measure solidly
1 large egg
packed beef cubes and solidly packed fat cubes in
cups, te/o/echilling them, as follows;
1-1/4
1/4
cups beef cubes
cup fat cubes
3/4 pound of mealloal
Put all ingredients except egg in work bowl and pulse/
chop 4 to 6 times. Then process continuously until
chopped fine. Add egg and pulse 4 or 5 times or until
Put beef and fat in work bowl and chop with metal
blade. Pulse/chop a few times to start, then let
machine run continuously, checking every 5 seconds
to check consistency. Be very careful not to over
desired consistency is reached, watching carefully to
avoid overprocessing. Pack mixture Into loaf pan and
bake at 350*F until cooked through, about 40 to 50
minutes.
process.
*You can vary these ingredients by using a mixture of
Handle hamburger with a light touch. Remove work
bowl from processor base and carefully take out metal
beef, veal and pork or replacing the milk with tomato
juice.
blade. Use as little pressure as possible in shaping
patties.
Variation: Instead of making a meat loaf, shape
mixture into balls of 2 tablespoons each, arrange them
in single layer in baking dish and bake at 375°F tor
about 25 minutes.
_____________
Page 38

32
Chili
Kids love chili and it's a versatile dish, Serve it on ho!
dogs, (ill tacos with il or eat it plain. This one freeies
Slir in the beans and cook until heated through. Taste
and add salt, il needed.
well lorabouie monlhs.
Try some of these garnishes wilh the chili: shredded
INGREDIENTS
3 medium garlic cloves
1
1
medium onion
pound boneless beel chuck, chilled
Cheddar or Monterey Jack cheese, shredded lettuce,
sliced jalapeno peppers, sliced scallions, sliced black
olives, chopped tomato or chopped avocado.
1-1/2 teaspoons whole cumin seed
2
2
2
1
1/8
1
1
tablespoons vegetable oil
tablespoons chili powder
tablespoons paprika
teaspoon sail
teaspoon crushed red peppers
8-ounce can whole tomatoes
cup water
2 cups red kidney bean
4-1/2
cups yield
Peel garlic and onion; quarter onion. Process both
with metal blade until (ineiy chopped, about 15
seconds. Remove and reserve. Trim beef ol all lat and
cut il into 1-inch cubes. Process until coarsely
chopped, about 10 to 12 pulses.
Brown cumin in saucepot over medium heat. Shake
pan constantly and cook until cumin begins to smoke.
about 1 minute. Remove and reserve.
Heal vegetable oil in same saucepot over medium heat. ■ ^ .-.1
Add garlic and onions and cook for 2 minules. Add
beet and cook, stirring often, until no pink color
remains, aboul 5 minules.
Reduce beat to tow. stir in cumin, chili powder,
paprika, salt and red peppers and cook uncovered for 5
minutes, stirring occasionally.
Use metal blade to chop tomatoes coarse, pulsing
twice. Add to saucepot with water and bring to boil.
Reduce heat and simmer, partially covered, over
medium-tow heat lor 45 minutes, stirring occasionally.
Page 39

33
Sausage
When you make your own sausage, you're in control of
Ihe ingredients. These sausages have no additives and
less than the usual amount of fat.
INGREDIENTS
_____________
1/2 pound pork or beef, cut in 1 -inch cubes
and chilled
3 ounces pork or beet fat. cut in 1 -inch cubes
and chilled
1 tablespoon cold water
3/4 teaspoon salt
1/2 teaspoon dried sage
1/8 teaspoon dried thyme
1/8 teaspoon pepper
Flour
3/4 pound, approximate yield
Put all ingredients except flour in work bowl and chop
with metal blade. Pulse/chop to start, then let machine
run continuously, slopping every 5 seconds until
desired texture is reached.
Shape mixture into cylinder 2 inches in diameter. Wrap
in plastic wrap or foil and refrigerate for 3 hours or
overnight. Cut into 1/2 inch slices and cook, or wrap
individually and freeze.
To cook, coat each patty with flour. Place patties in
cold skillet and cook over moderate heal until
Farmhouse Hash
II you don't have a kitchen scale, measure in cups —
2-1/4 cups of tightly packed meat cubes weigh about a
pound.
INGREDIENTS
4 tablespoons unsalted butter
1 small onion, peeled and halved
1/2 pound leltover meat, cut in 1-inch pieces
1/2 pound cooked potatoes, cut in -inch pieces
Salt and freshly ground pepper
1/4 cup beef or chicken slock
3 servings
Melt hall the butter in a heavy skillet. Use metal blade
to pulse/chop onion until it is finely chopped. 8 to 10
pulses. Saute onion in skillet until soft but not brown,
about 5 minutes. Reserve.
Use metal blade to process beef until coarsely
chopped. Add potatoes, salt, pepper and sauteed
onions and pulse only until potatoes are coarsely
chopped.
Heat remaining butter in skillet over medium heat. Add
hash, pour stock over all and pat down gently with
spatula. Cook over low heat for 20 to 25 minutes,
turning mixture over with spatula as crust forms on
bottom. Transfer to warm serving plate.
browned. Turn and cook second side over medium to
low heat, allowing 15 to 20 minutes total cooking time.
Page 40

34
Chicken and Vegetable Stir-Fry
Stir-frying and the food processor are a most effec
tive combiration to put a meal on the table in no
time.
INGREOIEMTS
2 red poppers, cored, seeded, stemmerl
6 scallions, cut to tit teed lube horizontally
2 zucchini, cut to fit feed tube horizontally
1 yellov/ squash, cut to fit teed tube
1 garlic cloves, peeled
1 1-tnch pieces Iresh ginger
2
pounds boneless chicken breasts
1/3 cuptvater
2 tablespoons dry Sbeiry
3 tablespoons soy sauce
2 teaspoons Oriental sesame oil
1/4 teaspoon black pepper
2
teaspoons cornstarch
3 lahifispoons vegetable oil
6
Splil chicken breasts lengtinvise Tuck ends under
lo form compact shapes ol uniform thickness. Wrap
ihdiuidually and freeze on baking sheet until firm to
the touch but easily pierced with the tip of a sharp
knife.
and cut vertically into 3 slabs
horizontally
servings
Use metal blade to mix vjaier. Sherry, soy sauce,
sesame oil, ground pepper, and cornstarch until
smooth, about 15 seconds. Remove metal blade,
leaving contents in work bowl.
Heat vegetable oil ih skillet over high lieal uhtil very
hot Add chickeh pieces and cook stilling vigorous
ly. until chicken is opaque, ahmit 3 minutes.
Add vegetable mixture and stir-lry over medium-high
heat until crisp-tender, about 2 minutes. Add sauce
mixture. Cook, stirring, until sauce thickens, aboul 1
minute. Serve over brown or white rice.
Stand peppers on long ends and use slicing disc to
slice Iheni, using light pressure. Lay scallion pieces
in feed lube horizontally and slice into slivers, using
light pressure.
Insert shredding disc and zucchini and squash,
using light pressure. Remove and reserve vegeta
bles.
Use iiieial blade lo chop garlic and ginger line, aboiil
4 pulses Do nol emply work bowl. Insert slicing
disc. Slaiid chicken pieces tightly in feed tube and
slice, using tirni pressure Remove and reserve on
plate, loosely covered with plastic wrap.
Page 41

VEGETABLES
35
Crab Cakes
These delicate seafood cakes are perfect with drinks. If
you're feeling festive, substitute cooked lobster meat
for half of the crabmeat.
_______
INGREDIENTS
_____________
4 slices white bread, lightly toasted
1 medium garlic clove, peeled
1 small onion, peeled and quartered
1 tablespoon unsalled butter
1 tablespoon parsley leaves
Broccoli Puree
Broccoli is high in fiber, high in potassium and low in
calories. This recipe uses the stems, which are often
discarded.
INGREDIENTS
t bunch broccoli, about 1-1/2 pounds
1 small onion, peeled
2 tablespoons butter
1 teaspoon lemon juice
Salt and pepper to taste
1 pound lump crabmeat, picked over to
remove cartilage
2-1/2 cupsyield
1/4 cup mayonnaise
1 large egg
1 tablespoon lemon juice
1/4 teaspoon salt
Tartar sauce (see recipe on page 38)
Remove stems from broccoli and reserve florets. Use
slicing disc to slice stems and onion. Cook sliced
vegetables in boiling water to cover with 1/2 reserved
florets until tender, about 6 to 8 minutes. Drain,
reserving liquid.
54 1/2-ounce crab cakes
Use metal blade to puree solids with remaining
Preheat oven to 375oF. Break bread in quarters and
ingredients until smooth, about 1 minute.
process with metal blade to fine crumbs, about 40
seconds. Reserve 1/4 of crumbs and put remainder in
pie plate.
Cut reserved florets into smaller florets and cook in
reserved liquid until tender, about 3 minutes. Remove
with slotted spoon. Pour enough hot cooking liquid
Drop garlic through feed tube with machine running
and process until finely chopped, about 10 seconds.
Add onion and chop fine, about 10 seconds. Cook
into work bowl to reach desired consistency, then
pulse in florets. Season to taste. Or serve the florets on
a bed of pureed broccoli.
mixture in the butler over low heat until golden brown,
stirring, about 10 minute.
Chop parsley fine, about 5 seconds. Add onion
mixture, crabmeat. mayonnaise, egg. lemon juice, salt
and reserved bread crumbs and pulse until combined,
about 8 times.
Form mixture into 1-1/2-inch cakes by generous
teaspoon measures. Coat them with crumbs in pie
plate and place on buttered baking sheet. (Recipe may
be prepared ahead to this point and refrigerated up to 4
hours.) Bake in preheated oven unlit golden brown. 10
to 15 minutes. Serve with Tartar Sauce.
Page 42

36
Mashed Potatoes
The shredding disc processes cooked potatoes to
the right texture. Be careful rot to over proecess
when you mix them with the other ingredients.
IMGREDIENTS INGREDIENTS
IM cup hot milk
2 tablespoons butter in pieces
1/2 teaspoon salt
Freshly ground pepper
Pinch of nutmeg (optional)
3 large potatoes, peeled, boiled
and drained
4
senings
Pul all ingredients except potatoes in work bowl and
insert shredding disc. Process potatoes and leave
them in work bowl. Remove shredding disc and
carefully insert metal blade. Pulse 2 or 3 times, until
liquid is absorbed. Rotates will become gluey if you
overprocess
Wonderfully light, tluMy mashed potatoes can also
be made with the optional Whisk Aitachmeni (DLC-
155).
Potatoes au Gratin
You can use baking or boiling potatoes for this
substantial yet elegant dish.
ounces Gruyère clieese. cut in
cubes
2
1
medium garlic cloves, peeled
medium onions, peeled and
quartered
2-1/2
1
cups milk or half-and-half
teaspoons salt
Freshly ground v/hite pepper
large potatoes (about 10 ounces
each), peeled and cut flat at ends
2-quart
8
baking dish
serwfjps
Preheat oven to 400°F and butter baking dish. Chop
cheese with metal blade until it is finely grated
Remove and reserve it. Drop onion and garlic
ttirough feed lube wbile machine is running anil
process until tinely chopped Put onion/garlie mix
ture in saucepan with milk, salt and pepper.
Shred potatoes with shredding disc, one at a lime,
using firm pressure on pusher. Add shredded pota
toes to saucepan and bring mixture to a boil, slirring
continuously to prevent scorching
■i' -
Remove saucepan from heat and spread potato mix
tute in prepared baking dish Sprinkle v/ith reserved
cheese and bake for 25 minutes or until potatoes are
tender and cheese is golden. Let stand for 10 min
utes before serving.
Page 43

y SALADS
37
Shredded Carrots and Zucchini
Because shredded vegetables cook so quickly, all
their natural flavor and crispness is preserved If
you like, substitute an equal amount of parsnips for
zucchini.
INGREDIENTS
3
medium carrots (about 2 ounces 1-1/2
each) 4-1/2
2
medium zucchini (about 4 1/2
ounces each)
1/4
cup unsalted butter
Salt and pepper to taste
1/2
teaspoon chopped tresh tarragon
or 1/4 as much dried
(optional)
4
servings
Peel carrots and cut them and unpeeled zucchini to
tit teed lube horizontally. Process with shredding
disc
Men butler in large skillet. Add stiredded vegetables
and sprinkle vvitti a liUle salt and pepper. Cover and
cook until lust tender. 2 or 3 minutes
Season with tarragon, salt and pepper to taste.
Sliced Tomatoes on Shredded Lettuce
You can prepare all the elements of this salad in the
work bowl.
i^rediemTs
1/4 cup paisley leaves, loosely
packed
1
medium shalloi. peeled
tablespoons red-wine vinegar
tablespoons safflovrer oil
teaspoon Dijon-style mustard
1/2
1/3
teaspoon sugar
leaspdon salt
Freshly ground black pepper
4
firm, ripe, medium lomaloes.
cored and cut Hat at ends
1
6
medium head romaine lettuce
servings
Use metal blade to chop parsley and shallots fine
Add all remaining ingredients, except lomatoes and
lettuce, through the feed tube opening while the
inactiine is running. Remove nielat blade and insert
slicing disc
Slice tomatoes into dressing, using light pressure
Cut lettuce into sections to lit teed tube Use slicing
disc to slice it. using medium pressure.
Transfer contents of woik bowl lo platter, arranging
tomatoes over lettuce in an attractive paltein.
TIP: When preparing a meal, make the dislies vhth
the least amount ol wet ingredients first. For exam
ple. make the bread first, then you don’l need lo
wash the bowl belore making the salad In many
cases, wiping the bowl with a paper towel botvreen
recipes is sufficient
Page 44

33
Creamy Cole Slaw
Cole slaw only takes minutes to prepare when you
don't have lo slice Ihe cabbage by hand.
Shredded Carrot Salad
The brilliant color of carrots and peas make this fresh
and simple salad a welcome addition to a party buffel
table.
INGREDIENTS
INGREDIENTS
1/4 cup loosely packed parsley leaves2 pounds young carrots, peeled
1
1/3 cup mayonnaise 1/4
1/2 fablespoon red-wine vinegar
1/4 teaspoon salt 1
l-ounce piece peeled onion 3 large scallions, trimmed
cup fresh lemon juice
1/4 cup vegetable oil
teaspoon salt
1/4 teaspoon freshly ground pepper 1 teaspoon sugar
1/2 large carrot, peeled Pinch ol cinnamon
1/2 medium head green cabbage, about 2
pounds
f/2
Pinch ol allspice
Freshly ground black pepper
cup cooked peas, fresh or frozen
5 cups yield
8 servings
Process parsley with metal blade until minced. Add
onion and process until minced. Add all remaining
ingredients except carrot and cabbage and process 5
seconds lo combine. Remove metal blade.
Cut carrots in lengths to (it feed tube horizontally and
parboil them in salted water until you can jusi pierce
Ihem with the tip of a sharp knife, about 3 lo 5
minutes. Drain them and rinse under cold water When
Cut carrot in half crosswise. Core cabbage and cut it
they are cool, blot dry with paper towels.
into wedges. Insert shredding disc and shred carrot,
using (irm pressure. Insert slicing disc and slice
cabbage, using lirm pressure. Add contents of work
bowl to mixing bowl and toss to combine. Adjust
seasoning. Serve immediately or refrigerate for up to
24 bouts. Before serving, drain excess liquid and
Cut scallions into 1-iich pieces and process scallions
with metal blade until they are linely chopped. Add
lemon juice, oil, salt, sugar, cinnamon, allspice and
pepper and process for about 3 seconds. Leave the
dressing in the work bowl.
adjust seasoning. Serve chilled.
Insert shredding disc, pack carrots lengthwise in feed
lube and shred, using medium pressure, Transfer
contents of work bowl fo serving bowl, add peas and
toss gently to coat all ingredients with dressing. Serve
cold or at room lemperature. Adjust seasoning just
before serving.
Page 45

SAUCES
39
Pesto
A classic pasta sauce from Italy. One cup is enough lor
1 pound of pasta. It’s also good on boiled potatoes or
in soups.
Mexican Salsa
Serve this sauce as a topping for tacos, or with grilled
fish or chicken. It is best when fresh; it may become
slightly bitter after standing a day.
INGREDIENTS INGREDIENTS
3 ounces imported Parmesan cheese, at1-1/2 jalapeno peppers
room temperature, in 1-inch pieces
1/2
medium onion
3 small garlic clove, peeled 1/3 cup packed cilantro leaves*
2
cups tightly packed fresh basil leaves
1/4 cup pine nuts
1/2
1/4
teaspoon salt 3 medium tomatoes, cored and quartered
cup olive oil
1/8
2
teaspoon salt
teaspoons lime juice
2 cups yield
1
cup yield
Cut peppers in halt lengthwise, remove and discard
Use metal blade to chop cheese and garlic, about 30
seconds. Add remaining ingredients except oil and
process until combined, about 8 pulses. With machine
running, pour oil through feed tube. Process until
stems, seeds and membranes. (Handle hot peppers
with care. Their oil may irritate your skin and cause
your eyes to sting. Wash hands alter handling them.)
Peel and quarter onion.
combined, about 10 seconds. Scrape down bowl and
continue processing until smooth, about 20 seconds.
Use metal blade to process peppers and cilantro until
finely chopped, about 20 seconds. Scrape bowl, add
This keeps for up to 5 days in the relrigerator and it
salt and lime juice and pulse twice.
also freezes well. Some people prefer to omit the
cheese when freezing pesto and add it just before
serving.
Add tomatoes and onions and pulse until they are
coarsely chopped, about 10 to 12 times.
Transfer to serving dish, stir and serve within 1 or 2
hours.
’Substitute llaHeat parsley it cilantro is not available.
Page 46

40
Basic Mayonnaise
For a ciassical mayonrtaise, as thick as butter,
substitule 2 egg yoiks for each whole egg.
No-Cook Cranberty-Orange Relish
Because this is an uncooked relish, ii requires oniy 1
cup of sugar to sweeten 1 pound of cranberries. Most
cooked relishes call for 2 cups.
1
1
large egg 2
tablespoon fresh lemon juice or wine
vinegar
INGREDIENTS
1
1-1/4
tablespoon mustard, preferably Dijon-styie
cups oil* 1-3/4
1-1/2 cups yield
1/2
1/2 cup sugar
Use metal blade lo chop cranberries and oranges
INGREDIENTS
cupsiresh cranberries
navel orange, unpeeled and quartered
cups yield
coarsely chopped, about 8 to 10 pulses. Add sugar
Use metal blade to process egg, lemon juice or
vinegar, mustard and 1 tablespoon oil in work bowl lor
and process lo mix, about 20 seconds. Taste and add
more sugar il desired Refrigerate in airtight container.
60 seconds. While machine is running, pour 1/4 cup
ol oil into smati pusher, (Do not put in more than this
or it will dribble through too quickly.) When II has
dribbled through hole in botlom of small pusher,
remove small pusher from feed lube and gradually add
remaining oil, while machine continues to run.
Mayonnaise will thicken as oil is added. Taste and
adjust seasoning if necessary.
'You can use one oil or a combination, about 20%
lighl olive oil lo B0% vegetable oil. for example.
Low cholesterol variation: Substitute 2 table
spoons of Egg Beaters" tor the egg, omit vinegar,
increase salt and add pepper. Proceed as above.
Herb Mayonnaise: Add 1/4 cup lightly packed fresh
green herbs when you put in the egg. Recommended
herbs are parsley, dill and tarragon, with stems
removed.
Tartar Sauce: Triple the amount of lemon juice.
When mayonnaise is finished, add these ingredients: 3
small gherkins, 1/4 small onion, 1 tablespoon capers.
1 tablespoon bottled horseradish and 3 drops Tabasco
sauce. Process until gherkins and onion are chopped
fine, about 10 seconds.
. \
Page 47

PASTRY
41
Chocolate Sauce
You can make a delicious chocolate sauce in your
Basic Pastry
This is the basic dough for pies, tarts and quiches.
work bowl in 1 minute! No more worries about melting
chocolate on top of the stove.
5
ounces semi-sweet chocolate, broken into
1/2-inch pieces
1/4 cup super-line sugar
INGREDIENTS
1/3
7/8
cup water, heated to boiling
cup yield
1-1/2
1
1/2
1/4
1
INGREDIENTS
cups all-purpose flour
stick very cold unsalled
butter, in 1- inch pieces
teaspoon salt
cup ice water
11-inch pie shell
Use metal blade to chop chocolate and sugar until
coarsely chopped, about 6 pulses. Then process
continuously until chopped to a fine powder, about 60
seconds. With machine running, slowly pour hot water
through feed tube. Process until chocolate melts,
about 45 seconds, stopping once to scrape down
bowl.
Mint variation: Add 1 tablespoon of peppermint
Use metal blade to process flour, butter and salt until
mixture is like coarse meal, about 8 seconds. Add ice
water and pulse until dough begins to clump together.
Do not let it form a ball. Put dough in a plastic food
storage bag. Work through bag to press dough
together into a ball, then a flat disc.
Refrigerate dough for at least 1 hour.
extract, creme de menthe or peppermint schnapps to
water after it is heated.
Roll dough on lightly floured surface to a circle about
1/8 Inch thick. Press into place in pie pan. Use kitchen
Raspberry Sauce
A fine finish for any fruit or chocolate dessert: ice
cream, sherbet or cake. You can substitute strawber
ries for the raspberries.
shears to trim dough, leaving 1-inch overlap beyond
pan. Fold overlap under. Pinch crust to form
decorative edge. Prick bottom and sides with fork and
refrigerate crust for 30 minutes, or until firm.
_______
INGREDIENTS
____________
Preheat oven to 400°F 15 minutes before baking.
1 10-ounce package frozen raspberries in
1 tablespoon honey
syrup, thawed
Line pie shell with parchment paper and fill it with
uncooked beans or rice. Bake it lor 12 minutes.
Remove paper, beans or rice, prick shell again and
1
cup yield
bake it 6 minutes longer, or until it is lightly browned.
Remove shell from pan and let cool on wire rack.
Use metal blade to puree raspberries and honey tor 30
seconds. Transfer to fine sieve over bowl. Press solids
through with back of spoon and discard seeds in sieve.
Serve at room temperature or warm slightly to serve
over icecream.
Fruit Tart:
To make a one-crust tart, use a tart pan instead of a
pie pan. When cooked shell is thoroughly cool,
spread about 1 cup of pastry cream (see recipe) on
the bottom. Arrange sliced fresh fruit decoratively
on top.
Page 48

QUICK BREAD, YEAST
BREAD AND PIZZA
42
Corn Bread
This is a particularly moist and llavorful corn bread
which is best served warm.
INGREDIENTS
3
tablespoons butter
3/4 cup yellow cornmeal
3/4
cup all-purpose flour 1/4
1-1/2 tablespoons sugar 1/3
2 teaspoons baking powder 1/4
1/4
1/4
teaspoon baking soda 1 large egg
teaspoon salt 1
1 cup buttermilk
1
1/3
large egg 1/4
cups fresh, frozen or canned corn kernels
8x8 pan sw in inches
Coftee Cake
This makes an excellent breakfast, or adds a sweet
flavor to lunch or supper.
INGREDIENTS
1 package dry yeast
2
tablespoons sugar
cup warm water
cup sour cream
cup cold milk
teaspoon vanilla
3
cups flour
cup butter
1/2
teaspoon salt
Filling
2 tablespoons melted butter
Preheat oven to 425 F. Melt butter in baking pan.
1/2
1/2
cup light brown sugar
cups raisins or dates, cut in 1-inch pieces
Use metal blade to process all dry ingredients until1/2 cup pecans
combined, about 10 seconds. Add butter and1
teaspoon cinnamon
remaining ingredienls except corn kernels and process
until mixed, about 5 seconds. Scrape down work bowl
and gently stir in corn.
To make Ihe dough, dissolve the yeast and half the
sugar in warm water in a 2-cup liquid measure. Let
stand until foamy. Whisk together the sour cream,
Pour into prepared pan and bake until a loolhpick
inserted in center comes out clean, about 25 minutes.
milk, egg, and vanilla extract and add to the yeast
mixture.
Muffin Variation: For corn muffins, pour baiter into
greased, standard-size mullin tins, filling them 3/4 full.
Bake in preheated 425‘F oven lor about 25 minutes.
Makes 6 muffins.
Use metal blade to process flour, butter, salt and
remaining sugar for 10 seconds. With machine
running, add liquid ingredients through feed tube in
steady stream as fast as flour absorbs them. After
dough cleans inside of work bowl, continue process
ing 40 seconds more to knead it.
Shape dough into ball and place it in lightly floured
plastic food storage bag. Squeeze out air and close top
with wire twist. Let rise in warm place until double,
about 1 hour.
Roll dough on lightly floured surface to rectangle
about 20 inches long and 12 inches wide. Brush with
Page 49

43
melted tmlter Wild remaining butter, brush inside ol
9x13-inch pan.
To make filling, use metal blade lo process sugar,
While Bread
It's best to make this bread with bread flour, or
unbleached flour, or a oombirtatlon of both. Bread
made vhth bread Hour will rise higher in the oven,
dales or raisins, pecans, and cinnamon until coarsely
_____
chopped, about 45 seconds. Spread lining over dough.
Roll dough up, jelly-roll lastiion, Irom long side. Use
sharp knile to cul rolled dough into 3/4-inch slices.
Place slices in pan, cut sides up, and lei rise unlil
doubled.
Preheat oven to 375’F and bake collee cake until
golden and bubbly, about 20 to 25 minutes.
1
package
1/3 cup warm water
2 teaspoons sugar
4 cups white flour
3 tablespoons unsalled butter, in lablespoon-
1 teaspoon salt
1 cup ice water
INGREDIENTS _____________
size pieces
/- pound loaves
Stir yeast and sugar into warm vrater in 2-cup mea
sure and let stand until loamy, 3 to 5 minutes Use
dough blade to process flour, butter and sail tor 20
seconds. Add ice water to yeast mixture.
With machine running, pour liquid through teed tube
in steady stream, only as fast as Hour absorbs it
Cohlihue processing until doiigli cleans inside ot
wdrk bovrl and torms a hall. Then let machine run
for GO seconds lo knead dough.
Shape dojgh into ball and place in lightly floured
plastic storage bag. Squeeze oul air and close end wilh
wire twist, allowing space for dough to rise. Let rise in
warm place until dough has doubled in bulk, about 1
lo M/2 hours.
dry
yeast
Punch dough down and shape into 2 loaves Place
each in greased 4-cup loaf pan. Cover with oiled
plastic wrap and let rise in warm place until dough just
rises above top o( pan, about 45 minutes. Bake in
middle rack of preheated 375T oven until top is
brown, about 35 minutes Remove Irom pan and cool
on wire rack.
Whole Wheat Variatirtn: Replace 1/2 of while Hour
wilh an equal amount ol whole wheat Hour.
Page 50

44
Basic Pizza Dough
With this dough, you can make large pizza crusts to
serve several, or small ores lo serve a few.
Pizza In a Hurry
It takes no longer to make this pizza than lo wait for
one you order to take out.
INGREDIENTS INGREDIENTS
1
1
package active dry yeast 1 14-ounce pizza crust (see recipe, left)
leaspoon sugar 4 ounces Parmesan cheese, at room tern
2/3 cup warm water peralure
1-2/3
3/4
2
1-1/2 tablespoons cornmeal lor pan
1
2
cups all-purpose flour
teaspoon salt
teaspoons oil
Vegetable oil for pan
14-inch pirn cwst OR
9-inch pizza crusts
2 ounces pepperoni, peeled, in 3 pieces
12 ounces Mozzarella cheese, very cold
1
small onion, peeled, ends cut Hat
1 medium green pepper, cored, seeded and
cut flat at stem
1
medium tomato, cored, cut flat at ends
1 cup Tomalo Pizza sauce (see recipe, right)
Pinch of sugar
Freshly ground black pepper
Stir yeast and sugar into warm water and let stand until
foamy, about 10 minutes. Insert metal blade, put flour
and salt in work bowl and turn on machine. Pour yeast
1/2 leaspoon dried basil or 1 teaspoon tresh
1/2 teaspoon dried oregano or 1 teaspoon
tresh
mixture through feed tube and process abou! 45
seconds, until dough pulls away from sides of bowl.
Add oil through feed tube and process 60 seconds
longer.
If dough sticks lo sides of bowl, add more (lour, l
tablespoon at a time, processing for 10 seconds after
each addition, until dough leaves sides of bowl but
Preheat oven lo 425’F and place rack in lower Ihird.
Bake pizza crust for 6 minutes. In the meantime.
prepare filling.
Use metal blade to process Parmesan cheese and
pepperoni until coarsely chopped. Set aside on dish or
waxed paper.
remains soft.
Insert shredding disc and process Mozzarella cheese.
Roll dough on floured surface into circle, rotaling and
Set aside.
turning dough oflen and using enough Hour so it
doesn't stick. If dough resists tolling, lei it rest for a
few minutes and try again. Roll dough into 15-inch
circle for flat 14-irch pizza pan, or into 10-inch circles
Insert slicing disc and slice onion. Sel aside. Slice
green pepper and set aside. Slice tomalo, using lighl
pressure. Sel aside on paper lowels to drain.
tor flat 9-inch pizza pans.
Use rubber spatufa to spread tomato sauce evenly over
Oil pan{s) lightly and sprinkle with cornmeal. Fold
rolled dough in hall loosely and then in half again.
Position point al center of pan and gently unfold. Press
into place from center outward, turn under the Mncti
overhang and shape it into a rim. Crust(s) is now ready
crust, leaving rim exposed. Separate each onion slice
inlo rings and distribute them over sauce. Distribute
shredded Mozzarella over onions. Arrange tomato
slices over cheese and sprinkle with pinch ol sugar
and pepper.
lo bake and till.
Page 51

DESSERTS
45
Distribute Parmesan cheese and pepperoni mixture,
then green pepper slices, over tomatoes. Sprinkle
Pudgy Brownies
These easy-to-make brownies are always a favorite in
lunch boxes or for after-school snacks.
evenly with basil and oregano. Return pizza to oven
and bake lor 18 minutes, or until rim of crust is golden
and bottom is deep brown.
INGREDIENTS
3 ounces unsweetened chocolate
Tomato Pizza Sauce
When this sauce stands, liquid may accumulate on
surface. Pour off all but 2 tablespoons, then stir well
before using.
1
cup light brown sugar
1/3 cup butter, melted
3
1
large eggs
teaspoon vanilla extract
2/3 cup flour
INGREDIENTS
2 large tomatoes, peeled, seeded
and quartered
_____________
1/4 teaspoon salt
1 teaspoon baking powder
1/2
cup pecan halves
1 cup canned tomato sauce
1/4 cup canned tomato paste
3/4 teaspoon dried oregano or 1 -1/2
8x8
16
inch pan
brownies
teaspoons fresh
3/4 teaspoon dried basil or 1 -1 /2 teaspoons
Preheat oven to 3S0°F. Grease pan.
fresh
1 teaspoon sugar
Salt and freshly ground black pepper
Break chocolate into 1-inch pieces. Use metal blade to
chop with half the sugar until coarsely chopped. 6 to 8
pulses. Then process continuously until finely
2 cups yield
Use metal blade to pulse/chop tomatoes about 6 times,
until coarsely chopped. Add remaining ingredients and
pulse 4 times to mix.
chopped, about 20 seconds.
With machine running, pour hot butter through feed
tube. Process until smooth, about 30 seconds. Add
remaining sugar, eggs and vanilla. Pulse twice, then
process 10 seconds more. Add dry ingredients and
nuts. Pulse/chop until mixed, 6 to 8 times. Spread in
prepared pan.
Bake until lightly crusty and moist inside, about 20
minutes. Cool and cut into squares.
Page 52

46
Chocolate Chip Oatmeal Cookies
Toasted nuts and oatmeal make these cookies good for
you as well as delicious.
Carrot Cake
To make this delicious, moist cake look really
professional, put a marzipan carrot in the center. You
can buy them at many pastry or candy shops.
INGREDIENTS
INGREDIENTS
1/2 cup quick-cooking oatmeal Fine, dry bread crumbs, lor dusting pans
3/4 cup pecans
3/4 cup butler
1/3 cup sugar
1/2 cup firmly packed light brown sugar 2
1 large egg
3/4 teaspoon vanilla extract
1 cup flour
1/2 teaspoon salt
1/2
1/2
1/2
1/2
1
3/4
1 cup all-purpose flour
pound carrots
cup granulated sugar
cup firmly packed dark brown sugar
large eggs
cup corn oil
teaspoon vanilla
cup walnut pieces
3/4 teaspoon baking soda 1 tablespoon unsweetened cocoa
6 ounces semi-sweet chocolate chips
1
1
35 2-1^-inch cookies
1/2
1/2
Preheat oven to 350T and place rack in center.
1/2
Toast oatmeal and pecans on baking sheet until lightly
teaspoon baking powder
teaspoon cinnamon
teaspoon baking soda
teaspoon salt
cup raisins, steamed over boiling water
for 10 minutes
browned, about 10 minutes. Remove and reserve. TurnCream Cheese Frosting (recipe tollows)
oven up to 375°F.
28-inch
Cut butter into 1-inch pieces. Use metal blade to6 to 10
round cake pans
servings
process with both sugars until smooth, about 2
minutes. Scrape work bowl as necessary. Add egg and
vanilla and pulse until just mixed, about 6 times.
Preheat oven to 350°F. Butter cake pans, line bottoms
with parchment paper and butter paper. Dust pans with
bread crumbs.
Add pecans, flour, salt, baking soda, and half the
oatmeal. Pulse until mixed, about 8 times. Remove to
large bowl, add remaining oatmeal and chocolate
Cut carrots into lengths to fit feed tube horizontally.
Use shredding disc to shred carrots and reserve them.
chips and stir to mix. Drop by rounded leaspoonfuls
onto greased baking sheets 1 inch apart and bake until
golden brown, about 11 minutes.
Process sugars, eggs, oil and vanilla with metal blade
until smooth, about 15 seconds. Add walnuts and dry
ingredients and pulse until combined, about 6 times,
stopping once to scrape down work bowl. Use spatula
to stir in raisins and carrots.
Divide batter between prepared pans and bake in
preheated oven until a cake tester inserted in the center
comes out clean, about 35 to 40 minutes. Cool in pans
Page 53

47
(or 2 lo 3 miriLtes and lorn out onto wire racks to cool
complelely. Remove paper.
Sherbet and Frozen Yogurt:
At least 5 hours before serving, prepare
fruit by cutting it into 1-inch pieces. For frozen
Spread frosting between layers and on top and sides o(
cake.
yogurts, freeze all of fruit in single layer on baking
sheer For sherbeds, freeze 3/4 of fruit in same way
and refrigerale remaining fruit
Cream Cheese Frosting
This quick and easy trosling is delicious on carrol
cake, bul it's also good on many older cakes.
INGREDIFNTñ
1/2 pound cream cheese, in pieces
1/2
1
1/2
stick butter, in pieces
cups confectioner's sugar
teaspoon vanilla extract
A
tevr
minutes before serving, process frozen Iriiit
and
sugar
then processing continuously until fruit is finely
chopped, scraping down vrork bowl and covet as
necessary.
vritli metal blade, piilsintj about 8 limes
Add refrigerated fruit or yogurl and any addilional
ingredients called lor in recipe. Process just unlil
mixture become smooth and creamy, scraping down
work bowl as necessary. Taste lor sweetness, adding
2 ti-in.
hosts layers listed al lell
Use metal blade lo process cheese and butter until
combined, about 10 seconds. Add sugar and process
until smooth, about 5 seconds. Add vanilla and
process until smoolh, about 15 seconds.
more sugar if necessary.
Sherberls and frozen yogurts are best when served
immedialely, but they may be (rozen for later use. To
prepare frozen mixture for serving, cut il into l-inch
chunks. Process with metal blade just until mixture
becomes smooth and creamy.
Pear Yogurt
3 medium pears
1/4 cup confectioners sugar
1/2 cup yogurt
1 tablespoon lemon juice
IMGREDIENTS
iJliUfo)
Banana-Apple Sherbet
IMGREDIEMTS
2 small bananas
1 tablespoons confectioners' sugar
2 medium Golden Delicious apples
t-t/2 tablespoons lemon juice
Page 54

48
Apple Pie
Use the basic pastry recipe and about 2 pounds of
apples, peeled and cored.
To assemble the pie, use the metal blade to mix 1/2
cup sugar, 3/4 teaspoon cinnamon, 1/8 teaspoon
salt, 1/8 teaspoon nutmeg and 3 tablespoons flour
for 5 seconds.
Slice the apples into the sugar and spice mixture.
Transfer the apples to the pie crust. Place second
crust over the apples. Pinch crust edges together.
With a sharp knife, make 6-8 small cuts in top crust
to allow steam to escape. Bake in preheated 375° F
oven until juices bubble, about 45 minutes.
Page 55

WARRANTY
49
CUISINART® PRO CLASSIC"*
FOOD PROCESSOR THREE-YEAR
LIMITED WARRANTY ON THE
ENTIRE MACHINE.
FIVE YEAR FULL WARRANTY
ON MOTOR
This warranty supersedes all pre
vious warranties on Cuisinart®
Pro Classic'“ Food Processor.
This warranty is available to con
sumers only. You are a con
sumer if you are the owner of a
Cuisinart® Pro Classic'“ Food
Processor that was purchased at
retail tor personal, family or
household use. Except as other
wise required under applicable
state law, this warranty is not
available to retailers or other
commercial purchasers or owners.
We warrant that your Cuisinart®
Pro Classic'“ Food Processor will
be free of detects in material or
workmanship under normal home
use for three years from the date
of original purchase.
We warrant that the motor tor
your Cuisinart Pro Classic"* Food
Processor will be free of defects
in material or workmanship under
normal home use lor five years
from the date of original pur-
chase.This motor warranty covers
the motor and excludes all other
parts in the motor base assembly
area such as the upper and lower
plastic housings, workbowl and
cover, blades and all electrical
components and vertical project
ing motor shaft sheath.
We suggest that you complete
and return the enclosed warranty
registration card promptly to
facilitate verification of the date of
original purchase. However
return of the warranty registration
card is not a condition of this
warranty.
If your Cuisinart® Pro Classic'“
Food Processor should prove to
be defective within the warranty
period, we will repair it, or it we
think necessary replace it, with
out charge to you. To obtain war
ranty service, simply call our toll
free number 800-726-0190 for
additional information from our
Customer Service Representatives.
Or send the defective product to
Customer Service at Cuisinart.
150 Milford Road. East Windsor,
New Jersey 08520. To facilitate
the speed and accuracy of your
return, please enclose a check or
money order for $10.00 shipping
and handling. DO NOT SEND
CASH.
Under California law, only proof
of purchase is required.
California residents should call
1-800-726-0190 for shipping
instructions. If the problem v/ith
the machine is determined to be
a defect of the motor within the
warranty period all postage and
handling charges will be refunded.
Please be sure to include a return
address, daytime telephone num
ber. description of the product
defect, product serial number,
original date of purchase, and any
other information pertinent to the
product’s return.
Your Cuisinart® Pro Classic'“
Food Processorr has been manu
factured to the strictest specifica
tions and has been designed tor
use with the Cuisinart® Pro
Classic'“ Food Processor autho
rized accessories and replace
ment parts. This warranty
expressly excludes any defects or
damages caused by accessories,
replacement parts or repair ser
vice other than those that have
been authorized by Cuisinart.
This warranty excludes all inci
dental or consequential damages.
Some states do not allow the
exclusion of or limitation of inci
dental damages, so this may not
apply to you.
This warranty gives you specific
legal rights, and you may have
other legal rights which vary from
state to state.
Warning:
Our Pro Classic'“ Food
Processor. Food Processors, and
Accessories have been carefully
designed and manufactured with
the highest quality materials to
assure your satisfaction and safe
ty when you use them. Although
accessories sold by companies
other than Cuisinart may be com
patible with your Cuisinart®
machine, they may also be
extremely dangerous, and expose
the user to serious injury.
We specifically caution you not
to use other brand accessories,
such as juicers, which permit
your machine to operate with
exposed cutting of shredding
discs. We also caution you not
to use the large feed tube on this
machine with machines built by
other manufacturers.
If you have any questions about
the safety feature of your
Cuisinart® Pro Classic'“ Food
Processor or any other Cuisinart®
product, please call us at the toll
free number that appears above.
Page 56

©2002 Cuisinart
Cuisinart® is a registered
trademark of Cuisinart
150 Milford Road
East Windsor, NJ 08520
Printed in China
U IB-2376C
 Loading...