

Page 1
INSTRUCTION AND
RECIPE BOOKLET
Cuisinart® Pro Classic™ Food Processor
For your safety and continued enjoyment of this product, always read the Instruction Book carefully before using.
DLC-10SY Series
Page 2

RECOMMENDED MAXIMUM WORK BOWL CAPACITY
FOOD CAPACITY
Sliced or shredded fruit, vegetables or cheese 5 cups
Chopped fruit, vegetables or cheese 2 cups
Puréed fruit, vegetables or cheese 3 cups cooked; 1½ cups puréed
Chopped or puréed meat, fish or seafood 1¼ pound
Thin liquid (e.g., dressings, soups, etc.)
Cake batter 8-inch cheesecake batter; 1 box (15.25 ounce) cake mix
Cookie dough 2½ dozen (based on average chocolate chip cookie recipe)
White bread/pizza dough 3 cups (all-purpose or bread flour)
Nuts for nut butter
5 cups
2 cups
2
Page 3
IMPORTANT UNPACKING
INSTRUCTIONS
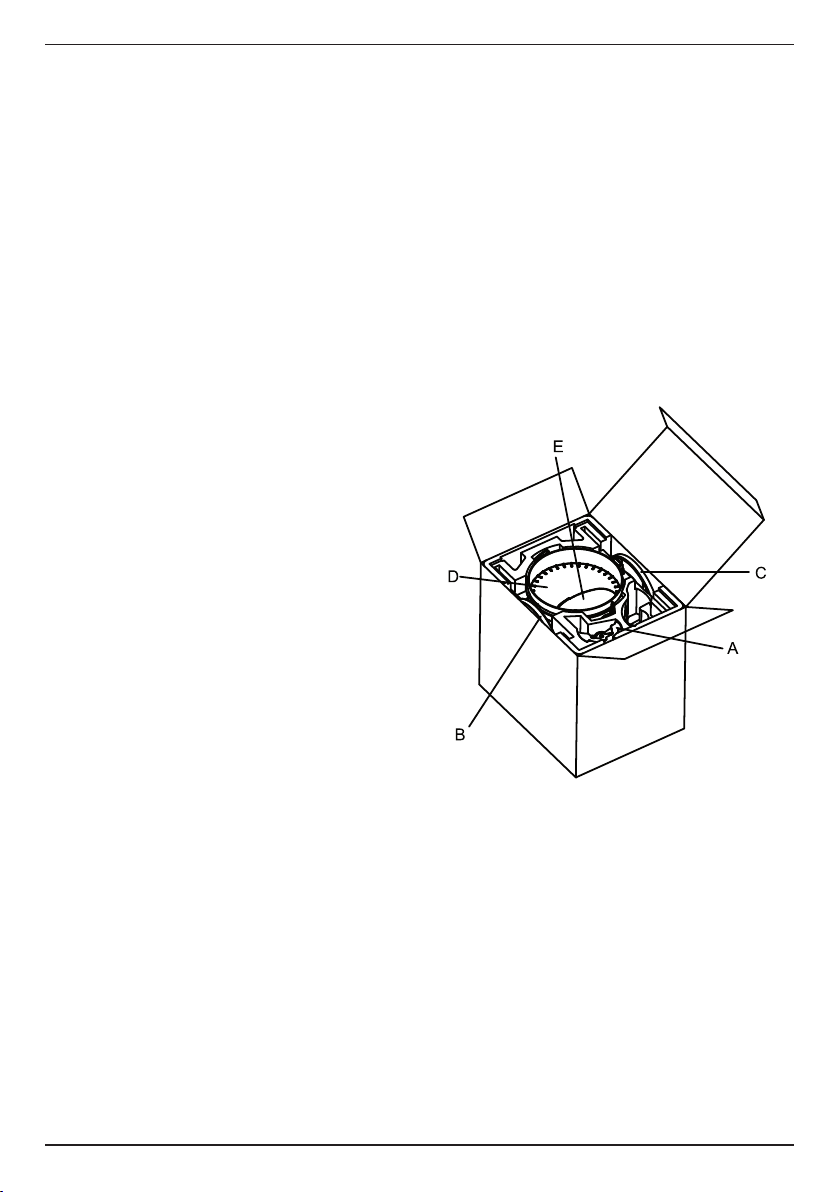
This package contains a Cuisinart® Food Processor, and these standard parts for it: metal
chopping blade, slicing disc and shredding disc,
detachable stem for discs, spatula and instruction/
recipe book.
CAUTION: THE CUTTING TOOLS HAVE VERY
SHARP EDGES. To avoid injury when unpacking
the parts, please follow these instructions:
1. Place the box on a low table or on the oor
next to the kitchen counter or table where you
plan to keep the food processor. Be sure the
box is right- side up.
2. Remove the cardboard insert which contains
the compact cover.
3. Remove the instructional material, the spatula
that's encased in the bag with instructional material, the cardboard panel and the small cube
of plastic foam.
4. You will see a rectangular block of plastic foam
that holds the processor parts, each tted into
a cavity in the foam.
The detachable stem (A) for the discs is in cav-
ity at one short side of the foam block. Remove
it rst.
The slicing disc (B) is on one long side and
the shredding disc (C) on the other. Slide them
out of their grooves WITH GREAT CARE; THE
BLADES ARE SHARP.
Now only the work bowl cover (D) with pusher
assembly (E) tted on remain in the foam block.
Grasp an edge of the work bowl cover and lift
them straight up together. (The sleeve on the
pusher may slide down as you lift them out.)
5. The machine base and work bowl with metal
blade are at the bottom of the box. CAREFULLY REMOVE THE METAL BLADE BY
GRASPING THE CENTER HUB AND LIFTING IT
STRAIGHT UP. NEVER TOUCH THE BLADES,
WHICH ARE RAZOR SHARP.
6. Remove the base and bowl together by grasping the plastic bowl at the top with both hands
and lifting the bowl straight up. Do not rotate
the bowl clockwise on the base. This will cause
the bowl to separate from the base.
7. Place the processor on a counter or table and
read the instructions thoroughly before using
the machine.
8. Save the shipping cartons and plastic foam
blocks. You may want to use them in shipping
the processor at a later date.
NOTE: We recommend that you visit our
website, www.cuisinart.com for a fast,
effi cient way to complete your online product
registration.
3
Page 4

IMPORTANT
SAFEGUARDS
Always follow these safety precautions when using
this appliance.
Getting Ready
1. Read all instructions.
2. Blades and discs are sharp. Handle them
carefully.
3. Turn the appliance OFF, then unplug from
the outlet when not in use, before
assembling or disassembling parts and
before cleaning. To unplug, grasp the plug
and pull from the outlet. Never pull from
the power cord.
4. Do not use outdoors.
5. Do not let cord hang over edge of table or
counter, or touch hot surfaces.
6. Do not operate any appliance with a damaged
cord or plug or after the appliance malfunctions,
or is dropped or damaged in any manner.
Contact the manufacturer at their customer
service telephone number for information on
examination, repair, or adjustment.
Operation
1. Keep hands as well as spatulas and other
utensils away from moving blades or discs
while processing food to prevent the
possibility of severe personal injury or damage
to food processor. A plastic scraper may be
used, but only when the food processor
motor is stopped.
2. Avoid contact with moving parts. Never push
food down by hand when slicing or shredding.
Always use pusher.
3. Make sure motor has completely stopped
before removing cover. (If machine does not
stop within 4 seconds after you remove the
bowl cover assembly, call 1-800-762-0190 for
assistance. Do not use the machine.)
4. Never store any blade or disc on motor shaft.
To reduce the risk of injury, no blade or disc
should be placed on the shaft except when
the bowl is properly locked in place and the
processor is in use. Store blades and discs, as
you would sharp knives, out of reach of children.
5. Be sure cover and feed tube are securely
locked in place before operating food processor.
6. Never try to override or tamper with cover
interlock mechanism.
Cleaning
To protect against risk of electrical shock, do not
put base in water or other liquids.
General
1. This appliance is not intended for use by
persons (including children) with reduced
physical, sensory, or mental capabilities, or
lack of experience and knowledge, unless
they are closely supervised and instructed
concerning use of the appliance by a person
responsible for their safety. Close supervision
is necessary when any appliance is used by
or near children. Children should be
supervised to ensure that they do not play
with the appliance.
2. Do not operate this, or any other motor-driven
appliance, while under the influence of alcohol
or other substances that affect your reaction
time or perception.
3. This food processor is UL listed for household
use. Use it only for food preparation as
described in the accompanying recipe and
instruction book. Do not use this appliance
outside of its intended use.
4. The use of attachments not recommended or
sold by Cuisinart may cause fire, electrical
shock or personal injury, or damage to your
food processor.
5. To avoid possible malfunction of work bowl
switch, never store processor with pusher
assembly in locked position.
6. Maximum rating of 5.0 amperes is based on
the attachment that draws greatest current.
Other recommended attachments may draw
significantly less current.
7. Do not operate your appliance in an appliance
garage or under a wall cabinet. When storing
in an appliance garage, always unplug the
unit from the electrical outlet. Not doing so
could create a risk of fire, especially if the
appliance touches the walls of the garage or
the door touches the unit as it closes.
8. Do not fill the bowl above the marked maximum
fill line (or rated capacity) to avoid risk of injury
due to damage to the cover or bowl.
NOTICE: If your food processor has a plastic case,
it has a polarized plug (one blade is wider than the
other). As a safety feature, this plug will fit in a
polarized outlet only one way. If the plug does not
fit fully in the outlet, reverse the plug. If it still does
not fit, contact a qualified electrician. Do not
attempt to defeat this safety feature.
4
Page 5
SAVE THESE
INSTRUCTIONS
FOR HOUSEHOLD
USE ONLY
1.
2.
Parts
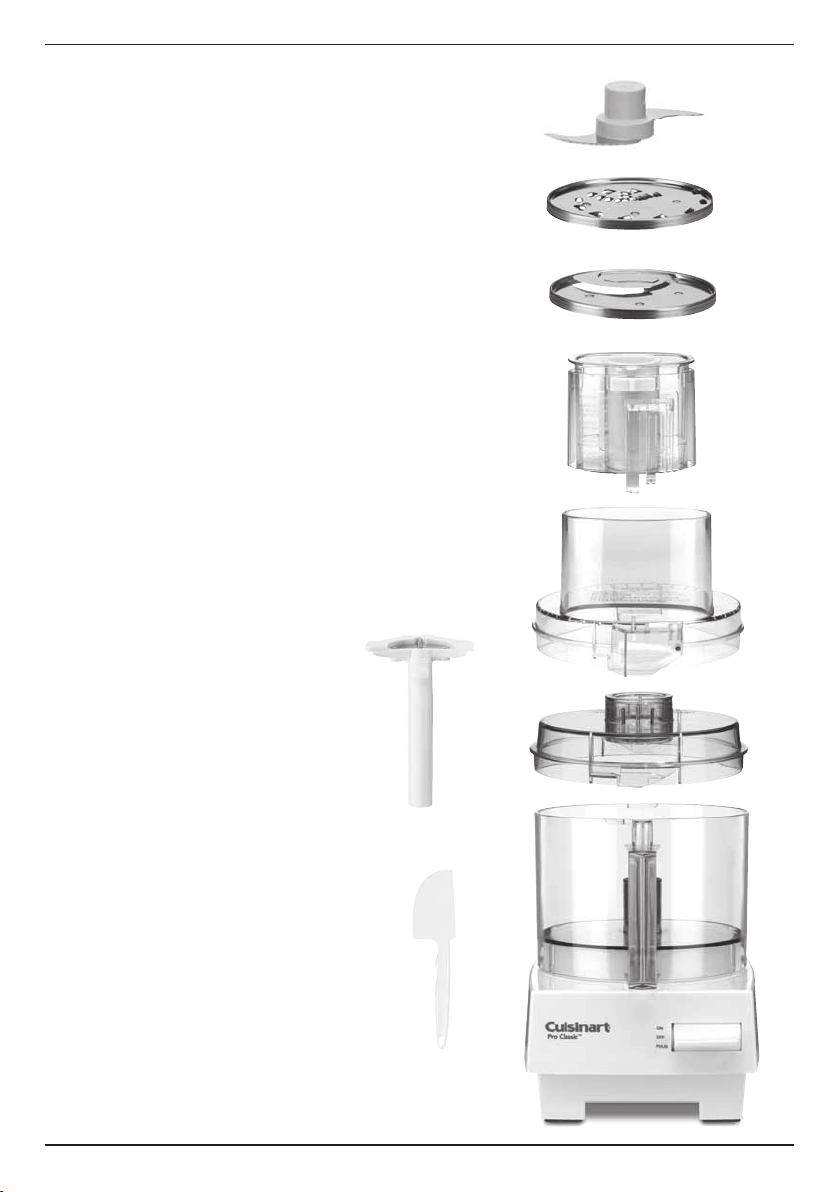
Your Cuisinart® DLC-10S or DLC-10C will look like this after
you follow the easy step-by-step assembly instructions inside.
1. Chopping/Mixing/Dough Blade
2. Shredding Disc
3. Slicing Disc
4. Feed Tube
5. Work Bowl Cover
6. Flat Cover
10.
7. Work Bowl
8. Motor Base
3.
4.
5.
6.
7.
9. Control Switch
10. Stem Adapter
11. Spatula
11.
8.
9.
5
Page 6

Contents
Maximum Work Bowl Capacity ................ 2
Important Unpacking Instructions ............ 3
Important Safeguards ............................... 4
Parts ......................................................... 5
Instructions for Use .................................. 7
Instructions for Slicing and Shredding ..... 7
Chopping and Puréeing with
Metal Blade .............................................. 8
Techniques for Chopping and
Puréeing with Metal Blade........................ 9
Techniques for Kneading Yeast Dough
with the Blade ......................................... 11
Troubleshooting with Typical
Bread Doughs ........................................ 12
Troubleshooting with Typical
Sweet Doughs ........................................ 13
Preparation for Slicing and Shredding ... 14
Removing Sliced or Shredded Food ...... 14
Slicing and Shredding Techniques ......... 15
Additional Information If You Have
a Problem ............................................... 16
Cleaning and Storing .............................. 16
For Your Safety ....................................... 17
Some Technical Data .............................. 17
Recipes ................................................... 18
Warranty ................................................. 33
6
Page 7

INSTRUCTIONS FOR USE
1. Put base on counter, with nameplate facing
you. Pick up work bowl, with handle facing
you, and place it on base with handle at
about 7 o’clock.
2. Turn work bowl counterclockwise until it
clicks.
3. Place metal blade over shaft matching
outline on top of hub to the same shape on
shaft. Lower blade will almost touch
bottom of bowl.
4. Put cover on work bowl, with feed tube at
about 7 o’clock. Turn cover counterclockwise until it fits into position.
5. The pusher assembly slides over the large
feed tube. It has a large pusher and a small
pusher. Push the small white pusher all the
way down until it twists it to lock. Push the
large pusher all the way down and push the
white Slide Lock right to lock.
6. Hold pusher with white Slide Lock toward
you. Slide pusher over feed tube on cover
and push locking tab down until locking tab
clicks. CAUTION: Machine must be
unplugged when you practice locking and
unlocking pusher. Repeated locking and
unlocking with machine plugged in is never
necessary in normal use and will make
machine inoperable.
7. Plug machine in. Move control switch to
ON position to start motor. Move control
switch down to OFF position to stop motor.
Move control switch to PULSE position and
release it for pulse/chopping. If machine
doesn’t start, make sure it is plugged in
and work bowl, cover and pusher assembly
are locked in position.
8. To remove cover, hold pusher assembly
with thumb away from two locking tabs.
Turn clockwise, and lift. The work bowl
won’t come off until the cover is unlocked.
INSTRUCTIONS FOR SLICING
AND SHREDDING
1. Lock bowl in place.
2. Place disc, cutting side down, on flat,
stable surface and hold it down firmly with
one hand. With other hand, line up two
symbols (o and Δ) on stem with similar
symbols on disc. Turn stem clockwise until
it clicks into position.
3. Place disc over shaft, matching outline on
its top to same shape on shaft. Without
touching blade edge, push disc down as
far as it will go.
4. Put cover on bowl, feed tube at 7 o’clock,
and turn clockwise until it clicks. Insert
food in feed tube.
5. Twist small pusher to lock it and push Slide
Lock to left to unlock pusher sleeve. Slide
large pusher sleeve over feed tube and
push all the way down until tabs click into
place.
6. Apply even pressure to large pusher while
holding lever down at PULSE position, and
push food through.
7. To remove pusher assembly, hold it with
thumb on large tab. Press firmly on tab and
lift straight up. Cover will stay in place,
allowing you to reload feed tube.
8. To remove disc from stem, slide button up
as far as it will go and turn stem counterclockwise.
7
Page 8

PRACTICING WITH FOOD
Try chopping some practice foods before you
process food to eat. A zucchini or potato is a good
choice. First cut it into 1-inch pieces. Insert the
metal blade and put pieces into work bowl. Put
on the cover and the pusher assembly; press the
pusher assembly down to lock it into place. Press
the lever down to PULSE and release it. Repeat
two to three times and see what happens. Each
time the blade stops, let the pieces drop to the
bottom of the bowl before you pulse again. That
puts them in the path of the blade each time the
motor starts.
Using the pulse/chopping technique, you can get
an even chop without danger of over-processing.
Check the texture frequently by looking through
the cover of the work bowl. If you want a ner
chop, keep pressing the lever down to PULSE
and releasing it until you achieve that desired
texture. Onions and other foods with a high water
content will quickly end up as a purée unless
examined after each pulse to make sure it is not
over-processed.
Try chopping other food, like meat for hamburger
and sausage. Then make mayonnaise, pastry or
bread, as described in the recipes in this book.
To obtain consistent results:
• Be sure all the pieces you add to the bowl are
the same size.
• Be sure the amount of food is no larger than
recommended.
Removing processed food
Before you do anything, wait for the blade to
stop spinning. When it does, remove the cover
rst. You can remove the cover and pusher assembly in one operation. Hold the pusher assembly with your thumb away from the descending
tabs and turn it clockwise. Lift it off, and the cover
will come with it.
Never try to remove the cover and the work bowl
together; this can damage the work bowl.
Remove the bowl from the base of the machine
before removing the blade. This creates a seal to
prevent food from leaking. Turn the bowl clockwise to unlock it from the base and lift it straight
up to remove it.
To prevent the blade from falling out of the work
bowl onto your hand, be sure your hands are dry.
Remove the metal blade before tilting the bowl,
using a spatula to scrap off any food sticking to it.
Or insert your nger through the hole in the bottom of the work bowl, gripping the blade from the
bottom, and grip the outside of the work bowl with
your thumb. Or hold the blade in place with your
nger or a spatula while pouring out processed
food.
CHOPPING AND PURÉEING WITH
METAL BLADE
To chop raw fruits and vegetables:
First cut the food into 1-inch pieces. You can get
more even chop when all pieces are about the
same size. Put no more than 2 cups of food into
work bowl. Lock the cover and pusher assembly
in place. Press the lever down to PULSE and
release it, repeating at the rate of 1 second on,
1 second off, until the food is chopped. Check frequently to avoid over-processing. Use the spatula
to scrape down any pieces that stick to the sides.
To purée fruit and cooked vegetables:
First, cut the food into 1-inch pieces. You get a
smoother purée faster when all the pieces are
about equal in size. Put no more than 2 cups of
food in the work bowl. Lock the cover and pusher
assembly in place. Pulse to chop coarsely, then
move the lever up to ON and process continuously
until the food is puréed. (NOTE: Cooked potatoes
are an exception to this procedure. They develop
a gluey texture when processed with the metal
blade. See the recipe for mashed potatoes at the
end of the book.)
• When making soup, you will want to purée
vegetables that have cooked in liquid. Don’t add
the liquid to the work bowl–just the cooked vegetables; remove them with a slotted spoon. They
will purée faster and smoother without liquid.
After processing, add just enough liquid to make
the purée pourable, return it to the soup liquid
and stir to combine.
• Occasionally, a piece of food may become
wedged between the blade and the work bowl. If
this happens, remove the cover, lift the blade out
carefully and remove the wedged piece. Empty
the bowl, reinsert the blade and lock the cover
and the pusher assembly into place, rst removing the small pusher. Move the lever up to ON
and drop the food piece through the small feed
tube while machine is running. Add the remaining food to the bowl and process usual way.
8
Page 9

TECHNIQUES FOR CHOPPING
AND PURÉEING WITH METAL
BLADE
To chop hard food like garlic and
hard cheese:
Remove the small pusher, press the ON lever and
drop the food through the small feed tube while
machine is running. Small foods like garlic can be
dropped in whole. Large foods like hard cheese
should be cut into 1-inch pieces. This method of
processing minces garlic, shallots and onions.
Hard cheese and coconut will have the same
texture as if they had been hand grated.
IMPORTANT: Never try to process cheese that is
too hard to cut with a knife. You may damage the
blade or the machine.
To chop parsley and other fresh herbs:
The herbs, the work bowl and the metal blade
must all be thoroughly cleaned and dry. Remove
stems from herbs. Add leaves to bowl and process until they are chopped as ne as you want.
The more herbs you chop at a time, the ner chop
you can obtain. If completely dry when chopped,
parsley and other herbs will keep for at least 10
days, stored in an airtight bag in the refrigerator.
They may be frozen for months, stored in an
airtight container or bag.
To chop peel from citrus fruits or to chop
sticky fruits like dates or raisins:
For citrus, remove the peel with a vegetable peeler, leaving on the white pith, which is bitter tasting.
Cut the peel into lengths of 2 inches or less and
process with ½ cup granulated sugar until nely
chopped. This may take 2 minutes or longer.
For sticky fruits like dates, raisins, prunes and
candied fruit, rst freeze the fruit for about 10
minutes. Add to it some of the our called for in
the recipe. Use no more than 1 cup of our for
each cup of fruit.
COMPACT FLAT COVER
Use the compact cover for added convenience
when your recipe calls for chopping, mixing,
puréeing and kneading. It is particularly useful
when preparing baked goods such as cakes,
cookies, pies and breads.
To assemble the compact cover:
Begin with the work bowl and the metal blade,
dough blade, or whisk attachment in place. Place
the compact cover on the work bowl so that the
Cuisinart logo written on the cover is face up and
readable. Then turn cover counterclockwise to
lock into place.
To disassemble the compact cover:
Place one hand near the Cuisinart logo and other
hand on opposite end of cover; turn cover clockwise. Lift cover up and off work bowl.
CHOPPING AND PURÉEING WITH
METAL BLADE
To chop meat, poultry, fi sh and seafood:
The food should be very cold, but not frozen.
Cut it into 1-inch pieces to ensure an even chop.
Process no more than 2½ cups (1¼ pounds) at a
time. Press the lever down to PULSE and release
it, repeating 3 or 4 times at a rate of 1 second
on, 1 second off. If the food is not chopped ne
enough, let the processor run continuously for a
few seconds. Check the texture often to avoid
over-processing. Use a spatula to scrape food
from the sides of the bowl as necessary.
To purée meat, poultry, fi sh and seafood:
Prepare the food as described above. Pulse until
it is evenly chopped, then process continuously to
the desired texture. Scrape the bowl with spatula
as needed. Leave the purée in the work bowl and
add eggs, cream and seasoning as called for by
the recipe. Process to combine thoroughly.
Remember, you control texture by length of time
you process. By varying the processing time, you
can get a range of textures suitable for hamburgers, hash, stuffed peppers, rough pâtés or smooth
mousses.
To chop nuts:
Chop no more than 2 cups at one time. Press the
lever down to PULSE and release it, repeating
several times. Check frequently to avoid letting
powdered nuts clump together in a nut butter.
When a recipe calls for our or sugar, add some
to the nuts before you chop them—about ½ cup
for each cup of nuts. This allows you to chop the
nuts as ne as you want without turning them
into a nut butter. You can also chop nuts with a
shredding disc. The optional Fine Shredding Disc
is particularly good.
To make peanut butter and
other nut butters:
Process up to 2 cups of nuts. Let the machine
run continuously. After 2 or 3 minutes, the ground
nuts will form a ball that will gradually smooth out.
Scrape sides of the bowl and continue processing
9
Page 10

until drops of oil are visible. Taste for consistency. The longer you process, the softer the butter
will be. For chunky style, add a handful of nuts
just after the ball of nut butter begins to smooth
out. To make cashew butter, add a little bland
vegetable oil. Processor nut butters contain no
preservatives. Store in the refrigerator to keep
them without separating.
To make fl avored butters, spreads
and dips:
Cut room-temperature butter into tablespoon-size
pieces. Process avoring ingredients rst–anchovies, cheese, herbs, etc.–chopping them ne. Be
sure the work bowl is clean and dry. Add small,
hard ingredients like garlic and hard cheese
through feed tube while machine is running. Next,
add the butter and process until smooth. Add any
liquid ingredients last, while the processor is running, and process just long enough to blend. Process ingredients for spreads and dips in the same
way. They should be at room temperature and cut
into 1-inch cubes, or added by tablespoonfuls.
To make mayonnaise:
The work bowl and metal blade must be clean and
dry. Use one large whole egg, or the yolks from
two large eggs. Mayonnaise made from yolks will
almost be as thick as butter. You should be able
2
to add
⁄3 cup of oil for each yolk or 1¼ cups for a
whole egg.
Process the yolks or egg with salt, mustard and
2 tablespoons of vegetable oil for at least 30
seconds. Then, while the machine is running, pour
¼ cup of oil into the small pusher. After it dribbles
through the pinhole at the bottom, remove the
small pusher and slowly add the remaining oil
while machine runs. See the recipe at the back of
this book.
To beat egg whites:
Use this method only for recipes that can be done
almost entirely by a food processor.
The work bowl must be absolutely clean. Add 3
or more egg whites and press the ON lever. Add
about 1 teaspoon of lemon juice or vinegar for every egg white. Vinegar makes stiffer whites; its avor is hardly detectable in cakes, souf és and ice
creams. Continue processing until the egg whites
hold their shape – about 1½ to 2½ minutes. For
the lightest, uf est egg whites, use the Whisk
Attachment, which is an optional attachment for
the Pro Classic
™
Food Processor.
To whip cream:
Processor whipped cream holds its shape very
well. It is good for decoration or as a topping for
gingerbread, berries or other desserts. It will not
whip to the light, uffy consistency obtained by
methods that beat in more air. Use the optional
Whisk Attachment for the uf est whipped cream.
Chill the cream well before starting. Process
continuously until it begins to thicken. Then add
sugar as desired and continue processing, watching carefully until the cream reaches the desired
consistency. For consistently reliable results, add
2 tablespoons of non-fat dry milk for every cup of
cream, before whipping.
To make crumbs and crumb crusts:
Cut out or break bread, crackers or cookies into
pieces and put them in the work bowl. Process
continuously until they reach the desired texture.
For seasoned crumbs, chop the parsley or other
fresh herbs with the crumbs. For buttered crumbs,
process until the dry crumbs are the desired texture, then dribble melted butter through small feed
tube while machine is running.
For crumb crust, process crackers or cookies as
described above. Add sugar, spices and butter,
cut into pieces, as speci ed by your recipe. Process until well combined.
To make pastry:
This describes a general procedure. A recipe giving exact proportions is in the back of this book.
Combine unbleached, all-purpose our, salt and
pieces of very cold or frozen butter in the work
bowl. Process to the consistency of cornmeal.
While the machine is running, start pouring ice water through the feed tube, a tablespoon at a time.
Stop processing as soon as the dough begins to
form a ball, to ensure tender, aky pastry. Use the
dough immediately or form it into a round disk
about 1 inch thick. Wrap in plastic and refrigerate
or freeze for later use.
To make quick breads and cakes that use
baking powder and/or soda:
The most important rule for success is not to
overmix after the our is added.
The ingredients for these soft doughs should be
cold. If the recipe calls for chopped ingredients
like lemon peel or nuts, chop them rst while work
bowl is clean and dry. Then set them aside until
needed. (Always use sugar when chopping lemon
peel.)
Put dry ingredients like our, salt and leavening in
the work bowl and process with the metal blade
10
Page 11

for 5 seconds to mix them. Remove and reserve
the dry ingredients.
Add the eggs and sugar to the work bowl and
process to mix, letting the machine run about
1 minute. Next, add butter at room temperature, cut into 1-inch pieces. Let the machine
run continuously for 1 minute, until the butter
is thoroughly mixed with the eggs and sugar.
Then add avoring and liquid—vanilla, spices,
cocoa
, etc., and process until mixed. Add the dry
ingredients to the work bowl. Process by pulsing,
inspecting after each pulse. Stop pulsing as soon
as the dry ingredients have almost disappeared
into the batter. Over-processing will cause quick
breads and cakes to be tough. (If your recipe calls
for ingredients that are coarsely chopped—like
raisins or nuts–add them last with the mixed dry
ingredients.)
To make cake mix:
Your food processor work bowl is large enough
for the preparation of an 15.25 oz. packaged cake
mix.
Insert the metal blade and add the cake mix to the
work bowl. While the machine is running, add the
eggs and liquid through the small feed tube and
process for 5 seconds. Scrape down the side of
the work bowl and process again for 1 minute for
maximum volume. Do not remove the metal blade.
Insert a nger into the underside of the blade from
the bottom of the work bowl to hold the blade in
place while emptying the batter.
TIP: After emptying cake batter or puréed soup
from the work bowl, replace the bowl on the motor
base. Insert the metal blade and pulse once.
Centrifugal force will spin the batter off the blade
onto the side of the work bowl. Remove the blade,
and use the spatula to scrape remaining batter
from the bowl.
TECHNIQUES FOR KNEADING
YEAST DOUGH WITH THE BLADE
The Pro Classic™ Food Processor can mix and
knead in a fraction of the time it takes to do it by
hand. You will get perfect results every time if you
follow these directions. NEVER TRY TO PROCESS
DOUGH THAT IS TOO STIFF TO KNEAD COMFORTABLY BY HAND.
There are two general types of yeast dough.
Typical bread dough is made with a our mix that
contains at least 50% white our. It is uniformly
soft, pliable and slightly sticky when properly
kneaded. It always cleans the inside of the work
bowl completely when properly kneaded.
Typical sweet dough contains a higher proportion of sugar, butter and/or eggs than a typical
bread dough. It is rich and sticky and it does not
clean the inside of the work bowl. It requires less
kneading after the ingredients are mixed. Although
30 seconds is usually suf cient, 60 to 90 seconds
gives better results if the machine does not slow
down. Except for kneading, described below,
the processing procedures are the same for both
types of dough.
Machine capacity
If a bread dough calls for more than the recommended amount of our, mix and knead in equal
batches. Do the same for sweet doughs that call
for more than 3½ cups of our. Recommended
maximum amount of our is: 4 cups of all-purpose
our or 2½ cups of whole-grain our.
Measuring the fl our
It’s best to weigh it. If you don’t have a scale, or
the recipe doesn’t specify weight, measure by
the “stir, scoop, sweep” method. Use a standard graduated dry measure, not a cup for liquid
ingredients.
With a spoon or fork, stir the our in its container.
With the dry measure, scoop up the our so it
over ows. With a spatula knife or chopstick—being careful to not press down—sweep excess our
back into the container so the top of the measure
is level.
Proofi ng the yeast
The expiration date is marked on the package. To
be sure your yeast is active, dissolve it in a small
amount of warm liquid (about
age of dry yeast). If the recipe includes a sweetener like sugar or honey, add a tablespoon with the
yeast. If no sweetener is called for, add a pinch.
The yeast won’t foam without it. Let the mixture
stand until it foams–up to 10 minutes.
1
⁄3 cup for one pack-
Processing dry ingredients
Put the our in the work bowl with all the other dry
ingredients. If the recipe calls for herbs, oil or solid
fat like butter, add them with the our. Turn the
machine on and let it run for about 20 seconds.
(Cheese, nuts and raisins may be added with the
dry ingredients or during the nal kneading. To
leave them almost whole, add them 5 seconds
before you stop kneading. For a ner texture, add
them sooner.)
Adding liquids
All liquids should be added through the feed tube
while the machine is running. Add liquid in a slow,
11
Page 12

steady stream, only as fast as dry ingredients absorb it. If liquid sloshes or splatters, stop adding it,
but do not turn off machine. Wait until ingredients
in the bowl have mixed, then add remaining liquid
slowly. Pour liquid onto dough as it passes under
feed tube opening. Do not pour liquid directly onto
bottom of bowl.
Follow the recipe carefully. It is important to add
enough liquid to make the dough soft enough to
knead. Kneading dough that is too stiff strains the
machine.
The temperature of the liquid used to dissolve and
activate yeast must be between 105 degrees F
and 120 degrees F. Yeast cells are not activated
at temperatures lower than this and they die when
exposed to temperatures higher than 130 degrees.
All liquids, except those used to activate yeast,
should be cold to minimize the possibility of overheating the dough. You must never knead a yeast
dough to a temperature higher than 100 degrees.
Doing so will slow or even prevent the action of
the yeast.
Kneading bread dough
Do not try to use the machine to knead dough that
is too stiff to knead comfortably by hand. Doing so
can strain the machine.
After the dough starts to clean the inside of the
work bowl completely and forms a ball, process it
for 60 seconds to knead it. Stop the machine and
test the dough to be sure it is properly kneaded.
Typical bread dough should have a soft, pliable
texture and it should feel slightly sticky. Stretch
the dough with your hands to test it. If it feels
hard, lumpy or uneven, continue processing until
it feels uniformly soft and pliable. Make sure
the blade is rmly pressed back into place after
removing dough to test it.
Kneading dough for coffee cakes, batter
bread and brioche
Process dough for at least 30 seconds after all the
ingredients are incorporated. It will not clean the
inside of the work bowl. If necessary, scrape the
bowl and process for 5 more seconds.
Rising
Put the dough in a large, lightly oured plastic bag.
Squeeze out all the air and close the end with a
wire twist, allowing space for the dough to rise. Or
put the ball of dough in a large bowl coated with
soft butter or vegetable oil. Roll the dough around
to coat its entire surface. Cover it with a damp
towel or a piece of oiled plastic wrap.
Let it rise in a warm, draft-free place—about
80 degrees. The rising time is about 1½ hours,
but will vary from 45 minutes to several hours,
depending on the type of our and the humidity
of the air. To test if the dough has risen enough,
stick a nger in it. An indentation should remain. If
it doesn’t, let the dough rise more and test again.
When it has risen enough, punch the dough down.
Shaping, fi nishing and baking
If you shape the dough in loaf pans, ll them only
half full. Let rise until dough is just slightly above
the top of the pan. If shaping free-form loaves, let
them rise on an oiled baking sheet until at least
doubled in bulk.
Making consecutive batches
You can make several batches of bread dough in a
row. The motor in the Pro Classic
sor is extremely ef cient. Follow the recipe for
White Bread at the end of this book.
™
Food Proces-
TROUBLESHOOTING WITH
TYPICAL BREAD DOUGHS
Blade doesn’t incorporate ingredients
Always start processor before adding liquid.
Add liquid in a slow, steady stream, only as fast as
dry ingredients absorb it. If you hear liquid sloshing, stop adding it, but do not turn off machine.
Instead, wait for ingredients in work bowl to have
mixed, then add remaining liquid slowly. Pour
liquid onto dough as it passes under feed tube; do
not pour liquid directly onto bottom of work bowl.
Blade rises in work bowl
Blade may not have been pushed down as far as it
will go before processing started.
Excessively sticky dough can cause blade to rise
even though it cleans inside of the work bowl. If
dough feels very sticky, reinsert blade and immediately add 2 tablespoons our through feed tube
while machine is running.
Dough doesn’t clean inside of work bowl
• Amount of dough may exceed maximum capacity of your food processor. Remove half and
process in two batches.
• Dough may be too dry. If it feels crumbly, add
water–1 tablespoon at a time–while machine is
running, until dough becomes moist and cleans
inside of work bowl. Wait 10 seconds between
additions of water.
• Dough may be too wet. While machine is
running, add 1 tablespoon of our. If necessary,
add more – 1 tablespoon at a time–until dough
cleans inside of work bowl and forms a ball.
12
Page 13

Nub of dough forms on top of blade and
does not become uniformly kneaded
Stop machine, carefully remove dough, divide it
into 3 pieces and redistribute them evenly in work
bowl. Continue processing until dough is uniformly
soft and pliable.
Dough feels tough after kneading
Divide dough into 2 or 3 pieces and redistribute
evenly in work bowl. Process 10 seconds or until
uniformly soft and pliable.
Soft dough or liquid leaks onto base of
food processor
Always start processor before adding liquid and
add liquid only as fast as dry ingredients absorb it.
Motor stops
• Pusher assembly may have become unlocked.
Push down pusher sleeve to lock it into place
and continue processing.
• Cover may have become unlocked. Lock cover
and continue processing.
• Power cord may have become unplugged. Plug
machine back in and continue processing.
•
Excessive strain may have caused motor to
overheat and stop. Wait for the motor to cool off,
5–10 minutes. A safety protector in the motor
prevents it from excessive overheating. If the motor stops, turn the machine off. After 5–10 minutes, divide dough into 2 batches and complete
processing. Pinch dough to make sure that it is
not too stiff to knead comfortably by hand. If it is,
add liquid—1 teaspoon at a time—until dough is
suf ciently moist to clean inside work bowl.
Dough doesn’t rise
We recommend that you always test activity of
yeast before using it by stirring it and at least ½
teaspoon sugar into about 1⁄3 cup of warm liquid.
Within 10 minutes foam should develop, indicating
yeast is active. Do not use dry yeast after expiration date on package.
Avoid killing yeast cells by dissolving yeast in too
warm water or overheating dough by excessive
kneading. Dissolve yeast in about 1⁄3 cup warm liquid at 105–120 degrees F. All other liquids should
be cold.
Do not knead so long that it becomes overheated.
The ideal temperature for kneaded dough is 80
degrees. It should never exceed 100 degrees.
Let dough rise in draft-free environment of about
80–90 degrees F.
Baked bread is too heavy
Next time, feel dough to be sure it is uniformly
soft, pliable and slightly sticky before setting it
aside to rise. Let dough fully double in bulk in bowl
or bag, punch it down, then let it double up again
after it is shaped.
TROUBLESHOOTING WITH
TYPICAL SWEET DOUGHS
Motor slows down
• Amount of dough may exceed maximum
capacity of your food processor. Remove half
and process in 2 batches.
•
Don’t process too long after all the ingredients
are incorporated. These rich doughs will give you
good results after only 30 seconds of kneading.
Blade doesn’t incorporate
ingredients
Butter or margarine, if not melted, must be cut
into tablespoon-size pieces before added to work
bowl.
Metal blade rises in work bowl
Blade may not have been pushed down as far as
it will go before processing started. Machine may
be overloaded. Stop it, remove half of dough and
process in 2 batches.
13
Page 14

PREPARATION FOR
SLICING AND SHREDDING
Round fruits and vegetables
Before processing onions, apples and other large,
round fruits and vegetables, trim them with a
knife. Cut the bottom end at, to make the food lie
stable on the disc.
Place the food in the feed tube, at side down.
Position it as far right as possible, to prevent it
from tilting when being processed.
Choose fruits that are rm and not too ripe.
Always remove large hard pits and seeds from
fruits before processing. Seeds from citrus fruits
need not be removed. You may remove the rind
before slicing or shredding, or leave the rind on.
Whole peppers are the exception
Remove the stem and cut the stem end at.
Remove the core and scoop out the seeds. Leave
the end opposite the stem whole, to keep the
structure stiff. This ensures round, even slices.
Large fruits like pineapple and
cantaloupe
Cut them in half and remove the seeds or core. If
necessary, cut the halves into smaller pieces to t
in the feed tube. Remember to cut the ends at.
Cabbage and iceberg lettuce
Turn the head on its side and slice the top and
bottom, leaving a center section about 3 inches
deep. Remove the core and cut the center section
in wedges to t the feed tube. Remove the core
from the bottom piece and cut it and the top piece
into two wedges to t the feed tube. The optional
2mm or 1mm Slicing Discs are excellent for slicing
cabbage for coleslaw.
If the fruit or vegetable doesn’t fi t
Try inserting it from the bottom of the feed tube.
The opening there is slightly larger.
Pack the feed tube for desired results
For small, round slices or short shreds from carrots, zucchini and other long vegetables, cut them
in feed tube heights and pack them tightly upright.
For long slices or shreds, cut the food in feed tube
widths and pack the pieces horizontally.
Food should t snuggly, but not so tight that it
prevents the pusher from moving.
When slicing or shredding food, always use the
pusher. Never put your ngers or a spatula into the
feed tube.
Never push down hard on the pusher. Use light
pressure for soft fruits and vegetables like ba-
nanas, mushrooms, strawberries and tomatoes,
and for all cheese. Use medium pressure for most
food—apples, celery, citrus fruit, potatoes and
zucchini. Use rm pressure for really hard vegetables like carrots and yams.
PRACTICING SLICING AND
SHREDDING
1. Insert a slicing or shredding disc, put the cover
on the work bowl and insert the prepared food
in feed tube.
2. Prepare the pusher assembly. Lock small push-
er in place and unlock the slide lock on back
of the sleeve, so the pusher can move up and
down freely.
3. Slide the pusher over the feed tube and push
the sleeve down to lock it into place, apply
pressure to the pusher while pressing the lever
down to PULSE. Release the lever as soon as
the food is sliced or shredded.
4. You can load the feed tube repeatedly without
removing the work bowl cover. Simply grasp
the pusher assembly with your thumb on the
wide locking tab. Press rmly on the tab and lift
up. The pusher assembly will come off easily,
leaving cover and feed tube in place. Your other
hand is free to reload the feed tube.
REMOVING SLICED OR
SHREDDED FOOD
Before you do anything, wait for the disc to stop
spinning. When it does, remove the cover rst.
Hold the pusher assembly with your thumb away
from the locking tabs and turn it clockwise. Lift,
and the pusher assembly and cover will come off
together.
Remove the slicing or shredding disc before
removing the work bowl. Place two ngers under
each side of the disc and lift it straight up. Then
turn the bowl clockwise to unlock it from the base
and lift it straight up to remove it.
You can place the disc on top of the inverted work
bowl cover, to minimize drips and spills.
14
Page 15

SLICING AND SHREDDING
TECHNIQUES
Small, round fruits and vegetables
For large berries, radishes and mushrooms, trim
the opposite ends at with a knife. Insert the food
through the feed tube, standing each piece on a
at end. You can ll the tube to about 1 inch from
the top. The bottom layer gives you perfect slices
for garnish. If you want all the slices to be perfect,
it’s best to process one layer at a time.
Long fruits and vegetables
Trim food like bananas, celery and zucchini by
cutting them into pieces a little shorter than the
feed tube. Cut both ends at. Fill in the feed tube
with the pieces, standing them vertically and
adding enough pieces so they are solidly packed
and cannot tilt sideways as they are sliced or
shredded.
Small amounts of food
Use the small feed tube and the small pusher.
Remove the small pusher from pusher assembly.
Slide the pusher assembly over the feed tube and
press the sleeve down to lock it into place. Be
sure the slide lock on the sleeve is locked. Cut the
food in lengths a little shorter than the feed tube.
If you are slicing one or two long, thin vegetables
like carrots, push them against the right. If you
are slicing a few vegetables that are wide at one
end and narrow at the other—carrots, celery, or
scallions—cut them in half and pack in pairs, one
wide end up, one narrow end up.
French-cut green beans
Trim fresh green beans to feed tube width. Blanch
them for 60 seconds in boiling salted water.
Plunge them immediately into cold water to stop
the cooking. When they are cold to the touch,
drain and dry them. Stack them in the feed tube
horizontally to about 1 inch from the top. Use the
slicing disc. Be sure the small pusher is locked
and the slide lock on the sleeve is unlocked. Apply
light pressure to the pusher and press the lever
down to PULSE until beans are sliced. To make
long, horizontal slices or shreds of raw zucchini or
carrots, use the same procedure.
Matchsticks or julienne strips
Process the food twice—“double-slice” it. Insert
any large fruit or vegetable—potatoes, turnips,
zucchini, apples—in the feed tube horizontally.
Apply pressure to the pusher while pressing the
lever down to PULSE until food is sliced. You will
get long slices. Remove the slices from work bowl
and reassemble them. Reinsert them in the
feed tube, wedging them in tightly. Slice them
again. You will obtain long julienne strips. With
the optional Square Julienne Discs, you can make
square julienne strips in one operation.
Slicing Meat and Poultry
Cooked meat and poultry
The food must be very cold. If possible, use a
chunk of food just large enough to t in the feed
tube. To make julienne strips of ham, bologna or
luncheon meat, stack slices of them. Then roll or
fold them double and stand them upright in the
feed tube, wedging in as many rolls as possible.
This technique works better with square or rectangular pieces than with round ones.
Uncooked meat and poultry
Cut the food into pieces to t the feed tube.
Boned, skinned chicken breasts will usually t
when cut in half crosswise. Wrap the pieces in
plastic wrap and put them in the freezer. They are
ready to slice when they pass this “knife test”:
They are easily pierced with the tip of a sharp
knife, although semi-frozen to the touch. Stand
them in the feed tube, cut side down, and slice
them against the grain, using rm pressure on
the pusher. Or lay them at in the feed tube, as
many as will t, and slice with the grain using rm
pressure.
Frankfurters, salami and other sausages
If the sausage is soft, freeze it until hard to the
touch, but easily pierced with the tip of a sharp
knife. Hard sausages need not be frozen. If the
sausage is thin enough to t in the small feed
tube, use that tube. Otherwise, cut the sausage
into pieces to t the large feed tube completely.
Stand the pieces vertically, packing them in tightly
so they cannot tilt sideways.
SLICING AND SHREDDING
CHEESE
Firm cheese like Swiss and Cheddar
Cut the cheese into pieces to t the feed tube.
Put it in the freezer until it is semi-frozen—hard
to the touch, but easily pierced with the tip of a
sharp knife. Stand the pieces in the feed tube and
apply light pressure to the pusher. IMPORTANT:
Never try to slice soft cheese like mozzarella or
hard cheese like Parmesan. You may damage
the slicing disc or the food processor itself. You
can successfully shred most cheeses except soft
ones. The exception is mozzarella, which shreds
well if thoroughly chilled. Hard cheeses like Parmesan shred well only at room temperature.
15
Page 16

ADDITIONAL INFORMATION
IF YOU HAVE A PROBLEM
Most problems with the food processor are easily
solved. Here are some possible problems and
their solutions.
Food is unevenly chopped
Either you are trying to process too much food at
one time, or you are running the machine continuously instead of pulsing on and off until pieces of
food are no larger than ½ -inch cubes.
Liquid leaks from bottom of bowl onto
motor base
Remove bowl from base as soon as you nish
processing. Do not remove metal blade rst. When
bowl and blade are removed together, blade drops
down and forms almost a perfect seal against
bowl.
Liquid leaks out between bowl and cover
when machine is running
You added too much liquid. Never use more than
3
2
⁄4 cups thin, 5 cups thick liquid.
The thicker the liquid, the more you can use. The
gures above are for thick mixtures, like pancakes
or cake batter.
Slices are uneven or slanted
Pack feed tube more carefully. Maintain even
pressure on pusher.
Carrots or similar foods fall over
in feed tube
Cut food into enough short pieces of equal height
to ll feed tube. To slice one or two pieces, use
small feed tube. Cut carrots in half and insert one
piece point down and the other stem down.
Sliced or shredded food piles up
on side of work bowl
This is normal. Remove disc occasionally and
even out processed food. When food gets close to
bottom of the disc, empty the work bowl.
A few pieces of food remain on top of
slicing or shredding disc
This is normal. In most cases, you can shred
more of the food by moving the large pusher up
and down, allowing the piece to be shredded, or
by repositioning the piece in the feed tube and
reshredding it.
Soft cheese like mozzarella spreads out
and collects on top of shredding disc
The cheese was not cold enough, or the pressure
on the pusher was too great. To shred soft cheese,
do not push the pusher, but let the cheese go
through by itself. Tap on the pusher to guide it
through.
CLEANING, STORAGE
AND MAINTENANCE
Keep your Pro Classic™ Food Processor ready to
use on a kitchen counter. When its not being used,
leave it unplugged. Don’t leave it with the pusher
assembly in lock position; this could damage the
on-off mechanism.
Store the blades and discs as you would sharp
knives—out of the reach of children. The Disc and
Blade Holders, optional accessories, offer safe
and convenient storage.
All parts, except for the motor base, are dishwasher safe, and we recommend washing them in the
dishwasher. Insert the work bowl upside down.
Remember where you place sharp blades and
discs and unload the dishwasher carefully.
To simplify cleaning, rinse the work bowl, cover,
pusher assembly and blade or disc completely
after use so food won’t dry on them. Openings at
the bottom of the large pusher provide drainage
and make cleaning easy. If food lodges in the
pusher, remove it by using a bottle brush.
If you wash blades and discs by hand, do it
carefully. Avoid leaving them in soapy water where
they may disappear from sight. To clean the metal
blade, ll the work bowl with soapy water, hold the
blade by its plastic center and move it rapidly up
and down on the center shaft of the bowl. Use of
a spray attachment is also effective. If necessary,
use a brush.
The work bowl is made of Lexan® plastic, which
is shatter resistant and heat resistant. It should
not be placed in a microwave oven. The tube at
the back of the bowl houses the metal rod that
activates the motor.
Chopping certain foods may scratch or cloud the
work bowl. Among them are ice, whole spices and
oils like wintergreen. If you like to prepare your
own spice blends, you may want to keep a second
bowl for just that purpose.
The base housing is made of a tough plastic with
high impact resistance. Its smooth surface will
look new for years. Keep a sponge handy as you
work to wipe spills from the base.
Four rubber feet on the underside keep the base
from moving on most work surfaces when the
machine is processing heavy loads. If the feet
16
Page 17

leave spots on the countertop, spray them with a
spot remover and wipe with a damp sponge. If any
trace of the spot remains, repeat procedure and
wipe the area with a damp sponge and nonabrasive powder. To clean the inside of the detachable
stem, slide the stem release button on the side
up as far as it will go and hold it there as you run
water through the stem.
IMPORTANT: Never store any blade or disc on the
motor shaft. No blade or disc should be placed on
the shaft except when the processor is about to
be used.
Maintenance: Any other servicing should be performed by an authorized service representative.
FOR YOUR SAFETY
Like all powerful electrical appliances, a food processor should be handled with care. Follow these
guidelines to protect you and your family from
misuse that could cause injury.
• Handle metal blade and discs carefully. Their
cutting edges are very sharp.
• Always place disc on at, stable surface before
connecting detachable stem.
• Never put blade or disc on motor shaft until work
bowl is locked in place.
• Always be sure that blade or disc is down as far
as it will go.
• Always insert metal blade in work bowl before
putting ingredients in bowl.
• When slicing or shredding food, always use
pusher. Never put your ngers or spatula in feed
tube.
• Always wait for blade or disc to stop spinning
before you remove pusher assembly or cover
from work bowl.
• Be careful to prevent metal blade from falling out
of work bowl when emptying bowl. Remove it
before tilting bowl, or hold it in place with your
nger, a spatula, or spoon.
• Do not use pusher assembly if sleeve becomes
detached from pusher. Call Cuisinart Consumer
Service immediately. Our toll-free number is
listed on the warranty.
SOME TECHNICAL DATA
The motor in your food processor operates on
standard line operating current. The appropriate
voltage and frequency for your machine are shown
on label under the base.
An automatic, temperature-controlled circuit
breaker in the motor ensures complete protection
against motor burnout. If the processor runs for
an exceptionally long time when chopping, mixing
or kneading a thick or heavy mixture in excessive
batches, the motor may overheat. If this happens,
the processor will stop. Turn it off before proceeding. It will usually cool off within 10 minutes. In
extreme cases, it could take an hour.
Safety switches prevent the machine from operating when the work bowl or the cover is not locked
into position. The motor stops within seconds
when the motor is turned off, and a fast-stop
circuit stops it instantly when the pusher assembly
is unlocked.
17
Page 18

RECIPES
Appetizers
Guacamole ...................................................... 19
Blue Cheese and Pecan Spread ..................... 19
Chicken Liver Pâté .......................................... 19
Cheese Coins .................................................. 19
Soups
Chunky Gazpacho ........................................... 20
Leek and Potato Soup/Vichyssoise ................ 20
Lentil Soup ...................................................... 21
Split Pea Soup ................................................. 21
Meats and Fish
Hamburgers ..................................................... 21
Meatloaf or Meatballs ...................................... 22
Chili .................................................................. 22
Sausage ........................................................... 23
Farmhouse Hash ............................................. 23
Chicken and Vegetables Stir-Fry ..................... 23
Crab Cakes ...................................................... 24
Vegetables
Broccoli Purée ................................................. 24
Mashed Potatoes ............................................ 24
Potatoes au Gratin .......................................... 25
Shredded Carrots and Zucchini ...................... 25
Quick Breads, Yeast Bread and Pizza
CornBread ....................................................... 28
Coffee Cake ..................................................... 29
White Bread ..................................................... 29
Pizza Dough .................................................... 29
Pizza in a Hurry................................................ 30
Tomato Pizza Sauce ........................................ 30
Desserts
Fudge Brownies .............................................. 31
Chocolate Chip Oatmeal Cookies ................... 31
Carrot Cake ..................................................... 31
Cream Cheese Frosting ................................... 32
Pear Yogurt ...................................................... 32
Banana-Apple Sherbet .................................... 32
Apple Pie ......................................................... 32
TIP: Use the Compact Cover for added convenience when your recipe calls for chopping,
mixing, puréeing or kneading. It is particularly
useful when you are preparing baked goods such
as cakes, cookies, pies and bread.
Salads
Tomato Salad .................................................. 25
Creamy Cole Slaw ........................................... 26
Shredded Carrot Salad .................................... 26
Sauces
Pesto ............................................................... 26
Mexican Salsa ................................................. 27
Basic Mayonnaise ........................................... 27
No-Cook Cranberry-Orange Relish ................. 27
Pastry Cream ..................................................... ?
Chocolate Sauce ............................................. 27
Raspberry Sauce ............................................. 28
Basic Pastry .................................................... 28
18
Page 19

Guacamole
Chicken Liver Pâté
Serve with tortilla chips or crisp vegetables.
For a less pungent taste, use fl at-leaf parsley
instead of cilantro.
2¼ cups yield
1 large garlic clove, peeled
1 medium jalapeño pepper, halved
and seeded
½ cup tightly packed cilantro leaves
1 medium scallion, white part and
2 inches of green, cut in 1-inch pieces
3 ripe medium avocados (½ pound each),
peeled, halved and pitted
3 tablespoons lemon juice
Pinch cumin
¼ teaspoon salt
¼ teaspoon chili powder
1 medium tomato, quartered, seeds
removed
Use metal blade to chop garlic, jalapeño pepper,
cilantro, and scallion until minced, about 15
seconds. Scrape down work bowl. Add avocados
and all remaining ingredients except tomato.
Process until smooth, about 1 minute, scraping
bowl as necessary. Add tomato and pulse about
6 to 8 times, until it is nely chopped. Adjust salt
if necessary.
An extraordinarily good party dish that is easy to
make and keeps well. Serve it on toasted French
2¼ cups yield
1 large, unpeeled garlic clove
3 tablespoons butter, for sautéing
1 pound chicken livers, trimmed
8 ounces unsalted butter
1 teaspoon salt
1
⁄8 teaspoon freshly ground black pepper
¼ teaspoon freshly ground allspice
1 tablespoon Cognac
Put garlic in small saucepan, cover with water
and simmer 10 minutes. Reserve. Heat butter in
skillet until it bubbles. Sauté chicken livers over
medium-high heat until brown on the outside, but
still pink within.
Squeeze softened interior of garlic into work bowl.
Add livers and remaining ingredients. Process
until creamy and smooth, about 1 minute. Scrape
down bowl as necessary.
Transfer pâté to crock or serving dish, cover and
refrigerate at least 4 hours. Let stand at room
temperature for 30 minutes before serving. Well
covered, can be refrigerated for up to 5 days.
bread or apple slices.
Cheese Coins
Blue Cheese and
Pecan Spread
You can substitute cottage cheese for all or part of
the cream cheese and you can substitute walnuts
for pecans.
1 cup yield
¼ cup shelled pecans
6 ounces cream cheese, in 1-inch pieces
2 tablespoons blue cheese
Process nuts with metal blade until they are
nely chopped, about 10 seconds. Add cream
cheese and blue cheese. Process until well mixed
and smooth, about 10 seconds. (If substituting
cottage cheese, process it until smooth, about 90
seconds.)
These tender and fl avorful appetizers are easy to
make, convenient to serve, and they can be refrig-
erated or frozen.
Makes 100 cheese coins
8 ounces cheddar cheese, cut in
1-inch pieces
4 ounces unsalted butter, at room
temperature, cut in pieces
¼ teaspoon salt
¼ teaspoon hot sauce or pinch of cayenne
pepper
1 cup fl our
Use metal blade to chip cheese until it resembles
coarse meal, about 30 seconds. Add butter, salt
and pepper. Process until smooth, about 60 seconds. Scrape down bowl, add our and process
19
Page 20

until our is just mixed in. Chill dough until rm
enough to shape into logs, about 1 hour.
Divide dough into 3 equal parts and roll each into
a cylinder about 1½ inches in diameter. Chill until
rm, about 2 hours.
Preheat oven to 400°F. Cut dough into 1⁄8-inch
slices and place slices 1½ inches apart on lightly
greased baking sheet. Bake until lightly colored,
about 10 minutes, being careful not to brown
them. Transfer to wire rack to cool.
Unbaked, plastic-wrapped cylinders keep for
about a week in the refrigerator. Cooked cheese
coins can be frozen and reheated for 6–8 minutes
in a 300°F oven.
Chunky Gazpacho
This refreshing, cold soup can be ready in less
than 10 minutes. You may serve it at once, but it
improves with chilling.
4½ cups yield
1 small garlic clove, peeled
½ small jalapeño pepper*
4 scallions
1 celery stalk
½ medium bell pepper
2 tomatoes
2 cups tomato or vegetable juice
1 medium cucumber
2 tablespoons lemon juice
1 teaspoon salt
¼ teaspoon freshly ground black pepper
Halve jalapeño pepper and remove seeds. Trim
scallions and celery and cut into 1-inch pieces.
Quarter and seed bell pepper and tomatoes. Peel
cucumber and cut in half lengthwise. Remove
seeds and cut to t feed tube vertically.
Use metal blade to process garlic and jalapeño
pepper until nely chopped. Add scallions, celery
and bell pepper. Pulse/chop to medium chop. Put
in large mixing bowl. Pulse/chop one tomato until
coarsely chopped. Add to mixing bowl. Purée
other tomato until smooth, about 1 minute. With
machine running, pour in ½ cup of tomato juice.
Add to mixing bowl with remaining tomato juice
and stir.
Insert slicing disc, stand cucumber pieces upright
in feed tube and slice, using light pressure. Add to
mixing bowl with remaining ingredients and stir to
combine. Cover and chill before serving.
*Handle hot peppers carefully. Their oil can irritate
the skin and eyes. Wash your hands after preparing them.
Leek and Potato Soup/
Vichyssoise
Louis Diat, longtime chef at the New York Ritz
Hotel, transformed the everyday Leek and Potato
Soup into a cold soup suitable for parties.
4 cups Leek and Potato Soup or
6 cups Vichyssoise
2 medium leeks, white part only,
thoroughly cleaned
½ medium onion, peeled and halved
1 tablespoon unsalted butter
2 medium, all-purpose potatoes, peeled
1½ cups chicken stock
1 cup water
Salt and freshly ground pepper to taste
1 cup milk
¼ cup heavy cream
Chopped chives, for garnish
Cut leeks to t feed tube. Use slicing disc to slice
leeks and onion. Melt butter in large saucepan.
Add leeks and onion and sauté, stirring often,
until soft but not brown, about 10 minutes.
Cut potatoes in half crosswise, then quarter
lengthwise. Use slicing disc to slice them. Add
potatoes, stock and water to saucepan. Bring
to boil, reduce heat, cover and simmer gently,
stirring occasionally until vegetables are very
tender, about 25 minutes. Adjust seasoning and
serve hot as Leek and Potato Soup or proceed as
follows for cold Vichyssoise.
Strain liquid into large saucepan and set aside.
Use metal blade to purée vegetables, stopping
once to scrape bowl. Whisk purée into reserved
liquid, add milk and bring to a boil over moderate
heat, stirring constantly. Remove from the heat
and stir in cream. Season to taste with salt and
pepper. Refrigerate until thoroughly chilled. Taste
again for seasoning and sprinkle with chopped
chives.
20
Page 21

Lentil Soup
Split Pea Soup
This hearty winter soup is a meal on its own,
accompanied by crusty bread and a salad.
6 cups yield
8 ounces lentils
½ large garlic clove, peeled
½ small onion, peeled and halved
½ medium celery rib, in 1-inch pieces
½ medium carrot, in 1-inch pieces
2 medium tomatoes, quartered
2½ cups beef broth
2½ cups water
2 teaspoons white wine vinegar
½ teaspoon paprika
½ teaspoon salt*
1
⁄8 teaspoon freshly ground pepper
Pinch dried thyme
½ pound Polish kielbasa or
other smoked sausage
Wash lentils under cold running water, drain
and place in a large saucepot. Use metal blade
to pulse/chop garlic, onion, celery and carrots
until nely chopped. Put in pot with lentils. Chop
tomatoes into ne pieces. Add to pot with all
remaining ingredients except sausage. Cover pot
and cook for about 1 hour.
Freeze sausage until hard to the touch, but easily
pierced with tip of sharp knife, about 30 minutes.
Drain and reserve soup liquid and purée solids
with metal blade. Return purée` to broth and stir
to combine. Use slicing disk to slice sausage.
Add sausage to soup and reheat gently until
sausage is heated through, stirring occasionally,
about 20 minutes.
*Omit salt if using salty sausage.
A perfect family lunch or supper.
4 cups yield
½ pound split green peas
½ large onion, quartered
½ large garlic clove, peeled
¾ pound smoked ham hocks
3½ cups water
1 medium carrot, peeled
½ large celery rib
½ medium potato, peeled
Salt and pepper
Rinse peas and place in large pot. Peel onion
and garlic. Use metal blade to chop garlic ne,
about 10 seconds. Add onion and pulse until
coarsely chopped, about 6 to 8 pulses. Add to
pot with ham hocks and water. Bring to a boil and
reduce heat. Cover and simmer for 1 hour, stirring
occasionally. Uncover and simmer until hocks are
tender, about 30 to 40 minutes. Stir occasionally
and add more water if necessary. Remove hocks
and let them cool while preparing vegetables.
Peel carrot, cut in feed-tube lengths, then halve
lengthwise. Cut celery in feed-tube lengths, then
halve lengthwise. Peel potato, halve crosswise,
then quarter halves lengthwise. Insert slicing disc.
Stand vegetables upright in feed tube and slice
with medium to rm pressure. Reserve.
Purée soup with metal blade until smooth, about
15 seconds. Return to pot. Remove meat from
hocks and pulse until coarsely chopped, 4–6 pulses. Add to pot with vegetables. Cover and simmer
until tender, stirring occasionally to prevent
sticking. This will take about 20 minutes. Season
to taste.
Hamburgers
Chop meat to the exact texture you want – and
control the amount of fat. Our test kitchen fi nds
20% fat ideal – less than the usual supermarket
mixture. Use boneless beef – round, chuck or any
cut you choose. Before chopping it, trim off all
membrane, gristle and fat. Reserve the fat, which
will usually be more than you need. Cut the beef
into 1-inch cubes and chill until slightly fi rm –
usually 30 minutes in the freezer.
21
Page 22

¾ pound combined meat and fat
If you don’t have a kitchen scale, measure solidly packed beef cubes and solidly packed fat
cubes in cups, before chilling them, as follows:
1
⁄4 cups beef cubes
1
¼ cup fat cubes
Put beef and fat in work bowl and chop with
metal blade. Pulse/chop a few times to start, then
let machine run continuously, checking every 5
seconds for consistency. Be very careful not to
over-process.
Handle hamburger with a light touch. Remove
work bowl from processor base and carefully take
out metal blade. Use as little pressure as possible
in shaping patties.
Meatloaf or Meatballs
For a spicier meatloaf, add a few drops of
hot sauce and a teaspoon of
Worcestershire sauce.
3
⁄4 pound yield
1 small onion, quartered
¼ cup loosely packed parsley leaves
1 slice day-old bread, broken in pieces
¾ pound boneless chuck,
cut in 1-inch pieces*
1½ tablespoons milk*
½ teaspoon salt
1
⁄8 teaspoon dried thyme leaves
1 large egg
Put all ingredients except egg in a work bowl and
pulse/chop 4 to 6 times. Then process continuously until chopped ne. Add egg and pulse 4 or
5 times or until desired consistency is reached,
watching carefully to avoid over-processing. Pack
mixture into loaf pan and bake at 350°F until
cooked through, about 40 to 50 minutes.
*You can vary these ingredients by using a mixture
of beef, veal and pork, or replacing the milk with
tomato juice.
Variation: Instead of making a meatloaf, shape
mixture into balls of 2 tablespoons each, arrange
them in a single layer in baking dish and bake at
375°F for about 25 minutes.
Chili
Kids love chili and it’s a versatile dish. Serve it on
hot dogs, fi ll tacos with it or eat it plain. This one
freezes well for about 6 months.
4½ cups yield
3 medium garlic cloves
1 medium onion
1 pound boneless beef chuck, chilled
1½ teaspoons whole cumin seed
2 tablespoons vegetable oil
2 tablespoons chili powder
2 tablespoons paprika
1 teaspoon salt
1
⁄8 teaspoon crushed red peppers
1
1
1 cup water
2 cups red kidney beans, canned
Peel garlic and onion, quarter onion. Process both
with metal blade until nely chopped, about 15
seconds. Remove and reserve. Trim beef of all fat
and cut it into 1-inch cubes. Process until coarsely
chopped, about 10–12 pulses.
Brown cumin seed in saucepot over medium heat.
Shake pan constantly and cook until cumin begins
to smoke, about 1 minute. Remove and reserve.
Heat vegetable oil in same saucepot over medium
heat. Add garlic and onions and cook for 2 minutes. Add beef and cook, stirring often, until no
pink color remains, about 5 minutes.
Reduce heat to low, stir in cumin, chili powder,
paprika, salt and red peppers and cook uncovered
for 5 minutes, stirring occasionally.
Use metal blade to chop tomatoes coarse, pulsing
twice. Add to saucepot with water and bring to
boil. Reduce heat and simmer, partially covered
over medium-low heat for 45 minutes, stirring
occasionally.
Stir in the beans and cook until heated through.
Taste and add salt, if needed.
Try some of these garnishes with the chili: shredded Cheddar or Monterey Jack cheese, shredded
lettuce, sliced jalapeño peppers, sliced scallions,
sliced black olives, chopped tomato or chopped
avocado.
⁄8 ounce can whole tomatoes
22
Page 23

Sausage
When you make your own sausage, you’re in
control of the ingredients. These sausages have no
additives and less than the usual amount of fat.
3
⁄4 pound approximate yield
½ pound pork or beef, cut in 1-inch cubes
and chilled
3 ounces pork or beef fat,
cut in 1-inch cubes and chilled
1 tablespoon cold water
¾ teaspoon salt
½ teaspoon dried sage
1
⁄8 teaspoon dried thyme
1
⁄8 teaspoon black pepper
Flour
Put all ingredients except our in work bowl and
chop with metal blade. Pulse/chop to start, then
let machine run continuously, stopping every 5
seconds until desired texture is reached.
Shape mixture into cylinder, 2 inches in diameter.
Wrap in plastic wrap or foil and refrigerate for 3
hours or overnight. Cut into ½-inch slices and
cook, or wrap individually and freeze.
To cook, coat each patty with our. Place patties
in cold skillet and cook over moderate heat until
browned. Turn and cook second side over medium to low heat, allowing 15 to 20 minutes for total
cooking time.
Farmhouse Hash
If you don’t have a kitchen scale, measure in cups
1
– 2
⁄4 cups of lightly packed meat cubes weigh
3 servings
about a pound.
chopped, 8 to 10 pulses. Sauté onion in skillet until soft, but not brown, about 5 minutes. Reserve.
Use metal blade to process beef until coarsely
chopped. Add potatoes, salt, pepper and sautéed
onions and pulse only until potatoes are coarsely
chopped.
Heat remaining butter in skillet over medium heat.
Add hash, pour stock over all and pat down gently
with spatula. Cook over low heat for 20 to 25
minutes, turning mixture over with spatula as crust
forms on bottom. Transfer to warm serving plate.
Chicken and
Vegetable Stir-Fry
Stir-frying and the food processor are a most
effective combination to put a meal on the table
6 servings
2 pounds boneless chicken breasts
2 red bell peppers, cored, seeded,
stemmed, and cut vertically into 3 slabs
6 scallions, cut to fi t feed tube
horizontally
2 zucchini, cut to fi t tube horizontally
1 yellow squash, cut to fi t feed tube
horizontally
1 garlic clove, peeled
1 1-inch piece fresh ginger
1
⁄3 cup water
2 tablespoons dry sherry
3 tablespoons soy sauce
2 teaspoons sesame oil
1
⁄4 teaspoon black pepper
2 teaspoons cornstarch
3 tablespoons vegetable oil
in no time.
4 tablespoons unsalted butter
1 small onion, peeled and halved
½ pound leftover cooked meat,
cut in 1-inch pieces
½ pound cooked potatoes,
cut in 1-inch pieces
Salt and freshly ground pepper
¼ cup beef or chicken stock
Melt half the butter in a heavy skillet. Use
metal blade to pulse/chop onion until it is nely
Split chicken breasts lengthwise. Tuck ends under
to form compact shapes of uniform thickness.
Wrap individually and freeze on baking sheet until
rm to the touch, but easily pierced with the top of
a sharp knife.
Stand peppers on long ends and use slicing disc
to slice them, using light pressure. Lay scallion
pieces in feed tube horizontally and slice into
slivers, using light pressure.
Insert shredding disc and zucchini and squash,
using light pressure. Remove and reserve vegetables.
23
Page 24

Use metal blade to chop garlic and ginger ne,
about 4 pulses. Do not empty work bowl. Insert
slicing disc. Stand chicken pieces tightly in feed
tube and slice, using rm pressure. Remove and
reserve on plate, loosely covered with plastic
wrap.
Use metal blade to mix water, sherry, soy sauce,
sesame oil, black pepper and cornstarch until
smooth, about 15 seconds. Remove metal blade
leaving contents in work bowl.
Heat vegetable oil in skillet over high heat until
very hot. Add chicken pieces and cook, stirring
vigorously, until chicken is opaque, about 3
minutes.
Add vegetable mixture and stir-fry over medium-high heat until crisp-tender, about 2 minutes.
Add sauce mixture. Cook, stirring until sauce
thickens, about 1 minute. Serve over brown or
white rice.
Crab Cakes
These delicate seafood cakes are perfect with
drinks. If you’re feeling festive, substitute cooked
lobster meat for half of the crabmeat.
54, ½-ounce crab cakes
4 slices white bread, lightly toasted
1 medium garlic clove, peeled
1 small onion, peeled and quartered
1 tablespoon unsalted butter
1 tablespoon parsley leaves
1 pound lump crabmeat, picked over to
remove cartilage
¼ cup mayonnaise
1 large egg
1 tablespoon lemon juice
¼ teaspoon salt
Tartar Sauce (see recipe on page 27)
Preheat oven to 375°F. Break bread in quarters
and process with metal blade to ne crumbs,
about 40 seconds. Reserve ¼ of crumbs and put
remainder in pie plate.
Drop garlic through feed tube with machine
running and process until nely chopped, about
10 seconds. Add onion and chop ne, about 10
seconds. Cook mixture in the butter over low heat
until golden brown, stirring, about 10 minutes.
Chop parsley ne, about 5 seconds. Add onion
mixture, crabmeat, mayonnaise, egg, lemon juice,
salt and reserved bread crumbs and pulse until
combined, about 8 times.
Form mixture into 1½ -inch cakes by generous
teaspoon measures. Coat them with crumbs in pie
plate and place on buttered baking sheet. (Recipe
may be prepared ahead to this point and refrigerated up to 4 hours.) Bake in preheated oven until
golden brown, 10–15 minutes. Serve with Tartar
Sauce.
Broccoli Purée
Broccoli is high in fi ber, high in potassium and low
in calories. This recipe uses the stems, which are
often discarded.
2½ cups yield
1 bunch broccoli, about 1½ pounds
1 small onion, peeled
2 tablespoons butter
1 teaspoon lemon juice
Salt and pepper to taste
Remove stems from broccoli and reserve orets.
Use slicing disc to slice stems and onion. Cook
sliced vegetables in boiling water to cover with ½
reserved orets until tender, about 6 to 8 minutes.
Drain, reserving liquid.
Use metal blade to purée solids with remaining
ingredients until smooth, about 1 minute.
Cut reserved orets into smaller orets and cook
in reserved liquid until tender, about 3 minutes.
Remove with slotted spoon. Pour enough hot
cooking liquid into work bowl to reach desired
consistency, then pulse in orets. Use more liquid
for a thinner purée, less liquid for a thicker purée.
Season to taste. Or serve the orets on a bed of
puréed broccoli.
Mashed Potatoes
The shredding disc processes cooked potatoes
to the right texture. Be careful not to over-process
when you mix them with the other ingredients.
4 servings
¼ cup hot milk
2 tablespoons butter in pieces
½ teaspoon salt
Freshly ground pepper
Pinch of nutmeg (optional)
3 large potatoes, peeled, boiled
and drained
24
Page 25

Put all ingredients except potatoes in work bowl
and insert shredding disc. Process potatoes and
leave them in a work bowl. Remove shredding
disc and carefully insert metal blade. Pulse 2 or
3 times, until liquid is absorbed. Potatoes will
become gluey if you over-process.
Wonderfully light, uffy mashed potatoes can
also be made with the optional whisk attachment
(DLC-155).
Potatoes au Gratin
You can use baking or boiling potatoes for this
substantial yet elegant dish.
8 servings
3 ounces Gruyère cheese, cut in cubes
2 medium garlic cloves, peeled
1 medium onion, peeled and quartered
2½ cups milk or half-and-half
1 teaspoon salt
Freshly ground white pepper
3 large potatoes (about 10 ounces each),
peeled and cut fl at at ends
Preheat oven to 400°F and butter a 2-quart baking
dish. Chop cheese with metal blade until it is nely
grated. Remove and reserve it. Drop onion and
garlic through feed tube while machine is running
and process until nely chopped. Put onion/garlic
mixture in saucepan with milk, salt and pepper.
Shred potatoes with shredding disc, one at a time,
using rm pressure on pusher. Add shredded
potatoes to saucepan and bring mixture to a boil,
stirring continuously to prevent scorching.
Remove saucepan from heat and spread potato
mixture in prepared baking dish. Sprinkle with
reserved cheese and bake for 25 minutes or until
potatoes are tender and cheese is golden. Let
stand for 10 minutes before serving.
Shredded Carrots and
Zucchini
Because shredded vegetables cook so quickly, all
their natural fl avor and crispness is preserved. If
you like, substitute an equal amount of parsnips
for zucchini.
4 servings
3 medium carrots (about 2 ounces each)
2 medium zucchini (about 4 ounces each)
¼ cup unsalted butter
Salt and pepper to taste
½ teaspoon chopped fresh tarragon or
¼ teaspoon, dried (optional)
Peel carrots and cut them and unpeeled zucchini to t feed tube horizontally. Process with
shredding disc. Melt butter in large skillet. Add
shredded vegetables and sprinkle with a little salt
and pepper. Cover and cook until just tender, 2 or
3 minutes. Season with tarragon, salt and pepper
to taste.
Sliced Tomatoes on
Shredded Lettuce
You can prepare all the elements of this salad in
the work bowl.
6 servings
¼ cup parsley leaves, loosely packed
1 medium shallot, peeled
1½ tablespoons red wine vinegar
4½ tablespoons saffl ower oil
½ teaspoon Dijon-style mustard
½ teaspoon sugar
½ teaspoon salt
Freshly ground black pepper
4 fi rm, ripe, medium tomatoes, cored and
cut fl at at ends
1 medium head romaine lettuce
Use metal blade to chop parsley and shallot ne.
Add all remaining ingredients, except tomatoes
and lettuce through the feed tube opening while
the machine is running. Remove metal blade and
insert slicing disk.
Slice tomatoes into dressing, using light pressure.
Cut lettuce into sections to t feed tube. Slice with
slicing disc, using medium pressure. Transfer contents of work bowl to platter, arranging tomatoes
over lettuce in an attractive pattern.
TIP: When preparing a meal, make the dishes
with the least amount of wet ingredients rst. For
example, make the bread rst, and then you don’t
need to wash the bowl before making the salad.
In many cases, wiping the bowl with a paper towel
between recipes is suf cient.
25
Page 26

Creamy Cole Slaw
Cole slaw only takes minutes to prepare when you
don’t have to slice the cabbage by hand.
5 cups yield
¼ cup loosely packed parsley leaves
1 1-ounce piece peeled onion
1
⁄3 cup mayonnaise
½ tablespoon red wine vinegar
¼ teaspoon salt
¼ teaspoon freshly ground pepper
½ large carrot, peeled
½ medium head green cabbage,
about 2 pounds
Process parsley with metal blade until minced.
Add onion and process until minced. Add all
remaining ingredients except carrot and cabbage
and process 5 seconds to combine. Remove
metal blade.
Cut carrot in half crosswise. Core cabbage and
cut it into wedges. Insert shredding disc and shred
carrot, using rm pressure. Insert slicing disc and
slice cabbage, using rm pressure. Add contents
of work bowl to mixing bowl and toss to combine.
Adjust seasoning. Serve immediately or refrigerate
for up to 24 hours. Before serving, drain excess
liquid and adjust seasoning. Serve chilled.
Shredded Carrot Salad
The brilliant colors of carrots and peas make this
fresh and simple salad a welcome addition to a
8 servings
2 pounds young carrots, peeled
3 large scallions, trimmed
¼ cup fresh lemon juice
¼ cup vegetable oil
1 teaspoon salt
1 teaspoon sugar
Pinch of cinnamon
Pinch of allspice
Freshly ground black pepper
½ cup cooked peas, fresh or frozen
party buffet table.
Cut carrots in lengths to t feed tube horizontally
and parboil them in salted water until you can just
pierce them with the tip of a sharp knife, about
3 to 5 minutes. Drain them and rinse under cold
water. When they are cooled, blot dry with paper
towels.
Cut scallions into 1-inch pieces and process
scallions with metal blade until they are nely
chopped. Add lemon juice, oil, salt, sugar, cinnamon, allspice and pepper and process for about 3
seconds. Leave the dressing in the work bowl.
Insert shredding disc, pack carrots lengthwise
in feed tube and shred, using medium pressure.
Transfer contents of work bowl to serving bowl,
add peas and toss gently to coat all ingredients
with dressing. Serve cold or at room temperature.
Adjust seasoning just before serving.
Pesto
A classic pasta sauce from Italy. One cup is
enough for 1 pound of pasta. It’s also good on
boiled potatoes or in soups.
1 cup yield
3 ounces imported Parmesan cheese,
at room temperature, in 1-inch pieces
3 small garlic cloves, peeled
2 cups tightly packed, fresh basil leaves
¼ cup pine nuts
½ teaspoon salt
¼ cup olive oil
Use metal blade to chop cheese and garlic, about
30 seconds. Add remaining ingredients except oil
and process until combined, about 8 pulses. With
machine running, pour oil through feed tube. Process until combined, about 10 seconds. Scrape
down bowl and continue processing until smooth,
about 20 seconds.
This keeps for up to 5 days in the refrigerator and
it also freezes well. Some people prefer to omit the
cheese when freezing pesto and add it just before
serving.
26
Page 27

Mexican Salsa
Serve this sauce as a topping for tacos, or with
grilled fi sh or chicken. It is best when fresh; it may
become slightly bitter after standing a day.
2 cups yield
1½ jalapeño peppers
½ medium onion
1
⁄3 cup packed cilantro leaves*
1
⁄8 teaspoon salt
2 teaspoons lime juice
3 medium tomatoes, cored and quartered
Cut peppers in half lengthwise, remove and discard stems, seeds and membranes. (Handle hot
peppers with care. Their oil may irritate your skin
and cause your eyes to sting. Wash hands after
handling them.) Peel and quarter onion.
Use metal blade to process peppers and cilantro
until nely chopped, about 20 seconds. Scrape
bowl, add salt and lime juice and pulse twice.
Add tomatoes and onions and pulse until they are
coarsely chopped, about 10 to 12 times.
Transfer to serving dish, stir and serve within 1 or
2 hours.
*Substitute at-leaf parsley if cilantro is not
available.
added. Taste and adjust seasoning if necessary.
*You can use one oil or a combination; about 20%
light olive oil to 80% vegetable oil, for example.
Low cholesterol variation: In place of the egg,
use 2 tablespoons of an egg substitute product,
omit vinegar, increase salt and add pepper. Proceed as above.
Herb Mayonnaise: Add ¼ cup tightly packed
fresh green herbs when you put in the egg. Recommended herbs are parsley, dill and tarragon,
with stems removed.
Tartar Sauce: Triple the amount of lemon juice.
When mayonnaise is nished, add these ingredients: 3 small gherkins, ¼ small onion, 1 tablespoon capers, 1 tablespoon bottled horseradish
and 3 drops hot sauce. Process until gherkins and
onion are chopped ne, about 10 seconds.
No-Cook Cranberry-Orange
Relish
Because this is an uncooked relish, it requires only
1 cup of sugar to sweeten 1 pound of cranberries.
Most cooked relishes call for 2 cups.
Basic Mayonnaise
For a classical mayonnaise, as thick as butter,
substitute 2 egg yolks for each whole egg.
1½ cups yield
1 large egg
1 tablespoon fresh lemon juice or
white wine vinegar
1 tablespoon mustard, preferably
Dijon style
1
⁄4 cups oil*
1
Use metal blade to process egg, lemon juice or
vinegar, mustard and 1 tablespoon oil in work
bowl for 60 seconds. While machine is running,
pour ¼ cup of oil into small pusher. (Do not put in
more than this or it will dribble through too quickly.) When it has dribbled through hole in bottom of
small pusher, remove small pusher from feed tube
and gradually add remaining oil, while machine
continues to run. Mayonnaise will thicken as oil is
3
1
⁄4 cups yield
2 cups fresh cranberries
½ navel orange, unpeeled and quartered
½ cup sugar
Use metal blade to chop cranberries and oranges
until coarsely chopped, about 8 to 10 pulses. Add
sugar and process to mix, about 20 seconds.
Taste and add more sugar if desired. Refrigerate in
airtight container.
Chocolate Sauce
You can make a delicious chocolate sauce in your
work bowl in 1 minute! No more worries about
melting chocolate on top of the stove.
7
⁄8 cup yield
5 ounces semisweet chocolate, broken
into ½-inch pieces
¼ cup superfi ne sugar
1
⁄3 cup water, heated to boiling
27
Page 28

Use metal blade to process chocolate and sugar
until chocolate is coarsely chopped, about 6
pulses. Then process continuously until chopped
to a ne powder, about 60 seconds. With machine
running, slowly pour hot water through feed tube.
Process until chocolate melts, about 45 seconds,
stopping once to scrape down bowl.
Mint Variation: Add 1 tablespoon of peppermint extract, crème de menthe or peppermint
schnapps to water after it is heated.
Raspberry Sauce
A fi ne fi nish for any fruit or chocolate dessert: ice
cream, sherbet or cake. You can substitute straw-
berries for the raspberries.
Use kitchen shears to trim dough, leaving 1-inch
overlap beyond pan. Fold overlap under. Pinch
crust to form decorative edge. Prick bottom and
sides with fork and refrigerate crust for 30 minutes, or until rm.
Preheat oven to 400°F, 15 minutes before baking.
Line pie shell with parchment paper and ll it with
uncooked beans or rice. Bake it for 12 minutes.
Remove paper, beans or rice, prick shell again
and bake it 6 minutes longer, or until it is lightly
browned. Remove shell from pan and let cool on
wire rack.
Cornbread
This is a particularly moist and fl avorful cornbread
which is best served warm.
1 cup yield
1 10-ounce package frozen raspberries in
syrup, thawed
1 tablespoon honey
Use metal blade to purée raspberries and honey
for 30 seconds. Transfer to ne sieve over bowl.
Press solids through with back of spoon and
discard seeds in sieve. Serve at room temperature
or warm slightly to serve over ice cream.
Basic Pastry
This is the basic dough for pies, tarts and quiches.
One 11-inch pie shell
1½ cups all-purpose fl our
1 stick very cold unsalted butter, cut
in 1-inch pieces
½ teaspoon salt
¼ cup ice water
Use metal blade to process our, butter and salt
until mixture is like coarse meal, about 8 seconds.
Add ice water and pulse until dough begins to
clump together. Do not let it form a ball. Put dough
in a plastic food storage bag, work through bag to
press dough together into a ball, then a at disk.
Refrigerate dough for at least 1 hour.
Roll dough on lightly oured surface to a circle
1
⁄8 inch thick. Press into place in a pie pan.
about
2 tablespoons unsalted butter
¾ cup yellow cornmeal
¾ cup all-purpose fl our
1½ tablespoons sugar
2 teaspoons baking powder
¼ teaspoon baking soda
¼ teaspoon salt
1 cup buttermilk
1 large egg
1
⁄3 cup fresh, frozen or canned
corn kernels
Preheat oven to 425°F. Melt butter in an 8 x 8-inch
baking pan. Use metal blade to process all dry
ingredients until combined, about 10 seconds.
Add butter and remaining ingredients except corn
kernels and process until mixed, about 5 seconds.
Scrape down work bowl and gently stir in corn.
Pour into prepared pan and bake until a toothpick
inserted in center comes out clean, about 25
minutes.
Muffi n Variation: For corn muf ns, pour batter
into greased, standard-size muf n tins, lling them
¾ full. Bake in preheated 425°F oven for about 25
minutes. Makes 6 muf ns.
28
Page 29

Coffee Cake
White Bread
This makes an excellent breakfast, or adds a sweet
Dough
1 package dry yeast
2 tablespoons sugar, divided
¼ cup warm water
1
⁄3 cup sour cream
¼ cup cold milk
1 large egg
1 teaspoon pure vanilla extract
3 cups fl our
¼ cup butter
½ teaspoon salt
2 tablespoons melted butter
Filling
½ cup light brown sugar
½ cup raisins or dates, cut in
½ cup pecans
1 teaspoon cinnamon
To make the dough, dissolve the yeast and half
the sugar in warm water in a 2-cup liquid measure.
Let stand until foamy, about 5–10 minutes. Whisk
together the sour cream, milk, egg and vanilla
extract and add to the yeast mixture.
Use metal blade to process our, butter, salt and
remaining sugar for 10 seconds. With machine
running, add liquid ingredients through feed tube
in steady stream as fast as our absorbs them.
After dough cleans inside of work bowl, continue
processing 40 seconds more to knead it.
Shape dough into ball and place it in lightly oured
plastic food storage bag. Squeeze out air and
close top with wire twist. Let rise in warm place
until doubled in size, about 1 hour.
Roll dough on lightly oured surface to rectangle
about 20 inches long and 12 inches wide. Brush
with melted butter. With remaining butter, brush
inside of 9 x 13-inch pan.
To make lling, use metal blade to process sugar,
dates or raisins, pecans, and cinnamon until
coarsely chopped, about 45 seconds. Spread
lling over dough. Roll dough up, jelly-roll fashion,
from long side. Use sharp knife to cut rolled dough
3
into
up, and let rise until doubled.
Preheat oven to 375°F and bake coffee cake until
golden and bubbly, about 20–25 minutes.
fl avor to lunch or supper.
1-inch pieces
⁄4-inch slices. Place slices in pan, cut sides
It’s best to make this bread with bread fl our, or
unbleached fl our, or a combination of both. Bread
made with bread fl our will rise higher in the oven.
Two 1-pound loaves
1 package dry yeast
1
⁄3 cup warm water
2 teaspoons sugar
4 cups unbleached bread fl our
3 tablespoons unsalted butter,
in tablespoon-size pieces
1 teaspoon salt
1 cup ice water
nonstick cooking spray
Stir yeast and sugar into warm water in a 2-cup
measure and let stand until foamy, 5 to 10 minutes. Use dough blade to process our, butter
and salt for 20 seconds. Add ice water to yeast
mixture. With machine running, pour liquid through
feed tube in steady stream, only as fast as our
absorbs it. Continue processing until dough
cleans inside of work bowl and forms a ball. Then
let machine run for 60 seconds to knead dough.
Shape dough into ball and place in lightly oured
plastic storage bag. Squeeze out air and close end
with wire twist, allowing space for dough to rise.
Let rise in warm place until dough has doubled in
bulk, about 1 to 1½ hours.
Punch dough down and shape into 2 loaves. Place
each in a sprayed 4-cup loaf pan. Cover with oiled
plastic wrap and let rise in warm place until dough
rises just above top of pan, about 45 minutes.
Bake in middle rack of preheated 375°F oven until
top is brown, about 35 minutes. Remove from pan
and cool on wire rack.
Whole Wheat Variation: Replace ½ of bread our
with an equal amount of whole wheat our.
Basic Pizza Dough
With this dough, you can make large pizza crusts
to serve several, or small ones to serve a few.
One 14-inch pizza crust OR two 9-inch
pizza crusts
1 package dry yeast
1 teaspoon sugar
2
⁄3 cup warm water
29
Page 30

2
1
⁄3 cups unbleached, all-purpose fl our
¾ teaspoon kosher salt
2 teaspoons olive oil
Vegetable oil for pan
1½ tablespoons cornmeal for pan
Stir yeast and sugar into warm water and let stand
until foamy, about 5 to 10 minutes. Insert metal
blade, put our and salt in work bowl and turn on
machine. Pour yeast mixture through feed tube
and process about 45 seconds, until dough pulls
away from sides of bowl. Add olive oil through
feed tube and process 60 seconds longer.
If dough sticks to sides of bowl, add more our, 1
tablespoon at a time, processing for 10 seconds
after each addition, until dough leaves sides of
bowl but remains soft.
Roll dough on oured surface into a circle, rotating
and turning dough often and using enough our
so it doesn’t stick. If dough resists rolling, let it rest
for a few minutes and try again. Roll dough into
15-inch circle for at 14-inch pizza pan, or into
10-inch circles for at 9-inch pizza pans.
Oil pan(s) lightly and sprinkle with cornmeal.
Fold rolled dough in half loosely and then in half
again. Position point at center of pan and gently
unfold. Press into place from center outward, turn
under the 1-inch overhang and shape it into a rim.
Crust(s) is now ready to bake and ll.
Pizza in a Hurry
It takes no longer to make this pizza than to wait
1 14-inch pizza crust (see recipe, above)
4 ounces Parmesan cheese,
2 ounces pepperoni, peeled in 3 pieces
12 ounces mozzarella cheese, very cold
1 small onion, peeled, ends cut fl at
1 medium green pepper, cored, seeded
1 medium tomato, cored, cut fl at at ends
1 cup Tomato Pizza Sauce
Pinch of sugar
Freshly ground black pepper
½ teaspoon dried basil or
½ teaspoon dried oregano or
for one you order to take out.
at room temperature
and cut fl at at stem
(see recipe, right)
1 teaspoon fresh
1 teaspoon fresh
Preheat oven to 425°F and place rack in lower
third. Bake pizza crust for 6 minutes. In the meantime, prepare lling.
Use metal blade to process Parmesan cheese and
pepperoni until coarsely chopped. Set aside on
a dish or waxed paper. Insert shredding disc and
process mozzarella cheese. Set aside.
Insert slicing disc and slice onion. Set aside. Slice
green pepper and set aside. Slice tomato, using
light pressure. Set aside on paper towels to drain.
Use rubber spatula to spread tomato sauce evenly
over pre-baked crust, leaving rim exposed. Separate each onion slice into rings and distribute them
over sauce. Distribute shredded mozzarella over
onions. Arrange tomato slices over cheese and
sprinkle with pinch of sugar and pepper.
Distribute Parmesan cheese and pepperoni
mixture, then green pepper slices, over tomatoes.
Sprinkle evenly with basil and oregano. Return
pizza to oven and bake for 18 minutes, or until rim
of crust is golden and bottom is deep brown.
Tomato Pizza Sauce
When this sauce stands, liquid may accumulate
on surface. Pour off all but 2 tablespoons, then stir
2 cups yield
2 large tomatoes, peeled, seeded and
quartered
1 cup canned tomato sauce
¼ cup canned tomato paste
¾ teaspoon dried oregano or
1
¾ teaspoon dried basil or 1
fresh
1 teaspoon sugar
Salt and freshly ground black pepper
Use metal blade to pulse/chop tomatoes, about
6 pulses, until coarsely chopped. Add remaining
ingredients and pulse 4 times to mix.
30
well before using.
½ teaspoons fresh
½ teaspoons
Page 31

Fudgy Brownies
These easy-to-make brownies are always a favorite
in lunchboxes or for after-school snacks.
16 brownies
3 ounces unsweetened chocolate
1 cup light brown sugar
1
⁄3 cup (51⁄3 tablespoons) butter, melted
3 large eggs
1 teaspoon pure vanilla extract
2
⁄3 cup unbleached, all-purpose fl our
¼ teaspoon kosher salt
1 teaspoon baking powder
½ cup pecan halves
Preheat oven to 350°F. Grease an 8 x 8-inch pan.
Break chocolate into 1-inch pieces. Use metal
blade to chop with half the sugar until coarsely
chopped, 6–8 pulses. Then process continuously
until nely chopped, about 20 seconds.
With machine running, pour hot butter through
feed tube. Process until smooth, about 30
seconds. Add remaining sugar, eggs and vanilla
extract. Pulse twice, then process 10 seconds
more. Add dry ingredients and nuts. Pulse/chop
until mixed, 6 to 8 times. Spread in prepared pan.
Bake until slightly crusty outside and moist inside,
about 20 minutes. Cool and cut into squares.
Chocolate Chip
Oatmeal Cookies
Toasted nuts and oats make these cookies good
35, 2½-inch cookies
½ cup quick-cooking oats
¾ cup pecans
¾ cup (12 tablespoons) butter
1
⁄3 cup granulated sugar
½ cup fi rmly packed light brown sugar
1 large egg
¾ teaspoon pure vanilla extract
1 cup unbleached, all-purpose fl our
½ teaspoon salt
¾ teaspoon baking soda
6 ounces semisweet chocolate chips
for you as well as delicious.
Preheat oven to 350°F and place rack in center.
Toast oats and pecans on baking sheet until
lightly browned, about 10 minutes. Remove and
reserve. Raise oven temperature to 375°F.
Use metal blade to process butter and both sugars until smooth, about 2 minutes. Scrape work
bowl as necessary. Add egg and vanilla extract;
pulse until just mixed, about 6 times.
Add toasted pecans, flour, baking soda, salt and
half the toasted oats. Pulse until mixed, about
8 times. Remove to large bowl, add remaining
oats and chocolate chips and stir to mix. Drop by
rounded teaspoonfuls onto greased baking sheets
1 inch apart and bake until golden brown, about
11 minutes.
Carrot Cake
To make this delicious, moist cake look really pro-
fessional, put a marzipan carrot in the center. You
can buy them at many pastry or candy shops.
8 to 10 servings
Softened butter for pans
Fine, dry breadcrumbs,
for dusting pans
½ pound carrots, peeled
½ cup granulated sugar
½ cup fi rmly packed dark brown sugar
2 large eggs
½ cups corn oil
1 teaspoon pure vanilla extract
¾ cup walnut pieces
1 cup unbleached, all-purpose fl our
½ tablespoon unsweetened cocoa
1 teaspoon baking powder
1 teaspoon cinnamon
½ teaspoon baking soda
½ teaspoon kosher salt
½ cup raisins, steamed over boiling water
for 10 minutes
Cream Cheese Frosting (recipe follows)
Preheat oven to 350°F. Butter two 8-inch round
cake pans, line bottoms with parchment paper
and butter paper. Dust pans with breadcrumbs.
Cut carrots into lengths to t feed tube horizontally. Use shredding disc to shred carrots and
reserve them.
31
Page 32

Process sugars, eggs, oil and vanilla extract with
metal blade until smooth, about 15 seconds.
Add walnuts and dry ingredients and pulse until
combined, about 6 times, stopping once to scrape
down work bowl. Use spatula to stir in raisins and
carrots.
Divide batter between prepared pans and bake in
preheated oven until a cake tester inserted in the
center comes out clean, about 35–40 minutes.
Cool in pans for 2 to 3 minutes and turn out onto
wire racks to cool completely. Remove paper.
Spread frosting between layers and on top and
sides of cake.
Cream Cheese Frosting
This quick and easy frosting is delicious on carrot
cake, but it’s also good on many other cakes.
Frosts two 8-inch cakes
½ pound cream cheese, in pieces, at room
temperature
½ stick (4 tablespoons) butter, in pieces
1 cup confectioners’ sugar
½ teaspoon pure vanilla extract
Use metal blade to process cream cheese and
butter until combined, about 10 seconds. Add
sugar and process until smooth, about 5 seconds.
Add vanilla extract and process until smooth,
about 15 seconds.
Pear Yogurt
3 medium pears
¼ cup confectioners’ sugar
½ cup yogurt
1 tablespoon lemon juice
Banana-Apple Sherbet
2 small bananas
1 tablespoon confectioners’ sugar
2 medium Golden Delicious apples
1½ tablespoons lemon juice
Apple Pie
Use the Basic Pastry recipe (page 28) and about
2 pounds of apples, peeled and cored.
To assemble the pie, use the metal blade to mix
½ cup sugar, ¾ teaspoon cinnamon, 1⁄8 teaspoon
salt, 1⁄8 teaspoon nutmeg and 3 tablespoons our
for 5 seconds.
Slice the apples into the sugar and spice mixture.
Transfer the apples to the pie crust. Place second
crust over the apples. Pinch crust edges together.
With a sharp knife, make 6–8 small cuts in top
crust to allow steam to escape. Place pie on a
baking sheet and bake in preheated 375°F oven
until juices bubble, about 45 minutes.
Sherbet and Frozen Yogurt
At least 5 hours before serving, prepare fruit by
cutting it into 1-inch pieces. For frozen yogurts,
freeze all the fruit in a single layer on baking sheet.
For sherbets, freeze ¾ of fruit in same way and
refrigerate remaining fruit.
A few minutes before serving, process frozen fruit
and sugar with metal blade, pulsing about 8 times,
then processing continuously until fruit is nely
chopped, scraping down work bowl and cover as
necessary.
Add refrigerated fruit or yogurt and any additional
ingredients called for in recipe. Process just until
mixture becomes smooth and creamy, scraping
down work bowl as necessary. Taste for sweetness, adding more sugar if necessary.
Sherbets and frozen yogurts are best when served
immediately, but they may be frozen for later use.
To prepare frozen mixture, cut into 1-inch chunks.
Process with metal blade just until mixture becomes smooth and creamy.
32
Page 33

WARRANTY
THREE-YEAR LIMITED WARRANTY ON THE
ENTIRE MACHINE.
FIVE–YEAR FULL WARRANTY ON MOTOR.
(U.S. and Canada Only)
This warranty supersedes all previous warranties
on Cuisinart® Pro Classic™ Food Processor.
This warranty is available to consumers only.
You are a consumer if you are the owner of a
Cuisinart® Pro Classic™ Food Processor that was
purchased at retail for personal, family or household use. Except as otherwise required under
applicable state law, this warranty is not available
to retailers or other commercial purchasers or
owners.
We warrant that your Cuisinart® Pro Classic™ Food
Processor will be free of defects in material or
workmanship under normal home use for three
years from the date of original purchase.
We warrant that the motor for your Cuisinart®
Pro Classic™ Food Processor will be free of
defects in material or workmanship under normal
home use for ve years from the date of original
purchase. This motor warranty covers the motor
and excludes all other parts in the motor base
assembly area such as the upper and lower plastic
housings, work bowl and cover, blades and all
electrical components and vertical projecting
motor shaft sheath.
We suggest that you complete and return the
enclosed warranty registration card promptly
to facilitate veri cation of the date of original
purchase. However, return of the warranty
registration card is not a condition of this warranty.
If your Cuisinart® Pro Classic™ Food Processor
should prove to be defective within the warranty
period, we will repair it, or if we think necessary, replace it, without charge to you. To obtain
warranty service, simply call our toll-free number
800-726-0190 for additional information from
out Consumer Service Representatives. Or send
the defective product to Consumer Service at
Cuisinart, 7475 Glen Harbor Blvd., Glendale, AZ
85307.
To facilitate the speed and accuracy of your return,
please enclose a check or money order for $10.00
shipping and handling made payable to Cuisinart.
DO NOT SEND CASH.
Under California law, only proof of purchase is
required. California residents should call
1-800-726-0190 for shipping instructions. If the
problem with the machine is determined to be a
defect of the motor within the warranty period, all
postage and handling charges will be refunded.
Please be sure to include a return address,
daytime telephone number, and description of the
product defect, product’s serial number, original
date of purchase, and any other information pertinent to the products return.
Your Cuisinart
been manufactured to the strictest speci cations
and has been designed for use only in 120-volt
outlets and only with authorized accessories
and replacement parts. This warranty expressly
excludes any defects or damages caused by
attempted use of this unit with a converter, as
well as use with accessories, replacement parts
or repair service other than those authorized
by Cuisinart. This warranty does not cover any
damage caused by accident, misuse, shipment or
other than ordinary household use. This warranty
excludes all incidental or consequential damages.
Some states do not allow the exclusion or limitation of these damages, so these exclusions may
not apply to you. You may also have other rights,
which vary from state to state.
®
Pro Classic™ Food Processor has
Warning:
Our Cuisinart® Pro Classic™ Food Processor and
accessories have been carefully designed and
manufactured with the highest quality materials to
assure your satisfaction and safety when you use
them. Although accessories sold by companies
other than Cuisinart may be compatible with your
Cuisinart machine, they may also be extremely
dangerous, and expose the user to serious injury.
We speci cally caution you not to use other
brand accessories, such as juicers, which permit
your machine to operate with exposed cutting or
shredding discs. We also caution you not to use
the large feed tube on this machine with machines
built by other manufacturers.
If you have any questions about the safety features of your Cuisinart® Pro Classic™ Food Processor or any other Cuisinart product, please call us
at the toll-free number, 1-800-726-0190.
33
Page 34

NOTES:
34
Page 35

NOTES:
35
Page 36

©2019 Cuisinart
East Windsor, NJ 08520
Printed in China
19CE064056
Trademarks or service marks of third parties used herein
are the trademarks or service marks of their respective owners.
IB-2376-ESP-A
Page 37

INSTRUCCIONES Y
LIBRO DE RECETAS
Procesadora de alimentos Cuisinart® Pro Classic
Para su seguridad y para disfrutar plenamente de este producto,
siempre lea cuidadosamente las instrucciones antes de usarlo.
™
Serie DLC-10SY
Page 38

CAPACIDADES MÁXIMAS
ALIMENTO CAPACIDAD
Frutas/vegetales/queso rebanados o triturados 5 tazas
Frutas/vegetales/queso picados 2 tazas
Frutas/vegetales/queso molidos 3 tazas (volumen procesado: 1½ taza)
Carne, pescado o mariscos picados o molidos 1¼ libra (570 g)
Líquidos fluidos (por ej. aderezo, sopa, etc.)
Mezcla para pastel Mezcla para una tarta de queso de 8 pulgadas (20 cm); 15.25 onzas (450 ml) de
Galletas 2½ docenas (receta de galletas de chispas de chocolate)
Pan blanco/Masa de pizza 3 tazas (375 g) de harina común o harina para hacer pan
Mantequilla de frutas secas (por ej. maní)
5 tazas (1.2 L)
mezcla preparada.
2 tazas
2
Page 39
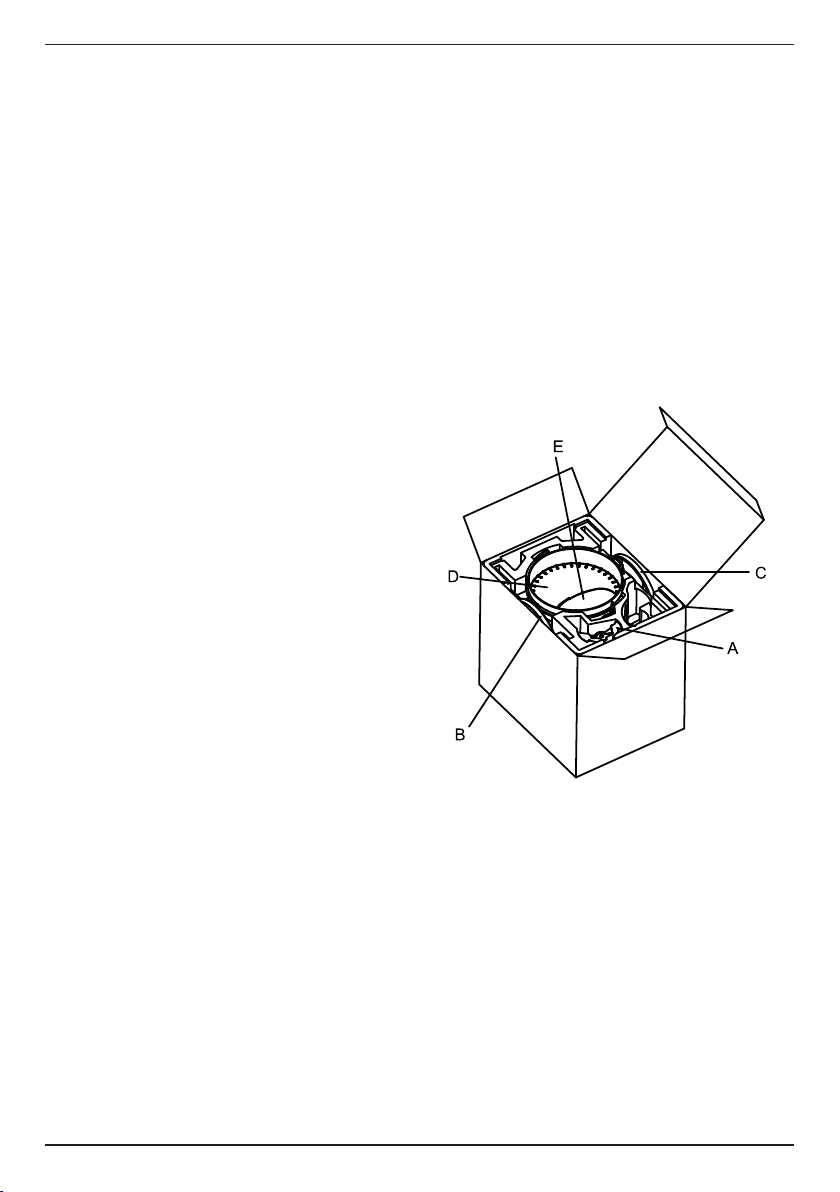
IMPORTANTES
INSTRUCCIONES
DE DESEMBALAJE
Esta caja contiene una procesadora de alimentos
Cuisinart® y sus accesorios: una cuchilla picadora
de metal, un disco rebanador, un disco triturador,
un adaptador removible para discos, una espátula
y un manual de instrucciones/libro de recetas.
PRECAUCIÓN: LAS HERRAMIENTAS DE
CORTE SON MUY AFILADAS. Para evitar las
heridas, desembale el aparato cuidadosamente,
siguiendo las instrucciones a continuación:
1. Ponga la caja sobre una superficie llana y
amplia, como una mesa o une encimera.
Asegúrese de que la caja esté del lado
correcto, no de cabeza.
2. Retire, la pieza de cartón que contiene la tapa
compacta.
3. Retire el manual de instrucciones, la espátula,
el panel de cratón y el pequeño cubo de
espuma de plástico.
4. En la caja, encontrará un bloque de espuma
de poliestireno que contiene las piezas de la
procesadora.
El adaptador removible para discos (A) se
encuentra en una cavidad en el lado corto del
bloque espuma. Sáquelo primero.
El disco rebanador (B) y el disco rallador (C)
se encuentran en las cavidades en los lados
largos del bloque de espuma. Sáquelos CON
SUMO CUIDADO; LOS FILOS SON MUY
CORTANTES.
Ahora, solo la tapa del bol (D) y el juego de
empujadores (E) quedan en el bloque de
espuma. Agarre la tapa por el borde y álcela
(puede que el empujador se deslice de la tapa
al alzar esta)
5. La base y el bol están en el fondo de la caja.
ALCE LA CUCHILLA CUIDADOSAMENTE,
SOSTENIÉNDOLA POR EL EJE DE PLÁSTICO.
NUNCA TOQUE LOS FILOS DE LAS
CUCHILLAS; SON MUY AFILADOS.
6. Retire el bloque-motor y el bol al mismo
tiempo, agarrando la parte superior del bol con
ambas manos y alzando para retirarlo de la
caja. No gire el bol al alzarlo; esto lo separaría
de la base.
7. Coloque el aparato sobre la encimera o la mesa
y lea cuidadosamente las instrucciones antes
de usarlo.
8. Le aconsejamos que guarde el material de
embalaje; puede que lo necesite para enviar el
aparato.
NOTA: le aconsejamos que llene el formulario
de registro disponible en
www.cuisinart.com
a fin de facilitar la verificación de la fecha de
compra original.
3
Page 40

MEDIDAS DE
SEGURIDAD
IMPORTANTES
Al usar aparatos eléctricos, siempre debe tomar
precauciones básicas de seguridad, incluso las
siguientes:
Preparación:
1. Lea todas las instrucciones.
2. Las cuchillas y los discos son muy filosos;
manipúlelas con sumo cuidado.
3. Apague (“OFF”) y desenchufe el aparato
cuando no está en uso, antes de instalar/
sacar piezas y antes de limpiarlo. Para
desenchufar, agarre el enchufe y jale de la
toma de corriente. Nunca jale el cable.
4. No lo utilice en exteriores.
5. No permita que el cable cuelgue del borde
de la encimera o de la mesa, ni que haga
contacto con superficies calientes.
6. No utilice este aparato si el cable o el
enchufe están dañados, si no funciona
correctamente, si está dañado, o después
que se haya caído, incluso en el agua;
llame al servicio de atención al cliente del
fabricante para obtener información sobre
cómo hacer revisar, reparar o ajustar el aparato.
Operación
1. Para reducir el riesgo de herida grave o de
daño al aparato, mantenga las manos y los
utensilios alejados de la cuchilla o del disco
durante el funcionamiento. Se podrá usar
una espátula de goma, siempre que el
aparato esté apagado.
2. Evite el contacto con las piezas móviles.
Nunca introduzca la mano en la boca de
llenado; siempre use el empujador.
3. Espere hasta que el motor se haya detenido
completamente antes de quitar la tapa. Si el
motor no se detiene dentro de 4 segundos
después de abrir la tapa, desconecte el
aparato y llame al 1-800-726-0190 para
asistencia. No utilice el aparato.
4. No guarde las cuchillas ni los discos en el
bol. Para prevenir el riesgo de heridas, nunca
instale la cuchilla o el disco antes de haberse
asegurado de que el bol esté debidamente
instalado. Guarde los accesorios fuera del
alcance de los niños.
5. Asegúrese de que la tapa esté debidamente
puesta y de que el empujador esté
completamente engranado antes de poner
el aparato en marcha.
6. No intente forzar el mecanismo de seguridad
de la tapa.
Limpieza
Para reducir el riesgo de electrocución, no
coloque el bloque-motor en agua u otro líquido.
General
1. Los niños o las personas que carezcan
de la experiencia o de los conocimientos
necesarios para manipular el aparato,
o aquellas cuyas capacidades físicas,
sensoriales, o mentales estén limitadas, no
deben utilizar el aparato sin la supervisión o
la dirección de una persona responsable por
su seguridad. Supervise el uso de este
aparato cuidadosamente cuando sea usado
por o cerca de niños. No permita que los
niños jueguen con este aparato.
2. No utilice este aparato bajo el efecto del
alcohol u otra sustancia que afecte su
tiempo de reacción o su percepción.
3. Este aparato está homologado por UL para
uso doméstico. Utilícelo únicamente con el
propósito para el cual fue diseñado, según
se describe en este manual de instrucciones.
No utilice el aparato para ningún otro fin que
no sea el indicado.
4. El uso de accesorios no recomendados o
vendidos por Cuisinart puede provocar un
incendio, un choque eléctrico o una herida.
5. Nunca guarde el aparato con el juego de
empujadores en la posición de bloqueo.
6. La potencia nominal máxima (5.0 amp) está
basada en el accesorio que consume más
electricidad; otros accesorios pueden utilizar
menos electricidad.
7. No haga funcionar el aparato debajo o
dentro de un armario/gabinete. Siempre
desconecte el aparato antes de guardarlo
en un armario/gabinete. Dejar el aparato
conectado presenta un riesgo de incendio,
especialmente si este toca las paredes o la
puerta del armario/gabinete cuando cierra.
8. Para evitar el riesgo de lesiones o daños al
bol o a la tapa, no llene el bol por encima
de la línea de llenado máximo, o más allá de
su capacidad.
AVISO: modelos con base de plástico: el cable
de este aparato está dotado de una clavija
4
Page 41

polarizada (una pata es más ancha que otra).
Como medida de seguridad, se podrá enchufar
de una sola manera en la toma de corriente
polarizada. Si no entrara en la toma de corriente,
inviértala. Si aún no entrara completamente,
comuníquese con un electricista. No intente ir
en contra de esta función de seguridad.
GUARDE ESTAS
INSTRUCCIONES
PARA USO
DOMÉSTICO
SOLAMENTE
Piezas
Véase las instrucciones de ensamblaje a continuación.
1. Cuchilla picadora/mezcladora/
amasadora
1.
2.
3.
4.
5.
2. Disco triturador
3. Disco rebanador
4. Boca de llenado
5. Tapa del bol
6. Tapa plana
7. Bol
8. Bloque-motor
9. Botón de control
10. Espátula
6.
7.
8.
10.
5
9.
Page 42

Índice
Capacidad del bol .................................... 2
Instrucciones de desembalaje ................. 3
Medidas de seguridad importantes ......... 4
Piezas ....................................................... 5
Instrucciones de uso ................................ 7
Instrucciones para rebanar/triturar/rallar .. 7
Usos de la cuchilla de metal .................... 8
Técnicas para picar/hacer puré................ 9
Técnicas para amasar ............................ 11
Resolución de problemas
al amasar masa de pan .......................... 12
Resolución de problemas al amasar
masa dulce ............................................. 13
Preparación de los alimentos para rebanar/
triturar/rallar ............................................ 14
Cómo retirar los alimentos rebanados/
triturados/rallados del bol ...................... 14
Técnicas para rebanar/triturar/rallar ....... 15
Resolución de problemas ....................... 16
Limpieza y almacenaje ........................... 16
Para su seguridad .................................. 17
Información técnica ................................ 17
Recetas .................................................. 18
Garantía .................................................. 33
6
Page 43

INSTRUCCIONES DE USO
1. Coloque el bloque-motor sobre una
encimera, cerca de una toma de corriente.
Agarre el bol y colóquelo sobre la base,
con el asa ligeramente a la izquierda del
centro.
2. Gire el bol en sentido antihorario para
sujetarlo.
3. Instale la cuchilla en el centro del bol,
haciendo coincidir el eje de la cuchilla con
el árbol-motor. La parte inferior de la
cuchilla casi debería tocar el fondo del
bol.
4. Instale la tapa sobre el bol, con la boca de
llenado ligeramente a la izquierda del
centro. Gire la tapa en sentido antihorario
para sujetarla.
5. El juego de empujadores encaja en la
boca de llenado grande. Incluye dos
empujadores: un empujador grande que
cabe en la boca de llenado y un
empujador pequeño que cabe en el
empujador grande. Presione el pequeño
empujador blanco hasta que se bloquee.
Presione el empujador grande hasta el
fondo y deslice el seguro blanco a la
derecha para bloquearlo.
6. Sostenga el juego de empujadores de
manera que el seguro blanco esté de su
lado. Deslice el juego de empujadores
sobre la tapa y presione la pata de
bloqueo hacia abajo hasta que encaje.
PRECAUCIÓN: cerciórese de que la
máquina esté apagada antes de practicar
bloquear/liberar el juego de empujadores.
Bloquear/liberar el juego de empujadores
no es necesario durante el
funcionamiento. Además, la máquina se
apagará si intenta hacerlo.
7. Conecte el cable a una toma de corriente
y ponga el botón de control sobre “ON”
para encender la máquina. Ponga el botón
de control sobre “OFF” para apagar el
motor. Ponga el botón de control sobre
“PULSE” para pulsar. Si el aparato no se
enciende, asegúrese de que esté
debidamente conectado y de que el bol,
la tapa y el juego de empujadores estén
debidamente instalados.
8. Para retirar la tapa, sostenga el juego de
empujadores manteniendo los dedos lejos
de las patas de bloqueo. Gire en sentido
horario y alce. Importante: la tapa debe
estar abierta para poder retirar el bol de la
base.
INSTRUCCIONES PARA
REBANAR/TRITURAR/RALLAR
1. Instalar el bol.
2. Colocar el disco deseado sobre una
superficie placa y segura, los filos
apuntando hacia abajo. Manténgalo
firmemente con una mano. Con la otra
mano, haga coincidir los símbolos “o” y
“Δ” sobre el adaptador removible con los
mismos símbolos sobre el disco. Gire el
adaptador en sentido horario hasta que se
bloquee.
3. Coloque el disco sobre el adaptador,
girando ligeramente para que encaje. Sin
tocar los filos del disco, presione este
hacia abajo hasta que quede asentado.
4. Colocar la tapa sobre el bol, con la boca
de llenado ligeramente a la izquierda del
centro y gire en sentido horario hasta que
se bloquee. Introduzca los alimentos en la
boca de llenado.
5. Gire el empujador pequeño para
bloquearlo y deslice el botón de bloqueo a
la izquierda para liberar la funda del
empujador. Introduzca el empujador
grande en la boca de llenado y presione la
funda para hasta el fondo asegurarlo.
6. Ponga el botón de control sobre “PULSE”
mientras empuja los alimentos.
7. Para retirar el juego de empujadores,
sostenga este con el pulgar sobre la pata
grande. Presione firmemente la pata y
alce el empujador. La tapa permanecerá
en su puesto, dejándole volver a llenar la
boca de llenado.
8. Para retirar el disco del adaptador, deslice
el botón hasta arriba y gire el adaptador
en sentido antihorario.
7
Page 44

EJERCICIOS DE PRÁCTICA
Procure practicar con algunos alimentos antes
de procesar los alimentos que desea comer. Una
papa o una zanahoria son buenas opciones para
practicar. Primero, corte los alimentos en pedazos
de 1 pulgada (2.5 cm). Instale la cuchilla de metal
y coloque los ingredientes en el bol. Cierre la
tapa y cerciórese que los empujadores están
debidamente puestos. Ponga el botón de control
sobre “PULSE” y luego suéltelo. Repita esto 2 o
3 veces. Permita que los alimentos bajen al fondo
del bol antes de volver a pulsar; esto los pone en
la trayectoria de la cuchilla.
Utilizar la función de pulso evita sobreprocesar
los alimentos. Averigüe la textura de los alimentos
a menudo. Siga pulsando hasta obtener la
consistencia deseada. Ciertos alimentos, como
las cebollas, suelen licuarse muy rápidamente;
averigüe su textura después de cada pulsación.
Intente picar otros alimentos, como carne para
hamburguesas o salchichas. Luego, prepare
mayonesa, masa de hojaldre o pan, según se
describe en el libro de recetas.
Para obtener resultados consistentes:
• Utilice pedazos del mismo tamaño.
• No procese cantidades de alimentos más altas
que las recomendadas.
Cómo vaciar el bol
Espere hasta que el motor se haya detenido
completamente antes de abrir la tapa. Cuando
lo esté, retire la tapa (puede retirar la tapa y
el juego de empujadores al mismo tiempo).
Sostenga el juego de empujadores, manteniendo
el pulgar lejos de las patas verticales, y gire en
sentido horario. Álcelo; la tapa seguirá.
No intente retirar la tapa y el bol al mismo tiempo;
esto puede dañar el bol.
Retire el bol de la base antes de retirar la cuchilla;
esto creará un sello que evitará los derrames. Gire
el bol en sentido horario y álcelo para retirarlo de
la base.
Utilice uno de los métodos siguientes para evitar
que la cuchilla se caiga al vaciar el bol: Agarre
la cuchilla por el eje de plástico y retírela del bol
antes de vaciar este. O bien: introduzca el dedo
en el orificio debajo del bol y mantenga la cuchilla
en su puesto al vaciar el bol. También puede
sostener la cuchilla por el eje con su dedo o una
espátula mientras vacía el bol.
USOS DE LA CUCHILLA DE
METAL
Cómo picar frutas/vegetales crudos:
Primero, corte los alimentos en pedazos de 1
pulgada (2.5 cm); esto producirá resultados más
uniformes. No procesa más de 2 tazas (400 g)
de alimentos a la vez. Cierre la tapa y asegure el
juego de empujadores. PULSE repetidamente,
poniendo el botón sobre “PULSE” por un
segundo, y luego esperando por un segundo
antes de repetir, hasta que los alimentos estén
picados. Averigüe la consistencia a menudo.
Raspe el bol con una espátula si es necesario
para despegar los alimentos de las paredes.
Cómo hacer puré de frutas/vegetales
cocidos:
Primero, corte los alimentos en pedazos de 1
pulgada (2.5 cm); esto producirá resultados más
uniformes. No procesa más de 2 tazas (400 g)
de alimentos a la vez. Cierre la tapa y asegure el
juego de empujadores. PULSE para picar grueso,
y luego procese continuamente, colocando el
botón de control sobre “ON”, hasta obtener la
consistencia deseada. NOTA: no haga puré de
papas usando este método; la cuchilla de metal
produce una textura pegajosa. (véase la receta
del puré de papas en el libro de recetas al final de
este manual).
• Para hacer sopas/cremas, cueza los vegetales
en agua/caldo. Coloque los vegetales en el bol,
separándolos del caldo con una espumadera.
Conseguirá resultados más suaves, más
rápidamente, sin no añade líquido. Después
de procesar, agregue la cantidad necesaria de
líquido de cocción para poder vaciar el bol.
• De vez en cuando, pedazos de alimentos
pueden quedar trabados entre la cuchilla y el
bol. Si esto ocurriera, apague y desconecte el
aparato, abra la tapa, retire la cuchilla y retire los
pedazos trabados. Vacíe el bol, vuelva a instalar
la cuchilla, regrese los alimentos en el bol y
cierre la tapa, quitando primero el empujador
pequeño. Encienda la máquina, colocando
el botón de control sobre “ON”, y eche los
pedazos de alimentos en la boca de llenado
pequeña. Agregue los ingredientes restantes y
siga procesando como de costumbre.
TÉCNICAS PARA PICAR/HACER
PURÉ
Para picar alimentos duros como el ajo o
queso duro:
8
Page 45

Retire el empujador pequeño, encienda el aparato
(“ON”) y eche los alimentos por la abertura en
el centro del empujador grande. Los alimentos
pequeños como el ajo pueden introducirse
enteros. Corte los alimentos grandes como el
queso en pedazos de 1 pulgada (2.5 cm). Este
método es ideal para picar ajo, chalote y cebolla.
Con el queso duro y el coco, obtendrá una textura
rallada.
IMPORTANTE: si el queso es demasiado duro
como para cortarse con cuchillo, no intente
picarlo; esto podría dañar la cuchilla o el aparato.
Cómo picar hierbas frescas:
Las hierbas, el bol y la cuchilla deben estar
limpios y totalmente secos. Quite los tallos de las
hierbas. Coloque las hojas en el bol y procese
hasta obtener la consistencia deseada. Cuantas
más hierbas pone en el bol, más fino el resultado.
Si están completamente secas cuando las picas,
las hierbas podrán conservarse en el refrigerador
durante 10 días o más, en una bolsa hermética.
También pueden congelarse durante hasta meses,
en una bolsa o un recipiente hermético.
Cómo rallar cáscara de cítricos o picar
frutas pegajosas como dátiles y pasas:
Pele la cáscara de los cítricos con un pelador
de vegetales (no pele la parte blanca, la cual
es amarga). Corte las peladuras en pedazos de
2 pulgadas (5 cm) o menos y procese con ½
taza (100 g) de azúcar granulada, hasta obtener
ralladura. Nota: esto puede tomar 2 minutos o
más.
Para picar frutas pegajosas como dátiles, pasas,
ciruelas pasas y frutas confitadas, primero
congele las frutas por aproximadamente 10
minutos. Coloque las frutas en el bol y agregue
un poco de la harina de la receta. No use más de
1 taza (125 g) de harina por cada taza (200 g) de
frutas.
TAPA COMPACTA
La tapa compacta es muy práctica para picar,
mezclar, hacer puré o amasar, especialmente
cuando preparar recetas tales como pasteles,
galletas, tartas y panes.
Para instalar la tapa compacta:
Cerciórese de que el bol y la cuchilla picadora,
la cuchilla amasadora o el accesorio batidor
estén debidamente instalados. Coloque la tapa
compacta sobre el bol de manera que el logotipo
Cuisinart de la tapa apunte hacia arriba y sea
legible. Luego, gire la tapa en sentido antihorario
para sujetarla.
Para retirar la tapa compacta:
Coloque una mano cerca del logotipo Cuisinart y
otra en el lado opuesto de la tapa; gire la tapa en
sentido horario. Alce la tapa para retirarla del bol.
USOS DE LA CUCHILLA DE
METAL
Cómo picar carne, aves, pescado y
mariscos:
Utilice alimentos helados, pero no congelados.
Corte la carne en pedazos de 1 pulgada (2.5
cm) para obtener resultados más homogéneos.
No procese más de 2½ tazas (570 g) a la vez.
Ponga el botón de control sobre “PULSE” por
un segundo 3 o 4 veces, esperando un segundo
entre cada pulsación. Para obtener una textura
más fina, procese continuamente por varios
segundos. Averigüe la consistencia a menudo.
Raspe el bol con una espátula si es necesario.
Cómo moler carne, aves, pescado y
mariscos:
Prepare los alimentos según se describió
en la sección anterior. PULSE para picar, y
luego procese continuamente hasta obtener
la consistencia deseada. Raspe el bol con una
espátula si es necesario. Deje los alimentos
molidos en el bol y agregue los ingredientes
especificados en la receta (por ej. huevos, crema,
condimentos). Siga procesando para mezclar.
Recuerda que la textura final depende de cuánto
tiempo procesa los alimentos. Variar el tiempo
permite obtener una variedad de texturas, ideales
para hamburguesas, papas ralladas, pimientos
rellenos, “pâtés” con pedazos o “mousses”
suaves.
Cómo picar nueces:
No procese más de 2 tazas (400 g) a la vez. Ponga
repetidamente el botón de control sobre “PULSE”,
averiguando a menudo para asegurarse de que
las nueces no se conviertan en mantequilla. Si una
receta incluye harina o azúcar, combine 1 taza
(200 g) de nueces con ½ taza (60g) de harina o
½ taza (100 g) de azúcar antes de procesar; esto
permitirá obtener resultados muy finos, sin hacer
mantequilla de nueces. También puede picar las
nueces con un disco triturador. El disco triturador/
rallador fino (opcional) es particularmente eficaz
para este trabajo.
Cómo hacer mantequilla de maní u otras
nueces:
No procese más de 2 tazas (400 g) a la vez.
9
Page 46

Procese continuamente. Después de 2–3 minutos,
las nueces empezarán a formar una bola que
se suavizará poco a poco. Raspe el bol con una
espátula y siga procesando
hasta que gotas de aceite sean visibles. Pruebe
para averiguar la consistencia. Cuanto más tiempo
procesa las nueces, más suave la mantequilla.
Para conseguir mantequilla con pedazos, agregue
un puñado de nueces al bol cuando la bola de
mantequilla empiece a suavizarse. Para hacer
mantequilla de anacardo, agregue un poco de
aceite vegetal sin sabor. Las mantequillas de
nueces caseras no contienen conservantes. Por lo
tanto, deberá conservarlas en el refrigerador.
Cómo hacer mantequillas aromatizadas,
cremas para untar y salsas para mojar:
Para hacer mantequilla aromatizada, corte la
mantequilla en pedacitos y permita que llegue a
temperatura ambiente. Procese los ingredientes
saborizantes (anchoas, queso, hierbas, etc.)
primero, picándolos finamente. Cerciórese de
que el bol esté limpio y seco. Si la receta incluye
ingredientes duros como ajo o queso duro,
encienda el aparato y eche los ingredientes en
la boca de llenado. Agregue la mantequilla y
procese continuamente (ON) hasta obtener una
mezcla suave. Agregue los ingredientes líquidos
de último, sin apagar el aparato, y procese justo
hasta incorporarlos. Para hacer cremas para untar
o salsas para mojar, procese los ingredientes de la
misma manera. Utilice ingredientes a temperatura
ambiente, córtelos en pedazos de 1 pulgada (2.5
cm) y agréguelos una cucharada a la vez.
Cómo hacer mayonesa:
Cerciórese de que el bol y la cuchilla estén limpios
y secos. Utilice un huevo grande entero, o las
yemas de dos huevos grandes. La mayonesa
hecha con yemas será casi tan espesa como la
mantequilla. Prepare
por yema o 1¼ taza (295 ml) de aceite por huevo
entero.
Procese las yemas o el huevo con sal, mostaza
y 2 cucharadas de aceite vegetal durante por
lo menos 30 segundos. Sin apagar la máquina,
vierta ¼ taza (60 ml) de aceite en el empujador
pequeño. Cuando el empujador esté vacío, retírelo
(sin apagar la máquina) y agregue muy lentamente
el resto del aceite. Véase el libro de recetas en la
parte de en el lado opuesto de este manual.
2
⁄3 taza (160 ml) de aceite
Cómo montar claras:
Utilice este método solamente para preparar
recetas que pueden prepararse casi por completo
usando una procesadora de alimentos.
Asegúrese de que el bol esté muy limpio. Coloque
3 o más claras de huevo en el bol y presione
el botón ON. Agregue 1 cucharadita de jugo
de limón o de vinagre por clara; esto permite
obtener claras montadas más firmes (el sabor es
imperceptible en los pasteles o soufflés). Siga
procesando por 1½–2½ minutos, hasta que la
claras batidas estén firmes. Para conseguir claras
montadas más ligeras, utilice el accesorio batidor
(opcional).
Cómo batir crema:
La crema batida/nata montada hecha con
procesadora mantiene su forma. Es perfecta para
decorar pasteles o servir con frutas del bosque o
postres. Sin embargo, no tendrá la consistencia
ligera y esponjosa de la crema batida tradicional.
Para conseguir crema batida más ligera y
esponjosa, utilice el accesorio batidor (opcional).
Refrigere la crema antes de empezar. Procese
continuamente hasta que empiece a espesarse.
Luego, agregue la cantidad deseada de azúcar
y siga procesando hasta obtener la consistencia
deseada. Para obtener resultados consistentes,
agregue 2 cucharadas (15 g) de leche sin grasa/
descremada en polvo a la crema antes de batir.
Cómo rallar pan y moler galletas:
Corte le pan o las galletas (saladas o dulces)
en pedazos y colóquelos en el bol. Procese
continuamente hasta obtener la consistencia
deseada. Añada perejil picado u otras hierbas
picadas si desea. Si desea añadir mantequilla,
primero procese el pan o las galletas, y luego
agregue la mantequilla por el empujador pequeño,
sin apagar la máquina.
Para preparar fondo de tarta de galletas
molidas, procese las galletas según se describe
anteriormente. Agregue azúcar, especias y
mantequilla, según se describe en la receta.
Procese hasta que la mezcla esté bien mezclada.
Cómo preparar masa de hojaldre:
Lo siguiente describe el método general; para
proporciones exactas, véase el libro de recetas en
el lado opuesto de este manual.
Coloque harina, sal y pedazos de mantequilla
muy fría o congelada en el bol. Procese hasta
obtener una mezcla que tenga la consistencia
de la harina de maíz. Sin apagar la máquina,
empiece a agregar agua helada por la boca
10
Page 47

de llenado, una cucharada a la vez. Deje de
procesar ni bien la masa forme una bola; esto
producirá una maza suave y hojaldrada. Utilice
la masa inmediatamente o forme un disco de
aproximadamente 1 pulgada (2.5cm) de espesor.
Envuelva la masa en papel film/plástico y
refrigérela hasta el momento de usar.
Para preparar panes sin levadura o
pasteles/tortas con polvo de hornear y/o
bicarbonato de sodio:
La regla más importante es no sobreprocesar la
masa después de añadir la harina.
Utilice ingredientes fríos. Si la receta requiere
ralladura o ingredientes picados (por ej. nueces),
prepare estos ingredientes primero, mientras
el bol está limpio y seco, y resérvelos hasta el
momento de usar (siempre añada azúcar para
hacer ralladura).
Coloque los ingredientes secos (harina, sal, polvo
de hornear/bicarbonato) en el bol y procese por 5
segundos, usando la cuchilla de metal. Retire los
ingredientes secos del bol.
Coloque los huevos y el azúcar en el bol y
procese continuamente por aproximadamente 1
minuto. Luego, agregue mantequilla a temperatura
ambiente, en pedacitos Procese por 1 minuto,
hasta obtener una mezcla homogénea. Agregue
los condimentos (vainilla, especias,
procese hasta obtener una mezcla suave. Agregue
los ingredientes secos. Pulse, averiguando el
resultado después de cada pulsación. Deje
de pulsar después de haber incorporado los
ingredientes secos. Si procesa demasiado la
masa, el pastel/bizcocho será duro. Nota: si la
receta requiere ingredientes picados grueso (por
ej. pasas o nueces), agregue estos al mismo
tiempo como los ingredientes secos.
cacao
, etc.);
Cómo procesar harinas preparadas para
pasteles:
Su procesadora de alimentos es lo
suficientemente grande como para procesar
un paquete de 15.25 onzas (430 g) de harina
preparada.
Instale la cuchilla de metal y coloque la harina
preparada en el bol. Encienda la máquina,
agregue los huevos y el líquido por el empujador
pequeño y procese por 5 segundos. Raspe el
bol y procese por 1 minuto adicional. No retire
la cuchilla de metal. Introduzca el dedo en la
abertura debajo del bol para mantener la cuchilla
en su puesto al vaciar el bol.
CONSEJO: después de vaciar el bol, regréselo
sobre el bloque-motor. Instale la cuchilla de
metal y pulse una vez más; esto despegará los
alimentos de la cuchilla. Retire la cuchilla y raspe
el bol con una espátula.
TÉCNICAS PARA AMASAR MASA
DE LEVADURA
Su procesadora de alimentos Pro Classic™ ha sido
diseñada para mezclar y amasar en una fracción
del tiempo. Obtendrá resultados perfectos si sigue
estas instrucciones: NUNCA PROCESE MASA
QUE ESTÉ DEMASIADO DURA PARA AMASARSE
A MANO.
Hay dos tipos de masa con levadura.
La masa de pan típica está hecha con una
mezcla de harina que contiene por lo menos
un 50% de harina blanca. Es suave, flexible y
ligeramente pegajosa. No pega a las paredes del
bol.
La masa dulce típica contiene más azúcar,
mantequilla y/o huevos que la masa de pan
típica. Es rica y pegajosa, y no deja el bol limpio.
Requiere amasarse durante menos tiempo (por
lo general, 30 segundos son suficientes, pero
obtendrá mejores resultados si la amasa durante
60–90 segundos, siempre que la máquina no
ralentice). El método para amasar es el mismo
para ambos tipos de masa.
Capacidad:
Si la receta incluye más de la cantidad
recomendada, procese los ingredientes en varias
veces. También procese la masa dulce en varias
veces si la receta requiere más de 3½ tazas
(435 g) de harina. Recomendamos usar un
máximo de 4 tazas (500 g) de harina común o 2½
tazas (300 g) de harina integral.
Cómo medir la harina:
Es preferible pesar la harina. Si no tiene balanza,
o si una receta no especifica el peso, utilice un
vaso medidor para ingredientes secos (no para
líquidos).
Revuelva la harina con una cuchara o un
tenedor antes de medirla. Llene el vaso medidor
completamente. Enrase la harina con el filo de un
cuchillo o una espátula.
Cómo activar/fermentar la levadura:
Averigüe la fecha de vencimiento de la levadura;
si pasó la fecha, no la use. Disuelva la levadura en
1
⁄3 taza (80 ml) de líquido tibio. Si la recete incluye
un edulcorante, como azúcar o miel, agregue
una cucharadita con la levadura. Si la receta no
11
Page 48

incluye edulcorante, agregue una pizca de azúcar;
Sin esto, la levadura no fermentará. Deje la mezcla
reposar durante hasta 10 minutos, hasta que se
vuelva espumosa.
Cómo procesar ingredientes secos:
Coloque la harina y los ingredientes secos en
el bol. Si la receta requiere hierbas, aceite o
manteca/mantequilla, agregue estos con la harina.
Procese continuamente durante 20 segundos.
Nota: puede añadir el queso, las nueces y las
pasas con los ingredientes secos o durante
el amasado final. Para dejarlos casi enteros,
agréguelos durante los últimos 5 segundos. Para
conseguir una textura más fina, agréguelos antes.
Cómo añadir líquidos:
Los líquidos deben añadirse por el empujador
pequeño, mientras la máquina está encendida.
Eche el líquido lentamente, para permitir
que los ingredientes secos lo absorban. Si el
líquido chapotea o salpica, deje de añadir, pero
no apague el aparato. Espere hasta que los
ingredientes se mezclen, y luego siga añadiendo
lentamente el líquido. Eche el líquido sobre la
masa en el momento en que pasa bajo la boca de
llenado. Procure no verter el líquido directamente
en el fondo del bol.
Siga la receta al pie de la letra. Es importante que
añada suficiente líquido, para que la masa pueda
amasarse debidamente. Amasar masa muy densa
puede cansar la máquina.
La temperatura del líquido usado para disolver la
levadura debe estar entre 105 ˚F (40˚C) y 120 ˚F
(49 ˚C). Si la temperatura es más baja, la levadura
no se activará. Si la temperatura es demasiado
alta (más de 130 ˚F/54 ˚C), la células de levadura
morirán.
Todos los líquidos usados en la receta, excepto el
líquido usado para activar/fermentar la levadura,
deben estar fríos, para evitar que la masa se
sobrecaliente. No permita que la masa alcance
más de 100 ˚F (37 ˚C); esto impediría que se
leude.
Para amasar masa de pan:
Procure no procesar masa que esté demasiado
dura para amasarse a mano; esto podría cansar
el motor.
Después de que la masa llegue a formar una bola,
procese por 60 segundos adicionales. Apague
la máquina y averigüe la consistencia de la
masa. La masa fermentada salada estará suave
y ligeramente pegajosa. Estire la masa entre sus
manos para averiguar la consistencia. Si se siente
dura, grumosa o irregular, siga procesando hasta
que esté suave y flexible. Asegúrese de que la
cuchilla esté debidamente instalada antes de
regresar la masa al bol.
Masa de panes dulces tipo “coffee cake”
o “brioche”:
Procese la masa durante por lo menos 30
segundos después de haber incorporado todos
los ingredientes. La masa seguirá pegando a las
paredes del bol. Si es necesario, raspe el bol y
procese por 5 segundos adicionales.
Cómo dejar leudar la masa:
Ponga la masa en una bolsa de plástico hermética
ligeramente enharinada. Expulse el aire y cierre
la bolsa, dejando suficiente espacio para que
la masa pueda leudar. O: ponga la masa en un
recipiente grande engrasado con mantequilla o
aceite vegetal. Voltee la masa para cubrirla con
mantequilla/aceite. Cubra el recipiente con una
toalla humedecida o papel film/plástico aceitado.
Deje leudar, en un lugar templado (80 ˚F/26 ˚C)
sin corrientes de aire. Por lo general, eso demora
1½ hora, pero puede tomar entre 45 minutos y
varias horas dependiendo del tipo de harina y de
la humedad en el aire. Para probar la masa, hunda
su dedo ligeramente en ella. la abolladura debería
permanecer en la masa. Si no lo hace, deje que
la masa leude por más tiempo y pruébela otra
vez. Cuando la masa esté lista, aplástela para
desinflarla.
Cómo dar forma y hornear al pan:
Si usa un molde de barra para cocer el pan, llene
el molde solamente hasta la mitad. Deje leudar
la masa en el molde hasta que pase ligeramente
la cumbre. Si desea dar forma al pan, coloque la
masa sobre una placa aceitada y permita que se
leude al doble de su volumen.
Preparación consecutiva:
Si desea, puede preparar varias tandas
consecutivas de pan. El motor de su procesadora
de alimentos es extremadamente eficaz. Siga las
recetas al final de este manual.
RESOLUCIÓN DE PROBLEMAS
AL AMASAR MASA DE PAN
La cuchilla no combina los ingredientes
Siempre ponga la procesadora en marcha antes
de agregar líquido.
Eche el líquido lentamente, para permitir que
los ingredientes secos lo absorban. Si el líquido
chapotea o salpica, deje de añadirlo, pero
12
Page 49

no apague el aparato. Espere hasta que los
ingredientes se mezclen, y luego siga añadiendo
lentamente el líquido. Eche el líquido por la boca
de llenado, en el momento preciso en que la
masa pasa bajo esta; procure no verter el líquido
directamente en el fondo del bol.
La cuchilla no permanece en el fondo del
bol
Presione la cuchilla para asegurarse de que esté
en el fondo del bol.
Masa excesivamente pegajosa puede alzar la
cuchilla. Si la masa parece muy pegajosa, vuelva
a instalar la cuchilla y agregue inmediatamente
2 cucharadas (15 g) de harina por la boca de
llenado, sin apagar la máquina.
La masa no deja el bol limpio
• Puede que la cantidad de masa exceda la
capacidad máxima. Dividir la masa en dos
porciones y amasar por separado.
• Puede que la masa esté demasiado seca. Si la
masa se desmigaja, añada agua 1 cucharada a
la vez, sin apagar la máquina, y siga procesando
hasta que la masa deje de pegar al bol. Espere
10 segundos entre cada adición.
• Puede que la masa esté demasiado húmeda.
Sin apagar la máquina, añada 1 cucharada de
harina. Si es necesario, añada más harina, 1
cucharada a la vez, hasta que la masa deje de
pegar al bol y forme una bola.
La masa se enreda en la cuchilla y no está
homogénea
Apague la máquina y retire cuidadosamente la
masa. Divida esta en 3 porciones y disponga las
porciones uniformemente en el fondo del bol.
Siga procesando hasta que la masa esté suave y
flexible.
La masa parece dura
Divida la masa en 2 o 3 porciones y disponga
estas uniformemente en el fondo del bol. Amase
por 10 segundos, hasta obtener una masa suave
y homogénea.
La masa está demasiado suave o se fuga
Siempre encienda la máquina antes de añadir
líquido y espere hasta que los ingredientes secos
absorban el líquido antes de añadir más.
El motor se apaga
• Puede que el juego de empujadores no esté
debidamente instalado. Presione la funda para
bloquear los empujadores y siga procesando.
• Puede que la tapa haya quedado abierta. Cierre
la tapa y siga procesando.
• Puede que el cable se haya desconectado de la
toma de corriente. Conecte el cable a la toma de
corriente y siga procesando.
Puede que la máquina se haya cansado y que
•
el motor haya sobrecalentado. Permita que el
motor se enfríe por–10 minutos. Un cortocircuito
de seguridad apaga automáticamente en motor
en caso de sobrecalentamiento. Si el motor se
apaga de repente, apague la máquina. Después
de 5–10 minutos, divida la masa en 2 porciones
y siga procesando cada porción por separado.
Pellizque la masa para asegurarse de que no
esté demasiado dura para amasarse a mano.
Si lo es, agregue líquido, 1 cucharadita a la vez,
hasta que la masa deje de pegar al bol.
La masa no leuda
Recomendamos que siempre active/fermente la
levadura, combinándola con ½ cucharadita de
azúcar y 1⁄3 taza (75 ml) de líquido tibio. Dentro
de 10 minutos, la levadura hará espuma, lo que
indica que está activa. No utilice levadura seca
vencida.
No utilice agua más caliente; esto podría matar
las células de levadura y sobrecalentar la masa.
Disuelva la levadura en aproximadamente 1⁄3 taza
(75ml) de agua tibia; el resto del líquido debe
estar frío.
Evite procesar la masa por demasiado tiempo;
podría sobrecalentarse. La temperatura de la
masa debería alcanzar 80 ˚F (26 ˚C), pero nunca
exceder 100 ˚F (37 ˚C).
Deje leudar la masa en un lugar templado de
80–90 ˚F (26–32 ˚C).
El pan está demasiado pesado/denso
La próxima vez, averigüe la textura de la masa
antes de ponerla a leudar. La masa debe estar
suave, flexible y ligeramente pegajosa. Deje leudar
la masa al doble de su volumen, en un recipiente
o una bolsa, y permita que se leude otra vez
después de dar forma al pan.
RESOLUCIÓN DE PROBLEMAS
AL AMASAR MASA DULCE
El motor pierde velocidad
• Puede que la cantidad de masa exceda la
capacidad máxima. Divida la masa en dos
porciones y amase cada porción por separado.
•
No procese la masa durante mucho tiempo
después de haber incorporado los ingredientes.
Las masas ricas producirán buenos resultados
después de tan solo 30 segundos.
13
Page 50

La cuchilla no incorpora los ingredientes:
A menos que la receta requiera mantequilla/
margarina derretida, corte la mantequilla en
pedacitos.
La cuchilla no permanece en el fondo del
bol:
Presione la cuchilla para asegurarse de que
esté en el fondo del bol. Puede que el bol esté
sobrecargado. Divida la masa en 2 porciones y
amase cada porción por separado.
PREPARACIÓN DE LOS
ALIMENTOS PARA REBANAR/
TRITURAR/RALLAR
Frutas y vegetales redondos (cebollas,
manzanas, etc.)
Corte la parte inferior de la fruta o del vegetal para
que repose recta sobre el disco.
Introduzca la fruta o el vegetal en la boca de
llenado, en lado cortado primero, y lo más posible
hacia la izquierda para que no se mueva durante
el procesamiento.
Elija frutas maduras, pero firmes.
Siempre saque las colas, pepas, huesos y semillas
antes de procesar. No es necesario quitar las
pepas de los cítricos. Tampoco es necesario
pelarlos.
Para cortar pimientos dulces en rodajas:
Quite el tallo y corte el lado del tallo recto. Quite el
corazón y las semillas con una cuchara. No corte
el otro lado del pimiento; esto producirá rodajas
más redondas y uniformes.
Frutas grandes (piña, melón, etc.)
Corte la fruta por la mitad y retire el corazón o
las pepas. Corte cada mitad en pedazos más
pequeños si es necesario. Corte la parte de arriba
y la parte de abajo.
Col y lechuga
Corte la parte de arriba y la de abajo, y luego
córtela verticalmente por la mitad. Quite el
corazón y corte la col/lechuga en pedazos
que quepan en la boca de llenado, siempre
verticalmente. El disco rebanador de 2 mm y
el disco rebanador de 1 mm (opcionales) son
perfectos para rebanar col para hacer ensalada.
Si los pedazos no caben en la boca de
llenado:
Intente introducirlos por la parte de abajo, la cual
es ligeramente más ancha.
Posicione los alimentos según el
resultado deseado:
Verticalmente para obtener rodajas cortas.
horizontalmente para obtener rodajas largas;
Apretuje los alimentos en la boca de llenado, pero
no sobrecargue esta.
Siempre use los empujadores para empujar los
alimentos. Nunca introduzca los dedos ni algún
utensilio en la boca de llenado.
Nunca empuje el empujador con mucha fuerza.
Emplee presión leve para empujar el queso y los
alimentos suaves (bananas, champiñones, fresas,
tomates). Emplee presión moderada para empujar
los alimentos firmes (manzanas, apio, cítricos,
papas y calabacines). Emplee presión firme para
empujar los alimentos muy duros (zanahorias,
batatas).
EJERCICIOS DE PRÁCTICA
1. Instale el disco deseado, cierre la tapa e
introduzca los alimentos en la boca de llenado.
2. Prepare el juego de empujadores. Bloquee el
empujador pequeño y deslice el seguro en la
parte trasera de la funda para que el empujador
grande pueda moverse libremente.
3. Introduzca el empujador grande en la boca de
llenado y presione la funda para asegurarlo.
PULSE mientras empuja los alimentos. Suelte
el botón ni bien los alimentos estén rebanados/
rallados.
4. Vuelva a llenar la boca de llenado, sin abrir
la tapa. Simplemente agarre el juego de
empujadores, posicionando sus dedos sobre
la pata de bloqueo ancha. Presione firmemente
la pata y alce el empujador. Saldrá fácilmente,
dejando la tapa y la boca de llenado en su
lugar. Coloque los alimentos en la boca de
llenado.
CÓMO RETIRAR LOS ALIMENTOS
DEL BOL
Espere hasta que el disco esté completamente
inmóvil. Cuando lo esté, retire la tapa. Sostenga
el juego de empujadores, manteniendo el pulgar
lejos de las patas de bloqueo, y gire en sentido
horario. El juego de empujadores y la tapa se
sacarán juntos.
Retire el disco rebanador/rallador del bol antes
de retirar este de la base. Introduzca dos dedos
debajo de cada lado del disco y álcelo. Gire el
bol en sentido horario y álcelo para retirarlo de la
base.
Coloque el disco sobre la tapa (puesta al revés)
para evitar los goteos.
14
Page 51

TÉCNICAS PARA REBANAR/
RALLAR
Pequeñas frutas/hortalizas redondas
(fresas, rábanos, champiñones, etc.)
Corte las frutas/hortalizas por ambos lados.
Introdúzcalas en la boca de llenado, el lado
cortado hacia abajo. La boca de llenado podrá
llenarse hasta 1 pulgada (2.5 cm) de la cumbre.
Las primeras rodajas son perfectas para
decorar. Si desea que todas las rodajas tengan
exactamente el mismo espesor, procese una capa
de frutas/hortalizas a la vez.
Frutas y vegetales largos (bananas, apio,
calabacines, etc.)
Córtelos en pedazos más pequeños si fuera
necesario. Corte ambos lados rectos. Posicione
los pedazos verticalmente en la boca de llenado,
apretujándolos para que no se muevan durante el
procesamiento.
Pequeñas cantidades
Introduzca los alimentos en el centro del
empujador grande y empújelos con el empujador
pequeño. Retire el empujador pequeño del
empujador grande. Introduzca el empujador
grande en la boca de llenado y presione la funda
para sujetarlo. Asegúrese de que el empujador
pequeño esté asegurado. Corte los alimentos
en pedazos si es necesario. Si los alimentos son
largos y finos (por ej. zanahorias), colóquelos
lo más posible hacia la izquierda para que no
se muevan. Si los alimentos son más ancho de
un lado que de otro (por ej. zanahorias, apio
o cebolletas), córtelos por la mitad y júntelos
en pares de manera que cada lado tenga
aproximadamente el mismo diámetro.
Habichuelas estilo francés
Corte las habichuelas para que quepan
horizontalmente en la boca de llenado. Escáldelas
en agua hirviente salada durante 60 segundos, y
luego póngalas inmediatamente en agua helada
para detener la cocción. Una vez frías, escúrralas
y séquelas. Dispóngalas horizontalmente en la
boca de llenado, llenando esta hasta 1 pulgada
(2.5cm) de la cumbre. Instale el disco rebanador.
Asegúrese de que el empujador pequeño esté
asegurado y de que el empujador grande pueda
moverse libremente. PULSE, ejerciendo presión
leve, para cortar las habichuelas en lonjas finas.
Utilice el mismo método para triturar o cortar las
zanahorias y los calabacines crudos en rodajas
largas y oblicuas.
Juliana de frutas o de vegetales
Preparar una Juliana consiste en cortar las frutas
o los vegetales dos veces, para obtener tiras
largas y muy delgadas. Introduzca las frutas o los
vegetales (papas, nabos, calabacines, manzanas,
etc.) horizontalmente en la boca de llenado.
PULSE mientras empuja los alimentos. Obtendrá
rodajas largas. Retire las rodajas del bol y vuelva
a ensamblar la fruta o el vegetal. Introduzca las
rodajas (juntas)
verticalmente en la boca de llenado. Rebánelas
otra vez. Obtendrá tiras largas y delgadas. Para
hacer Juliana de frutas/vegetales en un paso,
utilice el disco para cortar en Juliana (opcional).
Cómo rebanar carne/pollo
Carne/pollo cocinados
La carne debe estar muy fría. Corte la carne en
pedazos si es necesario. Para preparar Juliana
de jamón o mortadela, enrolle varias lonchas
juntas y coloque cuantos más rollos posible
verticalmente en la boca de llenado. Para obtener
resultados óptimos, utilice lonchas cuadradas o
rectangulares.
Carne/pollo crudos
Corte los alimentos en pedazos suficientemente
pequeños como para caber en la boca de llenado.
Por lo general, deberá cortar las pechugas
transversalmente por la mitad. Envuelva los
pedazos en papel film/plástico y póngalos en el
congelador. Una vez semicongelada (está dura
al tacto, pero se puede pinchar fácilmente con
la punta de un cuchillo afilado), la carne está
lista. Coloque los pedazos horizontalmente o
verticalmente en la boca de llenado, O coloque los
pedazos horizontalmente en la boca de llenado
y rebánelos en dirección del grano, ejerciendo
presión firme.
Salchichas, salami, etc.
Congele las salchichas tiernas hasta que estén
duras al tacto, pero lo suficientemente suaves
como para poder perforarse fácilmente con la
punta de un cuchillo afilado. No es necesario
congelar las salchichas duras. Si es delgada,
introduzca la salchicha en el centro del
empujador grande. En el caso contrario, córtela
en pedazos suficientemente pequeños como
para caber en la boca de llenado. Disponga los
pedazos verticalmente en la boca de llenado,
apretujándolos para que no se muevan durante el
procesamiento.
15
Page 52

CÓMO REBANAR/TRITURAR/
RALLAR QUESO
Quesos duros como el queso suizo y el
queso Cheddar
Corte el queso en pedazos suficientemente
pequeños como para caber en la boca de
llenado. Congélelo hasta que esté duro al tacto
pero que se pueda pinchar fácilmente con
la punta de un cuchillo afilado. Coloque los
pedazos verticalmente en la boca de llenado y
procese, empujando suavemente el empujador.
IMPORTANTE: nunca intente rebanar queso
suave como la Mozzarella o queso duro como el
queso Parmesano; esto podría dañar el disco o el
motor. La mayoría de los quesos pueden rallarse,
excepto los quesos muy suaves. Para triturar/
rallar Mozzarella, deberá congelarla durante unos
minutos primero. Los quesos duros deben estar a
temperatura ambiente.
RESOLUCIÓN DE PROBLEMAS
La mayoría de los problemas son fáciles de
solucionar. Aquí están algunos de los problemas
más comunes y sus soluciones.
Los resultados no son uniformes
Procese menos alimentos a la vez o utilice el
modo PULSE hasta conseguir pedazos de menos
de ½ pulgada (1.5 cm).
Líquido está filtrándose por la cuchilla
Retire el bol de la base ni bien termine. No retire
la cuchilla primero. Cuando retira el bol junto con
la cuchilla, la cuchilla baja, formando un sello casi
perfecto en el fondo del bol.
Líquido está filtrándose por la tapa
Ha agregado demasiado líquido. Nunca procese
más de 2
tazas (1.2 L) de líquido espeso.
Cuanto más espeso el líquido, más puede
procesar a la vez. Las cantidades arriba son
para mezclas espesas como mezcla de pastel o
panqueques.
Las rebanadas no son uniformes
Apretuje los alimentos en la boca de llenado
con más cuidado. Procese, ejerciendo presión
uniforme.
Los alimentos no se mantienen rectos en
la boca de llenado
Corte los alimentos en pedazos que quepan en
la boca de llenado y tengan la misma altura. Para
3
⁄4 tazas (650 ml) de líquido fluido o 5
rebanar solamente uno o dos pedazos, coloque
los alimentos en la boca de llenado pequeña.
Parta las zanahorias longitudinalmente a la mitad
e introduzca una mitad apuntando hacia abajo y la
otra mitad apuntando hacia arriba.
Los alimentos rebanados o triturados se
acumulan sobre las paredes del bol
Esto es normal. De vez en cuando, retire el disco
y raspe el bol con una espátula. Cuando los
alimentos procesados lleguen al nivel del disco,
vacíe el bol.
Pedazos de alimentos permanecen
encima del disco rebanador o rallador
Esto es normal. Mueva el empujador grande
hacia arriba y abajo para terminar de rebanar/
triturar/rallar los pedazos, o vuelva a posicionar
los pedazos en la boca de llenado y rebánelos/
tritúrelos/rállelos otra vez.
El queso suave, como la Mozzarella, se
descompone y se queda encima del disco
rallador
El queso no era lo suficientemente frío, o se
ejerció demasiada presión sobre el empujador.
Para triturar/rallar queso suave, no presione el
empujador sino deje que el disco triture/ralle el
disco, golpeteando el empujador para guiarlo.
LIMPIEZA, MANTENIMIENTO
Y ALMACENAJE
Guarde su procesadora de alimentos sobre la
encimera, para siempre tenerla lista. Desenchufe
el aparato cuando no está en uso. No guarde
el aparato con el juego de empujadores en
la posición de bloqueo; esto podría dañar el
mecanismo de encendido/apagado.
Guarde los accesorios fuera del alcance de los
niños. Las cajas de almacenaje (opcionales)
permiten guardar los accesorios de manera
segura y práctica.
Todas las piezas removibles son aptas para
lavavajillas. Recomendamos que las lave en el
nivel superior del lavavajillas únicamente. Ponga
el bol al revés para evitar que se llene de agua
durante el ciclo de lavado. Recuerde donde
colocó la cuchilla y los discos y tenga cuidado al
sacarlos del lavavajillas.
Le recomendamos que enjuague todas las piezas
inmediatamente después del uso para evitar
que los residuos de alimentos se sequen, lo que
dificulta la limpieza. El orificio en el fondo del
16
Page 53

empujador grande permite que el agua escurra
y facilita la limpieza. Si alimentos quedaron
atrapados en el empujador, límpielo con un cepillo
para botella.
Si desea lavar las cuchillas y los discos a mano,
haga esto con mucho cuidado. No los deje en
agua jabonosa, donde los pueda perder de
vista. Para limpiar la cuchilla, llene el bol con
agua jabonosa. Instale la cuchilla en el bol y,
sosteniéndola por el eje de plástico, muévala
rápidamente y repetidamente desde arriba
hasta abajo. También puede usar la ducha del
fregadero. Utilice un cepillo si es necesario.
El bol es de Lexan
inastillable y resistente al calor. Sin embargo, no
debe meterse al microondas porque contiene
piezas de metal.
Algunos alimentos duros pueden rallar el bol.
Es el caso del hielo, de las especias enteras y
de algunos aceites como el aceite de gaulteria
(“wintergreen”). Si le gusta preparar sus propias
mezclas de especias, es buena idea comprar otro
bol solamente para esto.
La carcasa está hecha de un plástico resistente a
impacto. El acabado lucirá nuevo durante años.
Limpie la base con una esponja ligeramente
humedecida durante el uso.
Los pies de goma de la base mantienen el aparato
estable sobre la mayoría de las superficies cuando
esté en marcha. Si los pies dejan marcas en la
encimera, rocíe producto quitamanchas y limpie
la zona con una esponja humedecida. Si esto
no soluciona el problema, vuelva a limpiar la
encimera con un limpiador en polvo no abrasivo.
Para limpiar el interior del adaptador removible,
deslice el botón de liberación hasta arriba y
manténgalo en esta posición mientras enjuaga el
interior.
IMPORTANTE: no guarde las cuchillas ni los
discos sobre el árbol del motor. Instale la cuchilla
o el disco en el momento de usarlo únicamente.
Mantenimiento: Cualquier otro servicio debe ser
realizado por un técnico autorizado
®
, un material plástico
PARA SU SEGURIDAD
Su aparato, como todos los electrodomésticos,
debe usarse con cuidado. Para prevenir los
riesgos de herida resultantes de un mal uso, siga
estas reglas de seguridad:
• Manipule la cuchilla y los discos con sumo
cuidado; sus filos son muy cortantes.
• Siempre coloque el disco sobre una superficie
plana y estable antes de conectar el adaptador
removible.
• Asegúrese de que el bol esté debidamente
asegurado antes de instalar la cuchilla o el
disco.
• Asegúrese de que la cuchilla o el disco estén
debidamente asentados, lo más bajo que
puedan.
• Siempre instale la cuchilla antes de agregar los
ingredientes.
• Siempre use el empujador para empujar los
alimentos; nunca introduzca los dedos ni una
espátula en la boca de llenado.
• Siempre espere hasta que la cuchilla o el disco
estén totalmente inmóviles antes de abrir la tapa
o retirar el empujador.
• Tenga cuidado de no dejar caer la cuchilla al
vaciar el bol. Retire la cuchilla antes de vaciar el
bol, o manténgala en su lugar con su dedo, una
espátula o una cuchara.
• No utilice el juego de empujadores si la funda
se separa del empujador. Llame al servicio de
atención al cliente de Cuisinart inmediatamente.
(véase la sección “Garantía”).
INFORMACIÓN TÉCNICA
El motor de su procesadora de alimento funciona
con corriente estándar. Las especificaciones
eléctricas del aparato están indicadas en la
etiqueta debajo de la base.
Un interruptor de seguridad apagará
automáticamente en motor en caso de
sobrecalentamiento. Esto puede ocurrir cuando
procesa mezclas espesas durante un tiempo
prolongado o cuando usa el aparato sin
interrupción durante un tiempo excesivo. Si esto
ocurriera, desconecte el aparato y permita que se
enfríe por 10 minutos o más (hasta una hora en
casos extremos).
Un mecanismo de seguridad impide que el
aparato se ponga en marcha a menos que el
bol y la tapa estén debidamente asegurados.
El motor de la procesadora se apaga muy
rápidamente después de apagar el aparato y se
detiene automáticamente al sacar el juego de
empujadores de la boca de llenado.
17
Page 54

RECETAS
Masa de hojaldre básica ................................. 28
Aperitivos/Entradas
Guacamole ...................................................... 19
Crema para untar de queso azul y pacanas ... 19
Pâté de hígado de pollo .................................. 19
“Monedas” de queso ...................................... 19
Sopas y cremas
Gazpacho con pedazos .................................. 20
Sopa de puerro y papas/“Vichyssoise” ........... 20
Sopa de lentejas .............................................. 21
Sopa de arvejas ............................................... 21
Carne, pollo y pescado
Hamburguesas ................................................ 21
Pan de carne o albóndigas.............................. 22
Chile ................................................................ 22
Salchicha ........................................................ 23
Croqueta de papa y carne ............................... 23
Salteado de pollo con vegetales ..................... 23
Croquetas de cangrejo .................................... 24
Vegetales
Puré de brécol ................................................. 24
Puré de papas ................................................. 24
Gratén de papas .............................................. 25
Zanahorias y calabacines rallados .................. 25
Masas
Masa de hojaldre básica ................................... ?
Tarta de fruta ..................................................... ?
Panes/bizcochos sin levadura, panes
de levadura y pizza
Pan de maíz ..................................................... 28
“Coffee cake” .................................................. 29
Pan blanco ...................................................... 29
Pan de trigo integral .......................................... ?
Masa de pizza ................................................. 29
Pizza rápida ..................................................... 30
Salsa de tomate para pizza ............................. 30
Postres
“Brownies” cremosos ...................................... 31
Galletas de avena con chispas de chocolate .. 31
Pastel de zanahoria ......................................... 31
Baño de queso crema ..................................... 32
Helado de yogur de pera ................................. 32
Sorbete de banana-manzana .......................... 32
Tarta de manzana ............................................ 32
CONSEJO: la tapa compacta es muy práctica
para picar, mezclar, hacer puré o amasar,
especialmente cuando preparar recetas tales
como pasteles, galletas, tartas y panes.
Ensaladas
Ensalada de tomates ....................................... 25
Ensalada de col cremosa ................................ 26
Ensalada de zanahoria rallada ........................ 26
Salsas
Pesto ............................................................... 26
Salsa mexicana ............................................... 27
Mayonesa básica ............................................ 27
Picadillo de naranja-arándanos
agrios sin cocinar ............................................ 27
Crema pastelera ................................................ ?
Salsa de chocolate .......................................... 27
Salsa de frambuesa ......................................... 28
18
Page 55

Guacamole
Sirva esta sabrosa salsa con chips de maíz o
vegetales crudos. Sustituya el cilantro por perejil
si desea.
Rinde 2¼ tazas (500 ml)
1 diente de ajo grande, pelado
1 jalapeño mediano, cortado a la mitad y
sin semillas
½ taza llena (15 g) de hojas de cilantro
1 cebolleta (“scallion”) mediana (parte
blanca y medio dedo de la parte verde),
en trozos
3 aguacates maduros medianos
3 cucharadas de jugo de limón fresco
1 pizca de comino en polvo
¼ cucharadita de sal
¼ cucharadita de chile en polvo
1 tomate mediano, en cuartos y sin
semillas
Instalar la cuchilla de metal. Poner el ajo, el
jalapeño, el cilantro y la cebolleta en el bol;
procesar por aproximadamente 15 segundos,
hasta que estén finamente picados. Raspar
el bol. Agregar el aguacate y los ingredientes
restantes, excepto los tomates. Procesar por
aproximadamente 1 minuto, raspando el bol si
es necesario, hasta obtener una mezcla suave.
Agregar el tomate y pulsar 6–8 veces, hasta que
esté finamente picado. Probar y agregar sal si es
necesario.
Crema para untar
de queso azul y pacanas
Puede sustituir el queso crema o la mitad de este
por requesón y las pacanas por nueces.
Rinde 1 taza (235 ml)
¼ taza (40 g) de pacanas
6 onzas (170 g) de queso crema bajo en
grasa, en pedazos
2 cucharadas de queso azul
Instalar la cuchilla de metal. Poner las nueces en
el bol; procesar por 10 segundos, hasta que estén
finamente picadas. Agregar el queso crema y el
queso azul. Procesar por aproximadamente 10
segundos, hasta obtener una mezcla suave (si
usa requesón, procesar por aproximadamente 90
segundos).
Pâté de hígado de pollo
Fácil de preparar y conservar, este aperitivo es
perfecto para las fiestas. Sírvalo sobre tostadas de
pan francés o tajadas de manzana.
Rinde 2¼ tazas (500 ml)
1 diente de ajo grande no pelado
3 cucharadas (45 g) de mantequilla para
saltear
1 libra (455 g) de hígado de pollo, limpio
8 onzas (225 g) de mantequilla sin sal
1 cucharadita de sal
1
⁄8 cucharadita de pimienta negra recién
molida
¼ cucharadita de pimienta de Jamaica
recién molida
1 cucharada (15 ml) de coñac
Colocar el ajo en una cacerola pequeña; cubrir
con agua y cocer a fuego lento por 10 minutos.
Reservar. Calentar la mantequilla en un sartén
hasta que burbujee, Saltear el hígado a fuego
medio-alto hasta que el exterior esté dorado, pero
que el interior siga rosado.
Estrujar el ajo y colocar la pulpa en el bol de la
procesadora. Agregar el hígado y el resto de los
ingredientes. Procesar por 1 aproximadamente
minuto, hasta obtener una mezcla suave y
cremosa. Raspar el bol si es necesario.
Colocar el paté en una vasija o un plato de servir
y refrigerar por 4 horas o más. Dejar entibiar a
temperatura ambiente por 30 minutos antes de
servir. Debidamente tapado, se conservará en el
refrigerador durante hasta 5 días.
“Monedas” de queso
Estos aperitivos tiernos y llenos de sabor son
fáciles de hacer y servir, y pueden refrigerarse o
Rinde 100 “monedas” de queso
8 onzas (225 g) de queso Cheddar, en
pedazos
congelarse.
19
Page 56

4 onzas (115 g) de mantequilla sin sal a
temperatura ambiente, en pedacitos
¼ cucharadita de sal
¼ cucharadita de salsa picante o una
pizca de pimienta de Cayena
1 taza (125 g) de harina común
Instalar la cuchilla de metal. Colocar el queso
en el bol y procesar por aproximadamente
30 segundos, hasta obtener una consistencia
parecida a la de una harina gruesa. Agregar la
mantequilla, la sal y la pimienta. Procesar por
60 segundos, hasta obtener una mezcla suave.
Raspar el bol. Agregar la harina y procesar
brevemente para mezclar. Refrigerar la masa por
1 hora, hasta que esté firme.
Dividir la masa en 3 porciones iguales y formar
un cilindro de 1½ pulgada (4cm) de diámetro con
cada porción. Refrigerar por aproximadamente 2
horas, hasta que estén firmes.
Precalentar el horno a 400 °F (200 °C). Cortar la
masa en rodajas de 1⁄8 pulgada (3 mm) y colocar
estas sobre una placa para horno ligeramente
engrasada, 1½ pulgada (4 cm) aparte una de otra.
Meter al horno por aproximadamente 10 minutos,
hasta dorarse ligeramente. Retirar del horno y
dejar enfriar sobre una rejilla.
Envuelta en plástico, la masa cruda se conservará
en el refrigerador durante hasta una semana.
Los aperitivos cocidos pueden congelarse;
recalentarlos al horno, en 300°F (150 °C), por 6–8
minutos.
molida
Partir el jalapeño longitudinalmente a la mitad y
quitar las semillas. Limpiar las cebolletas y el apio
y cortarlos en trozos. Cortar el pimiento dulce y
los tomates en cuartos. Pelar el pepino y cortarlo
longitudinalmente a la mitad. Sacar las semillas y
cortarlo para que quepa verticalmente en la boca
de llenado
Instalar la cuchilla de metal. Poner el ajo y el
jalapeño en el bol y procesar hasta que estén
finamente picados. Agregar las cebolletas, el
apio y el pimiento. Pulsar para picar en pedazos
medios. Colocar los vegetales picados en un
cuenco grande. Colocar un tomate en el bol y
pulsar para picar grueso. Agregar al cuenco.
Colocar el resto de los tomates en el bol; procesar
por aproximadamente 1 minuto, hasta obtener
una mezcla suave. Sin apagar la máquina, agregar
½ taza (120 ml) del jugo de tomate. Agregar al
cuenco, junto con el resto del jugo de tomate.
Instalar el disco rebanador. Colocar los pepinos
verticalmente en la boca de llenado y rebanar,
usando presión leve. Agregar al cuenco y revolver.
Cubrir y refrigerar antes de servir.
*Tenga cuidado al manipular jalapeños. Contienen
un aceite que puede irritar la piel y los ojos.
Lávese las manos después de prepararlos.
Sopa de puerro y
papas/“Vichyssoise”
Gazpacho con pedazos
Esta refrescante sopa fría estará lista en menos de
10 minutos. Puede servirla inmediatamente, pero
será aún mejor si la refrigera.
Rinde 4½ tazas (1 L)
1 diente de ajo pequeño
½ jalapeño pequeño*
4 cebolletas (“scallions”)
1 rama de apio
½ pimiento dulce
2 tomates
2 tazas (475 ml) de jugo de tomate o de
vegetales
1 pepino mediano
2 cucharadas de jugo de limón fresco
1 cucharadita de sal
¼ cucharadita de pimienta negra recién
Louis Diat, el antiguo Chef del Hotel Ritz de Nueva
York, hacía de esta sopa de todos los días en un
plato digno de las mejores fiestas.
Rinde 4 tazas (945 ml) de sopa de puerro y papas
o 6 tazas (1.4 L) de “Vichyssoise”
2 puerros medianos (parte blanca
solamente), limpios
½ cebolla mediana, partida a la mitad
1 cucharada (15 g) de mantequilla sin sal
2 papas medianas, peladas
1½ taza (355 ml) de caldo de pollo
1 taza (235 ml) de agua
Sal kosher y pimienta recién molida, a
gusto
1 taza (235 ml) de leche
¼ taza (60 ml) de crema líquida para batir
(“heavy cream”)
Cebollinos (“chives”) picados para
decorar
20
Page 57

Cortar el puerro en pedazos que quepan en la
boca de llenado. Rebanar el puerro y la cebolla,
usando el disco rebanador. Derretir la mantequilla
en una cacerola grande. Agregar el puerro y las
papas y saltearlos durante aproximadamente 10
minutos, revolviendo a menudo, hasta que estén
suaves pero sin permitir que se doren. Cortar las
papas transversalmente a la mitad, y luego cortar
cada mitad longitudinalmente. Rebanar, usando
el disco rebanador. Agregar las papas, el caldo y
el agua a la cacerola. Cuando la mezcla empiece
a hervir, reducir el fuego, tapar y hervir a fuego
lento por aproximadamente 25 minutos, hasta que
los vegetales estén muy tiernos. Probar y ajustar
la sazón. Servir caliente como sopa o continuar
según se indica a continuación para preparar
“Vichyssoise”.
Colar el líquido de cocción y reservarlo, en una
cacerola grande. Colocar los vegetales en el bol
de la procesadora equipado con la cuchilla de
metal y procesar hasta obtener un puré, parando
una vez para raspar el bol. Agregar el puré al
líquido de cocción reservado, batiendo. Agregar la
leche y calentar a fuego medio hasta que empiece
a hervir, revolviendo constantemente. Retirar
del fuego y agregar la crema. Sazonar con sal y
pimienta. Refrigerar hasta que esté helada. Probar
otra vez y ajustar la sazón si es necesario. Decorar
con cebollinos picados.
Lavar las lentejas en agua fría, escurrirlas y
colocarlas en una cacerola grande o una olla.
Instalar la cuchilla de metal. Poner el ajo, la
cebolla, el apio y la zanahoria en el bol; procesar
hasta que estén finamente picados. Agregar a la
cacerola. Picar los tomates. Agregar a la cacerola,
junto con los ingredientes restantes, excepto la
salchicha. Tapar y cocer por aproximadamente 1
hora.
Congelar la salchicha por aproximadamente
30 minutos, hasta que esté dura al tacto, pero
lo suficientemente suave como para poder
perforarse fácilmente con la punta de un cuchillo
afilado.
Colar la sopa, reservando el caldo. Procesar
los vegetales hasta obtener un puré. Regresar
el líquido de cocción y el puré de vegetales en
la cacerola; revolver para mezclar. Rebanar la
salchicha, usando el disco rebanador. Agregar
la salchicha a la sopa y recalentar a fuego
medio-lento, revolviendo de vez en cuando, por
aproximadamente 20 minutos.
*Opcional, especialmente si usa salchicha salada.
Sopa de arvejas partidas
Perfecta para un almuerzo o una cena de familia.
Sopa de lentejas
Sirva esta sustanciosa sopa con pan crujiente y
ensalada para una comida completa.
Rinde 6 tazas (1.4 L)
8 onzas (225 g) de lentejas
½ diente de ajo grande
½ cebolla mediana, partida a la mitad
½ apio mediano, en trozos
½ zanahoria mediana, en trozos
2 tomates medianos, en cuartos
2½ tazas (590 ml) de caldo de res
2½ tazas (590 ml) de agua
2 cucharaditas (10 ml) de vinagre blanco
½ cucharadita de páprika
½ cucharadita de sal*
1
⁄8 cucharadita de pimienta recién molida
1 pizca de tomillo seco
½ libra (225 g) de salchicha Kielbasa u
otra salchicha ahumada
Rinde 4 tazas (945 ml)
½ libra (225 g) de arvejas partidas
½ cebolla grande, en cuartos
½ diente de ajo grande
¾ libra (340 g) de jarretes de cerdo
ahumado
3½ tazas (830 ml) de agua
1 zanahoria mediana, pelada
½ rama de apio grande
½ papa mediana, pelada
Sal y pimienta, a gusto
Lavar las arvejas partidas y colocarlas en una
olla. Pelar la cebolla y el ajo. Procesar el ajo
por aproximadamente 10 segundos, usando
la cuchilla de metal, hasta que esté finamente
picado. Agregar la cebolla y pulsar 6–8 veces
para picar grueso. Agregar a la olla, junto con los
jarretes y el agua. Dejar hervir, y luego reducir
el fuego. Tapar y seguir cociendo a fuego lento
por 1 hora, revolviendo de vez en cuando. Quitar
la tapa y seguir hirviendo a fuego lento por
30–40 minutos, hasta que la carne esté suave
(revolver de vez en cuando y añadir más agua
21
Page 58

si es necesario). Retirar la carne y dejarla enfriar
mientras prepara los vegetales.
Pelar las zanahorias, cortarlas para que quepan
en la boca de llenado y partirlas longitudinalmente
a la mitad. Cortar el apio para que quepa en la
boca de llenado y partirlo longitudinalmente a la
mitad. Pelar las papas, cortarlas transversalmente
a la mitad, y luego cortar cada mitad
longitudinalmente. Instalar el disco rebanador.
Colocar los vegetales verticalmente en la boca de
llenado y rebanarlos, usando presión moderada a
firme. Reservar.
Colocar la mezcla de arvejas partidas en el bol
y procesar por aproximadamente 15 segundos,
usando la cuchilla de metal, hasta conseguir
una mezcla suave. Regresar a la olla. Quitar
la carne de los huesos, colocarla en el bol y
pulsar 4–6 veces para picar. Agregar a la olla.
Tapar y hervir a fuego lento hasta que la carne
esté tierna, revolviendo de vez en cuando para
evitar que la sopa se pegue. (esto debería tomar
aproximadamente 20 minutos). Sazonar al gusto.
Hamburguesa
“Moler” su propia carne permite obtener
exactamente la textura que desea y controlar
la cantidad de grasa en las hamburguesas. En
Cuisinart, nos gusta usar un 20% de grasa –
mucho menos que las mezclas de supermercado.
Utilice carne de res deshuesada (cuete, paleta,
o cualquier corte que le guste). Antes de picar la
carne, quite la membrana, los nervios y la grasa.
Reserve la grasa (por lo general, tendrá más de lo
suficiente). Corte la carne en cubos de 1 pulgada
(2.5 cm) y congélela hasta que esté ligeramente
firme (por lo general 30 minutos).
¾ libra (340 g) de carne y de grasa
Si no tiene balanza de cocina para pesar la
carne y la grasa (y así determinar el porcentaje
de grasa), mida la carne y la grasa (ambas en
cubos) antes de congelarlas, usando una taza
de medir. Utilice las proporciones siguientes:
1
⁄4 taza (270 g) de cubos de res
1
¼ taza (70 g) de cubos de grasa
Instalar la cuchilla de metal; poner la carne y
la grasa en el bol. Pulsar unas veces, y luego
procesar continuamente, averiguando la
consistencia cada 5 segundos, hasta obtener
la textura deseada. Tener cuidado de no
sobreprocesar.
Procurar no manosear la carne más de lo
necesario. Retirar el bol de la base y sacar
cuidadosamente la cuchilla de metal. Formar las
hamburguesas sin apretar mucho.
Pan de carne o albóndigas
Para un pan de carne más picante, agregue unas
gotas de salsa picante y una cucharadita de
Rinde
1 cebolla pequeña, en cuartos
¼ taza (15 g) de hojas de perejil fresco
1 rebanada de pan del día anterior, en
¾ libra (340 g) de paleta de res
1½ cucharada de leche*
½ cucharadita de sal
1
⁄8 cucharadita de tomillo seco
1 huevo grande
Precalentar el horno a 375°F (190°C). Instalar la
cuchilla de metal. Colocar todos los ingredientes
excepto el huevo en el bol; pulsar 4–6 veces
para picar. Luego, procesar continuamente hasta
que esté finamente picado. Agregar el huevo y
pulsar 4–5 veces, o hasta obtener la consistencia
deseada, teniendo cuidado de no sobreprocesar.
Colocar la mezcla en el molde y meter al horno
por 40–50 minutos, hasta que esté cocido.
*Si desea, puede variar los ingredientes, usando
una mezcla de res, ternera y cerdo, o sustituyendo
la leche por jugo de tomate.
Variación: para hacer albóndigas, formar bolas de
2 cucharadas de la mezcla, disponerlas en una
bandeja y meter al horno por 25 minutos.
salsa Worcestershire.
3
⁄4 libra (340 g)
pedazos
deshuesada, en pedazos*
Chile
Este plato versátil les encanta a los niños. Puede
usarlo sobre perritos calientes, en tacos o comerlo
así. Se conservará en el congelador durante hasta
Rinde 4½ tazas (1 L)
3 dientes medianos de ajo
6 meses.
22
Page 59

1 cebolla mediana
1 libra (455 g) de aguja/paleta de res,
deshuesada,
1½ cucharadita de semillas de comino
2 cucharadas de aceite vegetal
2 cucharadas de chile en polvo
2 cucharadas de páprika
1 cucharadita de sal
1
⁄8 cucharadita de hojuelas de pimiento
rojo
1
1
⁄8 onza (35 g) de tomates enteros
1 taza (235 ml) de agua
2 tazas (400 g) de frijoles pintos en lata
Pelar el ajo y la cebolla y cortar la cebolla en
cuartos. Procesar por 15 segundos, usando la
cuchilla de metal, hasta que estén finamente
picadas. Reservar. Quitar la grasa de la carne y
cortar esta en cubos. Colocar la carne en el bol y
pulsar 10–12 veces para picar grueso.
Colocar el comino en una olla y dorarlo a fuego
medio, moviendo la olla constantemente hasta
que el comino empiece a echar humo (esto
debería tomar aproximadamente 1 minuto).
Reservar.
Calentar el aceite a fuego medio, en la misma olla.
Agregar el ajo y la cebolla; cocer por 2 minutos.
Agregar la carne; cocer, revolviendo a menudo,
por aproximadamente 5 minutos, hasta que pierda
completamente su color rosado.
Reducir el fuego y agregar el comino, el chile
en polvo, la páprika, la sal, las hojuelas de
pimiento rojo; hervir a fuego lento por 5 minutos,
revolviendo de vez en cuando.
Colocar los tomates en el bol; pulsar dos veces
para picar grueso. Agregar a la olla y seguir
cociendo hasta que la mezcla hierva. Reducir el
fuego y seguir hirviendo a fuego medio-lento por
45 minutos, revolviendo ocasionalmente.
Agregar los frijoles y seguir cociendo hasta que
estén calientes. Probar y ajustar la sazón al gusto.
Servir con la guarnición de su elección, por
ejemplo queso Cheddar o Monterey Jack rallado,
lechuga rallada, rodajas de jalapeño, cebolleta
picada, rodajas de aceitunas negras, tomates
picados o aguacate picado.
Salchicha
Hacer sus propias salchichas permite controlar los
ingredientes – y lo que come. Nuestras salchichas
no llevan aditivos y contienen menos grasa que las
salchichas compradas.
3
⁄4 libra (340 g)
Rinde
½ libra (225 g) de cubos de carne de cerdo
o de res, congelados hasta que estén
firmes
3 onzas (85 g) de cubos de grasa de
cerdo o de res, congelados hasta que
estén firmes
1 taza (235 ml) de agua fría
¾ cucharadita de sal
½ cucharadita de salvia seca
1
⁄8 cucharadita de tomillo seco
1
⁄8 cucharadita de pimienta negra
Harina
Instalar la cuchilla de metal. Poner todos los
ingredientes excepto la harina en el bol. Pulsar
unas veces, y luego procesar continuamente,
averiguando la consistencia cada 5 segundos,
hasta obtener la textura deseada.
Sacar la mezcla del bol y formar un cilindro de 2
pulgadas (5 cm) de diámetro. Envolver en papel
film/plástico y refrigerar por 3–12 horas antes
de continuar. Cortar en rodajas de ½ pulgada
(1.5 cm) y cocer, o envolver individualmente y
congelar.
Para cocer: rebosar en harina. Colocar las rodajas
en un sartén frío y cocer a fuego medio hasta
dorarse. Después de este tiempo, reducir el
fuego, voltear y cocer el otro lado a fuego lento (la
cocción debería tomar 15–20 minutos).
Croqueta de papa y carne
Si no tiene balanza para pesar la carne, utilice una
taza de medir. Una libra (455 g) de carne equivale
Rinde 3 porciones
1
a 2
⁄4 tazas de cubos de carne.
4 cucharadas (55 g) de mantequilla sin sal
1 cebolla pequeña, partida a la mitad
½ libra (225 g) de carne cocida, en cubos
de 1 pulgada (2.5 cm)
½ libra (225 g) de papas cocidas, en cubos
23
Page 60

de 1 pulgada (2.5 cm)
Sal y pimienta recién molida, a gusto
¼ taza (60 ml) de caldo de res o de pollo
Derretir la mitad de la mantequilla en un sartén
pesado. Instalar la cuchilla de metal. Colocar
la cebolla en el bol; pulsar 8–10, hasta que
esté finamente picada. Saltear la cebolla por
aproximadamente 5 minutos, hasta que esté
suave pero no dorada. Reservar.
Colocar la carne en el bol; procesar para picar
grueso. Agregar las papas, la sal, la pimienta y la
cebolla salteada; pulsar unas cuantas veces para
picar grueso.
Calentar el resto de la mantequilla a fuego
medio, en el mismo sartén. Agregar la mezcla
de carne/papa, verter el caldo encima y aplastar
suavemente con una espátula. Cocer a fuego
lento por 20–25 minutos, volteando la croqueta
cuando la parte de abajo esté crujiente. Colocar
sobre un plato caliente para servir.
Salteado de pollo con
vegetales
Cortar los ingredientes con su procesadora de
alimentos y luego saltearlos es la manera más
efectiva de poner comida en la mesa
Rinde 6 porciones
2 libras (910 g) de pechugas de pollo,
deshuesadas
2 pimientos dulces rojos, sin semillas,
cortados verticalmente en 3 pedazos
6 cebolletas (“scallions”), cortadas para
caber horizontalmente en la boca de
llenado
2 calabacines (“zucchini”), cortados para
caber horizontalmente en la boca de
llenado
1 calabacín amarillo, cortado para caber
horizontalmente en la boca de llenado
1 diente de ajo
1 trozo de 1 pulgada (2.5 cm) de jengibre
fresco, pelado
1
⁄3 taza (80 ml) de agua
2 cucharadas (30 ml) de jerez seco
3 cucharadas (45 ml) de salsa de soya
2 cucharaditas (10 ml) de aceite de
rápidamente.
ajonjolí/sésamo
1
⁄4 cucharadita de pimienta negra
2 cucharaditas de maicena
3 cucharadas de aceite vegetal
Cortar las pechugas de pollo longitudinalmente
a la mitad. Meter las extremidades por debajo
para formar formas compactas del mismo
espesor. Envolver individualmente en plástico
y congelar hasta que estén duras al tacto, pero
lo suficientemente suaves como para poder
perforarse fácilmente con la punta de un cuchillo
afilado.
Instalar el disco rebanador. Colocar los pimientos
horizontalmente en la boca de llenado y rebanar,
usando presión moderada. Colocar las cebolletas
horizontalmente en la boca de llenado y rebanar,
usando presión leve.
Instalar el disco triturador. Rallar los calabacines,
usando presión leve. Reservar.
Instalar la cuchilla de metal. Procesar el ajo y el
jengibre por aproximadamente 4 segundos, hasta
que estén finamente picados. Dejarlos en el bol.
Instalar el disco rebanador. Colocar los pedazos
de pollo en la boca de llenado y rebanar, usando
presión firme. Reservar sobre un plato, cubierto
con papel film/plástico.
Instalar la cuchilla de metal. Colocar el agua, el
jerez, la salsa de soya, el aceite de sésamo, la
pimienta y la maicena en el bol; procesar por
15 segundos, hasta obtener una mezcla suave.
Retirar la cuchilla de metal, dejando el contenido
en el bol.
Calentar el aceite vegetal a fuego alto, en un
sartén, hasta que esté muy caliente. Agregar
los pedazos de pollo y cocer, revolviendo
enérgicamente, durante aproximadamente 3
minutos, hasta que pierda completamente su
color rosado.
Agregar los vegetales y saltear a fuego medio-alto
por aproximadamente 2 minutos, hasta que estén
crujientes-tiernos. Agregar la salsa. Cocer por
aproximadamente 1 minuto, revolviendo, hasta
que la salsa se espese. Servir con arroz integral o
arroz blanco.
Croquetas de cangrejo
Estas delicadas croquetas son perfectas para
acompañar un aperitivo. Si se siente de humor
festivo, sustituya la mitad del cangrejo por
Rinde 54 croquetas de cangrejo de ½ onza (15 g)
24
langosta cocida.
Page 61

4 rebanadas de pan blanco, ligeramente
tostadas
1 diente de ajo mediano
1 cebolla pequeña, en cuartos
1 cucharada (15 g) de mantequilla sin sal
1 cucharada de hojas de perejil
1 libra (455 g) de carne de cangrejo,
revisada cuidadosamente para eliminar
el cartílago
¼ taza (60 ml) de mayonesa
1 huevo grande
1 cucharada de jugo de limón fresco
¼ cucharadita de sal
Salsa tártara (receta en la página 27)
Precalentar el horno a 375°F (190°C). Cortar
cada rebanada en cuatro pedazos y procesar
por aproximadamente 40 segundos, usando
la cuchilla de metal, hasta que esté finamente
rallado. Reservar un cuarto del pan rallado y poner
el resto en un molde de tarta.
Encender la máquina, echar el ajo en la boca
de llenado y procesar por aproximadamente
10 segundos, hasta que esté finamente
picado. Agregar la cebolla y procesar por
aproximadamente 10 segundos, hasta que esté
finamente picada. Derretir la mantequilla a fuego
lento. Agregar la mezcla de ajo/cebolla y cocer,
revolviendo, por aproximadamente 10 minutos,
hasta que estén bien dorados.
Procesar el perejil por aproximadamente 5
segundos, hasta que esté finamente picado.
Agregar la mezcla de cebolla, la carne de
cangrejo, la mayonesa, el huevo, el jugo de
limón, la sal y el pan rallado reservado; pulsar
aproximadamente 8 veces para mezclar.
Formar croquetas de 1½ pulgada (4 cm) de
diámetro. Rebozar con el pan rallado reservado y
disponer sobre una placa para horno engrasada
con mantequilla. Nota: la mezcla se conservará
en el refrigerador durante hasta 4 horas. Meter al
horno por 10–15 minutos, hasta dorarse. Servir
con la salsa tártara.
Puré de brécol
El brécol es alto en fibra y potasio, y bajo en
calorías. Esta receta incluye los tallos, que muchas
veces se tiran.
Rinde 2½ tazas (590 ml)
1½ libra (680 g) de brécol
1 cebolla pequeña
2 cucharadas (30 g) de mantequilla
1 cucharadita de jugo de limón
Sal y pimienta, a gusto
Cortar los tallos del brécol y reservar los cogollos.
Instalar el disco rebanador; rebanar los tallos y la
cebolla. Cocer los tallos y la mitad de los cogollos
en agua hirviendo por 6–8 minutos, hasta que
estén tiernos. Colar, reservando el líquido de
cocción.
Instalar la cuchilla de metal. Colocar los vegetales
cocidos y el resto de los ingredientes (excepto
los cogollitos crudos) en el bol y procesar por
aproximadamente 1 minuto, hasta conseguir un
puré suave.
Cortar los cogollos reservados en pedazos más
pequeños y cocerlos en el líquido de cocción
reservado por aproximadamente 3 minutos, hasta
que estén tiernos. Retirarlos del agua con una
espumadera. Colocar los cogollos y la cantidad
deseada del líquido de cocción en el bol y pulsar
hasta conseguir la consistencia deseada. Cuanto
más líquido añada, más líquido el resultado.
Sazonar a gusto. Nota: también puede servir los
cogollos encima del puré.
Puré de papas
El disco triturador es perfecto para “majar” las
papas. Tenga cuidado de no sobreprocesar el
puré.
Rinde 4 porciones
¼ taza (60 ml) de leche caliente
2 cucharadas (30 g) de mantequilla sin sal
½ cucharadita de sal
Pimienta negra recién molida
1 pizca de nuez moscada (opcional)
3 papas grandes, peladas, cocidas en
agua
Colocar todos los ingredientes excepto las papas
en el bol. Instalar el disco triturador y rallar las
papas. Retirar el disco triturador e instalar la
cuchilla de metal. Pulsar 2–3 veces, hasta que
el líquido esté absorbido. Tenga cuidado de no
procesar demasiado la mezcla, o el puré tendrá
una textura pegajosa.
Para preparar puré de papas ligero, utilice el
accesorio batidor opcional (DLC-155).
25
Page 62

Gratén de papas
Este sustancioso y elegante plato puede
prepararse fácilmente con papas al horno o
cocidas.
Rinde 8 porciones
3 onzas (85 g) de queso Gruyère, en
cubos
2 dientes de ajo medianos
1 cebolla mediana, en cuartos
2½ tazas (590 ml) de leche o de crema
líquida “half-and-half” (mitad leche/
mitad crema)
1 cucharadita de sal
Pimienta negra recién molida
3 papas grandes, peladas, las
extremidades cortadas
Precalentar el horno a 400°F (200°C). Engrasar
una fuente de 2 cuartos de galón (1.9 L) con
mantequilla. Picar el queso, usando la cuchilla de
metal, hasta que esté finamente rallado. Reservar.
Encender la máquina y echar la cebolla y el ajo
en la boca de llenado; procesar hasta que están
finamente picados. Colocar la mezcla de cebolla/
ajo, la leche, la sal y la pimienta en una cacerola.
Instalar el disco triturador y rallar las papas, una
a la vez, usando presión firme. Agregar las papas
a la cacerola y cocer hasta que la mezcla hierva,
revolviendo continuamente.
Retirar del fuego y esparcir la mezcla en el fondo
de la fuente. Rociar con queso y meter al horno
por aproximadamente 25 minutos, hasta que las
papas estén tiernas y que el queso esté dorado.
Deje reposar por 10 minutos antes de servir.
Zanahorias y calabacines
rallados
Los vegetales rallados se cuecen tan rápido que
conservan su sabor natural y su textura. Si desea,
utilice chirivías en vez de calabacines.
½ cucharadita de estragón fresco picado
o ¼ cucharadita de estragón seco
(opcional)
Cortar las zanahorias y los calabacines para que
quepan horizontalmente en la boca de llenado.
Rallarlos, usando el disco triturador. Calentar
la mantequilla en un sartén grande. Agregar
los vegetales rallados; rociar con sal/pimienta.
Tapar y cocer por 2–3 minutos, hasta que estén
ligeramente tiernos. Sazonar con estragón y más
sal/pimienta si desea.
Ensalada de tomates en
cama de lechuga
Todos los elementos de esta ensalada pueden ser
preparados con su procesadora.
Rinde 6 porciones
¼ taza (15 g) de perejil fresco
1 chalote mediano, pelado
1½ cucharada (20 ml) de vinagre de vino
tinto
4½ cucharadas (65 ml) de aceite de
cártamo
½ cucharadita de mostaza de Dijon
½ cucharadita de azúcar granulada
½ cucharadita de sal
Pimienta negra recién molida
4 tomates medianos firmes, sin semillas,
las extremidades cortadas
1 lechuga romana mediana
Instalar la cuchilla de metal; procesar el perejil
y el chalote hasta que estén finamente picados.
Encender la máquina y verter el vinagre, el aceite,
la mostaza, el azúcar, la sal y la pimienta en la
boca de llenado; procesar para mezclar. Retirar la
cuchilla de metal e instalar el disco rebanador.
Rebanar los tomates, usando presión leve. Cortar
la lechuga en pedazos que quepan en la boca
de llenado. Rebanar, usando presión moderada.
Colocar el contenido del bol en un platón,
disponiendo los tomates sobre la lechuga.
Rinde 4 porciones
3 zanahorias medianas, peladas
2 calabacines (“zucchini”) medianos
¼ taza (55 g) de mantequilla sin sal
Sal y pimienta, a gusto
CONSEJO: cuando prepara una comida entera
con el aparato, prepare las recetas que lleven
menos ingredientes líquidos/frescos primero. Por
ejemplo, empiece por el pan; de esta manera, no
necesitará lavar el bol para preparar la ensalada.
En muchos casos, limpiar el bol con papel
26
Page 63

absorbente entre las recetas es suficiente.
Ensalada de col cremosa
La ensalada de col está lista en minutos cuando
no tiene que rebanar la col a mano.
1 pizca de canela en polvo
1 pizca de pimienta de Jamaica en polvo
Pimienta negra recién molida
½ taza ( 65 g) de arvejas frescas o
congeladas, cocidas
Rinde 5 tazas (1.2 L)
¼ taza (15 g) de hojas de perejil fresco
1 pedazo de 1 onza (30 g) de cebolla
1
⁄3 taza (80 ml) de mayonesa
1 cucharada de vinagre de vino tinto
¼ cucharadita de sal
¼ cucharadita de pimienta recién molida
½ zanahoria grande, pelada
½ col verde mediana de aproximadamente
2 libras (910 g)
Instalar la cuchilla de metal y procesar el perejil
hasta que esté finamente picado. Agregar la
cebolla y procesar hasta que esté finamente
picada. Agregar la mayonesa, el vinagre, la sal y la
pimienta; procesar por 5 segundos para mezclar.
Retirar la cuchilla de metal.
Cortar la zanahoria transversalmente a la mitad.
Descorazonar la col y cortarla en pedazos.
Instalar el disco triturador y rallar la zanahoria,
usando presión firme. Instalar el disco rebanador
y rebanar la col, usando presión firme. Colocar el
contenido del bol en un cuenco y revolver. Probar
y ajustar la sazón al gusto. Servir inmediatamente
o refrigerar durante hasta 24 horas. Antes de
servir, escurrir el líquido y ajustar la sazón. Servir
helado.
Ensalada de zanahoria
rallada
El color vibrante de las zanahorias y de las arvejas
hace de esta ensalada fresca y simple una adición
Rinde 8 porciones
2 libras (910 g) de zanahorias jóvenes,
3 cebolletas (“scallions”), en trozos
¼ taza (60 ml) de jugo de limón fresco
¼ taza (60 ml) de aceite vegetal
1 cucharadita de sal
1 cucharadita de azúcar
agradable a un buffet de fiesta.
peladas
Cortar las zanahorias para que quepan
verticalmente en la boca de llenado. Ponerlas a
hervir en agua salada por 3–5 minutos, hasta las
pueda perforar con la punta de un cuchillo afilado.
Escurrir y pasar por agua fría. Una vez frías,
secarlas con papel absorbente.
Instalar la cuchilla de metal; procesar las
cebolletas hasta que estén finamente picadas.
Agregar el jugo de limón, el aceite, la sal, el
azúcar, la canela, la pimienta de Jamaica y la
pimienta; procesar por 3 segundos para revolver.
Dejar el aderezo en el bol.
Instalar el disco triturador; rallar las zanahorias,
usando presión moderada. Colocar el contenido
del bol en un cuenco, agregar las arvejas y
revolver suavemente. Servir frío o a temperatura
ambiente. Probar y ajustar la sazón al gusto antes
de servir.
Pesto
Salsa italiana clásica para pasta. Una taza de pesto
es suficiente para aderezar 1 libra (455 g) de pasta.
También acompaña deliciosamente las papas
cocidas y las sopas.
Rinde 1 taza (235 ml)
3 onzas (85 g) de queso Parmesano
importado, a temperatura ambiente, en
pedazos
3 dientes de ajo pequeños
2 tazas llenas (120 g) de hojas de
albahaca fresca
¼ taza (35 g) de piñones
½ cucharadita de sal
¼ taza (60 ml) de aceite de oliva
Instalar la cuchilla de metal. Procesar el queso y el
ajo por aproximadamente 30 segundos para picar.
Agregar el resto de los ingredientes, excepto el
aceite, y pulsar 8 veces para mezclar. Encender
la máquina y agregar el aceite por la boca de
llenado. Procesar por 10 segundos. Raspar el bol
y procesar por 20 segundos adicionales, hasta
obtener una mezcla suave.
27
Page 64

Usar inmediatamente, conservar en el refrigerador
durante hasta 5 días o congelar. Nota: si piensa
congelar el pesto, prepararlo sin queso y añadir
este justo antes de servir.
Salsa mexicana
Esta sabrosa salsa es perfecta para acompañar
tanto tacos como pescado o pollo asados.
Cómasela fresca, ya que puede ser ligeramente
Rinde 2 tazas (475 ml)
1½ jalapeño
½ cebolla mediana
1
⁄3 taza llena (15 g) de hojas de cilantro*
1
⁄8 cucharadita de sal
2 cucharaditas de jugo de lima/limón
3 tomates medianos, en cuartos y sin
Cortar el jalapeño longitudinalmente a la mitad y
tirar las semillas (tenga cuidado al manipular el
jalapeño ya que contiene un aceite que puede
irritar la piel y los ojos; lávese las manos después
de prepararlo). Pelar la cebolla y cortarla en
cuartos.
Instalar la cuchilla de metal. Poner el jalapeño y el
cilantro en el bol; procesar por aproximadamente
20 segundos, hasta que estén finamente picados.
Raspar el bol. Agregar la sal y el jugo de limón;
pulsar dos veces.
Agregar los tomates y la cebolla; pulsar 10–12
veces para picar grueso.
Colocar la mezcla en un cuenco. Revolver y servir
dentro de 1–2 horas.
* También puede usar perejil de hoja plana.
amarga al día siguiente.
verde fresco
semillas
1
⁄4 taza (295 ml) de aceite*
1
Instalar la cuchilla de metal. Poner el huevo,
el jugo de limón (o el vinagre), la mostaza y 1
cucharada del aceite en el bol; procesar por
60 segundos. Sin apagar la máquina, verter ¼
taza (60 ml) del aceite en el empujador pequeño
(no agregar más, o goteará demasiado rápido).
Cuando el empujador esté vacío, retirarlo y
agregar lentamente el resto del aceite por el
empujador grande, sin apagar la máquina. La
mayonesa se volverá más espesa a medida que
agregue el aceite. Probar y ajustar la sazón al
gusto.
*Puede usar un aceite o una combinación de
aceites (por ej. 80% de aceite vegetal + 20% de
aceite de oliva).
Variación baja en colesterol: sustituir cada
huevo por 2 cucharadas de sustituto de huevo,
omitir el vinagre y agregar sal y pimienta. Seguir
la receta.
Mayonesa con hierbas: agregar ¼ taza llena
(10 g) de hierbas verdes frescas (por ej. perejil,
eneldo y estragón, sin tallos) con el huevo.
Salsa tártara: triplicar la cantidad de jugo de
limón. una vez lista la mayonesa, agregar los
ingredientes siguientes: 3 pepinillos pequeños, ¼
cebolla pequeña, 1 cucharada de alcaparras, 1
cucharada de salsa de rábano picante y 3 gotas
de salsa picante. Procesar por aproximadamente
10 segundos, hasta que los pepinillos y la cebolla
estén finamente picados.
Picadillo de naranja-
arándanos agrios sin
cocinar
Mayonesa básica
Para preparar mayonesa tradicional tan espesa
como mantequilla, sustituya cada huevo por 2
yemas.
Rinde 1½ taza (355 ml)
1 huevo grande
1 cucharada (15 ml) de jugo de limón
fresco o de vinagre de vino blanco
1 cucharada de mostaza de Dijon
Ya que no se cocina, este picadillo requiere solo 1
taza (200 g) de azúcar para endulzar 1 libra (455 g)
de arándanos agrios (la mayoría de los picadillos
3
Rinde 1
2 tazas (250 g) de arándanos agrios
½ naranja mediana, con piel, cortada en
½ taza (100 g) de azúcar granulada
⁄4 taza (415 ml)
frescos
cuartos
llevan el doble).
28
Page 65

Instalar la cuchilla de metal. Colocar los
arándanos y la naranja en el bol; pulsar 8–10
veces para picar grueso. Agregar el azúcar;
procesar por aproximadamente 20 segundos para
mezclar. Probar y agregar más azúcar si desea.
Conservar en el refrigerador, en un recipiente
hermético.
Salsa de chocolate
¡Esta deliciosa salsa de chocolate estará lista en
tan solo un minuto, sin necesidad de derretir el
7
Rinde
⁄8 taza (205 ml)
5 onzas (140 g) de chocolate semidulce,
¼ taza (50 g) de azúcar superfina
1
⁄3 taza (80ml) de agua hirviente
Instalar la cuchilla de metal. Poner el chocolate
y el azúcar en el bol; pulsar aproximadamente
6 veces para picar grueso. Luego, procesar por
aproximadamente 60 segundos, hasta que el
chocolate esté muy finamente picado. Sin apagar
la máquina, agregar el agua caliente por la boca
de llenado. Procesar por aproximadamente 45
segundos, hasta que el chocolate esté derretido,
parando una vez para raspar el bol.
Variación con menta: agregar 1 cucharada
de extracto de menta, “crème de menthe”
o “schnapps” de menta al agua después de
calentarla.
chocolate primero!
en pedacitos
Salsa de frambuesa
Perfecta para acompañar cualquier postre de
fruta o chocolate: helado, sorbete o pastel. Puede
sustituir las frambuesas por fresas si desea.
Rinde 1 taza (235 ml)
1 paquete de 10 onzas (285 g) de
frambuesas congeladas en jarabe,
descongeladas
1 cucharada de miel
Instalar la cuchilla de metal. Poner las frambuesas
y la miel en el bol; procesar por 30 segundos.
Colocar la mezcla en un colador de malla fina,
encima de un tazón. Presionar la mezcla a través
del colador con la parte de atrás de una cuchara;
tirar las semillas. Servir a temperatura ambiente o
calentar ligeramente y servir con helado.
Masa de hojaldre básica
Esta masa de hojaldre básica es ideal para la
mayoría de las tartas y quiches.
Rinde un fondo de tarta de 11 pulgadas (27 cm)
1½ taza (185 g) de harina común
1 barra (115 g) de mantequilla sin sal
helada, en pedazos
½ cucharadita de sal
¼ taza (60 ml) de agua helada
Instalar la cuchilla de metal. Poner la harina,
la mantequilla y la sal en el bol; procesar por
aproximadamente 8 segundos, hasta obtener una
consistencia parecida a la de una harina gruesa.
Agregar el agua helada y pulsar hasta que se
empiece a formar una masa. No permitir que la
masa forme una bola. Poner la masa en una bolsa
hermética; formar una bola, y luego aplastar para
formar un disco plano.
Refrigerar por 1 hora o más.
Estirar la masa con un rodillo, sobre una superficie
ligeramente enharinada, para formar un círculo
1
⁄8 pulgada (3 mm) de espesor. Comprimir
de
la masa en el fondo del molde. Cortar la masa
todo alrededor del molde, dejando un exceso de
medio dedo. Doblar el exceso de masa sobre sí
mismo, por debajo. Acanalar el borde con los
dedos. Pinchar el fondo de tarta con un tenedor y
refrigerar por 30 minutos, o hasta que esté firme.
Quince minutos antes de hornear, precalentar el
horno a 400°F (200°C).
Cubrir la masa con papel sulfurizado y llenar con
arroz crudo o frijoles secos. Meter al horno por 12
minutos. Quitar el papel sulfurizado y los frijoles
(o el arroz) y hornear por 6 minutos adicionales,
o hasta dorarse ligeramente. Desmoldar y dejar
enfriar sobre una rejilla.
Pan de maíz
Esta pan de maíz particularmente húmedo y lleno
2 cucharadas (30 g) de mantequilla sin sal
¾ taza (95 g) de harina de maíz amarilla
¾ taza (95 g) de harina común
de sabor es mejor tibio.
29
Page 66

1½ cucharada de azúcar granulada
2 cucharaditas de polvo de hornear
¼ cucharadita de bicarbonato de sodio
¼ cucharadita de sal
1 taza (245 g) de suero de leche
(“buttermilk”)
1 huevo grande
1
⁄3 taza (50 g) de maíz fresco, congelado o
enlatado
Precalentar el horno a 425°F (220°C). Derretir la
mantequilla en un molde de 8 x 8 pulgadas
(20 cm x 20 cm). Instalar la cuchilla de metal.
Poner los ingredientes secos en el bol y procesar
por aproximadamente 10 segundos para mezclar.
Agregar el resto de los ingredientes, excepto el
maíz; procesar por 5 segundos para mezclar.
Vaciar el contenido del bol en un tazón, agregar el
maíz y revolver suavemente.
Echar la mezcla en el molde preparado y meter
al horno por aproximadamente 25 minutos, hasta
que un probador introducido en el centro salga
limpio.
Para preparar “muffins”: echar la mezcla en
moldecitos para “muffins”, llenando estos hasta
los tres cuartos. Hornear en 425°F (220 °C) por
aproximadamente 25 minutos. Rinde 6 “muffins”.
“Coffee cake”
Este pastel es perfecto para el desayuno. También
es una excelente manera de terminar un almuerzo
Masa
1 paquete de levadura seca activa
2 cucharadas de azúcar granulada
¼ taza (60 ml) de agua fría
1
/3 taza (80 ml) de crema agria
¼ taza (60 ml) de leche fría
1 huevo grande
1 cucharadita de extracto natural de
vainilla
3 tazas (375 g) de harina común
¼ taza (55 g) de mantequilla
½ cucharadita de sal
2 cucharadas (30 g) de mantequilla,
derretida
Relleno
½ taza (100 g) de azúcar rubia
½ taza (50 g) de pasas o dátiles (en
o una cena.
pedacitos)
½ taza (50 g) de pacanas
1 cucharadita de canela en polvo
Disolver la levadura y la mitad del azúcar en
agua tibia, en una taza de medir grande. Dejar
fermentar por 5–10 minutos, hasta que se vuelva
espumosa. Poner la crema agria, la leche, el
huevo y la vainilla en un tazón y batir la mezcla;
agregar a la mezcla de levadura.
Instalar la cuchilla de metal. Poner la harina, la
mantequilla, la sal y el azúcar restante en el bol;
procesar por 10 segundos. Sin apagar la máquina,
agregar lentamente el líquido por la boca de
llenado, asegurándose de que la harina absorba
el líquido antes de echar más. Después de que
la masa llegue a formar una bola, procese por 40
segundos adicionales.
Dar forma de bola a la masa y ponerla en una
bolsa hermética ligeramente enharinada. Expulsar
el aire y cerrar la bolsa. Dejar leudar al doble de su
volumen, por aproximadamente 1 hora.
Estirar la masa con un rodillo, sobre una superficie
ligeramente enharinada, para formar un rectángulo
de aproximadamente 20 x 12 pulgadas (50 cm x
30 cm). Cepillar con mantequilla derretida. Con el
resto de la mantequilla, engrasar un molde de 9 x
13 pulgadas (22 cm x 32 cm).
Instalar la cuchilla de metal. Poner el azúcar, las
pasas (o los dátiles), las pacanas y la canela en el
bol; procesar por 45 segundos para picar grueso.
Esparcir el relleno sobre la masa. Enrollar la masa
a lo largo. Cortar el rollo en rodajas de
(2 cm), usando un cuchillo afilado. Colocar las
rodajas en el molde, el lado cortado apuntando
hacia arriba/abajo, y dejar leudar al doble de su
volumen.
Precalentar el horno a 375°F (180°C). Meter al
horno por 20–25 minutos, hasta que esté dorado
y burbujeante.
3
⁄4 pulgada
Pan blanco
Es preferible hacer este pan con harina para hacer
pan o una combinación de harina para hacer pan y
harina común. El pan hecho con harina para hacer
Rinde 2 barras de 1¼ libra (565 g)
1 paquete de levadura seca activa
1
⁄3 taza (80 ml) de agua tibia
2 cucharaditas de azúcar
4 tazas (500 g) de harina para hacer pan
3 cucharadas (45 g) de mantequilla sin
30
pan leudará más en el horno.
sal, en pedazos
Page 67

1 cucharadita de sal
1 taza (235 ml) de agua helada
Spray vegetal
Revolver la levadura y el azúcar con agua tibia,
en una taza de medir grande, y dejar fermentar
por 5–10 minutos, hasta que se vuelva espumosa.
Instalar la cuchilla amasadora. Poner la harina,
la mantequilla y la sal en el bol; procesar por 20
segundos. Agregar el agua helada a la mezcla
de levadura. Encender la máquina y agregar
lentamente el líquido por la boca de llenado,
asegurándose de que la harina absorba el líquido
antes de echar más. Cuando la masa llegue
a formar una bola, procesar por 60 segundos
adicionales.
Dar forma de bola a la masa y ponerla en una
bolsa de hermética ligeramente enharinada.
Expulsar el aire y cerrar la bolsa, dejando
suficiente espacio para que la masa pueda leudar.
Dejar leudar al doble de su volumen, por 1–1½
hora.
Aplastar para desinflar y formar dos barras.
Colocar cada barra en un molde de barra de
4 tazas (945 ml). Cubrir sin apretar con papel
film/plástico aceitado y dejar leudar al doble
de su volumen, en un lugar templado, por
aproximadamente 45 minutos. Precalentar el
horno a 375 °F (190 °C). Meter al horno por
aproximadamente 35 minutos, hasta dorarse.
Desmoldar y dejar enfriar sobre una rejilla.
Pan de trigo integral: sustituir la mitad de la
harina blanca por harina integral.
fermentar por aproximadamente 10 minutos, hasta
que se vuelva espumosa. Instalar la cuchilla de
metal. Poner la harina y la sal en el bol y encender
la máquina. Agregar la mezcla de levadura por la
boca de llenado y procesar por aproximadamente
45 segundos, hasta que la masa llegue a formar
una bola pegajosa. Agregar el aceite de oliva por
la boca de llenado y procesar por 60 segundos
adicionales.
Si la mesa pega al bol, agregar harina, 1
cucharada a la vez; procesar por 10 segundos
después de cada adición, hasta que la masa deje
de pegar al bol pero siga suave.
Estirar la masa sobre una superficie enharinada
para formar un disco (dar vuelta a la masa a
menudo para que no se pegue). Si la masa es
difícil de estirar, esperar unos minutos e intentar
otra vez. Formar un disco de 15 pulgadas (38
cm) para preparar pizza de 14 pulgadas (35 cm),
o discos de 10 pulgadas (25 cm) para preparar
pizzas de 9 pulgadas (22 cm).
Aceitar la placa para pizza y espolvorear con
harina de maíz. Doblar la masa en cuatro para
formar un triángulo. Colocar la punta del triángulo
en el centro de la placa y desplegar la masa.
Presionar la masa desde el centro hacia fuera
y doblar el exceso sobre sí mismo para formar
un borde. Seguir la receta de la pizza que desea
preparar.
Pizza rápida
Preparar esta pizza no toma más tiempo que pedir
una para llevar.
Masa de pizza básica
Prepare pizza grandes o pequeñas. ¡La ventaja de
hacer su propia masa es que la opción es suya!
Rinde 1 pizza de 14 pulgadas (35 cm) o 2 pizzas
de 9 pulgadas (22 cm)
1 paquete de levadura seca activa
1 cucharadita de azúcar
2
⁄3 taza (160 ml) de agua tibia
2
⁄3 taza (210 g) de harina común
1
¾ cucharadita de sal kosher
2 cucharadas (30 ml) de aceite de oliva
Aceite vegetal
1½ cucharada (10 g) de harina de maíz
Mezclar la levadura, el azúcar y el agua tibia; dejar
1 fondo de pizza de 14 pulgadas (35 cm)
(receta anterior)
4 onzas (115 g) de queso Parmesano, a
temperatura ambiente
2 onzas (55 g) de pepperoni, pelado y
cortado en 3 pedazos
12 onzas (340 g) de queso Mozzarella,
helado
1 cebolla pequeña, las extremidades
cortadas
1 pimiento dulce verde mediano, sin
semillas, la extremidad del tallo cortada
1 tomate mediano, sin semillas, las
extremidades cortadas
1 taza (235 ml) de salsa de tomate para
pizza (receta a continuación)
1 pizca de azúcar granulada
Pimienta negra recién molida
31
Page 68

½ cucharadita de albahaca seca o 1
cucharada de albahaca fresca
½ cucharadita de orégano seco o 1
cucharada de orégano fresco
Poner la rejilla del horno en la parte inferior del
mismo y precalentar el horno a 425°F (220°C).
Meter el fondo de pizza al horno por 6 minutos.
Durante este tiempo, preparar el relleno.
Instalar la cuchilla de metal. Poner el queso
Parmesano y el pepperoni en el bol; procesar para
picar grueso. Reservar, en un plato o sobre papel
encerado. Instalar el disco triturador y procesar la
Mozzarella. Reservar.
Instalar el disco rebanador y rebanar la cebolla.
Reservar. Rebanar la pimienta; reservar. Rebanar
el tomate, usando presión leve. Reservar, encima
de papel absorbente.
Esparcir la salsa de tomate sobre el fondo de
pizza, dejando un borde de masa sin salsa.
Separar los aros de cebolla y disponerlos encima
de la salsa. Esparcir la Mozzarella encima de las
cebollas. Disponer las rodajas de tomate encima
del queso y rociar con una pizca de azúcar y
pimienta.
Rociar con la mezcla de Parmesano/pepperoni,
y luego añadir las rodajas de pimiento. Rociar
uniformemente con albahaca y orégano. Meter al
horno por 18 minutos, hasta dorarse.
Salsa de tomate para pizza
Después de dejar reposar esta salsa, puede que
se acumule líquido a la superficie. Quite casi todo
el líquido y revuelva la salsa antes de usarla.
Rinde 2 tazas (475 ml)
2 tomates grandes, sin semillas, peladas
y cortadas en cuartos
1 taza (235 ml) de salsa de tomate en lata
¼ taza (60 ml) de concentrado de tomate
¾ cucharadita de orégano seco o 1
cucharada de orégano fresco
¾ cucharadita de orégano seco o 1
cucharada de orégano fresco
1 cucharadita de azúcar
Sal y pimienta recién molida, a gusto
Instalar la cuchilla de metal. Poner los tomates en
el bol y pulsar 6 veces para picar grueso. Agregar
el resto de los ingredientes y pulsar 4 veces para
mezclar.
½
½
“Brownies” cremosos
Estos “brownies” fáciles de hacer siempre son un
Rinde 16 “brownies”
3 onzas (85 g) de chocolate amargo
1 taza (200 g) de azúcar rubia
1
⁄3 taza (75 g) de mantequilla sin sal,
derretida
3 huevos grandes
1 cucharadita de extracto natural de
vainilla
2
⁄3 taza (85 g) de harina común
¼ cucharadita de sal kosher
1 cucharadita de polvo de hornear
½ taza (50 g) de pacanas
Precalentar el horno a 350°F (180°C). Derretir la
mantequilla en un molde de 8 x 8 pulgadas (20 cm
x 20 cm).
Romper el chocolate en pedazos de 1 pulgada
(2.5 cm). Instalar la cuchilla de metal. Poner el
chocolate y la mitad del azúcar en el bol; pulsar
6–8 veces para picar grueso. Luego, procesar por
aproximadamente 20 segundos, hasta que esté
finamente picado.
Sin apagar la máquina, agregar la mantequilla
caliente por la boca de llenado. Procesar por
30 segundos, hasta obtener una mezcla suave.
Agregar el azúcar restante, los huevos y la vainilla.
Pulsar 2 veces, y luego procesar por 10 segundos
más. Agregar los ingredientes secos y las nueces.
Pulsar 6–8 veces para picar. Repartir la mezcla en
el molde.
Meter al horno por aproximadamente 20 minutos,
hasta que la parte superior esté ligeramente
crujiente pero que el interior siga húmedo. Dejar
enfriar y cortar en cuadritos.
favorito.
Galletas de avena
con chispas de chocolate
Las nueces tostadas y la avena hacen que estas
galletas sean no solo deliciosas, sino también
Rinde 35 galletas de 2½ pulgadas (6 cm)
½ taza (40 g) de copos de avena
buenas para usted.
instantánea
32
Page 69

¾ taza (85 g) de pacanas
¾ taza (180 g) de mantequilla
1
⁄3 taza (65 g) de azúcar granulada
½ taza (100 g) de azúcar rubia
1 huevo grande
¾ cucharadita de extracto natural de
vainilla
1 taza (125 g) de harina común
½ cucharadita de sal
¾ cucharadita de bicarbonato de sodio
6 onzas (170 g) de chispas de chocolate
semidulce
Poner la rejilla del horno en el centro del mismo y
precalentar el horno a 350°F (180°C).
Disponer la avena y las pacanas sobre
una placa para horno y meter al horno por
aproximadamente 10 minutos, hasta dorarse
ligeramente. Reservar. Ajustar la temperatura a
375°F (190°C).
Instalar la cuchilla de metal. Poner la
mantequilla y el azúcar en el bol; procesar por
aproximadamente 2 minutos, hasta conseguir
una mezcla suave. Raspar el bol si es necesario.
Agregar los huevos y la vainilla; pulsar 6 veces
para mezclar.
Agregar las pacanas, la harina, la sal, el
bicarbonato y la mitad de la avena tostada. Pulsar
8 veces para mezclar. Poner la mezcla en un
tazón grande y agregar el resto de la avena y las
chipas de chocolate; revolver. Echar cucharadas
de la masa sobre placas para horno engrasadas,
1 pulgada (2.5 cm) aparte una de otra. Meter al
horno por aproximadamente 11 minutos, hasta
dorarse.
Pastel de zanahoria
Para que este pastel delicioso y húmedo luzca
profesional, coloque una zanahoria de mazapán
(disponible en muchas confiterías) en el centro.
8–10 porciones
Mantequilla suave para engrasar los
moldes
Pan rallado fino para espolvorear el
molde
½ libra (225 g) de zanahorias, peladas
½ taza (100 g) de azúcar granulada
½ taza llena (100 g) de azúcar morena
2 huevos grandes
½ taza (120 ml) de aceite de maíz
1 cucharadita de extracto natural de
vainilla
¾ taza (75 g) de nueces
1 taza (125 g) de harina común
½ cucharada de cacao amargo en polvo
1 cucharadita de polvo de hornear
1 cucharadita de canela en polvo
½ cucharadita de bicarbonato de sodio
½ cucharadita de sal kosher
½ taza (50 g) de pasas, cocidas al vapor
por 10 minutos
Baño de queso crema (receta a
continuación)
Precalentar el horno a 350°F (180°C). Engrasar
dos moldes redondos de 9 pulgadas (22cm) de
diámetro con mantequilla, cubrir el fondo con un
círculo de papel sulfurizado y engrasar el papel
con mantequilla. Espolvorear con pan rallado.
Cortar las zanahorias para que quepan
horizontalmente en la boca de llenado. Instalar
el disco triturador y rallar la zanahoria, usando
presión firme; reservar.
Instalar la cuchilla de metal. Poner el azúcar, los
huevos, el aceite y la vainilla en el bol; procesar
por 15 segundos, hasta obtener una mezcla
suave. Agregar las nueces y los ingredientes
secos; pulsar aproximadamente 6 veces para
mezclar, parando una vez para raspar el bol.
Agregar las pasas y las zanahorias; revolver con
una espátula.
Echar la mezcla en los moldes preparados y
meter al horno por 35–40 minutos, hasta que un
probador introducido en el centro salga limpio.
Dejar enfriar en los moldes por 2–3 minutos, luego
desmoldar y dejar enfriar sobre una rejilla. Quitar
el papel sulfurizado.
Esparcir el baño de queso crema entre las capas
de pastel, encima y todo alrededor del pastel.
Baño de queso crema
Esta cobertura fácil y rápida es perfecta para
cubrir pastel de zanahoria, y muchos otros tipos
de pastel.
Rinde suficiente cobertura para dos pasteles de 8
pulgadas (20 cm)
½ libra (225 g) de queso crema, a
temperatura ambiente
33
Page 70

4 cucharadas (55 g) de mantequilla sin
sal, en pedazos
1 taza (120 g) de azúcar glasé
½ cucharadita de extracto natural de
vainilla
Instalar la cuchilla de metal. Poner el queso
y la mantequilla en el bol; procesar por
aproximadamente 10 segundos para mezclar.
Agregar el azúcar; procesar por 5 segundos, hasta
obtener una mezcla suave. Agregar la vainilla;
procesar por 15 segundos, hasta obtener una
mezcla suave.
Sorbetes y helados de
yogur
Por lo menos 5 horas antes de servir, cortar las
frutas en pedazos de 1 pulgada (2.5 cm). Para
preparar helado de yogur, poner las frutas sobre
una placa para horno, en una capa, y congelarlas.
Para preparar sorbete, congelar solamente ¾ de
las frutas y refrigerar el resto.
Unos minutos antes de servir, poner las frutas
congeladas y el azúcar en el bol (equipado con
la cuchilla de metal). Pulsar 8 veces, y luego
procesar continuamente hasta que las frutas
estén finamente picadas, raspando el bol si es
necesario.
Agregar las frutas refrigeradas o el yogur y los
demás ingredientes. Procesar hasta conseguir una
mezcla suave y cremosa, raspando el bol si es
necesario. Probar y agregar más azúcar si desea.
Servir inmediatamente o congelar. Si lo congela:
cortar en pedazos de 1 pulgada (2.5 cm). Antes de
servir, procesar (usando la cuchilla de metal) hasta
conseguir una mezcla suave y cremosa.
Sorbete de banana-
manzana
2 bananas pequeñas
1 cucharada de azúcar glasé
2 manzanas Golden Delicious medianas
1½ cucharada de jugo de limón fresco
Tarta de manzana
2 fondos de tarta de masa de hojaldre
básica (receta en la página 28)
2 libras (910 g) de manzanas, peladas y
descorazonadas
½ taza (100 g) de azúcar granulada
¾ cucharadita de canela en polvo
1⁄8 cucharadita de sal
1⁄8 cucharadita de nuez moscada rallada
3 cucharadas de harina
Instalar la cuchilla de metal. Poner el azúcar, la
canela, la sal, la nuez moscada y la harina en el
bol; procesar por 5 segundos para mezclar.
Instalar el disco rebanador y rebanar las
manzanas. Echar la mezcla encima del fondo de
tarta. Colocar la cobertura encima. Pellizcar los
bordes juntos. Hacer 6–8 cortes pequeños en la
cobertura para permitir que el vapor se escape.
Colocar la tarta sobre una placa para horno y
meter al horno por aproximadamente 45 minutos,
en 375 °C (190°C) hasta que el jugo empiece a
burbujear.
Helado de yogur de pera
3 peras medianas
¼ taza (30 g) de azúcar glasé
½ taza (120 ml) de yogur
1 cucharada de jugo de limón fresco
34
Page 71

GARANTÍA
GARANTÍA LIMITADA DE TRES AÑOS SOBRE
LA MÁQUINA.
GARANTÍA PLENA DE CINCO AÑOS SOBRE EL
MOTOR.
(válida en los EE.UU. y en Canadá solamente)
Esta garantía reemplaza todas las demás
declaraciones expresas de garantía.
Esta garantía es para los consumidores
solamente. Usted es un consumidor si ha
comprado su aparato Cuisinart® en una tienda,
para uso personal o casero. A excepción de los
estados donde la ley lo permita, esta garantía no
es para los detallistas u otros comerciantes.
Cuisinart garantiza este aparato contra todo
defecto de materiales o fabricación durante 3
años después de la fecha de compra original,
siempre que el aparato haya sido utilizado para
uso doméstico y según las instrucciones.
Cuisinart garantiza este aparato contra todo
defecto de materiales o fabricación durante 3
años después de la fecha de compra original,
siempre que el aparato haya sido utilizado para
uso doméstico y según las instrucciones. La
garantía sobre el motor cubre el motor y excluye
las otras piezas del bloque-motor, como la
carcasa de plástico, el bol, la tapa, las cuchillas, el
árbol del motor o los componentes eléctricos.
Le aconsejamos que llene y regrese por correo el
formulario de registro adjunto
a fin de facilitar la verificación de la fecha de
compra
original. Sin embargo, no es necesario regresar el
formulario de registro
para recibir servicio bajo esta garantía.
Si este aparato presentara algún defecto de
materiales o fabricación durante el período de
garantía, la reparemos o reemplazaremos (a
nuestra opción). Para obtener servicio bajo esta
garantía, llame a nuestra línea directa gratuita al
1800-726-0190 o regrese el aparato defectuoso a:
Customer Service at Cuisinart, 7475 North Glen
Harbor Blvd., Glendale, AZ 85307.
Regrese el aparato defectuoso, junto con su
recibo de compra y un cheque o giro postal de
US$10.00 a nombre de Cuisinart por gastos
de manejo y envío. NO ENVÍE DINERO EN
EFECTIVO.
Los residentes de California solo necesitan
dar una prueba de compra. Los residentes de
California deben llamar al 1-800-726-CONAIR
para recibir instrucciones de envío. Si el problema
proviene de un defecto de motor y el aparato
sigue bajo garantía, le devolveremos los gastos de
manejo en envío.
Recuerde incluir su nombre, dirección y teléfono,
la descripción del problema, el número de serie
del aparato, la fecha original de compra, así como
cualquier información pertinente.
Este aparato satisface las más altas exigencias
de fabricación y ha sido diseñado para uso sobre
corriente de 120 V, usando accesorios y piezas
de repuesto autorizados solamente. Esta garantía
excluye expresamente los daños causados por
accesorios, piezas o reparaciones no autorizados
por Cuisinart, así como los daños causados
por el uso de un convertidor de voltaje. Esta
garantía no cubre el uso institucional o comercial
del producto, y no es válida en caso de daños
causados por mal uso, negligencia o accidente.
Esta garantía excluye expresamente todos los
daños incidentales o consecuentes. Algunos
Estados no permiten la exclusión o limitación de
daños incidentales o consecuentes, de modo que
las limitaciones mencionadas pueden no regir
para usted. Usted puede tener otros derechos que
varían de un Estado a otro.
Advertencia:
nuestras procesadoras de alimentos y sus
accesorios son cuidadosamente diseñados y
fabricados con materiales de alta calidad, para
asegurar su satisfacción y seguridad. Aunque
accesorios vendidos por otros fabricantes pueden
ser compatibles con ella, su uso puede ser
extremadamente peligroso y provocar heridas
graves.
Por ejemplo, usar un accesorio exprimidor de otra
marca con su máquina puede dejar la cuchilla o el
disco al descubierto. También advertimos de no
usar la tapa/boca de llenado con otra máquina.
Si tiene preguntas acerca de este aparato o de
cualquier otro producto Cuisinart® por favor llame
al nuestro servicio de atención al cliente al 1-800726-0190.
35
Page 72

©2019 Cuisinart
East Windsor, NJ 08520
Impreso en China
19CE054056
Todas las marcas registradas, comerciales o de servicio mencionadas en este
documento pertenecen a sus titulares respectivos.
IB-2376-ESP-A
 Loading...