

Page 1
INSTRUCTION BOOKLET
Single Cup Grind & Brew™ Coffeemaker
For your safety and continued enjoyment of this product, always read the instruction book carefully before using.
DGB-1
Page 2

IMPORTANT
SAFEGUARDS
When using electrical appliances, basic safety
precautions should always be followed to
reduce the risk of fire, electric shock and/or
injury to persons, including the following:
1. READ ALL INSTRUCTIONS.
2. Do not touch hot surfaces. Use handles
and knobs.
3. To protect against electric shock and
injury to persons, do not place cord,
plug, or base unit in water or other
liquids.
4. Close supervision is necessary when any
appliance is used by or near children.
5. Always unplug from outlet when not in
use and before cleaning. Allow to cool
before putting on or taking off parts,
and before cleaning the appliance.
6. Do not operate any appliance with a
damaged cord or plug or after the appliance malfunctions or has been dropped
or damaged in any manner. Return appliance to the nearest Cuisinart Repair
Center for examination, repair, or electrical or mechanical adjustment.
7. The use of accessory attachments not
recommended by Cuisinart may cause
injuries, fire, electric shock or injury to
persons.
8. Do not use outdoors.
9. Do not let cord hang over edge of table
or counter, or touch hot surfaces.
10. Do not place on or near a hot gas or
electric burner, or in a heated oven.
11. Always fill water reservoir first, then plug
cord into the wall outlet. To disconnect,
turn any control to “Off,” then remove
plug from wall outlet.
12. Scalding may occur if the filter chamber
is opened during the brewing cycle.
13. Do not use appliance for other than
intended use.
14. Do not open the lid of the coffeemaker
while brewing is in progress.
15. Do not overfill the water reservoir with
water. Use only water in this appliance!
Do not put any other liquids or foods in
the water reservoir except as instructed
in the cleaning instructions in this guide.
16. Do not clean drip tray with cleansers,
steel wool pads, or other abrasive
materials.
17. WARNING: TO REDUCE THE RISK OF
FIRE OR ELECTRIC SHOCK, DO NOT
REMOVE THE BASE PANEL. NO USERSERVICEABLE PARTS ARE INSIDE.
REPAIR SHOULD BE DONE ONLY BY
AUTHORIZED PERSONNEL.
18. Avoid contact with moving parts.
19. Check grinder basket for presence of
foreign objects before using.
20. Use the coffee grinder to grind roasted
coffee beans only. Grinding other substances, such as nuts, spices or unroasted beans, may dull the blade and cause
poor grinding or injury.
21. Do not place cloth or otherwise restrict
airflow beneath coffeemaker.
22. Use only the Cuisinart® Gold-Tone
Commercial-Style Filter or Standard #2
paper filters with the unit. OTHER GOLD
TONE PERMANENT FILTERS MAY
CAUSE THE COFFEEMAKER TO
OVERFLOW.
23. Do not operate your appliance in an
appliance garage or under a wall cabinet.
When storing in an appliance garage,
always unplug the unit from the electrical outlet. Not doing so could create a
risk of fire, especially if the appliance
touches the walls of the garage or the
door touches the unit as it closes.
SAVE THESE
INSTRUCTIONS
FOR HOUSEHOLD
USE ONLY
WARNING: RISK OF FIRE
OR ELECTRIC SHOCK
The lightning flash with arrowhead
symbol within an equilateral triangle
is intended to alert the user to the
presence of uninsulated dangerous
voltage within the product’s enclo-
2
Page 3
sure that may be of sufficient magnitude to
constitute a risk of fire or electric shock to
persons.
The exclamation point within an
equilateral triangle is intended to
alert the user to the presence of
important operating and maintenance (servicing) instructions in
the literature accompanying the
appliance.
SPECIAL CORD SET
INSTRUCTIONS
A short power-supply cord is provided to
reduce the risks resulting from becoming
entangled in or tripping over a longer cord.
Longer extension cords are available and
may be used if care is exercised in their use.
If a long extension cord is used, the marked
electrical rating of the extension cord must be
at least as great as the electrical rating of the
appliance, and the longer cord should be
arranged so that it will not drape over the
countertop or tabletop where it can be pulled
on by children or tripped over.
NOTICE
This appliance has a polarized plug (one blade
is wider than the other). To reduce the risk of
electric shock, this plug will fit into a polarized
outlet only one way. If the plug does not fit
fully into the outlet, reverse the plug. If it still
does not fit, contact a qualified electrician. Do
not modify the plug in any way.
CONTENTS
Important Safeguards .............. 2
Unpacking Instructions ............. 3
Features and Benefits .............4-5
Inserting the Water Filter ............ 5
The Quest for Perfect Cup of Coffee... 6
Before Brewing.................... 6
Making Coffee .................... 6
With Whole Bean Coffee ......... 6
With Pre-Ground Coffee .......... 7
Cleaning and Maintenance .......... 8
Tips and Hints .................... 9
Troubleshooting ................... 9
Warranty ........................ 10
IMPORTANT UNPACKING
INSTRUCTIONS
1. Place the box on a large, sturdy,
flat surface.
2. Remove any literature.
3. Turn the box so that the back side
of the brewer is down and slide the
coffeemaker from the box.
4. After removing the brewer, place the box
out of the way and place the inserts back
into the box.
5. Remove the polybag covering the brewer.
We suggest you save all packing materials
in the event that future shipping of the
machine is needed. Keep all plastic bags
away from children.
WARNING
RISK OF FIRE OR ELECTRIC SHOCK
DO NOT OPEN
WARNING: TO REDUCE THE RISK OF FIRE OR ELECTRIC SHOCK,
DO NOT REMOVE COVER (OR BACK)
NO USER-SERVICEABLE PARTS INSIDE
REPAIR SHOULD BE DONE BY AUTHORIZED SERVICE PERSONNEL ONLY
3
Page 4
FEATURES
AND BENEFITS
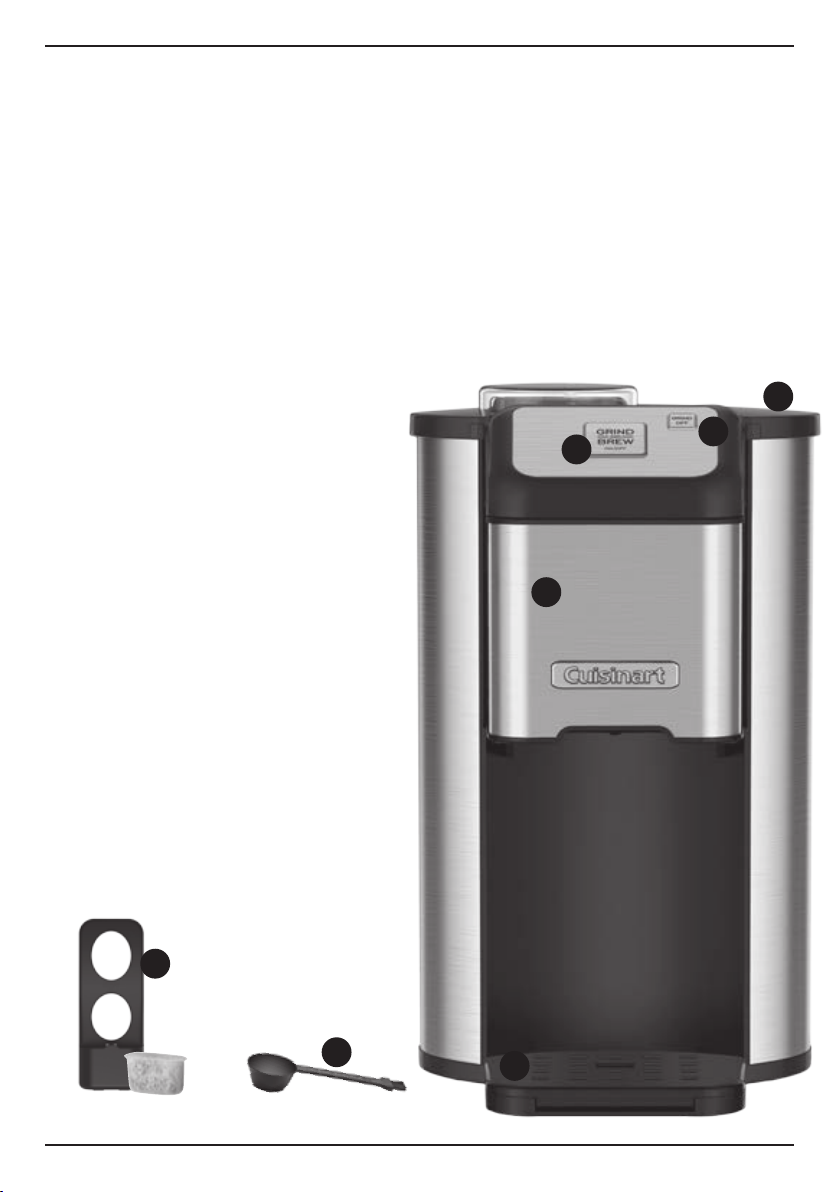
1. Coffeemaker Lid
Push down to release; opens to access
water reservoir, water filter and grinder
assembly.
2. Coffee Filter Compartment
Contains filter, filter basket, cover
and holder.
3. Grind & Brew (On/Off) Button
Starts brewing process. Press at
any time to stop brewing process.
4. Grind Off Button
Bypasses the grinding operation
when using pre-ground coffee.
5. Drip Tray
Removes for easy cleanup and to
accommodate tall travel mugs.
6. Measuring Scoop with Brush
7. Charcoal Water Filter and Holder
Eliminates chlorine, bad tastes and
odors from tap water. NOTE: Follow
directions for preparing and inserting
filter on page 5.
8. #2 Paper Filters included
Using a paper filter may result in some
coffee dripping from the filter basket
after the brew cycle has completed.
(not shown)
9. Water Reservoir
Marked for 4, 8, 12 and 16 ounces.
10. Grinder Assembly
10a. Grinder Cover
Lifts off to add beans.
NOTE: Cover must be in place
for unit to operate.
10b. Grinder
Blade grinder releases the best
of the bean.
1
4
3
2
7
6
4
5
Page 5
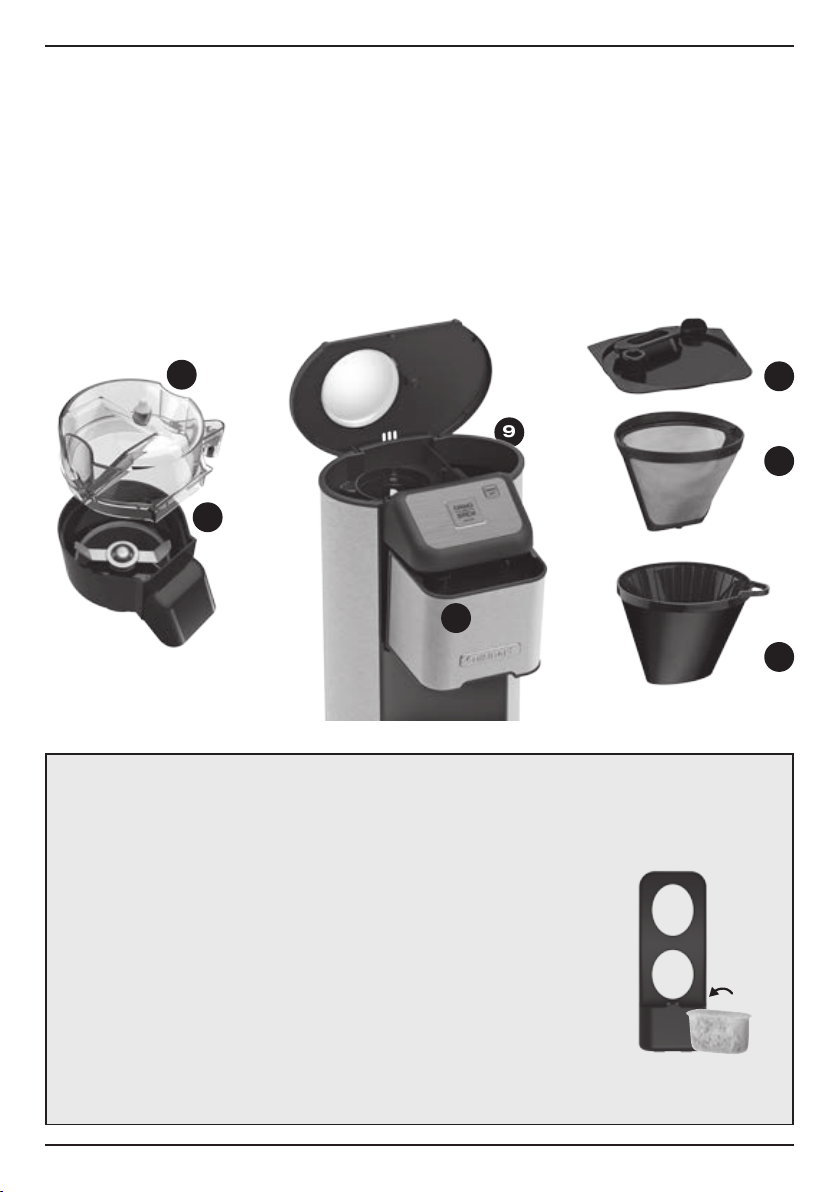
11. Filter Basket Cover
Cover becomes hot after coffee is
brewed. Use caution when removing
cover. NOTE: Cover must be in place
for unit to operate correctly.
12. Gold Tone Filter
Position handle toward front of unit so
it does not interfere with the flow of
coffee into the filter basket. Our
permanent filter may allow some fine
coffee grounds to flow through, which
can appear as sediment in your cup.
13. Filter Basket
Holds #2 paper filter or Cuisinart
permanent gold-tone filter. NOTE:
Filter basket must be in place for unit
to operate correctly.
14. Filter Basket Holder
Reach under and pull out to access
filter, filter basket and cover.
10a
10b
INSERTING THE WATER FILTER
Your coffeemaker comes with a charcoal water
filter that eliminates chlorine, bad tastes and
odors from tap water.
• Remove the filter from polybag and soak it,
fully immersed, in cold tap water for 15 minutes.
• Lift the water filter holder out of the water
reservoir.
• Press down on the filter compartment and pull
toward you to open.
• Place filter into the holder and snap it closed.
Be careful – improper placement can tear the
filter skin.
• Flush filter by running cold tap water through
holes in bottom of compartment for 10 seconds.
9
14
• Allow the filter to drain completely.
• Slide the water filter holder back into the
channel in the water reservoir, pushing it down
to the base of the unit.
NOTE: We
recommend changing
the water filter every
60 days or after 60
uses, and more often
if you have hard
water. Replacement
filters can be
purchased in stores,
or by calling Cuisinart
customer service, or
at www.cuisinart.com.
Coffeemaker Charcoal
Water Filter
11
12
13
5
Page 6
THE QUEST
FOR THE PERFECT
CUP OF COFFEE
ELEMENT 1
Coffee is 98% water. The quality of that
water is as important as the quality of
your coffee. If water doesn’t taste good
from the tap, it won’t taste good in your
coffee. Cuisinart includes a charcoal
water filter to remove chlorine, bad tastes
and odors, for the purest coffee flavor
every time you brew.
ELEMENT 2
While coffee is 98% water, all of the
flavor comes from the beans. To achieve
the same great taste you enjoy at a
coffee bar, buy only a two-week supply
of fresh coffee beans at a time. Once the
bean is broken, its flavor degrades
quickly. That’s why Cuisinart grinds your
beans just prior to brewing.
–
WATER
–
COFFEE
BEFORE BREWING YOUR
FIRST CUP OF COFFEE
Rinsing your coffeemaker: During the
manufacturing process, dust can get
trapped in the unit. We recommend
flushing out the system before brewing
your first cup of coffee. Simply fill the
reservoir, place a cup on the drip tray,
press the Grind Off button and power on
the unit. Do not add coffee!
MAKING COFFEE
WHOLE BEANS
Follow instructions in “Before Brewing Your
First Cup of Coffee.”
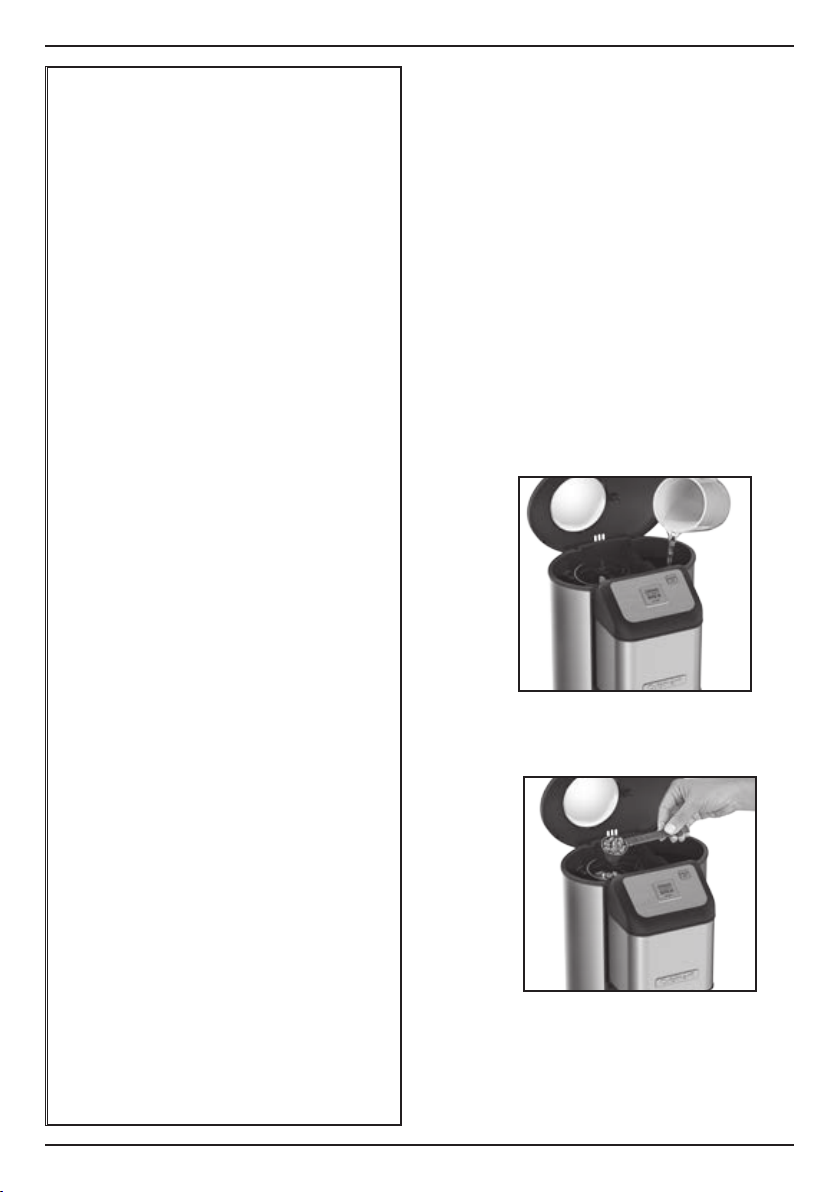
1. Open lid and add water to the
reservoir.
ELEMENT 3
The grind is critical for proper flavor
extraction. If the grind is too fine,
overextraction and bitterness will result.
Too fine a grind may also clog the filter.
If grind is too coarse, the water will pass
through too quickly and the maximum
flavor will not be extracted. Your
coffeemaker is preset for medium, the
optimal grind for this type of brewing
process.
ELEMENT 4
Coffee that is too strong or too weak
is always a disappointment. Follow the
recommended portions in the instructions
under MAKING COFFEE, and later adjust
the amount to your taste.
DO NOT OVERFILL OR THE GRINDER
COULD MALFUNCTION AND/OR THE
COFFEEMAKER COULD OVERFLOW.
–
GRIND
–
PROPORTION
2. Remove grinder cover and add beans
(see chart for recommended portions).
Replace grinder cover and close lid.
6
Page 7
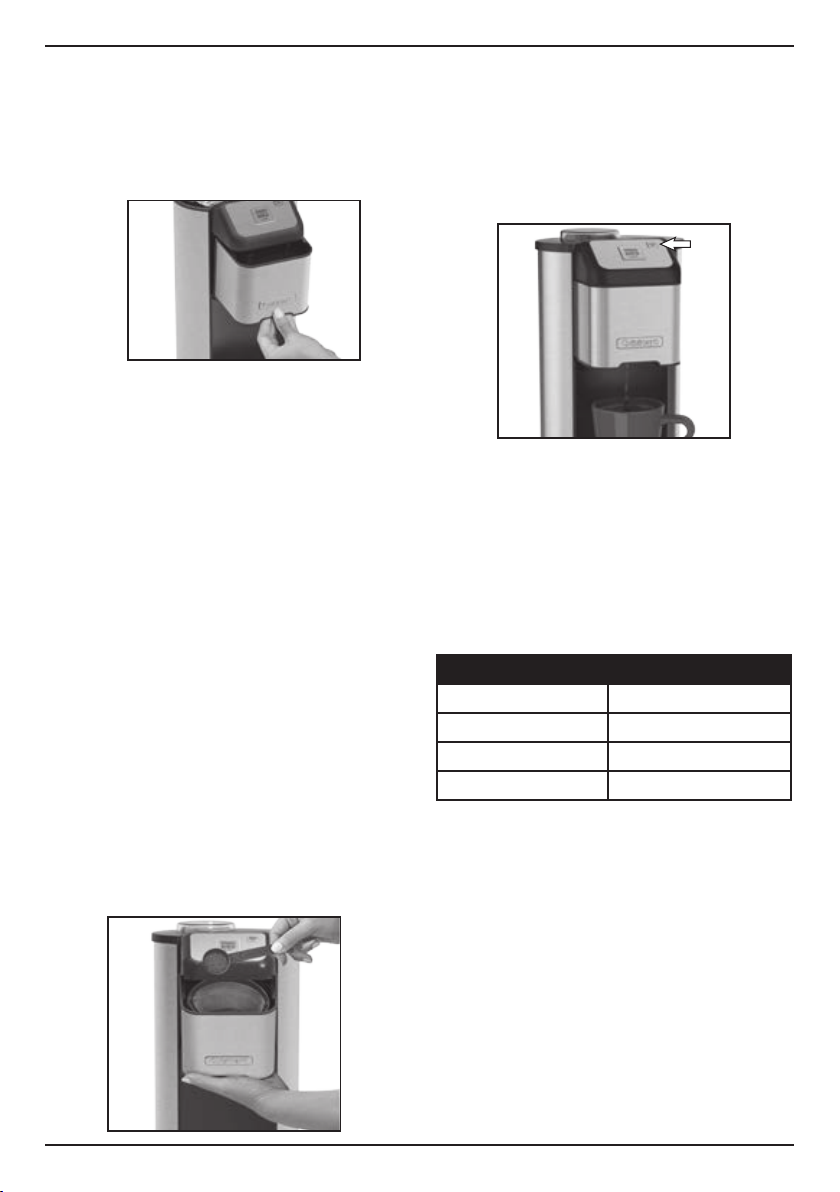
3. Pull out the coffee filter basket
compartment and place the gold-tone
filter or a #2 paper filter into the filter
basket. If using the paper filter, make
sure it is completely open and touching
the side walls and bottom of basket.
4. Put coffee filter cover in place, and
push the coffee filter basket
compartment back into the unit.
NOTE: Be sure compartment is
securely in place.
5. Place an appropriately sized cup on
drip tray.
6. Press Grind & Brew button to begin
brewing; a blue indicator around the
button will light up during brewing.
NOTE: To stop process at any time, press
the Grind & Brew button again.
PRE-GROUND COFFEE
Follow instructions in “Before Brewing Your
First Cup of Coffee,” page 6.
1.
Open lid and add water to the reservoir.
Close lid.
2. Pull out the coffee filter basket
compartment and place the gold-tone
filter or a #2 paper filter into the filter
basket.
3. Add your pre-ground coffee to the filter
(see chart for recommended portions).
4.
Put coffee filter cover in place, and push
the coffee filter basket compartment
back into the unit. NOTE: Be sure
compartment is securely in place
5. Press Grind Off button; a red indicator
around the button will light up to let
you know the grind function is off.
6. Place an appropriately sized cup on
drip tray.
7. Press On/Off button to begin brewing;
a blue indicator around the button will
light up during brewing.
NOTE: To stop brewing process at any
time, press the On/Off button again.
.
RECOMMENDED PORTIONS
CUP COFFEE
4 oz. 1 scoop
8 oz. 2 scoops
12 oz. 3 scoops
16 oz. 4 scoops
NOTE: Adjust portion to taste, as you get
to know your coffeemaker and personal
preferences. Be sure not to over-fill the
grinder. Six scoops is the maximum.
7
Page 8

CLEANING AND
MAINTENANCE
COMPLETELY CLEAN AND DRY ALL PARTS
WHEN DONE BREWING
We recommend cleaning your coffeemaker
when you are finished using it. Be sure unit
is OFF and unplugged before cleaning.
Open the lid and remove the grinder
assembly. Pull out the coffee filter
compartment and remove the filter, cover
and filter basket. We recommend washing
the filter basket holder by hand to protect
the brushed stainless steel finish. All other
parts can be hand-washed in warm, soapy
water and rinsed thoroughly, or cleaned in
the upper rack of the dishwasher.
Dry all parts. Do not put any water in the
unit once the grinder assembly has been
removed.
Wipe the area under the grinder assembly
with a damp cloth. If water gets into the
grinder motor, the motor may become
damaged and may malfunction.
Never use rough, abrasive materials or
cleansers to clean any part of your
coffeemaker. Do not dry the inside of the
water reservoir with a cloth, as lint may
remain.
Maintenance:
Any other servicing should be performed
by an authorized service representative.
DECALCIFICATION
Decalcification refers to removing the
calcium deposits which form over time on
the metal parts of the coffeemaker.
When both blue and red indicators flash, it
is time to clean your coffeemaker. We
recommend decalcifying every month for
best performance. The frequency depends
upon the hardness of your tap water and
how often you use the coffeemaker.
Directions:
1. Remove the water filter from the water
reservoir.
2. Fill the water reservoir to capacity with
a mixture of 6 ounces of white vinegar
and 10 ounces of water.
3. Place a 16-ounce container under
dispenser.
4. Press and hold both Grind & Brew and
Grind Off buttons for 2 seconds to
activate the cleaning/decalcification
process.
NOTE: Blue and red indicators will
alternately flash during the cleaning
cycle.
5. Discard solution when flow stops, and
return container to coffeemaker.
6. Rinse by repeating operation, this time
using 16 ounces of fresh, cold water.
NOTE: One cycle should be sufficient
to adequately clean the coffeemaker.
If there is any leftover smell or taste of
vinegar, run another cycle with fresh,
cold water.
8
Page 9

TIPS AND HINTS
• Use the cup you will brew into as your
“measuring cup.” Fill the cup with water
and pour it right into the reservoir.
• If you buy large portions of beans,
separate them into one-week portions
and store them in airtight containers in the
freezer. Preserve freshness by minimizing
exposure to air, light, and moisture. Once
beans are removed from the freezer, keep
them in a sealed container at room
temperature.
• Some experts feel freezing dark-roast
beans can cause oils to coagulate; others
disagree. You’ll have to decide that one
for yourself!
• It is OK to brew more than 1 cup at a
time. Be sure to empty the filter basket of
the used grounds, and add more water
and beans to the unit for each cup.
• Always open the coffee filter
compartment using the plastic grip on
the underside. The stainless steel will be
hot after brewing.
• For a quick iced coffee, put 8 ounces of
cold water into the water reservoir and 6
scoops of beans into the grinder. Fill a
16-ounce glass with ice cubes and brew
directly into the cup. Once brewed, add
sweeteners and or milk as desired. Note
that since it is cold, some sugars may
not fully dissolve, so simple syrup (equal
parts sugar and water, cooked over low
heat until sugar is dissolved, then fully
cooled) is a great item to have on hand.
TROUBLESHOOTING
PROBLEM:: SOLUTION:
Indicator lights are flashing If both red and blue indicator lights are flashing simultaneously, it is time
to clean the coffeemaker. See decalcification instructions on page 8.
If indicator lights are alternately flashing blue and red, your coffeemaker
is in the “clean” mode.
Pressed Grind & Brew
button, but nothing is
happening
Coffeemaker not grinding
beans
Coffee residue appears on
lid of grinder
Coffee is not strong
enough/too strong
Coffee is dripping after
coffee brewing should be
complete
Check that the outlet you are using has power. The grinder assembly
may not be properly in place. Make sure the grinder and cover are
properly positioned, lid is fully closed and try again.
Coffee beans are too tightly packed. Do not fill above Max Fill line.
Grind Off is selected. Press the button again to deselect.
This is normal and will occur each time you grind beans. It should not
affect coffee flavor when brewing consecutive cups.
Our recommended coffee recipe is provided on page 7. Tastes vary and
you should adjust the proportions according to your own preferences.
Just be sure not to fill the grinder with more than six scoops or above
the Max Fill line.
If the chute on the coffee grinder is not cleaned, it is possible for it to
collect enough residue to inhibit the flow of coffee grinds into the filter
basket – this will make your coffee weaker than expected. Be sure to
clean the chute portion when cleaning the coffee grinder.
If you are using a paper filter, it is possible for coffee to continue
dripping after the brewing cycle has completed – this is normal.
9
Page 10

WARRANTY
LIMITED THREE-YEAR
WARRANTY
This warranty is available to consumers
only. You are a consumer if you own a
Cuisinart® Single Cup Grind & Brew™
Coffeemaker that was purchased at retail for
personal, family or household use. Except
as otherwise required under applicable law,
this warranty is not available to retailers or
other commercial purchasers or owners. We
warrant that your Cuisinart® Single Cup Grind
& Brew™ Coffeemaker will be free of defects
in materials and workmanship under normal
home use for three years from the date of
original purchase.
We recommend that you visit our website,
www.cuisinart.com for a fast, efficient way to
complete your product registration. However,
product registration does not eliminate the
need for the consumer to maintain the original
proof of purchase in order to obtain the
warranty benefits. In the event that you do not
have proof of purchase date, the purchase
date for purposes of this warranty will be the
date of manufacture.
Your Cuisinart® Single Cup Grind & Brew™
Coffeemaker has been manufactured to the
strictest specifications and has been designed
for use only in 120-volt outlets and only with
authorized accessories and replacement
parts. This warranty expressly excludes any
defects or damages caused by attempted
use of this unit with a converter, as well as
use with accessories, replacement parts or
repair service other than those authorized
by Cuisinart. This warranty does not cover
any damage caused by accident, misuse,
shipment or other than ordinary household
use. This warranty excludes all incidental
or consequential damages. Some states do
not allow the exclusion or limitation of these
damages, so these exclusions may not apply
to you. You may also have other rights, which
vary from state to state.
Important: If the nonconforming product is to
be serviced by someone other than Cuisinart’s
Authorized Service Center, please remind the
servicer to call our Consumer Service Center
at 1-800-726-0190 to ensure that the problem
is properly diagnosed, the product is serviced
with the correct parts, and to ensure that the
product is still under warranty.
CALIFORNIA RESIDENTS ONLY
California law provides that for In-Warranty
Service, California residents have the option
of returning a nonconforming product (A)
to the store where it was purchased or (B)
to another retail store that sells Cuisinart
products of the same type. The retail store
shall then, according to its preference, either
repair the product, refer the consumer to
an independent repair facility, replace the
product, or refund the purchase price less the
amount directly attributable to the consumer’s
prior usage of the product. If neither of the
above two options results in the appropriate
relief to the consumer, the consumer may then
take the product to an independent repair
facility, if service or repair can be economically
accomplished. Cuisinart and not the consumer
will be responsible for the reasonable cost of
such service, repair, replacement, or refund
for nonconforming products under warranty.
California residents may also, according
to their preference, return nonconforming
products directly to Cuisinart for repair or,
if necessary, replacement by calling our
Consumer Service Center toll-free at 1-800726-0190. Cuisinart will be responsible for
the cost of the repair, replacement, and
shipping and handling for such nonconforming
products under warranty.
BEFORE RETURNING YOUR CUISINART
PRODUCT
If your Cuisinart® Single Cup Grind & Brew™
Coffeemaker should prove to be defective
within the warranty period, we will repair or,
if we think necessary, replace it. To obtain
warranty service, please call our Consumer
Service Center toll-free at 1-800-726-0190 or
write to: Cuisinart, 7475 North Glen Harbor
Blvd., Glendale, AZ 85307. To facilitate the
speed and accuracy of your return, enclose
$10.00 for shipping and handling. (California
residents need only supply a proof of
purchase and should call 1-800-726-0190
for shipping instructions.) Please be sure to
include your return address, phone number,
description of the product’s defect, product
serial number, and any other information
pertinent to the return. Please pay by check
or money order. NOTE: For added protection
and secure handling of any Cuisinart product
that is being returned, we recommend you use
a traceable, insured delivery service. Cuisinart
cannot be held responsible for in-transit
damage or for packages that are not delivered
to us. Lost and/or damaged products are not
covered under warranty.
10
Page 11

NOTES:
11
Page 12

©2015 Cuisinart
150 Milford Road
East Windsor, NJ 08520
Printed in China
14CE002775
Trademarks or service marks referred to herein are
the trademarks or service marks of their respective owners.
F IB-12653-ESP-A
Page 13

MANUAL DE INSTRUCCIONES
Cafetera de una taza con molinillo incorporado Grind & Brew
Para su seguridad y para disfrutar plenamente de este producto, siempre lea las instrucciones
cuidadosamente antes de usarlo.
™
DGB-1
Page 14

MEDIDAS DE
SEGURIDAD
IMPORTANTES
Siempre que use aparatos eléctricos, debe
tomar precauciones básicas de seguridad
para reducir el riesgo de incendio,
electrocución o heridas, incluso las siguientes:
1. LEA TODAS LAS INSTRUCCIONES.
2. No toque las superficies calientes; utilice
el mango y los botones o perillas.
3. Para reducir el riesgo de incendio,
electrocución o herida, no sumerja el
cable, la clavija o el aparato en agua u
otro líquido.
4. Supervise el uso de este aparato
cuidadosamente cuando esté usado por
o cerca de niños.
5. Siempre desconecte el aparato cuando
no esté en uso y antes de limpiarlo.
Permita que se enfríe antes de instalar o
remover piezas y antes de limpiarlo.
6. No utilice este aparato si el cable o la
clavija estuviesen dañados, después de
que hubiese funcionado mal o que se
hubiese caído o si estuviese dañado;
regréselo a un centro de servicio
autorizado para su revisión, reparación o
ajuste.
7. El uso de accesorios no recomendados o
proveídos por Cuisinart presenta un
riesgo de incendio, electrocución o
herida.
8. No lo utilice en exteriores.
9. No permita que el cable cuelgue del
borde de la encimera o de la mesa, ni
que haga contacto con superficies
calientes.
10. No coloque el aparato sobre o cerca de
un quemador a gas o una hornilla
eléctrica caliente, ni en un horno caliente.
11. Siempre llene el depósito de agua antes
de conectar el aparato a la toma de
corriente. Siempre apague el aparato
(OFF) antes de desconectarlo.
12. Para evitar las quemaduras, no abra el
portafiltros durante la preparación
13. No utilice el aparato para ningún otro fin
que no sea el indicado.
14. No abra la tapa durante el
funcionamiento.
15. No sobrellene el depósito de agua.
¡Utilice solamente agua en este aparato!
No ponga ningún otro líquido u alimento
en el depósito, a excepción de cuando
sea para limpiarlo, según las
instrucciones indicadas en este manual.
16. No limpie la bandeja de goteo con
limpiadores abrasivos, lana de acero u
otros materiales abrasivos.
17. ADVERTENCIA: PARA REDUCIR EL
RIESGO DE INCENDIO O
ELECTROCUCIÓN, NO DESARME EL
CUERPO DEL APARATO. ESTE
APARATO NO CONTIENE PIEZAS QUE
PUEDAN SER REPARADAS POR EL
USUARIO. LAS REPARACIONES DEBEN
SER REALIZADAS POR UN TÉCNICO
AUTORIZADO.
18. Evite el contacto con las piezas móviles.
19. Averigüe que no hay objetos extraños en
el molinillo antes de usarlo.
20. Utilice el molinillo solamente para moler
café tostado en grano. No lo use para
moler nueces, especias o café crudo.
Esto podría dañar las cuchillas o
provocar heridas.
20. No coloque la cafetera encima de un
paño/trapo ni obstruya el flujo de aire
debajo de ésta.
21. Solamente use un filtro dorado
permanente Cuisinart
No. 2. OTROS FILTROS PERMANENTES
PODRÍAN PROVOCAR UN DERRAME.
22. No haga funcionar el aparato bajo o
adentro de un armario. Siempre
desconecte el aparato antes de
guardarlo en un armario. Dejar el
aparato conectado presenta un riesgo de
incendio, especialmente si éste toca las
paredes o la puerta del armario cuando
cierra.
®
o filtros de papel
2
Page 15

GUARDE ESTAS
INSTRUCCIONES
corriente polarizada. Si no entrara en la toma
de corriente, inviértela. Si aún no entrara
completamente, comuníquese con un
electricista. No intente modificarla.
PARA USO
DOMÉSTICO
SOLAMENTE
ADVERTENCIA: RIESGO
DE INCENDIO O
ELECTROCUCIÓN
El símbolo representado por un
relámpago con punta de flecha
dentro de un triángulo equilátero
tiene como fin alertar al usuario de
la presencia de voltajes peligrosos
no aislados en el interior del aparato,
los cuales pueden ser de suficiente
magnitud para constituir un riesgo
de incendio o electrocución.
El signo de exclamación dentro de
un triángulo equilátero tiene como fin
alertar al usuario de la presencia de
instrucciones importantes de
operación y mantenimiento (servicio)
en la documentación que acompaña
al equipo.
USO DE EXTENSIONES
El cable provisto con este aparato es corto
para reducir el peligro de que alguien se
enganche o tropiece con un cable más largo.
Se podrá usar una extensión eléctrica,
siempre que respete las precauciones
siguientes.
La clasificación nominal de la extensión debe
ser por lo menos igual a la del aparato. Es
importante colocar la extensión sobre la
encimera o la mesa de tal forma que niños no
puedan jalarla o tropezar con ella.
AVISO
El cable de este aparato está dotado de una
clavija polarizada (una pata es más ancha que
otra). Como medida de seguridad, se podrá
enchufar de una sola manera en la toma de
ÍNDICE
Medidas de seguridad importantes . . . . 2
Instrucciones de desembalaje . . . . . . . . 3
Piezas y características . . . . . . . . . . . . . 5
Instalación del filtro de agua . . . . . . . . . 5
Sugerencias para la preparación de un
buen café . . . . . . . . . . . . . . . . . . . . . . . . 6
Antes del primer uso . . . . . . . . . . . . . . . 6
Operación. . . . . . . . . . . . . . . . . . . . . . . . 6
Preparación con café en grano . . . . 6
Preparación con café molido . . . . . . 7
Limpieza y mantenimiento . . . . . . . . . . . 8
Consejos útiles. . . . . . . . . . . . . . . . . . . . 9
Resolución de problemas . . . . . . . . . . . 9
Garantía . . . . . . . . . . . . . . . . . . . . . . . . 10
IMPORTANTES
INSTRUCCIONES DE
DESEMBALAJE
1. Ponga la caja sobre una superficie
espaciosa, plana y segura.
2. Retire el manual de instrucciones y otros
folletos de la caja.
3. Voltee la caja para que repose en su lado
y retire la cafetera.
4. Aleje la caja y retire el aparato del material
de embalaje; regrese los insertos en la
caja.
5. Remueva la bolsa protectora que envuelve
la cafetera. Le aconsejamos que conserve
el material de embalaje. Mantenga las
bolsas de plástico fuera del alcance de los
niños.
ADVERTENCIA
RIESGO DE INCENDIO O ELECTROCUCIÓN
NO LO ABRA
ADVERTENCIA: PARA REDUCIR EL RIESGO DE INCENDIO O ELECTROCUCIÓN,
ESTE APARATO NO CONTIENE PIEZAS QUE PUEDAN SER REPARADAS POR
NO DESARME EL CUERPO DEL APARATO.
EL USUARIO. LAS REPARACIONES DEBEN SER EFECTUADAS
POR TÉCNICOS AUTORIZADOS SOLAMENTE.
3
Page 16

PIEZAS Y
6
CARACTERÍSTICAS
1. Tapa de la cafetera
Presiónela para abrir y llenar el
depósito de agua, acceder al
portafiltros y llenar el molinillo.
2. Compartimiento del portafiltros - véase
los detalles en la página 5.
portafiltros y su soporte, la tapa de
portafiltros y el filtro.
3. Botón GRIND & BREW
Empieza la preparación. Presiónelo en
cualquier momento para detener la
preparación.
4. Botón GRIND OFF
Activa el modo "sin molienda" para
preparar café con café molido.
5. Bandeja de goteo
Removible para acomodar tazas
grandes y facilitar la limpieza.
6. Cuchilla medidora con cepillo
7. Filtro de carbón con soporte
Elimina el cloro, el mal olor y sabor del
agua corriente. NOTA: seguir las
instrucciones de preparación e
instalación del filtro en la página 5.
8. Filtros de papel no. 2
Usar un filtro de papel puede hacer
que el café siga goteando después de
la preparación.
9. Depósito de agua
Con marcas de medición para 4 onzas
(120 ml), 8 onzas (235 ml), 12 onzas
(355 ml) y 16 onzas (475 ml).
Encierra el
(no ilustrados)
10. Molinillo
10a. Tapa del molinillo
Se abre para agregar café en
grano. NOTA: la unidad no se
pondrá en marcha a menos que
la tapa esté debidamente puesta.
10b. Molinillo
Muele el café justo antes de
prepararlo, para un sabor puro
2
1
4
3
7
6
4
5
Page 17

café.
9
11. Cubierta del portafiltros
La cubierta se vuelve muy caliente
durante el funcionamiento. Tenga
cuidado al retirarla. NOTA: la unidad
no se pondrá en marcha a menos que
la tapa esté debidamente puesta.
12. Filtro dorado permanente
Asegúrese de que el asa del filtro
apunte hacia la parte delantera de la
cafetera, para no impedir el flujo del
café. Nota: el filtro permanente puede
dejar pasar posos finos de café.
de
13. Portafiltros
Para filtro de papel No. 2 o filtro
permanente. NOTA: la unidad no se
pondrá en marcha a menos que el
portafiltros esté debidamente
instalado.
14. Soporte del portafiltros
Agárrelo por la parte inferior y jale
para acceder al filtro, al portafiltros y a
la cubierta del portafiltros.
10a
10b
INSTALACIÓN DEL FILTRO
Su cafetera está equipada con un filtro de carbón
que elimina el cloro y el mal olor/sabor del agua
corriente.
• Retire el filtro de la bolsa de plástico y remójelo
en agua fría durante 15 minutos.
• Alce el soporte del filtro que se encuentra en el
depósito de agua de la cafetera.
• Abra el soporte.
• Instale el filtro en el soporte y ciérrelo. Haga esto
con mucho con cuidado. Si no instalara el filtro
de manera correcta, la membrana del filtro podría
romperse.
• Enjuague el filtro en agua fría durante 10
segundos para limpiarlo, las aberturas
directamente bajo el flujo de agua.
9
14
• Permita que el filtro seque completamente.
• Regrese el soporte del filtro en el depósito,
empujándolo hasta el fondo.
NOTA: le aconsejamos
que cambie el filtro de
agua cada 60 días o 60
usos, o más
frecuentemente si el
agua es dura. Los filtros
están disponibles en las
tiendas especializadas,
en nuestro sitio Web
www.cuisinart.com, o
llamando a nuestro
servicio postventa al
1-800-726-0190.
Filtro de carbón
11
12
13
5
Page 18

SUGERENCIAS
PARA LA PREPARACIÓN
DE UN BUEN CAFÉ
ELEMENTO 1 – EL AGUA
El café está constituido por un 98% de agua.
Por lo tanto, la calidad del agua es tan
importante como la del café. Si el agua tiene
mal sabor, el café tendrá mal sabor. Por eso
Cuisinart equipó su cafetera con un filtro de
carbón que remueve el cloro y el mal sabor y
olor, para preparar café puro, taza tras taza.
ELEMENTO 2 – EL CAFÉ
Aunque la mayor parte del brebaje es agua,
el sabor proviene del café. Para preparar café
sabroso, compre café tostado en grano
aproximadamente dos veces por mes. Una
vez que se rompen los granos, el sabor
intenso y rico del café comienza a
deteriorarse. Por eso Cuisinart equipó su
cafetera con un molinillo que muele los
granos justo antes de preparar el café.
ELEMENTO 3 – LA MOLIENDA
La molienda es primordial para preservar el
sabor del café. Café molido muy fino producirá
un café amargo. Esto también puede trabar el
filtro. Café molido muy grueso dejará pasar el
agua demasiado rápidamente, lo cual producirá
un café acuoso. Su cafetera ha sido
programada para proporcionar un molido
medio, el grado óptimo para la preparación
automática del café.
ELEMENTO 4 – LAS
PROPORCIONES
Para que el café sea perfecto, ni muy débil ni
muy fuerte, se debe usar la proporción
apropiada de café y agua. Siga las pautas en
la sección PREPARACIÓN y ajuste las
proporciones al gusto.
NO SOBRELLENE EL MOLINILLO. ESTO
PODRÍA PROVOCAR UN MAL
FUNCIONAMIENTO O UN DERRAME.
ANTES DEL PRIMER USO
Limpieza inicial del sistema interno: Puede
acumularse polvo en el aparato durante el
proceso de fabricación. Le recomendamos
que limpie el sistema interno de la cafetera
antes de preparar café por primera vez.
Simplemente llene el depósito de agua,
coloque una taza sobre la bandeja de
goteo, presione el botón GRIND OFF y
ponga la unidad en marcha. ¡No agregue
café!
FUNCIONAMIENTO
PREPARACIÓN CON CAFÉ
EN GRANO
Limpie la cafetera antes de usarla por
primera vez, según se indicó en la sección
“Antes del primer uso”.
1. Abra la tapa y llene el depósito de
agua con la cantidad deseada de
agua.
2. Abra el molinillo y agregue la cantidad
deseada de café en grano (véase
nuestras recomendaciones en la
tabla). Cierre la tapa del molinillo y la
tapa de la cafetera.
6
Page 19

3. Abra el compartimiento del portafiltros,
retire la tapa y coloque el filtro dorado
permanente o un filtro de papel no. 2
en el portafiltros. Si usa un filtro de
papel, asegúrese de que el filtro esté
completamente abierto y debidamente
instalado.
4. Regrese el portafiltros en su sitio y
cierre el compartimiento del
portafiltros.
NOTA: asegúrese de que el
compartimiento esté en su sitio.
5. Coloque una taza sobre la bandeja de
goteo.
6. Presione el botón GRIND & BREW
para empezar la preparación; el
indicador luminoso azul alrededor del
botón se encenderá.
NOTA: para detener la preparación en
cualquier momento, presione el botón
GRIND & BREW otra vez.
PREPARACIÓN CON CAFÉ
MOLIDO
Limpie la cafetera antes de usarla por
primera vez, según se indicó en la sección
“Antes del primer uso”.
1.
Abra la tapa y llene el depósito de agua
con la cantidad deseada de agua. Cierre
la tapa.
2. Abra el compartimiento del portafiltros,
retire la tapa y coloque el filtro dorado
permanente o un filtro de papel no. 2
en el portafiltros.
3. Agregar la cantidad deseada de café
molido al filtro (véase las
recomendaciones en la tabla).
4.
Regrese el portafiltros en su sitio y
cierre el compartimiento del portafiltros.
NOTA: asegúrese de que el
compartimiento esté en su sitio.
5. Presione el botón GRIND OFF para
activar el modo "sin molienda"; el
indicador luminoso rojo alrededor del
botón se encenderá.
6. Coloque una taza sobre la bandeja de
goteo.
7. Presione el botón ON/OFF para
empezar la preparación; el indicador
luminoso azul alrededor del botón se
encenderá.
NOTA: para detener la preparación en
cualquier momento, presione el botón ON/
OFF otra vez.
PROPORCIONES
ACONSEJADAS
TAZA CAFÉ
4 onzas (120 ml) 1 cucharada
8onzas (235 ml) 2 cucharadas
12 onzas (355 ml) 3 cucharadas
16 onzas (475 ml) 4 cucharadas
NOTA: ajuste la cantidad de café al gusto,
pero cerciórese de no sobrellenar el
molinillo. El molinillo tiene una capacidad
máxima de 6 cucharadas de café en grano.
7
Page 20

LIMPIEZA Y
MANTENIMIENTO
LAVE Y SEQUE TODAS LAS PIEZAS
DESPUÉS DE CADA USO.
Le aconsejamos que limpie la cafetera
después de cada uso. Asegúrese de que la
unidad esté apagada y desconectada antes
de limpiarla.
Abra la tapa y retire el molinillo. Abra el
compartimiento del portafiltros y retire el
filtro, la cubierta y el portafiltros. Le
aconsejamos que limpie el portafiltros a
mano para proteger el acabado de acero
inoxidable. Todas las otras piezas pueden
lavarse a mano, con detergente y agua
tibia, o en el nivel superior del lavavajillas.
Seque todas las piezas después de
lavarlas. No ponga agua en la unidad
después de retirar el molinillo.
Limpie el área bajo el molinillo con un paño
húmedo, teniendo cuidado de no dejar
penetrar agua adentro del motor, porque
esto podría dañarlo.
Nunca utilice materiales ásperos o
limpiadores abrasivos para limpiar la
cafetera. No seque el interior del depósito
de agua con un paño, porque pelusas
pueden quedarse adentro del mismo.
Mantenimiento:
cualquier otro servicio debe ser realizado
por un técnico autorizado.
ELIMINACIÓN DEL SARRO
Con el tiempo, depósitos de calcio (sarro)
se acumulan en las piezas metálicas de la
cafetera.
Cuando el indicador luminoso azul y el
indicador luminoso rojo empiezan a
parpadear al mismo tiempo, esto quiere
decir que es tiempo de eliminar el sarro del
sistema interno. Para un rendimiento
óptimo, le aconsejamos que elimine el sarro
cada mes, o después de 30 uso. La
frecuencia de la limpieza dependerá de la
dureza del agua y de la frecuencia de uso
de la cafetera.
Instrucciones:
1. Retire el filtro de agua del depósito de
agua.
2. Llene el depósito de agua hasta la
capacidad máxima con 6 onzas (175
ml) de vinagre y 10 onzas (295 ml) de
agua.
3. Coloque una taza de 16 onzas (475 ml)
sobre la bandeja de goteo.
4. Mantenga oprimido el botón GRIND &
BREW durante 2 segundos para
empezar el ciclo de limpieza.
NOTA: las luces parpadearán durante el
ciclo de limpieza.
5. Al final del ciclo de limpieza, tirar el
líquido y volver a colocar la taza sobre
la bandeja de goteo.
6. Agregar 16 onzas (475 ml) de agua al
depósito de agua y repetir el proceso.
NOTA: un ciclo debería ser suficiente
para eliminar el sarro. Si el olor/sabor a
vinagre es persistente, enjuague el
sistema interno con agua una vez más.
CONSEJOS ÚTILES
• Utilice la taza en la cual va a tomar café
para medir el agua. Llene la taza con
agua y vierta el agua en el depósito.
• Si usted compra grandes cantidades de
café en grano a la vez, divida los granos
en porciones para una semana y
guárdelos en el congelador, en
recipientes herméticos. Para maximizar el
aroma del café, evite exponer los granos
al aire, a la luz o a la humedad. Al sacar
los granos del congelador, mantenga el
envase cerrado a temperatura ambiente.
• Algunos expertos aconsejan no congelar
el café muy tostado porque sus aceites
pueden coagularse. Otros no están de
acuerdo. Le aconsejamos que
experimente y que decida por su cuenta.
• Puede preparar varias tazas consecutivas
de café. Simplemente vacíe el molinillo,
agregue más café en grano, más agua, y
empiece la preparación otra vez.
8
Page 21

• Para abrir el compartimiento del
portafiltros, agarre este por la pata de
plástico en la parte inferior. Las piezas
de acero inoxidable estarán muy
calientes después del uso.
• Para preparar café helado rápidamente,
vierta 8 onzas (235 ml) de agua fría en el
depósito y agregue 6 cucharadas de café
en grano al molinillo. Llene un vaso de 16
onzas (475 ml) con cubos de hielo y
coloque el vaso sobre la bandeja de
RESOLUCIÓN DE PROBLEMAS
PROBLEMA: SOLUCIÓN:
goteo. Una vez que el café está listo,
agregue edulcorante y/o leche/crema si
desea. Nota: puede que el azúcar no se
disuelva bien en el café helado. Utilice
jarabe simple (igual parte de azúcar y
agua cocidos a fuego bajo hasta que el
azúcar esté disuelto) si desea.
Los indicadores
luminosos están
parpadeando
Nada ocurre al presionar
el botón GRIND & BREW
El molinillo no muele los
granos de café
Hay residuos de café sobre
la tapa del molinillo
El café no está
suficientemente fuerte o está
demasiado fuerte
Si la luz roja y la luz azul están parpadeando al mismo tiempo, esto
significa que es tiempo de eliminar los depósitos de sarro del sistema
interno. Véase las instrucciones en la página [INSERT PAGE
NUMBER].
Las luces parpadean durante el ciclo de limpieza; esto es normal.
Averigüe que la toma de corriente a la cual está conectado el cable
está funcionando. Puede que las piezas del molinillo no estén en su
sitio. Cerciórese que el depósito de café en grano y la tapa del
molinillo estén debidamente instalados, y que la tapa de la cafetera
está completamente cerrada.
Los granos de café están demasiado apretujados. No pase la línea
"MAX".
La opción GRIND OFF (sin molienda) está activada. Presione el botón
GRIND OFF otra vez para desactivarlo.
Esto siempre ocurre después de moler café en granos. No afectará el sabor
del café siempre que prepare tazas consecutivas.
Véase los consejos en la página 7. Ajuste la cantidad de café a su gusto, pero
nunca llene de depósito de café con más de seis cucharadas o pase la línea
MAX.
Si el conducto de salida del café molido está sucio, es posible que residuos
de café estén obstruyendo el flujo de café, haciendo que el café sea menos
fuerte que de costumbre. Cerciórese de limpiar el conducto de salida del café
molido cuando limpia el molinillo.
Siguen cayendo gotas de
café después de final de la
preparación
Esto puede ocurrir con filtros de papel; es normal.
9
Page 22

GARANTÍA
GARANTÍA LIMITADA DE
TRES AÑOS
Esta garantía es para los consumidores
solamente. Usted es un consumidor si
ha comprado su aparato Cuisinart
una tienda, para uso personal o casero.
A excepción de los estados donde la ley
lo permita, esta garantía no es para los
detallistas u otros comerciantes. Cuisinart
garantiza este aparato contra todo defecto
de materiales o fabricación durante 3 años
después de la fecha de compra original,
siempre que el aparato haya sido utilizado
para uso doméstico y según las instrucciones.
Le aconsejamos que llene el formulario de
registro disponible en
a fin de facilitar la verificación de la fecha de
compra original. Sin embargo, registrar el
producto no es necesario para recibir servicio
bajo esta garantía. En ausencia del recibo de
compra, el período de garantía será calculado
a partir de la fecha de fabricación.
Este aparato satisface las más altas
exigencias de fabricación y ha sido
diseñado para uso sobre corriente de 120V,
usando accesorios y piezas de repuesto
autorizados solamente. Esta garantía
excluye expresamente los daños causados
por accesorios, piezas o reparaciones no
autorizados por Cuisinart, así como los
daños causados por el uso de un convertidor
de voltaje. Esta garantía no cubre el uso
institucional o comercial del producto, y no
es válida en caso de daños causados por mal
uso, negligencia o accidente. Esta garantía
excluye expresamente todos los daños
incidentales o consecuentes. Algunos Estados
no permiten la exclusión o limitación de daños
incidentales o consecuentes, de modo que
las limitaciones mencionadas pueden no regir
para usted. Usted puede tener otros derechos
que varían de un Estado a otro.
Importante: si debe llevar el aparato
defectuoso a un centro de servicio no
autorizado, por favor informe al personal
del centro de servicio que deberían llamar
al servicio posventa de Cuisinart al 1-800726-0190 a fin de diagnosticar el problema
correctamente, usar las piezas correctas para
repararlo y asegurarse de que el producto
esté bajo garantía.
www.cuisinart.com
®
en
RESIDENTES DE CALIFORNIA SOLAMENTE
La ley del estado de California ofrece dos
opciones bajo el período de garantía. Los
residentes del estado de California pueden (A)
regresar el producto defectuoso a la tienda
donde lo compraron o (B) a otra tienda que
venda productos Cuisinart
tienda, a su opción, reparará el producto,
referirá al consumidor a un centro de servicio
independiente, cambiará el producto o
reembolsará al consumidor el precio original
del producto, menos la cantidad imputable al
uso del producto por el consumidor hasta que
el producto se dañó. Si estas dos opciones
no satisfacen al consumidor, podrá llevar el
aparato a un centro de servicio independiente,
siempre que se pueda ajustar o reparar el
aparato de manera económica. Cuisinart
será responsable por los gastos de servicio,
reparación, reemplazo o reembolso de los
productos defectuosos durante el período de
garantía. Los residentes de California también
pueden, si lo desean, mandar el aparato
defectuoso directamente a Cuisinart para que
lo reparen o lo cambien. Para esto, se debe
llamar a nuestro servicio posventa al 1-800726-0190. Cuisinart será responsable por los
gastos de reparación, reemplazo, manejo y
envío de los productos defectuosos durante el
período de garantía.
ANTES DE HACER REPARAR SU APARATO
Si este aparato presentara algún defecto de
materiales o fabricación durante el período
de garantía, la reparemos o reemplazaremos
(a nuestra opción). Para obtener servicio
bajo esta garantía, llame a nuestra línea
directa gratuita al 1-800-726-0190 o regrese
el aparato defectuoso a: Cuisinart, 7475
North Glen Harbor Blvd. Glendale, AZ 85307.
Regrese el aparato defectuoso, junto con
su recibo de compra y un cheque o giro
postal de US$10.00 por gastos de manejo
y envío. Los residentes de California sólo
necesitan dar una prueba de compra y
deben llamar al 1-800-726-0190 para recibir
instrucciones de envío. Recuerde incluir su
nombre, dirección y teléfono, la descripción
del problema, así como cualquier información
pertinente. Sentimos no poder aceptar otras
formas de pago. NOTA: para más seguridad,
le aconsejamos que mande su paquete
por un método de entrega con seguro y
seguimiento. Cuisinart no será responsable
por los daños ocurridos durante el transporte
o por los paquetes mandados a una dirección
equivocada. Los productos perdidos y/o
lastimados durante el envío no serán cubiertos
bajo esta garantía.
®
de este tipo. La
10
Page 23

NOTES:
11
Page 24

©2015 Cuisinart
150 Milford Road
East Windsor, NJ 08520
Impreso en China
14CE002775
Todas marcas registradas o marcas de comercio
mencionadas en ésta pertenecen a sus titulares respectivos.
F IB-12653-ESP-A
 Loading...