

Page 1
Robot Blender
Food Processor Blender
BFP703CE : Chrome
Instructions - Hinweise - Instructies - Istruzioni - Instrucciones
BFP703E-BFP703CE-BFP703SIE
BFP703SIE : Silver
Page 2

Page 3

SOMMAIRE
Introduction . . . . . . . . . . . . . . . . . . . . . . . . . . . . . . . . . . . . . . . . . . . . . . . . . . . . . . . . . . . . . . . . . . . . . . . . . . . . . . . . . . . . . . . . . . . . . . . . . . . . . . . . . . . . . . . . . . .6
A. Le Blender . . . . . . . . . . . . . . . . . . . . . . . . . . . . . . . . . . . . . . . . . . . . . . . . . . . . . . . . . . . . . . . . . . . . . . . . . . . . . . . . . . . . . . . . . . . . . . . . . . . . . . . . . . . . . . . . . .6
1. Description et fonctions . . . . . . . . . . . . . . . . . . . . . . . . . . . . . . . . . . . . . . . . . . . . . . . . . . . . . . . . . . . . . . . . . . . . . . . . . . . . . . . . . . . . . . . . . . . . . . . . . . . . .6
2. Assemblage . . . . . . . . . . . . . . . . . . . . . . . . . . . . . . . . . . . . . . . . . . . . . . . . . . . . . . . . . . . . . . . . . . . . . . . . . . . . . . . . . . . . . . . . . . . . . . . . . . . . . . . . . . . . . . .7
3. Utilisation . . . . . . . . . . . . . . . . . . . . . . . . . . . . . . . . . . . . . . . . . . . . . . . . . . . . . . . . . . . . . . . . . . . . . . . . . . . . . . . . . . . . . . . . . . . . . . . . . . . . . . . . . . . . . . . . .7
4. Nettoyage et entretien . . . . . . . . . . . . . . . . . . . . . . . . . . . . . . . . . . . . . . . . . . . . . . . . . . . . . . . . . . . . . . . . . . . . . . . . . . . . . . . . . . . . . . . . . . . . . . . . . . . . . .8
5. Quelques conseils . . . . . . . . . . . . . . . . . . . . . . . . . . . . . . . . . . . . . . . . . . . . . . . . . . . . . . . . . . . . . . . . . . . . . . . . . . . . . . . . . . . . . . . . . . . . . . . . . . . . . . . . . .8
Guide de référence des fonctions Blender . . . . . . . . . . . . . . . . . . . . . . . . . . . . . . . . . . . . . . . . . . . . . . . . . . . . . . . . . . . . . . . . . . . . . . . . . . . . . . . . . . . . . .8
Guide de sélection des vitesses . . . . . . . . . . . . . . . . . . . . . . . . . . . . . . . . . . . . . . . . . . . . . . . . . . . . . . . . . . . . . . . . . . . . . . . . . . . . . . . . . . . . . . . . . . . . . . .8
B. Le Robot . . . . . . . . . . . . . . . . . . . . . . . . . . . . . . . . . . . . . . . . . . . . . . . . . . . . . . . . . . . . . . . . . . . . . . . . . . . . . . . . . . . . . . . . . . . . . . . . . . . . . . . . . . . . . . . . . . .9
1. Description et fonctions . . . . . . . . . . . . . . . . . . . . . . . . . . . . . . . . . . . . . . . . . . . . . . . . . . . . . . . . . . . . . . . . . . . . . . . . . . . . . . . . . . . . . . . . . . . . . . . . . . . . .9
2. Montage . . . . . . . . . . . . . . . . . . . . . . . . . . . . . . . . . . . . . . . . . . . . . . . . . . . . . . . . . . . . . . . . . . . . . . . . . . . . . . . . . . . . . . . . . . . . . . . . . . . . . . . . . . . . . . . . . .9
A. Avec la lame hachoir . . . . . . . . . . . . . . . . . . . . . . . . . . . . . . . . . . . . . . . . . . . . . . . . . . . . . . . . . . . . . . . . . . . . . . . . . . . . . . . . . . . . . . . . . . . . . . . . . . . . .9
B. Avec le disque réversible pour émincer et râper . . . . . . . . . . . . . . . . . . . . . . . . . . . . . . . . . . . . . . . . . . . . . . . . . . . . . . . . . . . . . . . . . . . . . . . . . . . . . . .9
3. Utilisation . . . . . . . . . . . . . . . . . . . . . . . . . . . . . . . . . . . . . . . . . . . . . . . . . . . . . . . . . . . . . . . . . . . . . . . . . . . . . . . . . . . . . . . . . . . . . . . . . . . . . . . . . . . . . . . .10
4. Nettoyage et rangement . . . . . . . . . . . . . . . . . . . . . . . . . . . . . . . . . . . . . . . . . . . . . . . . . . . . . . . . . . . . . . . . . . . . . . . . . . . . . . . . . . . . . . . . . . . . . . . . . . . .10
Préparation des aliments à hacher . . . . . . . . . . . . . . . . . . . . . . . . . . . . . . . . . . . . . . . . . . . . . . . . . . . . . . . . . . . . . . . . . . . . . . . . . . . . . . . . . . . . . . . . . . . .11
Préparation des aliments à émincer et râper . . . . . . . . . . . . . . . . . . . . . . . . . . . . . . . . . . . . . . . . . . . . . . . . . . . . . . . . . . . . . . . . . . . . . . . . . . . . . . . . . . .11
Consignes de sécurité . . . . . . . . . . . . . . . . . . . . . . . . . . . . . . . . . . . . . . . . . . . . . . . . . . . . . . . . . . . . . . . . . . . . . . . . . . . . . . . . . . . . . . . . . . . . . . . . . . . . . . . . . .12
CONTENTS
Introduction . . . . . . . . . . . . . . . . . . . . . . . . . . . . . . . . . . . . . . . . . . . . . . . . . . . . . . . . . . . . . . . . . . . . . . . . . . . . . . . . . . . . . . . . . . . . . . . . . . . . . . . . . . . . . . . . . .13
A. The Blender . . . . . . . . . . . . . . . . . . . . . . . . . . . . . . . . . . . . . . . . . . . . . . . . . . . . . . . . . . . . . . . . . . . . . . . . . . . . . . . . . . . . . . . . . . . . . . . . . . . . . . . . . . . . . . . .13
1. Product description and features . . . . . . . . . . . . . . . . . . . . . . . . . . . . . . . . . . . . . . . . . . . . . . . . . . . . . . . . . . . . . . . . . . . . . . . . . . . . . . . . . . . . . . . . . . . . .13
2. Assembly of the blender . . . . . . . . . . . . . . . . . . . . . . . . . . . . . . . . . . . . . . . . . . . . . . . . . . . . . . . . . . . . . . . . . . . . . . . . . . . . . . . . . . . . . . . . . . . . . . . . . . . .14
3. Using the blender . . . . . . . . . . . . . . . . . . . . . . . . . . . . . . . . . . . . . . . . . . . . . . . . . . . . . . . . . . . . . . . . . . . . . . . . . . . . . . . . . . . . . . . . . . . . . . . . . . . . . . . . .14
4. Cleaning & maintenance . . . . . . . . . . . . . . . . . . . . . . . . . . . . . . . . . . . . . . . . . . . . . . . . . . . . . . . . . . . . . . . . . . . . . . . . . . . . . . . . . . . . . . . . . . . . . . . . . . .15
5. Important helpful hints . . . . . . . . . . . . . . . . . . . . . . . . . . . . . . . . . . . . . . . . . . . . . . . . . . . . . . . . . . . . . . . . . . . . . . . . . . . . . . . . . . . . . . . . . . . . . . . . . . . .15
Reference guide to the blender features . . . . . . . . . . . . . . . . . . . . . . . . . . . . . . . . . . . . . . . . . . . . . . . . . . . . . . . . . . . . . . . . . . . . . . . . . . . . . . . . . . . . . . . . .15
Speed selection guide . . . . . . . . . . . . . . . . . . . . . . . . . . . . . . . . . . . . . . . . . . . . . . . . . . . . . . . . . . . . . . . . . . . . . . . . . . . . . . . . . . . . . . . . . . . . . . . . . . . . . . . .15
B. The Food Processor . . . . . . . . . . . . . . . . . . . . . . . . . . . . . . . . . . . . . . . . . . . . . . . . . . . . . . . . . . . . . . . . . . . . . . . . . . . . . . . . . . . . . . . . . . . . . . . . . . . . . . . . . .16
1. Product description and features . . . . . . . . . . . . . . . . . . . . . . . . . . . . . . . . . . . . . . . . . . . . . . . . . . . . . . . . . . . . . . . . . . . . . . . . . . . . . . . . . . . . . . . . . . . . .16
2. Assembly of the food processor . . . . . . . . . . . . . . . . . . . . . . . . . . . . . . . . . . . . . . . . . . . . . . . . . . . . . . . . . . . . . . . . . . . . . . . . . . . . . . . . . . . . . . . . . . . . . .16
A. With the chopping blade . . . . . . . . . . . . . . . . . . . . . . . . . . . . . . . . . . . . . . . . . . . . . . . . . . . . . . . . . . . . . . . . . . . . . . . . . . . . . . . . . . . . . . . . . . . . . . . . .16
B. With the reversible slicing/grating disc . . . . . . . . . . . . . . . . . . . . . . . . . . . . . . . . . . . . . . . . . . . . . . . . . . . . . . . . . . . . . . . . . . . . . . . . . . . . . . . . . . . . .16
3. Using the food processor . . . . . . . . . . . . . . . . . . . . . . . . . . . . . . . . . . . . . . . . . . . . . . . . . . . . . . . . . . . . . . . . . . . . . . . . . . . . . . . . . . . . . . . . . . . . . . . . . . .17
4. Cleaning and storage . . . . . . . . . . . . . . . . . . . . . . . . . . . . . . . . . . . . . . . . . . . . . . . . . . . . . . . . . . . . . . . . . . . . . . . . . . . . . . . . . . . . . . . . . . . . . . . . . . . . . .17
Preparing food to chop . . . . . . . . . . . . . . . . . . . . . . . . . . . . . . . . . . . . . . . . . . . . . . . . . . . . . . . . . . . . . . . . . . . . . . . . . . . . . . . . . . . . . . . . . . . . . . . . . . . . .18
Preparing food to slice and grate . . . . . . . . . . . . . . . . . . . . . . . . . . . . . . . . . . . . . . . . . . . . . . . . . . . . . . . . . . . . . . . . . . . . . . . . . . . . . . . . . . . . . . . . . . . .18
Safety Instructions . . . . . . . . . . . . . . . . . . . . . . . . . . . . . . . . . . . . . . . . . . . . . . . . . . . . . . . . . . . . . . . . . . . . . . . . . . . . . . . . . . . . . . . . . . . . . . . . . . . . . . . . . . . .19
3
Page 4

INHALTSVERZEICHNIS
Einleitung . . . . . . . . . . . . . . . . . . . . . . . . . . . . . . . . . . . . . . . . . . . . . . . . . . . . . . . . . . . . . . . . . . . . . . . . . . . . . . . . . . . . . . . . . . . . . . . . . . . . . . . . . . . . . . . . . . . .20
A. Der Blender . . . . . . . . . . . . . . . . . . . . . . . . . . . . . . . . . . . . . . . . . . . . . . . . . . . . . . . . . . . . . . . . . . . . . . . . . . . . . . . . . . . . . . . . . . . . . . . . . . . . . . . . . . . . . . . .20
1. Beschreibung und Funktionen . . . . . . . . . . . . . . . . . . . . . . . . . . . . . . . . . . . . . . . . . . . . . . . . . . . . . . . . . . . . . . . . . . . . . . . . . . . . . . . . . . . . . . . . . . . . . . .20
2. Zusammenbau . . . . . . . . . . . . . . . . . . . . . . . . . . . . . . . . . . . . . . . . . . . . . . . . . . . . . . . . . . . . . . . . . . . . . . . . . . . . . . . . . . . . . . . . . . . . . . . . . . . . . . . . . . . .21
3. Gebrauch . . . . . . . . . . . . . . . . . . . . . . . . . . . . . . . . . . . . . . . . . . . . . . . . . . . . . . . . . . . . . . . . . . . . . . . . . . . . . . . . . . . . . . . . . . . . . . . . . . . . . . . . . . . . . . . .21
4. Reinigung und Pflege . . . . . . . . . . . . . . . . . . . . . . . . . . . . . . . . . . . . . . . . . . . . . . . . . . . . . . . . . . . . . . . . . . . . . . . . . . . . . . . . . . . . . . . . . . . . . . . . . . . . . .22
5. Einige Ratschläge . . . . . . . . . . . . . . . . . . . . . . . . . . . . . . . . . . . . . . . . . . . . . . . . . . . . . . . . . . . . . . . . . . . . . . . . . . . . . . . . . . . . . . . . . . . . . . . . . . . . . . . . .22
Leitfaden zu den Funktionen des Blenders . . . . . . . . . . . . . . . . . . . . . . . . . . . . . . . . . . . . . . . . . . . . . . . . . . . . . . . . . . . . . . . . . . . . . . . . . . . . . . . . . . . . .22
Leitfaden zur Wahl der Geschwindigkeiten . . . . . . . . . . . . . . . . . . . . . . . . . . . . . . . . . . . . . . . . . . . . . . . . . . . . . . . . . . . . . . . . . . . . . . . . . . . . . . . . . . . .22
B. Der Roboter . . . . . . . . . . . . . . . . . . . . . . . . . . . . . . . . . . . . . . . . . . . . . . . . . . . . . . . . . . . . . . . . . . . . . . . . . . . . . . . . . . . . . . . . . . . . . . . . . . . . . . . . . . . . . . . .23
1. Beschreibung und Funktionen . . . . . . . . . . . . . . . . . . . . . . . . . . . . . . . . . . . . . . . . . . . . . . . . . . . . . . . . . . . . . . . . . . . . . . . . . . . . . . . . . . . . . . . . . . . . . . .23
2. Montage . . . . . . . . . . . . . . . . . . . . . . . . . . . . . . . . . . . . . . . . . . . . . . . . . . . . . . . . . . . . . . . . . . . . . . . . . . . . . . . . . . . . . . . . . . . . . . . . . . . . . . . . . . . . . . . . .23
A. Mit Hackmesser . . . . . . . . . . . . . . . . . . . . . . . . . . . . . . . . . . . . . . . . . . . . . . . . . . . . . . . . . . . . . . . . . . . . . . . . . . . . . . . . . . . . . . . . . . . . . . . . . . . . . . . . .23
B. Mit umkehrbaer Scheibe zum Reiben und Raspeln . . . . . . . . . . . . . . . . . . . . . . . . . . . . . . . . . . . . . . . . . . . . . . . . . . . . . . . . . . . . . . . . . . . . . . . . . . .23
3. Gebrauch . . . . . . . . . . . . . . . . . . . . . . . . . . . . . . . . . . . . . . . . . . . . . . . . . . . . . . . . . . . . . . . . . . . . . . . . . . . . . . . . . . . . . . . . . . . . . . . . . . . . . . . . . . . . . . . .24
4. Reinigen und Verstauen . . . . . . . . . . . . . . . . . . . . . . . . . . . . . . . . . . . . . . . . . . . . . . . . . . . . . . . . . . . . . . . . . . . . . . . . . . . . . . . . . . . . . . . . . . . . . . . . . . . .24
Vorbereitung des Hackguts . . . . . . . . . . . . . . . . . . . . . . . . . . . . . . . . . . . . . . . . . . . . . . . . . . . . . . . . . . . . . . . . . . . . . . . . . . . . . . . . . . . . . . . . . . . . . . . . . .25
Vorbereitung des Reib- und Raspelguts . . . . . . . . . . . . . . . . . . . . . . . . . . . . . . . . . . . . . . . . . . . . . . . . . . . . . . . . . . . . . . . . . . . . . . . . . . . . . . . . . . . . . . .25
Sicherheitshinweise . . . . . . . . . . . . . . . . . . . . . . . . . . . . . . . . . . . . . . . . . . . . . . . . . . . . . . . . . . . . . . . . . . . . . . . . . . . . . . . . . . . . . . . . . . . . . . . . . . . . . . . . . . .26
INHOUD
Inleiding . . . . . . . . . . . . . . . . . . . . . . . . . . . . . . . . . . . . . . . . . . . . . . . . . . . . . . . . . . . . . . . . . . . . . . . . . . . . . . . . . . . . . . . . . . . . . . . . . . . . . . . . . . . . . . . . . . . . .27
A. De Blender . . . . . . . . . . . . . . . . . . . . . . . . . . . . . . . . . . . . . . . . . . . . . . . . . . . . . . . . . . . . . . . . . . . . . . . . . . . . . . . . . . . . . . . . . . . . . . . . . . . . . . . . . . . . . . . . .27
1. Beschrijving en functies . . . . . . . . . . . . . . . . . . . . . . . . . . . . . . . . . . . . . . . . . . . . . . . . . . . . . . . . . . . . . . . . . . . . . . . . . . . . . . . . . . . . . . . . . . . . . . . . . . . .27
2. Assemblage . . . . . . . . . . . . . . . . . . . . . . . . . . . . . . . . . . . . . . . . . . . . . . . . . . . . . . . . . . . . . . . . . . . . . . . . . . . . . . . . . . . . . . . . . . . . . . . . . . . . . . . . . . . . . .28
3. Gebruik . . . . . . . . . . . . . . . . . . . . . . . . . . . . . . . . . . . . . . . . . . . . . . . . . . . . . . . . . . . . . . . . . . . . . . . . . . . . . . . . . . . . . . . . . . . . . . . . . . . . . . . . . . . . . . . . . .28
4. Schoonmaak en onderhoud . . . . . . . . . . . . . . . . . . . . . . . . . . . . . . . . . . . . . . . . . . . . . . . . . . . . . . . . . . . . . . . . . . . . . . . . . . . . . . . . . . . . . . . . . . . . . . . . .29
5. Enkele tips . . . . . . . . . . . . . . . . . . . . . . . . . . . . . . . . . . . . . . . . . . . . . . . . . . . . . . . . . . . . . . . . . . . . . . . . . . . . . . . . . . . . . . . . . . . . . . . . . . . . . . . . . . . . . . .29
Blenderfuncties . . . . . . . . . . . . . . . . . . . . . . . . . . . . . . . . . . . . . . . . . . . . . . . . . . . . . . . . . . . . . . . . . . . . . . . . . . . . . . . . . . . . . . . . . . . . . . . . . . . . . . . . . . .29
Snelheidskeuze . . . . . . . . . . . . . . . . . . . . . . . . . . . . . . . . . . . . . . . . . . . . . . . . . . . . . . . . . . . . . . . . . . . . . . . . . . . . . . . . . . . . . . . . . . . . . . . . . . . . . . . . . . . .29
B. De Robot . . . . . . . . . . . . . . . . . . . . . . . . . . . . . . . . . . . . . . . . . . . . . . . . . . . . . . . . . . . . . . . . . . . . . . . . . . . . . . . . . . . . . . . . . . . . . . . . . . . . . . . . . . . . . . . . . .30
1. Beschrijving en functies . . . . . . . . . . . . . . . . . . . . . . . . . . . . . . . . . . . . . . . . . . . . . . . . . . . . . . . . . . . . . . . . . . . . . . . . . . . . . . . . . . . . . . . . . . . . . . . . . . . .30
2. Montage . . . . . . . . . . . . . . . . . . . . . . . . . . . . . . . . . . . . . . . . . . . . . . . . . . . . . . . . . . . . . . . . . . . . . . . . . . . . . . . . . . . . . . . . . . . . . . . . . . . . . . . . . . . . . . . . .30
A. Met het hakmes . . . . . . . . . . . . . . . . . . . . . . . . . . . . . . . . . . . . . . . . . . . . . . . . . . . . . . . . . . . . . . . . . . . . . . . . . . . . . . . . . . . . . . . . . . . . . . . . . . . . . . . .30
B. Met de omkeerbare schijf om fijn te snijden en te raspen . . . . . . . . . . . . . . . . . . . . . . . . . . . . . . . . . . . . . . . . . . . . . . . . . . . . . . . . . . . . . . . . . . . . . .30
3. Gebruik . . . . . . . . . . . . . . . . . . . . . . . . . . . . . . . . . . . . . . . . . . . . . . . . . . . . . . . . . . . . . . . . . . . . . . . . . . . . . . . . . . . . . . . . . . . . . . . . . . . . . . . . . . . . . . . . . .31
4. Schoonmaken en opbergen . . . . . . . . . . . . . . . . . . . . . . . . . . . . . . . . . . . . . . . . . . . . . . . . . . . . . . . . . . . . . . . . . . . . . . . . . . . . . . . . . . . . . . . . . . . . . . . . .31
Voorbereiding van de te hakken voedingsmiddelen . . . . . . . . . . . . . . . . . . . . . . . . . . . . . . . . . . . . . . . . . . . . . . . . . . . . . . . . . . . . . . . . . . . . . . . . . . . . . .32
Voorbereiding van de fijn te snijden en te raspen voedingsmiddelen . . . . . . . . . . . . . . . . . . . . . . . . . . . . . . . . . . . . . . . . . . . . . . . . . . . . . . . . . . . . . . .32
Veiligheidsinstructies . . . . . . . . . . . . . . . . . . . . . . . . . . . . . . . . . . . . . . . . . . . . . . . . . . . . . . . . . . . . . . . . . . . . . . . . . . . . . . . . . . . . . . . . . . . . . . . . . . . . . . . . . .33
4
Page 5

INDICE
Introduzione . . . . . . . . . . . . . . . . . . . . . . . . . . . . . . . . . . . . . . . . . . . . . . . . . . . . . . . . . . . . . . . . . . . . . . . . . . . . . . . . . . . . . . . . . . . . . . . . . . . . . . . . . . . . . . . . . .34
A. Frullatore . . . . . . . . . . . . . . . . . . . . . . . . . . . . . . . . . . . . . . . . . . . . . . . . . . . . . . . . . . . . . . . . . . . . . . . . . . . . . . . . . . . . . . . . . . . . . . . . . . . . . . . . . . . . . . . . . .34
1. Descrizione e funzioni . . . . . . . . . . . . . . . . . . . . . . . . . . . . . . . . . . . . . . . . . . . . . . . . . . . . . . . . . . . . . . . . . . . . . . . . . . . . . . . . . . . . . . . . . . . . . . . . . . . . . .34
2. Assemblaggio . . . . . . . . . . . . . . . . . . . . . . . . . . . . . . . . . . . . . . . . . . . . . . . . . . . . . . . . . . . . . . . . . . . . . . . . . . . . . . . . . . . . . . . . . . . . . . . . . . . . . . . . . . . . .35
3. Utilizzo . . . . . . . . . . . . . . . . . . . . . . . . . . . . . . . . . . . . . . . . . . . . . . . . . . . . . . . . . . . . . . . . . . . . . . . . . . . . . . . . . . . . . . . . . . . . . . . . . . . . . . . . . . . . . . . . . .35
4. Pulizia e manutenzione . . . . . . . . . . . . . . . . . . . . . . . . . . . . . . . . . . . . . . . . . . . . . . . . . . . . . . . . . . . . . . . . . . . . . . . . . . . . . . . . . . . . . . . . . . . . . . . . . . . .36
5. Alcuni consigli . . . . . . . . . . . . . . . . . . . . . . . . . . . . . . . . . . . . . . . . . . . . . . . . . . . . . . . . . . . . . . . . . . . . . . . . . . . . . . . . . . . . . . . . . . . . . . . . . . . . . . . . . . . .36
Guida di riferimento delle funzioni frullatore . . . . . . . . . . . . . . . . . . . . . . . . . . . . . . . . . . . . . . . . . . . . . . . . . . . . . . . . . . . . . . . . . . . . . . . . . . . . . . . . . . .36
Guida di selezione delle velocità . . . . . . . . . . . . . . . . . . . . . . . . . . . . . . . . . . . . . . . . . . . . . . . . . . . . . . . . . . . . . . . . . . . . . . . . . . . . . . . . . . . . . . . . . . . . .36
B. Robot . . . . . . . . . . . . . . . . . . . . . . . . . . . . . . . . . . . . . . . . . . . . . . . . . . . . . . . . . . . . . . . . . . . . . . . . . . . . . . . . . . . . . . . . . . . . . . . . . . . . . . . . . . . . . . . . . . . . .37
1. Descrizione e funzioni . . . . . . . . . . . . . . . . . . . . . . . . . . . . . . . . . . . . . . . . . . . . . . . . . . . . . . . . . . . . . . . . . . . . . . . . . . . . . . . . . . . . . . . . . . . . . . . . . . . . . .37
2. Montaggio . . . . . . . . . . . . . . . . . . . . . . . . . . . . . . . . . . . . . . . . . . . . . . . . . . . . . . . . . . . . . . . . . . . . . . . . . . . . . . . . . . . . . . . . . . . . . . . . . . . . . . . . . . . . . . .37
A. Con la lama tritatutto . . . . . . . . . . . . . . . . . . . . . . . . . . . . . . . . . . . . . . . . . . . . . . . . . . . . . . . . . . . . . . . . . . . . . . . . . . . . . . . . . . . . . . . . . . . . . . . . . . .37
B. Con il disco reversibile per sminuzzare e grattugiare . . . . . . . . . . . . . . . . . . . . . . . . . . . . . . . . . . . . . . . . . . . . . . . . . . . . . . . . . . . . . . . . . . . . . . . . . .37
3. Utilizzo . . . . . . . . . . . . . . . . . . . . . . . . . . . . . . . . . . . . . . . . . . . . . . . . . . . . . . . . . . . . . . . . . . . . . . . . . . . . . . . . . . . . . . . . . . . . . . . . . . . . . . . . . . . . . . . . . .38
4. Pulizia e manutenzione . . . . . . . . . . . . . . . . . . . . . . . . . . . . . . . . . . . . . . . . . . . . . . . . . . . . . . . . . . . . . . . . . . . . . . . . . . . . . . . . . . . . . . . . . . . . . . . . . . . .38
Preparazione degli alimenti da tritare . . . . . . . . . . . . . . . . . . . . . . . . . . . . . . . . . . . . . . . . . . . . . . . . . . . . . . . . . . . . . . . . . . . . . . . . . . . . . . . . . . . . . . . . .39
Preparazione degli alimenti da sminuzzare e grattugiare . . . . . . . . . . . . . . . . . . . . . . . . . . . . . . . . . . . . . . . . . . . . . . . . . . . . . . . . . . . . . . . . . . . . . . . . .39
Istruzioni di sicurezza . . . . . . . . . . . . . . . . . . . . . . . . . . . . . . . . . . . . . . . . . . . . . . . . . . . . . . . . . . . . . . . . . . . . . . . . . . . . . . . . . . . . . . . . . . . . . . . . . . . . . . . . . .40
SUMARIO
Introducción . . . . . . . . . . . . . . . . . . . . . . . . . . . . . . . . . . . . . . . . . . . . . . . . . . . . . . . . . . . . . . . . . . . . . . . . . . . . . . . . . . . . . . . . . . . . . . . . . . . . . . . . . . . . . . . . . .41
A. La batidora de vaso . . . . . . . . . . . . . . . . . . . . . . . . . . . . . . . . . . . . . . . . . . . . . . . . . . . . . . . . . . . . . . . . . . . . . . . . . . . . . . . . . . . . . . . . . . . . . . . . . . . . . . . . .41
1. Descripción y funciones . . . . . . . . . . . . . . . . . . . . . . . . . . . . . . . . . . . . . . . . . . . . . . . . . . . . . . . . . . . . . . . . . . . . . . . . . . . . . . . . . . . . . . . . . . . . . . . . . . . .41
2. Montaje . . . . . . . . . . . . . . . . . . . . . . . . . . . . . . . . . . . . . . . . . . . . . . . . . . . . . . . . . . . . . . . . . . . . . . . . . . . . . . . . . . . . . . . . . . . . . . . . . . . . . . . . . . . . . . . . .42
3. Utilización . . . . . . . . . . . . . . . . . . . . . . . . . . . . . . . . . . . . . . . . . . . . . . . . . . . . . . . . . . . . . . . . . . . . . . . . . . . . . . . . . . . . . . . . . . . . . . . . . . . . . . . . . . . . . . .42
4. Limpieza y mantenimiento . . . . . . . . . . . . . . . . . . . . . . . . . . . . . . . . . . . . . . . . . . . . . . . . . . . . . . . . . . . . . . . . . . . . . . . . . . . . . . . . . . . . . . . . . . . . . . . . . .43
5. Consejos . . . . . . . . . . . . . . . . . . . . . . . . . . . . . . . . . . . . . . . . . . . . . . . . . . . . . . . . . . . . . . . . . . . . . . . . . . . . . . . . . . . . . . . . . . . . . . . . . . . . . . . . . . . . . . . . .43
Guía de referencia de las funciones de la batidora . . . . . . . . . . . . . . . . . . . . . . . . . . . . . . . . . . . . . . . . . . . . . . . . . . . . . . . . . . . . . . . . . . . . . . . . . . . . . .43
Guía de selección de las velocidades . . . . . . . . . . . . . . . . . . . . . . . . . . . . . . . . . . . . . . . . . . . . . . . . . . . . . . . . . . . . . . . . . . . . . . . . . . . . . . . . . . . . . . . . . .43
B. El Robot . . . . . . . . . . . . . . . . . . . . . . . . . . . . . . . . . . . . . . . . . . . . . . . . . . . . . . . . . . . . . . . . . . . . . . . . . . . . . . . . . . . . . . . . . . . . . . . . . . . . . . . . . . . . . . . . . . .44
1. Descripción y funciones . . . . . . . . . . . . . . . . . . . . . . . . . . . . . . . . . . . . . . . . . . . . . . . . . . . . . . . . . . . . . . . . . . . . . . . . . . . . . . . . . . . . . . . . . . . . . . . . . . . .44
2. Montaje . . . . . . . . . . . . . . . . . . . . . . . . . . . . . . . . . . . . . . . . . . . . . . . . . . . . . . . . . . . . . . . . . . . . . . . . . . . . . . . . . . . . . . . . . . . . . . . . . . . . . . . . . . . . . . . . .44
A. Con la cuchilla . . . . . . . . . . . . . . . . . . . . . . . . . . . . . . . . . . . . . . . . . . . . . . . . . . . . . . . . . . . . . . . . . . . . . . . . . . . . . . . . . . . . . . . . . . . . . . . . . . . . . . . . .44
B. Con el disco reversible para rebanar y rallar . . . . . . . . . . . . . . . . . . . . . . . . . . . . . . . . . . . . . . . . . . . . . . . . . . . . . . . . . . . . . . . . . . . . . . . . . . . . . . . . .44
3. Utilización . . . . . . . . . . . . . . . . . . . . . . . . . . . . . . . . . . . . . . . . . . . . . . . . . . . . . . . . . . . . . . . . . . . . . . . . . . . . . . . . . . . . . . . . . . . . . . . . . . . . . . . . . . . . . . .45
4. Limpieza y conservación . . . . . . . . . . . . . . . . . . . . . . . . . . . . . . . . . . . . . . . . . . . . . . . . . . . . . . . . . . . . . . . . . . . . . . . . . . . . . . . . . . . . . . . . . . . . . . . . . . . .45
Preparación de los alimentos antes de picarlos . . . . . . . . . . . . . . . . . . . . . . . . . . . . . . . . . . . . . . . . . . . . . . . . . . . . . . . . . . . . . . . . . . . . . . . . . . . . . . . . .46
Preparación de los alimentos antes de rebanarlos y rallarlos . . . . . . . . . . . . . . . . . . . . . . . . . . . . . . . . . . . . . . . . . . . . . . . . . . . . . . . . . . . . . . . . . . . . . .46
Consignas de seguridad . . . . . . . . . . . . . . . . . . . . . . . . . . . . . . . . . . . . . . . . . . . . . . . . . . . . . . . . . . . . . . . . . . . . . . . . . . . . . . . . . . . . . . . . . . . . . . . . . . . . . . . .47
5
Page 6
INTRODUCTION
Le blender/robot ménager Cuisinart®est un outil perfectionné et très
complet qui vous permettra de réaliser d’innombrables préparations
culinaires en quelques instants.
Grâce à sa fonction de blender, il vous permet de réduire en purée,
mélanger ou mixer toutes sortes d’aliments. Il permet aussi de piler la
glace ou de préparer des milk-shakes.
En fixant sur la base le bol robot, votre appareil peut hacher des aliments
crus ou cuits jusqu’à une consistance très fine. Le disque réversible permet
d’émincer ou râper les aliments en quelques secondes.
Facile à nettoyer, votre appareil vous garantit des années de préparations
culinaires particulièrement réussies.
2.
1.
3.
4.
5.
6.
6e.
6f.
6g.
6b.
6a.
6c.
6d.
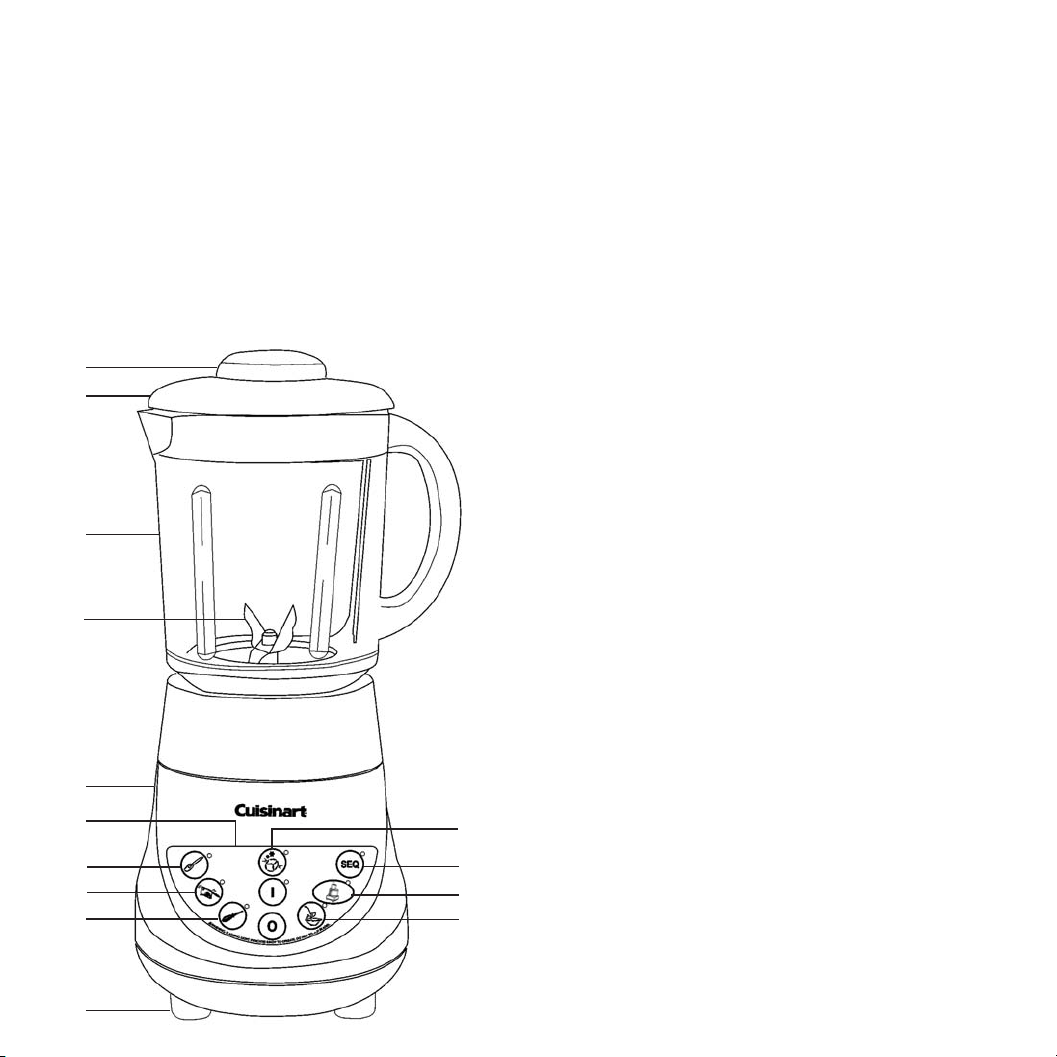
A. Le Blender
1. DESCRIPTION ET FONCTIONS
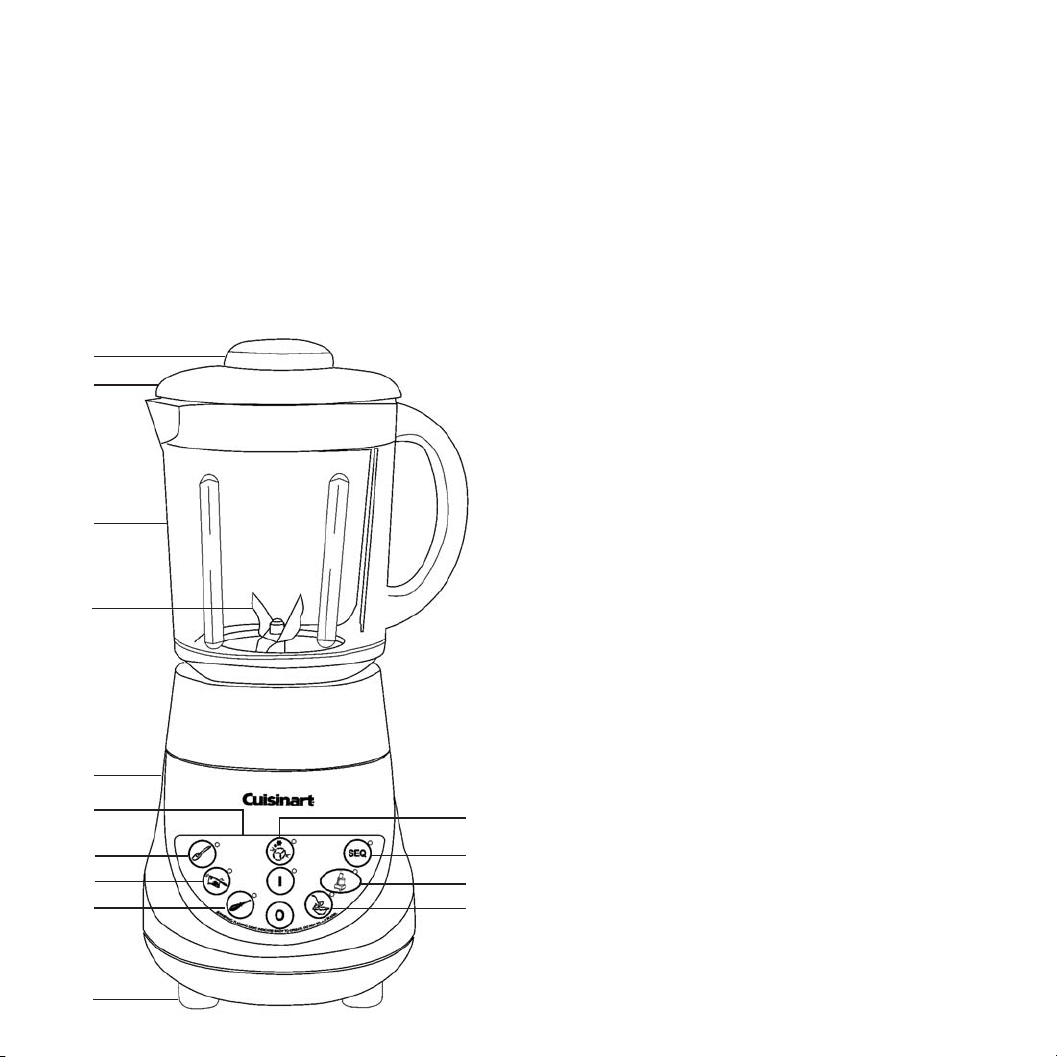
1. Couvercle
Facile à utiliser et résistant aux fuites, il se place sur le bol d’une
simple pression.
2. Doseur gradué
Il vous permet de mesurer jusqu’à 60ml et de verser les ingrédients
sans retirer le couvercle.
3. Bol en verre gradué d’une contenance de 1250ml
Epais, avec ouverture large et bec verseur anti-goutte.
4. Lames en acier inoxydable
Très résistantes, même pour piler la glace.
5. Bloc moteur
Robuste et stable, à haute résistance.
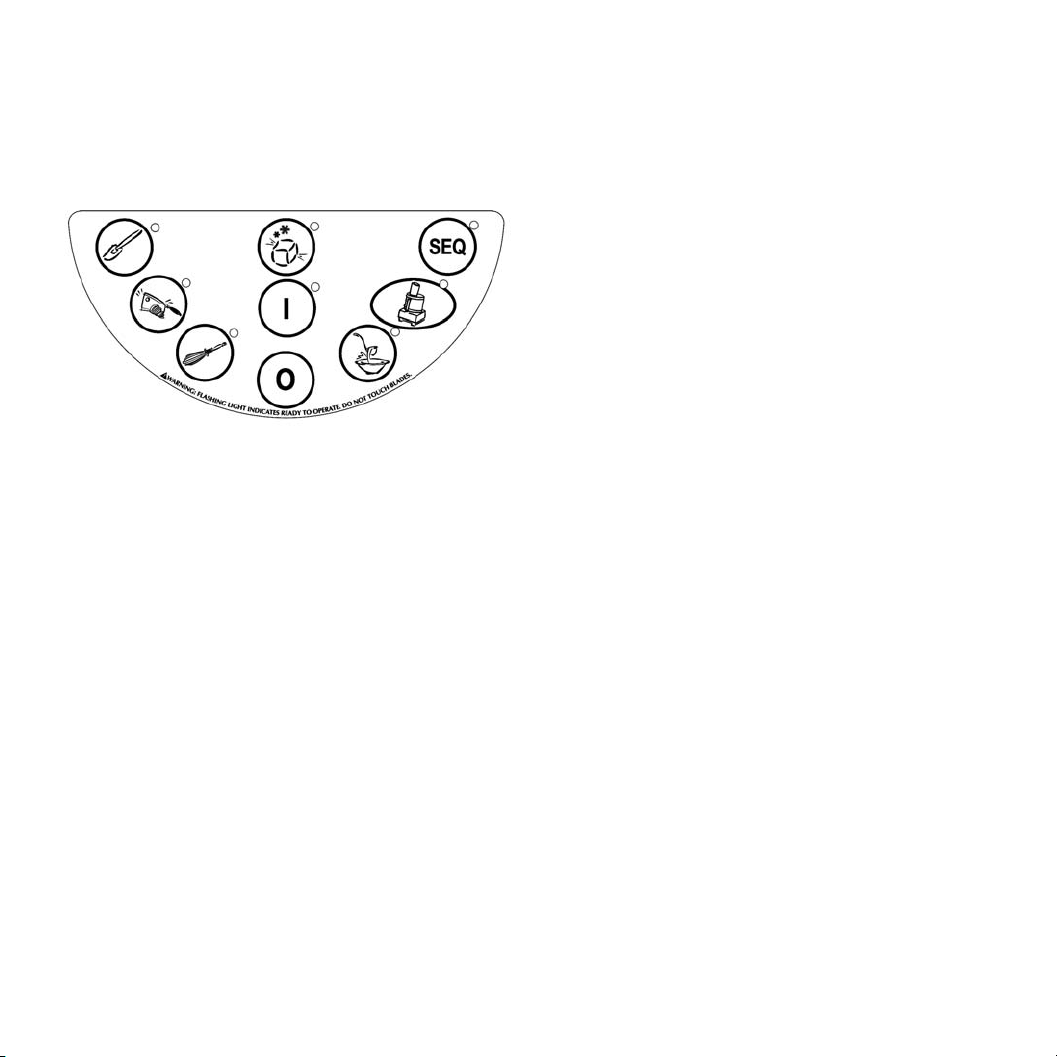
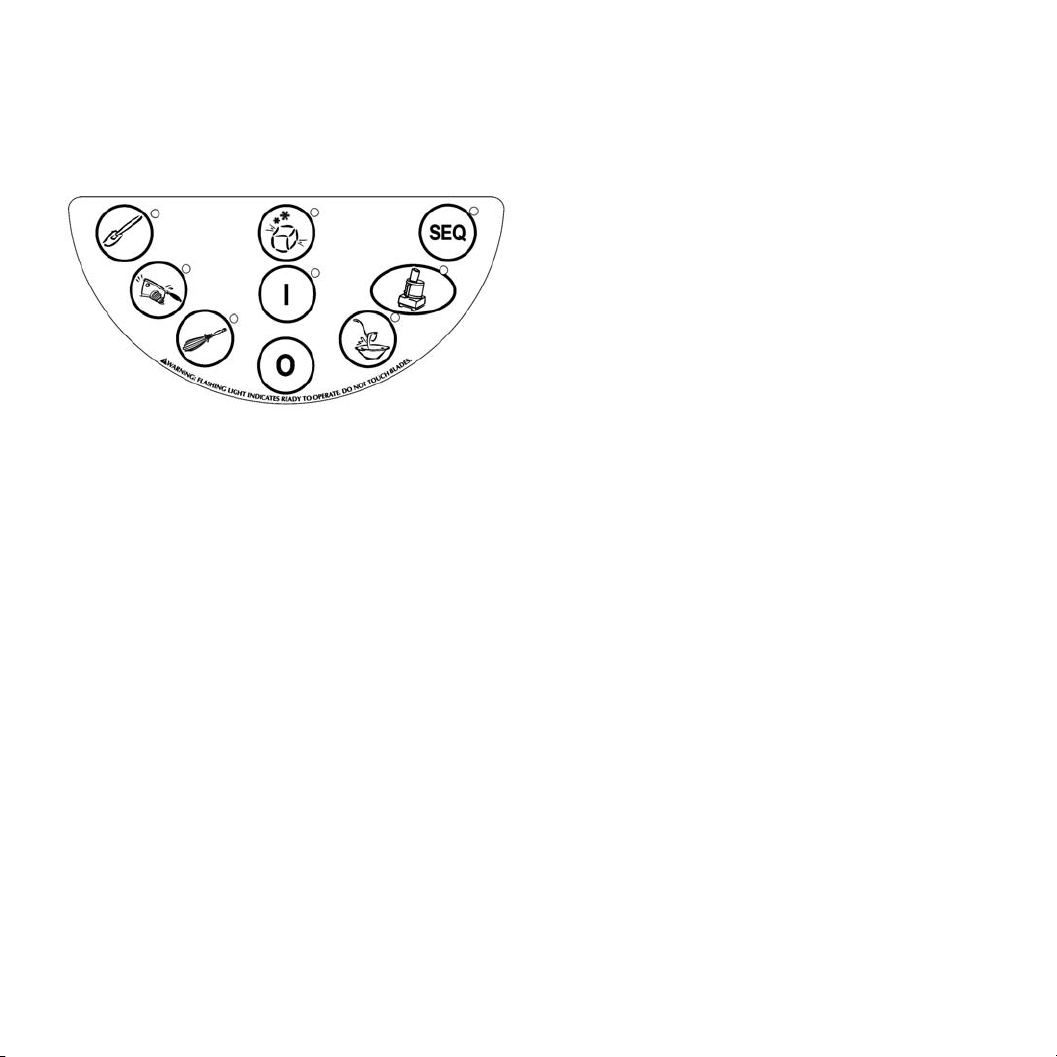
6. Touches de commande
Faciles à utiliser et à nettoyer. L’appareil est muni de 6 vitesses +
1 vitesse séquentielle (voir 6a), ce qui lui assure une grande
polyvalence. Les indicateurs lumineux aident à repérer la vitesse
utilisée.
6a. Touche SEQ - marche séquentielle
S’utilise sur n’importe quelle vitesse, pour vous permettre de mixer les
ingrédients exactement jusqu’à la consistance désirée.
6b. Touche Piler la Glace
Active une vitesse spéciale pour piler la glace. Important: les
accessoires du robot ménager ne sont pas conçus pour piler la glace.
6c. Touche Robot
S’utilise avec les accessoires du robot (voir page 4), et pour liquéfier.
6d. Touche Réduire en purée
Pour préparer des mélanges homogènes et crémeux à partir d’aliments
solides (milk-shakes ou aliments pour bébés par exemple).
6e. Touche Mélanger
Pour incorporer les aliments et obtenir un mélange homogène.
6f. Touche Hacher
Pour hacher les aliments grossièrement ou finement.
6g. Touche Battre
Pour battre la crème, créer des nappages pour gâteaux, etc.
7. Pieds antidérapants
Empêchent l’appareil de bouger pendant l’utilisation.
7.
6
Page 7
2. ASSEMBLAGE DU BLENDER
Pour utiliser le blender, il suffit de poser le bol sur le bloc moteur de telle
façon que les graduations inscrites sur le bol soient orienteés face à vous
et que la poignée soit positionnée sur le côté. Placer ensuite le couvercle
sur le bol et appuyer, puis emboîter le couvercle doseur. Brancher l’appareil.
Il est prêt à être utilisé.
3. UTILISATION DU BLENDER
1. Ajouter tous les ingrédients nécessaires et mettre le couvercle. Il est
également possible de placer le couvercle, puis d’ajouter les
ingrédients en ôtant le couvercle doseur. Replacer ensuite le couvercle
doseur. Des ingrédients supplémentaires peuvent aussi être ajoutés en
cours de mixage par le couvercle doseur.
Note: ajoutez tout d’abord les ingrédients liquides, puis les
ingrédients solides. Vous obtiendrez ainsi un mélange plus homogène
et épargnerez au moteur une tension inutile.
2. POUR COMMENCER A MIXER: presser la touche I. Le voyant rouge
clignote, indiquant que le blender est sous tension.
3. SELECTIONNER UNE VITESSE DE MIXAGE: presser la touche vitesse
choisie. Le blender se met en marche. Pour changer de vitesse, il suffit
d’appuyer sur une autre touche. Il n’est pas nécessaire d’éteindre le
moteur.
4. TEMPS DE MIXAGE: ne travaillez pas trop les aliments. Les résultats
escomptés sont atteints en quelques secondes et non en quelques
minutes.
5. ARRETER LE MIXAGE: presser la touche vitesse choisie. Le moteur
s’arrête. Le témoin lumineux clignote, indiquant que l’appareil est
toujours sous tension. Pour désactiver complètement le blender,
appuyer sur la touche 0.
6. MODE SEQ: pour procéder à un mixage par impulsions, presser la
touche I puis la touche SEQ. Le témoin lumineux SEQ clignote. Pressez
ensuite la touche de la vitesse désirée et relâchez-la. Répétez autant
de fois que vous le désirez. A chaque impulsion tous les témoins
lumineux (la position I, la touche SEQ et la vitesse sélectionnée)
s’allument.
La touche SEQ s’utilise pour venir à bout de morceaux d’aliments plus
importants ou pour contrôler la texture des aliments quand vous les
hachez. La fonction SEQ est également efficace en début de mixage,
ou lorsque vous passez des aliments qui ne nécessitent qu’un faible
temps de mixage.
7. POUR PILER LA GLACE: Utiliser le bol blender uniquement. Pour vous
permettre de mieux contrôler le processus, la fonction “Piler la glace”
fonctionne commme la touche SEQ. Placer les glaçons dans le bol
blender, mettre en place le couvercle et appuyer sur la touche I.
Presser ensuite la touche “Piler la glace” par brèves impulsions jusqu’à
ce que la glace ait la consistance désirée.
8 DETACHER LES ALIMENTS COINCES: utiliser une spatule pour retirer
les aliments logés autour du bloc hachoir. Ne jamais introduire la main
dans l’appareil lorsque celui-ci est branché. UTILISER LA SPATULE
UNIQUEMENT LORSQUE L’APPAREIL EST ETEINT ET DEBRANCHE.
Ensuite, remetttre le couvercle en place et continuer le mixage si
nécessaire. Ne jamais mettre le blender en marche lorsque la spatule
est dans le bol.
9. APRES LE MIXAGE: Presser la touche 0 et débrancher l’appareil. Retirer
ensuite le bol du bloc moteur en tirant vers le haut.
IMPORTANT
• Ne pas placer le bol blender sur la base ni le retirer pendant que le
moteur tourne.
• Ne pas introduire d’aliments liquides bouillants ou d’aliments solides
congelés (à l’exception des glaçons ou de morceaux de fruits
congelés). Laissez refroidir les liquides pendant au moins 5 minutes
avant de les placer dans le bol blender.
• Si vous mixez des liquides chauds, retirez le couvercle doseur (pièce
centrale du couvercle) pour permettre à la vapeur de s’échapper.
7
Page 8
4. NETTOYAGE ET ENTRETIEN
Débranchez toujours votre appareil avant le nettoyer. Nettoyez le bol
blender avant la première utilisation et après chaque utilisation.
Pour le nettoyer, retirer le bol du bloc moteur en le soulevant vers le haut.
Laver le bol dans l’eau chaude savonneuse, rincer et sécher à fond. Le bol
peut également être lavé au lave-vaisselle.
Ne pas tenter de démonter le bol blender, et le nettoyer avec la plus grande
prudence afin d’éviter tout risque de blessure
Pour nettoyer le bloc moteur, utiliser un chiffon humide pour en retirer les
résidus puis essuyer. Ne jamais immerger le bloc moteur dans l’eau ou dans
un autre liquide, et ne jamais le placer dans le lave-vaisselle.
5. QUELQUES CONSEILS SUR L’UTILISATION DU BLENDER
• Placer toujours le bloc moteur sur une surface stable, propre et sèche.
• Ajouter toujours les ingrédients liquides en premier lieu, puis ajouter les
ingrédients restants. De cette façon, les ingrédients seront toujours
mixés de façon uniforme.
• Découper la plupart des aliments en cubes d’1 à 5 cm pour obtenir un
résultat plus uniforme. Découper tous les fromages en morceaux d’1 cm
environ.
• Utiliser le couvercle doseur pour mesurer les ingrédients liquides tels
que l’alcool. Replacer le couvercle doseur une fois les ingrédients ajoutés.
• Utiliser une spatule au besoin, uniquement lorsque le blender est
éteint. N’utilisez jamais d’ustensiles en métal car ceux-ci pourraient
endommager le bol ou les lames.
• Si vous raclez le bol blender à l’aide d’une spatule, retirez les aliments
logés sur les parois du bol et placez-les au-dessus des lames .
• Si vous hachez des herbes fraîches, de l’ail, de l’oignon, des zestes, des
noisettes, des épices, etc. assurez-vous que le bol blender et les lames
soient complètement secs.
• Si les aliments ont tendance à coller aux parois pendant l’utilisation,
procéder par brèves impulsions.
• Espacer les impulsions pour que les lames s’arrêtent de tourner entre les
impulsions successives.
• Ne pas conserver d’aliments ou de liquides dans le bol.
• Cet appareil ne permet pas de réduire les pommes de terre en purée,
de pétrir la pâte ou de battre les œufs en neige.
• Ne travaillez pas trop les aliments. Les résultats escomptés sont atteints
en quelques secondes et non en quelques minutes.
• Ne surchargez pas le blender. Si le moteur cale, éteindre et débranche
l’appareil. Retirer une partie des aliments, puis rallumer.
GUIDE DE REFERENCE DES FONCTIONS BLENDER
Pour activer le blender
Pour commencer à mixer Presser une touche Vitesse.
Pour changer de vitesse Presser une touche Vitesse.
Pour donner des impulsions
Pour piler la glace
Pour désactiver le blender Presser la touche 0.
Pour arrêter de mixer (en
mode Remuer, Hacher,
Mixer ou Réduire en
purée)
Presser la touche 1 –
Le blender est sous tension.
En mode 1, appuyez sur SEQ, puis presser et relâcher
la touche vitesse autant de fois que nécessaire.
En mode 1, pressez la touche PILER LA GLACE et
relâchez-la autant de fois que nécessaire.
Presser à nouveau la touche Vitesse Le blender
basculera ainsi à nouveau en mode Position 1.
Appuyer sur la Position O pour mettre le blender à
l’ARRET.
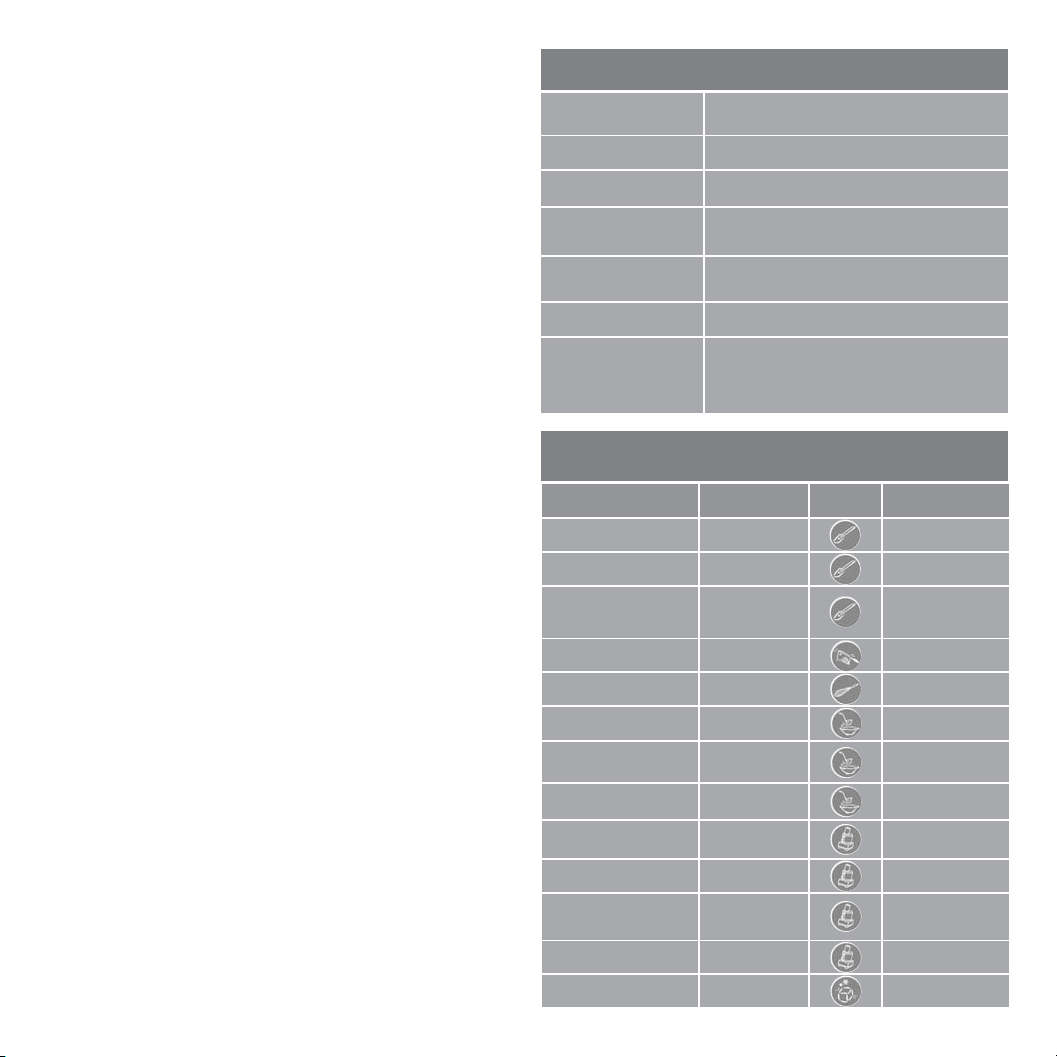
GUIDE DE SELECTION DES VITESSES
POUR FONCTIONS BLENDER
INGRÉDIENT/RECETTE VITESSE SYMBOLE RÉSULTAT
Mayonnaise Mélanger Epais et crémeux
Sauces salades Mélanger Consistance désirée
Reconstituer le jus
d’orange concentré congelé
Noisettes Hacher Epais à fin
Crème fouettée Battre Nappage épais
Zestes de citron Réduire en purée Uniformément fin
Milk-Shakes Réduire en purée
Aliments pour bébé Réduire en purée
Boissons naturelles Liquéfier
Cocktails glacés Liquéfier Epais et liquide
Fromage à pâte molle
écrasé
Epices Liquéfier Epais à fin
Glace Piler la glace Neigeux
Mélanger Homogène
Homogène et
crémeux
Homogène et
crémeux
Homogène et
crémeux
Liquéfier Epais à fin
8
Page 9
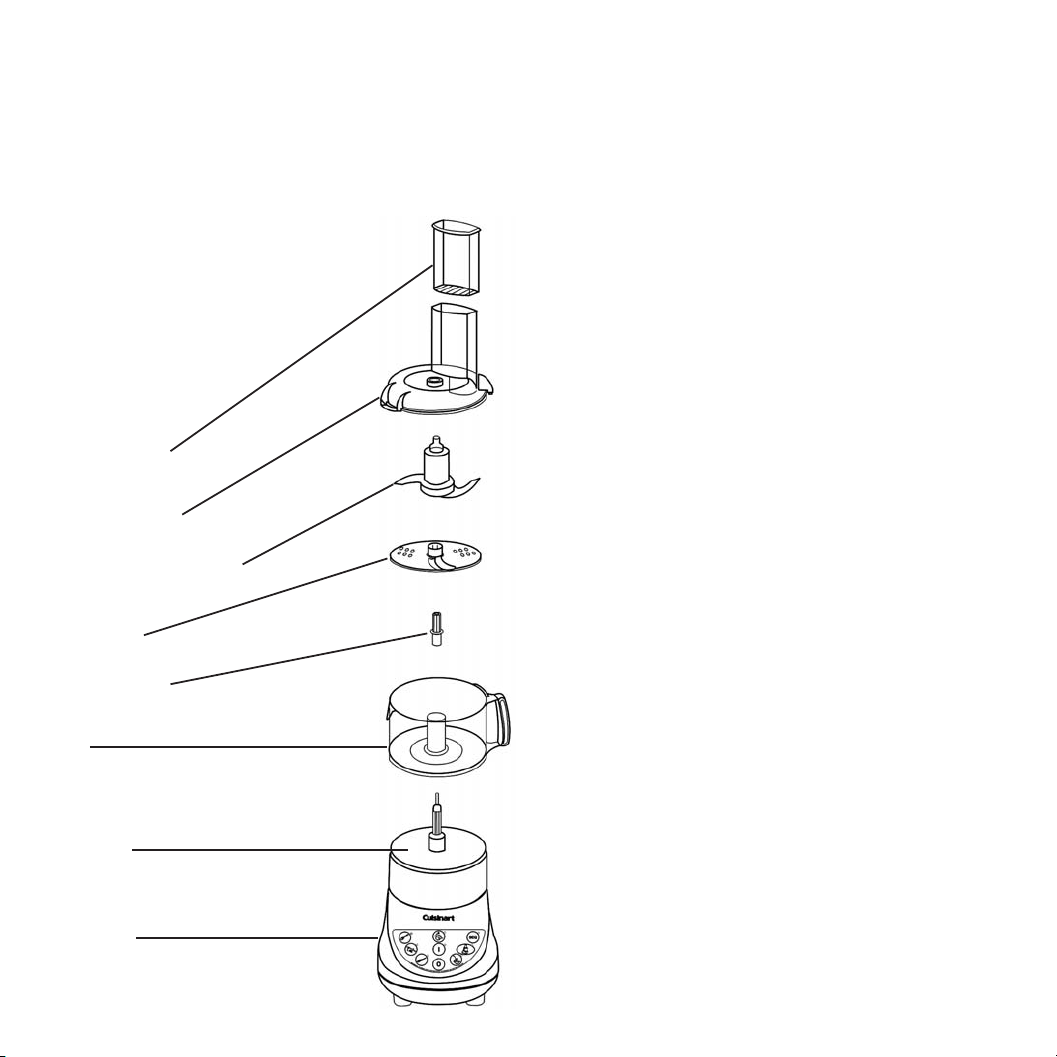
B. Le Robot
1. DESCRIPTION ET FONCTIONS
1. Poussoir à aliments
2. Couvercle du bol avec orifice d’alimentation
3. Lame en acier inoxydable. Hache les aliments crus et cuits. Permet
d’obtenir la consistance que vous souhaitez, d’un hachis épais à une
purée fine.
4. Le disque réversible à émincer/râper en acier
inoxydable permet de faire des tranches
parfaites ou de râper toute une variété de fruits
et légumes, viandes et fromages.
5. Tige pour le disque
6. Bol de préparation
7. Base Robot
8. Bloc moteur
Poussoir à aliments (1)
Couvercle du bol avec
orifice d’alimentation (2)
Lame hachoir en acier inoxydable (3)
Disque réversible à
émincer/râper (4)
Tige pour le disque (5)
Bol (6)
2. MONTAGE DU ROBOT
A. AVEC LA LAME HACHOIR
1. Maintenir la base robot d’une main et la poignée du bol de l’autre.
Visser le bol sur la base en le tournant dans le sens des aiguilles d’une montre.
2. Placer l’ensemble sur le bloc moteur.
Note: le bol et la base robot s’adaptent sur le moteur selon huit
positions différentes. La poignée peut se placer de face ou sur l’un ou
l’autre côté et l’orifice d’alimentation de face, à l’arrière, ou sur l’un ou
l’autre côté, selon votre préférence.
3. Placer la lame hachoir sur l’axe dans le bol. La lame doit s’enfoncer
facilement au fond du bol et toucher presque le fond du bol.
ATTENTION, LA LAME HACHOIR EST EXTREMEMENT TRANCHANTE
4. Introduire les aliments dans le bol. Placer le couvercle, et visser dans le
sens des aiguilles d’une montre jusqu’à ce qu’il se mette en place. Le
verrou du couvercle doit se fermer par un déclic. Si vous avez du mal à
adapter le couvercle sur le bol, tournez légèrement le moyeu de la lame
et replacez le couvercle.
5. Le poussoir à aliments s’adapte sur l’orifice d’alimentation, le côté plus
arrondi dirigé vers l’extérieur du bol. UTILISER TOUJOURS LE
POUSSOIR POUR GUIDER LES ALIMENTS A TRAVERS L’ORIFICE
D’ALIMENTATION. JAMAIS LES DOIGTS OU UNE SPATULE.
6. Brancher l’appareil. Appuyer sur la touche Position 1, puis sur la touche
Robot pour commencer à hacher. Nous vous recommandons de placer
une main sur le couvercle du robot pendant l’utilisation de manière à
stabiliser l’appareil. Si l’appareil ne démarre pas, assurez-vous qu’il est
branché et que le bol et le couvercle sont verrouillés.
B. AVEC LE DISQUE REVERSIBLE POUR EMINCER ET RAPER
1. Placer le bol sur la base robot, puis l’ensemble sur le bloc moteur.
2. Placer la tige du disque sur l’axe central.
Pour émincer: Attacher le disque à la tige, la lame éminceur orientée
vers le haut.
Pour râper: Fixer le disque à la tige, les fentes à râper orientées vers
le haut. Placer ensuite le disque sur l’axe.
Base Robot (7)
Bloc Moteur (8)
Attention: tenir le disque par les côtés afin d’éviter tout risque de blessure.
3. Placer le couvercle sur le bol et insérer les aliments dans l’orifice
d’alimentation.
4. Placer le poussoir dans l’orifice d’alimentation par-dessus les aliments.
Utiliser toujours le poussoir pour guider les aliments à travers l’orifice
d’alimentation. Jamais les mains ou une spatule.
5. Brancher et allumer l’appareil pour commencer à râper ou à émincer.
9
Page 10

3. UTILISATION DU ROBOT
La touche Robot offre la vitesse idéale pour l’utilisation de l’appareil en
tant que robot ménager. Vous pouvez également utiliser la touche SEQ
avec cette fonction pour procéder par impulsions.
Presser la touche 1. Pour un fonctionnement en continu, presser la touche
Robot. Pour arrêter le moteur, presser à nouveau la touche Robot ou
presser la touche 0.
Pour activer la fonction de marche séquentielle (SEQ), presser la touche 1,
puis la touche SEQ, puis presser et relâcher la touche Robot autant de
fois que nécessaire. En utilisant l’appareil de cette manière, vous pouvez
aisément contrôler la durée et la fréquence des impulsions. Laissez
suffisamment de temps entre les impulsions pour que les aliments tombent
dans le fond du bol.
A. HACHER ET REDUIRE EN PUREE
1. Pour hacher et réduire en purée, utiliser la lame hachoir. Placer les
aliments dans le bol. Les découper en morceaux de taille équivalente.
Vous pouvez introduire jusqu’à 250 g d’aliments à la fois.
2. Placer le couvercle et le verrouiller. Insérer le poussoir. Nous vous
recommandons de placer une main sur le couvercle du robot pendant
l’utilisation de manière à stabiliser l’appareil. Presser la touche 1, puis
la touche SEQ, et la touche Robot (pour donner une impulsion), puis
relâcher. Répéter deux à trois fois l’opération. Chaque fois que la lame
s’arrête, laisser les morceaux d’aliments tomber dans le fond du bol
avant de donner une nouvelle impulsion. Vérifier la texture en regardant
à travers le bol. Veillez à ne pas hacher les aliments trop finement.
Note: De temps à autre, un morceau peut se coincer entre la lame et le
bol. Si cela se produit, retirer le couvercle, soulever soigneusement la
lame et ôter le morceau coincé. Vider le bol, réinsérer la lame et les
aliments, verrouiller le couvercle et poursuivre l’utilisation.
3. Si vous désirez un hachis ou une purée plus fine, appuyez sur le bouton
Position 1, puis sur le bouton Robot et laissez la machine tourner sans
interruption jusqu’à ce que les aliments soient hachés aussi fin que
vous le désirez. Vérifier fréquemment à travers le couvercle ou le bol
transparent pour éviter de hacher trop fin. Utiliser une spatule pour
racler tous les morceaux restés collés à l’intérieur du bol.
Pour réduire les aliments en purée, suivre la même procédure que celle
utilisée pour hacher, mais laisser la machine tourner jusqu’à obtenir une
purée homogène. Attention, certains aliments (les pommes de terre par
exemple) risquent de donner une texture collante s’ils sont travaillés
trop longtemps.
B. AJOUTER DES ALIMENTS EN COURS DE FONCTIONNEMENT
Le poussoir est percé d’un trou permettant d’ajouter des ingrédients
liquides de manière lente et régulière. Si vous souhaitez ajouter du liquide
pendant que l’appareil tourne, versez-le à travers ce trou. Cette mesure est
spécialement utile lorsque vous faites de la mayonnaise ou des sauces.
Pour ajouter des aliments de petite taille ou coupés en morceaux comme
du fromage, de la viande ou des gousses d’ail pendant que la machine
tourne, les verser à travers l’ouverture de l’orifice d’alimentation. Veiller à
remettre le poussoir en place immédiatement après avoir versé les
ingrédients afin d’éviter tout risque d’éclaboussure ou de blessure.
C. RETIRER LES ALIMENTS DU ROBOT
Avant tout presser la touche 0 et attendre que les lames aient cessé de
tourner. Puis retirer le couvercle en le dévissant dans le sens anti-horaire.
Ne jamais essayer de retirer le couvercle et le bol ensemble; le bol
risquerait d’être endommagé.
Lorsque vous videz le bol, veillez à ce que la lame ne tombe pas afin
d’éviter tout risque de blessure.
D. EMINCER ET RAPER
1. Monter le robot avec son disque à râper/émincer. Toujours manipuler
le disque par les bords. Fermer le couvercle et insérer les aliments par
l’orifice d’alimentation.
2. Insérer le poussoir. Presser la touche I puis la touche Robot. Maintenir
une pression modérée sur le poussoir pour pousser les aliments vers le
bas. Au cours de l’utilisation, il est possible de retirer le poussoir pour
introduire de nouveaux aliments sans éteindre l’appareil. Veiller
toutefois à ne jamais introduire les doigts dans l’orifice d’alimentation.
Après avoir émincé ou râpé tous les aliments, presser la touche Robot ou
0. Attendre que le disque s’arrête de tourner avant de retirer le
couvercle. Oter ensuite le disque en saisissant la partie supérieure
plate de la tige adaptatrice et en la tirant vers le haut. Dévisser ensuite
le bol et le soulever pour le retirer.
4. NETTOYAGE ET RANGEMENT DES ACCESSOIRES
Ranger la lame et le disque à émincer/râper hors de la portée des enfants.
Tous les accessoires se lavent au lave-vaisselle, à l’exception de la base
robot, qui ne peut être plongée dans l’eau. Pour la nettoyer, utiliser un
chiffon humide.
Si vous nettoyez la lame et les disques à la main, faites-le soigneusement.
Evitez de les laisser tremper dans l’eau savonneuse car vous pourriez les
perdre de vue et risquer de vous couper.
10
Page 11

PRÉPARATION DES ALIMENTS À HACHER
PRÉPARATION DES ALIMENTS À ÉMINCER ET RÂPER
TYPE D’ALIMENT MODE DE PREPARATION
Fruits et légumes Eplucher et évider si nécessaire. Retirer les
morceaux durs et les pépins. Découper en
morceaux de ±2 cm et passer au robot
(max. 250 gr. à la fois).
Viande, volaille et poisson Les aliments de ce type doivent être très froids
mais pas congelés. Les découper au préalable en
morceaux de 2 cm. Placer jusqu’à 250 gr. dans
le bol. Appuyer sur Hacher/SEQ ou faire tourner
sans interruption jusqu’à obtenir la consistance
désirée. Vérifier la texture toutes les 2 ou 3 secondes
pour éviter de hacher trop fin.
Fromage à pâte dure «râpé» Découper en morceaux de 2 cm. Appuyer sur
Hacher/SEQ jusqu’à obtenir de petits grains, puis
passer au robot sans interruption. Vous
pouvez hacher aussi fin que vous le désirez. Faites
simplement tourner la machine plus longtemps
pour obtenir un hachis plus fin. Passer au robot
jusqu’à 85 gr. à la fois. Si le fromage est trop
difficile à découper au couteau, ne pas essayer de
le hacher – la lame risquerait d’être endommagée.
Crème fouettée La crème fouettée que vous obtiendrez au robot
est excellente comme nappage pour les desserts
ou les boissons chaudes. La crème doit être à
latempérature du réfrigérateur.
Persil et autres herbes fraîches Le bol et le couteau en métal doivent être propres
et secs. Retirer les tiges; utiliser les feuilles
uniquement. Sécher les herbes complètement.
Plus vous hachez d’herbes à la fois plus votre
hachis sera fin. Les herbes hachées se conservent
plusieurs jours au réfrigérateur dans des sacs
hermétiques, ou peuvent être congelées.
11
TYPE D’ALIMENT EMINCER RÂPER
Aliments longs et
fins (carottes, céleris,
concombres, aubergines)
Fruits et légumes de
forme arrondie (pommes,
oignons, pommes de terre,
poivrons, tomates)
Petits fruits et légumes
(fraises, champignons,
radis)
Chou, laitue croquante Couper le dessus et la base.
Viande et volaille crues
(250 gr. maximum
à la fois)
Fromages à pâte molle
(mozzarella)
Fromage à pâte semi-dure
(gruyère)
Fromage à pâte dure
(parmesan)
Découper en morceaux
réguliers d’environ 2,5 cm.
Insérer les morceaux
verticalement dans l’orifice
d’alimentation, côté plat
vers le bas, en ajoutant
suffisamment de morceaux
pour éviter qu’ils basculent.
Couper à plat une extrémité et
découper dans le sens de la
longueur en moitiés ou
quartiers. Bien entasser les
aliments dans l’orifice
d’alimentation pour éviter qu’ils
basculent. Maintenir une pression légère à modérée.
Remplir l’orifice d’alimentation, et maintenir une
pression légère.
Découper en morceaux de
manière à ce que les aliments
puissent passer par l’orifice
d’alimentation verticalement.
Utiliser des morceaux sans os
et semi-congelés (durs au
toucher mais pourvant être
coupés au couteau). Couper
les morceaux à la longueur
de l’orifice d’alimentation.
Ne pas trancher. Placer au congélateur jusqu’à
Découper en morceaux et
placer les morceaux
verticalement dans l’orifice
d’alimentation. Maintenir
une légère pression sur le
poussoir.
Ne pas trancher.
Pour de longues lamelles,
découper des morceaux juste
assez grands pour pouvoir
entrer de côté par l’orifice
d’alimentation. Empiler dans
l’orifice d’alimentation à
±2,5cm du sommet. Pour
râper fin, présenter les
morceaux à la verticale
dans l’orifice d’alimentation,
côté plat vers le bas.
Même méthode que celle
indiquée pour émincer. Placer
dans l’orifice d’alimentation,
latéralement pour obtenir
de longues lamelles, ou
verticalement pour râper fin.
Remplir l’orifice d’alimentation, et
maintenir une pression légère.
Les aliments doivent être
suffisamment durs pour pouvoir
être râpés (radis par exemple).
Ne pas râper.
Même méthode que celle
indiquée pour émincer.
ce que le fromage soit dur
au toucher. Maintenir une
faible pression sur le poussoir.
Râper max. 125 gr. à la fois.
Le fromage doit être très
froid. Le placer dans l’orifice
d’alimentation et maintenir
une légère pression sur le
poussoir. Râper max. 125
gr. à la fois.
Ne pas râper (utiliser la
lame hachoir).
Page 12

CONSIGNES DE SECURITE
1. Attention - Lors du déballage de l’appareil, veiller à manipuler les
lames et le disque avec le plus grand soin car ils sont extrêmement
aiguisés. Poser la boîte sur une surface plane et retirer l’appareil et les
différents accessoires un à un, en évitant de toucher les parties
métalliques.
2. Ne pas immerger le bloc moteur dans l’eau ou tout autre liquide.
3. Une surveillance accrue est nécessaire lorsque cet appareil est utilisé
à proximité d’enfants. Cet appareil ne doit pas être utilisé par des
enfants. Ranger les lames hors de portée des enfants. Ne jamais laisser
l’appareil sans surveillance.
4. Débrancher l’appareil immédiatement après utilisation, avant de placer
ou de retirer les accessoires et avant de procéder au nettoyage de
l’appareil ou encore avant de retirer le contenu du bol.
IMPORTANT: Ne jamais mettre les doigts dans le bol et ne jamais
manipuler les lames lorsque l’appareil est branché.
5. Eviter tout contact avec les pièces en mouvement.
6. Ne pas utiliser l’appareil si le cordon est endommagé ou si l’appareil
est tombé ou présente des traces de dommage. Si le cordon est
endommagé, il doit être remplacé par le fabricant. Retourner l’appareil
au fabricant pour toute vérification, réparation ou réglage électrique
ou mécanique. Aucune réparation ne peut être effectuée par
l’utilisateur.
7. Ne pas utiliser d’autres accessoires que ceux fournis avec l’appareil.
Ne pas utiliser les bols sur une autre base que celle fournie.
8. Ne pas utiliser à l’extérieur.
9. Ne pas laisser pendre le cordon sur un bord de table ou au bord du plan
de travail de la cuisine. Eviter tout contact entre le cordon et les
surfaces chaudes afin d’éviter tout risque de dommage.
10. Lorsque le bloc moteur est branché et en Position I et que les voyants
lumineux clignotent, ne pas toucher les lames, ni retirer le couvercle du
bol blender. Le fait de toucher malencontreusement un autre bouton
peut déclencher le fonctionnement de l’appareil.
11. Toujours faire fonctionner le robot avec le couvercle verrouillé. Ne pas
tenter de forcer le mécanisme de verrouillage du couvercle.
12. Ne jamais introduire d’aliments dans le robot avec la main. Toujours
utiliser le poussoir.
13. Toujours s’assurer que les lames ou le disque ont cessé de tourner
avant de retirer le couvercle.
14. IMPORTANT: Ne pas ouvrir la base de l’appareil. Aucune des pièces
contenues dans cet appareil ne peut être réparée ou remplacée par
l’utilisateur. Les réparations doivent être effectuées uniquement par le
fabricant.
15. Cet appareil satisfait aux exigences essentielles des directives
89/336/CEE (compatibilité électromagnétique) et 73/23/CEE (sécurité
des appareils électro-domestiques), amendées par la directive
93/68/CEE (marquage CE).
16. Utiliser cet appareil exclusivement pour cuisiner, en suivant les
instructions de ce manuel.
12
Page 13
INTRODUCTION
The Cuisinart blender/food processor is an improved all-round tool which
you can use for performing innumerable culinary preparations in no time
at all.
Thanks to its blending feature it is possible to purée, blend or mix all sorts
of foodstuffs. You can also use it to crush ice or prepare milk-shakes with.
By attaching the food-processor bowl to the base, your product can chop
raw uncooked or cooked foodstuffs to a very fine consistency. The
reversible disc allows you to grate or thinly slice foodstuffs in a matter of
seconds.
Being easy to clean, your product guarantees you years of highly
successful culinary preparations.
2.
1.
3.
4.
5.
6.
6e.
6f.
6g.
7.
6b.
6a.
6c.
6d.
A. The Blender
1. PRODUCT DESCRIPTION AND FEATURES
1. Lid
Easy to use and leak-resistant. Place the lid on top of the bowl,
applying slight pressure.
2. Graduated measuring cap
It allows you to measure up to 60ml and feed in ingredients without
removing the lid.
3. Glass bowl holding 1250ml
Thick glass bowl with wide opening and anti-drip spout.
4. Stainless-steel blades
The extremely heavy-duty stainless-steel blades can even be used for
crushing ice.
5. Motor unit
The motor unit is robust, stable, and very heavy-duty.
6. Touch-pad controls
The touch-pad controls are easy to use and clean. The product
is equipped with 7 speeds, which provide great versatility. Indicator
lights help you to pinpoint the speed used.
6a. SEQ - pulse
The SEQ touch-pad control is used at any speed for precise blending
of ingredients to a desired consistency.
6b. Ice-crush
The ice-crush touch-pad control activates a special speed for
crushing ice. Important: The food-processor attachments are not
designed for crushing ice.
6c. Food processor
The food-processor touch-pad control is used with the food
processor attachments (see page 11) or for liquefying.
6d. Purée
The Purée touch-pad control is used for preparing homogeneous
mixes from solid foods (milk-shakes or baby food for example).
6e. Stir
The stir touch-pad control is used for blending foodstuffs to obtain a
homogeneous mixture.
6f. Chop
The chop touch-pad control is used for coarse or fine chopping of
foodstuffs.
6g. Mix
The mix touch-pad control is used for whipping cream and creating
toppings for cakes etc.
7. Non-slip feet
Prevent the machine from moving during use.
13
Page 14
2. HOW TO ASSEMBLE THE BLENDER
To use the blender, simply place the bowl on the motor unit in such a way
that the indicators marked on the bowl are facing you, with
the handle at the side. Now place the lid on the bowl and fit the
measuring cap into the lid. Plug the product in and switch on.
It is now ready for use.
3. USING THE BLENDER
1. Add the ingredients and place the lid on the bowl. It is also possible to
place the lid on first, then add the ingredients through the measuring
cap. Put the measuring cap back in place after all ingredients have
been added. Additional ingredients can also be added through the
measuring cap during the blending cycle.
Note: First add the liquid ingredients, then the solid ingredients. In this
way you will obtain a more homogeneous mixture and prevent
unnecessary stress on the motor.
2. STARTING THE BLENDING CYCLE: press the I touch-pad control. The red
light flashes to indicate that the blender is switched on.
3. SELECTING A BLENDING SPEED: press the speed touch-pad control you
have selected. The blender starts to operate. To change the speed,
simply press another touch-pad control. It is not necessary to switch
the appliance off.
4. MIXING TIME: take care not to overprocess the food. The results are
achieved in seconds, not minutes.
5. STOPPING THE BLENDING CYCLE: Press the touch-pad control already
selected. The machine stops. The control light flashes, indicating that it
is still switched on. To disconnect, press 0.
6. SEQ MODE: start SEQ-mode blending by pressing the I touch-pad
control, then the SEQ touch-pad control. The SEQ control light flashes.
Then press the touch-pad control of the speed desired and release it.
Repeat as many times as you wish. Each time you press the SEQ touch-pad
control, all control lights (position I, SEQ and selected speed) light up.
The SEQ mode is used to process greater amounts of food or to monitor
the texture of foodstuffs when you chop them. The SEQ feature is also
effective at the start of blending, or when you feed in foodstuffs which
only require low-key blending.
7. TO CRUSH ICE: Use the blender bowl only . To help you monitor the
process better, the “ice crush” feature functions like the SEQ mode.
Place the ice cubes in the blender bowl, insert the lid and press the I
touch-pad control. Then press the “ice crush” touch-pad control in
short sharp bursts until the ice has reached the desired consistency.
8 DETACHING WEDGED FOOD: use a spatula to remove the food wedged
around the chopping unit. ENSURE THE MACHINE IS SWITCHED OFF
AND UNPLUGGED BEFORE USING THE SPATULA. Afterwards, insert the
lid and continue the blending operation if necessary. Never turn on the
blender when the spatula is in the bowl.
9. AFTER BLENDING: Press the 0 touch-pad control to switch off, and
unplug the machine. Then remove the bowl from the motor unit by
lifting it off.
IMPORTANT
• Never place the blender bowl on the base, nor remove it while
the machine is running.
• Never pour boiling liquid food into the bowl or introduce frozen solid
food (with the exception of ice cubes or pieces of frozen fruit). Allow
ingredients to cool for at least 5 minutes before placing them in the
blender bowl.
• If you are blending hot liquids, remove the measuring cap (central
piece of the lid) to allow the steam to escape.
14
Page 15

4. CLEANING AND MAINTENANCE
Always switch off and unplug the appliance before cleaning it. Clean the
blender bowl before using it for the first time, and immediately after each
use.
To clean it, remove the bowl from the motor unit by lifting it off. Wash the
bowl in warm soapy water, then rinse and dry it thoroughly. The bowl can
also be washed in a dishwasher.
Do not attempt to dismantle the blender bowl. Clean it extremely
cautiously to avoid any risk of injury.
To clean the motor unit, use a damp cloth to remove the residue, then wipe
clean. Never immerse the motor unit into water or in any other liquid, and
never put it in a dishwasher.
REFERENCE GUIDE TO THE BLENDER FEATURES
To activate the blender Press the 1 touch-pad control – The blender is switched on.
To start blending Press the selected speed touch-pad control.
To change the speed Press the selected speed touch-pad control.
To boost
To crush ice
To switch off the blender Press the 0 touch-pad control.
In mode 1, press SEQ, then press and release the
speed touch-pad control as many times as necessary.
In mode 1, press and release the ICE CRUSH
touch-pad control as many times as necessary.
5. IMPORTANT HELPFUL HINTS ON USING THE BLENDER
• Always place the motor unit on a clean, dry and steady surface.
• Always add the liquid ingredients first before adding the other
ingredients. Using this method, the ingredients will always be
uniformly blended.
• Cut the majority of foodstuffs into 1 to 5-cm cubes to obtain a more
uniform result. Chop all cheeses into approximately 1-cm pieces.
• Use the measuring cap to measure liquid ingredients such as
alcohol. Re-insert the measuring cap once the ingredients have been
added.
• Use a spatula if necessary, but only when the blender has been switched
off. Never use metal utensils, since these could damage the bowl or the
blades.
• If you scrape the blender bowl with a spatula, remove the food stuck to
the internal sides of the bowl and place it above the blades.
• If you are chopping fresh herbs, garlic, onion, zests, nuts and spices etc.,
ensure that the blender bowl and blades are completely dry.
• If the food tends to stick to the internal sides of the bowl during use,
operate the machine in short sharp bursts.
• Stagger the pulses so that the blades stop turning in between these
consecutive pulses.
• Do not store foodstuffs or liquids in the bowl.
• This machine is not intended for mashing potatoes, kneading dough or
stiffly beating egg whites.
• Do not over-process the foodstuffs. The results expected are achieved
in a few seconds, not minutes.
• Do not overload the blender. If the motor stalls, switch off the machine
and unplug it. Remove some of the food, then switch on again.
To stop the blender (in the
stirring, chopping, blending or purée modes)
Press the Speed touch-pad control again. The
blender will switch back to Position 1 mode. Press
touch-pad control 0 to stop the blender.
SPEED SELECTION GUIDE FOR BLENDER FEATURES
INGREDIENT/RECIPE SPEED SYMBOL RESULT
Mayonnaise
Salad sauces Stir Desired consistence
Restoring frozen
concentrated orange juice
Nuts Chop Fine to coarse
Whipped cream
Lemon zests
Milk-Shakes Purée
Baby foods
Natural drinks
Ice-cold cocktails
Mashed soft cheese
Spices Liquefy
Ice Ice crush
Stir Thick and creamy
Stir Homogeneous
Mix
Purée
Purée
Liquefy
Liquefy
Liquefy
Thick topping
Homogeneous and
Homogeneous and
Homogeneous and
Fine to coarse
Fine to coarse
Evenly fine
creamy
creamy
creamy
Thick liquid
Snow-like
15
Page 16

B. The Food Processor
1. PRODUCT DESCRIPTION AND FEATURES
1. Food pusher
2. Bowl lid with feedtube
3. Stainless-steel blade. Chops both raw uncooked foodstuffs as well as
cooked food. Capable of producing any desired consistence, from coarse
chopped vegetable or minced meat to a fine
purée.
4. The reversible stainless-steel grater/slicer disc
enables you to produce perfect slices or grate a
great variety of fruits, vegetables, meats and
cheeses.
5. Spindle for holding disc
6. Preparation bowl
7. Food-processor base
8. Motor unit
Food pusher (1)
Bowl lid with feed tube (2)
Stainless steel chopping blade (3)
Reversible grater/slicer disc (4)
2. HOW TO ASSEMBLE THE FOOD PROCESSOR
A. WITH CHOPPING BLADE
1. Hold the food-proceessor base with one hand and the bowl handle with
the other. Screw the bowl onto the base by rotating it in a clockwise
direction.
2. Place the bowl and base onto the motor unit.
Note: The bowl and food-processor base fit onto the motor unit in 8
different positions. The handle can face forwards or sideways, and the
feedtube can face forwards, backwards or sideways.
3. Fit the chopping blade onto the central stem in the bowl. The blade
should easily sink to the bottom of the bowl and almost touch the bottom
of the bowl.
CAUTION! THE CHOPPING BLADE IS EXTREMELY SHARP
4. Place the food in the bowl. Fit the lid on top by rotating it in a
clockwise direction until it locks into position. There should be
an audible click when it locks into position. If you have difficulty
fitting the lid onto the bowl, give the hub of the blade a slight
turn and re-insert the lid.
5. The food pusher fits into the feedtube, with the roundest side
pointing towards the outside of the bowl. ALWAYS USE THE PUSHER
TO GUIDE THE FOOD THROUGH THE FEEDTUBE. NEVER push with
YOUR FINGERS OR A SPATULA.
6. Plug in and switch on by pressing touch-pad control 1 , then press the
food-processor touch-pad control to start chopping. We
recommend that you place your hand over the lid of the food processor
while it is operating in order to prevent it from moving. If the machine
does not start up, check that it is plugged in and switched on, and that
the bowl and lid are securely locked in place.
Spindle for holding disc (5)
Preparation bowl (6)
Food processor base (7)
Motor unit (8)
B. WITH THE REVERSIBLE SLICING/GRATING DISC
1. Place the bowl on the food-processor base, then fit this set onto the
motor unit.
2. Fit the disc spindle into the disc.
For slicing: Attach the disc to the spindle with the slicing blade
facing upwards.
For grating: Set the disc on the spindle, with the grater slots
facing upwards. Then place the disc onto the central stem of the bowl.
Important: hold the disc by the rim to avoid any risk of injury.
3. Place the lid on the bowl and insert the food into the feedtube.
4. Place the pusher in the feedtube above the food. Always use the pusher to
guide the food through the feedtube. Never use your hands or a spatula.
5. Plug in and switch on the machine to start grating or slicing.
16
Page 17

3. USING THE FOOD PROCESSOR
The food-processor touch-pad control provides the ideal speed for using
the machine as a domestic food processor. You can also use the SEQ
touch-pad control with this feature.
Press the 1 touch-pad control. For a continuous operation, press
the food-processor touch-pad control. To stop the machine, press
the food-processor touch-pad control again, or press 0.
To activate the SEQ feature, press the 1 touch-pad control, then
the SEQ touch-pad control, then press and release the food-processor
touch-pad control as many times as necessary. By using the appliance in
this way, it is easy to control the duration and frequency of the
pulses. Leave enough time in between pulses to allow the food to fall to
the bottom of the bowl.
A. CHOPPING AND PRODUCING PUREES
1. Cut the food into pieces of a similar size, then place into the bowl. You
can put up to 250 g of food into the food processor at the same time.
2. Place the lid and lock in place. Insert the pusher. We recommend that
you hold the food processor with one hand while it is operating. Press
the 1 touch-pad control, then the SEQ touch-pad control. Press and
release the food-processor touch-pad control two or three times. Each
time you release the button, allow the food to fall to the bottom of the
bowl before pressing the button again. Check the texture by looking
through the bowl. Ensure you do not chop too finely
Note : From time to time, a piece of food may become wedged between
the blade and the bowl. In this case, remove the lid, carefully lift out the
blade and remove the wedged piece. Empty the bowl, re-insert the blade
and the food, lock the lid into position, and continue the operation.
3. If you want finer chopped vegetables or minced meat, or a
finer purée, press the 1 touch-pad control, then the food-processor
touch-pad control and allow the machine to operate uninterrupted
until the foodstuffs have been chopped as fine as desired.
Make frequent checks through the bowl to avoid the food being
chopped too finely. If necessary, use a spatula to scrape all the pieces
remaining stuck to the inside of the bowl.
To purée foodstuffs, follow the same procedure as that used for chopping,
but allow the machine to continue operating until you have obtained a
homogeneous purée. Caution! Some foods (potatoes for example) may
produce a gluey texture if processed for too long.
B. ADDING MORE FOOD WHILE THE MACHINE IS IN OPERATION
There is a hole in the pusher which allows you to add liquid
ingredients slowly and evenly. If you wish to add some liquid
while the machine is running, pour it through this hole. This step is
particularly useful when you are making mayonnaise or sauces.
To add foodstuffs which are small in size or cut into pieces, like cheese,
meat or cloves of garlic, add them through the feedtube opening. Ensure
you replace the pusher immediately after adding the ingredients, to avoid
any risk of splashes or injury.
C. REMOVING FOOD FROM THE FOOD PROCESSOR
Before anything else, press the 0 touch-pad control and wait until
the blade stops turning. Then remove the lid by rotating it in an
anticlockwise direction. Never attempt to remove the lid and bowl
together; you risk damaging the bowl.
When you empty the bowl, ensure that the blade does not fall out to avoid
any risk of injury.
D. SLICING AND GRATING
1. Fit the grater/slicer disc into the food processor. Always handle
the disc by the rim. Close the lid and insert the food through the
feedtube.
2. Insert the pusher. Press the I touch-pad control then the food processor
touch-pad control. Push the food to the bottom, exerting light
pressure. You can remove the pusher to add more food without
switching off the appliance. However, ensure that you never put your
fingers in the feedtube.
After having sliced or grated all the foodstuffs, press the
food-procesor or 0 touch-pad controls. Wait until the disc
stops turning before removing the lid. Then remove the disc
by lifting it up. Now remove the bowl and pour out the food.
4. CLEANING AND STORAGE OF THE ATTACHMENTS
Store the blade and slicer/grater disc out of reach of children.
All the attachments can be washed in a dishwasher, except the
food-processor base unit, which must not be immersed in water. Wipe it
with a damp cloth.
If you clean the blade(s) and discs by hand, be very careful. Avoid letting
them soak in soapy water, where they could disappear from view.
17
Page 18

PREPARING FOOD TO CHOP
PREPARING FOOD TO SLICE AND GRATE
TYPE OF FOOD METHOD OF PREPARATION
Fruit and vegetables Peel and core if necessary. Remove the hard
bits, and stones and pips. Cut into ±2
cm-size pieces, and process in the food
processor (max. 250 g at a time).
Meat, poultry and fish Foodstuffs of this type must be very cold,
but not frozen. Cut into 2 cm-size pieces.
Place up to 250 g in the bowl. Press the
CHOP/SEQ touch-pad controls, or allow the
processor to run without stopping until you
obtain the desired consistence. Check the
texture every 2 or 3 seconds to avoid the
food being chopped too finely.
Hard «grated» cheese Cut into 2 cm-size pieces. Press the
CHOP/SEQ touch-pad controls until you
obtain small grains, then process non-stop in
the food processor. You can chop it as fine
as you like. Simply run the machine longer
to obtain finer grains. Process up to 85 g at
a time. If the cheese is too hard to cut with
a knife, do not attempt to chop it in the
food processor – you risk damaging the
blade.
Whipped cream The whipped cream you obtain using the
food processor is excellent as a topping for
desserts or hot drinks. Cream must be at
refrigerator temperature.
Parsley and other fresh herbs The herbs, bowl and metal blade must be
clean and dry. Remove the stalks and only
use the leaves. The more herbs you chop at a
time, the finer the end result. Chopped herbs
can be kept for several days in
hermetically-sealed bags in the refrigerator,
or can be deep-frozen.
TYPE OF FOOD SLICING GRATING
Long, thin food (carrots,
celery, cucumber and
aubergines)
Round fruit and vegetables
(apples, onions, potatoes,
green peppers and toma-
toes)
Small fruit and vegetables
(strawberries, mushrooms
and radishes)
Cabbage and crispy let-
tuce
Raw uncooked meat and
poultry
(250 g maximum at a
time)
Soft cheeses
(mozzarella)
Semi-hard cheese
(gruyère)
Hard cheese
(parmesan)
Cut into even lengths.
Insert the pieces vertically
into the feedtube, flat
side downwards, adding
enough pieces to avoid
any toppling over.
Cut one end flat. Pack the
food well into the feedtube to avoid them toppling over. Press gently to
moderately with the
pusher.
Fill the feedtube and
press gently with the
pusher.
Cut off the outer leaves
and the base. Cut into
pieces in such a way that
the food can be guided
vertically through the
feedtube.
Use boned and halffrozen meat (hard to the
touch but capable of
being cut with a knife).
Cut into pieces the length
of the feedtube.
Do not slice. Place in the refrigerator
Cut into pieces and guide
vertically through the
feedtube. Press gently
with the pusher.
Do not slice. Do not grate (use the
For long thin strips, cut
into pieces which are just
big enough for fitting
sideways through the
feedtube. Tightly fill the
feedtube to ±2.5cm from
the top. For fine grating,
insert the pieces vertically
into the feedtube, flat
side downwards.
Same method as that
given for slicing. Place
horizontally in the feedtube
to obtain long thin strips,
or vertically for finely
grated.
Fill the feedtube and
press gently with the
pusher. Food must be hard
enough to grate (radishes
for example).
Do not grate.
Same method as that
given for slicing.
until the cheese is hard to
the touch. Press gently
with the pusher. Grate a
max. 125 g at a time.
The cheese must be very
cold. Place it in the feedtube
and press gently with the
pusher. Grate a max. 125
g at a time.
chopping blade).
18
Page 19

SAFETY CAUTIONS
1. Caution! When unpacking, ensure you handle the blade and disc
with the greatest care, since they are extremely sharp. Place the
box on an even surface, then remove the accessories without
touching the metal parts.
2. Do not immerse the motor unit into water or any other liquid.
3. Increased supervision is necessary when this appliance is used near
children. This appliance must not be used by children. Store out of
children’s reach. Never leave the appliance unsupervised.
4. Switch off and unplug the appliance immediately after use, before
fitting or removing attachments, before cleaning and before removing
the contents of the bowl.
IMPORTANT: Never put your fingers in the bowl and never handle
the blades when the appliance is plugged in and switched on.
5. Avoid all contact with the moving parts.
6. Do not use the appliance if the cord is damaged or if the appliance
was dropped or shows signs of damage. If the cord is damaged, it
must be replaced by the manufacturer. Return the appliance to the
manufacturer for any repair or electrical or mechanical
adjustments. No repair may be carried out by the user.
7. Do not use any attachments other than those supplied with the
product. Do not use the bowls on any other base except on that supplied.
8. Do not use outside.
9. Do not leave the cord hanging over the edge of a kitchen table or
worktop. Avoid any contact with hot surfaces, to avoid any risk of
damage.
10. When the motor unit is plugged in and switched on, do not touch the
blades or remove the lid from the blender bowl. Inadvertently touching
another touch-pad control can trigger the operation of the appliance.
11. Always have the lid locked into position when the food processor is
operating. Do not attempt to force the lid-locking mechanism.
12. Never put food into the food processor by hand. Always use the
pusher for guiding it in.
13. Always ensure that the blade and disc have stopped turning before
removing the lid.
14.IMPORTANT: Do not open the motor unit. None of the parts
contained in this appliance may be repaired or replaced by
the user. Repairs must be undertaken solely by the manufacturer.
15. This appliance complies with the basic requirements of directives
89/336/CEE (electromagnetic compatibility) and 73/23/CEE (safety of
electro-domestic appliances), amended by directive 93/68/CEE (CE
marking).
16. This appliance should be used solely for cooking, following the
instructions in this manual.
19
Page 20

EINLEITUNG
Der Mixer/Küchenroboter Cuisinart® ist ein perfektioniertes und sehr
vollständiges Werkzeug, mit dem Sie unzählig viele Köstlichkeiten in
wenigen Augenblicken zubereiten können.
Dank der Mixerfunktion können Sie mit ihm alle Arten von
Nahrungsmitteln pürieren, mischen und mixen. Sie können mit ihm auch
Eis hacken oder Milkshakes zubereiten.
Wenn das Robotergefäß auf dem Rumpf befestigt wird, kann Ihr Gerät
rohe oder gekochte Nahrungsmittel sehr fein hacken. Mit der
umkehrbaren Scheibe können Nahrungsmittel in Sekundenschnelle
gerieben oder geraspelt werden.
Ihr Gerät ist leicht zu reinigen und garantiert Ihnen über Jahre viele
besonders köstliche Zubereitungen.
2.
1.
3.
4.
5.
6.
6e.
6f.
6g.
7.
6b.
6a.
6c.
6d.
A. Der Blender
1. BESCHREIBUNG UND FUNKTIONEN
1. Deckel
Er ist leicht zu benutzen, dichtet das Gefäß ab und wird durch
einfaches Andrücken befestigt.
2. Dosierdeckel
Mit ihm können bis 60ml abgemessen und Zutaten hinzugefügt
werden, ohne den Deckel abzunehmen.
3. Glasgefäß mit Maßeinteilung und einem Inhalt von 1250ml
Dickwandig, mit einer breiten Öffnung und Anti-tropf-Gießer.
4. Klingen aus rostfreiem Edelstahl
Sehr widerstandsfähig, selbst zum Hacken von Eis geeignet.
5. Motorblock
Robust und stabil, sehr widerstandsfähig.
6. Bedienungstasten
Leicht zu gebrauchen und zu reinigen. Das Gerät verfügt über 6
Geschwindigkeitsstufen + 1 Sequenzfunktion (siehe 6a), was eine große
Vielseitigkeit gewährleistet.
Die Leuchtanzeigen helfen Ihnen, die Betriebsgeschwindigkeit zu
bestimmen.
6a. Taste SEQ - Sequenzfunktion
Kann bei allen Geschwindigkeiten verwendet werden und wird es Ihnen
ermöglichen, die Zutaten genau zu der gewünschten Konsistenz zu
mixen.
6b. Taste Eishacken
aktiviert eine Sondergeschwindigkeit zum Hacken von Eis. Wichtig: das
Zubehör des Küchenroboters ist nicht zum Hacken von Eis vorgesehen.
6c. Taste Roboter
Wird mit dem Roboterzubehör (siehe Seite 4) und zum Verflüssigen
verwendet.
6d. Taste Pürieren
Zum Zubereiten von homogenen, cremigen Mischungen aus festen
Zutaten (Milkshakes oder Babynahrung zum Beispiel).
6e. Taste Mischen
Zum Einarbeiten von Nahrungsmitteln und für homogene Mischungen.
6f. Taste Hacken
Um Nahrungsmittel grob oder fein zu hacken.
6g. Taste Schlagen
Zum Schlagen von Sahne, Zubereiten von Überzügen für Kuchen und
Torten, etc.
7. Rutschfeste Füße
Verhindern, dass das Gerät während des Gebrauchs verrutscht.
20
Page 21

2. ZUSAMMENSETZEN DES BLENDERS
Zur Verwendung des Blenders braucht lediglich das Gefäß so auf den
Motorblock gesetzt zu werden, dass die Maßeinteilungen auf dem Gefäß
zu Ihnen zeigen und sich der Griff an der Seite befindet. Danach den
Deckel auf das Gefäß geben und den Dosierdeckel einsetzen. Das Gerät an
den Netzstrom anschließen.
Es ist nun betriebsbereit.
3. GEBRAUCH DES BLENDERS
1. Alle benötigten Zutaten einfüllen und den Deckel schließen. Sie können
auch erst den Deckel schließen und dann die Zutaten hinzufügen,
indem Sie den Dosierdeckel abnehmen. Danach den Dosierdeckel
wieder schließen. Durch den Dosierdeckel können auch während des
Mixens nachträglich Nahrungsmittel hinzugefügt werden.
Anmerkung: fügen Sie zuerst alle flüssigen Zutaten hinzu, dann die
festen. So wird die Mischung homogener und Sie ersparen dem Motor
unnötige Belastung.
2. UM MIT DEM MIXEN ZU BEGINNEN: Drücken Sie die Taste I. Die rote
Anzeige blinkt und zeigt damit an, dass der Mixer eingeschaltet ist.
3. EINE MIXGESCHWINDIGKEIT WÄHLEN: drücken Sie die Taste für die
gewählte Geschwindigkeit. Der Mixer setzt sich in Bewegung. Um die
Geschwindigkeit zu ändern einfach eine andere Taste drücken. Der
Motor braucht nicht abgeschaltet zu werden.
4. MIXDAUER: verarbeiten Sie nicht zu viele Nahrungsmittel auf einmal.
Die Resultate werden in einigen Sekunden und nicht Minuten erreicht.
5. BEENDEN DES MIXVORGANGS: drücken Sie die Taste für die gewählte
Geschwindigkeit. Der Motor schaltet sich aus. Die Anzeige blinkt, um
anzuzeigen, dass das Gerät immer noch eingeschaltet ist. Um den
Mixer vollständig auszuschalten die Taste 0 drücken.
6. FUNKTION SEQ: um in Impulsen zu mixen, die Taste I und danach die
Taste SEQ drücken. Die rote Leuchtanzeige SEQ blinkt. Danach die Taste
für die gewünschte Geschwindigkeit drücken und wieder loslassen.
Wiederholen Sie den Vorgang, so oft Sie wünschen. Bei jedem Impuls
leuchten alle Anzeigen (die Position I, die Taste SEQ und die gewählte
Geschwindigkeit).
Die Taste SEQ wird verwendet, um größere Stücke Nahrungsmittel zu
meistern oder die Beschaffenheit der Zutaten beim Mixen zu
kontrollieren. Die Funktion SEQ ist auch zu Beginn des Mixvorgangs
nützlich, oder wenn Sie Nahrungsmittel verarbeiten, die nur sehr wenig
Mixzeit erfordern.
7. ZUM HACKEN VON EIS: Ausschließlich das Blendergefäß verwenden.
Die Funktion « Eis hacken » funktioniert wie die Taste SEQ, um es Ihnen
zu erlauben, den Verlauf besser in der Hand zu haben. Geben Sie die
Eiswürfel in das Blendergefäß, befestigen Sie den Deckel und drücken
Sie die Taste I. Danach die Taste « Eis hacken » in kurzen Impulsen
betätigen, bis das Eis die gewünschte Beschaffenheit hat.
8. FESTGEKLEMMTE NAHRUNGSMITTEL LÖSEN: benutzen Sie einen Spatel,
um die Nahrungsmittel zu entfernen, die sich rund um den Hackblock
befinden. Niemals die Hand in das Gerät halten, solange es an den
Netzstrom angeschlossen ist. DEN SPATEL NUR BENUTZEN, WENN DAS
GERÄT AUSGESCHALTET UND DER NETZSTECKER GEZOGEN IST. Danach
den Deckel wieder befestigen und gegebenenfalls den Mixvorgang
fortsetzen. Nie den Blender einschalten, wenn sich der Spatel im Gefäß
befindet.
9. BEENDEN DES MIXVORGANGS: Die Taste 0 drücken und den
Netzstecker ziehen. Danach das Gefäß nach oben vom Motorblock
abheben.
WICHTIG
• Das Blendergefäß nicht auf dem Sockel befestigen oder vom Sockel
nehmen, solange der Motor läuft.
• Keine kochende flüssige Nahrungsmittel oder gefrorene feste
Nahrungsmittel (außer Eiswürfeln und gefrorenen Obststücken)
eingeben.
Flüssigkeiten mindestens 5 Minuten abkühlen lasen, bevor sie in den
Blender gegeben werden.
• Wenn Sie heiße Flüssigkeiten mixen, nehmen Sie den Dosierdeckel ab
(mittlerer Deckelteil), damit der Dampf entweichen kann.
21
Page 22

4. REINIGUNG UND PFLEGE
Vor dem Reinigen immer den Netzstecker ziehen. Das Blendergefäß vor dem
ersten Gebrauch und nach jedem Gebrauch reinigen.
Das Gefäß zum Reinigen nach oben vom Motorblock abheben.
Das Gefäß in heißem Seifenwasser spülen, abspülen und gründlich trocknen. Das
Gefäß kann ebenfalls im Geschirrspüler gereinigt werden.
Versuchen Sie nicht, das Blendergefäß auseinander zu nehmen und lassen Sie
beim Reinigen große Vorsicht walten, um jedes Verletzungsrisiko zu vermeiden
Zum Reinigen des Motorblocks Rückstände mit einem feuchten Tuch entfernen
und danach abwischen. Niemals den Motorblock in Wasser oder andere
Flüssigkeiten tauchen und ihn nie in den Geschirrspüler geben.
5. EINIGE HINWEISE ZUM GEBRAUCH DES BLENDERS
• Den Motorblock immer auf eine stabile, saubere und trockene Oberfläche
stellen.
• Immer zuerst die flüssigen Zutaten eingeben und danach alle anderen
Zutaten hinzufügen. Auf diese Weise werden alle Zutaten immer gleichmäßig
gemixt.
• Die meisten Nahrungsmittel in Würfel von ca. 1 bis 5 cm schneiden, um ein
gleichmäßigeres Resultat zu erhalten. Käse in Stücke von ca. 1 cm schneiden.
• Den Dosierdeckel verwenden, um flüssige Zutaten wie Alkohol abzumessen.
Den Dosierdeckel wieder befestigen, nachdem die Zutaten hinzugefügt
wurden.
• Gegebenenfalls einen Spatel verwenden, aber nur bei ausgeschaltetem
Blender. Benutzen Sie nie Gegenstände aus Metall, da sie das Gefäß oder die
Klingen beschädigen könnten.
• Wenn Sie das Blendergefäß mit einem Spatel ausschaben, entfernen Sie die
Nahrungsmittel, die sich an den Gefäßwänden befinden und geben sie auf die
Klingen.
• Wenn Sie frische Kräuter, Knoblauch, Zitronen- oder Orangenschalen, Nüsse,
Gewürze, etc. hacken, sollten das Blendergefäß und die Klingen vollständig
trocken sein.
• Wenn die Nahrungsmittel dazu neigen, während des Mixens an den
Gefäßwänden zu kleben, gehen Sie in kurzen Impulsen vor.
• Lassen Sie einen kurzen Abstand zwischen den Impulsen, so dass die Klingen
zwischen den aufeinanderfolgenden Impulsen still stehen.
• Bewahren Sie keine Nahrungsmittel oder Flüssigkeiten im Gefäß auf.
• Mit diesem Gerät ist es nicht möglich, Kartoffeln zu pürieren, Teig zu kneten
oder Eischnee zu schlagen.
• Verarbeiten Sie nicht zu viele Nahrungsmittel auf einmal. Die Resultate
werden in einigen Sekunden und nicht Minuten erreicht.
• Überladen Sie den Blender nicht. Wenn der Motor klemmt, das Gerät
ausschalten und den Netzstecker ziehen. Einen Teil der Nahrungsmittel
entfernen und danach das Gerät wieder einschalten.
LEITFADEN ZU DEN FUNKTIONEN DES BLENDERS
Zum Aktivieren des Blenders Taste 1 drücken - Der Blender ist betriebsbereit.
Um mit dem Mixen zu beginnen Eine Geschwindigkeitstaste drücken.
Um die Geschwindigkeit zu ändern Eine Geschwindigkeitstaste drücken.
In Modus 1 SEQ betätigen, dann die
Um Impulse zu geben
Zum Hacken von Eis
Zum Deaktivieren des Blenders Die Taste 0 drücken.
Zum Beenden des Mixvorgangs (im
Modus Mischen, Hacken, Mixen
oder Pürieren)
Geschwindigkeitstaste drücken und wieder
loslassen, so oft dies nötig ist.
In Modus 1, die Taste HACKEN VON EIS drücken und
wieder loslassen, so oft dies nötig ist..
Erneut die Geschwindigkeitstaste drücken Der
Mixer geht so erneut in den Modus 1. Drücken Sie
die Position O, um den Blender AUSZUSCHALTEN.
LEITFADEN ZUR WAHL DER GESCHWINDIGKEITEN
FÜR BLENDERFUNKTIONEN
ZUTAT/REZEPT GESCHWINDIGKEIT SYMBOLE RESULTAT
Mayonnaise Mischen Dickflüssig und cremig
Salatsaucen Mischen Gewünschte Konsistenz
konzentrierten tiefgefrorenen
Orangensaft aufbereiten
Nüsse Hacken Dickflüssig bis fein
Schlagsahne Mixen Dicker Überzug
Zitronenschale Pürieren Gleichmäßig fein
Milkshakes Pürieren Homogen und cremig
Babynahrung Pürieren Homogen und cremig
Natürliche Getränke Verflüssigen Homogen und cremig
Gefrorene Cocktails Verflüssigen Dick und flüssig
Zerdrückter Weichkäse Verflüssigen Dickflüssig bis fein
Gewürze Verflüssigen Dickflüssig bis fein
Eis Eis hacken Schneeartig
22
Mischen Homogen
Page 23

B. Der Roboter
1. BESCHREIBUNG UND FUNKTIONEN
1. Schieber für Nahrungsmittel
2. Gefäßdeckel mit Einfüllöffnung
3. Klinge aus rostfreiem Edelstahl hackt rohe und gegarte Zutaten.
Ermöglicht es, immer die gewünschte Konsistenz zu erhalten, von grob
Gehacktem bis hin zu feinem Püree.
4. Mit der umkehrbaren Scheibe zum
Reiben/Raspeln aus rostfreiem Edelstahl können
perfekte Scheiben geschnitten oder alle Arten
von Obst, Gemüse, Fleisch und Käse geraspelt
werden.
5. Metallstift für die Scheibe
6. Zubereitungsgefäß
7. Robotersockel
8. Motorblock
Schieber für Nahrungsmittel (1)
Gefäßdeckel mit Einfüllöffnung (2)
Hackmesser aus rostfreiem Edelstahl (3)
Umkehrbare Scheibe zum Reiben/Raspeln (4)
Metallstift für die Scheibe (5)
Zubereitungsgefäß (6)
Robotersockel (7)
Motorblock (8)
2. MONTAGE DES ROBOTERS
A. MIT DEM HACKMESSER
1. Den Robotersockel in der einen Hand und den Griff des Gefäßes in der
anderen halten. Das Gefäß im Uhrzeigersinn auf den Sockel schrauben.
2. Alles auf den Motorblock setzen.
Anmerkung: das Gefäß und der Robotersockel passen in acht
verschiedenen Positionen auf den Motorblock. Der Griff kann sich vorne
oder auf der einen oder anderen Seite befinden, und die Einfüllöffnung
vorne, hinten oder auf einer der Seiten, ganz nach Ihren Wünschen.
3. Das Hackmesser auf der Achse im Gefäß befestigen. Die Klinge muss
sich leicht an den Boden des Gefäßes drücken lassen und den Boden
des Gefäßes beinahe berühren.
VORSICHT, DAS HACKMESSER IST EXTREM SCHARF
4. Die Nahrungsmittel in das Gefäß geben. Den Deckel aufsetzen und im
Uhrzeigersinn drehen, bis er richtig sitzt. Der Verschluss des Deckels
muss einrasten. Wenn Sie Schwierigkeiten haben, den Deckel auf dem
Gefäß zu befestigen, drehen Sie leicht die Nabe der Klinge und setzen
danach den Deckel wieder auf.
5. Der Nahrungsmittelschieber passt in die Einfüllöffnung, die runde Seite
ist dabei auf die Außenseite des Gefäßes gerichtet. BENUTZEN SIE
IMMER DEN SCHIEBER, UM DIE NAHRUNGSMITTEL DURCH DIE
EINFÜLLÖFFNUNG ZU FÜHREN. NIEMALS DIE FINGER ODER EINEN
SPATEL.
6. Das Gerät an den Netzstrom anschließen. Drücken Sie die Taste Position
1 und danach die Taste Roboter, um mit dem Hacken zu beginnen. Wir
raten Ihnen, während des Betriebs eine Hand auf den Deckel des
Roboters zu legen, um das Gerät zu stabilisieren. Wenn das Gerät nicht
läuft, überprüfen Sie, dass es an den Netzsrom angeschlossen ist und
dass Gefäß und Deckel eingerastet sind.
B. MIT UMKEHRBAER SCHEIBE ZUM REIBEN UND RASPELN
1. Das Gefäß auf dem Robotersockel und danach alles auf dem
Motorblock befestigen.
2. Den Stift der Scheibe auf der Mittelachse befestigen.
Zum Reiben: Die Scheibe mit der Reibeklinge nach oben auf dem Stift
befestigen.
Zum Raspeln: Die Scheibe mit den Raspelschlitzen nach oben auf dem
Achtung: die Scheibe an den Rändern festhalten, um jedes
Verletzungsrisiko zu vermeiden.
3. Den Deckel auf dem Gefäß befestigen und die Nahrungsmittel durch die
Einfüllöffnung geben.
4. Den Schieber über den Nahrungsmitteln in die Einfüllöffnung stecken.
Benutzen Sie immer den Schieber, um die Nahrungsmittel durch die
Einfüllöffnung zu führen. Niemals die Hände oder einen Spatel
verwenden.
5. Das Gerät an den Netzstrom anschließen und einschalten, um mit dem
Reiben oder Raspeln zu beginnen.
23
Page 24

3. GEBRAUCH DES ROBOTERS
Die Taste Roboter bietet die ideale Geschwindigkeit, um das Gerät als
Küchenroboter zu verwenden. Sie können mit dieser Funktion ebenfalls die
Taste SEQ verwenden, um Impulsweise vorzugehen.
Drücken Sie die Taste 1. Für Dauerbetrieb die Taste Roboter drücken. Zum
Anhalten des Motors erneut die Taste Roboter oder die Taste 0 drücken.
Zum Aktivieren der Sequenzfunktion (SEQ) die Taste 1 drücken, danach die
Taste SEQ, und dann die Taste Roboter beliebig oft drücken. Bei dieser
Betriebsart können Sie leicht Dauer und Häufigkeit der Impulse
kontrollieren. Lassen Sie zwischen den Impulsen ausreichend Zeit, so dass
die Nahrungsmittel wieder auf den Boden des Gefäßes zurückfallen.
A. HACKEN UND PÜRIEREN
1. Benutzen Sie zum Hacken und Pürieren das Hackmesser. Die
Nahrungsmittel in das Gefäß geben. In etwa gleich große Stücke
schneiden. Sie können bis zu 250 g Nahrungsmittel gleichzeitig
eingeben.
2. Den Deckel aufsetzen und verriegeln. Den Schieber einführen. Wir raten
Ihnen, während des Betriebs eine Hand auf den Deckel des Roboters zu
legen, um das Gerät zu stabilisieren. Die Taste 1 drücken, danach die
Taste SEQ und die Taste Roboter (um einen Impuls zu geben), dann
wieder loslassen. Wiederholen Sie den Vorgang zwei bis drei Mal. Jedes
Mal, wenn das Messer still steht warten, bis alle Nahrungsmittlestücke
auf den Gefäßboden gefallen sind, bevor Sie einen neuen Impuls geben.
Schauen Sie durch das Gefäß, um die Beschaffenheit zu überprüfen.
Achten Sie darauf, die Nahrungsmittel nicht zu fein zu hacken.
ANMERKUNG: Manchmal kann ein Stück zwischen Messer und Gefäß
festklemmen. In diesem Fall den Deckel abnehmen, vorsichtig das
Messer anheben und das festgeklemmte Stück entfernen. Das Gefäß
leeren, das Messer und die Nahrungsmittel wieder eingeben, den Deckel
verriegeln und den Betrieb fortsetzen.
3. Wenn Sie feiner hacken oder pürieren möchten, drücken Sie die Taste
Position 1, dann auf die Taste Roboter und lassen das Gerät
ununterbrochen laufen, bis die Nahrungsmittel so fein gehackt sind, wie
Sie es wünschen. Schauen Sie häufig durch den Deckel oder die
durchsichtige Gefäßwand um zu vermeiden, dass zu fein gehackt wird.
Benutzen Sie einen Spatel, um alle Stücke abzuschaben, die an der
Gefäßwand kleben geblieben sind. Zum Pürieren von Nahrungsmitteln
verfahren Sie auf die selbe Weise
Wie oben beschrieben und lassen das Gerät laufen, bis Sie ein
homogenes Püree erhalten. Vorsicht, gewisse Nahrungsmittel
(Kartoffeln zum Beispiel) werden leicht klebrig, wenn sie zu lange
bearbeitet werden.
B. NAHRUNGSMITTEL WÄHREND DES BETRIEBS HINZUFÜGEN
Der Schieber ist mit einer Öffnung versehen, um flüssige Zutaten langsam
und gleichmäßig hinzuzugeben. Wenn Sie Flüssigkeiten hinzu geben
möchten, während das Gerät in Betrieb ist, gießen Sie sie durch diese
Öffnung. Dieser Vorgang ist besonders nützlich, wenn Sie Mayonnaise
oder Saucen zubereiten. Kleine oder in Stücke geschnittene
Nahrungsmittel wie Käse, Fleisch oder Knoblauchzehen während des
Betriebs durch die Einfüllöffnung hinzugeben. Achten Sie darauf, den
Schieber direkt wieder einzusetzen, nachdem die Zutaten hinzugegeben
wurden, um jedes Risiko von Spritzern oder Verletzungen zu vermeiden.
C. DIE NAHRUNGSMITTEL AUS DEM ROBOTER ENTNEHMEN
Zuerst die Taste 0 drücken und warten, bis sich die Messer nicht mehr
drehen. Danach den Deckel abnehmen, indem er gegen den Uhrzeigersinn
gedreht wird. Versuchen Sie nie, Deckel und Gefäß zusammen zu
entfernen ; das Gefäß könnte hierdurch beschädigt werden.
Wenn Sie das Gefäß leeren, achten Sie darauf, dass das Messer nicht
herausfällt, um jedes Verletzungsrisiko zu vermeiden.
D. REIBEN UND RASPELN
1. Den Roboter mit der Scheibe zum Reiben/Raspeln montieren. Die
Scheibe immer nur an den Seiten halten. Den Deckel schließen und die
Nahrungsmittel durch die Einfüllöffnung hinzugeben.
2. Den Schieber einführen. Die Taste I und dann die Taste Roboter drücken.
Mäßig stark auf den Schieber drücken, um die Nahrungsmittel nach
unten zu schieben. Während des Betriebs ist es möglich, den Schieber
zu entfernen, um neue Nahrungsmittel hinzuzugeben, ohne das Gerät
auszuschalten. Achten Sie jedoch darauf, nie die Finger in die
Einfüllöffnung zu stecken.
Nachdem alle Nahrungsmittel gerieben oder geraspelt sind die Taste
Roboter oder 0 drücken. Warten, bis die Scheibe nicht mehr dreht,
bevor der Deckel geöffnet wird. Danach die Scheibe entfernen, indem
Sie den oberen, flachen Teil des Adapterstifts festhalten und nach oben
ziehen. Danach das Gefäß abschrauben und abheben.
4. REINIGEN UND VERSTAUEN DES ZUBEHÖRS
Das Messer und die Scheibe zum Reiben/Raspeln außerhalb der
Reichweite von Kindern aufbewahren. Alls Zubehörteile sind
spülmaschinenfest mit Ausnahme des Robotersockels, der nicht in Wasser
getaucht werden darf. Um ihn zu reinigen verwenden Sie bitte einen
feuchten Lappen. Seien Sie vorsichtig, wenn Sie das Messer und die
Scheiben von Hand spülen.
Lassen Sie sie nicht im Wasser einweichen, denn Sie könnten sie im
Seifenwasser verlieren und sich daran schneiden.
24
Page 25

VORBEREITUNG DES HACKGUTS
VORBEREITUNG DER LEBENSMITTEL ZUM REIBEN UND RASPELN
ART DES NAHRUNGSMITTELS ART DER ZUBEREITUNG
Obst und Gemüse Schälen und entleeren, falls nötig. Harte Teile und
Kerne entfernen. In Stücke von ±2 cm schneiden
und mit dem Roboter verarbeiten (höchstens
250 g auf einmal).
Fleisch, Geflügel und Fisch Solchartige Nahrungsmittel müssen sehr kalt aber
nicht gefroren sein. Vorher in Stücke von 2 cm
schneiden. Bis zu 250 gr in das Gefäß geben. Auf
Hacken/SEQ drücken oder ununterbrochen laufen
lassen, bis die gewünschte Konsistenz erreicht ist.
Alle 2 bis 3 Sekunden die Beschaffenheit
überprüfen, um nicht zu fein zu hacken.
Hartkäse «geraspelt» In Stücke von 2 cm schneiden. Auf Hacken/SEQ
drücken, bis Sie kleine Körner erhalten, und dann
zum ununterbrochenen Roboterbetrieb übergehen.
Sie können so fein hacken, wie Sie wünschen.
Lassen Sie einfach die Maschine länger laufen, um
feiner zu hacken. Bis zu 85 g auf einmal im
Roboter verarbeiten. Wenn es zu schwer ist, den
Käse mit dem Messer zu schneiden , versuchen Sie
nicht, ihn zu hacken - das Hackmesser könnte
hierdurch beschädigt werden.
Schlagsahne Die Schlagsahne, die Sie mit dem Roboter
zubereiten, eignet sich hervorragend als Überzug
für Desserts oder heiße Getränke. Die Sahne muss
Kühlschranktemperatur haben.
Petersilie und andere frische Kräuter Gefäß und Hackmesser müssen sauber und
trocken sein. Stiele entfernen; nur die Blätter
verwenden. Die Kräuter vollständig trocknen. Je
mehr Kräuter Sie auf einmal hacken, desto feiner
werden sie gehackt. Gehackte Kräuter können in
hermetisch verschließbaren Beuteln mehrere Tage
im Kühlschrank aufbewahrt oder tiefgekühlt
werden.
ART DES NAHRUNGSMITTELS REIBEN RASPELN
Lange, feine Nahrungsmittel
(Mohrrüben, Sellerie, Gurken,
Auberginen)
Rundes Obst oder Gemüse
(Äpfel, Zwiebeln, Kartoffeln,
Paprika, Tomaten)
Kleines Obst und Gemüse
(Erdbeeren, Champignons,
Radischen)
Kohl, knackiger Salat Oben und unten abschneiden.
Rohes Fleisch oder Geflügel
(höchstens 250 g auf einmal)
Weichkäse (Mozzarella) Nicht schneiden In den Tiefkühlschrank
Halbfester Käse
(Gruyère, Emmental)
Hartkäse (Parmesan) Nicht schneiden. Nicht raspeln (benutzen
In gleichmäßige Stücke von
ca. 2,5 cm schneiden. Die
Stücke senkrecht in die
Einfüllöffnung geben, die
flache Seite nach unten ;
geben Sie genug Stücke ein,
damit sie nicht umkippen.
Ein Ende flach schneiden
und der Länge nach
halbieren oder vierteln. Die
Nahrungsmittel gur in die
Einfüllöffnung drücken,
damit sie nicht umkippen.
Leichten bis mäßigen Druck
ausüben.
Die Einfüllöffnung füllen und
leichten Druck ausüben.
So in Stücke schneiden, dass
die Nahrungsmittel senkrecht
durch die Einfüllöffnung
passen.
Nehmen Sie halbgefrorene
Stücke ohne Stein (die sich
hart anfühlen, aber noch mit
dem Messer geschnitten
werden können). In Stücke
schneiden, die der Länge der
Einfüllöffnung entsprechen.
In Stücke schneiden und
diese senkrecht in die
Einfüllöffnung geben. Leichten
Druck auf den Schieber
ausüben.
25
Für lange Lamellen in
Stücke schneiden, die
gerade groß genug sind,
um seitlich durch die
Einfüllöffnung zu passen.
In der Einfüllöffnung bis
ca. ±2,5cm unter den
Oberrand stapeln. Um fein
zu raspeln die Stücke
waagerecht durch die
Einfüllöffnung schieben,
die flache Seite nach unten.
Genauso vorgehen wie für
das Reiben beschrieben. In
die Einfüllöffnung geben,
seitlich für lange Lamellen
oder waagerecht zum
feinen Raspeln.
Die Einfüllöffnung füllen
und leichten Druck
ausüben. Die Nahrungsmittel
müssen hart genug sein,
um geraspelt zu werden
(Radischen zum Beispiel).
Nicht raspeln.
Genauso vorgehen wie für
das Reiben beschrieben.
geben, bis sich der Käse
hart anfühlt. Leichten
Druck auf den Schieber
ausüben. Höchstens. 125 g
auf einmal raspeln.
Der Käse muss sehr kalt
sein. In die Einfüllöffnung
geben und leicht auf den
Schieber drücken. Höchstens
125 g auf einmal raspeln.
Sie das Hackmesser)
Page 26

HINWEISE ZUR SICHERHEIT
1. Vorsicht - Beim Auspacken des Geräts Klingen und Scheibe mit
größter Vorsicht behandeln, sie sind äußerst scharf. Den Karton auf
eine ebene Oberfläche stellen, das Gerät und die verschiedenen
Zubehörteile einzeln herausnehmen und dabei vermeiden, die
Metallteile zu berühren.
2. Den Motorblock nicht in Wasser oder andere Flüssigkeiten tauchen.
3. Besondere Vorsicht ist geboten, wenn das Gerät in der Nähe von
Kindern verwendet wird. Dieses Gerät darf nicht von Kindern
verwendet werden. Die Klingen außerhalb der Reichweite von Kindern
aufbewahren. Das Gerät nie unbeaufsichtigt lassen.
4. Unmittelbar nach dem Gebrauch des Geräts, vor dem Einsetzen oder
Entfernen der Zubehörteile und vor dem Reinigen des Geräts und auch
vor dem Entleeren des Inhalts des Gefäßes den Netzstecker ziehen.
WICHTIG: Nie die Finger in das Gefäß stecken und nie die Klingen
berühren, wenn das Gerät an den Netzstrom angeschlossen ist.
5. Jede Berührung mit den Teilen vermeiden, während sie sich bewegen.
6. Das Gerät nicht verwenden wenn das Kabel beschädigt oder das
Gerät gefallen ist und Spuren einer Beschädigung aufweist. Wenn
das Kabel beschädigt ist, muss es vom Hersteller ersetzt werden.
Bringen Sie das Gerät zur Überprüfung, Reparatur oder
elektrischen oder mechanischen Einstellung zurück zum Hersteller.
Der Benutzer darf keinerlei Reparaturen selbst durchführen.
7. Kein anderes Zubehör als das beiliegende verwenden. Die Gefäße nicht
auf einem anderen Sockel als dem beiliegenden verwenden.
8. Nicht im Freien verwenden.
9. Das Kabel nicht über den Rand des Tisches oder der Arbeitsplatte der
Küche hängen lassen. Jeden Kontakt des Kabels mit heißen Oberflächen
vermeiden, um es nicht zu beschädigen.
10. Nicht die Messer berühren oder das Blendergefäß entfernen, wenn der
Motorblock angeschlossen ist, auf Position I steht und die
Leuchtanzeigen blinken. Wenn zufällig eine andere Taste berührt wird,
kann sich das Gerät in Bewegung versetzen.
11. Den Roboter immer mit verriegeltem Deckel benutzen. Versuchen Sie
nicht, den Verriegelungsmechanismus des Deckels zu forcieren.
12. Nie Nahrungsmittel direkt mit der Hand in den Roboter geben. Immer
den Schieber verwenden.
13. Überprüfen Sie immer, dass die Messer oder die Scheibe nicht mehr
drehen, bevor Sie den Deckel abnehmen.
14. WICHTIG: Nicht den Boden des Geräts öffnen. Keines der in diesem
Gerät enthaltenen Teile darf durch den Benutzer repariert oder
ausgetauscht werden. Reparaturen dürfen ausschließlich vom
Hersteller durchgeführt werden.
15. Dieses Gerät entspricht den grundlegenden Anforderungen der
Richtlinien 89/336/EWG (elektromagnetische Kompatibilität) und
73/23/EWG (Sicherheit von Haushaltsgeräten), abgeändert durch die
Richtlinie 93/68/EWG (CE-Markierung).
16. Benutzen Sie dieses Gerät ausschließlich für Kochzwecke und
befolgen Sie die Hinweise in dieser Anleitung.
26
Page 27

INLEIDING
De blender/keukenrobot van Cuisinart® is een geperfectioneerd en zeer
volledig apparaat, waarmee u in enkele ogenblikken talloze
culinaire bereidingen tot stand kunt brengen.
Dankzij zijn blenderfunctie kunt u er alle soorten van voedingsmiddelen
mee pureren, mengen of mixen. U kunt er ook ijs mee fijnmalen of
milkshakes mee maken.
Nadat u de robotkom op de voet heeft bevestigd, kan uw apparaat rauwe
of gekookte voedingsmiddelen hakken, tot ze zeer fijn zijn. Met de
omkeerbare schijf kunnen voedingsmiddelen in enkele seconden worden
fijngesneden of geraspt.
Uw apparaat is makkelijk schoon te maken en zal gedurende jaren voor
bijzonder geslaagde culinaire bereidingen zorgen.
2.
1.
3.
4.
5.
6.
6e.
6f.
6g.
6b.
6a.
6c.
6d.
A. De Blender
1. BESCHRIJVING EN FUNCTIES
1. Deksel
Makkelijk te gebruiken en lekvrij. Wordt met een eenvoudige druk op
de kom aangebracht.
2. Maatdop
U kunt er tot 60ml mee afmeten en de ingrediënten toevoegen,
zonder het deksel te verwijderen.
3. Glazen kom met maataanduidingen, met een inhoud van 1250 ml
Dik glas, met een brede opening en een anti-druppel schenktuit.
4. Messen van roestvrij staal
Zeer sterk, zelfs om ijs fijn te malen.
5. Motorblok
Robuust en stabiel, zeer duurzaam.
6. Bedieningstoetsen
Makkelijk te gebruiken en schoon te maken. Het apparaat heeft 6
snelheden + 1 pulssnelheid (zie 6a), waardoor het uitermate
polyvalent is. De controlelampjes duiden de gebruikte snelheid aan.
6a. SEQ-toets – pulsstand
Wordt gebruikt bij om het even welke snelheid, zodat u de
ingrediënten tot de door u gewenste consistentie kunt mixen.
6b. Toets Ijs fijnmalen
Activeert een speciale snelheid om ijs fijn te malen. Belangrijk : de
hulpstukken van de keukenrobot zijn niet ontworpen om ijs fijn te
malen.
6c. Toets Robot
Wordt gebruikt met de hulpstukken van de robot (zie pagina 4), en
om vloeibaar te maken.
6d. Toets Pureren
Om homogene en smeuïge mengsels te maken op basis van vaste
voedingsmiddelen (milkshakes of babyvoeding, bijvoorbeeld).
6e. Toets Mengen
Om voedingsmiddelen bij te mengen en een homogeen mengsel te
krijgen.
6f. Toets Hakken
Om voedingsmiddelen grof of fijn te hakken.
6g. Toets Kloppen
Om room te kloppen, om afwerking voor taarten te maken, enz.
7. Anti-slipvoetjes
Verhinderen dat het apparaat tijdens de werking beweegt.
7.
27
Page 28

2. ASSEMBLAGE VAN DE BLENDER
Om de blender te gebruiken, zet u de kom zodanig op het motorblok, dat
u de op de kom aangebrachte maataanduidingen voor u ziet en dat de
handgreep zich opzij bevindt. Breng vervolgens het deksel op de kom en
druk het vast. Zet er dan de maatdop in. Sluit het apparaat aan.
De blender is klaar voor gebruik.
3. GEBRUIK VAN DE BLENDER
1. Breng alle nodige ingrediënten in de kom en zet het deksel erop. U kunt
ook eerst het deksel aanbrengen, de maatdop wegnemen, de
ingrediënten toevoegen en dan de maatdop opnieuw aanbrengen.
Tijdens het mixen kunnen extra ingrediënten worden toegevoegd via de
maatdop.
Opmerking: voeg eerst de vloeibare ingrediënten toe, daarna de vaste.
Het mengsel wordt dan homogener en de motor wordt minder belast.
te controleren. De functie SEQ is ook handig in het begin van het
mixen of als u voedingsmiddelen bewerkt die slechts korte tijd moeten
worden gemixt.
7. OM IJS FIJN TE MAKEN : Gebruik alleen de blenderkom. Om het proces
beter te kunnen controleren, werkt de functie “Ijs fijnmalen” zoals de
SEQ-toets. Breng de ijsblokjes in de blenderkom, zet het deksel op zijn
plaats en druk op toets I. Druk vervolgens met korte pulsen op de toets
“Ijs fijnmalen”, totdat het ijs de gewenste consistentie heeft.
8. VASTZITTENDE VOEDINGSMIDDELEN LOSMAKEN : gebruik een spatel
om voedingsmiddelen die rond het hakblok vastzitten, te verwijderen.
Steek nooit uw hand in het apparaat als de stekker nog in het
stopcontact zit. GEBRUIK DE SPATEL ALLEEN ALS HET APPARAAT
AFGEZET EN DE STEKKER UIT HET STOPCONTACT GEHAALD is. Breng het
deksel opnieuw aan en mix indien nodig verder. Zet de blender nooit in
werking als de spatel in de kom is.
9. NA HET MIXEN: Druk op toets 0 en haal de stekker uit het stopcontact.
Haal de kom van het motorblok door ze naar boven te trekken.
BELANGRIJK
• Zet de blenderkom niet op de voet of haal ze er niet weg, terwijl de
motor draait.
• Breng geen kokende vloeistoffen of diepgevroren vaste voedingsmiddelen
in de kom (met uitzondering van ijsblokjes of diepgevroren stukken
fruit). Laat de vloeistoffen gedurende minstens 5 minuten afkoelen,
voordat u ze in de blenderkom brengt.
• Mengt u warme vloeistoffen, verwijder dan de doseerdop (het
middenstuk van het deksel) om de stoom te laten ontsnappen.
2. OM TE BEGINNEN MIXEN: drukt u op toets I. Het rode lampje knippert,
wat betekent dat de blender ingeschakeld is.
3. EEN MIXSNELHEID KIEZEN: druk op de gekozen snelheidstoets. De
blender begint te werken. Om van snelheid te veranderen, drukt u
gewoon op een andere toets. U hoeft de motor niet af te zetten.
4. MIXTIJD: bewerk de voedingsmiddelen niet te lang. De gewenste
resultaten worden in enkele seconden en niet in enkele minuten bereikt.
5. HET MIXEN DOEN OPHOUDEN: druk op de gekozen snelheids-toets. De
motor stopt. Het lampje knippert. Dat betekent dat het apparaat nog
steeds onder spanning is. Om de blender volledig uit te zetten, drukt u
op toets 0.
6. PULSWERKING : om met pulsen te mixen, drukt u op toets I en dan op
toets SEQ. Het SEQ-lampje knippert. Druk vervolgens op de toets van de
gewenste snelheid en laat los. Herhaal dit zoveel keer als u wilt. Bij
iedere puls gaan de lampjes (stand I, de SEQ-toets en de gekozen
snelheid) branden.
De SEQ-toets wordt gebruikt om grotere stukken voedsel klein te
krijgen of om tijdens het hakken de textuur van de voedingsmiddelen
28
Page 29

4. SCHOONMAAK EN ONDERHOUD
Haal steeds de stekker uit het stopcontact, voordat u het apparaat schoonmaakt.
Maak de blenderkom schoon, voordat u ze de eerste keer gebruikt en na ieder gebruik.
Om de kom schoon te maken, haalt u ze van het motorblok, door ze naar boven op
te tillen. Was de kom in warm water met zeep, spoel af en droog grondig. De kom
kan ook worden gewassen in de vaatwasser.
Probeer niet om de blenderkom te demonteren en wees zeer voorzichtig bij het
schoonmaken ervan, om te vermijden dat u zich kwetst.
Om het motorblok schoon te maken, gebruikt u een vochtige doek om de restjes te
verwijderen, vervolgens droogt u het af. Het motorblok mag nooit in water of een
andere vloeistof worden ondergedompeld en nooit in de vaatwasser worden gezet.
5. ENKELE TIPS BIJ HET GEBRUIK VAN DE BLENDER
• Zet het motorblok steeds op een stabiel, schoon en droog oppervlak.
• Voeg steeds de vloeibare ingrediënten eerst toe en daarna de andere
ingrediënten. Op die manier worden de ingrediënten steeds gelijkmatig
gemixt.
• Snijd de meeste voedingsmiddelen in blokjes van 1 tot 5 cm, om een
gelijkmatiger resultaat te verkrijgen. Snijd kazen steeds in stukjes van
ongeveer 1 cm.
• Gebruik de doseerdop om vloeibare ingrediënten, zoals alcohol, af te meten.
Plaats de doseerdop terug zodra de ingrediënten er bijgedaan zijn.
• Gebruik indien nodig een spatel, alleen als de blender uitgeschakeld is.
Gebruik nooit metalen keukengerei, omdat dit de kom of de messen kan
beschadigen.
• Als u de blenderkom met een spatel uitschraapt, maak dan de
voedingsmiddelen die op de wanden van de kom vastzitten, los, en
breng ze bovenop de messen.
• Als u verse kruiden, look, ui, schilletjes, nootjes, specerijen, enz. hakt, zorg er
dan eerst voor dat de blenderkom en de messen volledig droog zijn.
• Als de voedingsmiddelen tijdens de werking van de blender de neiging
vertonen om aan de wanden te gaan kleven, bedien het apparaat dan
met korte pulsen.
• Laat voldoende tijd tussen de pulsen, zodat de messen tussen de
verschillende pulsen ophouden met draaien.
• Bewaar geen voedingsmiddelen of vloeistoffen in de kom.
• Dit apparaat is niet geschikt om aardappelen te pureren, deeg te
kneden of eiwit stijf te kloppen.
• Bewerk de voedingsmiddelen niet te lang. De gewenste resultaten
worden na enkele seconden en niet na enkele minuten bereikt.
• Overlaad de blender niet. Als de motor afslaat, schakel dan het
apparaat uit en haal de stekker uit het stopcontact. Verwijder een deel
van de voedingsmiddelen en schakel het apparaat opnieuw in.
BLENDERFUNCTIES
Om de blender in
te schakelen
Om te beginnen mixen Druk op een snelheidstoets.
Om van snelheid te veranderen Druk op een snelheidstoets.
Om pulsen te geven
Om ijs fijn te malen
Om de blender uit te schakelen Druk op toets 0
Om op te houden met mixen
(in stand Roeren, Hakken,
Mixen of Pureren)
Druk op toets 1 De blender is onder spanning.
In stand 1, druk op SEQ, daarna de snelheidstoets
indrukken en loslaten, zo vaak als nodig is.
In stand 1, de toets IJS FIJNMALEN indrukken en
loslaten, zo vaak als nodig is.
Druk opnieuw op de snelheidstoets. De blender zal
opnieuw op de Stand 1 overschakelen. Druk op Stand 0
om de blender UIT te schakelen.
SNELHEIDSKEUZE
B. De Robot
INGREDIËNT/RECEPT SNELHEID SYMBOOL RESULTAAT
Mayonaise Mengen Dik en romig
Slasauzen Mengen Gewenste consistentie
Geconcentreerd diepvries-
sinaasappelsap ontdooien
Nootjes Hakken Dik tot fijn
Slagroom Kloppen Dik vloeibare afwerking
Citroenschilletjes Pureren Gelijkmatig fijn
Milkshakes Pureren Homogeen en romig
Babyvoeding Pureren Homogeen en romig
Natuurlijke dranken Vloeibaar maken Homogeen en romig
Ijscocktails Vloeibaar maken Dik en vloeibaar
Geperste zachte kaas Vloeibaar maken Dik tot fijn
Kruiden Vloeibaar maken Dik tot fijn
Ijs Ijs fijnmalen Sneeuwachtig
VOOR DE BLENDERFUNCTIES
Mengen Homogeen
29
Page 30

B. De Robot
1. BESCHRIJVING EN FUNCTIES
1. Stamper
2. Deksel van de kom, met toevoeropening.
3. Hakmes van roestvrij staal. Hakt rauwe en gekookte voedingsmiddelen.
Maakt het mogelijk om de door u gewenste consistentie te verkrijgen,
van een dik haksel tot een fijne puree.
4. Met de roestvrijstalen omkeerbare schijf om fijn
te snijden/te raspen kunt u een grote keuze aan
vruchten en groenten, vlees en kaas fijnsnijden
of raspen.
5. Stang voor de schijf
6. Werkkom
7. Robotvoet
8. Motorblok
Stamper (1)
Deksel van de kom,
met toevoeropening (2)
Hakmes van roestvrij staal (3)
Omkeerbare schijf om
fijn te snijden/te raspen (4)
Stang voor de schijf (5)
Werkkom (6)
2. MONTAGE VAN DE ROBOT
A. MET HET HAKMES
1. Houd de robotvoet met de ene hand vast en de handgreep van de kom
met de andere.
Schroef de kom op de voet, door ze met de wijzers van de klok mee te
draaien.
2. Plaats het geheel op het motorblok.
Opmerking: de kom en de robotvoet passen in acht verschillende
standen op de motor. De handgreep kan naar voren of aan een van de
zijkanten worden gezet, en de toevoeropening vooraan, achteraan of
aan een van de zijkanten, zoals u verkiest.
3. Breng het hakmes op de as in de kom. Het mes moet makkelijk tot onder
in de kom zakken en bijna de bodem van de kom raken.
OPGELET, HET HAKMES IS ZEER SCHERP
4. Breng de voedingsmiddelen in de kom. Plaats het deksel erop en schroef
het vast met de wijzers van de klok mee, totdat het op zijn plaats zit. De
grendel van het deksel moet vastklikken. Als u het deksel niet goed op
de kom kunt plaatsen, draai de naaf van het mes dan een beetje en
breng het deksel opnieuw aan.
5. De stamper past op de toevoeropening, waarbij de meest afgeronde kant
naar de buitenkant van de kom is gericht. GEBRUIK STEEDS DE STAMPER
OM DE VOEDINGSMIDDELEN DOOR DE TOEVOEROPENING TE
BRENGEN. GEBRUIK NOOIT UW VINGERS OF EEN SPATEL.
6. Steek de stekker van het apparaat in het stopcontact. Druk op de toets
Stand 1, daarna op de toets Robot om te beginnen hakken. Wij raden u
aan om tijdens de werking één hand op het deksel van de robot te
plaatsen, om het apparaat stabiel te maken. Als het apparaat niet start,
kijk dan na of de stekker in het stopcontact zit en of de kom en het deksel
vergrendeld zijn.
B. MET DE OMKEERBARE SCHIJF OM FIJN TE SNIJDEN EN TE RASPEN
1. Plaats de kom op de robotvoet en breng daarna het geheel op het motorblok.
2. Breng de stang van de schijf op de centrale as.
Om fijn te snijden: Bevestig de schijf op de stang, het snijmes naar
boven gericht.
Om te raspen: Bevestig de schijf op de stang, de raspgleuven naar
boven gericht. Plaats vervolgens de schijf op de as.
Robotvoet (7)
Motorblok (8)
Opgelet: houd de schijf aan de zijkanten vast, om te vermijden dat u zich kwetst.
3. Plaats het deksel op de kom en breng de voedingsmiddelen er via de
toevoeropening in.
4. Plaats de stamper in de toevoeropening over de voedingsmiddelen heen.
Gebruik steeds de stamper om de voedingsmiddelen door de
toevoeropening te brengen. Gebruik nooit uw handen of een spatel.
5. Steek de stekker van het apparaat in het stopcontact en schakel het in,
om te beginnen raspen of fijnsnijden.
30
Page 31

3. GEBRUIK VAN DE ROBOT
De toets Robot zorgt voor de ideale snelheid om het apparaat als
keukenrobot te gebruiken. U kunt ook de SEQ-toets gebruiken bij deze
functie, om met pulsen te werken.
Druk op toets 1. Voor een ononderbroken werking drukt u op de toets
Robot. Om de motor stil te zetten, drukt u opnieuw op de toets Robot of
op de toets 0.
Om de functie pulswerking (SEQ) in te schakelen, drukt u eerst op toets 1,
daarna op toets SEQ. Daarna drukt u de toets Robot in en laat hem los zo
vaak als nodig is. Door het apparaat op deze wijze te gebruiken, kunt u
makkelijk de duur en de frequentie van de pulsen controleren. Laat
voldoende tijd tussen de pulsen, zodat de voedingsmiddelen onderin de
kom kunnen vallen.
A. HAKKEN EN PUREREN
1. Om te hakken en te pureren, gebruikt u het hakmes. Snijd de
voedingsmiddelen in gelijke stukken. Breng ze in de kom. U kunt tot
250g voedingsmiddelen tegelijk in de kom brengen.
2. Zet het deksel erop en vergrendel het. Wij raden u aan, om tijdens de
werking één hand op het deksel van de robot te plaatsen, om het
apparaat stabiel te houden. Druk op toets 1, daarna op de SEQ-toets en
de toets Robot (om een puls te geven), en laat dan los. Herhaal dit twee
tot drie keer. Telkens als het mes stilvalt, laat u de stukken voedsel
onderin de kom vallen, voordat u een nieuwe puls geeft. Controleer de
textuur door het glas van de kom. Hak de voedingsmiddelen niet te fijn.
OPMERKING : Af en toe kan een stuk vast komen te zitten tussen het
mes en de kom. In dat geval, neemt u het deksel weg, tilt het mes
voorzichtig op en verwijdert het vastzittend stuk. Maak de kom leeg,
doe het mes en de voedingsmiddelen er opnieuw in, vergrendel het deksel
en ga voort met het werk.
3. Wenst u een fijner haksel of een fijnere puree, druk dan op de toets
Stand 1, daarna op de toets Robot en laat de machine ononderbroken
draaien, totdat de voedingsmiddelen zo fijn gehakt zijn als u ze wenst.
Controleer regelmatig door het transparante deksel of de transparante
kom, om te vermijden dat de voedingsmiddelen te fijn worden gehakt.
Gebruik een spatel om alle stukken af te schrapen die aan de binnenkant
van de kom vastgeplakt zijn.
Om voedingsmiddelen te pureren, volgt u dezelfde procedure als voor
het hakken. U laat de machine echter draaien totdat een homogene
puree ontstaat. Opgelet, sommige voedingsmiddelen (aardappelen,
bijvoorbeeld) kunnen een kleverige textuur krijgen, als ze te lang worden
bewerkt.
B. VOEDINGSMIDDELEN TOEVOEGEN TIJDENS DE WERKING
In de stamper zit een gat, waardoor vloeibare ingrediënten langzaam en
regelmatig kunnen worden toegevoegd. Wenst u vloeistof toe te voegen
terwijl het apparaat werkt, giet ze dan door dit gat. Dit is bijzonder
handig bij het maken van mayonaise of sauzen.
Om kleine of in stukjes gesneden voedingsmiddelen, zoals kaas, vlees of
lookteentjes, toe te voegen terwijl de machine draait, doet u ze door de
toevoeropening in het deksel. Vergeet niet om de stamper meteen na het
toevoegen van de ingrediënten terug te plaatsen, om spatten of kwetsuren
te vermijden.
C. DE VOEDINGSMIDDELEN UIT DE ROBOT HALEN
Eerst en vooral drukt u op de toets 0. Wacht tot de messen niet meer
draaien. Neem dan het deksel weg, door het tegen de wijzers van de klok
in te draaien. Probeer nooit het deksel en de kom samen weg te nemen,
omdat de kom dan beschadigd kan worden.
Bij het legen van de kom moet u opletten dat het mes niet valt, om te
vermijden dat u zich kwetst.
D. FIJNSNIJDEN EN RASPEN
1. Monteer de robot met zijn rasp-/snijschijf. Neem de schijf steeds aan de
zijkanten vast. Sluit het deksel en breng de voedingsmiddelen door de
toevoeropening in de kom.
2. Breng de stamper aan. Druk op toets I, daarna op toets Robot. Handhaaf
een gematigde druk op de stamper, om de voedingsmiddelen naar onder
te duwen. U kunt de stamper weghalen, om nieuwe voedingsmiddelen
toe te voegen, zonder het apparaat stil te zetten. Steek evenwel nooit
uw vingers in de toevoeropening.
Nadat u alle voedingsmiddelen fijngesneden of geraspt heeft, drukt u op
de toets Robot of 0. Neem het deksel pas weg als de schijf niet meer
draait. Verwijder de schijf, door het platte bovenste gedeelte van de
stang vast te nemen en de stang zo naar boven te trekken. Draai vervolgens
de kom los en til ze op.
4. SCHOONMAKEN EN OPBERGEN VAN DE ACCESSOIRES
Het mes en de snij-/raspschijf moeten buiten het bereik van kinderen worden
opgeborgen.
Alle hulpstukken kunnen in de vaatwasser worden gewassen, met uitzondering
van de robotvoet, die niet in water mag worden ondergedompeld. Maak hem
schoon met een vochtige doek.
Wees voorzichtig bij het schoonmaken van het mes en de schijven. Laat ze
niet weken in water met zeep. U zou kunnen vergeten dat ze erin zitten en
u op die manier kunnen bezeren.
31
Page 32

VOORBEREIDING VAN DE TE HAKKEN
VOEDINGSMIDDELEN
TYPE VAN VOEDINGSMIDDEL VOORBEREIDINGSWIJZE
Fruit en groenten Schillen en indien nodig uitlepelen. De harde
Vlees, gevogelte en vis
«Geraspte» harde kaas
Slagroom
Peterselie en andere verse kruiden
stukken en de pitten verwijderen. In stukken van
±2 cm snijden en door de robot draaien (max.
250 g. tegelijk).
Voedingsmiddelen van dit type moeten zeer koud
zijn, maar niet diepgevroren. Snijd ze op voorhand
in stukken van 2 cm. Breng ze per 250 g in de
kom. Druk op Hakken/SEQ of laat ze
ononderbroken draaien, totdat de gewenste
consistentie is bereikt. Controleer de textuur om
de 2 of 3 seconden, om te vermijden dat ze te fijn
worden gehakt.
In stukken van 2 cm snijden. Druk op Hakken/SEQ
totdat er kleine brokjes ontstaan. Draai ze daarna
zonder onderbreking door de robot. U kunt ze zo
fijn hakken als u wenst. Laat de machine gewoon
langer draaien, om een fijner haksel te krijgen.
Breng tot 85 g in één keer in de robot. Is de kaas
moeilijk te snijden met een gewoon mes, probeer
hem dan niet met de robot te hakken. Het
robotmes zou beschadigd kunnen worden.
De slagroom die u met de robot maakt, is
uitstekend voor op desserts of warme dranken.
De room moet op koelkasttemperatuur zijn.
De kom en het metalen mes moeten schoon en
droog zijn. Verwijder de stengels, gebruik alleen
de blaadjes. Zorg dat de kruiden goed droog zijn.
Hoe meer kruiden u tegelijk hakt, hoe fijner uw
haksel zal zijn. De gehakte kruiden kunnen in
hermetisch gesloten zakken verschillende dagen in
de koelkast worden bewaard, of kunnen worden
diepgevroren.
VOORBEREIDING VAN FIJN TE SNIJDEN EN TE RASPEN
TYPE VAN
VOEDINGSMIDDEL
Lange en fijne voedingsmiddelen
(wortelen, selder, komkommer,
aubergines)
Ronde vruchten en groenten
(appelen, uien, aardappelen,
paprika’s, tomaten)
Klein fruit en groenten
(aardbeien, champignons,
radijzen)
Kool, knapperige sla Snijd de bovenkant en de
Rauw vlees en gevogelte
(max. 250 g. tegelijk)
Zachte kazen
(mozzarella)
Halfharde kazen
(gruyère)
Harde kazen
32
(parmezaan)
VOEDINGSMIDDELEN
FIJNSNIJDEN RASPEN
Snijd in regelmatige stukken
van ongeveer 2,5 cm. Steek
de stukken verticaal in de
toevoeropening, platte kant
naar onder, en voeg
voldoende stukken toe,
om te vermijden dat ze
omvallen.
Snijd één uiteinde vlak af en
snijd in de lengterichting in
helften of kwarten. Pers de
voedingsmiddelen goed
samen in de toevoeropening,
om te vermijden dat ze
omvallen. Handhaaf een
lichte tot matige druk.
Vul de toevoeropening en
handhaaf een lichte druk.
onderkant eraf. Snijd de
voedingsmiddelen zodanig
in stukken, dat ze verticaal
door de toevoeropening
kunnen.
Gebruik stukken zonder
been en halfdiepgevroren
(voelen hard aan, maar
kunnen met een mes
worden gesneden). Snijd de
stukken op de lengte van de
toevoeropening.
Niet doorsnijden. Breng de kaas in de
Snijd in stukken en breng de
stukken verticaal in de
toevoeropening. Handhaaf
een lichte druk op de stamper.
Niet doorsnijden. Niet raspen.
Om lange repen te
bekomen, snijd u stukken
die precies groot genoeg
zijn, om op hun kant door
de toevoeropening te
kunnen. Hoop ze op in de
toevoeropening tot
±2,5cm van de bovenkant.
Om fijn te raspen, steekt
u de stukken verticaal in
de toevoeropening, met
de platte kant naar onder.
Dezelfde methode als om
fijn te snijden. Plaats de
stukken zijdelings in de
toevoeropening om lange
repen te krijgen, of
verticaal om fijn te
raspen.
Vul de toevoeropening en
handhaaf een lichte druk.
De voedingsmiddelen
moeten hard genoeg zijn,
om te kunnen worden geraspt
(radijzen bijvoorbeeld).
Niet raspen.
Dezelfde methode als om
fijn te snijden.
diepvriezer totdat hij hard
aanvoelt. Handhaaf een
zwakke druk op de
stamper. Max. 125 g
tegelijk raspen.
De kaas moet zeer koud
zijn. Breng hem in de
toevoeropening en
handhaaf een lichte druk
op de stamper. Max. 125
g tegelijk raspen.
(gebruik het hakmes)
Page 33

VEILIGHEIDSINSTRUCTIES
1. Opgelet – Bij het uitpakken van het apparaat moet u de messen
en de schijf met de grootst mogelijke voorzichtigheid behandelen.
Ze zijn bijzonder scherp. Plaats de doos op een plat oppervlak en
neem het apparaat en de verschillende hulpstukken er één na één
uit. Vermijd daarbij de metalen delen aan te raken.
2. Dompel het motorblok niet onder in water of in een andere vloeistof.
3. Een grotere waakzaamheid is geboden, als dit apparaat in de buurt
van kinderen wordt gebruikt. Dit apparaat mag niet door kinderen
worden gebruikt. Berg de messen buiten het bereik van kinderen op.
Laat het apparaat nooit onbeheerd achter.
4. Haal de stekker van het apparaat uit het stopcontact onmiddelijk na
gebruik, voordat u de hulpstukken aanbrengt of wegneemt, voordat u
het apparaat begint schoon te maken of voordat u de inhoud uit de
kom neemt.
BELANGRIJK : Steek nooit uw vingers in de kom en blijf van de
messen als het apparaat ingeschakeld is.
5. Vermijd ieder contact met bewegende onderdelen.
6. Gebruik het apparaat niet als het snoer beschadigd is of als het
apparaat gevallen is of sporen van beschadiging vertoont. Als het
snoer beschadigd is, moet het door de fabrikant worden vervangen.
Breng het apparaat terug naar de fabrikant voor controle,
herstelling of elektrische of mechanische afstelling. Geen enkele
herstelling mag door de gebruiker gebeuren.
7. Gebruik geen andere hulpstukken dan de bij het apparaat geleverde
hulpstukken. Gebruik de kommen niet op een ander voet dan de
bijgeleverde.
8. Gebruik het apparaat niet buiten.
9. Laat het snoer niet over een tafelrand hangen of over de rand van het
keukenwerkblad. Vermijd ieder contact tussen het snoer en warme
oppervlakken, om beschadiging te vermijden.
10. Als het motorblok ingeschakeld is, in Stand I staat, en de
controlelampjes knipperen, mag u de messen niet aanraken en het
deksel niet van de blenderkom halen. Als per ongeluk een andere
toets wordt aangeraakt, kan het apparaat in werking gaan .
11. Laat de robot steeds werken met vergrendeld deksel. Probeer het
vergrendelingsmechanisme van het deksel niet te forceren.
12. Breng geen voedingsmiddelen met de hand in de robot. Gebruik
steeds de stamper.
13. Vergewis u er steeds van dat de messen of de schijf niet meer draaien,
voordat u het deksel wegneemt.
14. BELANGRIJK: Open de voet van het apparaat niet. Geen enkel
onderdeel van dit apparaat mag worden hersteld of vervangen door
de gebruiker. De herstellingen mogen uitsluitend door de fabrikant
gebeuren.
15. Dit apparaat beantwoordt aan de voornaamste vereisten van de
richtlijnen 89/336/EEG (elektromagnetische compatibiliteit) en
73/23/EEG (veiligheid van elektrische huishoudapparaten), gewijzigd
door richtlijn 93/68/EEG (EG-merking).
16. Gebruik dit apparaat uitsluitend voor keukenwerk en volg steeds de
instructies van deze handleiding.
33
Page 34

INTRODUZIONE
Il frullatore/robot da cucina Cuisinart® è un apparecchio moderno e completo
che vi permetterà di preparare un'infinità di piatti in pochi minuti.
Grazie alla funzione frullatore, potrete ridurre in purea, mischiare o frullare
ogni tipo di alimenti. Potrete inoltre tritare il ghiaccio o preparare gustosi
milk-shake.
Fissando sulla base la ciotola robot, il vostro apparecchio è in grado di
tritare alimenti crudi o cotti fino ad ottenere una consistenza molto fine.
Il disco reversibile permette di sminuzzare o grattugiare gli alimenti in
pochi secondi.
Facile da pulire, il vostro apparecchio vi garantirà anni di piatti saporiti e
di successo.
2.
1.
3.
4.
5.
6.
6e.
6f.
6g.
6b.
6a.
6c.
6d.
A. Frullatore
1. DESCRIZIONE E FUNZIONI
1. Coperchio
Facile da utilizzare e resistente alle fuoriuscite, si fissa sulla ciotola con
una semplice pressione.
2. Dosatore graduato
Consente di misurare fino a 60 ml e di versare gli ingredienti senza
togliere il coperchio.
3. Ciotola di vetro graduata - capacità 1250 ml
Spesso, con apertura ampia e beccuccio salvagoccia.
4. Lame in acciaio inossidabile
Estremamente resistenti, anche per tritare il ghiaccio.
5. Blocco motore
Robusto e stabile, ad alta resistenza.
6. Tasti di comando
Facili da utilizzare e da pulire. L'apparecchio è dotato di 6 velocità + 1
velocità sequenziale (vedi 6a), per il massimo della versatilità. Le spie
luminose aiutano a rilevare la velocità utilizzata.
6a. Tasto SEQ - funzionamento sequenziale
Utilizzabile con qualsiasi velocità per consentirvi di frullare gli
ingredienti esattamente alla consistenza desiderata.
6b. Tasto “Tritare il ghiaccio”
Aziona una velocità specifica per tritare il ghiaccio. Importante: gli
accessori del robot da cucina non sono previsti per tritare il ghiaccio.
6c. Tasto Robot
Utilizzabile con gli accessori del robot (vedi pagina 4) e per liquefare.
6d. Tasto “Ridurre in purea”
Per preparare composti omogenei e cremosi partendo da alimenti
solidi (ad es. milk-shake o alimenti per bambini).
6e. Tasto “Mischiare”
Per incorporare gli alimenti e ottenere un composto omogeneo.
6f. Tasto “Tritare”
Per tritare gli alimenti in modo fine o grossolano.
6g. Tasto “Sbattere”
Per sbattere la crema, creare coperture per i dolci, ecc.
7. Piedini antiscivolo
Impediscono all'apparecchio di muoversi durante l'utilizzo.
7.
34
Page 35

2. ASSEMBLAGGIO DEL FRULLATORE
Per utilizzare il frullatore, basta posizionare la ciotola sul blocco motore in
modo che le gradazioni segnate sulla ciotola stessa risultino orientate
verso l'utilizzatore, e che l'impugnatura sia posizionata di lato. Mettere poi
il coperchio sulla ciotola e premere, quindi inserire il coperchio dosatore.
Attaccare l'apparecchio alla corrente.
L'apparecchio è pronto per essere utilizzato.
3. UTILIZZO DEL FRULLATORE
1. Aggiungere tutti gli ingredienti necessari e mettere il coperchio. È
possibile anche mettere il coperchio e poi aggiungere gli ingredienti
dopo aver tolto il coperchio dosatore. Riposizionare il coperchio
dosatore. Sempre attraverso il coperchio dosatore è possibile
aggiungere altri ingredienti durante la frullatura.
6. MODALITÀ SEQ: per procedere ad una frullatura ad impulsi, premere il
tasto I poi il tasto SEQ. La spia luminosa SEQ lampeggia. Premere
quindi il tasto della velocità desiderato e poi rilasciare. Ripetere il
numero di volte desiderato. Ad ogni impulso si accendono tutte le spie
luminose (posizione I, tasto SEQ e velocità selezionata).
Il tasto SEQ serve per vincere la resistenza di pezzi più grossi di
alimenti o per controllare la consistenza degli alimenti stessi quando
vengono tritati. La funzione SEQ risulta efficace anche all'inizio della
frullatura, o quando si utilizzano alimenti per i quali basta un tempo
minimo di frullatura.
7. PER TRITARE IL GHIACCIO: utilizzare unicamente la ciotola frullatore.
Per consentirvi di controllare meglio tutto il processo, la funzione
“Tritare il ghiaccio” funziona come il tasto SEQ. Mettere i cubetti di
ghiaccio nella ciotola frullatore, posizionare il coperchio e premere il
tasto I. Premere quindi il tasto “Tritare il ghiaccio” con brevi impulsi,
fino ad ottenere la consistenza desiderata.
8. PER STACCARE GLI ALIMENTI BLOCCATI: utilizzare una spatolina per
togliere gli alimenti attaccati e bloccati attorno al blocco tritatutto. Non
mettere mai le mani all'interno se l'apparecchio è attaccato alla corrente.
UTILIZZARE LA SPATOLINA UNICAMENTE QUANDO L'APPARECCHIO È
SPENTO E STACCATO DALLA CORRENTE. Successivamente riposizionare il
coperchio e continuare all'occorrenza la frullatura. Non mettere mai il
frullatore in funzione quando la spatolina è nella ciotola.
9. DOPO LA FRULLATURA: premere il tasto 0 e staccare l'apparecchio dalla
corrente. Togliere quindi la ciotola dal blocco motore tirando verso
l'alto.
Nota: inserire prima gli ingredienti liquidi, poi quelli solidi. Si otterrà
così un composto più omogeneo e risparmierete al motore una
tensione inutile.
2. PER COMINCIARE A FRULLARE: premere il tasto I. La spia rossa
lampeggia, indicando che il frullatore è sotto tensione.
3. SELEZIONARE UNA VELOCITÀ DI FRULLATURA: premere il tasto
velocità prescelto. Il frullatore si mette in funzione. Per cambiare
velocità, basta premere un altro tasto. Non è necessario spegnere il
motore.
4. TEMPO DI FRULLATURA: non lavorare troppo gli alimenti. I risultati
previsti vengono raggiunti in pochi secondi e non in qualche minuto.
5. INTERROMPERE LA FRULLATURA: premere il tasto velocità prescelto. Il
motore si ferma. La spia luminosa lampeggia, indicando che
l'apparecchio è sempre sotto tensione. Per disattivare completamente
il frullatore, premere il tasto 0.
IMPORTANTE
• Non mettere la ciotola frullatore sulla base, né toglierla, mentre il
motore gira.
• Non introdurre alimenti liquidi bollenti o alimenti solidi congelati (ad
eccezione di cubetti di ghiaccio o di piccoli pezzi di frutta congelata).
Lasciar raffreddare i liquidi per almeno 5 minuti prima di metterli nella
ciotola frullatore.
• Se vengono frullati liquidi caldi, togliere il coperchio dosatore (parte
centrale del coperchio) per permettere al vapore di fuoriuscire.
35
Page 36

4. PULIZIA E MANUTENZIONE
Staccare sempre l'apparecchio prima di pulirlo. Pulire la ciotola frullatore prima del
primo utilizzo e dopo ogni utilizzo.
Per pulirla, togliere la ciotola dal blocco motore sollevandola verso l'alto.
Lavare la ciotola in acqua calda e sapone, sciacquare e asciugare bene. La ciotola può
essere lavata anche in lavastoviglie.
Non cercare di smontare la ciotola frullatore. Pulire con la massima prudenza per
evitare qualsiasi rischio di infortunio.
Per pulire il blocco motore, utilizzare un panno umido per togliere i residui, quindi
asciugare. Non immergere mai il blocco motore in acqua o altro liquido. Non mettere
mai in lavastoviglie.
GUIDA DI RIFERIMENTO DELLE FUNZIONI FRULLATORE
Per attivare il frullatore Premere il tasto 1 - Il frullatore è sotto tensione.
Per cominciare a frullare Premere un tasto Velocità.
Per cambiare velocità Premere un tasto Velocità.
Per procedere ad impulsi
Per tritare il ghiaccio
Per disattivare il frullatore Premere il tasto 0
In modalità 1, premere SEQ, quindi premere e rilasciare il tasto
velocità il numero di volte necessario.
In modalità 1, premere il tasto TRITARE IL GHIACCIO e rilasciare il
numero di volte necessario.
5. ALCUNI CONSIGLI PER L'UTILIZZO DEL FRULLATORE
• Mettere sempre il blocco motore su una superficie stabile, pulita e asciutta.
• Aggiungere sempre prima gli ingredienti liquidi e solo successivamente gli altri
ingredienti. In questo modo, gli ingredienti saranno sempre frullati in maniera
uniforme.
• Tagliare la maggior parte degli alimenti in cubetti da 1 a 5 cm, in modo da
ottenere un risultato più uniforme. I formaggi devono essere tagliati tutti in
pezzetti di circa 1 cm.
• Utilizzare il coperchio dosatore per misurare gli ingredienti liquidi, ad esempio
l'alcool. Rimettere il coperchio dosatore una volta aggiunti gli ingredienti.
• Utilizzare all'occorrenza una spatolina, e solo quando il frullatore è spento. Non
utilizzare mai utensili in metallo, in quanto potrebbero danneggiare la ciotola o le
lame.
• Per raschiare la ciotola frullatore con una spatolina, staccare gli alimenti che si
sono attaccati sulle pareti della ciotola, mettendoli sopra le lame.
• Se si tritano erbe aromatiche, aglio, cipolla, scorze di agrumi, nocciole, spezie, ecc.,
controllare che la ciotola frullatore e le lame siano perfettamente asciutte.
• Se gli alimenti tendono a aderire alle pareti durante l'utilizzo, procedere mediante
brevi impulsi.
• Distanziare gli impulsi, affinché le lame smettano completamente di girare fra un
impulso e l'altro.
• Non conservare alimenti o liquidi nella ciotola.
• Questo apparecchio non permette di ridurre le patate in purea, d'impastare né di
montare i bianchi d'uovo a neve.
• Non lavorare troppo gli alimenti. I risultati previsti vengono raggiunti in
pochi secondi e non in qualche minuto.
• Non sovraccaricare il frullatore. Se il motore si blocca, spegnere e staccare
l'apparecchio dalla corrente. Togliere una parte degli alimenti, quindi riaccendere.
Per smettere di frullare
(In modalità Mescolare, Tritare,
Frullare o Ridurre in purea)
Premere di nuovo il tasto Velocità Il frullatore tornerà in modalità
Posizione 1. Premere la Posizione O per BLOCCARE il frullatore.
GUIDA DI SELEZONE DELLE VELOCITÀ
PER FUNZIONI FRULLATORE
INGREDIENTE/RICETTA VELOCITÀ SIMBOLO RISULTATO
Maionese Mischiare Spesso e cremoso
Condimenti per insalata Mischiare Consistenza desiderata
Ricostituire il succo d'arancia
concentrato congelato
Nocciole Tritare Da spesso a fine
Panna montata Frullare Glassatura spessa
Scorze di limone Ridurre in purea Uniformemente fine
Milk-Shake Ridurre in purea Omogeneo e cremoso
Alimenti per bambini Ridurre in purea Omogeneo e cremoso
Bevande naturali Liquefare Omogeneo e cremoso
Cocktail ghiacciati Liquefare Spesso e liquido
Formaggio a pasta molle
schiacciato
Spezie Liquefare Da spesso a fine
Ghiaccio Tritare il ghiaccio Consistenza tipo neve
36
Mischiare Omogeneo
Liquefare Da spesso a fine
Page 37

B. Il Robot
1. DESCRIZIONE E FUNZIONI
1. Utensile spingi-alimenti
2. Coperchio della ciotola con apertura d'alimentazione
3. Lama in acciaio inossidabile. Per tritare alimenti cotti e crudi. Permette
di ottenere la consistenza desiderata, da un macinato spesso a una
purea fine.
4. Il disco reversibile per sminuzzare/ grattugiare in
acciaio inossidabile permette di fare delle fette perfette
o di grattugiare una grande varietà di frutta e verdura,
carni e formaggi.
5. Asta per il disco
6. Ciotola di preparazione
7. Base Robot
8. Blocco motore
Spingi-alimenti (1)
Coperchio della ciotola con
apertura d'alimentazione (2)
Lama tritatutto in acciaio inossidabile (3)
Disco reversibile per sminuzzare/ grattugiare (4)
Asta per il disco (5)
Ciotola (6)
Base Robot (7)
Blocco motore (8)
2. MONTAGGIO DEL ROBOT
A. CON LA LAMA TRITATUTTO
1. Tenere la base robot con una mano e l'impugnatura della ciotola con l'altra.
Avvitare la ciotola sulla base girandola in senso orario.
2. Posizionamento dell'assemblaggio sul blocco motore.
Nota: la ciotola e la base robot si adattano sul motore secondo otto diverse
posizioni. L'impugnatura può essere posizionata di fronte o su uno dei due lati.
L'apertura d'alimentazione può essere posizionata di fronte, sul retro o su uno dei
due lati, secondo la vostra preferenza.
3. Mettere la lama tritatutto sull'asse nella ciotola. La lama deve incastrarsi
facilmente in fondo alla ciotola e toccare quasi il fondo della stessa.
ATTENZIONE, LA LAMA TRITATUTTO È ESTREMAMENTE TAGLIENTE
4. Introdurre gli alimenti nella ciotola. Mettere il coperchio e avvitare in senso orario
fino a posizionamento avvenuto. Il blocco del coperchio deve chiudersi con uno
scatto. Se risulta difficoltoso adattare il coperchio sulla ciotola, girare leggermente
il mozzo della lama e rimettere il coperchio.
5. L'utensile spingi-alimenti si adatta sull'apertura d'alimentazione, con la parte più
arrotondata orientata verso l'esterno della ciotola. UTILIZZARE SEMPRE LO
SPINGI-ALIMENTI PER GUIDARE GLI ALIMENTI ATTRAVERSO L'APERTURA
D'ALIMENTAZIONE. NON UTILIZZARE MAI LE DITA O UNA SPATOLINA.
6. Attaccare l'apparecchio alla corrente. Premere il tasto Posizione 1, quindi il tasto
Robot per cominciare a tritare. Vi consigliamo di mettere una mano sul coperchio
del robot durante l'utilizzo, in modo da stabilizzare l'apparecchio. Se l'apparecchio
non si avvia, verificate che sia attaccato alla corrente e che ciotola e coperchio
siano chiusi correttamente.
B. CON IL DISCO REVERSIBLE PER SMINUZZARE E GRATTUGIARE
1. Mettere la ciotola sulla base robot, poi tutto l'assemblaggio sul blocco motore.
2. Posizionare l'asta del disco sull'asse centrale.
Per sminuzzare: attaccare il disco all'asta, la lama per sminuzzare orientata verso
l'alto.
Per grattugiare: fissare il disco all'asta, con le fessure per grattugiare orientate
verso l'alto. Mettere il disco sull'asse.
Attenzione: tenere il disco sui lati, in modo da evitare qualsiasi rischio di
infortunio.
3. Mettere il coperchio sulla ciotola e introdurre gli alimenti nell'apertura
d'alimentazione.
4. Mettere lo spingi-alimenti nell'apertura d'alimentazione sopra gli alimenti.
Utilizzare sempre lo spingi-alimenti per guidare gli alimenti attraverso l'apertura
d'alimentazione. Non utilizzare mai le mani o una spatolina.
5. Attaccare alla corrente e accendere l'apparecchio per cominciare a
grattugiare o sminuzzare.
37
Page 38

3. UTILIZZO DEL ROBOT
Il tasto Robot offre la velocità ideale per l'utilizzo dell'apparecchio come
robot da cucina. È possibile anche utilizzare il tasto SEQ con questa
funzione per procedere ad impulsi.
Premere il tasto 1. Per un funzionamento di continuo, premere il tasto
Robot. Per arrestare il motore, premere nuovamente il tasto Robot o il
tasto 0.
Per attivare il funzionamento sequenziale (SEQ), premere il tasto 1, il tasto
SEQ, premere e rilasciare il tasto Robot per il numero di volte necessario.
Utilizzando l'apparecchio in questo modo, è possibile controllare
facilmente la durata e la frequenza degli impulsi. Lasciare passare un
tempo sufficiente fra gli impulsi affinché gli alimenti possano ricadere sul
fondo della ciotola.
A. TRITARE E RIDURRE IN PUREA
1. Per tritare e ridurre in purea, utilizzare la lama tritatutto. Mettere gli
alimenti nella ciotola. Tagliarli in pezzi all'incirca delle stesse
dimensioni. È possibile introdurre fino a 250 g di alimenti alla volta.
2. Mettere il coperchio e bloccarlo in posizione. Inserire lo spingi-alimenti.
Consigliamo di mettere una mano sul coperchio del robot durante
l'utilizzo, in modo da stabilizzare l'apparecchio. Premere il tasto 1, poi
il tasto SEQ e il tasto Robot (per dare un impulso), quindi rilasciare.
Ripetere l'operazione due o tre volte. Ogni volta che la lama si ferma,
lasciar ricadere gli alimenti sul fondo della ciotola prima di dare un
nuovo impulso. Controllare la consistenza guardando attraverso la
ciotola. Fare attenzione a non tritare gli alimenti troppo finemente.
NOTA: ogni tanto, un alimento potrebbe incastrarsi fra la lama e la
ciotola. Se questo avviene, togliere il coperchio, sollevare con cura la
lama e togliere il pezzo incastrato. Svuotare la ciotola, reinserire la lama
e gli alimenti, chiudere il coperchio e riprendere l'utilizzo.
B. AGGIUNGERE ALIMENTI DURANTE IL FUNZIONAMENTO
Lo spingi-alimenti è dotato di un apposito foro che permette di aggiungere
ingredienti liquidi in modo lento e regolare. Se desiderate aggiungere del
liquido durante il funzionamento dell'apparecchio, versatelo attraverso il
foro. Questo accorgimento risulta particolarmente utile quando si
preparano salse, ad esempio maionese. Per aggiungere alimenti di piccole
dimensioni o tagliati a pezzetti, come formaggio, carne o spicchi d'aglio,
durante il funzionamento del robot, versarli attraverso l'apertura d'alimentazione. Non dimenticare di rimettere subito lo spingi-alimenti dopo aver
versato gli ingredienti per evitare qualsiasi rischio di schizzo o incidente.
C. TOGLIERE GLI ALIMENTI DAL ROBOT
Innanzi tutto premere il tasto 0 e aspettare che le lame abbiano smesso di
girare. Poi togliere il coperchio svitandolo in senso antiorario. Non togliere
mai coperchio e ciotola insieme; la ciotola rischierebbe di rompersi.
Quando viene svuotata la ciotola, fare attenzione a non far cadere la lama
in modo da evitare qualsiasi rischio di infortunio.
D. SMINUZZARE E GRATTUGIARE
1. Montare il robot con il disco per grattugiare/sminuzzare. Prendere
sempre il disco dai bordi. Chiudere il coperchio e introdurre gli alimenti
dall'apertura d'alimentazione.
2. Inserire lo spingi-alimenti. Premere il tasto I, poi il tasto Robot.
Esercitare una pressione moderata sullo spingi-alimenti per spingere gli
alimenti verso il basso. Durante l'utilizzo, è possibile togliere lo
spingi-alimenti per introdurre nuovi alimenti senza spegnere
l'apparecchio. Prestare la massima attenzione per non introdurre mai le
dita nell'apertura d'alimentazione.
Dopo aver sminuzzato o grattugiato tutti gli alimenti, premere il tasto
Robot o 0. Aspettare che il disco smetta di girare prima di togliere il
coperchio. Togliere quindi il disco afferrando la parte superiore piatta
dell'asta adattatrice tirandola verso l'alto. Svitare poi la ciotola e
sollevarla per toglierla.
3. Se si desidera un macinato o una purea più fini, premere il pulsante
Posizione 1, poi il pulsante Robot e lasciar girare la lame
ininterrottamente fino a quando gli alimenti risultano tritati alla
consistenza desiderata. Controllare spesso attraverso il coperchio o la
ciotola trasparente per evitare di tritare troppo finemente. Utilizzare
une spatolina per raschiare tutti gli alimenti che aderiscono all'interno
della ciotola.
Per ridurre gli alimenti in purea, seguire la stessa procedura utilizzata
per tritare, ma lasciar girare la lama fino ad ottenere una purea
omogeneo. Attenzione: alcuni alimenti (ad es. le patate) rischiano di
risultare appiccicose, come consistenza, se tritate troppo a lungo.
4. PULIZIA E MANUTENZIONE DEGLI ACCESSORI
Riporre la lama e il disco per sminuzzare/ grattugiare fuori della portata
dei bambini. Tutti gli accessori possono essere lavati in lavastoviglie,
tranne la base robot, che non può essere immersa in acqua. Per pulirla,
utilizzare un panno umido. Prestare la massima attenzione se lama e
dischi vengono lavati a mano.
Evitare di lasciarli immersi in acqua e sapone, in quanto sarebbe possibile
perderli di vista, con il conseguente rischio di tagliarsi.
38
Page 39

PREPARAZIONE DEGLI ALIMENTI DA TRITARE
PREPARAZIONE DEGLI ALIMENTI DA SMINUZZARE E GRATTUGIARE
TIPO DI ALIMENTO MODALITÀ DI PREPARAZIONE
Frutta e verdura Sbucciare e, se necessario, togliere l'interno. Togliere parti
Carne, pollame e pesce Gli alimenti di questo tipo devono essere molto freddi ma
Formaggi a pasta dura «grattugiati» Tagliare in pezzi di 2 cm. Premere Tritare/SEQ fino
Panna montata La panna montata che otterrete con il robot è eccellente
Prezzemolo ed altre erbe aromatiche La ciotola e il coltello di metallo devono essere puliti ed
dure e semi. Tagliare in pezzi di circa 2 cm e mettere nel
robot (massimo 250 gr alla volta).
non congelati. Tagliarli in pezzi da 2 cm. Metterne fino a 250
gr nella ciotola. Premere Tritare/SEQ o far girare senza
interruzione fino ad ottenere la consistenza
desiderata. Verificare la consistenza ogni 2 o 3 secondi per
evitare di tritare troppo fine.
ad ottenere piccoli granuli, poi passare al robot senza
interruzione. È possibile tritare per quanto fine si desideri.
Basta far girare la macchina più a lungo per ottenere un
risultato più fine. Passare al robot fino ad 85 gr. alla volta.
Se è troppo difficile tagliare il formaggio con il coltello, non
cercare di tritare; la lama potrebbe danneggiarsi.
come guarnizione di dolci o bevande calde. La panna deve
essere alla temperatura del frigo.
asciutti. Levare i gambi e utilizzare solo le foglie. Asciugare
bene le erbe. Più erbe aromatiche saranno
tritate alla volta e più il risultato finale risulterà fine. Le erbe
aromatiche tritate si conservano diversi giorni in frigo dentro
appositi sacchetti chiusi ermeticamente, oppure possono
essere congelate.
Frutta e verdura di piccole dimensioni
Formaggio a pasta semidure (gruviera) Tagliare a pezzi ed inserire poi i
39
TIPO DI ALIMENTO SMINUZZARE GRATTUGIARE
Alimenti lunghi e sottili (carote,
sedano, cetrioli, melanzane)
Frutta e verdura di forma arrotondata
(mele, cipolle, patate, peperoni,
pomodori)
(fragole, funghi, ravanelli)
Cavolo, lattuga croccante Tagliare la base e la parte
Carne e pollame crudi
(250 gr. al massimo alla volta)
Formaggio a pasta molle
(mozzarella)
Formaggio a pasta dura
(parmigiano)
Tagliare in pezzi regolari di circa
2,5 cm. Inserire i pezzi verticalmente
nell'apertura d'alimentazione,
parte piatta verso il basso,
aggiungendo abbastanza pezzi per
evitare che oscillino.
Tagliare un'estremità e dividere
nel senso della lunghezza a metà
o in quarti. Pigiare bene gli alimenti nell'apertura
d'alimentazione per evitare che
oscillino. Mantenere una pressione
leggera e moderata.
Riempire l'apertura d'alimentazione, e mantenere une leggera
pressione.
superiore. Dividere in pezzi,
affinché gli alimenti possano passare verticalmente dall'
apertura d'alimentazione.
Utilizzare pezzi senza ossa e
semi-congelati (duri al tatto ma
che possono essere tagliati con
il coltello). Tagliare i pezzi
delle lunghezza dell'apertura d'alimentazione.
Non tagliare. Mettere in congelatore fino a
pezzi verticalmente nell'apertura
d'alimentazione. Mantenere una
leggera pressione sullo spingi-alimenti.
Non tagliare. Non grattugiare (utilizzare la
Per ottenere lamelle lunghe,
tagliare in pezzi delle giuste
dimensioni per entrare di lato
dall'apertura d'alimentazione.
Impilare nell'apertura d'alimentazione a ±2,5 cm dalla cima.
Per grattugiare fine, mettere i
pezzi in verticale nell'apertura
d'alimentazione, lato piatto
verso il basso.
Stesso metodo indicato
per sminuzzare. Posizionare gli
alimenti nell'apertura
d'alimentazione, di lato per
ottenere lamelle lunghe o in
verticale per grattugiare fine.
Riempire l'apertura d'alimentazione, e mantenere una
leggere pressione. Gli alimenti
devono essere abbastanza duri
per poter essere grattugiati (ad
es. ravanelli).
Non grattugiare.
Stesso metodo indicato per
sminuzzare.
quando il formaggio risulta
duro al tatto. Mantenere
una leggera pressione sullo
spingi-alimenti. Grattugiare al
massimo 125 gr. alla volta.
Il formaggio deve essere
freddo. Metterlo nell'apertura
d'alimentazione e mantenere
una leggera pressione sullo
spingi-alimenti. Grattugiare al
massimo 125 gr. alla volta.
lama tritatutto).
Page 40

ISTRUZIONI DI SICUREZZA
1. Attenzione - In occasione del disimballaggio dell'apparecchio, far
attenzione nel manipolare le lame e il disco con la massima cura in
quanto sono estremamente affilati. Appoggiare la scatola su una
superficie piana e togliere l'apparecchio e i vari accessori uno a
uno, evitando di toccare le parti metalliche.
2. Non immergere il blocco motore in acqua o altro liquido.
3. Occorre una maggiore attenzione se l'apparecchio viene utilizzato vicino
a dei bambini. L'apparecchio non deve essere utilizzato dai bambini.
Riporre le lame fuori della portata dei bambini. Non lasciare mai
l'apparecchio incustodito.
4. Staccare l'apparecchio dalla corrente subito dopo l'utilizzo, prima di
mettere o togliere gli accessori, prima di pulire l'apparecchio o prima
di togliere il contenuto dalla ciotola.
IMPORTANTE: non mettere le dita nella ciotola e non manipolare
mai le lame quando l'apparecchio è attaccato alla corrente.
5. Evitare qualsiasi contatto con le parti in movimento.
6. Non utilizzare l'apparecchio se il filo è danneggiato o se l'apparecchio
è caduto o presenta danni apparenti. Il filo elettrico, se danneggiato,
deve essere sostituito dal fabbricante. Riportare l'apparecchio al
fabbricante per qualsiasi operazione di controllo, riparazione o
regolazione elettrica o meccanica. Nessuna riparazione può essere
effettuata dall'utilizzatore.
7. Non utilizzare accessori diversi da quelli forniti in dotazione con
l'apparecchio. Non utilizzare le ciotole su una base diversa da quella
fornita.
8. Non utilizzare all'aperto.
9. Non lasciar pendere il filo dal bordo del tavolo o del piano di lavoro
della cucina. Evitare il contatto fra filo elettrico e superfici calde, al
fine di evitare qualsiasi rischio di danno.
10. Quando il blocco motore è attaccato alla corrente, in Posizione I e le
spie luminose lampeggiano, non toccare le lame, né togliere il coperchio
dalla ciotola frullatore. Toccando inavvertitamente un altro pulsante, è
possibile avviare il funzionamento dell'apparecchio.
11. Il robot deve sempre funzionare con il coperchio chiuso e bloccato. Non
tentare di forzare il meccanismo di chiusura del coperchio.
12. Non introdurre mai alimenti nel robot con le mani. Utilizzare sempre lo
spingi-alimenti.
13. Controllare sempre che le lame o il disco abbiano smesso di girare
prima di togliere il coperchio.
14. IMPORTANTE: Non aprire la base dell'apparecchio. Nessuno dei
componenti presenti all'interno dell'apparecchio può essere riparato o
sostituito dall'utilizzatore. Le riparazioni devono essere eseguite
unicamente dal fabbricante.
15. Questo apparecchio soddisfa le norme delle direttive 89/336/CEE
compatibilità elettromagnetica) e 73/23/CEE. (sicurezza degli
elettrodomestici), emendate dalla direttiva 93/68/CEE (marcatura CE).
16. Utilizzare questo apparecchio esclusivamente per cucinare, seguendo
le istruzioni del presente manuale.
40
Page 41

INTRODUCCIÓN
La batidora de vaso / robot Cuisinart® es una herramienta perfeccionada
y muy completa que le permitirá realizar innumerables preparaciones
culinarias en unos instantes.
Gracias a su vaso batidor, podrá convertir en puré, mezclar o batir todo tipo
de alimentos. También permite picar hielo o preparar batidos.
Tras fijar sobre la base la jarra, su electrodoméstico puede picar
alimentos crudos o cocidos hasta obtener una consistencia muy fina. El
disco reversible permite rebanar o rallar los alimentos en unos segundos.
Este electrodoméstico es fácil de limpiar y le procurará durante años
grandes éxitos culinarios.
2.
1.
3.
4.
5.
6.
6e.
6f.
6g.
6b.
6a.
6c.
6d.
A. Batidora de vaso
1. DESCRIPCIÓN Y FUNCIONES
1. Tapadera
Fácil de utilizar y resistente a las fugas, se coloca sobre la jarra con una
simple presión.
2. Dosificador graduado
Le permite medir hasta 60 ml y verter los ingredientes sin necesidad de
retirar la tapadera.
3. Jarra de cristal graduado con una capacidad de 1.250 ml.
Cristal grueso, con boca ancha y pico vertedor antigoteo.
4. Cuchillas de acero inoxidable
Muy resistentes, incluso para picar hielo.
5. Bloque motor
Sólido y estable, de gran resistencia.
6. Teclas de control
Fáciles de utilizar y de limpiar. Está provisto de 6 velocidades + 1
velocidad secuencial (6a), lo que le proporciona gran polivalencia. Los
indicadores luminosos ayudan a identificar la velocidad utilizada.
6a.Tecla SEQ - funcionamiento secuencial
Se utiliza con cualquier velocidad, para que se puedan mezclar los
ingredientes con exactitud hasta obtener la consistencia deseada.
6b.Tecla Picar Hielo
Activa una velocidad especial para picar hielo. Importante: los accesorios
de la batidora no están previstos para picar hielo.
6c.Tecla Robot
Se utiliza con los accesorios del robot (página 4), y para hacer licuados.
6d.Tecla Puré
Para preparar mezclas homogéneas y cremosas a partir de alimentos
sólidos (batidos o alimentos para bebés, por ejemplo).
6e.Tecla Mezclar
Para incorporar los alimentos y obtener una mezcla homogénea.
6f. Tecla Picar
Para picar los alimentos gruesos o finos.
6g.Tecla Batir
Para montar nata, preparar coberturas para tartas, etc.
7. Patas antiderrapantes
Impiden que el aparato se mueva durante su utilización.
7.
41
Page 42

2. MONTAJE DE LA BATIDORA
Para utilizar la batidora, sólo tiene que colocar la jarra sobre el bloque
motor, de modo que la escala inscrita en la misma esté orientada de cara
al usuario y el asa quede a un lado. Luego coloque la tapadera sobre la
jarra, con una ligera presión y encaje el tapón dosificador. Enchufe el
aparato. Ya está listo para su uso.
3. UTILIZACIÓN DE LA BATIDORA
1. Añada todos los ingredientes necesarios y ponga la tapadera. También
es posible poner la tapadera e ir añadiendo los ingredientes tras retirar
el tapón dosificador. Después vuelva a colocar el tapón dosificador.
También puede añadir ingredientes con la batidora en marcha a través
del tapón dosificador.
Nota: añada en primer lugar los ingredientes líquidos y luego los
ingredientes sólidos. De esta forma obtendrá una mezcla más
homogénea y le ahorrará al motor una tensión innecesaria.
2.. PARA EMPEZAR A MEZCLAR: Pulse la tecla I. El piloto rojo se pone
intermitente, indicando que la batidora está encendida.
3. SELECCIONE UNA VELOCIDAD: Pulse la tecla de velocidad e
legida. La batidora se pone en marcha. Para cambiar de velocidad sólo
tiene que pulsar otra tecla. No es necesario apagar el motor.
4. TIEMPO DE BATIDO: no trabaje demasiado tiempo los alimentos. Los
resultados deseados se pueden obtener en unos segundos, no en unos
minutos.
5. DETENER LA BATIDORA: pulse la tecla de velocidad elegida. El motor se
detiene. El piloto luminoso se pone a parpadear, indicando que la
batidora sigue encendida. Para desactivar completamente la batidora,
pulse la tecla 0.
6. MODO SECUENCIAL: para proceder a un batido por impulsos, pulse la
tecla I y después la tecla SEQ. El piloto luminoso SEQ se pone a
parpadear. Luego pulse la tecla de velocidad deseada y suéltela. Repita
la operación cuantas veces sea necesario. En cada impulso, todos los
pilotos luminosos (posición I, tecla SEQ y velocidad seleccionada) se
encienden.
La tecla SEQ se utiliza para batir cantidades de alimentos más
importantes o para controlar la textura de los alimentos a medida que
los está picando. La función SEQ también es eficaz al comienzo del
batido, o cuando se trate de alimentos que sólo requieren un tiempo de
batido muy corto.
7. PARA PICAR HIELO: Utilice únicamente la jarra. Para controlar mejor el
proceso, la función «Picar hielo» funciona como la tecla SEQ. Coloque
los cubitos de hielo en la jarra, ponga la tapa y pulse la tecla I. Luego
pulse la tecla «Picar hielo» con breves impulsos hasta que el hielo
picado adquiera la consistencia deseada.
8. DESPEGAR ALIMENTOS ATASCADOS: utilice una espátula para retirar los
alimentos que se han quedado atascados entre las cuchillas. No meta la
mano en la batidora mientras está enchufada. UTILICE LA ESPÁTULA
ÚNICAMENTE CUANDO EL MOTOR ESTÁ APAGADO Y DESENCHUFADO.
Luego vuelva a poner la tapa y continúe batiendo si es necesario. No ponga
nunca en marcha la batidora con la espátula dentro de la jarra.
9. DESPUÉS DEL BATIDO: Pulse la tecla 0 y desenchufe el aparato. Retire
a continuación la jarra de la base tirando hacia arriba.
IMPORTANTE
• No coloque la jarra sobre la base ni la retire con el motor en marcha.
• No introduzca alimentos líquidos hirviendo o alimentos sólidos
congelados (con excepción de los cubitos de hielo o de los trozos de
fruta congelada). Deje enfriar los líquidos durante al menos 5 minutos
antes de colocarlos en la jarra.
• Si bate líquidos calientes, retire el tapón dosificador (pieza central de
la tapadera) para que pueda salir el vapor.
42
Page 43

4. LIMPIEZA Y MANTENIMIENTO
Desenchufe la batidora antes de limpiarla. Limpie la jarra antes de usarla
por primera vez y después de cada uso.
Para limpiarla, retire la jarra del bloque motor tirando hacia arriba.
Lave la jarra en agua caliente jabonosa, aclare y seque a fondo. La jarra
puede lavarse también en el lavavajillas.
No trate de desmontar la jarra y límpiela con la mayor prudencia, con el
fin de que evitar todo riesgo de lesiones.
Para limpiar el bloque motor, utilice un trapo húmedo para retirar los
residuos y séquelo. No sumerja en ningún caso la base en agua o en otro
líquido y no la meta en el lavavajillas.
5. CONSEJOS SOBRE LA UTILIZACIÓN DE LA BATIDORA
• Coloque siempre el bloque motor sobre una superficie estable, limpia y
seca.
• Añada siempre los ingredientes líquidos en primer lugar, y luego continúe
con los alimentos restantes. De esta forma, los ingredientes se batirán de
manera uniforme.
• Corte los alimentos en cubos de 1 a 5 cm para obtener un resultado más
uniforme. Corte el queso en trozos de 1 cm aproximadamente.
• Utilice el tapón dosificador para medir los ingredientes líquidos, como el
alcohol. Vuelva a colocar el tapón dosificador una vez añadidos los
ingredientes.
• Utilice la espátula cuando la necesite, pero únicamente con la batidora
apagada. No utilice nunca utensilios de metal, que podrían dañar la jarra
o las cuchillas.
• Retire los alimentos pegados a las paredes de la jarra y colóquelos sobre
las cuchillas con la ayuda de una espátula.
• Si está picando hierbas frescas, ajo, cebolla, cáscara de limón, avellanas,
especias... compruebe primero que la jarra y las cuchillas están
completamente secas.
• Si los alimentos tienen tendencia a pegarse a las paredes durante la
utilización, proceda mediante breves impulsos.
• Espacie los impulsos para que las cuchillas se detengan del todo entre
impulsos sucesivos.
• No conserve alimentos o líquidos en la jarra.
• Con este electrodoméstico no es posible hacer puré de patatas, masa o
montar claras a punto de nieve.
• No trabaje demasiado tiempo los alimentos. Los resultados deseados se
pueden obtener en unos segundos, no en unos minutos.
• No sobrecargue la batidora. Si el motor se cala, apague y desenchufe la
batidora. Retire una parte de los alimentos y vuélvala a encender.
GUÍA DE REFERENCIA DE LAS FUNCIONES
DE LA BATIDORA
Para activar la batidora Pulse la tecla 1- La batidora está encendida.
Para empezar a mezclar Pulse una tecla Velocidad.
Para cambiar de velocidad Pulse una tecla Velocidad.
Para proceder por impulsos
Para picar hielo
Para desactivar la batidora Pulse la tecla 0
Para detener la batidora
(en modo Batir, Picar,
Mezclar o Puré)
En modo I, pulse SEQ y luego pulse y suelte la tecla
de velocidad tantas veces como sea necesario.
En modo I, pulse la tecla PICAR HIELO y
suéltela tantas veces como sea necesario.
Pulse de nuevo una tecla Velocidad. La batidora
volverá así a la Posición 1. Pulse 0 para detener la
batidora.
GUÍA DE SELECCIÓN DE LAS VELOCIDADES
B. El Robot
INGREDIENTES/RECETA VELOCIDAD SÍMBOLO RESULTADO
Reconstituir zumo de naranja
concentrado congelado
Alimentos para bebé Puré Homogéneo y cremoso
Quesos de pasta blanda Licuar Grueso a fino
PARA LAS FUNCIONES DE LA BATIDORA
Mayonesa Mezclar Espeso y cremoso
Salsas, ensaladas Mezclar Consistencia deseada
Mezclar Homogéneo
Avellanas Picar Grueso a fino
Nata montada Batir Cobertura espesa
Cáscara de limón Puré Fino y uniforme
Batidos Puré Homogéneo y cremoso
Bebidas naturales Licuar Homogéneo y cremoso
Cóctel helado Licuar Espeso y líquido
Especias Licuar Grueso a fino
Hielo Picar hielo Polvo
43
Page 44

1. DESCRIPCIÓN Y FUNCIONES
1. Embutidor de alimentos
2. Tapadera de la cubeta con orificio de alimentación
3. Cuchillas de acero inoxidable. Pica alimentos crudos y cocidos. Permite
obtener la consistencia deseada, de un picado grueso a un puré fino.
4. El disco reversible rebanar/rallar de acero
inoxidable permite obtener rodajas perfectas o
rallar gran variedad de frutas y verduras, carnes
y quesos.
5. Adaptador para el disco
6. Cubeta de preparación
7. Base Robot
8. Bloque motor
Embutidor de alimentos (1)
Tapadera de la cubeta con orificio
de alimentación (2)
Cuchilla de picar de acero inoxidable (3)
Disco reversible rebanar/rallar (4)
Adaptador para el disco (5)
Cubeta (6)
Base robot (7)
Bloque motor (8)
2. MONTAJE DEL ROBOT
A. CON LA CUCHILLA
1. Mantenga la base del robot con una mano y el asa de la cubeta con la otra.
Inserte la cubeta sobre la base girando en el sentido de las agujas de un reloj.
2. Coloque todo ello sobre el bloque motor.
Nota: la cubeta y la base del robot se adaptan al motor en ocho posiciones
diferentes. El asa se puede colocar a ambos lados y el orificio de
alimentación delante o detrás, o a uno de los lados.
3. Coloque la cuchilla sobre el eje en la cubeta. La cuchilla debe situarse
fácilmente en el fondo de la cubeta y llegar casi hasta el fondo de la misma.
ATENCIÓN, LA CUCHILLA ESTÁ MUY AFILADA.
4. Introduzca los alimentos en la cubeta. Coloque la tapadera y gírela en el
sentido de las agujas del reloj hasta que se quede en su sitio. La tapadera se
bloquea mediante un clic. Si no consigue adaptar la tapadera sobre la
cubeta, gire ligeramente el núcleo de la cuchilla y vuelva a intentarlo.
5. El embutidor de alimentos se adapta al orificio de alimentación, con el lado
redondeado hacia el exterior de la cubeta. UTILICE SIEMPRE EL
EMBUTIDOR PARA GUIAR LOS ALIMENTOS A TRAVÉS DEL ORIFICIO DE
ALIMENTACIÓN. NO UTILICE NUNCA LOS DEDOS O UNA ESPÁTULA.
6. Enchufe el aparato. Pulse la tecla I y la tecla Robot para empezar a picar. Le
recomendamos que coloque una mano sobre la tapadera del robot durante
la utilización para estabilizar el aparato. Si el aparato no arranca, compruebe
que está enchufado y que la cubeta y la tapadera están bloqueadas.
B. CON EL DISCO REVERSIBLE PARA REBANAR Y RALLAR
1. Coloque la cubeta sobre la base del robot y el conjunto sobre el bloque
motor.
2. Coloque el adaptador del disco en el eje central.
Para rebanar: Coloque el disco sobre el adaptador, con la parte que rebana
colocada hacia arriba.
Para rallar: Fije el disco al adaptador, con la parte que ralla orientada hacia
arriba. A continuación coloque el disco sobre el eje.
Atención: sujete el disco por los lados con el fin de evitar riesgos de lesiones.
3. Coloque la tapadera sobre la cubeta e introduzca los alimentos por el orificio
de alimentación.
4. Coloque el embutidor en el orificio de alimentación y sobre los
alimentos. Utilice siempre el embutidor para guiar los alimentos a través del
orificio de alimentación. No utilice nunca la mano o una espátula.
5. Enchufe y encienda el aparato para empezar a rallar o a rebanar.
44
Page 45

3. UTILIZACIÓN DEL ROBOT
La tecla Robot ofrece la velocidad ideal para la utilización del
aparato como robot de cocina. También puede utilizar la tecla SEQ con
esta función para proceder mediante impulsos.
Pulse la tecla I. Para un funcionamiento en continuo, pulse la tecla Robot.
Para detener el motor, pulse de nuevo la tecla Robot o pulse la tecla 0.
Para activar el funcionamiento por impulsos (SEQ), pulse la tecla I, luego la tecla
SEQ, luego pulse y suelte la tecla Robot cuantas veces sea necesario. Si utiliza
el aparato de esta manera, podrá controlar fácilmente la duración y la
frecuencia de los impulsos. Deje tiempo suficiente entre los impulsos para que
los alimentos puedan volver a caer al fondo de la cubeta.
A. PICAR Y HACER PURÉ
1. Para picar y hacer puré, utilice la cuchilla. Introduzca los alimentos en
la cubeta. Córtelos en trozos de tamaño similar. Puede picar de una vez
hasta 250 g de alimentos.
2. Coloque la tapadera hasta bloquearla. Coloque el embutidor. Le
recomendamos que ponga una mano sobre la tapadera del robot
durante la utilización para estabilizar el aparato. Pulse la tecla I y la
tecla SEQ; luego pulse la tecla Robot (para dar un impulso) y suéltela.
Repita dos o tres veces la operación. Cada vez que se detenga la
cuchilla, deje que los alimentos vuelvan a caer al fondo de la cubeta
antes de dar un nuevo impulso. Verifique la textura a través de las paredes
de la cubeta. Procure no picar los alimentos demasiado.
OBSERVACIÓN: De vez en cuando, un fragmento puede quedar atascado
entre la cuchilla y la cubeta. Si es así, retire la tapadera, levante
cuidadosamente la cuchilla y retire el fragmento atascado. Vacíe la
cubeta, vuelva a colocar la cuchilla y los alimentos, bloquee la tapadera
y siga utilizando el robot.
3. Si desea un puré más fino, pulse el botón I, luego el botón Robot y deje
que la máquina gire sin interrupción hasta que los alimentos adquieran
la textura deseada. Verifique con frecuencia a través de la tapadera o
de la cubeta, para evitar que se pique demasiado. Utilice una espátula
para retirar los fragmentos que se queden pegados en el interior de la
cubeta. Para hacer puré, siga el mismo procedimiento que para picar,
pero deje que la máquina siga girando hasta obtener un puré homogéneo.
Atención, con algunos alimentos (las patatas, por ejemplo) se puede
obtener una textura pegajosa si se baten demasiado tiempo.
B. AÑADIR ALIMENTOS DURANTE EL FUNCIONAMIENTO
El embutidor lleva un orificio que permite añadir ingredientes líquidos de
forma lenta y regular. Si desea añadir líquidos mientras el aparato está en
funcionamiento, puede utilizar este orificio. Resulta especialmente útil
cuando se está haciendo mayonesa o salsa. Para añadir alimentos de
pequeño tamaño o cortados en trozos, como queso, carne o dientes de ajo
con la máquina en funcionamiento, puede utilizar este orificio de
alimentación. Vuelva a colocar el embutidor en su sitio inmediatamente
después de haber añadido los ingredientes, para evitar riesgos de
salpicaduras o lesiones.
C. RETIRAR LOS ALIMENTOS DEL ROBOT
Antes de hacer nada, pulse la tecla 0 y espere a que las cuchillas se
detengan totalmente. Luego retire la tapadera girándola en sentido
contrario a las agujas del reloj. No trate de retirar la tapadera y la cubeta
al mismo tiempo, pues podría dañar esta última.
Cuando vacíe la cubeta, procure que no caigan las cuchillas, para evitar el
riesgo de lesiones.
D. REBANAR Y RALLAR
1. Monte el robot con el disco de rebanar / rallar. Sujete siempre el disco
por los bordes. Ponga la tapadera e introduzca los alimentos por el
orificio de alimentación.
2. Coloque el embutidor. Pulse la tecla I y después la tecla Robot.
Mantenga una presión moderada sobre el embutidor, para empujar los
alimentos hacia abajo. Durante la utilización, es posible retirar el
embutidor para introducir nuevos alimentos sin necesidad de detener el
aparato. Tenga cuidado de no introducir los dedos en el orificio de
alimentación.
Después de haber rebanado o rallado todos los alimentos, pulse la tecla
Robot o la tecla 0. Espere siempre a que el disco se detenga antes de
retirar la tapa. A continuación, retire el disco tomándolo por la parte
superior plana del adaptador y tirando hacia arriba. Luego desenrosque
la cubeta y levántela para retirarla.
4. LIMPIEZA Y CONSERVACIÓN DE LOS ACCESORIOS
Guarde la cuchilla y el disco de rebanar / rallar fuera del alcance de los
niños. Todos los accesorios se pueden lavar en el lavavajillas, con
excepción de la base, que no se puede introducir en agua. Para limpiarla,
puede frotarla con un paño húmedo. Si limpia las cuchillas o los discos a
mano, hágalo con mucho cuidado.
Evite sumergir los accesorios en agua jabonosa, pues si los pierde de vista
podría lesionarse.
45
Page 46

PREPARACIÓN DE LOS ALIMENTOS
ANTES DE PICARLOS
TIPO DE ALIMENTO MODO DE PREPARACIÓN
Frutas y verduras Pele y limpie si es necesario. Retire los
fragmentos duros y las semillas Corte en
fragmentos de ±2 cm y no procese en el robot
más de 250 gr en cada tanda.
Carne, aves y pescado Los alimentos de este tipo deben estar muy
fríos, pero no congelados. Córtelos
previamente en fragmentos de 2 cm.
Introduzca hasta 250 gr en la cubeta. Pulse
Picar/SEQ o haga girar sin interrupción la
máquina hasta obtener la consistencia
deseada. Verifique la textura cada
2 a 3 segundos, para evitar que
quede demasiado picada.
Queso de pasta dura «rallado» Corte en fragmentos de 2 cm. Pulse Picar /
SEQ hasta obtener pequeños gránulos, y luego
haga funcionar el robot sin interrupción.
Puede picarlo tan fino como desee. Para
obtener un polvo más fino deje
funcionar el robot más tiempo. Puede
procesar en el robot hasta 85 gr en cada
tanda. Si le resulta muy difícil cortar el queso
con un cuchillo, no intente picarlo, pues
podría dañar las cuchillas.
Nata montada La nata montada que se obtiene con el robot
es excelente para la cobertura de postres o
para bebidas calientes. La nata debe estar a la
temperatura del refrigerador.
Perejil y hierbas frescas La cubeta y la cuchilla metálica deben estar
limpias y secas. Retire los tallos y utilice
únicamente las hojas únicamente.
Seque las hierbas completamente. Cuantas
más hierbas pique a la vez, más finas se
picarán. Las hierbas picadas se conservan
durante varios días en el refrigerador en
bolsas herméticas y también
se pueden congelar.
PREPARACIÓN DE LOS ALIMENTOS
ANTES DE REBANARLOS Y DE RALLARLOS
TIPO DE ALIMENTO REBANAR RALLAR
Alimentos largos y finos (zanaho-
rias, apio, pepino, berenjena)
Frutas y verduras de forma
redondeada (manzanas, cebollas,
patatas, pimientos, tomates)
Frutas y verduras pequeñas (fre-
sas, champiñones, rábanos)
Repollo, lechuga crocante Corte los extremos inferior y
Carne y aves crudas (250 gr
como máximo)
Quesos de pasta blanda (moz-
zarella)
Quesos de pasta semidura
(gruyere)
Quesos de pasta dura
(parmesano)
Corte en trozos regulares de
unos 2,5 cm. Inserte los
trozos verticalmente por el
orificio de alimentación, con
el lado plano hacia abajo,
añadiendo suficientes trozos
para evitar que se muevan.
Haga un corte plano en uno
de los extremos y corte en
sentido longitudinal en
mitades o en cuartos. Apriete
bien los alimentos en el orificio
de alimentación para evitar que
se muevan. Mantenga una
presión ligera a moderada.
Llene el orificio de
alimentación y mantenga una
presión ligera.
superior. Corte en trozos de
modo que los alimentos puedan
pasar por el orificio de
alimentación en sentido vertical.
Utilice trozos sin huesos y
semicongelados (duros al
tacto, pero que se puedan
cortar con cuchillo). Corte
fragmentos de la misma
longitud que el orificio de
alimentación.
Procéselo sin cortar Póngalo en el congelador
Corte en trozos que
introducirá verticalmente por
el orificio de alimentación.
Mantenga una ligera presión
sobre el embutidor.
Procéselo sin cortar No rallar (utilice la
Para obtener lonchas largas,
corte trozos lo
bastante grandes como para
que entren de lado por el
orificio de alimentación.
Puede apilarlos en el orificio
de alimentación a ±2,5 cm
de su parte superior. Para
obtener ralladuras finas,
presente los trozos en
posición vertical en el
orificio de alimentación, con
el lado plano hacia abajo.
Mismo método que para
rebanar. Coloque los trozos
en el orificio de
alimentación, en posición
lateral para obtener
rebanadas grandes, o
verticalmente, para obtener
ralladuras finas.
Llene el orificio de
alimentación y mantenga una
presión ligera. Los alimentos
deben ser lo bastante duros
para ser rallados (rábanos, por
ejemplo).
No rallar.
Mismo método que para
rebanar.
hasta que el queso esté
duro al tacto. Mantenga
una ligera presión sobre el
embutidor. Ralle como
máximo 125 gr de
una vez.
El queso debe estar muy
frío. Colóquelo en el
orificio de alimentación y
mantenga una ligera
presión sobre el embutidor.
Ralle como máximo 125 gr
de una vez.
cuchilla para picar).
46
Page 47

CONSIGNAS DE SEGURIDAD
1. Atención - Al desembalar el electrodoméstico, manipule las
cuchillas y el disco con la mayor precaución, pues están muy
afilados. Coloque la caja sobre una superficie plana y retire el
aparato y los diferentes accesorios uno por uno, evitando tocar las
partes metálicas.
2. No lo sumerja el bloque motor en agua ni en ningún otro líquido.
3. Proceda con especial atención cuando este aparato se utilice con niños
cerca. Este aparato no debe ser utilizado por niños. Guarde las cuchillas
fuera del alcance de los niños. No deje nunca el aparato sin vigilancia.
4. Desenchufe el aparato inmediatamente después de su uso, antes de
colocar o de retirar los accesorios y antes de proceder a la limpieza del
aparato o antes de retirar el contenido de la cubeta.
IMPORTANTE: No introduzca en ningún caso los dedos en la
cubeta ni manipule las cuchillas con el aparato enchufado.
5. Evite todo contacto con las piezas en movimiento.
6. No utilice el aparato si el cable está dañado o si el aparato
ha sufrido caídas o presenta señales de deterioro. Si el cable está
dañado, debe ser sustituido por el fabricante. Devuelva el aparato
al fabricante para cualquier verificación, reparación o ajuste
eléctrico o mecánico. El usuario no puede realizar reparación alguna.
7. Utilice exclusivamente los accesorios incluidos con el electrodoméstico.
No utilice la cubeta con una base diferente.
8. No lo utilice en exteriores.
9. No deje colgar el cable del borde de la mesa o del mostrador de la
cocina. Evite todo contacto entre el cable y las superficies calientes,
con el fin de evitar riesgos de daños.
10. Cuando el bloque motor esté enchufado en Posición I y los
pilotos luminosos estén parpadeando, no toque las cuchillas, ni retire
la tapadera de la cubeta. Si por casualidad tocara algún otro botón, el
aparato podría ponerse en marcha.
11. El robot siempre debe funcionar con la tapadera bloqueada. No trate
de forzar el mecanismo de bloqueo de la tapadera.
12. No introduzca en ningún caso alimentos en el robot con la mano.
Utilice siempre el embutidor.
13. Espere siempre que la cuchilla o el disco hayan dejado de girar antes
de retirar la tapadera.
14. IMPORTANTE: No abra la base del aparato. Ninguna de las piezas
contenidas en este aparato puede ser reparada o sustituida por el
usuario. Las reparaciones deben ser realizadas únicamente por el
fabricante.
15. Este aparato cumple con las exigencias esenciales de las
directivas 89/336/CEE (compatibilidad electromagnética) y 73/23/CEE
(seguridad de los electrodomésticos), modificadas por la directiva
93/68/CEE (marcado CE).
16. Utilice el electrodoméstico exclusivamente para cocinar, de acuerdo
con las instrucciones de este manual.
47
Page 48

 Loading...