

Page 1
HotPlug Operation
3
Warnings & Dangers
5
Frequently Asked Questions
6
Technical Specifications
6
WARNING: Risk of lethal elec tr ic shock.
HotPlug™
Patent No. 8,076,798
USER’S MANUAL
Revised August 8, 2013
With WiebeTech’s HotPlug, you can seize and move a computer without powering down the
computer! This allows you to thoroughly pursue forensic analysis of that computer utilizing the
resources of your forensic lab, instead of in the field.
HotPlug keeps power flowing to the computer while transferring the computer's power input from
one A/C source (such as a power strip) to another (such as a portable UPS).
Table of Contents
Accessories 2
Mouse Jiggler 2
HotPlug Control Panel 2
WiebeTech recommends that you read this manual in full, and practice the procedure several
times before using HotPlug in the field.
HotPlug- Euro (Patent No. 8,076,798) User Manual (A9- 000-0036 REV. 1.1 ) - 1 -
Live terminals exposed during normal usage
can carry sufficient voltage to be harmful or
deadly if misused. Care should be taken
while using this product. HotPlug should only
be used by individuals familiar with risks
associated with AC power sources
Page 2
WiebeTech
HotPlug
1
Input line cord
1
Output line cord
1
Plug protector and strap
1
Mouse Jiggler™ (Mouse activity dongle)
1
Mouse Jiggler Quick Start Guide # A9-000-0019-1
1
HotPlug User Manual # A9-000-0036
1
Accessories
Check the accessories packaged with your HotPlug. Please contact WiebeTech if any items are
missing or damaged. The box should contain the following items:
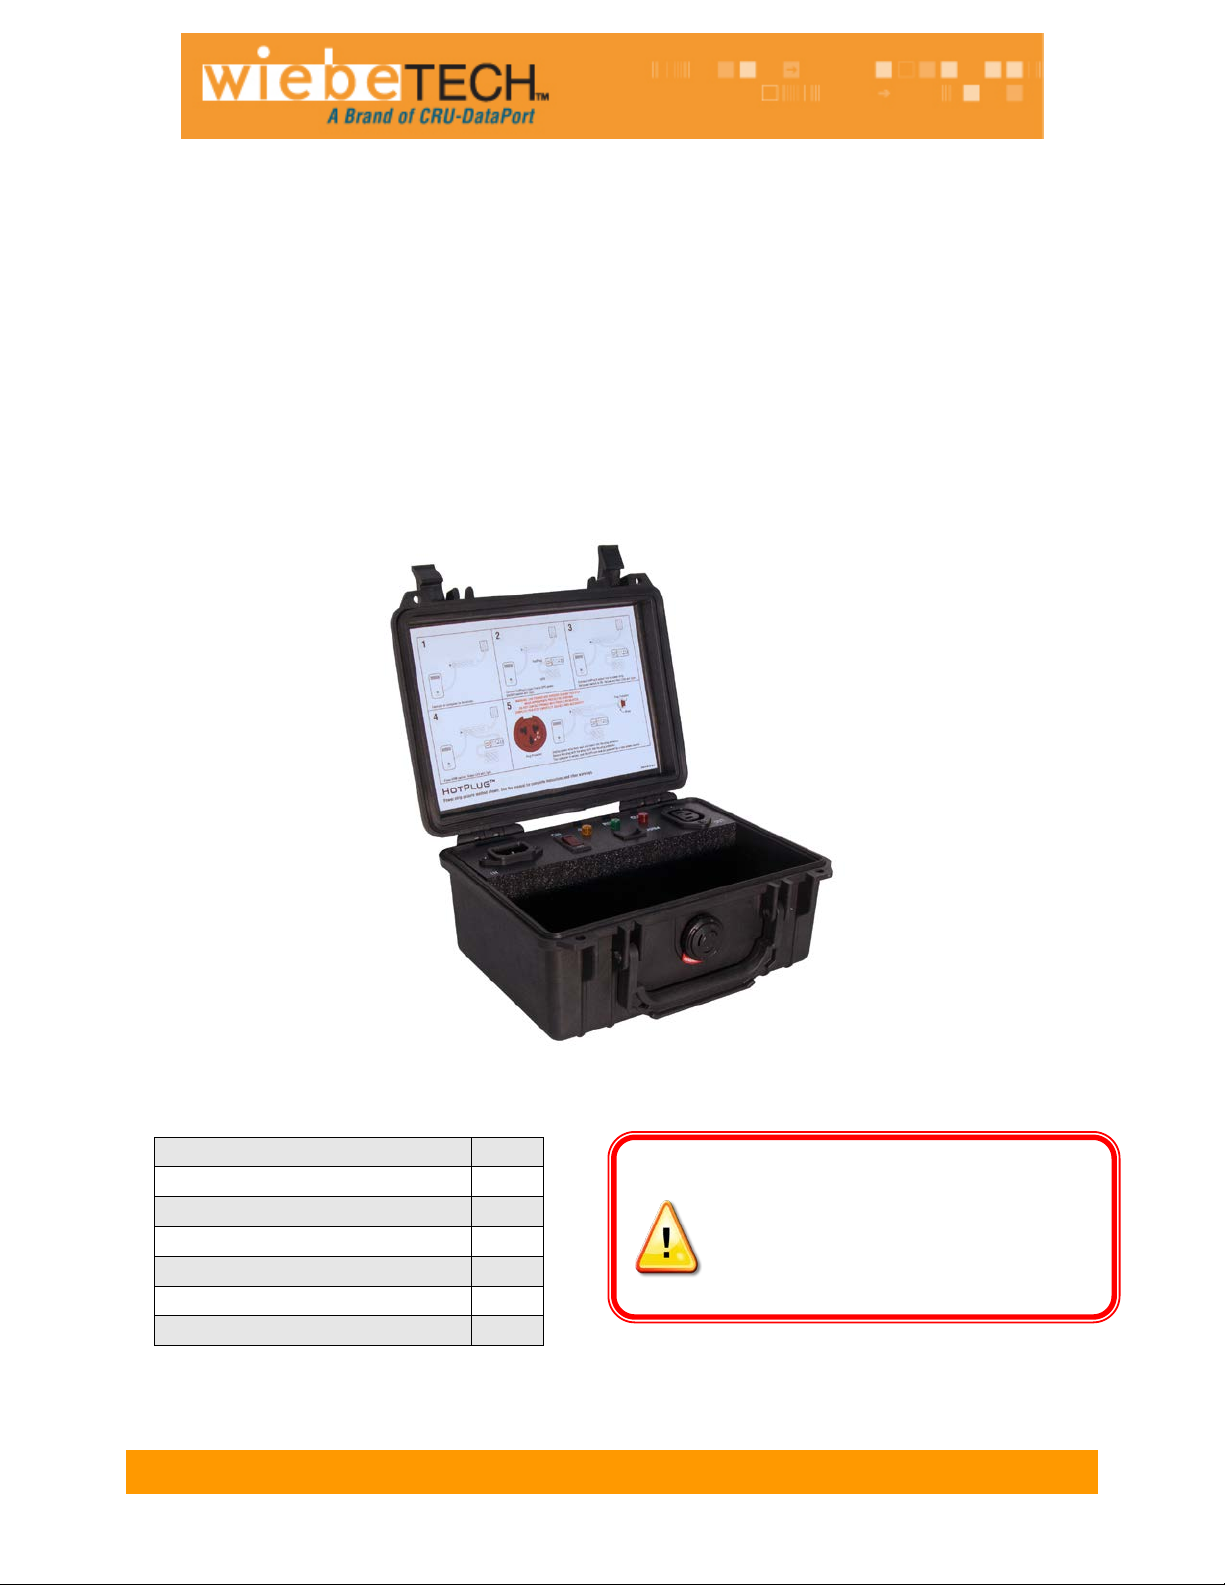
HotPlug is contained inside a sturdy, waterproof Pelican carrying case. There is a built-in compartment
for storing the accessories.
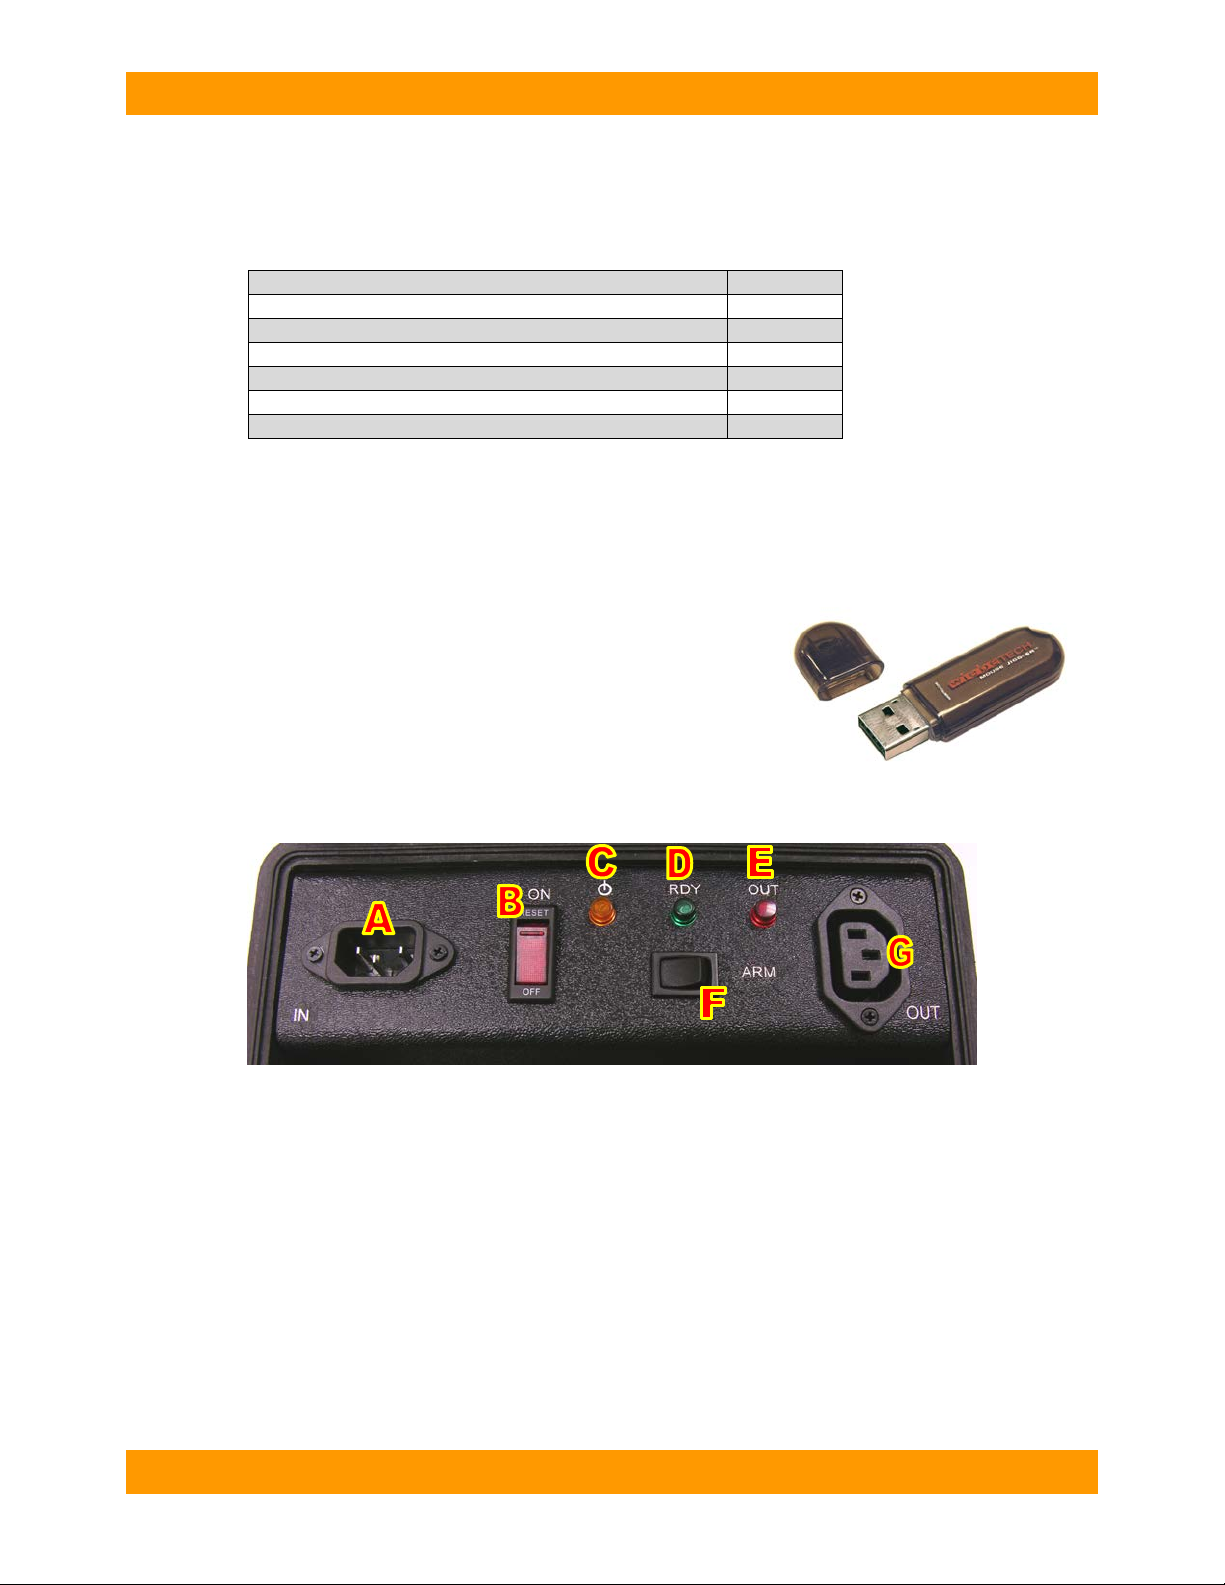
Mouse Jiggler
Before using HotPlu g to move a computer , plug Mouse Jiggler into
one of the computer’s USB ports. This will prevent the computer
from entering screen sa ver or s leep m odes, which m ay be protec ted
by passwords. For mor e information on the use of Mouse Jiggler,
see the instructions accompanying that product.
HotPlug Control Panel
A Input Power – power coming from the new power source, such as a portable UPS.
B Power Switch – Turns HotPlug unit on & off. Glows RED when HotPlug is connected to new power
source.
C Power Status LED – Glows YELLOW when HotPlug power switch is in the ON position.
D Ready LED – Glows GREEN when HotPlug is armed and ready for the power transfer.
E Power Output LED – Glows RED when HotPlug is connected to the computer’s original power
source.
F Arm Switch – When the cables are properly connected, pushing this switch will arm HotPlug so that it
is ready to transfer power.
G Output Power – power line connected to the computer’s original power source, such as a surge
protector, power strip, or wall plug.
HotPlug- Euro Version User Manual (A9- 000-0036 REV. 1.1) - 2 -
Page 3

WiebeTech
NOTE: Many UPSs have both
UPS
HotPlug
HotPlug Operat ion
1. Unplug any cables connected to the power strip that are not connected to the device(s) you want to
capture.
2. Ensure the HotPlug power switch is in the OFF position.
3. Plug the input line cord into the HotPlug unit (receptacle labeled “IN”).
4. Plug the other end of the input line cord into the UPS. The HotPlug pow er switc h will glow red,
indicating that HotPlug is receiving power.
5. Find an open connection on the power strip. Connect one end of the output line cord into the power
strip, and then the other end into the receptacle labeled “OUT” on HotPlug. The red LED (output
power indicator) will light.
HotPlug- Euro Version User Manual (A9- 000-0036 REV. 1.1) - 3 -
surge-protected and batterypowered outlets. Be sure to
use HotPlug with UPS outlets
that supply battery power.
Page 4

WiebeTech
Attach plug protector to
exposed pins.
Wrap strap around base
of plug.
Use the built-in grooves
to wrap the strap up and
over plug protector.
Bring the strap back
Wrap the remainder of
the strap around the
base.
Plug Protector
6. Move the HotPlug power switch to the ON position. The power indicator (yellow) will light.
7. The cabling should now all be in place, and the yellow and red indicators on the HotPlug console
should both be lit. Push the button labeled “ARM” to ready the HotPlug for the power transfer. The
green indicator will light, showing that HotPlug is armed and ready. Note: At this point, the
computer is still receiving power from th e original power source.
Warning: Live prongs are exposed during th is step. Do not contact prongs with people or
objects. Complete this step carefully, quickly, and accurately. We recommend wearing
gloves certified for high voltage use.
8. Unplug the power strip from the wall outlet in one quick motion, and
immediately plug it into the plug protector. Use the strap to secure the
plug protector to ensure it remains in place.
As soon as the power strip is unplugged from the wall outlet, HotPlug instantly begins supplying the
power strip with a new flow of power. The computer is now being powered by the new power source.
down the other side
HotPlug- Euro Version User Manual (A9- 000-0036 REV. 1.1) - 4 -
Page 5

WiebeTech
WARNING: After
same outlet.
The HotPlug is now fully connected. Handle the setup with care during transport.
unplugging the original
power source from the
wall outlet, DO NOT
replug it back into the
9. Plug the UPS into a power source after the seizure. Keep HotPlug in the circuit until the forensic
examination is complete.
Warnings & Dangers
• Misuse of this product could result in lethal electric shock. Always assume that the plug on the output
line cord is electrified whenever either end is plugged in.
• Be careful not to touch yourself, other people, or any objects with the power plug while transferring it
from one power source to another.
• During the power transfer process, remove the power plug with one quick motion. Do not use slow or
stuttering motions when removing the power plug.
• After removing the power plug from the original power source, DO NOT REINSERT THE PLUG INTO
THE SAME OUTLET.
• Do not use HotPlug in a wet environment.
HotPlug- Euro Version User Manual (A9- 000-0036 REV. 1.1) - 5 -
Page 6

WiebeTech
Product Name
HotPlug (Euro Version)
Case Construction
• Tough, high impact case material
Lockable
Status Indicators
• Power on and armed indicators are disc er nible at a gla nc e.
• Green indicator light shows the unit is armed
Power Control
ON/OFF switch on front panel
Power
• 240VAC, 50 Hz
• Capacity - 5.0 Amps Max.
Weight
Unit weight 3.5 lbs
Shipping weight 5 lbs.
Dimensions
9.12" x 7.56" x 4.37" 23.2 x 19.2 x 11.1 cm)
Support
We don’t want expect to go wrong with your CRU-Dataport product. But if it does,
WiebeTech is a brand of CRU.
Frequently Asked Questions (FAQs)
Q: This sounds like magic! How does it work?
A: First, you provide a new power source for the computer, such as an Uninterruptable Power Supply
(UPS). Plug the UPS into HotPlug, then plug HotPlug into the same power strip the computer is using.
Unplug the power strip from the wall. The instant this occurs, HotPlug detects the loss of power and
reroutes the power source from the wall to the UPS. The transfer of power occurs in a few milliseconds,
so the computer never loses power. Now that the UPS is providing power, you can transport the
computer wherever you need it.
Q: How long does HotPlug power the computer?
A: HotPlug doesn’t power the computer directly. You must provide a UPS to power the computer.
HotPlug handles the transfer of power from the wall outlet to the UPS. You should use a UPS that is
robust enough to power the computer as long as it takes to transport it to its destination.
Q: Has CRU patented this technology?
A: Yes, we have a provisional patent on HotPlug, and plan to seek a full patent.
Technical Specifications:
• Watertight
•
• Red indicator lights show which receptacles are powered
• Yellow indicator light shows the unit is turned on
• Usage – 3.5A
Technical Support is standing by and ready to help. Contact Technical Support
through wiebetech.com/techsupport or call (800) 260-9800
HotPlug, Mouse Jiggler, and WiebeT ec h are trademarks of CRU Acquisitions Group, LLC. Other marks are the
property of their respective owners.
© 2008, 2012 CRU Acquisitions Group, LLC. All rights reserved.
Limited Product Warranty
CRU-DataPort (CRU) warrants this product to be free of signi ficant defects in materi al and work manship for a period of two year from the original date
of purchase. CRU’s warranty is nontransferable and is limited to the original purchaser.
Limitation of Liability
The warranties set forth in this agreement replace all other warranties. CRU expressly disclaims all other warranties, including but not limited to, the
implied warranties of me r chantability and fitness for a particular purpose and non-infringement of third-party rights with respect to the documentation
and hardware. No CRU dealer, agent or employee is authorized to make any modification, extension, or addition to this warranty. In no event will CRU
or its suppliers be liable for any costs of procurement of substitute products or services, lost profits, loss of information or data, computer malfunction,
or any other special, indirect, consequential, or incidental damages arising in any way out of the sale of, use of, or inability to use any CRU product or
service, even if CRU has been advised of the possibility of such damages. In no case shall CRU’s liability exceed the actual money paid for the
products at issue. CRU reserves the right to make modifications and additions to this product without notice or taking on additional liability.
HotPlug- Euro Version User Manual (A9- 000-0036 REV. 1.1) - 6 -
 Loading...