

Page 1
FRTX400H-FJ™
USER’S MANUAL
Revised May 22, 2008
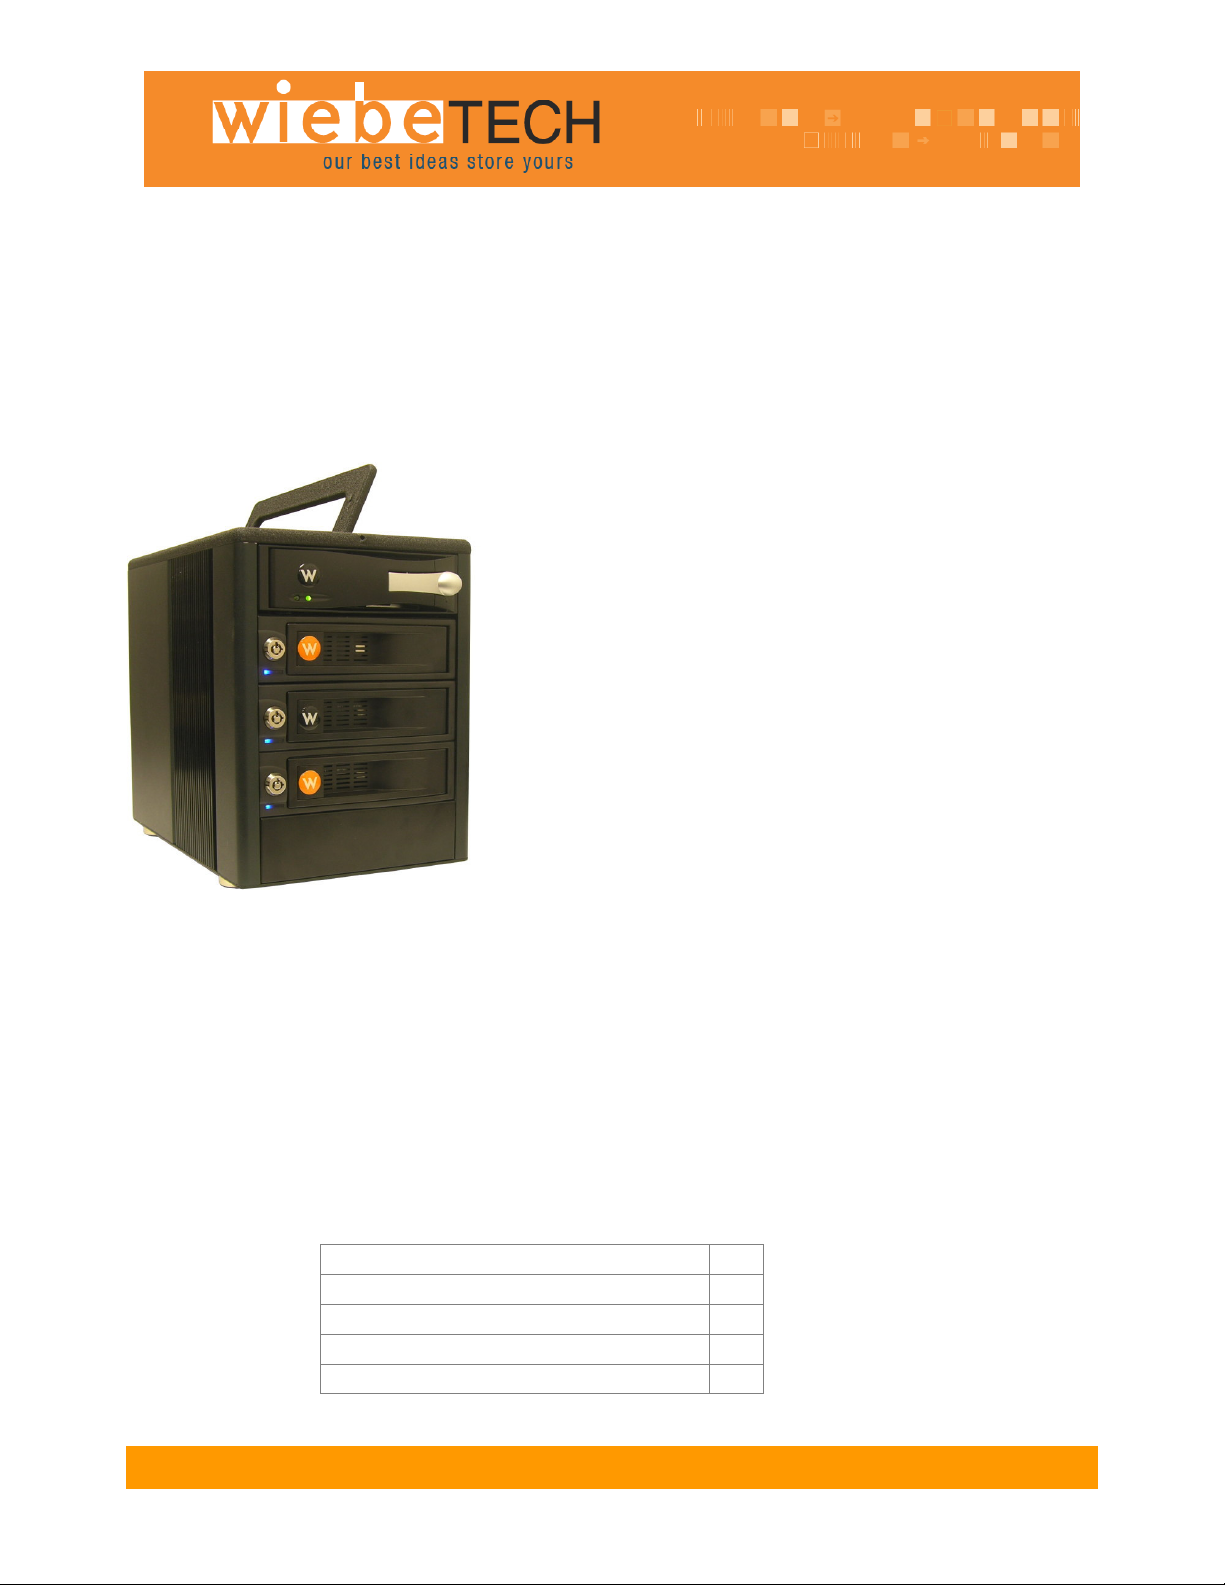
Features
• TrayFree™ technology! Simply slide in a SATA drive and
shut the door. Each SATA bay offers a lock for
additional security, and shock protection for longer drive
life.
• Copy data from IDE or SATA drives. Bays one (PATA)
and three (SATA) are write-blocked. Bays two and four
(SATA) are read/write making it possible to write to
SATA drives from the write-blocked drives.
• Both FireWire and USB connectivity.
• Each hard drive has its own data channel for maximum
speed.
• Power and access LEDs help let you know any activity
with the drive.
• Sturdy aluminum case provides excellent heat
dissipation and rugged durability.
• Heavy duty handle allows for easy transport.
Forensic Device User Advisory
We recommend that you perform a final check on this product.
Prior to first use, please verify that the write-blocking function of this product is working properly. This is
easily done: attach a known good formatted drive, and verify that the drive mounts properly on your
computer. Use a drive that has data on it that you are willing to overwrite. Transfer files to the drive. The
files will appear to transfer to the drive. Thereafter, unmount the drive and remount the drive. The files
that you wrote to the drive should not appear after the drive is remounted. If they do appear, there is a
problem with your Forensic Device, and you should contact our support department for further
instructions.
Table of
Contents
F R TX400H-FJ User M a n u a l - 1 -
Pre-installation Steps 2
Hardware Setup 3
Mounting Volumes 4
Ejecting Volumes 4
Technical Specifications & Warranty info 4
Page 2
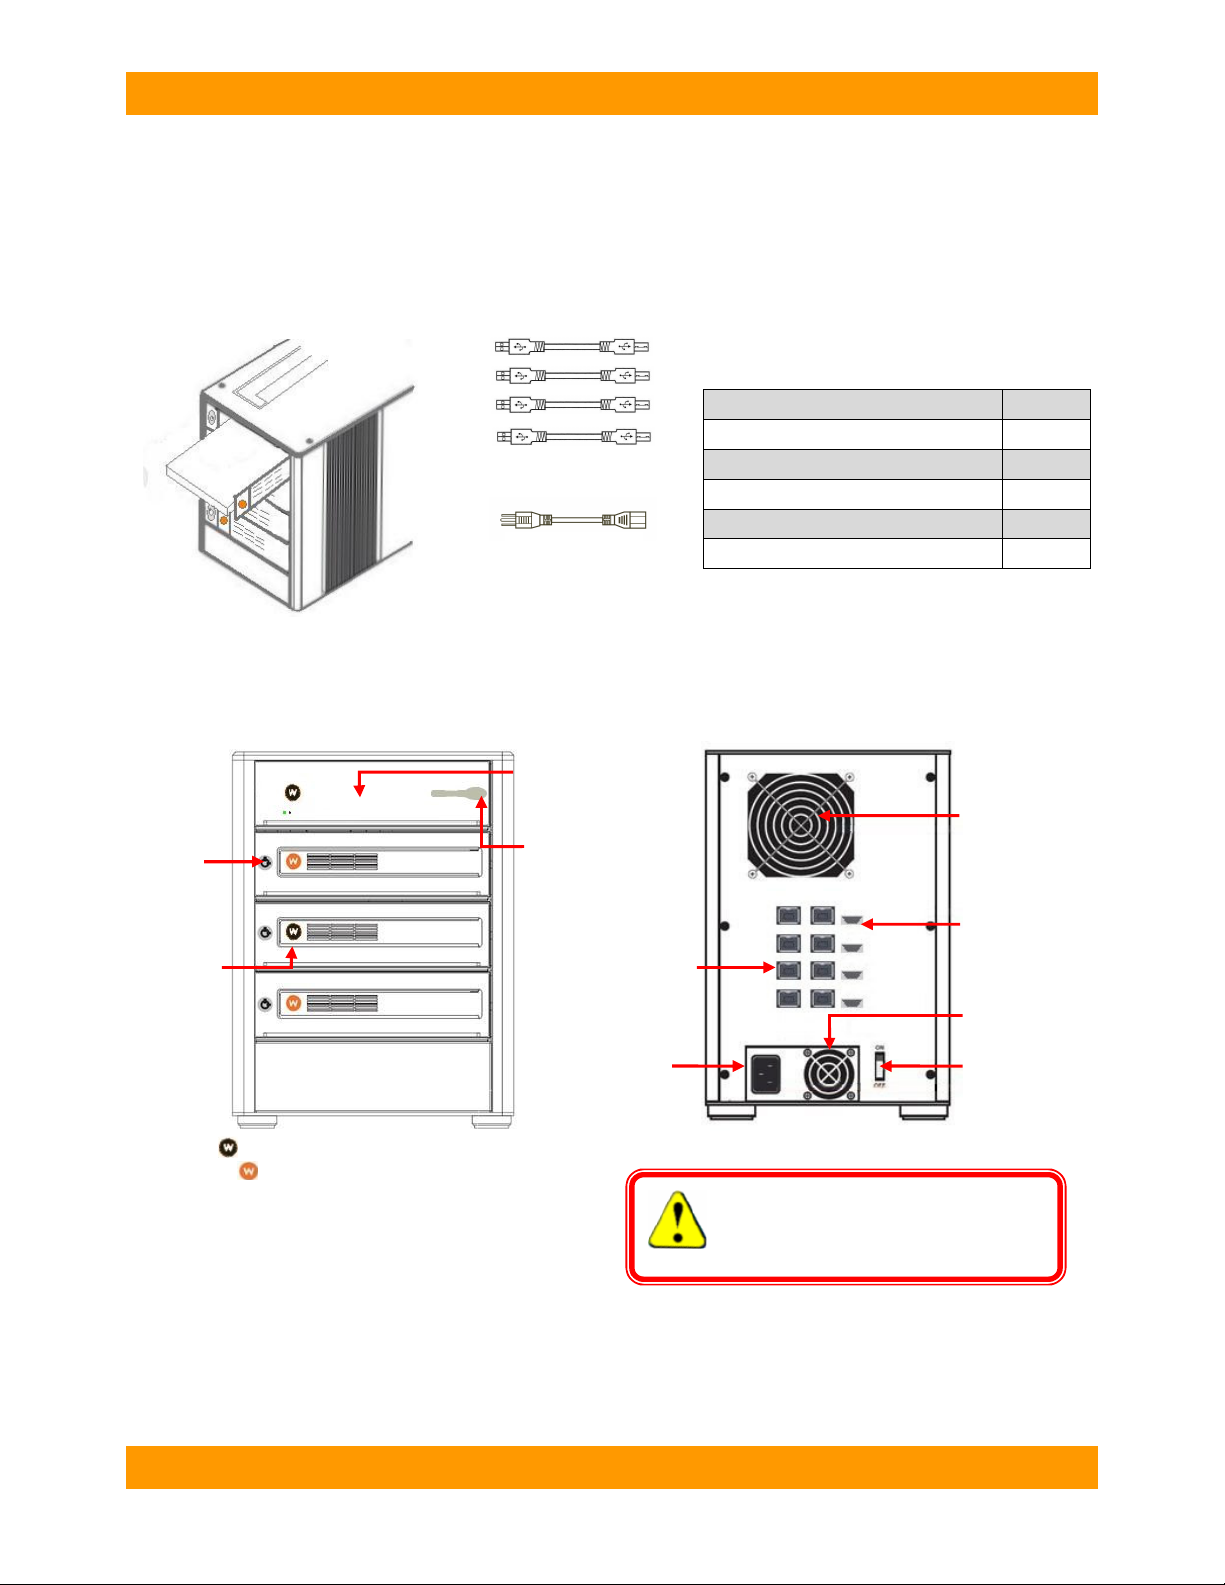
WiebeTech LLC
Power cable
Rear View
Before Installation
1. Check the accessories with your FRTX400H-FJ. Please contact WiebeTech if any parts are
missing or damaged. The box should contain the following items:
FireWire cables
Accessories Quantity
FRTX400H-FJ unit 1
FireWire cables 4
USB cables 4
Power cord 1
Packet of screws and keys 1
Manual and Warranty Information (on CD)
2. Take a moment to familiarize yourself with the parts of the FRTX400H-FJ. This will help you to
better understand the remaining instructions.
Key lock
Ejection handle
Bays one and three are write-blocked
Front View
Bays two and four are read/write
IDE/PATA Tray
Ejection handle/
Key lock
FireWire Port
Power
Connection
WARNING: Do not block the ventilation
fan during operation. Overheating may
damage the device or the hard drives.
8cm Fan
USB Port
Power Supply Fan
Power Switch
F R T X 4 0 0 H - F J U s e r M a n u a l - 2 -
Page 3

WiebeTech LLC
Hardware Setup
1. (Optional) Install a host bus adapter (HBA) with FireWire 800 ports
into an empty expansion slot inside your computer. If your computer
already has 4 available FireWire ports, or if you would rather use USB, you
can skip this step. Compatible cards are available from WiebeTech
(www.wiebetech.com). The following general steps will work for most cards.
Instructions for individual cards may vary, so consult your card’s user
manual.
a) Power down the computer system.
b) Insert the PCI card into an available PCI slot. Do not force it, but it will take firm pressure to fully
seat the interface. It may help to gently rock the card back and forth as you apply pressure.
c) Once the card is fully seated in the slot, secure it in place with a screw.
d) Turn the computer back on.
2. Install your hard drive. For SATA drives simply pull on the ejection handle and open the door.
Then just slide in your SATA drive and shut the door behind it. The drive slides in with the label up and
the SATA connection on the drive is the side that slides in first. For extra security for your hard drive you
can lock the bay, but make sure to unlock it before pulling on the ejection handle again.
For IDE/PATA drives, pull gently on the handle to slide the tray out. If the tray doesn’t slide out easily, do
not continue to pull on the handle. Check the lock and make sure that the tray is unlocked. Once the tray
is out, remove the tray’s lid. Attach your IDE/PATA drive to the ribbon cable and to the 4-pin power cable.
Put the drive into the tray and secure it with screws. Slide the lid back onto the tray and put the tray back
into the bay of the FRTX. Lock the tray—the tray will not power if left in the unlocked position—and then
move on to the next step.
3. Plug in the FireWire cables and power cord. The FRTX400H-FJ connects to your computer
through FireWire. Each drive has its own dedicated FireWire connection for maximal data speeds. Plug
one end of each cable to the back of the unit. Insert the other end into a FireWire port on the computer.
If daisy-chaining, join all four bays together using three FireWire cables. Connect a fourth FireWire cable
to one of the remaining open FireWire ports on the back of the FRTX. Plug the other end of that cable
into an open FireWire port on the computer. Be sure to label your drives in such a way that you’ll know
which one you’re accessing on the computer.
Your product is now ready to use! Turn on the power switch on the back of the unit. If your target drives
are already formatted, you can begin using them right away. Otherwise you can format them at this time
to prepare them for usage with your computer. For obvious reasons, drives in the write-blocked bays
cannot be formatted.
FireWire cables
F R T X 4 0 0 H - F J U s e r M a n u a l - 3 -
Page 4

WiebeTech LLC
2.4 or above (USB only)
Mounting Volumes
Assuming the drives are formatted in a format compatible with your computer, they’ll mount as soon as
you connect the FRTX to the computer and turn on the power. (Note: Each bay must also be locked to
have power.) On PCs, you can access the drives from My Computer. On Macs, the volume(s) will
appear on the desktop.
Ejecting Volumes
Before turning off power to a drive, or disconnecting its bay from the computer,
you must first safely eject all volumes associated with that drive to prevent data
corruption or loss. On a PC, use the ejection arrow on the task bar. Windows
will indicate when it is safe to disconnect or turn off the FRTX400H-FJ. If a drive
contains multiple partitions, you’ll need to eject each one. On a Mac, eject
volumes by dragging their icons to the trash.
(Windows XP)
(Mac)
Technical Specifications
Product name/code:
Host Interfaces:
Drive Types Supported:
TrayFree™ Technology:
Shock Absorbing Bays:
Lockable Bays:
Power LED:
Access LED:
Operating System
Requirements:
Operating Temperature:
Operating Humidity:
Power Switch:
Power Supply:
Cooling Fan:
External Material:
Shipping Weights:
Dimensions:
Warranty:
FRTX400H-FJ
Dual FireWire 800: up to 800 Mbps (55MB/s approximate actual speed)
USB 2.0: up to 480 Mbps (30MB/s approximate actual speed)
Bay One: 3.5″ IDE/PATA hard drive up to 750GB. Write-blocked.
Bay Two: 3.5” SATA 1 or SATA 2 hard drives up to 1TB. Read/Write.
Bay Three: 3.5” SATA 1 or SATA 2 hard drives up to 1TB. Write-blocked.
Bay Four: 3.5” SATA 1 or SATA 2 hard drives up to 1TB. Read/Write.
Yes, with bays two, three and four
Yes, with bays two, three and four
Yes, on all bays
Yes, on all bays
Yes, on all bays
Windows XP and Vista
Mac OS X
Linux distributions using Kernel version
50 – 85° Fahrenheit (10 – 30° Celsius)
5% to 95%, noncondensing
2 position: On / Off
Input: 100-240VAC
Output: 220 Watts
8cm Ball Bearing Fan
Aluminum alloy case
16 lbs sans drives
(177mm W x 270mm D x 231mm H)
2-year limited warranty. See warranty statement for details and limitations.
WiebeTech offers free phone support for 90 days after purchase (1-866-744-
8722). After 90 days, email support is available at support@wiebetech.com.
F R T X 4 0 0 H - F J U s e r M a n u a l - 4 -
Page 5

WiebeTech LLC
FRTX400H-FJ, RTX and TrayFree are trademarks of CRU-DataPort. Other marks are the property of their respective
owners.
© 2008 CRU-DataPort. All rights reserved.
If you have any questions or problems, please contact support@wiebetech.com for technical support. If you are
interested in purchasing more WiebeTech products, check our website or contact sales@wiebetech.com. We
appreciate being able to serve you!
F R T X 4 0 0 H - F J U s e r M a n u a l - 5 -
 Loading...