

Page 1
Page 2
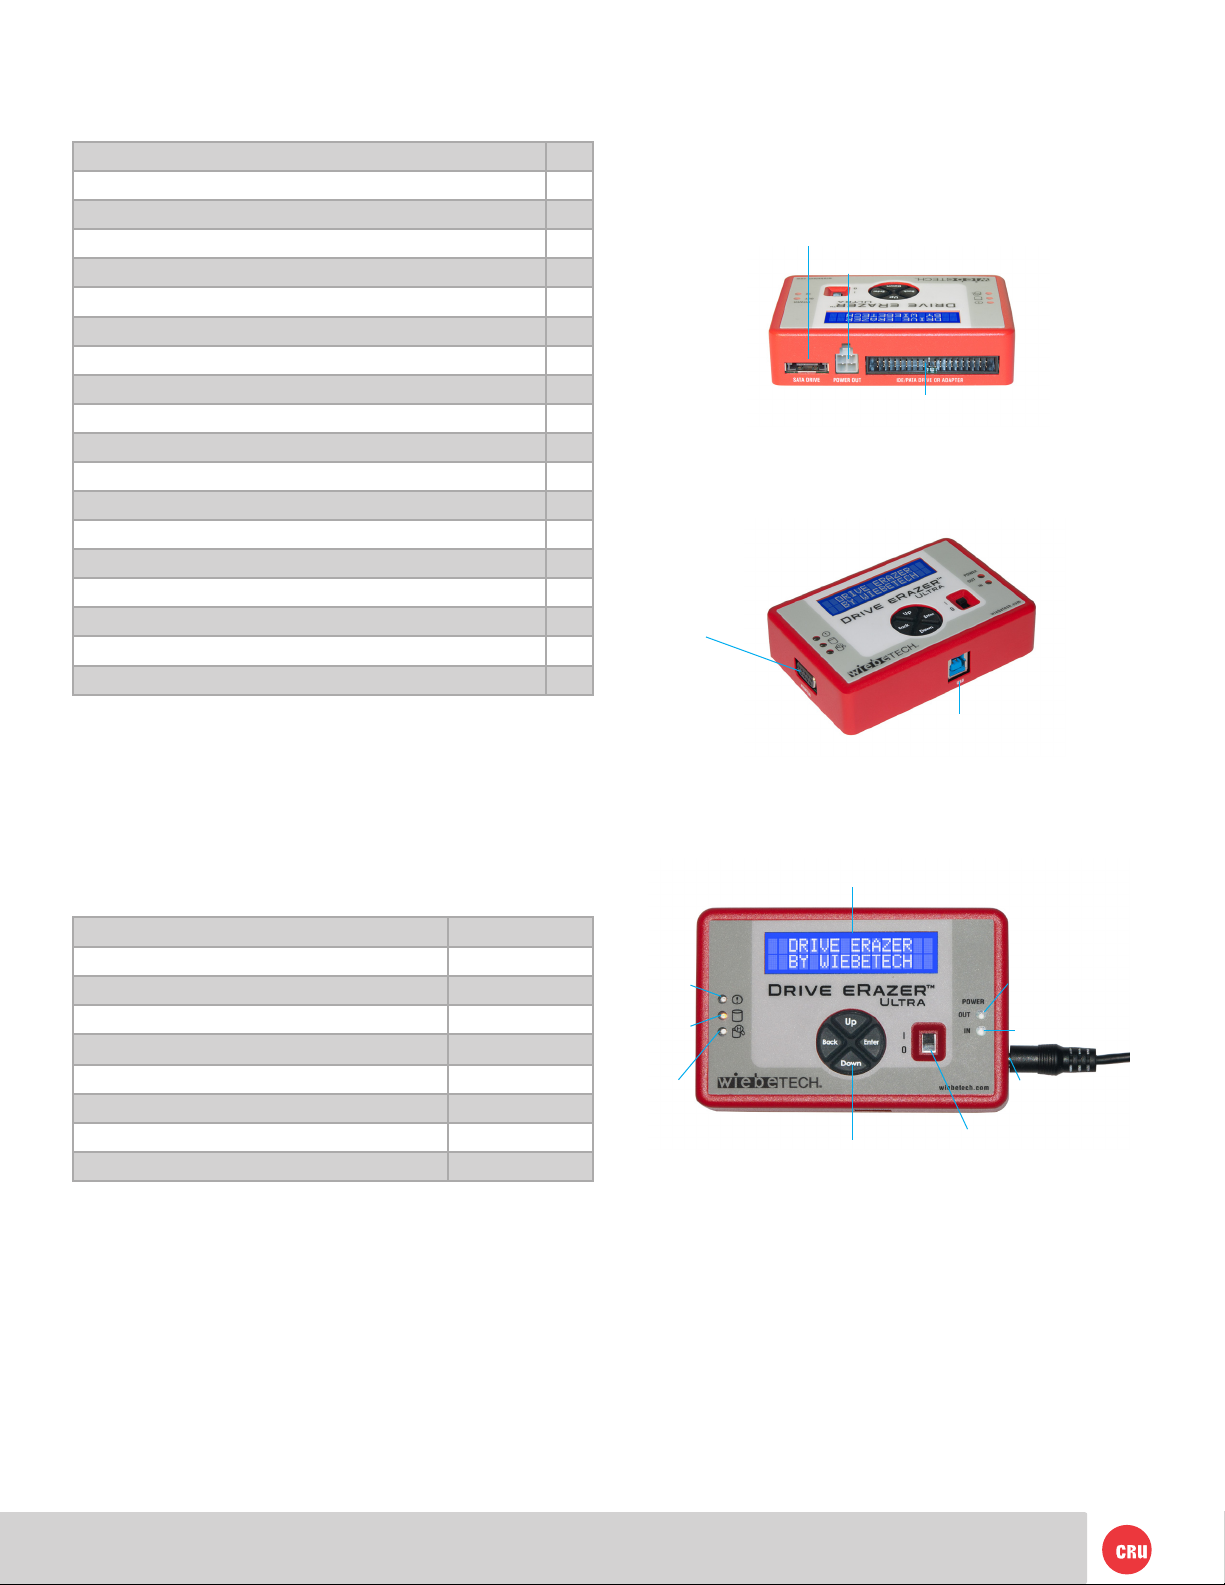
Table of Contents
1.2 Identifying Parts
1. Pre-Setup
1.1 Drive eRazer Ultra Accessories
1.2 Identifying Parts
2. Setup
3. Menu Structure and Usage
3.1 Home/Start Erasing
3.2 Review Settings
3.2.1 Erase Type
3.2.2 HPA/DCO Handling
3.2.3 Validation
3.2.4 Label Printer Output
3.2.5 Reset to factory
3.3 View Drive Info
3.4 View Dock Info
3.5 Other Screens During the Erasure Process
3.5.1 Operational Status
3.5.2 Error Indication
4. Frequently Asked Questions
5. Technical Specications
1. Pre-Setup
1.1 Accessories
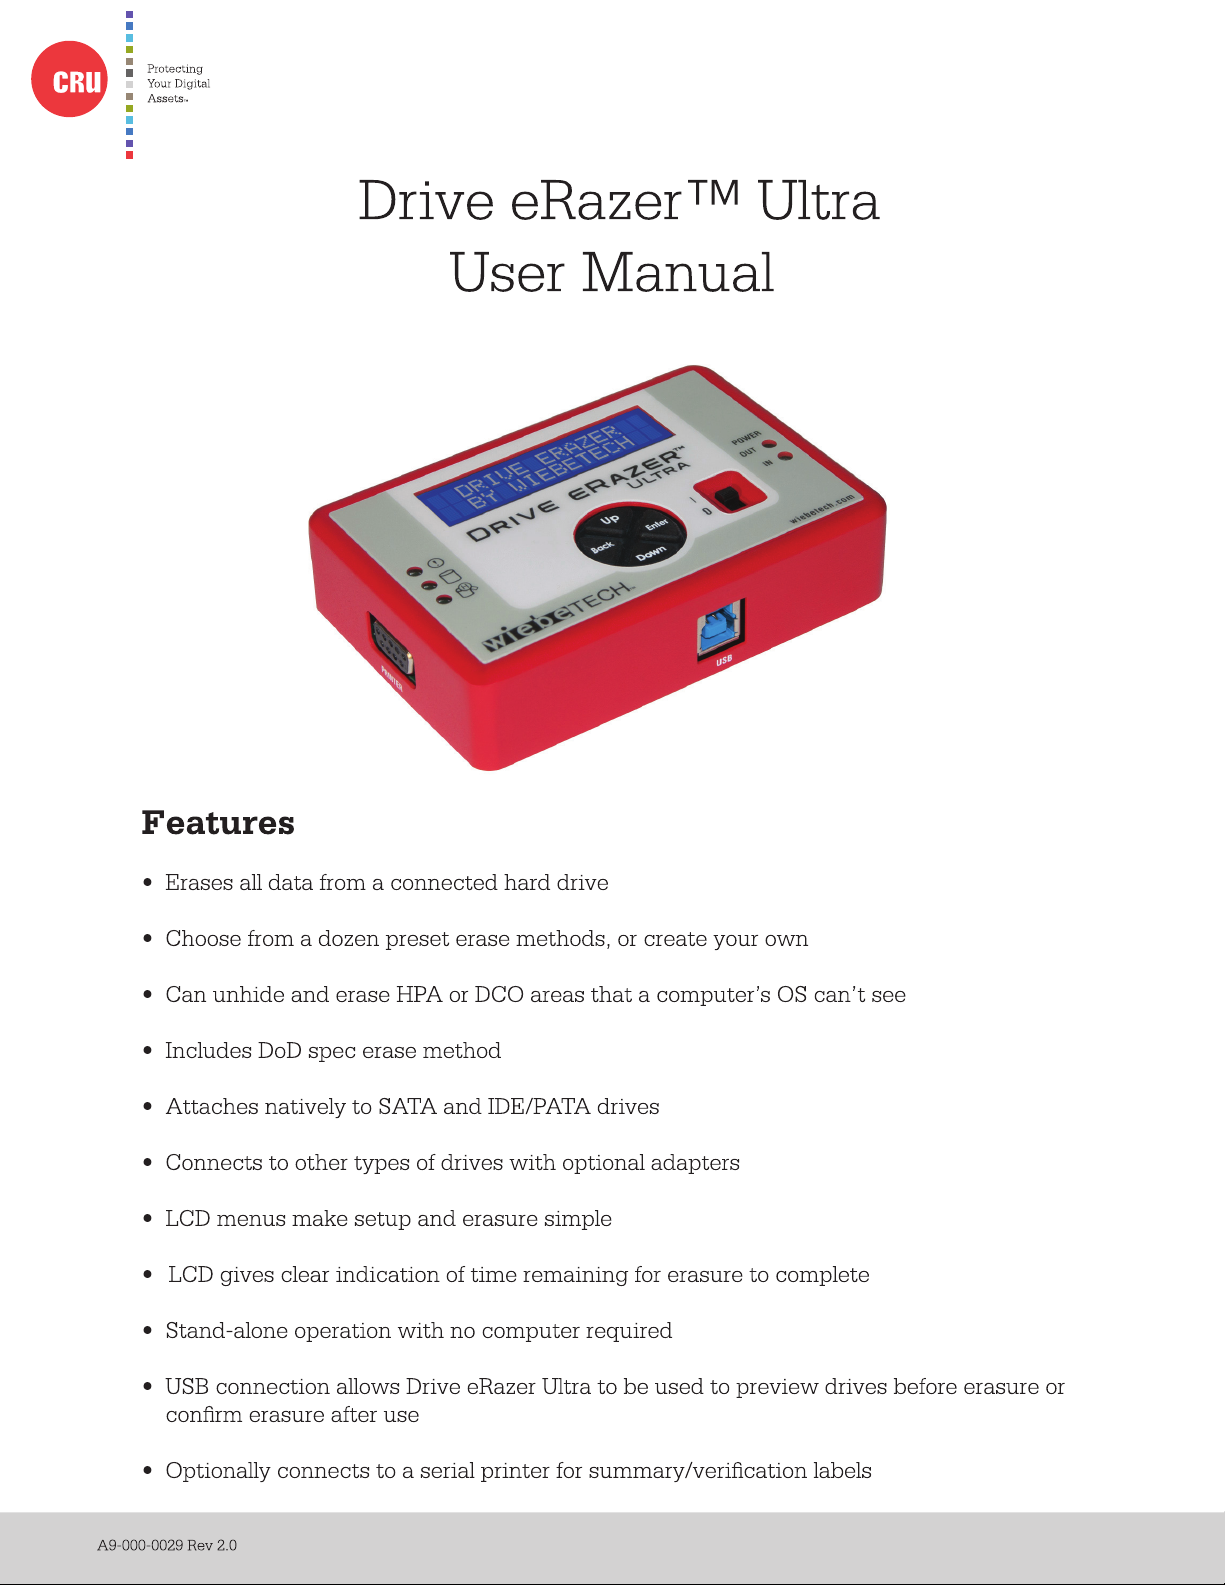
Take a moment to familiarize yourself with the parts of your
2
new Drive eRazer. This will aid you in the remaining steps.
2
2
3
3
eSATA connection for connecting SATA drives
4-pin square connection for drive power cable
3
3
3
4
40-pin IDE header for external IDE cable attachment
4
5
5
5
5
6
DB9 connector for
6
Serial connection for
6
printer output
7
9
USB B type connector
Check the accessories packaged with your Drive eRazer
Ultra. Please contact CRU if any items are missing or
damaged. The box should include:
Contains Number
Drive eRazer unit 1
AC adapter 1
Metal drive plate 1
Packet of screws and bumpers 1
SATA power/data cable 1
IDE/PATA power cable 1
IDE/PATA data cable 1
Quick Start Guide and warranty info 1
Error
LED
(red)
Disk access
LED (amber)
HPA/DCO
Indication
LED (green)
LCD
Navigation buttons
Power output
status LED (green)
Power output
status LED (green)
DC +12V input from
AC adapter
Power switch
Page 2
Page 3
2. Setup
a) Attach protective metal drive plate to your 3.5”
hard drive. (This step is optional.) The purpose
of the bottom plate is to provide protection to your
drive electronics and aid heat dissipation.
b) If erasing an IDE/PATA drive, congure the
jumpers on the rear of the drive. The drive must
be set to the Master setting. Consult the
instructions or your drive (some drives display
conguration information on the drive’s label).
c) Ensure that the Drive eRazer’s power switch is in
the OFF (0) position.
d) Connect Drive eRazer to the drive (or adapter) using
either the IDE ribbon cable for IDE drives or the
SATA data/power cable for SATA drives.
e) If using an adapter, connect the drive to the adapter.
f) Attach the power cable to Drive eRazer Ultra and
to the drive. For SATA drives, the power cable and
data cable are combined into a single SATA drive
interface.
g) Plug the AC adapter into Drive eRazer Ultra.
h) Turn on the power switch. The connected drive will
power up and Drive eRazer Ultra main menu will
appear on the LCD screen
WARNING: Ensure that Drive eRazer Ultra’s power
switch is in the OFF (0) position before connecting a drive.
3. Menu Structure/Usage of Drive eRazer
Ultra
Use the LCD and 4-button navigation interface to start
erasing, adjust settings, view information about the drive
and dock, or check on operational status. On the 4-button
navigation interface, UP and DOWN allow scrolling through
options, while ENTER selects and BACK goes back to the
previous screen. When asked if you want to save a setting as
the default, the ENTER button saves as default. Pressing UP
or DOWN continues without saving the selection as default.
3.1 Home/Start Erasing
Use this screen to begin the erasure process using current
settings. “Quick Erase” is the default erasure setting. Quick
Erase uses all zeroes as the overwrite pattern.
START ERASING
QUICK ERASE >
ESTIMATING
ERASE TIME
WILL ERASE ALL
DATA >
ERASING. . . 2%
19 M REMAINING
When Quick Erase is complete, Drive eRazer will verify a
sample to ensure completion. See section 3.2.3 for more
information on verication.
PREPARING VERIFY
VERIFY . . .2%
39M REMAINING
VERIFY
DONE >
3.2 Review Settings
REVIEW SETTINGS
>
From this screen, the user can choose the erase type, set
HPA/DCO handling, set the sample size for validation, and
select the printer output.
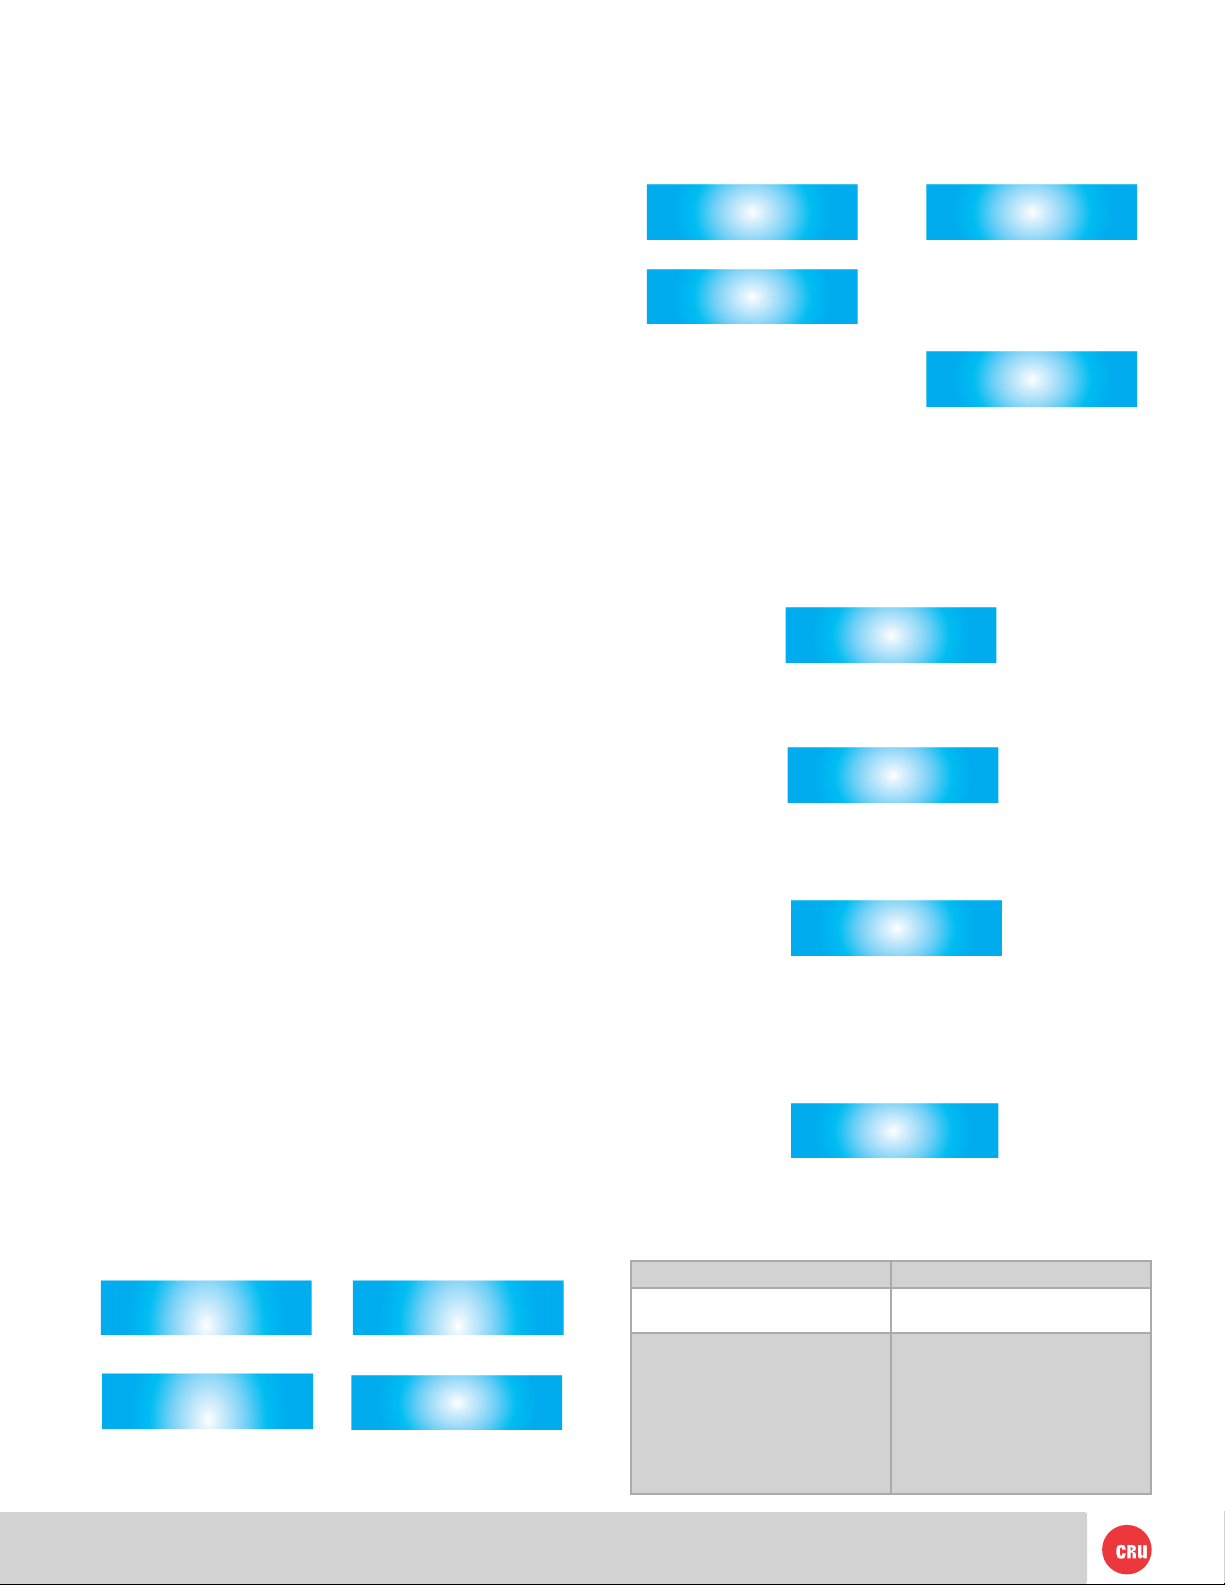
3.2.1 Erase Type
• From the “Review Settings” screen, press ENTER to
get to the “Erase Type” screen.
ERASE TYPE
>
• The current erase mode will display, along with
an option to change the setting. Press ENTER
to change.
QUICK ERASE
CHANGE SETTING? >
• Press the UP and DOWN buttons to scroll through the
different options. Press ENTER to select the erase
mode you want to use.
CHANGE MODE TO
CUSTOM ERASE >
• After you select the mode, you will be prompted to
make your selection the default mode. Pressing
ENTER saves the mode as the default. Pressing UP
or DOWN sets and continues without saving the
mode as default.
CUSTOM ERASE
MAKE DEFAULT? >
3.2.1.1 Erase Specications Supported: Drive eRazer
Ultra offers user exibility with over a dozen preset erase
methods. Use the following chart to help select which
erase specication to use.
Spec Explanation
QUICK ERASE Performs single pass writing all
CUSTOM ERASE Performs 1 to 99 passes (user-
zeroes
selectable), overwriting with zeroes
or a user-selected pattern. On
every other pass, the complement
(inverse) of the selected pattern
will be used, but the last pass
will always use the user-dened
pattern.
Page 3
Page 4

RANDOM ERASE Performs 1 to 99 passes (user-selectable),
SECURE ERASE N Initiates the drive’s built-in Secure Erase
SECURE ERASE E Initiates the drive’s built-in Secure Erase
DOD CLEAR US Department of Defense (DoD 5220.22-M)
DOD SANITIZE US Department of Defense (DoD 5220.22-M)
NIST80088 CLEAR “Clear” standard dened by the National
NIST80088 PURGE “Purge” standard dened by the National
CSEC ITSG-06 Canadian data sanitization standard
HMGIS5 BASELINE Great Britain’s “Baseline” drive erasure
HMGIS5 ENHANCED Great Britain’s “Enhanced” drive erasure
DSD ISM 6.2.92 Australian government’s data sanitization
VERIFY ONLY Does not erase anything. Performs the
overwriting with a randomly generated 32-bit
pattern. A new pattern is generated for each
pass.
(Normal) function. Per the ATA specication,
this function overwrites all addressable areas
using zeroes. HPA or DCO areas are excluded
per the spec, but Drive eRazer Ultra will
unhide such areas prior to initiating Secure
Erase if the user has changed the HPA/DCO
behavior in the Settings menu. Secure Erase
is better able to handle bad blocks compared
to other erase methods.
(Enhanced) function. This is similar to Secure
Erase Normal, except that HPA and DCO
areas are erased (without being removed),
and instead of all zeroes, a repeating pattern
is used. The pattern is set by the drive
manufacturer.
“Clear” standard
“Sanitize” standard
Institute of Standards and Technology’s
Guidelines for Media Sanitization special
publication 800-88
Institute of Standards and Technology’s
Guidelines for Media Sanitization special
publication 800-88
standard
standard
standard. Also satises New Zealand’s GCSB
NZISM 2010 standard. Removes HPA or DCO
areas, then performs a single pass of a random
pattern (three passes for drives smaller than
15GB).
verication step only.
3.2.1.2 Custom Erase: If this mode is selected, the
user may select the pass count number, overwrite
type, and overwrite pattern. After an erase mode is
selected, you can make it the default. ENTER saves as
the default. UP or DOWN sets and continues without
saving the selection as the future default.
# OF PASSES
01 >
DATA PATTERN
00000000 >
CUSTOM ERASE
MAKE DEFAULT? >
3.2.2 HPA/DCO Handling
Erase modes Quick Erase, Custom Erase, Secure Erase
N, and Secure Erase E allow the user to select how
hidden areas (HPAs and DCOs) are handled during the
erasing process.
• From the “Review Settings” screen, press ENTER and
then UP or DOWN to get to the HPA/DCO Handling
screen. Press ENTER.
HPA/DCO HANDLING
>
• The current HPA/DCO handling setting will display,
along with an option to change the setting.
Press ENTER to change.
UNLOCK ALL
CHANGE SETTING? >
• Use the UP and DOWN buttons to scroll through the
handling options: unlock all, unlock HPA only, and
ignore all. Press ENTER to select.
CHANGE TO
UNLOCK HPA ONLY >
• After you select the handling, you will be prompted
to make your selection as the default. Pressing ENTER
saves the mode as default. Pressing UP or DOWN sets
and continues without saving as default.
IGNORE ALL
MAKE DEFAULT? >
3.2.3 Validation: The user may select the level at
which the Drive eRazer veries the erasure process at
completion. The options are Minimal (factory default
selection), Medium, and High. This validation process
offers a basic level of assurance that the erasure was
successfully completed. Note: some erase specications
recommend or require that a separate tool be used for
validation.
• From the “Review Settings” screen, press ENTER,
and then UP or DOWN to get to the “Validation”
screen. Press ENTER.
VALIDATION
>
• The current validation setting will display, along with
an option to change the setting. Press ENTER to
change.
MINIMAL
CHANGE SETTING? >
• Use the UP and DOWN buttons to scroll through the
verify options: MINIMAL, MEDIUM, or HIGH.
Press ENTER to select.
CHANGE VERIFY TO
MEDIUM >
• After you select the validation you will be prompted to
make your selection the default. Pressing ENTER
saves the mode as the default. Pressing UP or DOWN
sets and continues without saving as default.
MEDIUM
MAKE DEFAULT? >
Page 4
Page 5

3.2.4 Label Printer Output
Drive eRazer Ultra features a DB9 null-modem serial
connection for the purpose of connecting a label printer.
This will allow Drive eRazer to print a label recording
details of an erase process. This occurs at the end of the
process. The label can then be afxed to the drive, or
to a DriveBox™ anti-static storage case. There are two
output modes, one for a 4” x 1” label and one for a 4” x
6” label. You may also print a label as a test without an
erasure process.
• From the “Review Settings” screen, press ENTER
and then UP or DOWN to get to the “Printer
Output” screen. Press ENTER.
PRINTER OUTPUT
>
• The current Printer Output setting will display, along
with an option to change the setting. Press ENTER to
change, or UP or DOWN to print a test label.
SMALL LABEL 4x1
CHANGE SETTING? >
PRINT TEST LABEL
>
• Use the UP and DOWN buttons to scroll through the
printer options: Small Label 4x1 or Large Label 4x6.
Press ENTER to select.
CHANGE LABEL TO
LARGE LABEL 4x6 >
• After you select the printer option, you will be
prompted to make your selection the default. Pressing
ENTER saves the mode as the default. Pressing UP or
DOWN sets and continues without saving as default.
LARGE LABEL 4x6
MAKE DEFAULT? >
3.2.5 Reset to Factory
From this screen, you can reset the settings on Drive
eRazer Ultra to the factory defaults.
Function Factory Default Setting
Erase Mode Quick Erase
HPA/DCO Handling Ignore All
Validation Minimal
Label Printer Output Small Label 4x1
• From the “Review Settings” screen, press ENTER and
then UP or DOWN to get to the ”Reset to
Factory” screen. Press ENTER.
• At the next screen, press ENTER to continue. The
settings are now reset to the factory defaults.
CONTINUE >
3.3 View Drive Info
This screen displays information about the attached drive.
• From the “Home/Start Erasing” screen, press the UP or
DOWN buttons to get to the “View Drive Info” screen.
Press ENTER.
VIEW DRIVE INFO
>
• Use the UP or DOWN buttons to scroll through and view
the following info about the drive.
Appearance on LCD Explanation
Capacity (Bytes) Capacity of the HDD, measured
in bytes.
Manufacturer Manufacturing company name
of the HDD.
Model number Model number of the HDD.
Serial number Serial number of the HDD.
Firmware Rev Firmware revision number of the
HDD .
HPA size (Bytes) The size of the Host Protected
Area of the HDD, measured in
bytes.
DCO size (Bytes) The size of the Device Congura-
tion Overlay of the HDD, mea-
sured in bytes.
Disk health Displays the S.M.A.R.T. health
status of the drive.
Secure Erase Nor time Time reported by the drive that
it will take to use Secure Erase
(Normal).
Secure Erase Enh time Time reported by the drive that
it will take to use Secure Erase
(Enhanced).
Start/Stops S.M.A.R.T. information on how
many times the drive has spun
up and spun down.
Power cycles S.M.A.R.T. information on how
many power on/off cycles the
drive has underwent.
Bad sectors Number of bad sectors reported
by the drive.
Page 5
RESET TO FACTORY
>
Page 6

3.4 View Dock Info
(continued)
This screen displays information about your Drive eRazer
unit.
• From the “Home/Start Erasing” screen, press the up or
down buttons to get to the “View Dock Info” screen.
Press ENTER.
VIEW DOCK INFO:
>
• Use the UP or DOWN buttons to scroll through and view
the following info about Drive eRazer.
Appearance on LCD Condition/Explanation
Product Name Brand name of the product (e.g.
“Drive eRazer Ultra”)
Unique ID# A specic, unique number as-
signed to the unit for identica-
tion, akin to a serial number.
Firmware ver. # Minimal
Label Printer Output Specic rmware version installed
on the Drive eRazer product.
3.5 Other Screens During the Erasure Process
3.5.1 Operational Status
During erasure, status messages are displayed on the
LCD. Examples are below.
Appearance
on LCD
STARTING
ERASURE
GATHERING
INFO
PREPARING
ERASE
ESTIMATING
ERASE TIME
PASSWORD
RESET
PASSWORD
RESET CYCLE
POWER
HPA RESET HPA was successfully removed.
DCO RESET DCO was successfully removed.
VERIFY DONE The erase process and verication completed
ERASE DONE The erase process completed successfully;
Condition/Explanation
Displays briey when user rst selects “start
erasing” and then conrms that selection.
Displays briey while DEU is gathering
information from the drive and making
calculations to determine such things as the
presence of an HPA or DCO.
Displays briey while DEU is checking user
settings and planning the erase.
DEU is wiping a portion of the drive (for 1
minute) for the purpose of estimating how
long it will take to erase the whole drive.
(Shown briey.) DEU is about to reset the
password.
Drive’s password was successfully reset. User
must turn off DEU and then turn it back on.
successfully.
verication not available (only seen with Secure Erase modes).
Appearance on LCD Condition/Explanation
PREPARING VERIFY DEU is checking user settings and
planning the verication process.
3.5.2 Error Indication
If Drive eRazer Ultra encounters any errors, a brief
explanatory message displays. Examples are below.
Appearance on LCD Condition/Explanation
PASSWORD ERROR DEU tried to reset the password
on the drive, but was unable to
do so. Received an error from the
drive.
CAN'T RESET PASSWORD Password reset was thought to
have been successful, but a subsequent double-check detected
that the password was still present.
FACTORY < min. Drive suspected of reporting
bogus information. DCO size appears to be unreasonably large,
leaving less than 5MB of disk
capacity.
NATIVE < min. Drive suspected of reporting
bogus information. HPA size appears to be unreasonably large,
leaving less than 5MB of disk
capacity.
BLOCKCNT < min. Drive suspected of reporting bo-
gus information. Drive’s factory
capacity appears to be less than
5MB.
HPA RESET ERROR Failed rst attempt to remove
HPA.
HPA RESET FAILED HPA was thought to have been
removed, but a subsequent
double-check found it to be still
present.
DCO RESET ERROR Failed rst attempt to remove
DCO.
DCO RESET FAILED DCO was thought to have been
SECURE ERASE NOR
NOT SUPPORTED
SECURE ERASE NOR
ERROR
SECURE ERASE ENH
NOT SUPPORTED
removed, but a subsequent
double-check found it to be still
present.
Drive does not support the
“Secure Erase (Normal)” feature.
An error occurred during the
Secure Erase (Normal) process.
Drive does not support the
“Secure Erase (Enhanced)”
feature.
Page 6
Page 7

(continued from previous page)
Appearance on LCD Condition/Explanation
SECURE ERASE ENH
ERROR
WRITE CMD ERROR DEU received an error while attempt-
READ CMD ERROR DEU received an error while attempt-
VERIFICATION ERROR A block on the drive doesn’t match
An error occurred during the Secure
Erase (Enhanced) process.
ing to write to the drive.
ing to read from the drive.
what was supposed to have been
overwritten there.
4. Frequently Asked Questions (FAQ)
Q: How does Secure Erase work?
A: Secure Erase is a feature on many modern hard drives
(greater than 15GB). This feature is activated by a low
level command to the drive and causes the drive to erase
itself using methods developed by the drive manufacturers
in conjunction with the NSA. To protect against malware
attacks, operating systems such as Windows and Mac
OS (and software applications written for these operating
systems) cannot send this command, but Drive eRazer Ultra
can.
Secure Erase sequentially overwrites the data on the drive,
similar to Drive eRazer’s other erase modes. However, Secure
Erase better handles data on “bad blocks” (single pass may
stop and report an error at a bad block).
Secure Erase is implemented on most drives that were
manufactured in 2001 or later. However, an estimated
time for completion was not added until later. Some drives
therefore support Secure Erase but will not give an estimated
completion time.
Q: Do I have to jumper my IDE drive to a particular setting?
A: We recommend that you jumper your IDE/PATA hard drives
to a MASTER setting. Some hard drives have two different
MASTER settings: one for when there is a SLAVE drive
present and one for when there is NO SLAVE drive present.
Choose the setting for NO SLAVE present. There may be
some drives that will not work with either of these settings.
The next choice is CABLE SELECT. If this does not work, try
using NO jumpers. This may be the same as MASTER with
NO SLAVE present.
Q: What kind of printer should I use with Drive eRazer Ultra?
A: Drive eRazer Ultra was tested primarily with Zebra brand
printers compatible with ZPL II formatted text (often indicated
by –Z at the end of the model number). During development
we made every effort to make this feature as compatible as
possible, but no list of compatible printers is currently being
published. If choosing a new printer, the Zebra product line
is a good starting point. Feel free to contact WiebeTech for
up-to-date information about Drive eRazer Ultra and serial
printers.
Q: What kind of cable do I need for the Printer Port?
A: The printer port is a standard 9-pin serial RS-232 port.
Drive eRazer Ultra requires a male end and most printers
also require a male end. If you need to source a new cable,
what you need is probably a “Male to Male RS-232 (DB9) Null
Modem Serial cable.” Check your printer’s documentation
regarding serial cable types. Connecting it to a computer’s
serial port is possible with a “Male to Female RS-232 (DB9)
Null modem serial cable”.
Q: What sizes are the labels that Drive eRazer Ultra prints?
A: Drive eRazer Ultra can print one of two different label sizes:
4”x1” or 4”x6”, depending upon how it’s congured.
Q: How fast will Drive eRazer Ultra erase the data on my drive?
A: Drive eRazer Ultra can erase modern hard drives at up to
7GB/minute or more. The erasure time depends on several
factors. Older drives will generally take longer than newer
ones. Higher levels of verication will not affect the time spent
erasing, but will make the total process take longer. Finally,
the erase mode plays a role. Quick Erase will generally nish
a little faster than Secure Erase.
Q: With what drive capacities is Drive eRazer compatible?
A: Drive eRazer cannot erase extremely small drives or media
that are less than 10,000 sectors. Assuming a 512 byte sector
size, 10,000 sectors is less than 5MB. There is currently no
known limit to how large of a disk Drive eRazer will erase. As
of September 2011 Drive eRazer has been tested with up to
3TB hard drives. We have no reason to believe Drive eRazer
will not continue to work with newer and larger drive sizes as
they are released.
Page 7
Q: What information is included on each label that Drive
eRazer Ultra prints?
A: Below are examples of the two types of labels that Drive
Eraser Ultra generates.
4” x 1” label
Page 8

(continued from previous page)
4” x 6” label
Q: Why does the USB connector look like USB 3.0 but the
documentation says it’s USB 2.0?
A: Drive eRazer Ultra uses a USB 3.0 style connector because
it shares a form factor and many parts with another product.
However, the controller chip that drives DEU’s USB connection
supports USB 2.0 only. The port can be used with either USB
2.0 or 3.0 type cables and with either USB 2.0 or 3.0 hosts, but
it will operate at USB 2.0 speed. The intended purposes of the
port are the previewing of a drive and rmware upgrading,
rather than for lengthy data transfers. For these two purposes
USB 2.0 speed is sufcient.
Q: Can I switch drives or attach a hard drive when the unit
is turned on?
A: This is not recommended, because it could cause an
electrical short that could damage the Drive eRazer ultra or
the drive.
Q: Will Drive eRazer Ultra work with a Solid State Drive (SSD)?
A: Short answer: SSDs erased by DEU in any mode would be
safe from casual data retrieval attempts, but for very sensitive
data the only way to guarantee security is to physically
destroy the drive.
The SSD’s controller may instead remap that physical
sector to a new logical sector, leaving the data intact but
inaccessible. Even a full overwrite of a SSD may therefore
not result in a fully wiped drive. However, the data
remaining on the drive would not be accessible via normal
means. Recovering such data would require removing the
actual ash chips from the SSD’s circuit board and accessing
them with special equipment and software tools.
Secure Erase modes offer the best chance of fully erasing an
SSD because they use the drive’s built-in erasing function.
Secure Erase is dened by the ATA specication and requires
drives to fully erase all user accessible data areas when the
command is received. The Enhanced version also erases any
data within HPA or DCO areas. However, at least one study
has shown that some SSD manufacturers did not correctly
follow at least this portion of the ATA specication. So,
while some SSDs will be erased fully by Secure Erase, others
may not. If you know that a particular SSD model correctly
implements Secure Erase modes per the ATA spec, these
modes can erase the SSD completely. If you’re unsure, you
should assume that data fragments could remain.
Q: My Drive eRazer Ultra shows “WRITE CMD ERROR” on
the LCD and the erase has stopped progressing. What do I
do next?
A: This message means that the drive reported an error when
attempting to execute a write command sent to it by DEU.
Several things can cause such an error, such as a bad block
on the drive, or a poor physical connection between DEU
and the drive. It may occur if the drive or dock is moved or
bumped during the erase process. This is an unrecoverable
error (indicated by the lighting of the Red “Error” LED).
The next step is to turn off DEU’s power. If you like, you can
turn DEU back on and attempt to erase the drive again. A
bad block is not always 100% bad, so sometimes a block that
fails to be overwritten on one attempt will succeed on the
next try. Make sure the cables connecting the drive and DEU
are fully seated, and do not attempt to move the drive, DEU,
or cables during the erase process. Make sure the drive has
good air ow around it to avoid any possible heat issues. If
you continue to see this error message on the drive, the next
thing to try is changing to Secure Erase Enhanced mode. This
mode doesn’t use write commands; rather, it issues a single
command to the drive that causes the drive to erase itself.
This mode handles bad blocks better than modes based on
write commands. If none of these remedies work, the only
way to ensure there are no recoverable data remaining on the
drive is to physically destroy it.
Longer answer: With SSDs, the host (such a computer or Drive
eRazer) does not have direct access to the sectors on the drive.
There is therefore no way to guarantee that a command to
erase a given sector will actually erase that sector.
Page 8
Page 9

Q: My department requires 100% verication of erasure. Does
Tested to comply
with FCC sta ndards
the “high” option verify 100% of the drive?
A: No, although the “high” checks a large number of sectors of
the drive, performing 100% verication would require a much
greater amount of time than the erasure process itself. For this
reason, and for the security of having an independent tool, we
recommend using a 3rd party tool for 100% verication.
Many organizations actually require that the erase tool and
the verication tool be separate products.
The Australian Government Information Security Manual,
November 2010, states that “Verifying the sanitisation
of media with a different product to the one conducting
the sanitisation process provides an independent level of
assurance that the sanitisation process was conducted
correctly” (161).
If it satises your department’s requirements, you could use
a hex editor, such as HxD, to visually inspect the contents of
the drive to verify that it was erased.
Technical Specs
Product name Drive eRazer Ultra
Drive
Compatibility
Able to Detect
& Erase HPA &
DCO Areas
Host
Connections
LEDs Power input status (green)
LCD Panel 16x2 backlit display
Erasure Speed Drive write speed dependent. Up to 7GB/min in
Label Output 4” x 1” (summary label, drive size)
Power Supply 100-240VAC +12V / 3A (included)
Power Input +12V 3A from AC adapter via +12V DC Jack
Power Output +12V / +5V to drive
Compliance CE, FCC, RoHS, C-Tick
Shipping
Weight
Warranty: 3 Years
Support Your investment in CRU products is backed up by our
2.5” and 3.5” SATA drives
3.5” IDE/PATA drives
Additional drives using optional adapters
Yes
One USB 3.0 B-type connector (operates as USB 2.0)
One DB9 connector (female; serial connection for
printer output)
Power output status (green)
HDD access (amber)
HPA/DCO indication (green)
Error state (red)
modern drives.
4” x 6” (form based on DoD certication of erasure
document)
3 pounds, including AC adapter
free technical support for the lifetime of the product. If
you need to contact us for any reason, please visit
cru-inc.com/support or call us at 1-800-260-9800 or
+1-360-816-1800.
© 2012, 2014 CRU Acquisition Group, LLC. ALL RIGHTS RESERVED
This User Manual contains proprietary content of CRU Acquisition Group,
LLC (“CRU”) which is protected by copyright, trademark, and other intellectual property rights.
Use of this User Manual is governed by a license granted exclusively by CRU
(the “License”). Thus, except as otherwise expressly permitted by that License, no part of this User Manual may be reproduced (by photocopying or
otherwise), transmitted, stored (in a database, retrieval system, or otherwise),
or otherwise used through any means without the prior express written permission of CRU.
Use of the full Drive eRazer Ultra is subject to all of the terms and conditions
of this User Manual and the above referenced License.
CRU ™ , WiebeTech®, etc. (collectively, the “Trademarks”) are trademarks
owned by CRU and are protected under trademark law. This User Manual
does not grant any user of this document any right to use any of the Trademarks.
Product Warranty and Limitation of Liability:
Product Warranty
CRU warrants this product to be free of signicant defects in material and
workmanship for a period of 3 years from the original date of purchase. CRU’s
warranty is nontransferable and is limited to the original purchaser.
Limitation of Liability
The warranties set forth in this agreement replace all other warranties. CRU
expressly disclaims all other warranties, including but not limited to, the im-
plied warranties of merchantability and tness for a particular purpose and
non-infringement of third-party rights with respect to the documentation
and hardware. No CRU dealer, agent, or employee is authorized to make any
modication, extension, or addition to this warranty. In no event will CRU or
its suppliers be liable for any costs of procurement of substitute products or
services, lost prots, loss of information or data, computer malfunction, or any
other special, indirect, consequential, or incidental damages arising in any
way out of the sale of, use of, or inability to use any CRU product or service,
even if CRU has been advised of the possibility of such damages. In no case
shall CRU’s liability exceed the actual money paid for the products at issue.
CRU reserves the right to make modications and additions to this product
without notice or taking on additional liability.
FCC Compliance Statement: “This device complies with Part 15 of the FCC
rules. Operation is subject to the following two conditions: (1) This device
may not cause harmful interference, and (2) this device must accept any interference received, including interference that may cause undesired operation.”
This equipment has been tested and found to comply with the limits for a
Class A digital device, pursuant to Part 15 of the FCC Rules. These limits
are designed to provide reasonable protection against harmful interference
when the equipment is operated in a commercial environment. This equipment generates, uses, and can radiate radio frequency energy and, if not
installed and used in accordance with the instruction manual, may cause
harmful interference to radio communications. Operation of this equipment
in a residential area is likely to cause harmful interference in which case the
user will be required to correct the interference at this own expense.
In the event that you experience Radio Frequency Interference, you should
take the following steps to resolve the problem:
1) Ensure that the case of your attached drive is grounded.
2) Use a data cable with RFI reducing ferrites on each end.
3) Use a power supply with an RFI reducing ferrite approximately
5 inches from the DC plug.
4) Reorient or relocate the receiving antenna.
FOR OFFICE OR COMMERC IAL USE
Page 9
 Loading...