

Page 1

PZM, PCC, SASS, GLM, LM, and CM
© 2000 Crown International, All rights reserved.
PZM® , PCC®, SASS®, are registered trademarks of Crown International,
Inc. Also exported as Amcron
128137-1
6/00
®
Crown International, Inc
P.O. Box 1000, Elkhart, Indiana 46515-1000
(219) 294-8200 Fax (219) 294-8329
www.crownaudio.com
Page 2

MICROPHONE TECHNIQUES FOR HOUSES
OF WORSHIP
In your house of worship, wouldn’t you like to better understand what is being said, and hear music
reproduced with a full, natural sound? You can do
this with a good sound system.
One goal of the sound system is to help the congregation hear more clearly. The message is important, so it must be loud enough and easy to
understand. Another goal is to reproduce music
with high fidelity or naturalness.
To help you meet these goals, this guide offers
some tips on microphone techniques. The types
of microphones you choose—and their placement—have a major effect on the sound quality.
MICROPHONE TYPES
Microphones (or “mics” for short) are available in
many types.
• Miniature clip-on mics (lavalier mics), which
you clip onto the minister’s robe or onto musical instruments.
• Lectern mics, which you mount on the pulpit or
lectern.
•
Surface-mounted mics which you put on surfaces (floor, ceiling, walls, tables).
• Miniature choir mics which you hang over the
choir.
• Handheld mics for vocalists and instruments.
Crown makes a microphone for each of these
needs. Many of the mics are so small, they become
nearly invisible in use. In this way, the microphones
do not distract from the service.
Microphones can also be classified according to
the way they pick up sounds from different directions. An omnidirectional (omni) mic picks up
sound equally well from all around. A unidirectional
mic picks up mainly what it’s aimed at. The most
common type of unidirectional mic is the cardioid
type. Unidirectional mics help prevent feedback.
Feedback is the squealing sound you hear when the
sound system is turned up too loud. The amplified
sound from the loudspeakers enters the microphones and is reamplified.
Microphones also differ in the way they convert
sound to electricity. A condenser or electret condenser microphone is charged with static electricity inside; a dynamic or moving coil microphone
has a magnet and a coil of wire. Generally, the condenser type is higher quality, but requires a power
supply to operate, such as an internal battery or an
external phantom power supply. This supply is al-
ready built into some mixers. Another advantage of
the condenser type is that it can be miniaturized.
A miniature condenser mic is desired when you want
the mic to be invisible—say, hanging over the choir,
clipped onto the minister’s robe, or affixed to the
pulpit.
HOW TO REDUCE FEEDBACK
First, here are some general tips on microphone usage to reduce the likelihood of feedback.
• Use as few microphones as possible.
• Keep loudspeakers and microphones as far apart
as is practical.
• Turn down microphones not in use.
• Keep microphones close to their sound sources
— as close as possible, but no closer than nec-
essary to achieve adequate volume before feedback occurs.
• Use directional microphones. A microphone is
directional if its polar pattern is cardioid,
supercardioid, or hypercardioid (check the microphone data sheet).
2
Page 3
SPECIFIC MIC TECHNIQUES
Below are some suggested microphone techniques
for each sound source.
Minister
The type of mic you will use on the minister depends on whether the minister stays at the pulpit or
moves about.
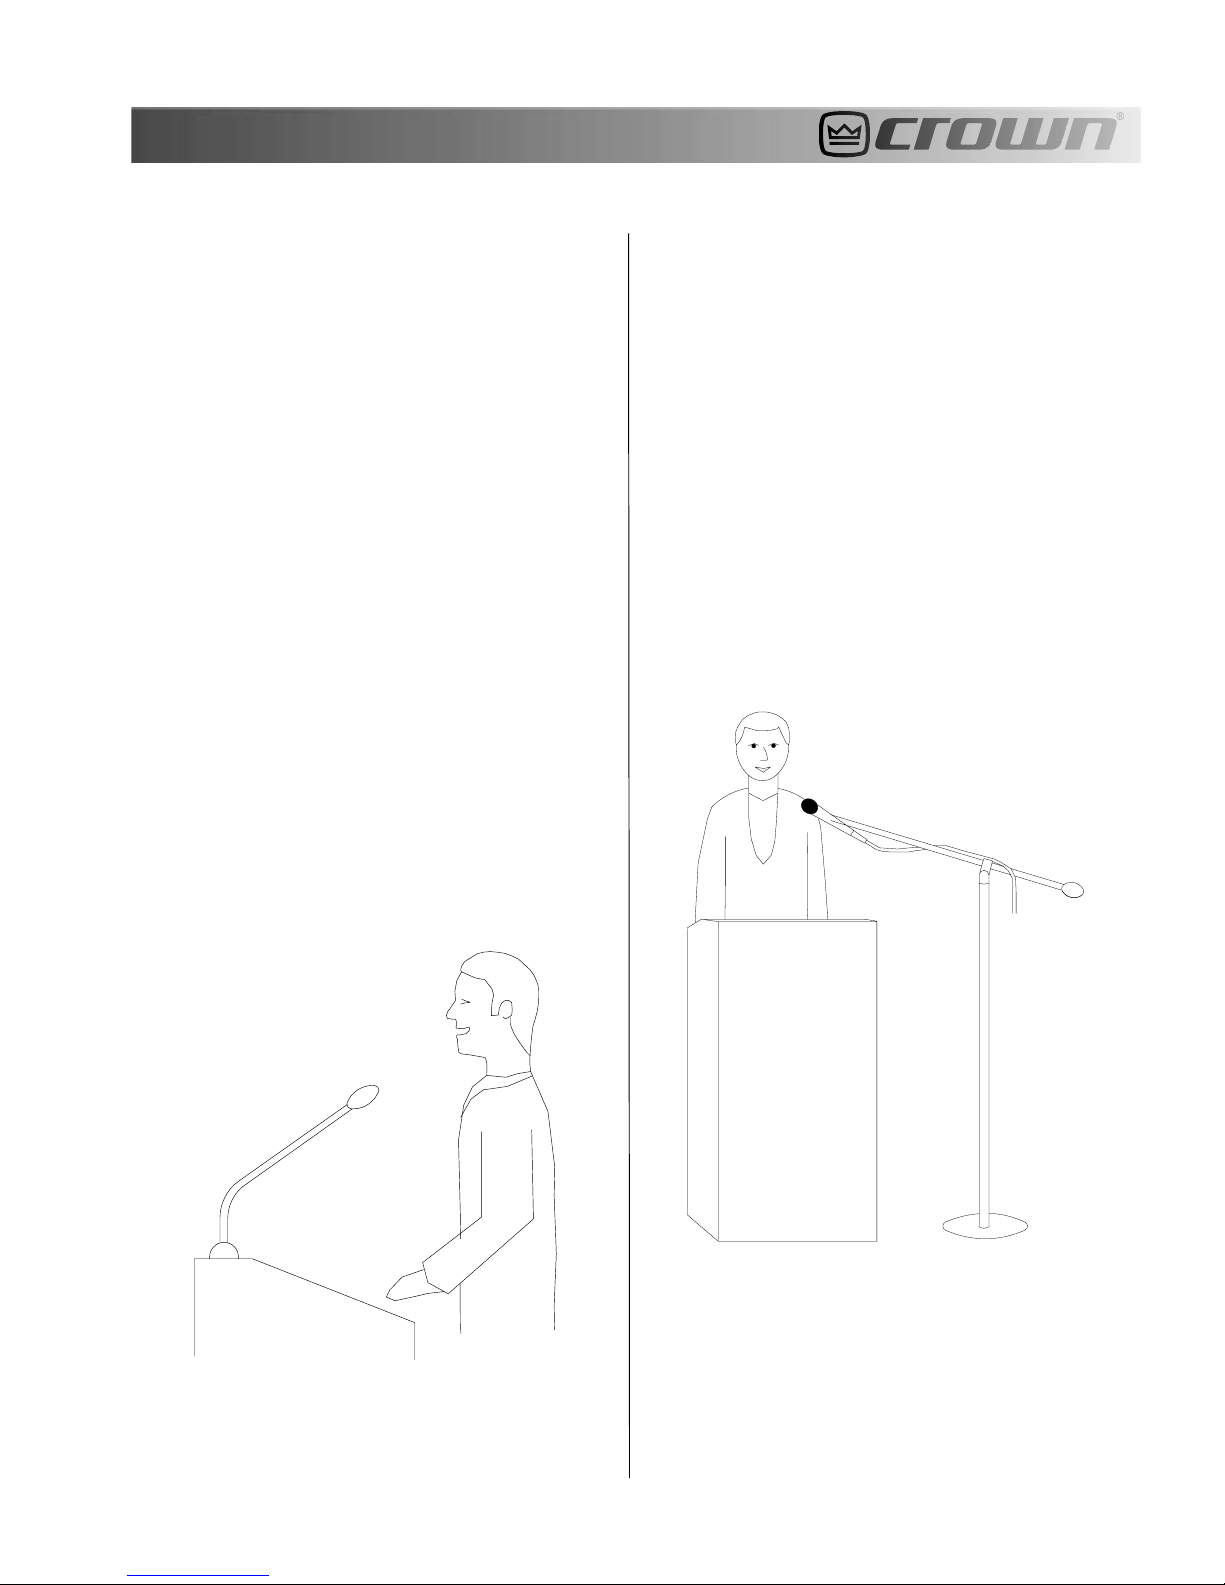
If the minister stays at the pulpit, install a lectern
mic on the pulpit (
Fig.1
). Another purpose for a lectern mic is to pick up anyone who walks up to the
lectern to make an announcement or read a passage.
One microphone at the pulpit gives a more consistent
tone quality than two, so install only one. Be sure to
add the provided foam
pop filter (windscreen)
to prevent explosive breath sounds (pops). Another way
to reduce pops is to speak about 8 inches from the
microphone and over the microphone rather than
into it.
If you don’t want to install the pulpit mic permanently, try mounting a handheld mic (
CM-700—Fig. 2
) on a boom stand about 8 inches
CM-200A or
away from the minister’s mouth. Put a foam pop
filter (windscreen) on the microphone.
Crown makes three microphones for this purpose:
the LM-201, LM-300A, and LM-301A. The LM-201
(see page 8) has a shock-mounted mic capsule and
a ball-and-socket swivel mount that adjusts silently.
The LM-300A (see page 8) is a slim gooseneck
model that also adjusts silently. It plugs directly into
a connector on the pulpit. The LM-301A adapts to a
5/8"-27 threaded adapter, and its cable can exit
downward or out the side.
Fig. 1—Miking the minister with a lectern mic on
the pulpit.
Fig. 2—Pulpit miking with a CM-200A.
Yet another alternative is to place a unidirectional
boundary mic (such as the Crown (PCC®-130, PCC160, PCC-170) on top of the pulpit, near the edge
furthest from the person speaking
(Fig. 3)
.
3
Page 4

Fig. 3—Pulpit miking with a PCC-160.
If the minister moves about, use a clip-on lavalier
microphone (
Fig. 4)
, either with a mic cable or with
a wireless transmitter worn on the belt. The transmitter comes with a receiver, which you plug into a
mic input in your mixer. Attach the mic at chest
height. Use the belt clip that came with the microphone, or place the mic connector in the pocket to
act as a cable strain relief.
A wireless lavalier microphone also works well for
a storyteller on the steps of the platform. Install a
fresh battery in the transmitter before each service,
and tell the minister or lay person to turn on the
transmitter before speaking.
Choir
If your choir is loud enough in your church without
amplification, you don’t need to mike the choir unless you want to pick them up for recording or
broadcast.
For permanent installations, you can hang miniature mics over the choir. The Crown
31
microphone (see page 8) are especially designed
CM-30
or
CM-
for choir miking; they are almost invisible in use
and sound natural. Use one microphone in the center of every 20-30 foot span. A choir of 30 to 45
voices should need only two or three mics.
If the choir mics are used for sound reinforcement,
place them close to the choir to minimize feedback:
about 1½ feet in front of the front row of singers,
and about 1½ feet above the head height of the back
row (
Fig. 9
). If the mics are used only for recording
or broadcast, you can place them a few feet farther
to pick up the acoustics of your santuary.
Fig. 4— Miking the minister with a clip-on microphone.
Fig. 5—Choir miking
4
.
Page 5

If you don’t want to hang the mics, attach them to
stands using the CM-30SA stand adapter. Make the
mic stands tall by adding baby booms.
Soloist or Reader
This person can be covered with a stand-mounted
handheld microphone such as the Crown
(Fig. 6
holder (swivel mount or clip) which screws onto
the mic stand. Be sure to place the foam pop filter
(windscreen) on the mic to prevent breath pops.
Use a baby boom on the mic stand to reach a person seated in a presider’s chair.
A vocalist might prefer a wireless mic in order to
move freely on stage. This is a microphone with a
radio transmitter built into the handle. Wireless mics
are susceptible to interference from lighting dimmers, fluorescent lights and auto ignitions, but this
interference is minimal if you use a VHF high-band
or UHF system. Good wireless mics cost $1000 and
up, so try the mic in your house of worship before
buying.
). The handheld mic will come with a mic
CM-200A
Vocal Duo or Trio
As shown in
mic on a stand 1 to 2 feet in front of the center of
the group.
Fig. 7,
place one CM-200A handheld
Fig. 7— Three singers using one microphone.
Fig. 6—A stand-mounted handheld microphone
.
Predue
(Kneeling Bench for Weddings)
Try a
PCC-160
on the floor near the bench.
unidirectional boundary microphone
Altar Table
Place a
boundary mic on the table aiming at the people
speaking. The first three models listed above are
available in white to blend with a white tablecloth.
PCC-130, PCC-160, PCC-170
, unidirectional
Baptismal
Hang a miniature choir mic (
head, or mount a
8
). If the baptismal is shallow, you can use a wire-
less lavalier mic because it eliminates the electrical
PZM®-6D
CM-30 or CM-31
inside on the glass
) over-
(Fig.
5
Page 6

hazard of dropping a microphone into the water.
The wireless mic uses only a 9-volt battery and
poses no risk of shock.
Fig. 8—Baptismal pickup.
Wedding
As shown in
ister. It will pick up the minister, bride and groom.
Fig. 9,
try one lavalier mic on the min-
Fig. 9—Wedding pickup.
notes with richness and depth. Hang one or two
mics 10-20 feet from the organ pipes or organ loudspeaker, 3 feet apart for stereo.Use one microphone
for each group of pipes.
If stereo imaging is important, use a Crown
P
MKII PZM
10 to 20 feet from the pipes.
Stereo Microphone (inside back page)
SASS®-
Congregation
You need to mike the congregation only for recording or broadcast. To do it, hang a microphone (such
as the Crown
row of the congregation, aiming at the back row. If
the recording or broadcast is in stereo, use two microphones 3 feet apart, or place a
side wall.
CM-30
) several feet over the front
PZM
on each
Plays
Place two
actors. Spread the mics a few feet apart so they
pick up all the actors equally well (
all the other mics in your system to prevent feedback. An alternative is to hang two
31
miniature choir mics overhead.
Typically, children’s voices are too quiet to pick up
with a distant microphone. When you turn up the
volume enough to hear them, you hear feedback.
You’ll need to place a handheld mic (
a mic stand, and place a foam pop filter on the
microphone to prevent breath pops. Have the children say their lines close to the microphone.
PCC-160
mics on the floor in front of the
Fig. 10
). Turn off
CM-30
or
CM-200A
CM-
) on
Organ
You won’t need to mic the organ for sound reinforcement, but you might need to for recording or
broadcast. Crown
recommended because they reproduce the low
GLM-100
or
CM-150
Fig. 10—Stage miking with PCCs.
mics are
6
Page 7

Musical Instruments
Microphone techniques for individual instruments
are covered in the
Guide
and the
cation Guide,
Crown dealer. In this booklet, we’ll cover only the
acoustic guitar and piano. If the guitarist has an electrical pickup on the guitar, its cable probably has a
phone plug on the end. Connect this phone plug to
a direct box, and connect the direct box to a mic
input. Set the ground-lift switch on the direct box
to the position where you monitor the least hum. If
you want to mike the acoustic guitarist, there are
several ways. One is to tape a
mount onto the guitar body, halfway between the
sound hole and the bridge, near the low E string
(Fig. 11 top
into this surface mount face down. Another way to
mike the guitarist is to mount a
stand and place the mic near the 12th fret (
bottom
). Insert a
).
Crown Microphone Application
Crown Boundary Microphone Appli-
both available free from Crown or your
GLM-100
GLM-SM
mini microphone
CM-700
surface
on a boom
Fig. 11
to place two
from the hammers, 8 inches above the strings, over
the bass and treble strings.
CM-700’s
about 8 inches horizontally
Fig. 12—Miking a grand piano with PZMS.
Fig.11 : Top miking with a GLM-100.
Bottom miking with a CM-700
To mike a grand piano, tape two
ary microphones to the underside of the raised lid,
one over the treble strings and one over the bass
strings (
lid and adjust your mixer equalization (tone controls) until the sound is natural. Another option is
Fig. 12
). If feedback is a problem, close the
PZM-30D
bound-
An upright piano can be miked with two
or
CM-700
aiming at the open front (
microphone near the sound board, or
Fig. 13
).
CM200A
Fig. 13—Miking an upright piano.
We hope that these suggestions give you better
sound, and that our microphones enhance your
services.
7
Page 8

CM-200A
handheld/stand-mount microphone
PCC-160
supercardioid boundary microphone
PCC-170
CM-700
supercardioid boundary microphone
vocal/instrument microphone
CM-30/CM-31
choir microphone
SASS-P MKII PZM
stereo microphone
LM-300A
lectern microphone
8
 Loading...