

Page 1

© 2000 Crown International, All rights reserved.
PZM® , PCC®, SASS® and DIFFEROID®, are registered trademarks of
Crown International, Inc. Also exported as Amcron
131374-1
®
6/00
Crown International, Inc
P.O. Box 1000, Elkhart, Indiana 46515-1000
(219) 294-8200 Fax (219) 294-8329
www.crownaudio.com
Page 2
MICROPHONE TECHNIQUES FOR VIDEO
No matter what your video application — sports,
news, corporate training — the soundtrack quality
depends on the microphones you choose and where
you place them. This booklet covers microphone
techniques to help you achieve better audio for
your video productions.
There are many types of microphones, each designed to help you solve a specific audio problem.
We’ll sort out these types and tell where each one is
useful. Then we’ll cover specific applications — how
to use microphones effectively in various
situations.
TRANSDUCER TYPES
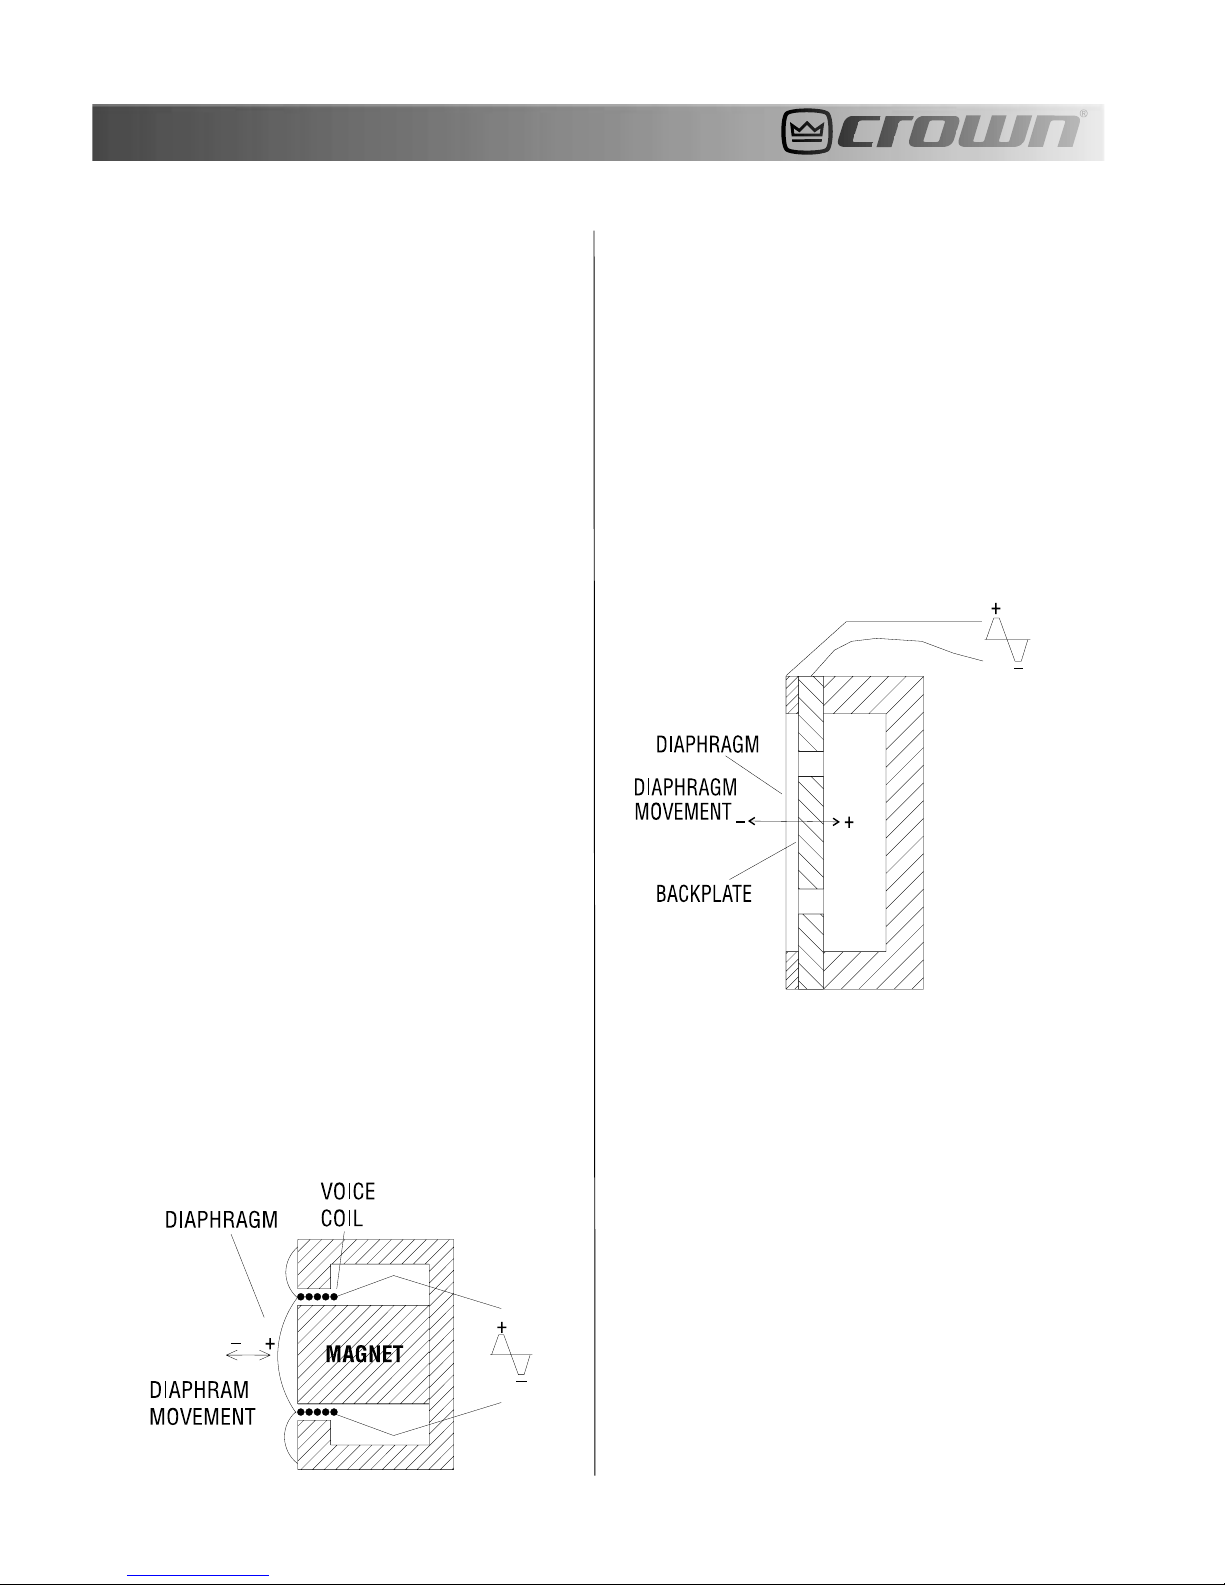
A microphone is a transducer, a device that converts energy from one form into another. Specifically, a microphone converts acoustical energy
(sound) into electrical energy (the signal).
A ribbon microphone works the same, except that
the diaphragm is also the conductor. It is a thin metal
foil or ribbon suspended in a magnetic field.
In a condenser microphone (Figure 2), a diaphragm
and an adjacent metallic disk (backplate) are
charged to form two plates of a capacitor. Sound
waves striking the diaphragm vary the spacing between the plates; this varies the capacitance and
generates an electrical signal similar to the incoming sound wave.
Fig. 2 – A condenser microphone.
Microphones differ in the way they convert sound
to electricity. Three popular transducer types are dynamic, ribbon, and condenser.
In a dynamic microphone (Figure 1), a coil of wire
attached to a diaphragm is suspended in a magnetic field. When sound waves vibrate the diaphragm, the coil vibrates in the magnetic field and
generates an electrical signal similar to the incoming sound wave.
Fig. 1 – A dynamic microphone.
The diaphragm and backplate can be charged either by an externally applied voltage or by a permanently charged electret material in the diaphragm
or on the backplate.
Because of its lower diaphragm mass and higher
damping, a condenser microphone responds faster
than a dynamic microphone to rapidly changing
sound waves (transients).
Dynamic microphones offer good sound quality, are
especially rugged, and require no power supply.
Condenser microphones require a power supply to
operate internal electronics, but generally provide
a clear, detailed sound quality with a wider,
smoother response than dynamics.
2
Page 3
Currently, all Crown microphones are the electret
condenser type — a design of proven reliability and
studio quality.
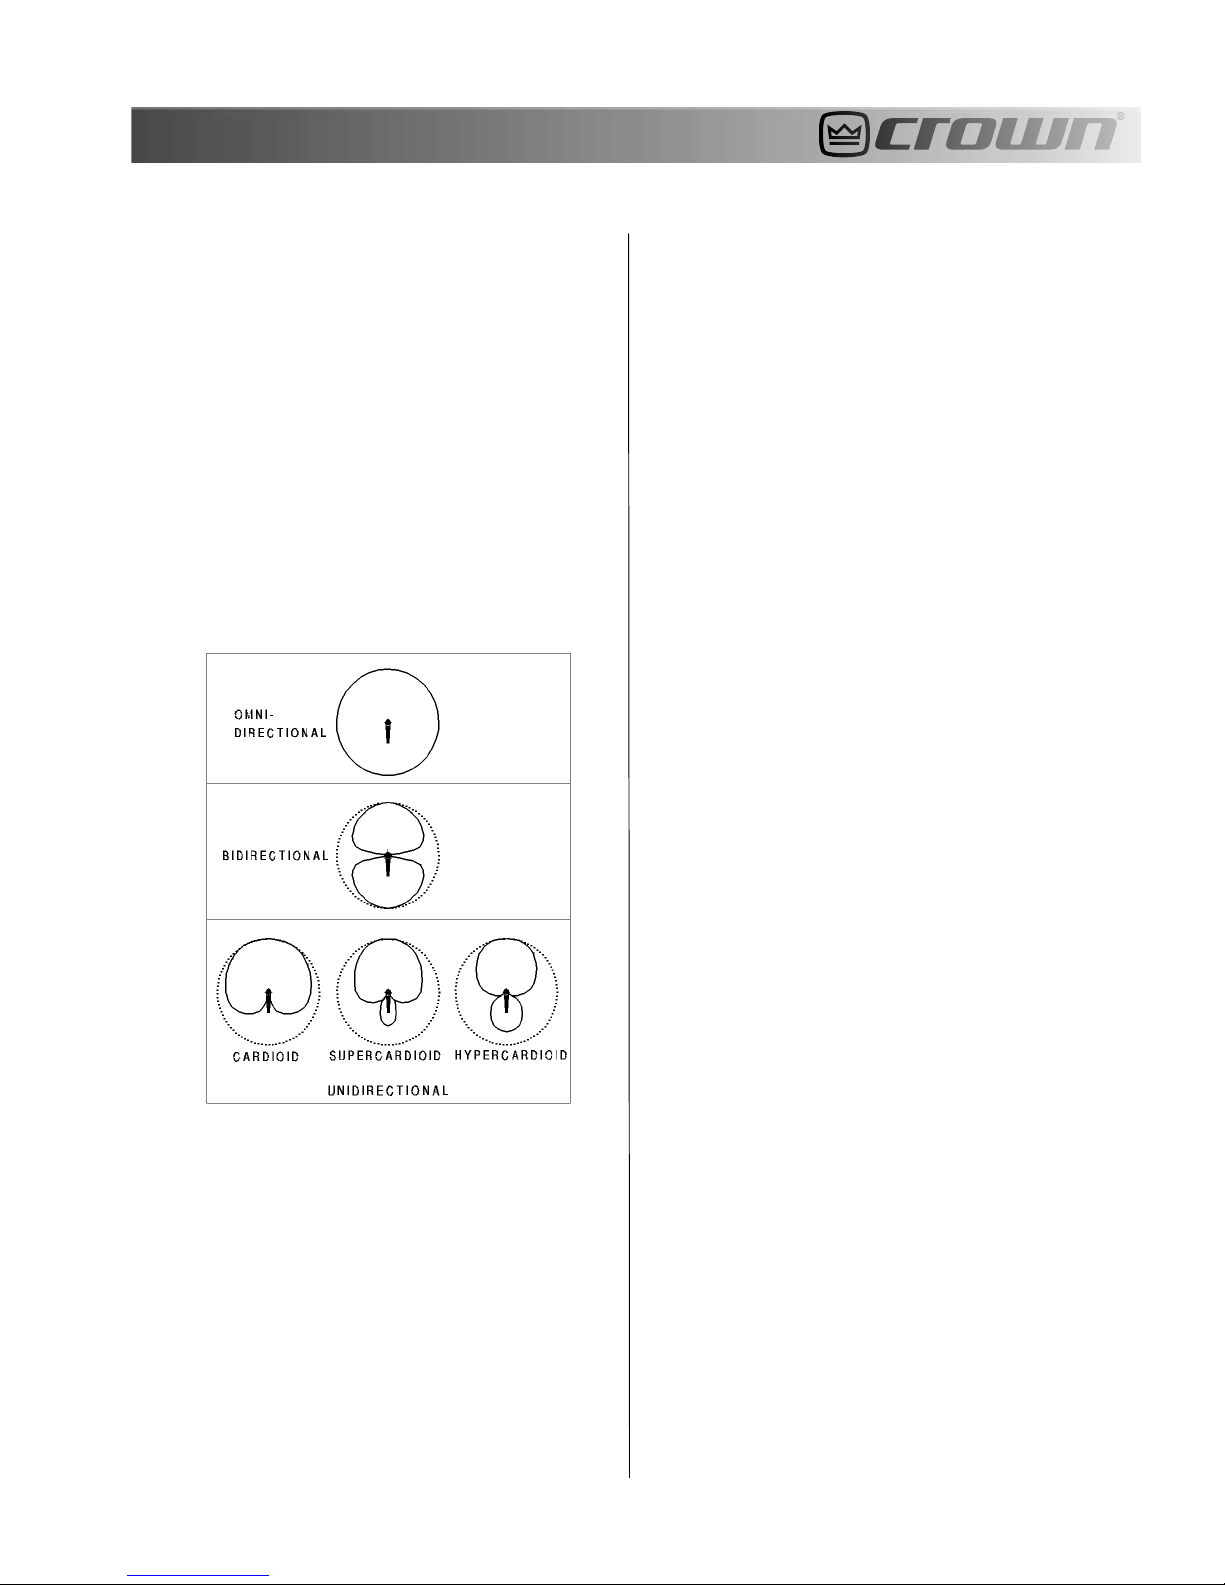
POLAR PATTERNS
Microphones also differ in the way they respond to
sounds coming from different directions. The sensitivity of a microphone might be different for
sounds arriving from different angles. A plot of microphone sensitivity verses the angle of sound incidence is called its polar pattern. Several polar
patterns are shown in Figure 3.
Fig. 3 – Polar patterns.
Three types of unidirectional patterns are the cardioid, supercardioid, and hypercardioid pattern. The
cardioid pattern has a broad pickup area in front of
the microphone. Sounds approaching the side of
the mic are rejected by 6 dB; sounds from the rear
(180 degrees off-axis) are rejected 20 to 30 dB. The
supercardioid rejects side sounds by 8.7 dB, and
rejects sound best at two “nulls” behind the microphone, 125 degrees off-axis.
The hypercardioid pattern is the narrowest pattern
of the three (12 dB down at the sides), and rejects
sound best at two nulls 110 degrees off-axis. This
pattern has the best rejection of room acoustics,
and provides the most gain-before-feedback from
the main sound reinforcement speakers.
Choose an omnidirectional mic when you need:
All-around pickup
Best pickup of room acoustics (ambience or
reverb)
An omnidirectional (omni) microphone is equally
sensitive to sounds coming from all directions. A
unidirectional microphone is most sensitive to
sounds coming from one direction — in front of
the microphone. A bidirectional (figure-eight)
microphone is most sensitive in two directions:
front and rear.
An omni microphone is also called a pressure mi-
crophone; a uni- or bi-directional microphone is
also called a pressure-gradient microphone.
Extended low-frequency response
Low handling noise
Low wind noise
No up-close bass boost
Choose a unidirectional mic when you need:
Selective pickup
Rejection of sounds behind the microphone
Rejection of room acoustics and leakage
More gain-before-feedback
Up-close bass boost
An omnidirectional boundary microphone (such as
a PZM) has a half-omni or hemispherical polar pattern. A unidirectional boundary microphone (such
as a PCC-160 or PCC-170) has a half-supercardioid
polar pattern. The boundary mounting increases the
directionality of the microphone, thus reducing
pickup of room acoustics.
3
Page 4

Most unidirectional mics have proximity effect, a
rise in the bass when used up close. Figure 4 is a
frequency-response graph that illustrates proximity effect. When the microphone is 2 feet from the
sound source, its low-frequency response rolls off.
But when the microphone is 2 inches from the sound
source, its low-frequency response rises, giving a
warm, bassy effect.
Fig. 4 – Proximity effect.
A special type of unidirectional microphone is the
variable-D type. Compared to a standard single-D
directional microphone, the variable-D has almost
no proximity effect, so it sounds natural when used
close up. The variable-D type also has less handling
noise and pop.
The most highly directional pattern is that of the
shotgun or line microphone (Figure 5). The shotgun microphone is used mainly for distant miking
(say, for dialog pickup where you want the mic to
be off-camera). It is highly directional at high
frequencies and hyper-cardioid at low frequencies.
The longer the shotgun mic is, the more directional
it is at mid-to-low frequencies.
Fig. 5 – Shotgun microphone and its polar pattern.
FREQUENCY RESPONSE
Each microphone has a different frequency response, which indicates the tonal characteristics
of the microphone: neutral, bright, bassy, thin, and
so on. Figure 6 shows two types of frequency response: bright (contoured) and flat. A bright frequency response has an emphasized or rising highfrequency response, which adds clarity, brilliance,
and articulation. A flat frequency response sounds
natural.
Fig. 6 – Frequency response.
FORMS OF MICROPHONES
Microphones come in many shapes that have different functions:
Fig. 7 – Handheld microphone.
Handheld (Figure 7). Used in the hand or on a mic
stand. An example is the Crown CM-200A cardioid
condenser microphone.
4
Page 5
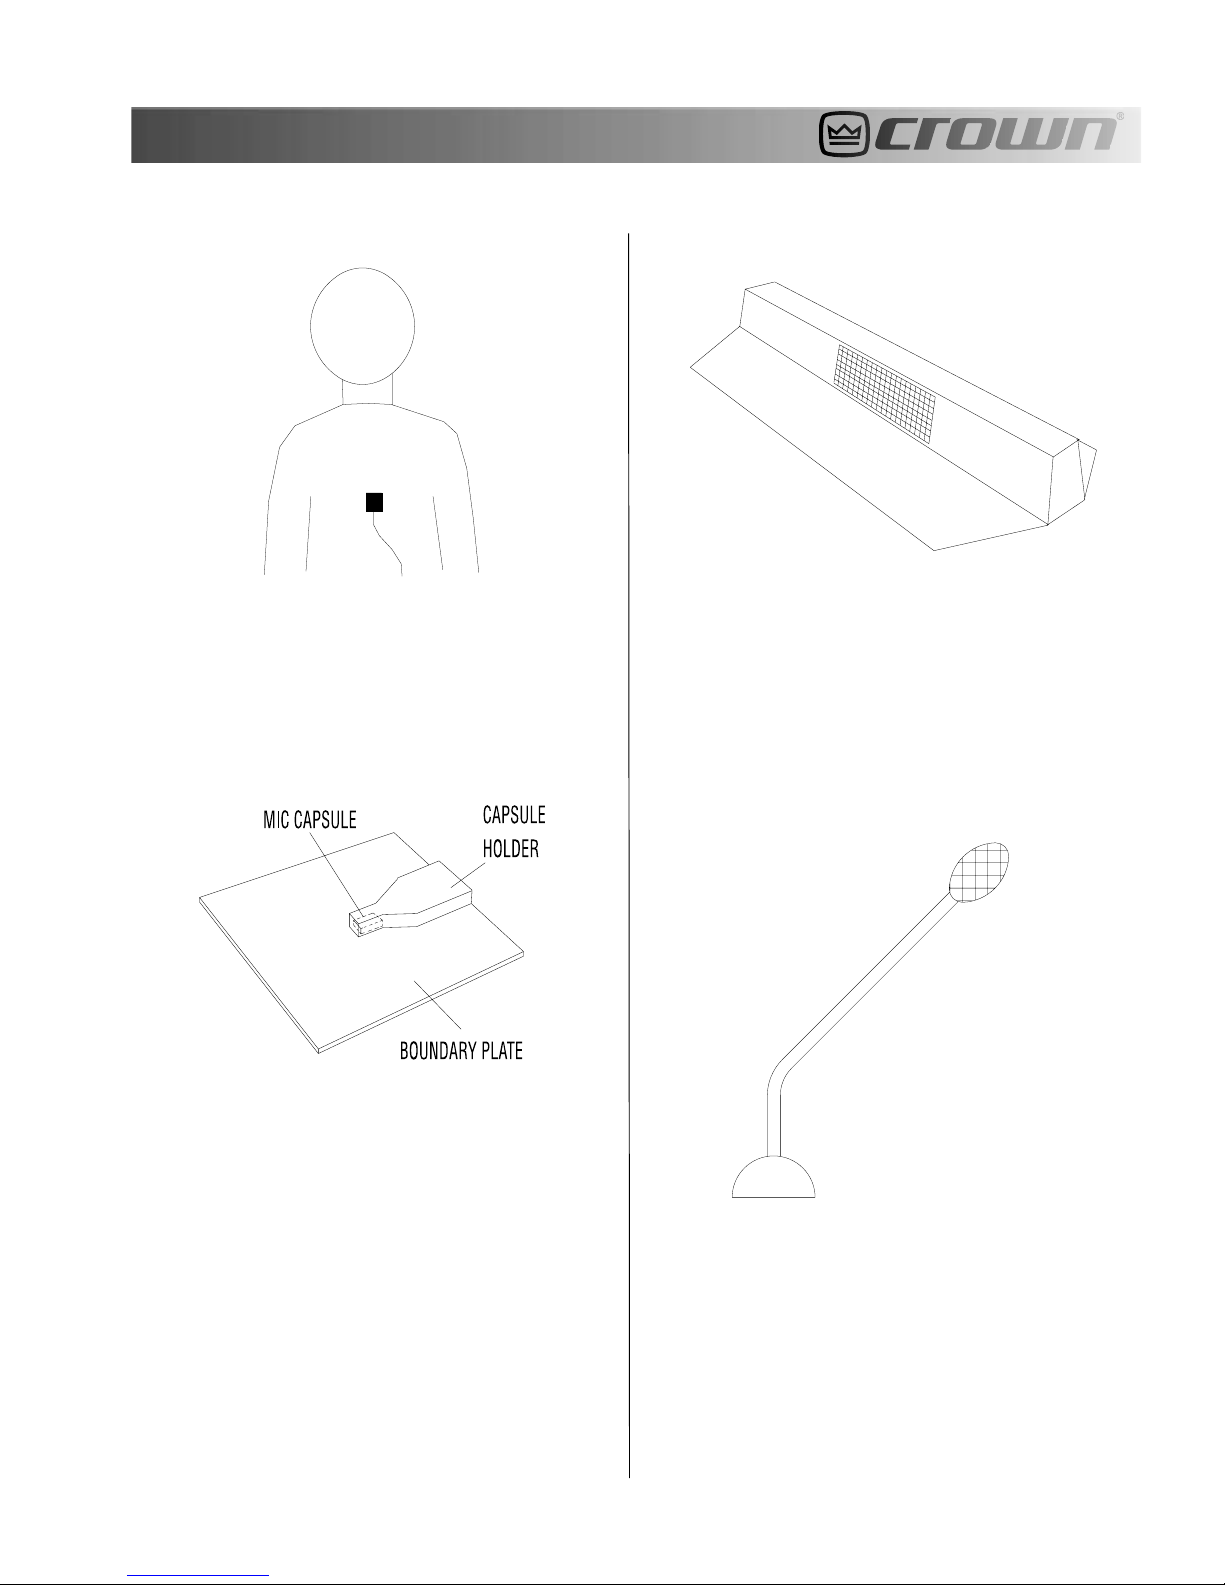
Fig. 8 – Lavalier microphone.
Lavalier (Figure 8). A miniature microphone which
you clip onto the clothing of the person speaking.
Two examples are the Crown GLM-100 (omni) and
GLM-200 (hypercardioid).
Fig. 9 – Boundary microphone.
Fig. 10 – Unidirectional boundary microphone.
The PCC (Figure 10) is a unidirectional boundary
microphone. When you place it on a surface, it has
a half-supercardioid polar pattern. The rugged PCC160 is especially useful for stage-floor pickup of
drama and musicals; the PCC-170 has a sleeker look
for miking a group discussion at a conference table.
Fig. 11 – Lectern microphone
Boundary (Figure 9). Boundary microphones are
meant to be used on large surfaces such as stage
floors, piano lids, hard-surfaced panels, or walls.
Boundary mics are specially designed to prevent
phase interference between direct and relected
sound waves, and have no off-axis coloration. Free-
field microphones are meant to be used away from
surfaces, say for up-close miking.
Crown Pressure Zone Microphones® (PZMs®) and
Phase Coherent Cardioids® (PCCs®) are boundary
microphones; Crown GLMs, CMs, and
LMs are free-field microphones.
Lectern A lectern microphone (Figure 11) is designed to mount on a lectern or pulpit. For example,
the Crown LM-300A and LM-300AL are slim, elegant units that plug into an XLR connector in the
lectern. The LM-301A screws onto a mic stand or
desk stand. Each has a silent-operating gooseneck.
The Crown LM-201 mounts permanently on the lectern, and has a rugged ball-and-socket swivel that
adjusts without any creaking.
5
Page 6

Fig. 12 – Stereo microphone.
A mid-side microphone is mono-compatible; that
is, it has the same frequency response in mono or
stereo. That’s because there is no spacing between
the mic capsules. If there were a spacing, this would
create a delay between left and right signals which
can cause phase cancellations in mono. The Crown
SASS stereo microphone, explained next, has
spaced mic capsules but is still mono-compatible
because of its special design.
Stereo: A stereo microphone combines two directional microphone capsules in a single housing for
convenient stereo miking (Figure 12). A special type
of stereo microphone is called mid-side or MS. It
uses two capsules: a MID unit aiming toward the
middle of the sound source, and a SIDE unit with a
bi-directional pattern aiming to the sides (Figure 13).
The mid unit can have any pattern, but cardioid is
most common.
Fig. 13 – Mid-side microphone polar patterns.
Fig. 14 & 15 – SASS-P MK
II stereo microphone.
The Crown SASS-P stereo microphone is shown
in Figure 14 (top view) and Figure 15 (front view).
It is made of two Pressure Zone Microphones
mounted on small boundaries that are angled apart
left and right. The capsules are spaced apart the
same distance as your ears. As a result, the SASS
gives very precise and spacious stereo imaging.
Between the two mic capsules is a special foam
baffle.The baffle creates amplitude or level differences between channels at high frequencies. Since
the two channels are different amplitudes, any
phase cancellations in the mono sum are incomplete, so the resulting dips in the frequency response are relatively slight. Thus, the SASS is
mono-compatible.
Inside the microphone or in an outboard box, the
mid and side signals are summed and differenced
to produce directional patterns aiming left and right.
By controlling the ratio between mid and side signals, you can control the stereo spread or stage
width. This can be done during recording or during
post-production.
6
Page 7

ELECTRICAL CHARACTERISTICS
Whatever type of microphone you use, it should
have a low-impedance balanced output with a 3pin pro audio connector. This allows long cable runs
(hundreds of feet) without hum pickup or high-frequency loss. All modern mixers are designed to work
with low-impedance microphones.
MICROPHONE-TECHNIQUE BASICS
How to reduce reverberation
Reverberation is sometimes loosely called “room
acoustics,” “ambience,” or “reverb.” It is a pattern
of sound reflections off the walls, ceiling, and floor.
For example, reverberation is the sound you hear
just after you shout in an empty gymnasium.
Too much reverberation in a recording sounds distant or muddy, and reduces intelligibility. To reduce
reverberation:
•Place the mic closer to the sound source.
•Use an automatic (gated) mixer. This device turns
off all microphones not in use, providing a clearer,
less muddy sound.
•Pick up each electric instrument with a direct box
or cable.
•Use a room or studio with dead acoustics. The
walls, ceiling and floor should be covered with
sound-absorbing material.
•Select a mic with a tighter polar pattern. Hypercardioid and super-cardioid patterns reject reverb
more than cardioid. Cardioid and bi-directional patterns reject reverb equally well, and more than an
omni.
How to reduce background noise
•Stop the noise at its source: turn off appliances
and air conditioning; wait for airplanes to pass; close
and seal doors and windows; use a quiet room.
•Mike close with directional mics.
•Pick up each electric instrument with a direct box
or cable.
•Aim the null of the polar patern at the offending
noise source. The null is the angle off-axis where
the mic is least sensitive. Different polar patterns
have nulls at different angles. Shown below and in
Figure 16 are the null angles for various polar patterns:
Cardioid:180 degrees.
Supercardioid: 125 degrees.
Hypercardioid: 110 degrees.
Bidirectional: 90 degrees.
Fig. 16 – Polar patterns
.
The table below tells how many dB of reverb rejection you can expect from various polar patterns
compared to an omni-directional pattern at the same
working distance:
Omnidirectional: 0.0 dB
Cardioid:-4.8 dB
Bidirectional: -4.8 dB
Supercardioid: -5.7 dB
Hypercardioid: -6.0 dB
How to pick up sound at a distance
The farther a microphone is placed from a sound
source, the more reverberation and background
noise you pick up. Also, you hear more mixer selfnoise relative to the signal because the mixer gain
must be higher with distant miking.
7
Page 8

To clearly pick up sound at a distance:
•Use a microphone with low self-noise (say, less
than 22 dB SPL), such as the Crown PCC-160, PCC170, CM-200A, or any PZM).
•Boost the presence range on your mixer’s EQ
(around 5 kHz).
•If necessary, compensate for air losses at high fre-
quencies by boosting EQ around 15 kHz.
•If you’re using a PZM, make it directional. To do
this, mount the tip of it cantilever (mic-capsule
holder) in a corner of the room, or in a corner made
of three plexiglass panels. Large panels provide
deeper bass and more directionality at low
frequencies than small panels.
•Use directional microphones. You can place a di-
rectional mic farther from its source than an omnidirectional mic and pick up the same amount of reverberation. The table below and Figure 17
show the distance multiplier for each pattern:
Omnidirectional: 1.0
Cardioid: 1.7
Bidirectional: 1.7
Supercardioid: 1.9
Hypercardioid: 2.0
How to reduce phase cancellations between two
mics:
If two microphones pick up the same sound source
at different distances, and their signals are fed to
the same channel, this might cause phase cancellations. These are peaks and dips in the frequency
response caused by various frequencies combining out-of-phase. The result is a colored, filtered
tone quality.
To reduce phase cancellations between two microphones:
•Mike close.
•Spread sound sources farther apart.
•Follow the 3-to-1 rule (Figure 18): The distance
between mics should be at least three times the micto-source distance. For example, if two microphones
are each 1 foot from their sound sources, the mics
should be at least 3 feet apart to prevent phase cancellations.
•Don’t use two mics when one will do the job. For
example, use just one mic on a lectern. If the talker
wanders, use a lavalier mic instead, such as a GLM-
100.
Fig. 18 – The 3-to-1 Rule.
Fig. 17 – For various polar patterns, distances from
the sound source that provide equal reverb pickup.
For example, if an omni mic is placed 1 foot from a
sound source, you can place a supercardioid mic at
1.9 feet and pick up the same amount of reverb as
the omni.
8
Page 9

How to reduce phase cancellations from surface
reflections:
Sometimes you must place a microphone near a
hard reflective surface. Situations where this might
occur are reinforcing drama, musicals, or opera with
the microphone near the stage floor, recording a
piano with the mic near the raised lid, or recording
an instrument surrounded by reflective baffles.
This situation can cause phase cancellations which
give a strange tone quality. Solve the problem by
using a Crown PZM or PCC microphone taped to
the piano lid, wall, floor, table, or other large flat
surface.
How to reduce handling noise and thumps
•Use an omnidirectional microphone, such as a
GLM-100 or any PZM.
•Use a directional microphone with low sensitivity
to handling noise and thump, such as the CM-200A,
CM-310A, PCC-160, PCC-170, or PCC-200.
•Use a directional microphone with an internal shock
mount.
•Use a shock-mount stand adapter, either handheld
or on a mic stand an example is the CM-SM.
•Place the mic stand on foam or sponges.
How to reduce lavalier clothing noise
•Tape the cable to clothing.
•Strain-relieve the cable by using a belt clip.
•Use an omni-directional lavalier (GLM-100) rather
than a uni-directional lavalier (GLM-200). The omni
type has less pickup of mechanical vibration.
How to reduce proximity effect:
Proximity effect is the bass boost you hear when
you mike close with a single-D directional microphone. “Single-D” means that the microphone has
a single distance from its front sound entry to the
rear sound entry. The close the mic is to the sound
source, the more bass you hear. To reduce proximity effect:
•Use an omnidirectional microphone such as a
Crown GLM-100 or PZM.
•Use a unidirectional microphone, but turn down
the excess bass with your mixer’s EQ.
•Use a variable-D unidirectional microphone.
How to reduce pop
Pop: is an explosive breath sound produced by the
letters “p,” “b,” or “t.” When a person says words
containing these sounds, a turbulent puff of air is
forced from the mouth. This air puff hits the microphone and makes a thump or little explosion called
a “pop.”
To reduce pop:
•Use an omnidirectional microphone, such as a
Crown PZM.
•Use a microphone with a built-in pop filter or ball-
shaped grille, such as the Crown CM-200A or CM310A.
•Place an external foam pop filter on the micro-
phone.
•Roll off low frequencies below 100 Hz.
•Place the microphone out of the path of pop travel
— above, below, or to the side of the mouth.
For example, Figure 19 shows an interview with the
microphone placed midway between the two people,
below their mouths. Figure 20 shows how a studio
announcer can be miked to prevent pop. The microphone is at eye level so that pops shoot under
the microphone and miss it. A hoop-type pop filter
also works quite well.
Fig. 19 – Reducing pop during an interveiw.
Fig. 20 – Miking a studio announcer to prevent
breath pops.
9
Page 10

How to reduce wind noise:
Use the same methods mentioned under “How to
reduce pop.” For best wind-noise rejection, keep
an air space between the foam windscreen and the
microphone. The bigger the windscreen, the better
it works. A large windscreen called a blimp is available for a shotgun mic. A blimp is covered in fur
and attenuates high frequencies somewhat, but is
more effective than a foam windscreen.
How to reduce distortion:
If you’re picking up a very loud sound source such
as a person yelling into a microphone, the microphone will generate a high-voltage signal that can
overdrive the mic preamp in your mixer, causing
distortion. To prevent this,
•In your mixer, switch in the pad or reduce the gain
trim, if any.
•Plug an in-line pad between the mic cable and the
mixer mic input.
•If a condenser mic has a pad built in, switch it on.
•Place the mic farther from the sound source.
To prevent shifting sound images, don’t move (pan)
a stereo microphone once it is set up.
Avoid extreme differences between sound and picture. Be careful not to reverse left and right channels (say, by inverting an end-fired stereo microphone).
Mono compatibility is important in stereo-TV productions because many people will listen to your
program in mono. For this reason, when miking with
a stereo pair of mics, use a mid-side stereo microphone or a coincident pair (Figure 21). The grille of
the left-aiming microphone is aligned vertically over
the grille of the right-aiming microphone. Since there
is no spacing between mics, there are no time or
phase cancellations to degrade the frequency response when the mics are summed to mono. The
Crown SASS stereo microphone is also mono compatible.
Fig. 21 – A coincident pair.
How to achieve a natural tone quality:
•Use a microphone with a flat frequency response,
such as a PZM-30D, GLM-100, CM-700, LM-300A,
or LM-201.
•Place the microphone as far from the sound source
as the source is big. For example, the sound board
of a guitar is about 18" long. Place the mic at least
18" away to pick up all the parts of the guitar about
equally.
•If you must mike close to reduce feedback or leak-
age, use your mixer’s EQ to restore a natural tonal
balance.
Recommendations for stereo TV productions:
Dialog that has a lot of stereo motion is distracting,
so record dialog in mono in the center or with a
narrow stereo spread. Record effects, audience reaction, and music in stereo. You can allow off-camera sounds to be imaged away from the TV screen
because the screen is considered a window on a
larger scene.
Often your microphone setup must be invisible oncamera.Use miniature microphones such as the
GLM-100 (omni), GLM-200 (hypercardioid), CM30 or CM-31 (supercardioid). You can hang these
over an orchestra or choir, mount them onto musical instruments, or hide them under clothing. A PZM
can be hidden under a table cloth.
10
Page 11

MICROPHONE ACCESSORIES
We’ve already mentioned microphone shock
mounts, windscreens, and pads. Some other useful accessories are described below:
Combiner
If you have more mics than inputs, a combiner
comes in handy. This resistor network mixes the
outputs of two or three mics into a single output.
Stereo bar
This device mounts two directional microphones
on a single mic stand for convenient stereo miking
(Figure 22), An example is the CM-SB.
Fig. 22 – A stereo bar.
Splitter
This is a box with one input for a microphone and
two or three isolated outputs that feed individual
mixers (Figure 23).
Fig. 23 – A splitter.
SPECIFIC TECHNIQUES
The soundtrack of most video productions has four
elements: narration, ambient or environmental
sound, sound effects, and music. Let’s look at
miking techniques for each of these.
Announcer
In these examples, we’ll assume it’s all right to see
the microphone on-camera.
•Clip a lavalier mic (such as the Crown GLM-100)
onto the announcer’s shirt about 8 inches below
the chin (Figure 24). Aim the front of the microphone at the mouth.
Fig. 24 – Using a lavalier mic.
You might use a splitter to feed one mic signal simultaneously to a sound-reinforcement mixer, recording mixer, and broadcast mixer.
To prevent ground loops and hum, only one mixer
should provide phantom power and ground. To do
this, you switch in the ground-lift switches on the
splitter to remove the grounds for the other mixers.
•Use a handheld omni dynamic.
•To reject background noise, try a handheld uni-di-
rectional dynamic, variable-D type, with a foam pop
filter. Place it close to the mouth.
•If the announcer is hard to hear because of loud
background noise (sirens, rock concert), try a CM310A Differoid® with lips touching the grille. The
CM-310A is a handheld cardioid microphone that
is noise-canceling or differential.
11
Page 12

“Differential” means it cancels sounds at a distance,
and “cardioid” means it cancels sounds from behind the microphone. Because of these abilities, the
CM-310A permits extreme isolation from background noise. When used as a stage vocal mic, it
provides extremely high gain-before-feedback.
To keep from canceling the announcer’s voice, the
microphone must be used with lips touching the
grille. Also, the announcer must talk directly into
the front of the microphone, not the side, or the
voice may get canceled and sound thin.
The Differoid is used by the Indianapolis 500 Speedway announcer who announces while sitting in the
stands. Even with the loudspeakers blaring in the
background, the Differoid rejects the sound of the
P.A., the cars, and the crowd.
and mix it with a closeup mic on the announcer (Figure 26, right side). This produces mono centered
dialog with stereo ambience.
Fig. 26– Two ways to pick up an announcer and
ambience with a SASS-MK11 stereo microphone.
In the studio, the announcer’s mic is often placed
about 8" away at eye level to prevent pops (Figure
25). A hoop-type pop filter also works quite well.
Fig. 25 – Placing an annuoncer’s mic to avoid breath
pops.
Announcer with ambience. If you want to pick up
the announcer along with ambient sound in stereo,
use a SASS microphone about 4 feet away (Figure
26, left side). For more flexibility in post production, use a SASS several feet away for ambience,
Dialog at a video shoot
In this case, you don’t want to see the microphone
on camera.
•Shotgun microphone. The most common choice
is a shock-mounted shotgun mic placed above the
actor and in front, as close as possible but just out
of the camera view.
•Lavalier microphone. To hide the microphone, at-
tach it under clothing. Since clothing can attenuate
high frequencies, boost the highs with your mixer
EQ until the sound is natural. Go wireless if the actor moves around a lot. The Crown GLM-100-E is
an omni lavalier without electronics, which you plug
into a wireless transmitter.
Ambience or environmental sound:
Try a stereo mic (Crown SASS-P MK11), or two
spaced omnis 25 feet apart (such as PZMs), or a
single omnidirectional mic for mono. The ambience
mic can be handheld, on a stand, on a camera hot
shoe, or on a Steadicam platform.
General Television Network used two PZMs in earspaced plexiglass pyramids to create the soundtrack
of an air show and a Muzzleloaders festival. Both
12
Page 13

these soundtracks won Emmys. The SASS was used
in the Indy 500 to pick up the audience and race
cars in stereo.
Interviews
For people seated at a table, try a PZM-6D in the
center of the table (Figure 27).
Fig. 27– Miking an interveiw with a PZM.
If you want to omit the handheld mic because it is
intimidating, try a PZM in your shirt pocket.
If background noise is excessive, try a handheld unidirectional dynamic microphone, variable-D design,
with a foam windscreen. Place it close to the mouth.
Group discussions
If the group is seated at a small table, try a PZM-6D
in the center of the table (Figure 29).
If the table is large, place a PCC-160 (Figure 30) or
Fig. 29– Miking a group discussion with a PZM.
For on-the-street interviews, if a handheld mic is
acceptable, use a handheld omni dynamic. Either
place it midway between the two people (Figure 28),
or hold it about 3 inches below the chin of the person speaking. Do not move the mic while talking,
or the level will vary.
Fig. 28– Miking an interview with a handheld mic.
PCC-170 on the table between every two people.
Run the mics through an automatic (gated) mixer
for the clearest sound.
If you don’t want to see mics on the table, try hang-
Fig. 30– Miking a group discussion with PCC microphones.
13
Page 14

ing a CM-30 or CM-31 miniature supercardioid mic
over the table, about 3 feet above the talkers’ heads
(Figure 31).
Try a PZM-6D on the wall near the group.
Fig. 31– Miking a group discussion with an overhead mic.
Basketball
A typical setup employs headset mics for the announcers mixed with a another mic aiming at the
crowd.To pick up the floor action, use a shotgun
mic operated by a person seated in the bleachers.
This person should follow the action with the shotgun mic.If you don’t want to use an operator, mount
a shotgun microphone on each backboard support,
aiming at the action on the floor.Try one or two PCC160s just outside the court. To pick up backboard
sounds, tape a PZM-30D on the backboard just below the hoop.
Golf, bowling
Place PZMs on the grass or near the pins.
Speeches at a lectern
For permanent installations, use a slim gooseneck
mic such as the Crown LM-201 or LM-300 (Figure
32). Place the included foam pop filter on the microphone, leaving an airspace between the pop
filter and the microphone grille.
Use a lavalier mic (GLM-100) on each participant.
Consider running the mics through an automatic
(gated) mixer for clearer sound.
Audience:
To pick up questions in the audience, try a shotgun
mic aimed by an operator.
For a clearer pickup of questions, use a handheld
wireless mic. Have an assistant hand the mic to each
person who wants to ask a question.
Try hanging several cardioid mics over the audience.
To record audience reaction, try a single stereo mic
such as the Crown SASS-PMK11. Or try a PZM on
a 2-foot-square plexiglass panel.
Fig. 32– A lectern microphone.
For temporary setups, place a cardioid mic (Crown
CM-700) on a boom stand 8" away from the talker’s
mouth (Figure 32). Place a foam pop filter on the
mic. If necessary, use a splitter to feed the mic signal to the P.A. mixer and the broadcast mixer.
14
Page 15

Fig. 33– Miking a speech.
Fig. 34– Miking a theater stage floor.
Sound effects
To record sound effects on location, use a stereo
mic to accurately track the motion, not a spaced
pair of mics. With the spaced pair, sounds may jump
from speaker to speaker as the sound source moves.
Audio people at the Indy 500 used a SASS to record
a promo for the Dodge Viper pace car. Movies such
as
Days of Thunder
ployed the SASS for sound-effects pickup.
and
Hunt for Red October
em-
Parade
•Use a mid-side shotgun microphone.
•Use a Crown SASS-P MK11.
•Try a PCC-160 on either side of plexiglass panel
over the street. Cover the panel with silk to reduce
wind noise.
•Try a PZM-30D on a 2-foot-square plexiglass panel.
Again, cover the panel with silk.
Wedding
Place one or two PZM-30Ds on the floor near the
minister. Two PZMs on the floor can pick up the
musicians who play at the reception.
Theater
Place two or three PCC-160 supercardioid boundary mics on the stage floor a few feet from the front
edge (Figure 34). For maximum gain-before-feedback and clarity, turn up only the microphone nearest the person talking.
Security and surveillance
A microphone designed for this purpose is the
Crown PZM-11. It can be mounted in the ceiling or
wall in a standard electrical outlet box. The PZM-11
is designed to look like a light switch so as not to
draw attention.
Use it in factories, jailhouses, classrooms, subway
platforms, military installations. Put it anywhere
there’s a need to listen for intruders, listen for people
in trouble, monitor conversations, or monitor machinery noise.
Musical applications
See the Crown
Microphone Application
Guide,Microphone Application Guide for Studio
Recording,
Application Guide
Crown dealer.
and the Crown
, available free from Crown or your
Boundary Microphone
15
 Loading...