

Page 1
FAHRRADFALTSCHLOSS
DE AT CH
FAHRRAD-FALTSCHLOSS
BEDIENUNGSANLEITUNG
FR CH
ANTIVOL PLIABLE POUR VELO
MODE D’EMPLOI
IT CH
LUCCHETTO PIEGHEVOLE
DA BICICLETTA
ISTRUZIONI PER L‘USO
GB
FOLDING BICYCLE LOCK
INSTRUCTION MANUAL
IAN 103943
DE ATCH
1
A1
A3
A6
A2
A4
A5
A7
DE AT CH
FAHRRAD-FALTSCHLOSS
Bedienungsanleitung
Einleitung:
Herzlichen Glückwunsch!
Mit Ihrem Kauf haben Sie sich für ein hochwertiges Produkt entschieden. Machen
Sie sich vor der ersten Inbetriebnahme mit
dem Produkt vertraut. Lesen Sie hierzu aufmerksam die nachfolgende Bedienungsanleitung. Benutzen Sie das Produkt nur wie
beschrieben und für die angegebenen Einsatzbereiche. Bewahren Sie diese Bedienungsanleitung gut auf. Händigen Sie alle
Unterlagen bei Weitergabe des Produkts
an Dritte ebenfalls mit aus.
Zeichen in dieser Gebrauchs- &
Montageanleitung:
!
Dieses Zeichen warnt Sie vor
Verletzungsgefahren.
!
So sind ergänzende Informationen
gekennzeichnet.
!
Bestimmungsgemäße
Verwendung:
Dieses Fahrrad-Faltschloss ist zum Abschließen von Fahrrädern, Rollern und ähnlichen
Fahrzeugen an dafür vorgesehene und ge
eignete Stellen oder feste Objekte gedacht.
Andere Verwendung oder Veränderung am
Produkt gelten als nicht bestimmungsgemäß
und können zu Risiken wie Verletzungen
und Beschädigungen führen. Für Schäden,
die aus der nicht bestimmungsgemäßen Ver
wendung resultieren, übernimmt der Inverkehrbringer keine Haftung. Das Produkt ist
nicht für den gewerblichen Einsatz bestimmt.
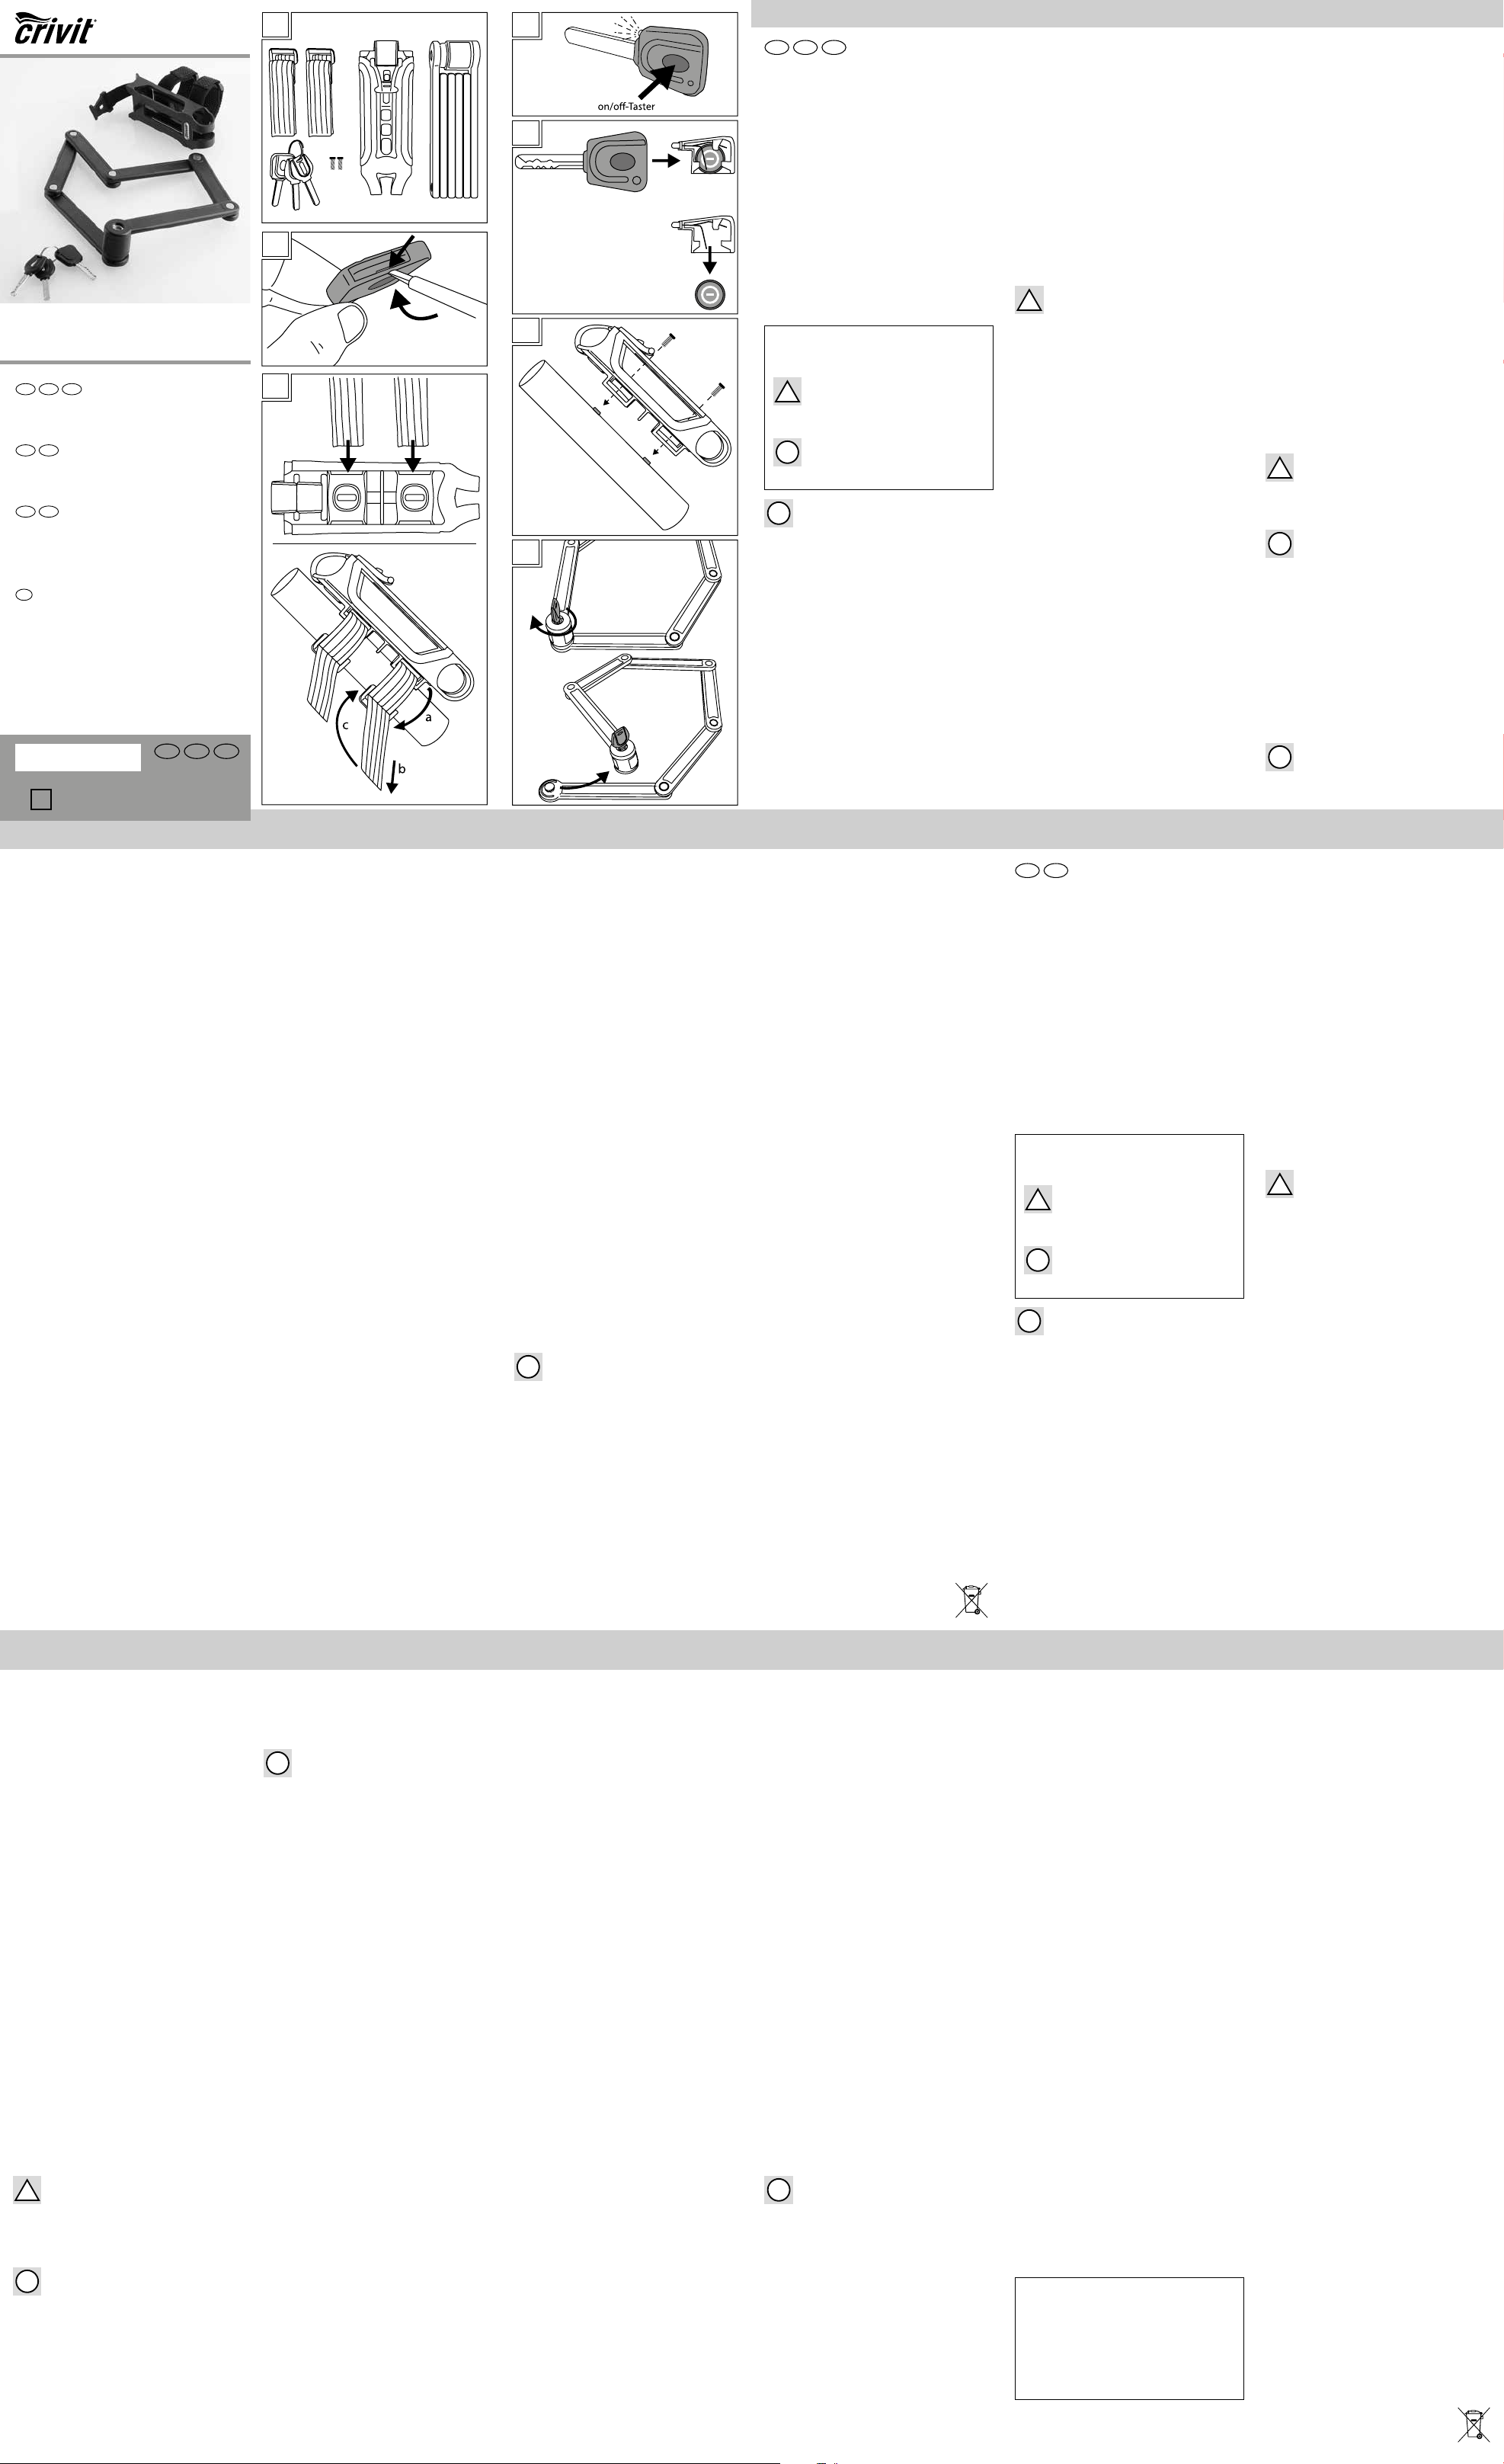
Lieferumfang: (A1)
1 x Faltschloss, bestehend aus 6 Segmenten
1 x Schlosshalterung
2 x Klettverschlussband
2 x Schlüssel
1 x Schlüssel mit LED-Licht
2 x Inbusschraube 2 x 28 mm
1 x Bedienungsanleitung (ohne Abb.)
Technische Daten:
Typ: Fahrrad-Faltschloss
Artikel-Nr.: 21260 / IAN 103943
Monz-Nr.: E83081
Länge: 6 Segmente, Gesamtlänge ca. 85 cm
Größe Faltschloss inkl. Schlosshalterung:
60 x 55 x 190 mm
Typ Batterie: CR1620
Produktionsdatum: 2014
Garantie: 2 Jahre
!
Sicherheitshinweis!
Verletzungsgefahr
Gefahr für Kinder
Achtung! Befestigen Sie die Schlosshalterung nur an einer Stelle des Fahrradrahmens, an der diese während des Fahrens
nicht stören bzw. Verletzungen verursachen
kann.
Achtung! Es besteht Quetschgefahr durch
die einzelnen Faltschloss-Segmente!
Achtung! Nicht geeignet für Kinder unter
36 Monaten. Gefahr des Verschluckens
von Kleinteilen.
Dieser Artikel ist kein Spielzeug. Halten Sie
diesen Artikel fern von Kindern.
Batterien können beim Verschlucken lebensgefährlich sein, daher muss dieser Artikel
und die dazugehörigen Batterien für Kleinkinder unzugänglich aufbewahrt werden.
Sollte jemand eine Batterie verschlucken, so
muss sofort medizinische Hilfe in Anspruch
genommen werden.
Aus Sicherheitsgründen bitten wir Sie, die
Bedienungsanleitung und die darin enthaltenen Sicherheitshinweise genauestens
durchzulesen und aufzubewahren, da sie
Ihnen bei Problemen mit Ihrem Fahrrad-Faltschloss immer hilfreich sein kann. Die Anleitung ist ein fester Bestandteil dieses Produktes und muss bei Weitergabe des Produktes
an Dritte mitgegeben werden.
Nehmen Sie keine Veränderungen an dem
Fahrrad-Faltschloss vor, da dies eine starke
DE/AT/CH DE/AT/CH
Auswirkung auf die Funktionen und Sicherheit hat.
Überprüfen Sie regelmäßig den Zustand
und die Funktion des Fahrrad-Faltschlosses.
Ein defektes Fahrrad-Faltschloss ist fachge
recht zu entsorgen (siehe Entsorgung).
Schlüssel mit LED-Licht:
Vermeiden Sie direkt in den Lichtstrahl zu
schauen.
Entfernen Sie die Batterien aus dem Schlüssel, wenn Sie diesen über einen längeren
Zeitraum nicht benutzen.
Entladene Batterien müssen unverzüglich
aus dem Schlüssel entfernt werden, um ein
Auslaufen der Batterien zu vermeiden.
Ausgelaufene Batterien müssen sofort aus
dem Schlüssel entfernt werden, um eine Beschädigung zu vermeiden.
Vorsicht! Ausgelaufene oder beschädigte Batterien können bei Berührung mit der
Haut Verätzungen verursachen. Berühren
Sie die Batterien nicht mit bloßen Händen.
Batterien dürfen nicht auseinander genommen, ins Feuer geworfen oder kurzgeschlossen werden.
!
Achtung! Verpackungsmaterial und
Kleinteile sind von Kleinkindern fern zu halten. Es besteht Erstickungsgefahr.
!
Reinigung &
Pflegehinweis:
- mit feuchtem Lappen reinigen
- nicht ins Wasser tauchen
- kontrollieren Sie regelmäßig die Beweglichkeit der einzelnen Segmente, ggfs. geben Sie ein geeignetes Schmiermittel auf
die Verbindungsstellen (das Schmiermittel
muss frostsicher und säurefrei sein!)
- das Fahrrad-Faltschloss ist wartungsfrei
- das Fahrrad-Faltschloss kühl, trocken und
vor UV-Licht geschützt lagern
!
Hinweis!
Das Fahrrad-Faltschloss bietet keinen
100%igen Schutz vor Diebstahl. Das Fahr-
-
rad-Faltschloss ist nicht geeignet Motorräder oder ähnliches vor Diebstahl zu sichern.
Batteriehinweis:
Batterien dürfen nicht auseinander genommen, ins Feuer geworfen oder kurzgeschlossen werden.
Ausgelaufene oder beschädigte Batterien
können bei Berührung mit der Haut Verätzungen verursachen. Berühren Sie die Batterien nicht mit bloßen Händen. Batterien
sollten nicht in der Nähe von Kindern aufbewahrt werden.
Sollte eine Batterie verschluckt worden sein,
suchen Sie bitte umgehend einen Arzt auf.
Verwenden Sie nur Batterien gleicher Hersteller.
Setzen Sie Batterien Ihrer Polarität entsprechend in das dafür vorgesehene Batteriefach ein.
Verwenden Sie keine Kombinationen aus
alten und neuen Batterien oder Akkus.
Lagern Sie Ihre Batterien trocken und kühl,
nicht feucht.
Werfen Sie Batterien auf keinen Fall ins Feuer.
Schließen Sie Batterien nicht kurz. Einwegbatterien verlieren auch bei der Lagerung
einen Teil ihrer Energie.
Leere Batterien oder verbrauchte Akkus sind
fachgerecht zu entsorgen. Batterien dürfen
nicht geladen werden.
Lagern Sie Einwegbatterien getrennt von
entladenen Batterien, um Verwechslungen
zu vermeiden.
Batterieentsorgung:
Batterien und Akkus dürfen nicht im Hausmüll entsorgt werden, sondern Sie sind
zur Rückgabe gebrauchter Batterien und
Akkus gesetzlich verpflichtet. Sie können
die Batterien nach Gebrauch entweder
in unserer Verkaufsstelle oder in unmittelbarer Nähe (z. B. im Handel oder in
kommunalen Sammelstellen) unentgeltlich
zurückgeben. Batterien und Akkus sind mit
einer durchgekreuzten Mülltonne sowie
dem chemischen Symbol des Schadstoffes
bezeichnet, nämlich „Cd“ für Cadmium,
„Hg“ für Quecksilber und „Pb“ für Blei.
Schlüssel mit LED-Licht:
Ein-/Ausschalten (A2)
Drücken Sie den on/off-Taster auf der
Oberseite des Schlüsselgriffs und halten
Sie diesen gedrückt, um das LED-Licht einzuschalten. Beim Loslassen des on/off-Tasters geht das LED-Licht aus.
Batteriewechsel (A3)
Öffnen Sie das Batteriefach mit einem flachen Schraubenzieher. Stecken Sie den
Schraubenzieher wie abgebildet in den
Schlitz und schieben Sie das Batteriefach
ein Stück weit aus dem Schlüssel. Nun ziehen Sie das Batteriefach vorsichtig ganz
aus dem Schlüssel heraus.
(A4) Ziehen Sie die Batterie aus der Halterung heraus, verbiegen Sie dabei nicht die
Kontaktdrähte. Anschließend können Sie
eine neue Batterie (CR1620) in die Aufnahme stecken. Achten Sie auf die richtige Polarität: der Pluspol muss nach unten zeigen.
Stecken Sie nun die Batteriehalterung wieder bis zum Anschlag in das Batteriefach.
Montage der Schlosshalterung am Fahrrad:
Befestigung der Schlosshalterung
mit Schrauben am Rahmen (A5)
- Entnehmen Sie zur Montage das Faltschloss aus der Schlosshalterung
- Öffnen Sie die beiden Klettverschlüsse
an der Rückseite der Schlosshalterung
und ziehen Sie diese vollständig aus der
Schlosshalterung heraus.
- Befestigen Sie die Schlosshalterung mit
den beiden mitgelieferten Schrauben
wie abgebildet an den Bohrungen für
die Trinkflaschenhalterung an Unter- oder
Sitzrohr.
- Prüfen Sie den festen Sitz der Schlosshalterung
- Stecken Sie das Faltschloss wieder in die
Schlosshalterung und fixieren Sie es mit
dem Halteband.
Befestigung der Schlosshalterung
mit Klettverschluss (A6)
- Entnehmen Sie zur Montage das Falt-
schloss aus der Schlosshalterung
- Stecken Sie die Klettverschlussbänder
durch die rückseitigen Halter.
- Legen Sie die Klettverschlussbänder um
das Unterrohr und ziehen Sie die Klettverschlussbänder durch die jeweilige Lasche.
- Ziehen Sie die Klettverschlussbänder straff
an und schließen Sie die Klettverschlüsse.
- Stecken Sie das Faltschloss wieder in die
Schlosshalterung und fixieren Sie es mit
dem Halteband.
Verwendung des FahrradFaltschlosses:
- Entnehmen Sie zur Verwendung das Faltschloss aus der Schlosshalterung
Achtung! Es besteht Quetschgefahr
durch die einzelnen Faltschloss-Segmente!
- (A7) Öffnen Sie das Faltschloss mit einem der mitgelieferten Schlüssel und ziehen Sie die beiden Enden des Faltschlosses auseinander.
- Falten Sie die Segmente auseinander und
legen Sie das Faltschloss vorsichtig um den
Fahrradrahmen. Sie können das Faltschloss
um den Fahrradrahmen und Vorder- oder
Hinterrad legen, oder Ihr Fahrrad an einem
festen Objekt (z. B. einem geeigneten Pfosten/Laternenpfahl) sichern.
- Stecken Sie die beiden Enden des Faltschlosses zusammen und verschließen Sie
das Faltschloss mit dem Schlüssel.
!
Hinweis!
Es reicht nicht, dass Fahrrad-Faltschloss nur
durch das Vorder- oder Hinterrad zu legen
und dann an einem geeigneten Objekt
(z. B. einem geeigneten Pfosten/Laternenpfahl) zu sichern, da das jeweilige Rad
durch einfaches Öffnen der Achsschraube
vom Fahrrad gelöst werden kann.
Entsorgung:
Die Verpackung besteht zu 100% aus umweltfreundlichen Materialien, die Sie über
die örtlichen Recyclingstellen entsorgen
können. Über Entsorgungsmöglichkeiten in
formieren Sie sich bitte bei Ihrer Gemeinde
oder Stadtverwaltung.
Garantie:
Garantie der MONZ Handelsgesellschaft
International mbH & Co. KG.
Sehr geehrte Kundin, sehr geehrter Kunde,
Sie erhalten auf dieses Produkt 2 Jahre Garantie ab Kaufdatum. Im Falle von Mängeln
dieses Produkts stehen Ihnen gegen den
Verkäufer des Produkts gesetzliche Rechte
zu. Diese gesetzlichen Rechte werden durch
unsere im Folgenden dargestellte Garantie
nicht eingeschränkt.
Garantiebedingungen:
Die Garantiefrist beginnt mit dem Kaufdatum. Bitte bewahren Sie den Original Kassenbon gut auf. Diese Unterlage wird als
Nachweis für den Kauf benötigt.
Tritt innerhalb von zwei Jahren ab dem Kaufdatum dieses Produkts ein Material- oder
Fabrikationsfehler auf, wird das Produkt
von uns – nach unserer Wahl – für Sie kostenlos repariert oder ersetzt. Diese Garantieleistung setzt voraus, dass innerhalb der
Zwei-Jahres-Frist das defekte Produkt und
der Kaufbeleg (Kassenbon) vorgelegt und
schriftlich kurz beschrieben wird, worin der
Mangel besteht und wann er aufgetreten ist.
Wenn der Defekt von unserer Garantie gedeckt ist, erhalten Sie das reparierte oder
ein neues Produkt zurück. Mit Reparatur
oder Austausch des Produkts beginnt kein
neuer Garantiezeitraum.
Inverkehrbringer:
MONZ Handelsgesellschaft
International mbH & Co. KG
Metternichstr. 37
54292 Trier / Germany
Serviceadresse:
Monz Service Center
c/o Teknihall Elektronik GmbH
Breitefeld 15, 64839 Münster / Germany
Hotline: 00800 / 68546854 (kostenfrei)
E-Mail: monz-de@teknihall.com
E-Mail: monz-at@teknihall.com
E-Mail: monz-ch@teknihall.com
-
Stand: 09/2014
DE/AT/CH FR/CHDE/AT/CHDE/AT/CHDE/AT/CH
FR CH
ANTIVOL PLIABLE POUR VELO
Mode d’emploi
Introduction :
Toutes nos félicitations !
En achetant ces bandes réfléchissantes,
vous avez choisi un produit de grande
qualité. Lisez attentivement ce mode d’emploi pour découvrir le produit avant une
première utilisation. Utilisez les bandes réfléchissantes uniquement selon l’usage décrit et les domaines d’utilisation indiqués.
Gardez précieusement ce mode d’emploi
et donnez l’ensemble des documents à des
tiers lors de la remise du produit.
Symboles dans cette notice d‘utilisation et de montage :
!
Ce symbole vous signale les
risques de blessures.
!
Les informations complémentaires
sont caractérisées ainsi.
!
Utilisation conforme à
l’usage :
Cet antivol pliable est prévu pour attacher
des vélos, des scooters ou des véhicules
semblables à des endroits adaptés et pré
vus à cet effet ou à des objets fixes.
Toute autre utilisation ou modification
du produit est considérée comme non
conforme à l’usage prévu et peut s’avérer
dangereuse (p. ex. risques de blessures et
de dommages). Le responsable de la commercialisation du produit décline toute responsabilité quant aux dommages résultant
d’une utilisation non conforme à l’usage
prévu. Le produit n’est pas destiné à une
utilisation professionnelle.
Contenu : (A1)
1 x antivol pliable composé de 6 segments
1 x support d’antivol
2 x bandes velcro
2 x clés
1 x clé avec lumière LED
2 x vis cruciformes 2 x 28 mm
2 x rondelles
1 x mode d’emploi (sans ill.
)
Données techniques :
Type : Antivol pliable pour vélo
N° d’article : 21260 / IAN 103943
N° Monz : E83081
Longueur : 6 segments, longueur totale :
env. 85 cm
Dimension antivol avec support d’antivol :
60 x 55 x 190 mm
Pile : 3V CR 1620
Date de production : 2014
Garantie : 2 ans
!
Consignes de sécurité !
Risque de blessure
Danger pour les enfants
Attention ! Fixer le support de l’antivol à
un endroit du cadre du vélo où il ne pourra pas gêner ou occasionner de blessures
pendant les déplacements.
Attention ! Il y a un risque d’écrasement
lié aux différents segments de l’antivol
pliable !
Attention ! Ne convient pas aux enfants
de moins de 36 mois. Risque d’étouffement
lié aux petites pièces.
Cet article n’est pas un jouet. Le tenir hors
de portée des enfants.
Les piles peuvent en cas d’ingestion présenter un danger de mort, il faut par conséquent conserver cet article et ses piles hors
de portée des petits enfants.
Si une pile devait être ingérée, il faut immédiatement avoir recours à des soins
médicaux.
Pour des raisons de sécurité, vous êtes
priés de lire attentivement le mode d’emploi et les consignes de sécurité qui y figurent et de conserver le mode d’emploi
pour d’éventuels problèmes ou questions
ultérieurs. Le mode d’emploi fait partie in-
tégrante de ce produit et doit être transmis
lors de la cession du produit à des tiers.
Toute modification de l’antivol pliable est
interdite, car cela peut avoir un impact
déterminant sur le fonctionnement et la
sécurité.
Il convient de vérifier régulièrement l’état
et le fonctionnement de cet antivol pliable.
Tout antivol pliable défectueux doit être
éliminé conformément à la réglementation
(voir consigne d’élimination).
Clé avec lumière LED :
Eviter de regarder directement dans la lumière.
Enlever les piles de la clé si elle ne sera
pas utilisée pendant quelque temps.
Les piles usagées doivent être immédiatement retirées de la clé afin d’éviter les
éventuelles fuites.
En cas de fuite d’une pile, il faut la retirer
immédiatement de la clé afin d’éviter tout
dommage.
Prudence ! Les piles endommagées ou
présentant des fuites peuvent provoquer
des brûlures en cas de contact avec la
peau. Ne pas toucher les piles à mains
nues.
Les piles ne doivent pas être démontées,
être jetées dans le feu ou être court-circuitées.
!
Attention ! Les emballages et
petites pièces doivent être tenus hors de
portée des petits enfants. Il y a un risque
d’étouffement.
!
Nettoyage & conseils
d’entretien :
- Nettoyer à l’aide d’un chiffon humide.
- Ne pas immerger dans l’eau.
- Vérifier régulièrement la mobilité des
différents segments, le cas échéant appliquer un lubrifiant approprié sur les jonctions (le lubrifiant doit être résistant au gel
et sans acide !).
- L’antivol pliable pour vélo ne nécessite
pas d’entretien.
- Conserver l’antivol pliable dans un endroit frais, sec et à l’abri des rayons UV.
!
Remarque !
L’antivol pliable ne garantit pas une protection à 100 % contre le vol.
L’antivol pliable pour vélo ne convient pas
à la protection contre le vol de motos ou
de véhicules semblables.
Remarques sur les piles :
Les piles ne doivent pas être désossées, jetées au feu ou court-circuitées.
Les piles présentant des fuites ou endommagées peuvent entraîner des brûlures en
cas de frottement avec la peau. Ne pas
touchez les piles avec les mains nues. Les
piles doivent être conservées hors de la
portée des enfants.
Appelez immédiatement un médecin en
cas d’ingestion. Utilisez uniquement les
piles des mêmes fabricants.
Respectez les polarités lorsque vous insérez les piles dans leur logement.
Ne pas mélangez des piles ou des accumulateurs anciens et neufs.
Conservez vos piles dans un endroit frais,
sec et non humide.
Ne jamais jetez les piles au feu.
Ne pas court-circuitez.
Les piles jetables perdent une partie de
leur énergie même quand elles sont stockées.
Les piles vides ou les accumulateurs usagés doivent être jetés conformément au
bon usage. Les piles ne doivent pas être
rechargées.
Afin d’éviter toute confusion, conservez les
piles jetables et les piles déchargées dans
des endroits séparés.
Élimination des piles :
Les piles et les accumulateurs ne doivent
pas être jetés avec les ordures ménagères.
La loi vous oblige à retourner les piles et
les accumulateurs usagés. Vous pouvez
rendre gratuitement les piles usagées dans
notre point de vente ou au point le plus
proche (p. ex. en magasin ou dans des
points de collecte municipaux). Les piles
et les accumulateurs sont marqués d’une
poubelle barrée et portent aussi le symbole
chimique représentant les polluants (« Cd »
pour le cadmium, « Hg » pour le mercure et
« Pb » pour le plomb).
Clé avec lumière LED :
Allumer/éteindre (A2)
Appuyer sur le bouton on/off sur le dessus de la tête de la clé et rester appuyé
pour allumer la lumière LED. En relâchant
le bouton on/off, la lumière LED s’éteint.
Remplacement des piles (A3)
Ouvrir le compartiment des piles à l’aide
d’un tournevis plat. Enfoncer le tournevis
comme illustré dans la fente et pousser le
compartiment de piles en dehors de la clé.
Enlever alors doucement le compartiment
de pile complètement de la clé.
(A4) Enlever la pile de son emplacement,
veiller à ne pas tordre les fils de contact.
Puis, une nouvelle pile (CR1620) peut être
installée dans l’emplacement. Veiller à la
bonne polarité : le pôle positif doit être dirigé vers le bas. Positionner la fixation de
la pile à nouveau jusqu’en butée dans le
compartiment de piles.
Montage du support de l’antivol sur le vélo :
Fixation du support de l’antivol à
l’aide de vis sur le cadre (A5)
- Retirer l’antivol pliable de son support
pour le montage.
- Ouvrir les deux bandes velcro à l’arrière
du support et les retirer complètement du
support.
- Fixer le support à l’aide des deux vis fournies comme illustré dans les perçages
prévus pour le porte-bidon sur le tube
inférieur ou de selle.
- Vérifier la bonne fixation du support de
l’antivol.
- Remettre l’antivol pliable dans le support
et l’attacher à l’aide de la sangle.
FR/CH FR/CH FR/CHFR/CHFR/CHFR/CH
Fixation du support de l’antivol à
l’aide des bandes velcro (A6)
- Retirer l’antivol pliable de son support
pour le montage.
- Passer les bandes velcro à travers les supports arrière.
- Placer les bandes velcro autour du tube
inférieur et passer les bandes velcro par
les languettes respectives.
- Tendre puis fermer les bandes velcro.
- Remettre l’antivol pliable dans le support
et l’attacher à l’aide de la sangle.
Utilisation de l’antivol pliable
pour vélo :
- Retirer l’antivol pliable de son support
pour l’utilisation.
Attention ! Il y a un risque d’écrase-
ment lié aux différents segments de l’antivol pliable !
- (A7) Ouvrir l’antivol pliable à l’aide
d’une clé fournie et tirer sur les deux extrémités de l’antivol.
- Déplier les segments et positionner l’antivol pliable avec précaution autour du
cadre du vélo. L’antivol pliable peut être
positionné autour du cadre et autour de
la roue avant ou arrière, ou servir à attacher le vélo à un objet fixe (p. ex. un
poteau/lampadaire approprié).
- Raccorder les deux extrémités de l’antivol et fermer l’antivol à l’aide de la clé.
!
Remarque !
Il ne suffit pas de passer l’antivol pliable à
travers la roue avant ou arrière puis de l’attacher à un objet fixe approprié (p. ex. un
poteau/lampadaire adapté), car la roue
en question peut être facilement enlevée
du vélo en desserrant la vis axiale.
Élimination :
L’emballage est entièrement constitué de
matières respectant l’environnement et
pouvant être éliminées dans des points
de recyclage proches. Le produit ne doit
pas être jeté avec les ordures ménagères
classiques. Veuillez vous informer des possibilités d’élimination de ce produit auprès
de votre commune ou de vos services municipaux.
Garantie :
Garantie de MONZ Handelsgesellschaft
International mbH & Co. KG.
Chères clientes, chers clients, vous bénéficiez de 2 ans de garantie sur ce produit (à
compter de la date d’achat). Vous pouvez
faire valoir vos droits légaux vis-à-vis du
vendeur si vous constatez des défauts sur
le produit. Notre garantie décrite ci-après
ne restreint pas vos droits légaux.
Conditions de garantie :
La durée de garantie démarre à compter
de la date d’achat du produit. Veuillez
conserver précieusement l’original du
ticket de caisse. Ce document vous permettra de prouver que vous avez bien acheté
le produit.
Nous réparons ou remplaçons gratuitement le produit en cas de défaut de matériau ou de fabrication ; cette prestation est
réalisée dans les deux ans suivant la date
d’achat. Le remplacement ou la réparation
du produit est à notre appréciation. Cette
prestation de garantie est réalisée si dans
un délai de deux ans, l’utilisateur présente
l’appareil défectueux et la preuve de son
achat (ticket de caisse) et qu’il décrit brièvement l’emplacement et la date d’apparition du problème (description écrite).
Si notre garantie prend en charge le dysfonctionnement, vous recevrez le produit
réparé ou un nouveau produit. Une réparation ou un échange de produit ne donne
pas lieu à un nouveau délai de garantie.
Indépendamment de la garantie commerciale souscrite, le vendeur reste tenu
des défauts de conformité du bien et des
vices rédhibitoires dans les conditions
prévues aux articles L211-4 et suivants
du Code de la consommation et aux
articles 1641 et suivants du Code Civil.
Responsable de la commercialisation du produit :
MONZ Handelsgesellschaft
International mbH & Co. KG
Metternichstr. 37
54292 Trier / Germany
Adresse du service
après-vente :
MONZ SERVICE CENTER
c/o Teknihall P/A Siemtech
ZA.Les Anguillarires 1
31410 Noe / France
Hotline: 00800 / 68546854 (gratuit)
E-Mail: monz@teknihall.fr
c/o Teknihall Elektronik GmbH
Breitefeld 15, 64839 Münster / Germany
Hotline: 00800 / 68546854 (gratuit)
Mail: monz-ch@teknihall.com
État: 09/2014
Page 2
IT/CH IT/CH IT/CHIT/CHIT/CH
IT CH
LUCCHETTO PIEGHEVOLE
DA BICICLETTA
Istruzioni per l’uso
Introduzione:
Congratulazioni!
Ha scelto di acquistare un prodotto di
grande qualità. La invitiamo a conoscere
nel dettaglio il prodotto prima di utilizzarlo
per la prima volta. Legga con attenzione le
seguenti istruzioni per l’uso. Utilizzi il prodotto solo secondo le modalità e finalità
qui descritte.
Conservi con cura le presenti istruzioni per
l’uso. In caso di cessione a terzi, consegni
tutti i documenti insieme al prodotto.
Simboli contenuti nel presente
manuale di montaggio ed uso:
!
Questo simbolo indica il pericolo
di lesioni.
!
Le informazioni aggiuntive sono
indicate come di seguito.
!
Uso conforme alle
disposizioni:
Il lucchetto pieghevole da bicicletta è progettato per chiudere biciclette, pattini a
rotelle e mezzi simili ai punti appositi ed
adeguati o ad oggetti fissi.
Le altre eventuali applicazioni o alterazioni apportate al prodotto sono considerate
non conformi alle disposizioni e possono
provocare situazioni di pericolo, come
ad esempio lesioni e danni. Il distributore
declina ogni responsabilità in relazione ai
danni derivanti da un impiego non conforme alle disposizioni. Il prodotto non è destinato per l’impiego industriale.
Contenuto: (A1)
1 lucchetto pieghevole formato da 6 segmenti
1 supporto del lucchetto
2 nastri di chiusura in velcro
2 chiavi
1 chiave con luce LED
2 viti a croce da 2 x 28 mm
2 rondelle
1 manuale delle istruzioni per l’uso (senza
illustrazioni)
Specifiche tecniche:
Modello: lucchetto pieghevole da bicicletta
Cod. art.: 21260 / IAN 103943
Cod. Monz: E83081
Lunghezza: 6 segmenti, lunghezza totale
85 cm circa
Dimensioni del lucchetto pieghevole compreso il supporto: 60 x 55 x 190 mm
Batteria: 3V CR 1620
Data di produzione: 2014
Garanzia: 2 anni
!
Indicazioni di sicurezza!
Pericolo di lesioni.
Pericolo per i bambini.
Attenzione! Fissare il supporto del lucchetto solo a un punto del telaio della bicicletta in cui non risulti d’intralcio durante
la marcia o non provochi eventuali lesioni.
Attenzione! È presente il pericolo di
schiacciamento provocato dai singoli segmenti del lucchetto pieghevole.
Attenzione! Il prodotto non è adatto ai
bambini di età inferiore ai 36 mesi. È presente il pericolo di ingestione dei componenti di piccole dimensioni.
Il presente articolo non è un giocattolo. Tenere il prodotto lontano dalla portata dei
bambini.
In caso di ingestione, le batterie possono
risultare fatali. Per questo motivo è obbligatorio conservare il prodotto e le relative batterie in un luogo inaccessibile ai bambini.
In caso di ingestione delle batterie, è obbligatorio richiedere immediatamente il
soccorso medico.
Per motivi di sicurezza è richiesto leggere
in tutte le loro le istruzioni per l’uso e le
indicazioni di sicurezza parti contenute
all’interno di queste ultime e conservarle
prestando la massima attenzione dato che
possono risultare sempre utili in caso di
eventuali problemi con il lucchetto pieghevole da bicicletta. Le istruzioni sono parte
integrante del prodotto e devono essere
consegnate insieme al prodotto in caso di
cessione del prodotto a terzi.
Non apportare modifiche al lucchetto
pieghevole da bicicletta dato che queste
producono seri effetti sulla funzionalità e
sulla sicurezza.
Verificare periodicamente lo stato e il
funzionamento del lucchetto pieghevole da bicicletta. È necessario procedere
allo smaltimento adeguato dei lucchetti
pieghevoli da bicicletta difettosi (vedere
smaltimento).
Chiave con luce LED:
Evitare di puntare il fascio di luce direttamente negli occhi.
Rimuovere le batterie dalla chiave se non
viene utilizzata per un periodo di tempo
prolungato.
È obbligatorio rimuovere le batterie scariche immediatamente dalla chiave per
evitare eventuali fuoriuscite di liquidi dalle
batterie.
È necessario provvedere immediatamente
allo smaltimento delle batterie che producano perdite di liquidi per evitare eventuali
danni.
Cautela! Le batterie che producono
perdite di liquidi o danneggiate possono
provocare ustioni in caso di contatto con
la pelle. Non toccare le batterie a mani
nude.
Non è consentito smontare le batterie, gettarle nel fuoco o sottoporle a cortocircuiti.
!
Attenzione! È necessario tenere il
materiale da imballaggio e i componenti
di piccole dimensioni fuori dalla portata
dei bambini. È presente il pericolo di soffocamento.
!
Pulizia e indicazioni per
la manutenzione:
- Pulire un panno umido.
- Non immergere in acqua.
- Controllare periodicamente la mobilità
dei singoli segmenti e applicare un lubrificante adeguato ai punti di raccordo (il
lubrificante deve essere antigelo e privo
di acidi).
- Il lucchetto pieghevole da bicicletta non
richiede manutenzione.
- Conservare il lucchetto pieghevole da
bicicletta in un luogo fresco, asciutto e
protetto dai raggi UV.
!
Nota!
Il lucchetto pieghevole da bicicletta non
offre una protezione totale dai furti.
Il lucchetto pieghevole da bicicletta non è
adatto a ruote da motocicli o simili e non
ne previene l’eventuale furto.
Indicazioni sulle batterie:
Le batterie non devono essere smontate,
gettate nel fuoco o cortocircuitate.
Le batterie danneggiate o con delle
perdite, se toccate, possono corrodere
la pelle. Non toccare le batterie a mani
nude. Le batterie devono essere tenute
fuori dalla portata dei bambini.
In caso di ingerimento delle batterie,
richiedere immediatamente soccorso
medico. Utilizzare solo batterie degli stessi
produttori.
Inserire le batterie nell’apposito scomparto
secondo la polarità.
Non utilizzare combinazioni di batterie o
accumulatori vecchi e nuovi.
Conservare le batterie in luogo fresco e
asciutto, non umido.
Non gettare per nessun motivo le batterie
nel fuoco.
Non cortocircuitare le batterie.
Le batterie usa e getta perdono parte
della loro energia anche quando vengono
conservate.
Le batterie o gli accumulatori scarichi
devono essere smaltiti correttamente. Le
batterie non possono essere caricate.
Conservare le batterie usa e getta
lontano da quelle scariche per evitare di
confonderle.
Smaltimento delle batterie:
Non è consentito gettare le batterie e gli
accumulatori con i rifiuti domestici, per
legge essi devono essere restituiti. Può
restituire le batterie usate nel nostro punto
vendita o nelle immediate vicinanze (ad
es. nel negozio o nei centri di raccolta
comunali). Sulle batterie sono presenti
l’immagine di un bidone dell’immondizia
con una croce e i simboli chimici delle
sostanze nocive, cioè “Cd” per il cadmio,
“Hg” per il mercurio e “Pb” per il piombo.
Chiave con luce LED:
Attivazione / disattivazione (A2)
Premere il pulsante ON/OFF sul lato superiore dell’impugnatura della chiave e
tenerlo premuto per attivare la luce LED.
Rilasciando il pulsante ON/OFF, la luce
LED si disattiva.
Sostituzione delle batterie (A3)
Aprire il vano batterie con un cacciavite
piatto. Inserire il cacciavite come mostrato nell’illustrazione nella fessurare e far
distaccare il vano batterie leggermente
dalla chiave. A questo punto estrarre il
vano batterie completamente dalla chiave
prestando attenzione.
(A4) Estrarre la batteria dal supporto
senza piegare i fili dei contatti. Quindi è
possibile innestare una nuova batteria
(CR1620) nella sede. Prestare attenzione
alla polarità giusta: il polo positivo deve
essere rivolto verso il basso. A questo punto inserire il supporto batterie nuovamente
fino all’arresto nel vano batterie.
Montaggio del supporto del
lucchetto sulla bicicletta:
Fissaggio del supporto del lucchetto con viti al telaio (A5)
- Per il montaggio rimuovere il lucchetto
pieghevole dal supporto.
- Aprire entrambe le chiusure in velcro sul
lato posteriore del supporto del lucchetto
ed estrarle completamente dal supporto.
- Fissare il supporto del lucchetto con entrambe le viti fornite in dotazione, come
mostrato nell’illustrazione, ai fori per il
portaborraccia sul tubo inferiore o della
seduta.
- Controllare la stabilità della sede del
supporto del lucchetto.
- Innestare il lucchetto pieghevole nuovamente nell’apposito supporto e fissarlo
con il nastro di ritenuta.
Fissaggio del supporto del lucchetto con chiusura in velcro (A6)
- Per il montaggio rimuovere il lucchetto
pieghevole dal supporto.
- Inserire i nastri di chiusura in velcro attraverso i supporti posteriori.
- Disporre i nastri di chiusura in velcro
intorno al tubo inferiore e tirare i nastri
utilizzando le rispettive linguette.
- Serrare a fondo i nastri della chiusura in
velcro e chiudere le chiusure in velcro.
- Innestare il lucchetto pieghevole nuovamente nell’apposito supporto e fissarlo
con il nastro di ritenuta.
Impiego del lucchetto pieghevole da bicicletta:
- Rimuovere il lucchetto pieghevole dal
supporto per utilizzarlo.
Attenzione! È presente il pericolo di
schiacciamento provocato dai singoli
segmenti del lucchetto pieghevole.
- (A7) Aprire il lucchetto pieghevole con
una delle chiavi fornite in dotazione e
allontanare entrambe le estremità del
lucchetto pieghevole.
- Divaricare i segmenti e disporre il lucchetto pieghevole intorno al telaio della bicicletta prestando attenzione. È possibile
disporre il lucchetto pieghevole intorno al
telaio della biciclette e alla ruota anteriore o posteriore o assicurare la bicicletta
ad un oggetto fisso, come ad esempio un
palo della luce / un apposito paletto.
- Inserire entrambe le estremità del lucchetto pieghevole e chiudere il lucchetto
pieghevole con la chiave.
!
Nota!
Non è sufficiente disporre il lucchetto pieghevole da bicicletta solo attraverso la
ruota anteriore o posteriore e assicurarlo
ad un oggetto adeguato, come ad esempio un palo della luce / un apposito paletto, perché è possibile rimuovere dalla
bicicletta le diverse ruote aprendo le viti
degli assi.
Smaltimento:
L’imballaggio è costituito al 100% da
materiali ecologici che è possibile smaltire
presso i centri di riciclaggio locali. Il
prodotto non può essere smaltito con i
rifiuti domestici. Richiedere informazioni
presso il comune o l’amministrazione
locale competente in merito alle possibilità
di smaltimento del prodotto.
Garanzia:
Garanzia della MONZ Handelsgesellschaft International mbH & Co. KG.
Gentile Cliente, per questo prodotto Lei
riceve una garanzia di 2 anni dalla data
d’acquisto. In caso di difetti del prodotto,
Le sono riconosciuti per legge dei diritti
nei confronti del venditore del prodotto.
Tali diritti non sono limitati dalla nostra
garanzia di seguito indicata.
Condizioni di garanzia:
Il periodo di garanzia inizia con la data
d’acquisto. Conservi con cura lo scontrino
originale. Tale documento è necessario
quale prova dell’acquisto.
In caso di comparsa di un difetto del
materiale o di fabbricazione entro due
anni dalla data d’acquisto del prodotto,
provvederemo - a nostra discrezione - a
riparare o sostituire il prodotto gratuitamente.
L’applicazione della garanzia presuppone
che entro il periodo di due anni siano
presentati e descritti brevemente per
iscritto l’apparecchio difettoso e la ricevuta
d’acquisto (scontrino), in cosa consiste il
difetto e quando è stato rilevato.
Se il difetto è coperto dalla nostra
garanzia, Lei riceverà il prodotto riparato
o un nuovo prodotto. Con la riparazione
o la sostituzione del prodotto non inizia un
nuovo periodo di garanzia.
Distributore:
MONZ Handelsgesellschaft
International mbH & Co. KG
Metternichstr. 37
54292 Trier / Germany
Indirizzo del servizio di
assistenza tecnica:
MONZ SERVICE CENTER
c/o Teknihall Elektronik GmbH
Breitefeld 15, 64839 Münster / Germany
Hotline: 00800 / 68546854 (gratuito)
Mail: monz-it@teknihall.com
Mail: monz-ch@teknihall.com
Versione del: 09/2014
GB
FOLDING BICYCLE LOCK
Instruction Manual
Introduction:
Congratulations!
You have purchased a high quality product. Please familiarise yourself with the
product before initial use. Read the following instruction manual carefully. Only use
the product as described and for the given
areas of application.
Keep these instructions in a safe place. If
you pass the product on to a third party
please also pass on all documentation.
Symbols in this instruction & installation manual:
!
This symbol indicates a risk of in-
jury.
!
This is how additional information
is earmarked.
!
Correct usage:
This folding bicycle lock is designed for locking bicycles, scooters and similar on fixed
objects and at locations that are intended
and suitable for this purpose
Any other uses of or modifications to the
product are considered incorrect and can
lead to risks such as injuries and damage.
The distributor does not accept liability for
damage resulting from incorrect usage. The
product is not intended for commercial use.
Contents: (A1)
1 x Folding lock, comprising 6 segments
1 x Lock mount
2 x Velcro strips
2 x Keys
1 x Key with LED light
2 x Cross-head screws 2 x 28 mm
2 x Washers
1 x Operating instructions (no illustration)
Technical data:
Type: Folding bicycle lock
Article no.: 21260 / IAN 103943
Monz no.: E83081
Length: 6 segments, total length approx.
85 cm
Size of folding lock including lock mount:
60 x 55 x 190 mm
Battery: 3V CR 1620
Production date: 2014
Guarantee: 2 years
!
Safety notes!
Risk of injury
Risk to children
Caution! Only attach the lock mount on
a position of the bicycle frame where it
cannot impede movement or cause injury.
Caution! There is a risk of crushing in the
individual folding lock segments.
Caution! Not suitable for children under
the age of 36 months. Risk of swallowing
small parts.
This article is not a toy. Keep this article
away from children.
Batteries can be life-threatening if swallowed and the article and the corresponding batteries must be kept out of the reach
of children for this reason.
Seek medical help immediately if a battery is swallowed.
For reasons of safety please read the operating instructions and the safety notes
they contain with great care and keep
them for later reference as they can be
helpful in the event of problems with your
bicycle lock. The instructions are an integral part of this product and must be
passed on if the product is transferred to
a third party.
Do not make any modifications to the folding bicycle lock as this has a significant
impact on function and safety.
Check the condition and function of the
folding bicycle lock at regular intervals.
A defective folding bicycle lock must be
disposed of correctly (see disposal).
GBIT/CH IT/CH GB GB
Key with LED light:
Avoid looking directly into the beam.
Remove the batteries from the key if it is out
of use for longer periods.
Remove empty batteries from the key immediately in order to avoid battery leakage.
Empty batteries must be removed from the
key immediately in order to avoid damage.
Caution! Leaking or damaged batteries
can cause burns to the skin on contact.
Do not touch the batteries with your bare
hands.
Batteries may not be dismantled, thrown
into the fire or short-circuited.
#
!
Caution! Packaging material and
small parts must be kept away from small
children. There is a risk of suffocation.
!
Note on cleaning and care:
- clean with a damp cloth
- do not submerge in water
- check the mobility of the individual segments regularly and lubricate the connections if necessary (the lubricant must be
frost-proof and acid-free).
- the folding bicycle lock is maintenance
free
- store the folding bicycle lock in a cool,
dry place and protect it from UV-light.
!
Note!
The folding bicycle lock does not offer
100% protection from theft.
The folding bicycle lock is not suitable as
theft-protection for motorbikes or similar.
Note on batteries:
Batteries may not be dismantled, thrown
into fire or short-circuited.
Leaking or damaged batteries can cause
acid burns to skin on contact. Do not
touch the batteries with bare hands. Batteries should not be stored in the vicinity
of children.
If a battery is swallowed please immedi-
ately consult a doctor. Only use batteries
from the same manufacturer.
Insert the batteries into the battery compartment in accordance with their polarity.
Do not use a combination of old and new
batteries and storage batteries.
Store your batteries in a cool dry place
where they cannot become damp.
Never throw batteries into the fire.
Do not short-circuit batteries.
Single-use batteries will also lose some of
their power during storage.
Empty batteries or spent storage batteries
must be disposed of correctly. Batteries
may not be charged.
Store single-use batteries away from spent
batteries in order to avoid confusion.
Battery disposal:
Batteries and storage batteries may not
be disposed of with household waste. You
are bound by law to return used batteries
and storage batteries. After use you can
either return batteries to our point of sale
or somewhere in the immediate vicinity
(e.g. at the shop or at communal collection points) free of charge. Batteries and
storage batteries are marked with a rubbish bin with a red cross through it and
the chemical symbol for the hazardous
material, namely ‘Cd’ for cadmium, ‘Hg’
for mercury and ‘Pb’ for lead.
Key with LED light:
Switching on and off (A2)
Press the on/off button on the top of the
key grip and hold it down to switch the LED
light on. The LED light switches off again
when you release the on/off button.
Changing the battery (A3)
Open the battery compartment with a flat
screwdriver. Insert the screwdriver into the
slot as shown and push the battery compartment out of the key a little. Now pull the battery compartment carefully out of the key.
(A4) Pull the battery out of the holder, taking care not to bend the contact
wires. Then you can insert a new battery
(CR1620) into the holder. Ensure correct
polarity: the positive pole must face downwards. Now slide the battery holder into
the battery compartment as far as possible.
Assembling the lock mount
on the bicycle:
Attach the lock mount to the frame
with screws (A5)
- Take the folding lock out of the lock
mount for assembly
- Open the two Velcro straps on the back
of the lock mount and pull them completely out of the lock mount
- Use the two screws that are included to
fix the lock mount as shown to the holes
for the drinking bottle mount on the upper
or lower seat tube.
- Check that the lock mount is fitted securely
- Insert the folding lock back into the lock
mount and attach it with the retaining
strap.
Attach the lock mount with the
Velcro strap (A6)
- Take the folding lock out of the lock
mount for assembly
- Insert the Velcro straps through the holders on the rear.
- Lay the Velcro straps around the lower
tube and pull the Velcro straps through
the relevant tab.
- Pull the Velcro straps tight and close the
Velcro straps
- Insert the folding lock back into the lock
mount and attach it with the retaining
strap.
Use of the folding bicycle lock:
- Remove the folding lock from the lock
mount for use
Caution! There is a risk of crushing in
the individual folding lock segments.
- (A7) Open the folding lock with one of
the included keys and pull the two ends
of the folding lock apart.
- Unfold the segments and lay the folding
lock carefully around the bicycle frame.
You can lay the folding lock around the
bicycle frame and the front or back wheel
or secure your bicycle on a fixed object
(e.g. a suitable pole/lamppost).
- Insert the two ends of the folding lock into
one another and lock the folding lock
with the key.
!
Note!
It is not sufficient to insert the folding bicycle
lock only through the front or back wheel
and then to a suitable object (e.g. a suitable pole/lamppost) as the wheel can be removed from the bicycle by simply opening
the axle bolt.
Disposal:
The packaging comprises 100% environmentally friendly materials that you can
dispose off at local recycling centres. The
product may not be disposed of in household waste. Please enquire with your
community or municipal administration regarding possibilities for the disposal of the
product.
Warranty:
Guaranteed by MONZ Handelsgesellschaft International mbH & Co. KG.
Dear Customer, we grant you 2 years warranty from the purchase date of this equipment. In the event that this product is faulty
you have the same rights against the product seller. These statutory rights are not limited by the warranty described below.
Warranty conditions:
The warranty period begins on the purchase date. Please keep the original receipt in a safe place. This document is required as proof of purchase.
In the event that a material or manufacturing fault occurs within two years of the
purchase date then we will either repair or
replace the product free of charge, as we
choose. This guarantee requires that the
defective product is presented within the
two-year period with proof of purchase (receipt) and a brief description of the defect
and when it occurred.
GBGBGB
If the defect is covered by our warranty
then you will receive either the repaired
product or a new product. The repair or
replacement of the product does not mark
the beginning of a new guarantee period.
Distributor:
MONZ Handelsgesellschaft
International mbH & Co. KG
Metternichstr. 37
54292 Trier / Germany
Service address:
MONZ SERVICE CENTER
c/o Teknihall Elektronik GmbH
Breitefeld 15, 64839 Münster / Germany
Hotline: 00800 / 68546854
(free of charge)
Mail: monz-gb@teknihall.com
Status as of: 09/2014
 Loading...