


IAN
309652
HEART RATE MONITOR WATCH
·
10/2018
· Art.-Nr.: 1-
LD5029
E
IHEART RATE MONITOR
WATCH
Usage and safety instructions
SZÍVFREKVENCIA-MÉRŐ ÓRA
OPTIKAI ÉRZÉKELŐVEL
Használati és biztonsági tanácsok
URA ZA MERJENJE SRČN
FREKVENCE Z OPTIČNIM
SENZORJEM
Navodilo za uporabo in varnostno
navodilo
HODINKY NA MERANIE
FREKVENCIE SRDCA S
OPTICKÝM SENZOROM
Návod na použitie a bezpečnostné
pokyny
MĚŘIČ TEPOVÉ FREKVENCE
S OPTICKÝM SENZOREM
Pokyny k obsluze a bezpečnostní pokyny
IHERZFREQUENZ-
MESSUHR MIT OPTISCHEM SENSOR
Bedienungs- und Sicherheitshinweise

Usage and safety instructions .................................................................. - 1 -
Használati és biztonsági tanácsok ....................................................... - 28 -
Navodilo za uporabo in varnostno navodilo ..................................... - 58 -
Pokyny k obsluze a bezpečnostní pokyny .......................................... - 85 -
Návod na použitie a bezpečnostné pokyny ......................................... - 112 -
Bedienungs- und Sicherheitshinweise ......................... - 140 -

- 1
-
Usage and safety instructions
Table of contents
Table of contents ........................................................................................................... - 1 -
Introduction .................................................................................................................... - 3 -
Intended use .................................................................................................................. - 3 -
Scope of delivery .......................................................................................................... - 3 -
Technical specifications ................................................................................................ - 3 -
Important safety information
Important safety information ..................................................................................... - 4 -
Important safety informationImportant safety information
Important safety information for the batteries............................................................. - 4 -
Important safety information for users ......................................................................... - 4 -
Optical heart rate measuring ....................................................................................... - 5 -
Correct positioning of the heart rate monitor watch .................................................. - 6 -
Important heart rate monitor watch usage information ............................................. - 7 -
Speed setting .......................................................................................................... - 7 -
Heart rate monitor watch initial setup ......................................................................... - 8 -
Light ................................................................................................................................ - 8 -
The heart rate monitor watch has 4 function modes ................................................. - 8 -
CLOCK (CLOCK / UHR / HORLOGE / OROLOGIO) .......................................... - 9 -
1. Clock ................................................................................................................... - 9 -
2. Alarm ................................................................................................................... - 9 -
3. TIMER (countdown) max. 23:59:59 ............................................................. - 10 -
Workout mode (WORKOUT / TRAINING / ENTRAIN. /ALLENAM.) .............. - 11 -
1. Workout timer .................................................................................................. - 12 -
2. Current/average pace time/km .................................................................... - 13 -
3. Current/average speed km/h ....................................................................... - 14 -
4. Distance ............................................................................................................ - 14 -
5. Heart rate (workout mode) ............................................................................. - 14 -
6. Calories burned / fat burned / BMI ............................................................. - 17 -
Pedometer mode ......................................................................................................... - 18 -
Sleep function mode (SLEEP / SCHLAF / DORMIR / DORMIRE) ....................... - 19 -
1. Starting manual sleep mode ........................................................................... - 19 -

- 2
-
2. Stopping manual sleep mode ........................................................................ - 20 -
3. Setting the automatic sleep mode .................................................................. - 20 -
Troubleshooting ........................................................................................................... - 21 -
Reset ............................................................................................................................. - 22 -
Low battery warning indicator ................................................................................... - 23 -
Replacing the battery .................................................................................................. - 23 -
Water resistance ......................................................................................................... - 23 -
Cleaning instructions ................................................................................................... - 24 -
Disposal of the electronic appliance ......................................................................... - 24 -
Disposal of the batteries ............................................................................................. - 24 -
Recycling ...................................................................................................................... - 24 -
Corrugated cardboard............................................................................................... - 24 -
Waste disposal ............................................................................................................ - 24 -
digi-tech gmbh warranty ............................................................................................ - 24 -
Warranty conditions ................................................................................................... - 25 -
Warranty period and defects liability ....................................................................... - 25 -
Scope of the warranty ................................................................................................ - 25 -
Warranty claim procedure ........................................................................................ - 25 -
Service.......................................................................................................................... - 27 -
Supplier ........................................................................................................................ - 27 -

- 3
-
HEART RATE MONITOR WATCH
Operating temperature
0 - 50°C
Dimensions
Ø 4,8 x 1,4 cm
Display
2,8 x 2,3 cm
Weight
45 g
Battery
CR 2032/3V
Introduction
Congratulations on the purchase of your new heart rate monitor. You have chosen a
high quality product. The instruction manual is part of the product- it contains
important information about safety, use and disposal. Read the manual with all
usage and safety notes before using the watch. Only use the watch in the intended
way and for the intended applications. If the watch is given to someone else, include
all documentation with the heart rate watch. Please keep the packaging and the
instruction manual for future reference.
Intended use
This heart rate monitor is intended for time display and the described additional
features. Any other use or modification of the heart rate monitor does not comply
with the intended uses. The manufacturer is not liable for damages caused by
improper use or misuse. The device is not intended for commercial use.
Scope of delivery
Please note: Check the scope of delivery after purchase. Please ensure that all
parts are included and undamaged.
1 x Heart rate monitor watch incl. battery (CR2032)
1 x Instruction manual
Technical specifications
Heart rate monitor watch
- 4
-
Important safety information
ATTENTION:
Important safety information for the batteries
WARNING!
Keep batteries out of reach of small children. If a battery is swallowed, you must
seek medical attention immediately. Batteries/rechargeable batteries must always
be inserted in the correct polarity. If necessary, clean the battery and device
contacts. Never attempt to recharge non-rechargeable batteries. Never short-circuit
or attempt to open batteries. Never throw batteries into fire as they may explode. If
the device will not be used for an extended time period, remove the battery and
store the device in a dry and dust-free area. Improper use of the battery can lead to
explosion or leakage. If the battery leaks, avoid contact with skin, eyes and mucous
membranes. Use gloves. If you are exposed to battery acid, rinse the affected areas
with plenty of clean water and immediately seek medical attention. Remove
discharged batteries from the device as they present an increased risk of leakage.
Important safety information for users
training program. Your doctor can help you choose the
proper training intensity and heart rate guidelines for your
exercises.
This Heart rate monitor watch is not a medical device and
should only be used as a guide for your training.
WARNING! RISK OF INJURY!
This device may be used by persons (including children over 8 years of age) with
reduced physical, sensory or mental abilities or lack of experience and knowledge,
HEALTH HAZARD!
RISK OF EXPLOSION!
Consult your doctor before you begin any
- 5
-
if they are supervised or instructed regarding the safe use of the device and
understand the dangers that may arise. Children may not play with the device.
Cleaning and user maintenance of the device may not be performed by children
without supervision. Keep packaging films out of the hands of children. There is a
danger of suffocation.
Optical heart rate measuring
Your heart rate monitor watch measures your heart rate at your wrist using an
optical sensor. A chest belt is not required when using this method.
Blood circulation
Blood circulation varies from person to person and may differ intra-individually (for
example, between the left and right arms). In some cases, natural blood flow may
not be optimal for heart rate measurement with an optical sensor in certain
individuals.
Environmental factors
If the ambient temperature is too low, blood flow to the forearms can be reduced
and this may reduce measurement accuracy.
Skin Colour
Skin reflectivity is influenced by the colour of the skin surface. In principle, the less
light is absorbed through the skin surface, the better the heart rate measurement.
Strong pigmentation of the skin, scarring and tattooing can therefore adversely
affect the measurement accuracy.
Keep skin dry and clean
It is important to keep your watch and skin clean and dry. Dry will maximize comfort
and prevent damage to the watch. This is especially important during workouts or
exposure to liquids. Liquids such as sweat, soap, sunscreen, and lotions can reduce
measurement accuracy.
Posture
Improper posture (such as sharply bent wrists) will affect the circulation of the
forearms and reduce heart rate measurement accuracy.

- 6
-
Correct positioning of the heart rate monitor watch
Place the heart rate monitor watch on your wrist. The correct positioning is important
for precise measurements.
To measure the heart rate, the heart rate monitor watch must be snugly fitted around
your wrist. The display must face upward and must be positioned one finger-width
behind the wrist bones. The sensor must be touching the skin. The heart rate monitor
watch must not be worn so tightly that blood circulation is reduced. While you are
not working out, the watch should be worn more loosely around your wrist- in the
style of a normal watch. Wear the watch slightly more tightly around your wrist while
working out to maximise the precision of the heart rate measurement.
Many exercises such as cycling or weightlifting require you to angle your wrists. This
may interfere with the heart rate measurement if the heart rate monitor watch is worn
too low on the wrist. For the best results, wear your heart rate monitor watch for a
few minutes before you begin your workout.
If your hands or skin feels cool quickly, warm up your skin below the sensor. Do
some warm up exercises before you begin your workout.
Ensure that the heart rate monitor watch has skin contact.
Do not wear the heart rate monitor watch too tightly around your wrist as this
may interfere with blood circulation and reduce measurement precision.

- 7
-
The heart rate monitor watch should be worn slightly more tightly around your
wrist when working out.
During very intense workouts or other activities, which cause forceful or
arrhythmic movements of your wrist, the sensor may not be able to measure
your heart rate correctly.
If your heart rate monitor watch does not display your heart rate, relax your
wrist and remain motionless for a short while (approximately 10 seconds). Your
heart rate should now appear.
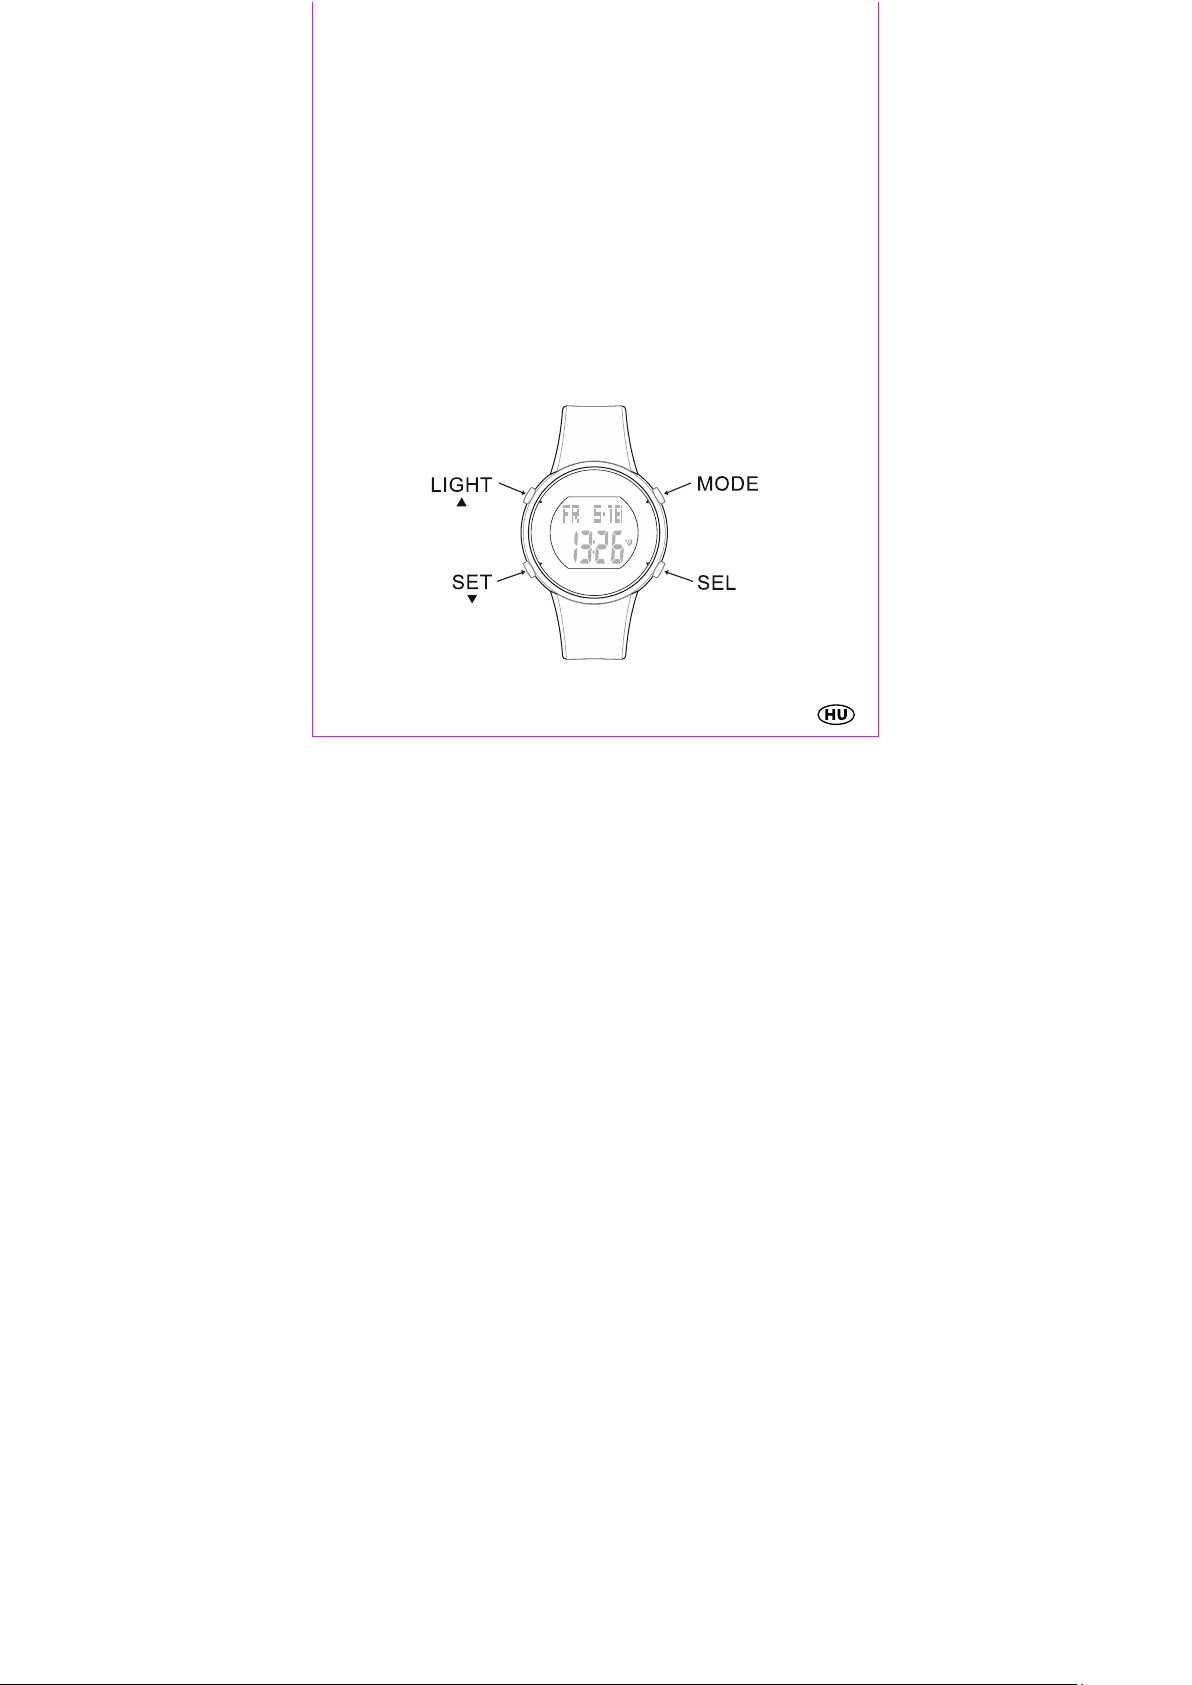
Important heart rate monitor watch usage information
Press MODE to change the feature mode of the watch or exit settings menus
Press SET to set your personal data by decreasing values
Press LIGHT to set your personal data by increasing values
Press SEL to confirm your setting and advance one step in a submenu
Speed setting
Press and hold SET or LIGHT while setting numerical values to use the speed-setting
feature.

- 8
-
Heart rate monitor watch initial setup
Remove the protective film from the display and press LIGHT, MODE, SEL or SET.
The watch will emit a beep sound. The heart rate monitor watch will now show the
starting display view. Set your personal data. Press and hold SET for 3
seconds. The language will appear on the display. Press SET/LIGHT
briefly to select English, Italian, French or German. Press SEL to
confirm your setting. The seconds appear on the display. Press
SET/LIGHT to reset the seconds to 00. Press SEL to confirm your setting. The minutes
appear on the display. Set the minutes by pressing SET/LIGHT and confirm your
setting by pressing SEL. Set the hours, year, month, day, date format, 12/24 hour
time format, unit of measurement, year of birth, gender, height, weight, key tone,
hourly chime and display contrast in the same manner. Press MODE to exit the
settings menu.
Light
Temporarily activate the backlight of the watch display by pressing LIGHT briefly.
The heart rate monitor watch has 4 function modes
Press MODE to select the function mode of the watch. The order of the functions is:
Furthermore, the function modes include different subfunctions.
The subfunctions can always be reached by pressing SEL.

- 9
-
CLOCK (CLOCK / UHR / HORLOGE / OROLOGIO)
Day of the week
Date
Time
Press MODE repeatedly to select the function CLOCK / UHR / HORLOGE /
OROLOGIO.
Press SEL to select the subfunctions of the clock mode.
1. CLOCK
2. ALARM
3. TIMER
1. 2. 3.
1. Clock
The day of the week and the date are shown in the upper part of the display. The
time is shown in the lower part of the display. Set the time as described under “heart
rate monitor watch initial setup”.
2. Alarm
Press SET in alarm mode to activate or deactivate the alarm.
Press and hold SET for 3 seconds to set the alarm time. The minutes will blink on the
display. Press SET/LIGHT to set the minutes and confirm your setting by pressing
SEL. The hours will blink on the display. Set the hours in the same manner. Confirm
by pressing MODE.

- 10
-
hours
seconds
minutes
Activating/deactivating the alarm and the snooze feature
Press any button when the alarm sounds to turn off the alarm. If the alarm is not
turned off within 30 seconds, the snooze feature will activate. The -symbol will
blink on the display and the alarm will sound again after 5 minutes. This will be
repeated 3 times. After 24 hours the alarm will sound again.
3. TIMER (countdown) max. 23:59:59
The preset time of 1:00 hour will appear on the display.
Press SET while in TIMER mode to start or stop the timer.
Press and hold SET for 3 seconds to reset the TIMER.
Press and hold SET again for 3 seconds to set a custom time for the TIMER. The
hours will blink. Press SET/LIGHT to set the hours and confirm your setting by
pressing SEL. The minutes will blink on the display. Set the minutes and seconds in
the same manner. Confirm by pressing MODE.

- 11
-
Stop the TIMER alarm by pressing any button. If no button is pressed, the alarm will
automatically stop after 30 seconds.
Workout mode (WORKOUT / TRAINING /
ENTRAIN. /ALLENAM.)
Press MODE repeatedly to select the function WORKOUT / TRAINING / ENTRAIN
/ ALLENAM.
Press SEL to select the subfunctions of the workout mode.
1. WORKOUT TIMER
2. CURRENT/AVERAGE PACE
3. CURRENT/AVERAGE SPEED
4. DISTANCE
5. HEART RATE
6. CALORIES BURNED/FAT BURNED/BMI

- 12
-
1. Workout timer
Press SET while in workout mode to begin the heart rate measurement. The heart
symbol will blink on the display.
ATTENTION: All described subfunctions will only function if the workout timer is
running.
Press SET while in workout mode to stop the heart rate measurement. The heart
symbol will remain on without blinking.
NOTE: If the workout timer is stopped, the heart rate monitor watch will revert to the
normal time display after approximately 5 minutes.
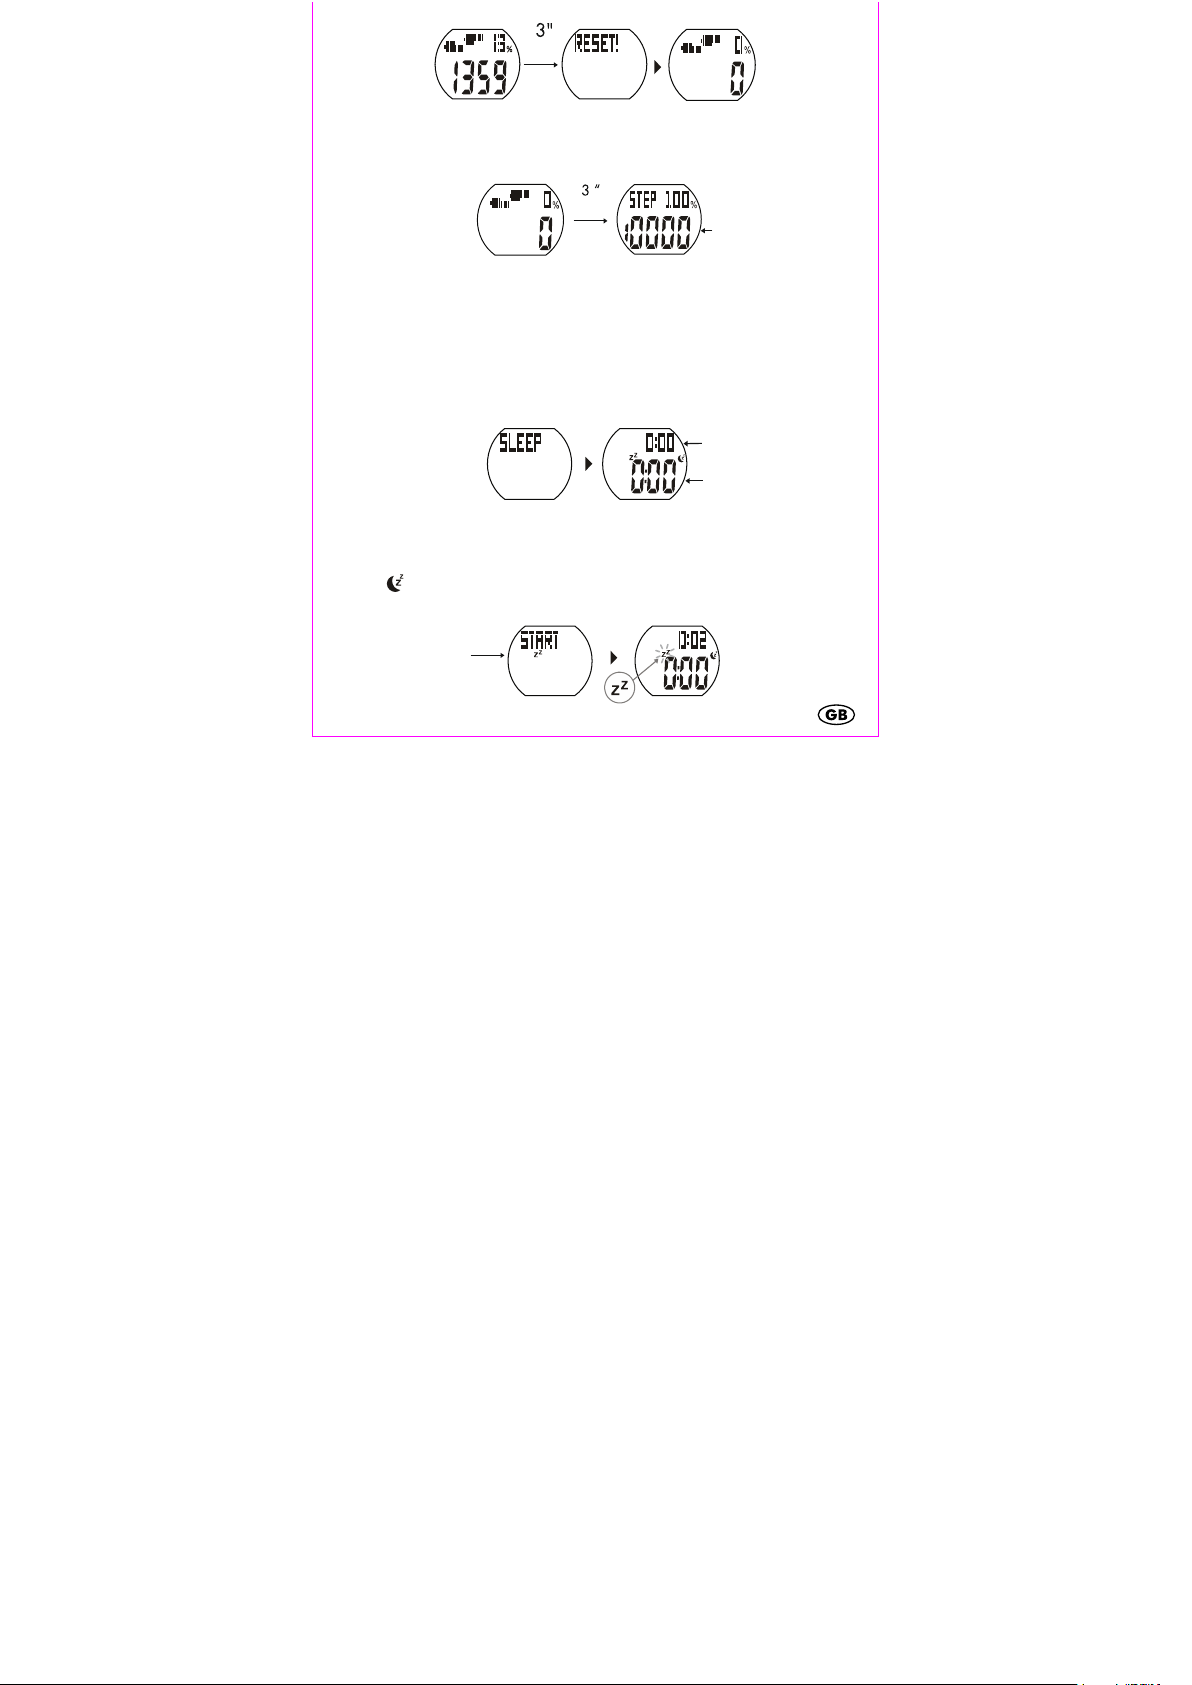
Press and hold SET for 3 seconds to reset the workout timer time.
NOTE: Resetting the workout timer time will also reset all data of the subfunctions.
Heart rate target zone
Within target zone
Above target zone
Below target zone
Automatic deactivation of the workout time (in workout mode)
After a duration of 2.5 hours the display will show:

- 13
-
Press SET/LIGHT to select YES/JA/OUI/SI or NO/NEIN/NON/NO and press
SEL to confirm.
Setting YES/JA/OUI/SI will stop the heart rate measurement.
Setting NO/NEIN/NON/NO will cause the heart rate measurement to continue.
If no button is pressed during the next 30 minutes (after 3 hours total workout time)
the measurement will stop automatically.
ATTENTION: After 5.5 hours, the message will reappear.
Automatic deactivation of the workout time (in another mode)
If a different function mode is selected after starting the workout timer, after 4
minutes the display will show:
Press SET/LIGHT to select YES/JA/OUI/SI or NO/NEIN/NON/NO and press
SEL to confirm.
Setting YES/JA/OUI/SI will stop the heart rate measurement.
Setting NO/NEIN/NON/NO will cause the heart rate measurement to continue.
If no button is pressed during the next minute, the measurement will stop
automatically.
2. Current/average pace time/km
Press SEL to show the pace in the upper part of the display. The lower part of the
display will show the heart rate. Press SET to show the current or average pace.

- 14
-
3. Current/average speed km/h
Press SEL to show the current/average speed in the upper part of the display. The
lower part will show the current heart rate. Press SET to show the current or average
speed.
4. Distance
Press SEL to show the distance in the upper part of the display. The lower part will
show the current heart rate.
5. Heart rate (workout mode)
Press SEL to show the average heart rate. Press SET to select the subfunctions.
A. AVERAGE HEART RATE
B. MAXIMUM HEART RATE
C. MINIMUM HEART RATE
D. MHR %*
E. TARGET HEART RATE ZONE

- 15
-
*MHR – Maximum heart rate
(100 % of the maximum heart rate = 220 – your age in years)
Workout target heart rate zone settings
ATTENTION: Consult your physician to find out which
target heart rate zone is suitable for you. The pre-set
values are only approximate and are not suitable for
everyone.
To set the workout target heart rate zone, the alarms and the stride length, press SET
for 3 seconds while in average heart rate display mode.
Press SET/LIGHT to select one of the pre-set workout target heart rate zones 1 – 3
or select MYZONE to set a custom workout target heart rate zone. The following
table shows an overview of zones 1-3.

- 16
-
Age in years
20 25 30 35 40 45 50 55 60 65
Zone 1 100 97 95 92 90 87 85 82 80 77
Recreation
- - - - - - - - - -
50-65 % MHR*
130 126 123 120 117 113 110 107 104 100
Zone 2 130 126 123 120 117 113 110 107 104 100
Fitness - - - - - - - - - -
65-80 % MHR*
160 156 152 148 144 140 136 132 128 124
Zone 3 160 156 152 148 144 140 136 132 128 124
Sports - - - - - - - - - -
80-95 % MHR*
190 185 180 175 171 166 161 156 152 147
While MYZONE is shown on the display, press SEL to enter setting mode for the
custom workout target heart rate zone. The lower limit of the zone will blink on the
display. Press SET/LIGHT to set the lower limit and confirm your setting by pressing
SEL. Set the upper limit in the same manner.
Alarm for workout target heart rate zone
Press SET/LIGHT to activate (ON) or deactivate (OFF) the alarm for the selected
limit. Confirm your settings by pressing SEL.
lower limit upper limit maximum heart rate
Alarm for heart rate exceeding maximum heart rate
If your heart rate reaches 99% of the maximum heart rate or exceeds the maximum
heart rate, a steady alarm tone will sound. The alarm tone will stop when your heart
rate drops to below 99% of the maximum heart rate.

- 17
-
Stride length setting
The stride length display appears. Enter your stride length for walking and running
by pressing SET/LIGHT. Press SEL to confirm each setting. Save by pressing MODE.
To determine your stride length, measure a distance of (for example) 100m. Walk
or run (depending on the value you wish to set) the distance with uniform strides and
count your steps. Divide the distance by the number of strides and convert the metres
to centimetres.
NOTE: Please set the values for walking and running even if you intend to use the
watch solely for walking. In this case, set the value for running as “fast walking”. A
meaningful result can only be achieved only if both values are entered. If the values
are not entered, the watch will use default values, which may not match your
personal movement profile.
NOTE: If the displayed values for distance strongly deviate from the actual distance
travelled, the stride length setting must be repeated. Your gait, your shoes and the
properties of the ground you are travelling on will always have an impact on the
measured values.
6. Calories burned / fat burned / BMI
Press SEL to show the calories burned. Press SET to enter the subfunctions.
A. CALORIES BURNED
B. FAT BURNED
C. BMI
Each value is shown in the upper part of the display. The heart rate is shown in the
lower part of the display.

- 18
-
NOTE: To increase the precision of the calories burned and fat burned values, the
Age BMI normal (kg/m²)
19 - 24
19 - 24
25 - 34
20 - 25
35 - 44
21 - 26
45 – 54
22 - 27
55 – 64
23 - 28
> 64 24 - 29
- Percentage of step
correct values for your age and weight must be set.
NOTE: The counter for fat burned only activates when the measured heart rate is
above 120 beats per minute.
BMI (Body Mass Index)
The BMI is a statistical measurement that can be used to judge a person’s weight.
For adults, a value between 18.5 and 25 is considered normal. Values below 18.5
are considered "underweight". Values above 25 are considered "overweight".
Values above 30 are considered "obese". The BMI is only a coarse guideline
because it does not take a persons body type and body composition (fat/muscle
tissue) into consideration.
The watch automatically calculates your BMI from the values entered during setup.
Pedometer mode
Press MODE repeatedly to select the pedometer function mode PEDO.
goal
- Step counter
Press and hold SET for 3 seconds to reset the daily step goal.
NOTE: The counted steps and the percentage of your step goal are reset
automatically every night.
- 19
-
- Total sleep duration
Setting the daily step counter
Press and hold SET again for 3 seconds to set the daily step goal. Press SET/LIGHT
to adjust the value (1.000 – 19.999) and confirm your setting by pressing MODE.
Sleep function mode (SLEEP / SCHLAF / DORMIR /
DORMIRE)
Press MODE repeatedly to select the sleep function mode SLEEP/ SCHLAF/
DORMIR / DORMIRE.
1. STARTING MANUAL SLEEP MODE
2. STOPPING MANUAL SLEEP MODE
3. SETTING THE AUTOMATIC SLEEP MODE
- Deep sleep duration
1. Starting manual sleep mode
Press SET to start the manual sleep mode. Your total sleep duration is shown in the
upper part of the display. Deep sleep duration is shown in the lower part of the
display . As soon as sleep mode is activated, the ZZ symbol appears blinking and
new sleep data is recorded.

- 20
-
2. Stopping manual sleep mode
- Last sleep
Press SET to stop the manual sleep mode. Total sleep duration is shown in the upper
part of the display. Deep sleep duration is shown in the lower part of the display.
The ZZ symbol and your sleep data remains on the display
recording
NOTE: Manual sleep mode has a higher priority than automatic sleep mode.
3. Setting the automatic sleep mode
Press and hold SET for 3 seconds to set automatic sleep mode. AUTO OFF/AUTO
AUS appears in the display. Press SET/LIGHT to activate the automatic sleep mode.
Confirm your setting by pressing SEL.
START / ANFANG / DEBUT / INIZIO appears in the upper part of the display and
the hours will blink in the lower part of the display. Set the hours by pressing
SET/LIGHT and confirm your setting by pressing SEL. The minutes will blink. Set the
minutes by pressing SET/LIGHT and confirm your setting by pressing SEL.
END / ENDE / FIN / FINE appears in the upper part of the display and the hours
will blink in the lower part of the display. Set the hours by pressing SET/LIGHT and
confirm your setting by pressing SEL. The minutes will blink. Set the minutes by
pressing SET/LIGHT and confirm your setting by pressing SEL. Save your settings by
pressing MODE.

- 21
-
Tag 1-7
- Total sleep durat
ion
Sleep mode will now activate and deactivate at the same time every day.
Stopping automatic sleep mode
Press and hold SET for 3 seconds. Press SET/LIGHT to deactivate automatic sleep
mode. Confirm your setting by pressing MODE.
7-day sleep history
Press SEL while in sleep mode. The day (1-7) is shown in the upper part of the
display with the total sleep duration to the right of the day. The deep sleep duration
is shown in the lower part of the display.
- Deep sleep duration
To display a different day press SEL.
To exit sleep mode press MODE.
Troubleshooting
The workout timer does not start
The maximum workout time (9 hours, 59 minutes, 59 seconds) has been
reached. Reset the workout timer as described in the chapter “Workout timer”.
Distance measurements are very imprecise
Incorrect stride lengths for walking and running were entered. Enter the correct
values as described in the chapter “Stride length setting”.
You have selected a different speed than the speed used when determing your
stride length.

- 22
-
The heart rate monitor watch was developed for activities on a flat plane. Steep
hills or stairs will cause a reduced distance measurement.
The displayed heart rate is not correct
Ensure that the heart rate monitor watch is positioned and fastened correctly.
Do warmup exercises to warm up your skin before you begin your workout.
Ensure that the heart rate monitor watch has skin contact
Don’t wear the heart rate monitor watch too tightly around your wrist as this
may interfere with blood circulation and reduce measurement precision
The heart rate monitor watch should be worn slightly more tightly around your
wrist when working out
During very intense workouts or other activities which cause forceful or
arrhythmic movements of your wrist, the sensor may not be able to measure
your heart rate correctly.
If your heart rate monitor watch does not display your heart rate, relax your
wrist and remain motionless for a short while (approximately 10 seconds). Your
heart rate should now appear.
Your battery may require replacement.
Display readability is low / the backlight does not work
Perhaps your heart rate monitor watch has not been switched on yet. Press any
button.
The contrast setting may be incorrect. Increase the contrast as described under
“heart rate monitor watch initial setup”.
Your heart rate monitor watch may have overheated. Please allow it to cool
down.
The heart rate monitor watch may be too cold. Warm up the watch.
Dirt could be blocking the sensor on the back side of the watch. Clean the
watch with a dry, lint free cloth only.
Replace the battery.
Reset
Press and hold SET and then also press and hold SEL to completely reset your heart
rate monitor watch. All stored data will be deleted.

- 23
-
After resetting the heart rate monitor watch, set up the heart rate monitor watch as
CR203
2
described under “heart rate monitor watch initial setup”.
Low battery warning indicator
If battery power is insufficient, the display of the heart rate monitor watch will show.
Replace the battery as soon as possible.
Replacing the battery
Battery replacements can be performed in conjunction with a water resistance test
by a watchmaker. If you wish to replace the battery yourself you may proceed as
follows:
Remove the 4 screws on the back side of the heart rate monitor watch with a small
Phillips head screwdriver. Open the case back (1). Use a small, flat tool to lift the
battery (2). Remove the battery and insert a new 3V CR2032 battery (3) with the
positive terminal facing upwards. Check the correct seating of the gasket. Close the
case back, reinsert and fasten the screws.
3
Water resistance
Water resistant up to 3 bar. The bar value specifies the atmospheric overpressure
which is applied during testing (DIN 8310).

- 24
-
Cleaning instructions
Clean the heart rate monitor watch with a dry and lint-free cloth. A glasses cleaning
cloth is ideal. After each use, clean the watch strap using lukewarm water or a mild
soap solution and a sponge. Please take care not to get the watch wet. Dry all parts
with a towel. Sweat and contaminants are detrimental to the function of the sensor.
Disposal of the electronic appliance
This Heart rate monitor watch may not be disposed of with normal
household waste. Dispose of the unit at an approved disposal facility or at
your local recycling centre. Please observe the current rules and regulations
when disposing of the appliance. Contact the disposal system if in doubt.
Disposal of the batteries
Please dispose of your batteries properly in containers especially set up at
retailers. Batteries do not belong in household waste. Dispose of the
batteries at an approved disposal facility or at your local recycling centre.
Contact the disposal system if in doubt.
Recycling
The product packaging consists of recyclable materials. Dispose of the
packaging in an environmentally sound manner using the proper
collection systems.
Corrugated cardboard
The packaging is made from corrugated cardboard.
Waste disposal
Dispose of the packaging in an environmentally sound manner.
digi-tech gmbh warranty
This Heart rate monitor watch includes a 3 year warranty starting on the day of
purchase. In case of defects of this Heart rate monitor watch you have, by law,
certain rights regarding the vendor of the watch. These rights are not changed by the
warranty which is described in the following paragraphs.

- 25
-
Warranty conditions
The warranty duration starts on the date of purchase. Please keep the original
receipt in a safe place. The receipt is needed as a proof of purchase. If a defect
occurs in the Heart rate monitor watch within 3 years, the Heart rate monitor watch
will be repaired or replaced (according to our choice) free of charge. This warranty
requires that, within the 3 year warranty period, the watch and the receipt can be
made available to us along with a short written description of the defect and when it
occured. If the defect is covered by the warranty, you will receive the repaired Heart
rate monitor watch or a new Heart rate monitor watch. Repair or replacement does
not cause the warranty period to restart.
Warranty period and defects liability
The warranty period is not increased by the defect liability. This also applies to
repaired or replaced parts. If defects are noticed at the time of purchase they must
be reported immediately upon unpacking the item. Paid repair may be available
after the end of the warranty period.
Scope of the warranty
The Heart rate monitor watch was manufactured according to strict quality
guidelines and was carefully inspected before delivery. The warranty does not
include parts that experience normal wear and tear and can thus be seen as wear
parts or fragile parts that are damaged. Examples include Switches, Batteries or
parts made of glass. This warranty becomes void if the Heart rate monitor watch is
damaged, is not used in the recommended way or is improperly repaired. For
proper use of the Heart rate monitor watch all instructions in this manual must be
adhered to exactly. Use of the Heart rate monitor watch in a way that is
discouraged in the manual must be avoided. The Heart rate monitor watch not
intended for commercial use. Abusive or improper use, excessive force and changes
that are made by non-authorized repair centers will void the warranty.
Warranty claim procedure
To ensure that your call is processed in a fast and efficient manner please note the
following directions:
Have your receipt (as proof of purchase) and the article number (309652)
handy.
- 26
-
The article number can be found on the type label, an engraving, the front page
of the manual (bottom left) or a sticker on the back side or bottom side of the
case.
In case defects occur, please first contact the service center (see below) by
phone or email.
Visit www.lidl-service.com to download this and many other
manuals, product videos and software.

- 27
-
Service
IAN
309652
Art.-Nr.: 1-
LD5029
Name: Inter-Quartz GmbH
Street: Valterweg 27A
Town: DE-65817 Eppstein
Country: GERMANY
Email: support@inter-quartz.de
Telephone: +49 (0)6198 5718255
0680 981220
0800 80847
800 142 315
0800 004449
Supplier
Please note that the following address is not a service address.
Please first contact the service address (see above).
Name: digi-tech gmbh
Street: Valterweg 27A
Town: DE-65817 Eppstein
Country: GERMANY

- 28
-
Használati és biztonsági tanácsok
Tartalomjegyzék
Tartalomjegyzék.......................................................................................................... - 28 -
Bevezetés ..................................................................................................................... - 30 -
Alapvetö felhasználás ................................................................................................ - 30 -
A csomag tartozékai ................................................................................................... - 30 -
Müszaki jellemzök ...................................................................................................... - 31 -
Fontos biztonsági tanácsok
Fontos biztonsági tanácsok..................................................................................... - 31 -
Fontos biztonsági tanácsokFontos biztonsági tanácsok
Biztonsági tanácsok elemek ....................................................................................... - 31 -
Biztonsági tanácsok felhasználók ............................................................................. - 32 -
Optikai pulzusmérés ................................................................................................... - 32 -
A pulzusszámmérő megfelelő helyzete .................................................................... - 33 -
Fontos tudnivalók a pulzusmérőóra működéséről ................................................... - 34 -
Gyorsbeállítás ...................................................................................................... - 35 -
A pulzusméröóra üzembehelyezése......................................................................... - 35 -
Világítás ....................................................................................................................... - 35 -
Az óra 4 funkcióval rendelkezik ............................................................................... - 36 -
Óra (CLOCK / UHR / HORLOGE / OROLOGIO) .............................................. - 36 -
1. Idö ..................................................................................................................... - 36 -
2. Ébresztés ........................................................................................................... - 37 -
3. TIMER (Countdownzeit) max. 23:59:59 ...................................................... - 37 -
Edzés mód (WORKOUT / TRAINING / ENTRAIN. /ALLENAM.)...................... - 39 -
1. Edzésidö ........................................................................................................... - 39 -
2. Aktuális/átlagos sebesség/tempó, kilométeridö......................................... - 41 -
3. Pillanatnyi/átlagos sebesség km/h ............................................................... - 41 -
4. Távolság ........................................................................................................... - 42 -
5. Szívritmus (edzés mód) ................................................................................... - 42 -
6. Kalóriafelhasználás/zsírégetés/BMI ........................................................... - 45 -
Lépésszámláló mód (PEDO) ...................................................................................... - 46 -
Alvási mód (SLEEP / SCHLAF / DORMIR / DORMIRE) ....................................... - 47 -
1. A MANUÁLIS ALVÁSI MÓD ELINDÍTÁSA .................................................. - 47 -

- 29
-
2. A MANUÁLIS ALVÁSI MÓD MEGÁLLÍTÁSA .............................................. - 47 -
3. AZ AUToMATIKUS ALVÁSI MÓD BEÁLLÍTÁSA .......................................... - 48 -
Hibaelhárítás ............................................................................................................... - 49 -
Reset (Visszaállítás) ..................................................................................................... - 50 -
Elem töltöttségi állapot jelzö ...................................................................................... - 51 -
Elemcsere ..................................................................................................................... - 51 -
Vízállóság .................................................................................................................... - 51 -
Tisztítás ......................................................................................................................... - 52 -
A készülék használaton kívül helyezése ................................................................... - 52 -
Az elemek használaton kívül helyezése ................................................................... - 52 -
Újrahasznosítás ........................................................................................................... - 52 -
Hullámkarton ............................................................................................................... - 52 -
Hulladékkezelés .......................................................................................................... - 52 -
JÓTÁLLÁSI TÁJÉKOZTATÓ ........................................................................................ - 53 -
A garancia kirterjedése .............................................................................................. - 55 -
Garanciaigény bejelentése ....................................................................................... - 55 -
Ügyfélszolgálat/szerviz ............................................................................................. - 57 -
Szállító ......................................................................................................................... - 57 -

- 30
-
SZÍVFREKVENCIA-MÉRŐ ÓRA
OPTIKAI ÉRZÉKELŐVEL
Bevezetés
Szívböl gratulálunk új pulzusmérö órájához. Döntésével kiváló minöségü áruhoz
jutott. Ez a használati útmutató az óra tartozéka, mely fontos biztonsági és
használati információkat tartalmaz, valamint a használat utáni megsemmisítéssel
kapcsolatos elöírásokat. Még használatbahelyezés elött alaposan tanulmányozza
a használati és biztonsági elöírásokat. Pulzusmérö óráját csak ezen elöírások szerint
használja. Amennyiben másnak adja a készüléket, ne mulassza el a mellékelt
dokumentumokat is átadni. Kérjük, késöbbi kérdések esetére örizze meg a
csomagolást és a használati útmutatót.
Alapvetö felhasználás
A pulzusmérö óra idömérö eszköz, valamint felhasználható az ezen
dokumentumban leírt további célokra. Minden ettöl eltérö alkalmazás, illetve a
szerkezet módosítása nem elöírásszerinti felhasználásnak minösül. Az ilyenfajta
felhasználásból, illetve a nem elöírás szerinti használatból eredö károsodásért a
gyártó nem vállal felelösséget. A pulzusmérö óra kereskedelmi célú felhasználása
nem megengedett.
A csomag tartozékai
Figyelem! Kérjük, vásárlást követöen ellenörizze a tartozékok meglétét.
Bizonyosodjon meg róla, hogy minden tartozék a csomagban van, és
müködöképes, nem károsodott.
1 x Pulzusmérö óra és elem (CR2032)
1 x Használati utasítás

- 31
-
Müszaki jellemzök
Müködési hömérséklettartomány
0 - 50°C
Méret (szíj nélkül)
Ø 4,8 x 1,4 cm
Kijelzöméret
2,8 x 2,3 cm
Súly 45 g
Elemek
CR 2032/3V
Pulzusmérö óra
Fontos biztonsági tanácsok
Biztonsági tanácsok elemek
FIGYELMEZTETÉS!
Az elemeket kisgyermekektöl tartsa távol. Az elemek esetleges lenyelése esetén
azonnal forduljon orvoshoz!
Az elemeket/újratölthetö akkumulátorokat megfelelö polaritás irányban helyezze a
készülékbe. Behelyezés elött, szükség esetén tisztítsa meg az elemeket és a készülék
érintkezöit. Soha ne próbáljon lemerült elemet feltölteni, illetve elemet rövidre zárni
vagy felnyitni. A fennálló robbanásveszély miatt soha ne dobjon elemet nyílt tüzbe.
Az elemek nem elöírás szerinti használata esetén robbanásveszély állhat fönn,
illetve az elemekben lévö sav kifolyhat. Savkifolyás esetén a folyadék ne kerüljön
szembe és ne érintkezzen szabad börfelülettel és nyálkahártyával. Használjon
kesztyüt! A savval kontaktusba került testfelületet bö vízzel öblítse le, és a további
teendökért kérje orvos tanácsát. A lemerült elemeket a lehetö leggyorsabban vegye
ki a készülékböl, mert savkifolyás fokozott veszélye áll fönn.
EGÉSZSÉGRE ÁRTALMAS!
ROBBANÁSVESZÉLY!

- 32
-
Biztonsági tanácsok felhasználók
FIGYELEM!
Beszéljen orvosával az edzés megkezdése
előtt. Ö tudja tájékoztatni Önt a megfelelő képzésről, a
képzési intenzitásról és a pulzus specifikációiról. Ez a
pulzusszámmérő nem egy orvosi eszköz, és csak az edzés
támogatására szolgál.
FIGYELMEZTETÉS! BALESETVESZÉLY!
Megváltozott cselekvö-, érzékelö- illetve értelmi képességü valamint szükséges
tapasztalattal és ismerettel nem rendelkezö felnött (beleértve 8 évnél idösebb
kiskorúakat is) a terméket csak felügyelet mellett használhatja, illetve amennyiben a
termék használatával járó kockázatokról elégséges tájékoztatást kapott és azt
megértette. A termék nem játékszer! A készülék tisztítását és felhasználó általi
karbantartását kiskorúak nem végezhetik. Az esetleges fulladásveszély miatt a
müanyag csomagolás gyermekektöl távol tartandó.
Optikai pulzusmérés
A pulzusmérő optikai érzékelőt használ a pulzusszám méréséhez a csuklójánál. Ez
a módszer nem igényel mellkasi hevedert.
Vérkeringés
A vérkeringés személyenként változik, és az ember két karján is eltérő lehet.
Néhány embernél a véráramlás nem optimális az optikai szenzorral való mérésre.
Külső hatások
Ha a környezeti hőmérséklet túl alacsony, akkor csökkenhet a véráramlást az
alkarra, ezáltal csökkentve a mérési pontosságot.
Bőrszín
A bőr reflexiója a bőr színétől függ. Elvben az optikai mérés annál jobban müködik,
minél kevesebb fény éri a bört. A nagyon pigmentált bőr, hegek vagy tetoválás
csökkenthetik a mérési pontosságot.

- 33
-
Tartsa a bőrét szárazon és tisztán
Növeli a kényelmet és megóvja az órát azáltal, ha a bőrét és az órát szárazon és
tisztán tartja. Ez különösen fontos az edzés során vagy amikor folyadékkal
érintkezik. Az izzadás, szappan, naptej, testápoló és más folyadékok csökkenthetik
a mérési pontosságot.
Testtartás
A helytelen testtartás (például élesen meghajlított csukló) csökkentheti a véráramlást
és csökkentheti a mérési pontosságot.
A pulzusszámmérő megfelelő helyzete
Csatlakoztassa a pulzusmérő jelzőt a csuklójához. A helyes pozíció fontos a pontos
méréshez.
A pulzus méréséhez a pulzusméröórát szorosan kell viselni a csukló körül. Az órát a
csukló csontja mögött egy ujjnyira kell elhelyezni, ahogy a rajzon látja. Az
érzékelőnek meg kell érintenie a bőrét. A pulzusszámmérőt nem szabad olyan
szorosan viselni, hogy a véráramlás csökkenjen. Amíg nem gyakorol, a
pulzusszámmérőt egy kicsit lazábban viselje. A mérés pontosságának
maximalizálásához edzés közben enyhén húzza meg a pulzusmérőt.
- 34
-
Számos gyakorlathoz, pl. kerékpározás vagy súlyemelés, a csuklók meghajlanak.
Ez befolyásolhatja a mérést, ha a pulzusmérő túl alacsonyan van a csuklón. A
legjobb mérési eredmény érdekében a pulzusmérőt néhány perccel már az edzés
kezdete előtt viselje.
Ha a keze és a bõre gyorsan hidegre vált, melegítse fel a bõrt az érzékelõ alatt.
Kezdjen bemelegítő gyakorlatokat, mielőtt elkezdi a gyakorlást.
Győződjön meg róla, hogy a pulzusmérő a bőrével érintkezik
Ne hordja túl erősen a pulzusmérőt, mert ez csökkenti a vér áramlását és a
mérési pontosságot.
A pulzusmérőt egy kicsit szorosabban kell viselni az edzés során.
Nagyon intenzív edzéshez vagy egyéb olyan tevékenységekhez, amelyeknél a
csukló erősen és nem ritmikusan mozog, az érzékelő meghibásodhat és nem
méri megfelelően a pulzust.
Ha a pulzusmérő jelzője nem mutatja a pulzusszámát, pihentesse a csuklóját és
várjon rövid ideig (körülbelül 10 másodpercig), amig megjelenik a pulzus.
Fontos tudnivalók a pulzusmérőóra működéséről

- 35
-
a MODE gomb megnyomásával válthat az óra funkciói között vagy kiléphet a
beállítási menüből.
A SET gomb megnyomásával kiválaszthatja a személyes adatait visszafelé
számolva
A LIGHT gomb megnyomásával kiválaszthatja a személyes adatait elörefelé
számolva
A SEL gomb megnyomásával megerösíti választását és továbblép az almenüben
Gyorsbeállítás
Numerikus értékek beállításakor a SET vagy a LIGHT gomb lenyomásával és
tartásával gyorsan beállíthatja az értékeket
A pulzusméröóra üzembehelyezése
Távolítsa el a védőfóliát a kijelzőről, és nyomja meg a LIGHT, MODE, SEL vagy
SET gombot. Hangjelzés hallatszik. A pulzusmérő kijelzőjén megjelenik az indító
képernyő.
Állítsa be személyes adatait. Nyomja meg és tartsa nyomva a SET
gombot 3 másodpercig. A kijelzőn megjelenik a nyelv. Nyomja meg
röviden a SET / LIGHT gombot az angol, az olasz, a francia és a
német nyelv kiválasztásához. Erősítse meg a SEL gombbal.
A másodpercek megjelennek. Nyomja meg a SET / LIGHT gombot a másodperc
beállításához 00-ra. Erősítse meg a SEL gombbal. Megjelenik a perc. Állítsa be a
perceket a SET / LIGHT gomb megnyomásával, és erősítse meg a SEL gombbal.
Állítsa be az órát (12/24), az évet, a hónapot, a napot, a dátumot, a
mértékegységet, születési évet, nemet, magasságot, súlyt, az óránkénti hangjelzést
ugyanúgy. A beállítási menüből való kilépéshez nyomja meg a MODE gombot.
Világítás
Nyomja meg röviden a LIGHT gombot a háttérvilágítás ideiglenes
bekapcsolásához.

- 36
-
Az óra 4 funkcióval rendelkezik
A MODE gomb megnyomásával válthat a funkciók között.
A váltás sorrendje:
Továbbá különböző funkciók vannak az alfunkciókban.
Az alfunkciók mindig elérhetők a SEL gomb megnyomásával.
Óra (CLOCK / UHR / HORLOGE / OROLOGIO)
Először válassza ki a CLOCK / UHR / HORLOGE / OROLOGIO funkciót a
MODE gomb ismételt megnyomásával.
A SEL megnyomásával kiválaszthatja az idő üzemmód alfunkcióit.
1. IDÖ
2. ÉBRESZTÈS
3. TIMER
1. 2. 3.
1. Idö
A hét napja és a dátum megjelenik a kijelző felső részén, az aktuális idő az alsó
részen. Állítsa be az időt az üzembe helyezés alatt leírtak szerint.

- 37
-
A hét napja
Dátum
Idö
2. Ébresztés
ALARM módban nyomja meg a SET gombot az ébresztés engedélyezéséhez vagy
letiltásához.
Nyomja le és tartsa lenyomva a SET gombot 3 másodpercig az ébresztési idő
beállításához. A percek villognak. Nyomja meg a SET / LIGHT gombot és
nyugtázza a SEL gombbal. Az órák villognak. Állítsa be az órákat ugyanúgy.
Nyomja meg a MODE gombot a beállítások menüből történő kilépéshez.
Aktiválhatja / deaktiválhatja az ébresztést és a szundi funkciót
Az ébresztés megszólalásakor nyomja meg bármelyik gombot az ébresztés
kikapcsolásához. Ha 30 másodperc után sem kapcsolta ki az ébresztést, a szundi
funkció aktiválódik. Villog a -jel és 5 perc elteltével ismét ébreszt az óra. Ezt 3 x
megismétli. 24 óra elteltével ismét ébreszt az óra.
3. TIMER (Countdownzeit) max. 23:59:59
A kijelzőn megjelenik az elöre beállított 1:00 óra visszaszámlálási idö.

- 38
-
Óra
Másodperc
Perc
A TIMER üzemmódban nyomja meg a SET gombot a TIMER elindításához és
leállításához.
Nyomja meg és tartsa lenyomva a SET gombot 3 másodpercig a TIMER
visszaállításához.
Nyomja meg és tartsa lenyomva a SET gombot 3 másodpercig a TIMER kívánt
időtartamra történő beállításához. Az órák villognak. A SET / LIGHT gomb
megnyomásával állítsa be és nyugtázza a SEL gombbal. A percek villognak. A
perceket és a másodperceket ugyanúgy állítsa be. Erősítse meg a MODE
megnyomásával.
A TIMER ébresztést bármelyik billentyű lenyomásával leállíthatja. Ha nem nyom
meg semmilyen gombot, 30 másodperc után automatikusan kikapcsol.

- 39
-
Edzés mód (WORKOUT / TRAINING /
ENTRAIN. /ALLENAM.)
A MODE gomb többszöri megnyomásával válassza ki a WORKOUT / TRAINING
/ ENTRAIN / ALLENAM funkciót.
A SEL gombbal az edzés mód alábbi alfunkciói közül választhat:
1. EDZÉSIDÖ
2. PILLANATNYI/ÁTLAGOS TEMPÓ
3. PILLANATNYI/ÁTLAGOS SEBESSÉG
4. TÁVOLSÁG
5. SZÍVRITMUS
6. KALÓRIAFELHASZNÁLÁS/ZSÍRÉGETÉS/BMI
1. Edzésidö
A pulzusmérés indításához nyomja meg a SET gombot. A szívjelzés villog.
Figyelem: A fent ismertetett összes alfunkció csak akkor működik, amikor az
edzésidő megkezdődött.

- 40
-
A pulzusmérés leállításához nyomja meg a SET gombot. A szívjelzés tartósan
megjelenik.
Az edzésidö visszaállításához nyomja le és 3 másodpercig tartsa lenyomva a SET
gombot.
Figyelem! Az edzésidö visszaállításakor az összes alfunkció értékei visszaállítódnak.
Célpulzus tartomány
A célpulzus tartományon belül
A célpulzus tartomány fölött
A célpulzus tartomány alatt
Az edzésidö automatikus kikapcsolása (edzés módban)
2,5 óra futóidöt követöen a kijelzön a következö felirat jelenik meg:
Nyomja meg a SET/LIGHT gonbot a YES/JA/OUI/SI (igen) és
NO/NEIN/NON/NO (nem) közötti váltáshoz. Választását erösítse meg a SEL
gombbal.
YES/JA/OUI/SI (igen) választása esetén a szívritmusmérés leáll.
NO/NEIN/NON/NO (nem) választásakor a szívritmusmérés folytatódik.

- 41
-
Amennyiben a következö 30 percben nem nyom meg semmilyen gombot (összesen
3 óra után) a mérés automatikusan leáll.
Figyelem: Ha az edzésidőt leállítja, a szívritmus-szabályozó automatikusan kb. 5
perc a pontos idöjelzésre áll vissza.
Figyelem: 5.5 óra múlva újra megjelenik a jelzés.
Az edzésidő automatikus kikapcsolása (egy másik üzemmódban)
Ha az edzésidő megkezdése után másik üzemmódra vált, a kijelzőn 4 perc
elteltével ez jelenik meg:
Nyomja meg a SET / LIGHT gombot a YES / JA / OUI / SI vagy NO / NEIN /
NON / NO közötti váltáshoz.
A megerősítéshez nyomja meg a SEL gombot.
A YES / JA / OUI / SI leállítja a pulzusmérést.
NO / NEIN / NON / NO folytatja a pulzusmérést.
Ha 1 percen belül egyetlen gombot sem nyom meg, a mérés automatikusan leáll.
2. Aktuális/átlagos sebesség/tempó, kilométeridö
Nyomja meg a SEL gombot az aktuális / átlagos sebesség / tempó
kiválasztásához, hogy megjelenjen a kijelző felső részén. Az alsó részen látható az
aktuális pulzusszám. Nyomja meg a SET gombot az aktuális és az átlagos tempó
közötti váltáshoz.
3. Pillanatnyi/átlagos sebesség km/h
A pillanatnyi ill. átlagsebességnek a kijelzö fölsö részén történö megjelenítéséhez
nyomja meg a SEL gombot. A kijelzö alsó részén az aktuális szívritmus érték látható.
A SET gombbal váltson a pillanatnyi és átlagos sebességértékek között.

- 42
-
4. Távolság
A megtett távolságnak a kijelzö fölsö részén történö megjelenítéséhez nyomja meg
a SEL gombot. A kijelzö alsó részén az aktuális szívritmus érték látható.
5. Szívritmus (edzés mód)
A SEL gombbal válassza ki a szívritmus funkciót, és a SET gombbal válassun az
alfunkciók közül.
A. ÁTLAGOS PULZUS
B. LEGMAGASABB PULZUSSZÁM
C. LEGALACSONYABB PULZUSSZÁM
D. MHR %*
E. PULZUSTARTOMÁNY
*MHR – Legmagasabb pulzusszám
(a legmagasabb pulzusszám 100 %-a = 220 – az Ön életkora években)

- 43
-
Edzészónák beállítása
Életkor években
20 25 30 35 40 45 50 55 60 65
Zone 1
100 97 95 92 90 87 85 82 80 77
Szabadidö
- - - - - - - - - -
50-65 %
130 126 123 120 117 113 110 107 104 100
Zone 2
130 126 123 120 117 113 110 107 104 100
Fitness
- - - - - - - - - -
65-80 %
160 156 152 148 144 140 136 132 128 124
Zone 3
160 156 152 148 144 140 136 132 128 124
Sport
- - - - - - - - - -
80-95 %
190 185 180 175 171 166 161 156 152 147
FIGYELEM: Az Önnek megfelelö cél-pulzustartományról
egyeztessen orvosával az edzésprogram megkezdése elött.
Az alapbeállítások csak közelítö értékeket mutatnak, és nem
mindeki számára megfelelök.
Átlagos szívritmus módban nyomja le és 3 mp-ig tartsa lenyomva a a SET gombot
az edzészóna, a figyelmeztetés és a lépéshossz beállításához.
A SET/LIGHT gomb megnyomásával válasszon a 3 elöre beállított edzészóna
közül vagy állítsa be egyéni edzészónáját a MYZONE funkcióval. A z alábbi
táblázat áttekintést nyújt a 3 elöre beállított edzészónáról.
MHR*
MHR*
MHR*

- 44
-
Az edzészóna egyéni beállításához válassza ki a MYZONE funkciót a SEL gomb
megnyomásával (beállítás módban). A kijelzön az alsó határérték villog. A
SET/LIGHT gombbal állítsa be a kívánt értéket és erösítse meg a beállítást a SEL
gombbal. Hasonló módon állitsa be a fölsö határértéket is.
A céltartomány jelzése
A SET/LIGHT gombbal válassza ki, hogy a határértékek elérését hangjelzés jelezze
(ON) vagy sem (OFF). Beállítását a SEL gombbal erösítse meg.
Alsó határérték fölsö határtérték maximális határérték
A maximális pulzusszám túllépésekor megszólaló hangjelzés
Amennyiben pulzusszáma eléri a maximális pulzusszám 99%-át vagy túllépi azt, a
készülék folyamatos hangjelzéssel jelez. A hangjelzés abbamarad, amint a
pulzusszám a 99%-os érték alá esik.
Lépéshossz beállítás
Megjelenik a lépéskijelző. Adja meg a lépéshosszát gyalogláshoz és futáshoz a
SET / LIGHT gomb megnyomásával. A megerősítéshez nyomja meg a SEL gombot.
Mentés a MODE megnyomásával.

- 45
-
A lépéshossz meghatározásához a legjobb a 100 méteres távolság mérése.
Sétáljon vagy fusson egyforma lépésekkel, számolva a lépéseket. Ezután ossza el a
távolságot a lépések számával, és számolja át a métereket centiméterre.
Figyelem: Ha csak sétáláshoz kívánja használni az órát, akkor is kérjük, hogy adja
meg az adatokat a gyalogláshoz és a futáshoz. Ebben az esetben a futást "gyors
gyaloglásnak" állítsa be. Ez az egyetlen módja annak, hogy értelmes eredményt
érjünk el. Ellenkező esetben a pulzusmérő olyan alapértelmezett értékeket fog
használni, amelyek eltérnek személyes mozgási profiljától.
Figyelem: Ha az ábrázolt távolság túlságosan eltér, akkor újra be kell állítania a
lépéshosszt. Az Ön járása, cipője és a talaj mindig befolyásolja a mért értékeket
6. Kalóriafelhasználás/zsírégetés/BMI
A funkció kiválasztásához nyomja meg a SEL gombot, a SET gombbal válasszon az
alfunkciók közül.
A. KALÓRIAFELHASZNÁLÁS
B. ZSÍRÉGETÉS
C. BMI
Az értékek a kijelzö felsö részén jelennek meg, az alsó részen a szívritmusszám
látható..
Figyelem! A kalóriafelhasználás és zsírégetés értékek pontos kijelzéséhez az életkor
és testsúly értékeket is pontosan kell megadni.
Figyelem! A zsírégetés számítása és kijelzése csak 120-as pulzus fölött aktiválódik.
BMI (Body Mass Index – testtömeg index)
A BMI az egyén testsúlyának értékeléséhez használt mértékegység. Egészséges
felnöttnél a 18,5 és 25 közötti érték normálisnak tekinthetö. 18,5 alatti érték túl
alacsony testúlyt, 25 fölötti érték túlsúlyt, 30 fölötti érték elhízást jelez.

- 46
-
A BMI csak egy viszonyítási érték, amely nem veszi figyelembe az egyéni testi
Életkor
Normál BMI (kg/m²)
19 - 24
19 - 24
25 - 34
20 - 25
35 - 44
21 - 26
45 – 54
22 - 27
55 – 64
23 - 28
> 64 24 – 29
- Céllépésszám
adottságokat, a testsúly zsír- és izomarányát. A pulzusmérö óra az Ön által
megadott adatok alapján számolja ki ezt az értéket.
Lépésszámláló mód (PEDO)
Először válassza ki a PEDO funkciót a MODE gomb ismételt megnyomásával.
A SEL megnyomásával elöhívja az alfunkciókat.
százaléka
- Lépésszámláló
Nyomja meg és tartsa lenyomva a SET gombot 3 másodpercig a napi céllépésszám
visszaállításához.
Figyelem: A lépésszámláló és a céllépésszám százalékos aránya automatikusan
visszaáll éjszaka.
A napi lépésszámláló beállítása
Nyomja meg újra és tartsa lenyomva a SET gombot 3 másodpercig a napi
lépésszám cél beállításához a SET / LIGHT (1000 - 19,999) gomb
megnyomásával,

- 47
-
Erősítse meg a MODE megnyomásával.
- Teljes alvásidö
Alvási mód (SLEEP / SCHLAF / DORMIR / DORMIRE)
Először válassza ki a funkciót a MODE gomb ismételt megnyomásával SLEEP/
SCHLAF/ DORMIR / DORMIRE
1. A MANUÁLIS ALVÁSI MÓD ELINDÍTÁSA
2. A MANUÁLIS ALVÁSI MÓD MEGÁLLÍTÁSA
3. AZ AUTOMATIKUS ALVÁSI MÓD BEÁLLÍTÁSA
- Mélyalvás fázis
1. A MANUÁLIS ALVÁSI MÓD ELINDÍTÁSA
Nyomja meg a SET gombot az alvási mód aktiválásához. A kijelzö fölsö részén
megjelenik a teljes alvási idö, az alsó részen a mélyalvás idötartama . Az alvási
mód aktiválásakor a ZZ jel villog a kijelzön, és elkezdödik az új adatok rögzítése.
2. A MANUÁLIS ALVÁSI MÓD MEGÁLLÍTÁSA
Nyomja meg a SET gombot az alvási mód megállításához. A kijelzö fölsö részén
megjelenik a teljes alvássall töltött idö, alul a mélyalvás ideje. A ZZ-jel és az alvási
adatok folyamatosan világítanak.

- 48
-
- Az utolsó
rögzítése
Megjegyzés: A manuális alvási mód elsöbbséget élvez az automatikussal
szemben.
3. AZ AUToMATIKUS ALVÁSI MÓD BEÁLLÍTÁSA
Az automatikus alvási mód kiválasztásához nyomja le és 3 másodpercig tartsa
lenyomva a SET gombot. A kijelzön AUTO OFF / AUTO ON jelenik meg. Nyomja
meg a SET/LIGHT gombot az automatikus alvási mód aktiválásához. Kiválasztását
erösítse meg a SEL gombbal.
alvás
A kijelzö fölsö részén START / ANFANG / DEBUT / INIZIO jelenik meg, az alsó
részen az óra érték villog. A SET/LIGHT gombbal állítsa be a kívánt óra értéket,
majd erösítse meg a SEL gombbal. Ekkor a perc érték villog. Állítsa be a perc értéket
a SET/LIGHT gombbal, majd erösítse meg a beállítást a SEL megnyomásával.
A kijelzö felsö részén END / ENDE / FIN / FINE jelenik meg, az alsó részen az
óra érték villog. A SET/LIGHT gombbal állítsa be a kívánt óra értéket, majd erösítse
meg a SEL gombbal. Ekkor a perc érték villog. Állítsa be a perc értéket a
SET/LIGHT gombbal, majd erösítse meg a beállítást a SEL megnyomásával.
Beállítását mentse el a MODE gomb megnyomásával.
Az alvási mód ezután naponta a beállított idöben aktiválódik ill. áll meg.

- 49
-
Napok
- Teljes alvásidö
Az automatikus alvás mód kikapcsolása
Az automatikus alvás mód deaktiválásához nyomja meg és 3 mp-ig tartsa lenyomva
a SET/LIGHT gombot, majd választását erösítse meg a MODE gombbal.
7 napos alvásrögzítés
Alvás módban nyomja meg a SEL gombot. A kijelzö baloldali felsö részén a hét
napja (1-7), jobb oldalon a teljes alvásidö jelenik meg. A kijelzö alsó részén a
kiválasztott naphoz tartozó mélyalvási idö jelenik meg.
1-7
- Mélyalvás
A hét más napjának kiválasztásához nyomja meg a SEL gombot.
Az alvás módból való kilépéshez nyomja meg a MODE gombot
Hibaelhárítás
Az edzésidő nem indul el
Elértük a maximális edzési idöt (9 óra, 59 perc, 59 másodperc). Állítsa vissza
az edzési időt az "Edzésidő" fejezetben leírtak szerint.
A távolság mérése nagyon pontatlan
A gyaloglás és futás lépései nem megfelelőek. Adja meg mindkét lépéshosszát
a "Lépéshossz beállítása" fejezetben leírtak szerint.
Másmilyen tempót választott, mint a lépéshossz meghatározásakor.

- 50
-
A pulzusmérő készüléket egyenletes felületen való használatra tervezték.
Meredek emelkedöknél vagy lépcsőknél pontatlan távolságméréshez
vezethetnek
A pulzus nem jelenik meg, vagy nem megfelelően jelenik meg
Ellenörizze a pulzusmérö óra megfelelö elhelyezését és illeszkedését.
Edzés elött a börfelület hömérsékletének emelése érdekében melegítsen be
Gyözödjön meg róla, hogy a készülék érintkezik börfelülettel
Ne húzza túl szorosra a pulzusmérö óra pántját, mert ezzel elszoríthatja a
véráramlást, ami csökkenti a mérési pontosságot.
Edzés közben a pulzusmérö órát valamivel szorosabbra rögzítse mint máskor.
Intenzív edzésnél, illetve olyan mozgásnál, amelynél csuklója erösen és nem
ritmikusan mozog, a szenzor esetleg nem pontosan méri (többek között) a
pulzust.
Amennyiben a pulzusmérö órán nem jelenik meg a pulzus érték, lazítsa el
csuklóját, és kb. 10 másodpercig tartsa mozdulatlanul. A pulzus érték ekkor
újra megjelenik.
Gyözödjön meg róla, hogy az elem cserére szorul-e.
A kijelzö nehezen olvasható / a világítás nem müködik
Gyözödjön meg, hogy a pulzusmérö óra bekapcsolt állapotban van-e.
Nyomjon meg egy tetszöleges gombot.
Ellenörizze a kijelzö kontraszt beállítását, állítson be erösebb kontrasztot az
„üzembehelyezés“ fejezetben leírtak szerint.
Elöfordulhat, hogy a pulzusmérö óra túlmelegedett, ebben az esetben hagyja
lehülni.
Amennyiben a pulzusmérö óra túlságosan hideg, melegítse föl.
A pulzusmérö óra hátoldalán taláható szenzor bepiszkolódhatott. Tisztítsa meg
a készüléket egy száraz, szálmentes törlökendövel.
Cseréljen elemet.
Reset (Visszaállítás)
Először nyomja meg a SET, majd a SEL gombot az óra teljes visszaállításához.
Minden tárolt adat elvész.

- 51
-
Állítsa be a pulzusméröórát a "Pulzusméröóra üzembe helyezése" részben leírtak
CR203
2
szerint.
Elem töltöttségi állapot jelzö
Ha az elem lemerülöben van, akkor a kijelzőn a következö jel jelenik meg:
Cserélje ki az elemet.
Elemcsere
Az elemcserét egy vízállósági tesztre szakosodott órással végeztesse el. Ha az
elemet egyedül szeretné kicserélni, kérem, az alábbiak szerint járjon el:
Lazítsa meg a pulzusmérőóra hátulján lévő 4 csavart egy kis csavarhúzóval. Nyissa
ki a hátlapját (1). Az elemet (2) egy kis, lapos szerszámmal emelje ki.
Vegye ki az elemet, és helyezzen be egy új 3V CR2032 elemet (3) a pozitív
pólussal felfelé. Ellenőrizze a tömítőgyűrű megfelelő helyét. Zárja be a hátlapot és
csavarja szorosan vissza.
3
Vízállóság
3 bar-ig vízálló..A bar-jelzés a légnyomásra vonatkozik, amelyet a vízzárósági
vizsgálat részeként használnak (DIN8310).
- 52
-
Tisztítás
A pulzusszámmérőt csak száraz, szöszmentes ruhával, például. szemüveglencsék
tisztítására szolgáló kendövel tisztítsa meg.
Minden használat után tisztítsa meg az órát langyos vízzel vagy enyhén szappanos
vízzel és szivaccsal.
Vigyázzon rá,, hogy a pulzusmérő ne legyen nedves.
Az összes alkatrészt törölje meg egy száraz kendövel.
Az izzadás és a szennyeződések befolyásolják az érzékelő működését.
A készülék használaton kívül helyezése
A pulzusmérö óra kukába nem dobható. A készüléket kijelölt
hulladéklerakó helyen kell átadni. Kérjük, ügyeljen az érvényben lévö
hulladékkezelési
rendelkezésekre. Amennyiben kétsége merül föl a megfelelö eljárással
kapcsolatban, lépjen kapcsolatba az illetékes köztisztasági hatósággal.
Az elemek használaton kívül helyezése
A használt elemeket az erre a célra kihelyezett elemgyüjtö konténerekbe
dobja, illetve hulladéklerakó helyen adja át. A használt elem kukába nem
dobható. Kérjük, ügyeljen az érvényben lévö hulladékkezelési
rendelkezésekre. Amennyiben kétsége merül föl a megfelelö eljárással
kapcsolatban, lépjen kapcsolatba az illetékes köztisztasági hatósággal.
Újrahasznosítás
A termékcsomagolás újrahasznosítható anyagokból áll.
A telepített gyűjtőrendszerek segítségével ártalmatlanítsa őket
környezetbarát módon.
Hullámkarton
A csomagolás hullámkartonból készül.
Hulladékkezelés
A csomagolást környezetbarát módon ártalmatlanítsa.

- 53
-
JÓTÁLLÁSI TÁJÉKOZTATÓ
A termék megnevezése:
A termék azonosításra alkalmas
A gyártó cégneve, címe és email
Szívfrekvencia-mérő óra
optikai érzékelővel
A termék típusa: 1-LD5029
címe:
Cégnév: digi-tech GmbH
Út: Valterweg 27A
Város: DE- 65817 Eppstein
Ország: NÉMETORSZÁG
E-mail: email@digi-tech-gmbh.com
Az importáló és forgalmazó cégneve és címe: Lidl Magyarország Kereskedelmi
Bt., H-1037 Budapest, Rádl árok 6.
1. A jótállási idő a Magyar Köztársaság területén, Lidl Magyarország
Kereskedelmi Bt. üzletében történt vásárlás napjától számított 3 év.
2. A jótállási igény a jótállási jeggyel érvényesíthető. A jótállási jegy szabálytalan
kiállítása, vagy átadásának elmaradása nem érinti a jótállási kötelezettségvállalás érvényességét. Kérjük, hogy a vásárlás tényének és időpontjának
bizonyítására őrizze meg a pénztári fizetésnél kapott jótállási jegyet (nyugtát).
3. A vásárlástól számított három napon belül érvényesített csereigény esetén a
forgal-mazó köteles a terméket kicserélni, feltéve ha a hiba a rendeltetésszerű
használatot akadályozza.
A jótállási jogokat a termék tulajdonosaként a fogyasztó érvényesítheti az
áruházak-ban, valamint a jótállási tájékoztatóban feltüntetett szervizekben.
A fogyasztó jótállási kifogásáról a forgalmazó (szerviz) jegyzőkönyvet köteles
Gyártási szám: 309652
részeinek
meghatározása:
A szerviz neve, címe és telefonszáma:
Cégnév: inter-quartz GmbH
Út: Valterweg 27A
Város: DE-65817 Eppstein
Ország: NÉMETORSZÁG
E-mail: support@inter-quartz.de

- 54
-
fel-venni, amelyben rögzíteni kell a fogyasztó nevét, címét, a fogyasztási cikk
(termék) megnevezését, vételárát, a vásárlás időpontját, a hiba bejelentésének
időpontját, a hiba leírását, a fogyasztó által érvényesíteni kívánt igényt, a
kifogás rendezésének módját.
Amennyiben a kifogás rendezésének módja a fogyasztó igényétől eltér, ennek
indo-kolását a jegyzőkönyvben meg kell adni. A jegyzőkönyv másolatát a
fogyasztónak át kell adni. Ha a kötelezett a fogyasztó igényének
teljesíthetőségéről annak beje-lentésekor nem tud nyilatkozni, álláspontjáról
legkésőbb három munkanapon belül köteles értesíteni a fogyasztót.
A jótállás ideje alatt a fogyasztó kérheti a termék kijavítását, kicserélését, vagy
ha a termék nem javítható vagy cserélhető, árleszállítást kérhet, vagy elállhat a
szerződéstől és visszakérheti a vételárat. Ha a forgalmazó, vagy szerviz a
termék kijavítását megfelelő határidőre nem vállalja, vagy nem végzi el, a
fogyasztó a hibát a forgal-mazó költségére kijavíthatja, vagy mással
kijavíttathatja. A kijavítás során a termék-be csak új alkatrész kerülhet
beépítésre.
4. A fogyasztó a hiba felfedezésé után a lehető legrövidebb időn belül köteles a
hibát bejelenteni és a terméket a jótállási jogok érvényesítése céljából átadni. A
hiba fel-fedezésétől számított két hónapon belül bejelentett jótállási igényt
időben közöltnek kell tekinteni. A közlés elmaradásából eredő kárért a
fogyasztó felelős. A jótállási igény érvényesíthetőségének határideje a termék,
vagy fődarabjának kicserélése, ki-javítása esetén a kicserélt, vagy kijavított
termékre, illetve alkatrészre újra kezdődik.
5. A rögzített bekötésű, illetve a 10 kg-nál súlyosabb, vagy tömegközlekedési
eszkö-zön nem szállítható terméket az üzemeltetés helyén kell megjavítani.
Abban az eset-ben, ha a javítás a helyszínen nem végezhető el, a termék ki- és
visszaszereléséről, valamint szállításáról a forgalmazónak kell gondoskodnia.
6. A jótállás nem áll fenn, ha a hiba a nem rendeltetésszerű használatból,
átalakítás-ból, helytelen tárolásból, vagy a használati utasítástól eltérő
kezelésből, vagy bármely a vásárlást követő behatásból fakad, vagy elemi kár
okozta, és azt a for-galmazó, vagy a szerviz bizonyítja. A jótállás nem
vonatkozik a mozgó kopó alkat-részek (világítótestek, gumiabroncsok stb.)

- 55
-
rendeltetésszerű elhasználódására. A szerviz és a forgalmazó a kijavítás során
A jótállási igény bejelentésének és
A hiba oka:
A fogyasztó részére történő visszaadás
A hiba javításának módja:
A szerviz bélyegzője, kelt és aláírása:
A javításra tekintettel a jótállás új
nem felel a terméken a fogyasztó vagy harmadik személyek által tárolt
adatokért vagy beállításokért.
A jótállás a fogyasztó törvényből eredő szavatossági jogait és azok
érvényesíthető-ségét nem érinti.
javításra
átvételi időpontja:
időpontja:
határideje:
A garancia kirterjedése
Ez a készülék szigorú minöségi elöírások alapján készült, és szállítás elött megfelelö
ellenörzésen ment keresztül. A garancia anyag- és gyártási hibákra terjed ki. A
garancia nem terjed ki a készülék olyan alkatrészeire, amelyek a rendeltetésszerü
használat során kopásnak, törésnek vannak kitéve, és ezért “kopó, fogyó
alkatrésznek” tekinthetök. Ilyen alkatrészek például a kapcsolók, elemek, illetve az
üvegböl készült alkatrészek.
A garancia érvényét veszti a készülék sérülése, nem elöírásszerinti használata vagy
nem megfelelö karbantartása esetén. Az idöjárás állomás elöírás szerinti
használatához a jelen használati útmutatóban leírtak pontos betartása szükséges.
Feltétlenül kerülni kell az olyan használatot és kezelést, amely az útmutató szerint
tiltott vagy nem ajánlott.
A termék kizárólag személyes és nem kereskedelmi használat céljára készült. A
készülék szakszerütlen vagy visszaélésszerü használata, ill. az azon történt bármely
– nem szakszerviz által végzett – módosítás a garancia elvesztésével jár.
Garanciaigény bejelentése
Garanciaigényének gyors kezeléséhez, kérjük, a következök szerint járjon el:

- 56
-
A bejelentéshez, kérjük, készítse elö a vásárlást igazoló nyugtát vagy számlát,
valamint a készülék cikkszámát (309652).
A cikkszámot a készülék típuscímkéjén, a használati útmutató címlapjának alján
bal oldalon ill. a készülék aljára vagy hátlapjára ragasztva találja.
Meghibásodás esetén forduljon ügyfélszolgálatunkhoz a késöbbiekben
megadott telefonszámon vagy e-mail címen.
Ez az útmutató, valamint számos más kézikönyv, termékvideó és
szoftver letölthetö a www.lidl.com internetes oldalról.

- 57
-
Ügyfélszolgálat/szerviz
IAN
309652
Art.-Nr.: 1-
LD5029
Cégnév: Inter-Quartz GmbH
Út: Valterweg 27A
Város: DE-65817 Eppstein
Ország: NÉMETORSZÁG
E-mail: support@inter-quartz.de
Telefon: +49 6198 571825
0680 981220
0800 80847
800 142 315
0800 004449
Szállító
Figyelem! Az alábbi cím nem ügyfélszolgálati cím. Kérdésével, ill. panaszával,
kérjük, forduljon a fent megadott ügyfélszolgálathoz.
Cégnév: digi-tech GmbH
Út: Valterweg 27A
Város: DE-65817 Eppstein
Ország: NÉMETORSZÁG

- 58
-
Navodilo za uporabo in varnostno
navodilo
Kazalo
Kazalo .......................................................................................................................... - 58 -
Uvodna opomba ......................................................................................................... - 60 -
Predvidevna uporaba ................................................................................................. - 60 -
Komplet vsebuje .......................................................................................................... - 60 -
Tehnične podrobnosti ................................................................................................. - 60 -
Pomembne varnostne informacije
Pomembne varnostne informacije .......................................................................... - 61 -
Pomembne varnostne informacijePomembne varnostne informacije
Varnostne informacije za baterije ............................................................................. - 61 -
Varnostne informacije za uporabnike ....................................................................... - 61 -
Optično merjenje srčnega utripa ............................................................................... - 62 -
Pravilno pozicioniranje ure za merjenje srčnega utripa ......................................... - 62 -
Pomembne informacije o uporabi ure za merjenje srčnega utripa ....................... - 64 -
Hitra nastavitev ..................................................................................................... - 64 -
Začetna nastavitev ure za merjenje srčnega utripa ................................................ - 65 -
Osvetlitev ..................................................................................................................... - 65 -
Ura za merjenje srčnega utripa ima 4 načine delovanja ....................................... - 65 -
ČAS (CLOCK / UHR / HORLOGE / OROLOGIO) ............................................. - 66 -
1. Čas (CLOCK) ................................................................................................... - 66 -
2. Alarm (ALARM) ................................................................................................ - 66 -
3. Odštevalnik (TIMER) max. 23:59:59 ............................................................ - 67 -
Način vadbe (WORKOUT / TRAINING / ENTRAIN. /ALLENAM.) .................. - 68 -
1. Timer vadbe ...................................................................................................... - 69 -
2. Trenutni/povprečni tempo time/km .............................................................. - 71 -
3. Trenutna/povprečna hitrost km/h ................................................................. - 71 -
4. Razdalja ........................................................................................................... - 71 -
5. Srčni utrip (način vadbe) ................................................................................. - 71 -
6. Poraba kalorij / pokurjena maščoba / BMI ................................................ - 74 -
Pedometer (Števec korakov) način ........................................................................... - 76 -
Način spanja (SLEEP / SCHLAF / DORMIR / DORMIRE) ................................... - 76 -

- 59
-
1. Zagon ročnega načina mirovanja ................................................................ - 77 -
2. Zaustavitev ročnega načina mirovanja ......................................................... - 77 -
3. Nastavitev samodejnega načina mirovanja ................................................. - 77 -
Odpravljanje težav ..................................................................................................... - 79 -
Ponastavitev (Reset) .................................................................................................... - 80 -
Prikaz iztrošene baterije ............................................................................................. - 80 -
Zamenjava baterije ..................................................................................................... - 80 -
Vodotesnost ................................................................................................................. - 81 -
Navodilo za čiščenje .................................................................................................. - 81 -
Odlaganje elektronskih naprav ................................................................................. - 82 -
Odlaganje baterij ....................................................................................................... - 82 -
Recikliranje .................................................................................................................. - 82 -
Valovita lepenka ......................................................................................................... - 82 -
Odlaganje odpadkov ................................................................................................ - 82 -
Servis ............................................................................................................................ - 82 -
Dobavitelj ..................................................................................................................... - 83 -
Garancijski list ............................................................................................................. - 83 -

- 60
-
URA ZA MERJENJE SRČNE FREKVENCE
T
emperatur
a delovanja
0 - 50°C
Dimen
zije Ø 4,8 x 1,4 cm
Zaslon
2,8 x 2,3 cm
Teža 45 g
Bat
erija CR 2032/3V
Z OPTIČNIM SENZORJEM
Uvodna opomba
Preberite navodila pred prvo uporabo izdelka, čeprav ste izkušeni pri uporabi
elektronske opreme. Prosimo, bodite posebno pozorni pri branju poglavja
"Pomembne varnostne informacije". Ohranite navodila za uporabo, tako da jih
lahko uporabite v prihodnosti. Če želite prodati ali pa dati ta izdelek nekomu je zelo
pomembno, da daste tudi ta priročnik. Prosimo, da shranite embalažo in navodila
za nadaljnjo uporabo.
Predvidevna uporaba
Ta elektronska naprava je namenjena za prikaz časa in opisane dodatne funkcije.
Vsaka druga uporaba ali sprememba elektronske naprave ni v skladu s predvideno
uporabo. Proizvajalec ne odgovarja za škodo, nastalo zaradi nepravilne uporabe
ali zlorabe. Naprava ni namenjena za komercialno uporabo.
Komplet vsebuje
Opomba: Preverite vsebino po nakupu. Prosimo, poskrbite, da so vsi deli zajeti in
nepoškodovani.
1 x Ura za merjenje srčnega utripa, baterija vključena (CR2032)
1 x Navodilo za uporabo
Tehnične podrobnosti
Ura za merjenje srčnega utripa

- 61
-
Pomembne varnostne informacije
POZOR
:
Varnostne informacije za baterije
OPOZORILO!
Baterije hranite izven dosega majhnih otrok. Če nekdo baterijo pogoltne,
nemudoma poiščite zdravniško pomoč. Baterije / baterije za ponovno polnjenje
vedno vstavite pravilno v skladu s polariteto. Če je potrebno, obrišite baterijo in
kontakte na bateriji. Ne poskušajte polniti navadnih baterij, samo baterije za
ponovno polnjenje. Baterij ni dovoljeno razstavljati, provzročati kratkega stika ali jih
metati v ogenj, saj obstaja nevarnost eksplozije. Nepravilna uporaba baterij lahko
povzroči eksplozijo ali iztekanje. Če je baterija iztekla, se izogibajte stiku s kožo,
očmi in sluznico. Uporabite rokavice. Če ste prišli v stik z baterijsko kislino, umijte se
s čisto vodo in takoj poiščite zdravniško pomoč. Odstranite izpraznjene baterije iz
naprave, ker obstaja povečana nevarnost iztekanja.
Varnostne informacije za uporabnike
Posvetujte se s svojim zdravnikom, preden
začnete katerikoli program vadbe. Zdravnik vam lahko
pomaga izbrati primerno intenzivnost vadbe in smernice
območja srčnega utripa za vaše vadbe.
Ta merilnik srčnega utripa ni medicinski pripomoček in ga je
treba uporabljati le kot vodilo za vašo vadbo.
OPOZORILO! NEVARNOST POŠKODB!
Napravo lahko uporabljajo tudi osebe z zmanjšanimi fizičnimi, senzornimi ali
duševnimi zmožnostmi, osebe brez izkušenj ali znanja (tudi otroci stari 8 in več
let), samo pod nadzorom in po navodilih, kako varno uporabljati napravo, ter
NEVARNOST ZA ZDRAVJE!
NEVARNOST EKSPLOZIJE!

- 62
-
opozorjeni na z njo povezane nevarnosti. Otroci naj se ne igrajo z napravo.
Otroci naj naprave ne čistijo in vzdržujejo brez nadzora. Embalažni material
hranite izven dosega otrok. Predstavlja nevarnost za zadušitev.
Optično merjenje srčnega utripa
Ura za merjenje srčnega utripa meri vaš srčni utrip pri zapestju z uporabo optičnega
senzorja. Ko uporabljate to metodo, srčni pas ni potreben.
Krvni obtok
Kroženje krvi se razlikuje od osebe do osebe in se lahko razlikuje znotraj
posameznikov (na primer med levo in desno roko). V nekaterih primerih naravni
pretok krvi morda ni optimalen za merjenje srčnega utripa z optičnim senzorjem pri
nekaterih posameznikih.
Okoljski dejavniki
Če je temperature okolja prenizka, se lahko pretok krvi v podlahti zniža, kar lahko
zmanjša merilno natančnost.
Barva kože
Na kožno odbojnost vpliva barva površine kože. Načeloma, če se manjša svetloba
absorbira skozi površino kože, bolje je merjenje srčnega utripa. Močna
pigmentacija kože, brazgotine in tetoviranje lahko zato negativno vplivajo na
natančnost merjenja.
Hranite kožo suho in čisto
Pomembno je, da vaša ura in koža ostaneta čisti in suhi. Suho bo povečalo udobje
in preprečilo poškodbo ure. To je še posebej pomembno med vadbo ali
izpostavljenosti tekočinam. Tekočine, kot znoj, milo, krema za sončenje in losjoni
lahko zmanjšajo natančnost merjenja.
Drža
Neprimeren položaj (kot so močno upognjena zapestja) vpliva na obtok in zmanjša
natančnost merjenja srčnega utripa.
Pravilno pozicioniranje ure za merjenje srčnega utripa
Postavite uro za merjenje srčnega utripa na zapestje. Pravilno pozicioniranje je
pomembno za natančne meritve.

- 63
-
Za merjenje srčnega utripa je treba uro pritrditi okrog zapestja. Zaslon mora biti
obrnjen navzgor in mora biti nameščen za širino prsta od kosti zapestja. Senzor se
mora dotakniti kože. Ure za merjenje srčnega utripa ne smete nositi tako tesno, da
se krvni obtok zmanjša. Medtem ko ne vadite, uro nosite bolj ohlapno okoli zapestja
– v stilu normalne ročna ura. Med treningom nosite uro nekoliko bolj tesno okoli
zapestja, da bi povečali natančnost merjenja srčnega utripa.
Mnoge vaje, kot je kolesarjenje ali dvigovanje teže, zahtevajo, da nagnete
zapestje. To lahko vpliva na merjenje srčnega utripa, če se ura za merjenje srčnega
utripa nosi prenizko na zapestju. Za najboljše rezultate nosite uro za merjenje
srčnega utripa nekaj minut pred začetkom vadbe.
Če se vaše roke ali koža ohladi, ogrejte kožo pod senzorjem. Pred vadbo naredite
nekoliko ogrevalnih vaj.
Prepričajte se, da ima ura za merjenje srčnega utripa stik s kožo.
Ne nosite ure za merjenje srčnega utripa preveč tesno okoli zapestja, ker to
lahko ovira krvni obtok in zmanjša natančnost merjenja.

- 64
-
Med treningom uro za merjenje srčnega utripa nosite nekoliko bolj tesno okoli
zapestja.
Med zelo intenzivnimi vajami, ki povzročajo močne ali aritmične gibe zapestja,
senzor morda ne bo mogel pravilno izmeriti srčnega utripa.
Če vaša ura za merjenje srčnega utripa, ne pokaže srčnega utripa, sprostite
zapestje in ostanite negibno za kratek čas (približno 10 sekund). Vaš srčni utrip
bi se zdaj moral pojaviti.
Pomembne informacije o uporabi ure za merjenje
srčnega utripa
Pritisnite MODE, da spremenite način delovanja ure ali za izhod iz menija z
nastavitvami
Pritisnite SET, da nastavite osebne podatke z zmanjšanjem vrednosti
Pritisnite LIGHT, da nastavite osebne podatke s povečanjem vrednosti
Pritisnite SEL da potrdite nastavitev in v podmeniju naredite korak naprej
Hitra nastavitev
Pritisnite in zadržite tipko SET ali LIGHT za hitro nastavitev številčnih vrednosti.

- 65
-
Začetna nastavitev ure za merjenje srčnega utripa
Odstranite zaščitno folijo z zaslona ure in pritisnite tipko LIGHT, MODE, SEL ali SET.
Ura bo oddala zvočni signal. Ura za merjenje srčnega utripa bo zdaj prikazala
začetni prikaz zaslona.
Nastavite svoje osebne podatke.
Pritisnite in zadržite tipko SET 3 sekunde.
Jezik bo prikazan na zaslonu. Na kratko pritisnite SET/LIGHT za
izbiro angleščine, italijanščine, francoščine ali nemščine. Pritisnite SEL, da potrdite
nastavitev.
Na zaslonu se prikažejo sekunde. Pritisnite SET/LIGHT, da ponastavite sekunde na
00. Pritisnite SEL, da potrdite nastavitev. Na zaslonu se prikažejo minute. Nastavite
minute tako, da pritisnete SET/LIGHT in pritisnite SEL, da potrdite nastavitev. Na
enak način nastavite ure, leto, mesec, dan, obliko datuma, 12/24-urni format časa,
merilno enoto, leto rojstva, spol, višino, težo, zvočni ton, urni zvok in kontrast
zaslona. Pritisnite MODE, da zapustite meni z nastavitvami.
Osvetlitev
Na kratko pritisnite LIGHT, da začasno aktivirate osvetlitev.
Ura za merjenje srčnega utripa ima 4 načine delovanja
Pritisnite tipko MODE za izbiro načina delovanja ure.
Vrstni red načinov delovanja:
Poleg tega vsak način delovanja ima več pod-funkcij.
Pod-funkcije je vedno mogoče doseči s pritiskom na tipko SEL.

- 66
-
ČAS (CLOCK / UHR / HORLOGE / OROLOGIO)
Dan v
tednu Datum
Čas
Večkrat pritisnite tipko MODE za izbiro časovnega načina CLOCK / UHR /
HORLOGE / OROLOGIO.
Pritisnite tipko SEL za izbiro pod-funkcij časovnega načina.
1. CLOCK (Čas)
2. ALARM (Alarm)
3. TIMER (Odštevalnik)
1. 2. 3.
1. Čas (CLOCK)
Dan v tednu in datum sta prikazana v zgornjem delu zaslona. Čas je prikazan v
spodnjem delu zaslona. Nastavite čas, kot je opisano v poglavju “Začetna
nastavitev ure za merjenje srčnega utripa”.
2. Alarm (ALARM)
Pritisnite tipko SET v načinu alarma, da vključite, ali izključite alarm.
Pritisnite in zadržite tipko SET 3 sekunde, da nastavite čas alarma. Minute alarma
utripajo na zaslonu. Pritisnite tipko SET/LIGHT, da nastavite minute in potrdite

- 67
-
nastavitev s pritiskom na tipko SEL. Ure alarma utripajo na zaslonu. Nastavite ure
ure
sekunde
minute
na enak način. Potrdite nastavitev s pritiskom na tipko MODE.
Vključitev / izključitev alarma in funkcije dremeža
Pritisnite kateri koli gumb, ko se oglasi alarm, da zaustavite alarm. Če se alarm ne
izklopi v 30 sekundah, se aktivira funkcija dremeža (snooze). Simbol bo utripal
na zaslonu in alarm se bo znova oglasil po 5 minutah. To se bo ponovilo 3-krat. Po
24 urah se bo alarm znova oglasil.
3. Odštevalnik (TIMER) max. 23:59:59
Na zaslonu se prikaže prednastavljen čas 1:00.
Pritisnite tipko SET, medtem ko je v načinu TIMER, da vključite ali izključite TIMER.
Pritisnite in zadržite tipko SET 3 sekunde, da ponastavite TIMER.

- 68
-
Pritisnite in držite tipko SET še 3 sekunde, da nastavite čas po meri za TIMER. Ure
utripajo. Pritisnite tipko SET/LIGHT, da nastavite ure in potrdite nastavitev s
pritiskom na tipko SEL. Potrdite s tipko MODE.
Zaustavite TIMER alarm s pritiskom na katero koli tipko. Če ne pritisnega nobenega
gumba, se bo alarm po 30 sekundah samodejno ustavil.
Način vadbe (WORKOUT / TRAINING /
ENTRAIN. /ALLENAM.)
Večkrat pritisnite tipko MODE, da izberete način treninga WORKOUT / TRAINING
/ ENTRAIN / ALLENAM.
Pritisnite SEL, če želite izbrati pod-funkcije načina vadbe.
1. WORKOUT TIMER (Timer vadbe)
2. CURRENT/AVERAGE PACE (trenutni/povprečni tempo)
3. CURRENT/AVERAGE SPEED (trenutna/povprečna hitrost)
4. DISTANCE (Razdalja)
5. HEART RATE (Srčni utrip)
6. CALORIES BURNED/FAT BURNED/BMI (Poraba kalorij/maščob/BMI)

- 69
-
1. Timer vadbe
Pritisnite tipko SET, medtem ko ste v načinu vadbe, da začnete merjenje srčnega
utripa. Simbol srca utripa na zaslonu.
POZOR: Vse opisane pod-funkcije delajo samo, če je vključen timer vadbe.
Pritisnite tipko SET, medtem ko ste v načinu vadbe, da vstavite merjenje srčnega
utripa. Simbol srca bo ostal brez utripa.
OPOMBA: Če je timer vadbe ustavljen, se bo ura za merjenje srčnega utripa po
približno 5 minutah vrnila na običajen časovni prikaz.
Pritisnite in zadržite tipko SET 3 sekunde za ponastavitev časa timera vadbe.
OPOMBA: Ponastavitev časa timera vadbe bo ponastavila vse podatke o podfunkcijah.
Ciljno območje srčnega utripa
V ciljnem območju
Nad ciljnim območjem
Pod ciljnim območjem

- 70
-
Samodejno dezaktiviranje časa vade (v načinu vadbe)
Po dveh urah in pol bo zaslon prikazoval:
Pritisnite SET/LIGHT za izbiro YES/JA/OUI/SI (DA) ali NO/NEIN/NON/NO
(NE) in pritisnite tipko SEL, da potrdite nastavitev.
Nastavitev YES/JA/OUI/SI (DA) ustavi merjenje srčnega utripa.
Če nastavite NO/NEIN/NON/NO (NE), se bo merjenje srčnega utripa
nadaljevalo.
Če v naslednjih 30 minutah ne pritisnete nobenega gumba (po 3 urah celotnega
časa vadbe) se meritev samodejno ustavi.
POZOR: Po petih urah in pol se bo sporočilo ponovno pojavilo.
Samodejno dezaktiviranje časa (v drugem načinu)
Če je izbran drugi način delovanja, po zagonu timera vadbe, se po 4 minutah na
zaslonu prikaže:
Pritisnite tipko SET/LIGHT za izbiro YES/JA/OUI/SI (da) ali
NO/NEIN/NON/NO (ne) in pritisnite tiko SEL, da potrdite.
Nastavitev YES/JA/OUI/SI (DA) ustavi merjenje srčnega utripa.
Če nastavite NO/NEIN/NON/NO (NE), se bo merjenje srčnega utripa
nadaljevalo.
Če v naslednji minuti ne pritisnete nobenega gumba, se meritev samodejno ustavi

- 71
-
2. Trenutni/povprečni tempo time/km
Pritisnite tipko SEL za prikaz tempa v zgornjem delu zaslona. Srčni utrip se prikaže v
spodnjem delu zaslona. Pritisnite tipko SET, da se prikaže trenutni ali povprečni
tempo.
3. Trenutna/povprečna hitrost km/h
Pritisnite tipko SEL za prikaz trenutne/povprečne hitrosti v zgornjem delu zaslona.
Trenutni srčni utrip se prikaže v spodnjem delu zaslona. Pritisnite tipko SET, da se
prikaže trenutna ali povprečna hitrost.
4. Razdalja
Pritisnite tipko SEL za prikaz razdalje v zgornjem delu zaslona. Trenutni srčni utrip se
prikaže v spodnjem delu zaslona.
5. Srčni utrip (način vadbe)
Pritisnite tipko SEL, da se prikaže povprečni srčni utrip. Pritisnite SET za izbor podfunkcij.
A. AVERAGE HEART RATE (POVPREČNI SRČNI UTRIP)
B. MAXIMUM HEART RATE (MAKSIMALNI SRČNI UTRIP)
C. MINIMUM HEART RATE (MINIMALNI SRČNI UTRIP)
D. MHR %*
E. TARGET HEART RATE ZONE (CILJNA ZONA SRČNEGA UTRIPA)

- 72
-
*MHR – Maksimalni srčni utrip
(100 % najvišjega srčnega utripa = 220 – vaša starost v letih)
Nastavitev ciljnega območja srčnega utripa
POZOR: Preden izberete ciljno območje srčnega utripa
primerno za vas, se posvetujte s svojim zdravnikom.
Prednastavljene vrednosti so le približne in niso primerne
za vse.
Če želite nastaviti ciljno območje srčnega utripa, alarme in dolžino koraka, pritisnite
tipko SET za 3 sekunde, ko ste v načinu prikaza povprečnega srčnega utripa.
Pritisnite SET/LIGHT, da izberete eno od predhodno nastavljenih ciljnih območij
srčnega utripa 1 do 3 ali izberite MYZONE, da nastavite ciljno območje srčnega
utripa po meri. Naslednja tabela prikazuje pregled območij 1 do 3.

- 73
-
Starost v letih
20 25 30 35 40 45 50 55 60 65
Območje
1
100 97 95 92 90 87 85 82 80 77
Re
kreacija - - - - - - - - - -
50-65 % MHR*
130 126 123 120 117 113 110 107 104 100
Območje
2
130 126 123 120 117 113 110 107 104 100
Fitnes - - - - - - - - - -
65-80 % MHR*
160 156 152 148 144 140 136 132 128 124
Območje
3
160 156 152 148 144 140 136 132 128 124
Šport - - - - - - - - - -
80-95 % MHR*
190 185 180 175 171 166 161 156 152 147
Medtem ko je na zaslonu prikaz MYZONE, pritisnite tipko SEL za vhod v način
nastavitve za ciljno območje srčnega utripa po meri. Na zaslonu utripa spodnja
meja območja. Pritisnite SET/LIGHT, da nastavite spodnjo mejo in potrdite
nastavitev s pritiskom na tipko SEL. Na enak način nastavite zgornjo mejo.
Alarm za ciljno območje srčnega utripa
Pritisnite SET/LIGHT, da vključite (ON) ali izklopite (OFF) alarm za izbrano
omejitev. Potrdite nastavitev s pritiskom na tipko SEL.
spodnja meja zgornja meja maksimalni srčni utrip
Alarm za srčni utrip, ki presega maksimalni srčni utrip
Če vaš srčni utrip doseže 99 % maksimalnega srčnega utripa ali preseže
maksimalni srčni utrip, se oglasi zvok alarma. Signal opozorila se bo ustavil, ko vaš
srčni utrip pade pod 99 % maksimalnega srčnega utripa.

- 74
-
Nastavitev dolžine koraka
Na zaslonu se prikaže dolžina koraka. Nastavite svojo dolžino koraka za hojo in
tek tako, da pritisnete SET/LIGHT. Pritisnite tipko SEL, da potrdite vsako nastavitev.
Shranite s pritiskom na MODE.
Da določite dolžino koraka, izmerite razdaljo (na primer) 100 m. Hodite ali
zaženite (odvisno od vrednosti, ki jo želite nastaviti) z enakimi koraki in štejte
korake. Razdaljo razdelite s številom korakov in pretvorite metre v centimetre.
.
OPOMBA: Nastavite vrednosti za hojo in tek, tudi če nameravate uporabljati uro
samo za hojo. V tem primeru nastavite vrednost za “hitro hojo”. Smiseln rezultat je
mogoče doseči le, če se vneseta obe vrednosti.
Če vrednosti niso nastavljene, bo ura uporabljala privzete vrednosti, ki se morda ne
bodo ujemale z osebnim profilom gibanja
OPOMBA: Če prikazane vrednosti za razdaljo močno odstopajo od dejanske
razdalje, je treba nastaviti dolžino koraka. Vaša hoja, čevlji in lastnosti tla bodo
vedno vplivale na izmerjene vrednosti.
6. Poraba kalorij / pokurjena maščoba / BMI
Pritisnite SEL, da prikažete uporabo kalorij. Pritisnite SET, za vhod v pod-funkcije.
A. CALORIES BURNED (porabljene kalorije)
B. FAT BURNED (pokurjena maščoba)
C. BMI
Vsaka vrednost je prikazana v zgornjem delu zaslona. Srčni utrip je prikazan v
spodnjem delu zaslona.
.

- 75
-
Starost
BMI normal
ni (kg/m²)
19 - 24
19 - 24
25 - 34
20 - 25
35 - 44
21 - 26
45 – 54
22 - 27
55 – 64
23 - 28
> 64 24 - 29
OPOMBA: Da bi povečali natančnost porabljenih kalorij in maščob, je treba
nastaviti pravilne vrednosti za vašo starost in težo.
OPOMBA: Števec za pokurjeno maščobo se vključi samo, če je izmerjeni srčni utrip
nad 120 utripov na minuto.
BMI (Body Mass Index - ITM Indeks telesne mase)
ITM je statistično merilo, ki se lahko uporablja za oceno teže osebe. Za odrasle,
vrednost med 18.5 in 25 je normalna. Vrednost pod 18.5 pomeni
"nedohranjenost". Vrednost nad 25 je "čezmerna telesna teža". Vrednost nad 30 se
šteje za "debelost".
ITM je le groba smernica, ker ne obravnava telesnega tipa in sestave telesne mase
(maščoba/mišično tkivo).
Ura samodejno izračuna ITM (BMI) na podlogi vnesenih podatkov med
nastavitvijo.

- 76
-
Pedometer (Števec korakov) način
- Odstotek
ciljnega
Večkrat pritisnite MODE, da izberete način delovanja pedometra PEDO.
števila korakov
- Števec korakov
Pritisnite in zadržite SET 3 sekunde za ponastavitev dnevnega cilja korakov.
OPOMBA: Število korakov in odstotek ciljnega števila korakov se ponastavita
samodejno vsako noč.
Nastavitev števca dnevnih korakov
Pritisnite in držite tipko SET še 3 sekunde, da nastavite dnevni cilj korakov. Pritisnite
SET/LIGHT za nastavitev vrednosti (1.000 – 19.999) in potrdite nastavitev s
pritiskom na tipko MODE.
Način spanja (SLEEP / SCHLAF / DORMIR / DORMIRE)
Pritisnite večkrat tipko MODE za izbiro načina spanja SLEEP/ SCHLAF/ DORMIR /
DORMIRE.
4. ZAGON ROČNEGA NAČINA MIROVANJA
5. ZAUSTAVITEV ROČNEGA NAČINA MIROVANJA
6. NASTAVITEV SAMODEJNEGA NAČINA MIROVANJA

- 77
-
- Skupno
trajanje
- Zadnji posnetek
spanja
- Trajanje globokega
spanca
1. Zagon ročnega načina mirovanja
Pritisnite SET, da zaženete ročni način mirovanja. Skupno trajanje spanja je
prikazano v zgornjem delu zaslona. Trajanje globokega spanca je prikazano v
spodnjem delu zaslona . Takoj, ko je vključen način mirovanja, utripa simbol Z
simbol in se posnamejo novi podatki o spanju.
2. Zaustavitev ročnega načina mirovanja
Pritisnite SET, da zaustavite ročni način mirovanja. Skupno trajanje spanja je
prikazano v zgornjem delu zaslona. Trajanje globokega spanca je prikazano v
spodnjem delu zaslona. Simbol ZZ in podatki o spanju ostanejo na zaslonu.
spanja
OPOMBA: Ročni način mirovanja ima večjo prednost kot samodejni način
mirovanja
3. Nastavitev samodejnega načina mirovanja
Pritisnite in zadržite tipko SET 3 sekunde za nastavitev samodejnega načina
mirovanja. Na zaslonu se prikaže AUTO OFF/AUTO AUS. Pritisnite SET/LIGHT,
da vključite samodejni način mirovanja. Potrdite nastavitev s pritiskom na SEL.
Z

- 78
-
V zgornjem delu zaslona se prikaže START / ANFANG / DEBUT / INIZIO in ure
utripajo v spodnjem delu zaslona. Nastavite ure s pritiskom na SET/LIGHT in
potrdite nastavitev s pritiskom na SEL. Minute utripajo. Nastavite minute s pritiskom
na SET/LIGHT in potrdite nastavitev s pritiskom na SEL.
V zgornjem delu zaslona se prikaže END / ENDE / FIN / FINE in ure utripajo v
spodnjem delu zaslona. Nastavite ure s pritiskom na SET/LIGHT in potrdite
nastavitev s pritiskom na SEL. Minute utripajo. Nastavite minute s pritiskom na
SET/LIGHT in potrdite nastavitev s pritiskom na SEL. Nastavitve shranite s pritiskom
na tipko MODE.
Način mirovanja se zdaj vklopi in izklopi ob istem času vsak dan.
Zaustavitev samodejnega načina mirovanja
Pritisnite in zadržite SET 3 sekunde. Pritisnite SET/LIGHT, da izključite samodejni
način mirovanja. Potrdite nastavitev s pritiskom na MODE.

- 79
-
7-dnevna zgodovina mirovanja
Dan 1-7
- Celotno trajanje
V načinu mirovanja pritisnite SEL. Dan (1-7) je prikazan v zgornjem delu zaslona s
celotnim trajanjem spanja na desni strani dneva. Trajanje globokega spanca je
prikazano v spodnjem delu zaslona.
spanja
- Trajanje globokega
spanca
Če želite prikazati drugi dan, pritisnite SEL.
Za izhod iz načina mirovanja pritisnite MODE.
Odpravljanje težav
Timer vadbe se ne začne
Maksimalni čas vadbe (9 ur, 59 minut, 59 sekund) je bil dosežen. Ponastavite
timer vadbe, kot je opisano v poglavju “Timer vadbe”.
Meritve razdalje so zelo nenatančne
Vnesli ste napačne dolžine korakov za hojo in tek. Vnesite pravilne vrednosti,
kot je opisano v poglavju “Nastavitev dolžine koraka”.
Izbrali ste drugo hitrost kot hitrost, ki se uporablja pri določanju dolžine koraka.
Ura za merjenje srčnega utripa je bila razvita za dejavnosti na ravni površini.
Strmi griči ali stopnice bodo povzročali manjše merjenje razdalje.
Prikazani srčni utrip ni pravilen
Poskrbite, da je ura za merjenje srčnega utripa pravilno nameščena in pritrjena.
Vaje za ogrevanje segrejejo kožo, preden začnete vadbo.
Pazite, da ura za merjenje srčnega utripa ima stik s kožo.
Ne nosite ure za merjenje srčnega utripa preveč tesno okoli zapestja, ker to
lahko ovira krvni obtok in zmanjša natančnost merjenja.
Med treningom uro za merjenje srčnega utripa nosite nekoliko bolj tesno okoli
zapestja.

- 80
-
Med zelo intenzivnimi vajami ali drugimi dejavnostmi, ki povzročajo močne ali
aritmične gibe zapestja, senzor morda ne bo mogel pravilno izmeriti srčnega
utripa
Če vaša ura ne prikaže srčnega utripa, sprostite zapestje in ostanite negibno za
kratek čas (približno 10 sekund). Vaš srčni utrip bi se zdaj moral pojaviti.
Morda boste morali zamenjati baterijo .
Čitljivost zaslona je slaba / osvetlitev ozadja ne deluje
Morda vaša ura še ni bila vklopljena. Pritisnite kateri koli gumb.
Nastavitev kontrasta je lahko napačna. Povečajte kontrast, kot je opisano v
“Začetna nastavitev ure za merjenje srčnega utripa”.
Vaša ura za merjenje srčnega utripa se je morda pregrela. Prosimo, pustite, da
se ohladi.
Ura za merjenje srčnega utripa je morda preveč hladna. Ogrevajte uro.
Umazanija lahko blokira senzor na hrbtni strani ure. Očistite uro s suho krpo, ki
ne pušča vlaken.
Zamenjajte baterijo.
Ponastavitev (Reset)
Pritisnite in zadržite tipko SET, nato pa tudi pritisnite in zadržite tipko SEL, da
popolnoma ponastavite uro za merjenje srčnega utripa. Vsi shranjeni podatki bodo
izbrisani.
Po ponastavitvi ure za merjenje srčnega utripa nastavite uro, kot je opisano v
poglavju “Začetna nastavite ure za merjenje srčnega utripa”.
Prikaz iztrošene baterije
Če je baterija prešibka, se na zaslonu ure prikaže indikator napolnjenosti baterije:
Zamenjajte baterijo čim prej.
Zamenjava baterije
Zamenjavo baterije lahko izvede urar, poleg testa vodoodpornosti. Če želite
zamenjati baterijo sami, lahko nadaljujete na naslednji način:

- 81
-
Odstranite 4 vijaka s hrbtne strani ure z majhnim izvijačem Phillips. Odprite hrbtno
CR203
2
stran ohišja (1). Uporabite majhno ravno orodje, da dvignete baterijo (2).
Odstranite baterijo in vstavite novo CR2032 3 V baterijo (3) tako, da je + pol
obrnjen navzgor. Prepričajte se, da je tesnilo pravilno postavljeno. Zaprite hrbtno
stran ohišja, znova vstavite in privijte vijake.
3
Vodotesnost
Ura je vodotesna do 3 barov. Ta vrednost označuje vrednost atmosferskega tlaka
uporabljenega v preizkusu (DIN 8310).
Navodilo za čiščenje
Očistite uro s suho krpo, ki ne pušča nitke. Idealna je krpica za čiščenje očal. Po
vsaki uporabi očistite pas na uri z mlačno vodo, blago milnico in gobo. Prosimo,
bodite previdni, da ure ne zmočite. Posušite vse dele z brisačo. Znoj in
onesnaževalci so škodljivi za funkcijo senzorja.
- 82
-
Odlaganje elektronskih naprav
Elektronske naprave ni dovoljeno odlagati med gospodinjske odpadke.
Odložite napravo v posebne zbiralnike, ki so za to namenjeni ali napravo
oddajte v zbirnem mestu za recikliranje materialov. Prosimo, poglejte
sedanja pravila za odlaganje elektronskih naprav. Za podrobnejše
informacije o recikliranju elektronskih naprav se obrnite na lokalni občinski urad,
podjetje za odvažanje gospodinjskih odpadkov.
Odlaganje baterij
Prosimo vas, da iztrošene baterije odložite v za to postavljene zbiralnike
v trgovinah. Baterije ne spadajo med gospodinjske odpadke. Odložite
baterije v posebne zbiralnike, ki so za to namenjeni ali jih oddajte v
zbirnem mestu za recikliranje materialov. Za podrobnejše informacije o
recikliranju baterij se obrnite na lokalni občinski urad, podjetje za odvažanje
gospodinjskih odpadkov.
Recikliranje
Embalaža izdelka je sestavljena iz recikliranih materialov. Embalažo
odstranite na okolju prijazen način z uporabo ustreznih sistemov zbiranja.
Valovita lepenka
Embalaža je izdelana iz valovitega kartona.
Odlaganje odpadkov
Embalažo zavrzite na okolju prijazen način.
Servis
Naziv: Inter-Quartz GmbH
Ulica: Valterweg 27A
Mesto: DE-65817 Eppstein
Država: NEMČIJA
E-pošta: support@inter-quartz.de
Telefon: +49 6198 571825

- 83
-
0680 981220
Art.-Nr.: 1-
LD5029
IAN
309652
0800 80847
800 142 315
0800 004449
Dobavitelj
Prosimo, upoštevajte, da naslednji naslov ni naslov servisa.
Najprej se obrnite na naslov servisa (glej zgoraj)
Naziv: digi-tech gmbh
Ulica: Valterweg 27A
Mesto: DE-65817 Eppstein
Država: NEMČIJA
Garancijski list
1. S tem garancijskim listom digi-tech gmbh, Valterweg 27A, Eppstein 65817,
jamčimo, da bo izdelek v garancijskem roku ob normalni in pravilni uporabi
brezhibno deloval in se zavezujemo, da bomo ob izpolnjenih spodaj
navedenih pogojih odpravili morebitne pomanjkljivosti in okvare zaradi napak
v materialu ali izde-lavi oziroma po svoji presoji izdelek zamenjali ali vrnili
kupnino.
2. Garancija je veljavna na ozemlju Republike Slovenije.
3. Garancijski rok za proizvod je 3 leta od datuma izročitve blaga. Datum
izročitve blaga je razviden iz računa.

- 84
-
4. Kupec je dolžan okvaro javiti pooblaščenemu servisu oziroma se informirati o
nadaljnjih postopkih na zgoraj navedeni telefonski številki. Svetujemo vam, da
pred tem natančno preberete navodila o sestavi in uporabi izdelka.
5. Kupec je dolžan pooblaščenemu servisu predložiti garancijski list in račun, kot
potrdilo in dokazilo o nakupu ter dnevu izročitve blaga.
6. V primeru, da proizvod popravlja nepooblaščeni servis ali oseba, kupec ne
more uveljavljati zahtevkov iz te garancije.
7. Vzroki za okvaro oziroma nedelovanje izdelka morajo biti lastnosti stvari same
in ne vzroki, ki so zunaj proizvajalčeve oziroma prodajalčeve sfere. Kupec ne
more uveljavljati zahtevkov iz te garancije, če se ni držal priloženih navodil za
sestavo in uporabo izdelka ali če je izdelek kakorkoli spremenjen ali nepravilno
vzdrževan.
8. Jamčimo servis in rezervne dele še 3 leta po preteku garancijskega roka.
9. Obrabni deli oz. potrošni material so izvzeti iz garancije.
10. Vsi potrebni podatki za uveljavljanje garancije se nahajajo na dveh ločenih
dokumentih (garancijski list, račun).
11. Ta garancija proizvajalca ne izključuje pravic potrošnika, ki izhajajo iz
odgovornosti prodajalca za napake na blagu.
Prodajalec:
Lidl Slovenija d.o.o. k.d., Pod lipami 1, SI-1218 Komenda

- 85 -
Pokyny k obsluze a bezpečnostní pokyny
Obsah
Obsah .......................................................................................................................... - 85 -
Úvod ............................................................................................................................. - 87 -
Použití v souladu s určením ........................................................................................ - 87 -
Rozsah dodávky ......................................................................................................... - 87 -
Technické údaje .......................................................................................................... - 87 -
Důležitá bezpečností upozornění
Důležitá bezpečností upozornění .......................................................................... - 88 -
Důležitá bezpečností upozorněníDůležitá bezpečností upozornění
Bezpečností upozornění pro baterie ........................................................................ - 88 -
Bezpečností upozornění pro uživatele ..................................................................... - 88 -
Optické měření srdečního tepu.................................................................................. - 89 -
Správné umístění měřiče tepové frekvence .............................................................. - 90 -
Důležitá upozornění k ovládání měřiče tepové frekvence ..................................... - 91 -
Rychlé nastavení ................................................................................................... - 91 -
Uvedení měřiče tepové frekvence do provozu ........................................................ - 92 -
Podsvícení .................................................................................................................... - 92 -
Hodinky znázorňují 4 funkce ..................................................................................... - 92 -
Čas (CLOCK / UHR / HORLOGE / OROLOGIO) ............................................... - 93 -
1. Hodiny .............................................................................................................. - 93 -
2. Budík ................................................................................................................. - 93 -
3. Časovač (Countdown) max. 23:59:59 ........................................................ - 94 -
Režim tréninku (WORKOUT / TRAINING / ENTRAIN. /ALLENAM.) ................ - 95 -
1. Doba tréninku ................................................................................................... - 96 -
2. Aktuální/průměrné tempo/pace čas/km .................................................... - 98 -
3. Aktuální/průměrná rychlost km/h ................................................................. - 98 -
4. Vzdálenost ........................................................................................................ - 98 -
5. Tepová frekvence (režim tréninku) ................................................................. - 98 -
6. Spotřeba kalorií / spalování tuků / BMI ................................................... - 101 -
Režim krokoměru (PEDO) ....................................................................................... - 102 -
Režim spánku (SLEEP / SCHLAF / DORMIR / DORMIRE) ................................ - 103 -

- 86 -
1. Spuštění manuálního režimu spánku .......................................................... - 103 -
2. Vypnutí manuálního režimu spánku ............................................................ - 104 -
3. Nastavení automatického režimu spánku .................................................. - 104 -
Odstranění chyb ...................................................................................................... - 105 -
Uvedení do původního stavu .................................................................................. - 106 -
Varovný ukazatel stavu baterie .............................................................................. - 107 -
Výměna baterie ........................................................................................................ - 107 -
Vodotěsnost .............................................................................................................. - 107 -
Pokyny pro čištění .................................................................................................... - 108 -
Likvidace elektrického přístroje ............................................................................... - 108 -
Likvidace baterií ....................................................................................................... - 108 -
Recyklace .................................................................................................................. - 108 -
Vlnitá lepenka ........................................................................................................... - 108 -
Likvidace odpadu .................................................................................................... - 108 -
Záruka společnosti digi-tech gmbh ........................................................................ - 108 -
Záruční podmínky .................................................................................................... - 109 -
Záruční doba a zákonné nároky vyplývající z vad.............................................. - 109 -
Rozsah záruky .......................................................................................................... - 109 -
Vyřízení záručního případu .................................................................................... - 110 -
Servis ......................................................................................................................... - 111 -
Dodavatel ................................................................................................................. - 111 -

- 87 -
MĚŘIČ TEPOVÉ FREKVENCE
rozsah teploty použití
0 - 50°C
rozměry
Ø 4,8 x 1,4 cm
displej
2,8 x 2,3 cm
hmotnost
45 g
baterie
CR 2032/3V
S OPTICKÝM SENZOREM
Úvod
Blahopřejeme ke koupi vašeho nového měřiče srdečního tepu. Rozhodli jste se k
nákupu vysoce kvalitního přístroje. Návod k obsluze je součástí tohoto měřiče
srdečního tepu. Obsahuje důležité pokyny pro bezpečnost, použití a likvidaci.
Předtím, než začnete měřič používat, seznamte se prosím se všemi pokyny k obsluze
a bezpečnostními pokyny. Měřič používejte jen popsaným způsobem a k
uvedenému účelu použití. Při předání měřiče třetím osobám současně předejte i
všechny podklady. Obal a návod k obsluze, prosím, uschovejte pro případ další
potřeby.
Použití v souladu s určením
Sporttester je určen jen k měření času a k použití popsaných dodatečných funkcí.
Jakékoli jiné použití nebo úprava není v souladu s jeho určením. Výrobce
neodpovídá za škody způsobené užíváním v rozporu s daným určením nebo
nesprávnou obsluhou. Sporttester není určený ke komerčnímu použití.
Rozsah dodávky
Upozornění: Prosím skontrolujte po koupi rozsah dodávky. Skontrolujte, jestli jsou
všechny díly k dispozici a nepoškozené.
1 x Sporttester včetně baterie (CR2032)
1 x Návod k obsluze
Technické údaje
Sporttester

- 88 -
POZOR:
Důležitá bezpečností upozornění
Bezpečností upozornění pro baterie
VAROVÁNÍ!
Uchovávejte baterie mimo dosah dětí. Pokud dojde ke spolknutí baterie, je třeba
ihned vyhledat lékařskou pomoc.
Baterie / akumulátory musí být vždy vloženy podle správné polarity. V případě
potřeby předem vyčistěte kontakty baterie i přístroje. Nepokoušejte se o dobíjení
baterií, jejich zkratování nebo otvírání. Nikdy nevhazujte baterie do ohně, neboť
hrozí nebezpečí výbuchu. Nesprávné použítí baterie může způsobit výbuch a
vytečení baterie.
V případě vytečení baterie zabraňte kontaktu s kůží, očima a sliznicemi. Používejte
ochranné rukavice. V případě kontaktu s kyselinou baterie opláchněte postižené
místo čistou vodou a okamžitě vyhledejte lékaře.
Okamžitě vyjměte vybité baterie z přístroje, je zde zvýšené riziko vytečení.
Bezpečností upozornění pro uživatele
lékařem. Může s Vámi prokonzultovat vhodný trénink,
jeho intenzitu a zadaný tep. Tento měřič tepové frekvence
není lékařský přístroj a slouží pouze k tréninkovým účelům.
ZDRAVOTNÍ NEBEZPEČÍ!
NEBEZPEČÍ VÝBUCHU!
Před zahájením tréninku se poraďte se svým
VAROVÁNÍ! NEBEZPEČÍ ZRANĚNÍ!

- 89 -
Toto zařízení může být používáno i osobami se sníženými fyzickými, smyslovými
nebo duševními schopnostmi nebo bez patřičných zkušeností a znalostí (včetně dětí
starších než 8 let), pokud jsou pod dohledem nebo pokud byly poučeny o
bezpečném používání přístroje a jsou schopny pochopit z toho plynoucí rizika.
Nedovolte dětem hrát si se spotřebičem. Čištění a uživatelskou údržbu nesmí
provádět děti bez dozoru. Obaly uchovávejte mimo dosah dětí. Hrozí nebezpečí
udušení.
Optické měření srdečního tepu
Váš měřič tepové frekvence využívá při měření Vaší tepové frekvence optického
senzoru na zápěstí. Tato metoda nevyžaduje užívání hrudního pásu.
Srdeční rytmus
Srdeční rytmus je u každého člověka jiný a může být rozdílný i u jednotlivých paží
jednoho člověka. Srdeční rytmus některých lidí není optimální pro měření optickým
senzorem.
Venkovní vlivy
Příliš nízká venkovní teplota může omezit proudění krve v předloktí a tím zmenšit
přesnost měření.
Barva pleti
Reflexní stupeň pleti je závislý na její barvě. Zásadně funguje optické měření tím líp,
čím méně světla pokožka vstřebá. Silně pigmentovaná pleť, jizvy nebo tetování
mohou omezit přesnost měření.
Udržujte Vaši pokožku suchou a čistou
Zlepšete komfort nošení a zamezte škodám na hodinkách tím, že Vaši pokožku
udržujete suchou a čistou. To je důležité především při tréninku nebo při kontaktu s
kapalinami, potem, mýdlem, krémem na opalování, pleťovým mlékem a jinými
tekutinami, které mohou omezit přesnost měření.
Držení těla
Nevhodné držení těla (např. silně ohnutá zápěstí), může omezit proudění krve a
přesnost měření.

- 90 -
Správné umístění měřiče tepové frekvence
Upevněte měřič tepové frekvence na zápěstí. Správné umístění je důležité pro
přesné měření.
Pro měření tepu musí být měřič tepové frekvence nošen těsně kolem zápěstí. Musí
být umístěn ukazatelem nahoru zhruba o jeden prst dál za zápěstní kůstkou. Snímač
se musí dotýkat kůže. Měřič tepové frekvence ale nesmí být nošen tak těsně, aby
zamezoval proudění krve. Pokud netrénujete, měli byste měřič tepové frekvence
nosit volněji – podobně jako normální náramkové hodinky. Měřič tepové frekvence
přitáhněte při tréninku trochu těsněji, abyste maximalizovali přesnost měření.
Při mnoha cvicích, např. jízda na kole nebo vzpírání jsou zápěstí ohnuta. To může
narušit měření, pokud je měřič tepové frekvence nošen příliš blízko zápěstí. Pro lepší
výsledek měření noste měřič tepové frekvence již pár minut před začátkem tréninku.
Pokud jsou Vaše ruce a pokožka citlivé na chlad, ohřejte pokožku pod snímačem.
Než začnete s tréninkem, zahřejte se.
Dbejte na to, aby Váš měřič tepové frekvence měl kontakt s pokožkou.
Nenoste měřič tepové frekvence moc těsně, aby neomezoval proudění krve a
přesnost měření.
Měřič tepové frekvence by měl být při tréninku nošen těsněji.

- 91 -
Při velmi intenzivním tréninku nebo jiných aktivitách, při kterých se Vaše zápěstí
silně a nerytmicky pohybuje, nemusí snímač tep přesně měřit.
Pokud Váš měřič tepové frekvence nezobrazuje Váš tep, uvolněte zápěstí a
setrvejte bez pohybu (cca 10 vteřin). Tep by se měl následně zobrazit.
Důležitá upozornění k ovládání měřiče tepové
frekvence
Stisknutím tlačítka MODE měníte funkční režimy hodinek nebo opouštíte
nastavení.
Stisknutím tlačítka SET volíte Vaše osobní údaje, přičemž se zobrazují postupně
odzadu.
Stisknutím tlačítka LIGHT volíte Vaše osobní údaje, přičemž se zobrazují postupně
dopředu.
Stisknutím tlačítka SEL potvrdíte Vaše zadání a jdete v podfunkci o krok dál.
Rychlé nastavení
Při nastavování číselných hodnot můžete dlouhým stiskem a držením tlačítka SET
nebo LIGHT využít rychlého nastavení.

- 92 -
Uvedení měřiče tepové frekvence do provozu
Odstraňte ochrannou fólii z displeje a stiskněte LIGHT, MODE, SEL nebo SET. Zazní
zvukový signál. Váš měřič tepové frekvence zobrazuje počáteční
ukazatel. Nastavte Vaše osobní údaje. Stiskněte a držte 3 vteřiny
tlačítko SET. Na displeji se zobrazí jazyk nastavení. Krátkým
stisknutím tlačítka SET/LIGHT můžete volit mezi angličtinou,
italštinou, francouzštinou a němčinou. Volbu potvrďte tlačítkem SEL.
Zobrazí se vteřiny. Stisknutím tlačítka SET/LIGHT je můžete nastavit na 00. Potvrďte
stisknutím tlačítka SEL. Zobrazí se minuty. Stisknutím tlačítka SET/LIGHT nastavte
minuty a potvrďte stisknutím tlačítka SEL. Stejným způsobem nastavte hodiny, rok,
měsíc, den, ukazatel data, 12/24 hodin, měřící jednotku, rok narození, pohlaví,
velikost, hmotnost těla, tón tlačítek, hodinový signál a kontrast.
Režim nastavení ukončete stisknutím tlačítka MODE.
Podsvícení
Stiskněte krátce tlačítko LIGHT, abyste dočasně aktivovali podsvícení.
Hodinky znázorňují 4 funkce
Stisknutím tlačítka MODE měníte funkční režimy hodinek.
Pořadí funkcí je následující:
Dále jsou ve funkčních režimech obsaženy různé podfunkce.
K podfunkcím vždy přejdete stisknutím tlačítka SEL.

- 93 -
Čas (CLOCK / UHR / HORLOGE / OROLOGIO)
Den v týdnu
Datum
Čas
Opakovaným stisknutím tlačítka MODE vyberte funkci CLOCK / UHR /
HORLOGE / OROLOGIO.
Stisknutím tlačítka SEL vyvoláte podfunkce režimu času.
1. HODINY
2. BUDÍK
3. ČASOVAČ
1. 2. 3.
1. Hodiny
V horní části displeje se zobrazí den v týdnu a datum, aktuální čas ve spodní části.
Nastavení času proveďte podle popisu v části návodu Uvedení do provozu.
2. Budík
Pro zapnutí nebo vypnutí budíku stiskněte v režimu ALARM tlačítko SET.
Pro nastavení času buzení stiskněte a držte 3 vteřiny tlačítko SET. Blikají minuty.
Stiskněte tlačítko SET/LIGHT a potvrďte stisknutím tlačítka SEL. Blikají hodiny.
Hodiny nastavte stejným způsobem.
Režim nastavení opustíte stisknutím tlačítka MODE.
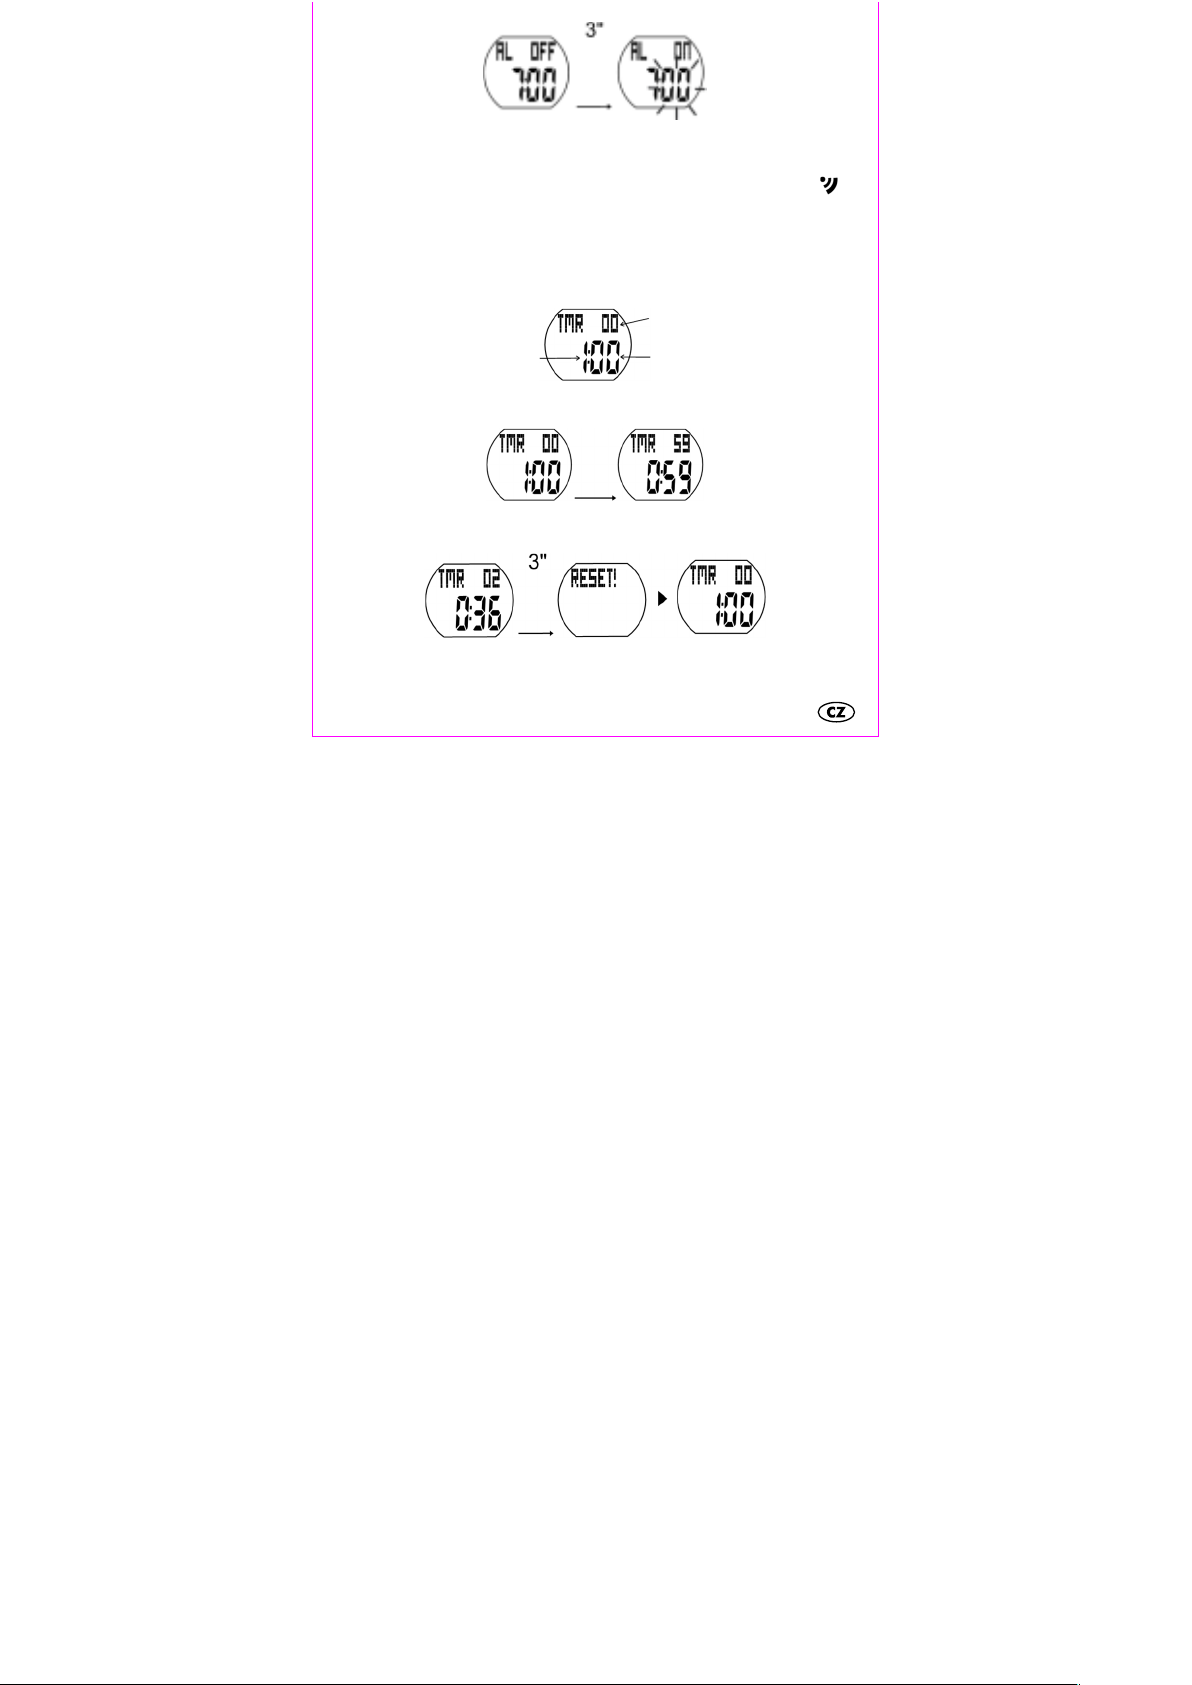
- 94 -
Hodiny
Vteřiny
Minuty
Zapnutí nebo vypnutí budíku a funkce opakovaného buzení
Pro vypnutí buzení stiskněte při zaznění budíku libovolné tlačítko. Pokud buzení
nevypnete do 30 vteřin, aktivuje se funkce opakovaného buzení. Bliká symbol a
budík se rozezní opět po 5 minutách. Tento jev se opakuje 3 krát. Po 24 hodinách
se budík opět spustí.
3. Časovač (Countdown) max. 23:59:59
Na displeji se zobrazí přednastavený čas 1:00 hodina.
Pro spuštění a vypnutí časovače stiskněte v režimu TIMER tlačítko SET.
Pro vynulování časovače stiskněte a držte 3 vteřiny tlačítko SET.
Pro nastavení časovače na požadovanou dobu opět stiskněte a 3 vteřiny držte
tlačítko SET. Blikají hodiny. Pro nastavení stiskněte SET/LIGHT a potvrďte stisknutí

- 95 -
tlačítka SEL. Blikají minuty. Stejným způsobem nastavte minuty a vteřiny. Potvrďte
tlačítkem MODE.
Stisknutím libovolného tlačítka můžete alarm časovače vypnout. Pokud žádné
tlačítko nestisknete, vypne se automaticky po 30 vteřinách.
Režim tréninku (WORKOUT / TRAINING /
ENTRAIN. /ALLENAM.)
Opakovaným stisknutím tlačítka MODE zvolte režim WORKOUT / TRAINING /
ENTRAIN / ALLENAM.
Stisknutím tlačítka SEL vyvolejte podfunkce režimu WORKOUT.
1. DOBA TRÉNINKU
2. AKTUÁLNÍ/PRŮMĚRNÉ TEMPO/PACE
3. AKTUÁLNÍ/PRŮMĚRNÁ RYCHLOST
4. VZDÁLENOST
5. TEPOVÁ FREKVENCE
6. SPOTŘEBA KALORIÍ/SPALOVÁNÍ TUKŮ/BMI

- 96 -
1. Doba tréninku
Pro spuštění měření tepové frekvence stiskněte tlačítko SET. Symbol srdce bliká.
POZOR: Všechny výše popsané podfunkce fungují pouze když je spuštěna doba
tréninku.
Pro zastavení měření tepové frekvence stiskněte tlačítko SET. Symbol srdce se
zobrazí trvale.
Upozornění: Pokud je doba tréninku vypnuta, přepne se měřič tepové frekvence
automaticky po cca 5 minutách na údaj času.
Pro vymazání doby tréninku stiskněte a držte 3 vteřiny tlačítko SET.
Upozornění: Vymazáním doby tréninku se vymažou i veškeré údaje podfunkcí.
Rozmezí cílového pulzu
V cílové zóně
Nad cílovou zónou
Pod cílovou zónou
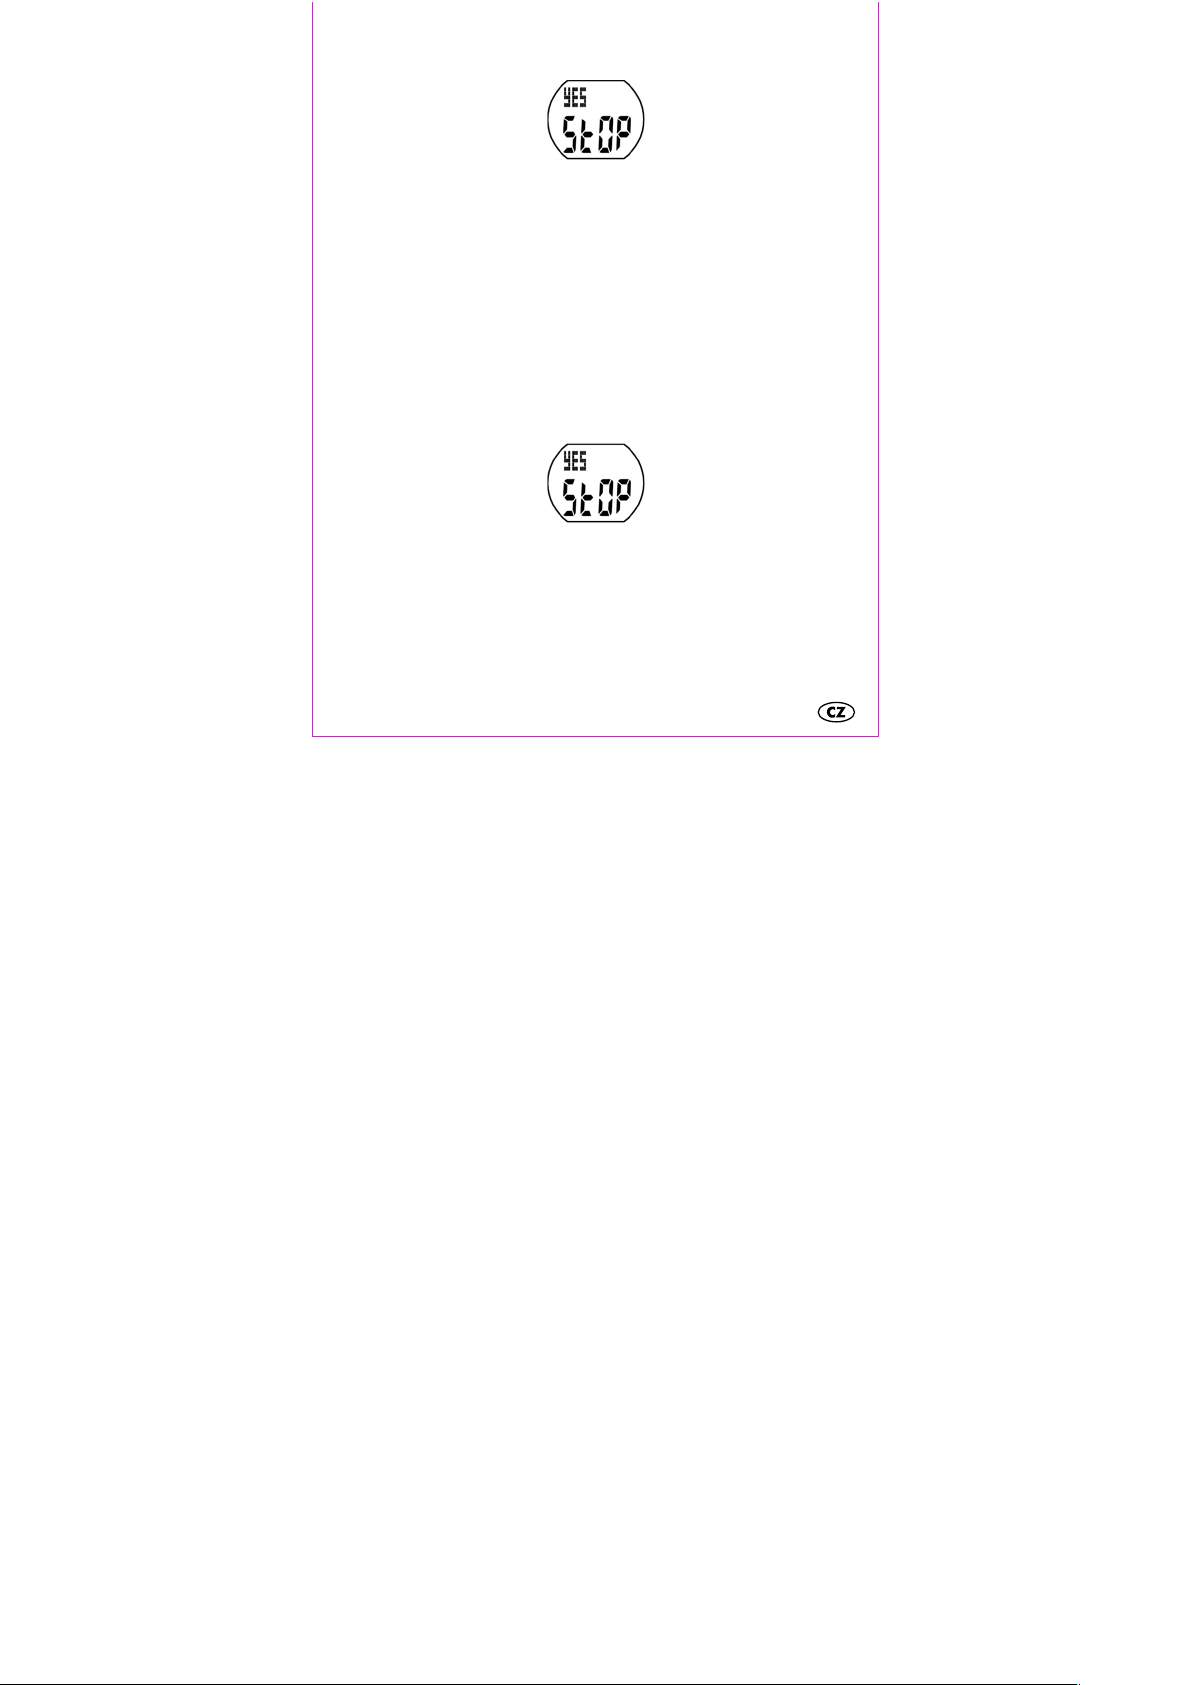
- 97 -
Automatické vypnutí doby tréninku (v režimu tréninku)
Po 2,5 hodinách chodu se na displeji zobrazí:
Pro výběr mezi ano YES/JA/OUI/SI nebo ne NO/NEIN/NON/NO stiskněte
tlačítko SET/LIGHT. Stisknutím tlačítka SEL potvrďte.
Při YES/JA/OUI/SI se měření tepové frekvence ukončí.
Při NO/NEIN/NON/NO bude měření tepové frekvence pokračovat.
Pokud během následujících 30 minut nestisknete žádné tlačítko (po 3 hodinách
celkového času cvičení), vypne se měření automaticky.
Pozor: Po 5,5 hodinách se toto oznámení objeví znovu.
Automatické vypnutí doby tréninku (v jiném režimu)
Pokud po spuštění doby tréninku přejdete do jiného režimu, objeví se na displeji po
4 minutách:
Pro výběr mezi ano YES/JA/OUI/SI nebo ne NO/NEIN/NON/NO stiskněte
tlačítko SET/LIGHT.
Stisknutím tlačítka SEL potvrďte.
Při YES/JA/OUI/SI se měření tepové frekvence ukončí.
Při NO/NEIN/NON/NO bude měření tepové frekvence pokračovat.
Pokud během 1 minuty nestisknete žádné tlačítko, vypne se měření automaticky.

- 98 -
2. Aktuální/průměrné tempo/pace čas/km
Tlačítkem SEL vyberte aktuální/průměrné tempo/pace, aby se zobrazilo v horní
části displeje. Ve spodní části vidíte aktuální tepovou frekvenci. Pro výběr mezi
aktuálním a průměrným tempem stiskněte tlačítko SET.
3. Aktuální/průměrná rychlost km/h
Tlačítkem SEL vyberte aktuální/průměrnou rychlost, aby se zobrazila v horní části
displeje. Ve spodní části vidíte aktuální tepovou frekvenci. Pro výběr mezi aktuální a
průměrnou rychlostí stiskněte tlačítko SET.
4. Vzdálenost
Tlačítkem SEL vyberte vzdálenost, aby se zobrazila v horní části displeje. Ve spodní
části vidíte aktuální tepovou frekvenci.
5. Tepová frekvence (režim tréninku)
Tlačítkem SEL vyberte tepovou frekvenci, stisknutím tlačítka SET přejdete do
podfunkcí.
A. PRŮMĚRNÁ TEPOVÁ FREKVENCE
B. MAXIMÁLNÍ TEPOVÁ FREKVENCE
C. MINIMALNÍ TEPOVÁ FREKVENCE
D. MHR %*
 Loading...