

Page 1
IAN
103142
Heart
R
ate Monitor
10/2014 ·
Art.-Nr.:
1-LD3875
Návod na použitie a bezpečnostné
pokyny
-
-
-
-
Heart Rate Monitor
Usage and safety instructions
Hodinky na meranie
srdcovej frekvencie
Sporttester
Pokyny k obsluze a bezpečnostní
pokyny
Herzfrequenz-Messuhr
Bedienungs- und Sicherheitshinweise
Usage and safety instructions ........................................................................ - 1
Pokyny k obsluze a bezpečnostní pokyny ................................................ - 22
Návod na použitie a bezpečnostné pokyny ................................................. - 44
Bedienungs- und Sicherheitshinweise ................................. - 66
Page 2
- 1 -
Usage and safety instructions
- 2 -
Table of contents
Table of contents......................................................................................................... - 1 -
Introduction ................................................................................................................. - 3 -
Intended use ................................................................................................................ - 3 -
Scope of delivery ....................................................................................................... - 3 -
Technical specifications ............................................................................................. - 4 -
Important safety information
Important safety information .................................................................................. - 4 -
Important safety informationImportant safety information
Batteries ............................................................................................................... - 4 -
Heart rate monitor should not be in the hands of children ............................. - 5 -
Chest belt ..................................................................................................................... - 5 -
Bicycle holder ............................................................................................................. - 7 -
Light .............................................................................................................................. - 7 -
Important Information regarding the use of the Heart rate monitor watch. .......... - 8 -
Quick setting ....................................................................................................... - 8 -
Setting up the heart rate monitor watch ................................................................... - 8 -
Calibration .......................................................................................................... - 9 -
The watch has 7 modes of operation ............................................................ - 10 -
Time (ZEIt/TIME) ..................................................................................................... - 10 -
Time setting ....................................................................................................... - 11 -
Alarm (ALARM) ....................................................................................................... - 11 -
Stopwatch (St-UHR/CHRONO) ........................................................................... - 12 -
Timer (TIMER) max. 9:59:00 ................................................................................. - 12 -
Pedometer (PEDO) .................................................................................................. - 13 -
Calibrating the pedometer ............................................................................. - 13 -
Heart rate monitor (PULS/PULSE) ......................................................................... - 14 -
Setting the heart rate target zone................................................................... - 14 -
Activating/deactivating the heart rate alarm ............................................... - 15 -
Resetting the heart rate data ........................................................................... - 15 -
Memory mode (SPEICH/MEMORY).................................................................... - 16 -
Total memory (14 days) ................................................................................. - 16 -
BMI (Body Mass Index) .................................................................................. - 16 -
Troubleshooting ....................................................................................................... - 16 -
Reset .......................................................................................................................... - 17 -
Replacing the watch battery ................................................................................... - 17 -
Battery low indicator ............................................................................................... - 18 -
Water resistance ...................................................................................................... - 18 -
Water resistance of the chest belt .......................................................................... - 18 -
Cleaning instructions ............................................................................................... - 18 -
Disposal of the electronic appliance ..................................................................... - 19 -
Disposal of the batteries.......................................................................................... - 19 -
Declaration of conformity ....................................................................................... - 19 -
digi-tech gmbh warranty ........................................................................................ - 19 -
Warranty conditions ............................................................................................... - 19 -
Warranty period and defects liability ................................................................... - 20 -
Scope of the warranty............................................................................................. - 20 -
Warranty claim procedure ..................................................................................... - 20 -
Service ...................................................................................................................... - 21 -
Supplier .................................................................................................................... - 21 -
Page 3

- 3 -
Heart Rate Monitor
- 4 -
Operating temperature
0-
50°C
Dimensions
4,4 x 5,2 x 1,5 cm
Display
2,5 x 2,5 cm
Weight
47g
Battery
CR 2032/3V
Operating temperature
0-
50°C
Dimensions
7 x 3,4 x 1,2 cm
Frequency
5,3 kHz
Weight
53g
Battery
CR 2032/3V
ATTENTION:
Introduction
Congratulations on the purchase of your new heart rate monitor. You have chosen
a high quality product. The instruction manual is part of the product- it contains
important information about safety, use and disposal. Read the manual with all
usage and safety notes before using the watch. Only use the watch in the intended
way and for the intended applications.
If the watch is given to someone else, include all documentation with the heart rate
watch with chest belt.
Intended use
This heart rate monitor is intended for time display and the described additional
features. Any other use or modification of the heart rate monitor does not comply
with the intended uses. The manufacturer is not liable for damages caused by
improper use or misuse. The device is not intended for commercial use.
Scope of delivery
Please note: Check the scope of delivery after purchase. Please ensure that all
parts are included and undamaged.
• Heart rate monitor incl. battery (CR2032)
• Chest belt incl. battery (CR2032)
• Bicycle holder
• Instruction manual
Technical specifications
Heart rate monitor
Chest belt
Important safety information
Consult your doctor before you begin any
training program. Your doctor can help you choose the
proper training intensity and heart rate guidelines for your
exercises.
Batteries
Keep batteries out of reach of small children. If a battery is swallowed, you must
seek medical attention immediately. Batteries/rechargeable batteries must always
be inserted in the correct polarity. If necessary, clean the battery and device
contacts. Never attempt to recharge non-rechargeable batteries. Never shortcircuit or attempt to open batteries. Never throw batteries into fire as they may
explode.
This heart rate wrist watch is not a medical device and should
only be used as a guide for your training.
Page 4
- 5 -
If the device will not be used for an extended time period, remove the battery and
battery CR2032
- 6 -
contact area
store the device in a dry and dust-free area. Improper use of the battery can lead
to explosion or leakage.
If the battery leaks, avoid contact with skin, eyes and mucous membranes. Use
gloves. If you are exposed to battery acid, rinse the affected areas with plenty of
clean water and immediately seek medical attention. Remove discha-rged
batteries from the device as they present an increased risk of leakage.
Heart rate monitor should not be in the hands of children
This device may be used by persons (including children over 8 years of age) with
reduced physical, sensory or mental abilities or lack of experience and
knowledge, if they are supervised or instructed regarding the safe use of the
device and understand the dangers that may arise. Children may not play with the
device. Cleaning and user maintenance of the device may not be performed by
children without supervision. Keep packaging films out of the hands of children.
There is a danger of suffocation.
Chest belt
ATTENTION: Pacemaker patients should consult their physicians before
using the chest belt.
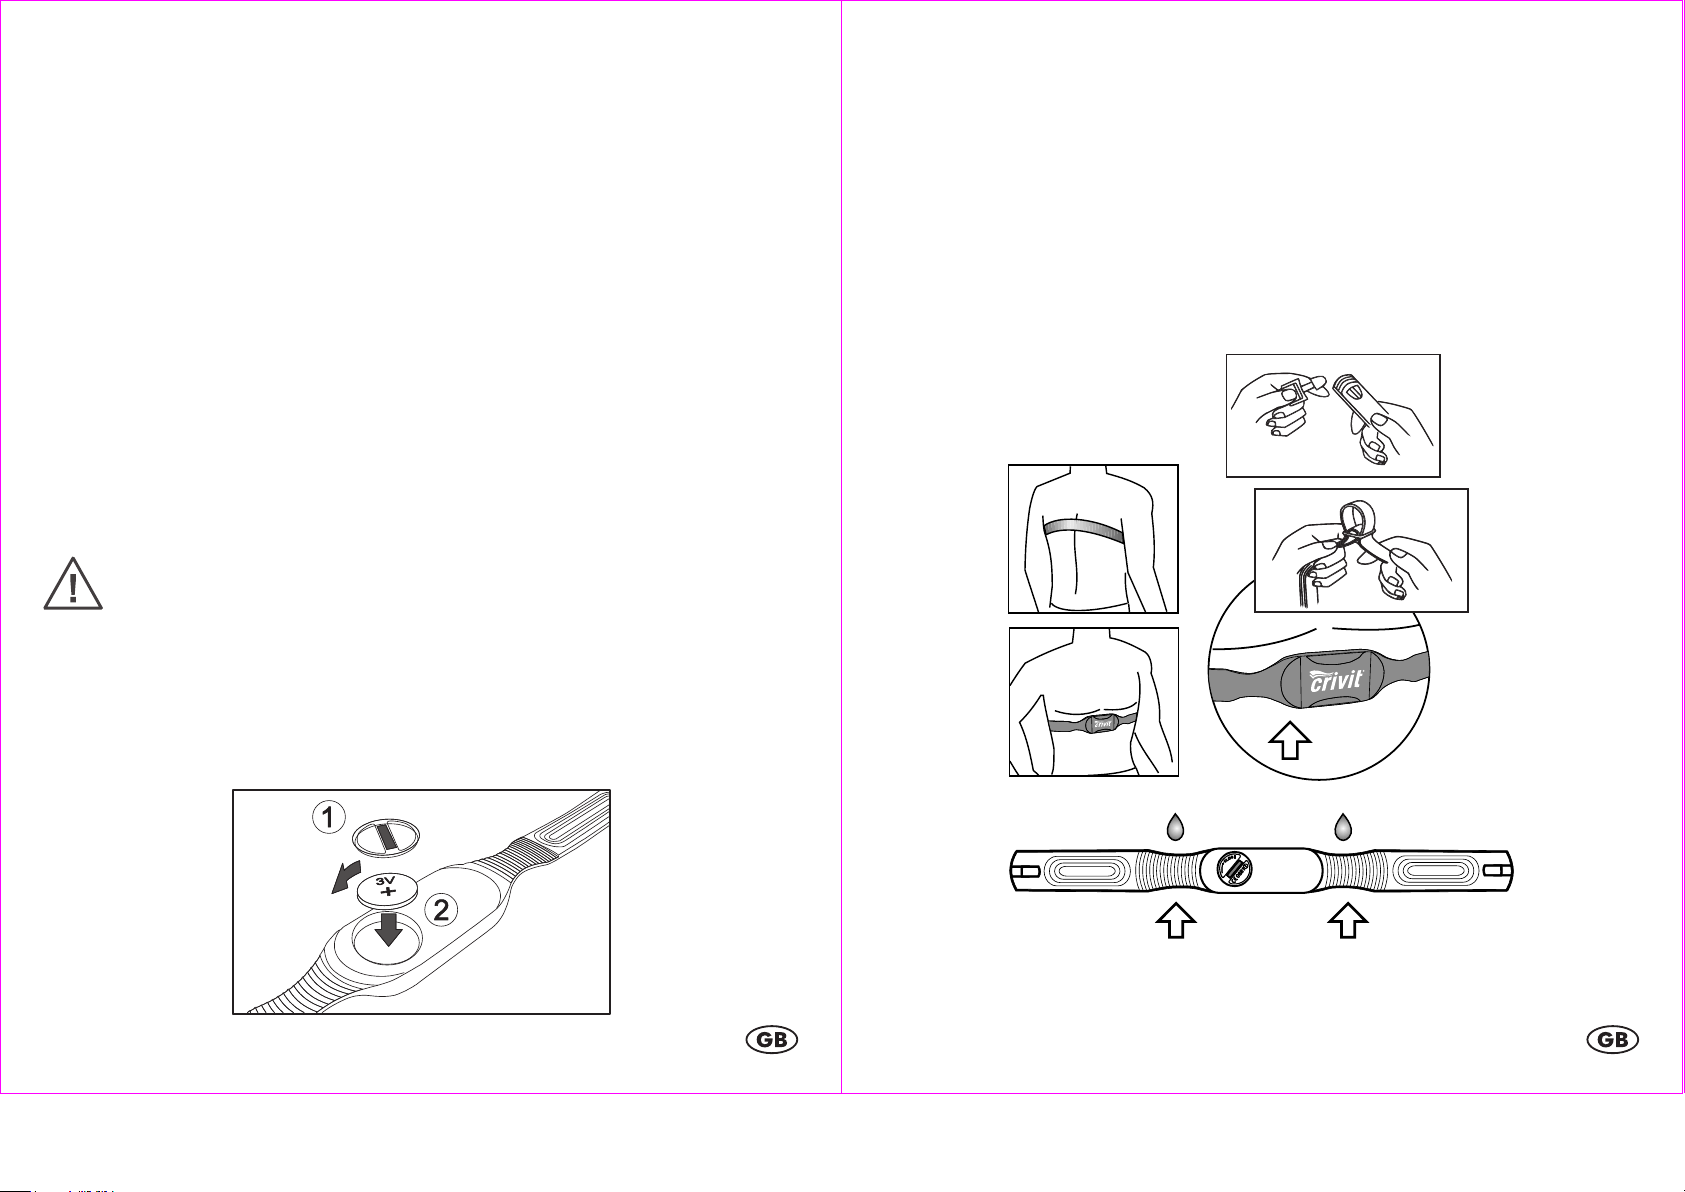
Inserting the batteries into the chest belt
Use a coin to unscrew the battery cover on the back side of the chest belt and
insert the 3V battery with the (+) sign facing up. Screw the battery compartment
cover back into the case.
Wearing the chest belt
Adjust the chest belt so that it fits snugly directly below the chest muscles. Moisten
the contact areas with water or ECG gel (ECG gel can be purchased at a
pharmacy). Ensure that the contact areas constantly remain in skin contact.
Position the chest belt as per the following illustration.
Please ensure that the chest belt is seated properly. When you have exhaled
completely the chest belt should still have very slight tension pressing it to your
chest.
High voltage power lines, Trains or moving vehicular traffic may interfere with the
heart rate measurement. Please consider this when planning your exercise route.
Page 5

- 7 -
Bicycle holder
- 8 -
Using the bicycle holder
The included bicycle holder can be used to attach the heart rate monitor to the
handlebar of a bicycle. Press the bicycle holder onto the top of the handlebar.
Handlebars with an especially large diameter may require the use of additional
force to snap on the bicycle holder. The heart rate monitor can now be attached to
the bicycle holder in the same way that you would attach it to your wrist.
The maximum range of 60cm between the heart rate monitor and the chest belt
should not be exceeded.
Please note that the pedometer features of the heart rate monitor (distance, speed
etc.) will not be functional while the watch is mounted on the bicycle holder.
Important Information regarding the use of the Heart
rate monitor watch.
Press MODE to select or exit the modes of the watch. Press SEL to enter your
personal data and press SET to confirm the setting.
Press MODE to proceed within the menu.
Quick setting
Press and hold SEL when setting numerical values to use the quick setting feature.
Light
Briefly press LIGHT to temporarily activate the light.
Setting up the heart rate monitor watch
Remove the protective film from the display of the watch and press MODE, SEL or
SET. The watch will now guide you through the initial settings menu.
Press SEL to select the English or German language (DEU/ENG) and confirm your
setting by pressing SET. Select the unit (EINH/UNIT) of measurement KM or miles
in the same way. Enter your year of birth (GEB/BIRtH). Press SEL to set the value
and press SET to confirm the setting. Set the month and the day of your birth in the
same way. Now select 12 or 24-hour time display mode (ZEIt/TIME) by pressing
SEL and confirm your setting by pressing SET. Now set the hours, minutes and
seconds. Set each value by pressing SEL and confirm each setting by pressing SET.
Set the year, month and day in the same way and confirm each setting by pressing
SET. The body weight setting now appears. Set your weight by pressing SEL and
confirm by pressing SET. Set your height in the same way and confirm the setting
Page 6
- 9 -
by pressing SET. The pedometer calibration option appears (KALI/CALI). Press
- 10 -
SEL to select NEIN/NO or JA/YES and confirm your selection by pressing SET.
Notes on calibration:
Please calibrate the watch for walking and running even if you only intend to use
the watch for walking. In this case, perform a fast walk during the calibration for
running. The calibration can also be performed later when using the watch in
pedometer mode.
If the pedometer is not calibrated, it will use the default settings and this may cause
the values shown on the display during training to deviate strongly from the actual
values. During calibration, the watch will record your personal movement profile.
Greater consistency of movement during the recording and longer duration of the
recording will increase the precision of the pedometer during training. The
calibration will allow the watch to automatically detect whether you are running or
walking and adjust the displayed values automatically. The displayed values are
more exact if your movement during training has the same rhythm and speed as
during calibration. Wear the watch on the same wrist during calibration and
during training.
Calibration
Press SEL to start the recording. KALI/CALI and JA/YES will appear on the
display. Press SET to confirm. LAUFEN/RUN will appear on the display. Press SET
to show the distance setting (DST). Press SEL to select the distance and confirm
your setting by pressing SET. Now press SEL to start the calibration. After you are
finished running the calibration distance, press SEL once again. ENDE/DONE or
ERROR will appear on the display. If ERROR appears, the calibration must be
repeated. After successful calibration, perform the calibration for GEHEN/WALK
in the same way as for LAUFEN/RUN.
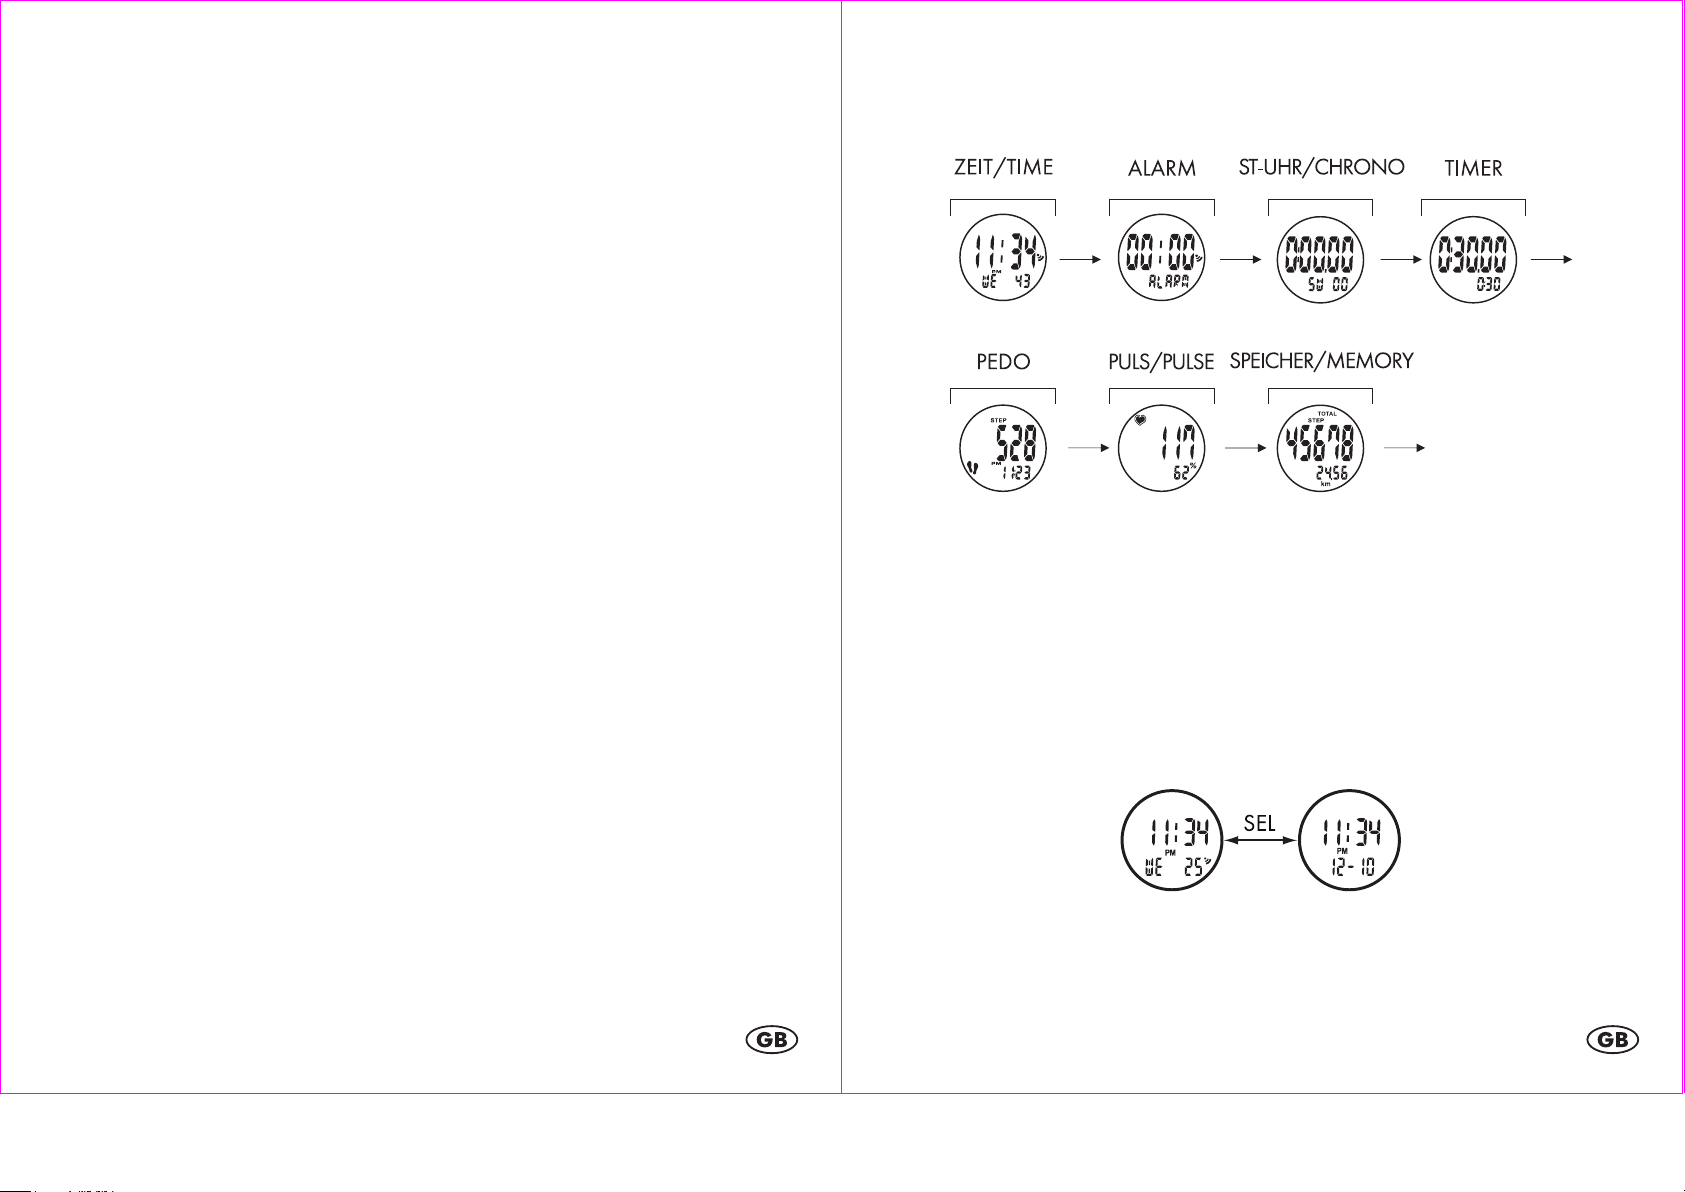
The watch has 7 modes of operation
Press MODE to select the mode of operation of the watch.
The order of the modes is:
Additionally, each mode of operation has several sub-features.
The sub-features can always be reached by pressing SEL.
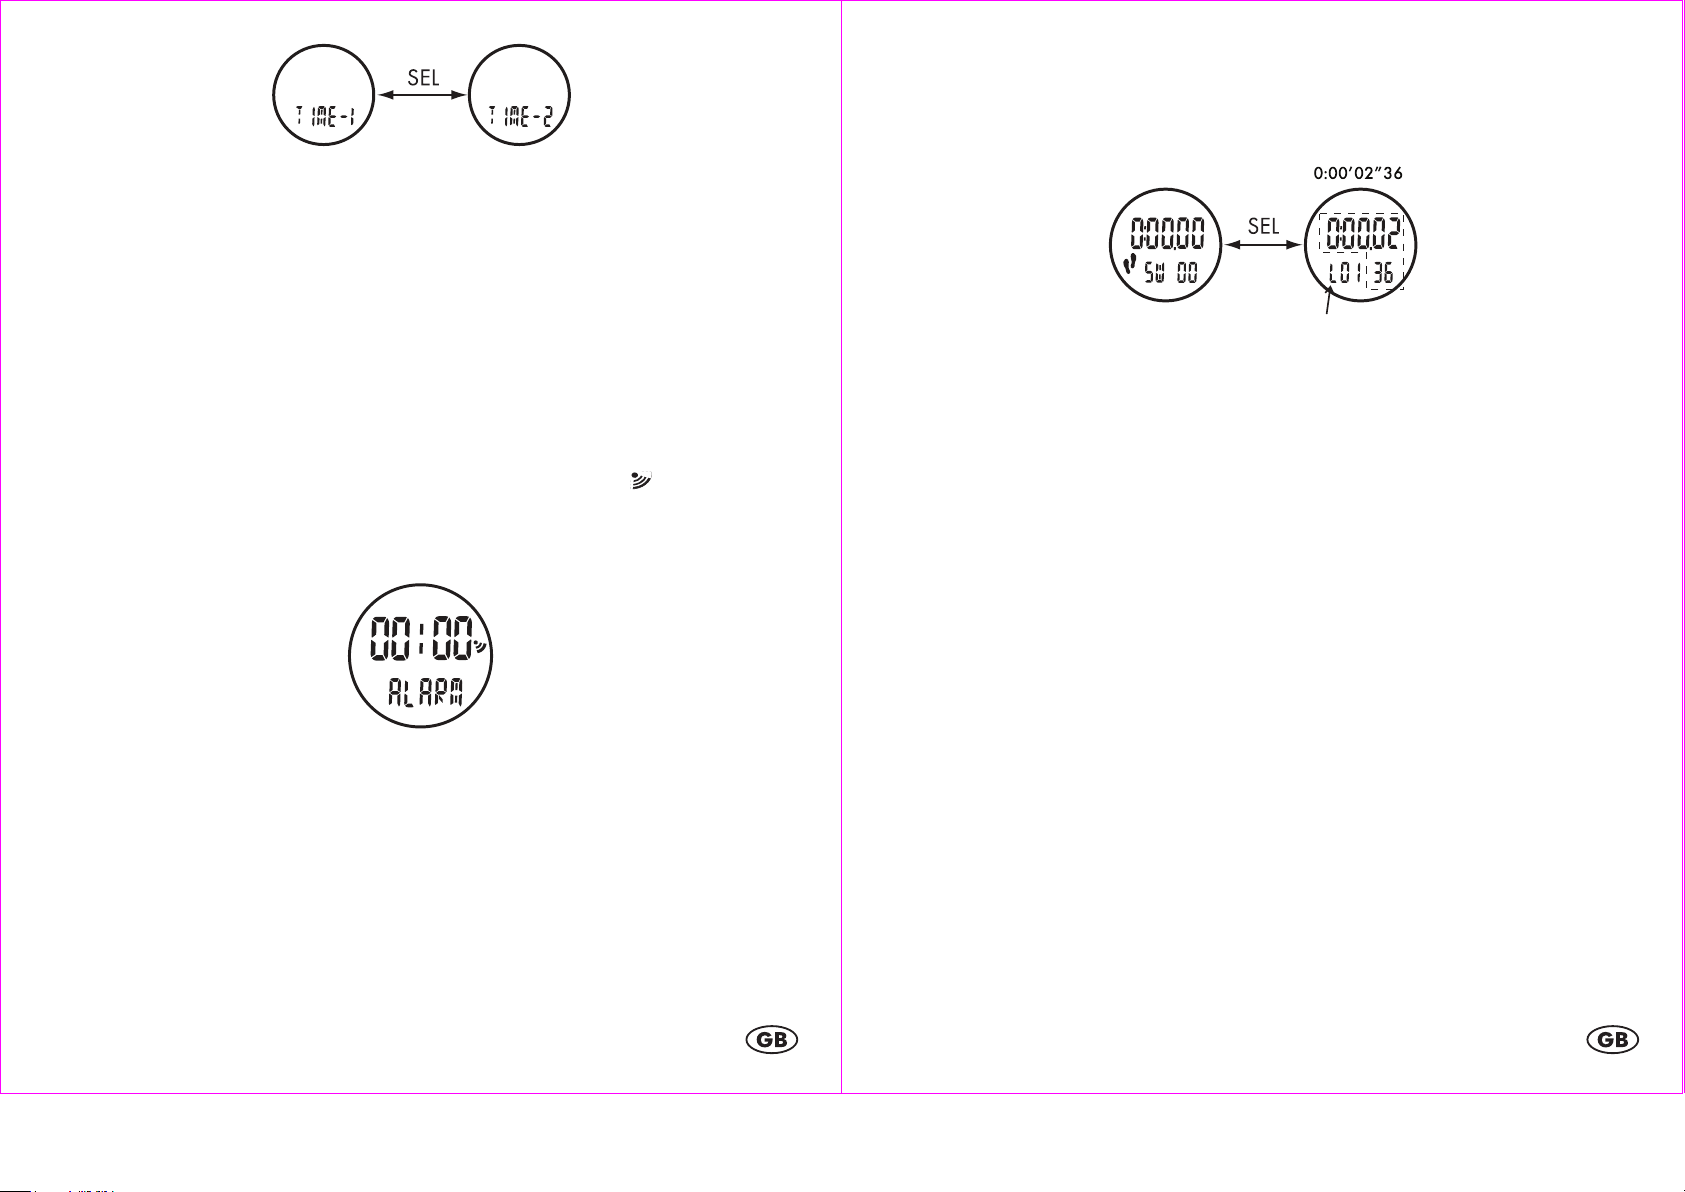
Time (ZEIt/TIME)
Press MODE to select time mode (ZEIt-1/TIME-1). Press SEL to select the subfeatures of the time mode.
Time, day of the week and seconds <-> time and date.
Press and hold SEL to switch to the second time zone (ZEIt 2 / TIME-2).
Page 7
- 11 -
- 12 -
Time setting
Press and hold SET. The 12/24 hour time mode indicator will appear. Select the
preferred mode and confirm your selection by pressing SET. Now set the hours,
minutes and seconds by pressing SEL to set each value and pressing SET to
confirm each setting. Now set the year, month and day in the same way and
confirm the setting with SET. Time zone 1 and time zone 2 may be set in the same
way.
Alarm (ALARM)
Repeatedly press MODE to select alarm mode (ALARM). Press SEL to activate or
deactivate the alarm. If the alarm is activated, the alarm symbol will appear.
Press and hold SET to enter setting mode. The hours of the alarm time will blink on
the display.
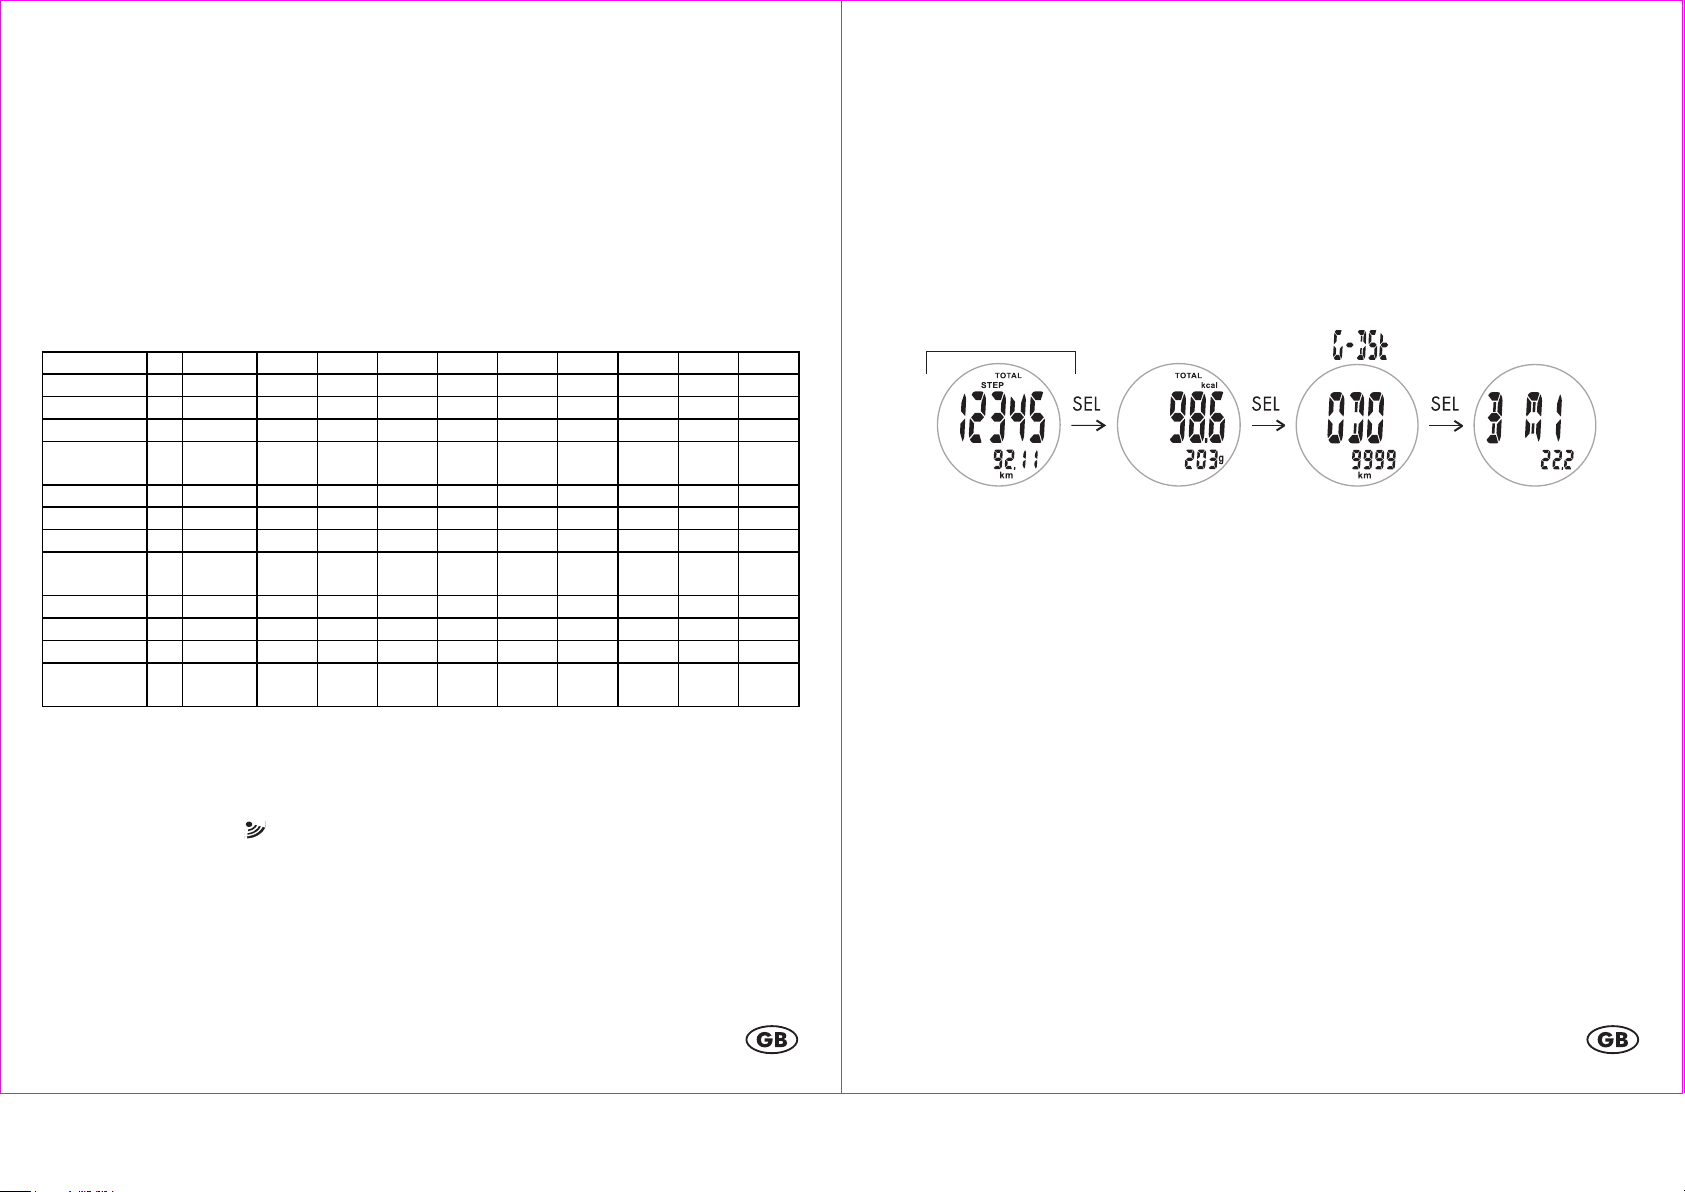
Stopwatch (St-UHR/CHRONO)
Repeatedly press MODE to select the stop watch (ST-UHR/CHRONO).
Press SEL to start or stop the stop watch.
Press SET while the stopwatch is running to record a lap time (L01). Up to 99 lap
times (L99) can be recorded. VOLL/FULL will appear after reaching the maximum
number of lap time recordings.
When the stopwatch is stopped, press SET to activate the memory feature (R) and
display the best lap time (BESte/BEST LAP). Press SEL repeatedly to display the
other lap times. Press SET to return to the stopwatch.
Press and hold SEL to reset the stopwatch.
Note: The memory feature can only be used if at least one lap time has been
recorded.
Press SEL to set the hours and confirm your setting by pressing SET. Set the minutes
in the same way.
Press any button when the alarm sounds to stop the alarm.
If no button is pressed, the alarm will sound for about 60 seconds and restart after
5 minutes.
Timer (TIMER) max. 9:59:00
First, press MODE repeatedly to select timer mode (TIMER). The pre-set time of
0:3000 seconds will appear on the display.
Press and hold SET to set the timer.
The hours of the timer time will appear blinking on the display. Press SEL to set the
hours and press SET to confirm your setting. Set the minutes in the same way. Press
SEL to start or stop the timer. After the set time has elapsed, an alarm will sound for
60 seconds. Press MODE, SEL or SET to stop the alarm.
Page 8

- 13 -
Pedometer (PEDO)
- 14 -
current heart
First, press MODE repeatedly to select pedometer mode (PEDO). STEP will
appear on the display along with the data that has been stored thus far. Press SEL
to switch between the different features.
Steps (STEP) and time > steps (STEP) and training duration (T) > steps (STEP) and
distance (D) > steps (STEP) and speed (S) > Calories (KCAL) and fat burn in gram
(g), steps (STEP) and heart rate (HR).
Press SET to start the pedometer. A symbol showing two feet will appear on the
display. Press SET again to stop the pedometer.
Pedometer reset
Press and hold SET to delete all data.
Calibrating the pedometer
If the pedometer has not been calibrated as described in the chapter “Setting up
the heart rate monitor watch” or if you wish to recalibrate the pedometer, press
and hold SET.
The body weight setting now appears. Set your weight by pressing SEL and
confirm your setting by pressing SET. Now set your height in the same way and
confirm the setting by pressing SET. The calibration option now appears
(KALI/CALI).
Press SEL to start the recording. KALI/CALI and JA/YES will appear on the
display. Press set to confirm. LAUFEN/RUN will appear on the display. Press SET
to show the distance (DST) setting. Press SEL to select the distance and confirm
your setting by pressing SET. Now press SEL to start the calibration. After you are
finished running the calibration distance, press SEL once again. ENDE/DONE or
ERROR will appear on the display. If ERROR appears, the calibration must be
repeated. After successful calibration, perform the calibration for GEHEN/WALK
in the same way as for LAUFEN/RUN.
Heart rate monitor (PULS/PULSE)
Note: The heart rate monitor will only work while using the chest belt. The current
heart rate and the blinking heart symbol will appear on the display.
First, press MODE repeatedly to select pulse mode (PULS/PULSE). Press SEL to
select the different sub-features.
Current heart rate / MHR (%) > current heart rate / time (TIME) > current heart
rate / current speed (km/h) > current heart rate / average heart rate (A) > current
heart rate / maximum heart rate (H) > current heart rate / lowest heart rate (L) >
current heart rate / target zone.
rate
target zone
I
MHR – maximum heart rate
(Percent of the maximum heart rate. Maximum heart rate = 220 - your age in
years)
Setting the heart rate target zone
ATTENTION: Consult your physician before selecting a
target zone. The target zone presets are approximate
guidelines and are not suitable for everyone.
Page 9
- 15 -
Age > 20 25 30 35 40 45 50 55 60 65
Zone 1
130 126 123 120 117 113 110 107 104 100
Leisure
to to to to to to to to to to
50-65 %
100 97 95 92 90 87 85 82 80 77
Zone 2
160 156 152 148 144 140 136 132 128 124
Fitness to to to to to to to to to to
65-80 %
130 126 123 120 117 113 110 107 104 100
Zone 3
190 185 180 175 171 166 161 156 152 147
Sport to to to to to to to to to to
80-95
160 156 152 148 144 140 136 132 128 124
- 16 -
While viewing the current heart rate and target zone sub-feature, press and hold
SET to select a preset target zone or set the user defined target zone (ZN-P/ZNU). The user defined target zone will appear on the display. Repeatedly press SEL
to select the desired target zone: User defined (ZN-P/ZN-U), Leisure (ZN-1),
Fitness (ZN-2), Sport (ZN-3). The following table contains an overview of the
zones 1-3. To set the user defined target zone press set while displaying the user
defined target zone (ZN-P/ZN-U) to enter setting mode. The lower limit will blink
on the display. Set the lower limit by pressing SEL and confirm your setting by
pressing SET. Set the upper limit in the same way.
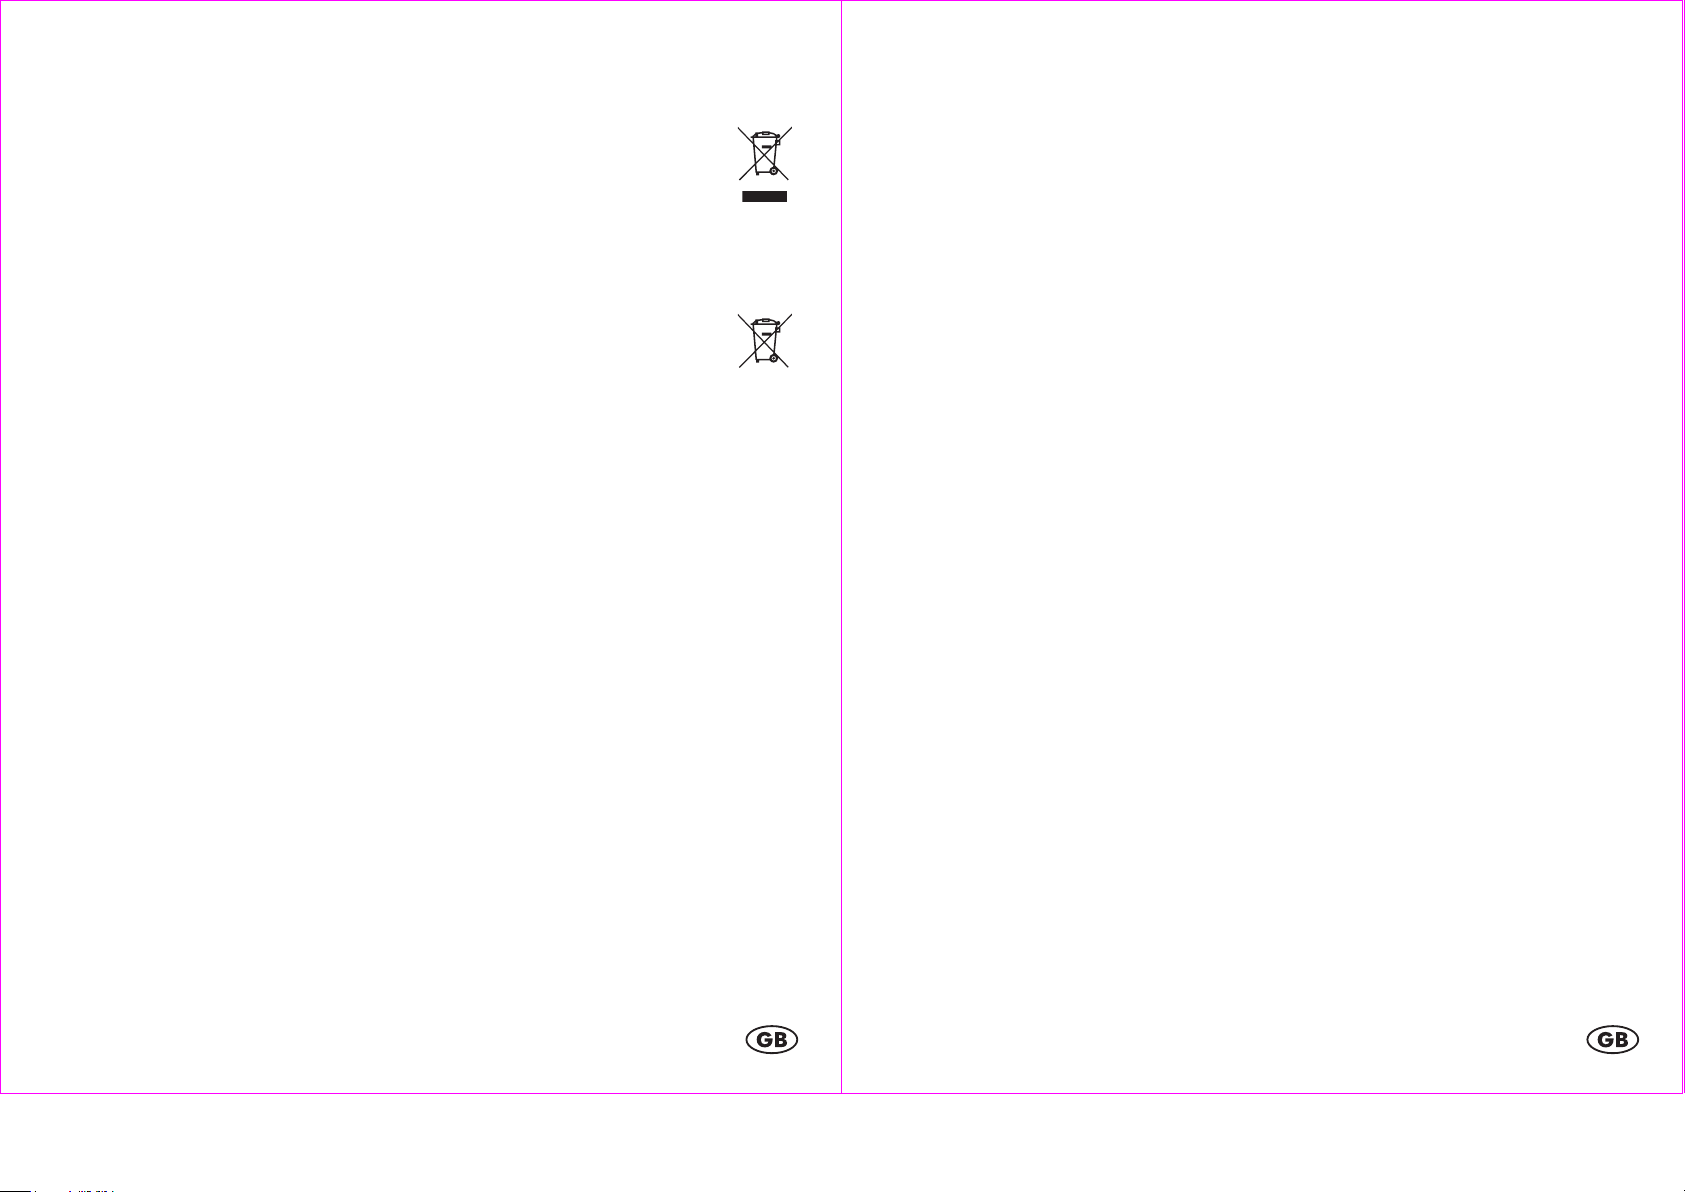
Memory mode (SPEICH/MEMORY)
First, press MODE to select memory mode (SPEICH/MEMORY). The data for the
past 14 days can now be viewed. Press SEL to access the next feature. The data
for steps, distance (km), calories, fat burn (g) and odometer (G-Dst/ODO) is
saved for 14 days.
Total memory (14 days)
The order of the features is: Total Step/Total Distance (Total Step/Total Distance)
> Total Calories/Total Fat Burn (Total Calories/Total Fat Burn) > Odometer (GDst/ODO) > BMI (BMI)
MHR
MHR
MHR
Activating/deactivating the heart rate alarm
Press SET while viewing the current heart rate and target zone sub-feature, press
SET briefly to activate or deactivate the target heart rate alarm. If the alarm is
activated, the symbol will appear on the display.
Resetting the heart rate data
The heart rate data is reset daily at midnight.
Note:
The stored daily values for calories, fat burn, average speed and maximum speed
are reset nightly at 0:00 but are stored in the 14-day memory.
BMI (Body Mass Index)
The BMI is a statistical measurement that can be used to judge a persons weight.
For adults, a value between 18.5 and 25 is considered normal. Values below
18.5 are considered "underweight". Values above 25 are considered
"overweight". Values above 30 are considered "Obese".
The BMI is only a coarse guideline because it does not take a persons body type
and body composition into consideration.
The watch automatically calculates your BMI from the values entered during setup.
Troubleshooting
The distance measurements are very imprecise
The watch uses the step length measured during calibration to estimate the
traveled distance.
Page 10

- 17 -
Recalibrate the step counter. Calibrate it for walking and for running and use extra
- 18 -
care during the calibration.
Running on uneven surfaces may also result in bad calibration.
The heart rate is not shown or is shown incorrectly
Make sure the chest belt is positioned correctly and fits well
Your skin should not be too dry or too cold.
The contact areas can be slightly moistened to improve function
Electromagnetic interference may have an adverse effect on reception
The distance between watch and chest belt must be under 60cm
Other heart rate measuring devices within a 2m range may also cause
interference.
Wireless bicycle computers may cause interference
The batteries may be low and require replacing
The display is unreadable / the light does not work
Replace the batteries
Reset
Press SET and SEL simultaneously to totally reset the watch. All stored data will be
lost. This is the only way to change language and the units of measurement. Set up
the watch as described in the chapter “Setting up the heart rate monitor watch”.
Battery low indicator
If the battery voltage on the chest belt battery drops below the voltage required for
normal operation, (GURT/BELT) and (BATT/LO BAT) will appear on the display.
Replace the battery of the chest belt as described in the chapter "Chest belt".
Water resistance
Water resistant up to 3 bar. The bar value specifies the atmospheric overpressure
which is applied during testing (DIN 8310).
Replacing the watch battery
The battery replacement can be performed by a watch maker in addition to a
water resistance test. To replace the battery yourself, please read the following
instructions first:
Remove the screws (1, 2, 3 and 4) from the back side of the watch with a small
Phillips screwdriver. Remove the caseback and the battery sticker. Use a small, flat
tool to open the latch (5) of the battery holder. Remove the battery and insert a
fresh 3V CR2032 battery with the (+) terminal facing upwards. Ensure that the
gasket (6) is seated correctly. Close the latch of the battery holder. Replace the
battery sticker and the caseback and replace the screws.
Water resistance of the chest belt
Water-resistant according to IEC 60529 IPX7.
Cleaning instructions
Clean the heart rate monitor with a soft, dry and lint-free cloth. A glasses cleaning
cloth is ideal.
After each use, clean the chest belt and the watch strap using lukewarm water,
mild soap solution and a sponge. Please take care not to get the watch wet.
Page 11
- 19 -
Dry all parts with a towel and hang the chest belt to dry. Sweat and contaminants
- 20 -
are detrimental to the function of the sensor.
Disposal of the electronic appliance
This heart rate monitor may not be disposed of with normal household
waste. Dispose of the unit at an approved disposal facility or at your
local recycling centre. Please observe the current rules and regulations when
disposing of the appliance. Contact the disposal system if in doubt.
Disposal of the batteries
Please dispose of your batteries properly in containers especially set up
at retailers. Batteries do not belong in household waste. Dispose of the
batteries at an approved disposal facility or at your local recycling centre. Contact
the disposal system if in doubt.
Declaration of conformity
If used as intended this product conforms to the basic standards of § 3 and the
other relevant provisions of the FTEG (Section 3 of the R&TTE directive).
You can request the declaration of conformity here:
conformity@digi-tech-gmbh.com
digi-tech gmbh warranty
This heart rate monitor includes a 3 year warranty starting on the day of purchase.
In case of defects of this heart rate monitor you have, by law, certain rights
regarding the vendor of the watch. These rights are not changed by the warranty
which is described in the following paragraphs.
Warranty conditions
The warranty duration starts on the date of purchase. Please keep the original
receipt in a safe place. The receipt is needed as a proof of purchase. If a defect
occurs in the heart rate monitor within 3 years, the heart rate monitor will be
repaired or replaced (according to our choice) free of charge. This warranty
requires that, within the 3 year warranty period, the watch and the receipt can be
made available to us along with a short written description of the defect and when
it occured. If the defect is covered by the warranty, you will receive the repaired
heart rate monitor or a new heart rate monitor. Repair or replacement does not
cause the warranty period to restart.
Warranty period and defects liability
The warranty period is not increased by the defect liability. This also applies to
repaired or replaced parts. If defects are noticed at the time of purchase they must
be reported immediately upon unpacking the item. Paid repair may be available
after the end of the warranty period.
Scope of the warranty
The heart rate monitor was manufactured according to strict quality guidelines and
was carefully inspected before delivery. The warranty does not include parts that
experience normal wear and tear and can thus be seen as wear parts or fragile
parts that are damaged. Examples include Switches, Batteries or parts made of
glass.
This warranty becomes void if the heart rate monitor is damaged, is not used in the
recommended way or is improperly repaired.
For proper use of the heart rate monitor all instructions in this manual must be
adhered to exactly. Use of the heart rate monitor in a way that is discouraged in
the manual must be avoided.
The heart rate monitor not intended for commercial use. Abusive or improper use,
excessive force and changes that are made by non-authorized repair centers will
void the warranty.
Warranty claim procedure
To ensure that your call is processed in a fast and efficient manner please note the
following directions:
• Have your receipt (as proof of purchase) and the article number (103142)
handy.
• The article number can be found on the type label, an engraving, the front
page of the manual (bottom left) or a sticker on the back side or bottom side of
the case.
Page 12
- 21 -
• In case defects occur, please first contact the service center (see below) by
IAN 103142
- 22 -
phone or email.
Visit www.lidl-service.com to download this and many other
manuals, product videos and software.
Service
Name: Inter-Quartz GmbH
Street: Valterweg 27A
Town: Eppstein 65817
Country: Germany
Email: support@inter-quartz.de
Telephone: +49 (0)6198 571825
800 142 315
0800 004449
Supplier
Please note that the following address is not a service address.
Please first contact the service address (see above).
Name: digi-tech gmbh
Street: Valterweg 27A
Town: Eppstein 65817
Country: Germany
Pokyny k obsluze a bezpečnostní pokyny
Obsah
Obsah ....................................................................................................................... - 22 -
Úvod ......................................................................................................................... - 24 -
Použití v souladu s určením ..................................................................................... - 24 -
Rozsah dodávky ...................................................................................................... - 24 -
Technické údaje ....................................................................................................... - 25 -
Důležité bezpečnostní upozornění
Důležité bezpečnostní upozornění .................................................................... - 25 -
Důležité bezpečnostní upozorněníDůležité bezpečnostní upozornění
Baterie ............................................................................................................... - 25 -
Měřič srdečního tepu nepatří o rukou dětem................................................ - 26 -
Hrudní pás ................................................................................................................ - 26 -
Držák na kolo .......................................................................................................... - 28 -
Světlo ........................................................................................................................ - 28 -
Důležitá upozornění k ovládání měřiče tepové frekvence .................................. - 29 -
Rychlé nastavení .............................................................................................. - 29 -
Uvedení měřiče tepové frekvence do provozu .................................................... - 29 -
Kalibrace .......................................................................................................... - 30 -
Hodinky znázorňují 7 funkcí .......................................................................... - 31 -
Čas (ZEIt/TIME) ...................................................................................................... - 31 -
Nastavení času ................................................................................................ - 32 -
Budík (ALARM) ........................................................................................................ - 32 -
Stopky (St-UHR/CHRONO) ................................................................................. - 33 -
Časovač (TIMER) max. 9:59:00 ........................................................................... - 33 -
Krokoměr (PEDO) .................................................................................................... - 34 -
Kalibrace krokoměru ....................................................................................... - 34 -
Měřič tepu (PULS/PULSE) ...................................................................................... - 35 -
Nastavení hodnot cílového srdečního tepu .................................................. - 35 -
Aktivace/deaktivace funkce tepového alarmu ............................................ - 36 -
Vynulování tepových hodnot .......................................................................... - 36 -
Funkce paměti (SPEICH/MEMORY) .................................................................... - 37 -
Celkové uložení v paměti/Total memory (14 dnů) ..................................... - 37 -
BMI (Body Mass Index) .................................................................................. - 37 -
Page 13

- 23 -
Odstránění závad ................................................................................................... - 38 -
- 24 -
Uvedení do původního stavu (Reset) ..................................................................... - 38 -
Výměna baterie v hodinkách ................................................................................. - 38 -
Varovný ukazatel stavu baterie ............................................................................ - 39 -
Vodotěsnost .............................................................................................................. - 39 -
Voděodolnost hrudního pásu ................................................................................. - 39 -
Pokyn k čištění .......................................................................................................... - 40 -
Likvidace elektrického přístroje .............................................................................. - 40 -
Likvidace baterií ....................................................................................................... - 40 -
Prohlášení o shodě .................................................................................................. - 40 -
Záruka společnosti digi-tech gmbh ....................................................................... - 40 -
Záruční podmínky .................................................................................................... - 41 -
Záruční doba a zákonné nároky vyplývající z vad ............................................. - 41 -
Rozsah záruky ......................................................................................................... - 41 -
Vyřízení záručního případu .................................................................................... - 41 -
Servis......................................................................................................................... - 43 -
Dodavatel ................................................................................................................. - 43 -
Sporttester
Úvod
Blahopřejeme ke koupi vašeho nového měřiče srdečního tepu. Rozhodli jste se k
nákupu vysoce kvalitního přístroje. Návod k obsluze je součástí tohoto měřiče
srdečního tepu. Obsahuje důležité pokyny pro bezpečnost, použití a likvidaci.
Předtím, než začnete měřič používat, seznamte se prosím se všemi pokyny k
obsluze a bezpečnostními pokyny. Měřič používejte jen popsaným způsobem a k
uvedenému účelu použití.
Při předání měřiče třetím osobám současně předejte i všechny podklady.
Použití v souladu s určením
Měřič srdečního tepu je určen jen k měření času a k použití popsaných
dodatečných funkcí. Jakékoli jiné použití nebo úprava není v souladu s jeho
určením. Výrobce neodpovídá za škody způsobené užíváním v rozporu s daným
určením nebo nesprávnou obsluhou. Měřič srdečního tepu není určený ke
komerčnímu použití.
Rozsah dodávky
Upozornění: Prosím skontrolujte po koupi rozsah dodávky. Skontrolujte, jestli
jsou všechny díly k dispozici a nepoškozené.
• Měřič srdečního tepu včetně baterie (CR2032)
• Náprsní pás včetně baterie (CR2032)
• Držák na kolo
• Návod k obsluze
Page 14
- 25 -
Technické údaje
rozsah teploty použití
0-
50°C
rozměry
4,4 x 5,2
x 1,5 cm
displej
2,5 x
2,5 cm
baterie
CR 2032/3V
rozsah teploty použití
0-
50°C
rozměry
7 x 3,
4 x 1,2 cm
Frekvence
5,3 kHz
hmotnost
53g
baterie
CR 2032/3V
POZOR:
- 26 -
Baterie: CR2032
Měřiče srdečního tepu
hmotnost 47g
Hrudní pás
Nepoužíváte-li přístroj delší dobu, vyjměte baterie a přístroj uložte na suchém a
bezprašném místě. Nesprávné použítí baterie může způsobit výbuch a vytečení
baterie.
V případě vytečení baterie zabraňte kontaktu s kůží, očima a sliznicemi. Používejte
ochranné rukavice. V případě kontaktu s kyselinou baterie opláchněte postižené
místo čistou vodou a okamžitě vyhledejte lékaře.
Okamžitě vyjměte vybité baterie z přístroje, je zde zvýšené riziko vytečení.
Měřič srdečního tepu nepatří o rukou dětem
Toto zařízení může být používáno i osobami se sníženými fyzickými, smyslovými
nebo duševními schopnostmi nebo bez patřičných zkušeností a znalostí (včetně
dětí starších než 8 let), pokud jsou pod dohledem nebo pokud byly poučeny o
bezpečném používání přístroje a jsou schopny pochopit z toho plynoucí rizika.
Nedovolte dětem hrát si se spotřebičem. Čištění a uživatelskou údržbu nesmí
provádět děti bez dozoru. Obaly uchovávejte mimo dosah dětí. Hrozí nebezpečí
udušení.
Důležité bezpečnostní upozornění
Před zahájením tréninku doporučujeme
konzultaci s lékařem. Vysvětlí vám vhodný trénink,
intenzitu tréninku a údaje o tepu. Tento měřič srdečního
tepu není lékařským přístrojem a slouží jen jako podpora
vaší tréninkové koncepce.
Baterie
Uchovávejte baterie mimo dosah dětí. Pokud dojde ke spolknutí baterie, je třeba
ihned vyhledat lékařskou pomoc.
Baterie / akumulátory musí být vždy vloženy podle správné polarity. V případě
potřeby předem vyčistěte kontakty baterie i přístroje. Nepokoušejte se o dobíjení
baterií, jejich zkratování nebo otvírání. Nikdy nevhazujte baterie do ohně, neboť
hrozí nebezpečí výbuchu.
Hrudní pás
POZOR: Pacienti s kardiostimulátorem by měli užívání hrudního pásu
konzultovat se svým lékařem.
Vložení baterie do hrudního pásu
Odšroubujte pomocí mince víčko z
prostoru pro baterií na zadní straně
hrudního pásu a vložte 3V baterií s
(+)plus nahor. Víčko opět pevně
zašroubujte.
Page 15

- 27 -
Nosení hrudního pásu
Kontaktní plochy
- 28 -
Pás si nastavte tak, aby ležel těsně pod hrudními svaly. Navlhčite kontaktní plochy
pásu vodou nebo EKG-gelem (můžete ho mít z lékárny). Přesvědčte se, jestli se
kontakty dotykají pokožky. Umístnite pás tak, jak je to zobrazeno na obrázku.
Dbejte na to, aby hrudní pás správně seděl. Při kompletním vydechnutí by pás měl
ještě lehkým tlakem obepínat hrudník.
Sloupy vysokého napětí, trolejové vedení drah nebo plynulá doprava můžou
ovlivnit nebo rušit měření.
Dbejte na to při výběru tratě.
Držák na kolo
Použití držáku na kolo
Měřič srdečního tepu můžete nosit na zápěstí nebo ho můžete upevnit pomocí
držáku, který je součástí dodávky, na řídítka svého kola.
Přitiskněte držák ze shora na řidítko. U řídítek se zvlášť velkým průměrem je nutno
k upevnění držáku eventuálně vyvinout větší sílu. Nyní můžete měřič upevnit na
držák stejně jako na zápěstí.
Při použití měřiče nepřekračujte maximální přenosovou vzdálenost 60 cm od
náprsního pásu.
Neopomeňte prosím, že funkce krokoměru (vzdálenost, rychlost a pod.) při
montáži na jízdním kole nelze užívat.
Světlo
Krátko stiskněte LIGHT, aby ste aktivovali osvětlení pozadí.
Page 16

- 29 -
Důležitá upozornění k ovládání měřiče tepové
- 30 -
frekvence
Stisknutím tlačítka MODE můžete měnit nebo ukončit funkční módy Vašich
hodinek, stisknutím tlačítka SEL zvolíte Vaše osobní údaje a stisknutím tlačítka SET
potvrdíte Vaše zadání.
Stisknutím tlačítka MODE se v menu pohybujete dále.
Rychlé nastavení
Při nastavování číselných hodnot můžete dlouhým stiskem a držením SEL využít
rychlého nastavení.
Uvedení měřiče tepové frekvence do provozu
Odstraňte ochrannou fólii z displeje a stiskněte MODE, SEL nebo SET.
Budete tak automaticky uvedeni do menu základního nastavení.
Zvolte tlačítkem SEL anglický nebo německý jazyk pro nastavení (DEU/ENG) a
volbu potvrďte tlačítkem SET. Stejným způsobem zvolte jednotky (EINH/UNIT) km
nebo míle. Zadejte rok Vašeho narození (GEB /BIRtH). Pro nastavení stiskněte
tlačítko SEL a potvrďte stisknutím SET. Stejným způsobem nastavte měsíc a den
Vašeho narození. Tlačítkem SEL potom zvolte 12 nebo 24 hodinový formát
(ZEIt/TIME) a potvrďte stisknutím SET. Následuje zadání hodin, minut a sekund,
které pokaždé zadáte tlačítkem SEL a tlačítkem SET potvrdíte. Zadejte stejným
způsobem rok, měsíc a den a potvrďte tlačítkem SET. Objeví se údaj váhy.
Nastavte Vaši tělesnou váhu stisknutím tlačítka SEL a údaj potvrďte tlačítkem SET.
Stejným způsobem zadejte Vaši výšku těla a potvrďte tlačítkem SET. Nyní se
zobrazí údaj ke kalibrování krokoměru (KALI/CALI). Zvolte tlačítkem SEL mezi
NEIN / NO (ne) a JA / YES (ano) a potvrďte tlačítkem SET.
Upozornění ke kalibraci:
Pokud chcete hodinky užívat pouze při chůzi, přesto, prosím, kalibrujte chůzi i
běh. Kalibrujte v tomto případě běh jako "rychlou chůzi". Tuto můžete později
zadat v módu krokoměru (pedometr).
Pokud pedometr nebude kalibrován, bude vycházet se standartních údajů a
zobrazené hodnoty se při tréninku mohou významně odchylovat od skutečných
hodnot. Během kalibrování nahrávají hodinky Váš osobní pohybový profil. Čím
rovnoměrněji se pohybujete a čím delší je doba nahrávání profilu, tím přesnější
budou zobrazené hodnoty pedometru při tréninku. Hodinky díky kalibraci
automaticky poznají, zda jdete nebo běžíte a přizpůsobí podle toho zobrazené
hodnoty.
Zobrazené hodnoty budou přesnější, pokud poběžíte ve stejném rytmu a stejné
rychlosti jako při kalibraci.
Noste hodinky na stejném zápěstí při kalibraci i při tréninku.
Kalibrace
Pro nastavení nahrávání stiskněte tlačítko SEL, zobrazí se KALI/CALI a JA/YES.
Potvrďte tlačítkem SET. Zobrazí se LAUFEN/RUN (běh), stiskněte tlačítko SET,
abyste přešli ke vzdálenosti (DST). Stisknutím tlačítka SEL můžete zvolit vzdálenost,
potvrďte tlačítkem SET. Nyní můžete stisknutím tlačítka SEL kalibraci spustit. Po
ukončení běhu opět zmáčkněte tlačítko SEL. Zobrazí se ENDE/DONE (konec)
nebo ERROR (chyba). Při ERROR je nutno proces opakovat. Po úspěšné kalibraci
spusťte kalibraci GEHEN/WALK (chůze) a postupujte stejně jako u
LAUFEN/RUN.
Page 17

- 31 -
Hodinky znázorňují 7 funkcí
- 32 -
Stisknutím tlačítka MODE měníte funkční módy hodinek.
Pořadí funkcí je následující:
Dále jsou ve funkčních módech obsaženy různé podfunkce.
K podfunkcím vždy přejdete stisknutím tlačítka SEL.
Čas (ZEIt/TIME)
Nejprve zvolte stisknutím tlačítka MODE mód času (ZEIt 1/TIME-1).
Stisknutím tlačítka SEL můžete vyvolat jeho podfunkce.
Čas, den v týdnu a sekundy <-> Čas a datum
Stiskněte a držte tlačítko SEL, abyste přešli do 2. časové zóny (ZEIt 2 / TIME-2).
Nastavení času
Stiskněte a držte tlačítko SET, objeví se 12/24 hodinový formát.
Zvolte mezi 12 a 24 hodinovým formátem tlačítkem SEL a volbu potvrďte tlačítkem
SET. Následuje zadání hodin, minut a sekund, které vždy zadáte tlačítkem SEL a
potvrdíte tlačítkem SET. Pak stejným způsobem zadejte rok, měsíc a den a
potvrďte tlačítkem SET.
Časová zóna 1 a časová zóna 2 se nastavují stejným způsobem.
Budík (ALARM)
Opakovaným stisknutím tlačítka MODE zvolte funkci budíku (ALARM).
Stiskněte tlačítko SEL, abyste budík aktivovali nebo deaktivovali. Při aktivovaném
alarmu se objeví symbol buzení .
Stiskněte a držte tlačítko SET, abyste přešli do módu nastavení. Na displeji blikají
hodiny času buzení.
Pro nastavení stiskněte tlačítko SEL a potvrďte stisknutím tlačítka SET. Stejným
způsobem nastavte minuty.
Pro vypnutí buzení stiskněte při zaznění alarmu jakékoliv tlačítko. Pokud žádné
tlačítko nestisknete, rozezní se na ca. 60 vteřin alarm, který se po 5 minutách
znovu spustí.
Page 18

- 33 -
Stopky (St-UHR/CHRONO)
- 34 -
Opakovaným stisknutím tlačítka MODE zvolte funkci měření času (STUHR/CHRONO).
Stiskem tlačítka SEL stopky spusťte nebo zastavte.
Krokoměr (PEDO)
Opakovaným stisknutím tlačítka MODE nejdříve zvolte funkci krokoměru (PEDO).
Na displeji se zobrazí STEP, můžete odečíst data chůze. Stisknutím tlačítka SEL,
volíte mezi různými funkcemi.
Kroky (STEP) a čas > Kroky (STEP) a doba tréninku (T) > Kroky (STEP) a
vzdálenost (D) > Kroky (STEP) a rychlost (S) > Kalorie (KCAL) a spálené tuky
v gramech (g) > Kroky (STEP) a tep (HR).
Pro odečtení průběžného času stiskněte při měření času (L01) tlačítko SET. Může
být naměřeno až 99 průběžných časů (L99). Po jejich dosažení se na displeji
zobrazí VOLL / FULL.
Stisknutím tlačítka SET při zastaveném měření času se dostanete do funkce paměti
„R“, ve které můžete odečíst nejlepší průběžný čas (BESte / BEST LAP). Pro
odečtení dalších průběžných časů opakovaně zmáčkněte tlačítko SEL. Stisknutím
tlačítka SET se vrátíte zpět k měření času. Stopky vynulujete stisknutím a držením
tlačítka SEL.
Upozornění: Funkci paměti lze vyvolat pouze tehdy, když byl nahrán alespoň
jeden průběžný čas.
Časovač (TIMER) max. 9:59:00
Opakovaným stisknutím tlačítka MODE zvolte funkci časovače (TIMER).
Na displeji se zobrazí přednastavený čas 0:3000 sekundy. Stiskněte a držte
Může být naměřeno až 99 průběžnýchtlačítko SET, abyste časovač nastavili.
Může být naměřeno až 99 průběžných
Na displeji blikají hodiny časovače. Pro jejich nastavení stiskněte tlačítko SEL a
potvrďte tlačítkem SET. Stejným způsobem zadejte minuty. Stiskem SEL časovač
spustíte nebo zastavíte. Po dosažení nastaveného času se na ca. 60 vteřin rozezní
alarm. Pro jeho vypnutí stiskněte tlačítko MODE, SEL nebo SET.
Pro spuštění krokoměru stiskněte tlačítko SET. Na displeji se zobrazí dvě chodidla.
Opětovným stisknutím tlačítka SET krokoměr zastavíte.
Vynulování krokoměru
Pro vymazání všech dat stiskněte a držte tlačítko SET.
Kalibrace krokoměru
Pokud jste krokoměr nekalibrovali tak, jak je popsáno v odstavci “Uvedení měřiče
tepové frekvence do provozu“ nebo pokud chcete krokoměr kalibrovat znovu,
stiskněte a držte tlačítko SET.
Nyní se zobrazí váha. Nastavte Vaši tělesnou váhu stisknutím tlačítka SEL a
potvrďte stisknutím tlačítka SET. Nyní se zobrazí výška těla. Nastavte Vaši tělesnou
výšku stisknutím tlačítka SEL a potvrďte stisknutím tlačítka SET. Nyní se zobrazí
údaj ke kalibrování krokoměru (KALI/CALI). Pro nastavení nahrávání stiskněte
tlačítko SEL, zobrazí se KALI/CALI a JA/YES. Potvrďte tlačítkem SET. Zobrazí se
LAUFEN/RUN (běh), stiskněte tlačítko SET, abyste přešli k vzdálenosti (DST).
Stisknutím tlačítka SEL můžete zvolit vzdálenost, potvrďte tlačítkem SET. Nyní
můžete stisknutím tlačítka SEL kalibraci spustit. Po ukončení běhu opět zmáčkněte
tlačítko SEL. Zobrazí se ENDE/DONE nebo ERROR. Při ERROR je nutno proces
opakovat. Po úspěšné kalibraci spusťte kalibraci GEHEN/WALK (chůze) a
postupujte jako u LAUFEN/RUN.
Page 19

- 35 -
Měřič tepu (PULS/PULSE)
Aktuální tep
I
- 36 -
Věk > 20 25 30 35 40 45 50 55 60 65
Zóna 1
130 126 123 120 117 113 110 107 104 100
Volný čas
to to to to to to to to to to
50-65 %
100 97 95 92 90 87 85 82 80 77
Zóna 2
160 156 152 148 144 140 136 132 128 124
Fitness to to to to to to to to to to
65-80 %
130 126 123 120 117 113 110 107 104 100
Zóna 3
190 185 180 175 171 166 161 156 152 147
Sport to to to to to to to to to to
80-95
160 156 152 148 144 140 136 132 128 124
Upozornění: Měřič tepu funguje pouze při užívání hrudního pásu. Na displeji se
zobrazí aktuální tep a bliká symbol srdce.
Stisknutím tlačítka MODE nejdříve zvolte funkci (PULS/PULSE).
Stisknutím tlačítka SEL můžete vyvolat podfunkce měřiče tepu.
Aktuální tep /maximální srdeční tep (%) > Aktuální tep /čas > Aktuální tep
/aktuální rychlost (km/h) > Aktuální tep /průměrný tep (A) > Aktuální tep
/nejvyšší tep (H) > Aktuální tep /nejnižší tep (L) > Aktuální tep /cílová zóna
Cílová zóna
MHR – maximální srdeční tep
(procento maximálního srdečního tepu. Maximální srdeční tep = 220 – Váš věk)
definovanou cílovou zónu. Zobrazí se uživatelem definovaná cílová zóna (ZNP/ZN-U). Pro zvolení požadované cílové zóny stiskněte opakovaně tlačítko SEL:
uživatelem definovaná cílová zóna (ZN-P/ZN-U), volný čas (ZN-1), fitness (ZN-
2), sport (ZN-3). V následující tabulce získáte přehled o zónách 1-3. Pro
definování cílové zóny uživatelem přejděte při údaji ZN-P/ZN-U stisknutím
tlačítka SET do módu nastavení. Bliká údaj nejnižší spodní hodnoty. Údaj zvolte
stisknutím tlačítka SEL a nastavení potvrďte tlačítkem SET. Stejným způsobem
nastavte nejvyšší horní hodnotu.
MHR
MHR
MHR
Nastavení hodnot cílového srdečního tepu
POZOR: Před začátkem tréninku prokonzultujte s Vaším
lékařem, jaký cílový srdeční tep je pro Vás vhodný.
Přednastavené hodnoty jsou pouze orientační a nejsou
vhodné pro všechny osoby.
Pokud se nacházíte v podfunkci Aktuální tep a cílová zóna, stiskněte a držte
tlačítko SET, abyste zvolili přednastavenou cílovou zónu nebo nastavili uživatelem
Aktivace/deaktivace funkce tepového alarmu
Pokud se nacházíte v podfunkci Aktuální tep a cílová zóna, stiskněte krátce
tlačítko SET, abyste alarm pro cílový tep aktivovali nebo deaktivovali. Při
aktivovaném alarmu se na displeji zobrazí .
Vynulování tepových hodnot
Tepové hodnoty se každý den o půlnoci automaticky vynulují.
Page 20

- 37 -
Funkce paměti (SPEICH/MEMORY)
- 38 -
Nejdříve vyberte stisknutím tlačítka MODE funkci (SPEICH/MEMORY). Nyní si
můžete nechat zobrazit data posledních 14 dnů. Stiskněte tlačítko SEL, abyste
přešli k další funkci.
Následující data budou 14 dnů uložena: Kroky, vzdálenost (km/h), spálené
kalorie a spálený tuk(g) a měřič kilometrů (G-DSt) (celková dráha).
Celkové uložení v paměti/Total memory (14 dnů)
Pořadí funkcí je: Celkové kroky/celková vzdálenost (Total Step/Total Dist.) >
celkové kalorie/celkový spálený tuk (Total Calories/Total Fat Burn) > měřič
kilometrů/odometr (G-Dst /ODO) > BMI (BMI).
Upozornění:
Nahrané denní hodnoty kalorií, spáleného tuku, průměrné rychlosti a nejvyšší
rychlosti se každou noc v 0:00 hodin vynulují, jsou ale uloženy ve 14ti denní
paměti.
BMI (Body Mass Index)
BMI je míra k ohodnocení hmotnosti člověka. Hodnota mezi 18,5 a 25 platí pro
dospělého člověka jako normální. Při hodnotách pod 18,5 se hovoří o podváze.
Při hodnotách nad 25 se hovoří o nadváze. Pri hodnotách nad 30 se hovorí o
otylosti.
BMI udáva jen hrubou smernou hodnotu, protože neuvažuje, že tělo člověka jako
i hmotnost je individuálne zložení z tukové a svalové hmoty.
Měřič tepové frekvence automaticky vypočte BMI z Vámi zadaných dat.
Odstránění závad
Měření vzdálenosti je velmi nepřesné
Hodinky mohou ušlou vzdálenost odhadnout pouze podle délky kroku měřené při
provádění kalibrace. Proveďte kalibraci krokoměru znovu.
Kalibrujte jak chození tak běhání a proveďte kalibraci obzvlášť pečlivě.
Nepřesnosti mohou vzniknout i při běhání na nerovném terénu.
Tep se nezobrazuje nebo není správně zobrazený.
Dávejte pozor na správné umístnění a polohu hrudního pásu.
Vaše kůže by neměla být příliš suchá nebo studená.
Kontaktní plochy můžete vlhčit, aby ste zlepšili funkci.
Elektromagnetické zdroje můžou příjem omezovat.
Vzdálenost mezi hodinkami a hrudním pásem může být max. 60cm.
Jiné měriče tepu ve vzdálenosti do 2m můžou rušit příjem.
Bezdrátový bicyklový počítač může rušit příjem.
Možno musíte vyměnit baterky.
Displej není čitelný / osvětlení nefunguje
Možno musíte vyměnit baterky.
Uvedení do původního stavu (Reset)
Současným stisknutím tlačítek SET a SEL se hodinky mohou uvést do původního
stavu, veškeré uložené údaje se vymažou.
Teprve po uvedení do původního stavu můžete opět změnit jazyk a jednotky.
Nastavte měřič srdeční frekvence jak popsáno v odstavci „Uvedení měřiče tepové
frekvence do provozu“.
Výměna baterie v hodinkách
Výměnu baterie společně se zkouškou vodotěsnosti můžete nechat provést u
hodináře. Pokud chcete baterii vyměnit sami, postupujte prosím následovně:
Uvolněte šrouby (1,2,3 a 4) na zadní straně hodinek malým křížovým
šroubovákem. Odstraňte zadní stranu pouzdra a nálepku na baterii. K otevření
západky (5) držáku baterie použijte malý plochý nástroj. Vyjměte baterii a vložte
Page 21

- 39 -
novou baterii 3V CR2032 pólem (+) směrem nahoru. Zkontrolujte správné
- 40 -
umístění těsnicího kroužku (6). Držák baterie zajistěte západkou (5). Znovu
nalepte nálepku na baterii, nasaďte zadní stranu pouzdra a pevně ji přišroubujte.
Varovný ukazatel stavu baterie
Když je baterie na hrudním pásu pro normální provoz již slabá, objeví se na
displeji náramkových hodinek "GURT/BELT" a " BATT/ LO BAT ". Vyměňte baterie
na hrudním pásu jak je popsáno v kapitole "Hrudní pás".
Vodotěsnost
Vodotěsné do 3 bar. Údaj v barech se vztahuje na atmosferický přetlak, který byl
použitý při zkoušce nepromokavosti (DIN 8310).
Pokyn k čištění
Pás očistěte jen suchým hadříkem bez vláken, jaký se používá např. na čištění
brýlových skel.
Po každém použití očistěte hrudní pás a pásek hodinek vlažnou vodou nebo
jemným mýdlovým roztokem a houbou. Dbejte na to, aby se při tom nenamočily
náramkové hodinky. Osušte všechny díly utěrkou a pověste pás, aby oschl. Pot a
nečistoty narušují funkci vysílače.
Likvidace elektrického přístroje
Toto elektrické zařízení nepatří do běžného domácího odpadu. Prosím
odevzdejte ho nejlépe do komunálních sběren surovín Neopomente prosím
na aktuálně platné předpisy. V případě pochybností se spojte s vašimi sběrnými
surovinami.
Likvidace baterií
Použité baterie likvidujte nejlépe do nádob pro baterie v obchodních
domech. Baterie nepatří do běžného domovního odpadu. Likvidujte baterie
prosím v souladu s předpisy o třídění odpadu, nejlépe do komunálních sběren
surovín Neopomente prosím na aktuálně platné předpisy. V případě pochybností
se spojte s vašimi sběrnými surovinami.
Prohlášení o shodě
Tento výrobek odpovídá při použití podle určeného účelu základním požadavkům
§ 3 a ostatních příslušných ustanovení směrnice FTEG (článek 3 směrnice R&TTE).
Prohlášení o shodě si lze vyžádat zde:
conformity@digi-tech-gmbh.com
Voděodolnost hrudního pásu
Voděodolnost podle IEC 60529 IPX7.
Záruka společnosti digi-tech gmbh
Na tento měřič srdečního tepu výrobce poskytuje záruku v délce 3 let ode dne
zakoupení. V případě vad máte vůči prodávajícímu výrobku zákonná práva. Tato
zákonná práva nejsou omezena naší dále uvedenou zárukou. Tato zákonná
práva nejsou naší následně zmiňovanou zárukou omezena.
Page 22

- 41 -
Záruční podmínky
- 42 -
Na internetových stránkách www.lidl
-
service.com si můžete
software.
Záruční lhůta začíná běžet od data zakoupení. Dobře si uschovejte originální
pokladní stvrzenku. Pokud se v průběhu tří let od data zakoupení tohoto výrobku
vyskytnou závady materiálu nebo výrobní vady, bude tento výrobek námi zdarma
opraven nebo nahrazen – podle naší volby. Uplatnění záruky vyžaduje, aby byl v
tomto tříletém období předložen vadný přístroj a doklad o koupi (účtenka) a
písemně bylo krátce uvedeno, o jakou závadu se jedná a kdy vznikla. Pokud
závada zakláda nárok k uznání záruky, obdržíte od nás opravený nebo nový
výrobek. Opravou nebo výměnou výrobku nezačíná běžet nová záruční lhůta.
Záruční doba a zákonné nároky vyplývající z vad
Záruční doba se neprodlužuje o dobu, po kterou bylo zboží v záruční opravě. To
platí i pro vyměněné a opravené díly. Eventuální škody a vady existující již při
koupi je nutno reklamovat ihned po vybalení. Opravy prováděné po uplynutí
záruční doby budou placené.
Rozsah záruky
Tento přístroj byl pečlivě vyroben podle přísných směrnic kvality a před dodáním
důkladně ověřen. Záruka se vztahuje na vady materiálu nebo výrobní vady. Tato
záruka se nevztahuje na díly, které jsou vystaveny běžnému opotřebení a mohou
proto být považovány za opotřebovávané díly, nebo na poruchy na rozbitných
dílech, např. vypínač, baterie nebo díly, které jsou vyrobeny ze skla.
Tato záruka propadá, pokud je výrobek poškozen, nebyl řádně užíván nebo o
něj bylo špatně pečováno. Pro řádné užívání výrobku se musí přesně dodržovat
všechna nařízení v návodu k obsluze. Vyvarujte se užití nebo zacházení, před
kterým je zrazováno nebo je před ním varováno v tomto návodu.
Tento výrobek je určen pouze pro soukromé a nikoliv průmyslové užívání. Při
zneužití nebo neodborném zacházení, užití násilí nebo při zákrocích, které nejsou
provedeny naší autorizovanou servisní pobočkou, zaniká záruka.
• Pro všechny dotazy si připravte pokladní stvrzenku a číslo artiklu (103142)
jako doklad o koupi.
• Číslo artiklu zjistíte z typového štítku, gravury, na titulní straně návodu (vlevo
dole) nebo z nálepky na zadní nebo spodní straně.
• V případě funkčních nebo jiných vad nejdříve kontaktujte telefonicky nebo e-
mailem dále uvedené servisní oddělení.
stáhnout tento manuál a mnoho dalších manuálů, videí k výrobků a
Vyřízení záručního případu
Abychom vaši žádost mohli rychle zpracovat, řiďte se prosím následujícími
pokyny:
Page 23

- 43 -
Servis
IAN
103142
- 44 -
Název: Inter-Quartz GmbH
Ulice: Valterweg 27A
Město: Eppstein 65817
Země: Německo
E-mail: support@inter-quartz.de
Telefon: +49 6198 571825
0800 142 315
0800 004449
Dodavatel
Berte prosím na vědomí, že následující adresa není adresa servisu. Kontaktujte
prosím nejdříve výše uvedené servisní místo.
Název: digi-tech gmbh
Ulice: Valterweg 27A
Město: Eppstein 65817
Země: Německo
Návod na použitie a bezpečnostné pokyny
Obsah
Obsah ....................................................................................................................... - 44 -
Úvod ......................................................................................................................... - 46 -
Určený účel použitia ............................................................................................... - 46 -
Rozsah dodávky ...................................................................................................... - 46 -
Technické údaje ....................................................................................................... - 47 -
Dôležité bezpečnostné upozornenie
Dôležité bezpečnostné upozornenie ................................................................ - 47 -
Dôležité bezpečnostné upozornenieDôležité bezpečnostné upozornenie
Batérie ............................................................................................................... - 47 -
Hodinky na meranie srdcovej frekvencie nepatria do detských rúk .......... - 48 -
Hrudný pás ............................................................................................................... - 48 -
Držiak na riadidlá bicykla ...................................................................................... - 50 -
Svetlo ........................................................................................................................ - 50 -
Dôležité informácie pre ovládanie hodiniek na meranie srdcovej frekvencie .. - 51 -
Zrýchlené nastavovanie .................................................................................. - 51 -
Uvedenie hodiniek na meranie srdcovej frekvencie do prevádzky ................... - 51 -
Kalibrácia ......................................................................................................... - 52 -
Hodinky majú 7 funkčných režimov .............................................................. - 53 -
Čas (ZEIt/TIME) ...................................................................................................... - 53 -
Nastavenie času .............................................................................................. - 54 -
Budík (ALARM) ........................................................................................................ - 54 -
Stopky (St-UHR/CHRONO) ................................................................................. - 55 -
Čas odpočítavania (TIMER) max. 9:59:00 .......................................................... - 55 -
Krokomer (PEDO) .................................................................................................... - 56 -
Kalibrácia krokomeru...................................................................................... - 56 -
Merač tepu (PULS/PULSE) ..................................................................................... - 57 -
Nastavenie rozsahu cieľového tepu .............................................................. - 57 -
Zapnutie/vypnutie funkcie alarmu tepu ........................................................ - 58 -
Vynulovanie hodnôt tepu ................................................................................ - 58 -
Funkcia pamäte (SPEICH/MEMORY) .................................................................. - 59 -
Celková pamäť/Total memory (14 dní) ....................................................... - 59 -
BMI (Body Mass Index) .................................................................................. - 59 -
Page 24

- 45 -
Odstránenie chýb .................................................................................................... - 60 -
- 46 -
Reset .......................................................................................................................... - 60 -
Výmena batérie náramkových hodín .................................................................... - 60 -
Údaj stavu batérie ................................................................................................... - 61 -
Vodotesnosť.............................................................................................................. - 61 -
Odolnosť hrudného popruhu voči vode ................................................................ - 61 -
Pokyny pre čistenie .................................................................................................. - 62 -
Likvidácia elektrického prístroja ............................................................................. - 62 -
Likvidácia batérií ...................................................................................................... - 62 -
Vyhlásenie o zhode ................................................................................................. - 62 -
Záruka digi-tech gmbh ........................................................................................... - 62 -
Záručné podmienky ................................................................................................ - 63 -
Záručná doba a zákonné nároky pri nedostatkoch ............................................ - 63 -
Rozsah záruky ......................................................................................................... - 63 -
Postup pri uplatňovaní záruky ................................................................................ - 64 -
Servis......................................................................................................................... - 65 -
Dodávateľ ................................................................................................................ - 65 -
Hodinky na meranie srdcovej frekvencie
Úvod
Srdečne vám blahoželáme k zakúpeniu nových hodiniek na meranie srdcovej
frekvencie. Rozhodli ste sa tým pre vysokokvalitný prístroj. Návod na použitie je
neoddeliteľnou súčasťou hodiniek na meranie srdcovej frekvencie. Obsahuje
dôležité informácie o bezpečnosti, používaní a likvidácii. Pred používaním
hodiniek sa oboznámte so všetkými pokynmi pre obsluhu a bezpečnostnými
pokynmi. Hodinky používajte iba na opísané účely a uvedené oblasti použitia.
Všetku dokumentáciu pri predaji výrobku poskytnite kupujúcemu.
Určený účel použitia
Hodinky na meranie srdcovej frekvencie sú vhodné na zobrazovanie času a na
používanie opísaných prídavných funkcií. Každé iné používanie alebo úpravy
hodiniek na meranie srdcovej frekvencie sú v rozpore s určeným účelom použitia.
Výrobca neručí za škody, spôsobené nesprávnym používaním alebo obsluhou
hodiniek. Hodinky na meranie srdcovej frekvencie nie sú určené pre profesionálne
použitie.
Rozsah dodávky
Upozornenie: Prosím skontrolujte po kúpe rozsah dodávky. Skontrolujte, či sú
všetky diely naporúdzi a nepoškodené.
• Hodinky na meranie srdcovej frekvencie s batériou (CR2032)
• Hrudný popruh s batériou (CR2032)
• Držiak na riadidlá bicykla
• Návod na použitie
Page 25

- 47 -
Technické údaje
rozsah teploty
použitia
0-
50°C
rozmery
4,4 x 5,2
x 1,5 cm
displej
2,5 x
2,5 cm
47 47g
batérie
CR 2032/3V
rozsah teploty použitia
0-
50°C
rozmery
7 x 3,
4 x 1,2 cm
frekvencie
5,3 kHz
hmotnosť
53g
batérie
CR 2032/3V
UPOZORNENIE:
- 48 -
B
atérie
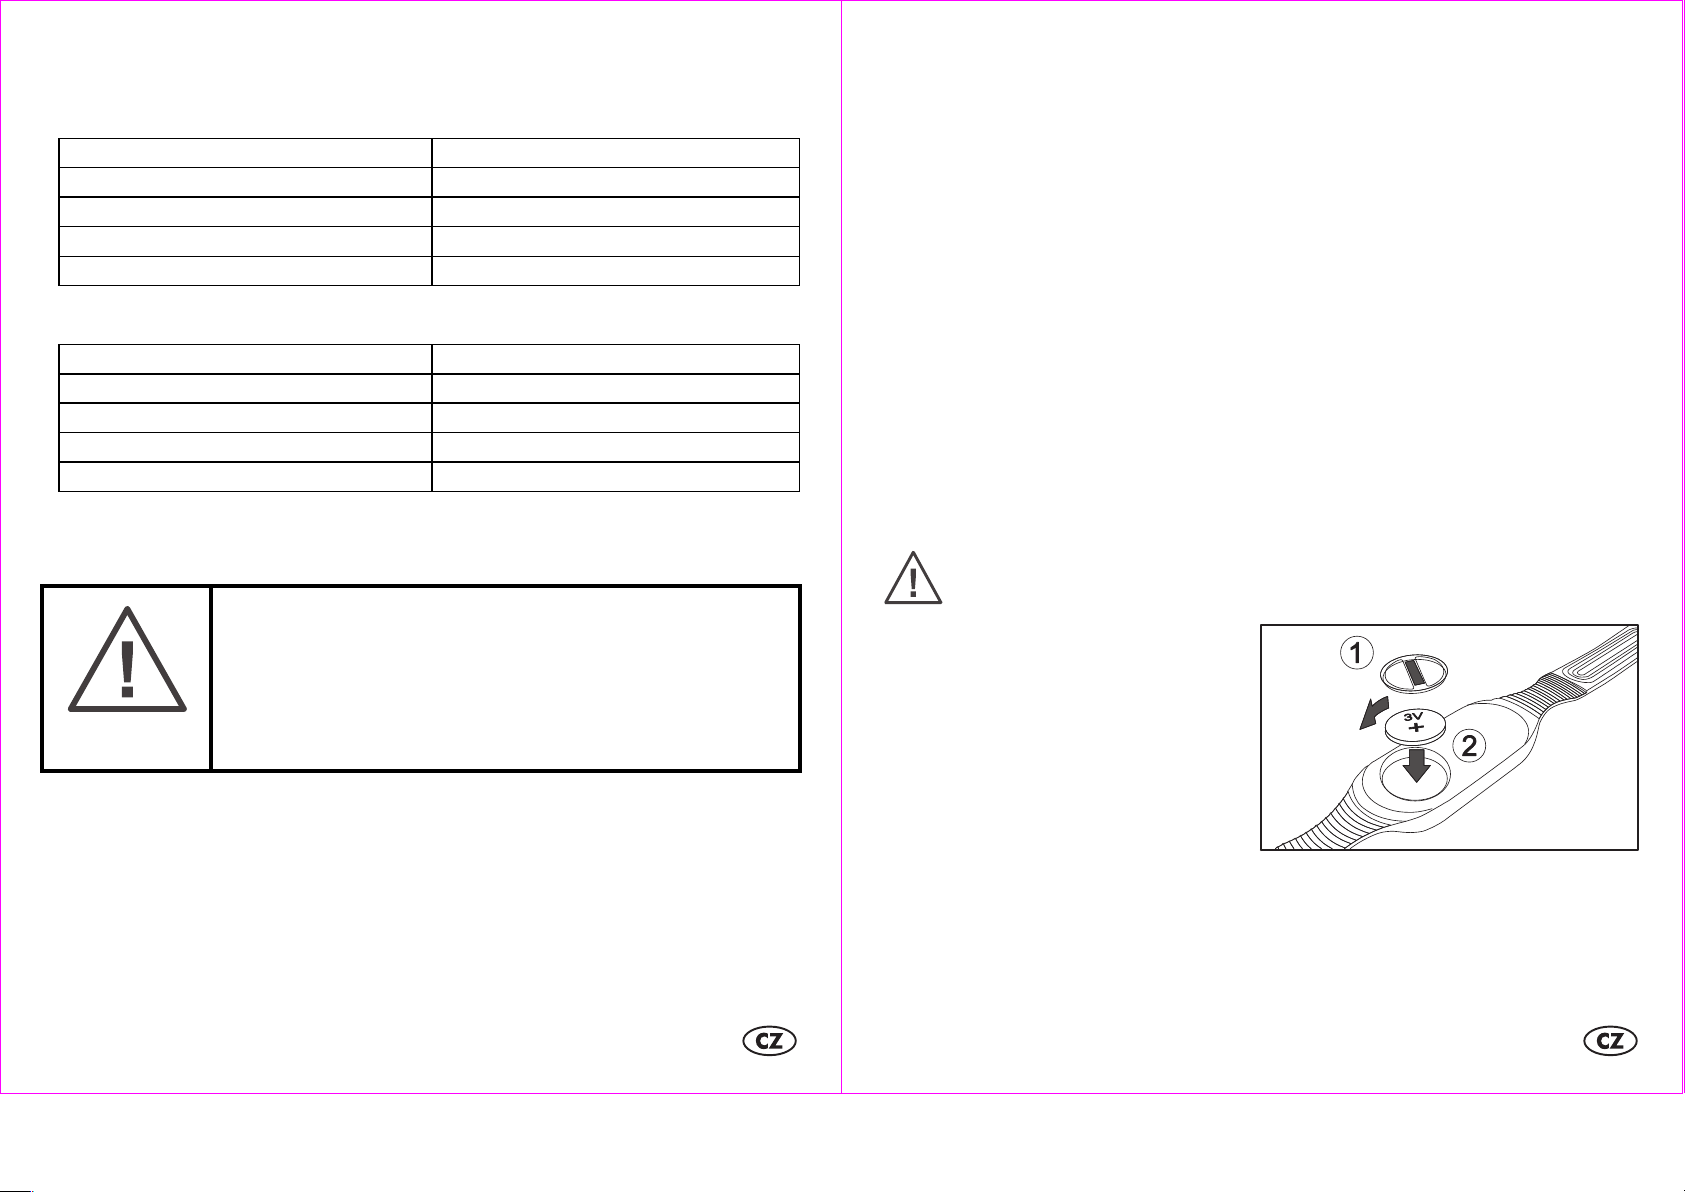
: CR2032
Hodinky na meranie srdcovej frekvencie
V prípade dlhšieho nepoužívania prístroja vyberte batériu a uložte prístroj na
suchom a bezprašnom mieste. Pri neodbornom používaní batérie vzniká
nebezpečenstvo výbuchu a vytečenia.
Ak by batéria predsa len vytiekla, vyvarujte sa kontaktu s pokožkou, očami a
sliznicami. Používajte rukavice. Pri kontakte s batériovou kyselinou vypláchnite
príslušné miesta dostatočným množstvom čistej vody a bezodkladne vyhľadajte
lekára. Spotrebované batérie odstráňte ihneď z prístroja, hrozí zvýšené
nebezpečenstvo vytečenia.
Hrudný pás
Dôležité bezpečnostné upozornenie
Pred zahájením tréningu sa poraďte
so svojim lekárom. Môže vám poradiť ohľadne vhodného
tréningu, jeho intenzite a o hodnotách tepu. Tieto hodinky
na meranie srdcovej frekvencie
Batérie
Batérie uschovajte mimo dosahu malých detí. V prípade prehltnutia batérie sa musí
ihneď vyžiadať lekárska pomoc.
Batérie/akumulátory sa musia vždy vkladať správne podľa pólov. V prípade
potreby najprv vyčistite kontakty batérie a prístroja. Nikdy sa nepokúšajte batérie
znova nabíjať, skratovať alebo otvárať. Batérie nehádžte nikdy do ohňa, pretože
môžu vybuchnúť.
nie sú lekársky prístroj a slúžia iba na podporu vašich
tréningových aktivít.
Hodinky na meranie srdcovej frekvencie nepatria do detských rúk
Tento prístroj môžu používať osoby (vrátane detí starších ako 8 rokov) so
zníženými fyzickými, senzorickými alebo mentálnymi schopnosťami alebo
nedostatkom skúseností a vedomostí, keď sa na ne dohliada alebo keď boli
poučené vzhľadom na bezpečné používanie prístroja a chápu z toho vyplývajúce
nebezpečenstvá. Deti sa s prístrojom nesmú hrať. Čistenie a údržbu používateľa
nesmú vykonávať deti bez dozoru. Obalové fólie držte taktiež mimo dosahu detí.
Hrozí nebezpečenstvo zadusenia.
Hrudný pás
POZOR: Osoby s implantovaným kardiostimulátorom by mali pred
použitím hrudného popruhu konzultovať svojho lekára.
Vloženie batérií do hrudného pásu
Odskrutkujte pomocou mince vrchnák
z priestoru pre batériu na zadnej
strane hrudného pásu a vložte 3V
batériu s (+) plus nahor. Zaskrutkujte
vrchnák znovu pevne späť.
Page 26

- 49 -
Nosenie hrudného pásu
Kontaktné plochy
- 50 -
Pás si nastavte tak, aby ležal tesne pod prsnými svalmi. Navlhčite kontaktné
plochy pásu vodou alebo EKG-gelom (môžte ho kúpiť v lekárni). Presvedčte sa, či
kontakty sa dotykajú povrchu tela. Umiestnite pás tak, ako je to zobrazené na
obrázku. Dajte pozor na správne nosenie hrudného pásu. Ak ste úplne vydýchli
vzduch z plúc, mal by pás ležať s jemným napätím na hrudnom koši.
Vysokonapäťové stožiare, diaľkové vedenia vlakov alebo plynulá premávka aut
môže meranie ovplyvniť alebo rušiť. Preto pri výbere vašej bežeckej trati dbajte na
určité podmienky.
Držiak na riadidlá bicykla
Používanie držiaka na bicykel
Hodinky na meranie srdcovej frekvencie môžete nosiť na zápästí ako hodinky
alebo ich pomocou priloženého držiaka môžete upevniť na riadidlá vášho
bicykla. Držiak na bicykel zhora zatlačte na tyč riadidiel bicykla. Pri tyčiach
riadidiel s veľkým priemerom je potrebné na upevnenie držiaka vyvinúť vyšší tlak.
Hodinky na meranie srdcovej frekvencie teraz môžete upevniť na držiak ako na
zápästie.
Pri používaní hodiniek na meranie srdcovej frekvencie neprekračujte, prosím,
maximálnu prenosovú vzdialenosť 60 cm od hrudného popruhu.
Funkcie počítača krokov (vzdialenosť, rýchlosť atď. ) pri montáži na držiak
nemôžte použiť.
Svetlo
Krátko stlačte LIGHT, aby ste aktivovali osvetlenie pozadia.
Page 27

- 51 -
Dôležité informácie pre ovládanie hodiniek na
- 52 -
meranie srdcovej frekvencie
Stlačením tlačidla MODE môžete zmeniť alebo ukončiť funkčný režim hodiniek,
stlačením tlačidla SEL vyberiete svoje osobné údaje a stlačením tlačidla SET
potvrdíte vstup.
Stlačte tlačidlo MODE, aby ste sa v menu dostali ďalej.
Zrýchlené nastavovanie
Pri nastavovaní číselných hodnôt môžete stlačením a podržaním tlačidla SEL
použiť zrýchlené nastavovanie.
zobrazenia času (ZEIt/TIME) a potvrďte ho tlačidlom SET. Teraz vždy pomocou
tlačidla SEL zadajte hodiny, minúty a sekundy a zadania potvrďte tlačidlom SET.
Analogickým spôsobom zadajte rok, mesiac a deň a zadania potvrďte vždy
tlačidlom SET. Teraz sa zobrazí hmotnosť. Nastavte svoju hmotnosť stláčaním
tlačidla SEL a nastavenie potvrďte stlačením tlačidla SET. Analogickým spôsobom
nastavte svoju telesnú výšku a nastavenie potvrďte tlačidlom SET. Zobrazí sa
obrazovka na kalibráciu krokomeru (KALI/CALI). Pomocou tlačidla SEL zvoľte
NEIN/NO alebo JA/ YES a potvrďte tlačidlom SET.
Pokyny pre kalibráciu:
Ak chcete hodinky používať výlučne pri chôdzi, nakalibrujte napriek tomu chôdzu
a beh. V tomto prípade nakalibrujte beh ako „rýchlu chôdzu“. Tieto nastavenia
môžete vykonať aj neskôr v režime krokomeru.
Ak krokomer nenakalibrujete, budú sa používať štandardné hodnoty a hodnoty
zobrazené pri tréningu sa tak môžu značne odchyľovať od skutočných hodnôt.
Počas kalibrácie zaznamenajú hodinky váš osobný pohybový profil. Čím
rovnomernejšie sa budete pohybovať a čím dlhší bude čas zaznamenávania
profilu, tým presnejšie budú hodnoty krokomeru zobrazované pri tréningu. Vďaka
kalibrácii rozpoznajú hodinky, či idete alebo bežíte a náležite prispôsobia
zobrazované hodnoty. Zobrazované hodnoty sú presnejšie, ak bežíte v rovnakom
rytme a rovnakou rýchlosťou, ako pri kalibrácii. Noste hodinky pri kalibrácii a pri
tréningu na rovnakom zápästí.
Uvedenie hodiniek na meranie srdcovej frekvencie do
prevádzky
Stiahnite z displeja ochrannú fóliu a stlačte tlačidlo MODE, SEL alebo SET.
Budete teraz automaticky prevedený základným nastavovacím menu.
Pomocou tlačidla SEL si zvoľte nemecký alebo anglický jazyk (DEU/ENG) a
výber potvrďte tlačidlom SET. Analogickým spôsobom zvoľte jednotku
(EINH/UNIT) KM alebo míle. Následne zadajte rok svojho narodenia (GEB
/BIRtH). Pre nastavenie stlačte tlačidlo SEL a nastavenú hodnotu potvrďte
stlačením tlačidla SET. Analogickým spôsobom nastavte mesiac a deň svojho
narodenia. Pomocou tlačidla SEL si potom zvoľte 12- alebo 24-hodinový formát
Kalibrácia
Na spustenie záznamu stlačte tlačidlo SEL, zobrazí sa text KALI/CALI a JA/YES.
Potvrďte kalibráciu tlačidlom SET. Zobrazí sa text LAUFEN/RUN, stlačte tlačidlo
SET, aby ste sa dostali k vzdialenosti (DST). Stláčaním tlačidla SEL zvolíte
vzdialenosť a voľbu potvrďte tlačidlom SET. Teraz môžete stlačením tlačidla SEL
spustiť kalibráciu. Po ukončení behu stlačte znova SEL. Zobrazí sa text
ENDE/DONE alebo ERROR. Ak sa zobrazí ERROR, musíte postup zopakovať. Po
úspešnej kalibrácii behu spustite kalibráciu chôdze (GEHEN/WALK) a pokračujte
analogicky podľa postupu opísaného pri kalibrácii behu (LAUFEN/RUN).
Page 28

- 53 -
Hodinky majú 7 funkčných režimov
- 54 -
Stláčaním tlačidla MODE môžete prepínať jednotlivé funkčné režimy hodiniek.
Poradie jednotlivých funkcií je nasledovné:
Okrem toho majú jednotlivé funkčné režimy rôzne podfunkcie.
K podfunkciám sa dostanete vždy stlačením tlačidla SEL.
Čas (ZEIt/TIME)
Zvoľte najprv stlačením tlačidla MODE funkciu (ZEIt 1/TIME-1).
Stlačením tlačidla SEL môžete vyvolávať podfunkcie režimu času.
Čas, deň v týždni a sekundy < - > čas a dátum
Stlačte tlačidlo SEL a podržte ho stlačené, ak chcete prejsť na 2. časové pásmo
(ZEIt 2/TIME-2).
Nastavenie času
Stlačte tlačidlo SET a podržte ho stlačené, zobrazí sa 12-/24-hodinové
zobrazenie času.
Pomocou tlačidla SEL si potom zvoľte 12- alebo 24-hodinový formát zobrazenia
času a potvrďte ho tlačidlom SET. Teraz vždy pomocou tlačidla SEL zadajte
hodiny, minúty a sekundy a zadania potvrďte tlačidlom SET. Potom analogickým
spôsobom zadajte rok, mesiac a deň a zadania potvrďte vždy tlačidlom SET.
Časové pásmo 1 a časové pásmo 2 sa nastavujú rovnakým spôsobom.
Budík (ALARM)
Zvoľte najprv opakovaným stláčaním tlačidla MODE funkciu (ALARM).
Na zapnutie alebo vypnutie alarmu stlačte tlačidlo SEL. Pri zapnutom alarme sa
zobrazuje symbol alarmu .
Na prepnutie do nastavovacieho režimu stlačte tlačidlo SET a podržte ho
stlačené. Na displeji blikajú hodiny času budenia.
Pre nastavenie stlačte tlačidlo SEL a nastavenie potvrďte stlačením tlačidla SET.
Analogickým spôsobom nastavte minúty.
Ak zaznie alarm, stlačte ľubovoľné tlačidlo, ak chcete alarm vypnúť.
Ak nestlačíte žiadne tlačidlo, bude po dobu cca 60 sekúnd zaznievať alarm a po
piatich minútach sa alarm spusti nanovo.
Page 29

- 55 -
Stopky (St-UHR/CHRONO)
- 56 -
Zvoľte najprv opakovaným stláčaním tlačidla MODE funkciu (STUHR/CHRONO).
Pre spustenie alebo zastavenie stopiek stlačte tlačidlo SEL.
Krokomer (PEDO)
Zvoľte najprv opakovaným stláčaním tlačidla MODE funkciu (PEDO).
Na displeji sa zobrazí STEP, môžete odčítať uložené údaje. Na prepínanie medzi
rôznymi funkciami stlačte tlačidlo SEL.
Počet krokov (STEP) a čas > počet krokov (STEP) a doba tréningu (T) > počet
krokov (STEP) a vzdialenosť (D) > počet krokov (STEP) a rýchlosť (S), kalórie
(KCAL) a spálené tuky v gramoch (g), počet krokov (STEP) a tep (HR).
Pre zastavenie času kola (L01) stlačte pri bežiacich stopkách tlačidlo SET. Môžete
zastaviť až 99 časov kola (L99). Po ich dosiahnutí sa na displeji zobrazí text
VOLL/FULL.
Stlačte pri zastavených stopkách tlačidlo SET, aby ste prešli na funkciu pamäte (R)
a mohli odčítať najlepší čas kola (BESte/BEST LAP). Stláčajte teraz opakovane
tlačidlo SEL, aby ste odčítali ďalšie časy kola. Pre návrat na stopky stlačte tlačidlo
SET.
Pre vynulovanie stopiek stlačte tlačidlo SEL a podržte ho stlačené.
Upozornenie: Funkciu pamäte možno vyvolať iba v prípade, ak bol
zaznamenaný minimálne jeden čas kola.
Čas odpočítavania (TIMER) max. 9:59:00
Zvoľte najprv opakovaným stláčaním tlačidla MODE funkciu (TIMER).
Na displeji sa zobrazí prednastavený čas 0:3000 sekúnd. Pre nastavenie
časovača stlačte tlačidlo SET a podržte ho stlačené.
Na displeji blikajú minúty času časovača. Pre nastavenie stlačte tlačidlo SEL a
nastavenie potvrďte stlačením tlačidla SET. Analogickým spôsobom nastavte
minúty. Pre spustenie alebo zastavenie času odpočítavania stlačte tlačidlo SEL. Po
uplynutí času odpočítavania zaznie po dobu cca 60 sekúnd akustický signál. Na
vypnutie akustického signálu stlačte tlačidlo MODE, SEL alebo SET.
Na spustenie krokomeru stlačte SET. Na displeji sa zobrazia dve chodidlá. Na
zastavenie krokomeru stlačte opätovne SET.
Vynulovanie krokomeru
Ak chcete vymazať všetky údaje, stlačte tlačidlo SET a podržte ho stlačené.
Kalibrácia krokomeru
Ak ste krokomer ešte nenakalibrovali podľa postupu opísaného v kapitole
„Uvedenie hodiniek na meranie srdcovej frekvencie do prevádzky“ alebo ak
chcete krokomer nakalibrovať nanovo, stlačte tlačidlo SET a podržte ho stlačené.
Teraz sa zobrazí hmotnosť. Nastavte svoju hmotnosť stláčaním tlačidla SEL a
nastavenie potvrďte stlačením tlačidla SET. Teraz sa zobrazí telesná výška.
Nastavte svoju telesnú výšku stláčaním tlačidla SEL a nastavenie potvrďte
stlačením tlačidla SET. Zobrazí sa obrazovka na kalibráciu krokomeru
(KALI/CALI). Na spustenie záznamu stlačte SEL, zobrazí sa text KALI/CALI a
JA/YES. Potvrďte tlačidlom SET. Zobrazí sa text LAUFEN/RUN, stlačte tlačidlo
SET, aby ste sa dostali k vzdialenosti (DST). Stláčaním tlačidla SEL zvoľte
vzdialenosť a potvrďte tlačidlom SET. Teraz môžete stlačením tlačidla SEL spustiť
kalibráciu. Po ukončení behu stlačte tlačidlo SEL. Zobrazí sa text ENDE/DONE
alebo ERROR. Ak sa zobrazí ERROR, musíte postup zopakovať. Po úspešnej
kalibrácii behu spustite kalibráciu chôdze (GEHEN/WALK) a pokračujte
analogicky podľa postupu opísaného pri kalibrácii behu (LAUFEN/RUN).
Page 30

- 57 -
Merač tepu (PULS/PULSE)
Aktuálny tep
I
- 58 -
Vek > 20 25 30 35 40 45 50 55 60 65
Zóna 1
130 126 123 120 117 113 110 107 104 100
Voľný čas
to to to to to to to to to to
50 –
65 %
100 97 95 92 90 87 85 82 80 77
Zóna 2
160 156 152 148 144 140 136 132 128 124
Fitnes to to to to to to to to to to
65 –
80 %
130 126 123 120 117 113 110 107 104 100
Zóna 3
190 185 180 175 171 166 161 156 152 147
Šport to to to to to to to to to to
80 –
95 %
160 156 152 148 144 140 136 132 128 124
Upozornenie: Merač tepu funguje iba pri používaní hrudného popruhu. Na
displeji sa zobrazí aktuálny tep a bliká symbol srdca.
Zvoľte najprv stlačením tlačidla MODE funkciu (PULS/PULSE).
Stlačením tlačidla SEL môžete vyvolať podfunkcie merača tepu.
Aktuálny tep/MHR (%) > aktuálny tep/čas > aktuálny tep/aktuálna rýchlosť
(km/h) > aktuálny tep/priemerný tep (A) > aktuálny tep/najvyšší tep (H) >
aktuálny tep/najnižší tep (L) > aktuálny tep/cieľová zóna.
Cieľová
zóna
MHR – maximálna srdcová frekvencia
(percentá maximálnej srdcovej frekvencie. Maximálna srdcová frekvencia = 220
– váš vek)
Ak sa nachádzate v podfunkcii Aktuálny tep a cieľová zóna, stlačte tlačidlo SET a
podržte ho stlačené, aby ste zvolili prednastavený rozsah cieľového tepu alebo
nastavili vlastný rozsah cieľového tepu. Zobrazí sa vlastný rozsah cieľového tepu
(ZN-P/ZN-U). Stláčajte opakovane tlačidlo SEL, aby ste si zvolili požadovaný
rozsah cieľového tepu: vlastný (ZN-P/ZN-U), voľný čas (ZN-1), fitnes (ZN-2),
šport (ZN-3). V nasledujúcej tabuľke získate prehľad o zónach 1 – 3. Na
nastavenie vlastného rozsahu cieľového tepu sa na obrazovke ZN-P/ZN-U
stlačením tlačidla SET prepnite do nastavovacieho režimu. Bliká dolná medzná
hodnota. Hodnotu nastavte stláčaním tlačidla SEL a nastavenie potvrďte stlačením
tlačidla SET. Analogickým spôsobom nastavte hornú medznú hodnotu.
MHR
MHR
Nastavenie rozsahu cieľového tepu
POZOR: Pred začatím tréningu sa opýtajte svojho lekára,
ktorý rozsah cieľového tepu je pre vás vhodný.
Prednastavené hodnoty sú len orientačné a nie sú vhodné
pre každého.
MHR
Zapnutie/vypnutie funkcie alarmu tepu
Ak sa nachádzate v podfunkcii Aktuálny tep a Cieľová zóna, stlačte krátko
tlačidlo SET, aby ste zapli alebo vypli funkciu alarmu cieľového tepu. Pri
zapnutom alarme sa na displeji zobrazuje .
Vynulovanie hodnôt tepu
Hodnoty tepu sa každý deň o polnoci automaticky vynulujú.
Page 31

- 59 -
Funkcia pamäte (SPEICH/MEMORY)
- 60 -
Zvoľte najprv stlačením tlačidla MODE funkciu (SPEICH/MEMORY). Teraz si
môžete pozrieť uložené údaje za posledných 14 dní, stlačte tlačidlo SEL, aby ste
prešli na nasledujúcu funkciu.
V pamäti sa uložia údaje počet krokov, vzdialenosť (km), kalórie a spálené tuky
(g) a počítadlo kilometrov (G-DSt) za posledných 14 dní.
Celková pamäť/Total memory (14 dní)
Poradie funkcií je nasledovné: celkový počet krokov/celková vzdialenosť (Total
Step/Total Dist.) > celkové množstvo kalórií/celkové množstvo spálených tukov
(Total Calories/Total Fat Burn) > počítadlo kilometrov/Odometer (G-DSt /ODO)
> BMI (BMI).
Upozornenie:
Zaznamenané denné hodnoty kalórií, spálených tukov, priemernej rýchlosti a
maximálnej rýchlosti sa vynulujú každú noc o 0:00 hod., ostanú však
zaznamenané v 14-dňovej pamäti.
BMI (Body Mass Index)
BMI je miera k ohodnoteniu hmotnosti človeka. Hodnota medzi 18,5 a 25 platí
pre dospelého človeka ako normálna. Pri hodnotách pod 18,5 sa hovorí o
podváhe. Pri hodnotách nad 25 sa hovorí o nadváhe. Pri hodnotách nad 30 sa
hovorí o obezite.
BMI udáva len hrubú smernú hodnotu, pretože neuvažuje, že telo človeka ako i
hmotnosť je individuálne zložená z tukovej a svalovej hmoty.
Hodinky na meranie srdcovej frekvencie automaticky vypočítajú zo zadaných
údajov index telesnej hmotnosti (BMI).
Odstránenie chýb
Meranie vzdialenosti je veľmi nepresné
Hodinky môžu prejdenú vzdialenosť odhadnúť len na základe prevedenej
kalibrácie nameranej dĺžky kroku.
Preveďte opäť kalibráciu počítača krokov. Kalibrujte nielen chôdzu ale aj beh a
kalibráciu preveďt obzvlášť pozorne.
Nepresnosti sa môžu objaviť aj pri behu po nerovnom teréne.
Tep sa nezobrazuje alebo nie je správne zobrazený.
Dbajte na správne umiestnenie a polohu hrudného pásu.
Vaša koža by nemala byť veľmi suchá alebo studená.
Kontaktné plochy môžte navlhčiť, aby ste zlepšili funkciu.
Elektromagnetické zdroje môžu príjem ovplyvniť.
Vzdialenosť medzi hodinkami a hrudným pásom môže byť max. 60cm.
Iné merače tepu vo vzdialenosti do 2m môžu rušiť príjem.
Bezdrôtový bicyklový počítač môže rušiť príjem.
Pravdepodobne musia byť vymenené baterky.
Displej sa nedá čítať / osvetlenie nefunguje
Pravdepodobne musia byť vymenené baterky.
Reset
Súčasným stlačením tlačidla SET a SEL môžete hodinky kompletne resetovať,
všetky uložené údaje sa stratia.
Až po resete môžete znova zmeniť jazyk a merné jednotky. Nastavte hodinky na
meranie srdcovej frekvencie podľa postupu opísaného v kapitole „Uvedenie
hodiniek na meranie srdcovej frekvencie do prevádzky“.
Výmena batérie náramkových hodín
Výmenu batérie môžete spolu so skúškou vodotesnosti nechať vykonať hodinárovi.
Ak chcete batériu vymeniť sami, postupujte nasledovne:
Uvoľnite skrutky (1,2,3 a 4) na zadnej strane náramkových hodín pomocou
malého krížového skrutkovača. Odstráňte zadný kryt a batériovú nálepku.
Page 32

- 61 -
Na otvorenie poistky (5) držiaka batérie použite malý, plochý nástroj. Vyberte
- 62 -
batériu a vložte novú batériu 3V CR2032 tak, aby (+) pól smeroval nahor.
Skontrolujte, či je správne vsadený tesniaci krúžok (6). Zaistite držiak batérie (5).
Nalepte znova batériovú nálepku, vložte zadný kryt a priskrutkujte ho.
Pokyny pre čistenie
Hodinky čistite iba suchou utierkou, ktorá nepúšťa chlpy, aká sa používa napr. na
čistenie skiel okuliarov.
Po každom použití vyčistite hrudný popruh a remienok hodiniek vlažnou vodou
alebo slabým roztokom mydlovej vody a hubkou. Dávajte pozor na to, aby ste
pritom nezamočili náramkové hodinky. Osušte všetky diely handričkou a zaveste
pás, aby uschol. Pot a nečistoty narúšajú funkciu vysielača.
Likvidácia elektrického prístroja
Toto elektrické zariadenie nepatrí do normálneho domového odpadu.
Likvidujte ho prosím s predpismi o triedenom odpade, najlepšie do
miestnych zberných surovín. Dbajte na aktuálne platné predpisy. V
sporných prípadoch sa spojte s vašími zbernými surovinami.
Údaj stavu batérie
Ak stav batérie hrudného pásu pre normálne použitie nestačí, zobrazí sa na
displeji hodiniek "GURT/BELT" a "BATT/ LO BAT ". Vymeňte batériu hrudného
pásu, ako je to popísané v kapitole "Hrudný pás".
Vodotesnosť
Vodotesné do 3 bar. Údaj v baroch sa odvoláva na atmosferický pretlak, ktorý
bol vynaložený pri skúške vodotesnosti (DIN 8310).
Odolnosť hrudného popruhu voči vode
Odolnosť voči vode podľa IEC 60529 IPX7.
Likvidácia batérií
Použité batérie prosím likvidujte najlepšie do nádob pre batérie v
nákupných strediskách. Batérie nepatria do bežného domového
odpadu. Likvidujte baterie prosím s predpismi o triedenom odpade, najlepšie do
miestnych zberných surovín. Dbajte na aktuálne platné predpisy. V sporných
prípadoch sa spojte s vašími zbernými surovinami.
Vyhlásenie o zhode
Tento produkt pri použití na zamýšľaný účel vyhovuje základným požiadavkám
§3 a ďalších príslušných ustanovení FTEG (článok 3 smernice R&TTE). Vyhlásenie
o zhode si môžete vyžiadať na adrese:
conformity@digi-tech-gmbh.com
Záruka digi-tech gmbh
Na toto zariadenie sa poskytuje záruka 3 roky odo dňa zakúpenia. V prípade
nedostatkov tohto výrobku si môžete uplatniť svoje zákonné práva voči predajcovi
výrobku. Tieto zákonné práva nie sú obmedzené našou nižšie uvedenou zárukou.
Page 33

- 63 -
Záručné podmienky
- 64 -
Na stránke www.lidl
-
service.com si môžete
stiahnuť tento návod
softvérom.
Záručná doba začína plynúť dňom zakúpenia výrobku. Originál dokladu o
nákupe si, prosím, starostlivo uschovajte. Tento doklad je potrebný ako dôkaz
zakúpenia výrobku. Ak sa počas troch rokov platnosti záruky od dňa zakúpenia
tohto výrobku na ňom vyskytnú chyby materiálu alebo výrobné chyby, bude vám
výrobok po našom posúdení bezplatne opravený alebo vymenený. Uplatnenie
nárokov, vyplývajúcich zo záruky predpokladá predloženie chybného zariadenia
v priebehu trvania trojročnej záruky spolu s dokladom o kúpe (pokladničným
blokom) a krátkym opisom nedostatku a časom jeho výskytu. Ak sa na daný
nedostatok naša záruka vzťahuje, obdržíte opravený alebo nový výrobok.
Opravou výrobku alebo výmenou za nový sa dĺžka platnosti záruky nepredlžuje.
Záručná doba a zákonné nároky pri nedostatkoch
Záručná doba sa uplatnením nárokov, vyplývajúcich zo záruky nepredlžuje. Platí
to aj pre vymenené a opravené časti. Prípadné chyby a nedostatky, zistené už pri
nákupe, sa musia bezodkladne ohlásiť hneď po rozbalení výrobku. Prípadné
opravy po uplynutí záručnej doby sú spoplatňované.
Rozsah záruky
Zariadenie bolo vyrobené pri dôslednom dodržiavaní kvalitatívnych noriem a
pred vyskladnením boli svedomite skontrolované. Nároky, vyplývajúce zo záruky
sa vzťahujú na chyby materiálu alebo nedostatky v dôsledku nedodržania
technologického postupu výroby. Táto záruka sa nevzťahuje na časti výrobku,
ktoré sú vystavené normálnemu opotrebovaniu a preto sa považujú za spotrebné
diely alebo na poškodenia chúlostivých častí, napr. vypínačov, akumulátorov
alebo častí, vyrobených zo skla.
Záruka zaniká v prípade poškodenia výrobku, nesprávneho používania alebo
nedostatočnej údržby. Pre správne použitie výrobku sa musia presne dodržiavať
všetky pokyny uvedené v návode na použitie. Používaniu a zaobchádzaniu, ktoré
sa v návode na použitie neodporúča alebo sa pred ním vystríha, je potrebné sa
bezpodmienečne vyhýbať.
Výrobok je určený iba na osobné a nie profesionálne použitie. Pri nedbanlivom a
nesprávnom zaobchádzaní, použití násilia a pri zásahoch, ktoré boli vykonané
mimo nášho autorizovaného servisného strediska, záruka zaniká.
Postup pri uplatňovaní záruky
Pre rýchle vybavenie vašej požiadavky dodržiavajte, prosím, nasledujúce pokyny:
• Pri všetkých otázkach si, prosím, pripravte pokladničný blok a číslo výrobku
(103142) ako dôkaz o zakúpení výrobku.
• Číslo výrobku nájdete vygravírované na typovom štítku, na titulnej strane tohto
návodu (vľavo dolu) alebo na nálepke na zadnej alebo spodnej strane.
• V prípade výskytu porúch funkcií alebo iných nedostatkov sa najprv
telefonicky alebo elektronickou poštou spojte s nasledujúcim servisným
oddelením.
spolu s množstvom ďalších príručiek, videí o výrobkoch a
Page 34

- 65 -
Servis
IAN
103142
- 66 -
Názov: Inter-Quartz GmbH
Ulica: Valterweg 27A
Mesto: Eppstein 65817
Krajina: Nemecko
E-mail: support@inter-quartz.de
Telefón: +49 (0)6198 571825
0800 142 315
0800 004449
Dodávateľ
Nezabúdajte, prosím, že nasledujúca adresa nie je adresou servisu. Obráťte sa
najprv na vyššie uvedené servisné stredisko.
Názov: digi-tech gmbh
Ulica: Valterweg 27A
Mesto: Eppstein 65817
Krajina: Nemecko
Bedienungs- und
Sicherheitshinweise
Inhaltsverzeichnis
Inhaltsverzeichnis..................................................................................................... - 66 -
Einleitung .................................................................................................................. - 68 -
Bestimmungsgemäße Verwendung ....................................................................... - 68 -
Lieferumfang............................................................................................................. - 68 -
Technische Daten .................................................................................................... - 69 -
Wichtige Sicherheitshinweise
Wichtige Sicherheitshinweise ............................................................................. - 69 -
Wichtige SicherheitshinweiseWichtige Sicherheitshinweise
Batterien ............................................................................................................ - 69 -
Herzfrequenz-Messuhr nicht in Kinderhände ............................................... - 70 -
Brustgurt .................................................................................................................... - 70 -
Fahrradhalterung ..................................................................................................... - 72 -
Licht ........................................................................................................................... - 72 -
Wichtige Informationen zur Bedienung der Herzfrequenz-Messuhr ................. - 73 -
Schnelleinstellung ............................................................................................ - 73 -
Inbetriebnahme der Herzfrequenz-Messuhr ........................................................ - 73 -
Kalibrierung...................................................................................................... - 74 -
Die Uhr verfügt über 7 Funktionsmodi ........................................................... - 75 -
Uhrzeit (ZEIt/TIME) ................................................................................................. - 75 -
Zeiteinstellung .................................................................................................. - 76 -
Weckalarm (ALARM) .............................................................................................. - 76 -
Stoppuhr (St-UHR/CHRONO) .............................................................................. - 77 -
Countdownzeit (TIMER) max. 9:59:00................................................................. - 77 -
Schrittzähler (PEDO) ............................................................................................... - 78 -
Schrittzähler kalibrieren .................................................................................. - 78 -
Pulsmesser (PULS/PULSE) ...................................................................................... - 79 -
Zielpulsbereich einstellen ................................................................................ - 79 -
Puls-Alarmfunktion aktivieren/deaktivieren .................................................. - 80 -
Reset der Pulsdaten ......................................................................................... - 80 -
Speicherfunktion (SPEICH/MEMORY)................................................................. - 81 -
Page 35

- 67 -
Gesamtspeicher/Total memory (14 Tage)................................................... - 81 -
- 68 -
BMI (Body Mass Index) .................................................................................. - 81 -
Fehlerbehebung ....................................................................................................... - 82 -
Reset .......................................................................................................................... - 82 -
Die Batterie der Armbanduhr wechseln ................................................................ - 82 -
Batteriestandswarnanzeige .................................................................................... - 83 -
Wasserdichtigkeit .................................................................................................... - 83 -
Wasserbeständigkeit des Brustgurtes .................................................................... - 84 -
Reinigungshinweis ................................................................................................... - 84 -
Entsorgung der Herzfrequenz-Messuhr ................................................................ - 84 -
Entsorgung der Batterien ........................................................................................ - 84 -
Konformitätserklärung ............................................................................................. - 84 -
Garantie der digi-tech gmbh.................................................................................. - 85 -
Garantiebedingungen ............................................................................................ - 85 -
Garantiezeit und gesetzliche Mängelansprüche ................................................. - 85 -
Garantieumfang ...................................................................................................... - 85 -
Abwicklung im Garantiefall .................................................................................... - 86 -
Service ...................................................................................................................... - 87 -
Lieferant .................................................................................................................... - 87 -
Herzfrequenz-Messuhr
Einleitung
Herzlichen Glückwunsch zum Kauf Ihrer neuen Herzfrequenz-Messuhr. Sie haben
sich damit für ein hochwertiges Gerät entschieden. Die Bedienungsanleitung ist
Bestandteil dieser Herzfrequenz-Messuhr. Sie enthält wichtige Hinweise für
Sicherheit, Gebrauch und Entsorgung. Machen Sie sich vor der Benutzung der
Herzfrequenz-Messuhr mit allen Bedien- und Sicherheitshinweisen vertraut.
Benutzen Sie die Herzfrequenz-Messuhr nur wie beschrieben und für die
angegebenen Einsatzbereiche.
Händigen Sie alle Unterlagen bei Weitergabe der Herzfrequenz-Messuhr an
Dritte mit aus.
Bestimmungsgemäße Verwendung
Die Herzfrequenz-Messuhr ist zur Zeitanzeige und zur Verwendung der
beschriebenen Zusatzfunktionen geeignet. Jede andere Verwendung oder
Veränderung der Herzfrequenz-Messuhr gilt als nicht bestimmungsgemäß. Der
Hersteller haftet nicht für Schäden, die durch nicht bestimmungsgemäßen
Gebrauch oder falsche Bedienung verursacht werden. Die Herzfrequenz-Messuhr
ist nicht für den gewerblichen Einsatz vorgesehen.
Lieferumfang
Hinweis: Bitte überprüfen Sie nach dem Kauf den Lieferumfang. Stellen Sie
sicher, dass alle Teile vorhanden und nicht defekt sind.
• Herzfrequenz-Messuhr inkl. Batterie (CR2032)
• Brustgurt inkl. Batterie (CR2032)
• Fahrradhalterung
• Bedienungsanleitung
Page 36

- 69 -
Technische Daten
Betriebstemperaturbereich
0-
50°C
Maße (exkl. Band)
4,4 x 5,2 x 1,5 cm
Displaymaße
2,5 x 2,5 cm
Gewicht
47g
Batterie
CR 2032/3V
Betriebstemperaturbereich
0-
50°C
Maße (exkl. Band)
7 x 3,4 x 1,2 cm
Übertragungsfrequenz
5,3 kHz
Gewicht
53g
Batterie
CR 2032/3V
ACHTUNG:
- 70 -
Herzfrequenz-Messuhr
trockenen und staubfreien Ort. Bei unsachgemäßem Gebrauch der Batterie
besteht Explosions- und Auslaufgefahr.
Sollte die Batterie doch einmal ausgelaufen sein, vermeiden Sie Kontakt mit Haut,
Augen und Schleimhäuten. Benutzen Sie Handschuhe. Bei Kontakt mit
Batteriesäure die betroffenen Stellen mit reichlich klarem Wasser spülen und
umgehend einen Arzt aufsuchen. Entfernen Sie erschöpfte Batterien umgehend aus
dem Gerät, es besteht erhöhte Auslaufgefahr.
Brustgurt
Wichtige Sicherheitshinweise
Sprechen Sie vor Trainingsbeginn mit Ihrem
Arzt. Er kann Sie über das für Sie geeignete Training, die
Trainingsintensität und die Pulsvorgaben aufklären. Diese
Herzfrequenz-Messuhr ist kein medizinisches Gerät und
Batterien
Bewahren Sie Batterien für Kleinkinder unerreichbar auf. Wurde eine Batterie
verschluckt, muss sofort medizinische Hilfe in Anspruch genommen werden.
Batterien/Akkus müssen stets polrichtig eingelegt werden. Reinigen Sie Batterieund Gerätekontakte zuvor bei Bedarf. Versuchen Sie nicht Batterien wieder
aufzuladen, kurzzuschließen oder zu öffnen. Werfen Sie niemals Batterien ins
Feuer, da diese eventuell explodieren können. Wenn Sie das Gerät längere Zeit
nicht benutzen, entnehmen Sie die Batterie und verstauen Sie das Gerät an einem
dient nur zur Unterstützung Ihrer Trainingsgestaltung.
Herzfrequenz-Messuhr nicht in Kinderhände
Dieses Gerät kann von Personen (einschließlich Kindern ab 8 Jahren) mit
verringerten physischen, sensorischen oder mentalen Fähigkeiten oder Mangel an
Erfahrung und Wissen benutzt werden, wenn sie beaufsichtigt oder bezüglich des
sicheren Gebrauchs des Geräts unterwiesen wurden und die daraus
resultierenden Gefahren verstehen. Kinder dürfen nicht mit dem Gerät spielen.
Reinigung und Benutzer-Wartung dürfen nicht von Kindern ohne Beaufsichtigung
durchgeführt werden. Halten Sie auch die Verpackungsfolien von Kindern fern. Es
besteht Erstickungsgefahr.
Brustgurt
ACHTUNG: Träger von Herzschrittmachern sollten vor Benutzung des
Brustgurts mit ihrem Arzt sprechen.
Einsetzen der Batterie in den Brustgurt
Schrauben Sie mit einer Münze den
Batteriefachdeckel von der Rückseite
des Brustgurts auf und setzen Sie die 3V
Batterie mit dem (+) Plus nach oben ein.
Schrauben Sie den Batteriefachdeckel
wieder fest zu.
Batterie: CR2032
Page 37

- 71 -
Tragen des Brustgurts
- 72 -
Passen Sie den Gurt so an, dass er direkt unter den Brustmuskeln eng anliegt.
Befeuchten Sie die Kontaktflächen des Gurtes leicht mit Wasser oder EKG-Gel
(welches Sie in der Apotheke erhalten können). Stellen Sie sicher, dass die
Kontaktflächen immer Hautkontakt haben. Positionieren Sie den Gurt wie auf der
folgenden Abbildung. Achten Sie auf den richtigen Sitz des Brustgurts. Wenn Sie
komplett ausgeatmet haben, sollte der Gurt noch mit ganz leichter Spannung auf
dem Brustkorb aufliegen.
Hochspannungsmasten, Oberleitungen der Bahn oder fließender Autoverkehr
können die Messung beeinflussen oder stören.
Darauf bei der Auswahl der Laufstrecke achten.
Fahrradhalterung
Verwenden der Fahrradhalterung
Sie können die Herzfrequenz-Messuhr am Handgelenk tragen oder mit der
mitgelieferten Fahrradhalterung am Lenker Ihres Fahrrads befestigen.
Drücken Sie die Fahrradhalterung von oben auf die Lenkstange Ihres Lenkers. Bei
Lenkstangen mit besonders großem Durchmesser ist u.U. ein erhöhter
Kraftaufwand nötig, um die Fahrradhalterung zu befestigen. Sie können die
Herzfrequenz-Messuhr nun auf die gleiche Art wie bei Ihrem Handgelenk an der
Fahrradhalterung befestigen. Überschreiten Sie zur Verwendung der
Herzfrequenz-Messuhr bitte nicht die maximale Übertragungsdistanz zum
Brustgurt von 60 cm. Bitte beachten Sie, dass die Funktionen des Schrittzählers
(Distanz, Geschwindigkeit etc.) bei Montage an der Fahrradhalterung nicht
verwendet werden können.
Licht
Drücken Sie kurz LIGHT, um die Hintergrundbeleuchtung vorübergehend zu
aktivieren.
Kontaktfläche
Page 38

- 73 -
Wichtige Informationen zur Bedienung der
- 74 -
Herzfrequenz-Messuhr
Durch Druck auf MODE können Sie den Funktionsmodus der Uhr wechseln oder
beenden, durch Druck auf SEL wählen Sie Ihre persönlichen Daten und mit Druck
auf SET bestätigen Sie die Eingabe.
Drücken Sie MODE um im Menü weiterzugelangen.
Schnelleinstellung
Bei der Einstellung von numerischen Werten können Sie durch Drücken und Halten
von SEL die Schnelleinstellung verwenden.
Inbetriebnahme der Herzfrequenz-Messuhr
Ziehen Sie die Schutzfolie vom Display ab und drücken Sie MODE, SEL oder SET.
Sie werden nun automatisch durch das Grundeinstell-Menü geführt.
Wählen Sie mit SEL zwischen der englischen und der deutschen Sprache und
bestätigen Sie Ihre Wahl mit SET. Wählen Sie auf die gleiche Weise die Einheit
(EINH/UNIT) KM oder Meilen. Anschließend geben Sie das Jahr Ihres
Geburtstages (GEB /BIRtH) ein. Drücken Sie zum Einstellen SEL und bestätigen
Sie Ihre Einstellung durch Druck auf SET. Stellen Sie auf die gleiche Weise Monat
und Tag ein. Wählen Sie dann zwischen der 12 und 24 Stundenanzeige mit SEL
und bestätigen Sie mit SET. Es folgt die Eingabe von Stunden, Minuten und
Sekunden, die Sie jeweils mit SEL eingeben und mit SET bestätigen. Nun geben
Sie auf die gleiche Weise das Jahr, den Monat und den Tag ein und bestätigen
mit SET. Es erscheint nun die Anzeige des Gewichts. Stellen Sie Ihr Gewicht durch
Druck auf SEL ein und bestätigen Sie Ihre Eingabe mit SET. Anschließend stellen
Sie auf die gleiche Weise Ihre Körpergröße ein und bestätigen mit SET. Es
erscheint nun die Anzeige zum Kalibrieren des Schrittzählers (KALI/CALI).
Wählen Sie mit SEL zwischen NEIN/NO und JA/YES und bestätigen Sie mit SET.
Hinweise zur Kalibrierung:
Falls Sie die Uhr ausschließlich beim Gehen verwenden möchten, dann kalibrieren
Sie bitte trotzdem Gehen und Laufen. Kalibrieren Sie in diesem Fall Laufen als
"schnelles Gehen". Sie können diese auch später noch im Pedometermodus
vornehmen.
Wird das Pedometer nicht kalibriert, so greift es auf die Standardwerte zurück und
die angezeigten Werte beim Training können dadurch stark von den tatsächlichen
Werten abweichen. Während des Kalibrierungsvorgangs zeichnet die Uhr Ihr
persönliches Bewegungsprofil auf. Je gleichmäßiger sie sich bewegen und je
länger die Dauer der Profilaufzeichnung ist, desto genauer werden die
angezeigten Werte des Pedometers beim Training. Die Uhr erkennt dank der
Kalibrierung automatisch, ob Sie gehen oder laufen und passt die angezeigten
Werte dementsprechend an. Die angezeigten Werte sind genauer, wenn Sie im
gleichen Rhythmus und der gleichen Geschwindigkeit laufen, wie bei der
Kalibrierung. Tragen Sie die Uhr bei der Kalibrierung und beim Training am
gleichen Handgelenk.
Kalibrierung
Um die Aufnahme zu starten drücken Sie SEL, es erscheint KALI/CALI und
JA/YES. Bestätigen Sie mit SET. Es erscheint LAUFEN, drücken Sie SET um zur
Distanz (DST) zu gelangen. Mit Druck auf SEL können Sie die Entfernung wählen,
bestätigen Sie mit SET. Nun können Sie mit Druck auf SEL die Kalibrierung starten.
Nach erfolgtem Laufen drücken Sie erneut SEL. Es erscheint ENDE/DONE oder
ERROR. Bei ERROR müssen Sie den Vorgang wiederholen. Nach erfolgreicher
Kalibrierung, starten Sie die Kalibrierung GEHEN und fahren wie bei LAUFEN
beschrieben fort.
Page 39

- 75 -
Die Uhr verfügt über 7 Funktionsmodi
- 76 -
Durch Druck auf MODE können Sie den Funktionsmodus der Uhr wechseln.
Die Reihenfolge der Funktionen ist:
Des Weiteren gibt es in den Funktionsmodi verschiedene Unterfunktionen.
Die Unterfunktionen erreichen Sie immer durch Drücken von SEL.
Uhrzeit (ZEIt/TIME)
Wählen Sie zuerst durch Druck auf MODE die Funktion (ZEIt 1/TIME-1) aus.
Durch Druck auf SEL können Sie die Unterfunktionen des Zeitmodus abrufen.
Uhrzeit, Wochentag und Sekunden <-> Uhrzeit und Datum
Drücken und halten Sie SEL, um in die 2. Zeitzone (ZEIt 2 / TIME-2) zu wechseln.
Zeiteinstellung
Drücken und halten Sie SET, es erscheint die 12/24 Stundenanzeige.
Wählen Sie dann zwischen der 12 und 24 Stundenanzeige mit SEL und
bestätigen Sie mit SET. Es folgt die Eingabe von Stunden, Minuten und Sekunden,
die Sie jeweils mit SEL eingeben und mit SET bestätigen. Nun geben Sie auf die
gleiche Weise das Jahr, den Monat und den Tag ein und bestätigen mit SET.
Zeitzone 1 und Zeitzone 2 werden auf gleiche Weise eingestellt.
Weckalarm (ALARM)
Wählen Sie zuerst durch wiederholten Druck auf MODE die Funktion (ALARM).
Drücken Sie SEL um den Alarm zu aktivieren oder zu deaktivieren. Bei aktiviertem
Alarm erscheint das Alarmsymbol .
Drücken und halten Sie SET, um in den Einstellungsmodus zu wechseln. Auf dem
Display blinken die Stunden der Weckzeit.
Drücken Sie zum Einstellen SEL und bestätigen Sie Ihre Einstellung durch Druck auf
SET. Stellen Sie auf die gleiche Weise die Minuten ein.
Drücken Sie bei Ertönen des Alarms eine beliebige Taste, um den Alarm zu
stoppen.
Drücken Sie keine Taste ertönt für ca. 60 Sekunden ein Alarmton und nach 5
Minuten startet der Alarm erneut.
Page 40

- 77 -
Stoppuhr (St-UHR/CHRONO)
- 78 -
Wählen Sie zuerst durch wiederholten Druck auf MODE die Funktion (STUHR/CHRONO).
Drücken Sie zum Starten oder Stoppen der Stoppuhr SEL.
Schrittzähler (PEDO)
Wählen Sie zuerst durch Druck auf MODE die Funktion (PEDO) aus.
Auf dem Display erscheint STEP, Sie können die zurückgelegten Daten ablesen.
Drücken Sie SEL, um zwischen den verschiedenen Funktionen umzuschalten.
Schritte (STEP) und Uhrzeit > Schritte (STEP) und Trainingsdauer > Schritte (STEP)
und Distanz > Schritte (STEP) und Geschwindigkeit, Kalorien (KCAL) und
Fettverbrennung in Gramm, Schritte (STEP) und Puls (HR).
Drücken Sie bei laufender Stoppuhr SET, um eine Rundenzeit zu stoppen. Es
können bis zu 99 Rundenzeiten gestoppt werden. Nach deren Erreichen erscheint
auf dem Display VOLL / FULL.
Drücken Sie bei gestoppter Stoppuhr SET um zur Speicherfunktion „R“ zu
wechseln und die beste Rundenzeit abzulesen (BESte / BEST LAP). Drücken Sie
nun wiederholt SEL um die weiteren Rundenzeiten abzulesen. Drücken Sie SET, um
zur Stoppuhr zurückzukehren.
Drücken und halten Sie SEL, um die Stoppuhr zurückzusetzen.
Hinweis: Die Speicherfunktion kann nur abgerufen werden, wenn mindestens eine
Rundenzeit aufgezeichnet wurde.
Countdownzeit (TIMER) max. 9:59:00
Wählen Sie zuerst durch wiederholten Druck auf MODE die Funktion (TIMER) aus.
Auf dem Display erscheint eine voreingestellte Zeit von 0:3000 Sekunden.
Drücken und halten Sie SET, um den Timer einzustellen.
Auf dem Display blinken die Stunden der Timerzeit. Drücken Sie zum Einstellen SEL
und bestätigen Sie Ihre Einstellung durch Druck auf SET. Stellen Sie die Minuten
auf die gleiche Weise ein. Drücken Sie SEL zum Starten oder Stoppen der
Countdownzeit. Nach Ablauf der Countdownzeit ertönt für ca. 60 Sekunden ein
Signalton. Drücken Sie MODE, SEL oder SET, um den Signalton zu stoppen.
Drücken Sie SET um den Schrittzähler zu starten. Auf dem Dislpay erscheinen die
beiden Füße. Drücken Sie erneut SET um den Schrittzähler zu stoppen.
Schrittzähler Reset
Drücken und halten Sie SET um alle Daten zu löschen
Schrittzähler kalibrieren
Sollten Sie den Schrittzähler noch nicht wie unter „Inbetriebnahme der
Herzfrequenz-Messuhr“ beschrieben, kalibriert haben oder möchten Sie den
Schrittzähler neu kalibrieren, drücken und halten Sie SET.
Es erscheint nun die Anzeige des Gewichts. Stellen Sie ihr Gewicht durch Druck
auf SEL ein und bestätigen Sie Ihre Einstellung durch Druck auf SET. Nun erscheint
die Anzeige der Körpergröße. Stellen Sie Ihre Körperhöhe durch Druck auf SEL
ein und bestätigen Sie Ihre Eingabe durch Druck auf SET. Es erscheint nun die
Anzeige zum Kalibrieren des Schrittzählers (KALI/CALI). Um die Aufnahme zu
starten drücken Sie SEL, es erscheint KALI/CALI und JA/YES. Bestätigen Sie mit
SET. Es erscheint LAUFEN, drücken Sie SET um zur Distanz (DST) zu gelangen. Mit
Druck auf SEL können Sie die Entfernung wählen, bestätigen Sie mit SET. Nun
können Sie mit Druck auf SEL die Kalibrierung starten. Nach erfolgtem Laufen
drücken Sie SEL. Es erscheint ENDE/DONE oder ERROR. Bei ERROR müssen Sie
den Vorgang wiederholen. Nach erfolgreicher Kalibrierung, starten Sie die
Kalibrierung GEHEN und fahren Sie wie unter LAUFEN beschrieben fort.
Page 41

- 79 -
Pulsmesser (PULS/PULSE)
Aktueller Puls
I
- 80 -
Alter > 20 25 30 35 40 45 50 55 60 65
Zone 1
130 126 123 120 117 113 110 107 104 100
Freizeit
to to to to to to to to to to
50-65 %
100 97 95 92 90 87 85 82 80 77
Zone 2
160 156 152 148 144 140 136 132 128 124
Fitness to to to to to to to to to to
65-80 %
130 126 123 120 117 113 110 107 104 100
Zone 3
190 185 180 175 171 166 161 156 152 147
Sport to to to to to to to to to to
80-95
160 156 152 148 144 140 136 132 128 124
Hinweis: Der Pulsmesser funktioniert nur bei Verwendung des Brustgurtes. Es
erscheint im Display der aktuelle Puls und es blinkt das Herzsymbol.
Wählen Sie zuerst durch Druck auf MODE die Funktion (PULS/PULSE) aus.
Durch Druck auf SEL können Sie die Unterfunktionen des Pulsmessers abrufen.
Aktueller Puls (Current Pulse)/MHR (%MHR) > Aktueller Puls (Current Pulse)/Zeit
(TIME) > Aktueller Puls (Current Pulse)/Aktuelle Geschwindigkeit (Current Speed)
> Aktueller Puls (Current Pulse)/Durchschnittlicher Puls (Av. Pulse) „A“ > Aktueller
Puls (Current Pulse)/Höchster Puls (Max. Pulse) „H“ > Aktueller Puls (Current
Pulse)/Niedrigster Puls (Min. Pulse) „L“ > Aktueller Puls (Current Pulse)/Zielzone
(Target zone)
Zielzone
Wenn Sie sich in der Unterfunktion Aktueller Puls und Zielzone befinden, drücken
und halten Sie SET um einen voreingestellen Zielpulsbereich zu wählen oder den
benutzerdefinierten Zielpulsbereich einzustellen. Es erscheint der
benutzerdefinierte Zielpulsbereich (ZN-P/ZN-U). Drücken Sie wiederholt SEL, um
den gewünschten Zielpulsbereich zu wählen: benutzerdefiniert (ZN-P/ZN-U),
Freizeit (ZN-1), Fitness (ZN-2), Sport (ZN-3). In der nachfolgenden Tabelle
erhalten Sie einen Überblick der Zonen 1-3. Um den benutzerdefinierten
Zielpulsbereich einzustellen, wechseln Sie bei Anzeige ZN-P/ZN-U durch Druck
auf SET in den Einstellungsmodus. Es blinkt die Anzeige des unteren Grenzwertes.
Stellen Sie den Wert durch Druck auf SEL und bestättigen Sie die Einstellung durch
Druck auf SET. Stellen Sie auf die gleiche Weise den oberen Grenzwert.
MHR
MHR – Maximale Herzfrequenz
(Prozent der maximalen Herzfrequenz. Maximale Herzfrequenz = 220 – Ihr Alter)
Zielpulsbereich einstellen
ACHTUNG: Klären Sie vor Trainingsbeginn mit Ihrem
Arzt, welcher Zielpulsbereich für Sie geeignet ist. Die
Voreinstellungen sind nur grobe Richtwerte und nicht für jede
Person geeignet.
MHR
MHR
Puls-Alarmfunktion aktivieren/deaktivieren
Wenn Sie sich in der Unterfunktion Aktueller Puls und Zielzone befinden, drücken
Sie kurz SET, um den Zielpuls-Alarm zu aktivieren oder zu deaktivieren. Bei
aktiviertem Alarm erscheint im Display.
Reset der Pulsdaten
Die Pulsdaten werden automatisch jeden Tag um Mitternacht zurückgesetzt.
Page 42

- 81 -
Speicherfunktion (SPEICH/MEMORY)
- 82 -
Wählen Sie zuerst durch Druck auf MODE die Funktion (SPEICH/MEMORY) aus.
Sie können sich nun die gespeicherten Daten der letzten 14 Tage ansehen,
drücken Sie SEL um zur nächsten Funktion zu gelangen.
Es werde die Daten Schritte/Steps, Entfernung/Distance, Kalorien-/Calorien und
Fettverbrennung/Fat Brun und Kilometerzähler/Odometer (Gesamtstrecke) 14
Tage lang gespeichert.
Gesamtspeicher/Total memory (14 Tage)
Die Reichenfolge der Funktionen ist: Gesamte Schritte/Gesamte Entfernung (Total
Step/Total Dist.) > Gesamte Kalorien/Gesamte Fettverbrennung (Total
Calories/Total Fat Burn) > Kilometerzähler/Odometer (G-Dst /ODO) > BMI
(BMI).
Hinweis:
Die aufgezeichneten Tagesdaten der Kalorien, Fettverbrennung,
Durchschnittsgeschwindigkeit und Höchstgeschwindigkeit, werden jede Nacht um
0:00 Uhr zurückgesetzt, aber im 14-Tagesspeicher erfasst.
BMI (Body Mass Index)
Der BMI ist eine Maßzahl für die Bewertung des Körpergewichts eines Menschen.
Ein Wert zwischen 18,5 und 25 gilt bei Erwachsenen als normal. Bei Werten unter
18,5 spricht man von Untergewicht. Bei Werten über 25 spricht man von
Übergewicht. Bei Werten über 30 spricht man von Adipositas (Fettleibigkeit).
Der BMI gibt lediglich einen groben Richtwert an, da er die Statur eines Menschen
und die individuell verschiedene Zusammensetzung des Körpergewichts aus Fettund Muskelgewebe naturgemäß nicht berücksichtigt. Die Herzfrequenzmessuhr
berechnet automatisch den BMI aus Ihren eingegebenen Daten.
Fehlerbehebung
Die Distanzmessung ist sehr ungenau
Die Uhr kann die zurückgelegte Distanz nur anhand der bei der durchgeführten
Kalibrierung gemessenen Schrittlänge schätzen. Führen Sie die Kalibrierung des
Schrittzählers erneut durch. Kalibrieren Sie sowohl für Gehen als auch für Rennen
und führen Sie die Kalibrierung besonders sorgfältig durch.
Ungenauigkeiten können auch durch das Laufen auf unebenen Flächen entstehen.
Der Puls wird nicht oder nicht korrekt angezeigt
Achten Sie auf die korrekte Positionierung und den guten Sitz des Brustgurtes.
Ihre Haut sollte nicht zu trocken oder kalt sein. Die Kontaktflächen können leicht
angefeuchtet werden, um die Funktion zu verbessern.
Elektromagnetische Störquellen können den Empfang beeinträchtigen.
Die Distanz zwischen Gurt und Uhr darf max. 60 cm betragen. Andere
Herzfrequenz-Messuhren in weniger als 2m Abstand können den Empfang stören.
Kabellose Fahrradcomputer können den Empfang stören.
Evtl. müssen die Batterien ersetzt werden.
Das Display ist schlecht lesbar / Die Beleuchtung funktioniert nicht
Ersetzen Sie die Batterien.
Reset
Durch gleichzeitigen Druck auf SET und SEL kann die Uhr total zurückgesetzt
werden, alle gespeichten Daten gehen verloren.
Erst nach dem Rücksetzen können Sie die Sprache und die Maßeinheiten wieder
ändern. Stellen Sie die Herzfrequenzmessuhr wie im Abschnitt „Inbetriebnahmen
der Herzfrequenzmessuhr“ ein.
Die Batterie der Armbanduhr wechseln
Sie können den Batteriewechsel zusammen mit einer Wasserdichtigkeitsprüfung
von einem Uhrmacher durchführen lassen. Um die Batterie selbst zu wechseln,
gehen Sie bitte wie folgt vor:
Page 43

- 83 -
Lösen Sie die Schrauben (1, 2, 3 und 4) auf der Rückseite der Armbanduhr mit
- 84 -
einem kleinen Kreuzschraubendreher. Entfernen Sie den Gehäuseboden und den
Batterieaufkleber. Verwenden Sie ein kleines, flaches Werkzeug, um den Riegel
(5) der Batteriehalterung zu öffnen. Entnehmen Sie die Batterie und setzen Sie eine
neue 3V CR2032 Batterie mit dem (+)-Pol nach oben ein. Prüfen Sie den korrekten
Sitz des Dichtungsringes (6). Verriegeln Sie die Batteriehalterung (5). Kleben Sie
den Batterieaufkleber wieder ein, setzen Sie den Gehäuseboden ein und
schrauben Sie ihn fest.
Batteriestandswarnanzeige
Wenn der Batteriestand des Brustgurtes für den normalen Betrieb nicht mehr
ausreicht, erscheint auf dem Display der Armbanduhr "GURT/BELT" und
"BATT/LO BAT". Wechseln Sie die Batterie des Brustgurtes wie im Kapitel
"Brustgurt" beschrieben.
Wasserdichtigkeit
Wasserdicht bis 3 bar. Die bar-Angabe bezieht sich auf den Luftüberdruck,
welcher im Rahmen der Wasserdichtigkeitsprüfung angewandt wurde (DIN8310).
Wasserbeständigkeit des Brustgurtes
Wasserbeständigkeit nach IEC 60529 IPX7.
Reinigungshinweis
Reinigen Sie die Herzfrequenz-Messuhr nur mit einem trockenen, fusselfreien Tuch,
wie es z.B. zur Reinigung von Brillengläsern verwendet wird.
Nach jedem Tragen reinigen Sie den Brustgurt und das Uhrenarmband mit
lauwarmen Wasser oder einer milden Seifenwasserlösung und einem Schwamm.
Achten Sie darauf, dass die Armbanduhr dabei nicht nass wird. Trocknen Sie alle
Teile mit einem Tuch ab und hängen Sie den Gurt zum Trocknen auf. Schweiß und
Verunreinigungen beeinträchtigen die Funktion des Senders.
Entsorgung der Herzfrequenz-Messuhr
Diese Herzfrequenz-Messuhr darf nicht im normalen Hausmüll entsorgt
werden. Entsorgen Sie die Herzfrequenz-Messuhr über einen
zugelassenen Entsorgungsbetrieb oder über Ihre kommunale
Entsorgungseinrichtung. Beachten Sie die aktuell geltenden Vorschriften. Setzen
Sie sich im Zweifelsfall mit Ihrer Entsorgungseinrichtung in Verbindung.
Entsorgung der Batterien
Bitte entsorgen Sie Ihre Batterien sachgerecht in extra hierfür aufgestellten
Gefäßen im Handel. Batterien gehören nicht in den Hausmüll. Entsorgen
Sie Batterien bitte über einen zugelassenen Entsorgungsbetrieb oder über Ihre
kommunale Entsorgungseinrichtung. Beachten Sie die aktuell geltenden
Vorschriften. Setzen Sie sich im Zweifelsfall mit Ihrer Entsorgungseinrichtung in
Verbindung.
Konformitätserklärung
Dieses Produkt entspricht bei bestimmungsgemäßer Verwendung den
grundlegenden Anforderungen des § 3 und den übrigen einschlägigen
Bestimmungen des FTEG (Artikel 3 der R&TTE).
Die Konformitätserklärung können Sie hier anfordern:
conformity@digi-tech-gmbh.com
Page 44

- 85 -
Garantie der digi-tech gmbh
- 86 -
Sie erhalten auf diese Herzfrequenz-Messuhr 3 Jahre Garantie ab Kaufdatum. Im
Falle von Mängeln dieser Herzfrequenz-Messuhr stehen Ihnen gegen den
Verkäufer des Produkts gesetzliche Rechte zu. Diese gesetzlichen Rechte werden
durch unsere im Folgenden dargestellte Garantie nicht eingeschränkt.
Garantiebedingungen
Die Garantiefrist beginnt mit dem Kaufdatum. Bitte bewahren Sie den Original
Kassenbon gut auf. Diese Unterlage wird als Nachweis für den Kauf benötigt. Tritt
innerhalb von drei Jahren ab dem Kaufdatum dieser Herzfrequenz-Messuhr ein
Material- oder Fabrikationsfehler auf, wird die Herzfrequenz-Messuhr von uns –
nach unserer Wahl – für Sie kostenlos repariert oder ersetzt. Diese
Garantieleistung setzt voraus, dass innerhalb der Drei-Jahres-Frist die defekte
Herzfrequenz-Messuhr und der Kaufbeleg (Kassenbon) vorgelegt und schriftlich
kurz beschrieben wird, worin der Mangel besteht und wann er aufgetreten ist.
Wenn der Defekt von unserer Garantie gedeckt ist, erhalten Sie die reparierte
oder eine neue Herzfrequenz-Messuhr zurück. Mit Reparatur oder Austausch des
Produkts beginnt kein neuer Garantiezeitraum.
Garantiezeit und gesetzliche Mängelansprüche
Die Garantiezeit wird durch die Gewährleistung nicht verlängert. Dies gilt auch für
ersetzte und reparierte Teile. Eventuell schon beim Kauf vorhandene Schäden und
Mängel müssen sofort nach dem Auspacken gemeldet werden. Nach Ablauf der
Garantiezeit anfallende Reparaturen sind kostenpflichtig.
Garantieumfang
Die Herzfrequenz-Messuhr wurde nach strengen Qualitätsrichtlinien sorgfältig
produziert und vor Anlieferung gewissenhaft geprüft. Die Garantieleistung gilt für
Material- oder Fabrikationsfehler. Diese Garantie erstreckt sich nicht auf
Produktteile, die normaler Abnutzung ausgesetzt sind und daher als Verschleißteile
angesehen werden können oder für Beschädigungen an zerbrechlichen Teilen, z.
B. Schalter, Akkus oder die aus Glas gefertigt sind.
Diese Garantie verfällt, wenn die Herzfrequenz-Messuhr beschädigt, nicht
sachgemäß benutzt oder gewartet wurde. Für eine sachgemäße Benutzung der
Herzfrequenz-Messuhr sind alle in der Bedienungsanleitung aufgeführten
Anweisungen genau einzuhalten. Verwendungszwecke und Handlungen, von
denen in der Bedienungsanleitung abgeraten oder vor denen gewarnt wird, sind
unbedingt zu vermeiden.
Die Herzfrequenz-Messuhr ist lediglich für den privaten und nicht für den
gewerblichen Gebrauch bestimmt. Bei missbräuchlicher und unsachgemäßer
Behandlung, Gewaltanwendung und bei Eingriffen, die nicht von unserer
autorisierten Service-Niederlassung vorgenommen wurden, erlischt die Garantie.
Abwicklung im Garantiefall
Um eine schnelle Bearbeitung ihres Anliegens zu gewährleisten, folgen Sie bitte
den folgenden Hinweisen:
• Bitte halten Sie für alle Anfragen den Kassenbon und die Artikelnummer
(103142) als Nachweis für den Kauf bereit.
• Die Artikelnummer entnehmen Sie bitte dem Typenschild, einer Gravur, auf dem
Titelblatt Ihrer Anleitung (unten links) oder als Aufkleber auf der Rück- oder
Unterseite.
• Sollten Funktionsfehler oder sonstige Mängel auftreten kontaktieren Sie
zunächst die nachfolgende Serviceabteilung telefonisch oder per E-Mail.
• Eine als defekt erfasste Herzfrequenz-Messuhr können sie anschließend unter
Beifügung des Kaufbelegs (Kassenbon) und der Angabe, worin der Mangel
besteht und wann er aufgetreten ist, für Sie portofrei an die Ihnen mitgeteilte
Service Anschrift übersenden.
Auf www.lidl-service.com können Sie diese und viele weitere
Handbücher, Produktvideos und Software herunterladen.
Page 45

- 87 -
Service
IAN
103142
IAN
103142
Name: Inter-Quartz GmbH
Str.: Valterweg 27A
Stadt: Eppstein 65817
Land: Deutschland
E-Mail: support@inter-quartz.de
Telefon: +49 (0)6198 571825
0800 142 315
0800 004449
Lieferant
Bitte beachten Sie, dass die folgende Anschrift keine Serviceanschrift ist.
Kontaktieren Sie zunächst die oben benannte Servicestelle.
Name: digi-tech gmbh
Str.: Valterweg 27A
Stadt: Eppstein 65817
Land: Deutschland
digi-tech gmbh
Valterweg 27A
D-65817 Eppstein
Last information update ·
Stav informací · Stav informácií
Stand der Informationen: 10/2014
Art.-Nr.: 1-LD3875
 Loading...