

Page 1
IAN
103142
Medidor de frecuencia cardíaca
· 10/2014 Art.-Nr.:
1-LD3875
Medidor de frecuencia
cardíaca
Indicaciones sobre su utilización y su
seguridad
Heart Rate Monitor
Usage and safety instructions
Medidor de frequência
cardíaca
Avisos de utilização e segurança
Herzfrequenz-Messuhr
Bedienungs- und Sicherheitshinweise
Indicaciones sobre su utilización y su seguridad......................................... - 1 -
Avisos de utilização e segurança ............................................................... - 23 -
Usage and safety instructions ..................................................................... - 45 -
Bedienungs- und Sicherheitshinweise ........................................................ - 67 -
Page 2

- 1 -
- 2 -
Indicaciones sobre su utilización y su
seguridad
Índice
Índice ........................................................................................................................... - 1 -
Introducción ................................................................................................................ - 3 -
Uso conforme a su propósito .................................................................................... - 3 -
Entrega ........................................................................................................................ - 3 -
Datos Técnicos ............................................................................................................ - 4 -
Información Importante de Seguridad
Información Importante de Seguridad ................................................................. - 4 -
Información Importante de SeguridadInformación Importante de Seguridad
Pilas ...................................................................................................................... - 4 -
No dejar el medidor de frecuencia cardíaca al alcance de niños ............... - 5 -
Correa de pecho ........................................................................................................ - 5 -
Soporte para bicicleta ............................................................................................... - 7 -
Luz ................................................................................................................................ - 7 -
Informaciones importantes sobre el manejo del
medidor de frecuencia cardíaca .............................................................................. - 8 -
Ajuste rápido ....................................................................................................... - 8 -
Puesta en funcionamiento del medidor de frecuencia cardíaca ........................... - 8 -
Calibración ......................................................................................................... - 9 -
El reloj tiene 7 modos de funcionamiento ........................................................ - 9 -
Hora (ZEIt/TIME) .................................................................................................... - 10 -
Ajuste de la hora ............................................................................................. - 11 -
Despertador (ALARM) ............................................................................................ - 11 -
Cronómetro (ST-UHR/CHRONO) ........................................................................ - 11 -
Temporizador (TIMER) máx. 9:59:00 .................................................................. - 12 -
Podómetro (PEDO) .................................................................................................. - 12 -
Calibración del podómetro ............................................................................ - 13 -
Pulsómetro (PULS/PULSE) ...................................................................................... - 13 -
Ajuste del área de pulso objetivo .................................................................. - 14 -
Activar / desactivar la función alarma de pulso ......................................... - 15 -
Reinicialización (Reset) de los datos del pulso ............................................ - 15 -
Función de memoria (SPEICH/MEMORY) .......................................................... - 15 -
Memoria total / Total memory (14 días) ..................................................... - 16 -
IMC (BMI-Body Mass Index) ......................................................................... - 16 -
Solución de problemas ........................................................................................... - 16 -
Reinicialización (Reset) ........................................................................................... - 17 -
Cambio de la pila del medidor de frecuencia cardíaca..................................... - 17 -
Advertencia del estado de la batería.................................................................... - 18 -
Resistencia al agua ................................................................................................. - 18 -
Resistencia al agua de la banda pectoral ............................................................ - 18 -
Nota relativa a la limpieza .................................................................................... - 19 -
Eliminación y reciclaje del medidor de frecuencia cardíaca ............................. - 19 -
Eliminación de las pilas .......................................................................................... - 19 -
Declaración de conformidad ................................................................................. - 19 -
Garantía de digi-tech gmbh ................................................................................... - 19 -
Condiciones de la garantía .................................................................................... - 20 -
Duración de la garantía y derecho de reclamación ........................................... - 20 -
Ámbito de la garantía ............................................................................................. - 20 -
Procedimiento en caso de garantía....................................................................... - 21 -
Servicio técnico........................................................................................................ - 22 -
Proveedor ................................................................................................................. - 22 -
Page 3
- 3 -
- 4 -
Temperatura de funcionamiento
0-
50°C
Dimensiones
4,4 x 5,2
x 1,5
cm
Visualización
2,5 x
2,5 cm
Peso
47g
Pila CR2032/3V
Temperatura
de funcionamiento
0-
50°C
Dimensiones
7 x 3,
4 x 1,2 cm
Frecuencia
5,3 kHz
Peso
53g
Pila CR2032/3V
PRECAUCIÓN:
Medidor de frecuencia cardíaca
Introducción
Enhorabuena por la compra de su nuevo medidor de frecuencia cardíaca Se ha
decidido Ud. por un dispositivo de alta calidad. Este manual de instrucciones
forma parte del equipamiento del medidor de frecuencia cardíaca. Contiene
indicaciones importantes sobre a su seguridad, su manejo y su eliminación como
residuo. Antes de comenzar a utilizar su medidor de frecuencia cardíaca,
familiarícese con todas las indicaciones de uso y seguridad. Utilice el medidor de
frecuencia cardíaca únicamente de la forma y para los ámbitos de aplicación
indicados.
En caso de ceder el medidor de frecuencia cardíaca a terceros, entrégueles
también ésta documentación.
Uso conforme a su propósito
El medidor de frecuencia cardíaca está diseñado para indicar la fecha y la hora,
así como para las funciones adicionales que aquí se detallan. La utilización para
cualquier otro propósito o la realización de modificaciones en el medidor de
frecuencia cardíaca no considera adecuada a sus propósitos. El fabricante no se
hace responsable de los daños causados por una utilización no adecuada a sus
propósitos o por una utilización errónea. El medidor de frecuencia cardíaca no es
apto para un uso de carácter comercial o industrial.
Entrega
Nota: Por favor, revise el contenido del paquete después de la compra.
Asegúrese de que todas las partes estén presentes y no defectuosas.
• Medidor de frecuencia cardíaca, incluida la pila (CR2032)
• Banda pectoral, incluida la pila (CR2032)
• Soporte para bicicleta
• Manual del usuario
Datos Técnicos
Medidor de frecuencia cardíaca
Banda pectoral
Información Importante de Seguridad
Antes de comenzar con el entrenamiento,
consulte a su médico. Él le podrá indicar cuál es el tipo de
entrenamiento y los valores de ritmo cardíaco más
adecuados para usted. Este medidor de frecuencia cardíaca
no es un instrumento médico y solo sirve como apoyo a la
planificación del entrenamiento.
Pilas
Mantenga las pilas fuera del alcance de los niños pequeños. En caso de haber
sido tragada una pila, deverá ser prestada inmediatamente ayuda médica.
Las pilas/baterías han de colocarse siempre teniendo en atención la polaridad
correcta. Siendo necesario, limpie primero los contactos de las pilas y del
aparato. No intente cargar, provocar cortocircuito o abrir las pilas. Nunca tire las
Page 4
- 5 -
Pila: CR2032
- 6 -
Superficies de
c
ontacto
pilas al fuego, porque podrían explotar. Si no usa el aparato durante un periodo
de tiempo prolongado, retire la pila y guarde el aparato en un lugar seco y sin
polvo. El uso inadequado de las pilas puede provocar explosión o derrame.
Si la pila ha derramado, evite el contacto con la piel, los ojos o las mucosas. Use
guantes. En caso de contacto con el ácido de la pila lave las partes afectadas con
bastante água limpia y vaya a ver inmediatamente a un médico. Retire
inmediatamente las pilas gastadas del aparato, hay peligro elevado de derrame.
No dejar el medidor de frecuencia cardíaca al alcance de niños
Este aparato puede ser usado por personas (incluídos niños a partir de los 8
años) con capacidades físicas , sensoriales o mentales disminuídas o con falta de
experiencia y conocimentos siempre que sean supervisionadas o hayan sido
instruídas sobre el uso seguro del aparato y hayan comprendido los peligros
resultantes. Los niños no deben jugar con el aparato. Los niños no deben limpiar o
mantener el aparato sin supervisión. Mantenga las películas del embalaje fuera
del alcance de los niños. Hay riesgo de asfixia.
Correa de pecho
ATENCION: Portadores de marcapasos deben consultar con su
médico, antes de usar la banda pectoral.
Inserción de la pila en la correa del pecho
Use una moneda para desenroscar
la tapa del compartimiento de la
parte posterior de la correa de pecho
y reemplaze la pila con el 3V (+)
hacia arriba. Atornille la tapa de
compartimento de pila de nuevo.
Ponerse la correa de pecho
Ajuste la correa de tal manera para que esté sujeto directamente bajo los
músculos del pecho. Humedezca las superficies de contacto de la cinta
ligeramente con agua o gel de ECG (que se puede obtener en la farmacia).
Asegúrese de que las superficies de contacto siempre tienen contacto con la piel.
Coloque la correa como en la siguiente figura. Preste atención al ajuste de la
correa. Si usted ha exhalado por completo, la correa debe descansar aún con la
tensión muy ligera en el pecho. Torres de alta tensión, rieles en el techo del tren o
el tráfico de automóviles puede molestar o interferir con la medición.
Tenga cuidado en la selección de la ruta de correr.
Page 5
- 7 -
- 8 -
Soporte para bicicleta
Usando el soporte para bicicleta
Puede colocarse el medidor de frecuencia cardíaca en la muñeca o puede
también sujetarlo al manillar de su bicicleta utilizando el soporte que se incluye en
el equipo. Presione desde arriba sobre el soporte para colocarlo sobre el manillar
de su bicicleta. En manillares de diámetro especialmente grande puede tener que
presionarse con una cierta fuerza para colocar este soporte. Sujete el medidor de
frecuencia cardíaca al soporte como si se lo colocara en la muñeca. Para la
transmisión de datos a la banda pectoral es necesario no sobrepasar una
distancia de 60 cm entre la banda y el medidor de frecuencia cardíaca.
Tenga en cuenta que las funciones del contador de pasos (distancia, velocidad,
etc) una vez instalado en el soporte para bicicleta no se pueden utilizar.
Informaciones importantes sobre el manejo del
medidor de frecuencia cardíaca
Presionando MODE puede Usted cambiar o terminar el modo de funcionamiento
de su reloj, presionando SEL elija Usted sus datos personales y confirme su
elección presionando SET. Presione MODE para ingresar al menú.
Ajuste rápido
Para el ajuste de valores numéricos, puede Usted utilizar el ajuste rápido
presionando y manteniendo presionado SEL.
Luz
Pulse brevemente LIGHT para activar la iluminación de fondo de forma temporal.
Puesta en funcionamiento del medidor de frecuencia
cardíaca
Remueva la película protectora de la pantalla (display) y presione MODE, SEL o
SET.
Usted se moverá automáticamente a través del menú básico de ajuste. Elija con
SEL entre el idioma inglés o alemán (DEU/ENG) y confirme su elección con SET.
Elija de la misma manera, la unidad (EINH/UNIT) KM o Millas. A continuación
introduzca el año de su nacimiento (GEB/BIRTH). Presione para ajustar SEL y
confirme presionando SET. Configure de la misma manera el mes y el día de su
nacimiento. Elija luego con SEL entre el modo de visualización de 12 ó 24 horas
(ZEIt/TIME) y confirme con SET. A continuación ajuste las horas, minutos y
segundos respectivamente con SEL y confirme con SET. Ajuste de idéntica forma el
Page 6
- 9 -
- 10 -
año, el mes y el día y corfirme con SET. Aparece ahora la visualización del peso.
Presionando SEL ingrese su peso y confirme con SET. De la misma forma, ingrese
su estatura y confirme con SET. Aperece la visualización para calibrar el
podómetro (KALI/CALI). Elija con SEL entre NEIN/NO y JA/YES y confirme con
SET.
Informaciones sobre la calibración:
Si Usted desea utilizar su reloj exclusivamente para caminar, calibre no obstante
por favor también para caminar y correr . Calibre en éste caso correr como
“marcha rápida”. Usted puede también más tarde efectuar ésto en el modo de
podómetro. Si el podómetro no está calibrado, éste recurre a los valores estándar
y los valores indicados en el entrenamiento pueden diferir mucho de los valores
reales. Durante el proceso de calibración, el reloj registra su perfil de movimiento
personal. Mientras más regular sea su movimiento y mientras más dure el registro
de su perfil, cuánto más exactos serán los valores visualizados del podómetro
durante el entrenamiento. El reloj detecta de forma automática gracias a la
calibración, si usted está caminando (marchando) o corriendo, y ajusta los
correspondientes valores a visualizar. Los valores indicados son más exactos, si
camina al mismo ritmo y velocidad, como en la calibración. Lleve puesto el reloj
en la misma muñeca a la hora de la calibración y durante el entrenamiento.
Calibración
Para iniciar la grabación presione SEL, aparece KALI/CALI y JA/YES. Confirme
con SET. Aparece LAUFEN/RUN, presione SET para entrar a la distancia (DST).
Presionando SEL puede elegir la distancia, confirme con SET. Ahora puede iniciar
la calibración presionando SEL . Luego de efectuar la carrera, presione
nuevamente SEL. Aparece ENDE/DONE o ERROR. Si aparece ERROR, debe
repetir el procedimiento. Si la calibración fue excitosa, inicie la calibración para
GEHEN/WALK y proceda de la misma manera como fue descrita para calibrar
LAUFEN/RUN.
Además hay en los modos de funcionamientos diferentes sub-funciones.
A las sub-funciones se puede llegar siempre pulsando SEL.
Hora (ZEIt/TIME)
Elija primero, presionando MODE, la función (ZEIt 1/TIME-1).
Presionando SEL puede llamar las sub-funciones del modo de la hora.
Hora, día de la semana y segundos < - > Hora y fecha
Presione y mantenga presionado SEL, para cambiar a la segunda zona horaria
(ZEIt 2 / TIME-2)
El reloj tiene 7 modos de funcionamiento
Presionando MODE puede cambiar el modo de funcionamiento del reloj.
El orden de las funciones es:
Page 7
- 11 -
- 12 -
Ajuste de la hora
Presione y mantenga presionado SET, aparece la visualización de 12/24 horas.
Elija entonces entre la visualización de 12 ó 24 horas con SEL y confirme con
SET. Continúe con el ajuste de las horas, minutos y segundos, los cuales ajusta
respectivamente con SEL y confirma con SET. Ahora ajuste de la misma manera el
año, el mes y el día y confirme con SET.
Zona horaria 1 y zona horaria 2 se ajustan de la misma forma.
Despertador (ALARM)
Elija primero, presionando nuevamente MODE, la función (ALARM).
Presione SEL para activar o desactivar la alarma. Cuando la alarma está activada
aparece en su pantalla el símbolo de la alarma .
Presione y mantenga presionado SET, para cambiar al modo de ajuste. En el
display parpadean las horas de la hora del despertador.
Presione para ajustar SEL y confirme su elección presionando SET. Ajuste de la
misma manera los minutos.
Cuando suene la alarma presione cualquier botón para detener la alarma.
Si Usted no presiona ningún botón, suena el tono de la alarma por aprox. 60
segundos y luego de 5 minutos suena la alarma nuevamente.
Cronómetro (ST-UHR/CHRONO)
Escoja primero, presionando nuevamente MODE, la función (STUHR/CHRONO).
Presione SEL para iniciar o detener el cronómetro.
Presione SET, para que mientras esté en marcha el cronómetro, pueda finalizar un
tiempo de vuelta (L01). Pueden detenerse hasta 99 tiempos de vuelta (L99). Al
alcanzarlas aparece en el display VOLL/FULL. Presione SET cuando el
cronómetro esté parado, para cambiar a la función memoria (R) y leer el mejor
tiempo de vuelta (BESTe/BEST LAP). Presione ahora repetidamente SEL para
poder leer los otros tiempos de vuelta. Presione SET, para regresar al cronómetro.
Presione y mantenga presionado SEL, para reinicializar el cronómetro.
Nota: Sólo se puede acceder a la función de memoria, si por lo menos se ha
registrado un tiempo de vuelta.
Temporizador (TIMER) máx. 9:59:00
Elija primero, presionando nuevamente MODE, la función (TIMER).
En el display aparece un tiempo prefijado de 0:3000 segundos. Presione y
mantenga presionado SET, para ajustar el temporizador. En la pantalla aparecen
intermitentemente las horas del tiempo del temporizador. Presione SEL para
ajustar y confirme su elección presionando SET. Ajuste los minutos de idéntica
forma. Presione SEL para iniciar o detener el temporizador. Al finalizar la
temporización sonará una señal por aprox. 60 segundos. Presione MODE, SEL o
SET, para detener la señal.
Podómetro (PEDO)
Elija primero, presionando nuevamente MODE, la función (PEDO).
En la pantalla se visualiza STEP, Usted puede leer los datos registrados. Presione
SEL, para cambiar entre las diferentes funciones.
Page 8
- 13 -
- 14 -
Pulso actual
I
Pasos (STEP) y hora > Pasos (STEP) y duración del entrenamiento (T) > Pasos
(STEP) y distancia (D) > Pasos (STEP) y velocidad (S) , Calorías (KCAL) y quema
de grasas en gramos (g), pasos (STEP) y pulso (HR).
Presione SET, para iniciar el podómetro. En la pantalla aparecen los dos pies.
Presione nuevamente SET para detener el podómetro.
Reinicialización (Reset) del Podómetro
Presione y mantenga presionado SET para borrar todos los datos.
Elija primero, presionando MODE, la función (PULS/PULSE).
Presionando SEL puede activar las sub-funciones del pulsómetro.
Pulso actual / MHR (%) > Pulso actual / Hora (Zeit) > Pulso actual / Velocidad
actual (Km/h) > Pulso actual / Pulso promedio (A) > Pulso actual / Pulso máximo
(H) > Pulso ctual / Pulso mínimo (L) > Pulso actual / Zona objetivo
Zona
objetivo
Calibración del podómetro
Si todavía no ha calibrado su podómetro, como está descrito en “Puesta en
funcionamiento de su Medidor de frecuencia cardíaca”, o si desea calibrarlo
nuevamente, presione y mantenga presionado SET. Aparece ahora la
visualización del peso. Ajuste su peso presionando SEL y confirme su elección
presionando SET. Aparece la visualización de su estatura. Ajuste la altura
corporal presionando SEL y confirme su elección presionando SET. Aparece la
visualización para calibrar el podómetro (KALI/CALI). Para iniciar la grabación
presione SEL, aparece KALI/CALI y JA/YES. Confirme con SET. Aparece
LAUFEN/RUN, presione SET para llegar a la distancia (DST). Presionando SEL
puede elejir la distancia y confirme con SET. Ahora puede iniciar la calibración
presionando SEL. Luego de efectuar la carrera, presione SEL. Aparece
ENDE/DONE o ERROR. Si aparece ERROR, debe repetir el procedimiento. Si la
calibración fue excitosa, inicie la calibración para GEHEN/WALK y proceda de
la misma manera como fue descrita para calibrar LAUFEN/RUN.
Pulsómetro (PULS/PULSE)
Nota: El pulsómetro funciona únicamente utilizando la banda pectoral. Aparece
en la pantalla el pulso actual y parpadea el símbolo del corazón.
MHR- Frecuencia cardíaca máxima
(Porcentaje de la frecuencia cardíaca máxima. Frecuencia cardíaca máxima =
220 – su edad)
Ajuste del área de pulso objetivo
ATENCION : Aclare con su médico antes de iniciar con
el entrenamiento, cuál área de pulso objetivo es adecuada
para Usted. Los preajustes son sólo valores referenciales
aproximados y no apropiados para cada persona.
Cuando Usted se encuentre en la sub-función Pulso actual y Zona objetivo
presione y mantenga presionado SET para elegir una de las áreas de pulso
objetivo preajustadas o para ajustar un área de pulso objetivo definida por el
usuario (personalizada). Aparece el área de pulso objetivo personalizada (ZNP/ZN-U). Presione nuevamente SEL para elegir el área de pulso objetivo: área de
pulso objetivo personalizada (ZN-P/ZN-U), Tiempo libre (ZN-1), Fitness (ZN-
Pulso actual y Zona objetivo,
Pulso actual y Zona objetivoPulso actual y Zona objetivo
Page 9
- 15 -
Edad > 20 25 30 35 40 45 50 55 60 65
Zona 1
130 126 123 120 117 113 110 107 104 100
Tiempo
a a a a a a a a a a
50-65 %
100 97 95 92 90 87 85 82 80 77
Zona 2 160 156 152 148 144 140 136 132 128 124
Fitness a a a a a a a a a a
65-80 %
130 126 123 120 117 113 110 107 104 100
Zona 3 190 185 180 175 171 166 161 156 152 147
Deportes
a a a a a a a a a a
80-95
160 156 152 148 144 140 136 132 128 124
- 16 -
2), Deportes (ZN-3). En la siguiente Tabla puede ver una vista de las zonas 1-3.
Para ajustar el área de pulso objetivo personalizada, cambie en la visualización
de ZN-P/ZN-U, presionando SET, al modo de ajuste. Parpadea la visualización
del valor mínimo. Ajuste el valor presionando SEL y confirme su elección
presionando SET. Ajuste de idéntica forma el valor máximo.
libre
MHR
MHR
Serán registrados los datos pasos, distancia (km), quema de calorías y grasas (g)
y contador de kilómetros (G-DSt) por 14 días.
Memoria total / Total memory (14 días)
El orden de las funciones es: Pasos totales / Distancia total (Total Step/Total Dist.)
> Calorías totales / Quema total de grasas (Total Calories/Total Fat Burn) >
Contador de kilómetros / Odómetro (G-DSt /ODO) > IMC (BMI).
Nota:
Los datos diarios registrados de calorías, quema de grasas, velocidad promedio y
velocidad máxima, serán cada noche a las 0:00 horas reinicializados, pero
serán registrados en la memoria de 14 días.
MHR
Activar / desactivar la función alarma de pulso
Cuando se encuentre en la sub-función del pulso actual y zona objetivo, presione
brevemente SET, para activar o desactivar la alarma de pulso objetivo. Cuando
la alarma está activada se visualiza en la pantalla el símbolo .
Reinicialización (Reset) de los datos del pulso
Los datos del pulso se reinicializan automáticamente cada día a la medianoche.
Función de memoria (SPEICH/MEMORY)
Elija primero, presionando MODE, la función (SPEICH/MEMORY). Usted sólo
puede ver los datos registrados en los últimos 14 días, presione SEL para ingresar
a la siguiente función.
IMC (BMI-Body Mass Index)
El IMC es una medida para evaluar el peso de un ser humano.
El valor de 18,5 a 25 cuenta como normal para los adultos. Valores por debajo
de 18,5 indican falta de peso. Valores por encima de 25 indican exceso de peso.
Valores por encima de 30 se le llama Adipositas (Obesidad). El IMC constituye
solamente una guía aproximada, dado que no considera individualmente la
estatura de un hombre y la composición diferente de peso del cuerpo.
El medidor de frecuencia cardíaca calcula automáticamente el IMC de su datos
registrados.
Solución de problemas
La medición de la distancia es muy impreciso.
El reloj se puede calcular la distancia recorrida utilizando sólo la calibración
realizada con la longitud de paso medido.
Page 10
- 17 -
- 18 -
Realice la calibración del contador de pasos de nuevo. Calibrar tanto para
caminar, así como para correr y realize la calibración con mucho cuidado.
Las imprecisiones también puede resultar de caminar sobre superficies irregulares.
El pulso no es visualizado o no se visualiza correctamente
Busca la posición correcta y el buen ajuste de la correa de pecho
Su piel no debe ser demasiado seca o fría
Las superficies de contacto pueden ser fácilmente remojado para mejorar la
función
La interferencia electromagnética puede afectar a la recepción
La distancia entre el cinturón y el reloj puede ser de 60cm al máximo
Otros contadores de pasos en menos de 2 m distancia puede interferir con la
recepción
Computadora de bicicletas pueden interferir con la recepción
Posiblemente las pilas deben ser reemplazadas
La pantalla no es legible / La luz no funciona
Reemplace las pilas
nueva con el polo (+) hacia arriba. Compruebe que el anillo estanco (6) está
correctamente colocado y vuelva a cerrar el pestillo de la ranura de la pila (5).
Vuelva a pegar la pegatina de la pila, encaje la tapa y atorníllela.
Advertencia del estado de la batería
Si el nivel de la bateria de la banda pectoral para el funcionamiento normal ya
no es suficiente, aparece en la pantalla del reloj "GURT / BELT" y " BATT /LO
BAT ". Vuelva a colocar la bacteria nueva en la correa del pecho como se
describe en la sección de "pecho".
Reinicialización (Reset)
Presionando simultáneamente SET y SEL puede reinicializar el reloj
completamente, todos los datos registrados se perderán. Recién luego de que se
reinicialice puede cambiar el idioma y las unidades nuevamente. Ajuste su
medidor de frecuencia cardíaca como se indica en “Puesta en funcionamiento de
su medidor de frecuencia cardíaca”.
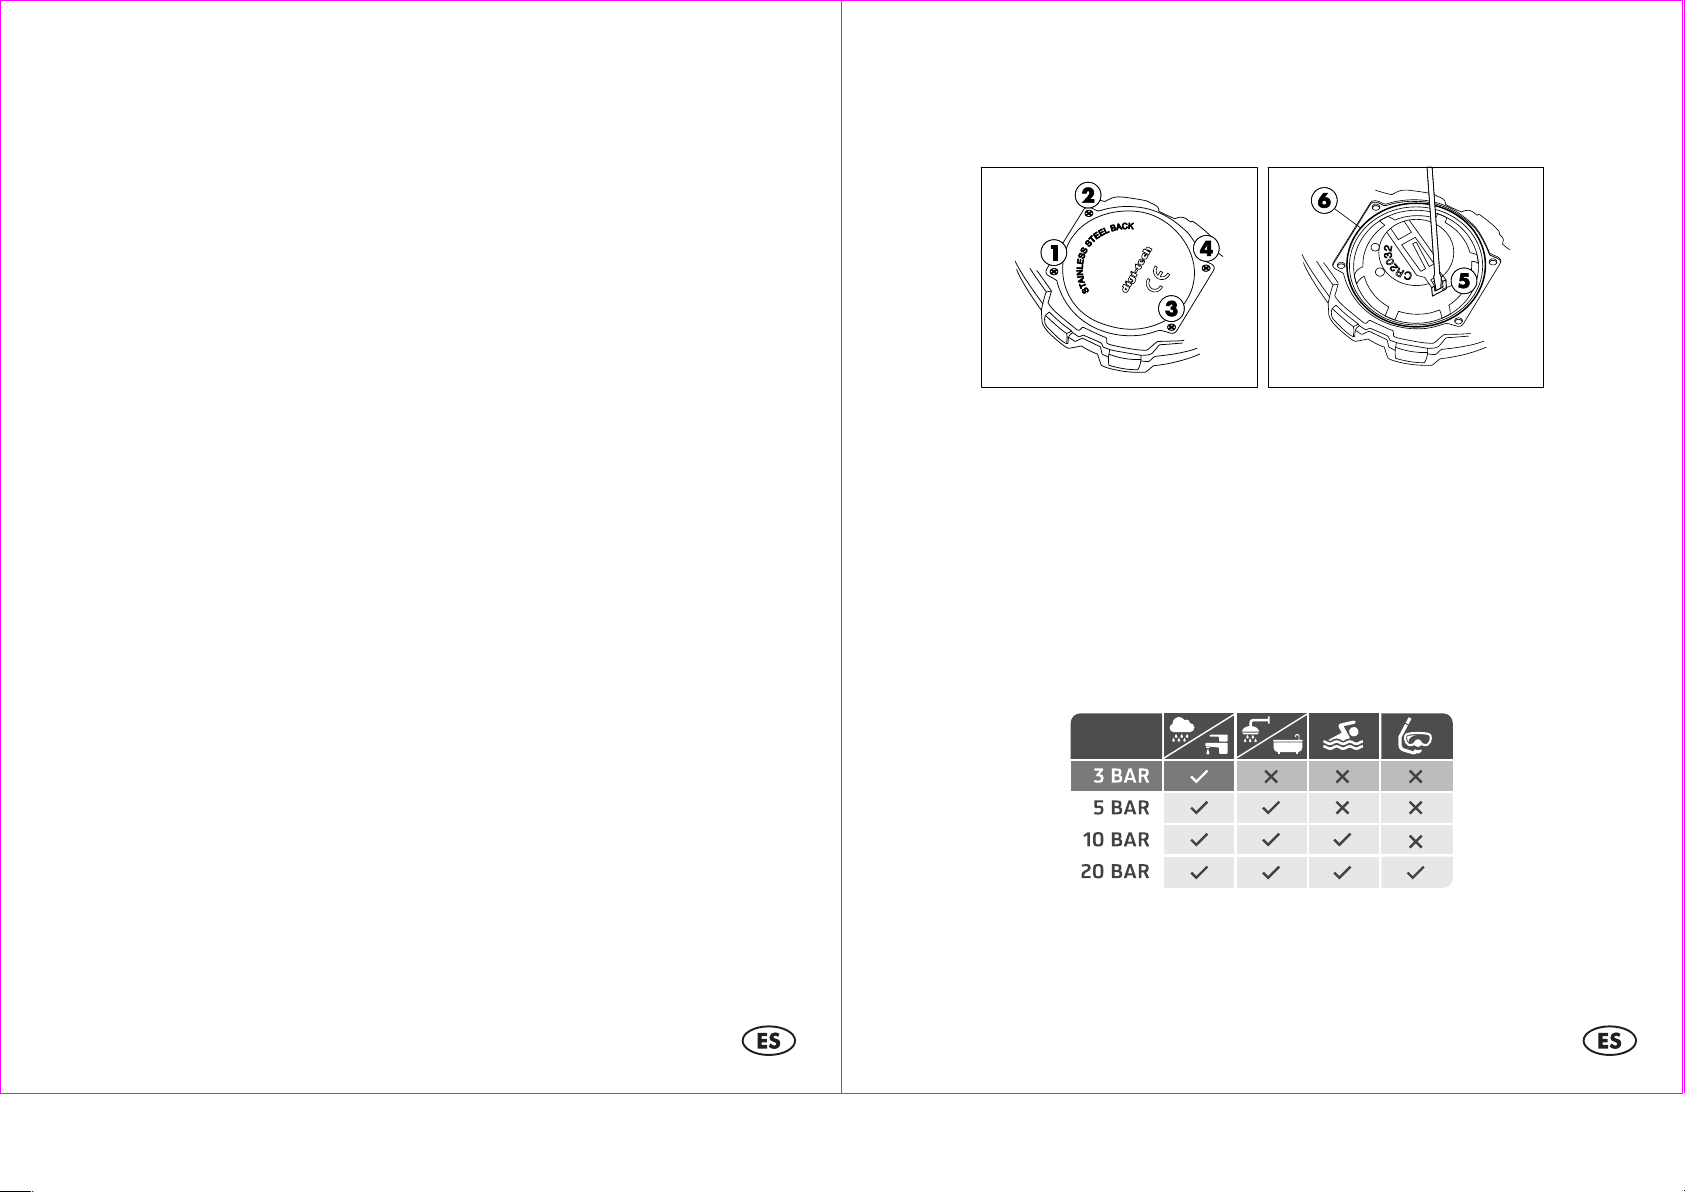
Cambio de la pila del medidor de frecuencia cardíaca
Si lleva el reloj al relojero para cambiar la pila puede solicitar una prueba de
estanqueidad para comprobar la resistencia al agua del reloj. Si prefiere cambiar
la pila usted mismo/a, siga estos pasos:
Suelte los tornillos (1, 2, 3 y 4) de la tapa trasera del reloj con un destornillador
pequeño en cruz. Retire la tapa y la pegatina de la pila.
Sírvase de una herramienta pequeña y plana para abrir el pestillo (5) de la
ranura de la pila. Retire la pila gastada y coloque otra pila CR2032 de 3 V
Resistencia al agua
Resistencia al agua hasta 3 bares. La indicación- bar se refiere a la presión que
ha sido empleada en las pruebas de la resistencia al agua (DIN 8310).
Resistencia al agua de la banda pectoral
Resistencia al agua según norma IEC 60529 IPX7.
Page 11
- 19 -
- 20 -
Nota relativa a la limpieza
Realice la limpieza del instrumento utilizando únicamente un paño seco y sin
pelusas, como los utilizados para la limpieza de gafas.
Después de cada uso limpie la banda pectoral y la correa del reloj con agua tibia
o con una solución de jabón suave con agua y una esponja. Tenga cuidado de
que el reloj no se moje. Seque todas las piezas con un paño y colgue la cinta
pectoral para que seque bien. Sudor y suciedad perjudican el funcionamiento del
sensor.
Eliminación y reciclaje del medidor de frecuencia
cardíaca
Este medidor de frecuencia cardíaca no debe eliminarse con los residuos
domésticos. Deseche el medidor de frecuencia cardíaca utilizando un
servicio de reciclaje autorizado o el punto verde de su municipio. En caso de
duda, consulte a su punto de reciclaje.
Eliminación de las pilas
Por favor, deseche las pilas correctamente, en los contenedores
especiales de pilas dispuestos en tiendas de comercio. Las pilas no deben tirarse
a la basura de casa. Deseche las pilas a través de un servicio de eliminación de
residuos autorizados o a través de sus instalaciones locales de eliminación.
Toman nota de las normas actualmente en vigor. En caso de duda, póngase en
contacto con su centro de eliminación de residuos.
Declaración de conformidad
Si se usa correctamente, el presente producto cumple los requisitos básicos del
art. 3 y de las demás disposiciones de los ETRT (artículo 3 de los R&TTE).
La declaración de conformidad puede solicitarse aquí:
conformity@digi-tech-gmbh.com
Garantía de digi-tech gmbh
Con estemedidor de frecuencia cardíacarecibe Ud. una garantía con una validez
de 3 años a partir de la fecha de la compra. En caso de defectos de estemedidor
de frecuencia cardíacale corresponden a Ud. derechos legalmente reconocidos
frente al vendedor. Estos derechos legalmente reconocidos no se ven limitados
por la garantía que se expone a continuación.
Condiciones de la garantía
El período de garantía comienza con la fecha de la compra. Por favor, guarde
cuidadosamente y a tal fin el ticket de compra original. Este documento es
necesario como prueba de la compra. Si en el transcurso de tres años contados a
partir de la fecha de la compra aparecieran en elmedidor de frecuencia
cardíacadefectos de material o de fabricación, se procederá (a elección de digitech-gmbh) a la reparación o sustitución del mismo sin coste alguno para Ud. La
prestación de esta garantía se halla supeditada a la presentación, dentro del
plazo de 3 años, delmedidor de frecuencia cardíacadefectuoso, de la prueba de
la compra (ticket de compra) y de una corta descripción por escrito del defecto y
del momento de su aparición. En caso de que nuestra garantía cubra el defecto,
recibirá Ud. elmedidor de frecuencia cardíacareparado o uno nuevo. A la
recepción delmedidor de frecuencia cardíacareparado o de su sustituto nuevo no
comenzará un nuevo período de garantía.
Duración de la garantía y derecho de reclamación
La duración de la garantía no se alarga tras la prestación del servicio
garantizado, lo que se extiende también a piezas reparadas o sustituidas. Los
posibles daños ya existentes en el momento de la compra deberán ser notificados
inmediatamente después del desembalaje. Las reparaciones que se tengan que
efectuar tras la finalización del período de garantía deberán ser abonadas.
Ámbito de la garantía
Elmedidor de frecuencia cardíacaha sido fabricado cuidadosamente siguiendo
pautas de calidad muy estrictas y superando un control de calidad previo a su
puesta en venta. Esta garantía se extiende solamente a defectos de material o de
fabricación. Esta garantía no se extiende a piezas componentes del instrumento
sometidas a un proceso de desgaste normal y que por lo tanto puedan ser
consideradas como piezas consumibles, ni a desperfectos aparecidos en partes
Page 12
- 21 -
- 22 -
IAN
103142
frágiles como por ejemplo, botones, acumuladores o piezas compuestas de
cristal.
Esta garantía pierde su vigencia si elmedidor de frecuencia cardíacaha sido
dañado, utilizado incorrectamente o sometido a operaciones de mantenimiento
incorrectas. Para una utilización adecuada delmedidor de frecuencia
cardíacadeberán observarse estrictamente todas las indicaciones contenidas en
el manual de instrucciones. Deben evitarse necesariamente usos y manejos
desaconsejados en el manual de instrucciones o de los cuales se haya advertido
en el mismo.
Elmedidor de frecuencia cardíacaestá indicado únicamente para su utilización a
título particular y no para un uso comercial o industrial. La garantía pierde su
vigencia en caso de un mal o incorrecto uso del mismo, su utilización de forma
violenta o en caso de operaciones técnicas no efectuadas por alguno de nuestros
servicios técnicos autorizados.
Servicio técnico
Razón social: Inter-Quartz GmbH
Dirección.: Valterweg 27A
Localidad: Eppstein 65817
País: Alemania
Correo electrónico: support@inter-quartz.de
Teléfono: +49 (0)6198 571825
00800 5515 6616
00800 5515 6616
Procedimiento en caso de garantía
Para garantizar un procedimiento rápido de su solicitud, siga por favor las
siguientes instrucciones:
• Para cualquier comunicación, tenga a mano el ticket de compra y el código de
artículo (103142), como prueba de su compra.
• Encontrará el código del artículo bien en una placa indicativa del tipo de
aparato, bien grabada en la carcasa, en la portada del manual de
instrucciones (parte inferior izda.) o en una pegatina en la parte trasera o
inferior del aparato.
• En caso de aparecer defectos de funcionamiento, contacte primero por
teléfono o mediante correo electrónico con el departamento técnico abajo
indicado.
En www.lidl-service.com pueden descargarse este y muchos otros
manuales de instrucciones, videos de productos y software.
Proveedor
Esta razón social no se corresponde con ningún servicio técnico. Contacte
primero con la dirección de servicio arriba indicada.
Razón social: digi-tech gmbh
Dirección.: Valterweg 27A
Localidad: Eppstein 65817
País: Alemania
Page 13

- 23 -
- 24 -
Avisos de utilização e segurança
Índice
Índice ........................................................................................................................ - 23 -
Introdução ................................................................................................................ - 25 -
Utilização adequada .............................................................................................. - 25 -
Conteúdo.................................................................................................................. - 25 -
Dati tecnici ................................................................................................................ - 26 -
Avisos de segurança importantes
Avisos de segurança importantes ...................................................................... - 26 -
Avisos de segurança importantesAvisos de segurança importantes
Pilhas ................................................................................................................. - 26 -
Medidor de frequência cardíaca fora do alcance das crianças ............... - 27 -
Cinto peitoral ........................................................................................................... - 27 -
Suporte para bicicleta ............................................................................................ - 29 -
Luz ............................................................................................................................. - 29 -
Informações importantes quanto ao funcionamento do
medidor de frequência cardíaca ........................................................................... - 30 -
Acerto rápido ................................................................................................... - 30 -
Funcionamento do medidor de frequência cardíaca .......................................... - 30 -
Calibrar ............................................................................................................ - 31 -
O relógio possui 7 modos de funções .......................................................... - 32 -
Hora (ZEIt/TIME) .................................................................................................... - 32 -
Acerto da hora................................................................................................. - 33 -
Alarme (ALARM) ..................................................................................................... - 33 -
Cronómetro (St-UHR/CHRONO) ......................................................................... - 34 -
Temporizador de contagem decrescente (TIMER) max. 9:59:00 ..................... - 34 -
Podómetro (PEDO) .................................................................................................. - 35 -
Calibrar o podómetro ..................................................................................... - 35 -
Medidor de pulso (PULS/PULSE) .......................................................................... - 36 -
Acertar o pulso a atingir ................................................................................. - 37 -
Ligar/desligar a função de alarme de pulso ............................................... - 38 -
Colocar os dados de pulso a zero ................................................................ - 38 -
Função de memória (SPEICH/MEMORY) ........................................................... - 38 -
Memória total/Total memory (14 dias) ....................................................... - 38 -
BMI (Body Mass Index) .................................................................................. - 39 -
Solução de problemas............................................................................................ - 39 -
Colocar a zero ........................................................................................................ - 40 -
Substituir a pilha do medidor de frequência cardíaca ........................................ - 40 -
Indicador de pilha fraca ......................................................................................... - 40 -
Impermeabilidade à água ..................................................................................... - 41 -
Resistência à água do cinto peitoral ..................................................................... - 41 -
Avisos de limpeza ................................................................................................... - 41 -
Eliminação do medidor de frequência cardíaca ................................................. - 41 -
Reciclagem das pilhas ............................................................................................ - 41 -
Declaração de conformidade................................................................................ - 42 -
Garantia da empresa digi-tech gmbh................................................................... - 42 -
Condições de garantia ........................................................................................... - 42 -
Período de garantia e direitos legais relativos a defeitos ................................... - 42 -
Extensão da garantia .............................................................................................. - 43 -
Procedimento no caso de garantia ....................................................................... - 43 -
Serviço ...................................................................................................................... - 44 -
Fornecedor ............................................................................................................... - 44 -
Page 14
- 25 -
- 26 -
Ambito di temperatura di funzionamento
0-
50°C
Misure
4,4 x 5,2
x 1,5
cm
Indicazione
2,5 x
2,5 cm
Peso
47g
Pilha
CR2032/3V
Ambito di temperatura di
funzionamento
0-
50°C
Misure
7 x 3,3 x 1,2 cm
Frequência
5,3 kHz
Peso
53g
Pilha
CR2032/3V
ATENÇÃO:
Fale com o seu médico antes de começar o
Medidor de frequência cardíaca
Introdução
Parabéns pela compra do seu novo medidor de frequência cardíaca. Você
decidiu-se por um aparelho de grande qualidade. O manual de utilização faz
parte deste medidor de frequência cardíaca. Aqui encontrará avisos importantes
referentes à segurança, à utilização e ao descarte do aparelho. Leia atentamente
este manual antes de utilizar o seu medidor de frequência cardíaca. Use o
aparelho apenas como é descrito e só nos campos de aplicação indicados.
Se vender o aparelho ou o entregar a outra pessoa, entregue-lhe também este
manual.
Utilização adequada
O medidor de frequência cardíaca destina-se à indicação da hora e ao uso das
funções descritas neste manual. Qualquer outro uso ou alteração do medidor de
frequência cardíaca é indevido. O fabricante não se responsabiliza por danos
causados pelo uso indevido ou pelo manuseamento incorrecto. O medidor de
frequência cardíaca não se destina ao uso comercial.
Conteúdo
Aviso: verifique o conteúdo logo após a compra. Assegure-se de que todos os
acessórios estão incluídos e não estão danificados.
• medidor de frequência cardíaca inclusive pilha (CR2032)
• cinto peitoral inclusive pilha (CR2032)
• suporte para a bicicleta
• Manual do usuário
Dati tecnici
Medidor de frequência cardíaca
Cintura da petto
Avisos de segurança importantes
treino. Ele poderá esclarecê-lo sobre o treino mais
apropriado para Si, bem como sobre a intensidade em que
o mesmo poderá ser praticado e os valores que o seu pulso
pode atingir. Este medidor de frequência cardíaca não é um
aparelho médico e serve apenas para apoiá-lo na
organização do seu treino.
Pilhas
Mantenha as pilhas fora do alcance de crianças pequenas. No caso de ter sido
engolida uma pilha, deverá ser prestada ajuda médica imediatamente.
As pilhas/baterías devem ser sempre colocadas tendo em conta a polaridade
correcta. Sendo necessário, limpe primeiro os contactos das pilhas e do aparelho.
Page 15

- 27 -
Pilha: CR2032
- 28 -
Superfici di contatto
Não tente carregar, provocar curto-circuito ou abrir as pilhas. Nunca deite pilhas
ao fogo, pois elas podem explodir.
Se não usar o aparelho durante um período de tempo prolongado, retire a pilha
e guarde o aparelho num local seco e livre de pó. A utilização indevida das
pilhas pode causar explosão ou derrame das mesmas.
Se a pilha sofreu derrame, evite o contacto com a pele, os olhos ou as mucosas.
Use luvas. Em caso de contacto com o ácido da pilha lave as partes afectadas
com bastante água limpa e procure imediatamente um médico. Retire as pilhas
gastas imediatamente do aparelho, há perigo elevado de derrame.
Medidor de frequência cardíaca fora do alcance das crianças
Este aparelho pode ser usado por pessoas (incluídas crianças a partir dos 8
anos) com capacidades físicas , sensoriais ou mentais diminuídas ou com falta de
experiência e conhecimento desde que sejam supervisionadas ou tenham sido
instruídas sobre a utilização segura do aparelho e tenham entendido os perigos
daí resultantes. As crianças não devem brincar com o aparelho. As crainças não
devem limpar ou fazer manutenção sem supervisão. Mantenha as películas da
embalagem fora do alcance das crianças. Há perigo de asfixia.
Cinto peitoral
Utilização do cinto peitoral
Adapte o cinto de maneira a que o mesmo fique bem ajustado directamente sob o
músculo peitoral. Humedeça as superfícies de contacto do cinto com um pouco de
água ou com gel para electroencefalograma (que pode obter na farmácia).
Certifique-se que as superfícies de contacto estejam sempre em contacto directo
com a sua pele. Coloque o cinto como indicado na imagem seguinte.
Verifique se o cinto peitoral está bem colocado. O cinto deverá exercer uma
ligeira pressão sobre o peito mesmo depois de expirar o ar completamente. Os
postes de alta tensão, as linhas eléctricas de caminhos de ferro ou o trânsito
automóvel podem influenciar ou perturbar a medição. Tenha isso em
consideração quando escolher o percurso.
ATENÇÃO: Se tiver um pacemaker deve consultar o seu médico antes
da utilização do cinto peitoral.
Colocação da pilha no cinto peitoral
Abra o compartimento das pilhas que
está na parte de trás do cinto peitoral
usando uma moeda e coloque a
pilha 3V com o sinal (+) para cima.
Feche bem a tampa do
compartimento das pilhas.
Page 16

- 29 -
- 30 -
Suporte para bicicleta
Uso do suporte para bicicleta
Você pode usar o medidor de frequência cardíaca no pulso ou fixá-lo no guiador
da bicicleta utilizando o suporte fornecido. Carregue o suporte no guiador da
bicicleta exercendo pressão desde cima. No caso de guiadores de grande
diâmetro será provavelmente necessário carregar o suporte com mais força para
conseguir fixá-lo. Pode fixar o medidor de frequência cardíaca ao suporte de
bicicleta da mesma maneira do que no pulso. Ao utilizar o medidor de pulso não
ultrapasse a distância máxima de transmissão de 70 cm em relação ao cinto
peitoral. Tenha em consideração que as funções do conta-passos (distância,
velocidade, etc.) não estão disponíveis com a montagem no suporte de bicicleta.
Informações importantes quanto ao funcionamento do
medidor de frequência cardíaca
Carregue em MODE para mudar ou terminar o modo da função, carregando em
SEL escolha os seus dados pessoais e carregando em SET confirme os dados
introduzidos.
Carregue em MODE para voltar ao menu.
Acerto rápido
Ao introduzir valores numéricos, pode usar o acerto rápido carregando e
mantendo carregado SEL.
Luz
Carregue brevemente em LIGHT para ligar a luz de fundo por uns segundos.
Funcionamento do medidor de frequência cardíaca
Retire a película protetora do monitor e carregue em MODE, SEL ou SET.
Você será automaticamente conduzido pelo menu de acerto-base.
Use SEL para escolher entre o idioma inglês ou alemão (DEU/ENG) e confirme a
sua escolha com SET. Proceda do mesmo modo para escolher a unidade
(EINH/UNIT) KM ou milhas. Finalmente introduza o ano do seu nascimento (GEB
/BIRtH). Para acertar carregue em SEL e confirme carregando em SET. Proceda
da mesma maneira para introduzir o mês e o dia do seu nascimento. Escolha
entre a indicação de 12 ou 24 horas (ZEIt/TIME) com SEL e confirme com SET.
Segue-se a introdução da hora, dos minutos e dos segundos, respectivamente
com SEL e confirmando com SET. Introduza da mesma maneira o ano, o mês e o
Page 17

- 31 -
- 32 -
dia e confirme os dados respectivamente com SET. Aparece agora a indicação
do peso. Carregue em SEL para introduzir o seu peso e confirme com SET.
Proceda da mesma maneira para introduzir a sua altura, confirmando com SET.
Aparece a indicação para calibrar o podómetro (KALI/CALI). Escolha com SEL
entre não NEIN / NO e sim JA / YES e confirme com SET.
Aviso para o calibrar:
Se utilizar o relógio unicamente para caminhar, então calibre, mesmo assim as
duas possibilidades, caminhar e correr. Neste caso, calibre correr como
"caminhar depressa". Pode ainda alterar esta informação, mais tarde, no modo
de podómetro.
Se o podómetro não for calibrado, então o relógio serve-se dos valores-base e
os valores indicados durante o treino podem desviar-se bastante dos valores
realmente alcançados. Durante o procedimento de calibrar, o relógio grava o seu
perfil de movimento pessoal. Quanto mais uniformemente se mover, e quanto
mais tempo durar a gravação do perfil, tanto mais exatos serão os valores
indicados pelo podómetro durante o treino. Graças a ter sido calibrado, o
relógio reconhece automaticamente, se está a caminhar ou a correr e adapta os
valores indicados. Os valores indicados são mais exatos se caminhar com o
mesmo ritmo e com a mesma velocidade que quando calibrou o relógio. No
treino, use o relógio no mesmo pulso em que o usou para o calibrar.
Calibrar
Para começar a gravação carregue em SEL, aparece KALI/CALI e JA/YES.
Confirme com SET. Aparece LAUFEN/RUN (correr), carregue em SET para obter
a distância (DST). Carregue em SEL para escolher a distância, confirme com SET.
Agora pode começar a calibrar o relógio carregando em SEL. Após a corrida
carregue de novo em SEL. Aparece ENDE/DONE (fim) ou ERROR (erro). No
caso de obter ERROR terá de repetir o procedimento. Depois de calibrar
corretamente o relógio, comece a calibrar GEHEN/WALK para a caminhada e
proceda da maneira que foi descrita para LAUFEN/RUN.
O relógio possui 7 modos de funções
Carregue em MODE para alternar entre as funções do relógio.
A sequência das funções é:
Além disso, os diversos modos têm diferentes sub-funções.
Pode obter as sub-funções carregando em SEL.
Hora (ZEIt/TIME)
Primeiro, carregue em MODE para obter a função do primeiro fuso horário (ZEIt
1/TIME-1).
Carregue em SEL para obter as sub-funções do modo de hora.
Hora, dia da semana e segundos < - > Hora e data
Carregue e mantenha carregado SEL, para obter o 2° fuso horário (ZEIt 2 /
TIME-2).
Page 18

- 33 -
- 34 -
Se não carregar em nenhuma tecla, o sinal de alarme soará durante cerca de 60
segundos e, passados 5 minutos o alarme soará de novo.
Acerto da hora
Carregue SET durante uns segundos e aparece a indicação de 12/24 horas.
Escolha entre a indicação de 12 ou de 24 horas com SEL e confirme com SET.
Segue-se a introdução da hora, dos minutos e dos segundos. Introduza-os
respectivamente com SEL e confirme com SET. Agora, proceda da mesma
maneira com o ano, o mês e o dia e confirme com SET.
Fuso horário 1 e fuso horário 2 acertam-se da mesma forma.
Alarme (ALARM)
Primeiro, carregue repetidamente em MODE para obter a função de alarme
(ALARM).
Carregue em SEL para ligar ou desligar o alarme. Quando o alarme está ligado
aparece o símbolo de alarme .
Carregue SET durante uns segundos, para passar ao modo de acerto. A hora de
despertar pisca no mostrador.
Cronómetro (St-UHR/CHRONO)
Primeiro, carregue repetidamente em MODE para obter a função de cronómetro
(ST-UHR/CHRONO).
Para iniciar ou parar o cronómetro carregue em SEL.
Enquanto o cronómetro está em funcionamento carregue em SET para ler o tempo
de uma volta (L01). Podem ser cronometrados os tempos de até 99 voltas (L99).
Depois disso, aparece no mostrador a indicação VOLL / FULL.
Com o cronómetro parado carregue em SET para obter a função de memória (R)
e poder ler o tempo da volta mais rápida (BESte / BEST LAP). Carregue agora
repetidamente em SEL para ler o tempo das restantes voltas. Carregue em SET
para voltar ao cronómetro.
Carregue e mantenha carregado SEL para pôr o cronómetro em zero.
Aviso: só pode obter a função de memória se tiver sido gravado, pelo menos, o
tempo de uma volta.
Para introduzir a hora carregue em SEL e confirme a sua escolha com SET.
Proceda da mesma maneira com os minutos.
Ao soar o alarme carregue em qualquer tecla para parar o alrme.
Temporizador de contagem decrescente (TIMER) max.
9:59:00
Primeiro, carregue repetidamente em MODE para obter a função de contagem
decrescente (TIMER).
No mostrador aparece um tempo pré-definido de 0:3000 segundos. Carregue
SET durante uns segundos para acertar o temporizador.
Page 19

- 35 -
- 36 -
Zona a
I
Os minutos da hora do temporizador piscam no mostrador. Para acertar carregue
em SEL e confirme carregando em SET. Proceda da mesma maneira para acertar
os minutos. Pode iniciar ou parar o temporizador carregando em SEL. Passado o
tempo desejado soa um sinal durante cerca de 60 segundos. Carregue em
MODE, SEL ou SETpara desligar o sinal sonoro.
Podómetro (PEDO)
Carregue repetidamente em MODE para obter a função podómetro (PEDO).
No mostrador aparece STEP e pode ler os valores gravados. Carregue em SEL
para alternar entre as várias funções.
Passos (STEP) e hora > Passos (STEP) e duração do treino (T) > Passos (STEP) e
distância (D) > Passos (STEP) e velocidade (S), calorias (KCAL) e queima de
gordura em gramas (g), Passos (STEP) e pulso (HR).
Carregue em SET para iniciar o podómetro. Aparecem ambos os pés no
mostrador. Carregue novamente em SET para parar o podómetro.
Colocar os valores do podómetro em zero
Carregue em SET durante alguns segundos para apagar todos os dados
carregue em SET para obter a distância (DST). Carregando em SEL pode
escolher a distância, depois confirme com SET. Agora pode começar a calibrar o
podómetro carregando em SEL. Depois de calibrá-lo, carregue em SEL. Aparece
ENDE/DONE ou ERROR. Se obtiver ERROR, terá de repetir o procedimento.
Depois de calibrar o podómetro, comece a calibrar GEHEN/WALK para a
caminhada e proceda como foi descrito em LAUFEN/RUN.
Medidor de pulso (PULS/PULSE)
Aviso: o medidor de pulso só funciona se utilizar o cinto peitoral. No mostrador
aparece o pulso actual e o símbolo de coração a piscar.
Escolha primeiro, carregando em MODE, a função de pulso (PULS/PULSE).
Carregando em SEL pode obter as sub-funções do medidor de pulso.
Pulso actual/MHR (%) > Pulso actual/hora > Pulso actual/ velocidade
actual(km/h) > Pulso actual/ Pulso médio (A) > Pulso actual/ Pulso máximo (H) >
Pulso actual/ Pulso mínimo (L) > Pulso actual/fuso horário.
atingir do
pulso actual
Calibrar o podómetro
Se ainda não calibrou o podómetro como vem descrito no capítulo
„Funcionamento do medidor de frequência cardíaca“, ou se desejar calibrar o
podómetro de novo, carregue em SET durante alguns segundos.
Aparece agora a indicação do peso. Introduza o seu peso carregando em SEL e
confirme carregando em SET. Agora aparece a indicação da altura. Introduza a
altura carregando em SEL e confirme com SET. Aparece a indicação para
calibrar o podómetro (KALI/CALI). Para começar a gravação carregue em SEL,
aparece KALI/CALI e JA/YES. Confirme com SET. Aparece LAUFEN/RUN,
MHR –Frequência cardíaca máxima
(Percentagem da frequência cardíaca máxima. Frequência cardíaca máxima =
220 – a sua idade)
Page 20

- 37 -
Idade > 20 25 30 35 40 45 50 55 60 65
Zona 1 130 126 123 120 117 113 110 107 104 100
Tempo livre
to to to to to to to to to to
50-65 %
100 97 95 92 90 87 85 82 80 77
Zona 2 160 156 152 148 144 140 136 132 128 124
Fitness to to to to to to to to to to
65-80 %
130 126 123 120 117 113 110 107 104 100
Zona 3 190 185 180 175 171 166 161 156 152 147
Desporto
to to to to to to to to to to
80-95
160 156 152 148 144 140 136 132 128 124
- 38 -
Acertar o pulso a atingir
ATENÇÃO: Antes de começar o treino esclareça com o
seu médico qual é o pulso a atingir adequado para si. Os
acertos pré-definidos são apenas valores de orientação
que não se aplicam a todas as pessoas.
Quando se encontrar na sub-função Pulso actual e zona a atin
Pulso actual e zona a atingir
Pulso actual e zona a atinPulso actual e zona a atin
gir, carregue em
girgir
SET durante uns segundos para escolher um pulso a atingir pré-definido ou para
introduzir o pulso pessoal a atingir. Aparece a zona de pulso a atingir
personalizado (ZN-P/ZN-U). Carregue repetidamente em SEL para escolher a
zona de pulso a atingir desejada: Personalizado (ZN-P/ZN-U), Tempo livre (ZN-
1), Condição Física - Fitness (ZN-2), Desporto (ZN-3). Na tabela seguinte tem
uma indicação das zonas 1-3. Para acertar a zona de pulso a atingir
personalizado, mude a partir da indicação ZN-P/ZN-U carregando em SET para
o modo de acerto. O valor do limite inferior pisca no mostrador. Acerte o valor
carregando em SEL e confirme carregando em SET. Proceda da mesma maneira
para o valor-limite superior.
Ligar/desligar a função de alarme de pulso
Se se encontrar na sub-função de pulso actual e zona a atingir, carregue
brevemente em SET, para ligar ou desligar o alarme do pulso a atingir. Quando o
alarme está ligado aparece no mostrador.
Colocar os dados de pulso a zero
Os dados do pulso colocam-se automaticamente a zero à meia-noite de cada
dia.
Função de memória (SPEICH/MEMORY)
Carregue em MODE para obter a função de memória (SPEICH/MEMORY).
Pode ver os dados gravados dos últimos 14 dias, carregue em SEL para obter a
função seguinte.
As informações sobre passos, distância (km), queima de calorias de de gordura
(g) e contador de quilómetros (G-DSt) ficam gravados durante 14 dias.
Memória total/Total memory (14 dias)
A sequência das funções é: passos totais/distância total (Total Step/Total Dist.) >
total de calorias/queima de calorias total (Total Calories/Total Fat Burn) >
contador de quilómetros/Podómetro (G-DSt /ODO) > BMI (BMI).
MHR
MHR
MHR
Aviso:
Os dados diários de calorias, queima de gordura, velocidade média e
velocidade máxima gravados, são colocados em zero automaticamente todas as
noites às 0:00 horas, mas registados na memória de 14 dias.
Page 21

- 39 -
- 40 -
BMI (Body Mass Index)
O BMI é um número de medida para a avaliação do peso de uma pessoa. Um
valor entre 18,5 e 25 é considerado normal para um adulto. Quando o valor é
inferior a 18,5 considera-se que há falta de peso. Quando o valor é superior a
25 considera-se que há excesso de peso. Quando o valor é superior a 30 está-se
na presença de Adipositas (obesidade). O BMI fornece apenas um valor de
orientação rudimentar já que não considera a altura de uma pessoa e a
composição natural do peso em tecidos gordurosos e musculares diferentes para
cada indivíduo. O medidor de frequência cardíaca calcula automaticamente o
índice de massa corporal IMC com base nos dados introduzidos por Si.
Solução de problemas
A medição da distância é muito imprecisa
O relógio só pode estimar a distância percorrida com base no comprimento dos
passos medido durante o processo de calibrar.
Calibre novamente o conta-passos. Calibre tanto para andar como para correr e
proceda de forma especialmente cuidada.
As inexactidões também podem resultar de caminhar em superfícies irregulares.
O pulso não é indicado ou não é correcto
Verifique se o cinto peitoral está colocado correctamente
A sua pele não deve estar nem demasiado seca nem fria
Pode humedecer ligeiramente as superfícies de contacto para melhorar a função
Fontes electromagnéticas podem prejudicar a recepção do sinal.
A distância entre o cinto e o relógio deve ser, no máximo, de 60cm
Outros medidores de pulso que estejam a uma distância inferior a 2m podem
prejudicar a recepção do sinal Computadores de bicicleta sem fios podem
prejudicar a recepção do sinal Eventualmente terá de substituir as pilhas
O mostrador é de leitura difícil / A luz não funciona
Substitua as pilhas
Colocar a zero
Carregando em simultâneo em SET e SEL pode colocar todos os valores do
relógio a zero; todos os dados gravados perdem-se.
Só pode voltar a alterar o idioma e as unidades de medida depois de colocar o
relógio a zero. Acerte o medidor de frequência cardíaca como vem descrito no
capítulo „Funcionamento do medidor de frequência cardíaca“.
Substituir a pilha do medidor de frequência cardíaca
Dirija-se a um relojoeiro para efectuar a substituição da pilha juntamente com um
teste de estanquidade do relógio. Se pretender trocar a pilha sem ajuda, proceda
do seguinte modo:
Desaperte os parafusos (1,2,3 e 4) na parte de trás do relógio com uma chave
estrela pequena. Retire a tampa traseira e o autocolante da pilha. Use uma
ferramenta pequena e chata para abrir o trinco (5) do suporte da pilha. Remova
a pilha e insira uma nova de 3V CR2032 com a marcação dos pólos (+)- virada
para cima. Verifique se a borracha vedante (6) ficou bem colocada. Volte a
fechar o trinco do suporte da pilha (5). Coloque novamente o autocolante da
pilha e feche a tampa traseira, apertando bem os parafusos.
Indicador de pilha fraca
Quando a pilha do cinto peitoral está demasiado fraca para o funcionamento
normal, no mostrador do relógio aparece "GURT/BELT" e " BATT LO BAT ". Mude
a pilha do cinto peitoral como vem indicado no capítulo "cinto peitoral".
Page 22

- 41 -
- 42 -
Impermeabilidade à água
À prova de água até 3 bar. Esta indicação refere-se à pressão atmosférica que
foi aplicada no quadro da prova à impermeabilidade à água (DIN 8310).
autorizados ou na sua câmara municipal. Observe as regulamentações
respectivas em vigor. Em caso de dúvida, contacte a sua câmana municipal.
Declaração de conformidade
Este produto corresponde, quando utilizado correctamente, às exigências
fundamentais do § 3 e das restantes disposições pertinentes da Directiva relativa
aos equipamentos de rádio e equipamentos terminais de telecomunicações
(Artigo 3° da Directiva R&TTE). Pode encomendar a declaração de
conformidade em:
conformity@digi-tech-gmbh.com
Resistência à água do cinto peitoral
Resitência à água em conformidade com a norma internacional IEC 60529 IPX7.
Avisos de limpeza
Limpe o aparelho apenas com um pano seco que não largue pêlos, como por
exemplo, para a limpeza de óculos.
Após cada utilização limpe o cinto peitoral e a bracelete do relógio com água
tépida ou com uma solução de sabão suave e uma esponja. Tenha cuidado para
que o relógio não se molhe. Seque todas as peças com um pano e pendure o
cinto peitoral para que seque bem. Suor e sujidade prejudicam o bom
funcionamento do sensor.
Eliminação do medidor de frequência cardíaca
Não deite este aparelho no lixo normal. Entregue-o num dos pontos de
recolha de aparelhos eléctricos autorizados ou na sua câmara
municipal. Observe as regulamentações respectivas em vigor. Em caso
de dúvida contacte a sua câmara municipal.
Reciclagem das pilhas
Deite as pilhas nos contentores existentes para o efeito („pilhões“). Não
deite as pilhas no lixo normal. Entregue-as num dos pontos de recolha
Garantia da empresa digi-tech gmbh
Para este medidor de frequência cardíacaoferecemos uma garantia de 3 anos
contados a partir data de compra. No caso de este relógio apresentar falhas ou
defeitos Você tem direitos legais perante o vendedor do produto. Estes direitos
legais não são restringidos pela nossa garantia que descrevemos de seguida.
Condições de garantia
O prazo de garantia começa a partir da data de compra. Guarde por isso o
talão de compra original num sítio seguro. Este documento é necessário como
comprovativo da compra. Se, dentro do prazo de três anos contados a partir da
data de compra, o medidor de frequência cardíacaapresentar algum defeito ou
falha de material ou de fabrico o relógio será - segundo o nosso critério arranjado ou substituído a título gratuito. É condição prévia que, dentro do prazo
de três anos, apresente o medidor de frequência cardíacadefeituoso bem como o
comprovativo de compra (talão da caixa) e descreva por escrito de que defeito
se trata e quando surgiu o mesmo. Se o defeito estiver coberto pela nossa
garantia, receberá um relógio reparado ou um novo.
Período de garantia e direitos legais relativos a
defeitos
O período de garantia não será prolongado com a prestação de garantia. O
mesmo se aplica aos componentes que tenham sido arranjados ou substituídos.
Page 23

- 43 -
- 44 -
IAN
103142
Os danos ou defeitos que sejam detectados no acto da compra deverão ser-nos
comunicados de imediato. Qualquer arranjo que tiver de ser feito passado o
período de garantia terá de ser pago.
Em www.lidl-service.com pode carregar este e muitos outros
manuais de instruções, vídeos de produtos e software.
Extensão da garantia
O medidor de frequência cardíacafoi produzido cumprindo directivas de
qualidade rigorosas e foi testado escrupulosamente antes da sua entrega. A
garantia extende-se a falhas ou defeitos de material ou de fabrico. Esta garantia
não se extende a componentes do produto que estejam sujeitos ao desgaste
normal e que sejam, por isso, considerados como elementos desgastáveis, nem a
danos em componentes frágeis como interruptores, acumuladores de bateria ou
que sejam feitos de vidro.
A garantia deixa de ter aplicação sempre que o medidor de frequência
cardíacaseja danificado ou não seja usado ou mantido devidamente. Devem ser
cumpridas todas as instruções para uma utilização adequada mencionadas neste
manual. Deverão ser evitadas as formas de uso que sejam desaconselhadas ou
das quais se avise neste manual.
O medidor de frequência cardíacadestina-se exclusivamente ao uso privado e
não ao uso comercial. A garantia deixa de aplicar-se em caso de uso abusivo ou
indevido, uso de violência ou interferências não autorizadas pelo nosso serviço
autorizado.
Procedimento no caso de garantia
Para assegurar um procedimento rápido queira seguir os seguintes conselhos:
• No caso de ter reclamações ou perguntas tenha sempre à disposição o talão
de compra e o número do artigo (103142).
• O número do artigo encontra-se no rótulo, gravado, no título do manual de
instruções (parte inferior esquerda) ou na etiqueta colada na parte de trás ou
de baixo do aparelho.
• Se surgirem falhas nas funções ou outros defeitos contacte primeiro o
departamento de serviço seguinte por telefone ou por E-Mail.
Serviço
Nome: Inter-Quartz GmbH
Str.: Valterweg 27A
Cidade: Eppstein 65817
País: Alemanha
E-Mail: support@inter-quartz.de
Telefone: +49 (0)6198 571825
00800 5515 6616
00800 5515 6616
Fornecedor
Tenha em consideração que o endereço seguinte não é um endereço de serviço.
Contacte primeiro o departamento de serviço mencionado acima.
Nome: digi-tech gmbh
Str.: Valterweg 27A
Cidade: Eppstein 65817
País: Alemanha
Page 24

- 45 -
- 46 -
Usage and safety instructions
Table of contents
Table of contents...................................................................................................... - 45 -
Introduction .............................................................................................................. - 47 -
Intended use ............................................................................................................. - 47 -
Scope of delivery .................................................................................................... - 47 -
Technical specifications .......................................................................................... - 48 -
Important safety information
Important safety information ............................................................................... - 48 -
Important safety informationImportant safety information
Batteries ............................................................................................................ - 48 -
Heart rate monitor should not be in the hands of children .......................... - 49 -
Chest belt .................................................................................................................. - 49 -
Bicycle holder .......................................................................................................... - 51 -
Light ........................................................................................................................... - 51 -
Important Information regarding the use of the Heart rate monitor watch. ....... - 52 -
Quick setting .................................................................................................... - 52 -
Setting up the heart rate monitor watch ................................................................ - 52 -
Calibration ....................................................................................................... - 53 -
The watch has 7 modes of operation ............................................................ - 54 -
Time (ZEIt/TIME) ..................................................................................................... - 54 -
Time setting ....................................................................................................... - 55 -
Alarm (ALARM) ....................................................................................................... - 55 -
Stopwatch (St-UHR/CHRONO) ........................................................................... - 56 -
Timer (TIMER) max. 9:59:00 ................................................................................. - 56 -
Pedometer (PEDO) .................................................................................................. - 57 -
Calibrating the pedometer ............................................................................. - 57 -
Heart rate monitor (PULS/PULSE) ......................................................................... - 58 -
Setting the heart rate target zone................................................................... - 59 -
Activating/deactivating the heart rate alarm ............................................... - 60 -
Resetting the heart rate data ........................................................................... - 60 -
Memory mode (SPEICH/MEMORY).................................................................... - 60 -
Total memory (14 days) ................................................................................. - 60 -
Notes on the BMI ............................................................................................ - 60 -
Troubleshooting ....................................................................................................... - 61 -
Reset .......................................................................................................................... - 61 -
Replacing the watch battery ................................................................................... - 62 -
Battery low indicator ............................................................................................... - 62 -
Water resistance ...................................................................................................... - 62 -
Water resistance of the chest belt .......................................................................... - 63 -
Cleaning instructions ............................................................................................... - 63 -
Disposal of the electronic appliance ..................................................................... - 63 -
Disposal of the batteries.......................................................................................... - 63 -
Declaration of conformity ....................................................................................... - 64 -
digi-tech gmbh warranty ........................................................................................ - 64 -
Warranty conditions ............................................................................................... - 64 -
Warranty period and defects liability ................................................................... - 64 -
Scope of the warranty............................................................................................. - 64 -
Warranty claim procedure ..................................................................................... - 65 -
Service ...................................................................................................................... - 66 -
Supplier .................................................................................................................... - 66 -
Page 25

- 47 -
- 48 -
Operating temperature
0-
50°C
Dimensions
4,4 x 5,2 x 1,5 cm
Display
2,5 x 2,5 cm
Weight
47g
Battery
CR 2032/3V
Operating temperature
0-
50°C
Dimensions
7 x 3,4 x 1,2 cm
Frequency
5,3 kHz
Weight
53g
Battery
CR 2032/3V
ATTENTION:
Consult your doctor before you begin any
Heart Rate Monitor
Introduction
Congratulations on the purchase of your new heart rate monitor. You have chosen
a high quality product. The instruction manual is part of the product- it contains
important information about safety, use and disposal. Read the manual with all
usage and safety notes before using the watch. Only use the watch in the intended
way and for the intended applications.
If the watch is given to someone else, include all documentation with the heart rate
watch with chest belt.
Intended use
This heart rate monitor is intended for time display and the described additional
features. Any other use or modification of the heart rate monitor does not comply
with the intended uses. The manufacturer is not liable for damages caused by
improper use or misuse. The device is not intended for commercial use.
Scope of delivery
Please note: Check the scope of delivery after purchase. Please ensure that all
parts are included and undamaged.
• Heart rate monitor incl. battery (CR2032)
• Chest belt incl. battery (CR2032)
• Bicycle holder
• Instruction manual
Technical specifications
Heart rate monitor
Chest belt
Important safety information
training program. Your doctor can help you choose the
proper training intensity and heart rate guidelines for your
exercises.
Batteries
Keep batteries out of reach of small children. If a battery is swallowed, you must
seek medical attention immediately. Batteries/rechargeable batteries must always
be inserted in the correct polarity. If necessary, clean the battery and device
contacts. Never attempt to recharge non-rechargeable batteries. Never short-
This heart rate wrist watch is not a medical device and should
only be used as a guide for your training.
Page 26

- 49 -
battery CR2032
- 50 -
contact area
circuit or attempt to open batteries. Never throw batteries into fire as they may
explode.
If the device will not be used for an extended time period, remove the battery and
store the device in a dry and dust-free area. Improper use of the battery can lead
to explosion or leakage.
If the battery leaks, avoid contact with skin, eyes and mucous membranes. Use
gloves. If you are exposed to battery acid, rinse the affected areas with plenty of
clean water and immediately seek medical attention. Remove discha-rged
batteries from the device as they present an increased risk of leakage.
Heart rate monitor should not be in the hands of children
This device may be used by persons (including children over 8 years of age) with
reduced physical, sensory or mental abilities or lack of experience and
knowledge, if they are supervised or instructed regarding the safe use of the
device and understand the dangers that may arise. Children may not play with the
device. Cleaning and user maintenance of the device may not be performed by
children without supervision. Keep packaging films out of the hands of children.
There is a danger of suffocation.
Chest belt
Wearing the chest belt
Adjust the chest belt so that it fits snugly directly below the chest muscles. Moisten
the contact areas with water or ECG gel (ECG gel can be purchased at a
pharmacy). Ensure that the contact areas constantly remain in skin contact.
Position the chest belt as per the following illustration.
Please ensure that the chest belt is seated properly. When you have exhaled
completely the chest belt should still have very slight tension pressing it to your
chest.
High voltage power lines, Trains or moving vehicular traffic may interfere with the
heart rate measurement. Please consider this when planning your exercise route.
ATTENTION: Pacemaker patients should consult their physicians before
using the chest belt.
Inserting the batteries into the chest belt
Use a coin to unscrew the battery
cover on the back side of the chest
belt and insert the 3V battery with the
(+) sign facing up. Screw the battery
compartment cover back into the
case.
Page 27

- 51 -
- 52 -
Bicycle holder
Using the bicycle holder
The included bicycle holder can be used to attach the heart rate monitor to the
handlebar of a bicycle. Press the bicycle holder onto the top of the handlebar.
Handlebars with an especially large diameter may require the use of additional
force to snap on the bicycle holder. The heart rate monitor can now be attached to
the bicycle holder in the same way that you would attach it to your wrist.
The maximum range of 60cm between the heart rate monitor and the chest belt
should not be exceeded.
Please note that the pedometer features of the heart rate monitor (distance, speed
etc.) will not be functional while the watch is mounted on the bicycle holder.
Important Information regarding the use of the Heart
rate monitor watch.
Press MODE to select or exit the modes of the watch. Press SEL to enter your
personal data and press SET to confirm the setting.
Press MODE to proceed within the menu.
Quick setting
Press and hold SEL when setting numerical values to use the quick setting feature.
Light
Briefly press LIGHT to temporarily activate the light.
Setting up the heart rate monitor watch
Remove the protective film from the display of the watch and press MODE, SEL or
SET. The watch will now guide you through the initial settings menu.
Press SEL to select the English or German language (DEU/ENG) and confirm your
setting by pressing SET. Select the unit (EINH/UNIT) of measurement KM or miles
in the same way. Enter your year of birth (GEB/BIRtH). Press SEL to set the value
and press SET to confirm the setting. Set the month and the day of your birth in the
same way. Now select 12 or 24-hour time display mode (ZEIt/TIME) by pressing
SEL and confirm your setting by pressing SET. Now set the hours, minutes and
seconds. Set each value by pressing SEL and confirm each setting by pressing SET.
Page 28

- 53 -
- 54 -
Set the year, month and day in the same way and confirm each setting by pressing
SET. The body weight setting now appears. Set your weight by pressing SEL and
confirm by pressing SET. Set your height in the same way and confirm the setting
by pressing SET. The pedometer calibration option appears (KALI/CALI). Press
SEL to select NEIN/NO or JA/YES and confirm your selection by pressing SET.
Notes on calibration:
Please calibrate the watch for walking and running even if you only intend to use
the watch for walking. In this case, perform a fast walk during the calibration for
running. The calibration can also be performed later when using the watch in
pedometer mode.
If the pedometer is not calibrated, it will use the default settings and this may cause
the values shown on the display during training to deviate strongly from the actual
values. During calibration, the watch will record your personal movement profile.
Greater consistency of movement during the recording and longer duration of the
recording will increase the precision of the pedometer during training. The
calibration will allow the watch to automatically detect whether you are running or
walking and adjust the displayed values automatically. The displayed values are
more exact if your movement during training has the same rhythm and speed as
during calibration. Wear the watch on the same wrist during calibration and
during training.
Calibration
Press SEL to start the recording. KALI/CALI and JA/YES will appear on the
display. Press SET to confirm. LAUFEN/RUN will appear on the display. Press SET
to show the distance setting (DST). Press SEL to select the distance and confirm
your setting by pressing SET. Now press SEL to start the calibration. After you are
finished running the calibration distance, press SEL once again. ENDE/DONE or
ERROR will appear on the display. If ERROR appears, the calibration must be
repeated. After successful calibration, perform the calibration for GEHEN/WALK
in the same way as for LAUFEN/RUN.
The watch has 7 modes of operation
Press MODE to select the mode of operation of the watch.
The order of the modes is:
Additionally, each mode of operation has several sub-features.
The sub-features can always be reached by pressing SEL.
Time (ZEIt/TIME)
Press MODE to select time mode (ZEIt-1/TIME-1). Press SEL to select the subfeatures of the time mode.
Time, day of the week and seconds <-> time and date.
Press and hold SEL to switch to the second time zone (ZEIt 2 / TIME-2).
Page 29

- 55 -
- 56 -
Time setting
Press and hold SET. The 12/24 hour time mode indicator will appear. Select the
preferred mode and confirm your selection by pressing SET. Now set the hours,
minutes and seconds by pressing SEL to set each value and pressing SET to
confirm each setting. Now set the year, month and day in the same way and
confirm the setting with SET. Time zone 1 and time zone 2 may be set in the same
way.
Alarm (ALARM)
Repeatedly press MODE to select alarm mode (ALARM). Press SEL to activate or
deactivate the alarm. If the alarm is activated, the alarm symbol will appear.
Press and hold SET to enter setting mode. The hours of the alarm time will blink on
the display.
Stopwatch (St-UHR/CHRONO)
Repeatedly press MODE to select the stop watch (ST-UHR/CHRONO).
Press SEL to start or stop the stop watch.
Press SET while the stopwatch is running to record a lap time (L01). Up to 99 lap
times (L99) can be recorded. VOLL/FULL will appear after reaching the maximum
number of lap time recordings.
When the stopwatch is stopped, press SET to activate the memory feature (R) and
display the best lap time (BESte/BEST LAP). Press SEL repeatedly to display the
other lap times. Press SET to return to the stopwatch.
Press and hold SEL to reset the stopwatch.
Note: The memory feature can only be used if at least one lap time has been
recorded.
Press SEL to set the hours and confirm your setting by pressing SET. Set the minutes
in the same way.
Press any button when the alarm sounds to stop the alarm.
If no button is pressed, the alarm will sound for about 60 seconds and restart after
5 minutes.
Timer (TIMER) max. 9:59:00
First, press MODE repeatedly to select timer mode (TIMER). The pre-set time of
0:3000 seconds will appear on the display.
Press and hold SET to set the timer.
The hours of the timer time will appear blinking on the display. Press SEL to set the
hours and press SET to confirm your setting. Set the minutes in the same way. Press
SEL to start or stop the timer. After the set time has elapsed, an alarm will sound for
60 seconds. Press MODE, SEL or SET to stop the alarm.
Page 30

- 57 -
- 58 -
current heart
target zone
Pedometer (PEDO)
First, press MODE repeatedly to select pedometer mode (PEDO). STEP will
appear on the display along with the data that has been stored thus far. Press SEL
to switch between the different features.
Steps (STEP) and time > steps (STEP) and training duration (T) > steps (STEP) and
distance (D) > steps (STEP) and speed (S) > Calories (KCAL) and fat burn in gram
(g), steps (STEP) and heart rate (HR).
Press SET to start the pedometer. A symbol showing two feet will appear on the
display. Press SET again to stop the pedometer.
Pedometer reset
Press and hold SET to delete all data.
Calibrating the pedometer
If the pedometer has not been calibrated as described in the chapter “Setting up
the heart rate monitor watch” or if you wish to recalibrate the pedometer, press
and hold SET.
The body weight setting now appears. Set your weight by pressing SEL and
confirm your setting by pressing SET. Now set your height in the same way and
confirm the setting by pressing SET. The calibration option now appears
(KALI/CALI).
Press SEL to start the recording. KALI/CALI and JA/YES will appear on the
display. Press set to confirm. LAUFEN/RUN will appear on the display. Press SET
to show the distance (DST) setting. Press SEL to select the distance and confirm
your setting by pressing SET. Now press SEL to start the calibration. After you are
finished running the calibration distance, press SEL once again. ENDE/DONE or
ERROR will appear on the display. If ERROR appears, the calibration must be
repeated. After successful calibration, perform the calibration for GEHEN/WALK
in the same way as for LAUFEN/RUN.
Heart rate monitor (PULS/PULSE)
Note: The heart rate monitor will only work while using the chest belt. The current
heart rate and the blinking heart symbol will appear on the display.
First, press MODE repeatedly to select pulse mode (PULS/PULSE). Press SEL to
select the different sub-features.
Current heart rate / MHR (%) > current heart rate / time (TIME) > current heart
rate / current speed (km/h) > current heart rate / average heart rate (A) > current
heart rate / maximum heart rate (H) > current heart rate / lowest heart rate (L) >
current heart rate / target zone.
rate
MHR – maximum heart rate
(Percent of the maximum heart rate. Maximum heart rate = 220 - your age in
years)
Page 31

- 59 -
Age > 20 25 30 35 40 45 50 55 60 65
Zone 1
130 126 123 120 117 113 110 107 104 100
Leisure
to to to to to to to to to to
50-65 %
100 97 95 92 90 87 85 82 80 77
Zone 2
160 156 152 148 144 140 136 132 128 124
Fitness to to to to to to to to to to
65-80 %
130 126 123 120 117 113 110 107 104 100
Zone 3
190 185 180 175 171 166 161 156 152 147
Sport to to to to to to to to to to
80-95
160 156 152 148 144 140 136 132 128 124
- 60 -
Setting the heart rate target zone
ATTENTION: Consult your physician before selecting a
target zone. The target zone presets are approximate
guidelines and are not suitable for everyone.
Activating/deactivating the heart rate alarm
Press SET while viewing the current heart rate and target zone sub-feature, press
SET briefly to activate or deactivate the target heart rate alarm. If the alarm is
activated, the symbol will appear on the display.
Resetting the heart rate data
The heart rate data is reset daily at midnight.
While viewing the current heart rate and target zone sub-feature, press and hold
SET to select a preset target zone or set the user defined target zone (ZN-P/ZNU). The user defined target zone will appear on the display. Repeatedly press SEL
to select the desired target zone: User defined (ZN-P/ZN-U), Leisure (ZN-1),
Fitness (ZN-2), Sport (ZN-3). The following table contains an overview of the
zones 1-3. To set the user defined target zone press set while displaying the user
defined target zone (ZN-P/ZN-U) to enter setting mode. The lower limit will blink
on the display. Set the lower limit by pressing SEL and confirm your setting by
pressing SET. Set the upper limit in the same way.
MHR
MHR
MHR
Memory mode (SPEICH/MEMORY)
First, press MODE to select memory mode (SPEICH/MEMORY). The data for the
past 14 days can now be viewed. Press SEL to access the next feature. The data
for steps, distance (km), calories, fat burn (g) and odometer (G-Dst/ODO) is
saved for 14 days.
Total memory (14 days)
The order of the features is: Total Step/Total Distance (Total Step/Total Distance)
> Total Calories/Total Fat Burn (Total Calories/Total Fat Burn) > Odometer (GDst/ODO) > BMI (BMI)
Note:
The stored daily values for calories, fat burn, average speed and maximum speed
are reset nightly at 0:00 but are stored in the 14-day memory.
Notes on the BMI
The BMI is a statistical measurement that can be used to judge a persons weight.
For adults, a value between 18.5 and 25 is considered normal. Values below
18.5 are considered "underweight". Values above 25 are considered
"overweight". Values above 30 are considered "Obese".
Page 32

- 61 -
- 62 -
The BMI is only a coarse guideline because it does not take a persons body type
and body composition into consideration.
The watch automatically calculates your BMI from the values entered during setup.
Troubleshooting
The distance measurements are very imprecise
The watch uses the step length measured during calibration to estimate the
traveled distance.
Recalibrate the step counter. Calibrate it for walking and for running and use extra
care during the calibration.
Running on uneven surfaces may also result in bad calibration.
The heart rate is not shown or is shown incorrectly
Make sure the chest belt is positioned correctly and fits well
Your skin should not be too dry or too cold.
The contact areas can be slightly moistened to improve function
Electromagnetic interference may have an adverse effect on reception
The distance between watch and chest belt must be under 60cm
Other heart rate measuring devices within a 2m range may also cause
interference.
Wireless bicycle computers may cause interference
The batteries may be low and require replacing
The display is unreadable / the light does not work
Replace the batteries
Replacing the watch battery
The battery replacement can be performed by a watch maker in addition to a
water resistance test. To replace the battery yourself, please read the following
instructions first:
Remove the screws (1, 2, 3 and 4) from the back side of the watch with a small
Phillips screwdriver. Remove the caseback and the battery sticker. Use a small, flat
tool to open the latch (5) of the battery holder. Remove the battery and insert a
fresh 3V CR2032 battery with the (+) terminal facing upwards. Ensure that the
gasket (6) is seated correctly. Close the latch of the battery holder. Replace the
battery sticker and the caseback and replace the screws.
Battery low indicator
If the battery voltage on the chest belt battery drops below the voltage required for
normal operation, (GURT/BELT) and (BAT/BATT) will appear on the display.
Replace the battery of the chest belt as described in the chapter "Chest belt".
Reset
Press SET and SEL simultaneously to totally reset the watch. All stored data will be
lost. This is the only way to change language and the units of measurement. Set up
the watch as described in the chapter “Setting up the heart rate monitor watch”.
Water resistance
Water resistant up to 3 bar. The bar value specifies the atmospheric overpressure
which is applied during testing (DIN 8310).
Page 33

- 63 -
- 64 -
Water resistance of the chest belt
Water-resistant according to IEC 60529 IPX7.
Cleaning instructions
Clean the heart rate monitor with a soft, dry and lint-free cloth. A glasses cleaning
cloth is ideal.
After each use, clean the chest belt and the watch strap using lukewarm water,
mild soap solution and a sponge. Please take care not to get the watch wet.
Dry all parts with a towel and hang the chest belt to dry. Sweat and contaminants
are detrimental to the function of the sensor.
Disposal of the electronic appliance
This heart rate monitor may not be disposed of with normal household
waste. Dispose of the unit at an approved disposal facility or at your
local recycling centre. Please observe the current rules and regulations when
disposing of the appliance. Contact the disposal system if in doubt.
Disposal of the batteries
Please dispose of your batteries properly in containers especially set up
at retailers. Batteries do not belong in household waste. Dispose of the
batteries at an approved disposal facility or at your local recycling centre. Contact
the disposal system if in doubt.
Declaration of conformity
If used as intended this product conforms to the basic standards of § 3 and the
other relevant provisions of the FTEG (Section 3 of the R&TTE directive).
You can request the declaration of conformity here:
conformity@digi-tech-gmbh.com
digi-tech gmbh warranty
This heart rate monitor includes a 3 year warranty starting on the day of purchase.
In case of defects of this heart rate monitor you have, by law, certain rights
regarding the vendor of the watch. These rights are not changed by the warranty
which is described in the following paragraphs.
Warranty conditions
The warranty duration starts on the date of purchase. Please keep the original
receipt in a safe place. The receipt is needed as a proof of purchase. If a defect
occurs in the heart rate monitor within 3 years, the heart rate monitor will be
repaired or replaced (according to our choice) free of charge. This warranty
requires that, within the 3 year warranty period, the watch and the receipt can be
made available to us along with a short written description of the defect and when
it occured. If the defect is covered by the warranty, you will receive the repaired
heart rate monitor or a new heart rate monitor. Repair or replacement does not
cause the warranty period to restart.
Warranty period and defects liability
The warranty period is not increased by the defect liability. This also applies to
repaired or replaced parts. If defects are noticed at the time of purchase they must
be reported immediately upon unpacking the item. Paid repair may be available
after the end of the warranty period.
Scope of the warranty
The heart rate monitor was manufactured according to strict quality guidelines and
was carefully inspected before delivery. The warranty does not include parts that
experience normal wear and tear and can thus be seen as wear parts or fragile
Page 34

- 65 -
- 66 -
IAN
103142
parts that are damaged. Examples include Switches, Batteries or parts made of
glass.
This warranty becomes void if the heart rate monitor is damaged, is not used in the
recommended way or is improperly repaired.
For proper use of the heart rate monitor all instructions in this manual must be
adhered to exactly. Use of the heart rate monitor in a way that is discouraged in
the manual must be avoided.
The heart rate monitor not intended for commercial use. Abusive or improper use,
excessive force and changes that are made by non-authorized repair centers will
void the warranty.
Service
Name: Inter-Quartz GmbH
Street: Valterweg 27A
Town: Eppstein 65817
Country: Germany
Email: support@inter-quartz.de
Telephone: +49 (0)6198 571825
00800 5515 6616
Warranty claim procedure
To ensure that your call is processed in a fast and efficient manner please note the
following directions:
• Have your receipt (as proof of purchase) and the article number (103142)
handy.
• The article number can be found on the type label, an engraving, the front
page of the manual (bottom left) or a sticker on the back side or bottom side of
the case.
• In case defects occur, please first contact the service center (see below) by
phone or email.
Visit www.lidl-service.com to download this and many other
manuals, product videos and software.
00800 5515 6616
Supplier
Please note that the following address is not a service address.
Please first contact the service address (see above).
Name: digi-tech gmbh
Street: Valterweg 27A
Town: Eppstein 65817
Country: Germany
Page 35

- 67 -
- 68 -
Bedienungs- und Sicherheitshinweise
Inhaltsverzeichnis
Inhaltsverzeichnis..................................................................................................... - 67 -
Einleitung .................................................................................................................. - 69 -
Bestimmungsgemäße Verwendung ....................................................................... - 69 -
Lieferumfang............................................................................................................. - 69 -
Technische Daten .................................................................................................... - 70 -
Wichtige Sicherheitshinweise
Wichtige Sicherheitshinweise ............................................................................. - 70 -
Wichtige SicherheitshinweiseWichtige Sicherheitshinweise
Batterien ............................................................................................................ - 70 -
Herzfrequenz-Messuhr nicht in Kinderhände ............................................... - 71 -
Brustgurt .................................................................................................................... - 71 -
Fahrradhalterung ..................................................................................................... - 73 -
Licht ........................................................................................................................... - 73 -
Wichtige Informationen zur Bedienung der Herzfrequenz-Messuhr ................. - 74 -
Schnelleinstellung ............................................................................................ - 74 -
Inbetriebnahme der Herzfrequenz-Messuhr ........................................................ - 74 -
Kalibrierung...................................................................................................... - 75 -
Die Uhr verfügt über 7 Funktionsmodi ........................................................... - 76 -
Uhrzeit (ZEIt/TIME) ................................................................................................. - 76 -
Zeiteinstellung .................................................................................................. - 77 -
Weckalarm (ALARM) .............................................................................................. - 77 -
Stoppuhr (St-UHR/CHRONO) .............................................................................. - 78 -
Countdownzeit (TIMER) max. 9:59:00................................................................. - 78 -
Schrittzähler (PEDO) ............................................................................................... - 79 -
Schrittzähler kalibrieren .................................................................................. - 79 -
Pulsmesser (PULS/PULSE) ...................................................................................... - 80 -
Zielpulsbereich einstellen ................................................................................ - 81 -
Puls-Alarmfunktion aktivieren/deaktivieren .................................................. - 82 -
Reset der Pulsdaten ......................................................................................... - 82 -
Speicherfunktion (SPEICH/MEMORY)................................................................. - 82 -
Gesamtspeicher/Total memory (14 Tage)................................................... - 82 -
BMI (Body Mass Index) .................................................................................. - 83 -
Fehlerbehebung ....................................................................................................... - 83 -
Reset .......................................................................................................................... - 84 -
Die Batterie der Armbanduhr wechseln ................................................................ - 84 -
Batteriestandswarnanzeige .................................................................................... - 84 -
Wasserdichtigkeit .................................................................................................... - 85 -
Wasserbeständigkeit des Brustgurtes .................................................................... - 85 -
Reinigungshinweis ................................................................................................... - 85 -
Entsorgung der Herzfrequenz-Messuhr ................................................................ - 85 -
Entsorgung der Batterien ........................................................................................ - 86 -
Konformitätserklärung ............................................................................................. - 86 -
Garantie der digi-tech gmbh.................................................................................. - 86 -
Garantiebedingungen ............................................................................................ - 86 -
Garantiezeit und gesetzliche Mängelansprüche ................................................. - 87 -
Garantieumfang ...................................................................................................... - 87 -
Abwicklung im Garantiefall .................................................................................... - 87 -
Service ...................................................................................................................... - 88 -
Lieferant .................................................................................................................... - 88 -
Page 36

- 69 -
- 70 -
Betriebstemperaturbereich
0-
50°C
Maße (exkl. Band)
4,4 x 5,2 x
1,5 cm
Displaymaße
2,5 x 2,5 cm
Batterie
CR 2032/3V
Betriebstemperaturbereich
0-
50°C
Maße (exkl. Band)
7 x 3,4 x 1,2 cm
Übertragungsfrequenz
5,3 kHz
Gewicht
53g
Batterie
CR 2032/3V
ACHTUNG:
Sprechen Sie vor Trainingsbeginn mit Ihrem
Herzfrequenz-Messuhr
Einleitung
Herzlichen Glückwunsch zum Kauf Ihrer neuen Herzfrequenz-Messuhr. Sie haben
sich damit für ein hochwertiges Gerät entschieden. Die Bedienungsanleitung ist
Bestandteil dieser Herzfrequenz-Messuhr. Sie enthält wichtige Hinweise für
Sicherheit, Gebrauch und Entsorgung. Machen Sie sich vor der Benutzung der
Herzfrequenz-Messuhr mit allen Bedien- und Sicherheitshinweisen vertraut.
Benutzen Sie die Herzfrequenz-Messuhr nur wie beschrieben und für die
angegebenen Einsatzbereiche.
Händigen Sie alle Unterlagen bei Weitergabe der Herzfrequenz-Messuhr an
Dritte mit aus.
Bestimmungsgemäße Verwendung
Die Herzfrequenz-Messuhr ist zur Zeitanzeige und zur Verwendung der
beschriebenen Zusatzfunktionen geeignet. Jede andere Verwendung oder
Veränderung der Herzfrequenz-Messuhr gilt als nicht bestimmungsgemäß. Der
Hersteller haftet nicht für Schäden, die durch nicht bestimmungsgemäßen
Gebrauch oder falsche Bedienung verursacht werden. Die Herzfrequenz-Messuhr
ist nicht für den gewerblichen Einsatz vorgesehen.
Lieferumfang
Hinweis: Bitte überprüfen Sie nach dem Kauf den Lieferumfang. Stellen Sie
sicher, dass alle Teile vorhanden und nicht defekt sind.
• Herzfrequenz-Messuhr inkl. Batterie (CR2032)
• Brustgurt inkl. Batterie (CR2032)
• Fahrradhalterung
• Bedienungsanleitung
Technische Daten
Herzfrequenz-Messuhr
Gewicht 47g
Brustgurt
Wichtige Sicherheitshinweise
Arzt. Er kann Sie über das für Sie geeignete Training, die
Trainingsintensität und die Pulsvorgaben aufklären. Diese
Herzfrequenz-Messuhr ist kein medizinisches Gerät und
Batterien
Bewahren Sie Batterien für Kleinkinder unerreichbar auf. Wurde eine Batterie
verschluckt, muss sofort medizinische Hilfe in Anspruch genommen werden.
Batterien/Akkus müssen stets polrichtig eingelegt werden. Reinigen Sie Batterieund Gerätekontakte zuvor bei Bedarf. Versuchen Sie nicht Batterien wieder
aufzuladen, kurzzuschließen oder zu öffnen. Werfen Sie niemals Batterien ins
Feuer, da diese eventuell explodieren können. Wenn Sie das Gerät längere Zeit
dient nur zur Unterstützung Ihrer Trainingsgestaltung.
Page 37

- 71 -
Batterie: CR2032
- 72 -
Kontaktfläche
nicht benutzen, entnehmen Sie die Batterie und verstauen Sie das Gerät an einem
trockenen und staubfreien Ort. Bei unsachgemäßem Gebrauch der Batterie
besteht Explosions- und Auslaufgefahr.
Sollte die Batterie doch einmal ausgelaufen sein, vermeiden Sie Kontakt mit Haut,
Augen und Schleimhäuten. Benutzen Sie Handschuhe. Bei Kontakt mit
Batteriesäure die betroffenen Stellen mit reichlich klarem Wasser spülen und
umgehend einen Arzt aufsuchen. Entfernen Sie erschöpfte Batterien umgehend aus
dem Gerät, es besteht erhöhte Auslaufgefahr.
Herzfrequenz-Messuhr nicht in Kinderhände
Dieses Gerät kann von Personen (einschließlich Kindern ab 8 Jahren) mit
verringerten physischen, sensorischen oder mentalen Fähigkeiten oder Mangel an
Erfahrung und Wissen benutzt werden, wenn sie beaufsichtigt oder bezüglich des
sicheren Gebrauchs des Geräts unterwiesen wurden und die daraus
resultierenden Gefahren verstehen. Kinder dürfen nicht mit dem Gerät spielen.
Reinigung und Benutzer-Wartung dürfen nicht von Kindern ohne Beaufsichtigung
durchgeführt werden. Halten Sie auch die Verpackungsfolien von Kindern fern. Es
besteht Erstickungsgefahr.
Brustgurt
Tragen des Brustgurts
Passen Sie den Gurt so an, dass er direkt unter den Brustmuskeln eng anliegt.
Befeuchten Sie die Kontaktflächen des Gurtes leicht mit Wasser oder EKG-Gel
(welches Sie in der Apotheke erhalten können). Stellen Sie sicher, dass die
Kontaktflächen immer Hautkontakt haben. Positionieren Sie den Gurt wie auf der
folgenden Abbildung. Achten Sie auf den richtigen Sitz des Brustgurts. Wenn Sie
komplett ausgeatmet haben, sollte der Gurt noch mit ganz leichter Spannung auf
dem Brustkorb aufliegen.
Hochspannungsmasten, Oberleitungen der Bahn oder fließender Autoverkehr
können die Messung beeinflussen oder stören.
Darauf bei der Auswahl der Laufstrecke achten.
ACHTUNG: Träger von Herzschrittmachern sollten vor Benutzung des
Brustgurts mit ihrem Arzt sprechen.
Einsetzen der Batterie in den Brustgurt
Schrauben Sie mit einer Münze den
Batteriefachdeckel von der Rückseite
des Brustgurts auf und setzen Sie die 3V
Batterie mit dem (+) Plus nach oben ein.
Schrauben Sie den Batteriefachdeckel
wieder fest zu.
Page 38

- 73 -
- 74 -
Fahrradhalterung
Verwenden der Fahrradhalterung
Sie können die Herzfrequenz-Messuhr am Handgelenk tragen oder mit der
mitgelieferten Fahrradhalterung am Lenker Ihres Fahrrads befestigen.
Drücken Sie die Fahrradhalterung von oben auf die Lenkstange Ihres Lenkers. Bei
Lenkstangen mit besonders großem Durchmesser ist u.U. ein erhöhter
Kraftaufwand nötig, um die Fahrradhalterung zu befestigen. Sie können die
Herzfrequenz-Messuhr nun auf die gleiche Art wie bei Ihrem Handgelenk an der
Fahrradhalterung befestigen. Überschreiten Sie zur Verwendung der
Herzfrequenz-Messuhr bitte nicht die maximale Übertragungsdistanz zum
Brustgurt von 60 cm. Bitte beachten Sie, dass die Funktionen des Schrittzählers
(Distanz, Geschwindigkeit etc.) bei Montage an der Fahrradhalterung nicht
verwendet werden können.
Wichtige Informationen zur Bedienung der
Herzfrequenz-Messuhr
Durch Druck auf MODE können Sie den Funktionsmodus der Uhr wechseln oder
beenden, durch Druck auf SEL wählen Sie Ihre persönlichen Daten und mit Druck
auf SET bestätigen Sie die Eingabe.
Drücken Sie MODE um im Menü weiterzugelangen.
Schnelleinstellung
Bei der Einstellung von numerischen Werten können Sie durch Drücken und Halten
von SEL die Schnelleinstellung verwenden.
Licht
Drücken Sie kurz LIGHT, um die Hintergrundbeleuchtung vorübergehend zu
aktivieren.
Inbetriebnahme der Herzfrequenz-Messuhr
Ziehen Sie die Schutzfolie vom Display ab und drücken Sie MODE, SEL oder SET.
Sie werden nun automatisch durch das Grundeinstell-Menü geführt.
Wählen Sie mit SEL zwischen der englischen und der deutschen Sprache und
bestätigen Sie Ihre Wahl mit SET. Wählen Sie auf die gleiche Weise die Einheit
(EINH/UNIT) KM oder Meilen. Anschließend geben Sie das Jahr Ihres
Geburtstages (GEB /BIRtH) ein. Drücken Sie zum Einstellen SEL und bestätigen
Sie Ihre Einstellung durch Druck auf SET. Stellen Sie auf die gleiche Weise Monat
und Tag ein. Wählen Sie dann zwischen der 12 und 24 Stundenanzeige mit SEL
und bestätigen Sie mit SET. Es folgt die Eingabe von Stunden, Minuten und
Sekunden, die Sie jeweils mit SEL eingeben und mit SET bestätigen. Nun geben
Page 39

- 75 -
- 76 -
Sie auf die gleiche Weise das Jahr, den Monat und den Tag ein und bestätigen
mit SET. Es erscheint nun die Anzeige des Gewichts. Stellen Sie Ihr Gewicht durch
Druck auf SEL ein und bestätigen Sie Ihre Eingabe mit SET. Anschließend stellen
Sie auf die gleiche Weise Ihre Körpergröße ein und bestätigen mit SET. Es
erscheint nun die Anzeige zum Kalibrieren des Schrittzählers (KALI/CALI).
Wählen Sie mit SEL zwischen NEIN/NO und JA/YES und bestätigen Sie mit SET.
Hinweise zur Kalibrierung:
Falls Sie die Uhr ausschließlich beim Gehen verwenden möchten, dann kalibrieren
Sie bitte trotzdem Gehen und Laufen. Kalibrieren Sie in diesem Fall Laufen als
"schnelles Gehen". Sie können diese auch später noch im Pedometermodus
vornehmen.
Wird das Pedometer nicht kalibriert, so greift es auf die Standardwerte zurück und
die angezeigten Werte beim Training können dadurch stark von den tatsächlichen
Werten abweichen. Während des Kalibrierungsvorgangs zeichnet die Uhr Ihr
persönliches Bewegungsprofil auf. Je gleichmäßiger sie sich bewegen und je
länger die Dauer der Profilaufzeichnung ist, desto genauer werden die
angezeigten Werte des Pedometers beim Training. Die Uhr erkennt dank der
Kalibrierung automatisch, ob Sie gehen oder laufen und passt die angezeigten
Werte dementsprechend an. Die angezeigten Werte sind genauer, wenn Sie im
gleichen Rhythmus und der gleichen Geschwindigkeit laufen, wie bei der
Kalibrierung. Tragen Sie die Uhr bei der Kalibrierung und beim Training am
gleichen Handgelenk.
Kalibrierung
Um die Aufnahme zu starten drücken Sie SEL, es erscheint KALI/CALI und
JA/YES. Bestätigen Sie mit SET. Es erscheint LAUFEN, drücken Sie SET um zur
Distanz (DST) zu gelangen. Mit Druck auf SEL können Sie die Entfernung wählen,
bestätigen Sie mit SET. Nun können Sie mit Druck auf SEL die Kalibrierung starten.
Nach erfolgtem Laufen drücken Sie erneut SEL. Es erscheint ENDE/DONE oder
ERROR. Bei ERROR müssen Sie den Vorgang wiederholen. Nach erfolgreicher
Kalibrierung, starten Sie die Kalibrierung GEHEN und fahren wie bei LAUFEN
beschrieben fort.
Die Uhr verfügt über 7 Funktionsmodi
Durch Druck auf MODE können Sie den Funktionsmodus der Uhr wechseln.
Die Reihenfolge der Funktionen ist:
Des Weiteren gibt es in den Funktionsmodi verschiedene Unterfunktionen.
Die Unterfunktionen erreichen Sie immer durch Drücken von SEL.
Uhrzeit (ZEIt/TIME)
Wählen Sie zuerst durch Druck auf MODE die Funktion (ZEIt 1/TIME-1) aus.
Durch Druck auf SEL können Sie die Unterfunktionen des Zeitmodus abrufen.
Uhrzeit, Wochentag und Sekunden <-> Uhrzeit und Datum
Drücken und halten Sie SEL, um in die 2. Zeitzone (ZEIt 2 / TIME-2) zu wechseln.
Page 40

- 77 -
- 78 -
Drücken Sie keine Taste ertönt für ca. 60 Sekunden ein Alarmton und nach 5
Minuten startet der Alarm erneut.
Zeiteinstellung
Drücken und halten Sie SET, es erscheint die 12/24 Stundenanzeige.
Wählen Sie dann zwischen der 12 und 24 Stundenanzeige mit SEL und
bestätigen Sie mit SET. Es folgt die Eingabe von Stunden, Minuten und Sekunden,
die Sie jeweils mit SEL eingeben und mit SET bestätigen. Nun geben Sie auf die
gleiche Weise das Jahr, den Monat und den Tag ein und bestätigen mit SET.
Zeitzone 1 und Zeitzone 2 werden auf gleiche Weise eingestellt.
Weckalarm (ALARM)
Wählen Sie zuerst durch wiederholten Druck auf MODE die Funktion (ALARM).
Drücken Sie SEL um den Alarm zu aktivieren oder zu deaktivieren. Bei aktiviertem
Alarm erscheint das Alarmsymbol .
Drücken und halten Sie SET, um in den Einstellungsmodus zu wechseln. Auf dem
Display blinken die Stunden der Weckzeit.
Drücken Sie zum Einstellen SEL und bestätigen Sie Ihre Einstellung durch Druck auf
SET. Stellen Sie auf die gleiche Weise die Minuten ein.
Drücken Sie bei Ertönen des Alarms eine beliebige Taste, um den Alarm zu
stoppen.
Stoppuhr (St-UHR/CHRONO)
Wählen Sie zuerst durch wiederholten Druck auf MODE die Funktion (STUHR/CHRONO).
Drücken Sie zum Starten oder Stoppen der Stoppuhr SEL.
Drücken Sie bei laufender Stoppuhr SET, um eine Rundenzeit zu stoppen. Es
können bis zu 99 Rundenzeiten gestoppt werden. Nach deren Erreichen erscheint
auf dem Display VOLL / FULL.
Drücken Sie bei gestoppter Stoppuhr SET um zur Speicherfunktion „R“ zu
wechseln und die beste Rundenzeit abzulesen (BESte / BEST LAP). Drücken Sie
nun wiederholt SEL um die weiteren Rundenzeiten abzulesen. Drücken Sie SET, um
zur Stoppuhr zurückzukehren.
Drücken und halten Sie SEL, um die Stoppuhr zurückzusetzen.
Hinweis: Die Speicherfunktion kann nur abgerufen werden, wenn mindestens eine
Rundenzeit aufgezeichnet wurde.
Countdownzeit (TIMER) max. 9:59:00
Wählen Sie zuerst durch wiederholten Druck auf MODE die Funktion (TIMER) aus.
Auf dem Display erscheint eine voreingestellte Zeit von 0:3000 Sekunden.
Drücken und halten Sie SET, um den Timer einzustellen.
Auf dem Display blinken die Stunden der Timerzeit. Drücken Sie zum Einstellen SEL
und bestätigen Sie Ihre Einstellung durch Druck auf SET. Stellen Sie die Minuten
Page 41

- 79 -
- 80 -
Aktueller Puls
I
auf die gleiche Weise ein. Drücken Sie SEL zum Starten oder Stoppen der
Countdownzeit. Nach Ablauf der Countdownzeit ertönt für ca. 60 Sekunden ein
Signalton. Drücken Sie MODE, SEL oder SET, um den Signalton zu stoppen.
Schrittzähler (PEDO)
Wählen Sie zuerst durch Druck auf MODE die Funktion (PEDO) aus.
Auf dem Display erscheint STEP, Sie können die zurückgelegten Daten ablesen.
Drücken Sie SEL, um zwischen den verschiedenen Funktionen umzuschalten.
Schritte (STEP) und Uhrzeit > Schritte (STEP) und Trainingsdauer > Schritte (STEP)
und Distanz > Schritte (STEP) und Geschwindigkeit, Kalorien (KCAL) und
Fettverbrennung in Gramm, Schritte (STEP) und Puls (HR).
Drücken Sie SET um den Schrittzähler zu starten. Auf dem Dislpay erscheinen die
beiden Füße. Drücken Sie erneut SET um den Schrittzähler zu stoppen.
Schrittzähler Reset
Drücken und halten Sie SET um alle Daten zu löschen
Druck auf SEL können Sie die Entfernung wählen, bestätigen Sie mit SET. Nun
können Sie mit Druck auf SEL die Kalibrierung starten. Nach erfolgtem Laufen
drücken Sie SEL. Es erscheint ENDE/DONE oder ERROR. Bei ERROR müssen Sie
den Vorgang wiederholen. Nach erfolgreicher Kalibrierung, starten Sie die
Kalibrierung GEHEN und fahren Sie wie unter LAUFEN beschrieben fort.
Pulsmesser (PULS/PULSE)
Hinweis: Der Pulsmesser funktioniert nur bei Verwendung des Brustgurtes. Es
erscheint im Display der aktuelle Puls und es blinkt das Herzsymbol.
Wählen Sie zuerst durch Druck auf MODE die Funktion (PULS/PULSE) aus.
Durch Druck auf SEL können Sie die Unterfunktionen des Pulsmessers abrufen.
Aktueller Puls (Current Pulse)/MHR (%MHR) > Aktueller Puls (Current Pulse)/Zeit
(TIME) > Aktueller Puls (Current Pulse)/Aktuelle Geschwindigkeit (Current Speed)
> Aktueller Puls (Current Pulse)/Durchschnittlicher Puls (Av. Pulse) „A“ > Aktueller
Puls (Current Pulse)/Höchster Puls (Max. Pulse) „H“ > Aktueller Puls (Current
Pulse)/Niedrigster Puls (Min. Pulse) „L“ > Aktueller Puls (Current Pulse)/Zielzone
(Target zone)
Schrittzähler kalibrieren
Sollten Sie den Schrittzähler noch nicht wie unter „Inbetriebnahme der
Herzfrequenz-Messuhr“ beschrieben, kalibriert haben oder möchten Sie den
Schrittzähler neu kalibrieren, drücken und halten Sie SET.
Es erscheint nun die Anzeige des Gewichts. Stellen Sie ihr Gewicht durch Druck
auf SEL ein und bestätigen Sie Ihre Einstellung durch Druck auf SET. Nun erscheint
die Anzeige der Körpergröße. Stellen Sie Ihre Körperhöhe durch Druck auf SEL
ein und bestätigen Sie Ihre Eingabe durch Druck auf SET. Es erscheint nun die
Anzeige zum Kalibrieren des Schrittzählers (KALI/CALI). Um die Aufnahme zu
starten drücken Sie SEL, es erscheint KALI/CALI und JA/YES. Bestätigen Sie mit
SET. Es erscheint LAUFEN, drücken Sie SET um zur Distanz (DST) zu gelangen. Mit
Zielzone
MHR – Maximale Herzfrequenz
(Prozent der maximalen Herzfrequenz. Maximale Herzfrequenz = 220 – Ihr Alter)
Page 42

- 81 -
ACHTUNG:
Klären Sie vor Trainingsbeginn mit Ihrem
Alter > 20 25 30 35 40 45 50 55 60 65
Zone 1
130 126 123 120 117 113 110 107 104 100
Freizeit
to to to to to to to to to to
50-65 %
100 97 95 92 90 87 85 82 80 77
Zone 2
160 156 152 148 144 140 136 132 128 124
Fitness to to to to to to to to to to
65-80 %
130 126 123 120 117 113 110 107 104 100
Zone 3
190 185 180 175 171 166 161 156 152 147
Sport to to to to to to to to to to
80-95
160 156 152 148 144 140 136 132 128 124
- 82 -
Zielpulsbereich einstellen
Arzt, welcher Zielpulsbereich für Sie geeignet ist. Die
Voreinstellungen sind nur grobe Richtwerte und nicht für
jede Person geeignet.
Wenn Sie sich in der Unterfunktion Aktueller Puls und Zielzone
Aktueller Puls und Zielzone befinden,
Aktueller Puls und ZielzoneAktueller Puls und Zielzone
drücken und halten Sie SET um einen voreingestellen Zielpulsbereich zu wählen
oder den benutzerdefinierten Zielpulsbereich einzustellen. Es erscheint der
benutzerdefinierte Zielpulsbereich (ZN-P/ZN-U). Drücken Sie wiederholt SEL, um
den gewünschten Zielpulsbereich zu wählen: benutzerdefiniert (ZN-P/ZN-U),
Freizeit (ZN-1), Fitness (ZN-2), Sport (ZN-3). In der nachfolgenden Tabelle
erhalten Sie einen Überblick der Zonen 1-3. Um den benutzerdefinierten
Zielpulsbereich einzustellen, wechseln Sie bei Anzeige ZN-P/ZN-U durch Druck
auf SET in den Einstellungsmodus. Es blinkt die Anzeige des unteren Grenzwertes.
Stellen Sie den Wert durch Druck auf SEL und bestättigen Sie die Einstellung durch
Druck auf SET. Stellen Sie auf die gleiche Weise den oberen Grenzwert.
Puls-Alarmfunktion aktivieren/deaktivieren
Wenn Sie sich in der Unterfunktion Aktueller Puls und Zielzone befinden, drücken
Sie kurz SET, um den Zielpuls-Alarm zu aktivieren oder zu deaktivieren. Bei
aktiviertem Alarm erscheint im Display.
Reset der Pulsdaten
Die Pulsdaten werden automatisch jeden Tag um Mitternacht zurückgesetzt.
Speicherfunktion (SPEICH/MEMORY)
Wählen Sie zuerst durch Druck auf MODE die Funktion (SPEICH/MEMORY) aus.
Sie können sich nun die gespeicherten Daten der letzten 14 Tage ansehen,
drücken Sie SEL um zur nächsten Funktion zu gelangen.
Es werde die Daten Schritte/Steps, Entfernung/Distance, Kalorien-/Calorien und
Fettverbrennung/Fat Brun und Kilometerzähler/Odometer (Gesamtstrecke) 14
Tage lang gespeichert.
Gesamtspeicher/Total memory (14 Tage)
Die Reichenfolge der Funktionen ist: Gesamte Schritte/Gesamte Entfernung (Total
Step/Total Dist.) > Gesamte Kalorien/Gesamte Fettverbrennung (Total
Calories/Total Fat Burn) > Kilometerzähler/Odometer (G-Dst /ODO) > BMI
(BMI).
MHR
MHR
MHR
Hinweis:
Die aufgezeichneten Tagesdaten der Kalorien, Fettverbrennung,
Durchschnittsgeschwindigkeit und Höchstgeschwindigkeit, werden jede Nacht um
0:00 Uhr zurückgesetzt, aber im 14-Tagesspeicher erfasst.
Page 43

- 83 -
- 84 -
BMI (Body Mass Index)
Der BMI ist eine Maßzahl für die Bewertung des Körpergewichts eines Menschen.
Ein Wert zwischen 18,5 und 25 gilt bei Erwachsenen als normal. Bei Werten unter
18,5 spricht man von Untergewicht. Bei Werten über 25 spricht man von
Übergewicht. Bei Werten über 30 spricht man von Adipositas (Fettleibigkeit).
Der BMI gibt lediglich einen groben Richtwert an, da er die Statur eines Menschen
und die individuell verschiedene Zusammensetzung des Körpergewichts aus Fettund Muskelgewebe naturgemäß nicht berücksichtigt.
Die Herzfrequenzmessuhr berechnet automatisch den BMI aus Ihren
eingegebenen Daten.
Fehlerbehebung
Die Distanzmessung ist sehr ungenau
Die Uhr kann die zurückgelegte Distanz nur anhand der bei der durchgeführten
Kalibrierung gemessenen Schrittlänge schätzen. Führen Sie die Kalibrierung des
Schrittzählers erneut durch. Kalibrieren Sie sowohl für Gehen als auch für Rennen
und führen Sie die Kalibrierung besonders sorgfältig durch.
Ungenauigkeiten können auch durch das Laufen auf unebenen Flächen entstehen.
Der Puls wird nicht oder nicht korrekt angezeigt
Achten Sie auf die korrekte Positionierung und den guten Sitz des Brustgurtes.
Ihre Haut sollte nicht zu trocken oder kalt sein. Die Kontaktflächen können leicht
angefeuchtet werden, um die Funktion zu verbessern.
Elektromagnetische Störquellen können den Empfang beeinträchtigen.
Die Distanz zwischen Gurt und Uhr darf max. 60 cm betragen. Andere
Herzfrequenz-Messuhren in weniger als 2m Abstand können den Empfang stören.
Kabellose Fahrradcomputer können den Empfang stören.
Evtl. müssen die Batterien ersetzt werden.
Das Display ist schlecht lesbar / Die Beleuchtung funktioniert nicht
Ersetzen Sie die Batterien.
Reset
Durch gleichzeitigen Druck auf SET und SEL kann die Uhr total zurückgesetzt
werden, alle gespeichten Daten gehen verloren. Erst nach dem Rücksetzen können
Sie die Sprache und die Maßeinheiten wieder ändern. Stellen Sie die
Herzfrequenzmessuhr wie im Abschnitt „Inbetriebnahmen der
Herzfrequenzmessuhr“ ein.
Die Batterie der Armbanduhr wechseln
Sie können den Batteriewechsel zusammen mit einer Wasserdichtigkeitsprüfung
von einem Uhrmacher durchführen lassen. Um die Batterie selbst zu wechseln,
gehen Sie bitte wie folgt vor:
Lösen Sie die Schrauben (1, 2, 3 und 4) auf der Rückseite der Armbanduhr mit
einem kleinen Kreuzschraubendreher. Entfernen Sie den Gehäuseboden und den
Batterieaufkleber. Verwenden Sie ein kleines, flaches Werkzeug, um den Riegel
(5) der Batteriehalterung zu öffnen. Entnehmen Sie die Batterie und setzen Sie eine
neue 3V CR2032 Batterie mit dem (+)-Pol nach oben ein. Prüfen Sie den korrekten
Sitz des Dichtungsringes (6). Verriegeln Sie die Batteriehalterung (5). Kleben Sie
den Batterieaufkleber wieder ein, setzen Sie den Gehäuseboden ein und
schrauben Sie ihn fest.
Batteriestandswarnanzeige
Wenn der Batteriestand des Brustgurtes für den normalen Betrieb nicht mehr
ausreicht, erscheint auf dem Display der Armbanduhr "GURT/BELT" und
Page 44

- 85 -
- 86 -
"BATT/LO BAT". Wechseln Sie die Batterie des Brustgurtes wie im Kapitel
"Brustgurt" beschrieben.
Wasserdichtigkeit
Wasserdicht bis 3 bar. Die bar-Angabe bezieht sich auf den Luftüberdruck,
welcher im Rahmen der Wasserdichtigkeitsprüfung angewandt wurde (DIN8310).
Wasserbeständigkeit des Brustgurtes
Wasserbeständigkeit nach IEC 60529 IPX7.
Reinigungshinweis
Reinigen Sie die Herzfrequenz-Messuhr nur mit einem trockenen, fusselfreien Tuch,
wie es z.B. zur Reinigung von Brillengläsern verwendet wird.
Nach jedem Tragen reinigen Sie den Brustgurt und das Uhrenarmband mit
lauwarmen Wasser oder einer milden Seifenwasserlösung und einem Schwamm.
Achten Sie darauf, dass die Armbanduhr dabei nicht nass wird. Trocknen Sie alle
Teile mit einem Tuch ab und hängen Sie den Gurt zum Trocknen auf. Schweiß und
Verunreinigungen beeinträchtigen die Funktion des Senders.
Entsorgung der Herzfrequenz-Messuhr
Diese Herzfrequenz-Messuhr darf nicht im normalen Hausmüll entsorgt
werden. Entsorgen Sie die Herzfrequenz-Messuhr über einen
zugelassenen Entsorgungsbetrieb oder über Ihre kommunale
Entsorgungseinrichtung. Beachten Sie die aktuell geltenden Vorschriften. Setzen
Sie sich im Zweifelsfall mit Ihrer Entsorgungseinrichtung in Verbindung.
Entsorgung der Batterien
Bitte entsorgen Sie Ihre Batterien sachgerecht in extra hierfür aufgestellten
Gefäßen im Handel. Batterien gehören nicht in den Hausmüll. Entsorgen
Sie Batterien bitte über einen zugelassenen Entsorgungsbetrieb oder über Ihre
kommunale Entsorgungseinrichtung. Beachten Sie die aktuell geltenden
Vorschriften. Setzen Sie sich im Zweifelsfall mit Ihrer Entsorgungseinrichtung in
Verbindung.
Konformitätserklärung
Dieses Produkt entspricht bei bestimmungsgemäßer Verwendung den
grundlegenden Anforderungen des § 3 und den übrigen einschlägigen
Bestimmungen des FTEG (Artikel 3 der R&TTE).
Die Konformitätserklärung können Sie hier anfordern:
conformity@digi-tech-gmbh.com
Garantie der digi-tech gmbh
Sie erhalten auf diese Herzfrequenz-Messuhr 3 Jahre Garantie ab Kaufdatum. Im
Falle von Mängeln dieser Herzfrequenz-Messuhr stehen Ihnen gegen den
Verkäufer des Produkts gesetzliche Rechte zu. Diese gesetzlichen Rechte werden
durch unsere im Folgenden dargestellte Garantie nicht eingeschränkt.
Garantiebedingungen
Die Garantiefrist beginnt mit dem Kaufdatum. Bitte bewahren Sie den Original
Kassenbon gut auf. Diese Unterlage wird als Nachweis für den Kauf benötigt. Tritt
innerhalb von drei Jahren ab dem Kaufdatum dieser Herzfrequenz-Messuhr ein
Material- oder Fabrikationsfehler auf, wird die Herzfrequenz-Messuhr von uns –
nach unserer Wahl – für Sie kostenlos repariert oder ersetzt. Diese
Garantieleistung setzt voraus, dass innerhalb der Drei-Jahres-Frist die defekte
Herzfrequenz-Messuhr und der Kaufbeleg (Kassenbon) vorgelegt und schriftlich
kurz beschrieben wird, worin der Mangel besteht und wann er aufgetreten ist.
Wenn der Defekt von unserer Garantie gedeckt ist, erhalten Sie die reparierte
oder eine neue Herzfrequenz-Messuhr zurück. Mit Reparatur oder Austausch des
Produkts beginnt kein neuer Garantiezeitraum.
Page 45

- 87 -
- 88 -
IAN
103142
Garantiezeit und gesetzliche Mängelansprüche
Die Garantiezeit wird durch die Gewährleistung nicht verlängert. Dies gilt auch für
ersetzte und reparierte Teile. Eventuell schon beim Kauf vorhandene Schäden und
Mängel müssen sofort nach dem Auspacken gemeldet werden. Nach Ablauf der
Garantiezeit anfallende Reparaturen sind kostenpflichtig.
Garantieumfang
Die Herzfrequenz-Messuhr wurde nach strengen Qualitätsrichtlinien sorgfältig
produziert und vor Anlieferung gewissenhaft geprüft. Die Garantieleistung gilt für
Material- oder Fabrikationsfehler. Diese Garantie erstreckt sich nicht auf
Produktteile, die normaler Abnutzung ausgesetzt sind und daher als Verschleißteile
angesehen werden können oder für Beschädigungen an zerbrechlichen Teilen, z.
B. Schalter, Akkus oder die aus Glas gefertigt sind. Diese Garantie verfällt, wenn
die Herzfrequenz-Messuhr beschädigt, nicht sachgemäß benutzt oder gewartet
wurde. Für eine sachgemäße Benutzung der Herzfrequenz-Messuhr sind alle in
der Bedienungsanleitung aufgeführten Anweisungen genau einzuhalten.
Verwendungszwecke und Handlungen, von denen in der Bedienungsanleitung
abgeraten oder vor denen gewarnt wird, sind unbedingt zu vermeiden.
Die Herzfrequenz-Messuhr ist lediglich für den privaten und nicht für den
gewerblichen Gebrauch bestimmt. Bei missbräuchlicher und unsachgemäßer
Behandlung, Gewaltanwendung und bei Eingriffen, die nicht von unserer
autorisierten Service-Niederlassung vorgenommen wurden, erlischt die Garantie.
• Eine als defekt erfasste Herzfrequenz-Messuhr können sie anschließend unter
Beifügung des Kaufbelegs (Kassenbon) und der Angabe, worin der Mangel
besteht und wann er aufgetreten ist, für Sie portofrei an die Ihnen mitgeteilte
Service Anschrift übersenden.
Auf www.lidl-service.com können Sie diese und viele weitere
Handbücher, Produktvideos und Software herunterladen.
Service
Name: Inter-Quartz GmbH
Str.: Valterweg 27A
Stadt: Eppstein 65817
Land: Deutschland
E-Mail: support@inter-quartz.de
Telefon: +49 (0)6198 571825
00800 5515 6616
00800 5515 6616
Abwicklung im Garantiefall
Um eine schnelle Bearbeitung ihres Anliegens zu gewährleisten, folgen Sie bitte
den folgenden Hinweisen:
• Bitte halten Sie für alle Anfragen den Kassenbon und die Artikelnummer
(103142) als Nachweis für den Kauf bereit.
• Die Artikelnummer entnehmen Sie bitte dem Typenschild, einer Gravur, auf dem
Titelblatt Ihrer Anleitung (unten links) oder als Aufkleber auf der Rück- oder
Unterseite.
• Sollten Funktionsfehler oder sonstige Mängel auftreten kontaktieren Sie
zunächst die nachfolgende Serviceabteilung telefonisch oder per E-Mail.
Lieferant
Bitte beachten Sie, dass die folgende Anschrift keine Serviceanschrift ist.
Kontaktieren Sie zunächst die oben benannte Servicestelle.
Name: digi-tech gmbh
Str.: Valterweg 27A
Stadt: Eppstein 65817
Land: Deutschland
Page 46

IAN
103142
digi-tech gmbh
Valterweg 27A
D-65817 Eppstein
Actualización de las informaciones · Data das informações ·
Stand der Informationen · Last information update: 10/2014
Art.-Nr.: 1-LD3875
 Loading...