

Page 1
Heart Rate Monitor 1/2013 · Art.-Nr.: 1-LD3473
Heart Rate Monitor
Usage and safety instructions
Pulzusmérő óra
Használati és biztonsági tanácsok
Herzfrequenz-Messuhr
Bedienungs- und Sicherheitshinweise
IAN 87794
Pulsometr z pasem na piersi
Wskazówki obsługi i bezpieczęństwa
srčnega utripa
Navodilo za uporabo in varnostno navodilo
Ura za merjenje
Usage and safety instructions ........................................................................- 1 -
Wskazówki obsługi i bezpieczęństwa....................................................... - 23 -
Használati és biztonsági tanácsok............................................................. - 45 -
Navodilo za uporabo in varnostno navodilo........................................... - 68 -
Bedienungs- und Sicherheitshinweise........................................................ - 89 -
Page 2

-
1 -
Usage and safety instructions
-
2 -
Table of contents
Table of contents.........................................................................................................- 1 -
Preliminary note..........................................................................................................- 3 -
Intended use................................................................................................................- 3 -
Scope of delivery .......................................................................................................- 3 -
Technical specifications.............................................................................................- 3 -
Features.......................................................................................................................- 4 -
Important safety information......................................................................- 5 -
Setup of the heart rate monitor..................................................................................- 6 -
Important notes on the operation of the wrist watch...............................................- 8 -
Light..............................................................................................................................- 8 -
Time and basic settings..............................................................................................- 9 -
Alarm .........................................................................................................................- 10 -
Timer (max. 23:59:00)............................................................................................- 11 -
Stop watch ................................................................................................................- 11 -
Memory feature........................................................................................................- 11 -
Heart rate measurement ..........................................................................................- 12 -
Calories, fat burn and BMI......................................................................................- 15 -
Fitness.........................................................................................................................- 16 -
Coded transmission..................................................................................................- 16 -
Troubleshooting........................................................................................................- 17 -
Replacing the watch battery....................................................................................- 17 -
Battery low indicator................................................................................................- 18 -
Water resistance of the heart rate monitor ............................................................- 18 -
Water resistance of the chest belt...........................................................................- 18 -
Cleaning instructions................................................................................................- 18 -
Disposal of the electronic appliance......................................................................- 19 -
Disposal of the batteries...........................................................................................- 19 -
Declaration of conformity........................................................................................- 19 -
digi-tech gmbh warranty .........................................................................................- 19 -
Warranty conditions ................................................................................................- 19 -
Warranty period and defects liability....................................................................- 20 -
Scope of the warranty..............................................................................................- 20 -
Warranty claim procedure......................................................................................- 21 -
Service.......................................................................................................................- 22 -
Supplier .....................................................................................................................- 22 -
Warning light............................................................................................................- 13 -
Timer ..........................................................................................................................- 13 -
Memory feature........................................................................................................- 13 -
Target heart rate.......................................................................................................- 14 -
Page 3
-
3 -
Heart Rate Monitor
-
4 -
Preliminary note
Please read the instruction manual before using the product for the first time- even
if you are experienced at using electronic equipment. Please take special care
when reading the chapter "Important safety information". Keep this instruction
manual so you may use it a reference material in the future. If you sell or give this
product to someone else it is very important to also include this manual.
Intended use
This electronic appliance is intended for time display and the described additional
features. Any other use or modification of the electronic appliance does not
comply with the intended uses. The manufacturer is not liable for damages caused
by improper use or misuse. The device is not intended for commercial use.
Scope of delivery
Please note: Check the scope of delivery after purchase. Please ensure that all
parts are included and undamaged.
• Wrist watch incl. battery (CR2032)
• Chest belt incl. battery (CR2032)
• Bicycle holder
Technical specifications
Wrist watch
Operating temperature 0-50°C
Dimensions 4,6 x 3,3 x 1,6 cm
Display 2,5 x 1,9 cm
Weight 51g
Battery CR 2032/3V
Chest belt
Operating temperature 0-50°C
Dimensions 7 x 3,3 x 1,2 cm
Frequency 110 kHz
Weight 51g
Battery CR 2032/3V
Features
Heart rate measurement
• Alarm for maximum heart rate
• Target heart rate training with timer and alarm
(Health, Fitness, Peformance and user defined)
• Max. heart rate, min. heart rate and average heart rate
• Warning light for high heart rate
Calorie features
• Calories and fat burned during training
• BMI-calculation
• Fitness Level
Stop watch
• 1/100 seconds with 99 lap times
Countdown timer
Time features
• Time
• Calendar
• Alarm with snooze
• Hourly chime
Page 4
-
5 -
• Second time zone
-
6 -
battery CR2032
Other
• Back light
Important safety information
ATTENTION: Consult your doctor before you begin any
training program. Your doctor can help you choose the
proper training intensity and heart rate guidelines for your
exercises.
This heart rate wrist watch is not a medical device and
should only be used as a guide for your training.
- Batteries
Insert the batteries/ rechargeable batteries in the correct polarity. Don’t try to
recharge non-rechargeable batteries and under no circumstances throw them into
fire. Danger of explosion.
Do not use unequal batteries (old and new, Alkaline and carbon, etc.)
simultaneously. If you will not use the device for a long time, remove the batteries
and store the device in a dry and dust-free place. Improper use of batteries may
cause an explosion or leakage. If the batteries have leaked, use gloves and clean
the appliance thoroughly with a dry cloth.
- Electrical devices should not be in the hands of children
Never let children use electrical devices unsupervised. Children can’t always
recognize the possible dangers properly. Batteries/ rechargeable batteries can
be life threatening when swallowed. Store the batteries where they cannot be
reached by small children. If a battery is swallowed, medical aid must be sought
immediately.
Also keep the packaging foils away from children. Danger of suffocation.
Setup of the heart rate monitor
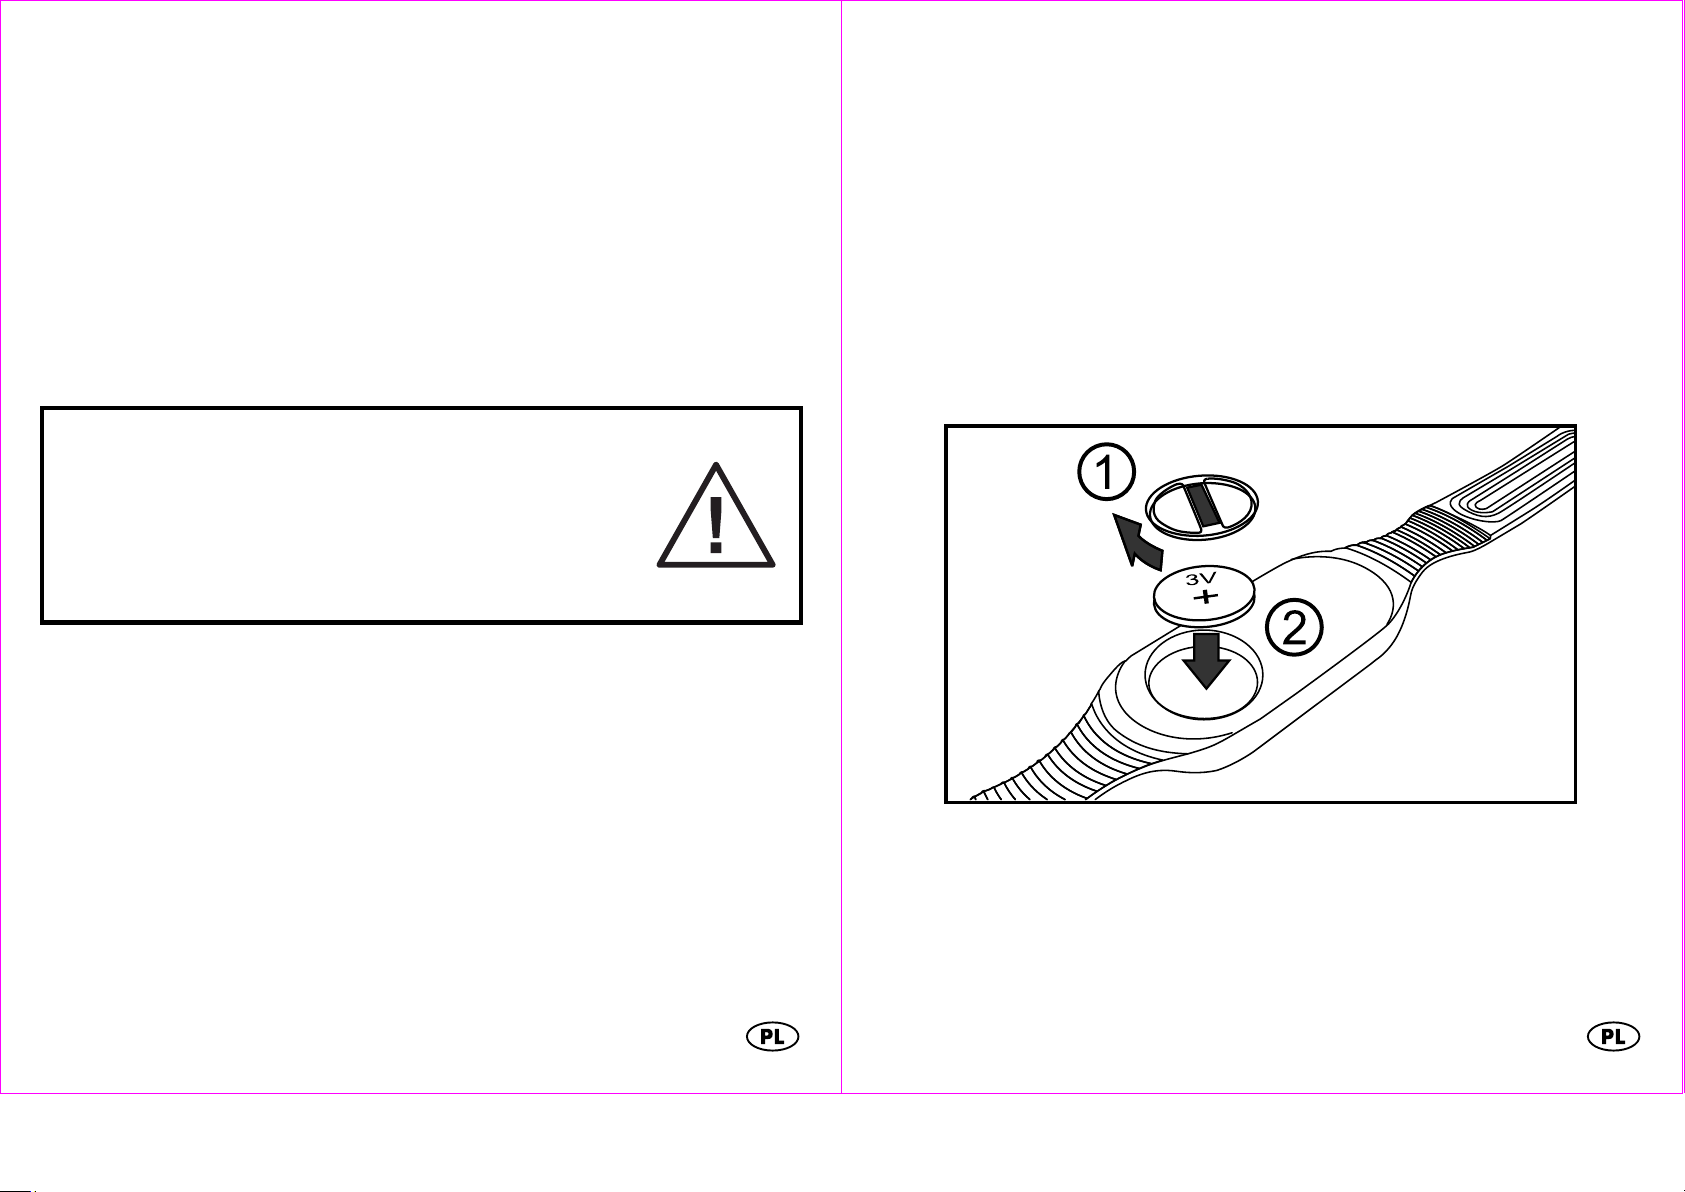
Use a coin to unscrew the battery cover on the back side of the chest belt and
insert the 3V battery with the (+) sign facing up. Screw the battery compartment
cover back into the case.
Remove the protective film from the display and press MODE, SEL or SET.
Now select English, German, French or Spanish language by pressing SEL and
confirm your setting by pressing SET.
Select the unit KM-KG
METRIC KM - KG KM - KG KM - KG
or Miles/pounds
IMPERIAL M - LB M - LB M - LB
in the same way. Complete the setting procedure by pressing MODE.
The watch can be reset by pressing and holding SET and SEL together. Only after
reseting the watch the other language can be selected.
Page 5
-
7 -
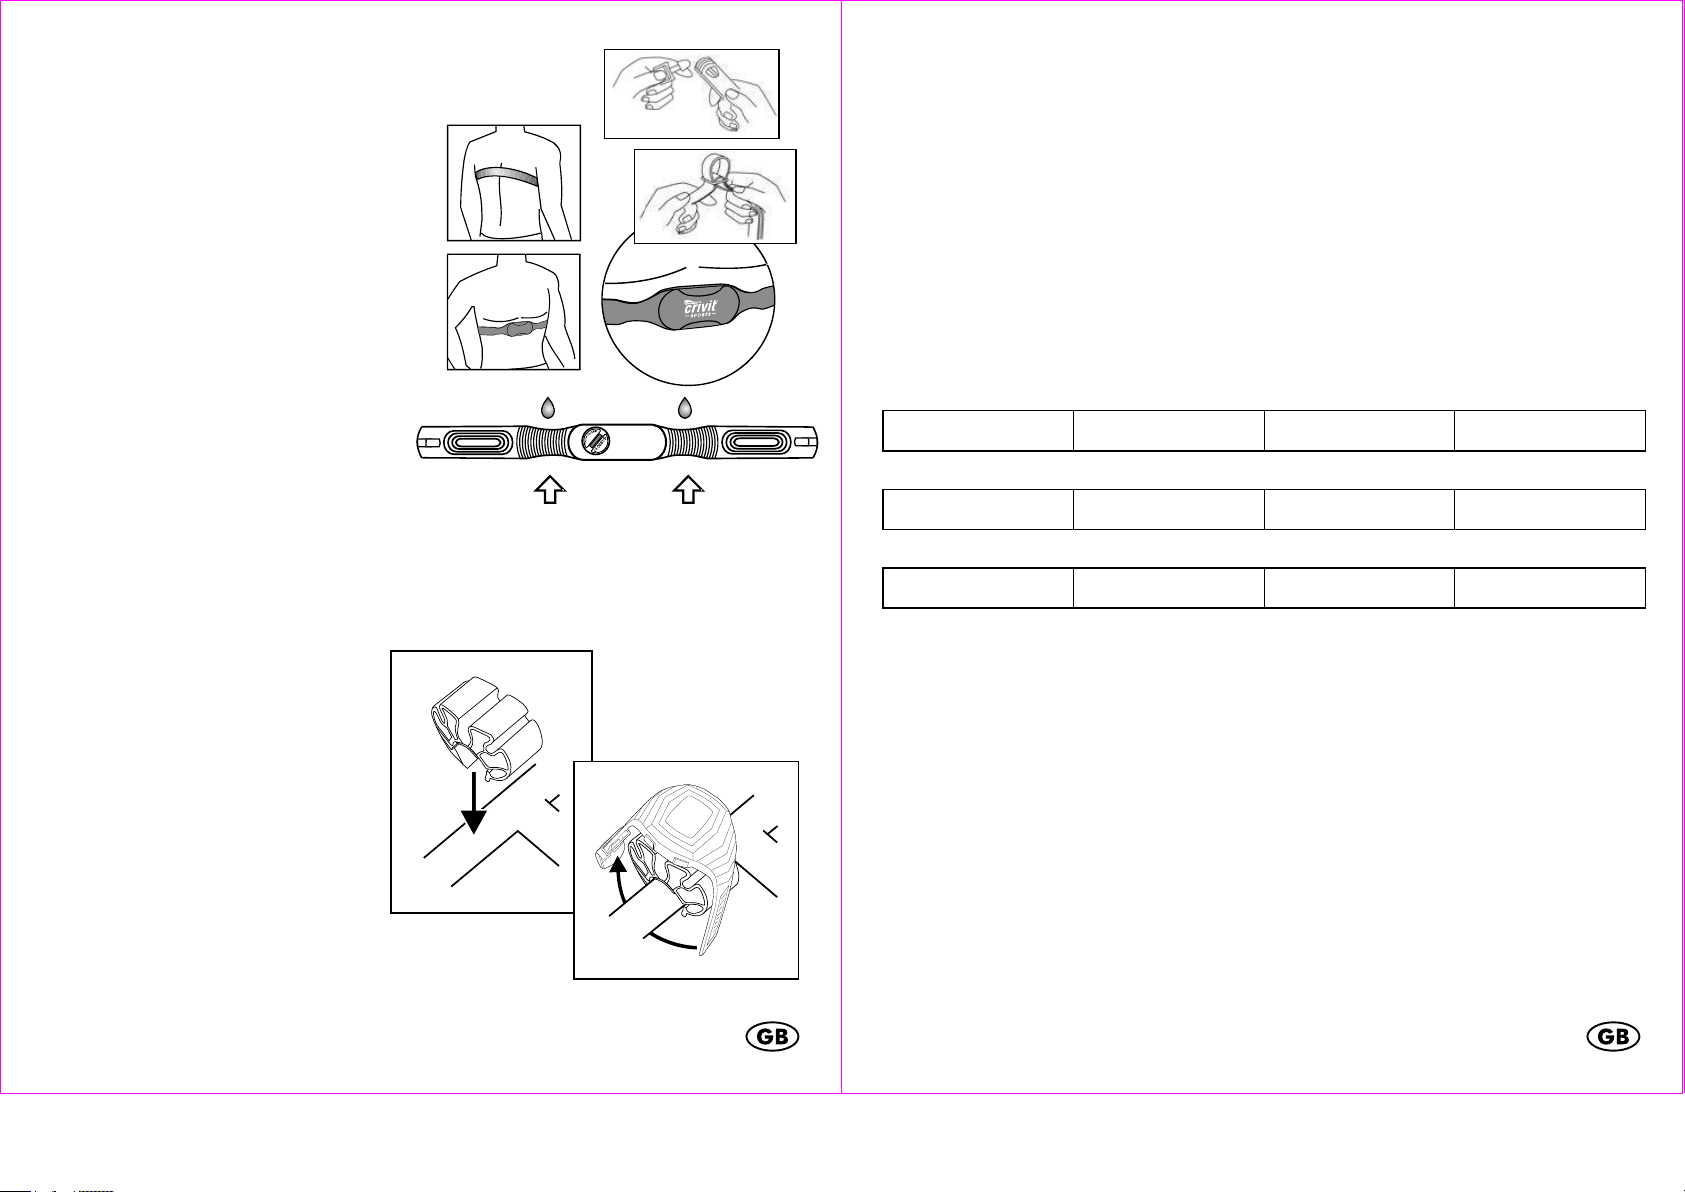
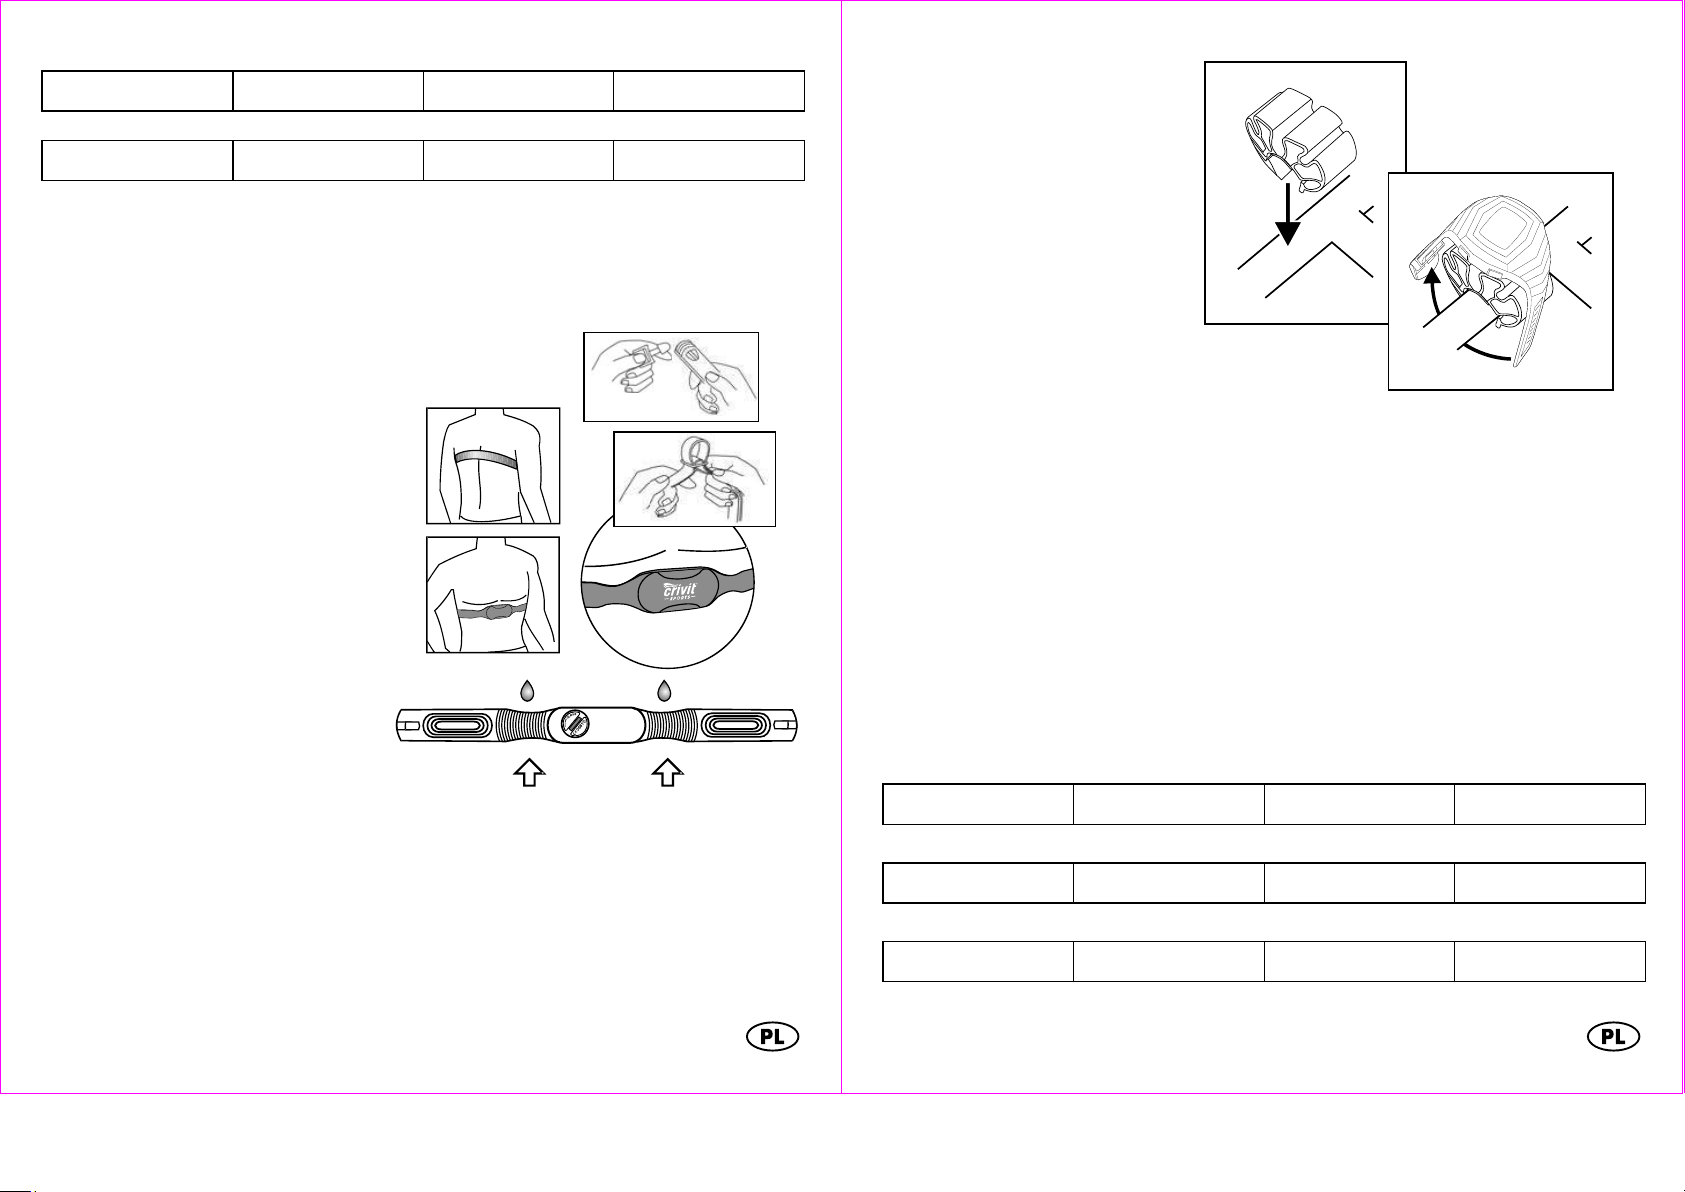
Wearing the chest belt
contact area
-
8 -
Adjust the chest belt so that it fits
snugly directly below the chest
muscles. Moisten the contact areas
with water or ECG gel (ECG gel can
be purchased at a pharmacy). Ensure
that the contact areas constantly
remain in skin contact.
Position the chest belt as per the
following illustration.
Please ensure that the chest belt is
seated properly. When you have
exhaled completely the chest belt
should still have very slight tension
pressing it to your chest.
High voltage power lines, Trains or
moving vehicular traffic may interfere
with the heart rate measurement.
Please consider this when planning
your exercise route.
Using the bicycle holder
The included bicycle holder can
be used to attach the wrist watch
to the handlebar of a bicycle.
Press the bicycle holder onto the
top of the handlebar. Handlebars
with an especially large diameter
may require the use of additional
force to snap on the bicycle
holder. The heart rate monitor can
now be attached to the bicycle
holder in the same way that you
would attach it to your wrist.
The maximum range of 70cm between the wrist watch and the chest belt should
not be exceeded.
Important notes on the operation of the wrist watch
The watch has
Press MODE to select the mode of operation of the watch.
The order of the modes is as follows:
3 different Modes of Operation.
Time and basic settings
TIME ZEIT TEMPS HORA
stop watch
CHRONO ST-UHR CHRONO CRONO
heart rate
HRM PULS FC PULSO
Each mode of operation may have several subfeatures.
The subfeatures can always be accessed by pressing SEL.
Speed setting
When setting numerical values, press and hold SEL to use the speed setting
feature.
Light
Briefly press LIGHT to temporarily activate the light.
Page 6
-
9 -
Time and basic settings
-
10 -
HEIGHT GROESSE TAILLE TAMANO
TIME ZEIT TEMPS HORA
The subfeatures of the time mode can be accessed by pressing SEL.
time and basic settings
TIME ZEIT TEMPS HORA
alarm
ALARM ALARM ALARM ALARMA
timer
TIMER TIMER COMPTE TIMER
Press and hold SET for 3 seconds to access setting mode.
The display will show
HOLD
TO SET
and the 12 or 24 hour selection will blink on the display.
Press SEL to select a setting and confirm your setting by pressing SET. Set the
seconds, minutes, hours, year, month and day in the same way.
Now the basic settings will follow. First the year of the birthday setting will appear
BIRTHDAY GEB-TAG DATNAISS CUMPL-AN
Press SEL to set the year and press SET to confirm your setting. Set the month and
day in the same way.
Now the weight will appear
WEIGHT GEWICHT POIDS PESO
Set the digits of your weight by pressing SEL and confirm each digit by pressing
SET.
Now the height display will appear
HALTEN=
EINST.
MAINT=
REGLER
MANT=
AJUST
Set each digit of your height by pressing SEL and confirm each digit by pressing
SET.
Exit setting mode by pressing MODE.
Second time zone
Press and hold SEL for 3 seconds. The watch will switch to the second time zone
display and T2 will appear on the display. Setting the second time zone can be
accomplished in the same way as described in the previous paragraph.
Press and hold SEL for 3 seconds to return to normal time mode.
Alarm
ALARM ALARM ALARM ALARMA
Press and hold SET for 3 seconds to enter setting mode.
"AL" will appear on the display and the minutes of the alarm time will blink.
Press SEL to set the minutes and press SET to confirm your setting. Set the hours in
the same way.
You may optionally set the month and day as well.
If neither month nor day are set the alarm will sound daily. If the day is set, the
alarm will sound monthly. If both the month and the day are set the alarm will
sound only at the set date.
The hourly chime setting will now appear on the display
CHIME STDALARM SIGN HOR HORA AL
Press SEL to select a setting and confirm your setting by pressing SET
(ON/EIN/ACTIF/ENCENDID=on,
OFF/AUS/INACTIF/APAGADO=off).
If the chime is activated, the bell symbol will appear and the watch will chime at
the beginning of every hour.
Exit setting mode by pressing MODE. The alarm can be activated or deactivated
by pressing SET. If the alarm is activated the alarm symbol will appear.
When the alarm sounds, press SET, SEL or MODE to stop the alarm.
Page 7
-
11 -
Snooze feature
-
12 -
If no button is pressed when the alarm sounds, the alarm will shut off after 30
seconds and the symbol will blink on the display. The alarm will stop and will
resume after sounding after 2 minutes. The process will repeat itself 5 times.
Timer (max. 23:59:00)
TIMER TIMER COMPTE TIMER
Press and hold SET for 3 seconds to enter setting mode.
The minutes of the timer time will blink on the display.
Press SEL to set minutes of the timer time and confirm your setting by pressing SET.
Set the hours in the same way.
Now the additional settings for the timer will follow. Press SEL to select the desired
mode:
Cd r After reaching 0:00 the timer will count the set time again
Cd U After reaching 0:00 the timer will count forward
Cd S After reaching 0:00 the timer will stop
Exit setting mode by pressing MODE.
The timer can be started or stopped by pressing SET.
Press and hold SET to reset the timer.
After the timer time is up an alarm will sound.
Stop watch
CHRONO ST-UHR CHRONO CRONO
Press SET to start or stop the stop watch. Press SEL while the stop watch is running
to record a lap time. Up to 99 laps can be recorded.
Press and hold SET to reset the stop watch.
Memory feature
DATA
RECALL
ANSICHT
DATEN
APPEL
DONNEES
RECUP
DATOS
Press SEL while the stop watch is stopped to display the fastest lap on the display.
Press SET to display the other lap times.
Please note: The memory feature can only be used if at least one lap time was
recorded.
Heart rate measurement
HRM PULS FC PULSO
The subfeatures of the heart rate measurement can only be used when the chest
belt is connected.
Press SEL to access the subfeatures of the heart rate watch.
Timer
TIMER TIMER COMPTE TEMPORIZADOR
memory feature
MEMORY SPEICHER MEMOIRE MEMORIA
target heart rate
ZONE BEREICH ZONE ZONA
calories, fat burn and BMI
CALORIE KALORIEN CALORIES CALORIAS
fitness
FITNESS
LEVEL
In the middle row of the display the heart rate is shown while wearing the chest
belt. If the signal is received from the chest belt the heart symbol will flash. To the
right of the heart rate the heart rate in percent of the maximum heart rate is shown.
The maximum heart rate is calculated by evaluating your age, weight and height.
FITNESS
LEVEL
NIV FORM
PHYSIQ
NIVEL
FIT
Page 8
-
13 -
Warning light
ST/SP
- 14 -
The stored values are shown in the bottom row of the display.
maximum heart rate during training
HI H FO AL
If your heart rate reaches or exceeds
99% of your maximum heart rate, or
your heart rate exceeds the target
zone values (see target zone) the red
warning light will blink.
Timer
TIMER TIMER COMPTE TEMPORIZADOR
The bottom row of the display will show the elapsed training time. The middle row
will show your heart rate and the heart rate in percent of the maximum heart rate.
The timer will start automatically when the chest belt starts measuring the heart
rate. The timer will continue counting the time if the feature mode of the watch is
changed.
Press SET to select the timer mode:
TIMER total training time
training time in heart rate target zone
▲
training time with heart rate over target zone
▼
training time with heart rate below target zone
Press and hold SET to reset the training time.
Memory feature
MEMORY SPEICHER MEMOIRE MEMORIA
minimum heart rate during training
LO N FA BA
average heart rate during training
AV D MO PR
Press and hold SET to reset the stored values.
Target heart rate
ZONE BEREICH ZONE ZONA
The bottom row of the display will show the lower and upper limit value of the
target zone.
The selected training type is shown on the top row of the display.
L- U user defined
L-1 Health (50-65% of maximum heart rate)
L-2 Fitness (65-80% of maximum heart rate)
L-3 Performance (80-95% of maximum heart rate)
Press and hold SET for 3 seconds to enter setting mode.
Select the training type by pressing SEL. If "U" is selected (user defined) the lower
and upper limits can be set. Press SET. The display will show the lower limit.
Set the value by pressing SEL and confirm your setting by pressing SET. Set the
upper limit in the same way.
Exit setting mode by pressing MODE. Press and hold SEL to activate the heart rate
alarm. When the heart rate alarm is activated, the alarm symbol will appear
on and an alarm will sound when the measured heart rate is not within the set zone
"BEEP-BEEP...BEEP-BEEP...BEEP-BEEP".
Page 9
-
15 -
If the measured heart rate is at or above 99% of the maximum heart rate the max.
-
16 -
heart rate alarm will sound. "BEEP-BEEP-BEEP-BEEP-BEEP-BEEP". The max. heart
alarm is independant of the training zone and the heart rate alarm of the training
zone.
Calories, fat burn and BMI
CALORIE KALORIEN CALORIES CALORIAS
The lower row will show the burned calories
CALORIE KALORIEN CALORIES CALORIAS
Press SET to switch to the display of fat burn in gram
FAT BURN FETT CONSGRAISSES
or to the display of your BMI
BMI BMI IMC IMC
In the display for calorie burn or fat burn the values can be reset by pressing and
holding SET.
Note: To increase the accuracy of the calorie and fat burn displays your age and
weight must be set correctly.
Note: The counter for fat burn is only activated while your heart rate is above 120
beats per minute.
Notes on the BMI
The BMI is a statistical measurement that can be used to judge a persons weight.
For adults, a value between 18.5 and 25 is considered normal. Values below
18.5 are considered "underweight". Values above 25 are considered
"overweight". Values above 30 are considered "Obese".
The BMI is only a coarse guideline because it does not take a persons body type
and body composition into consideration.
GRASA
Fitness
FITNESS
LEVEL
After your training, immediately press SET. A 5 minute countdown will start (cool
down phase).
The bar will show the remaining time. On the left side of the display the heart rate
at the beginning of cool down is shown. On the right side of the display the current
heart rate is shown. The countdown time is shown on the bottom row of the
display.
After 5 minutes your fitness level will appear.
Fitness level Heart rate
6 >130
5 130-120
4 120-110
3 110-105
2 105-100
1 <100
FITNESS
LEVEL
NIV FORM
PHYSIQ
NIVEL
FIT
Coded transmission
The chest belt's transmissions are digitally coded to prevent interference if you are
training with a training partner who is using an identical watch and chest belt.
When using the chest belt for the first time, a random channel is selected
automatically. The channel is briefly displayed at the top of the display upon
entering the heart rate display mode. The available channels are CH10, CH11,
CH12, CH13 and CH14.
The channel can be changed by briefly removing the battery from the chest best
and reinserting it. The chest belt will randomly select a channel and after approx. 1
minute the heart rate and the new channel will appear on the display of the watch.
Page 10
-
17 -
Troubleshooting
-
18 -
Battery low indicator
The heart rate is not shown or is shown incorrectly
Make sure the chest belt is positioned correctly and fits well.
Your skin should not be too dry or too cold.
The contact areas can be slightly moistened to improve function.
Electromagnetic interference may have an adverse effect on reception.
The distance between watch and chest belt must be under 70cm.
Other heart rate measuring devices within a 2m range may also cause
interference.
Wireless bicycle computers may cause interference.
The batteries may be low and require replacing.
The display is unreadable / the light does not work
Replace the batteries.
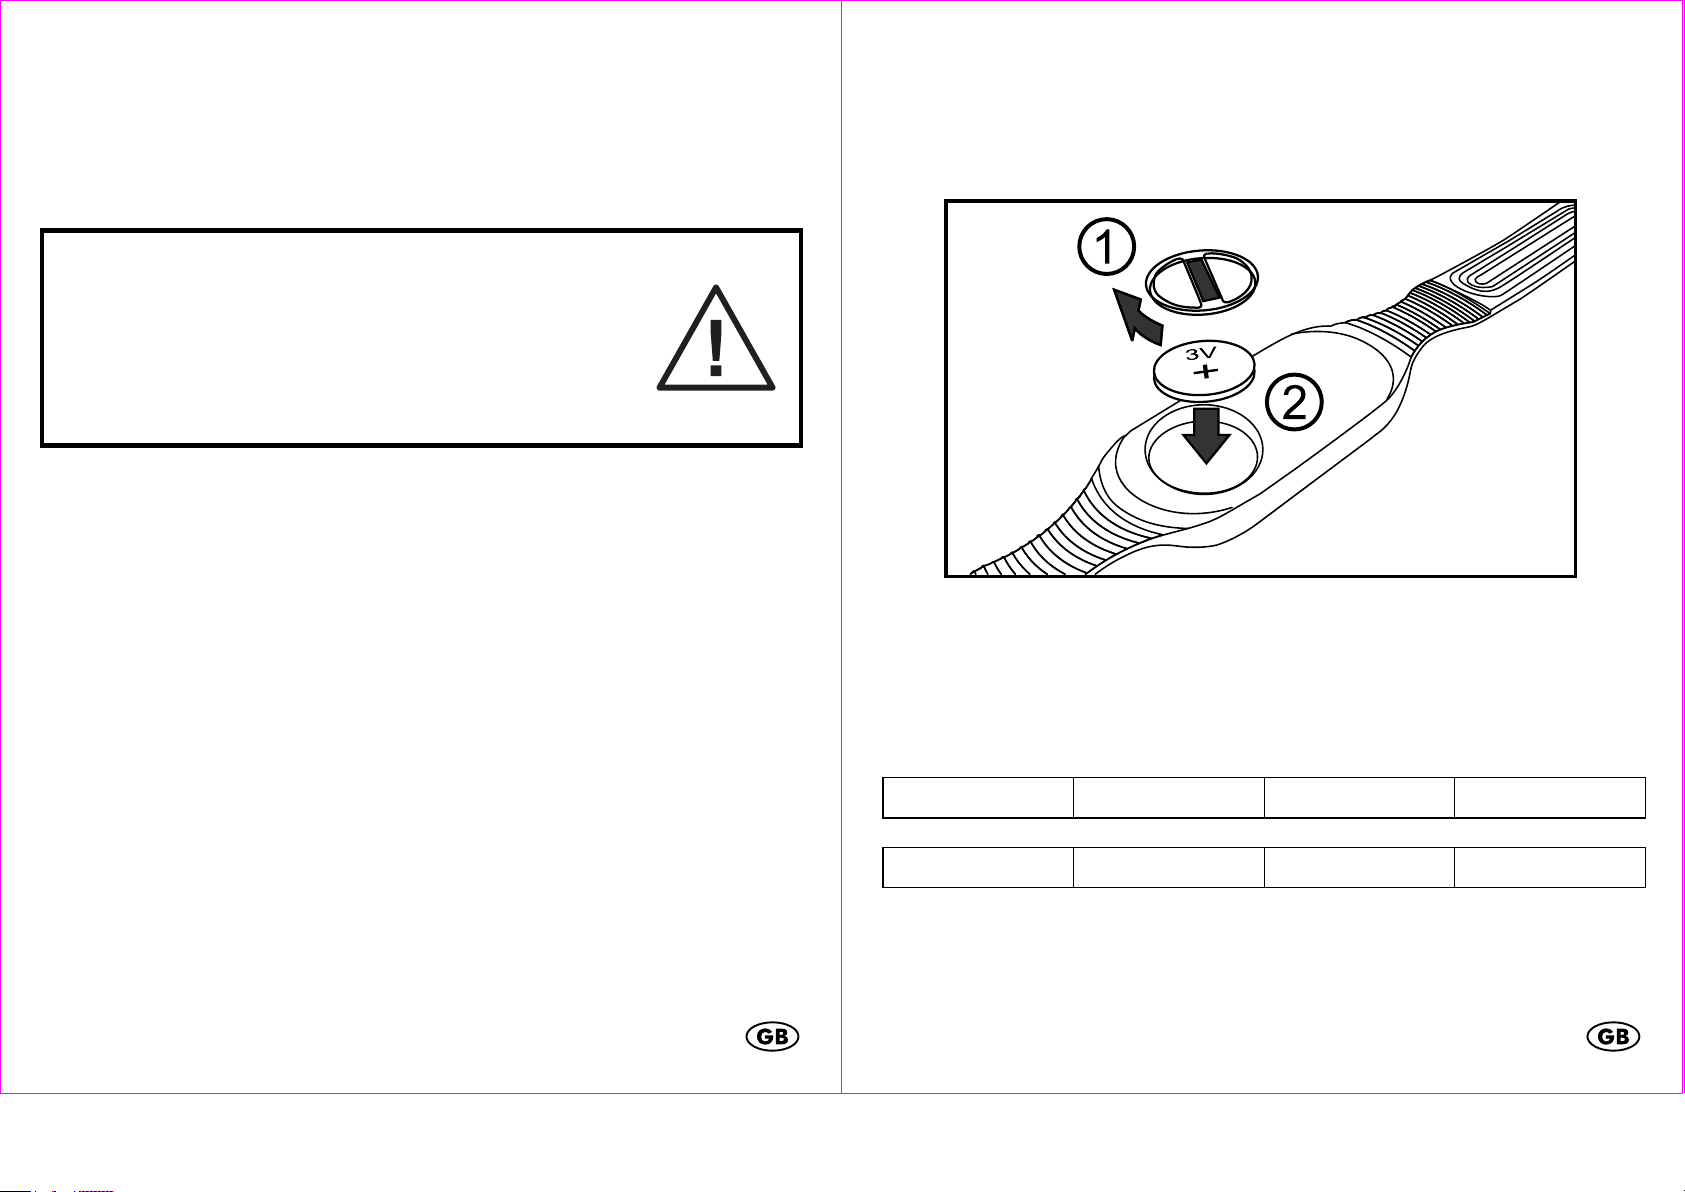
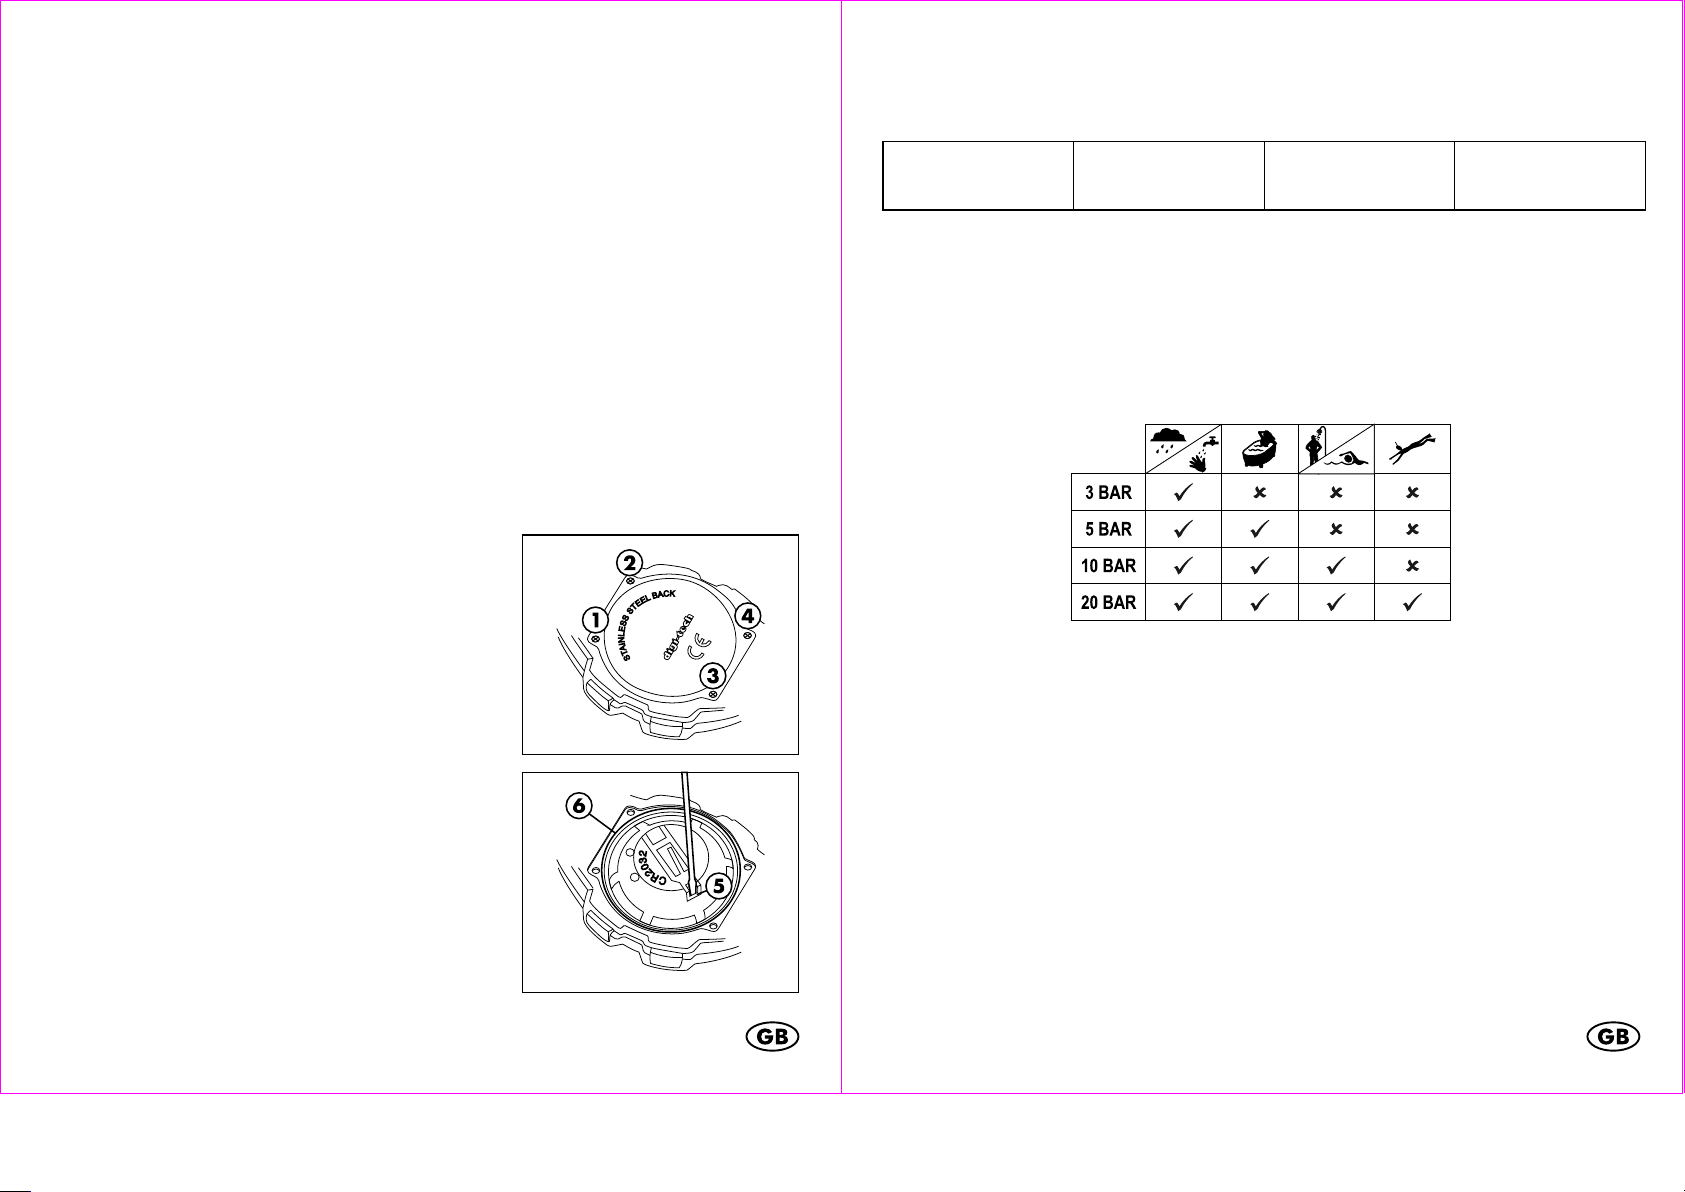
Replacing the watch battery
The battery replacement can be performed by a
watch maker in addition to a water resistance
test.
To replace the battery yourself, please read the
following instructions first:
Remove the screws (1, 2, 3 and 4) from the back
side of the watch with a small Phillips
screwdriver. Remove the caseback and the
battery sticker.
Use a small, flat tool to open the latch (5) of the
battery holder. Remove the battery and insert a
fresh 3V CR2032 battery with the (+) terminal
facing upwards. Ensure that the gasket (6) is
seated correctly. Close the latch of the battery
holder. Replace the battery sticker and the
caseback and replace the screws.
If the battery voltage on the chest belt battery drops below the voltage required for
normal operation,
TXBELT
LO BAT
will appear on the display. Replace the battery of the chest belt as described in the
chapter "Chest belt".
TXGURT
BATT
SNGLTX
PILE
TXBCIN
BAT BA
Water resistance of the heart rate monitor
Water resistant up to 3 bar. The bar value specifies the atmospheric overpressure
which is applied during testing (DIN 8310).
Water resistance of the chest belt
Water resistance according to IEC 60529 IPx7: 30m
Cleaning instructions
Clean the product with a soft, dry and lint-free cloth. A glasses cleaning cloth is
ideal.
After each use, clean the chest belt and the watch strap with a sponge and
lukewarm mild soap water. Dry all parts with a towel and hang the chest belt to
dry. Sweat and contaminants are detrimental to the function of the sensor.
Page 11
-
19 -
Disposal of the electronic appliance
-
20 -
This electronic appliance may not be disposed of with normal household
waste. Dispose of the unit at an approved disposal facility or at your
local recycling centre. Please observe the current rules and regulations when
disposing of the appliance. Contact the disposal system if in doubt.
Disposal of the batteries
Please dispose of your batteries properly in containers especially set up
at retailers. Batteries do not belong in household waste. Dispose of the batteries at
an approved disposal facility or at your local recycling centre. Contact the
disposal system if in doubt.
Declaration of conformity
If used as intended this product conforms to the basic standards of § 3 and the
other relevant provisions of the FTEG (Section 3 of the R&TTE directive).
You can request the declaration of conformity here:
conformity@digi-tech-gmbh.com
digi-tech gmbh warranty
This watch includes a 3 year warranty starting on the day of purchase. In case of
defects of this heart rate monitor you have, by law, certain rights regarding the
vendor of the heart rate monitor. These rights are not changed by the warranty
which is described in the following paragraphs.
heart rate monitor or a new heart rate monitor. Repair or replacement does not
cause the warranty period to restart.
Warranty period and defects liability
The warranty period is not increased by the defect liability. This also applies to
repaired or replaced parts. If defects are noticed at the time of purchase they must
be reported immediately upon unpacking the item. Paid repair may be available
after the end of the warranty period.
Scope of the warranty
The heart rate monitor was manufactured according to strict quality guidelines and
was carefully inspected before delivery. The warranty does not include parts that
experience normal wear and tear and can thus be seen as wear parts or fragile
parts that are damaged. Examples include Switches, Batteries or parts made of
glass.
This warranty becomes void if the heart rate monitor is damaged, is not used in the
recommended way or is improperly repaired.
For proper use of the heart rate monitor all instructions in this manual must be
adhered to exactly. Use of the heart rate monitor in a way that is discouraged in
the manual must be avoided.
The heart rate monitor not intended for commercial use. Abusive or improper use,
excessive force and changes that are made by non-authorized repair centers will
void the warranty.
Warranty conditions
The warranty duration starts on the date of purchase. Please keep the original
receipt in a safe place. The receipt is needed as a proof of purchase. If a defect
occurs in the heart rate monitor within 3 years, the heart rate monitor will be
repaired or replaced (according to our choice) free of charge. This warranty
requires that, within the 3 year warranty period, the watch and the receipt can be
made available to us along with a short written description of the defect and when
it occured. If the defect is covered by the warranty, you will receive the repaired
Page 12
-
21 -
Warranty claim procedure
-
22 -
Service
To ensure that your call is processed in a fast and efficient manner please note the
following directions:
• Have your receipt (as proof of purchase) and the article number (87794)
handy.
• The article number can be found on the type label, an engraving, the front
page of the manual (bottom left) or a sticker on the back side or bottom side of
the case.
• In case defects occur, please first contact the service center (see below) by
phone or email.
Visit www.lidl-service.com to download this and many other manuals,
product videos and software.
Name: inter-quartz GmbH
Email: support@inter-quartz.de
Telephone: 00800 5515 6616
Based in: Germany
IAN 87794
00800 44 11 493
0680 981220
0800 80847
Supplier
Please note that the following address is not a service address.
Please first contact the service address (see above).
Name: digi-tech gmbh
Street: Valterweg 27A
Town: Eppstein 65817
Country: Germany
Page 13

-
23 -
Wskazówki obsługi i bezpieczęństwa
-
24 -
Spis treści
Spis treści...................................................................................................................- 23 -
Wprowadzenie ........................................................................................................- 25 -
Zastosowanie zgodne z przeznaczeniem.............................................................- 25 -
Zakres dostawy ........................................................................................................- 25 -
Dane Techniczne......................................................................................................- 26 -
Funkcje.......................................................................................................................- 26 -
Ważne Wskazówki Bezpieczęństwa.....................................................- 27 -
Uruchomienie pulsometru z pasem na piersi.........................................................- 28 -
Wazne informacje dla obsługi pulsometru z pasem na piersi ............................- 30 -
Swiatlo.......................................................................................................................- 31 -
Godzina i ustawienie podstawowe........................................................................- 31 -
Alarm budzenia........................................................................................................- 32 -
Timer (max. 23:59:00)............................................................................................- 33 -
STOPER......................................................................................................................- 34 -
Funkcja pamieci........................................................................................................- 34 -
Pulsometr ...................................................................................................................- 34 -
Lampka ostrzegawcza.............................................................................................- 35 -
Kalorie, Spalanie tłuszczu i BMI.............................................................................- 37 -
Fitness.........................................................................................................................- 38 -
Kodowana transmisja rytmu serca .........................................................................- 39 -
Rozwiazanie Problemów.........................................................................................- 39 -
Wymiana baterii w zegarku na rękę .....................................................................- 40 -
Wskaznik ostrzegawczy stanu baterii....................................................................- 40 -
Wodoszczelnosć pulsometru.................................................................................- 41 -
Wodoodpornosćc pasa piersiowego....................................................................- 41 -
Wskazówki dla czyszczenia...................................................................................- 41 -
Usuwanie pulsometru...............................................................................................- 41 -
Usuwanie baterii.......................................................................................................- 42 -
Deklaracja zgadnosci..............................................................................................- 42 -
Gwarancja digi-tech gmbh.....................................................................................- 42 -
Warunki gwarancji...................................................................................................- 42 -
Okres gwarancji i ustawowe roszczenia gwarancyjne.......................................- 43 -
Zakres gwarancji......................................................................................................- 43 -
Przebieg zalatwiania reklamacji objetych gwarancja........................................- 43 -
Service.......................................................................................................................- 44 -
Dostawca ..................................................................................................................- 44 -
Timer ..........................................................................................................................- 36 -
Funkcja pamieci........................................................................................................- 36 -
Zakres celowego tetna ............................................................................................- 36 -
Page 14
-
25 -
Pulsometr z pasem na piersi
-
26 -
Wprowadzenie
Serdeczne gratulacje z okazji zakupu polsometru z pasem na piersi. Zdecydowali
się państwo na urządzenie o wysokiej jakości. Instrukcja obsługi jest czescią
skladowa tego pulsometru. Zawiera ona ważne wskazówki dla bezpieczęństwa,
wykorzystania i utylizacji. Przed użyciem pulsometru należy zapoznać się ze
wszystkimi wskazówkami obsługi i bezpieczęństwa. Zaleca się używanie
pulsometru tylko w opisany sposób i określony dla poszczególnych aplikacji. W
razie przekazania pulsometru osobom trzecim, należy również dołączyć
instrukcję obsługi.
Zastosowanie zgodne z przeznaczeniem
Pulsometr z pasem na piersi przeznaczony jest do wyświetlania czasu oraz do
uzytku dodatkowych, opisanych funkcji. Każde inne zastosowanie albo zmiana
urządzenia, jest niezgodna z przeznaczeniem. Producent nie odpowiada za
szkody powstałe niezgodnie z przeznaczeniem, albo niewłasciwą obsługę. To
urządzenie nie jest przeznaczone dla celów przemyslowych.
Zakres dostawy
Wskazówka: Prosimy po zakupie sprawdzić zakres dostawy.
Należy upewnić się, czy nie brakuje części oraz, czy nie jest coś zepsute.
• Pulsomert z pasem na piersi wlacznie bateria (CR2032)
• Opaska na klatkę piersiową wlacznie bateria (CR2032)
• Uchwyt rowerowy
Dane Techniczne
Pulsometr z pasem na piersi
Zakres pracy temperatury 0-50°C
Wymiary (bez paska) 4,4 x 5,0 cm
Wielkość ekranu 2,4 x 1,8 cm
Waga 51 g
Baterii: CR2032
Opaska na klatkę piersiową
Zakres pracy temperatury 0-50°C
Wymiary (bez paska) 7 x 3,3 x 1,2 cm
Czestotliwość transmisji 110 kHz
Waga 51 g
Baterii: CR2032
Funkcje
Pomiar pulsu
• Alarm dla maksymalnego pulsu
• Trening celowego pulsu z zegarem i alarmem
(Zdrowie, Fitnes, Wydajnosc definiowane przez uzytkownika)
• Najwyższy puls, najniższy puls, przeciętny puls
• Lampka kontrolna (przy przekroczeniu określonego pulsu
Funkcje kalorii
• Zużycie kalorii oraz spalanie tłuszczu podczas treningu
• Obliczanie BMI
• Fitness (poziom sprawności fizycznej)
Stoper
• 1/100 sekund przy 99 okrążeniach
Page 15
-
27 -
Countdown Timer
-
28 -
B
aterii: CR2032
Funkcje czasowe
• Godzina
• Kalendarz
• Alarm budzenia z ponownym budzeniem
• Sygnał godziny
• Druga strefa czasowa
Pozostałe
• Podświetlenie
Ważne Wskazówki Bezpieczęństwa
UWAGA: Przed rozpoczeciem treningu należy
skonsultowac się z lekarzem. Lekarz może udzielić
informacji na temat odpowiedniego rodzaju treningu, jego
intensywności oraz objaśnic zagadnienia dotyczące tętna.
Niniejszy pulsometr nie jest urządzeniem medycznym i
służy wylącznie do pomocy w organizacji treningu.
- Pulsometr z pasem na piersi nie lalezy do rąk dzeci
Nigdy nie pozwolić dzieciom bez nadzoru używania pulsometru. Dzieci nie
zawsze potrafią rozpoznać możliwe niebezpieczęństwo.
Połkniecie baterii albo Akkus może zagrażac życiu. Baterie należy
przechowywac w miejscach niedostepnych dla dzieci.
W razie połkniecia baterii, konieczna jest pomoc medyczna.
Opakowania przechowywać z daleka od dzieci. Jest możliwe ryzyko uduszenia.
Uruchomienie pulsometru z pasem na piersi
Odkręcić znajdującą się na spodzie opaski pokrywkę pojemnika na baterie przy
użyciu monety i włożyć baterię 3V z biegunem dodatnim (+) skierowanym do
góry. Ponownie przykręcic pokrywkę.
- Baterie
Baterie/Akkus należy założyc zgodnie z polaryzacją, nie należy je na nowo
ładować, albo otwierać.
Nigdy nie powinno się wrzucać baterii do ognia, bo mogą eksplodować. Nie
używać różnych baterii jednocześnie (starych i nowych, alkalicznych i
węglowych, itd.) Niewłaściwe uzżcie baterii może doprowadzić do eksplozji i
ryzyka wycieku.
Jeżeli dojdzie do rozlania baterii, należy ubrac rękawiczki i wyczyścić pulsometr
suchą ścierką.
Usunąc folię ochronną z wyświetlacza zegarka i nacisnąć MODE, SEL albo SET.
Przez nacisk na SEL wybrać odpowiedni język: angielski, niemiecki, franzuski,
hiszpański. Potwierdzić wybór przez nacisk na SET.
Page 16
-
29 -
W taki sam sposób wybrać jednostkę KM-KG
Styki opaski
-
30 -
METRIC KM - KG KM - KG KM - KG
albo Meilen/Pfund (M-LB)
IMPERIAL M - LB M - LB M - LB
Zakończyć uruchomienie przez nacisk na MODE.
Przez jednoczesny nacisk na SET i SEL można pulsometr cofnąć do tylu. Dopiero
po cofnięciu można wybrać inny język.
Zakładanie opaski na klatkę piersiową
Opaskę należy dopasować w taki
sposób, aby znajdowala się
bezpośrednio pod miesniami
piersiowymi i przylegala scisle do
ciala. Styki opaski należy lekko
zwilżyć wodą lub żelem EKG (do
kupienia w aptece). Styki powinny
mieć stale kontakt ze skóra.
Załozyć opaskę tak, jak pokazano
na rysunku obok.
Upewnić się, czy opaska ma
wlaściwą pozycje. Po kompletnym
wydechu powietrza, opaska
powinna przylegać do klatki
piersiowej
z calkiem lekkim napreżeniem.
Maszty wysokiego napięcia,,
napowietrzne koleje, albo biegła
komunikacja samochodowa mogą
mieć wplyw na pomiary,albo je
zaklócać. Z tego względu należy uważać na wybór odpowiedniej trasy.
Użycie uchwytu rowerowego
Pulsometr z pasem na piersi
można nosić na ręce, albo
przymocować na kierownicy
roweru za pomocą uchwytu
dostępnego w komplecie.
Uchwyt rowerowy przycisnąć z
góry do kierownicy roweru.
Przy kierownicach o bardzo
dużych średnicach może byc
konieczny zwiekszony wysiłek
dla umocowania uchwytu.
Pulsometr mozna przymocowac
do uchwytu roweru w taki sam sposób, jak przy zapięciu na nadgarstku.
Podczas używania pulsometru nie należy przekraczać maksymalnej odległości
transmisji 70 cm do opaski.
Wazne informacje dla obsługi pulsometru z pasem na
piersi
Pulsometr z pasem na piersi posiada
Przez nacisk na MODE można zmienić modus pulsometru
Kolejność funkcji to:
3 Modusy funkcyjne.
Godzina i ustawienie podstawowe
TIME ZEIT TEMPS HORA
Stoper
CHRONO ST-UHR CHRONO CRONO
Pulsometr
HRM PULS FC PULSO
Page 17

-
31 -
Ponadto istnieją w modusach funkcyjnych różne
-
32 -
Podfunkcje.
Dla użycia podfunkcji należy zawsze nacisnac SEL.
Szybkie ustawienie
Dla ustawienia wartości liczbowych można użyć szybkiego ustawienia przez
naciśnięcie i przytrzymanie SEL.
Swiatlo
Aby tymczasowo wlączyć podświetlenie, należy krótko nacisnąć LIGHT.
Godzina i ustawienie podstawowe
TIME ZEIT TEMPS HORA
Przez nacisk na SEL można wywołać podfunkcje trybu czasu.
Godzina i ustawienie podstawowe
TIME ZEIT TEMPS HORA
Alarm budzenia
ALARM ALARM ALARM ALARMA
Timer
TIMER TIMER COMPTE TIMER
Nacisnąć i przytrzymać 3 sekundy SET, żeby przejść do trybu ustawiania.
Na wyświetlaczu pojawi się
HOLD
TO SET
I miga wskaźnik 12 albo 24-godzinny.
Dla ustawienia nacisnąć SEL i potwierdzić ustawienie przez nacisk na SET. W taki
sam sposób ustawić sekundy, minuty,, godziny, rok,miesiąc i dzień.
Nastepują ustawienia podstawowe. Najpierw pojawi sie rok daty urodzenia.
HALTEN=
EINST.
MAINT=
REGLER
MANT=
AJUST
BIRTHDAY GEB-TAG DATNAISS CUMPL-AN
Dla ustawienia nacisnąć SEL i ptwierdzić ustawienie przez nacisk na SET. W taki
sam sposob ustawic miesiąc i dzień.
Pojawia sie wskaźnik wagi.
WEIGHT GEWICHT POIDS PESO
Przez nacisk na SEL wprowadzić cyfry swojej wagi i potwierdzić każdorazowe
ustawienie przez nacisk na SET.
Pojawia się wskaźnik wzrostu.
HEIGHT GROESSE TAILLE TAMANO
Przez nacisk na SEL wprowadzić cyfry swojego wzrostu i potwierdzić
każdorazowe ustawienie przez nacisk na SET.
Zakończyc tryb ustawiania przez nacisk na MODE.
Druga strefa czasowa
Nacisnąć i przytrzymac 3 sekundy SEL. Pulsometr przechodzi do wskaźnika
drugiej strefy czasowej i na wyświetlaczu pojawi sie T2. Ustawienia drugiej strefy
czasowej należy dokonać w taki sam sposób, jak opisane w poprzednim odcinku.
Aby powrócic do wskaźnika normalnego czasu, należy nacisnąc i przytrzymac 3
sekundy SEL.
Alarm budzenia
ALARM ALARM ALARM ALARMA
Nacisnąć 3 sekundy SET, żeby przejść do trybu ustawiania.
Na wyświetlaczu pojawi sie "AL" i migają minuty czasu budzenia.
Dla ustawienia nacisnąć SEL i potwierdzić ustawienie przez nacisk na SET. W taki
sam sposób ustawić godziny.
W razie potrzeby, ustawić miesiąc i dzień.
Page 18
-
33 -
Jeżeli nie ustawi się miesiąca, ani dnia, alarm bedzie dzwonił codziennie. Jeżeli
-
34 -
ustawi się tylko dzień, Alarm będzie dzwonil co miesiąc. Jeżeli ustawi się miesiąc i
dzień, alarm zadzwoni tylko w dniu ustawionej daty.
Na wyświetlaczu pojawia sie ustawianie sygnalu godziny.
CHIME STDALARM SIGN HOR HORA AL
Nacisnąć dla ustawienia SEL i potwierdzic ustawienie przez nacisk na SET
(ON/EIN/ACTIF/ENCENDID=załączone,
OFF/AUS/INACTIF/APAGADO=wyłączone).
Przy uaktywnionym sygnale godziny pojawi się symbol dzwonka i przy każdej
pełnej godzinie zadzwoni sygnał.
Zakończyć tryb ustawiania przez nacisk na MODE.
Przez nacisk na SET można alarm włączyc albo wyłączyć. Przy załączonym
alarmie pojawi sie symbol alarmu .
Gdy zabrzmi alarm, nacisnąć SET, SEL albo MODE, żeby go zatrzymać.
Funkcja drzemki
Gdy zabrzmi alarm i nie naciśnie się żadnego przycisku, po 30 sekundach
zostanie automatycznie uaktywniona funkcja drzemki i symbol miga na
wyświetlaczu. Alarm wyciszy sie i zabrzmi po 2 minutach ponownie. Ten proces
powtórzy sie 5 razy.
Timer (max. 23:59:00)
TIMER TIMER COMPTE TIMER
Nacisnąć i przytrzymać 3 sekundy SET, żeby ustawić Timer.
Na wyświetlaczu migaja minuty czasu Timer.
Dla ustawienia nacisnąć SEL i potwierdzić ustawienie przez nacisk
na SET. W taki sam sposób ustawić godziny.
Nastepują dodatkowe ustawienia Timer.
Przez nacisk na SEL wybrać żądany tryb:
Cd r Po osiągnięciu 0:00 Timer liczy ustawiony czas z powrotem
Cd U Po osiągnięciu 0:00 Timer liczy do przodu
Cd S Po osiagnięciu 0:00 Timer zatrzymuje się
Zakończyć tryb ustawiania przez nacisk na MODE.
Przez nacisk na SET Timer można uruchomic lub zatrzymać.
Nacisnąć i przytrzymać SET, żeby Timer zresetować.
Po upływie czasu Timer rozlegnie sie sygnał dźwiekowy.
STOPER
CHRONO ST-UHR CHRONO CRONO
W celu startu albo zatrzymania stopera nacisnąć SET.
Nacisnąć SEL przy uruchomionym stoperze, żeby zatrzymać czas jednego
okrążenia. Może byc zatrzymanych do 99 okrążeń.
Nacisnąć SET żeby, zresetować stoper.
Funkcja pamieci
DATA
RECALL
Przy zatrzymanym stoperze nacisnąć SEL i na wyświetlaczu pokaże się
najszybsze okrążenie. Nacisnąć SET, żeby zobaczyć czas pozostałych okrążeń.
Wskazówka: funkcja pamięci może być tylko wywołana, jeżeli zanotowany
został conajmniej jeden czas okrążenia.
ANSICHT
DATEN
APPEL
DONNEES
RECUP
DATOS
Pulsometr
HRM PULS FC PULSO
Pulsometr funkcjionuje tylko z użyciem paska na klatkę piersiową.
Przez nacisk na SEL można wywołać podfunkcje pulsometru:
Timer
TIMER TIMER COMPTE TEMPORIZADOR
Funkcja pamięci
MEMORY SPEICHER MEMOIRE MEMORIA
Page 19

-
35 -
Celowe tętno
ST/SP
-
36 -
ZONE BEREICH ZONE ZONA
Zużycie kalorii,Spalanie tłuszczu i BMI
CALORIE KALORIEN CALORIES CALORIAS
Fitness
FITNESS
LEVEL
W środkowym wierszu wyświetlacza, przy użyciu opaski na klatkę piersiową
pokaże się tętno. Jeżeli odbierany jest symbol ilości uderzeń serca, miga symbol
serca. Z prawej strony, obok wskaźnika tętna pojawi się osiągnięta część
maksymalnego tętna w procentach. Tętno maksymalne oblicza się automatycznie
na podstawie wieku, wagi i wzrostu.
FITNESS
LEVEL
NIV FORM
PHYSIQ
NIVEL
FIT
Lampka ostrzegawcza
Czerwona lampka ostrzegawcza
świeci, jeżeli: mierzony puls osiągnie
99% pulsu maksymalnego, albo go
nawet przekroczy, oraz w przypadku
przekroczenia ustawionego
ograniczenia („pulsu celowego")
Timer
TIMER TIMER COMPTE TEMPORIZADOR
W dolnym wierszu wyświetlacza pojawi sie dotychczasowy czas treningu. W
środkowym wierszu pojawi sie osiągnieta część maksymalnego tętna w
procentach. Timer liczy automatycznie od czasu załozenia opaski na klatkę
piersiową
Timer liczy także dalej, jeżeli przejdzie się do innego trybu.
Nacisnąć krótko SET, żeby wybrać tryb Timer:
TIMER Całkowity czas treningu
Czas treningu w zakresie celowego tętna
▲
Czas treningu powyżej zakresu celowego tetna
▼
Czas treningu poniżej zakresu celowego tętna
Nacisnąć i przytrzymać SET, żeby cofnąć czas treningu.
Funkcja pamieci
MEMORY SPEICHER MEMOIRE MEMORIA
Zakodowane wartosci pojawią sie w dolnym wierszu wyświetlacza
Osiągnięte maksymalne tetno
HI H FO AL
Osiągnięte minimalne tetno
LO N FA BA
Przecietne tetno
AV D MO PR
Nacisnąć i przytrzymać SET, żeby cofnąć zakodowane wartości.
Zakres celowego tetna
ZONE BEREICH ZONE ZONA
Page 20

-
37 -
W dolnym wierszu pokaże się górna i dolna wartość graniczna zakresu
-
38 -
celowego tętna.
Wybrany rodzaj treningu pokaże się w górnym wierszu.
L- U Zdefiniowany przez użytkownika
L-1 Zdrowie (50-65% maksymalnego pulsu)
L-2 Fitness (65-80% maksymalnego pulsu)
L-3 Wydajność (80-95% maksymalnego pulsu)
Nacisnąć i przytrzymać 3 sekundy SET, żeby przejść do trybu ustawiania.
Przez nacisk na SEL wybrać rodzaj treningu. Przy wyborze „U“ (definiowany
przez użytkownika) można wartości graniczne ustawic ręcznie.
Nacisnąć na SET. Na wyświetlaczu miga dolna wartość graniczna. Ustawić
wartość przez nacisk na SEL i potwierdzić ustawienie przyciskiem SET.
W taki sam sposób ustawić górną wartość graniczną.
Zakończyć tryb ustawiania przez nacisk na MODE.
Nacisnac i przytrzymac SEL, zeby uaktywnic alarm tętna. Przy uaktywnionym
alamie tetna pojawi się na wyświetlaczu symbol alarmu a przy opuszczeniu
zakresu celowego tetna zadzwoni sygnal "PIEP-PIEP... PIEP-PIEP...PIEP-PIEP".
Jeżeli mierzone tętno osiągnie 99% maksymalnego pulsu, abo nawet przekroczy
tę wartość, zadzwoni sygnał alarmu "PIEP-PIEP-PIEP-PIEP-PIEP...". Ten dźwięk jest
niezależny od strefy treningu i alarmu tętna strefy treningu.
Kalorie, Spalanie tłuszczu i BMI
CALORIE KALORIEN CALORIES CALORIAS
W dolnym wierszu pojawią się zużyte kalorie.
CALORIE KALORIEN CALORIES CALORIAS
Nacisnąć SET, żeby przejsc do wskaźnika spalania tłuszczu w gramach
FAT BURN FETT CONSGRAISSES
albo do wskaźnika BMI.
BMI BMI IMC IMC
GRASA
We wskaźniku zużycia kalorii albo spalania tluszczu można cofnąć zakodowane
wartosci, przez naciśnięcie i przytrzymanie SET.
Wskazówka: Aby zwiekszyć dokladność wskaźnika spalania kalorii i tłuszczu,
należy prawidłowo wprowadzić wiek i wagę.
Wskazówka: Licznik dla spalania tluszczu jest aktywny tylko przy tętnie powyżej
120 uderzeń na minutę.
Wskazówka dla BMI
BMI jest wzorcem dla oszacowania wagi ciała czlowieka. Wartości pomiedzy
18,5 a 25 oznaczają normalną wartośću dorosłych osób. Przy wartościach
poniżej 18,5 mówi sie o niedowadze. Przy wartościach powyżej 25 mowi się o
nadwadze., a powyzej 30 o otyłosci.
BMI daje nam jedynie ogólną wartość, nie uwzględnia budowy ciała czlowieka,
jego indywidulany sklad tkanek tluszczowych i mięsni
Fitness
FITNESS
LEVEL
Bezpośrednio po zakończeniu treningu nacinąć SET. Następnie zaczyna się 5-cio
minutowe odliczanie Countdown,(faza odpoczynku)
Belka wskazuje pozostały czas oczekiwania. Z lewej strony pokaze sie tętno
początkowe, a z prawej aktualne tętno. W dolnym wierszu
pojawi się czas Countdown.
Po upływie 5 minut pojawi się stopień wydolności(sprawnosci fizycznej)
Stopien wydolnosci Puls
6 >130
5 130-120
4 120-110
3 110-105
2 105-100
1 <100
FITNESS
LEVEL
NIV FORM
PHYSIQ
NIVEL
FIT
Page 21

-
39 -
Kodowana transmisja rytmu serca
-
40 -
Wymiana baterii w zegarku na rękę
Transmisja danych z paska piersiowego jest kodowana cyfrowo, w celu
uniknięcia możliwych zaklóceń, podczas treningu z partnerem, który korzysta z
takiego samego urządzenia. Przy pierwszym użyciu paska piersiowego zostaje
losowo wybrany kanał. Kanał ten widoczny jest krótko na wyświetlaczu, jeżeli
przechodzi się do wskaźnika pracy serca. Do dyspozycji są nastepujące kanaly:
CH10, CH11, CH12, CH13 und CH14. Zmiany kanału można dokonać
poprzez krótkie wyjecie i ponowne założenie baterii w pasku piersiowym. Pasek
wybiera Losowo nowy kanal i po uplywie 1 minuty na pulsometrze pokaze sie
puls i nowy kanal.
Rozwiazanie Problemów
Nie wyswietla się puls, albo nieprawidłowy odczyt
Sprawdzić ulożenie opaski. Skóra powinna być nie za sucha i nie za zimna.
Sprawdzić stan styków opaski. Jeżeli to konieczne, należy styki zwilżyć.
Usunąć źródła potencjalnych zakłóceń. Odległość między opaską a zegarkiem
może wynosić max. 70 cm. Inne urządzenia do mierzenia pulsu, znajdujące się
w odległości mniejszej jak 2m, mogą zakłócać odbiór. Bezkablowy komputer
rowerowy może też zakłocać odbiór.
Możliwa jest konieczność wymiany baterii.
Słaby wyświetlacz/podświetlenie nie funkcjionuje
Wymienić baterie.
Wraz z wymianą baterii można zlecić
zegarmistrzowi kontrolę wodoszczelności. Aby
samodzielnie wymienić baterię, proszę
postępować w następujący sposób:
Śrubki (1, 2, 3 i 4) z tyłu zegarka odkręcić przy
użyciu śrubokręta krzyżowego. Zdjąć spód
obudowy i nalepkę zabezpieczającą baterię.
Do otwarcia zatrzasku (5) mocowania baterii
użyć małego, płaskiego narzędzia. Wyjąć
zużytą baterię i włożyć nową baterię 3 V
CR2032 biegunem (+)- do góry. Sprawdzić
prawidłowe osadzenie pierścienia
uszczelniającego (6). Zatrzasnąć mocowanie
baterii (5).
Z powrotem nakleić nalepkę zabezpieczającą
baterię, nałożyć spód obudowy i przykręcić go.
Wskaznik ostrzegawczy stanu baterii
Kiedy stan baterii opaski na klatkę piersiową nie wystarczy do normalnej pracy,
na wyświetlaczu zegarka pojawi się:
TXBELT
LO BAT
Zmienić baterie, jak opisane jest w punkcie "Opaska na klatkę piersiową"
TXGURT
BATT
SNGLTX
PILE
TXBCIN
BAT BA
Page 22

-
41 -
Wodoszczelnosć pulsometru
-
42 -
Usuwanie baterii
Wodoszczelny do 3 bar. Wskazanie bar odnosi się do kontroli ciśnienia z
uwzględnieniem ciśnienia powietrza (DIN8310).
Wodoodpornosćc pasa piersiowego
Wodoodporny IEC 60529 IPX7: 30 m
Wskazówki dla czyszczenia
Urządzenie powinno być czyszczone tylko suchą ścierką, np. taką, jak do
czyszczenia szkieł okularow.
Po każdym użyciu należy pas piersiowy i pasek zegarka wyczyszcić gąbką
zwilżoną w letniej wodzie, albo łagodnym roztworze mydlanym. Wysuszyć
wszystkie części ręcznikiem albo wywiesić do wyschnięcia. Pot i zanieczyszczenia
wpływają ujemnie na funkcje nadajnika.
Usuwanie pulsometru
To urzadzenie elektroniczne nie można usunąć do zwykłego,
domowego śmietnika. Prosimy usunąć to urządzenie poprzez
dopuszczalny zaklad niszczenia odpadów albo komunalne instytucje odpadów.
Prosimy o zachowanie obowiązujących przepisów. W razie niepewności prosimy
skontaktować się z odpowiednią instytucją niszczenia odpadów.
Prosimy wrzucić baterie po wyczerpaniu do specjalnych kontenerów
ustawionych w sklepach. Baterie nie należa do domowego śmietnika. Prosimy
usunąć baterie poprzez dopuszczalny zakład niszczenia odpadów, albo
komunalne instytucje odpadów. Prosimy o zachowanie obowiązujących
przepisów. W razie niepewności prosimy skontaktować się z odpowiednią
instytucją niszczenia odpadów
Deklaracja zgadnosci
Przy użyciu zgodnym z przeznaczeniem produkt ten odpowiada wymaganiom
zawartym w§3 i pozostałych odnoszących się do tego paragrafu uregulowań
FTEG ( Artykuł 3 R&TTE). W celu uzyskania deklaracji zgodności można
skorzystać z nastepujacego adresu:
conformity@digi-tech-gmbh.com
Gwarancja digi-tech gmbh
Na to urządzenie przysluguje 3 lata gwarancji od daty zakupu. W przypadku
wad pulsometru osoba kupujaca posiada ustawowe prawa wobec sprzedawcy
tego urządzenia. Prawa te nie sa ograniczone przez nasza, poniższą gwarancję.
Warunki gwarancji
Okres gwarancji zaczyna się od daty zakupu. Prosimy dobrze zachować
oryginalny paragon sprzedaży. Bedzie on potrzebny jako dowód zakupu. Jeżeli
w przeciągu trzech lat od daty zakupu nastapią usterki wynikające z uszkodzeń
tworzywa oraz blędów produkcyjnych, pulsometr – po ustaleniu z naszej
strony– zostanie albo naprawiony, albo wymieniony. Ta gwarancja zobowiązuje
do tego, żeby w trzyletnim okresie gwarancji, można było przedstawić zepsute
urządzenie i paragon
z krótkim opisem, gdzie istnieje wada i kiedy ona nastąpiła. Jeżeli wada ta objęta
jest naszą gwarancja, otrzymaja państwo albo naprawione, albo nowe
urzadzenie z powrotem. Naprawa albo wymiana produktu nie oznacza początek
nowego okresu gwarancji.
Page 23

-
43 -
Okres gwarancji i ustawowe roszczenia gwarancyjne
-
44 -
Service
Okres gwarancji przez świadczenie gwarancji nie przedłuża sie. To dotyczy
także części zastąpionych,albo naprawionych. Ewentualnie zaraz przy zakupie
zauważone szkody i braki po rozpakowaniu muszą być zgłoszone. Naprawy po
zakończonej gwarancji sa odpłatne.
Zakres gwarancji
Pulsometr z pasem na piersi zostal wyprodukowany wedlug ścisłych wytycznych z
zakresu jakości i sprawdzone przed wysyłką. Gwarancja obejmuje usterki
wynikajace z uszkodzeń tworzywa oraz blędów produkcyjnych. Niniejsza
gwarancja nie obejmuje części produktów, które narażone sa na normalne
zużycie oraz uszkodzenia na łatwo łamliwych
Artykułach n.p. przelaczniki, akkus oraz artykuly ze szkla.
Gwarancja jest nieważna, jeżeli urządzenie jest uszkodzone, nie było wlaściwie
używane albo utrzymane. Należy postępować zgodnie ze wskazówkami
zawartymi w instrukcji obsługi. Należy unikać wszystkich działań, które
odradzane sa w instrukcji obslugi.
Pulsometr przeznaczony jest tylko do użytku prywatnego a nie komercyjnego.
Zastosowanie przemocy lub niewłasciwe użycie prowadzą do utraty gwarancji.
Przebieg zalatwiania reklamacji objetych gwarancja
Żeby zapewnić szybkie opracowanie pańskich zapytań, prosimy dostosować się
do nastepujących wskazówek:
• Zachować paragon i numer artykułu (87794) jako dowód zakupu
• Numer artykułu znajduje się na tabliczce, na grawerunku, na stronie tytułowej
instrukcji obsługi (po lewej stronie, na dole), albo jako naklejka na odwrotnej
lub dolnej stronie produktu.
• W przypadku awarii, albo innych problemów , prosimy skontaktowac sie z
naszym serwisem telefonicznie lub mailem.
Na www.lidl-service.com można pobrać te i wiele innych podręczników,
filmów produktu i oprogramowania.
nazwa: inter-quartz GmbH
e-mail: support@inter-quartz.de
telefon: +49 (0)6198 571825
kraj: Niemcy
IAN 87794
00800 44 11 493
0680 981220
0800 80847
Dostawca
Należy pamiętać, że nastepujący adres nie jest adresem serwisu.
Prosimy najpierw skontaktować się z wyżej wymienionym serwisem.
nazwa: digi-tech gmbh
droga: Valterweg 27A
miasto: Eppstein 65817
kraj: Niemcy
Page 24

-
45 -
Használati és biztonsági tanácsok
-
46 -
Tartalomjegyzék
Tartalomjegyzék.......................................................................................................- 45 -
Bevezetés ..................................................................................................................- 47 -
Alapvetö felhasználás..............................................................................................- 47 -
A csomag tartozékai................................................................................................- 47 -
Müszaki jellemzök....................................................................................................- 48 -
Funkciók.....................................................................................................................- 48 -
Fontos figyelmeztetés! .................................................................................- 49 -
Üzembehelyezés......................................................................................................- 50 -
Fontos információk a pulzusmérö óra használatához .........................................- 52 -
Világítás.....................................................................................................................- 53 -
Óra és alapbeállítások............................................................................................- 53 -
Ébresztöóra funkció..................................................................................................- 54 -
TIMER (visszaszámláló) funkció (max. 23:59:00) ...............................................- 55 -
Stopperóra................................................................................................................- 56 -
Memóriafunkció .......................................................................................................- 56 -
Pulzusmérö................................................................................................................- 56 -
Figyelmeztetö jelzés.................................................................................................- 57 -
Kalória- és zsírégetés, BMI.....................................................................................- 59 -
Fitness.........................................................................................................................- 60 -
A szívritmus kódolt átvitele.......................................................................................- 61 -
Hibaelhárítás.............................................................................................................- 61 -
Elemcsere a karórában............................................................................................- 62 -
Elem állapotjelzö......................................................................................................- 62 -
Az óra vízállósága...................................................................................................- 63 -
A mellkaspánt vízállósága ......................................................................................- 63 -
Tisztítási útmutató......................................................................................................- 63 -
A készülék használaton kívül helyezése................................................................- 63 -
Az elemek használaton kívül helyezése ................................................................- 64 -
Megfelelöségi nyilatkozat.......................................................................................- 64 -
A digi-tech GmbH garanciája................................................................................- 64 -
Garanciális feltételek...............................................................................................- 64 -
Garanciaidö és garanciaigény ..............................................................................- 65 -
A garancia kirterjedése ...........................................................................................- 65 -
Garanciaigény bejelentése.....................................................................................- 66 -
Ügyfélszolgálat/szerviz..........................................................................................- 67 -
Szállító.......................................................................................................................- 67 -
Timer ..........................................................................................................................- 58 -
Memóriafunkció .......................................................................................................- 58 -
Célpulzus-tartomány................................................................................................- 59 -
Page 25

-
47 -
Pulzusmérö óra
-
48 -
Bevezetés
Szívböl gratulálunk új pulzusmérö órájához. Döntésével kiváló minöségü áruhoz
jutott. Ez a használati útmutató az óra tartozéka, mely fontos biztonsági és
használati információkat tartalmaz, valamint a használat utáni megsemmisítéssel
kapcsolatos elöírásokat. Még használatbahelyezés elött alaposan tanulmányozza
a használati és biztonsági elöírásokat. Pulzusmérö óráját csak ezen elöírások
szerint használja.
Amennyiben másnak adja a készüléket, ne mulassza el a mellékelt
dokumentumokat is átadni.
Alapvetö felhasználás
A pulzusmérö óra idömérö eszköz, valamint felhasználható az ezen
dokumentumban leírt további célokra. Minden ettöl eltérö alkalmazás, illetve a
szerkezet módosítása nem elöírásszerinti felhasználásnak minösül. Az ilyenfajta
felhasználásból, illetve a nem elöírás szerinti használatból eredö károsodásért a
gyártó nem vállal felelösséget. A pulzusmérö óra kereskedelmi célú felhasználása
nem megengedett.
A csomag tartozékai
Figyelem! Kérjük, vásárlást követöen ellenörizze a tartozékok meglétét.
Bizonyosodjon meg róla, hogy minden tartozék a csomagban van, és
müködöképes, nem károsodott.
• Pulzusmérö óra és elem (CR2032)
• Mellkaspánt és elem (CR2032)
• Kerékpárra szerelhetö tartó
Müszaki jellemzök
Pulzusmérö óra
Müködési hömérséklettartomány 0-50°C
Méret (szíj nélkül) 4,4 x 5,0 cm
Kijelzöméret 2,4 x 1,8 cm
Súly 51 g
Elemek CR 2032/3V
Mellkaspánt
Müködési hömérséklettartomány 0-50°C
Méret (szíj nélkül) 7 x 3,3 x 1,2 cm
Adatátviteli frekvencia 110 kHz
Súly 51 g
Elemek CR 2032/3V
Funkciók
Pulzusmérés
• Figyelmeztetö jelzés maximális pulzusszámnál
• Célpulzusmérés idözítö és figyelmeztetö funkcióval (“egészség”,
“edzettség”, “teljesítmény” és felhasználó által beállított kategóriák)
• Legmagasabb, legalacsonyabb és átlagpulzusszám
• Figyelmeztetö lámpa (elöirányzott pulzusszám túllépése esetén)
Kalóriafunkciók
• Kalóriafelhasználás és zsírégetés az edzésidö alatt
• BMI számítás
• Edzettségi szint
Stopperóra
• Századmásodperc kijelzés, 99 köridö
Page 26

-
49 -
Visszaszámláló óra (Countdown timer)
-
50 -
Elemek
: CR2032
Idömérö funkciók
• Óra, perc, másodperc
• Naptár
• Ébresztöfunkció, ismétlö szerkezettel
• Óránkénti idöjelzés
• Második idözóna
Egyéb
• Háttérvilágítás
Fontos figyelmeztetés!
FIGYELEM! Edzésprogramja megkezdése elött kérjen
tanácsot orvosától. Töle információt szerezhet az Önnek
megfelelö edzésprogram és –intenzitás kialakításához,
valamint a célpulzus-beállításhoz. A pulzusmérö óra nem
orvosi müszer, használatának célja az Ön
edzésprogramjának segítése.
- Gyermekektöl távol tartani!
Soha ne engedje, hogy a pulzusmérö órát gyermekek felügyelet nélkül
használják, mert ök sok esetben nem tudják az esetleges veszélyforrásokat
megfelelöen felmérni.
Az elemek lenyelve életveszélyt okozhatnak, ezért ezeket kisgyermekektöl tartsa
mindig távol. Amennyiben gyermeke mégis lenyelne egy elemet, forduljon
azonnal orvoshoz megfelelö ellátásért.
A csomagoló fóliát is tartsa gyermekektöl távol, mert fulladásveszélyt okozhat.
Üzembehelyezés
Egy pénzérme segítségével csavarja le a mellpánt hátlapját, és helyezze be a 3
voltos elemet a pozitív (+) töltésü oldalával fölfelé. Ezután csavarja vissza a
fedelet.
- Elemek
A mellékelt elemeket elöírás szerint, megfelelö pólusirányban helyezze a
készülékbe. A nem újratölthetö elemek újratöltése, illetve felnyitása tilos! Soha ne
dobjon elemet tüzbe, mert ez robbanáshoz vezethet. Soha ne használjon
egyidöben különbözö elemeket (pl. régi és új, alkali és szén stb.) Az elemek
helytelen használata esetén robbanás- és savkifolyásveszély áll fönn.
Amennyiben az elemek a készülékben esetleg kifolynak, kesztyüben, száraz
ruhával törölgetve tisztítsa meg a készüléket.
Távolítsa el a védöfóliát a szívritmusmérö óra kijelzöjéröl, és nyomja meg a
MODE, SEL vagy SET gombot. A SEL gomb segítségével válassza ki a használati
nyelvet: angol, német, francia vagy spanyol. Erösítse meg a választását a SET
gomb megnyomásával.
Hasonló módon válassza ki a mértékegységet – metrikus (KM-KG)
Page 27

-
51 -
METRIC KM - KG KM - KG KM - KG
Érzkelö felületek
-
52 -
vagy „hagyományos“ mérföld-font (M-LB)
IMPERIAL M - LB M - LB M - LB
Fejezze be az üzembehelyezést a MODE gomb megnyomásával.
A SET és SEL gombok egyidejü megnyomásával az óra visszaállítható. Csak ezt
követöen választhat új használati nyelvet.
A mellkaspánt használata
Úgy állítsa be a mellkaspántot,
hogy az a mellizmok alatt szorosan
tartson. Vízzel vagy
gyógyszertárban kapható EKGzselével nedvesítse be az érzékelö
felületeket. Bizonyosodjon meg
róla, hogy az érzékelö felületek
folyamatosan érintkeznek a börrel.
Úgy helyezze el a mellkaspántot,
ahogy a mellékelt ábrán látható.
Ügyeljen, hogy a mellkaspánt
megfelelöen tartson. Teljes
kilégzéskor a pánt gyengén
feszüljön a mellkason. Közelben
lévö magasfeszültségü távvezeték,
vasúti felsövezeték vagy sürü
A kerékpár rögzítö alkalmazása
A pulzusmérö órát használhatja a
csuklóra vagy a mellékelt
tartozékkal kerékpárja
kormányára rögzítve. Nyomja a
rögzítöt fölülröl a kerékpár
kormányára. Bizonyos kormányátmérö esetén erösen kell nyomni
a rögzítöt, hogy a kormányra
feszüljön. Ezek után a pulzusmérö
órát ugyanúgy tudja a kerékpárra
erösíteni, mint ahogy a csuklójára
rögzíti.
Mérés közben ügyeljen arra, hogy a mellkaspánt és a pulzusmérö óra közötti
távolság ne legyen több, mint 70 cm.
Fontos információk a pulzusmérö óra használatához
A pulzusmérö órának
A MODE gomb megnyomásával választhat a használati módok közül a
következö sorrendben:
3 használati mód
ja van.
Óra és alapbeállítások
TIME ZEIT TEMPS HORA
gépkocsiforgalom befolyásolhatják
vagy zavarhatják a méröfunkciót,
erre ügyeljen az edzésútvonal megválasztásánál.
Stopperóra
CHRONO ST-UHR CHRONO CRONO
Pulzusmérö
HRM PULS FC PULSO
A használati módokon belül további alfunkciók találhatók, amelyeket a SEL gomb
megnyomásával érhet el.
Page 28

-
53 -
Gyors beállítás
-
54 -
A numerikus értékek beállításakor a gyors beállítási funkció a SEL gomb
lenyomásával és lenyomva tartásával érhetö el.
Világítás
A háttérvilágítás aktiválásához nyomja meg röviden a LIGHT gombot.
Óra és alapbeállítások
TIME ZEIT TEMPS HORA
A SEL gomb megnyomásával elérhetök óra mód alfunkciói.
Óra- és alapbeállítások
TIME ZEIT TEMPS HORA
Ébresztöóra
ALARM ALARM ALARM ALARMA
Timer
TIMER TIMER COMPTE TIMER
Nyomja meg és 3 másodpercig tartsa lenyomva a SET gombot a beállítások mód
kiválasztásához. A kijelzön a következö felirat jelenik meg, miközben a 12 ill. 24
órás idömérés kijelzöje villog:
HOLD
TO SET
A SEL gombbal állítsa be a kívánt módot, majd beállítása megerösítéséhez
nyomja meg a SET gombot. Hasonlóképpen járjon el a perc, óra, év, hónap és
nap beállításához. Ezt követöen végezheti el az alapbeállításokat. Elsöként
születési évét állítsa be.
BIRTHDAY GEB-TAG DATNAISS CUMPL-AN
HALTEN=
EINST.
MAINT=
REGLER
MANT=
AJUST
A SEL gombbal állítsa be a kívánt évet, majd beállítása megerösítéséhez nyomja
meg a SET gombot. Hasonló módon állítsa be a hónapot és napot. A kijelzön
megjelenik a testsúly érték.
WEIGHT GEWICHT POIDS PESO
A SEL gomb segítségével állítsa be testsúly értékét, és a SET gombbal erösítse meg
a bevitelt.
A kijelzön a testmagasság jelenik meg.
HEIGHT GROESSE TAILLE TAMANO
A SEL gomb segítségével állítsa be testmagasság értékét, és a SET gombbal
erösítse meg a bevitelt.
Fejezze be a beállításokat a MODE gomb megnyomásával.
Második idözóna
Nyomja meg a SEL gombot, és tartsa lenyomva 3 másodpercig. Az óra a második
idözóna kijelzésére vált, és a kijelzön “D2” jelenik meg. A második idözónához
tartozó idöt a fent leírtak szerint állíthatja be. A normál idö kijelzéséhez ismételten
nyomja meg és 3 másodpercig tartsa lenyomva a SEL gombot.
Ébresztöóra funkció
ALARM ALARM ALARM ALARMA
A beállításhoz nyomja meg és 3 másodpercig tartsa lenyomva a SET gombot. A
kijelzön „AL“ és az ébredési idö perc adata – villogva – jelenik meg.
A SEL gombbal állítsa be a kívánt percet, és a SET gombbal erösítse meg a
bevitelt. Hasonló módon állítsa be az órát is. Amennyiben szükséges, állítsa be a
hónapot és a napot is. Amennyiben a hónap és a nap nincs beállítva az ébresztési
funkció naponta müködésbe lép.
Amennyiben csak a napot állítja be, az ébresztési funkció havonta egyszer lép
müködésbe. Ha mind a hónapot, mind a napot beállítja, az ébresztöfunkció csak
a megadott napon lép müködésbe.
A kijelzön megjelenik az óránkénti jelzöfunkció.
Page 29

-
55 -
CHIME STDALARM SIGN HOR HORA AL
-
56 -
A beállításhoz nyomja meg a SEL gombot, és választását erösítse meg a SET
gomb megnyomásával (ON/EIN/ACTIF/ENCENDID=bekapcsolva,
OFF/AUS/INACTIF/APAGADO=kikapcsolva).
Az óránkénti jelzöfunkció bekapcsolt állapotát a kijelzön megjelenö harang
mutatja. A hangjelzés minden egész órakor megszólal.
A beállítások befejezéséhez nyomja meg a MODE gombot.
Az ébresztöfunkciót a SET gomb megnyomásával aktiválhatja, illetve
deaktiválhatja. Aktivált állapotban a kijelzön megjelenik az ébresztöfunkció jele.
.
Az ébresztöjelzést a SET, SEL vagy MODE gomb megnyomásával állíthatja le.
“SNOOZE” funkció
Ha az ébresztöjelzés megszólalása után egyetlen gombot sem nyom meg, 30
másodperc múlva a “snooze” funkció automatikusan bekapcsol, és az
ébresztöfunkció jele a kijelzön villogni kezd. Az ébresztöjelzés kikapcsol,
majd 2 perc múlva ismét megszólal. Mindez 5 alkalommal ismétlödik.
TIMER (visszaszámláló) funkció (max. 23:59:00)
TIMER TIMER COMPTE TIMER
A timer beállításához nyomja meg és 3 másodpercig tartsa lenyomva a SET
gombot. A kijelzön a timer funkció perc értéke villogni kezd.
A SEL gombbal állítsa be a kívánt percet, majt a beállítást erösítse meg a SET
gomb megnyomásával. Az órát hasonlóképpen állítsa be.
Ezt követöen a timer további funkcióit állíthatja be. A SEL gomb megnyomásával
válassza ki a kívánt funkciót:
Cd r 0:00 elérését követöen a visszaszámlálás újra kezdödik
Cd U 0:00 elérését követöen a timer elörefelé kezd számolni
Cd S 0:00 elérésekor a számlálás megáll
Fejezze be a beállítást a MODE gomb megnyomásával.
A SET gomb segítségével indíthatja és állíthatja a timert. A kiinduló beállítás
visszaállításához tartsa lenyomva a SET gombot. A timer visszaszámlálás végén a
készülék hangjelzéssel jelez.
Stopperóra
CHRONO ST-UHR CHRONO CRONO
A stopperóra elindításához és megállításához a SET gombot használja. A köridö
méréséhez nyomja meg a SEL gombot. Összesen 99 köridö mérésére van
lehetöség.
Nyomja meg és tartsa lenyomva a SET gombot a stopperóra visszaállításához.
Memóriafunkció
DATA
RECALL
Megállított stopperóránál nyomja meg a SEL gombot. A kijelzön a leggyorsabb
köridö jelenik meg. Nyomja meg a SET gombot a további köridök elöhívásához.
A memóriafunkció csak abban az esetben alkalmazható, ha legalább egy köridöt
elmentett.
ANSICHT
DATEN
APPEL
DONNEES
RECUP
DATOS
Pulzusmérö
HRM PULS FC PULSO
A pulzusmérö funkció csak a mellkaspánt használatakor müködik.
A SEL gomb megnyomásával hívhatja elö a különbözö pulzusmérö funkciókat:
Timer
TIMER TIMER COMPTE TEMPORIZADOR
Memóriafunkció
MEMORY SPEICHER MEMOIRE MEMORIA
Célpulzus
Page 30

-
57 -
ZONE BEREICH ZONE ZONA
ST/SP
-
58 -
Timer
Kalóriafelhasználás, zsírégetés és BMI
CALORIE KALORIEN CALORIES CALORIAS
Edzettségi állapot
FITNESS
LEVEL
A mellkaspánt használatakor a pulzusmérö kijelzöjének középsö sorában
megjelenik az aktuális pulzusszám. A szívritmusjel vételekor a kijelzön a szív jel
villog.
A pulzusérték mellett job oldalon megjelenik az arány a maximális pulzus
százalékában. A maximális pulzus becsült értékét a készülék automatikusan
számolja ki a megadott kor, testsúly és testmagasság alapján.
FITNESS
LEVEL
NIV FORM
PHYSIQ
NIVEL
FIT
Figyelmeztetö jelzés
Amikor az aktuális pulzusszám eléri
vagy meghaladja a maximális
pulzusérték 99%-át, vagy ha az elöre
megadott pulzushatárértéket (ld.
“Célpulzus”) túllépi, a kijelzön a piros
figyelmeztetö jel villogni kezd.
TIMER TIMER COMPTE TEMPORIZADOR
A kijelzö alsó sorában az eddig eltelt edzésidö látható. A középsö sorban a
pulzusszám és a maximális pulzus százaléka szerepel.
A timer funkció a mellkaspánt használatba vételét követöen azonnal
automatikusan müködésbe lép. A timer tovább számol abban az esetben is amikor
Ön az óra más funckiójára kapcsol.
Röviden nyomja meg a SET gombot a timer mód kiválasztásához:
TIMER Teljes edzésidö
Edzésidö a célpulzus tartományban
▲
Edzésidö a cépulzus fölötti tartományban
▼ Edzésidö a célpulzus alatti tartományban
Az edzésidö-érték visszaállításához nyomja meg és tartsa lenyomva a SET
gombot.
Memóriafunkció
MEMORY SPEICHER MEMOIRE MEMORIA
Az elmentett értékek a kijelzö alsó sorában láthatók.
Elért legmagasabb pulzus
HI H FO AL
Elért legalacsonyabb pulzus
LO N FA BA
Átlagos pulzusszám
AV D MO PR
A memóriafunkció értékeinek törléséhez/visszaállításához nyomja meg és tartsa
lenyomva a SET gombot.
Page 31

-
59 -
Célpulzus-tartomány
-
60 -
BMI BMI IMC IMC
ZONE BEREICH ZONE ZONA
A kijelzö alsó sorában a célpulzus-tartomány also és felsö határértéke látható. A
kiválasztott edzésfajta a felsö sorban jelenik meg.
L-U Felhasználó által meghatározott
L-1 Egészségmegörzés (a maximális pulzus 50-65%-a)
L-2 Fitness (a maximális pulzus 65-80%-a)
L-3 Teljesítmény (a maximális pulzus 80-95%-a)
A beállításhoz nyomja meg a SET gombot, és tartsa lenyomva 3 másodpercig.
A SEL gombbal válassza ki a kívánt edzésmódot. “U” (felhasználó által
meghatározott) választásánál manuálisan állíthatja be a határértékeket. Nyomja
meg a SET gombot. A kijelzön az alsó határérték villog. A SEL gombbal állitsa be
a kívánt értéket, és a SET gombbal erösítse meg a beállítást.
Hasonló módon állítsa be a felsö értéket.
Fejezze be a beállítást a MODE gomb megnyomásával.
A pulzusjelzö funkció aktiválásához nyomja meg a SEL gombot. Aktivált
pulzusjelzö funkciónál a kijelzön az ébresztö funkció jelzése jelenik meg, és a
célpulzus-tartomány elhagyásakor “bip-bip…bip-bip…bip-bip” hangjelzés
hallható. A maximális pulzusszám 99%-os megközelítésekor, illetve ennek
átlépésekor a készülék “bip-bip-bip-bip-bip…” hangjelzést ad. Ez a jelzés
független az edzésmódtól, illetve az edzésmódhoz kötödö hangjelzéstöl.
Kalória- és zsírégetés, BMI
CALORIE KALORIEN CALORIES CALORIAS
Az alsó sorban az elégetett kalóriaérték látható
CALORIE KALORIEN CALORIES CALORIAS
Nyomja meg a SET a zsírégetés értékének megjelenítéséhez (gramm),
FAT BURN FETT CONSGRAISSES
illetve a BMI értékhez
GRASA
A kalóriafelhasználás és zsírégetés kijelzésekor a megörzött (elmentett) értékeket
a SET gomb lenyomásával és nyomva tartásával törölheti.
Figyelem! A kalóriafelhasználás és zsírégetés kijelzésének potosságához az
életkor és testsúly helyes megadása szükséges.
Figyelem! A zsírégetés számlálója csak min. 120-as pulzusszám elérésekor lép
müködésbe.
BMI
A BMI egy olyan méröszám, amely az emberi testsúly értékeléséhez. 18,5 és 25
között egy felnött esetében a testsúly normális. 18,5 alatt a testsúly túlságosan
alacsony, 25-ös érték fölött túlsúlyosság áll fönn. 30 fölötti BMI érték elhízottságot
jelent. A BMI csupán egy közelítö tájékoztatóérték, ugyanis nem veszi figyelembe
az egyén testalkatát, valamint az izom- és zsírszövetek által meghatározott egyedi
testsúlyfelépítést.
Fitness
FITNESS
LEVEL
Edzése befejezésekor azonnal nyomja meg a SET gombot. Ekkor egy 5 perces
visszaszámlálás kezdödik (pihenöidö).
A kijelzön a visszaszámlálásból hátralévö idö látható. Bal oldalon megjelenik a
kezdöpulzus, jobb oldalon a jelenlegi pulzusszám, az alsó sorban pedig az idö.
Az 5 perc letelte után megjelenik az edzettségi állapot foka.
Edzettségi állapot Pulzusszám
6 >130
5 130-120
4 120-110
3 110-105
2 105-100
1 <100
FITNESS
LEVEL
NIV FORM
PHYSIQ
NIVEL
FIT
Page 32

-
61 -
A szívritmus kódolt átvitele
-
62 -
Elemcsere a karórában
A mellkaspánt adatátvitele digitálisan kódolt annak érdekében, hogy ne léphessen
fel zavar, például abban az esetben ha Ön és edzöpartnere egyforma készüléket
visel. A mellkaspánt elsö használatakor automatikusan beállít egy véletlenszerüen
kiválasztott csatornát. A csatorna száma rövid ideig megjelenik a kijelzön, amikor
Ön pulzusszám mérésre vált. A lehetséges csatornák CH10, CH11, CH12, CH13
és CH14. A csatorna megváltoztatásához rövid idöre távolítsa el az elemet a
mellkaspántból, majd helyezze vissza. A mellkaspánt ekkor új csatornát
választ, amely kb. 1 perc elteltével megjelenik a pulzusmérö óra kijelzöjén.
Hibaelhárítás
A készülék nem jelzi a pulzusszámot, illetve rossz értéket jelez
Ellenörizze, hogy a mellkaspánt megfelelöen van felhelyezve és rögzítve.
A börfelület nem lehet teljesen száraz, illetve hideg.
Enyhén nedvesítse meg az érintkezöket a megfelelö müködéshez.
Elektromágneses zavarforrások befolyásolhatják a vételt.
Ügyeljen rá, hogy a mellkaspánt és a pulzusmérö óra közötti távolság ne legyen
több a maximális 70cm-nél.
2 méteres körzeten belül lévö más pulzusmérö készülék zavarhatja a vételt.
Vezeték nélküli kerékpárkompjúter befolyásolhatja a müködést.
Ellenörizze, hogy az elemek nem szorulnak-e cserére.
A kijelzö értékei olvashatatlanok / a háttérvilágítás nem müködik
Cseréljen elemet a készülékben.
Az óra vízállóságának megörzése érdekében az
elemcserét óraszaküzletben végeztesse.
Amennyiben Ön cserél elemet órájában, a
következöképpen járjon el:
Egy kisméretü csillagcsavarhúzóval lazítsa meg
az óra hátlapján lévö csavarokat (1,2,3 és 4),
majd távolítsa el a hátlapot és az elemen lévö
matricát. Egy kis lapos szerszám segítségével
nyissa ki az elemrögzítöt, és vegye ki az elemet.
Megfelelö polaritás-irányban (+ jel fölfelé
legyen) helyezzen be egy új, 3V CR2032 típusú
elemet. Ellenörizze, hogy a szigetelögyürü (6)
megfelelöen illeszkedik-e, majd zárja vissza az
elemtartót (5). Ragassza vissza az öntapadó
matricát, végül helyezze fel és csavarozza vissza
az óra hátlapját.
Elem állapotjelzö
Ha a mellkaspánt elemének állapota már nem megfelelö a készülék
alapfunkcióinak ellátásához, a pulzusmérö óra kijelzöjén a következö felirat
jelenik meg:
TXBELT
LO BAT
Cseréljen elemet a “Mellkaspánt” fejezetben leírtak szerint.
TXGURT
BATT
SNGLTX
PILE
TXBCIN
BAT BA
Page 33

-
63 -
Az óra vízállósága
-
64 -
Az elemek használaton kívül helyezése
Az óra 3 bar nyomásig vízálló. A megadott nyomás érték a vízállósági teszten
alkalmazott víznyomásnak felel meg (DIN8310).
A mellkaspánt vízállósága
A mellkaspánt IEC 60529 IXP7 szerint 30 m-ig vízálló.
Tisztítási útmutató
A készülék tisztításához kizárólag száraz, szöszmentes kendöt – pl.
szemüveglencse-tisztító – használjon.
A mellpántot és a karóra pántját minden nap tisztítsa meg langyos vízzel vagy
enyhén szappanos vízbe mártott szivaccsal. Ezután egy kendövel törölje ezeket
szárazra, majd a teljes száradáshoz lógassa fel az övet. Izzadság miatti
nedvesség, illetve nem megfelelö tisztítás befolyásolhatja a készülék megfelelö
müködését.
A készülék használaton kívül helyezése
A pulzusmérö óra kukába nem dobható. A készüléket kijelölt
hulladéklerakó helyen kell átadni. Kérjük, ügyeljen az érvényben lévö
hulladékkezelési
rendelkezésekre. Amennyiben kétsége merül föl a megfelelö eljárással
kapcsolatban, lépjen kapcsolatba az illetékes köztisztasági hatósággal.
A használt elemeket az erre a célra kihelyezett elemgyüjtö
konténerekbe dobja, illetve hulladéklerakó helyen adja át. A használt
elem kukába nem dobható. Kérjük, ügyeljen az érvényben lévö hulladékkezelési
rendelkezésekre. Amennyiben kétsége merül föl a megfelelö eljárással
kapcsolatban, lépjen kapcsolatba az illetékes köztisztasági hatósággal.
Megfelelöségi nyilatkozat
Rendeltetésszerü használat esetén ez a termék megfelel az EU R&TTE
(Rádióberendezések és távközlö végberendezések) 3.§ elöírásainak és az FTEG
(rádiós és távközlési eszközökröl szóló törvény) vonatkozó rendelkezéseinek. A
teljes megfelelöségi nyilatkozat itt szerezhetö be: conformity@digi-tech-gmbh.com.
A digi-tech GmbH garanciája
A pulzusmérö órára vonatkozó garancia a vásárlás napjától számított 3 évig
érvényes. A termék meghibásodása esetén Önnek az eladóval szembeni,
törvényileg szabályozott jogai vannak. Az alábbiakban részletezett garancia
ezeket a jogokat nem korlátozza.
Garanciális feltételek
A garancia idötartama a vásárlás napjával kezdödik. Kérjük, örizze meg a
vásárlást igazoló pénztári nyugtát, ill. számlát, garanciaigény esetén ezzel kell
igazolnia a vásárlás tényét. Amennyiben a vásárlás napjától számított három éven
belül a pulzusmérö órával kapcsolatban anyag- vagy gyártási hiba merül fel, a
készüléket térítésmentesen megjavítjuk, illetve kicseréljük. A javítás, ill. csere
eldöntésének jogát a gyártó fenntartja. Ennek feltétele, hogy a hibás készüléket és
a vásárlást igazoló nyugtát, ill. számlát eljuttatja hozzánk a meghibásodás
idejének megjelölésével, valamint a hiba rövid leírásával. Amennyiben a
garanciafeltételek fennálnak, rövid idön belül megkapja tölünk a megjavított
készüléket vagy egy új pulzusmérö órát. A javítással, ill. cserével új garanciaidö
nem kezdödik.
Page 34

-
65 -
Garanciaidö és garanciaigény
-
66 -
Garanciaigény bejelentése
A garanciaidöt az elözöekben leírt garanciális szolgáltatás nem hosszabbítja
meg. Ez a cserélt, ill. megjavított alkatrészekre is vonatkozik. A már vásárláskor
felmerülö esetleges hiánnyal vagy hibával kapcsolatos garanciaigényét
haladéktalanul jelentse. A garanciaidö lejárta után bejelentett javítások, ill. cserék
nem térítésmentesek.
A garancia kirterjedése
A pulzusmérö óra szigorú minöségi elöírások alapján készült, és szállítás elött
megfelelö ellenörzésen ment keresztül. A garancia anyag- és gyártási hibákra
terjed ki. A garancia nem terjed ki a készülék olyan alkatrészeire, amelyek a
rendeltetésszerü használat során kopásnak, törésnek vannak kitéve, és ezért
“kopó, fogyó alkatrésznek” tekinthetök. Ilyen alkatrészek például a kapcsolók,
elemek, illetve az üvegböl készült alkatrészek.
A garancia érvényét veszti a készülék sérülése, nem elöírásszerinti használata
vagy nem megfelelö karbantartása esetén. Az pulzusmérö óra elöírásszerinti
használatához a jelen használati útmutatóban leírtak pontos betartása szükséges.
Feltétlenül kerülni kell az olyan használatot és kezelést, amely az útmutató szerint
tiltott vagy nem ajánlott.
A pulzusmérö óra kizárólag személyes és nem kereskedelmi használat céljára
készült. A készülék szakszerütlen vagy visszaélésszerü használata, ill. az azon
történt bármely – nem szakszerviz által végzett – módosítás a garancia
elvesztésével jár.
Garanciaigényének gyors kezeléséhez, kérjük, a következök szerint járjon el:
• A bejelentéshez, kérjük, készítse elö a vásárlást igazoló nyugtát vagy
számlát, valamint a készülék cikkszámát (87794).
• A cikkszámot a készülék típuscímkéjén, a használati útmutató
címlapjának alján bal oldalon ill. a készülék aljára vagy hátlapjára
ragasztva találja.
• Meghibásodás esetén forduljon ügyfélszolgálatunkhoz a
késöbbiekben megadott telefonszámon vagy e-mail címen.
Ez az útmutató, valamint számos más kézikönyv, termékvideó és szoftver
letölthetö a www.lidl.com internetes oldalról.
Page 35

-
67 -
Ügyfélszolgálat/szerviz
-
68 -
Cégnév: inter-quartz GmbH
E-mail: support@inter-quartz.de
Telefon: +49 6198 571825
Telephely: Németország
Navodilo za uporabo in varnostno navodilo
Kazalo
IAN 87794
00800 44 11 493
0680 981220
0800 80847
Szállító
Figyelem! Az alábbi cím nem ügyfélszolgálati cím. Kérdésével, ill. panaszával,
kérjük, forduljon a fent megadott ügyfélszolgálathoz.
Cégnév: digi-tech GmbH
Út: Valterweg 27A
Város: Eppstein 65817
Ország: Németország
Kazalo.......................................................................................................................- 68 -
Uvodna opomba......................................................................................................- 70 -
Predvidevna uporaba..............................................................................................- 70 -
Komplet vsebuje .......................................................................................................- 70 -
Tehnične podrobnosti ..............................................................................................- 70 -
Funkcije......................................................................................................................- 71 -
Pomembne varnostne informacije .........................................................- 72 -
Nastavitev merilca srčnega utripa..........................................................................- 73 -
Pomembne opombe o delovanju ročne ure..........................................................- 75 -
Osvetlitev...................................................................................................................- 75 -
Čas in osnovne nastavitve.......................................................................................- 75 -
Budilka.......................................................................................................................- 77 -
Števec -Timer (maksimalno 23:59:00)..................................................................- 78 -
Štoparica...................................................................................................................- 78 -
Funkcija pomnilnika..................................................................................................- 78 -
Merjenje srčnega utripa ..........................................................................................- 79 -
Opozorilna lučka .....................................................................................................- 80 -
Timer ..........................................................................................................................- 80 -
Funkcija pomnilnika..................................................................................................- 80 -
Page 36

-
69 -
Ciljni srčni utrip .........................................................................................................- 81 -
-
70 -
Kalorije, izgorevanje maščob in ITM (BMI).........................................................- 82 -
Ura za merjenje srčnega utripa
Fitnes (telesna pripravljenost)..................................................................................- 83 -
Kodirani prenos........................................................................................................- 83 -
Odpravljanje napak.................................................................................................- 84 -
Zamenjava baterije pri uri.......................................................................................- 84 -
Indikator izrabe baterije..........................................................................................- 85 -
Vodotesnost monitorja srčnega utripa....................................................................- 85 -
Vodotesnost prsnega pasa......................................................................................- 85 -
Navodilo za čiščenje...............................................................................................- 85 -
Odlaganje elektronskih naprav..............................................................................- 86 -
Odlaganje baterij.....................................................................................................- 86 -
Izjava o usklajenosti.................................................................................................- 86 -
Servis..........................................................................................................................- 87 -
Dobavitelj..................................................................................................................- 87 -
Garancijski list...........................................................................................................- 87 -
Uvodna opomba
Preberite navodila pred prvo uporabo izdelka, čeprav ste izkušeni pri uporabi
elektronske opreme. Prosimo, bodite posebno pozorni pri branju poglavja
"Pomembne varnostne informacije". Ohranite navodila za uporabo, tako da jih
lahko uporabite v prihodnosti. Če želite prodati ali pa dati ta izdelek nekomu je
zelo pomembno, da daste tudi ta priročnik.
Predvidevna uporaba
Ta elektronska naprava je namenjena za prikaz časa in opisane dodatne
funkcije. Vsaka druga uporaba ali sprememba elektronske naprave ni v skladu s
predvideno uporabo. Proizvajalec ne odgovarja za škodo, nastalo zaradi
nepravilne uporabe ali zlorabe. Naprava ni namenjena za komercialno uporabo.
Komplet vsebuje
Opomba: Preverite vsebino po nakupu. Prosimo, poskrbite, da so vsi deli
zajeti in nepoškodovani.
• Ročna ura, baterija vključena (CR2032)
• Prsni pas, baterija vključena (CR2032)
• Nastavek za kolo
Tehnične podrobnosti
Ročna ura
Temperatura delovanja 0-50°C
Dimenzije 4,6 x 3,3 x 1,6 cm
Zaslon 2,5 x 1,9 cm
Teža 51g
Baterija CR 2032/3V
Page 37

-
71 -
Prsni pas
-
72 -
Temperatura delovanja 0-50°C
Dimenzije 7 x 3,3 x 1,2 cm
Frekvenca 110 kHz
Teža 51g
Baterija CR 2032/3V
Funkcije
Merjenje srčnega utripa
• Alarm za maksimalni srčni utrip
• Vadba ciljnega srčnega utripa s štoparico in alarmom
(Zdravje, Telesna pripravljenost, učinkovitost in uporabniško določen)
• Maksimalni srčni utrip, min. srčni utrip in povprečni srčni utrip
• Signalna luč za visok srčni utrip
Značilnosti kalorij
• Poraba kalorij in maščob med vadbo
• ITM (BMI) izračun
• Nivo telesne pripravljenosti
Štoparica
• 1/100 sekund, 99 vmesnih časov
Odštevalec (Countdown timer)
Funkcije časa
• Čas
• Koledar
• Budilka s funkcijo dremeža
• Urni zvonec
• Drugi časovni pas
Drugo
• Osvetlitev zaslona
Pomembne varnostne informacije
POZOR: Posvetujte se s svojim zdravnikom, preden
začnete katerikoli program vadbe. Zdravnik vam lahko
pomaga izbrati primerno intenzivnost vadbe in smernice
območja srčnega utripa za vaše vadbe.
Ta merilnik srčnega utripa ni medicinski pripomoček in ga
je treba uporabljati le kot vodilo za vašo vadbo.
- Baterije
Vstavite baterije / polnilne baterije, pri čemer bodite pozorni na pravilno
polarnost. Ne poskušajte polniti baterije, ki se ne polnijo in pod nobenim
pogojem ne vrzite baterije v ogenj. Nevarnost eksplozije. Ne uporabljajte
neenake baterije (stare in nove, alkalne in ogljikove, itd.) istočasno. Če ne boste
uporabljali naprave dlje časa, odstranite baterije in shranite napravo na suhem in
kjer ni prahu. Nepravilna uporaba baterij lahko povzroči eksplozijo ali puščanje.
Če so baterije puščale, uporabite rokavice in očistite aparat temeljito s suho krpo.
- Električne naprave ne smejo biti v rokah otrok
Nikoli ne pustite, da otroci uporabljajo električne naprave brez nadzora. Otroci
ne morejo vedno pravilno prepoznati možne nevarnosti. Baterije / polnilne
baterije so lahko smrtno nevarne, če so pogoltnjene. Spravite baterije, kamor jih
ne morejo otroci doseči. Pri zaužitju baterije zdravniško pomoč, je treba takoj
poiskati. Prav tako varujte pred otroki embalažne folije. Nevarnost zadušitve.
Page 38

-
73 -
Nastavitev merilca srčnega utripa
Baterije
CR2032
-
74 -
območje kontakta
Uporabite kovanec, da odvijete pokrov predala za baterije na hrbtni strani
prsnega pasu in vstavite 3V baterijo (+) znak obrnjen navzgor. Zavijte pokrov
predala za baterijo nazaj v ohišje.
Odstranite zaščitno folijo z zaslona in pritisnite MODE, SEL ali SET.
Sedaj izberite angleški, nemški, francoski ali španski jezik s pritiskom na tipko SEL
in potrdite s pritiskom na tipko SET.
Izberite enoto KM-KG
METRIC KM - KG KM - KG KM - KG
ali milje/funti
IMPERIAL M - LB M - LB M - LB
na enak način. Dokončajte postopek nastavitve s pritiskom na tipko MODE. Ura
se resetira tako, da pritisnete in zadržite skupaj tipke SET in SEL. Šele po
resetiranju ure, lahko izberete drugi jezik.
Nošenje prsnega pasu
Nastavite prsni pas tako, da se vam
tesno prilega neposredno pod
prsnimi mišicami. Navlažite kontaktne
površine z vodo ali EKG gelom (EKG
gel lahko kupite v lekarni). Prepričajte
se, da so kontaktne površine nenehno
v stiku s kožo.
Postavite prsni pas, kot na spodnji
sliki.
Prosimo, zagotovite, da je prsni pas
pravilno nameščen. Ko močno
izdihnete, še vedno zelo rahlo
pritiska vaša prsa.
Visokonapetostni električni vodi, vlaki
ali avtomobilski promet lahko ovirajo
merjenje srčnega utripa. Prosimo,
upoštevajte to pri planiranju vadbe.
Uporaba nastavka za kolo
Nastavek za kolo, ki je vključen,
se lahko uporablja tako, da se
zapestna ura nastavi na krmilo
kolesa.
Pritisnite nastavek za kolo na
krmilo. Krmila, ki so posebno
velikega premera, lahko
zahtevajo uporabo dodatne sile,
da se pritrdi nastavek za kolo.
Merilnik srčnega utripa je zdaj
lahko pritrjen na nastavek za kolo
na isti način kot na zapestje.
Med prsnim pasom in ročno uro je največji domet 70 cm.
Page 39

-
75 -
Pomembne opombe o delovanju ročne ure
-
76 -
Ura ima
Pritisnite tipko MODE, da izberete način delovanja ure.
Vrstni red načinov je naslednji:
3 različna načina delovanja.
Čas in osnovne nastavitve
TIME ZEIT TEMPS HORA
štoparica
CHRONO ST-UHR CHRONO CRONO
srčni utrip
HRM PULS FC PULSO
Vsak način delovanja ima lahko več pod-funkcij.
S pritiskom na tipko SEL so lahko vedno dostopne pod-funkcije.
Hitre nastavitve
Ko nastavljate numerične vrednosti, pritisnite in zadržite tipko SEL za hitro
nastavitev funkcij.
Osvetlitev
Na kratko pritisnite tipko LIGHT da začasno aktivirate osvetlitev.
čas in osnovne nastavitve
TIME ZEIT TEMPS HORA
budilka
ALARM ALARM ALARM ALARMA
števec (timer)
TIMER TIMER COMPTE TIMER
Pitisnite in 3 sekunde zadržite tipko SETda pridete v način nastavitev.
Na zaslonu se prikaže
HOLD
TO SET
In 12 ali 24-urni prikaz časa začne utripati na zaslonu. Pritisnite tipko SEL za
izbor prikaza časa in s pritiskom na tipko SET potrdite izbor. Nastavite sekunde,
minute, ure, leto, mesec in dan na enak način.
Sledijo osnovne nastavitve. Najprej se prikaže nastavitev leta rojstva
BIRTHDAY GEB-TAG DATNAISS CUMPL-AN
Pritisnite tipko SEL, da nastavite leto in pritisnite tipko SET, da potrdite nastavitev.
Nastavite mesec in dan na enak način.
Sedaj se prikaže teža
WEIGHT GEWICHT POIDS PESO
HALTEN=
EINST.
MAINT=
REGLER
MANT=
AJUST
Čas in osnovne nastavitve
TIME ZEIT TEMPS HORA
V časovnem načinu s pritiskom na tipko SEL pridete do pod-funkcij časovnega
načina.
S pritiskom na tipko SEL nastavite številke vaše teže in s pritiskom na tipko SET
potrdite vsako številko.
Sedaj se prikaže višina na zaslonu
HEIGHT GROESSE TAILLE TAMANO
Page 40

-
77 -
S pritiskom na tipko SEL nastavite številke vaše višine in s pritiskom na tipko SET
-
78 -
potrdite vsako številko.
Prtisnite tipko MODE za izhod iz nastavitev.
Drugi časovni pas
Pritisnite in zadržite 3 sekunde tipko SEL. Ura se preklopi na prikaz drugega
časovnega pasu in T2 se prikaže na zaslonu. Nastavitev drugega časovnega
pasu lahko izvedete enako, kot je opisano v prejšnjem odstavku. Pritisnite in
zadržite 3 sekunde tipko SEL, da se vrnete v normalen prikaz časa.
Budilka
ALARM ALARM ALARM ALARMA
Pritisnite in zadržite 3 sekune tipko SET za vstop v način nastavitev budilke.
"AL" se prikaže na zaslonu in minute alarma začnejo utripati na zaslonu.
Pritisnite tipko SEL da nastavite minute in pritisnite tipko SET, da potrdite nastavitev.
Nastavite ure na enak način.
Če želite, lahko nastavite tudi mesec in dan.
Če ni nastavljen mesec in dan budilke, budilka se sproži vsak dan. Če je
nastavljen dan, se budilka oglasi enkrat mesečno. Če je nastavljen mesec in dan,
se budilka oglasi določenega datuma.
Nastavitev urnega zvonca se prikaže na zaslonu
CHIME STDALARM SIGN HOR HORA AL
Funkcija dremeža (snooze)
Če ne pritisnete nobene tipke, ko se sproži alarm, se alarm izklopi po 30
sekundah in simbol utripa na zaslonu. Alarm se bo ustavil in bo nadaljeval
opozarjati po 2 minutah. Proces se bo ponovil petkrat.
Števec -Timer (maksimalno 23:59:00)
TIMER TIMER COMPTE TIMER
Pritisnite in zadržite 3 sekunde tipko SET za vstop v način nastavljanja.
Minute časa števca utripajo na zaslonu.
Pritisnite tipko SEL, da nastavite minute časa števca in potrdite nastavitev s
pritiskom na tipko SET. Nastavite ure na enak način.
Zdaj sledijo dodatne nastavitve števca. Pritisnite tipko SEL, da izberete želeni
način:
Cd r Po doseganju 0:00 timer bo spet prešteval nastavljeni čas
Cd U Po doseganju 0:00 timer bo štel naprej
Cd S Po doseganju 0:00 timer se ustavi
Izhod iz nastavitev je s pritiskom na tipko MODE.
Tmer se lahko vklopi ali izklopi s pritiskom na tipko SET.
Pritisnite in zadržite tipko SET za ponastavitev števca.
Ko bo čas števca iztekel, alarm se bo sprožil.
Štoparica
Pritisnite tipko SEL, da izberete nastavitev in potrdite nastavitev s pritiskom na tipko
SET
ON/EIN/ACTIF/ENCENDID=vklop,OFF/AUS/INACTIF/A
PAGADO=izklop
Če je aktiviran urni zvonec, simbol zvonca se prikaže in budilka se oglasi na
začetku vsake ure. Zapustite način nastavitve s pritiskom na tipko MODE. Alarm se
lahko aktivira ali dezaktivira s pritiskom na tipko SET. Če se alarm vklopi, simbol
za alarm se prikaže. Ko se oglasi budilka, pritisnite tipko SET, SEL ali MODE,
da ustavite budilko.
CHRONO ST-UHR CHRONO CRONO
Pritisnite tipko SET za vklop ali izklop štoparice. Pritisnite tipko SEL, medtem ko
štoparica teče, da posnamete vmesne čase. Do 99 vmesnih časov je mogoče
posneti. Pritisnite tipko SET za ponastavitev štoparice.
Funkcija pomnilnika
DATA
RECALL
ANSICHT
DATEN
APPEL
DONNEES
RECUP
DATOS
Page 41

-
79 -
Pritisnite tipko SEL, medtem ko štoparica stoji, da vidite na zaslonu najhitrejši
-
80 -
ST/SP
vmesni čas. Pritisnite tipko SET za prikaz drugih vmesnih časov.
Prosimo, upoštevajte, funkcija pomnilnika se lahko uporabi samo, če je bil posnet
vsaj en vmesni čas.
Merjenje srčnega utripa
HRM PULS FC PULSO
Pod-funkcije za merjenje srčnega utripa se lahko uporabljajo samo, če je
priključen prsni pas.
Pritisnite tipko SEL za dostop pod-funkcijam ure za merjenje srčnega utripa.
Timer
TIMER TIMER COMPTE TEMPORIZADOR
funkcija pomnilnika
MEMORY SPEICHER MEMOIRE MEMORIA
ciljni srčni utrip
ZONE BEREICH ZONE ZONA
kalorije, izgorevanje maščob in ITM (BMI)
CALORIE KALORIEN CALORIES CALORIAS
fitnes
FITNESS
LEVEL
V srednji vrstici zaslona je srčni utrip prikazan med nošenjem prsnega pasu. Če je
signal prsnega pasa sprejet, bo znak srce utripal. Na desni strani prikaza srčnega
utripa je prikazan, srčni utrip v odstotkih maksimalnega srčnega utripa.
Maksimalni srčni utrip se izračuna tako, da se upošteva vaša starost, teža in
višina.
FITNESS
LEVEL
NIV FORM
PHYSIQ
NIVEL
FIT
Opozorilna lučka
Če vaš srčni utrip doseže ali preseže
99 % vašega maksimalnega srčnega
utripa, ali vaš srčni utrip presega
mejna ciljna območja (glej ciljno
območje), opozorilna rdeča lučka bo
utripala.
Timer
TIMER TIMER COMPTE TEMPORIZADOR
Spodnja vrstica na zaslonu prikaže pretekli čas vadbe. Srednja vrsta bo prikazala
vaš srčni utrip in srčni utrip v odstotkih maksimalnega srčnega utripa.
Timer se samodejno zažene, ko začne prsni pas merjenje srčnega utripa. Timer
nadaljuje štetje časa, če se spremeni način dela ure.
Pritisnite tipko SET, da izberete timer:
TIMER skupni čas vadbe
čas vadbe je znotraj ciljnega območja srčnega utripa
▲ čas vadbe je nad ciljnim območjem srčnega utripa
▼ čas vadbe je pod ciljnim območjem srčnega utripa
Pritisnite in zadržite tipko SET za ponastavitev časa vadbe.
Funkcija pomnilnika
MEMORY SPEICHER MEMOIRE MEMORIA
Page 42

-
81 -
Shranjene vrednosti so prikazane v spodnji vrstici zaslona.
-
82 -
maksimalni srčni utrip med vadbo
HI H FO AL
najmanjši srčni utrip med vadbo
LO N FA BA
povprečni srčni utrip med vadbo
AV D MO PR
Pritisnite in zadržite tipko SET za ponastavitev shranjenih vrednosti.
Ciljni srčni utrip
ZONE BEREICH ZONE ZONA
V spodnji vrstici na zaslonu prikažejo se spodnje in zgornje mejne vrednosti
ciljnega območja.
Izbrana vrsta vadbe je prikazana v zgornji vrstici na zaslonu.
L- U uporabniško določena
L-1 Zdravje (50-65% maksimalnega srčnega utripa)
L-2 Fitnes (65-80 % maksimalnega srčnega utripa)
L-3 Zmogljivost (80-95% maksimalnega srčnega utripa)
Pritisnite in zadržite 3 sekunde tipko SET za vstop v način nastavitev.
Izberite vrsto vadbe s pritiskom na tipko SEL. Če je "U" je izbran (uporabniško
določena), lahko določite spodnje in zgornje meje. Pritisnite tipko SET. Na zaslonu
bo prikazana spodnja meja.
Nastavite vrednost s pritiskom na tipko SEL in potrdite nastavitev s pritiskom na
tipko SET. Nastavite zgornjo mejo na enak način.
Izhod iz nastavitev je s pritiskom na tipko MODE. Pritisnite in zadržite tipko SEL,
da vključite alarm srčnega utripa. Ko je funkcija alarma za srčni utrip aktivirana,
prikaže se simbol alarma in alarm se bo sprožil, ko izmerjen srčni utrip ni v
območju določene zone "BEEP-BEEP...BEEP-BEEP...BEEP-BEEP".
Če je izmerjen srčni utrip 99% maksimalnega srčnega utripa ali več, alarm
maksimalnega srčnega utripa se bo oglasil. "BEEP BEEP--BEEP BEEP--BEEP-BEEP".
Alarm maksimalnega srčnega utripa je neodvisen od zone vadbe in alarma
srčnega utripa območja vadbe.
Kalorije, izgorevanje maščob in ITM (BMI)
CALORIE KALORIEN CALORIES CALORIAS
Spodnja vrsta kaže porabljene kalorije
CALORIE KALORIEN CALORIES CALORIAS
Pritisnite tipko SET za prehod na prikaz izgorevanja maščob v gramih
FAT BURN FETT CONSGRAISSES
ali za prikaz vašega ITM (BMI)
BMI BMI IMC IMC
Na zaslonu za porabo kalorij in izgorevanje maščob vrednosti lahko ponastavite,
če pritisnete in zadržite tipko SET.
Opomba: Če želite povečati točnost prikaza porabe kalorij in izgorevanje
maščob, vaša starost in teža morata biti pravilno nastavljeni.
Opomba: števec za izgorevanje maščob je aktiviran le, ko je vaš srčni utrip nad
120 utripov na minuto.
Opombe o ITM (BMI)
ITM je statistična meritev, ki služi kot smernica o vaši idealni teži. Za odrasle se
vrednost med 18,5 in 25 šteje za normalno. Vrednost pod 18,5 velja za
"podhranjenost". Vrednosti nad 25 se štejejo za "prekomerna telesno masa".
Vrednosti nad 30 se štejejo za "debelost".
ITM je le groba smernica, ker ne obravnava oseben tip telesa in sestave telesa.
GRASA
Page 43

-
83 -
Fitnes (telesna pripravljenost)
-
84 -
Odpravljanje napak
FITNESS
LEVEL
Po vadbi, takoj pritisnite tipko SET. Začne se 5 minutno odštevanje (faza
ohlajanja).
Vrstica prikaže preostali čas. Na levi strani zaslona je prikazan srčni utrip na
začetku ohlajanja. Na desni strani zaslona je prikazan trenutni srčni utrip.
Odštevanje časa je prikazano v spodnji vrstici zaslona.
Po 5 minutah se prikaže vaš nivo telesne pripravljenosti.
Nivo telesne pripravljenosti Srčni utrip
6 >130
5 130-120
4 120-110
3 110-105
2 105-100
1 <100
FITNESS
LEVEL
NIV FORM
PHYSIQ
NIVEL
FIT
Kodirani prenos
Prsni pas je digitalno kodiran in omogoča, da drugi uporabniki ne motijo prenosa
srčnega utripa, če vadite s partnerjem z enakim pasom in uro.
Če uporabljate prsni pas prvič, se naključno samodejno izbere kanal. Kanal je na
kratko prikazan na vrhu zaslona ob vstopu načina prikaza srčnega utripa.
Razpoložljivi kanali so CH10, CH11, CH12, CH13 in CH14.
Kanal lahko spremenite s kratko odstranitvijo baterije iz prsnega pasu in baterijo
znova vstavite. Prsni pas bo naključno izbral kanal in po približno eni minuti, srčni
utrip in nov kanal se prikažeta na zaslonu ure.
Srčni utrip ni prikazan, ali pa je nepravilno prikazan
Poskrbite, da je prsni pas pravilno nameščeni in dobro prilega.
Vaša koža ne sme biti preveč suha ali preveč hladna.
Kontaktne površine so lahko rahlo navlažene za izboljšanje delovanja.
Elektromagnetne motnje imajo lahko škodljiv učinek na sprejem. Razdalja med uro
in prsnim pasom mora biti manj kot 70 cm.
Drugi merilci srčnih utripov v območju 2 m lahko tudi povzročijo motnje.
Brezžični kolesarski računalniki lahko povzročijo motnje.
Baterije lahko izrabljena in zahteva zamenjavo.
Zaslon je neberljiv / luč ne deluje
Zamenjajte baterije.
Zamenjava baterije pri uri
Zamenjavo baterije lahko izvede urar, poleg
testa vodoodpornosti.
Če želite zamenjati baterijo sami, prosimo,
najprej preberite naslednja navodila: Odstranite
vijake (1, 2, 3 in 4) s hrbtne strani ure z majhnim
izvijačem Phillips. Odstranite hrbtno stran ohišja
in nalepko baterije.
Uporabite majhno ravno orodje, da odprete
zapah (5) za držalo baterije. Odstranite baterijo
in vstavite novo CR2032 3V baterijo (+) pol
obrnjen navzgor. Prepričajte se, da je tesnilo (6)
pravilno postavljeno. Zaprite zapah držala
baterije. Zamenjajte baterijsko nalepko in vrnite
hrbtno stran ohišja in privijte vijake.
Page 44

-
85 -
Indikator izrabe baterije
-
86 -
Odlaganje elektronskih naprav
Če je napetost baterije prsnega pasu manjša od napotesti potrebne za normalno
delovanje,,
TXBELT
LO BAT
se prikaže na zaslonu. Zamenjajte baterijo v prsnem pasu, kot je opisano v
poglavju "Prsni pas".
TXGURT
BATT
SNGLTX
PILE
TXBCIN
BAT BA
Vodotesnost monitorja srčnega utripa
Vodotesnost je do 3 bare. Vrednost bara določa zračni nadtlak, ki se uporablja
med preskušanjem (DIN 8310).
Vodotesnost prsnega pasa
Elektronske naprave ni dovoljeno odlagati med gospodinjske odpadke.
Odložite napravo v posebne zbiralnike, ki so za to namenjeni ali
napravo oddajte v zbirnem mestu za recikliranje materialov. Prosimo, poglejte
sedanja pravila za odlaganje elektronskih naprav. Za podrobnejše informacije o
recikliranju elektronskih naprav se obrnite na lokalni občinski urad, podjetje za
odvažanje gospodinjskih odpadkov.
Odlaganje baterij
Prosimo vas, da iztrošene baterije odložite v za to postavljene zbiralnike
v trgovinah. Baterije ne spadajo med gospodinjske odpadke. Odložite baterije v
posebne zbiralnike, ki so za to namenjeni ali jih oddajte v zbirnem mestu za
recikliranje materialov. Za podrobnejše informacije o recikliranju baterij se
obrnite na lokalni občinski urad, podjetje za odvažanje gospodinjskih odpadkov.
Izjava o usklajenosti
Ta izdelek je v skladu z osnovnim zahtevam § 3 in ostalim bitnim odredbam FTEG
(Člen 3 R&TTE), če se uporablja za svoj namen.
Izjavo o usklajenosti lahko naročite tukaj:
conformity@digi-tech-gmbh.com
Vodotesnost v skladu z IEC 60529 IPX7: 30m
Navodilo za čiščenje
Očistite uro s suho krpico, ki ne pušča nitke. Idealna je krpica za čiščenja očal. Po
vsaki uporabi očistite prsni pas in pašček za uro z gobo in mlačno vodo z blagim
milom. Posušite vse dele s krpo in obesitr prsni pas, da se posuši. Znoj in
onesnaževalci so škodljivi za funkcijo senzorja.
Page 45

-
87 -
Servis
-
88 -
3. Garancijski rok za proizvod je 3 leta od dneva nabave.
Naziv: inter-quartz GmbH
E-pošta: support@inter-quartz.de
Telefon: 00800 5515 6616
S sedežem v: Nemčija
IAN 87794
00800 44 11 493
0680 981220
0800 80847
Dobavitelj
Prosimo, upoštevajte, da naslednji naslov ni naslov servisa.
Najprej se obrnite na naslov servisa (glej zgoraj)
Naziv: digi-tech gmbh
Ulica: Valterweg 27A
Mesto: Eppstein 65817
Država: Nemčija
Garancijski list
1. S tem garancijskim listom jamčimo digi-tech gmbh, da bo izdelek v
garancijskem roku ob normalni in pravilni uporabi brezhibno deloval in se
zavezujemo, da bomo ob izpolnjenih spodaj navedenih pogojih odpravili
morebitne pomanjkljivosti in okvare zaradi napak v materialu ali izdelavi oz.
po svoji presoji izdelek zamenjali ali vrnili kupnino.
4. Kupec je dolžan okvaro javiti pooblaščenemu servisu oz. se informirati o
nadaljnih postopkih na zgoraj navedeni telefonski številki. Svetujemo vam,
da pred tem natančno preberete navodila o sestavi in uporabi izdelka.
5. Kupec je dolžan pooblaščenemu servisu predložiti garancijski list in račun,
kot potrdilo in dokazilo o nakupu.
6. V primeru, da proizvod popravlja nepooblaščeni servis ali oseba, kupec ne
more uveljavljati zahtevkov iz te garancije.
7. Vzroki za okvaro oz. nedelovanje izdelka morajo biti lastnosti stvari same, in
ne vzroki, ki so zunaj proizvajalčeve oz. prodajalčeve sfere. Kupec ne more
uveljavljati zahtevkov iz te garancije, če se ni držal priloženih navodil za
sestavo in uporabo izdelka ali, če je izdelek kakorkoli spremenjen ali
nepravilno vzdrževan.
8. Jamčimo servisiranje in rezervne dele za dobo, ki je minimalno zahtevana s
strani zakonodaje.
9. Obrabni deli oz. potrošni material so izvzeti iz garancije.
10. Vsi potrebni podatki za uveljaljanje garancije se nahajajo na dveh ločenih
dokumentih (garancijski list, račun).
11. Ta garancija proizvajalca ne izključuje pravic potrošnika, ki izhajajo iz
odgovornosti prodajalca za napake na blagu.
Prodajalec:
Lidl d.o.o.k.d., Žeje pri Komendi 100, SI-1218 Komenda
2. Garancija je veljavna na ozemlju Republike Slovenije
Page 46

-
89 -
Bedienungs- und Sicherheitshinweise
-
90 -
Inhaltsverzeichnis
Inhaltsverzeichnis......................................................................................................- 89 -
Einleitung...................................................................................................................- 91 -
Bestimmungsgemäße Verwendung........................................................................- 91 -
Lieferumfang..............................................................................................................- 91 -
Technische Daten .....................................................................................................- 92 -
Funktionen.................................................................................................................- 92 -
Wichtige Sicherheitshinweise...................................................................- 93 -
Inbetriebnahme der Herzfrequenz-Messuhr .........................................................- 94 -
Wichtige Informationen zur Bedienung der Herzfrequenz-Messuhr..................- 96 -
Licht............................................................................................................................- 97 -
Uhrzeit und Grundeinstellungen.............................................................................- 97 -
Weckalarm ...............................................................................................................- 98 -
Timer (max. 23:59:00)............................................................................................- 99 -
Stoppuhr.................................................................................................................- 100 -
Speicherfunktion....................................................................................................- 100 -
Pulsmesser ..............................................................................................................- 100 -
Kalorien, Fettverbrennung und BMI....................................................................- 103 -
Fitness......................................................................................................................- 104 -
Kodierte Übertragung der Herzfrequenz ...........................................................- 105 -
Fehlerbehebung.....................................................................................................- 105 -
Die Batterie der Armbanduhr wechseln..............................................................- 106 -
Batteriestandswarnanzeige..................................................................................- 106 -
Wasserdichtigkeit der Armbanduhr.....................................................................- 107 -
Wasserbeständigkeit des Brustgurtes..................................................................- 107 -
Reinigungshinweis.................................................................................................- 107 -
Entsorgung der Herzfrequenz-Messuhr..............................................................- 107 -
Entsorgung der Batterien ......................................................................................- 108 -
Konformitätserklärung...........................................................................................- 108 -
Garantie der digi-tech gmbh................................................................................- 108 -
Garantiebedingungen ..........................................................................................- 108 -
Garantiezeit und gesetzliche Mängelansprüche...............................................- 109 -
Garantieumfang....................................................................................................- 109 -
Abwicklung im Garantiefall..................................................................................- 110 -
Service....................................................................................................................- 111 -
Lieferant..................................................................................................................- 111 -
Warnleuchte ..........................................................................................................- 101 -
Timer .......................................................................................................................- 102 -
Speicherfunktion....................................................................................................- 102 -
Zielpulsbereich.......................................................................................................- 102 -
Page 47

-
91 -
Herzfrequenz-Messuhr
-
92 -
Einleitung
Herzlichen Glückwunsch zum Kauf Ihrer neuen Herzfrequenz-Messuhr. Sie haben
sich damit für ein hochwertiges Gerät entschieden. Die Bedienungsanleitung ist
Bestandteil dieser Herzfrequenz-Messuhr. Sie enthält wichtige Hinweise für
Sicherheit, Gebrauch und Entsorgung. Machen Sie sich vor der Benutzung der
Herzfrequenz-Messuhr mit allen Bedien- und Sicherheitshinweisen vertraut.
Benutzen Sie die Herzfrequenz-Messuhr nur wie beschrieben und für die
angegebenen Einsatzbereiche.
Händigen Sie alle Unterlagen bei Weitergabe der Herzfrequenz-Messuhr an
Dritte mit aus.
Bestimmungsgemäße Verwendung
Die Herzfrequenz-Messuhr ist zur Zeitanzeige und zur Verwendung der
beschriebenen Zusatzfunktionen geeignet. Jede andere Verwendung oder
Veränderung der Herzfrequenz-Messuhr gilt als nicht bestimmungsgemäß. Der
Hersteller haftet nicht für Schäden, die durch nicht bestimmungsgemäßen
Gebrauch oder falsche Bedienung verursacht werden. Die Herzfrequenz-Messuhr
ist nicht für den gewerblichen Einsatz vorgesehen.
Lieferumfang
Hinweis: Bitte überprüfen Sie nach dem Kauf den Lieferumfang. Stellen Sie
sicher, dass alle Teile vorhanden und nicht defekt sind.
• Herzfrequenz-Messuhr inkl. Batterie (CR2032)
• Brustgurt inkl. Batterie (CR2032)
• Fahrradhalterung
Technische Daten
Herzfrequenz-Messuhr
Betriebstemperaturbereich 0-50°C
Maße (exkl. Band) 4,4 x 5,0 cm
Displaymaße 2,4 x 1,8 cm
Gewicht 51 g
Batterie CR 2032/3V
Brustgurt
Betriebstemperaturbereich 0-50°C
Maße (exkl. Band) 7 x 3,3 x 1,2 cm
Übertragungsfrequenz 110 kHz
Gewicht 51 g
Batterie CR 2032/3V
Funktionen
Pulsmessung
• Alarm für Maximalpuls
• Zielpulstraining mit Timer und Alarm
(Gesundheit, Fitness, Leistung und benutzerdefiniert)
• Höchster Puls, niedrigster Puls, durchschnittlicher Puls
• Warnleuchte (bei Überschreiten der Pulsvorgaben)
Kalorienfunktionen
• Kalorienverbrauch und Fettverbrennung während des Trainings
• BMI-Berechnung
• Fitness Level
Stoppuhr
Page 48

-
93 -
• 1/100 Sekunden mit 99 Rundenzeiten
-
94 -
Countdown Timer
Zeitfunktionen
• Zeit
• Kalender
• Weckalarm mit Weckwiederholung
• Stundensignal
• Zweite Zeitzone
Sonstiges
• Hintergrundbeleuchtung
Wichtige Sicherheitshinweise
ACHTUNG: Sprechen Sie vor Trainingsbeginn mit Ihrem
Arzt. Er kann Sie über das für Sie geeignete Training, die
Trainingsintensität und die Pulsvorgaben aufklären. Diese
Herzfrequenz-Messuhr
ist kein medizinisches Gerät und dient nur zur
Unterstützung Ihrer Trainingsgestaltung.
- Herzfrequenz-Messuhr nicht in Kinderhände
Lassen Sie Kinder niemals unbeaufsichtigt die Herzfrequenz-Messuhr
benutzen. Kinder können mögliche Gefahren nicht immer richtig erkennen.
Batterien/Akkus können bei Verschlucken lebensgefährlich sein. Bewahren Sie die
Batterien für Kleinkinder unerreichbar auf.
Wurde eine Batterie verschluckt, muss sofort medizinische Hilfe in Anspruch
genommen werden.
Halten Sie auch die Verpackungsfolien von Kindern fern. Es besteht
Erstickungsgefahr.
Inbetriebnahme der Herzfrequenz-Messuhr
Schrauben Sie mit einer Münze den Batteriefachdeckel von der Rückseite des
Brustgurts und setzen Sie die 3V Batterie mit dem (+) Plus nach oben ein.
Schrauben Sie den Batteriefachdeckel wieder fest.
- Batterien
Legen Sie Batterien / Akkus stets polrichtig ein, versuchen Sie nicht, Batterien
wieder aufzuladen oder zu öffnen. Werfen Sie niemals Batterien ins Feuer, da
diese eventuell explodieren können. Verwenden Sie keine unterschiedlichen
Batterien (alte und neue, Alkali und Kohle, usw.) gleichzeitig. Bei unsachgemäßem
Gebrauch der Batterien besteht Explosions- und Auslaufgefahr.
Sollten die Batterien doch einmal ausgelaufen sein, benutzen Sie Handschuhe und
reinigen Sie die Herzfrequenz-Messuhr
gründlich mit einem trockenen Tuch.
Ziehen Sie die Schutzfolie vom Display der Herzfrequenzmessuhr ab und drücken
Sie MODE, SEL oder SET.
Wählen Sie nun durch Druck auf SEL zwischen den Sprachen: Englisch, Deutsch,
Französisch und Spanisch. Bestätigen Sie Ihre Wahl mit Druck auf SET.
Page 49

-
95 -
Wählen Sie auf die gleiche Weise die Einheit KM-KG
Kontaktfläche
-
96 -
METRIC KM - KG KM - KG KM - KG
oder Meilen/Pfund (M-LB)
IMPERIAL M - LB M - LB M - LB
Beenden Sie die Inbetriebnahme durch Druck auf MODE.
Durch gleichzeitigen Druck auf SET und SEL kann die Uhr zurückgesetzt werden.
Erst nach dem Rücksetzen kann die andere Sprache ausgewählt werden.
Tragen des Brustgurts
Passen Sie den Gurt so an, dass er
direkt unter den Brustmuskeln eng
anliegt. Befeuchten Sie die
Kontaktflächen des Gurtes leicht
mit Wasser oder EKG-Gel
(welches Sie in der Apotheke
erhalten können). Stellen Sie sicher,
dass die Kontaktflächen immer
Hautkontakt haben.
Positionieren Sie den Gurt wie auf
der folgenden Abbildung.
Achten Sie auf den richtigen Sitz
des Brustgurts. Wenn Sie komplett
ausgeatmet haben, sollte der Gurt
noch mit ganz leichter Spannung
auf dem Brustkorb aufliegen.
Hochspannungsmasten,
Oberleitungen der Bahn oder
fließender Autoverkehr können die
Messung beeinflussen oder stören.
Darauf bei der Auswahl der Lauftstrecke achten.
Verwenden der Fahrradhalterung
Sie können die HerzfrequenzMessuhr am Handgelenk tragen
oder mit der mitgelieferten
Fahrradhalterung am Lenker Ihres
Fahrrads befestigen.
Drücken Sie Fahrradhalterung von
oben auf die Lenkstange Ihres
Lenkers. Bei Lenkstangen mit
besonders großem Durchmesser ist
u.U. ein erhöhter Kraftaufwand
nötig, um die Fahrradhalterung zu
befestigen. Sie können die Herzfrequenz-Messuhr nun auf die gleiche Art wie bei
Ihrem Handgelenk an der Fahrradhalterung befestigen.
Überschreiten Sie zur Verwendung der Herzfrequenz-Messuhr bitte nicht die
maximale Übertragungsdistanz zum Brustgurt von 70 cm.
Wichtige Informationen zur Bedienung der
Herzfrequenz-Messuhr
Die Herzfrequenz-Messuhr verfügt über
Durch Druck auf MODE können Sie den Funktionsmodus der HerzfrequenzMessuhr wechseln.
Die Reihenfolge der Funktionen ist:
3 Funktionsmodi.
Uhrzeit und Grundeinstellungen
TIME ZEIT TEMPS HORA
Stoppuhr
CHRONO ST-UHR CHRONO CRONO
Pulsmesser
HRM PULS FC PULSO
Page 50

-
97 -
Desweiteren gibt es in den Funktionsmodi verschiedene Unterfunktionen.
-
98 -
Die Unterfunktionen erreichen Sie immer durch Drücken von SEL.
Schnelleinstellung
Bei der Einstellung von numerischen Werten können Sie durch Drücken und Halten
von SEL die Schnelleinstellung verwenden.
Licht
Drücken Sie kurz LIGHT, um die Hintergrundbeleuchtung vorübergehend zu
aktivieren.
Uhrzeit und Grundeinstellungen
TIME ZEIT TEMPS HORA
Durch Druck auf SEL können Sie die Unterfunktionen des Zeitmodus abrufen.
Uhrzeit und Grundeinstellungen
TIME ZEIT TEMPS HORA
Weckalarm
ALARM ALARM ALARM ALARMA
Timer
TIMER TIMER COMPTE TIMER
Drücken und halten Sie 3 Sekunden SET, um in den Einstellungsmodus zu
wechseln.
Auf dem Display erscheint
HOLD
TO SET
und es blinkt die Anzeige des 12 oder 24-Stunden Modus.
Drücken Sie zum Einstellen SEL und bestätigen Sie Ihre Einstellung durch Druck auf
SET. Stellen Sie auf die gleiche Weise die Sekunden, Minuten, Stunden, Jahr,
Monat und Tag ein.
HALTEN=
EINST.
MAINT=
REGLER
MANT=
AJUST
Nun folgen die Grundeinstellungen. Zuerst erscheint das Jahr Ihres Geburtstages.
BIRTHDAY GEB-TAG DATNAISS CUMPL-AN
Drücken Sie zum Einstellen SEL und bestätigen Sie Ihre Einstellung durch Druck auf
SET. Stellen Sie auf die gleiche Weise Monat und Tag ein.
Es erscheint nun die Anzeige des Gewichts.
WEIGHT GEWICHT POIDS PESO
Stellen Sie die Ziffern Ihres Gewichts jeweils durch Druck auf SEL ein und
bestätigen Sie Ihre Eingabe jeweils durch Druck auf SET.
Es erscheint nun die Anzeige der Körpergröße.
HEIGHT GROESSE TAILLE TAMANO
Stellen Sie die Ziffern Ihrer Körpergröße jeweils durch Druck auf SEL ein und
bestätigen Sie Ihre Eingabe jeweils durch Druck auf SET.
Beenden Sie den Einstellungsmodus durch Druck auf MODE.
Zweite Zeitzone
Drücken und halten Sie 3 Sekunden SEL. Die Uhr wechselt zur Anzeige der
zweiten Zeitzone und T2 erscheint auf dem Display. Das Einstellen der zweiten
Zeitzone erfolgt wie im vorherigen Absatz beschrieben.
Drücken und halten Sie 3 Sekunden SEL, um zurück zu der normalen Zeitanzeige
zu wechseln.
Weckalarm
ALARM ALARM ALARM ALARMA
Halten Sie 3 Sekunden SET, um in den Einstellungsmodus zu gelangen.
Auf dem Display erscheint "AL" und es blinken die Minuten der Weckzeit.
Drücken Sie zum Einstellen SEL und bestätigen Sie Ihre Einstellung durch Druck auf
SET. Stellen Sie auf die gleiche Weise die Stunden ein.
Falls gewünscht, stellen Sie nun den Monat und den Tag ein.
Page 51

-
99 -
Wird weder Monat noch Tag eingestellt, ertönt der Alarm täglich. Wird nur der
-
100
-
Tag eingestellt, ertönt der Alarm monatlich. Wird sowohl Monat als auch Tag
eingestellt, ertönt der Alarm nur an dem eingestellten Datum.
Auf dem Display erscheint nun die Einstellung des Stundensignals.
CHIME STDALARM SIGN HOR HORA AL
Drücken Sie zum Einstellen SEL und bestätigen Sie Ihre Einstellung durch Druck auf
SET (ON/EIN/ACTIF/ENCENDID=an,
OFF/AUS/INACTIF/APAGADO=aus).
Bei aktiviertem Stundensignal erscheint das Glockensymbol und es ertönt zu jeder
vollen Stunde ein Signalton.
Beenden Sie den Einstellungsmodus durch Druck auf MODE.
Sie können den Alarm durch Druck auf SET aktivieren oder deaktiveren. Bei
aktiviertem Alarm erscheint das Alarmsymbol .
Drücken Sie bei Ertönen des Alarms SET, SEL oder MODE, um den Alarm zu
stoppen.
Schlummerfunktion
Drücken Sie bei Ertönen des Weckalarms keine Taste, wird automatisch nach 30
Sekunden die Schlummerfunktion aktiviert und das Symbol blinkt auf dem
Display. Der Alarm verstummt nun und ertönt nach 2 Minuten erneut. Dieser
Vorgang wiederholt sich 5 mal.
Timer (max. 23:59:00)
TIMER TIMER COMPTE TIMER
Drücken und halten Sie 3 Sekunden SET, um den Timer einzustellen.
Auf dem Display blinken die Minuten der Timerzeit.
Drücken Sie zum Einstellen SEL und bestätigen Sie Ihre Einstellung durch Druck auf
SET. Stellen Sie die Stunden auf die gleiche Weise ein.
Nun folgt die Zusatzeinstellung des Timers. Wählen Sie durch Druck auf SEL den
gewünschten Modus:
Cd r Nach Erreichen von 0:00 zählt der Timer die eingstellte Zeit
erneut zurück
Cd U Nach Erreichen von 0:00 zählt der Timer vorwärts
Cd S Nach Erreichen von 0:00 stoppt der Timer
Beenden Sie den Einstellungsmodus durch Druck auf MODE.
Sie können den Timer durch Druck auf SET starten oder stoppen.
Drücken und halten Sie SET, um den Timer zurückzusetzen.
Nach Ablauf der Timerzeit ertönt ein Signalton.
Stoppuhr
CHRONO ST-UHR CHRONO CRONO
Drücken Sie zum Starten oder Stoppen der Stoppuhr SET. Drücken Sie bei
laufender Stoppuhr SEL, um eine Rundenzeit zu stoppen. Es können bis zu 99
Rundenzeiten gestoppt werden.
Drücken und halten Sie SET, um die Stoppuhr zurückzusetzen.
Speicherfunktion
DATA
RECALL
Drücken Sie bei gestoppter Stoppuhr SEL und auf dem Display wird die schnellste
Runde angezeigt. Drücken Sie SET, um die anderen Rundenzeiten anzuzeigen.
Hinweis: Die Speicherfunktion kann nur abgerufen werden, wenn mindestens eine
Rundenzeit aufgezeichnet wurde.
ANSICHT
DATEN
APPEL
DONNEES
RECUP
DATOS
Pulsmesser
HRM PULS FC PULSO
Der Pulsmesser funktioniert nur bei Verwendung des Brustgurtes.
Durch Druck auf SEL können Sie die Unterfunktionen des Pulsmessers abrufen:
Timer
TIMER TIMER COMPTE TEMPORIZADOR
Page 52

-
101
-
Speicherfunktion
ST/SP
-
102
-
MEMORY SPEICHER MEMOIRE MEMORIA
Zielpuls
ZONE BEREICH ZONE ZONA
Kalorienverbrauch, Fettverbrennung und BMI
CALORIE KALORIEN CALORIES CALORIAS
Fitness
FITNESS
LEVEL
In der mittleren Zeile des Displays wird bei Verwendung des Brustgurtes der Puls
angezeigt. Wenn das Herzfrequenzsignal empfangen wird, blinkt das Herz
Symbol.
Rechts neben der Pulsanzeige erscheint der erreichte Anteil am Maximalpuls in
Prozent. Der geschätzte Maximalpuls errechnet sich automatisch aus Alter,
Gewicht und Körpergröße.
FITNESS
LEVEL
NIV FORM
PHYSIQ
NIVEL
FIT
Warnleuchte
Wenn Ihr Puls 99% des Maximalpuls
erreicht oder diesen Wert sogar
überschreitet, oder der Puls den
eingestellten Grenzwert (siehe
"Zielpulsbereich") überschreitet, blinkt
die rote Warnleuchte.
Timer
TIMER TIMER COMPTE TEMPORIZADOR
In der unteren Zeile des Displays wird die bisher verstrichene Trainingszeit
angezeigt. In der mittleren Zeile werden der Puls und der erreichte Anteil am
Maximalpuls in Prozent angezeigt.
Der Timer zählt automatisch ab dem Zeitpunkt, an dem der Brustgurt angelegt
wird. Der Timer zählt auch dann weiter, wenn Sie in einen anderen Modus
wechseln.
Drücken Sie kurz SET, um den Timermodus zu wählen:
TIMER Trainingszeit gesamt
Trainingszeit im Zielpulsbereich
▲
Trainingszeit über Zielpulsbereich
▼
Trainingszeit unter Zielpulsbereich
Drücken und halten Sie SET, um die Trainingszeit zurückzusetzen.
Speicherfunktion
MEMORY SPEICHER MEMOIRE MEMORIA
Die gespeicherten Werte werden in der unteren Zeile angezeigt.
erreichter Maximalpuls
HI H FO AL
erreichter Minimalpuls
LO N FA BA
durchschnittlicher Puls
AV D MO PR
Drücken und halten Sie SET, um die gespeicherten Werte zurückzusetzen.
Zielpulsbereich
ZONE BEREICH ZONE ZONA
Page 53

-
103
-
In der unteren Zeile werden oberer und unterer Grenzwert des Zielpulsbereichs
-
104
-
angezeigt.
Die gewählte Trainingsart wird in der oberen Zeile angezeigt.
L- U Benutzerdefiniert
L-1 Gesundheit (50-65% des Maximalpuls)
L-2 Fitness (65-80% des Maximalpuls)
L-3 Leistung (80-95% des Maximalpuls)
Drücken und halten Sie 3 Sekunden SET, um in den Einstellungsmodus zu
wechseln.
Wählen Sie die Trainingsart durch Druck auf SEL. Bei Wahl von "U"
(Benutzerdefiniert) können Sie die Grenzwerte manuell einstellen.
Drücken Sie SET. Auf dem Display blinkt der untere Grenzwert. Stellen Sie den
Wert durch Druck auf SEL ein und bestätigen Sie die Einstellung durch Druck auf
SET.
Stellen Sie auf die gleiche Weise den oberen Grenzwert ein.
Beenden Sie den Einstellungsmodus durch Druck auf MODE.
Drücken und halten Sie SEL, um den Pulsalarm zu aktivieren. Bei aktiviertem
Pulsalarm erscheint das Alarmsymbol im Display und bei Verlassen des
Zielpulsbereichs ertönt ein Signalton "PIEP-PIEP... PIEP-PIEP...PIEP-PIEP". Wenn Ihr
Puls 99% des Maximalpuls erreicht oder diesen Wert sogar überschreitet, ertönt
der Alarmton für den Maximalpuls "PIEP-PIEP-PIEP-PIEP-PIEP...". Dieser Ton ist
unabhängig von der Trainingszone und dem Pulsalarm der Trainingszone.
Kalorien, Fettverbrennung und BMI
CALORIE KALORIEN CALORIES CALORIAS
In der unteren Zeile werden die verbrauchten Kalorien angezeigt.
CALORIE KALORIEN CALORIES CALORIAS
Drücken Sie SET, um zur Anzeige der Fettverbrennung in Gramm
FAT BURN FETT CONSGRAISSES
oder zur Anzeige Ihres BMI zu wechseln.
GRASA
BMI BMI IMC IMC
In der Anzeige des Kalorienverbrauchs oder der Fettverbrennung können Sie die
gespeicherten Werte durch Drücken und Halten von SET zurücksetzen.
Hinweis: Um die Genauigkeit der Kalorien- und Fettverbrennungs-anzeige zu
verbessern, müssen Alter und Gewicht korrekt eingestellt sein.
Hinweis: Der Zähler für die Fettverbrennung wird nur bei einem Puls von über 120
Schlägen pro Minute aktiv.
Hinweise zum BMI
Der BMI ist eine Maßzahl für die Bewertung des Körpergewichts eines Menschen.
Ein Wert zwischen 18,5 und 25 gilt bei Erwachsenen als normal. Bei Werten unter
18,5 spricht man von Untergewicht. Bei Werten über 25 spricht man von
Übergewicht. Bei Werten über 30 spricht man von Adipositas (Fettleibigkeit).
Der BMI gibt lediglich einen groben Richtwert an, da er die Statur eines Menschen
und die individuell verschiedene Zusammensetzung des Körpergewichts aus Fettund Muskelgewebe naturgemäß nicht berücksichtigt.
Fitness
FITNESS
LEVEL
Drücken Sie sofort nach Ihrem Training SET. Ein 5 Minütiger Countdown startet
(Ruhephase). Der Balken zeigt die noch verbleibende Wartezeit an. Links erscheint
der Anfangspuls und rechts der aktuelle Puls. In der unteren Zeile erscheint die
Countdownzeit.
Nach Ablauf der 5 Minuten erscheint der Fitnessgrad.
Fitnessgrad Puls
6 >130
5 130-120
4 120-110
3 110-105
2 105-100
1 <100
FITNESS
LEVEL
NIV FORM
PHYSIQ
NIVEL
FIT
Page 54

-
105
-
Kodierte Übertragung der Herzfrequenz
-
106
-
Die Batterie der Armbanduhr wechseln
Die Datenübertragung des Brustgurtes wird digital kodiert, um zu verhindern, dass
Störungen auftreten, wenn Sie mit einem Trainingspartner trainieren, der ein
baugleiches Gerät verwendet.
Bei der ersten Verwendung des Brustgurtes wird automatisch nach dem
Zufallsprinzip ein Kanal gewählt. Der Kanal wird kurz oben im Display angezeigt,
wenn Sie zur Anzeige der Herzfrequenz wechseln. Die verfügbaren Kanäle sind
CH10, CH11, CH12, CH13 und CH14.
Sie können den Kanal wechseln, indem Sie die Batterie kurz aus dem Brustgurt
entfernen und erneut einsetzen. Der Brustgurt wählt nach dem Zufallsprinzip einen
neuen Kanal und nach ca. 1 Min. wird der Puls und der neue Kanal auf der
Herzfrequenz-Messuhr angezeigt.
Fehlerbehebung
Der Puls wird nicht oder nicht korrekt angezeigt
Achten Sie auf die korrekte Positionierung und den guten Sitz des Brustgurtes.
Ihre Haut sollte nicht zu trocken oder kalt sein.
Die Kontaktflächen können leicht angefeuchtet werden, um die Funktion zu
verbessern.
Elektromagnetische Störquellen können den Empfang beeinträchtigen.
Die Distanz zwischen Gurt und Uhr darf max. 70 cm betragen.
Andere Pulsmessgeräte in weniger als 2m Abstand können den Empfang stören.
Kabellose Fahrradcomputer können den Empfang stören.
Evtl. müssen die Batterien ersetzt werden.
Das Display ist schlecht lesbar / Die Beleuchtung funktioniert nicht
Ersetzen Sie die Batterien.
Sie können den Batteriewechsel zusammen mit
einer Wasserdichtigkeitsprüfung von einem
Uhrmacher durchführen lassen. Um die Batterie
selbst zu wechseln, gehen Sie bitte wie folgt vor:
Lösen Sie die Schrauben (1,2,3 und 4) auf der
Rückseite der Armbanduhr mit einem kleinen
Kreuzschraubendreher. Entfernen Sie den
Gehäuseboden und den Batterieaufkleber.
Verwenden Sie ein kleines, flaches Werkzeug,
um den Riegel (5) der Batteriehalterung zu
öffnen. Entnehmen Sie die Batterie und setzen Sie
eine neue 3V CR2032 Batterie mit dem (+)-Pol
nach oben ein. Prüfen Sie den korrekten Sitz des
Dichtungsringes (6). Verriegeln Sie die
Batteriehalterung (5).
Kleben Sie den Batterieaufkleber wieder ein,
setzen Sie den Gehäuseboden ein und
schrauben Sie ihn fest.
Batteriestandswarnanzeige
Wenn der Batteriestand des Brustgurtes für den normalen Betrieb nicht mehr
ausreicht, erscheint auf dem Display der Herzfrequenz-Messuhr:
TXBELT
LO BAT
Wechseln Sie die Batterie des Brustgurtes wie im Kapitel "Brustgurt" beschrieben.
TXGURT
BATT
SNGLTX
PILE
TXBCIN
BAT BA
Page 55

-
107
-
Wasserdichtigkeit der Armbanduhr
-
108
-
Entsorgung der Batterien
Wasserdicht bis 3 bar. Die bar-Angabe bezieht sich auf den Luftüberdruck,
welcher im Rahmen der Wasserdichtigkeitsprüfung angewandt wurde (DIN8310).
Wasserbeständigkeit des Brustgurtes
Wasserbeständigkeit nach IEC 60529 IPX7: 30 m
Reinigungshinweis
Reinigen Sie das Gerät nur mit einem trockenen, fusselfreien Tuch, wie es z.B. zur
Reinigung von Brillengläsern verwendet wird.
Nach jedem Tragen reinigen Sie den Brustgurt mit lauwarmen Wasser oder einer
milden Seifenwasserlösung und einem Schwamm. Trocknen Sie alle Teile mit
einem Tuch ab und hängen Sie den Gurt zum Trocknen auf. Schweiß und
Verunreinigungen beeinträchtigen die Funktion des Senders.
Entsorgung der Herzfrequenz-Messuhr
Diese Herzfrequenz-Messuhr darf nicht im normalen Hausmüll entsorgt
werden. Entsorgen Sie die Herzfrequenz-Messuhr über einen
zugelassenen Entsorgungsbetrieb oder über Ihre kommunale
Entsorgungseinrichtung. Beachten Sie die aktuell geltenden Vorschriften. Setzen
Sie sich im Zweifelsfall mit Ihrer Entsorgungseinrichtung in Verbindung.
Bitte entsorgen Sie Ihre Batterien sachgerecht in extra hierfür aufgestellten
Gefäßen im Handel. Batterien gehören nicht in den Hausmüll. Entsorgen Sie
Batterien bitte über einen zugelassenen Entsorgungsbetrieb oder über Ihre
kommunale Entsorgungseinrichtung. Beachten Sie die aktuell geltenden
Vorschriften. Setzen Sie sich im Zweifelsfall mit Ihrer Entsorgungseinrichtung in
Verbindung.
Konformitätserklärung
Dieses Produkt entspricht bei bestimmungsgemäßer Verwendung den
grundlegenden Anforderungen des § 3 und den übrigen einschlägigen
Bestimmungen des FTEG (Artikel 3 der R&TTE).
Die Konformitätserklärung können Sie hier anfordern:
conformity@digi-tech-gmbh.com
Garantie der digi-tech gmbh
Sie erhalten auf diese Herzfrequenz-Messuhr 3 Jahre Garantie ab Kaufdatum. Im
Falle von Mängeln dieser Herzfrequenz-Messuhr stehen Ihnen gegen den
Verkäufer des Produkts gesetzliche Rechte zu. Diese gesetzlichen Rechte werden
durch unsere im Folgenden dargestellte Garantie nicht eingeschränkt.
Garantiebedingungen
Die Garantiefrist beginnt mit dem Kaufdatum. Bitte bewahren Sie den Original
Kassenbon gut auf. Diese Unterlage wird als Nachweis für den Kauf benötigt. Tritt
innerhalb von drei Jahren ab dem Kaufdatum dieser Herzfrequenz-Messuhr ein
Material- oder Fabrikationsfehler auf, wird die Herzfrequenz-Messuhr von uns –
nach unserer Wahl – für Sie kostenlos repariert oder ersetzt. Diese
Garantieleistung setzt voraus, dass innerhalb der Drei-Jahres-Frist die defekte
Herzfrequenz-Messuhr und der Kaufbeleg (Kassenbon) vorgelegt und schriftlich
kurz beschrieben wird, worin der Mangel besteht und wann er aufgetreten ist.
Wenn der Defekt von unserer Garantie gedeckt ist, erhalten Sie die reparierte
Page 56

-
109
-
oder eine neue Herzfrequenz-Messuhr zurück. Mit Reparatur oder Austausch des
-
110
-
Produkts beginnt kein neuer Garantiezeitraum.
Garantiezeit und gesetzliche Mängelansprüche
Die Garantiezeit wird durch die Gewährleistung nicht verlängert. Dies gilt auch für
ersetzte und reparierte Teile. Eventuell schon beim Kauf vorhandene Schäden und
Mängel müssen sofort nach dem Auspacken gemeldet werden. Nach Ablauf der
Garantiezeit anfallende Reparaturen sind kostenpflichtig.
Garantieumfang
Die Herzfrequenz-Messuhr wurde nach strengen Qualitätsrichtlinien sorgfältig
produziert und vor Anlieferung gewissenhaft geprüft. Die Garantieleistung gilt für
Material- oder Fabrikationsfehler. Diese Garantie erstreckt sich nicht auf
Produktteile, die normaler Abnutzung ausgesetzt sind und daher als Verschleißteile
angesehen werden können oder für Beschädigungen an zerbrechlichen Teilen, z.
B. Schalter, Akkus oder die aus Glas gefertigt sind.
Diese Garantie verfällt, wenn die Herzfrequenz-Messuhr beschädigt, nicht
sachgemäß benutzt oder gewartet wurde. Für eine sachgemäße Benutzung der
Herzfrequenz-Messuhr sind alle in der Bedienungsanleitung aufgeführten
Anweisungen genau einzuhalten. Verwendungszwecke und Handlungen, von
denen in der Bedienungsanleitung abgeraten oder vor denen gewarnt wird, sind
unbedingt zu vermeiden.
Die Herzfrequenz-Messuhr ist lediglich für den privaten und nicht für den
gewerblichen Gebrauch bestimmt. Bei missbräuchlicher und unsachgemäßer
Behandlung, Gewaltanwendung und bei Eingriffen, die nicht von unserer
autorisierten Service-Niederlassung vorgenommen wurden, erlischt die Garantie.
Abwicklung im Garantiefall
Um eine schnelle Bearbeitung ihres Anliegens zu gewährleisten, folgen Sie bitte
den folgenden Hinweisen:
• Bitte halten Sie für alle Anfragen den Kassenbon und die Artikelnummer
(87794) als Nachweis für den Kauf bereit.
• Die Artikelnummer entnehmen Sie bitte dem Typenschild, einer Gravur, auf dem
Titelblatt Ihrer Anleitung (unten links) oder als Aufkleber auf der Rück- oder
Unterseite.
• Sollten Funktionsfehler oder sonstige Mängel auftreten kontaktieren Sie
zunächst die nachfolgende Serviceabteilung telefonisch oder per E-Mail.
• Eine als defekt erfasste Herzfrequenz-Messuhr können sie anschließend unter
Beifügung des Kaufbelegs (Kassenbon) und der Angabe, worin der Mangel
besteht und wann er aufgetreten ist, für Sie portofrei an die Ihnen mitgeteilte
Service Anschrift übersenden.
Auf www.lidl-service.com können Sie diese und viele weitere Handbücher,
Produktvideos und Software herunterladen.
Page 57

-
111
-
Service
Name: inter-quartz GmbH
E-Mail: support@inter-quartz.de
Telefon: 00800 5515 6616
Sitz: Deutschland
IAN 87794
00800 44 11 493
0680 981220
0800 80847
Lieferant
Bitte beachten Sie, dass die folgende Anschrift keine Serviceanschrift ist.
Kontaktieren Sie zunächst die oben benannte Servicestelle.
Name: digi-tech gmbh
Str.: Valterweg 27A
Stadt: Eppstein 65817
Land: Deutschland
digi-tech gmbh
Valterweg 27A
D-65817 Eppstein
Last information update · Stan informacji
Utolsó módosítás · Stav informací
Stav informácií · Stand der Informationen:
1/2013 · Art.-Nr.: 1-LD3473
IAN 87794
Page 58

IAN 87794
 Loading...